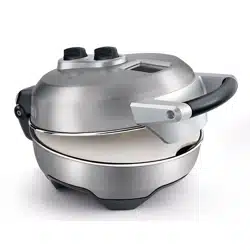
A. ON/OFF switch Switches pizza oven ON or OFF. B. Variable temperature control For thick to thin crust pizzas plus low heat and keep warm. C. Viewing window Monitor the cooking progress without having to open up the lid. D. Cool touch handle For safe and easy handling. E. Top and bottom heating elements Heats the pizza stone to a maximum of 660 "F to recreate the effects of a traditional brick oven. F. Sturdy non slip feet G. Removable 12" pizza stone Absorbs moisture and distributes heat evenly for a crispy crust. H. 1200 watts of power Pizza cooks in as little as 10 minutes. I. Heating indicator light Tells you when the pizza oven is heating.
OPERATING
OPERATING YOUR BREVILLE PRODUCT
BEFORE FIRST USE
Before using the pizza oven for the first time, remove and safely discard any packaging material, promotional labels and ensure the power cord is unplugged.
Remove the pizza stone from the pizza oven and wipe with a soft, damp cloth. Dry thoroughly. Wipe the interior surfaces of the pizza oven with a soft, damp cloth. Dry thoroughly. Re-insert the pizza stone and close the lid.
There is no need to season the pizza stone before using it for the first time.
The stone will season itself over time with repetitive use.
Residue flour or semolina used to roll out the dough will be enough to prevent the pizza dough from sticking.
THE PIZZA OVEN IS NOW READY TO USE
1. Insert the power plug into the power outlet. Turn the ON | OFF switch to ON position. When first switched on, the heating indicator light will illuminate to indicate that the pizza oven is in heating mode.
2. Preheat the pizza oven before use. To do this, set the variable temperature control to preheat setting.
3. The heating indicator light will illuminate when the pizza oven is preheating. Recommend pre-heating for at least 30 minutes when first switched on.
4. Turn the variable temperature control to either THIN, MEDIUM or THICK crust range to suit your pizza preference. Temperature increases as selector dial is turned clockwise. When selecting MEDIUM or THICK crusts, allow pizza oven to stand for 5 minutes to adjust to selected heat setting before starting to cook.
TEMPERATURE I
5. Place fresh pizza dough directly onto a floured pizza peel and roll out to desired thickness. Prick pizza dough evenly with a docker or a fork, Assemble ingredients onto pizza dough and transfer pizza onto pizza stone.
NOTE
If cooking a pro-purchased pizza, ensure that all packaging materials are removed before cooking. Some pre-purchased pizzas are packed on a sheet of paper or polystyrene which may stick to the dough of the pizza or to the pizza stone.
6. Carefully close the lid and cook to desired cooking time (see cooking table on page 14 for suggested cooking times). Use the viewing window to check on the cooking progress.
7. When the pizza is cooked to desired doneness, carefully open the lid using oven mitts. Do not lean or stand over the pizza oven when opening the lid as steam may be released.
8. Remove the pizza using a pizza peel or heat proof spatula.
9. To prevent smoking and burning, scrape off hot melted cheese and ingredients that may have fallen onto the stone after each pizza has been cooked.
LOW SETTING
Ideal for reheating cold, previously cooked pizza slices and garlic bread. Also suitable to heat up flat breads such as tortillas.
Turn variable temperature control dial within the LOW range to engage this setting.
KEEP WARM
Used to keep cooked pizzas warm when there is a delay in serving.
Turn variable temperature control dial within the KEEP WARM range to engage this setting.
PIZZA PEEL OPTIONAL ALTERNATIVE
We reeoir.tr.end that the best method for transferring your pizza onto the pizza stone is with the use of a pizza peel. If you do not have a pizza peel or find it difficult to use. follow this optional alternative method.
1. Follow Operating Instructions 1-4.
2. Place fresh pizza dough directly onto a large square of parchment paper the size of the pizza stone and roll out to desired thickness. Prick pizza base evenly with a docker or a fork. Assemble ingredients onto the pizza base and transfer the pizza and parchment paper onto the pizza stone.
3. Carefully close the lid and cook for 2 minutes: open lid, using oven mitts and gently slide parchment paper out. leaving the pizza inside the pizza oven. Close the lid again and cook to desired cooking time (see cooking table on page 14 for suggested cooking times).
4. Follow Operating Instructions 7-9 for the remainder of the cooking process.
CARE, CLEANING AND STORAGE
CLEANING AFTER USE
Always ensure the pizza oven ON|OFF switch is set to the OFF position and the power cord is unplugged prior to moving or cleaning.
While stone is still warm, scrape off any cheese or pizza ingredients that may have fallen onto the stone.
Allow the pizza oven to cool completely.
CLEANING THE OUTER BODY
After each use, wipe the outer body with a soft, damp cloth and dry thoroughly. A non-abrasive liquid cleanser may be used to avoid build-up of food residue and stains.
Allow all parts and surfaces to dry thoroughly before plugging the pizza oven in and using.
CLEANING THE INTERIOR
To clean any food splattering, wipe the interior with a soft cloth dampened with warm water. Dry thoroughly.
CLEANING THE VIEWING WINDOW AND REAR VENT AREA
Viewing window and rear vent area will darken from cooking vapors with ongoing use.
To clean, make a paste from 2 teaspoons baking soda, 1 teaspoon white vinegar and 1 teaspoon of water.
Rub paste onto viewing window or rear vent area and wipe clean with a damp cloth.
CARE AND CLEANING THE PIZZA STONE
Pizza stones are porous and will absorb fats and oils. It is normal for pizza stones to accumulate stains from dripping cheese and fatty toppings. This will not affect the taste of the pizza or the performance of the stone, however, cooking residue may create excess smoke and odor to form.
To remove stains, cool stone completely and follow instructions below:
Small stains can be cleaned easily by scrubbing with a toothbrush and a paste made from equal parts of baking soda and water. Work in small circles until stains are removed. Wipe clean with a damp cloth and dry completely before reusing.
To remove burnt on food, use a scouring pad lightly over stubborn areas.
If the accumulation is heavy, use a hard abrasive paper like sand paper to clean the surface.
Make sure to wipe the stone clean with a damp cloth and allow plenty of time for the stone to dry out completely before use.
NOTE Do not immerse the pizza stone in water or use cleaning liquids or detergents. Immersing the pizza stone in water could cause it to crack. Cleaning liquids or detergents will absorb into the stone and transfer to the pizza during baking.
STORAGE
When storing the pizza oven, remove the power plug from the power outlet. Ensure the appliance is completely cool, clean and dry. Ensure the lid is closed and do not place any objects on top. Store the appliance standing on its support legs.
TROUBLESHOOTING
POSSIBLE PROBLEM
SOLUTION/CHECK
Unit does not switch on
Make sure the power plug is plugged into the outlet. Rotate the on and off dial to "ON” position.
Unit does not heat up to desired temperature level
Check to make sure the temperature set dial is correctly positioned. If not hot enough, adjust the temperature dial to hotter setting.
Heating light does not stay on
Heating light will turn on and off during normal usage. Heating light will only turn on when the unit is in heating cycle.
Pizza sticks to pizza peel
Ensure that enough flour has been added to the pizza peel to allow the pizza to slide off.
Do not add too much sauce or ingredients. Heavy pizzas will be difficult to slide off of the peel.