Loading ...
Loading ...
Loading ...
En-4
A B C
D E F
A B C
D E F
A B C
E F
A B C
D E F
A B C
D D E F
DRDRDRDRDR
P P P P P
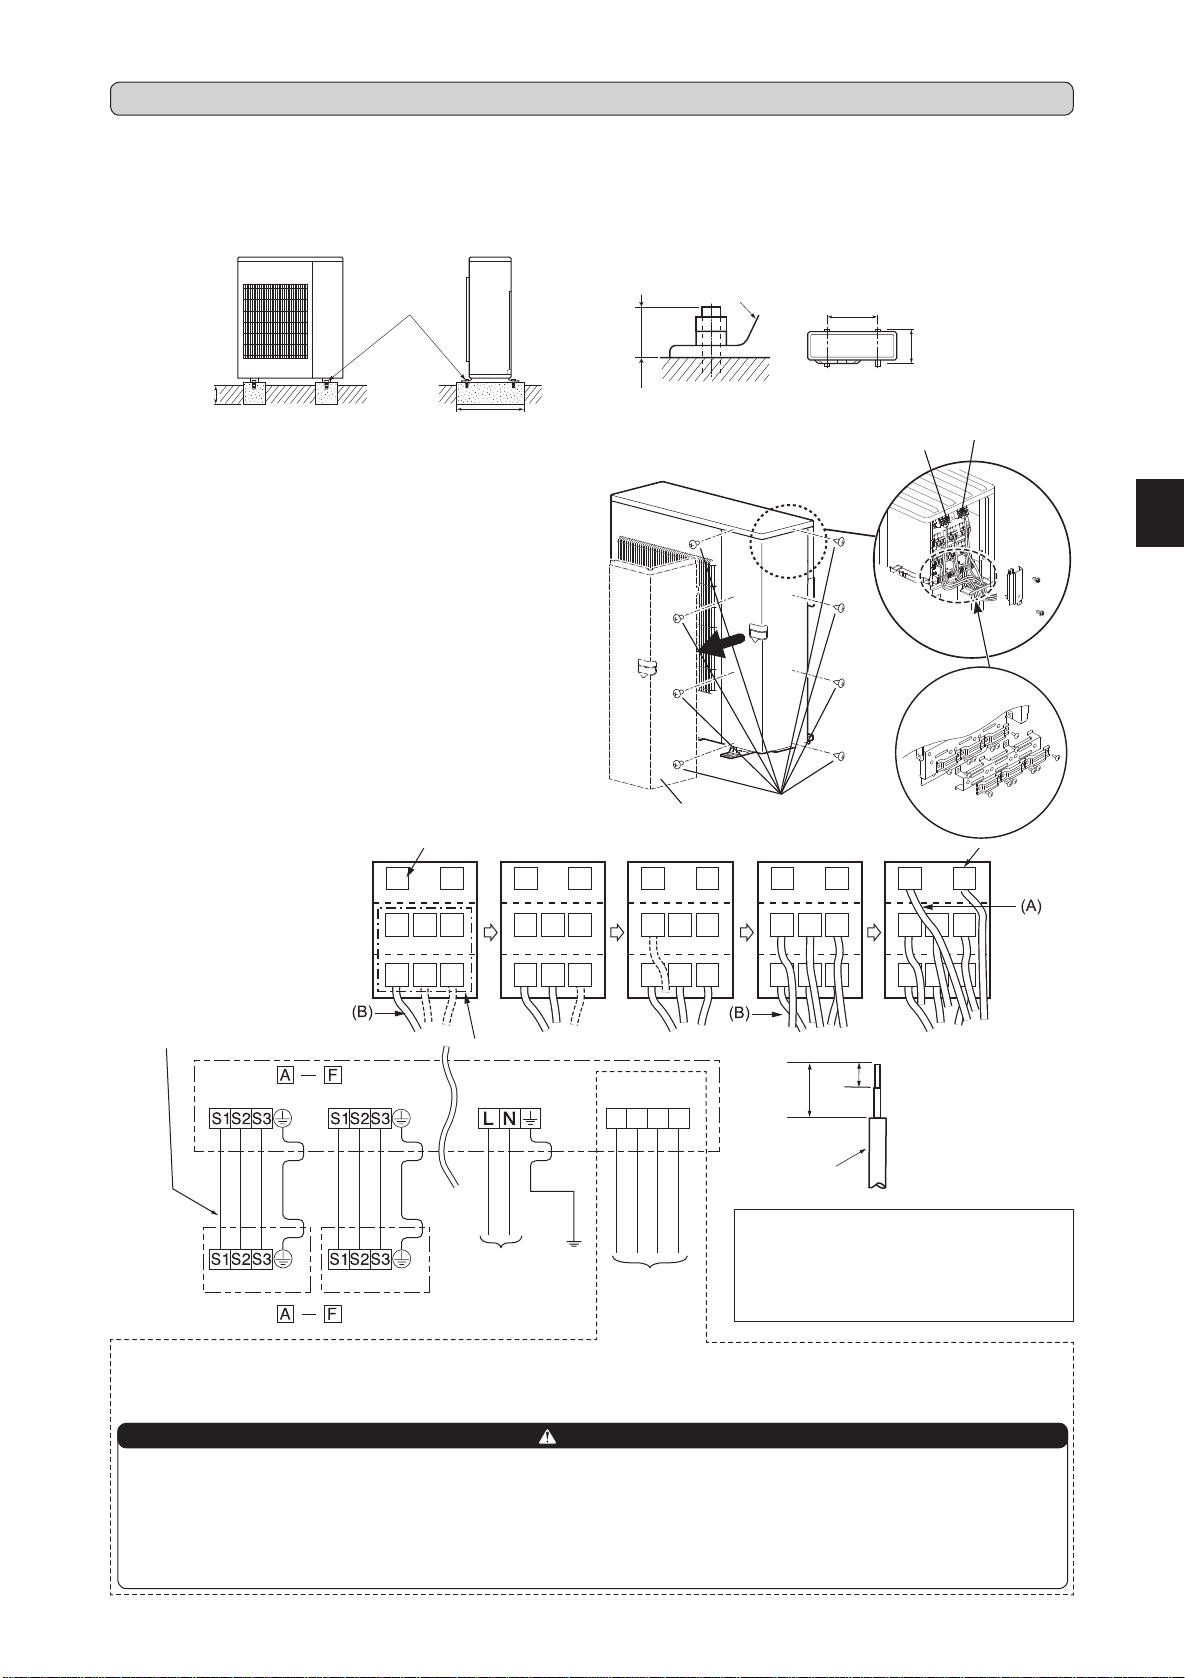
2-1. INSTALLING THE UNIT
Fixherewith
M10bolts.
Makethesetting
depthdeeper.
Makewidthwider.
Anchor leg
25orless
Anchor bolt length
Anchorboltpitch
(Unit:mm)
2-2. CONNECTING WIRES FOR OUTDOOR UNIT
Terminalblock
forpowersupply
• Besuretoxtheunit’slegswithboltswheninstallingit.
• Besuretoinstalltheunitrmlytoensurethatitdoesnotfallbyanearthquakeoragust.
• Refertothegureintherightforconcretefoundation.
• Donotusethedrainsocketandthedraincapsinthecoldregion.
Drainmayfreezeanditmakesthefanstop.
• Removethetapeonthepanelwhenopeningthepackage.(DONOTremovetheLABELSonthepanel.)
1)Removetheservicepanel.
2)Loosenterminalscrew,andconnectindoor/outdoorunitconnectingwire
(B)fromtheindoorunitcorrectlyontheterminalblock.Becarefulnot
tomakemis-wiring.Fixthewiretotheterminalblocksecurelysothat
nopartofitscoreisappeared,andnoexternalforceisconveyedtothe
connectingsectionoftheterminalblock.
3)Firmlytightentheterminalscrewstopreventthemfromloosening.After
tightening,pullthewireslightlytoconrmthattheydonotmove.
4)Perform2)and3)foreachindoorunit.
5)Connectpowersupplycord(A).
6)Fixindoor/outdoorunitconnectingwire(B)andpowersupplycord(A)
withthecableclamps.
7)Closetheservicepanelsecurely.Makesurethat3-2.PIPECONNEC-
TIONiscompleted.
• After making connectionsbetweenbothpowersupplycord(A) and
indoor/outdoorunitconnectingwire(B),besuretoxbothcableand
wirewithcableclamps.
Connectingorder
• Connect theterminal block in
followingorder.
A
→
B
→
C
→
D
→
E
→
F
→
P
→
DR
Terminalblockforindoor/outdoorunit
Cableclamps
600
370
Servicepanel
Screws
Note:
• Removingthehandleincreasestheeffectivenessofthewiringoperation.
• Besuretoreinstallthehandle.
2. OUTDOOR UNIT INSTALLATION
Terminalblock
forDREDInterface
DREDInterface
Powersupply
35mm
15mm
Leadwire
• Besuretoattacheachscrewtoitscorrespondent
terminalwhensecuringthecordand/orthewireto
theterminalblock.
• Makeearthwirealittlelongerthanothers.
(Morethan35mm)
• Forfutureservicing,giveextralengthtothecon-
nectingwires.
1 2 3 C
<OUTDOORUNIT>
Indoor/outdoorunit
connectingwire
<INDOORUNIT>
Terminalblock
Terminalblock Terminalblock
Terminalblockfor
powersupply
Terminalblock
<INDOORUNIT>
POWERSUPPLY
~/N230V50Hz
ThisunithasdemandresponsecapabilitywhichiscompliantwithAS/NZS4755.3.1.Toactivatethisfunction,youneedtomakeacontractwithremote
agentssuchaselectricsupplycompany,thenthisunitshouldbeconnectedtoDemandresponseenablingdevise(DRED).Forfurtherinformation,
consultyourdealer.Thisunitsupports3DemandResponseModes(DRMs):DRM1,DRM2andDRM3.
CAUTION
•Topreventmalfunctioncausedbynoise,routethecordconnectingthisunittoDREDandthepowersupplycordasparallelaspossible.
•Donotconnectthedemandcontroltransmissioncabletotheterminalblockforpowersupply.
•Donotpull,extremelybendorapplystrongpressureonthewiretopreventfailure.
•DonotscrewDREDtooutdoorunit.
•DonotputDREDinoutdoorunit.
•Secureelectricalwiringaboveclamp.
•DonotgetDREDwirecaughtintheservicepanel.
1:DRM1
2:DRM2
3:DRM3
C:COMMON
AS/NZS4755
terminalblock
BH79A274H01_en.indd 4 2016/03/23 10:42:17
Loading ...
Loading ...
Loading ...