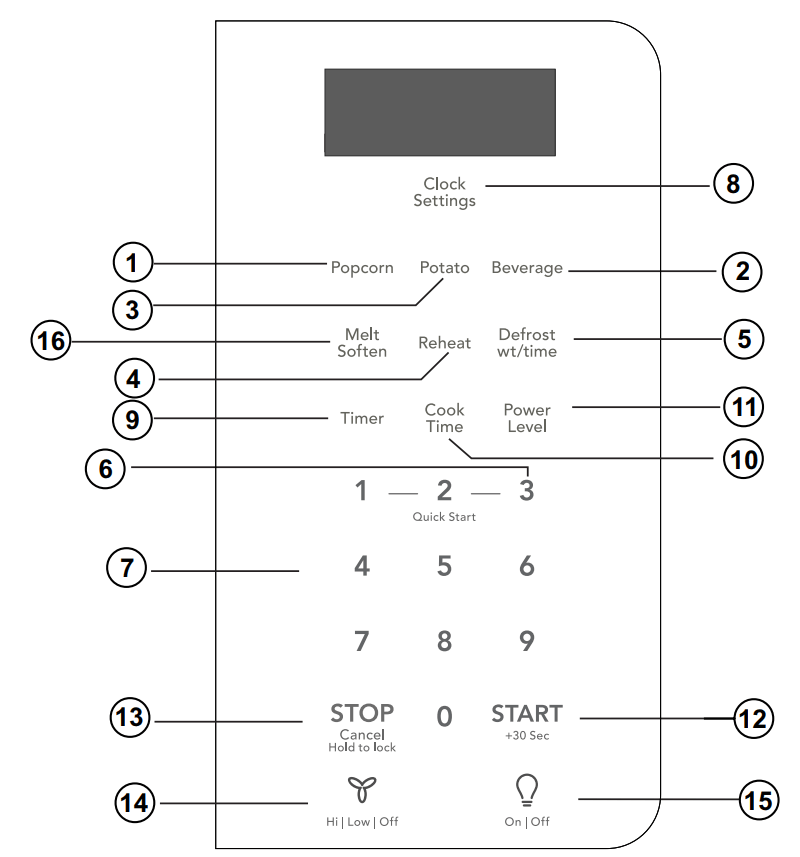
Exhaust (High/Low/Off) ~ Use to turn the exhaust fan on, off, or to adjust fan speed
Surface Light ~ Press this pad to turn the surface lights on or off.
Melt Soften
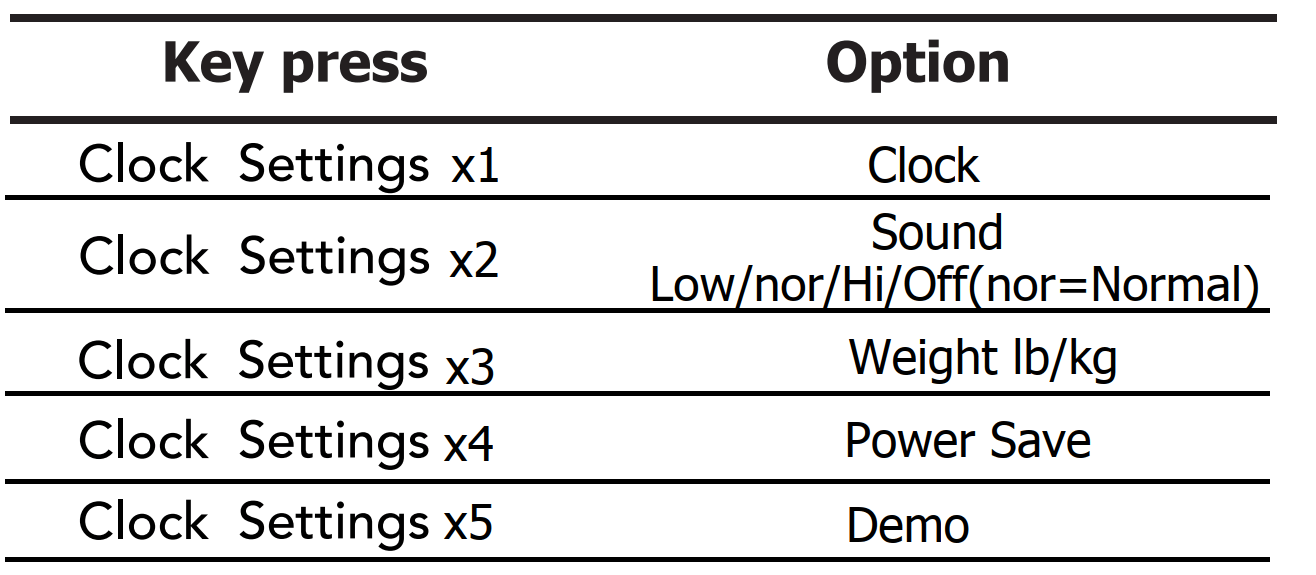
SETTING
Clock Settings
The microwave oven has settings that allow you to customize the operation for your convenience. Below is the table showing the various settings. Touch the Clock & Settings key multiple times to scroll to the desired setting function.
Setting the timer
Example: setting timer for 5 minutes:
1. Touch Clock Settings pad once
2. Enter time using number pads.
3. Touch Timer pad again.
Timer count down does not stop even if the door is opened. To stop/cancel the timer, press the Timer key once .When the timer has reached the end of set time, you will hear beep alerts indicating the timer has run out.
Exhaust High / Low / Off
The exhaust ventilation removes steam and other cooking vapors from the cooking surface of the range below the microwave oven.
To operate the exhaust vent, Touch the Exhaust High/Low/Off pad once for the highest speed setting. Touch the pad again to choose the Low speed setting and a 3rd time to turn the exhaust ventilation off.
Note: If the temperature gets too hot around the microwave oven, the fan in the exhaust vent hood will automatically turn on at the LOW setting to cool the oven. The fan will automatically turn off when the internal parts are cool. When this occurs, the vent cannot be turned off.
Surface Light / On / Off
Touch the Surface Light/On/Off pad once for a cooking surface light. Press the pad again to turn the light off.
Control Lock
You may lock the control panel to prevent the microwave from being accidentally started or used by children.
The control lock feature is very useful when cleaning the control panel. The lock will prevent accidental programming when wiping the control panel clean.
Example: to set the control lock ON:
Touch and hold the pad for more than 3 seconds. The Lock icon will appear in the display window along with 2 beeps.
Example: to change the control lock from ON to OFF:
Touch and hold the Stop/Cancel pad for more than 3 seconds. The Lock icon will disappear in the display window.
Using Ready Set
Microwave heating or cooking may be quickly set at 100% power level for 1, 2 or 3 minutes. Use the number keys 1, 2 or 3 to choose the desired minutes of cook time (this option will only work using the 1, 2 or 3 numeric pads):
NOTE
Note: the Ready Set function cannot be set when using the Defrost (by weight) feature.
"Food” will be displayed if a quick start cooking cycle or sec key is not selected within 5 minutes of placing food in the microwave. You must open then close the door again to clear ''Food'' from the display.
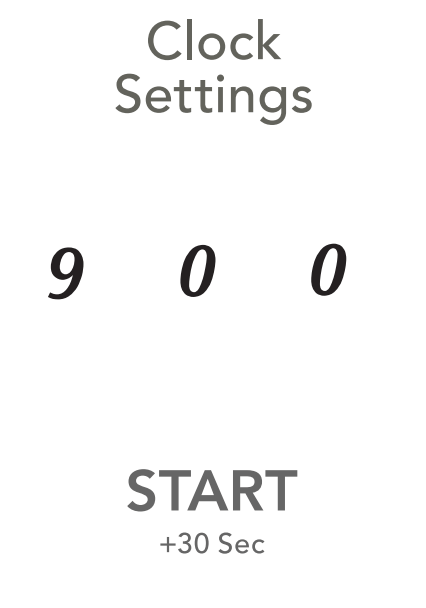
Heating with high power level
1. Press Cook Time pad.
2. Use the number pads to enter desired heating time (cook time may be set up to 99 minutes and 99 seconds).
3. Touch START+30sec pad.
MANUAL COOKING
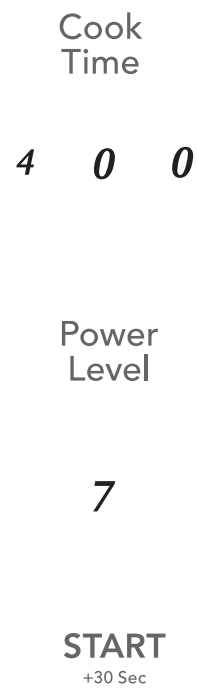
Heating with lower power levels
Using the highest power level to heat foods with does not always give the best results when some types of food need slower cooking, such as roasts, baked goods or custards.
Your oven has nine other power levels you may choose.
1. Press Cook Time.
2. Use the number pads to enter desired heating time (cook time may be set up to 99 minutes and 99 seconds).
3. Press Power Level pad once for power level 10 (100% power).
4. Use the number key to change the power level to 7. P-70 a ppears in the display (70 % power).
5. Touch START+30sec pad.
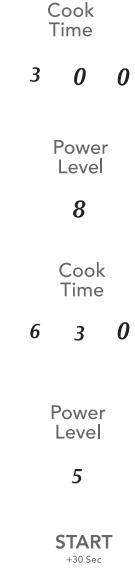
Heating with multiple cooking stages
For best results, some microwave recipes call for different power levels or different lengths of time for cooking. Your microwave may be set to change from one stage to another automatically (2 stages maximum).
1. Press Cook Time.
2 .Use the number pads to enter heating time for the 1st stage (cook time may be set up to 99 minutes and 99 seconds).
3. Press Power Level pad once.
4. Use the number keys to enter power level for the 1st stage. P-80 in the display (80 % power
5. Press Cook Time pad for 2nd stage.
6. Use the number pads to enter heating time for the 2nd stage (cook time may be set up to 99 minutes and 99 seconds).
7. Press Power Level pad for 2nd stage
8. Use the number key to enter power level for the 2nd stage. P-50 appears in the display (50 % power).
9. Press START+30sec pad.
Using the Stop/Cancel key
This feature will let you quickly stop or cancel the cooking process.
Touch the Stop/Cancel pad to :
Erase if you have entered wrong information.
Cancel timer setting process.
Press pad once to pause the oven temporarily during cooking. (Touch START+30sec pad again to resume cooking.)
Return the time of day (clock) to the display after cooking cycle is completed.
Cancel a program during cooking, touch twice.
Using the Start/+ 30 sec. key
This feature will let you quickly start or add 30 seconds
Touch START+30 sec the pad to :
Start programmed cooking.
Start cooking for 30 seconds at 100% power level.
Extend cooking time in multiples of 30 seconds each time this pad is touched during microwave cooking.
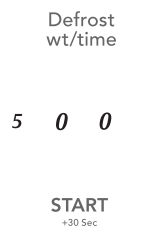
Setting Defrost (by Weight)
1. Press Defrost pad once. 0.0 will appear in the display.
2. Use the numeric pads to input weight of food to defrost in pounds (10 = 1.0lb.) You may enter any weight from 0.1 to lbs.
3. Press START+30sec pad.
Note: The weight amount must be a valid entry for this feature to start. A valid weight entry is 0.1 to 6.0 pounds.
Setting Defrost (by Time)
1. Press Defrost pad once. 0.0 will appear in the display.
2. Use the number pads to enter desired defrost time (defrost time may be set up to 99 minutes and 99 seconds).
3. Press START+30sec pad.
Special notes for defrosting by time
After pressing START+30sec pad, the display will count down remaining defrost time. The oven will beep during the defrost cycle. At this time open the door and turn the food if needed and remove any portions that have already thawed. Touch the Start+30sec key to resume the defrost cycle.
When heating has finished you will hear beeps.
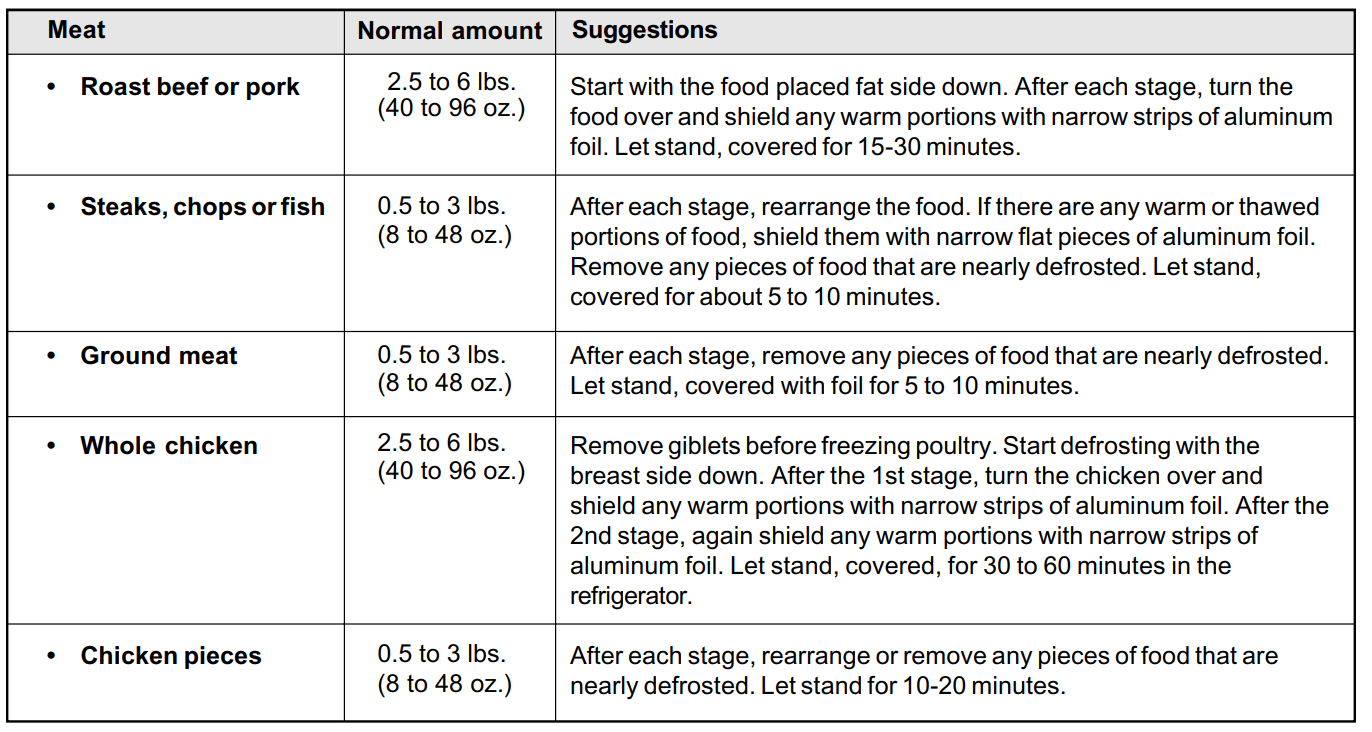
Defrost suggestions for meats
Suggested power levels for cooking
AUTO COOKING
Convenience cooking suggestions
Convenience category
Amount
Suggestions
Popcorn
1.75,3.0, 3.3 oz. pkg.
Cook a single “microwave-only” bag of popcorn at a time. Use caution when removing and opening the hot popcorn bag from the oven. Let microwave oven cool down at least 5 minutes before using again.
Potato
1,2,3,4 potatoes 8,16,24,36 oz
Pierce each potato several times using a fork. Place on turntable in spoke-like fashion. After cooking, let stand for 3-5 minutes. Let oven cool for at least 5 minutes before using again. Use the pad to increase cook time for larger potatoes.
Beverage
1,2 cups (8 oz,16 oz)
Use a microwave-safe measuring cup or mug; do not cover. Place the beverage in the microwave. After heating, stir well. Let oven cool for at least 5 minutes before using again. Beverages heated with the beverage category may be very hot.
Remove the container with care.
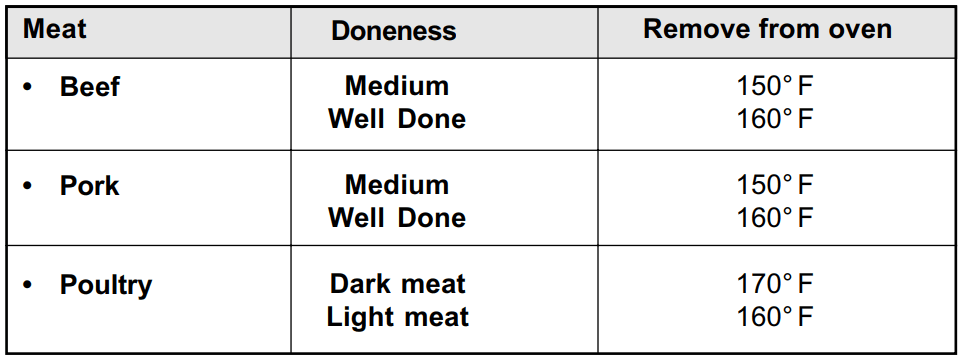
Cooking meat in your microwave
Be sure to place prepared meats on a microwave-safe roasting rack in a microwave-safe dish. Start cooking the meat fat side down and if necessary, use narrow strips of aluminum foil to shield any bone tips or thin meat areas. After cooking, check the temperature in several places before letting the meat stand the recommended time. Please note that the temperatures in the following charts are temperatures at removal time; the temperature will rise during the standing period.
* Expect a 10° F rise in the temperature during the standing period.
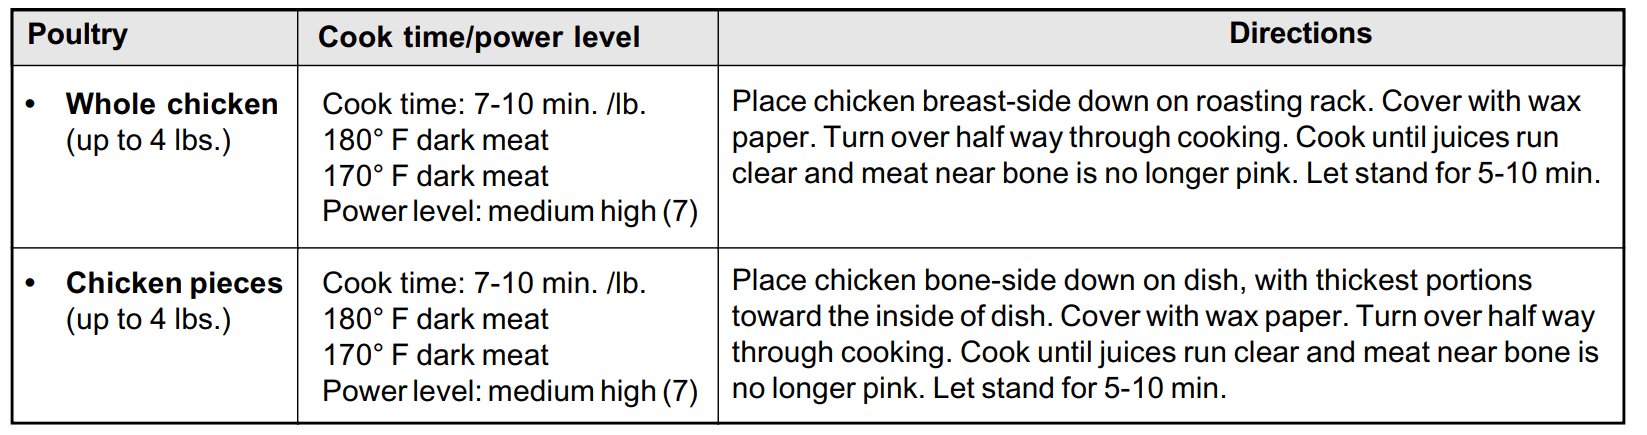
Cooking poultry in your microwave
Be sure to place poultry on a microwave-safe roasting rack in a microwave-safe dish. Cover poultry with wax paper to prevent splattering. Use narrow strips of aluminum foil to shield any bone tips or thin meat areas, or areas that start to overcook. After cooking, check the temperature in several places before letting the meat stand the recommended time.
Cooking eggs in your microwave
Never cook eggs in the shell and never warm hard- cooked eggs in the shell; they can explode.
Always pierce whole eggs to keep them from bursting.
Cook eggs just until set; they will become tough if overcooked.
Cooking vegetables in your microwave
Vegetables should be washed just before cooking. Rarely is extra water needed. If dense vegetables such as potatoes, carrots and greens are being cooked, add about 1⁄4 cup of water.
Small vegetables (sliced carrots, peas, lima beans, etc.) will cook faster than larger vegetables.
Whole vegetables, such as potatoes, acorn squash or corn on the cob, should be arranged in a circle on the turntable before cooking. The will cook more evenly if turned over halfway through cooking.
Always place vegetables like asparagus and broccoli with the stem ends pointing towards the edge of the dish and the tips toward the center.
When cooking cut vegetables, always cover the dish with a lid or vented microwavable plastic wrap.
Whole, unpeeled vegetables such as potatoes, squash, eggplant, etc., should have their skin pricked in several locations before cooking to prevent them from bursting.
For more even cooking, stir or rearrange whole vegetables halfway through the cook time.
Most of the time, the denser the food the longer the required standing time. For example, a baked potato should stand for 5 minutes before serving, while a dish of peas may be served immediately.
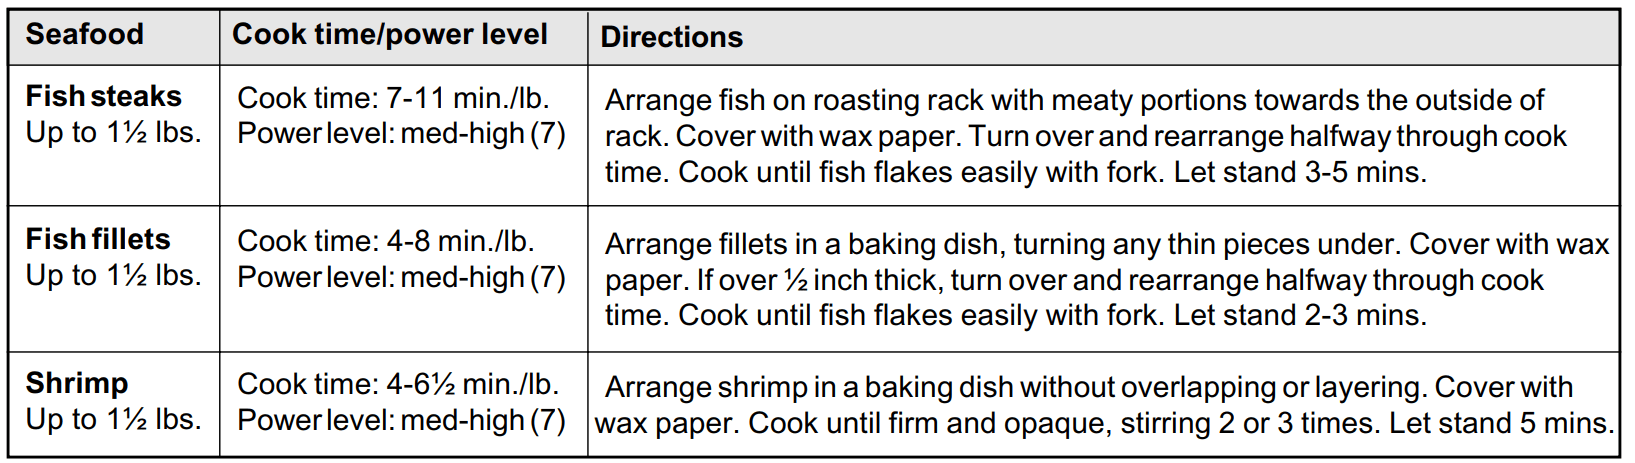
Cooking seafood in your microwave
Place fish on a microwave-safe roasting rack in a microwave-safe dish. Be sure to always cook fish until it flakes easily with a fork. Use a tight cover to steam fish; a lighter cover of wax paper or paper towel provides less steaming. And be sure not to overcook fish; check it for doneness at a minimum cooking time before cooking longer.
CONVENIENT FEATURES
Setting the sound
Turning Sound
Audible signals are available to guide you when setting and using your oven.
A programming tonewill sound each time you touch a pad.
Three tones signal the end of a Kitchen Timer count down.
Three tones signal the end of a cooking cycle.
Setting Weight Ib/Kg
1. Touch Clock Settings pad 3 times.
2. Op-3 will display and the START+30sec reeds to be pressed to select.
3. lb/kg auto scrolls every 2 seconds through each selection.
4. Touch START+30sec pad to confirm your selection.
Setting Power save mode
1. Touch Clock Settings pad 4 times.
2. Op-4 displays and the START+30se needs to be pressed to select.
3. on/off auto scrolls every 2 seconds through each selection.
Touch START+30sec pad to confirm the LED shows on.
CARE AND CLEANING
EXTERIOR
The outside surface is precoated steel and plastic. Clean the outside with mild soap and water; rinse and dry with a soft cloth. Do not use any type of household or abrasive cleaner.
DOOR
Wipe the window on both sides with a soft cloth to remove any spills or spatters. Metal parts will be easier to maintain if wiped frequently with a soft cloth. Avoid the use of spray and other harsh cleaners as they may stain, streak or dull the door surface.
EASY CARETM STAINLESS STEEL/ SMUDGE_PROOF™ STAINLESS STEEL/ BLACK STAINLESS STEEL
Your microwave oven(some models) may have a StainlessSteel finish or coating. Clean the stainless with warm soapy water using a clean sponge or cloth. Rinse with clean water and dry with a soft clean cloth. DO NOT use ANY store bought cleaners like Stainless Steel cleaners or any other types of cleaners containing any abrasive, chlorides, chlorines or ammonia. It is recommended to use mild dish soap and water or a 50/50 solution of water and vinegar.
TOUCH CONTROL PANEL
Care should be taken in cleaning the touch control panel. If the control panel becomes soiled, open the microwave oven door before cleaning. Wipe the panel with a cloth dampened slightly with water only. Dry with a soft cloth. Do not scrub or use any sort of chemical cleaners. Close door and touch STOP/CLEAR.
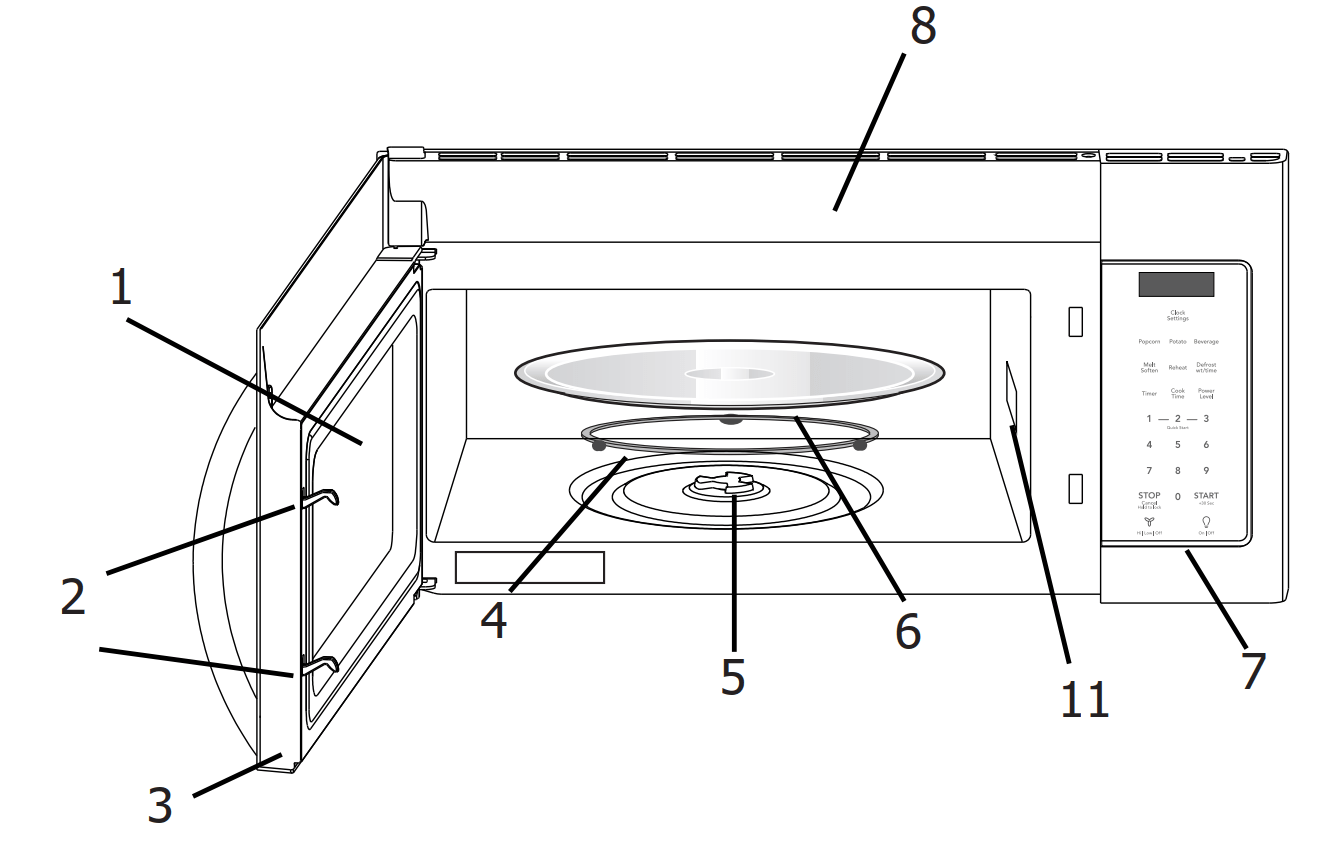
WAVEGUIDE COVER
The waveguide cover is located on the right side in the microwave oven cavity. It is made from mica so requires special care. Keep the waveguide cover clean to assure good microwave oven performance. Carefully wipe with a damp cloth any food spatters from the surface of the cover immediately after they occur. Built-up splashes may overheat and cause smoke or possibly catch fire. DO NOT REMOVE THE WAVEGUIDE COVER.
ODOR REMOVAL
Occasionally, a cooking odor may remain in the microwave oven. To remove, combine 1 cup water, grated peel and juice of 1 lemon in a 2-cup glass measuring cup. Boil for several minutes using 100% power. Allow to set in microwave oven until cool. Wipe interior with a soft cloth.
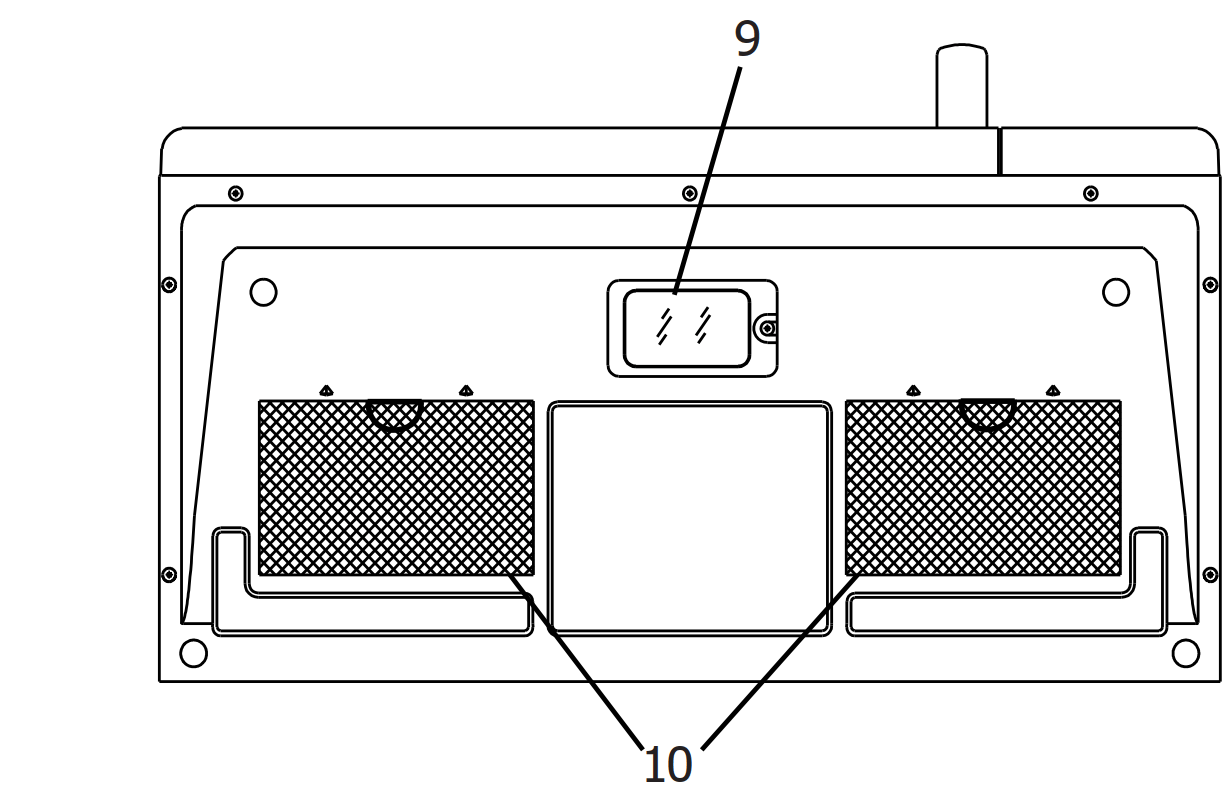
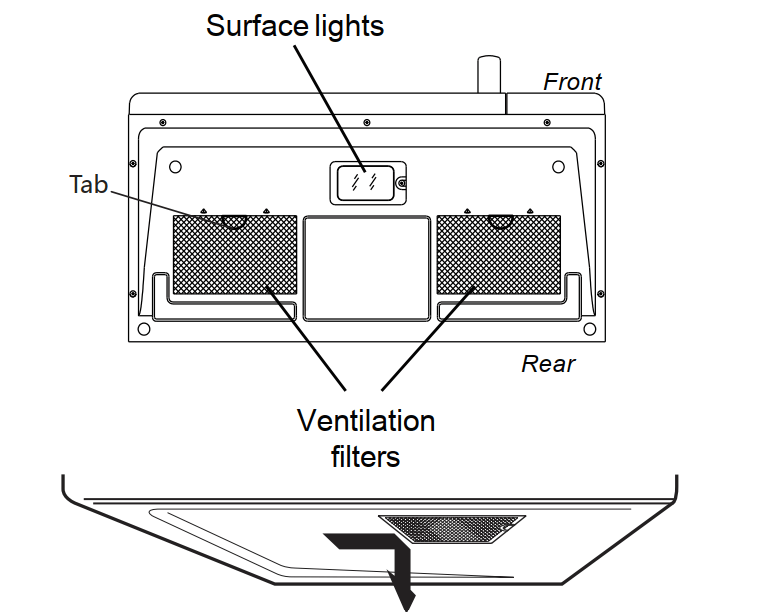
Cleaning the exhaust filters
1. To remove the exhaust ventilation filters, slide the filter to the rear. Then pull filter downward and push to the other side. The filter will drop out. Repeat for the 2nd filter.
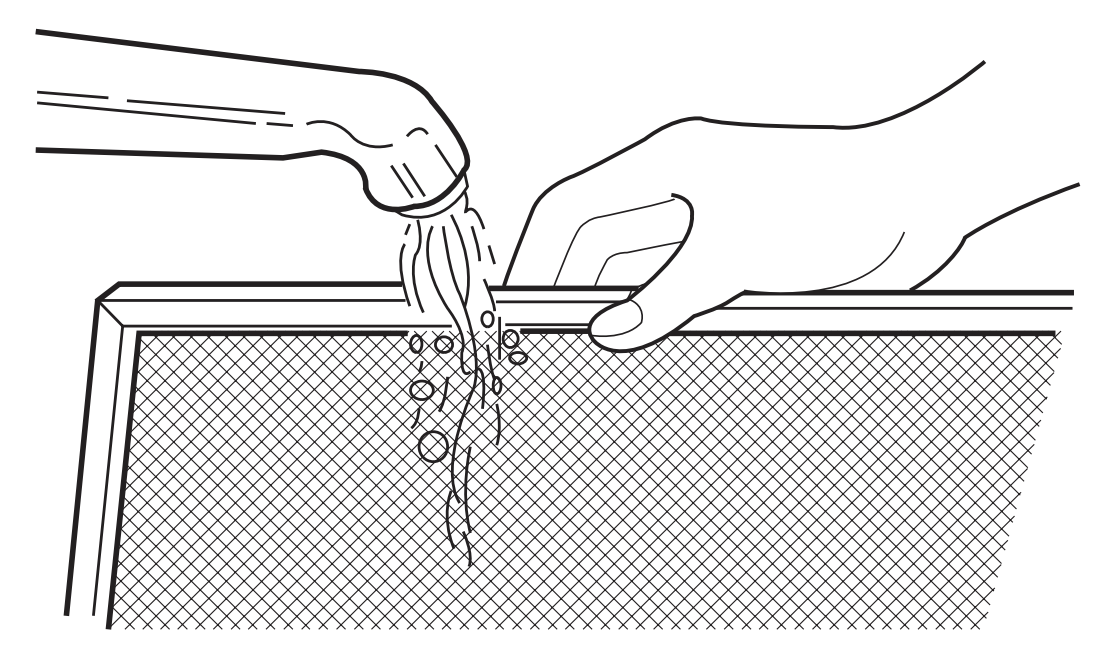
2. Soak the ventilation filters in hot water using a mild detergent. Rinse well and shake to dry or wash in dishwasher
Do not use ammonia. The aluminum on the filter will corrode and darken.
3. To reinstall the exhaust ventilation filter, slide it into the side slot, then push up and toward oven to lock.
Reinstall the 2nd filter using the same procedure.
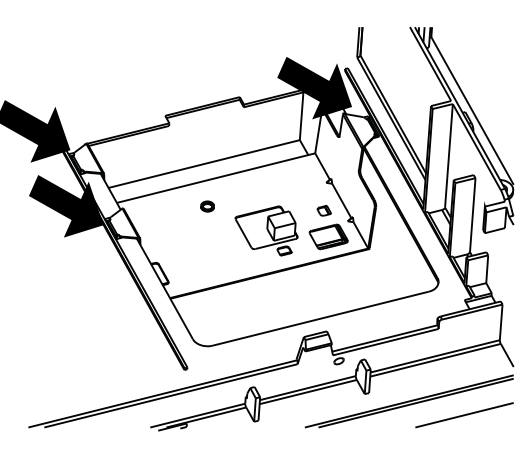
Surface light replacement
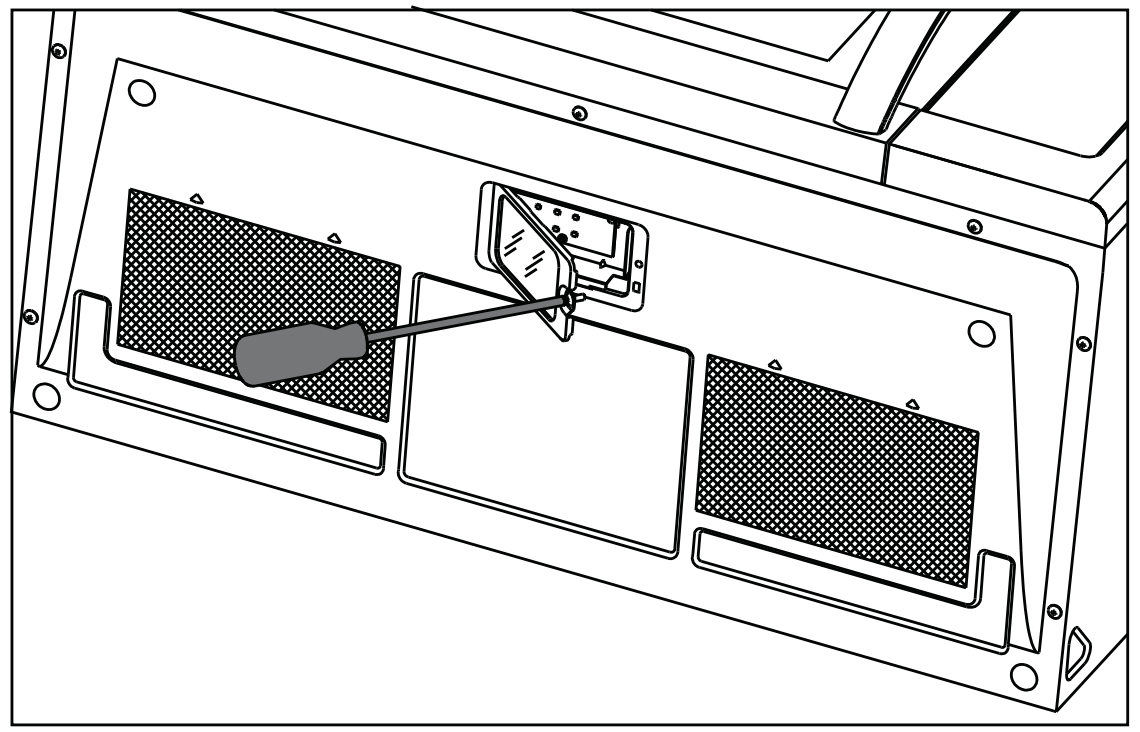
1 Unplug the microwave oven or turn off power at the main circuit breaker.
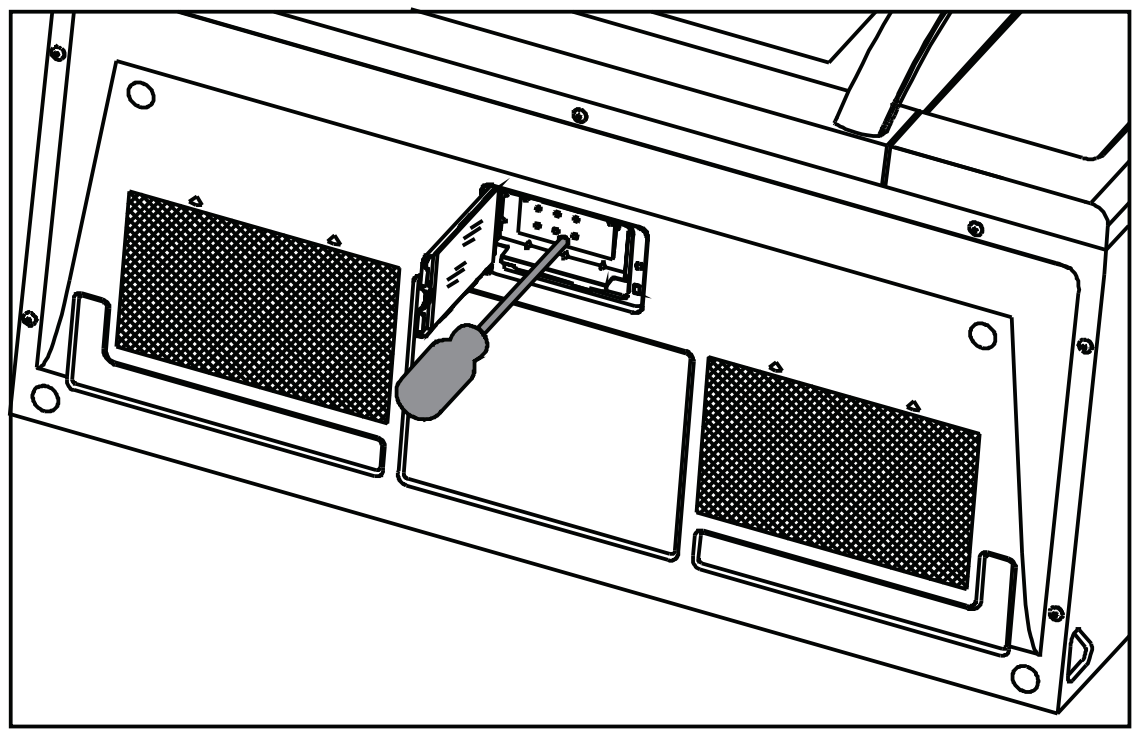
2 Remove the cover moun ting screw under the microwave.
3. Remove the LED light mounting screw.
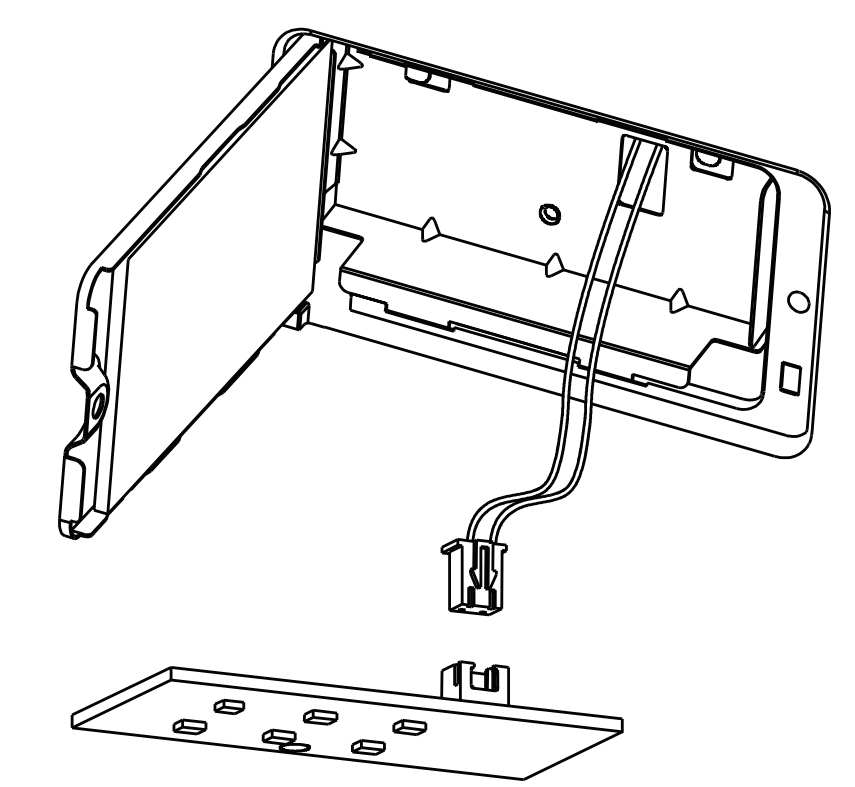
4. Unplug the LED light from the harness, replace with part 5304499540.
5. Re-install LED light and mounting screw.
When re-installing mounting screw be careful not to damage the LED light.
6. Re-install LED light cover and mounting screw.
7. Plug the microwave back into the power supply or turn the power back on at the main circuit breaker.
Charcoal filter replacement
Charcoal Filter when installed in your microwave oven,is used for nonvented, recirculated Installation. The filter should be changed every 6 to 12 months depending on use.
1. Disconnect power to the microwave oven at the circuit breaker panel or by unplugging.
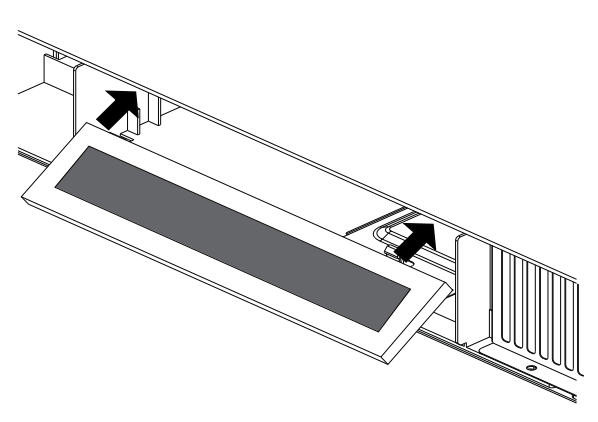
2. Remove the vent grill mounting screws.
3. Pull the vent grill away from the unit.
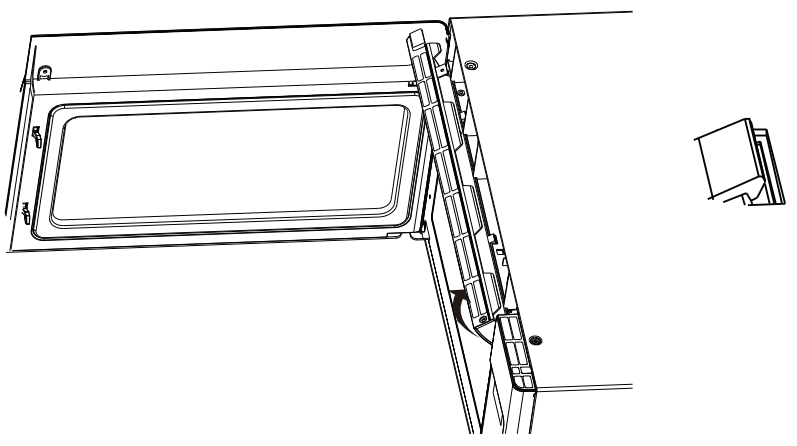
4. Remove the charcoal filter by pushing t?he top of the filter inwards, then pull it forward out from the unit.
5. Slide the top of the new charcoal filter into the top area of the filter cavity.
6. Press the bottom of charcoal filter to place it into the correct position.
7. Put the vent grille bottom tabs into the slots then push the top of the vent grilled into place
8. Reinstall the vent grille screws.
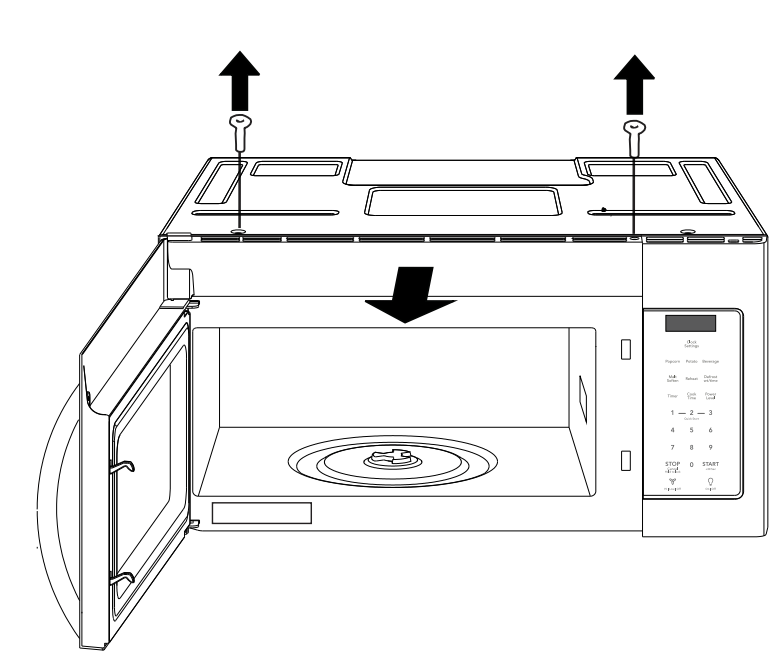
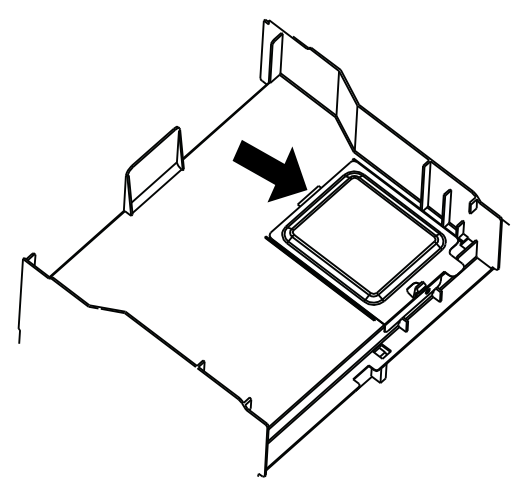
Oven light replacement
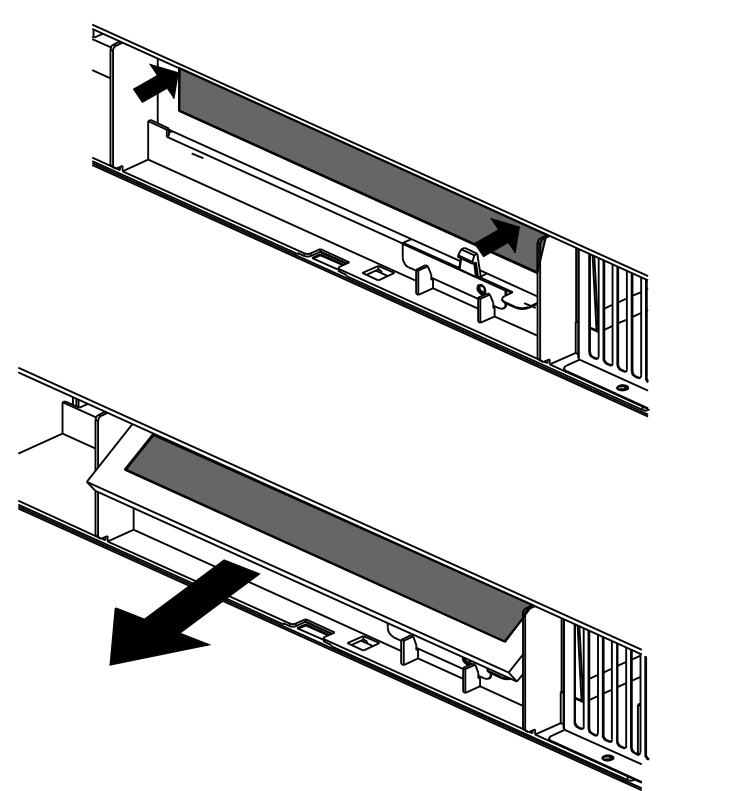
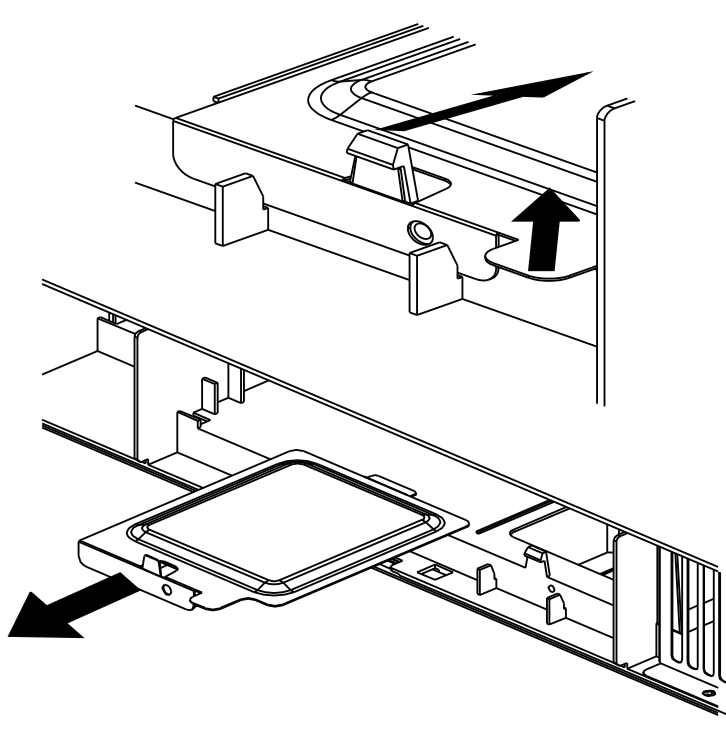
1. Remove the light cover by carefully pulling up on the front edge and pulling the cover forward.
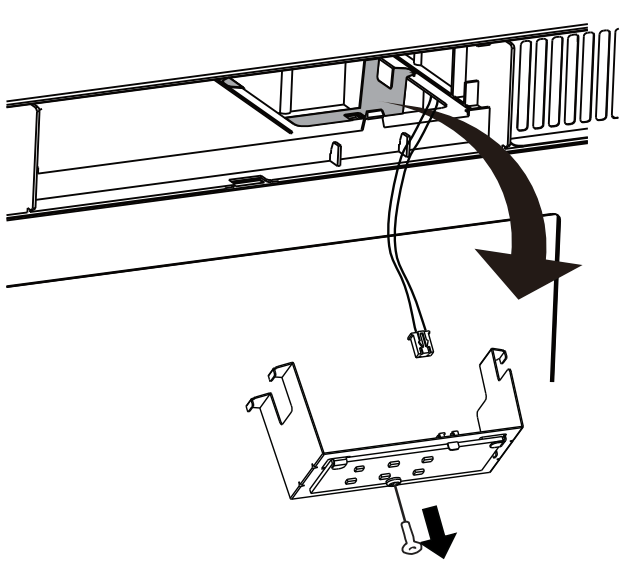
2. Remove the LED bracket and light assembly. Removethe LED light from the bracket by removing the oun-ting screw and replace only
3. Re-install LED light to the bracket with mounting screw.When re-installing mounting screw be careful not to damage the LED light.
4. Reconnect LED light to the harness and place the LED light assembly back into the plastic housing.
5. Replace the microwave oven light cover by carefully pushing into place (make sure the light cover rear tab is inserted into slot at rear).
6. Replace the charcoal filter (if installed). Push the vent grill back into place (engaging both the bottom and top tabs) and replace the vent grill mounting screws.