Owner's Guide Television
Connections and setup
Connecting an antenna, cable, or satellite box
If you are using an antenna, CATV cable without a set-top box, or a cable or satellite box that has only an antenna output, connect a 75-ohm coaxial cable (not provided) from the device to the ANT/CABLE input on the TV.
Tip: If you are using an antenna with a 300 ohm twin-lead cable, you need to use a 300-to-75 ohm adapter (not provided) to adapt the twin-lead cable to a connection that is compatible with the TV’s antenna input.
Tip: If you receive your TV stations through a set top box from a cable or satellite TV provider, connect it to the TV using the best connection method available. From most to least desirable:
- HDMI® input – Digital HD and SD video
- AV input – analog SD video
- Antenna input – analog SD video using NTSC

Connecting external equipment with a composite AV video cable
If the best connection available on your device is AV or composite video output, connect it to the TV using a composite AV cable (not provided). Composite AV cables typically have three RCA-type plugs on each end, color coded as follows:
- Yellow – Video
- Red – Audio, right channel
- White or black – Audio, left channel
Connect each plug to the corresponding connector on the device and on the TV.
Note: Select models have an AV Input that looks like a headphone jack. Use the breakout cable (included) to adapt this input to the three RCA-type plugs on your composite cable.
Connecting external equipment with an HDMI® cable
If possible, connect your devices using HDMI® cables (not provided).
They help to provide the best video quality and also carry audio signals, so that only one cable is needed. For better picture quality, we recommend that you use cables designated as High Speed HDMI® Cables.
Tip: You might need to configure the device to send its signal through its HDMI® connector.
The connector labeled HDMI IN (ARC) has the additional ability to use the audio return channel to send digital audio to a receiver or sound bar, as explained in Connecting an AV receiver or digital sound bar.

Connecting headphones or analog sound bar to the TV
You can connect headphones or an analog sound bar (not provided) to the TV’s headphone jack.
Tip: Inserting a plug in the headphone jack disables the sound from the TV’s built-in speakers.
Warning: Loud noise can damage your hearing. When using headphones, use the lowest volume setting on your headphones that still lets you hear the sound.
Select models also have an audio line out connection that is not affected by TV volume or mute settings and does not disable the TV speakers. Use this connection when you want to use your amplifier or sound bar to control the TV volume. To turn off the TV’s built-in speakers, in the Home screen menu, navigate to Settings > Audio > TV speakers and change the setting.

Connecting an AV receiver or digital sound bar
You can enjoy Dolby Audio™ multichannel sound from your TV if you connect a digital amplifier or sound bar (not provided) in either of two ways:
- Digital optical audio out (S/PDIF) – Connect a TOSLINK optical cable (not provided) from the TV to the Optical input on your receiver or sound bar.
- HDMI ® ARC – Connect an HDMI ® cable (not provided) from the HDMI (ARC) connector to the HDMI ® input on your receiver or sound bar. This connection uses the Audio Return Channel (ARC) feature of the HDMI ® specification to output sound from the TV to a compatible device. To use this feature, you must configure the TV to enable HDMI ® ARC, as explained in Enable HDMI ® ARC.

Preparing for Internet connectivity
If you want to watch streaming content and take advantage of the cool features of your TCL Roku TV, connect it to the Internet through a wireless modem/router or a wireless access point (not provided). The TV has a built-in wireless LAN adapter.
Note: The TV supports only its internal wireless network adapter—it does not support the use of a USB network adapter.
Select 4K models have wired in addition to wireless network connectivity. To use the wired network connection, connect an RJ-45 Ethernet cable (not provided) from the jack on the back of your TV to your network router or switch. The wired connection supports both 10 Base-T and 100 Base-T Ethernet.
AC power
Plug your TV into a power outlet. You can tell that the TV has power because the status indicator lights up when the TV is off.
The topic Status indicator explains how the status indicator shows what is happening with the TV.
Roku remote batteries
Open the back of your Roku remote and insert the included batteries, observing the proper orientation as indicated in the battery compartment. Reattach the back cover.

TCL Roku TV remote
Use the following information to identify the buttons on your Roku remote.
Note: Certain remote buttons and features vary by model. Your remote might not have all buttons or features listed.
- If your remote has a microphone button
 just below the purple pad, then you have a Roku Voice Remote.
- If your remote has a headphone jack on its left edge, then you have a Roku Enhanced Voice Remote.
The Roku voice remotes have additional capabilities as described in the following table.


Guided Setup
With the preliminaries out of the way, it’s time to turn on your TV. As the TV starts for the first time, it leads you through Guided Setup, which configures the TV before you start to use it.
During Guided Setup, you’ll:
- Answer a few questions
- Provide network connection information
- Get a software update
- Link your TV to your Roku account.
- Connect devices such as a DVD player, game console, or cable box.
Starting Guided Setup
To start Guided Setup, press the POWER button on the remote to turn on your TV.
Note: Guided Setup normally runs only once, the first time you turn on your TV. If you need to run Guided Setup again, you’ll have to perform a factory reset, as explained in Factory reset everything.
When you first turn on your TV, it will take a few seconds to get itself ready. You’ll notice the following things happening:
- The status indicator blinks every time the TV is busy doing something; in this case it’s powering up and getting ready for you.
- The power-on screen appears and the status indicator blinks slowly for a few more seconds. The power-on screen shows a brand logo while the TV starts up.
- After a few seconds, Guided Setup starts.
Completing Guided Setup
Follow these steps to complete Guided Setup. At this point, you should be seeing the Language screen.

- Only on models that have a Roku voice remote: A few moments after the Let’s get started screen appears, Guided Setup starts the pairing process for the voice remote. (You’ll know if you have this type of remote because it will have microphone or search button just below the down arrow on the purple pad.) If the voice remote does not pair automatically, follow the instructions on the screen to complete the pairing process.
Tip: On TVs sold in the United States, if you are blind or visually impaired, you can activate Audio Guide, a text-to-speech screen reader to help you navigate the TV’s menus and commands. To enable the Audio Guide, press the  button on the remote four times in rapid succession. Repeat to disable Audio Guide. (The button is located directly below the directional pad on the right side of the Roku remote.)
Note: If you enabled Audio Guide, choosing any language other than English disables it.
- Press the DOWN arrow on the remote to highlight your preferred language, and then press OK or the RIGHT arrow.
- Some models have a country selection screen: If you don’t see this screen, skip ahead to the next step. If you see this screen, select your country.

Note: If you enabled Audio Guide, choosing any country other than United States disables it.
- Press OK or the RIGHT arrow on the remote to go to the next screen:

Note: Some models show the title First things first instead of Set up environment.
- Press OK to select Set up for home use. This is the right choice for enjoying your TV at home. It provides energy saving options as well as access to all features of the TV.
Note: Store mode configures the TV for retail display and is not recommended for any other use. In store mode, some features of the TV are missing or limited. To switch from one mode to the other, you have to perform a factory reset as explained in Factory reset everything, and then repeat Guided Setup.
Network connection
After you select Set up for home use, the TV prompts you to make a network connection. If your TV has both wired and wireless connections, you’ll see the following screen.

- Only models that display the Connect to the Internet screen: Make a selection:
Wireless connection – Highlight Set up new wireless connection and press OK. The TV prompts you through wireless setup. Skip ahead to the next step for help with the process.
Wired connection – Highlight Connect to wired network and press OK. The TV immediately attempts to connect to your wired network, your local network, and then the Internet. Go to Step 9 to continue with Guided Setup.
Connect to the Internet later – If you don’t want to connect to the Internet right now, you can skip this step and use the TV to watch Antenna TV channels, play games, and watch DVDs. When you’re ready to connect, it’s easy. We’ll show you how in Benefits of connecting.
Note: If you decide not to connect, Guided Setup skips ahead to setting up the devices that you’ve connected to your TV. Jump ahead to Connect your devices to complete Guided Setup.
- On models that have wireless only, or models with both wired and wireless and you’ve selected Wireless: The TV scans for the wireless networks within range and displays them in order, with the strongest signals first. In addition to your own wireless signal, the TV might pick up signals from your neighbors.

Press the UP or DOWN arrows to highlight the name of your wireless network, and then press OK to select it.
Note: Some networks, such as those often found in dorm rooms, hotels, and other public places, require you to read and agree to terms, enter a code, or provide identifying information before letting you connect to the Internet. If your TCL Roku TV detects that you are connecting to such a network, it prompts you through the connection process using your compatible smartphone or tablet to provide the needed information.
Other options
Connect to the Internet later – If you don’t want to connect to the Internet right now, you can skip this step and use the TV to watch Antenna TV channels, play games, and watch DVDs. When you’re ready to connect, it’s easy. We’ll show you how in Benefits of connecting.
Note: If you decide not to connect, Guided Setup skips ahead to setting up the devices that you’ve connected to your TV. Jump ahead to Connect your devices to continue.
Scan again / Scan again to see all networks – The name of this option depends on the number of wireless networks within range.
Scan again appears if the list already shows all available wireless networks within range. If you don’t see your wireless network name in the list, you might need to adjust the location of your wireless router or the TV, turn on your router, or make other changes. When everything is ready, select Scan again to see if your network name now appears in the list.
Scan again to see all networks appears if there are more wireless networks than the strongest ones it initially listed. If you don’t see your wireless network name in the list, this option displays the complete list. If you still don’t see your network name, you might have your router configured to provide wireless service as a “private network.”
Note: Highlighting either of these options displays an informational panel with the unique media access control (MAC) address of your TCL Roku TV. You will need the MAC address if your wireless router is configured to use MAC address filtering.
Private network – If your wireless network name is hidden, it won’t appear in the list. Select Private network to display an on-screen keyboard, and use it to enter your network name. Unless you changed the factory-set network name, you can find the name (also called SSID) on a label on the router.
Tip: Wireless networks that are password-protected display a “padlock” icon adjacent to the name. This icon enables you to know that you are going to be prompted to enter a password after you select that network.
- Only if you select a password protected wireless network: An on-screen keyboard appears. Use the keyboard to enter the network password.

After you submit your wireless network password, the TV displays progress messages as it connects to your wireless network, your local network, and the Internet.
- Only if your TV cannot get the correct time zone and current time from your network service provider: Use the UP and DOWN arrows to highlight your time zone, and then press OK.

Tip: Your TV needs to know the local time zone so that it can correctly display information about the program you are currently watching. If the TV is unable to automatically determine the local time zone, it prompts you to choose your time zone from a list.
As soon as the TV is able to connect to the Internet, it downloads and installs its first software update, and then restarts.
Tip: Your TV automatically checks for updates periodically. These updates provide new features and improve your overall experience with the TV. After an update, you might notice that some Options have moved, and that there are new options or features. This User Guide describes version 8.0. To determine your current TCL Roku TV software version, go to Settings > System > About after you complete Guided Setup. You can download an updated User Guide that matches your TCL Roku TV software version from the TCL Roku TV web site.
Activation
After the TV restarts, it displays the Activation screen:

Using a compatible computer, tablet, or smartphone with an Internet connection, go to the web address displayed on the screen and enter the code that appears on your screen.
Why do I need a Roku account?
You need a Roku account for several reasons:
- It links you, your TCL Roku TV, and your other Roku streaming devices to the Roku Channel Store and billing service.
- Streaming content providers know that it’s OK to send content you request to your TCL Roku TV.
- Roku can automatically send updates to your device.
You need a Roku account to activate your device and access entertainment across thousands of streaming channels. Roku accounts are free, and while a valid credit card number is not required to create your account, providing your credit card information makes renting and purchasing entertainment from the Roku Channel Store fast and convenient.
After you log in or create your Roku account, the link page suggests that you select some streaming channels. After you confirm your selections, the TV gets an acknowledgement, and then adds your preexisting and newly-selected streaming channels to your TCL Roku TV. This process is automatic and takes a few moments—a little longer if you already have a lot of streaming channels to add.
Tip: Streaming channels from all Roku streaming devices associated with your account are synchronized periodically, so that all of your Roku streaming devices have the same set of streaming channels (subject to compatibility with the device).
Connect your devices
Next, Guided Setup helps you set up the external devices that you want to use with it, such as a cable box, Blu-rayTM player, or game console.

- Press OK or the RIGHT arrow to proceed:

- Connect all the devices you plan to use with your TV, turn them all on, and then select Everything is plugged in and turned on. The TV now takes you step by step through each of its inputs and asks what kind of device you have connected.
On each input that has a connected and active device, you can see its picture and hear its sound.

- Press the UP or DOWN arrows to highlight the label you want to associate with the input. If you are not using the input, select Nothing, and the input won’t appear on the Home screen.
- While setting up your devices, rather than using the predefined names and icons, you can set a custom name and icon. To do so, scroll up or down to highlight Set custom name & icon, and then press OK. Follow the instructions on the screen to enter a name and select an icon for the input. See Rename inputs for more information.
Note: If you have renamed the inputs, you cannot use voice commands to switch inputs. Voice commands can only switch among inputs that have their original names, such as “AV,” and “HDMI 1.”
- Repeat the previous step for each input.
You’re done with Guided Setup.

Note: Some TCL Roku TVs, depending on where you live and other factors, show you an introductory video filled with some great hints and tips. If you’re not interested in viewing this video, press  on the remote to return to the TCL Roku TV Home screen.
Whenever you press on the remote, the Home screen greets you.
From here, you can explore everything your TV has to offer. Press the arrow keys to move around, and press OK to select a highlighted item. We’ve designed the TV to encourage you to explore, and you can probably figure out most of the capabilities and settings on your own. If you have any questions or difficulties, you can find answers and solutions in this guide.
Home screen
The following illustrations show typical Home screens, which vary depending on location, connected mode, selected theme, number of TV inputs enabled, and streaming channels and apps added.
Note: A paid subscription or other payments may be required for some channel content. Channel availability is subject to change and varies by country. Not all content is available in countries or regions where Roku ® products are sold.

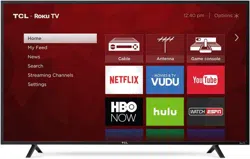
Typical connected Home screen, United States
- Home screen menu—shows options available to you when you are on the Home screen.
- Highlighted option—press OK on the remote to select.
- TV input tiles—select an input to watch the connected device.
- Streaming channel and app tiles—select a tile to go to the indicated streaming channel or application.
- Options hint—press on the remote for options when this symbol is present.
- Next screen hint—press the RIGHT arrow on the remote to see the next screen.

Typical connected Home screen, Canada
- Home screen menu—shows options available to you when you are on the Home screen.
- Highlighted option—press OK on the remote to select.
- TV input tiles—select an input to watch the connected device.
- Streaming channel and app tiles—select a tile to go to the indicated streaming channel or application.
- Options hint—press on the remote for options when this symbol is present.
- Next screen hint—press the RIGHT arrow on the remote to see the next screen.

Typical non-connected Home screen
- Home screen menu—shows options available to you when you are on the Home screen.
- Highlighted option—press OK on the remote to select.
- TV input tiles—select an input to watch the connected device.
- Options hint—press on the remote for options when this symbol is present.
- Next screen hint—press the RIGHT arrow on the remote to see the next screen.
More settings
Changing time settings
You can change time settings to suit your preferences. You can find the following settings by navigating from the Home screen menu to Settings > System > Time:
- Sleep timer – Set a time delay after which the TV will automatically shut off. This setting reflects the setting you can make in the Options menu from any TV input, as explained in Options menu settings. Note that the sleep timer setting is not input specific.
- Time zone – Select whether to set the time zone automatically or manually, and if set manually, select your current time zone. Typically, a TV connected to the Internet can discover its own time zone automatically, and a TV that is not connected to the Internet must be set manually. Initially, this setting is made when you set up the TV tuner, as explained in Setting up Antenna TV. Correct time zone information is needed to correctly display program data.
- Clock format – Select whether to display time in a 12-hour or 24-hour format, or to turn off time display. This setting is available only on TVs that are connected to the Internet. Non-connected TVs do not display the time.
Using the TV in a home theater
Your TV has several features that make it an ideal TV for a home theater. But you might not notice them because they remain in the background until you decide to use them.
Turning off the speakers
When you use your TV with a sound bar or an external amplifier and speakers, you’ll probably want to turn off the internal TV speakers.
To turn off the TV’s built-in speakers, in the Home screen menu, navigate to Settings > Audio > TV speakers and change the setting.
Tip: The TV’s internal speakers can be enabled and disabled automatically as needed by system audio control, as described in Enable system audio control. Using the headphone jack also turns off the internal speakers.
Setting up a digital audio connection
To take advantage of your TV’s advanced audio capabilities, connect it to an external amplifier, receiver, or sound bar by using either of these two digital audio connections:
- HDMI ARC – The HDMI ® Audio Return Channel enables the TV to output digital audio on one of its HDMI ® connectors. The connected amplifier can also function simultaneously as an input source to the TV, if needed. To use the ARC capability, you must connect an HDMI ® cable from your amplifier’s HDMI ® ARC connector to the HDMI ARC connector on the TV. You also must:

- Be sure your HDMI ® cable is certified by HDMI® .
- Enable HDMI ARC under Settings > System > Control other devices (CEC), as explained in Enable HDMI ® ARC.
- SPDIF optical – The SPDIF optical connector outputs a digital audio signal. To use the optical output, connect a TOSLINK optical cable from the amplifier to the Optical or SPDIF connector on the TV.

Note: Dolby Audio™ supporting Dolby Digital Plus™ format is not available through the SPDIF optical output. This format is only available through the HDMI ® ARC connection.
After making the required HDMI ® ARC or SPDIF optical connection, go to Settings > Audio > S/PDIF and ARC option and select the audio format to use.
Note: In most cases, Auto detect is the best option. Other settings can result in no sound when the content you are viewing does not contain the audio stream type you selected.
Controlling other devices through CEC
Consumer Electronics Control (CEC) enables your TV and other CEC-compatible home entertainment devices to control one another in various ways. First, the CECcompatible devices must “discover” one another and report their capabilities. After this, one device can control another according to the features you enable. For example, playing a disc on a Blu-ray™ player could switch the TV to the Blu-ray™ player’s input. Or, powering off the TV could also power off the Blu-ray™ player and the home theater receiver.
Discover connected CEC devices
To discover CEC devices:
- Make sure that your CEC-compatible devices are connected to the TV with a suitable High Speed HDMI ® Cable that supports HDMI ® ARC and CEC control.
- Turn on each device and make sure all devices are CEC enabled.
Tip: Some manufacturers have their own branded names for CEC functionality, so you might need to read the product documentation to correctly identify the CEC features of the device.
- On the TV’s Home screen menu, navigate to Settings > System > Control other devices (CEC) and then select Search for CEC devices. Press OK to repeat the discovery process, if necessary.
When finished, the TV displays a list of CEC devices that are connected to each HDMI® input, as well as any devices that had previously been connected. The TV remembers the names of multiple CEC devices even when they are no longer connected. If the list is longer than the allowed space, press Þ to see a complete list in a scrollable window.
Enable HDMI ® ARC
HDMI ® ARC is the audio return channel that is available on one of the TV’s HDMI ® ports. The audio return channel enables you to send a Dolby Audio™ signal back to a home theater receiver that is also sending an audio and video signal into the TV. Using HDMI ® ARC reduces the number of cables needed and optionally lets you control the volume and mute state of the receiver by enabling system audio control.
HDMI ® ARC is disabled by default. To enable HDMI ® ARC, in the Home screen menu, navigate to Settings > System > Control other devices (CEC), and then highlight HDMI ARC. Press OK to enable or disable the feature.
Note: Enabling HDMI ARC also enables System audio control. After enabling HDMI ARC, you can disable System audio control if you prefer.
Enable system audio control
System audio control enables the TV remote to change the volume and mute state of an amplifier or sound bar connected through HDMI® , and to display the external device’s volume and mute status in the TV’s on-screen display.
The TV automatically turns off its internal speakers and sends volume and mute control signals to an external amplifier when all of the following are true:
- System audio control is enabled on the TV.
- The TV is connected to a CEC-compatible amplifier, it is powered on, and CEC discoverability is enabled.
- The CEC-compatible amplifier’s HDMI ® ARC connector is connected to the TV’s HDMI ARC connector with a suitable HDMI ® cable.
When the CEC-compatible amplifier is off, the TV automatically turns on its speakers (unless you have turned them off as described in Turning off the speakers) and resumes local control of volume and mute state.
To enable or disable system audio control, in the Home screen menu, navigate to Settings > System > Control other devices (CEC) and highlight System audio control. Press OK to enable or disable the feature.
Enable 1-touch play
1-touch play enables a device to control which TV input is active. For example, pressing Play on your Blu-ray™ player switches the TV to the Blu-ray™ input.
1-touch play is disabled by default. To enable 1-touch play, in the Home screen menu, navigate to Settings > System > Control other devices (CEC) and highlight 1-touch play. Press OK to enable or disable the feature.
Enable system standby
The system standby feature causes other devices to power off when you power off your TV. Depending on the CEC System Standby implementation, it also might enable connected devices to power off your TV when you power off the device.
System standby is disabled by default. To enable system standby, in the Home screen menu, navigate to Settings > System > Control other devices (CEC) and highlight System standby. Press OK to enable or disable the feature.
Restarting the TV
You can restart the TV when necessary. Restarting has the same effect as unplugging the TV power and then plugging it in again.
To restart the TV, navigate to Settings > System > Power, and then select System restart. Highlight Restart, and then press OK to confirm restart.
While the TV restarts, the screen goes dark for a few seconds, and then displays the startup screen for a few more seconds. When the restart operation completes, the TV displays the activity you selected in Power on settings.
Resetting the TV
You can choose to reset only the TV picture and audio settings to their original values, or perform a full factory reset to return the TV to the state it was in when you first unpacked and turned it on.
Reset audio/video settings
To reset only the TV picture and audio settings to their original values, navigate to Settings > System > Advanced system settings > Factory reset, and then highlight Reset TV audio/video settings. Read the information on the screen to make sure you understand what the reset operation does.
To proceed with the reset operation, press PLAY/PAUSE three times in a row.
Factory reset everything
A full factory reset returns the TV’s settings to their original state and removes all personally identifiable information from the TV. When finished, you must repeat Guided Setup, reconnecting to the Internet, re-linking your Roku account, and reloading any streaming channels. You also must repeat Antenna TV setup and input configuration.
Factory reset is the recommended choice if you want to transfer the TV to another owner, and it is the only choice if you want to switch from Store mode to Home mode (if you inadvertently selected Store mode during Guided Setup).
To perform a factory reset, navigate to Settings > System > Advanced system settings > Factory reset, and then highlight Factory reset everything. Read the information on the screen to make sure you understand what this reset operation does.
To proceed with the full factory reset, use the on-screen number pad to enter the code displayed on the screen, and then select OK to proceed.
When the factory reset operation completes, the TV restarts and displays the first Guided Setup screen.
What if I can’t access the Factory Reset option?
It is possible for your TV to get into a state where you cannot access the various menus, including the menu option that lets you perform a factory reset operation. If that happens, you can force the TV to reset by following these steps.
Models with a RESET button
- Using a straightened paper clip or ball-point pen, press and hold the recessed RESET button on the TV connector panel.
- Continue to hold the RESET button for approximately 12 seconds.
When the reset cycle completes, the status indicator comes on dim.
- Release the RESET button. The TV is now powered off.
- Turn on the TV and proceed through Guided Setup. See Guided Setup.
Models without a RESET button
- On the TV panel (not the remote) press and hold down the MUTE and POWER buttons.
- Unplug the TV power, and then plug it in while continuing to hold down the MUTE and POWER buttons.
- When you see the startup screen appear on the TV, release the buttons.
- Turn on the TV and proceed through Guided Setup. See Guided Setup.
Network connection reset
If you want to remove your network connection information without disturbing other settings, navigate from the Home screen to Settings > System > Advanced systems settings > Network connection reset, and then select Reset connection.
When you select this option, the TV removes your wireless network information, including the name of the connection (its SSID) and your wireless password, if any, and then it restarts. After restarting, your TV retains all of its other settings and its association with your Roku account.
After resetting your network connection, navigate from the Home screen to Settings > Network > Set up new connection to continue enjoying all of the benefits of your connected TV.
Changing your Roku Channel Store PIN preference
When you created your Roku account, you were given the opportunity to create a PIN code and to specify when it must be used. If you created a Channel Store PIN and want to change it, or you don’t remember your PIN, or if you didn’t create a Channel Store +PIN and want to add one, you can easily make these changes.
- On a computer, tablet, or smartphone, use your web browser and sign in.
After signing in, the My Account page appears.
- Under PIN Preference, click Update to open the Choose Your PIN Preferences page.
- Skip this step if you just want to change your PIN. Otherwise, choose the option your prefer from among those listed:
Require a PIN to make purchases or to add any item from the Channel Store.
Require a PIN to make purchases.
Do not require a PIN to make purchases.
- If you choose either of the first two options, enter your PIN twice in the appropriate boxes.
- Click Save Changes to save your changes and return to the My Account page.
Note that your current setting is described under PIN Preference.
Other devices
Screen Mirroring your phone or tablet
Only in connected mode, your TV has a feature called screen mirroring that lets you mirror your compatible smartphone or tablet on your TV. Share videos, photos, web pages, and more from compatible devices.
By default, your TV’s screen mirroring mode is set to Prompt. In this mode, when your TV receives a screen mirroring request, it prompts you with the following options, unless you have previously selected Always accept or Always ignore for the device:
- Always accept – Always accept mirrored content from the mobile device without additional prompting in the future for this device.
- Accept – Accept mirrored content from the mobile device this time only.
Prompt again next time this device attempts to mirror content.
- Ignore – Do not accept mirrored content from the mobile device at this time.
Prompt again next time this device attempts to mirror content.
- Always ignore – Never accept mirrored content from this mobile device.
Note: You can manage and change the list of devices that are set to Always accept or Always ignore by navigating from the Home screen to Settings > System > Screen mirroring > Screen mirroring devices.
- If you prefer to always allow all screen mirroring attempts without prompting, go to Settings > System > Screen mirroring, and then change the Screen mirroring mode to Always allow.
- If you prefer to never allow screen mirroring from any device, change the Screen mirroring mode to Never allow.
Getting and using the Roku mobile app
Roku makes the Roku mobile app free for compatible iOS ® and Android™ mobile devices.
The Roku mobile app is an alternative remote for your TCL Roku TV. The Roku mobile app helps you find and add new Roku Channels, more easily search and find something to watch and, only in the United States, even use your voice to search without typing.
Private Listening on the Roku mobile app
Only on compatible Apple and Android devices, the Roku mobile app enables you to use headphones connected to your device to listen to streaming programs Antenna TV channels. Make sure you have the latest version of the Roku mobile app before using this feature.
Using a universal remote
In many cases, you can program your cable or satellite universal remote to also control your TV. You will need to have instructions for programming the remote handy. Check with your cable or satellite provider for instructions.