User manual Television for TCL 32S321
Connections and setup
Refer to your TV’s Quick Start Guide or other provided documentation to for model- specific information about attaching the base or a wall mount and making connections to AC power and to your other audio/video devices. The following information applies to all TCL Roku TV models.
Connecting an antenna, cable, or satellite box
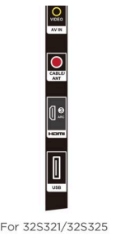
If you are using an antenna, CATV cable without a set-top box, or a cable or satellite box that has only an antenna output, connect a 75-ohm coaxial cable (not provided) from the device to the ANT/CABLE input on the TV.
Tip: If you are using an antenna with a 300 ohm twin-lead cable, you need to use a 300-to-75 ohm adapter (not provided) to adapt the twin-lead cable to a connection that is compatible with the TV’s antenna input.
Tip: If you receive your TV stations through a set top box from a cable or satellite TV provider, connect it to the TV using the best connection method available. From most to least desirable:
- HDMI® input – Digital HD and SD video
- AV input – analog SD video
- Antenna input – analog SD video using NTSC

Connecting external equipment with a composite AV video cable
If the best connection available on your device is AV or composite video output, connect it to the TV using a composite AV cable (not provided). Composite AV cables typically have three RCA-type plugs on each end, color coded as follows:
- Yellow – Video
- Red – Audio, right channel
- White or black – Audio, left channel
Connect each plug to the corresponding connector on the device and on the TV.
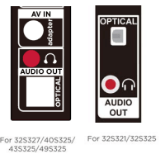
Note: Select models have an AV Input that looks like a headphone jack. Use the breakout cable (included) to adapt this input to the three RCA-type plugs on your composite cable.
Connecting headphones or analog sound bar to the TV
- You can connect headphones or an analog sound bar (not provided) to the TV’s headphone jack.
- Tip: Inserting a plug in the headphone jack disables the sound from the TV’s built-in speakers.
- Warning: Loud noise can damage your hearing. When using headphones, use the lowest volume setting on your headphones that still lets you hear the sound.
- Select models also have an audio line out connection that is not affected by TV volume or mute settings and does not disable the TV speakers. Use this connection when you want to use your amplifier or sound bar to control the TV volume. To turn off the TV’s built-in speakers, in the Home screen menu, navigate to Settings > Audio > TV speakers and change the setting.
Starting Guided Setup
To start Guided Setup, press the POWER button on the remote to turn on your TV.
Note: Guided Setup normally runs only once, the first time you turn on your TV. If you need to run Guided Setup again, you’ll have to perform a factory reset, as explained in Factory reset everything.
When you first turn on your TV, it will take a few seconds to get itself ready. You’ll notice the following things happening:
- The status indicator blinks every time the TV is busy doing something; in this case it’s powering up and getting ready for you.
- The power-on screen appears and the status indicator blinks slowly for a few more seconds. The power-on screen shows a brand logo while the TV starts up.
- After a few seconds, Guided Setup starts.
Completing Guided Setup
Follow these steps to complete Guided Setup. At this point, you should be seeing the Language screen.
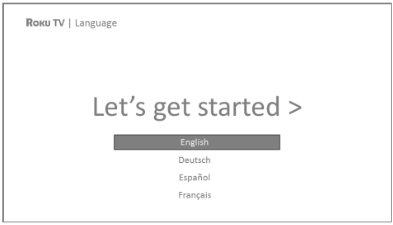
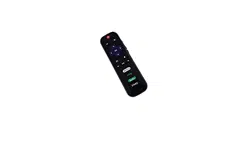
1. Only on models that have a Roku voice remote: A few moments after the Let’s get started screen appears, Guided Setup starts the pairing process for the voice remote. (You’ll know if you have this type of remote because it will have microphone or search button just below the down arrow on the purple pad.) If the voice remote does not pair automatically, follow the instructions on the screen to complete the pairing process.
Tip: On TVs sold in the United States, if you are blind or visually impaired, you can activate Audio Guide, a text-to-speech screen reader to help you navigate the TV’s menus and commands. To enable the Audio Guide, press the * button on the remote four times in rapid succession. Repeat to disable Audio Guide. (The * button is located directly below the directional pad on the right side of the Roku remote.)
Note: If you enabled Audio Guide, choosing any language other than English disables it.
2. Press the DOWN arrow on the remote to highlight your preferred language, and then press OK or the RIGHT arrow.
3. Some models have a country selection screen: If you don’t see this screen, skip ahead to the next step. If you see this screen, select your country.
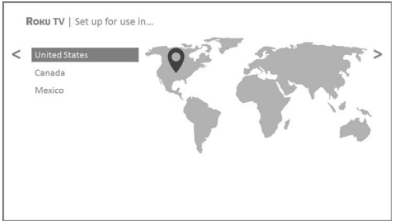
Note: If you enabled Audio Guide, choosing any country other than United States disables it.
4. Press OK or the RIGHT arrow on the remote to go to the next screen:
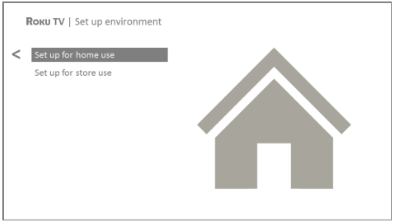
Note: Some models show the title First things first instead of Set up environment.
5. Press OK to select Set up for home use. This is the right choice for enjoying your TV at home. It provides energy saving options as well as access to all features of the TV.
Note: Store mode configures the TV for retail display and is not recommended for any other use. In store mode, some features of the TV are missing or limited. To switch from one mode to the other, you have to perform a factory reset as explained in Factory reset everything, and then repeat Guided Setup.
Home screen
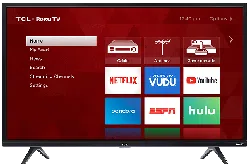
The following illustrations show typical Home screens, which vary depending on location, connected mode, selected theme, number of TV inputs enabled, and streaming channels and apps added.
Note: A paid subscription or other payments may be required for some channel content. Channel availability is subject to change and varies by country. Not all content is available in countries or regions where Roku® products are sold.

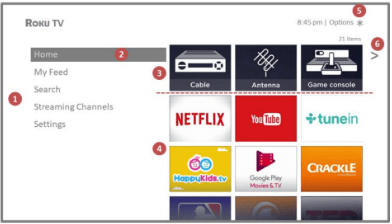
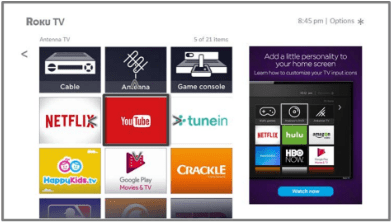
Typical connected Home screen, United States
1. Home screen menu—shows options available to you when you are on the Home screen.
2. Highlighted option—press OK on the remote to select.
3. TV input tiles—select an input to watch the connected device.
4. Streaming channel and app tiles—select a tile to go to the indicated streaming channel or application.
5. Options hint—press * on the remote for options when this symbol is present.
6. Next screen hint—press the RIGHT arrow on the remote to see the next screen.
Typical connected Home screen, Canada
1. Home screen menu—shows options available to you when you are on the Home screen.
2. Highlighted option—press OK on the remote to select.
3. TV input tiles—select an input to watch the connected device.
4. Streaming channel and app tiles—select a tile to go to the indicated streaming channel or application.
5. Options hint—press * on the remote for options when this symbol is present.
6. Next screen hint—press the RIGHT arrow on the remote to see the next screen.
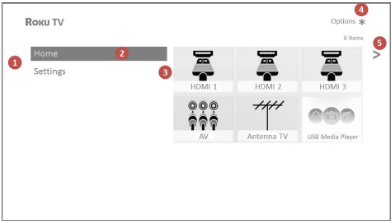
Typical non-connected Home screen
1. Home screen menu—shows options available to you when you are on the Home screen.
2. Highlighted option—press OK on the remote to select.
3. TV input tiles—select an input to watch the connected device.
4. Options hint—press * on the remote for options when this symbol is present.
5. Next screen hint—press the RIGHT arrow on the remote to see the next screen.
Setting up Antenna TV
In addition to the other entertainment possibilities of your TCL Roku TV, you may also want to watch broadcast channels from an antenna or cable TV service connected to the ANT input. On your TCL Roku TV, you watch broadcast TV in much the same way you watch other entertainment choices. You select a tile—in this case, the Antenna TV tile—from the Home screen.
The first time you select the Antenna TV tile, you have to set up the TV tuner. Setting up the TV tuner scans for active channels and adds them to your Antenna TV channel list.
How do I set up the TV tuner?
- Make sure your antenna (not provided) or TV cable is connected to the TV’s ANT/CABLE input.
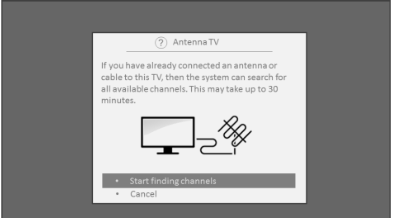
- On the Home screen, select the Antenna TV tile.
- Read the simple on-screen instructions, and then select Start finding channels.
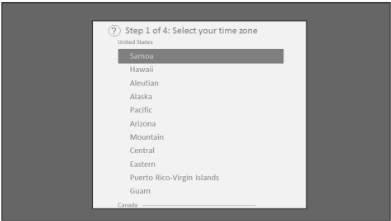
- If prompted, select your time zone. You’ll only need to do this if the TV can’t figure out your time zone from your Internet connection.
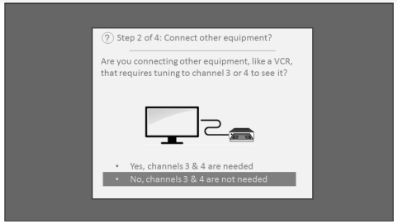
- When prompted, select whether to add analog channels 3 and 4. These channels enable you to connect older set top boxes, VCRs, or game consoles.
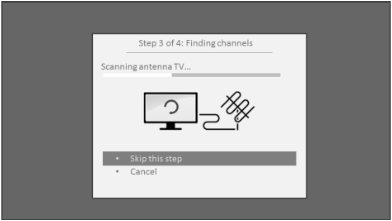
- Wait while your TV scans for Antenna TV stations...
... and then cable TV channels.
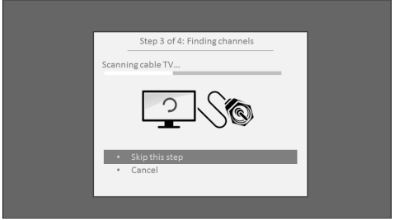
Scanning for channels can take several minutes.
Tip: If you use a set-top box to receive cable TV channels (and don’t have your cable connected directly to the TV’s ANT input), you can save time by skipping the cable TV portion of the channel scan.
- When the channel scans finish, the TV shows the number of channels it added.
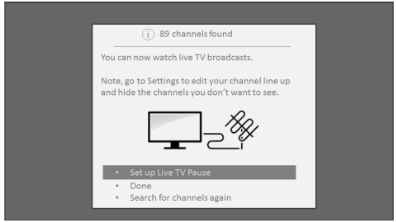
Only in connected mode, you have the option of setting up Live TV Pause. The topic Pausing Live TV explains how to set up and use this feature. If you don’t want to set up Live TV Pause, or if this option is not available to you, select Done to start watching Live TV.
Tip: Repeat the channel scan from time to time to make sure you are receiving all of the latest channels. Broadcasters add and remove channels, move channels to different parts of the spectrum, and change the power levels of their channels periodically. Your antenna reception and picture quality depend on the position of your antenna and on your location relative to the antennas of broadcasters in your area.
Note: You’ll have to repeat the channel scan if you remove and re-add the Antenna TV tile from the Home screen or perform a factory reset. To repeat the channel scan, go to Settings > TV inputs > Antenna TV > Scan again for channels > Start finding channels.
Using your TV
Status indicator
Your TV has a single status indicator. It goes on and off and blinks in different ways depending on the status of the TV, as shown in the following table:
On (screen is active)
Screen is communicating that TV is on.
Screensaver (screen is active)
Screen is communicating that TV is on.
Off (no power)
TV is not connected to power.
Off (standby)
TV is connected to power and is ready to use.
Starting up from off state
- Slow pulsing blink until startup completes
TV is doing something.
On (receiving update from USB)
- Slow pulsing blink until update completes
TV is doing something.
Remote command received
TV has received your command.
Network connection lost
- Two short blinks, pause, repeat
TV was connected and paired with a Roku account and now has no network connection.
Powering down to standby mode
- Slow pulsing blink until the TV reaches standby.
TV is doing something.
Standby mode energy savings
- When you turn off your TV, it remains in a higher power mode for a few minutes, after which it goes into a very low power standby mode. If you turn on the TV again before it has entered the very low power mode, it turns on immediately. After the TV goes into the lower power standby mode, it takes a few seconds longer to start up.
- Only in connected mode on TVs that do not have an Energy Star® rating, you can optionally enable Fast TV start. When this option is enabled, your TV starts up almost immediately regardless of how long it has been turned off, but uses somewhat more power in standby mode. For more information, see Fast TV start.
Disable Smart TV experience
If you decide you want to disable Smart TV experience, follow these steps:
- From the Home screen, go to Settings > Privacy > Smart TV experience.
- Navigate to the right to highlight Use info from TV inputs.
- Press OK on the remote to clear the check box.
Disable Auto Notifications
If you want to keep the Smart TV experience enabled, but you do not want to see notifications while you are watching shows, you can disable notifications. To do so, follow these steps:
- From the Home screen, go to Settings > Privacy > Smart TV experience.
- Navigate to the right to highlight Use info from TV inputs.
- Press DOWN on the remote to highlight Enable auto notifications.
- Press OK on the remote to clear the check box.
Note: These settings do not affect recommendations for More Ways to Watch that you see in the Smart Guide when watching Antenna TV channels. Those recommendations come from the Smart Guide and do not rely on ACR technology.
Pausing Live TV
Live TV Pause gives your TCL Roku TV the ability to pause, play, fast forward, and rewind digital Antenna TV. You can pause Antenna TV for up to 90 minutes.
Enabling Live TV Pause
You can start setting up Live TV Pause in any of the following ways:
- Go to Settings > TV inputs > Antenna TV > Live TV Pause, and then select Enable.
- After completing a channel scan, select Set up Live TV Pause from the available options.
- Press Play/Pause on the Roku remote while watching a digital Antenna TV channel.
- Highlight the Antenna TV tile on the Home screen, press * on the remote, and then select Enable Live TV Pause.
After starting setup of Live TV Pause in any of these ways, the TV prompts you through the steps needed to enable this feature. Setup takes only a few moments.
Note: Use of a USB hub is not supported.
Using Live TV Pause
If you have used the Roku remote to watch streaming channels, using Live TV Pause should be very familiar to you.
- While watching a digital Antenna TV channel, press PLAY/PAUSE to pause or play the content. After the TV program has been paused for 90 minutes, the TV resumes playing.
- After watching a channel for a while, press REWIND to jump back up to the point where you first started watching the channel, up to 90 minutes.
- After pausing or rewinding, press FAST FORWARD to jump ahead up to the point where you are once again watching the live TV program.
- Press FAST FORWARD or REWIND repeatedly to cycle through 1x, 2x, and 3x skip speeds. Press INSTANT REPLAY to play back the last several seconds of the program.
- When the program is paused, press the LEFT and RIGHT arrows to move forward and backward through the program approximately 10 seconds per press. Small frames appear across the screen to identify your location in the program.
Notes about Live TV Pause
- You can use Live TV Pause only with digital broadcast and cable channels received through the TV’s ANT input (ATSC and Clear QAM channels).
- Changing channels erases and restarts the Live TV Pause buffer.
- Returning to the Home screen, selecting another input, or turning off the TV erases and resets the Live TV Pause buffer.
- Removing the USB drive erases the Live TV Pause buffer.
Playing content from local network media servers
- Only in connected mode, your TV can play personal video, music, and photo files from a media server on your local network. Media servers include personal computers running media server software such as Plex or Windows Media Player, network file storage systems that have built-in media server software, and other devices that implement the specifications of the Digital Living Network Alliance. Some servers do not fully implement the DLNA specification but are UPNP (Universal Plug and Play) compatible. The Roku Media Player will connect to them as well.
- Some media servers can convert files into Roku compatible formats. DRM-protected content is not supported.
Using your TV in a hotel or dorm room
- Hotels, school dorms, conference facilities, and similar locations with public wireless Internet access often require you to interact with a web page to authenticate your access. These types or networks are called restricted public networks . When you select a network of this type, the TV automatically detects that additional information is needed and prompts you through using another wireless device to supply the requested information.
Getting your TCL Roku TV on line on a restricted public network
1. Either during Guided Setup or after using the Settings > Network menu to set up a new connection, the TV automatically detects that you are connecting to a restricted network and displays the following prompt:
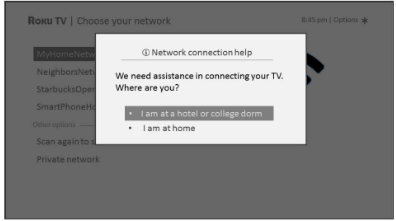
Tip: Your TV can connect to a restricted network only if Enable ‘Device connect’ is selected in Settings > System > Advanced system settings. (Device connect is enabled by default, but if you have disabled it, the TV cannot complete the connection.)
Note: Device connect is not present if the TV is in non-connected mode.
2. After selecting the correct network, highlight I am at a hotel or college dorm, and then press OK. The TV prompts you to use your smartphone, tablet, or laptop to complete the connection.
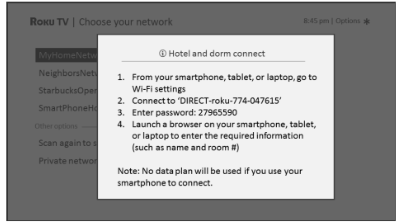
3. Use a phone, tablet, or wireless-enabled computer to detect wireless networks. In most cases, you can simply open the device’s Wi-Fi Settings or Network Settings screen to start scanning. Note: The phone, tablet, or computer must be on the same wireless network to which you are connecting the TV.
4. Connect to the network named on your TV screen. The actual network name varies. Note: The previous step connects your smartphone, tablet, or computer directly to the TV. No connection charges apply and the connection does not impact your device’s data plan.
5. The wireless connection process prompts you for a password. Enter the password as shown on the TV screen. The actual password varies.
6. Start the web browser on your smartphone, tablet, or computer. When you attempt to open any web page, the restricted connection will prompt you for whatever information it needs. In most cases, you must agree to terms and conditions, provide identifying information, or enter a password, PIN, or room number to proceed. The information requested depends on the organization that controls the wireless connection.
7. After you enter the requested information, the TV automatically proceeds to complete its connection and resumes normal operation.
8. If the TV prompts you to link to your Roku account, use your smartphone, tablet, or computer to complete the pairing operation and activate your TCL Roku TV.
Checking the Roku voice remote battery level
- You can check the condition of the batteries in your Roku voice remote at any time by navigating to Settings > Remote > Battery level. The resulting screen displays not only the battery level, but also other information that can be useful when you need technical support with your remote.
- Tip: When you first turn on the TV, a battery level indicator appears in the upper right corner of the screen for a few seconds.
Video description through Secondary Audio Program (SAP)
- Video description is audio descriptions of the action in a program, to help individuals who are blind or visually impaired enjoy the program. You enable video description by selecting one of the Secondary Audio Program (SAP) options.
- To hear video description narrations in programs that have them, turn on SAP. If there are multiple SAP options for a channel, such as Spanish and French, try each one to determine which setting carries the video description track.
- Note: Broadcasters provide video descriptions only on a small number of programs. If you are unable to hear video descriptions after following these instructions, the program you are viewing does not provide them.
Advanced audio settings – DTS TruSurround (select models only)
This topic describes the Advanced audio settings menu for TV models with DTS TruSurround. Each TV input has separate settings for fine tuning sound quality. All of the settings in this menu apply only to the currently-selected input. To use the Advanced audio settings menu, first press * to display the Options menu. Then select Advanced audio settings.

Advanced audio settings menu for models with DTS TruSurround
- Audio effect – Select from among various preset audio modes to improve speech, make music sound its best, boost bass or treble, or simulate a theater. Use Reset audio settings, described below, to return the input’s current settings to their original values.
- DTS TruSurround –Simulates surround sound that otherwise would require installation of a surround sound audio system. Sometimes, the effect interferes with dialog clarity. Use the Dialog Clarity option to compensate.
- Dialog Clarity – Available only when DTS TruSurround is On. Choose among Low, Medium, and High settings to improve the clarity of dialog when you are using the TruSurround feature.
- TruVolume – Minimizes annoying volume fluctuations in programs.
- Reset audio settings – Returns DTS TruSurround, Dialog Clarity, and TruVolume settings, to their default settings for the selected Audio effect.
Rearrange tiles
When you add a TV input tile, it’s added at the top of your Home screen. When you add a new streaming channel, it’s added at the bottom of your Home screen.
You can easily rearrange the order of the tiles on the Home screen to suit your viewing preferences. For example, you might want Antenna TV to be the first tile in your Home screen. But if you mostly watch one streaming channel, you might want its tile to be the first one on your Home screen.
- From the Home screen, highlight one of the tiles you want to move.
- Press * to display a list of options for the type of tile you selected.
- Select Move input or Move channel. The list of options disappears and the highlighted tile shows arrows indicating how it can be moved.
Note: A paid subscription or other payments may be required for some channels. Channel availability is subject to change and varies by country. Not all content is available in countries or regions where Roku® products are sold.
- Use the arrow keys to move the highlighted tile to its new position. As you move the tile, it pushes other tiles out of its way.
- Press OK to lock the tile into its new position.
- Repeat these steps to move other tiles until you have arranged your Home screen to your liking.
Care and Cleaning
- Caution: Turn off your TV before cleaning.
- Clean the TV as needed using a soft lint-free cloth. Be sure to occasionally dust the ventilation slots in the cabinet to help assure adequate ventilation.
- IMPORTANT: Never use strong cleaning agents, such as ammonia-based cleaners, or abrasive powder. These types of cleaners will damage the TV.
The TV’s screen may be cleaned with a soft, lint-free cloth as well. Take care not to scratch or mar the screen. If necessary, you may use a cloth dampened with warm water. While cleaning, do not spray liquid directly on the screen, or allow liquid to run down the screen and inside the TV. Also, never place drinks or vases with water on top of the TV. This could increase the risk of fire, shock hazard or damage to the TV.