User manual AC5659

1. IMPORTANT SAFEGUARDS
READ AND SAVE THESE SAFETY INSTRUCTIONS BEFORE USING THIS AIR PURIFIER
When using electrical appliances, basic precautions should always be followed to reduce the risk of fire, electric shock, and injury to persons, including the following:
• Read all instructions before operating the air purifier.
• Do not expose the air purifier to rain, or use near water, in a bathroom, laundry area or other damp location.
• Do not use the air purifier where combustible gases or vapors are present.
• Do not block the air inlet and outlet by placing items on the air outlet or in front of the air inlet. Do not insert fingers or foreign objects into the air outlet or air inlet.
• Do not let water or any other liquid or flammable detergent enter the appliance to avoid electric shock and/or a fire hazard.
• Do not clean the appliance with water, any other liquid, or a (flammable) detergent to avoid electric shock and/ or a fire hazard.
• Do not spray any flammable materials such as insecticides or fragrance around the appliance.
• Check if the voltage indicated on the appliance corresponds to the local power voltage before you connect the appliance to the electrical outlet.
• Always switch the air purifier OFF and unplug from the electrical outlet after using and before cleaning, moving and changing the filters. Be sure to remove the plug from the outlet. Never handle the power plug with wet or damp hands.
• Only use the power cord supplied with the air purifie
• Keep the cord out of heavy traffic areas and arrange cord so that it will not be tripped over.
• Do not put the cord under carpets or throw rugs or near heat vents and open flames.
• Locate the air purifier near an electrical outlet and avoid using an extension cord.
• Do not use the plug in or near a power outlet that contains an electric air freshener to prevent damage to the plug.
• Do not use the air purifier outdoors. For indoor use only.
• If an extension cord must be used, exercise care.
• The marked electrical rating of the cord must be as great as the rating of the air purifier.
• Do not operate any air purifier with a damaged cord or plug. Discard air purifier or call 1-866-309- 8817 for assistance.
• Do not run cord under carpeting. Do not cover cord with throw rugs, runners, or similar coverings. Do not route cord under furniture or appliances. Arrange cord away from traffic area and where it will not be tripped over.
• The cord should be arranged so that it will not drape over the edge of a counter or table where it could be pulled by children or tripped over unintentionally.
• Do not operate this appliance if it has a damaged power cord, plug or motor, if it is not working properly or after the appliance malfunctions or has been damaged in any manner. For assistance call 1-866-309-8817.
• Close supervision is necessary when the appliance is used by, on, or near children or invalids.
• This appliance is not a toy. Children should be supervised to ensure they do not play with the air purifier.
WARNING: To reduce the risk of fire or electric shock, do not use this air purifier with any solid-state speed control device.
This device complies with Part 15 of the FCC Rules. Operation is subject to the following two conditions:
(1) This device may not cause harmful interference, and
(2) This device must accept any interference received, including interference that may cause undesired operation.
Note: This product has been tested and found to comply with the limits for a Class B digital device, pursuant to Part 15 of the FCC Rules. These limits are designed to provide reasonable protection against harmful interference in a residential installation. This product generates, uses, and can radiate radio frequency energy and, if not installed and used in accordance with the instructions, may cause harmful interference to radio communications. However, there is no guarantee that interference will not occur in a particular installation. If this product does cause harmful interference to radio or television reception, which can be determined by turning the equipment off and on, the user is encouraged to try to correct the interference by one or more of the following measures:
• Reorient or relocate the receiving antenna.
• Increase the separation between the equipment and receiver.
• Connect the equipment into an outlet on a circuit different from that to which the receiver is connected.
• Consult the dealer or an experienced radio/TV technician for help.
Please take attention that changes or modification not expressly approved by the party responsible for compliance could void the user’s authority to operate the equipment.
This equipment should be installed and operated with a minimum distance 20cm between the radiator and your body.
This device complies with Industry Canada licenceexempt RSS standard(s). Operation is subject to the following two conditions:
(1) this device may not cause interference, and
(2) this device must accept any interference, including interference that may cause undesired operation of the device.
Under Industry Canada regulations, this radio transmitter may only operate using an antenna of a type and maximum (or lesser) gain approved for the transmitter by Industry Canada. To reduce potential radio interference to other users, the antenna type and its gain should be so chosen that the equivalent isotropically radiated power (e.i.r.p.) is not more than that necessary for successful communication.
Caution
• This appliance is not a substitute for proper ventilation, regular cleaning, or use of an exhaust fan or hood while cooking.
• A loose fit between the AC outlet (receptacle) and plug may cause overheating and a distortion of the plug. Contact a qualified electrician to replace loose or worn outlet.
• Never use the air purifier unless it is fully assembled and with filters in place.
• The air purifier must be used in its upright position.
• Make sure the air purifier is assembled/connected properly after cleaning the air quality sensor and pre-filter or replacing the filters.
• If the air purifier will not be used for a long period of time, unplug from the electrical outlet, clean the appliance, air quality sensor and pre-filter (see 'Cleaning') before storing.
• Make sure that you plug the appliance into a properly connected electrical outlet.
• Always place and use the appliance on a dry, stable, level, and horizontal surface. Make sure the air purifier cannot be easily knocked over by a person or object.
• Leave at least 20cm/8in free space behind and on both sides of the appliance and leave at least 30cm/12in free space above the appliance.
• Do not place anything on top of the appliance.
• Do not sit, stand or place heavy objects on the air purifier.
• Do not place the appliance directly below an air conditioner to prevent condensation from dripping onto the appliance.
• Make sure all filters are properly installed before you switch on the appliance.
• Only use the original Philips filters specially intended for this appliance. Do not use any other filters.
• Do not use the filter as fuel or for similar purposes.
• Avoid knocking against the appliance (the air inlet and outlet in particular) with hard objects.
• Always lift or move the appliance by the handle on back side of the appliance.
• NEVER tilt, move or attempt to change or replace a filter while the air purifier is operating. Switch OFF and unplug from the electrical outlet. Do not move the air purifier by pulling on the power cord.
• Do not use this appliance when using indoor smoke-type insect repellents or in places with oily residues, burning incense, or chemical fumes.
• Do not use the appliance near gas appliances, heating devices or fireplaces.
• Do not use the appliance in a room with major temperature changes, as this may cause condensation inside the appliance.
• To prevent interference, place the appliance at least 2 meters/6 1/2 feet away from electrical appliances that use airborne radio waves such as TVs, radios, and radiocontrolled clocks.
• Use this air purifier for its intended household use as described in this manual. Do not use attachments not recommended by Philip's North America LLC.
• The appliance does not remove carbon monoxide (CO) or radon (Rn). It cannot be used as a safety device in case of accidents with combustion processes and hazardous chemicals.
• Always wash your hands thoroughly after changing or cleaning a filter. • Unplug the appliance to override smart enabled or remote functions.
SAVE THESE INSTRUCTIONS
• This appliance has a polarized plug (one blade is wider than the other). To reduce the risk of electric shock, this plug is intended to fit in a polarized outlet only one way. If the plug does not fit fully in the outlet, reverse the plug. If it still does not fit, contact a qualified electrician. DO NOT ATTEMPT TO DEFEAT THIS SAFETY FEATURE.
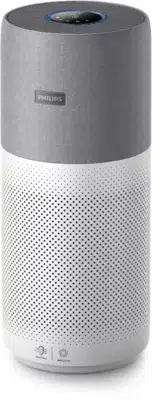
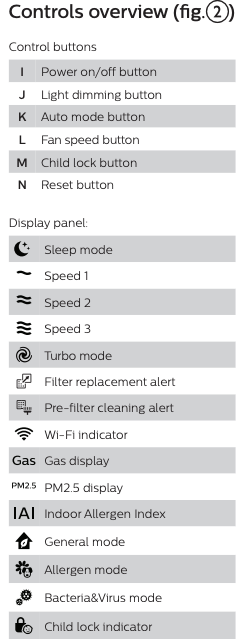
2. Your air purifier
Congratulations on your purchase, and welcome to Philips! To fully benefit from the support that Philips offers, register your product at www.philips.com/welcome.
3. Getting started
Installing the filters
Note
• Make sure the air purifier is unplugged from the electrical outlet before installing the filters.
• Make sure the side of the filter with the tag is pointing towards you.
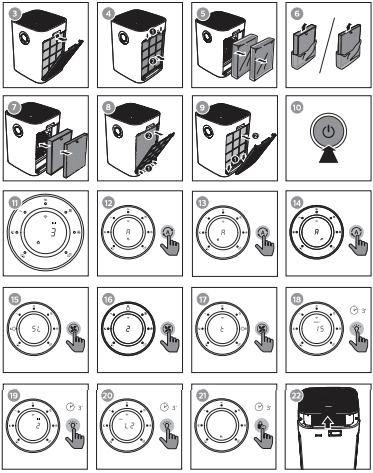
1. Pull the top part of the side panel to remove it from the the air purifier (fig.3).
2. Press the two clips down (1) and pull the pre-filter towards you (2) (fig.4).
3. Remove all filters (fig.5).
4. Remove all packaging materials from the filters (fig.6).
5. Place the thick HEPA filter (FY5185) into the air purifier and then the thin activated carbon filter (FY5182). The model numbers are shown on each filter (fig.7).
6. Attach the pre-filter back into the air purifier (fig.8).
Note • Make sure the side with the two clips is pointing towards you, and that all hooks of the pre-filter are properly attached to the purifier.
7. Reattach the front panel by pressing the top part of the panel onto the top of the air purifier (1). Then, gently push the panel against the body of the air purifier (2) (fig.9).
8. Repeat the above steps and assemble the filter for the other side of the air purifier.
9. Wash your hands thoroughly after installing filters.
Wi-Fi setup
Setting up the Wi-Fi connection for the first time
1. Download and install the 'Air Matters' App developed by FreshIdeas Studio from the App Store or Google Play.

2. Put the plug of the air purifier in the wall outlet and touch  to turn on the air purifier.
  The Wi-Fi indicator
  blinks orange for the first time.
3. Make sure that your mobile device is successfully connected to your Wi-Fi network.
4. Launch the 'Air Matters' App and follow the onscreen instructions to connect the air purifier to your network.
5. After the successful pairing and connection, the Wi-Fi indicator will light up white. If pairing is not successful, consult the troubleshooting section, or the help section in the 'Air Matters' App for extensive and up-to-date troubleshooting tips.
Note
• This instruction is only valid when the air purifier is being set up for the first time. If the network has changed or the setup needs to be performed again, consult section “Setting up the Wi-Fi connection when the network has changed” on page 11.
• If you want to connect more than one air purifier to your smart device, you have to do this successively. Complete the set up of one air purifier before you turn on the other air purifier.
• Make sure that the distance between your mobile device and the air purifier is less than 10 m without any obstructions.
• This App supports the latest versions of Android and iOS. Please check www.philips.com/purifier-compatibility for the latest update of supported operating systems and devices.
Setting up the Wi-Fi connection when the network has changed
Note
• This applies when your default network connected with your air purifier has changed.
1. Put the plug of the air purifier in the wall outlet and touch to turn on the air purifier.
2. Touch and  simultaneously for 3 seconds until you hear a beep.
The air purifier goes to pairing mode.
The Wi-Fi indicator blinks orange.
3. Follow the steps 4-5 in "Setting up the Wi-Fi connection for the first time" section.
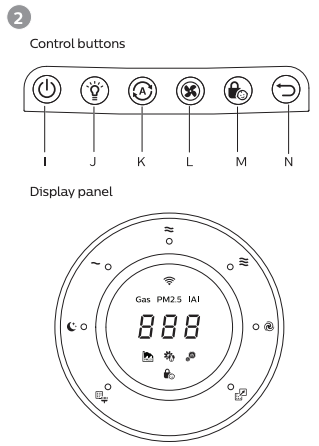
4. Using the air purifier
Understanding the air quality light
Indoor Allergen Index (IAI) is a real-time numerical display that provides visual and immediate feedback on indoor allergen level.
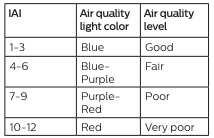
The air quality light automatically goes on when the air purifier is switched on, and lights up all colors in sequence. After approximately 30 seconds, the air quality sensors select the color that corresponds to the surrounding air quality of airborne particles.
PM2.5
AeraSense sensing technology accurately detects and quickly respond to even the slightest particle change in the air. It provides you with reassurance with real-time PM2.5 feedback.
IAI
The professional-grade AeraSense sensor detects the level of indoor air allergen and with numerical feedback from 1 to 12 the potential risk level of indoor air allergens can be displayed.
GAS
With a professional-grade gas sensor, a display ranging from L1 to L4 shows the density level of potential harmful gases (incl. VOC, odor, etc.) detected.
Turning on and off
Note
• Always place the air purifier on a stable, horizontal, and level surface with the front of the unit facing away from walls or furniture.
• For optimum purification performance, close doors and windows. • Keep curtains away from the air inlet or air outlet.
1. Put the plug of the air purifier in the wall outlet.
2. Touch to switch on the air purifier (fig.10).
The air purifier beeps.
The air purifier operates under the allergen mode by default.
When the air purifier is warming up, displays on the screen. After measuring the particulate matter only in the air, the air purifier shows the IAI level and operates in the auto mode with
  displayed on the screen (fig.11).
After measuring the air quality for approximately 30 seconds, the air quality sensor automatically selects the appropriate air quality light color.
3. Touch and hold for 3 seconds to switch off the air purifier.
Note
• If the air purifier stays connected to the electrical outlet after turning OFF, the air purifier will operate under the previous settings when turned ON again.
Changing the Auto mode setting
You can choose the Allergen mode , the General mode ( )or the Bacteria & Virus mode
Allergen mode
The extra-sensitive allergen mode is designed to react to even a small change in allergen levels in the surrounding air.
• Touch the Auto mode button to select the Allergen mode (fig.12).
Auto  and display on the screen.
General mode
A smart auto-setting that automatically adjusts the air purifier’s settings to the ideal level.
• Touch the Auto mode button to select the General mode (fig.13).
Auto and display on the screen
Bacteria & Virus mode
The bacteria & virus mode boosts the airflow to quickly reduce bacteria & viruses.
• Touch the Auto mode button to select the Bacteria & Virus mode (fig.14).
Auto and display on the screen
Changing the fan speed
In addition to the Auto modes, there are several fan speeds available.
When using the manual fan speed settings, the purifier will still monitor the air quality, but it will not automatically adjust the fan speed if it detects changes in the air quality.
Sleep mode 
In sleep mode, the air purifier operates quietly at a very low speed.
• Touch the fan speed button  to select the sleep mode (SL) (fig.15).
The  displays on the screen.
The sleep mode indicator  goes on.
Manual
• Touch the fan speed button repeatedly to select the fan speed you need (fig.16):
 (Speed 1)
 (Speed 2)
 (Speed 3).
 Tip
Tip
• If the air quality light lights up blue, it indicates that the air quality is good, and you can select a lower fan speed. On the other hand, if the air quality light lights up red-purple or red, it indicates that the air quality is unhealthy, and you can select a higher fan speed to purify the air more quickly.
Turbo (t)
In Turbo mode, the air purifier operates on the highest speed.
• Touch the fan speed button to select the Turbo mode ( ) (fig.17).
The " " displays on the screen.
The turbo speed indicator  goes on.
Switching the display indicator
The air purifier has three display indicators, IAI index, PM2.5 index, and Gas level.
Note
• The air purifier operates in IAI index by default.
1. Touch the light dimming button for 3 seconds again to switch to PM2.5 index (fig.18).
The PM2.5 indicator and the actual PM2.5 index display on the screen.
2. Touch the light dimming button for 3 seconds to switch to IAI index (fig.19).
The IAI indicator and the actual IAI index display on the screen.
3. Touch the light dimming button for 3 seconds again to switch to Gas level display (fig.20).
The Gas indicator and the actual Gas level display on the screen.
Note
• It is possible that the air quality light may still be red even if the PM2.5 index is very low. It's normal. This is because that at least one of the index ( the IAI index or Gas level) is high that turns the air quality light to red.
Using the light on/off function
With the light dimming button, you can switch on or off the air quality light, the display screen and the function indicator if desired.
1. Touch the light dimming button  once, the air quality light will be dimmed.
2. Touch the light dimming button again, the air quality light will go off.
3. Touch the light dimming button for the third time, all lights will be on again.
Setting the child lock
1. Touch and hold the child lock button  for 3 seconds to activate child lock (fig.21).
The child lock icon displays on the screen.
When the child lock is on, all the other buttons are not responsive.
2. Touch and hold the child lock button for 3 seconds again to deactivate child lock.
The child lock icon disappears.
5. Cleaning
Note
• Always turn the air purifier off and unplug from the electrical outlet before cleaning.
• Never immerse the air purifier in water or any other liquid.
• Never use abrasive, aggressive, or flammable cleaning agents such as bleach or alcohol to clean any part of the air purifier.
• Only the pre-filter is washable. The HEPA and AC air filters are not washable.
• Do not attempt to clean the filters or air quality sensor with a vacuum.
Cleaning the body of the air purifier
Regularly clean the inside and outside of the air purifier to prevent dust from collecting.
1. Use a soft, dry cloth to clean both the interior and exterior of the air purifier.
2. The air outlet can also be cleaned with a dry, soft cloth.
Cleaning the air outlet cover
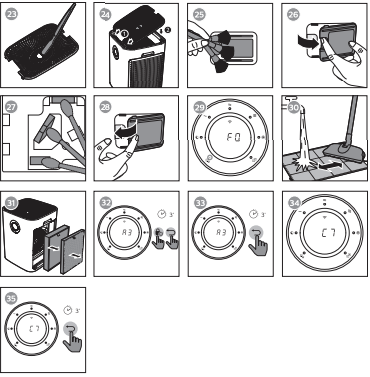
1. To unlock the air outlet cover, grab the handle on the cover and pull the cover up (fig.22).
2. Clean the cover with a brush (fig.23
3. To reattach the cover, mount it onto the top of the appliance first, and then push the side with the handle towards the appliance (fig.24).
Cleaning the air quality sensor
Clean the air quality sensor every 2 months for optimal functioning of the purifier.
Note
• If the air purifier is used in a dusty environment, it may need to be cleaned more often.
• If the humidity level in the room is very high, condensation may develop on the air quality sensor and the air quality light may indicate a more poor air quality even though the air quality is actually good. If this occurs, clean the air quality sensor or use the air purifier on a manual speed setting.
1. Switch off the air purifier and unplug from the wall outlet.
2. Clean the air quality sensor inlet and outlet with a soft brush (fig.25).
3. Remove the air quality sensor cover (fig.26).
4. Clean the air quality sensor, the dust inlet and the dust outlet with a damp cotton swab (fig.27).
5. Dry all parts thoroughly with a dry cotton swab.
6. Reattach the air quality sensor cover (fig.28.)
Cleaning the pre-filter
Clean the pre-filter when F0 is displayed on the screen and the pre-filter cleaning indicator  is on (fig.29).
1. Switch off the air purifier and unplug from the wall outlet.
2. Pull the top part of the side panel to remove it from the air purifier (fig.3).
3. Press the two clips down (1) and pull the pre-filter towards you (2) (fig.4).
4. If the pre-filter is very dirty, use a soft brush to brush away the dust. Then wash the pre-filter under running tap water (fig.30).
5. Allow the pre-filter to air dry thoroughly before placing back in the air purifier.
6. Put the pre-filter back into the air purifier (fig.8).
Note
• To optimize the lifetime of the prefilter, make sure it air dries completely after cleaning.
• Wash your hands after handling the filter.
• Make sure the side with the two clips is pointing towards you, and that all hooks of the pre-filter are properly attached to the air purifier.
7. To reattach the front panel, press the top part of the panel onto the top of the air purifier (1). Then, gently push the panel against the body of the air purifier (2) (fig.9).
8. Put the plug of the air purifier in the wall outlet.
9. Touch and hold the reset button  for 3 seconds to reset the pre-filter cleaning time.
10. Wash your hands thoroughly after installing filters.
6. Replacing the filters
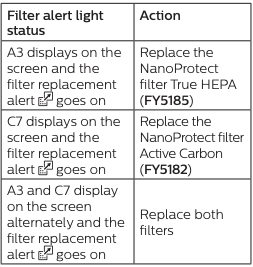
Filter replacement indicator
This air purifier is equipped with a filter replacement indicator to make sure that the air purification filter is in optimal condition when the air purifier is operating. When the filters need to be replaced, the filter code displays on the screen (see Filter alert chart).
If the filters are not replaced in time, the air purifier will stop operating and automatically lock to protect the air quality in the room. Replace the filters as soon as possible according to the filter code.
Replacing the filters
Note
• The HEPA and AC air filters are not washable or reusable.
• Always turn off the air purifier and unplug from the electrical outlet before replacing the filters.
• Do not clean the filters with a vacuum.
• If the pre-filter is damaged, worn or broken, do not use. Visit www.philips.com/support or call 1-866-309-8817 for assistance.
1. Turn off the air purifier and unplug from the wall outlet.
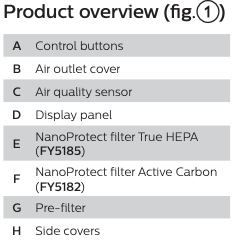
2. Take out the used air filter according to the filter alert light status displayed on the screen. Discard used filters (fig.31).
Note
• Do not touch the pleated filter surface, or smell the filters as they have collected pollutants from the air.
3. Remove all packaging material from the new filters (fig.6).
4. Place the new filters into the air purifier (fig.7).
5. Put the plug of the air purifier in the wall outlet.
6. Touch and hold the reset button for 3 seconds to reset the filter lifetime counter.
Note
• Wash your hands after changing a filter.
• This air purifier has no other userserviceable parts. For assistance, call 1-866-309-8817.
Filter reset
You can replace filters even if there is no filter replacement code displayed on the screen. After replacing a filter, you need to reset the filter lifetime counter manually.
1. Touch and simultaneously for 3 seconds to enter the filter reset mode (fig.32).
Code (A3) of the NanoProtect filter True HEPA displays on the screen.
2. Touch and hold for 3 seconds to force reset the filter lifetime counter of the NanoProtect filter True HEPA (fig.33).
3. Code (C7) of the NanoProtect filter Active Carbon displays on the screen after the lifetime counter of the NanoProtect filter True HEPA has been reset (fig.34).
4. Touch and hold for 3 seconds to force reset the filter lifetime counter of the NanoProtect filter Active Carbon and exit the filter reset mode (fig.34).
7. Storage
1. Turn off the air purifier and unplug from the wall outlet.
2. Clean the air purifier, air quality sensor and pre-filter (see chapter ‘Cleaning’).
3. Let all parts air dry thoroughly before storing.
4. Wrap the filters and pre-filters separately in air tight plastic bags.
5. Store the air purifier, filters and prefilters in a cool, dry location.
6. Always thoroughly wash hands after handling filters.
8. Troubleshooting
This chapter summarizes the most common problems you could encounter with the air purifier. If you are unable to solve the problem with the information below, visit www.philips.com/support or call 1-866-309-8817 for assistance.
The air purifier does not work even though it is plugged into the wall outlet and switched on.
• The timer is set to a specific time interval. Reset or turn off the timer.
• Try a different electrical outlet or check the wall switch.
• The filter alert status is displaying the filter code. Replace the corresponding filter and reset the filter lifetime counter (see chapter "Replacing the filters").
• If the problem persists, visit www.philips.com/support or call 1-866-309-8817 for assistance.
The air purifier does not work even though it is switched on.
• The filter replacement indicator has been on continuously but you have not replaced the corresponding filter, and the air purifier is now locked. In this case, replace the filter and reset the filter lifetime counter.
The air purifier accidentally powers off.
• The air purifier restarts automatically and goes to the previous mode when the power resumes.
The airflow that comes out of the air outlet is significantly weaker than before.
• The pre-filter is dirty. Clean the pre-filter (see chapter "Cleaning").
The air quality does not improve, even though the air purifier has been operating for a long time.
• One of the filters has not been placed in the air purifier or a filter is not placed properly. Make sure that all filters are properly installed in the following order, starting with the innermost filter: 1) NanoProtect filter True HEPA (FY5185); 2) NanoProtect filter Active Carbon (FY5182); 3) pre-filter.
• The air quality sensor is wet. Make sure that the air quality sensor is clean and dry (see chapter "Cleaning").
The color of the air quality light always stays the same.
• The air quality sensor is dirty. Clean the air quality sensor (see chapter "Cleaning").
The air purifier produces a unpleasant smell.
• The first few times you use the appliance, it may produce a plastic smell. This is normal. However, if the appliance produces a burnt smell, contact your Philips dealer or an authorized Philips service center. The filter may produce smell after being used for a while because of the absorption of indoor air. Remove the filter and place it where it has direct sunlight and ventilation for several hours. Re-install and try using it again. If the odor remains, please replace the filter.
• If the air purifier produces a burnt odor, switch OFF and unplug from the electrical outlet. Call 1-866-309-8817 for assistance.
The air purifier is loud.
• If the air purifier is too loud, change the fan speed to a lower fan speed level. When using the air purifier in a bedroom at night, choose the sleep mode.
The air purifier still indicates that I need to replace a filter, but I already did.
• Perhaps you did not reset the filter lifetime counter. Plug in the air purifier, touch to switch on the air purifier, and touch and hold the reset button for 3 seconds (see Filter force reset section).
Error code "E1" displays on the screeen.
• The hall sensor is not working properly. Remove and then reattach the front panel. If the error code "E1" still exists, visit www.philips.com/support or call 1-866-309-8817 for assistance.
Error codes "E2", "E3", "E4" or "E5" displays on the screeen.
• The appliance has malfunctions. Visit www.philips.com/ support or call 1-866-309-8817 for assistance.
Which App I should download?
• Please download and install the 'Air Matters' App developed by FreshIdeas Studio from the App Store or Google Play.
The Wi-Fi setup is not successful.
• If the router your purifier is connected to is dual – band and currently it is not connecting to a 2.4GHz network, please switch to another band of the same router (2.4GHz) and try to pair your purifier again. 5GHz networks are not supported.
• Web authentication networks are not supported.
• Check if the purifier is within range of the Wi-Fi router. You can try to locate the air purifier closer to the Wi-Fi router.
• Check if the network name is correct. The network name is case-sensitive.
• Check if the Wi-Fi password is correct. The password is case-sensitive.
• Retry the setup with the instructions in section ‘Set up the Wi-Fi connection when the network has changed’.
• The Wi-Fi connectivity can be interrupted by electromagnetic or other interferences. Keep the appliance away from other electronic devices that may cause interferences.
• Check if the mobile device is in airplane mode. Make sure to have the airplane mode deactivated when connecting to the Wi-Fi network.
• Consult the help section in the App for extensive and upto-date troubleshooting tips.
9. Warranty
FULL TWO-YEAR WARRANTY Philips Electronics North America Corporation warrants each new Philips product, Models AC5659 (excluding filters), against defects in materials or workmanship for a period of two years from the date of purchase, and agrees to repair or replace any defective product without charge.
IMPORTANT: This warranty does not cover damage resulting from accident, misuse or abuse, lack of reasonable care, the affixing of any attachment not provided with the product or loss of parts or subjecting the product to any but the specified voltage.*
NO RESPONSIBILITY IS ASSUMED FOR ANY SPECIAL, INCIDENTAL, OR CONSEQUENTIAL DAMAGES.
In order to obtain warranty service, simply go to www.philips.com/support or call 1-866-309-8817 for assistance. It is suggested that for your protection, you return shipments of product by insured mail, insurance prepaid. Damage occurring during shipment is not covered by this warranty
NOTE: No other warranty, written or oral, is authorized by Philips Electronics North America Corporation. This warranty gives you specific legal rights, and you may also have other rights that vary from state to state. Some states do not allow the exclusion or limitation of incidental or consequential damages, so the above exclusion and limitations may not apply to you.
* Read enclosed instructions carefully