Loading ...
Loading ...
Loading ...
A37564,R22GV,/22GT/23GT/24GT/25JT
6
Because your Sharp Commercial Microwave Oven will be used frequently, place it so that there is easy
access for all users.
1. Be sure all electrical requirements are met. See page 5.
2. Exhaust vents are on the back of the unit near the top. Install the unit at least 2 inches away from the
nearest wall to permit adequate ventilation for proper cooling and air flow in the oven.
3. Install the unit where no excessive heat or steam are generated. Do not place next to an oven or
cooking surface.
4. The unit may be secured to a countertop or stand. There is a screw hole in the bottom of the unit. After
the oven is permanently placed, drill a hole through the counter top for a 3/16 inch self-tapping screw.
The hole should be 12 inches from the hinge side of the oven door and 51/4 inches back from the front
edge of the removable filter.
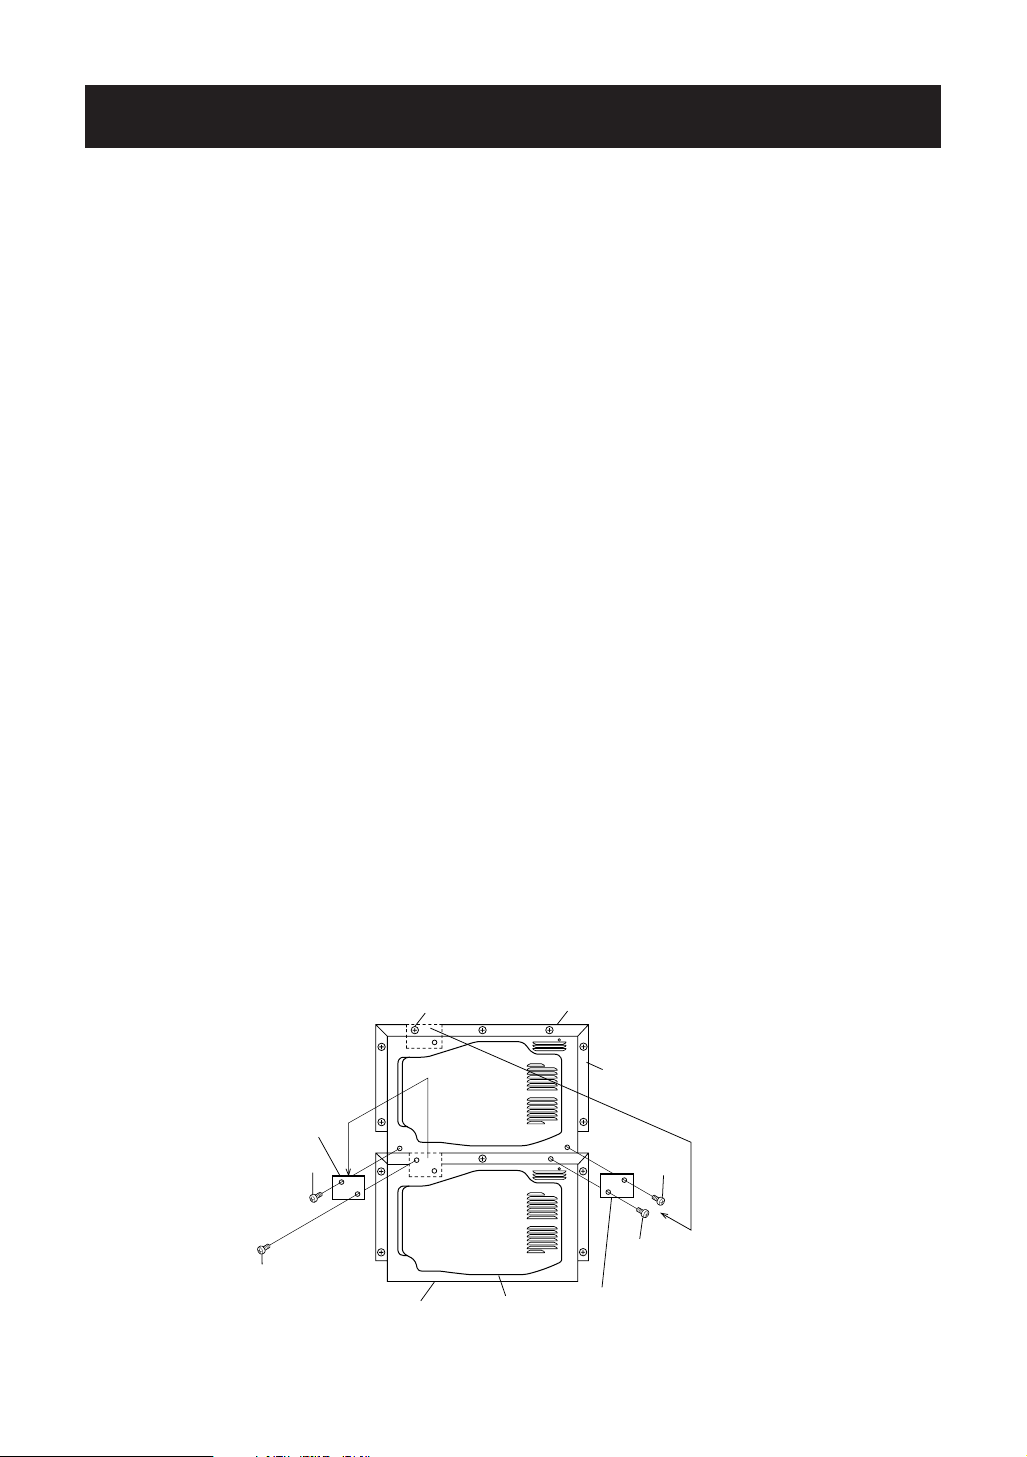
5. STACKING PROCEDURE FOR TWO MICROWAVE OVENS
Two units can be installed together by placing one on top of the other. Follow these instructions:
a. Place oven A in the desired location. Position Oven B on top of Oven A as shown in the figure.
b. Remove Screws (b) from the lower edge of the back of Oven B.
c. Loosen Screw (a) which holds Mounting Plate A on the back of Oven A.
d. Turn Mounting Plate A 180° so that it is on the lower edge of Oven B.
e. Using Screw (b) removed in step b, install Mounting Plate A to the lower edge of Oven B as shown
in the figure.
f. Tighten Screw (a) which was loosened in step c.
g. Remove another Screw (a) which holds Mounting Plate B on the back of Oven B. Remove Mounting
Plate B.
h. Replace Screw (a) removed in step g and tighten.
i. Remove Screw (c) from the rear of Oven A.
j. Remove Screw (d) from the rear of Oven B.
k. Turn Mounting Plate B and position it on Ovens A and B as shown in the figure. Using Screws (c)
and (d), fasten Mounting Plate B in place.
WARNING:
When two ovens are installed together by placing one on top of another:
1. Always use two mounting plates.
2. Make sure that the power supply cords are not caught between the ovens.
3. Do not install more than one oven on top of another.
INSTALLATION
INSTALLATION
Oven B (Back)
Rear cabinet
Mounting plate B
Screw (c)
Screw (a)
Screw (b)
Screw (a)
Oven A (Back)
Figure
Rear cabinet
Screw (d)
Mounting plate A
Loading ...
Loading ...
Loading ...