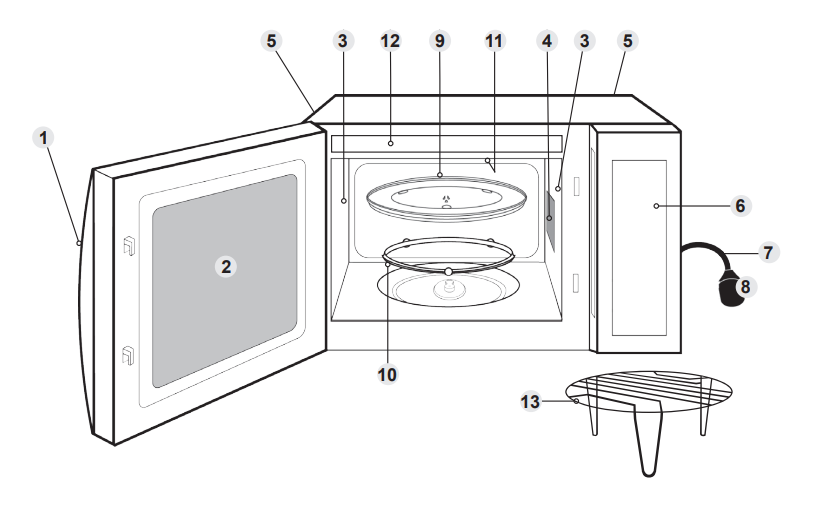
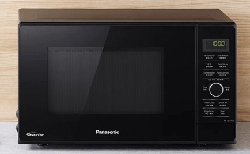
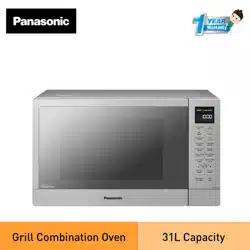
1. Door handle: Pull to open the door. Opening the door during cooking will stop the cooking process without cancelling the programme. Cooking resumes after the door is closed and Start is pressed. It is quite safe to open the door at any time during a cooking programme and there is no risk of microwave exposure.
2. Oven window
3. Air vent
4. Microwave feed guide (Do not remove.)
5. External air vents
6. Control panel
7. Power supply cord
8. Plug
9. Glass tray
10. Roller ring
11. Grill elements
12. Menu label
13. Wire rack
Identification and caution labels are attached on the oven.
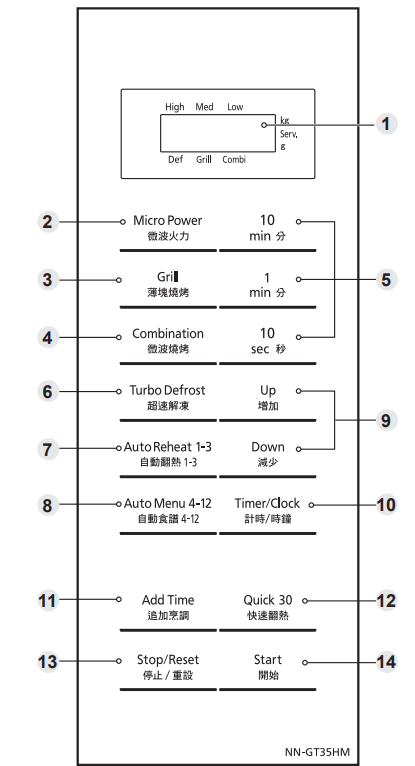
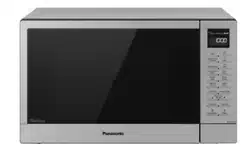
Control panel
1 Display window
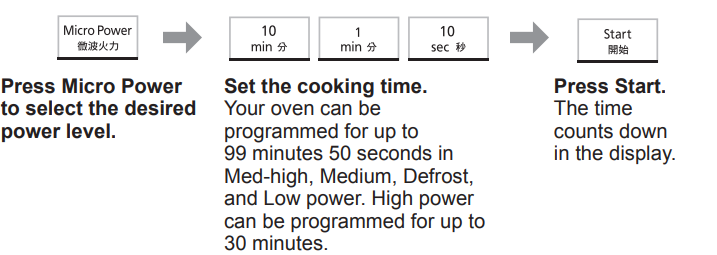
Micro Power pad
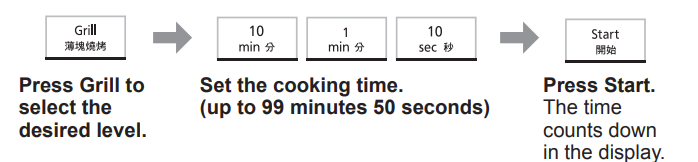
Grill pad
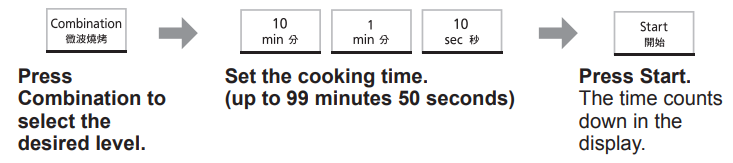
Combination pad
Time pads
Turbo Defrost pad
Auto Reheat 1-3 pad
Auto Menu 4-12 pad
Up / Down pads for weight setting
Timer / Clock pad
Add Time pad
Quick 30 pad
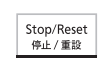
Stop / Reset pad: Before Cooking One press clears your instructions. During Cooking One press temporarily stops the cooking process. Another press cancels all your instructions and a colon or the time of day will appear in the display.
Start pad: One press allows oven to begin operation. If door is opened or Stop/Reset is pressed once during oven operation, Start must be pressed again to restart oven.
Your control panel may have differences in appearance, but the words on the pads and functionality will be the same.
Beep sound
When a pad is pressed correctly a beep will be heard. If a pad is pressed and no beep is heard, the unit has not or cannot accept the instruction. The oven will beep twice between programmed stages. At the end of any complete programme, the oven will beep 5 times.
Note: If Start is not pressed for 6 minutes after cooking programme setting, the oven will automatically cancel the cooking programme. The display will revert back to clock or colon.
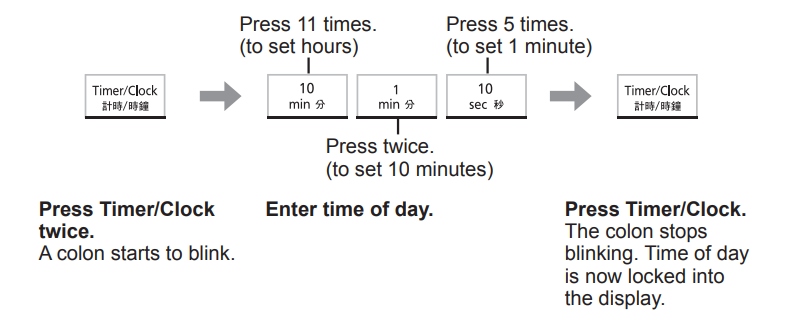
Setting the clock
When the oven is plugged in for the first time, “88.88” appears in display.
Example: To set 11:25am
Notes
To reset the clock, repeat step 1 through to step 3, as above.
The clock will keep the time of day as long as the oven is plugged in and electricity is supplied.
This is a 12 hour clock
Child safety lock
This feature will make the oven controls inoperable; however, the door can be opened. Child Lock can be set when the display shows a colon or the time
To Set:
Press Start 3 times in 10 seconds. The clock will disappear. Actual time will not be lost. “Child” is indicated in the display
To Cancel:
Press Stop/Reset 3 times in 10 seconds. The clock will reappear in the display
Microwave cooking and defrosting
The glass tray must always be in position when using the oven.
The oven will automatically work on High microwave power if a cooking time is entered without the power level previously being selected.
While cooking, the glass tray may vibrate. This will not affect cooking performance.
For MULTI-STAGE COOKING, refer to page 18.
STANDING TIME can be programmed after microwave power and time setting. Refer to page 20.
DO NOT use microwave only with any metal accessory in the oven.
Always check the food during defrosting by opening the door then restarting. It is not necessary to cover food during defrosting. To ensure an even result, stir, turn or separate several times during defrosting. For large joints and poultry, turn halfway through defrosting and protect ends and tips with foil. Refer to Defrosting guidelines on page 22 for details
Grilling
GRILL is particularly useful for thin slices of meat, steaks chops, kebabs, sausages or pieces of chicken. It is also suitable for hot sandwiches and all gratin dishes.
Press
Level
Types of food
once
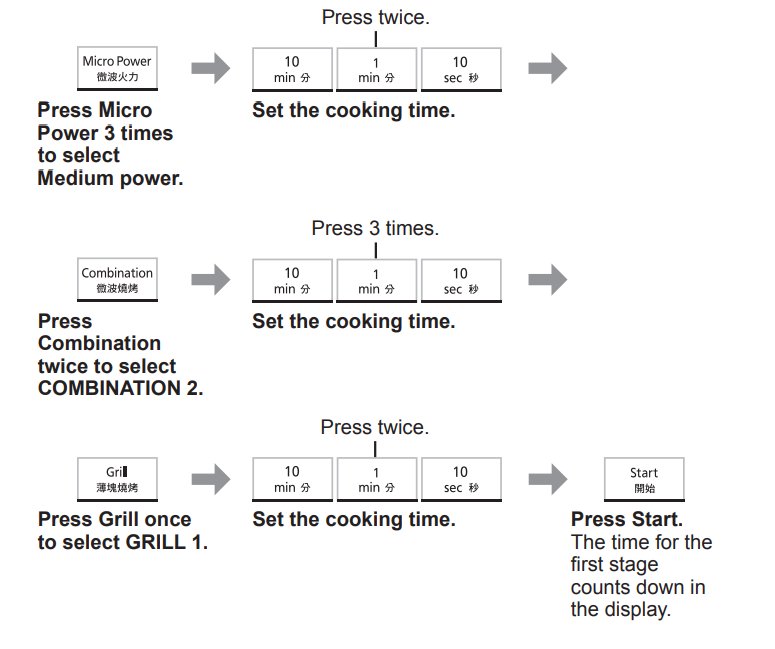
Grill 1
Meat, poultry (pieces)
twice
Grill 2
Seafood, garlic bread, toast
Notes
Place food on wire rack on glass tray. Place a heatproof plate underneath to catch fat and drips.
Never cover foods when grilling.
DO NOT preheat the oven.
There is no microwave power used in GRILL cooking.
Most foods require turning halfway during cooking. When turning food, open oven door and CAREFULLY remove wire rack using oven gloves.
After turning, return food to the oven and close door, and then press Start. The oven display will continue to count down the remaining grilling time.
The grill elements will glow on and off during cooking - this is normal.
DO NOT touch heating device on top of inside cavity while cavity is hot. Heating device may be still hot.
After GRILL use, the product may not operate for some time to prevent overheating.
CAUTION! The wire rack must always be used with the glass tray in position. Remove wire rack from oven by holding the rack and heatproof dish firmly. Use oven gloves when removing accessories. Never touch the outside window or inside metal parts of the door or oven when taking food in or out due to the high temperatures involved.
Combination cooking
When cooking by COMBINATION, the MICROWAVE power cooks food quickly whilst the GRILL gives traditional browning and crisping.
Press
Level
Types of food
once
Combination 1
Whole poultry
twice
Combination 2
Beef, lamb, seafood
3 times
Combination 3
Baked potatoes, puddings
Notes
While cooking, the glass tray may vibrate. This will not affect cooking performance.
The wire rack is designed to be used for COMBINATION and GRILLING. Never use any other metal accessory except the one provided with the oven. Place a heatproof dish underneath to catch any fat or drips.
Use the wire rack only as described. DO NOT use if operating the oven with less than 200 g of food on a manual programme. For small quantities, do not cook by COMBINATION, but cook by GRILL or MICROWAVE ONLY for best results.
Never cover foods when cooking on COMBINATION.
DO NOT preheat the oven on COMBINATION.
Arcing may occur accidentally if the incorrect weight of food is used, the wire rack has been damaged, or a metal container has been used. Arcing is flashes of blue light seen in the microwave oven. If this occurs, stop the oven immediately.
Some foods should be cooked on COMBINATION without using the wire rack i.e. roasts, gratins, pies and puddings. The food should be placed in a heatproof non-metallic dish and placed directly onto the glass tray.
DO NOT use plastic MICROWAVE containers on COMBINATION programmes (unless suitable for COMBINATION cooking). Dishes must be able to withstand the heat of the top grill - heatproof glass or ceramic is ideal.
DO NOT use your own metal dishes or tins, as the microwaves will not penetrate the food evenly.
CAUTION! The wire rack must always be used with the glass tray in position. Remove wire rack from oven by holding the rack and heatproof dish firmly. Use oven gloves when removing accessories. Never touch the outside window or inside metal parts of the door or oven when taking food in or out due to the high temperatures involved.
Multi-stage cooking
This feature allows you to programme up to 3 stages of cooking continuously.
Example: To continually set Medium MICROWAVE power for 2 minutes, COMBINATION 2 power for 3 minutes and GRILL 1 power for 2 minutes
Notes
AUTO PROGRAMMES cannot be used with MULTI-STAGE COOKING.
When operating, 2 beeps will sound between each stage, and 5 beeps will sound after all stages have finished.
Quick 30 feature
This feature allows you to set cooking time in 30 seconds increments up to 5 minutes at High MICROWAVE power. It is only available for MICROWAVE.
Notes
You can select other power level if you need. Select the desired power level before pressing Quick 30.
This function will not operate for 1 minute after manual cooking.
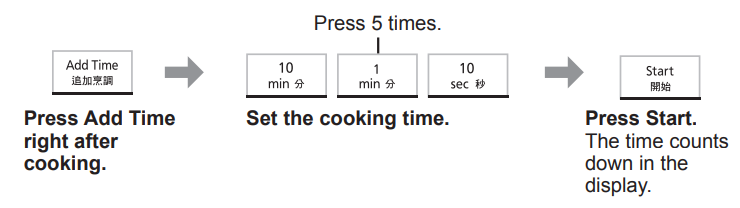
Add time feature
This feature allows you to add cooking time during and at the end of cooking. It is available for MICROWAVE, GRILL and COMBINATION cooking.
Example: To add 5 minutes at the end of cooking
Notes
During cooking, set the additional cooking time (1 to 10 minutes) in 5 seconds after pressing Add Time. Time will be added without pressing Start.
After cooking, ADD TIME can be set up to 30 minutes for High MICROWAVE power and 99 minutes 50 seconds for other MICROWAVE powers, GRILL and COMBINATION cooking. It will be cancelled, if you don’t perform any operation for 1 minute after cooking.
ADD TIME feature can be used after MULTI-STAGE COOKING. The power level is the same as the last stage. This function will not operate if the last stage was standing time.
ADD TIME feature is not available for AUTO PROGRAMMES.
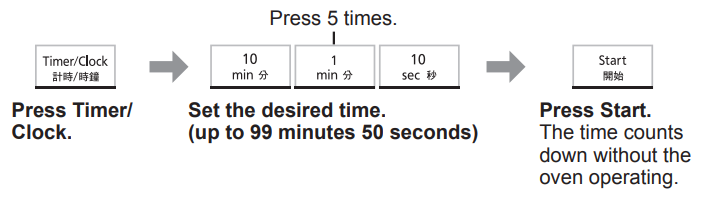
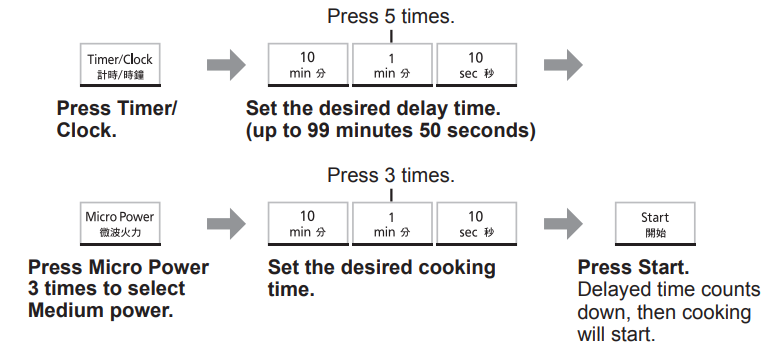
Using the timer
This feature operates as a KITCHEN TIMER or allows you to programme the STANDING TIME/DELAY START
Kitchen timer
Example: To count 5 minutes.
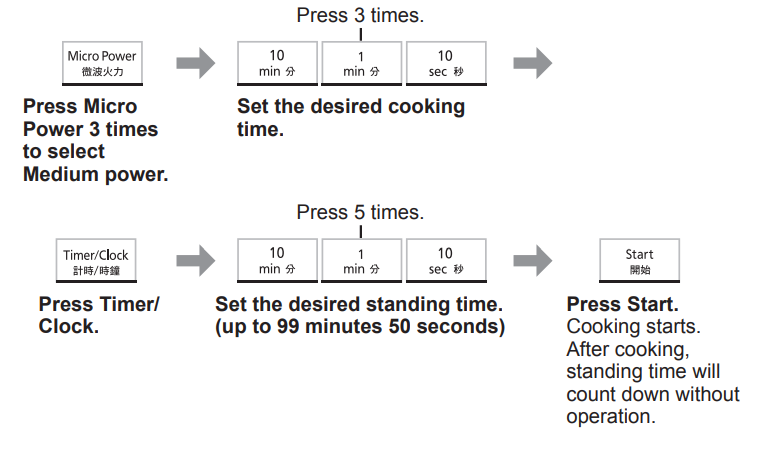
Standing time
Example: To stand for 5 minutes after cooking at Medium MICROWAVE power for 3 minutes.
Delay start
Example: To start cooking at Medium MICROWAVE power for 3 minutes after 5 minutes of standing time.
Notes
MULTI-STAGE COOKING can be programmed including STANDING TIME and DELAY START.
Even if the oven door is opened during KITCHEN TIMER, STANDING TIME or DELAY START, the time in the display window will continue to count down.
STANDING TIME/DELAY START cannot be programmed before/after any AUTO PROGRAMME
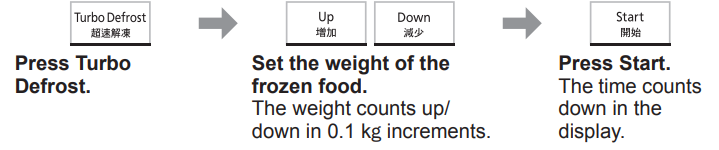
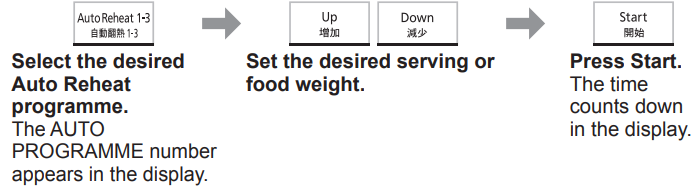
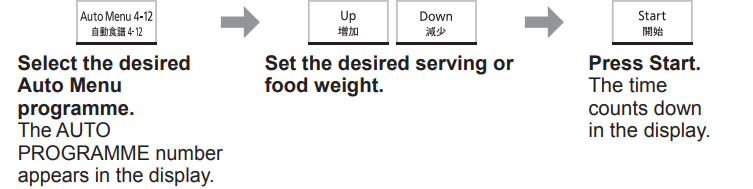
Auto programmes
With this feature you can defrost/reheat/cook food according to the weight. Select the category and set the weight of the food. The weight is programmed in kilograms for TURBO DEFROST and in grams for AUTO REHEAT/MENU. The oven determines MICROWAVE power level, GRILL power, and/or COMBINATION setting, and then cooking time automatically. For quick selection, the weight starts from the most commonly used weight for each category. Do not include the weight of any added water or the container weight.
Notes
The AUTO PROGRAMMES must ONLY be used for foods described.
Only defrost/cook foods within the weight ranges described.
Always weigh the food rather than relying on the package information.
Most foods benefit from a STANDING TIME. After cooking with an AUTO PROGRAMME, allow heat to continue conducting to the centre.
Turbo defrost
Food
Maximum Weight
Minced meat, chicken pieces, chops
2.0 kg
Beef roast, lamb, whole chickens
2.0 kg
Whole fish, scallops, prawns, fish fillets
1.0 kg
Note: The shape and size of the food determine the maximum weight the oven can accommodate
Defrosting guidelines
For Best Results:
Place foods in a suitable container. Meat joints and chickens should be placed on an upturned saucer or on a plastic rack if you have one.
Check food during defrosting, as foods vary in their defrosting speed.
It is not necessary to cover the whole food (see point 6).
Always turn or stir the food especially when the oven “beeps”. Shield if necessary (see point 6).
Minced meat, chops and other small items should be broken up or separated and placed in a single layer.
Shielding prevents food from cooking. It is essential when defrosting chickens and joints of meat. The outside thaws out first, so protect wings/breast and fat with smooth pieces of aluminium foil secured with cocktail sticks.
Allow standing time so that the centre of the food thaws out (minimum of 1 hour for joints of meat and whole chickens)
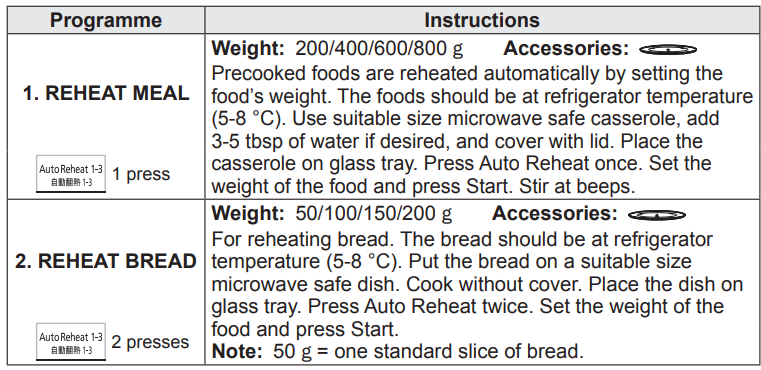
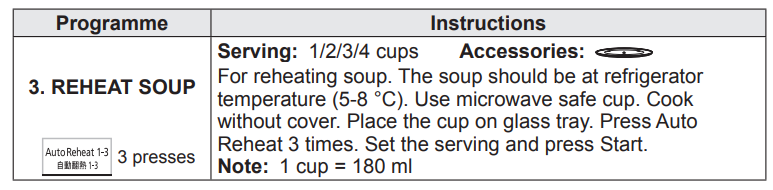
Auto reheat
Notes
Only use the accessories as indicated below.
As some variations may occur in food, check that food is thoroughly cooked and piping hot before serving
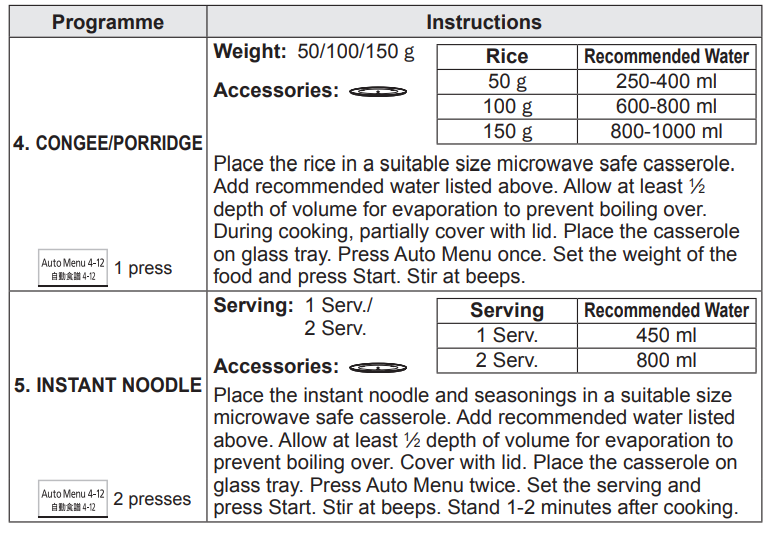
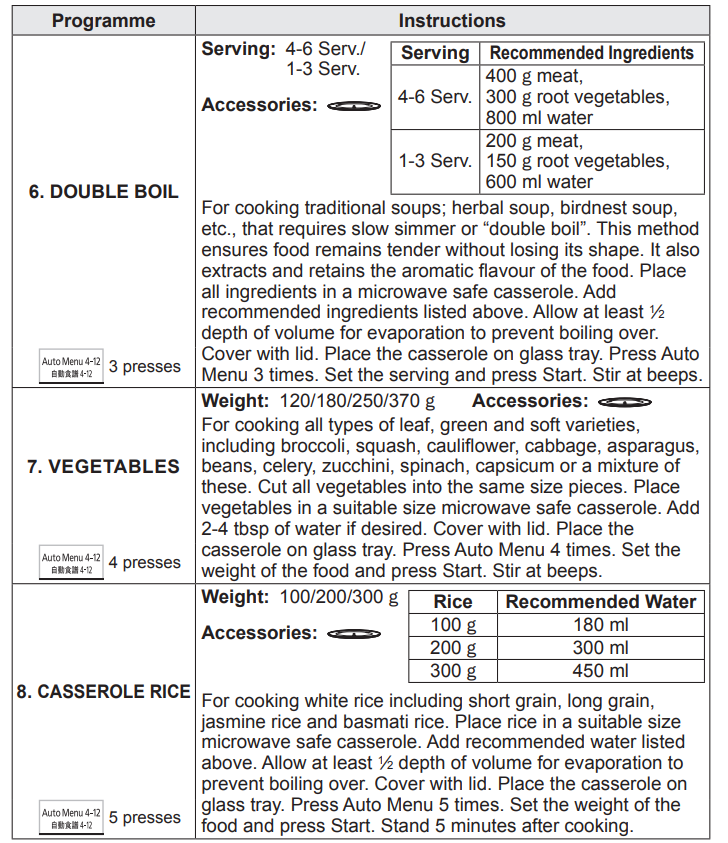
Auto menu
Notes
Only use the accessories as indicated below.
As some variations may occur in food, check that food is thoroughly cooked and piping hot before serving.
Cooking and reheating guidelines
Most foods reheat very quickly in your oven by HIGH power. Meals can be brought back to serving temperature in just minutes.
Always check food is piping hot and return to oven if necessary.
As a general rule, always cover wet foods, e.g. soups, casseroles and plated meals.
Do not cover dry foods e.g. bread rolls, mince pies, sausage rolls, etc.
Remember when cooking or reheating any food that it should be stirred or turned wherever possible. This ensures even cooking or reheating on the outside and in the centre.
MINCE PIES - CAUTION: REMEMBER even if the pastry is cold to the touch, the filling will be piping hot and will warm the pastry through. Take care not to overheat otherwise burning can occur due to the high fat and sugar content of the filling. Check the temperature of the filling before consuming to avoid burning your mouth.
PUDDINGS AND LIQUIDS - CAUTION: Puddings and other foods high in fats or sugar, e.g. jam, mince pies, must not be over heated. These foods must never be left unattended as with over cooking these foods can ignite. Take great care when reheating these items. Do not leave unattended. Do not add extra alcohol
BABIES BOTTLES - CAUTION:
Milk or formula MUST be shaken thoroughly before heating and again at the end and tested carefully before feeding a baby.
For 7-8 fl. oz. of milk from fridge temperature, remove top and teat. Heat on HIGH power for 30-50 secs. CHECK CAREFULLY BEFORE FEED.
For 3 fl. oz. of milk from fridge temperature, remove top and teat. Heat on HIGH power for 15-20 secs. CHECK CAREFULLY BEFORE FEED.
N.B. Liquid at top of bottle will be much hotter than at bottom.
The bottle must be shaken thoroughly and tested before use.
WE DO NOT RECOMMEND THAT YOU USE YOUR MICROWAVE TO STERILISE BABIES’ BOTTLES.
If you have a special microwave steriliser, we urge extreme caution, due to the low quantity of water involved. It is vital to follow the manufacturers instructions implicitly
PLATED MEALS: Everyone’s appetite varies and reheat times depend on meal contents. Dense items e.g. mashed potato, should be spread out well. If a lot of gravy is added, extra time may be required. Place denser items to the outside of the plate. Between 2-4 mins. on HIGH power will reheat an average portion. Do not stack meals.
CANNED FOODS: Remove foods from can and place in a suitable dish before heating.
SOUPS: Use a bowl and stir before heating and at least once through reheat time and again at the end.
CASSEROLES: Stir halfway through and again at the end of heating
Questions and answers
Q: Why won’t my oven turn on?
A: When the oven does not turn on, check the following:
Is the oven plugged in securely? Remove the plug from the outlet, wait 10 seconds and reinsert.
Check the circuit breaker and the fuse. Reset the circuit breaker or replace the fuse if it is tripped or blown.
If the circuit breaker or fuse is all right, plug another appliance into the outlet. If the other appliance works, there probably is a problem with the oven. If the other appliance does not work, there probably is a problem with the outlet. If it seems that there is a problem with the oven, contact an authorised Service Centre.
Q: My oven causes interference with my TV. Is this normal?
A: Some radio and TV interference might occur when you cook with the oven. This interference is similar to the interference caused by small appliances such as mixers, vacuums, blow dryers, etc. It does not indicate a problem with your oven.
Q: The oven won’t accept my programme. Why?
A: The oven is designed not to accept an incorrect programme. For example, the oven will not accept a 4th stage.
Q: Sometimes warm air comes from the oven vents. Why?
A: The heat given off from the cooking food warms the air in the oven cavity. This warmed air is carried out of the oven by the air flow pattern in the oven. There are no microwaves in the air. The oven vents should never be blocked during cooking.
Q: Can I use a conventional oven thermometer in the oven?
A: Only when you are using GRILL cooking mode. The metal in some thermometers may cause arcing in your oven and should not be used on MICROWAVE and COMBINATION cooking modes.
Q: There are humming and clicking noises from my oven when I cook by COMBINATION. What is causing these noises?
A: The noises occur as the oven automatically switches from MICROWAVE power to GRILL to create the COMBINATION setting. This is normal.
Q: My oven has an odour and generates smoke when using the COMBINATION and GRILL function. Why?
A: After repeated use, it is recommended to clean the oven and then run the oven without food, glass tray, and roller ring on GRILL for 5 minutes. This will burn off any food, residue or oil which may cause an odour and/or smoking.
Care of your oven
The oven should be unplugged before cleaning.
Clean the inside of the oven, door seals and door seal areas regularly. When food splatters or spilled liquids adhere to the oven walls, door seals and door seal areas wipe off with a damp cloth. Mild detergent may be used if they get very dirty. The use of harsh detergent or abrasive is not recommended. Avoid cleaning the microwave feed guide area situated on the right hand side of the cavity wall. DO NOT USE COMMERCIAL OVEN CLEANERS.
Do not use harsh, abrasive cleaners or sharp metal scrapers to clean the oven door glass since they can scratch the surface, which may result in shattering the glass.
The outside oven surface should be cleaned with a damp cloth. To prevent damage to the operating parts inside the oven, water should not be allowed to seep into the ventilation openings.
If the Control Panel becomes dirty, clean it with a soft cloth. Do not use harsh detergents or abrasives on the Control Panel. When cleaning the Control Panel leave the oven door open to prevent the oven from accidentally turning on. After cleaning press Stop/Reset to clear display window.
If steam accumulates inside or around the outside of the oven door, wipe with a soft cloth. This may occur when the oven is operated under high humidity conditions and in no way indicates a malfunction of the unit.
It is occasionally necessary to remove the glass tray for cleaning. Wash the tray in warm soapy water or in a dishwasher.
The roller ring and oven cavity floor should be cleaned regularly to avoid excessive noise. Simply wipe the bottom surface of the oven with mild detergent and hot water then dry with a clean cloth. The roller ring may be washed in mild soapy water. Cooking vapours collect during repeated use but in no way affect the bottom surface or roller ring wheels. After removing the roller ring from the cavity floor for cleaning, be sure to replace it in the proper position.
When using the GRILL or COMBINATION mode, some foods may inevitably splatter grease on to the oven walls. If the oven is not cleaned occasionally, it may start to “smoke” during use.
A steam cleaner is not to be used for cleaning.
This oven should only be serviced by qualified personnel. For maintenance and repair of the oven contact the nearest authorised dealer.
Failure to maintain the oven in a clean condition could lead to deterioration of surfaces that could affect the life of the appliance and possibly result in a hazardous situation.
Keep air vents clean at all times. Check that no dust or other material is blocking any of the air vents on the top, bottom or rear of the oven. If air vents become blocked this could cause overheating which would affect the operation of the oven and possibly result in a hazardous situation.