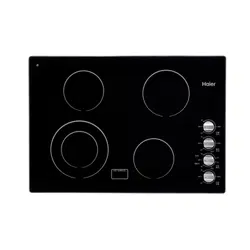
Use Manual Electric Cooktop
Use
Directions and suggestions for using
- Do not touch the built-in ceramic hob with wet hands or feet.
- Do not operate the built-in electric hob when you are bare footed.
- Do not let young children operate the built-in ceramic hob.
- Please disconnect the power supply before you do any maintenance and cleaning.
- When the built-in ceramic hob is working ,the temperature of the electric hob and the ambience become higher, so please do not touch it and keep the children away from it.
- Asteam cleaner must not be used for cleaning the appliance.
- The appliance is not intended to be operated by means of an external timer or separate remote-control system.
- The built-in ceramic hob must be built into a heat resistant cabinet. Some smoking may occur when first used. Leave on for a short period to burn off excess sealant.
Operation of the top with the heating area
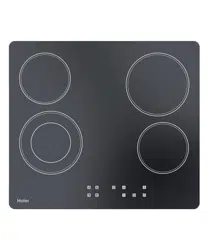
The ceramic tops can either be standard, or rapid type. This last feature a red mark at their centre An appropriately selected pan saves energy. A pan should have a thick, flat base with a diameter equal to the plate diameter as in that case heat is transferred most efficiently.
Advice on the use of cooking tops To save energy and to have a longer life of the ceramic tops, we advise using pans with flat bottom and with a diameter not less than the diameter of the tops. Care must be taken that fluids do not spill on the ceramic plates. Never leave the tops on without pans on them or with empty pans, and never use the tops to heat the plates. Switch on the plates after having set the pans on them. Once switched off, the plates remain warm for a while, do not touch. Switch off the heating element before removing the pans

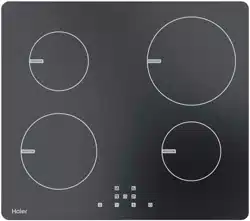
Touch control

- All operations are performed by means of the touch controls on the control panel.
- Each touch control has a corresponding visual display (indicator light).
- You will hear a beep each time a touch is registered.
Switching on the ceramic hob
- Press the ON/OFF button (fig.1) to switch on the appliance.
- The hob will beep once and all cooking zone indicators will light up briefly. Indicating that the hob has entered stand-by mode .
Notice: To make the next step within one minute, otherwise the controller will automatically shut down.
Switching on a cooking zone and setting a power level
- Press the cooking zone select button (fig.2) for the zone you want to use.
- Select the heat level required (1-9) by using the up and down buttons (fig.3). By holding down either of these buttons, the value on the heat level display will adjust up or down.
Note: when the power displayed 0, press the down button, the power will set to 9
Switching off the ceramic hob
- Press the ON/OFF button, the hob will switch off. It is possible to turn the hob off at any time by pressing the ON/OFF button.
- Press the up or down buttons to 0, then hob will switch off.
After a zone is switched off, the corresponding heat level display will show a flashing letter “H” . This means that the temperature of the zone is above 60°C and is therefore still high enough to cause injury.
- When the temperature of the zone falls below 60°C the letter “H” will go out. It is still possible to burn yourself on a hob zone, even when its temperature has dropped below 60°C.
IMPORTANT: The residual heat indicator will disappear if the mains supply to the product is cut.
Locking the ceramic hob
To lock the ceramic hob, press the safety lock button (fig.4) while the appliance is switched on. With the safety lock activated, all buttons on the control panel will be disabled, except the ON/OFF button. To disable the safety lock feature, press the safety lock button again. And you are then able to adjust the heat level of any zone on the hob.
Timer
Your hob has a timer which you can set (from 1 to 99 minutes) for each cooking zone. At the end of the countdown period, a buzzer will sound and the relevant cooking zone will be switched off.
- Select the cooking zone (fig.2) and heat level (fig.3).
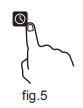
- Press the timer button (fig.5), and then use the up and down buttons to set the countdown time.
- Each time the timer up or down button is pressed, the timer display will increase or decrease in 1 minute increments.
Safety cut-off
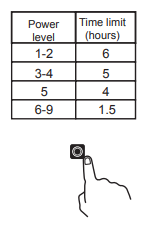
- If one or more of the cooking zones are accidentally left on, a safety cut-off will activate after a certain period of time. The length of time depends on the set power level for that zone. The table on the right gives the time limits for each power level.
- If more than one zone is operating when one of the zones reaches its safety cut-off point, only the zone that has reached its safety cut-off point will switch off.
DUAL COOKING ZONE
Open the DUAL COOKING ZONE ,the inner ring is working, press the DUAL COOKING button (fig. 6), the outer ring is working.
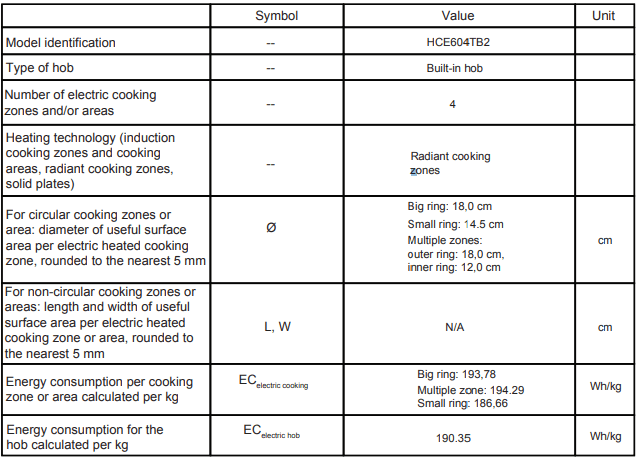
Technical Data

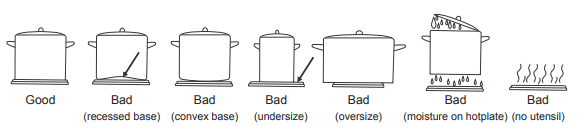
Utensils
Use pans with flat bottoms. Uneven or thin bottoms will waste energy and are slow to cook. Use pans slightly larger than the hotplates. Smaller pans will waste energy. Do not use oversized pans. More than 50mm overhang can overheat cooktop components and can cause fine cracks in the enamel hob which will trap dirt. Use only dry utensils. Do not place wet or steamy parts (eg.lids) on the hotplates. Use Do not use pots and pans that are unsteady and likely to rock or overbalance. Do not operate the cooktop tor an extended time without utensil on the hotplate.
Cleaning
Turn off the mains to the equipment before carrying out any maintenance and wait for it cool down. We advise using lukewarm water and detergents to clean enameled elements.Never use abrasive products. Rinse the glass worktop with water and dry using a soft cloth. Use sponges or a moist cloth to clean the tops, and remember that water in excess can damage the electric elements. Clean tough stains using non abrasive detergents, or warm vinegar. Clean the electric tops using a moist cloth, then lightly oil the the top when it is still warm. Only licensed repairers should service the appliance.
Installation
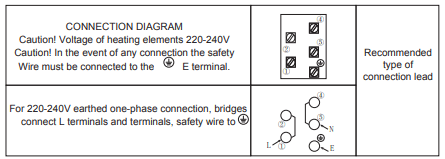
Electrical connectionAppliances with three-pole cable are set up for operation with alternating current at the voltage and frequency indicated on the rating plate Look at the connection wiring diagram. The earth conductor is yellow/green. The connection to the electricity supply must be made by a qualified person and following the regulations in force. When the appliance is to be installed above a built-in oven, the two appliances must be connected separately. The supply cable must be so positioned that no point can reach a temperature 50° C higher than ambient temperature. Also check that the supply system has an effective earth connection and corresponds to the standards in force and that the breaker can be reached easily when the appliance is installed.
Fitting guidelines
The voltage rating of the hob heating elements is 220-240V .Appliance with three-pole cable are set upfor operation current at the voltage and frequency indicated on the rating plate Look at the connection wiring diagram.The earth conductor is yellow/green. The connection to the electricity supply must be made be made by a qualified person and followingthe regulations in force. When the appliance is to be installed above a built-in oven,the two apliances must be connected separately, to make it easier to take the appliances out and for electrical safety.
If the appliance you have purchased is not fitted with a mains power lead a power lead resistant to a temperature of at least 90℃ must be used. Otherwise, the electrical safety lf the appliance may be put at risk. The manufacturer declines all responsibility for damage to persons or things caused by nonobservance of the above prescriptions or by interference with any part of the appliance.
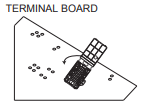
WARMING Close the cable clamp after making the electrical connection. Close the terminal board cover by twisting it down.
The manufacturer refuses all responsibility if the standards in force are not respected.TECHNICAL INFORMATION FOR INSTALLATION PERSONNEL: This appliance must be installed only by authorised personnel and in accordance with the regulations of Electricity authorities. The wall and bench surfaces must be capable of sustaining temperatures of 95 degrees Celsius. All laminates, fixing adhesive and surfacing materials should be certified suitable for this temperature.Do not install it in the unfireresistant place (like curtain etc). When you operate, the manufacturer has no responsibility. According to the picture as follows, cut the square hole in bench and place the built-in electric hob in it. Your hob can be fitted to any worktop with a thickness of 40 to 50 mm.
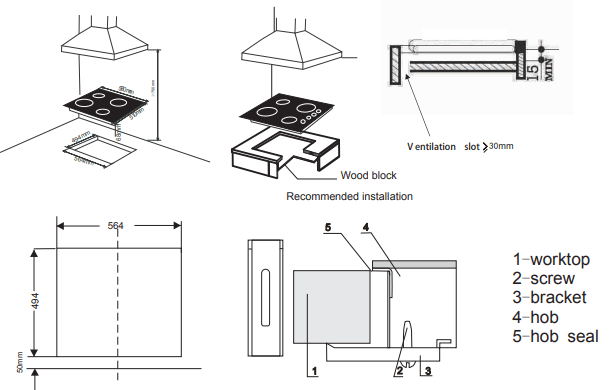
Inserting and fixing the hob
Before insertinf the hob into the work surface, place the adhesive seal ‘a) arount the underside edge fo the hob. It is important to fix this gasket evely, without gaps or overlapping to prevent liquids from seeping inderneath the hob.
- Remove the pan stands and the burner caps then turn the hob upside down, taking care not to damage the ignition pligs and the thermocouples.
- Place the gasket around the bottom edge of the hobs as shown in the illustataion overleaf.
- Place the hob in the installation opening and push it down so thaht the hob is resting frimly on the cabinet.
- Secure the hob in position using the fixing brackets supplied.
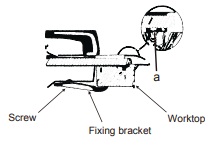
Secure the hob to the underside of the worktop using the fixings provided.Screw one end of the bracket into the pre-drilled holes in the underside of the hob.The other end of the bracket should be located underneath the worktop to secure the hob in position.
Note 1 : Fire resistant material (eg ceramic tiles) is required to 450mm above burner top if wall or vertical structures are not permitted within 200 mm from burner.
Note 2: No overhanging surface or rangehood and exhaust system are not permitted within 750 mm above burner tops.
Note 3:Leave at least 50 mm clearance between the base of the appliance and a combustibile surface.Never leave the packing components (plastic bags, nails, foamed polystyrene, etc..) within the reach of the children since they are a source of potential danger. The hob has a speciaf seal which prevents liquid from entering the cabinet Follow these instructions in order to correctly apply this
Seal:
Detach the seals from their backing, that the transparent protection still adheres to the seal itself. Turn over the hob and correctly position seal under the edge of the hob itself, so that the outer part of the seal itself perfectly matches the outer edge of the hob. Evenly and securely fix the seal to the hob, pressing it firmly in place.
CLEANING AND MAINTENANCE
-Do not use cleaning products containing abrasive materials for the cleaning and maintenance of the glass front panel.
-When cleaning do not use cleaning agents with a strong abbrasive effect,such as e.g. scouring powders containing an abrasive,abrasive compounds,abrasive stones,pumice stones,wire brushes and so on.They may scratch the hob surface, causing irreversible damage.
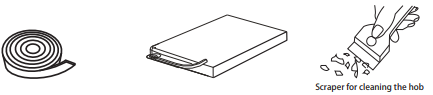
-Large spillages that are firmly stuck to the hob can be removed by a special scraper; but be careful not to damage the ceramic hob frame when doing this.
Caution!
The sharp blade should always be protected by adjusting the cover(just push it with you thumb). Injuries are possible so be careful when using this instrument-keep out of reach of children
. Appropriate light cleaning or washing products are recommended,such as e.g. any kind of liquids emulsions for fat removal. Alternatively a solution of warm water with a little washing up liquid or cleaning products for stainless steel sinks can be used.
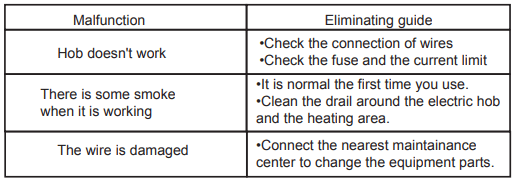
MALFUNCTION ELIMINATION
WARNING : The appliance and its accessible parts become hot during use. Care should be taken to avoid touching heating elements. Children less than 8 years of age shall be kept away unless continuously supervised. This appliance can be used by children aged from 8 years and above and persons with reduced physical, sensory or mental capabilities or lack of experience and knowledge if they have been given supervision or instruction concerning use of the appliance in a safe way and understand the hazards involved. Children shall not play with the appliance. Cleaning and user maintenance shall not be made by children without supervision.
WARNING : Unattended cooking on a hob with fat or oil can be dangerous and may result in fire. NEVER try to extinguish a fire with water, but switch off the appliance and then cover flame e.g. with a lid or a fire blanket.
WARNING : Danger of fire: do not store items on the cooking surfaces. WARNING : If the surface is cracked, switch off the appliance to avoid the possibility of electric shock. WARNING : A steam cleaner is not to be used.
WARNING : the appliance is not intended to be operated by means of an external timer or separate remote-control system.