When the TV is turned on for the first time after being shipped from the factory, initialization of the TV may take approximately one minute.
Image shown may differ from your TV.
Your TV’s OSD (On Screen Display) may differ slightly from that shown in this manual.
The available menus and options may differ from the input source or product model that you are using.
New features may be added to this TV in the future.
The device must be easily accessed to a location outlet near the access. Some devices are not made by turning on / off button, turning off the device and unplugging the power cord.
The items supplied with your product may vary depending upon the model.
Product specifications or contents of this manual may be changed without prior notice due to upgrade of product functions.
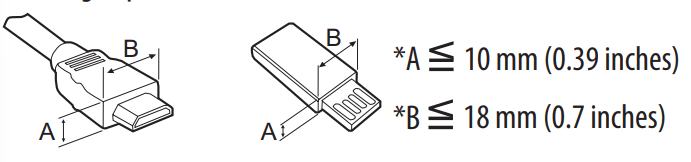
For an optimal connection, HDMI cables and USB devices should have bezels less than 10 mm (0.39 inches) thick and 18 mm (0.7 inches) width.
Use an extension cable that supports USB 2.0 if the USB cable or USB flash drive does not fit into your TV’s USB port.
Use a certified cable with the HDMI logo attached. If you do not use a certified HDMI cable, the screen may not display or a connection error may occur.
Recommended HDMI cable types (3 m (9.84 feet) or less)
- Ultra High Speed HDMI cable®/™
Optional Extras
Optional extras can be changed or modified for quality improvement without any notification. Contact your dealer for buying these items. These devices work only with certain models.
The model name or design may be changed due to the manufacturer’s circumstances or policies.
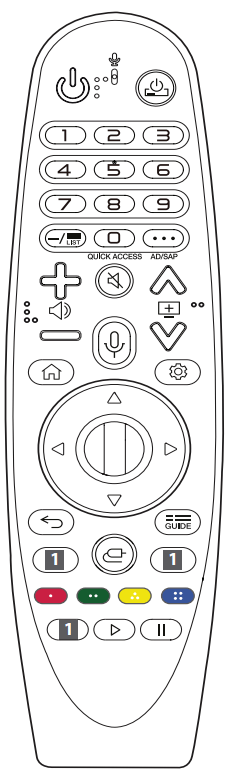
Magic Remote Control
(Depending upon model)
MR20GA
Check whether your TV model supports Bluetooth in the Wireless Module Specification to verify whether it can be used with the Magic Remote.
Wall Mounting Bracket
(DepenD wall mount kits are described in the following table.
Model
43/50UN69*
43/50UN70*
43UN71*
43/50UN73*
50UN80*
55UN69*
49/55UN70*
49/55UN71*
49/55UN73*
55UN80*
VESA (A x B) (mm)
200 x 200
300 x 300
Standard screw
M6
M6
Number of screws
4
4
Wall mount bracket (optional)
LSW240B MSW240
OLW480B MSW240
Model
60/65UN69*
60UN70*
65UN71*
60/65UN73*
65UN80*
65UN85*
70/75UN69*
70/75UN70*
70/75UN71*
70/75UN73*
75/82UN80*
75/82/86UN85*
VESA (A x B) (mm)
300 x 300
600 x 400
Standard screw
M6
M8
Number of screws
4
4
Wall mount bracket (optional)
OLW480B
LSW640B
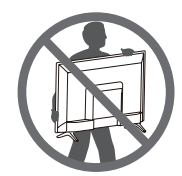
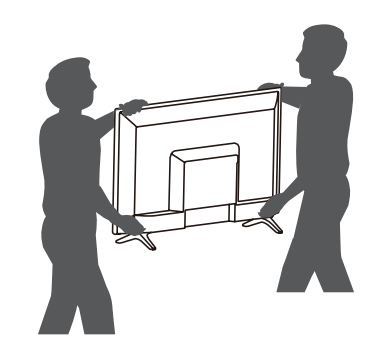
Lifting and moving the TV
When moving or lifting the TV, read the following to prevent the TV from being scratched or damaged and for safe transportation regardless of its type and size.
It is recommended to move the TV in the box or packing material that the TV originally came in.
Before moving or lifting the TV, disconnect the power cord and all cables.
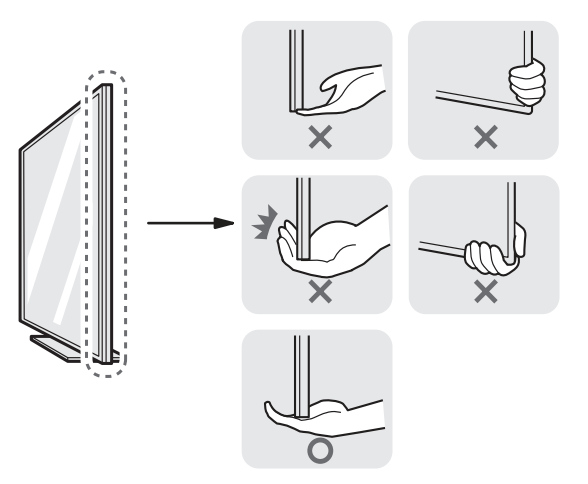
When holding the TV, the screen should face away from you to avoid damage.
Hold the top and bottom of the TV frame firmly. Make sure not to hold the transparent part, speaker, or speaker grille area.
Use at least two people to move a large TV.
When transporting the TV by hand, hold the TV as shown in the following illustration.
When transporting the TV, do not expose the TV to jolts or excessive vibration.
When transporting the TV, keep the TV upright; never turn the TV on its side or tilt towards the left or right.
When handling the TV, be careful not to damage the protruding buttons.
Avoid touching the screen at all times, as this may result in damage to the screen.
Do not place the product on the floor with its front facing down without padding. Failure to do so may result in damage to the screen.
When attaching the stand to the TV set, place the screen facing down on a cushioned table or flat surface to protect the screen from scratches.
Mounting on the Table
1. Lift and tilt the TV into its upright position on a table.
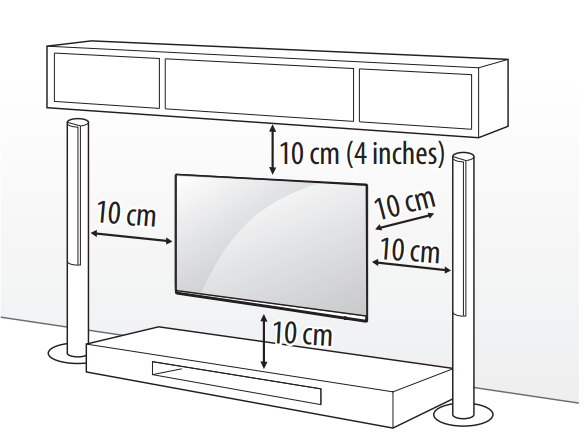
Leave a minimum of 10 cm (4 inches) space from the wall for proper ventilation.
(Depending upon model)
2. Connect the power cord to a wall outlet.
Do not apply foreign substances (oils, lubricants, etc.) to the screw parts when assembling the product.
(Doing so may damage the product.)
If you install the TV on a stand, you need to take actions to prevent the product from overturning. Otherwise, the product may fall over, which may cause injury.
Do not use any unapproved items to ensure the safety and product life span.
Any damage or injuries caused by using unapproved items are not covered by the warranty.
Make sure that the screws are fastened tightly. (If they are not fastened securely enough, the TV may tilt forward after being installed.)
Do not fasten the screws with excessive force otherwise they may strip and become loose.
Securing TV to the Wall
(Depending upon model)
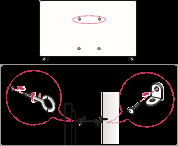
Insert and tighten the eye-bolts, or TV brackets and bolts on the back of the TV.
If there are bolts inserted at the eye-bolts position, remove the bolts first.
Mount the wall brackets with the bolts to the wall. Match the location of the wall bracket and the eye-bolts on the rear of the TV.
Connect the eye-bolts and wall brackets tightly with a sturdy rope. Make sure to keep the rope horizontal with the flat surface.
Use a platform or cabinet that is strong and large enough to support the TV securely.
Brackets, bolts and ropes are not provided. You can obtain additional accessories from your local dealer.
Mounting to the Wall
An optional wall mount can be used with your LG Television. Consult with your local dealer for a wall mount that supports the VESA standard used by your TV model. Carefully attach the wall mount bracket at the rear of the TV. Install the wall mount bracket on a solid wall perpendicular to the floor. If you are attaching the TV to other building materials, please contact qualified personnel to install the wall mount. Detailed instructions will be included with the wall mount. We recommend that you use an LG brand wall mount. The LG wall mount is easy to adjust or to connect the cables. When you do not use LG’s wall mount bracket, use a wall mount bracket where the device is adequately secured to the wall with enough space to allow connectivity to external devices. If you are using a non-adjustable mount, attach the mount to the wall. Attach the cables to the TV first, then attach the TV to the mount.
(Dependingupon model)
Remove the stand before installing the TV on a wall mount by performing the stand attachment in reverse.
For more information of screws and wall mount bracket, refer to the Separate purchase.
If you intend to mount the product to a wall, attach VESA standard mounting interface (optional parts) to the back of the product. When you install the set to use the wall mounting bracket (optional parts), fix it carefully so as not to drop.
When mounting a TV on the wall, make sure not to install the TV by hanging the power and signal cables on the back of the TV.
Do not install this product on a wall if it could be exposed to oil or oil mist. This may damage the product and cause it to fall.
When installing the wall mounting bracket, it is recommended to cover the stand hole using tape, in order to prevent the influx of dust and insects, (Depending upon model).
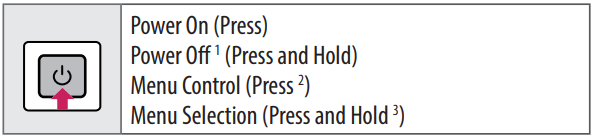
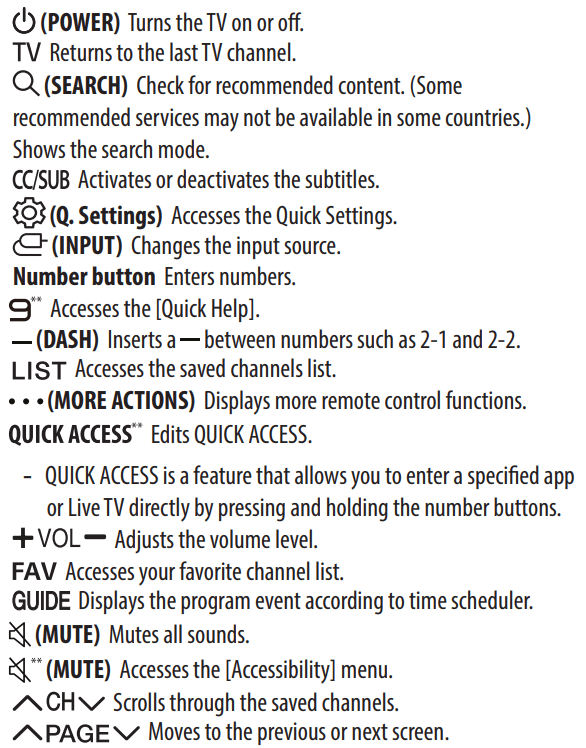
Using Button
You can simply operate the TV functions, using the button.
Basic functions
1 All running apps will close.
2 You can access and adjust the menu by pressing the button when TV is on.
3 You can use the function when you access menu control.
Adjusting the menu
When the TV is turned on, press the button on time.You can adjust the Menu items using the button.
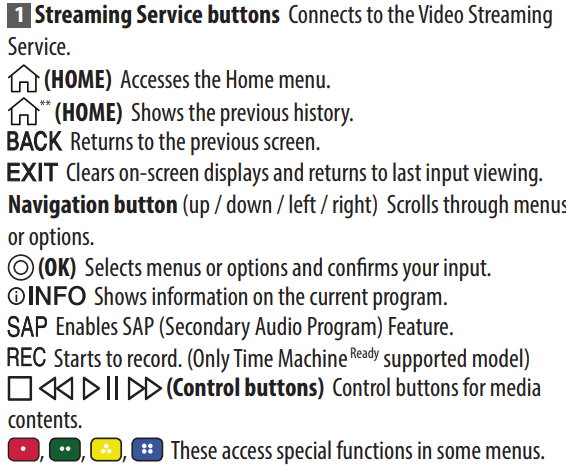
Using Remote Control
(Dependingupon model)
The descriptions in this manual are based on the buttons on their remote control. Please read this manual carefully and use the TV correctly. To install batteries, open the battery cover, replace batteries (1.5 V AAA) matching the and ends to the label inside the compartment, and closes the battery cover. To remove the batteries, perform the installation actions in reverse. This remote uses infrared light. When in use, it should be pointed in the direction of the TV’s remote sensor. Make sure to point the remote control toward the remote control sensor on the TV.
(Some buttons and services may not be provided depending upon models or regions.)
** To use the button, press and hold for more than 1 second.
Using Magic Remote Control
(Depending upon model)
The descriptions in this manual are based on the buttons on their remote control. Please read this manual carefully and use the TV correctly.
When the message [Magic remote battery is low. Please change the battery.] is displayed, replace the batteries.
To install batteries, open the battery cover, replace batteries (1.5 V AAA) matching the and ends to the label inside the compartment, and close the battery cover. Be sure to point the magic remote toward the remote control sensor on the TV. To remove the batteries, perform the installation actions in reverse. This remote uses infrared light. When in use, it should be pointed in the direction of the TV’s remote sensor.
Registering Magic Remote Control
How to register the Magic Remote Control
To use the Magic Remote, first pair it with your TV.
1 Put batteries into the Magic Remote and turn theTV on.
2 Point the Magic Remote at your TV and press the Wheel (OK)on the remote control.
* If the TV fails to register the Magic Remote, try again after turning the TV off and back on.
How to deregister the Magic Remote Control
Press the (BACK)and (HOME)buttons at the same time, for five seconds, to unpair the Magic Remote with your TV.
* Press and hold the button for more than 5 seconds to disconnect and re-register the Magic Remote at the same time.
• Do not mix new batteries with old batteries. This may cause the batteries to overheat and leak.
• Failure to match the correct polarities of the battery may cause the battery to burst or leak, resulting in fire, personal injury, or ambient pollution.
• This apparatus uses batteries. In your community, there might be regulations that require you to dispose of these batteries properly due to environmental considerations. Please contact your local authorities for disposal or recycling information.
• Batteries inside or inside the product shall not be exposed to excessive heat such as sunshine, fire or the like.
User Guide
For more information about this TV, read the USER GUIDE embedded in the product.
• To open the USER GUIDE → → [Support] → [User Guide]
Troubleshooting
Cannot control the TV with the remote control.
• Checkifanythingsuch as tape has been placed over the receiver.
• Check if there is any obstacle between the product and the remote control.
• Replace the batteries with new fresh ones.
No image display and no sound is produced.
• Check if the product is turned on.
• Check if the power cord is connected to a wall outlet.
• Check if there is problem in the wall outlet by connecting other products.
The TV turns off suddenly.
• Check the power control settings.The power supply maybe interrupted.
• Check if the auto-off function is activated in the settings menu.
• If there is no signal while the TV is on, the TV will turn off automatically after 15 minutes of inactivity.
Connections
You can connect various external devices to the TV. For more information on external device’s connection, refer to the manual provided with each device.
Antenna/Cable
Connect an antenna, cable, or cable box to watch TV while referring to the following. The illustrations may differ from the actual items and an RFcableisoptional.
• Make sure not to bend the copper wire of the RF cable.
• Complete all connections between devices,and then connect the power cord to the power outlet to prevent damage to your TV.
• Useasignal splitter touse2TVsor more.
• DTV Audio Supported Codec: MPEG, Dolby Digital
• This TV cannot receive ULTRA HD (3840x2160 pixels) broadcasts directly because the related standards have not been confirmed.
Other connections
Connect your TV to external devices.For the best picture and audio D quality, connect the external device and the TV with the HDMI cable.
HDMI
• When connecting the HDMI cable, the product and external devices should be turned off and unplugged.
• HDMI Audio Supported Format:
(Depending upon model)
True HD (48kHz),
Dolby Digital / Dolby Digital Plus (32kHz /44.1kHz /48kHz), PCM (32kHz /44.1kHz /48kHz /96kHz /192kHz)
• → [Picture] → [AdditionalSettings] → [HDMI Ultra HD DeepColor]
If the device connected to Input Portal so supports Ultra HD Deep Color, your picture may be clearer. However, if the device doesn’t support it, it may not work properly. In that case, changetheTV’s [HDMI Ultra HD Deep Color] setting off.
- This feature is available only on certain models which support HDMI Ultra HD Deep Color.
External Devices
Supported external devices are: Blu-ray player, HD receivers, DVD players, VCRs, audio systems, USB storage devices, PC, gaming devices, and other external devices. For more information on external device’s connection, refer to the manual provided with each device.
If you record a TV program on a Blu-ray/DVD recorder or VCR, make sure to connect the TV signal input cable to the TV through a DVD recorder or VCR. For more information about recording, refer to the manual provided with the connected device.
The external device connections shown may differ slightly from illustrations in a manual.
Connect external devices to the TV regardless about the order of the TV port.
If you connect a gaming device to the TV, use the cable supplied with the gaming device.
Refer to the external equipment’s manual for operating instructions.
In PC mode, there may be noise associated with the resolution, vertical pattern, contrast or brightness. If noise is present, change the PC output to another resolution, change the refresh rate to another rate or adjust the brightness and contrast on the [Picture] menu until the picture is clear. Depending on the graphics card, some resolution settings may not allow the image to be positioned on the screen properly.
Some USB Hubs may not work. If a USB device connected through a USB Hub is not detected, connect it directly to the USB port on the TV.
When connecting via a wired LAN, it is recommended to use a CAT 7 cable.
The TV may be capable of operating without a set top box from a multichannel video programming distributor (MVPD
#1 Does this TV have the FUBO TV App? Fubo news said it should but I don't see it.
The Fubo TV app does not come as a pre-installed app on the LG 55 inch Class 4K Smart UHD TV with AI ThinQ® (54.6'' Diag), Model # 55UN7300AUD or on LG TVs, but it is compatible with our webOS TV Platform and it can be downloaded and installed on our Smart TVs from the LG Content Store (App Store). The LG Content Store can be launched from the TV's home screen so you can download and install the Fubo TV app on the TV.
#2 What’s difference in UN7300 PUF and UN7300 AUD?
The LG 50 inch Class 4K Smart UHD TV with AI ThinQ® (49.5'' Diag), Model # 50UN7300PUF, and Model # 50UN7300AUD have the same specifications and features with the only difference being that Model # 50UN7300PUF has black bezels and black stand legs while Model # 50UN7300AUD has dark grey bezels and dark grey stand legs and the TVs are sold through different retail outlets.
The LG 43 inch Class 4K Smart UHD TV with AI ThinQ® (42.5'' Diag), Model # 43UN7300AUD has a native refresh rate of 60Hz and features HDMI 2.0 ports. It does not support 4K @ 120Hz. Only our TVs that feature HDMI 2.1 ports are capable of displaying 4K @ 120Hz.
#4 How far apart are the legs on the 55un7300aud TV? Critical to whether it will fit on the cabinet I have in mind.
The measurement for how far apart the stand legs for the LG 55 inch Class 4K Smart UHD TV with AI ThinQ® (54.6'' Diag), Model # 55UN7300AUD are is listed in the TV's specifications on its product detail page as 'Stand Width' - 44.4".


 button on time.You can adjust the Menu items using the button.
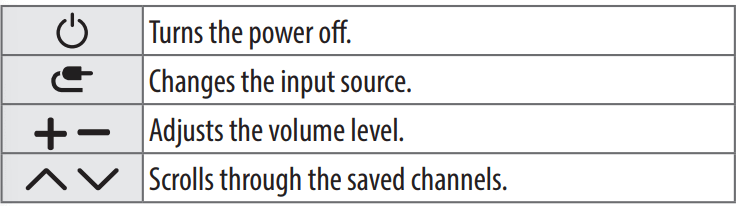
 and
and  ends to the label inside the compartment, and closes the battery cover. To remove the batteries, perform the installation actions in reverse. This remote uses infrared light. When in use, it should be pointed in the direction of the TV’s remote sensor. Make sure to point the remote control toward the remote control sensor on the TV.
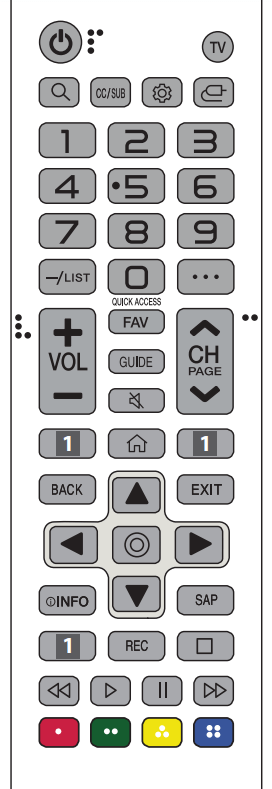
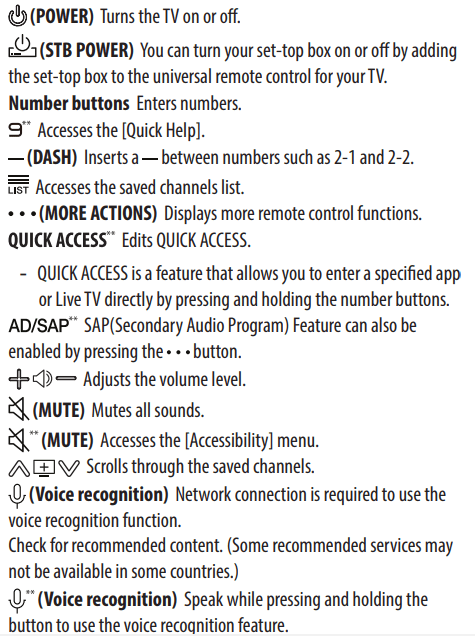
 Wheel (OK)on the remote control.
 (BACK)and
  (HOME)buttons at the same time, for five seconds, to unpair the Magic Remote with your TV.
 button for more than 5 seconds to disconnect and re-register the Magic Remote at the same time.
 →
→  → [Support] → [User Guide]
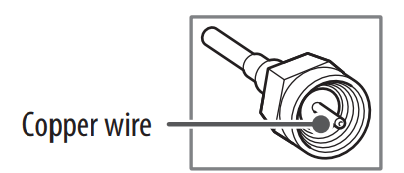
 →
→  [Picture] → [AdditionalSettings] → [HDMI Ultra HD DeepColor]