OFF
ON
x2
Hold for 6 seconds
until LEDs start
blinking
quick-start guide
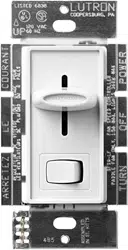
In-wall fan control
Welcome—and thank you for purchasing a Caséta
Wireless in-wall fan control. In order to control your
ceiling fan from an app or remote, you’ll need to replace
an existing switch with a Caséta Wireless in-wall fan
control.
Before you install the fan control, please read the quick-
start guide and watch the installation video at
www.casetawireless.com/support
We hope you enjoy the convenience of Caséta Wireless!
IMPORTANT NOTES
1. For indoor use only.
2. Operate between 32 ˚F (0 ˚C) and 104 ˚F (40 ˚C).
3. Use to control one paddle-type ceiling fan.
4. Use the ceiling fan’s pull chain to set its speed to
the highest setting.
5. Do not use to control exhaust fans (e.g. bathroom
or kitchen exhaust fans).
6. Do not use to control fans that have integrated
fan speed controls other than a pull chain (i.e.
fans that have a remote control), unless the
integrated control is removed from the ceiling fan.
7. Do not connect to any other motor-operated
appliance or to any lighting load type.
8. Do not use to control lighting loads on a fan.
9. Do not use to control DC motor fans.
Fan—up to 1.5 A
Contents supplied
Double your warranty
In-wall fan control (PD-FSQN)
120 V~ 50/60 Hz 1.5 A
Tools you’ll need
Works with one paddle-type
ceiling fan:
Flat-head screwdriver
Wire connectors (3)
Phillips-head screwdriver
Pliers
Screws (2)
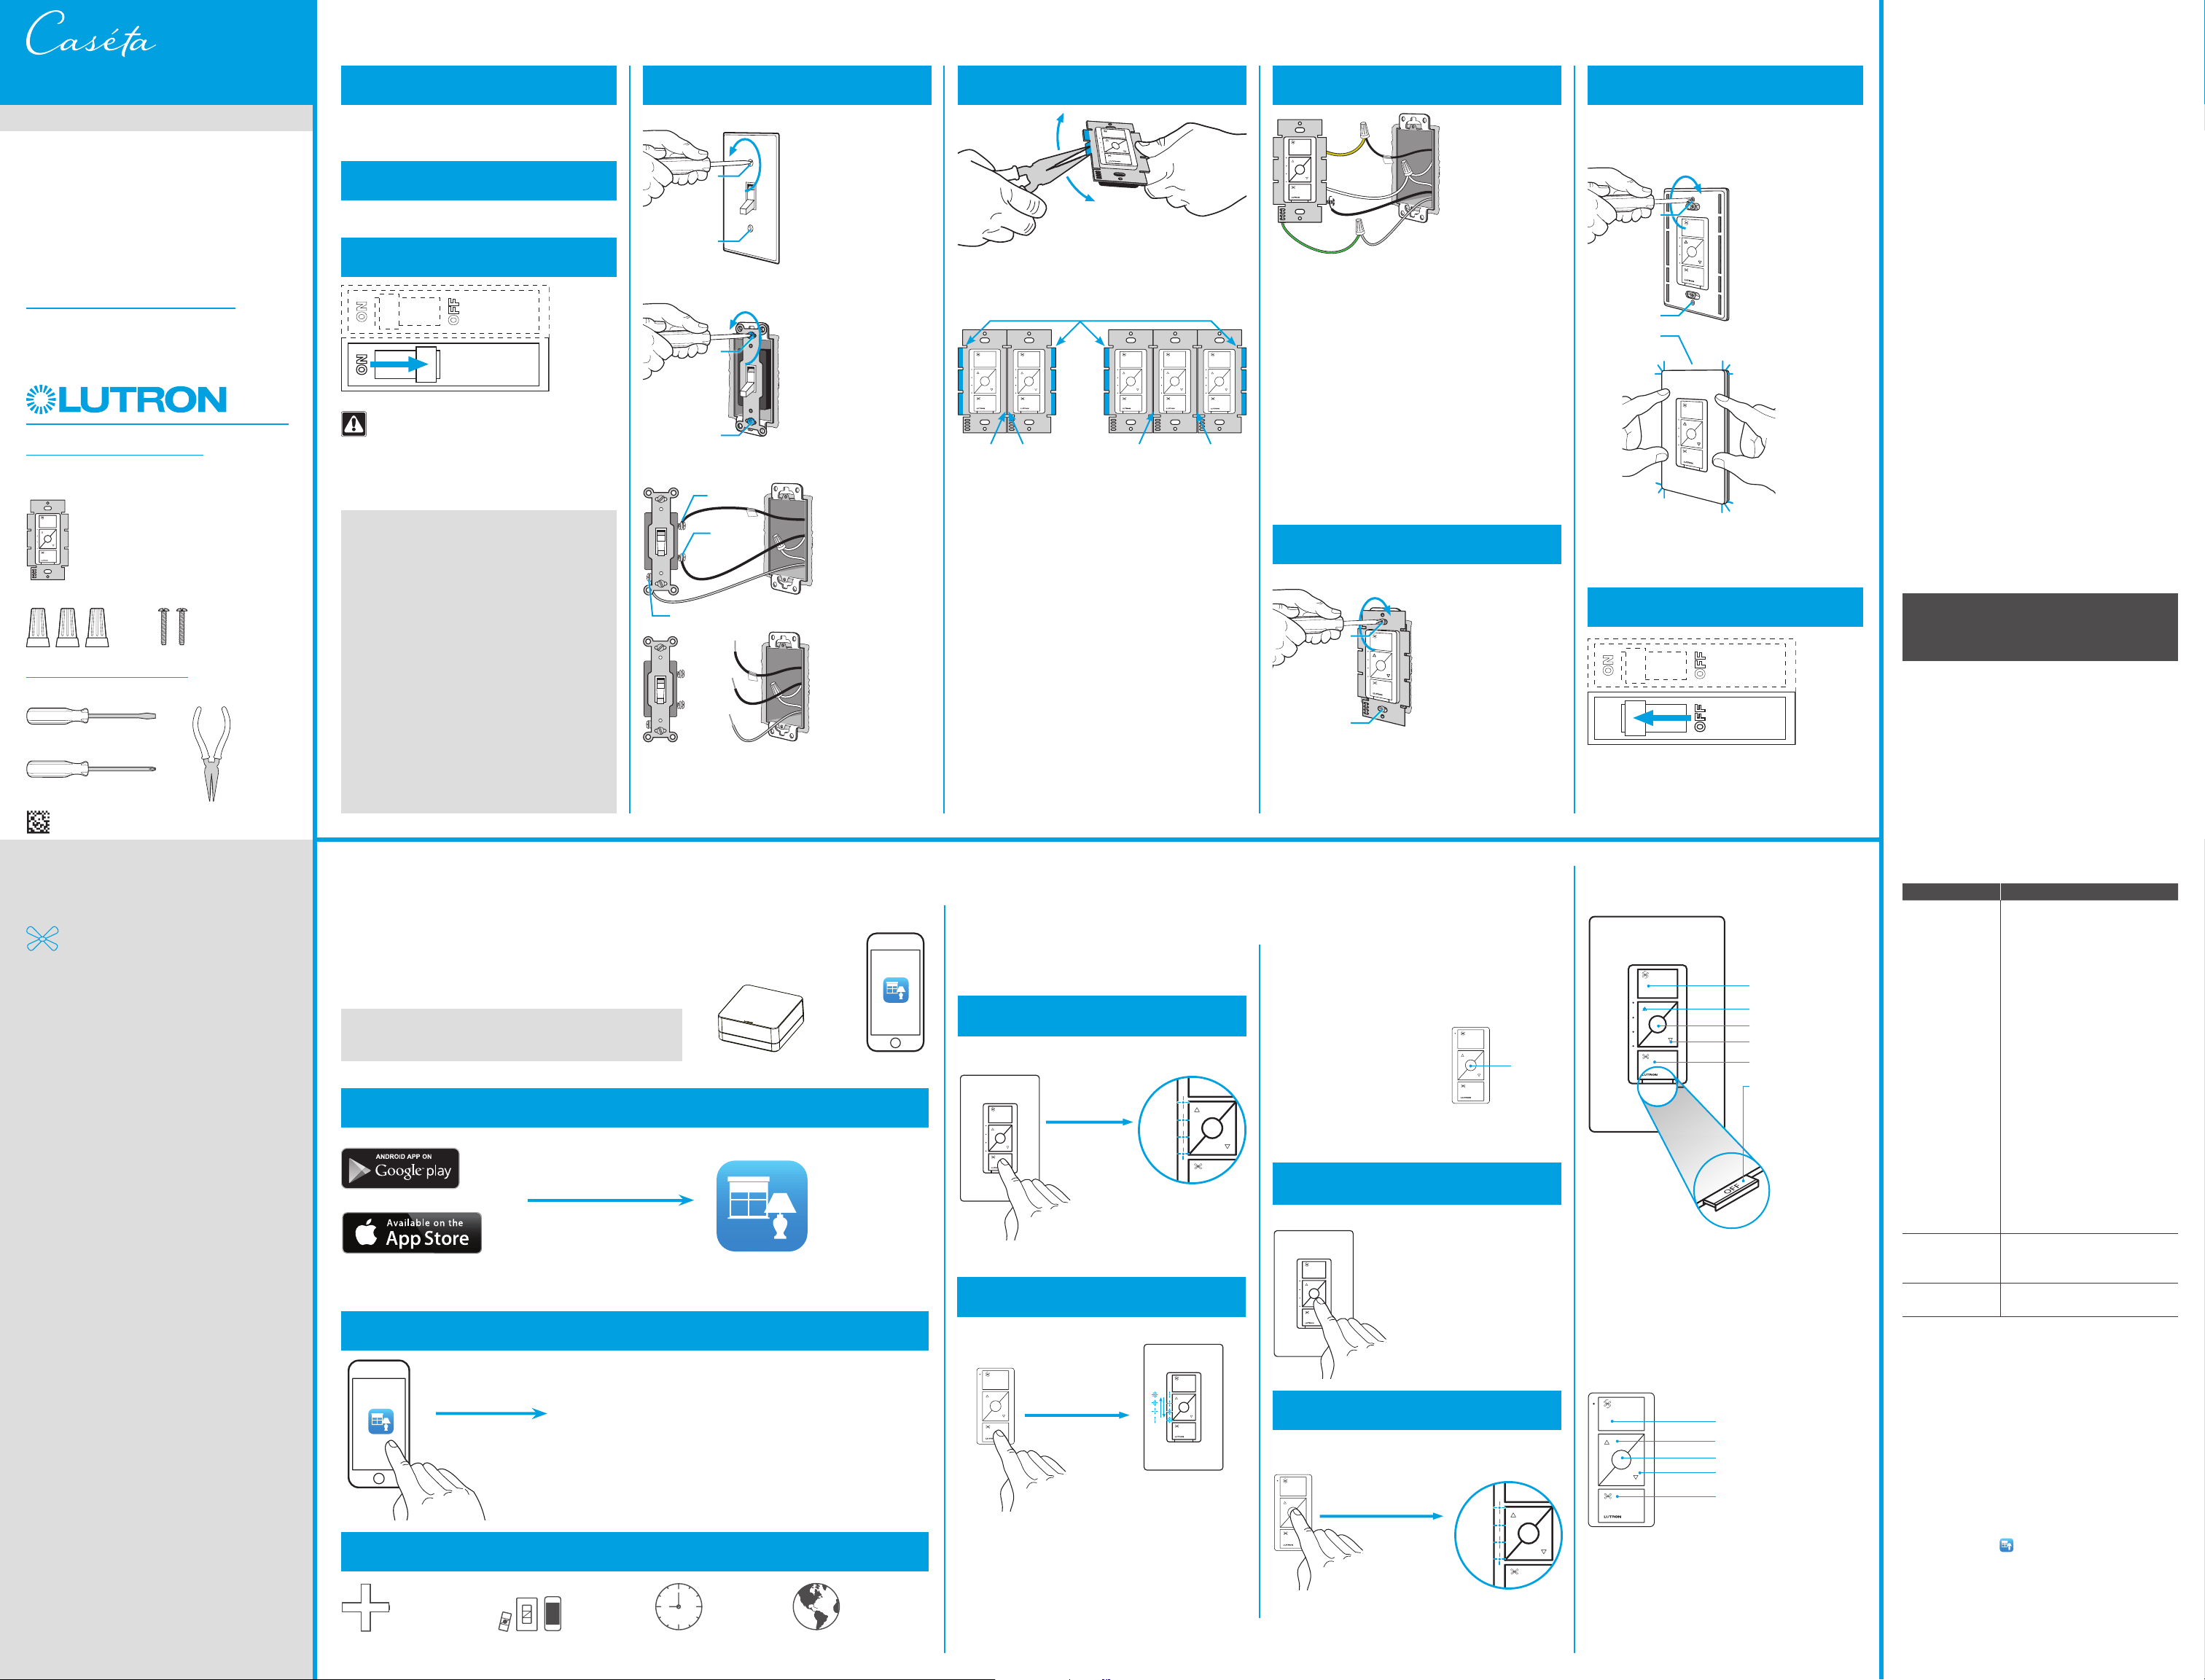
Installing your fan control
Using your Caséta Wireless kit (sold separately)
Some fans have one wall switch, while others
have two or more wall switches. We’ve included
instructions for fans with one wall switch (called a
single pole). If your fan has more than one switch
(called a 3-way), please visit
www.casetawireless.com/3way for complete
installation instructions and how-to videos.
WARNING: SHOCK HAZARD.
May result in serious injury or death. Turn off
power at circuit breaker or fuse before installing.
1
Install the fan
2
Set the fan speed
3
Turn power off at circuit breaker!
Press and hold “off” button on the
fan control
2
Press and hold “off” button on the
Pico remote control
6
Connect the fan control
7
Mount the fan control
8
Attach the wallplate
9
Turn power on at circuit breaker
4
Remove existing switch from wall
Remove the wallplate from the switch.
Install the fan according to the manufacturer’s
instructions and ensure proper operation.
Set the fan to the highest speed using the pull chains.
5
Remove side sections (if necessary)
Remove the switch and pull it away from the wall.
* If your switch has more than 3 wires attached, see
“Installing Caséta Wireless in a 3-way switch application”
video at www.casetawireless.com/3way
Bend back
and forth.
3
5
Tag
1
4
6
Ground
Ground
7
2
Place tag on load wire. Disconnect all three
wires* from the switch.
1 Connect the bare copper (or green) “ground” wire
from the wallbox to the green wire on the fan control
using a wire connector.
2 Wrap line/hot wire around screw terminal. Tighten
securely to 5 in-lb (0.55 N•m).
3 Connect the neutral wire from the wallbox to the
white wire on the fan control using a wire connector.
4 Connect the load/tagged wire from the wallbox
to the yellow wire on the fan control using a
wire connector.
Do not remove outside side sections
on the controls at the end of gang.
Each control
has inside side
sections removed.
Control at middle has all
side sections removed.
If using a Claro wallplate (sold separately), attach the
adapter to the fan control using the screws provided
and snap on the wallplate.
‘snap’
Use the screws provided.
Pairing the fan control and
Pico remote control
Go to www.casetawireless.com/support for
additional troubleshooting suggestions.
Symptoms Probable cause and action
Fan does not
turn ON and no
indicator lights
turn ON.
• Ensure that the fan pull chain is
set to highest possible setting.
• Load and Line wires may be
reversed. Swap wires that are
attached to the yellow wire and
black screw terminal on the fan
control. Refer to wiring diagram
in step 6.
• Neutral wire is not connected.
Refer to wiring diagram in
step 6.
• Front Accessible Service Switch
(FASS) is in the OFF position.
Push FASS in to the ON
position.
• Breaker is OFF or tripped (or
fuse blown). Reset breaker
or replace fuse. If condition
persists, contact Lutron
Customer Assistance or a
licensed electrician.
Fan does not turn
ON and indicator
lights are ON.
Fan direction switch is between
forward and reverse. Set switch
to desired position.
Fan speed is too
slow.
Set fan pull chain speed to high.
Love Caséta Wireless controls? Have ideas
for making them better? Tell us what you think
and we’ll extend your warranty by 1 year.
www.casetawireless.com/register
For advanced features, tips for using Caséta Wireless products, the complete Caséta Wireless product line, and more,
please visit www.casetawireless.com/features
Changing the favorite setting on
the Pico remote control (sold
separately) or fan control
The round “favorite” button on the
Pico remote control or fan control
can be used to recall favorite
speed(s). Both the Pico remote
control and the fan control can
have different favorite speeds. The
default is Medium, but it can be
changed to any speed.
Favorite
CAUTION
Use only with permanently installed ceiling fans. To
avoid overheating and possible damage to other
equipment, do not use to control receptacles, motor-
driven appliances, or transformer-supplied appliances.
Codes
Install in accordance with all national and local
electrical codes.
Grounding
When no “grounding means” exist in wallbox, the
National Electrical Code (NEC®) allows a control to
be installed as a replacement if 1) a nonmetallic,
noncombustible faceplate is used with nonmetallic
attachment screws or 2) the circuit is protected by a
ground fault circuit interrupter (GFCI). When installing
a control according to these methods, cap or remove
green wire before screwing control into wallbox.
FCC/IC Information
This device complies with part 15 of the FCC Rules and Industry Canada
license-exempt RSS standard(s). Operation is subject to the following two
conditions: (1) This device may not cause interference, and (2) this device
must accept any interference, including interference that may cause undesired
operation. Modifications not expressly approved by Lutron Electronics Co.,
Inc. could void the user’s authority to operate this equipment.
Note: This equipment has been tested and found to comply with the limits for
a Class B digital device, pursuant to part 15 of the FCC Rules. These limits
are designed to provide reasonable protection against harmful interference
in a residential installation. This equipment generates, uses and can radiate
radio frequency energy and, if not installed and used in accordance with
the instructions, may cause harmful interference to radio communications.
However, there is no guarantee that interference will not occur in a particular
installation. If this equipment does cause harmful interference to radio or
television reception, which can be determined by turning the equipment off
and on, the user is encouraged to try to correct the interference by one or
more of the following measures:
—Reorient or relocate the receiving antenna.
—Increase the separation between the equipment and receiver.
— Connect the equipment into an outlet on a circuit different from that to which
the receiver is connected.
—Consult the dealer or an experienced radio/TV technician for help.
)Lutron Lutron, Caséta,
Lutron
and Pico are trademarks of Lutron
Electronics Co., Inc., registered in the U.S. and other countries. FASS
and Smart Bridge are trademarks of Lutron Electronics Co., Inc. NEC is a
registered trademark of the National Fire Protection Association, Quincy,
Massachusetts. Google and the Google logo are registered trademarks
of Google Inc., used with permission. Apple is a trademark of Apple Inc.,
registered in the U.S. and other countries. App Store is a service mark of
Apple Inc.
© 2018-2019 Lutron Electronics Co., Inc
P/N 0301910 REV A
Lutron Electronics Co., Inc.
7200 Suter Road
Coopersburg, PA 18036-1299, U.S.A.
1
2
1
2
Hold the favorite button on
either the remote or control
for 6 seconds until LEDs
blink twice on in-wall fan
control. New favorite level is
now saved.
3
Set desired fan speed setting on
fan control
4
Press and hold “favorite” button
Important note:
Troubleshooting
Hold for 6 seconds
until fan control LEDs
flash in a waterfall
pattern.
Repeat steps to pair other
Pico remote controls.
Wireless
Pico remote control (sold separately)
High
Off
Slower
Faster
Favorite
FASS
Front Accessible
Service Switch
Important Notice: To service or clean the fan, remove
power by pulling out the FASS as far as possible. To
restore power after servicing the load, push the FASS
back in completely.
In-wall fan
control
High
Off
Slower
Favorite
Faster
With a smartphone or tablet (Bridge required, sold separately)
1 Press and hold “off” button on dimmer
2
Press and hold “off” button on remote
The Lutron app will walk you through
setting up your devices.
Download the Lutron app
www.casetawireless.com/LutronApp
Launch the Lutron app
Lutron
The Caséta Wireless fan control can be controlled from a
smartphone when used with the Lutron Smart Bridge.
If you are using the fan control and remote control with the Lutron
Smart Bridge follow the instructions below.
Search for “Lutron Caseta”
3
Press and hold “off” button on remote
Use the Lutron app to complete ALL remaining steps
Lutron
Lutron Smart Bridge
Note: If you are using the fan control and remote control with
another manufacturer’s bridge, please refer to that manufacturer’s
instructions for set-up.
Lutron
Lutron app
Without a smartphone or tablet (Bridge not required)
Warranty
For warranty information, please visit
www.casetawireless.com/warranty
P/N 0301910 REV A
Control
three ways
Add devices
• Pico remotes
• Dimmers
• Shades
• Switches
• Fan controls
Schedule
your lights or
fans
Connect
while away
3
Tag
2
3
4
Ground
Tag
1
1
Using your controls

OFF
ON
x2
Maintenez enfoncé
pendant 6 secondes
jusqu'à ce que les
DEL commencent
à clignoter
guide de démarrage rapide
Commande de ventilateur mural
Bienvenue—et merci d’avoir acheté une commande de
ventilateur murale Caséta Wireless. Afin de commander
votre ventilateur de plafond depuis une application ou une
télécommande, vous devrez remplacer un interrupteur
existant par une commande de ventilateur murale
Caséta Wireless.
Avant d’installer la commande de ventilateur, veuillez
lire le guide de démarrage rapide et visionner la vidéo
d’installation sur www.casetawireless.com/support
Nous espérons que vous apprécierez le confort de
Caséta Wireless!
REMARQUES IMPORTANTES
1. Utilisation à l’intérieur seulement.
2. Fonctionne entre 0°C (32°F) et 40°C (104°F).
3. Utilisez ce modèle pour commander un ventilateur
de plafond à pales.
4. Utilisez la chaînette de commande du ventilateur
pour le régler à sa vitesse maximale.
5. Ne l’utilisez pas pour commander les ventilateurs
d’évacuation (par exemple, les ventilateurs
d’évacuation de salles de bains ou de cuisine).
6. Ne l’utilisez pas pour commander des ventilateurs
à commandes de vitesse intégrées autres qu’une
chaînette de commande (c.à.d. les ventilateurs
ayant une commande distante), à moins que cette
commande intégrée soit retirée du ventilateur
de plafond.
7. Ne le connectez à aucun autre appareil motorisé ou
à aucun autre type de charge d'éclairage.
8. Ne l’utilisez pas pour contrôler les charges
d'éclairage sur un ventilateur.
9. Ne l’utilisez pas avec des ventilateurs motorisés à
courant continu.
Ventilateur—jusqu’à 1,5 A
Livré avec:
Doublez votre garantie
Commande de ventilateur mural (PD-FSQN)
120 V~ 50/60 Hz 1,5 A
Outils dont vous aurez besoin
Fonctionne avec un ventilateur
de plafond à pales:
Tournevis plat
Connecteurs de fils (3)
Tournevis Phillips
Pince
Vis (2)
Installer votre commande de ventilateur
Utiliser votre kit Caséta Wireless (vendu séparément)
Certains ventilateurs disposent d’un interrupteur
mural, tandis que d'autres disposent de deux
interrupteurs muraux ou plus. Nous avons inclus des
instructions pour les ventilateurs avec un interrupteur
mural (appelé unipolaire). Si votre ventilateur dispose
de plus d’un interrupteur (appelé va-et-vient), veuillez
consulter le site www.casetawireless.com/3way
pour des instructions d'installation complètes et des
vidéos explicatives.
AVERTISSEMENT : RISQUE
D’ÉLECTROCUTION.
Peut causer des blessures graves ou la mort.
Coupez l’alimentation au niveau du disjoncteur
ou du fusible avant l’installation.
1
Installer le ventilateur
2
Régler la vitesse du ventilateur
3
Couper l’alimentation au niveau
du disjoncteur!
Appuyer et maintenir le bouton « Off » de
la commande de ventilateur enfoncé
2
Appuyer et maintenir le bouton « Off »
enfoncé de la télécommande Pico
6
Raccorder la commande du ventilateur
7
Monter la commande du ventilateur
8
Attacher la plaque murale
9
Connecter l’alimentation au niveau
du disjoncteur
4
Retirer l’interrupteur existant du mur
Retirez la plaque murale de l’interrupteur.
Installez le ventilateur conformément aux instructions du
fabricant et assurez-vous du bon fonctionnement.
Réglez le ventilateur à la vitesse la plus élevée à l’aide
des chaînettes de commande.
5
Retirer les sections latérales
(si nécessaire)
Retirez l’interrupteur et tirez-le du mur.
* Si votre commutateur est connecté à plus de 3 fils, visionnez la
vidéo «Installation d’un Caséta Wireless dans une application
d’interrupteur va-et-vient» («Installing Caseta Wireless in a
3-way switch application») disponible sur
www.casetawireless.com/3way
Pliez d’avant
en arrière.
3
5
Étiquette
2
3
4
1
4
6
Masse
Masse
Masse
7
2
Placez l’étiquette sur le fil de charge.
Débranchez les trois fils* de l'interrupteur.
1 Raccordez le fil de cuivre dénudé (ou vert) «masse» du
boîtier d’encastrement au fil vert de la commande du
ventilateur à l’aide d’un connecteur de fils.
2 Enroulez le fil de ligne/sous tension autour de la borne à
vis. Serrez fermement à 0,55 N•m (5po-lb).
3 Raccordez le fil neutre du boîtier d’encastrement au
fil blanc de la commande de ventilateur à l’aide d’un
connecteur de fils.
4 Raccordez le fil de charge/étiqueté du boîtier
d’encastrement au fil jaune de la commande de
ventilateur à l’aide d’un connecteur de fils.
Ne pas retirer les sections latérales extérieures
des commandes à la fin du compartiment.
Chaque commande a
ses sections latérales
intérieures retirées.
La commande centrale
a toutes ses sections
latérales retirées.
Si vous utilisez une plaque murale Claro (vendue
séparément), attachez l’adaptateur à la commande
du ventilateur à l’aide des vis fournies et enclenchez la
plaque murale.
‘encliquetage’
Utilisez les vis fournies.
Associer la commande de ventilateur
et la télécommande Pico
Consultez www.casetawireless.com/support pour
d’autres suggestions de dépannage.
Symptômes Cause probable et action
Le ventilateur ne
s’allume pas et
aucun indicateur
lumineux ne
s’allume.
• Assurez-vous que la chaînette
de commande du ventilateur
est réglée sur le réglage le plus
haut possible.
• Les fils de charge et de
ligne peuvent être inversés.
Intervertissez les fils reliés au fil
jaune et à la borne à vis noire
de la commande du ventilateur.
Reportez-vous au schéma de
câblage à l’étape 6.
• Le fil neutre n’est pas raccordé.
Reportez-vous au schéma de
câblage à l’étape 6.
• L’interrupteur de service
accessible à l’avant (FASS) est
en position ARRÊT. Actionnez
l’interrupteur FASS en position
MARCHE.
• Le disjoncteur est ouvert ou
déclenché (ou un fusible a
grillé). Réinitialisez le disjoncteur
ou remplacez le fusible. Si la
condition persiste, contactez
l’assistance à la clientèle de
Lutron ou un électricien qualifié.
Le ventilateur ne
s’allume pas et
les indicateurs
lumineux
s’allument.
Le commutateur de direction
du ventilateur est réglé entre la
position avant et arrière. Réglez
le commutateur dans la position
souhaitée.
La vitesse du
ventilateur est
trop basse.
Réglez la vitesse de la chaînette
de commande du ventilateur en
position haute.
Vous aimez les commande Caséta Wireless? Vous avez
des idées pour les améliorer? Dites-nous ce que vous
pensez et nous prolongerons votre garantie d’un an.
www.casetawireless.com/register
Pour découvrir des fonctions avancées, des conseils pour utiliser les produits Caséta Wireless, la gamme complète des produits
Caséta Wireless et plus, veuillez consulter www.casetawireless.com/features
Modifier le réglage favori de la
télécommande Pico (vendues
séparément) ou de la commande
du ventilateur
Le bouton rond «favori» (favorite) sur la
télécommande Pico ou la commande de
ventilateur peut être utilisé pour le rappel
des vitesses favorites. La télécommande
Pico et la commande de ventilateur peuvent
avoir des vitesses favorites différentes. Le
réglage par défaut est la vitesse Moyenne,
mais il peut être changé pour n’importe
quelle vitesse.
Favori
ATTENTION
À n’utiliser qu’avec des ventilateurs de plafond installés
de façon permanente. Pour éviter toute surchauffe et
d’endommager d’autres équipements, n’utilisez pas
ce produit pour commander des prises, des appareils
motorisés ou des appareils alimentés par transformateur.
Codes
Effectuez l’installation en conformité avec les codes
électriques en vigueur.
Mise à la terre
En l’absence de «moyens de mise à la terre» existant
dans le boîtier d’encastrement, le National Electrical
Code (NEC®) autorise l’installation d’une commande
en remplacement si 1) une façade non métallique et
incombustible est utilisée avec des vis de fixation non
métalliques ou 2) le circuit est protégé par un disjoncteur
différentiel de fuite à la terre (DDFT). Lors de l’installation
d’une commande selon ces méthodes, capuchonnez
ou retirez le fil vert avant de visser la commande dans le
boîtier d’encastrement.
Informations FCC/ IC
Cet appareil est conforme à la partie 15 des règles du FCC et aux normes
industrielles RSS d’exemption de licence du Canada. Le fonctionnement est sous
réserve des deux conditions suivantes: (1) Cet appareil ne doit pas provoquer
d’interférences, et (2) cet appareil ne doit accepter aucune interférence, y compris
des interférences qui pourraient provoquer un fonctionnement indésirable. Les
modifications qui n’ont pas été expressément approuvées par Lutron Electronics
Co., Inc. peuvent annuler le pouvoir de l’utilisateur d’utiliser cet équipement.
Remarque: Cet équipement a été testé et est conforme aux limites d’un appareil
numérique de Classe B en vertu de la partie 15 des règles de la FCC. Ces limites
sont conçues pour fournir une protection raisonnable face aux interférences nuisibles
dans une installation résidentielle. Cet équipement génère, utilise et peut émettre
une énergie de fréquence radio et, s’il n’est pas installé et utilisé conformément aux
instructions, il peut provoquer des interférences nuisibles aux communications radio.
Cependant, il n’y a aucune garantie que des interférences ne surviendront dans
une installation particulière. Si cet équipement provoque des interférences nuisibles
pour la réception radio et télévisuelle, ce qui peut être déterminé en allumant et en
éteignant l’équipement, il est recommandé que l’utilisateur tente de corriger ces
interférences en utilisant une ou plusieurs des mesures suivantes :
—Réorientez ou repositionnez l’antenne réceptrice.
—Augmentez la séparation entre l’équipement et le récepteur.
— Connectez l’équipement à une prise électrique se trouvant sur un circuit différent
de celui où le récepteur est connecté.
—Demandez l’aide du vendeur ou d’un technicien radio/TV expérimenté.
)Lutron Lutron, Caséta,
Lutron
et Pico sont des marques commerciales de
Lutron Electronics Co., Inc., enregistrées aux États-Unis et dans d’autres
pays. FASS et Smart Bridge sont des marques déposées de Lutron
Electronics Co., Inc. NEC est une marque déposée de la National Fire
Protection Association de Quincy, Massachusetts. Google et le logo Google
sont des marques déposées de Google Inc., utilisées avec permission. Apple
est une marque commerciale de Apple Inc., enregistrée aux États-Unis et
dans d’autres pays. App Store est une marque de service de Apple Inc.
© 2018-2019 Lutron Electronics Co., Inc
N
o
de pièce 0301910 Rév. A
Lutron Electronics Co., Inc.
7200 Suter Road
Coopersburg, PA 18036-1299, États-Unis
1
2
1
2
Maintenez le bouton favori
de la télécommande ou de la
commande enfoncé pendant
6 secondes jusqu'à ce que les
DEL clignotent deux fois sur la
commande murale du ventilateur.
Le nouveau niveau favori est
maintenant enregistré.
3
Régler la vitesse du ventilateur souhaité
sur la commande du ventilateur
4
Appuyez
et
maintenez
le bouton
«favori» enfoncé
Remarque importante :
Dépannage
Maintenez-le enfoncé
pendant 6 secondes
jusqu'à ce que les DEL
de la commande du
ventilateur clignotent en
cascade.
Répétez les étapes pour associer
d'autres télécommandes Pico.
Wireless
Télécommande Pico (vendue séparément)
Vitesse haute
Désactivé
Plus lent
Plus rapide
Favori
FASS
Interrupteur de
service accessible à
l’avant
Avis important : Pour effectuer l’entretien et le nettoyage
du ventilateur, coupez l’alimentation en tirant le FASS
dans la mesure du possible. Pour restaurer l’alimentation
une fois l’entretien de la charge terminé, repoussez
l’interrupteur FASS entièrement.
Commande
de ventilateur
mural
Vitesse haute
Désactivé
Plus lent
Favori
Plus rapide
Avec un smartphone ou une tablette
(Bridge requis, vendu séparément)
1
2
L’application Lutron vous aidera à
configurer vos appareils.
Téléchargez l’application Lutron
www.casetawireless.com/LutronApp
Lancez l’application Lutron
Lutron
La commande de ventilateur Caséta Wireless peut être contrôlée à
partir d’un smartphone lorsqu’elle est utilisée avec le Smart Bridge
de Lutron.
Si vous utilisez la commande de ventilateur et la télécommande avec le
Smart Bridge de Lutron, suivez les instructions ci-dessous.
Recherchez «Lutron Caseta»
3
Utilisez l’application Lutron pour effectuer TOUTES les étapes restantes
Lutron
Smart Bridge de Lutron
Remarque: Si vous utilisez la commande de ventilateur et la
télécommande avec le Bridge d’un autre fabricant, veuillez vous
reporter aux instructions de ce fabricant pour la configuration.
Lutron
Application
Lutron
Sans smartphone ou tablette (Bridge non requis)
Garantie
Pour des renseignements sur la garantie, veuillez
consulter www.casetawireless.com/warranty
N
o
de pièce
0301910 Rév. A
Commandez
de 3 façons
Ajouter appareils
• Télécommandes
Pico
• Gradateurs
• Stores
• Interrupteurs
• Commandes de
ventilateur
Programmez
vos lumières
ou ventilateurs
Connectez-
vous
à distance
3
Étiquette
Étiquette
1
1
Utiliser vos commandes