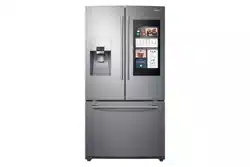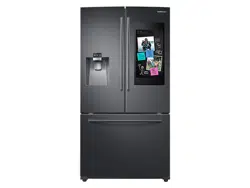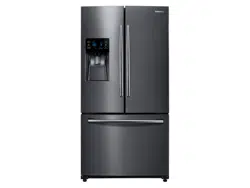
imagine the possibilities
RF263TE****
RF263BE****
Free Standing Appliance
English
Refrigerator
user manual
Thank you for purchasing this Samsung product.
DA68-02601A-16.indb 1 2018. 10. 8. 오후 4:31
2_ Safety information
safety information
SAFETY INFORMATION
• Before using your new Samsung Refrigerator,
please read this manual thoroughly to ensure
that you know how to operate the features and
functions that your new appliance oers safely
and eciently.
• This appliance is not intended for use by
persons (including children) with reduced
physical, sensory or mental capabilities, or
lack of experience and knowledge, unless they
have been given supervision or instruction
concerning use of the appliance by a person
responsible for their safety. Children should be
supervised to ensure that they do not play with
the appliance.
• Because the following instructions cover
various models, the characteristics of your
refrigerator may dier slightly from the
refrigerator described in this manual.
• If you have any question, contact us at
1-800-SAMSUNG or find help and information
online at www.samsung.com.
• R-600a or R-134a is used as a refrigerant.
Check the compressor label on the rear of
the appliance or the rating label inside the
fridge to see which refrigerant is used for your
refrigerator. If this product contains flammable
gas (Refrigerant R-600a), contact your local
authority in regard to safe disposal of this
product.
• It is hazardous for anyone other than an
Authorized Service Person to service this
appliance.
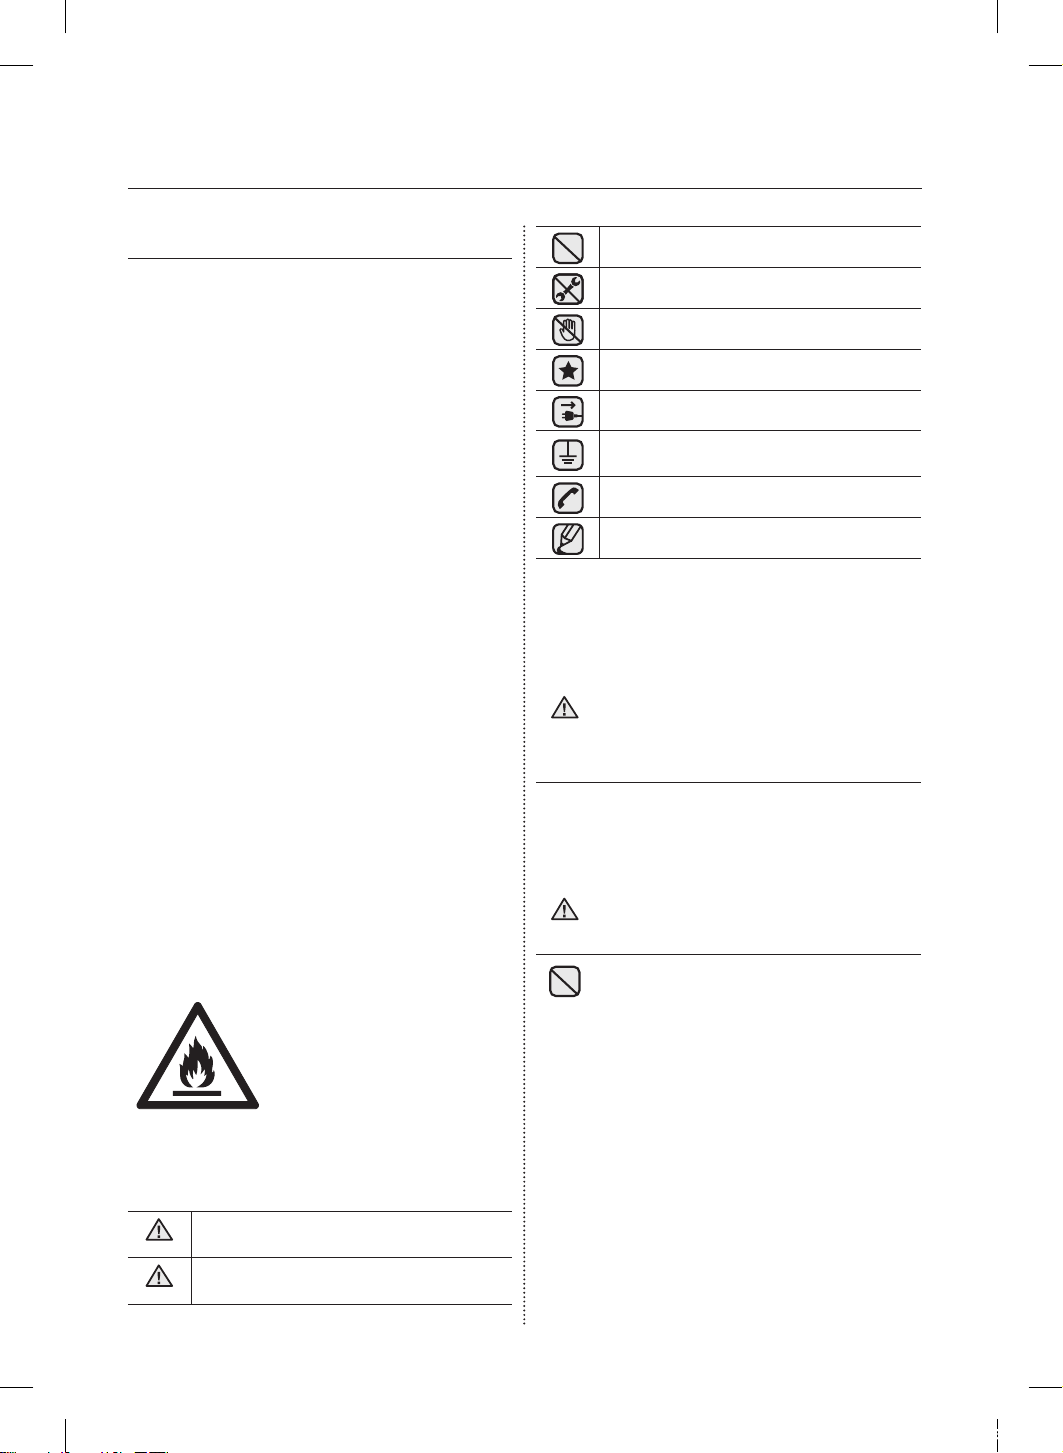
Warning :
Risk of fire
/ flammable
materials
Important safety symbols and
precautions:
WARNING
Hazards or unsafe practices that may result in
severe personal injury or death.
CAUTION
Hazards or unsafe practices that may result in
minor personal injury or property damage.
Do NOT attempt.
Do NOT disassemble.
Do NOT touch.
Follow directions carefully.
Unplug the power plug from the wall socket.
Make sure the refrigerator is grounded
to prevent electric shock.
Call the contact center for help.
Note.
These warning signs are here to prevent
injury to you and others.
Please follow them carefully.
After reading this section, keep it in a safe
place for future reference.
STATE OF CALIFORNIA
PROPOSITION 65
WARNING
• Cancer and Reproductive Harm - www.
P65Warnings.ca.gov.
SEVERE WARNING SIGNS
FOR INSTALLATION
• Do not install the refrigerator in a damp
place or place where it may come in
contact with water.
- Deteriorated insulation of electrical parts may
cause an electric shock or fire.
• Do not place this refrigerator in direct sunlight
or expose to the heat from stoves, room
heaters or other appliance.
• Do not plug several appliances into the same
multiple power strip. The refrigerator should
always be plugged into its own individual
electrical outlet which has a voltage rating that
matches the voltage listed on the refrigerator’s
rating plate.
- This provides the best performance and
also prevents overloading house wiring
WARNING
WARNING
DA68-02601A-16.indb 2 2018. 10. 8. 오후 4:31
Safety information _3
circuits, which could cause a fire hazard from
overheated wires.
• If the wall socket is loose, do not insert the
power plug.
- There is a risk of electric shock of fire.
• Do not use a cord that shows cracks or
abrasion damage along its length or at either
end.
• Do not bend the power cord excessively or
place heavy articles on it.
- Do not pull or excessively bend the power
cord.
• Do not twist or tie the power cord.
• Do not hook the power cord over a metal
object, place a heavy object on the power
cord, insert the power cord between objects,
or push the power cord into the space behind
the appliance.
- When moving the refrigerator, be careful not to
roll over or damage the power cord.
- This may result in an electric shock or fire.
• This appliance should be positioned in such a
way that it is accessible to the power plug.
- Failing to do so may result in an electric shock
or fire due to electric leakage.
• Keep ventilation opening in the appliance
enclosure or mounting structure clear of
obstruction.
• Do not attempt to repair, disassemble, or
modify the appliance yourself.
- Do not use any fuse(such as cooper, steel
wire, etc.) other than the standard fuse.
- hen repairing or reinstalling the appliance is
required, contact your nearest service center.
- Failing to do so may result in an electric shock,
fire, problems with the product, or injury.
• To get the best energy eciency of this
product, please leave all selves, drawers and
baskets on their original position like as above
illustration.
• Never unplug your refrigerator by pulling on the
power cord. Always grip plug firmly and pull
straight out from the outlet.
- Damage to the cord may cause a short-circuit,
fire and/or electric shock.
• Do not use aerosols near the refrigerator.
- Aerosols used near the refrigerator may cause
an explosion or fire.
• Do not install this appliance near a heater,
inflammable material.
• Do not install this appliance in a humid, oily or
dusty location, in a location exposed to direct
sunlight and water (rain drops).
• Do not install this appliance in a location where
gas may leak.
- This may result in an electric shock or fire.
• This refrigerator must be properly
installed and located in accordance
with the manual before you use it.
• Connect the power plug in the proper position
with the cord hanging down.
- If you connect the power plug upside down,
the wire can get cut o and cause a fire or
electric shock.
• When moving the refrigerator, be careful not to
roll over or damage the power cord.
- This constitutes a fire hazard.
• Make sure that the power plug is not
squashed or damaged by the back of the
refrigerator.
• Keep the packing materials out of reach of
children.
- There is a risk of death from suocation if a
child puts the packing materials on his or her
head.
• The appliance must be positioned so that the
plug is accessible after installation.
• You need to remove all the protective plastic
film before you initially plug the product in.
• The refrigerator must be safely
grounded.
- Always make sure that you have grounded the
refrigerator before attempting to investigate
or repair any part of the appliance. Power
leakages can cause severe electric shock.
• Never use gas pipes, telephone lines or other
potential lightning attractors as an electrical
ground.
- Improper use of the grounding plug can result
in a risk of electric shock. If it is necessary
to use an extension cord, use only a 3-wire
extension cord that has a 3-blade grounding
plug and a 3-slot receptacle that will accept
the plug on the appliance. The marked rating
of the extension cord should be AC115-
120 V, 10 A, or more. If a grounding adapter
is used, make sure the receptacle box is fully
grounded.
• If the power cord is damaged,
have it replaced immediately by the
manufacturer or its service agent.
• The wall socket must be easily accessible so
that the appliance can be quickly disconnected
from the wall socket in an emergency.
• It must be outside the area of the rear of the
appliance.
DA68-02601A-16.indb 3 2018. 10. 8. 오후 4:31
4_ Safety information
• When positioning the appliance, ensure the
power cord is not trapped or damaged.
• Do not locate multiple portable socket-outlets
or portable power supplies at the rear of the
appliance.
• Do not store explosive substances such as
aerosol cans with a flammable propellant in
this appliance.
INSTALLATION CAUTIONS
• Allow sucient space to install the
refrigerator on a flat surface.
- If your refrigerator is not level, the internal
cooling system may not work correctly.
• Keep the ventilation space in the appliance
enclosure or mounting structure clear of
obstruction.
• Allow the appliance to stand for 2 hours after
installation.
• We recommend you have installed this
refrigerator by a qualified technician or service
company.
- Failing to do so may result in an electric shock,
fire, explosion, problems with the product, or
injury.
• This appliance must be properly grounded.
• Do not ground the appliance to a gas pipe,
plastic water pipe, or telephone line.
- You must ground the refrigerator to prevent
any power leakages or electric shocks caused
by current leakage from the refrigerator.
- This may result in an electric shock, fire,
explosion, or problems with the product.
- Never plug the power cord into a socket that is
not grounded correctly and make sure that it is
in accordance with local and national codes.
• Plug the power plug into the wall socket firmly.
Do not use a damaged power plug, damaged
power cord or loose wall socket.
- This may result in an electric shock or fire.
• The installation or any service of this appliance
is recommended by a qualified technician or
service company.
• Failing to do so may result in an electric shock,
fire, explosion, problems with the product, or
injury.
• Do not touch the power plug with wet hands.
- This may result in an electric shock.
• Do not store articles on the top of the
appliance.
• When you open or close the door, the articles
may fall and cause personal injury and/or
material damage.
• Do not use or place any substances sensitive
CAUTION
to temperature such as inflammable sprays,
inflammable objects, dry ice, medicine, or
chemicals near or inside of the refrigerator.
• Do not keep volatile or inflammable objects or
substances (benzene, thinner, propane gas,
alcohol, ether, LP gas and other such products
etc.) in the refrigerator.
- This refrigerator is for storing food only.
- This may result in fire or explosion.
• If you smell pharmaceutical or smoke, pull
out power plug immediately and contact your
Samsung Electronics service center
CRITICAL USAGE
WARNINGS
• Do not insert the power plug with wet
hands.
• Do not store articles on the top of the
appliance.
- When you open or close the door, the articles
may fall and cause personal injury and/or
material damage.
• Do not put a container filled with water on the
refrigerator.
- If spilled, there is a risk of fire or electric shock.
• Children should be supervised to ensure that
they do not play with the appliance.
- Keep fingers out of “pinch point” areas;
clearances between the doors and cabinet are
necessarily small. Be careful when you open
the doors when children are in the area.
• Do not let children hang on the door. A serious
injury may occur.
• Do not let children go inside the refrigerator.
Children could become trapped.
• Do not insert your hands into the bottom area
under the appliance.
- Any sharp edges may cause personal injury.
• Do not let children step on a drawer’s cover.
- The drawer may break and cause them to slip.
• Do not overfill the refrigerator with food.
- When you open the door, an item may fall out
and cause personal injury or material damage.
• Do not touch the inside walls of the freezer or
products stored in the freezer with wet hands.
- This may cause frostbite.
• Never put fingers or other objects into the
water dispenser hole, ice chute, or ice maker
bucket.
- It may cause personal injury or material
damage.
WARNING
DA68-02601A-16.indb 4 2018. 10. 8. 오후 4:31
Safety information _5
• Do not spray flammable gas near the
refrigerator.
- There is a risk of explosion or fire.
• Do not store volatile or flammable substances
in the refrigerator.
- The storage of benzene, thinner, alcohol, ether,
LP gas and other such products may cause
explosions.
• Do not store pharmaceuticals products,
scientific materials, or temperature sensitive
products in the refrigerator.
- Products that require strict temperature
controls must not be stored in the refrigerator.
• Do not place or use an electrical appliance
inside the refrigerator, unless it is of a type
recommended by the manufacturer. Do not
stand on top of the appliance or place objects
(such as laundry, lighted candles, lighted
cigarettes, dishes, chemicals, metal objects,
etc.) on the appliance. This may result in an
electric shock, fire, problems with the product,
or injury. Do not put a container filled with
water on the appliance.
- If spilled, there is a risk of fire or electric shock.
• Do not use mechanical devices or any other
means to accelerate the defrosting process,
other than those recommended by the
manufacturer.
• Do not damage the refrigerant circuit.
• Do not spray volatile material such as
insecticide onto the surface of the appliance.
- As well as being harmful to humans, it may
also result in an electric shock, fire or problems
with the product.
• Never stare directly at the UV LED lamp for
long periods of time.
- This may result in eye strain due to the
ultraviolet rays.
• Do not disassemble or repair the
refrigerator by yourself.
- You run risk of causing a fire, malfunction and/
or personal injury.
- When the interior or exterior LED lamp has
gone out, please contact your service agents.
• Children should be supervised to
ensure that they do not play with the
appliance.
- Keep fingers out of “pinch point” areas :
clearances between the doors and cabinet are
necessarily small. Be careful when you open
the doors when children are in the area. Do not
let children hang on the door. If not, a serious
injury may occur. Risk of children entrapment.
Do not let children enter inside the refrigerator.
• Bottles should be stored tightly together so
that they do not fall out.
• This product is intended only for the storage of
food in a domestic environment.
• If a gas leak is detected, avoid any naked
flames or potential sources of ignition and air
the room in which the appliance is standing for
several minutes.
- Do not touch the appliance or power cord.
- Do not use a ventilating fan.
- A spark may result in explosion or fire.
• If the products is equipped with the LED
Lamp, do not disassemble Lamp Cover and
LED Lamp by yourself.
- Please contact your service agent.
• Use only the LED Lamps provided by
manufacturer or service agent.
a) Allow the appliance to stand for 2 hours after
installation.
b) To get Best performance from the product,
1) Do not place foods too closely in front of
the vents at the rear of the appliance as it
can obstruct free air circulation in the freezer
compartment.
2) Wrap the food up properly or place it in
airtight containers before putting it into the
fridge or freezer.
3) Do not put any newly introduced food for
freezing near to already existing food.
c) Do not place glass or bottles or carbonated
beverages into the freezer.
- The container may freeze and break, and this
may result in injury.
d) Please observe maximum storage times and
expiry dates of frozen goods.
e) There is no need to disconnect the refrigerator
from the power supply if you will be away for
less than three weeks. But, Remove all the food
if you are going away for the three weeks or
more. Unplug the refrigerator and clean it, rinse
and dry.
• Remove all foreign substances such as dust
or water from the power plug terminals and
contact points using a dry cloth on a regular
basis.
- Unplug the power plug and clean it with a dry
cloth.
- Failing to do so may result in an electric shock
or fire.
• Before cleaning or performing maintenance,
unplug the appliance from the wall socket.
- Failing to do so may result in an electric shock
or fire.
DA68-02601A-16.indb 5 2018. 10. 8. 오후 4:31
6_ Safety information
• If there are burning smells or smoke,
pull out power plug immediately and
contact your Samsung Electronics
service center.
• If you experience diculty when changing the
light, contact a service agent.
• If the product is equipped with LED Lamps,
do not disassemble the Lamp Cover and LED
Lamp by yourself.
- Please contact your service agents.
• If any dust or water is in refrigerator, pull out
the power plug and contact your Samsung
Electronics service center.
- Otherwise there is a risk of fire.
USAGE CAUTIONS
• Do not re-freeze frozen foods that
have thawed completely. Do not place
carbonated or fizzy drinks in the freezer
compartment. Do not put bottles or
glass containers in the freezer.
- When the contents freeze, the glass may break
and cause personal injury.
• Use only the ice maker provided with
the refrigerator. The water supply to this
refrigerator must only be installed/connected
by a suitably qualified person and connected
to a potable water supply only. In order to
operate the ice maker properly, water pressure
of 20 ~ 125 psi is required. If you have a long
vacation or business trip and won’t use water
or ice dispensers, close the water valve.
- Otherwise, water leakage may occur.
• Wipe excess moisture from the inside and
leave the doors open.
- Otherwise, odor and mold may develop.
• Service warranty and Modification.
- Any changes or modifications performed by
a 3rd party on this finished appliance are not
covered under Samsung warranty service, nor
can Samsung be responsible for safety issues
that result from 3rd party modifications.
• Do not block air holes.
- If the air holes are blocked, especially with
a plastic bag, the refrigerator can be over
cooled. If this cooling period lasts too long,
the water filter may break and cause water
leakage.
• If the refrigerator is disconnected from the
power supply, you should wait for at least five
minutes before plugging it back in.
CAUTION
• If you have a long vacation planned or the
refrigerator is not to be used for a long period
of time, you must empty the refrigerator and
pull out the power plug.
- Letting the refrigerator run for a long time
without using it can cause the insulation to
deteriorate and may cause a fire.
- Wipe excess moisture from the inside and
leave the doors open. Otherwise, odor and
mold may develop.
• To get the best performance from the product:
- Do not place foods too close to the vents at
the rear of the appliance as it can obstruct free
air circulation in the refrigerator compartment.
- Wrap food up properly or place it in airtight
containers before putting it into the refrigerator.
• Fill the water tank, ice tray, and water cubes
only with potable water.
• If the product is flooded, make sure to
contact your nearest service center.
- There is a risk of electric shock or fire.
• Do not keep vegetable oil in your refrigerator’s
door bins. The oil can solidify, making it foul-
tasting and dicult to use. In addition, the
open container can leak and the leaked oil can
cause the door bin to crack. After opening an
oil container, it is best to keep the container in
a cool and shaded place such as a cupboard
or pantry.
- Examples of vegetable oil: olive oil, corn oil,
grape-seed oil, etc.
CLEANING CAUTIONS
• Do not directly spray water on the
inside or outside the refrigerator.
- There is a risk of fire or electric shock.
• Do not use a hair dryer to dry the inside of the
refrigerator. Do not place a lighted candle in
the refrigerator to remove bad odors.
- This may result in an electric shock or fire.
• Remove any foreign matter or dust
from the power plug pins. Do not use
a wet or damp cloth when cleaning
the plug.
- Otherwise, there is a risk of fire or electric
shock.
• Unplug the refrigerator before cleaning
or making repairs.
CAUTION
DA68-02601A-16.indb 6 2018. 10. 8. 오후 4:31
Safety information _7
• Use a clean sponge or soft cloth and a
mild detergent in warm water to clean the
refrigerator.
• Do not use abrasive or harsh cleansers
such as window sprays, scouring cleansers,
flammable fluids, muriatic acid, cleaning
waxes, concentrated detergents, bleaches, or
cleansers containing petroleum products on
exterior surfaces (doors and cabinet), plastic
parts, door and interior liners, and gaskets.
- These can scratch or damage the material.
• Do not clean glass shelves or covers with
warm water when they are cold. Glass shelves
and covers may break if exposed to sudden
temperature changes or impacts such as
bumping or dropping.
CRITICAL DISPOSAL
WARNINGS
• Risk of child entrapment. Before you
throw away your old refrigerator or
freezer:
- Take o the doors.
- Leave the shelves in place so that children may
not easily climb inside.
Please dispose of the packaging material from
this product in an environmentally friendly
manner.
• Leave the shelves in place so that children
can not easily climb inside. Ensure that none
of the pipes on the back of the appliance are
damaged prior to disposal.
• R600a or R134a is used as a refrigerant.
• Check the compressor label on the rear of
the appliance or the rating label inside the
fridge to see which refrigerant is used for your
refrigerator. If this product contains flammable
gas (Refrigerant R600a), contact your local
authority in regard to safe disposal of this
product.
WARNING
• When disposing of this refrigerator, remove
the door/door seals and door latch so that
small children or animals cannot become
trapped inside. Children should be supervised
to ensure that they do not play with the
appliance.
• Cyclopentane is used in the insulation. The
gases in the insulation material require a
special disposal procedure. Please contact
your local authorities in regard to the
environmentally safe disposal of this product.
Ensure that none of the pipes on the back of
the refrigerator are damaged prior to disposal.
• When you use this function the energy
consumption of the refrigerator will increase.
• Remember to turn it o when you don’t
need it and return the freezer to your original
temperature setting.
power freezing
• If you need to freeze large amount of food
stu, activate Power Freeze function at least
24 hours before.
• Never put fingers or other objects into the
dispenser hole, ice chute and ice maker
bucket.
- It may cause a personal injury or material
damage.
THIS APPLIANCE IS INTENDED
TO BE USED IN HOUSEHOLD
AND SIMILAR APPLICATIONS
SUCH AS
• sta kitchen areas in shops, oces and other
working environments;
• farm houses and by clients in hotels, motels
and other residential type environments;
• bed and breakfast type environments;
• catering and similar non-retail applications.
contents
SETTING UP YOUR FRENCH DOOR REFRIGERATOR ………………………………… 08
OPERATING YOUR FRENCH DOOR REFRIGERATOR …………………………………… 16
TROUBLESHOOTING ………………………………………………………………………… 28
DA68-02601A-16.indb 7 2018. 10. 8. 오후 4:31
8_ setting up
Setting up your French Door
Refrigerator
GETTING READY TO INSTALL
THE REFRIGERATOR
Congratulations on your purchase of this Samsung
French Door Refrigerator.
We hope you enjoy the state-of-art features and
eciencies that this new appliance oers.
Selecting the best location for the refrigerator
Choose:
• A location with easy access to a water supply.
• A location without direct exposure to sunlight.
• A location with a level floor.
• A location with enough space for the
refrigerator doors to open easily.
• A location that allows sucient space to the
right, left, back and top for air circulation.
• A location that allows you to move the
refrigerator easily if it needs maintenance or
service.
• Do not install the refrigerator where the
temperature will go below 50 ºF (10 ºC).
• Do not locate the refrigerator where it may
become wet.
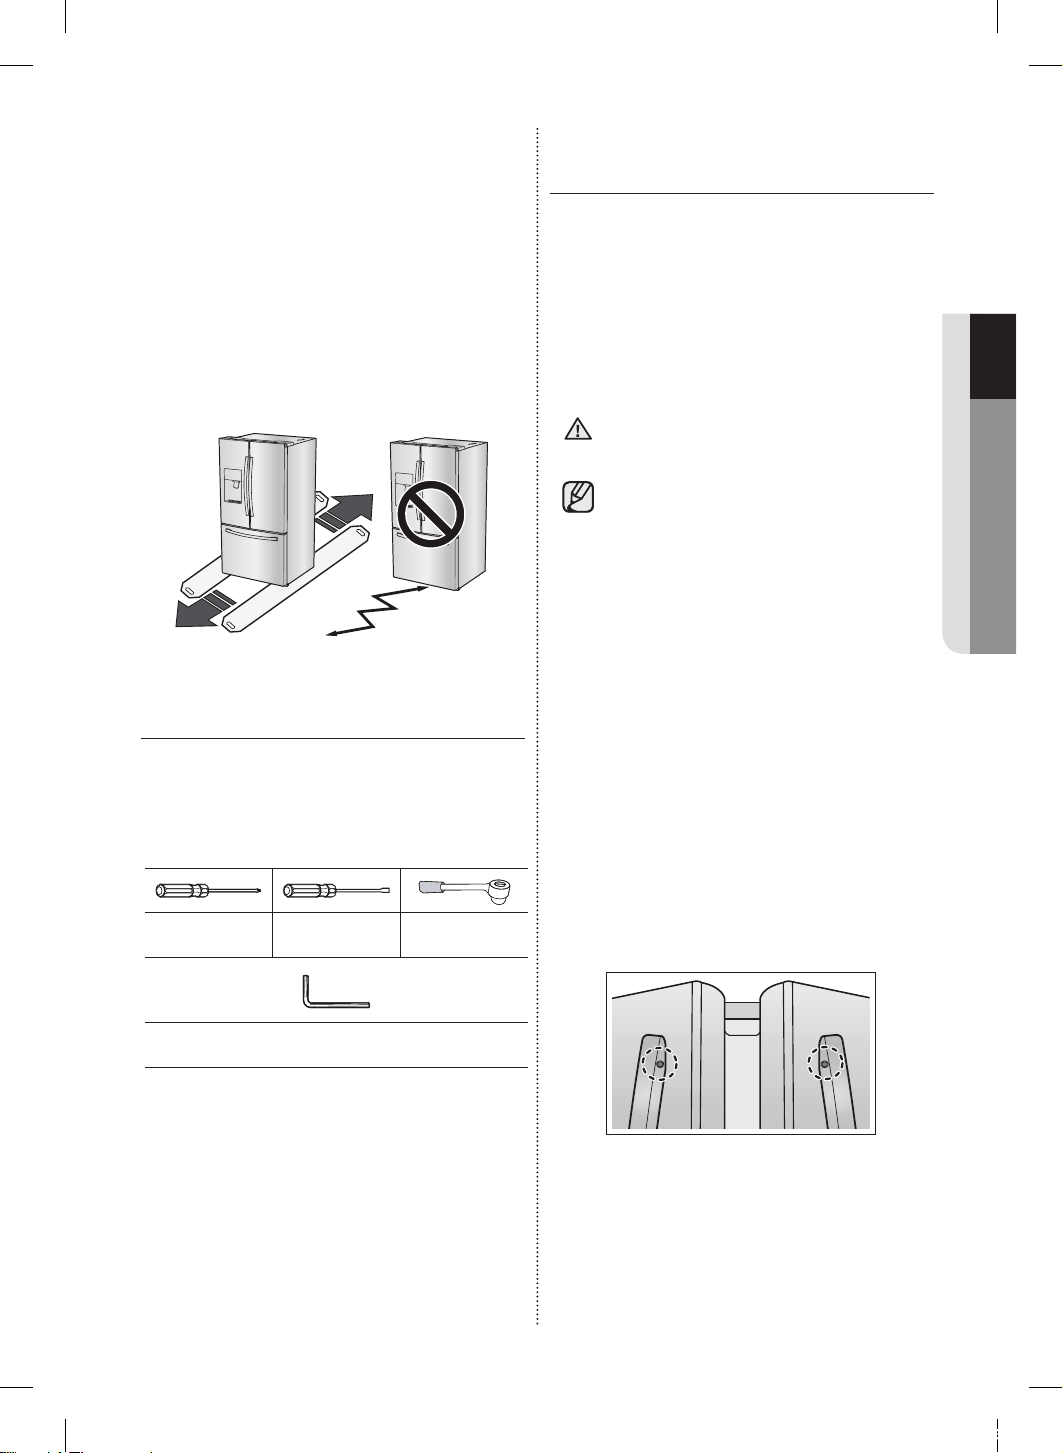
When moving your refrigerator
To prevent floor damage, be sure the
front adjusting legs are in the up position
(above the floor). Refer to ‘Adjusting the
Level’ in the manual (on page 12).
Flat-blade screw
driver(-)
Control Lever
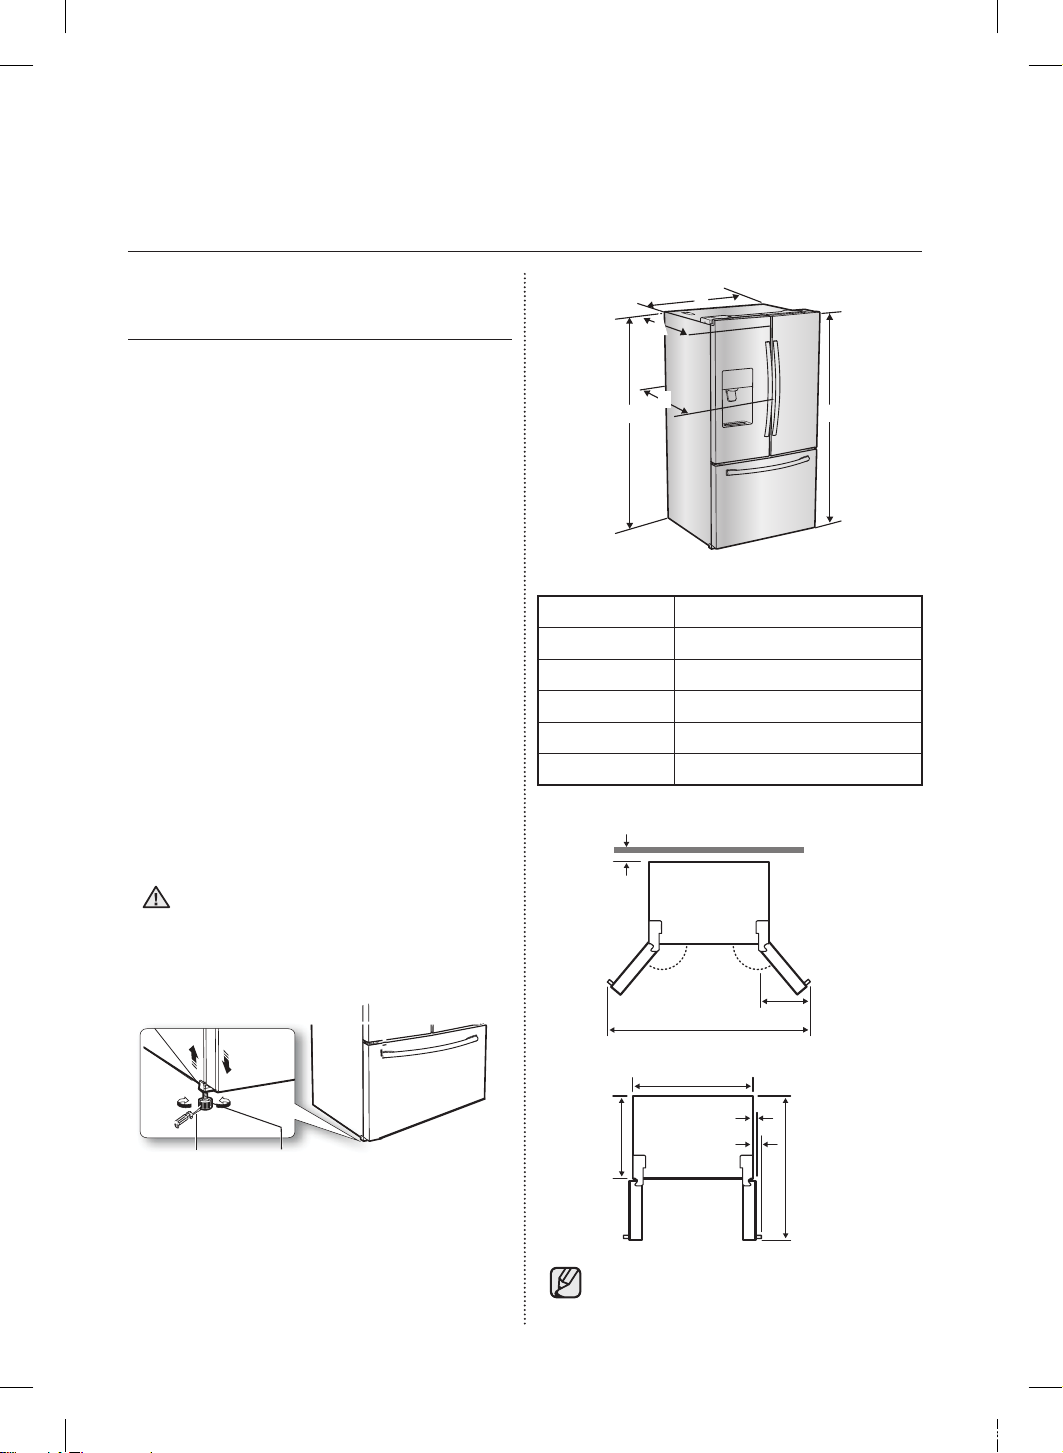
CAUTION
B
A
C
E
D
B
A
C
E
D
Model RF263T**/ RF263B**
Depth “A” 33 1/2” (850mm)
Width “B” 35 3/4” (909mm)
Height “C” 68 3/8” (1737mm)
Overall Height “D” 70” (1778mm)
Depth “E” 35 3/4” (910mm)
63 3/4
”
(1620 mm)
13 3/8”
(340 mm)
140° 140°
2”
(50 mm)
35 3/4”
(909 mm)
29 1/4”
(745 mm)
48 ”
(1220 mm)
1 5/8”
(40 mm)
3 3/4”
(95 mm)
• The measurements here are based on
the design dimension, which may dier
depending on the measuring method.
DA68-02601A-16.indb 8 2018. 10. 8. 오후 4:31
setting up _9
01 SETTING UP
FLOORING
For proper installation, you must place this
refrigerator on a level, hard surface that is the
same height as the rest of the floor. This surface
should be strong enough to support a fully loaded
refrigerator, or approximately 335lbs (152kg).
To protect the finish of the flooring, cut a large
section of the cardboard carton and place it under
the refrigerator where you are working. When
moving the refrigerator, you need to pull and push
it straight forwards or back. Do not wiggle it from
side to side.
REQUIRED TOOLS
Required Tools (Not provided)
You need the following tools to complete the
installation of your refrigerator:
Philips
screwdriver(+)
Flat-blade screw
driver(-)
Socket wrench
(10mm)
Allen wrench
(3/16”) (5mm)
REMOVING THE REFRIGERATOR
DOORS
For some installations you need to remove the
fridge and freezer drawers so you can move the
refrigerator to its final location. Do not remove
the doors/drawer if you don’t need to. If you do
not need to remove the refrigerator doors, go to
Adjusting the Level on page 12. If you need to
remove the doors. continue below.
Before removing the door/drawer, make sure you
read the following items:
Disconnect power to the refrigerator
before removing the door or drawer.
• Be careful not to drop, damage or
scratch the door/drawer while removing
them.
• Use care when you remove the doors/drawer.
The doors are heavy and you could injure
yourself.
• Reattach the doors/drawer properly to avoid:
- Moisture from air leakage.
- Uneven door alignment.
- Wasting energy due to improper door seal.
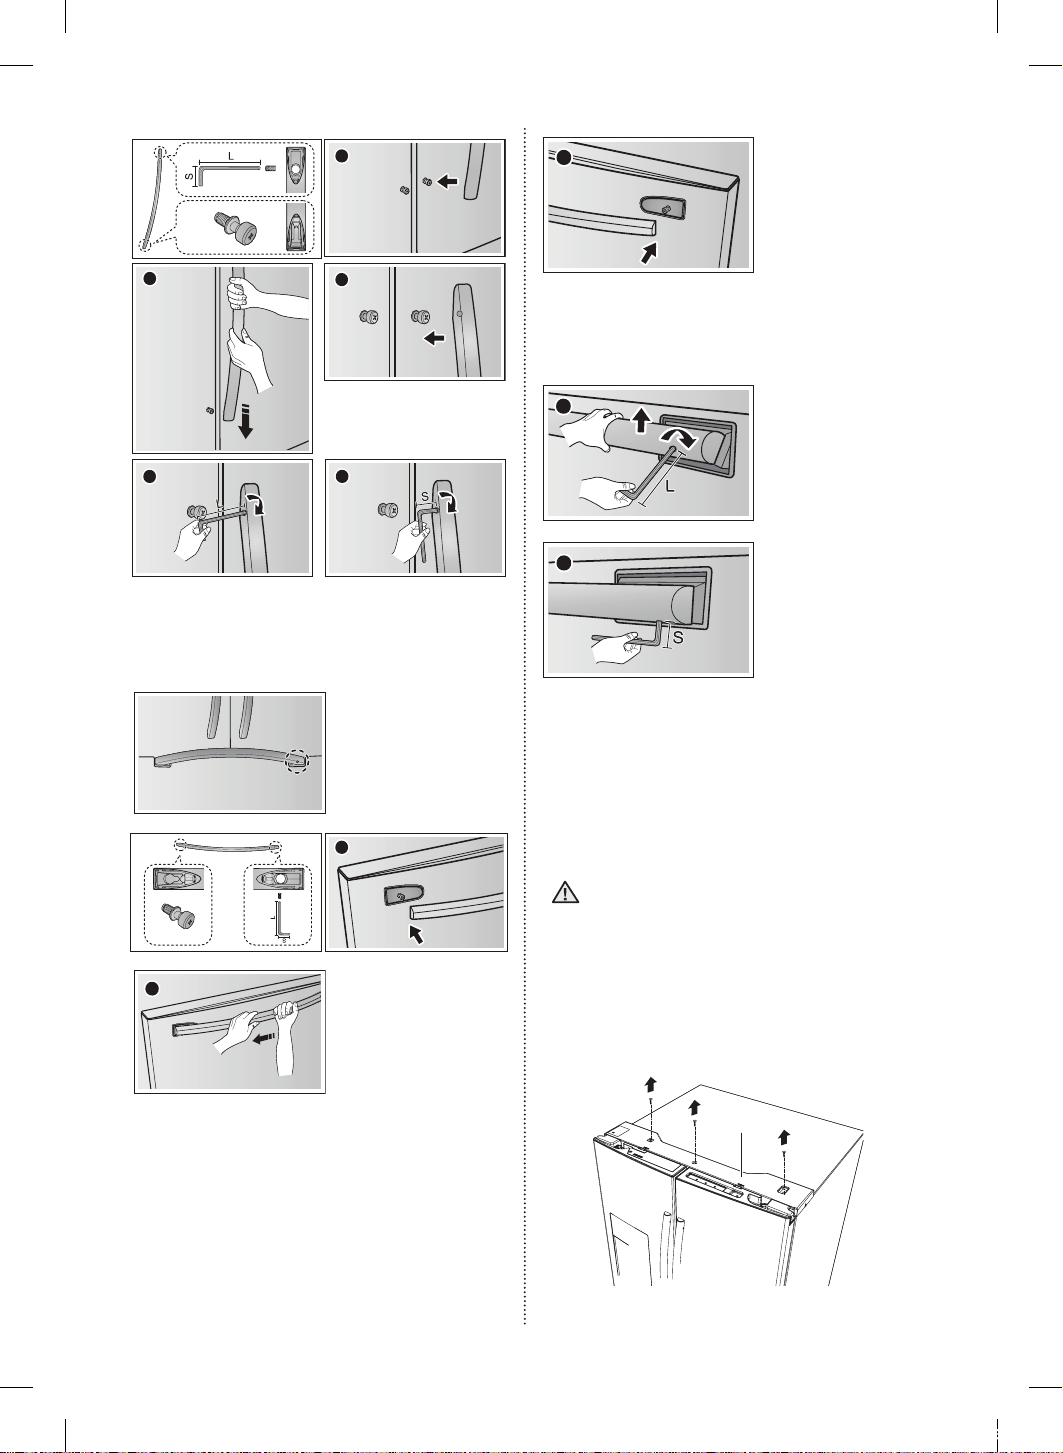
HOW TO ASSEMBLE THE HANDLE
Orient each handle so that the end with the sticker
attached is at the top and the holes with the
tightening screws are facing each other.
Then, follow the directions below to install each
handle.
By using Phillips screwdriver, fix the screw
(optional) and then put the handle on the fixer by
sliding them down firmly.
WARNING
DA68-02601A-16.indb 9 2018. 10. 8. 오후 4:31
10_ setting up
2
1
3
5
4
Fix the handles to the doors
by sliding them down firmly.
Screw
Tighten with wrench firmly
Drawer door handle assembly
Check the direction of
Handle assembly.
1
2
Fix the handles to the
doors by sliding them
side firmly.
3
Fix the handles to the doors by sliding them left
side firmly.
4
5
Tilt up the Handle bar and tighten with wrench
firmly.
Disassembling the refrigerator doors
Be careful not to drop and scratch the
doors while removing them.
With the door opened
1. Remove 3 screws holding down the TOP
TABLE ( 1 ) and turn it with wires connected.
( 1 )
WARNING
DA68-02601A-16.indb 10 2018. 10. 8. 오후 4:31
setting up _11
01 SETTING UP
2. Disconnect two connectors ( 2 ) on the left
side door. To remove the water coupler from
the hinge, twist and pull it from the hinge.
Remove the water line ( 3 ) while pressing the
marked part ( 4 ) of the water line coupler.
If a red clip is on the coupler, it must be
removed before removing the tube.
2
3
4
Red Clip
(1/4”)
3. Pull and remove the hinge lever ( 5 ). Remove
the ground screw ( 6 ) attached to the upper
left door hinges with a philips screwdriver (+).
Remove the upper left and right door hinges
( 7 ).
5
6
7
4. Lift the door straight up to remove.
5. Remove the screw ( 8 ) attached to the
lower left and right door hinges with a philips
screwdriver (+). Remove the 2 hex head bolts
( 9 ) attached to the lower left and right door
hinges with an allen wrench (3/16”). Remove
the lower left and right door hinges ( 10 ).
Allen wrench
10
8
9
CAUTION
REATTACHING THE
REFRIGERATOR DOORS
To reattach the fridge doors after you have moved
the fridge to its final location, assemble the parts
in reverse order.
1. The Water Line must be fully Inserted to the
center of transparent coupler to prevent water
leakage from the dispenser.
2. Insert the clip in the top plate and check that it
Center of transparent coupler
The Guide Lines
Dispenser
- TYPE A - - TYPE B -
By placing the 3 screws again ensure
that the wires are in not to damage the
harness.
DISASSEMBLING THE FLEX DOOR
1. Take out the upper drawer by lifting it up.
2. Take out the lower basket ( 1 ) by lifting the
basket up from the rail system.
1
3. Press the fixing hook of rail system.
CAUTION
DA68-02601A-16.indb 11 2018. 10. 8. 오후 4:32
12_ setting up
4. Holding the top of the Freezer Drawer, pull it
out all the way and then remove it from the rail
system.
Be careful not to scratch or dent the
sliding rail by letting it strike the floor.
Make sure that you mount the freezer
basket in the right position when
removing / installing the freezer door.
Failing to do so may result in the door not
opening or closing properly.
ASSEMBLE THE FREEZER
DRAWER
To reattach the drawer after you have moved the
fridge to its final location, assemble the parts in
reverse order.
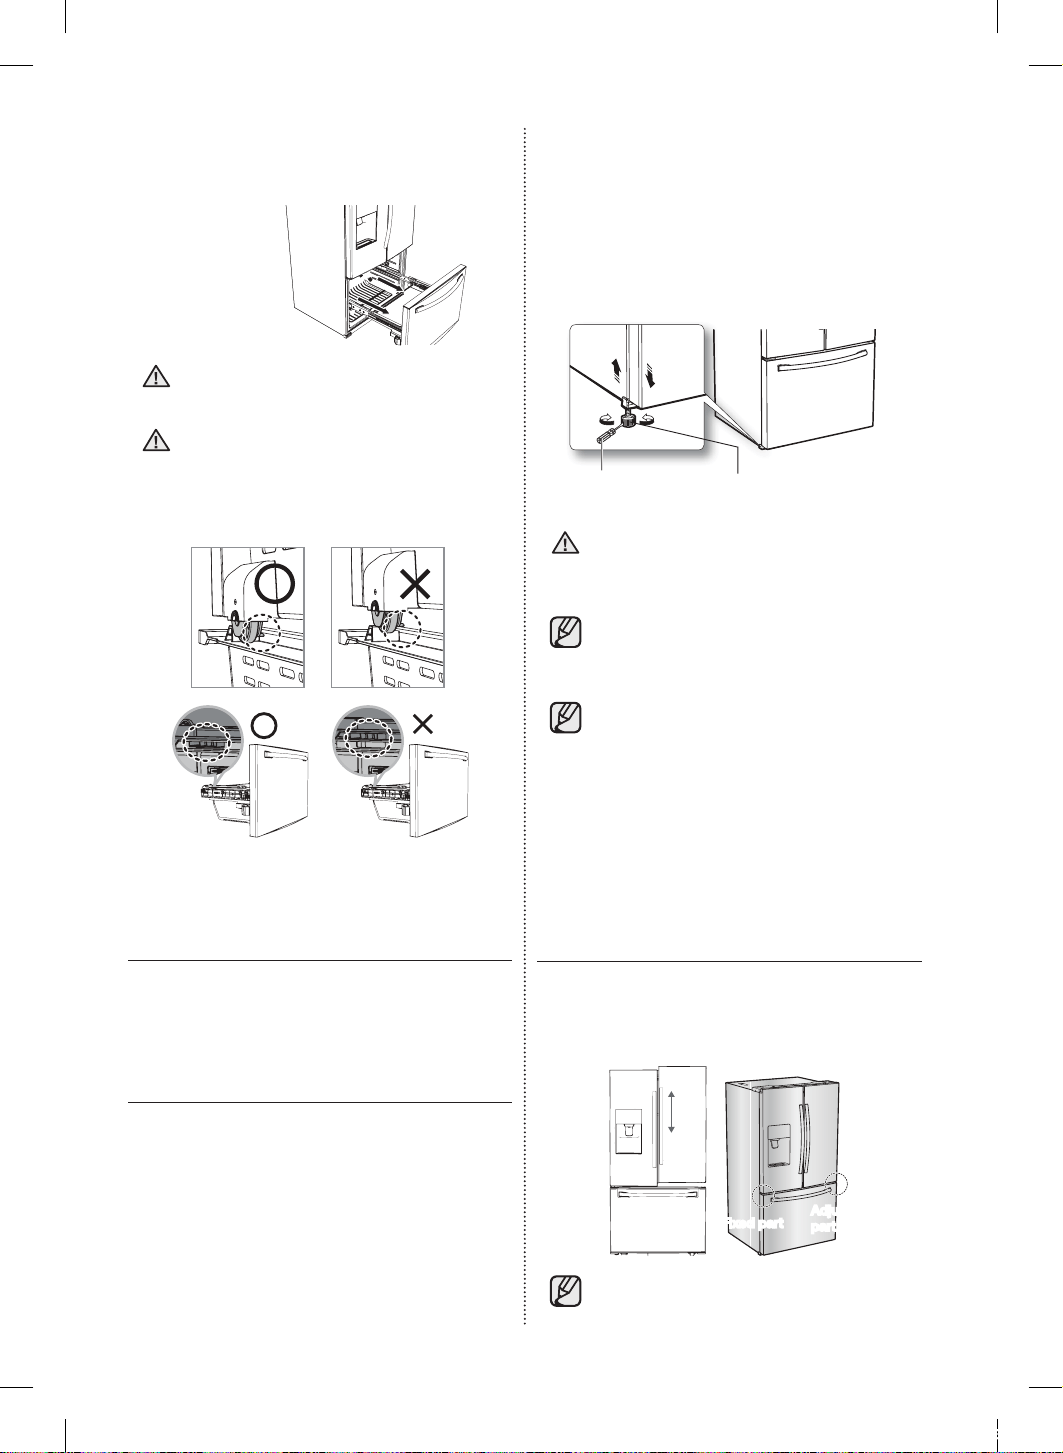
ADJUSTING THE LEVEL
Make sure the refrigerator is level so that you can
make final adjustments. Use a level to test if the
refrigerator is level both side to side and back to
front. If the refrigerator is not level, it will not be
possible to get the doors perfectly even, which
may cause moisture condensation and increased
energy bills. Below is an example of how to level
the refrigerator if the left side of the refrigerator is
lower than the right side.
CAUTION
CAUTION
How to adjust the level
1. Open the freezer drawer and remove the lower
basket.
2. Insert a flat-blade screwdriver (-) into the
notch on the left control lever, and then turn
it counter-clockwise to level the refrigerator.
(You turn the lever clockwise to lower the
refrigerator and counterclockwise to raise it.)
flat-blade screwdriver (-) Control Lever
Both control levers must be touching the
floor to avoid possible personal injury or
property damage because of tipping.
• If the right side is lower, perform the
same procedure, but with the right
control lever.
• It is dicult to remove the cover leg
front from the refrigerator, so we do not
recommend making small adjustments
with the control lever. Instead, refer to
the next page for the best way to make
minor adjustments to the doors.
MAKING MINOR
ADJUSTMENTS TO THE
DOORS
Remember, a leveled refrigerator is necessary
for getting the doors perfectly even. If you need
help, review the previous section on leveling the
refrigerator.
Adjustment
part
Fixed part
• The left door is fixed. To make minor
adjustments between doors, adjust only
the right door.
CAUTION
DA68-02601A-16.indb 12 2018. 10. 8. 오후 4:32
setting up _13
02 SETTING UP
1. Pull out the freezer drawer ( 1 ), then you can
see the lower hinge ( 2 ).
2. Insert a philips screwdriver (+) ( 3 ) into the
shaft ( 4 ) of the lower hinge.
3. Adjust the height by turning a philips
screwdriver (+) ( 3 ) clockwise (
DOWN
) or
counterclockwise (
UP
).
• When you turn a philips screwdriver (+)
counterclockwise (
UP
), the door will
move up.
1
2
3
4
3
INSTALLING THE WATER
DISPENSER LINE
A water dispenser with a filter is one of the helpful
features on your new refrigerator. To help promote
better health, the water filter removes unwanted
particles from your water. However, it does not
sterilize or destroy microorganisms. You may need
to purchase a water purifying system to do that.
The water line also connects to the ice maker.
For the ice maker to operate properly, water
pressure of 20~125psi (138~862 kPa) is required.
If the refrigerator is installed in an area with low
water pressure (below 20psi), you can install
a booster pump to compensate for the low
pressure.
After you have connected the water line, make
sure the water storage tank inside the refrigerator
is properly filled. To do this, press the water
dispenser lever until the water runs from the water
outlet.
• Water line installation kits are available at
extra cost from your dealer.
We recommend using a water line
installation kit that contains copper
tubing and a ¼” compression nut.
• Use the new hose-sets supplied with the
appliance only. Do not re-use an old hose set.
Keep ventilation openings, in the
appliance enclosure or in the built-in
structure, clear of obstruction. Connect
to potable water supply only.
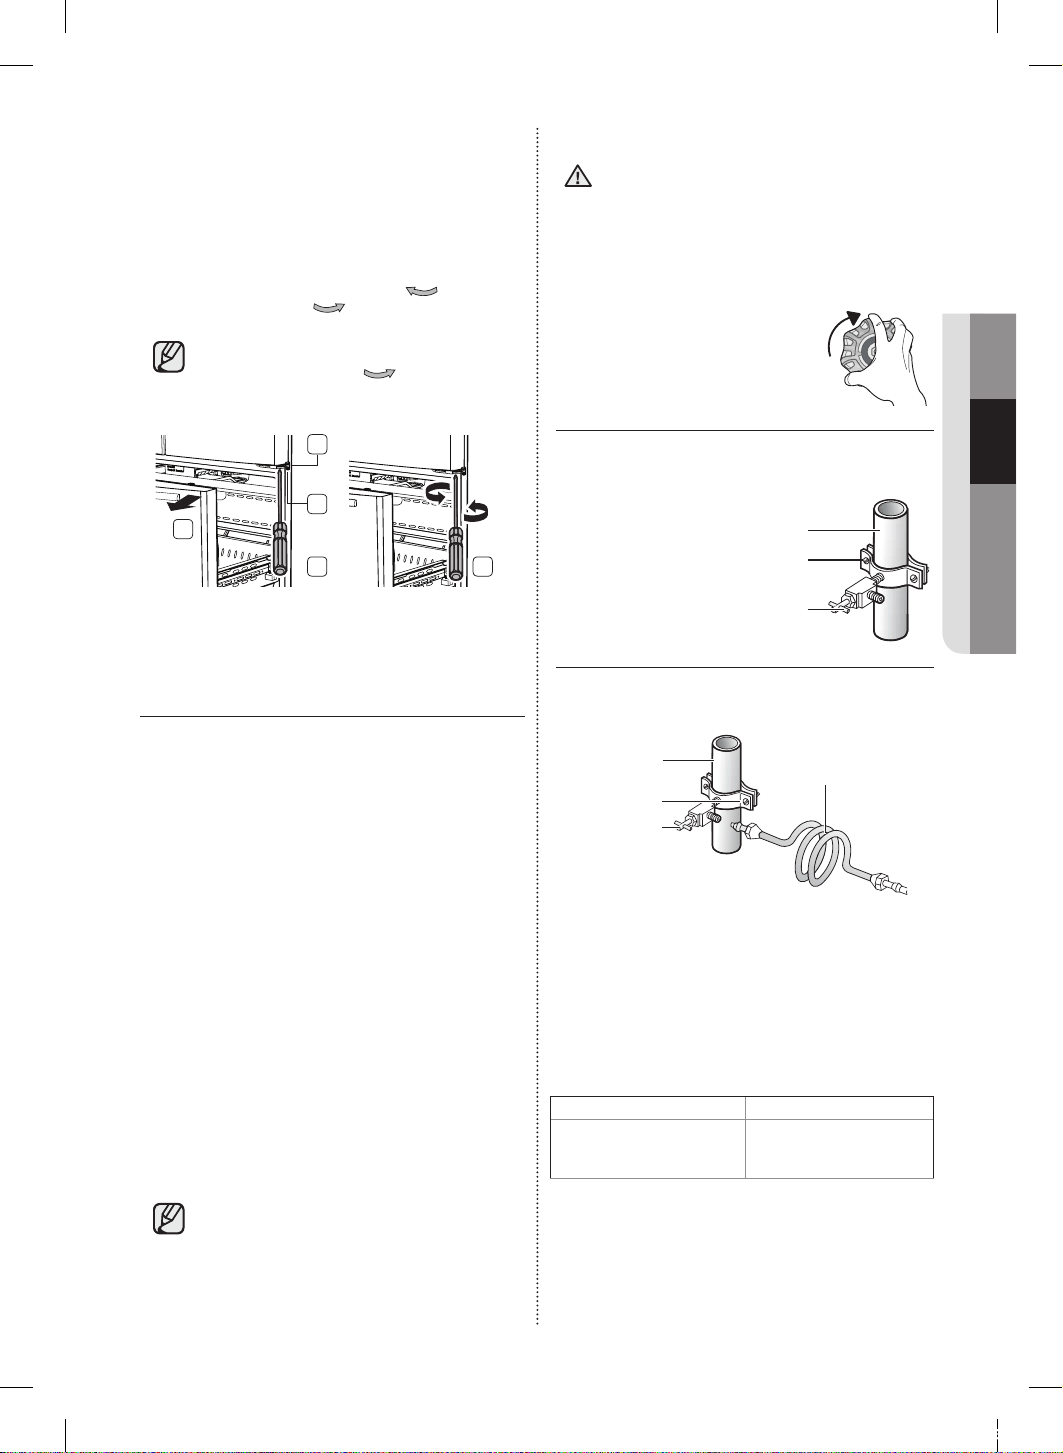
Connecting to the water supply line
1. First, shut o the main water
supply.
2. Locate the nearest cold water drinking line and
install the pipe clamp and shut o valve.
Pipe clamp
Cold water line
Shut o valve
3. Connect the water line installation kit to the
shut o valve.
Shut o valve
Pipe clamp
Cold water line
Water line installation kit
Connecting the water supply line to
the refrigerator.
There are several items that you need to purchase
to complete this connection.
You may find these items sold as a kit at your local
hardware store.
Use Copper Tubing Use Plastic Tubing
• ¼” copper tubing
• ¼” compression nut (1pc)
• Ferrule (2pc)
• ¼” plastic tubing
- Molded end(Bulb)
• ¼” compression nut (1pc)
WARNING
DA68-02601A-16.indb 13 2018. 10. 8. 오후 4:32

14_ setting up
Compression
Nut (1/4”)
(Assembled)
Ferrule
(Not supplied)
Plastic Tubing
(Assembled)
Compression
Fitting
(Assembled)
Molded
end(Bulb)
Compression
nut (B) (1/4”)
(Not supplied)
or
Copper tubing
(Not supplied)
Plastic tubing (B)
(Not supplied)
Household water supply line
Refrigerator
1. Connect the household water line to the
assembled compression fitting.
- If you are using copper tubing, slip the
compression nut ( B ) (not supplied) and
ferrule (not supplied) on the copper tubing (not
supplied) as shown.
- If you are using plastic tubing ( B ) , insert the
molded end (Bulb) of the plastic tubing ( B ) into
the compression fitting.
Do not use without the molded end (Bulb)
of the plastic tubing ( B ).
2. Tighten the compression nut ( B ) onto the
compression fitting.
Do not over-tighten the compression nut ( B ).
3. Turn the water on and check for any leakage.
If you find water drops or leakage in the
connection areas, turn o the main water
supply. Check the connections and, if
necessary, tighten.
4. Flush 1 gallon of water through the filter
before drinking or using the water from the
refrigerator. (Flush approximately 6 minutes.)
To flush, press a large glass or cup against the
water dispenser lever. Fill the glass, empty it
into the kitchen sink after it is filled, and then
repeat.
5. After you turn on the refrigerator, let the ice
maker make ice for 1 to 2 days. Over that
period of time, throw out the first 1 or 2
CAUTION
buckets of ice the freezer makes to ensure all
impurities have been removed from the water
line.
• Only connect the water line to a
drinkable water source.
• If you have to repair or disassemble the water
line, cut o 1/4” of the plastic tubing to make
sure you get a snug, leak-free connection.
• You can test the water line quickly using
a paper cup. Under normal conditions,
the water dispenser can fill a 5.75 oz.
(170 cc) cup in about 10 seconds.
COMPLETING THE SET UP
Now that you have your new refrigerator installed
in place, you are ready to set up and enjoy the
features and functions of the appliance.
By completing the following steps, your refrigerator
should be fully operational.
1. Make sure your refrigerator is in an appropriate
location with reasonable clearance between it
and the wall. Refer to installation instructions in
this manual.
2. Once the refrigerator is plugged in, make sure
the interior light comes on when you open the
doors.
3. Set the Temperature control to the coldest
temperature and wait for an hour. The freezer
will get slightly chilled and the motor will run
smoothly. Reset the refrigerator and freezer to
the temperatures you want.
4. After you plug the refrigerator in, it will
take a few hours to reach the appropriate
temperature. You can store food and drinks
in the refrigerator after the temperature is
suciently cool.
In the event of a power failure, call the local oce
of your Electricity Company and ask how long it is
going to last.
- Most power failures that are corrected in an
hour or two will not aect your refrigerator
temperatures. However, you should minimize
the number of door openings while the
power is o.
- But Should the power failure last more than
24hours, remove all frozen food.
DA68-02601A-16.indb 14 2018. 10. 8. 오후 4:32
setting up _15
01 SETTING UP
If the key is provided with refrigerator, the keys
should be kept out of the reach of children and
not be in the vicinity of the appliance.
The appliance might not operate consistently
(possibility of defrosting of co tents or
temperature becoming too warm in the frozen
food compartment) when sited for an extended
period of time below the cold end of the range of
temperatures for which the refrigerating appliance
is designed.
Do not store food which goes bad easily at low
temperature, such as bananas, melons.
Your appliance is frost free, which means there is
no need to manually defrost your appliance, as
this will be carried out automatically.
Temperature rise during defrosting can comply
with ISO requirements. But If you want to prevent
an undue rise in the temperature of the frozen
food while defrosting the appliance, please wrap
the frozen food up in several layers of newspaper.
Any increase in temperature of frozen food during
defrosting can shorten its storage life.
Do not re-freeze frozen foods that have thawed
completely.
Install the appliance in a cool, dry room with
adequate ventilation.
Ensure that it is not exposed to direct sunlight and
never put it near a direct source of heat (radiator,
for example).
Never block any vents or grilles on the appliance.
Allow warm food to cool down before placing it in
the appliance.
Put frozen food in the refrigerator to thaw. You
can then use the low temperatures of the frozen
products to cool food in the refrigerator.
Do not keep the door of the appliance open for
too long when putting food in or taking food out.
The shorter time for which the door is open, the
less ice will form in the freezer.
Allow clearance to the right, left, back and top
when installing.
This will help reduce power consumption and
keep your energy bills lower.
• Under normal conditions a 170 cc(5.75
oz) cup can be filled in about 10
seconds.
DA68-02601A-16.indb 15 2018. 10. 8. 오후 4:32
16_ operating
Operating your French Door
Refrigerator
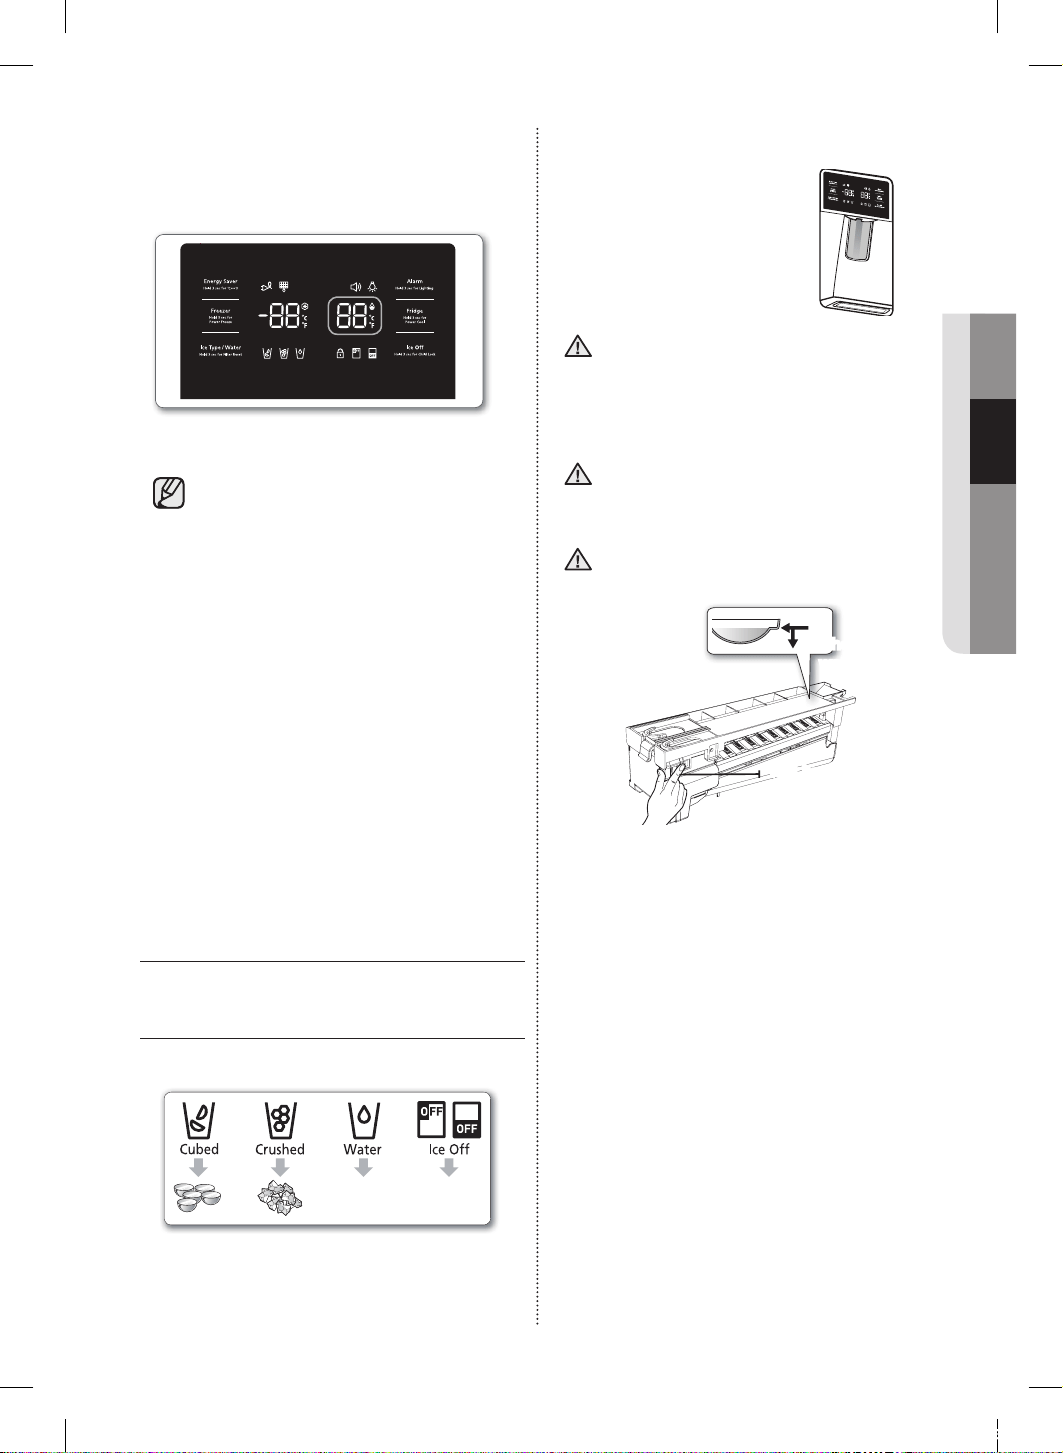
USING THE CONTROL PANEL
8
7
1
2
3
5
6
4
( 1 ) Energy
Saver
Hold 3 sec for
ºC ↔ ºF
Touching this button turns Energy Saver
mode on and o. When you turn Energy
Saver on, the Energy Saver icon lights.
Turn Energy Saver o and the icon
goes o. The Energy Saver function
automatically turns on when power is
supplied to the refrigerator.
If condensation or water drops appear
on the doors, turn the Energy Saver
mode o.
Touch and hold this button for 3
seconds to switch the temperature
units between °C and °F.
( 2 ) Freezer
(Hold 3 sec
for Power
Freeze)
Touch this button to set the freezer to
your desired temperature.
You can set the temperature between
-8°F and 5°F (between -23°C and
-15°C). Touch and hold this button for
3 seconds to decrease the time needed
to freeze products in the Freezer. It
can be helpful if you need to quickly
freeze easily spoiled items or if the
temperature in the freezer has warmed
dramatically (For example, if the door
was left open).
( 3 ) Ice
Type/Water
Hold 3 sec for
Filter Reset
Touch this button to select the ice or
water function. You can select water or
the types of ice(cubed/crushed ice).
Each time you press the button, the
cubed and crushed ice modes alternate
and the Cubed or Crushed ice icon
lights up, indicating your selection.
After you replace the water filter, touch
and hold this button for 3 seconds to
reset the water filter life indicator.
( 4 ) Alarm
Hold 3 sec
for Lighting
To turn the door open alarm on and o
If the door alarm is set to On, an alarm
beeps if any refrigerator door is left open
for more than three minutes. The beeping
stops when you close the door. The door
alarm function is preset to On int the
factory You can turn it o by touching and
then releasing this button. You can turn
it back on in the same fashion. The icon
lights up when the function is on.
If you touch and hold the Alarm/Lighting
button for 3 seconds, the dispenser LED
Lamp will stay on. To turn o the light
press the button for 3 seconds again.
( 5 ) Fridge
Hold 3 sec for
Power Cool
Touch this button to set the fridge to your
desired temperature. You can set the
temperature between 34°F and 44°F
(between 1°C and 7°C ). Touch and hold
this button for 3 seconds to decrease
the time needed to cool products in the
Refrigerator. It can be helpful if you need
to quickly cool easily spoiled items or if
the temperature in the fridge has warmed
dramatically (For example, if the door was
left open).
( 6 ) Ice O
Hold 3 sec for
Child Lock
If you don’t want to make more ice, touch
the Ice O button. Touching this button
for 3 seconds turns on Child Lock which
locks the display panel and dispenser
buttons so the buttons can not be used.
The Child Lock icon lights up to indicate
you’ve activated the Child Lock function.
Press 3 seconds to unlock. The Child
Lock are not going to lock the Cool
Pantry. The lights and motors start until
the refrigerator turns o again.
( 7 ) Ice O
If you don’t want to make more ice, touch
the Ice O button.
The icon will light up and the Ice-Maker
stops making ice.
We recommend you to stop ice
making if the following occur:
- There is enough ice in the ice bucket.
- You want to save water and energy.
- Water is not being supplied to
the refrigerator.
If the ice maker function is
ON, and the water Line is not
connected, there will be a water
valve noise from the back of the
unit, press the Ice O (Hold 3sec
for child lock) button for less
than 3 seconds until the Ice O
Indicator ( ) illuminates.
(RF263T**)
(RF263B/N**)
DA68-02601A-16.indb 16 2018. 10. 8. 오후 4:32
operating _17
02 OPERATING
( 8 ) Filter
Water filter usage
This icon will light up when you need
to change the filter. After you use
about 300 gallons of water, the filter
indicator lights up. (about 6 months).
The icon will blink red for several
seconds when you open or close
the door. After you install the new
water filter, reset the filter indicator by
touching the Ice Type/Water Hold 3
sec for Filter Reset button.
• If water is not dispensing or
dispensing slowly, you need to
replace the water filter because
the water filter is clogged.
• Some areas have large
amounts of lime in their water,
which causes the water filter to
clog more quickly.
Cooling O
Mode
Cooling O mode (also called Shop
mode), is designed for use by retailers
when they are displaying refrigerators
on the shop floor. In Cooling O
mode, the refrigerator’s fan motor
and lights work normally, but the
compressor does not run, and the
refrigerator and freezer do not get
cold. To start Cooling O mode, touch
and hold the Energy Saver button
and the Freezer button for 5 seconds
during normal operation.
The refrigerator chime sounds and the
temperature display flashes OF OF.
To cancel Cooling O mode, touch
and hold the Energy Saver and the
Freezer buttons again for 5 seconds.
CHANGING THE WATER FILTER
To reduce risk of water damage to your
property DO NOT use generic brands
of water filters in your SAMSUNG
Refrigerator.
USE ONLY SAMSUNG BRAND WATER FILTERS.
SAMSUNG will not be legally responsible for any
damage, including, but not limited to property
damage caused by water leakage from the use of
a generic water filter. SAMSUNG Refrigerators are
designed to work ONLY WITH SAMSUNG Water
Filter.
The Filter light turns red to let you
know when it is time to change
your water filter cartridge.
To give you time to get a new filter,
the red light comes on just before
the capacity of the current filter
runs out.
(Red)
Changing the filter on time provides you with the
freshest, cleanest water from your refrigerator.
1. Shut o the water supply. Then, turn the water
filter ( 1 ) about 1/4 turn, counter-clockwise.
2. Pull the water filter ( 1 ) from the case filter ( 2 ).
WARNING
2
1
• To change the water filter more easily,
shut o the water supply valve.
• Sometimes, it is hard to disassemble the water
filter because impurities in the water cause it
to stick. If you are having diculties, grip the
water filter firmly and pull it hard.
• When you pull the
water filter, a little
water can leak from
the opening. This is
normal.
3
2
To minimize the water leaks, keep the filter
cartridge horizontal when you pull it.
• To prevent overflow, empty the water filter tray
( 3 ) and dry around the filter case ( 2 ).
3. Insert the new filter into the filter case ( 4 ).
4. Push the filter, and then turn it clockwise until
it locks.
• If you have trouble inserting the water
filter because of high water pressure,
shut o the water supply valve.
• The locked symbol should be lined up with the
indicator line.
4
5. Touch and “Ice Type/
Water Hold 3 sec for
Filter Reset” button
(
(Filter Reset)
) for about
3 seconds to reset the
water filter. The color
of the indicator ( )
changes from red to
light o.
6. If you turned o the water supply, turn it back on.
• For a replacement water filter, you can
visit your local home Improvement
center or contact the Samsung Parts
distributor.
• Be sure the replacement water filter has the
SAMSUNG logo on the box and on the water
filter. Link : http://www. samsungparts.com
DA68-02601A-16.indb 17 2018. 10. 8. 오후 4:32
18_ operating
Removing any residual matter inside
the water supply line after installing
the water filter.
1. Turn ON the main
water supply and
supply water to the
refrigerator.
2. Select water in the button “ICE TYPE/
WATER”,pour 1 Gal (6-7 minutes) to clean the
water supplier system and it will take the air
out from the lines.
3. If after pour 1 Gal the water doesn’t turn
clear is possible an additional flushing in the
household lines.
4. Open the Refrigerator door and make sure
there are no water leaks coming from the
water filter.
• Be sure to flush the dispenser system
thoroughly, otherwise water may drip
from the dispenser.
• This means that there is still air in the line.
Reverse Osmosis Water Supply
IMPORTANT :
The pressure of the water supply coming out of a
reverse osmosis system going to the water inlet
valve of the refrigerator needs to be between 35
and 120 psi (241 and 827 kPa).
If a reverse osmosis water filtration system is
connected to your cold water supply, the water
pressure to the reverse osmosis system needs to
be a minimum of 40 to 60 psi (276 to 414 kPa.) If
the water pressure to the reverse osmosis system
is less than 40 to 60 psi (276 to 414 kPa):
• Check to see whether the sediment filter in the
reverse osmosis system is blocked. Replace
the filter if necessary.
• Allow the storage tank on the reverse osmosis
system to refill after heavy usage.
• If your refrigerator has a water filter, it may
further reduce the water pressure when used
in conjunction with a reverse osmosis system.
Remove the water filter.
If you have questions about your water pressure,
call a licensed, qualified plumber.
CONTROLLING THE TEMPERATURE
Basic temperature of Freezer and
Refrigerator Compartments
The basic temperature and recommended
temperatures of the Freezer and Refrigerator
Compartments are 0°F and 37°F(or -18°C and
3°C) respectively. If the temperature of the Freezer
and Refrigerator Compartments are too high or
low, adjust the temperature manually.
Controlling the Freezer temperature
Recommend Temp (Freezer) : 0 °F (or -18 °C )
The Freezer temperature can be set between -8°F
and 5°F (or between -23°C and -15°C) to suit
your particular needs. Press the Freezer button
repeatedly until the desired temperature is shown
in the temperature display. The temperature will
change by 1°F (or 1°C) with each press. See
below.
Fahrenheit : 0°F
➞
-1°F
➞
-2°F
➞
-3°F
➞
-4°F
➞
-5°F
➞
-6°F
➞
-7°F
➞
-8°F
➞
5°F
➞
4°F
➞
3°F
➞
2°F
➞
1°F
➞
0°F.
Centigrade : -18°C
➞
-19°C
➞
-20°C
➞
-21°C
➞
-22°C
➞
-23°C
➞
-15°C
➞
-16°C
➞
-17°C
➞
-18°C.
Keep in mind that foods such as ice cream may
melt at 4°F (or -15.5°C). The temperature display
will move sequentially from -8°F to 5°F (or from
-23°C to -15°C).
Controlling the fridge temperature
The fridge temperature can be set between 34 °F
and 44 °F (or between 1 °C and 7 °C) to suit
your particular needs. Press the Fridge button
repeatedly until the desired temperature is shown
in the temperature display. The temperature will
change by 1 °F (or 1 °C) with each press. See
below.
Fahrenheit : 37 °F ➞ 36 °F ➞ 35 °F ➞ 34 °F ➞
44 °F ➞ 43 °F ➞ 42 °F ➞ 41 °F ➞
40 °F ➞ 39 °F ➞ 38 °F ➞ 37 °F.
Centigrade : 3 °C ➞ 2 °C ➞ 1 °C ➞ 7 °C ➞ 6 °C
➞ 5 °C ➞ 4 °C ➞ 3 °C.
The temperature control process for the Fridge
works just like the Freezer process. Press the
DA68-02601A-16.indb 18 2018. 10. 8. 오후 4:32
operating _19
02 OPERATING
Fridge button to set your desired temperature.
After a few seconds, the Fridge will begin
adjusting towards the newly set temperature. This
will be reflected in the digital display.
Recommend Temp (Fridge) : 37 °F (or 3 °C )
- The temperature of the Freezer, Fridge
or Cool Select Pantry Zone may
rise when you open the doors too
frequently, or if a large amount of warm
or hot food is placed inside.
- This may cause the digital display to blink.
Once the Freezer and Fridge temperature
return to their normal set temperatures, the
blinking will stop.
- If the blinking continues, you may need to
“reset” the Refrigerator. Try unplugging the
appliance, wait for around 10 minutes and
then plug the power cord back in.
- If there is a communication error between the
Display and Main Controller, the Convertible
Display light may blink. If the blinking continues
for a long period of time, please contact a
Samsung Electronics Service Center.
USING THE COLD WATER
DISPENSER
Push the appropriate ice type button
to select what you want dispensed.
NO ICE
Select this if you want to
turn ice maker o
Using the ice Dispenser
Place a glass underneath
the ice dispenser and push
gently against the dispenser
lever with your glass.
Make sure the glass is in line
with the dispenser to prevent
the ice from bouncing out.
Please wait 2 seconds before removing
the glass under the dispenser to prevent
spills.
If the Refrigerator door opens, the
Dispenser does not work.
When Cubed Ice is selected after using
the Crushed Ice mode, a small amount of
residual crushed ice might be produced.
Do not pull the lever out. You could
damage or break the lever’s spring.
check the
water level
Test button
Maintaining the Ice Bucket
• To clean the ice bin/bucket, wash with a mild
detergent, rinse well, and dry thoroughly it. Do
not use harsh or abrasive cleaners or solvents.
• The ice cubes generated by the rapid ice
making process will look white, which indicates
they are generated normally.
• As the ice maker in the refrigerator room
makes ice cubes even faster, move the ice
cubes from the refrigerator ice bin to the
freezer ice bin if you need more ice cubes.
• If ice doesn’t come out, pull out the ice bucket
and press the test button located on the right
side of ice maker.
• Do not press the test button continuously
when the tray is filled with ice or water. Water
may overflow or ice may jam the bucket.
• Normal Use
To fill the ice bucket to maximum capacity after
installation, follow these steps:
Water may overflow or ice may jam the bucket.
CAUTION
CAUTION
CAUTION
DA68-02601A-16.indb 19 2018. 10. 8. 오후 4:32

20_ operating
check the
water level
Test button
To remove the ice cubes without use the
Ice Bucket, turn o the ice maker.
(Remove the front cover of the Ice Maker)
Ice cubes in the ice machine may leak on
the drawer.
Not put food into the tray of ice.de hielo.
If you store food in the ice bucket,may
hinder the ice maker to open or close the
door, and damage the ice maker.
Note that the ice cubes from the ice
bucket can spill over the box to remove
the tray from the drawer. In this case, you
must remove the drawer the ice cubes
that have been spilled.
In case of power outage, ice cubes can
melt and then freeze when power returns,
causing the dispenser to stop working.
To prevent this from happening after a power
outage, remove the ice bucket and discard the ice
and wastewater.
• If you use all the ice at one time, repeat
Steps 2 and 3 on the previous page.
• However, wait only 8 hours before removing the
first 4 to 6 cubes. This procedure will replace
ice cubes and ensure their maximum output.
• The first ice should be dicarded as they
may have bad taste.
How to Use Ice O function
WARNING
WARNING
WARNING
WARNING
When you select the O Ice (hielodesactivado),
remove all ice cube tray. If not using the ice
dispenser, it is possible to stack the cubes.
Remove the tank in the direction of the arrow.
Dispose of ice cubes or ice mass. Push the
bottom of the tray until it clicks. If the tray does
not fit, turn the propeller 90 degrees and try again.
Use only the ice maker refrigerator.
Only a suitably qualified person must
install / connect the water supply to the
refrigerator. Connect only to a potable
water supply.
In order that the ice maker work properly, need a
water pressure of 20 ~ 125 psi (138 ~ 862 kPa).
Whether traveling for vacation or business and will
not use water dispensers and ice for an extended
period:
- Close the stopcock. If not, can result in water
leakage.
- Remove all food.
- Unplug the refrigerator.
- Remove excess moisture from inside the
refrigerator and leave doors open. Otherwise,
odor and mold may occur. Do not put fingers,
hands or any other inappropriate object in the
container or bucket of ice maker. It may cause
personal injury or property damage.
- Never put fingers or objects into the dispenser
opening. Can cause injury.
Never try to take the ice maker.
- Do not wipe or spray the ice tray with water
while in the refrigerator. Remove for cleaning.
When inserting the tray of the ice maker,
make sure it is well centrada.
De Otherwise, you could lock.
The phenomenon of turbidity
• The water entering the cooler circulates
through the main filter is a filter for
alkaline water. In the filtering process,
the pressure of the water leaving
the filter increases, and the water is
saturated with oxygen and nitrogen.
When it is contacted with air, the
pressure drops rapidly and the oxygen
and nitrogen is oversaturated and
generate gas bubbles.
• Temporarily, water can have a cloudy
appearance due to these bubbles of oxygen.
After a few seconds, water is colorless.
WARNING
WARNING
DA68-02601A-16.indb 20 2018. 10. 8. 오후 4:32
operating _21
02 OPERATING
• Please wait 1 second before removing
the cup after dispensing water to
prevent spills. Do not pull out the
lever dispenser after dispensing ice or
water. It comes back automatically.
Ice is made in cubes. When you select
“Crushed”, the ice maker grinds the ice
cubes into crushed ice.
Test button
Ice Maker in Freezer
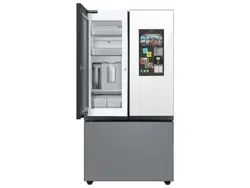
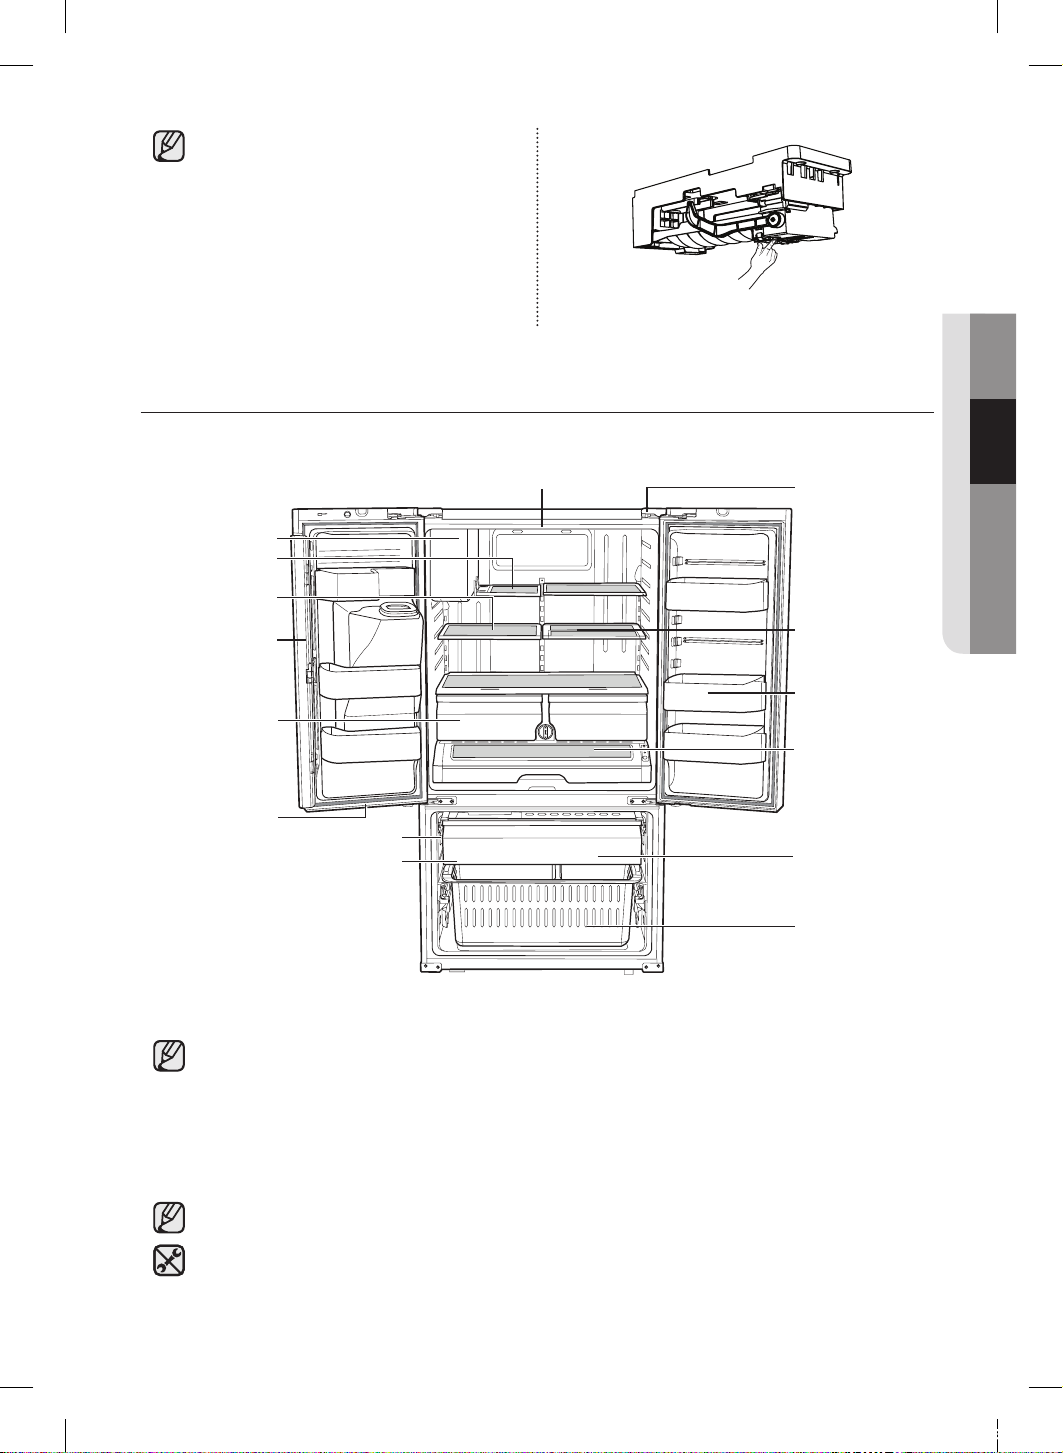
PARTS AND FEATURES
Use this page to become more familiar with the parts and features of the refrigerator
Light
Auto Door Closer
Quick-Space
Glass Shelf
(on some models)
Door Bins
Cool Select
Pantry
Foldable-Shelf
FF Ice-Maker
Slide-Shelf
Vertical Hinged
Section
Vegetable &
Fruit Drawers
FZ Ice-Maker (on some model)
Light
Ice Bucket
Auto Pull Out
Drawer
Freezer
Drawer Bin
• When closing the door, make sure the Vertical Hinged Section is in the correct position to
avoid scratching the other door.
• If the Vertical Hinged Section is reversed, put it back to the right position and close the door.
• Moisture may appear at times on the Vertical Hinged Section.
• The door handle may become loose over time. If this happens, tighten the bolts found on the
inside of the door.
• If you close one door with a lot of force, the other door may open.
• When the door opens, the interlock switch automatically turns o the auger motor in the ice
maker for safety reasons.
• When the interior or exterior LED lamp has gone out, please contact your service agents.
DA68-02601A-16.indb 21 2018. 10. 8. 오후 4:32

22_ operating
USING THE COOL SELECT
PANTRY
The Cool Select Pantry is a full-width drawer with
adjustable temperature control. This pantry can
be used for large party trays, deli items, pizza,
beverages or miscellaneous items.
There is a temperature control which can adjust
the amount of cold air allowed into the pantry.
The control is located on the right side of the
pantry.
• The Pantry has three modes: The Fresh mode,
Chilled mode, and Deli mode. Fresh mode is
the default. Press the Temp button repeatedly
until the mode you want is lit. Once you select
a mode, the temperature will change to match
the mode you selected.
• The Pantry temperature may change
depending on the number of items inside
and where they are located, the ambient
temperature, and how often the door is
opened.
The Pantry Selection Button
1. When you select “Deli”, the temperature of the
pantry will be kept around 41 °F (or 5 °C). This
feature helps keep food fresh for a long time.
2. When you select
“Fresh”, the
temperature of
the pantry will be
kept around 38 °F
(or 3 °C).
This feature helps
keep food fresh
for a longer time.
3. When you select “Chilled”, the temperature of
the pantry will be kept around 34 °F (or 1 °C).
This feature also helps keep meat or fish fresh
for a longer time.
The table below lists the Pantry modes and
the kinds of foods that can be stored safely for
each mode.
Deli Fresh Chiled
• Pineapples • cucumbers • steaks
• lemons • apples • hard cheeses
• avocado • oranges • cold cuts
• potato • grapes • bacon
• zucchinis • hot dogs
• corn
• Fruits and vegetables may be damaged
when the “Chilled” mode is set.
• Do not store lettuce or other leafy produce in
this pantry.
Do not store glass bottles in this pantry.
If they are frozen, they can break and
cause personal injury.
In case you put a water bowl without its
ild into the pantry, condensation may
form around surrounding parts.
REMOVING THE REFRIGERATOR
ACCESSORIES
1. Door Bins & Dairy Compartment
• Door Bins ( 1 )
To remove - Simply lift the bin up and pull straight
out.
To relocate - Slide it in above the desires location
and push down until it stops.
• Door Bins ( 2 )
To remove - Take the right side of the bin out by
lifting it at an angle along the guide, and then take
the left side out by pulling it from the door.
To relocate - Slide it into the original location and
push down until it sticks.
2
1
CAUTION
CAUTION
DA68-02601A-16.indb 22 2018. 10. 8. 오후 4:32
operating _23
02 OPERATING
• Injury may occur if the door bins are not
firmly assembled.
• Do not allow children to play with the bins.
Sharp corners of the bins may cause injury.
Do not adjust a bin full of food. Remove
the food first.
To remove dust from the bins - Remove
the guard and wash in water.
2. Tempered Glass shelves
To remove - Tilt up the front of the shelf in the
direction shown ( 1 ) and lift it up vertically ( 2 ).
Pull the shelf out.
To relocate - Tilt the front of the shelf up and
guide the shelf hooks into the slots at a desired
height. Then lower the front of the shelf so that the
hooks can drop into the slots.
The Tempered Glass shelves are heavy.
Use special care when removing them.
1
2
3. Vegetable & Fruit Drawers
To remove - Pull the drawer out to full extension.
Tilt up the front of the drawer and pull straight out.
To relocate - Insert the drawer into the frame rails
and push back into place.
The drawers need to be removed before
the glass shelf above them can be lifted
out.
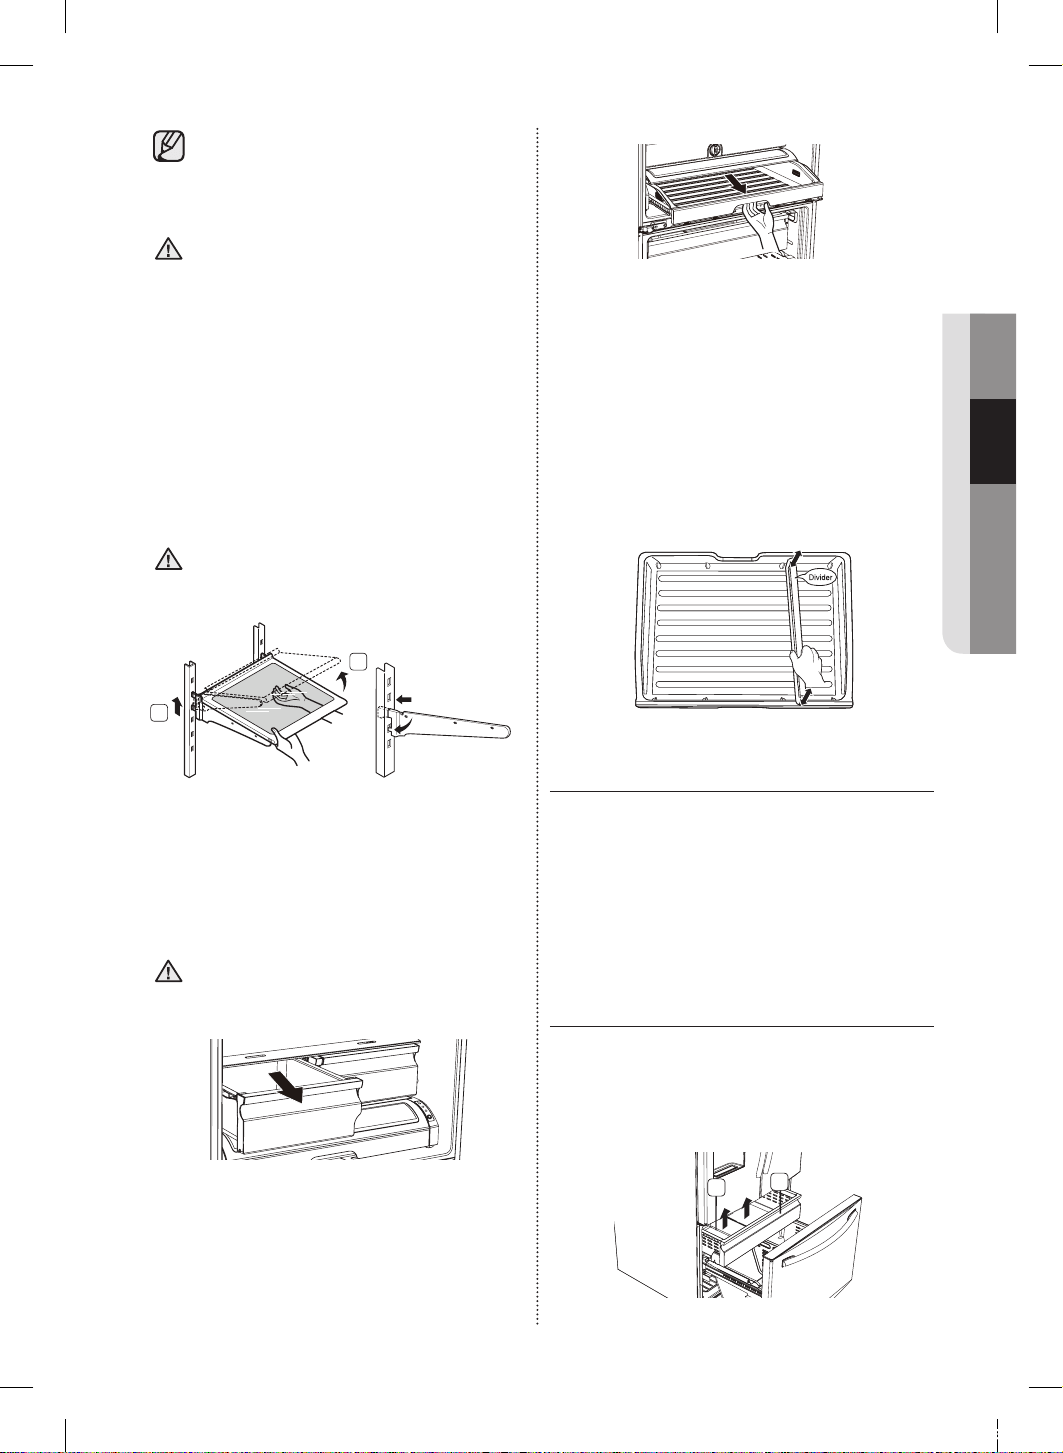
4. Cool select pantry
To remove the Cool select pantry - Pull the
pantry out to full extension. Tilt up the front side of
the pantry and pull straight out.
CAUTION
CAUTION
CAUTION
To relocate the Cool select pantry – Push
the rails to the back of the refrigerator. Place the
drawer onto the rails and slide the pantry back
until it is in place.
To remove the divider – Pull the pantry
completely out to full extension and raise the front
side of the divider to unhook it from the rear wall
of the pantry, then lift the divider out.
To relocate the divider - Hook the back of the
divider over the rear wall of the pantry and push
the divider down.
Using the doors
Ensure that the doors close all the way and are
securely sealed.
When the refrigerator door is only partially open,
it will automatically close. But, the door will stay
open when opened more than the auto close
range and you must close it manually.
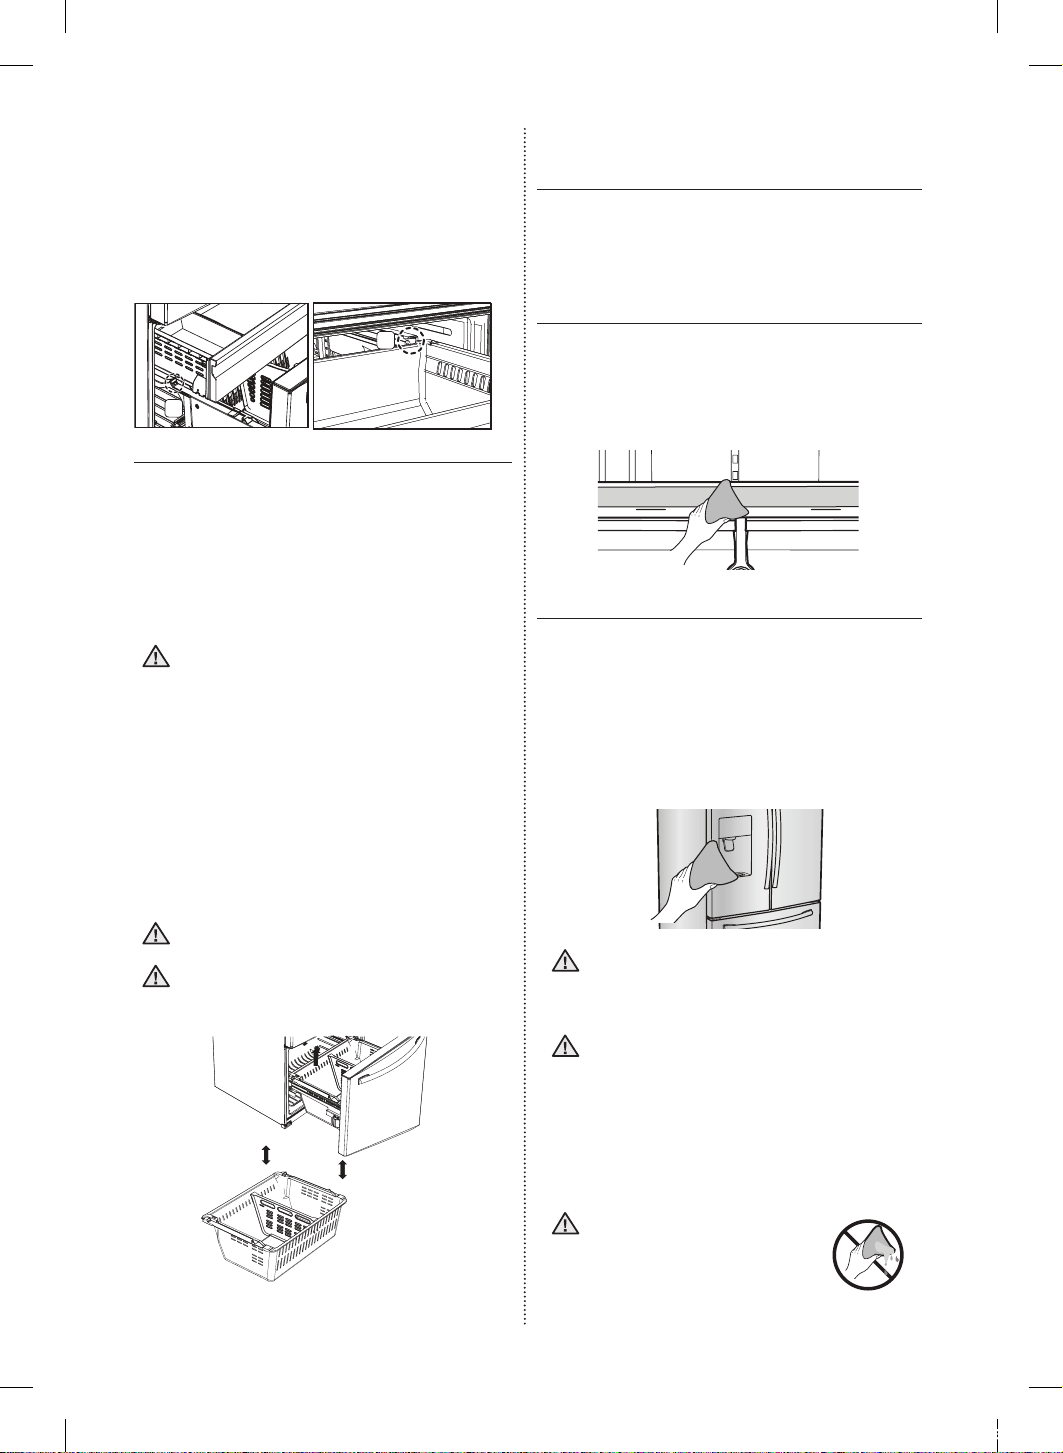
REMOVING THE REFRIGERATOR
ACCESSORIES
1.
ICE BUCKET (in Auto Pull out drawer)
To remove - Lift the ice bucket ( 1 ).
To relocate - Place the ice bucket into the Auto
Pull out drawer ( 2 ).
1
2
DA68-02601A-16.indb 23 2018. 10. 8. 오후 4:32
24_ operating
2. Super Extended Drawer
To remove - Pull the drawer out to full extension.
Tilt up the rear of the drawer and lift straight out.
To relocate - Place the drawer onto the rails ( 4 )
by tilting it up. Lower the drawer into place until it
is horizontal and slide the Drawer ( 3 ) in.
3
4
3. Freezer Drawer
To remove the freezer drawer - Pull the freezer
drawer out fully. Tilt up the rear of the bin and lift it
out to remove.
To relocate the freezer drawer - Place the bin
into the rail assembly.
Do not allow babies or children go inside
the drawer.
- It can cause death from suocation by
entrapment or a personal injury.
Do not sit on the Freezer door.
- The door may be broken and cause a
personal injury.
To prevent children entrapment, you
must reinstall the divider using provided
screw after cleaning or other actions
if you removed the divider from the
drawer.
Do not remove the divider.
If trapped inside, children may be injured
or suocate to death.
CAUTION
CAUTION
WARNING
CLEANING THE
REFRIGERATOR
Caring for your Samsung French Door Refrigerator
prolongs the life of your appliance and helps keep
the refrigerator free of odor and germs.
Cleaning the Interior
Clean the inside walls and accessories with a mild
detergent and then wipe dry with a soft cloth. You
can remove the drawers and shelves for a more
thorough cleaning. Just make sure to dry drawers
and shelves before putting them back into place.
Cleaning the Exterior
Wipe the control panel and digital display with
a damp, clean, soft cloth. Do not spray water
directly on the surface of the refrigerator.
The doors, handles, and cabinet surfaces should
be cleaned with a mild detergent and then wiped
dry with a soft cloth. To keep your appliance
looking its best, polish the exterior once or twice a
year.
Do not spray water directly on the
refrigerator. Use a clean, damp cloth to
clean.
Do not clean the appliance by spraying
water directly onto it.
Do not use benzene, thinner or alcohol
to clean the appliance.
• This may result in discoloration, deformation,
damage, electric shock or fire. Do not spray
inflammable gas near the refrigerator.
- There is a risk of explosion or fire.
You can erase the printed
letters on the display if you
apply stainless cleaner
directly to the area where
the letters are printed.
CAUTION
CAUTION
CAUTION
DA68-02601A-16.indb 24 2018. 10. 8. 오후 4:32
operating _25
02 OPERATING
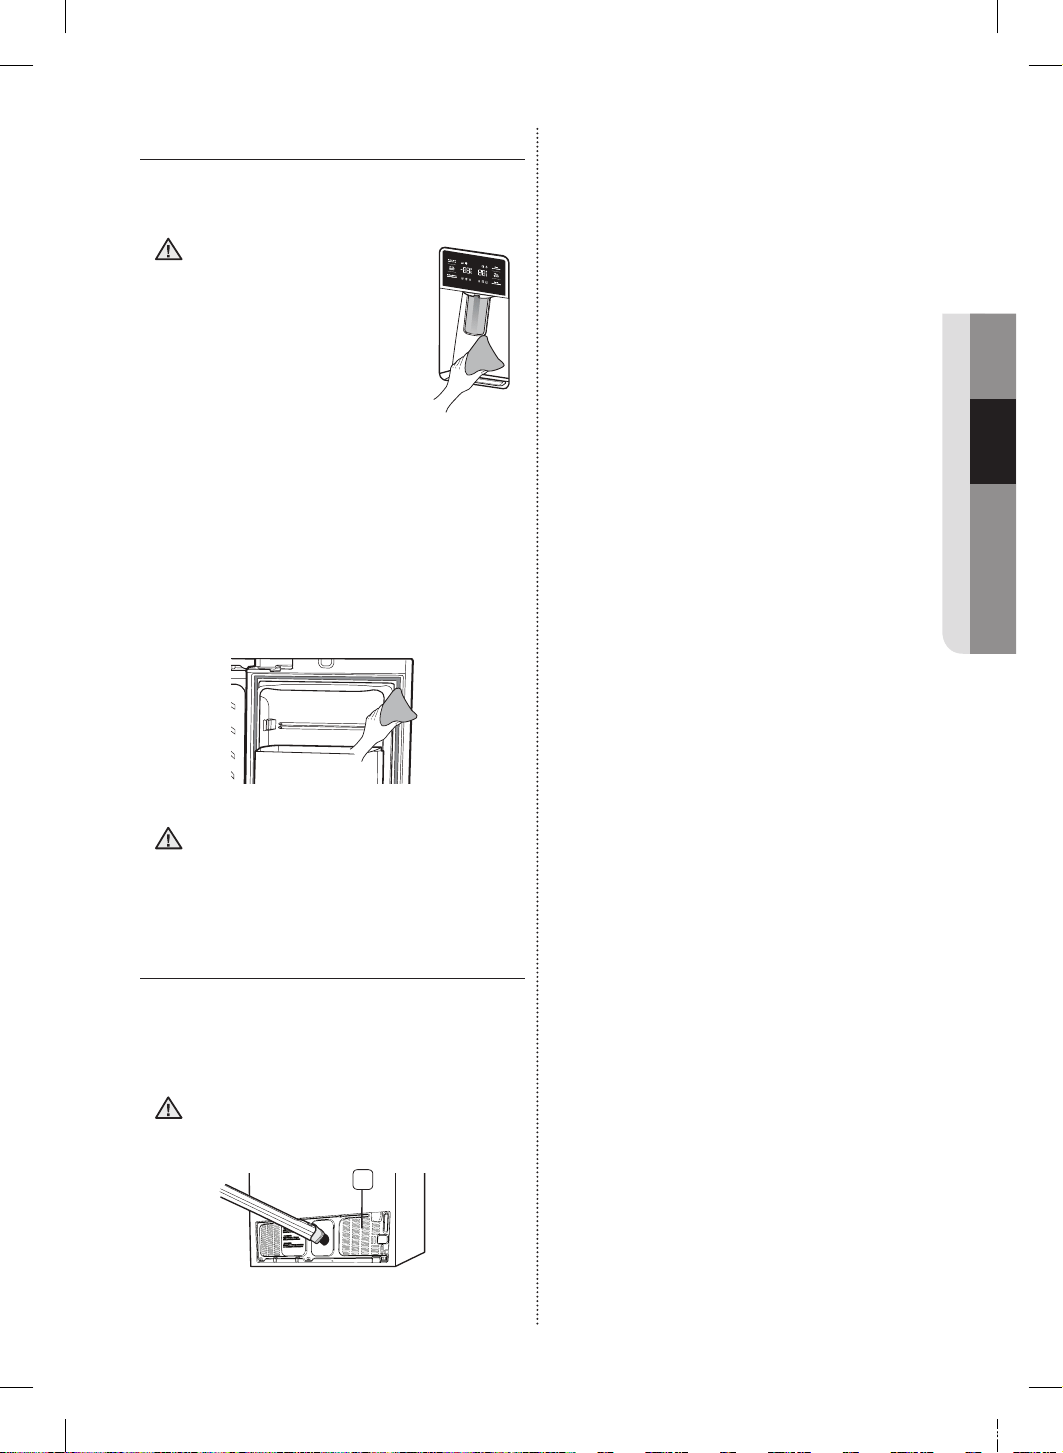
Cleaning the Ice / Water Dispenser
Wipe the Ice / Water Dispenser with a clean and
soft cloth.
When using the crushed
ice selection from the
dispenser some residual
ice chips may start to
collect in the ice chute.
To prevent that residual ice
from melting and running
out of the chute you should
clean out the residual ice
when you see it start to
collect in the ice chute.
If the rubber door seals are dirty, the doors may
not close properly, and the refrigerator will not
operate eciently. Keep the door seals free of
dust or stains by cleaning the doors with a mild
detergent and damp cloth. Wipe dry with a clean,
soft cloth.
Do not clean the refrigerator with
benzene, thinner, or car detergent.
These substance could cause a fire.
Cleaning the rear side of the
refrigerator
To keep cords and exposed parts free of dust and
dirt accumulation.
Vacuum the rear side of the appliance once or
twice a year.
Do not remove the back cover ( 1 ).
You could suer an electric shock.
1
CAUTION
CAUTION
CAUTION
DA68-02601A-16.indb 25 2018. 10. 8. 오후 4:32
26_ operating
FOOD STORAGE TIPS
Foods Refrigerator Freezer Storage Tips
DAIRY PRODUCTS
Butter 2-3 Weeks 6-9 Months Wrap or cover tightly.
Milk 1-2 Weeks Not recommended
Check date code. Most milk and similar prod-
ucts are sold in date-coded cartons that indicate
a products’s peak freshness. Re-seal with cap
or wrap tightly. Do not return unused portions to
original container.
Cream Cheese, cheese
food, and cheese spread
2-4 Weeks Not recommended
Check date code. Keep all cheese tightly packed
in moisture proof wrap
Hard Cheese (unopened) 3-4 Months 6 Months
Hard Cheese (opened) 2 Months Not recommended
Cottage Cheese 10-15 Days Not recommended
Cream 7-10 Days 2 Months Check date code. Most yogurt, creams, and
similar products are sold in date-coded cartons
that indicate a product’s peak freshness. Re-seal
or cover tightly. Do not return unused portions to
original container.
Sour Cream 2 Weeks Not recommended
Cream Dips (opened) 1 Week Not recommended
Yogurt 10-14 Days Not recommended
Check date code. Keep covered.
Frozen Yogurt na 2 Months
EGGS
Eggs (uncooked) 3-4 Weeks Not recommended
Check date code. Store eggs in coldest part of
refrigerator and in their original container.
Eggs (cooked) 1 Week Not recommended Store in covered container
Leftover egg dishes 3-4 Days Not recommended Store in covered container
FRESH FRUITS
Apples 1 Month Not recommended
If storing in refrigerator, do not wash fruit before
storing. Store in moisture resistant bags or
containers. Wrap cut fruits. Some fruits darken
when refrigerated.
Bananas 2-4 Days Not recommended
Peaches, Melons, Pears,
Avocados
3-5 Days Not recommended
Berries and Cherries 2-3 Days 12 Months
Apricots 3-5 Days Not recommended
Grapes 2-5 Days na
Pineapple (un-cut) 2-3 Days Not recommended
Pineapple (cut) 5-7 Days 6-12 Months
Citrus 1-2 Weeks Not recommended Store uncovered.
Juice 6 Days Not recommended
Check date code and re-seal in original con-
tainer. Do not return unused portions to original
container.
Frozen Juice Thawing only 12 Months Check date code. Do not re-freeze.
DA68-02601A-16.indb 26 2018. 10. 8. 오후 4:32
operating _27
02 OPERATING
Foods Refrigerator Freezer Storage Tips
FISH AND SHELLFISH
Fish
Fatty Fish (mack-
erel, trout, salmon)
1-2 Days 2-3 Months
Keep in original wrapper and store in coldest part of
refrigerator. Package in vapor-proof and moisture
proof wrap for freezer. Freeze at 0ºF(or -18°C ).
Thaw in refrigerator or check date code. Freeze in
original packaging.
Lean Fish (cod,
flounder, etc)
1-2 Days 6 Months
Frozen or Breaded na 3 Months
Shellfish
Shrimp (uncooked) 1-2 Days 12 Months
To freeze, package in vapor-proof and moisture-proof
container.
Crab 3-5 Days 10 Months
Cooked Fish or
Shellfish
2-3 Days 3 Months
MEAT
Fresh, Uncooked
Chops 2-4 Days 6-12 Months
Check date code for use. Store in coldest part of
refrigerator in original packaging. Package in moisture-
proof and vapor-proof container for freezing. Recom-
mended refrigerator temperature 33ºF to 36ºF (or
1°C to 2°C ) and freezer temperature 0ºF to 2ºF (or
-18°C to -16°C )
Ground 1 Day 3-4 Months
Roast 2-4 Days 6-12 Months
Bacon 1-2 Weeks 1-2 Months
Sausage 1-2 Days 1-2 Months
Steak 2-4 Days 6-9 Months
Poultry 1 Day 12 Months
Lunch meat 3-5 Days 1 Month
Cooked
Meat 2-3 Days 2-3 Months
Check date code for use. Store in coldest part of
refrigerator in original packaging. Package in moisture-
proof and vapor-proof container for freezing.
Poultry 2-3 Days 4-5 Months
Ham 1-2 weeks 1-2 Months
Sources:
American Meat Institute Foundation. 1994. Yellow pages: answers to predictable questions consumers ask about
meat and poultry. American Meat Institute Food Marketing Institute. 1999. The food keeper. Food Marketing Institute,
Washington, D.C. Freeland-Graves, J.H. and G.C. Peckham. 1996. Foundations of food preparation, 6th ed. Prentice-
Hall, Inc. Englewood Clis, NJ. Hillers, V.N. 1993. Storing foods at home. Washington State University Cooperative
Extension, Pullman, WA. Publ. EB 1205.
National Restaurant Association. 2001. Be cool-chill out! Refrigerate promptly. National Restaurant Association
Education Foundation¼s International Food Safety Council, Washington, D.C. USDA. 1997. Basics for handling food
safely. U.S. Department of Agriculture, Food Safety and Inspection Service, Washington, D.C.
DA68-02601A-16.indb 27 2018. 10. 8. 오후 4:32
28_ Troubleshooting
Troubleshooting
PROBLEM SOLUTION
The refrigerator
does not work at
all or it does not
chill suciently.
• Check if the power plug is properly connected.
• Check if the set temperature on the digital display is warmer than the freezer or fridge
inner temperature. If it is, set the refrigerator colder.
• Is the refrigerator in direct sunlight or located near a heat source?
• Is the back of the refrigerator too close to the wall, preventing proper ventilation?
The food in the
fridge is frozen.
• Check if the set temperature on the digital display is too low.
• Try setting the refrigerator to a warmer temperature.
• Is the temperature in the room too low? Set the refrigerator warmer.
• Did you store the food which is juicy in the coldest part of the refrigerator? Try moving
those items to the other shelves in the fridge instead of keeping them in the colder
areas or bins.
You hear unusual
noise or sounds.
• Check if the refrigerator is level and stable.
• Is the back of the refrigerator too close to the wall, preventing proper ventilation?
Try moving the back of the refrigerator at least 2 inches from the wall.
• Was anything dropped behind or under the refrigerator?
• A “ticking” sound is heard from inside the refrigerator. This is normal and occurs
because various accessories are contracting or expanding according to the
temperature of the refrigerator interior.
• If it sounds as if something is hitting something else inside the refrigerator, this is normal.
The sound is caused by the compressor operating at high capacity.
The cabinet-door
sealing area of the
appliance is hot
and condensation
is occurring.
• Some heat is normal as anti-condensators are installed in the vertical hinged section
of the refrigerator to prevent condensation.
• Is the refrigerator door ajar? Condensation can occur when you leave the door open
for a long time.
Ice Maker is not
producing ice.
• Did you wait for 12 hours after installation of the water supply line before making ice?
• Is the water line connected and the shut-o valve opened?
• Did you manually stop the ice making function?
• Is the freezer temperature too warm? Try setting the freezer temperature lower.
You can hear
water bubbling in
the refrigerator.
• This is normal. The bubbling comes from refrigerant circulating through the refrigerator.
There is a bad
smell in the
refrigerator.
• Check for spoiled food.
• Foods with strong odors (for example, fish) should be tightly covered.
• Clean out your freezer periodically and throw away any spoiled or suspicious food.
Frost forms on
the walls of the
freezer.
• Is the air vent blocked? Remove any obstructions so air can circulate freely.
• Allow sucient space between the stored foods for ecient air circulation.
• Is the freezer drawer closed properly?
Water dispenser
is not functioning.
• Is the water line connected and the shut-o valve opened?
• Has the water supply line tubing been crushed or kinked?
• Make sure the tubing is free and clear of any obstruction.
• Is the water tank frozen because the fridge temperature is too low?
Try selecting a warmer setting on the Digital display.
Auto close
system does not
work with the
freezer door.
• Is there an imbalance between the right and left parts of the door?
• Open and close the door smoothly 1~2 times.
After you do this, the auto close system usually works properly again.
• Try opening the door smoothly to avoid unbalancing the right and the left part of the
door.
DA68-02601A-16.indb 28 2018. 10. 8. 오후 4:32

Warranty (USA)
WARRANTY ON SAMSUNG REFRIGERATOR
LIMITED WARRANTY (U.S.A.)
SAMSUNG REFRIGERATOR
LIMITED WARRANTY TO ORIGINAL CONSUMER PURCHASER WITH PROOF OF PURCHASE
This SAMSUNG brand product, as supplied and distributed by Samsung Electronics America, Inc. (SAMSUNG)
and delivered new, in the original carton to the original consumer purchaser, is warranted by SAMSUNG against
manufacturing defects in materials or workmanship for the limited warranty period of:
One (1) year parts and labor
Five (5) years parts and labor on Sealed Refrigeration System Only (Compressor, Evaporator, Condenser, Drier,
and Connecting Tubing)
Ten (10) years part and Five (5) years labor on Digital Inverter Compressor Only
This limited warranty is valid only on products purchased and used in the United States that have been installed,
operated, and maintained according to the instructions attached to or furnished with the product. To receive
warranty service, the purchaser must contact SAMSUNG at the address or phone number provided below
for problem determination and service procedures. Warranty service can only be performed by a SAMSUNG
authorized service center. The original dated bill of sale must be presented upon request as proof of purchase to
SAMSUNG or SAMSUNG’s authorized service center to receive warranty service.
SAMSUNG will provide in-home service within the contiguous United States during the warranty period at no
charge, subject to availability of SAMSUNG authorized servicers within the customer’s geographic area. If in-
home service is not available, SAMSUNG may elect, at its option, to provide transportation of the product
to and from an authorized service center. If the product is located in an area where service by a SAMSUNG
authorized servicer is not available, you may be responsible for a trip charge or required to bring the product to a
SAMSUNG authorized service center for service.
To receive in-home service, product must be unobstructed and accessible to the service agent.
During the applicable warranty period, a product will be repaired, replaced, or the purchase price refunded,
at the sole option of SAMSUNG. SAMSUNG may use new or reconditioned parts in repairing a product, or
replace the product with a new or reconditioned product. Replacement parts and products are warranted for the
remaining portion of the original product’s warranty or ninety (90) days, whichever is longer. All replaced parts
and products are the property of SAMSUNG and you must return them to SAMSUNG.
This limited warranty covers manufacturing defects in materials or workmanship encountered in normal
household, noncommercial use of this product and shall not cover the following: damage that occurs in
shipment, delivery, installation, and uses for which this product was not intended; damage caused by
unauthorized modification or alteration of the product; product where the original factory serial numbers have
been removed, defaced, changed in any way, or cannot be readily determined; cosmetic damage including
scratches, dents, chips, and other damage to the product’s finishes; damage caused by abuse, misuse, pest
infestations, accident, fire, floods, or other acts of nature or God; damage caused by use of equipment, utilities,
services, parts, supplies, accessories, applications, installations, repairs, external wiring or connectors not
supplied or authorized by SAMSUNG; damage caused by incorrect electrical line current, voltage, fluctuations
and surges; damage caused by failure to operate and maintain the product according to instructions; in-home
instruction on how to use your product; and service to correct installation not in accordance with electrical or
plumbing codes or correction of household electrical or plumbing (i.e., house wiring, fuses, or water inlet hoses).
The cost of repair or replacement under these excluded circumstances shall be the customer’s responsibility.
Visits by an authorized servicer to explain product functions, maintenance or installation are not covered by this
limited warranty. Please contact SAMSUNG at the number below for assistance with any of these issues.
DA68-02601A-16.indb 29 2018. 10. 8. 오후 4:32

EXCLUSION OF IMPLIED WARRANTIES
IMPLIED WARRANTIES, INCLUDING THE IMPLIED WARRANTIES OF MERCHANTABILITY OR FITNESS FOR A
PARTICULAR PURPOSE, ARE LIMITED TO ONE YEAR OR THE SHORTEST PERIOD ALLOWED BY LAW. Some
states do not allow limitations on how long an implied warranty lasts, so the above limitations or exclusions may not
apply to you. This warranty gives you specific rights, and you may also have other rights, which vary from state to
state.
LIMITATION OF REMEDIES
YOUR SOLE AND EXCLUSIVE REMEDY IS PRODUCT REPAIR, PRODUCT REPLACEMENT, OR REFUND OF THE
PURCHASE PRICE AT SAMSUNG’S OPTION, AS PROVIDED IN THIS LIMITED WARRANTY. SAMSUNG SHALL NOT
BE LIABLE FOR SPECIAL, INCIDENTAL OR CONSEQUENTIAL DAMAGES, INCLUDING BUT NOT LIMITED TO TIME
AWAY FROM WORK, HOTELS AND/OR RESTAURANT MEALS, REMODELING EXPENSES, LOSS OF REVENUE
OR PROFITS, FAILURE TO REALIZE SAVINGS OR OTHER BENEFITS REGARDLESS OF THE LEGAL THEORY ON
WHICH THE CLAIM IS BASED, AND EVEN IF SAMSUNG HAS BEEN ADVISED OF THE POSSIBILITY OF SUCH
DAMAGES. Some states do not allow exclusion or limitation of incidental or consequential damages, so the above
limitations or exclusions may not apply to you. This warranty gives you specific rights, and you may also have other
rights, which vary from state to state.
SAMSUNG does not warrant uninterrupted or error-free operation of the product. No warranty or guarantee given by
any other person, firm, or corporation with respect to this product shall be binding on SAMSUNG.
To obtain warranty service, please contact SAMSUNG at:
Samsung Electronics America, Inc.
85 Challenger Road
Ridgefield Park, NJ 07660
1-800-SAMSUNG (726-7864)
www.samsung.com/us/support
DA68-02601A-16.indb 30 2018. 10. 8. 오후 4:32

In case the need for servicing arises
Do not hesitate to call any Samsung Authorized Service Center nearby giving them your name, address and telephone
number when your product is not functioning properly.
Warranty Information (CANADA)
Limited Warranty for Original Purchaser
This Samsung product is warranted by Samsung Electronics Canada Inc. (hereafter referred to as SECA) against
manufacturing defects in material or workmanship for the following periods:
Labor : 1 years (in-home)
Parts : 1 years
Inverter Compressor : 10 years (Part only)
SECA further warrants that if this product fails to operate properly within the specified warranty period and the failure is
due to improper workmanship or defective material, SECA will repair or replace the product at its option.
All warranty repairs or part replacements must be performed by a SECA Authorized Service Center. (To find the nearest
SECA Service Center, call 1-800-SAMSUNG (7267864) or visit our web site at www.samsung.com/ca)
Obligation to the Original Owner
The original dated sales receipt must be retained by the customer and is the only acceptable proof of purchase.
It must be presented to a SECA Authorized Service Center at the time service is requested before warranty services
are rendered. On all carry-in models, transportation to and from the Authorized Service Center is the responsibility of
the customer.
Exclusions of the Warranty
This warranty does not cover damage due to accident, fire, flood, and/or other Acts of God, misuse, incorrect line
voltage, improper installation, improper or unauthorized repairs, commercial use, or damage that occurs during
shipping. Customer adjustments which are explained in this owners manual are not covered under the terms of this
warranty. This warranty will automatically be voided for any unit found with a missing or altered serial number.
This warranty is valid only on products purchased and used in the Canada.
SAMSUNG CUSTOMER CARE CENTER
Samsung Electronics Canada Inc. 2050 Derry Road West, Mississauga, Ontario L5N 0B9 Canada
1-800-SAMSUNG (726-7864)
www.samsung.com/ca/support (English)
www.samsung.com/ca_fr/support (French)
DA68-02601A-16.indb 31 2018. 10. 8. 오후 4:32
Scan the QR code* or visit
www.samsung.com/spsn
to view our helpful
How-to Videos and Live Shows
*
Requires reader to be installed on your
smartphone
Contact SAMSUNG WORLD WIDE
If you have any questions or comments relating to Samsung products, please contact the SAMSUNG
customer care center.
COUNTRY CALL OR VISIT US ONLINE AT WRITE
U.S.A
1-800-SAMSUNG(726-7864)
1-844-SAM-PAYS (726-7297)
www.samsung.com/us/support
Samsung Electronics America, Inc.
85 Challenger Road Ridgefield Park,
NJ 07660
CANADA
1-800-SAMSUNG(726-7864)
1-844-SAM-PAYS (726-7297)
www.samsung.com/ca/support (English)
www.samsung.com/ca_fr/support (French)
Samsung Electronics Canada Inc. 2050
Derry Road West, Mississauga, Ontario
L5N 0B9 Canada
DA68-02601A-16.indb 32 2018. 10. 8. 오후 4:32

Imagine las posibilidades
RF263TE****
RF263BE****
Electrodoméstico independiente
Español
Refrigerador
manual del usuario
Gracias por adquirir este producto Samsung.
DA68-02601A-16.indb 1 2018. 10. 8. 오후 4:32
2_ información sobre seguridad
información sobre seguridad
INFORMACIÓN SOBRE SEGURIDAD
• Antes de utilizar su nuevo refrigerador Samsung,
lea detenidamente este manual a fin de aprender a
usar las funciones que ofrece de manera segura y
eficiente.
• Este electrodoméstico no debe ser utilizado
por personas (incluidos niños) con capacidades
mentales, sensoriales o físicas reducidas, o por
personas que carezcan de experiencia y de
conocimientos, a menos que se encuentren bajo
supervisión o hayan recibido las instrucciones de
uso por parte de un responsable de su seguridad.
Se deberá vigilar a los niños para asegurarse de que
no jueguen con el electrodoméstico.
• Debido a que las siguientes instrucciones
corresponden a diversos modelos, es posible
que las características de su refrigerador difieran
ligeramente de las que se describen en este
manual.
• Si tiene alguna duda, comuníquese al
1-800-SAMSUNG o encuentre ayuda e información
en línea en www.samsung.com.
• Se utiliza R-600a o R-134a como refrigerante. Mire
la etiqueta del compresor en la parte posterior del
electrodoméstico o la etiqueta de voltaje dentro
del refrigerador para constatar qué refrigerante
fue utilizado en su refrigerador. Si este producto
contiene gas inflamable (Refrigerante R-600a),
comuníquese con las autoridades locales para
desechar este producto en forma segura.
• Es peligroso que una persona que no sea un
técnico de servicio autorizado realice tareas de
reparación en este aparato.
Advertencia:
riesgo de
incendio/
materiales
inflamables
Símbolos y advertencias de
seguridad importantes:
ADVERTENCIA
Riesgos o prácticas inseguras que pueden causar
graves lesiones personales o incluso la muerte.
PRECAUCIÓN
Riesgos o prácticas inseguras que pueden causar
leves lesiones personales o daños materiales.
NO lo intente.
NO lo desarme.
NO lo toque.
Siga atentamente las instrucciones.
Desconecte el enchufe de la pared.
Asegúrese de que el refrigerador esté
conectado a tierra para evitar una
descarga eléctrica.
Comuníquese con el centro de contacto
para obtener ayuda.
Nota.
Estas señales de advertencia se incluyen
aquí para evitar lesiones a usted y a terceros.
Sígalas atentamente.
Después de leer esta sección, consérvela en
un lugar seguro para referencia futura.
ADVERTENCIA SOBRE LA STATE
OF CALIFORNIA PROPOSITION
65
• Cáncer y Daño Reproductivo - www.P65Warnings.
ca.gov.
SEÑALES DE ADVERTENCIA
IMPORTANTES PARA LA
INSTALACIÓN
• No instale el refrigerador en un lugar
húmedo o que se encuentre en contacto
con agua.
- El aislamiento deteriorado de las piezas eléctricas
puede provocar una descarga eléctrica o un
incendio.
• No exponga este refrigerador a la luz solar directa ni
al calor de cocinas, calefactores u otros artefactos.
• No enchufe varios artefactos en el mismo toma
múltiple. El refrigerador debe conectarse siempre
a una toma de corriente individual cuyo voltaje
nominal coincida con el que se especifica en la
placa de voltaje del refrigerador.
- Este procedimiento brinda el mejor rendimiento y
también impide que se sobrecarguen los circuitos
del cableado de la casa, lo cual podría provocar un
riesgo de incendio a causa de cables recalentados.
• Si el enchufe de pared está flojo, no conecte el
cable.
ADVERTENCIA
ADVERTENCIA
DA68-02601A-16.indb 2 2018. 10. 8. 오후 4:32
información sobre seguridad _3
- Existe el riesgo de que se produzca una descarga
eléctrica y causar un incendio.
• No utilice un cable que esté dañado o gastado en
toda su extensión o en cualquiera de los extremos.
• No doble excesivamente el cable de alimentación ni
coloque elementos pesados sobre él.
- No tire del cable de alimentación ni lo doble
excesivamente.
• No retuerza ni amarre el cable de alimentación.
• No coloque el cable de alimentación sobre un
objeto metálico, no coloque sobre él ningún objeto
pesado, no lo coloque entre objetos ni lo empuje
hacia el espacio que hay detrás del aparato.
- Al mover el refrigerador, tenga cuidado de no
enroscar el cable de alimentación o dañarlo.
- Esto podría causar una descarga eléctrica o un
incendio.
• Este refrigerador debe colocarse de manera tal que
se pueda acceder al enchufe.
- No seguir esta recomendación puede causar una
descarga eléctrica o un incendio debido a una fuga
de electricidad.
• Mantenga el espacio de ventilación en el gabinete
o estructura de montaje del refrigerador libre de
obstáculos.
• No intente reparar, desarmar ni modificar el
refrigerador usted mismo.
- No utilice ningún fusible (tales como los de
alambres de acero, de cobre, etc.) que no sea el
fusible estándar.
- Cuando sea necesario reparar o reinstalar el
refrigerador, comuníquese con su Centro de
Servicio más cercano.
- No seguir esta recomendación puede causar
descargas eléctricas, incendios, problemas con el
producto o lesiones.
• Para obtener el mejor ahorro de energía de este
producto, deje todos los estantes, cajones y cestas
en su posición original como se muestra en la
ilustración anterior.
• Nunca desenchufe el refrigerador tirando del cable
de alimentación. Siempre sostenga el enchufe con
firmeza y tire para extraerlo del toma de corriente.
- Los daños al cable pueden provocar un
cortocircuito, un incendio o una descarga eléctrica.
• No utilice aerosoles cerca del refrigerador.
- Si se utilizan aerosoles cerca del refrigerador puede
causar una explosión o un incendio.
• No instale este refrigerador cerca de calefactores o
materiales inflamables.
• No instale este refrigerador en un lugar húmedo,
engrasado o sucio, en una ubicación expuesta
directamente a la luz del sol o al agua (lluvia).
• No instale el refrigerador en un lugar donde pueda
haber pérdidas de gas.
- Esto podría causar una descarga eléctrica o un
incendio.
• Este refrigerador debe instalarse de
manera apropiada y ubicarse de acuerdo
con las instrucciones del manual antes de
usarse.
• Conecte el enchufe en la posición correcta con el
cable colgando hacia abajo.
- Si conecta el enchufe al revés, el cable puede
cortarse y provocar un incendio o una descarga
eléctrica.
• Al mover el refrigerador, tenga cuidado de no
enroscar el cable de alimentación o dañarlo.
- Esto representa un riesgo de incendio.
• Asegúrese de que el enchufe no esté aplastado o
dañado por la parte posterior del refrigerador.
• Mantenga los materiales de embalaje fuera del
alcance de los niños.
- Existe el riesgo de muerte por asfixia si un niño se
coloca los materiales de embalaje en la cabeza.
• El refrigerador debe colocarse de manera tal
que se pueda acceder al enchufe después de la
instalación.
• Es necesario quitar toda la película plástica
protectora antes de enchufar el producto por
primera vez.
• El refrigerador debe estar conectado a
tierra de manera segura.
- Siempre asegúrese de haber conectado el
refrigerador a tierra antes de intentar examinar o
reparar alguna pieza. Las fugas de energía pueden
provocar una descarga eléctrica grave.
• Nunca utilice tubos de gas, líneas telefónicas o
potenciales fuentes de atracción de rayos como
conexión a tierra.
- El uso inapropiado de la conexión a tierra puede
traer como consecuencia un riesgo de descarga
eléctrica. Si necesita usar un cable de extensión,
use sólo uno de tres hilos con un enchufe que
tenga una tercera punta para el polo a tierra; el
toma de corriente deberá tener 3 ranuras para
adaptarse al enchufe del refrigerador. La potencia
indicada en el cable de extensión debe ser CA115-
120 V, 10 A o superior. Si se utiliza un adaptador
de tierra, asegúrese de que el receptáculo esté
conectado correctamente a tierra.
• Si el cable de alimentación está dañado,
solicite su reemplazo inmediato al
fabricante o al agente de servicios.
• Debe poder accederse a la toma de pared
con facilidad para que el electrodoméstico
pueda desenchufarse rápidamente en caso de
emergencia.
• Debe encontrarse fuera de la zona trasera del
electrodoméstico.
• Cuando instale el electrodoméstico, asegúrese de
que el cable de alimentación no esté atrapado ni
dañado.
• No ubique varias regletas de tomacorrientes
portátiles o unidades de alimentación móviles en la
parte trasera del electrodoméstico.
• No almacene sustancias explosivas como latas de
DA68-02601A-16.indb 3 2018. 10. 8. 오후 4:32

4_ información sobre seguridad
aerosoles con gases propelentes inflamables en
este electrodoméstico.
PRECAUCIONES PARA LA
INSTALACIÓN
• Deje espacio suficiente para instalar el
refrigerador sobre una superficie plana.
- Si su refrigerador no está nivelado, es posible que
el sistema de enfriamiento interno no funcione
correctamente.
• Mantenga el espacio de ventilación en el gabinete
o estructura de montaje del refrigerador libre de
obstáculos.
• El refrigerador debe permanecer en posición vertical
durante dos horas después de la instalación.
• Recomendamos que este refrigerador lo instale un
técnico calificado o una compañía de servicios.
- No seguir esta recomendación puede causar
descargas eléctricas, incendio, explosión,
problemas con el producto o lesiones.
• Este refrigerador debe estar conectado a tierra
correctamente.
• No conecte el refrigerador a tierra en una tubería de
gas, tubería de agua de plástico o línea telefónica.
- El refrigerador debe estar conectado a tierra para
evitar cualquier fuga de energía o descarga eléctrica
provocada por fugas de corriente del refrigerador.
- Esto podría causar descargas eléctricas, incendios,
explosión o problemas con el producto.
- Nunca enchufe el cable de alimentación en un
enchufe que no esté correctamente conectado a
tierra y asegúrese de que esta conexión se realice
según los códigos locales y nacionales.
• Conecte bien el enchufe al enchufe de pared. No
utilice enchufes o cables de alimentación dañados
ni enchufes de pared flojos.
- Esto podría causar una descarga eléctrica o un
incendio.
• Se recomienda que un técnico calificado o una
compañía de servicios realicen la instalación de este
electrodoméstico o cualquier tipo de servicios.
• No seguir esta recomendación puede causar
descargas eléctricas, incendio, explosión,
problemas con el producto o lesiones.
• No toque el enchufe con las manos mojadas.
- Esto podría causar una descarga eléctrica.
• No coloque elementos en la parte superior del
refrigerador.
• Cada vez que abra o cierre la puerta, éstos pueden
caerse y provocar lesiones personales o daños
materiales.
• No utilice ni coloque ninguna sustancia sensible a la
temperatura tales como pulverizadores inflamables,
objetos inflamables, hielo seco, medicinas o
químicos cerca o dentro del refrigerador.
• No almacene sustancias u objetos volátiles o
inflamables (benceno, solvente, gas propano,
alcohol, éter, gas licuado y cualquier otro producto
de este tipo, etc.) en el refrigerador.
PRECAUCIÓN
- Este refrigerador se debe utilizar solo para
almacenar alimentos.
- Esto podría causar un incendio o una explosión.
• En caso de sentir olor a fármacos o a humo,
desenchufe el refrigerador de inmediato y
comuníquese con el Centro de Servicio de
Samsung Electronics
ADVERTENCIAS MUY
IMPORTANTES PARA EL USO
• No conecte el enchufe con las manos
mojadas.
• No coloque elementos en la parte superior del
refrigerador.
- Cada vez que abra o cierre la puerta, éstos pueden
caerse y provocar lesiones personales o daños
materiales.
• No coloque un recipiente con agua sobre el
refrigerador.
- Si se derrama, existe el riesgo de que se produzca
un incendio o una descarga eléctrica.
• Se deberá vigilar a los niños para asegurarse de que
no jueguen con el refrigerador.
- Aleje los dedos de los puntos de agarre; los
espacios entre las puertas y el gabinete son
necesariamente pequeños. Abra las puertas con
cuidado si hay niños cerca.
• No permita que los niños se cuelguen de la puerta.
Pueden producirse lesiones graves.
• No permita que los niños ingresen al refrigerador.
Los niños podrían quedar atrapados.
• No coloque las manos debajo del refrigerador.
- Es posible que algunas puntas filosas le provoquen
lesiones.
• No permita que los niños se paren sobre la cubierta
de un cajón.
- El cajón se puede romper y los niños pueden
caerse.
• No sobrecargue el refrigerador con comida.
- Cuando abra la puerta, algún elemento puede
caerse y provocar lesiones personales o daños
materiales.
• No toque las paredes internas del congelador, ni
los productos almacenados en éste con las manos
mojadas.
- Puede provocar congelación.
• Nunca coloque los dedos u otros objetos en el
hueco del dispensador de agua, en el recipiente de
hielo o en la cubeta de la fábrica de hielo.
- Es posible que provoque lesiones personales o
daños materiales.
• No pulverice con gas inflamable cerca del
refrigerador.
- Existe el riesgo de que se produzca una explosión
o un incendio.
• No almacene sustancias volátiles o inflamables en
el refrigerador.
- Si se almacena benceno, solvente, alcohol, éter,
gas licuado y otros productos similares, se pueden
ADVERTENCIA
DA68-02601A-16.indb 4 2018. 10. 8. 오후 4:32
información sobre seguridad _5
provocar explosiones.
• No almacene en el refrigerador productos
farmacéuticos, materiales científicos ni productos
sensibles a la temperatura.
- No se deben almacenar productos que requieran
controles estrictos de temperatura.
• No coloque ni utilice aparatos eléctricos dentro
del refrigerador, a menos que sean del tipo
recomendado por el fabricante. No se pare sobre
el refrigerador ni coloque objetos (tales como
ropa, velas o cigarrillos encendidos, platos,
productos químicos, objetos metálicos, etc.) sobre
el refrigerador. Esto podría causar descargas
eléctricas, incendios, problemas con el producto o
lesiones. No coloque un recipiente con agua sobre
el refrigerador.
- Si se derrama, existe el riesgo de que se produzca
un incendio o una descarga eléctrica.
• No utilice dispositivos mecánicos ni cualquier
otro medio para acelerar el proceso de
descongelamiento, que no sean aquellos
recomendados por el fabricante.
• No dañe el circuito refrigerante.
• No pulverice material volátil tal como un insecticida
sobre la superficie del refrigerador.
- Además de ser perjudicial para los seres humanos,
puede causar también descargas eléctricas,
incendio o problemas con el producto.
• No mire fijamente la lámpara de LED UV durante
mucho tiempo.
- Los rayos ultravioletas podrían dañarle la visión.
• No desarme ni repare el refrigerador usted
mismo.
- Corre el riesgo de provocar un incendio,
funcionamiento incorrecto y/o lesiones personales.
- Si el LED interior o exterior se ha apagado,
comuníquese con los agentes de servicio técnico.
• Se deberá vigilar a los niños para
asegurarse de que no jueguen con el
refrigerador.
- Aleje los dedos de los puntos de agarre: los
espacios entre las puertas y el gabinete son
necesariamente pequeños. Abra las puertas con
cuidado si hay niños cerca. No permita que los
niños se cuelguen de la puerta. De lo contrario, es
posible que se produzca una lesión grave. Riesgo
de que los niños se queden encerrados. No permita
que los niños ingresen al refrigerador.
• Las botellas se deben almacenar una junto a otra
de manera tal que no se caigan.
• Este producto se debe utilizar sólo para almacenar
alimentos en un entorno doméstico.
• Si se detecta una fuga de gas, evite llamas o
posibles fuentes de inflamación y ventile el ambiente
en el que se encuentra el refrigerador durante varios
minutos.
- No toque el electrodoméstico ni el cable de
alimentación.
- No utilice un ventilador.
- Una chispa puede provocar una explosión o un
incendio.
• Si el producto cuenta con lámparas de LED, no
desarme la Cubierta de la Lámpara y la lámpara de
LED usted mismo.
- Comuníquese con su agente de servicio.
• Utilice solamente lámparas de LED proporcionadas
por el fabricante o por el agente de servicios.
a) El refrigerador debe permanecer en posición
vertical durante dos horas después de la
instalación.
b) Para obtener el mejor rendimiento del producto,
1) No coloque alimentos muy cerca de las
rejillas de ventilación de la parte posterior del
refrigerador ya que pueden obstruir la libre
circulación del aire en el congelador.
2) Envuelva los alimentos adecuadamente
o colóquelos en recipientes herméticos
antes de almacenarlos en el refrigerador o
congelador.
3) No coloque alimentos frescos en el
congelador cerca de los alimentos ya
congelados.
c) No coloque botellas, recipientes de vidrio ni
bebidas carbonatadas en el congelador.
- El recipiente puede congelarse y romperse, y
esto puede ocasionar lesiones.
d) Cumpla con los tiempos máximos de
almacenamiento y las fechas de vencimiento de
los alimentos congelados.
e) No es necesario desenchufar el refrigerador
si se ausentará menos de tres semanas. Pero
retire todos los alimentos si se ausentará
durante tres semanas o más. Desenchufe el
refrigerador, límpielo, enjuáguelo y séquelo.
• Quite frecuentemente todas las sustancias extrañas,
tales como polvo y agua, de las terminales del
enchufe y de los puntos de contacto con un paño seco.
- Desconecte el enchufe y límpielo con un paño seco.
• Antes de limpiar o realizar el mantenimiento,
desenchufe el refrigerador del enchufe de pared.
- No seguir esta recomendación puede causar una
descarga eléctrica o un incendio.
• En caso de sentir olor a quemado o a
humo, desenchufe el refrigerador de
inmediato y comuníquese con el Centro de
Servicio de Samsung Electronics.
• Si le resulta difícil cambiar la luz, comuníquese con
un agente de servicio.
• Si el producto cuenta con lámparas de LED, no
desarme la cubierta de la lámpara y la lámpara de
LED usted mismo.
- Comuníquese con su agente de servicio.
• Si el refrigerador tiene polvo o agua, desenchúfelo
y comuníquese con el Centro de Servicio de
Samsung Electronics.
- Si no lo hace, existe el riesgo de que se produzca
un incendio.
DA68-02601A-16.indb 5 2018. 10. 8. 오후 4:32

6_ información sobre seguridad
PRECAUCIONES DE USO
• No vuelva a congelar alimentos que se
hayan descongelado completamente. No
coloque bebidas carbonatadas o con gas
en el compartimento del congelador. No
coloque botellas ni recipientes de vidrio en
el congelador.
- Cuando el contenido se congela, el vidrio puede
romperse y provocar lesiones personales.
• Utilice solamente la fábrica de hielo del refrigerador.
Sólo una persona adecuadamente calificada
deberá instalar/conectar el suministro de agua
al refrigerador y solo deberá ser conectado al
suministro de agua potable. A fin de que la fábrica
de hielo funcione correctamente, se necesita
una presión de agua de 20 ~ 125 psi. Si viaja
por vacaciones o negocios y no utilizará los
dispensadores de agua o hielo, cierre la válvula de
agua.
- Si no lo hace, pueden producirse fugas de agua.
• Retire el exceso de humedad del interior del
refrigerador y deje las puertas abiertas.
- Si no lo hace, pueden aparecer olores y moho.
• Garantía de servicio y modificación.
- El servicio de garantía de Samsung no cubre
los cambios o modificaciones realizados por un
tercero a este refrigerador; Samsung tampoco
es responsable de los problemas relacionados
con la seguridad que puedan surgir a causa de
modificaciones hechas por terceros.
• No obstruya las tomas de aire.
- Si las tomas de aire están bloqueadas, en particular
con una bolsa de plástico, el refrigerador se puede
sobrecongelar. Si el período de enfriamiento es
demasiado prolongado, el filtro del agua puede
romperse y provocar fugas de agua.
• Si se desconecta el refrigerador del suministro de
energía, espere al menos cinco minutos antes de
volver a enchufarlo.
• Si tiene planificado tomarse unas largas vacaciones
o si el refrigerador no se utilizará durante mucho
tiempo, debe vaciarlo y desenchufarlo.
- Si se deja el refrigerador encendido por mucho
tiempo sin utilizarlo, se puede deteriorar el
aislamiento y provocar un incendio.
- Retire el exceso de humedad del interior del
refrigerador y deje las puertas abiertas. Si no lo
hace, pueden aparecer olores y moho.
• Para obtener el mejor rendimiento del producto:
- No coloque alimentos muy cerca de las rejillas de
ventilación de la parte posterior del refrigerador ya
que pueden obstruir la libre circulación del aire en el
refrigerador.
- Envuelva los alimentos adecuadamente o
PRECAUCIÓN
colóquelos en recipientes herméticos antes de
almacenarlos en el refrigerador.
• Llene el tanque de agua, la charola para el hielo y
los cubos de agua solamente con agua potable.
• Si el producto está lleno de agua,
comuníquese con el Centro de Servicio
más cercano.
- Existe el riesgo de que se produzca una descarga
eléctrica o un incendio.
• No guarde aceite vegetal en los compartimientos
de la puerta del refrigerador. El aceite puede
solidificarse y modificar su sabor y la facilidad de
uso. Asimismo, el envase abierto puede gotear
y el aceite vertido puede causar grietas en el
compartimiento de la puerta. Una vez abierto el
envase de aceite, es mejor almacenarlo en un lugar
fresco y a la sombra, como un armario o alacena.
- Ejemplos de aceite vegetal: aceite de oliva, de maíz,
de semilla de uva, etc.
PRECAUCIONES PARA LA
LIMPIEZA
• No pulverice con agua directamente
dentro o fuera del refrigerador.
- Existe el riesgo de que se produzca un incendio o
una descarga eléctrica.
• No utilice un secador de cabello dentro del
refrigerador. No coloque velas encendidas en el
refrigerador para quitar los malos olores.
- Esto podría causar una descarga eléctrica o un
incendio.
• Retire cualquier sustancia extraña o polvo
de las clavijas del enchufe. No utilice un
paño mojado ni húmedo para limpiar el
enchufe.
- De lo contrario, existe el riesgo de que se produzca
un incendio o una descarga eléctrica.
• Desenchufe el refrigerador antes de limpiarlo o
repararlo.
• Utilice una esponja limpia o un paño suave y un
detergente neutro disuelto en agua templada para
limpiar el refrigerador.
• No utilice limpiadores abrasivos ni muy fuertes,
como limpiacristales, limpiadores corrosivos,
líquidos inflamables, ácido clorhídrico, ceras
limpiadoras, detergentes concentrados,
blanqueadores o limpiadores que contengan
petróleo en las superficies exteriores (puertas y
paneles), piezas de plástico, revestimientos de
puertas e interiores y sellos.
PRECAUCIÓN
DA68-02601A-16.indb 6 2018. 10. 8. 오후 4:32
información sobre seguridad _7
- Pueden rayar o dañar el material.
• No limpie con agua templada los estantes o las
cubiertas de vidrio cuando estén fríos, estos
pueden romperse si se exponen a cambios bruscos
de temperatura o a impactos como golpes o
caídas.
ADVERTENCIAS MUY
IMPORTANTES PARA LA
ELIMINACIÓN
• Riesgo de que los niños se queden
encerrados. Antes de eliminar su antiguo
refrigerador o congelador:
- Retire las puertas.
- Deje los estantes en su lugar de manera tal
que los niños no puedan entrar fácilmente al
electrodoméstico.
• Deseche el material de embalaje de este producto
de forma que no resulte nocivo para el medio
ambiente.
• Deje los estantes en su lugar de manera tal que
los niños no puedan trepar dentro del refrigerador
fácilmente. Asegúrese de que ninguno de los tubos
que se encuentran detrás del refrigerador estén
dañados antes de desecharlos.
• Se utiliza R600a o R134a como refrigerante.
Controle la etiqueta del compresor en la parte
posterior del refrigerador o la etiqueta del voltaje
dentro del refrigerador para constatar qué
refrigerante fue utilizado en su refrigerador. Si este
producto contiene gas inflamable (Refrigerante
R600a), comuníquese con las autoridades locales
para desechar este producto en forma segura.
• Cuando deseche este refrigerador, retire los
burletes y los pestillos de las puertas de manera tal
que los niños pequeños o los animales no puedan
quedarse atrapados en el interior.
Se deberá vigilar a los niños para asegurarse de que
no jueguen con el refrigerador.
Se utiliza ciclopentano como aislante. Los gases del
material de aislamiento requieren un procedimiento
ADVERTENCIA
especial de eliminación.
• Comuníquese con las autoridades locales para
desechar este producto de manera que no resulte
nocivo para el medio ambiente.
Asegúrese de que ninguno de los tubos que se
encuentran en la parte trasera del refrigerador estén
dañados antes de desecharlos.
• Cuando utiliza esta función, el consumo de energía
del refrigerador aumenta.
• Recuerde desactivarla cuando no la necesite y
restablezca el ajuste de temperatura original del
congelador.
poder de congelación
• Si necesita congelar gran cantidad de comida,
active la función Power Freeze (Poder de
congelación) como mínimo 24 horas antes.
• Nunca coloque los dedos u otros objetos en el
hueco del dispensador, en el recipiente de hielo o
en la cubeta de la fábrica de hielo.
- Puede provocar lesiones personales o daños
materiales.
ESTE ELECTRODOMÉSTICO
ESTÁ DISEÑADO PARA USO
DOMÉSTICO Y EN LUGARES
COMO
• zonas de cocina de tiendas, oficinas y otros
entornos de trabajo
• granjas y zonas de uso de los clientes en hoteles,
moteles u otros entornos de tipo residencial
• hospederías
• banqueterías y eventos en instalaciones similares
contenido
PUESTA A PUNTO DEL REFRIGERADOR DE PUERTA FRANCESA …………………… 08
FUNCIONAMIENTO DEL REFRIGERADOR DE PUERTA FRANCESA ………………… 16
SOLUCIÓN DE PROBLEMAS ……………………………………………………………… 28
DA68-02601A-16.indb 7 2018. 10. 8. 오후 4:32
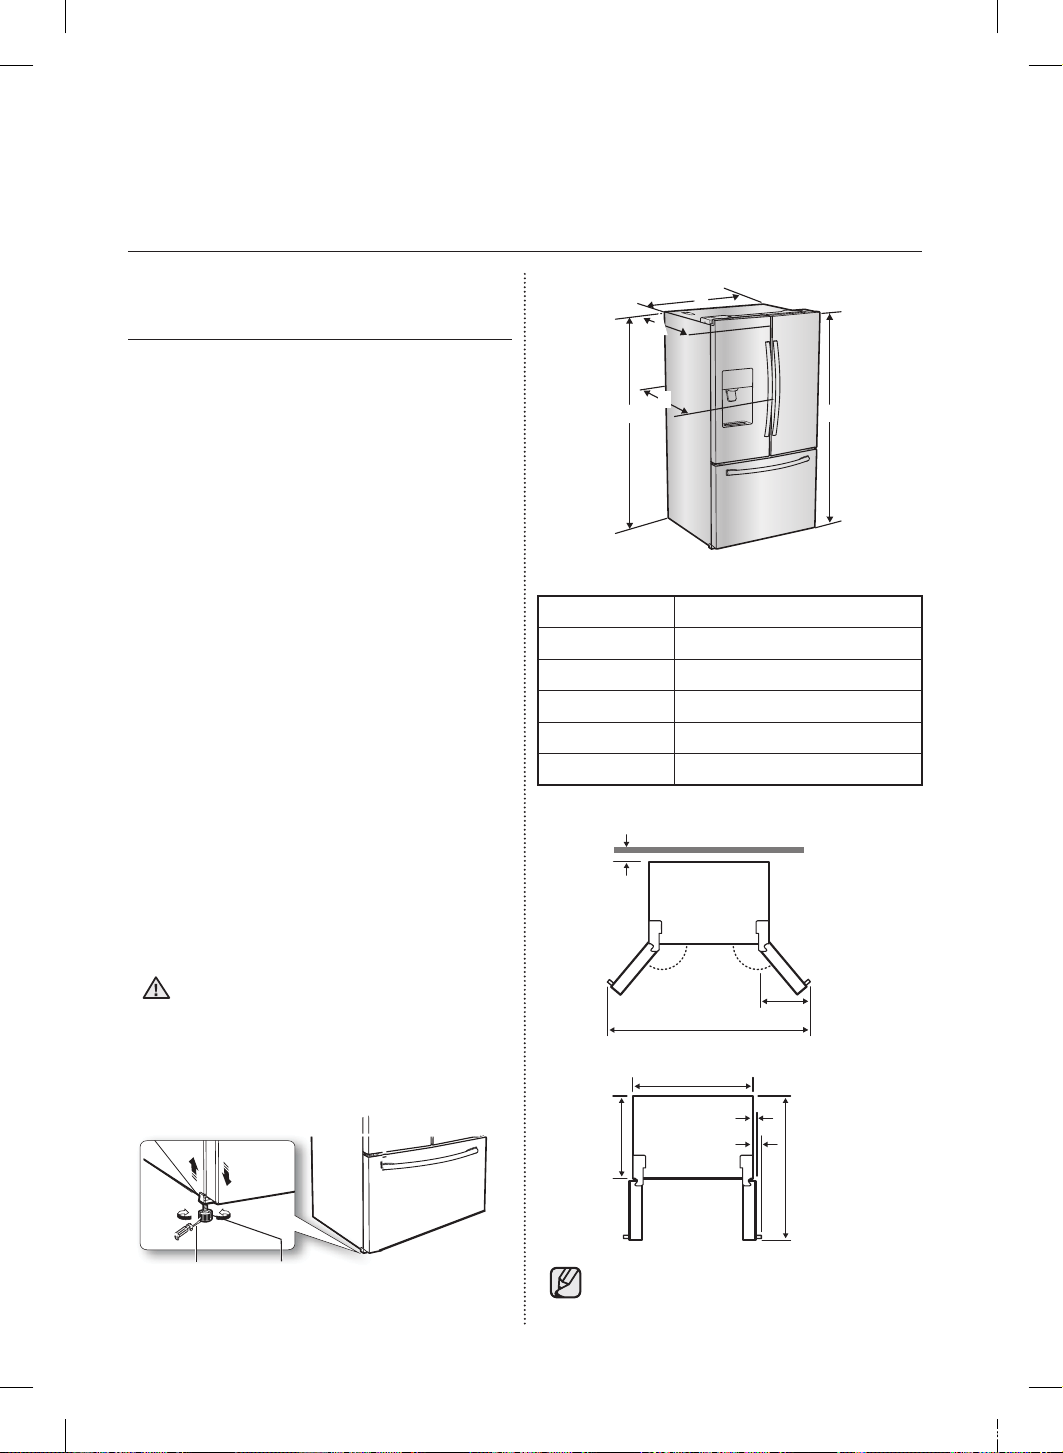
8_ Puesta a punto
Puesta a punto del refrigerador
de puerta francesa
PREPARACIÓN PARA LA
INSTALACIÓN DEL REFRIGERADOR
Felicitaciones por haber adquirido este refrigerador
de puerta francesa Samsung.
Esperamos que disfrute las funciones y ventajas
de vanguardia que ofrece este nuevo refrigerador.
Selección de la mejor ubicación para el
refrigerador
• Una ubicación con fácil acceso a un suministro
de agua.
• Una ubicación sin exposición directa a la luz
solar.
• Una ubicación en la que el piso esté nivelado.
• Una ubicación con suficiente espacio para
que las puertas del refrigerador se abran
fácilmente.
• Una ubicación que deje el espacio libre
suficiente a la derecha, izquierda, atrás y arriba
del refrigerador para la circulación del aire.
• Una ubicación que permita mover fácilmente
el refrigerador si necesita mantenimiento o
reparación.
• No instale el refrigerador en un sitio donde la
temperatura sea inferior a 50 ºF (10 ºC).
• No coloque el refrigerador en un lugar en el
que pueda mojarse.
Cuando mueva el refrigerador
Para evitar que se dañe el piso,
asegúrese de que las patas de ajuste
delanteras estén en posición vertical
(sobre el piso). Consulte ‘Ajuste del nivel’
en el manual (página 12).
Destornillador de
punta chata (-)
Palanca de control
PRECAUCIÓN
B
A
C
E
D
B
A
C
E
D
Modelo RF263T** / RF263B**
Profundidad “A” 33 1/2” (850mm)
Ancho “B” 35 3/4” (909mm)
Altura “C” 68 3/8” (1737mm)
Altura Total “D” 70” (1778mm)
Profundidad “E” 35 3/4” (910mm)
63 3/4
”
(1620 mm)
13 3/8”
(340 mm)
140° 140°
2”
(50 mm)
35 3/4”
(909 mm)
29 1/4”
(745 mm)
48 ”
(1220 mm)
1 5/8”
(40 mm)
3 3/4”
(95 mm)
• Las mediciones aquí se basan en la
dimensión del diseño, que puede diferir
dependiendo del método de medición.
DA68-02601A-16.indb 8 2018. 10. 8. 오후 4:32
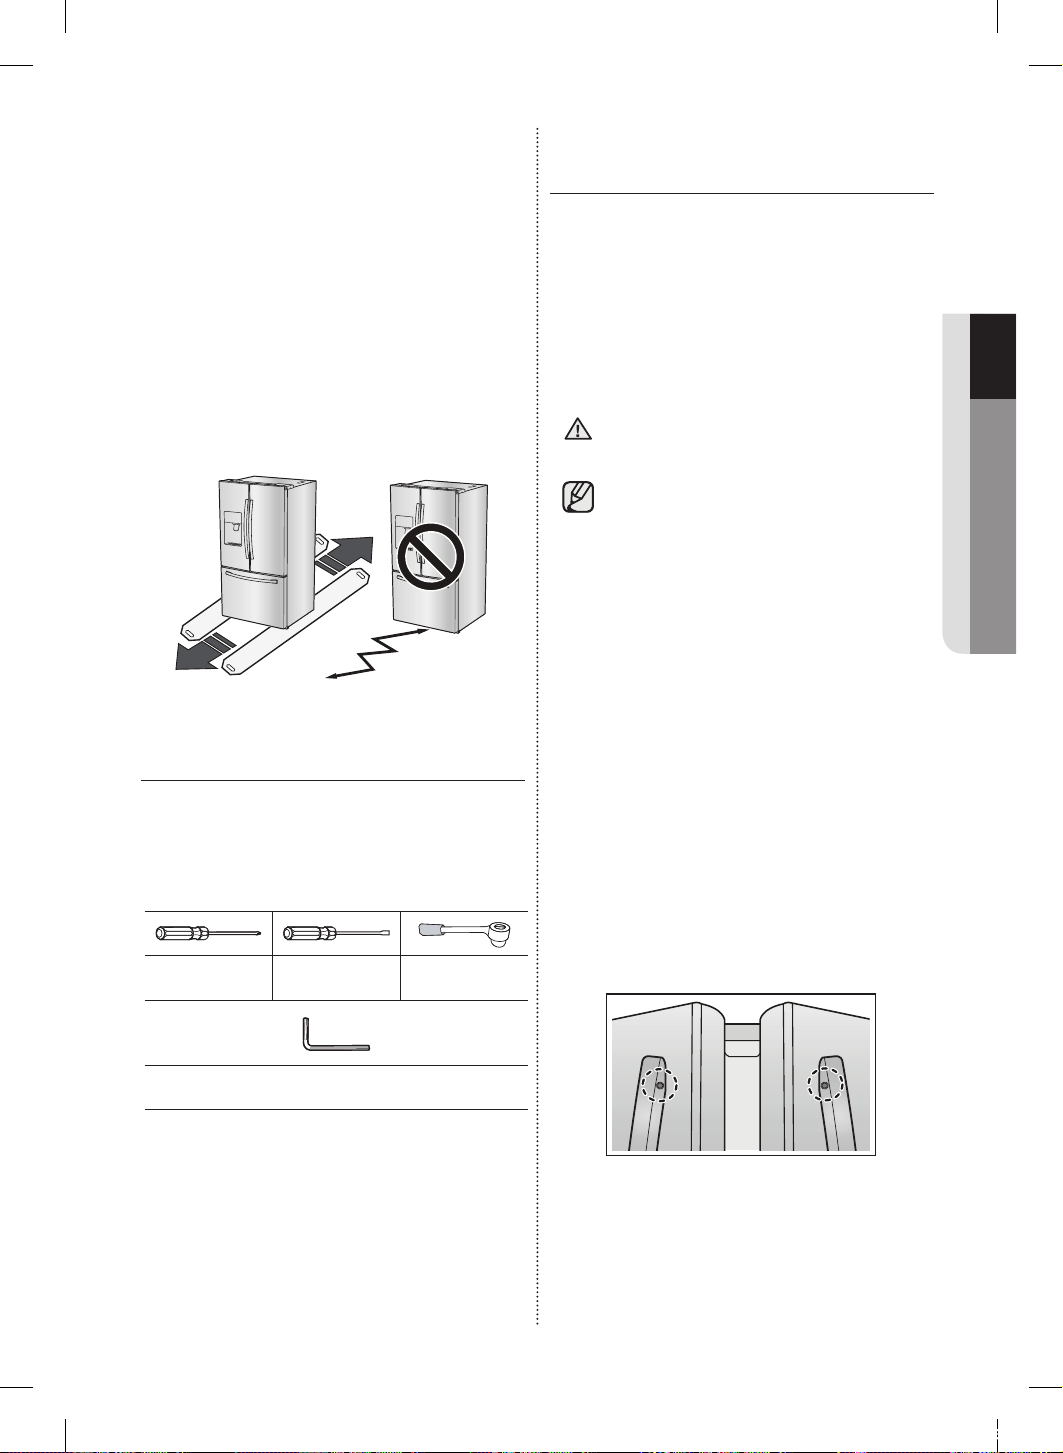
Puesta a punto _9
01 PUESTA A PUNTO
PISO
Para realizar una instalación correcta, se debe
colocar el refrigerador sobre una superficie
nivelada de material rígido que tenga la misma
altura que la del resto del piso. Esta superficie
debe ser lo suficientemente resistente como para
soportar el peso de un refrigerador completamente
cargado o aproximadamente 335lbs (152kg).
Para proteger el acabado del piso, corte una
hoja grande del cartón y colóquela debajo del
refrigerador mientras trabaja. Cuando mueva el
refrigerador, tire y empuje en forma recta hacia
adelante o hacia atrás. No lo mueva de lado a
lado.
HERRAMIENTAS NECESARIAS
Herramientas necesarias (No provistas)
Se necesitan las siguientes herramientas para
finalizar la instalación del refrigerador:
Destornillador
Philips (+)
Destornillador de
punta chata (-)
Llave de tubo
(10mm)
Llave Allen
(3/16”) (5 mm)
CÓMO RETIRAR LAS PUERTAS
DEL REFRIGERADOR
En algunas instalaciones se necesita retirar los
cajones del refrigerador y del congelador para
poder instalar el refrigerador en su ubicación final.
No retire las puertas/el cajón si no es necesario.
Si no necesita retirar las puertas del refrigerador,
diríjase a la sección Ajuste del nivel en la página 12.
Si debe retirar las puertas, continúe leyendo.
Antes de retirar la puerta/el cajón, asegúrese de
leer lo siguiente:
Disconnect power to the refrigerator
before removing the door or drawer.
• Tenga cuidado de no dejar caer la
puerta, ni dañar o rayar la puerta/el
cajón al retirarlos.
• Tenga cuidado al retirar las puertas o los
cajones.
Las puertas son pesadas y podría lastimarse.
• Vuelva a colocar la puerta/el cajón
correctamente para evitar:
- Humedad por fuga de aire.
- Alineación incorrecta de la puerta.
- Pérdida de energía a causa de una puerta mal
cerrada.
ENSAMBLE DE JALADERAS
Oriente cada manija de manera que el extremo
de la etiqueta quede arriba y los orificios con los
tornillos de sujeción queden frente a frente.
Luego siga las indicaciones siguientes para
instalar cada manija.
Usando un desarmador de cruz, fijar los tornillos
(Opcional) luego colocar la jaladera sobre el tornillo
y deslizar hacia abajo.
ADVERTENCIA
DA68-02601A-16.indb 9 2018. 10. 8. 오후 4:32
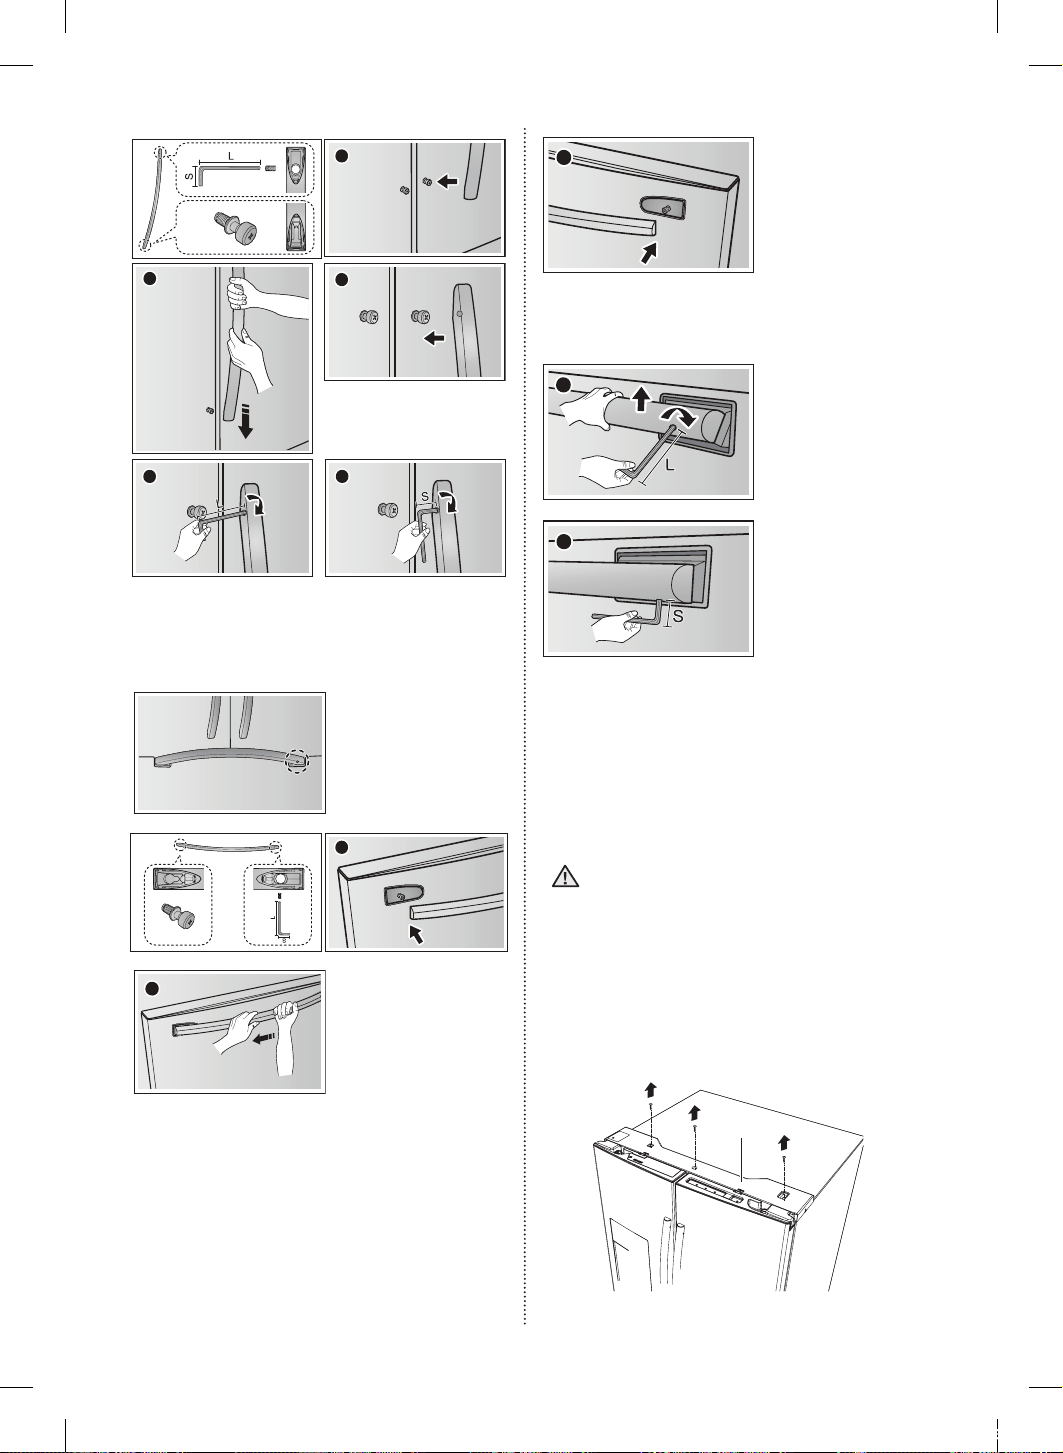
10_ Puesta a punto
2
1
3
5
4
Fije las jaladeras a las
puertas deslizándolas hacia
abajo firmemente.
tornillo
Ajuste con la llave Allen
Ensamble de jaladeras en la puerta del congelador
Verifique la dirección
del ensamble de las
jaladeras.
1
2
Fije las jaladeras a las
puertas deslizandolas
firmemente hacia el lado
izquierdo.
3
4
5
Incline la jaladera y apriete con la llave firmemente.
Desensamble de las puertas del
refrigerador
Tenga cuidado de no dejar caer
las puertas o rayarlas mientras las
desensambla.
Con la puerta abierta
1. Remueva 3 tornillos sosteniendo el TOP
TABLE ( 1 ) y gírela con los cables conectados.
( 1 )
PRECAUCIÓN
DA68-02601A-16.indb 10 2018. 10. 8. 오후 4:32

Puesta a punto _11
01 PUESTA A PUNTO
2. Desconecte los dos conectores ( 2 ) de la puerta
izquierda. Para retirar el acoplador del agua
de la bisagra gire y tire de él desde la bisagra.
Retire la tubería de agia ( 3 ) presionando la
pieza marcada ( 4 ) del acoplador de la tubería
de agua.
Antes de retirar el tubo, quite la grapa
roja del acoplador, si está instalada.
2
3
4
Grapa roja
(1/4”)
3. Tire y retire la palanca de la bisagra ( 5 ). Retire el
tornillo de conexión a tierra ( 6 ) conectado a las
bisagras superiores de la puerta izquierda con
un destornillador Pjilips (+). Retire las bisagras
superiores de las puertas izquierda y derecha ( 7 ).
5
6
7
4. Levante la puerta para retirarla.
5. Retire el tornillo ( 8 ) conectado a las bisagras
inferiores de las puertas izquierda y derecha con
un destornillador Philips (+). Retire los 2 tornillos de
cabezal hexagonal ( 9 ) conetados a las bisagras
inferiores de las puertas izquierda y derecha con
una llave Allen (3/16’’). Retire las bisagras inferiores
de las puertas izquierda y derecha ( 10 ).
Llave Allen
10
8
9
PRECAUCIÓN
REARMADO DE LAS PUERTAS
DEL REFRIGERADOR
Para volver a colocar las puertas del refrigerador
cuando éste se encuentra en su ubicación final,
monte las piezas en orden inverso.
1. La tubería de agua se debe insertar
completamente hasta el centro del acoplador
transparente para impedir que haya fugas de
agua del dispensador.
2. Inserte la grapa que se encuentra en la placa
superior y compruebe que quede bien fija.
Centro de acoplador transparente
Marcas de guia
Dispensador
- TIPO A - - TIPO B -
Al colocar los 3 tornillos nuevamente
asegúrese que los cables queden
dentro para no dañar el harness.
DESARMADO DE LA PUERTA DEL
CAJÓN FLEX
1. Retire el cajón superior levantándolo.
2. Extraiga la cesta inferior ( 1 ) levantándola de
los rieles.
1
3. Presione el gancho de fijación de los rieles.
PRECAUCIÓN
DA68-02601A-16.indb 11 2018. 10. 8. 오후 4:32
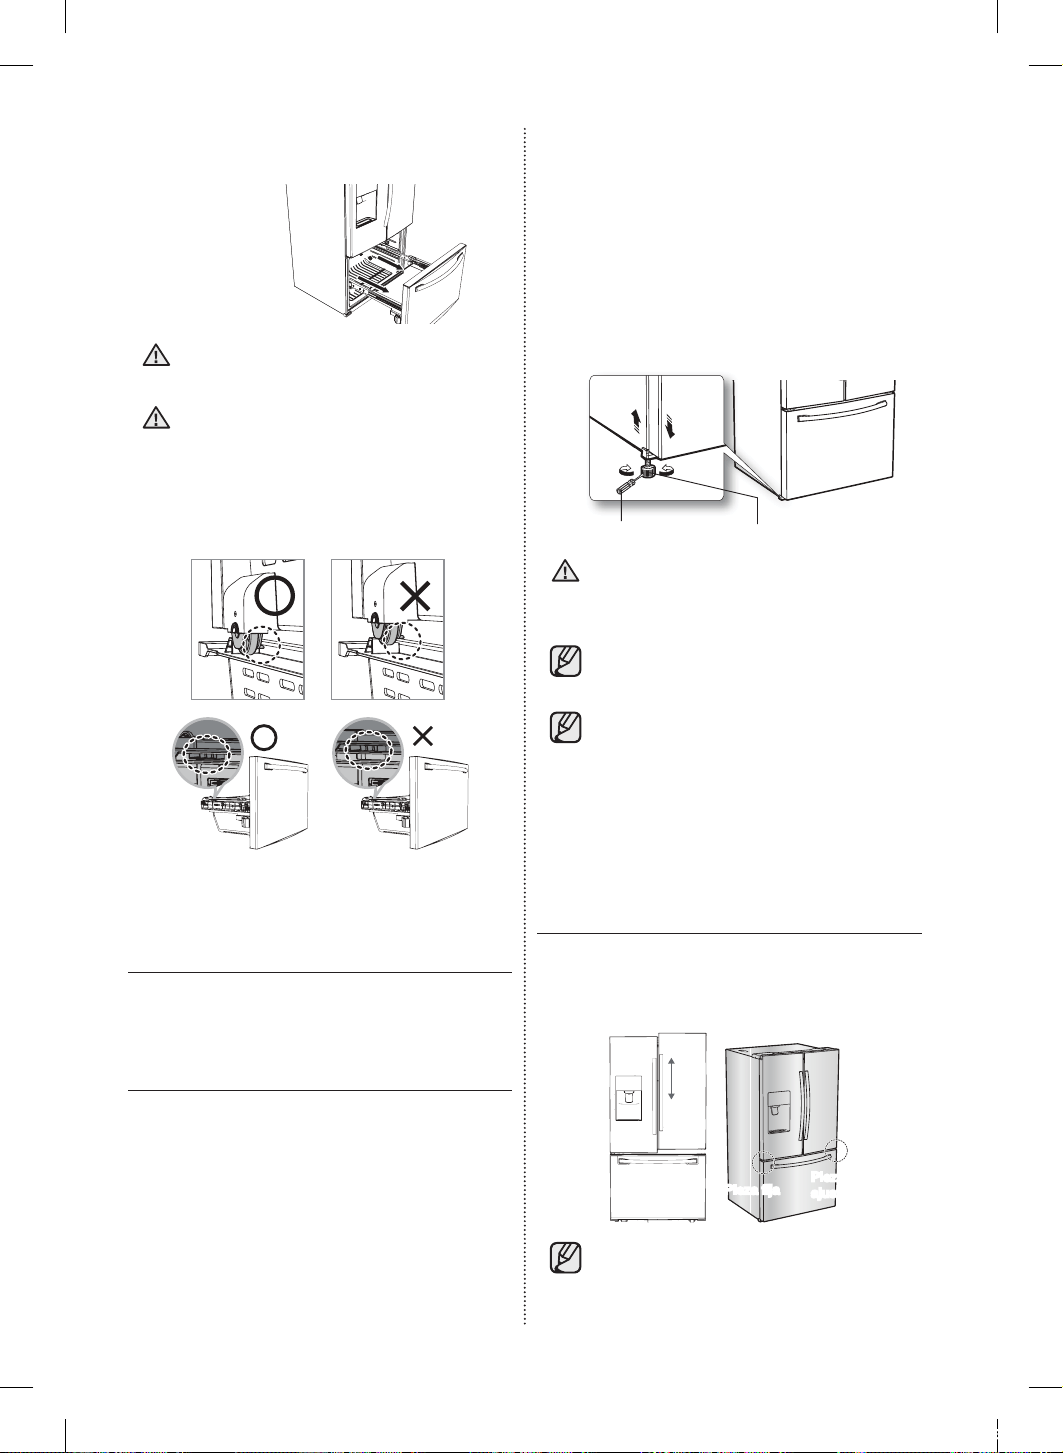
12_ Puesta a punto
4. Sostenga y hale la parte superior de la puerta
del congelador y retírela de los rieles.
Asegúrese de que no se raye el extremo
del riel deslizante si golpea el suelo.
Asegúrese de instalar la cesta del
congelador en la posición correcta
cuando retire/instale la puerta del
congelador.
No seguir esta recomendación puede
causar que la puerta no se abra o cierre
correctamente.
MONTAJE DEL CAJÓN DEL
CONGELADOR
Para volver a colocar el cajón cuando el
refrigerador se encuentra en su ubicación final,
monte las piezas en orden inverso.
AJUSTE DEL NIVEL
Asegúrese de que el refrigerador esté nivelado
antes de realizar los ajustes finales. Utilice
un nivelador para evaluar si el refrigerador se
encuentra nivelado tanto en los laterales como
en la parte trasera y delantera. Si el refrigerador
no está nivelado, las puertas no estarán
perfectamente alineadas, lo que podría provocar
condensación de humedad y costosas facturas
de energía. A continuación se explica cómo nivelar
el refrigerador si el lado izquierdo está a un nivel
inferior del lado derecho.
PRECAUCIÓN
PRECAUCIÓN
Cómo ajustar el nivel
1. Abra el cajón del congelador y extraiga la
cesta inferior.
2. Inserte un destornillador de punta chata (-) en
una muesca dentro de la palanca de control
izquierda y gírelo en el sentido contrario de
las agujas del reloj para nivelar el refrigerador.
(Se debe girar la palanca en el sentido de las
agujas del reloj para bajar el refrigerador y en
el sentido contrario de las agujas del reloj para
elevarlo).
destornillador de punta chata (-) Palanca de control
Ambas palancas de control deben tocar
el piso para impedir posibles lesiones
personales o daños materiales a causa
de la inclinación.
• Si el lado derecho está más bajo, realice
el mismo proceso, pero con la palanca
de control derecha.
• Es complicado quitar el frente de la
cubierta de las patas del refrigerador,
por lo tanto, no recomendamos realizar
pequeños ajustes con la palanca de
control. Consulte en la página siguiente
la mejor manera de realizar pequeños
ajustes en las puertas.
CÓMO HACER PEQUEÑOS
AJUSTES ENTRE LAS PUERTAS
Recuerde que se necesita que el refrigerador esté
nivelado para que las puertas estén perfectamente
alineadas. Si necesita ayuda, revise la sección
anterior sobre la nivelación del refrigerador.
Pieza de
ajuste
Pieza fija
• La puerta izquierda está fija. Para
realizar pequeños ajustes entre las
puertas, ajuste solamente la puerta
derecha.
PRECAUCIÓN
DA68-02601A-16.indb 12 2018. 10. 8. 오후 4:32
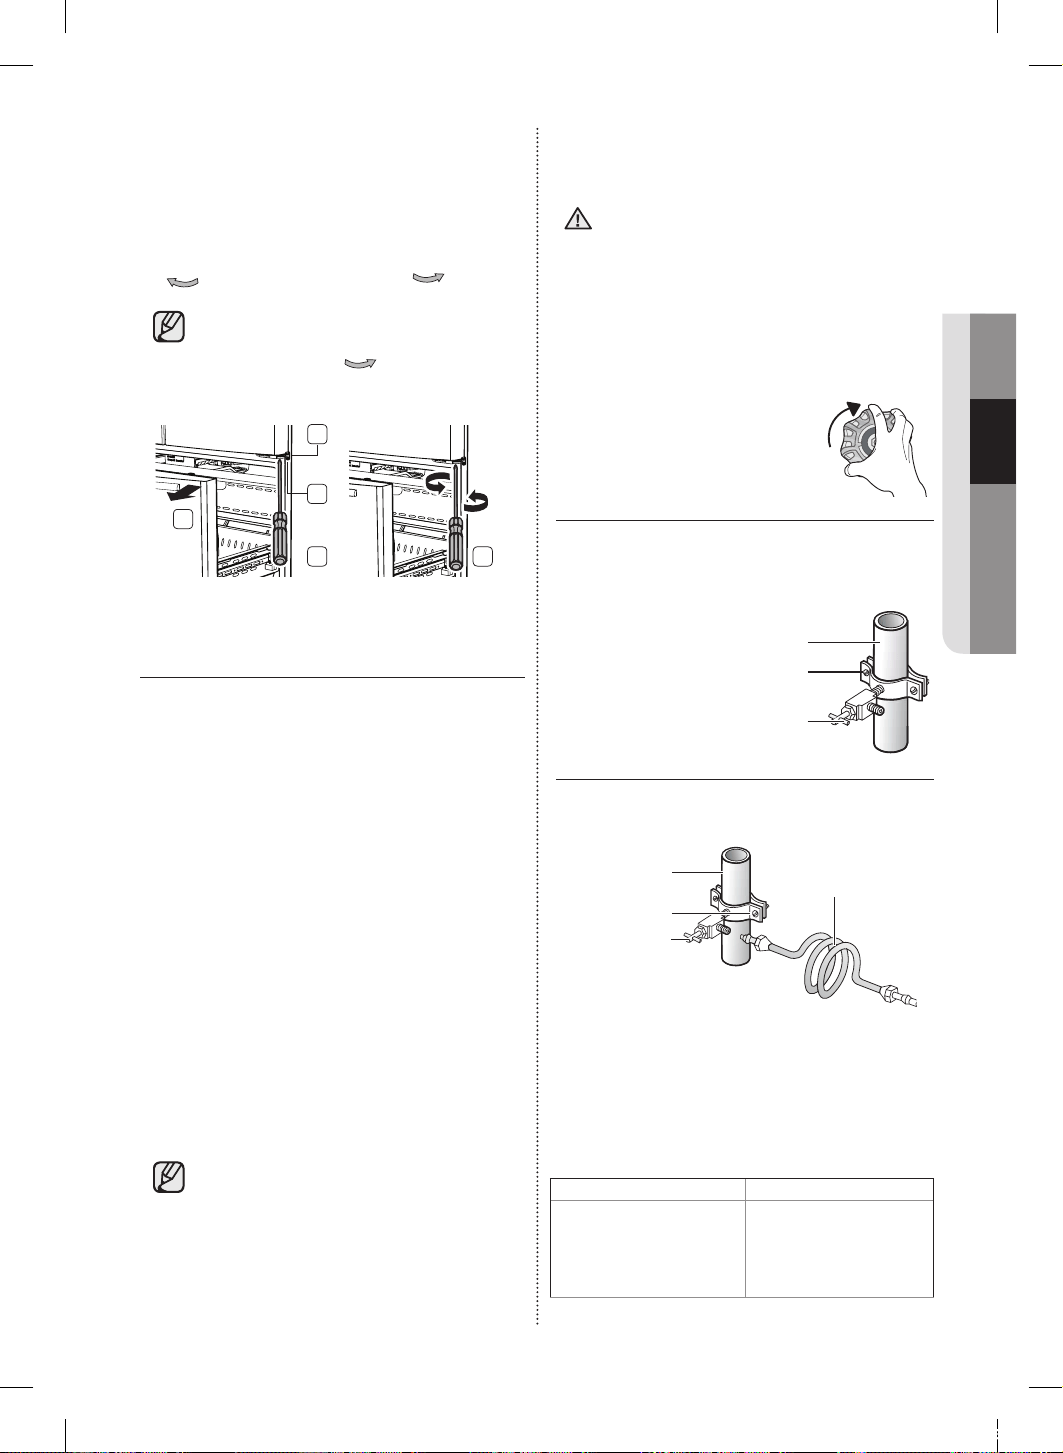
Puesta a punto _13
02 PUESTA A PUNTO
1. Extraiga el cajón del congelador ( 1 ), podrá ver
la bisagra inferior ( 2 ).
2. Inserte un destornillador Philips (+) ( 3 ) en el
eje ( 4 )de la bisagra inferior.
3. Ajuste la altura girando un destornillador Philips
(+) ( 3 ) en el sentido de las agujas del reloj (
ABAJO
) o en el sentido contrario (
ARRIBA
).
• Cuando se gira un destornillador Philips
(+) en el sentido contrario al de las
agujas del reloj (
ARRIBA
), la puerta se
levanta.
1
2
3
4
3
INSTALACIÓN DE LA TUBERÍA
DEL DISPENSADOR DE AGUA
El dispensador de agua con filtro es una de las
funciones útiles de su nuevo refrigerador.
Con el fin de promover la buena salud, el filtro de
agua elimina las partículas no deseadas del agua.
No obstante, no la esteriliza ni destruye los
microorganismos. Para eso, necesita adquirir un
sistema de purificación de agua.
La tuberia de agua tambien se tiene que conectar
a la Fabrica de Hielo.
A fin de que la fábrica de hielo funcione
correctamente, se necesita una presión de agua
de 20~125 psi (138~862 kPa).
Si el refrigerador se instala en una zona de presión
de agua baja (debajo de los 20 psi), puede instalar
una bomba cebadora para compensar la baja
presión.
Una vez conectada la tubería de agua, asegúrese
de que el tanque de almacenamiento de agua
dentro del refrigerador esté lleno. Para hacerlo,
presione la palanca del dispensador hasta que
salga el agua.
• Su distribuidor le podrá ofrecer los
kits de instalación de tuberías de
agua disponibles a un costo adicional.
Recomendamos utilizar un kit de
instalación de tubería de agua que
contenga tubería de cobre y una tuerca
de compresión de ¼”.
• Utilice solo las mangueras nuevas provistas con
el electrodoméstico. No reutilice las mangueras
antiguas.
Mantenga las aberturas de ventilación
del gabinete o estructura incorporada del
electrodoméstico libres de obstrucciones.
Conéctelo solamente a un suministro de
agua potable.
Conexión a la tubería de suministro
de agua
1. En primer lugar, cierre el
suministro de agua principal.
2. Ubique la tubería de agua potable fría más
cercana e instale la abrazadera y la válvula de
cierre.
Abrazadera
Tubería de agua fría
Válvula de cierre
3. Conecte el kit de instalación de la tubería de
agua a la válvula de cierre.
Válvula de cierre
Abrazadera
Tubería de
agua fría
Kit de instalación
de tubería
Conexión de la tubería de suministro
de agua al refrigerador.
Para llevar a cabo la conexión, necesita adquirir
varios elementos.
Posiblemente su ferretería local los venda todos
juntos en un kit.
Uso de la tubería de cobre
Uso de la tubería de plástico
• Tubería de cobre de ¼”
• Tuerca de compresión
de ¼” (1)
• Férula (2)
• Tubería de plástico de ¼”
- Extremo moldeado
(lámpara)
• Tuerca de compresión
de ¼” (1)
ADVERTENCIA
DA68-02601A-16.indb 13 2018. 10. 8. 오후 4:32
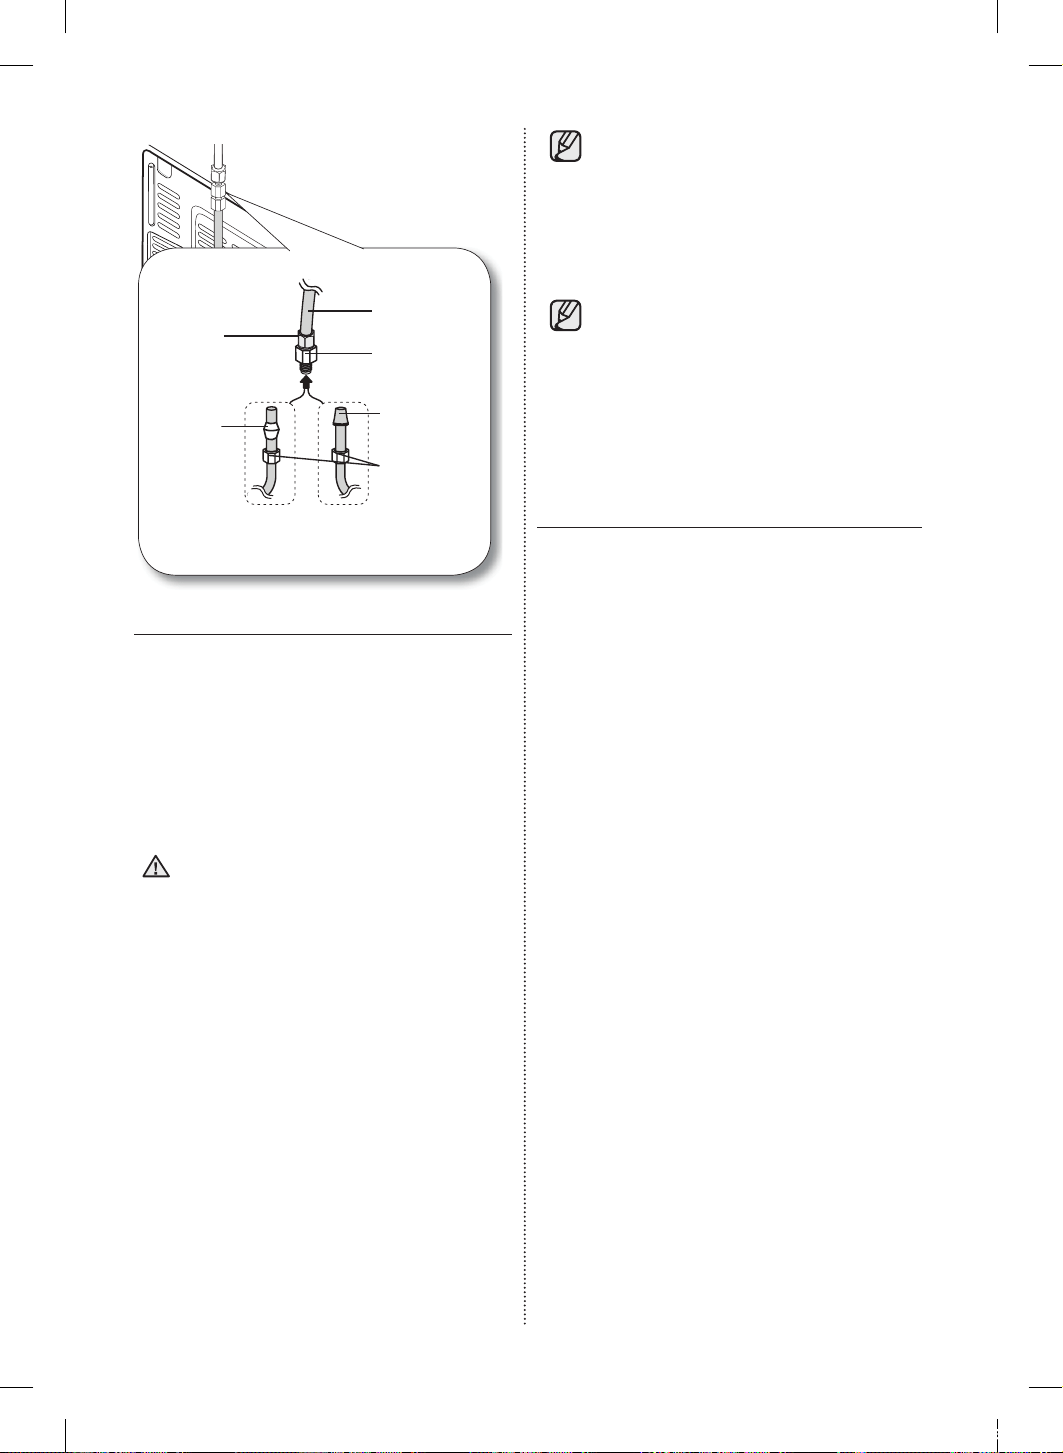
14_ Puesta a punto
Tuerca de
compresión
(1/4”)
(armada)
Férula
(No provista)
Tubería de
plástico
(armado)
Acople de
compresión
(armado)
Extremo moldeado
(lámpara)
Tuerca de
compresión (B)
(1/4”) (No provista)
o
Tubería de cobre
(No provista)
Tubería de plástico (B)
(No provista)
Tubería de suministro del agua corriente
Refrigerador
1. Conecte la tubería del agua corriente al acople
de compresión ensamblado.
- Si utiliza una tubería de cobre, deslice la tuerca
de compresión ( B ) (no suministrada) y la férula
(no suministrada) por la tubería de cobre (no
suministrada) como se muestra en el gráfico.
- Si utiliza una tubería de plástico ( B ), inserte el
extremo moldeado (lámpara) de la tubería de
plástico ( B ) en el acople de compresión.
No lo utilice sin el extremo moldeado
(lámpara) de la tubería de plástico ( B ).
2. Ajuste la tuerca de compresión ( B ) sobre el
acople de compresión. No ajuste demasiado la
tuerca de compresión ( B ).
3. Abra el agua y verifique si hay alguna fuga. Si
encuentra gotas o fugas de agua en las zonas
de las conexiones, cierre el suministro de agua
principal. Compruebe las conexiones y, de ser
necesario, ajústelas.
4. Haga correr 1 galón de agua a través del
filtro antes de beber o de utilizar el agua del
refrigerador. (El agua debe correr unos 6
minutos.) Para hacer correr el agua, presione la
palanca del dispensador de agua con un vaso
o una taza grandes. Llene el vaso, vacíelo en el
fregadero de la cocina y repita el proceso.
5. Tras poner en funcionamiento el refrigerador,
deje que la fábrica de hielo haga hielo durante
1 o 2 días. Pasado este tiempo, deseche
las 1 o 2 primeras cubetas de hielo para
asegurarse de que se hayan eliminado todas
las impurezas de la tubería de agua.
PRECAUCIÓN
• Solamente conecte la tubería de agua a
una fuente de agua potable.
Si debe reparar o desarmar la tubería
de agua, recorte 1/4” de la tubería
de plástico para asegurarse de que
la conexión sea perfecta y libre de
pérdidas.
• Puede probar el flujo de agua en las
tuberias usando un vaso de papel.
En condiciones normales el dispensador
de agua puede llenar un vaso de
5.75oz. (170cc) en aproximadamente
10 segundos.
FINALIZACIÓN DE LA
INSTALACIÓN
Ahora que ya tiene el nuevo refrigerador instalado
en su lugar, puede configurarlo y disfrutar de sus
funciones.
Complete los siguientes pasos para poner el
refrigerador en funcionamiento.
1. Asegúrese de que el refrigerador se
encuentre en una ubicación apropiada a una
distancia razonable de la pared. Consulte las
instrucciones de instalación de este manual.
2. Una vez enchufado, asegúrese de que la
luz interior se encienda cuando se abran las
puertas.
3. Coloque el control de temperatura en la marca
más fría y espere una hora. El congelador
comenzará a enfriarse y el motor funcionará
adecuadamente. Restablezca la temperatura
del refrigerador y del congelador que desee.
4. Después de enchufar el refrigerador, tardará
algunas horas en alcanzar la temperatura
adecuada. Podrá almacenar alimentos y
bebidas en el refrigerador una vez que la
temperatura sea lo suficientemente baja.
En caso de un corte de energía, comuníquese
con su compañía de electricidad local y pregunte
cuánto tiempo durará el corte.
- La mayoría de los cortes de energía que se
solucionan dentro del lapso de una hora
o dos, no afectan las temperaturas del
refrigerador. Sin embargo, deberá abrir la
puerta del refrigerador la menor cantidad de
veces posible.
- Pero si el corte de energía dura más de
24 horas, deberá retirar toda la comida
congelada.
DA68-02601A-16.indb 14 2018. 10. 8. 오후 4:32
Puesta a punto _15
01 PUESTA A PUNTO
Si se proporciona una llave con el refrigerador,
debe estar fuera del alcance de los niños y lejos
del refrigerador.
El refrigerador puede no funcionar
constantemente (el contenido se puede
descongelar o la temperatura en el
compartimiento de comidas congeladas puede
elevarse) cuando se lo coloca durante mucho
tiempo por debajo del extremo frío del rango
de temperaturas para el que está diseñado el
refrigerador.
No coloque alimentos que se descompongan
fácilmente a bajas temperaturas como, por
ejemplo, bananas y melones.
El refrigerador es no frost, lo que significa que no
es necesario descongelarlo manualmente, ya que
lo hará de forma automática.
El aumento de la temperatura durante el
descongelamiento puede cumplir con los
requerimientos ISO. Pero si desea evitar un
aumento excesivo en la temperatura de los
alimentos congelados mientras descongela el
refrigerador, envuelva el alimento congelado con
varias capas de papel de periódico.
Cualquier aumento en la temperatura del alimento
congelado durante el descongelamiento puede
disminuir su vida de almacenamiento.
No vuelva a congelar alimentos que se hayan
descongelado completamente.
Instale el refrigerador en un ambiente fresco y
seco con la ventilación adecuada.
Asegúrese de que no esté expuesto a la luz solar
directa y nunca lo coloque cerca de una fuente de
calor directa (por ejemplo, un radiador).
Nunca obstruya las ventilaciones ni las rejillas del
refrigerador. Deje enfriar los alimentos calientes
antes de colocarlos en el refrigerador.
Coloque los alimentos congelados en el
refrigerador para descongelarlos. Luego
puede utilizar las temperaturas bajas de los
productos congelados para enfriar los alimentos
en el refrigerador. No mantenga la puerta del
refrigerador abierta durante demasiado tiempo
cuando coloque o retire alimentos.
Cuanto menor sea ese tiempo en que esté
abierta la puerta, menos hielo se formará en el
congelador.
Cuando realice la instalación, deje un espacio
libre a la derecha, izquierda, atrás y arriba del
refrigerador.
Esto ayudará a reducir tanto el consumo como los
gastos de energía.
• En condiciones normales, un vaso de
170 cc (5,75 oz.) puede llenarse en
unos 10 segundos.
DA68-02601A-16.indb 15 2018. 10. 8. 오후 4:32
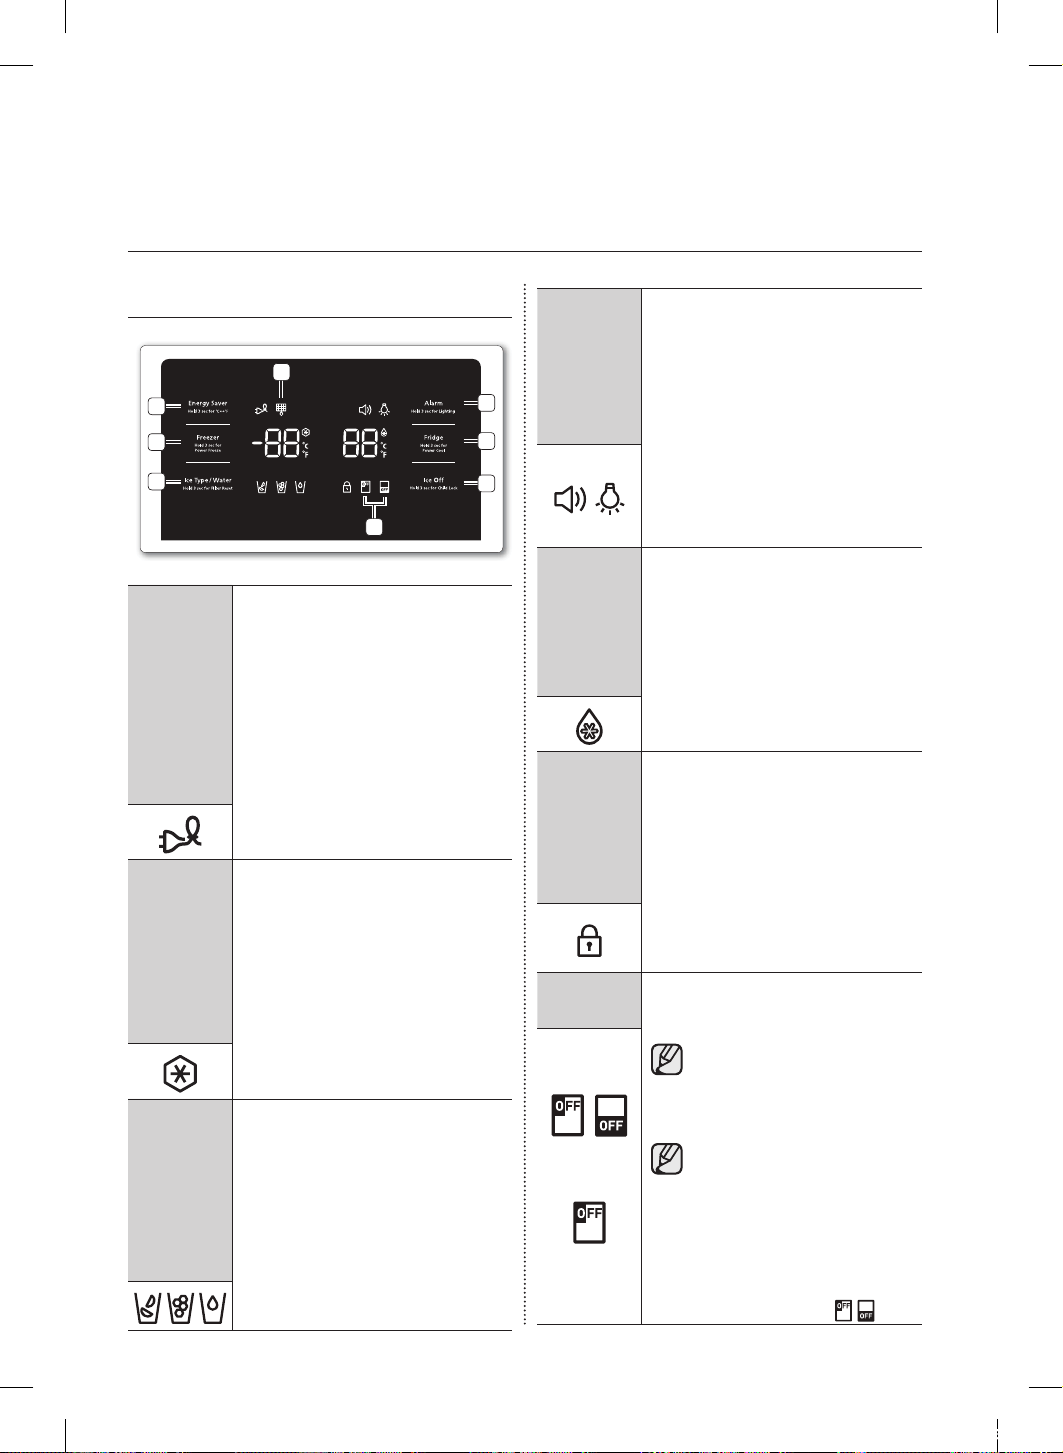
16_ Funcionamiento
Funcionamiento del refrigerador
de puerta francesa
USO DEL PANEL DE CONTROL
8
7
1
2
3
5
6
4
( 1 )
Energy
Saver
(Ahorro de
energía)
Hold 3 sec
for °C °F
(Presionar
3 segundos
para cambiar
entre ºC y ºF)
Tocando este botón se activa y desactiva
el modo Energy Saver (Ahorro de energía).
Cuando se activa el modo Ahorro de
energía, se ilumina el icono Energy Saver
(Ahorro de energía).
Cuando se desactiva el modo Ahorro de
energía el icono se apaga. La función
Energy Saver (Ahorro de energía) se activa
automáticamente cuando se enciende el
refrigerador. Si hay condensación o gotas
de agua en las puertas, apague el modo
Energy Saver (Ahorro de energía).
Presione y mantenga presionado este
botón durante 3 segundos para cambiar las
unidades de temperatura entre °C y °F.
( 2 ) Freezer
(Congelador)
(Hold 3 sec
for Power
Freeze)
(Presionar
3 seg para
Poder de
congelación)
Presione este botón para ajustar el
congelador a la temperatura deseada.
Puede establecer la temperatura entre -8
°F y 5 °F (entre -23 °C y -15 °C). Presione
y mantenga presionado este botón
durante 3 segundos para reducir el tiempo
necesario para congelar los productos que
se encuentran en el congelador. Puede
ser útil si necesita congelar rápidamente
líquidos que se degradan fácilmente o si
la temperatura del congelador ha subido
drásticamente (por ejemplo, si la puerta
quedó abierta).
( 3 ) Ice Type/
Water (Tipo
de hielo/Agua)
Hold 3 sec for
Filter Reset
(Presionar
3 segundos
para
restablecer el
filtro)
Presione este botón para seleccionar
la función de hielo o de agua. Puede
seleccionar el agua o el tipo de hielo
(cubos/triturado). Cada vez que
presiona el botón, los modos de hielo
en cubos o triturado alternan y el
ícono correspondiente se enciende,
indicando su selección. Cuando se haya
reemplazado el filtro de agua, presione y
mantenga presionado este botón durante
3 segundos para restablecer el indicador
de vida útil del filtro de agua.
( 4 ) Alarm
(Alarma)
Hold 3 sec
for Lighting
(Presionar
3 segundos
para el modo
Luz)
Encender y apagar la alarma cuando la puerta
queda abierta Si la alarma de la puerta está
activada, cuando cualquiera de las puertas
del refrigerador quede abierta durante más de
tres minutos, sonará una alarma. El sonido se
detiene cuando se cierra la puerta. La función de
alarma de la puerta ya viene activada de fábrica.
Puede desactivarla presionando y soltando este
botón. Se puede volver a activar con el mismo
procedimiento. El ícono se enciende cuando
la función se activa. Para apagar la luz volver a
presionar el botón por 3 segundos. Si mantiene
presionado el botón Alarm/ Lighting (Alarma/Luz)
durante 3 segundos, la luz LED del dispensador
quedará encendida.
( 5 ) Fridge
(Refrigerador)
Hold 3 sec for
Power Cool
(Presionar
3 seg para
Poder de
enfriamiento)
Presione este botón para ajustar el refrigerador
a la temperatura deseada. Puede establecer la
temperatura entre 34 °F y 44 °F (entre 1 °C y
7 °C ). Presione y mantenga presionado este
botón durante 3 segundos para reducir el tiempo
necesario para enfriar los productos que se
encuentran en el refrigerador. Puede ser útil si
necesita congelar rápidamente alimentos que se
descompongan fácilmente o si la temperatura
del congelador ha subido drásticamente (por
ejemplo, si la puerta quedó abierta).
( 6 ) Ice
O (Hielo
desactivado)
Hold 3 sec
for Child lock
(Presionar
3 seg para
Bloqueo para
niños)
Si no desea hacer más hielo, toque el botón de
Ice O (Hielo desactivado).
Al presionar este botón niños) que activa Child
Lock (Bloqueo para bloquea el panel del visor
y los botones del dispensador de manera tal
que los botones utilizarse. El ícono Child Lock
no pueden enciende para indicar (Bloqueo
para niños) se que está activada la función de
bloqueo para niños. Presione 3 segundos para
desbloquear. El Child Lock no bloqueará el Cool
Pantry. Las luces y los motores se encienden
hasta que se vuelva a apagar el refrigerador.
( 7 ) Ice
O (Hielo
desactivado
Si no desea hacer más hielo, toque el botón de
Ice O (Hielo desactivado). El ícono se encenderá
y la fábrica de hielo se detendrá.
Recomendamos que detenga la
fábrica de hielo si sucede lo siguiente:
- Hay suficientes cubos de hielo en la cubeta.
- Desea ahorrar agua y energía.
- El refrigerador no está recibiendo agua.
Si la función de fábrica de hielo está
encendida y la tubería de agua no está
conectada, se escuchará un sonido de
válvula de agua desde la parte posterior de
la unidad. Mantenga presionado el botón
Ice O (Hold 3sec for child lock) (Hielo
desactivado/Presionar 3 segundos para el
bloqueo para niños) durante menos de 3
segundos hasta que se ilumine el indicador
Ice O (Hielo desactivado) ( ).
(RF263T**)
(RF263B/N**)
DA68-02601A-16.indb 16 2018. 10. 8. 오후 4:32
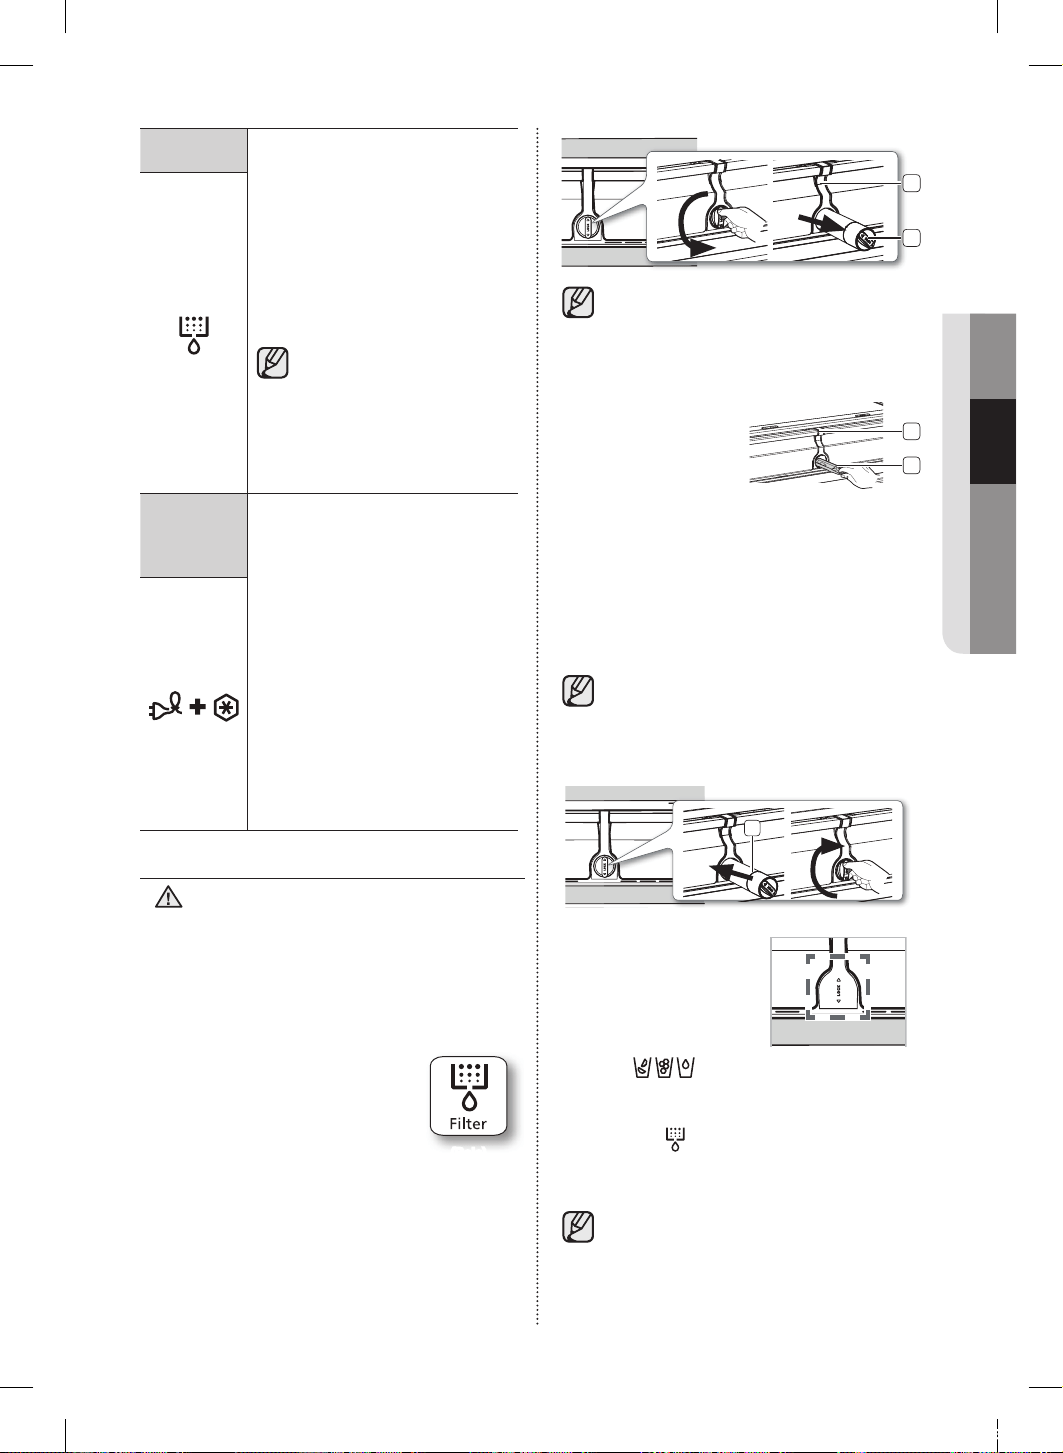
Funcionamiento _17
02 FUNCIONAMIENTO
( 8 ) Filtro
Uso del filtro de agua
Este ícono se iluminará cuando sea necesario
cambiar el filtro. Después de consumir
aproximadamente 300 galones de agua, el
indicador del filtro se enciende, (aprox. 6
meses). El ícono se pondrá de color rojo y
parpadeará durante varios segundos cuando se
abra o se cierre la puerta.
Después de haber instalado el nuevo filtro
de agua, restablezca el indicador del filtro
presionando el botón Ice Type / Water / hold 3
sec for Filter Reset (Ice Type / Water / Presionar
3 seg. para restablecer el filtro).
• Si el agua no sale del dispensador
o lo hace lentamente, se necesita
reemplazar el filtro porque está
obturado.
• Algunas zonas poseen grandes
cantidades de cal en el agua, lo
que provoca que el filtro de agua se
obstruya más rápidamente.
Modo
Cooling O
(Enfriamiento
desactivado)
El modo Cooling O (Enfriamiento desactivado),
también llamado modo Shop (Tienda), está
diseñado para que lo usen los distribuidores
cuando exhiben los refrigeradores en las
tiendas. En el modo Cooling O (Enfriamiento
desactivado), el motor del ventilador del
refrigerador funciona normalmente, pero
el compresor no lo hace, por lo tanto el
refrigerador y el congelador no se enfrían.
Para iniciar el modo Cooling O (Enfriamiento
desactivado), presione y mantenga presionado
el botón Energy Saver (Ahorro de energía)
y el botón Freezer (Congelador) durante 5
segundos durante el funcionamiento normal.
Se escuchará un repique en el refrigerador y en
el indicador de temperatura parpadeará OF OF
para cancelar el modo Cooling O (Enfriamiento
dasactiado), presione y mantenga presionado
nuevamente el botón Energy Saver (Ahorro de
energía) y el botón Freezer (Congelador) durante
5 segundos.
CAMBIO DEL FILTRO DE AGUA
Para reducir el riesgo de daños ocasionados por
agua NO use marcas genéricas de filtros de agua
en su Refrigerador SAMSUNG. SOLO USE FILTROS
DE AGUA MARCA SAMSUNG. SAMSUNG no será
legalmente responsable por cualquier daño incluso,
pero no limitado a, daños causados por pérdidas de
agua por el uso de un filtro de agua genérico. Los
Refrigeradores SAMSUNG están diseñados para
funcionar SOLO CON Filtros de Agua SAMSUNG.
La luz del filtro se pone roja para indicar
el momento en que hay que cambiar el
cartucho del filtro de agua. Para darle
tiempo hasta que consiga un nuevo
filtro, la luz roja se enciende justo antes
de que la capacidad del filtro actual se
acabe.
(Rojo)
Cambiar el filtro a tiempo le provee agua más
fresca y limpia de su refrigerador.
1. Cierre el suministro de agua. Luego gire el filtro de
agua ( 1 ) aproximadamente un cuarto de vuelta,
en el sentido contrario al de las agujas del reloj.
2. Extraiga el filtro de agua ( 1 ) del compartimento ( 2 ).
ADVERTENCIA
2
1
•
Para cambiar más fácilmente el filtro del
agua, cierre la válvula de suministro de agua.
• Algunas veces, es difícil desarmar el filtro de agua
debido a que las impurezas en el agua hacen que
el mismo se pegue. Si tiene dificultades, sostenga
firmemente el filtro de agua y jale con fuerza.
• Al jalar el filtro de
agua, puede filtrarse
algo de agua de la
abertura. Esto es
normal.
3
2
Para minimizar las filtraciones de agua,
mantenga el cartucho del filtro de agua en
forma horizontal al extraerlo.
• Para impedir derrames, vacíe el filtro de
agua de la charola (
3
) y seque alrededor del
compartimento del filtro (
2
).
3. Inserte el nuevo filtro en el compartimento (
4
).
4. Presione el filtro y luego gírelo en el sentido de
las agujas del reloj hasta que quede ajustado.
• Si tiene dificultades para insertar el filtro
debido a la alta presión de agua, cierre
la válvula de suministro del agua.
• El símbolo de bloqueo deberá estar alineado
con la línea del indicador.
4
5. Presione el botón “Ice
Type/ Water (Tipo de
hielo/Agua) Hold 3 sec
for Filter Reset (Presionar
3 segundos para
restablecer el filtro)”
(
((Restablecimiento del filtro))
) durante
aproximadamente 3 segundos para
restablecer el filtro del agua. El color del
indicador ( ) cambia de rojo a apagado.
6. Si desactivó el suministro de agua, actívelo
nuevamente.
• Para reemplazar su filtro de agua, puede visitar
su centro de pruebas local o comunicarse con el
distribuidor de piezas Samsung. Asegúrese de que
el filtro de agua de reemplazo tenga el logotipo
SAMSUNG en la caja sobre el filtro de agua. Vínculo :
http://www.samsungparts.com
DA68-02601A-16.indb 17 2018. 10. 8. 오후 4:32
18_ Funcionamiento
Remoción de los materiales residuales
que se encuentran dentro de la tubería de
suministro de agua después de instalar el
filtro de agua.
1. Abra el suministro de
agua de la casa para
que sea suministrada al
refrigerador.
2. Seleccione en el Display la opción de
agua botón “Ice Type Water” y vierta 1 Gal
completo (6 a 7 min)esto ayudará a limpiar el
sistema de suministro de agua y eliminará aire
de las tuberías.
3. Es posible que se necesite realizar una
limpieza adicional en algunos hogares. Si
después de vertir 1 Gal el agua no se torna
incolora, es posible que se necesite realizar
una limpieza adicional de la tubería en el
hogar.
4. Abra la puerta del refrigerador y asegúrese de
que no haya filtraciones de agua provenientes
del filtro de agua
• Limpie muy bien el sistema del
dispensador, de lo contrario puede filtrar
agua. Esto significa que aún hay aire en
la tubería.
Suministro de agua por ósmosis
inversa IMPORTANTE:
La presión del suministro de agua que sale del
sistema por ósmosis inversa que va a la válvula
de entrada de agua del refrigerador necesita estar
entre 35 y 120 psi (241 y 827 kPa).
Si se conecta un sistema de filtración de agua
por ósmosis inversa al suministro de agua fría, la
presión de agua al sistema de ósmosis inversa
debe tener un mínimo de 40 a 60 psi (276 a 414
kPa). Si la presión de agua al sistema de ósmosis
inversa es inferior a 40 hasta 60 psi (276 a 414
kPa):
• Verifique si el filtro de sedimentos en el
sistema de ósmosis inversa está bloqueado.
Reemplácelo si es necesario.
• Llene nuevamente el tanque de
almacenamiento del sistema de ósmosis
inversa luego de mucho uso.
• Si su refrigerador cuenta con un filtro de agua,
es posible que la presión de agua disminuya
aún más al usarlo con el sistema de ósmosis
inversa. Saque el filtro de agua.
Si tiene dudas sobre la presión del agua, llame a
un plomero calificado autorizado.
CONTROL DE LA TEMPERATURA
Temperatura básica de los compartimentos
del congelador y del refrigerador
Las temperaturas básicas y recomendadas de los
compartimentos del congelador y del refrigerador
son 0 °F y 37 °F (o -18 °C y 3 °C) respectivamente.
Si la temperatura de los compartimentos del
Congelador y del Refrigerador es muy alta o baja,
ajuste la temperatura manualmente.
Control de la temperatura del congelador
Temperatura recomendada (Congelador): 0 °F (o -18 °C)
La temperatura del congelador puede establecerse
entre -8°F y 5°F (o entre -23°C y -15°C) para
cumplir con sus necesidades particulares. Presione
el botón Freezer (Congelador) varias veces hasta
que aparezca la temperatura deseada en el visor.
Cada vez que presione el botón la temperatura
cambiará 1°F (o 1°C). Vea a continuación.
Fahrenheit :
0°F
➞
-1°F
➞
-2°F
➞
-3°F
➞
-4°F
➞
-5°F
➞
-6°F
➞
-7°F
➞
-8°F
➞
5°F
➞
4°F
➞
3°F
➞
2°F
➞
1°F
➞
0°F.
Centígrados :
-18°C
➞
-19°C
➞
-20°C
➞
-21°C
➞
-22°C
➞
-23°C
➞
-15°C
➞
-16°C
➞
-17°C
➞
-18°C.
Tenga en cuenta que algunos alimentos tales como el
helado pueden derretirse a 4°F (o -15.5°C). El visor
de la temperatura cambiará de manera secuencial
desde -8°F a 5°F ) (o desde -23°C a -15°C).
Control de la temperatura del refrigerador
La temperatura del refrigerador puede
establecerse entre 34 °F y 44 °F (o entre 7 °C
y 1 °C) para cumplir con sus necesidades
particulares. Presione el botón Fridge
(Refrigerador) varias veces hasta que aparezca la
temperatura deseada en el visor. Cada vez que
presione el botón la temperatura cambiará 1°F
(o 1°C). Vea a continuación.
Fahrenheit : 37 °F ➞ 36 °F ➞ 35 °F ➞ 34 °F ➞
44 °F ➞ 43 °F ➞ 42 °F ➞ 41 °F ➞
40 °F ➞ 39 °F ➞ 38 °F ➞ 37 °F.
Centígrados : 3 °C ➞ 2 °C ➞ 1 °C ➞ 7 °C ➞
6 °C ➞ 5 °C ➞ 4 °C ➞ 3 °C.
DA68-02601A-16.indb 18 2018. 10. 8. 오후 4:32
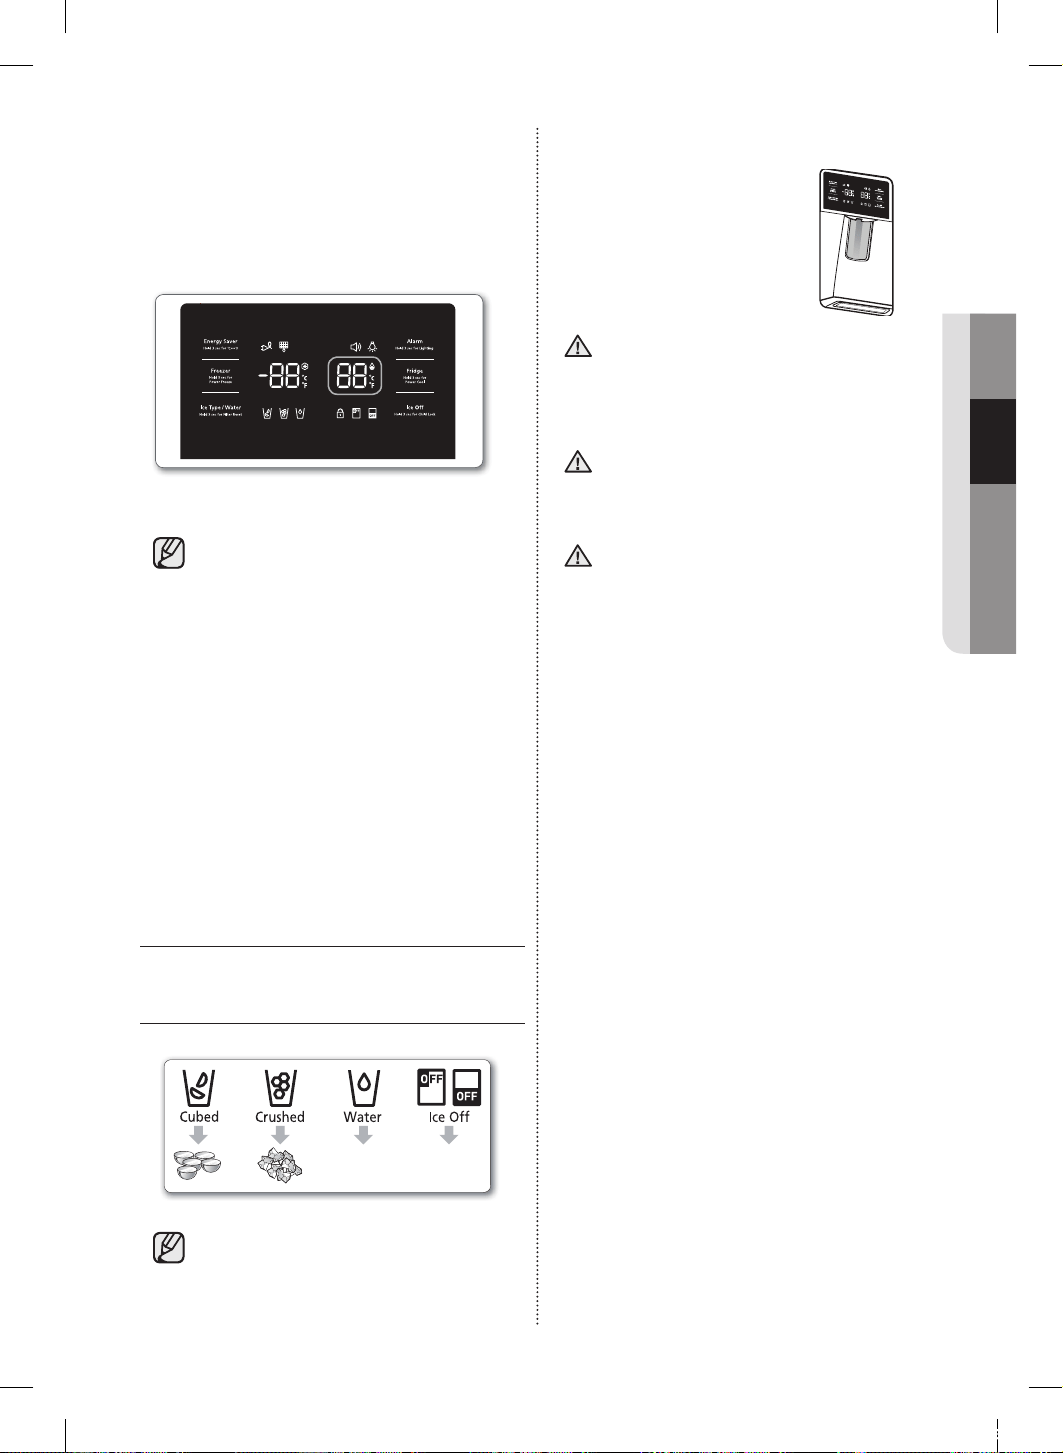
Funcionamiento _19
02 FUNCIONAMIENTO
El proceso de control de temperatura para el
refrigerador es igual al del congelador. Presione
Botón Fridge (Refrigerador) para establecer la
temperatura deseada. Luego de unos pocos
segundos, el Congelador comenzará a ajustarse
hacia la nueva temperatura establecida. La misma
se reflejará en el visor digital.
Temperatura recomendada (Refrigerador): 37 °F (o 3 °C)
-
La temperatura del refrigerador, del congelador
o de la zona Cool Select Pantry puede subir
cuando se abren las puertas con frecuencia o
si se coloca una gran cantidad de alimentos
calientes dentro de ellos.
- Esto puede hacer que el Display parpadee. Cuando las
temperaturas del congelador y del refrigerador vuelvan a
las temperaturas normales, el visor dejará de parpadear
- Si continúa parpadeando, deberá “restablecer” el
Refrigerador. Intente desenchufar el refrigerador,
espere aproximadamente 10 minutos y luego enchúfelo
nuevamente.
- Si existe un error de comunicación entre el visor y
el regulador principal, es posible que la luz del visor
convertible parpadee. Si continúa parpadeando durante
mucho tiempo, comuníquese con el Centro de Servicio
de Samsung Electronics.
USO DEL DISPENSADOR DE AGUA FRÍA
Presione el botón del tipo de hielo
adecuado para seleccionar lo que desea.
SIN HIELO
Seleccione esta opción si desea
apagar la fábrica de hielo
•
Espere 1 segundo antes de retirar el
vaso después de llenarlo de agua para
evitar derrames. No tire de la palanca del
dispensador después de sacar hielo o agua,
vuelve automáticamente.
Uso del dispensador de hielo
Coloque un vaso debajo del
dispensador de hielo y empújelo
suavemente contra la palanca
del dispensador.
Asegúrese de que el vaso esté
alineado con el dispensador para
impedir que se caiga el hielo.
Espere 1 segundo antes de retirar el vaso del
dispensador para evitar derrames. No jale el
dispensador despues de servir hielo o agua, éste
regresa automaticamente. Si se abre la puerta
del refrigerador, el dispensador no funciona.
Cuando selecciona el modo Cubed Ice (Hielo
en cubos) después de utilizar el modo Crushed
Ice (Hielo triturado), puede producirse una
pequeña cantidad de hielo triturado residual.
No jale de la palanca. Se podría dañar o
romper el resorte de la palanca.
Mantenimiento de la Fabrica de Hielo
• Para limpiar el cajón/cubeta de hielo, utilice un
detergente suave, enjuague y seque bien. No utilice
limpiadores ni solventes abrasivos.
• El hielo es hecho en cubos, al seleccionar “Crushed”,
la fábrica de hielo tritura los cubos de hielo y lo
transforma en hielo molido.
• Los cubos de hielo generados por el proceso de
fabricación de hielo rápido serán blancos, lo que indica
que se han generado con normalidad.
• Ya que la fábrica de hielo del compartimento del
refrigerador fabrica cubos de hielo más rápidamente,
muévalos del cajón del refrigerador al cajón del
congelador cuando necesite más cubos de hielo.
• Si no sale hielo, extraiga la cubeta y pulse el botón Test
(Probar) ubicado a la derecha de la fábrica de hielo.
(Ver ilustración en la siguiente página)
• No presione el botón Test (Probar) continuamente
cuando la charola está llena de hielo o agua. El agua
se puede desbordar o el hielo puede atascar la cubeta.
Fabricando Hielo
• Siga estos pasos:
1. Deje que el refrigerador funcione y se enfríe durante 24 horas
(o 1 día entero).
- Si espera 24 horas, la fábrica de hielo enfriará correctamente.
2. Vierta de 4 a 6 cubos de hielo en el vaso.
3. Después de 8, y luego 16 horas, llene un vaso completo.
• Cuando presione el botón Test (Probar), escuchará el repique
del refrigerador (talán, talán). Cuando escuche el sonido,
suelte el botón Test (Probar). Para la fabrica de hielos del
congelador no hace talán talán, después de presionar por 3
segundos se escucha y siente el sonido del motor solamente.
• Se escuchará automáticamente un sonido que indica que la
máquina de hielo está funcionando correctamente.
PRECAUCIÓN
PRECAUCIÓN
PRECAUCIÓN
DA68-02601A-16.indb 19 2018. 10. 8. 오후 4:32
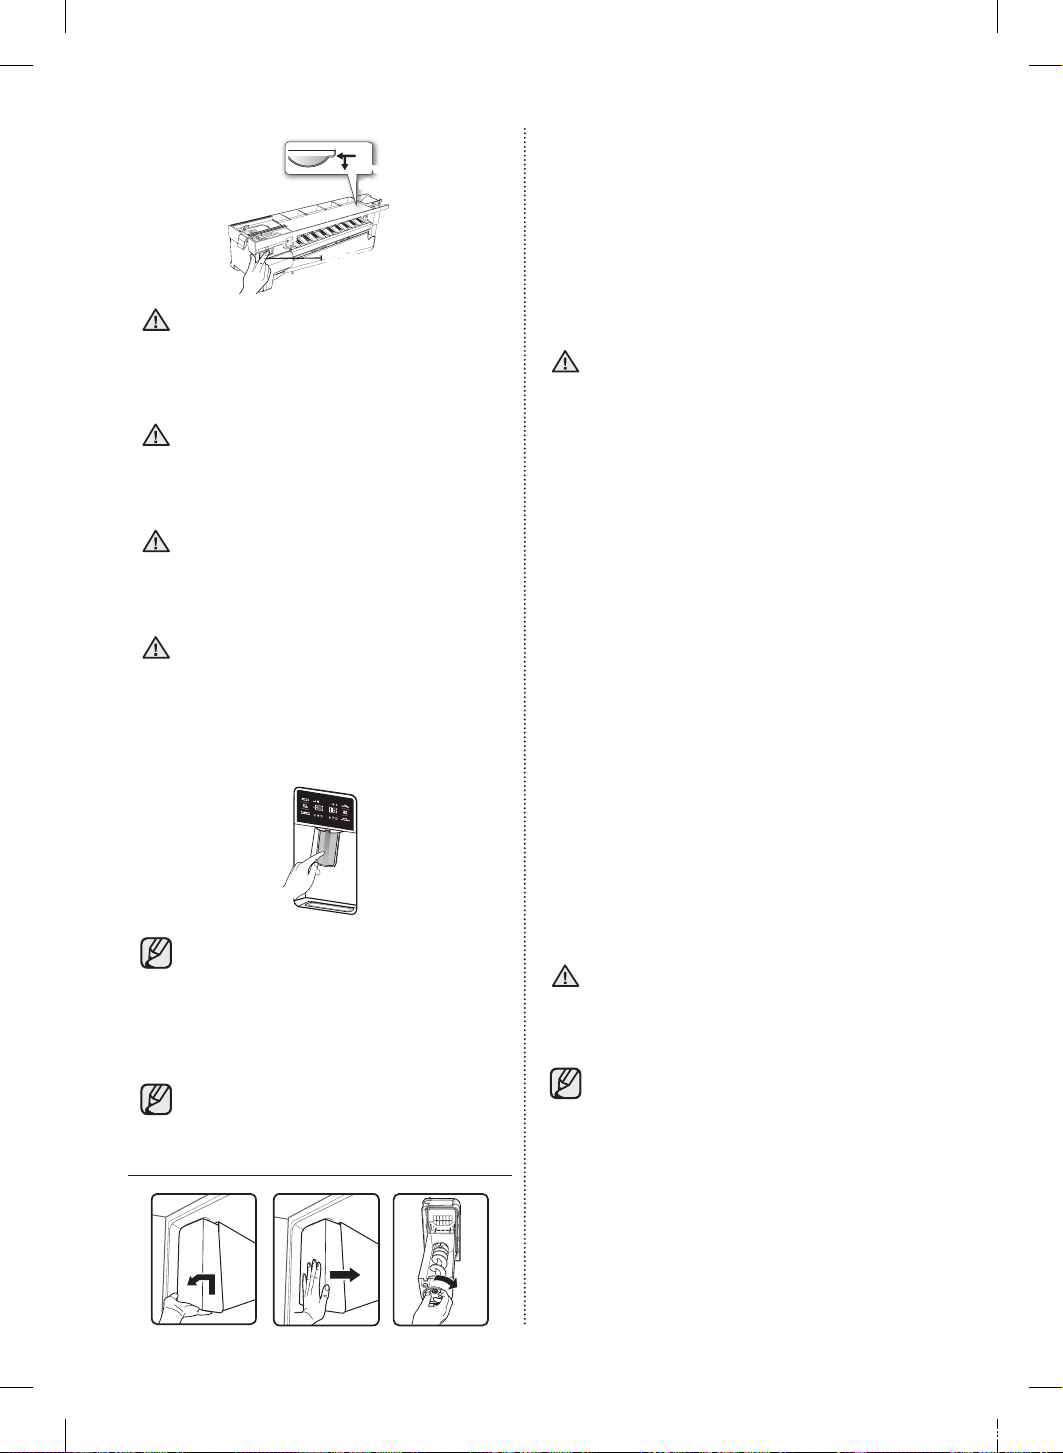
20_ Funcionamiento
verifique el
nivel de agua
Botón Test (Probar)
Si desea retirar los cubos de hielo sin
utilizar la cubeta de hielo, apague la
máquina de hielo. (Sin embargo, retire la
cubierta frontal de la máquina de hielo.)
Los cubos de hielo de la máquina de
hielo pueden derramarse sobre el cajón.
No ponga alimentos en la cubeta de
hielo. Si almacena alimentos en la cubeta
de hielo, pueden obstaculizar la máquina
de hielo al abrir o cerrar la puerta, y
dañar la máquina de hielo.
Observe que los cubos de hielo de la
cubeta de hielo pueden derramarse sobre
el cajón al retirar la cubeta del cajón.
En este caso, debe retirar del cajón los
cubos de hielo que se han derramado.
En caso de corte de energía, los cubos de
hielo pueden derretirse y luego congelarse
cuando vuelve la energía, provocando
que el dispensador deje de funcionar.
Para impedir que esto suceda, después de un
corte de energía, extraiga la cubeta de hielo y tire
el hielo y el agua residual.
• Si utiliza todo el hielo de una sola vez,
repita los Pasos 2 y 3 de la página
anterior. Sin embargo, espere solamente
8 horas antes de extraer los primeros 4
a 6 cubos. Este procedimiento repondrá
cubos de hielo y garantizará su máxima
producción.
•
Los primeros hielos deberán ser
desechados ya que pueden tener mal
sabor.
Uso de la función Ice O (Hielo desactivado)
PRECAUCIÓN
PRECAUCIÓN
PRECAUCIÓN
PRECAUCIÓN
Cuando selecciona el modo Ice O (Hielo
desactivado), retire todos los cubos de hielo de
la cubeta. Si no está utilizando el dispensador de
hielo, es posible que los cubos se amontonen.
Retire el depósito siguiendo la dirección de la
flecha.
Elimine los cubos de hielo o la masa de hielo.
Empuje la parte inferior de la cubeta hasta que
escucheun clic. Si la cubeta no ajusta, gire la
hélice 90 grados e inténtelo nuevamente.
Utilice solamente la fábrica de hielo
del refrigerador. Solo una persona
adecuadamente calificada deberá
instalar/conectar el suministro de agua al
refrigerador. Conéctelo solamente a un
suministro de agua potable.
Vacaciones...
Si viaja por vacaciones o negocios y no utilizará
los dispensadores de agua o hielo por un período
prolongado:
- Cierre la llave de paso. Si no lo hace, pueden
producirse fugas de agua.
- Retire todos los alimentos.
- Desenchufe el refrigerador.
- Retire el exceso de humedad del interior del
refrigerador y deje las puertas abiertas. Si no lo hace,
pueden aparecer olores y moho. No coloque los
dedos, las manos ni cualquier otro objeto inapropiado
en el recipiente o en la cubeta de la fábrica de hielo.
- Es posible que provoque lesiones personales o daños
materiales.
Que hacer y que no hacer con la Fabrica de Hielo.
- No coloque los dedos u objetos en la abertura
del dispensador.Puede provocar lesiones.
- No intente desarmar la fábrica de hiel
- No limpie ni pulverice la cubeta de hielo con
agua mientras está dentro del refrigerador.
- Retírela para limpiarla.
Cuando inserte la charola de la fábrica
de hielo, asegúrese de que esté bien
centrada. De lo contrario, se podría trabar.
El fenómeno de turbidez del agua
•
El agua que ingresa al refrigerador circula a
través del filtro principal que es un filtro para agua
alcalina. En el proceso de filtrado, la presión del
agua que sale del filtro aumenta, y el agua se
satura con oxígeno y nitrógeno.
• Cuando ésta se pone en contacto con el aire,
la presión desciende rápidamente y el oxígeno
y el nitrógeno se sobresaturan y generan
burbujas de gas. Temporariamente, el agua
puede tener una apariencia turbia debido a
estas burbujas de oxígeno. Después de unos
segundos, el agua será incolora.
PRECAUCIÓN
PRECAUCIÓN
DA68-02601A-16.indb 20 2018. 10. 8. 오후 4:32
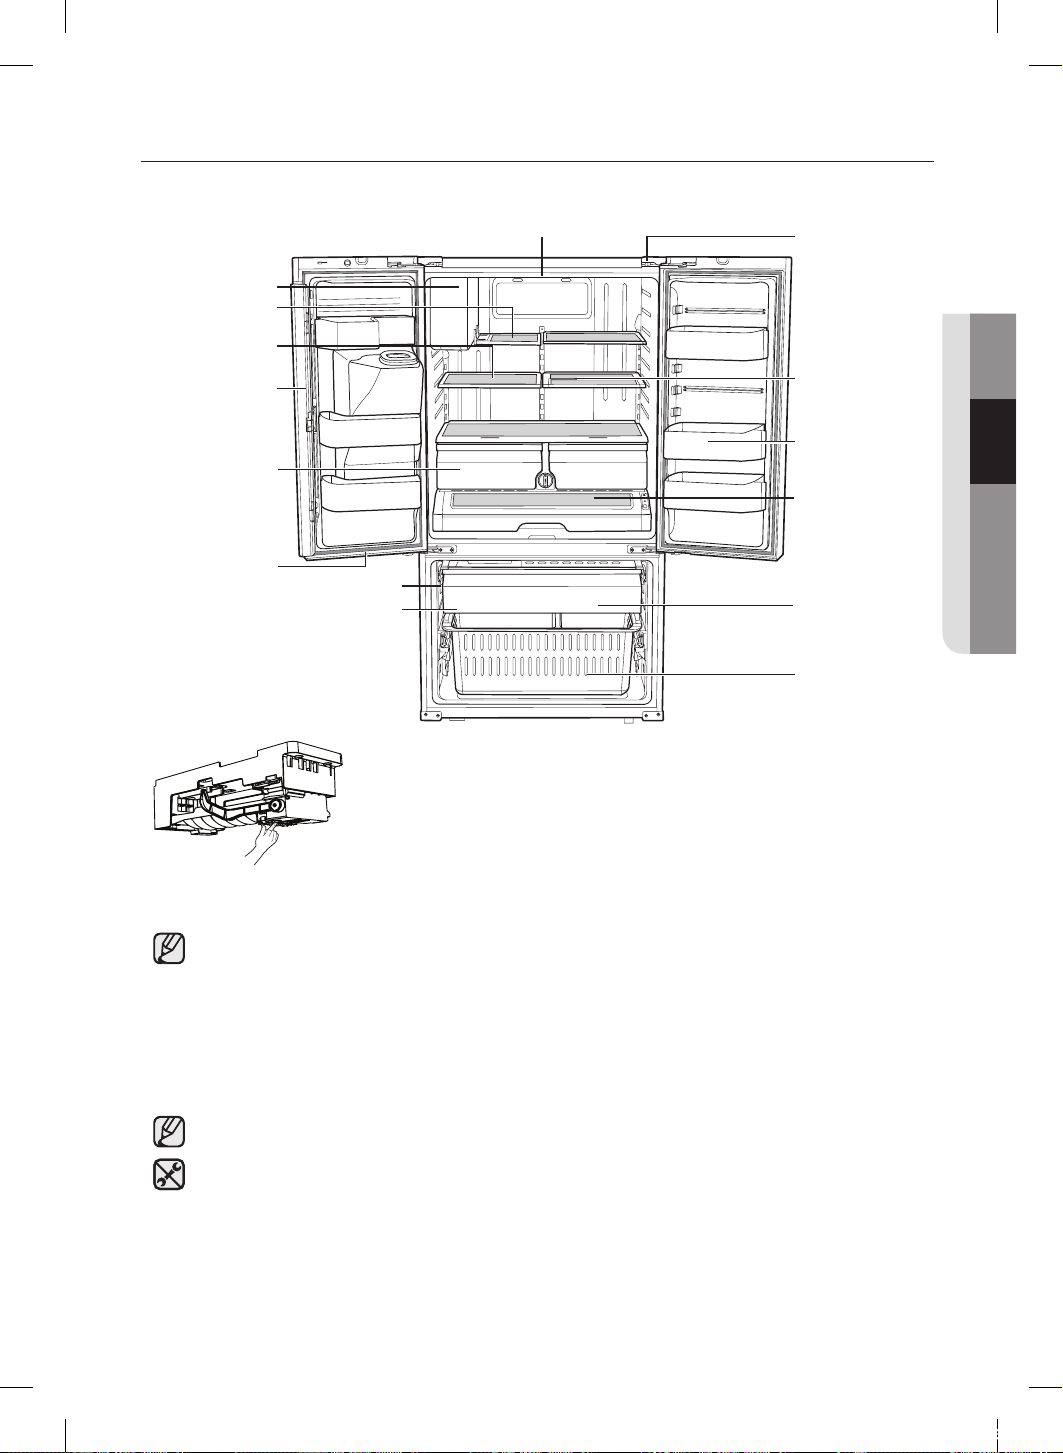
Funcionamiento _21
02 FUNCIONAMIENTO
PIEZAS Y FUNCIONES
Utilice esta página para familiarizarse con las piezas y las funciones del refrigerador.
Luz
Cierre de la
puerta
Estante de vidrio
Quick-Space (en
algunos modelos)
Compartimentos
de puertas
Cool Select
Pantry
Estante plegable
Fábrica de hielo del
refrigerador y del
congelador
Estante corredizo
Sección bisagra
vertical
Cajón de vegetales
y frutas
Fábrica de hielo del congelador (en algunos
modelos)
Luz
Cubeta de hielo
Cajón de extracción
automática
Congelador
Cajón
Botón de Prueba
Fabrica de hielos en
congelador
• Al cerrar la puerta, asegúrese de que la sección de la bisagra vertical se encuentre en la
posición correcta para impedir que se raye con la otra puerta.
• Si la sección de la bisagra vertical está invertida, colóquela en la posición correcta y cierre la
puerta.
• Algunas veces puede aparecer humedad en esta sección.
• La manija de la puerta puede aflojarse con el tiempo. Si esto sucede, ajuste los tornillos que
se encuentran dentro de la puerta.
• Si la cierra con mucha fuerza, la otra puerta puede abrirse.
• Cuando se abre la puerta, el disyuntor apaga automáticamente el motor sinfín de la fábrica de
hielo por razones de seguridad.
• Si el LED interior o exterior se ha apagado, comuníquese con los agentes de servicio técnico.
DA68-02601A-16.indb 21 2018. 10. 8. 오후 4:32

22_ Funcionamiento
USO DE COOL SELECT
PANTRY
El Cool Select Pantry es un cajón completo con
control de temperatura regulable. Puede utilizarse
para grandes bandejas para fiestas, comidas
selectas, pizzas, bebidas o artículos varios.
Cuenta con un control de temperatura que permite
ajustar la cantidad de aire frío permitido en este
cajón.
El control está ubicado en el lado derecho del cajón.
• El cajón tiene tres modos: Fresh (Fresco), Chilled (Frío)
y Deli (Comidas selectas). El modo Fresh (Fresco) es el
predeterminado. Presione el botón Temp (Temperatura)
varias veces hasta que se ilumine el modo que desee.
Luego de seleccionar el modo, la temperatura cambia
para que coincida con el modo seleccionado.
• La temperatura del cajón puede cambiar según la
cantidad de artículos almacenados, su ubicación, la
temperatura ambiente y la frecuencia con la que se
abre la puerta.
Botón de selección del cajón
1. Cuando selecciona “Deli (Comidas selectas)”, la
temperatura del cajón se mantiene alrededor de
41 °F (o 5°C). Esta función resulta útil para mantener
los alimentos frescos durante mucho tiempo.
2. Cuando selecciona
“Fresh (Fresco)”, la
temperatura del cajón
se mantiene alrededor
de 38 °F (o 3 °C).
Esta función resulta
útil para mantener
los alimentos frescos
durante mucho más
tiempo.
3. Cuando selecciona “Chilled (Frío)”, la
temperatura del cajón se mantiene alrededor
de 34 °F (o 1 °C). Esta función resulta útil para
mantener la carne o el pescado fresco durante
mucho más tiempo. En la tabla siguiente se
muestran los modos del cajón y los tipos
de alimentos que se pueden almacenar con
seguridad en cada modo.
Deli
(Comidas
selectas)
Fresh (Fresco) Chilled (Frío)
• piña • pepinos • bistec
• limones • manzanas • quesos duros
• aguacates • naranjas • fiambres
• patatas • uvas • tocino
• calabacines • hot dogs
• maíz
• Las frutas y los vegetales pueden
descomponerse si se selecciona la opción
“chilled (frío)”. No almacene lechugas ni otros
vegetales de hoja en este cajón.
No almacene botellas de vidrio en este cajón. Si se
congelan, pueden romperse y provocar lesiones personales.
Si pone un tazón de agua sin tapa en el cajón, puede
generarse condensación en las piezas cercanas.
REMOCIÓN DE LOS ACCESORIOS
DEL REFRIGERADOR
1.
Compartimentos de las puertas y de los lácteos
• Compartimentos de las puertas (1)
Para retirarlos: simplemente levante la bandeja
y jale hacia afuera. Para volver a colocarlos:
deslícelos por encima de la ubicación deseada y
empuje hacia abajo hasta que se traben.
• Compartimentos de las puertas (2)
Para retirarlos: quite el lado derecho del
compartimento levantándolo en ángulo a lo largo
de la guía y luego quite el lado izquierdo jalándolo
de la puerta.
Para volver a colocarlos: deslícelos en la
ubicación original y empuje hacia abajo hasta que
se traben.
2
1
PRECAUCIÓN
PRECAUCIÓN
DA68-02601A-16.indb 22 2018. 10. 8. 오후 4:32
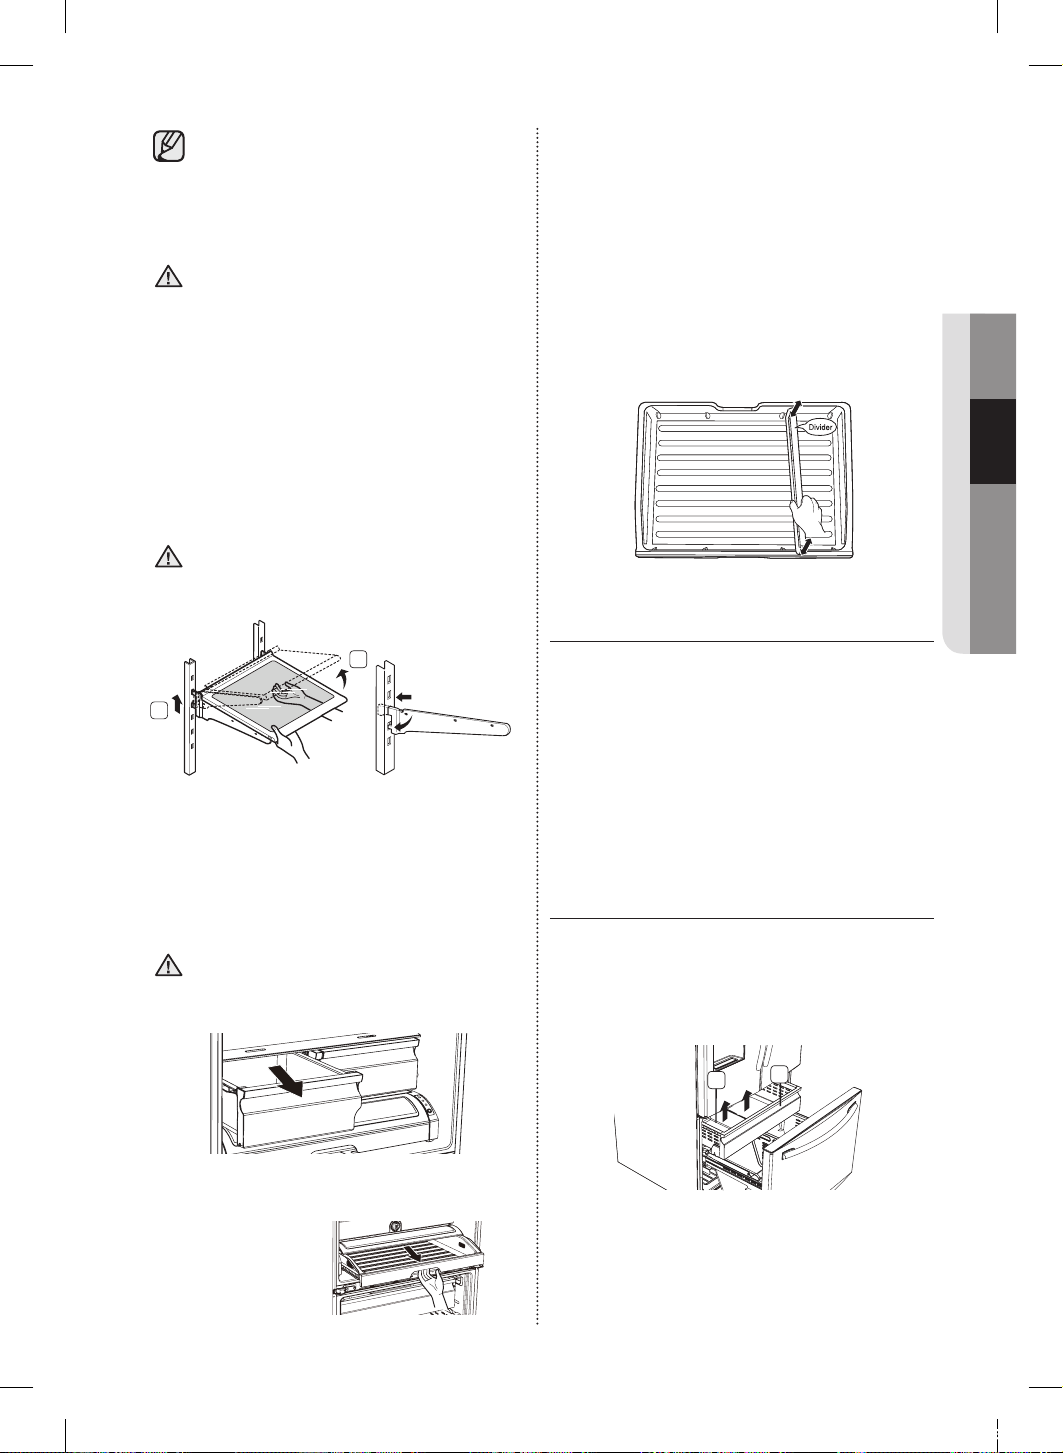
Funcionamiento _23
02 FUNCIONAMIENTO
• Pueden producirse lesiones si los
compartimentos de las puertas no están
firmemente colocados.
• No permita que los niños jueguen con los
compartimentos. Sus esquinas filosas pueden causar
lesiones.
No ajuste un compartimento lleno de
alimentos. Primero retírelos.
Método para retirar el polvo: retire la
guarda y limpie con agua.
2. Estantes de vidrio templado
Para retirarlos: incline el frente del estante hacia arriba en
la dirección que se muestra en el gráfico ( 1 ) y levántelo en
forma vertical ( 2 ). Extraiga el estante.
Para volver a colocarlos: incline el frente del estante
hacia arriba y deslice los ganchos del estante dentro de las
ranuras a la altura deseada. Luego baje el frente del estante
de manera tal que los ganchos caigan dentro de las ranuras.
Los estantes de vidrio templado son pesados.
Tenga mucho cuidado cuando los retire.
1
2
3. Cajones de vegetales y frutas
Para retirarlo: retire el cajón totalmente hacia afuera.
Incline el frente del cajón hacia arriba y retírelo.
Para volver a colocarlos: inserte el cajón
dentro de los rieles y empújelo hasta colocarlo
nuevamente en su lugar.
Se deben retirar los cajones antes de
levantar el estante de vidrio que se
encuentra sobre ellos.
4. Cool Select Pantry
Para retirar el cajón
Cool Select Pantry:
retire totalmente el cajón.
Incline el frente del cajón
hacia arriba y retírelo.
PRECAUCIÓN
PRECAUCIÓN
PRECAUCIÓN
Para volver a colocar el cajón Cool Select
Pantry: empuje hacia atrás los rieles del
refrigerador. Coloque el cajón en los rieles y
deslice el cajón hacia atrás hasta que esté en su
lugar.
Parar retirar el separador: extraiga
completamente el cajón, levante el lado frontal del
divisor para desengancharlo de la pared posterior
del cajón y retire el divisor.
Para volver a colocar el separador: Enganche
la parte posterior del divisor sobre la pared
posterior del cajón y empújelo hacia abajo.
Uso de las puertas
Asegúrese de que las puertas cierren
completamente y están bien selladas.
Cuando la puerta del refrigerador está
parcialmente abierta, se cerrará automáticamente.
Sin embargo, la puerta quedará abierta si su
ángulo de abertura está fuera del alcance del
cierre automático; en este caso deberá cerrarse
manualmente.
REMOCIÓN DE LOS ACCESORIOS
DEL REFRIGERADORS
1.
CUBETA DE HIELO
Para retirarla: levante la cubeta de hielo ( 1 ).
Para volver a colocarla: coloque la cubeta de
hielo en el cajón de extracción automatica( 2 ).
1
2
DA68-02601A-16.indb 23 2018. 10. 8. 오후 4:32
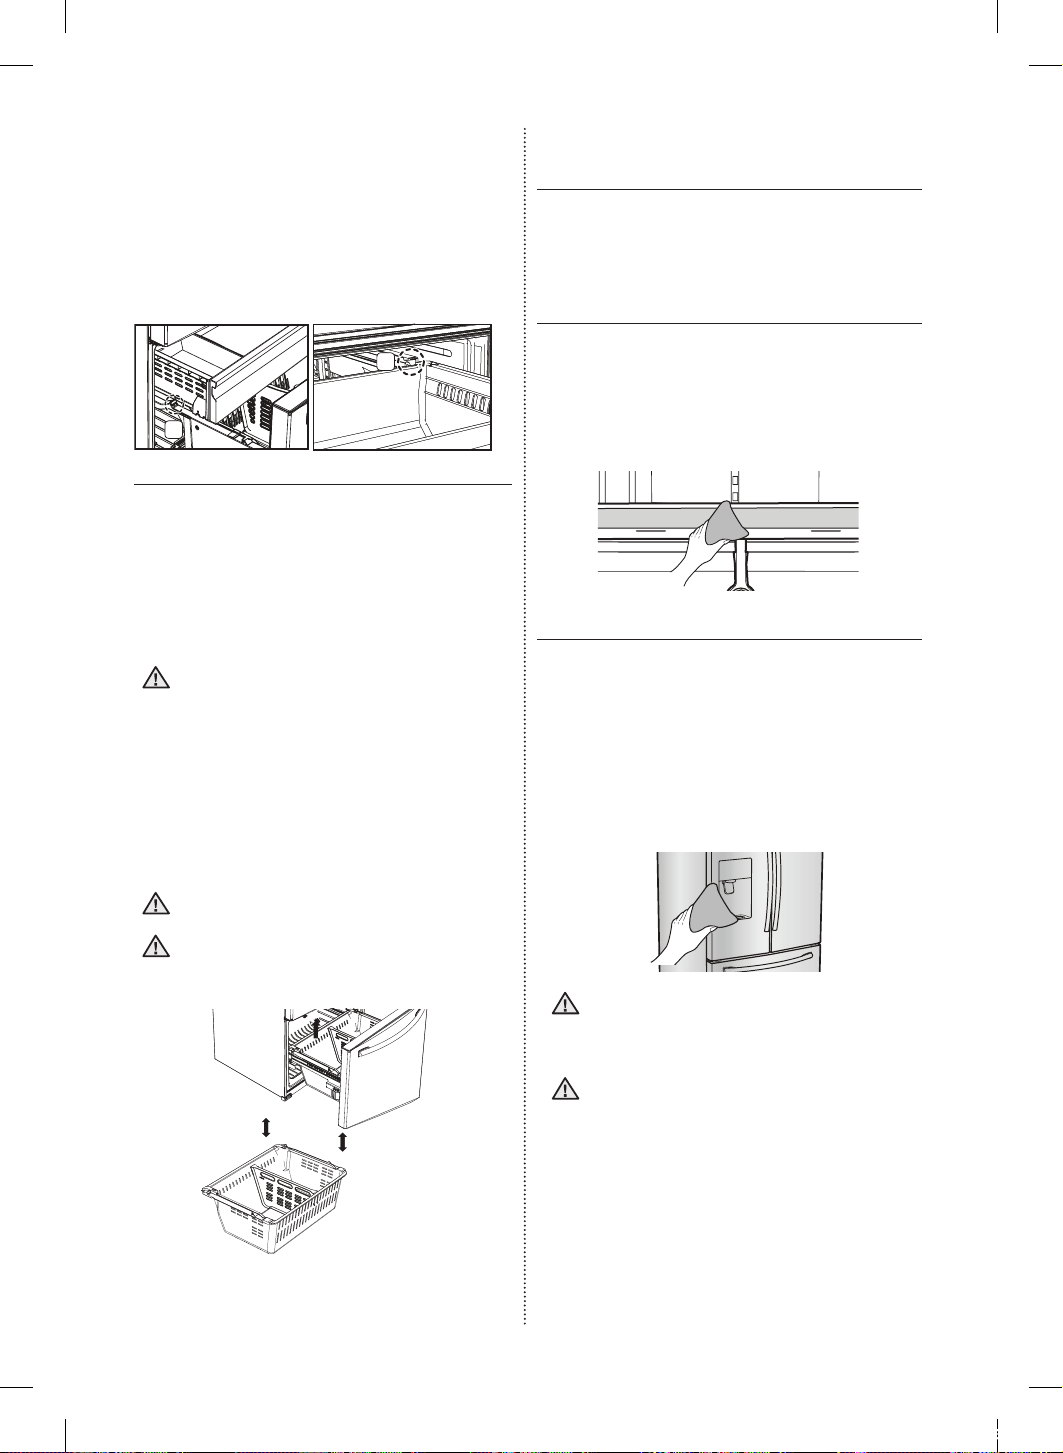
24_ Funcionamiento
2. Cajón de extracción automática
Para retirarlo: retire el cajón totalmente hacia afuera.
Incline la parte posterior del cajón hacia arriba y levántelo.
Para volver a colocarlo: coloque el cajón sobre los
rieles ( 4 ) inclinándolo hacia arriba. Baje el cajón y
colóquelo en su lugar hasta que se encuentre en posición
horizontal, luego deslice el cajón hasta el tope ( 3 ).
3
4
3. Cajón del congelador
Para retirar el cajón: extraiga el cajón del congelador
completamente. Incline la parte posterior del
compartimento hacia arriba y levántelo para retirarlo.
Para volver a colocar el cajón: inserte la bandeja
en los rieles.
No permita que bebés o niños entren en
el cajón.
- Esto puede provocar la muerte por sofocación
debido al encierro o lesiones personales.
No se siente en la puerta del congelador.
- La puerta puede romperse y causar lesiones.
- Para prevenir que los niños se queden encerrados,
debe reinstalar el divisor, utilizando los tornillos
provistos después de la limpieza, o de otras
actividades si ha quitado el divisor del cajón.
No retire el divisor.
Si quedan atrapados dentro, los niños
pueden lesionarse o sofocarse hasta
morir.
PRECAUCIÓN
PRECAUCIÓN
ADVERTENCIA
LIMPIEZA DEL
REFRIGERADOR
El cuidado del refrigerador de puerta francesa
Samsung prolonga su vida útil y ayuda a que no
se filtren olores ni gérmenes.
Limpieza del interior
Limpie las paredes internas y los accesorios con
un detergente suave, luego seque con un paño
suave. Puede retirar los cajones y estantes para
limpiar a fondo. Asegúrese de secar los cajones
y estantes antes de colocarlos nuevamente en su
lugar.
Limpieza del exterior
Limpie el panel de control y el visor digital con
un paño húmedo, limpio y suave. No pulverice
con agua directamente sobre la superficie del
refrigerador.
Las puertas, manijas y las superficies del gabinete
se deben limpiar con un detergente suave y luego
secar con un paño suave. Para que el refrigerador
luzca mejor que nunca, recomendamos pulir el
exterior una o dos veces al año.
No pulverice agua directamente sobre
el refrigerador. Utilice un paño limpio y
húmedo para la limpieza.
No limpie el refrigerador rociando agua
directamente sobre él.
No limpie el refrigerador con benceno,
solvente o alcohol.
• Esto podría causar decoloración,
deformación,
daños, una descarga eléctrica o un incendio.
No pulverice con gas inflamable cerca del
refrigerador.
- Existe el riesgo de que se produzca una
explosión o un incendio.
PRECAUCIÓN
PRECAUCIÓN
DA68-02601A-16.indb 24 2018. 10. 8. 오후 4:32
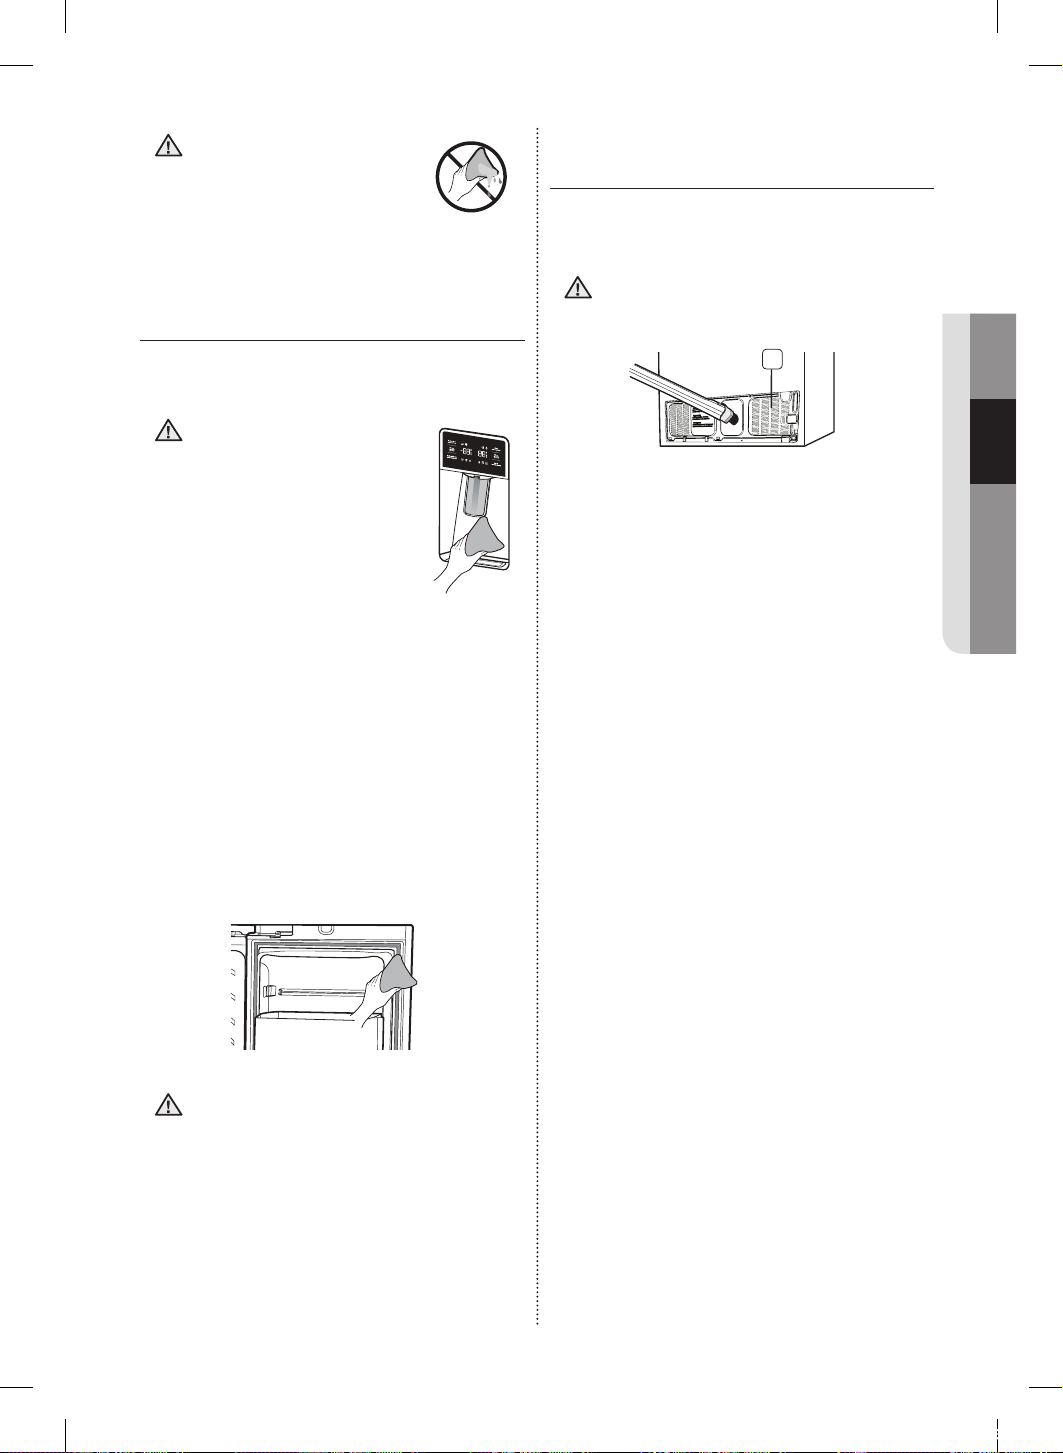
Funcionamiento _25
02 FUNCIONAMIENTO
Las letras impresas en el
visor pueden borrarse si
se aplica directamente
el limpiador de acero
inoxidable sobre la zona.
Limpieza del dispensador de
hielo/agua
Limpie el dispensador de hielo/agua con un paño
limpio y suave.
Cuando se utilice la
selección de hielo triturado
del dispensador es posible
que en el recipiente de
hielo se comiencen a
acumular fragmentos de
hielo residual.
Para impedir que este
hielo residual se derrita y
sobresalga del recipiente,
deberá limpiar el hielo
residual cuando vea que
empieza a acumularse en
el recipiente del hielo.
Si los burletes de goma de la puerta están
sucios, es posible que las puertas no cierren
correctamente, y el refrigerador no funcionará
como corresponde. Mantenga los burletes libres
de polvo o manchas limpiando las puertas con un
detergente suave y un paño húmedo. Seque con
un paño limpio y suave.
No limpie el refrigerador con bencina,
solvente o detergente para automóviles
ya que puede provocar un incendio.
PRECAUCIÓN
PRECAUCIÓN
PRECAUCIÓN
Limpieza de la parte posterior del
refrigerador
Para mantener los cables y las partes expuestas
libres de polvo y suciedad Aspire la parte posterior
del refrigerador una o dos veces por año.
No retire la tapa posterior ( 1 ).
Podría sufrir una descarga eléctrica.
1
PRECAUCIÓN
DA68-02601A-16.indb 25 2018. 10. 8. 오후 4:32
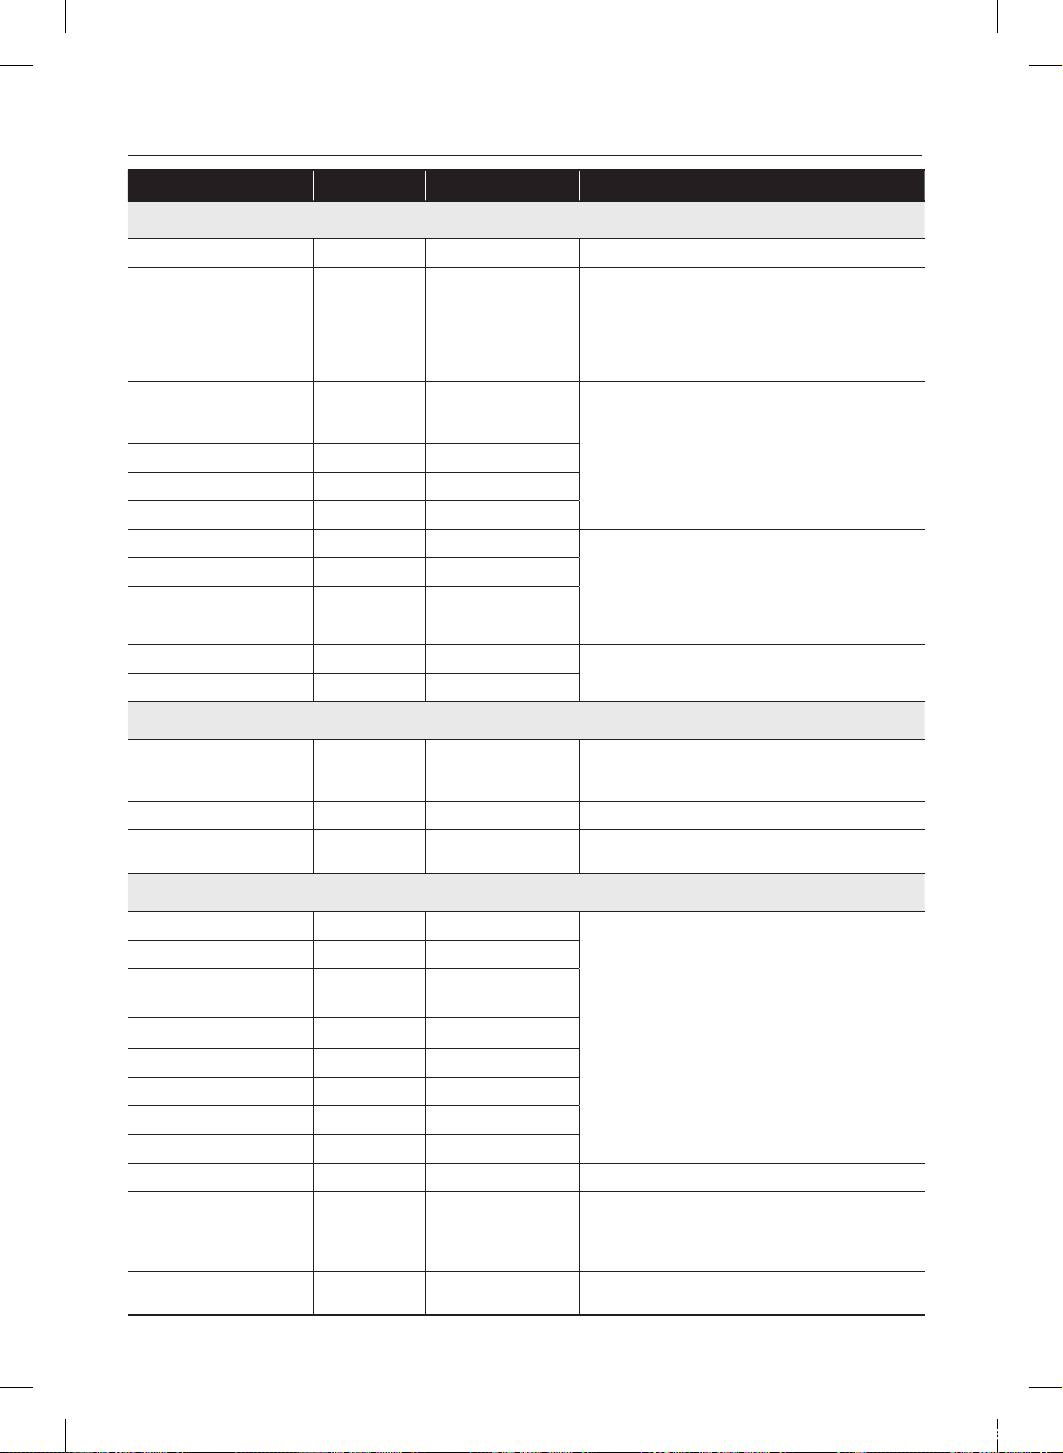
26_ Funcionamiento
RECOMENDACIONES DE ALMACENAMIENTO DE ALIMENTOS
Alimentos Refrigerador Congelador Recomendaciones de almacenamiento
LÁCTEOS
Mantequilla 2-3 semanas 6-9 meses Envolver o cubrir muy bien.
Leche 1-2 semanas No recomendado
Verificar el código de fecha. La leche y casi
todos los productos derivados se venden en
envases de cartón con código de fecha de
vencimiento del producto. Cerrar con tapa o en-
volver muy bien. No volver a colocar el producto
que no se ha ingerido en el envase original.
Queso crema, alimentos
que contienen queso y
queso untable
2-4 semanas No recomendado
Verificar el código de fecha. Mantener el queso
envuelto firmemente evitando que se filtre la
humedad.
Queso duro (sin abrir) 3-4 meses 6 meses
Queso duro (abierto) 2 meses No recomendado
Requesón 10-15 días No recomendado
Crema 7-10 días 2 meses
Verificar el código de fecha. La mayoría de los
yogures, cremas y productos similares se ven-
den en envases de cartón con código de fecha
de vencimiento del producto. Volver a cerrar o
cubrir muy bien. No volver a colocar el producto
que no se ha ingerido en el envase original.
Crema agria 2 semanas No recomendado
Salsas de crema
(abiertas)
1 semana No recomendado
Yogur 10-14 días No recomendado
Verificar el código de fecha. Mantener tapado.
Yogur congelado N/A 2 meses
HUEVOS
Huevos (crudos) 3-4 semanas No recomendado
Verificar el código de fecha. Almacenar los
huevos en el sector más frío del refrigerador y en
su recipiente original.
Huevos (cocidos) 1 semana No recomendado Almacenar en un recipiente tapado
Sobras de comidas con
huevo
3-4 días No recomendado Almacenar en un recipiente tapado
FRUTAS FRESCAS
Manzanas 1 mes No recomendado
Si se almacena fruta en el refrigerador, no lavar
antes de guardar. Almacenar en bolsas o re-
cipientes resistentes a la humedad. Envolver las
frutas cortadas. Al - gunas frutas se oscurecen
cuando se las enfría.
Plátanos 2-4 días No recomendado
Duraznos, melones,
peras, aguacates
3-5 días No recomendado
Moras y cerezas 2-3 días 12 meses
Chabacanos 3-5 días No recomendado
Uvas 2-5 días N/A
Piña (entera) 2-3 días No recomendado
Piña (cortada) 5-7 días 6-12 meses
Cítricos 1-2 semanas No recomendado Almacenar sin tapa.
Jugo 6 días No recomendado
Verificar el código de fecha y volver a almacenar
cerrado en su recipiente original. No volver a
colocar el producto que no se ha ingerido en el
envase original.
Jugo congelado
Se descongela
solamentey
12 meses
Verificar el código de fecha. No volver a con-
gelar.
DA68-02601A-16.indb 26 2018. 10. 8. 오후 4:32
Funcionamiento _27
02 FUNCIONAMIENTO
Alimentos Refrigerador Congelador Recomendaciones de almacenamiento
PESCADOS Y MARISCOS
Pescados
Pescado graso
(caballa, trucha,
salmón)
1-2 días 2-3 meses
Mantener en el envoltorio original y almacenar en el
sector más frío del refrigerador. Envolver con un mate-
rial resistente a la humedad y al vapor para el conge-
lador. Congelar a 0 ºF ( -18 °C ). Descongelar en el
refrigerador o verificar el código de fecha. Congelar en
su envoltorio original.
Pescado magro
(bacalao, platija,
etc.)
1-2 días 6 meses
Congelado o
empanado
N/A 3 meses
Mariscos
Camarones (crudos)
1-2 días 12 meses
Para congelar, envolver en un recipiente resistente a la
humedad y al vapor.
Cangrejo 3-5 días 10 meses
Pescado o maris-
cos cocidos
2-3 días 3 meses
CARNE
Fresca, cruda
Chuletas 2-4 días 6-12 meses
Verificar el código de fecha antes de usar. Almacenar
en el sector más frío del refrigerador en su envoltorio
original. Colocar dentro de un recipiente resistente al
vapor y a la humedad para congelar. La temperatura
recomendada para el refrigerador es de 33ºF a 36ºF
(o 1°C a 2°C ) y para el congelador de 0ºF a 2ºF (o
-18°C a -16°C )
Molida 1 día 3-4 meses
Asada 2-4 días 6-12 meses
Tocino 1-2 semanas 1-2 meses
Salchichas 1-2 días 1-2 meses
Bistec 2-4 días 6-9 meses
Aves 1 día 12 meses
Fiambres 3-5 días 1 mes
Cocida
Carne 2-3 días 2-3 meses
Verificar el código de fecha antes de usar. Almacenar
en el sector más frío del refrigerador en su envoltorio
original. Colocar dentro de un recipiente resistente al
vapor y a la humedad para congelar.
Aves 2-3 días 4-5 meses
Jamón 1-2 semanas 1-2 meses
Fuentes:
American Meat Institute Foundation. 1994. Páginas amarillas: respuestas a preguntas previsibles que los
consumidores realizan con respecto a la carne y a las aves. American Meat Institute Food Marketing Institute. 1999.
The food keeper.
Food Marketing Institute, Washington, D.C. Freeland-Graves, J.H. y G.C. Peckham. 1996. Foundations of food
preparation, 6th ed. Prentice-Hall, Inc. Englewood Clis, NJ. Hillers, V.N. 1993. Storing foods at home. Washington
State University Cooperative Extension, Pullman, WA. Publ. EB 1205.
National Restaurant Association. 2001. Be cool-chill out! Refrigerate promptly. National Restaurant Association
Education Foundation¼s International Food Safety Council, Washington, D.C. USDA. 1997. Basics for handling
foodsafely. U.S. Department of Agriculture, Food Safety and Inspection Service, Washington, D.C.
DA68-02601A-16.indb 27 2018. 10. 8. 오후 4:32
28_ Solución de problemas
Solución de problemas
PROBLEMA SOLUCIÓN
El refrigerador
no funciona para
nada o no enfría lo
suficiente.
• Verifique que el enchufe esté correctamente conectado.
• Verifique si la temperatura en el display es más alta que la temperatura interna del
refrigerador o congelador. Si es así, ajuste el refrigerador a una temperatura inferior.
• ¿El refrigerador está ubicado directamente al sol o cerca de una fuente de calor?
• ¿La parte posterior del refrigerador está demasiado cerca de una pared, evitando la
ventilación adecuada?
La comida en el
congelador está
congelada.
• Verifique si la temperatura en el Display está demasiado baja.
• Intente poner el refrigerador en una temperatura más alta.
• ¿La temperatura de la habitación es demasiado baja? Ponga el refrigerador a una
temperatura más alta.
• ¿Colocó el alimento con jugo en el sector más frío del refrigerador? Corra esos
alimentos a otros estantes en el congelador en lugar de guardarlos en las áreas más
frías o cajones.
Escucha ruidos o
sonidos fuera de lo
normal.
• Verifique que el refrigerador esté nivelado y estable.
• ¿La parte posterior del refrigerador está demasiado cerca de una pared, evitando la
ventilación adecuada? Trate de separar el refrigerador al menos 2 pulgadas de la pared.
• ¿Cayó algo detrás o debajo del refrigerador?
• Se oye un “tic” proveniente del interior del refrigerador. Es normal y ocurre porque varios
accesorios se contraen o expanden según la temperatura del interior del refrigerador.
• Es normal que se escuche como si algo golpeara algún elemento dentro del
refrigerador. El ruido se debe al compresor funcionando a alta capacidad.
El área de cierre de
la puerta del gabinete
del refrigerador
está caliente y se
está generando
condensación.
• Es normal que se genere algo de calor ya que los anticondensadores están instalados
en la sección de la bisagra vertical del refrigerador para impedir la condensación.
• ¿Está la puerta del refrigerador entreabierta? Puede producirse condensación cuando
deja la puerta abierta por mucho tiempo.
La fábrica de hielo
no funciona.
• ¿Esperó 12 horas luego de haber instalado la tubería de suministro de agua antes de
hacer hielo?
• ¿Está conectado el suministro de agua y abierta la válvula de cierre?
• ¿Detuvo manualmente la función para hacer hielo?
• ¿Está demasiado alta la temperatura del congelador? Baje la temperatura del
congelador.
Puede que se generen
burbujas de agua
dentro del refrigerador.
• Esto es normal. Las burbujas pertenecen al refrigerante que circula a través del
refrigerador
Hay mal olor en el
refrigerador.
• Verifique si hay alimentos descompuestos.
• Los alimentos con olores fuertes (por ejemplo, pescado) se deberían tapar muy bien.
• Limpie su congelador periódicamente y deseche los alimentos descompuestos o que
considera que pueden descomponerse.
Se forma escarcha
en las paredes del
congelador.
• ¿Está bloqueada la ventilación de aire? Quite cualquier obstrucción de modo que el aire
pueda circular libremente
• Deje espacio suficiente entre los alimentos guardados para la correcta circulación del
aire.
• ¿El cajón del congelador está correctamente cerrado?
El dispensador de
agua no funciona.
• ¿Está conectado el suministro de agua y abierta la válvula de cierre?
• ¿Está la tubería de suministro de agua aplastada o enroscada?
• Asegúrese de que la tubería esté libre y sin obstrucciones.
• ¿Está congelado el tanque de agua porque la temperatura del congelador está
demasiado baja? Seleccione una temperatura más alta en el visor digital.
El sistema de cierre
automático no funciona
con la puerta del
congelador.
• ¿Están desequilibradas las partes derecha e izquierda de la puerta?
• Abra y cierre suavemente la puerta 1~2 veces. Luego de hacerlo en general el sistema
de cierre automático funciona correctamente.
• Abra la puerta suavemente para evitar desequilibrar la parte derecha y la parte izquierda
de la puerta.
DA68-02601A-16.indb 28 2018. 10. 8. 오후 4:32

Garantía (USA)
GARANTÍA DEL REFRIGERADOR SAMSUNG
GARANTÍA LIMITADA (EE.UU.)
REFRIGERADOR SAMSUNG
GARANTÍA LIMITADA AL COMPRADOR ORIGINAL CON COMPROBANTE DE COMPRA
Este producto de marca SAMSUNG, suministrado y distribuido por Samsung Electronics America, Inc.
(SAMSUNG) y entregado nuevo en su caja de fábrica al comprador original, está garantizado por SAMSUNG
ante defectos de fabricación relacionados con los materiales o la mano de obra durante el período de garantía
limitado a:
Un (1) año para las piezas y la mano de obra
Cinco (5) años para las piezas y la mano de obra exclusivamente del sistema hermético de refrigeración
(compresor, evaporador, condensador, deshumidificador y tuberías de conexión)
Diez (10) años para las piezas y cinco (5) años para la mano de obra exclusivamente del compresor Inverter
digital
Esta garantía limitada solo es válida para productos comprados y utilizados en Estados Unidos de América
que hayan sido instalados, operados y mantenidos de acuerdo a las instrucciones que se adjuntaron o
proporcionaron con el producto. Para recibir el servicio técnico de la garantía, el comprador debe comunicarse
con SAMSUNG en la dirección o con el número de teléfono detallado en esta garantía con el fin de que se
determine el problema y los procedimientos del servicio. El servicio de garantía solo puede realizarse a través de
un Centro de Servicio autorizado por SAMSUNG. Debe presentarse la factura original de venta bajo solicitud de
SAMSUNG o del Centro de Servicio autorizado por SAMSUNG como prueba de compra para recibir el servicio
técnico de la garantía.
SAMSUNG brindará servicio técnico a domicilio sin costo dentro de los Estados Unidos contiguos durante el
período de garantía, sujeto a disponibilidad de los prestadores de servicio técnico autorizados dentro del área
geográfica del cliente. Si el servicio a domicilio no está disponible, SAMSUNG podrá, según su criterio, optar por
brindar el servicio de transporte del producto de ida y vuelta al centro de servicio. Si el producto se encuentra
en un área sin prestadores de servicio técnico autorizado de SAMSUNG, es posible que se cobre el costo del
viaje o se solicite que el cliente lleve el producto a un centro de servicio técnico autorizado de SAMSUNG para
que se realice el servicio técnico. Como condición para que se preste este servicio a domicilio, el producto debe
encontrarse libre de obstrucciones y accesible para el agente de servicio.
Durante el período de garantía correspondiente, el producto se reparará, remplazará, o se devolverá el monto
de la compra, según decida SAMSUNG. SAMSUNG podrá utilizar piezas nuevas o reparadas al reparar el
producto; o lo remplazará con un producto nuevo o reparado. Las piezas y los productos reemplazados
estarán garantizados por la garantía del producto original que resta, o noventa (90) días, el período que sea el
más prolongado. Todas las piezas y los productos reemplazados son propiedad de SAMSUNG y deben ser
devueltos a SAMSUNG.
Esta garantía limitada cubre defectos de fabricación en materiales o de mano de obra bajo condiciones de
uso doméstico normal, no comercial, del producto y no cubrirá lo siguiente: daños ocasionados durante
el transporte, la entrega o la instalación o por uso distinto al previsto para este producto; producidos por
modificación o alteración no autorizada del producto; productos a los que se le borraron, desfiguraron o
cambiaron de forma alguna los números de serie de fabricación originales, o en los que no se puede leer con
claridad; daños cosméticos como rayones, abolladuras o muescas, o cualquier daño al acabado del producto;
daños producidos por abuso, uso incorrecto, infestación de plagas, accidentes, incendios, inundaciones u otros
fenómenos de la naturaleza o casos de fuerza mayor; daños producidos por uso de equipos, herramientas,
servicios, piezas, suministros, accesorios, aplicaciones, instalaciones, reparaciones, cableado externo o
conectores no suministrados o autorizados por SAMSUNG; daños causados por corriente o voltaje incorrectos,
sobretensión o fluctuación de la línea eléctrica; daños causados por no operar o mantener el producto como
establecen las instrucciones; instrucción a domicilio sobre el uso del producto; servicio técnico para el arreglo
de instalaciones que no se adecuan a los códigos de electricidad y fontanería o arreglo de conexiones eléctricas
o de fontanería del hogar (por ejemplo, arreglos de cableado, fusibles o tuberías de la toma de agua). El costo
de reparación o remplazo bajo estas circunstancias excluidas le corresponderá al cliente.
DA68-02601A-16.indb 29 2018. 10. 8. 오후 4:32

Las visitas de un técnico de servicio autorizado para explicar las funciones, el mantenimiento o la instalación del
producto no están cubiertas por esta garantía limitada. Comuníquese con SAMSUNG al número que figura a
continuación si necesita asistencia en los anteriores casos.
EXCLUSIÓN DE GARANTÍAS IMPLÍCITAS
GARANTÍAS TÁCITAS, INCLUYENDO LAS GARANTÍAS DE COMERCIABILIDAD O APTITUD PARA UN PROPÓSITO
ESPECIAL, POSEEN UN TÉRMINO LIMITADO DE UN AÑO O EL PERÍODO MÁS CORTO PERMITIDO POR LA LEY.
Algunos Estados no permiten limitaciones en cuanto al plazo de una garantía implícita, por lo tanto las limitaciones o
exclusiones antedichas pueden no aplicarse en su caso. Esta garantía le otorga derechos específicos, e incluso puede
otorgarle otros derechos que varían de un estado a otro.
LIMITACIÓN DE COMPENSACIÓN
SU ÚNICA COMPENSACIÓN ES LA REPARACIÓN DEL PRODUCTO, EL REMPLAZO DEL PRODUCTO O LA
DEVOLUCIÓN DEL MONTO DE LA COMPRA, SEGÚN DECIDA SAMSUNG, DE ACUERDO A LO ESTIPULADO EN
ESTA GARANTÍA LIMITADA. SAMSUNG NO SERÁ RESPONSABLE DE DAÑOS IMPREVISTOS O DERIVADOS,
QUE INCLUYEN PERO NO SE LIMITAN AL TIEMPO Y FORMA DEL TRABAJO, HOTELES Y/O COMIDAS DE
RESTAURANTES, GASTOS DE REMODELACIÓN, PÉRDIDA DE INGRESOS O GANANCIAS, NO OBTENCIÓN DE
AHORROS U OTROS BENEFICIOS SIN IMPORTAR LA TEORÍA JURÍDICA EN LA QUE SE BASA EL RECLAMO,
INCLUSO SI SE HA NOTIFICADO A SAMSUNG QUE TALES DAÑOS ERAN POSIBLES. Algunos estados no permiten
la exclusión o limitación de daños imprevistos o derivados, por lo tanto las limitaciones o las exclusiones nombradas
anteriormente podrían no aplicarse. Esta garantía le otorga derechos específicos, e incluso puede otorgarle otros
derechos que varían de un estado a otro.
SAMSUNG no garantiza un funcionamiento ininterrumpido y sin fallas del producto. Ninguna otra garantía otorgada
por persona, compañía o corporación alguna con respecto al presente producto revestirá carácter vinculante para
SAMSUNG.
Para obtener el servicio de garantía, pónganse en contacto con SAMSUNG en:
Samsung Electronics America, Inc.
85 Challenger Road
Ridgefield Park, NJ 07660
1-800-SAMSUNG (726-7864)
www.samsung.com/us/suppor
DA68-02601A-16.indb 30 2018. 10. 8. 오후 4:32
un monde de possibilités
RF263TE****
RF263BE****
Appareil non encastrable
Français
Réfrigérateur
Manuel d’utilisation
Merci d’avoir choisi ce produit Samsung.
DA68-02601A-16.indb 1 2018. 10. 8. 오후 4:32
2_ Consignes de sécurité
Consignes de sécurité
CONSIGNES DE SÉCURITÉ
• Avant d’utiliser votre nouveau réfrigérateur Samsung,
veuillez lire attentivement ce guide afin de vous
assurer que vous savez comment utiliser de manière
sûre et ecace ses diérentes fonctionnalités.
• Cet appareil n’est pas conçu pour être utilisé par
des personnes (y compris des enfants) manquant
d’expérience et de connaissances, ou dont les
capacités physiques, sensorielles ou mentales sont
réduites, sauf si celles-ci sont sous la surveillance
ou ont reçu les instructions d’utilisation appropriées
de la personne responsable de leur sécurité. Il est
nécessaire de surveiller les enfants pour s’assurer
qu’ils ne jouent pas avec l’appareil.
• Les instructions suivantes concernent
plusieurs modèles; il est donc possible que les
caractéristiques de votre réfrigérateur soient
légèrement diérentes de celles spécifiées dans ce
guide.
• Pour toute question, communiquez avec nous au
1-800-SAMSUNG ou connectez-vous sur www.
samsung.com.
• Le gaz réfrigérant utilisé est le R600a ou R134a.
Vérifiez le gaz réfrigérant utilisé dans votre
réfrigérateur sur l’étiquette du compresseur située à
l’arrière de l’appareil ou sur l’étiquette signalétique
située à l’intérieur du réfrigérateur. Si ce produit
contient du gaz inflammable (gaz réfrigérant R-600a),
veuillez communiquer avec les autorités locales pour
obtenir des renseignements sur la mise au rebut en
toute sécurité de votre appareil.
• Il est dangereux pour quiconque qui n’est pas un
agent de maintenance autorisé d’entretenir cet
appareil.
Avertissement :
Risque d’incendie
/ matériaux
inflammables
Consignes de sécurité importantes et
symboles :
AVERTISSEMENT
Pratiques inadaptées ou dangereuses
susceptibles de causer des blessures graves,
voire mortelles.
ATTENTION
Pratiques inadaptées ou dangereuses
susceptibles de causer des blessures légères
ou des dommages matériels.
À NE PAS faire.
NE PAS démonter.
NE PAS toucher.
Suivre scrupuleusement les consignes.
Débrancher la prise murale.
S’assurer que le réfrigérateur est relié à la
terre afin d’éviter toute électrocution.
Contacter le service d’assistance technique
pour obtenir de l’aide.
Remarque.
Ces symboles d’avertissement ont pour but
d’éviter tout risque de blessure.
Respectez-les en toutes circonstances.
Lisez attentivement la section Consignes
de sécurité de ce manuel et conservez ce
dernier en lieu sûr afin de pouvoir vous y
reporter ultérieurement.
AVERTISSEMENT CONCERNANT
LA PROPOSITION 65 DE L’ÉTAT
DE LA CALIFORNIE
• Cancer et Troubles de l’appareil reproducteur -
www.P65Warnings.ca.gov.
SYMBOLES D’AVERTISSEMENT
IMPORTANTS CONCERNANT
L’INSTALLATION
• N’installez pas le réfrigérateur dans un
lieu humide ou dans un lieu où il est
susceptible d’être en contact avec de l’eau.
- Une détérioration de l’isolation des composants
électriques est susceptible de provoquer une
électrocution ou un incendie.
• N’exposez pas ce réfrigérateur à la lumière directe
du soleil ou à la chaleur d’un poêle, d’appareils de
chauage ou autre appareil.
• Ne branchez pas plusieurs appareils sur la même
multiprise. Le réfrigérateur doit toujours être branché
sur une prise électrique indépendante dotée d’une
tension nominale correspondant à celle figurant sur
la plaque signalétique de l’appareil.
Vous obtiendrez de meilleurs résultats et éviterez
également une surcharge des circuits électriques
(risque d’incendie suite à une surchaue des fils).
AVERTISSEMENT
DA68-02601A-16.indb 2 2018. 10. 8. 오후 4:32
Consignes de sécurité _3
• Ne branchez pas la fiche d’alimentation si la prise
murale est mal fixée.
- Cela risquerait d’entraîner une électrocution ou un
incendie.
• N’utilisez pas de cordon craquelé ou endommagé
sur toute sa longueur ou à l’une de ses extrémités.
• Ne pliez pas le cordon d’alimentation à l’excès et ne
posez pas d’objets lourds dessus.
- Ne tirez pas ou ne pliez pas excessivement le
cordon d’alimentation.
• Ne tordez pas ou ne nouez pas le cordon
d’alimentation.
• N’accrochez pas le cordon d’alimentation sur un
objet métallique, ne placez pas un objet lourd sur
le cordon d’alimentation, n’insérez pas le cordon
d’alimentation entre les objets, ou ne poussez pas
le cordon d’alimentation dans l’espace situé derrière
l’appareil.
- Lorsque vous déplacez le réfrigérateur, veillez à
ne pas le faire passer sur le cordon d’alimentation
(risque d’endommagement des fils électriques).
- Risque d’électrocution ou d’incendie.
• Cet appareil doit être positionné de sorte que la
prise d’alimentation soit facilement accessible.
- Le non-respect de cette consigne risquerait de
provoquer une électrocution ou un incendie par
suite de fuites électriques.
• N’obstruez pas l’ouverture de ventilation de
l’emplacement ou de la structure de montage de
l’appareil.
• Ne tentez pas de réparer, démonter ou modifier
l’appareil vous-même.
- N’utilisez aucun fusible (tel que du cuivre, un fil
d’acier, etc.) autre que le fusible standard.
- Si une réparation ou une réinstallation de l’appareil
est requise, contactez le centre d’assistance le plus
proche.
- Le non-respect de cette consigne risque d’entraîner
un dysfonctionnement, une électrocution, un
incendie ou des blessures corporelles.
• Pour optimiser la consommation d’énergie du
réfrigérateur, laissez toujours les étagères, tiroirs et
paniers dans leur position d’origine comme indiqué
par l’illustration ci-dessus.
• Ne débranchez jamais le réfrigérateur en tirant
sur le cordon d’alimentation. Maintenez toujours
fermement la prise pour débrancher.
- Tout dommage sur le cordon est susceptible
d’entraîner un court-circuit, un incendie et/ou une
électrocution.
• N’utilisez pas d’aérosols à proximité du réfrigérateur.
- Risque d’explosion ou d’incendie.
• N’installez pas cet appareil près d’une source de
chaleur ni d’un matériel inflammable.
• N’installez pas cet appareil dans un lieu humide,
huileux ou poussiéreux, ni dans un endroit exposé
directement au soleil ou à l’eau (gouttes de pluie).
• N’installez pas cet appareil dans un endroit où des
fuites de gaz sont susceptibles de se produire.
- Risque d’électrocution ou d’incendie.
• Ce réfrigérateur doit être installé
conformément au manuel d’utilisation
avant d’être utilisé.
• Branchez la prise d’alimentation de telle façon que
le cordon pende vers le bas.
- Si vous branchez la prise d’alimentation à l’envers,
le fil est susceptible de se rompre et de provoquer
un incendie ou une électrocution.
• Lorsque vous déplacez le réfrigérateur, veillez à
ne pas le faire passer sur le cordon d’alimentation
(risque d’endommagement des fils électriques).
- Risque d’incendie.
• Assurez-vous que le réfrigérateur ne repose pas
sur le câble d’alimentation (risque d’écrasement et
d’endommagement des fils électriques).
• Gardez les éléments d’emballage hors de portée
des enfants.
- Il existe un risque d’asphyxie si un enfant place les
éléments d’emballage sur sa tête.
• L’appareil doit être positionné de telle façon que la
prise reste facilement accessible.
• Vous devez retirer tous les films protecteurs en
plastique avant de brancher l’appareil pour la
première fois.
• Le réfrigérateur doit être correctement mis
à la terre.
- Veillez toujours à ce que le réfrigérateur soit branché
à la terre avant de vérifier ou de réparer n’importe
quelle partie de l’appareil.
Les fuites électriques peuvent provoquer des
électrocutions graves.
• N’utilisez jamais de conduites de gaz, de fils
téléphoniques ou d’autres éléments susceptibles
d’attirer la foudre pour relier l’appareil à la terre.
- Toute utilisation non conforme de la prise de mise à
la terre peut entraîner un risque d’électrocution.
Si l’utilisation d’une rallonge s’avère nécessaire,
utilisez uniquement un cordon avec prise de terre
trois fils et une prise à trois fiches acceptant la prise
de l’appareil. Les caractéristiques électriques de
la rallonge doivent être de AC 115-120 V et 10 A
minimum. Si un adaptateur de mise à la terre est
utilisé, vérifiez que la boîte de prise de courant est
entièrement mise à la terre.
•
Si le cordon d’alimentation est endommagé,
demandez son remplacement immédiat par
le fabricant ou le réparateur agréé.
• La prise murale doit être facilement accessible afin
de pouvoir rapidement débrancher l’appareil de la
prise murale en cas d’urgence.
• Elle ne doit pas se situer derrière l’appareil.
• Lors du positionnement de l’appareil, assurez-vous
que le cordon d’alimentation n’est pas coincé ou
DA68-02601A-16.indb 3 2018. 10. 8. 오후 4:32
4_ Consignes de sécurité
endommagé.
• Ne placez pas plusieurs rallonges électriques ou
sources d’alimentation portables à l’arrière de
l’appareil.
• Dans cet appareil, ne stockez aucune substance
explosive telle que des aérosols avec un propulseur
inflammable.
POUR UNE INSTALLATION
EN TOUTE SÉCURITÉ
• Ménagez un espace susant pour installer
le réfrigérateur sur une surface plane.
- Si votre réfrigérateur n’est pas mis à niveau, il est
possible que le système de refroidissement interne
ne fonctionne pas correctement.
• N’obstruez pas l’espace de ventilation de
l’emplacement ou de la structure de montage de
l’appareil.
• Laissez l’appareil reposer pendant 2 heures après
l’installation.
• Nous vous recommandons de faire installer votre
réfrigérateur par un technicien qualifié ou une
entreprise de dépannage.
- Le non-respect de cette consigne risque d’entraîner
un dysfonctionnement, une électrocution,
un incendie, une explosion ou des blessures
corporelles.
• Cet appareil doit être correctement mis à la terre.
• Pour la mise à la terre, ne raccordez pas l’appareil
à une conduite de gaz, à une conduite d’eau en
plastique ou à une ligne téléphonique.
- Le réfrigérateur doit être mis à la terre afin
d’éviter les fuites électriques ou les électrocutions
provoquées par les fuites de courant de l’appareil.
- Le non-respect de cette consigne risque d’entraîner
une électrocution, un incendie, une explosion ou
des problèmes avec l’appareil.
- Ne branchez jamais le cordon d’alimentation sur
une prise qui n’a pas été correctement mise à la
terre et assurez-vous qu’elle est conforme aux
règlementations locales et nationales.
• Débranchez fermement la fiche de la prise murale.
N’utilisez pas de prise d’alimentation endommagée,
de cordon d’alimentation endommagé ou de prise
murale mal fixée.
- Risque d’électrocution ou d’incendie.
• Il est conseillé de faire appel à un technicien qualifié
ou à une entreprise de dépannage pour installer ou
faire réparer l’appareil.
• Le non-respect de cette consigne risque d’entraîner
un dysfonctionnement, une électrocution,
un incendie, une explosion ou des blessures
corporelles.
• Ne touchez pas la prise d’alimentation si vous avez
les mains mouillées.
- Cela pourrait entraîner une électrocution.
• N’entreposez pas d’objets sur le dessus de
ATTENTION
l’appareil.
• Lors de l’ouverture ou de la fermeture de la porte,
les objets risqueraient de tomber et de provoquer
des blessures corporelles et/ou des dommages
matériels.
• N’utilisez pas et n’entreposez pas de substances
thermosensibles (ex. : pulvérisateurs, objets
inflammables, glace sèche, médicaments ou
produits chimiques) à proximité ou à l’intérieur du
réfrigérateur.
• Ne stockez pas d’objets ou de substances volatiles
ou inflammables (benzène, diluant, propane,
d’alcool, d’éther, de gaz liquéfié et de toute autre
substance similaire, etc.) dans le réfrigérateur.
- Le réfrigérateur a été conçu exclusivement pour le
stockage des produits alimentaires.
- Cela pourrait entraîner un incendie ou une
explosion.
• Si l’appareil dégage une odeur chimique ou de la
fumée, débranchez-le immédiatement et contactez
votre centre de service technique Samsung
AVERTISSEMENT
IMPORTANT CONCERNANT
L’UTILISATION
• Ne branchez pas la prise d’alimentation
avec les mains mouillées.
• N’entreposez pas d’objets sur le dessus de
l’appareil.
- Lors de l’ouverture ou de la fermeture de la porte,
les objets risqueraient de tomber et de provoquer
des blessures corporelles et/ou des dommages
matériels.
• Ne placez pas de récipient rempli d’eau sur le
réfrigérateur.
- En cas de renversement, cela pourrait entraîner un
incendie ou une électrocution.
• Les enfants ne doivent pas utiliser l’appareil sans la
surveillance d’un adulte.
- Maintenez les doigts éloignés des zones contenant
des «points de pincement» ; le jeu entre les portes
et l’armoire doit nécessairement être faible. Soyez
attentifs lorsque vous ouvrez les portes si des
enfants se trouvent dans la zone.
• Ne laissez pas les enfants se suspendre à la porte
de l’appareil. Ils risqueraient de se blesser.
• Ne laissez pas les enfants entrer à l’intérieur du
réfrigérateur. Ils risqueraient de rester emprisonnés.
• Ne placez pas vos mains sous l’appareil.
- Les bords coupants sont susceptibles de provoquer
des blessures corporelles.
• Ne laissez pas les enfants marcher sur la protection
de tiroir.
- Le tiroir risquerait de se casser et de provoquer leur
chute.
• Ne remplissez pas trop le réfrigérateur.
- Lors de l’ouverture de la porte, un article est
AVERTISSEMENT
DA68-02601A-16.indb 4 2018. 10. 8. 오후 4:32
Consignes de sécurité _5
susceptible de tomber et de provoquer des
blessures corporelles ou des dommages matériels.
• Ne touchez pas les parois intérieures du congélateur
ni les produits qui y sont stockés si vous avez les
mains mouillées.
- Risque de gelures.
• Ne mettez jamais les doigts ni d’autres objets
dans l’orifice du distributeur d’eau, le conduit
d’écoulement ou le bac à glace.
- Cela est susceptible de provoquer des blessures
corporelles ou des dommages matériels.
• Ne vaporisez pas de gaz inflammable à proximité du
réfrigérateur.
- Il existe un risque d’explosion ou d’incendie.
• Ne stockez pas de substances volatiles ou
inflammables dans le réfrigérateur.
- Le stockage de benzène, de diluant, d’alcool,
d’éther, de gaz liquéfié et de toute autre substance
similaire est susceptible de provoquer une
explosion.
• Ne stockez pas de produits pharmaceutiques,
chimiques ou sensibles aux températures dans le
réfrigérateur.
- Les produits nécessitant un contrôle strict de la
température ne doivent pas être entreposés dans le
réfrigérateur.
• Ne placez pas et n’utilisez pas d’appareil électrique
à l’intérieur du réfrigérateur sauf s’il s’agit d’un type
recommandé par le fabricant.
Ne montez pas sur le dessus de l’appareil ni ne
placez pas d’objets (tels que du linge, des bougies
allumées, des cigarettes allumées, des plats, des
produits chimiques, des objets métalliques, etc.)
sur l’appareil. Le non-respect de cette consigne
risque d’entraîner une électrocution, un incendie,
des problèmes avec l’appareil ou des blessures
corporelles. Ne placez pas de récipient rempli d’eau
sur l’appareil.
- En cas de renversement, cela pourrait entraîner un
incendie ou une électrocution.
• N’utilisez pas d’appareil mécanique ni de
dispositif susceptible d’accélérer le processus de
décongélation, autres que ceux recommandés par
le fabricant.
• N’endommagez pas le circuit frigorifique.
• Ne vaporisez pas de substance volatile sur la
surface de l’appareil.
- Ces produits peuvent se révéler dangereux pour
la santé et risquent en outre de provoquer une
électrocution, un incendie ou un dysfonctionnement.
• Ne fixez jamais directement la LED UV pendant une
période prolongée.
- Cela risquerait d’entraîner une fatigue oculaire due
aux rayons ultraviolets.
• Ne démontez pas et ne réparez pas le
réfrigérateur vous-même.
- Vous risqueriez de provoquer un incendie, un
dysfonctionnement et/ou de vous blesser.
- Veuillez contacter votre réparateur agréé lorsque la
DEL intérieure ou extérieure est grillée.
• Les enfants ne doivent pas utiliser
l’appareil sans la surveillance d’un adulte.
- Maintenez les doigts éloignés des zones contenant
des «points de pincement» ; le jeu entre les portes
et l’armoire doit nécessairement être faible. Soyez
attentifs lorsque vous ouvrez les portes si des
enfants se trouvent dans la zone. Ne laissez pas
les enfants se suspendre à la porte de l’appareil.
Dans le cas contraire, ils risqueraient de se blesser.
Risque d’enfermement des enfants. Ne laissez pas
les enfants entrer à l’intérieur du réfrigérateur.
• Serrez les bouteilles les unes contre les autres pour
éviter qu’elles ne tombent.
• Cet appareil est destiné au stockage des aliments
dans un environnement domestique uniquement.
• Si une fuite de gaz est détectée, évitez toute flamme
nue ou source potentielle d’inflammation et aérez
pendant plusieurs minutes la pièce dans laquelle se
trouve l’appareil.
- Ne touchez pas à l’appareil ou au cordon
d’alimentation.
- N’utilisez pas de ventilateur.
- Une étincelle risquerait de provoquer une explosion
ou un incendie.
• Si l’appareil est équipé d’une DEL, ne tentez pas de
démonter vous-même le cache et l’ampoule.
- Contactez un réparateur agréé.
• Utilisez uniquement les DEL fournies par le fabricant
ou son réparateur agréé.
a) Laissez l’appareil reposer pendant 2 heures après
l’installation.
b) Pour un fonctionnement optimal de l’appareil :
1) Ne placez pas d’aliments trop près devant les
orifices de ventilation situés à l’arrière de l’appareil
car ils sont susceptibles d’empêcher la libre
circulation de l’air dans la partie congélateur.
2) Emballez correctement les aliments ou mettezles
dans des récipients hermétiques avant de les
placer dans le congélateur ou le réfrigérateur.
3) Ne placez pas des aliments non surgelés près des
aliments déjà congelés à l’intérieur du congélateur.
c) Ne placez pas de verre ou de bouteilles ni de
boissons gazeuses dans le congélateur.
- Le récipient peut geler et se briser, ce qui peut
entraîner une blessure.
d) Respectez les durées de congélation et les dates de
péremption associées aux aliments surgelés.
e) Il n’est pas nécessaire de débrancher le réfrigérateur
lorsque vous vous absentez moins de trois semaines.
Cependant, retirez tous les aliments si vous prévoyez
de vous absenter trois semaines ou davantage.
Débranchez le réfrigérateur, nettoyez-le, rincez-le et
séchez-le.
• Retirez régulièrement toutes les substances
étrangères telles que la poussière ou l’eau des
DA68-02601A-16.indb 5 2018. 10. 8. 오후 4:32
6_ Consignes de sécurité
fiches des prises électriques à l’aide d’un chion
sec.
- Débranchez la fiche d’alimentation et nettoyezla à
l’aide d’un chion sec.
- Le non-respect de cette consigne risquerait de
provoquer un incendie ou une électrocution.
• Débranchez l’appareil de la prise murale avant de le
nettoyer et d’en faire l’entretien.
- Le non-respect de cette consigne risquerait de
provoquer un incendie ou une électrocution.
• Si l’appareil dégage une odeur de brûlé ou
de la fumée, débranchez le immédiatement
et contactz votre centre de service
technique Samsung.
• Cotnactez un réparte ur si vous rencontr ez des
dicultés pour remplacer l’ampoule.
• Si l’appareil est équipé d’ampoules DEL, ne
démontez pas vous-même le cache de la lampe et
l’ampoule.
- Contactez un réparateur.
• En cas de traces de poussière ou d’eau dans le
réfrigérateur, débranchez la prise et contactez le
centre de service technique Samsung Electronics.
- À défaut, il existe un risque d’incendie.
POUR UNE UTILISATION EN
TOUTE SÉCURITÉ
• Ne recongelez pas les aliments
entièrement décongelés. Ne mettez
pas de boissons gazeuses dans la
partie congélateur. Ne mettez pas de
bouteilles ou de récipients en verre dans le
congélateur.
- Lorsque le contenu gèle, le verre est susceptible de
se briser et de provoquer des blessures corporelles.
• Utilisez uniquement la machine à glaçons fournie
avec le réfrigérateur. L’arrivée d’eau de ce
réfrigérateur doit être installée/branchée par une
personne qualifiée et raccordée à une source d’eau
potable uniquement. Pour que la machine à glaçons
puisse fonctionner correctement, la pression de
l’eau doit être comprise entre 20 et 125 psi. Si vous
devez vous absenter et que le distributeur d’eau et
de glace restera inutilisé, fermez la vanne d’eau.
- Afin d’éviter tout risque de fuite.
• Essuyez l’excédent d’humidité à l’intérieur et laissez
les portes ouvertes.
- Dans le cas contraire, des odeurs et de la
moisissure pourraient se développer.
• Garantie de réparation et modification.
- Les changements et modifications apportés à cet
appareil par un tiers ne sont pas couverts par le
service de garantie Samsung. Samsung ne peut
pas être tenu pour responsable de tout problème
de sécurité résultant des modifications apportées
ATTENTION
par un tiers.
• Ne bloquez pas les orifices d’aération.
- Si les orifices d’aération sont obstrués, notamment
par un sac en plastique, le réfrigérateur risque de
trop refroidir. Une période de refroidissement trop
longue risque d’endommager le filtre à eau et de
provoquer des fuites.
• Si le réfrigérateur est débranché de la prise
d’alimentation, patientez au moins cinq minutes
avant de le rebrancher.
• Si vous prévoyez de vous absenter longtemps
ou de laisser le réfrigérateur inutilisé pendant une
période prolongée, videz-le et débranchez-le.
- Laisser le réfrigérateur fonctionner pendant une
période prolongée sans l’utiliser peut entraîner une
détérioration de l’isolation et provoquer un incendie.
- Essuyez l’excédent d’humidité à l’intérieur et laissez
les portes ouvertes. Dans le cas contraire, des
odeurs et de la moisissure pourraient se développer.
• Pour un fonctionnement optimal de l’appareil:
- Ne placez pas d’aliments trop près des orifices
de ventilation à l’arrière de l’appareil car ils sont
susceptibles d’empêcher la libre circulation de l’air
dans la partie réfrigération.
- Emballez les aliments ou mettez-les dans des
récipients hermétiques avant de les placer dans le
réfrigérateur.
• Remplissez le réservoir et le bac à glaçons d’eau
potable uniquement.
• En cas d’inondation, si votre appareil a été
en contact avec l’eau, contactez le centre
de dépannage le plus proche.
- Risque d’électrocution ou d’incendie.
• Ne conservez pas d’huile végétale dans les bacs
de la porte de votre réfrigérateur. L’huile risque de
se solidifier, de prendre un goût infect et de devenir
dicile à utiliser. De plus, le récipient ouvert peut fuir
et l’huile qui a coulé risque de faire fissurer le bac de
la porte. Après avoir ouvert un récipient d’huile, le
mieux est de le conserver dans un endroit frais et à
l’abri du soleil, comme un placard ou un cellier.
- Exemples d’huile végétale: huile d’olive, huile de
maïs, huile de pépins de raisin, etc.
NETTOYER EN TOUTE SÉCURITÉ
• Ne vaporisez pas directement de l’eau à
l’intérieur ou à l’extérieur du réfrigérateur.
- Risque d’incendie ou d’électrocution.
• N’utilisez pas de sèche-cheveux pour sécher
l’intérieur du réfrigérateur. Ne placez pas de bougie
allumée à l’intérieur du réfrigérateur pour en éliminer
les mauvaises odeurs.
- Risque d’électrocution ou d’incendie.
• Eliminez les corps étrangers et la poussière
ATTENTION
DA68-02601A-16.indb 6 2018. 10. 8. 오후 4:32
Consignes de sécurité _7
des broches de la prise d’alimentation.
N’utilisez pas de chion mouillé ou humide
lors du nettoyage de la prise.
- Dans le cas contraire, il existe un risque d’incendie
ou d’électrocution.
• Débranchez le réfrigérateur avant de le
nettoyer ou de le réparer.
• Utilisez une éponge propre ou un chion doux avec
un nettoyant doux et de l’eau tiède pour nettoyer le
réfrigérateur.
• N’utilisez pas de nettoyants abrasifs ou agressifs
(produit à vitres, produits de décapage, liquides
inflammables, acide chlorhydrique, cires
nettoyantes, produits de nettoyage concentrés,
agents de blanchissage ou produits de nettoyage
contenant du pétrole) sur les surfaces extérieures
(portes et meuble), les pièces en plastique, les
revêtements intérieurs et de la porte et sur les joints.
- Ces produits risquent de rayer ou d’endommager
le matériau.
• Ne nettoyez pas les clayettes en verre ou les caches
avec de l’eau tiède lorsqu’ils sont froids.
Les clayettes en verre et les caches risquent de
se casser s’ils sont exposés à des changements
soudains de température ou à des chocs (coups ou
chutes).
AVERTISSEMENT IMPORTANT
CONCERNANT LA MISE AU REBUT
• Risque d’enfermement des enfants.
Avant de jeter votre vieux réfrigérateur ou
congélateur:
- Retirez les portes.
- Ne retirez pas les clayettes afin que les enfants
ne puissent pas facilement monter à l’intérieur de
l’appareil.
• Jetez le matériel d’emballage de cet appareil dans le
respect de l’environnement.
• Ne retirez pas les clayettes afin que les enfants ne
puissent pas facilement monter dans le réfrigérateur.
Assurez-vous qu’aucun des tuyaux situés à l’arrière
de l’appareil n’est endommagé avant la mise au rebut.
• R600a ou R134a est utilisé comme gaz réfrigérant.
Vérifiez le gaz réfrigérant utilisé dans votre
réfrigérateur sur l’étiquette du compresseur située à
l’arrière de l’appareil ou sur l’étiquette signalétique
située à l’intérieur du réfrigérateur.
AVERTISSEMENT
Si ce produit contient du gaz inflammable (gaz
réfrigérant R600a), veuillez prendre contact avec
les autorités locales pour obtenir des obtenir des
renseignements sur les normes en matière de
traitement des déchets
• Lors de la mise au rebut de ce réfrigérateur, retirez
la porte/les joints de porte ainsi que le loquet de la
porte afin que des petits enfants ou des animaux
ne puissent pas se retrouver enfermés à l’intérieur.
Les enfants ne doivent pas utiliser l’appareil sans la
surveillance d’un adulte.
• Du cyclopentane est utilisé comme isolant.
Les gaz utilisés pour l’isolation nécessitent une
procédure d’élimination spéciale. Pour obtenir des
renseignements sur les normes écologiques en
matière de traitement des déchets, veuillez prendre
contact avec les autorités locales.
Assurez-vous qu’aucun des tuyaux situés à l’arrière
du réfrigérateur n’est endommagé avant sa mise
au rebut.
• Lorsque vous utilisez cette fonction, la consommation
énergétique du réfrigérateur augmente.
• N’oubliez pas de la désactiver lorsque vous
n’en avez plus besoin et de régler à nouveau la
température d’origine.
Congélation rapide
• Si vous devez congeler de grandes quantités
d’aliments, activez la fonction Power Freeze
(Congélation rapide) 24 heures à l’avance.
• Ne mettez jamais les doigts ni d’autres objets dans
l’orifice du distributeur, le conduit d’écoulement et
le bac à glace.
- Risque de dommages corporels ou matériels.
CET APPAREIL EST DESTINÉ À ÊTRE
UTILISÉ DANS LES APPLICATIONS
DOMESTIQUES ET SIMILAIRES TELLES
QUE
• zones de cuisine du personnel dans les magasins,
bureaux et autres environnements de travail ;
• fermes et clients d’hôtels, motels et autres
environnements de type résidentiel ;
• environnement de type « chambres d’hôtes » ;
• applications de restauration et collectives similaires
Table des matières
INSTALLATION DE VOTRE RÉFRIGÉRATEUR DOUBLE PORTE ………………………… 08
FONCTIONNEMENT DE VOTRE RÉFRIGÉRATEUR DOUBLE PORTE ………………… 16
DÉPANNAGE …………………………………………………………………………………… 28
DA68-02601A-16.indb 7 2018. 10. 8. 오후 4:32
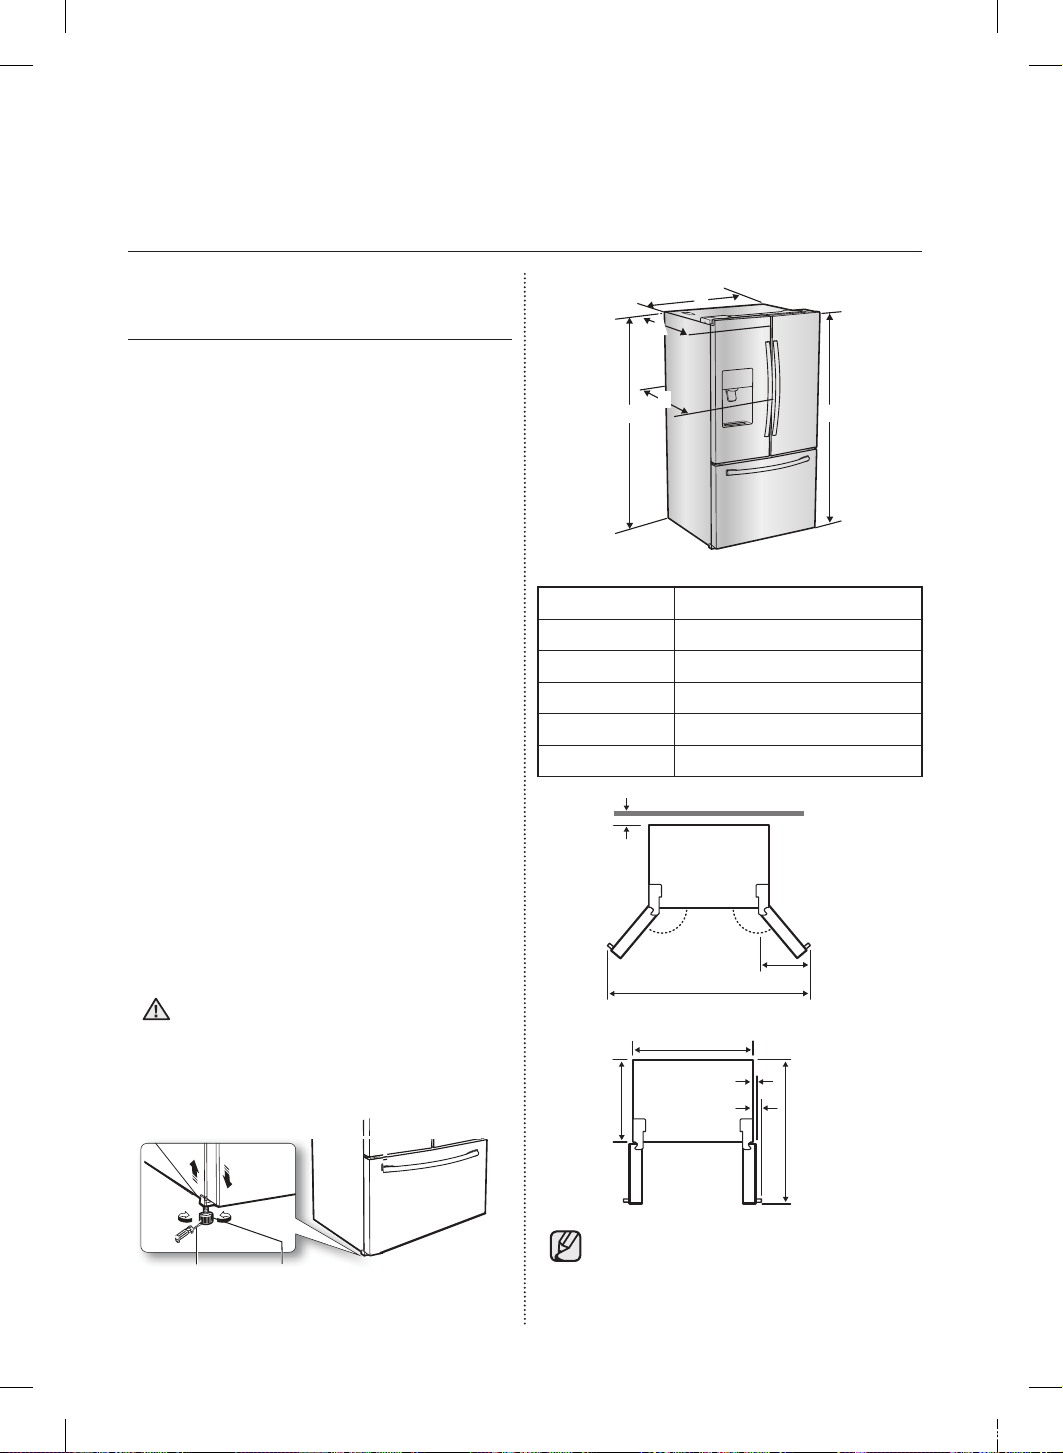
8_ Installation
Installation de votre réfrigérateur
double porte
AVANT D’INSTALLER LE
RÉFRIGÉRATEUR
Nous vous félicitons d’avoir choisi ce réfrigérateur
double porte Samsung.
Nous espérons que vous appréciez les
fonctionnalités de pointe oertes par ce nouvel
appareil.
Choix du meilleur emplacement pour le
réfrigérateur
• Un emplacement disposant d’un accès facile à
l’arrivée d’eau.
• Un emplacement non exposé à la lumière
directe du soleil.
• Un emplacement avec une surface plane.
• Un emplacement avec un espace susant
permettant l’ouverture facile des portes du
réfrigérateur.
• Un emplacement avec susamment d’espace
à droite, à gauche, à l’arrière et au-dessus de
l’appareil, pour permettre la circulation de l’air.
• Un emplacement qui vous permette de
déplacer facilement le réfrigérateur pour les
opérations de maintenance ou de réparation.
• N’installez pas le réfrigérateur à un endroit où
la température est susceptible de descendre
en dessous de 50 °F (10 °C).
• Ne placez pas le réfrigérateur dans un lieu
humide.
Déplacer le réfrigérateur
Afin de ne pas détériorer le sol, assurez-
vous que les pieds réglables avant sont
relevés (au-dessus du sol). Reportez-
vous au chapitre « Mise à niveau »
dumanuel (page 12).
Tournevis à lame plate (-)
Molette
ATTENTION
B
A
C
E
D
B
A
C
E
D
Modèle RF263T**/ RF263B**
Profondeur “A” 33 1/2” (850mm)
Largeur “B” 35 3/4” (909mm)
Hauteur “C” 68 3/8” (1737mm)
Hauteur totale “D” 70” (1778mm)
Profondeur “E” 35 3/4” (910mm)
63 3/4
”
(1620 mm)
13 3/8”
(340 mm)
140° 140°
2”
(50 mm)
35 3/4”
(909 mm)
29 1/4”
(745 mm)
48 ”
(1220 mm)
1 5/8”
(40 mm)
3 3/4”
(95 mm)
•
Les mesures ici sont basées sur la
dimension de la conception, qui peuvent
diérer en fonction de la méthode de
mesure.
DA68-02601A-16.indb 8 2018. 10. 8. 오후 4:32
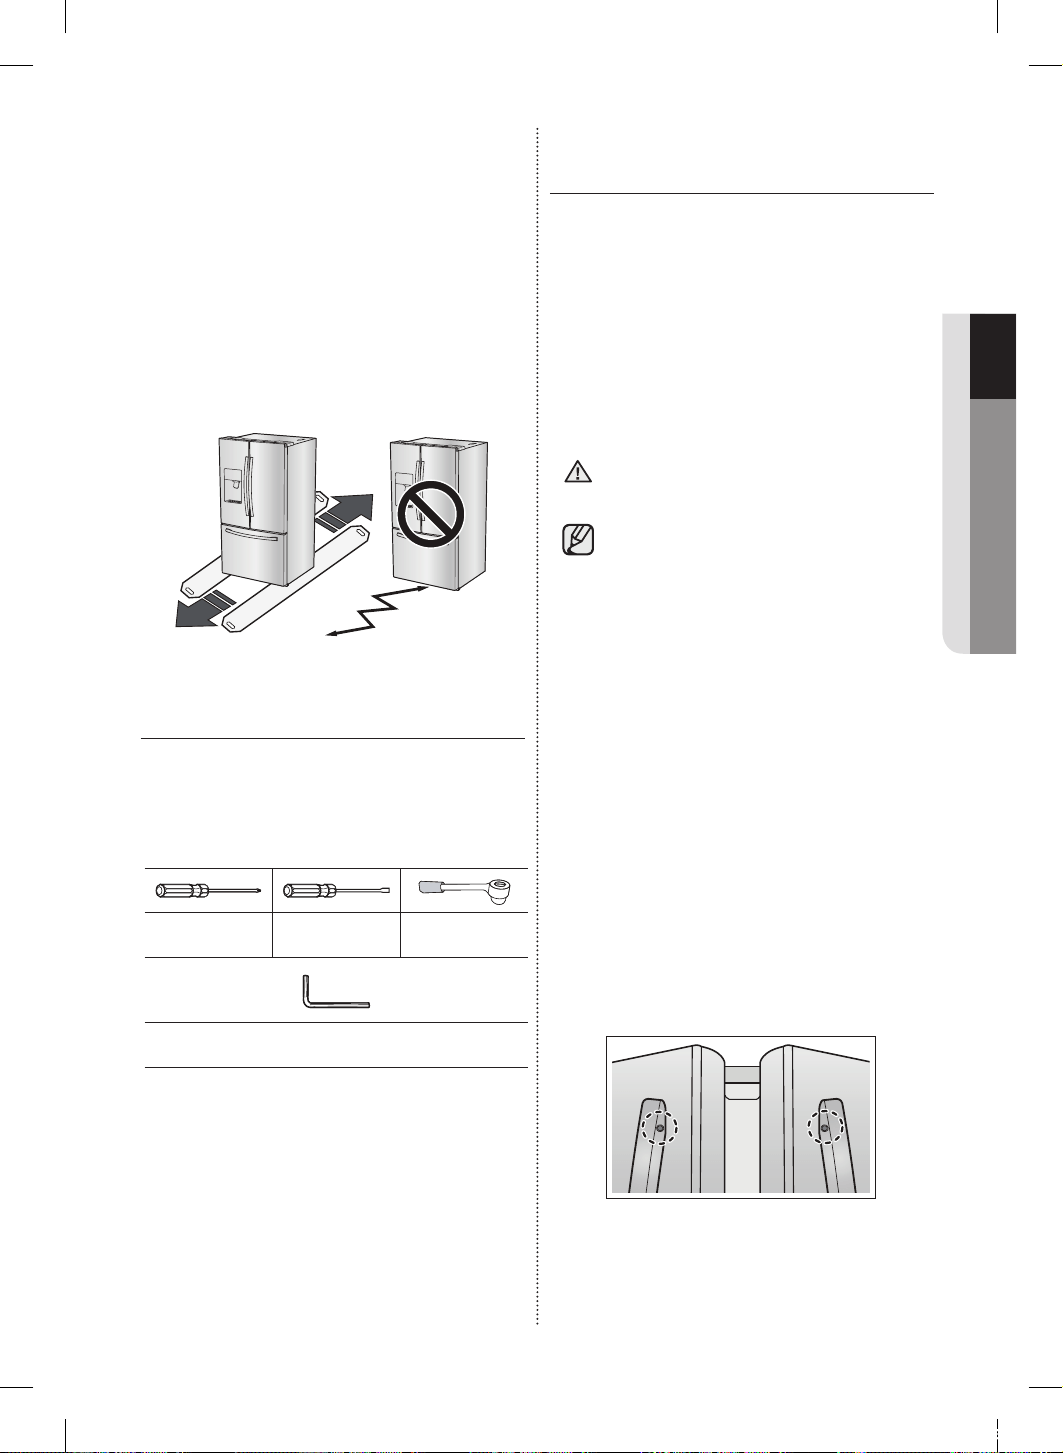
Installation _9
01 INSTALLATION
SOL
Pour une installation correcte, vous devez placer le
réfrigérateur sur une surface plane et dure située
au même niveau que le reste du sol. Cette surface
doit être susamment résistante pour supporter le
poids d’un réfrigérateur plein, soit environ 335lb
(152 kg). Afin de protéger la finition du plancher,
coupez un grand morceau de carton et placez-le
sous le réfrigérateur, à l’endroit où vous travaillez.
Lors du déplacement du réfrigérateur, tirez-le et
poussez-le droit vers l’avant ou vers l’arrière.
Ne le basculez pas d’un côté à l’autre.
OUTILS NÉCESSAIRES
Outils nécessaires (non fournis)
Les outils suivants sont nécessaires pour terminer
l’installation de votre réfrigérateur :
Tournevis
cruciforme (+)
Tournevis à lame
plate (-)
Clé à douille
(10 mm)
Clé hexagonale
(3/16”, 5 mm)
RETIRER LES PORTES DU
RÉFRIGÉRATEUR
Certaines installations nécessitent le retrait des
tiroirs du réfrigérateur et du congélateur pour
déplacer le réfrigérateur jusqu’à son emplacement
final. Ne retirez pas les portes/le tiroir si cela
n’est pas indispensable. Si vous n’avez pas
besoin de retirer les portes du réfrigérateur, passez
à la section Mise à niveau en page 12.
Si vous devez retirer les portes, passez à la
section ci-dessous.
Lisez les consignes suivantes avant de retirer la
porte/le tiroir :
Débranchez l’alimentation du réfrigérateur
avant de retirer la porte ou le tiroir.
• Veillez à ne pas faire tomber,
endommager ou rayer la porte/le tiroir
lors de son retrait.
• Soyez prudent lorsque vous retirez les portes
et tiroirs. Les portes sont lourdes et vous
pourriez vous blesser.
• Remontez correctement la porte/le tiroir afin
d’éviter:
- l’humidité suite à une fuite d’air;
- un alignement irrégulier des portes;
- une perte d’énergie en raison d’une jointure de
porte non hermétique.
COMMENT ASSEMBLER LA POIGNÉE
Orientez chaque poignée de sorte que l’extrémité
avec l’autocollant soit en-haut et que les orifices
avec les vis de serrage soient dirigés l’un vers
l’autre. Puis, suivez les directions ci-dessous pour
installer chaque poignée.
En utilisant un tournevis Phillips, fixer la vis (en
option) et mettre la poignée sur le fixateur en les
faisant glisser vers le bas fermement.
AVERTISSEMENT
DA68-02601A-16.indb 9 2018. 10. 8. 오후 4:32
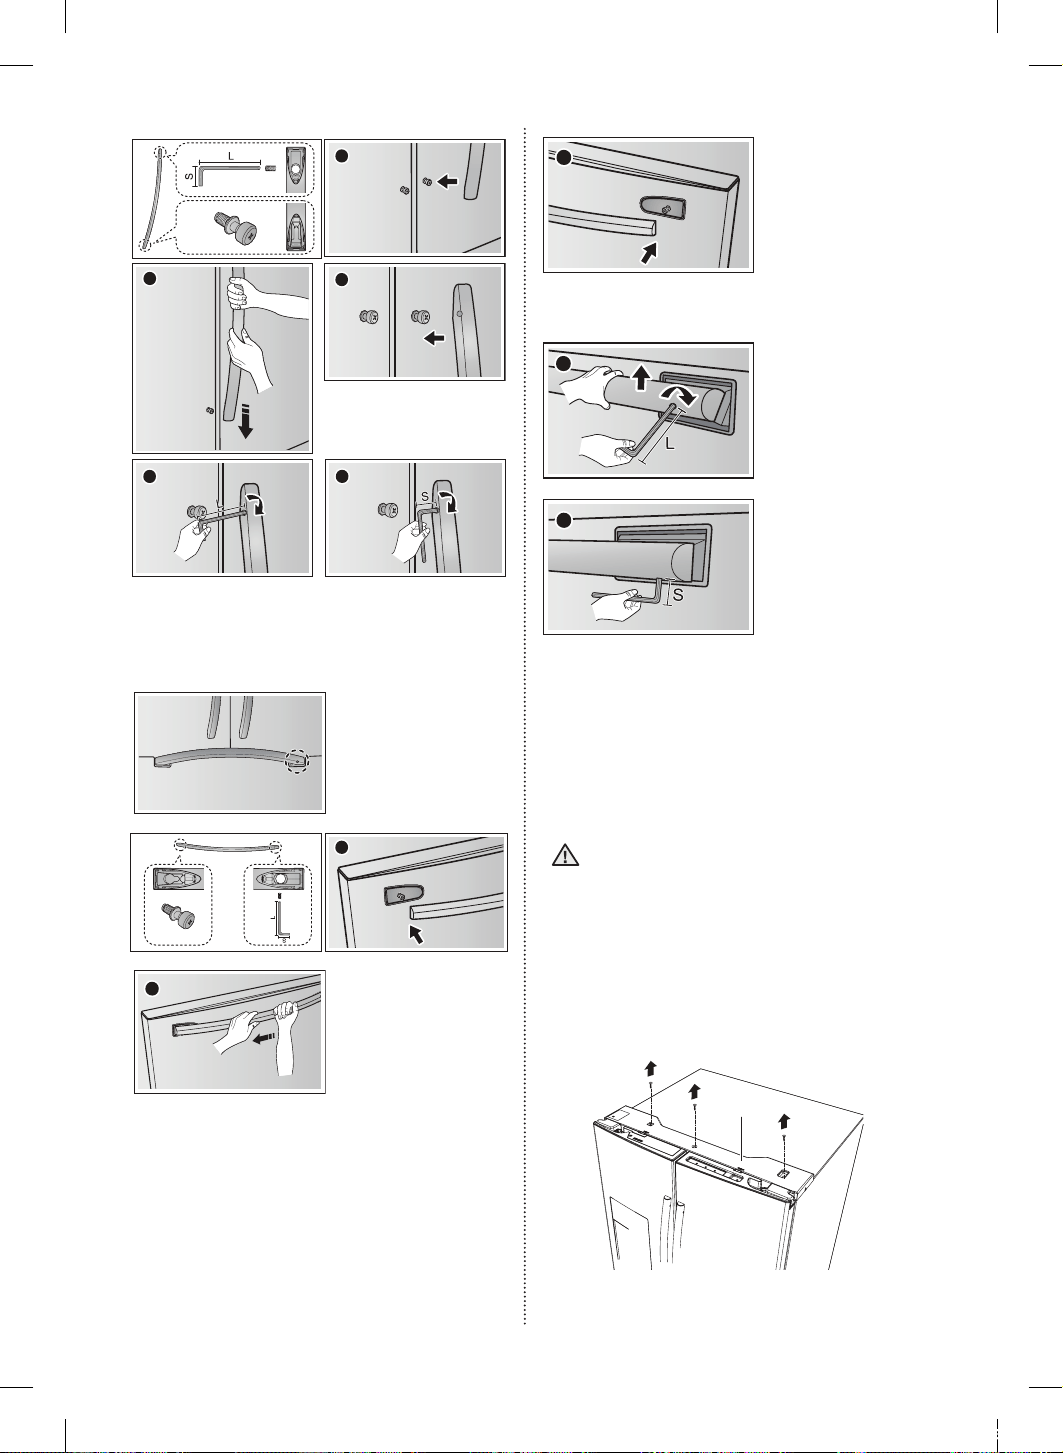
10_ Installation
2
1
3
5
4
Fixer les poignées aux
portes en les faisant glisser
fermement vers le bas.
Vis
Serrez fermement à l’aide d’une clé.
Assemblage de la poignée de la porte du tiroir
Vérifiez le sens de
montage de la poignée.
1
2
Fixer les poignées aux
portes en les faisant
glisser fermement vers la
gauche.
3
4
5
Faites basculer la barre vers le haut et serrez-la
fermement à l’aide de la clé.
Démontage des portes du
réfrigérateur
Veillez à ne pas faire tomber ou rayer les
portes lors de leur retrait.
Avec la porte ouverte
1. Retirez les 3 vis fixant la PLAQUE
SUPÉRIEURE ( 1 ) et tournez-les avec les fils
connectés.
( 1 )
AVERTISSEMENT
DA68-02601A-16.indb 10 2018. 10. 8. 오후 4:32
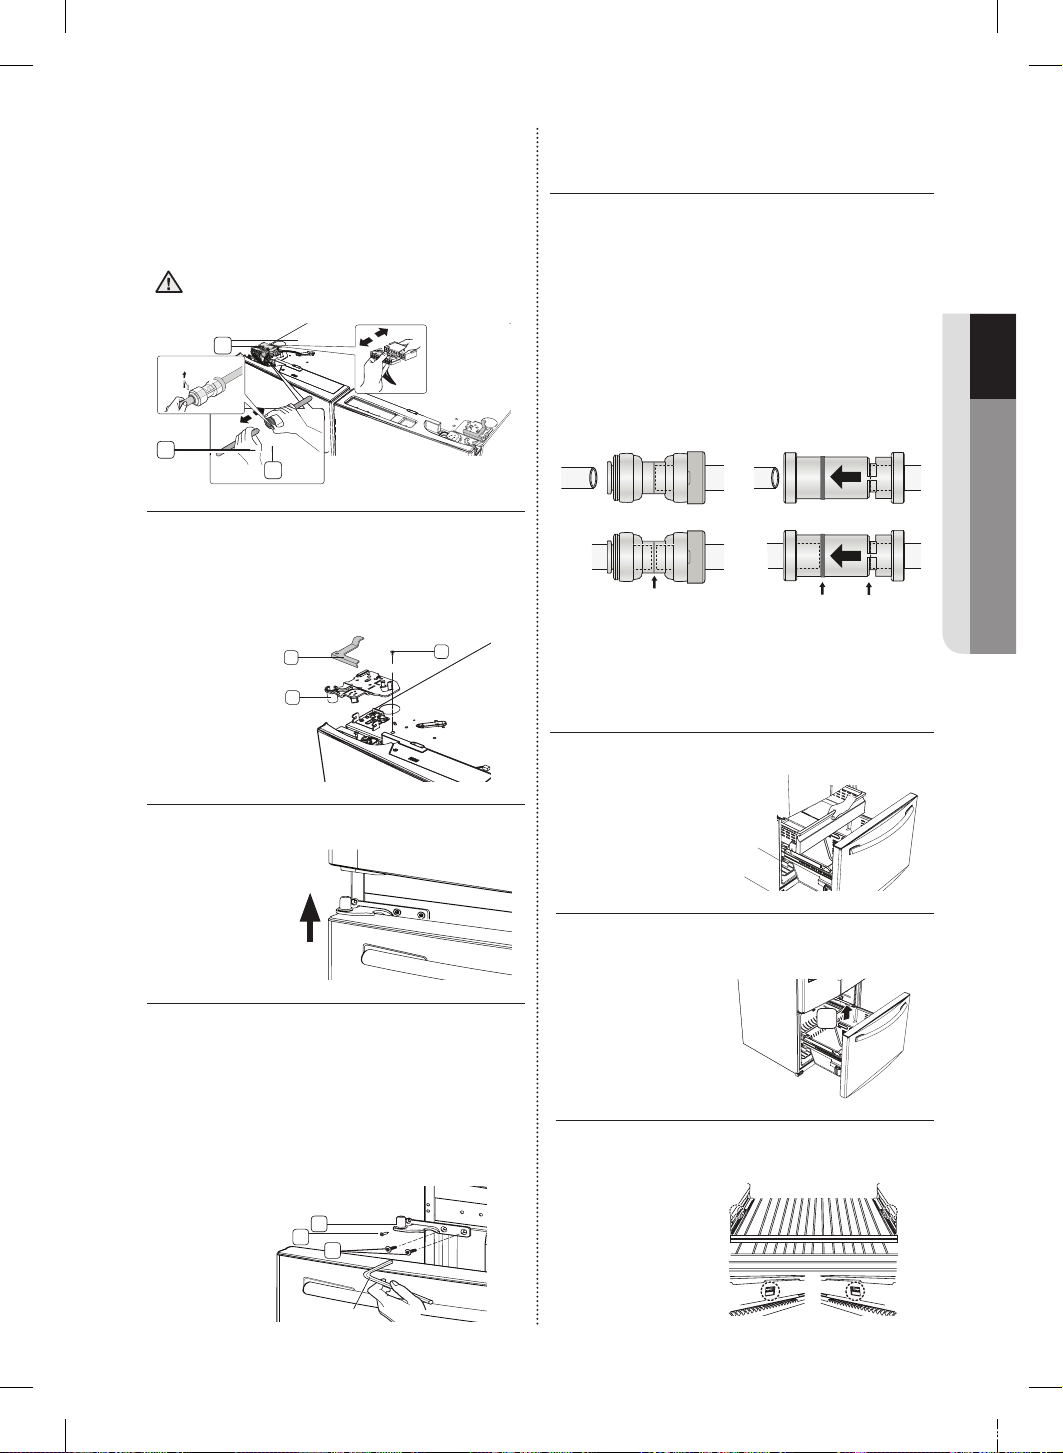
Installation _11
01 INSTALLATION
2. Débranchez les deux connecteurs ( 2 ) sur la
porte gauche. Pour retirer le coupleur d’eau
de la charnière, tordez-le et retire-le de la
charnière. Retirez le tuyau d’eau ( 3 ) tout
en appuyant sur la partie indiquée ( 4 ) du
coupleur du tuyau d’eau.
Si le coupleur comporte une bride rouge,
retirez-la avant d’enlever le tuyau.
2
3
4
Bride rouge
(1/4”)
3. Tirez et retire le levier de charnière ( 5 ). Retirez
les vis de terre ( 6 ) fixées aux charnières
supérieures gauche de la porte à l’aide d’un
tournevis cruciforme (+). Retirez les charnières
supérieures droite et gauche de la porte ( 7 ).
5
6
7
4. Soulevez la porte pour la retirer.
5. Retirez les vis ( 8 ) fixées aux charnières
inférieures des portes droite et gauche à
l’aide d’un tournevis cruciforme (+). Retirez
les deux boulons à tête hexagonale ( 9 ) fixés
aux charnières inférieures des portes droite et
gauche à l’aide d’une clé hexagonale (3/16”).
Retirez les charnières inférieures des portes
droite et gauche ( 10 ).
Clé hexagonale
10
8
9
ATTENTION
REMETTRE EN PLACE LES
PORTES DU RÉFRIGÉRATEUR
Pour remonter les portes du réfrigérateur après
l’avoir déplacé jusqu’à son emplacement final,
assemblez les pièces dans l’ordre inverse.
1. Le tuyau d’eau doit être inséré jusqu’au centre
du coupleur transparent afin d’éviter toute fuite
d’eau au niveau du distributeur.
2. Insérez la bride dans l’emplacement prévu à
cet eet et vérifiez qu’elle maintient fermement
le tuyau.
Centre de coupleur transparent
Marquage de guide
Dispensateur
- TYPE A - - TYPE B -
DÉMONTAGE DE LA PORTE DE LA
ZONE FLEXIBLE
1. Soulevez le tiroir supérieur pour le retirer.
2. Enlevez le bac inférieur ( 1 ) en le soulevant du
système de rail.
1
3. Appuyez sur le crochet de fixation du système
de rail.
DA68-02601A-16.indb 11 2018. 10. 8. 오후 4:32
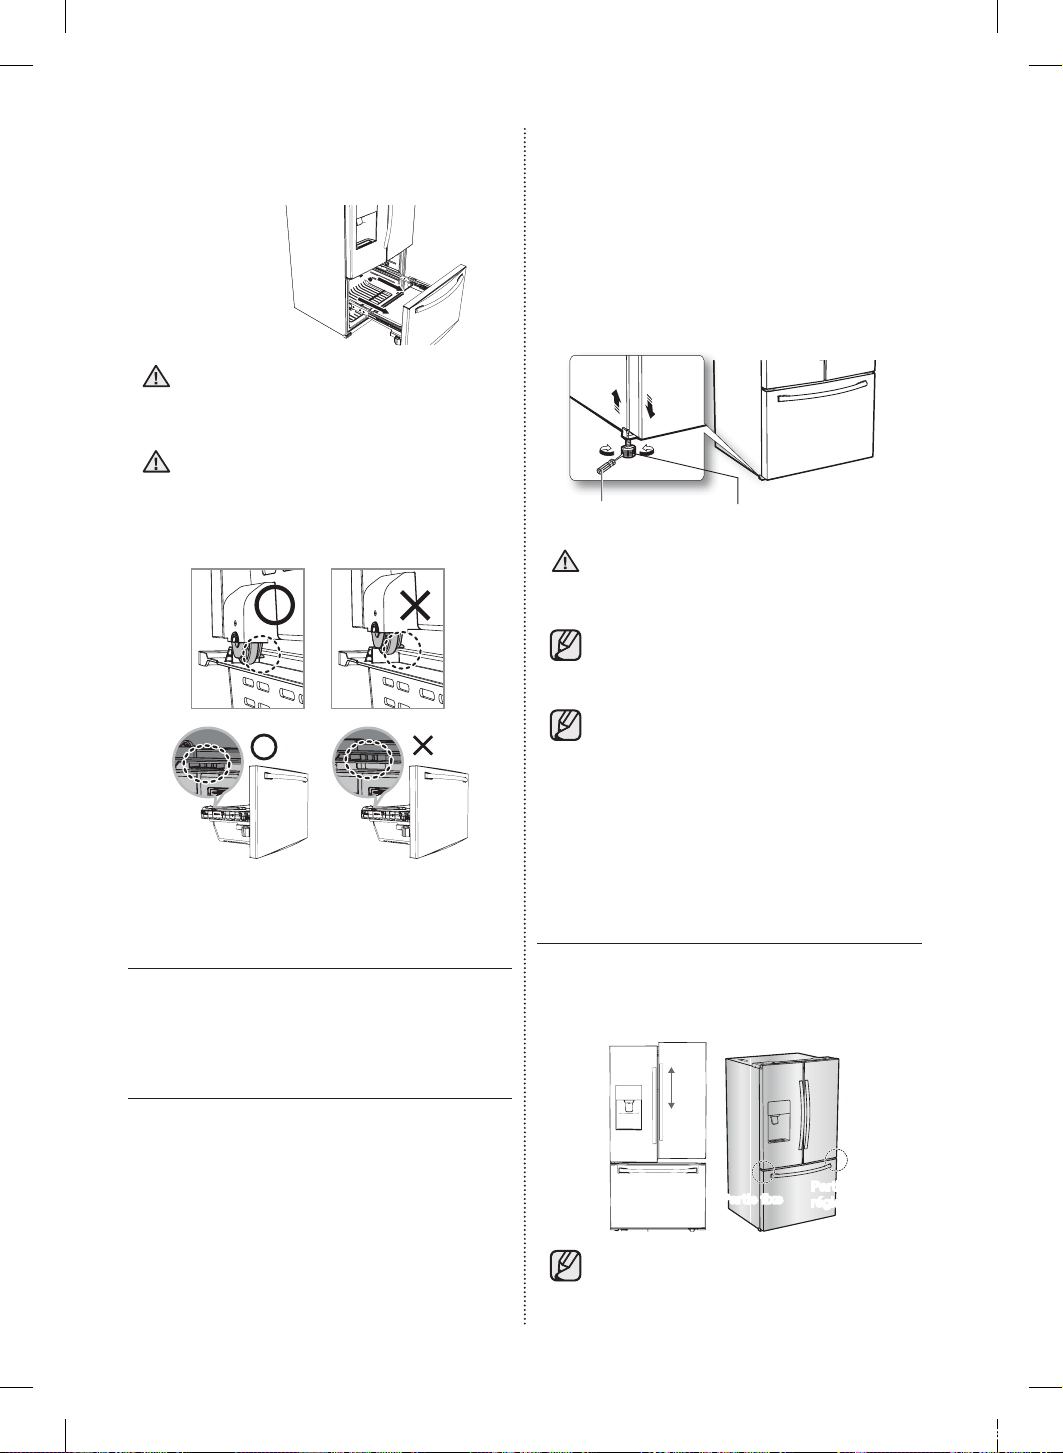
12_ Installation
4. Après avoir saisi et tiré le haut de la porte du
congélateur vers l’extérieur, retirez-la au niveau
du système de rail.
Assurez-vous qu’il n’y ait aucune rayure
à l’extrémité de la rail de guidage suite à
un contact avec le sol.
Veillez à monter le panier du congélateur
dans la position appropriée lors du
montage / démontage de la porte du
congélateur. Sinon, la porte pourrait ne
pas s’ouvrir ou se fermer correctement.
MONTAGE DU TIROIR DU
CONGÉLATEUR
Pour remonter le tiroir du congélateur après avoir
déplacé le réfrigérateur jusqu’à son emplacement
final, assemblez les pièces dans l’ordre inverse.
MISE À NIVEAU
Assurez-vous que le réfrigérateur est de niveau
afin de pouvoir procéder aux derniers réglages.
Utilisez un niveau pour vérifier que le réfrigérateur
est à niveau - des deux côtés, puis à l’avant
et à l’arrière. Si le réfrigérateur n’est pas de
niveau, les portes risquent de ne pas être
parfaitement alignées, ce qui peut provoquer de la
condensation et une surconsommation. L’exemple
ci-dessous montre comment mettre de niveau le
réfrigérateur si le côté gauche du réfrigérateur est
plus bas que le côté droit.
ATTENTION
ATTENTION
Comment ajuster le niveau
1. Ouvrez la porte du congélateur et retirez le bac
inférieur.
2. Insérez un tournevis à lame plate (-) dans
l’encoche de la molette gauche et tournez
dans le sens inverse des aiguilles d’une montre
pour mettre le réfrigérateur à niveau. (Tournez
dans le sens des aiguilles d’une montre pour
abaisser le réfrigérateur et dans le sens inverse
pour le surélever.)
tournevis à lame plate (-) Molette
Les deux molettes doivent toucher le sol
pour éviter tout risque de blessure ou de
dommage matériel dû à un basculement.
• Si le côté droit est plus bas que le côté
gauche, eectuez la même opération
mais avec la molette droite.
• Le cache des pieds avant est dicile à
retirer. C’est pourquoi, pour les petites
réglages, il est déconseillé de les
réaliser à l’aide des molettes. À la place,
reportez-vous à la page suivante pour
connaître le meilleur moyen d’eectuer
de petits réglages sur les portes.
PETITS RÉGLAGES AU NIVEAU
DES PORTES
N’oubliez pas que le réfrigérateur doit être de niveau
pour que les portes soient parfaitement droites.
Si vous avez besoin d’aide, consultez le chapitre
précédent sur la mise à niveau du réfrigérateur.
Partie
réglable
Partie fixe
• La position de la porte gauche est
correcte. Pour réaliser de petits réglages
au niveau des portes, réglez uniquement
la porte droite.
ATTENTION
DA68-02601A-16.indb 12 2018. 10. 8. 오후 4:32
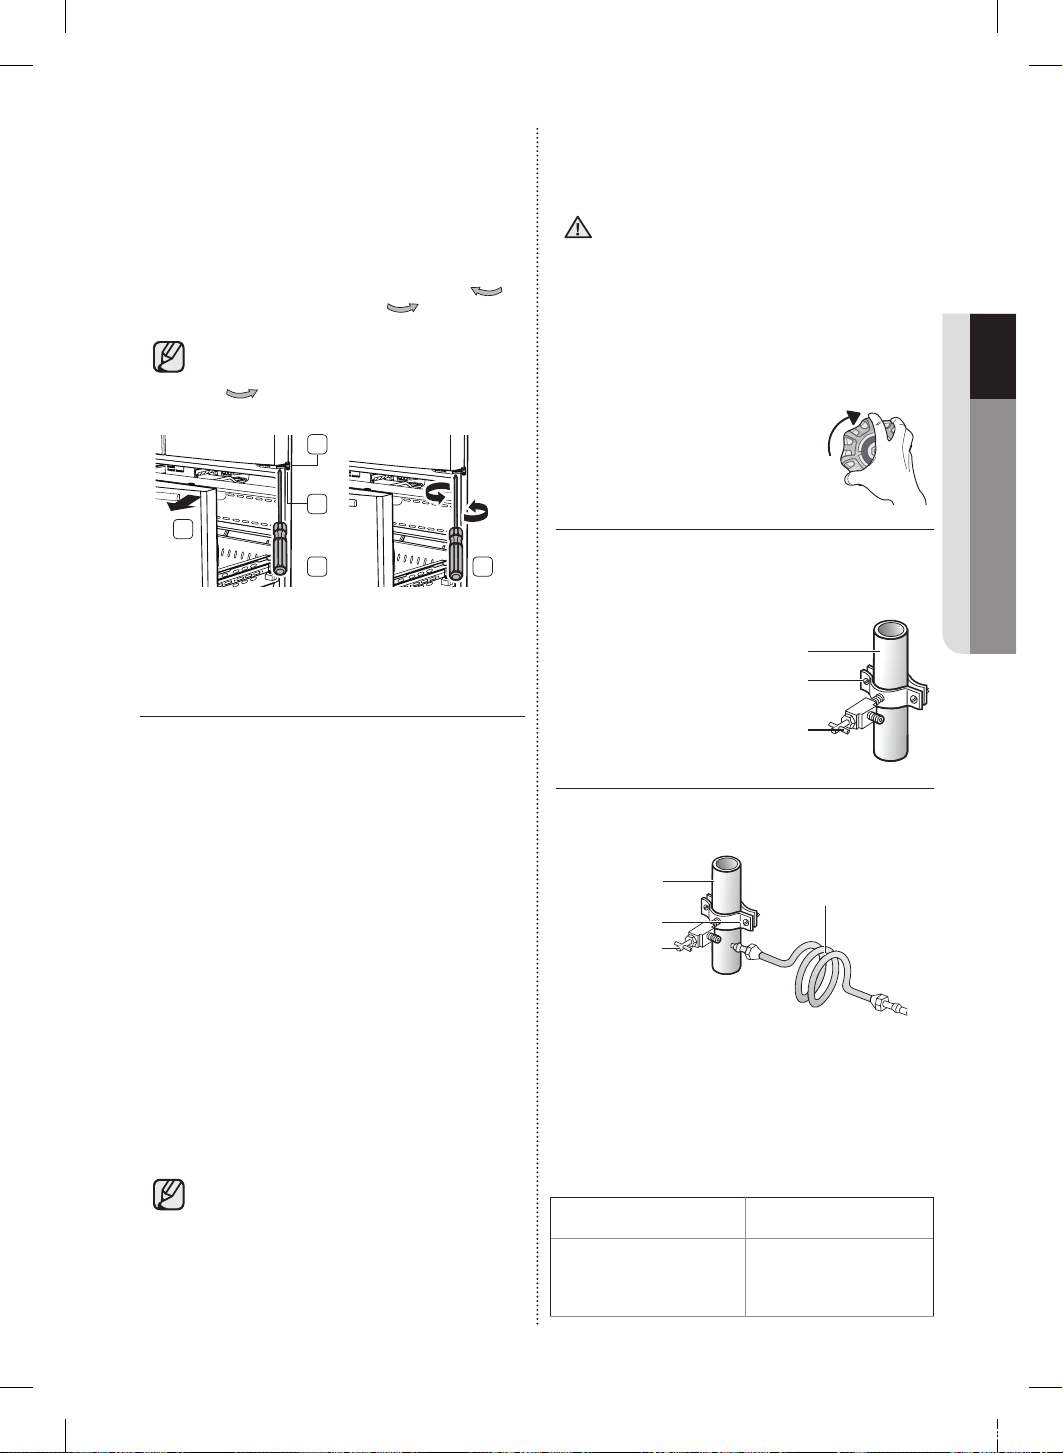
Installation _13
01 INSTALLATION
1. Ouvrez le tiroir du congélateur ( 1 ) afin de
laisser apparaître la charnière inférieure ( 2 ).
2. Insérez un tournevis cruciforme (+) ( 3 ) dans
l’arbre ( 4 ) de la charnière inférieure.
3. Réglez la hauteur en faisant tourner un tournevis
cruciforme (+) ( 3 ) dans le sens horaire (
BAS
)
ou dans le sens anti-horaire (
HAUT
).
• Lorsque vous faites tourner un tournevis
cruciforme (+) dans le sens anti-horaire
(
HAUT
), la porte monte.
1
2
3
4
3
INSTALLATION DU CIRCUIT
DU DISTRIBUTEUR D’EAU
Le distributeur d’eau avec filtre est l’une des
fonctions très pratiques que vous ore votre
nouveau réfrigérateur. Afin de préserver votre
santé, le filtre supprime toutes les particules
indésirables présentes dans l’eau. Toutefois,
il ne permet pas de stériliser ni de détruire les
microorganismes. Pour cela, un purificateur d’eau
est nécessaire.
The water line also connects to the ice maker For
the ice maker to operate properly, water pressure
of 20-125 psi (138~862 Kpa) is required.
Si le réfrigérateur est installé dans une zone où la
pression de l’eau est faible (inférieure à 20 psi),
vous pouvez installer une pompe de charge pour
compenser la faible pression.
Après avoir raccordé le tuyau d’eau, assurez-vous
que le réservoir d’eau à l’intérieur du réfrigérateur
est bien rempli. Pour cela, appuyez sur le levier du
distributeur d’eau jusqu’à ce que l’eau s’écoule
par la sortie d’eau.
• Des kits d’installation de conduite
d’eau sont disponibles auprès de
votre revendeur contre un supplément.
Il est recommandé d’utiliser un kit
d’installation de conduite d’eau
composé d’un tube en cuivre et d’un
écrou de serrage ¼”.
• Utilisez uniquement les tuyaux neufs fournis
avec l’appareil. Ne réutilisez pas d’anciens
tuyaux.
N’obstruez pas les orifices de ventilation
à l’intérieur du caisson de l’appareil ou
à l’intérieur de la structure encastrée.
Raccordez le réfrigérateur à une source
d’eau potable uniquement.
Branchement du distributeur sur le
tuyau d’arrivée d’eau
1. D’abord, coupez l’arrivée d’eau
principale.
2. Localisez la conduite d’eau froide potable la
plus proche et installez le crochet de fixation
puis le robinet de sectionnement.
Crochet de fixation
Conduite d’eau froide
Robinet de sectionnement
3. Raccordez le kit d’installation de conduite
d’eau au robinet de sectionnement.
Robinet de
sectionnement
Crochet de
fixation
Conduite d’eau
froide
Kit d’installation de
conduite d’eau
Raccordement du tuyau d’arrivée
d’eau au réfrigérateur.
Vous devez vous munir de plusieurs accessoires
pour eectuer ce raccordement.
Ces accessoires sont en vente sous forme de kit
dans votre magasin de matériel de plomberie local.
Utilisation d’un tube en
cuivre
Utilisation d’un tube en
plastique
• Tube en cuivre 1/4”
• Écrou de serrage 1/4” (x1)
• Bague (x2)
• Tube en plastique ¼”
→ Extrémité moulée (en
forme de poire)
• Écrou de serrage 1/4” (x1)
AVERTISSEMENT
DA68-02601A-16.indb 13 2018. 10. 8. 오후 4:32
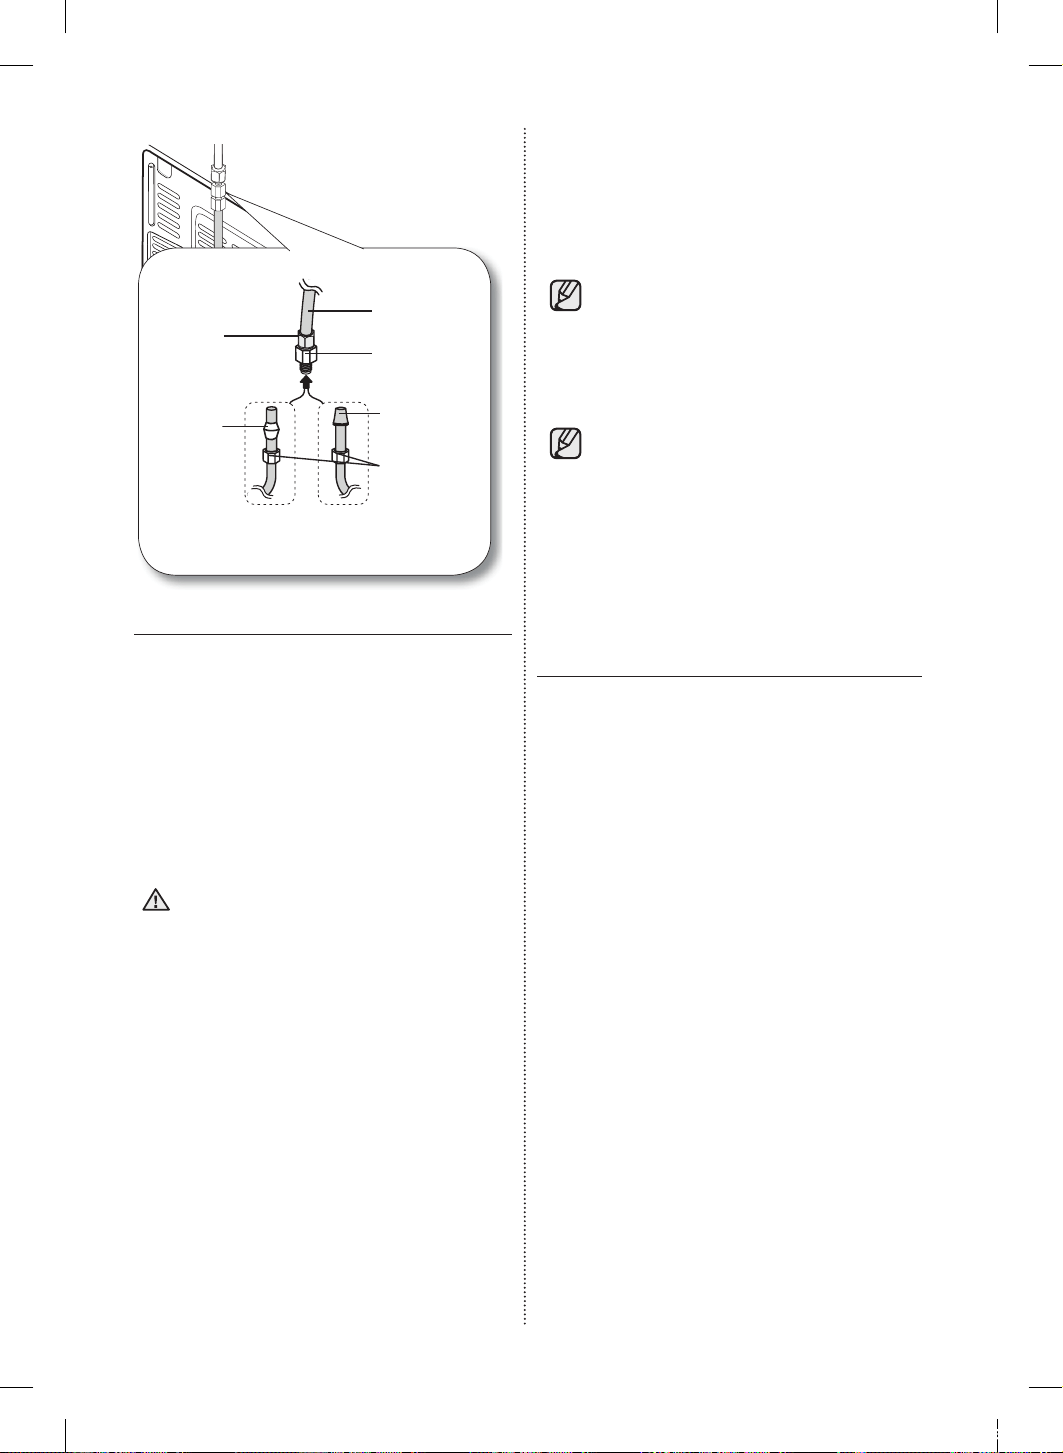
14_ Installation
Écrou de
serrage (1/4”)
(Fourni)
Bague
(non fourni)
Tube en plastique
(Assemblé)
Raccord à
compression
(Assemblé)
Extrémité moulée
(en forme de poire)
Écrou de serrage
(B) (1/4”)
(Non fourni)
ou
Tube en cuivre
(non fourni)
Tube en plastique (B)
(non fourni)
Conduite d’eau domestique
Réfrigérateur
1. Reliez le tuyau d’eau domestique au raccord à
compression :
- Si vous utilisez un tube en cuivre, faites glisser
l’écrou de serrage ( B ) (non fourni) et la bague
(non fournie) sur le tube en cuivre (non fourni)
comme illustré.
- Si vous utilisez un tube en plastique ( B ),
insérez l’extrémité moulée (en forme de poire)
du tube en plastique ( B ) dans le raccord à
compression.
N’installez pas le tube de plastique (B)
sans l’extrémité moulée (en forme de poire).
2. Serrez l’écrou de serrage ( B ) sur le raccord à
compression.
Prenez garde toutefois à ne pas trop le serrer
( B ).
3. Ouvrez l’arrivée d’eau et vérifiez qu’il n’y a
pas de fuite. Si vous détectez des gouttes
ou des fuites d’eau au niveau du raccord,
fermez l’arrivée d’eau principale. Vérifiez les
branchements et resserrez si nécessaire.
4. Laissez s’écouler 1 gallon d’eau à travers le
filtre avant de consommer ou d’utiliser l’eau
du réfrigérateur (faites s’écouler l’eau pendant
environ 6 minutes). Pour ce faire, accolez
un grand verre ou une tasse contre le levier
et poussez dessus. Laissez le récipient se
remplir et videz l’eau dans l’évier de la cuisine.
Répétez ensuite l’opération plusieurs fois.
ATTENTION
5. Après avoir allumé le réfrigérateur, patientez 1
à 2 jours avant de vous servir de la machine
à glaçons. Pendant cette période, jetez le
premier ou les 2 premiers bacs de glace afin
d’évacuer toutes les impuretés de la conduite
d’eau.
• Raccordez le tuyau d’eau à une source
d’eau potable uniquement.
•
Si vous devez réparer ou démonter le tuyau d’eau,
coupez environ 1/4» du tube en plastique afin
d’assurer un raccordement sûr et étanche.
• Vous pouvez tester la ligne d’eau
rapidement en utilisant une tasse de
papier. Dans des conditions normales,
le distributeur d’eau peut remplir une
oz 5,75. (170cc) tasse en 10 secondes
environ.
RÉGLAGE DU
RÉFRIGÉRATEUR
Une fois votre nouveau réfrigérateur installé,
réglez-le et profitez des fonctionnalités oertes.
Eectuez les étapes suivantes afin que votre
réfrigérateur soit entièrement opérationnel.
1. Assurez-vous que votre réfrigérateur est placé
dans un endroit approprié avec susamment
d’espace entre lui et le mur. Reportez-vous
aux consignes d’installation fournies.
2. Une fois le réfrigérateur branché, assurez-vous
que l’éclairage intérieur s’allume à l’ouverture
des portes.
3. Réglez la température sur la valeur la plus
basse et patientez une heure. Le congélateur
est légèrement réfrigéré et le moteur tourne
doucement. Réglez ensuite les températures
que vous souhaitez pour le réfrigérateur et le
congélateur.
4. Après le branchement du réfrigérateur,
plusieurs heures sont nécessaires pour
atteindre la température appropriée. Vous
pouvez entreposer de la nourriture et des
boissons dans le réfrigérateur une fois la
température susamment basse.
En cas de coupure de courant, contactez le
service clientèle de votre fournisseur d’électricité
afin de connaître la durée du problème.
DA68-02601A-16.indb 14 2018. 10. 8. 오후 4:32
Installation _15
01 INSTALLATION
- La plupart des coupures de courant qui
sont corrigées dans l’heure ou dans les
deux heures qui suivent n’aectent pas les
températures du réfrigérateur. Cependant,
il est recommandé de limiter le nombre
d’ouvertures de la porte pendant l’absence
de courant.
- Lorsqu’il est prévu que la coupure de courant
soit supérieure à 24 heures, retirez tous les
aliments surgelés.
Si le réfrigérateur est fourni avec une clé,
conservez-la hors de portée des enfants dans un
lieu éloigné de l’appareil.
L’appareil pourrait ne pas fonctionner d’une
manière régulière (possibilité de décongélation
des aliments ou de hausse trop importante de
la température à l’intérieur du compartiment
d’aliments surgelés) lorsqu’il reste pendant une
longue période en dessous du seuil inférieur de la
plage de températures pour laquelle l’appareil de
réfrigération a été conçu.
Ne stockez pas d’aliments qui pourraient pourrir à
basse température, comme des bananes ou des
melons.
Votre appareil est équipé de la fonction de
dégivrage automatique, ce qui veut dire que vous
n’avez pas besoin de le dégivrer manuellement.
L’augmentation de la température pendant le
dégivrage reste conforme aux normes ISO.
Cependant, si vous souhaitez éviter toute
augmentation excessive de la température
des aliments surgelés pendant le dégivrage de
l’appareil, emballez-les dans plusieurs couches de
papier (un journal par exemple).
Toute augmentation de la température des
aliments surgelés pendant le dégivrage peut
raccourcir la durée de stockage.
Ne recongelez pas les aliments entièrement
décongelés.
Installez l’appareil dans une pièce sèche et
fraîche, correctement ventilée.
Vérifiez qu’il n’est pas exposé à la lumière directe
du soleil et ne le placez jamais à proximité d’une
source de chaleur (un radiateur par exemple).
Ne bloquez jamais les orifices de ventilation
ou les grilles de l’appareil. Laissez refroidir les
aliments chauds avant de les placer à l’intérieur
de l’appareil.
Placez les aliments surgelés dans le réfrigérateur
pour les laisser décongeler. Les aliments surgelés
peuvent ainsi servir à refroidir les aliments stockés
dans le réfrigérateur.
Veillez à refermer la porte rapidement lorsque
vous mettez des aliments dans le réfrigérateur ou
lorsque vous les en sortez.
Ceci afin de réduire la formation de glace à
l’intérieur du congélateur.
Laissez un espace susant tout autour de
l’appareil au moment de l’installation.
Ceci vous permettra de réduire sa consommation
d’énergie.
• Dans des conditions normales de
170 cc (5,75 oz) tasse peut être rempli
en 10 secondes environ.
DA68-02601A-16.indb 15 2018. 10. 8. 오후 4:32
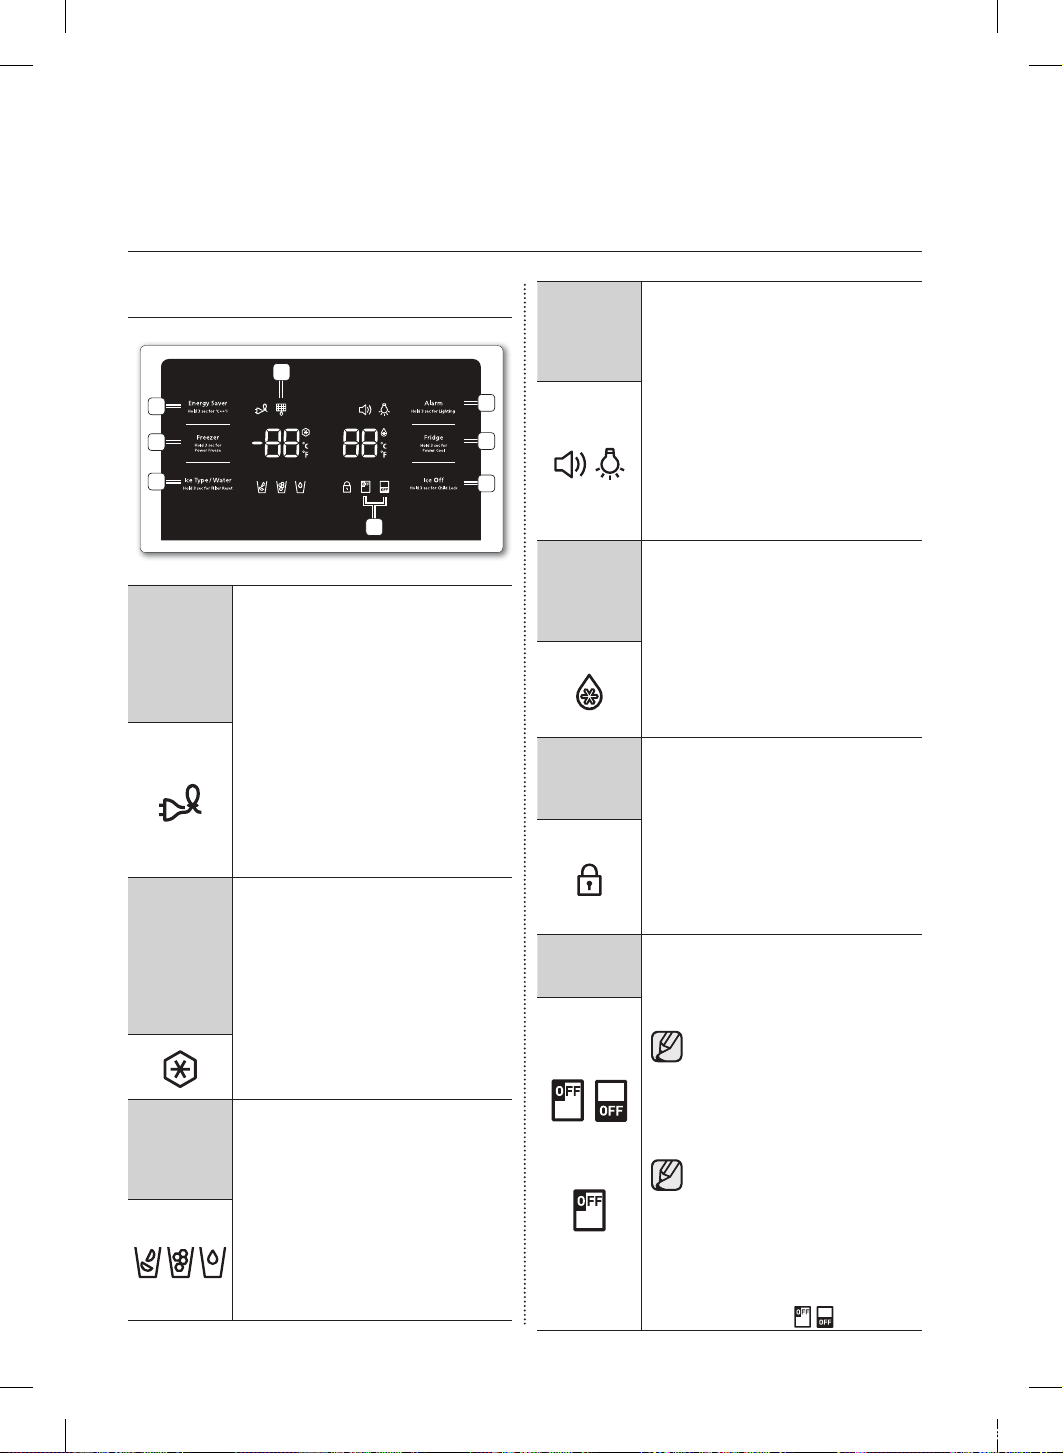
16_ Fonctionnement
Fonctionnement de votre
réfrigérateur double porte
PANNEAU DE COMMANDE
8
7
1
2
3
5
6
4
( 1 ) Energy
Saver
(Économie
d’énergie)
Appuyez
pendant 3 s
pour ºC ↔ ºF
Ce bouton permet d’activer ou de
désactiver le mode d’économie
d’énergie. Lorsque ce mode est activé,
l’icône correspondante s’allume.
Lorsque ce mode est désactivé, l’icône
correspondante s’éteint. Le mode
Energy Saver (Économie d’énergie)
s’active automatiquement lorsque le
réfrigérateur est sous tension.
Si de la condensation ou des gouttes
d’eau se forment sur les portes,
désactivez le mode Energy Saver
(Économiseur d’énergie).
Appuyez sur ce bouton pendant
3secondes pour basculer entre les
unités °C et °F.
( 2 )
Congélateur
(Appuyez
dessus pendant
3 secondes
pour activer
la congélation
rapide)
Appuyez sur ce bouton pour régler la
température souhaitée du congélateur.
Vous pouvez régler la température entre
-8 °F et 5 °F (entre -23 °C et -15°C).
Appuyez sur ce bouton pendant 3
secondes pour accélérer le temps de
congélation des produits. Cette fonction
permet de congeler rapidement des
aliments qui gâtent facilement ou de
faire baisser rapidement la température
du congélateur en cas de surchaue
(par exemple, si la porte est restée ouverte).
( 3 ) Type de
glace/Eau
Appuyez
pdt 3 s pour
réinit. filtre
Appuyez sur ce bouton pour
sélectionner la fonction glace ou eau.
Vous pouvez sélectionner l’eau ou les
types de glace (glaçon ou glace pilée).
À chaque pression, le mode alterne
entre glaçons et glace pilée et l’icône
correspondante (Cubed ice ou Crushed
ice) s’allume.
Après avoir changé le filtre à eau,
appuyez sur ce bouton pendant 3
secondes pour réinitialiser l’indicateur
de durée de vie du filtre à eau.
( 4 ) Alarme
Appuyez
pendant 3 s
pour activer
éclairage
Activer et désactiver le signal d’alarme
d’ouverture des portes Si le signal
d’alarme est activé, un signal sonore
retentit dès que l’une des portes du
réfrigérateur reste ouverte plus de
trois minutes. Il s’arrête dès que la
porte est refermée. Cette fonction
est activée par défaut en usine. Pour
la désactiver, appuyez sur le bouton
quelques secondes. Pour la réactiver,
procédez de même. L’icône est allumée
lorsque la fonction est activée. Si vous
appuyez sur le bouton Alarm/Lighting
(Alarme/Éclairage) et le maintenez
enfoncé pendant 3 secondes, la DEL du
distributeur restera allumée.
( 5 )
Réfrigérateur
Appuyez pdt 3s
pour activer refr.
rapide
Appuyez sur ce bouton pour régler la
température souhaitée du réfrigérateur.
Vous pouvez régler la température entre
34°F et 44°F (entre 7°C et 1°C).
Appuyez sur ce bouton pendant 3
secondes pour accélérer le temps de
réfrigération des produits. Cette fonction
permet de refroidir rapidement des
aliments qui gâtent facilement ou de faire
baisser rapidement la température du
réfrigérateur en cas de surchaue (par
exemple, si la porte est restée ouverte).
( 6 )
Désactivation
glace Appuyez
pdt 3s pour Verr.
Appuyez sur le bouton Ice O
(Désactivation glace) si vous ne souhaitez
pas fabriquer plus de glace.
Ce bouton permet d’activer la fonction de
verrouillage et de verrouiller le panneau
d’achage lorsque vous appuyez 3
secondes dessus ; les boutons du
distributeur deviennent donc inactifs.
L’icône Child Lock (Verrouillage) s’allume
pour indiquer que la fonction de
verrouillage est activée. Appuyez pendant
3 secondes pour déverrouiller.
( 7 )
Désactivation
glace
Appuyez sur le bouton Ice O
(Désactivation glace) si vous ne souhaitez
pas fabriquer plus de glace. L’icône
s’allume alors et la machine à glaçons
arrête de fonctionner.
Il est conseillé d’arrêter la machine
à glaçons dans les cas suivants :
- Le bac à glace contient
susamment de glace.
- Vous souhaitez ecoécnomiser de
l’eau et de l’énergie.
- Le réfrigérateur n’est pas alimenté
en eau.
Si la fonction de machine à glaçons
est activée alors que le tuyau d’eau
n’est pas raccordé, la vanne d’eau
située à l’arrière de l’appareil sera
bruyante ; appuyez sur le bouton
Ice O (Hold 3 sec for Child lock)
(Désactivation glace (Appuyez pdt
3s pour Verr.)) pendant moins de 3
secondes jusqu’à ce que le voyant
correspondant ( ) s’allume.
(RF263T**)
(RF263B/N**)
DA68-02601A-16.indb 16 2018. 10. 8. 오후 4:32
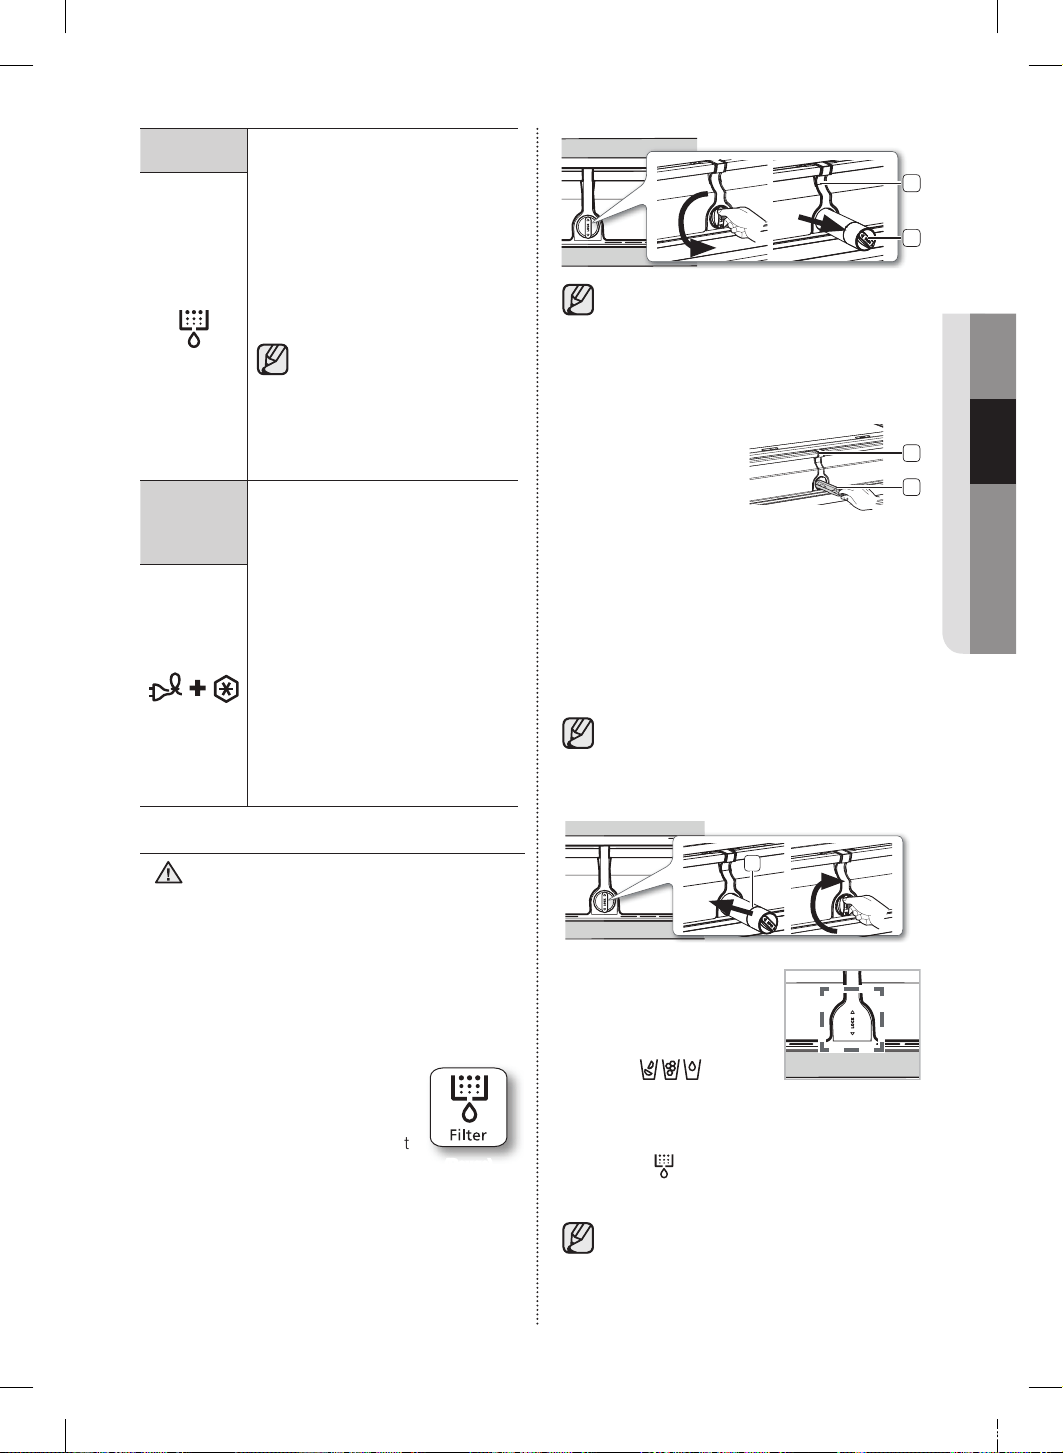
Fonctionnement _17
02 FONCTIONNEMENT
( 8 ) Filter
Usure du filtre à eau
Lorsque cette icône s’allume, vous devez
remplacer le filtre. Après environ 300
gallons d’eau, l’indicateur du filtre devient
rouge (après 6 mois). Lorsque vous ouvrez
ou fermez la porte, le voyant clignote
rouge pendant quelques secondes.
Après avoir installé le filtre à eau neuf,
réinitialisez le voyant du filtre en appuyant
sur le bouton Ice Type / Water / hold 3sec
for Filter Reset. (Appuyez pdt 3 s pour
réinit. filtre).
• Si l’eau ne s’écoule pas ou
s’écoule très lentement, vous
devez changer le filtre à eau car
cela signifie qu’il est obstrué.
• L’eau de certaines régions est
fortement calcaire, ce qui peut
expliquer que le filtre à eau
s’obstrue plus rapidement.
Mode sans
refroidi-
ssement
Le mode sans refroidissement (également
appelé mode Démo) est destiné aux
vendeurs qui mettent les réfrigérateurs
en démonstration dans leur magasin.
En mode sans refroidissement, seuls
le moteur du ventilateur et les voyants
du réfrigérateur fonctionnent ; les
compresseurs du réfrigérateur et du
congélateur sont désactivés et ne
produisent donc pas de froid. Pour activer
le mode Sans refroidissement, appuyez
sur les boutons Energy Saver et Freezer
pendant 5 secondes en fonctionnement
normal. Le réfrigérateur émet un signal
sonore et le message « OF OF » clignote
sur l’écran de la température.
Pour annuler le mode Sans refroidissement,
appuyez à nouveau sur les boutons Energy
Saver et Freezer pendant 5 secondes.
REMPLACEMENT DU FILTRE D’EAU
Afin d’éviter les risques de fuite, n’utilisez
JAMAIS de filtre à eau de marque
générique dans votre réfrigérateur SAMSUNG.
UTILISEZ UNIQUEMENT DES FILTRES À EAU
DE MARQUE SAMSUNG SAMSUNG ne sera pas
tenu responsable en cas de dommages matériels
incluant mais ne se limitant pas aux dommages
matériels causés par l’utilisation d’un filtre à eau
générique. Les réfrigérateurs SAMSUNG sont
conçus pour fonctionner UNIQUEMENT avec un
filtre à eau SAMSUNG.
Le voyant Filter (Filtre) devient rouge
lorsque la cartouche du filtre d’eau a
besoin d’être changée.
Afin de vous laisser le temps de
vous procurer un filtre neuf, le voyant
rouge s’allume un peu avant que le
filtre ne soit totalement usé.
(Rouge)
Remplacer le filtre à temps permet d’avoir toujours
une eau fraîche et pure.
1. Fermez l’arrivée d’eau. Faites ensuite tourner le
filtre d’eau ( 1 ) d’environ un quart de tour
dans
le sens inverse des aiguilles d’une montre.
2. Sortez le filtre d’eau ( 1 ) de son logement ( 2 ).
AVERTISSEMENT
2
1
• Pour faciliter le remplacement du filtre d’eau,
coupez l’arrivée d’eau.
• Il peut arriver que le filtre d’eau soit dicile à extirper
en raison des impuretés présentes dans l’eau qui
le rendent collant. Si vous rencontrez des dicultés
à le sortir, tenez-le fermement et tirez dessus avec
énergie.
• Lorsque vous retirez
le filtre d’eau, il se
peut qu’un peu
d’eau s’écoule par
l’ouverture. Ceci est
tout à fait normal.
3
2
Afin de limiter l’écoulement d’eau, maintenez la
cartouche du filtre à l’horizontale lorsque vous la retirez.
• Afin d’éviter tout débordement, videz le bac
récepteur du filtre d’eau ( 3 ) et essuyez le
pourtour du logement du filtre ( 2 ).
3. Insérez le filtre neuf dans le logement ( 4 ).
4. Poussez le filtre et tournez-le dans le sens
des aiguilles d’une montre jusqu’à ce qu’il
s’enclenche.
• Si vous ne parvenez pas à insérer le
filtre en raison de la pression élevée de
l’eau, coupez l’arrivée d’eau.
• L’inscription « LOCK » doit être alignée
sur le repère.
4
5. Appuyez sur le bouton “Ice
Type/Water Hold 3 sec
for Filter Reset” (Type de
glace/Eau Appuyez pendant
3 secondes pour réinitialiser
le filtre) (
(Filter Reset)
) pendant
environ trois secondes pour
remettre l’indicateur du filtre
d’eau à zéro.
Le voyant ( ) s’éteint.
6. Si vous coupez l’arrivée d’eau, n’oubliez pas de la
remettre au moment voulu.
• Pour remplacer le filtre, rendez-vous chez
votre quincailler ou contactez un revendeur
de pièces Samsung. Vérifiez que le logo
SAMSUNG figure bien sur l’emballage et le
filtre lui-même.
Lien : http://www. samsungparts.com
DA68-02601A-16.indb 17 2018. 10. 8. 오후 4:32
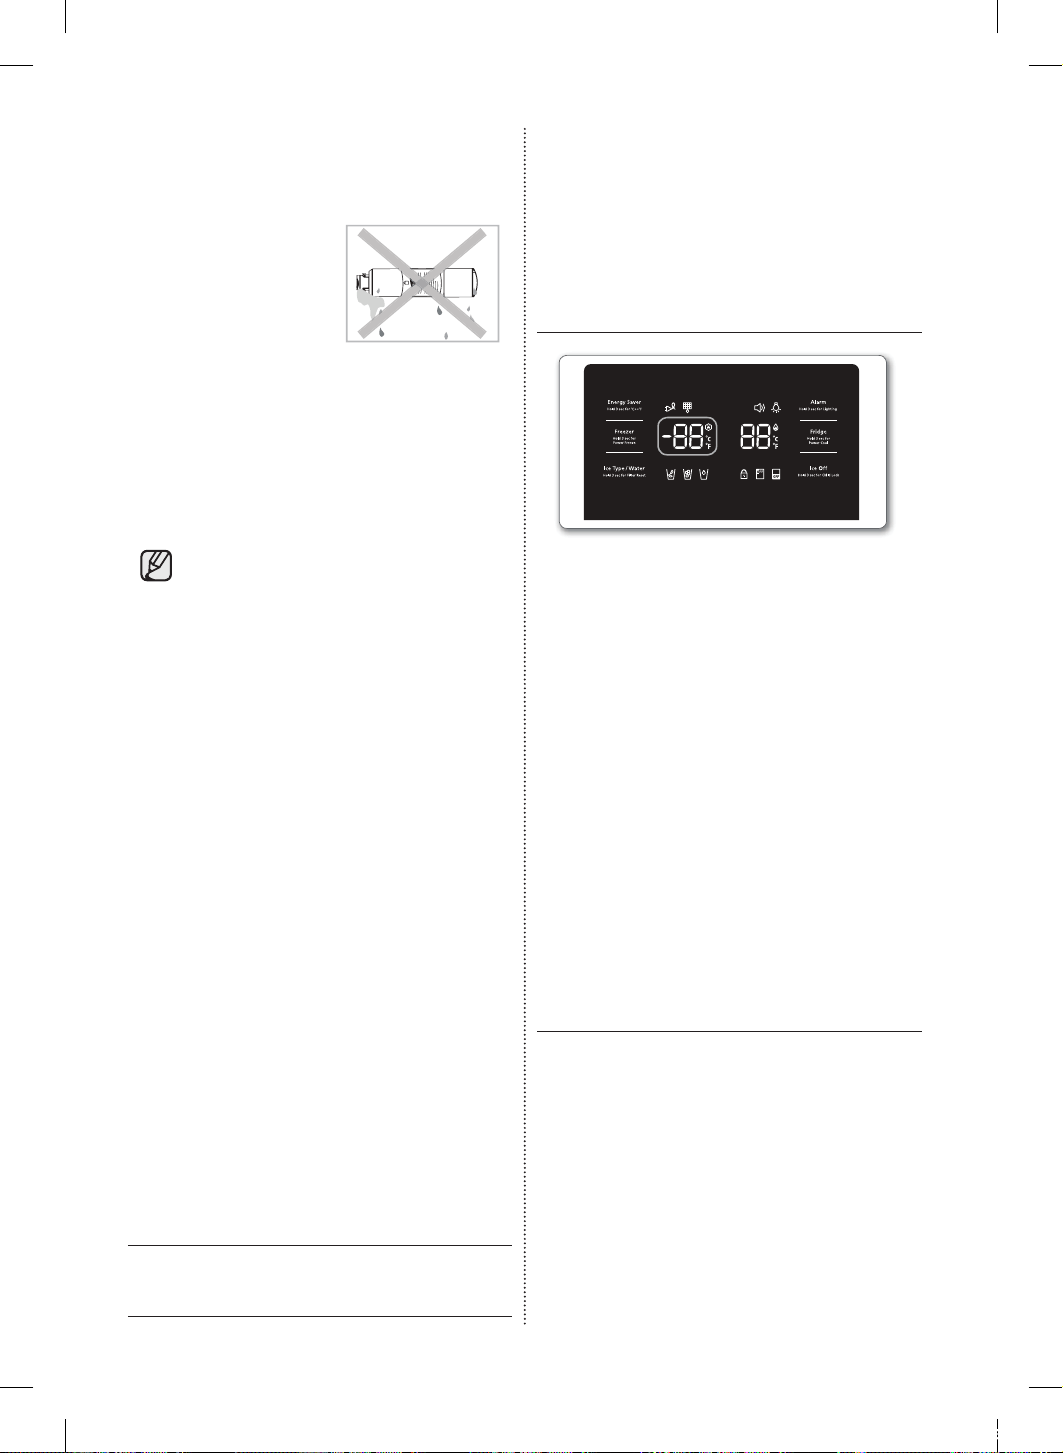
18_ Fonctionnement
Éliminer toute substance résiduelle
présente à l’intérieur du tuyau d’arrivée
d’eau après installation du filtre d’eau.
1. Ouvrez l’arrivée d’eau
principale et laissez
s’écouler l’eau depuis
le tuyau d’arrivée.
2. Laissez l’eau s’écouler par le distributeur
jusqu’à ce qu’elle soit claire (environ 6 à
7 minutes). Cela permet de nettoyer le
système d’arrivée d’eau et de faire sortir les
bulles d’air des tuyaux.
3. Il peut s’avérer nécessaire de laisser l’eau
s’écouler plus longtemps selon les installations.
4. Ouvrez la porte du réfrigérateur et vérifiez que
le filtre d’eau ne fuit pas.
• Veillez à laisser couler l’eau du
distributeur susamment longtemps afin
d’éviter que celui-ci ne goutte.
• Cela signifierait que des bulles d’air sont
toujours présentes dans le tuyau.
Arrivée d’eau par osmose inverse
IMPORTANT :
la pression de l’eau sortant d’un système
d’osmose inverse et arrivant dans la vanne
d’arrivée d’eau du réfrigérateur doit être comprise
entre 35 et 120 psi (241 et 827 kPa).
Si un système de filtration d’eau d’osmose inverse
est raccordé à votre arrivée d’eau froide, la
pression de l’eau arrivant à ce système doit être
de 40 à 60 psi minimum (276 à 414 kPa.) Si la
pression de l’eau arrivant au système d’osmose
inverse est inférieure à 40 à 60 psi (276 à 414 kPa) :
• Vérifiez que le filtre sédiment du système
d’osmose inverse n’est pas obstrué.
Remplacez le filtre si nécessaire.
• Laissez le temps au réservoir du système
d’osmose inverse de se remplir après une
utilisation intensive.
• Si votre réfrigérateur est équipé d’un filtre à
eau, cela peut réduire davantage la pression
de l’eau s’il est utilisé en conjonction avec un
système d’osmose inverse. Retirez le filtre à eau.
Si vous avez des questions sur votre pression
d’eau, contactez un plombier qualifié agréé.
CONTRÔLE DE LA TEMPÉRATURE
Température de base des compartiments
congélateur et réfrigérateur
La température de base et les températures
recommandées des compartiments congélateur
et réfrigérateur sont respectivement de 0°F et
37°F (ou -18°C et 3°C). Si la température des
compartiments congélateur et réfrigérateur est
trop élevée ou trop basse, réglez-la manuellement.
Contrôle de la température du
congélateur
Température recommandée (Congélateur) : 0 °F (ou -18 °C )
La température du congélateur peut être réglée
entre -8°F et 5°F (ou entre -23°C et-15°C) en
fonction de vos besoins. Appuyez sur le bouton
Freezer (Congélateur) plusieurs fois jusqu’à ce que
la température souhaitée s’ache. La température
change de 1°F (ou 1°C) à chaque pression. Voir
ci-dessous.
Fahrenheit : 0°F
➞
-1°F
➞
-2°F
➞
-3°F
➞
-4°F
➞
-5°F
➞
-6°F
➞
-7°F
➞
-8°F
➞
5°F
➞
4°F
➞
3°F
➞
2°F
➞
1°F
➞
0°F.
Celsius : -18°C
➞
-19°C
➞
-20°C
➞
-21°C
➞
-22°C
➞
-23°C
➞
-15°C
➞
-16°C
➞
-17°C
➞
-18°C.
Bon à savoir : des aliments tels que la crème
glacée commencent à fondre dès 4°F (ou 15,5°C).
Les di
é
rentes temp
é
ratures d
é
filent de -8 °F à
5°F (ou de -23°C à -15°C).
Contrôle de la température du
réfrigérateur
La température du réfrigérateur peut être réglée
entre 34 °F et 44 °F (ou entre 7 °C et 1 °C) en
fonction de vos besoins. Appuyez sur le bouton
Fridge (Réfrigérateur) plusieurs fois jusqu’à ce que
la température souhaitée s’ache. La température
change de 1 °F (ou 1 °C) à chaque pression. Voir
ci-dessous.
Fahrenheit : 37 °F ➞ 36 °F ➞ 35 °F ➞ 34 °F ➞
44 °F ➞ 43 °F ➞ 42 °F ➞ 41 °F ➞
40 °F ➞ 39 °F ➞ 38 °F ➞ 37 °F.
Celsius : 3 °C ➞ 2 °C ➞ 1 °C ➞ 7 °C ➞ 6 °C ➞
5 °C ➞ 4 °C ➞ 3 °C.
La procédure de réglage de la température du
réfrigérateur est exactement la même que pour
celle du congélateur.
DA68-02601A-16.indb 18 2018. 10. 8. 오후 4:32
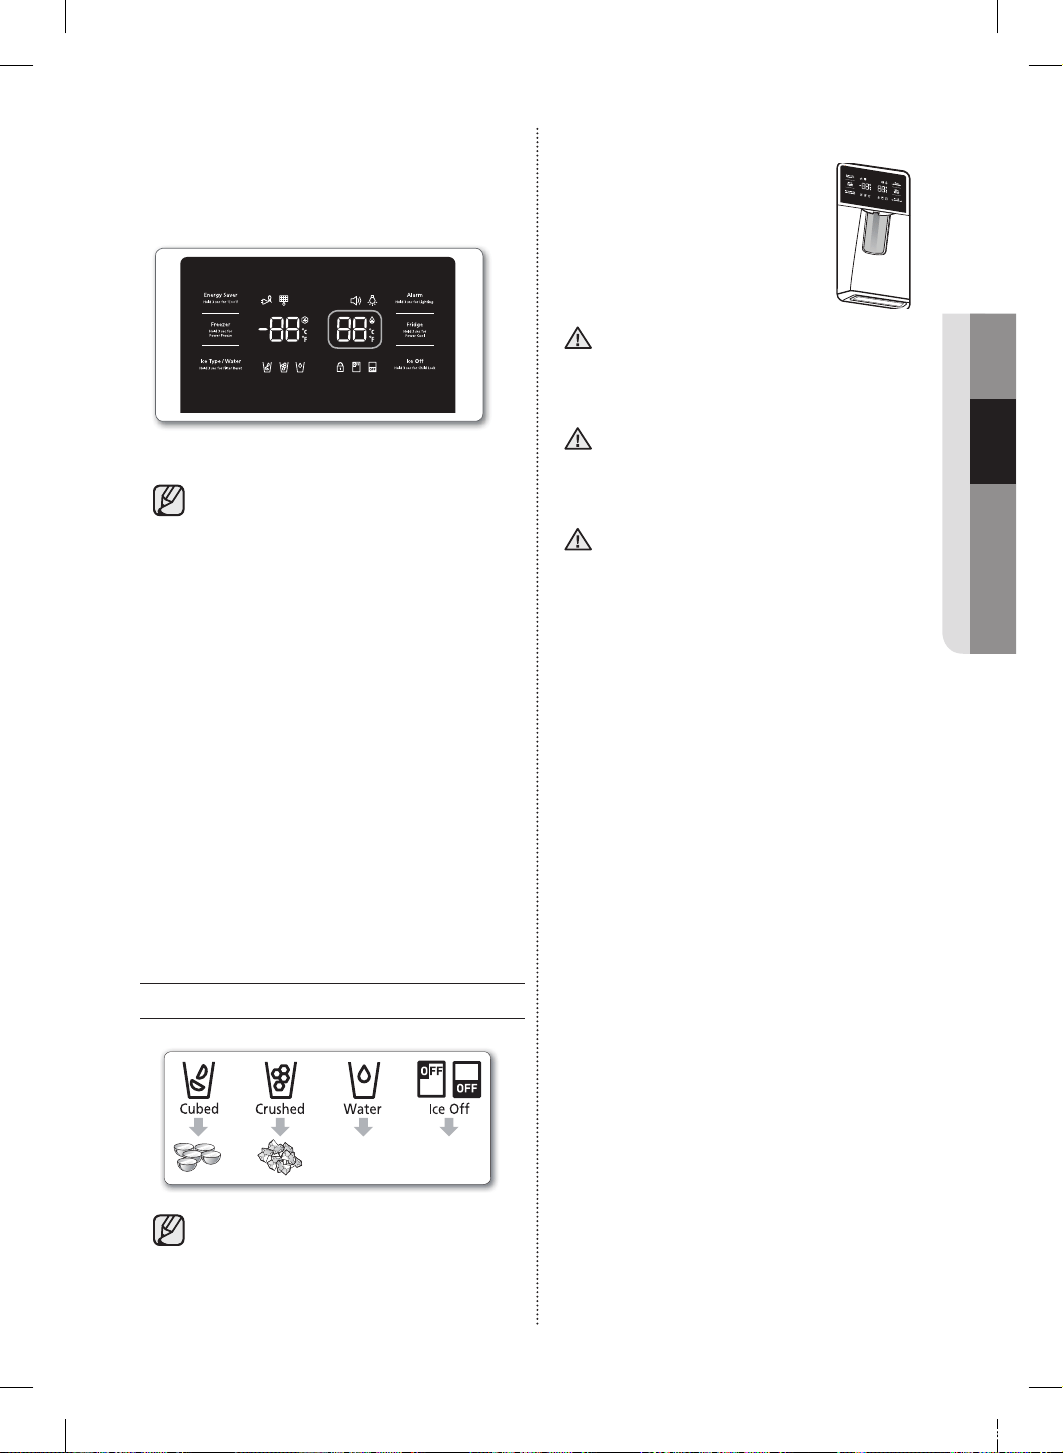
Fonctionnement _19
02 FONCTIONNEMENT
Appuyez sur le bouton Fridge (Réfrigérateur)
pour régler la température souhaitée. Au bout de
quelques secondes, le réfrigérateur commence à
régler la température sur la nouvelle valeur. Celleci
s’ache sur l’écran numérique.
Température recommandée (Réfrigérateur) : 37 °F (ou 3 °C )
- La température du congélateur, du
réfrigérateur ou du compartiment
à température réglable risque
d’augmenter si vous ouvrez les portes
trop fréquemment ou si une grande
quantité d’aliments tièdes ou chauds est
placée à l’intérieur.
- L’achage peut ainsi se mettre à clignoter.
Une fois la température du congélateur et du
réfrigérateur revenue à la normale, l’achage
s’arrête de clignoter.
- S’il continue à clignoter, il peut s’avérer
nécessaire de « réinitialiser » le réfrigérateur.
Débranchez l’appareil, patientez environ 10
minutes puis rebranchez le cordon d’alimentation.
- En cas d’erreur de communication entre l’écran
et les commandes principales, la lumière de
l’achage du bac convertible clignote. S’il
continue à clignoter longtemps, contactez un
centre de réparation Samsung Electronics.
UTILISATION DU
DISTRIBUTEUR D’EAU FROIDE
vous souhaitez.
PAS DE GLACE
Sélectionnez cette option si vous souhaitez
désactiver la machine à glaçons
• S’il vous plaît attendez 1 seconde avant de
retirer la tasse après la distribution d’eau
pour éviter les déversements. Ne tirez
pas sur le levier du distributeur après la
distribution de la glace ou l’eau. Il revient
automatiquement.
Utilisation du distributeur de glace
Placez un verre sous le distributeur
de glace et poussez légèrement le
levier avec votre verre.
Veillez à ce que le verre se situe
bien en dessous du distributeur
afin d’éviter que
la glace ne se
déverse à côté.
Afin d’éviter les éclaboussures, attendez
2 secondes avant de retirer le verre du
dessous du distributeur.
Si la porte du réfrigérateur est ouverte, le
distributeur ne fonctionnera pas.
Si vous appuyez sur le bouton Cubed
Ice (Glaçons) après avoir utilisé le mode
Crushed Ice (Glace pilée), une petite
quantité de glace pilée peut sortir du
distributeur ; ceci est parfaitement normal.
Ne tirez pas sur les leviers. Vous risqueriez
d’endommager ou de casser le ressort
Le maintien de la Seau à glace
• Pour nettoyer le bac à glace, utilisez un
nettoyant doux, rincez-le abondamment et
essuyez-le soigneusement. N’utilisez pas de
nettoyants abrasifs ni de solvants.
• Si vous appuyez sur le bouton Cubed Ice
(Glaçons) après avoir utilisé le mode Crushed
Ice (Glace pilée), une petite quantité de glace
pilée peut sortir du distributeur ; ceci est
parfaitement normal.
• Les glaçons générés par le procédé de fabrication
des glaçons rapide sont apparemment blancs, ce
qui signifie qu’ils ont été générés normalement.
• La machine à glaçons dans le compartiment
du réfrigérateur fabrique des glaçons encore
plus vite, déplace ces glaçons du bac à
glace du réfrigérateur vers le bac à glace du
congélateur si avez besoin de plus de glaçons.
• Si la glace ne sort pas, tirez sur le bac à glace
et appuyez sur le bouton de test situé à droite
de la machine à glaçons.
• Ne maintenez pas le bouton de test enfoncé si
le bac est plein de glace ou d’eau. Ce dernier
risquerait de déborder.
Faire de la glace
• Suivez ces étapes
1. Laissez le réfrigérateur fonctionner et se
refroidir pendant 24 heures (un jour entier).
- Attendre 24 heures permet à la machine à
glaçons de se refroidir susamment.
2. Laissez tomber 4 à 6 glaçons dans un verre.
3. Après 8 heures, laissez tomber un verre entier
de glaçons. Renouvelez l’opération 8 heures après.
• Si vous appuyez sur le bouton de test, le
réfrigérateur émet un signal sonore (sonnette).
• À ce moment-là, relâchez le bouton de test.
• Le signal sonore retentit à nouveau automatiquement
pour signaler que tout fonctionne normalement.
ATTENTION
ATTENTION
ATTENTION
DA68-02601A-16.indb 19 2018. 10. 8. 오후 4:32
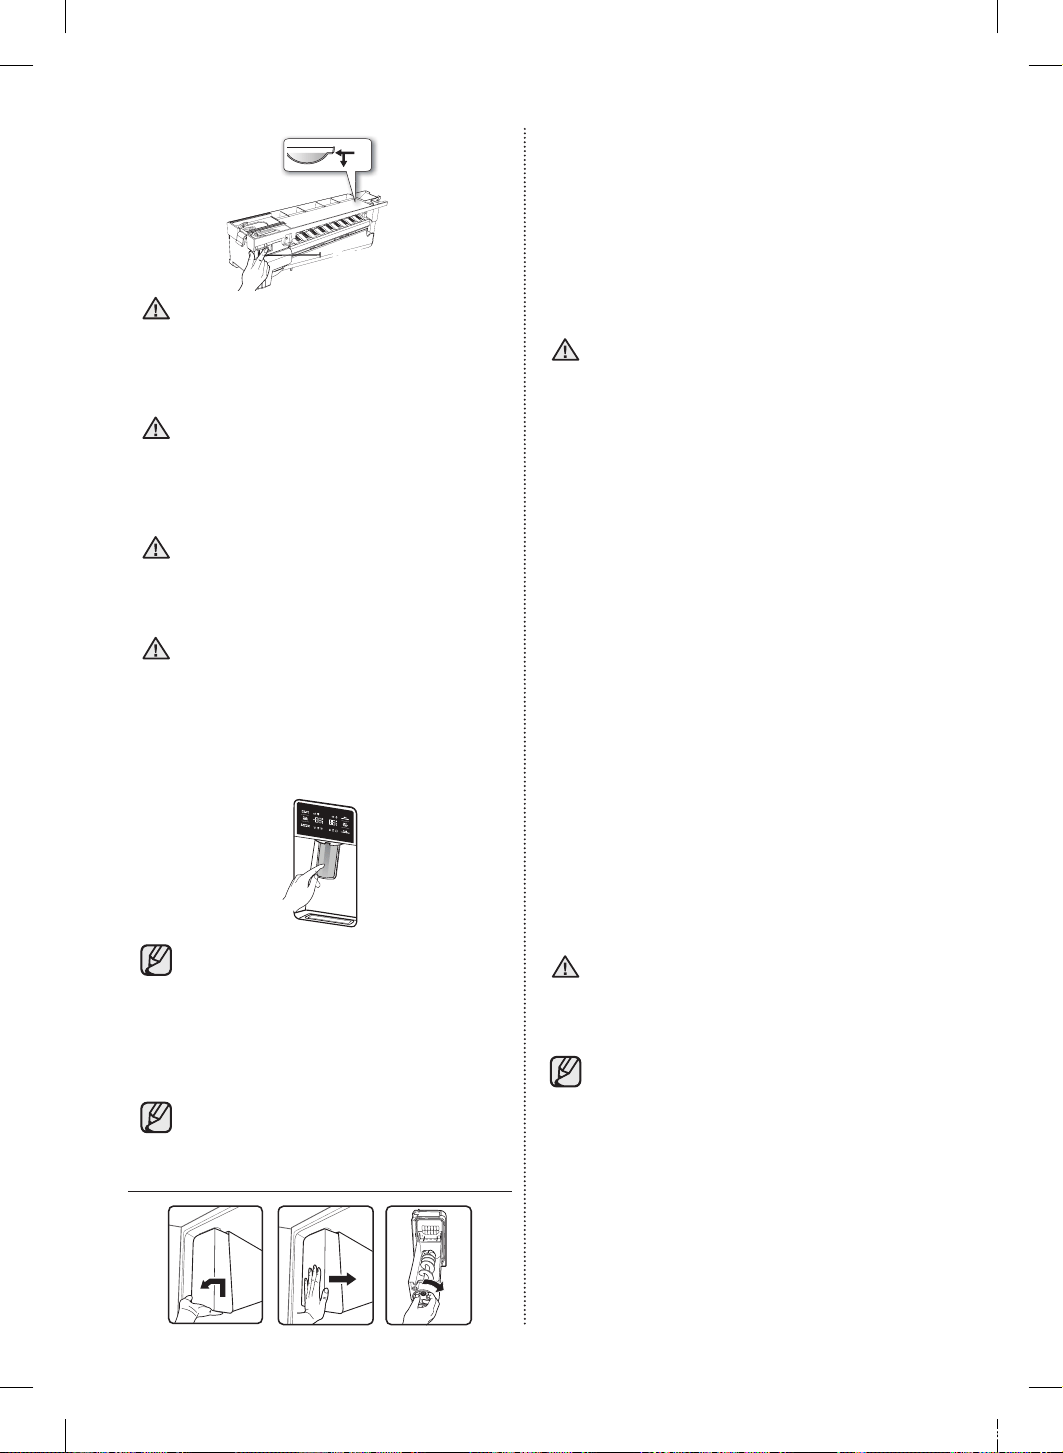
20_ Fonctionnement
verifique
el nivel de
agua
Botón Test (Probar)
Si vous désirez retirer les glaçons
sans utiliser le bac à glace, éteignez la
machine à glaçon. (Cependant, retirez
le capot avant de la machine à glaçon.)
Les glaçons contenus dans la machine à
glaçons peuvent déborder du tiroir.
Ne placez pas d’aliments dans le bac
à glace. Si vous stockez des aliments
dans le bac à glace, ils sont susceptibles
de pénétrer dans la machine à glaçons
lors de l’ouverture/ fermeture de la porte,
endommageant ainsi la machine à glaçons.
Notez que les glaçons contenus dans le
bac à glace peuvent déborder du tiroir
lorsque vous retirez le bac du tiroir.
Si
cela se produit, assurez-vous de récupérer
les glaçons qui ont débordé du tiroir.
En cas de coupure de courant, il se peut
que les glaçons fondent et que l’eau
forme un bloc en regelant, provoquant
ainsi une panne du distributeur.
Afin d’éviter ce problème, sortez le bac à glace
et jetez la glace ou l’eau résiduelle en cas de
coupure de courant.
• Si vous utilisez toute la glace en une
seule fois, répétez les étapes 2 et 3
détaillées sur la page précédente.
• Vous devrez toutefois attendre 8 heures
avant de faire tomber les 4 à 6 premiers
glaçons. Cela permet de remplir le bac
à glaçons et de garantir une production
de glace optimale.
• La glace doit être écartée car ils peuvent
avoir de mauvais goût
Utilisation de la fonction Ice O
ATTENTION
ATTENTION
ATTENTION
ATTENTION
Lorsque vous sélectionnez le mode Ice O, retirez
tous les glaçons du bac. Si vous n’utilisez pas
le distributeur de glace, les glaçons risquent de
former un bloc.
Retirez le bac dans le sens indiqué par la flèche.
Jetez les glaçons ou le conglomérat de glace.
Remettez le bac en place en poussant le fond
jusqu’à entendre un déclic. Lorsque le bac ne se
monte pas, tournez la rampe hélicoïdale de 90° et
réessayez.
Utilisez uniquement la machine à
glaçons fournie avec le réfrigérateur.
L’arrivée d’eau de ce réfrigérateur doit
uniquement être installée/ raccordée par
une personne qualifiée. Raccordez à une
source d’eau potable uniquement.
Va de vacances
Si vous devez vous absenter et que le distributeur
d’eau et de glace restera inutilisé pendant une
période prolongée :
- Fermez la vanne d’arrivée d’eau afin d’éviter
tout risque de fuite.
- Videz le réfrigérateur.
- Débranchez le réfrigérateur.
- Essuyez l’excédent d’humidité à l’intérieur
et laissez les portes ouvertes. Dans le cas
contraire, des odeurs et de la moisissure
pourraient se développer.
Ice Maker et Don’ts
N’insérez jamais vos doigts ou des objets dans
le conduit d’écoulement ni dans le bac de la
machine à glaçons.
- Vous risqueriez de vous blesser ou
d’endommager l’appareil. Ne mettez jamais
vos doigts ou des objets dans l’ouverture du
distributeur.
- Vous risqueriez de vous blesser.
N’essayez pas de démonter la machine à
glaçons. Ne lavez pas ni ne vaporisez pas
d’eau dans le bac à glace s’il est dans le
réfrigérateur. Retirez-le pour le nettoyer.
Au moment de l’insertion de la machine à
glaçons, veillez à ce que le bac soit bien
centré afin d’éviter qu’il ne reste bloqué.
Phénomène opacification de l’eau
• Toute l’eau fournie au réfrigérateur
passe à travers le filtre qui est un filtre
pour eau alcaline. Lors du processus
de filtration, la pression de l’eau qui
s’écoule du filtre est réduite et l’eau
devient saturée en oxygène et en azote.
• Lorsque cette eau entre en contact
avec l’air, la pression chute, l’oxygène et
l’azote deviennent hypersaturés et des
bulles de gaz se forment.
• À cause de ces bulles d’oxygène, l’eau
peut temporairement devenir trouble.
Au bout de quelques secondes, l’eau
redevient claire.
ATTENTION
ATTENTION
DA68-02601A-16.indb 20 2018. 10. 8. 오후 4:32
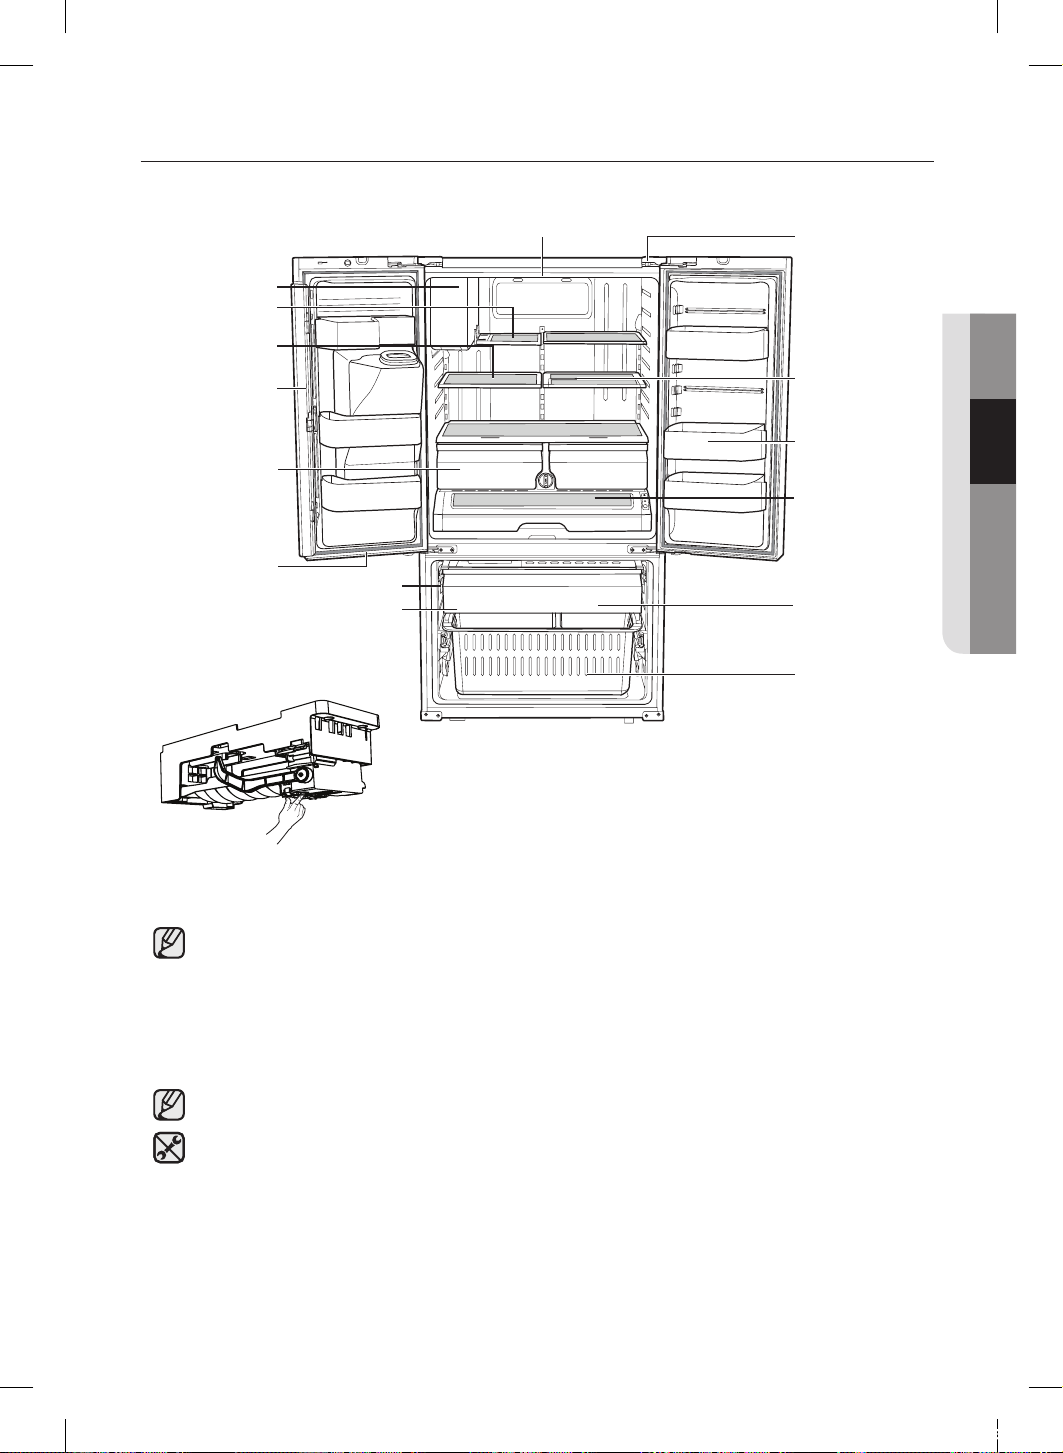
Fonctionnement _21
02 FONCTIONNEMENT
PIÈCES ET CARACTÉRISTIQUES
Cette page permet de vous familiariser avec les pièces et caractéristiques du réfrigérateur.
Éclairage
Système de
fermeture de
porte
Clayette en verre
intermédiaire (sur
certains modèles)
Bacs de la porte
Compartiment
à température
réglable
Étagère pliante
Machine à glaçons FF
Étagère coulissante
Section à charnière
verticale
Tiroirs à fruits
et légumes
Machine à glaçons FZ (sur certains modèles)
Éclairage
Bac à glace
Tiroir à ouverture
automatique
Freezer
(Congélateur)
Bac tiroir
• Lorsque vous fermez la porte, assurez-vous que la section à charnière verticale est
correctement positionnée afin d’éviter que l’autre porte ne soit rayée.
Si la section à charnière verticale est inversée, remettez-la en place et fermez la porte.
Il se peut que de l’humidité apparaisse parfois sur la section à charnière verticale.
Avec le temps, la poignée de la porte peut se desserrer. Si cela se produit, resserrez les
boulons situés à l’intérieur de la porte.
Si vous fermez une porte un peu fort, il est possible que l’autre porte s’ouvre.
• Lorsque la porte s’ouvre, le commutateur d’interverrouillage éteint automatiquement le moteur
à vis sans fin de la machine à glaçons pour des raisons de sécurité.
• Veuillez contacter votre réparateur agréé lorsque la DEL intérieure ou extérieure est grillée.
bouton de test
machine à glaçons dans le congélateur
DA68-02601A-16.indb 21 2018. 10. 8. 오후 4:32
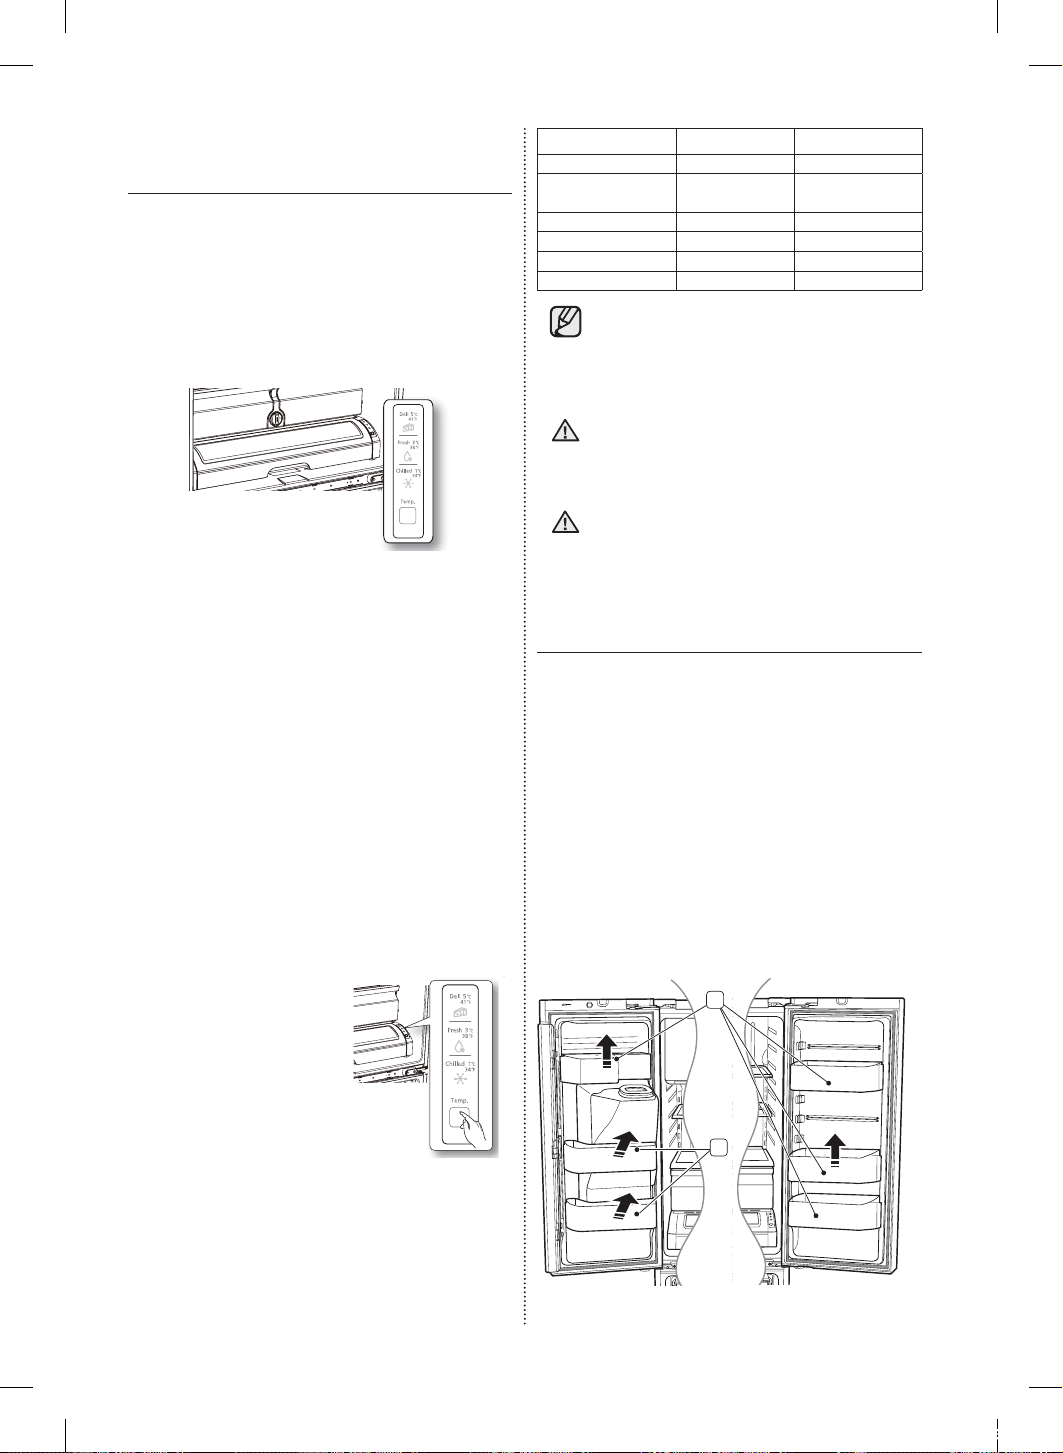
22_ Fonctionnement
UTILISATION DU COMPARTIMENT
À TEMPÉRATURE RÉGLABLE
TM
Le Cool Select Pantry™ (compartiment à
température réglable) est un tiroir pleine largeur
doté d’un système réglable de contrôle de la
température. À utiliser pour les grands plateaux
de réception, les produits frais, les pizzas, les
boissons et les aliments divers.
Une commande thermique permet de régler la
quantité d’air froid envoyée dans ce compartiment.
La commande se situe du côté droit du compartiment.
• Le compartiment comporte trois modes :
mode Fresh (Frais), mode Chilled (Réfrigéré) et
mode Deli (Délicat).
Le mode Fresh (Frais) est le mode par défaut.
Appuyez plusieurs fois sur le bouton de
température jusqu’à ce que le mode souhaité
s’ache. Une fois le mode sélectionné, la
température change pour correspondre au
mode sélectionné.
• La température du compartiment peut varier
en fonction de la quantité d’aliments placés
à l’intérieur, de leur positionnement, de la
température ambiante et de la fréquence à
laquelle la porte est ouverte.
Le bouton de sélection du compartiment
1. Une fois le mode « Deli » (Délicat) sélectionné,
la température du compartiment est maintenue
aux alentours de 41 °F (5 °C). Cette fonction
permet de conserver des aliments au frais plus
longtemps.
2. Une fois le mode « Fresh
» (Frais) sélectionné,
la température du
compartiment est
maintenue aux alentours
de 38 °F (3 °C). Cette
fonction permet de
conserver des aliments au
frais plus longtemps.
3. Une fois le mode « Chilled » (Réfrigéré)
sélectionné, la température du compartiment
est maintenue aux alentours de 34 °F (1 °C).
Cette fonction permet de conserver la viande ou
le poisson au frais plus longtemps. Le tableau
cidessous indique les modes du compartiment
et les types d’aliments pouvant être conservés
en toute sécurité selon le mode sélectionné.
Produits frais Frais Réfrigéré
• Ananas • concombres • steaks
• citron • pommes • fromages à
pâte dure
• avocat • oranges • charcuterie
• pomme de terre • raisins • bacon
• courgettes • hot dogs
• maïs
• Les fruits et légumes risquent d’être
endommagés en mode « Chilled »
(Réfrigéré).
• N’entreposez pas de laitue ni d’autres
produits à feuilles dans le compartiment.
N’entreposez pas de bouteilles en
verre dans le compartiment. En cas de
congélation, elles risquent de se briser et
d’entraîner des blessures.
Si vous placez un bol d’eau sans son
couvercle dans le compartiment, de la
condensation peut se former autour
RETRAIT DES ACCESSOIRES
DU RÉFRIGÉRATEUR
1. Bacs de la porte et compartiment
à produits laitiers
• Bacs de la porte ( 1 )
Pour les retirer : soulevez légèrement le bac et
tirez horizontalement.
Pour les remettre en place : faites-le glisser à
l’emplacement souhaité et poussez jusqu’à la butée.
• Bacs de la porte ( 2 )
Pour les retirer : enlevez le côté droit du bac en
le soulevant en biais le long de son guide, puis
enlevez le côté gauche de la porte en le tirant.
Pour les remettre en place : faites-le glisser à
l’emplacement d’origine et poussez jusqu’à la butée.
2
1
ATTENTION
ATTENTION
DA68-02601A-16.indb 22 2018. 10. 8. 오후 4:32
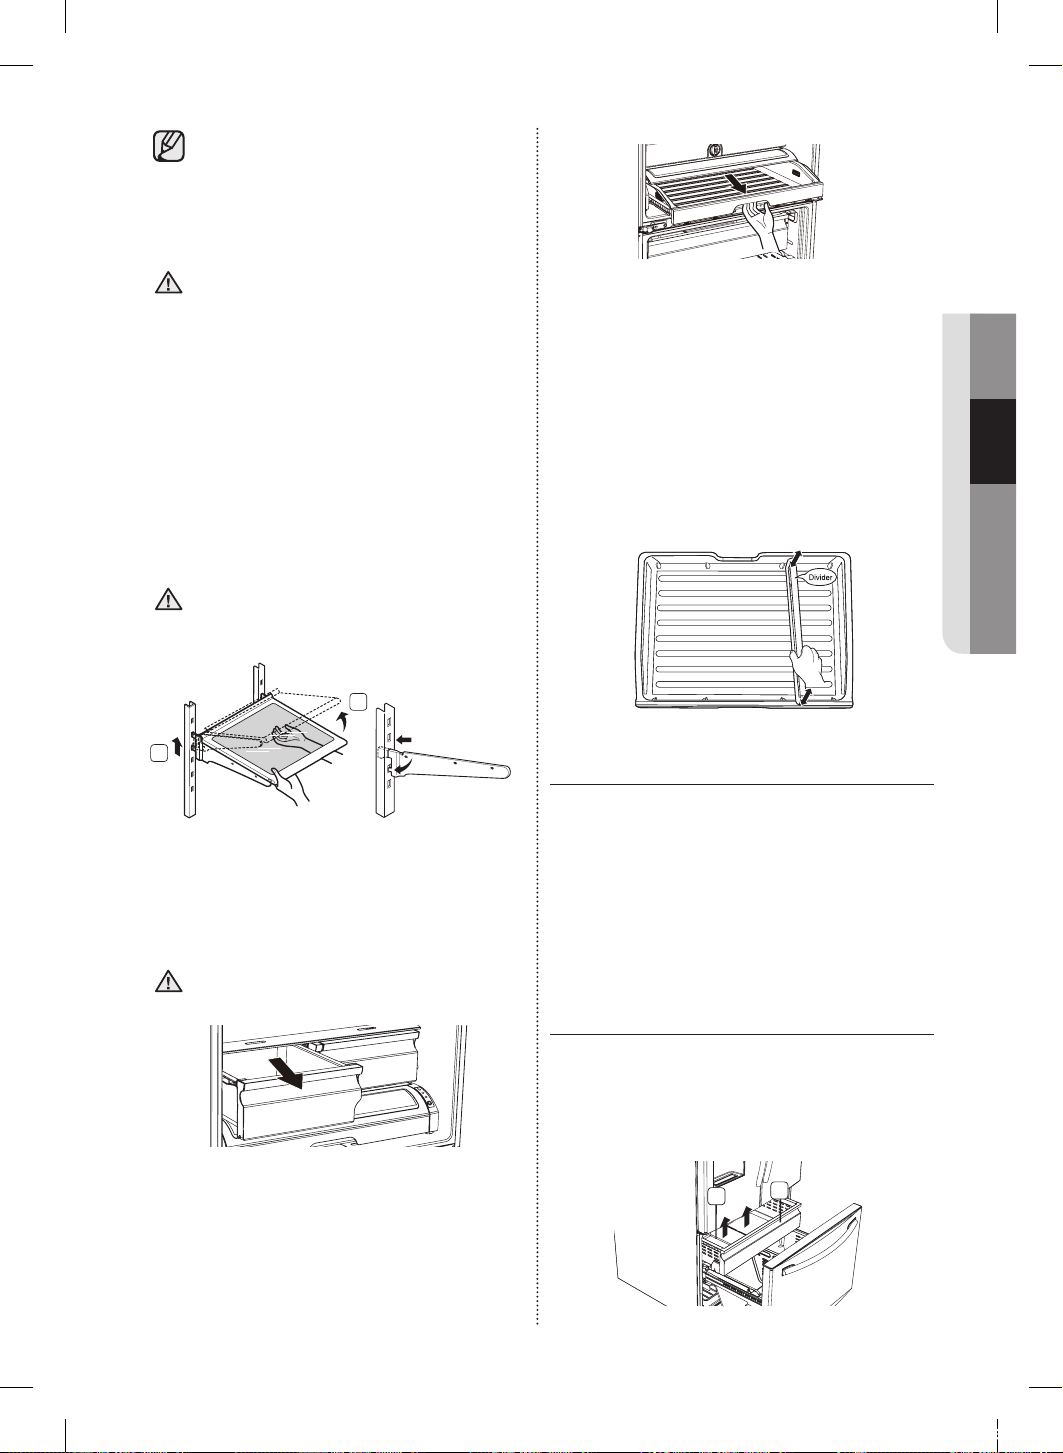
Fonctionnement _23
02 FONCTIONNEMENT
• Vous risquez de vous blesser si les bacs
de la porte ne sont pas correctement
fixés.
• Ne laissez pas les enfants jouer avec les
bacs. Ils risqueraient de se blesser sur
les coins pointus.
Ne fixez pas le bac s’il contient des
aliments. Videz-le d’abord.
Nettoyage : retirez la barre de retenue et
nettoyez à l’eau.
2. Clayettes en verre trempé
Pour les retirer : inclinez l’avant de la clayette
dans le sens indiqué ( 1 ) puis soulevez-la
verticalement ( 2 ). Sortez la clayette.
Pour les remettre en place : inclinez l’avant de
la clayette vers le haut et insérez les crochets dans
les encoches à la hauteur souhaitée. Abaissez
ensuite l’avant de la clayette de manière à ce que
les crochets s’insèrent dans les encoches.
Les clayettes tempérées sont lourdes.
Soyez prudent au moment de les retirer.
1
2
3. Bacs à fruits et légumes
Pour le retirer : ouvrez le bac à fond. Inclinez l’avant
du bac vers le haut puis tirez dessus pour le sortir.
Pour les remettre en place : insérez le bac dans
les rails et poussez dessus pour le remettre en place.
Les bacs doivent être retirés pour pouvoir
sortir la clayette du dessus.
4.
Compartiment à température réglable
Pour retirer le compartiment à température
réglable : ouvrez complètement le compartiment.
Inclinez le côté avant du compartiment puis tirez
dessus pour le sortir.
ATTENTION
ATTENTION
ATTENTION
Pour remettre le compartiment à température
réglable en place : poussez les rails vers l’arrière
du réfrigérateur. Placez le tiroir sur les rails et faites
glisser le compartiment jusqu’à ce qu’il soit en place.
Pour retirer la grille de séparation : ouvrez
complètement le compartiment et soulevez le côté
avant de la grille de séparation pour la décrocher
de la paroi arrière du compartiment, puis soulevez
la grille.
Pour remettre la grille de séparation en place :
accrochez l’arrière de la grille de séparation à la
paroi arrière du compartiment et enfoncez-la.
Utilisation des portes
Assurez-vous que les portes ferment
hermétiquement et sur toute la longueur.
Lorsqu’une porte du réfrigérateur est entrouverte,
elle se ferme automatiquement. En revanche, si
elle est ouverte au-delà de l’écartement prévu
de fermeture automatique, elle restera ouverte et
vous devrez la fermer manuellement.
RETRAIT DES ACCESSOIRES
DU RÉFRIGÉRATEUR
1.BAC À GLACE
Pour le retirer : Soulevez le bac à glace ( 1 ).
Pour le remettre en place : placez le bac à
glace dans le tiroir grande capacité ( 2 ).
1
2
DA68-02601A-16.indb 23 2018. 10. 8. 오후 4:32
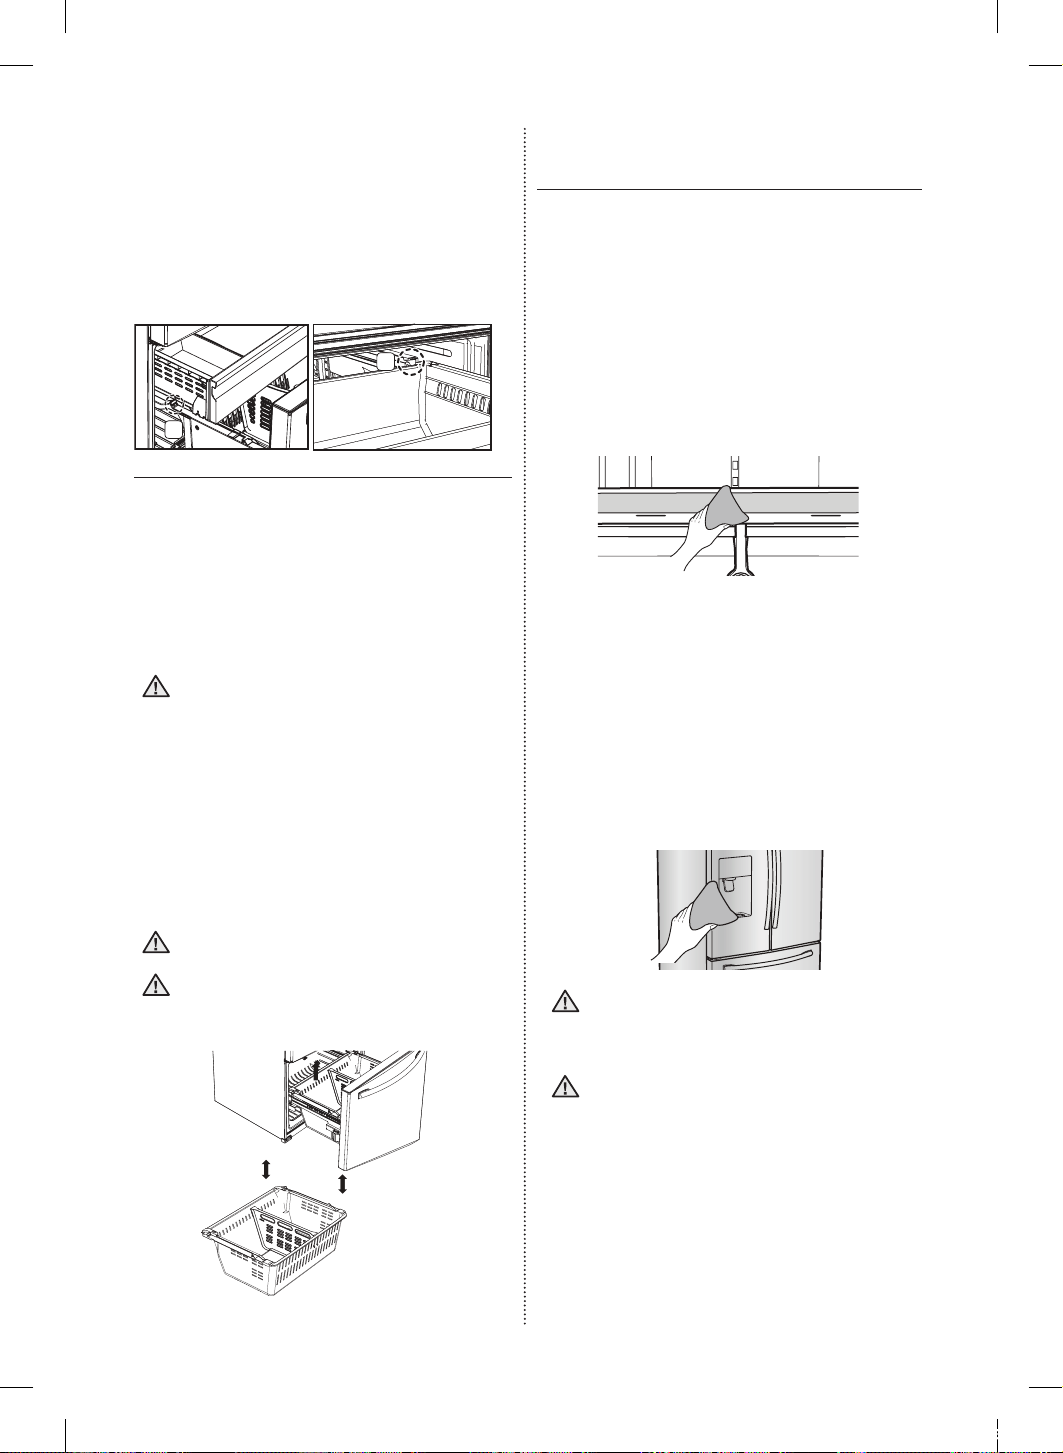
24_ Fonctionnement
2. Tiroir grande capacité
Pour le retirer : ouvrez le bac à fond. Inclinez
l’arrière du tiroir vers le haut puis tirez-le pour le
sortir.
Pour le remettre en place : replacez le tiroir sur
les rails ( 4 ) en l’inclinant vers le haut. Abaissez le
tiroir en position horizontale et poussez-le ( 3 ).
3
4
3. Tiroir du congélateur
Pour retirer le tiroir du congélateur : tirez
dessus de façon à le sortir complètement de son
logement. Inclinez l’arrière du tiroir vers le haut et
soulevez-le pour le retirer.
Pour remettre le tiroir du congélateur en
place : repositionnez le tiroir sur le rail.
Ne laissez pas les jeunes enfants
s’approcher du tiroir.
- Risque d’étouement ou de blessures.
Ne vous asseyez pas sur la porte du
congélateur.
-
Risque de dommage physique ou matériel.
Afin d’éviter qu’un enfant ne reste piégé
à l’intérieur de l’appareil, n’oubliez
pas de remettre en place la grille de
séparation à l’aide de la vis fournie
lorsque vous la retirez.
Ne retirez pas la grille de séparation.
Les enfants risqueraient de se retrouver
coincés à l’intérieur, d’être blessés ou de
s’asphyxier.
ATTENTION
ATTENTION
AVERTISSEMENT
NETTOYAGE DU
RÉFRIGÉRATEUR
Un bon entretien de votre réfrigérateur double porte
Samsung prolongera sa durée de vie et évitera
l’apparition de mauvaises odeurs et de germes.
Nettoyage de la partie intérieure
Nettoyez les parois et accessoires intérieurs à
l’aide d’un nettoyant doux puis essuyez à l’aide
d’un chion doux. Vous pouvez retirer les tiroirs et
clayettes pour un nettoyage plus en profondeur.
Veillez à bien sécher les tiroirs et les clayettes
avant de les remettre en place.
Nettoyage de la partie extérieure
Essuyez le panneau de commande et l’achage
digital à l’aide d’un chion doux humide et propre.
N’aspergez pas d’eau directement sur la surface
du réfrigérateur.
Les portes, poignées et surfaces du châssis
doivent être nettoyées à l’aide d’un nettoyant
doux puis essuyées à l’aide d’un chion doux.
Afin de préserver son aspect, lustrez les parois
extérieures une ou deux fois par an.
Évitez de vaporiser de l’eau directement
sur le réfrigerateur. Utilisez un chion
humide et propre pour le nettoyer.
Ne nettoyez pas l’appareil en vaporisant
de l’eau directement dessus.
N’utilisez pas de benzène, de diluant ni
d’alcool pour nettoyer cet appareil.
• Cela pourrait entraîner une décoloration, une
déformation, endommager l’appareil ou provoquer
une électrocution ou un incendie.
Ne vaporisez pas de gaz inflammable à proximité du
réfrigérateur.
- Il existe un risque d’explosion ou d’incendie.
ATTENTION
ATTENTION
DA68-02601A-16.indb 24 2018. 10. 8. 오후 4:32
Fonctionnement _25
02 FONCTIONNEMENT
Vous eacerez les lettres
imprimées sur l’achage
si vous appliquez un
nettoyant spécial inox
directement sur la surface
où sont imprimées les lettres.
Nettoyage du distributeur de glace/
d’eau
Essuyez le distributeur de glace/d’eau à l’aide d’
un chion propre et doux.
Lorsque vous utilisez la
fonction de glace pilée du
distributeur, des morceaux
de glace peuvent tomber
et s’accumuler dans la
gouttière. Afin d’éviter
tout débordement,
veillez à vider la gouttière
régulièrement (dès
que vous voyez qu’elle
commence à se remplir).
Si les joints des portes en caoutchouc sont
sales, les portes risquent de ne plus se fermer
correctement et le fonctionnement du réfrigérateur
ne sera plus optimal. Maintenez les joints des
portes propres en les nettoyant à l’aide d’un
produit de nettoyage doux et d’un chion humide.
Essuyez à l’aide d’un chion propre et doux.
Ne nettoyez pas le réfrigérateur à l’aide
de benzène, de diluant ni de nettoyant
pour voiture car cela risque de provoquer
un incendie.
ATTENTION
ATTENTION
ATTENTION
Nettoyage de l’arrière du réfrigérateur
Pour éviter l’accumulation de poussière et de
saletés sur les cordons et les parties exposées:
Passez l’aspirateur sur l’arrière de l’appareil une
ou deux fois par an.
Ne retirez pas la plaque de protection
arrière ( 1 ).
Vous risqueriez de vous électrocuter.
1
ATTENTION
DA68-02601A-16.indb 25 2018. 10. 8. 오후 4:33
26_ Fonctionnement
CONSEILS DE CONSERVATION DES ALIMENTS
Aliments
Réfrigéra-
teur
Freezer (Congé-
lateur)
Conseils de conservation
PRODUITS LAITIERS
Beurre
2 à 3 semaines
6 à 9 mois Emballez ou couvrez bien.
Lait
1 à 2 se-
maines
Non recommandé
Vérifiez la date limite de consommation. La plu -
part des produits laitiers sont vendus en boîtes
datées indiquant leur date limite de consomma
- tion. Refermez ou emballez soigneusement. Ne
replacez pas de portions non consommées dans
le récipient d’origine.
Fromage à la crème, pré -
paration à base de fromage
et fromage à tartiner
2 à 4 se-
maines
Non recommandé
Vérifiez la date limite de consommation. Conser
- vez tous ces aliments soigneusement emballés
dans un papier anti-humidité.
Fromage à pâte dure (non
ouvert)
3 à 4 mois 6 mois
Fromage à pâte dure (ouvert)
2 mois Non recommandé
Fromage blanc 10 à 15 jours Non recommandé
Crème fraîche 7 à 10 jours 2 mois
Vérifiez la date limite de consommation. La plu-
part des produits laitiers (yaourts, crème fraîche)
sont vendus en boîtes datées indiquant leur date
limite de consommation. Refermez le récipient
ou cou - vrez soigneusement. Ne replacez pas
de portions non consommées dans le récipient
d’origine.
Crème aigre 2 semaines Non recommandé
Sauces à base de crème
(ouvertes)
1 semaine Non recommandé
Yaourt 10 à 14 jours Non recommandé
Vérifiez la date limite de consommation. Conser -
vez dans un récipient fermé.
Yaourt glacé s/o 2 mois
OEUFS
OEufs (crus)
3 à 4 semaines
Non recommandé
Vérifiez la date limite de consommation. Conser -
vez les oeufs dans la partie la plus froide du
réfrigérateur et dans leur emballage d’origine.
OEufs (cuits) 1 semaine Non recommandé Conservez dans un récipient fermé.
Restes de plats à base
d’oeuf
3 à 4 jours Non recommandé Conservez dans un récipient fermé.
FRUITS FRAIS
Pommes 1 mois Non recommandé
Ne lavez pas le fruit avant le mettre au réfrigéra-
teur. Conservez dans un sac ou récipient anti-
humidité. Emballez les fruits cou -
pés. Certains fruits noircissent au réfrigérateur.
Bananes 2 à 4 jours Non recommandé
Pêches, melons, poires,
avocats
3 à 5 jours Non recommandé
Baies et cerises 2 à 3 jours 12 mois
Abricots 3 à 5 jours Non recommandé
Raisin 2 à 5 jours s/o
Ananas (entier) 2 à 3 jours Non recommandé
Ananas (en morceaux) 5 à 7 jours 6 à 12 mois
Agrumes
1 à 2 semaines
Non recommandé Conservez sans couvrir.
Jus 6 jours Non recommandé
Vérifiez la date limite de consommation et
conservez dans le récipient d’origine refermé. Ne
replacez pas de portions non consommées dans
le récipient d’origine.
Jus de fruits givré
Uniquement
le temps de la
décongélation
12 mois
Vérifiez la date limite de consommation. Ne pas
recongeler.
DA68-02601A-16.indb 26 2018. 10. 8. 오후 4:33
Fonctionnement _27
02 FONCTIONNEMENT
Aliments Réfrigérateur
Freezer
(Congélateur)
Conseils de conservation
POISSON ET FRUITS DE MER
Poisson
Poisson gras
(maquereau, truite,
saumon)
1 à 2 jours 2 à 3 mois
Conservez dans l’emballage d’origine et stockez dans
la partie la plus froide du réfrigérateur. Emballez dans
un papier étanche à la vapeur et à l’humidité pour la
congélation. Congelez à 0 °F (ou -18 °C).
Déconge -
lez dans le réfrigérateur ou vérifiez la date limite de
consommation. Congelez dans l’emballage d’origine.
Poisson maigre (ca -
billaud, filet, etc.)
1 à 2 jours 6 mois
Congelé ou pané s/o 3 mois
Fruits de mer
Crevettes (crues) 1 à 2 jours 12 mois
Pour congeler, placez dans un récipient étanche à la
vapeur et à l’humidité.
Crabe 3 à 5 jours 10 mois
Poisson ou fruits de
mer cuits
2 à 3 jours 3 mois
VIANDE
Fraîche, crue
Côtelettes 2 à 4 jours 6 à 12 mois
Vérifiez la date limite de consommation. Conservez
dans la partie la plus froide du réfrigérateur dans son
emballage d’origine. Placez dans un récipient étanche
à la vapeur et à l’humidité pour la congélation. Tem -
pérature recommandée pour le réfrigérateur : 33 ºF à
36 ºF (ou 1 °C à 2 °C) et pour le congélateur : 0 ºF à
2ºF (ou -18 °C à -16 °C)
Viande hachée 1 jour 3 à 4 mois
Rôti 2 à 4 jours 6 à 12 mois
Bacon 1 à 2 semaines 1 à 2 mois
Saucisse 1 à 2 jours 1 à 2 mois
Bifteck 2 à 4 jours 6 à 9 mois
Volaille 1 jour 12 mois
Charcuterie 3 à 5 jours 1 mois
Cuite
Viande 2 à 3 jours 2 à 3 mois
Vérifiez la date limite de consommation. Conservez
dans la partie la plus froide du réfrigérateur dans son
emballage d’origine. Placez dans un récipient étanche
à la vapeur et à l’humidité pour la congélation.
Volaille 2 à 3 jours 4 à 5 mois
Jambon 1 à 2 semaines 1 à 2 mois
Sources :
American Meat Institute Foundation. 1994. Pages jaunes : réponses aux questions susceptibles d’être posées par les
clients concernant la viande et la volaille. American Meat Institute Food Marketing Institute. 1999. The food keeper.
Food Marketing Institute, Washington, D.C. Freeland-Graves, J.H. et G.C. Peckham. 1996. Foundations of food
preparation, 6ème édition. Prentice-Hall, Inc. Englewood Clis, NJ. Hillers, V.N. 1993. Storing foods at home.
Washington State University Cooperative Extension, Pullman, WA. Publ. EB 1205.
National Restaurant Association. 2001. Be cool-chill out! Refrigerate promptly. National Restaurant Association
Education Foundation¼s International Food Safety Council, Washington, D.C. USDA. 1997. Basics for handling food
safely. U.S. Department of Agriculture, Food Safety and Inspection Service, Washington, D.C.
DA68-02601A-16.indb 27 2018. 10. 8. 오후 4:33
28_ Troubleshooting
Dépannage
PROBLÈME SOLUTION
Le réfrigérateur
ne fonctionne
pas du tout ou
ne refroidit pas
susamment.
• Vérifiez que la prise d’alimentation est correctement branchée.
• Vérifiez si la température achée à l’écran est plus élevée que celle du congélateur ou
à l’intérieur du réfrigérateur. Si tel est le cas, réglez le réfrigérateur sur une température
plus basse.
• Le réfrigérateur est-il exposé à la lumière directe du soleil ou situé à proximité d’une
source de chaleur?
• L’arrière du réfrigérateur est-il trop près du mur, empêchant une ventilation adéquate?
Les aliments dans
le réfrigérateur
sont gelés.
• Vérifiez que la température achée à l’écran n’est pas trop basse.
• Essayez de régler le réfrigérateur sur une température plus élevée.
• La température ambiante est-elle trop basse? Réglez le réfrigérateur sur une
température plus élevée.
• Avez-vous entreposé des aliments juteux dans la partie la plus froide du réfrigérateur?
Essayez de placer ces articles sur d’autres clayettes du réfrigérateur au lieu de les
conserver dans les zones les plus froides ou dans les bacs.
Des bruits
inhabituels sont
audibles.
• Vérifiez que le réfrigérateur est de niveau et stable.
• L’arrière du réfrigérateur est-il trop près du mur, empêchant une ventilation adéquate?
Positionnez le réfrigérateur à au moins 2 pouces du mur.
• Des objets sont-ils tombés derrière ou sous le réfrigérateur?
• Un cliquetis est audible à l’intérieur du réfrigérateur. Ce phénomène est normal : les
diérents accessoires se rétractent ou se distendent en fonction de la température à
l’intérieur du réfrigérateur.
• Si vous avez l’impression qu’un élément heurte un autre élément à l’intérieur du réfrigérateur,
cela est normal. Ce son est dû au fonctionnement à haut régime du compresseur.
La zone de jointure
de la porte de
l’appareil est chaude
et de la condensation
se forme.
• La présence de chaleur est normale car des systèmes anti-condensation sont
installés dans la section à charnière verticale du réfrigérateur.
• La porte du réfrigérateur est-elle entrebâillée? De la condensation peut se former
lorsque la porte reste ouverte pendant une durée prolongée.
La machine
à glaçons ne
produit pas de
glaçons.
• Avez-vous attendu 12 heures après l’installation du tuyau d’arrivée d’eau avant de
fabriquer des glaçons?
• Le tuyau d’arrivée d’eau est-il connecté et le robinet de sectionnement est-il ouvert?
• Avez-vous arrêté manuellement la fonction de fabrication des glaçons?
• La température du congélateur est-elle trop élevée ? Réglez le congélateur sur une
température plus basse.
Vous entendez de
l’eau glouglouter
dans le réfrigérateur.
• Ceci est tout à fait normal. Ce son provient du réfrigérant qui circule dans le
réfrigérateur.
Le réfrigérateur
dégage une odeur
désagréable.
• Vérifiez qu’il n’y a pas d’aliments gâtés.
• Les aliments ayant une forte odeur (le poisson par exemple) doivent être
hermétiquement emballés.
• Nettoyez régulièrement votre congélateur et jetez tout aliment périmé ou suspect.
Du gel se forme
sur les parois du
congélateur.
• L’orifice d’aération est-il obstrué ? Assurez-vous que l’air puisse circuler librement.
• Ménagez un espace susant entre les aliments stockés pour une circulation ecace
de l’air.
• Le tiroir du congélateur est-il fermé correctemen?
Le distributeur
d’eau ne
fonctionne pas.
• Le tuyau d’arrivée d’eau est-il connecté et le robinet de sectionnement est-il ouvert?
• Le tuyau d’arrivée d’eau est-il écrasé ou pincé?
• Vérifiez que le tuyau est entièrement dégagé.
• Le réservoir d’eau a-t-il gelé car la température du réfrigérateur est trop basse?
Sélectionnez une température plus élevée sur l’écran.
Le système de
fermeture automatique
ne fonctionne pas
avec la porte du
congélateur.
• Existe-t-il un déséquilibre entre les parties droite et gauche de la porte?
• Ouvrez et fermez doucement la porte une à deux fois. Après cela, le système de
fermeture automatique fonctionne généralement à nouveau correctement.
• Ouvrez doucement la porte pour éviter de déséquilibrer les parties droite et gauche
de celle-ci.
DA68-02601A-16.indb 28 2018. 10. 8. 오후 4:33

Si votre réfrigérateur doit être réparé
N’hésitez pas à appeler un centre de service agréé Samsung proche en lui communiquant votre nom, adresse et
numéro de téléphone lorsque votre appareil ne fonctionne pas correctement.
Informations relatives à la garantie (CANADA)
Garantie limitée à l’acheteur initial
Cet appareil Samsung est garanti par Samsung Electronics Canada, Inc. (désigné ci-après par SECA) contre les
défauts de fabrication matériels ou une malfaçon durant les périodes suivantes :
Main d’oeuvre : 1 an (à domicile)
Pièces : 1 an
Compresseurs Inverter : 10 ans (pièce uniquement)
SECA garantit en outre que si cet appareil ne fonctionne pas correctement durant la période de garantie spécifiée et
que le dysfonctionnement est dû à une malfaçon ou à un matériau défectueux, SECA réparera ou remplacera l’appareil
à sa discrétion. Le service à domicile n’est pas disponible partout. Contactez-nous pour savoir si le service à domicile
est actuellement disponible dans votre région en utilisant les informations de contacts se trouvant au dos de votre
garantie.
Toutes les réparations ou tous les remplacements de pièces sous garantie doivent être eectués par un centre de
service agréé SECA. (Pour localiser le centre de service SECA le plus proche, appelez le 1-800-SAMSUNG (7267864)
ou visitez notre site Web à l’adresse www.samsung.com/ca)
Obligation du propriétaire initial
La preuve d’achat datée originale doit être conservée par le client et il s’agit de la seule preuve d’achat acceptable.
Elle doit être présentée au centre de service agréé SECA au moment de l’intervention avant que les services de
garantie ne soient rendus. Pour tous les modèles subissant une intervention en après-vente, le transport vers et depuis
le centre de service agréé relève de la responsabilité du client.
Exclusions de la garantie
Cette garantie ne couvre pas les dommages provoqués par un accident, un incendie, une inondation et/ou toutes
autres catastrophes naturelles, une manipulation, une tension d’alimentation ou une installation incorrectes, des
réparations incorrectes ou non-autorisées, une utilisation commerciale ou enfin des dommages survenus au cours de
l’expédition. Les ajustements de la part du client qui sont expliqués dans ce manuel d’utilisation ne sont pas couverts
par les dispositions de la présente garantie. Cette garantie sera automatiquement annulée pour toute unité reçue avec
un numéro de série manquant ou altéré. Cette garantie est valide uniquement pour les produits achetés et utilisés au
Canada.
SAMSUNG SERVICE À LA CLIENTÈLE
Samsung Electronics Canada Inc. 2050 Derry Road West, Mississauga, Ontario L5N 0B9 Canada
1-800-SAMSUNG (726-7864)
www.samsung.com/ca/support (English)
www.samsung.com/ca_fr/support (French)
DA68-02601A-16.indb 29 2018. 10. 8. 오후 4:33

mémo
DA68-02601A-16.indb 30 2018. 10. 8. 오후 4:33

mémo
DA68-02601A-16.indb 31 2018. 10. 8. 오후 4:33
Comment contacter Samsung dans le monde
Si vous avez des suggestions ou des questions concernant les produits Samsung, veuillez contacter
leService Consommateurs Samsung.
PAYS APPELEZ LE
OU RENDEZ-VOUS SUR LE SITE
ÉCRIVEZ À
ÉTATS-UNIS
1-800-SAMSUNG(726-7864)
1-844-SAM-PAYS (726-7297)
www.samsung.com/us/support
Samsung Electronics America, Inc.
85 Challenger Road Ridgefield Park,
NJ 07660
CANADA
1-800-SAMSUNG(726-7864)
1-844-SAM-PAYS (726-7297)
www.samsung.com/ca/support (English)
www.samsung.com/ca_fr/support (French)
Samsung Electronics Canada Inc. 2050
Derry Road West, Mississauga, Ontario
L5N 0B9 Canada
DA68-02601A-16
DA68-02601A-16.indb 32 2018. 10. 8. 오후 4:33