Do not do anything that could damage the power cord.
Do not place it near a heater.
Do not bend it excessively or alter it.
Do not scratch it.
Do not place it under a heavy object.
Using the power cord/adaptor with the core of the cord exposed could cause electric shocks or a fire.
Do not touch the power plug or cord if there is a chance of lightning. Failure to observe this may cause electric shocks.
Use this unit with the power supply voltage printed on it. Failure to connect to an appropriate AC outlet may cause a fire, electric shocks, or malfunctions.
Check the electric plug periodically and remove any dirt or dust which may have accumulated on it. Failure to observe this may cause a fire or electric shocks.
When setting up the unit, make sure that the AC outlet you are using is easily accessible. If some trouble or malfunction occurs, immediately turn off the power switch and disconnect the plug from the AC outlet. Even when the power switch is turned off, as long as the power cord is not unplugged from the wall AC outlet, the unit will not be disconnected from the power source.
If you hear thunder or suspect approaching lightning, quickly turn off the power switch and pull the power plug from the AC outlet. Failure to observe this may cause a fire or malfunctions.
If not using the unit for long periods of time, be sure to pull the power plug from the AC outlet. Failure to observe this may cause a fire or malfunctions.
Do not disassemble
Do not disassemble or modify this unit. Failure to observe this may cause a fire, electric shocks, injury, or malfunctions. If you notice any irregularities, be sure to request an inspection or repair from the dealer where you purchased the unit or from qualified Yamaha service personnel.
Water warning
Do not expose the unit to rain, use it near water or in damp or wet conditions, or place on it any containers (such as vases, bottles or glasses) containing liquids which might spill into any openings or places where water may drop. A liquid such as water getting into the unit may cause a fire, electric shocks, or malfunctions. If any liquid such as water seeps into the device, turn off the power immediately and unplug the power cord from the AC outlet. Then, request an inspection from the dealer where you purchased the unit or from qualified Yamaha service personnel.
Never insert or remove an electric plug with wet hands. Do not handle this unit with wet hands. Failure to observe this may cause electric shocks or malfunctions.
Fire warning
Do not place any burning items or open flames near the unit, since they may cause a fire.
Maintenance and care
Do not use aerosols or spray-type chemicals that contain combustible gas for cleaning or lubrication. The combustible gas will remain inside the unit, which may cause explosion or fire.
Battery use
Do not disassemble a battery. If the contents of the battery get on your hands or in your eyes, it can cause blindness or chemical burns.
Do not dispose of batteries in fire. Doing so may result in the battery bursting, causing a fire or injury.
Do not expose a battery to high temperatures, such as direct sunlight or a fire. The battery may burst, causing a fire or injury
Do not attempt to recharge batteries that are not intended to be charged. Charging could cause the battery to burst or leak, which can cause blindness, chemical burns, or injury.
If the batteries do leak, avoid contact with the leaked fluid. If the battery fluid should come in contact with your eyes, mouth, or skin, wash immediately with water and consult a doctor. Battery fluid is corrosive and may possibly cause loss of sight or chemical burns.
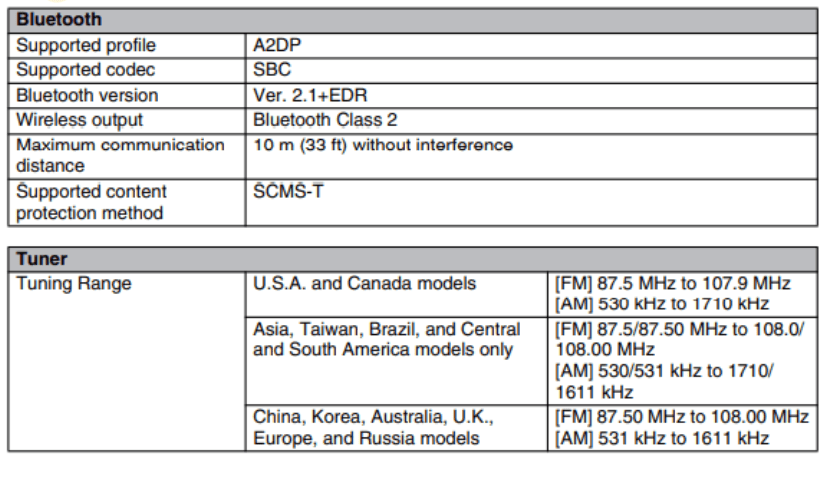
Wireless unit
Do not use this unit near medical devices or inside medical facilities. Radio waves from this unit may affect electro-medical devices.
Do not use this unit within 15 cm (6 in) of persons with a heart pacemaker implant or a defibrillator implant. Radio waves from this unit may affect electro-medical devices, such as a heart pacemaker implant or defibrillator implant.
If you notice any abnormality
If any of the following abnormalities occur, immediately turn off the power and disconnect the power plug. If any of the following abnormalities occur, immediately turn off any amplifiers and receivers.
The power cord/plug is damaged.
An unusual smell or smoke is emitted from the unit.
Foreign material gets into the interior of the unit.
There is a loss of sound during use.
There is a crack or damage in the unit.
Continued use could cause electric shocks, a fire, or malfunctions. Immediately request an inspection or repair from the dealer where you purchased the unit or from qualified Yamaha service personnel.
Be careful not to drop or apply strong impact to this unit. If you suspect the unit may have been damaged due to dropping or impact, immediately turn off the power and pull the power plug from the AC outlet. Failure to observe this may cause electric shocks, a fire, or malfunctions. Immediately request an inspection from the dealer where you purchased the unit or from qualified Yamaha service personnel
Power supply/power cord
Do not use an AC outlet where the power plug fits loosely when inserted. Failure to observe this may cause a fire, electric shocks, or burns.
When removing the electric plug from the unit or an AC outlet, always hold the plug itself and not the cord. Pulling by the cord can damage it and cause electric shocks or a fire.
Insert the power plug firmly all the way into the AC outlet. Using the unit when it is not plugged in sufficiently can cause dust to accumulate on the plug, causing a fire or burns.
Installation
Do not place the unit in an unstable position where it might accidentally drop or fall over and cause injuries.
Do not block this unit's ventilation holes (cooling slits). This unit has ventilation holes on the top/side/bottom to prevent the internal temperature from becoming too high. Failure to observe this may trap heat inside the unit, causing a fire or malfunctions.
When installing this unit:
Do not cover it with any cloth.
Do not install it on a carpet or rug.
Make sure the top surface faces up; do not install on its sides or upside down.
Do not use the device in a confined, poorly-ventilated location.
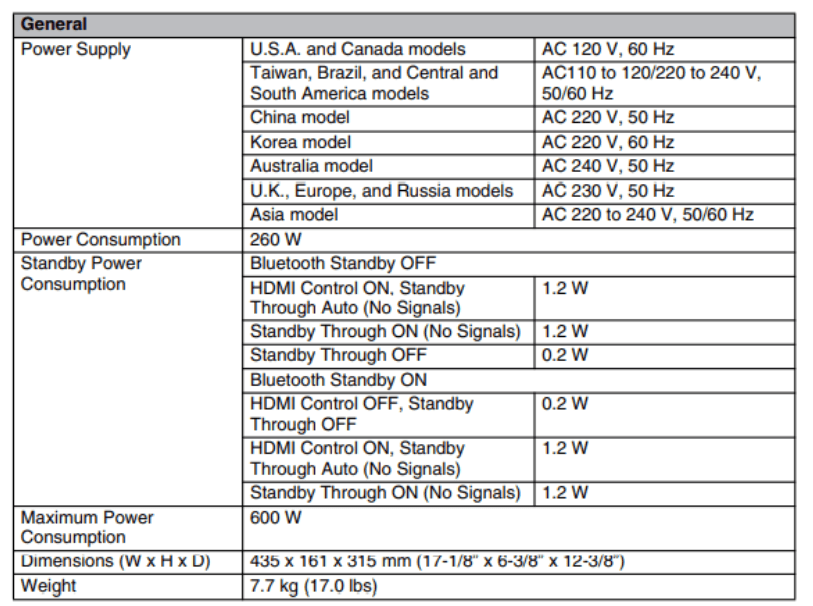
Failure to observe the above may trap heat inside the unit, causing a fire or malfunctions. Ensure that there is adequate space around the unit: at least 30 cm (11-3/4 in) on top, 20 cm (7-7/8 in) on the sides, and 20 cm (7-7/8 in) on the rear.
Do not install the unit in places where it may come into contact with corrosive gases or salt air. Doing so may result in malfunction.
Avoid being near the unit during a disaster, such as an earthquake. Since the unit may turn over or fall and cause injury, quickly move away from the unit and go to a safe place.
Before moving this unit, be sure to turn off the power switch and disconnect all connection cables. Failure to observe this may damage the cables or cause you or someone else to trip and fall.
For proper installation of the outdoor antenna, make sure to have it done by the dealer from where you purchased the unit or by qualified service personnel. Failure to observe this may cause the installation to fall and result in injury. Installation requires special skills and experience.
Hearing loss
Do not use the unit/speakers or headphones for a long period of time at a high or uncomfortable volume level, since this can cause permanent hearing loss. If you experience any hearing loss or ringing in the ears, consult a physician.
Before connecting the unit to other devices, turn off the power for all devices. Also, before turning the power of all devices on or off, make sure that all volume levels are set to the minimum. Failing to do so may result in hearing loss, electric shock, or device damage.
When turning on the AC power in your audio system, always turn on the amplifier or receiver LAST, to avoid hearing loss and speaker damage. When turning the power off, the amplifier or receiver should be turned off FIRST for the same reason. Failure to observe the above may cause hearing impairment or speaker damage.
Maintenance
Remove the power plug from the AC outlet before cleaning the unit. Failure to observe this may cause electric shocks.
Handling caution
Do not insert your hand or fingers into the ventilation holes of this unit. Failure to observe this may cause injury.
Do not insert foreign materials such as metal or paper into the ventilation holes of this uniunit. Failure to observe this may cause a fire, electric shocks, or malfunctions. If foreign material gets into the unit, immediately shut off the power and pull the power plug from the AC outlet and request an inspection from the dealer where you purchased the unit or from qualified. Yamaha service personnel.
Do not do the following:
put heavy items on top of the equipment.
place the equipment in a stack.
apply unreasonable force to buttons, switches, input/output terminals, etc.
Avoid pulling the connected cables to prevent injuries or damage to the unit by causing it to fall.
Battery use
Always replace all batteries at the same time. Do not use new batteries together with old ones. Using new ones with old ones could cause a fire, burns, or inflammation due to fluid leaks.
Do not use batteries other than specified batteries. Doing so cause fire, burns, or inflammation due to leakage.
Do not mix battery types, such as alkaline batteries with manganese batteries, or batteries from different makers, or different types of batteries from the same maker, since this can cause a fire, burns, or inflammation due to fluid leaks.
Keep batteries away from children. A child could accidentally swallow a battery. Failure to observe this may also cause inflammation due to battery fluid leaks.
Do not put in a pocket or bag, carry, or store batteries together with pieces of metal. The battery could short, burst, or leak, causing a fire or injury.
Always make sure all batteries are inserted in conformity with the +/- polarity markings.
Failure to do so might result in a fire, burns, or inflammation due to fluid leaks.
When the batteries run out, or if the unit is not to be used for a long time remove the batteries from the remote control to prevent possible leakage of the battery fluid.
When storing or discarding batteries, insulate the terminal area by applying tape, or some other protection. Mixing them with other batteries or metal objects can cause a fire, burns, or inflammation due to fluid
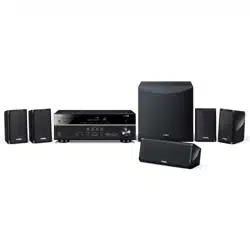
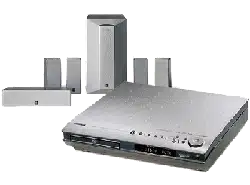
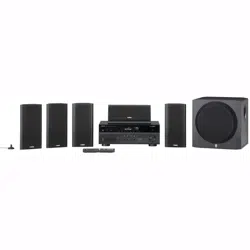
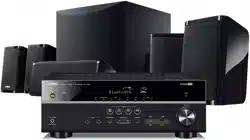
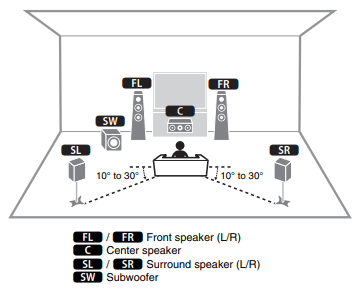
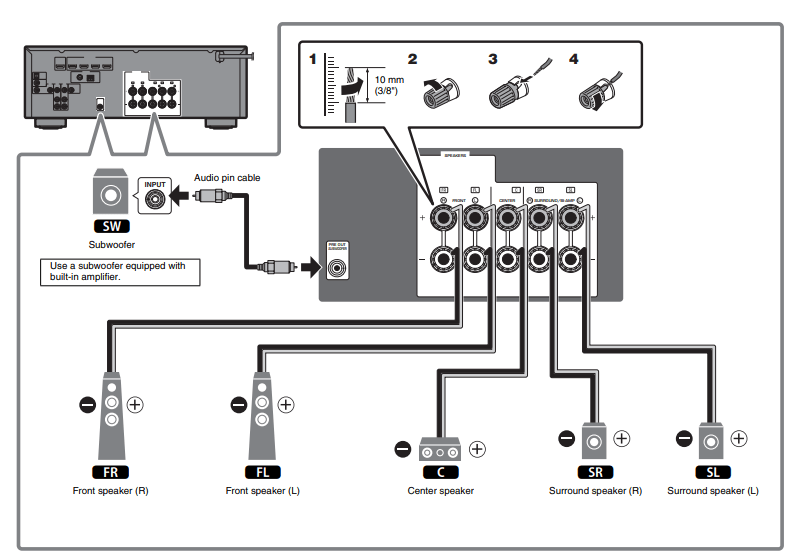
Connecting speakers/subwoofer
Positioning speakers
Use the diagram as a reference for positioning speakers.
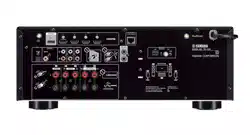
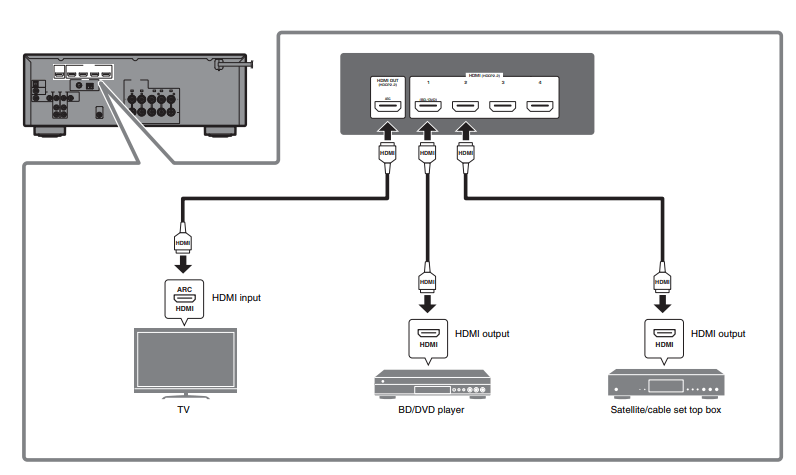
Connecting external devices
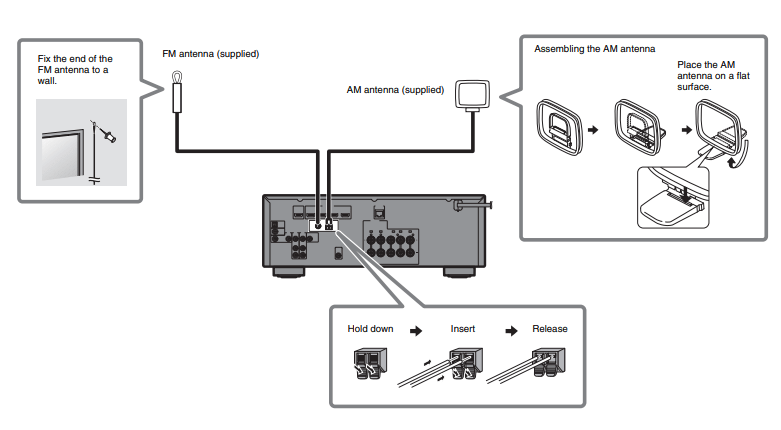
Connecting the FM/AM antennas
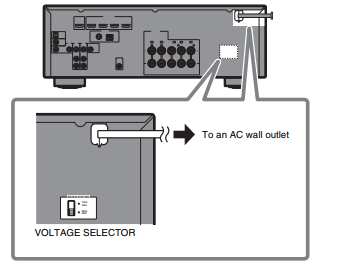
Connecting the power cable to an AC wall outlet, and turning on the unit
1 Plug the power cable into an AC wall outlet.
2 Press (receiver power) to turn on the unit.
3 Turn on the TV and switch the TV input to display video from the unit (HDMI OUT jack).
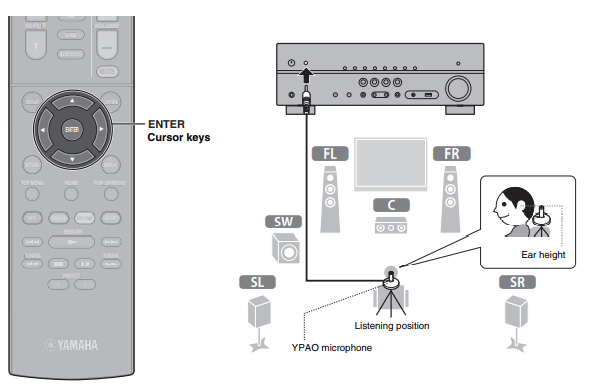
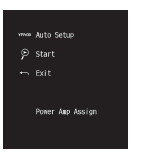
Optimizing the speaker settings automatically (YPAO)
The Yamaha Parametric room Acoustic Optimizer (YPAO) function detects speaker connections, measures the distances from them to your listening position(s), and then automatically optimizes the speaker settings, such as volume balance and acoustic parameters, to suit your room.
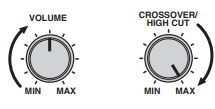
1 Turn on the subwoofer and set the volume to half. If the crossover frequency is adjustable, set it to maximum.
2 Place the YPAO microphone at your listening position and connect it to the YPAO MIC jack on the front panel. The screen below appears on the TV
Note Place the YPAO microphone at your listening position (same height as your ears). We recommend the use of a tripod as a microphone stand. You can use the tripod screws to stabilize the microphone.
3 Press ENTER.
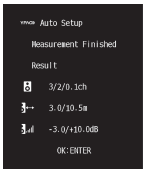
The measurement will start in 10 seconds. It takes about 3 minutes to measure. The screen below appears on the TV when the measurement finishes.
4 Confirm the results displayed on the screen and press ENTER.
5 Use the cursor keys () to select “SAVE” (Save) and press ENTER.
6 Disconnect the YPAO microphone from the unit
Playback
This section describes basic operations such as playing Blu-ray Discs and DVDs, and tuning into radio stations. Most operations can be performed using the remote control.
Basic playback functions
Playing a BD/DVD
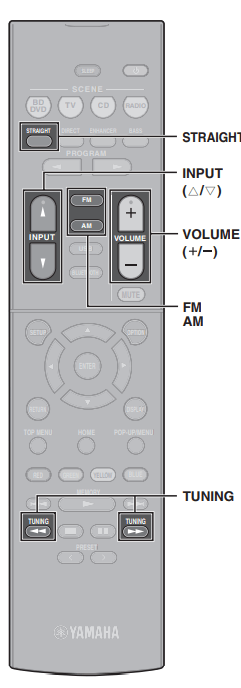
We recommend playing back multichannel audio (5.1-channel or more) to feel surround sound produced by the unit. 1 Turn on the BD/DVD player. 2 Press INPUT () repeatedly to select “HDMI 1”. The name of the connected device such as “BD player” may be displayed.
3 Start playback on the BD/DVD player. 4 Press STRAIGHT to select “STRAIGHT”. Note When “STRAIGHT” (straight decode) is enabled, each speaker produces each channel audio signal directly (without sound field processing). 5 Press VOLUME to adjust the volume. Note When sound is not heard, or no sound is output from a specific speaker, see “TROUBLESHOOTING” in the Owner’s Manual.
Listening to FM/AM radio
1 Press FM or AM to select “TUNER” as the input source.
2 Press TUNING to set a frequency. Hold down the key for about a second to search stations automatically.
“TUNED” lights up when the unit is receiving an FM/AM radio station signal. “STEREO” lights up when the unit is receiving a stereo FM radio signal.
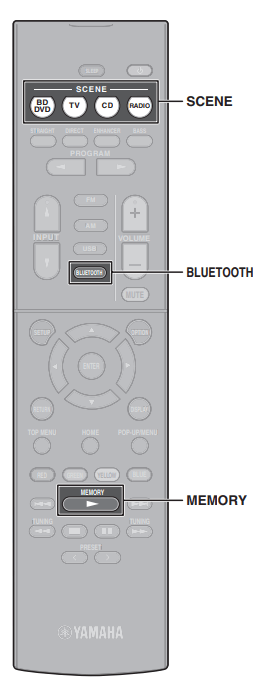
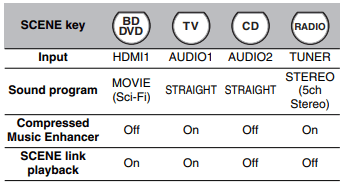
SCENE function
Unit input sources and settings that have been assigned to SCENE keys can be selected with a single touch (SCENE function). When a SCENE key is pressed, the unit turns on automatically if it is in standby mode. By default, the following settings have been assigned to each SCENE key.
Registering a scene
The settings assigned to each SCENE key by default can be changed to suit individual preferences.
1. Play an input source.
2. Apply settings for functions such as Sound programs and Compressed Music Enhancer.
3. Press and hold a SCENE key until “SET Complete” appears on the front display.
Playing music stored on a Bluetooth® device
1 Press BLUETOOTH to select “Bluetooth” as the input source.
2 Hold down MEMORY for more than 3 seconds. “Searching…” appears in the front display.
3 Turn on the BLUETOOTH function on your device, and select the model name of the unit from the BLUETOOTH device list on your device.
If the passkey is required, enter the number “0000”. When the connection is established, the indicator will glow in the front display.
4 Select a song and start playback on the Bluetooth device.
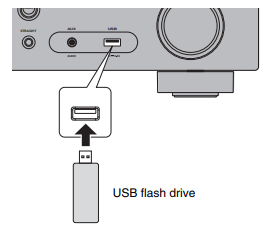
Playing music stored on a USB flash drive
1 Connect the USB flash drive to the USB jack.
2 Press USB to select “USB” as the input source.
The browse screen is displayed on the TV.
3 Use the cursor keys to select an item and press ENTER.
When a song is selected, playback starts and the playback screen is displayed.
Basic operation of the Option menu
This section explains basic operation of the Option menu. The Option menu can be used to configure the unit’s playback functions according to the input source.
1 Press OPTION.
The Option menu is also displayed on the TV screen.
2 Use the cursor keys to select an item and press ENTER.
3 Use the cursor keys to select a setting.
4 Press OPTION.
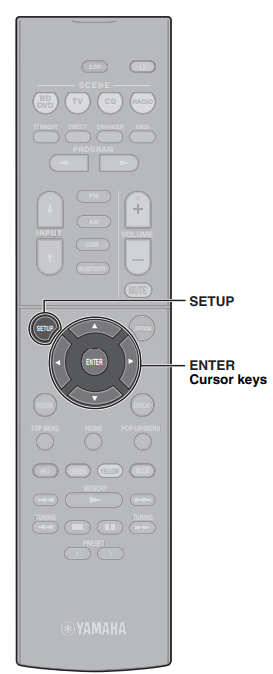
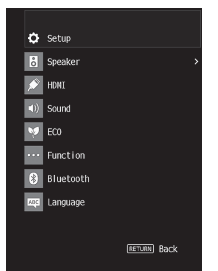
Basic operation of the Setup menu
This section explains basic operation of the Setup menu. The setup menu can be used to configure the unit’s functions in detail.
1 Press SETUP.
2 Use the cursor keys to select a menu and press ENTER.
3 Use the cursor keys to select an item and press ENTER.
4 Use the cursor keys to select a setting and press ENTER.
5 Press SETUP.
Troubleshooting
If trouble occurs, first check the following:
Make sure of the following when the unit does not function properly.
The power cables of the unit, TV and playback devices (such as BD/DVD players) are connected to AC wall outlets securely.
The unit, subwoofer, TV and playback devices (such as BD/DVD players) are turned on.
The connectors of each cable are securely inserted in to jacks on each device.
If there is no problem with the power and cables, refer to the instructions shown in the table below.
If the problem you are experiencing is not listed or if the instructions do not help, turn off the unit, disconnect the power cable, and contact the nearest authorized Yamaha dealer or service center.
The power does not turn on.
The protection circuitry has been activated three times consecutively. When the unit is in this condition, the standby indicator on the unit’s front panel blinks if you try to turn on the power.
As a safety precaution, capability to turn on the power is disabled. Contact your nearest Yamaha dealer or service center to request repair.
The power turns off (standby mode) immediately.
The unit was turned on while a speaker cable was shorted.
Twist the bare wires of each speaker cable firmly and reconnect to the unit and speakers (p. 10).
The unit is not reacting.
The internal microcomputer is frozen, due to an external electric shock (such as lightning or excessive static electricity) or to a drop in the power supply voltage.
Hold down on the unit’s front panel for more than 10 seconds to initialize and reboot the unit. (If the problem persists, disconnect the power cable from the AC wall outlet and plug it again.)
No sound.
Another input source is selected.
Select an appropriate input source with the input selection keys.
Signals that the unit cannot reproduce are being input.
Some digital audio formats cannot be played back on the unit. To check the audio format of the input signal, use “Signal Info.” in the “Option” menu (p. 20). For details, see “Checking information about the video/audio signals” in the Owner’s Manual
No sound is coming from a specific speaker.
The playback source does not contain a signal for the channel.
Use “Signal Info.” in the “Option” menu (p. 20) to check the audio signal. For details, see “Checking information about the video/audio signals” in the Owner’s Manual.
The currently selected sound program/decoder does not use the speaker.
Use “Test Tone” in the “Setup” menu (p. 21) to check the speaker output. For details, see “Outputting test tones” in the Owner’s Manual.
Audio output of the speaker is disabled.
Perform YPAO (p. 15).
Use “Configuration” in the “Setup” menu to change the speaker settings. For details, see “Configuring the speaker settings” in the Owner’s Manual.
No sound is coming from the subwoofer.
The playback source does not contain LFE or low frequency signals.
Enable the Extra Bass function using the BASS key (p. 17).
Subwoofer output is disabled.
Perform YPAO (p. 15).
Set “Subwoofer” in the “Setup” menu to “Use” (p. 21). For details, see “Setting the use of a subwoofer” in the Owner’s Manual.
No video.
Another input source is selected on the unit.
Select an appropriate input source with the input selection keys.
Another input source is selected on the TV.
Switch the TV input to display the video from the unit.
No video from the playback device connected to the unit with HDMI.
The input video signal (resolution) is not supported by the unit.
To check the information about the current video signal (resolution), see “Checking information about the video/audio signals” in the Owner’s Manual. For information about video signals supported by the unit, see “HDMI signal compatibility” in the Owner’s Manual.
The TV does not support HDCP (High-bandwidth Digital Content Protection).
Refer to the instruction manuals for the TV and check the TV’s specifications. If you want to play back contents that require HDCP 2.2-compatible devices, both the TV and playback device must support HDCP 2.2.
#1 I get netflix picture. But the sound is my local cable channel still why?
Use the HDMI inputs on the receiver for both the DVR as well as your streaming device. If you're using a smart TV instead of a streaming device, then use the HDMI input on the TV and use optical or the RCA outputs on the TV to the receiver. Otherwise, it's your TV that has an issue.
The Yamaha AV Receiver is not able to connect to a wireless subwoofer. However, we sell the SVS SoundPath Wireless Audio Adapter. It is two "boxes", one for transmitting the subwoofer signal from the receiver sub out to the receiver located at the subwoofer input. The adapter will work with any powered subwoofer. It is recommended that you disconnect the Yamaha wired subwoofer.
 (receiver power) to turn on the unit.
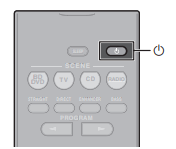
 ) to select “SAVE” (Save) and press ENTER.
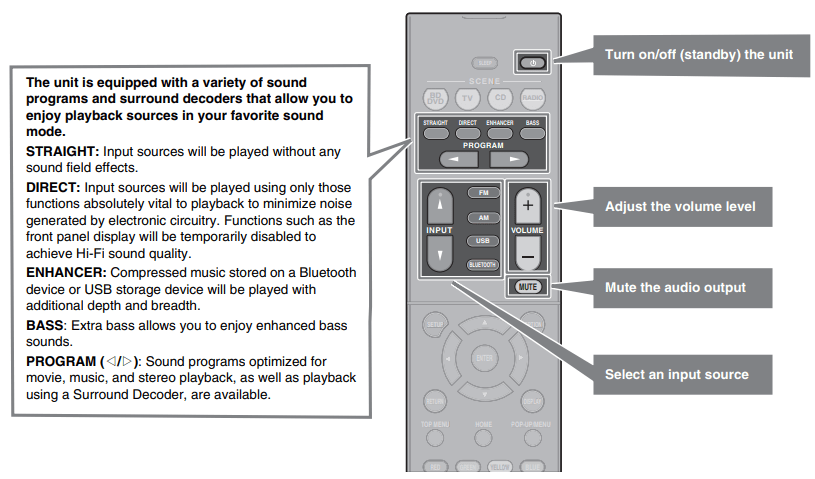
 ) repeatedly to select “HDMI 1”.
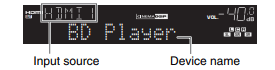

 indicator will glow in the front display.
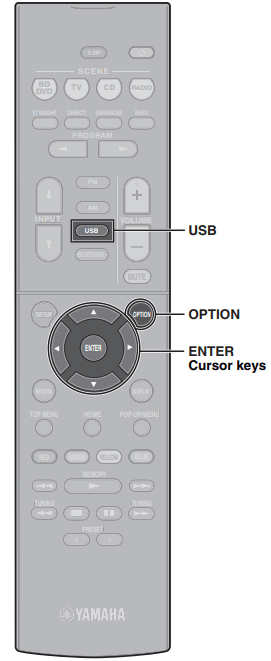

 on the unit’s front panel for more than 10 seconds to initialize and reboot the unit. (If the problem persists, disconnect the power cable from the AC wall outlet and plug it again.)