Yamaha VX-C 2019 WaveRunner
Product's Documents
Below are documents related to this product, you can read online or download:
- Owner's manual - (English) Read Online | Download pdf
Read the following labels before using this watercraft. If have any questions, consult a Yamaha dealer.
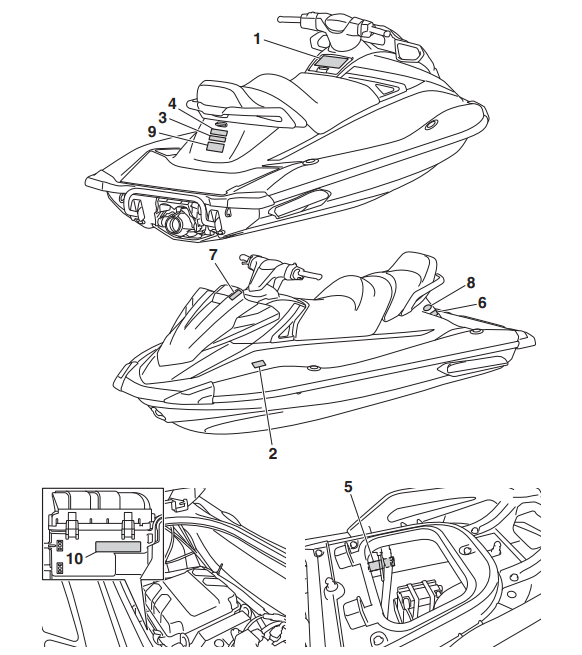
Exterior
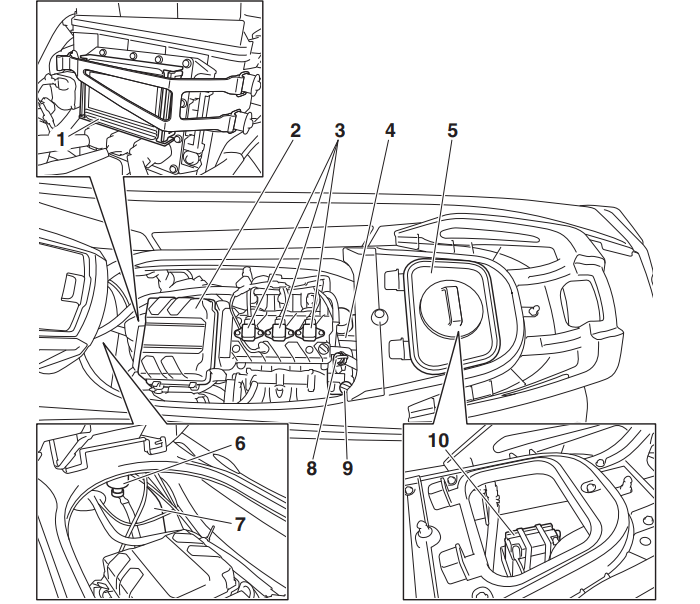
Engine compartment
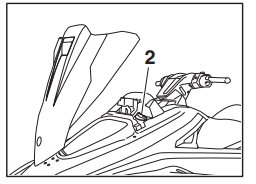
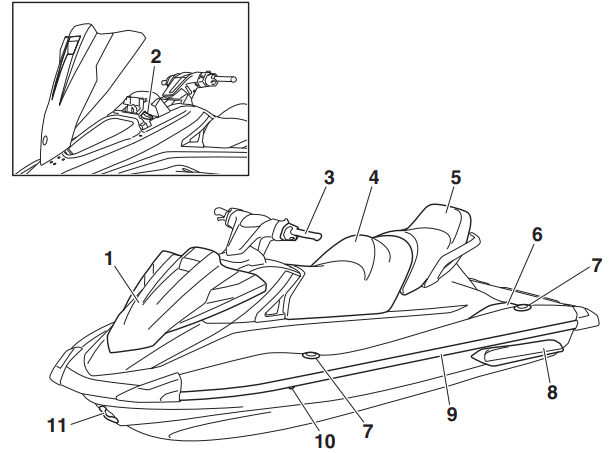
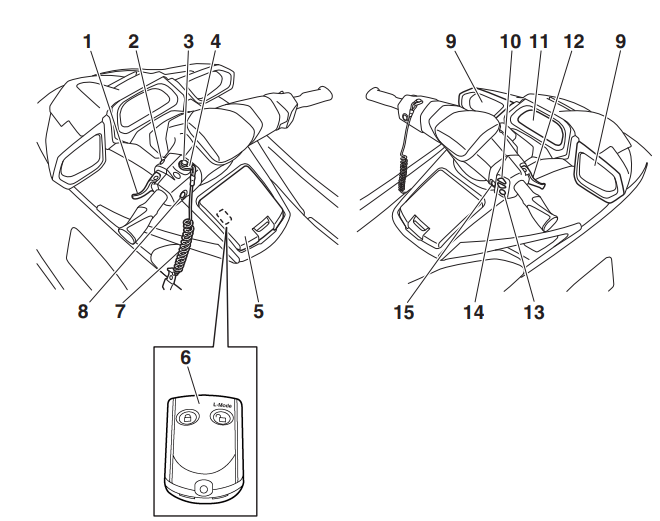
EJU31026 Watercraft control functions
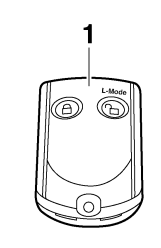
EJU43910 Remote control transmitter (VX Deluxe / VX Cruiser / VX Limited)
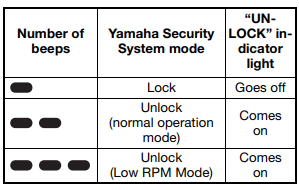
EJU31385 Yamaha Security System (VX Deluxe / VX Cruiser / VX Limited)
TIP: The Yamaha Security System settings can only be selected while the engine is stopped.
EJU36776 Yamaha Security System settings
TIP:
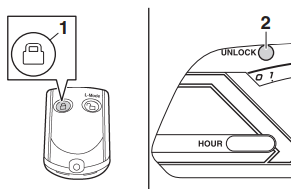
To select the lock mode:
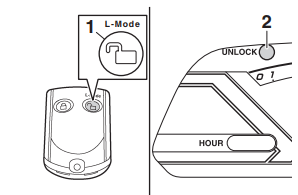
To select the unlock mode: Push the “L-Mode” (unlock) button on the remote control transmitter briefly. The beeper sounds two or three times and the “UNLOCK” indicator light blinks two or three times, then comes on. This indicates the unlock mode is selected
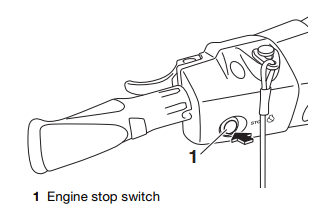
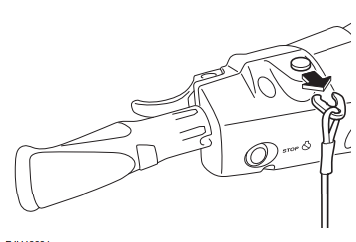
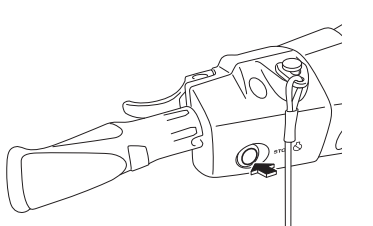
EJU31153 Engine stop switch “ ”
”
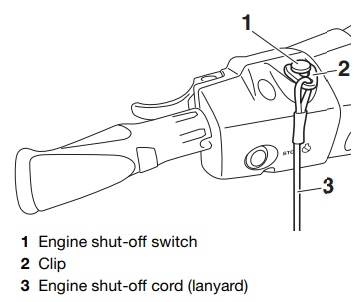
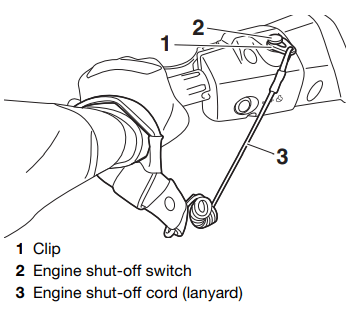
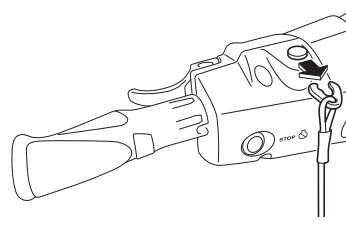
EJU31164 Engine shut-off switch “ ”
”
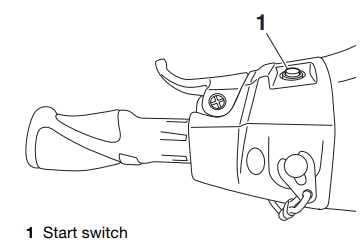
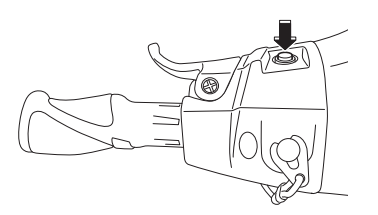
EJU43631 Start switch “ ”
”
The engine will not start under any of the following conditions:
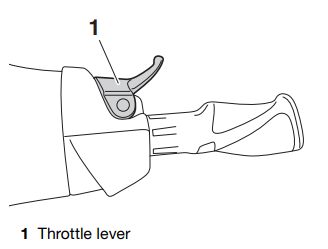
EJU31212 Throttle lever
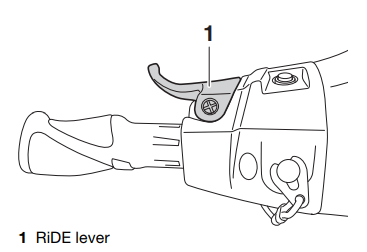
EJU43342 RiDE lever (VX / VX Deluxe / VX Cruiser / VX Limited)
EJU31262 Steering system
EJU35975 Cooling water pilot outlet
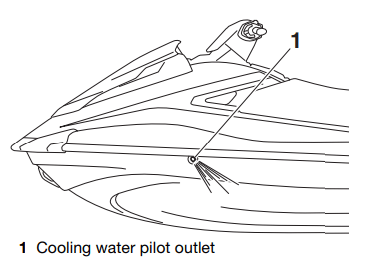
TIP:
EJU40323 Water separator
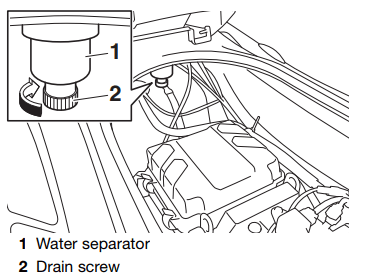
To drain water from the water separator:
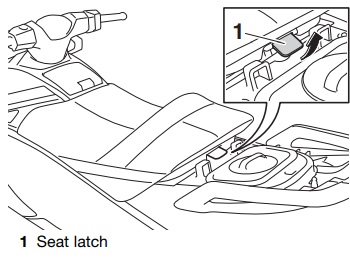
Seats
The front and rear seats are removable. Remove the seats to access the engine compartment and removable watertight storage compartment.
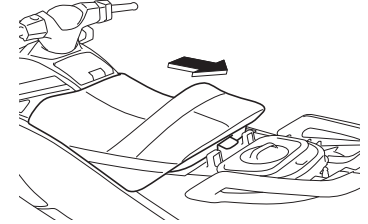
To remove the rear seat:
(1) Pull the rear seat latch up, and then lift up the rear of the seat.
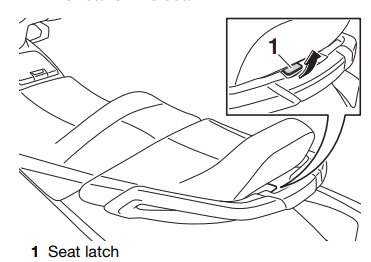
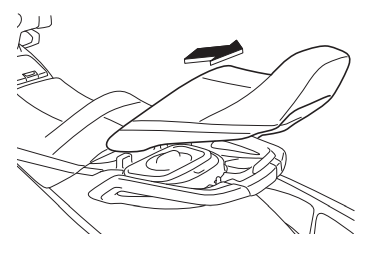
(2) Pull the seat rearward and remove it.
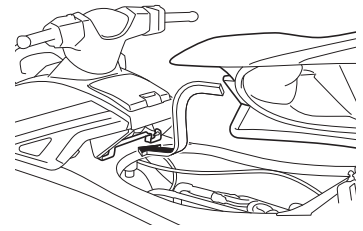
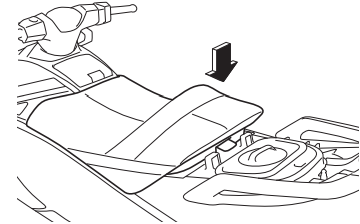
To install the rear seat:
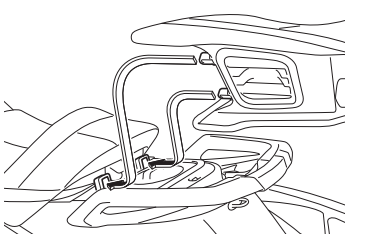
(1) Insert the projections on the front of the seat into the stays on the deck.
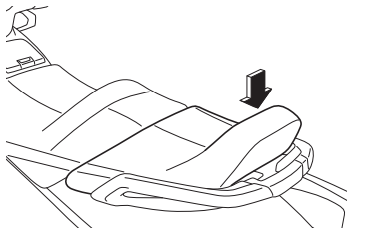
(2) Push the rear of the seat down to securely lock it in place.
To remove the front seat:
(1) Remove the rear seat.
(2) Pull the front seat latch up, and then lift up the rear of the seat.
(3) Pull the seat rearward and remove it
To install the front seat:
(1) Insert the projection on the front of the seat into the stay on the deck.
(2) Push the rear of the seat down to securely lock it in place.
(3) Securely install the rear seat in its original position.
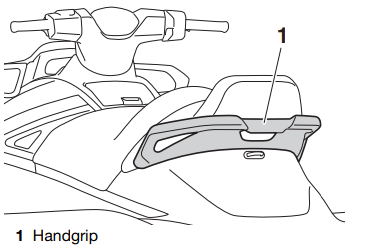
Handgrip
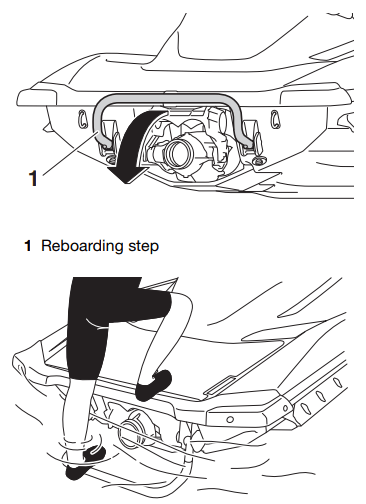
Reboarding step (VX / VX Deluxe / VX Cruiser / VX Limited)
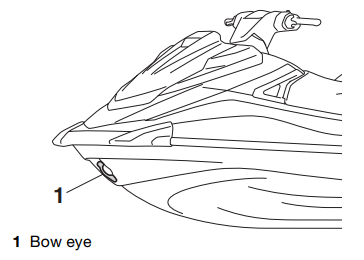
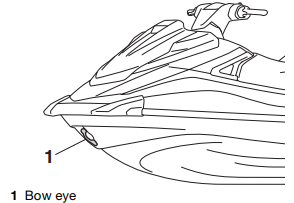
Bow eye
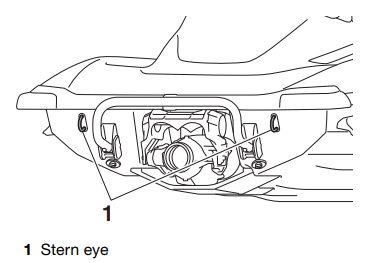
Stern eyes
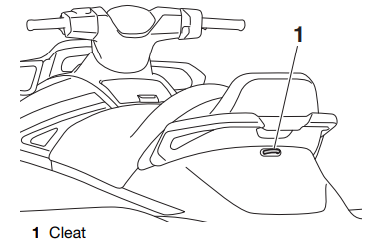
Cleat
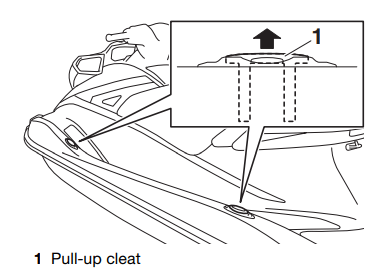
Pull-up cleats (VX Limited)
Storage compartments
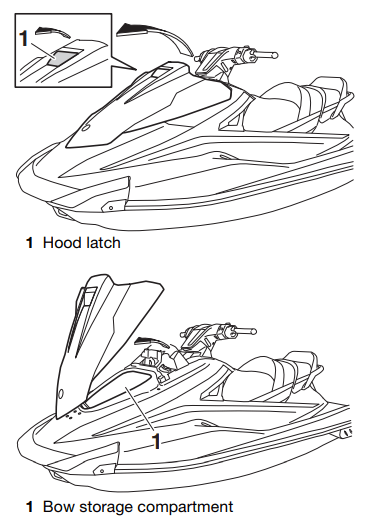
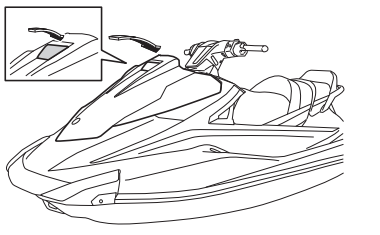
Bow storage compartment
The bow storage compartment is located under the hood.
To open the bow storage compartment:
To close the bow storage compartment:
To drain water from the bow storage compartment:
(1) Remove the drain plug on the bottom of the storage compartment to drain the water into the engine compartment.
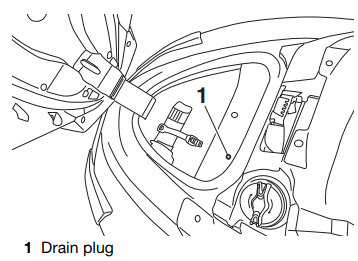
(2) Securely install the drain plug in its original position.
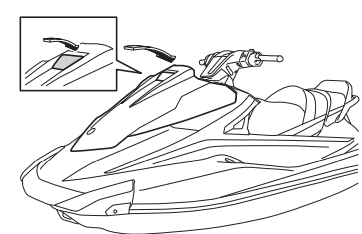
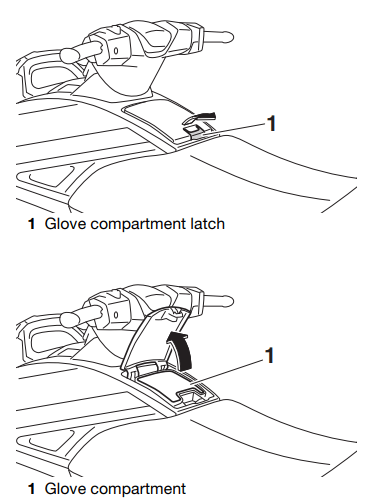
Glove compartment
To open the glove compartment:
Pull the glove compartment latch up, and then lift up the lid.
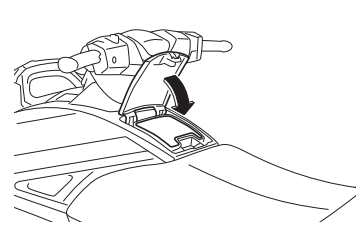
To close the glove compartment:
Push the lid down to securely lock it in place
Removable watertight storage compartment
The removable watertight storage compartment is located under the rear seat. The compartment is watertight when the cap is closed securely.
To open the removable watertight storage compartment:
(1) Remove the rear seat. (See page 49 for seat removal and installation procedures.)
(2) Loosen the cap and remove it.
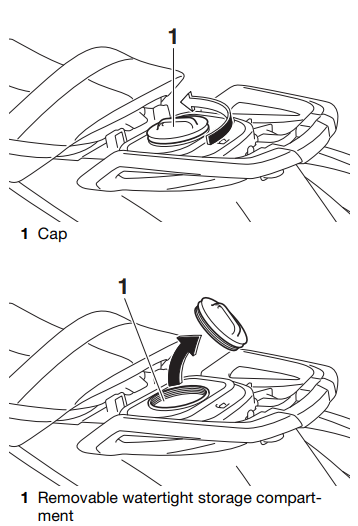
To close the removable watertight storage compartment:
(1) Securely install the cap by tightening it until it stops.
(2) Securely install the rear seat in its original position.
Fire extinguisher holder and cover
The fire extinguisher holder and cover are located in the bow storage compartment.
To use the fire extinguisher holder and cover:
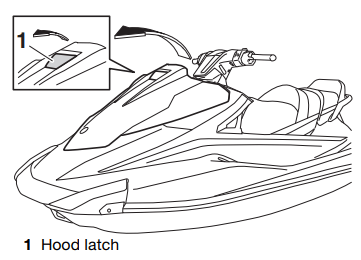
(1) Pull the hood latch up, and then lift up the rear of the hood.
(2) Unhook the band and remove the fire extinguisher from the fire extinguisher cover
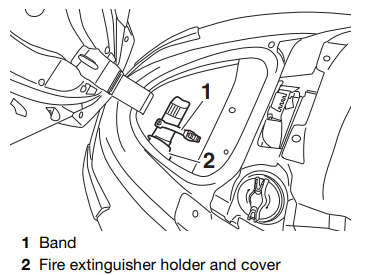
(3) Place the fire extinguisher in the fire extinguisher cover, and then securely fasten the fire extinguisher with the band.
(4) Return the hood to its original position, and then push the hood latch down to securely lock it in place. Make sure that the hood is securely closed before using the watercraft.
Engine break-in
NOTICE: Failure to perform the engine break-in could result in reduced engine life or even severe engine damage.
The engine break-in is essential to allow the various components of the engine to wear and polish themselves to the correct operating clearances. This ensures proper performance and promotes longer component life.
To perform the engine break-in:
After the engine break-in is complete, the watercraft can be operated normally.
WARNING: Before operating your watercraft, become familiar with all of the controls. Consult a Yamaha dealer about any control or function that you do not fully understand. Failure to understand how the controls work could cause an accident or prevent you from avoiding an accident.
Getting to know your watercraft
Learning to operate your watercraft
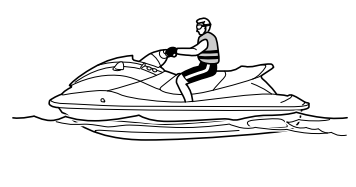
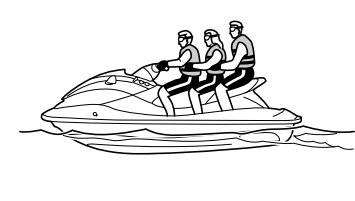
Riding position
Launching the watercraft
Starting the engine on water
WARNING: Do not apply throttle when anyone is at the rear of the watercraft. Turn the engine off or keep it at idle. Water and debris exiting the jet thrust nozzle can cause severe injury.
To start the engine:
(1) VX Deluxe / VX Cruiser / VX Limited: If the lock mode is selected for the Yamaha Security System setting, select the unlock mode. (See page 32 for Yamaha Security System setting procedures.)
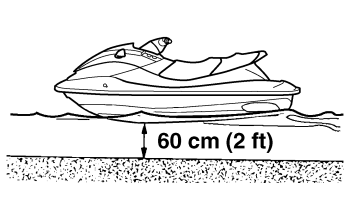
(2) Move the watercraft to an area that is free from weeds and debris, and has a water depth of at least 60 cm (2 ft) from the bottom of the watercraft. NOTICE: Never run the engine in water that is less than 60 cm (2 ft) deep from the bottom of the watercraft, otherwise pebbles or sand could be sucked into the jet intake, causing impeller damage and engine overheating. [ECJ00473]
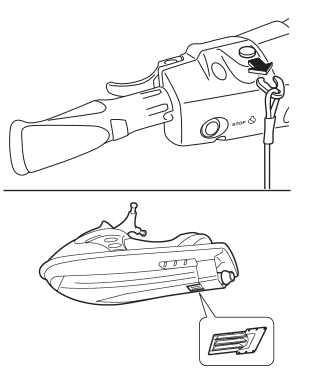
(3) Attach the engine shut-off cord (lanyard) to your left wrist, and then attach the clip to the engine shut-off switch. (See page 33 for information on operating the engine shut-off switch.) WARNING! Check that the engine shut-off cord (lanyard) is attached correctly. If the engine shut-off cord (lanyard) is not attached correctly, it may not pull free when the operator falls off, allowing the watercraft to continue to run and cause an accident. [EWJ00582]
(4) With the throttle lever released, push the start switch (green button) to start the engine. (See page 33 for information on operating the start switch.)
Stopping the engine
Leaving the watercraft
Operating the watercraft VX-C:
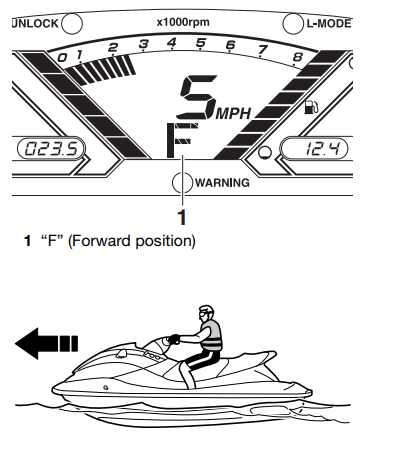
When the engine is running, the watercraft will move forward at trolling speed even if the throttle lever is in the fully closed (idle) position.

VX / VX Deluxe / VX Cruiser / VX Limited: When the throttle lever is squeezed, the “F” (forward) shift indicator will be displayed and the watercraft will move forward. While the “F” (forward) shift indicator is displayed, the watercraft will move forward at trolling speed even if the throttle lever is in the fully closed (idle) position. (See page 37 for shift system operation procedures.)
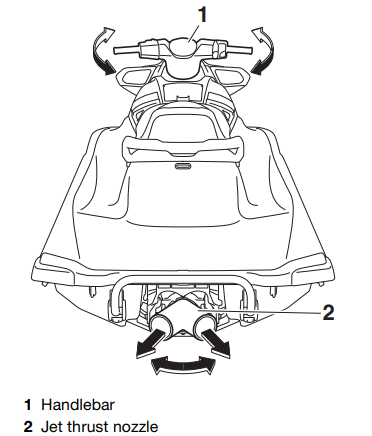
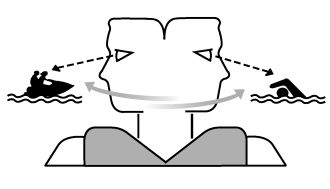
Turning the watercraft
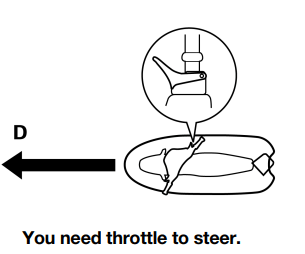
Steering control depends on the combination of handlebar position and the amount of throttle.
Water sucked in through the intake grate is pressurized by the impeller in the jet pump. As the pressurized water is expelled from the pump through the jet thrust nozzle, it creates thrust to move and steer the watercraft. The higher the engine speed, the more thrust produced.
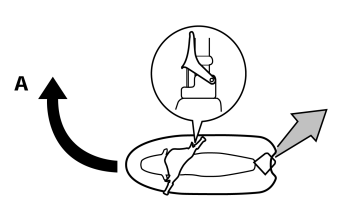
The amount of jet thrust, in addition to the position of the handlebars, determines how sharply you turn.
A. More throttle produces higher thrust, so the watercraft will turn more sharply.
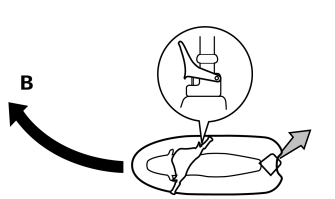
B. Less throttle produces lower thrust, so the watercraft will turn more gradually
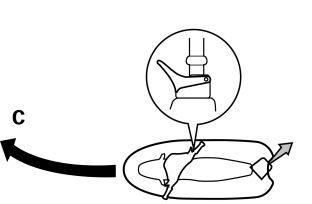
C. Releasing the throttle lever completely produces only minimum thrust. If you are traveling at speeds above trolling, you will have rapidly decreasing ability to steer without throttle. You may still have some turning ability immediately after releasing the throttle lever, but once the engine slows down, the watercraft will no longer respond to handlebar input until you apply throttle again or you reach trolling speed.
At trolling speed, the watercraft can be turned gradually by handlebar position alone using just the amount of thrust available at idle
D. If the engine is stopped while riding, there is no thrust. The watercraft will go straight even though the handlebars are turned.
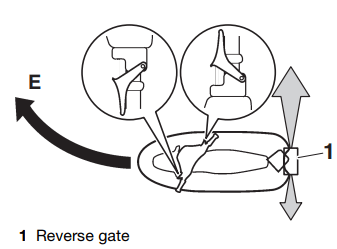
E. VX / VX Deluxe / VX Cruiser / VX Limited: If the RiDE lever is squeezed and the handlebars are turned when the watercraft is cruising at planing speed, the watercraft will turn gradually while slowing down.
This model is equipped with the Yamaha Engine Management System (YEMS) that includes an off-throttle steering (OTS) system. It will activate at planing speeds should you attempt to steer the watercraft after releasing the throttle lever (see condition C above). The OTS system assists in turning by continuing to supply some thrust while the watercraft is decelerating, but you can turn more sharply if you apply throttle while turning the handlebars. The OTS system does not function below planing speeds or when the engine is off. Once the engine slows down, the watercraft will no longer turn in response to handlebar input until you apply throttle again or you reach trolling speed.
Flushing the cooling water passages
Flush the cooling water passages to prevent them from clogging with salt, sand, or dirt.
(1) Place the watercraft in a horizontal position.
(2) Remove the seats and removable watertight storage compartment. (See page 49 for seat removal and installation procedures and page 54 for information on the removable watertight storage compartment.)
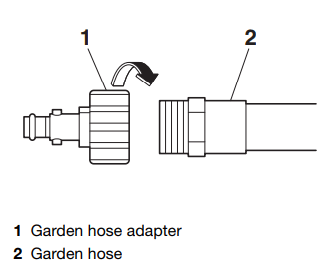
(3) Connect the garden hose adapter to a garden hose.
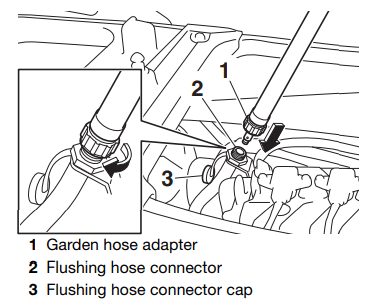
(4) Loosen the flushing hose connector cap and remove it. Insert the garden hose adapter into the flushing hose connector by pushing and twisting it until it is securely connected.
(5) Connect the garden hose to a water tap.
(6) Make sure that the area around the watercraft is clear, and then start the engine. Immediately after the engine starts, fully turn the water supply on so that water flows out continually from the jet thrust nozzle.
(7) Run the engine at idling speed for about 3 minutes watching the engine condition. If the engine stops while flushing, turn the water supply off immediately and perform the procedure again from step 6. NOTICE: Do not supply water to the cooling water passages when the engine is not running. The water could flow back through the muffler into the engine, causing severe engine damage. [ECJ00123]
(8) Turn the water supply off.
(9) Discharge the remaining water out of the cooling water passages by alternately squeezing and releasing the throttle lever quickly for 10 to 15 seconds.
(10) Stop the engine.
(11) Remove the garden hose adapter, and then securely install the flushing hose connector cap by tightening it until it stops.
(12) Securely install the removable watertight storage compartment and seats in their original positions
Cleaning the watercraft
(1) Remove the seats. (See page 49 for seat removal and installation procedures.)
(2) If the watercraft will be stored for a week or more, rustproof the internal engine components to help prevent corrosion. (See page 90 for information on rustproofing the internal engine components.)
(3) Rinse the engine and engine compartment with a small amount of water. NOTICE: Do not use high-pressure water when rinsing the engine or engine compartment as severe engine damage could result. [ECJ00572]
(4) Drain the water from the engine compartment. (See page 60 for information on draining the bilge water.)
(5) Wipe the engine and engine compartment with a dry cloth.
(6) Wash down the hull, deck, and jet pump with fresh water.
(7) Wipe the hull, deck, and jet pump with a dry cloth.
(8) Wipe all vinyl and rubber components, such as the seats and engine compartment seals, with a vinyl protectant such as Yamaclean Vinyl Dressing™.
(9) To minimize corrosion, spray metallic parts of the hull, deck, and engine with a rust inhibitor such as Yamalube Silicone Protectant & Lubricant.
(10) Allow the engine compartment to air dry completely before installing the seats.
(11) Securely install the seats in their original positions.
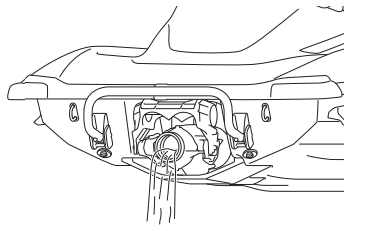
Battery care
To remove the battery:
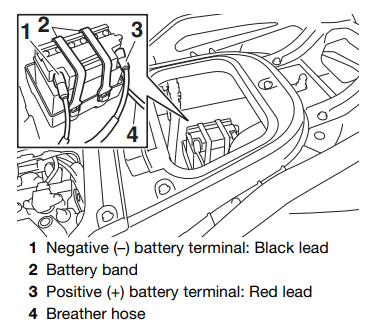
Checking the battery
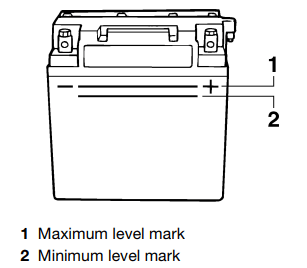
Checking the electrolyte level
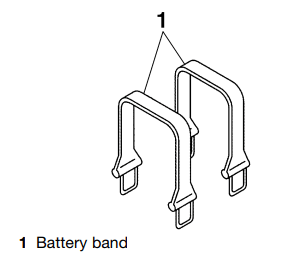
Checking the battery bands
Make sure that the battery bands are not damaged.
To store the battery:
(1) Clean the battery case using fresh water.
(2) If the battery terminals are dirty or corroded, clean them using a wire brush.
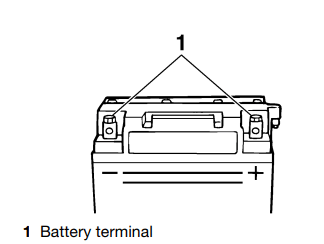
(3) Apply water-resistant grease to the battery terminals.
(4) Store the battery in a cool, dry place. NOTICE: Storing the battery in an uncharged condition can cause permanent battery damage. Check the battery periodically. [ECJ00103]
To install the battery:
WARNING: Always place the watercraft upright in a horizontal position when storing it, otherwise fuel could leak out into the engine or engine compartment, which could create a fire hazard
Storage for long periods of time, such as winter storage, requires preventive maintenance to ensure against deterioration. It is advisable to have the watercraft serviced by a Yamaha dealer prior to storage.
However, the following procedures can be performed easily by the owner.
Cleaning
(1) Flush the cooling water passages. (See page 86 for information on flushing the cooling water passages.
TIP: If you will be storing the watercraft for a prolonged period, such as winter storage, top off the fuel tank with fresh gasoline and add one ounce of Yamalube Fuel Stabilizer & Conditioner Plus to each gallon of fuel in the fuel tank before starting the engine.
(2) Clean the watercraft. (See page 87 for information on cleaning the watercraft.) Wax the hull with a non-abrasive wax such as Yamalube Professional Polish.
Lubrication
To keep moving parts sliding or rotating smoothly, lubricate them with water-resistant grease.
Recommended water-resistant grease: YAMALUBE MARINE GREASE

TIP: Disconnect the shift rod from the ball joint before lubricating.
Rustproofing
Rustproofing the hull, deck, and engine Spray metallic parts of the hull, deck, and engine with a rust inhibitor such as Yamalube Silicone Protectant & Lubricant.
Rustproofing the internal engine components Rustproof the internal engine components with a rust inhibitor such as Yamalube StorRite Engine Fogging Oil.
To rustproof the internal engine components:
(1) Remove the seats. (See page 49 for seat removal and installation procedures.)
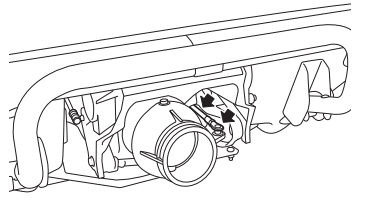
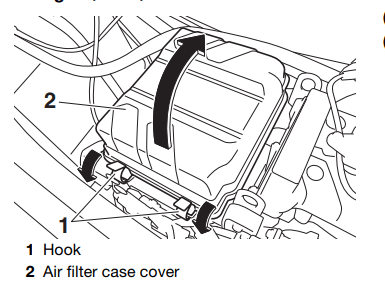
(2) Release the hooks on the port side of the air filter case, and then lift up the air filter case cover. NOTICE: Do not lift up the air filter case cover forcefully. Otherwise, the fuel hose that is secured to the air filter case cover could be damaged. [ECJ02620]
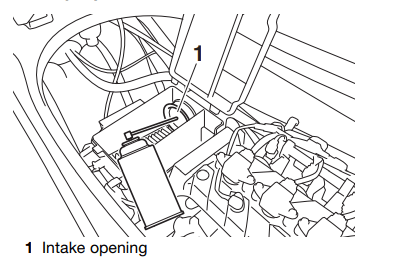
(3) Spray a rust inhibitor such as Yamalube Stor-Rite Engine Fogging Oil into the intake opening for 3 seconds. WARNING! Do not spray flammable rust inhibitor products on engine surfaces while the engine is hot. The sprayed substance or propellants could catch fire. [EWJ00262]
(4) Place the air filter case cover in its original position, and then fit the hooks onto the cover.
TIP: Make sure that the air filter case cover is securely installed.
(5) Make sure that the area around the watercraft is clear, and then start the engine in a well-ventilated area and let it run at idle for 15 seconds. (See page 33 for information on starting the engine.)
(6) Stop the engine.
(7) Securely install the seats in their original positions.
WARNING: Be sure to turn off the engine when you perform maintenance unless otherwise specified. If you are not familiar with machine servicing, this work should be done by a Yamaha dealer or other qualified mechanic.
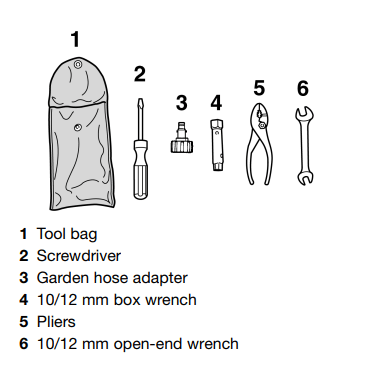
Tool kit
Periodic maintenance chart
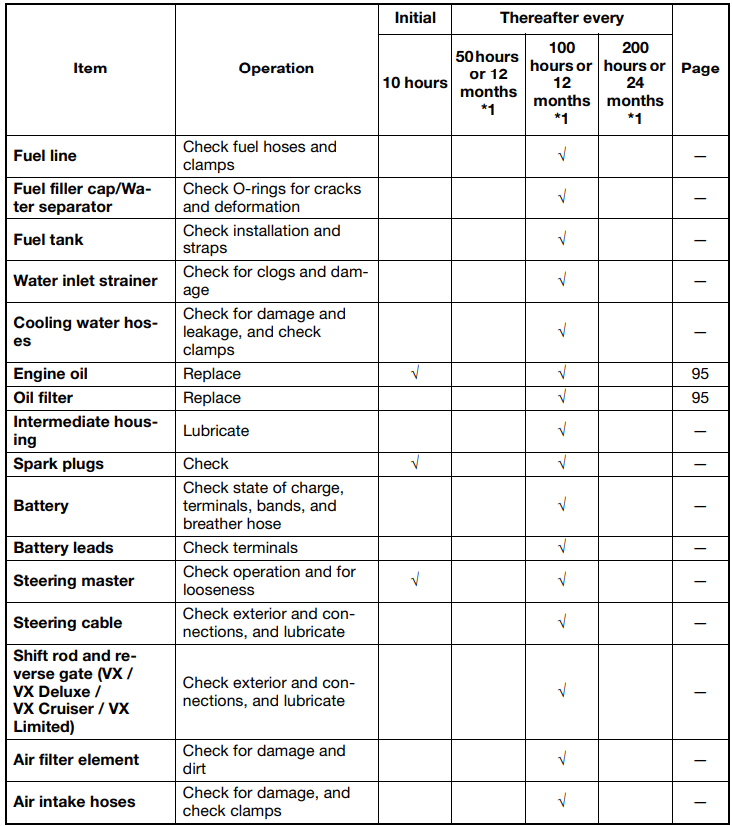
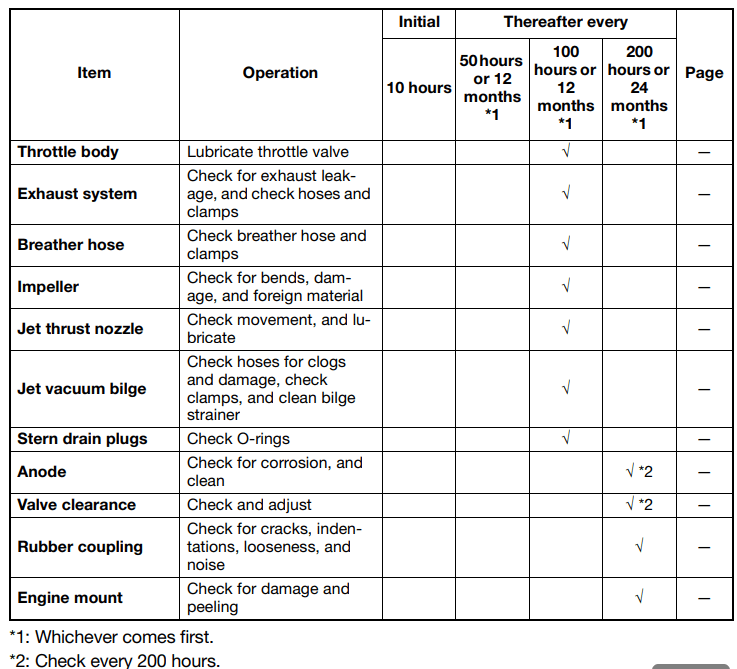
Perform the pre-operation checks and post-operation checks before performing periodic maintenance.
Engine oil and oil filter
WARNING: Engine oil is extremely hot immediately after the engine is turned off. Coming in contact with or getting any engine oil on your clothes could result in burns.
NOTICE: Do not run the engine with too much or not enough oil in the engine, otherwise the engine could be damaged.
If you have any trouble with your watercraft, use the troubleshooting chart to check for the possible cause.
If you cannot find the cause, consult a Yamaha dealer.
Troubleshooting chart
Confirm the possible cause and remedy, and then refer to the applicable page.
TROUBLE | POSSIBLE CAUSE | REMEDY | PAGE | |
| Engine does not start (Starter motor does not turn over) | Yamaha Security System (VX Deluxe / VX Cruiser / VX Limited) | Lock mode selected | Select unlock mode | 32 |
| Engine shutoff switch | Clip not in place | Install clip | 33 | |
| Fuse | Burned out | Have serviced by Yamaha dealer | - | |
| Battery | Run down | Recharge | 87 | |
| Poor terminal connections | Tighten as required | 87 | ||
| Terminal corroded | Clean or replace | 87 | ||
| Starter moto | Faulty | Have serviced by Yamaha dealer | - | |
| Engine does not start (Starter motor turns over) | Throttle lever | Squeezed | Release | 33 |
| Faulty | Have serviced by Yamaha dealer | - | ||
| Fuel | Fuel tank empty | Refill as soon as possible | 56 | |
| Stale or contaminated | Have serviced by Yamaha dealer | - | ||
| Fuel tank | Water or dirt present | Have serviced by Yamaha dealer | - | |
| Spark plug | Fouled or defective | Have serviced by Yamaha dealer | - | |
| Fuel injection system | Fuel pump faulty | Have serviced by Yamaha dealer | - | |
| Engine runs irregularly or stalls | Fuel | Fuel tank empty | Refill as soon as possible | 56 |
| Stale or contaminated | Have serviced by Yamaha deale | - | ||
| Fuel tank | Water or dirt present | Have serviced by Yamaha deale | - | |
| Spark plug | Fouled or defective | Have serviced by Yamaha deale | - | |
| Incorrect heat range | Have serviced by Yamaha deale | - | ||
| Gap incorrect | Have serviced by Yamaha deale | - | ||
| Electrical wiring | Loose connection | Have serviced by Yamaha deale | - | |
| Fuel injection system | Faulty or clogged injectors | Have serviced by Yamaha deale | - | |
| Warning light or indicator blinks or comes on | Fuel level warning | Fuel tank empty | Refill as soon as possible | 56 |
| Oil pressure warning | Oil pressure dropped | Have serviced by Yamaha dealer | 46 | |
| Engine overheat warning | Jet intake clogged | Clean | 100 | |
| Check engine warning | Faulty sensors | Have serviced by Yamaha dealer | 47 | |
| Watercraft slow or loses power | Watercraft operation mode (VX Deluxe / VX Cruiser / VX Limited) | Low RPM Mode activated | Deactivate Low RPM Mode | 39 |
| Cavitation | Jet intake clogged | Clean | 100 | |
| Impeller damaged or worn | Have serviced by Yamaha dealer | 100 | ||
| Engine overheat warning | Engine speed reduction control activated | Clean jet intake and cool engine | 46 | |
| Oil pressure warning | Engine speed reduction control activated | Add oil | 46 | |
| Spark plug | Fouled or defective | Have serviced by Yamaha dealer | - | |
| Incorrect heat range | Have serviced by Yamaha dealer | - | ||
| Gap incorrect | Have serviced by Yamaha dealer | - | ||
| Electrical wiring | Loose connection | Have serviced by Yamaha dealer | - | |
| Fuel | Stale or contaminated | Have serviced by Yamaha dealer | - | |
| Air filter | Clogged | Have serviced by Yamaha dealer | - | |
| Oil buildup | Have serviced by Yamaha dealer | - | ||
| Throttle lever | Faulty | Have serviced by Yamaha dealer | - | |
Cleaning the jet intake and impeller
WARNING: Before attempting to remove weeds or debris from the jet intake or impeller area, shut the engine off and remove the clip from the engine shut-off switch. Severe injury or death could result from coming in contact with the rotating parts of the jet pump.
NOTICE: If weeds or debris gets caught in the jet intake, do not operate the watercraft above trolling speed until they have been removed. [ECJ00654]
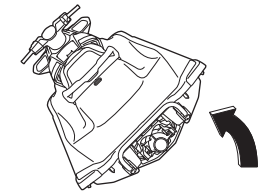
(1) Place a suitable clean cloth or carpeting underneath the watercraft to protect it from abrasions and scratches. Turn the watercraft on its side as shown. NOTICE: When turning the watercraft on its side, support the bow so that the handlebars are not bent or damaged. [ECJ02690]
(2) Remove any weeds or debris from around the jet intake, drive shaft, impeller, jet pump housing, and jet thrust nozzle. If debris is difficult to remove, consult a Yamaha dealer.
Raising the reverse gate (VX / VX Deluxe / VX Cruiser / VX Limited)
To raise the reverse gate:
(1) Stop the engine and remove the clip from the engine shut-off switch.
(2) Enter the water and move to the rear of the watercraft.
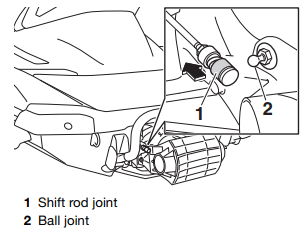
(3) Slide the shift rod joint toward the bow, and then disconnect the shift rod joint from the ball joint.
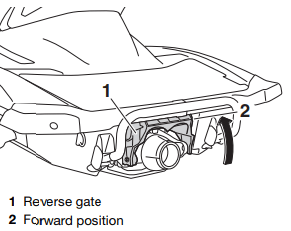
(4) Raise the reverse gate to the forward position.
TIP:
Jumping the battery
If the watercraft battery has run down, the engine can be started using a 12-volt booster battery and jumper cables.
Connecting the jumper cables
WARNING: To avoid battery explosion and serious damage to the electrical system:
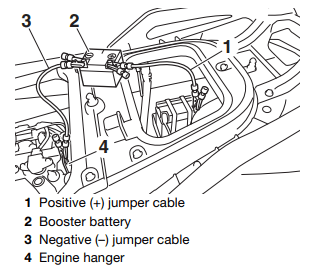
(1) Connect the positive (+) jumper cable to the positive (+) battery terminals of both batteries.
(2) Connect one end of the negative (–) jumper cable to the negative (–) battery terminal of the booster battery.
(3) Connect the other end of the negative (–) jumper cable to an engine hanger
4) Start the engine, and then disconnect the jumper cables by reversing the steps above. (See page 33 for information on starting the engine.)
Towing the watercraft
WARNING
If the watercraft becomes inoperative in the water, it can be towed to shore.
To tow the watercraft:
Use a towline that is three times the combined length of the towing boat and the watercraft.
(1) Securely attach the towline to the bow eye of the watercraft being towed.
(2) Sit astride the seat and hold on to the handlebars in order to balance the watercraft. NOTICE: The bow must be kept up out of the water during towing, otherwise water could flood the engine compartment or water could flow back into the engine, causing severe engine damage. [ECJ01331]
Tow the watercraft at 8 km/h (5 mph) or less.
NOTICE: Tow the watercraft at 8 km/h (5 mph) or less, otherwise water could flood the engine compartment or water could flow back into the engine, causing severe engine damage. [ECJ01322]
Submerged watercraft
If the watercraft is submerged or flooded with water, drain the bilge water from the engine compartment. Then, have a Yamaha dealer service the watercraft as soon as possible.
If the watercraft was submerged:
(1) Remove the watercraft from the water and drain the water from the storage compartments. (See page 52 for information on draining the storage compartments.)
(2) Drain the bilge water from the engine compartment. (See page 60 for information on draining the bilge water.)
(3) Have the watercraft serviced by a Yamaha dealer as soon as possible.
NOTICE: Be sure to have a Yamaha dealer inspect the watercraft. Otherwise, serious engine damage could result. [ECJ00792]
Reference file: Yamaha VX-C 2019 WaveRunner
Additionally, the document applies to other Yamaha models: VX-C/VX/VX DELUXE, VX CRUISER, VX LIMITED