
PS-9000 User’s Manual
US English

1
Introduction
Thank you for purchasing PS-9000 print server.
This manual provides complete information on how to set up and use PS-9000 safely. Please read this
manual carefully before using the product.
PS-9000 print server provides small-scale network connectivity for your PS-9000–compatible P-touch
printers. PS-9000 is compatible with print monitors of P-touch printer drivers. You can check the
statuses (tape amount, tape width, errors, etc.) of P-touch machines that are connected to the network
in real time from your computer.
■ PS-9000
Supported Protocol: TCP/IP
Supported OS: Microsoft
®
Windows
®
95/98/98SE/Me, Microsoft
®
Windows NT® 4.0, Microsoft
®
Windows
®
2000
Pro, Microsoft
®
Windows
®
XP
*Please note that the supported printer OS differ per model.
10BASE-T/100BASE-TX (auto-detect)
USB interface port
■ About this Manual
Copying all or any part of this manual without permission is strictly prohibited.
The contents of this manual may be changed without advance notice.
If you have any questions about this manual or our products, please contact our customer support.
Extreme care has been taken to edit this manual; however, we take no responsibility for any
mistakes included in this manual or any damages, direct or indirect, arising from the use of this
manual.
P-touch is a registered trademark of Brother Industries, Ltd. in the U.S. and other countries.
Microsoft
®
, Windows
®
, Windows NT®, etc. are registered trademarks of Microsoft Corporation in
the U.S. and other countries.
Other brand or product names are registered trademarks or trademarks of their respective
companies.
■ Conventions
This manual uses the following symbols to point out specific information that should always be well
observed. In addition, refer to the precautions described in “Safety Instructions” for details on the
safe and correct operation.
Caution
● This type of notation indicates important information that must be observed when operating the
product. Be sure to read this information for safe and proper use.
Note
● This type of notation indicates useful information that is helpful during operation. When you
experience difficulties operating the product, refer to this information first.

2
Brother
®
One Year Limited Warranty and Replacement Service
(This warranty is valid only within the United States.)
Who is covered:
• This limited warranty (“warranty”) is given only
to the original end-use/retail purchaser (referred
to in this warranty as “Original Purchaser”) of
the accompanying product, consumables and
accessories (collectively referred to in this
warranty as “this Product”).
• If you purchased a product from someone other
than an authorized Brother reseller in the United
States or if the product was used (including but
not limited to floor models or refurbished
product), prior to your purchase you are not the
Original Purchaser and the product that you
purchased is not covered by this warranty.
What is covered:
• This Product includes a Machine and
Consumable and Accessory Items. Consumable
and Accessory Items include but are not limited
to label cassettes, cutters, stamps, power
adapters, cases and batteries.
•
Except as otherwise provided herein, Brother
warrants that the Machine and the accompanying
Consumable and Accessory Items will be free
from defects in materials and workmanship,
when used under normal conditions.
•
This warranty applies only to products purchased
and used in the United States. For products
purchased in, but used outside, the United States,
this warranty covers only warranty service within
the United States (and does not include shipping
outside the United States).
What is the length of the Warranty Period(s):
• Machines have a two-stage warranty: 90 days
from the original purchase date and an
additional warranty up to one year from the
original purchase date.
•
Consumable and Accessories Items accompanying
the Machine have a one-stage warranty: 90 Days
from the original purchase date.
What is NOT covered:
This warranty does not cover:
(1) Physical damage to this Product;
(2) Damage caused by improper installation,
improper or abnormal use, misuse, neglect or
accident (including but not limited to
transporting this Product without the proper
preparation and/or packaging);
(3)
Damage caused by another device or software
used with this Product (including but not limited to
damage resulting from use of non Brother
®
-brand
parts and Consumable and Accessory Items);
(4) Consumable and Accessory Items that expired
in accordance with a rated life; and,
(5) Problems arising from other than defects in
materials or workmanship.
This limited warranty is VOID if this Product has
been altered or modified in any way (including but
not limited to attempted warranty repair without
authorization from Brother and/or alteration/
removal of the serial number).
What to do if you think your Product is eligible for
warranty service:
Report your issue to either our Customer Service
Hotline at 1-877-478-6824
or a Brother Authorized
Service Center within the applicable warranty
period. Supply Brother or the Brother Authorized
Service Center with a copy of your dated bill of sale
showing that this Product was purchased within the
U.S. For the name of local Brother Authorized
Service Center(s), call 1-800-521-2846.
What Brother will ask you to do:
After contacting Brother or a Brother Authorized
Service Center, you may be required to deliver (by
hand if you prefer) or send the Product properly
packaged, freight prepaid, to the Authorized
Service Center together with a photocopy of your
bill of sale.
You are responsible for the cost of shipping,
packing product, and insurance (if you desire). You
are also responsible for loss or damage to this
Product in shipping.
What Brother will do:
First 90 Days:
If the problem reported concerning
your Machine and/or accompanying Consumable
and Accessory Item(s) is covered by this warranty
and if you first reported the problem to Brother or an
Authorized Service Center within 90 days from the
date of original purchase, Brother or its Authorized
Service Center will repair or replace the Machine
and/ or accompanying Consumable and Accessory
Item(s) at no charge to you for parts or labor. The
decision as to whether to repair or replace the
Machine and/or accompanying Consumable and
Accessory Item(s) is made by Brother in its sole
discretion. Brother reserves the right to supply a
refurbished or remanufactured replacement
Machine and/or accompanying Consumable and
Accessory Item(s) and use refurbished parts
provided such replacement products conform to the
manufacturer’s specifications for new product/
parts. The repaired or replacement Machine and/or
accompanying Consumable and Accessory Item(s)
will be returned to you freight prepaid or made
available for you to pick up at a conveniently
located Authorized Service Center.

3
Brother
®
One Year Limited Warranty and Replacement Service
(This warranty is valid only within the United States.)
91
st
day to 1 year:
If the problem reported concerning your Machine is
covered by this warranty and if you first reported the
problem after 90 days, but before 1 year from the date
of original purchase, Brother will furnish, free of
charge (excluding labor charges), replacement part(s)
for those part(s) of the Machine determined by Brother
or its Authorized Service Center to be defective.
You
will be responsible for all labor charges associated
with repairs made after the first 90 days from original
purchase.
After 90 days from the original purchase
date, accompanying Consumable and Accessory
Items are no longer covered by this warranty. If the
Machine and/or accompanying Consumable and
Accessory Item(s) are not covered by this warranty
(either stage), you will be charged for shipping the
Machine and/or accompanying Consumable and
Accessory Item(s) back to you
.
The foregoing are your sole (i.e., only) and
exclusive remedies under this warranty.
What happens when Brother elects to replace your
Machine:
If you have delivered the Machine to an Authorized
Service Center, the Authorized Service Center will
provide you with a replacement Machine after
receiving one from Brother. If you are dealing directly
with Brother, Brother will send to you a replacement
Machine, after you supply the required proof of
purchase information, together with the Machine that
Brother agreed to replace. You are then expected to
pack the Machine that Brother agreed to replace in the
package from the replacement Machine and return it
to Brother using the air bill supplied by Brother in
accordance with the instructions provided by Brother.
Since you will be in possession of two machines,
Brother will require that you provide a valid major
credit card number. Brother will issue a hold against
the credit card account number that you provide until
Brother receives your original Product and determines
that your original Product is entitled to warranty
coverage. Your credit card will be charged up to the
cost of a new Product only if: (i) you do not return your
original Product to Brother within five (5) business
days; (ii) the problems of your original Product are not
covered by the limited warranty; (iii) the proper
packaging instructions are not followed and has
caused damage to the product; or (iv) the warranty
period on your original Product has expired or has not
been sufficiently validated with a copy of the proof of
purchase (bill of sale). The replacement Machine you
receive (even if refurbished or remanufactured) will be
covered by the balance of the limited warranty period
remaining on the original Product, plus an additional
thirty (30) days. You will keep the replacement
Machine that is sent to you and your original Machine
shall become the property of Brother.
Retain your
original accessory items and a copy of the return air
bill, signed by the courier.
Limitations:
Brother is not responsible for damage to or loss of
any equipment, media, programs or data related to
the use of this Product. Except for that repair or
replacement as described above, Brother shall not
be liable for any direct, indirect, incidental or
consequential damages or specific relief. Because
some states do not allow the exclusion or limitation
of consequential or incidental damages, the above
limitation may not apply to you.
THIS WARRANTY IS GIVEN IN LIEU OF ALL
OTHER WARRANTIES, WRITTEN OR ORAL,
WHETHER EXPRESSED BY AFFIRMATION,
PROMISE, DESCRIPTION, DRAWING, MODEL
OR SAMPLE. ANY AND ALL WARRANTIES
OTHER THAN THIS ONE, WHETHER EXPRESS OR
IMPLIED, INCLUDING IMPLIED WARRANTIES OF
MERCHANTABILITY AND FITNESS FOR A
PARTICULAR PURPOSE, ARE HEREBY
DISCLAIMED.
• This Limited Warranty is the only warranty that
Brother is giving for this Product. It is the final
expression and the exclusive and only statement
of Brother’s obligations to you. It replaces all
other agreements and understandings that you
may have with Brother or its representatives.
• This warranty gives you certain rights and you
may also have other rights that may vary from
state to state.
• This Limited Warranty (and Brother’s obligation
to you) may not be changed in any way unless
you and Brother sign the same piece of paper in
which we (1) refer to this Product and your bill
of sale date, (2) describe the change to this
warranty and (3) agree to make that change.
Important:
We recommend that you keep all original packing
materials, in the event that you ship this product.

4
Important Information
Should you have questions, or need information
about your Brother Product, we have a variety of
support options for you to choose from:
USA-Customer Service:
Customer Service
877-478-6824 (voice)
Customer Service
901-379-1210 (fax)
Automated Faxback
800-521-2846
World Wide Web
www.brother.com
Supplies / Accessories
www.brothermall.com
or 888-879-3232
BROTHER INTERNATIONAL CORPORATION
100 SOMERSET CORPORATE BLVD.
BRIDGEWATER, NEW JERSEY 08807-0911
Please record your model and serial number and
your date and location of Purchase below for your
records. Keep this information with your proof of
purchase (bill of sale) in case your Product requires
service.
Model #
Serial #
Date of purchase:
Store where purchased:
Location of store:
Important: We recommend that you keep all
original packing materials, in the event you ship this
product.

5
Table of Contents
Introduction ......................................................................................................................1
Brother
®
One Year Limited Warranty and Replacement Service
(This warranty is valid only within the United States.) ......................................................2
Important Information ......................................................................................................4
Safety Instructions .............................................................................................................7
1 About PS-9000 ......................................................................................... 8
About PS-9000 ..................................................................................................................9
Compatible models ..........................................................................................................................9
Parts and Functions .........................................................................................................10
Top ................................................................................................................................................10
Bottom ...........................................................................................................................................10
Back ...............................................................................................................................................11
Right side .......................................................................................................................................11
Connection to the Network .............................................................................................12
Specifications ..................................................................................................................14
Hardware specifications .................................................................................................................14
Software specifications ...................................................................................................................14
Operation requirements ..................................................................................................................14
2 Using PS-9000 in a Windows
®
Environment ......................................... 15
Starting the Brother PS-9000 Utility ................................................................................16
How to Set Up PS-9000 ...................................................................................................17
PS-9000 Setup Method 1 ...............................................................................................18
“Installs this unit and the utility.”
-Using the TCP/IP protocol .............................................................................................................18
PS-9000 Setup Method 2 ...............................................................................................22
“Installs the utility.”
-Install the printing client software ..................................................................................................22
Other Functions ..............................................................................................................25
Automatic IP address configuration with DHCP/BOOTP ................................................................25
Automatic IP address configuration with RARP ...............................................................................25
Uninstalling the Software ................................................................................................26
Using PS-9000 With a Different P-touch .........................................................................26
3 Using the Web Browser ......................................................................... 27
Using the Web Browser ...................................................................................................28
Display the PS-9000 Web page ......................................................................................................28
Manage PS-9000 Via the Web Page .................................................................................29

6
4 Questions & Answers ............................................................................. 30
Questions & Answers ......................................................................................................31
Troubleshooting ..............................................................................................................33
5 Appendix ............................................................................................... 35
LPR Printing in Microsoft
®
Windows NT
®
4.0, Microsoft
®
Windows
®
2000 Pro and
Microsoft
®
Windows
®
XP ................................................................................................36
Print using an LPR port in Microsoft
®
Windows NT
®
4.0 (PT-9500PC only) ...................................36
Print using an LPR port in Microsoft
®
Windows
®
2000 Pro ............................................................38
Print using an LPR port in Microsoft
®
Windows
®
XP ......................................................................41
PS-9000 Settings ..............................................................................................................44
Contact Information (For USA Only) ..............................................................................46

7
Safety Instructions
To ensure safe and proper use, please read the following information carefully before starting to use
this product. These safety instructions include important information on the safe handling of the
product and on general safety issues for the user.
■ Do not subject the machines to impacts. If the P-touch or this unit is subjected to an impact and is
damaged, unplug it from the electrical outlet, and then contact the service representative. If you
continue to operate a damaged machine, a fire or an electric shock may result.
■ Keep the cords and cables connected to this unit out of the reach of children, otherwise an electric
shock or injuries may result.
■ Before disconnecting this unit, be sure to first unplug the P-touch machines and this unit from the
electrical outlet.
■ Do not disassemble or alter this product in any way.
■ Do not use this unit with the cover removed, otherwise an electric shock may occur.
■ Do not try to service, adjust or repair this unit, otherwise an electric shock may occur. Contact a
service representative to request servicing, adjustments or repairs for this unit.
■ Stop using this unit if it does not operate correctly (for example, if it becomes unusually hot or
produces smoke or an unusual odor), otherwise a fire, an electric shock or damage may result.
Immediately turn off the P-touch, unplug the AC adapter from this unit, unplug the AC adapter
from the electrical outlet, and then contact a service representative for service or repairs.
■ If any foreign objects (such as metal or liquids) enters the unit, immediately turn off the P-touch,
unplug the AC adapter from this unit, unplug the AC adapter from the electrical outlet, and then
contact a service representative for service or repairs. Continuing to use the unit may result in a
fire or an electric shock.

1
About PS-9000
About PS-9000 ................................................................................................9
Parts and Functions.......................................................................................10
Connection to the Network...........................................................................12
Specifications................................................................................................14

9
About PS-9000
PS-9000 is a USB print server for P-touch machines on a 10BASE-T/100BASE-TX network environment.
PS-9000 is compatible with print monitors of P-touch printer drivers and enables you to visually check
the statuses of print jobs and P-touch machines.
Compatible models
■ QL-500/QL-550/QL-650TD
■ QL-1050/QL-1050N
■ PT-9500PC
■ PT-9200DX
The appropriate P-touch driver compatible with PS-9000 must be installed. From the dialog box that
appears when the CD-ROM included with PS-9000 (this unit) is inserted into the drive, click [P-touch
Driver], install the network driver for your P-touch, and then begin the setup.
■ Federal Communications Commission (FCC) Declaration of Conformity (For USA Only)
Responsible Party: Brother International Corporation
100 Somerset Corporate Boulevard
Bridgewater, NJ 08807-0911 USA
TEL: (908) 704-1700
declares that the product
Product Name: Brother Print Server 9000
Model Number: PS-9000
complies with Part 15 of the FCC Rules. Operation is subject to the following two conditions: (1)
this device may not cause harmful interference, and (2) this device must accept any interference
received, including interference that may cause undesired operation.
This equipment has been tested and found to comply with the limits for a Class B digital device,
pursuant to Part 15 of the FCC Rules. These limits are designed to provide reasonable protection
against harmful interference in a residential installation. This equipment generates, uses, and can
radiate radio frequency energy and, if not installed and used in accordance with the instructions,
may cause harmful interference to radio communications. However, there is no guarantee that
interference will not occur in a particular installation. If this equipment does cause harmful
interference to radio or television reception, which can be determined by turning the equipment
off and on, the user is encouraged to try to correct the interference by one or more of the
following measures:
- Reorient or relocate the receiving antenna.
- Increase the separation between the equipment and receiver.
- Connect the equipment to an outlet on a circuit different from that to which the receiver is
connected.
- Consult the dealer or an experienced radio/TV technician for help.
- Changes or modifications not expressly approved by Brother Industries, Ltd. could void the
user’s authority to operate the equipment.
■ Tested to Comply with FCC Standards for Home or Office Use
This Class B digital apparatus complies with Canadian ICES-003.
Cet appareil numérique de la classe B est conforme à la norme NMB-003 du Canada.
10
Parts and Functions
Top
You can check the LED on the board.
■ 10BASE LINK LED (Green)
Lights when a proper 10BASE-T network
connection is established.
■ 100BASE LINK LED (Green)
Lights when a proper 100BASE-TX network
connection is established.
■ STATUS LED (Orange)
Flashes during data transfer.
Bottom
■ Ethernet Address
The Ethernet Address of the device. The last 6
digits are the product’s serial number.
10BASE LINK
LED (Green)
100BASE LINK
LED (Green)
STATUS LED
(Orange)
Note
● Ethernet address 00:80:77:50:00: 01 is
noted as 008077500001. The product’s
number (serial number) is 500001.
Ethernet Address
(The last 6 digits are the product’s serial number.)

11
Back
■ Network Port (10BASE-T/100BASE-TX)
Connection for the network cable.
*In 100BASE-TX environment, use category
5.
■ USB Port
Connection for the USB cable.
■ Power Connector
Connection for the AC adapter.
Right side
■ Push Button
Press this button to reset PS-9000 to its
factory default settings.
■ Factory Default Settings
1
Make sure that the AC adapter is not connected to PS-9000.
2
While pressing the push button, connect the AC adapter to PS-9000. The STATUS LED (orange)
will blink once when the connection is made.
3
Continue to press the push button for two seconds. The STATUS LED will blink again when the
settings are successfully reset to the factory default settings. Release the push button.
DC5V IN
LAN
USB
Network Port
(10BASE-T/100BASE-TX)
USB Port
Power Connector
Push Button
Caution
● Do not turn off the PS-9000 while it is being initialized to the factory default settings.
● When PS-9000 is turned on again after being initialized to the factory default settings, do not
press the push button.
● PS-9000 can be initialized to its factory default settings from the Brother PS-9000 Utility.
12
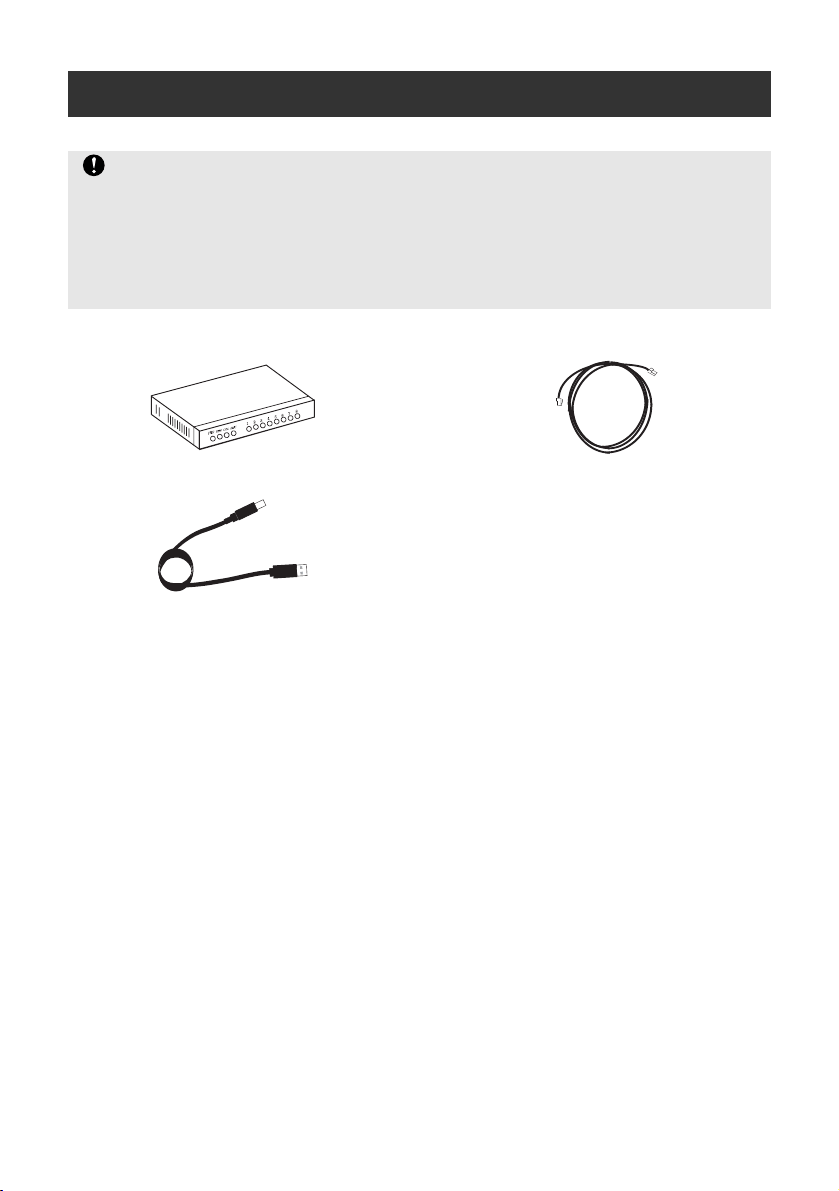
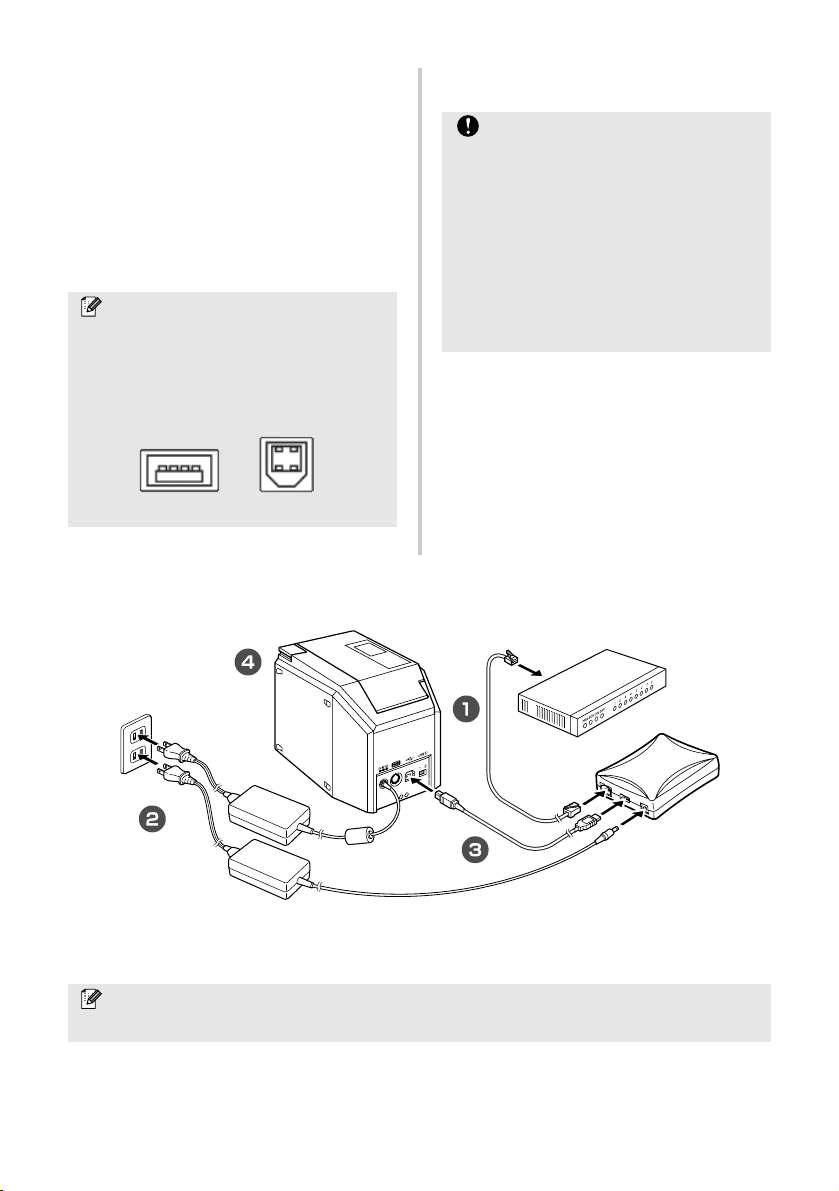
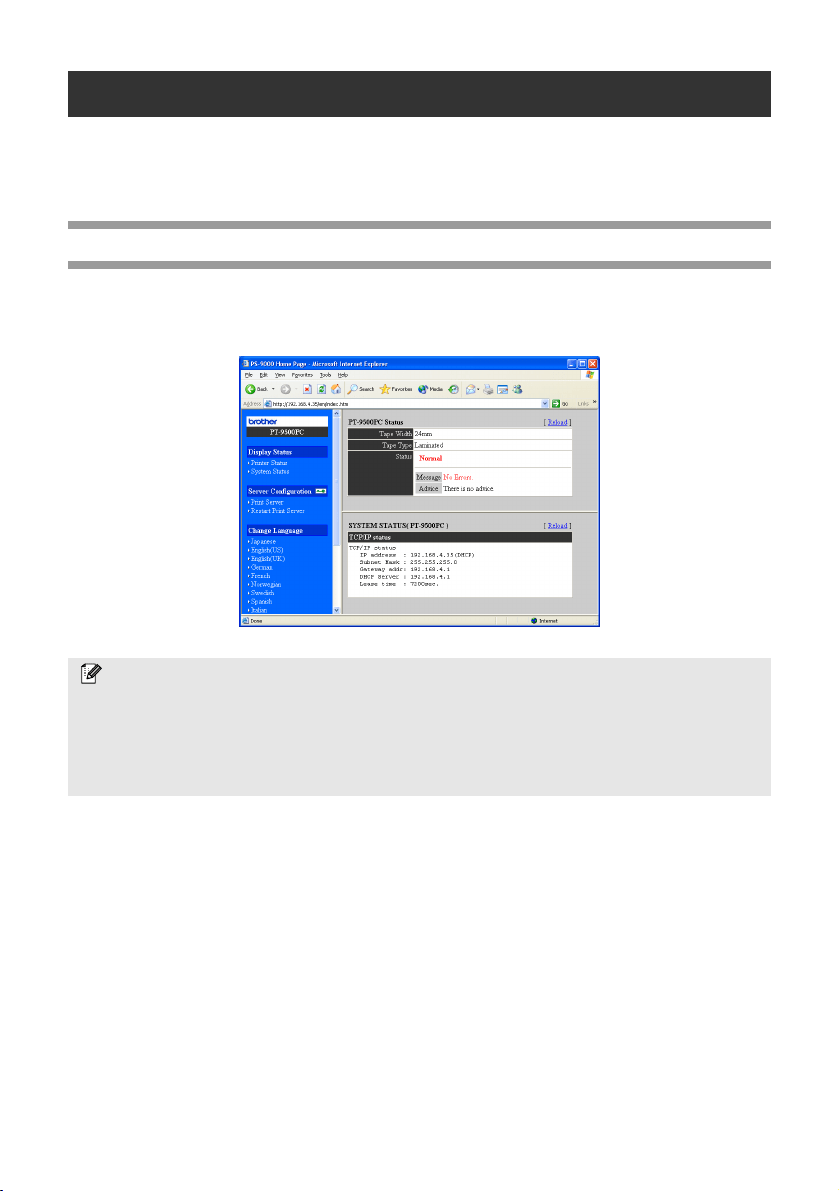
Connection to the Network
■ Prepare the following items.
Ethernet HUB
USB Cable
Network Cable
Caution
● If you have already used PS-9000 on another network or if it had been connected to other
P-touch units, initialize PS-9000 to its factory default settings. You can initialize PS-9000 from
Brother PS-9000 Utility.
● PS-9000 cannot be used with a USB hub.
● If you are using PS-9000 in a 100BASE-TX environment, prepare a 100BASE-TX Ethernet hub
and network cable (Category 5).
13
1
Use the network cable to connect
PS-9000 to the Ethernet hub.
2
Connect the AC adapter to PS-9000, and
then plug the power cable of the P-touch
and PS-9000 into the electrical outlet.
3
Use the USB cable to connect PS-9000 to
the P-touch. (PS-9000: Type A connector;
P-touch: Type B connector)
4
Turn on the P-touch.
Note
● The USB cable has two different types of
connectors. Be sure to insert the correct
type of connector into the correct port.
■ USB Cable Connectors
Type A
Type B
Caution
● Using an AC adapter other than the one
supplied with PS-9000 may result in
damage.
● Do not connect devices other than a
P-touch to the PS-9000 USB port.
● Wait more than 2 seconds between
connecting and disconnecting the USB
cable.
● Do not disconnect the USB cable while
printing.
Note
● The shape of the power cord depends on your model.
P-touch
PS-9000
Ethernet HUB

14
Specifications
Hardware specifications
■ CPU
32bit RISC CPU
■ Memory
RAM: 8 MBytes
Flash ROM: 1 MByte
■ Network Interface
10BASE-T/100BASE-TX 1 port (automatic
detection)
■ USB Interface
A Port
■ Others
Push Button: 1 button
LED Indicators: 3 LEDs, one for Status
(orange), one for 10BASE Link (green), and
one for 100BASE Link (green)
Software specifications
■ Supported Protocol
TCP/IP
■ TCP/IP
Network Layer: ARP, RARP, ICMP, IP
Session Layer: TCP, UDP
Application Layer: LPR, FTP, BOOTP, HTTP,
DHCP
IP address can be set with Setup Utility.
Operation requirements
■ Network Environment
Microsoft
®
Windows
®
95/98/98SE/Me,
Microsoft
®
Windows NT® 4.0, Microsoft
®
Windows
®
2000 Pro, Microsoft
®
Windows
®
XP
*Please note that the supported printer OS
differ per model.
■ Operating Environment
Temperature: 5 °C to 35 °C
Humidity: 20% to 80% RH (no condensation
allowed)
■ Storage Environment
Temperature: -10 °C to 50 °C
Humidity: 20% to 90% RH (no condensation
allowed)

2
Using PS-9000 in a Windows
®
Environment
Starting the Brother PS-9000 Utility..............................................................16
How to Set Up PS-9000 ................................................................................17
PS-9000 Setup Method 1 .............................................................................18
PS-9000 Setup Method 2 .............................................................................22
Other Functions ............................................................................................25
Uninstalling the Software..............................................................................26
Using PS-9000 With a Different P-touch.......................................................26
16
Starting the Brother PS-9000 Utility
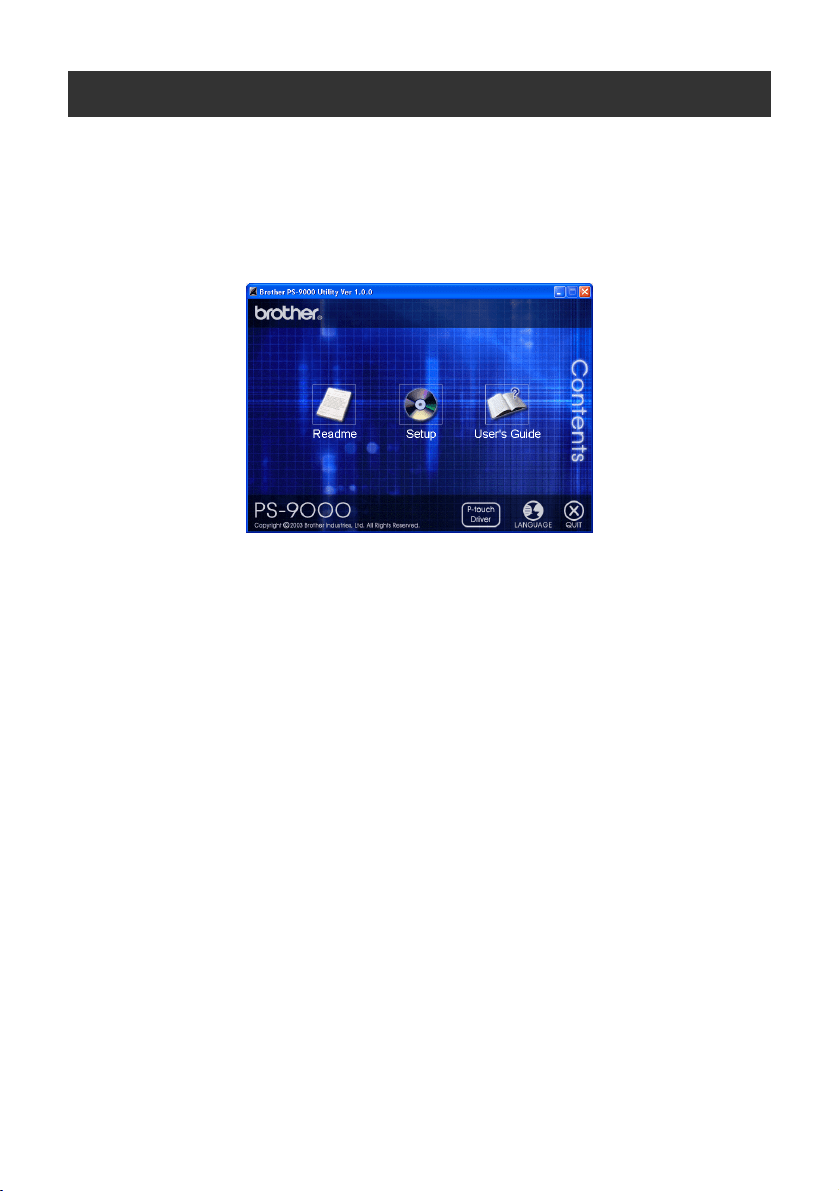
Insert the CD-ROM included with PS-9000 into the CD-ROM drive of your computer. The main menu
dialog box will automatically appear.
1
After the CD-ROM is inserted into the CD-ROM drive of the computer, the main menu dialog
box automatically appears.
● If the main menu dialog box does not appear, open My Computer, select the CD-ROM drive,
and then run “autorun.exe“.
■ Readme
Click [Readme] for important information on the Brother PS-9000 Utility. Make sure to read this
information carefully before starting to use PS-9000.
■ Setup
The installation wizard will be started. This leads you through the setup of PS-9000 for printing.
■ User’s Guide
Click [User’s Guide] to access the on-line manual. Adobe
®
Acrobat Reader
®
must be installed in
order to view the manual.

17
How to Set Up PS-9000
There are two setup methods available with the Brother PS-9000 Utility.
1
“Installs this unit and the utility.“
With this method, the PS-9000 print server settings are specified and the software for printing on
a network is installed onto the computer. Select this method if the PS-9000 is being used for the
first time after it was purchased or after its settings were reset to the factory default settings.
2
“Installs the utility.“
With this method, only the software for printing on a network is installed onto computers. Select
this setup method if PS-9000 is already set up and the software is being installed onto the second
or more computer.
Caution
● When setting up PS-9000 on an operating system that has administrator privileges (such as,
Microsoft
®
Windows NT® 4.0, Microsoft
®
Windows
®
2000 Pro or Microsoft
®
Windows
®
XP),
be sure to log in with a user account that has administrator privileges.
Caution
● Install the printing software onto all computers that will use the P-touch connected to PS-9000.
Software License
● Use the software according to the license agreement that appears during installation.
● Install the software onto multiple computers at a single location and use it to print from the
P-touch connected to PS-9000.
18
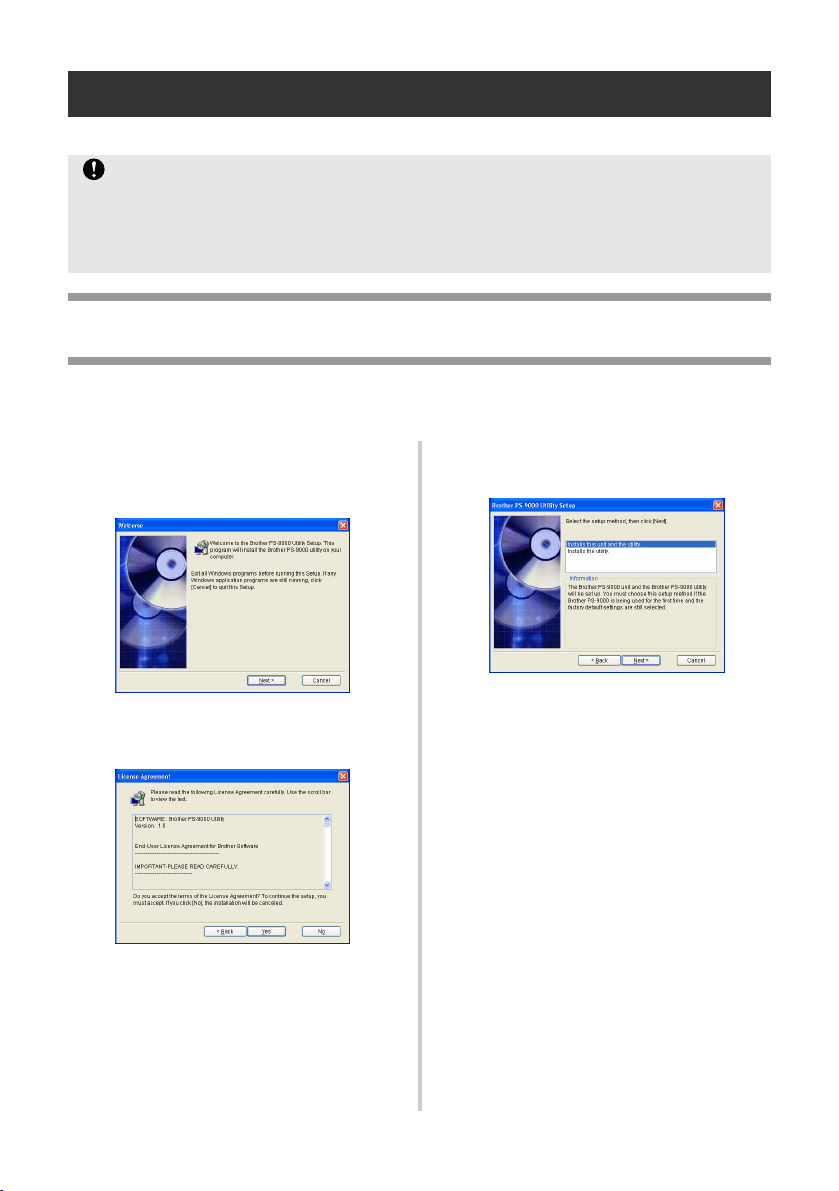
PS-9000 Setup Method 1
The setup via the setup wizard is very easy.
“Installs this unit and the utility.”
-Using the TCP/IP protocol
This method sets up PS-9000 and the printing software. Choose this setup mode when you are using
PS-9000 for the first time and the product is still set to its factory default settings.
1
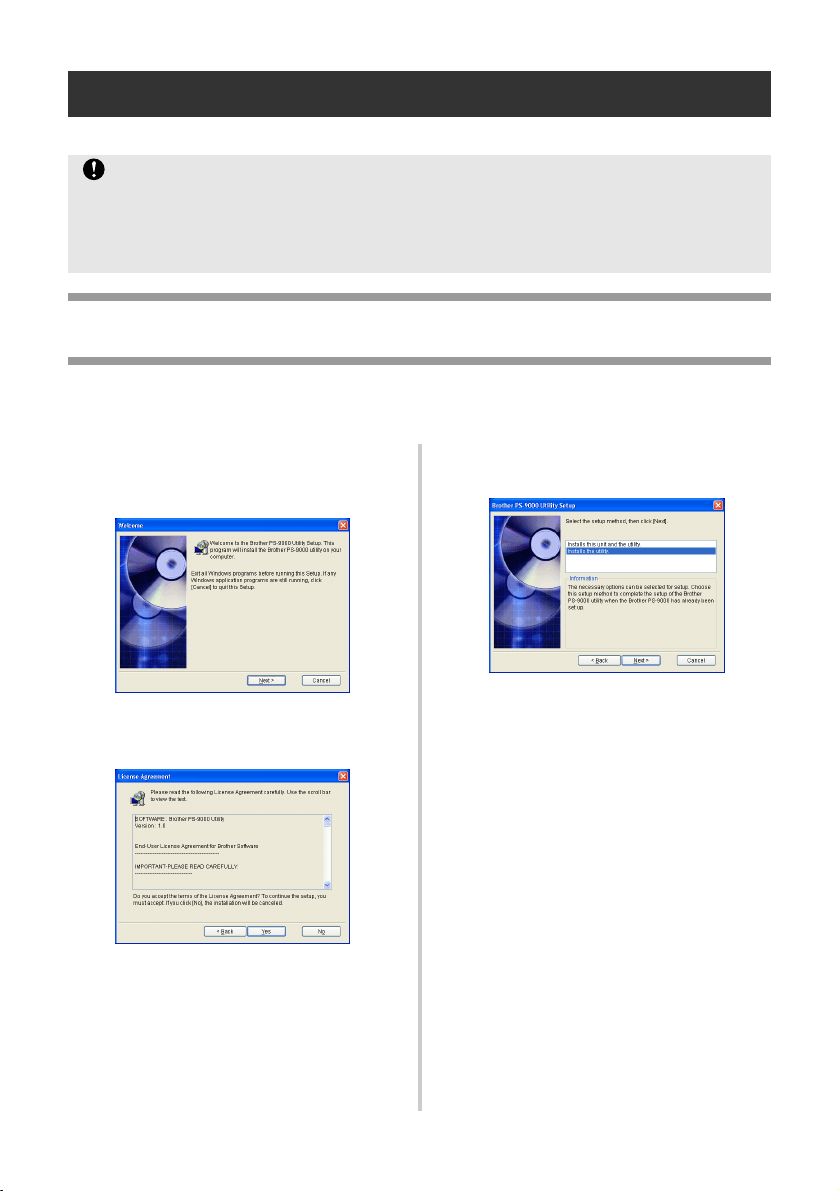
In the main menu dialog box, click
[Setup]. The welcome message shown
below appears. Click [Next].
2
Read the Software License Agreement,
and then click [Yes] if you agree.
3
Select “Installs this unit and the utility.”,
and then click [Next].
Caution
● Before specifying settings, be sure to install the P-touch printer driver. (From the dialog box
that appears when the CD-ROM included with PS-9000 (this unit) is inserted into the drive,
click [P-touch Driver], and then install the network driver for your P-touch.
● Before starting the setup, make sure to quit all application programs that are running.

19
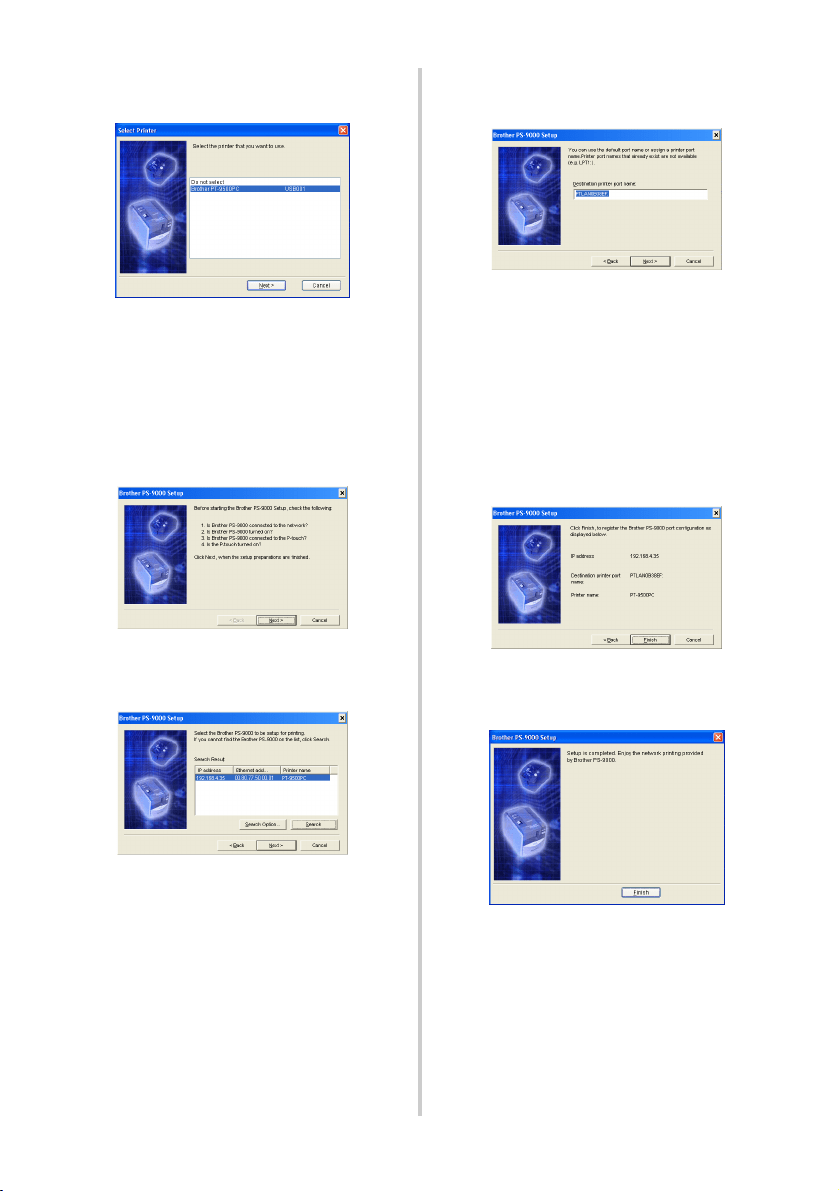
4
Select PS-9000, which is to be set up, and
then click [Next].
• If the product is not displayed in the
list, click [Search].
• Alternatively, you can type in the
Ethernet address of the product that you
want to set up.
• If you want to reset the product to its
factory default settings, click [Initialize]
and follow the instructions.
5
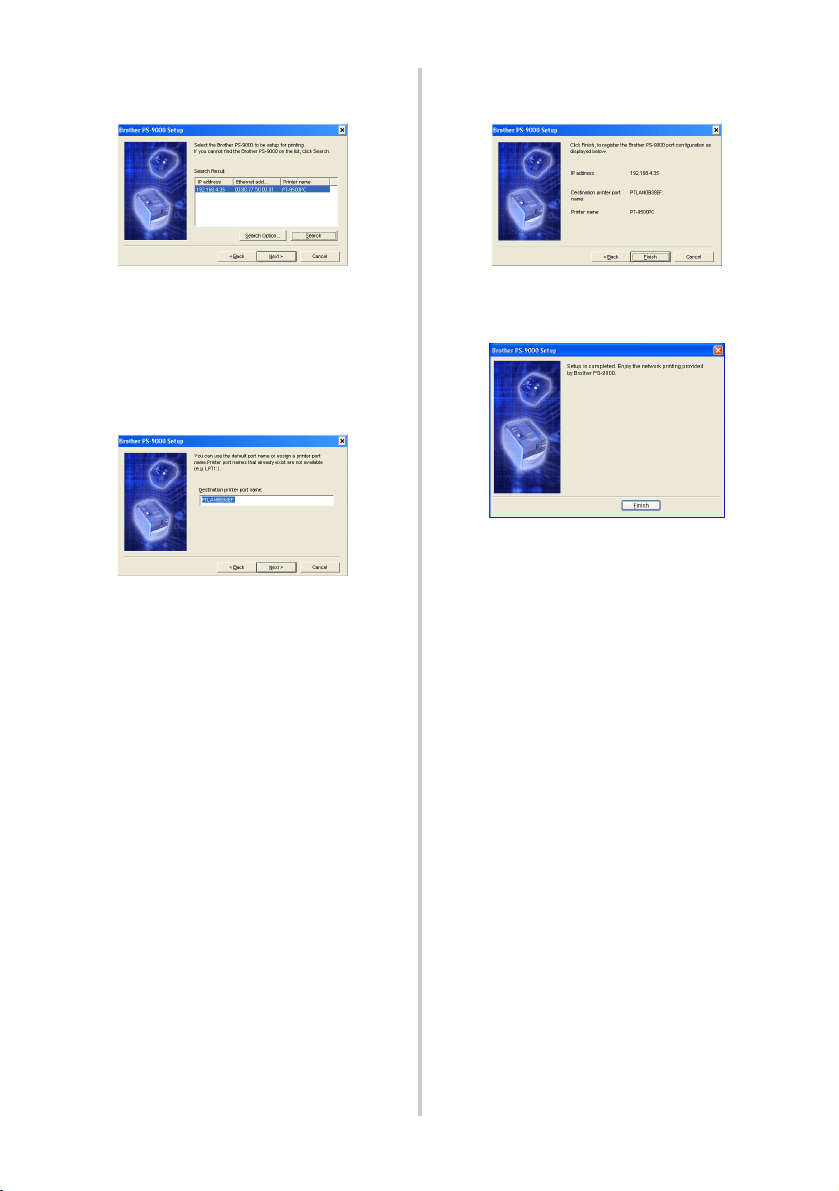
Specify the IP address.
• If “Assign an IP address” is selected
(recommended)
→ In the following dialog box that
appears, type in the IP address,
subnet mask and default gateway.
Consult your network administrator
for the appropriate settings.
• If “Obtain an IP address automatically”
is selected
→ In an environment with a DHCP/
BOOTP server, the IP address of PS-
9000 is automatically assigned.
Caution
● After setup, the IP address may
change when the unit is turned off,
then turned on again. In that case, the
PS-9000 must be set again and the
printing software must be reinstalled.
20
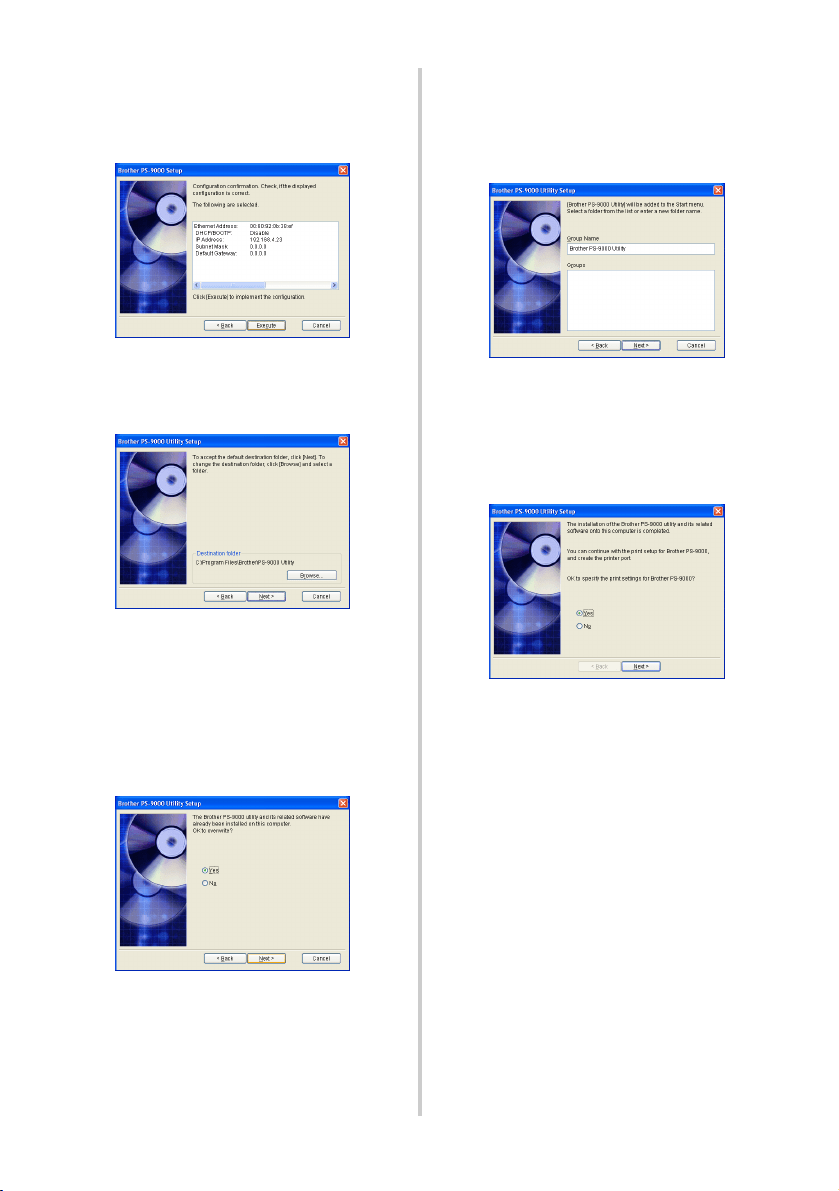
6
The selected configuration is displayed
for you to check it. If the configuration is
correct, click [Execute] to apply it. The
settings are sent to PS-9000.
7
The Brother PS-9000 Utility is installed.
Click [Next] if you do not want to change
the destination directory.
• The screen shown below appears if the
Brother PS-9000 Utility has already
been installed on your computer.
Select if you want to overwrite the
software, and then click [Next]. If you
selected “Yes”, continue with the
operation described above. If you
selected “No”, continue with step 10.
8
Specify the group name that will appear
in the Start menu.
The default group name is “Brother
PS-9000 Utility”. After specifying the
group name, click [Next].
• If you change the name, make sure that
the group name you specify is not used
already.
9
Select if you want to set up the printer
port.
Select “Yes”, and then click [Next].
21
0
Select the P-touch to be set up, and then
click [Next].
• If there are no compatible P-touch
units, click [Cancel] to quit this setup
wizard, install a P-touch printer driver,
and then repeat the setup procedure for
PS-9000 from the beginning.
a
After the setup preparations are
finished, click [Next].
b
Select PS-9000, which is to be set up,
and then click [Next].
• If the product to be set up is not
displayed in the list, click [Search].
• If you click [Search Option], the TCP/IP
broadcast address can be configured.
c
Type in the printer port name, and then
click [Next].
• When you assign the printer port name,
make sure that the port name you
specify is not used already (e.g., LPT1:).
• The default port name is
“PTLANxxxxxx:” (where “xxxxxx” is
the last six digits of the Ethernet
address).
d
The setup configuration is displayed.
Click [Finish].
e
When setup is complete, the dialog box
shown bellow appears. Click [Finish].
22
PS-9000 Setup Method 2
The setup wizard is very easy.
“Installs the utility.”
-Install the printing client software
This method sets up only the Brother PS-9000 Utility. Choose this setup method when PS-9000 has
already been set up in the environment.
1
In the main menu dialog box, click
[Setup]. The welcome message shown
below appears. Click [Next].
2
Read the Software License Agreement,
and then click [Yes] if you agree.
3
Select “Installs the utility.”, and then
click [Next].
Caution
● Before specifying settings, be sure to install the P-touch printer driver. (From the dialog box
that appears when the CD-ROM included with PS-9000 (this unit) is inserted into the drive,
click [P-touch Driver], and then install the network driver for your P-touch.
● Before starting the setup, make sure to quit all application programs that are running.
23
4
The Brother PS-9000 Utility is installed.
Click [Next] if you do not want to change
the destination directory.
• The screen shown below appears if the
Brother PS-9000 Utility has already
been installed on your computer.
Select if you want to overwrite the
software, and then click [Next]. If you
selected “Yes”, continue with the
operation described above. If you
selected “No”, continue with step 7.
5
Specify the group name that will appear
in the Start menu.
The default group name is “Brother
PS-9000 Utility”. After specifying the
group name, click [Next].
• If you change the name, make sure that
the group name you specify is not used
already.
6
Select if you want to set up the printer
port.
Select “Yes”, and then click [Next].
7
Select the P-touch to be set up, and then
click [Next].
• If there are no compatible P-touch
units, click [Cancel] to quit this setup
wizard, install a P-touch printer driver,
and then repeat the setup procedure for
PS-9000 from the beginning.
8
After the setup preparations are finished,
click [Next].
24
9
Select PS-9000, which is to be set up, and
then click [Next].
• If the product is not displayed in the
list, click [Search].
• If you click [Search Option], the TCP/IP
broadcast address can be configured.
0
Type in the printer port name, and then
click [Next].
• When you assign the printer port name,
make sure that the port name you
specify is not used already (e.g., LPT1:).
• The default port name is
“PTLANxxxxxx:” (where “xxxxxx” is
the last six digits of the Ethernet
address).
a
The setup configuration is displayed.
Click [Finish].
b
When setup is complete, the dialog box
shown bellow appears. Click [Finish].

25
Other Functions
Other functions of PS-9000 are as follows.
Automatic IP address
configuration with DHCP/
BOOTP
PS-9000 supports the DHCP/BOOTP protocol.
TCP/IP-related settings can be specified within
the network where the DHCP/BOOTP server is
operating.
Automatic IP address
configuration with RARP
The PS-9000 supports RARP protocol. The IP
address can be set within the network where
the RARP server is operating.
Caution
● PS-9000 supports DHCP/BOOTP
protocols that are in accordance with
RFC2131/2132.
● To use the DHCP/BOOTP function of
PS-9000, contact your network
administrator.
● If the IP address obtained by the PS-9000
from a DHCP/BOOTP server is changed,
printing will no longer be possible. We
recommend using a fixed IP address for
the PS-9000.
Caution
● To use the RARP function of PS-9000,
contact your network administrator.
● If the IP address obtained by the PS-9000
from a RARP server is changed, printing
will no longer be possible. We
recommend using a fixed IP address for
the PS-9000.
26
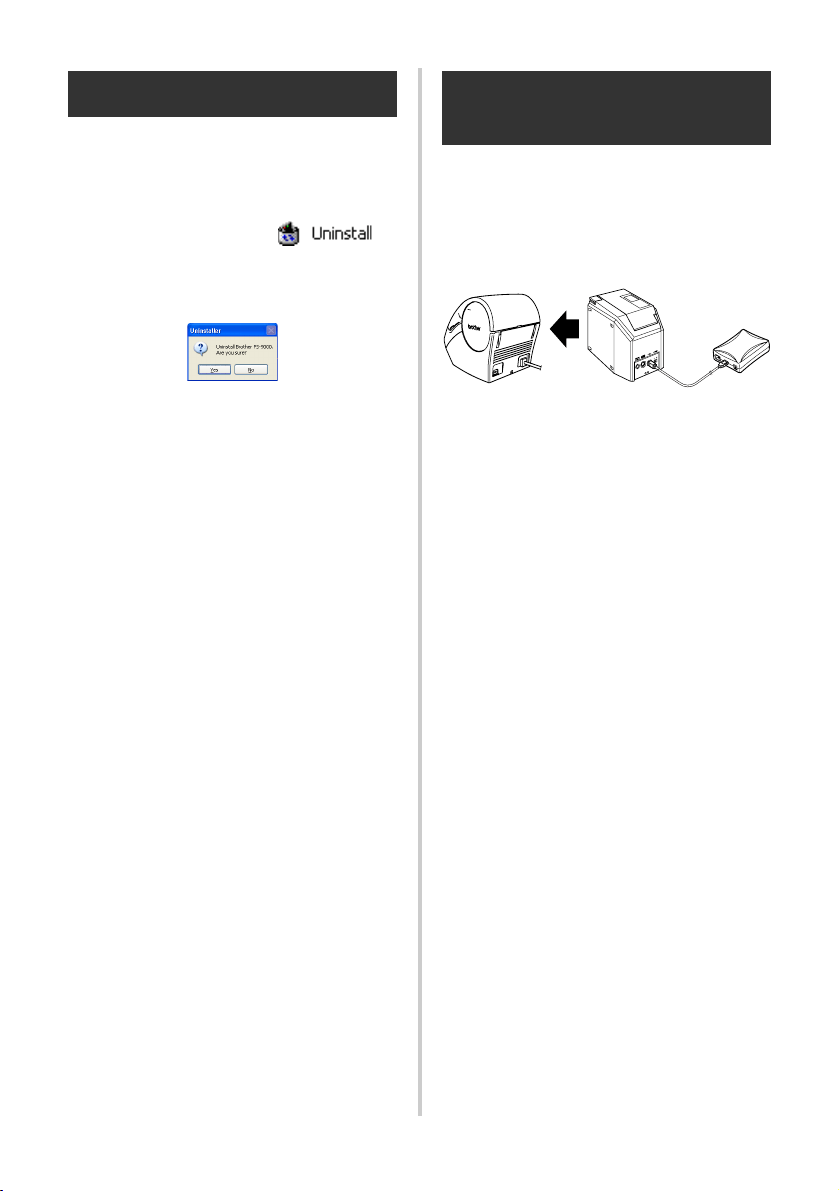
Uninstalling the Software
If this product will no longer be used, remove
(uninstall) the software.
1
On the Start menu, point to “All
Programs”*, click “Brother PS-9000
Utility”, and then click .
(*”Programs” on operating systems other
than Windows XP.)
- The Uninstaller dialog box appears.
2
Click [Yes].
The software is uninstalled.
Using PS-9000 With a
Different P-touch
When using PS-9000 with a different P-touch
than the one that is currently connected,
remove (uninstall) the Brother PS-9000 Utility
from the computer, reset PS-9000 to its factory
default settings, and then perform the setup
procedure from the beginning.
1
Uninstall the Brother PS-9000 Utility.
(Refer to “Uninstalling the Software” in
chapter 2, “Using PS-9000 in a
Windows
®
Environment”.)
2
Reset PS-9000 to its factory default
settings.
(Refer to “Parts and Functions” in
chapter 1, “About PS-9000”.)
3
Set up PS-9000.
(Refer to “PS-9000 Setup Method 1” in
chapter 2, “Using PS-9000 in a
Windows
®
Environment”.)

28
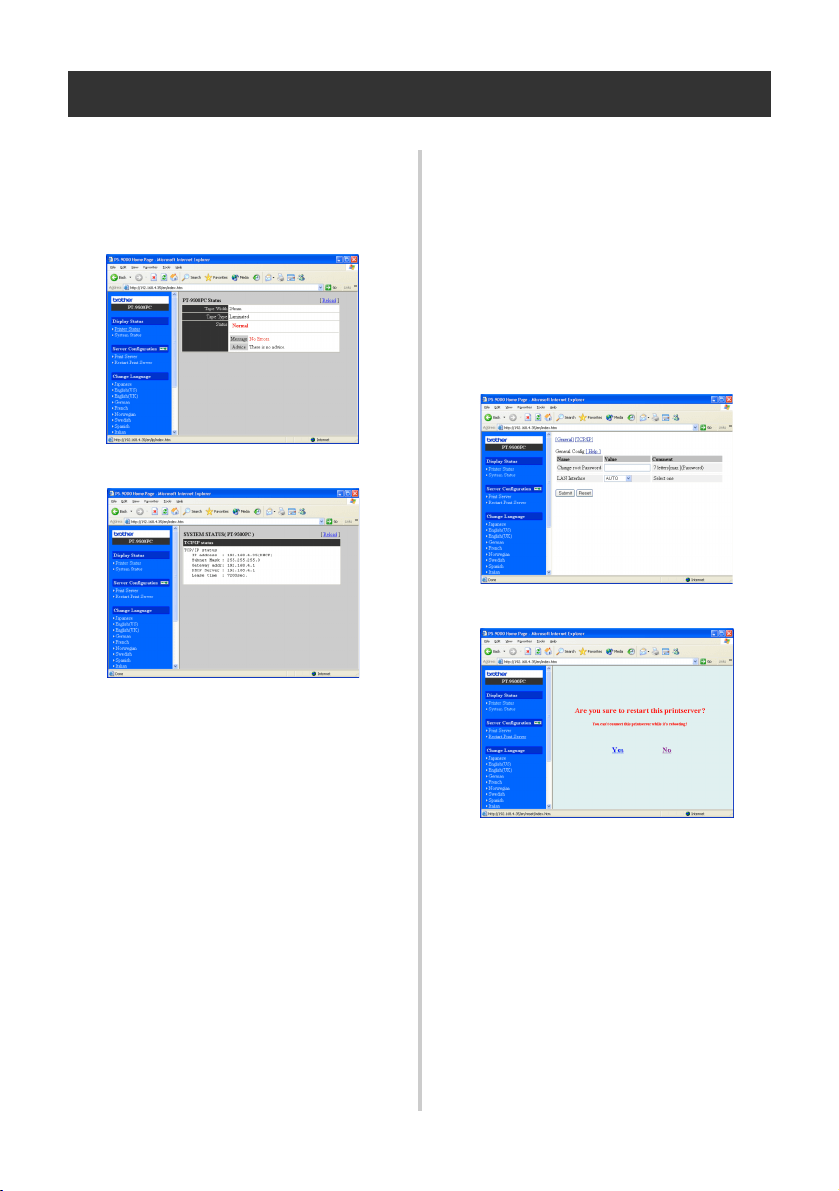
Using the Web Browser
This chapter provides a description on the procedure for using a Web browser to access the PS-9000
Web page.
Using a Web browser, the various PS-9000 settings and the status of PS-9000 and the P-touch can be
checked.
Display the PS-9000 Web page
1
Type the IP address of PS-9000 in the Web browser.
Example: If the IP address is 192.168.40.112, type “http://192.168.40.112/”.
Note
● For the Web browser, we recommend Internet Explorer 4.01 SP2 (or higher) or Netscape
Navigator 4.0 (or higher). If a different web browser is used, it must be compatible with HTTP
1.0 (RFC1945) and HTML 2.0 (RFC1866).
● The information may be different depending on the products.
● In order to use the Web browser, an IP address must be assigned to PS-9000.
29
Manage PS-9000 Via the Web Page
■ Display Status
The printer status and system information of
the P-touch connected to PS-9000 can be
seen here.
(Printer status)
(System information)
■ Configuration
Through the Web browser setup, you can
configure PS-9000 (general and TCP/IP
settings) and restart PS-9000. You must type
in the user name (root) and password to
change the configuration. We recommend
that you change the password after setting up
PS-9000, so that only the network
administrator can change the configuration.
(As a factory default, “root” is specified as the
user name, and no password is set.)
(Configure PS-9000)
(Restart PS-9000)
• If a print job with an error that has
occurred remains on the print server,
the jobs can be deleted by restarting
PS-9000.


31
Questions & Answers
This chapter answers questions and offers solutions to problems that might arise when using the
product.
Symptom Cause Remedy
CD-ROM is
inserted, but
does not start
automatically.
If your computer does not
support Autorun, the main
menu will not automatically
appear after the CD-ROM is
inserted.
In this case, run “autorun.exe” in the root directory
(D:\ if the CD-ROM is loaded in drive D of the
computer) of the CD-ROM.
PS-9000 is not
found after
searching
during setup
with the
Brother
PS-9000
Utility.
Make sure that the LINK LED
is blinking. If the LINK LED is
not blinking, PS-9000 may not
be properly connected to the
network.
Check for the following, and then initialize PS-9000 to its
factory default settings and set it up from the beginning.
•Check if PS-9000 is turned on.
•Check if the network cable is inserted correctly
to PS-9000.
•Check if the network cable is broken.
•Check if the LINK LED of PS-9000 and the
Ethernet hub is blinking.
•Check if the Ethernet hub is working properly.
If communication is limited to TCP/
IP, PS-9000 may not be found.
If a personal firewall is activated, deactivate it. If
TCP/IP filtering limitations are applied, remove them.
The print job is
not printed.
Make sure that the LINK LED
is blinking. If the LINK LED is
not blinking, PS-9000 may not
be properly connected to the
network.
Check for the following, and then initialize PS-9000 to its
factory default settings and set it up from the beginning.
•Check if the PS-9000 power is turned on.
•Check if the network cable is inserted correctly
to PS-9000.
•Check if the network cable is broken.
•Check if the LINK LED of PS-9000 and the
Ethernet hub is blinking.
•Check if the Ethernet hub is working properly.
•Check if PS-9000 and the P-touch are connected
properly.
•Check if the USB cable is connected properly.
If you are using the TCP/IP
protocol, ping PS-9000 with
the set IP address to see if
there is any reply. If there is no
reply to pinging, the IP address
may not be set properly.
Reset PS-9000 to its factory default settings and set it
up again from the beginning.
Example: When sending a ping in Windows
®
98
MS-DOS
Go to “Start” – “Programs” – “MS-DOS Prompt”
and run “Ping xxx.xxx.xxx.xxx”. You will see the
message below. “xxx.xxx.xxx.xxx” is the IP
address of PS-9000.
•When there is a reply to pinging:
Reply from xxx.xxx.xxx.xxx:bytes=32
time=58ms TTL=253
Reply from xxx.xxx.xxx.xxx:bytes=32
time=58ms TTL=253
Reply from xxx.xxx.xxx.xxx:bytes=32
time=58ms TTL=253
Reply from xxx.xxx.xxx.xxx:bytes=32
time=58ms TTL=253
•When there is no reply to pinging:
Request timed out.
Request timed out.
Request timed out.
Request timed out.

32
The print job is
not printed.
If a DHCP/BOOTP server or
an RARP server resides on the
network, the IP address is
automatically issued by the
server. In this case, the IP
address that was manually set
for PS-9000 may have been
overwritten by the server.
Create a local environment where the server does
not exist and issue the IP address to PS-9000. At the
same time, make sure that “Obtain an IP address
automatically” in the TCP/IP setting is not marked.
If PS-9000 and the computer
are not in the same segment, a
subnet mask and gateway
address must to be set for
PS-9000.
Use the Brother PS-9000 Utility to check whether
the subnet mask and gateway address are correct.
Check the printer port name of PS-9000. The port
name is indicated by “(PTLAN xxxxxx: P-touch TCP
Port)” after the assigned port name.
Dial-up starts
when printing
is performed.
Depending on the operating
system being used, the
automatic dial-up setting may
have been specified.
When using PS-9000, cancel the setting for
automatic dial-up or, if the automatic dial-up setting
cannot be cancelled, click [Cancel] in the dialup
dialog box to begin printing.
An error
occurs during
printing.
If the unit stopped operating
because of a tape width error
or no more tape in the cassette
during another user’s print job,
printing is not possible until
the error is cancelled.
After the other user’s print job is finished, try printing
again. Otherwise, use the Web browser to restart
PS-9000, and then try printing again.
LPR printing is
not available
with PS-9000.
With some of the P-touch
machines, LPR printing is not
available.
With the PT-9200DX, install the printing software
for PS-9000 onto each client, and use it instead of
using LPR printing.
The tape width
cannot be
detected by
P-touch Editor 4
or Quick Editor.
If PT-9500PC is connected to
PS-9000, the tape width
detection function of P-touch
Editor 4 and Quick Editor does
not operate. (There is no tape
width detection function with
PT-9200DX.)
Manually specify the tape width.
Can PS-9000
be initialized
(reset to its
factory default
settings)?
PS-9000 can be initialized (reset to its factory default
settings) by using the Brother PS-9000 Utility.
Select PS-9000 in the PS-9000 setting dialog box of
the Brother PS-9000 Utility, and then click
[Initialize]. Otherwise, PS-9000 can be initialized by
pressing the push button. For further information on
how to initialize PS-9000 by pressing the push
button, refer to “Parts and Functions” in chapter 1,
“About PS-9000”.
Symptom Cause Remedy
33
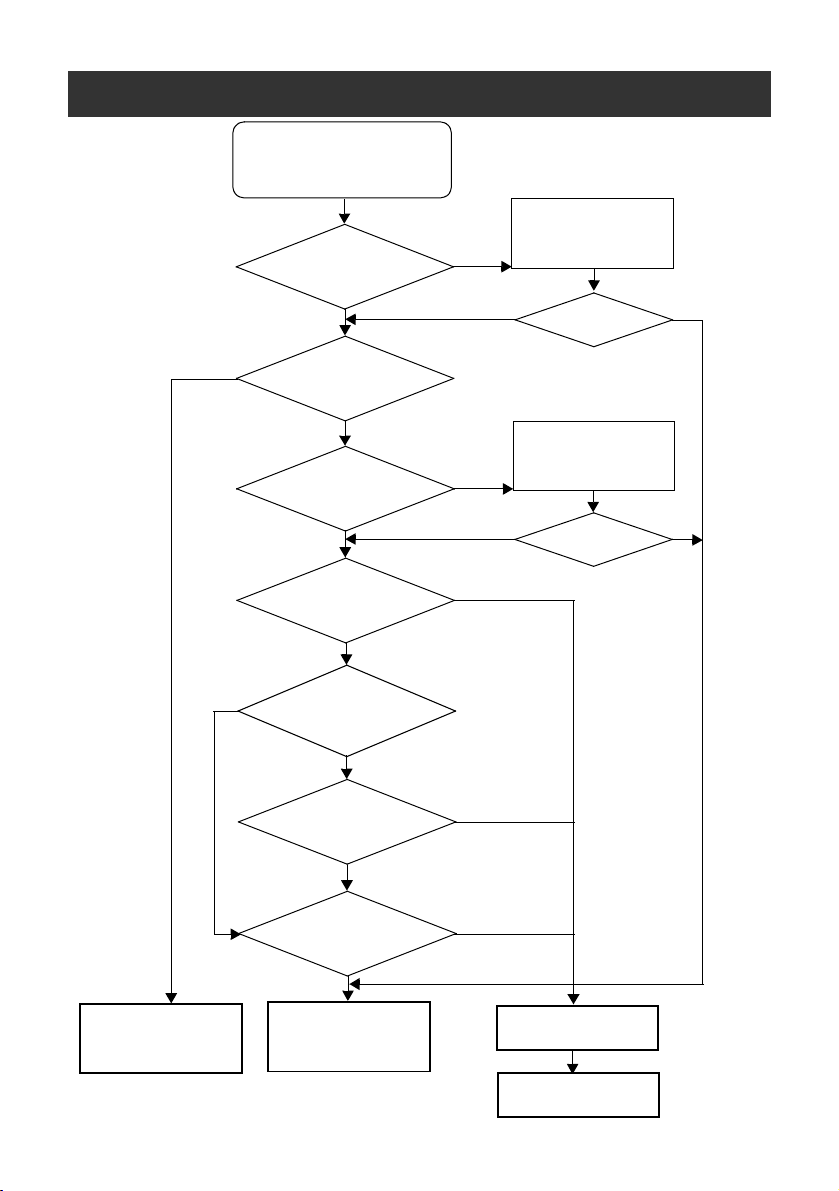
Troubleshooting
Network printing is not possible.
Is the printer driver
installed?
No
Install the printer
driver.
Is printing possible?
Is printing
possible if the P-touch is
directly connected to the
computer?
Is other equipment
on the network operating
properly?
Do the LEDs
on the print server indicate that it
is operating correctly?
Was there a reply
to “C:\pingxxx.xxx.xxx.xxx”
(where “xxx.xxx.xxx.xxx” is the IP
address of PS-9000) at the
command prompt?
Can PS-9000 be
found when the utility is
used?
Is printing possible?
Is printing possible?
No
Check the network
environment that is
being used.
No
No
Yes
Yes
Yes
Yes
No
Yes
No
Yes
Yes
*
There may be a problem
with the print server.
The problem has been
corrected.
There is a problem with
the printer.
Check the setup procedure
for the printer.
No
No
Yes
No
Yes
Consult a service
representative.

34
*For details on the LEDs, refer to “Parts and Functions” in chapter 1, “About PS-9000”.
■ 2 LINK LEDs (green)
Lights when a proper LAN connection is established.
With a 100BASE-TX–compatible machine, check which LED is lit to determine if the connected
LAN interface is 10BASE-T or 100BASE-TX.
■ STATUS LED (orange)
Flashes during data transfer. During data transfer, this LED flashes at irregular intervals.
If the LEDs indicate that operations are not being performed correctly, connected equipment or cables
connecting the PS-9000 to the computer running the setup utility are not set up correctly. (Check that
the indicators for the power supply and connection on the hub or router indicate that they are
operating correctly.) If they are not operating correctly, replace the power supply cables, connection
cables or connected equipment, and then try performing the operation again.

5
Appendix
Caution
● You need to have administrator privileges to set up PS-9000 in Microsoft
®
Windows
NT
® 4.0, Microsoft
®
Windows
®
2000 Pro and Microsoft
®
Windows
®
XP.
LPR Printing in Microsoft
®
Windows NT
®
4.0, Microsoft
®
Windows
®
2000 Pro
and Microsoft
®
Windows
®
XP.......................................................................36
PS-9000 Settings............................................................................................44
Contact Information (For USA Only) ............................................................46
36
LPR Printing in Microsoft
®
Windows NT
®
4.0, Microsoft
®
Windows
®
2000 Pro and Microsoft
®
Windows
®
XP
This section explains how to setup and print with PS-9000 using LPR of Microsoft
®
Windows NT
®
4.0,
Microsoft
®
Windows
®
2000 Pro and Microsoft
®
Windows
®
XP.
Print using an LPR port in Microsoft
®
Windows NT
®
4.0
(PT-9500PC only)
1
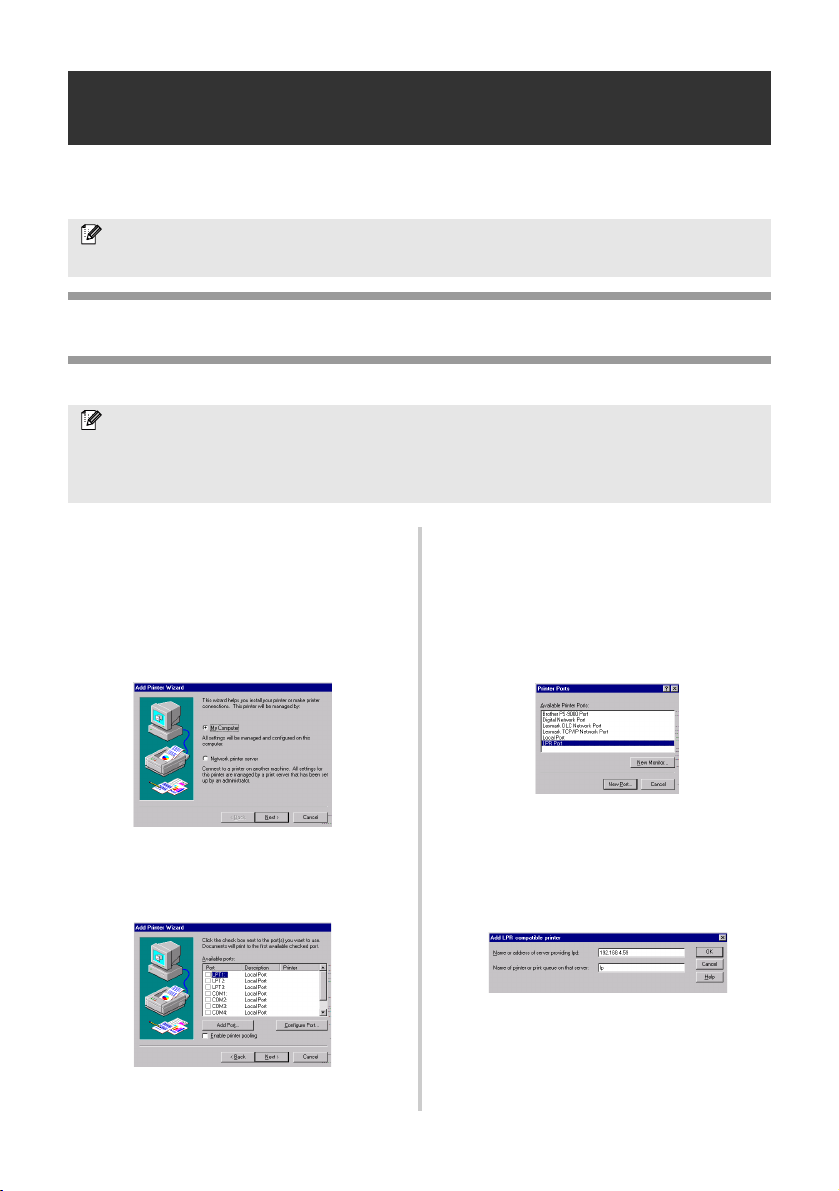
Go to “Start” – “Settings” – “Printers”,
and then double-click [Add Printer] to
start up the wizard.
2
In the following dialog box that
appeared, select “My Computer”, and
then click [Next].
3
In the following dialog box that
appeared, click [Add Port], and then
create a new port.
• If you have already created a port when
you installed PS-9000, select the port
from the list, and then continue with
step 6.
4
Select “LPR Port” from the “Available
Printer Ports”, and then click [New Port].
5
In the “Name or address of server
providing lpd” box, type in the IP address
that was set for PS-9000. In the “Name
of printer or print queue on that server”
box, type in “lp”, and then click [OK].
Note
● PT-9200DX doesn’t support LPR printing.
Note
● In order to print using LPR, an LPR port must be added. Go to “Start” – “Settings” – “Control
Panel”
– “Network”, and then select “Services”. Click [Add], select “Microsoft TCP/IP Printing”,
and then click [OK]. The component is installed. Restart the computer.
37
6
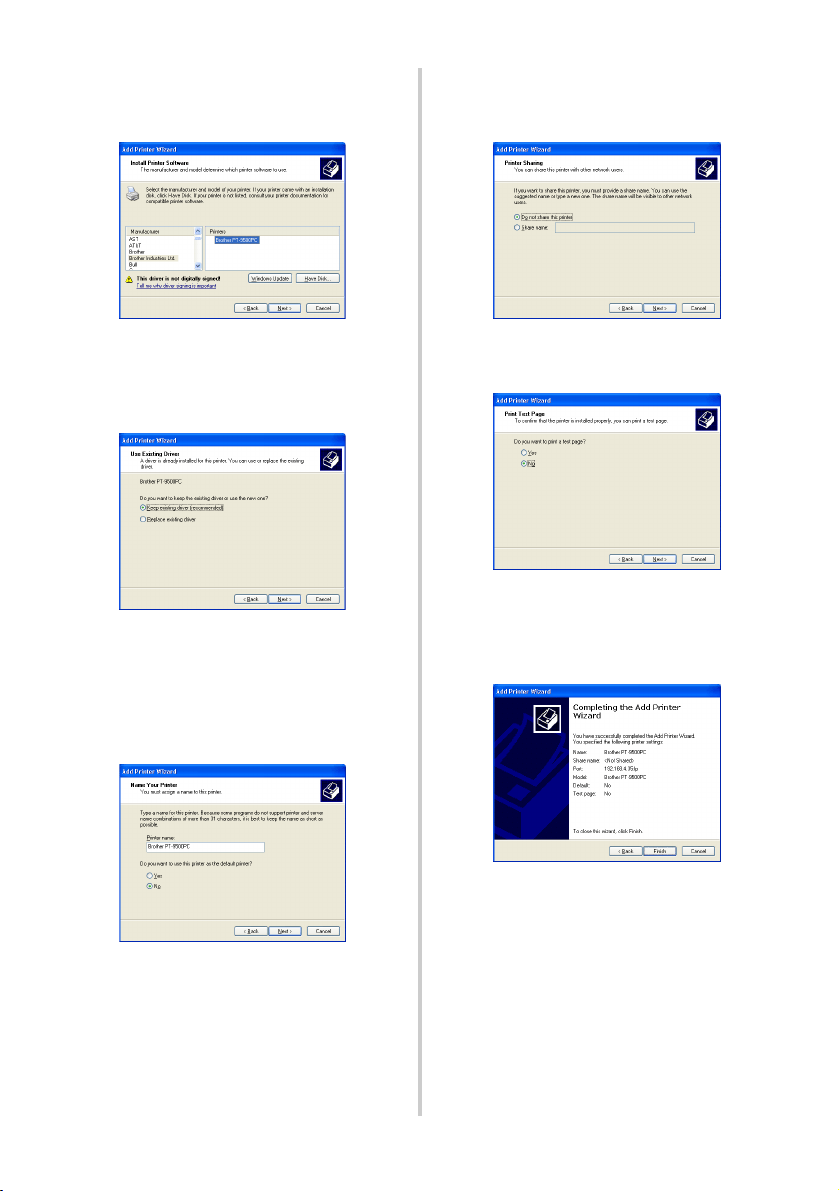
In the list of “Available Ports”, select the
appropriate port, and then click [Next].
7
In the Add Printer Wizard dialog box,
select the P-touch printer driver to be
used, and then click [Next].
8
In the Use Existing Driver dialog box,
select whether to keep the existing driver
or replace it with a new driver, and then
click [Next].
9
In the “Printer name” box, type the
P-touch printer name to be used in
Microsoft
®
Windows NT® 4.0. If
necessary, type in the desired name.
Select whether or not to use this printer as
the default printer, and then click [Next].
0
In the Printer Sharing dialog box, select
“Shared” or “Not shared” according to
your environment. If the printer is
shared, type a share name. Then, click
[Next].
a
In the Print Test Page dialog box, select
“No”, and then click [Finish].
When the new printer is added to the list,
the printer setup is complete.
b
Print after displaying the printer’s
Properties dialog box, then clearing the
“Enable bidirectional support” check
box on the Ports tab, and selecting
“Disable” for Printer Monitor on the
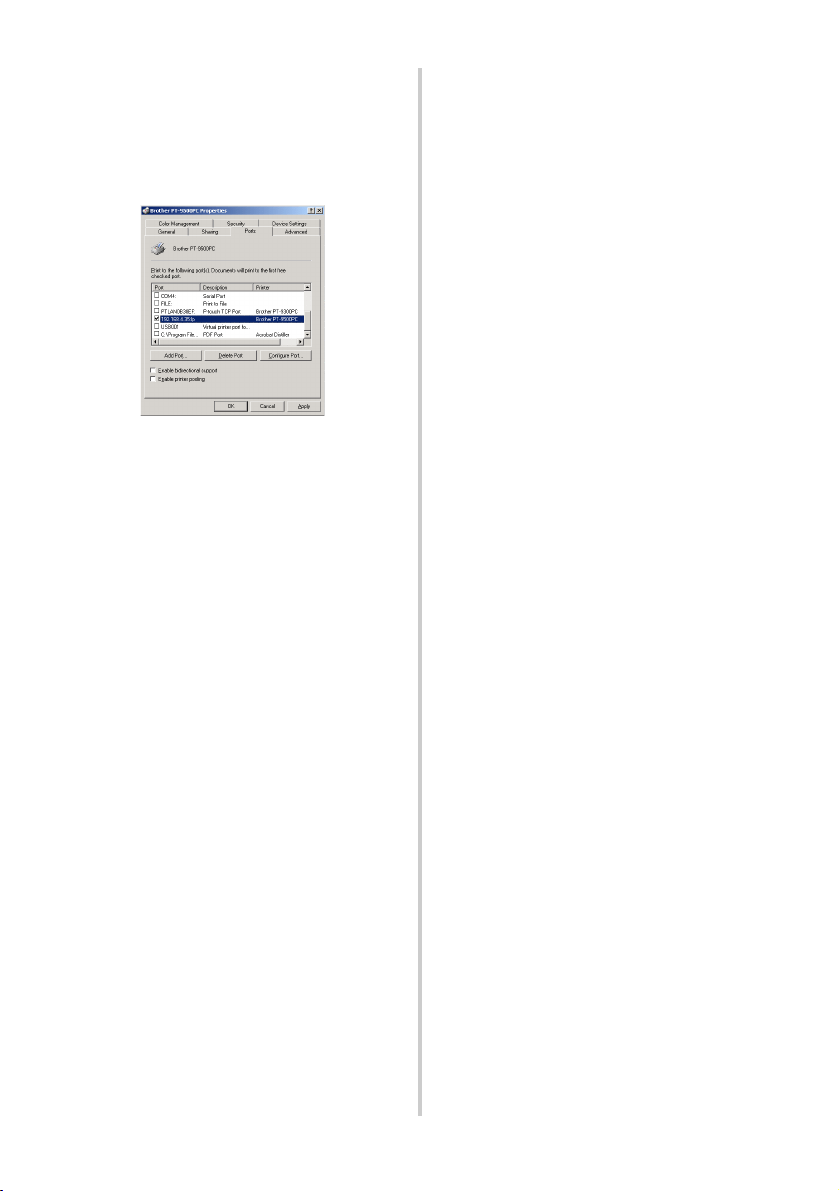
Device Settings tab.
38
Print using an LPR port in Microsoft
®
Windows
®
2000 Pro
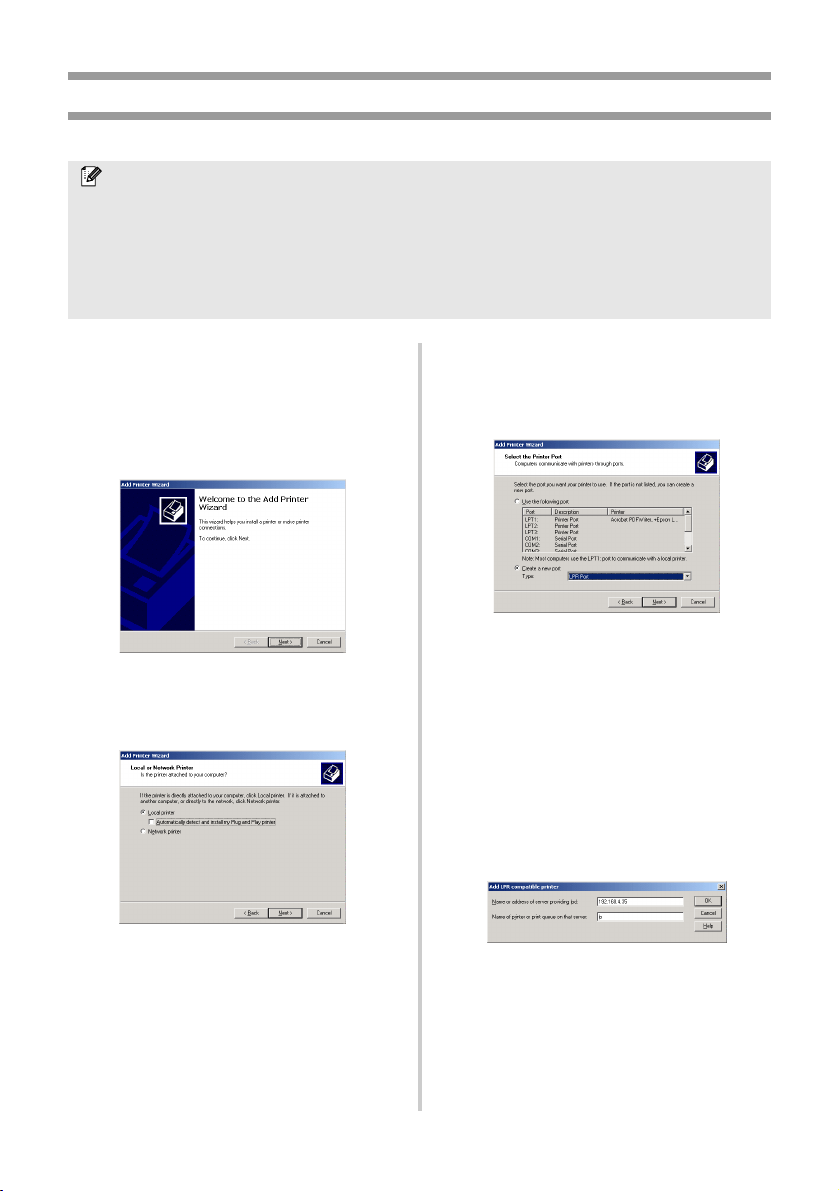
1
Go to “Start” – “Settings” – “Control
Panel” – “Printers”, and then double-
click [Add Printer].
The Add Printer Wizard starts up.
2
Click [Next].
3
Select “Local printer”. Be sure to clear
the “Automatically detect and install my
Plug and Play printer” check box.
4
In the Select the Printer Port dialog box,
select “Create a new port” to create a
new port. Select “LPR Port”, and then
click [Next].
• If the destination print port was created
when PS-9000 was installed, select the
port from the “Use the following port”
list, and then click [Next].
5
In the “Name or address of server
providing lpd” box of the Add LPR
compatible printer dialog box, type in the
IP address that was set for PS-9000. In
the “Name of printer or print queue on
that server” box, type in “lp”, and then
click [OK].
Note
● In order to print using LPR, an LPR port must be added. Go to “Start” – “Settings” – “Control
Panel”
– “Add/Remove Programs” – “Add/Remove Windows Components” to start up the
Windows Components Wizard. In the “Components” list, select “Other Network File and Print
Services,” click [Details], select “Print Services for Unix”, and then click [OK]. In the Windows
Component Wizard, click [Next]. After the component is added, click [Finish]. The LPR port is
added.
39
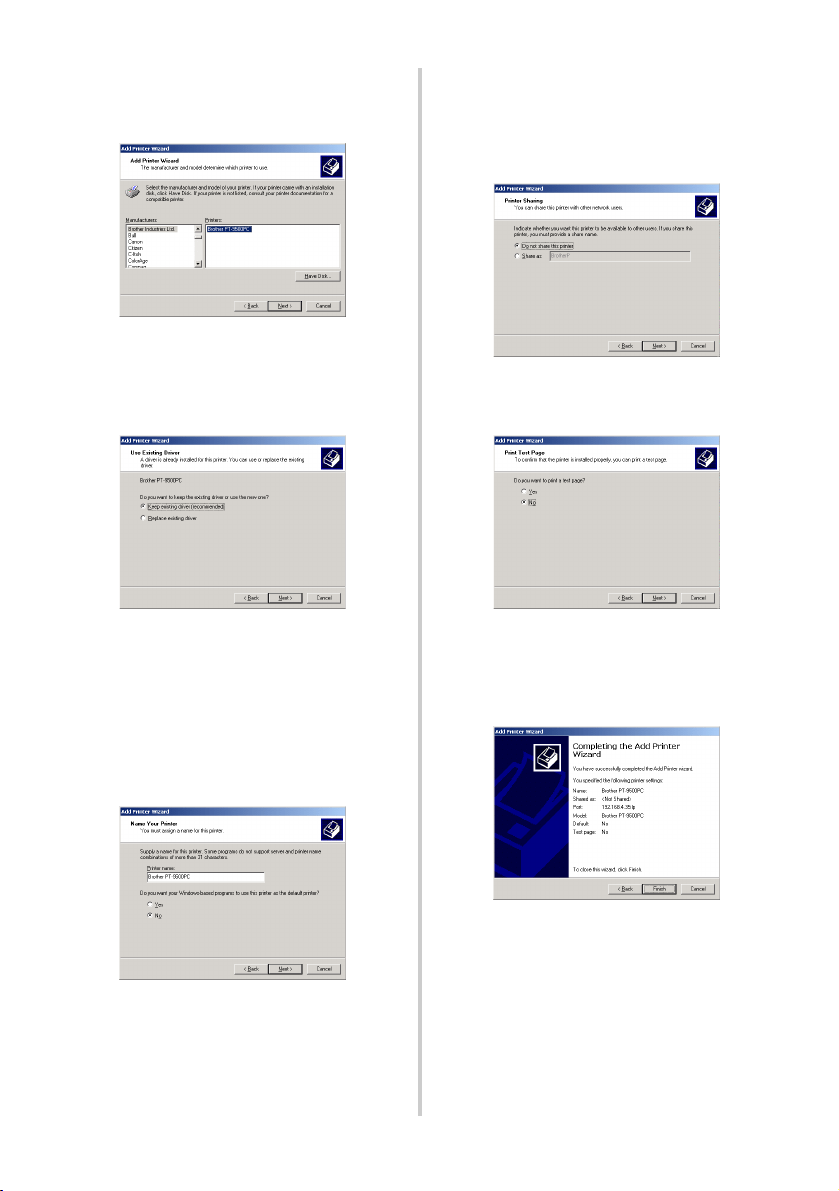
6
In the Add Printer Wizard dialog box,
select the P-touch printer driver to be
used, and then click [Next].
7
In the Use Existing Driver dialog box,
select whether to keep the existing driver
or replace it with a new driver, and then
click [Next].
8
In the “Printer name” box, type in the
P-touch printer name to be used in
Microsoft
®
Windows
®
2000 Pro. If
necessary, type in the desired name.
When you are asked to select whether or
not to use this printer as the default
printer, select “No”, and then click
[Next].
9
In the Printer Sharing dialog box, select
“Share as” or “Do not share this printer”
according to your environment. If the
printer is shared, type a share name.
Then, click [Next].
0
In the Print Test Page dialog box, select
“No”, and then click [Next].
a
The configuration information will be
listed. If it is correct, click [Finish].
When the new printer is added to the list,
the printer setup is complete.
40
b
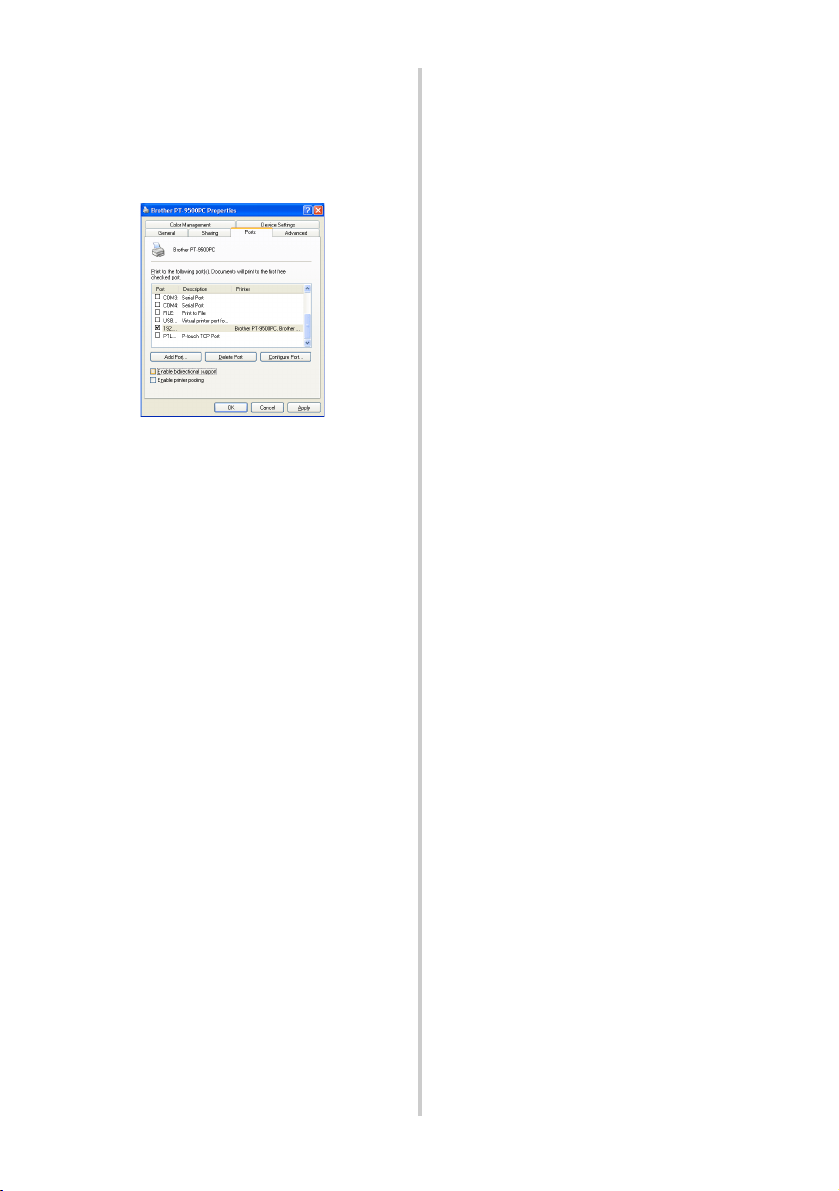
Print after displaying the printer’s
Properties dialog box, then clearing the
“Enable bidirectional support” check
box on the Ports tab, and selecting
“Disable” for Printer Monitor on the
Device Settings tab.

41
Print using an LPR port in Microsoft
®
Windows
®
XP
1
Go to “start” – “Control Panel” –
“Printers and Other Hardware”, and
then click [Add a printer] to start up the
wizard.
2
Select “Local printer attached to this
computer”. Be sure to clear the
“Automatically detect and install my Plug
and Play printer” check box.
3
In the Select a Printer Port dialog box,
select “Create a new port” to create a
new port. Select “LPR Port”, and then
click [Next].
• If the destination print port was created
when PS-9000 was installed, select the
port from the “Use the following port”
list, and then click [Next].
4
In the “Name or address of server
providing lpd” box of the Add LPR
compatible printer dialog box, type in the
IP address that was set for PS-9000. In
the “Name of printer or print queue on
that server” box, type in “lp”, and then
click [OK].
Note
● In order to print using a LPR, an LPR port must be added. Go to “start” – “Control Panel” – “Add
or Remove programs”
– “Add/Remove Windows Components” to start up the Windows
Components Wizard. In the “Components” list, select “Other Network File and Print Services”,
click [Details], select “Print Services for Unix”, and then click [OK]. In the Windows
Components Wizard, click [Next]. After the component is added, click [Finish]. The LPR port is
added.
42
5
In the Add Printer Wizard dialog box,
select the P-touch printer driver to be
used, and then click [Next].
6
In the Use Existing Driver dialog box,
select whether to keep the existing driver
or replace it with a new driver, and then
click [Next].
7
In the “Printer name” box, type in the
P-touch printer name to be used in
Microsoft
®
Windows
®
XP. If necessary,
type in the desired name.
Select whether or not to use this printer as
the default printer, and then click [Next].
8
In the Printer Sharing dialog box, select
“Do not share this printer”, and then
click [Next].
9
In the Print Test Page dialog box, select
“No”, and then click [Next].
0
The configuration information will be
listed. If it is correct, click [Finish].
When the new printer is added to the list,
the printer setup is complete.
43
a
Print after displaying the printer’s
Properties dialog box, then clearing the
“Enable bidirectional support” check
box on the Ports tab, and selecting
“Disable” for Printer Monitor on the
Device Settings tab.

44
PS-9000 Settings
Below are the settings for PS-9000.
General
TCP/IP
Name
Factory
Default
Explanation
CD-ROM
Setup
Web page
LAN Interface AUTO
Set up network type. Normally use in
AUTO. If the LINK LED on the hub
does not light up after the PS-9000 is
turned on, select the appropriate
network type for the hub.
Name
Factory
Default
Explanation
CD-ROM
Setup
Web page
Receive IP
address
automatically
DHCP/BOOTP ENABLE
Enables or disables DHCP/BOOTP.
These are protocols where the IP
address is acquired from the
DHCP/BOOTP server during start up.
In order for DHCP/BOOTP to specify
the IP address of PS-9000, a
DHCP/BOOTP server must exist
within the subnetwork and be
properly set up. PS-9000 will
automatically acknowledge DHCP
and BOOTP, and use as its own
address the IP address that it
previously received as a reply.
RARP ENABLE
Enables or disables RARP. RARP is a
protocol where the IP address is
acquired from the RARP server during
start up. In order for DHCP/BOOTP to
specify the IP address of PS-9000, an
RARP server must exist within the
subnetwork and be properly set up.
IP Address IP Address 0.0.0.0
Sets up the IP address of PS-9000. The
value must be configured in the
format of four series of numbers
separated by decimal points, such as
“xxx.xxx.xxx.xxx”.

45
Subnet Mask Subnet Mask 0.0.0.0
Sets up the subnet mask of PS-9000.
The value must be configured in the
format of four series of numbers
separated by decimal points, such as
“xxx.xxx.xxx.xxx”. If “0.0.0.0” is
specified, this setting will become
disabled and, according to the IP
address, the subnet mask will
automatically be used.
Default
Gateway
Default
Gateway
0.0.0.0
Sets up the gateway IP address. The
value must be configured in the
format of four series of numbers
separated by decimal points, such as
“xxx.xxx.xxx.xxx”. The gateway must
reside within the same subnetwork as
PS-9000. If “0.0.0.0” is specified, this
setting will become disabled.
Name
Factory
Default
Explanation
CD-ROM
Setup
Web page

46
Contact Information (For USA Only)
Service Center Locations
If you need a local service center, please call 1-800-284-HELP (4357)
to locate the authorized service center closest to you.
Note: Be sure to call the Service Center before your visit.
Service centers do not provide operational assistance. See “Operational Assistance”.
Operational Assistance
For technical and operational assistance you may call Brother Customer Service at:
Voice 1-877-4-PTouch, or Fax 1-901-379-1210
Assistance on the Internet
For product information and downloading the latest drivers: http://www.brother.com
For purchasing accessories and certain Brother products: http://www.brothermall.com
Fax-Back System
Brother Customer Service has installed an easy-to-use Fax-Back System so you can get
instant answers to common technical questions and product information for all Brother products.
This system is available 24 hours a day, 7 days a week. You can use the system to send the information
to any fax machine, not just the one you are calling from.
Please call 1-800-521-2846 and follow the voice prompts to receive faxed instructions on how to
use the system and an index of Fax-Back subjects.
SHOULD YOU ENCOUNTER ANY PROBLEMS WITH YOUR PRODUCT, PLEASE DO NOT
RETURN YOUR PRODUCT TO THE STORE!
After referring to this User’s Guide, if you still need assistance, refer to the Brother Contact
information in this guide.