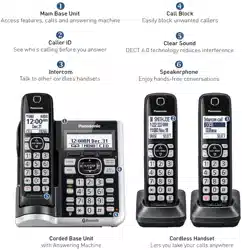
User Manual Cordless Phone
Getting Started
Setting up
Connections
- If you do not connect the telephone line cord and use only cellular lines, set the cellular line only mode to use this unit more conveniently (page 19).
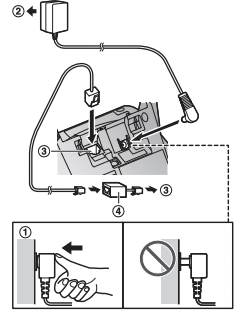
Base unit
- Connect the AC adaptor to the unit by pressing the plug firmly.
- Connect the AC adaptor to the power outlet.
- Connect the telephone line cord to the unit, then to the single-line telephone jack (RJ11C) until you hear a click.
- A DSL/ADSL filter (not supplied) is required if you have a DSL/ADSL service.
Note:
- Use only the supplied Panasonic AC adaptor PNLV226.
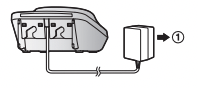
Charger
- 1 Connect the AC adaptor to the power outlet.
Battery installation
- USE ONLY rechargeable Ni-MH batteries AAA (R03) size

- Do NOT use alkaline/manganese/Ni-Cd batteries.
- Confirm correct polarities

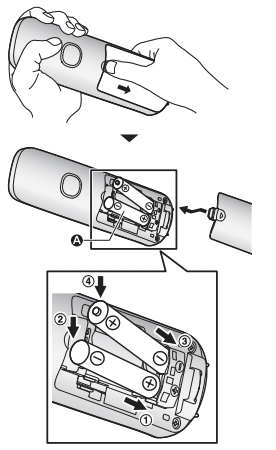
- Follow the directions on the display to set up the unit.
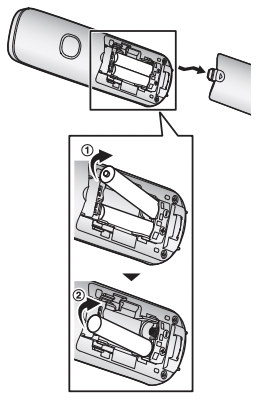
Removing the battery
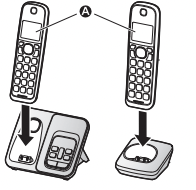
Battery charging
Charge for about 7 hours.
- Confirm “Charging” is displayed
- When the batteries are fully charged, “Fully charged” is displayed.
Note when setting up
Note for connections
- The AC adaptor must remain connected at all times. (It is normal for the adaptor to feel warm during use.)
- The AC adaptor should be connected to a vertically oriented or floor-mounted AC outlet. Do not connect the AC adaptor to a horizontally oriented AC outlet that faces the floor, such as an AC outlet installed on a ceiling or under a table, as the weight of the adaptor may cause it to become disconnected.
Power failure
- The unit cannot be used to make or receive calls during a power failure. We recommend connecting a corded-type telephone that does not use an AC adaptor to your telephone line.
Note for battery installation
- Use the supplied rechargeable batteries. For replacement, we recommend using the Panasonic rechargeable batteries noted on page 4, 8.
Note for battery charging
- It is normal for the handset to feel warm during charging.
- Clean the charge contacts of the handset, base unit, and charger with a soft and dry cloth once a month. Before cleaning the unit, disconnect from power outlets and any telephone line cords. Clean more often if the unit is exposed to grease, dust, or high humidity.
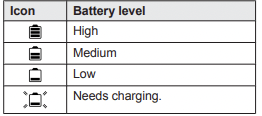
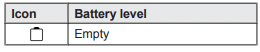
Battery level
Panasonic Ni-MH battery performance (supplied batteries)
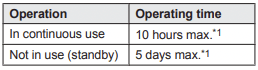
*1 If eco mode is on.
Note:
- Actual battery performance depends on usage and ambient environment.
Intelligent eco mode
This feature automatically reduces handset power consumption by suppressing handset transmission power when the handset is close to the base unit.
- When this feature is activated,
 is displayed. However, during a cellular call, is not displayed even though this feature is activated.
- Eco mode is turned off when the clarity booster is activated (page 23).
Controls
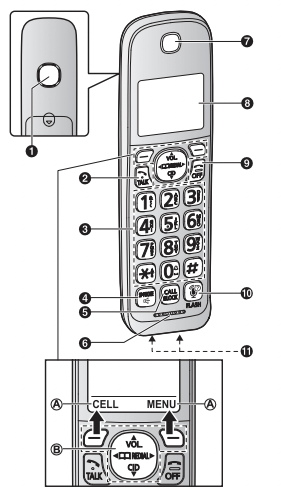
Handset
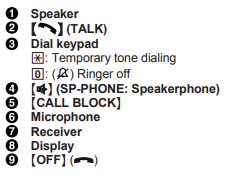
Control type
 Soft keys
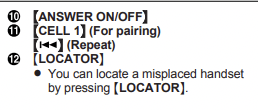
By pressing a soft key, you can select the feature shown directly above it on the display. After a cellular phone is paired, [CELL] is displayed
 Navigator key
–  or
or  : Scroll through various lists and items.
– VOL. (Volume:  or
or  ): Adjust the receiver or speaker volume while talking.
–  : View the phonebook entry.
–  REDIAL: View the redial list.
–  CID (Caller ID): View the caller list.
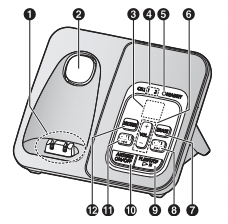
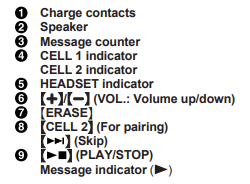
Base unit
Display icons/Indicators
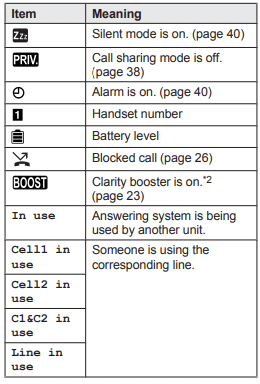
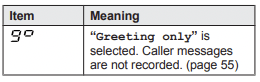
Handset display items
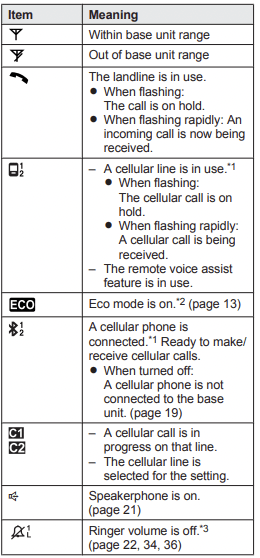
*1 Corresponding lines (1, 2: cellular line) are indicated next to the item.
*2 During a cellular call, the item is not displayed even though the feature is activated.
*3 Corresponding lines (1, 2: cellular line, L: landline) are indicated next to the item. If all lines are turned off, no line is indicated.
Base unit display item
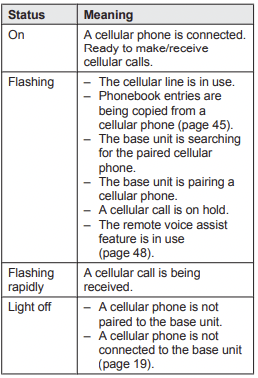
CELL indicators on the base unit
The CELL indicators show each cellular line status.
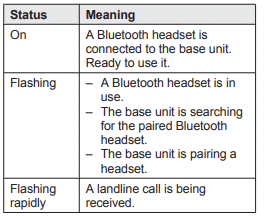
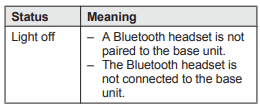
Bluetooth HEADSET indicator on the base unit
The HEADSET indicator shows the Bluetooth headset status.
Language settings
Display language


Voice announcement language
You can select the language used for the following features.
– Answering system guidance
– Talking Caller ID
– Application (App) alert announcement
– Text message (SMS) alert announcement


Date and time

- Enter the current month, date, and year by selecting 2 digits for each. Example: July 12, 2017

- [OK]
- Enter the current hour and minute (12-hour clock format) by selecting 2 digits for each. Example: 9:30


Note:
- When English is selected as the display language, 12-hour clock format is used. When Spanish is selected, 24-hour clock format is used.
Recording your greeting message
You can record your own greeting message instead of using a pre-recorded greeting message. See page 51 for details.


Other settings
Dialing mode
If you cannot make calls, change this setting according to your telephone line service. The default setting is “Tone”. “Tone”: For tone dial service.
“Pulse”: For rotary/pulse dial service.


Link to cell feature
You can connect your base unit and cellular phone using Bluetooth wireless technology, so that you can make or answer cellular calls using your phone system. This allows you to:
– use the unit to talk on cellular calls even if some areas of your home have poor cellular reception, simply by placing your cellular phone in an area with good reception.
– talk on cellular calls even if your cellular phone is in your pocket or bag.
– enjoy cordless cellular calls even if your cellular phone plugged in and charging.
Important:
- Your cellular phone must support the Hands Free Profile (HFP) specification.
- may pair 2 cellular phones and 1 Bluetooth headset.
- The unit can be used to talk on 2 lines at the same time (for example, 2 cellular lines, or the landline and 1 cellular line).
- Only 2 Bluetooth devices can be used with the unit at the same time (for example, 2 cellular lines, or the Bluetooth headset and 1 cellular line*1).
- Locate your cellular phone near the base unit. If the cellular phone is too close to the base unit during a cellular call, you may hear noise. For best performance, we recommend placing the cellular phone between 0.6 m to 3 m (2 feet to 10 feet) away from the base unit.
*1 You cannot use a Bluetooth headset to talk on a cellular line.
Pairing a cellular phone
Important:
- For more details and the list of compatible cellular phones, please visit our Website
- Before pairing a Bluetooth enabled cellular phone to the base unit, make sure that no other Bluetooth device such as a Bluetooth headset is connected to your cellular phone
1 Base unit:
Press and hold [CELL1] or [CELL2] for about 5 seconds.
- After the corresponding CELL indicator on the base unit starts flashing, the rest of the procedure must be completed within 5 minutes.
2 Your cellular phone:
While the corresponding CELL indicator is flashing, follow the instructions of your cellular phone to enter the pairing mode.
- Depending on your cellular phone, it may ask you to enter the Bluetooth PIN (default: “0000”).
- If your cellular phone prompts you to confirm the passkey, tap [OK] or otherwise to accept the pairing request.
3 Base unit:
Wait until a long beep sounds.
- It may take more than 10 seconds to complete pairing.
- When the corresponding CELL indicator lights up, the cellular phone is connected to the base unit. You are ready to make cellular calls.
Note:
- If the cellular phone has already paired to the base unit, it is overwritten.
- Make sure that your cellular phone is set to connect to this product automatically. Refer to your cellular phone’s operating instructions.
- Make sure you cancel your cellular phone’s current pairing if you want to pair it to the other line (page 17).
- The default setting for the alert feature is “On”, so when you pair your cellular phone to the base unit, this feature may be activated (page 47). (This depends on the version and type of cellular phone you are using.)
Unpairing a cellular phone
You can cancel the pairing of a cellular phone that is stored in the base unit.
Link to Cell
- For CELL 1:
 For CELL 2:
 When the cellular phone is unpaired, the CELL indicator is turned off.
Link to cell settings
Selecting which unit receives cellular calls
You can select which unit rings and receives calls for a cellular line. When “All” is selected, all handsets and the base unit ring
- For CELL 1:
 For CELL 2:

Note:
- When you select a specific handset to receive calls for a cellular line other handsets cannot answer the calls.
- When you change to “All” from another setting, the base unit ringer volume also returns to the lowest level even if the ringer volume was changed.
- The units selected with this setting have the alert feature (page 47) applied to them.
Ring as cell mode
Once this feature is turned on, the handset and base unit ring using the same ringer tone as your cellular phone. The following settings are available:
– “Off”: Turn this feature off to use the ringer tones of the handset and base unit. Caller information is announced depending on the Talking Caller ID setting (page 36).
– “On (with Talking CID)” (default): The handset and base unit use your cellular phone’s ringer tone. Caller information is announced even if the Talking Caller ID is turned off.
– “On (without Talking CID)”: The handset and base unit use your cellular phone’s ringer tone. Caller information is not announced even if the Talking Caller ID is turned on.
Important:
- To use this feature, your cellular phone must support Bluetooth in-band ringtone. Refer to your cellular phone’s operating instructions.
- For CELL 1:
 For CELL 2:

Note:
- The units use the preset ringer tones instead of your cellular phone’s ringer tone when a cellular call is being received if:
– your cellular phone is in silent mode (depending on your cellular phone).
– the base unit is in use.
– 2 handsets are sharing a landline call.
- If your cellular phone is in silent mode with “On (with Talking CID)” set, the unit announces caller information even when Talking Caller ID is turned off (page 36).
To use the handset ringer tone instead of your cellular phone’s ringer tone
Select “Off” in step 2, “Ring as cell mode”, page 18. To change the handset ringer tone for a cellular line, see page 34.
Auto connection to the Bluetooth devices (cellular phones)
After pairing, your Bluetooth devices are connected to the base unit. If you move the Bluetooth devices out of base unit range, the Bluetooth devices are disconnected from the base unit. This feature allows the base unit to try to reconnect the Bluetooth devices at regular intervals when it returns within base unit range. You can set the interval. The default setting is “1 min”.
Using Bluetooth® Devices
Copying phonebook from a cellular phone (phonebook transfer)
You can copy phonebook entries from the paired cellular phones or other cellular phones (not paired) to the unit’s phonebook. A cellular phone must be compatible with Bluetooth wireless technology.
Important:
- Your cellular phone must support Phone Book Access Profile (PBAP) or Object Push Profile (OPP) specification.
- If a copied entry has 2 or more phone numbers, each phone number (6 max.) is stored as a separate entry with the same name.
- If a phonebook entry includes additional data such as a picture, that entry may fail to copy to the base unit.
- If your cellular phone includes international call entries, set the conversion codes before copying (page 45).
1 Handset: 
2 Handset: To copy from paired cellular phones:
 : Select the desired cellular phone.
  [SELECT]
- Copied items are stored to the group (“Cell 1” or “Cell 2”) which the cellular phone is paired to
To copy from other cellular phones (not paired):
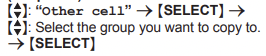
3 Handset:
When “Use the cell to transfer phone book” is displayed: Go to step 4.
When “Select mode” menu is displayed:
: Select “Auto” or “Manual”. [SELECT]
“Auto”: Download all entries from the cellular phone automatically. Go to step 5.
“Manual”: Copy entries you selected.
- “Select mode” menu is displayed only when the cellular phone supports Phone Book Access Profile (PBAP) for Bluetooth connection.
- Some cellular phones may require you to perform an operation on the cellular phone even if you select “Auto”
4 Cellular phone:
Follow the instructions of your cellular phone to copy phonebook entries
- For other cellular phones (not paired), you need to search for and select the base unit. The Bluetooth PIN (default: “0000”) may be required.
- If your cellular phone prompts you to confirm the passkey, tap [OK] or otherwise to accept the pairing request.
- The entries being copied are displayed on the handset.
5 Handset:
Wait until “Completed” is displayed.
- You can continue copying other entries if necessary.
6 Handset: [OFF]
Note:
- Some copied entries may have characters which are not available. These characters can be displayed but cannot be entered when editing an entry.
- The unit does not support some characters. If a copied entry includes those characters, they are replaced with other available characters or “
 ”.
”.
- If you receive a call while copying phonebook entries, the copying procedure stops. Try again after finishing the call.
Setting conversion codes
You must first set the following 3 dialing codes before transferring the phonebook from your cellular phone (4 digits max. each).
– “International code”: An international prefix used when you make an international call.
– “Country code”: Your country code for international calls.
– “Trunk prefix”: A trunk prefix; the initial digit(s) to be dialed in a domestic call, prior to the area code.
1. [MENU]
2 To store “International code”: 
To store “Country code”: 
To store “Trunk prefix”: 
3 Enter the desired number. [SAVE] [OFF]
Note:
- After you copy the entries, confirm that the numbers were transferred correctly.
Starting the app for the first time
1 Make sure that your Android device’s Bluetooth feature is turned on and that your Android device is paired to the base unit.
2 Start the Link to Cell app by tapping its icon.
3 Follow the on-screen instructions.
Important:
- For further information, refer to the instructions on web page listed above.
- To use this feature, the following settings are required.
– Android phone: Bluetooth must be turned on.
– Android phone: [Application Alerts manager]*1 must be turned on.
– Handset: “Alert On/Off” must be turned on (page 47).
- If this feature does not work, turn on your device’s Bluetooth feature, unplug the base unit’s AC adaptor, and then reconnect it.
*1 Turning on [Application Alerts manager]
Use the following procedure after installing the Link to Cell app.
Android 2.x: Open your device’s
[Settings] app. Tap [Accessibility]. Turn on the [Accessibility] and [Application Alerts manager] checkboxes.
Android 4.x: Open your device’s
[Settings] app. Tap [Accessibility]. Turn on [Application Alerts manager].
Requirements
- An Android device (Android 2.1 or later)
Turning alert on/off
Once this feature is turned on, it will alert you on the handset when your cellular phone receives notifications.
– “On” (default): The handset alerts you.
– “Off”: The handset does not alert you.
1. For CELL 1: 
For CELL 2: 
2. 
Setting the voice alert
You can turn on/off the voice alert.
– “On” (default): The handset notifies you by voice announcement.
– “Off”: Voice announcement is not available as alert.
1. For CELL 1: 
For CELL 2: 
2. 
Selecting the alert tone
1. For CELL 1: 
For CELL 2: 
2. 
Error messages
Ask phone company for VM access #
- You have not stored the voicemail access number. Store the number (page 56).
Busy
- No cellular phone is paired to the base unit. Pair a cellular phone (page 17).
- The called unit is in use.
- Other units are in use and the system is busy. Try again later.
- The handset you are using is too far from the base unit. Move closer and try again.
- Only 2 Bluetooth devices can be used with the unit at the same time (for example, 2 cellular lines, or the headset and 1 cellular line).
- The voice recognition feature could not be activated. Try again later.
Check tel line
- The supplied telephone line cord has not been connected yet or not connected properly. Check the connections (page 11).
- If you do not connect the telephone line cord and use only cellular lines, set the cellular line only mode (page 19).
Error!!
- Recording was too short. Try again.
- Someone is using a cellular line or headset. Try again later.
- The phonebook copy is incomplete (page 45). The cellular phone is disconnected from the base unit. Make sure that other Bluetooth devices are not connected to the cellular phone, and try again.
Failed
Although the unit tried to connect to the cellular phone or headset, the connection has been failed.
– Someone is using a cellular line or headset. Try again later.
– Make sure that the cellular phone or headset is not connected to other Bluetooth devices.
Invalid
- There is no handset registered to the base unit matching the handset number you entered.
- The handset is not registered to the base unit. Register the handset (page 41).
Main unit no power or No link. Reconnect base AC adaptor.
- Confirm the base unit’s AC adaptor is connected to the unit and the power outlet correctly.
- The handset has lost communication with the base unit. Move closer to the base unit and try again.
- Unplug the base unit’s AC adaptor to reset the unit. Reconnect the adaptor and try again.
- The handset’s registration may have been canceled. Re-register the handset (page 41).
Requires subscription to Caller ID.
- You must subscribe to a Caller ID service. Once you receive caller information after subscribing to a Caller ID service, this message will not be displayed.
Use rechargeable battery.
- A wrong type of battery such as alkaline or manganese was inserted. Use only the rechargeable Ni-MH batteries noted on page 4, 8.
Troubleshooting
If you still have difficulties after following the instructions in this section, disconnect the base unit’s AC adaptor, then reconnect the base unit’s AC adaptor. Remove the batteries from the handset, and then insert them into the handset again.
General use
The handset does not turn on even after installing charged batteries.
- Place the handset on the base unit or charger to turn on the handset.
The unit does not work.
- Make sure the batteries are installed correctly (page 11). R
- Fully charge the batteries (page 12).
- Check the connections (page 11).
- Unplug the base unit’s AC adaptor to reset the unit. Reconnect the adaptor and try again.
- The handset has not been registered to the base unit. Register the handset (page 41).
I cannot pair a cellular phone to the base unit.
- Depending on the compatibility of the cellular phone, you may not be able to pair it to the base unit. Confirm that your cellular phone supports the hands-free profile (HFP) specification.
- Confirm that the Bluetooth feature of your cellular phone is turned on. You may need to turn this feature on depending on your cellular phone.
- The Bluetooth technology on your cellular phone may not be functioning normally. Turn off and on your cellular phone.
- If your cellular phone is already connected to another Bluetooth device such as a Bluetooth headset, turn it off or disconnect it from your cellular phone.
- Some cellular phones may require you to enter the Bluetooth PIN to pairing. Confirm that you entered the correct PIN.
I cannot connect a cellular phone to the base unit.
- Confirm that your cellular phone is turned on.
- Confirm that your cellular phone is within base unit range (page 14).
- Your cellular phone’s Bluetooth feature is turned off. Turn it on.
- Depending on the state of the wireless environment, such as the presence of any electrical interference, there may be a delay even if the auto connection feature is turned on. You can connect to the base unit manually (page 19).
- The cellular phone has not been paired to the base unit. Pair the cellular phone (page 17).
- If your cellular phone is already connected to another Bluetooth device such as a Bluetooth headset or other Panasonic DECT phone, disconnect the device, then perform the connecting procedure to the base unit.
- If your cellular phone is already registered on another Panasonic DECT phone, this function will not work properly. We strongly recommend that you remove the registration of this phone on both your cellular phone and on the other Panasonic DECT phone.
I cannot hear a dial tone.
- The base unit’s AC adaptor or telephone line cord is not connected. Check the connections.
- Disconnect the base unit from the telephone line and connect the line to a known working telephone. If the working telephone operates properly, contact our service personnel to have the unit repaired. If the working telephone does not operate properly, contact your phone service provider.
Menu list
The display is in a language I cannot read.
- Change the display language (page 16).
I cannot register a handset to a base unit.
- The maximum number of handsets (6) is already registered to the base unit. Cancel unused handset registrations from the base unit (page 41).
Battery recharge
The handset beeps and/or flashes.
- Battery charge is low. Fully charge the batteries (page 12).
I fully charged the batteries, but
– still flashes,
– is displayed, or
– the operating time seems to be shorter.
- Clean the battery ends and the charge contacts with a dry cloth and charge again.
- It is time to replace the batteries (page 11).
Making/answering calls, intercom
 is displayed.
- The handset is too far from the base unit. Move closer.
- The base unit’s AC adaptor is not properly connected. Reconnect AC adaptor to the base unit.
- The handset is not registered to the base unit. Register it (page 41).
Noise is heard, sound cuts in and out.
- You are using the handset or base unit in an area with high electrical interference. Re-position the base unit and use the handset away from sources of interference.
- Move closer to the base unit.
- If you use a DSL/ADSL service, we recommend connecting a DSL/ADSL filter between the base unit and the telephone line jack. Contact your DSL/ADSL provider for details.
The handset or base unit does not ring.
- The ringer volume for landline is turned off. Adjust the ringer volume (page 22, 36).
- The ringer volume for cellular line is turned off. Adjust the ringer volume (page 22, 34).
- The unit which is not selected to ring for cellular calls does not ring. To change the selection, see page 18.
- Silent mode is turned on. Turn it off (page 40).
- The ringer volume is turned off by pressing and holding
 ). Press and hold ) again to turn it on (page 22).
I cannot make local calls with the handset using a cellular line.
- You need to add your area code when making cellular calls. Store your area code in order to automatically add it to the beginning of the 7-digit phone number when making cellular calls (page 20).
I cannot make or answer cellular calls with the handset.
- Depending on the cellular phone’s compatibility (page 5), you may not be able to make or answer cellular calls even if the cellular phone is connected to the base unit.
- Make sure that the CELL indicator lights up and the cellular phone is connected to the base unit (page 19).
- Only 2 Bluetooth devices can be used with the unit at the same time (for example, 2 cellular lines, or the headset and 1 cellular line).
- The cellular phone is being used separately from your system.
I can make and answer cellular calls but cannot hear a sound.
- The Bluetooth technology on your cellular phone may not be functioning normally. Turn off and on your cellular phone.
- Disconnect and reconnect the base unit AC adaptor and try again.
I cannot switch cellular calls from the unit to the cellular phone.
- Your cellular phone may not support this feature. Refer to the operating instructions of your cellular phone.
I cannot make a call using a landline.
- The dialing mode may be set incorrectly. Change the setting (page 16).
I cannot use a cellular line or a landline.
- The unit can be used to talk on 2 lines at the same time (for example, 2 cellular lines, or the landline and 1 cellular line).
I cannot make long distance calls.
- Make sure that you have long distance service.
Caller ID/Talking Caller ID
Caller information is not displayed.
- You must subscribe to Caller ID service. Contact your phone service provider for details.
- If your unit is connected to any additional telephone equipment such as a Caller ID box or cordless telephone line jack, plug the unit directly into the wall jack.
- If you use a DSL/ADSL service, we recommend connecting a DSL/ADSL filter between the base unit and the telephone line jack. Contact your DSL/ADSL provider for details.
- The name display service for landline calls may not be available in some areas. Contact your phone service provider for details.
- Other telephone equipment may be interfering with this unit. Disconnect the other equipment and try again.
Caller information is displayed or announced late.
- Depending on your phone service provider, the unit may display or announce the caller’s information at the 2nd ring or later.
- Move closer to the base unit.
Caller information is not announced.
- The ringer volume for landline is turned off. Adjust the ringer volume (page 36).
- The ringer volume for cellular line is turned off. Adjust the ringer volume (page 34).
- The unit which is not selected to ring for cellular calls does not announce caller information. To change the selection, see page 18.
- The Talking Caller ID feature is turned off. Turn it on (page 36).
- The ring as cell mode is set to “On (without Talking CID)”. To change the mode, see page 18.
- The number of rings for the answering system is set to “2 rings” or “Toll saver”. Select a different setting (page 54).
- Your unit does not announce caller information while the other devices such as headset or handsets are engaged in a call.
The caller list/incoming phone numbers are not edited automatically.
- The Caller ID number auto edit feature is turned off. Turn it on and try again (page 37).
- You need to call back the edited number to activate Caller ID number auto edit.
I cannot dial the phone number edited in the caller list.
- The phone number you dialed might have been edited incorrectly (for example, the long distance “1” or the area code is missing). Edit the phone number with another pattern (page 44).
Time on the unit has shifted.
- Incorrect time information from incoming Caller ID changes the time. Set the time adjustment to “Manual” (off) (page 36).
The 2nd caller’s information is not displayed during an outside call.
- In order to use Caller ID, call waiting, or Call Waiting Caller ID (CWID), you must first contact your phone service provider and subscribe to the desired service. After subscribing, you may need to contact your phone service provider again to activate this specific service, even if you already subscribed to both Caller ID and Call Waiting with Caller ID services (CWID).
Using Bluetooth devices
I cannot copy phonebook entries from a cellular phone.
- Confirm that the cellular phone supports Bluetooth wireless technology.
- Confirm that the cellular phone supports the Phone Book Access Profile (PBAP) or Object Push Profile (OPP) specification.
- If the cellular phone is already connected to another Bluetooth device such as a Bluetooth headset, turn it off or disconnect it from the cellular phone.
- Someone is using a cellular line or headset. Try again later.
- Turn the cellular phone off, then turn it on and try again.
- If an entry is already stored in the unit’s phonebook, the entry cannot be copied even by selecting another group.
- iPhone does not support individual phonebook copy.
I cannot have a conversation using the headset. or I cannot connect my headset to the base unit.
- Confirm that the Bluetooth wireless headset supports the HeadSet Profile (HSP) specification.
- Your Bluetooth headset is not paired. Pair it (page 49).
- Turn your headset off, then turn it on and try again.
- If your headset is already connected to another Bluetooth device such as your cellular phone, disconnect the headset from your cellular phone, then perform the connecting procedure from the base unit.
- Only 2 Bluetooth devices can be used with the unit at the same time (for example, 2 cellular lines, or the headset and 1 cellular line).
Noise is heard during a call on the headset.
- A Bluetooth headset can communicate with the base unit within a range of approximately 10 m (33 feet). The connection may be subject to interference from obstructions such as walls or electronic devices. Move closer to the base unit.
Some headset enhanced features are not available.
- The base unit does not support enhanced features such as Last number redial or Call reject.
An error tone is heard when I try to program the Bluetooth feature
- The Bluetooth feature cannot be accessed immediately after connecting the AC adaptor to the base unit. Wait a few seconds and try again.
- The headset has not connected to the base unit yet, even though you performed the connecting procedure setting. Wait a few seconds and try again.
App alert is not displayed or announced. or Text message alert is not displayed or announced.
- Confirm that the cellular phone supports the Message Access Profile (MAP) specification to use text message alert feature.
- Confirm that the cellular phone supports the Serial Port Profile (SPP) specification to use App alert feature.
- Confirm that the [Application Alerts manager] setting of your Android phone is turned on.
- “Alert On/Off” is set to “Off”. Set it to “On” (page 47).
- “Voice alert” is set to “Off”. Set it to “On” (page 47).
- The Bluetooth device’s Bluetooth notifications setting is turned off.
- The handset selected to display and/or announce alerts is in use.
- The Bluetooth device or its corresponding cellular line is in use.
- Your cellular phone’s Bluetooth feature is turned off. Turn it on.
- The unit which is not selected to ring for cellular calls does not ring. To change the selection, see page 18
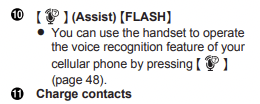
Your cellular phone’s voice recognition feature does not start after pressing 
- This feature may not be available when your cellular phone is in use. Try again later.
- If you cannot use this feature while your cellular phone is locked, unlock your phone and try again.
- For some cellular phones, you may be able to set your phone to allow its voice recognition feature to be used even when the phone is locked. For more information, refer to the operating instructions of your cellular phone.
- You may not be able to use this feature if other features or applications on your cellular phone are using Bluetooth features. Turn off these features or exit these applications, and then try again
The desired app does not start when you try to start the app using remote voice assist.
- In order to use this feature, your cellular phone’s voice recognition feature must be ready to use.
– iPhone: Make sure Siri is turned on.
– Android: In order to use Google Now, make sure your cellular phone is registered to your Google account.
- If you have multiple voice recognition features installed in your cellular phone, you may need to set the desired voice recognition feature as the default. If you cannot set the default, delete the other voice recognition features.
Answering system
The unit does not record new messages.
- The answering system is turned off. Turn it on (page 51).
- The answering system does not answer or record calls from cellular lines.
- The message memory is full. Erase unnecessary messages (page 52, 52).
- The recording time is set to “Greeting only”. Change the setting (page 55).
- Your phone service provider’s voicemail service may be answering your calls before the unit’s answering system can answer your calls. Change the unit’s number of rings setting (page 54) to a lower value, or contact your phone service provider.
- The answering system will not answer incoming calls while the other devices such as headset or handsets are engaged in a call.
I cannot operate the answering system remotely.
- The remote access code is not set. Set the remote access code (page 53).
- You are entering the wrong remote access code. If you have forgotten your remote access code, enter the remote access code setting to check your current code (page 53).
- The answering system is turned off. Turn it on (page 54).
- You cannot operate the answering system when calling a cellular phone paired to the base unit.
The unit does not emit the specified number of rings.
- If the first ring is turned off (“No”) (page 27), the number of rings decreases by 1 from the specified number of rings.
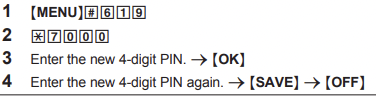
Bluetooth PIN
I cannot remember the PIN.
- Change the PIN using the following method.
Voicemail
“Voicemail msg. via phone co.” is shown on the handset display. How do I remove this message from the display?
- This notification is displayed when your phone service provider’s voicemail service (not the unit’s answering system) has recorded a message for you. Typically you can remove this notification from the display by listening to the message. To listen to the message, dial the voicemail number provided by your phone service provider (for most cases, this will be your own phone number), and follow the voice instructions. Depending on your phone service provider, you may need to remove all messages from your voice mailbox to remove the notification. You can also remove this notification by pressing and holding # until the unit beeps.
Liquid damage
Liquid or other form of moisture has entered the handset/base unit.
- Disconnect the AC adaptor and telephone line cord from the base unit. Remove the batteries from the handset and leave to dry for at least 3 days. After the handset/base unit are completely dry, reconnect the AC adaptor and telephone line cord. Insert the batteries and charge fully before use. If the unit does not work properly, contact an authorized service center.
Caution:
- To avoid permanent damage, do not use a microwave oven to speed up the drying process.