z
Before using this printer, be sure to read this Owner
’
s Manual.
z
We suggest that you keep this manual in a handy place for future
reference.
Owner’s Manual
Manual del usuario
General Description
Operating Procedures
Appendix, etc.
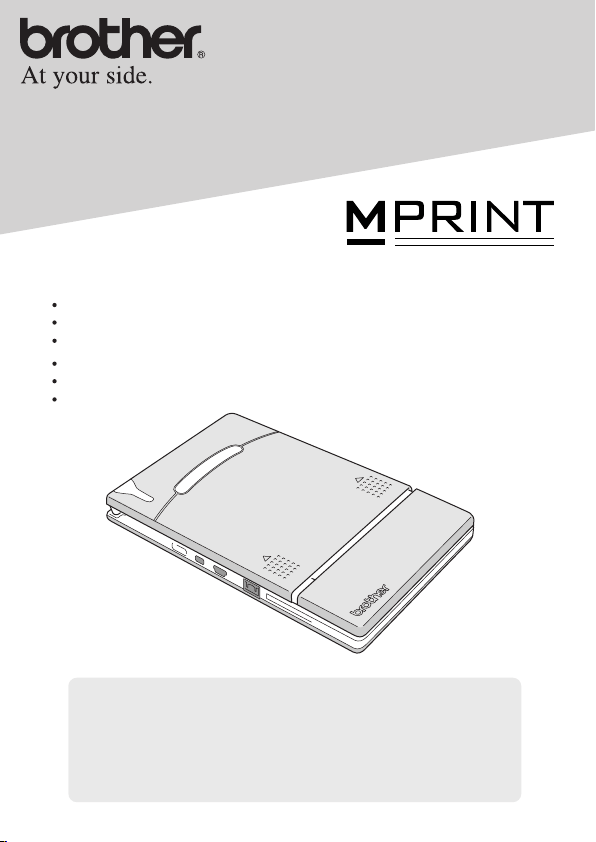
MW-120
Mobile Printer
Impresora móvil
z
Antes de usar esta impresora, asegúrese de leer esta “Manual del
usuario”.
z
Aconsejamos mantener este manual a mano para futuras consultas.
Descripción general
Procedimientos de manejo
Apéndice, etc.

Introduction
i
Thank you for purchasing the MPrint MW-120 (hereafter referred to as “the
printer”).
This monochrome thermal mobile printer is ultra-portable and can be connected
to a Pocket PC (PDA running Pocket PC) or a computer to make quick printouts.
This User’s Guide contains operating precautions and instructions. Before using
this printer, be sure to read this manual for information on its correct operation.
In addition, we suggest that you keep this manual in a handy place for future ref-
erence. If you haven’t already returned your machine warranty card, take a few
minutes to register at www.registermybrohter.com.
Introduction
Federal Communications Commission (FCC) Declaration of Conformity (For USA Only)
Responsible Party :Brother International Corporation
100 Somerset Corporate Boulevard Bridgewater, NJ 08807-0911 USA
TEL : (908) 704-1700
declares that the product
Product Name :Brother
MPrint
MW-120
Model Number :MW-120
complies with Part 15 of the FCC Rules. Operation is subject to the fol-
lowing two conditions: (1) this device may not cause harmful interfer-
ence, and (2) this device must accept any interference received,
including interference that may cause undesired operation.
This equipment has been tested and found to comply with the limits for a Class
B digital device, pursuant to Part 15 of the FCC Rules. These limits are designed
to provide reasonable protection against harmful interference in a residential
installation. This equipment generates, uses, and can radiate radio frequency
energy and, if not installed and used in accordance with the instructions, may
cause harmful interference to radio communications. However, there is no guar-
antee that interference will not occur in a particular installation. If this equip-
ment does cause harmful interference to radio or television reception, which
can be determined by turning the equipment off and on, the user is encouraged
to try to correct the interference by one or more of the following measures:
-Reorient or relocate the receiving antenna
-Increase the separation between the equipment and receiver.
-Connect the equipment into an outlet on a circuit different from that to which
the receiver is connected.
-Consult the dealer or an experienced radio/TV technician for help.
-Changes or modifications not expressly approved by Brother Industries, Ltd.
could void the user’s authority to operate the equipment.

ii
{
The contents of this manual are subject to change without
notice.
{ The contents of this manual may not be duplicated or repro-
duced, partially or in full, without permission.
{ Please note that we assume no responsibility for damages
arising from earthquakes, fire, other disasters, actions of third
parties, the user’s intentional or negligent operation, misuse or
operation under other special conditions.
{ Please note that we assume no responsibility for damage
(such as losses, loss of business profits, lost profits, business
disruptions or a lost means of communication) that may result
from the use or inability to use this printer.
{ If this printer should be defective due to faulty manufacturing,
we shall replace it during the warranty period.
{ We assume no responsibility for damages that may result from
incorrect operation of this printer by connecting incompatible
equipment or using incompatible software.
{
Microsoft
®
and Windows
®
are registered trademarks of Microsoft
Corporation in the United States and other countries.
{
Adobe
®
, Acrobat
®
, Reader
®
are either registered trademarks or
trademarks of Adobe Systems Incorporated in the United States
and/or other countries.
{
This printer is installed with IrFront from ACCESS CO., LTD. Copy-
right (C)
1996–2003 ACCESS CO., LTD.
{
All other software and product names mentioned are trademarks
or registered trademarks of their respective companies.
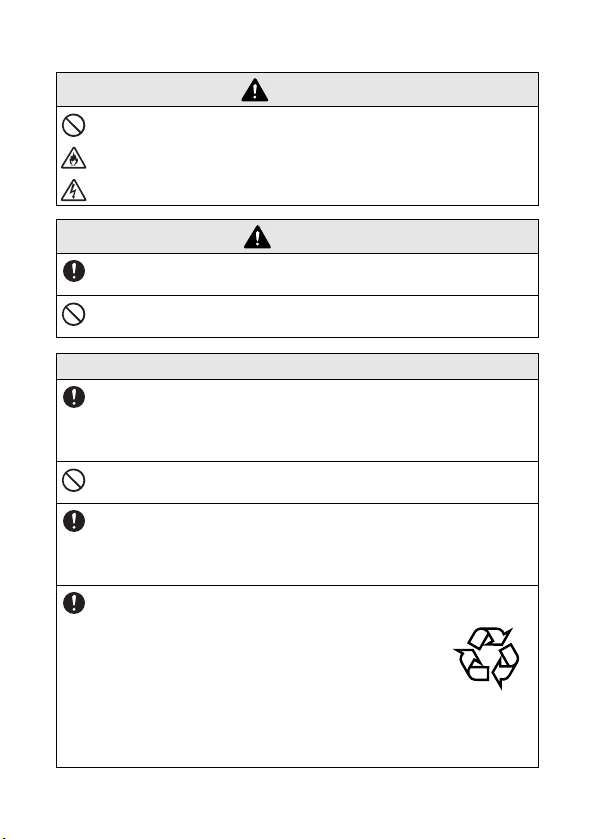
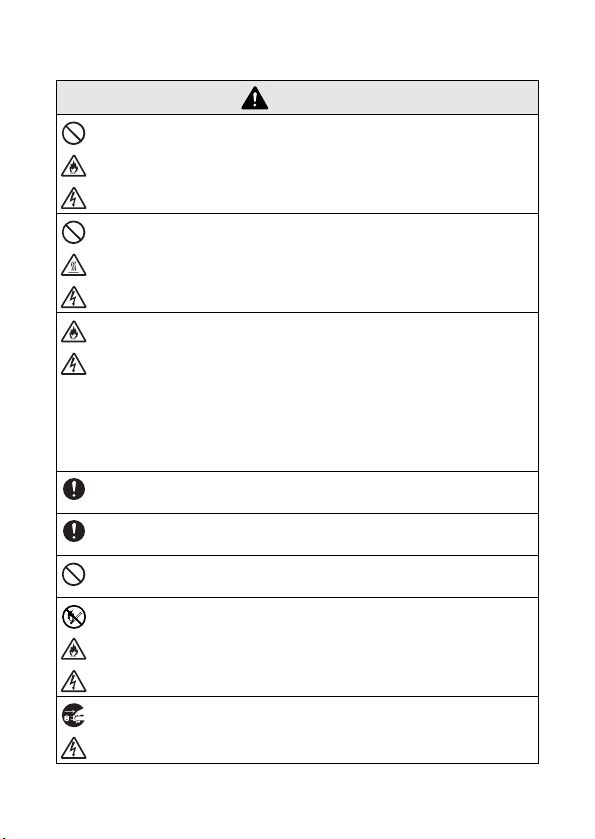
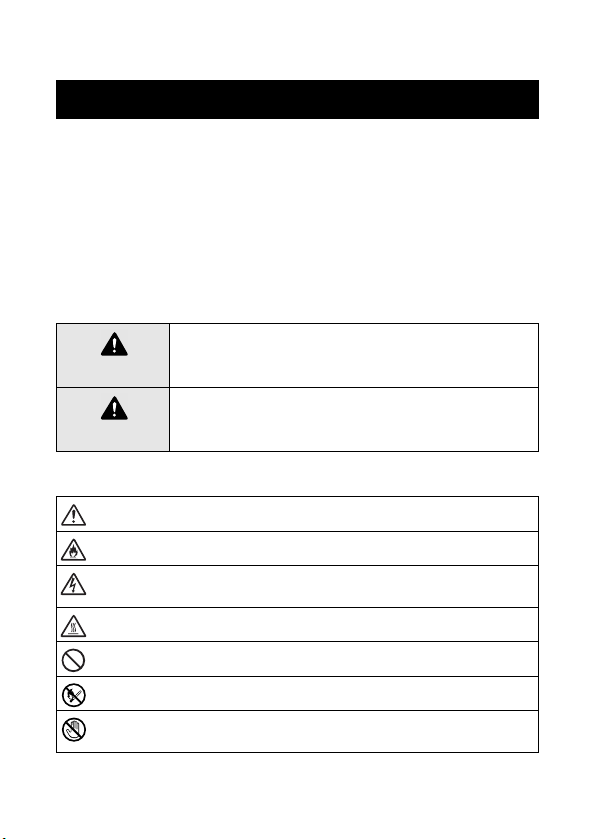
Precautions
iii
Precautions indicated as shown below contain important safety
information and should be strictly observed.
If the printer malfunctions, immediately stop using it, and then
contact the sales representative where it was purchased.
The meanings for marks used in this manual are described below
.
Meanings for symbols used in this manual
Precautions
Warning
Failure to observe instructions marked with this symbol
may result in death or serious injuries.
Caution
Failure to observe instructions marked with this symbol
may result in injuries or property damage.
Indicates danger
Indicates danger of fire under certain circumstances
Indicates danger of electric shock under certain circumstances
Indicates danger of burns under certain circumstances
Indicates an action that must not be performed
Indicates danger of combustion if fire is nearby
Indicates danger of sustaining injuries if the indicated part of the
printer is touched
Indicates danger of injuries, such as electric shock, if the indi-
cated part if the printer is disassembled
Indicates danger of electric shock if the operation is performed
with wet hands
Indicates danger of electric shock if the printer is exposed to
water

iv
Indicates an action that must be performed
Indicates that the power supply cord must be unplugged from the
electrical outlet
Precautions
v
Concerning this printer (including the built-in lith-
ium ion battery)
Warning
y
Do not use this printer wherever it is prohibited, for exam-
ple, on an airplane, otherwise it may affect equipment,
resulting in an accident.
y
If this printer is to be used in special environments, for
example, near medical equipment, make sure in advance
that there would be no harmful effects from electromag-
netic waves. Please note that we assume no responsibility
for injuries resulting from interference from electromagnetic
waves.
y
Do not insert foreign objects into the printer or its connec-
tors and ports, otherwise a fire, an electric shock or dam-
age may result.
y
If foreign objects are dropped into the printer, immediately
turn it off, unplug the AC adapter from the electrical outlet,
and then contact the sales representative where it was pur-
chased. If you continue to operate the printer, a fire, an
electric shock or damage may result.
y
Do not operate, recharge or store the printer in the follow-
ing locations, otherwise it may leak or fire, electric shock or
damage may result.
{
Near water, such as in a bathroom or near a water
heater, or in an extremely humid location
{
In a location where it is exposed to rain or moisture
{
In an extremely dusty location
{
In an extremely hot location, such as naked flames, or
heaters or direct sunlight
{
In a closed car under a hot sun
{
In a location where condensation may form
vi
y
Liquid leaking from the printer may indicate that the built-in
battery is damaged. Immediately move the printer away
from flames, otherwise a fire may result.
In addition, do not touch the leaking liquid. This liquid may
damage your eyes or skin if brought in contact with them. If
the liquid makes contact with your eyes, immediately rinse
them with water and consult a medical professional. If the
liquid makes contact with your skin or clothing, immediately
rinse them with water.
y
Do not try to disassemble or alter this printer, otherwise
fire, electric shock or damage may result. For servicing,
adjustments or repairs, contact the sales representative
where it was purchased. (The warranty does not cover
repairs for damage resulting from disassembly or alter-
ations performed by the user.)
y
The printer may be damaged if it is dropped or subjected to
strong shocks, for example, from being stepped on. If you
continue to operate a damaged printer, a fire or an electric
shock may result. If the printer is damaged, immediately
turn it off, unplug the AC adapter from the electrical outlet,
and then contact the sales representative where it was pur-
chased.
y
If the printer operates abnormally, for example, if it pro-
duces smoke, an unusual odor or an unusual noise, stop
using it, otherwise fire, electric shock or damage may
result. Immediately turn off the printer, unplug the AC
adapter from the electrical outlet, and then contact the
sales representative where it was purchased for repairs.
y
Do not charge the printer with a charger other than that
specified.
Warning
Precautions
vii
y
If the printer is not fully charged after the specified amount
of time has passed, stop charging it, otherwise fire, electric
shock or damage may result.
Caution
y
Keep the printer out of the reach of children, particularly
infants, otherwise injuries may result.
y
Stop operating the printer if it leaks or becomes discolored,
deformed or otherwise defective.
Others
y
The built-in lithium ion battery is slightly charged so that the
operation of the printer can be verified; however, the bat-
tery should be fully charged with the AC adapter before the
printer is used.
y
Do not leave the printer in a closed car under a hot sun,
otherwise it may be damaged.
y
If the printer is not to be used for a long period of time, be
sure to charge the lithium ion battery at least once every
six months in order to prevent a reduction in the efficiency
and life of the battery.
y
This printer is powered with a built-in lithium
ion battery. If this printer can only be used
for a short period of time, even though it is
fully charged, the battery may have reached
the end of its service life. Replace the lithium
ion battery with a new one.
Contact the sales representative where the
printer was purchased to have the built-in
lithium ion battery replaced.
Warning
Li-ion

viii
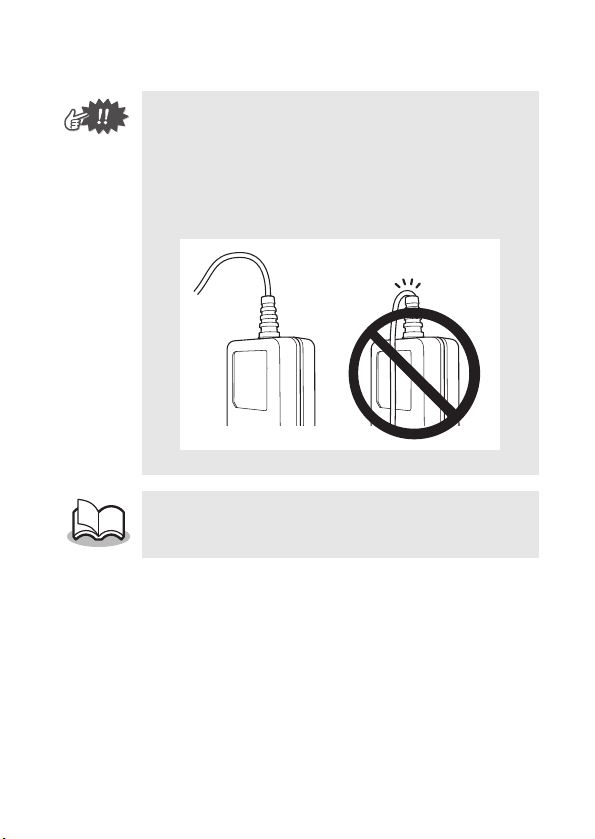
Concerning the AC adapter
Warning
y
Only use the AC adapter designed specifically for this
printer, otherwise fire, electric shock or damage may result.
y
Do not plug the printer into an electrical outlet other than a
household outlet (AC 110 V
–
120 V), otherwise fire, elec-
tric shock or damage may result.
y
Do not touch the AC adapter or the power supply plug with
wet hands, otherwise electric shock may occur.
y
Do not try to disassemble, alter or repair the AC adapter,
otherwise fire, electric shock or injuries may result.
For servicing, adjustments or repairs, contact the sales
representative where the printer was purchased.
y
Do not spill water or drinks, such as coffee or juice, on the
AC adapter. In addition, do not use the adapter in a loca-
tion where it may get wet, otherwise combustion or electric
shock may result.
y
If the power supply plug becomes dirty, for example, with
dust, unplug it from the electrical outlet, and then wipe it
with a dry cloth. If you continue to use a dirty power supply
plug, a fire may result.
Precautions
ix
Warning
y
When unplugging the power supply cord, do not pull on the
cord, otherwise fire or electric shock may result.
y
Do not insert foreign objects into the terminals of the AC
adapter, otherwise burns or electric shock may result.
y
Incorrectly using the AC adapter may result in fire or
electric shock. Therefore, observe the following precau-
tions.
{
Do not damage it.
{
Do not place objects on it.
{
Do not modify it.
{
Do not subject it to heat.
{
Do not twist it.
{
Do not bind it.
{
Do not severely bend it.
{
Do not allow it to be
{
Do not pull on it. pinched.
y
If the AC adapter is damaged, request a new one from the
sales representative where the printer was purchased.
y
Keep the AC adapter out of the reach of children, particu-
larly infants, otherwise injuries may result.
y
Do not use the AC adapter near microwave ovens, other-
wise damage may result.
y
Do not use the AC adapter near flames or heaters. If the
covering of the AC adapter cord melts, fire or electric shock
may result.
y
Before maintaining the printer, for example, when cleaning
it, unplug the AC adapter from the electrical outlet, other-
wise electric shock may result.

x
y
If the printer is not to be used for a long period of time, be
sure to unplug the AC adapter from the unit and the electri-
cal outlet for safety reasons.
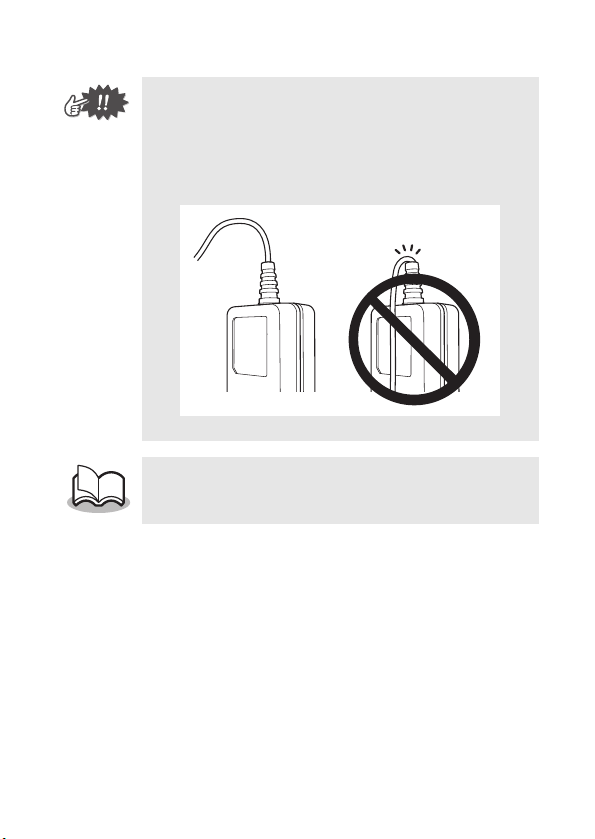
y
Do not wind the AC adapter cable around the adapter or
bend the cable, otherwise the cable may be damaged.
Warning

Precautions
xi
Operating precautions
Operate this printer in an environment that meets the follow-
ing requirements.
{ Temperature: 32 – 104 °F / 0 – 40 °C
{
Humidity: 20 – 80 % (Maximum wet-bulb temperature: 80.6 °F/
27 °C)
{ Do not operate or store this printer in a location exposed to
extremely high or extremely low temperatures, extreme
humidity, extreme dust, or extreme vibrations, otherwise
the printer may be damaged or malfunction.
{ Do not use the printer in a location exposed to extreme tem-
perature fluctuations, otherwise condensation may occur,
resulting in the printer being damaged or malfunctioning.
{ If condensation occurs, allow it to dry naturally before
operating the printer.
The AC adapter case and the printer may become hot while
the printer is charging or printing. This does not indicate a
malfunction.
When the printer is not used, unplug the power supply plug
from the electrical outlet.
Do not block the paper output slot.
If the AC adapter connector or USB port becomes dirty, incor-
rect connection or incorrect charging may result. Periodically
clean the connector and port with a dry cotton swab.
When cleaning the printer, use a soft, dry cloth. Do not use
benzene or paint thinners, otherwise the printer may become
discolored or deformed. (
→ Refer to page 13.)
When using optional accessories, use them as described in
their instruction manuals.
Use thermal paper with this printer. If printed text is written
over or stamped, the text may disappear or become discol-
ored. In addition, it may take some time for the ink to dry.
Do not touch the printer with wet hands.
Do not leave paper cassette cover open when storing as this
may cause paper misfeeding or a paper sensor error.

xii
Concerning the paper cassette and the handling of the paper
{ Store the paper cassette away from extremely hot,
extremely humid or extremely dusty locations and out of
direct sunlight, otherwise the paper may become dis-
colored or a malfunction may result.
{ Be sure to close the lid of the paper cassette before storing
it, otherwise the paper may become discolored.
{ Do not leave paper cassettes in a closed car under a hot
sun, otherwise they may become discolored.
{ After opening the package of paper cassettes, close it
again as soon as possible, otherwise the paper may
become discolored.
{ Do not use paper that has been exposed to condensation.
{ Do not try to use paper transferred from one paper cas-
sette to another, otherwise a malfunction may result.
{ Do not try to reuse paper that has already passed through
the printer, otherwise a malfunction may result.
{ Do not open the paper cassette cover or pull out or push in
the paper while the printer is printing, otherwise a malfunc-
tion may result.
{ Do not use folded, curled, cut, wet or damp paper, other-
wise a paper misfeed or a malfunction may result.
{ Do not touch paper cassettes or paper with wet hands,
otherwise a malfunction may result.
{ Do not prepare or replace the paper cassette in an
extremely humid location, otherwise a malfunction may
result.

Precautions
xiii
{
Depending on the environmental conditions of the location
and the quality of the material that the adhesive-backed
paper is attached to, the adhesive-backed paper may
become discolored, peel off, be difficult to remove, leave
adhesive behind or damage the surface that it was affixed
to. Before using the adhesive-backed paper, test it by affix-
ing a small piece to an inconspicuous area of the intended
surface.
{ Do not affix the adhesive-backed paper to people, animals
or plants. Also, do not affix it to public property or other
peoples possessions without permission.

xiv

CONTENTS
1
Introduction .......................................................... i
Precautions ......................................................... iii
Operating precautions .............................................. xi
1 General Description ........................................ 2
2 Operating Procedures .................................... 3
Charging ....................................................................3
Turning on the printer ................................................5
Preparing the paper ...................................................6
Installing the paper cassette ......................................8
Sending data from a Pocket PC or computer ..........10
Feeding paper .........................................................12
Maintenance ............................................................13
Disposing of this printer ...........................................15
3 Appendix ........................................................ 16
Product specifications .............................................16
Troubleshooting .......................................................17
Indicator lights .........................................................20
CONTENTS
2
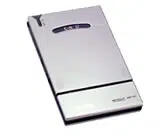
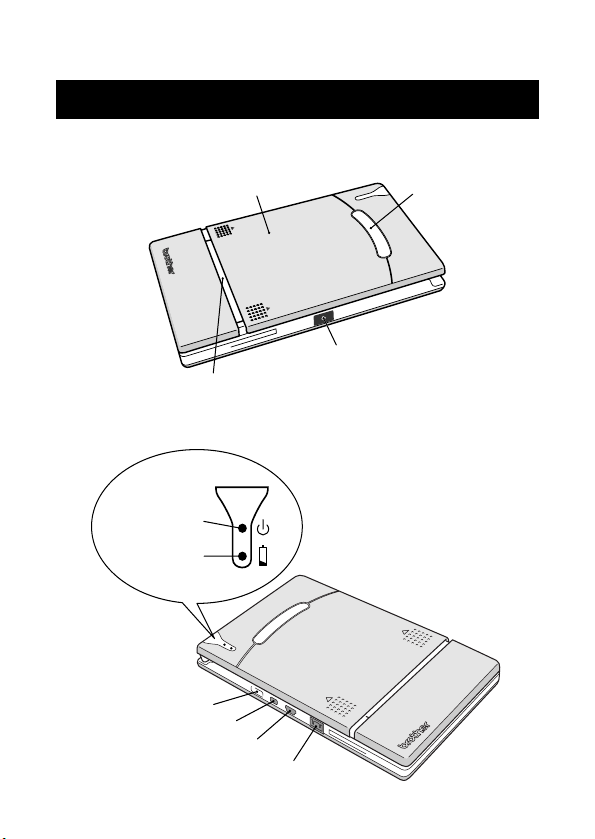
Right side
Left side
1 General Description
Paper cassette cover
Paper check window
Paper output slot
IrDA infrared port
Status
indicator light
AC adapter connector
Power button
USB port
Charging
indicator light
Serial port
Operating Procedures
3
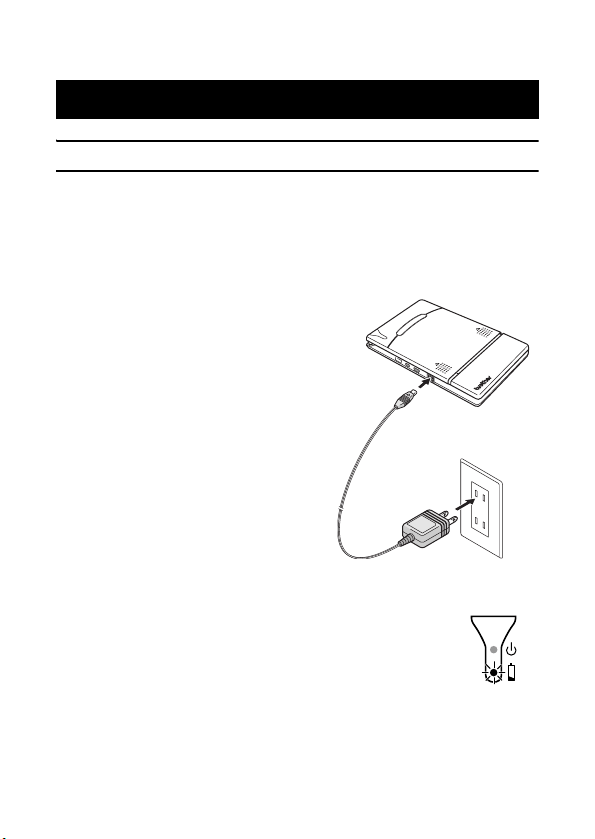
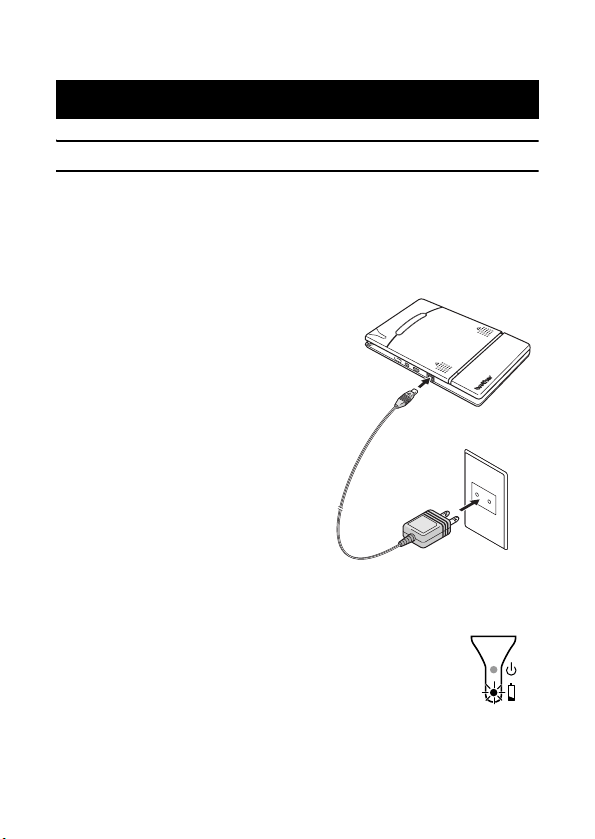
Charging
This printer is equipped with a built-in lithium ion battery. Use the
AC adapter designed specifically for this printer to charge the
battery.
After purchasing this printer, be sure to charge the battery fully
before using it.
1
Plug the AC adapter
cable into the AC adapter
connector on the printer.
2
Plug the AC adapter plug
into a household electri-
cal outlet (AC 110 V
–
120 V).
Charging of the built-in lithium
ion battery automatically
begins.
→
The charging indicator light comes on in
orange.
→ When charging is finished, the charging
indicator light goes off.
3
After charging is finished, disconnect the AC
adapter.
2 Operating Procedures
4
• In order to protect the circuitry, the battery cannot
be charged if the unit is in a location exposed to
extremely high or extremely low temperatures.
•
Do not wind the AC adapter cable around the adapter
or bend the cable, otherwise the cable may be dam-
aged.
• It takes approximately three hours for the battery
to be recharged from completely empty to fully
charged (with the printer turned off).

Operating Procedures
5
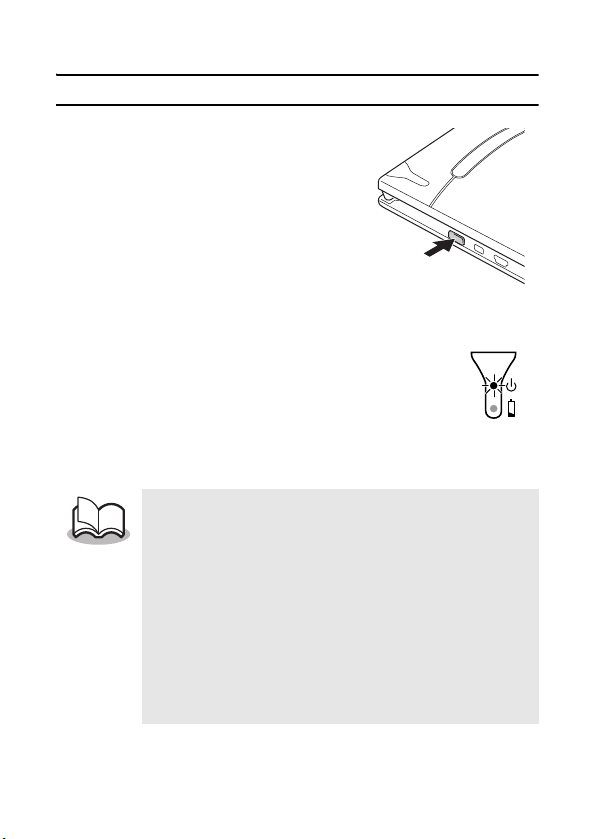
Turning on the printer
1
Press and hold the power
button for a short while,
until the green status indi-
cator light illuminates.
If the power button is pressed again, the
printer is turned off.
• In order to prevent this printer from accidentally
being turned on, it will not come on if the power
button is lightly pressed. Therefore, if the printer
does not come on, hold the power button pressed
for a little while.
• In order to conserve the built-in lithium ion battery,
the printer automatically goes off if no operation is
performed or if no data is sent to it for five minutes
(except when the battery is being charged with
the AC adapter).
6
Preparing the paper
Use only the paper cassette designed exclusively for this printer.
Use of any other paper will result in damage.
To prepare the paper cassette
Prepare the paper cassette before installing it into the printer.
•
Be careful not to drop any paper while the paper cassette is being
prepared
.
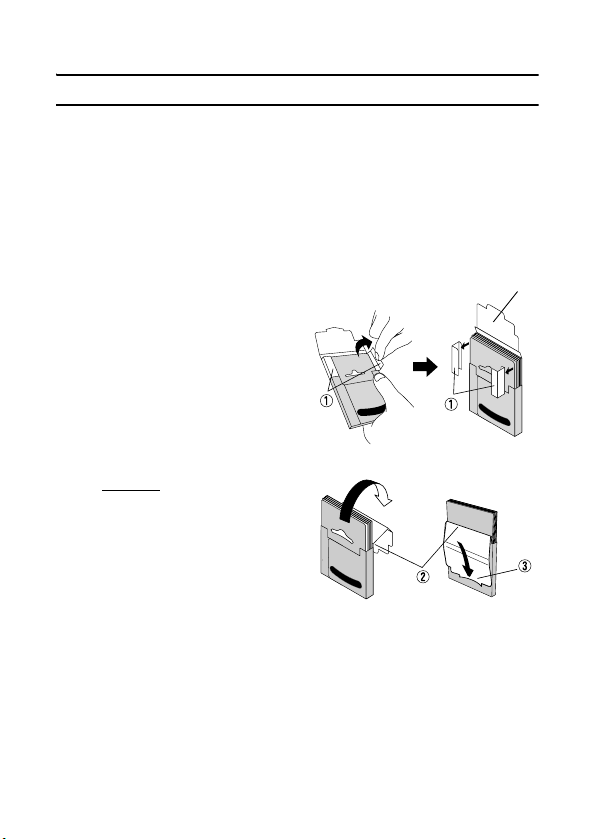
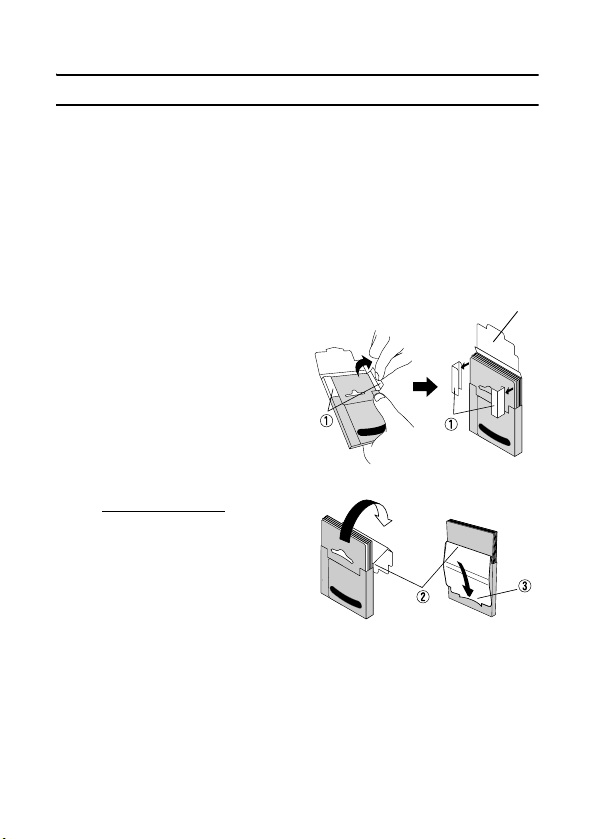
1
Open the lid of the
paper cassette, and
then tear off the two
pieces (1) on the
sides.
2
Firmly
fold the lid back
along the fold (
2
).
3
Insert the tab on the lid
into the slit (3) at the back of the cassette.
Lid
Paper cassette
Front
Back

Operating Procedures
7
Handling the paper cassette
{ This printer determines the paper type depending
on the installed paper cassette, then automati-
cally selects the settings appropriate for that type
of paper. Do not transfer paper to a different
paper cassette.
{ Do not try to reuse paper that has already passed
through the printer.
{ The paper cassette is made of cardboard. After
all of the paper is used, dispose of the cassette
according to local regulations.
{ Do not use a torn or deformed paper cassette,
otherwise damage may result.
{ Do not prepare the paper cassette in an
extremely humid location, otherwise a malfunc-
tion may result.
{ Do not touch paper cassettes or paper with wet
hands, otherwise a malfunction may result.
{ Store the paper cassette out of extremely hot,
extremely humid or extremely dusty locations and
out of direct sunlight.
{ When storing the paper cassette, be sure to close
its lid.
{ Do not leave paper cassettes in a closed car
under a hot sun.
{ Use the paper as quickly as possible, otherwise it
may become discolored.
8
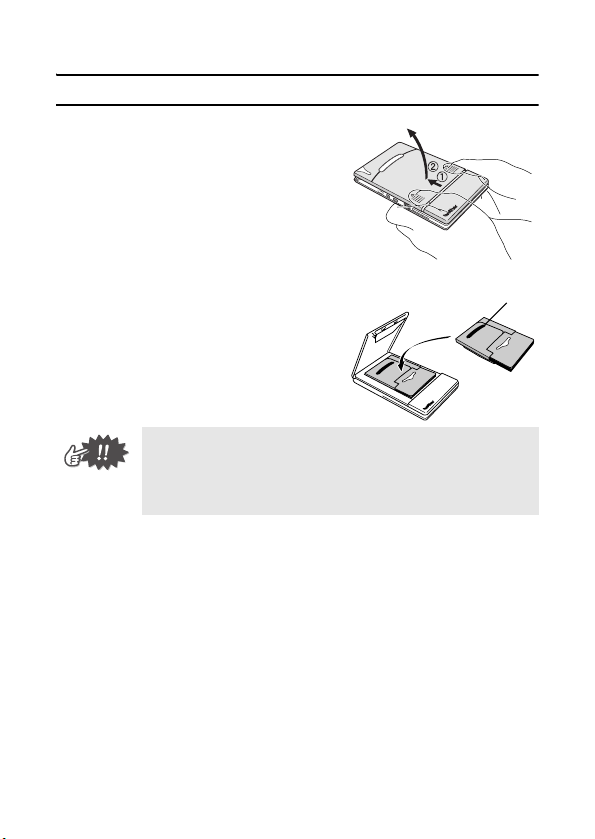
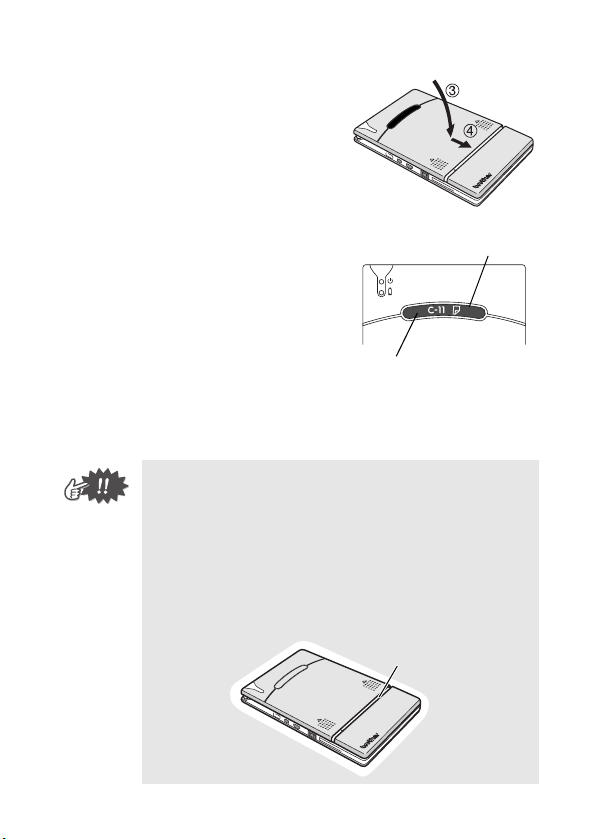
Installing the paper cassette
1
Slide the paper cassette
cover (on the top of the
printer) in direction 1.
→ The paper cassette cover
will open in the direction
indicated by 2.
2
Insert the paper cassette.
The paper type indication on the
paper cassette should face up.
The end of the paper should
point toward you.
• When loading the paper cassette, make sure that
it is correctly aligned and that the end of the
paper is not folded, otherwise a paper misfeed
may result.
Paper type indication
Operating Procedures
9
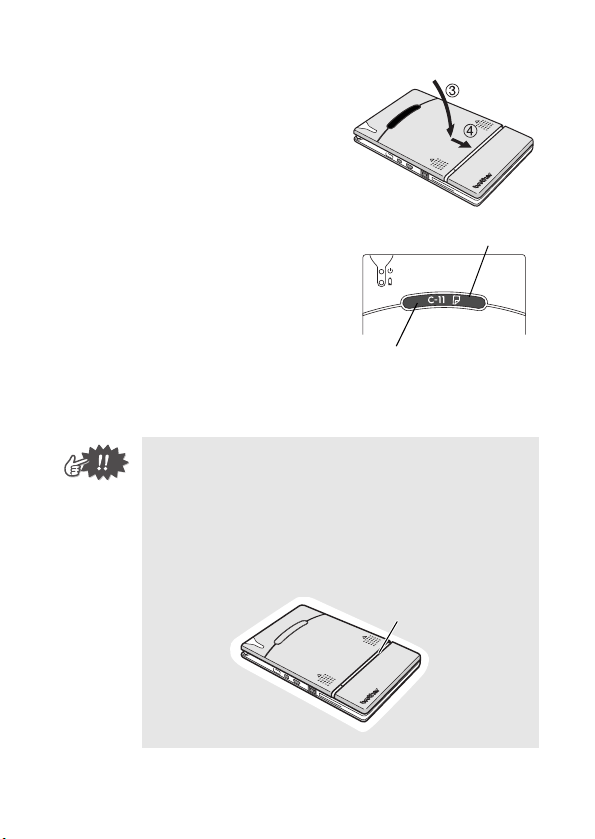
3
Close the paper cassette
cover in direction 3.
4
Slide the paper cassette
cover in direction 4.
If the paper cassette is correctly
loaded, the paper type indication
on the cassette can be seen
through the paper check win-
dow, and the paper cassette
cover will be locked.
• Do not remove the paper from the paper cassette
and load it directly into the printer.
• To change the paper type, install a different paper
cassette.
• While the printer is printing, do not apply pressure
to the paper output slot or place anything on the
printer.
Paper check window
Paper type indication
Paper output slot
10
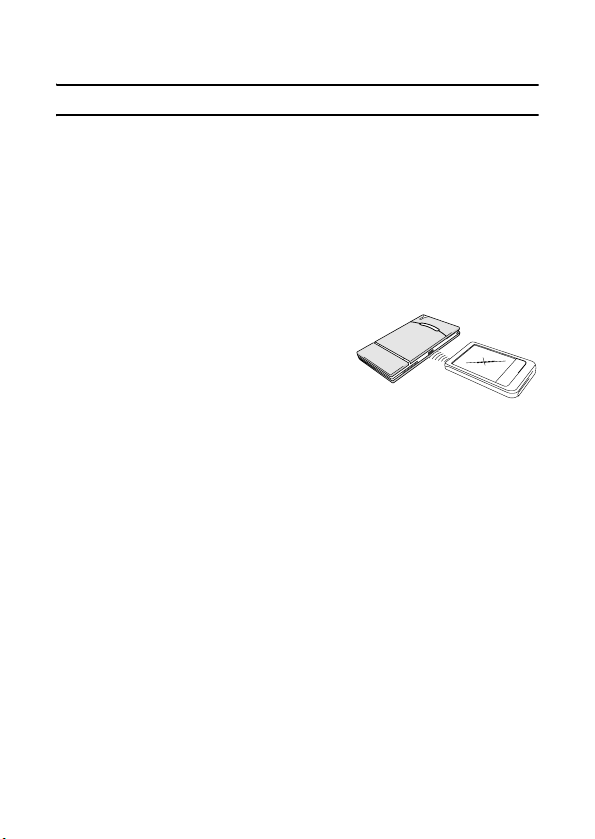
Sending data from a Pocket PC or computer
In order use this printer to print data from a Pocket PC (PDA run-
ning Pocket PC) or computer, the software must first be installed
onto the Pocket PC or computer as described in the ‘software
guide’ supplied with the printer.
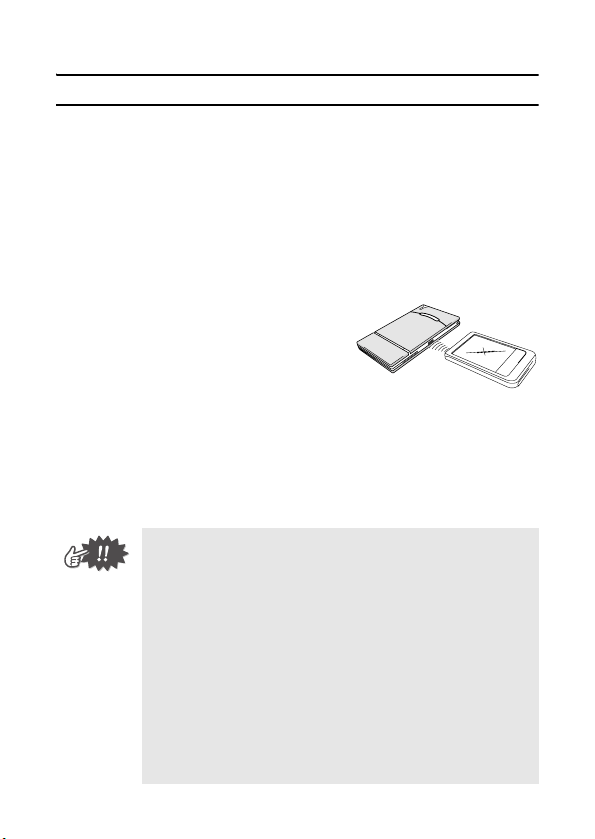
Sending data through an IrDA connection
A Pocket PC can communicate with this printer through its IrDA
infrared port.
1
Position this printer and
the Pocket PC so that
their IrDA infrared ports
are facing each other and
are positioned not more
than 7.9" (20 cm) apart.
2
Start printing from the Pocket PC.
→ While data is being transmitted through the IrDA infra-
red port, the status indicator light flashes in green.
• During transmission, do not move this printer or
the Pocket PC.
• Make sure that there are no obstacles between
this printer and the Pocket PC.
• If this printer is connected with a USB cable or if
the Pocket PC is connected through a serial con-
nection, the infrared transmission cannot be
used.
• IrDA infrared transmission is not possible with
personal computers
• For more details, refer to the instruction manual
for the Pocket PC.
Operating Procedures
11
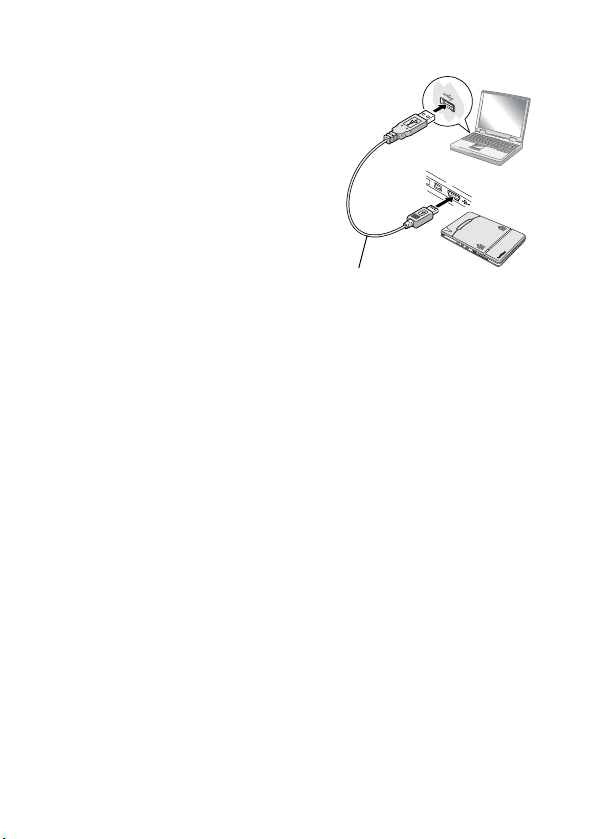
Sending data through a USB
connection
Using the enclosed USB cable, this
printer can be connected to a com-
puter or a Pocket PC supporting a
USB host interface.
Enclosed USB cable
12
Feeding paper
If a paper misfeed occurs, remove the paper according to the fol-
lowing procedure.
If the paper has fed out of the paper output slot:
1
Pull the paper out from the
paper output slot.
If the paper has not fed out of the paper output slot:
1
Open the paper cassette cover.
2
Remove the paper cas-
sette.
3
Pull out the misfed paper.
• When pulling out the paper, be sure not to tear it.
• When pulling out the paper, be sure not to tear it.
• Pulling out the paper will not affect the operation
of the printer.
Operating Procedures
13
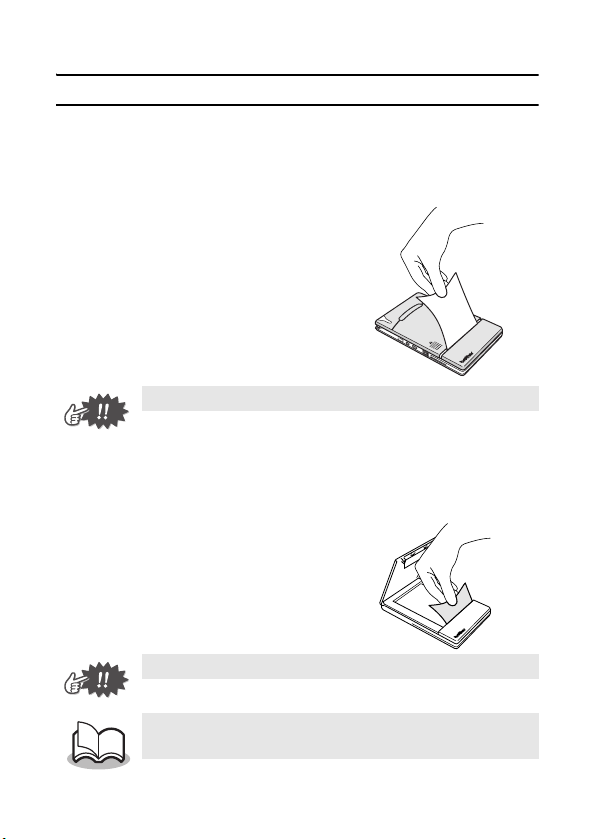
Maintenance
Cleaning the printer
Clean the front of the printer.
1
Clean off any dust or other dirt from the printer by
wiping it with a soft, dry cloth.
If the printer is extremely dirty, wipe it with a slightly damp
cloth.
Cleaning the paper cassette sensor
If the paper cassette sensor is dirty, it will not be able to correctly
detect the paper cassette, and a malfunction may result.
1
Clean the paper cassette sensor with a dry cotton
swab.
y Be sure to turn off the printer before cleaning it.
y Do not use benzene or paint thinners, otherwise
the printer may become discolored or deformed.
Paper cassette sensor
14
Cleaning the pick-up roller
If the pick-up roller is dirty, paper may not be fed correctly.
1
Affix a piece of cellophane
tape to the pick-up roller.
2
Remove the cellophane
tape from the pick-up
roller.
→ Any dirt on the pick-up roller is removed with the tape.
Rotate the pick-up roller and repeat the procedure to clean
the entire surface of the roller.
Pick-up roller
Cello-
phane tape

Operating Procedures
15
Disposing of this printer
Before disposing of this printer, be sure to remove the built-in
lithium ion battery.
Removing the lithium ion battery
1
Turn off the printer, and
then disconnect the AC
adapter.
2
Using a screwdriver,
loosen the four screws at
the back of the printer,
and then remove the back
cover.
3
Disconnect the connector, and then remove the
lithium ion battery.
• Removing the back cover will void the warranty.
Do not remove the back cover unless the printer
is to be disposed of.
• The lithium ion battery is attached to the printer
with adhesive tape. When removing the lithium
ion battery, grasp it, and then pull it off of the
printer. Be careful not to pull on the cable.
• When unplugging the connector, do not pull on
the cable.
• Risk of explosion if battery is replaced by incor-
rect type.
Dispose of used batteries according to local regu-
lations concerning special waste.
Lithium ion
battery
Connector

16
Product specifications
Printer specifications
3 Appendix
Indicators
Status indicator light (red/green)
Charging indicator light (orange)
Printing
Method
Direct thermal printing with a line thermal
print head
Resolution 300 dpi × 300 dpi
Print speed
15 seconds/sheet
(standard text on thermal paper with 7 % cover-
age at an ambient temperature of 74.6 °F / 25 °C)
No. of
pages that
can be
printed
Approximately 100 pages can be printed
continuously if the battery is fully charged
(standard text on thermal paper with 7 % cover-
age at an ambient temperature of 74.6 °F / 25 °C)
Paper supply
method
Brother paper cassette, automatic paper
feed mechanism
Paper
Brother A7 cut paper (2.9" (74 mm) × 4.1"
(105 mm))
Power supply
Compact switching AC adapter for charging,
lithium ion battery (built in) 7.4 V
Interface
Serial Interface (RS-232C)
Complies with USB Ver. 1.1 and an infrared
port compliant with IrDA 1.2
Dimensions
3.9" (100 mm) (W) × 6.3" (160 mm) (D) ×
0.7" (17.5 mm) (H)
Weight
0.66 lbs. (300 g) (including the built-in lithium
ion battery and a paper cassette containing
50 sheets of plain thermal paper)

Appendix
17
Paper sizes (print area)
Troubleshooting
Symptoms & remedies
Normal type
A7 size: 2.9
" (
74 mm) × 4.1
"
(105 mm)
(2.7
"
(69 mm) × 3.9
"
(100 mm))
Label sheets
(four down)
2.9
" (
74 mm) × 1.0
"
(26.25 mm)
(2.7
"
(69 mm) × 0.8
"
(21.25 mm))
Label sheets
(two down)
2.9
" (
74 mm) × 2.1
"
(52.5 mm)
(2.7
"
(69 mm) × 1.9
"
(47.5 mm))
Symptom: The printer
cannot be turned on.
Remedy: Press and hold the power button
for a short while. (→ Refer to page 5.)
Remedy: The built-in lithium ion battery
needs recharging. (→ Refer to page 3.)
Symptom: Although the
print command was
issued, the printer
does not print.
With an IrDA connection:
Remedy: Make sure that there is no
obstacle between this printer and the
PDA, and check that they are within
7.9" (20 cm) of each other. (→ Refer
page 10.)
Remedy: Disconnect the USB cable. (→
Refer to page 10.)
Remedy: Disconnect the serial cable.
With a USB connection:
Remedy: Check that this printer is
securely connected to the computer
with the USB cable. (→ Refer to page
11.)
With a serial connection:
Remedy: Check that this printer is
securely connected to the computer
with the serial cable.
Symptom: There is a
paper misfeed.
Remedy: Remove the paper. (→ Refer to
page 12.)

18
Symptom: Even though
the misfed paper was
removed, the error
cannot be cancelled.
Remedy: Some torn paper may still
remain in the printer. Contact the sales
representative where the printer was
purchased.
Symptom: An indicator
light is lit or flashing.
Remedy: Refer to the explanation in “Indi-
cator lights” on page 20.
Symptom: The paper
does not feed.
Remedy: Make sure that the lid of the
paper cassette is firmly folded along
the fold (2). (→ Refer to page 6.)
Remedy: Make sure that the paper cas-
sette cover is securely closed. (→
Refer to page 9.)
Remedy: The paper may be dirty. Pull out
the first sheet from the back of the
paper cassette, and then install the
paper cassette again. (→ Refer to
pages 6 and 8.)
Remedy: Clean the pick-up roller. (→
Refer to page 14.)
Symptom: The print is
faint (light).
Remedy: Make sure that the paper cas-
sette cover is securely closed. (→
Refer to page 9.)
Appendix
19
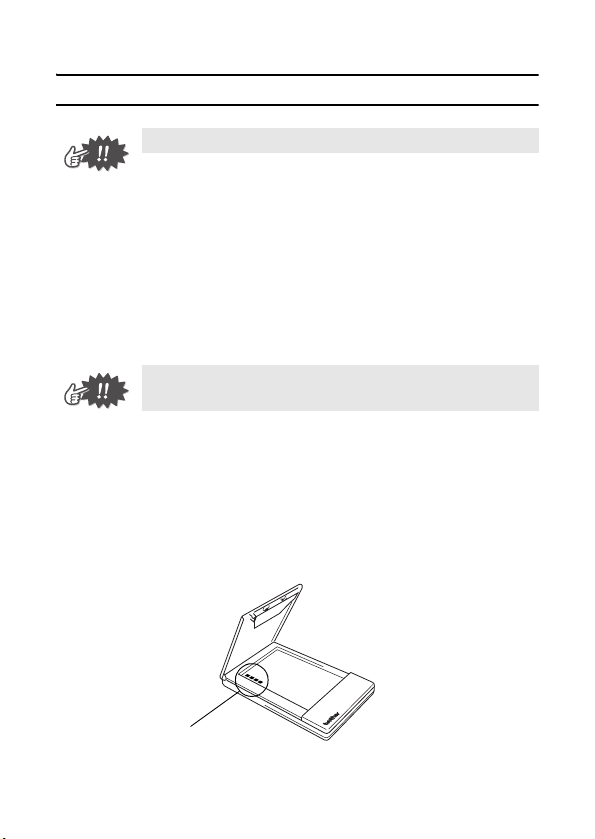
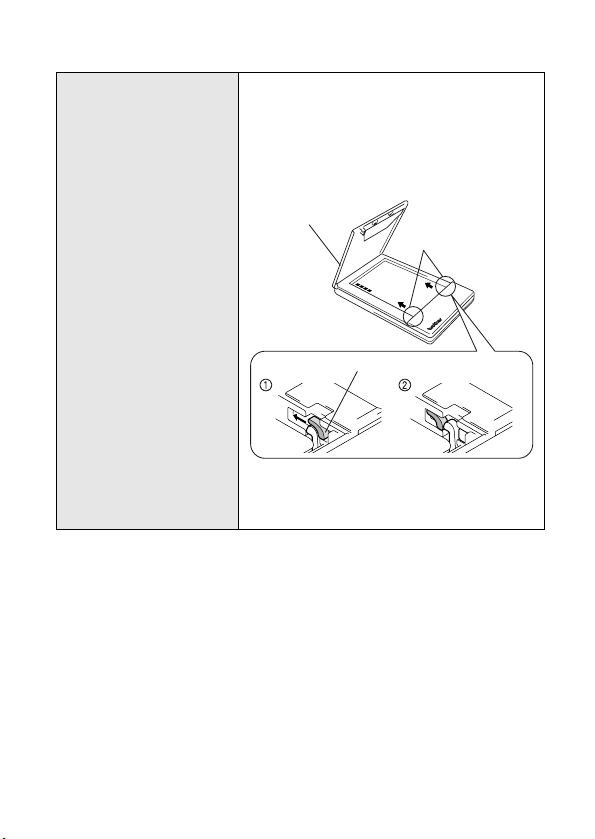
Symptom: The paper
cassette cover can-
not be closed.
Remedy: The parts indicated by “A” in the
illustration below have locked up.
Refer to the illustration and use the tip of
a ball-point pen to slide the indicated part
in the direction of the arrow to free it
.
Free the part on the opposite side
using the same method
Paper cassette
cover
A
Push with the tip of a ball-point pen to slide it.
20
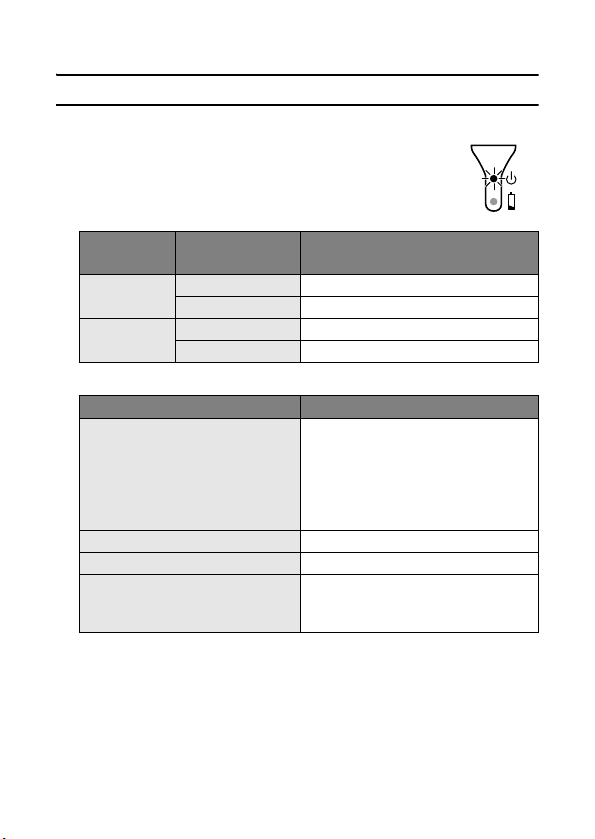
Indicator lights
Status indicator light
A green light indicates the printer is operating
correctly, while red indicates an error has
occurred.
If an error has occurred, check for the following causes.
If a system error has occurred:
The printer may be damaged. Contact the sales representa-
tive where it was purchased.
Indicator
light color
Indicator light
status
Printer status
Green
Constantly lit Waiting to receive data
Flashing Receiving data
Red
Flashing An error has occurred.
Constantly lit A system error has occurred.
Error description Remedy
There is no paper cassette
installed.
The paper cassette is
installed facing the wrong
direction.
There is no more paper.
Correctly install a paper cas-
sette containing paper.
A paper misfeed occurred. Remove the misfed paper.
A transmission error occurred. Check the transmission status.
An overheat error occurred.
The inside of the printer has
started to overheat. Wait until it
cools down
Appendix
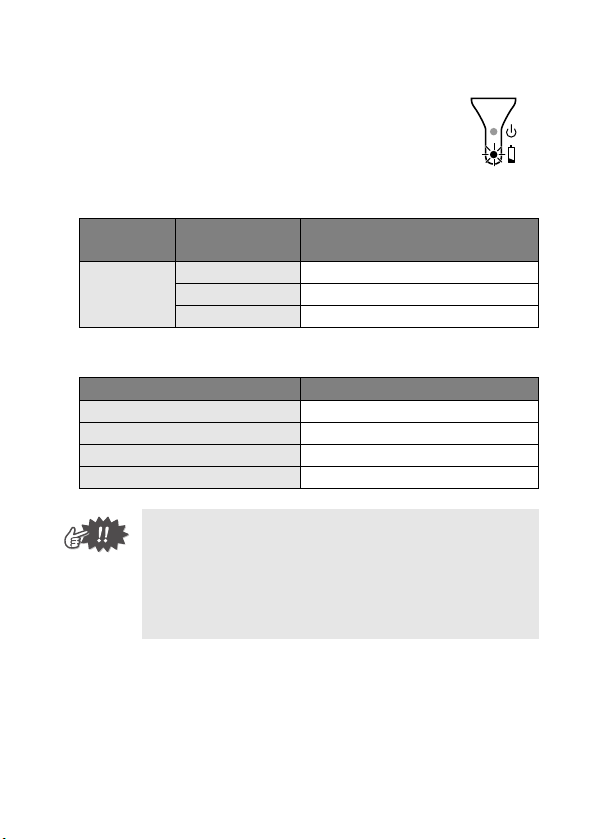
21
Charging indicator light
With the charging indicator light, the status of
the power supply can be checked. The charg-
ing indicator light has two functions.
1 Checking the charging status (when the AC
adapter is connected)
2 Checking the battery level (while running off the built-in lith-
ium ion battery)
Indicator
light color
Indicator light
status
Printer status
Orange
Constantly lit Charging
Off Finished charging
Flashing Malfunctioning built-in battery
Indicator light status Battery level
Off More than 60% charged
Flashes once Less than 60% charged
Flashes twice Less than 30% charged
Continues to flash 3 times Almost empty
• When the battery level is less than 60% charged,
recharge the battery.
• If the charging indicator light flashes while the
printer is printing, immediately connect the AC
adapter and charge the battery. The printer may
stop printing.

22
MW-120 Accessories
Stock No. Description
C-11 A7 Thermal paper (4.1" (105 mm) x 2.9" (74 mm))
C-21 A7 Label (4.1" (105 mm) x 2.9" (74 mm))
C-41
A7 Cut label sheet (4/Sheet) (1.0" (26.25 mm) x
2.9" (74 mm))
C-42
A7 Cut label sheet (2/Sheet) (2.1" (52.5 mm) x
2.9" (74 mm))
C-51 Carbon Paper (2 ply)
2S-100 Two way stand
PG-100 Paper guide
PCS-100 Carrying Case
RC-120 Serial Cable (D-sub/9pins)
Count:
50 sheets/cassette (thermal paper)
30 sheets/cassette (all others)

Appendix
23
Brother
®
Printer One Year Limited Warranty and Replacement Service
(For USA Only)
Who is covered:
This limited warranty (“warranty”) is
given only to the original end-use/retail
purchaser (referred to in this warranty
as “Original Purchaser”) of the accom-
panying product, consumables and
accessories (collectively referred to in
this warranty as “this Product”).
If you purchased a product from
someone other than an authorized
Brother reseller in the United
States or if the product was used
(including but not limited to floor
models or refurbished product),
prior to your purchase you are not
the Original Purchaser and the
product that you purchased is not
covered by this warranty.
What is covered:
This Product includes a Machine
and Consumable and Accessory
Items. Consumable and Accessory
Items include but are not limited to
paper cassettes.
Except as otherwise provided
herein, Brother warrants that the
Machine and the accompanying
Consumable and Accessory Items
will be free from defects in materi-
als and workmanship, when used
under normal conditions.
This warranty applies only to prod-
ucts purchased and used in the
United States. For products pur-
chased in, but used outside, the
United States, this warranty covers
only warranty service within the
United States (and does not include
shipping outside the United States).
What is the length of the Warranty
Periods:
Machines: one year from the origi-
nal purchase date.
Accompanying Consumable and Acces-
sory Items: 90 days from the original pur-
chase date or the rated life of the
Consumable Item, whichever occurs first.
What is NOT covered:
This warranty does not cover:
(1) Physical damage to this Product;
(2) Damage caused by improper instal-
lation, improper or abnormal use,
misuse, neglect or accident (includ-
ing but not limited to transporting
this Product without the proper
preparation and/or packaging);
(3) Damage caused by another device
or software used with this Product
(including but not limited to dam-
age resulting from use of non
Brother
®
-brand parts and Consum-
able and Accessory Items);
(4) Consumable and Accessory
Items that expired in accordance
with a rated life; and,
(5) Problems arising from other than
defects in materials or workmanship.
This limited warranty is VOID if this
Product has been altered or modified
in any way (including but not limited to
attempted warranty repair without
authorization from Brother and/or alter-
ation/removal of the serial number).
What to do if you think your Prod-
uct is eligible for warranty service:
Report your issue to our Customer
Service Hotline at 1-877-276-8437 or
1-877-BROTHER within the appli-
cable warranty period. Supply
Brother with a copy of your dated bill
of sale showing that this Product was
purchased within the U.S.

24
Brother
®
Printer One Year Limited Warranty and Replacement Service
(For USA Only)
What Brother will ask you to do:
After contacting Brother you may be
required to deliver (by hand if you
prefer) or send the Product properly
packaged, freight prepaid, to the
together with a photocopy of your bill
of sale. You are responsible for the
cost of shipping, packing prod-
uct, and insurance (if you desire).
You are also responsible for loss
or damage to this Product in ship-
ping.
What Brother will do:
If the problem reported concerning
your Machine and/or accompanying
Consumable and Accessory Items is
covered by this warranty and
if you
first reported the problem to Brother
within the applicable warranty period,
Brother will repair or replace the
Machine and/or accompanying Con-
sumable and Accessory Items at no
charge to you for parts or labor. The
decision as to whether to repair or
replace the Machine and/or accom-
panying Consumable and Accessory
Items is made by Brother in its sole
discretion. Brother reserves the right
to supply a refurbished or remanu-
factured replacement Machine and/
or accompanying Consumable and
Accessory Items and use refur-
bished parts provided such replace-
ment products conform to the
manufacturer’s specifications for new
product/parts. The repaired or
replacement Machine and/or accom-
panying Consumable and Accessory
Items will be returned to you freight
prepaid.
If the Machine and/or accompanying
Consumable and Accessory Items
are not covered by this warranty
(either stage), you will be charged for
shipping the Machine and/or accom-
panying Consumable and Accessory
Items back to you.
The foregoing are your sole (i.e.,
only) and exclusive remedies
under this warranty.

Appendix
25
Brother
®
Printer One Year Limited Warranty and Replacement Service
(For USA Only)
What happens when Brother
elects to replace your Machine:
When a replacement Machine is autho-
rized by Brother will send to you a
replacement Machine with the under-
standing that you will, after receipt of the
replacement Machine, supply the
required proof of purchase information,
together with the Machine that Brother
agreed to replace. You are then
expected to pack the Machine that
Brother agreed to replace in the pack-
age from the replacement Machine and
return it to Brother using the freight bill
supplied by Brother in accordance with
the instructions provided by Brother.
Since you will be in possession of two
machines, Brother will require that you
provide a valid major credit card num-
ber. Brother will issue a hold against
the credit card account number that you
provide until Brother receives your origi-
nal Product and determines that your
original Product is entitled to warranty
coverage. Your credit card will be
charged up to the cost of a new Product
only if: (i) you do not return your original
Product to Brother within five (5) busi-
ness days; (ii) the problems of your orig-
inal Product are not covered by the
limited warranty; (iii) the proper packag-
ing instructions are not followed and has
caused damage to the product; or (iv)
the warranty period on your original
Product has expired or has not been
sufficiently validated with a copy of the
proof of purchase (bill of sale). The
replacement Machine you receive (even
if refurbished or remanufactured) will be
covered by the balance of the limited
warranty period remaining on the origi-
nal Product, plus an additional thirty
(30) days. You will keep the replace-
ment Machine that is sent to you and
your original Machine shall become the
property of Brother.
Retain your origi-
nal Accessory Items and a copy of
the return freight bill, signed by the
courier.
Limitations:
Brother is not responsible for damage
to or loss of any equipment, media,
programs or data related to the use of
this Product. Except for that repair or
replacement as described above,
Brother shall not be liable for any
direct, indirect, incidental or conse-
quential damages or specific relief.
Because some states do not allow the
exclusion or limitation of consequen-
tial or incidental damages, the above
limitation may not apply to you.
THIS WARRANTY IS GIVEN IN LIEU OF
ALL OTHER WARRANTIES, WRITTEN
OR ORAL, WHETHER EXPRESSED BY
AFFIRMATION, PROMISE, DESCRIP-
TION, DRAWING, MODEL OR SAMPLE.
ANY AND ALL WARRANTIES OTHER
THAN THIS ONE, WHETHER EXPRESS
OR IMPLIED, INCLUDING IMPLIED
WARRANTIES OF MERCHANTABILITY
AND FITNESS FOR A PARTICULAR
PURPOSE, ARE HEREBY DIS-
CLAIMED.
This Limited Warranty is the only
warranty that Brother is giving for this
Product. It is the final expression and
the exclusive and only statement of
Brother’s obligations to you. It
replaces all other agreements and
understandings that you may have
with Brother or its representatives.

26
Brother
®
Printer One Year Limited Warranty and Replacement Service
(For USA Only)
This warranty gives you certain
rights and you may also have other
rights that may vary from state to
state.
This Limited Warranty (and
Brother’s obligation to you) may not
be changed in any way unless you
and Brother sign the same piece of
paper in which we (1) refer to this
Product and your bill of sale date,
(2) describe the change to this war-
ranty and (3) agree to make that
change.
Important: We recommend that you
keep all original packing materials, in
the event that you ship this product.
Register your product:
By registering your product with
Brother International Corporation,
you will be recorded as the original
owner of the product. Your registra-
tion with Brother:
may serve as a confirmation of the
purchase date of your product
should you lose your receipt;
may support an insurance claim by
you in the event of product loss
covered by insurance; and,
will help us notify you of enhance-
ments to your product an special
offers.
Please complete the Brother Warranty
Registration online at www.register-
mybrother.com.

Appendix
27
Important Information
Should you have questions, or need information about your Brother Prod-
uct, we have a variety of support options for you to choose from:
USA-Customer Service:
Customer Service
877-276-8437 / 877-BROTHER (voice)
Customer Service
901-379-1210 (fax)
Automated Faxback
800-521-2846
World Wide Web
www.brother.com
Supplies / Accessories
www.brothermall.com
or 888-879-3232
BROTHER INTERNATIONAL CORPORATION
100 SOMERSET CORPORATE BLVD.
BRIDGEWATER, NEW JERSEY 08807-0911
Please record your model and serial number and your date and location
of Purchase below for your records. Keep this information with your proof
of purchase (bill of sale) in case your Product requires service.
Model #
Serial #
Date of purchase:
Store where purchased:
Location of store:
Important: We recommend that you keep all original packing materials,
in the event you ship this product.

28

Manual del usuario


Introducción
i
Gracias por la adquisición de la MPrint MW-120 (designada a partir de aquí como “la
impresora”).
Esta impresora móvil térmica y monocromática es ultraportátil y puede conectarse a un PC de
bolsillo (PDA con Pocket PC) o a un equipo para llevar a cabo impresiones rápidas.
Esta “Guía del usuario” contiene precauciones e instrucciones de manejo. Antes de usar esta
impresora, asegúrese de leer este manual para informarse acerca de su manejo correcto.
Asimismo, aconsejamos mantener este manual a mano para futuras consultas.
Si todavía no ha enviado la tarjeta de garantía de su máquina, tómese un momento para
registrarla en www.registermybrohter.com.
Introducción
Declaración de conformidad de la Federal Communications Commission
(Comisión federal de comunicaciones, FCC) (sólo para Estados Unidos)
Parte responsable : Brother International Corporation
100 Somerset Corporate Boulevard Bridgewater, NJ 08807-0911 USA
TEL: (908) 704-1700
declara que el producto
Nombre del producto : MPrint MW-120 de Brother
Número de modelo : MW-120
cumple con la Parte 15 de las Normas de la FCC. El funcionamiento está sujeto a las dos condi-
ciones siguientes: (1) este dispositivo no puede causar interferencias perjudiciales, y (2) este dis-
positivo debe aceptar cualquier interferencia que reciba, que incluye interferencias que puedan
causar un funcionamiento no deseado.
Este equipo se ha comprobado y cumple los límites establecidos para un dispositivo digital
de clase B, conforme a la Parte 15 de la normativa de la FCC. Estos límites se han diseñado
para proporcionar una protección razonable contra las interferencias indeseables en una
instalación doméstica. Este equipo genera, utiliza y puede emitir energía de radiofrecuencia
y, si no se instala y se usa según las instrucciones, puede causar interferencias perjudi-
ciales a las comunicaciones de radio. No obstante, no se garantiza que no se producirán
interferencias en una instalación específica. Si este equipo causara interferencias perjudi-
ciales en la recepción de radio o de televisión, lo cual se puede comprobar apagando y
encendiendo el dispositivo, el usuario puede corregir la interferencia llevando a cabo una o
más de las medidas siguientes:
-Volver a orientar o cambiar de sitio la antena de recepción
-Aumentar la separación entre el equipo y el receptor.
-Conectar el equipo a una toma o a un circuito diferente del que está conectado el receptor.
-Consultar con el distribuidor o con un técnico experto en radio y TV.
-Debe usarse el cable de interfaz que se incluye para garantizar la conformidad con los
límites para un dispositivo digital de Clase B.
-Los cambios o las modificaciones no expresamente aprobados por Brother Industries,
Ltd., anulan la autorización del usuario para utilizar el equipo.

ii
{
El contenido de este manual está sujeto a cambios sin previo
aviso.
{ El contenido de este manual no se puede duplicar ni
reproducir, ni parcial ni totalmente, sin una autorización.
{ No asumimos ninguna responsabilidad por daños que sean
consecuencia de terremotos, incendios u otros siniestros, de
acciones de terceros, o del uso indebido o la utilización en
circunstancias especiales, ya sea de manera intencionada o
negligente, por parte del usuario.
{ No asumimos ninguna responsabilidad por daños (como
pérdidas, pérdida de beneficios comerciales, beneficios
perdidos, interrupciones de la actividad comercial o pérdida
de medios de comunicación) que puedan derivarse del uso de
esta impresora o de la imposibilidad de usarla.
{ Si esta impresora presenta fallos debidos a una fabricación
defectuosa, nos comprometemos a reponerla durante el
periodo de garantía.
{ No asumimos ninguna responsabilidad por los daños que
puedan derivarse de la utilización indebida de software o
equipos incompatibles en esta impresora.
{Microsoft
®
, Windows
®
, Windows NT
®
y Windows Mobile™ son
marcas comerciales registradas o marcas comerciales de
Microsoft Corporation en Estados Unidos y otros países.
{Adobe
®
, Acrobat
®
, Reader
®
son marcas comerciales
registradas o marcas comerciales de Adobe Systems
Incorporated en los Estados Unidos y/o en otros países.
{
Esta impresora tiene instalado IrFront de ACCESS CO., LTD.
Copyright (C)
1996–2003 ACCESS CO., LTD.
{
Los nombres de productos y aplicaciones de software restantes
mencionados en este documento son marcas comerciales o
marcas registradas de sus respectivas compañías.
Precauciones
iii
Las precauciones que se describen a continuación contienen
información de seguridad importante y deben seguirse
rigurosamente.
Si la impresora presenta algún fallo de funcionamiento, deje de
utilizarla inmediatamente y póngase en contacto con el
representante de ventas del establecimiento en el que la
adquirió.
Los significados de los símbolos utilizados en este manual se
explican a continuación
.
Significado de los símbolos utilizados en este manual
Precauciones
Advertencia
El incumplimiento de las instrucciones marcadas con
este símbolo puede producir lesiones graves e
incluso la muerte.
Precaución
El incumplimiento de las instrucciones marcadas con
este símbolo puede producir lesiones o daños
materiales.
Indica peligro
Indica peligro de incendio en determinadas circunstancias
Indica peligro de descarga eléctrica en determinadas
circunstancias
Indica peligro de quemaduras en determinadas circunstancias
Indica una acción que no se debe realizar
Indica peligro de combustión si hay fuego en las proximidades
Indica peligro de sufrir lesiones si se toca la parte de la
impresora especificada
iv
Indica peligro de lesiones, como descargas eléctricas, si se
desmonta la parte de la impresora especificada
Indica peligro de descarga eléctrica si la operación se realiza
con las manos mojadas
Indica peligro de descarga eléctrica si la impresora está
expuesta al agua
Indica una acción que se debe realizar
Indica que el cable de alimentación se debe desenchufar de la
toma de corriente eléctrica.

Precauciones
v
Indicaciones relativas a esta impresora (incluida la
batería de ión-litio integrada)
Advertencia
y
No utilice esta impresora en lugares donde esté prohibido
hacerlo, como por ejemplo en un avión, ya que podría
afectar a los equipos y ocasionar un accidente.
y
Si esta impresora se va a utilizar en entornos especiales,
como por ejemplo cerca de aparatos médicos, asegúrese
de antemano de que no se producirán efectos perjudiciales
debidos a las ondas electromagnéticas. No asumimos
ninguna responsabilidad por lesiones resultantes de
interferencias causadas por las ondas electromagnéticas.
y
No inserte objetos extraños en la impresora o en sus
conectores y puertos, ya que podría ocasionar un incendio,
una descarga eléctrica u otros daños.
y
Si algún objeto extraño cae dentro de la impresora,
apáguela de inmediato, desenchufe el adaptador de CA de
la toma de corriente eléctrica y póngase en contacto con el
representante de ventas del establecimiento en el que la
adquirió. Si sigue utilizando la impresora, puede producirse
un incendio, una descarga eléctrica u otros daños.
vi
y
No utilice, recargue, ni guarde la impresora en los
siguientes lugares; de lo contrario, podría ocasionar una
fuga, un incendio, una descarga eléctrica u otros daños.
{
Cerca del agua, como por ejemplo en un cuarto de
baño o cerca de un calentador de agua, o en un lugar
con un nivel elevado de humedad
{
En un lugar donde esté expuesta a la lluvia o a la
humedad
{
En un lugar con mucho polvo
{
En un lugar muy caliente, como cerca de una llama o
de un calentador, o en una zona expuesta a la luz
directa del sol
{
En un automóvil cerrado expuesto a un sol intenso
{
En un lugar en el que pueda formarse condensación
y
Una fuga de líquido de la impresora puede indicar que la
batería integrada se ha dañado. Aparte la impresora de las
llamas inmediatamente; de lo contrario, puede producirse
un incendio.
No toque el líquido derramado. Este líquido puede
provocar lesiones si entra en contacto con los ojos o la
piel. Si el líquido entra en contacto con los ojos, lávelos
inmediatamente con agua y consulte a un médico. Si entra
en contacto con la piel o la ropa, lávelas inmediatamente
con agua.
y
No trate de desmontar o alterar la impresora, ya que al
hacerlo podría provocar un incendio, una descarga
eléctrica u otros daños. Para las tareas de mantenimiento,
ajuste o reparación, póngase en contacto con el
representante de ventas del establecimiento en el que
adquirió la impresora. (La garantía no cubre las
reparaciones de los daños debidos al desmontaje o a
alteraciones que haya realizado el usuario.)
Advertencia
Precauciones
vii
y
La impresora puede resultar dañada si se cae o se somete
a golpes fuertes, como por ejemplo, si alguien la pisa. Si
sigue utilizando una impresora dañada, puede producirse
un incendio o una descarga eléctrica. Si la impresora está
dañada, apáguela inmediatamente, desenchufe el
adaptador de CA de la toma de corriente y póngase en
contacto con el representante de ventas del
establecimiento en el que la adquirió.
y
Si la impresora no funciona normalmente, si por ejemplo
despide humo o un olor raro o emite ruidos extraños, deje
de usarla, ya que de lo contrario podría producirse un
incendio, una descarga eléctrica u otros daños. Apague la
impresora inmediatamente, desenchufe el adaptador de
CA de la toma de corriente y póngase en contacto con el
representante de ventas del establecimiento en el que la
adquirió para que se lleven a cabo las reparaciones
pertinentes.
y
No cargue la impresora con un cargador distinto del
especificado.
y
Si la impresora no se carga completamente una vez
transcurrido el periodo de tiempo especificado, detenga la
carga, porque de lo contrario podría producirse un
incendio, una descarga eléctrica u otros daños.
Precaución
y
Mantenga la impresora fuera del alcance de los niños,
especialmente de los más pequeños, ya que podrían sufrir
lesiones.
y
Deje de utilizar la impresora si detecta alguna fuga o si
observa decoloraciones, deformaciones o algún otro
defecto.
Advertencia
viii
Otros
y
La batería de ión-litio integrada tiene una ligera carga, de
modo que se puede comprobar el funcionamiento de la
impresora; no obstante, la batería debe cargarse por
completo con el adaptador de CA antes de usar la
impresora.
y
No deje la impresora en automóviles cerrados expuestos a
un sol intenso, porque podría resultar dañada.
y
Si la impresora no se va a utilizar durante un periodo
prolongado de tiempo, asegúrese de cargar la batería de
ión-litio al menos una vez cada seis meses con el fin de
impedir que se reduzcan su eficiencia y su vida útil.
y
Esta impresora está alimentada por una
batería de ión-litio integrada. Si la impresora
sólo se puede utilizar durante un breve
periodo de tiempo, a pesar de estar
completamente cargada, es posible que la
batería haya llegado al final de su vida útil.
Sustituya la batería de ión-litio por una
nueva.
Póngase en contacto con el representante
de ventas del establecimiento en el que adquirió la
impresora para cambiar la batería de ión-litio integrada.
Li-ion
Precauciones
ix
Indicaciones relativas al adaptador de CA
Advertencia
y
Utilice sólo el adaptador de CA diseñado específicamente
para esta impresora; de no hacerlo, podría provocar un
incendio, una descarga eléctrica u otros daños.
y
No enchufe la impresora en una toma de corriente que no
corresponda al estándar doméstico (CA 110 V
–
120 V),
porque de lo contrario podría producirse un incendio, una
descarga eléctrica u otros daños.
y
No toque el adaptador de CA o el enchufe de suministro
eléctrico con las manos mojadas, ya que podría sufrir una
descarga eléctrica.
y
No trate de desmontar, alterar o reparar el adaptador de
CA, porque podría provocar un incendio, una descarga
eléctrica o lesiones.
Para las tareas de mantenimiento, ajuste o reparación,
póngase en contacto con el representante de ventas del
establecimiento en el que adquirió la impresora.
y
No derrame agua ni bebidas, como café o zumos, sobre el
adaptador de CA. Asimismo, no utilice el adaptador en un
lugar donde pueda mojarse, ya que podrían producirse
combustiones o descargas eléctricas.
y
Si el enchufe de suministro eléctrico se ensucia, por
ejemplo de polvo, desconéctelo de la toma de corriente y
límpielo con un paño seco. Si continúa usando un enchufe
de suministro eléctrico sucio, puede producirse un
incendio.
x
Advertencia
y
Para desenchufar el cable de suministro eléctrico, no tire
del cable, porque podría provocar un incendio o una
descarga eléctrica.
y
No inserte objetos extraños en los terminales del
adaptador de CA, porque al hacerlo podría ocasionar
quemaduras o descargas eléctricas.
y
Un uso incorrecto del adaptador de CA puede ocasionar
incendios o descargas eléctricas. Por tanto, respete las
siguientes precauciones.
{
No lo dañe.
{
No coloque objetos sobre él.
{
No lo modifique.
{
No lo exponga al calor.
{
No lo retuerza.
{
No lo ate.
{
No lo doble
{
No permita que quede
excesivamente. atrapado entre dos objetos.
{
No tire de él.
y
Si el adaptador de CA está dañado, pida uno nuevo al
representante de ventas del establecimiento en el que
adquirió la impresora.
y
Mantenga el adaptador de CA fuera del alcance de los
niños, especialmente de los más pequeños, ya que
podrían sufrir lesiones.
y
No utilice el adaptador de CA cerca de hornos microondas,
porque podrían producirse daños.
y
No utilice el adaptador de CA cerca de llamas o
calentadores. Si se derrite el aislante que rodea el cable
del adaptador de CA, pueden producirse incendios o
descargas eléctricas.
Precauciones
xi
y
Antes de efectuar una operación de mantenimiento de la
impresora, por ejemplo durante su limpieza, desenchufe el
adaptador de CA de la toma de corriente para evitar que
se produzca una descarga eléctrica.
y
Si la impresora no se va a utilizar durante un periodo
prolongado de tiempo, asegúrese de desenchufar el
adaptador de CA de la unidad y de la toma de corriente por
razones de seguridad.
y
No enrolle el cable del adaptador de CA en torno al
adaptador ni lo doble, porque podría dañarse.
Advertencia

xii
Precauciones de uso
Utilice esta impresora en un entorno que cumpla los
siguientes requisitos.
{ Temperatura: 32 – 104
°
F / 0 – 40
°
C
{
Humedad: 20 – 80 % (Temperatura húmeda máxima: 80,6 °F /
27 °C)
{ No utilice ni guarde esta impresora en un lugar sometido a
condiciones extremas de temperatura, humedad, polvo o
vibraciones, ya que, de lo contrario, la unidad podría
dañarse o presentar fallos de funcionamiento.
{ No utilice la impresora en lugares expuestos a fluctuaciones
de temperatura extremas, porque esto podría generar
condensación con el consiguiente riesgo de daños y fallos
de funcionamiento en la unidad.
{ Si se produce condensación, deje que la impresora se
seque por sí sola antes de utilizarla.
La caja del adaptador de CA y la impresora pueden llegar a
calentarse mientras la impresora está cargándose o
imprimiendo. Esto no significa que hay un problema de
funcionamiento.
Cuando la impresora no esté en uso, desconecte el enchufe
de suministro eléctrico de la toma de corriente.
No obstaculice la ranura de salida del papel.
Si se ensucia el puerto USB o el conector del adaptador de
CA, pueden producirse fallos de conexión o de carga. Limpie
periódicamente el conector y el puerto con una torunda de
algodón seca.
Para limpiar la impresora, utilice un paño suave y seco. No
utilice benceno o disolventes, porque la impresora podría
decolorarse o deformarse. (
→ Consulte la página 13.)
Cuando utilice los accesorios opcionales, hágalo como se
indica en los manuales de instrucciones correspondientes.

Precauciones
xiii
Utilice papel térmico con esta impresora. Si se estampa o se
escribe encima del texto impreso, éste puede desaparecer o
decolorarse. Asimismo, la tinta puede tardar unos minutos en
secarse.
No toque la impresora con las manos mojadas.
No deje abierta la cubierta del paquete de papel cuando
guarde la impresora, porque podrían producirse fallos de
alimentación o errores del sensor del papel.
Indicaciones relativas al paquete de papel y a la manipulación
del papel
{ Guarde el paquete de papel lejos de lugares con
condiciones extremas de temperatura o humedad, con
mucho polvo o expuestos a la luz directa del sol, ya que el
papel podría decolorarse y pueden producirse fallos.
{ Asegúrese de cerrar la tapa del paquete de papel antes de
guardarlo, ya que de lo contrario el papel podría
decolorarse.
{ No deje paquetes de papel en automóviles cerrados
expuestos a un sol intenso, porque podrían decolorarse.
{ Después de abrir la caja de paquetes de papel, ciérrela de
nuevo lo antes posible, porque de lo contrario el papel
podría decolorarse.
{ No utilice papel que haya estado expuesto a la
condensación.
{ No intente usar papel transferido de un paquete de papel
a otro, porque pueden producirse fallos de
funcionamiento.
{ No trate de reutilizar papel que ya ha pasado por la
impresora, ya que pueden producirse fallos de
funcionamiento.
{ No abra la cubierta del paquete de papel ni empuje el
papel o tire de él mientras la impresora está imprimiendo,
ya que podría producirse un fallo de funcionamiento.

xiv
{
No utilice papel doblado, ondulado, cortado, mojado o
húmedo, ya que puede producirse un fallo de
funcionamiento o un error de alimentación del papel.
{ No toque los paquetes de papel o el papel con las manos
mojadas, ya que pueden producirse fallos.
{ No prepare o reemplace el paquete de papel en un lugar
con un nivel elevado de humedad, porque podrían
producirse fallos de funcionamiento.
{ Dependiendo de las condiciones ambientales del lugar y
de la calidad del material al que está pegado el papel
adhesivo, puede que éste se decolore, se despegue, sea
difícil de separar, manche de adhesivo la impresora o
dañe la superficie a la que estaba adherido. Antes de
utilizar papel adhesivo, haga una prueba pegando un
trozo pequeño a un área poco visible de la superficie que
se pretende utilizar.
{ No pegue el papel adhesivo sobre personas, animales o
plantas. No lo pegue tampoco en propiedades públicas o
en bienes pertenecientes a otras personas sin que éstas
lo autoricen.

CONTENIDO
1
Introducción .......................................................... i
Precauciones ...................................................... iii
Precauciones de uso ............................................... xii
1 Descripción general ........................................ 2
2 Procedimientos de uso ................................... 3
Carga .........................................................................3
Encendido de la impresora ........................................5
Preparación del papel ...............................................6
Instalación del paquete de papel ...............................8
Envío de datos desde un equipo o PC de bolsillo ...10
Alimentación del papel ............................................12
Mantenimiento .........................................................13
Eliminación de la impresora ....................................15
3 Apéndice ........................................................ 16
Especificaciones del producto .................................16
Diagnóstico de problemas .......................................18
Luces indicadoras ...................................................21
CONTENIDO

2
Lado derecho
Lado izquierdo
1 Descripción general
Cubierta del paquete de papel
Ventana de
comprobación
de papel
Ranura de salida de
Puerto de infrarrojos IrDA
Luz indicadora
de estado
Conector del adaptador de CA
Botón de encendido
Puerto USB
Luz indicadora
de carga
Puerto serie
Procedimientos de uso
3
Carga
Esta impresora está equipada con una batería de ión-litio
integrada. Utilice el adaptador de CA diseñado específicamente
para esta impresora para cargar la batería.
Tras adquirir esta impresora y antes de usarla, cargue
completamente la batería.
1
I
nserte el cable del
adaptador de CA en el
conector correspondiente
de la impresora.
2
Inserte el enchufe del
adaptador de CA en la
toma de corriente de la
pared (CA 110 V
–
120 V).
La carga de la batería de ión-
litio integrada comienza
automáticamente.
→
La luz indicadora de carga se enciende
con color naranja.
→ Cuando se termina de cargar, la luz
indicadora de carga se apaga.
3
Cuando se haya terminado de cargar,
desenchufe el adaptador de CA.
2 Procedimientos de uso
4
• A fin de proteger los circuitos, la batería no se
puede cargar si la unidad está situada en un
lugar expuesto a temperaturas extremas.
•
No enrolle el cable del adaptador de CA en torno al
adaptador ni lo doble, porque podría dañarse.
• La batería tarda unas tres horas en recargarse
completamente desde un estado de descarga
total (con la impresora apagada).
Procedimientos de uso
5
Encendido de la impresora
1
Pulse y mantenga pulsado
el botón de encendido
durante unos segundos,
hasta que la luz indicadora
de estado de color verde
se ilumine.
Si el botón de encendido se pulsa de
nuevo, la impresora se apaga.
• Con el fin de impedir el encendido accidental, la
impresora no se enciende si el botón de
encendido se pulsa levemente. Por tanto, si la
impresora no se enciende, mantenga pulsado el
botón de encendido durante unos segundos.
• A fin de evitar un desgaste innecesario de la
batería de ión-litio integrada, la impresora se
apaga automáticamente si no se ejecuta ninguna
operación o si no se envían datos durante cinco
minutos (salvo cuando la batería se está
cargando con el adaptador de CA).
6
Preparación del papel
Utilice sólo el paquete de papel diseñado exclusivamente para
esta impresora. El uso de cualquier otro tipo de papel
ocasionará daños a la unidad.
Para preparar el paquete de papel
Prepare el paquete de papel antes de instalarlo en la impresora.
•
Tenga cuidado de no dejar caer papel mientras prepara el
paquete de papel
.
1
Abra la tapa del
paquete de papel y
arranque las dos
piezas (1) de los
lados.
2
Con firmeza,
vuelva a
colocar la tapa a lo
largo del pliegue (
2
).
3
Inserte la pestaña de la tapa dentro de la ranura
(3) situada en la parte trasera del paquete.
Tap a
Paquete de papel
Parte delantera
Parte trasera

Procedimientos de uso
7
Manipulación del paquete de papel
{ Esta impresora determina el tipo de papel en
función del paquete de papel instalado y
selecciona automáticamente la configuración
apropiada para ese papel. No trasvase papel a
un paquete diferente.
{ No trate de reutilizar papel que ya ha pasado por
la impresora.
{ El paquete de papel está hecho de cartón.
Después de usar todo el papel, deseche el
paquete siguiendo las normativas locales.
{ No utilice un paquete de papel roto, deformado o
con cualquier otra irregularidad, ya que pueden
producirse daños.
{ No prepare el paquete de papel en una zona con
un nivel elevado de humedad, porque pueden
producirse fallos de funcionamiento.
{ No toque los paquetes de papel o el papel con
las manos húmedas, ya que podrían producirse
fallos de funcionamiento.
{ Guarde el paquete de papel lejos de lugares con
niveles elevados de temperatura, humedad o
polvo, o que estén expuestos a la luz directa del
sol.
{ Al guardar el paquete de papel, asegúrese de
cerrar la tapa.
{ No deje paquetes de papel en un automóvil
cerrado expuesto a un sol intenso.
{ Utilice el papel lo antes posible, ya que de lo
contrario podría decolorarse.

8
Instalación del paquete de papel
1
Deslice la cubierta del
paquete de papel (situada en
la parte superior de la
impresora) en la dirección
1
.
→ La cubierta del paquete de
papel se abrirá en la
dirección indicada por 2.
2
Inserte el paquete de
papel.
La indicación del tipo de papel
que aparece en el paquete debe
quedar hacia arriba. El extremo
del papel debe apuntar hacia
usted.
• Al cargar el paquete de papel, asegúrese de que
lo ha alineado correctamente y de que el extremo
final del papel no está doblado. De lo contrario,
podría producirse un fallo en la alimentación.
Indicación del tipo de papel
Procedimientos de uso
9
3
Cierre la cubierta del
paquete de papel en la
dirección 3.
4
Deslice la cubierta del
paquete de papel en la
dirección 4.
Si el paquete de papel se ha
cargado correctamente, se
podrá ver la indicación del tipo
de papel situada en el paquete a
través de la ventana de
comprobación de papel y la
cubierta del paquete estará
bloqueada.
• No saque el papel del paquete; cargue el
paquete directamente en la impresora.
• Para cambiar el tipo de papel, instale un paquete
de papel diferente.
• Mientras la impresora está imprimiendo, no
aplique presión sobre la ranura de salida de
papel ni coloque ningún objeto sobre la
impresora.
Ventana de
comprobación de papel
Indicación del tipo de
papel
Ranura de salida
de papel
10
Envío de datos desde un equipo o PC de bolsillo
Para que esta impresora imprima datos desde un equipo o PC de
bolsillo (PDA con Pocket PC), se debe instalar primero el software
correspondiente en el equipo o PC de bolsillo, tal y como se
describe en la “Guía del software” suministrada con la impresora.
Envío de datos a través de la conexión IrDA
Un PC de bolsillo se puede comunicar con esta impresora a
través de su puerto de infrarrojos IrDA.
1
Coloque la impresora y el
PC de bolsillo de manera
que sus puertos de
infrarrojos IrDA estén uno
frente al otro a una
distancia no superior a 7,9" (20 cm).
2
Empiece a imprimir desde el PC de bolsillo.
→ Mientras los datos se transmiten a través del puerto de
infrarrojos IrDA, la luz indicadora de estado parpadea
en verde.
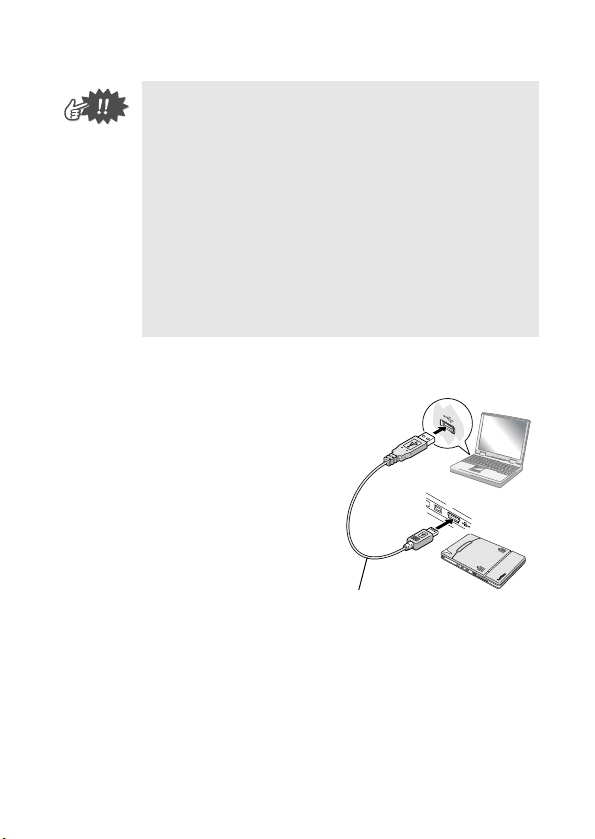
Procedimientos de uso
11
Envío de datos a través de
una conexión USB
Mediante el cable USB adjunto, la
impresora se puede conectar a un
equipo o PC de bolsillo que admita
una interfaz USB.
• Durante la transmisión, no mueva la impresora ni
el PC de bolsillo.
• Asegúrese de que no hay ningún obstáculo entre
la impresora y el PC de bolsillo.
• Si la impresora está conectada mediante un
cable USB o el PC de bolsillo está conectado a
través de una conexión serie, no se puede utilizar
la transmisión por infrarrojos.
• La transmisión por infrarrojos IrDA no es posible
con los equipos personalos.
• Para obtener información detallada, consulte el
manual de instrucciones del PC de bolsillo.
Cable USB adjunto
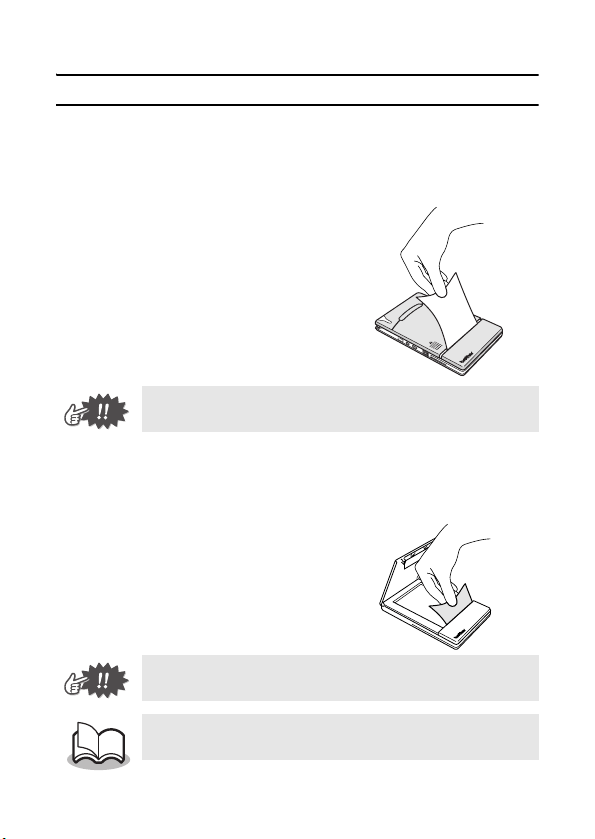
12
Alimentación del papel
Si se produce un fallo en la alimentación de papel, extraiga el
papel tal y como se describe en el procedimiento siguiente.
Si el papel sobresale por la ranura de salida del papel:
1
Extraiga el papel tirando
de él por la ranura de
salida.
Si el papel no sobresale por la ranura de salida del papel:
1
Abra la cubierta del paquete de papel.
2
Saque el paquete de
papel.
3
Saque el papel que ha
generado el error de
alimentación.
• Al tirar del papel, tenga cuidado de que no se
rasgue.
• Al tirar del papel, tenga cuidado de que no se
rasgue.
• Tirar del papel hacia fuera no afectará al
funcionamiento de la impresora.
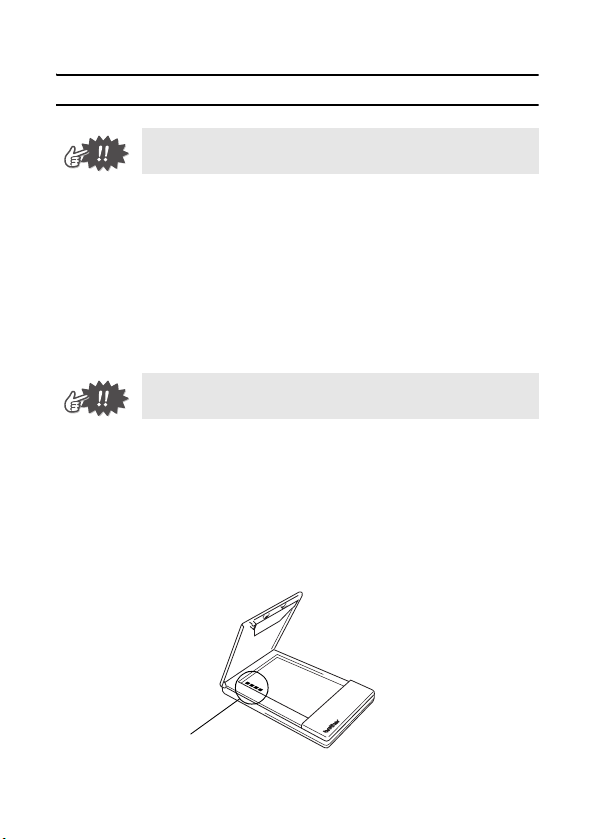
Procedimientos de uso
13
Mantenimiento
Limpieza de la impresora
Limpie la parte delantera de la impresora.
1
Elimine el polvo o la suciedad de la impresora
pasando por encima un trapo suave y seco.
Si la impresora está muy sucia, límpiela con un trapo
ligeramente humedecido.
Limpieza del sensor del paquete de papel
Si el sensor del paquete de papel está sucio, no podrá detectar
correctamente el paquete de papel y pueden producirse fallos.
1
Limpie el sensor del paquete de papel con una
torunda de algodón seca.
y Asegúrese de apagar la impresora antes de
limpiarla.
y No utilice benceno o disolventes, ya que la
impresora podría decolorarse o deformarse.
Sensor del paquete de papel
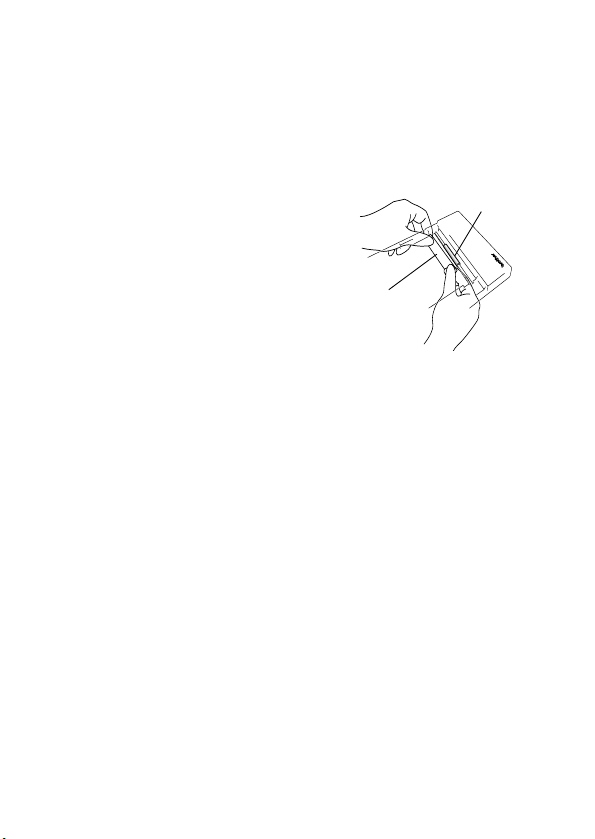
14
Limpieza del rodillo de captación
Si el rodillo de captación está sucio, pueden producirse
problemas de alimentación del papel.
1
Pegue un trozo de cinta
adhesiva en el rodillo de
captación.
2
Quite la cinta adhesiva del
rodillo de captación.
→ La suciedad que pudiera
haber en el rodillo de captación
se elimina al despegar la cinta.
Gire el rodillo de captación y repita el procedimiento hasta
limpiar toda su superficie.
Rodillo de
captación
Cinta
adhesiva
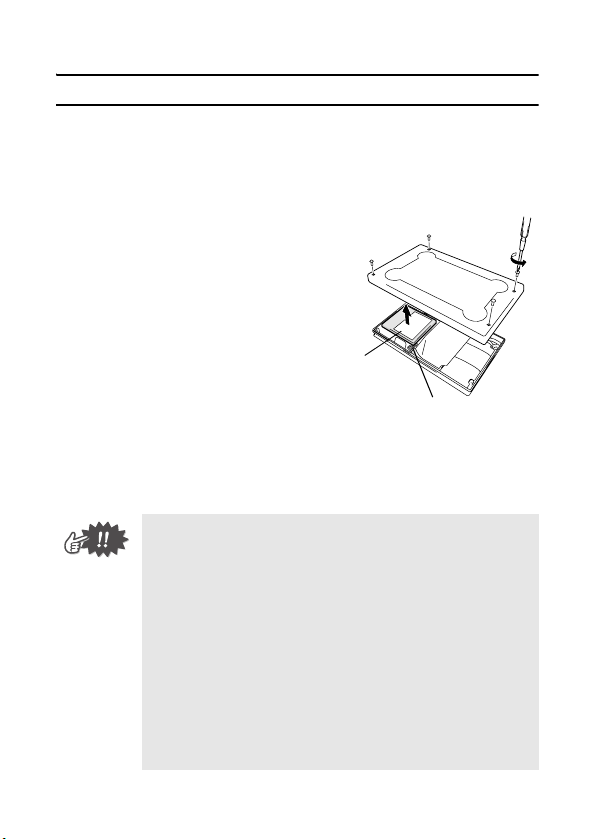
Procedimientos de uso
15
Eliminación de la impresora
Antes de desechar la impresora, quite la batería de ión-litio
integrada.
Extracción de la batería de ión-litio
1
Apague la impresora y
desconecte el adaptador
de CA.
2
Con un destornillador,
afloje los cuatro tornillos
situados en la parte
trasera de la impresora y
extraiga la cubierta
trasera.
3
Desenchufe el conector y extraiga la batería de
ión-litio.
• Al abrir la cubierta trasera, la garantía quedará
invalidada. No quite la cubierta trasera a menos
que tenga intención de desechar la impresora.
• La batería de ión-litio está fijada a la impresora
con cinta adhesiva. Sujete la batería de ión-litio y
tire de ella para sacarla de la impresora. Tenga
cuidado de no tirar del cable.
• No tire del cable para desenchufar el conector.
• Existe riesgo de explosión si la batería se
reemplaza por otra de un tipo incorrecto.
Deseche las baterías usadas de acuerdo con las
regulaciones locales para residuos especiales.
Batería de
ión-litio
Conector

16
Especificaciones del producto
Especificaciones de la impresora
3 Apéndice
Indicadores
Luz indicadora de estado (roja/verde)
Luz indicadora de carga (naranja)
Impresión
Método
Impresión térmica directa con un cabezal de
impresión térmica de línea
Resolución 300 ppp × 300 ppp
Velocidad
de
impresión
15 segundos/hoja
(texto estándar sobre papel térmico con
cobertura del 7 % a una temperatura ambiente
de 74,6 °F / 25 °C)
Nº de
páginas
que se
pueden
imprimir
Se pueden imprimir unas 100 páginas de
manera continua si la batería está
completamente cargada (texto estándar
sobre papel térmico con cobertura del 7 % a
una temperatura ambiente de 74,6 °F / 25 °C)
Método de
suministro de
papel
Paquete de papel Brother, mecanismo
automático de alimentación de papel
Papel
Papel cortado A7 de Brother
(2,9" (74 mm) × 4,1" (105 mm))
Suministro
eléctrico
Adaptador de CA de conmutación compacto
para la carga, batería de ión-litio (integrada)
de 7,4 V
Interfaz
Interfaz serie (RS-232C)
Compatible con USB versión 1.1 y un puerto
de infrarrojos compatible con IrDA 1.2
Dimensiones
3,9" (100 mm) (anchura) × 6,3" (160 mm)
(profundidad) × 0,7" (17,5 mm) (altura)
Peso
0,66 lbs. (300 g) (incluido el peso de la
batería de ión-litio integrada y el de un
paquete de papel con 50 hojas de papel
térmico normal)

Apéndice
17
Tamaños de papel (área de impresión)
Tipo normal
Tamaño A7: 2,9" (74 mm) × 4,1" (105 mm)
(2,7" (69 mm) × 3,9" (100 mm))
Hojas de
etiquetas
(cuatro en
vertical)
2,9" (74 mm) × 1,0" (26,25 mm)
(2,7" (69 mm) × 0,8" (21,25 mm))
Hojas de
etiquetas
(dos en vertical)
2,9" (74 mm) × 2,1" (52,5 mm)
(2,7" (69 mm) × 1,9" (47,5 mm))

18
Diagnóstico de problemas
Síntomas y soluciones
Síntoma: La impresora
no se puede
encender.
Solución: Pulse y mantenga pulsado el
botón de encendido durante unos
segundos. (→ Consulte la página 5.)
Solución: Es necesario recargar la batería
de ión-litio integrada.
(→ Consulte la página 3.)
Síntoma: Aunque se ha
dado la orden de
imprimir, la
impresora no
imprime.
Con una conexión IrDA:
Solución: Asegúrese de que no existen
obstáculos entre la impresora y el
PDA, y compruebe que se encuentran
a menos de 7,9" (20 cm) de distancia.
(→ Consulte la página 10.)
Solución: Desenchufe el cable USB.
(→ Consulte la página 10.)
Solución:
Desconecte el cable de conexión
en serie.
Con una conexión USB:
Solución: Compruebe que la impresora
está bien conectada al equipo
mediante el cable USB.
(→ Consulte la página 11.)
Con una conexión en serie:
Solución: Compruebe que la impresora
esté conectada con seguridad al
ordenador mediante el cable de
conexión en serie.
Síntoma: Hay un fallo en
la alimentación de
papel.
Solución: Saque el papel.
(→ Consulte la página 12.)

Apéndice
19
Síntoma: Aunque se ha
quitado el papel que
ha causado el fallo
de alimentación, no
se puede cancelar el
error.
Solución: Puede que haya quedado algún
trozo de papel en la impresora.
Póngase en contacto con el
representante de ventas del
establecimiento en el que la adquirió.
Síntoma: Una luz
indicadora está
iluminada o
parpadea.
Solución: Consulte la explicación que
aparece en la sección “Luces
indicadoras” de la página 21.
Síntoma: El papel no
entra en la impresora.
Solución: Asegúrese de que la tapa del
paquete de papel está bien doblada a
lo largo del pliegue (2).
(→ Consulte la página 6.)
Solución: Asegúrese de que la cubierta
del paquete de papel está firmemente
cerrada. (→ Consulte la página 9.)
Solución: El papel puede estar sucio.
Quite la primera hoja de la parte
trasera del paquete de papel y vuelva
a instalar el paquete.
(→ Consulte las páginas 6 y 8.)
Solución: Limpie el rodillo de captación.
(→ Consulte la página 14.)
Síntoma: La impresión
es débil (apenas
perceptible).
Solución: Asegúrese de que la cubierta
del paquete de papel está firmemente
cerrada. (→ Consulte la página 9.)
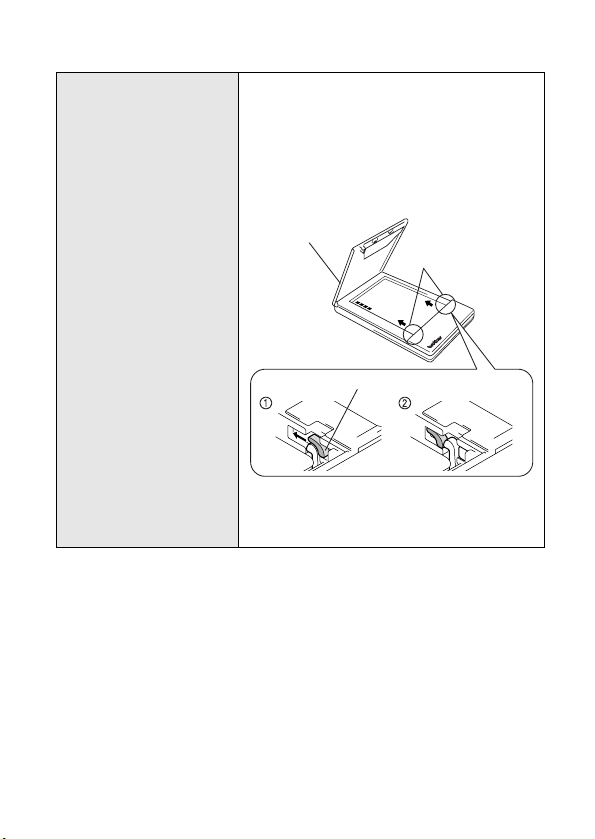
20
Síntoma: La cubierta del
paquete de papel no
se puede cerrar.
Solución: Las piezas indicadas con una
“A” en la figura siguiente están
bloqueadas.
Consulte la figura y, con la punta de un
bolígrafo, deslice la pieza indicada en la
dirección de la flecha para liberarla
.
Libere la pieza del lado opuesto
usando el mismo método
Cubierta del
paquete de papel
A
Con la punta de un bolígrafo, empuje para deslizarla.
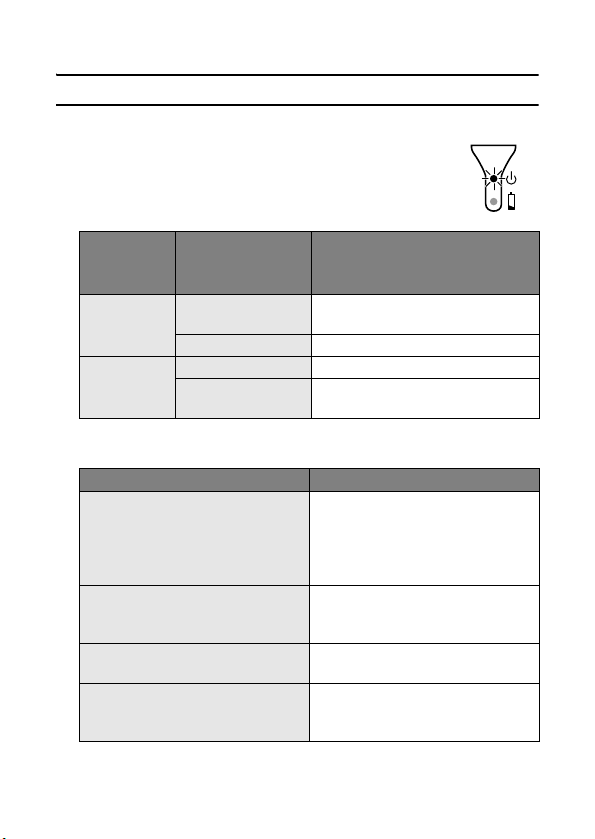
Apéndice
21
Luces indicadoras
Luz indicadora de estado
Una luz verde indica que la impresora está
funcionando correctamente y una luz roja
indica que se ha producido un error.
Si se ha producido un error, compruebe las siguientes causas
posibles.
Color de la
luz
indicadora
Estado de la luz
indicadora
Estado de la impresora
Verde
Encendida
permanentemente
Esperando para recibir datos
Parpadeando Recibiendo datos
Rojo
Parpadeando Se ha producido un error.
Encendida
permanentemente
Se ha producido un error en el
sistema.
Descripción del error Solución
No hay ningún paquete de
papel instalado.
El paquete de papel se ha
instalado al revés.
No queda papel.
Instale correctamente un
paquete de papel que
contenga papel.
Se ha producido un fallo en la
alimentación de papel.
Saque el papel que ha
provocado el fallo de
alimentación.
Se ha producido un error de
transmisión.
Compruebe el estado de la
transmisión.
Se ha producido un error de
sobrecalentamiento.
El interior de la impresora ha
empezado a sobrecalentarse.
Espere a que se enfríe.
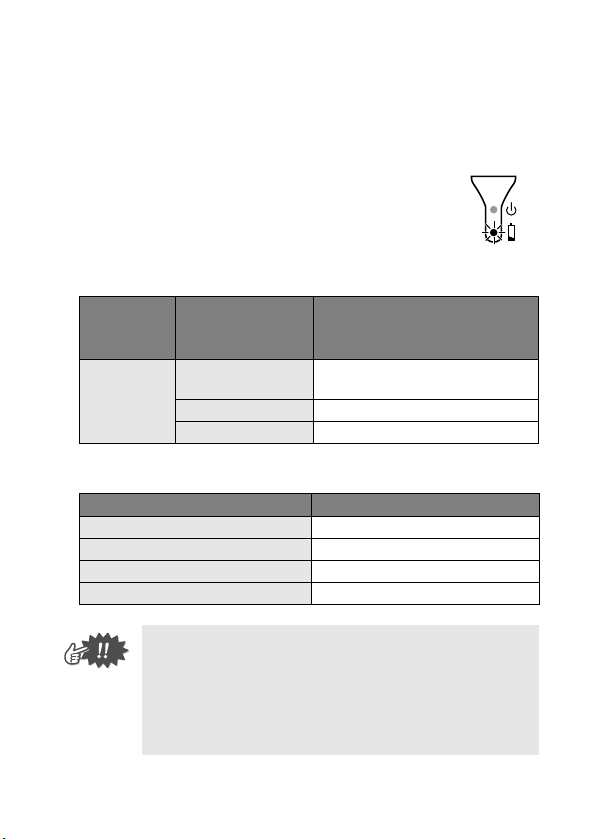
22
Si se ha producido un error de sistema:
La impresora puede estar dañada. Póngase en contacto con
el representante de ventas del establecimiento en el que la
adquirió.
Luz indicadora de carga
La luz indicadora de carga permite comprobar
el estado del suministro eléctrico. La luz
indicadora de carga tiene dos funciones.
1 Comprobación del estado de carga (cuando
el adaptador de CA está conectado)
2 Comprobación del nivel de la batería (cuando la batería de
ión-litio integrada se está agotando)
Color de la
luz
indicadora
Estado de la luz
indicadora
Estado de la impresora
Naranja
Encendida
permanentemente
En carga
Apagada Carga completada
Parpadeando Fallo en la batería integrada
Estado de la luz indicadora Nivel de la batería
Apagada Nivel de carga superior al 60%
Parpadea una vez Nivel de carga inferior al 60%
Parpadea dos veces Nivel de carga inferior al 30%
Continúa parpadeando 3 veces Casi vacía
• Cuando el nivel de carga de la batería sea inferior
al 60%, recárguela.
• Si la luz indicadora de carga parpadea mientras
la impresora está imprimiendo, conecte
inmediatamente el adaptador de CA y cargue la
batería. La impresora puede dejar de imprimir.

Apéndice
23
Accesorios de la unidad MW-120
Lote Nº Descripción
C-11 Papel térmico A7 (4,1" (105 mm) x 2,9" (74 mm))
C-21 Etiqueta A7 (4,1" (105 mm) x 2,9" (74 mm))
C-41
Hoja de etiquetas cortadas A7 (4/hoja)
(1,0" (26,25 mm) x 2,9" (74 mm))
C-42
Hoja de etiquetas cortadas A7 (2/hoja)
(2,1" (52,5 mm) x 2,9" (74 mm))
C-51 Papel carbón (2 hojas)
2S-100 Soporte de dos posiciones
PG-100 Guía de papel
PCS-100 Estuche para el transporte
Recuento:
50 hojas/paquete (papel térmico)
30 hojas/paquete (todos los demás)

z
Before using this printer, be sure to read this Owner
’
s Manual.
z
We suggest that you keep this manual in a handy place for future
reference.
Owner’s Manual
Manual del usuario
General Description
Operating Procedures
Appendix, etc.
MW-120
Mobile Printer
Impresora móvil
z
Antes de usar esta impresora, asegúrese de leer esta “Manual del
usuario”.
z
Aconsejamos mantener este manual a mano para futuras consultas.
Descripción general
Procedimientos de manejo
Apéndice, etc.