USER MANUAL Portable Room Air Conditioner
Operating Instructions
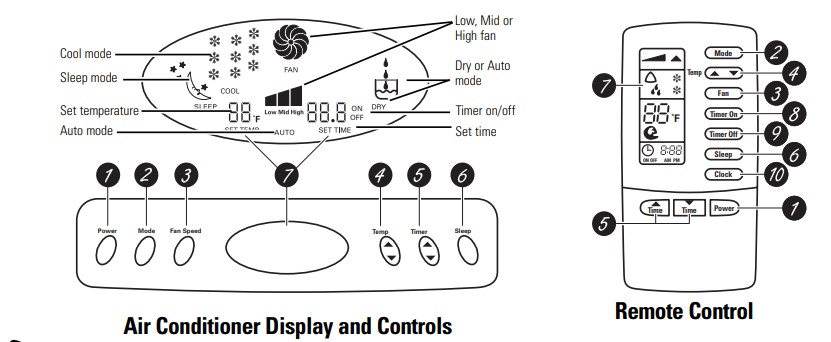
About the controls on the air conditioner.
Appearance and features may vary.
Using the portable air conditioner.
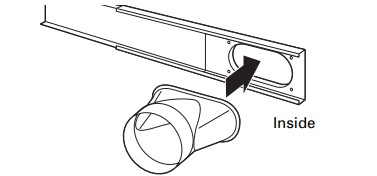
Always make sure the water bucket is locked into place on the portable air conditioner.
Using the Water Bucket
- Make sure the drain connector is capped and in the up position. When the bucket is removed, the unit will shut off. Empty and replace the bucket, making sure that it is fully seated in the unit.
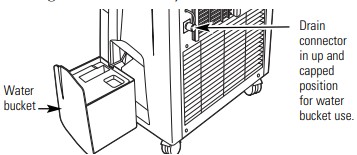
IMPORTANT: When using the water bucket to remove collected water, make sure that the drain connector is in the up position and that it is capped. If it is not in the up position water will drain from the connector onto the floor
- When the water bucket is full, a signal will beep and the display will show E4 until the water bucket has been emptied.
NOTE: The fan will continue to operate even when the water bucket is full. However, the Cooling or Dry mode will not work until the water bucket has been emptied and replaced correctly
- To empty the water bucket before it is full, turn the unit off and wait for three minutes for all water to collect into the bucket.
Using the Drain Hose
- Water can be automatically emptied into a floor drain by uncapping the drain connector, tilting it down and connecting the drain hose. Route the drain hose straight to a floor drain.
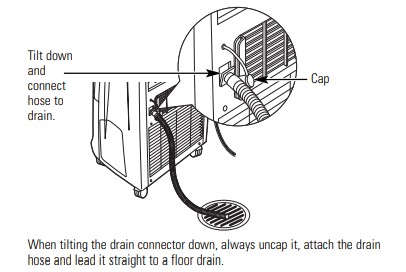
IMPORTANT: When the drain connector is tilted down the water will drain through the connector. Make sure the hose is connected and that it is led straight to a floor drain. Never tilt the drain connector down with it capped because draining water will cause the unit to malfunction.
How to Insert the Batteries in the Remote Control
- Remove the battery cover by sliding it according to the arrow direction.
- Insert new batteries, making sure that the (+) and (–) of battery are installed correctly.
- Reattach the cover by sliding it back into position.
NOTES:
- Use 2 “AAA” (1.5 volt) alkaline batteries. Do not use rechargeable batteries.
- Remove the batteries from the remote control if the system is not going to be used for a long time.
Care and Cleaning
Grille and Case
To clean the case:
- Use water and a mild detergent. Do not use bleach or abrasives.
To clean the front grille:
- Use a vacuum attachment or brush.
Air Filter
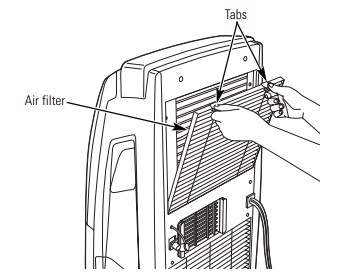
- The air filter is on the back of the air conditioner. It should be checked and cleaned at least every 30 days or more often if necessary.
NOTE: DO NOT rinse or put the filter in an automatic dishwasher.
CAUTION: DO NOT operate the air conditioner without the filter because dirt and lint will clog it and reduce
To remove:
- Pinch the two filter cover tabs and pull the filter cover out and off. Remove the filter from the cover. Wash it in warm soapy water. Rinse and let the filter dry before replacing it.
To replace:
- Hook the filter back onto the filter cover. Place the bottom of the filter cover onto the lower edge of the filter compartment and close it. performance.
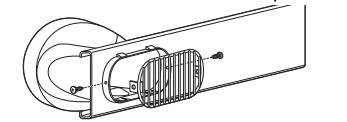
Cleaning the Coil
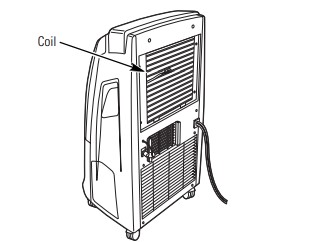
- After removing the air filter cover, clean the coil with a soft brush when the soil is soft and wet.
NOTE: Do not allow water to enter the electrical/machine compartment through the circular opening behind the coil.
- Do not spray the coil with a hose.
Water Bucket
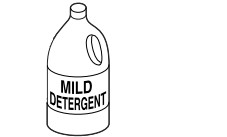
- Every few weeks, rinse the inside of the water bucket with a mild detergent to prevent growth of mold, mildew and bacteria.
NOTE: DO NOT rinse or put the water bucket in an automatic dishwasher
Installation Instructions
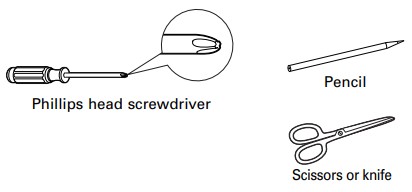
TOOLS YOU WILL NEED
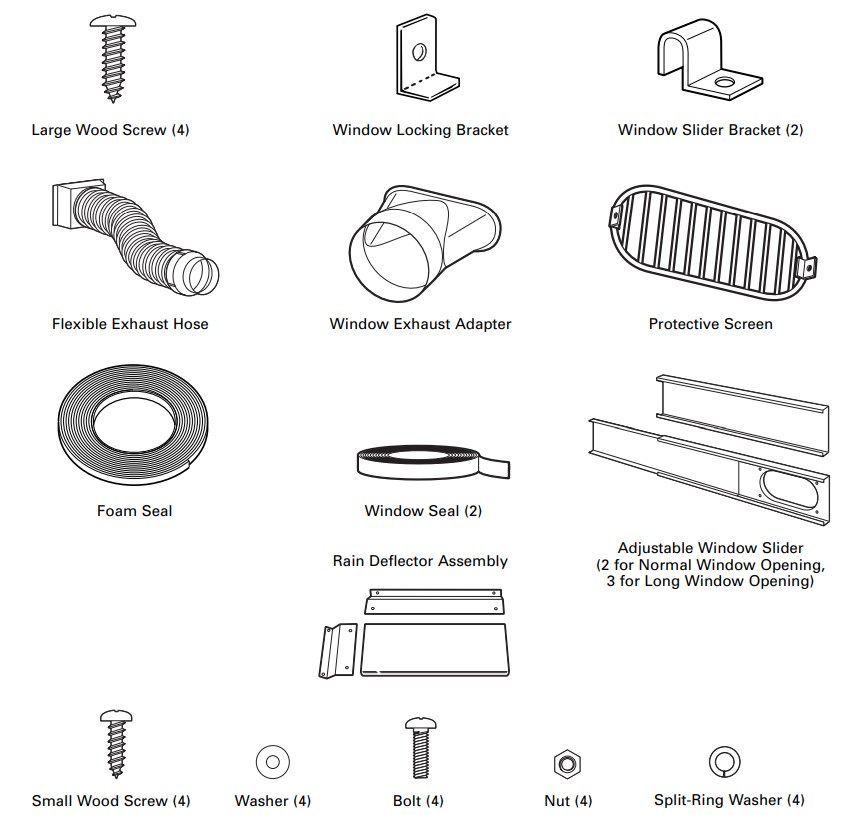
PARTS INCLUDED
Power cord includes a current interrupter device. A test and reset button is provided on the plug case. The device should be tested on a periodic basis by first pressing the TEST button and then the RESET button. If the TEST button does not trip or if the RESET button will not stay engaged, discontinue use of the air conditioner and contact a qualified service technician.
CHOOSE A LOCATION
- Place the air conditioner on a smooth, level floor strong enough to support the unit with a full bucket of water.
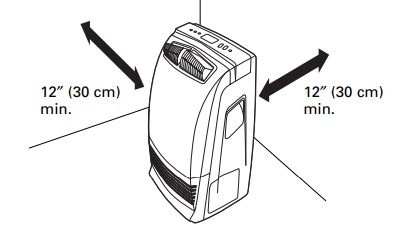
- Allow at least 12 inches (30 cm) of air space on all sides of the unit for good air circulation
- Place the unit in an area where the temperature will not fall below 65°F (18°C). The coils can become covered with frost at temperatures below 65°F, which may reduce performance.
NOTE: The portable air conditioner has rollers to aid placement, but it should only be rolled on smooth, flat surfaces. Do not attempt to roll the portable air conditioner on carpet or over objects.
ATTACH EXHAUST ADAPTER TO WINDOW SLIDER INSIDE OPENING
- Snap the exhaust adapter into the inside opening of the window slider.
ATTACH PROTECTIVE SCREEN TO OUTSIDE OF EXHAUST ADAPTER
- Use two small wood screws on each side to attach the protective screen onto the outside of the exhaust adapter.
INSTALL RAIN DEFLECTOR TO OUTSIDE OF ADJUSTABLE WINDOW SLIDER
- Remove the appropriate plugs (save for future use) from the window slider and rain deflector to prepare for either a double-hung window installation or a slider window installation. Line up the holes on the rain deflector and the window slider. Use the four bolts, splitring washers and nuts to attach the rain deflector onto the window slider.

INSTALL WATER BUCKET COVER
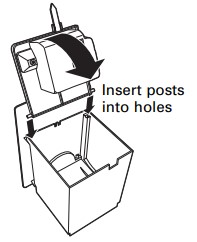
- Remove the shipping tape from the side of the unit and remove the water bucket.
- Pull the cover from the bucket and install it by inserting its posts into the holes.
- Close the cover and insert bucket into unit.
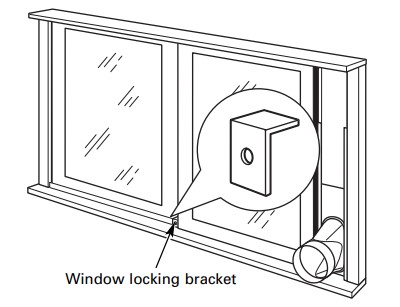
INSTALL TOP WINDOW GASKET AND WINDOW LOCKING BRACKET
- Cut the foam top window gasket to the window width. Stuff the foam between the glass and the window to prevent air and insects from getting into the room.
- Attach the window locking bracket with one large wood screw.

INSTALL WINDOW SLIDER IN WINDOW
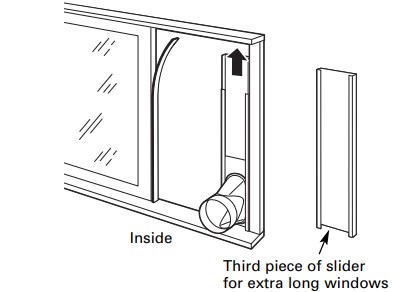
- If the window slider is shorter than the height of the window, pull the sliding arm out to the height of the window. If the window slider is longer than the height of the window, cut the slider arm to the height of the window. If the two-piece window slider is too short for the height of the window, attach and use the third piece of the slider.
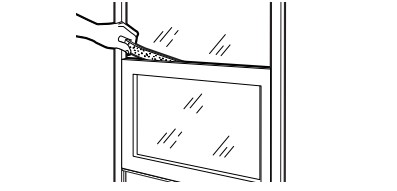
- Cut the window seal (adhesive-backed) to the window height and stick the adhesive side to the inner window sliding face, as shown above.
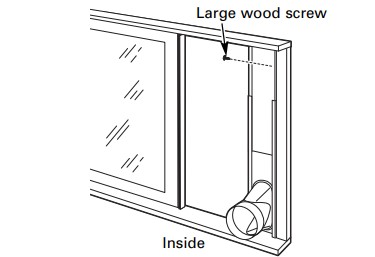
- Attach the top of the slider to the window face using a large wood screw through one of its holes.
- Slide the window against the edge of the window slider.
- If applicable, hook the two window slider brackets over the side edge of the window slider and attach to the inner window sliding face using two large wood screws.
INSTALL WINDOW LOCKING BRACKET
- Attach the window locking bracket with one large wood screw.
Troubleshooting Tips
E4 appears in the display
- Water bucket is full or not installed correctly.
- Remove, empty and replace the water bucket. See the Using the Water Bucket section and the Installation Instructions in this manual.
- Water bucket was removed while unit was operating.
- Replace the water bucket. See the Using the Water Bucket section.
NOTE: Replace the water bucket immediately after emptying it to catch any condensation which may continue to accumulate.
"HEAT" mode is selected but unit does not heat
- If you have a Cool only model, heat settings will not be active on your model.
- Set the unit to AUTO, COOL, DRY or FAN mode. HEAT mode is not available and will not operate on cool only models.
Air conditioner does not start
- The air conditioner is unplugged.
- Make sure the air conditioner plug is pushed completely into the outlet
- The fuse is blown/circuit breaker is tripped.
- Check the house fuse/circuit breaker box and replace the fuse or reset the breaker.
- Power failure.
- If a power failure occurs, turn the air conditioner OFF. When power is restored, wait 3 minutes to restart the air conditioner to prevent tripping of the compressor overload.
- The current interrupter device is tripped.
- Press the RESET button located on the power cord plug
- If the RESET button will not stay engaged, discontinue use of the air conditioner and contact a qualified service technician.
- The remote control is not working.
- Try operating the control on the unit. See The remote control is not working below.
Air conditioner has stopped running
- Power interruption or power failure occurred.
- When the power is restored, wait 3 minutes to restart the air conditioner to prevent tripping of the compressor overload. Touch the Power pad and reset the controls to the desired settings.
- Sleep mode or the Timer Off pad has turned off the air conditioner.
- Set the air conditioner to the desired setting.
Air conditioner does not cool as it should
- Airflow is restricted.
- Make sure there are no curtains, blinds or furniture blocking the inlets located on the left and rear sides of the air conditioner. Make sure there are at least 12″ of space on all sides of the unit. Make sure airflow through the vent exhaust is not blocked.
- The temp control may not be set correctly.
- In COOL mode, touch the Temp Decrease ▼ pad.
- The air filter is dirty
- Clean the filter at least every 30 days. See the Care and cleaning section
- The room may have been hot
- When the air conditioner is first turned on, you need to allow time for the room to cool down.
- Cooling coils have iced up.
- See “Air conditioner freezing up” below.
Air conditioner freezing up
- Ice blocks the airflow and stops the air conditioner from cooling the room.
- The air conditioner will defrost and return to operation on its own.
- To defrost the air conditioner more quickly, select the COOL mode and HIGH fan and set the thermostat to a higher temperature.
The remote control is not working
- The batteries are inserted incorrectly
- Check the position of the batteries. They should be inserted in the opposite (+) and (–) direction.
- The batteries may be dead.
- The remote control is too far from the air conditioner.
- Operate the remote control closer to the air conditioner.
- An object, such as furniture or a towel, is blocking the signal.
Unit does not work after pressing the Power pad
- The water bucket is full or the water bucket is not properly installed
- Remove water from the water bucket and push the water bucket back in place.
Noise or vibration
- The floor is not level.
- Place unit on a flat, level surface.