Owner 's Manual Air Conditioner
Operating Instructions
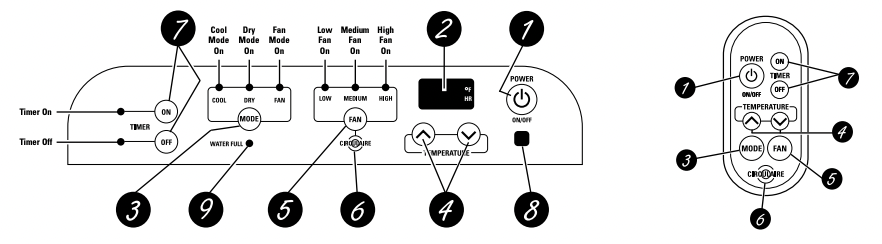
About the controls on the air conditioner
Air Conditioner Control Remote Control
Controls
 ON/OFF Pad
Turns the air conditioner on and off.
 Display
Shows the room temperature. Also shows the set temperature while setting the temperature in COOL mode or the set time while setting TIMER ON or TIMER OFF.
NOTE: The display will change to show the room temperature after settings have been made. To recall the set cooling temperature, press the or
or pad. To recall the timer setting, press the TIMER ON pad or the TIMER OFF pad for the timer that is set.
 MODE
MODE
Use to set the air conditioner to COOL, DRY or FAN mode.
 Increase /Decrease Pads
Use to set temperature when in COOL mode or to set a time with the timer feature.
 FAN Pad
Use to set the fan speed to LOW, MEDIUM or HIGH.
 CIRCULAIRE
Turn on to provide continuous side-to-side air circulation.
For fixed side-to-side air direction, turn on until the desired air direction is obtained, then turn it off.
 TIMER Pad
ON—The air conditioner can be set to automatically come on in 1/2 (0.5) to 24 hours at its previous setting. The unit must be on while setting TIMER ON.
- Press the POWER (ON/OFF) pad.
- Press the TIMER ON pad. The TIMER ON light will blink.
- Press the or pad to set the desired time for the unit to start. (Each time you touch the or pads, the set time will advance by 30 minutes between 0 and 10 hours and by one hour between 10 and 24 hours.)
- Press the TIMER ONpad again to start the timer.
- Press the POWER (ON/OFF) pad to turn the unit off.
OFF—When the air conditioner is on, it can be set to automatically turn off in 1/2 (0.5) to 24 hours.
- Press the TIMER OFF pad. The TIMER OFF light will blink.
- Press the or pad to set the desired time for the unit to stop. (Each time you touch the or pads, the set time will advance by 30 minutes between 0 and 10 hours and by one hour between 10 and 24 hours.)
- Press the TIMER OFF pad again to start the timer.
After settings have been made, the display will change back to show the room temperature.
NOTE: Both timers may be set, in combination, to turn the unit on and off as desired.
To cancel the timer, press and hold the TIMER ON or TIMER OFF pad (depending on the timer(s) set) until its indicator light goes off.
 Remote Control Signal Receiver
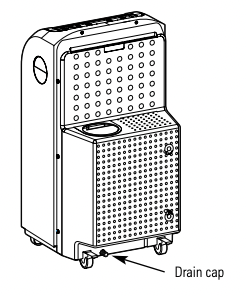
 Water Full Indicator Light
When the Water Full Indicator Light begins blinking, the unit has reached maximum water collection level.
If water level does not lower in 40 minutes, the unit will power off and it must be manually drained.
- Unplug the power cord and roll the unit to a drain or outside.
- Pull out the drain cap from the back bottom edge and allow water to drain from the unit.
- Replace the drain cap and put the unit back into operation.
NOTE: The unit is designed to automatically evaporate water collected in normal settings. However, in very humid settings, the unit may occasionally need to be drained.
The display will always default to show the room temperature.
When the air conditioner is turned on, it will automatically start in the last mode and fan settings selected.
COOL Mode
Use the COOL mode for cooling.
To set the COOL mode:
- Press the MODE pad until the COOL indicator light is lit.
- Press the FAN pad to set HIGH, MEDIUM or LOW fan speed.
- Press or to set the desired temperature between 64°F and 90°F in 1°F increments.
After settings have been made, the display will change back to show the room temperature. The temperature control is used to maintain the room temperature. The compressor will cycle on and off to keep the room at the set level of comfort. Set the temperature control at a lower number and the indoor air will become cooler. Set the temperature control at a higher number and the indoor air will become warmer.
NOTE: If the air conditioner is off and is then turned on while set to COOL, it will take approximately 3 minutes for the compressor to start and cooling to begin.
Cooling Descriptions
- For Normal Cooling—Select the COOL mode and HIGH or MEDIUM fan speed with a middle set temperature.
- For Maximum Cooling—Select the COOL mode and HIGH fan speed with a lower set temperature.
- For Quieter & Nighttime Cooling—Select the COOL mode and LOW fan speed with a middle set temperature.
NOTE: If you switch from a COOL setting to OFF or to a fan setting, wait at least 3 minutes before switching back to a COOL setting
DRY Mode—Dehumidification
Use the DRY mode to provide dehumidification only. The fan will run at a fixed speed at this setting, so a fan speed cannot be set. Keep windows and doors closed for the best dehumidifying effects. The exhaust hose must be attached to the unit when using the DRY mode.
To set the DRY mode:
- Press the MODE pad until the DRY indicator light is lit.
In the DRY mode, a set temperature will not be displayed. After DRY mode has been set, the display will change back to show the room temperature.
NOTE: If you switch from a DRY setting to OFF or to a fan setting, wait at least 3 minutes before switching back to a DRY setting.
If using the unit in the DRY mode for an extended time:
- Unplug the power cord.
- Roll the unit so that its drain nozzle is located over a floor drain and pull out the drain cap from the back bottom edge. A water hose (not included) may also be attached to the nozzle and led to a floor drain. Reconnect the power cord.
- Press the MODE pad until the DRY indicator light is lit.
FAN Mode
Use the FAN mode to provide air circulation and filtering without cooling.
To set the FAN mode:
- Press the FAN pad until the desired indicator light for HIGH, MEDIUM or LOW fan speed is lit.
Since fan only settings do not provide cooling, a set temperature will not be displayed. After FAN speed has been set, the display will change back to show the room temperature.
Power Outage Recovery Feature
In the case of a power outage or interruption, the unit will automatically re-start in the settings last used after the power is restored.
NOTE: If the TIMER was set before the power outage, it will need to be reset after power is restored.
Care and cleaning of the air conditioner
Turn the air conditioner off and remove the plug from the wall outlet before cleaning
Case
To clean the case:
Use water and a mild detergent. Do not use bleach or abrasives.
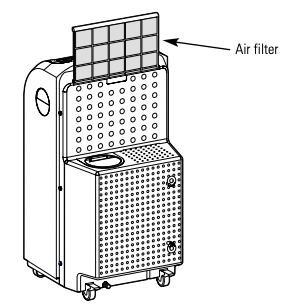
Air Filter
The air filter is on the back of the air conditioner. It should be checked and cleaned at least every days or more often if necessary.
NOTE: DO NOT put the filter in an automatic dishwasher.
CAUTION: DO NOT operate the air conditioner without the filter because dirt and lint will clog it and reduce performance.
To remove:
Grasp the tab and gently pull the filter up and out. Wash it in warm soapy water. Rinse and let the filter dry before replacing it.
Drainage/Routine Maintenance
This air conditioner produces water during normal operation. The unit should be drained if it is not going to be run for an extended period of time. The unit should also be drained prior to storage at the end of the cooling season.
To drain the unit, follow the instructions below:
- Unplug the power cord and roll the unit to a drain or outside.
- Pull out the drain cap and allow water to drain from the unit.
- Securely replace the drain cap
Remote Control
To replace the battery:
- Slide the battery cover open on the back edge of the remote control.
- Insert new battery, making sure that the + is toward the bottom of the remote control.
- Slide the cover back into position.
NOTES: Replace with a lithium CR2025 battery. Remove the battery from the remote control if the system is not going to be used for a long time.
- To ensure proper operation, aim the remote control at the signal receiver on the air conditioner.
- The remote control signal has a range of up to 21 feet.
- Make sure nothing is between the air conditioner and the remote control that could block the signal.
Installation Instructions
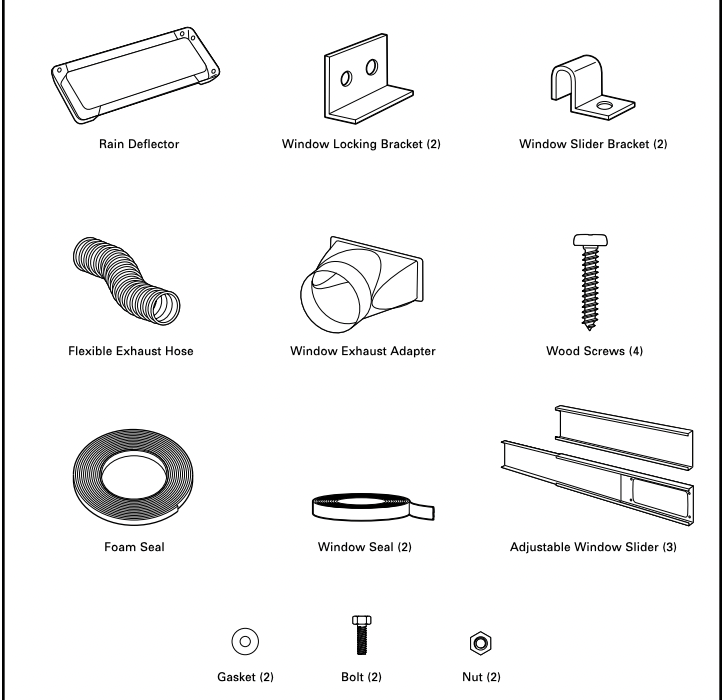
PARTS INCLUDED
1. CHOOSE A LOCATION
• Place the air conditioner on a smooth, level floor strong enough to support the unit.
• Allow at least 12 inches (30 cm) of air space on all sides of the unit for good air circulation.

• Place the unit in an area where the temperature will not fall below 65°F (18°C). The coils can become covered with frost at temperatures below 65°F, which may reduce performance.
NOTE: The portable air conditioner has rollers to aid placement, but it should only be rolled on smooth, flat surfaces. Do not attempt to roll the portable air conditioner on carpet or over objects.
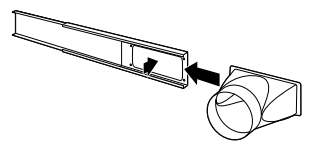
2. ATTACH THE EXHAUST ADAPTER TO THE WINDOW SLIDER INSIDE OPENING
- Pull the sliding arm of the window slider out until the oval opening in the slider is completely clear.
- Slide the exhaust adapter inside the end of the slider and snap it into the opening.
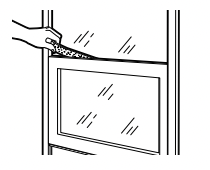
3. INSTALL RAIN DEFLECTOR TO OUTSIDE OF ADJUSTABLE WINDOW SLIDER
- Remove the appropriate plugs (save in a secure place) from the window slider to prepare for either a double hung window installation or a slider window installation. Line up the holes on the rain deflector and the window slider. Use the bolts, gaskets and nuts to attach the rain deflector onto the window slider.
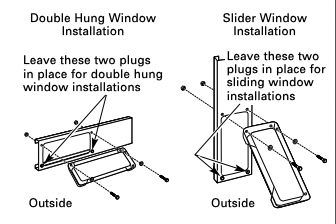
NOTE: If installing slider in a sliding window or patio door, skip to step 4 on page 11 and proceed.
4. INSTALL WINDOW SLIDER IN A DOUBLE HUNG WINDOW
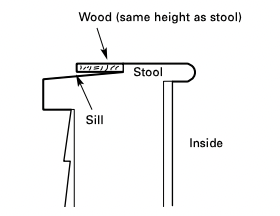
- A. To allow the window to close properly around the adjustable window slider, attach a piece of wood to the sill at the back of the window stool.
WOOD PIECE–
WIDTH: 1″
LENGTH: Long enough to fit inside the window frame.
THICKNESS: To determine the thickness, place a piece of wood on the sill behind the window stool to make it the same height as the stool.
Attach securely with nails or screws provided by the installer.
- B. Cut the window sash seal (adhesivebacked) to the window width and stick the adhesive side to the bottom of the sash. Cut the window stool seal (non-adhesive backed) to the window width and place on the window stool.

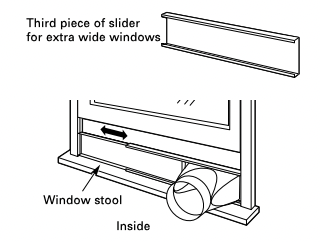
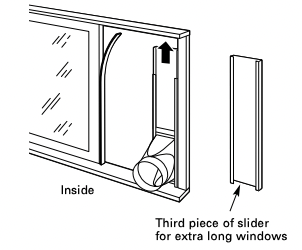
- C. If the window slider is shorter than the width of the window, pull the sliding arm out to the width of the window. If the window slider is longer than the width of the window, cut the slider arm to the width of the window. If the two-piece window slider is too short for the width of the window, attach and use the third piece of the slider.
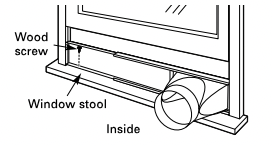
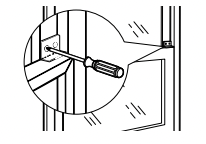
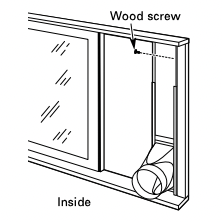
- D. Attach the slider to the stool through one of its holes using a wood screw (not included).
- E. Pull the window down against the top of the window slider.
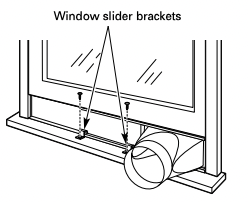
- F. Hook the two window slider brackets over the bottom edge of the window slider and attach to the window stool using two screws.
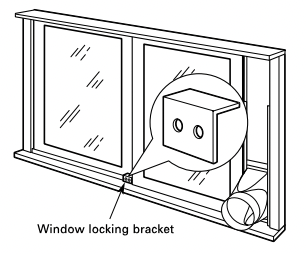
5. INSTALL TOP WINDOW GASKET AND WINDOW LOCKING BRACKET
- A. Cut the foam top window gasket to the window width. Stuff the foam between the glass and the window to prevent air and insects from getting into the room.
- B. Attach the window locking bracket with two screws.
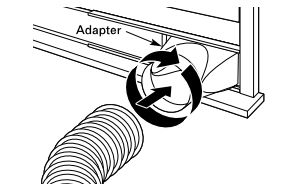
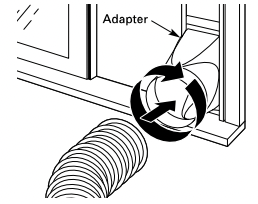
6. ATTACH EXHAUST HOSE TO WINDOW SLIDER
Insert the end of the hose into the adapter and rotate it several turns to thread it securely into the adapter.
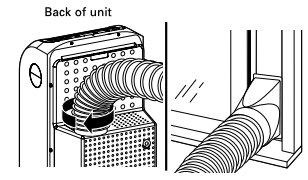
7. INSTALL EXHAUST HOSE TO UNIT
- The exhaust hose must be properly installed to the back of the unit and to the adjustable window slider, and exhausted to the outside when using the unit in the COOL mode.
- Attach the unit end of the exhaust hose to the back of the air conditioner by pushing it into the exhaust outlet and twisting to lock it in place.
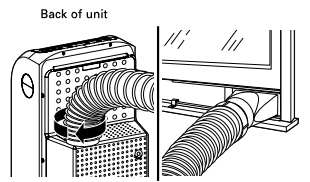
IMPORTANT: To ensure proper cooling, do not kink or pinch the duct.
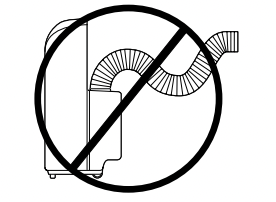
An excessive number of bends in the exhaust hose may compromise the cooling performance. Installation into a double hung window is now complete.
NOTE: If installing slider in a double hung window, go back to step 4 on page 9 and proceed.
INSTALL WINDOW SLIDER IN A SLIDING WINDOW OR PATIO DOOR
- A. If the window slider is shorter than the height of the window, pull the sliding arm out to the height of the window. If the window slider is longer than the height of the window, cut the slider arm to the height of the window. If the two-piece window slider is too short for the height of the window, attach and use the third piece of the slider.
- B. Cut the window seal (adhesive-backed) to the window height and stick the adhesive side to the inner window sliding face, as shown above.
- C. Attach the top of the slider to the window face using a screw through one of its holes.
- D. Slide the window against the edge of the window slider.
INSTALL WINDOW LOCKING BRACKET
Attach the window locking bracket with two screws.
ATTACH EXHAUST HOSE TO WINDOW SLIDER
Insert the end of the hose into the adapter and rotate it several turns to thread it securely into the adapter.
INSTALL EXHAUST HOSE TO UNIT
- The exhaust hose must be properly installed to the back of the unit and to the adjustable window slider, and exhausted to the outside when using the unit in the COOL mode.
- Attach the unit end of the exhaust hose to the back of the air conditioner by pushing it into the exhaust outlet and twisting to lock it in place.
IMPORTANT: To ensure proper cooling, do not kink or pinch the duct.
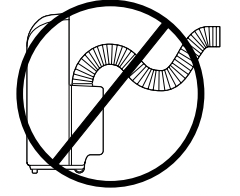
An excessive number of bends in the exhaust hose may compromise the cooling performance. Installation into a sliding window or patio door is now complete.
Troubleshooting Tips
Before you call for service…
 Troubleshooting Tips.
Save time and money! Review the chart below first and you may not need to call for service.
Air conditioner does not start
The air conditioner is unplugged.
- Make sure the air conditioner plug is pushed completely into the outlet.
The fuse is blown/circuit breaker is tripped.
- Check the house fuse/circuit breaker box and replace the fuse or reset the breaker.
Power failure.
- If a power failure occurs, turn the air conditioner OFF. When power is restored, wait 3 minutes to restart the air conditioner to prevent tripping of the compressor overload.
Air conditioner has stopped running
Power interruption or power failure occurred.
- When the power is restored, wait 3 minutes to restart the air conditioner to prevent tripping of the compressor overload. Press the ON/OFF pad.
Air conditioner does not cool as it should
Airflow is restricted.
- Make sure there are no curtains, blinds or furniture blocking the inlets located on the left and rear sides of the air conditioner. Make sure there are at least 12″ of space on all sides of the unit.
The temp control may not be set correctly.
- In COOL mode, press the Decrease
 pad.
pad.
The air filter is dirty.
- Clean the filter at least every 30 days. See the Care and cleaning section.
The room may have been hot.
- When the air conditioner is first turned on, you need to allow time for the room to cool down
Cooling coils have iced up.
- See “Air conditioner freezing up and control beeps” section below.
Air conditioner freezing up and control beeps
Ice blocks the air flow and stops the air conditioner from cooling the room.
- Select the COOL mode and HIGH fan and set the thermostat to a higher temperature.
The remote control is not working
The battery is inserted incorrectly.
- Check the position of the battery. See the Care and Cleaning section.
The battery may be dead.
Noise or vibration
The floor is not level.
- Place unit on a flat, level surface.
Gurgling sound
This is normal.
TIMER feature not working properly
A power outage or interruption occurred.
- If the TIMER was set before the power outage, it will need to be reset after power is restored.
WATER FULL indicator light is blinking and the unit is still operating
The unit has reached maximum water collection level.
- The unit will resume its set operation once the collected water is sufficiently evaporated.
WATER FULL indicator light stays on and the unit shuts off
The unit is designed to automatically evaporate water collected in normal settings. However, in very humid settings, the unit may occasionally need to be drained.
- 1. Unplug the power cord and roll the unit to a drain or outside.
- 2. Pull out the drain cap from the back bottom edge and allow water to drain from the unit.
- 3. Replace the drain cap and put the unit back into operation.