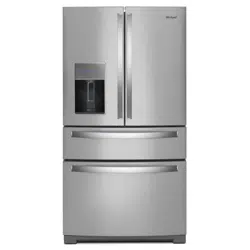
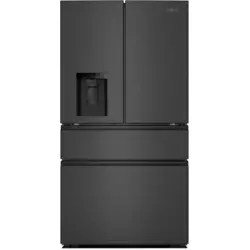
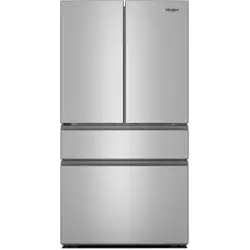
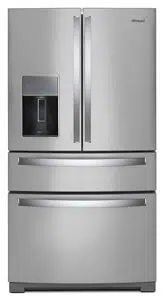
User Guide Bottom Mount Refrigerator
OPERATING YOUR REFRIGERATOR
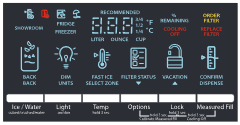
Using the Temperature Controls
IMPORTANT: The display screen on the dispenser control panel will turn off automatically and enter “sleep” mode when the control buttons and dispenser pads have not been used for 2 minutes or more. Press any control button to reactivate the display screen.
IMPORTANT:
- Wait 24 hours before you put food into the refrigerator. If you add food before the refrigerator has cooled completely, your food may spoil.
- NOTE: Adjusting the set points to a colder than recommended setting will not cool the compartments any faster.
- If the temperature is too warm or too cold in the refrigerator or freezer, first check the air vents to be sure they are not blocked before adjusting the controls.
- The recommended settings should be correct for normal household use. The controls are set correctly when milk or juice is as cold as you like and when ice cream is firm.
Recommended Refrigerator Temperature

Adjusting the Temperature
For your convenience, your refrigerator and freezer controls are preset at the factory. When you first install your refrigerator, make sure that the controls are still set to the recommended settings. The factory recommended set points are 37°F (3°C) for the refrigerator and 0°F (-18°C) for the freezer.
Refrigerator set point range: 33°F to 45°F (0°C to 7°C).
Freezer set point range: -5°F to 5°F (-21°C to -15°C).
IMPORTANT: Adjust the temperature by only 1° at a time and wait at least 24 hours between adjustments. Recheck the temperatures before other adjustments are made.
- Press and hold TEMPERATURE for 3 seconds.
- Select the zone by pressing TEMPERATURE (Refrigerator/ Freezer).
- Press LOCK to raise the set point, or press OPTIONS to lower the set point.
- Press MEASURED FILL to save the settings (confirm).
NOTE: To view temperature in degrees Celsius, press LIGHT when adjust mode is activated. To return the display to Fahrenheit, press LIGHT again
Turn Cooling On/Off
To turn cooling on/off, press and hold LOCK and MEASURED FILL at the same time for 3 seconds.
- When cooling is off, “COOLING OFF” will appear on the display screen.
Temperature-Controlled Exterior Drawer
- Use the refrigerated drawer to store large party platters or deli trays or use a drawer organizer to store smaller items such as yogurt, juice boxes, bottled drinks, leafy vegetables and lunch meat within easy access.
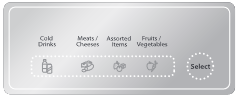
- IMPORTANT: This control sets the temperature for this drawer only. Temperatures have been preset for the storage of cold drinks, meats/ cheeses, assorted items, and fruits/vegetables. These preset temperatures cannot be adjusted.
- Press SELECT to toggle through the temperature settings. The icon will illuminate when it is selected.
FEATURES GUIDE
Fast Ice  : The Fast Ice feature assists with temporary periods of heavy ice use by increasing ice production, over a 24-hour period. Once activated, Fast Ice remains on for 24 hours unless manually turned off.
- To turn On/Off the Fast Ice feature, press the OPTIONS button to access the Options menu, then press TEMP, under Fast Ice to activate the feature. When the feature is on, the Fast Ice icon will appear on the dispenser display.
Door Ajar Alarm  : The Door Ajar Alarm feature sounds an alarm when the refrigerator door(s) or freezer drawer is open for 5 minutes and cooling is turned on. The alarm will repeat every 2 minutes. Close all doors and drawer to turn it off
- To mute the audible alarm while keeping the doors open, such as while cleaning the inside of the refrigerator, press any button on the control panel. The alarm sound will be temporarily turned off, but the Door Ajar icon will still be displayed on the dispenser control panel.
Vacation Mode  : In Vacation mode, the freezer will defrost less often to conserve energy. Once activated, opening and closing the doors or drawers during the first 24 hours will not affect the setting. After 24 hours has passed, opening and closing the doors or drawers will turn off Vacation mode.
- To turn On/Off Vacation mode, press the OPTIONS button to access the Options menu, then press LOCK, under Vacation. When the feature is on, the Vacation icon will appear on the control display.
Disabling Sounds: Mutes the dispenser control tones and sounds.
- To turn Off/On control and dispenser sounds, press and hold ICE/WATER and MEASURED FILL at the same time for 3 seconds. All normal operating tones are disabled. Only alert tones will be audible.
Water Filter Status: Displays the percentage of use remaining in the water filter (from 100% remaining to 0% remaining). The water filter status lights will help you know when to change your water filter.
- ORDER FILTER (Yellow) - Order a replacement water filter.
- REPLACE FILTER (Red) - Replace the water filter. Replacing the disposable water filter will automatically reset the water filter status tracking feature. See “Water Filtration System.”
NOTE: “REPLACE FILTER” will remain illuminated if a filter is not installed or is installed incorrectly.
Press OPTIONS to access the Options menu. Press OPTIONS, under Filter Status, again to display % remaining
Showroom Mode: This mode is used only when the refrigerator is on display in a retail store. If you unintentionally activate Showroom mode, the word “Showroom” will light up on the display. All lights and controls will function, but the refrigerator will not cool.
- Exit Showroom mode by pressing and holding LIGHT and LOCK at the same time for 3 seconds.
ICE AND WATER
Water and Ice Dispensers
IMPORTANT:
- Allow 3 hours for the refrigerator to cool down and chill water.
- The dispensing system will not operate when either the refrigerator door or freezer drawer is open.
Flush the Water System
Air in the water dispensing system can cause the water dispenser to drip. After connecting the refrigerator to a water source or replacing the water filter, flush the water system to force air from the water line.
NOTE: As air is cleared from the system, water may spurt out of the dispenser.
- Using a sturdy container, depress and hold the water dispenser paddle for 5 seconds.
- Release the dispenser paddle for 5 seconds. Repeat steps 1 and 2 until water begins to flow.
- Once water begins to flow, continue depressing and releasing the dispenser pad (5 seconds on, 5 seconds off) until a total of 3 gal. (12 L) has been dispensed.
Calibrate Measured Fill
Household water pressure may affect the accuracy of the Measured Fill feature. So, for optimum performance of your water dispenser, you must first calibrate Measured Fill.
IMPORTANT: Flush the water system before calibrating Measured Fill. For best results, calibration should be performed when water is not being used in the house.
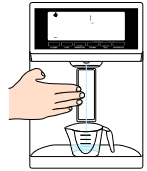
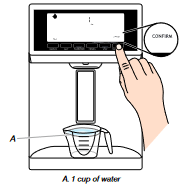
1. Place a sturdy measuring cup (1 cup [237 mL] size) on the dispenser tray centered in front of the ice/water dispenser paddle. NOTE: Depending on your model, a measuring cup may be provided.

2. Press and hold the OPTIONS and LOCK buttons at the same time for 3 seconds. The words “Back” and “1 Cup” will appear on the display screen. Also, the Calibrate Measured Fill icon will illuminate and remain lit while the Measured Fill feature is being calibrated. 
NOTE: You may press ICE/WATER “Back” at any time to exit calibration mode. The Calibrate Measured Fill icon will disappear.
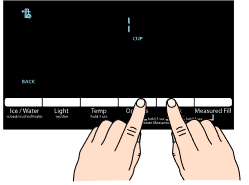
3. Press and release the ice/water dispenser paddle, as needed, to dispense water to the 1 cup fill line.
NOTE: If overfilling or spilling occurs, discard the water and press ICE/WATER “Back” to restart the calibration process.
4. When 1 cup of water has been correctly dispensed into the measuring cup, press the MEASURED FILL button under the word “Confirm” to confirm the calibration.
When Measured Fill calibration has been confirmed the icons will disappear and the display will return to the home screen.
Dispensing
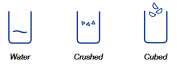
Press ICE/WATER to toggle through the following choices in a continuous loop:
- Water (default) - Dispenses water
- Cubed - Dispenses cubed ice.
- Crushed - Dispenses crushed ice
NOTES:
- The word “ICE” appears on the display screen when either crushed or cubed ice is selected.
- For crushed ice, cubes are crushed before being dispensed. This may cause a slight delay when dispensing crushed ice. Noise from the ice crusher is normal, and pieces of ice may vary in size.
- When changing from crushed to cubed, a few ounces of crushed ice will be dispensed along with the first cubes.
The Water Dispenser
IMPORTANT:
- Dispense at least 1 qt (1 L) of water every week to maintain a fresh supply.
- If the flow of water from the dispenser decreases, it could be caused by low water pressure.
- With the water filter removed, dispense 1 cup of water. If 1 cup of water is dispensed in 8 seconds or less, the water pressure to the refrigerator meets the minimum requirement.
- If it takes longer than 8 seconds to dispense 1 cup of water, the water pressure to the refrigerator is lower than recommended. See “Water Supply Requirements” and “Troubleshooting” for suggestions.
To Dispense Water (Standard):
- Press a sturdy glass against the dispenser paddle.
- Remove the glass to stop dispensing.
To Dispense Water (Measured Fill):
Measured Fill allows you to dispense a specified amount of water with the touch of a few controls.
NOTE: The amount of water you select will be dispensed. Make sure that the container is empty and can hold the entire volume. If ice is in the container, you may need to adjust your selection.
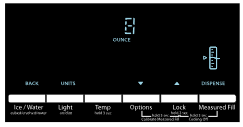
1. Press MEASURED FILL to turn on the feature. When the feature is on, the Measured Fill screen appears on the display.
- Press ICE/WATER to manually turn off the Measured Fill feature. NOTE: The dispenser will automatically turn off Measured Fill after 1 minute of inactivity.
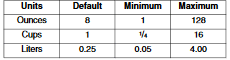
2. You can dispense water by the ounce, cup or liter. The default unit is ounces. To switch to cups or liters, press the LIGHT button. Default, minimum, and maximum volumes are listed below.
3. Press LOCK or OPTIONS to adjust the water volume as desired. The LOCK control increases the volume, and the OPTIONS control lowers the volume. NOTE: Most coffee cups (commonly 4 to 6 oz [118 to 177 mL] per cup) are not the same size as a measuring cup (8 oz [237 mL]). You may need to adjust the volume to avoid unintentionally overfilling coffee cups.
4. To dispense water, press sturdy glass against the water dispenser lever OR place the glass below the water dispenser and press the MEASURED FILL button. NOTE: While dispensing water, the digital display will count down how much water remains to be dispensed, according to the volume you selected. The flow of water will automatically stop once the desired volume has been dispensed.
5. To stop dispensing before the selected volume has been dispensed, remove the glass from the dispenser paddle OR press MEASURED FILL a second time. NOTE: If you stop dispensing before the desired volume has been dispensed, the digital display will continue to show how much water remains to be dispensed. The display will turn off after 1 minute of inactivity.
6. To select a new volume or start dispensing the same volume again, you must first finish dispensing the selected volume, or turn off the Measured Fill feature (either by waiting 1 minute so it will automatically turn off or by pressing ICE/WATER, under Back, to manually turn it off) and then turn it back on.
The Ice Dispenser
- Ice dispenses from the ice maker storage bin. To turn off the ice maker, see “Ice Maker and Storage Bin.”
- The dispenser may continue to make noise and ice may continue to dispense for several seconds after releasing the dispenser button or paddle.
- IMPORTANT: If the ice cubes are hollow or have an irregular shape, it could be because of low water pressure. See “Water Supply Requirements” in the Installation Instructions and Problem Solver.
To Clean the Ice Dispenser Chute:
Humidity causes ice to naturally clump together. Ice particles can build up until the ice dispenser chute becomes blocked.
If ice is not dispensed regularly, it may be necessary to empty the ice storage bin and clean the ice delivery chute, the ice storage bin and the area beneath the storage bin every 2 weeks.
- Remove the ice clogging the storage bin and delivery chute, using a plastic utensil if necessary.
- Clean the ice delivery chute and the bottom of the ice storage bin using a warm, damp cloth, then dry thoroughly.
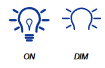
The Dispenser Light
- Press LIGHT to toggle through the following choices in a continuous loop: OFF, ON and DIM.
- The dispenser lights are LEDs that cannot be changed. If it appears that your dispenser lights are not working, see “Problem Solver” for more information.
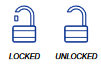
The Dispenser Lock
Lock feature deactivates the controls and dispenser pads.
- Press and hold LOCK for 3 seconds to Lock/Unlock the dispenser.
Ice Maker and Ice Storage Bin (on some models)
IMPORTANT: To avoid low ice production and poor quality ice, flush the water system before turning on the ice maker. See “Water Dispenser.”
- Allow 24 hours to produce the first batch of ice. Discard the first three batches of ice produced. Allow 2 to 3 days for the storage bin to fill completely following installation.
- The quality of your ice will be only as good as the quality of the water supplied to your ice maker. Avoid connecting the ice maker to a softened water supply. Water softener chemicals (such as salt) can damage parts of the ice maker and lead to poor quality ice. If a softened water supply cannot be avoided, make sure the water softener is operating properly and is well maintained.
- Do not use anything sharp to break up the ice. This can cause damage to the ice bin and the dispenser mechanism.
- Do not store anything on top of or in the ice maker or ice storage bin.
Ice Production Rate
- The ice maker should produce approximately 3 lbs of ice per day under normal operation.
- To increase ice production, select the increased ice production feature from the Options menu on the control panel. See “Using the Controls.”
Ice Maker
The ice maker is located on the left-hand side of the refrigerator compartment ceiling. Ice cubes are ejected into the ice storage bin, located on the left-hand refrigerator door.
Turn the Ice Maker On/Off
1. Push up on the latch on the left-hand side of the ice compartment to open the door.
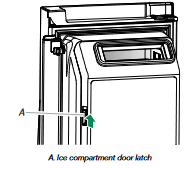
2. Turn on the ice maker by moving the switch to the (left) ON position.
NOTES:
- To manually turn off the ice maker, move the control to the OFF (right) position.
- Your ice maker has an automatic shutoff. The sensor will automatically stop ice production if the storage bin is full, if the door is open or the storage bin is removed. The control will remain in the ON (left) position.
3. Close the ice compartment door.
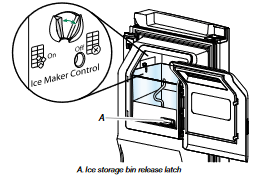
Remove and Replace the Ice Storage Bin
- Remove the ice storage bin by inserting your fingers into the hole at the base of the bin and squeezing the latch to release the bin from the compartment. Lift the storage bin up and pull it straight out.
- Replace the storage bin inside the ice compartment and push down to make sure it is firmly in place.
Water Filtration System
Do not use with water that is microbiologically unsafe or of unknown quality without adequate disinfection before or after the system. Systems certified for cyst reduction may be used on disinfected waters that may contain filterable cysts
Replacing the Water Filter
- Locate the water filter compartment in the right-hand side of the refrigerator ceiling. Push up to release and lower the compartment door.
- Turn the water filter counterclockwise (to the left), and pull it straight out of the compartment. NOTE: There may be some water in the filter. Some spilling may occur. Use a towel to wipe up any spills.
- Take the new filter out of its packaging and remove the cover from the O-rings. Be sure the O-rings are still in place after the cover is removed.
- Align the arrow on the water filter label with the cutout notch in the filter housing and insert the filter into the housing.
- Turn the filter clockwise 90 degrees (¹⁄₄ turn), until it locks into the housing. NOTE: If the filter is not correctly locked into the housing, the water dispenser will not operate. Water will not flow from the dispenser.
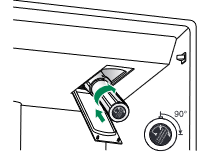
6. While the compartment door is still open, lift the filter up into the compartment. Then, close the filter compartment door completely.
7. Flush the water system. See “Flushing the Water Filter” in the “Water and Ice Dispensers” section.
IMPORTANT: If you do not flush the water system, you may experience dripping and/or decreased flow from the water dispenser.