User Manual French Door Refrigerator
Setting up your French Door Refrigerator
GETTING READY TO INSTALL THE REFRIGERATOR
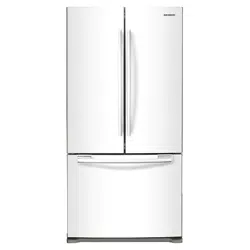
Congratulations on your purchase of this Samsung French Door Refrigerator. We hope you enjoy the state-of-art features and efficiencies that this new appliance offers.
Selecting the best location for the Refrigerator
• A location with easy access to the water supply.
• A location without direct exposure to sunlight.
• A location with level (or nearly level) flooring.
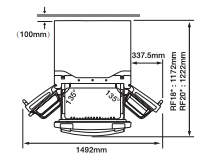
• A location with enough space for the Refrigerator doors to open easily.
• Allow sufficient space to the right, left, back and top for air circulation.
• Please ensure that appliance can be moved freely in the event of maintenance & service.
• If you install the Refrigerator where is below 50ºF (10ºC), it may not function optimally.
• Do not locate the refrigerator where the wet condition.
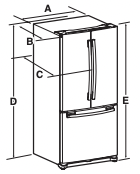
First thing! Make sure that you can easily move your Refrigerator to its final location by measuring doorways (both width and height), thresholds, ceilings, stairways, etc. The following chart details the exact height and depth of Samsung French Door Refrigerator.
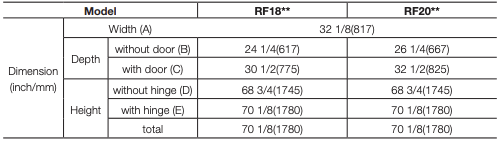
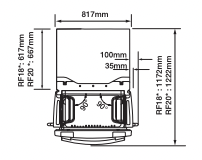
 • The measurements here are based on the design dimension,which may differ depending on the measuring method.
CAUTION When moving your refrigerator
To prevent floor damage, be sure the front adjusting legs are in the up position(above the floor). Refer to ‘Adjusting the doors’ (on page 15).
FLOORING
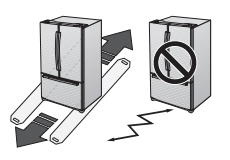
For proper installation, this refrigerator must be placed on a level surface of hard material that is the same height as the rest of the flooring. This surface should be strong enough to support a fully loaded refrigerator, or approximately 223lbs(106kg). To protect the finish of the flooring, cut a large section of the cardboard carton and place under the refrigerator where you are working. When moving the refrigerator, be sure to pull it straight out and return it to position by pushing it straight in.
SETTING UP THE REFRIGERATOR
Now that you have your new Refrigerator installed in place, you are ready to set up and enjoy the features and functions of the appliance. By completing the following steps, your Refrigerator should be fully operational.
1. Place the Refrigerator in an appropriate location with reasonable clearance between it and the wall. Refer to installation instructions in this manual. (page 9, selecting the best location for the Refrigerator)
2. Once the Refrigerator is plugged in, make sure the interior light comes on when you open the doors.
3. Set the Temperature control to the coldest temperature and wait for an hour. The Freezer will get slightly chilled and the motor will run smoothly.
4. After powering the Refrigerator, it will take a few hours to reach the appropriate temperature. You can store food and drinks in the Refrigerator after the temperature is sufficiently cool.
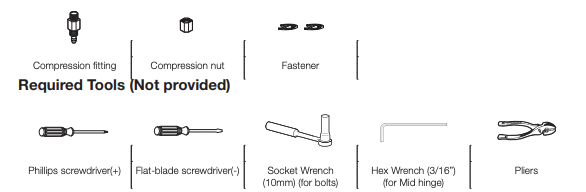
Check the accessories listed below
REMOVING THE REFRIGERATOR DOORS
Some installations require door/drawer removal to transport the Refrigerator to its final location. Do not remove the door/drawer if it is not needed. Before removing the door/drawer make sure you read following items.
WARNING: Disconnect power to the Refrigerator before removing the door or drawer.
• Be careful not to drop, damage or scratch the door/drawer while removing them.
• Be careful not to get injured while removing the door/drawer.
• Reattach the door/drawer properly to avoid:
- Moisture from air leakage.
- Uneven door alignment.
- Wasting energy due to improper door seal.
Disassembling the fridge door
WARNING: Be careful not to drop and scratch the fridge door while removing the fridge door!
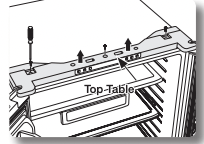
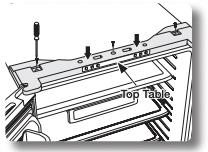
1. Remove the 3 screws holding down the top table and remove it.
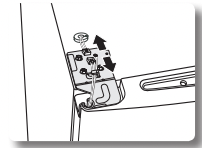
2. Disconnect electric wire on the top of the refrigerator.
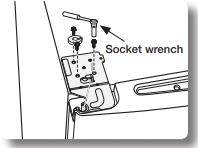
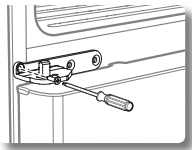
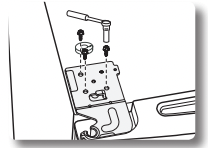
3. Remove the 3 hex bolts that hold the hinge on the top of the refrigerator with the 10mm socket wrench.
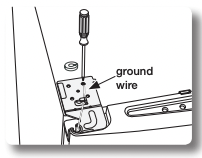
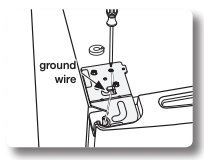
4. Remove the screw that holds the ground wire with a philips screwdriver(+).
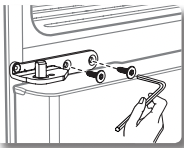
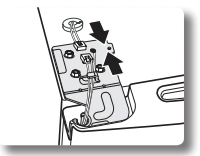
5. Separate the hinge from the electric wire and ground wire as shown above.
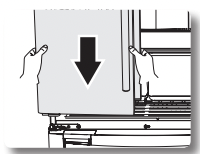
6. Lift the door straight up to remove. Be careful not to drop and scratch the doors while removing them.
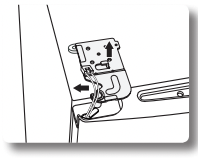
Disassembling the freezer door
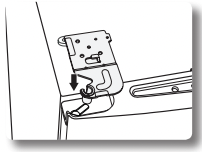
1. Separate the cap on the middle hinge.
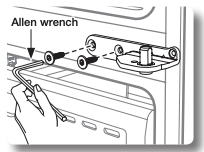
2. Remove the screw attached to the left and right middle hinges with a philips screwdriver(+). Remove the 2 hex head bolts attached to the left and right middle hinges with an allen wrench(3/16”).
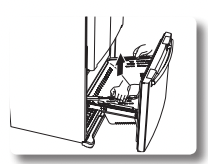
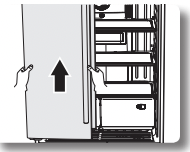
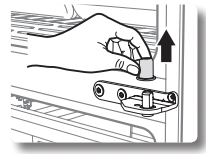
3. After opening the Freezer door, lift the drawer box.
4. Remove 4 hex head bolts from both sides with a socket wrench(10mm)
5. Lift up the freezer door from the rails. Be careful not to drop and scratch the freezer door.
Reassembling the fridge door
1. Insert and tighten the screw into the left and right middle hinges with a philips screwdriver(+).
2. Insert and tighten the 2 hex head bolts into the left and right middle hinges with an allen wrench(3/16”).

3. Replace the middle hinge cap.
4. Place the hole in the bottom of the left d oor over the middle hinge.
5. Insert the left upper hinge shaft into the hole on the corner of the fridge door.
6. Insert the upper hinges into the holes at the top of the door. Insert and tighten the 3 hex head bolts into the left and right upper hinges with a socket wrench.
7. Insert and tighten the ground screw into the left and right upper hinges with a philips screwdriver(+).
8. Connect the electronic wire on the top of the refrigerator.
9. Position the top table in place. Insert and tighten the 3 screws into the top table with a philips screwdriver(+).
Reassembling the freezer door (DRAWER TYPE - RF18,RF20)
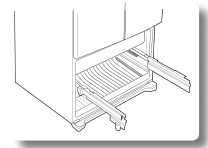
1. Pull out the rails to the full length on each sidle of the cabinet evenly
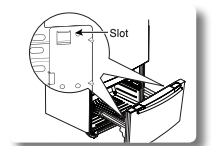
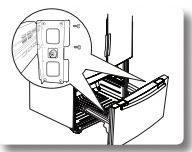
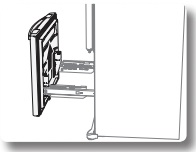
2. Hang the freezer door front onto open slot on the sides.
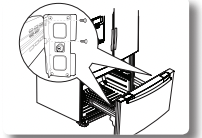
3. With the 10mm wrench, reattach 4 bolts to connect the rail with the door.
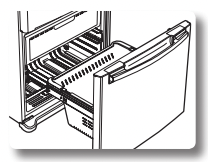
4. With the drawer pulled out fully, insert the drawer box into the rail system.
ADJUSTING THE DOORS
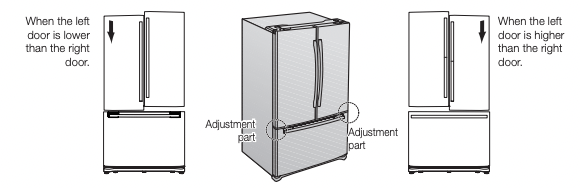
Now that the doors are back on the Refrigerator, you want to make sure the Refrigerator is level so that you can make final adjustments. If the Refrigerator is not level, it will not be possible to get the doors perfectly even.
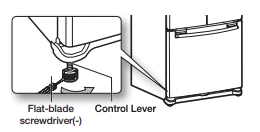
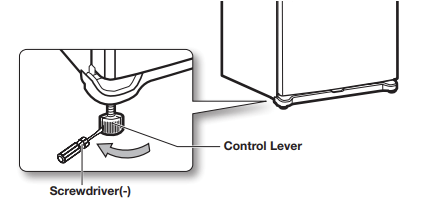
When the Left door is lower than the Right door.
Insert a flat-blade screwdriver into a notch on the left control lever, turn it clockwise or counter-clockwise to level the left door.
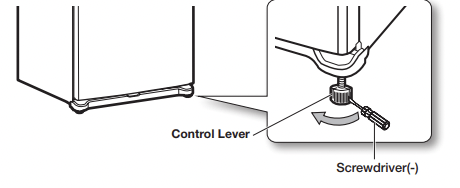
When the Left door is higher than the Right door.
Insert a flat-blade screwdriver into a notch on the right control lever, turn it clockwise or counter-clockwise to level the right door.
CAUTION Both control levers must be surely touching the floor to avoid the possible personal injury or property damage because of tipping.
MAKING MINOR ADJUSTMENTS BETWEEN DOORS
Remember, a level Refrigerator is necessary for getting the doors perfectly even. If you need help, review the previous section on leveling the Refrigerator.
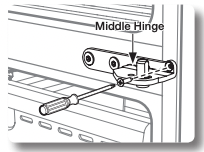
1. Pull out the freezer drawer ( 1 ), then you can see the middle hinge ( 2 ) .
2. Insert the hex wrench (4mm) ( 3 ) into the shaft ( 4 ) of the middle hinge.
3. Please adjust the height by turning the hex wrench ( 3 ) clockwise (  ) or counter-clockwise
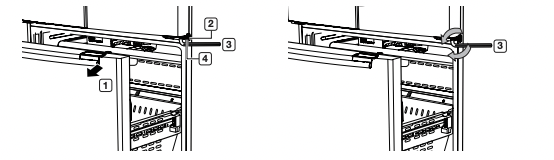
When you turn the hex wrench counter-clockwise, the door will move up.
1. After adjusting the doors, please insert the supplied fastener ( 5 ) using Pliers ( 6 ) in the gap between the hinge-grommet ( 7 ) and the middle hinge ( 8 ). The number of fasteners you’ll need to insert depends on the gap.
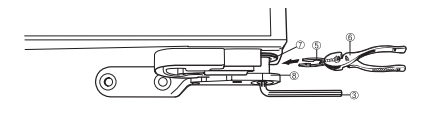
2 fastener are enclosed with the refrigerator. The thickness of each fastener is 0.04”.
INSTALLATION OF THE WATER LINE
Before You Install the water line
• Unplug the electric power to prevent electric shocks while installing the water supply line.
• The water line installation is not warranted by the refrigerator manufacturer. So before you install the water line, read the whole steps for installing and follow these instructions carefully to minimize the risk of expensive water damage.
• Banging pipes (water banging in the pipes) in house plumbing can cause damage to fridge parts and lead to water leakage or flooding. Call a qualified plumber to correct the problem before installing the water supply line to the fridge.
• To prevent burns and product damage, do not hook up the water line to the hot water line.
• Do not install the water line in areas where temperatures fall below freezing.
• When using any electrical device (such as a power drill) during installation, be sure the device is insulated or wired in a manner to prevent electric shock.
• All installations must be in a accordance with local plumbing code requirements.
• Use designated tubing.
• Cut the tubing, making sure the ends are square and clean.
• Water line must be connected to drinkable water only
Important (cold water supply)
• For the ice maker to be operated properly,water pressure of 20~125psi is required.
• If cold water supply is under 20psi, purchase and install a booster pump to compensate for the low water pressure or call your utility company.
• After initial installation, it may take up to two days for the ice maker try to fill with ice.
• If you turn the refrigerator on before the water line is connected, turn the ice maker off.
• See the user manual for further information
• A compression fitting and nut kit is supplied with the unit and it is inside the fridge drawer.
• If you want to install a water filter, it must be installed outside the refrigerator. It is not provided with your new refrigerator. The filter cartridge and holder kit can be purchased from the retailer where you purchased this refrigerator.Make sure you buy the SAMSUNG filter cartridge (Replacement cartridge No : DA29-10105J) to ensure the best performance.
• Water line Kit and water filter are not covered by Samsung’s Warranty. The manufacturer (or dealer, installer) of them is responsible for any defects and all the loss caused by water filter & water line kit .
• The filter should be replaced according to manufacturer (or dealer)’s instruction.
• To order additional water filters, please contact the manufacturer (or dealer) of the filter.
• When pushing the Refrigerator back, make sure you don’t roll over the power cord or water line(Icemaker supply line).
Using the water filter (not supplied)
Connecting to water supply line
• Shut off the main water supply line and turn the Ice maker to the off position.
• Locate the nearest cold drinking water line.
• Follow the instructions in the water filter installation kit.
• After connecting the water supply line to the Cartridge Holder inlet (insert plastic line in fully), install the Filter Cartridge.
• Turn on water supply and Flush 3 gallons through filter before use (flush approximately 6 minutes)
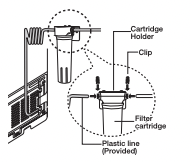
Connect the water line to the fridge
• Connect the plastic line on the back of your fridge to the cartridge holder outlet (fully insert the plastic line to the cartridge holder outlet).
• Insert plastic clip to the cartridge holder inlet and outlet.
• Turn water on and check for any leakage.
Do not use copper line.
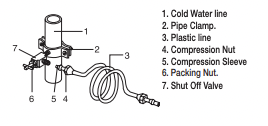
To use without the water filter
Connecting to the water supply line
• Shut off the main water supply line and turn the Ice maker to the off position.
• Locate the nearest cold water drinking line.
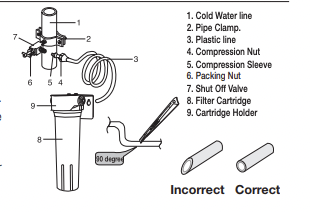
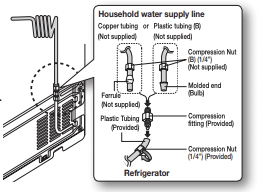
Connecting the water supply line to the refrigerator
There are several items that you need to purchase to complete this connection. You may fi nd these items sold as a kit at your local hardware store.
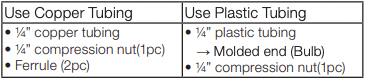
1. Connect the household water line to the compression fitting.
- If you are using copper tubing, slip the compression nut ( B ) (not supplied) and ferrule (not supplied) on the copper tubing (not supplied) as shown.
- If you are using plastic tubing ( B ), insert the molded end (Bulb) of the plastic tubing ( B ) into the compression fitting.
CAUTION Do not use without the molded end(Bulb) of the plastic tubing (B).
2. Tighten the compression nut ( B ) onto the compression fitting. Do not over-tighten the compression nut ( B ) .
3. Turn the water on and check for any leakage. If you fi nd water drops or leakage in the connection areas, turn off the main water supply. Check the connections and, if necessary, tighten.
4. After you turn on the refrigerator, let the ice maker make ice for 1 to 2 days. Over that period of time, throw out the first 1 or 2 buckets of ice the freezer makes to ensure all impurities have been removed from the water line.
If you have to repair or disassemble the water line, cut off 1/4“ of the plastic tubing to make sure you get a snug, leak-free connection.
Operating your SAMSUNG Refrigerator
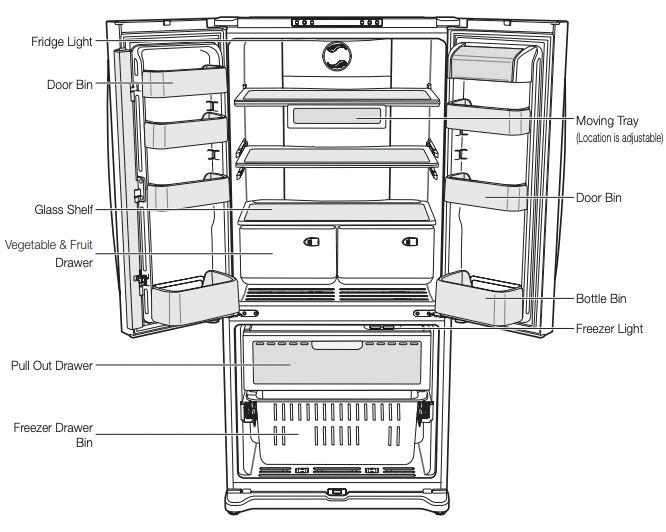
PARTS AND FEATURES
Use this page to become more familiar with the parts and features of the Refrigerator.
USING THE CONTROL PANEL
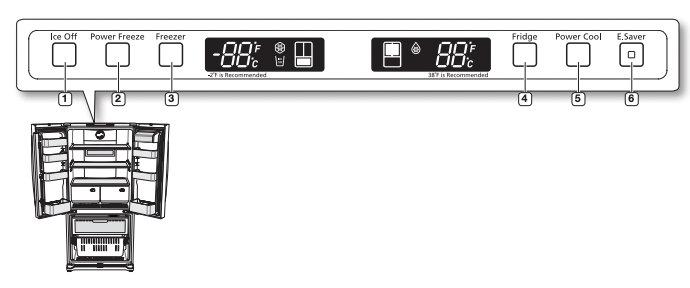
Temperature & Function select / control panel
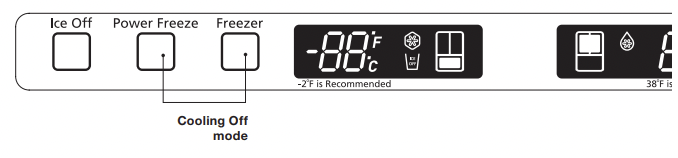
- Ice Off Button When the Ice Off Button is pressed, ice will not be produced. Use this function only when it is needed.
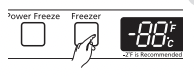
- Power Freeze Button Press this button to freeze food quickly. (Power Freeze will last 2 and a half hours.)
- Freezer Button Freezer temperature set button. Press this button to set the Freezer temp between 8ºF and -8ºF. (At initial power on, the default setting is -2ºF.)
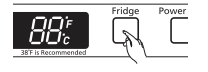
- Fridge Button Fridge temperature set button. Press this button to set the Fridge temperature in 2ºF intervals between 46ºF and 34ºF. (At initial power on, the default setting is 38ºF.)
- Power Cool Button Press this button to cool the food in the fridge quickly. (Power Cool will shut off when 25ºF is reached or after 2 and a half hours.
- E.Saver Button Press the Energy Saver button for better energy efficiency. If water drops appear on the doors, turn the Energy Saver function off.
CONTROLLING THE TEMPERATURE

Setting the freezer temperature
If you want to control the freezer temperature, follow as below.
Press the Freezer Button (Refer the picture)
- The temperature can be set in 2ºF interval between -8ºF and 8ºF.
- Each time the Freezer Button is pressed, the temperature setting will change as follows; (-2ºF → -4ºF → -6ºF → -8ºF → 8ºF → 6ºF → 4ºF → 2ºF → 0ºF → -2ºF)
When selecting the temperature, the set temperature is displayed initially for 5 seconds, then the actual temperature is displayed. (There may be slight difference between the set temperature and displayed actual temperature, but it will be corrected to the set temperature automatically.)
- The Freezer temperature will change depending on the number of door openings, quantity of food, ambient temperature, etc.
- The temperature display will blink when freezer temperature increases due to frequent door opening, keeping warm food, etc.
(Blinking will stop when the refrigerator reaches normal temperature. If for some reason it does not stop after a long period of time, contact a Samsung service center.)
Setting the fridge temperature
If you want to control the fridge temperature, follow as below.
Press the Fridge Button (Refer the picture)
- The temperature can be set in 2ºF interval between 34ºF and 46ºF.
- Each time the Fridge Button is pressed, the temperature setting will change as follows; (38ºF → 36ºF → 34ºF → 46ºF → 44ºF → 42ºF → 40ºF → 38ºF)
When selecting the fridge temperature, the set temperature is displayed initially for 5 seconds, then the actual temperature is displayed. (There may be slight difference between the set temperature and displayed actual temperature, but it will be corrected to the set temperature automatically.)
- The Fridge temperature will change depending on the number of door openings, quantity of food, ambient temperature, etc.
- Temperature of each shelve or container in the fridge may be different.
- The temperature display will blink when fridge temperature is increases due to frequent door opening, keeping warm food, etc.
(Blinking will stop when the refrigerator reaches normal temperature. If for some reason it does not stop after a long period of time, contact a Samsung service center.)
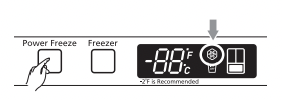
If you want to make ice faster (Controlling the Power Freeze)
Press the Power Freeze Button. (Refer to the picture.)
- The power Freeze light on the display goes on (see the arrow mark) and this function begins to operate regardless of the set freezer temperature.
Press the Power Freeze Button again to cancel this function.
- The light goes off and it operates at the set freezer temperature again.
- The Power Freeze function operates for 2 and a half hours regardless of the set temperature.
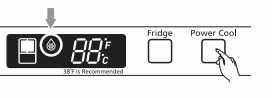
If you want to speed up the cooling in the Fridge (Power Cool)
Press the Power Cool Button. (Refer to the picture.)
- The Power cool light on the display goes on (see the arrow mark) and this function begins to operate regardless of the set fridge temperature.
Press the Power Cool Button again to cancel this function.
- The light goes off and it operates at the set fridge temperature again.
- The Power Cool function operates for 2 and a half hours regardless of the set temperature.
Cooling Off Mode (“OF & OF” code on the display)
This function is for store display refrigerators. It is not for customer use.
CAUTION In Cooling Off Mode, the refrigerator works but doesn’t make cool air. To cancel this mode, press the Power Freeze and Freezer buttons at the same time for 3 seconds until a “Ding-dong” sound is heard. The unit will now cool.
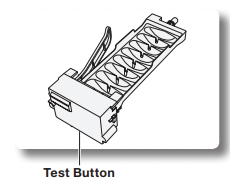
Ice Maker Operation
The ice maker will produce 8 cubes per cycle - approximately 100~130 cubes in a 24-hour period, depending on freezer compartment temperature, room temperature, number of door openings and other use conditions. Throw away the first few batches of ice to allow the water line to clear
Be sure nothing interferes with the sweep of the feeler arm. When the bin fills to the level of the feeler arm, the icemaker will stop producing ice.
After the icemaker has been turned on again, there will be a time delay before the icemaker resumes operation. It is normal for several cubes to be joined together. If ice is not used frequently, old ice cubes will become cloudy, taste stale and shrink. So if you don’t want to make ice, press the Ice Off button.
- When “Ice making” function is selected,ice-making is priority, Then the temperature of freezer will be lower than the setting temperature. If you don’t need the “Ice making” function,please press the button of “Ice Off”. Failing to do so may cause noise.
STORING FOOD IN THE REFRIGERATOR
The Samsung Refrigerator has been designed to provide you with maximum space saving features and functions. Here are some of the customized compartments we have created to keep your food fresher longer. In order to further prevent odor from seeping into the ice compartment, stored food should be wrapped securely and as airtight as possible.

Do not place any large articles of food under the lamp in the Refrigerator. An air sensor is located near the lamp and if the sensor is blocked, your Refrigerator may become too cold. Please place Vegetable and Fruits in the Vegetable and Fruits Drawers to avoid freezing them. If the food in your Refrigerator becomes frozen, please set the temperature higher.
STORING FOOD IN THE FREEZER DRAWER

Bottles should be stored tightly together so that they do not tip and fall out when the Refrigerator door is opened.
If you plan to go away for a long time, empty the Refrigerator and turn it off. Wipe the excess moisture from the inside of the appliance and leave the doors open. This helps keep odor and mold from developing.
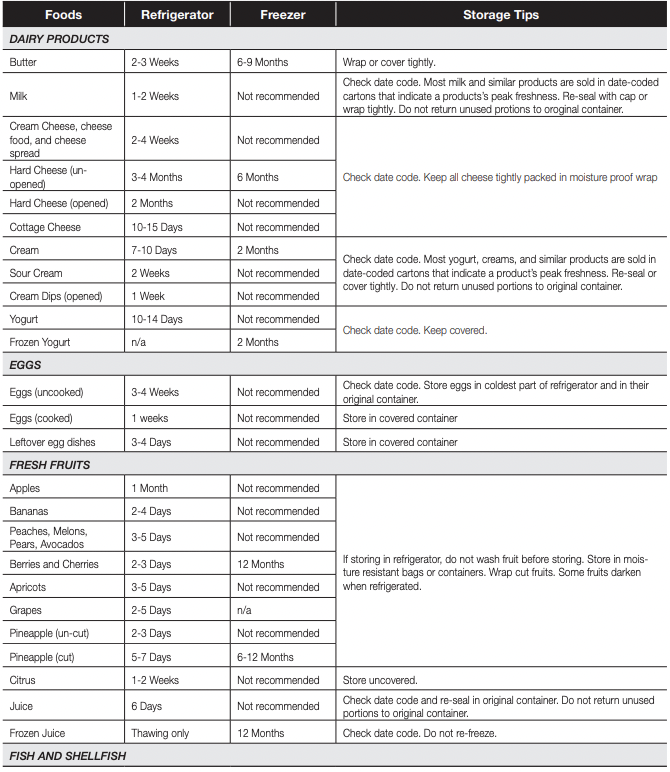
FOOD STORAGE TIPS
 Sources: American Meat Institute Foundation. 1994. Yellow pages: answers to predictable questions consumers ask about meat and poultry. American Meat Institute Food Marketing Institute. 1999. The food keeper. Food Marketing Institute, Washington, D.C. Freeland-Graves, J.H. and G.C. Peckham. 1996. Foundations of food preparation, 6th ed. Prentice-Hall, Inc. Englewood Cliffs, NJ. Hillers, V.N. 1993. Storing foods at home. Washington State University Cooperative Extension, Pullman, WA. Publ. EB 1205. National Restaurant Association. 2001. Be cool-chill out! Refrigerate promptly. National Restaurant Association Education Foundation¼s International Food Safety Council, Washington, D.C. USDA. 1997. Basics for handling food safely. U.S. Department of Agriculture, Food Safety and Inspection Service, Washington, D.C.
REMOVING THE FRIDGE ACCESSORIES
1. Door Bins
- To remove - Simply lift the bin up and pull straight out.
- To replace - Slide it in above the desired location and push down until it stops.
CAUTION Injury may occur if the door bins are not firmly inserted. Do not allow children to play with bins. Sharp corners of the bins may cause injury
Do not adjust a bin full of foods.
Dust removal method -Remove the guard and wash in water.
2. Fridge shelves
- To remove - When pulling out the shelf, if it does not slide out easily, lift it up slightly and pull out again.
- To replace - When pushing in the shelf, if it does not slide in easily, lift it up slightly and push in again.
CAUTION The Glass shelves are heavy. Use special care when removing them.
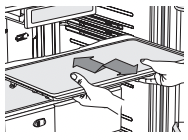
3. Vegetable & Fruit Drawers
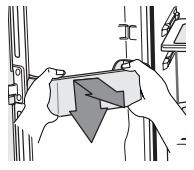
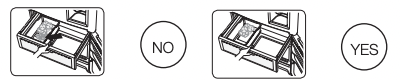
To remove - Pull the drawer out to full extension. Tilt up the front of the drawer and pull straight out. (Refer to picture 1~3)
To replace - Insert the drawer into the frame rails and push back into place. (Refer to picture 4)
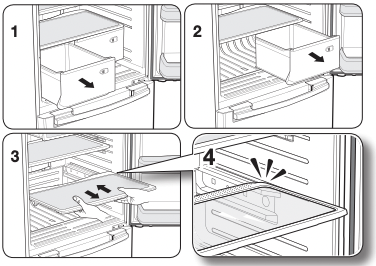
The drawers need to be removed before the glass shelf above them can be lifted out.
REMOVING THE FREEZER ACCESSORIES
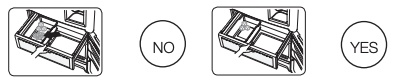
1. Pull Out Drawer
To remove - Pull the drawer out to full extension. Tilt up rear of drawer and lift straight out. (Refer to picture 1 & 2)
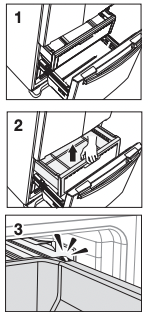
Open the freezer door fully and remove the drawer
To replace - Place the drawer onto the rails by tilting it up. Lower the drawer into place until it is horizontal and slide the drawer in. (Refer to picture 3)
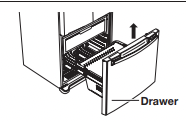
2. Freezer Drawer Bin
- To remove the drawer - Pull the drawer out fully. Tilt up the rear of the bin and lift it out to remove.
- To relocate the drawer - Place the bin into the rail assembly.
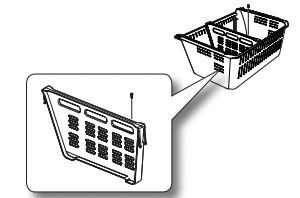
CAUTION Do not allow baby or children go inside the drawer bin. They could damage the Refrigerator and seriously injure themselves. Do not sit on the Freezer door. The door may break. Do not allow children to climb into the Freezer basket.
WARNING If you remove the divider to clean the basket bin, you must reinstall the divider using 1 screw after cleaning to prevent children from getting trapped inside the basket.
CLEANING THE REFRIGERATOR
Caring for your Samsung Refrigerator prolongs the life of your appliance and helps keep it odor and germ-free.
Cleaning the Interior
Clean the inside walls and accessories with a mild detergent and then wipe dry with a soft cloth. You can remove the drawers and shelves for a more thorough cleaning. Just make sure to dry drawers and shelves before putting them back into place.
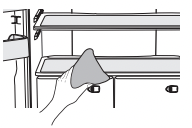
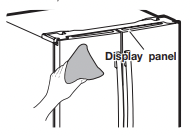
Cleaning the Exterior
Wipe the display panel with a damp, clean and soft cloth. Do not spray water directly on the surface of the Refrigerator. The doors, handles and cabinet surfaces should be cleaned with a mild detergent and then wiped dry with a soft cloth. To keep your appliance looking its best, the exterior should be polished once or twice a year.
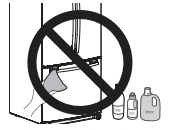
CAUTION Do not use Benzene, Thinner, car detergent, or Clorox for cleaning. They may damage the surface of the appliance and may cause fire.
Printed letters on the display may come off if you spray the cleaning products directly on the product.
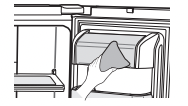
Cleaning the Rubber door seals
If the rubber door seals are dirty, the doors may not close properly, and the Refrigerator will not operate efficiently. Keep the door seals free of grit or grime by cleaning the doors with a mild detergent and damp cloth. Wipe dry with a clean, soft cloth.
Cleaning behind the Refrigerator
To keep cords and exposed parts free of dust and dirt accumulation, vacuum behind the appliance once or twice a year.
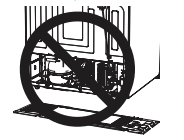
CAUTION Do not remove the back cover. Doing so may cause an electric shock.
CAUTION
- Use a clean sponge or soft cloth and a mild detergent in warm water to clean the refrigerator.
- Do not use abrasive or harsh cleansers such as window sprays, scouring cleansers, flammable fluids, muriatic acid, cleaning waxes, concentrated detergents, bleaches, or cleansers containing petroleum products on exterior surfaces (doors and cabinet), plastic parts, door and interior liners, and gaskets.
- These can scratch or damage the material.
- Do not clean glass shelves or covers with warm water when they are cold. Glass shelves and covers may break if exposed to sudden temperature changes or impacts such as bumping or dropping.
CHANGING THE INTERIOR LIGHTS
CAUTION Do not disassemble or replace the LED type Lighting. To change the LED Type Lighting contact Samsung service center or your authorised Samsung dealer
CAUTION If Users randomly exchange the LED lamp by yourself, this may result in electric shock or personal injury.
 When the interior or exterior LED lamp has gone out, please contact your service agents.
CAUTION
Clean the ice box if there are some small pieces of ice on the bottom.
Throw away the coherent ice if the ice maker is not used for long time.
 Set “Ice Off” for saving energy if the ice maker will not be used for long time.
 If you want to buy and use a tool of shoveling ice,put it into special place of ice box or take it out.
Troubleshooting
The Refrigerator does not work at all or it does not chill sufficiently.
• Check that the power plug is properly connected.
• Is the temperature control on the display panel set to the correct temperature? Try setting it to a lower temperature.
• Is the Refrigerator in direct sunlight or located near a heat source?
• Is the back of the Refrigerator so close to the wall that air cannot keep circulating? (Refer to page 10 for the best location.)
The food in the Refrigerator is frozen.
• Is the temperature control on the display set to the correct temperature? Try setting it to a warmer temperature.
• Is the temperature in the room too low?
• Did you store the food too close to the air vent at the back of the Refrigerator? Move the food away from the air vent.
You hear unusual noise or sounds.
• Check that the Refrigerator is level and stable.
• Is the back of the Refrigerator too close to the wall and therefore keeping air from circulating?
• Was anything dropped behind or under the Refrigerator?
• A “ticking” sound is heard from inside the Refrigerator. It is normal and occurs because various accessories are contracting or expanding according to the temperature of the Refrigerator interior.
• When the automatic ice maker is on, ice is made in the ice container. After the ice is made, the container inverts and the ice falls into the storage compartment and water flows through the water valve. These operations cause noise at regular intervals, but that noise is normal.
The front corners and vertical hinged section of the appliance are hot and condensation is occurring.
• Some heat is normal as anti-condensators are installed in the vertical hinged section of the Refrigerator to prevent condensation.
• Is the Refrigerator door ajar? Condensation can occur when you leave the door open for a long time.
Ice Maker is not producing ice.
• Did you wait for 12 hours after installation of the water supply line before making ice?
• Is the water line connected and the shut-off valve opened?
• Did you manually stop the ice making function?
• Is the Freezer temperature too warm? Try setting the Freezer temperature lower.
You hear water bubbling in the Refrigerator.
• This is normal. The bubbling comes from the Refrigerator coolant liquid circulating through the Refrigerator.
There is a bad smell in the Refrigerator.
• Check for spoiled food.
• Foods with strong odors(for example, fish) should be tightly covered.
• Clean out your Freezer periodically and throw away any spoiled or suspicious food.
Frost forms on the walls of the Freezer.
• Is the air vent blocked? Remove any obstructions so air can circulate freely.
• Allow sufficient space between the foods stored for efficient air circulation.
• Is the Freezer drawer closed properly?
Water dispenser is not functioning. (Water dispenser models only)
• Is the water line connected and the shut-off valve opened?
• Has the water supply line tubing been crushed or kinked? Make sure the tubing is free and clear of any obstruction.
• Is the water tank frozen because the Refrigerator temperature is too low? Try selecting a warmer setting on the main display panel.