Owner 's Manual for Remote ControlFeatures and Benefits
The TRC-1080 is one of URC’s most advanced devices that is optimized for usage with Total Control 2.0.
Enjoy these key features:
Updated User Experience:
This device has the capability of using URC’s Total Control 2.0 software suite. Using this software provides this device with a modern “look and feel” giving the end-user an improved user experience in terms of graphics, performance, and features.
Quick Connect Wi-Fi:
When picked up, the TRC-1080 connects to Wi-Fi within moments to control the Total Control 2.0 system and devices.
Two-Way Metadata Feedback:
Experience two-way feedback right on the remote’s display when used with compatible devices like URC’s Music Streamer (SNP-2), iPod Dock (PSX-2), or URC Thermostat (THZ-100). Enjoy the same feedback when used in conjunction with an expanding line of 3rd party products.
Pick-up Sensor:
Lifting the remote immediately wakes it up, turns on the backlight, the LCD screen, and quickly connects to the Wi-Fi for control of the Total Control 2.0 system.
Rechargeable Lithium Polymer Battery and Charging Dock:
Included in the box is a replaceable lithium polymer battery and charging cradle to quickly and conveniently charge the TRC-1080.

Before Getting Started
The TRC-1080 remote control is only to be used with an MRX Advanced System Controller. This device can control a Total Control 2.0 system without being in line-of-sight of the equipment by sending the commands over the home network.
To fully automate the audio/video system, the programmer must have detailed knowledge of each component, LAN configuration, Wi-Fi optimization and how the system is connected and operated. Only a trained and certified professional audio/video installer can install a TRC-1080 remote control.

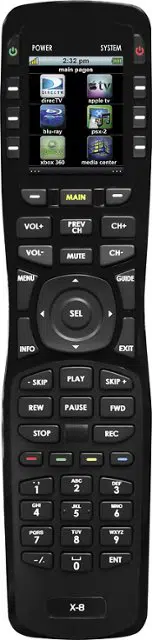
Using the TRC-1080

The TRC-1080’s Main Menu pages display the activities and/or device programmed into the system. Press the Main button to view those activities/or devices. Large systems may have more than one page. Select either Page buttons to view additional pages.
Once within a device or activity, the Page buttons reveal additional buttons. Press any button adjacent to the screen to select an activity and/or device.
Below are detailed descriptions of the available buttons and features:
- Main: this button can be programmed to jump the interface to the Main Menu where all activities/devices are located or to the URC Scenes Menu.
- Page Buttons: Use the Left and Right keys to navigate between Main Menu pages, Device Menu pages, and to access the Scenes Menu. The Scenes Menu is accessible by navigating the menu pages to the far left. Locate the the Page Indicators above the Main button, the icon to the far left symbolizes the Scenes Menu.
- Volume Buttons: The Volume buttons are always available regardless of what screen is displayed.
- Rooms Button: Select this button to access the Room’s Menu. From the Room’s Menu it is possible to select another room in the system for control.
- Power Button: Tap this button once to turn off the current room or hold the button for over five (5) seconds to access the Power Menu.
- Navigation Keys: The five (5) way cursor buttons are used to navigate through a device’s menu with ease.
Available View Modes

With Total Control 2.0, there are two (2) ways to view the Main Menu. Either view type must be programmed by a custom installer:
- Ribbon View: This is the default layout of the TRC-1080’s interface. It holds a maximum of three (3) items per page.
- Grid View: This alternate view mode must be set by the system programmer. It holds up to a maximum of six (6) items per page.

As mentioned on the previous page, select the Rooms button to access the Room’s Menu. The Room’s Menu provides a single location to view all the rooms programmed into the Total Control 2.0 system.
From here it is possible to do the following:
- Select a room. Once a room is selected, the remote control displays available actions that were programmed into the Total Control 2.0 system.
- All options on this page must be programmed by the system programmer:
A. Volume Control: Select this button to raise, lower, or mute the volume of a room without entering that room’s menu.
B. Lights Off Action Command: This button is programmed by the custom integrator and can be set to turn off all the lights in a particular room.
C. Room Off: Select this button to turn off all the devices in that particular room. This button can only be used to turn off a room.
D. Room Linking: This feature is only available on DMS Audio devices. It is used to link DMS Zones/Areas. This means having one menu that controls volume for multiple zones simultaneously or individually
E. Now Playing: This section displays what device/activity is currently active in that room. Select this jumps the TRC-1080 to that device/activity’s menu for control.
Room Linking:
From the Room’s Menu, the user can link DMS Zones/Areas together to have a single menu for volume control. This features is only currently available on Zones/Areas that are using a DMS device for volume control.

1. From the Room’s Menu, select the Room Link button.
2. The Room Linking menu appears, select the available room from this menu to create a link. Only rooms that are DMS Zones/Areas are found on this menu.
3. Select the check mark to confirm and link the selected rooms.
Room Linking Features
Room Linking allows the Total Control 2.0 system to combine two (2) or more rooms that have their volume controlled by a DMS device.

Room Link: Volume Control:
When rooms are linked, the Total Control 2.0 system can control volume of each linked zone through a single convenient menu.
In a linked room, select the Vol+ or Vol- hard button to displays the Linked Volume menu. This menu makes it possible to control the volume of each linked room individually and/or adjust the volume of all the combined zones.
Use the LCD buttons to the right and left of specific rooms to increase or decrease the volume of that specific room.
Room Link: Power
When rooms are linked, the Total Control 2.0 system can turn off all linked room or rooms individually.
Use the Power button located at the top right of the remote control. Once pressed, the Linked Power Options menu displays.
Select Yes to turn off all linked rooms or select No to only turn off the current room the remote control is controlling.

Press and hold the Main button to display the Shortcuts Popup Menu. This menu can hold up to six (6) items.
This menu is created on a per room basis and the only items that can be added to it are devices/activities that are programmed into that specific room.
To add an item to this menu perform the following:
- Locate a blank/available button space.
- Press and hold that available space for approximately three (3) seconds. The Add a Shortcut menu displays with the available devices/activities for that room.
- Select a device/activity to add it to the Shortcut Popup Menu.
Using the Shortcut Popup Menu:

After items have been added to the Shortcut Popup Menu, it is easy to launch devices/activities.
To do so just press the LCD button assigned to the device/activity to launch. This sends out the macro assigned to the device/activity and jumps the TRC-1080 to menu for control.
Removing Shortcuts:
The process of removing an item from the Shortcuts Popup Menu is similar to adding one. To do so, follow these steps from within the Shortcuts Popup Menu:
- Press and hold the item desired for at least three (3) seconds.
- The Remove a Shortcut window displays, select Remove

This feature is unique to Total Control 2.0 and can be customized by the system programmer. Scenes provide the end-user with quick and easy access to commonly used activities or can be used to set a particular room into a specific mode/scene.
For example, a Dinner scene can turn on the dining room lights, turn off the home theater system in another room, and turn on music. Speak with the system programmer for specific ideas or request for the Scenes Menu.
The Scenes Menu can hold up to one hundred (100) Scenes per room. Keep in mind that Scenes are programmed for each room individually. This means each room has a unique Scenes Menu.
To access the Scenes Menu use the left button next to Main to navigate to the far left. The icon circled in the image represents the location of the Scenes Menu.
Additionally, the Scenes Menu can be programmed as the default landing page when the Main button has been pressed.

To access this menu, press and hold the Main and Enter buttons for greater than three (3) seconds. Generally, the Settings Menu does not require any interaction with the end-user.
The following options are available in the Settings Menu:
● Sleep Timers: Manage when the LCD screen turns OFF.
● Network: Use this option to connect the TRC-1080 to the home network.
● Brightness: Allows for the adjustment of the LCD screen's brightness.
● System: Provides general information such as memory used, current version, and version details.
● Button Light: Adjust the brightness of the button backlight.
● Power: This option allows the user to set the level of battery charge remaining at which point the remote control displays the Low Battery Indicator
● Date & Time: This option allows the user to set the Date & Time parameters that are displayed on the remote control.
● Sound: This option allows the user to adjust the volume level of the remote control's sound effects.
● Pickup: This option allows the user to turn on, turn off, or adjust the sensitivity of the remote control’s automatic wake up setting.
● Software Update: This option allows the user to check for available firmware updates and perform them.
● Factory Default: This option allows the user to reset the remote control’s custom programming to the factory settings.
Sleep Timer:

Allows the user to adjust the amount of time before the TRC-1080 turns off the LCD display. Adjustments can be made by using the right and left keys located to the sides of each option on this menu. There are two (2) available option here:
● LCD on Battery Power: Allows for the adjustment of time when the remote is disconnected from the charging cradle. The time period can be set from a minimum of 10 seconds to a max of three (3) minutes.
● LCD on the Cradle: Allows for the adjustment of time when remote is connected to the charging cradle. The time period can be set from a minimum of 10 seconds to a max of three (3) minutes.
Network:

Allows the user to view and adjust the the Network Access settings on the remote control. There are the following available options:
● Preferred List: Contains all saved Wi-Fi networks that the device has been connected to.
● Wireless Search: Select this to scan for available wireless networks. After the wireless search has been performed, select the home network and enter the password as required. This saves that network to the preferred list and connects the remote to the Wi-Fi.
● Network Settings: Adjust settings specific to the network the remote control is connected to such as IP address, address type, and more.
Brightness:

Allows the user to adjust the luminosity level of the remote control’s LCD screen. To do so use the LCD buttons to the left and right of display.
Select the left LCD screen button to lower the brightness or the right to increase the brightness of the LCD display.
System:

Allows the user to check a variety of the remote control’s system operation details. Generally this menu has little to no use with the end-user.
There is important firmware information available in this menu that may be needed by URC’s Technical Support department when troubleshooting.
Button Light:

Allows the user to adjust the luminosity of the remote control’s backlighting.
Select the left LCD screen button to lower the brightness or the right to increase the brightness of the LCD display.
Power:

Allows the user to set the battery power level at which the remote control displays the Low Battery Warning.
Select the left LCD screen button to lower the battery percentage level or the right to increase the battery percentage level of the LCD display.
Date & Time:

Allows the user to adjust the settings of the remote control's display of the date and time on the LCD screen.
● Date: Select this option using either the left or right LCD button. This allows for a manual adjustment of the Month, Day, and Year.
● Time: Select this option using either the left or right LCD button. This allows for a manual adjustment of the Hour, Minutes, and seconds.
● 12 Hr/24 Hr: Use the left and right LCD buttons to adjust the time format.
Sound:

Allows the user to adjust the volume level of the client’s sound effects.
Select the left LCD screen button to lower the sound or the right to increase the sound of the remote control.
Software Update:

Allows the user to request a Software Update from the system controller for the remote control.
Select Yes to begin a software update or select No to cancel
Factory Default:

Allows the user to return the remote control to the factory installed default setting. This completely removes any programming and required the remote to be reprogrammed before working with a Total Control 2.0 system.
- Press and hold the Factory Default button for over five (5) seconds.
- Press and hold the Yes option for over five (5) seconds. The remote performs the factory reset and reboots.