Before using the appliance for the first time, you should be informed of the following tips
Ventilation of appliance
In order to improve efficiency of the cooling system and save energy, it is necessary to maintain good ventilation around the appliance for the dissipation of heat. For this reason, sufficient clear space should be available around the refrigerator.
Suggest:It is advisable for there to be at least 75mm of space from the back to the wall, at least 100mm from its Suggest top,at last 100mm from its side to the wall and a clear space in front to allow the doors to open 135°. As shown in following diagrams.
Note:
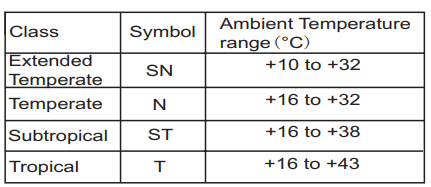
This appliance performs well within the climate class from N to T showed in the table below.
It may not work properly if being left at a temperature above or below the indicated range for a long period.
Stand your appliance in a dry place to avoid high moisture.
Keep the appliance out of direct sunlight, rain or frost. Stand the appliance away from heat sources such as stoves, fires or heaters.
Leveling of appliance
For sufficient leveling and air circulating in the lower rear section of the appliance, the bottom feet may need to be adjusted. You can adjust them manually by hand or by using a suitable spanner.
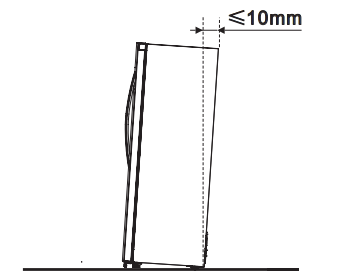
To allow the door to self-close, tilt the top backwards by about 10mm.
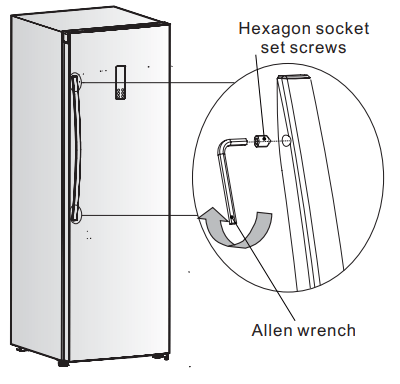
Adjusting the door handle
Before you use the appliance, please check the refrigerator handle. If the handles is loose, please adjust them by using an Allen wrench in the clockwise direction until handle is securely in place. the handle is fitted with 2 screws.
Description of the appliance
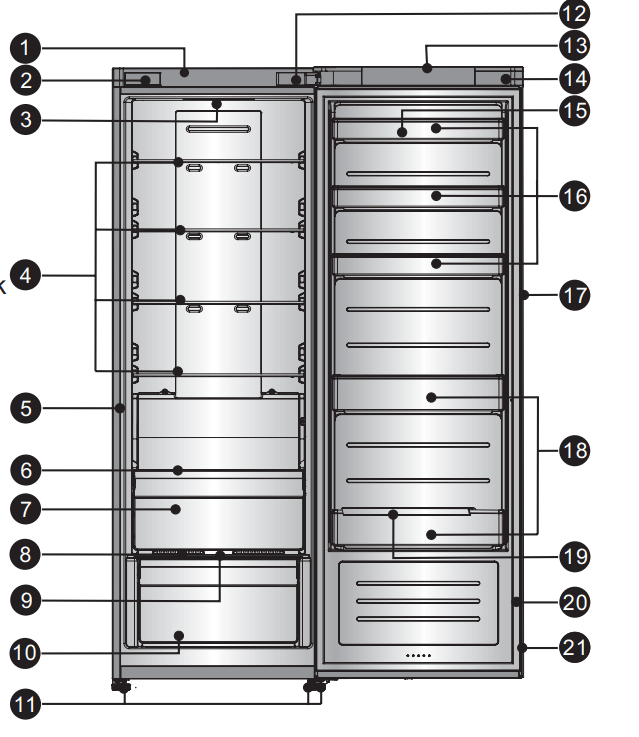
View of the appliance(HR6AFF355SD,HR6AFF355D)
Upper cover
Block cover
LED light
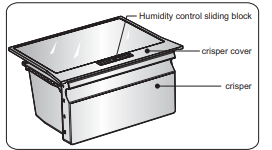
Crisper box
Glass shelf
Cabinet
Small glass shelf
Crisper cover
Humidity control sliding block
Moisture fresh crisper
Adjustable bottom feet
Hinge cover
Upper cover of door
Corner cover
Egg tray(inside)
Upper rack
Handle(back)
Lower rack
Bottle holder(inside)
Fridge door
Fridge door seal
Note: Due to constant improvement of our products, your refrigerator may be slightly different from this illustration manual, but its functions and using methods remain the same.
Note: To get the best energy efficiency of this product, please place all shelves, drawers and baskets on their original position as the illustration above.
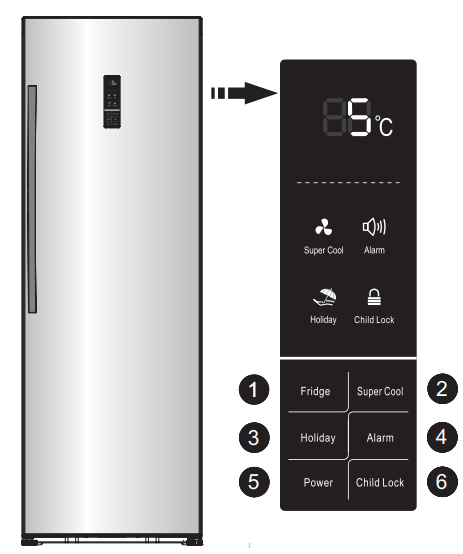
Display controls
All functions and controls of the unit are accessible from a control panel conveniently located on the door of the refrigerator. A keypad of touch buttons and a digital display allow easy configuration of features and settings in a simple and intuitive manner.
Important! Touch buttons require only a short press on a button to operate. The operation occurs when releasing your finger from the button, not while the button is pressed. There is no need for applying pressure on the keypad. “Holiday" and “Child Lock” buttons require a long touch of a least 3 sec. Please refer to those related sections of this Manual for detailed instructions. The control panel consists of the indicating temperature area, four icons representing different modes and six touch buttons. When the appliance is powered on for the first time, the backlight of the display panel turns on. If no buttons have been pressed and the door remains closed, the backlight will turn off after 60 sec.
Controlling the temperature
We recommend that when you start your refrigerator for the first time, the temperature for the refrigerator is set to 5°C. If you want to change the temperature, follow the instructions below
Caution! When you set a temperature, you set an average temperature for the whole refrigerator cabinet.
Temperature inside the compartment may vary from the temperature values displayed on the panel, depending on how much food you store and where you place them. Ambient temperature may also affect the actual temperature inside the appliance.
1. Fridge
Press Fridge button repeatedly to set your desired fridge temperature between 8 and 2 the temperature will decrease 1 degrees with each press and the fridge temperature indicator will display corresponding value according to the following sequence " , .
2. Super Cool
Super Cool can refrigerate the food quicker and keep food fresh for a long period.
Press” Super Cool” button to activate this function. The Super Cool icon will light up and the Fridge temperature indicator will display 2 . Super cool automatically switches off after 6 hours.
Press “Super Cool” or “Fridge” to cancel super cool mode and revert to the previous temperature settings.
3. Holiday
This function is designed to minimise the energy consumption and electricity bills while the Fridge is not in use for a long period of time. You can activate this function by pressing “Holiday” button for 3 seconds until the Holiday light icon is illuminated
Important! Do not store any food in the refrigerator chamber during this time.
When the holiday function is activated, the temperature of the refrigerator is automatically switched to 15°C to minimise the energy consumption. The refrigerator temperature setting displays “-".
Press “Holiday" ,"Fridge’"or "Super Cool” button for a short to cancel Holiday mode and revert to previous temperature settings.
4. Alarm
In case of alarm. “Alarm” icon will light up and a buzzing sound will start.
Press “Alarm” button to stop alarm and buzzing then “Alarm” icon will turn off
Caution! When the refrigerator is turned on after a period of inactivity, the Alarm may be activated. In this case, press “Alarm” button to cancel it.
Door Alarm
The alarm light on and a buzzing sound indicate abnormal conditions, such as accidentally a door left open.
Leaving the door of refrigerator open for over 2 minutes will activate a door alarm and buzzer. The buzzer will beep 3 times per minute for 10 minutes. Closing the door cancels the door alarm and buzzer.
To save energy. please avoid keeping the door open for a long time when using refrigerator. The door alarm can also be cleared by closing the door.
5. Power
If you want to stop using it, you can turn the appliance off by pressing “Power” button.
When the refrigerator is working, you can switch the appliance off by pressing “Power” button for 5 seconds, meanwhile the display panel will be turned off.
Important! Do not store any food in the fridge during this time.
When the appliance is power off, you can switch the appliance on by pressing “Power” button for 1 second, and the refrigerator returns to the previous temperature setting.
6. Child Lock
You can press the "Child Lock” button in case children touch the buttons to avoid wrong set. When the Child Lock function is activated, pressing the other buttons would not work except “Alarm” button.
When the appliance is unlocked, you can activate the Child Lock function by pressing “Child Lock" button for 3 seconds, meanwhile “Child Lock” icon will be illuminated.
When the Child Lock function is activated, you can switch off this function by pressing "Child Lock” button for 3 seconds, meanwhile “Child Lock’ icon will be turned off. iL
Using your appliance
This section explains that how to use the refrigerator features. We recommend that you read through carefully before using the appliance.
Door rack
The refrigerator chamber is fitted with door racks suitable for storing canned liquid, bottled drinks and packed food. Do not place a large amount of heavy food and items inside door racks.
Note : There is an egg tray provided that should be located in the upper rack.
Shelf in Refrigerator chamber
There are shelves in refrigerator chamber, and they can be taken out to be cleaned.
Crisper cover
It is for controlling the temperature of the crisper and avoiding the vegetable losing moisture.
Moisture fresh crisper
It is suitable for the storage of fruits and vegetable.
Crisper and Humidity control
The crisper is for storing vegetables and f ruits. You can adjust the humidity inside by using the sliding block.
The sliding block on crisper cover can slide to left or right and the air hole become more or less relatively. More air hole opening means less humidity and less means more humidity.
We recommend that you store vegetables with more humidity and fruits less humidity.
When you remove the crisper, pull them forward, then lift the crisper off the roll wheels. Remember to empty food in the crisper firstly
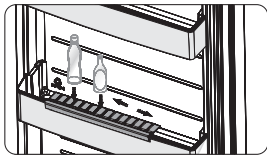
Bottle holder
The bottle holder can be used to fix the bottle.
Note: There is a bottle holder in the lower rack.
Helpful hints and tips
Energy saving tips
We recommend that you follow the tips below to save energy.
Try to avoid keeping the door open for long periods in order to conserve energy.
Ensure the appliance is away from any sources of heat. (Direct sunlight, electric oven or cooker etc.) Don't set the temperature colder than necessary.
Don't store warm food or evaporating liquid in the appliance.
Place the appliance in a well ventilated, humidity free, room. Please refer to Installing your new appliance chapter.
If the diagram shows the correct combination for the drawers, crisper and shelves, do not adjust the combination as this is designed to be the most energy efficient configuration.
Hints for fresh food refrigeration
Do not place hot food directly into the refrigerator, the internal temperature will increase resulting in the compressor having to work harder and will consume more energy.
Do cover or wrap the food particularly if it has a strong flavor.
Place food properly so that air can circulate freely around it.
Hints for refrigeration
Meat (All Types) Wrap in polythene food: Wrap and place on the glass shelf above the vegetable drawer. Always follow food storage times and use by dates suggested by manufacturers.
Cooked food, cold dishes, etc.: They should be covered and may be placed on any shelf.
Fruit and vegetables: They should be stored in the special drawer provided.
Butter and cheese: Should be wrapped in airtight foil or plastic film wrap.
Milk bottles: Should have a lid and be stored in the door racks.
Switching off your appliance
If the appliance needs to be switched off for an extended period, the following steps should be taken prevent mould on the appliance.
Remove all food.
Remove the power plug from the mains socket.
Clean and dry the interior thoroughly.
Ensure that all the doors are wedged open slightly to allow air to circulate.
Cleaning and care
For hygienic reasons the appliance (including exterior and interior accessories) should be cleaned regularly at least every two months.
Caution! The appliance must not be connected to the mains during cleaning. Danger of electrical shock! Before cleaning switch the appliance off and remove the plug from the mains socket.
Exterior cleaning
To maintain good appearance of your appliance, you should clean it regularly.
Wipe the digital panel and display panel with a clean, soft cloth.
Spray water onto the cleaning cloth instead of spraying directly on the surface of the appliance. This helps ensure an even distribution of moisture to the surface
Clean the doors, handles and cabinet surfaces with a mild detergent and then wiped dry with a soft cloth
Caution!
Don't use sharp objects as they are likely to scratch the surface.
Don't use Thinner, Car detergent, Clorox, ethereal oil, abrasive cleansers or organic solvent such as Benzene for cleaning. They may damage the surface of the appliance and may cause fire.
Interior cleaning
You should clean the appliance interior regularly. It will be easier to clean when food stocks are low. Wipe the inside of the fridge freezer with a weak solution of bicarbonate of soda, and then rinse with warm water using a wrung-out sponge or cloth. Wipe completely dry before replacing the shelves and baskets.
Thoroughly dry all surfaces and removable parts.
Although this appliance automatically defrosts, a layer of frost may occur on the freezer compartment's interior walls if the freezer door is opened frequently or kept open too long. If the frost is too thick, choose a time when the supply of food stocks are low and proceed as follows:
Remove existing food and accessories baskets, unplug the appliance from the mains power and appliance from the mains power and leave the doors open. Ventilate the room thoroughly to accelerate the thawing process.
When defrosting is completed, clean your freezer as described above.
Caution! Don't use sharp objects to remove frost from the freezer compartment. Only after the interior is completely dry should the appliance be switched back on and plugged back into the mains socket.
Door seal cleaning
Take care to keep door seals clean. Sticky food and drinks can cause seals to stick to the cabinet and tear when you open the door. Wash seal with a mild detergent and warm water. Rinse and dry it thoroughly after cleaning
Caution! Only after the door seals are completely dry should the appliance be powered on.
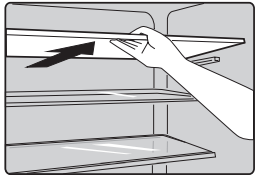
Replacing the LED light
Warning: The LED light must not be replaced by the user! If the LED light is damaged, contact the customer helpline for assistance. To replace the LED light, the below steps can be followed:
Unplug your appliance.
Remove light cover by pushing up and out.
Hold the LED cover with one hand and pull it with the other hand while pressing the connector latch.
Replace LED light and snap it correctly in place.
Troubleshooting
If you experience a problem with your appliance or are concerned that the appliance is not functioning correctly, you can carry out some easy checks before calling for service, please see below. You can carry out some easy checks according to this section before calling for service.
Warning! Don't try to repair the appliance yourself. If the problem persists after you have made the checks mentioned below, contact a qualified electrician, authorized service engineer or the shop where you purchased the product.
Problem
Possible cause & Solution
Appliance is not
working correctly
Check whether the power cord is plugged into the power outlet properly.
Check whether the “Power” funtion is on by pressing the “power” button for 1 second.
Check the fuse or circuit of your power supply, replace if necessary.
The ambient temperature is too low. Try setting the chamber temperature to a colder level to solve this problem.
It is normal that the refrigerator is not operating during the automatic defrost cycle, or for a short time after the appliance is switched on to protect the compressor.
Odours from the compartments
The interior may need to be cleaned.
Some food, containers or wrapping cause odours.
Noise from the appliance
The sounds below are quite normal:
Compressor running noises.
Air movement noise from the small fan motor in the fridge compartment or other compartments.
Gurgling sound similar to water boiling.
Popping noise during automatic defrosting.
Clicking noise before the compressor starts.
Other unusual noises are due to the reasons below and may need you to check and take action:
The cabinet is not level.
The back of appliance touches the wall.
Bottles or containers fallen or rolling.
The motor runs continuously
It is normal to frequently hear the sound of the motor, it will need to run more when in following circumstances:
Temperature setting is set colder than necessary
Large quantity of warm food has recently been stored within the appliance.
The temperature outside the appliance is too high.
Doors are kept open too long or too often.
After your installing the appliance or it has been switched off for a long time.
A layer of frost occurs in the compartment
Check that the air outlets are not blocked by food and ensure food is placed within the appliance to allow sufficient ventilation. Ensure that door is fully closed. To remove the frost, please refer to cleaning and care chapter.
Temperature inside is too warm
You may have left the doors open too long or too frequently; or the doors are kept open by some obstacle; or the appliance is located with insufficient clearance at the sides, back and top.
Temperature inside is too cold
Increase the temperature by following the “Display controls” chapter.
Doors can't be closed easily
Check whether the top of the refrigerator is tilted back by 10-15mm to allow the doors to self close, or if something inside is preventing the doors from closing
Water drips on the floor
The water pan (located at the rear bottom of the cabinet) may not be properly leveled, or the draining spout located underneath the top of the compressor depot may not be properly positioned to direct water into this pan, or the water spout is blocked. You may need to pull the refrigerator away from the wall to check the pan and spout.
The light is not working
The LED light may be damaged. Refer to replace LED lights in cleaning and care chapter.
The control system has disabled the lights due to the door being kept open too long, close and reopens the door to reactivate the lights.
 In order to improve efficiency of the cooling system and save energy, it is necessary to maintain good ventilation around the appliance for the dissipation of heat. For this reason, sufficient clear space should be available around the refrigerator.
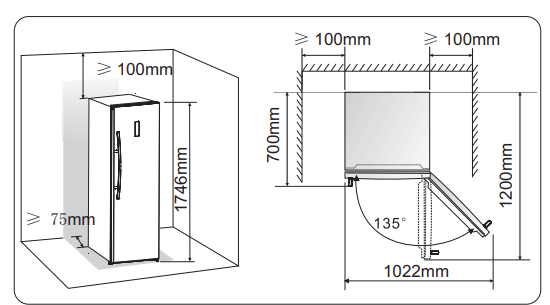

 Super Cool can refrigerate the food quicker and keep food fresh for a long period.
 This function is designed to minimise the energy consumption and electricity bills while the Fridge is not in use for a long period of time. You can activate this function by pressing “Holiday” button for 3 seconds until the Holiday light icon is illuminated
 In case of alarm. “Alarm” icon will light up and a buzzing sound will start.
 You can press the "Child Lock” button in case children touch the buttons to avoid wrong set. When the Child Lock function is activated, pressing the other buttons would not work except “Alarm” button.