To avoid permanently damaging the glass-ceramic top, do not use:
Pots with bottoms that are not perfectly flat.
Metal pots with enamelled bottom.
Any aesthetic defects (scratches, surface marks, etc.) must be reported immediately upon installation.
DIMENSIONS OF THE HOB (mm)
Type PLEAT 230-240 V ~ 50/60 Hz 5.7 kW
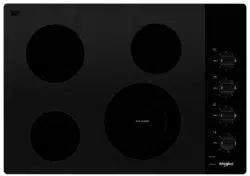
A
On/Off
C-E
Heat setting increase and decrease
B
Cooking zone and timer selection
D
Key lock
Upon first installation, the control panel performs a functional test for about 1 second, after which it automatically switches to the "Key lock” function.
To deactivate the function, press and hold button “D”; an acoustic signal will sound and the corresponding led will turn off.
NOTE: If a reset occurs, repeat the procedure described above.
To switch the hob on, keep button “A” pressed for approx. 2 seconds. The 4 cooking zone displays show “0”. If within 20 seconds none of the cooking zones is activated, the hob switches off automatically as a safety precaution.
Press one of the buttons “B” corresponding to the cooking zone you intend to use.
Select the heat setting required with buttons “E” or “C”. The other selectable cooking settings go from 1 to 9. Press buttons +/- at the same time to cancel all settings.
Pressing button " + ” when level 9 is reached, the "Booster” function is activated and the letter “A” appears on the display.
IMPORTANT: the control is deactivated 10 seconds after the heat setting has been selected. To change the heat setting, first press the selection button “B” again, then proceed to change the setting, using buttons “E” or “C”.
To set the Timer function, select the desired cooking zone and power setting then press the cooking zone key again and a luminous dot will appear on the display of the timer-controlled cooking zone. The indication “00” blinks on the 2 displays. Press buttons “C” or “E” to set the time from 1 to 99. IMPORTANT: after 10 seconds the timer displays will show the power setting of the other cooking zones.
To view the remaining cooking time, press the timer-controlled cooking zone key twice.
The KEY LOCK function is switched on by holding down button “D” until a dot lights up above the function button. The Key lock function locks all the hob's other functions, with the exception of the On/Off button “A”. The function remains on even after the hob is switched off and on again and can be deactivated by pressing button “D” again until the dot above the function button goes off. RESIDUAL HEAT INDICATOR
When the cooking zone is switched off, the residual heat indicator “H” remains on or flashes alternating with “0” until the temperature of the hob returns within safety levels.
IMPORTANT: The hob's safety features include an automatic switching off function. Prolonged use of the same heat setting triggers automatic switch-off of the cooking zone (for example, after around 1 hour at maximum heat setting, the cooking zone switches off).
BEFORE USING THE GLASS CERAMIC HOB
INSTALLATION
Cooktop
The cooktop must be set into a worktop between 20 mm and 50 mm deep
There must be nothing between the cooktop and the oven (cross rails, brackets, etc.).
The distance between the lower face of the glass ceramic hob and the cupboard or separating panel must be at least 20 mm.
If the cooktop is to be installed next to a column unit, leave a distance of at least 100 mm from the edge of the cooktop to the side of the column unit.
Make an opening in the worktop, respecting the dimensions indicated in the enclosed product description sheet.
Apply the supplied gasket to the cooktop (unless it has already been fitted), after having cleaned its surface.
Important
In order to prevent the electronic circuits from overheating, and therefore from being damaged, we recommend the following:
Do not install the cooktop near a dishwasher or washing machine, so that the electronic circuits do not come into contact with steam or moisture, which could damage them.
If an oven (from our range of ovens) is installed beneath the cooktop, make sure that it is equipped with a cooling system.
If the temperature of the electronic circuits exceeds the maximum permitted temperature, the cooktop will switch off automatically; in this case, wait for a few minutes until the internal temperature of the electronic circuits reaches a tolerable level, at which point it will be possible to switch the hob on again.
Switch the hob off after use.
ELECTRICAL CONNECTIONS
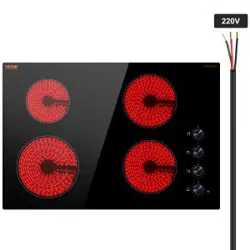
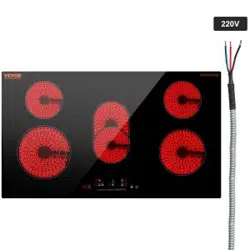
Electrical connection must be made before connecting the appliance to the electricity supply. The appliance must be installed by a qualified electrician who is fully aware of current safety and installation regulations. Specifically, installation must be carried out in compliance with the regulations of the local electricity supply company. Make sure that the voltage shown on the rating plate is the same as the power supply voltage in your home. Regulations require that the appliance be earthed: use conductors (including the earth conductor) of the appropriate size only. The manufacturer declines all liability for injury to persons or animals and for damage to property resulting from failure to observe the above regulations. For the electrical connection use a H05RR-F type cable as indicated in the table below:
Power supply voltage.
Conductors
Amount x size
230-240V ~ +
3 X 4 mm2
The appliance must be connected to the electricity supply by means of an all-pole disconnect switch with minimum contact gap of 3 mm.
Attention: the power supply cable must be long enough to allow the cooktop to be removed from the worktop and must be positioned so as to avoid damage or overheating caused by contact with the base.
Connecting to the terminal board
Note: the yellow/green earth wire must be connected to the terminal with the symbol and must be longer than the other wires.
Remove approx. 70 mm of the cable sheath from the power supply cable (B).
Strip approx. 10 mm of sheath from the wires. Then insert the power supply cable into the cable clamp and connect the wires to the terminal block as indicated in the connection diagram placed close to the terminal block itself.
Secure the power supply cable (B) by means of the cable clamp.
Close the terminal board with the cover (A) securing it with the screw provided.
After the electrical connection, fit the hob from the top and hook it to the support springs, according to the illustration.
ENERGY SAVING TIPS
Use pots and pans whose bottom diameter is equal to that of the cooking zone or slightly larger.
Only use flat-bottomed pots and pans.
If possible, keep pot lids on when cooking.
Cook vegetables, potatoes, et. with little water in order to cut down cooking time.
A pressure cooker allows you to save even more energy and time.
SAFEGUARDING THE ENVIRONMENT
1. Packing
The packaging material can be 100% recycled, as confirmed by the recycling symbol ()
2. Products
This appliance is marked according to the European directive 2002/96/EC on Waste Electrical and Electronic Equipment (WEEE). By ensuring this product is disposed of correctly, you will help prevent potential negative consequences for the environment and human health.
The symbol on the product, or on the documents accompanying the product, indicates that this appliance may not be treated as household waste. Instead it shall be handed over to the applicable collection point for the recycling of electrical and electronic equipment.
Disposal must be carried out in accordance with local environmental regulations for waste disposal.
For more detailed information about treatment, recovery and recycling of this product, please contact your local authority, the household waste disposal service or the shop where you purchased the product.
Declaration of conformity CE
This cooktop is suitable for contact with foodstuffs and complies with EEC (CE) Regulation n. 1935/2004.
The appliances are designed solely for use as cooking appliances. Any other use of the appliances (e.g. for room heating) is considered as improper use and potentially dangerous.
The appliances are designed, built and sold in compliance with:
safety objectives of the “Low Voltage” Directive 2006/95/EC (which replaces 73/23/EEC and subsequent amendments);
the protection requirements of Directive “EMC” 2004/108/EC;
the requirements of Directive 93/68/EEC.
PRECAUTIONS AND GENERAL RECOMMENDATIONS
Warning: Accessible parts become very hot when the equipment is in operation. Keep children away from the appliance in order to avoid the risk of scalding and burns.
This appliance is not intended for use by persons (including children) with reduced physical, sensory or mental capabilities or lack of experience and knowledge unless they have been given initial supervision or instruction concerning use of the appliance by a person responsible for their safety.
Make sure children do not play with the appliance.
Before any maintenance on the appliance, disconnect it from the electrical power supply.
Keep children away form the appliance when it is in use and also when it has been just switched off.
The appliances must be repaired or adjusted exclusively by a qualified technician.
Make sure that the electrical wires of other electrical appliances near the hob do not come into contact with hot parts.
Do not switch on the hotplates/cooking zones when there is no pan in position.
Avoid the use of high pressure water or steam cleaning equipment.
If liquid spills or boils over, the hob may switch off: to enable it to be switched back on again, carefully dry the controls zone.
The cooktop features different size hotplates/ cooking zones. Use pots whose base diameter is the same as that of the hotplate/cooking zone.
To avoid permanently damaging the glass ceramic cooktop, do not use:
- pots with bottoms that are not perfectly flat;
- Metal pots with enamelled bottom.
- When finished cooking, press button
Do not use the cooktop as a work surface or a support surface.
Do not leave the appliance unattended when frying food -risk of fire.
If the glass ceramic surface should break or crack due to violent impact (falling objects, etc.) do not use it and call the After-Sales Service immediately.
Do not place food wrapped in aluminium foil, plastic containers or cloths on the hot cooking zones.
Do not drag pans across the glass-ceramic surface - risk of scratches.
Avoid spilling sugar and similar substances on the cooktop. If necessary, clean the cooktop immediately following the care and maintenance instructions in this handbook.
If the hob is fitted with halogen lamps, do not stare at the bulbs directly.
The appliance is not intended to be operated by means of an external timer or separate remote-control system.
HOB ACCESSORIES
Child guard accessory AMH 122
This accessory can be obtained from the After-Sales Service under Part N° 4819 310 18436.
CARE AND MAINTENANCE OF THE GLASS-CERAMIC HOB
Clean the cooktop, when it is cool, after each use. This will prevent the build-up of dirt and make cleaning easier.
Important: at all costs avoid the use of high pressure water or steam cleaning equipment.
Use a clean cloth, absorbent kitchen wipes and washing up liquid or a specific glass ceramic cleaner.
Remove baked-on dirt with the special scraper tool (if provided) and specific cleaning products.
Food spills should be cleaned off before they bake onto the glass ceramic surface.
Foods with high sugar content (toffee, fruit juice, jam, etc.) that boil over while cooking, or spattered sugar stains must be immediately removed using a scraper.
Do not use abrasive products, bleach, oven-cleaner spray or pan scourers.
The cooktop should be treated periodically with a proprietary brand of protective wax for glass-ceramic hobs.
TROUBLESHOOTING GUIDE
Cooktop not working
When pressing the control buttons, did you follow the instructions in the section “Using the hob” in the enclosed ’’Product Description Sheet”?
Is there perhaps a power failure?
Did you dry the hob carefully after cleaning it?
1. If a cooking zone has been selected and an “F” or an “ER” appear on the display followed by a number, contact the After Sales
Service and inform them.
- With the exception of the message “F03” or “ER03” that identifies the incorrect cleaning of the controls area.
- To solve the problem follow the instruction in the “Cleaning and maintenance of the glass-ceramic hob” paragraph.
2. If the hob does not work following intensive use, the hob internal temperature is too high. Wait a few minutes until the hob cools down.
AFTER SALES SERVICE
Before contacting After Sales Service
1. Try to solve the problem (see “Troubleshooting Guide”).
2. Turn off the appliance and restart it to see if the fault is repeated.
If after the above checks the fault still occurs, get in touch with the nearest After Sales Service.
Please give: a short description of the fault,
the precise type and model of the appliances,
the service number (the number after the word “Service” on the data plate), located under the hob or on the Product Description Sheet. The service number is also indicated on the warranty booklet,
your complete address and phone number.
If any repairs are required, please contact an authorized After-sales Service as indicated in the warranty.
In the unlikely event that an operation or repair is carried out by an unauthorised technician, always request a certification of the job carried out and insist on the use of original spare parts. Failure to comply with these instructions may compromise the safety and quality of the product.


 To switch the hob on, keep button “A” pressed for approx. 2 seconds. The 4 cooking zone displays show “0”. If within 20 seconds none of the cooking zones is activated, the hob switches off automatically as a safety precaution.
 To set the Timer function, select the desired cooking zone and power setting then press the cooking zone key again and a luminous dot will appear on the display of the timer-controlled cooking zone. The indication “00” blinks on the 2 displays. Press buttons “C” or “E” to set the time from 1 to 99. IMPORTANT: after 10 seconds the timer displays will show the power setting of the other cooking zones.
 When the cooking zone is switched off, the residual heat indicator “H” remains on or flashes alternating with “0” until the temperature of the hob returns within safety levels.


 on the product, or on the documents accompanying the product, indicates that this appliance may not be treated as household waste. Instead it shall be handed over to the applicable collection point for the recycling of electrical and electronic equipment.