User manual LED Backlight TV
Shortcuts Instructions
You can use shortcuts on the remote control for fast operation. Refer to the “ Quick Setup Guide ” for more information.
Turning your TV on or off
To turn your TV on or off :
- Plug the AC power cord into a socket outlet of AC power supply.
- When the TV is powered on, press the [
 ] button on the remote control, to turn TV on or off.
NOTES
- When your TV is in standby mode, it is still consuming power. To completely disconnect power, please remove the mains plug from the mains socket.
- If your TV does not receive an input signal for several minutes, it automatically goes into standby mode.
Selecting the Input Source
Select the Input Source depending on the video device you have connected to your TV.
To select the input source:
- Turn on your TV, then press the [INPUT] button on the remote, the list of Source appears.
- Press the [ ∧/∨ / < / >] buttons to select the input source.
- Press the [OK] button to confirm your selection.
Using the Live TV
- To view broadcast programs, press the [Live TV] button on your remote.
- Channel search guide: When switching to Live TV, the TV detects the presence of the channel list information (Channel scan must have been completed). If the scan has not yet been completed, a prompt will appear to begin scanning for channels. Press the Begin scanning button to enter the channel search interface.
- Launch Live TV: After channel tuning is done for the first time, the screen will display Live TV operating tips.
- [OK] load channel list.
- [Up] load info bar.
- [Down] load PVR/T.Shift.
- [Back] jump to previous channel.
- Viewing channel information: As you use the [CH+ / CH-] button on your remote to scroll through channels, an information banner appears on the top of the screen.
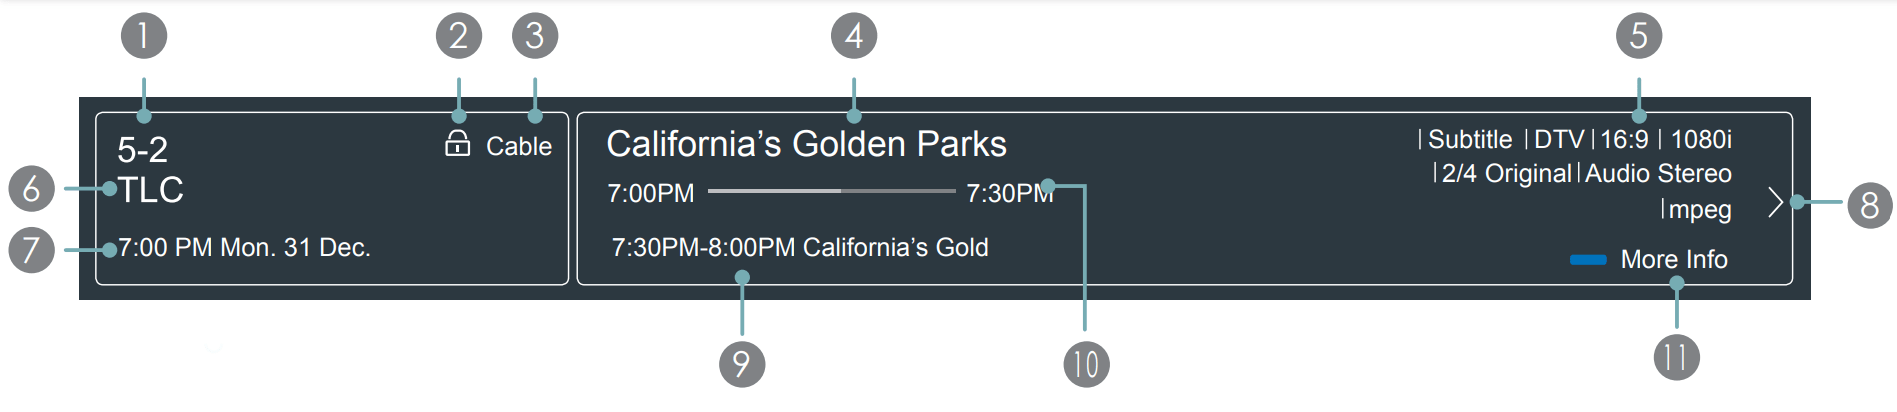
The information banner displays the following information:
- Channel number
- Lock status
- Input
- Program name
- Show identification
- Channel name
- Current date and time
- Prompt
- Beginning and end time of the next program
- Start/Stop time progress bar of the current program
- More info
If you are watching a particular channel, you can also press the up arrow button of your remote to view channel information.
Viewing a channel list
- After you have done an automatic channel scan (if you’re using an antenna) or receiving your channels through a cable provider, you can view your list of channels by pressing [OK] button on your remote. You will see the channel list display on the right side of the screen.
Creating a Favorites List: To quickly access your most-watched channels, you can create a Favorites List. To create your Favorites List:
- Press the [
 ] button on your remote.
- Press the [v] button to select Settings, and then press [OK] button to enter the Settings menu.
- Select Channel > Channel Edit > FAV > Edit > Add channels.
- Using the [ ∧/v] buttons of your remote, select a channel and press [OK] button. A heart-shaped indicator will appear beside the channel as confirmation that it has been successfully added.
Viewing your Favorite list
- To view channels that you’ve added to your Favorites List, press [OK] button on your remote to call out the channel list.
- The channel list appears on the right side of the screen and heart-shaped icons are shown next to the channels that make up your Favorites List.
EPG
It provides convenience to check TV programs that will be available in the next 7 days. The information displayed by the EPG is made available by the commercial television networks for digital channels only. The EPG also provides a simple way to program the recording of your favorite programs and a reminder function which can switch channel automatically at scheduled time so that you do not miss programs of interest. (The availability and amount of programme information will vary, depending on the particular broadcaster).
- Press the [EPG] button on the remote control to display channel information on program guide list.
| Watch |
When a current program is selected, press the [OK] button to watch it in full screen mode. |
|
PVR/Reminder
|
Press the [ ∧/∨] buttons to select the channels, press the [< / >] buttons to select program based on the time schedule.
Press the [OK] button to select PVR or Reminder.
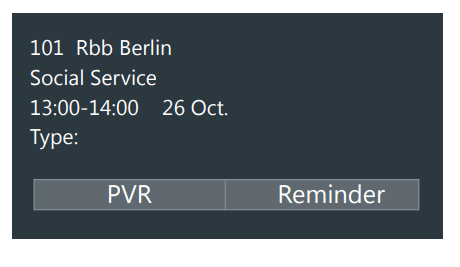
Press the [ ∧/∨/ < / >] buttons to change and set different options.
- Select and set Start Time/End Time: Press the [< / >] buttons to move to the position you want to set, press the [OK] button, and then press the [0~9] buttons to input the desired numbers. (Selecting and setting end time is only available for PVR)
- Repeat: You can select from Once, Daily, Mon to Fri and Weekly.
NOTES
- Reminder is only available for programmes that haven’t been aired yet.
- A storage device must be attached to the television for recording purposes.
- The TV will record the program even in standby mode.
|
| Page Up/Down |
Press the [CH+/CH-] buttons to move programme listing page up/down. |
| Program details |
Press the [INFO] button to display detailed information of the selected program. |
| Schedule |
Press the [RED] button to view a list of scheduled reminders and recordings. |
| 24- |
Press the [YELLOW] button to go backwards a day. |
| 24+ |
Press the [BLUE] button to move forwards a day |
PVR/T.Shift
PVR
- The PVR enables the user to easily record the digital television content for later viewing. The function is to be used in DTV source only. The format of storage disk is recommended to be FAT32 or NTFS. This option does not commerce if the data storage device has not been connected.
- There are two options for recording, the first option is to use Electronic Program Guide (EPG), the second option is to press the [∨] button to select PVR or T.Shift.
- Press the [ ∨/ [■] button to display the recording progress bar when there is no progress bar appeared, press the [■] button to stop record, a *.PVR file will be saved. The files can be played back in Media.
T.Shift
- This option allows the user to watch a live broadcast (DTV only) with a delay. Since the function record the program temporarily onto a hard disk only. Please connect a hard disk and the storage capacity should be no less than 2GB. Otherwise the recording will not commence.
- Press the [∨] button on the remote to display the menu, press the [II] button to pause the live broadcast and press the [►] button to play. Press the [
 ] button to rewind and press the [
 ] button to fast forward. Press the [■] button to exit the function and watch the current broadcast.
NOTES
- When connecting a hard disk, always connect the mains adapter of the connected device to the power supply.
- If a USB 1.1 or USB2.0 device requires more than 500mA or 5V, the USB device may not be supported. Max supported current for USB 3.0 device is 1A. Exceeding the max supported current may result in damage or data loss.
- The maximum supported storage space of the hard disk is 2T.
- If you want to store the video streaming of a DTV program, the transfer rate of the USB storage device should be no less than 5MB/s.
- The PVR and T.Shift functions doesn’t support analogue channels.
- The PVR function is disabled for scrambled channels (CI module).
- The T.Shift function is disabled for channels locked with Channel Lock or scrambled channels (CI module or password needed).
Using the Menu Function
To quickly access menu function, press the [ ] button on your remote.
- Audio Language
- Select a desired language from the list. (Only available for DTV channels)
- NOTE: This function is only available on certain models in specific geographical areas.
- Subtitle: Select desired subtitles from the list if the selected channel supports multi-language subtitles. (Only available for DTV channels)
- Headphone Volume: Adjust the volume of the headphone when the headphone is connected.
- Audio Track: Select a desired audio track from the list if the video has the multiple audio tracks. (Only available for ATV channels)
- Picture Mode: Select the optimal picture mode for your TV viewing conditions. There are five types of picture modes available: Standard, Natural, Cinema, Dynamic, Football.
- Sound Mode: Select a preset sound mode to suit the type of content you are listening to: Standard, Theatre, Music, Speech and Late Night.
- Audio Only: When you select this option, the screen will not display the picture. You can only listen the audio. Press any button except the [ / VOL+ / VOL- /
 ] buttons to restore operation.
- Teletext
- Display the teletext mode.
- NOTE: This function is only visible when the selected channel has the corresponding information.
- Recording List
- View recording schedule list. You can edit the settings of the selected schedule or delete it. (Only available for TV mode)
- HbbTV
- The global switch to enable or disable HbbTV functionality for all channels. (Only available for DTV channels)
- NOTE: This function is only available on certain models in specific geographical areas.
- Settings: The Settings Menu consists of the following settings: Picture, Sound, Network, Channel, System and Support.
Using the Settings Menu
- Press the [ ] button on your remote, press the [v] button on the remote to select Settings, and then press the [OK] button to enter the Settings menu. The Settings Menu consists of the following settings:
- Picture
- Sound
- Network
- Channel
- System
- Support
- In each menu, you can: Press the [ ∧/∨/ < / >] buttons to select an item, Press the [OK] buttons to enter the sub-menu or to set on or off, Press the [< / >] buttons to adjust the value, Press the [BACK] button to return to the previous menu.
- Press the [EXIT] button to exit the menu
Using the Picture Menu
| Picture Mode |
Select a preset picture mode to best suit the content you’re viewing. |
| Aspect Ratio |
Adjust the Aspect Ratio to stretch or zoom in on your picture. |
| Picture Mode Settings |
Adjust display settings for each Picture Mode.
- Apply Picture Settings: Adjust current picture mode to apply to all sources or just current source.
- Backlight: Set the overall brightness of the screen.
- Brightness: Adjust the Brightness level to generate lighter or darker images.
- Contrast: Adjust the Contrast level to increase or decrease how bright images appear.
- Color Saturation: Adjust the color intensity of the picture for a more vibrant image.
- Sharpness: Adjust how sharp or soft edges of images appear.
- Tint: Adjust the colors from a green to magenta tint to view the natural skin tones of people on the screen.
- Game Mode: Best suited for PC or Games console. Reduces Input Lag and improves responsiveness. NOTE: Some models don’t support this function.
- Adaptive Contrast: Automatically darken dark areas and lighten light areas of images to see more details.
- Ultra Smooth Motion: Reduce seeing afterimages that are left on the screen when viewing fast-moving objects. NOTE: Some models don’t support this function.
- Noise Reduction: Improve how clear the picture appears by reducing noise.
- MPEG Noise Reduction: Reduces MPEG block noise and provides clearer edge transitions. NOTE: Some models don’t support this function.
- Color Temperature: Adjust how warm(red) or cool(blue) the white areas of an image appears.
- Color Gamut: Change the range of Colors the TV displays. NOTE: Some models don’t support this function.
- Color Tuner: Adjust the Hue, Saturation and Brightness of Color settings.
- White Balance: Adjust the intensity of red, green and blue lights to view the true colours of all images in the picture.
- Restore current mode to default: Restore all the picture settings in the current picture mode to the factory default values.
- Overscan: Change the video size settings to slightly crop the edges of the displayed image.
|
Using the Sound Menu
| Sound Mode |
Select a preset sound mode to suit the type of content you are listening to. |
| Headphone |
- Headphone Mode: Change the way audio is sent through the type of device that’s connected to your TV Audio Out port.
- Headphone Volume: Independently adjust the volume of audio out devices.
|
| Sound Mode Settings |
Customize selected Sound Mode.
- Apply Audio Settings: Adjust current sound mode to apply to all source or just current source.
 Total Sonics: Optimizes overall sound quality by increasing bass, widening the sound field and provides a clear, natural dialog. Total Sonics: Optimizes overall sound quality by increasing bass, widening the sound field and provides a clear, natural dialog. Total Volume: Maintains consistent loudness levels from wide dynamic range programs, loud commercials, and channel or input changes. Total Volume: Maintains consistent loudness levels from wide dynamic range programs, loud commercials, and channel or input changes. Total Surround: Provides surround sound experience by utilizing psychoacoustic processing to place sounds beside, behind and above the viewer. For best results use with Total Sonics. Total Surround: Provides surround sound experience by utilizing psychoacoustic processing to place sounds beside, behind and above the viewer. For best results use with Total Sonics.- Equalizer: Boost the volume at different frequencies.
- Subwoofer: Built-in Subwoofer switch. NOTE: The feature is only available on selected models.
- Bass Boost: Built-in Bass Adjustment. NOTE: The feature is only available on selected models.
- Restore current mode to default: Restore all of the audio settings in current audio mode to the factory default values.
|
| Speakers |
- Audio Output: Select the speakers which you want to use.
- Digital Audio Out: Select the digital audio output format that best suits the audio device type.
- Digital Audio Delay: Adjust the digital audio output delay time to sync sound from an external speaker with the images on the TV.
- Lip Sync: Synchronize the displayed image with the audio output.
- Balance: Adjust the left and right speaker strength to optimize audio for a specific location.
|
| Audio Type |
- Audio Type: Select the audio type of programmes.
- Voiceover output: Select the voiceover audio out.
- Voiceover Volume: Independently adjust the volume of voiceover.
NOTE: Audio Type is only available on certain models in specific geographical areas.
|
Using the Network Menu
| Network |
Set up the network to gain full access of Smart TV features.
- Connection Type: Ethernet - Choose a wired network connection to access the Internet. IP Setting: Configure the IP setting for your network connection.
- Connection Type: Wireless - Choose a wireless network connection to access the Internet. Advanced Settings: Configure the advanced wireless network settings for the TV. Refresh: Refresh wireless network. Add Network: You can add wireless network.
- Connection Type: Off - Turn off the Internet connection.
|
| Internet Connection |
- Connection Test: Start a network connection test.
- Network Information: View information about your network connection.
|
| Wake on Wireless Network |
Using a wireless connection, turn on your TV with a screen-cast feature inside an app |
| Wake on LAN |
Using an Ethernet connection, turn on your TV with a screen-cast feature inside an app. |
Using the Channel Menu
| Auto Scan |
Automatically scan for channels to view programmes from your TV source. |
| Channel Edit |
Manually edit the channel list order to your preference. |
| Advanced Settings |
Adjust advanced settings for Channel.
- Manual Scan: Perform manual channel scan for ATV and DTV.
- ATV Fine Tuning: Fine tuning current channel to improve the programme picture.
- Channel List Auto-Update : Allow your TV auto-update the channel list from the content provider.
- CAM Settings:
- Common Interface: Review CAM boot menu. NOTE: CI Card is not supported in some regions so this option may not be available.
- CI card PIN: Set the CI CAM pin. NOTE: CI Card is not supported in some regions so this option may not be available.
- CAM Profile Search: Quick channel scan with CAM. NOTE: CI Card is not supported in some regions so this option may not be available.
|
Using the System Menu
| Time |
Set the current time based on your location.
- Time Format: Set the time to display in a 12 or 24-hour format.
- Jalaali: Turn the Jalaali On or Off. NOTE: Jalaali is not supported in some regions so this option may not be available.
- Date/Time: Select the mode Manual or Auto and set the Date and Time if select Manual.
- Time Zone: Select your location time zone.
- Daylight Savings: Select whether to apply Daylight Savings Time to the TV.
|
| Timer Settings |
Adjust the timer settings to suit your preference.
- Sleep Timer: Set the sleep timer to automatically turn the TV Off within a specified time.
- Power On Timer: Set the clock for the time you want the TV to turn on automatically.
- Power Off Timer: Set the clock for the time you want the TV to turn off automatically.
- Menu Timeout: Set the amount of time that you’d like for the menu to display.
- Auto Sleep: Set the amount of time that you’d like for TV auto power off without any activity: Off, 3H, 4H.
NOTE: Auto Sleep is only available on certain models in specific geographical areas.
|
| System PIN |
Change your PIN that you use to access Parental Controls, Auto Channel Scan and Reset To Factory Defaults.
NOTE: If you forget your password, call the Consumer Electronics Care Center.
|
| Parental Controls |
Turn On Parental Controls to block children from being able to view certain programmes. You can do this by creating a 4-digit password.
- Locks: Turn the Lock system On or Off.
- Block Time: Block certain channels and programs during certain periods of time.
- Channel Block: Block programs by channels when you activate the parental controls settings.
- Programme Block: Block certain programs when you activate the parental controls settings.
- Input Block: Block content from devices that are connected to certain TV ports.
- Restore Parental Control Defaults: Restore Parental Control back to the factory default setting.
|
| Location and Language |
Select the language used for this TV and your location.
- Location: Choose the location from where you will watch your TV.
- Menu Language: Set the default language for the TV menu.
- Primary Audio: Set the default audio output language for the type of digital broadcast content that you’re viewing.
- Secondary Audio : Set the secondary audio output language for digital broadcast content.
- Primary Subtitle: Set the default subtitle language for digital broadcast content.
- Secondary Subtitle : Set the secondary subtitle language for digital broadcast content.
- Digital Teletext : Set the Teletext language.
- Decoding Page : Adjusts Teletext decoding.
|
| Application Settings |
Set settings for apps on your TV.
- Anyview Stream: Share video, music or other content from another device on to your TV screen.
- HbbTV: Disable or enable HbbTV function. NOTE: HbbTV is only available on certain models in specific geographical areas.
- Clear Cache & Cookies: Clear cache, cookies, user data and temporary files for application, browser and HbbTV.
- Do not Trak: You can choose the the Mode 1, Mode 2, Mode 3.
- Netflix: Remove this TV from your Netflix account. Please contact Netflix if you want to stop being billed for your service.
|
| HDMI & CEC Functions |
Configure how to control CEC-enabled devices with your TV remote.
- CEC Control: Allow HDMI devices to control each other.
- Device Auto Power Off: Allow CEC enabled devices to turn off with the TV.
- TV Auto Power On: Allow the TV to turn On with CEC-enabled devices.
- Detect: Allow CEC-enabled devices to communicate with each other when connected through an HDMI cable.
NOTES
- HDMI cables must be used to connect HDMI CEC-compatible devices to your TV.
- The HDMI CEC feature of the connected device must be turned on.
- If you connect an HDMI device that is not HDMI CEC-compatible, all the HDMICEC control features do not work.
- Depending on the connected HDMI device, the HDMI-CEC Control feature may not work.
|
| Advanced Settings |
Access the Advanced Settings menu.
- TV Name: Choose a name for your TV. The name will be shown to devices that are available for sharing data.
- PVR&Time-Shift Settings: Initialize the external USB disk to support PVR and Time-Shift. (Since the function record temporary the program onto a hard disk only.)
- Input Labels: Edit the input labels.
- Notifications: Allow pop-up notifications to appear for useful information and events that occur with your TV.
- Setup Wizard: Use the Setup Wizard for instructions to help you set up your TV.
- Store Mode: Set the TV to use in Home or Store Mode.
- Fast Power On: Turn on or off the fast power on.
|
Using the Support Menu
| System Info |
View system information |
| System Update |
Set your TV to receive the latest firmware.
- Check Firmware Upgrade: Check to ensure that your TV has received the latest firmware.
- Check OAD Upgrade : Check to ensure that your TV has received the latest firmware via the tuner. NOTE: This function may not be available in your country/region.
- Upgrade from USB: Upgrade TV software from USB device.
NOTE: Some models don’t support this function.
|
| Disclaimer |
- Accept All EULA Items: Check
- EULA: Check
- Improve your Smart TV: Check
|
| Restore To Factory Default |
Restore your TV back to the factory default. |
Advanced Features
Getting familiar with the Home screen
- The simple design of the Home screen menu makes it easy to navigate. It serves as the central location to access Notifications, Apps, LiveTV, Source, Media and Settings.
- To access the Home screen, press the [
 ] button on your remote control and use the arrows on the D-pad to make your selection.
Indicators and Icons on the top of the Home screen:
- You can always view the current time at the top left corner of the Home screen.
- If your TV is connected to the Internet through a wireless connection, then an icon
 will display at the top right corner of the screen. This location makes it very convenient for you to determine if you still have Internet connectivity when you use the TV.
Names of sections that appear on the Home screen: The Home screen displays the following section names:
- Notifications
- Apps
- LiveTV
- Source
- Media
- Settings
Notifications: If your TV is connected to an external device, the screen will be prompted.
Apps: This is the one location where you have access to all the apps on your TV. You can enjoy a wide range of services including video streaming and web browsing.
LiveTV: Switch to LiveTV input.
Source: All Source are listed here. You can select a connected external device, then the output of the selected device is displayed on the TV’s screen.
Media: You can play media content saved on external storage devices.
Settings: Open the settings menu.
Editing the Home screen: Press the [v ] button on your remote control to add a new tile to the home page, Press the [ ∧] button on your remote control to change the location of any tile already listed.
Apps
Numerous factory-installed apps are available for you to choose from for your entertainment preferences.
Installing an App: Even though your TV has numerous factory-installed apps, there may be others that you’d like to download. To install an app:
- From the Home screen, click on the Apps to select the VEWD icon.
- Navigate to the SEARCH tab at the top of the screen.
- Begin typing the name of the app. As you begin typing the first two to three letters the VEWD icon suggests words to quicken your search time. s that shows a written description of the app.
- Click on ADD TO FAVORITES.
Removing an App: You can only delete apps that you’ve installed to the TV. Some factory-installed apps can not be deleted. To delete an app:
- Use the navigation buttons on your remote to select the app that you want to remove.
- Press the ‘red’ button on your remote. A dialog message displays that asks do you want.
- Click on Delete. The icon is removed from the Apps list screen. NOTE: If an app is deleted, the information related to that app is also removed.
Media
Media is a central location for you to upload and view or listen to different types of content (for example, your photos, music and movies) through the following methods:
- A USB thumb drive or hard drive
- Compatible mobile phone, tablet or other personal devices: You can stream movies, pictures and photos that are stored on Compatible personal device and play or view the content on your TV.
Panels that appear on the Media screen: The Media screen displays five panels: Search, All, Picture, Video, Music.
File formats that may be supported
- NOTE: Due to differences in programming tools and other factors, some of the file formats that are listed may or may not be supported.
| Medium |
File Format |
| Video |
AVI, MP4, MKV |
| Picture |
JPG, BMP, PNG, GIF |
| Music |
MP3 |
Browsing Content
To browse through content based on the type that you wish to access:
- Navigate to the appropriate menu tab on far-right top the screen and select All, Picture, Video or Music. The library of items display on the screen.
- Press the [ ∧/ ∨/ < / >] buttons to select the name of the folder that contains your content.
- Press the [OK] button to enter/play the folder/content.
If you want to close out of the Media center, press the [EXIT] button on your remote.
Using Anyview Cast to mirror content from your device to the TV screen
The Anyview Cast is an app that enables you to share (or cast) a video, audio or image from your Androidbased device to the TV.
From your tablet or phone To mirror content from your tablet to the TV:
- Press the [ ] button on your remote, press the [v] button on the remote to select Settings, press the [OK] button to enter the Settings menu. Go to Network > Network Configuration and select Wireless.
- Press the [INPUT] button on your remote and select the Anyview Cast.
- Turn on the wireless display function on your Android-based device. NOTE: Some Android-based devices may not support casting.
- Find your TV in the list of devices that displays and select it.
- Wait for the ‘Creating Connection’ progress bar to complete on the TV screen and the video or image will display in a moment.
Software updates for your TV
The software (also referred to as firmware) is part of what powers your TV. We will provide software updates to continuously enhance your TV and correct any issues that may impact your user experience; therefore, we recommend that you keep your TV connected to the Internet to receive updates when they are available. You can choose to receive updates automatically or check for software updates and install them manually
Checking for the latest firmware / OAD
To manually check for the latest firmware:
- Press the [ ] button on the remote, press the [v] button to select Settings, and then press the [OK] button to enter the Settings menu.
- Go to Support > System Upgrade > Check Firmware Upgrade / Check OAD Upgrade.
NOTE This function is only applicable in some countries.
Troubleshooting
If the TV does not operate as usual or appears to be faulty please read carefully this section. Many operational issues can be resolved by users.
It is also advisable to unplug the TV form the AC socket on the wall for 60 seconds or more, then reconnect and start again. This simple procedure helps in restoring stable conditions for electric circuits and firmware of the unit.
Please contact Manufacturer Customer Care if the problem is unresolved or you have other concerns
| SYMPTOMS |
POSSIBLE SOLUTIONS |
| No sound or picture. |
- Check if the power cord is plugged into a powered AC outlet.
- Check to see if LED light is red. If illuminated, power to TV is OK
|
| I have connected an external source to my TV and I get no picture and/or sound. |
- Check for the correct output connection on the external source and for the correct input connection on the TV.
- Make sure you have made the correct selection for the input mode for the incoming signal.
|
| When I turn on my television, there is a few second delay before the picture appears. Is this normal? |
Yes, this is normal. That is the TV searching for previous setting information and initializing the TV. |
| Picture is normal, but no sound. |
- Check the volume settings.
- Check if Mute mode is set “on”.
|
| Sound but no picture or black and white picture. |
- If black and white picture first unplug TV from AC outlet and replug after 60 seconds.
- Check that the Color is set to 50 or higher.
- Try different TV channels.
|
| Sound and picture distorted or appear wavy |
- An electrical appliance may be affecting TV set. Turn off any appliances, if interference goes away, move appliance farther away from TV.
- Insert the power plug of the TV set into another power outlet
|
| Sound and picture is blurry or cuts out momentarily |
- If using an external antenna, check the direction, position and connection of the antenna.
- Adjust the direction of your antenna or reset or fine tune the channel.
|
| Horizontal/vertical stripe on picture or picture is shaking. |
Check if there is interfering source nearby, such as appliance or electric tool. |
| The plastic cabinet makes a “clicking” type of sound. |
Click" sound can be caused when the temperature of the television changes. This change causes the television cabinet to expand or contract, which makes the sound. This is normal and the TV is OK. |
| Remote control does not work. |
- Confirm that TV still has power and is operational.
- Change the batteries in the remote control.
- Check if the batteries are correctly installed.
|
| Smart Television with wireless network capability Wi-Fi fail to join a local network. |
- Configure the local wireless router or access point for WPA-PSK security before attempting to connect the TV to the Wi-Fi network.
- Follow instruction in the User Manual of the television to setup a wireless connection
|