Search
Home
Bookmarks
Brands
Articles
About us
Home
Bosch
Bosch SMV69T10AU User Manual
Page 2
User Manual - Page 2
For SMV69T10AU. Also, The document are for others Bosch models: SM..., SB...
Page 2/36
Page 1
Page 2
Page 3
Page 4
Page 5
Page 6
Page 7
Page 8
Page 9
Page 10
Page 11
Page 12
Page 13
Page 14
Page 15
Page 16
Page 17
Page 18
Page 19
Page 20
Page 21
Page 22
Page 23
Page 24
Page 25
Page 26
Page 27
Page 28
Page 29
Page 30
Page 31
Page 32
Page 33
Page 34
Page 35
Page 36
Contents
Table of Contents
Search
Previous
Next
Bookmarks
Loading ...
K
6WDUW
K
KPLQ
5HVHWVHF
$%
&
Loading ...
Loading ...
Loading ...
<
1
2
3
4
5
6
>
File type: PDF
File name: smv69t10au.pdf
File size: 2.32 MB
Rating:
File Language: English
Pages: 36
Author: Bosch
Published: 2020-03-23 00:00:00
Updated: 2023-05-20
Download File
Table of Contents
×
8 Intended use
2
Intended use
2
( Safety instructions
2
Safety instructions
2
Before you switch ON the appliance
2
Delivery
3
1. Check the packaging and dishwasher immediately for damage caused in transit. Do not switch on a damaged appliance, but contact your supplier.
3
2. Please dispose of the packaging material in an environmentally friendly manner.
3
3. Do not let children play with packaging and its parts. There is a risk of suffocation from collapsible boxes and film.
3
Installation
3
In daily use
4
Childproof lock (door lock)Door lock *
4
Damage
4
Disposal
4
1. Make redundant appliances unusable to prevent subsequent accidents.
4
2. Dispose of the appliance in a n environmentally friendly manner.
4
m Warning
4
Risk of injury!
4
m Warning
5
Risk of explosion!
5
m Warning
5
Risk of scalding!
5
m Warning
5
Risks to children!
5
7 Protection of the environment
6
Protection of the environment
6
Packaging
6
Old appliances
6
* Getting to know your appliance
6
Getting to know your appliance
6
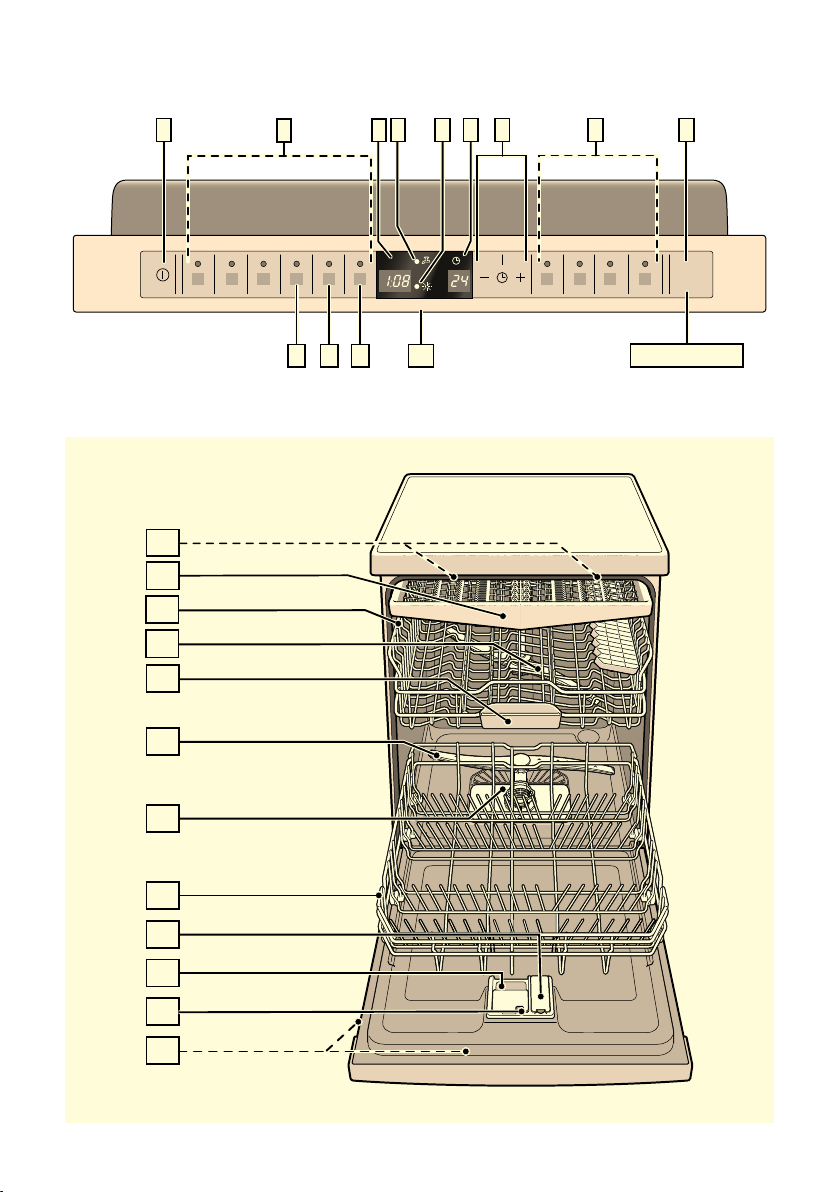
Control panel
6
Appliance interior
6
Overview of menu
7
, Rinse aid
7
Rinse aid
7
1. Open the dispenser 1b by pressing and lifting the plate on the cover.
7
2. Carefully pour rinse aid up to the max. mark in the filler opening.
7
3. Close cover until it clicks shut.
7
4. To prevent excessive foam formation during the next rinse cycle, remove any rinse aid which has run over with a cloth.
7
Setting amount of rinse aid
7
1. Open the door.
7
2. Switch on ON/OFF switch (.
7
3. Hold down programme button # and press START button h until š:‹.... is indicated on the digital display.
7
4. Release both buttons.
7
5. Press programme button # until the factory set value §:‹† is indicated on the digital display 8.
7
To change the setting:
8
1. Press programme button 3.
8
2. Press START button h.
8
3. Close the door.
8
Switching off rinse aid refill indicator
8
- Utensils
8
Utensils
8
Not suitable
8
Glass and utensil damage
8
Loading the dishwasher
8
1. Remove large food remnants. It is not necessary to prerinse utensils under running water.
8
2. Place the utensils so that
8
Unloading the dishwasher
9
Note
9
Cups and glasses
9
Pans
9
Tip
9
Tip
9
Cutlery drawer
10
Folding spikesFolding spikes *
10
Small accessories holder *Small accessories holder
10
Adjusting the height of the basket
11
Appliance height 81.5 cm
11
16 cm
11
30 cm
11
18.5 cm
11
27.5 cm
11
21 cm
11
25 cm
11
Appliance height 86.5 cm
11
18 cm
11
33 cm
11
20.5 cm
11
30.5 cm
11
23 cm
11
28 cm
11
1. Pull out the top basket 12 out.
11
2. To lower the basket, press in the left and then the right lever on the outside of the basket. In doing so, hold the sides of the basket along the upper edge to prevent it from suddenly dropping.
11
3. To raise the basket, hold the basket on the sides of the upper edge and lift it up.
11
4. Before re-inserting the basket again, ensure that it is at the same height on both sides. Otherwise, the appliance door cannot be closed and the upper spray arm will not be connected to the water circuit.
11
. Detergent
11
Detergent
11
Note
11
m Warning
11
Adding detergent
12
1. If the detergent dispenser 1j is still closed, press the lock 9" to open the detergent dispenser.
12
2. Close the cover on the detergent dispenser by sliding it up until the lock engages without difficulty.
12
Tip
12
m Warning
12
m Warning
12
Notes
12
/ Overview of programmes
13
Overview of programmes
13
The max. possible number of programmes is illustrated in this overview. The corresponding programmes for your appliance can be found on the fascia. The programme data has been measured in the laboratory according to AS/NSZ 2007.
13
Type of utensils and soiling
13
Programme
13
Programme data
13
1.) Duration: hs/mins
13
2.) Energy consumption in kWh
13
3.) Water consumption in litres
13
4.) With Aquasensor
13
Possible additional options
13
Programme sequence
13
Programme selection
14
Information for test institutes
14
0 Additional options
15
Additional options
15
Express Wash/ Speed Perfect (VarioSpeed)Ÿ Express Wash/ Speed Perfect/ (VarioSpeed) *
15
Half load§ Half load *
15
µ HygienePlus *HygienePlus
15
Ï Intensive zone *Intensive zone
15
¿ Extra drying *Extra drying
15
1 Operating the appliance
15
Operating the appliance
15
Aqua sensorAqua sensor *
15
Switching on the appliance
16
1. Turn on the tap fully.
16
2. Open the door.
16
3. Switch on ON/OFF switch (.
16
4. Press the START button h.
16
5. Close the door.
16
Optical display while the programme is running *Optical display while the programme is running
16
To change the setting:
16
1. Open the door.
16
2. Switch on ON/OFF switch (.
16
3. Hold down programme button # and press START button h until š:‹.... is indicated on the digital display.
16
4. Release both buttons.
16
5. Keep pressing programme button # until the previously set value, e.g. †:‹‚, is indicated on the digital display 8 †:‹... (for the optical display).
16
6. Keep pressing programme button 3 until the required value, e.g. †:‹ƒ, is indicated on the digital display 8.
16
7. Press START button h.
16
8. Close the door.
16
Remaining running time display
16
Timer programming
16
1. Open the door.
16
2. Switch on ON/OFF switch (.
16
3. Press the button X + until ‹‚ is flaching in the timer programming display P.
16
4. Press + or – button until the X displayed time corresponds with your requirements.
17
5. Press START button h, timer programming is activated.
17
6. To delete timer programming X, press the + or – button until ‹‹ is indicated on the digital display P.
17
7. Close the door.
17
End of programme
17
1. Open the door.
17
2. Switch on ON/OFF switch (.
17
3. Hold down programme button # and press START button h until š:‹.... is indicated on the digital display.
17
4. Release both buttons.
17
5. Press programme button # until the factory set value ›:‹ƒ is indicated on the digital display 8.
17
To change the setting:
17
1. Press programme button 3. Each time the button is pressed, the set value increases by one level; when the value of ›:‹„ has been reached, the display jumps back to ›:‹‹ (off).
17
2. Press START button h, the set value is saved.
17
3. Close the door.
17
Note
17
Automatic switch off after end of programme or interior light*Automatic switch off / interior light
17
1. Open the door.
17
2. Switch on ON/OFF switch (.
17
3. Hold down programme button # and press START button h until š:‹... is indicated on the digital display.
17
4. Release both buttons.
17
5. Keep pressing programme button # until the value ˜:‹... is indicated on the numerical display 8.
17
To change the setting:
18
1. Press programme button 3.
18
2. Press START button h.
18
3. Close the door.
18
Switching off the appliance
18
1. Open the door.
18
2. Switch off ON/OFF switch (.
18
3. Turn off the tap (not applicable if Aqua-Stop fitted).
18
4. Remove the utensils when they have cooled down.
18
Note
18
Interrupting the programme
18
1. Open the door.
18
2. Switch off ON/OFF switch (.
18
3. To continue the programme, switch on the ON/OFF switch ( again.
18
4. Close the door.
18
Terminating the programmeTerminating the programme (Reset)
18
1. Open the door.
18
2. Press START button h for approx. 3 sec.
18
3. Close the door.
18
4. Open the door.
18
5. Switch off ON/OFF switch (.
18
6. Close the door.
18
Changing the programme
18
Intensive drying
19
1. Open the door.
19
2. Switch on ON/OFF switch (.
19
3. Hold down programme button # and press START button h until š:‹.... is indicated on the digital display.
19
4. Release both buttons.
19
5. Press programme button # until the factory set value š:‹‹ is indicated on the digital display 8.
19
To change the setting:
19
1. Press the button 3 to switch the Intensive drying on š:‹‚ or off š:‹‹.
19
2. Press START button h.
19
3. Close the door.
19
2 Cleaning and maintenance
19
Cleaning and maintenance
19
Overall condition of the machine
19
m Warning
20
Health hazard
20
Rinse aid
20
Filters
20
1. After each washing cycle check the filters for residue.
20
2. Unscrew filter cylinder as illustrated and take out filter system.
20
3. Remove any residue and clean filters under running water.
20
4. Re-install filter system in reverse sequence and ensure that the arrow marks are opposite each other after closing the filter system.
20
Spray arms
20
1. Check outlet nozzles on the spray arms for blockages.
20
2. Unscrew the upper spray arm 1:.
20
3. Remove the lower spray arm 1J upwards.
20
4. Clean spray arms under running water.
20
5. Re-engage or screw on spray arms.
20
3 Fault, what to do?
21
Fault, what to do?
21
Note
21
m Warning
21
Waste water pump
21
1. First always disconnect the appliance from the power supply.
21
2. Take out top basket 12 and bottom basket 1Z.
21
3. Remove the filters 1R.
21
4. Scoop out water, use a sponge if required.
21
5. Prise out the white pump cover (as illustrated) using a spoon. Grip the cover on the crosspiece and lift diagonally inwards. Remove cover completely.
21
6. Check impeller wheel and remove any foreign objects.
21
7. Place cover in the original position and press down until it engages (click).
21
8. Install filters.
21
9. Re-insert baskets.
21
Fault table
22
Fault
22
Cause
22
Remedial action
22
4 Customer service
29
Customer service
29
5 Installation and connection
29
Installation and connection
29
1. Checking appliance on delivery
29
2. Installing the appliance
29
3. Waste water connection
29
4. Fresh water connection
29
5. Electrical connection
29
Product package
29
Safety instructions
29
Delivery
30
Technical specifications
30
Installation
30
Waste-water connection
30
1. The required work sequence can be found in the installation instructions. If required, fit a siphon with an drainage connection.
30
2. Connect the waste-water hose to the drainage connection of the siphon with the enclosed parts.
30
Fresh water connection
31
1. Connect the fresh-water connection to the tap according to the installation instructions with the enclosed parts.
31
2. When replacing the appliance, always use a new water supply hose.
31
Electrical connection
31
Removing the appliance
32
1. Disconnect the appliance from the power supply.
32
2. Turn off the water supply.
32
3. Disconnect the waste water and fresh water connections.
32
4. Loosen fastening screws for the furniture parts.
32
5. If fitted, remove the base panel.
32
6. Pull out the appliance, carefully pulling the hose behind.
32
Transportation
32
Drain the appliance according to the following steps:
32
1. Turn on the tap.
32
2. Open the door.
32
3. Switch on ON/OFF switch (.
32
4. Select programme with the highest temperature.
32
5. Press START button h.
32
6. Close the door.
32
7. Open door after approx. 4 minutes.
32
8. Press START button h until ‹:‹‚ is indicated on the digital display.
32
9. Close the door.
32
10. Open door after approx. 1 minute.
32
11. Switch off ON/OFF switch (.
32
12. Turn off the tap, disconnect supply hose and drain water.
32
Protection against frostProtection against frost (Emptying the appliance)
32
Search:
×
Search