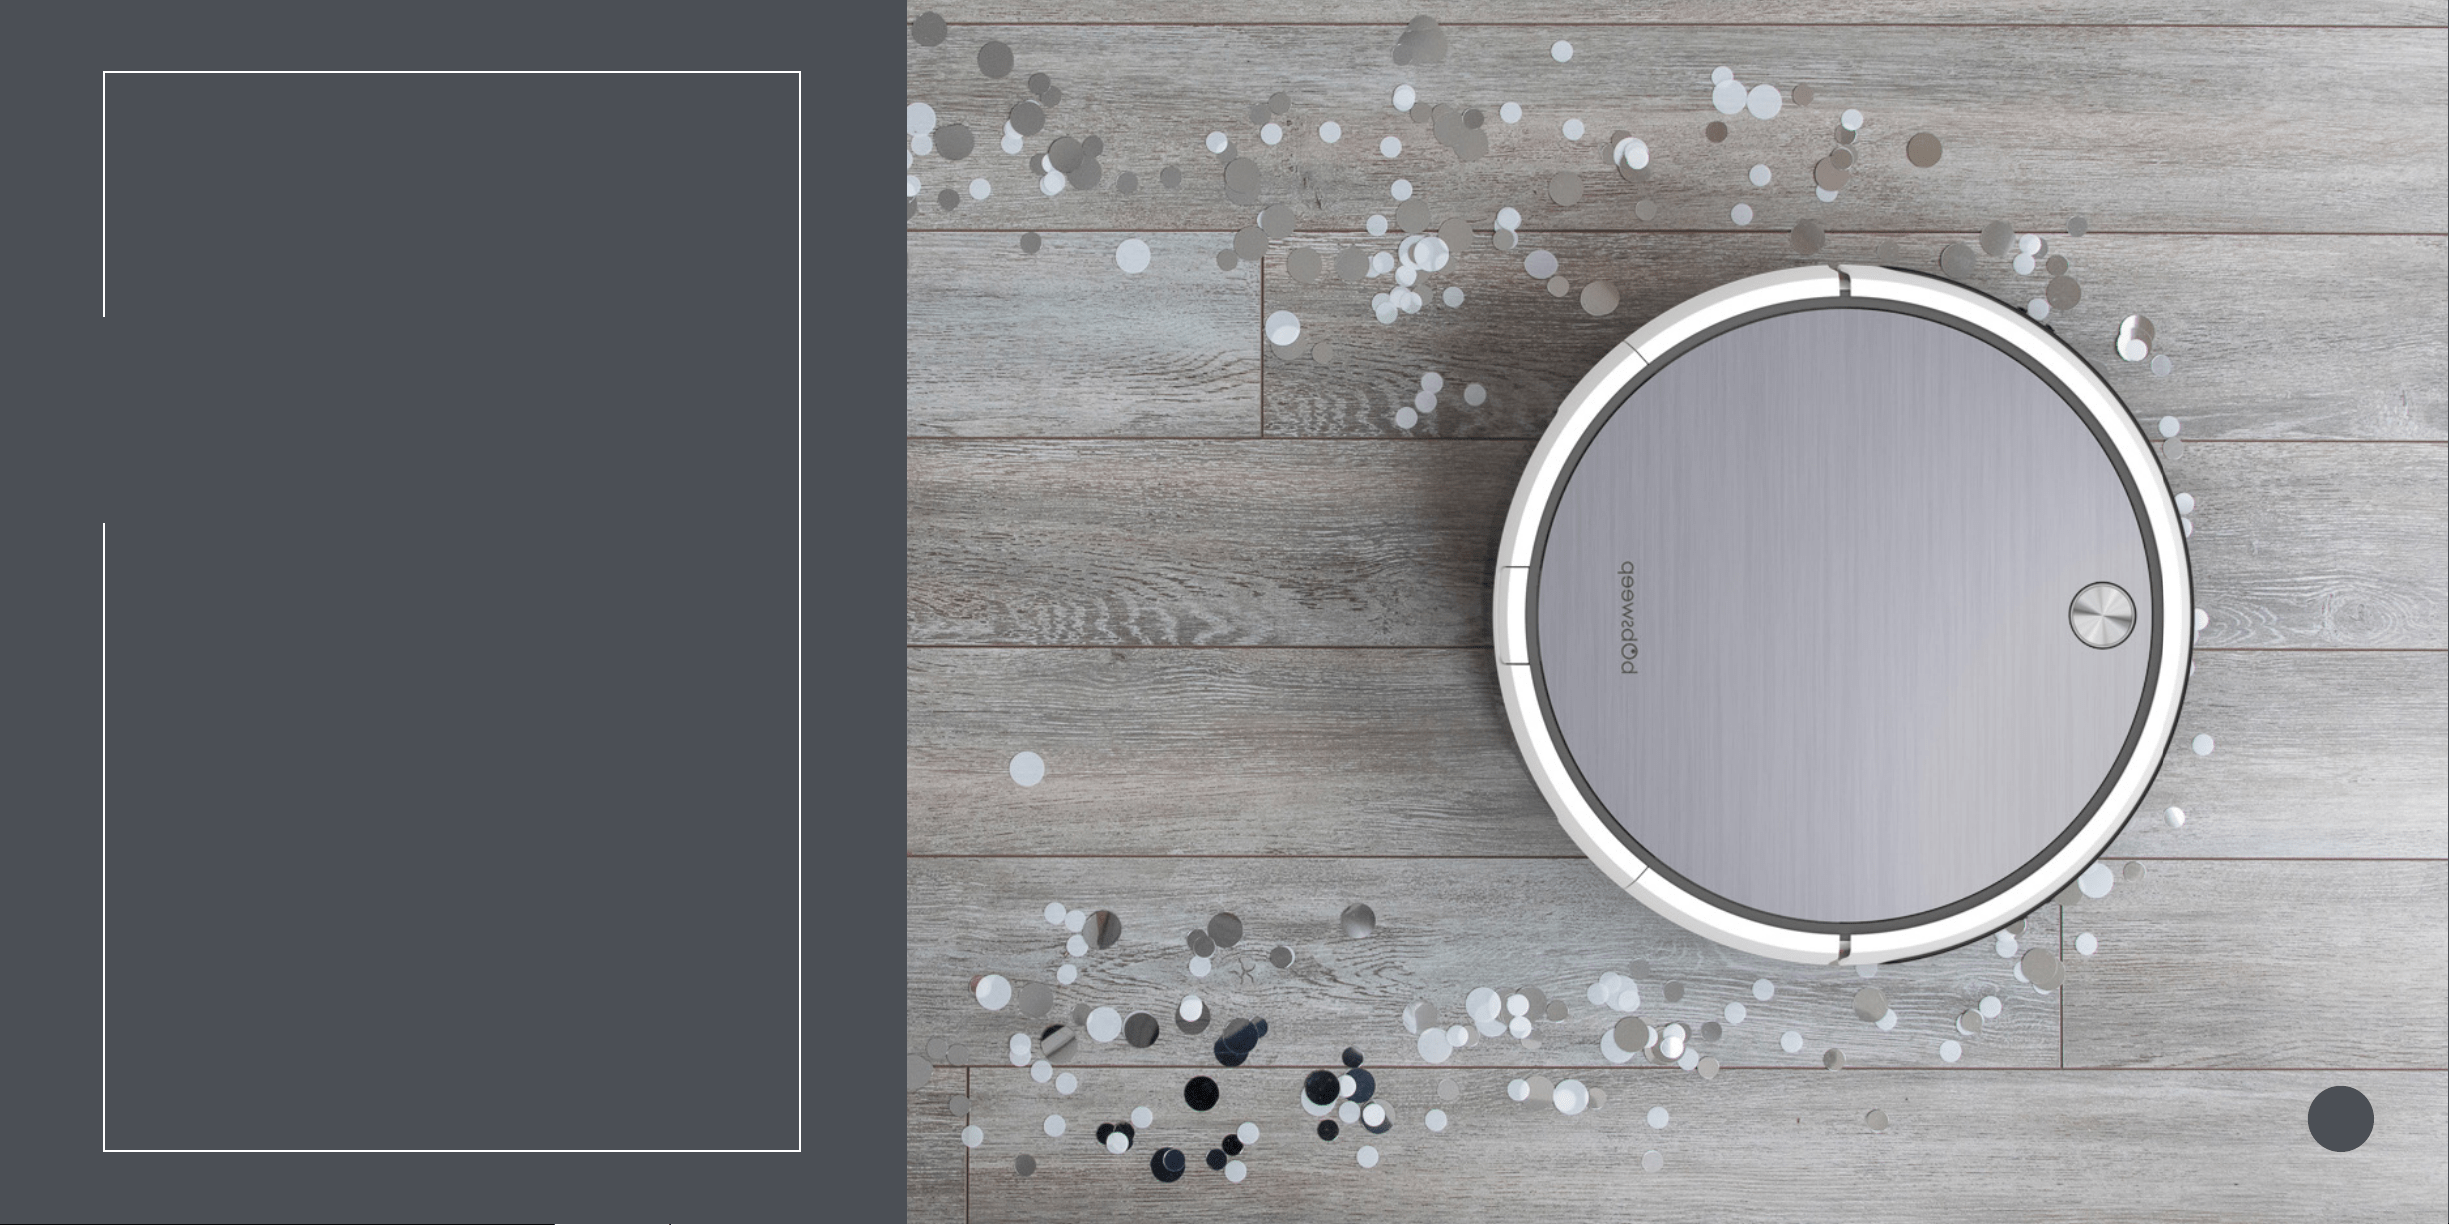
Bob Pro
OWNER’S MANUAL

Bob Pro
OWNER’S MANUAL
Model SJP110020
Manual Version 2019.1
Bob Pro
OWNER’S MANUAL
Model SJP110020
Manual Version 2019.1

Congratulations!
Congratulations on your new intelligent oor cleaner! Bob is now at
your service. To see Bob at his best, please read the Quick Start
Guide and this manual thoroughly.
Welcome to the bObsweep family and Happy Sweeping!
If you have any questions or concerns, feel free to contact our helpful support team at
Our business hours are Monday – Friday, 9 a.m. – 5 p.m. Pacic Standard Time.

Congratulations!
Congratulations on your new intelligent oor cleaner! Bob is now at
your service. To see Bob at his best, please read the Quick Start
Guide and this manual thoroughly.
Welcome to the bObsweep family and Happy Sweeping!
If you have any questions or concerns, feel free to contact our helpful support team at
[email protected] or 1-888-549-8847.
Our business hours are Monday – Friday, 9 a.m. – 5 p.m. Pacic Standard Time.

Important Safety
Instructions
Do not immerse any part of Bob
in water or other liquids. You may
immerse the dustbin in water
after removing the lters.
Do not mutilate or incinerate the
battery, as it will explode at high
temperatures.
Do not use Bob outdoors.
Do not expose Bob, his charging
station, or remote control to
temperatures higher than 113° F
(45° C), moisture, or humidity.
Turn Bob OFF and unplug him from the outlet
when he is not in use and before conducting
maintenance.
Bob is not intended for use by persons (including
children) with reduced physical or mental
capabilities, or lack of experience and knowledge,
unless under the close supervision of a person
responsible for their safety.
Leaks from the battery cells can occur under
extreme usage or temperature conditions. If the
liquid gets on the skin, wash quickly with water. If
the liquid gets into the eyes, ush them immediately
with clean water for a minimum of 10 minutes, and
seek medical attention.
Bob is composed of electronic components that in
rare and unintended cases can cause hazards of
heating, re, and other malfunctions. Furthermore,
because Bob is capable of autonomous movement,
his use poses the risk of collision with property,
pets, and persons. Unintended removal of articles
— such as small valuables, jewelry, or hair of
persons or pets lying on the oor — may also
occur.
If Bob, his remote control, charging station, or
blOck Plus™ has been damaged in any way, do
not operate them. Contact our customer care
center at [email protected].
Do not dispose of your battery
in re. Old batteries should be
recycled safely through your
local recycler.
Do not let Bob pick up anything
that is burning or smoking,
such as cigarettes, matches,
or hot ashes.
Do not handle Bob, his remote
control, or charging station with
wet hands; use only on dry
surfaces.
Do not pull or carry the charging
station by the cord, use the cord
as a handle, close a door on the
cord, or pull the cord around
sharp edges or corners. Keep the
cord away from heated surfaces.
To unplug the cord, grasp the
plug, not the cord.
Do not attempt to open the
charging station. Repairs on the
station should only be carried out
by our qualied technicians.
Important Safety
Instructions
Do not immerse any part of Bob
in water or other liquids. You may
immerse the dustbin in water
after removing the lters.
Do not mutilate or incinerate the
battery, as it will explode at high
temperatures.
Do not use Bob outdoors.
Do not expose Bob, his charging
station, or remote control to
temperatures higher than 113° F
(45° C), moisture, or humidity.
Turn Bob OFF and unplug him from the outlet
when he is not in use and before conducting
maintenance.
Bob is not intended for use by persons (including
children) with reduced physical or mental
capabilities, or lack of experience and knowledge,
unless under the close supervision of a person
responsible for their safety.
Leaks from the battery cells can occur under
extreme usage or temperature conditions. If the
liquid gets on the skin, wash quickly with water. If
the liquid gets into the eyes, ush them immediately
with clean water for a minimum of 10 minutes, and
seek medical attention.
Bob is composed of electronic components that in
rare and unintended cases can cause hazards of
heating, re, and other malfunctions. Furthermore,
because Bob is capable of autonomous movement,
his use poses the risk of collision with property,
pets, and persons. Unintended removal of articles
— such as small valuables, jewelry, or hair of
persons or pets lying on the oor — may also
occur.
If Bob, his remote control, charging station, or
blOck Plus™ has been damaged in any way, do
not operate them. Contact our customer care
Do not dispose of your battery
in re. Old batteries should be
recycled safely through your
local recycler.
Do not let Bob pick up anything
that is burning or smoking,
such as cigarettes, matches,
or hot ashes.
Do not handle Bob, his remote
control, or charging station with
wet hands; use only on dry
surfaces.
Do not pull or carry the charging
station by the cord, use the cord
as a handle, close a door on the
cord, or pull the cord around
sharp edges or corners. Keep the
cord away from heated surfaces.
To unplug the cord, grasp the
plug, not the cord.
Do not attempt to open the
charging station. Repairs on the
station should only be carried out
by our qualied technicians.
Declaration of Conformity
This device complies with Part 15 of the FCC rules. Operation is subject to the following two conditions:
(1) this device may not cause harmful interference, and (2) this device must accept any interference
received, including interference that may cause undesired operation. The manufacturer is not responsible
for any radio or TV interference caused by unauthorized modications or change to this equipment.
Such modications or change could void the user’s authority to operate the equipment.
This equipment has been tested and found to comply with the limits for a Class B digital device, pursuant
to part 15 of the FCC Rules. These limits are designed to provide reasonable protection against
harmful interference in a residential installation. This equipment generates, uses, and can radiate radio
frequency energy and, if not installed and used in accordance with the instructions, may cause harmful
interference to radio communications. However, there is no guarantee that interference will not occur
in a particular installation. If this equipment does cause harmful interference to radio or television
reception, which can be determined by turning the equipment off and on, the user is encouraged to try
to correct the interference by one or more of the following measures:
• Reorient or relocate the receiving antenna.
• Increase the separation between the equipment and receiver.
• Connect the equipment to an outlet on a circuit different from that to which the receiver is connected.
• Consult the dealer or an experienced radio/TV technician for help.
Warranty
Every Bob Pro purchased from an authorized seller includes a 1-year limited warranty, 5-year
subsidized repair plan, and lifetime of customer support. The warranty covers the battery, labor, and
non-consumable parts; it does not cover postal charges and consumable parts such as brushes and
lters.
Even after Bob’s 1-year warranty is over, replacement parts and visits to the bObsweep hospital are
subsidized between 25% – 50% for 5 years from the date he was first purchased.
To activate Bob’s warranty, register him online at www.bobsweep.com/warranties. To
purchase additional coverage plans, go to www.bobsweep.com/coverageplans.

Table of
Contents
Charging
18. Charging Station
20. Charging Bob
Remote Control
24. Remote Buttons
26. Syncing the Remote
28. Navigating Bob
30
Cleaning
Schedule
32. Setting Current Time
34. Setting Cleaning Schedule
36
Parts and
Maintenance
38. Dustbin
42. Filters
44. Main Brush
46. Side Brush
48. Battery
50. Sensors
52. Wheels
Troubleshooting
56. Left Wheel
58. Right Wheel
60. Wheel Sensors
62. Front Wheel
64. Edge Sensors
66. Low Battery
68. Touch Sensors
70. Main Brush
72. Side Brush
74. Wall Sensors
76. Vacuum Motor
78. Power System
04
Getting Started
6. Box Contents
8. Bob’s Anatomy
10. Get to Know Bob
12. Get Bob Started
16 22
End User License
Agreement
54 80
Getting Started
6 Box Contents
8 Bob’s Anatomy
10 Get to Know Bob
12 Get Bob Started
Let’s start at the very beginning. We’ll
walk you through the basics and help
you get Bob started for the very rst
time.
4
Getting Started
6 Box Contents
8 Bob’s Anatomy
10 Get to Know Bob
12 Get Bob Started
Let’s start at the very beginning. We’ll
walk you through the basics and help
you get Bob started for the very rst
time.
4
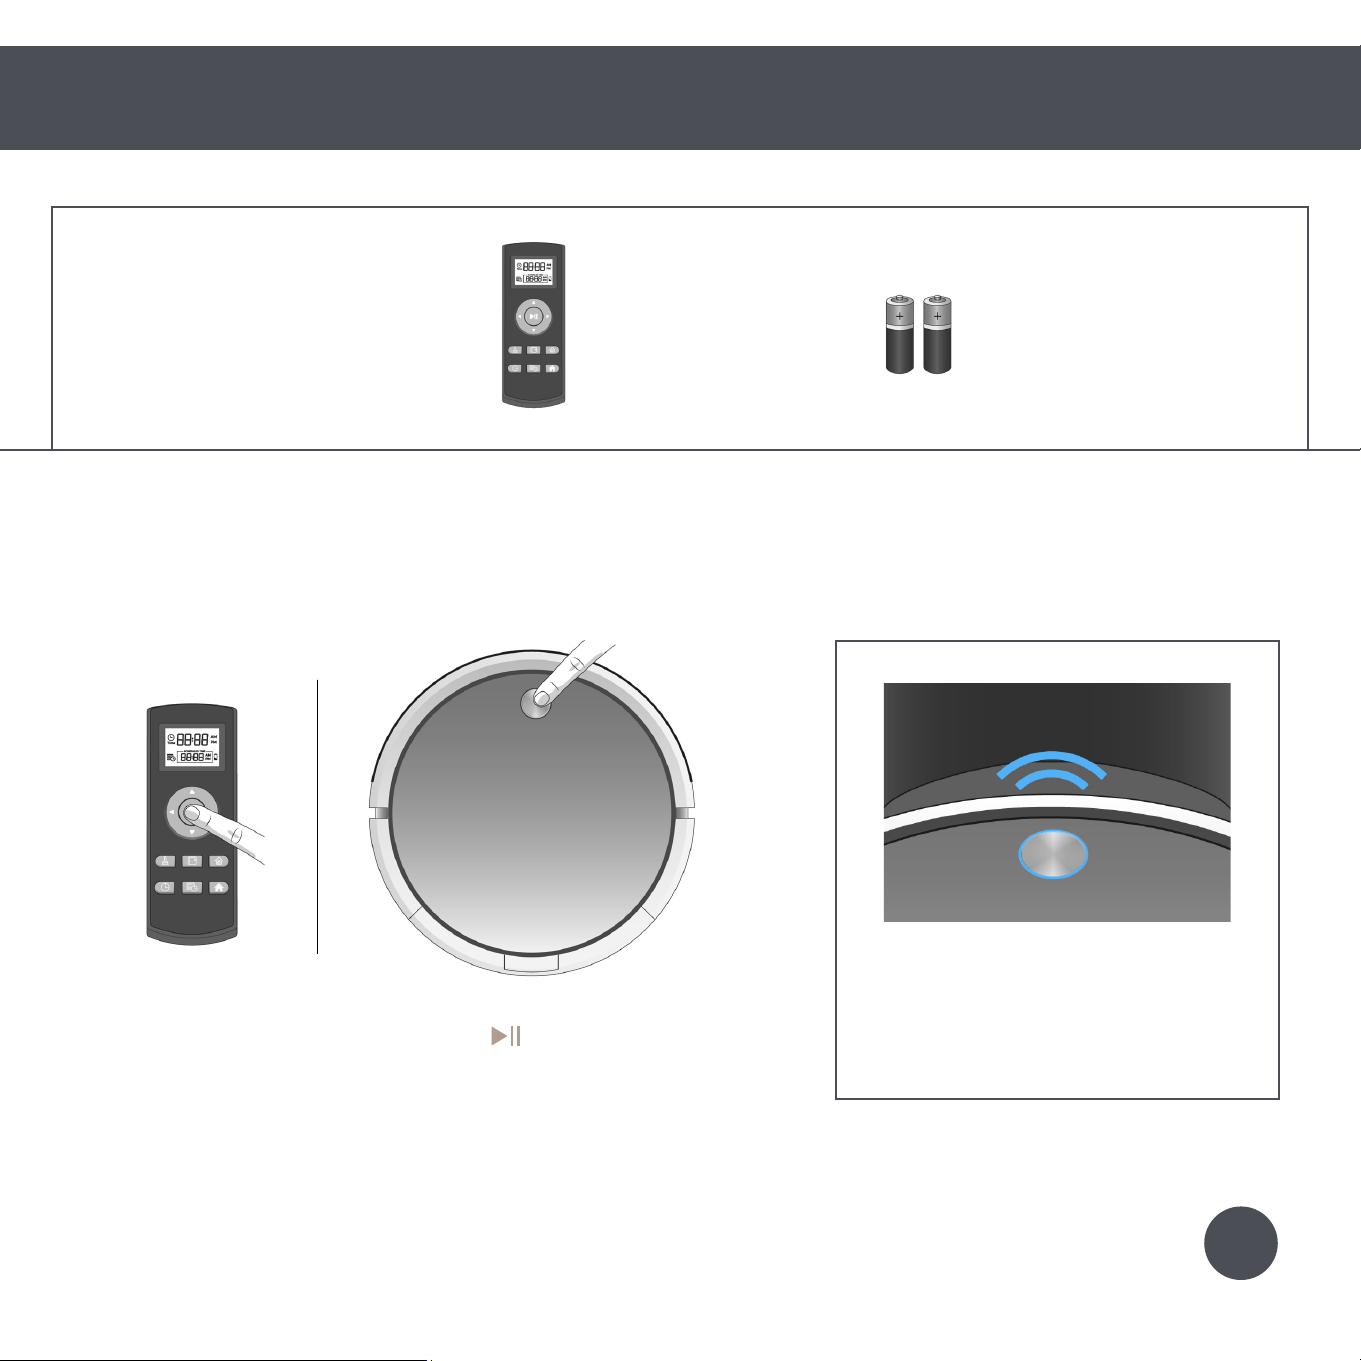
1 Charging Station
2 Charging Adapter
3 Remote Control
4 Spare Filters
5 Cleaning Tool
Quick Start
Getting Started
Box Contents
1 2 3
4
5 9
6
7
8
10
6
Side Brush Screws (2)
7 Phillips Head Screwdriver
8 Spare Side Brushes (2)
9 Owner’s Manual, Quick Start Guide,
and Warranty Card
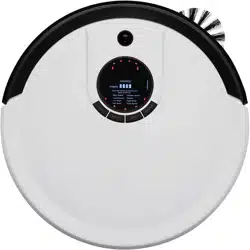
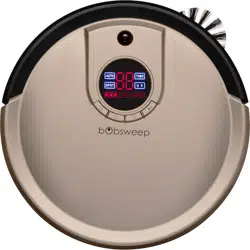
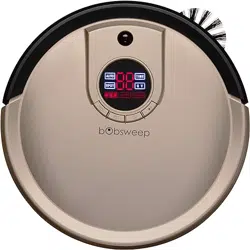
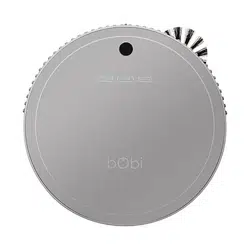
10 Bob Pro
Box Contents
Bob comes with the following items. You can purchase replacement parts and accessories at
www.bobsweep.com/shop.
65
1 Charging Station
2 Charging Adapter
3 Remote Control
4 Spare Filters
5 Cleaning Tool
Quick Start
Getting Started
Box Contents
1 2 3
4
5 9
6
7
8
10
6
Side Brush Screws (2)
7 Phillips Head Screwdriver
8 Spare Side Brushes (2)
9 Owner’s Manual, Quick Start Guide,
and Warranty Card
10 Bob Pro
Box Contents
Bob comes with the following items. You can purchase replacement parts and accessories at
www.bobsweep.com/shop.
65

Top View Bottom View
Quick Start
Getting Started
Bob’s Anatomy
Charging Plates
Battery
Main Brush
Left Wheel
Dustbin
Side Brushes
Front Wheel
Bumper
Cover Button
Cover
Right Wheel
Edge Sensors
Bob’s Anatomy
87
Top View Bottom View
Quick Start
Getting Started
Bob’s Anatomy
Charging Plates
Battery
Main Brush
Left Wheel
Dustbin
Side Brushes
Front Wheel
Bumper
Cover Button
Cover
Right Wheel
Edge Sensors
Bob’s Anatomy
87

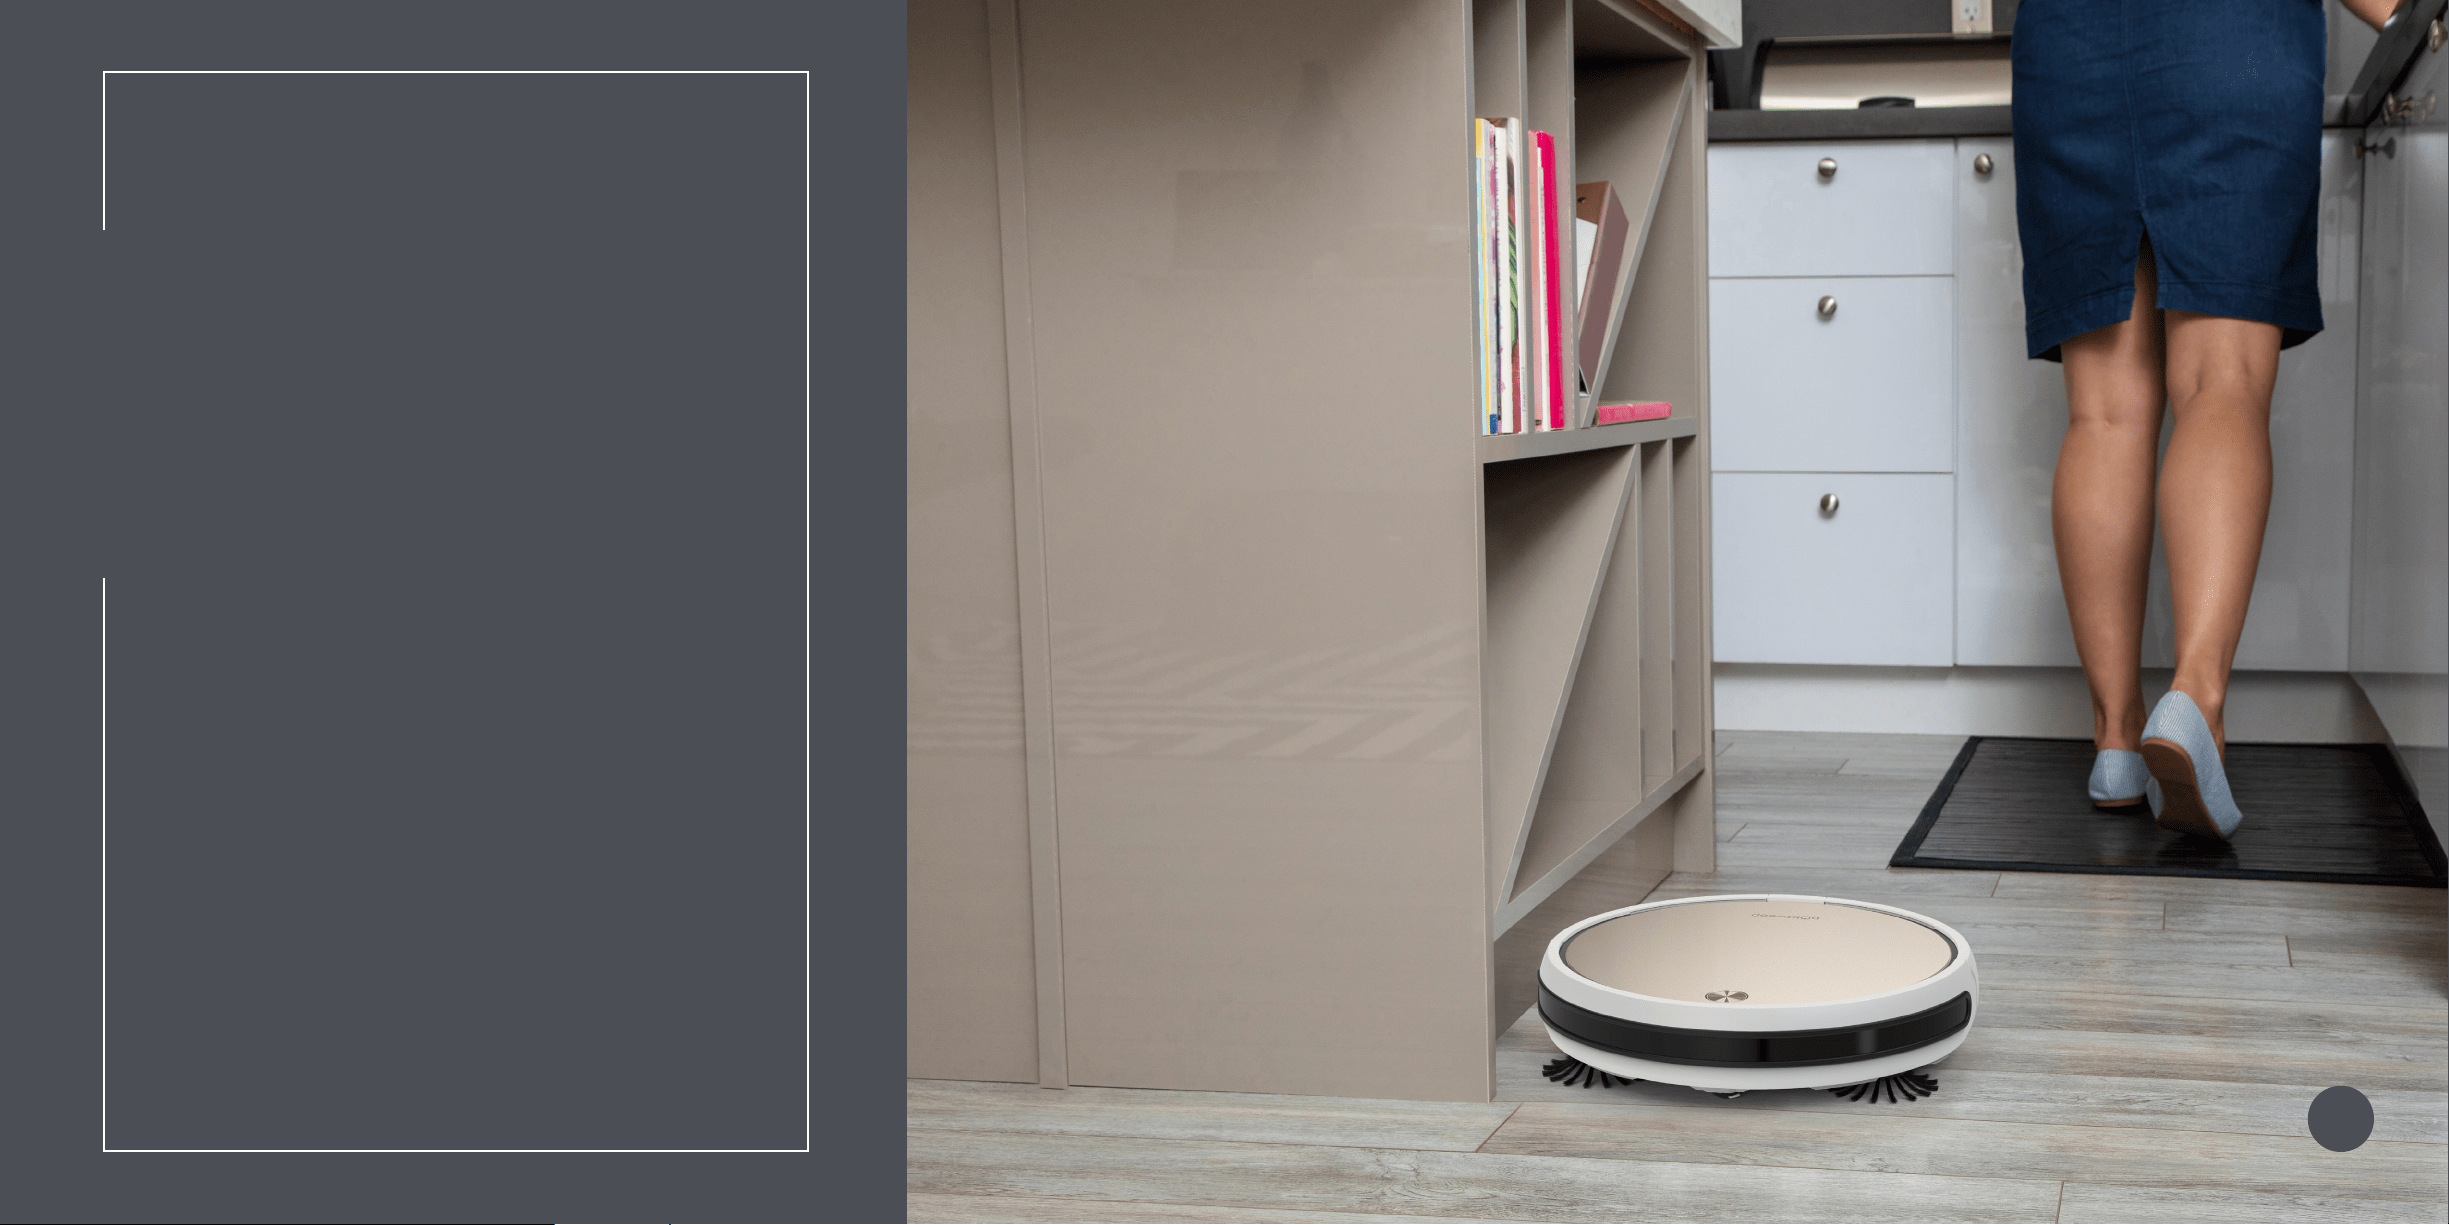
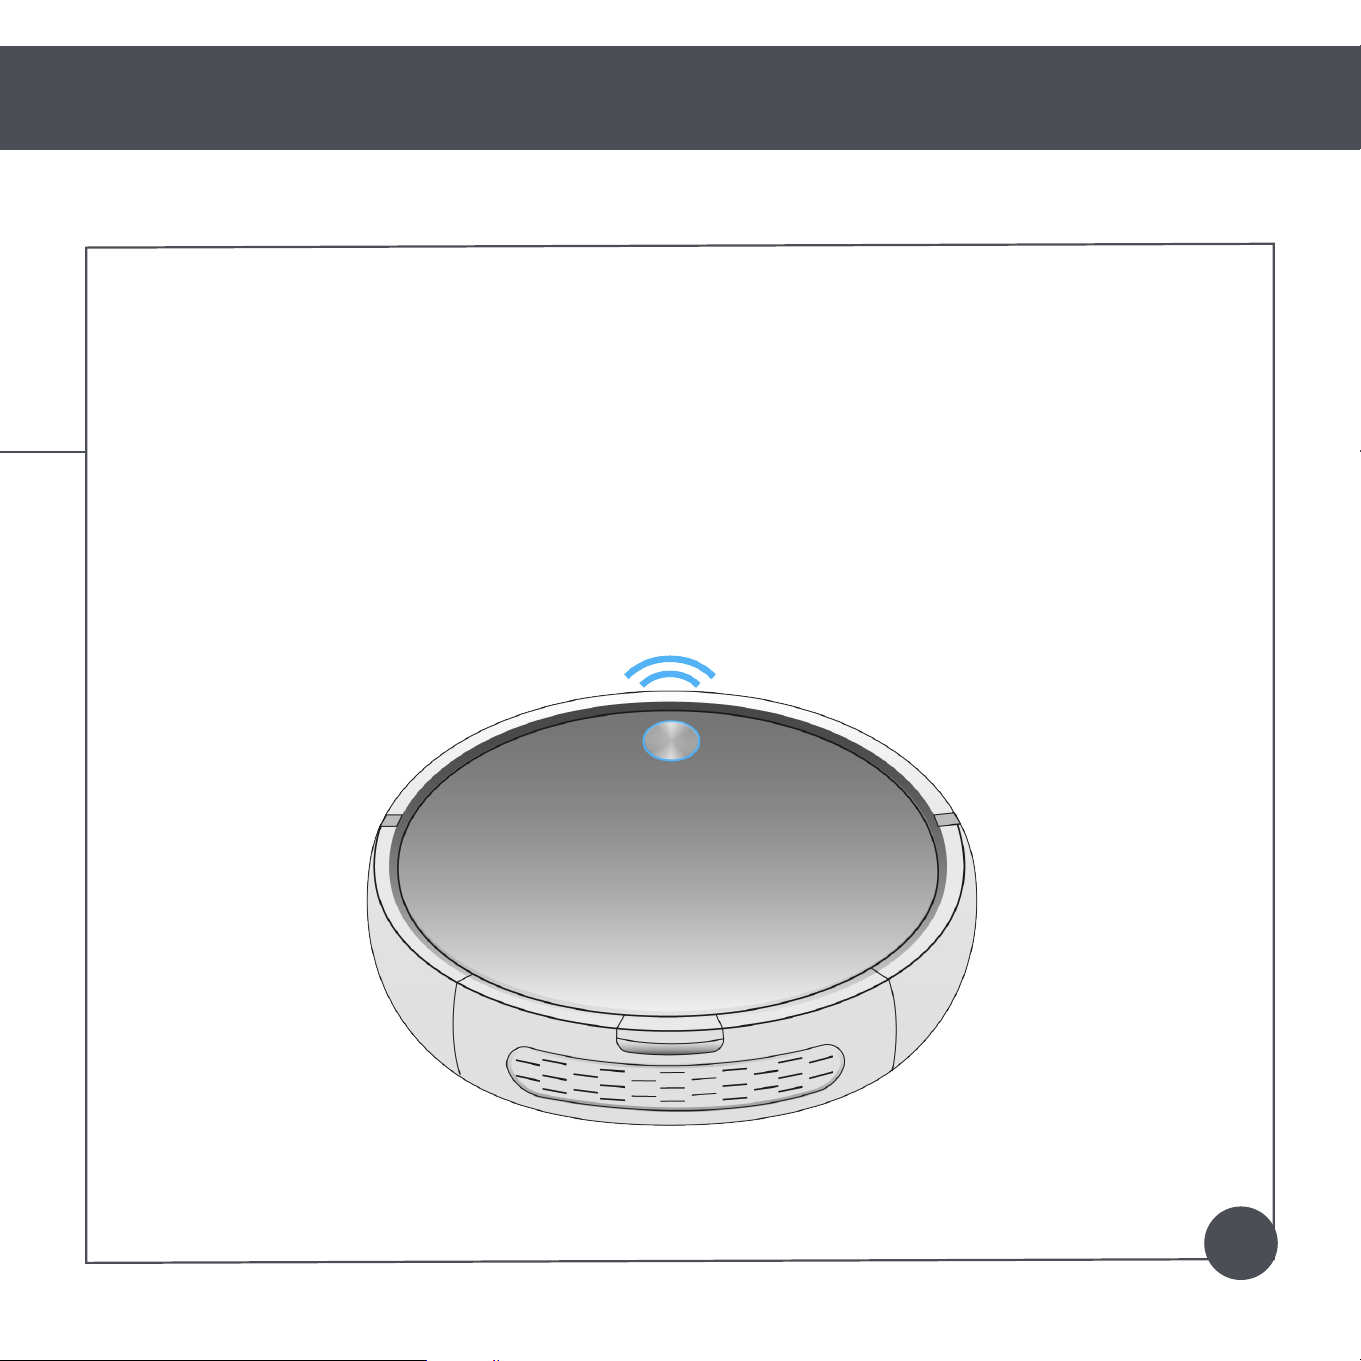
Who is Bob?
Bob is an autonomous robotic vacuum cleaner, at your service! He can vacuum and sweep all the same
time — and at the end of his cleaning session, he automatically returns to his station for a power nap.
Set Bob to clean on a schedule and he’ll clean on his own even when you’re not around.
Should I pick up Bob?
You may pick up Bob while he’s cleaning, but it’s best to let him work in his own way. Moving him
around, manipulating his movements, or picking him up may confuse him and disrupt his cycle.
Quick Start
Getting Started
Get to Know Bob
Navigating Difcult Obstacles
Unique Furniture
Bob is designed to maneuver around
furniture of most shapes and sizes, but
he may nd it difcult to clean under
chairs with narrow legs or furniture that is
too high for his bumper sensors to detect.
Specialty furniture, such as desk chairs
with wheels or stools with circular bases,
may also confuse him momentarily —
but don’t worry, Bob usually nds his way
around with time.
How does Bob nd his way
around?
Bob doesn’t store any data about your home; instead,
he uses a network of reactionary sensors to detect
obstacles. To maximize his coverage, he may spiral
outward, zigzag across a small area, or follow along
walls. If he seems to be ignoring some spaces or
spending too much time on others, don’t worry! Bob
will efciently clean your home over the course of a
full cycle — just check his dustbin for the evidence!
Dark-Colored Carpet
Bob may have difculty cleaning dark
carpet due to his infrared edge sensors.
Bob will repeatedly back up or stop
working when his edge sensors are
being triggered. Keep Bob away from
dark carpet that interferes with his edge
sensors.
Shag Carpet
Bob’s main brush is not designed to clean
shag carpet or rugs with long bers. If
you’d like Bob to clean shag carpet or
long-bered rugs, you may remove his
main brush and allow him to vacuum
without it.
Inclines
Sometimes Bob will attempt to drive
up angled surfaces, get stuck for a
few minutes, and then decide to clean
somewhere else. As long as Bob does
not display a trouble message on his
screen, let him continue cleaning and
nd his own way around. Take note of
the areas Bob nds the most challenging
and, if possible, adjust your furniture
accordingly.
109
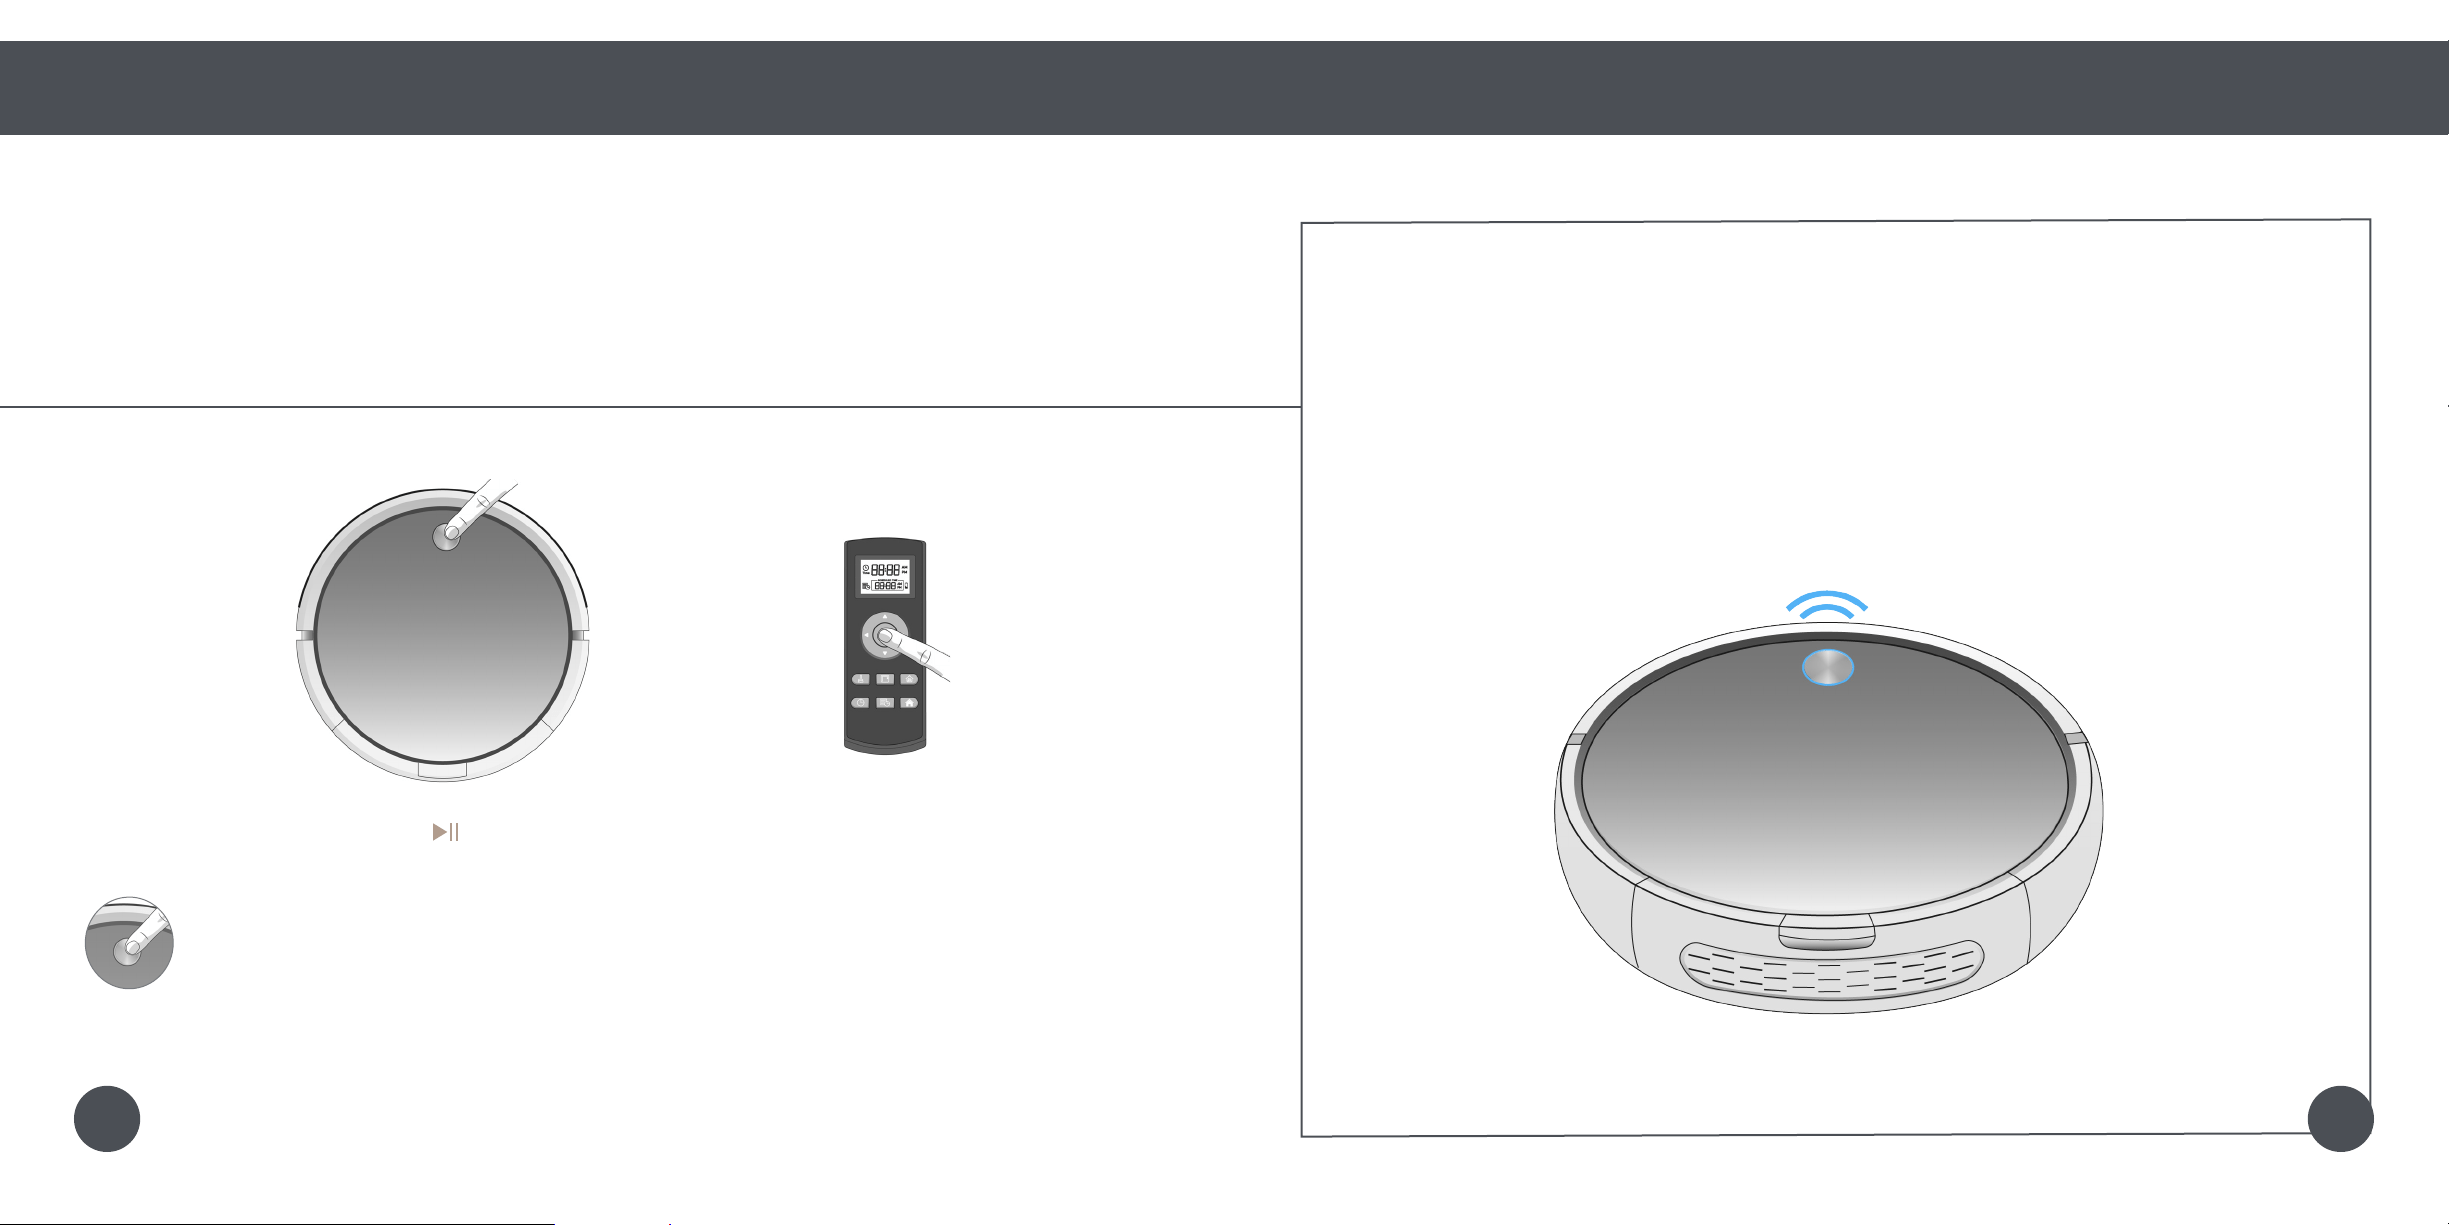
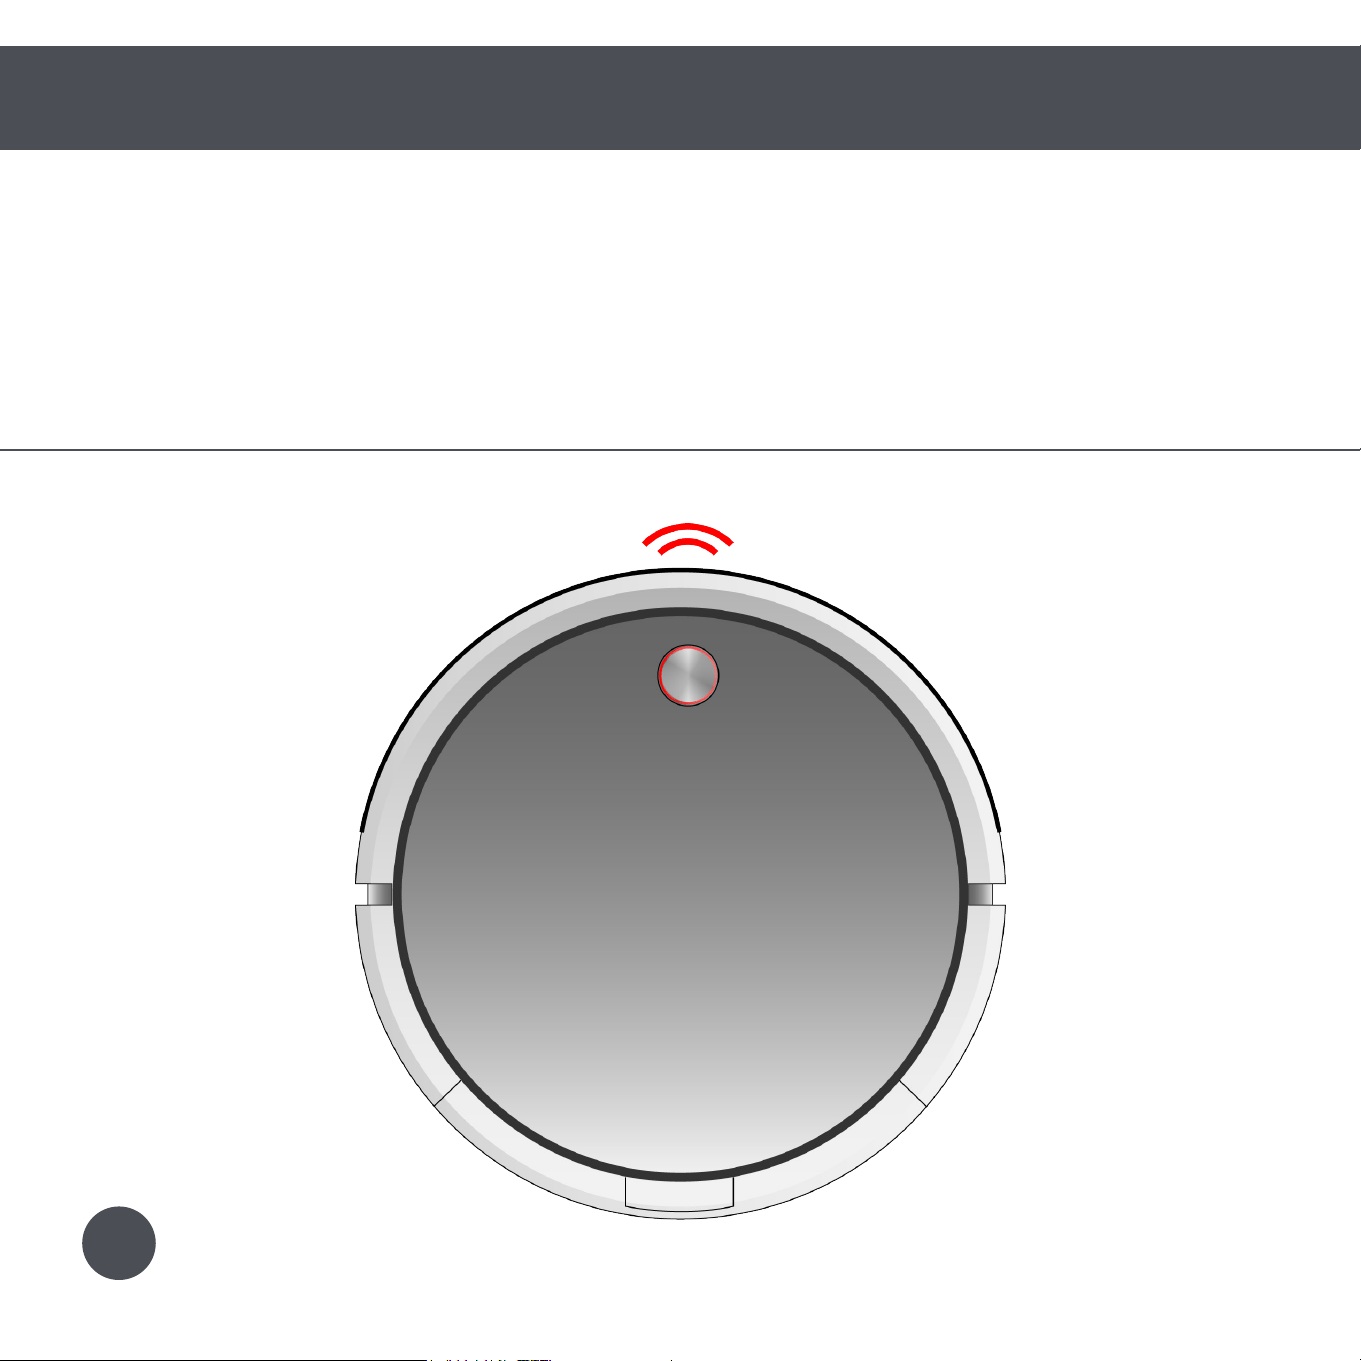
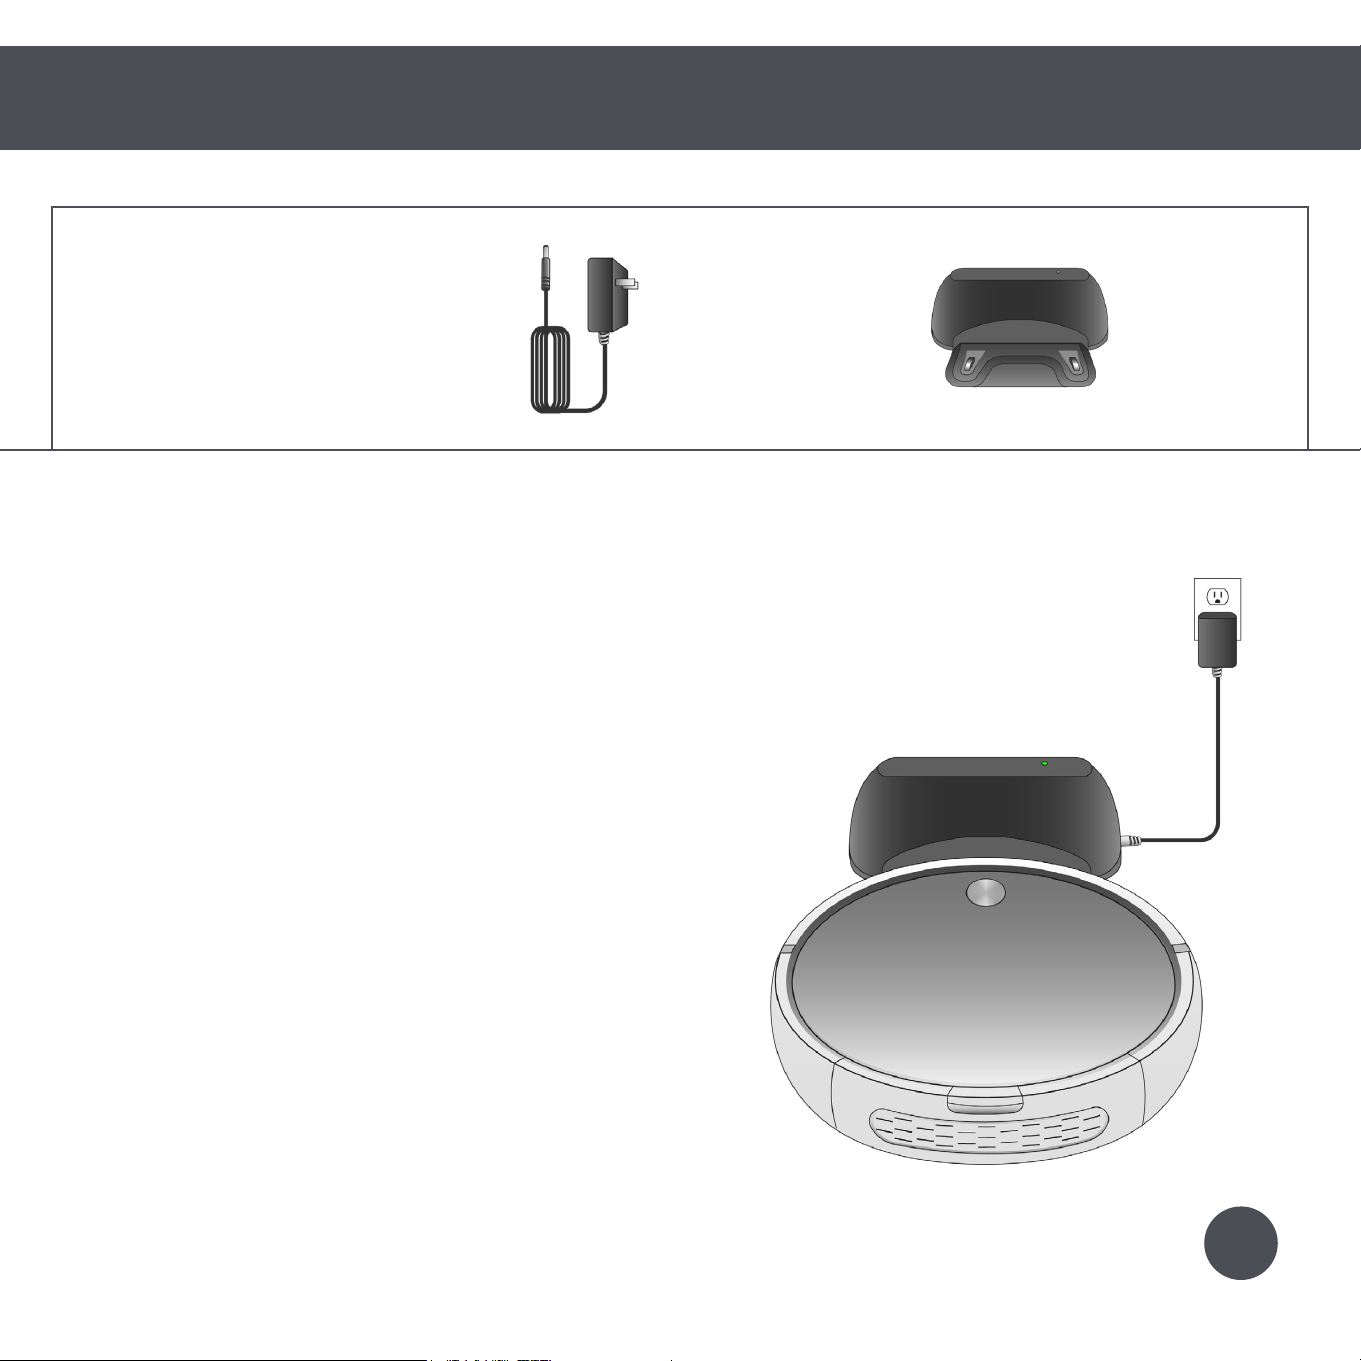
Step 1: Charge Bob
Allow Bob to fully charge before using him for the rst time.
Quick Start
Getting Started
Get Bob Started: Bob will be ready to clean in just 2 easy steps.
1. Plug the power adapter into the side
of the charging station. The station’s
green power light will turn on.
2. Place Bob on his charging station with
the metal plates on his underside sitting
on top of the nodes on his station.
Bob will chirp once and
slowly blink his cover button
to let you know that he is
charging.
When Bob has fully charged,
his cover button will stop
blinking and remain solid.
The green light on the station will be turned off while Bob is charging.
Quick Tip:
Parts You’ll Need: Power Adapter Charging Station
1211
Step 2: Click and Go!
Once Bob is fully charged, he is ready to clean!
Quick Start
Getting Started
Get Bob Started: Bob will be ready to clean in just 2 easy steps.
Quick Tip:
If Bob is left idling for 5 minutes, he will enter standby mode to conserve his battery
When in standby mode, Bob is paused.
To take him out of standby mode, press his cover button or any button on his remote.
Press Bob’s cover button, or the button on his remote, and he will clean on his default Robot mode.
OR
Bob works on the 2-Click System!
1 click to clean, and 2 clicks to charge.
It’s as easy as 1-2-Sweep.
1413
Charging
18 Charging Station
20 Charging Bob
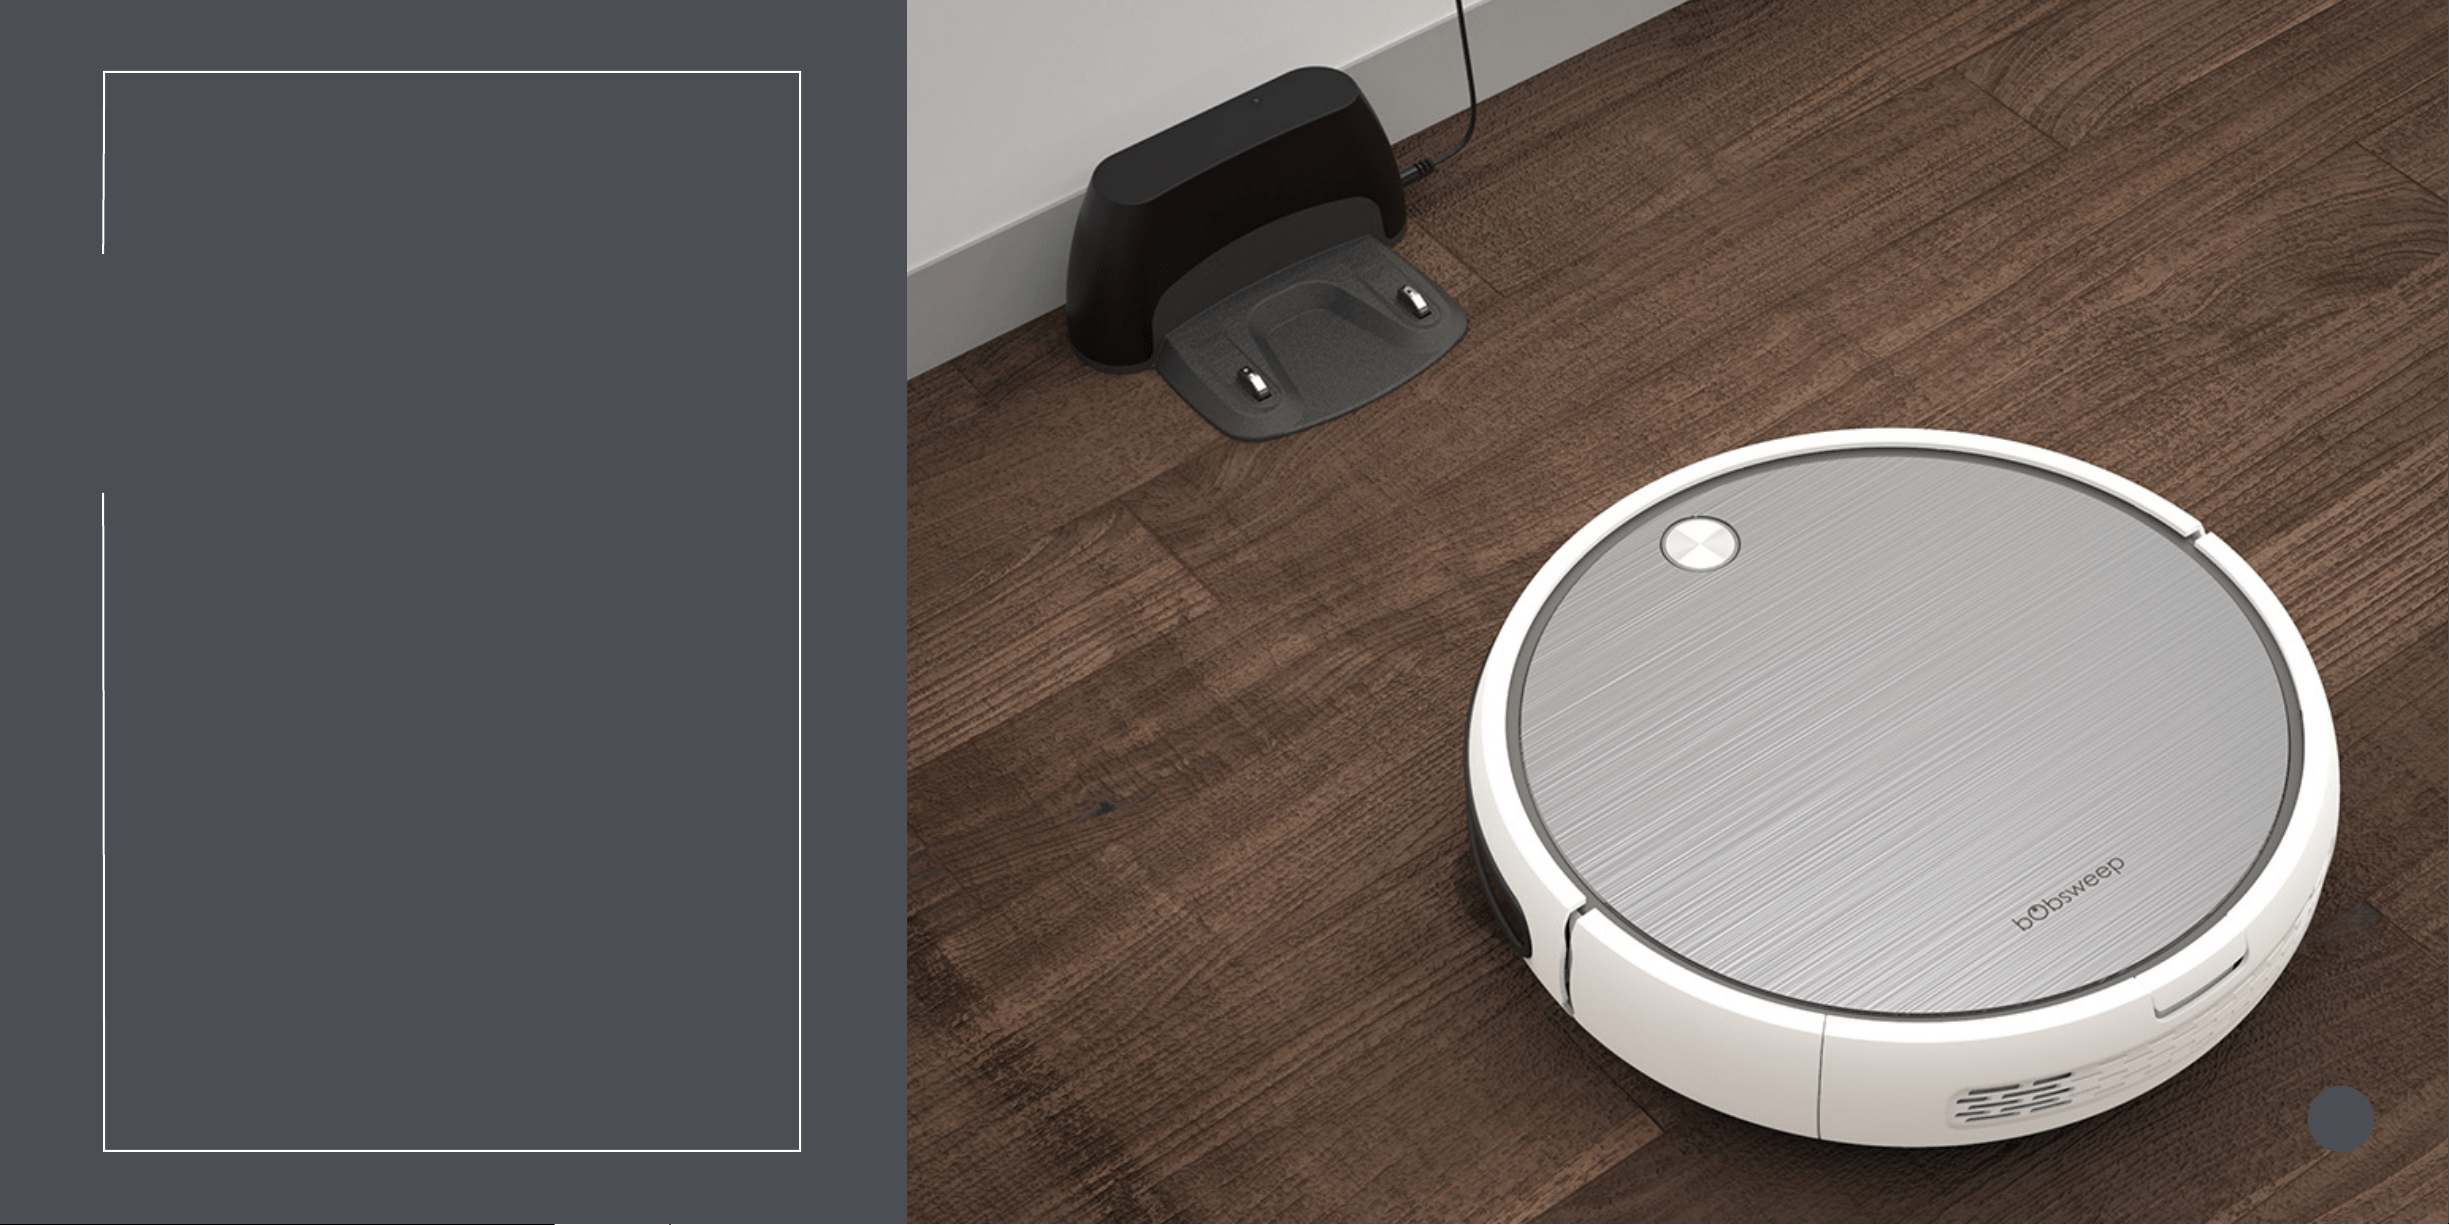
Bob automatically returns to his
charging station when low on battery.
To maximize Bob’s chance of nding
his station, it’s best to place it in an
easily accessible location with plenty
of space around it.
16
Charging
18 Charging Station
20 Charging Bob
Bob automatically returns to his
charging station when low on battery.
To maximize Bob’s chance of nding
his station, it’s best to place it in an
easily accessible location with plenty
of space around it.
16
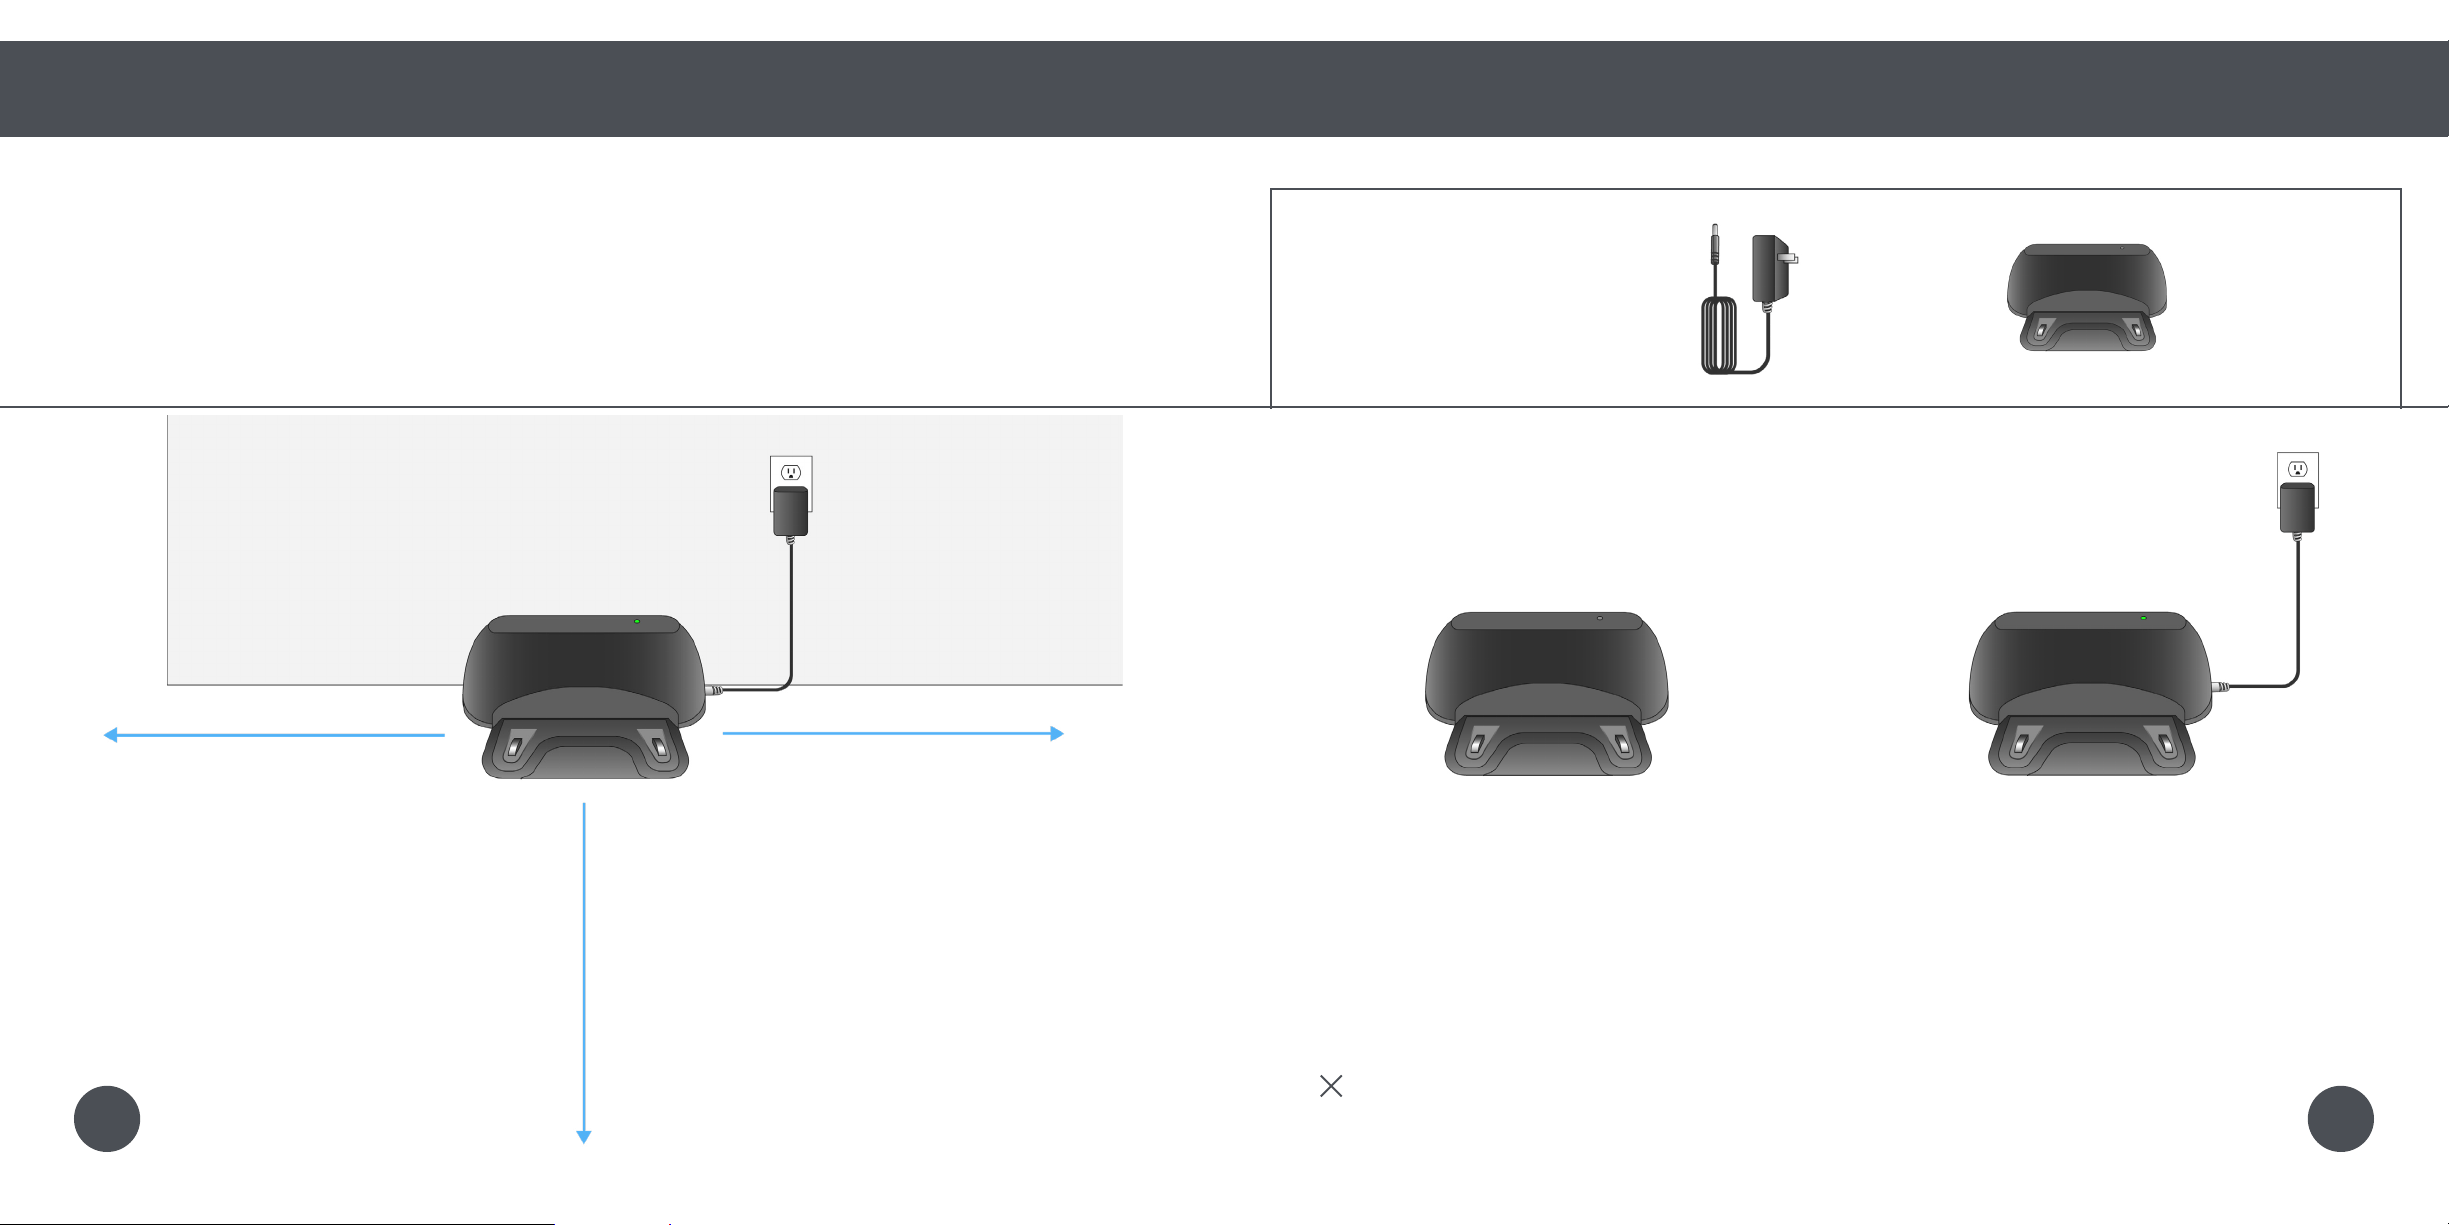
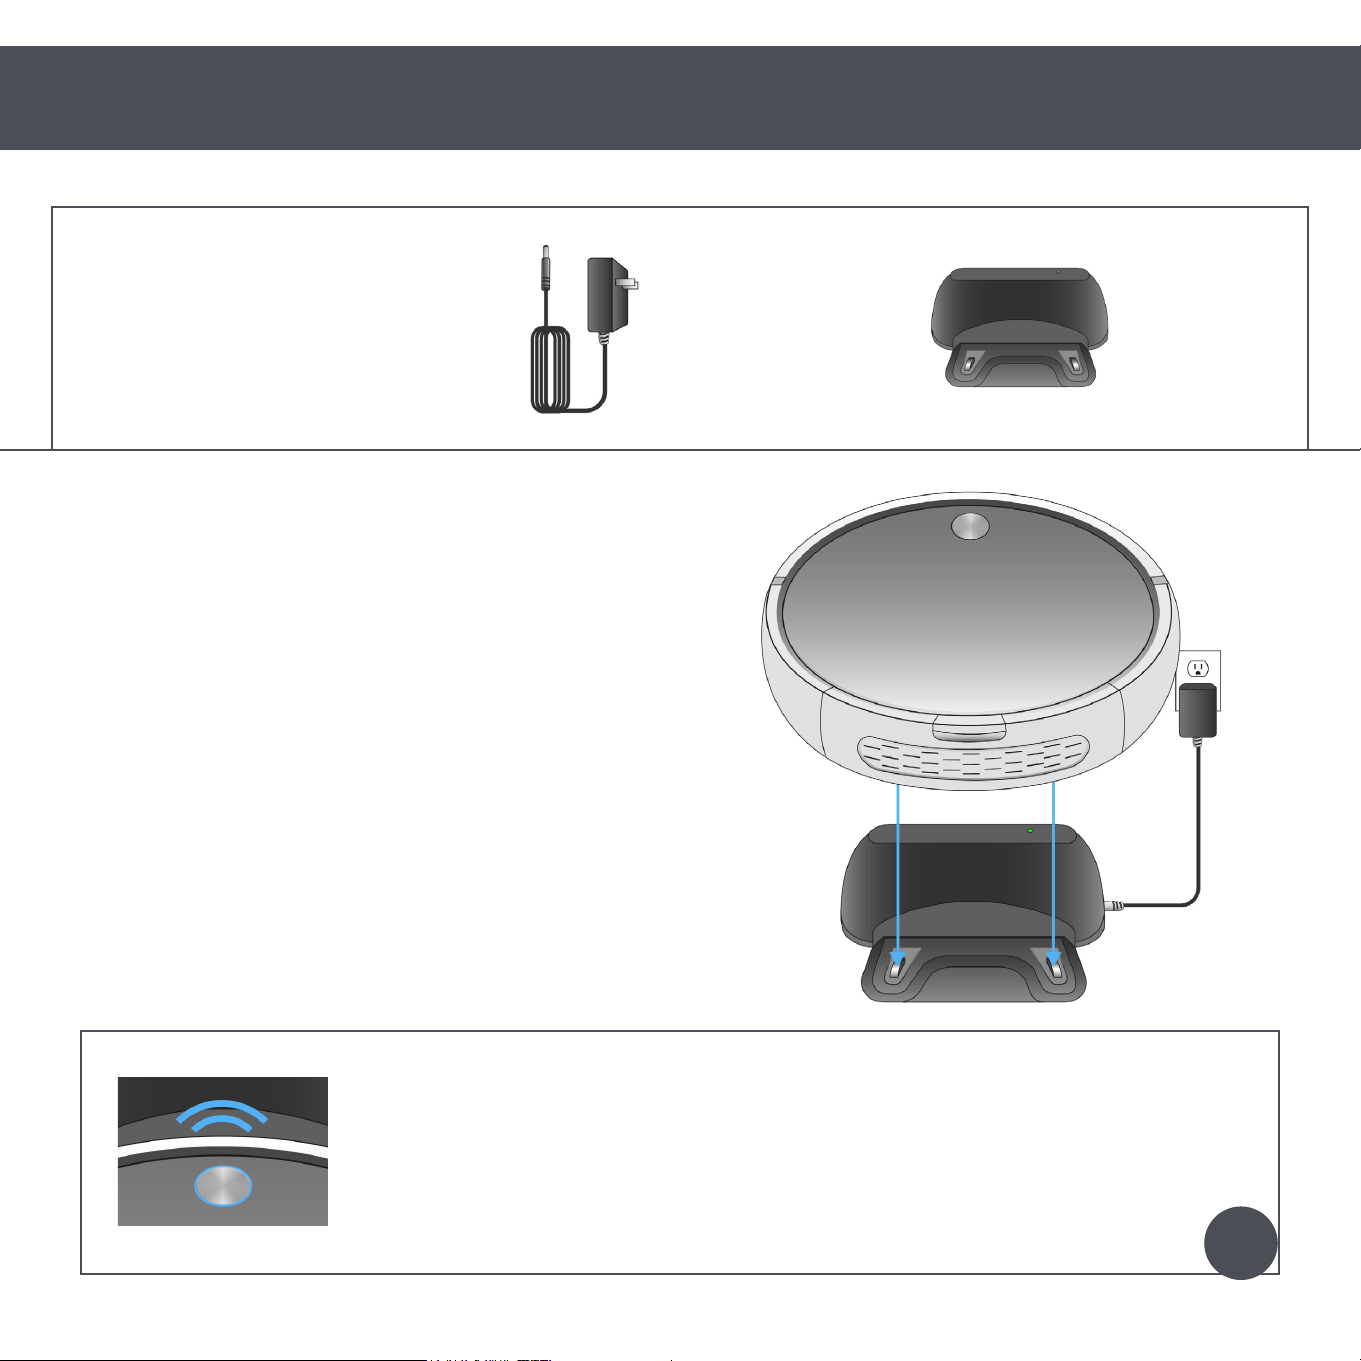
Quick Start
Charging Station
Bob will automatically return to his charging station when low on battery. To maximize Bob’s chance
of nding his station, place it in an easily accessible location with plenty of space around it.
1. Position the charging station against a
wall on a hard, at surface. If possible,
avoid positioning the charging station
on carpet or soft surfaces.
2. Make sure there is at least 10 feet
(3 m) of open space to the front and
2 feet (0.6 m) of open space to the
sides of the station.
Charging
Charging Station
Do not move Bob’s charging station while he is working.
Quick Tip:10 feet (3 m)
2 feet (0.6 m)2 feet (0.6 m)
Parts You’ll Need: Power Adapter Charging Station
1817
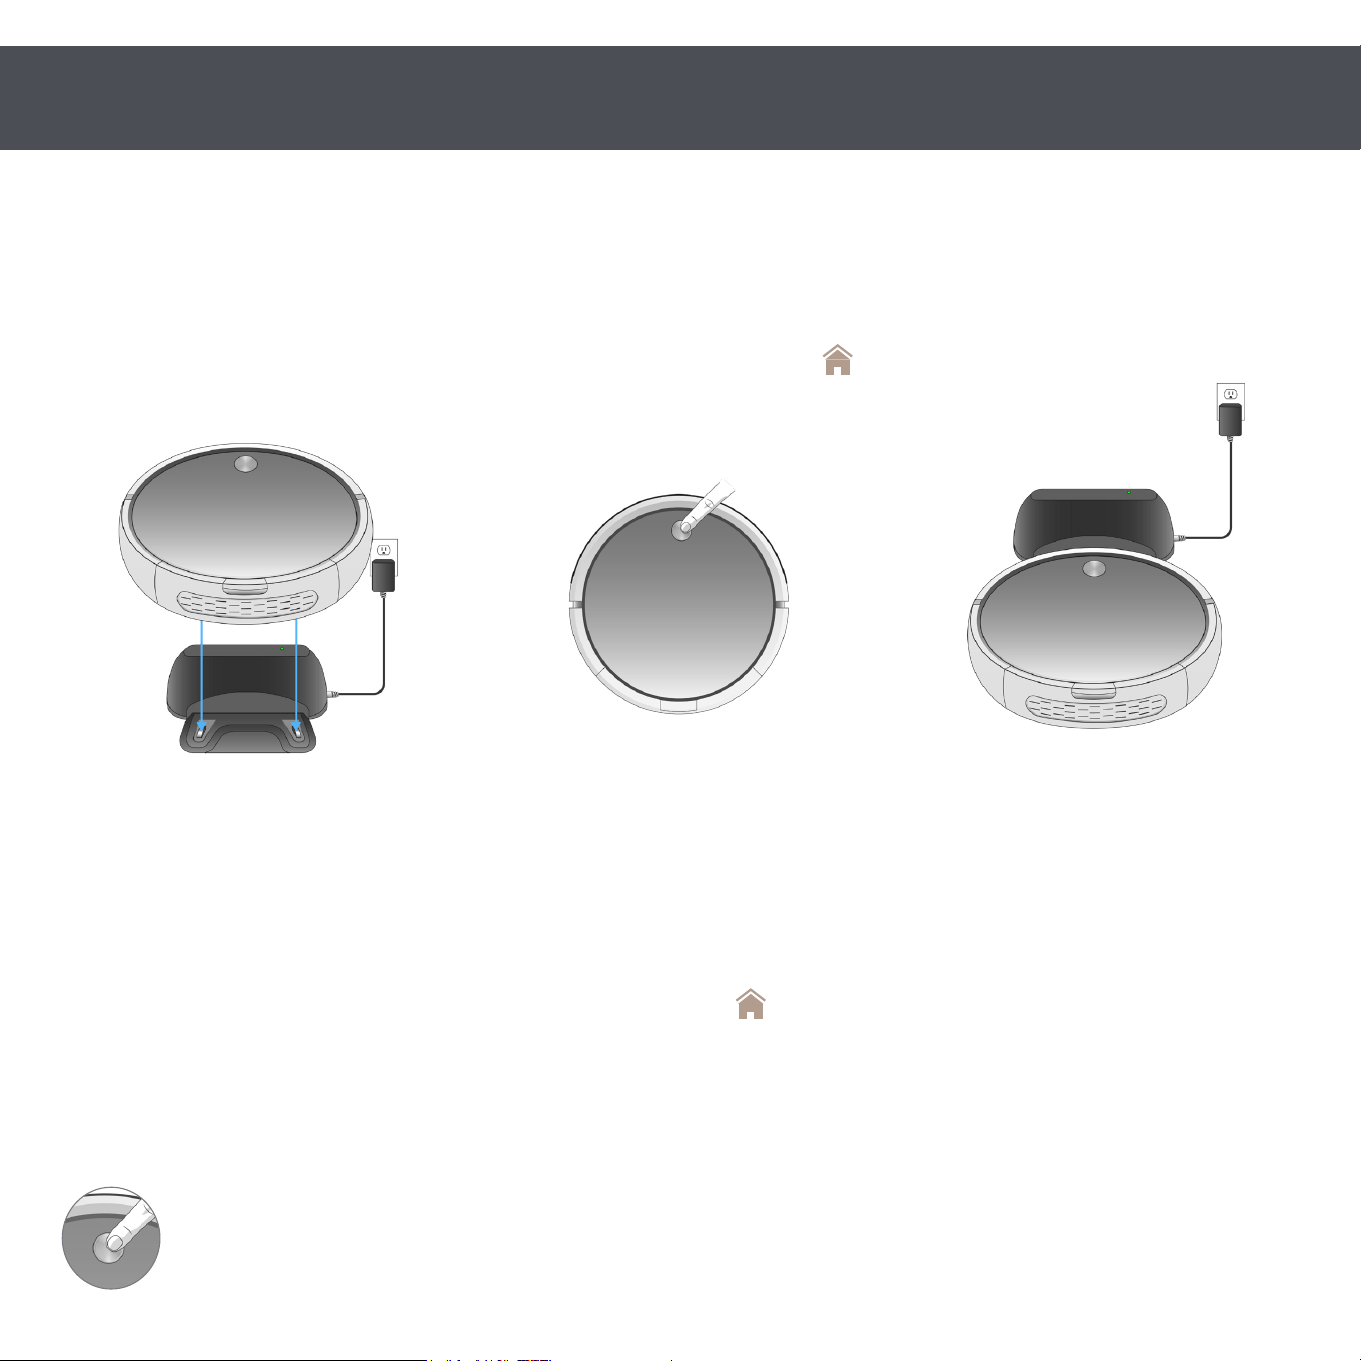
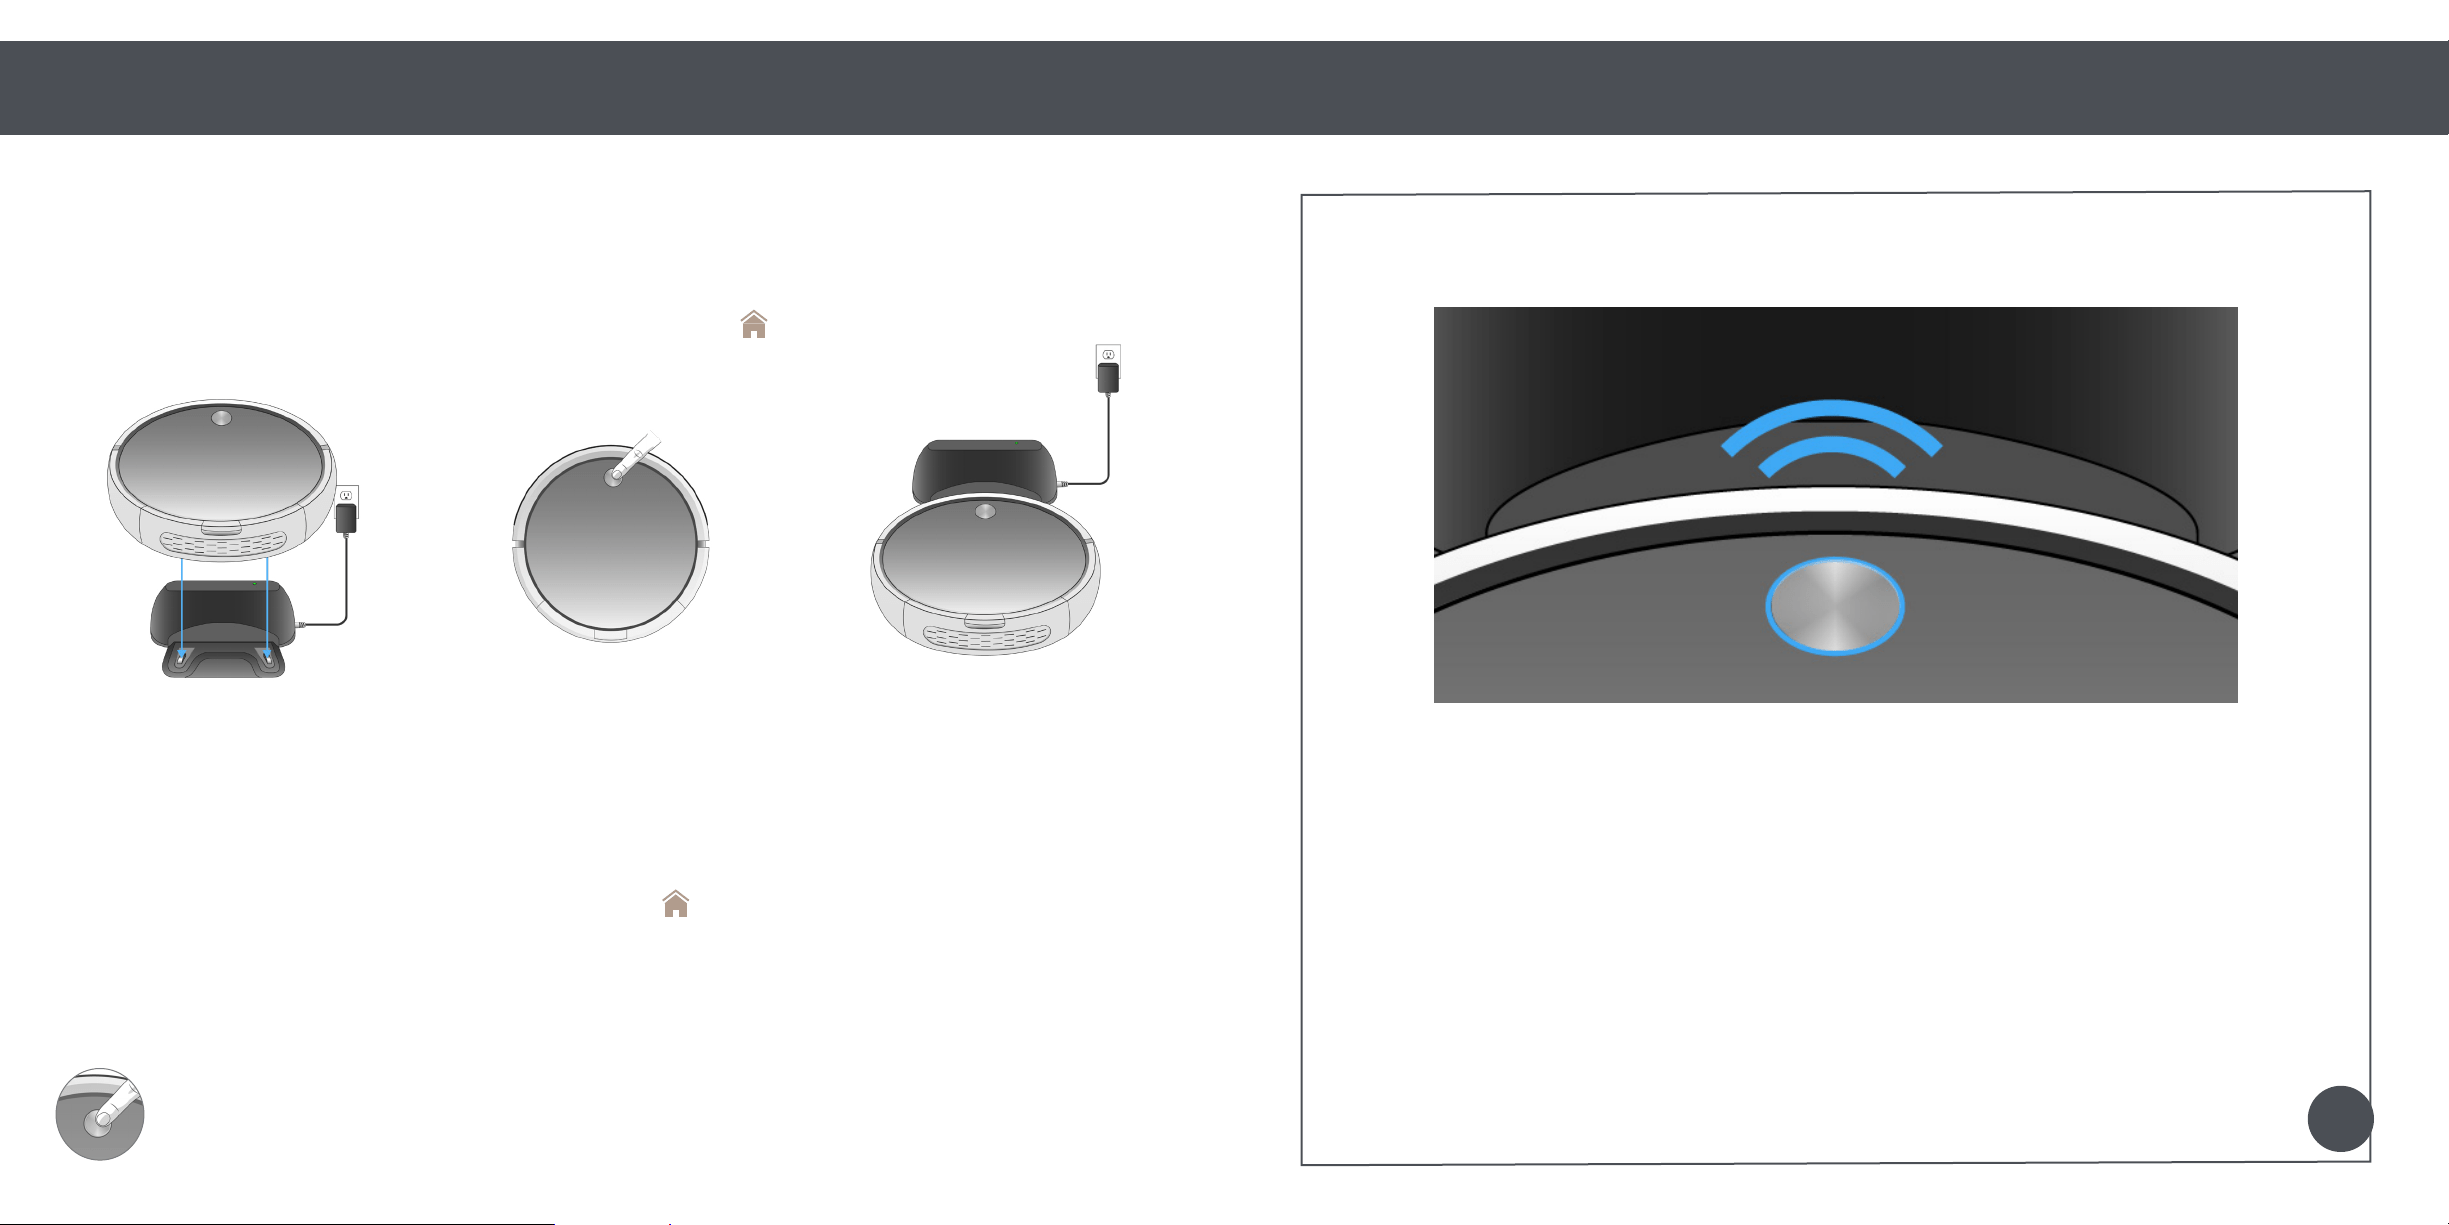
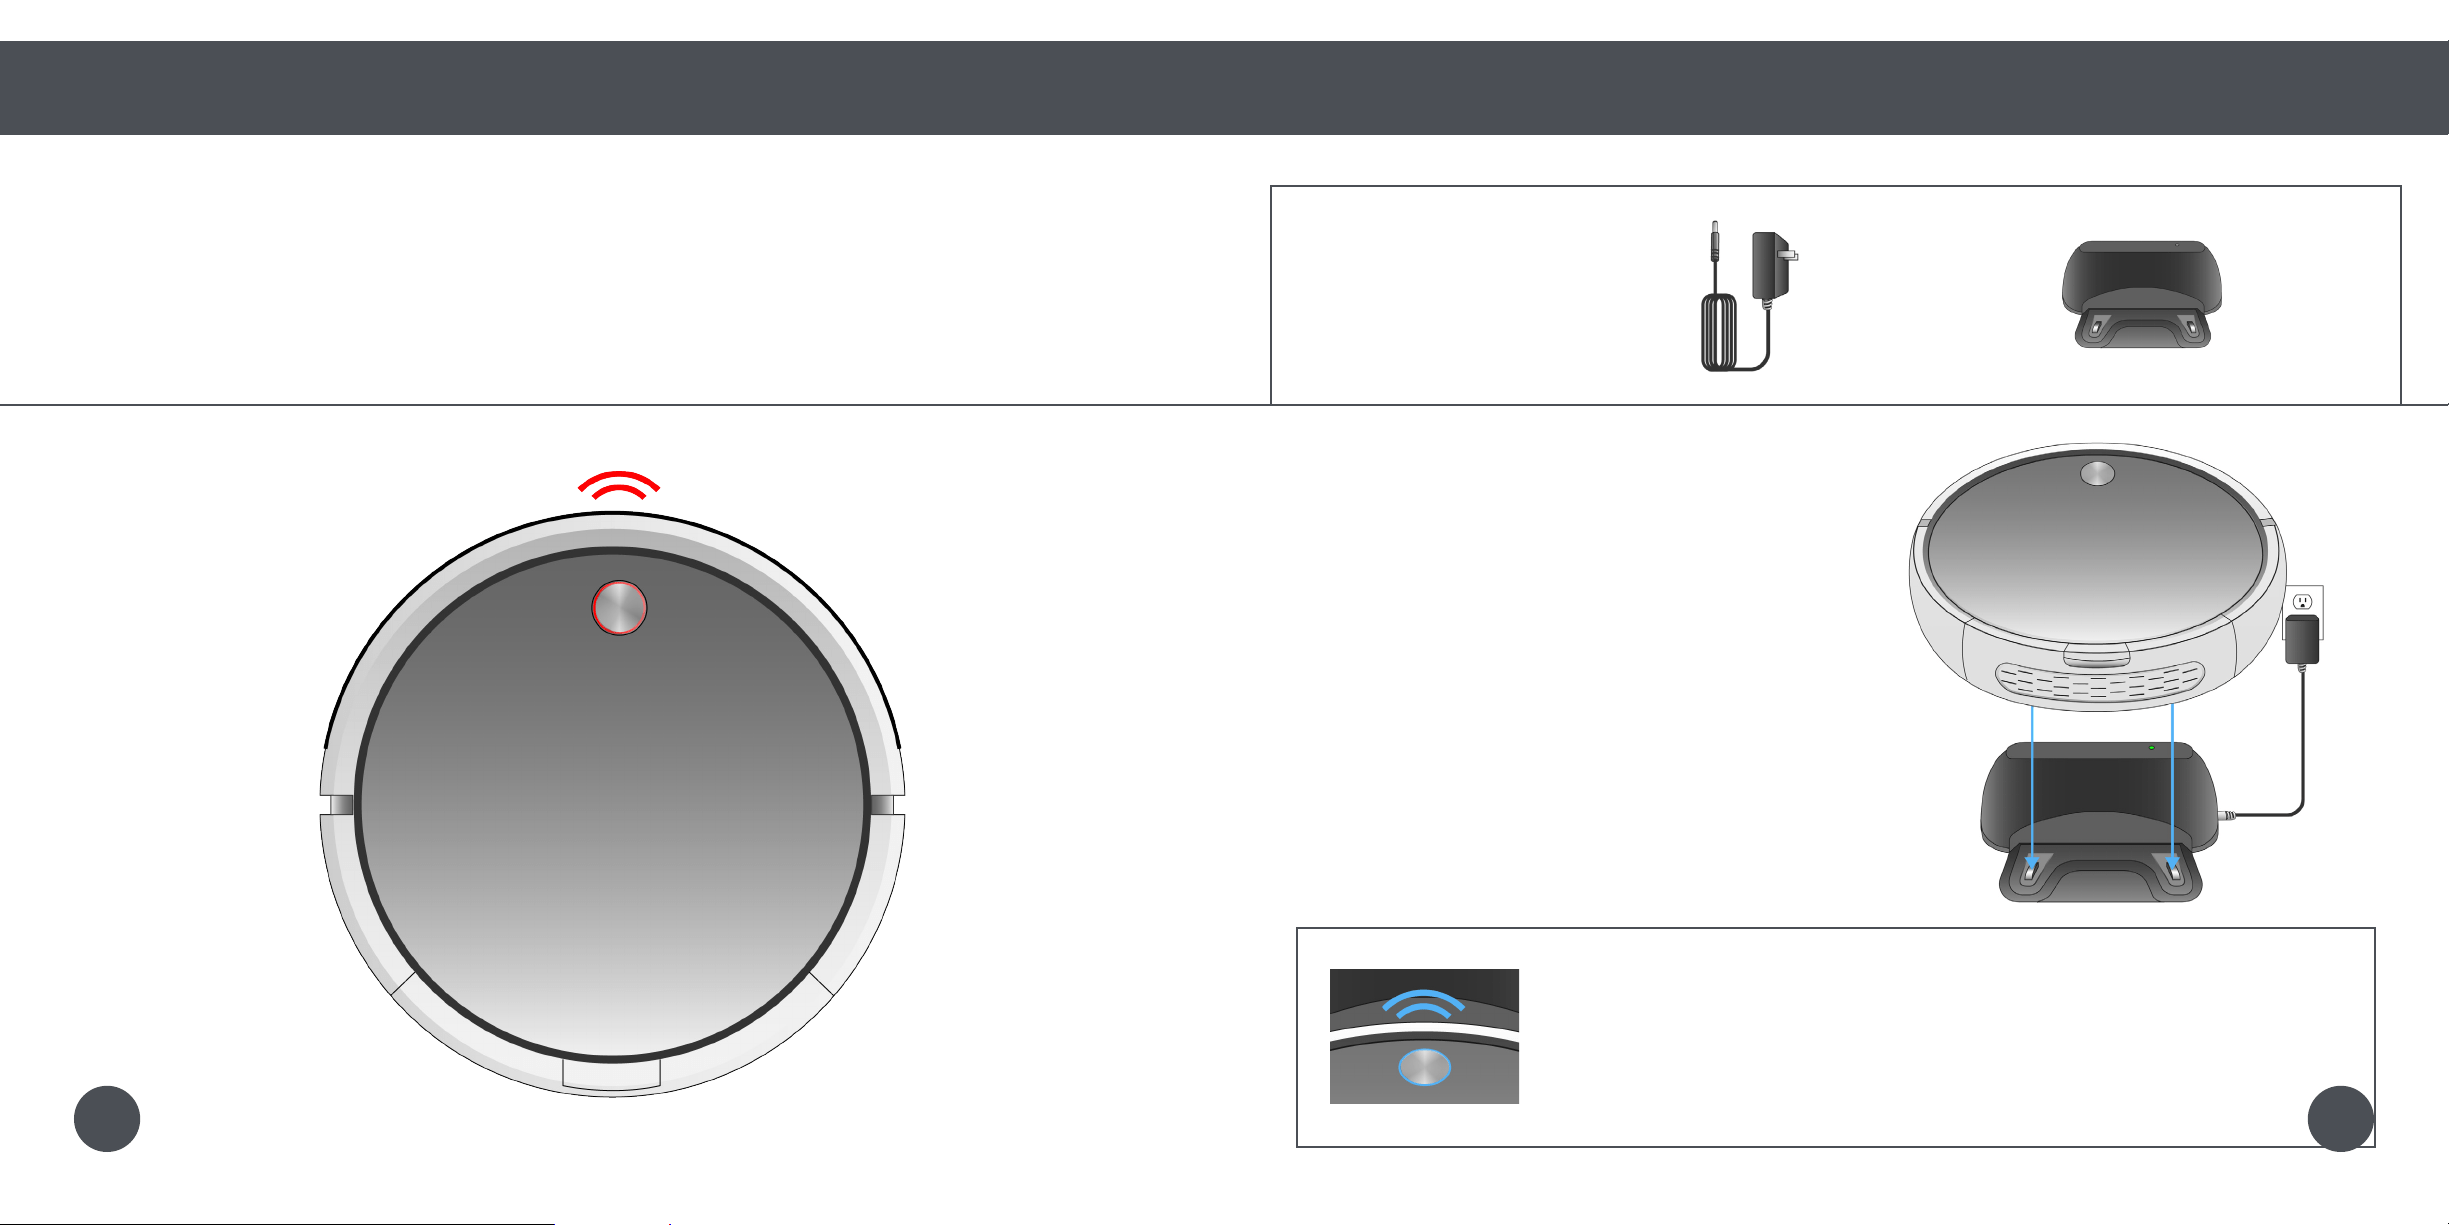
Quick Start
Charging
Charging Bob
Charging Bob on the
Charging Station
To charge Bob, place him on
his charging station with the
metal plates on his underside
sitting on top of the nodes on
his station. Make sure the
station is plugged in.
Bob will chirp once and slowly blink his cover
button to let you know that he is charging.
When Bob has fully charged, his cover button will
stop blinking and remain solid.
Sending Bob to
Charge
To send Bob to his charging
station, double click his cover
button or press the
button
on his remote.
Charging Bob
Bob will automatically return to his charging station when low on battery. You can send Bob to charge
at any time by double clicking his cover button or pressing the
button on his remote.
Conserving Bob’s
Battery
Bob should not sit on his
charging station for more than
5 days. If you will not be using
him at least once every 5 days,
turn him off and remove him
from the station to conserve
his battery.
To turn Bob off, push in the bumper while pressing the cover button for about 4 seconds.
Release the button when you hear Bob chirp. Bob’s cover light will then turn off.
20
Remote
Control
24 Remote Buttons
26 Syncing the Remote
28 Navigating Bob
You can set Bob’s cleaning schedule,
select his cleaning modes, and control
his movements all from his remote
control.
22
Remote
Control
24 Remote Buttons
26 Syncing the Remote
28 Navigating Bob
You can set Bob’s cleaning schedule,
select his cleaning modes, and control
his movements all from his remote
control.
22
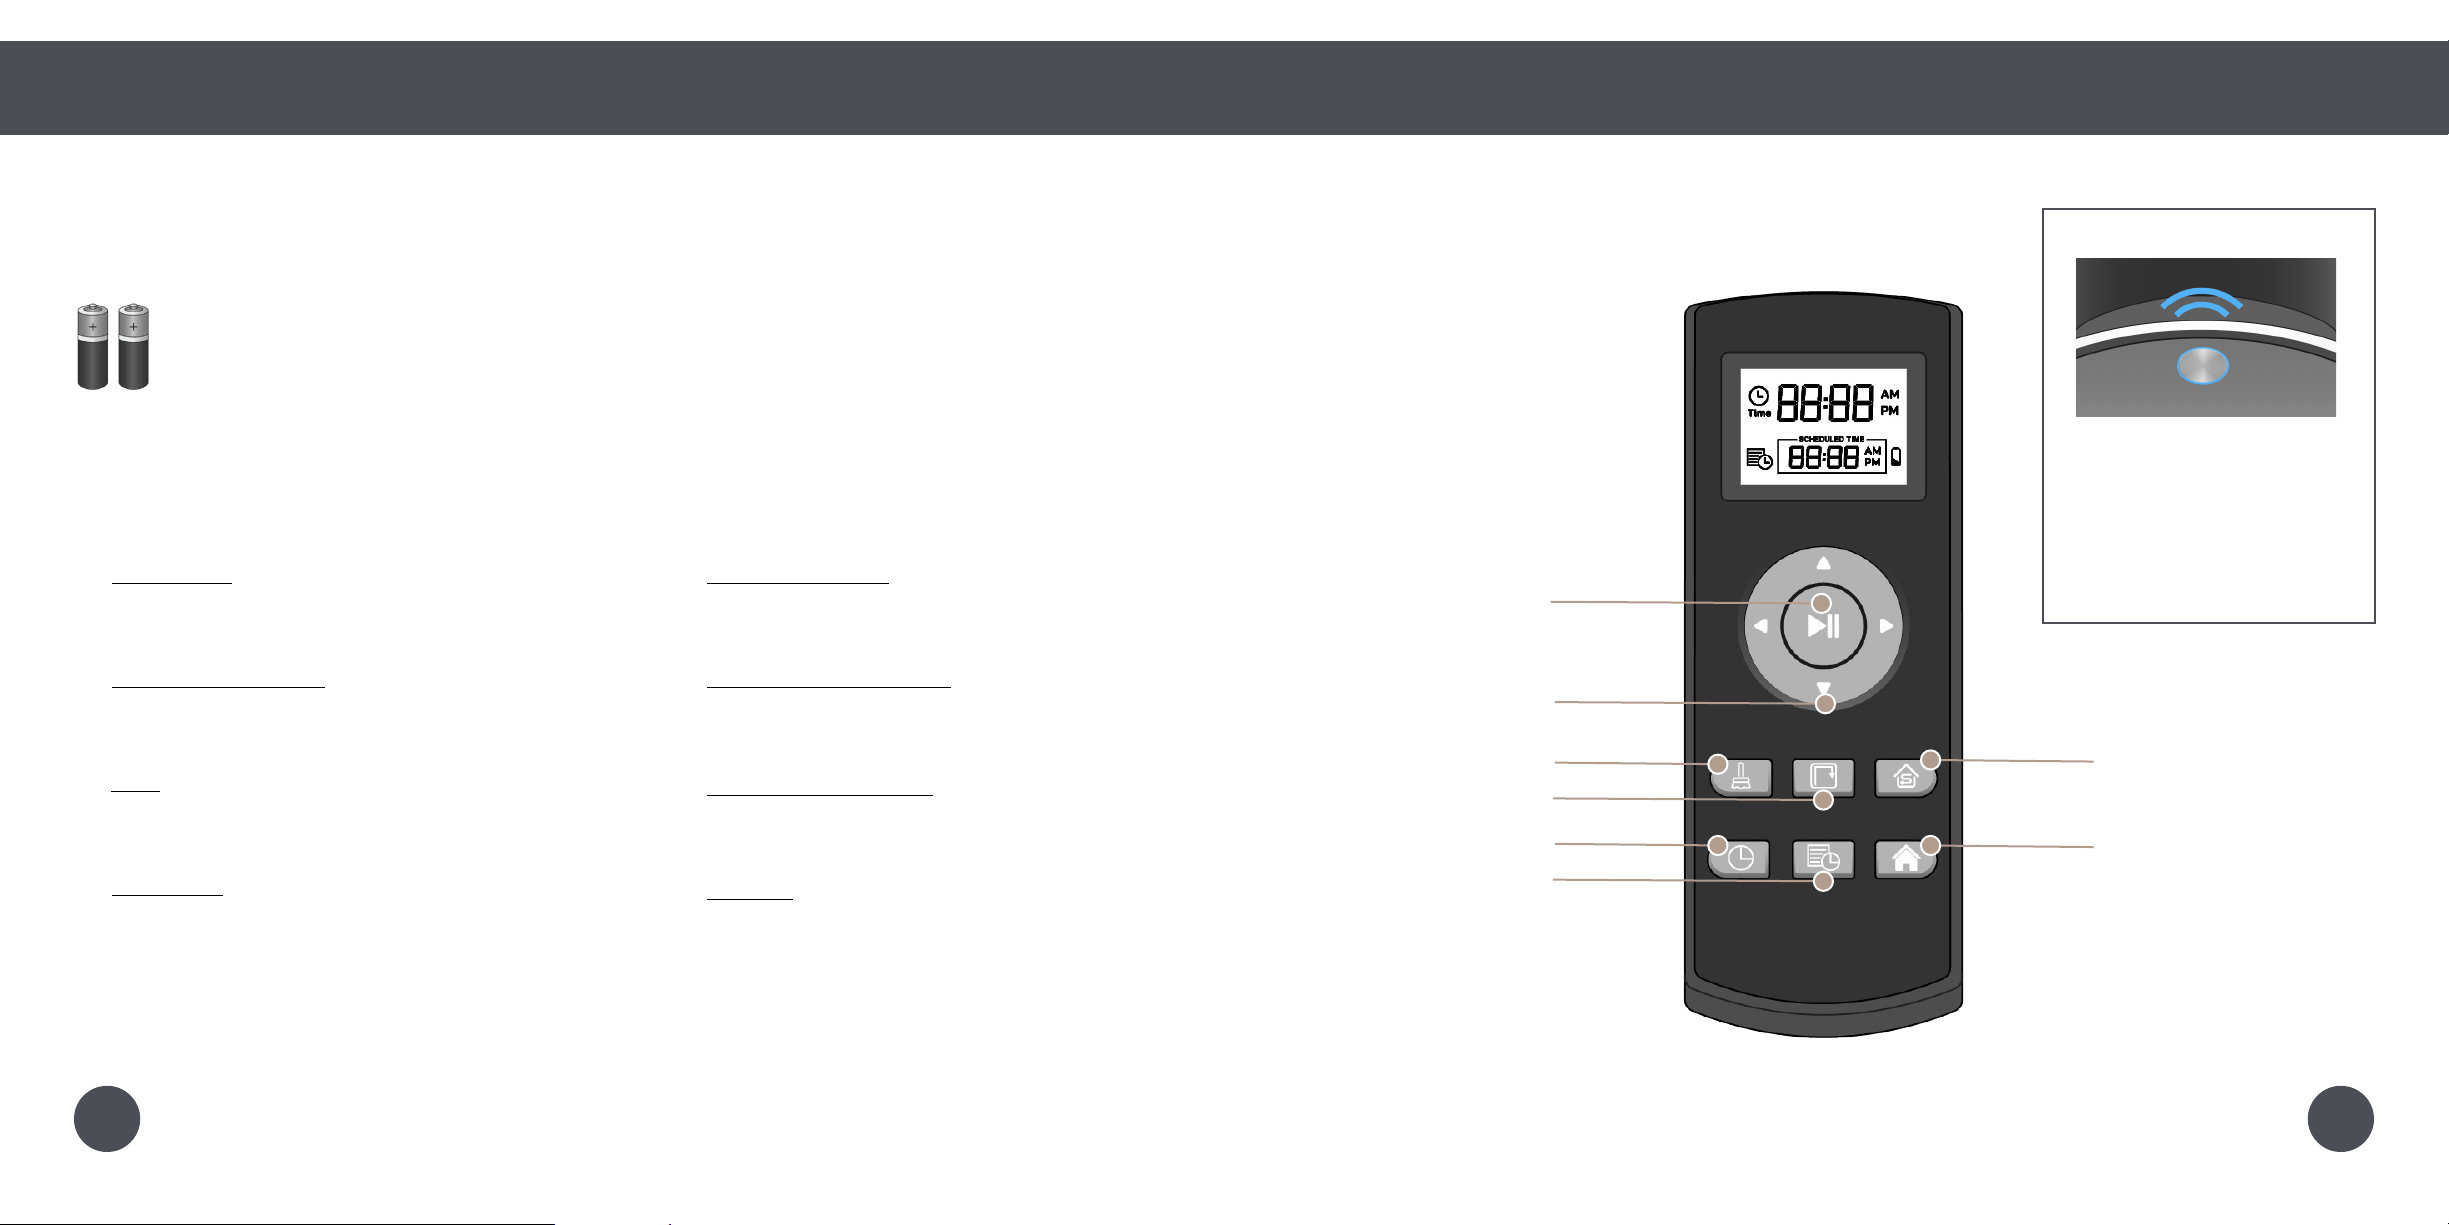
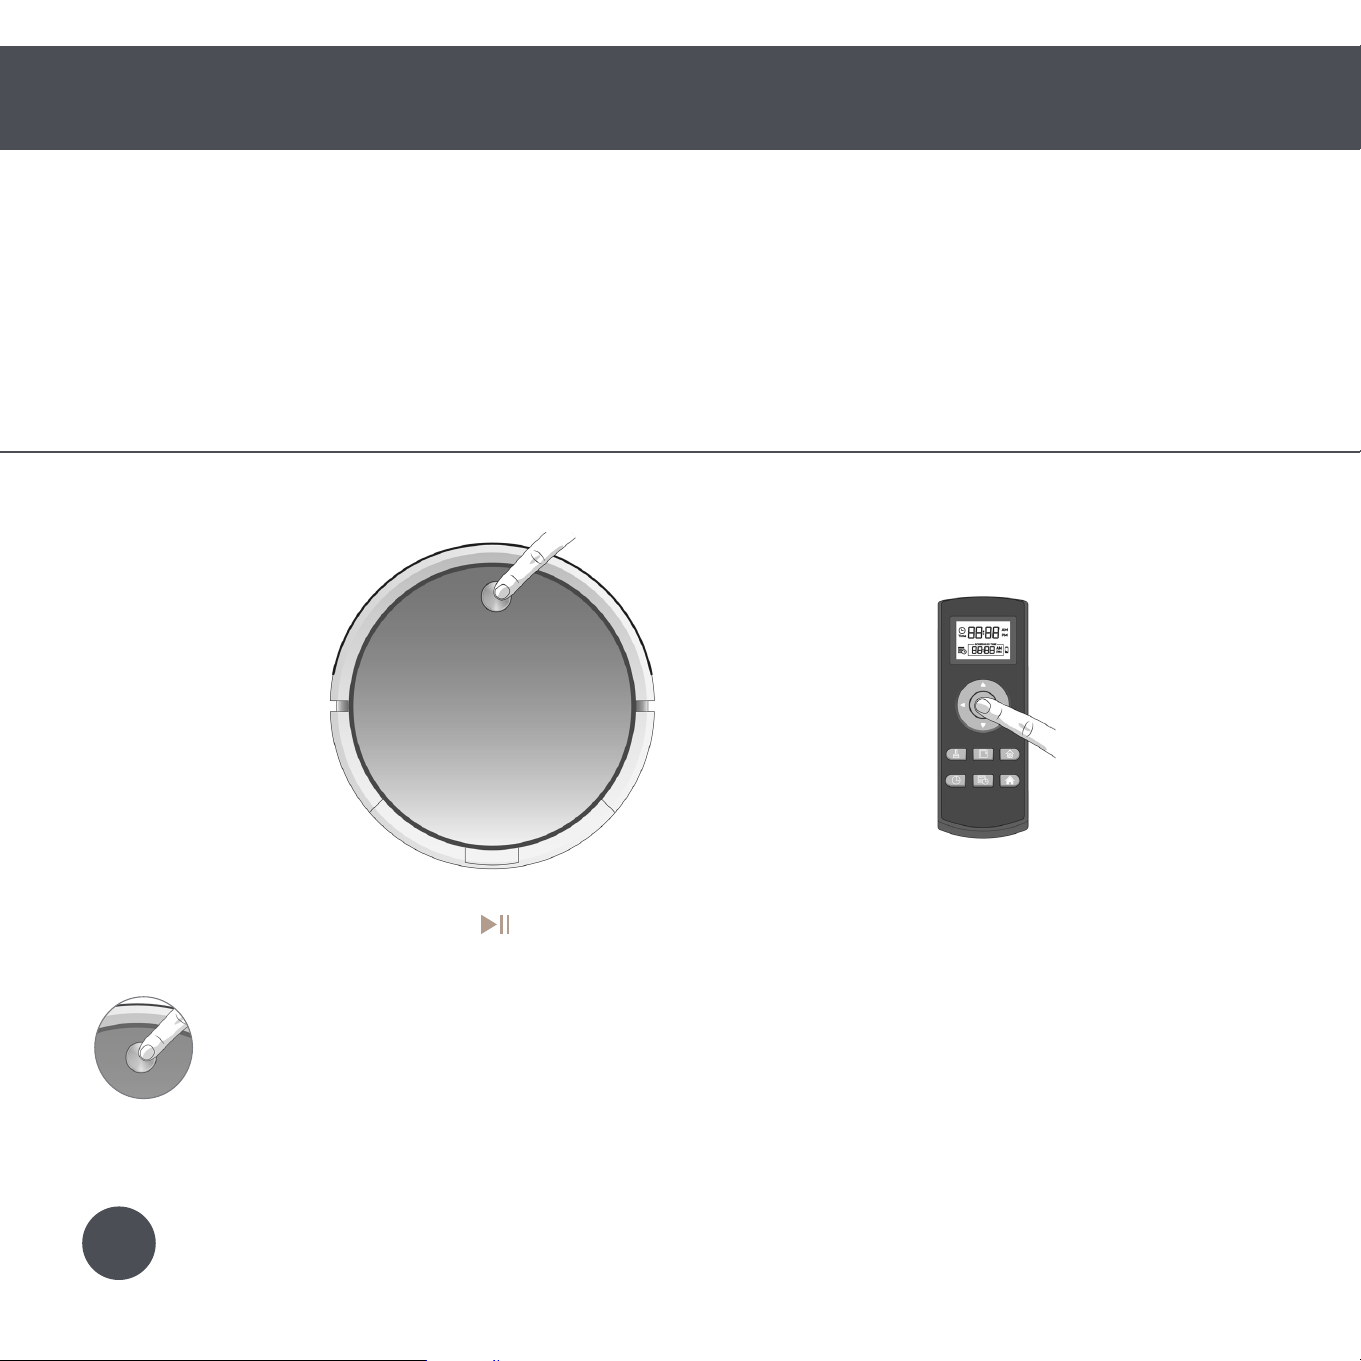
Remote Buttons
Quick Start
Remote Control
Remote Buttons
1 Start / Stop
Starts or pauses Bob’s movements.
2 Navigational Butons
Guide Bob forward, backward, right, or left.
3 Auto
Puts Bob on his default setting (Robot mode).
4 Wall Track™
Sends Bob to clean along walls and corners.
5 Set Current Time
Sets the current time.
6 Set Cleaning Schedule
Sets Bob’s cleaning schedule.
7 Quick Clean (30 min)
Sends Bob to clean for 30 minutes.
8 Charge
Sends Bob to his charging station.
1
2
3
4
5
6
7
8
Bob’s FullCommand™ remote requires 2 AAA batteries (not included). Remove the batteries
if you are not using the remote on a regular basis. Keep the remote at room temperature.
When Bob is on, he
chirps every time he
receives a command
from his remote control.
2423

Remote Buttons
Quick Start
Remote Control
Remote Buttons
1 Start / Stop
Starts or pauses Bob’s movements.
2 Navigational Butons
Guide Bob forward, backward, right, or left.
3 Auto
Puts Bob on his default setting (Robot mode).
4 Wall Track™
Sends Bob to clean along walls and corners.
5 Set Current Time
Sets the current time.
6 Set Cleaning Schedule
Sets Bob’s cleaning schedule.
7 Quick Clean (30 min)
Sends Bob to clean for 30 minutes.
8 Charge
Sends Bob to his charging station.
1
2
3
4
5
6
7
8
Bob’s FullCommand™ remote requires 2 AAA batteries (not included). Remove the batteries
if you are not using the remote on a regular basis. Keep the remote at room temperature.
When Bob is on, he
chirps every time he
receives a command
from his remote control.
2423
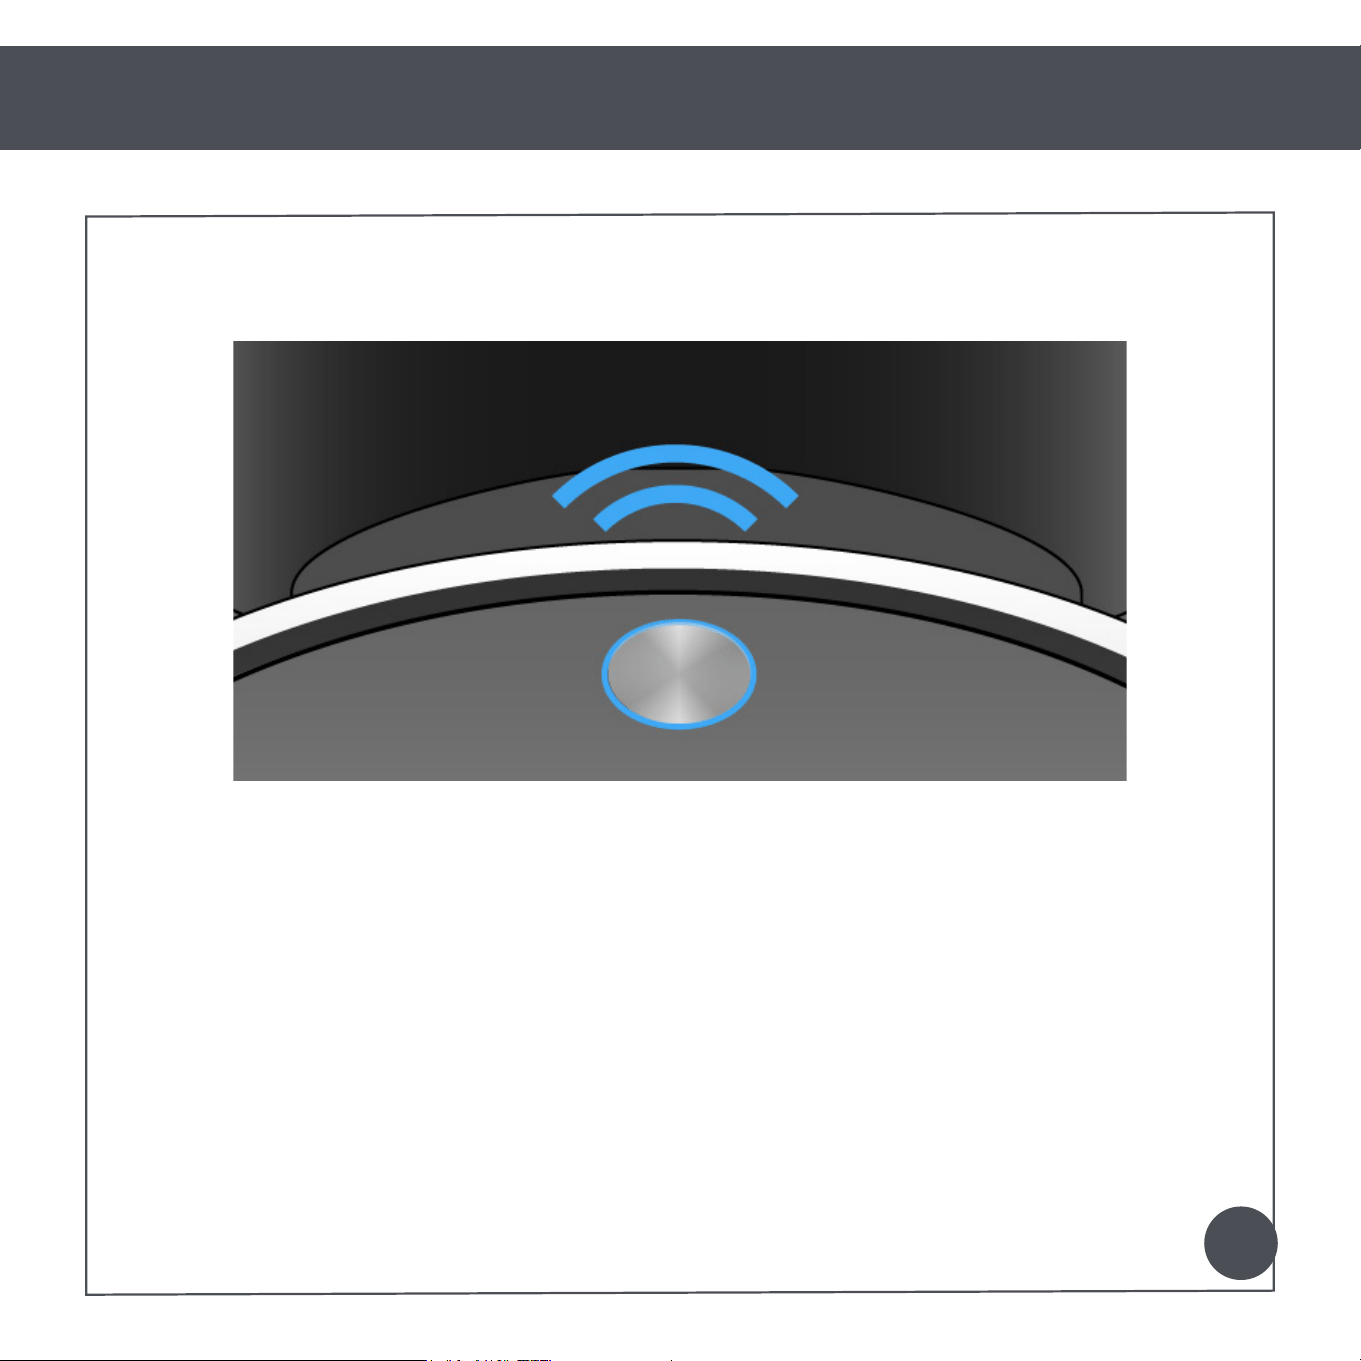
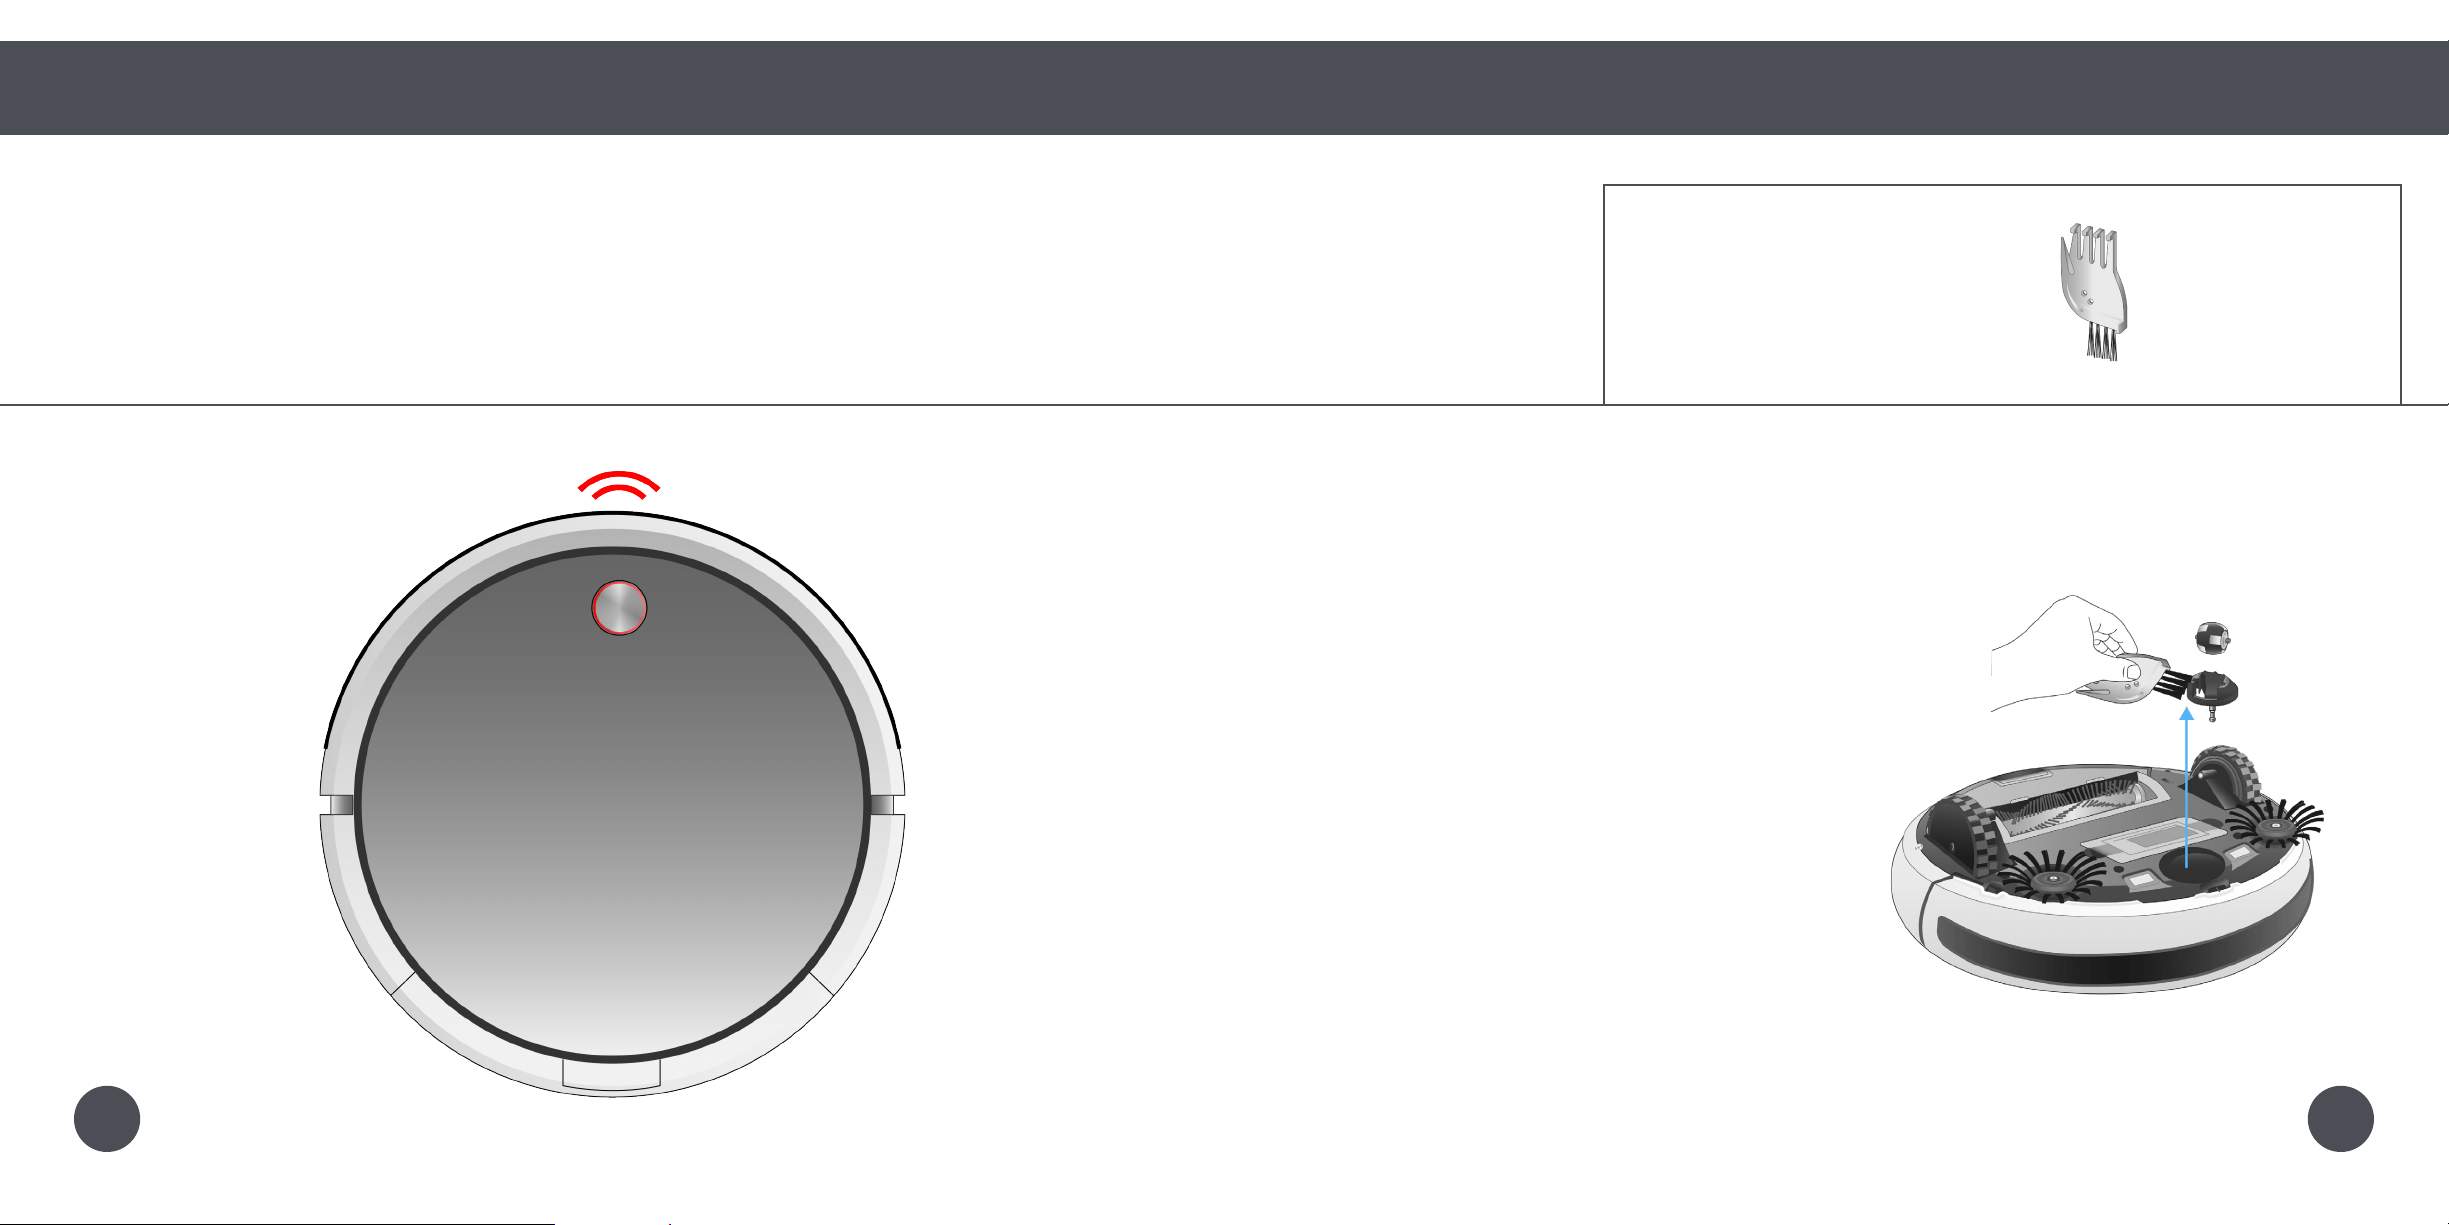
Quick Start
Remote Control
Syncing the Remote
Syncing the Remote
If Bob is not responding to his remote, he may need to be synced to it. You will only need to do this
once. Make sure the remote has a working pair of batteries before proceeding.
Parts You’ll Need: Remote Control AAA Batteries x2
(not included)
1. While still holding down the button, press
and hold Bob’s cover button for 4 seconds.
Bob will chirp 3 times to let you
know the sync was successful.
2625
Quick Start
Remote Control
Syncing the Remote
Bob’s edge sensors are located along his front, not along his back. Do not
reverse Bob towards edges, as he will fall.
Navigating Bob
Hold down the navigational buttons to control Bob’s movements.
Quick Tip:
Bob can be manually controlled only while he is in his default Robot mode, not while he is in Quick
Clean or Wall Follow modes.
Using the navigational buttons resets Bob’s cleaning algorithm, so it is not recommended that you
repeatedly control Bob while he is cleaning. It is best give Bob some time to understand your home so
he can clean at his best.
Important to Note:
2. Press the button to return Bob to his
default Robot mode.
1. Hold down a navigational button on the
remote to keep Bob moving in the desired
direction.
2827
Cleaning
Schedule
32 Setting the Current Time
34 Setting the Cleaning Schedule
Bob can be programmed to clean
every day at the time of your choice
through his remote control.
30
Cleaning
Schedule
32 Setting the Current Time
34 Setting the Cleaning Schedule
Bob can be programmed to clean
every day at the time of your choice
through his remote control.
30
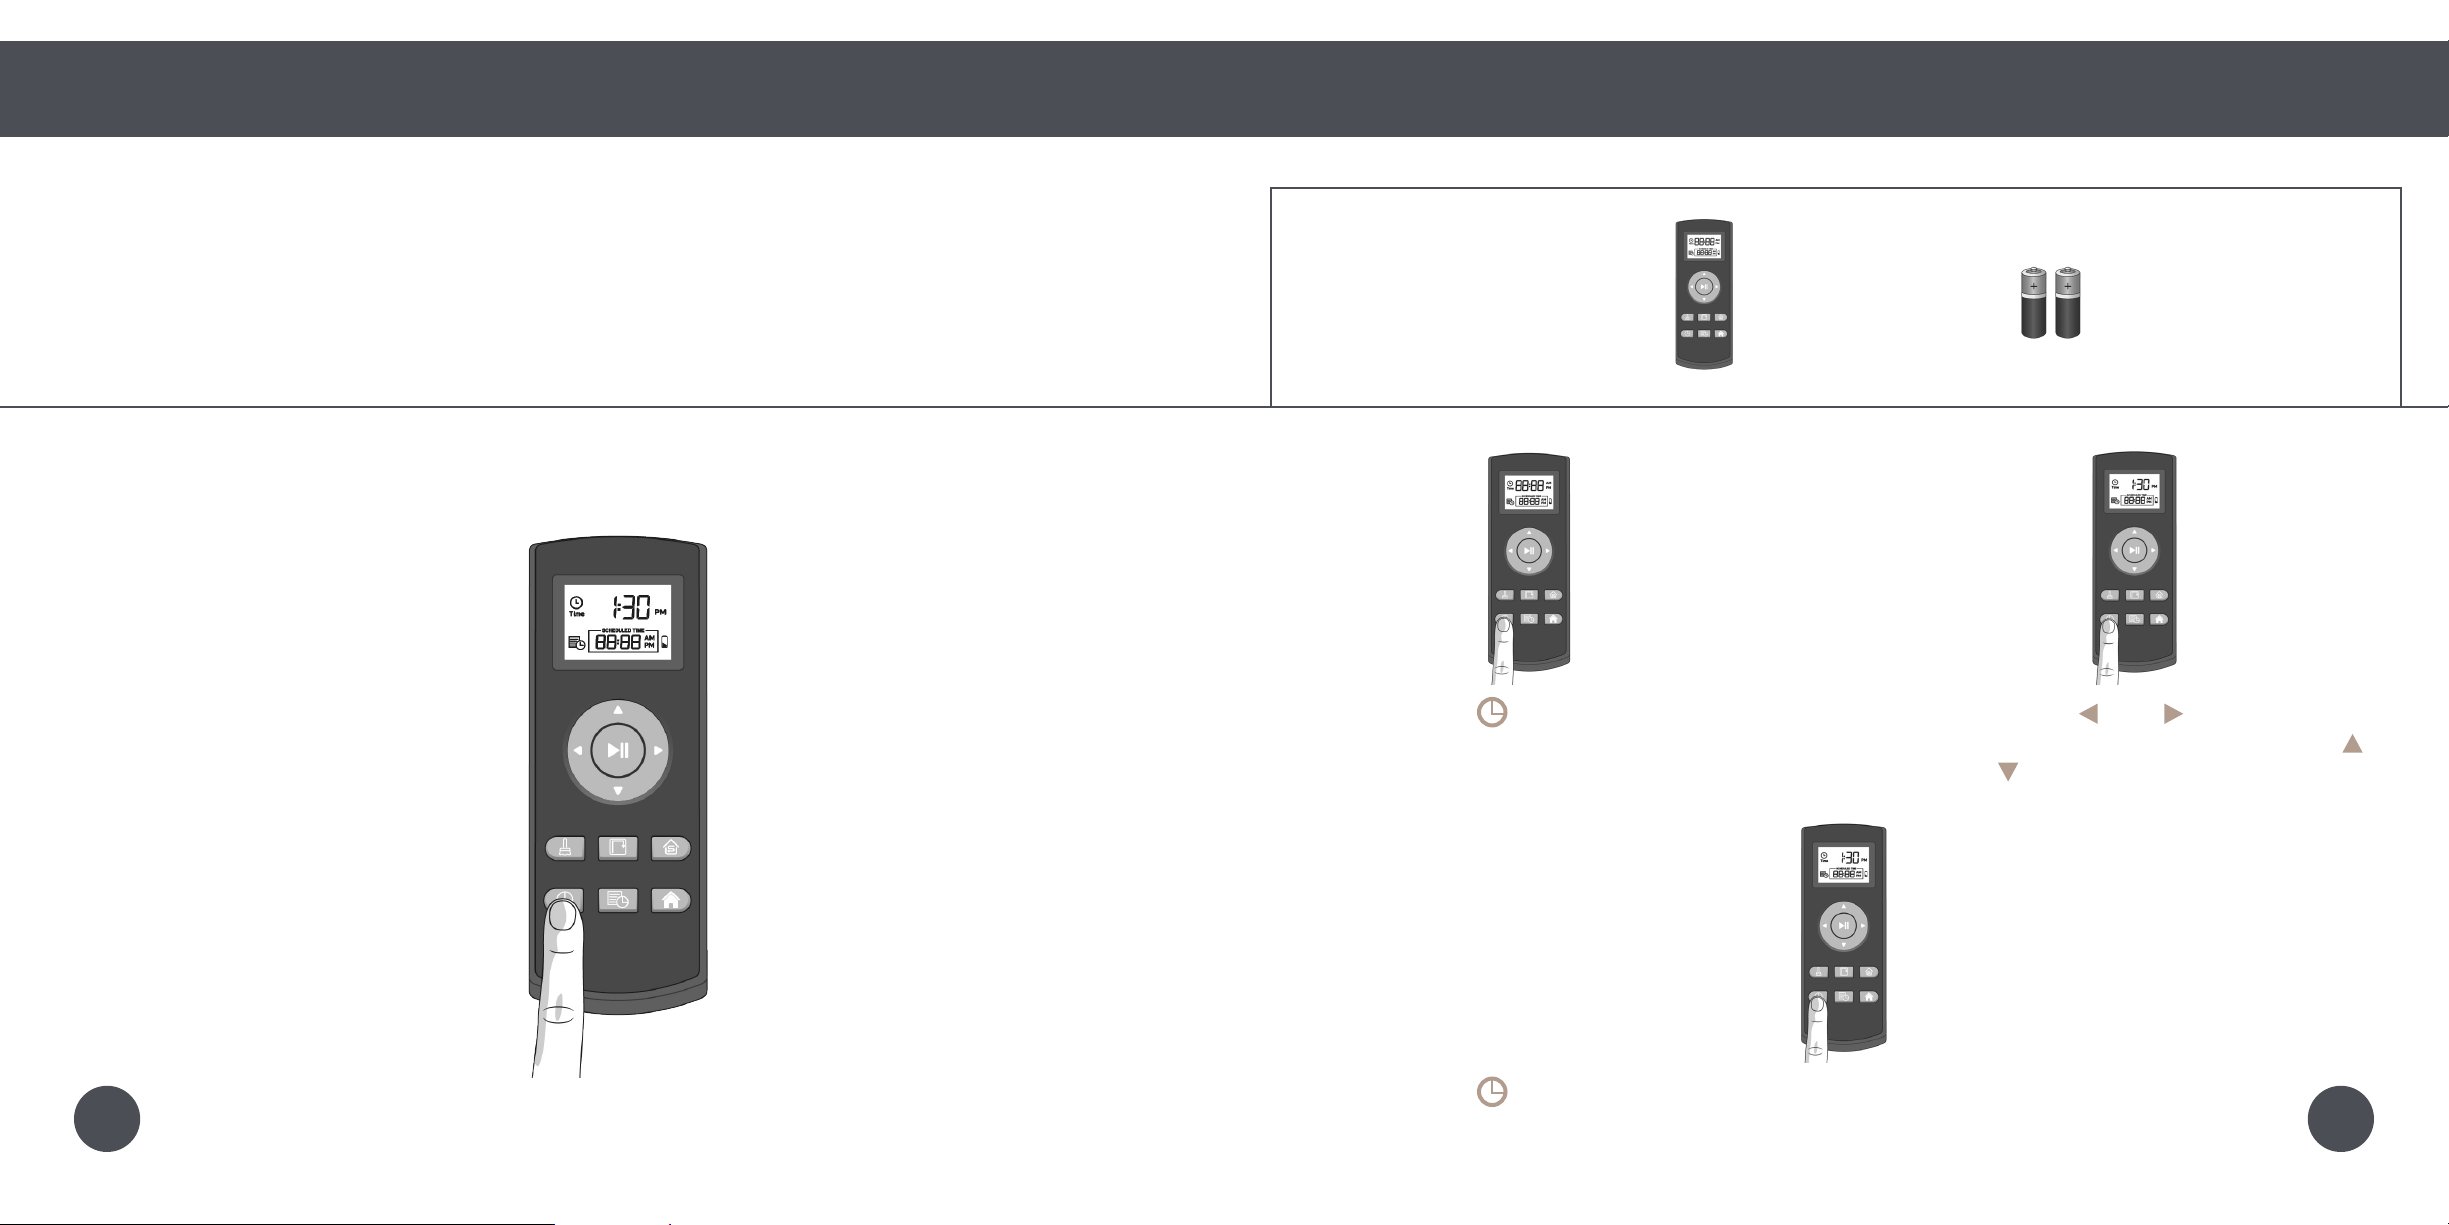
Quick Start
Cleaning Schedule
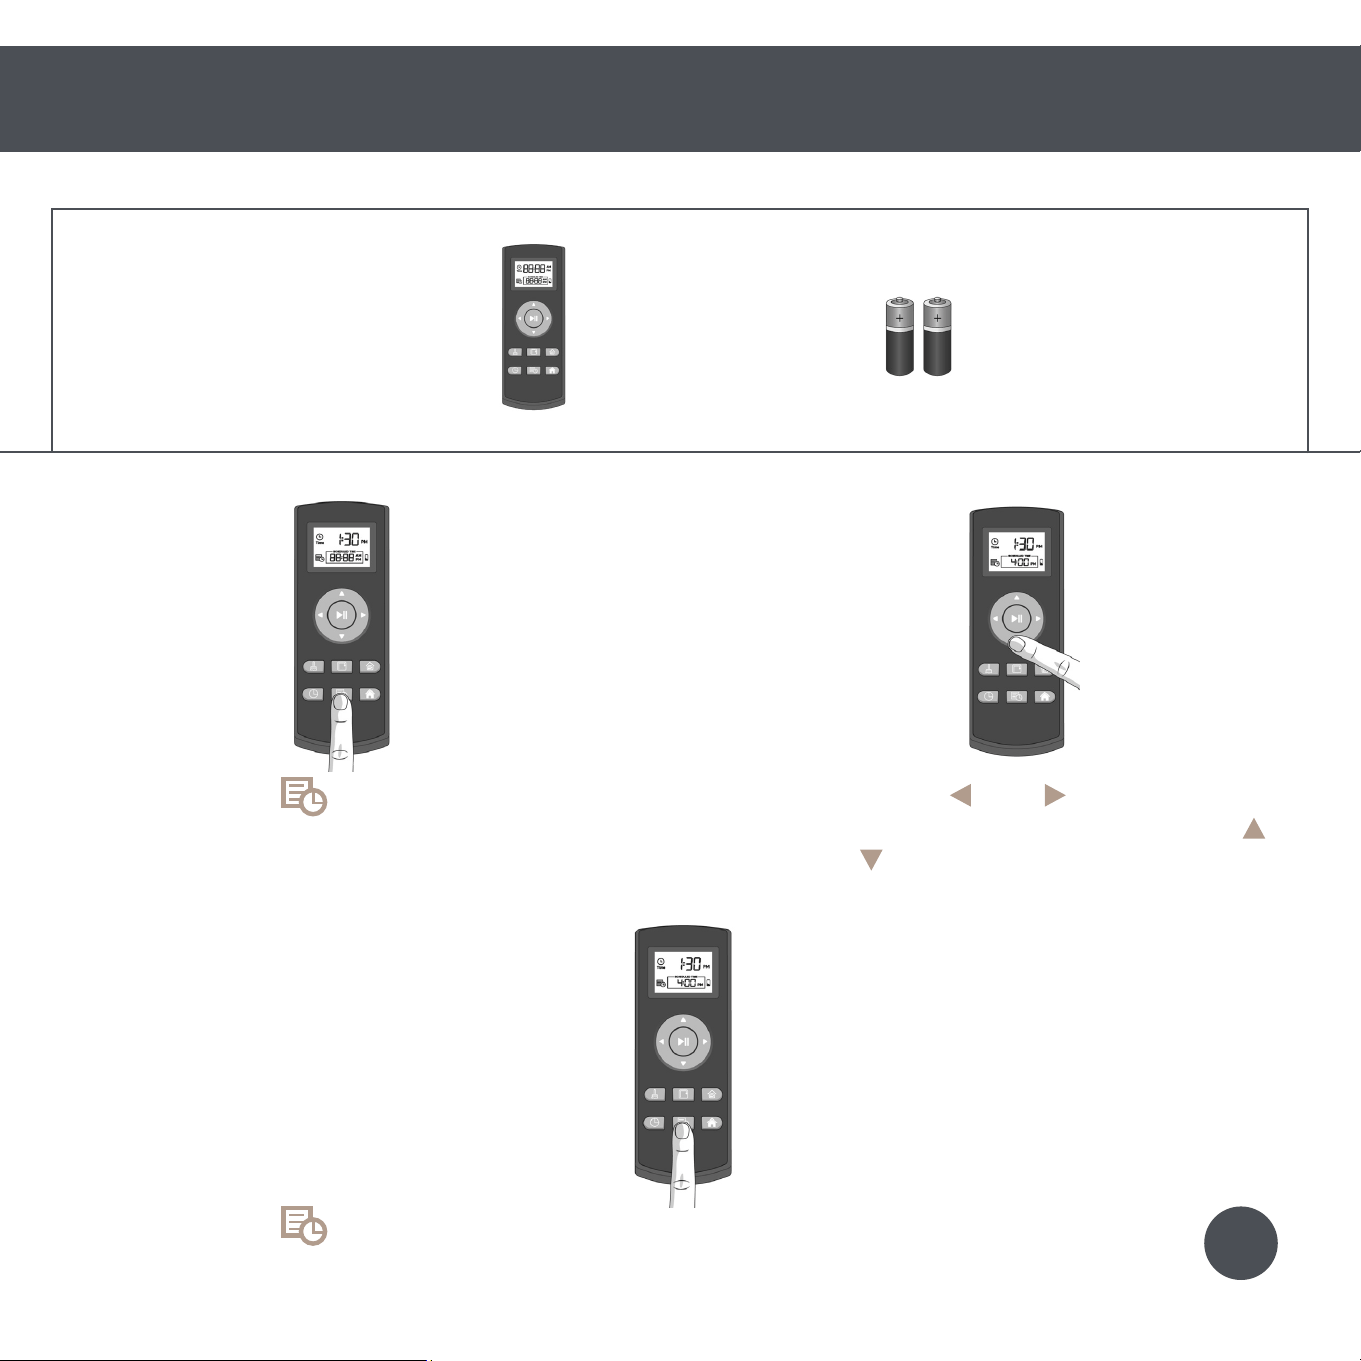
Setting the Current Time
Setting the Current Time
Bob can be programmed to clean every day at the time of your choice through his remote control.
To set Bob’s cleaning schedule, you must rst set the current time on his remote. Make sure the
remote is synced and has a working pair of batteries before proceeding.
1. Press the button on the remote.
The hour digits will start ashing.
2. Use the the and buttons to move
between minutes and hours. Use the
and buttons to adjust your selection.
3. Press the button again to save your settings. Bob will chirp to conrm your save.
Parts You’ll Need: Remote Control AAA Batteries x2
(not included)
3231
Quick Start
Cleaning Schedule
Setting the Current Time
Setting the Current Time
Bob can be programmed to clean every day at the time of your choice through his remote control.
To set Bob’s cleaning schedule, you must rst set the current time on his remote. Make sure the
remote is synced and has a working pair of batteries before proceeding.
1. Press the button on the remote.
The hour digits will start ashing.
2. Use the the and buttons to move
between minutes and hours. Use the
and buttons to adjust your selection.
3. Press the button again to save your settings. Bob will chirp to conrm your save.
Parts You’ll Need: Remote Control AAA Batteries x2
(not included)
3231
Quick Start
Cleaning Schedule
Setting the Cleaning Schedule
Setting the Cleaning Schedule
After setting the time on Bob’s remote, you may set his cleaning schedule.
1. Press the button on the remote.
The hour digits will start ashing.
2. Use the the and buttons to move
between minutes and hours. Use the
and buttons to adjust your selection.
3. Press the button again to save your settings. Bob will chirp to conrm your save.
Parts You’ll Need: Remote Control AAA Batteries x2
(not included)
3433
38 Dustbin
42 Filters
44 Main Brush
46 Side Brush
48 Battery
50 Sensors
52 Wheels
To maximize Bob’s efciency, it is
best to clean his dustbin, lters,
brushes, sensors, and wheels about
once a week. Bob’s battery should
last several years and comes with a
2-year warranty.
Parts and
Maintenance
36
38 Dustbin
42 Filters
44 Main Brush
46 Side Brush
48 Battery
50 Sensors
52 Wheels
To maximize Bob’s efciency, it is
best to clean his dustbin, lters,
brushes, sensors, and wheels about
once a week. Bob’s battery should
last several years and comes with a
2-year warranty.
Parts and
Maintenance
36

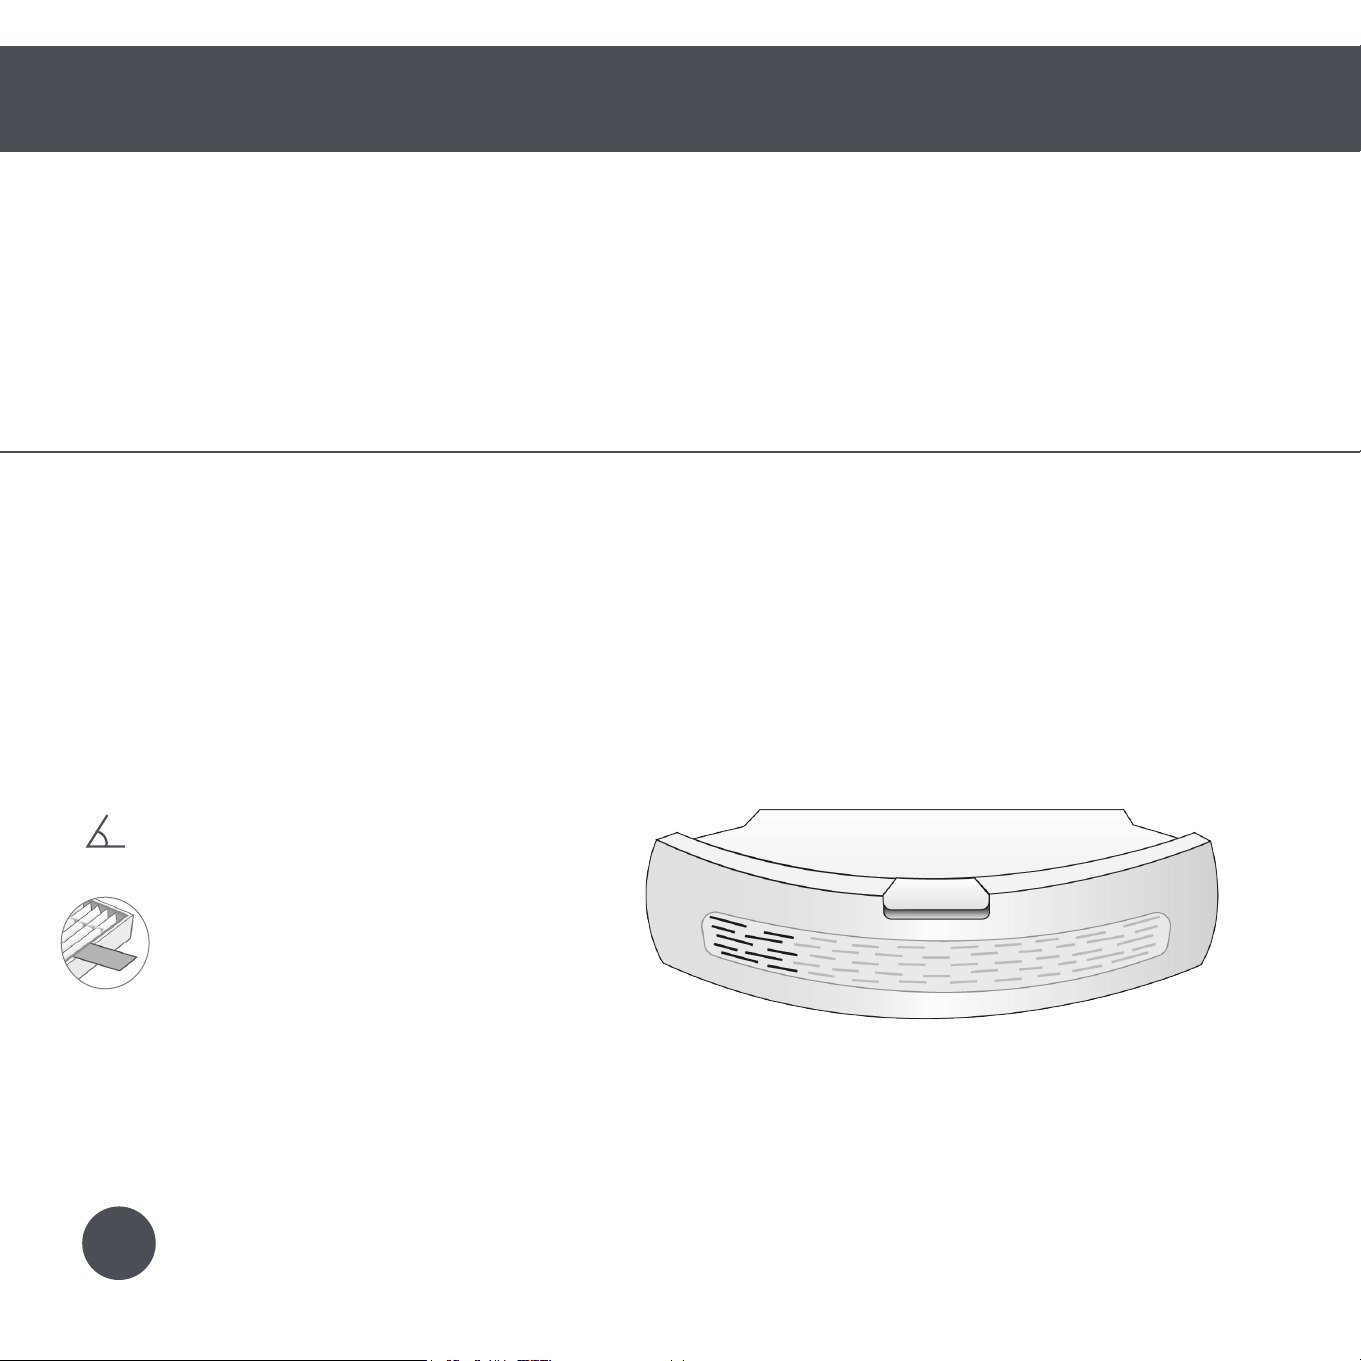
Quick Start
Parts and Maintenance
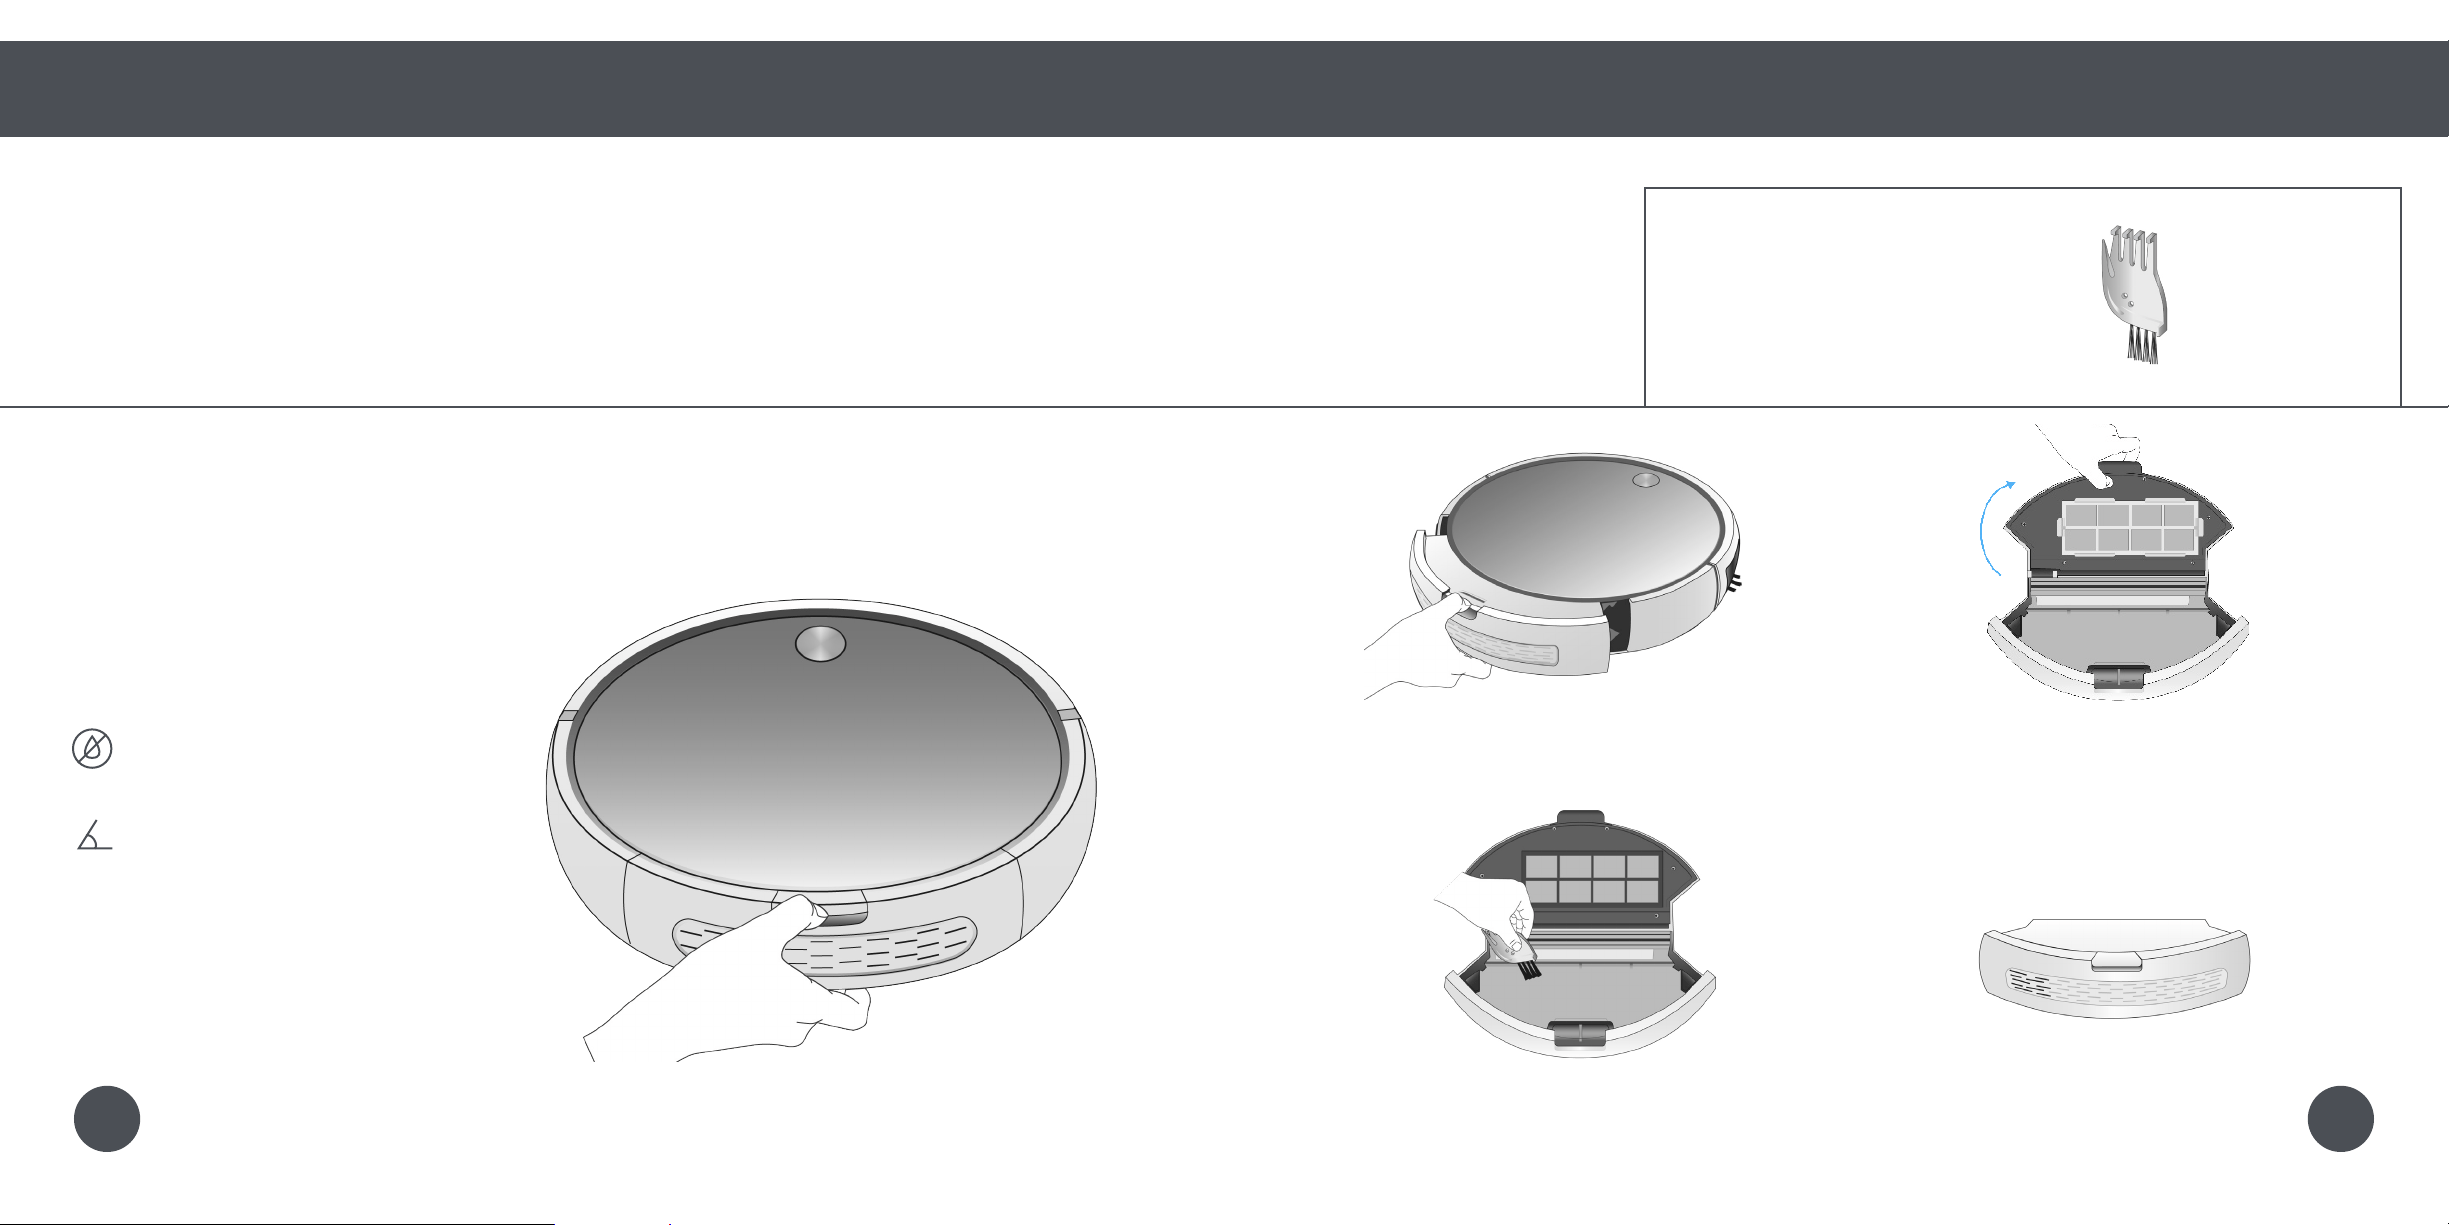
Dustbin
Dustbin
To maximize Bob’s efciency, it is best to empty his dustbin about once a week, or about once every
6 cleaning cycles.
Emptying Bob’s Dustbin
1.
Push down the tab on Bob’s back and
slide the dustbin out.
2. Lift the tab to open the dustbin.
3. Dump the contents of the dustbin and
brush it with Bob’s cleaning tool.
4. Close the dustbin and slide it
back into Bob.
Do not wash the dustbin without
removing the lters rst.
Do not force the dustbin past its
natural opening point.
Quick Tips:
Parts You’ll Need: Cleaning Tool
3837
Quick Start
Parts and Maintenance
Dustbin
Dustbin
To maximize Bob’s efciency, it is best to empty his dustbin about once a week, or about once every
6 cleaning cycles.
Emptying Bob’s Dustbin
1.
Push down the tab on Bob’s back and
slide the dustbin out.
2. Lift the tab to open the dustbin.
3. Dump the contents of the dustbin and
brush it with Bob’s cleaning tool.
4. Close the dustbin and slide it
back into Bob.
Do not wash the dustbin without
removing the lters rst.
Do not force the dustbin past its
natural opening point.
Quick Tips:
Parts You’ll Need: Cleaning Tool
3837
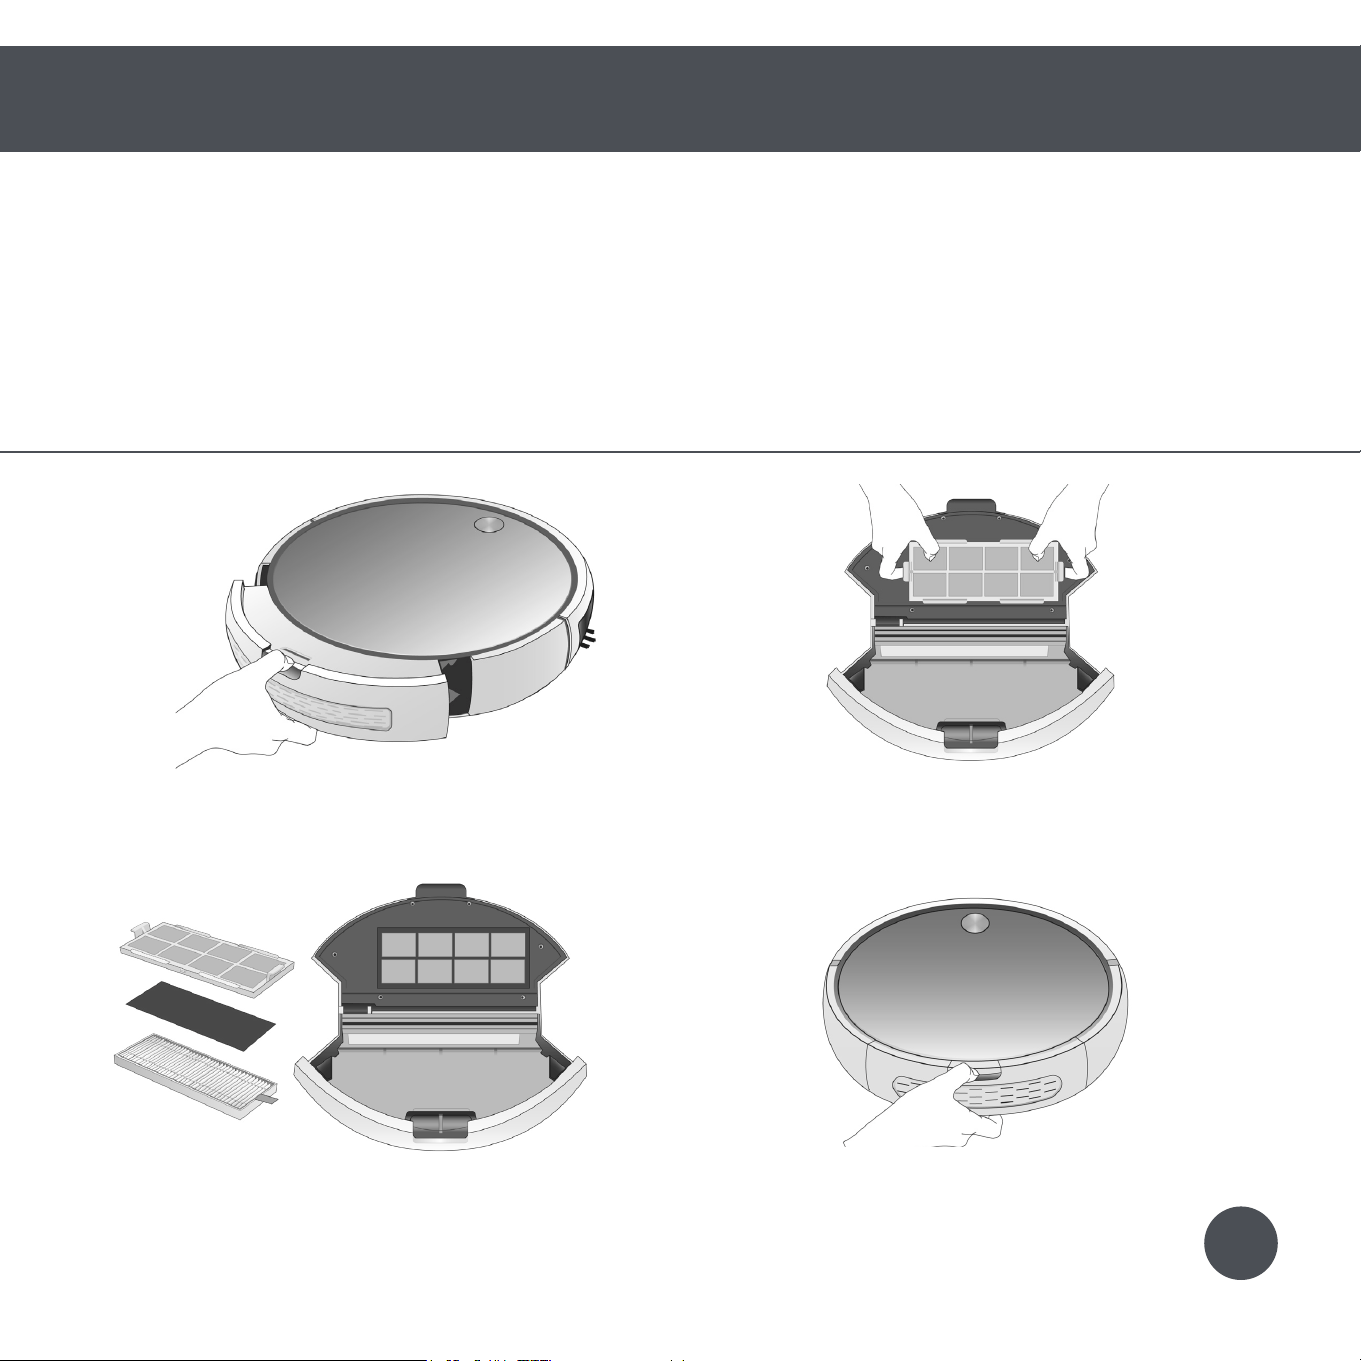
Quick Start
Parts and Maintenance
Dustbin
Dustbin
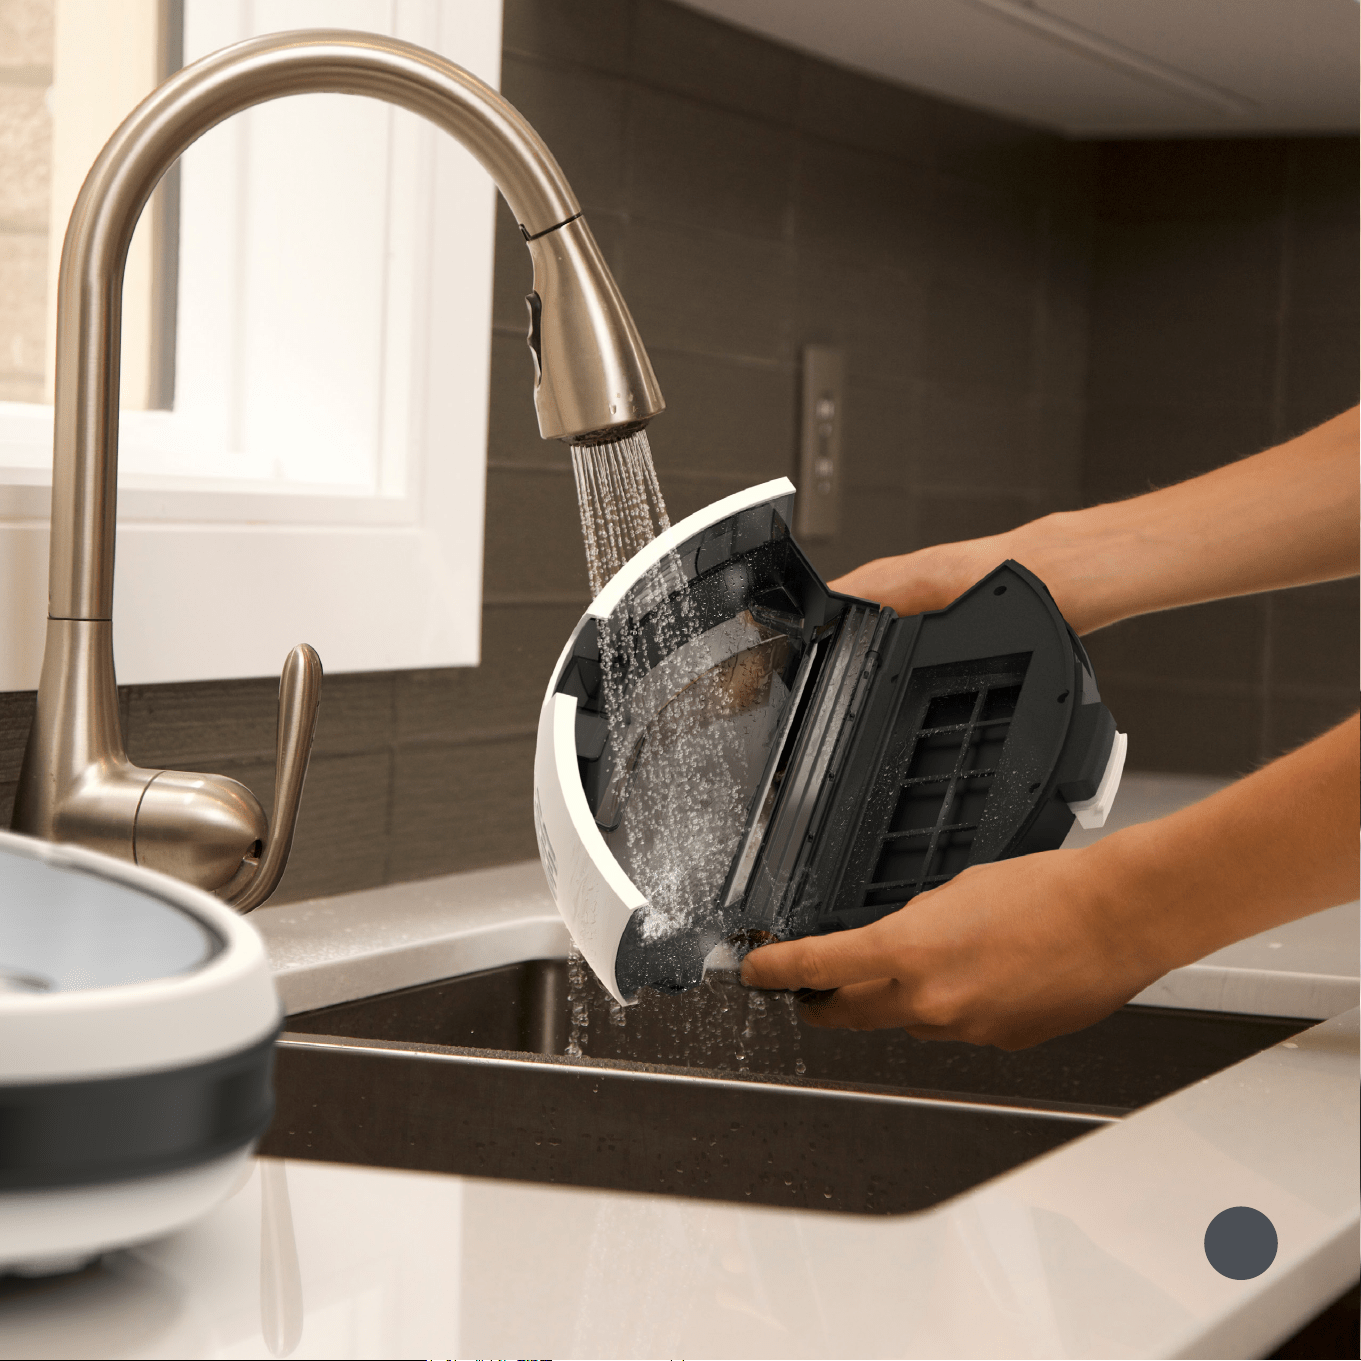
Bob’s dustbin can be washed once you remove his lters.
Washing Bob’s Dustbin
1.
Push down the tab on Bob’s back and
slide the dustbin out.
2. Lift the tab to open the dustbin. Lift the
lter tray out, using the tabs for leverage.
3. Remove the lters and set them aside.
Wash the dustbin with water.
4. Allow the dustbin to fully dry before
replacing the lters and lter tray. Close
the dustbin and slide it back into Bob.
Do not force the dustbin past its
natural opening point.
When replacing the lters, make
sure the tab on the high-efciency
lter faces up.
Quick Tips:
4039
Quick Start
Parts and Maintenance
Dustbin
Dustbin
Bob’s dustbin can be washed once you remove his lters.
Washing Bob’s Dustbin
1.
Push down the tab on Bob’s back and
slide the dustbin out.
2. Lift the tab to open the dustbin. Lift the
lter tray out, using the tabs for leverage.
3. Remove the lters and set them aside.
Wash the dustbin with water.
4. Allow the dustbin to fully dry before
replacing the lters and lter tray. Close
the dustbin and slide it back into Bob.
Do not force the dustbin past its
natural opening point.
When replacing the lters, make
sure the tab on the high-efciency
lter faces up.
Quick Tips:
4039
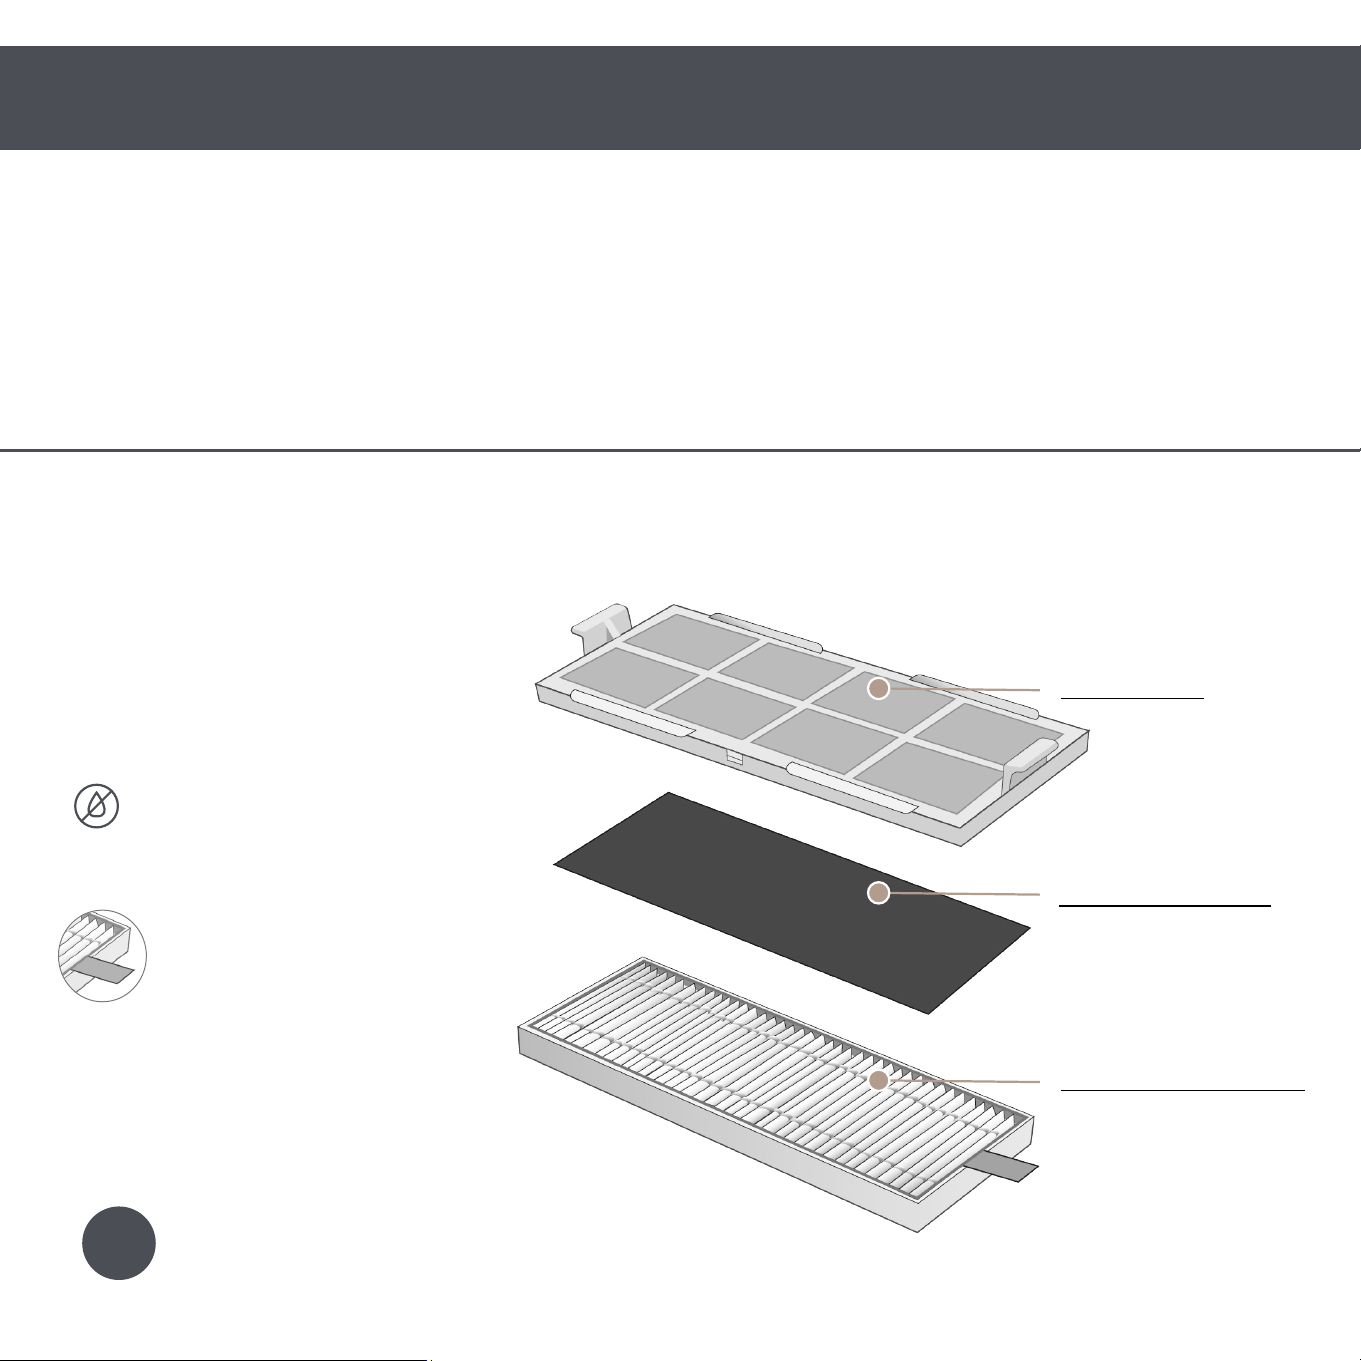
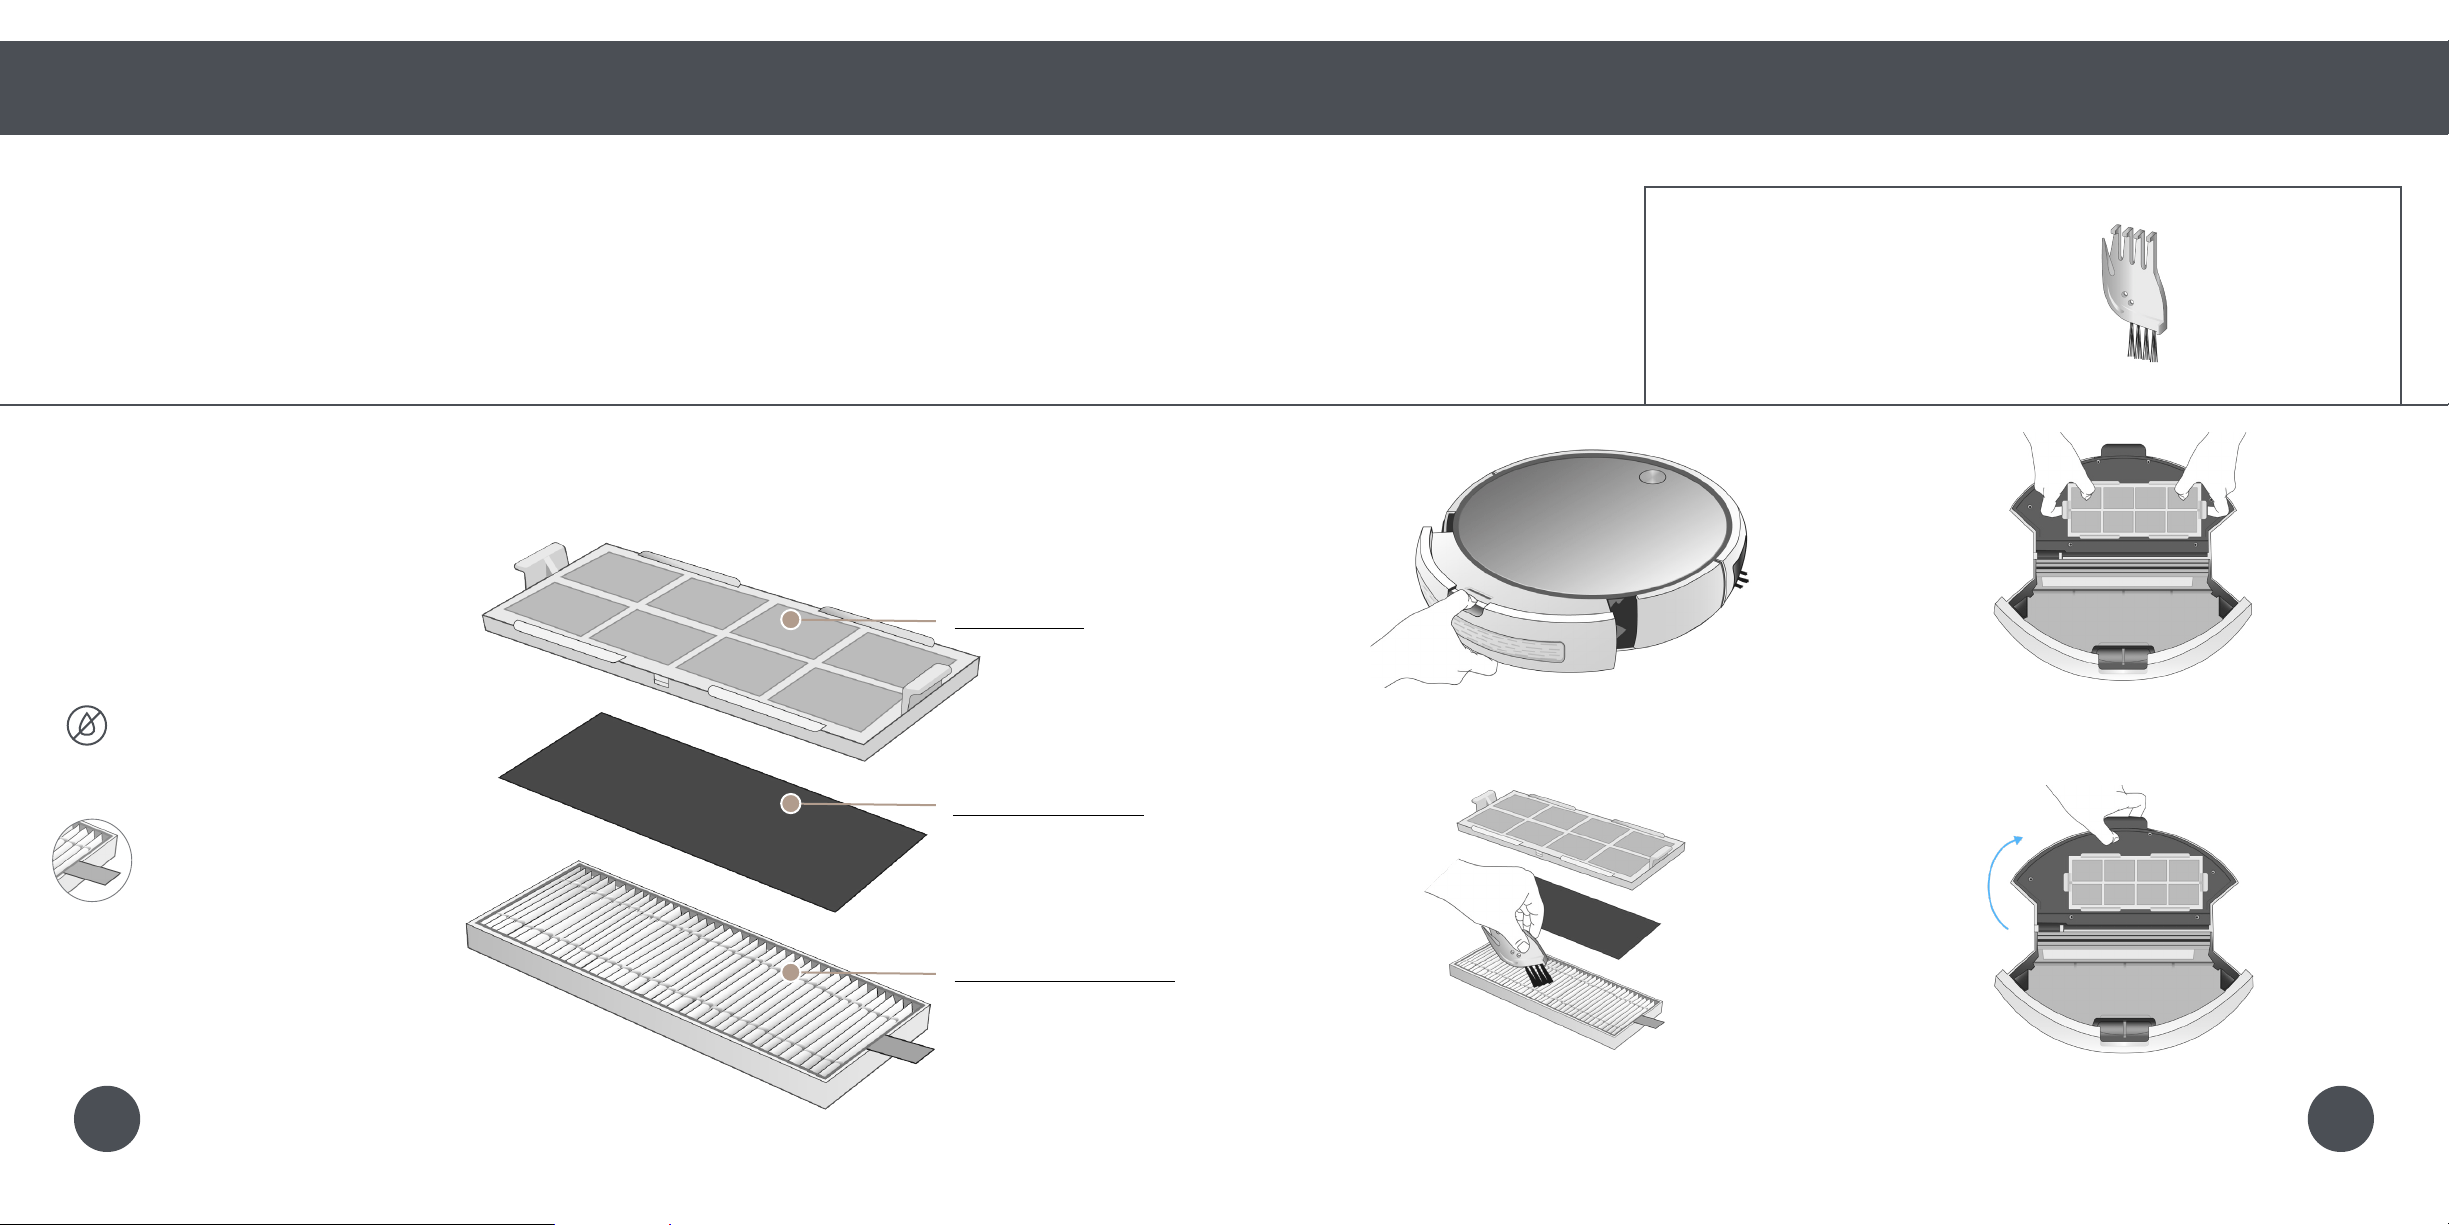
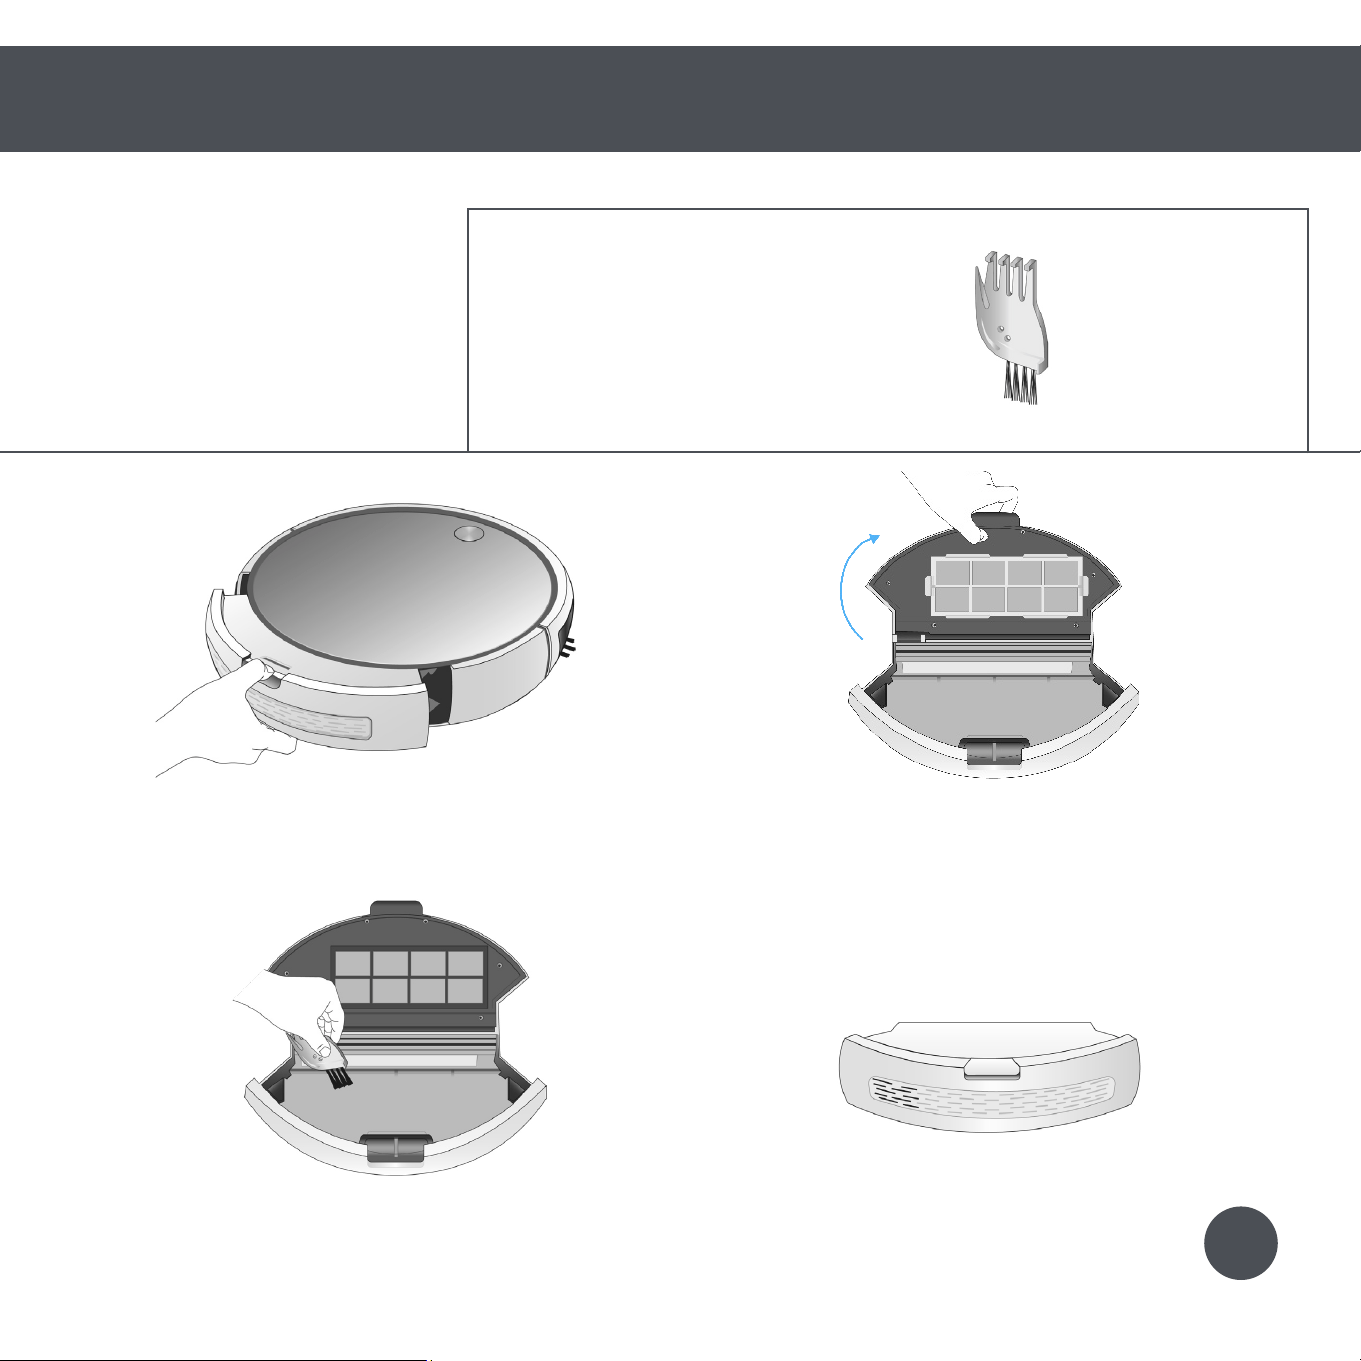
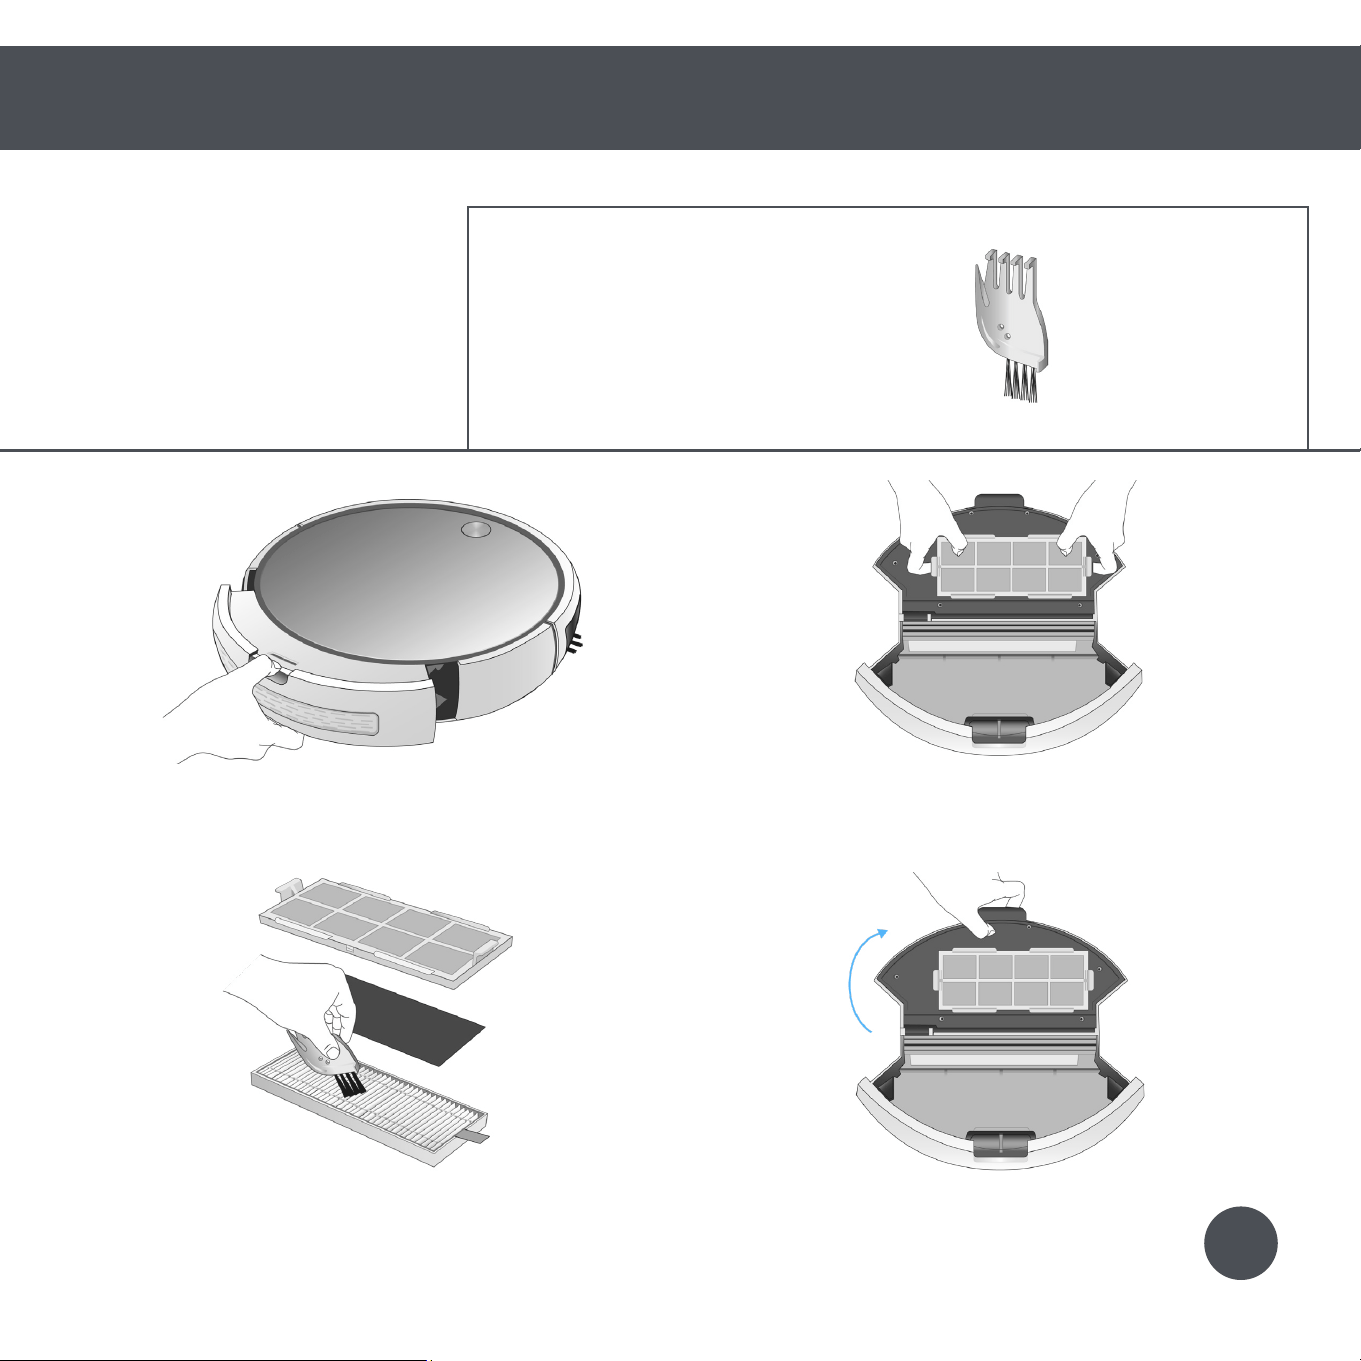
Quick Start
Parts and Maintenance
Filters
Filter Frame
High-Efciency Filter
For ne particles
Electrostatic Filter
For smaller particles
Filters
To maximize Bob’s efciency, it is best to clean his lters about once a week and replace them about
once every 6 months. Three lters are located inside the dustbin. These lters capture ne particles and
prevent them from escaping the dustbin.
1. Push down the tab on Bob’s back and
slide the dustbin out.
4. Replace the lters and the lter tray.
Close the dustbin and slide it back
into Bob.
3. Remove the lters and brush them with
Bob’s cleaning tool.
Cleaning Bob’s Filters
2.
Lift the tab to open the dustbin. Lift the
lter tray out, using the tabs for leverage.
Parts You’ll Need: Cleaning Tool
Do not wash the dustbin
without removing the lters
rst.
When replacing the lters,
make sure the tab on the
high-efciency lter faces
up.
Quick Tips:
4241
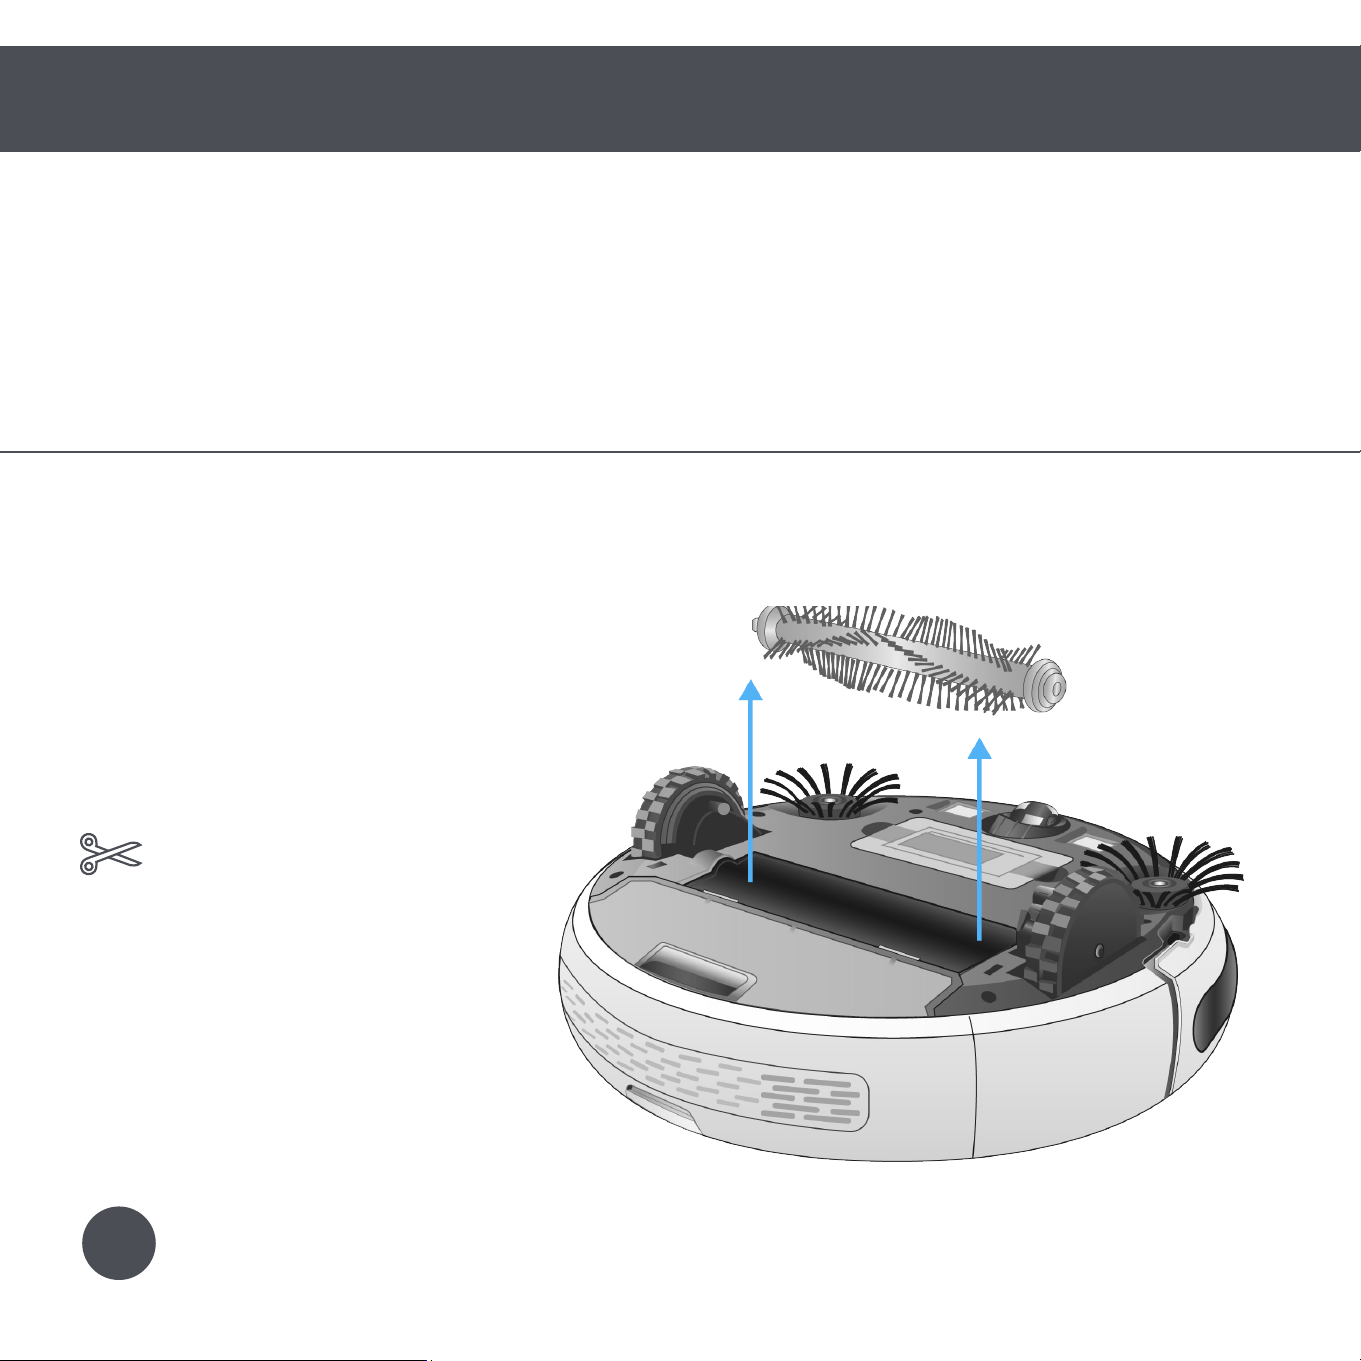
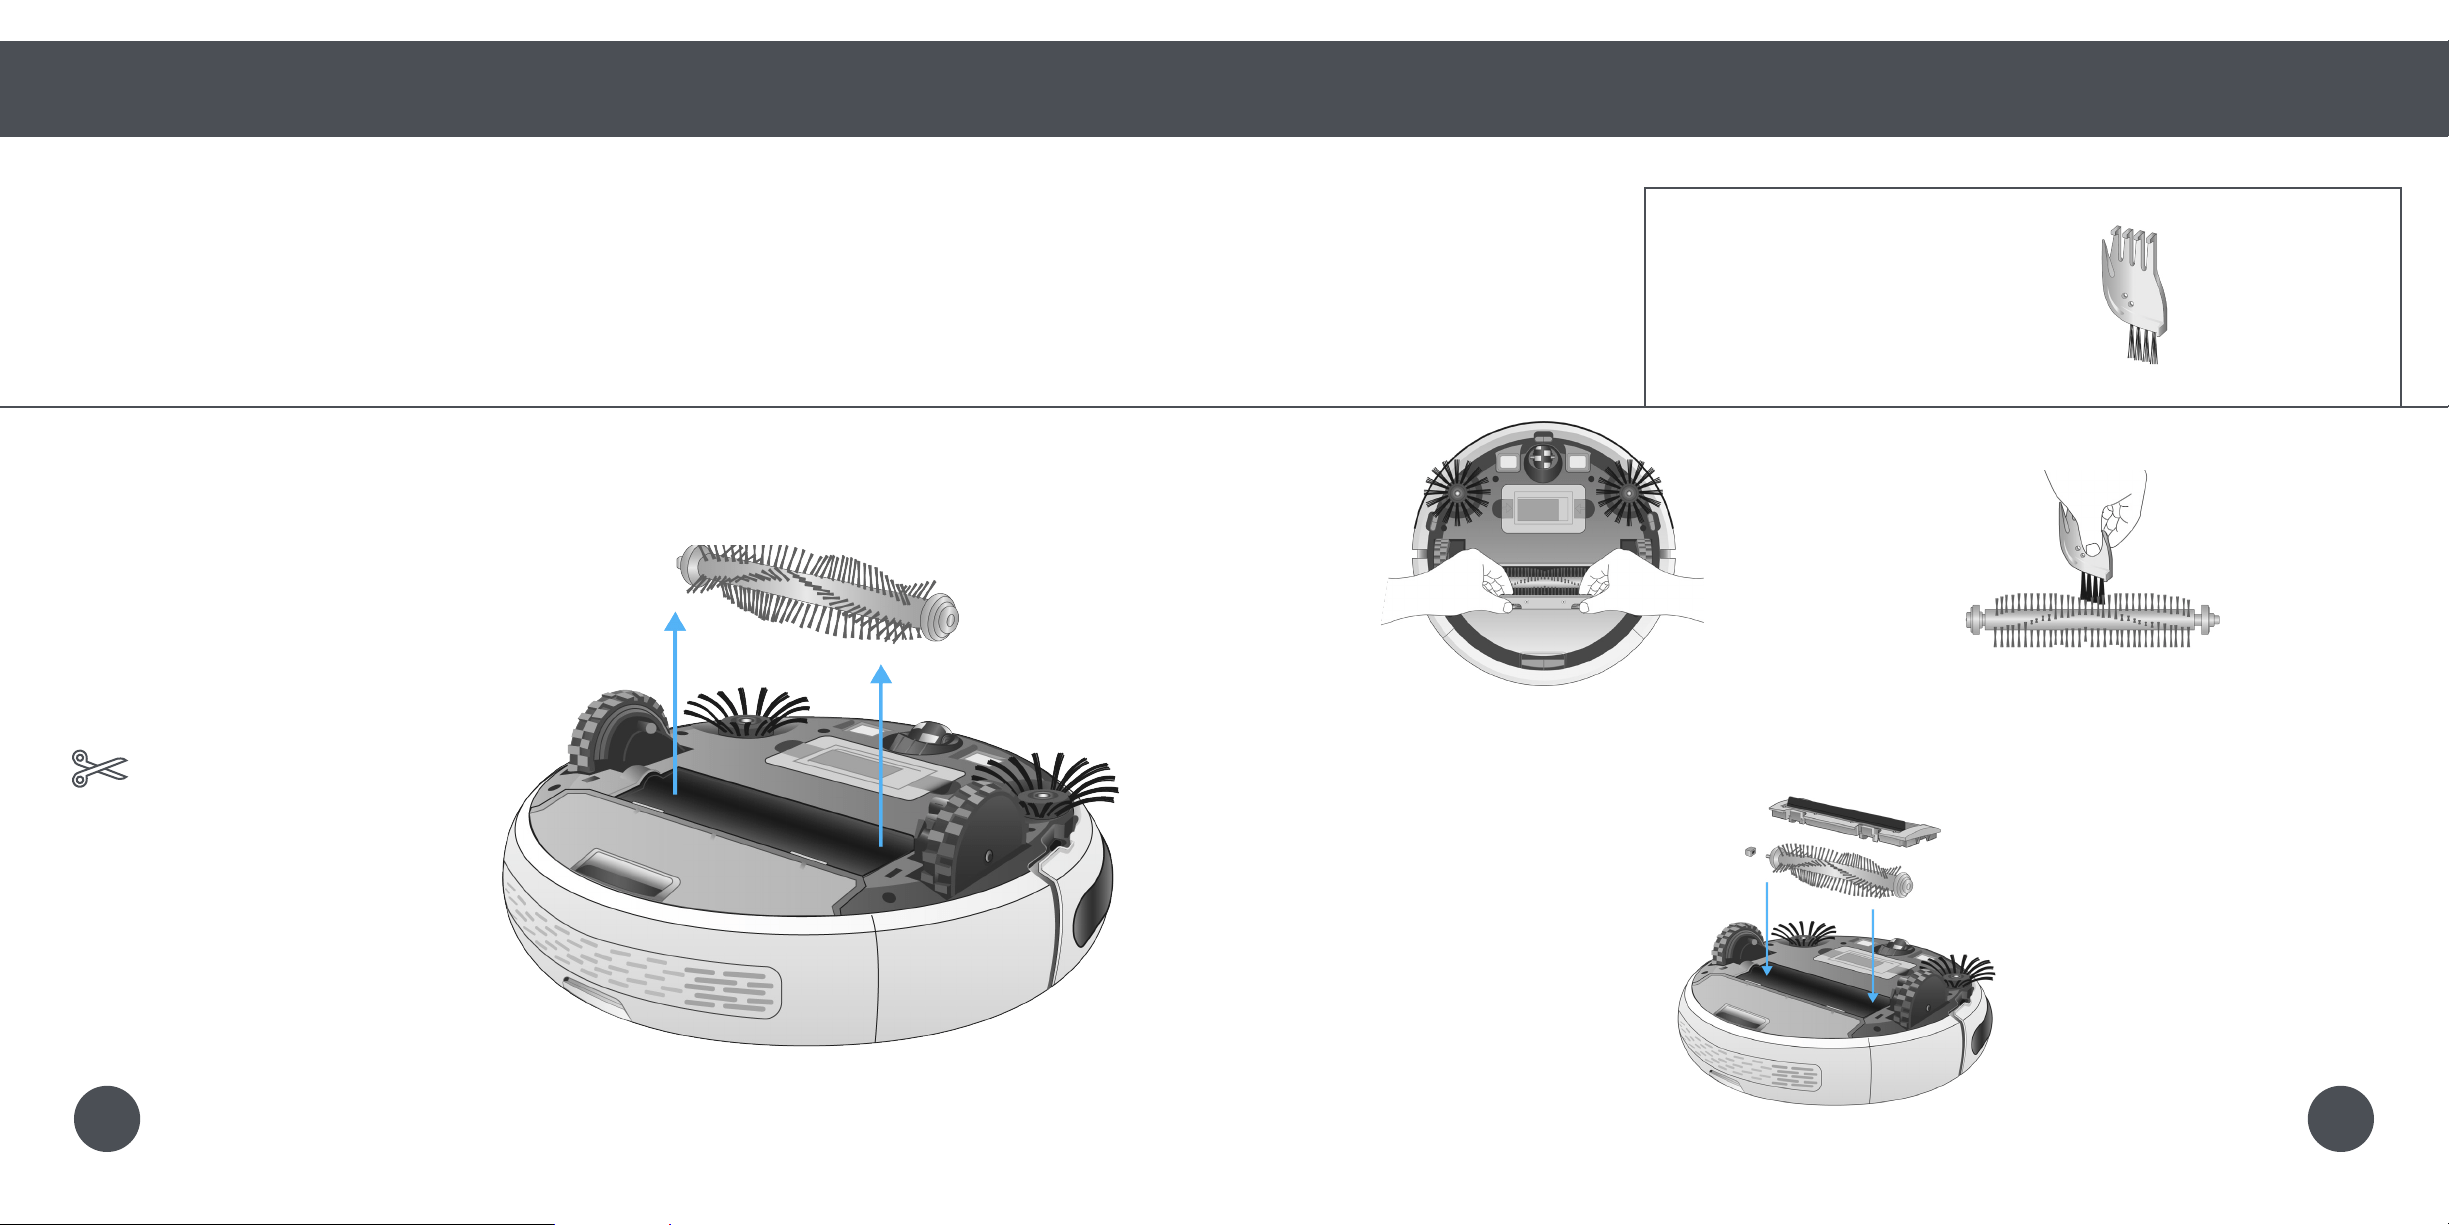
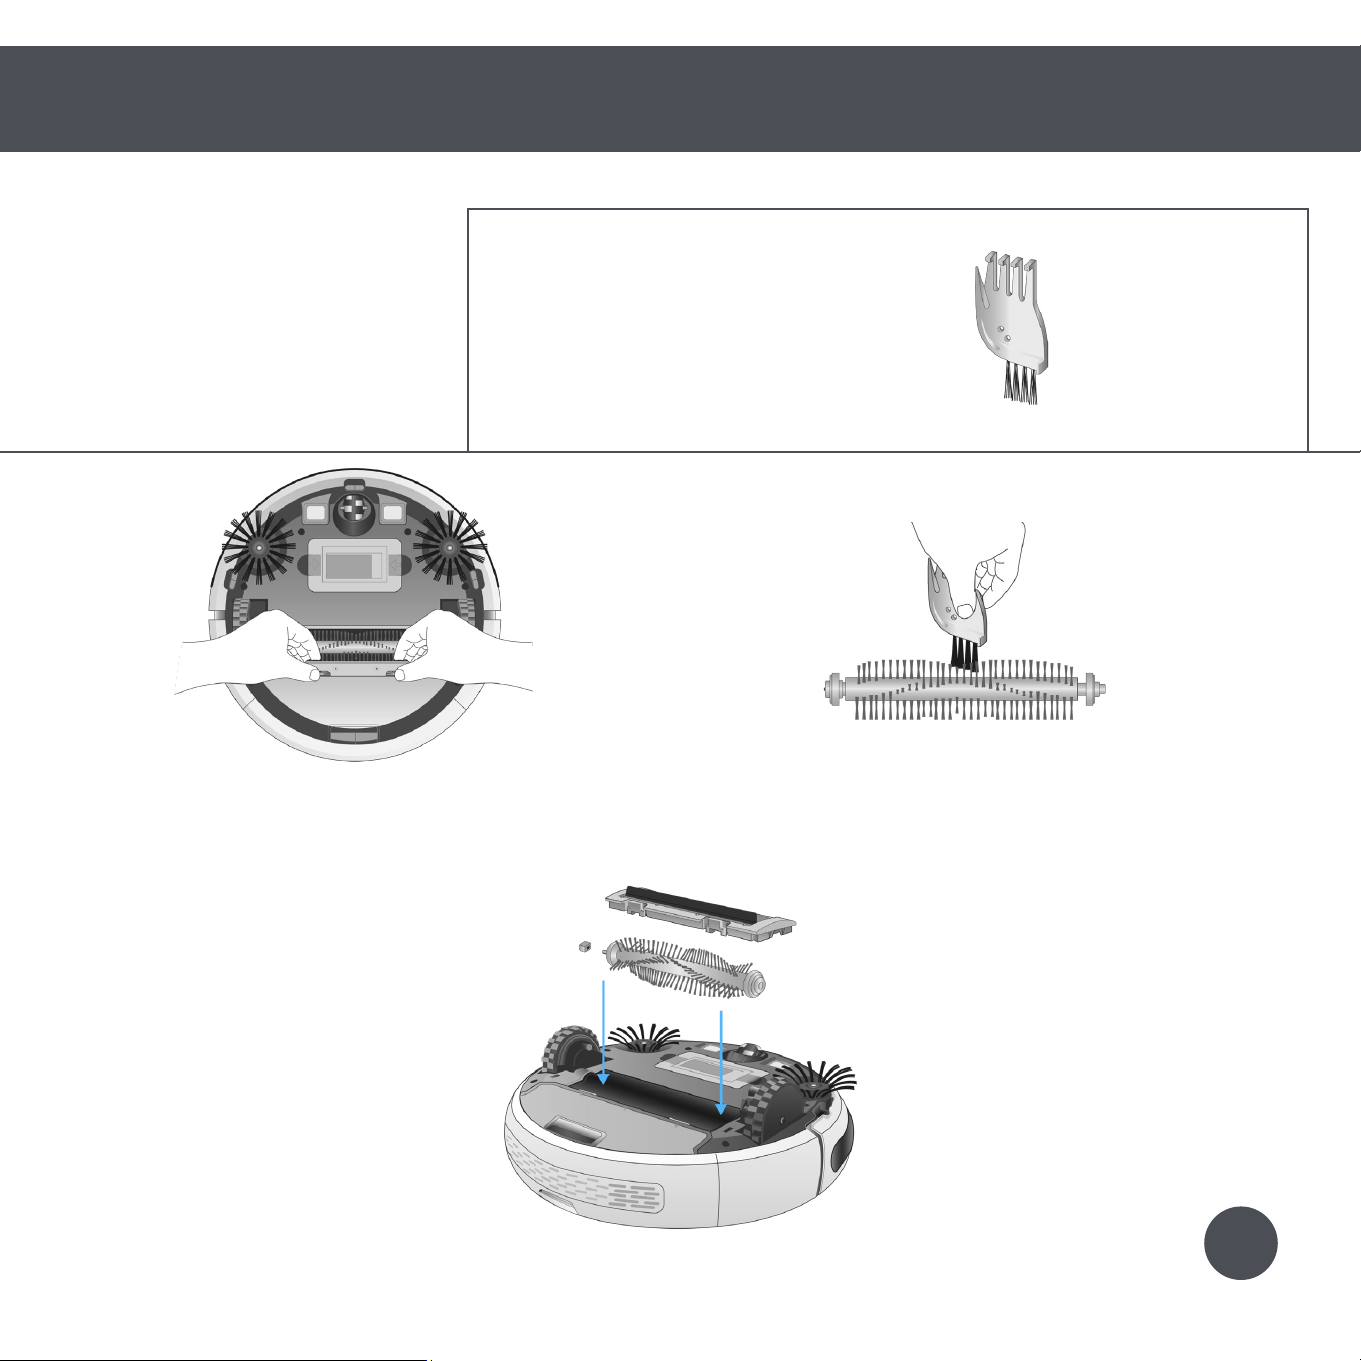
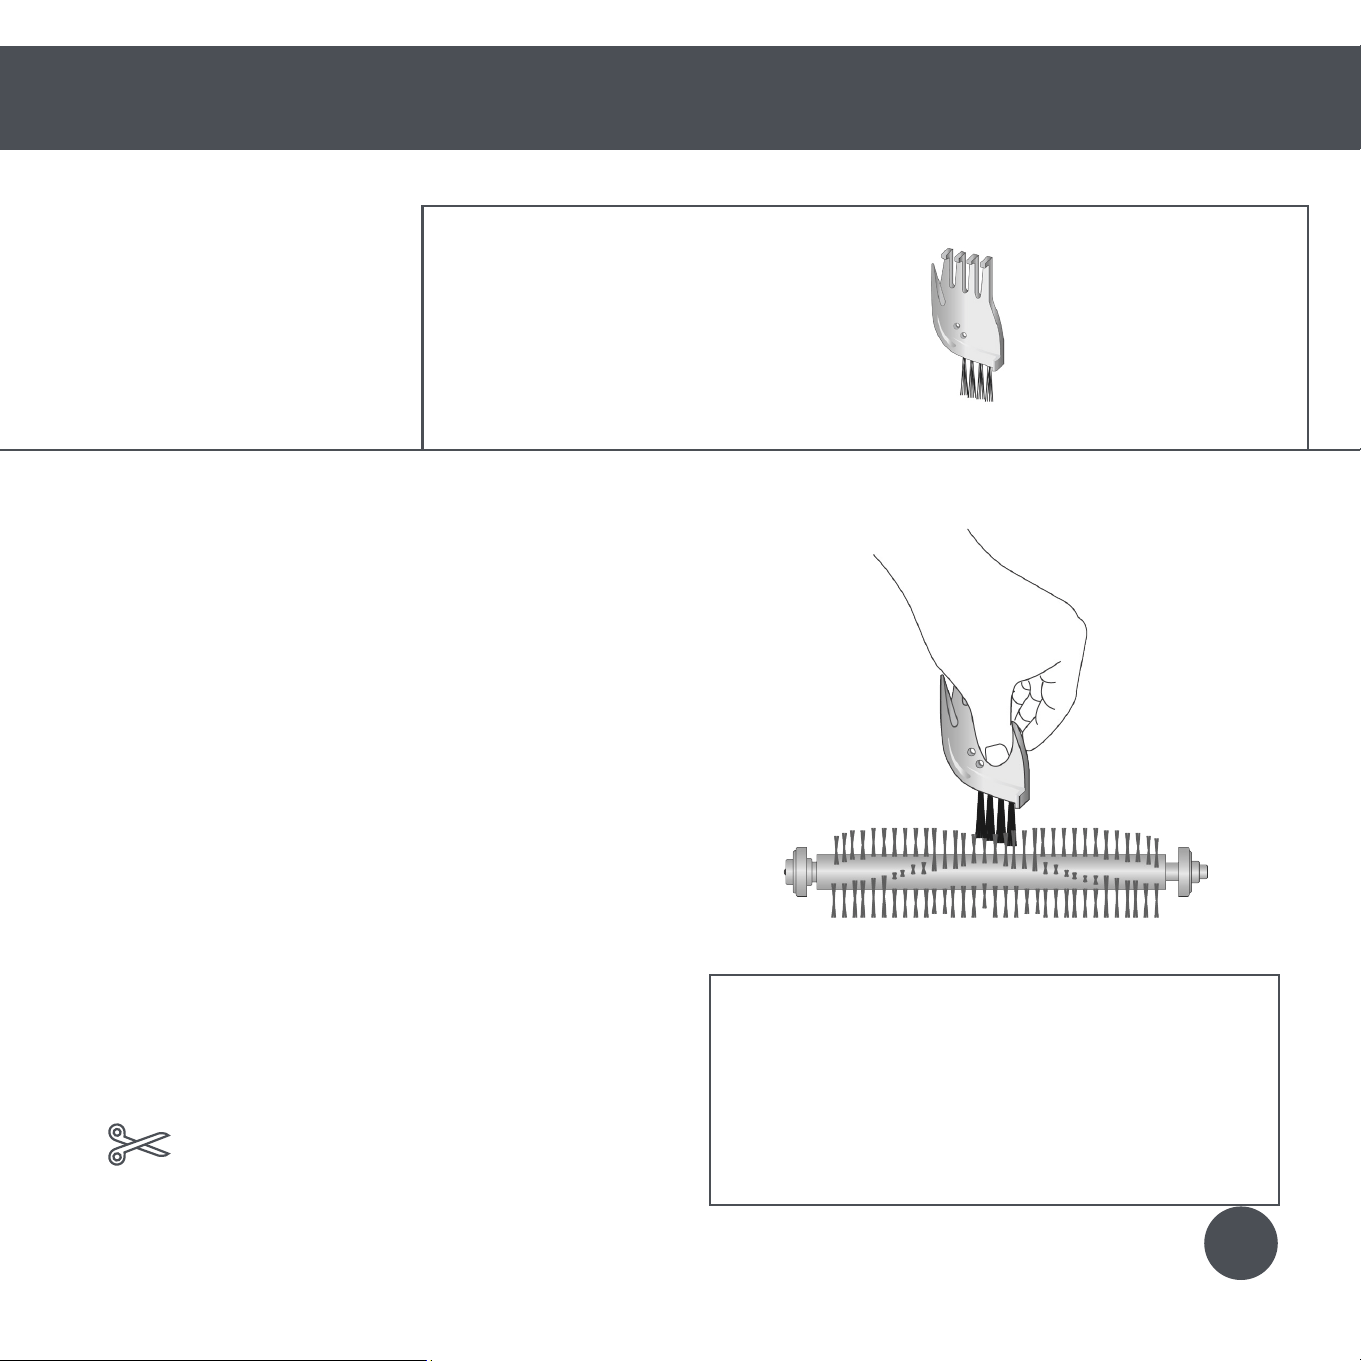
Quick Start
Parts and Maintenance
Main Brush
Main Brush
To maximize Bob’s efciency, it is best to clean his main brush about once a week.
Cleaning Bob’s Main Brush
1.
Push in the tabs on the main brush
frame and lift.
2. Use Bob’s cleaning tool to clean the main
brush and the notches inside Bob where
the brush is held.
3. When done, secure the brush cap to the pin end of the main brush. Lastly, replace the
main brush and main brush frame.
Parts You’ll Need: Cleaning Tool
You may use scissors to cut
away entanglements of hair,
or tweezers to unclog the
notches inside Bob.
Quick Tips:
4443
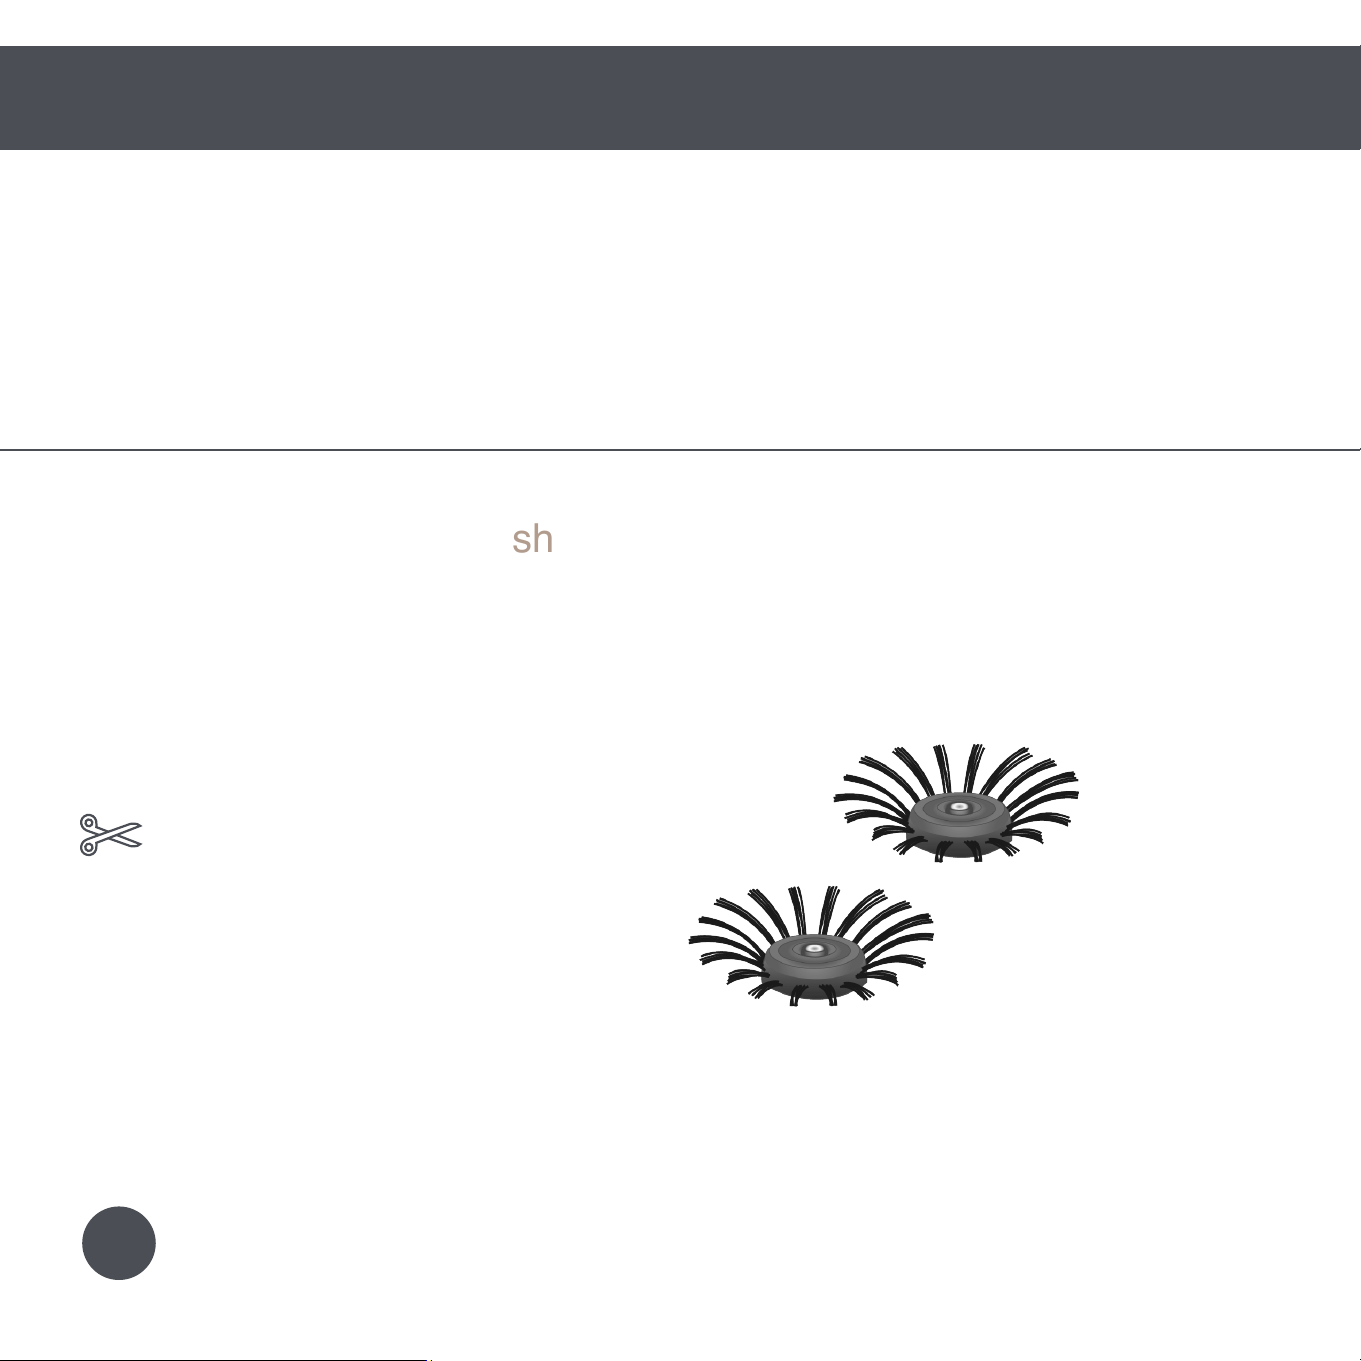
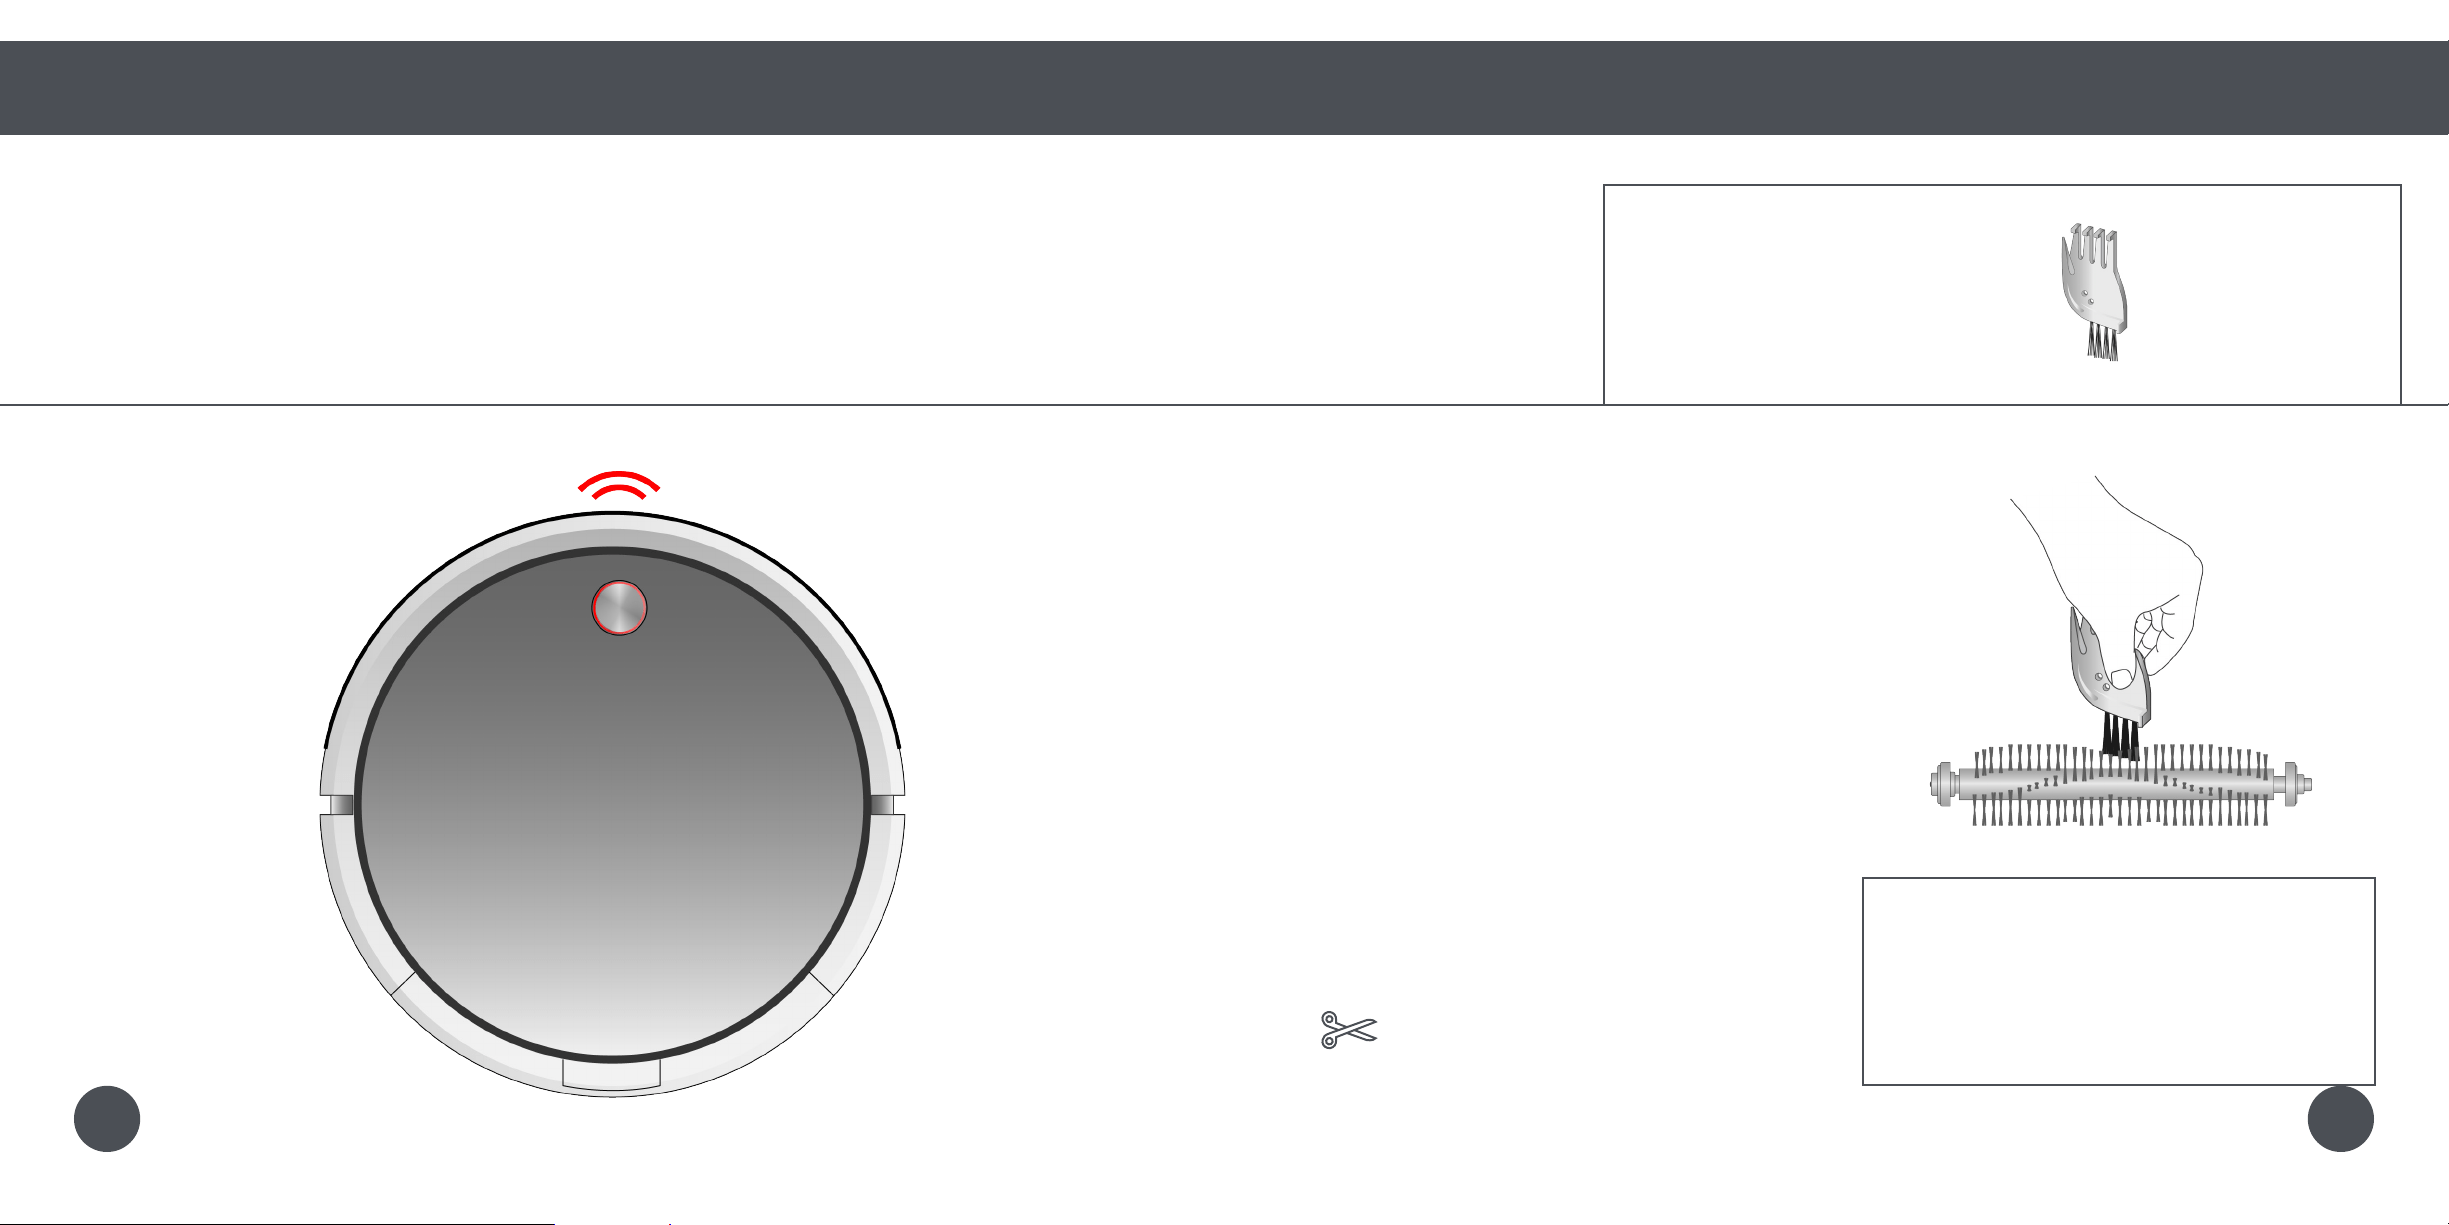
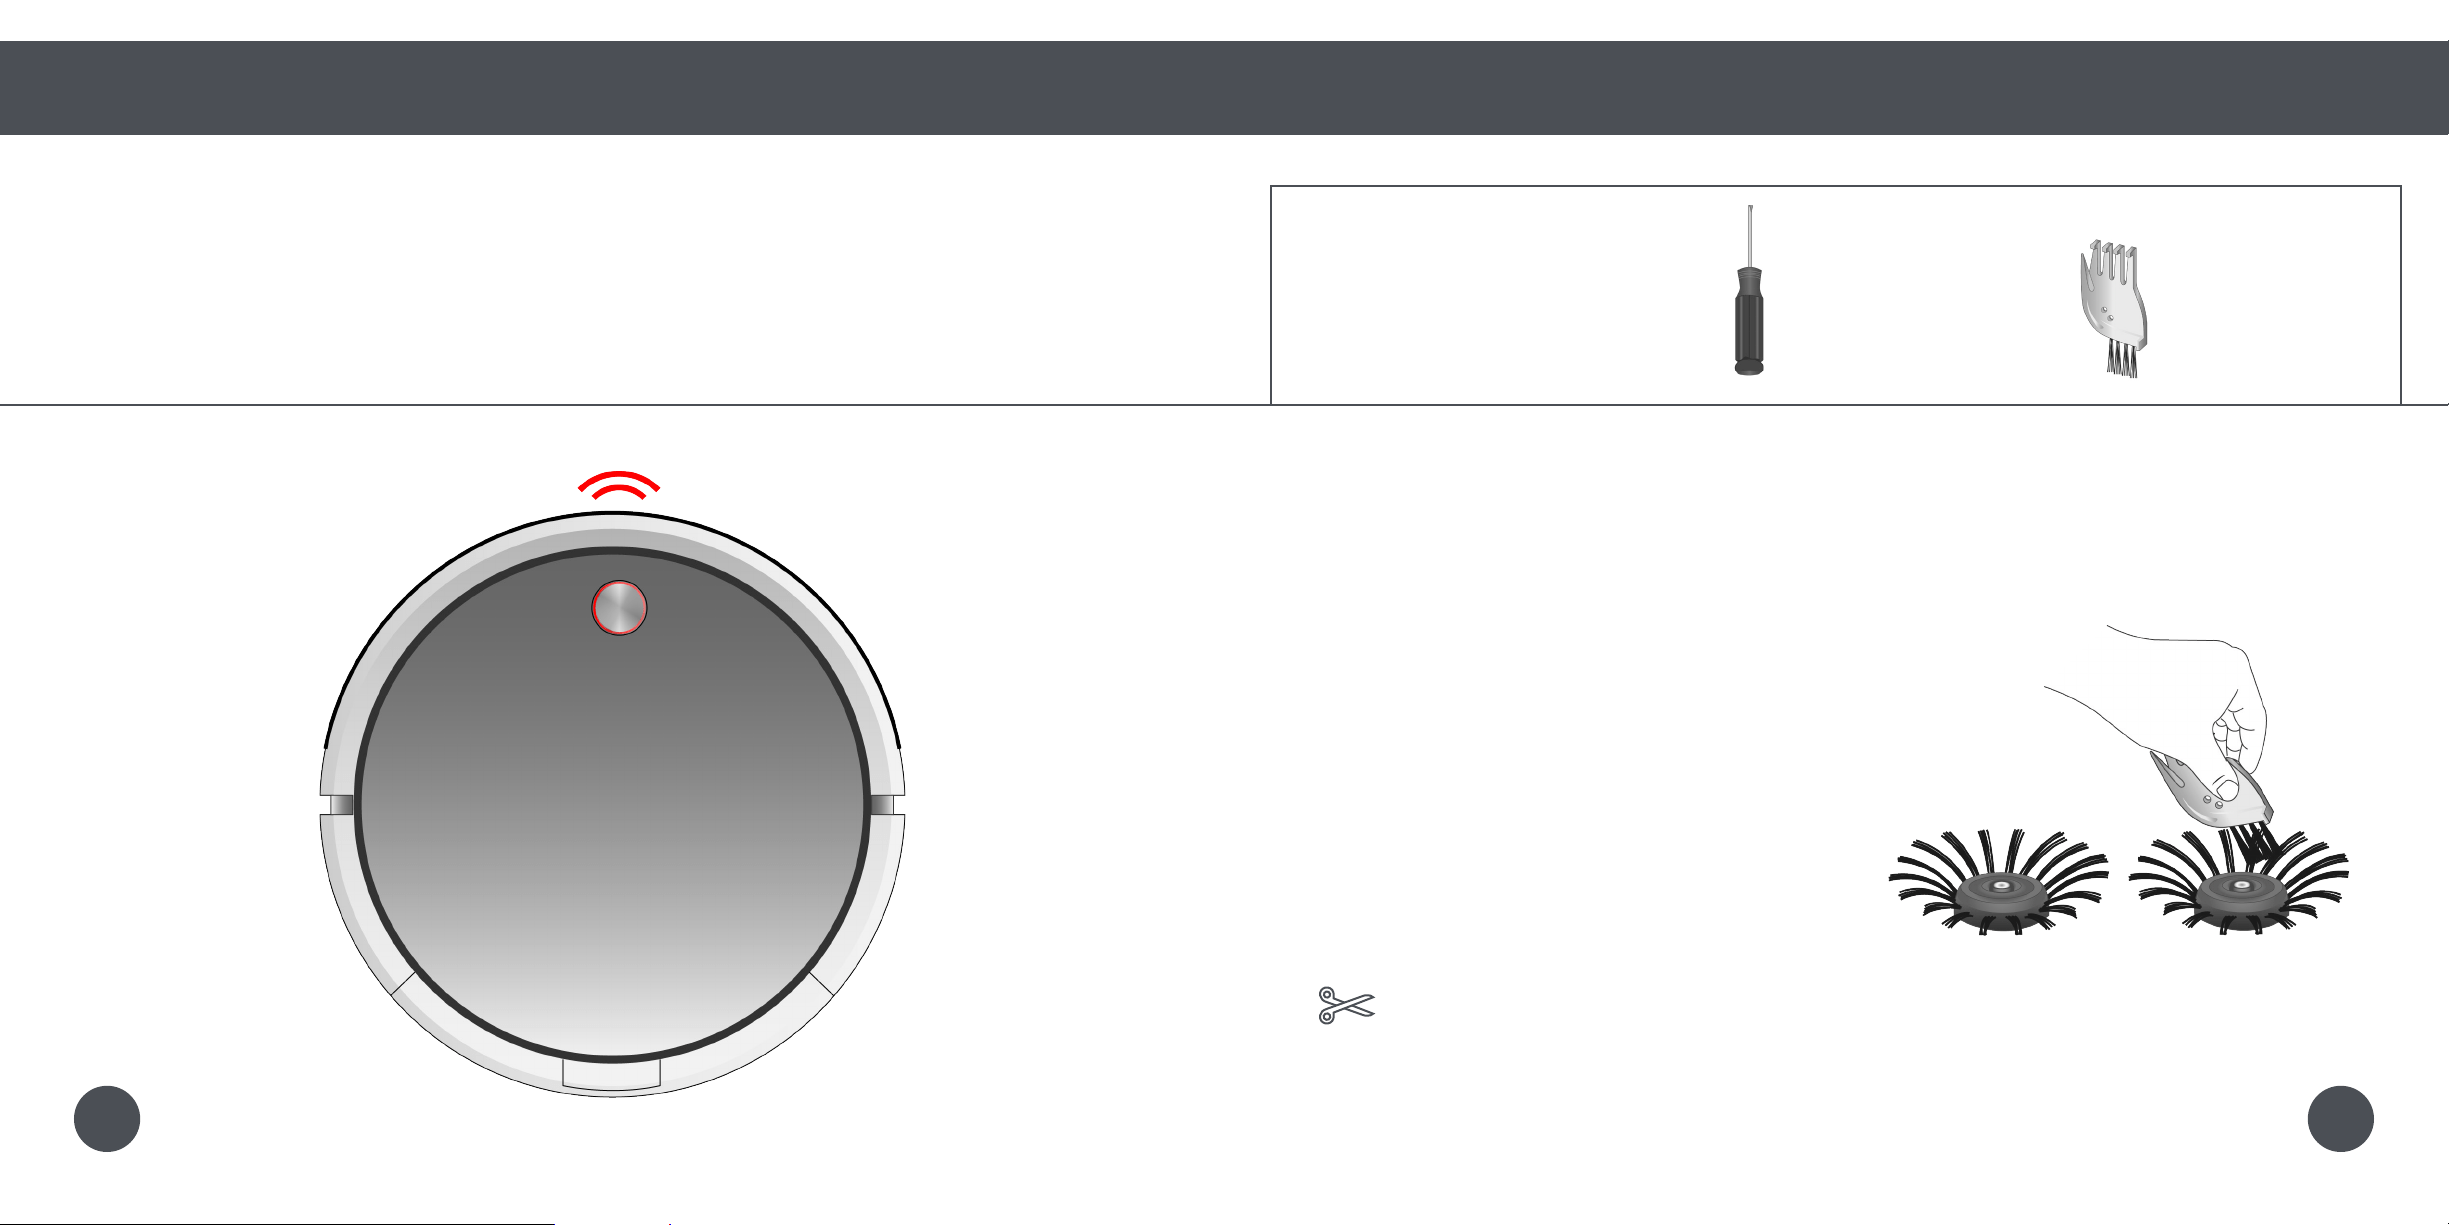
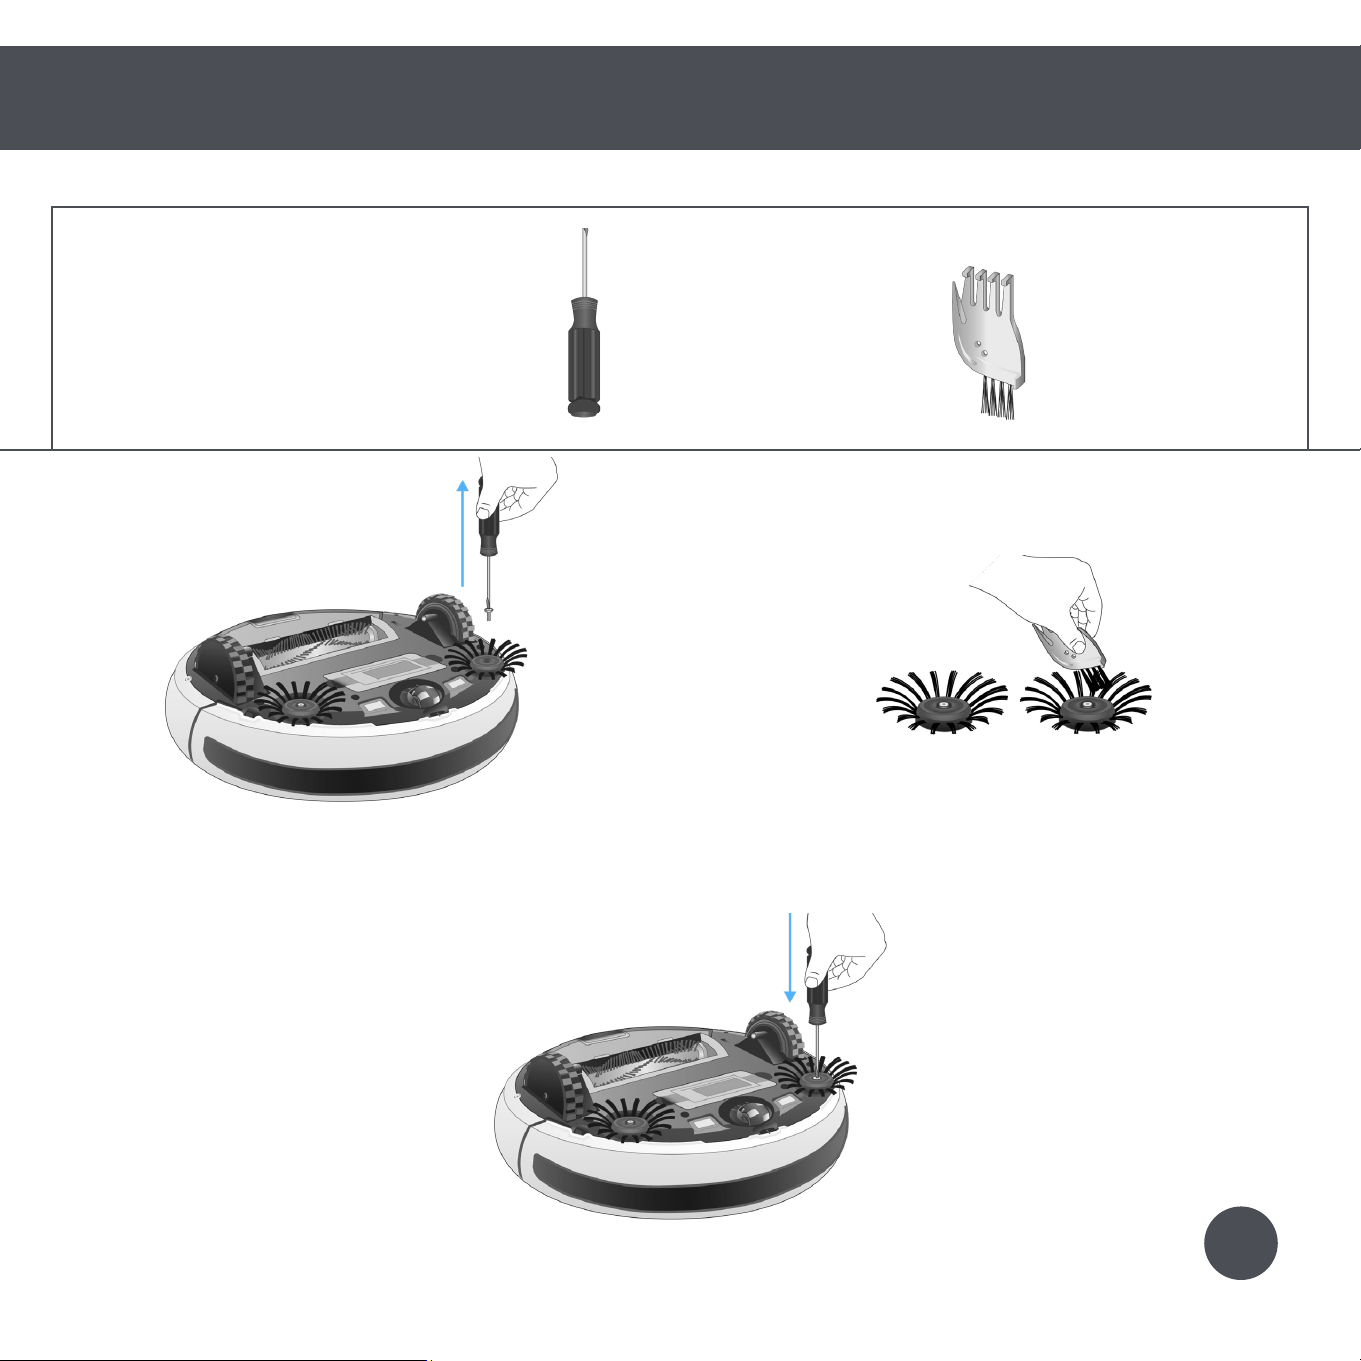
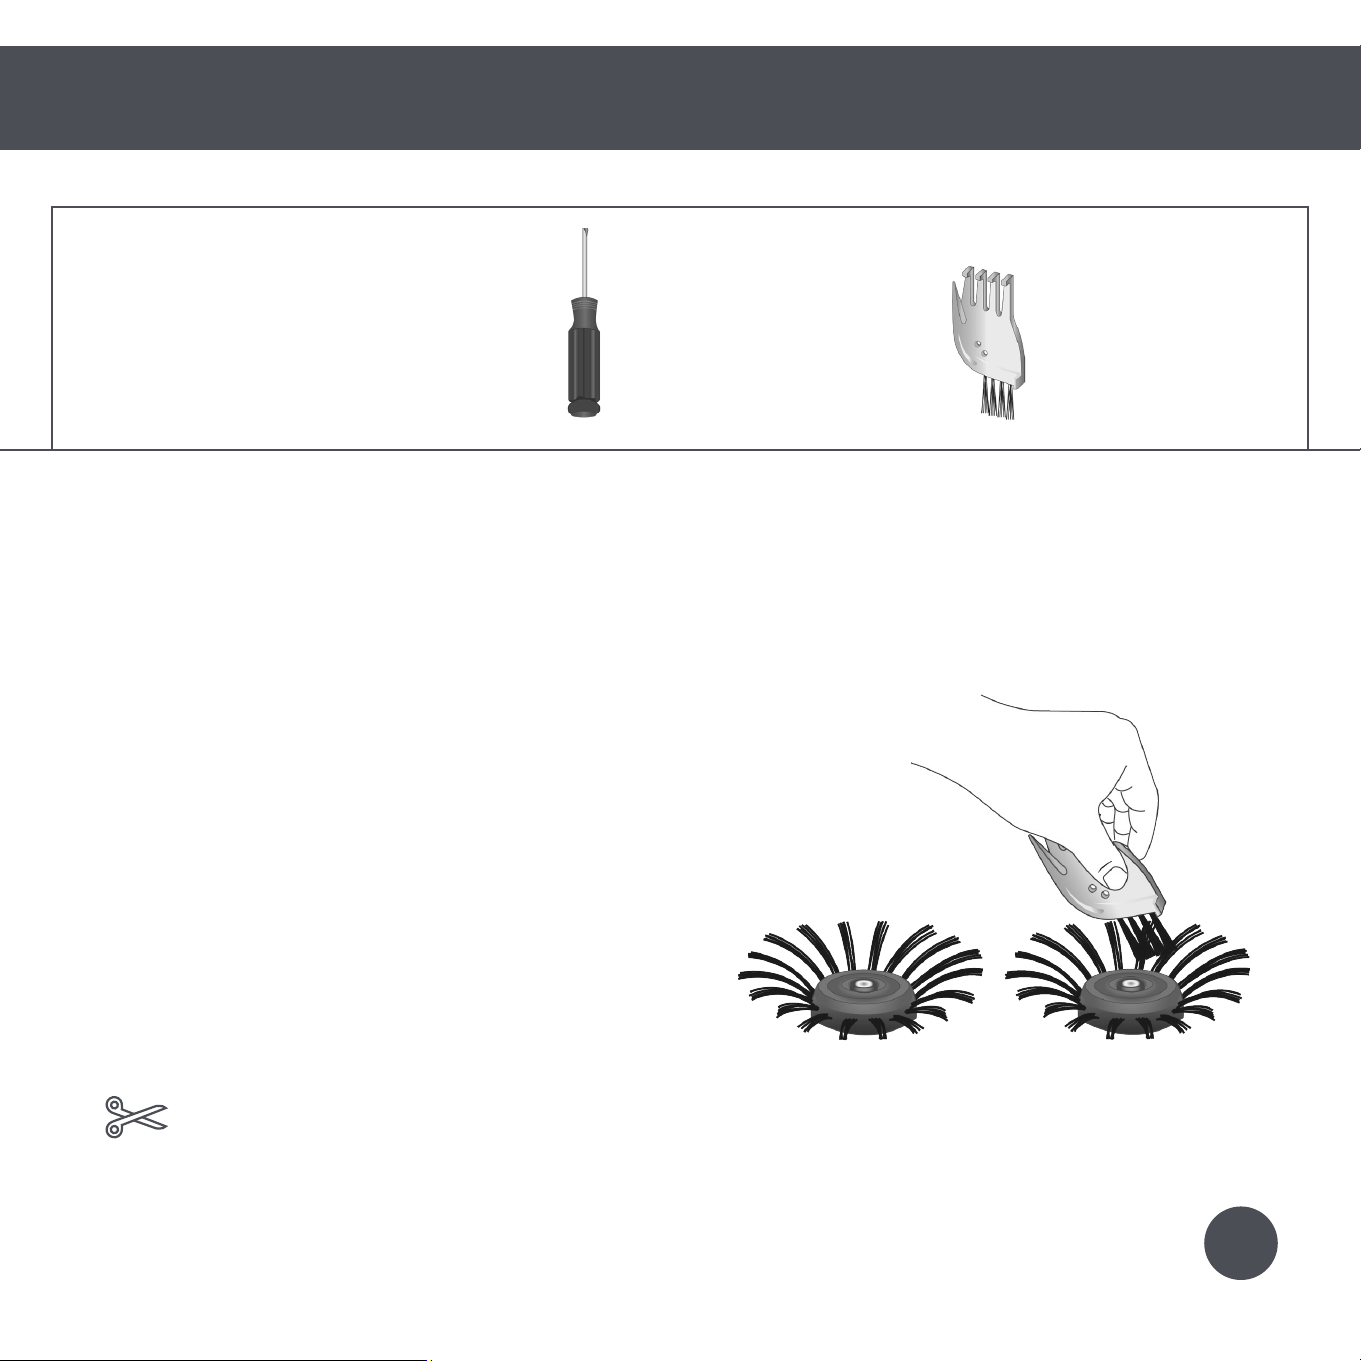
Quick Start
Parts and Maintenance
Side Brush
Side Brush
To maximize Bob’s efciency, it is best to clean his side brush about once a week.
Parts You’ll Need: Screwdriver Cleaning Tool
1. Remove the screw on the side brush.
3. When done, replace the side brushes and screws.
2. Use the cleaning tool to clean the side
brushes and the brush sockets.
Cleaning Bob’s Side Brush
You may use scissors to cut
away entanglements of hair,
or tweezers to unclog the
brush sockets.
Quick Tips:
4645
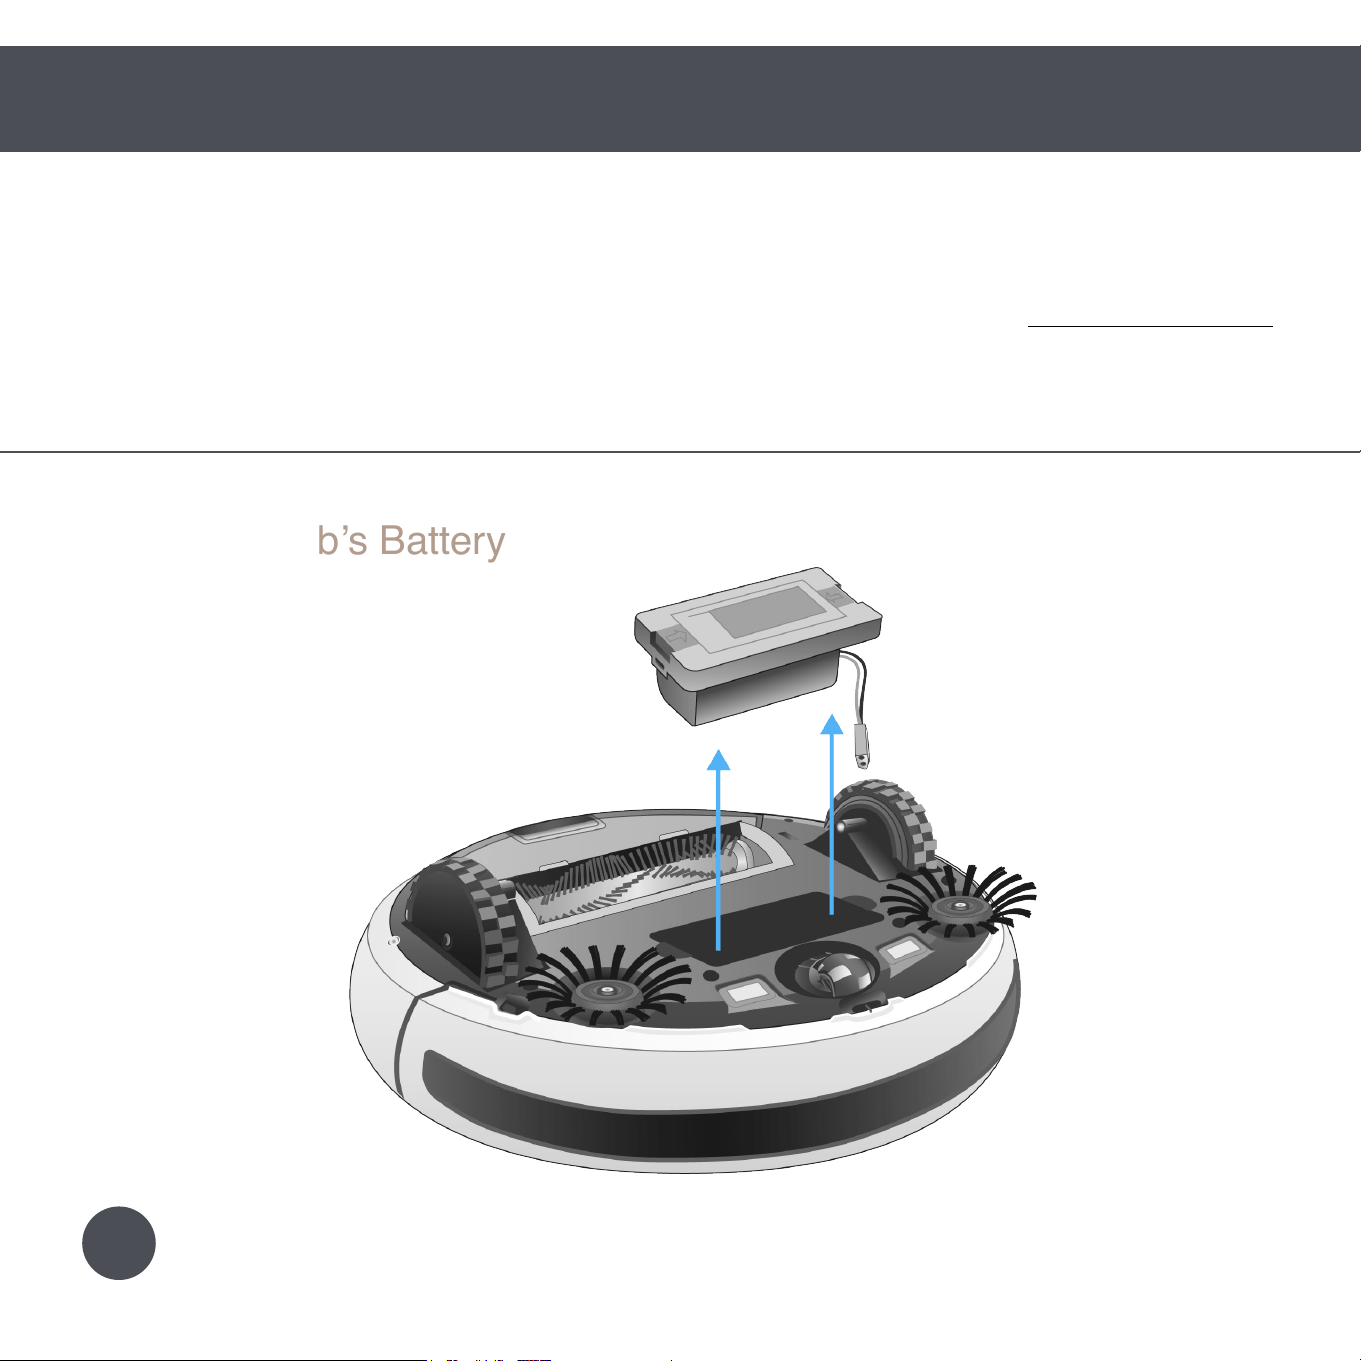
Quick Start
Parts and Maintenance
Battery
Battery
Bob’s battery has a 2-year warranty. Replacement batteries can be purchased at bobsweep.com/shop.
1. Pinch the orange tabs on the battery inward
and lift the battery out.
3. Slide the new battery into Bob and apply
pressure until it clicks into place.
2. Unplug the old battery by pulling at the
circuit junction. Then, plug in your new
battery.
Replacing Bob’s Battery
If you are not using Bob for an
extended period of time, unplug his
charging station, remove his battery,
and store everything in a dry place at
room temperature.
Do not leave Bob in direct sunlight.
4847
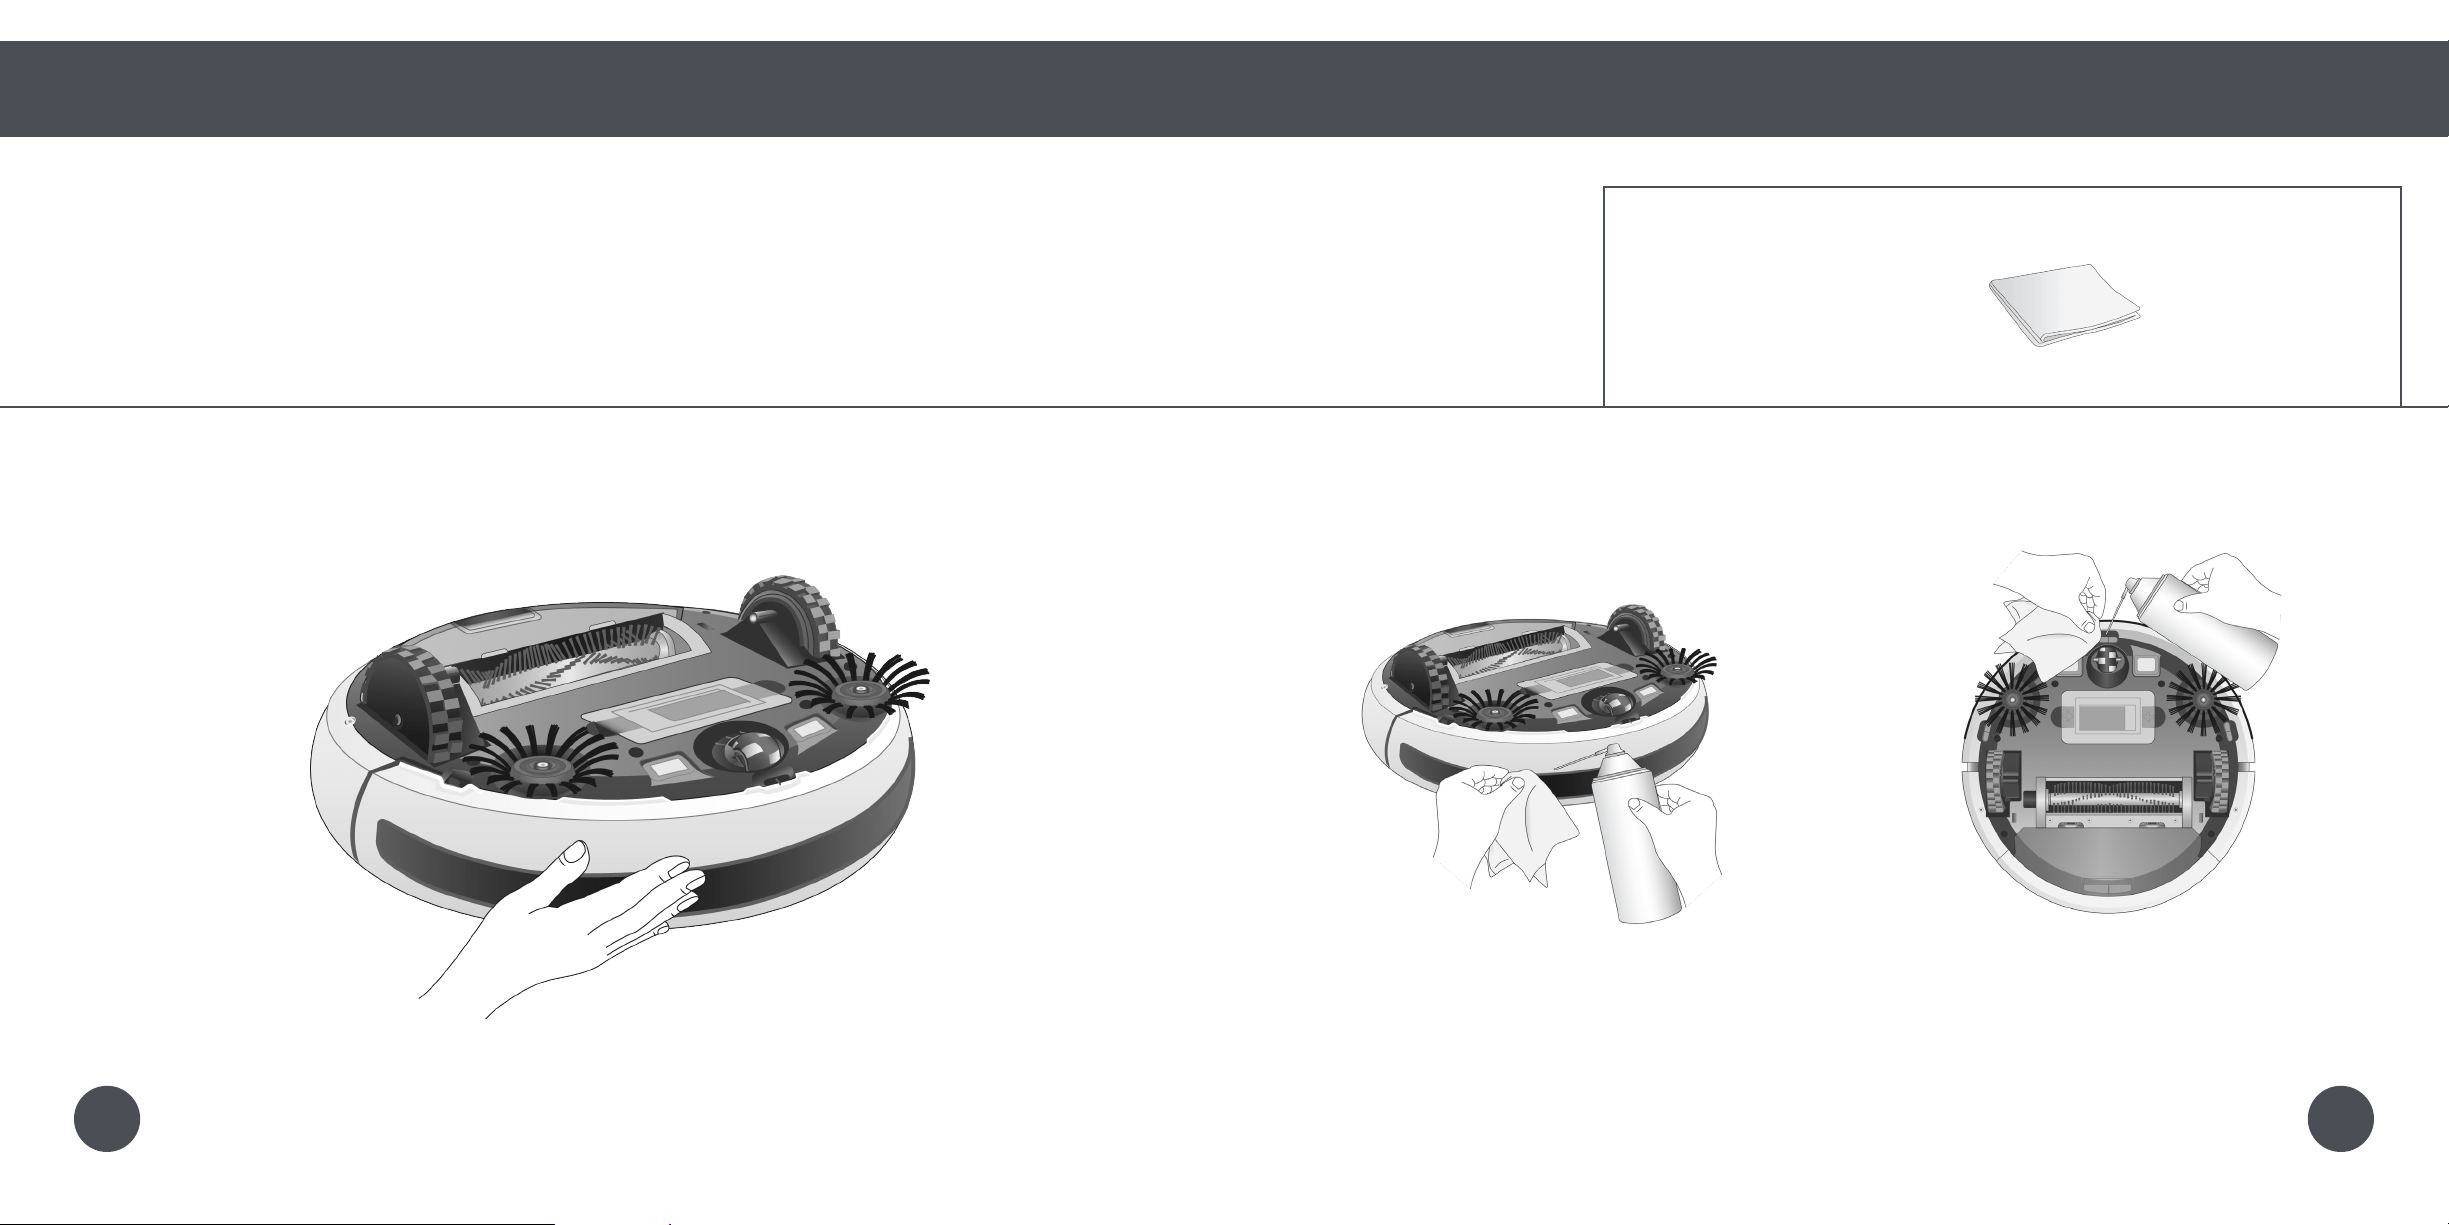
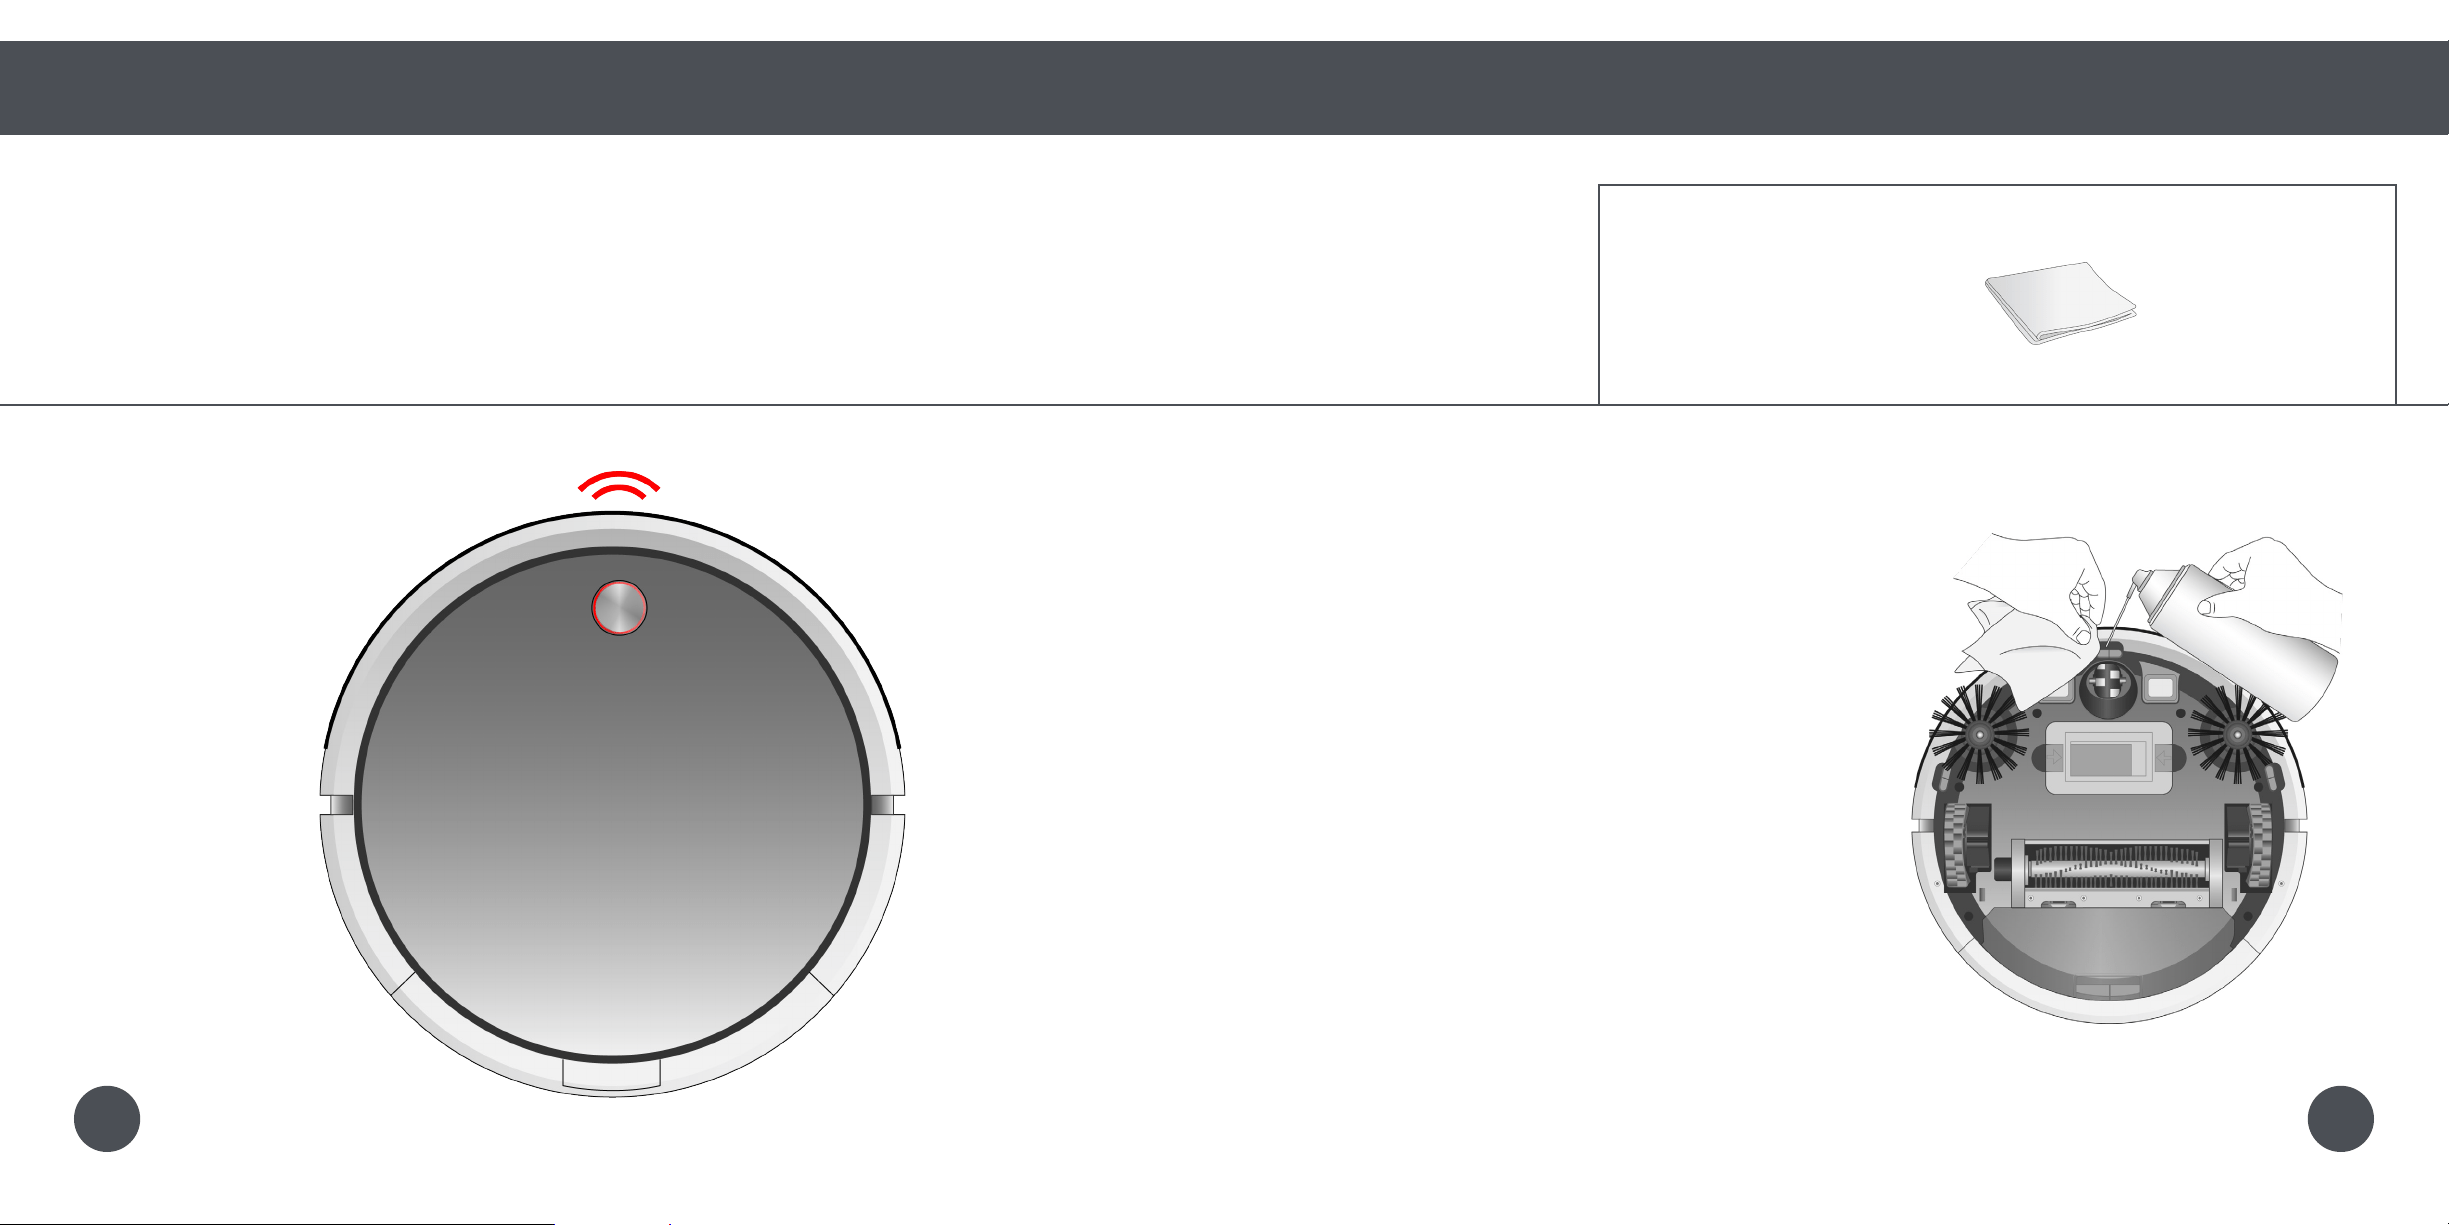
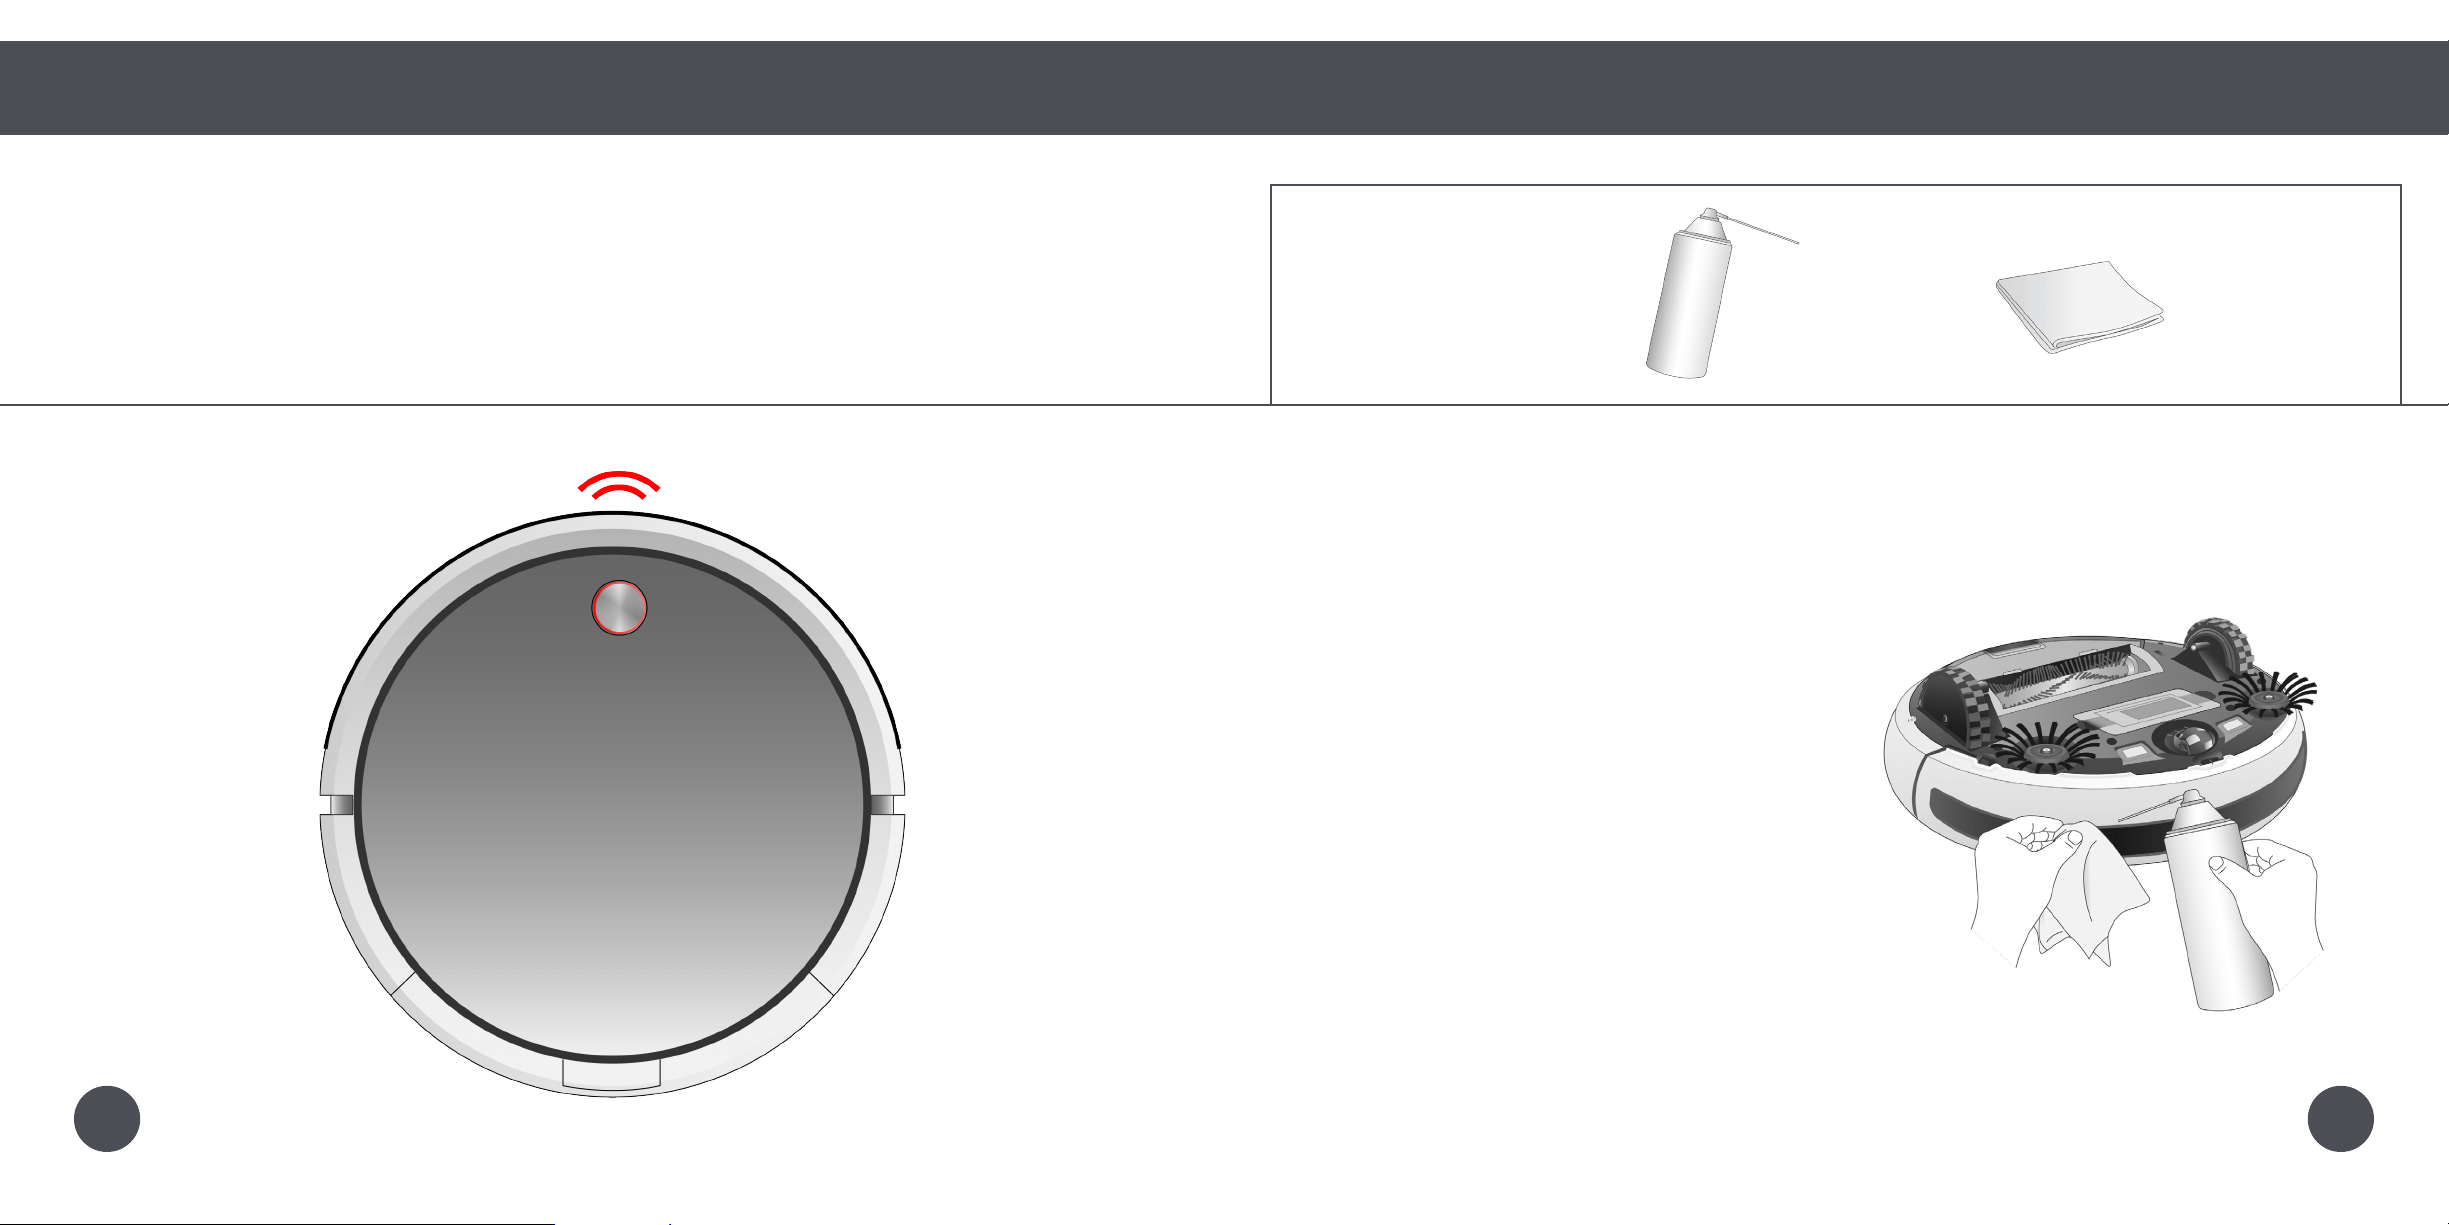
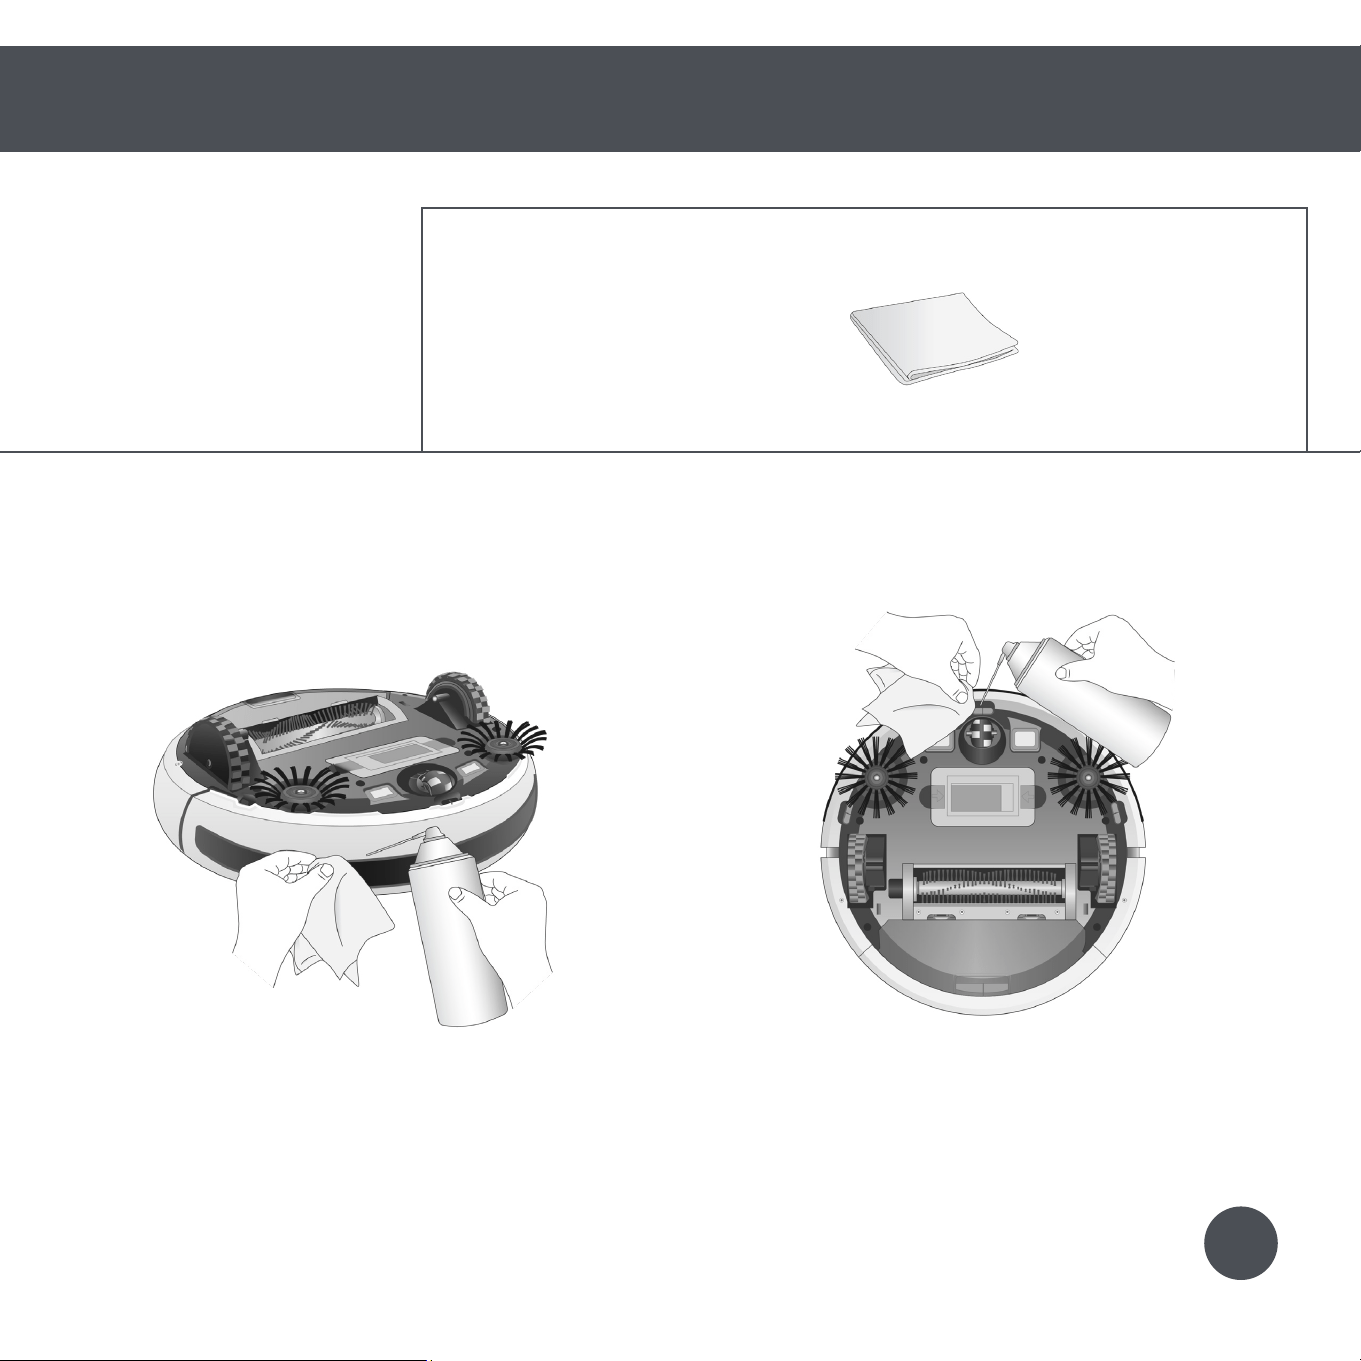
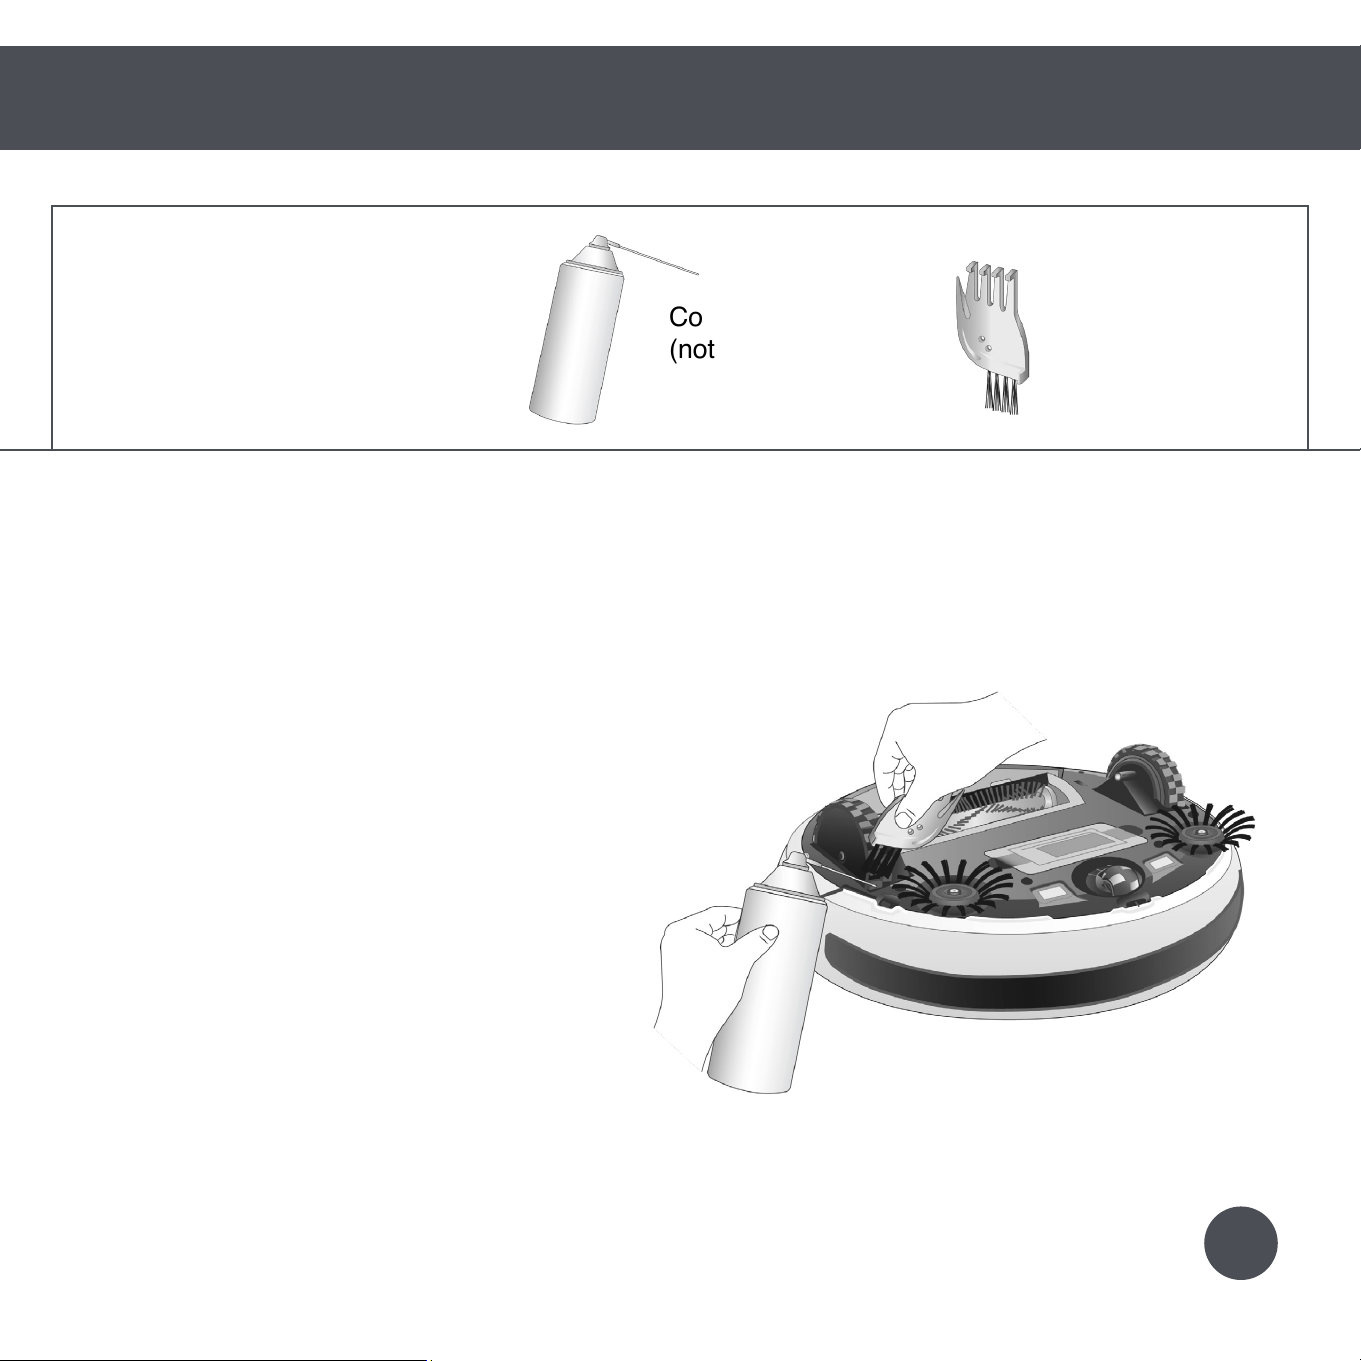
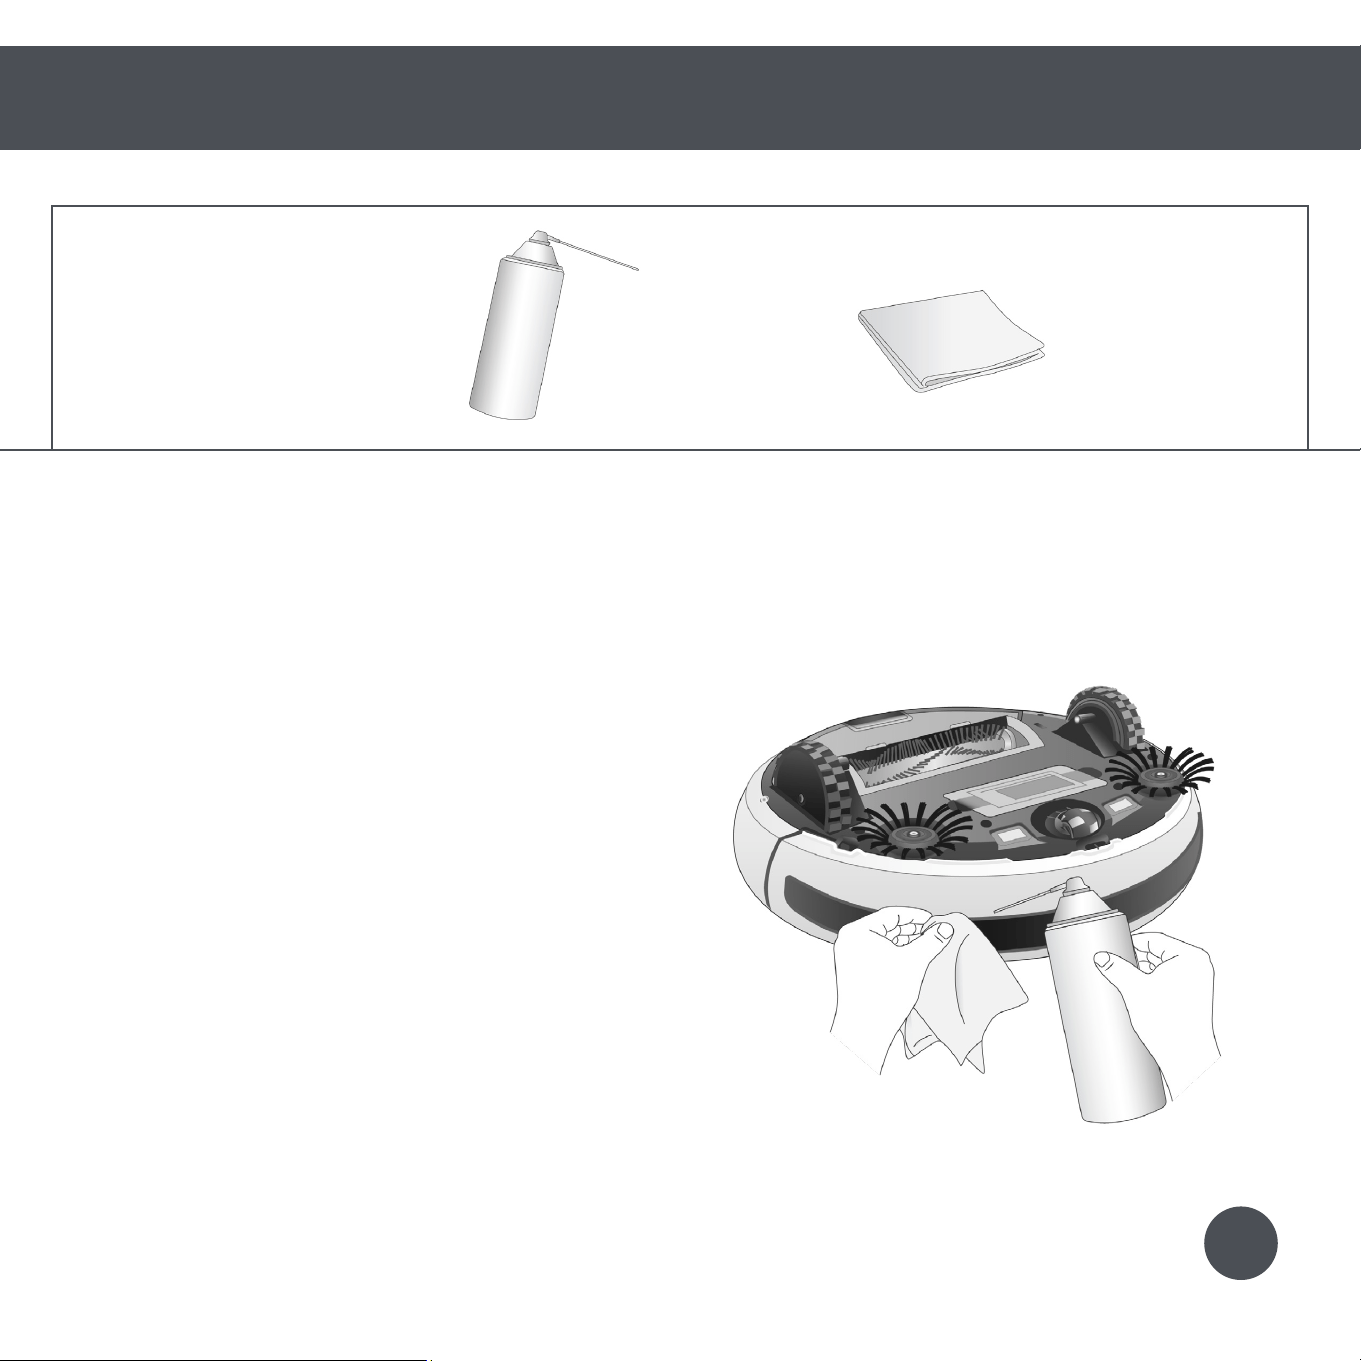
Quick Start
Parts and Maintenance
Sensors
Sensors
To maximize Bob’s efficiency, it is best to clean his sensors about once a week. Bob’s wall sensors are
located along his bumper; his edge sensors are located along the front of his underside.
1. Wipe the wall and edge sensors using a soft cloth slightly dampened with cold water or alcohol.
Cleaning Bob’s Sensors
Parts You’ll Need: Cloth
(not included)
5049
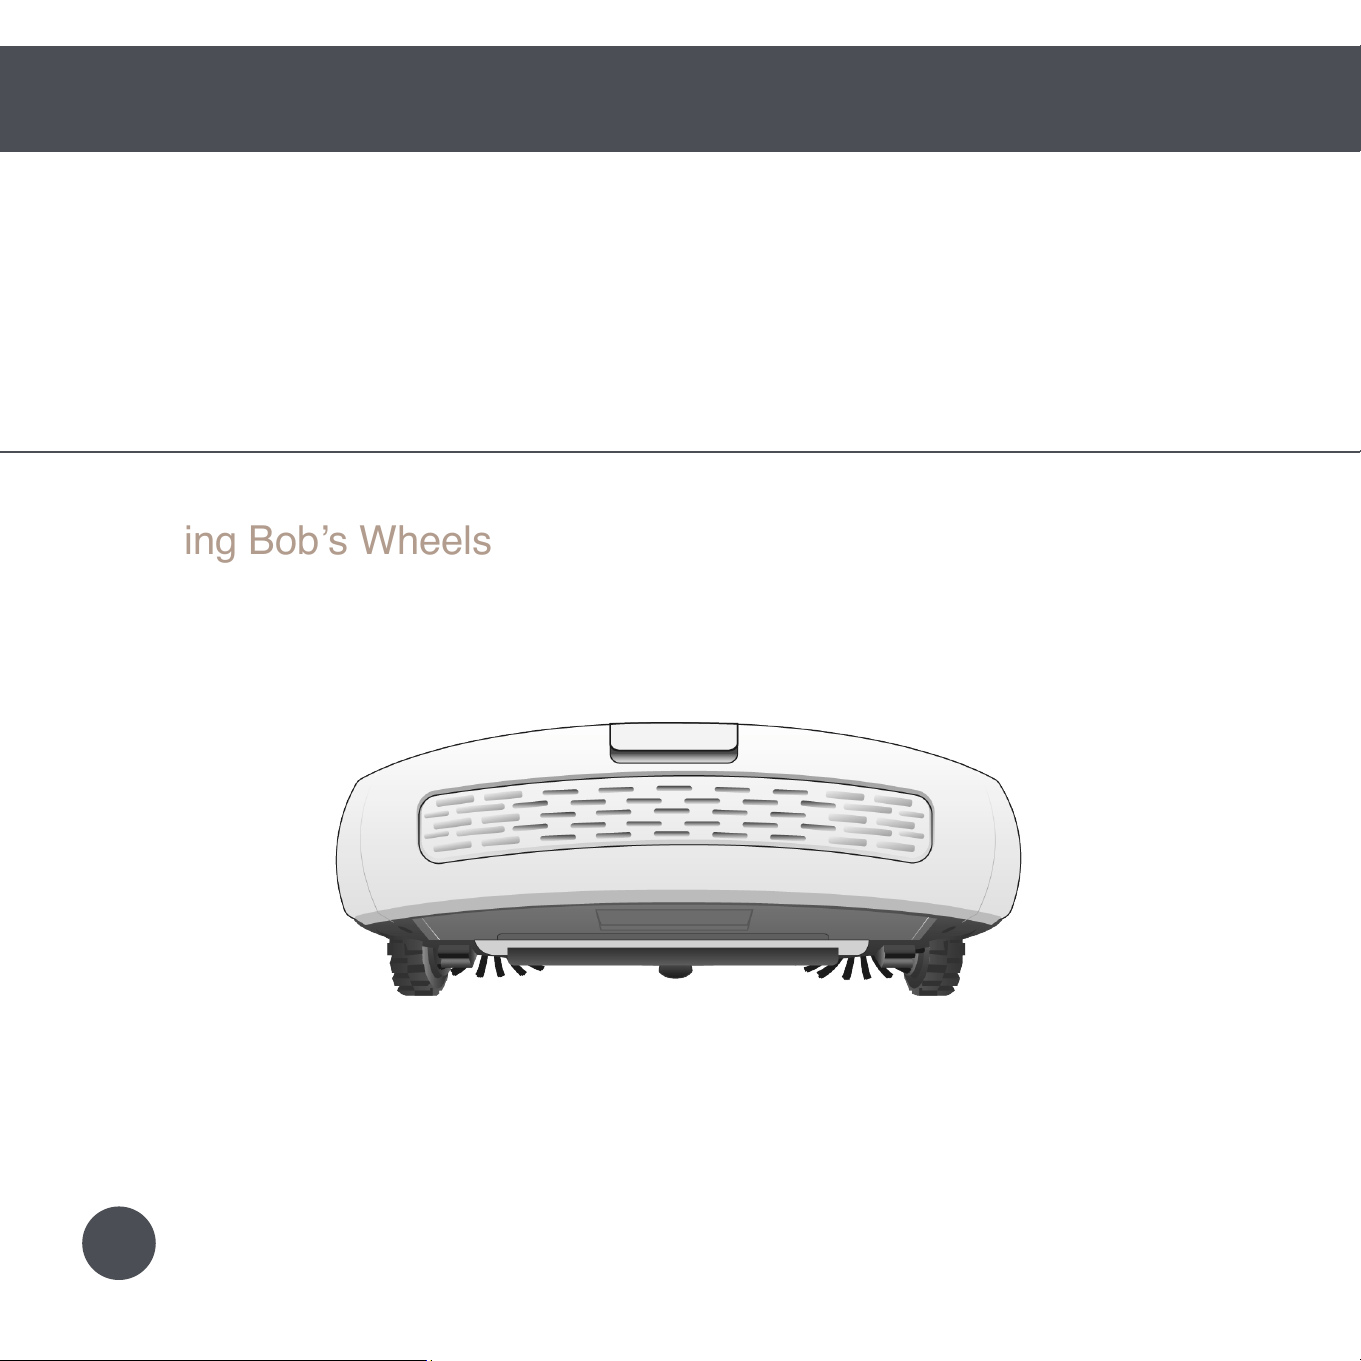
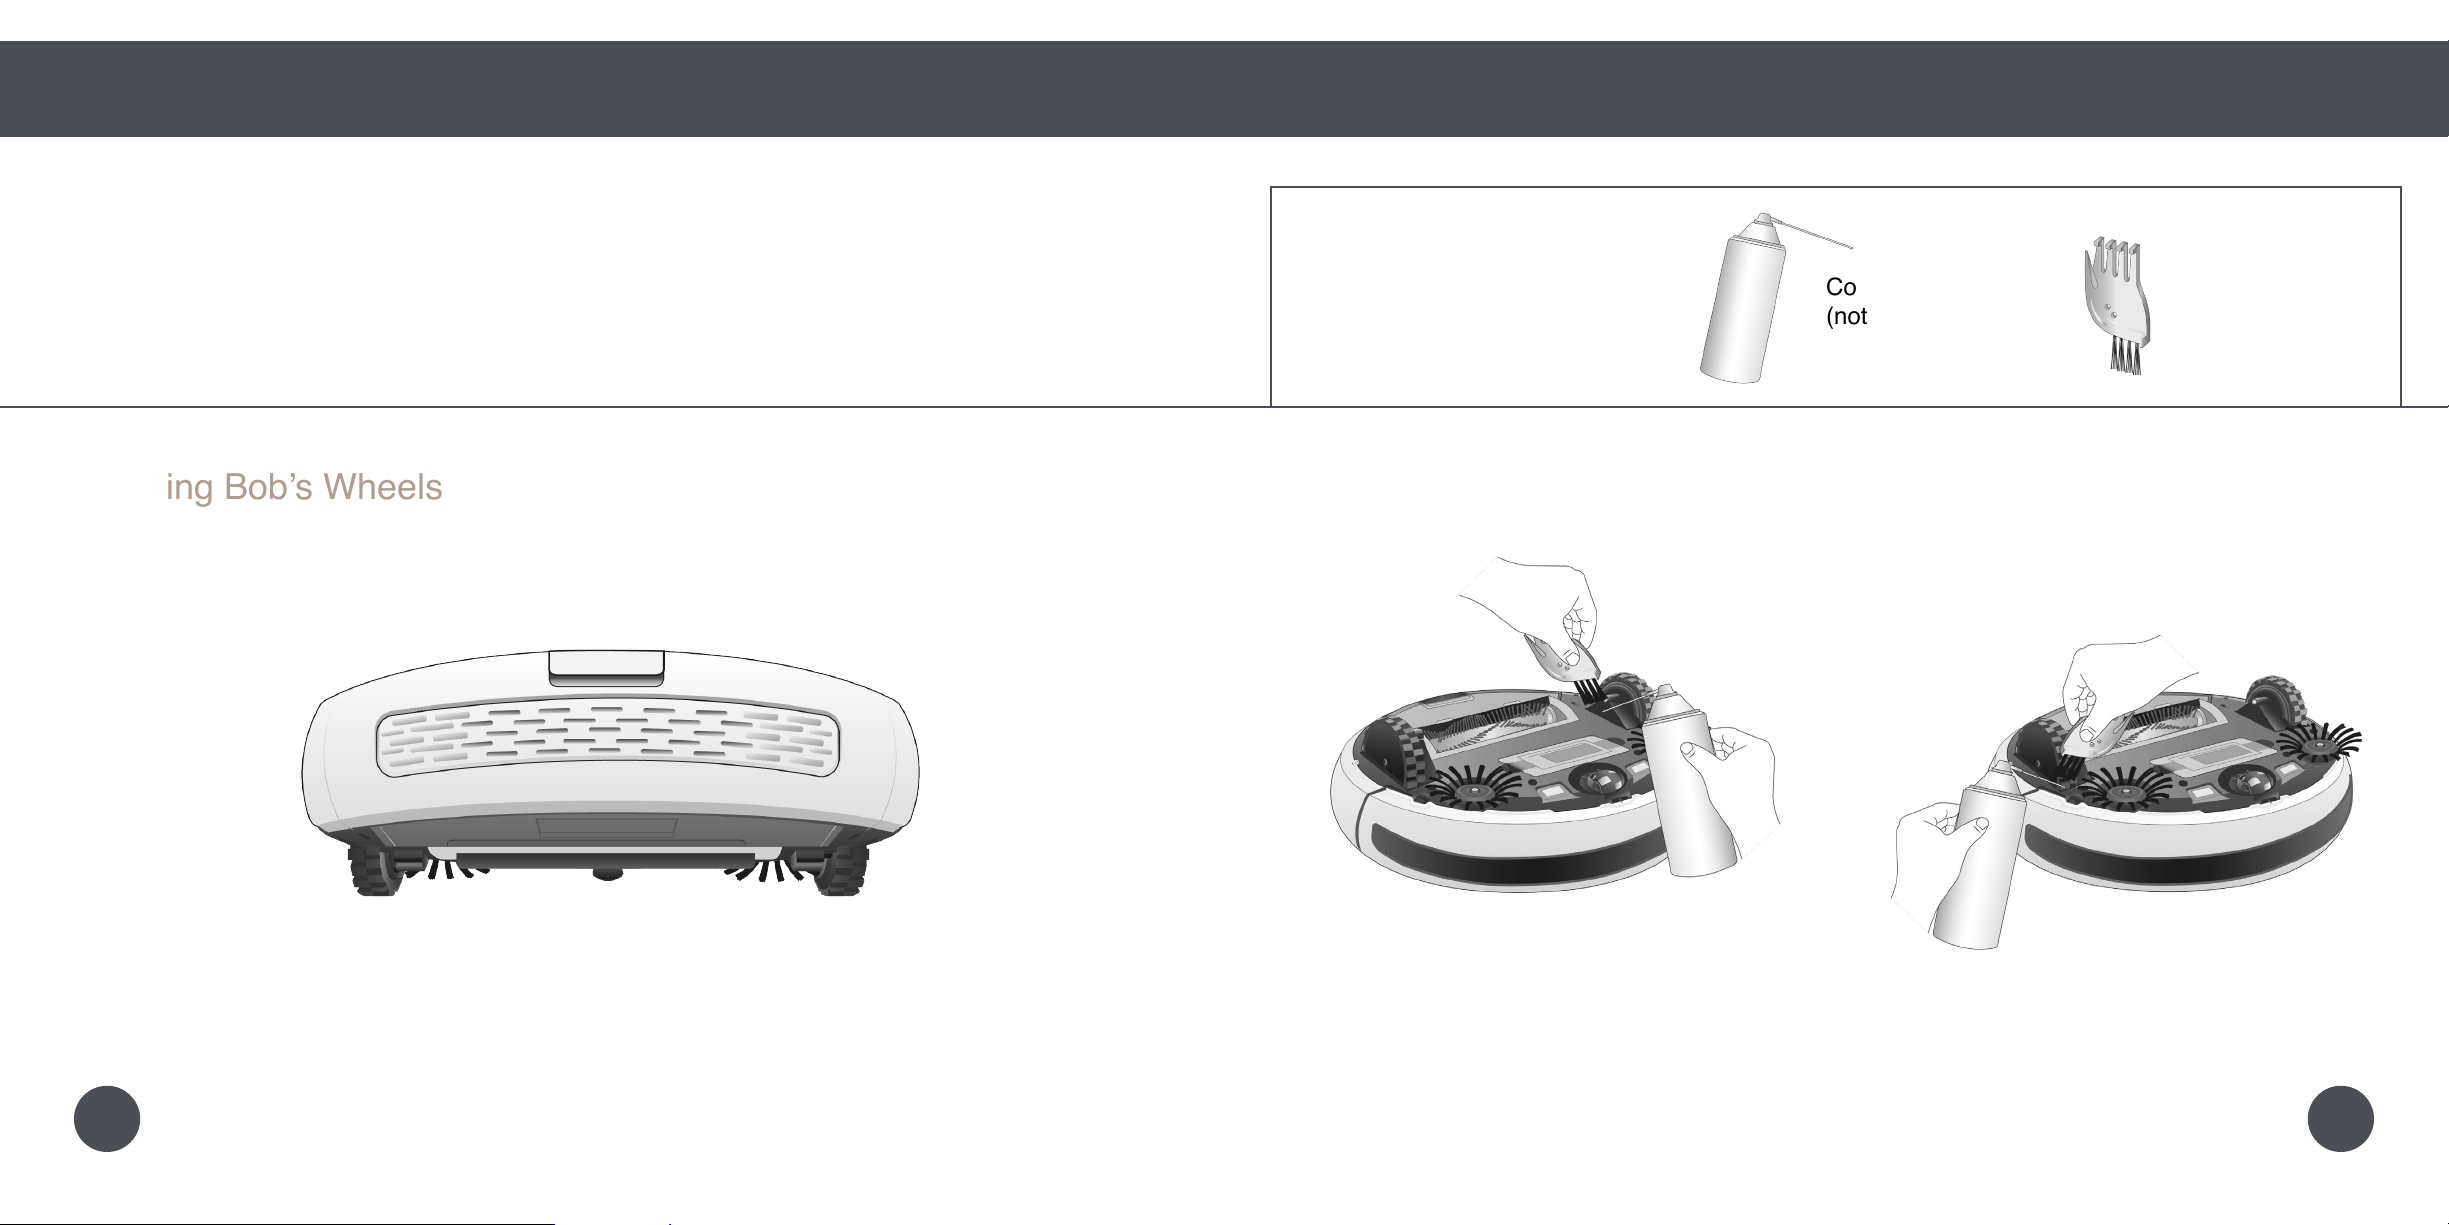
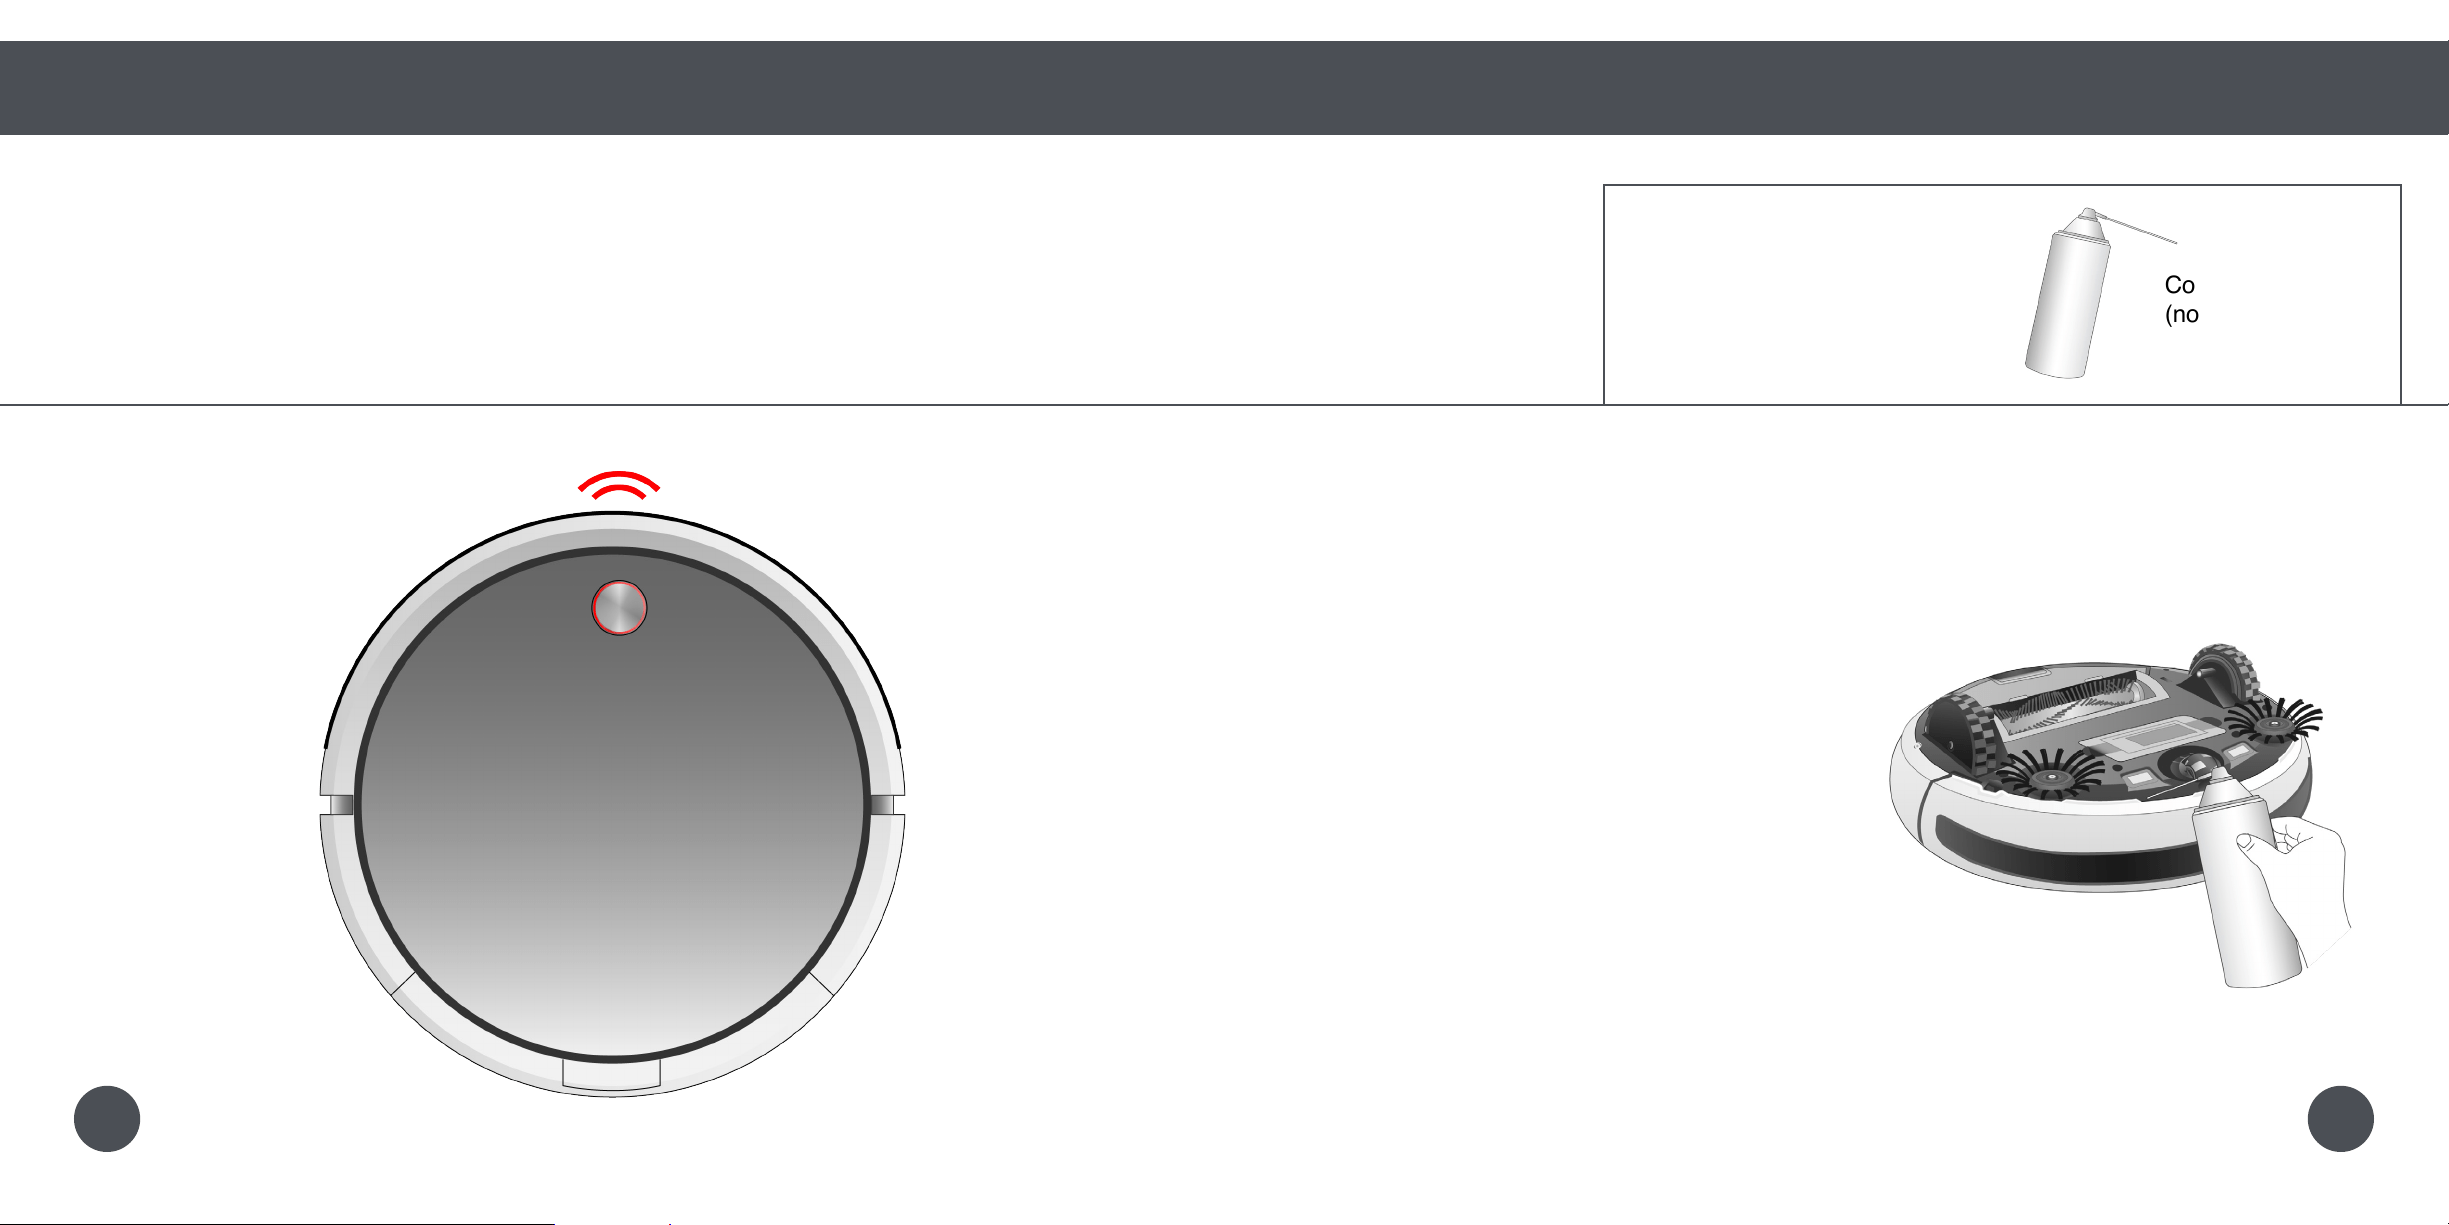
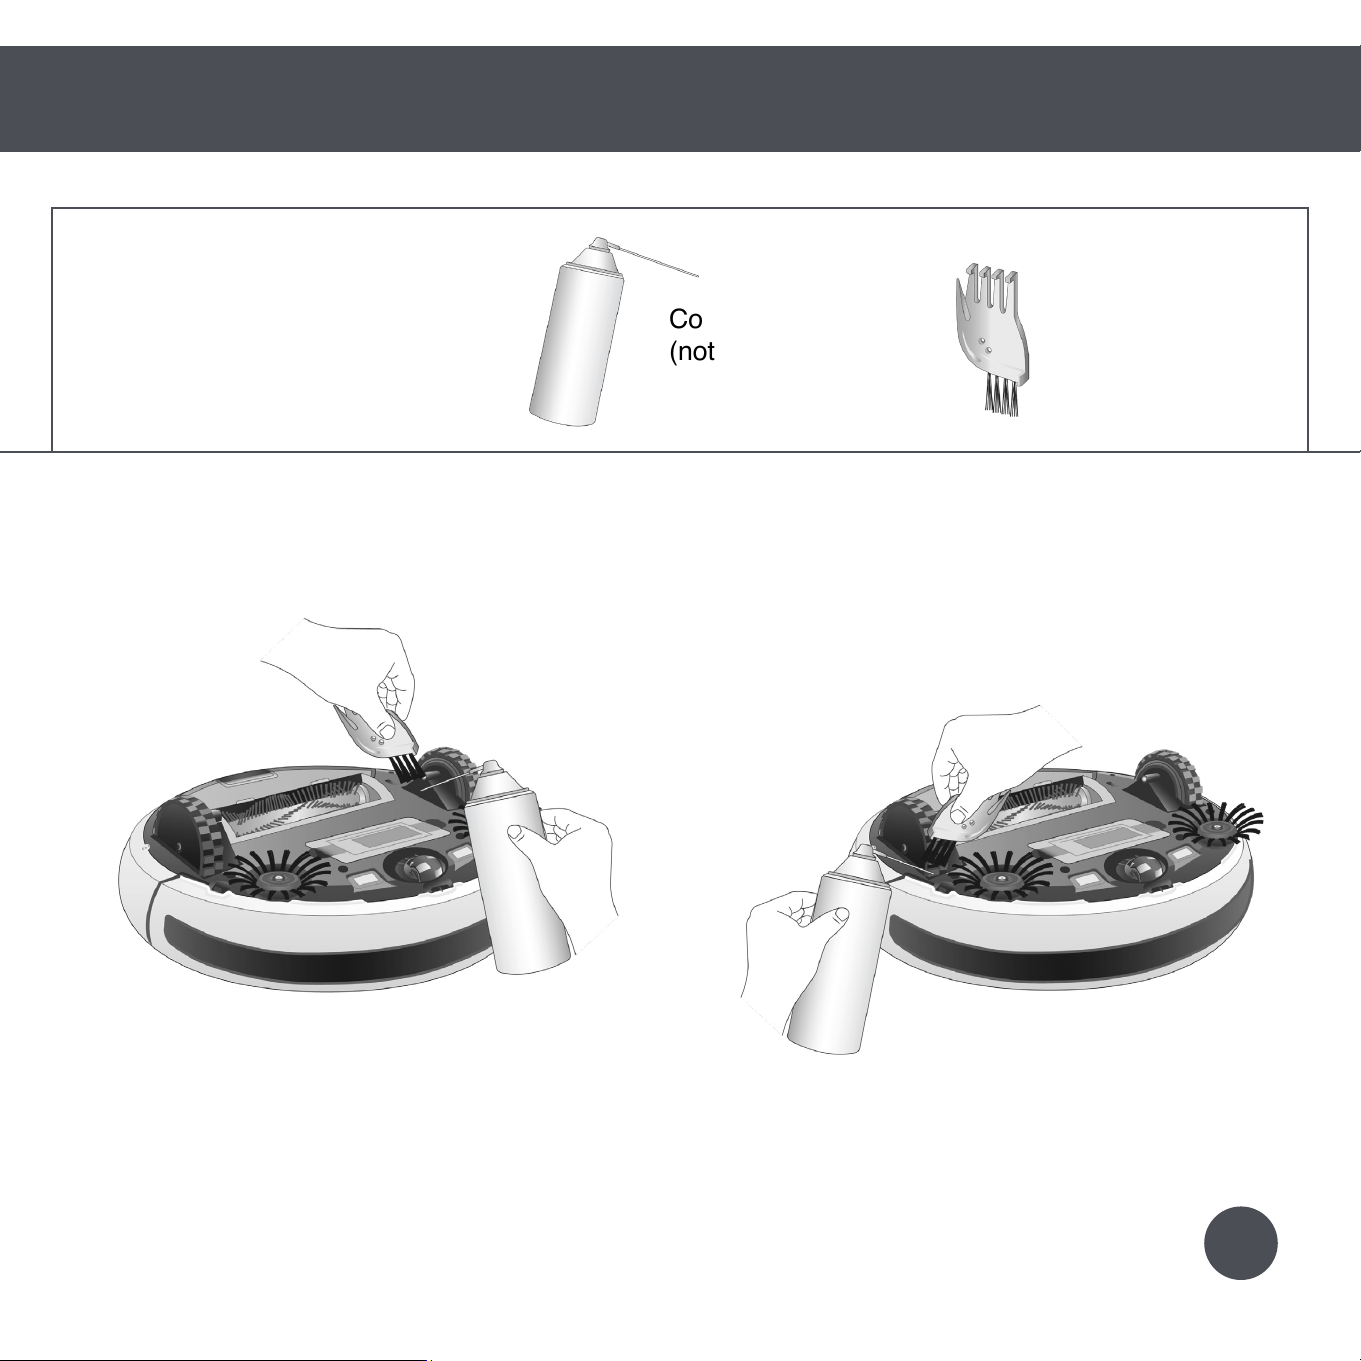
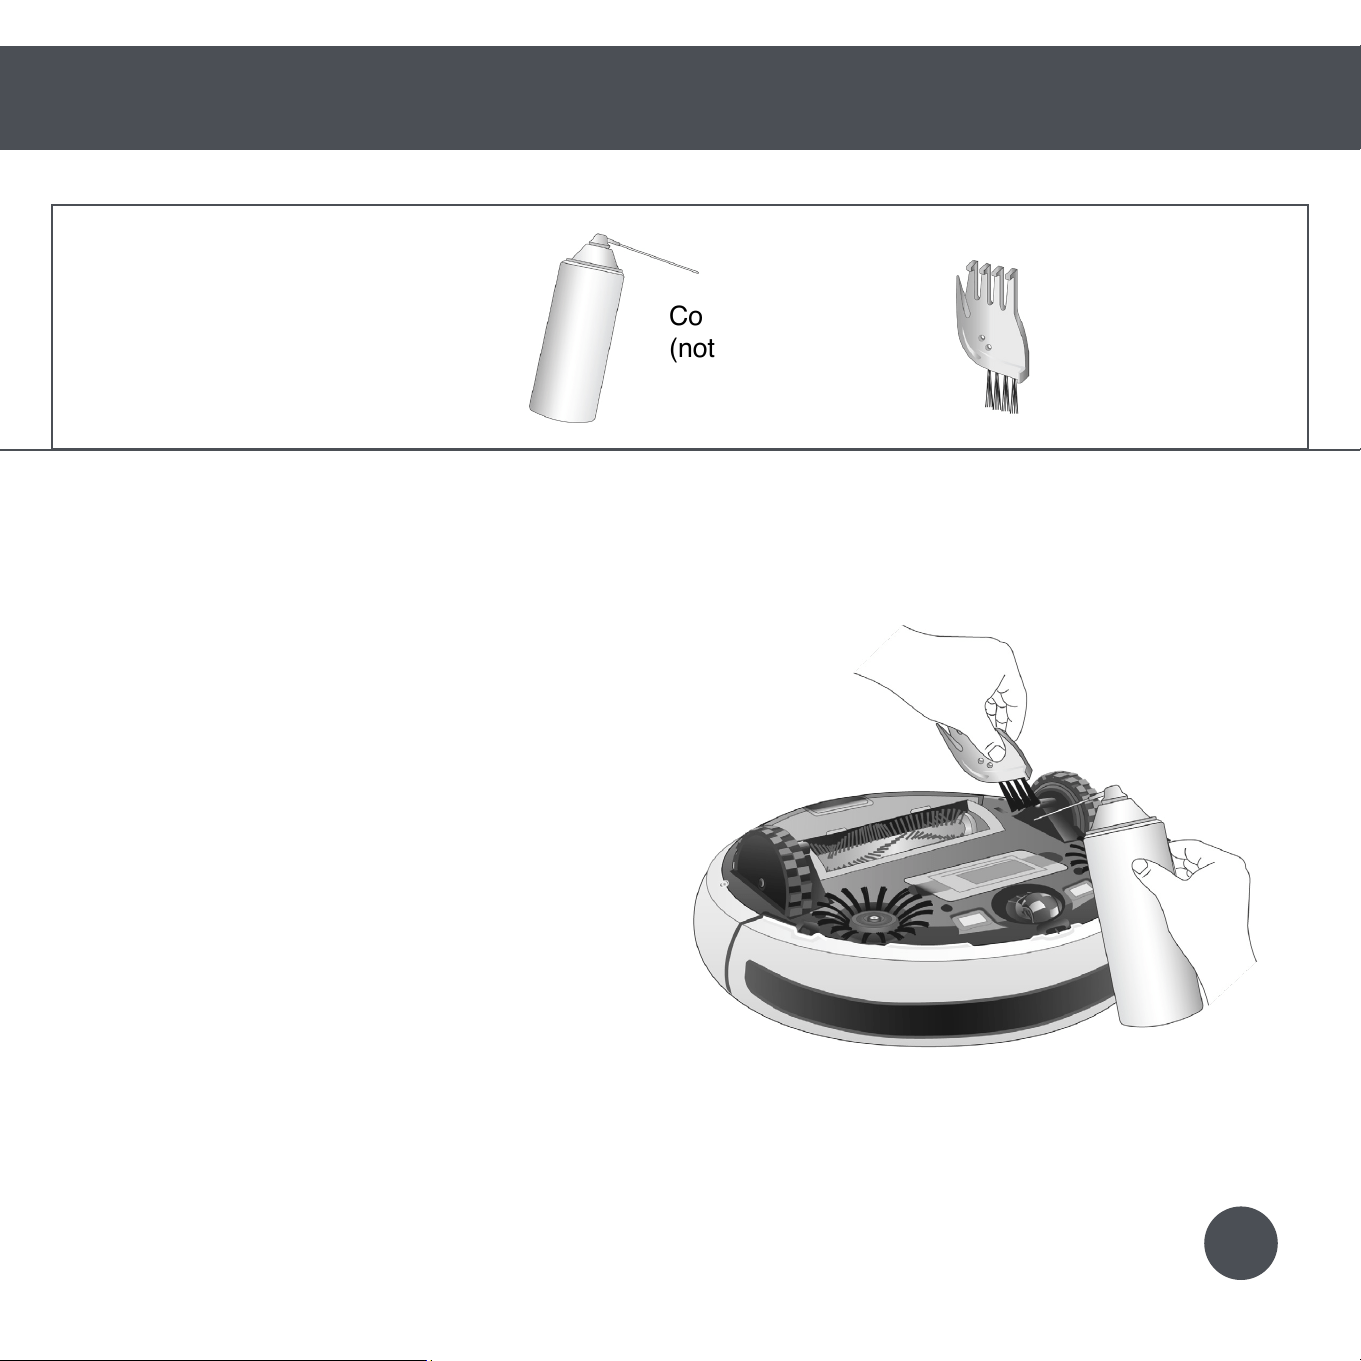
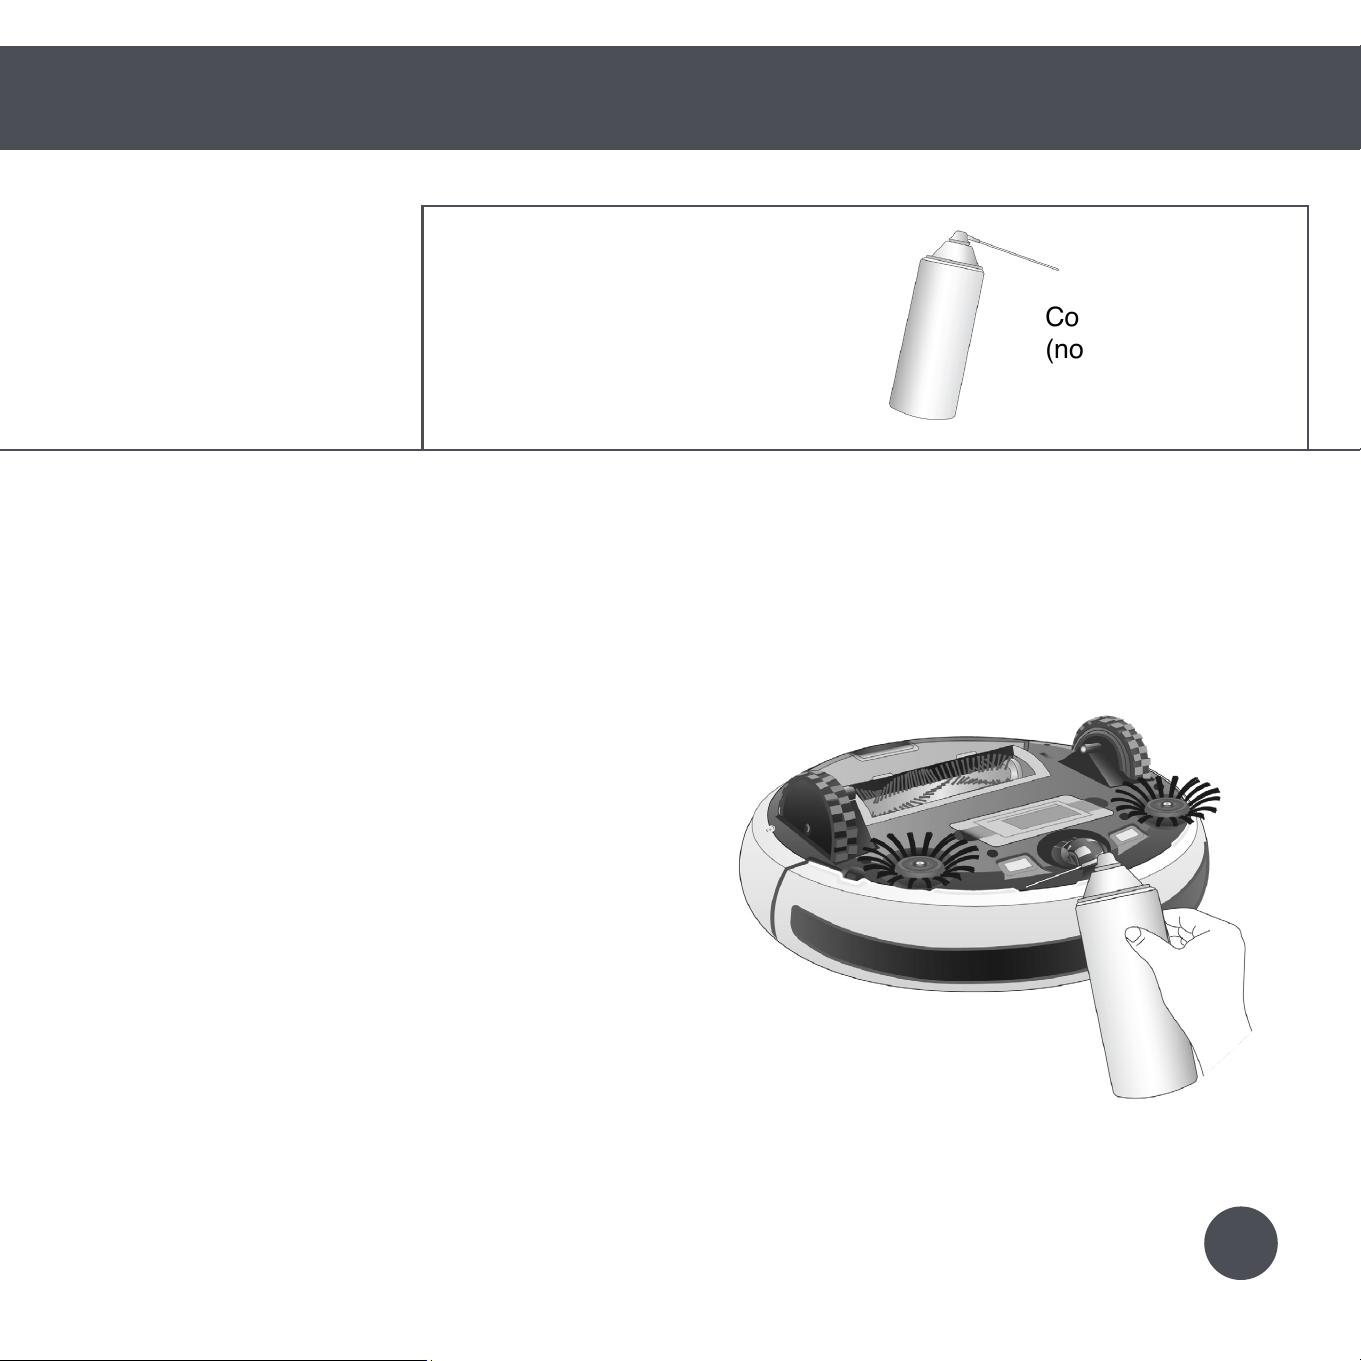
Quick Start
Parts and Maintenance
Wheels
Wheels
To maximize Bob’s efficiency, it is best to clean his wheels about once a week.
1. Clean the left or right wheels using compressed air or the cleaning tool.
Cleaning Bob’s Wheels
Parts You’ll Need: Compressed Air Cleaning Tool
(not included)
5251
Quick Start
Parts and Maintenance
Wheels
Wheels
To maximize Bob’s efficiency, it is best to clean his wheels about once a week.
1. Clean the left or right wheels using compressed air or the cleaning tool.
Cleaning Bob’s Wheels
Parts You’ll Need: Compressed Air Cleaning Tool
(not included)
5251

Troubleshooting
56 Left Wheel
58 Right Wheel
60 Wheel Sensors
62 Front Wheel
64 Edge Sensors
66 Low Battery
When Bob encounters an issue, he
communicates it through a series of red
light flashes. He will beep once, flash a set
number of times, pause, and then beep
again before restarting the cycle.
If Bob’s problems persist, please contact
our customer care center at 1-888-549-8847
or support@bobsweep.com. Our hours are
Monday – Friday, 9 a.m. – 5 p.m. Pacic
Standard Time.
68 Touch Sensors
70 Main Brush
72 Side Brush
74 Wall Sensors
76 Vacuum Motor
78 Power System
54
Troubleshooting
56 Left Wheel
58 Right Wheel
60 Wheel Sensors
62 Front Wheel
64 Edge Sensors
66 Low Battery
When Bob encounters an issue, he
communicates it through a series of red
light flashes. He will beep once, flash a set
number of times, pause, and then beep
again before restarting the cycle.
If Bob’s problems persist, please contact
our customer care center at 1-888-549-8847
or [email protected]. Our hours are
Monday – Friday, 9 a.m. – 5 p.m. Pacic
Standard Time.
68 Touch Sensors
70 Main Brush
72 Side Brush
74 Wall Sensors
76 Vacuum Motor
78 Power System
54

Red Light Flashes: Left Wheel
If Bob stops working and flashes a red light 2 times between beeps, then his left wheel may
be congested.
Quick Start
Troubleshooting
Troubleshooting: Left Wheel
What to do:
Clean the left wheel using compressed air
or the cleaning tool.
2
Parts You’ll Need: Compressed Air Cleaning Tool
(not included)
5655

Red Light Flashes: Right Wheel
If Bob stops working and flashes a red light 3 times between beeps, then his right wheel may
be congested.
Quick Start
Troubleshooting
Troubleshooting: Right Wheel
Parts You’ll Need: Compressed Air Cleaning Tool
(not included)
What to do:
Clean the right wheel using compressed air
or the cleaning tool.
3
5857
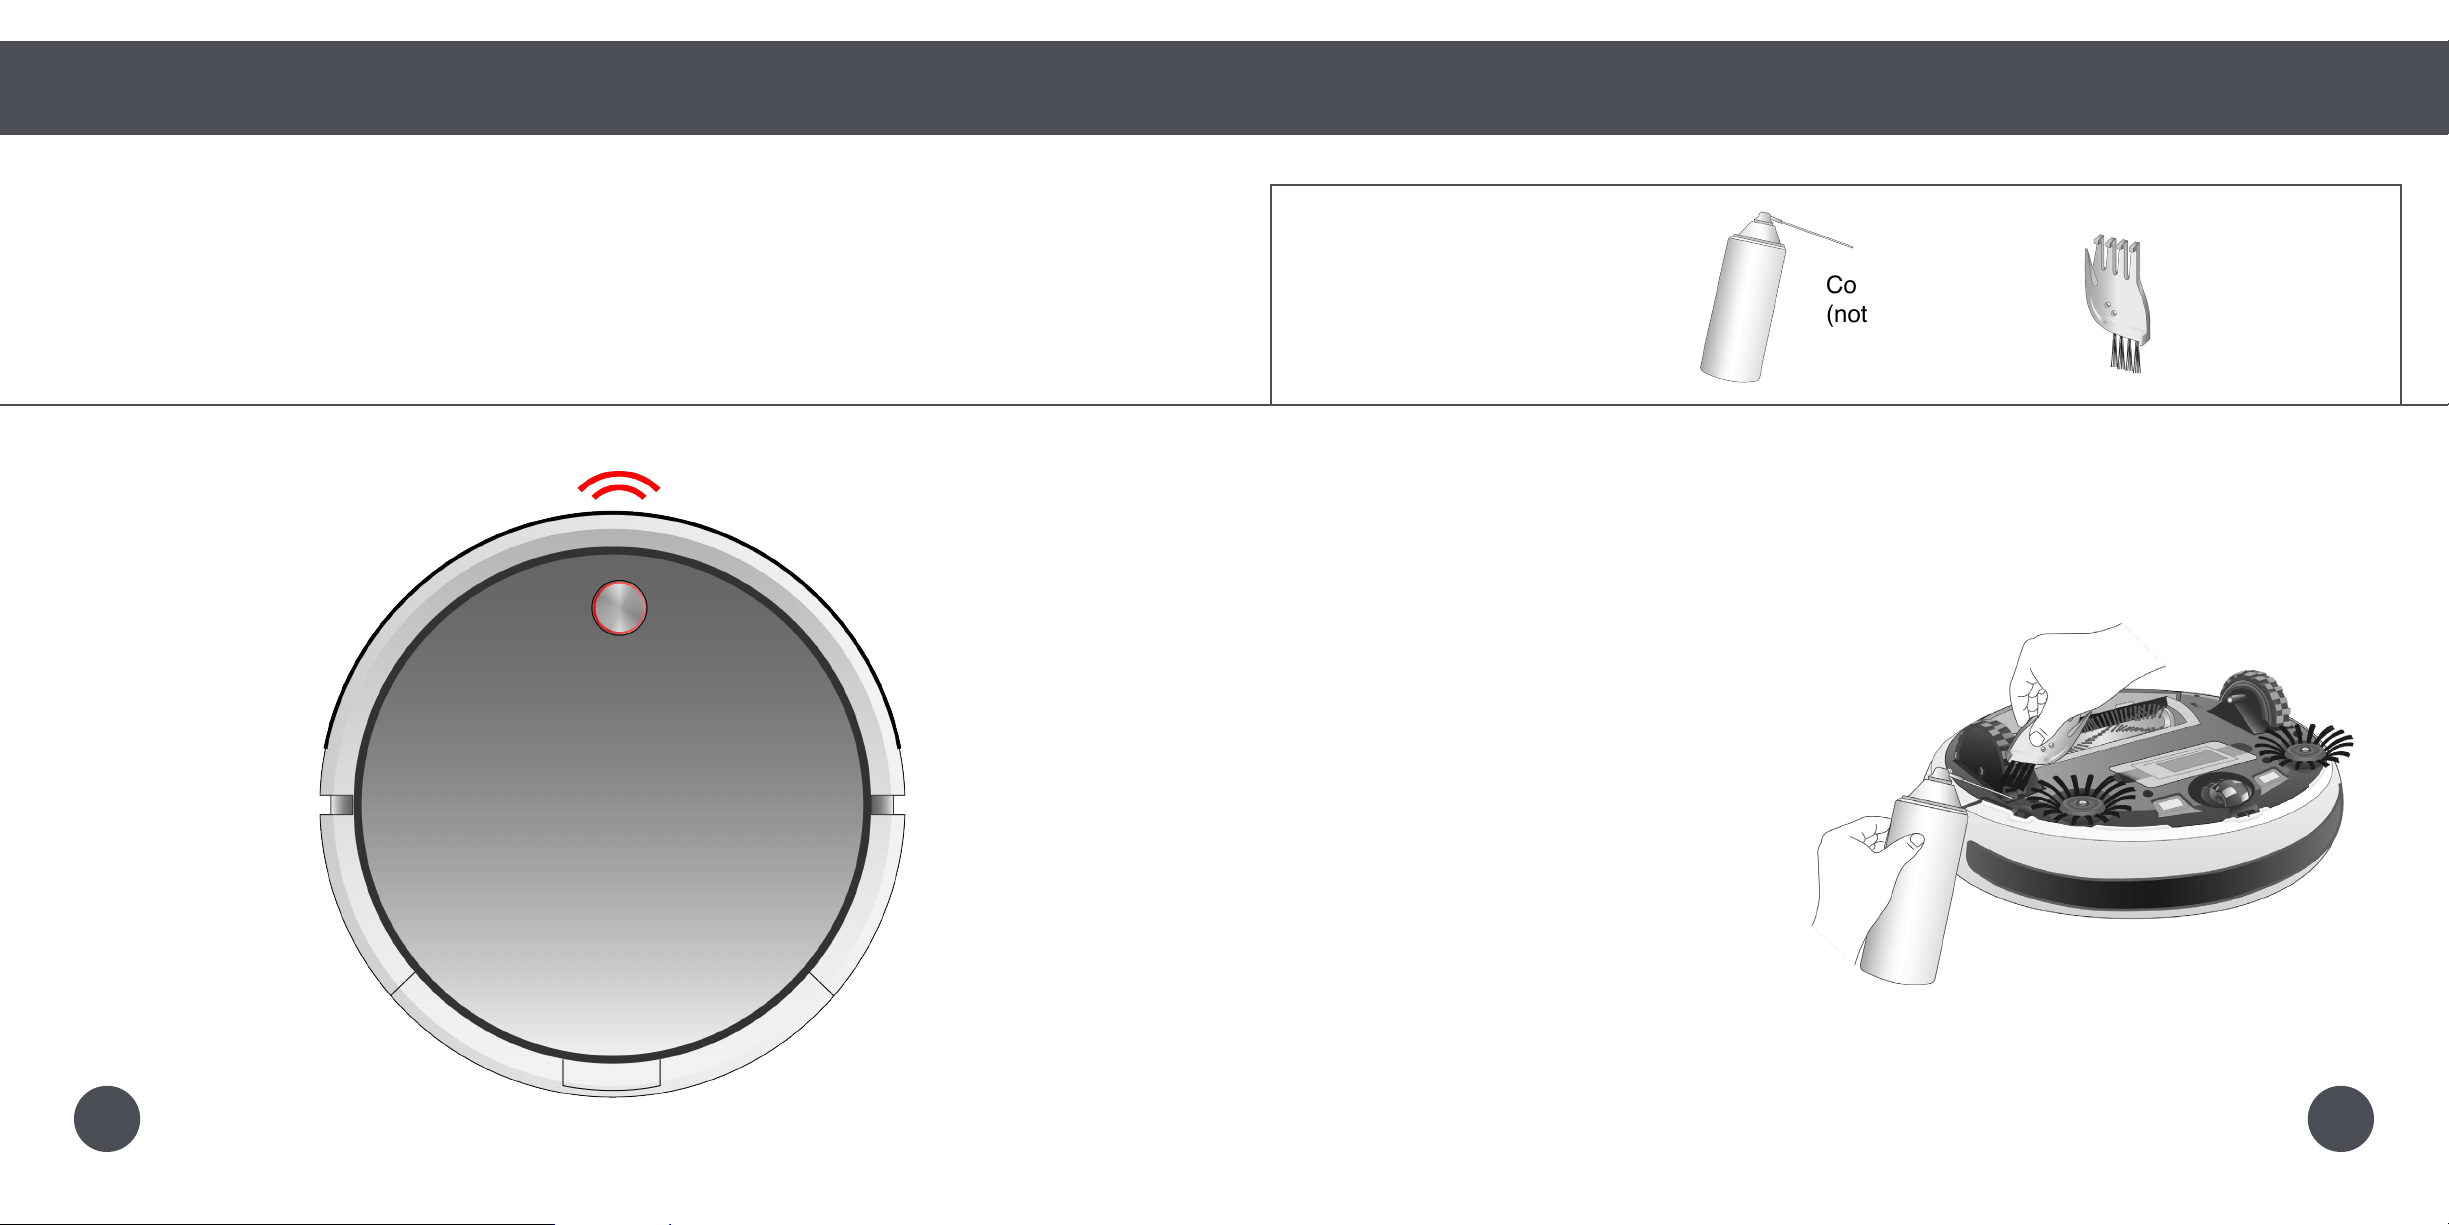
Red Light Flashes: Wheel Sensors
If Bob stops working and flashes a red light 4 times between beeps, then his wheel
sensors may be off the floor
Quick Start
Troubleshooting
Troubleshooting: Wheel Sensors
What to do:
Make sure Bob’s wheels are not suspended
in the air and can reach the floor evenly.
4
6059

Red Light Flashes: Front Wheel
If Bob stops working and flashes a red light 5 times between beeps, then his front wheel may
be congested.
Quick Start
Troubleshooting
Troubleshooting: Front Wheel
What to do:
Grip the wheel assembly with your hand
and pull up. You may use a screwdriver for
leverage if needed.
Remove the wheel by applying pressure to
the back of it so that it pops out of place.
Clean it thoroughly.
Replace the wheel and wheel assembly.
Make sure the wheel spins freely inside the
assembly.
5
1.
2.
3.
Parts You’ll Need: Cleaning Tool
6261
Red Light Flashes: Edge Sensors
If Bob stops working and flashes a red light 6 times between beeps, then his edge sensors
may be dirty.
Quick Start
Troubleshooting
Troubleshooting: Edge Sensors
What to do:
Wipe the edge sensors using a soft cloth
slightly dampened with cold water or alcohol.
Keep Bob away from dark carpet that
interferes with his edge sensors.
6
Parts You’ll Need: Cloth
(not included)
6463

Red Light Flashes: Low Battery
If Bob stops working and flashes a red light 7 times between beeps, then his battery power
is below 2%.
Quick Start
Troubleshooting
Troubleshooting: Low Battery
What to do:
Place Bob on his charging station with the
metal plates on his underside sitting on top
of the nodes on his station. Allow him to fully
charge.
7
Parts You’ll Need: Power Adapter Charging
Bob will chirp once and slowly blink his cover button to let you know that he
is charging.
When Bob has fully charged, his cover button will stop blinking and remain
solid.
6665

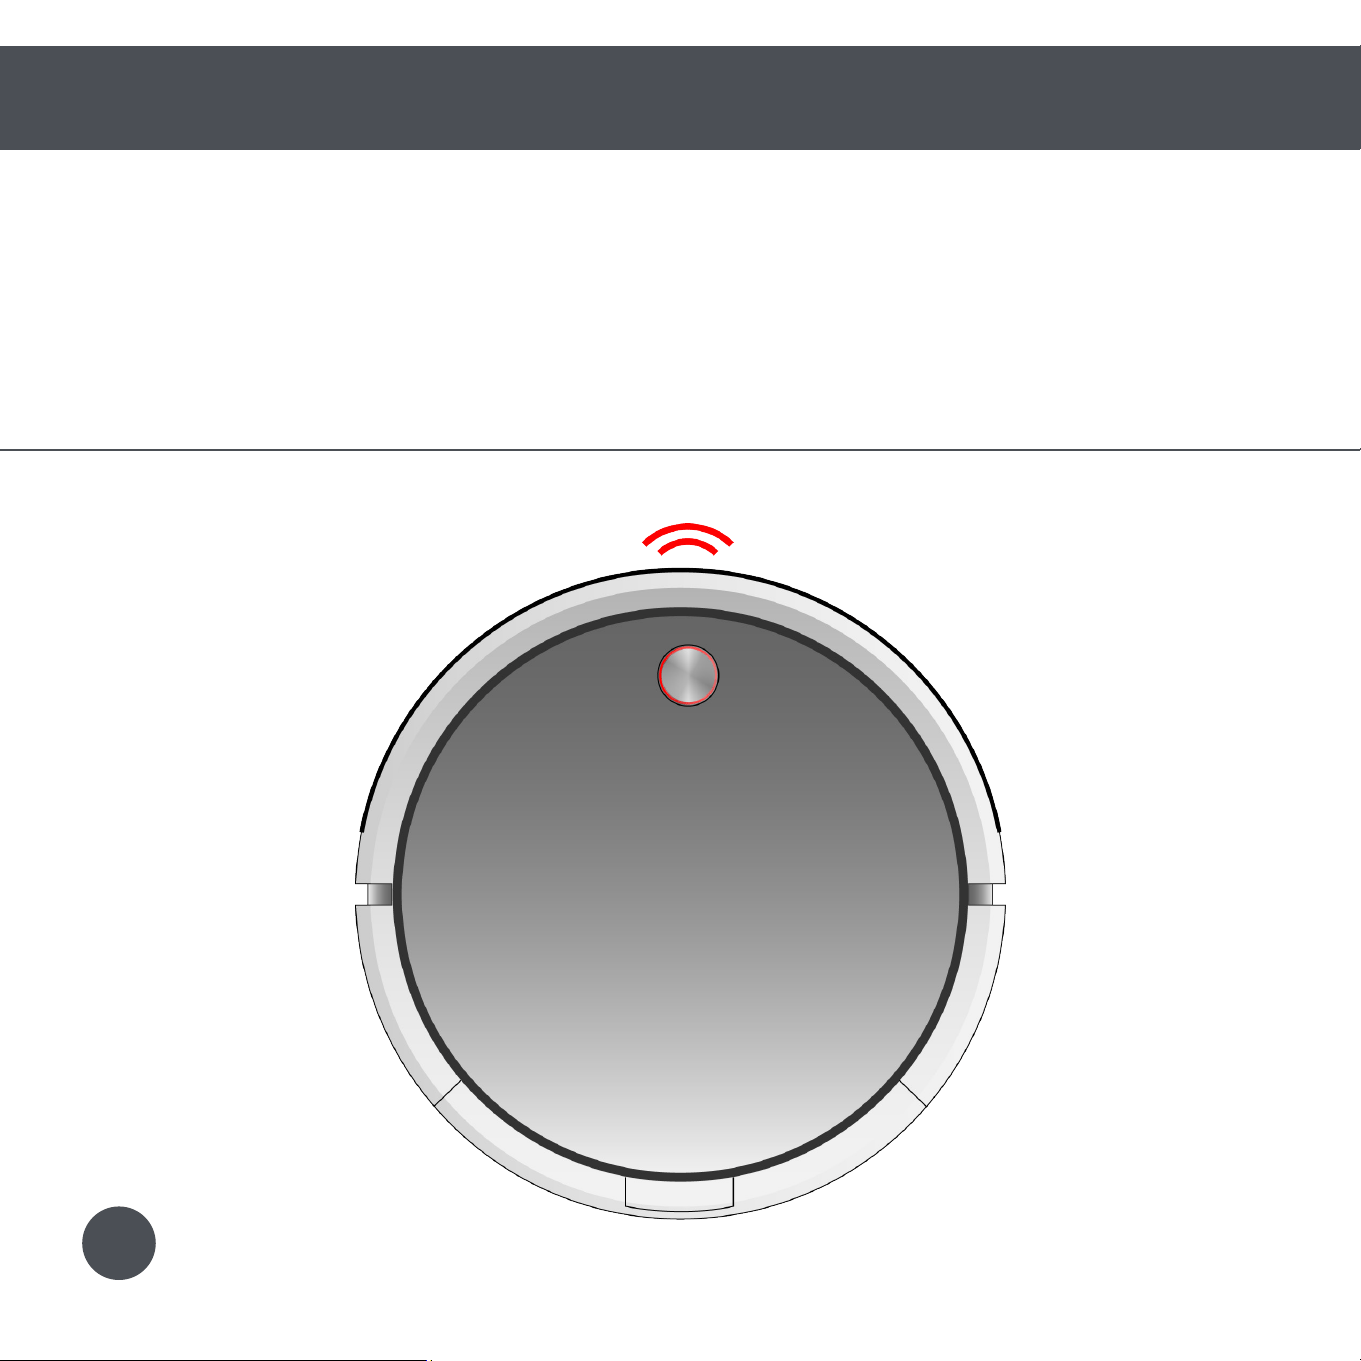
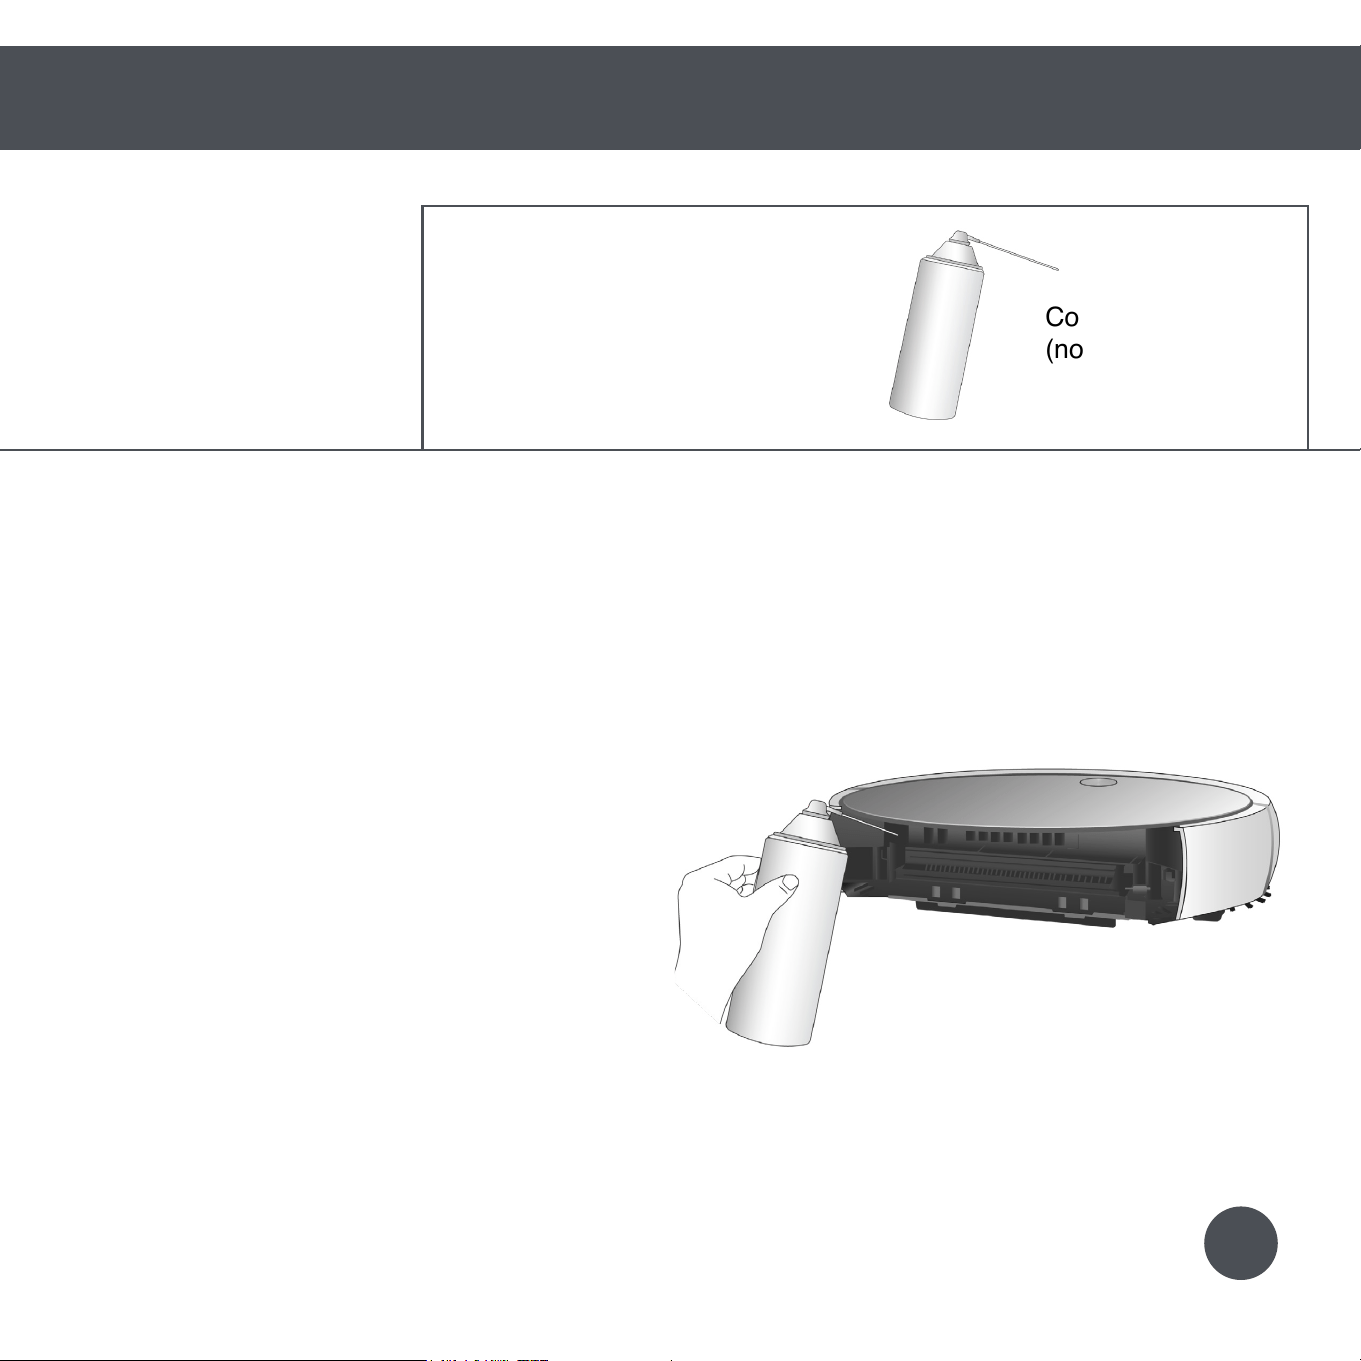
Red Light Flashes: Touch Sensors
If Bob stops working and flashes a red light 8 times between beeps, then his bumper may
be congested.
Quick Start
Troubleshooting
Troubleshooting: Touch Sensors
Parts You’ll Need: Compressed Air
(not included)
What to do:
Clean the inside of the bumper using
compressed air.
8
6867

Red Light Flashes: Main Brush
If Bob stops working and flashes a red light 9 times between beeps, then his main brush may
be congested.
Quick Start
Troubleshooting
Troubleshooting: Main Brush
Parts You’ll Need: Cleaning Tool
What to do:
Push in the tabs on the main brush frame
and lift.
Use Bob’s cleaning tool to clean the main
brush and the notches inside Bob where
the brush is held.
When done, secure the brush cap to the
pin end of the main brush. Lastly, replace
the main brush and main brush frame.
9
1.
Bob’s main brush is not designed to clean
shag carpet or rugs with long fibers. If
you’d like Bob to clean shag carpet or long-
fibered rugs, you may remove his main
brush and allow him to vacuum without it.
You may use scissors to cut away
entanglements of hair, or tweezers to
unclog the notches inside Bob.
Quick Tips:
2.
3.
7069

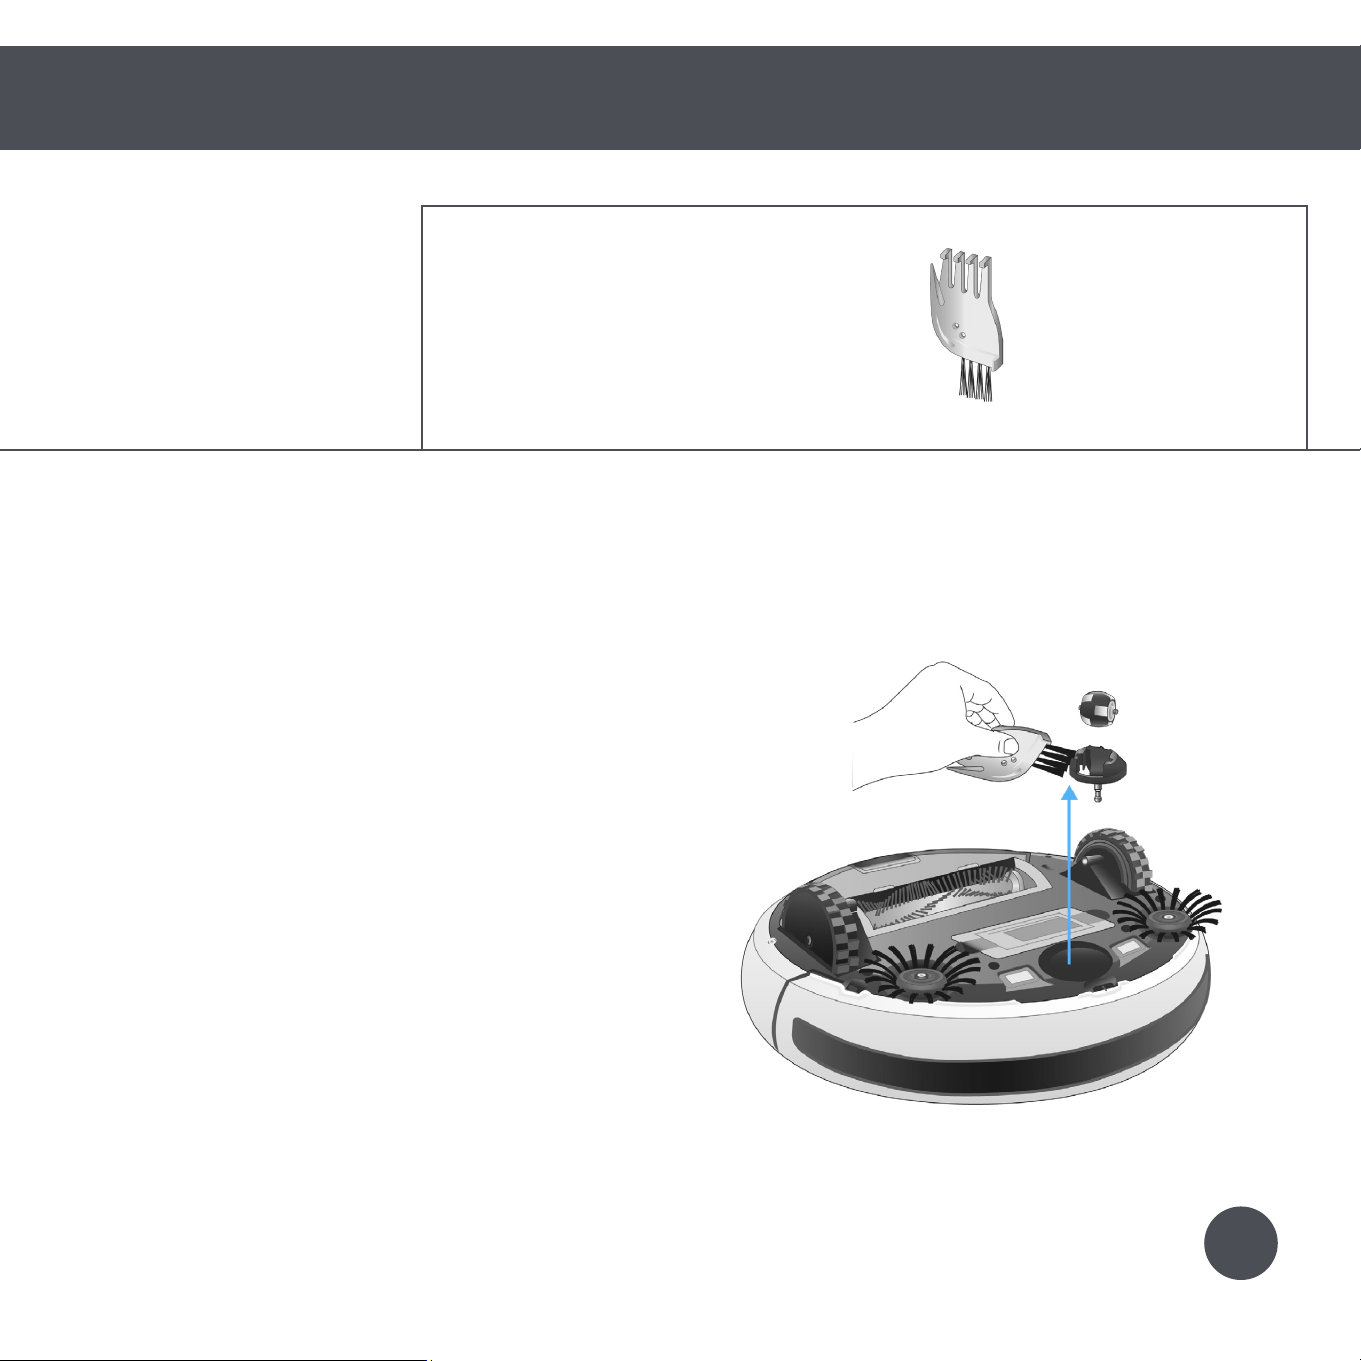
Red Light Flashes: Side Brush
If Bob stops working and flashes a red light 10 times between beeps, then his main brush
may be congested.
Quick Start
Troubleshooting
Troubleshooting: Side Brush
What to do:
Remove the screw on each side brush.
Use the cleaning tool to clean the side
brushes and the brush sockets.
When done, replace the side brushes and
screws.
10
1.
Parts You’ll Need:
Screwdriver Cleaning Tool
You may use scissors to cut away
entanglements of hair, or tweezers to
unclog the notches inside Bob.
Quick Tips:
2.
3.
7271

Red Light Flashes: Wall Sensors
If Bob stops working and flashes a red light 11 times between beeps, then his wall sensors
may be dirty.
Quick Start
Troubleshooting
Troubleshooting: Wall Sensors
What to do:
Wipe the wall sensors using a soft cloth
slightly dampened with cold water or alcohol.
Bob’s wall sensors are located along his
bumper.
11
Parts You’ll Need: Compressed Air Cloth
(not included) (not included)
7473

Red Light Flashes: Vacuum Motor
If Bob stops working and flashes a red light 12 times between beeps, then his vacuum
motor is having an issue.
Quick Start
Troubleshooting
Troubleshooting: Vacuum Motor
Parts You’ll Need: Compressed Air
(not included)
What to do:
Remove Bob’s dustbin and clean the inside
of Bob with compressed air.
12
7675

Red Light Flashes: Power System
If Bob stops working and flashes a red light 14 times between beeps, then his power
system is having an issue.
Quick Start
Troubleshooting
Troubleshooting: Power System
What to do:
Remove Bob’s battery by pinching the tabs
on the battery and pulling up. Unplug the
battery, wait 10 seconds, and then replug it.
Inspect the charging adapter. Plug the
charging adapter into the station. The green
power light should turn on.
If the adapter appears to be working
properly, place Bob on his station and leave
him to fully charge.
14
1.
2.
Parts You’ll Need: Power Adapter Charging
3.
7877
End User
Agreement
80

End User
Agreement
80

IMPORTANT - READ BEFORE USING. Do not use the robot (“Bobsweep”) accompanying this license agreement
(“Agreement”) until you have carefully read and agreed to the following terms and conditions. By using the Bobsweep,
you agree to the terms of this End User License Agreement (“EULA”) and any amendment or addenda accompanying this
Agreement. If you do not agree to the terms of this EULA, you may not use the Bobsweep. The Bobsweep contains an
electronic and software interface that allows you to control or modify its behavior, and remotely monitor its sensors.
THIS IS A LEGAL AGREEMENT. BY ACCESSING AND USING THE PRODUCT AND PRODUCT SOFTWARE, YOU ARE
ACCEPTING AND AGREEING TO THIS EULA ON BEHALF OF YOURSELF OR THE ENTITY YOU REPRESENT IN
CONNECTION WITH THE ACCESS. YOU REPRESENT AND WARRANT THAT YOU HAVE THE RIGHT, AUTHORITY, AND
CAPACITY TO ACCEPT AND AGREE TO THIS EULA ON BEHALF OF YOURSELF OR THE ENTITY YOU REPRESENT.
YOU REPRESENT THAT YOU ARE OF SUFFICIENT LEGAL AGE IN YOUR JURISDICTION OR RESIDENCE TO USE
OR ACCESS THE PRODUCT SOFTWARE AND TO ENTER INTO THIS EULA. IF YOU DO NOT AGREE WITH ANY OF
THE PROVISIONS OF THESE TERMS, YOU SHOULD CEASE USING THE PRODUCT AND PRODUCT SOFTWARE.
Terms and Conditions
LICENSE: Subject to all of the terms of this Agreement, Bobsweep Inc. (“Bobsweep”) grants to you one (1) revocable,
royalty-free, personal, non- exclusive, nontransferable, non-assignable, non-commercial intellectual property license to use
the Bobsweep software contained on the Bobsweep, including the protocol for communicating with the Bobsweep software
contained on the Bobsweep (“Bobsweep Software”), to use the Bobsweep.
NONCOMMERCIAL LICENSE: You may use the Bobsweep Software and the Bobsweep only for personal, noncommercial,
educational, and research purposes. The Bobsweep Software and the Bobsweep may not be used for any other purpose,
whether “for prot” or “not for prot.” Any work performed or produced using the Bobsweep, including Your Software, cannot be
performed or produced for the benet of other parties for a fee, compensation, or any other reimbursement or remuneration. A
separate license is required for each additional use and/or individual user in all other cases. If you are an entity, Bobsweep
grants you the right to designate one individual within your organization to have the sole right to use the Bobsweep Software
and the Bobsweep in the manner provided above.
RESTRICTIONS: You agree not to: (i) use or copy the Bobsweep Software or the Bobsweep except as provided in this
Agreement; (ii) rent or lease the Bobsweep Software or the Bobsweep to any third party; (iii) assign this Agreement or
transfer the Bobsweep Software or the Bobsweep except as provided in this Agreement; (iv) modify, adapt, or translate
the Bobsweep Software or the Bobsweep in whole or in part except as expressly provided in this Agreement; (v) reverse
engineer, reverse compile, or disassemble the Bobsweep Software or the Bobsweep; or (vi) distribute, sublicense or transfer
the source code form of Your Software and derivatives thereof to any third party except as provided in this Agreement.
YOUR SOFTWARE : Use and distribution of any software that you create for your Bobsweep (“Your Software”) is also subject
to the following limitations: You (i) shall be solely responsible for any update or support obligation or other liability which may
arise from your use or distribution, (ii) shall not make any statement that Your Software is “certied,” or that its performance
is guaranteed, by Bobsweep, (iii) shall not use Bobsweep’s name or trademarks, (iv) shall prohibit disassembly and reverse
engineering of the Bobsweep Software and the Bobsweep, (v) shall not publish reviews of Bobsweep products designated
as beta without written permission from Bobsweep, and (vi) shall indemnify, hold harmless, and defend Bobsweep and its
suppliers from and against any claims or lawsuits, including attorney’s fees, that arise or result from Your Software, including
your use and your distribution.
TITLE: Title to the Bobsweep Software remains with Bobsweep or its suppliers. The Bobsweep Software is licensed, not
sold. Except as expressly provided herein, Bobsweep does not grant any express or implied right to you under Bobsweep
patents, copyrights, trademarks, or trade secret information. You will not remove any copyright or patent notice from the
Bobsweep Software or the Bobsweep.
ONE-TIME TRANSFER: The initial user of the Bobsweep Software and the Bobsweep may make a one-time permanent
transfer of this Agreement, the Bobsweep Software, and the Bobsweep to another end user, provided that the initial user
retains no copies of the Bobsweep Software and the Bobsweep. This transfer must include the Bobsweep Software, the
Bobsweep, and all of the materials accompanying the Bobsweep (including all component parts and printed materials,
any upgrades, and this End User License Agreement document). The transfer may not be an indirect transfer, such as a
consignment. Prior to the transfer, the end user receiving the Bobsweep Software and the Bobsweep must agree to all the
terms of this Agreement.
NO WARRANTY AND LIMITED REPLACEMENT: EXCEPT AS STATED IN THE LIMITED WARRANTY TO THE ORIGINAL
PURCHASER, THE BOBSWEEP SOFTWARE AND THE BOBSWEEP ARE PROVIDED “AS IS” WITH NO WARRANTIES,
EXPRESS OR IMPLIED, INCLUDING BUT NOT LIMITED TO ANY IMPLIED WARRANTY OF MERCHANTABILITY,
FITNESS FOR A PARTICULAR PURPOSE, NON-INFRINGEMENT OF INTELLECTUAL PROPERTY RIGHTS, OR ANY
WARRANTY OTHERWISE ARISING OUT OF ANY PROPOSAL, SPECIFICATION, OR SAMPLE. NO ORAL OR WRITTEN
INFORMATION OR ADVICE GIVEN BY BOBSWEEP OR ITS AGENTS SHALL CREATE A WARRANTY. If the Bobsweep
Software or the Bobsweep is found to be defective in material or workmanship under normal use for a period of one (1) year
from the date of receipt, Bobsweep’s entire liability and your exclusive remedy shall be the replacement of the Bobsweep
Software or the Bobsweep. This offer is void if the defect results from accident, abuse, misapplication, or software that
you developed for your Bobsweep. Any updates or supplements to the Bobsweep Software or the Bobsweep provided
to you after the expiration of the one (1) year period are not covered by any warranty or condition, express, implied or
statutory. SOME JURISDICTIONS DO NOT ALLOW THE EXCLUSION OF IMPLIED WARRANTIES, SO THE ABOVE
EXCLUSION MAY NOT APPLY TO YOU. LIMITATION OF LIABILITY: THE ABOVE REPLACEMENT PROVISION IS THE
ONLY WARRANTY OF ANY KIND. BOBSWEEP OFFERS NO OTHER WARRANTY EITHER EXPRESS OR IMPLIED
INCLUDING THOSE OF MERCHANTABILITY, NON INFRINGEMENT OF THIRD-PARTY INTELLECTUAL PROPERTY
OR FITNESS FOR A PARTICULAR PURPOSE. NEITHER BOBSWEEP NOR ITS SUPPLIERS SHALL BE LIABLE FOR
ANY DAMAGES WHATSOEVER (INCLUDING, WITHOUT LIMITATION, VICARIOUS LIABILITY, CONSEQUENTIAL
DAMAGES, INCIDENTAL DAMAGES, DAMAGES FOR LOSS OF BUSINESS PROFITS, BUSINESS INTERRUPTION,
LOSS OF BUSINESS INFORMATION, OR OTHER LOSS) ARISING OUT OF THE USE OF OR INABILITY TO USE THE
BOBSWEEP SOFTWARE, THE BOBSWEEP, OR SOFTWARE THAT YOU DEVELOPED FOR YOUR BOBSWEEP, EVEN
IF BOBSWEEP HAS BEEN ADVISED OF THE POSSIBILITY OF SUCH DAMAGES. BECAUSE SOME JURISDICTIONS
PROHIBIT THE EXCLUSION OR LIMITATION OF LIABILITY FOR CONSEQUENTIAL OR INCIDENTAL DAMAGES,
THE ABOVE LIMITATION MAY NOT APPLY TO YOU UNAUTHORIZED USE: THE BOBSWEEP SOFTWARE AND THE
BOBSWEEP ARE NOT DESIGNED, INTENDED, OR AUTHORIZED FOR USE IN ANY AERONAUTICAL, NUCLEAR,
MEDICAL, LIFE SAVING OR LIFE SUSTAINING SYSTEMS, OR FOR ANY OTHER APPLICATION IN WHICH THE USE
OF THE BOBSWEEP SOFTWARE OR THE BOBSWEEP COULD CREATE A SITUATION WHERE PERSONAL INJURY
OR DEATH MAY OCCUR. Should you use the Bobsweep Software or Bobsweep for any such unintended or unauthorized
use, you shall indemnify and hold harmless Bobsweep and its ofcers, subsidiaries and afliates against all claims, costs,
damages, and expenses, and reasonable attorney fees arising out of, directly or indirectly, any claim of product liability,
personal injury or death associated with such unintended or unauthorized use, even if such claim alleges that Bobsweep
was negligent regarding the design or manufacture of the Bobsweep Software, the Bobsweep, or any part or portion thereof.

USER SUBMISSIONS: You agree that any material, information or other communication, including all data, images,
sounds, text, and other things embodied therein, that you transmit or post to a Bobsweep website or provide to Bobsweep
(“Communications”) will be considered non-condential. Bobsweep will have no condentiality obligations with respect to
the Communications. You agree that Bobsweep and its designees will be free to copy, modify, create derivative works,
publicly display, disclose, distribute, license and sublicense through multiple tiers of distribution and licensees, incorporate
and otherwise use the Communications, including derivative works thereof, for any and all commercial or non-commercial
purposes without the payment of any royalty to you, and that such license will survive the termination of this Agreement.
TERMINATION: This Agreement becomes effective on the date you accept this Agreement and will continue until terminated
as provided for in this Agreement. You may terminate this Agreement voluntarily at any time. Bobsweep may terminate this
Agreement at any time if you are in breach of any of its terms and conditions, and may refuse to license the Bobsweep
Software or the Bobsweep to you after termination. Upon termination by either party, you will immediately return to Bobsweep
or destroy the Bobsweep Software and the Bobsweep and all your copies thereof. Articles 5 and 7 through 17 of this
Agreement shall survive such termination. U.S. GOVERNMENT RESTRICTED RIGHTS: The Bobsweep Software and
the Bobsweep are provided with “RESTRICTED RIGHTS.” Use, duplication or disclosure by the Government is subject to
restrictions set forth in FAR52.227-14 and DFAR252.227-7013 et seq. or its successor. Use of the Bobsweep Software or
the Bobsweep by the Government constitutes acknowledgment of Bobsweep’s rights in them.
NO EXPORT: You may not export the Bobsweep Software or the Bobsweep in violation of applicable export laws.
INTERPRETATION PROVISION: The provisions of this Agreement are severable. If any provision of this Agreement is
held to be unenforceable, such provision shall be reformed only to the extent necessary to make it enforceable. Any law
or regulation which provides that the language of a contract shall be construed against the drafter shall not apply to this
Agreement.
INTEGRATION: This Agreement represents the complete agreement concerning the subject matter hereof, and any and all
understandings, conversations and communications, proposals, and counterproposals, oral and written (including any draft
of this Agreement) are merged into and superseded by this Agreement and shall be of no force or effect, except as expressly
provided herein. No such understandings, conversations, communications, proposals, counterproposals or drafts shall be
referred to in any proceeding concerning this Agreement. Further, no understanding contained in this Agreement shall be
modied, altered or amended, except by a writing signed by the party against whom enforcement is sought.
ARBITRATION: All disputes relating to this Agreement (excepting any dispute relating to intellectual property rights) shall
be subject to nal and binding arbitration, with the losing party paying all costs of arbitration. Any arbitration relating to this
Agreement shall be held in California, under the auspices of an arbiter selected by Bobsweep. Any litigation relating to this
Agreement shall be subject to exclusive venue and jurisdiction in the federal and state courts of California, with the losing
party responsible for costs, including without limitation, court costs and reasonable attorneys fees and expenses.
APPLICABLE LAWS: Any claim arising under or relating to this Agreement shall be governed by the internal substantive
laws of the Commonwealth of California, without regard to its principles of conict of laws. The application of the United
Nations Convention on Contracts for the International Sale of Goods is expressly excluded.