Owner's manual & Installation instructions Bottom Freezer Refrigerators
Operating Instructions
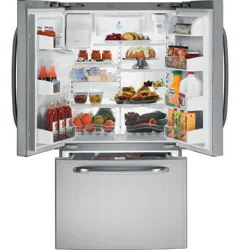
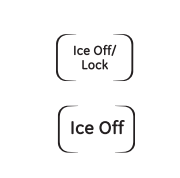
Automatic Icemaker
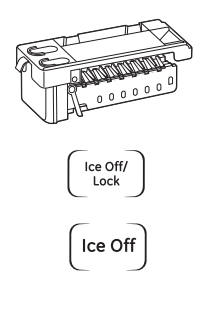
The icemaker will produce seven cubes per cycle—approximately 100–130 cubes in a 24-hour period, depending on freezer compartment temperature, room temperature, number of door openings and other use conditions. If the refrigerator is operated before the water connection is made to the icemaker, press and release the Ice Off/Lock or Ice Off pad on the control panel to disengage the icemaker.
When the refrigerator has been connected to the water supply, press and release the Ice Off/Lock or Ice Off pad on the control panel to engage the icemaker. A newly installed refrigerator may take 12 to 24 hours to begin making ice cubes. You will hear a buzzing sound each time the icemaker fills with water. Throw away the first few batches of ice to allow the water line to clear. Be sure nothing interferes with the sweep of the feeler arm. When the bin fills to the level of the feeler arm, the icemaker will stop producing ice. It is normal for several cubes to be joined together. If ice is not used frequently, old ice cubes will become cloudy, taste stale and shrink.
NOTE: In homes with lower-than-average water pressure, you may hear the icemaker cycle multiple times when making one batch of ice.
NOTE: Turn on the Ice Off feature if the water supply is shut off
Care and cleaning of the refrigerator
Cleaning the Outside
The door handles and trim. Clean with a cloth dampened with soapy water. Dry with a soft cloth. Do not use wax on the door handles and trim.
Keep the outside clean. Wipe with a clean cloth lightly dampened with kitchen appliance wax or mild liquid dish detergent. Dry and polish with a clean, soft cloth. Do not wipe the refrigerator with a soiled dish cloth or wet towel. These may leave a residue that can erode the paint. Do not use scouring pads, powdered cleaners, bleach or cleaners containing bleach because these products can scratch and weaken the paint finish. The stainless steel panels and door handles.
Stainless steel (on some mode) can be cleaned with a commercially available stainless steel cleaner. A spray-on stainless steel cleaner works best. Do not use appliance wax or polish on the stainless steel.
Silver-accented plastic parts. Wash parts with soap or other mild detergents. Wipe clean with a sponge, damp cloth or paper towel. Do not scrub with steel-wool pads or other abrasive cleaners.
Cleaning the Inside
To help prevent odors, leave an open box of baking soda in the refrigerator and freezer compartments.
Unplug the refrigerator before cleaning. If this is not practical, wring excess moisture out of sponge or cloth when cleaning around switches, lights or controls. Use an appliance wax polish on the inside surface between the doors. Use warm water and baking soda solution— about a tablespoon (15 ml) of baking soda to a quart (1 liter) of water. This both cleans and neutralizes odors. Rinse and wipe dry. After cleaning the door gaskets, apply a thin layer of petroleum jelly to the door gaskets at the hinge side. This helps keep the gaskets from sticking and bending out of shape. Avoid cleaning cold glass shelves with hot water because the extreme temperature difference may cause them to break. Handle glass shelves carefully. Bumping tempered glass can cause it to shatter.
Do not wash any plastic refrigerator parts in the dishwasher. Silver-accented plastic parts. Wash parts with soapy water. Wipe clean with a sponge, damp cloth or paper towel. Do not scrub with steel-wool pads or other abrasive cleaners.
Behind the Refrigerator
Be careful when moving the refrigerator away from the wall. All types of floor coverings can be damaged, particularly cushioned coverings and those with embossed surfaces. Raise the leveling legs located at the bottom front of the refrigerator. See Level the Refrigerator in the Installation Instructions for leveling leg details. Pull the refrigerator straight out and return it to position by pushing it straight in.
Moving the refrigerator in a side direction may result in damage to the floor covering or refrigerator. Lower the leveling legs until they touch the floor. When pushing the refrigerator back, make sure you don’t roll over the power cord or icemaker supply line (on some models) and ensure the anti-tip bracket is engaged (if equipped)
Preparing for Vacation
For long vacations or absences, remove food and unplug the refrigerator. Clean the interior with a baking soda solution of one tablespoon (15 ml) of baking soda to one quart (1 liter) of water. Leave the doors open.
Press and release the Ice Off/Lock or Ice Off pad on the control panel to disengage the icemaker. If the temperature can drop below freezing, have a qualified servicer drain the water supply system (on some models) to prevent serious property damage due to flooding.
Preparing to Move
Secure all loose items such as base grille, shelves and drawers by taping them securely in place to prevent damage. When using a hand truck to move the refrigerator, do not rest the front or back of the refrigerator against the hand truck. This could damage the refrigerator. Handle only from the sides of the refrigerator. Be sure the refrigerator stays in an upright position during moving.
Replacing the light bulbs
Refrigerator Lights
- Unplug the power cord from the outlet.
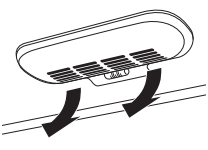
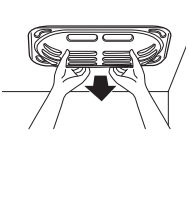
- Rotate the shield down while depressing the two tabs on the back side of the cover to remove it.
- Turn the bulb counterclockwise.
- Replace with an appliance bulb of the same or lower wattage.
- Replace the shield. Plug the refrigerator back in.
NOTE: Reveal® appliance bulbs may be ordered from GE Parts and Accessories, 800.626.2002
Freezer Light
- Unplug the power cord from the outlet.
- Pull drawer out to the stop position.
- Rotate the shield down while pushing it backwards to remove it.
- Turn the bulb counterclockwise.
- Replace with an appliance bulb of the same or lower wattage.
- Replace the shield. Plug the refrigerator back in.
Installation Instructions
BEFORE YOU BEGIN
Read these instructions completely and carefully.
• IMPORTANT — Save these instructions for local inspector’s use.
• IMPORTANT — Observe all governing codes and ordinances.
• Note to Installer – Be sure to leave these instructions with the Consumer
• Note to Consumer – Keep these instructions for future reference.
• Skill level – Installation of this appliance requires basic mechanical skills
• Completion time – Refrigerator Installation 20 minutes Water Line Installation 30 minutes
• Proper installation is the responsibility of the installer.
• Product failure due to improper installation is not covered under the Warranty
PREPARATION
MOVING THE REFRIGERATOR INDOORS
If the refrigerator will not fit through a doorway, the refrigerator doors and freezer drawer can be removed.
• To remove the refrigerator door, see the Installing the Refrigerator section.
• To remove the freezer drawer, see the Removing the Freezer Drawer section.
REFRIGERATOR LOCATION
• Do not install the refrigerator where the temperature will go below 60°F (16°C) because it will not run often enough to maintain proper temperatures.
• Do not install the refrigerator where the temperature will go above 100°F (37°C) because it will not perform properly.
• Install it on a floor strong enough to support it fully loaded
CLEARANCES
Allow the following clearances for ease of installation, proper air circulation and plumbing and electrical connections.
Sides 1/8″ (3 mm)
Top 1″ (25 mm)
Back 1″ (25 mm)
REMOVING THE REFRIGERATOR DOORS
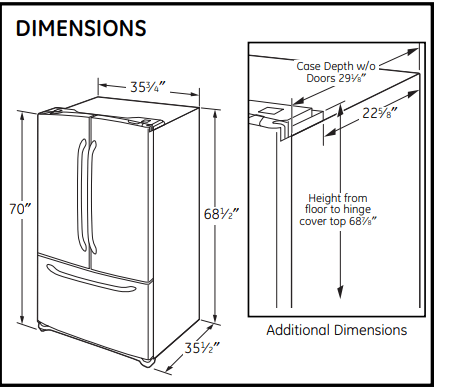
• IMPORTANT NOTE: This refrigerator is 35.6″ deep. Doors and passageways leading to the installation location must be at least 36″ wide in order to leave the doors and handles attached to the refrigerator while transporting it into the installation location. If passageways are less than 36″, the refrigerator doors and handles can easily be scratched and damaged. The top cap and doors can be removed to allow the refrigerator to be safely moved indoors. Start with Step 1.
• If it is not necessary to remove doors, skip to Step 9. Leave tape and all packaging on doors until the refrigerator is in the final location.
• NOTE: Use a padded hand truck to move this refrigerator. Place the refrigerator on the hand truck with a side against the truck. We strongly recommend that TWO PEOPLE move and complete this installation.
REMOVE THE FRESH FOOD DOOR HANDLE
Stainless steel and plastic handles:
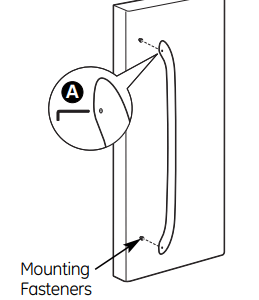
REMOVING THE DOOR HANDLE: Loosen the set screws with the 1/8″ Allen wrench and remove the handle.
NOTE: If the handle mounting fasteners need to be tightened or removed, use a Phillips-head screwdriver
REMOVE THE FREEZER DOOR HANDLE
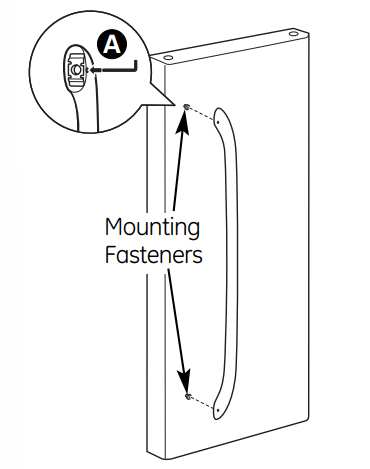
Stainless steel and plastic handles: Loosen the set screws located on the underside of the handle with the 1/8″ Allen wrench and remove the handle
NOTE: If the handle mounting fasteners need to be tightened or removed, use a Phillips-head screwdriver

ATTACH THE FRESH FOOD DOOR HANDLE
Stainless steel and plastic handles:
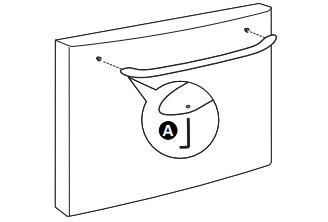
A:Attach the handle to the handle mounting fasteners and tighten the set screws with a 1/8″ Allen wrench
ATTACH THE FREEZER DOOR HANDLE
Stainless steel and plastic handles:
A:Attach the handle firmly to the mounting fasteners and tighten the set screws on the bottom of the handle with a 1/8″ Allen wrench.
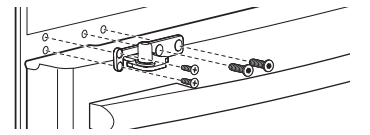
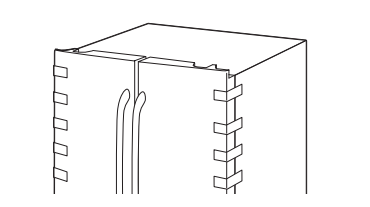
REMOVE THE REFRIGERATOR DOORS
A:Open the refrigerator doors.
B:Remove the two rectangular caps with a flat-head screwdriver

C:Remove the three screws on top with a Phillips-head screwdriver
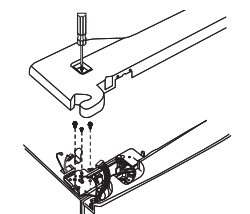
D:Disengage the two electrical connectors
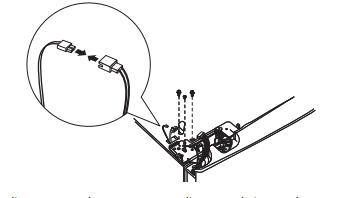
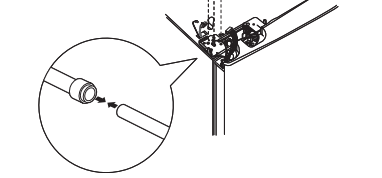
E:To disconnect the water coupling, push in on the gray color of the coupling and pull out the tubing.
F:Remove the two grounding cables with a Phillips-head screwdriver.
G:Remove three 10 mm hex-head bolts (right and left)
H:Lift the door straight up to remove.
I:the two bolts using a 3/16″ Allen wrench and two Phillips-head screws from the center hinge. Set the hinge, bolts and screw aside
REPLACING THE REFRIGERATOR DOORS
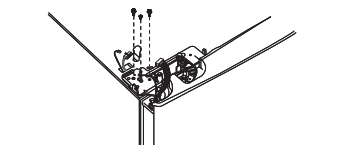
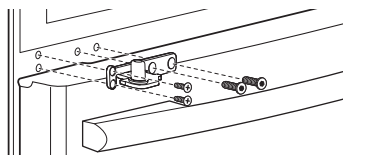
A:Install the center hinge on each side
B:Lower the refrigerator door onto the center hinge pin. Ensure that the plastic hinge pin thimble is on the center hinge pin or inside door hinge pin hole located in the bottom of the door
C:Securely tape the door shut with masking tape or have a second person support the door
D:Insert the top hinge pin into the hinge hole on top of the refrigerator door. Make sure the door is aligned with the cabinet and opposite door. Attach the hinge to the top of the cabinet. Do not tighten bolts completely.
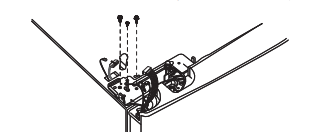
E:On left-hand doors, pass the wires and water line through the top hinge pin. Then connect the water line and two connectors

F:Attach the ground wire with a Phillips-head screwdriver at the right and left hinge.
G:Make sure the gasket on the door is flush against the cabinet and is not folded. Make sure the door is straight and the gap between the doors is even across the front. While holding the aligned door in place, tighten the top hinge bolts.
H:Reconnect the two connectors at each side of the top cap and reattach the three Phillips-head screws on top
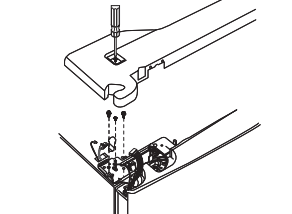
I:Reinstall the rectangular caps removed in Step 5
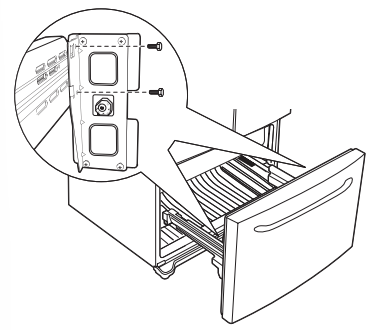
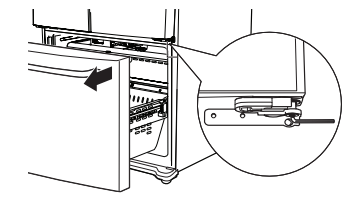
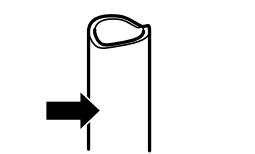
REMOVE THE FREEZER DOOR
A:Pull the freezer door open to full extension.
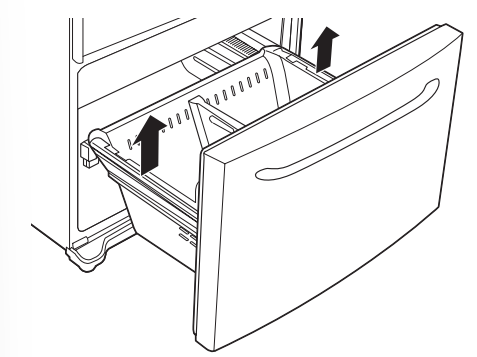
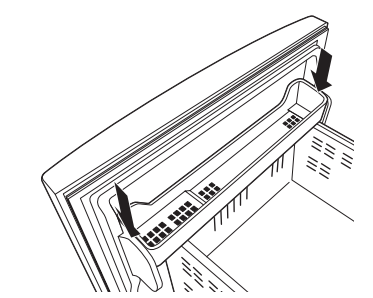
B:Remove the freezer bin by pulling both brackets upward at the same time. (See page 10.
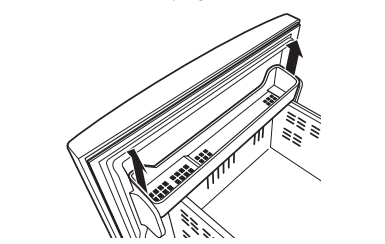
C:Take out the lower basket by lifting the basket up from the rail system. (See page 10.)
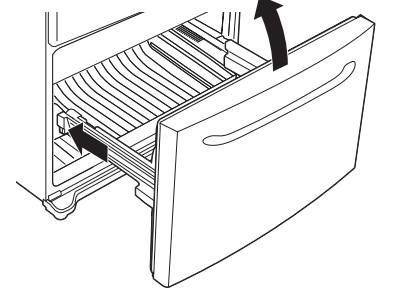
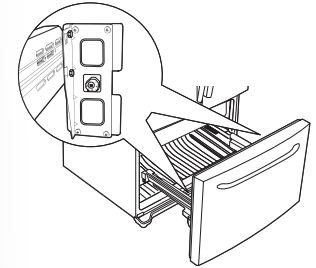
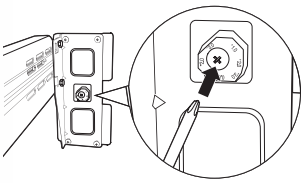
D:Remove the two 10 mm hex-head bolts from the right and left side.

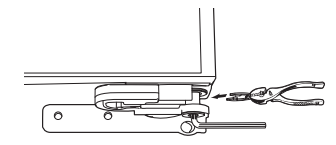
E:Use the tip of a screwdriver to separate the rail from the rail cover. Tilt the front end up and lift the entire door.
F:LSet the door front on a nonscratching surface.
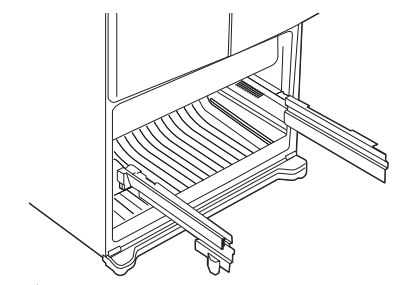
G:Push the rail assemblies back into the cabinet.
REPLACING THE FREEZER DOOR
Two people may be required to complete this procedure.
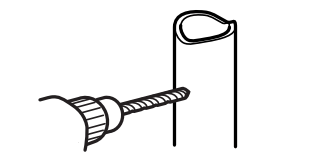
ATTACH AND SECURE THE DRAWER FRONT TO THE SLIDES
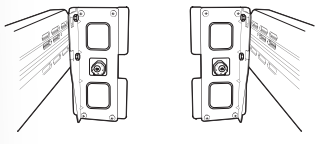
A:Pull out the rail assemblies to the full length on each side of the cabinet.
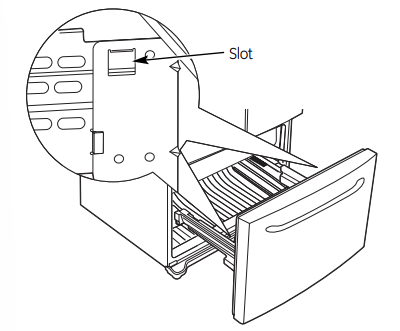
B:Hang the freezer door front onto open slots on the sides
C:Tighten screws completely. (There are four 10 mm hex-head bolts.)
REPLACE THE FREEZER BASKET
Replace the freezer basket by lowering it into the frame

REPLACE THE FREEZER BIN
Hook the ends of the freezer bin into both brackets, and push down until they lock into place. (See page 10.
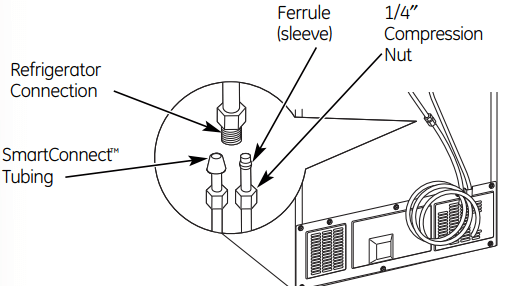
CONNECTING THE REFRIGERATOR TO THE HOUSE WATER LINE
A cold water supply is required for automatic icemaker operation. If there is not a cold water supply, you will need to provide one. See Installing the Water Line section.
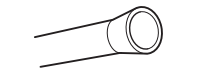
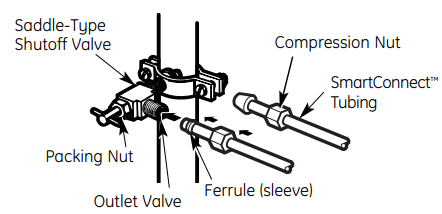
NOTE: Before making the connection to the refrigerator, be sure the refrigerator power cord is not plugged into the wall outlet. If you are using copper tubing, place a compression nut and ferrule (sleeve) onto the end of the tubing coming from the house cold water supply. If you are using the GE SmartConnect™ tubing, the nuts are already assembled to the tubing
A:If you are using copper tubing, insert the end of the tubing into the refrigerator connection, at the back of the refrigerator, as far as possible. While holding the tubing, tighten the fitting. If you are using GE SmartConnect™ tubing, insert the molded end of the tubing into the refrigerator connection, at the back of the refrigerator, and tighten the compression nut until it is hand tight. Then tighten one additional turn with a wrench. Overtightening may cause leaks. Fasten the tubing into the clamp provided to hold it in position. You may need to pry open the clamp.
B:If you are using copper tubing, insert the end of the tubing into the refrigerator connection, at the back of the refrigerator, as far as possible. While holding the tubing, tighten the fitting. If you are using GE SmartConnect™ tubing, insert the molded end of the tubing into the refrigerator connection, at the back of the refrigerator, and tighten the compression nut until it is hand tight. Then tighten one additional turn with a wrench. Overtightening may cause leaks.
C:Fasten the tubing into the clamp provided to hold it in position. You may need to pry open the clamp.
TURN ON THE WATER SUPPLY
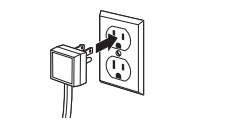
PLUG IN THE REFRIGERATOR
LEVEL THE REFRIGERATOR
The leveling legs have 2 purposes:
1) Leveling legs adjust so the refrigerator is firmly positioned on the floor and does not wobble.
2) Leveling legs serve as a stabilizing brake to hold the refrigerator securely in position during operation and cleaning.
A:The leveling legs also prevent the refrigerator from tipping. Turn the leveling legs clockwise to raise the refrigerator, counterclockwise to lower it.
LEVEL THE REFRIGERATOR DOORS
Remember a level refrigerator is necessary for getting the doors perfectly even. If you need help, review the previous section on leveling the refrigerator.
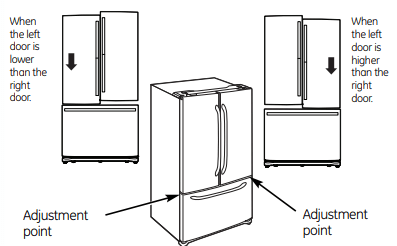
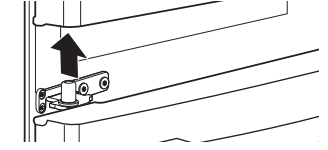
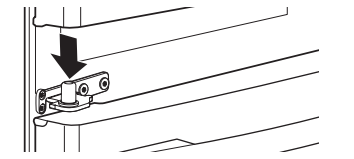
A:If you open the freezer door, you can see the center hinge.
B:Insert the supplied 4 mm Allen wrench into the shaft of the center hinge
C:Adjust the height by turning clockwise or counterclockwise. When you turn counterclockwise, the door will move up
D:After adjusting the doors, insert the supplied fastener ring using a pair of pliers in the gap between the hinge grommet and the center hinge. The number of fastener rings you will need to insert depends on the gap
NOTE: Four fastener rings are enclosed with the refrigerator. Thickness of each fastener ring is 0.04″.
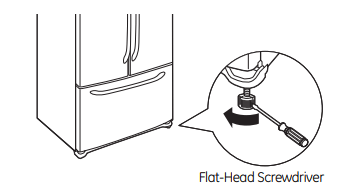
LEVEL THE FREEZER DOOR
A:Locate the height adjuster in the freezer door. Slightly loosen the four Phillips-head screws from the door on each side (right and left)
B:Loosen the controller screw with a Phillips-head screwdriver to adjust the level
C:Find the best position to align the door slope.
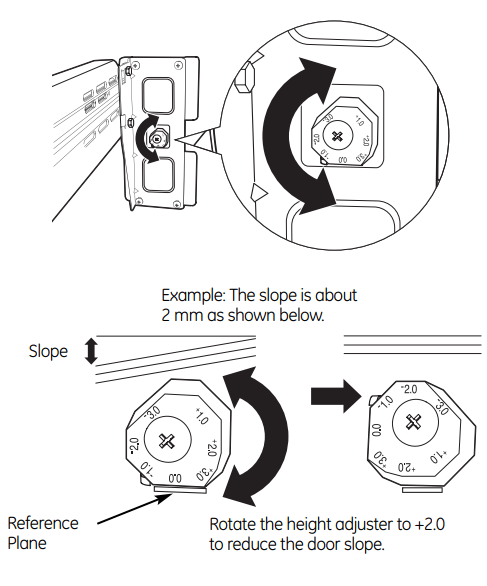
D:After adjustment, tighten all the screws.
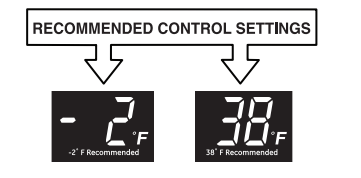
SET THE CONTROLS
Set the controls to the recommended setting.
REMOVE PACKAGING
A) Remove all tape, foam and protective packing from shelves and drawers
INSTALLING THE WATER LINE
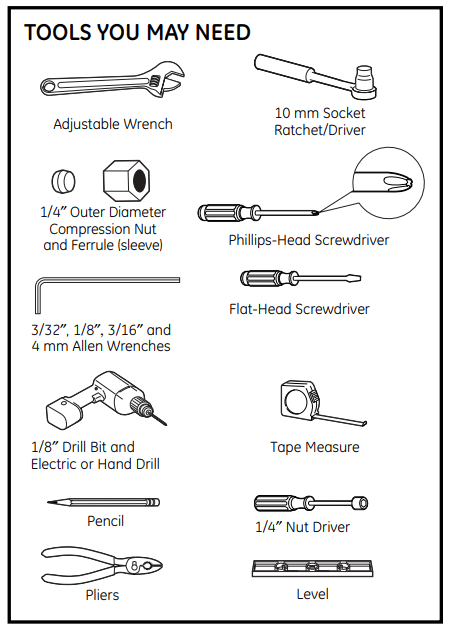
WHAT YOU WILL NEED
• A GE water supply kit (containing tubing, shutoff valve and fittings listed below) is available at extra cost from your dealer or from Parts and Accessories, 800.626.2002 (in Canada 1.888.261.3055).
• A cold water supply. The water pressure must be between 20 and 120 p.s.i. (1.4–8.1 bar).
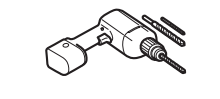
• Power drill.
• 1/2″ or adjustable wrench.
• Straight and Phillips blade screwdriver
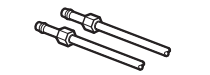
• Two 1/4″ outer diameter compression nuts and 2 ferrules (sleeves)—to connect the copper tubing to the shutoff valve and the refrigerator water valve. OR
• If you are using a GE SmartConnect™ Refrigerator Tubing kit, the necessary fittings are preassembled to the tubing.
• If your existing copper water line has a flared fitting at the end, you will need an adapter (available at plumbing supply stores) to connect the water line to the refrigerator OR you can cut off the flared fitting with a tube cutter and then use a compression fitting. Do not cut formed end from GE SmartConnect™ Refrigerator tubing
• Shutoff valve to connect to the cold water line. The shutoff valve should have a water inlet with a minimum inside diameter of 5/32″ at the point of connection to the COLD WATER LINE. Saddle-type shutoff valves are included in many water supply kits. Before purchasing, make sure a saddle-type valve complies with your local plumbing codes.
SHUT OFF THE MAIN WATER SUPPLY
Turn on the nearest faucet long enough to clear the line of water
CHOOSE THE VALVE LOCATION
Choose a location for the valve that is easily accessible. It is best to connect into the side of a vertical water pipe. When it is necessary to connect into a horizontal water pipe, make the connection to the top or side, rather than at the bottom, to avoid drawing off any sediment from the water pipe
DRILL THE HOLE FOR THE VALVE
Drill a 1/4″ hole in the water pipe (even if using a self-piercing valve), using a sharp bit. Remove any burrs resulting from drilling the hole in the pipe. Take care not to allow water to drain into the drill. Failure to drill a 1/4″ hole may result in reduced ice production or smaller cubes
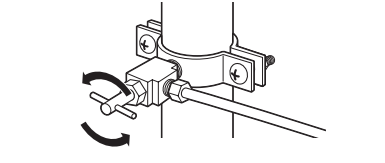
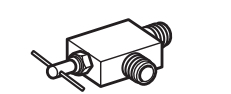
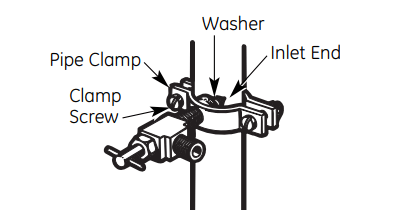
FASTEN THE SHUTOFF VALVE
Fasten the shutoff valve to the cold water pipe with the pipe clamp.
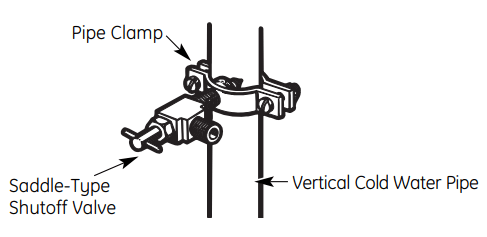
NOTE: Commonwealth of Massachusetts Plumbing Codes 248CMR shall be adhered to. Saddle valves are illegal and use is not permitted in Massachusetts. Consult with your licensed plumber
TIGHTEN THE PIPE CLAMP
Tighten the clamp screws until the sealing washer begins to swell.
NOTE: Do not overtighten or you may crush the tubing.
ROUTE THE TUBING
Route the tubing between the cold water line and the refrigerator. Route the tubing through a hole drilled in the wall or floor (behind the refrigerator or adjacent base cabinet) as close to the wall as possible.
CONNECT THE TUBING TO THE VALVE
Place the compression nut and ferrule (sleeve) for copper tubing onto the end of the tubing and connect it to the shutoff valve. Make sure the tubing is fully inserted into the valve. Tighten the compression nut securely. For plastic tubing from a GE SmartConnect™ Refrigerator Tubing kit, insert the molded end of the tubing into the shutoff valve and tighten compression nut until it is hand tight, then tighten one additional turn with a wrench. Overtightening may cause leaks.
NOTE: Commonwealth of Massachusetts Plumbing Codes 248CMR shall be adhered to. Saddle valves are illegal and use is not permitted in Massachusetts. Consult with your licensed plumber.
FLUSH OUT THE TUBING
Turn the main water supply on and flush out the tubing until the water is clear. Shut the water off at the water valve after about one quart (1 liter) of water has been flushed through the tubing

Troubleshooting Tips
| Problem |
Possible Causes |
What To Do |
| Motor operates for ong periods or cycles on and off frequently.(Modern refrigerators with more storage space and a larger freezer require more operating time. They start and stop often to maintain even |
- Normal when refrigerator is first plugged in.
- Often occurs when large amounts of food are placed in refrigerator.
- Door left open.
- Hot weather or frequent door openings
- Temperature control set at the coldest setting
|
- Wait 24 hours for the refrigerator to completely cool down
- This is normal
- Check to see if package is holding door open
- This is normal.
- See About the controls
- See About the controls
- Set the temperature control one step colder.See About the controls
- Check to see if package is holding door open
|
| Frost or ice crystals on frozen food frost within package is normal) |
Door left open.
Door openings too frequent or too long.
|
- Check to see if package is holding door open
|
| Frequent “buzzing” soun |
- Ice Off feature is turned off, but the water supply to the refrigerator has not been connected.
|
- Press and release the Ice Off/Lock pad on the control panel to turn on the Ice Off feature, and then the
 icon will be displayed. Keeping the Ice Off feature on will damage the water valve. icon will be displayed. Keeping the Ice Off feature on will damage the water valve.
|
| Small or hollow cubes |
|
- Replace filter cartridge with new cartridge or with plug.
|
| Automatic icemaker does not work |
- Ice Off feature is turned on.
- Water supply turned off or not connected
- Freezer compartment too warm.
- Piled up cubes in the storage bin cause the icemaker to shut off
- Ice cubes stuck in icemaker.
|
- Press and release the Ice Off/Lock pad on the control panel to turn off the Ice Off feature, and then the
 icon will disappear icon will disappear
- See Installing the water line..
- Wait 24 hours for the refrigerator to completely cool down.
- Level cubes by hand
- Turn off the icemaker, remove cubes and turn the icemaker back on
|
| Ice cubes have odor/taste |
- Food transmitting odor/taste to ice cubes.
- Interior of refrigerator needs cleaning.
|
- Wrap foods well
- See Care and cleaning.
- Keep an open box of baking soda in the refrigerator; replace every three months
|
| Slow ice cube freezing |
- Door left open.
- Freezer control not set cold enough.
|
- Check to see if package is holding door open.
- See About the controls
|
| Refrigerator has odor |
- Foods transmitting odor to refrigerator
- Interior needs cleaning
|
- Foods with strong odors should be tightly wrapped.
- Keep an open box of baking soda in the refrigerator; replace every three months.
- See Care and cleaning
|
| Moisture forms on outside of refrigerator |
- Not unusual during periods of high humidity
|
- Wipe surface dry and reset the refrigerator control one setting colder.
- Turn off Energy Saver mode
|
| Moisture collects inside (in humid weather, air carries moisture into refrigerator when doors are opened) |
- Too frequent or too long door openings
|
|
| Refrigerator or freezer compartment light does not work |
- No power at outlet Light bulb burned out or loose.
|
- Replace fuse or reset the breaker
- See Replacing the light bulbs.
|
| Door/drawer does not close by itself |
- Leveling legs need adjusting
|
- See Installing the Refrigerator
|
| Hot air from bottom of refrigerator |
- Normal air flow cooling motor. In the refrigeration process, it is normal that heat be expelled in the area under the refrigerator. Some floor coverings will discolor at these normal and safe temperatures.
|
|
| Food freezing in the refrigerator |
- Food too close to the air vent at the back of the refrigerator.
- Refrigerator control is set too cold
|
- Move the food away from the air vent.
- Move the refrigerator control to a warmer temperature setting one increment at a time
|
| Water has poor taste/odo |
- Water dispenser has not been used for a long time.
|
- Dispense water until all water in system is replenished
|
| Water in first glass Normal when refrigerator is warm |
- Normal when refrigerator is first installed.
- Water dispenser has not been used for a long time.
- Water system has been drained.
|
- Wait 24 hours for the refrigerator to completely cool down.
- Dispense water until all water is system is replenished
- Allow several hours for replenished supply to chill
|
| Water dispenser Water supply line turned off does not work |
- Water supply line turned off or not connected.
- Water filter clogged
- . Air may be trapped in the water system.
- Water in reservoir is frozen because the controls are set too cold.
|
- See Installing the water line.
- Replace filter cartridge or remove filter and install plug.
- Press the dispenser arm for at least 2 minutes.
- Set the refrigerator control to a warmer setting and wait 24 hours. If water does not dispense after 24 hours, call for service
|
| Flow of water to Water filter clogged dispenser is slow |
|
- Replace filter cartridge or remove filter and install plug
|
| Water spurting from dispenser |
- Newly installed filter cartridge.
|
- Run water from the dispenser for 3 minutes
|
| No water or ice cube production |
- Supply line or shutoff valve is clogged.
- Water filter clogged
- Filter cartridge not properly installed
|
- Call a plumber.
- Replace filter cartridge or remove filter and install plug
- Remove and reinstall filter cartridge, being certain that it locks into place. The blade on the end of the cartridge should be positioned vertically
|
| Water is leaking from dispenser |
- Glass not being held under the dispenser long enough after button is released. to dispense after the button is released.
- Air may be present in the water line system, causing water to drip after being dispensed
|
- Hold the glass underneath the dispenser for 2–3 seconds after releasing the dispenser button. Water may continue to dispense after the button is released.
- Dispense water for at least 2 minutes to remove air from system.
|
| Handle is loose / handle has a gap |
|
- See Attach the Fresh Food handle and Attach the Freezer handle sections for detailed instructions.
|
| Refrigerator beeping |
|
|