... on purchasing this fully automatic coffee machine! You have now acquired a high-quality and modern kitchen appliance. It combines innovative technology with a range of functions and is easy to use. It will enable you to prepare a variety of delicious hot drinks quickly and simply – whether you’re in the mood for an invigorating espresso, a creamy cappuccino, a smooth latte macchiato or white coffee, or a tradi- tional cup of coffee. At the same time the appliance offers you a wide range of options for adapting it to your individual taste. To ensure that you can use this fully auto- matic coffee machine with all its functions and features reliably and safely, we would like you to familiarize yourself with its com- ponents, functions, displays and controls. These instructions are designed to help you. So please take the time to read them before you switch on the appliance.
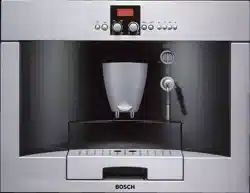
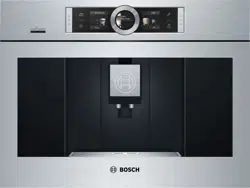
Overview
(Figures B to E on the fold-out pages)
1. Appliance door
a Recessed grip (for opening the door)
b Drip tray
2. Control panel (see next page)
a Control ring
b Information display
c Touch display (left and right)
3. Outlet system (coffee, milk, hot water), height-adjustable
a Cover
4. Milk system
a Snap lever
b Beverage outlet (upper part, lower part)
c Milk tube (2 pieces)
d Connecting element, metal (for magnet holder)
5. Power switch (power supply)
6. Accessory drawer (for quick reference guide and accessories)
Note: Further information about the appliance, such as how to change the opening angle of the door, can be found in the installation instructions.
Controls
The appliance features user-friendly menu navigation to ensure that operation is as easy as possible while at the same time offering a wide range of functions. That means a range of options can be selected with just a few operating steps.
Power switch
The power switch (with the door open) is used to switch the appliance on, or to switch it off fully (power supply off).
NOTICE: Do not press the power switch while the appliance is in use. Switch off the appliance only when it is in energy saving mode, so that it can rinse automatically.
Control panel (touch field)
Note:
These operating instructions refer to several models. In some models and are touchscreen elements.
on/off
Press to switch on the appliance or put it into energy saving mode. The appliance is rinsed automatically.
The appliance does not rinse if:
if it is still warm when switched on, or
if no coffee was dispensed before it was switched off.
The appliance is ready for use as soon as the images for the drinks selection appear on the display.
start/stop
Press for either beverage preparation or to launch a service program.
Press again while the drink is being prepared to prematurely halt dispensing.
There are four menu fields in the control panel which can be activated by pressing.
The active menu field lights up red.
lights up as soon as the appliance is in operation. Drinks can be selected and dispensed or settings for the drinks can be changed.
MyCoffee
Press to open the selection of "Personalized beverage preparation”. Personal settings for coffee drinks can be saved and called up (see the section "Personalized drinks”).
Menu
Press to call up the menu. Settings can be made and information called up see the section “Menu”).
Service
Press to open the selection of service programs. Run the desired program as described in the section “Service programs”.
Note:
Press , or again to exit the respective menu.
Control ring
Turn the control ring to navigate in the display or to change parameters.
Information display
The round display shows the drink selected, the settings or information.
Touch display (left and right)
Depending on the setting, different fields are shown in both the touch displays. A field is activated when pressed either to enter settings or change values.
Initial use
General
Fill the appropriate container using only pure, cold, uncarbonated water and only roasted beans. Do not use coffee beans that have been glazed, caramelized or treated with other additives containing sugar, since they will block the brewing unit.
WARNING: Before the appliance can be switched on and used, it must be assembled and connected according to the enclosed assembly instructions.
Setting up the appliance
Remove any protective plastic film.
NOTICE:
Only use the appliance in a frost-free room. If it has been transported or stored at tem- peratures below 32°F, wait at least 3 hours before initial use.
Take hold of the appliance door by the recessed grip and open.
Remove the water tank, rinse it and fill it with fresh water up to the “max” mark.
Replace the water tank and click into place.
Remove the bean container, fill with coffee beans and replace.
Set the power switch to and close the appliance door.
The appliance heats up and is rinsed.
The control panel is activated.
"Language” appears.
Turn the control ring with your finger to select the desired language and press the [Water hardness ] field.
Note:
It is important to set the water hardness correctly to enable the appliance to accu- rately indicate when the descaling program should be run. The preset water hardness is level 4. If a water softener is installed in the house, please set the water hardness to level 3. You can also check the water hard- ness by asking your local water supplier.
Use the enclosed test strip to determine the water hardness. Briefly dip the test strip in water and check the result after one minute.
Turn the control ring with your finger to set the water hardness determined.
Press [ Set-up complete ]. The settings are saved.
The appliance is ready to use as soon as the drink images are shown and the lights up.
The integrated fan switches on each time a drink is dispensed and switches off again after a few minutes.
Note: When the appliance is used for the first time after running a service program, or if it has not been operated for a long period, the first beverage will not have the full aroma. When the fully automatic coffee machine is first used, a suitable thick and stable crema” is only achieved after the first few cups have been dispensed.
Switch off appliance
Press .
The appliance rinses and switches to energy saving mode.
Exception: If only hot water is dispensed, the appliance switches off without rinsing.
To switch the appliance off completely, open the appliance door and set the power switch to .
NOTICE: Do not press the power switch while the appliance is in use.
Note:
The factory settings of the fully automatic coffee machine are programmed for optimal performance. The appliance switches auto- matically to the energy saving mode after a specified time and rinses (duration can be set, see “Switch off after” in the section "Menu”).
Note:
The appliance is equipped with a sensor. If there is a milk container, this will be correspondingly shown on the display when switching to the energy saving mode. If there is milk in the container, please store in the fridge.Control panel
Information is shown on the display or settings can be entered by pressing the touchscreen and the control ring.
Display
The control panel shows the selected drinks, settings and setting options, as well as messages about the appliance’s operating status.
e.g. Drink selection
e.g. Drink selection
Information disappears after operating the appliance or after a short time. The information remains, however in the information display in the form of a small symbol.
Prompts to take action
Note:If the action required was carried out, e.g. filling the water tank, the corresponding message and symbol will disappear.
Operation
Press texts or symbols combined with turning the control ring to navigate in the control panel (for an example, see section "Drink adjustment”).
An audible signal is heard when pressing the touch display. These audible signals can be switched on or off (see the section "Menu – Key tones”).
Preparing drinks
This fully automatic coffee machine can be operated using coffee beans or ground coffee (but not instant coffee). If using coffee beans, they will be freshly ground for each brewing. For optimum quality, store the beans in a cool place in sealed containers.
Note: Cups should be prewarmed, e.g. with hot water. This applies particularly to small thick-walled espresso cups.
NOTICE: Fill the water tank with fresh, uncarbonated, cold water every day. The tank should always contain sufficient water for operating the appliance.
Note: For some settings, coffee is prepared in two stages (see the section " Aroma Double Shot” and “Two cups at once”). Please wait until the process is completely finished.
Beverage selection
Turn the control ring to select different drinks:
The image and the name of the selected drink will appear in the middle of the infor- mation display.
The values currently set, e.g. for the coffee strength and temperature are shown on the left and right of the touch display.
The following drinks can be selected:
Ristretto
Espresso
Espresso Macchiato
Coffee
Cappuccino
Latte Macchiato
Café Latte
Milk froth
Warm milk
Hot water
The drink selected can be directly prepared with the pre-set values or first adjusted to individual taste.
Drink adjustment
Press one of the fields shown on the touch display, e.g. to activate the field, turns red.
Turn the control ring to change the setting.
Press again to save the setting.
An example:
The values for a cup of Coffee can be changed as follows:
Turn the control ring and select “Coffee”.
Press the field, e.g. to active, lights up red.
Turn the control ring and set the desired coffee strength in the middle of the infor- mation display , e.g. to “very strong”.
Press the field .
Turn the control ring to set the required amount of coffee, e.g. “5 oz”.
Press the field .
Turn the control ring and set the desired temperature, e.g. “very high”.
Save the settings by pressing the active field or by starting to dispense the drink.
Note: There are different setting options depend- ing on the type of drink. For coffee drinks, for example, the strength, temperature and quantity can be set; for milk, only the volume.
The following settings are possible:
Coffee strength
mild
normal
strong
very strong
Double Shot
Double Shot +
Double Shot ++
Note:
Aroma Double Shot
The longer coffee is brewed, the more bitter substances and undesirable aromas are released. This has a negative effect on the taste and makes the coffee less easily digested. For extra strong coffee, the appliance has therefore a special Aroma Double Shot function. When half the quantity has been prepared, it grinds and brews fresh coffee beans so that only the pleasant, aromatic scents are released.
Note: When the 12 oz (360 ml) or 16 oz (480 ml) volume is selected, the Aroma Double Shot function is not aperable.
Note: The Aroma Double Shot function is not available for Ristretto, Espresso Macchiato, and when ground coffee is used.
Volume
The volume differs depending on the type of drink and can be set in “oz” or “ml” incre- ments. The factory setting is in “oz” and can be converted to “ml”, see chapter “Menu - Volume units”.
Note: The volume dispensed can fluctuate depending on the quality of the milk.
Drinks temperature
Values for coffee drinks:
normal
high
very high
Values for hot water:
The factory setting is in “°F” and can be converted to “°C”, see chapter “Menu -
Temperature format”.
160°F (70°C) White tea
180°F (80°C) Green tea
200°F (90°C) Black tea
Max Fruit tea
Note: If no controls are activated for approx. seconds, the appliance will automatically exit the settings mode. The settings made will be automatically stored.
Two cups at once
Press to prepare two cups of the selected drink simultaneously. The setting is shown as text, e.g. “2 x Espresso”.
Press .
Place two cups left and right underneath the beverage outlet.
Press to start dispensing.
The selected drink is prepared and then dispensed into both cups.
Note: The drink is prepared in two stages (two grinding operations). Please wait until the process is completely finished, to remove the cup.
Note: When the 12 oz (360 ml) or 16 oz (480 ml) volume is selected, it is not possible to dispense two cups at once.
Note: Two cups at once cannot be dispensed for the settings “Aroma Double Shot” or ground coffee”.
Preparation using coffee beans
The appliance must be ready for use.
Place a cup underneath the beverage outlet.
Turn the control ring and select “Ristretto”, “Espresso” or “Coffee”.
The display shows the selected drink along with the preset values for the drink.
Note: The settings can be changed as described in the section “Drink adjustment”.
Press to start dispensing.
The coffee is brewed and then dispensed into the cup.
Press again to prematurely halt dispensing.
Preparation using milk
This fully automatic coffee machine has an integrated beverage outlet. This can be used to prepare coffee drinks with milk or milk froth and warm milk.
Milk container
The milk container has been designed especially for use together with this fully automatic coffee machine. It is intended solely for use in the household and for storing milk in the refrigerator.
NOTICE:
Remove cups or glasses before opening the door to prevent them from falling.
Connecting the milk container or a milk carton:
Open the appliance door.
Remove the cover of the beverage outlet towards the front.
Connect and fix the milk tubes and connecting elements as illustrated.
Attach the cover firmly from the front on to the beverage outlet.
Attach the suction pipe and insert into the milk container.
Close the appliance door.
Note: Dried milk residues are difficult to remove, therefore always clean immediatly after use (see the section “Cleaning the milk system”).
Coffee drinks with milk
Place a cup or glass underneath the beverage outlet.
Turn the control ring and select “Espresso Macchiato”, “Cappuccino”, ”Latte Macchiato” or “Café Latte”.
The display shows the selected drink along with the preset values for this drink.
Note:
The settings can be changed as described in the section “Drink adjustment”.
Press to start dispensing. The milk is dispensed into the cup or glass first. Then the coffee is brewed and runs into the cup or glass.
Press again to stop the current step of the process prematurely.
Milk froth or warm milk
Place a cup or glass underneath the beverage outlet.
Turn the control ring and select "Milk froth” or “Warm milk”.
Note:
The settings can be changed as described in the section “Drink adjustment”.
Press to start dispensing.
Milk froth or warm milk is dispensed from the beverage outlet.
Press again to prematurely halt the dispensing process.
Preparation using ground coffee
Note: When using ground coffee, the setting for the strength of the coffee, dispensing two cups at once and dispensing larger volumes (12 oz/360 ml or 16 oz/480 ml) is not operable. If the message “Double dispensing not possible with ground coffee” appears, please select a volume smaller than 12 oz/360 ml.
NOTICE:
Remove cups or glasses before opening the door to prevent them from falling.
The appliance must be ready for use.
Open the appliance door.
Remove the ground coffee drawer. The removable drawer must be dry.
Put in coffee grounds (maximum 2 level measuring spoons); do not press firmly.
NOTICE:
Do not use whole beans or instant coffee.
Replace the ground coffee drawer.
Close the appliance door.
Note:
If coffee is not dispensed within 90 seconds, the brewing chamber empties automatically to avoid an overflow. The appliance is then rinsed.
Place a cup underneath the beverage outlet.
Turn the control ring and select a coffee drink or a coffee drink with milk.
The display shows the selected drink, a measuring spoon and the preset values for this drink.
Note: The settings can be changed as described in the section “Drink adjustment”.
Note: For coffee drinks with milk, please observe the instructions in the section “Preparation using milk”.
Press to start dispensing.
The coffee is brewed and then dispensed into the cup. When selecting coffee drinks with milk, the milk is first dispensed and then the coffee brewed.
Note: For another drink with ground coffee, repeat the procedure.
Dispensing hot water
The appliance must be ready for use.
Remove the milk tube from the milk container.
Remove any milk or coffee residue from the outlet.
Place a cup or glass underneath the beverage outlet.
Turn the control ring and select "Hot water”.
Note:
The settings can be changed as described in the section “Drink adjustment”.
Press to start dispensing.
The message appears “Milk hose separated from milk container and coffee outlet cleaned?”.
If still connected, remove the milk tube and press [ Yes ] on the display.
Hot water flows out of the beverage outlet.
Press again to prematurely halt the dispensing process.
Personalized drinks
Press to open the selection for personalized drinks.
Up to 8 storage spaces can be used. Save your favourite drinks that are frequently dispensed here with all their settings.
Note:
Press to exit the menu without saving at any time.
Entering or changing drinks
Press . The selection of memory locations appears.
Turn the control ring to choose an empty memory location (empty glass) to make a new entry, change an occupied memory location, or delete a favourite drink.
Select [ new ] at an empty memory location or [ Details ] at an occupied memory location.
The menu for adjusting the drinks opens. The last drink dispensed is shown with the last settings selected.
If you do not wish to save last drink dispensed, turn the control ring and select another drink.
Press each setting to be changed and turn the control ring to adjust the values as desired.
Other setting options appear depending on the selection.
Press [ Further details | Save ] to enter other settings.
Note:
For milk drinks, the mixing ratio of coffee and milk can be set.
The settings can be stored under an indi- vidual name. Press [ Name ]. The screen for entering the name opens.
Turn the control ring and select a letter or a symbol.
Press [ Save letter ] to confirm the letter selected or [ Delete letter ] to delete it.
Select other letters or symbols and confirm.
With [ Save ] the entry is saved. The selection menu opens.
Press to exit the menu.
Deleting a drink
Press
Turn the control ring and select the occupied memory location.
Press [ Details ] and [ Further details | Save ].
Press [ Delete beverage ] and then [Delete ].
The memory location is again free.
Select a personalized drink and dispense
Press . The selection of memory locations opens.
Turn the control ring and select the desired memory location.
Place a cup or glass underneath the beverage outlet.
Press to start dispensing.
Adjusting the grind setting
This fully automatic coffee machine has an adjustable grinding unit. This enables the grinding level of the coffee to be individually changed.
Open the appliance door.
Slide the regulator to select the grinding degree setting between finely ground coffee and coarsely ground coffee .
Close the appliance door.
Note: For dark roast coffee beans, choose a finer grind, for lighter beans a coarser grind.
Note: Make only small changes to the grinding degree setting.
Note: The new setting will not become apparent until after the second cup of coffee.
Note: If the display shows the message “Select a coarser degree of grinding”, this means that the beans are being ground too finely. Adjust the grinding level to a coarser setting.
Child-proof lock
The appliance can be locked to protect children against scalding and burns.
Press and hold for at least seconds. “Child-proof lock activated” briefly appears on the display. No further operation is now possible; only can be pressed.
To deactivate the child lock, press and hold for at least 4 seconds. "Child-proof lock deactivated” briefly appears on the display.
Menu
The menu is used for changing individual settings, accessing information and launching processes.
Press to open the menu.
The different setting options will appear in the touch display and the current setting in the round information display.
Navigating through the menu:
By pressing e.g. [ Language ] the corresponding setting option is activated and highlighted red.
Turn the control ring to enter the settings, e.g. “English”. By pressing [ Continue ], other setting options will appear.
For example:
Set the appliance at 15 minutes to switch off automatically:
Press . The menu opens.
Press [ Switch off after ], the field is high- lighted red.
Turn the control ring and select “00h15m”.
Press . [ Save ] and [ Do not save ] appears.
Press [ Save ]. The setting is saved.
The drink selection appears on the display.
Note: Press to exit the menu at any time. If no entry is made within approx. 30 seconds, the menu closes automatically and the settings are not saved.
The following settings can be made:
Language
Set the desired language to show the display texts.
Water hardness
Set this to the local water hardness.
Level “1 (soft)” to “4 (very hard)” can be selected. The preset water hardness is very hard)”.
Note:
It is important to set the water hardness correctly to enable the appliance to accu- rately indicate when the descaling program should be run.
You can check the water hardness using the enclosed test strip or by asking your local water supplier. If a water softening system is installed in the house, please select the “Softening device” setting.
Water filter
If a water filter is inserted, renewed or removed, the setting “Insert”, “Replace” or "Remove” must be made in the menu.
Note:
A water filter lowers limescale deposits, reduces impurities in water and improves the coffee taste. Water filters are available from retail outlets or from customer service (see the section " Accessories”).
Inserting or renewing a water filter: A new water filter must be rinsed before it can be used.
Turn the control ring to select either "Insert” or “Replace”.
Press the water filter firmly into the opening of the water tank.
Fill the water tank with cool water up to the “max” mark.
Remove the milk tube from the milk container and close the door.
NOTICE:
Do not jam the tube when closing the door.
Place a container with a capacity of 17 oz under the outlet .
Press .
Water will now flow through the filter to rinse it.
Then empty the container.
The appliance is ready for use again.
Note:
Rinsing the filter simultaneously activates the setting for the change filter display.
The filter is no longer effective when the "Replace water filter” display appears, or at the latest after two months. It needs to be replaced for reasons of sanitation and to prevent a build-up of limescale (which could damage the appliance).
If a new filter is not inserted, select the setting [ Remove ] and press C.
The message “Remove filter, reinsert water tank, close door” appears.
Note:
If the appliance has not been used for a prolonged period (for example, while you are on vacation), the existing filter should be rinsed before the first time the appliance is used again. To do this, simply dispense a cup of hot water.
Detailed information about the water filter can be found in the manual supplied with the filter.
Temperature Format
Setting option in “°F” or “°C”.
Volume units
Setting option in “oz” or “ml”.
Switch off after
To set how long the appliance should wait after the last drink was prepared before it automatically rinses and switches itself off.
You can specify values from 15 minutes to hours. The factory setting is 30 minutes.
Illumination
Setting the illumination of the beverage outlet. “On”, “when in use” or “Off” can be selected.
Brightness illumination
Setting the illumination lightness of the beverage outlet. “Level 1” to “Level 10” can be selected.
Brightness display
Setting the illumination lightness of display.
Key tones
Switch the signal tones on or off.
Clock
Display option for time “Off”, “Analog” (on) or “Digital” (on). The setting for this can be changed in the Clock menu option.
Note:
If the appliance is switched off at the power switch or there is a power failure, the set- tings for the time will be lost.
Time
Setting for the current time.
Clock format
Setting option in “12hr” (American mode) or hr” (European mode)
Note: No difference between am and pm.
Frost protection
Service program to prevent frost damage during transportation and storage.
This program completely empties the appliance.
Empty the water tank and reinsert.
If available remove the milk container and close the door.
The appliance automatically empties all its pipes.
Empty the drip tray and re-insert.
Beverage info
Display shows how many drinks have been prepared since its initial use.
Factory settings
Resets your own settings to the condition when delivered.
Press [ Reset ] or [ Do not reset ] to either confirm or interrupt.
Home Connect
This fully automatic coffee machine is Wi-Fi-capable and can be remotely con- trolled using a mobile device (e.g. tablet PC, smartphone). The Home Connect App offers additional functions which are a perfect complement to the networked appliance. If the appliance is not connected to the WLAN network (home network), it functions in the same way as a fully automatic coffee machine with no network connection and can be operated as usual via the display.
Note: Please ensure that you follow the safety instructions given at the beginning of this instruction manual and that these are also observed when operating the appliance via the Home Connect app and when away from home. Please also follow the instruc- tions in the Home Connect App.
Note: Operation on the appliance itself always takes priority, and during this time it is not possible to operate the appliance using the Home Connect App.
Setting up
To implement settings via Home Connect, you must have installed the Home Connect App on a mobile device (e.g. tablet PC, smartphone). Please observe the supplied Home Connect documents with regard to this feature. Follow the steps specified by the app to implement the settings. Login of the appliance in the WLAN network can be carried out on initial set-up of the fully automatic coffee machine either directly or using the menu (first touch A to open the menu):
Touch [ Home Connect ].
Touch [ Wi-Fi ] to start the wireless con- nection. “Wi-Fi Activated” appears in the display.
Touch [ Connect network ]. The following selection appears: [ Connect automatically ] and [Manually connect ].
Note: If the router has WPS functionality, please select [ Connect automatically ].
Connect automatically in the WLAN network (home network)
Press the WPS button on the home network router within a few minutes and wait until the display of the fully auto- matic coffee machine shows “Network connection successful”.
Open the app on the mobile device.
Touch [ Connect to app ]. The fully auto- matic coffee machine connects with the app.
Wait until [ Connect with app successful ] lights up briefly in the display.
Touch [ Remote start ]. A warning message appears.
Touch [ Continue ] and read the warning message.
Touch [ confirm ].
With the mobile device the functions of the fully automatic coffee machine can now be used to their full extent via the app.
Note: If [Remote start ] - [ Deactivate ] is selected, only the modes of the fully automatic coffee machine are displayed in the Home Connect app. You can specify settings but not start drinks dispensing.
Connect manually in the WLAN network (home network)
Touch [ Manually connect ]. The fully auto- matic coffee machine sets up a separate WLAN network which can be accessed with a tablet or smartphone. The display shows the SSID (the name) and the key the password) of this network.
Log the mobile device in to the network of the fully automatic coffee machine with the “HomeConnect” SSID and the "HomeConnect” key.
Start the app on the mobile device and follow the instructions for network login in the app and the supplied Home Connect documents.
The login process is complete when "Network connection successful” lights up briefly in the display of the fully automatic coffee machine.
Touch [ Connect to app ]. The app must also be opened on the mobile device. The fully automatic coffee machine connects with the app.
Wait until [ Connect with app successful ] lights up briefly in the display.
Touch [ Remote start ]. A warning message appears.
Touch [ Continue ] and read the warning message.
Touch [ confirm ].
With the mobile device the functions of the fully automatic coffee machine can now be used to their full extent via the app.
Note: If [Remote start ] - [ Deactivate ] is selected, only the modes of the fully automatic coffee machine are displayed in the Home Connect app. You can specify settings but not start drinks dispensing.
Switching Wi-Fi on and off
Wi-Fi can be switched “Activated” or "Deactivated” as required (e.g. when on holiday).
Note: Network information is retained after the appliance is switched off. After switching on, wait a few seconds until the fully automatic coffee machine has connected to the WLAN network again. In networked standby mode the appliance requires a maximum of 2 W.
Touch to open the menu.
Touch [ Home Connect ].
Touch [ Wi-Fi ] to switch the wireless module “Activated” and “Deactivated”.
Disconnecting
The fully automatic coffee machine can be disconnected from the WLAN network at any time.
Note: If the fully automatic coffee machine is disconnected from the WLAN network, it cannot be operated using Home Connect.
Touch to open the menu.
Touch [ Home Connect ].
Touch [ Disconnect from network ].
The connection to the network and app is disconnected. Wi-Fi and remote start are switched off.
Note: Information about the WLAN network is cleared.
Connecting with app
The Home Connect app can be installed on any number of mobile devices, which can then be used to connect to the fully auto- matic coffee machine.
The fully automatic coffee machine must already be connected to the WLAN network.
Open the app on the mobile device.
Touch to open the menu.
Touch [ Home Connect ].
Touch [ Connect to app ] to connect to the appliance with the app.
Care and daily cleaning
Wipe the outside of the appliance with a soft, damp cloth.
Use a very mild cleaning agent.
Clean the control panel using a micro- fibre cloth.
Do not use any cleaning agents containing alcohol or spirits.
Do not use abrasive cloths or cleaning agents.
Always remove any limescale, residues of coffee or milk, cleaning or descaling solu- tion immediately. It is possible for corrosion to form underneath such deposits.
Note: New sponge cloths may contain salts. Salts can cause rust film on stainless steel and must therefore be washed out thoroughly before use.
Open the door and pull the drip tray out forward.
Remove drip tray cover and coffee grounds container.
Empty, clean and dry individual parts.
NOTICE:
The drip tray and coffee grounds container should be emptied and cleaned every day in order to prevent deposits.
Remove the ground coffee drawer, clean under running water and dry well.
Wipe and dry the inside of the appliance support, drip tray and the ground coffee drawer) and collecting tray.
Replace the dried parts, e.g. the ground coffee drawer.
NOTICE:
Do not put the following parts in the dishwasher:
Accessory drawer, water tank, lid of the water tank, beverage outlet cover, bean container, lid of the bean container, metal connecting element, ground coffee drawer, protective cover of the brewing unit and the milk container.
The following parts may be cleaned in the dishwasher:
Drip plate, collecting tray, drip tray, drip tray cover, coffee grounds container, milk tubes, suction pipes, individual parts of the bever- age outlet, measuring spoon and individual parts of the milk container lid.
Note: If the appliance is cold when switched on, or if it is switched off after dispensing coffee, it rinses automatically. The system is therefore self-cleaning.
NOTICE: If the appliance is not used for a lengthy period (e.g. while you are on vacation), clean the entire appliance thoroughly, including the milk system, the ground coffee drawer and the brewing unit before use.
Cleaning the milk system
The milk system is automatically cleaned with a short jet of steam directly after pre- paring a milk drink.
Note: For particularly thorough cleaning, the milk system can be additionally rinsed with water see the section “Rinsing the milk system”).
NOTICE: Aditionally clean the milk system manually every week and, if required, also more often see the section “Cleaning the milk system manually”).
Rinsing the milk system
Press .
Press [ Rinse milk system ] to select the program.
Open door and remove suction pipe from the milk tube.
Wipe the suction pipe and insert the end of the suction pipe into the hole on the coffee grounds container.
Close the door. Be careful not to jam the milk tube.
Place an empty glass underneath the beverage outlet.
Press .
The milk system is rinsed with water.
Then empty the glass.
Press to exit the program.
Cleaning the milk system manually
Take the milk system apart to clean it:
Push the beverage outlet down completely and pull the cover forward to remove.
Press the snap lever to the left of the beverage outlet downwards and pull the beverage outlet forward.
Remove the milk tube. Dismantle the top and bottom sections of the beverage outlet.
Separate the milk tubes, connecting element and suction pipe.
Clean the individual parts with a deter- gent solution and a soft cloth.
Rinse all parts with clean water and dry them.
All parts of the milk system can also be put in the dishwasher.
Put the individual parts back together again (see also the quick reference guide).
Attach the beverage outlet directly from the front firmly to the three connections.
Replace the cover.
Cleaning the milk container
For reasons of sanitation, the milk container should be cleaned regularly. Only the individual parts of the lid are suitable for being cleaned in the dishwasher. Clean the stainless steel milk container by hand with a mild detergent.
Cleaning the brewing unit (see also the Quick reference guide)
In addition to the automatic cleaning program, the brewing unit should be removed regularly for cleaning.
Open the appliance door.
Use the power switch to switch off the appliance completely.
Remove the protective cover of the brewing unit.
Remove the coffee grounds container.
Slide the red latch on the brewing unit all the way to the left .
Press the eject lever right down. The brewing unit will be released.
Take hold of the brewing unit by the recessed grips and carefully remove it.
Remove the cover of the brewing unit and clean thoroughly under running water.
Clean the strainer of the brewing unit thoroughly under the water jet.
Thoroughly clean the connecting nozzles of the brewing unit.
Important: Clean it without using washing-up liquid and do not put it in the dishwasher.
Clean the inside of the appliance thoroughly with a moist cloth, removing any coffee residues.
Leave the brewing unit and the inside of the appliance to dry.
Place the cover back on the brewing unit.
Push the brewing unit all the way into the appliance and press on the middle until it audibly clicks into place.
NOTICE:
The red latch must be right over at the left at before replacing (see figure E).
Press the eject lever up and push the red latch over to the right to .
Insert the coffee grounds container.
Replace the protective cover.
Close the appliance door.
Simple troubleshooting
The following table provides solutions for problems that may arise as you use your Bosch machine. If you do not find a solution for your specific problem or the problem persists after troubleshooting, please contact 1-800-944-2904.
Problem
Cause
Solution
Strongly fluctuating coffee or milk froth quality (e.g. fluctuation in quantity or milk froth spraying).
Build-up of limescale in the appliance.
Descale the appliance according to the instructions, see the section “Service programs”.
The suction pipe is blocked.
Clean the suction pipe.
Drinks cannot be dispensed.
Beverage outlet or one of the connections are blocked.
Clean the beverage outlet and the connections.
The drink runs out at the entire outlet during dispensing.
Lower part of the beverage outlet is missing.
Attach the lower part, see the section “Cleaning the milk system”.
Too little milk froth, none at all, or the milk system is not taking in any milk.
Build-up of limescale in the appliance.
Descale the appliance according to the instructions, see the section “Service programs”.
Beverage outlet or one of the connections are blocked.
Clean the beverage outlet and the connections.
Milk not suitable for foaming.
Do not use milk that has already been boiled. Use cold milk with a fat content of at least 1.5%.
Beverage outlet or the milk tubes are not correctly assembled.
Moisten the individual parts and put them together again.
The suction pipe is blocked.
Clean the suction pipe.
The personally selected volume is not reached. Coffee dispensing slows to a trickle or stops completely.
Coffee is ground too finely. Preground coffee is too fine.
Adjust the grinding level to a coarser setting. Use a coarser ground coffee.
Heavy build-up of limescale in the appliance.
Descale the appliance according to the instructions, see the section “Service programs”.
The brewing unit is soiled.
Clean brewing unit, see chapter “Cleaning the brewing unit”.
Hot water milky or tastes of coffee.
Milk tube has not been removed.
Remove the milk tube from the milk container.
Milk or coffee residue in the beverage outlet.
Clean the beverage outlet.
Coffee has no “crema”.
Unsuitable type of coffee.
Use a type of coffee with a higher proportion of robusta beans.
The beans are no longer fresh.
Use fresh beans.
The grinding level is not suitable for the beans.
Adjust the grinding unit to a finer setting.
Coffee is too “acidic”.
The grinding level is too coarse. Preground coffee is too coarse.
Adjust the grinding unit to a finer setting. Use a finer ground coffee.
Unsuitable type of coffee.
Change the type of coffee.
Coffee is too “bitter”.
Coffee is ground too finely. Preground coffee is too fine.
Adjust the grinding level to a coarser setting. Use a coarser ground coffee.
Unsuitable type of coffee.
Change the type of coffee.
Coffee tastes burnt.
The brewing temperature is too high.
Reduce the temperature, see the section “Drink adjustment”.
Coffee is ground too finely. Preground coffee is too fine.
Adjust the grinding level to a coarser setting. Use a coarser ground coffee.
Unsuitable type of coffee.
Change the type of coffee.
Coffee is too “weak”.
Coffee strength selected is too weak.
Raise the strength of the coffee, see the section “Drink adjustment”.
Ground coffee jammed in the coffee drawer.
Remove the ground coffee drawer, clean and dry thoroughly.
Ground coffee sticks in the coffee drawer.
Ground coffee sticks together.
Do not press the ground coffee firmly into the coffee drawer.
Coffee drawer is damp.
Remove the ground coffee drawer, clean and dry thoroughly.
The water filter does not stay in position in the water tank.
The water filter is not mounted correctly.
Firmly press the water filter straight down into the tank connection.
Bean container sticks when inserting.
There are beans in the housing.
Remove the beans.
The coffee grounds are not compact and are too wet.
The grinding setting is too fine or too coarse, or not enough ground coffee has been used.
Adjust the grinding unit to a coarser or finer setting, or use 2 level measuring spoons of ground coffee.
Grinding level adjustment is stiff.
Too many beans in the grinding unit.
Dispensing a drink from coffee beans. Only make any subsequent changes to the grinding level in small steps.
Brewing unit cannot be inserted.
Brewing unit is in the wrong position.
Insert the brewing unit according to the instructions, see the section “Cleaning the brewing unit”.
Brewing unit is locked.
Unlock the brewing unit, see the section “Cleaning the brewing unit”.
Protective cover of the brewing unit cannot be properly attached.
Brewing unit is not locked.
Lock the brewing unit, see the section “Cleaning the brewing unit”.
There is water under the drip tray.
This water is condensed.
Do not insert drip tray without cover.
Display shows “12:00”
Power failure or appliance switched off at power switch.
Sure! You put in the kind of milk you want into the stainless steel container.
#3 Why do the instructions say not to plug it in behind the machine?
The machine is very deep and it is very hard to plug it in and then install the machine if the plug is behind and the chord provided is extremely short. If you have no other option make sure to read the manual ahead of time because the chord is very short and you will want to plan ahead on where you put the plug.
#4 Do you have to fill a water tank or is connected to a water supply?
Yes you have to fill water tank. Unit is not plumbed.
#5 Does it work with 220 v ? does it has european plugin?
Yes it’s built 220v
#6 Does the unit hold only one coffee type at a time?
Yes. To fill you open the front of the unit (it is a very easy door), pull out the bean container, fill bean container, put back in. Close door front of unit and put the cup under the spout. Select the type of drink and voila out it comes. You will need to arm wrestle your family members for the desired coffee bean to put in. I personally like to blend espresso and a blond in the container.
 (power supply)
 and
and  are touchscreen elements.
 MyCoffee
 Menu
Menu Service
 .
.


 to activate the field,


 .
.
 .
.
 to prepare two cups of the selected drink simultaneously. The setting is shown as text, e.g. “2 x Espresso”.
 to start dispensing.


 to open the selection for personalized drinks.

 and coarsely ground coffee
 for at least seconds. “Child-proof lock activated” briefly appears on the display. No further operation is now possible; only


 Do not put the following parts in the dishwasher:
 The following parts may be cleaned in the dishwasher:
 .
.
 .
. to exit the program.


 All parts of the milk system can also be put in the dishwasher.


 to switch off the appliance completely.
 .
.


 Important: Clean it without using washing-up liquid and do not put it in the dishwasher.
 .
.