Loading ...
© Tasman Sinkware
TF 45c August 2013
FOLLOW THESE STEPS TO INSTALL THE OLIVERI UNDERMOUNT SINK
IF COUNTER / BENCHTOP IS SUPPLIED WITH CUT-OUT, SKIP STEPS MARKED WITH*
CHECK SPACE
Ensure there is adequate space for tapware (including a splashback
ifspecied).Checkspaceforinstallation(underneath)andoperation
(above). Particular care must be taken when a thick splash back is
used (it may interfere with tapware location and operation). Ensure the
cabinetwillnotfoulthesinkmountingangeorbasins.
ADDITIONAL FASTENING
The sealant alone may appear to bond the sink to the counter/
benchtop. However, when installing your Oliveri undermount sink, it
is important to always use methods A, B or C (below) to locate the
sink securely in the counter/bench top in conjunction with the sealant
manufacturer’s instructions.
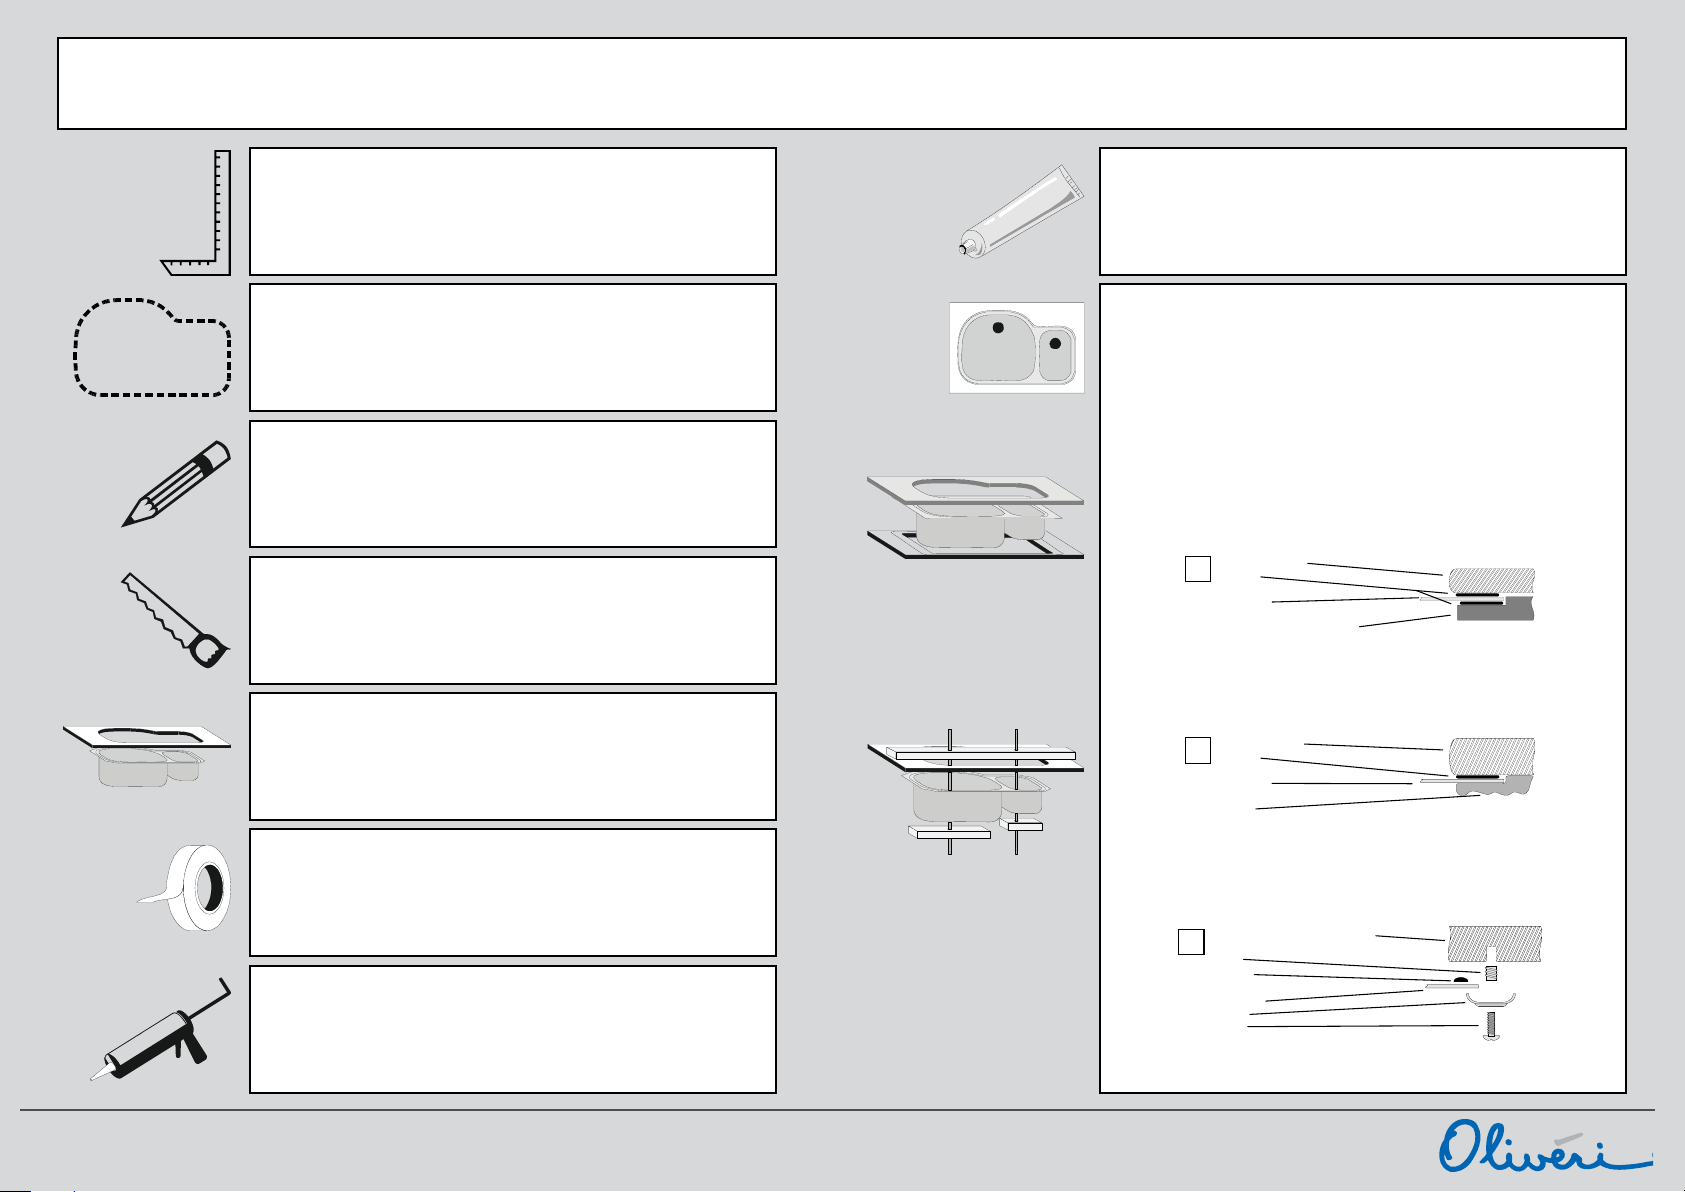
FITTING THE SINK
Position and align the sink correctly in the cutout (some threaded rod
and timber bearers will help to clamp the sink in place) and either
‘A’ Sandwich Method: RECOMMENDED FOR BOTH THIN AND
THICKCOUNTER/BENCHTOP.Firmlyxasupportboardinto/over
thecabinetandcutthesinkholesothatthesinkangewillsitabove
theedgeoftheboard.Slightlyrouttheedgesothatthesinkangewill
situshwiththetopsurface.Testfort.Installsinkandsealbetween
angeandsupportboard.Applysealanttotheundersideedgeofthe
cutout on counter/benchtop material and position it over the support
board to sandwich the sink in place. Fasten the counter/benchtop
securely.
‘B‘ Bond: For minimum 1” / 25mm thick material. Bond it to the
underside of the counter/benchtop with a structural high strength epoxy
compound. NOT RECOMMENDED TO BE USED WHEN FITTING
SINK TO THINNER COUNTER/BENCHTOPS.
‘C‘ Bolt: For minimum 1” / 25mm thick material. Bolt it to the counter /
benchtop using “molly” assemblies. Care must be taken during drilling
and tightening to avoid cracking. NOT RECOMMENDED TO BE USED
WHEN FITTING SINK TO THINNER COUNTER/BENCHTOPS.
Ifyouhaveanydoubts,conrmthecorrectmountingmethodfor
your material by consulting the counter/benchtop supplier.
TEMPLATE *
Cut out templates for your Oliveri sink are available online at
oliverisinks.com.Usetheproductmodelnumbertondthetemplate.
Some sink templates apply to both left-hand and right-hand
modelssinks. Ensure template is correct way around for your model.
MARK CUT OUT *
Carefully mark out the template (or follow drawing instructions) making
allowance for any additional polishing back that is required after cutting.
NOTE: THE TEMPLATE IS THE EXACT FINISHED CUT-OUT SIZE
REQUIRED.
CUT & FINISH HOLE *
Drill pilot holes to accept an appropriate cutting tool for the counter/
benchtop material (wear suitable personal protection equipment). Cut
insidethemark,allowingsufcientroomforanypolishingback.
Note: Accuracy is essential to ensure the bowl / basin and
accessoriestcorrectly.
TRIAL FIT THE SINK
Carefully position the sink against counter/benchtop to make sure it
tsthecut-outcorrectly.Ifthetisnotcorrect,removethesinkand
proceedwithremedialwork.Performanothertrialtaftercorrections
have been made.
MASKING
To prevent sealant overrun, it is recommended that both the inside
edge of the basin and the edge of the cut-out is covered with a suitable
masking tape.
APPLY SEALANT
Apply suitable sealant recommended for both the counter/benchtop
material being used and for stainless steel. Neutral-cure sealant will
not damage stainless steel. It may be easier to apply sealant after
preparing your clamping equipment. Do not allow the sealant to dry
before the sink is clamped to the counter/benchtop.
Above shows sandwich method
where sink is clamped between a
lower support board (with routed
edge) and the upper counter /
benchtop using method A.
Above shows how threaded rod
and timber bearers may be used
to clamp the sink in place while
fastening to the counter / benchtop
using methods B and C.
Do not overtighten as this may
damage the sink.
Counter / benchtop
Sealant
Sink flange
Support board with routed edge
(such as timber)
A
Counter / benchtop
Sealant
Sink flange
Epoxy
B
1” Counter / benchtop with hole drilled
Molly
Sealant
Sink flange
Saddle
Screw
C