User manual Coffee Maker
Components
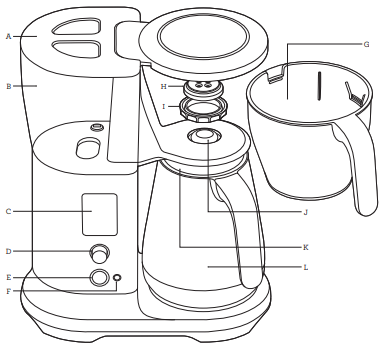
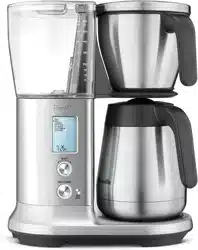
A. Tank lid
B. Water tank
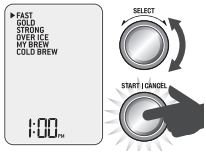
C. LCD display
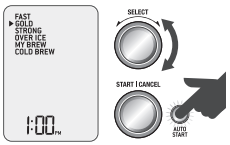
D. SELECT dial
E. START|CANCEL button
F. AUTO START button
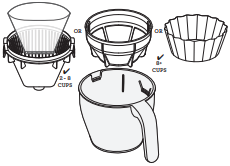
G. Brew basket
H. Showerhead
I. Showerhead ring
J. Drip stop lever
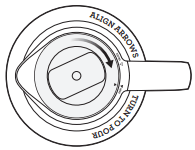
K. Carafe lid
L. Carafe

ACCESSORIES
A. Cone filter basket insert
B. Mesh basket filter
C. Brew basket
D. Breville coffee measuring scoop
E. Flat bottom basket filter paper pack (10 pieces)
F. Water hardness test strip (see page 11 for directions)
Features
Your Breville Precision Brewer has been designed to make coffee of the highest quality, just the way you like it, no matter what style of coffee you enjoy.
Fast: Brew up to 12 cups (60oz) as fast as the brewer can deliver the water in the tank.
Gold: This mode has been certified by the SCA (Specialty Coffee Association) to meet their rigorous technical requirements using the Cone Filter Basket and water volumes of 1.0L & 1.2L together with a brew ratio of 55g of coffee to 1.0L of water.
Strong: Brew settings are automatically adjusted so you get a stronger cup of coffee. Tip: for strong coffee, increase the amount of ground coffee you normally use.
Over Ice: Brew up to 4 cups (20oz) of stronger coffee that tastes great when poured over ice and garnished any way you like.
MyBrew: Brew up to 12 cups (60oz) having total control over all the variables, brew water temperature, bloom time, water delivery speed, so you get coffee just the way you like it.
Cold Brew: Brew up to 20oz of Cold Brew coffee with the flexibility to adjust steeping time between 0-24 hours and have the coffee automatically delivered into your favorite vessel.
SCA CERTIFIED HOME BREWER LOGO
The SCA recognizes home brewers that meet their longstanding rigorous technical requirements. These requirements are based on decades of industry knowledge and research by the Coffee Brewing Center. All SCA Certified Home Brewers have met these requirements, which are based generally on proper water temperature, brewing time, and ability to brew within the SCA Golden Cup recommendations.
If a brewer passes all of the tests in the certification procedure, as conducted by the SCA, that brewer will be eligible to be recognized as an examplary home brewer and join the short list of SCA Certified Home Brewers.
The Breville Precision Brewer has met these SCA requirements when using the "Gold" setting and the Cone Filter basket.

Assembly
BEFORE FIRST USE
Unpack all parts and accessories before removing and safely discarding all packaging material and promotional labels. Ensure the power cord is unplugged from the power outlet.
Wipe the exterior stainless steel housing with a soft, damp cloth. Wash the lid, brew basket, cone filter insert, mesh basket filter, and carafe in warm, soapy water and a soft cloth. Do not use abrasive cleansers, pads or cloths which can scratch the surface. Rinse and dry thoroughly. Press carafe drip stop ensuring it can freely move up and down.
WATER HARDNESS SETTING
When first turned on, the machine will show 'HArd' on LCD, asking you water hardness level. Press SELECT dial once. Dip the water hardness test strip into the filled water tank for 1 second, remove and wait for 1 minute to reveal the result. Rotate SELECT dial and press the dial to select the level accordingly. To reset water hardness, please refer to FACTORY RESET (page 18).
FLUSHING FOR FIRST TIME USE
- 1. Ensure that the empty coffee basket and empty carafe (with assembled lid) are inserted into the machine.
- 2. Fill the water tank with fresh cold water to the MAX mark on the water tank. Plug into power outlet and press the START|CANCEL button to turn the machine on. Rotate the SELECT dial to FAST. Press the START|CANCEL button. The machine will dispense all the water from the tank, through the system & into the empty carafe.
3. After flushing, empty the basket and carafe.
NOTE We recommend to flush once more in Fast mode.
Operation
BREWING A CARAFE
Ensure the brew basket is clean and the drip stop seal in the bottom of the basket is clean and free of coffee particles.
1. Select the correct basket & filter for the amount of coffee you’re making. When brewing between 2 and 8 cups, we recommend you use the Cone shaped filter basket insert with paper filter (Cone paper filter is not included). When brewing more than 8 cups, use mesh basket filter or flat bottom brew basket with large paper filter.
CAUTION Filling the basket without a mesh basket filter or filter paper may cause the basket to overflow during the brewing cycle.
2. The LCD will display the basket setting - "Basket" or "Cone". To change the basket type, rotate the SELECT dial to Settings & press the dial. Rotate the SELECT dial to the basket type, press the SELECT dial to set.
3. Fill the water tank with fresh cold water up to the MAX marking on the water tank.
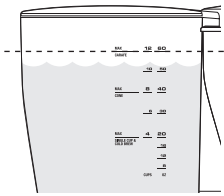
NOTE This machine will brew all the water in the tank. Ensure the tank does not contain an excess amount of water.
4. For the very best tasting coffee, we recommend using freshly roasted whole bean coffee and grind with a burr grinder directly before you brew. The grind should be medium/coarse, never use coffee ground for espresso as your coffee basket may overflow.
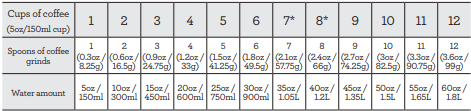
5. Grind enough coffee beans for the volume you’re making. For a full 60oz carafe, we recommend 3.5oz (99g) of coffee, approximately 12 level Breville measuring scoops. Roughly 1 scoop for every 5oz. Refer coffee/water ratio chart on page 16.
6. Insert the correct filter paper, cone or flat bottom, or mesh basket, into the brew basket, then, add your ground coffee. Insert the brew basket into the machine.
NOTE Never use both mesh basket filter and paper filter at the same time.
NOTE Coffee with superior taste & clarity will come from using a paper filter.
NOTE The mesh basket filter will allow some fine coffee grounds to brew into the coffee. This will appear as sediment in the cup or carafe. This is normal. Only use the mesh basket filter provided as others may cause the machine to overflow.
7. Lock the carafe lid and place the carafe under the drip stop outlet.
CAUTION The carafe MUST be in place before you brew with water level higher than ‘SINGLE CUP’ line. Otherwise the coffee basket will overflow.
NOTE Always ensure your carafe is clean and empty before brewing. Residual coffee will affect the taste and liquid in the carafe will cause it to overflow.
NOTE Always ensure your carafe is EMPTY before brewing to prevent overflow.
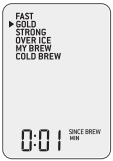
8. Rotate the SELECT dial to the desired mode. Press the START|CANCEL button. The machine will display the progress:
- The machine will remind you to insert either cup or carafe where applicable.
- Heating: the heating system is being pre-heated to the optimal temperature.
- Blooming: the bloom phase of preparation is in progress.
- Brewing: brew water at the correct/ selected temperature is being delivered to the ground coffee.
9. When your coffee is ready, the machine will beep 3 times. The machine will display the “Time since brewed”.
NOTE Never fill the water tank once the coffee machine has started a brewing cycle.
BREW MODES
- FAST: This mode is to deliver the fastest brewed coffee. This coffee machine is one of the fastest 12 cup (60oz) brewers.
- GOLD (recommended): This mode has been certified by the SCA (Specialty Coffee Association) to meet their rigorous technical requirements using the cone filter basket.
- STRONG: This brewing mode delivers a stronger tasting coffee.
- MY BREW: Allows you to customize every brew setting
- Bloom Time: Coffee bloom occurs when hot water hits the ground coffee. This setting allows you to adjust how long the bloom time lasts. We recommend 30-60 seconds. During this time the brewing cycle pauses to allow coffee to naturally bloom. See ‘TIPS’ for more about Bloom Time.
- Brewing Temp: You can adjust the temperature of the brew water being delivered to the ground coffee to suit your favorite coffee. See “TIPS” for more about setting brew water temperature.
- Flow Rate: You can adjust brewing time to control contact time by adjusting the water delivery speed. Choose between Slow, Medium, and Fast.
- Pour Over: If you are using the Pour Over Adapter, this must be turned on. The Adapter is sold separately at breville.com.
- OVER ICE: This is to make stronger coffee for ice coffee.
- Fill the water tank with the amount of water you want to brew up to 20oz line and start brewing. After brewing, pour over ice. See ‘TIPS’ for details.
- COLD BREW: Cold Brew coffee is brewed differently to traditional coffee. It uses cold, not hot water. Your brewer uses the “Full Immersion” method of brewing cold brew which steeps the water and coffee together over an extended duration – typically between 4 - 14 hours. This method creates an intense smooth coffee with little bitterness. Brew ratios are also different, and much higher than normal. Breville recommends a brew ratio 2-3 times higher than average, approximately 3 Breville scoops to every 5oz of water.
- See ‘TIPS’ for step-by-step guide of brewing Cold Brew.
- Brew time is adjustable.
NOTE OVER ICE mode and COLD BREW mode will be disabled if there is more than 20oz of water in the tank.
SINGLE CUP/SMALLER VOLUMES (LESS THAN 4 CUPS, 20OZ)
1. Your Breville Precision Brewer will recognize when the brewer has less than 4 cups (20oz) of water & will adjust the brew settings, automatically, to make the best possible tasting coffee. Fill your cup with fresh cold water and then pour it into the water tank, ensuring the water level stays below the SINGLE CUP line.
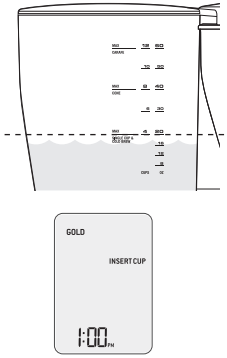
NOTE DO NOT fill the water tank more than SINGLE CUP line or the volume of the cup used to receive the coffee. It will overflow as the machine brews until the water tank becomes empty.
2. Place your empty cup underneath the brew basket outlet.
3. We recommend using cone filter basket insert for single cups. It ensures proper contact between the brew water and the ground coffee.
4. To change the basket type, rotate the SELECT dial to Settings and press to enter the Settings mode and select "Basket Type".
5. Rotate the dial to select “Cone”, and press dial to select. “Cone” will be displayed on the LCD.
6. Insert the Cone filter basket into the brew basket. Use the alignment marks as a guide.
7. Place a cone shaped paper filter into the cone filter basket.
8. Grind the correct amount of whole bean coffee for the amount you are brewing. 1 level Breville scoop of ground coffee is suitable for 5oz (150ml) of water.
9. Select desired brewing mode, Fast, Gold, MyBrew or Strong.
10.Press START|CANCEL to begin brewing.
Programming
AUTO START
Allows you to automatically start brewing at preset time.
1. Set filter basket type for the amount of coffee you're brewing.
2. Select your brewing mode.
3. Fill the water tank with enough fresh cold water for the amount of coffee you're brewing.
4. Insert the brew basket with your desired insert or paper filter and add coffee.
5. Insert the appropriate cup or the carafe with the lid locked in place into the machine.
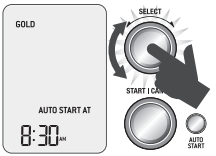
6. Press the AUTO START button.
7. The machine will prompt you to set the time for Auto Start. Rotate the SELECT dial to adjust Auto Start time press SELECT dial to set. Auto Start is now set and the machine will enter Auto Start mode, brewing automatically at the set Auto Start time.
NOTE If the clock hasn’t been set, the machine will prompt you to set the clock. Ensure the clock is correct. The clock will reset every time the unit is unplugged.
8. Pressing START|CANCEL will cancel Auto Start.
SETTINGS
- SET CLOCK: Set the time displayed on LCD.
- SOUND: Sound volume is adjustable and also can be turned off.
- STANDBY: Adjust time to automatically enter STANDBY mode after a period of no use.
- FILTER TYPE: Factory setting is Flat basket, adjustable when using the Cone filter basket insert.
ENTERING STANDBY MODE AT ANY TIME
Press the START|CANCEL button for 2 seconds.
DEGREE INDICATION PREFERENCE (°C/°F)
To switch between °F and °C, press SELECT dial and AUTO START button together. Rotate SELECT dial to select, then press SELECT dial to set.
CHILD-LOCK
To prevent children from possible danger, child-lock feature is available. Hold AUTO START and START button together for 3 seconds. LCD will display “CL” when it is locked. Repeat this again or unplug the unit to unlock.
Tips
WHOLE BEANS
- FRESH IS BEST! Freshly roasted, quality coffee is key to making great tasting coffee. Peak flavor potential is 5-20 days after roast. Always look for a “Roasted On” date on the bag. Avoid coffee with a “Best Before” or “Use By” date as you never know when it was roasted.
- Coffee flavor and strength are a personal preference. Vary the type of coffee beans and the amount of ground coffee to achieve your preferred taste.
- Freshly ground beans are the key to making coffee with more flavor and body. Pre-ground coffee will have lost most of its flavor and aromatics, so always grind right before you brew for superior taste.
- Store coffee beans in a dark, cool and dry place. Vacuum seal if possible.
- Buy coffee beans in small batches to reduce the storage time and store no more than one week’s supply at any time.
PRE-GROUND COFFEE
- Pre-ground coffee is convenient, but will never taste as good as coffee ground right before you brew. We recommend investing in a quality burr grinder so you can grind fresh whole bean coffee right before you brew and enjoy superior tasting coffee.
- The grind will affect the rate at which the water flows through the coffee in the coffee basket and therefore the taste of the coffee. If the grind is too fine the water will not flow through the coffee and may clog or overflow the coffee basket. It may pass through the mesh basket filter leaving sediment in the cup or carafe. The resulting coffee will be over extracted, too dark and bitter. If the grind is too coarse the water will flow through the coffee too quickly. This will result in an under-extracted coffee lacking in flavor.
- Always use “drip filter grind” suitable for use with a drip coffee machines. Never use “Espresso grind” as the finer grind size may cause the coffee basket to block and and will be over-extracted.
COFFEE/WATER RATIO
We recommend 1 level Breville scoop of coffee grounds per 5oz (150ml) cup of water. Adjust the amount according to your individual taste. The maximum capacity for pre-ground coffee is 12 level Breville scoops. Exceeding this amount may cause the coffee basket to overflow.
BLOOMING
When coffee is roasted, CO2 is trapped inside the bean. Coffee grounds release this CO2 when hot water hits them, and this is called “blooming”. Your Brewer can automatically adjust bloom time by controlling the water flow. Blooming can have an impact on the aromas and flavors of the brewed cup. If the coffee is overly bitter shorten bloom time, and if it’s sour make it a little longer.
PRE-HEATING
Pre-heat the carafe or cup for best results. A pre-heated carafe or cup will help maintain the coffee’s optimal temperature and keep coffee hotter for longer. Fill with hot water for about 30 seconds then discard the water.
WATER QUALITY
Fresh, good-tasting water is essential for a perfect cup. If the water contains excessive sediment, or has an ‘off’ taste or odor, we recommend using filtered water.
ICED COFFEE
- Iced coffee is at its best when the coffee is brewed strong because the coffee is diluted by the melting ice cubes. To achieve great Iced coffee we recommend brewing in OVER ICE mode. Fill the tank ensuring the water level does not exceed the 20oz level.
- Fill the brew basket with twice the amount of coffee you'd normally use for regular brewed coffee.
- Brew into the carafe.
- Once the brewing cycle is complete, transfer the coffee to a heatproof pitcher and let cool to room temperature. Refrigerate until cold, at least 2 hours or overnight. Fill glasses with ice cubes. Pour the coffee into the glasses, filling them to within 1.5" (4cm) of the rim. Top each glass with cream, milk, syrups or sweeteners as desired.
NOTE If using granulated sugar as a sweetener, add while the coffee is hot to encourage the sugar to completely dissolve.
- To avoid a diluted taste, you can also use regular strength coffee and serve it over coffee ice cubes. Prepare coffee ice cubes by pouring cool coffee into ice-cube trays and freezing.
COLD BREW
Your Brewer will produce a maximum of 20oz of Cold Brew. Due to the long duration (typically 4-14 hours) of the brewing process we recommend setting the machine up overnight so the Cold Brew will be ready in the morning.
1. Fill the tank with your desired volume of water ensuring this is below the COLD BREW line.
2. Remove the basket, and ensure both the cone insert and mesh basket filter are removed. Add a large paper filter and then coffee at 2-3 times of regular ratio (approximately 12 scoops for 20oz). Reinsert the basket into the machine.
3. Remove the lid from the carafe and re-insert – the lid must not be on the carafe during the brewing process, alternatively, use another vessel.
4. Navigate to the COLD BREW setting and press START|CANCEL. The machine will then begin brewing the water without the heating element. Once this is complete a countdown timer will display on the LCD indicating when the Cold Brew is finished. At this point the machine will automatically dispense the Cold Brew into the waiting carafe
NOTE Brew Time for Cold Brew can easily be adjusted to your preference, anywhere between 1min – 24hrs.
NOTE Do not add ice to the tank. Cold, chilled water should be added.
Care & Cleaning
Always turn the coffee machine off and remove the plug from the power outlet before cleaning.
CLEANING THE OUTER HOUSING
The outer housing and LCD screen can be cleaned with a soft, damp cloth. Apply cleaner to the cloth and not the LCD surface. Polish with a soft, dry cloth. Cleaning and drying with dry paper towels or abrasive cloths and cleaners may scratch the surface.
CLEANING THE COFFEE BASKET AND MESH BASKET FILTER
Remove the coffee basket. Discard any ground coffee and filter paper. The coffee basket and mesh basket filter can be rinsed under running water. Ensure the fine holes of the mesh basket filter are clear. For a deeper clean, wash the coffee basket and mesh basket filter in warm, soapy water with a soft bristled brush.
CAUTION The coffee basket, mesh basket or paper filter may still be very hot after brewing. Use caution and allow to cool before removing.
CLEANING THE CARAFE
After each use, empty the carafe. Do not let brewed coffee stand overnight as this can cause the carafe to stain. Rinse the carafe and carafe lid under warm running water. For a deeper clean, we recommend regularly washing the carafe in warm, soapy water using a soft bristled brush. Do not use abrasive cleansers, pads or cloths which can scratch the surface. Rinse and dry thoroughly.
CLEANING THE SHOWERHEAD
Simply wipe down the showerhead area periodically. However, if a more thorough clean is required, the Showerhead can be removed by unlocking the Showerhead Ring. Rotate clockwise then remove the Showerhead for cleaning. Once complete, reinstall the Showerhead.
DESCALING
After regular use, hard water can cause mineral build up in internal components, reducing the brewing flow, brewing temperature, power of the machine, and taste of the coffee. We recommend to descale regularly. When LCD shows “DESCALE” (flashing), descaling cycle is needed
NOTE It takes approximately 15 minutes to complete descaling cycle.
1. Empty the tank. Prepare a descale solution in accordance with manufacturer's instructions. Pour this solution into the empty water tank.
2. Place the basket and the carafe into position under the drip stop outlet (Ensure the carafe is empty and the lid is securely locked).
3. Press SELECT button for 3 seconds to start descaling cycle. LCD with show “dSL” for 1 second and then tell remaining time of descaling cycle.
4. When the descaling process is finished, the LCD screen will go back to the main menu. To completely remove residual water in the tank, invert the machine and brew with fresh water twice. Discard the water from the carafe and rinse thoroughly
NOTE We recommend to brew through again after descaling to brew out the residue descale solution.
NOTE You cannot stop the descaling process mid cycle. Force stop by unplugging the cord from the power outlet.
FACTORY RESET
This is to reset the machine to the factory settings, including water hardness setting. Hold the START button, the SELECT button, and AUTO START button altogether for 3 seconds. When LCD shows “rES” (flashing), press SELECT button to start. Then next prompt asks “YES” or “no” to confirm. Rotate and press SELECT dial/ button.
Troubleshooting
Coffee too strong or weak
- Amount of coffee and water is not correct (1 spoon : 5oz/150ml cup).
Check correct amount of coffee or water is used.
Coffee leaking from basket when removed
- The basket drip-stop seal doesn’t cover the gap properly due to foreign material.
Check that there is no obstruction in the basket drip-stop seal. Wash out the basket seal by turning the basket upside down, and pressing down and rinsing into the seal to clear any particles obstructing that area.
Coffee overflowing from the basket (CAUTION: If the basket has overflowed remove slowly and with caution)
If you are brewing with carafe, check that the carafe is inserted.
- Amount of coffee and water is not correct (1 spoon : 5oz/150ml cup).
Check that the correct amount of coffee and water is used for the operation.
- Grind size is too fine.
- Too much grinds in the basket.
Correct grind size/amount.
- No paper in the basket.
- Putting paper into mesh basket filter.
Use mesh basket filter without paper and other baskets with paper.
‘FILL TANK’ on LCD screen
- Water tank is empty or not enough water to brew the selected volume.
Open the lid and pour the desired amount of cold, preferably filtered water.
While the tank is empty wipe the sensor prisms in the tank with a cloth.
Auto Start does not function
- Auto Start does not repeat after it has been activated.
Re-engage the Auto Start mode for each time that it needs to be used.
Shows ‘CLOCK’ when Auto Start is pressed
- Current time should be set before setting Auto Start.
Set the current time before using Auto Start.
Clock does not remember time
- Clock is cleared every time the unit is unplugged.
Keep the unit plugged.
Auto Start starts at the wrong time
- Current time is not correct.
Check that the current time is correct.
Carafe overfilling
- Carafe is not completely empty before brewing.
Check that the carafe is empty before brewing.
- Amount of water is too much.
Check that the MAX line on the water tank is not exceeded.
Ensure water runs freely through carafe lid.
LCD shows 'FILL TANK' when there is water in the tank
- Check that the unit is not in direct sunlight or direct bright lighting.
Move unit away from the light source.
Brew doesn’t start
- There is no water in the water tank.
Check that the water tank is filled.
- Each brewing mode has different water amount limits, and it does not brew when the amount is beyond the limit.
Check the water amount limits for each mode.
Showerhead falls out
- The showerhead may loosen and fall out from time to time if not inserted or tightened correctly
Please wash the showerhead ring and seal and re-insert.
The mesh filter in the water tank loosens and floats
- Mesh filter is not inserted or tightened correctly.
Call Breville Consumer Support.
Carafe drip stop stays down
Pull the drip stop back up.
Clean the drip stop for any foreign objects of coffee grinds or stains.
If the problem persists and drip stop does not return to top position please call Breville Consumer Support.
Unit produces excessive steam while brewing or runs for extended periods with only steam output
- Brewing performance is affected by scale accumulated by hard water.
Descale the unit.
- Brewing temperature profile is not properly set.
Call Breville Consumer Support if problem persists.
‘DESCALE’ on LCD screen (flashing)
- Brewing performance is affected by scale accumulated by hard water.
Descale the unit.
Unit shows "too hot"
- Unit has been run too many times back to back and the components are overheated.
Let unit rest for at least 20mins before starting another cycle.
Shows Err1, Err2, Err4, or Err5
Unplug unit and let cool and retry. Call Breville Consumer Support if problem persists.
Shows Err6
- Tank is dirty or contaminated.
Empty the water tank and clean all internal areas. Call Breville Consumer Support if problem persists.
Shows Err3
- The issue indicates an unstable power supply.
Unplug and check plug connections and power supply with caution. Let cool and retry. Call Breville Consumer Support if problem persists.