Y
OU
R HANDB
OO
K
O
N THE INTERNET!
CITROËN lets you view your vehicle's
documentation on line, to see earlier versions
and the latest information, simply and free of
charge.
Connect to http://service.citroen.com :
1
|
Select your language and register,
click on the link in the "Private customer access" zone to consult the
vehicle documentation; a window opens providing access to all of the
handbooks,
select your vehicle, choose the body type then the date of issue of the
handbook,
fi nally, click on the heading of your choice.
2
|
3
|
4
|

!
1
Your vehicle is
fi
tted with onl
y
some o
f
the equipment
d
escr
ib
e
d
i
n t
hi
s
d
ocument,
d
epen
di
n
g
on t
h
e tr
i
m
l
evel, version and the specifi cations for the countr
y
in whi
c
h it i
s
so
l
d
.
The fi ttin
g
of electrical equipment or accessories
which are not recommended b
y
CITROËN ma
y
result
in a
f
ailure o
f
y
our vehicle's electronic s
y
stem. Please
note this specifi c warnin
g
and contact a CITRO
Ë
N
d
ea
l
er to
b
e s
h
own t
h
e recommen
d
e
d
equ
i
pment an
d
accesso
ri
es
.
CITROËN has a presence on ever
y
continent,
a complete product ran
g
e,
brin
g
in
g
to
g
ether technolo
gy
and a permanent spirit o
f
innovation,
for a modern and creative approach to mobilit
y
.
We thank
y
ou and con
g
ratulate
y
ou on
y
our choice.
H
app
y
motor
i
n
g!
K
e
y
safet
y
warnin
g
We draw
y
our attention to the followin
g
...
contributes to the protection o
f
the environment
refer to the pa
g
e indicated
A
t the wheel o
f
y
our new vehicle,
g
ettin
g
to know each s
y
stem,
each control, each settin
g
,
makes
y
our trips,
y
our
j
ourne
y
s
more com
f
ortable and more en
j
o
y
able.
2
CO
NTENT
S
Ve
nt
ila
t
io
n
4
4
A
utomat
i
c a
i
r con
di
t
i
on
i
n
g
4
6
F
ront seats
5
0
R
ear seats
5
3
R
ear
b
enc
h
seat
5
8
M
irrors 6
1
S
teerin
g
wheel ad
j
ustment 6
3
F
ront
fi
ttin
g
s 6
4
R
ear
fi
ttin
g
s 6
9
Boot
fi
ttin
g
s
7
0
II - COMFORT 44
Î
72
R
emote contro
l
k
e
y
7
3
Elec
tr
ic
w
i
n
do
w
s
7
7
Doo
r
s
7
9
Tail
g
ate
8
0
Lower tail
g
ate
8
1
S
unroo
f
8
2
Fuel tank
8
4
III - ACCESS 73
Î
8
5
Li
g
htin
g
stalk
8
6
Da
y
time runnin
g
lamps
8
8
A
u
t
o
m
a
ti
c
ill
u
min
a
ti
o
n
of
headlam
p
s
8
8
H
eadlamp ad
j
ustment
8
9
W
i
p
er controls
9
0
Automatic rain sensitive wi
p
ers
9
1
Courtes
y
lamps
9
2
IV - VISIBILITY 86
Î
93
C
hild seats
9
4
I
SO
FIX mountin
g
s
9
8
C
hild lock 1
0
1
V
-
C
HILD
SAFETY 94
Î
10
1
Direction indicators 1
0
2
H
azard warnin
g
lamps 1
0
2
H
orn 1
0
2
Brakin
g
assistance s
y
stems 1
0
3
Tra
j
ector
y
control s
y
stems 1
0
4
F
ront seat belts 1
0
5
A
irba
g
s 1
0
8
V
I - SAFETY 102
Î
111
Instrument panel
2
1
Warnin
g
lamps
2
2
Instrument panel displa
y
s
2
5
In
fo
rm
a
ti
o
n in th
e
in
s
tr
u
m
e
nt
panel screen
3
1
Di
s
t
a
n
ce
r
eco
r
de
r
s
3
2
Se
rvi
ce
in
d
i
ca
t
o
r
3
3
Trip computer
3
4
S
ettin
g
menu 3
5
Mo
n
oc
hr
o
m
e
sc
r
ee
n
3
9
Co
l
ou
r
sc
r
ee
n 4
1
Li
g
htin
g
rheostat 4
3
FAMILIARISATION 4
Î
20
I - MONITORING 21
Î
43
3
CO
NTENT
S
Parkin
g
brake 1
1
2
M
anual
g
earbox 1
1
2
C
VT
g
earbox 1
1
3
DCS
g
earbox 1
1
5
Four wheel drive s
y
stem 1
1
9
C
ruise control 1
2
1
Audible rear parkin
g
sensors 1
2
3
R
eversin
g
camera 1
2
4
VII
-
D
RIVING 112
Î
12
4
Bo
nn
e
t 1
2
6
R
unnin
g
out of fuel 1
2
6
Petrol en
g
ine 1
2
7
Diesel en
g
ine 1
2
8
C
heckin
g
levels 1
2
9
C
hecks 1
3
0
V
III - CHECK
S
125
Î
13
1
Chan
g
in
g
a wheel 13
2
Chan
g
in
g
a bulb 13
7
Chan
g
in
g
a fuse 14
6
Batter
y
1
5
1
Chan
g
in
g
a wiper blade 1
5
3
Towin
g
1
5
4
Towin
g
a trailer 1
5
6
Fittin
g
roof bars 1
5
7
Accessories 1
5
8
IX - PRA
C
TI
C
AL
INFORMATION 132
Î
15
8
En
g
ines 1
5
9
W
ei
g
hts 16
0
Dimensions 1
6
1
Identifi cation markin
g
s 16
2
X
- TE
C
HNI
C
AL
D
ATA 159
Î
16
3
A
udio CD s
y
stem 164
CD chan
g
er 1
7
5
Error messa
g
es 1
7
7
A
udio-Telematic S
y
stem 1
7
8
Navi
g
ation 1
8
0
DVD mode 2
0
8
H
ands-free tele
p
hone 2
1
6
X
I - AUDIO and
T
ELEMATICS 164
Î
223
V
ISUAL
SEARCH 224
Î
22
9
ALPHABETI
C
AL
INDEX
230
Î
24
0
4
FAMILIARI
S
ATI
ON
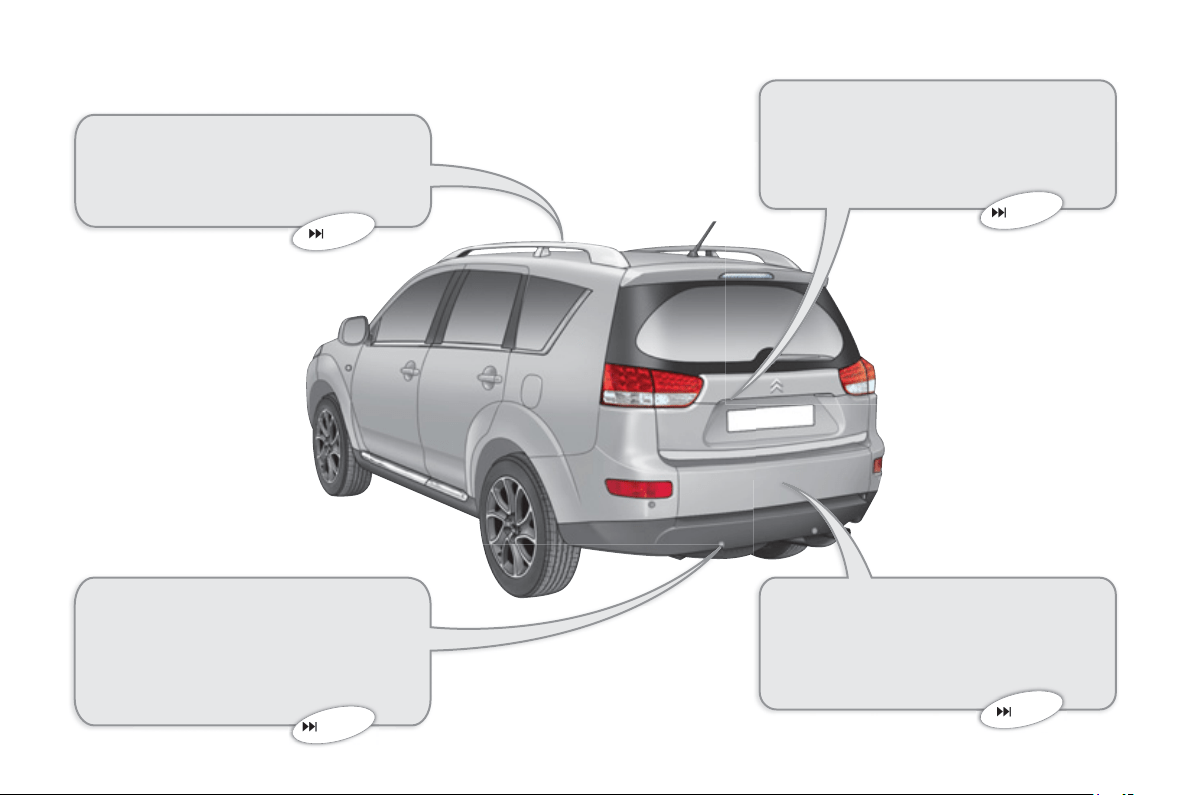
Sunroof
This roof improves the ventilation and
ligh
t
i
n t
h
e passen
g
er compartment.
82
81
123
EXTERIOR
Audible rear parkin
g
sensors
This s
y
stem warns
y
ou i
f
an obstacle
i
s
de
t
ec
t
ed
be
hin
d
th
e
v
e
hi
c
l
e
wh
e
n
r
eversin
g
.
Reversin
g
camera
This s
y
stem is activated automati-
c
all
y
when reverse
g
ear is en
g
a
g
ed
p
rovidin
g
a visual ima
g
e on the colour
screen
.
Lower tail
g
ate
This lower tail
g
ate provides remark-
able accessibilit
y
and makes the load-
in
g
of bulk
y
ob
j
ects easier.
124
5
FAMILIARI
S
ATI
ON
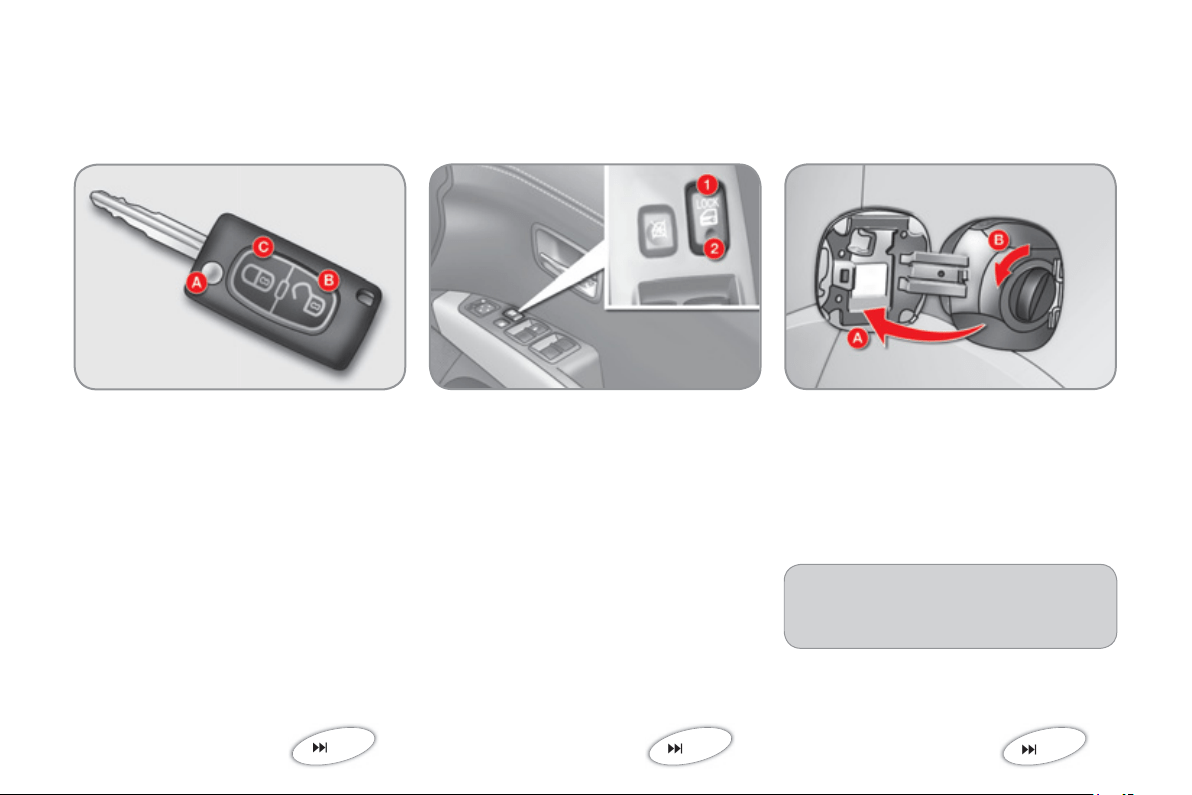
Fuel tank
A
.
O
penin
g
the fuel fi ller fl ap.
B.
Removin
g
the fuel fi ller cap.
84
1
.
Lockin
g
the vehicle.
2.
Unlockin
g
the vehicle.
Remote control ke
y
A.
Unfoldin
g
/foldin
g
the ke
y
.
B.
U
n
l
oc
ki
n
g
t
h
e ve
hi
c
l
e.
C
.
L
oc
ki
n
g
t
h
e ve
hi
c
l
e.
73
Manual central lockin
g
79
OPENIN
G
When re
fi
ttin
g
the cap, insert the
upper part
fi
rst turnin
g
it to the ri
g
ht.
C
apacity o
f
the tank: approximately
60
litr
es
.
!
6
FAMILIARI
S
ATI
ON
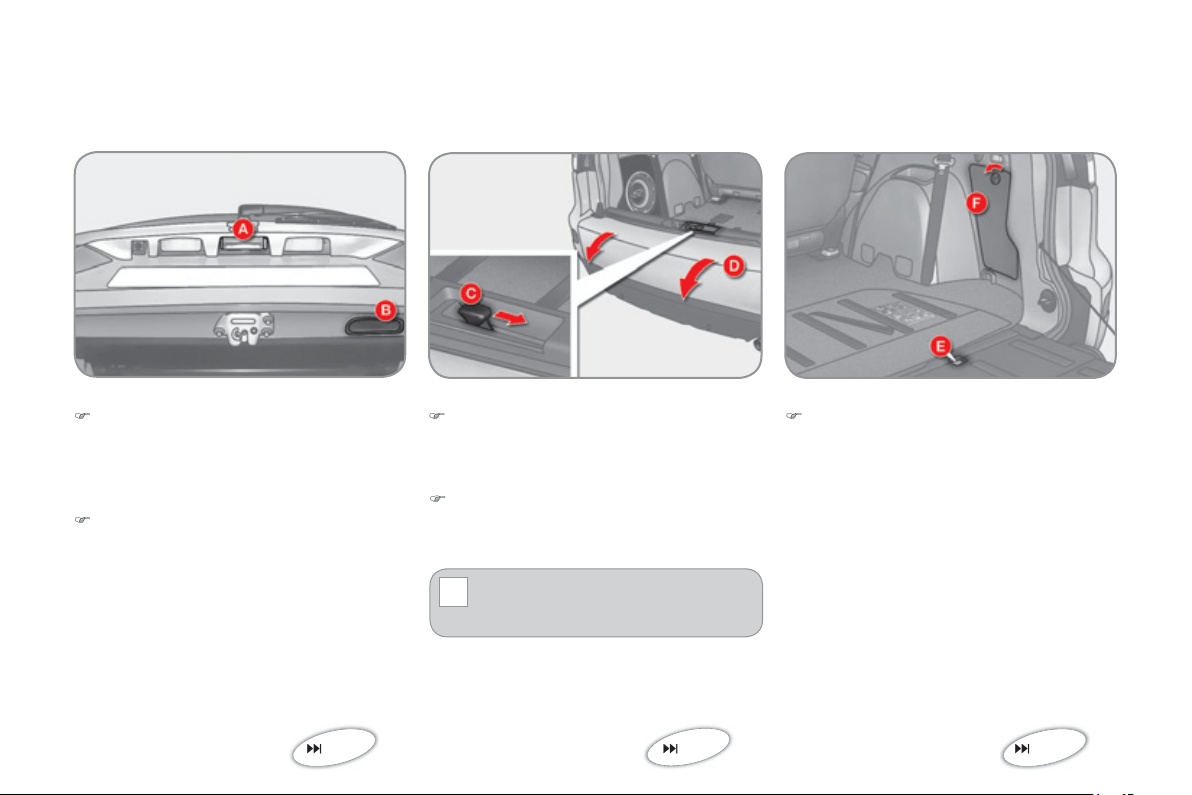
Opening
)
A
f
ter unlockin
g
the vehicle usin
g
the
remote control or the ke
y
, press the
ha
n
d
l
e
A
and raise the tail
g
ate.
Tail
g
ate Lower tail
g
ate
Opening
)
P
us
h th
e
h
a
n
d
l
e
C
to the ri
g
ht and
tilt the tail
g
ate
D
g
entl
y
.
The maximum authorised wei
g
ht
on the lower tail
g
ate when open
i
s
2
00 k
g
.
Spare wheel and tools
Access to the spare wheel
)
Remove the plastic cover
E
to
g
ain
access to the spare wheel
fi
xin
g
sy
stem.
80
OPENIN
G
81
132
Closing
)
P
u
ll th
e
h
a
n
d
l
e
B
do
wnw
a
r
ds
.
Closing
)
Raise the tail
g
ate
D
,
p
ush it to
c
lose it, then check that it is latched
c
orrect
ly
.
Access to the tools
The tools are stored in the stora
g
e com-
p
artment
F
in the boot ri
g
ht-hand trim.
7
FAMILIARI
S
ATI
ON
CONFIGURING
S
EAT
S
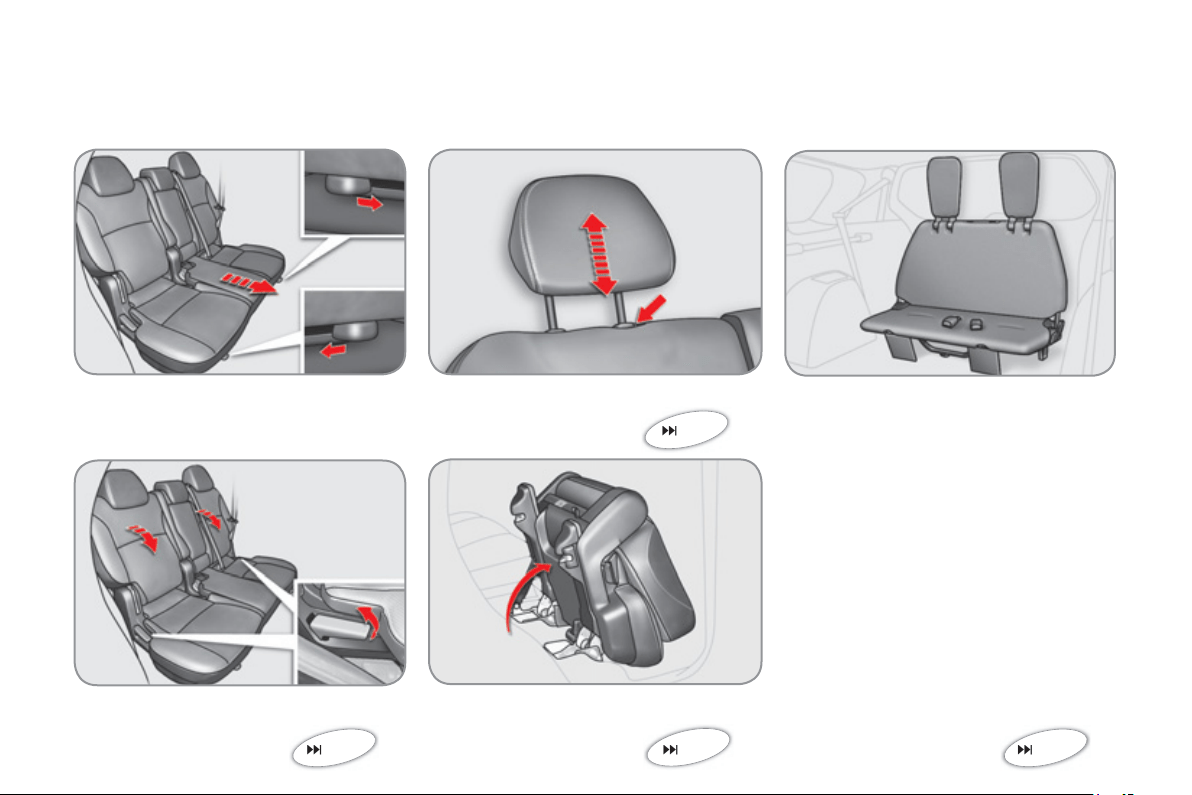
Rear seats
(
row 2
)
F
orwar
d
s-
b
ac
k
war
d
s a
dj
ustment
Seat back an
g
le ad
j
ustment
53
H
ea
d
restra
i
nt
h
e
igh
t a
dj
ustment
A
ccess to the third row
(
7-seat version
)
54
Rear bench seat
(
row 3
)
Th
e
r
ea
r
be
n
c
h
sea
t
ca
n
be
f
o
l
ded
. It i
s
s
t
o
w
ed
in
a
l
oca
ti
o
n in th
e
fl
oo
r
of
th
e
v
ehicle
.
58
52
8
FAMILIARI
S
ATI
ON
INTERIOR
Di
g
i
ta
l
a
i
r con
di
t
i
on
i
ng
This automatic air conditionin
g
s
y
stem
ma
int
a
in
s
th
e
des
ir
ed
l
e
v
e
l
of
co
m-
fort and ade
q
uate air circulation in the
passenger compartment.
Cruise control
Thi
s s
y
stem automat
i
ca
lly
ma
i
nta
i
ns
t
h
e ve
hi
c
l
e spee
d
at t
h
e va
l
ue pro-
g
rammed by the driver, without use o
f
the accelerator pedal.
Audio and communication
s
y
stems
These s
y
stems benefi t from the latest
technolo
gy
: MP3 compatible audio s
y
s-
tem, Bluetooth hands-free telephone,
colou
r
sc
r
ee
n...
F
our w
h
ee
l
d
r
i
ve s
y
stem w
i
t
h
el
ectron
i
c contro
l
This s
y
stem permits the selection o
f
a
transm
i
ss
i
on mo
d
e to su
i
t t
h
e
d
r
i
v
i
n
g
co
n
d
iti
o
n
s
.
44
121
164
119
9
FAMILIARI
S
ATI
ON
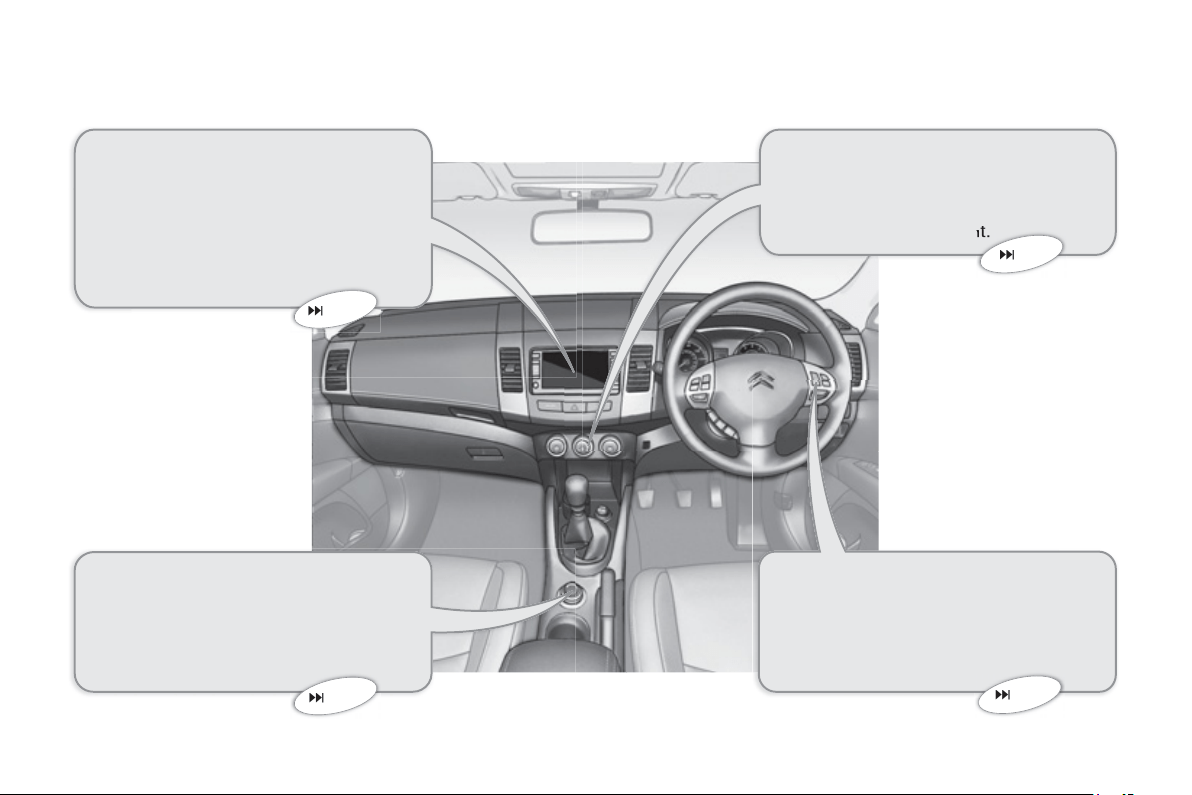
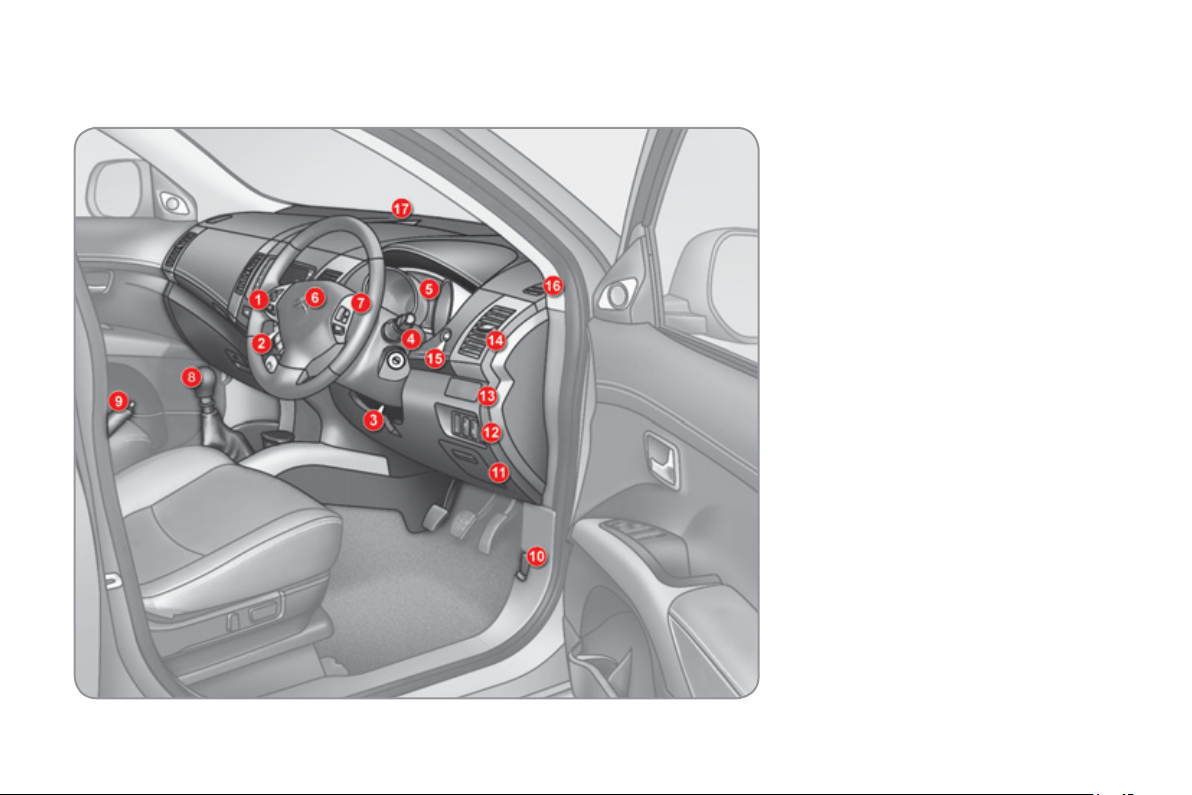
IN
S
TRUMENT
S
AND CONTROL
S
1.
Audio s
y
stem controls.
2.
T
e
l
ep
h
one contro
l
s.
3.
S
teerin
g
wheel ad
j
ustment control.
4.
Front and rear wipers
/
screenwash
co
ntr
o
l
s
t
a
lk.
5
.
Instrument panel.
6
.
Driver
’
s airba
g
.
H
o
rn.
7.
C
ruise control switches.
8.
G
ear lever.
9.
P
ar
ki
n
g
b
ra
k
e.
1
0
.
B
o
nn
e
t r
e
l
ease
l
e
v
e
r.
1
1
.
Enclosed stora
g
e compartment.
1
2
.
Headlamp hei
g
ht ad
j
ustment.
Deactivation of the ASC s
y
stem.
Deactivation of the audible parkin
g
sensors
.
1
3
.
C
up holder.
1
4
.
S
ide adjustable air vent.
1
5
.
In
fo
rm
a
ti
o
n
bu
tt
o
n.
1
6
.
Window demistin
g
/defrostin
g
vent.
17.
Windscreen demistin
g
/defrostin
g
v
e
nt.
1
0
FAMILIARI
S
ATI
ON
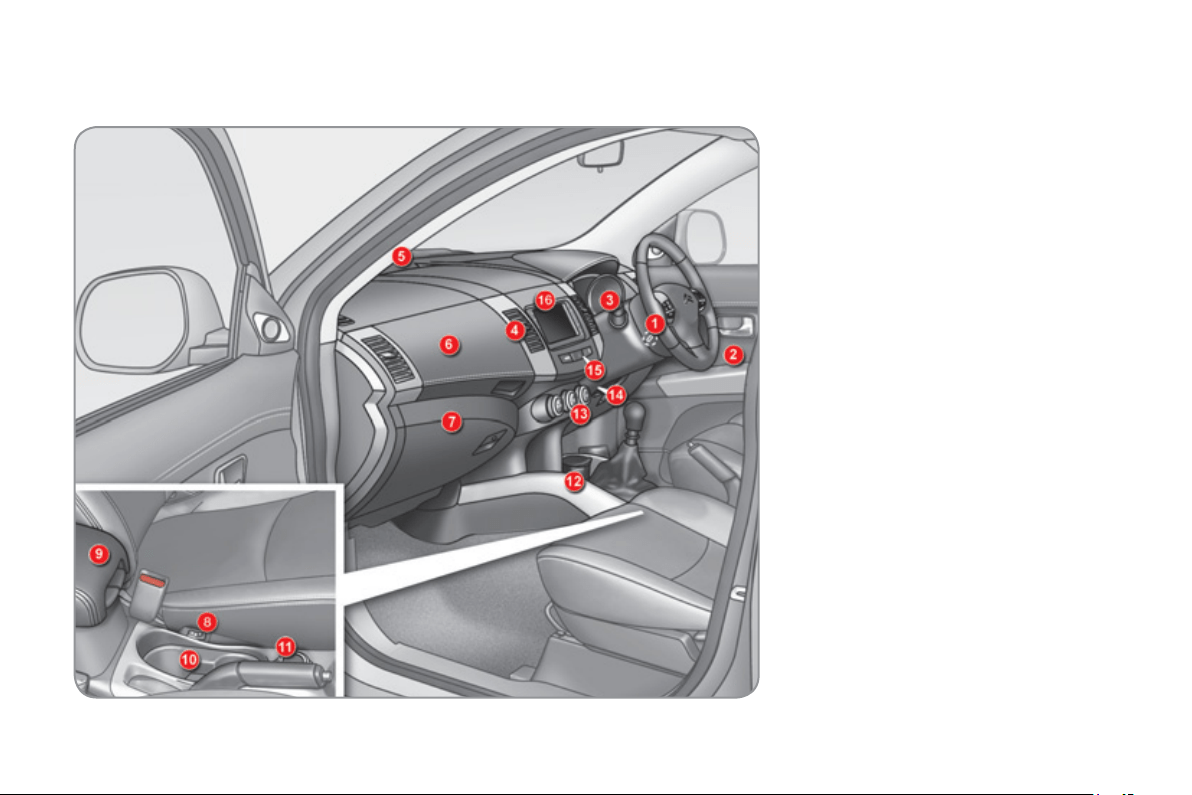
IN
S
TRUMENT
S
AND CONTROL
S
1.
Steerin
g
lock and i
g
nition.
2.
Doo
r m
i
rr
o
r
co
ntr
ols
.
Elec
tr
ic
w
i
n
do
w
a
n
d
r
ea
r
elec
tr
ic
win
do
w
deac
tiv
a
ti
o
n
co
ntr
o
l
s
.
3.
Li
g
htin
g
and direction indicator
c
ontrol stalk. Headlam
p
wash
co
ntr
o
l.
4.
Central ad
j
ustable air vents.
5
.
S
unshine sensor.
6
.
C
ooled upper
g
love box.
7
.
L
oc
k
a
bl
e
l
ower g
l
ove
b
ox.
Passen
g
er
’
s airba
g
deactivation.
F
usebo
x.
8.
H
ea
t
ed
sea
t
co
ntr
o
l
s
.
9.
Armrest with stora
g
e
c
ompartments.
12 volt socket
(
120 W max
)
.
1
0
.
C
up holder.
1
1
.
Four wheel drive system position
se
l
ec
t
o
r.
1
2
.
Removable ashtra
y
/
12 volt socket
(
120 W max
)
.
1
3
.
Automatic air conditionin
g
controls.
14.
T
emperature sensor.
1
5
.
H
azar
d
warn
i
n
g
l
amps sw
i
tc
h
.
1
6
.
C
olour screen
/
Audio system.
11
FAMILIARI
S
ATI
ON
S
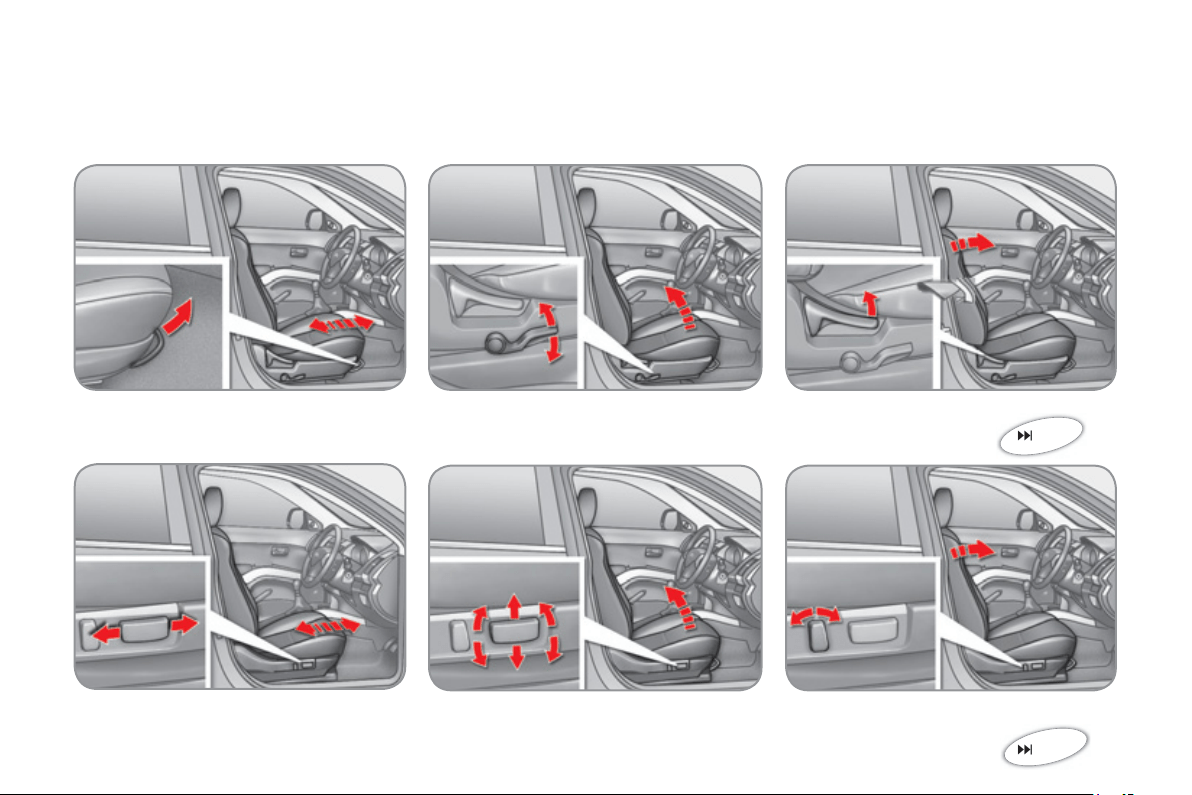
ITTING COMFORTABLY
51
Front seats
F
o
rw
a
r
ds
-
bac
kw
a
r
ds
Driver
’
s seat cushion hei
g
ht and an
g
le
S
eat back an
g
le
Manual adjustments
Electric adjustments (driver’s seat only)
F
o
rw
a
r
ds
-
bac
kw
a
r
ds
Seat cushion hei
g
ht and an
g
l
e
Seat back an
g
le
50
12
FAMILIARI
S
ATI
ON
S
ITTING COMFORTABLY
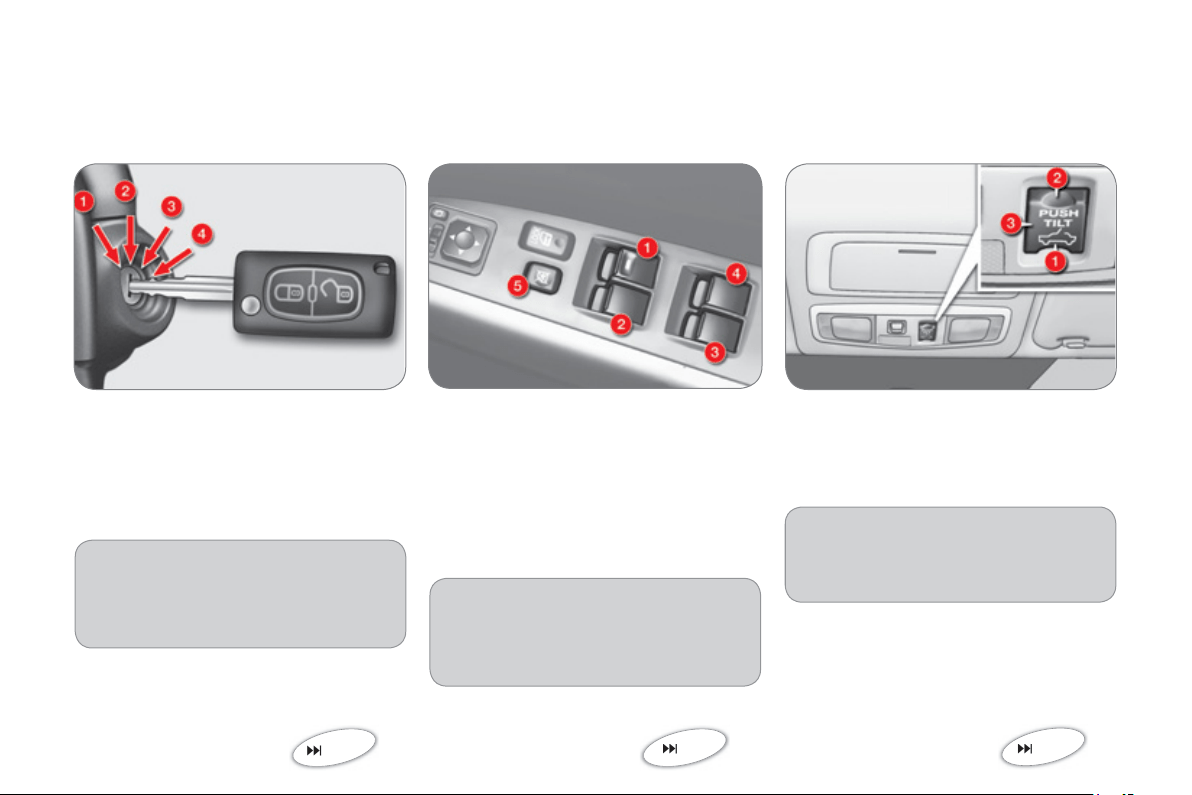
1.
Releasin
g
the ad
j
ustment mecha-
nis
m.
2.
L
oc
ki
n
g
t
h
e a
dj
ustment mec
h
a-
nis
m.
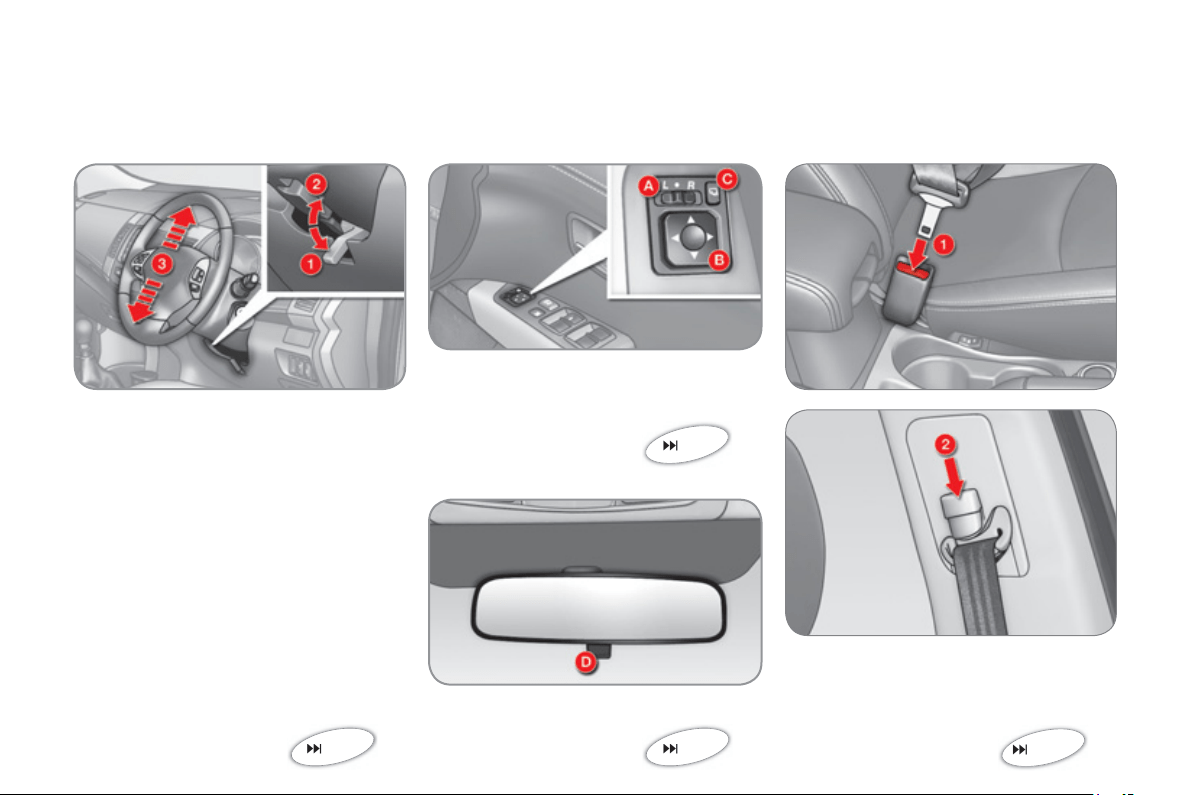
3.
Adjustment o
f
the height o
f
the
s
teerin
g
wheel.
Manual steerin
g
wheel hei
g
ht
a
d
j
ustment
Door mirror ad
j
ustment
A.
Se
l
ec
ti
o
n
of
th
e
mirr
o
r
B.
Ad
j
ustment of the position of the mirror.
C.
Foldin
g
/Unfoldin
g
.
63
Rear view mirror ad
j
ustment
D.
Control for selection of the "da
y
/
night" position of the mirror.
61
62
Front seat belt
1
.
Fastenin
g
.
2.
Hei
g
ht ad
j
ustment.
105
13
FAMILIARI
S
ATI
ON
S
ITTING COMFORTABLY
I
g
nition switch
1.
L
OCK position.
2.
A
CC
pos
i
t
i
on.
3.
ON pos
i
t
i
on.
4.
S
TAR
T
position.
75
Electric window controls
1
.
Driv
e
r
’s
e
l
ec
tri
c
win
do
w
co
ntr
o
l.
2.
Passen
g
er
’
s electric window control.
3.
Rear ri
g
ht electric window control.
4.
R
ea
r l
ef
t
e
l
ec
tri
c
win
do
w
co
ntr
o
l.
Also...
5
.
Deactivation of the front
p
assen-
g
er and rear electric window con-
tr
ols
.
77
Sunroof controls
1.
O
penin
g
control.
2
.
C
losing control.
3.
Tilt openin
g
control.
Also...
3.
Allows sunroof openin
g
/closin
g
to
be stopped at an
y
time.
82
A
heav
y
ob
j
ect
(
ke
y
fob...
)
, attached
to the ke
y
and wei
g
hin
g
down on
its shaft in the i
g
nition switch, could
cause
a
m
a
lf
u
n
c
ti
o
n.
1
4
FAMILIARI
S
ATI
ON
S
EEING CLEARLY
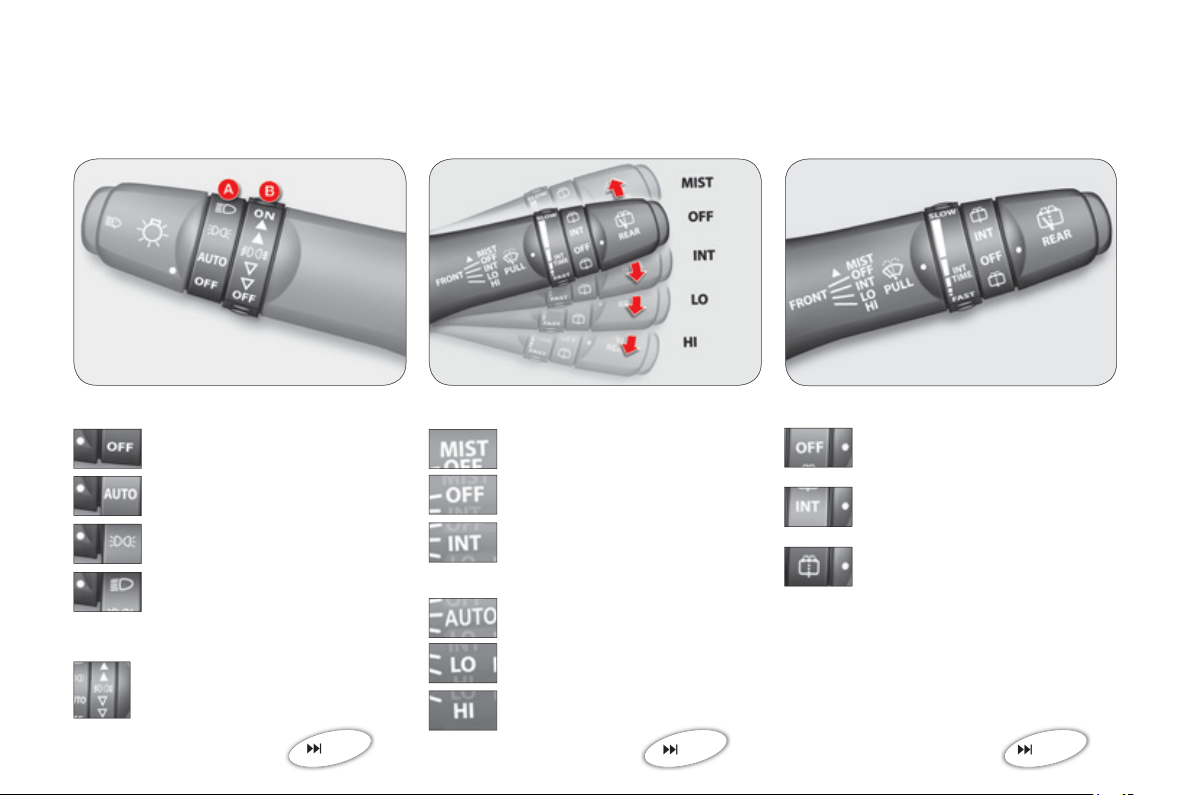
Li
g
htin
g
Ring A
Ring B
Windscreen wipers
Wi
p
ers
Rear wiper
Front
f
o
g
lamps and rear
f
o
g
lamps.
86
9
0
91
Li
g
htin
g
o
ff
.
A
u
t
o
m
a
ti
c
ill
u
min
a
ti
o
n
of
h
ea
dl
amps.
S
idelamps.
Di
pp
ed or main beam head-
lam
p
s.
Sin
g
le wipe.
P
a
rk.
Intermittent
(
speed ad
j
ustable
m
anuall
y)
.
S
low.
F
as
t.
P
a
rk.
I
nterm
i
ttent w
i
pe.
Wiping with screen wash.
or
A
u
t
o
m
a
ti
c
r
a
in
se
n
s
itiv
e
(
speed ad
j
ustable manuall
y)
.

15
FAMILIARI
S
ATI
ON
V
ENTILATIO
N
Di
g
ital air conditionin
g
Temperature ad
j
ustment.
E
xt
e
r
io
r
ai
r
i
nt
ake
.
I
nt
e
r
io
r
ai
r r
eci
r
cula
t
io
n.
Air
fl
ow ad
j
ustment.
A
utomatic pro
g
ramme
(
com
f
ort
)
.
Deactivation o
f
the air conditionin
g
.
A
ir distribution ad
j
ustment.
Front visibilit
y
settin
g
.
Rear screen demistin
g/
de
f
rostin
g
.
46
1
6
FAMILIARI
S
ATI
ON
M
ONITORIN
G
Instrument
p
anel Switch
p
anel
Wh
en t
h
e
ig
n
i
t
i
on
i
s on, t
h
e oran
g
e an
d
re
d
warn
i
n
g
l
amps come on.
When the en
g
ine is runnin
g
, these
warnin
g
lamps should
g
o o
ff
.
If warnin
g
lamps remain on, refer to the
pa
g
e concerned.
Warnin
g
lamps
21
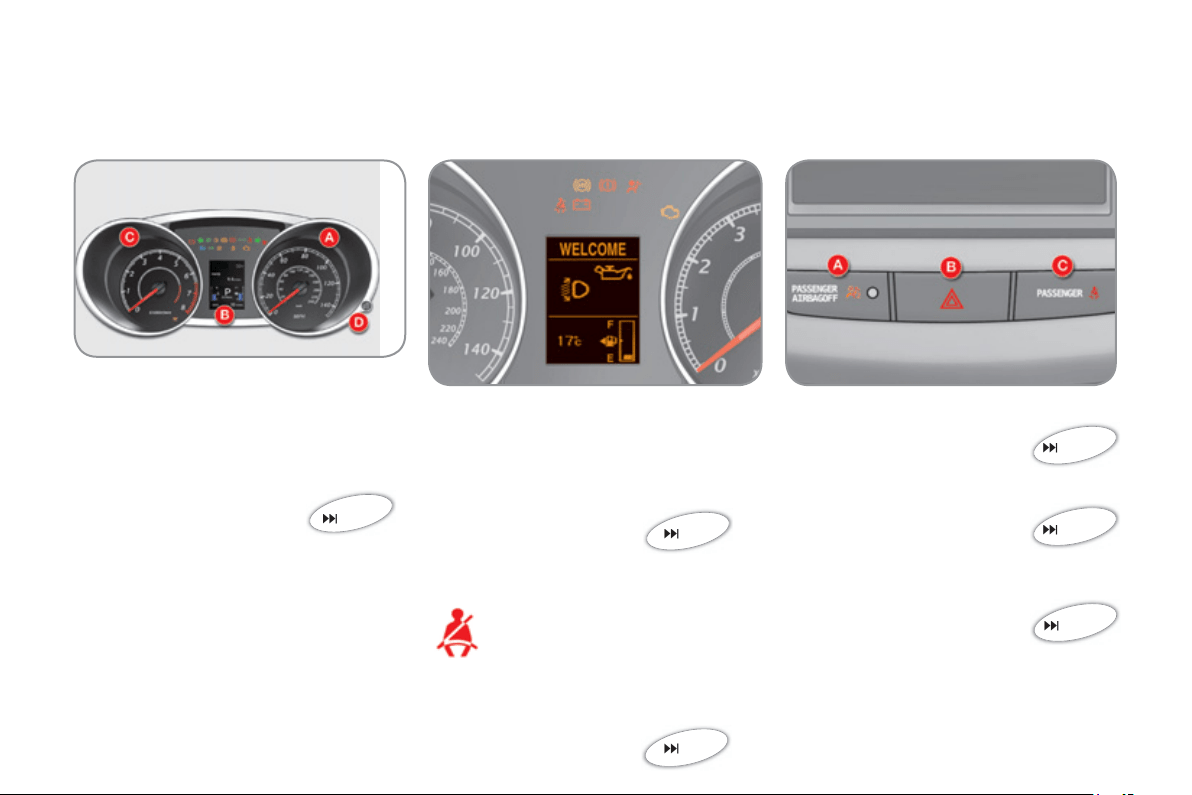
A.
Passen
g
er’s airba
g
deactivated
warning lamp.
10
9
B
.
H
azar
d
warn
i
n
g
l
amps sw
i
tc
h
.
102
C.
Front passen
g
er
’
s seat belt not
f
astened or un
f
astened warnin
g
lamp
.
10
6
22
Detection of driver’s seat belt
fastenin
g
Wh
e
n th
e
ig
nition is switched
on
,
th
e
seat belt warnin
g
lam
p
c
omes on accompanied b
y
an
audible si
g
nal if the driver has
n
o
t f
as
t
e
n
ed
th
e
ir
sea
t
be
lt.
The warnin
g
lamp
g
oes o
ff
when the
sea
t
be
lt i
s
fas
t
e
n
ed
.
24
A
.
S
p
eedometer.
B.
Instrument panel screen.
C.
Re
v
cou
nt
e
r.
D.
D
as
hb
oar
d
ligh
t
i
n
g
di
mmer.
17
FAMILIARI
S
ATI
ON
PA
SS
ENGER
S
AFETY
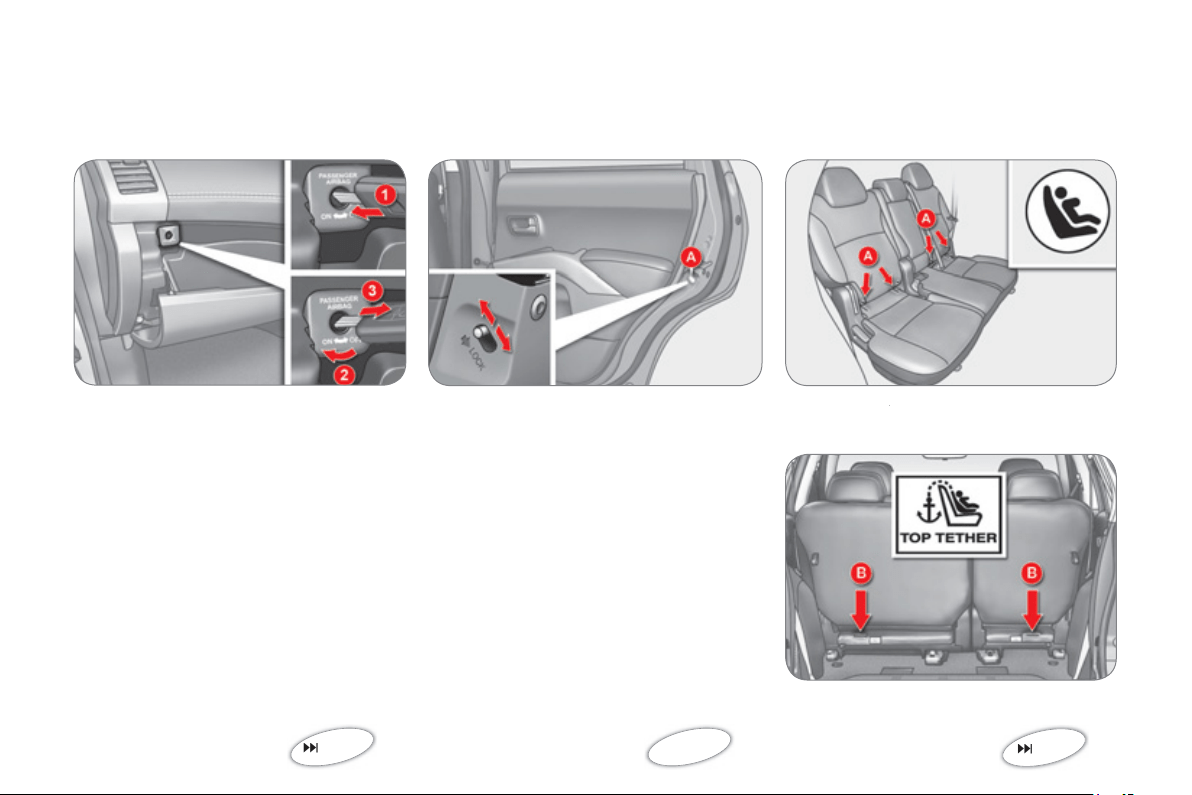
Front passen
g
er’s airba
g
Child lock
1.
Insert the key.
2
.
Se
l
ec
t th
e
"
OFF" position.
3.
Remove the ke
y
.
This prevents openin
g
o
f
the door con-
ce
rn
ed
fr
o
m th
e
in
s
i
de
.
L
o
w
e
r
o
r r
a
i
se
th
e
co
ntr
o
l
A
t
o
l
oc
k
o
r
u
n
lock
.
109
101
ISOFIX mountin
g
s
Two rings
A
, located between the seat
A
bac
k
a
n
d
sea
t
cus
hi
o
n
of
th
e
v
e
hi
c
l
e
’
s
sea
t
a
r
e
used
t
o
in
s
t
a
ll
a
n I
sofi
x
c
hil
d
sea
t.
A rin
g
B is used to secure the upper
s
trap re
f
erred to as the
T
OP TETHER
.
98
1
8
FAMILIARI
S
ATI
ON
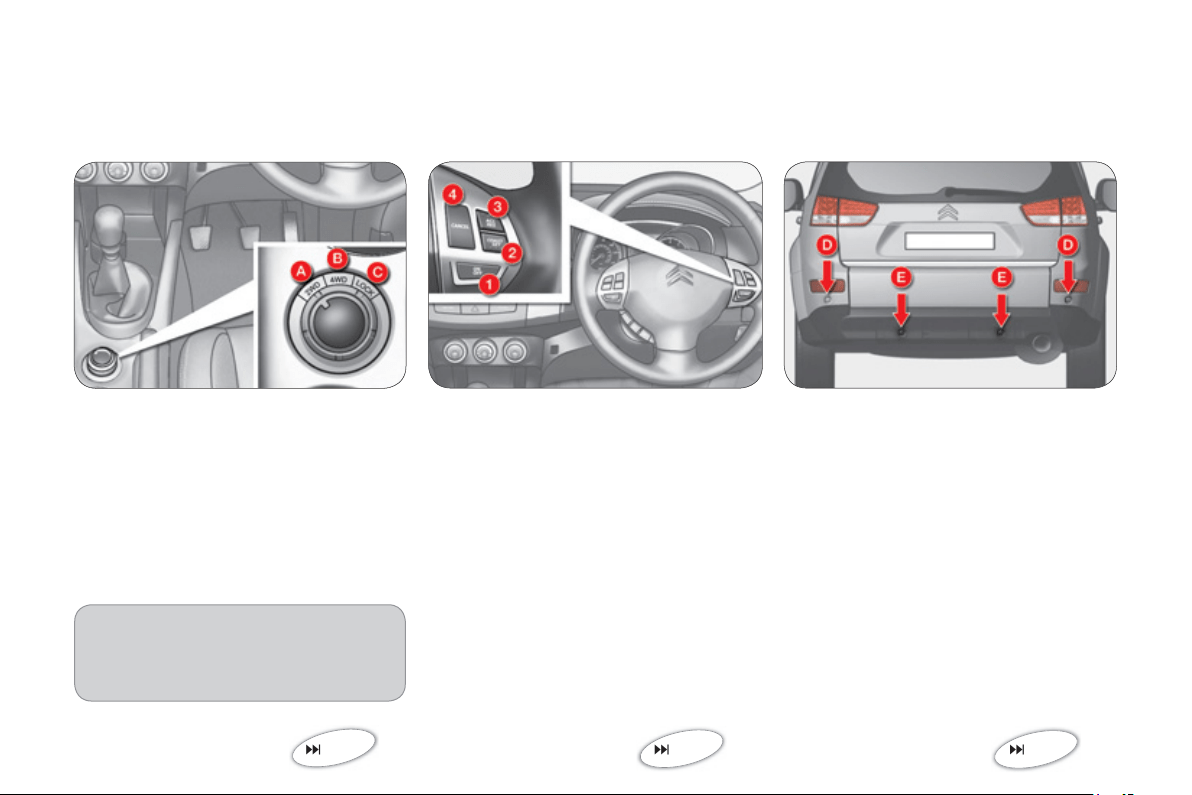
Cruise control
This maintains a constant vehicle s
p
eed
pro
g
rammed b
y
the driver.
1.
"ON/OFF" button: activation
/
deac
tiv
a
ti
o
n
o
f
c
r
u
i
se
co
ntr
o
l m
ode
.
2.
"COAST SET"
b
utton: stor
i
n
g
a
d
r
i
v
i
n
g
spee
d
t
h
en
d
ecreas
i
n
g
t
h
e
c
ruising speed.
3.
"ACC RES" button: increasin
g
the
c
ruisin
g
speed and recallin
g
the
s
tored s
p
eed.
4.
"
C
AN
C
EL" button: switchin
g
off the
c
r
uise
co
ntr
ol
.
I
n or
d
er to
b
e pro
g
ramme
d
or act
i
vate
d
,
t
h
e ve
hi
c
l
e spee
d
must
b
e
high
er t
h
an
25 mph
(
40 km
/
h
)
with at least second
g
ear en
g
a
g
ed.
This detects obstacles
(
person, vehicle,
tree,
g
ate, ...
)
located behind the vehicle.
Th
e
v
e
hi
c
l
e
i
s
fi
tt
ed
with
fou
r
se
n
so
r
s
:
D.
tw
o
s
i
de
se
n
so
r
s
.
E
.
tw
o
ce
ntr
a
l
se
n
so
r
s
.
A
u
dibl
e rear par
ki
n
g
sensors
121
123
DRIVING
S
AFELY
F
our w
h
ee
l
d
r
i
ve s
y
stem
Thr
ee
tr
a
n
s
mi
ss
i
o
n m
odes
a
r
e
a
v
a
il-
able and can be selected manuall
y
b
y
th
e
d
riv
e
r t
o
su
it th
e
c
ir
cu
m
s
t
a
n
ces
:
A. Two wheel drive
(
2WD
),
B. Four wheel drive
(
4WD AUTO
),
C. Four wheel drive (4WD LOCK)
.
119
Also...
You can chan
g
e transmission mode
when stationar
y
or when drivin
g
at a
s
peed below 60 mph
(
100 km/h
)
.

1
9
E
CO-DRIVING
Eco-drivin
g
is a ran
g
e o
f
ever
y
da
y
practices that allow the motorist to optimise their
f
uel consumption and
CO
2
e
m
is
-
s
i
o
n
s
.
Optimise the use of
y
our
g
earbox
With a manual gearbox, move o
ff
gen-
tl
y
, chan
g
e up without waitin
g
and
drive b
y
chan
g
in
g
up quite soon. I
f
y
our vehicle has the s
y
stem, the
g
ear
s
hift indicator invites
y
ou to chan
g
e up;
it is displa
y
ed in the instrument panel,
f
o
ll
o
w it
s
in
s
tr
uc
ti
o
n
s
.
With an automatic or electronic
g
earbox,
s
ta
y
in Drive
"D
"
o
r A
u
t
o
"A
", accordin
g
to the t
y
pe of
g
earbox, without pressin
g
t
h
e acce
l
erator pe
d
a
l
h
eav
ily
or su
d
-
d
en
ly
.
Drive smoothl
y
M
a
int
a
in
a
safe
d
i
s
t
a
n
ce
be
tw
ee
n v
e
-
hicles, use en
g
ine brakin
g
rather than
the brake
p
edal, and
p
ress the accel-
e
rator pro
g
ressivel
y
. These practices
co
ntri
bu
t
e
t
o
w
a
r
ds
a
r
educ
ti
o
n in f
ue
l
c
onsumption and C
O
2
e
m
issio
n
s
a
n
d
also helps reduce the background traf-
22
fi
c
n
o
i
se
.
I
f
y
our vehicle has cruise control,
make use o
f
the s
y
stem at speeds
above 25 mph
(
40 km
/
h
)
when the
tra
ffi
c is
fl
owin
g
well.
Control the use of
y
ou
r
e
lectrical e
q
ui
p
ment
Be
f
ore movin
g
o
ff
, i
f
the passen
g
er
c
ompartment is too warm, ventilate it
b
y
openin
g
the windows and air vents
before usin
g
the air conditionin
g
.
A
bove 30 mph
(
50 km/h
)
, close the
w
i
n
do
w
s
a
n
d
lea
v
e
t
he
ai
r v
e
nt
s
open
.
Remember to make use o
f
equipment
that can help keep the temperature
in the passen
g
er compartment down
(
sun roo
f
and window blinds...
)
.
Switch off the air conditionin
g
, unless
it has automatic di
g
ital re
g
ulation, as
s
oon as the desired temperature is at-
t
ai
n
ed
.
S
witch o
ff
the demistin
g
and de
f
rost-
ing controls, i
f
not automatic.
S
wit
c
h
off
th
e
h
ea
t
ed
sea
t
as
soo
n
as
p
ossible.
Switch off the headlamps and front
fo
g
lamps when the level of li
g
ht does
n
ot requ
i
re t
h
e
i
r use.
A
void runnin
g
the en
g
ine be
f
ore mov-
in
g
o
ff
, particularl
y
in winter;
y
our ve-
h
icle will warm u
p
much faster while
drivin
g
.
A
s a passen
g
er, i
f
y
ou avoid connect-
ing your multimedia devices
(fi
lm, mu-
s
ic, video
g
ame...
)
,
y
ou will contribute
towards limitin
g
the consumption o
f
e
lectrical ener
gy
, and so of fuel.
Disconnect
y
our portable devices be-
fore leavin
g
the vehicle.

20
Limit the causes of excess
c
onsum
p
tion
S
pread loads throu
g
hout the vehicle;
p
lace the heaviest items in the bottom
o
f the boot, as close as
p
ossible to the
rea
r
sea
t
s
.
Li
m
i
t t
he
loads
ca
rr
ied
i
n t
he
v
ehicle
a
nd reduce wind resistance
(
roo
f
bars,
r
oo
f
rack, bic
y
cle carrier, trailer...
)
. Use
a
roo
f
box in pre
f
erence.
R
e
m
o
v
e
r
oof
ba
r
s
a
n
d
r
oof
r
ac
k
s
af
t
e
r
use
.
A
t the end o
f
winter, remove snow
t
y
res and re
fi
t
y
our summer t
y
res.
Observe the recommendations
on maintenance
C
heck the t
y
re pressures re
g
ularl
y
,
when cold, referrin
g
to the label in the
door a
p
erture, driver's side.
Carr
y
out this check in particular:
- before a lon
g
j
ourne
y
,
- at each chan
g
e o
f
season,
- a
f
ter a long period out o
f
use.
Don't
f
or
g
et the spare wheel and the
t
y
res on an
y
trailer or caravan.
Have
y
our vehicle serviced re
g
ularl
y
(
en
g
ine oil, oil fi lter, air fi lter...
)
and ob-
s
erve the schedule of operations rec-
o
mmended b
y
the manu
f
acturer.
When re
f
uellin
g
, do not continue a
f
ter
the
3
rd cut-off of the nozzle to avoid
an
y
overfl ow.
At the wheel o
f
y
our new vehicle, it is onl
y
a
f
ter the
fi
rst 1 800 miles
(
3 000 kilometres
)
that
y
ou will see the fuel consumption set-
tle down to a consistent avera
g
e.

I
21
IN
S
TRUMENT PANEL
Panel grouping together the dials and
warning/indicator lamps. These inform
the driver of the activation/deactivation
of a system or of the occurrence of a
fault.
3. Instrument panel screen:
- Warning and status displays.
- Total and trip distance recorders.
- Service indicator.
- Coolant temperature.
- Trip computer information.
- Cruise control setting.
- Dashboard lighting and parameter
settings.
- Fuel level.
- Ambient temperature.
- Transmission mode.
Screen type 1
Screen type 2
1. Rev counter.
2. Speedometer.
I
22
IN
S
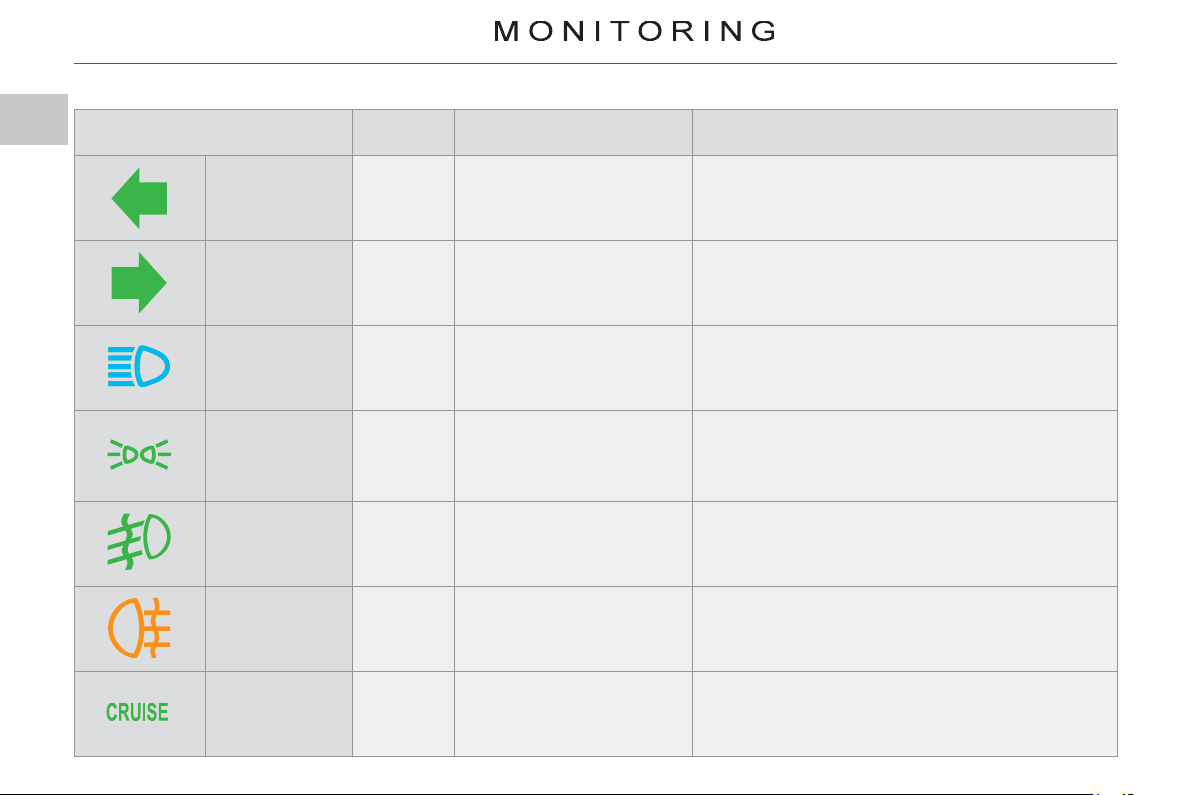
TRUMENT PANEL WARNING LAMP
S
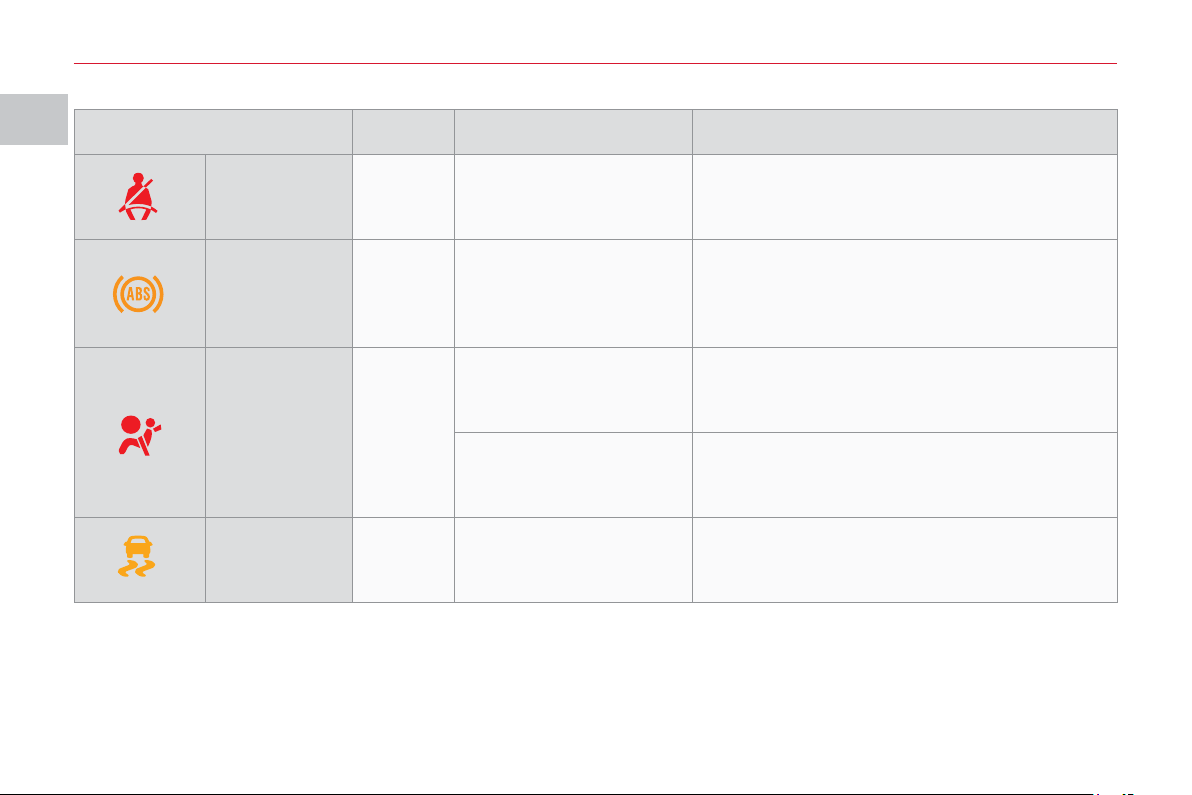
Warning lamp is on Cause Actions/ Observations
Left-hand
direction
indicator
Flashing
with
audible
warning
This fl ashes when you
press the lighting stalk
down.
If this indicator lamp fl ashes abnormally quickly, this
could indicate that the bulb of one of the direction
indicators has blown. Change the bulb or contact a
CITROËN dealer or a qualifi ed workshop.
Right-hand
direction
indicator
Flashing
with
audible
warning
This fl ashes when you
push the lighting stalk up.
If this indicator lamp fl ashes abnormally quickly, this
could indicate that the bulb of one of the direction
indicators has blown. Change the bulb or contact a
CITROËN dealer or a qualifi ed workshop.
Main beam
headlamps
Fixed
This comes on when
you pull the lighting stalk
towards you.
Pull the stalk to return to dipped beam
headlamps.
Sidelamps Fixed
This comes on when the
lighting stalk is in the
"Sidelamps" or "Dipped
beam headlamps"
position.
Turn the stalk to the desired position.
Front foglamps Fixed
This comes on when you
use the front foglamps.
Turn the ring on the stalk forwards to switch on
the foglamps.
Rear foglamps Fixed
This comes on when you
use the rear foglamps.
Turn the ring on the stalk forwards to switch on
the foglamps.
Cruise control Fixed
This comes on when the
mode is active.
Press the "ON/OFF" button to activate/
deactivate the mode.
I
MO
NIT
O
RIN
G
2
3
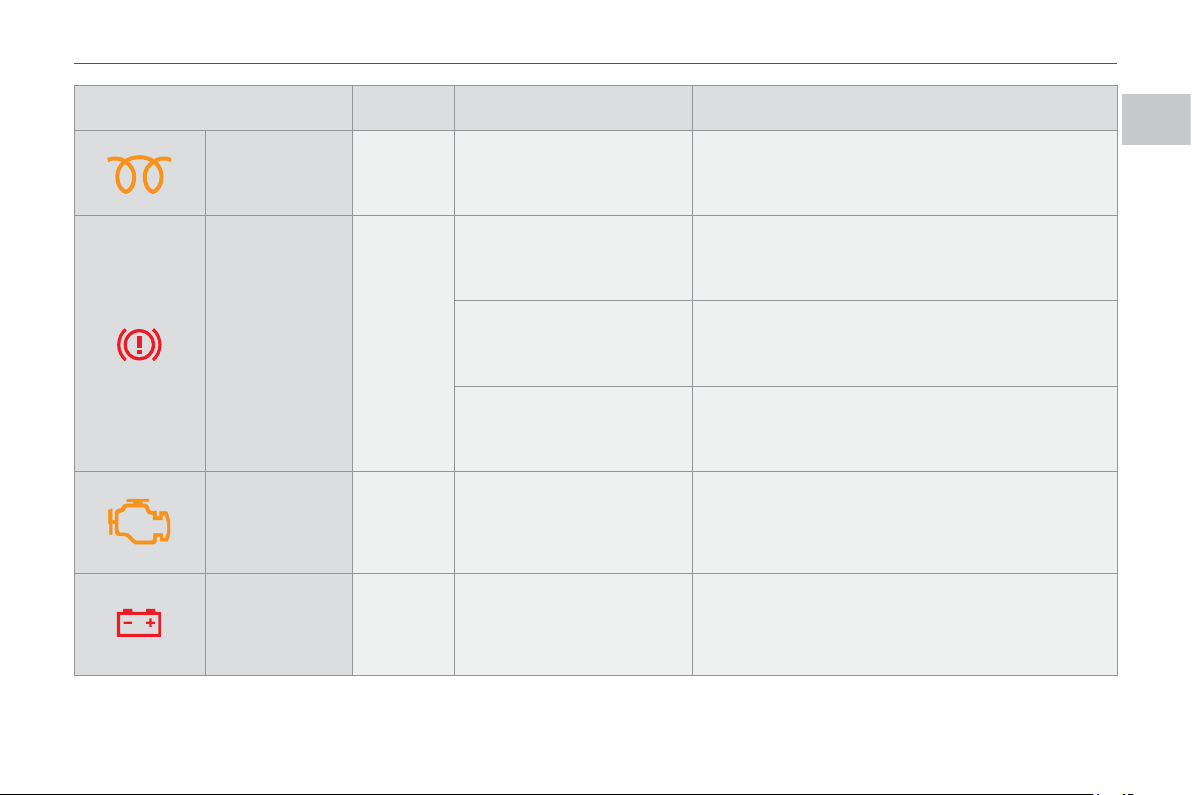
Warning lamp is on Cause Actions/Observations
Diesel
preheating
Fixed
This comes on when the
ignition switch is in the
ON position.
Wait until this goes off before starting.
The duration for which this is on is determined
by the exterior climatic conditions.
Parking brake/
Brake fl uid
level
Fixed
This comes on for a few
seconds when the ignition
is turned to "ON" then
goes off.
It is accompanied by a message on
the instrument panel screen.
The parking brake is
applied or has not been
released fully.
It is accompanied by a message on the
instrument panel screen. Release the parking
brake to switch off the warning lamp.
The brake fl uid level is
too low.
It is accompanied by a message on the
instrument panel screen. Top up with brake fl uid
and contact a CITROËN dealer or a qualifi ed
workshop.
Emission
control system
Fixed or
fl ashing
This comes on or fl ashes
in the event of a fault with
the system.
Contact a CITROËN dealer or a qualifi ed
workshop.
It should go off a few seconds after starting
the engine.
Battery charge Fixed
This comes on if a
charging circuit fault
occurs.
It should go off when the engine is started.
It is accompanied by a message on
the instrument panel screen. Check the battery
terminals (refer to the "Battery" section).
I
MO
NIT
O
RIN
G
24
Warning lamp is on Cause Actions/Observations
Driver's
seat belt not
fastened
Fixed
The driver has not
fastened or has
unfastened their seat belt.
This is accompanied by a message on
the instrument panel screen.
Fasten the driver's seat belt.
ABS Fixed
This comes on if an anti-
lock braking system fault
occurs.
It is accompanied by a message in the
instrument panel screen. The vehicle retains
conventional braking without assistance but
you are advised to stop. Have it checked by
a CITROËN dealer or a qualifi ed workshop.
Airbags and
pretensioners
Fixed
This comes on for a few
seconds when the ignition
is turned to "ON" then
goes off.
It should go off when the engine is started. If it
does not go off, contact a CITROËN dealer or
a qualifi ed workshop.
This comes on if an
airbag or pretensioner
fault occurs.
It is accompanied by a message on
the instrument panel screen. Have the system
checked by a CITROËN dealer or a qualifi ed
workshop without delay.
Dynamic
stability control
system (ASC)
Fixed
This comes on if
a dynamic stability control
system fault occurs.
It is accompanied by a message on
the instrument panel screen. Have the system
checked by a CITROËN dealer or a qualifi ed
workshop without delay.
I
MO
NIT
O
RIN
G
2
5
Each time the engine is started: a series of warning lamps and/or messages come on, applying a checking self test. They go
off after a few seconds. Engine running: the warning lamp or the message becomes a warning if it remains on continuously
or fl ashes. This initial warning may be accompanied by an audible signal and a message on the screen. Do not ignore these
warnings.
The messages displayed may differ between the type 1 instrument panel and the type 2 instrument panel.
When the cause of the appearance of the warning lamp or warning message has been rectifi ed, the warning disappears
from the screen automatically. If the cause of the warning is not rectifi ed, you can return to the previous screen at any time
by pressing the INFO button on the dashboard.
The symbol "!" is displayed.
To return to the previous screen (with the "!" symbol), you must press the INFO button several times.
Warnin
g
messa
g
es
(
i
g
nition at "OFF"
)
You can close the warning messages which show these symbols in order to move on to the next screen.
To do this, press the INFO button according to the symbol displayed.
Press briefl y . Press and hold .
S
y
mbols which appear in the top ri
g
ht corner of the screen.
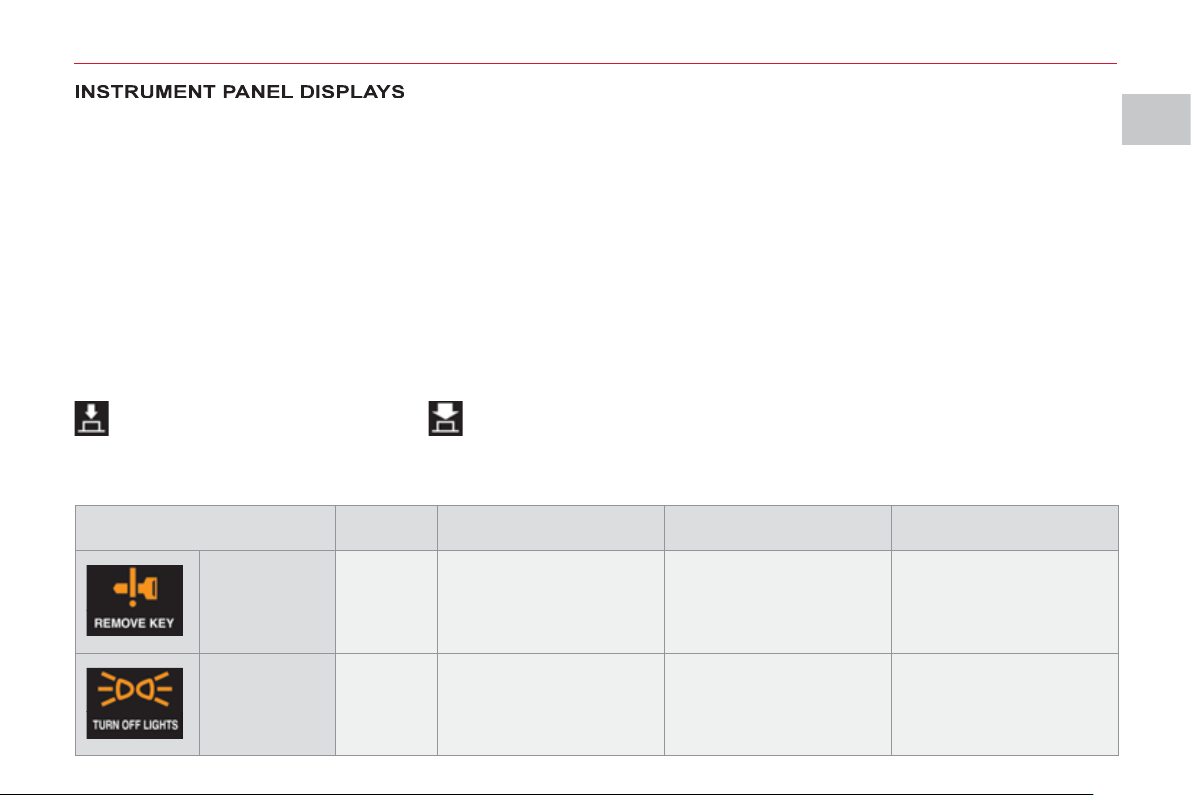
Message is on Cause Solution - action Observations
Key in
ignition
Fixed
The driver's door is open
and you have forgotten
to remove the key from
the ignition.
Turn the ignition switch
to the LOCK position
and remove the key.
Only if the engine has
been started.
An intermittent audible
signal is heard.
Lighting
left on
Fixed
You have forgotten to
switch off the vehicle
lighting.
Switch off the vehicle
lighting by placing the
stalk at OFF.
An intermittent audible
signal is heard.
I
MO
NIT
O
RIN
G
2
6
Warnin
g
messa
g
es
(
i
g
nition at "ON"
)
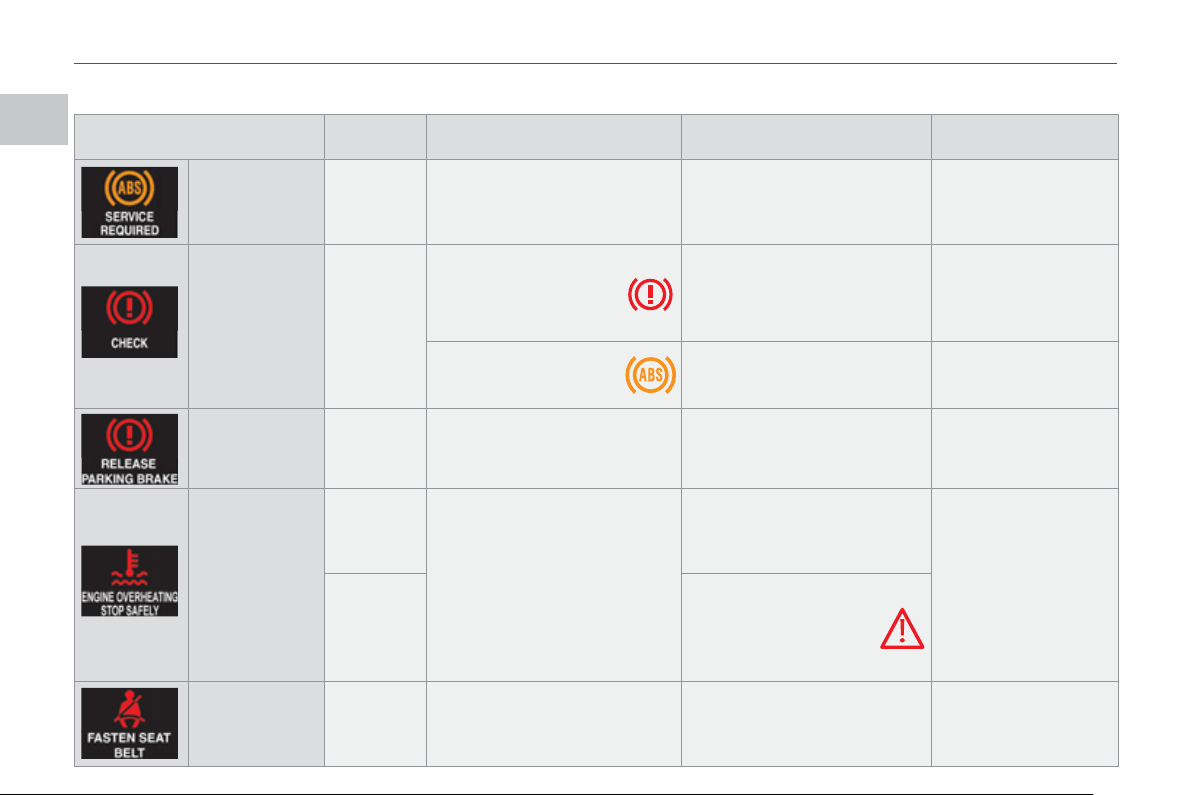
Message is on Cause Solution - action Observations
ABS Fixed
Anti-lock braking system
(ABS) fault.
Contact a CITROËN dealer
or a qualifi ed workshop.
The vehicle retains
conventional braking
without assistance
but you are advised
to stop.
Braking
system
Fixed
Associated warning
lamp.
The level of brake
fl uid in the reservoir is
too low.
Stop and top up, otherwise
contact a CITROËN dealer
or a qualifi ed workshop.
If the message
remains on after
topping up, contact a
CITROËN dealer or
a qualifi ed workshop.
Associated warning
lamp.
Braking system fault.
Contact a CITROËN dealer
or a qualifi ed workshop.
You must stop as
soon as it is safe
to do so.
Parking brake
on
Fixed
You have moved off with
the parking brake still
applied.
Release the parking brake.
Coolant
temperature
Flashing
High engine temperature.
If the message fl ashes ,
wait for the engine to cool
before topping up the level,
if necessary.
You must stop
your vehicle as
soon as it is safe
to do so.
Flashing
If the message fl ashes
and the service
warning light comes
on , contact a CITROËN
dealer or a qualifi ed
workshop without delay.
Seat belt Fixed
The driver has not fastened
or has unfastened his seat
belt.
Fasten your seat belt.
There is an
intermittent audible
signal above 5 mph
(8 km/h).

I
MO
NIT
O
RIN
G
27
Message is on Cause Solution - action Observations
Airbags Fixed
Fault in the airbags or
pretensioners.
Contact a CITROËN
dealer or a qualifi ed
workshop.
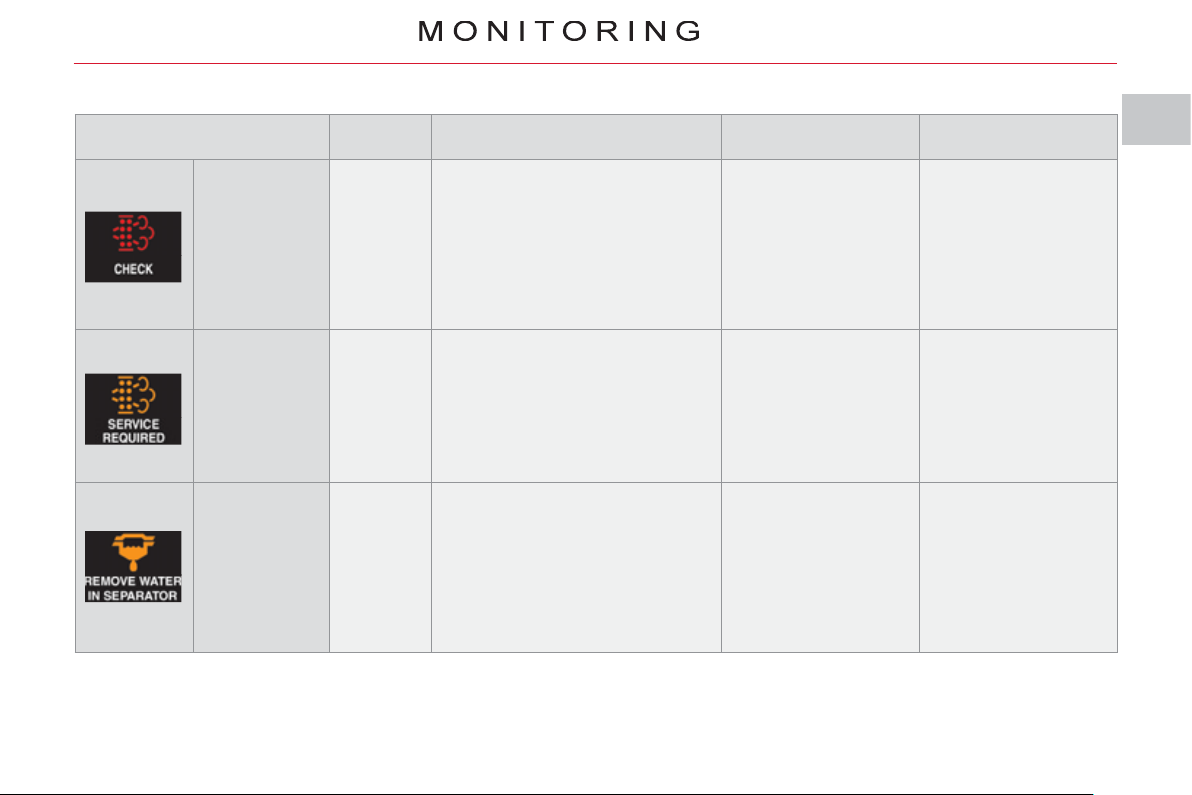
Service Fixed
Problem in one of the systems
which does not have a specifi c
message.
Stop the vehicle and
contact a CITROËN
dealer or a qualifi ed
workshop.
To identify the
problem, contact a
CITROËN dealer or
a qualifi ed workshop.
Engine oil
pressure
Fixed
Engine oil pressure too low or
fault in the engine lubrication
system.
Stop the vehicle and
contact a CITROËN
dealer or a qualifi ed
workshop.
Engine oil
level
Fixed Engine oil level too low.
Stop the vehicle and
check the level using
the dipstick.
If there is a lack of
oil, top up the level.
Low fuel
warning
Fixed The fuel level is low.
Refuel as soon as
possible.
Fuel system Fixed Fuel system fault.
Contact a CITROËN
dealer or a qualifi ed
workshop.
Opening
not closed
correctly
Fixed
One of the doors or the tailgate
is not closed correctly.
Close the door or the
tailgate.
The opening
concerned is
indicated on the
screen.
I
MO
NIT
O
RIN
G
28
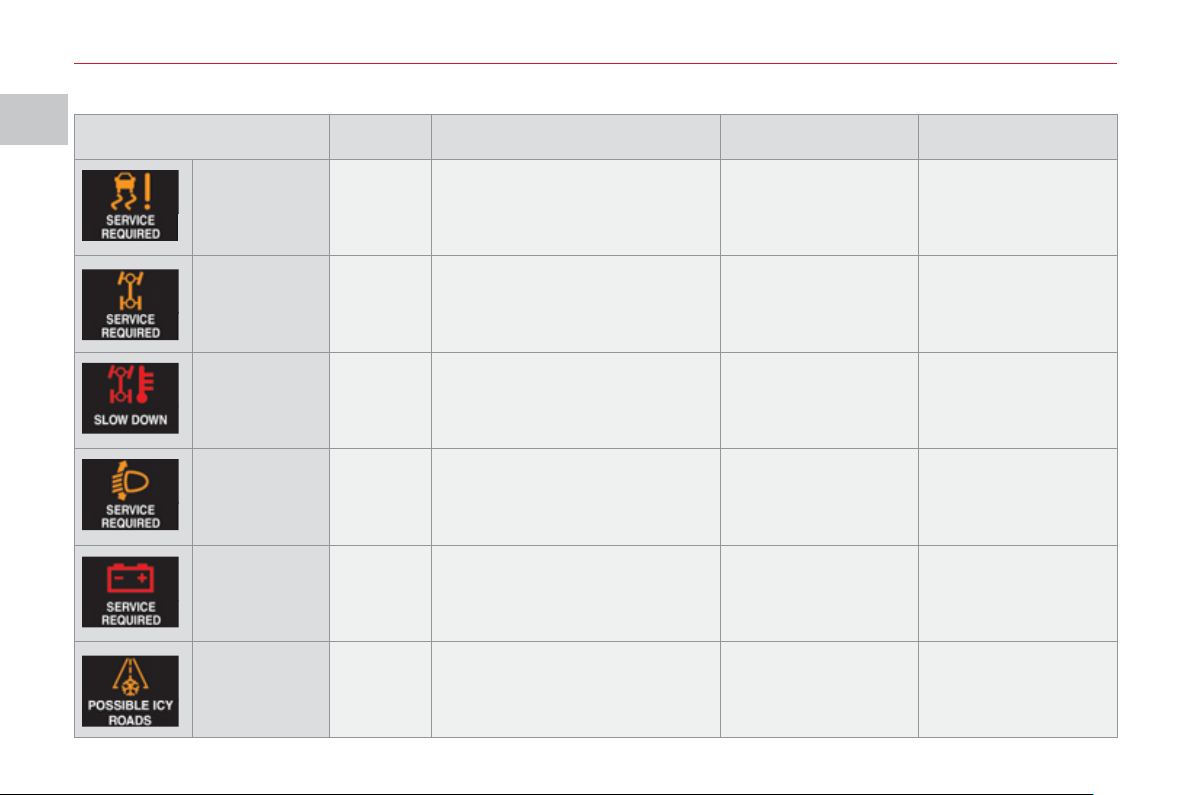
Message is on Cause Solution - action Observations
Dynamic
stability
control
system (ASC)
Fixed
Dynamic stability control system
(ASC) fault.
Contact a CITROËN
dealer or a qualifi ed
workshop.
Four wheel
drive system
Fixed
Four wheel drive transmission
system fault.
Contact a CITROËN
dealer or a qualifi ed
workshop.
Four wheel
drive system
temperature
Fixed
The temperature of the four
wheel drive transmission
system is too high.
Stop the vehicle and
contact a CITROËN
dealer or a qualifi ed
workshop.
The vehicle switches
to front wheel
drive (2 WD) mode
automatically.
Automatic
headlamp
adjustment
system
Fixed
The automatic headlamp
adjustment is faulty.
Contact a CITROËN
dealer or a qualifi ed
workshop.
Only on vehicle fi tted
with xenon bulbs.
Battery
charge
Fixed Battery charge fault.
Stop the vehicle and
contact a CITROËN
dealer or a qualifi ed
workshop.
Ambient
temperature
Fixed
The ambient temperature is
3 °C (37 °F) or below.
Road icy.
Take care and drive
slowly.
Caution: The road
may be icy even
when this screen is
not displayed.
I
29
Message is on Cause Solution - action Observations
Saturation of
the particle
emission fi lter
Fixed
Start of saturation of the particle
emission fi lter.
As soon as traffi c
conditions permit,
regenerate the fi lter
by driving at a speed
of at least 35 mph
(60 km/h) until the
message is cleared.
If the message is still
displayed, contact a
CITROËN dealer or
a qualifi ed workshop.
Diesel
additive level
Fixed Low Diesel additive level.
Have the level
topped up by a
CITROËN dealer or
a qualifi ed workshop
without delay.
Water in the
Diesel fi lter
(according to
country)
Fixed
The presence of water in the
Diesel fi lter is indicated.
Risk of damage to the injection
system on Diesel engines.
Contact a CITROËN
dealer or a qualifi ed
workshop without
delay.
I
MO
NIT
O
RIN
G
30
Prevention messa
g
es
Information messa
g
es
(
i
g
nition at "ON"
)
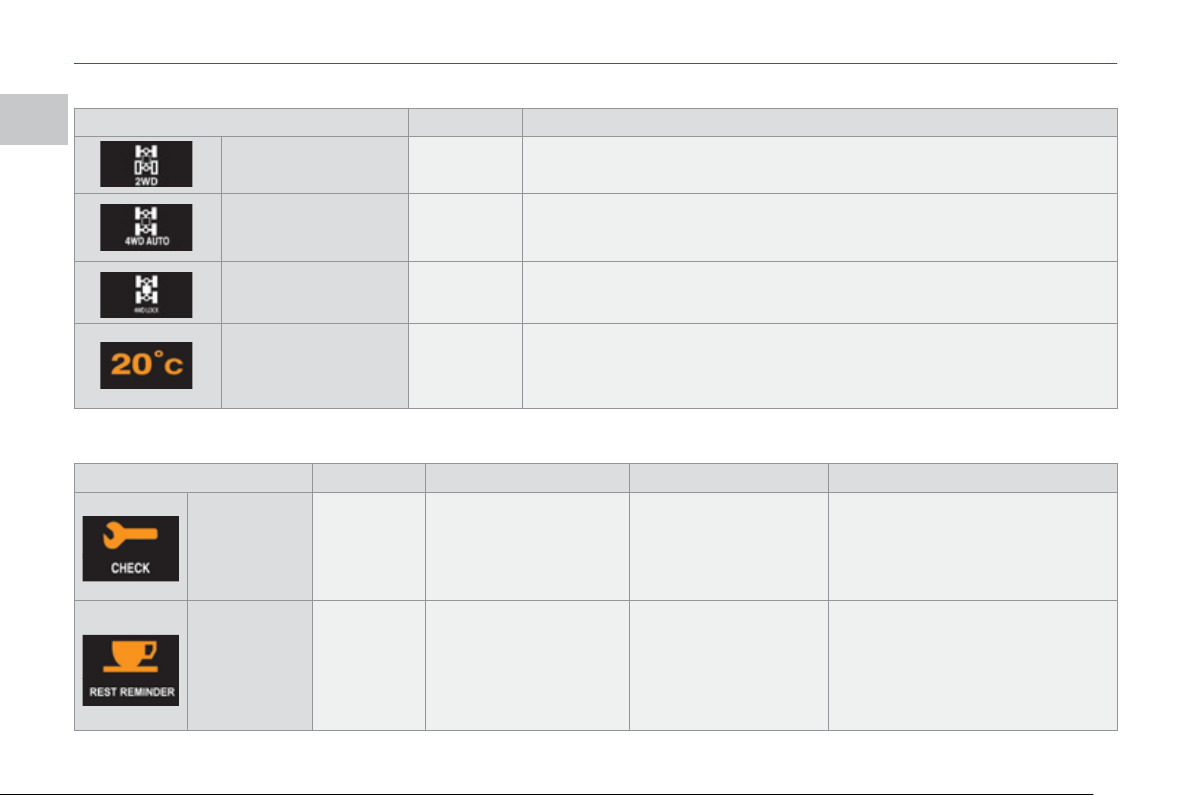
Message is on Status of the system
2WD two wheel
drive system
Flashing
When the "2WD" (2 wheel drive) mode is selected using the
transmission mode selector.
4WD four wheel
drive system
Flashing
When the "4WD" (4 wheel drive) mode is selected using the
transmission mode selector.
This mode is the default mode.
4WD LOCK four
wheel drive system
Flashing
When the "LOCK" (4 wheel drive) mode is selected using the
transmission mode selector.
Ambient
temperature
Fixed
This indicates the ambient temperature.
When the vehicle is stationary or if the speed is below 12 mph (20 km/h)
the temperature displayed may not be the true temperature.
Display is on Cause Solution - action Observations
Service
indicator
Fixed
Informs the driver of
the time remaining
before the vehicle's
scheduled service.
Contact a CITROËN
dealer or a qualifi ed
workshop.
This is displayed for a few
seconds when the ignition is
switched on.
Break
advised
Fixed
Informs the driver that
they should stop to
take a break.
You are advised to
take a break.
This is displayed when the
driving time that you set
previously is reached.
An audible signal is heard
3 times and is then heard every
5 minutes until the vehicle stops.
I
31
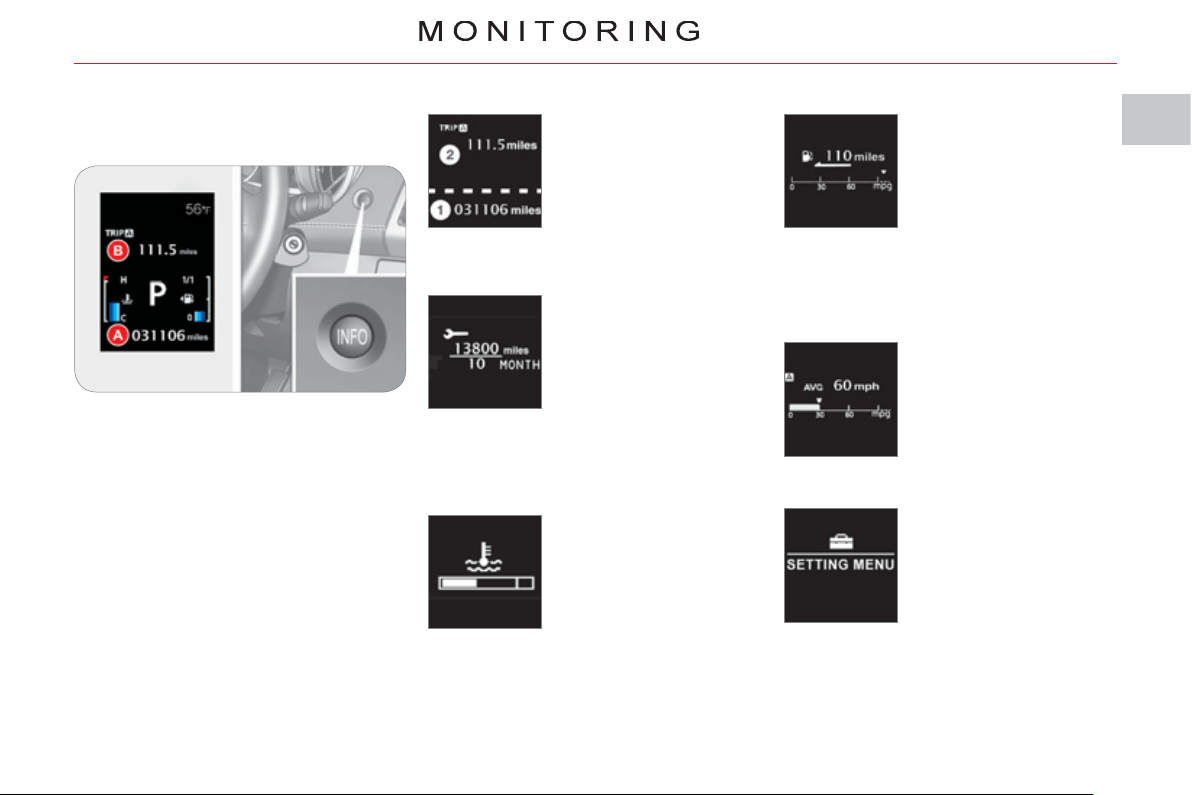
The total distance is dis-
played in zone 1 of the
screen and the trip dis-
tance in zone 2 (refer to
the "Distance recorders"
section).
Distance recorder (A and B)
INFORMATION IN THE
IN
S
TRUMENT PANEL
S
CREEN
Information displa
y
With the ignition on, press the INFO
button, located on the dashboard to the
right of the instrument panel, to display
the various information in succession:
- distance recorder A,
- distance recorder B,
- service indicator,
- coolant temperature,
- range,
- trip computer,
- setting menu.
This displays the dis-
tance and the number of
months remaining before
the next service in line
with with the manufac-
turer’s servicing sched-
ule (refer to the "Service
indicator" section).
Service indicator
When the engine is run-
ning, this indicates the
temperature of the cool-
ant (refer to the "Coolant
temperature indicator"
section).
Coolant temperature
When the engine is
running, this indicates
the number of miles
(kilometres) which can
still be travelled with the
fuel remaining in the tank
based on the average
fuel consumption over
the last few miles (kilometres) travelled
(refer to the "Range" section).
Range
This indicates the aver-
age fuel consumption,
the average speed and
the current fuel con-
sumption (refer to the
"Trip computer" section).
Trip computer
When the vehicle is sta-
tionary , this allows the
user to change the follow-
ing settings (refer to the
"Setting menu" section):
- the display language,
- the temperature dis-
play units,
- the fuel consumption units,
- the option to reset the average
fuel consumption and the average
speed,
- the break (rest) reminder display in-
terval.
Setting menu

I
!
!
MO
NIT
O
RIN
G
3
2
The total distance is
displayed in zone 1 of
the screen and the trip
distance in zone 2 .
D
ISTANCE RECORDERS
(
A/B
)
System for measuring the total distance
travelled by the vehicle during its
service life and the distance travelled in
a day or other period until it is reset to
zero by the driver.
Zero reset
With the ignition on, press the INFO
button for more than 2 seconds until
zeros appear.
When the engine is
running, this indicates
the temperature of the
coolant.
COOLANT TEMPERATURE
If the bar is close to the critical position
located on the right, the temperature is
too high.
The symbol fl ashes when your engine
is overheating.
You must stop your vehicle as soon
as it is safe to do so.
Wait a few minutes before switching
off the engine.
Wait for the engine to cool before
topping up the level. The cooling
system is pressurised.
When the engine is
running , this indicates
the distance which can
still be travelled with the
fuel remaining in the tank
based on the average
fuel consumption over the
last few miles/kilometres
travelled.
RANGE
When the range is less than 30 miles
(50 km) , dashes are displayed.
Refuel as soon as possible. The display
of the range is updated.
To avoid any risk of scalding, unscrew
the cap by two turns to allow the
pressure to drop.
When the pressure has dropped,
remove the cap and top up the level, if
necessary.
Contact a CITROËN dealer or a
qualifi ed workshop.
This fi gure may increase following a
change in the style of driving or the
relief, resulting in a reduction in the
current fuel consumption.
If you only add a few litres, the
value displayed will be incorrect.
Therefore, you must fi ll the tank
whenever possible.
When you disconnect the
battery, the previous fuel
consumption data is lost and the
value displayed will be different from
that displayed before the battery was
disconnected. The distance displayed
must be considered an approximate
indication.
I
MO
NIT
O
RIN
G
33
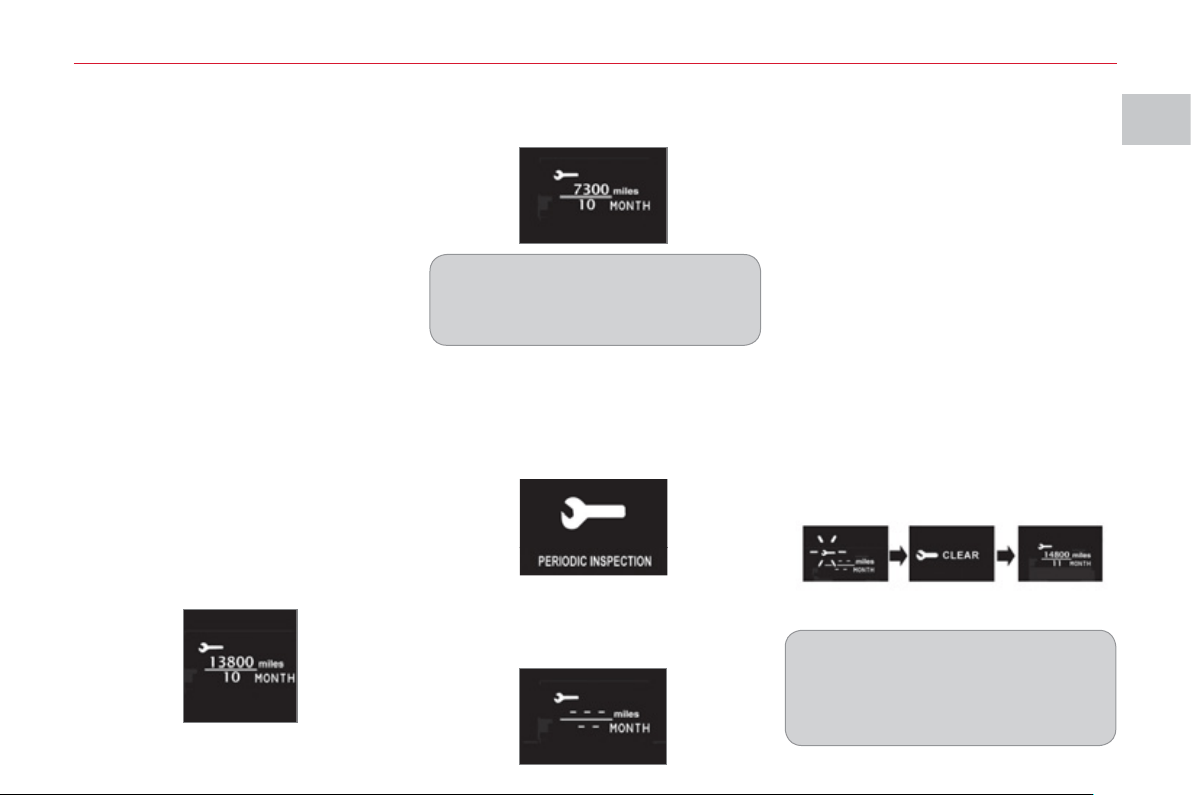
S
ERVICE INDICATOR Resettin
g
the service indicator
t
o zero
Your CITROËN dealer or a qualifi ed
workshop carries out this operation
after each service.
If you have carried out your vehicle's
service yourself, the zero reset
procedure is the following:
) switch off the ignition.
) press the INFO button several times
in succession until the service indi-
cator is displayed.
) press and hold the INFO button for
a few seconds until the spanner
fl ashes .
) press the INFO button while the
spanner is fl ashing to change the dis-
play "---" to "CLEAR" then the time
remaining before the next service is
due is displayed.
Service overdue
O
p
eration
When the ignition is switched on, you
must press the INFO button several
times in succession until the service
indicator is displayed. The distance
recorder display line indicates the
number of miles (kilometres) remaining
and the time elapsed line indicates the
number of months remaining before the
next service is due.
After a certain distance and a certain
time, the display of "---" is reinitialised
and the display indicates the time
remaining before the next service is
due.
System which informs the driver when
the next service is due in accordance
with the manufacturer's servicing
schedule.
The point at which the next service is
due is calculated from the last service
indicator zero reset.
It is determined by two parameters:
- the distance travelled (in miles (km)),
- the time elapsed since the last ser-
vice (in months).
The distance remaining to be travelled
may be weighted by the time factor,
depending on the user's driving habits.
Example: the display indicates that
7 300 miles (kilometres) remain before
the next service is due.
The symbol "--" remains displayed
until the fi rst service of a new vehicle
has been carried out.
Example: the display indicates that the
service is overdue. This service must
be carried out by a CITROËN dealer or
a qualifi ed workshop.
Each time the ignition is switched on,
the display "PERIODIC INSPECTION"
is displayed for a few seconds to
indicate that the service must be carried
out without delay.

I
MO
NIT
O
RIN
G
3
4
T
RIP COMPUTER
A
vera
g
e fuel
c
onsumption
(
l/100 km
o
r km/l or mp
g)
This is the average fuel
consumption since the
last zero reset.
This fi gure may change following a
change in the style of driving or the
relief resulting in a change in the cur-
rent fuel consumption.
Avera
g
e speed
(
km/h
or mph
)
This is the average
speed calculated since
the last zero reset.
Resettin
g
the information to zero
When the ignition is switched on, the
zero reset switches automatically from
manual mode to automatic mode.
If dashes "---" are displayed for long
periods in place of the digits while
driving, contact a CITROËN dealer or
a qualifi ed workshop.
Current fuel
c
onsumption
(
l/100 km
o
r km/l or mp
g)
This is the average fuel
consumption during the
last few seconds of driving.
Information displa
y
With the ignition on, press the INFO
button on the dashboard, to the right
of the instrument panel, several times
in succession to display the different
information:
- average fuel consumption,
- average speed,
- current fuel consumption.
When the required information is
displayed, press the INFO button for
more than two seconds to reset all of
the information to zero.
Automatic
If the ignition key remains in the
OFF position for more than 4 hours,
the information is reset to zero
automatically.
I
!
MO
NIT
O
RIN
G
35
When the vehicle is
stationary , it allows
the user to change the
following settings:
- resetting average fuel
consumption and av-
erage speed,
- the fuel consumption units,
- the temperature display units,
- the display language,
- activation/deactivation of the INFO
button sound,
- the break (rest) reminder display in-
terval,
- restore factory settings.
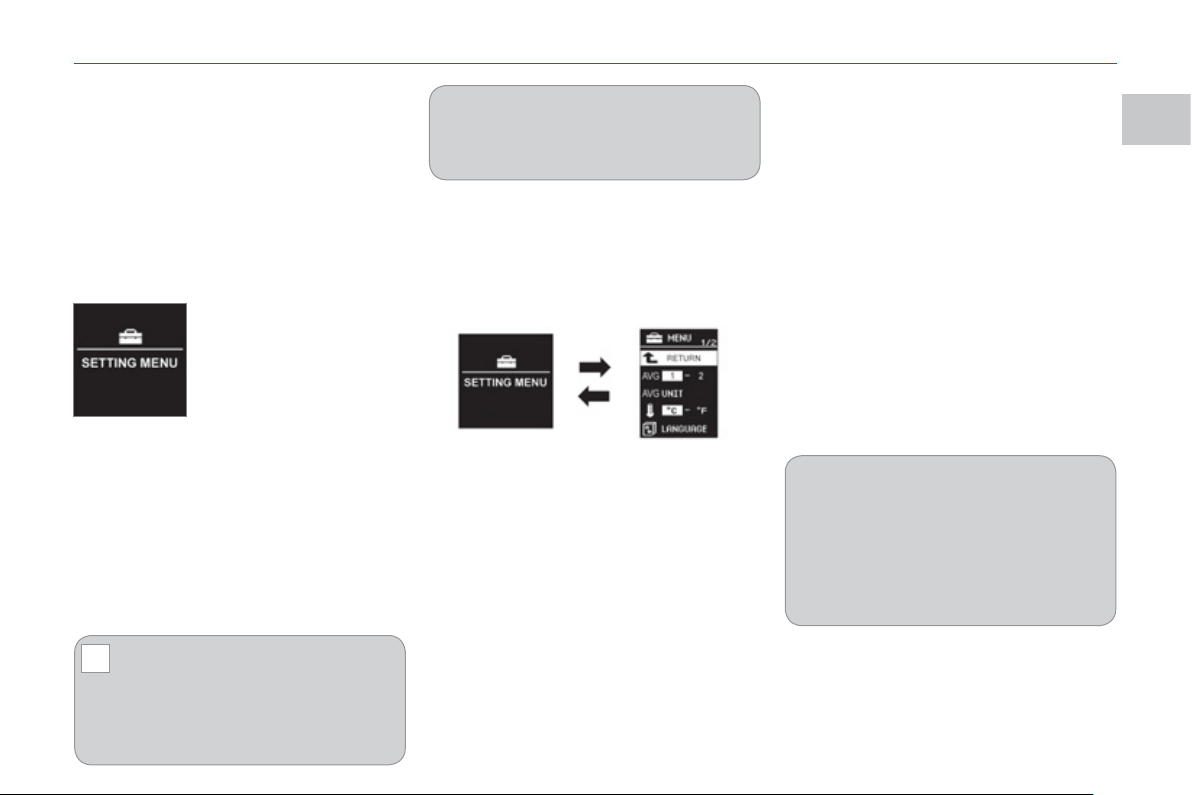
S
ETTING MENU
System which provides access to the
settings of certain functions.
To change the settings, you
must stop the vehicle and switch
on the ignition.
Apply the parking brake and place
the gear lever in neutral.
When the vehicle is moving , the
setting menu screen is not displayed
when you press the INFO button.
The various menus may differ for the
type 1 instrument panel and the type 2
instrument panel.
With the ignition on , press the INFO
button on the dashboard, to the right of
the instrument panel, several times in
succession until the "SETTING MENU"
screen is displayed.
Operation
) press and hold the INFO button for
a few seconds to display the menu
screen.
Press and hold the INFO button
for a few seconds to return to the
previous screen.
When the menus screen is
displayed, if no operation is carried
out within 15 seconds, the setting
menu screen is displayed.
) on the menu screen, press the INFO
button to select a function from the
list:
MENU 2/3:
- a/b (option of displaying a different
language in the instrument panel
screen and the navigation screen),
- activation/deactivation of the
INFO button sound ,
- ALARM (changing the "BREAK RE-
MINDER" display interval),
- choice of the direction indicators
sound,
- activation/deactivation of current
fuel consumption,
MENU 1/3 :
- 1 - 2 (options for resetting aver-
age fuel consumption and average
speed),
- UNIT (choice of the fuel consump-
tion units),
- choice of the temperature display
unit s ,
- LANGUAGE (choice of display lan-
guage),
MENU 3/3:
- RESET (restore factory settings).
I
MO
NIT
O
RIN
G
36
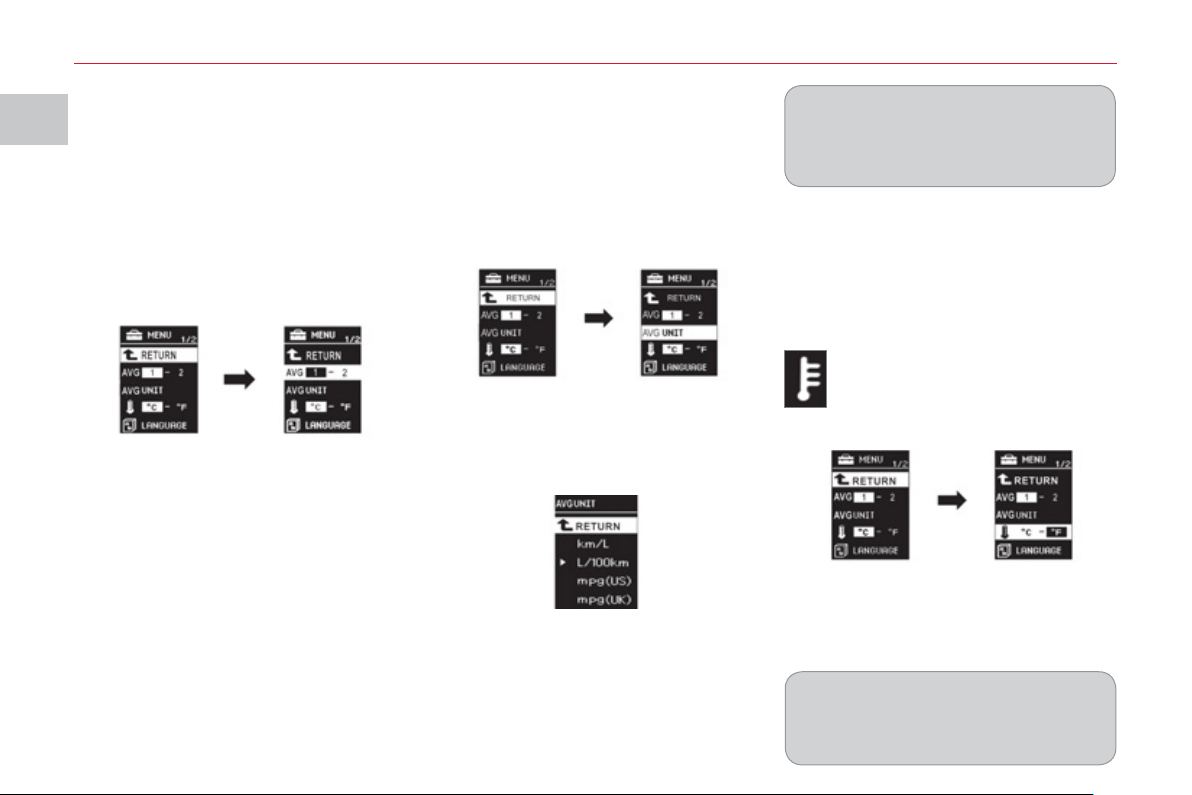
Choice of fuel consum
p
tion
u
nits
You can choose between different units
for displaying fuel consumption.
On the menu screen:
) press the INFO button to select
"UNIT" .
) press and hold the INFO button for
a few seconds to display the "UNIT"
screen.
) press the INFO button to scroll the
units (km/L, L/100 km, mpg(US),
mpg(UK) and RETURN) in succes-
sion.
) press and hold the INFO button for
a few seconds to confi rm your se-
lection.
In this case, the distance, speed and
quantity of fuel units will also be changed
in accordance with your choice of fuel
consumption unit.
If the battery is disconnected, the
settings memory is cleared and
the default unit (km/L) is restored
automatically.
Choice of temperature displa
y
u
nits
You can choose between different units
for displaying the temperature.
On the menu screen:
) press the INFO button to se-
lect the temperature unit set-
ting symbol (thermometer).
) press and hold the INFO button for
a few seconds to alternate between
the units (°C and °F).
The mode selected is confi rmed.
If the battery is disconnected, the
settings memory is cleared and the
default unit (°C) is restored automati-
cally.
Options for resettin
g
avera
g
e
f
uel consumption and avera
g
e
s
p
eed
You can choose between two average
fuel consumption and average speed
resetting modes:
- automatic reset ( choice 1) ,
- manual reset (choice 2) .
On the menu screen:
) press the INFO button to select:
) press and hold the INFO button for a
few seconds to switch in succession
from resetting mode 1 (automatic)
to resetting mode 2 (manual) .
The mode selected is confi rmed.
I
MO
NIT
O
RIN
G
3
7
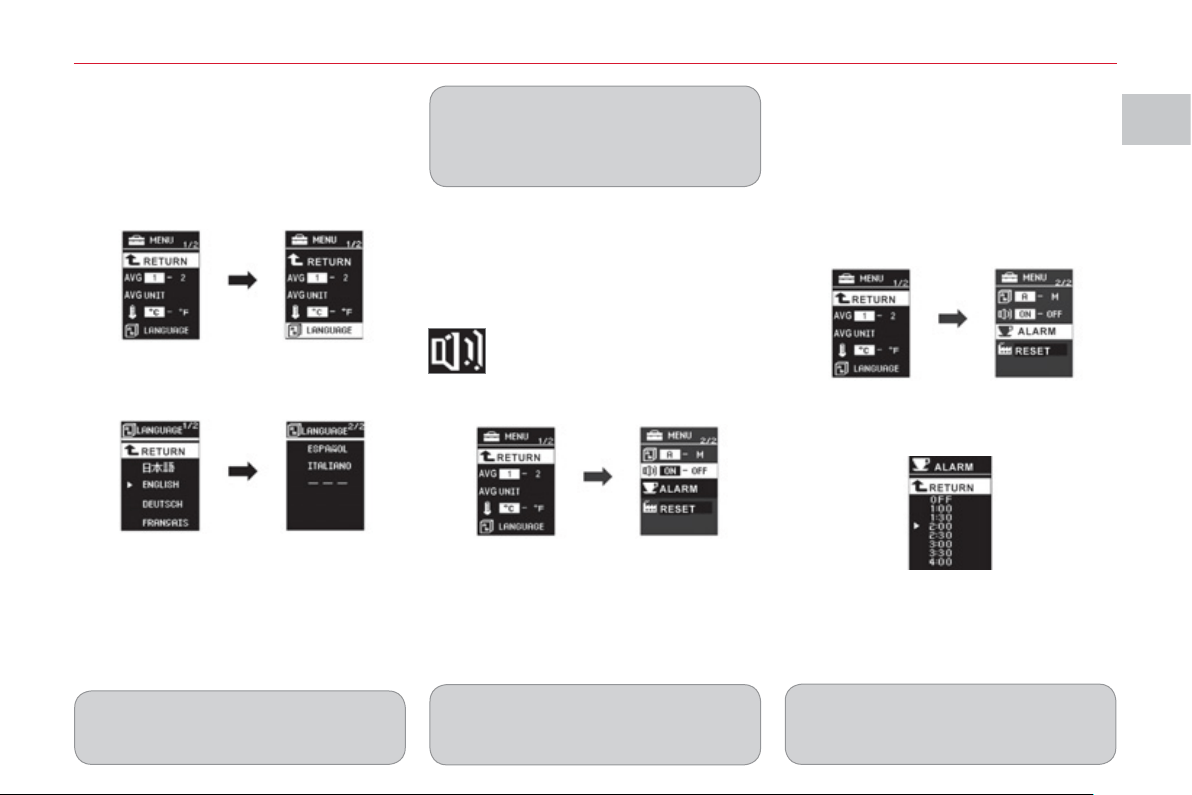
Choice of displa
y
lan
g
ua
g
e
(
LANGUAGE
)
You can choose between different
languages for the screen.
On the menus screen:
) press the INFO button to select
"LANGUAGE" .
) press and hold the INFO button
for a few seconds to display the
"LANGUAGE" screen.
) press the INFO button to scroll
through the languages (Japonais,
English, Deutsch, Français, Espa-
nol, Italiano, "---" and RETURN) in
succession.
) press and hold the INFO button for
a few seconds to confi rm your se-
lection.
If you select the "---" setting, no
message will be displayed in
message display situations.
If the battery is disconnected, the
settings memory is cleared and
the default language (ENGLISH) is
restored automatically.
Activation/deactivation of the
"
INFO" button sound
You can activate or deactivate the INFO
button sound.
On the menus screen:
) press the INFO button to
select the INFO button
sound activation/deactiva-
tion symbol (located on
menu 2/3) .
) press and hold the INFO button for
a few seconds to alternate between
the choices (ON, OFF).
The mode selected is confi rmed.
If the battery is disconnected, the
settings memory is cleared and
the default choice (ON) is restored
automatically.
Chan
g
in
g
the displa
y
interval
of the "BREAK REMINDER"
m
essa
g
e
You can change the display interval of
the "BREAK REMINDER" message.
On the menu screen:
) press the INFO button to select
"ALARM" (located on menu 2/3) .
) press and hold the INFO button
for a few seconds to display the
"ALARM" screen.
) press the INFO button to select
the display interval of the "BREAK
REMINDER" message.
) press and hold the INFO button for
a few seconds to confi rm.
If the battery is disconnected, the
settings memory is cleared and
the default value (OFF) is restored
automatically.
I
MO
NIT
O
RIN
G
38
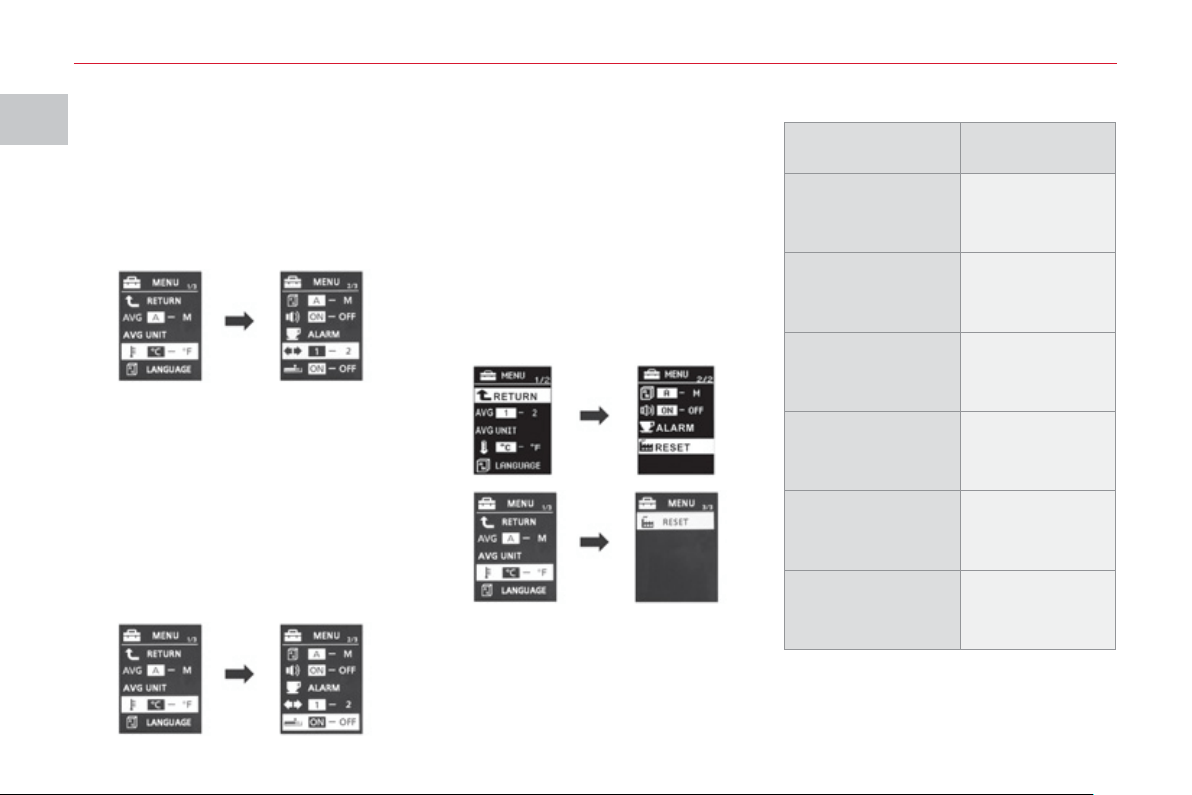
Choice of the direction
i
ndicators sound
You can choose the sound of the
direction indicators, on the type 2
instrument panel only.
On the menus screen:
) press the INFO button to select
sound 1 or 2 (located on menu
2/3) .
Functions Factory setting
Resetting average
fuel consumption
and average
speed
1 (automatic)
Fuel consumption
units
L/100 km
Temperature
display unit
°C
Display language ENGLISH
INFO button
sound
ON (activated)
Display of
the "BREAK
REMINDER"
message
OFF (deactivated)
Activation/deactivation of the
c
urrent fuel consum
p
tion
You can activate or deactivate the
current fuel consumption, on the type 2
instrument panel only.
On the menu screen:
) press the INFO button to select the
current fuel consumption activation/
deactivation symbol (located on
menu 2/3) .
) press the INFO button for a few
seconds to alternate between the
choices (ON, OFF).
Restorin
g
factor
y
settin
g
s
(
RESET
)
You can restore all of the factory settings
for all of the functions.
On the menu screen:
) press the INFO button to select
"RESET" (located on menu 2/2 or
3/3 depending on the instrument
panel) .
The factory settings are:
) press and hold the INFO button for
at least 5 seconds .
An audible signal is heard and all of the
factory settings are restored for all of
the functions.
I
MO
NIT
O
RIN
G
39
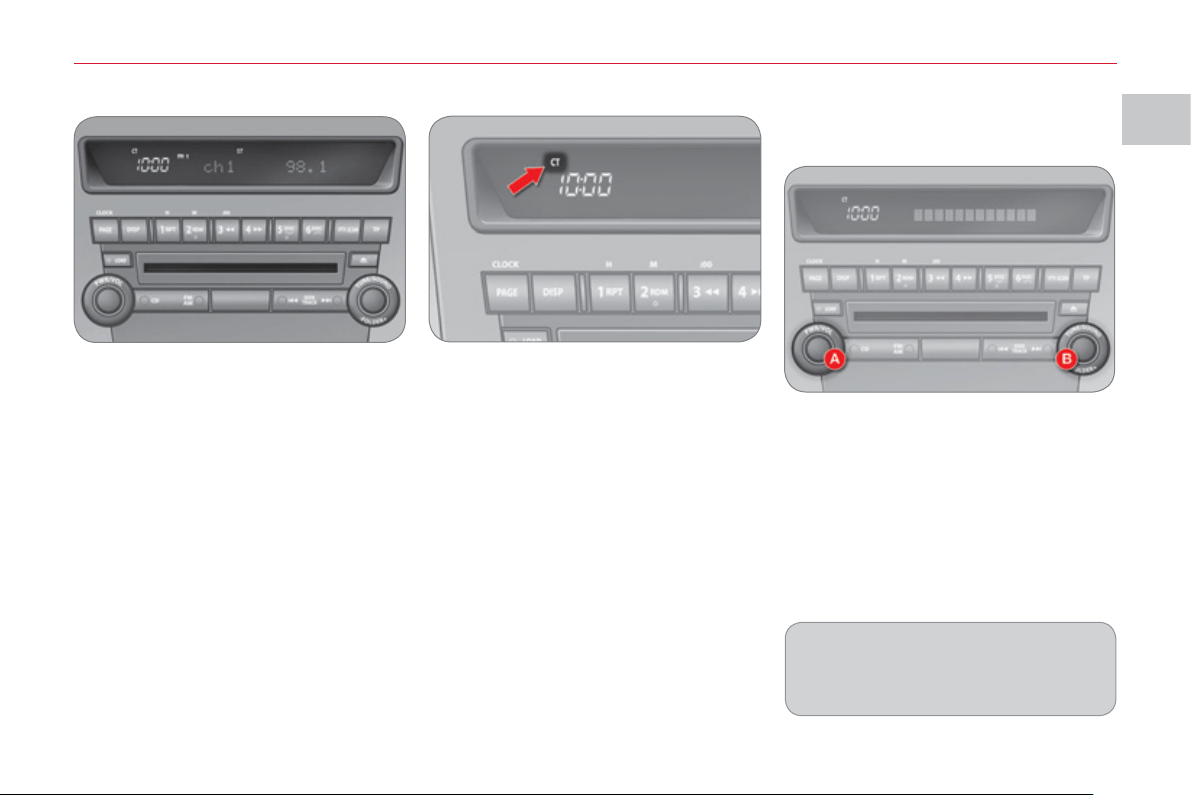
M
ONOCHROME SCREEN
This provides the following information:
- the time,
- audio system information (refer to
the "Audio and Telematics" section).
Settin
g
the time
The digital clock can be set in automatic
mode or in manual mode .
Selectin
g
the Settin
g
Select the automatic mode or the
manual mode as follows:
) Press button A "PWR" to switch on
the audio system.
) Access the setting mode by pressing
button B "TUNE" for approximately
2 seconds.
) Press button B "TUNE" several
times to scroll through the various
menus and select the CT menu
(clock time).
The order of the menus is the following:
AF/CT/REG/TP-S/PTY display language/
SCV/PHONE/Functions setting mode
OFF.
Automatic mode
This mode permits automatic setting
of the local time using the signal from
RDS stations.
The symbol "CT" appears on the screen.
Manual mode
This mode permits manual setting of
the time using the audio equipment
buttons.
It can also be used when the "Automatic
mode" displays an inaccurate time, when
the local RDS stations are broadcasting
from a different time zone.
I
MO
NIT
O
RIN
G
4
0
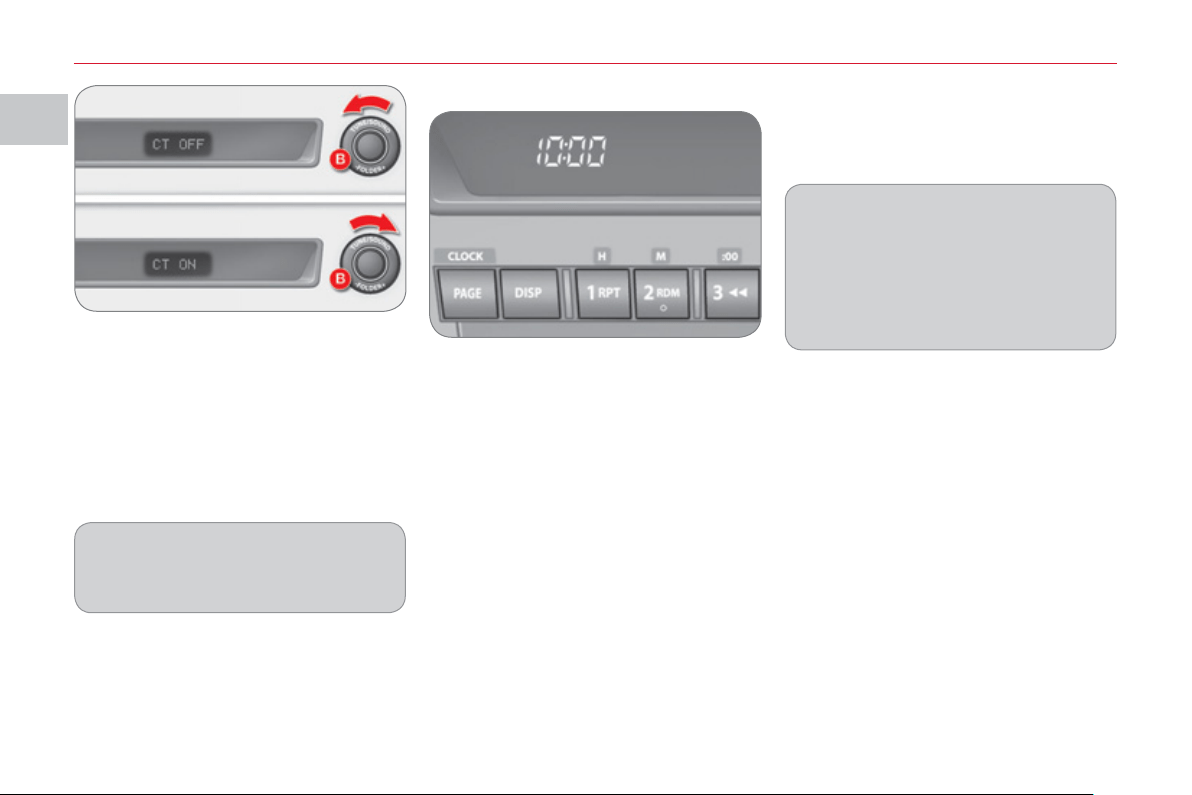
Set the time using the buttons as
indicated below:
) with the ignition on or in the ACC
(Accessories) position, press and
hold the CLOCK button until the
time display fl ashes.
) Press the appropriate button to set
the time:
Button H: to set the hours
The hours digits scroll when you press
this button.
Button M: to set the minutes
The minutes digits scroll when you
press this button.
Button 00: to reset the minutes to zero.
- from 1 to 29 min : rounded down to
the previous hour,
- from 30 to 59 min: rounded up to
the next hour.
Manual mode
A
utomat
i
c mo
d
e
In this mode, setting is automatic using
the signal from the RDS radio stations.
) After setting the time, press the
DISP button; the time display stops
fl ashing.
The digital clock does not display
seconds.
When the "minutes" display is set or
reset to zero, the clock starts at the
zero second of the minute selected.
The time setting is lost if the battery
is disconnected.
) Turn button B "TUNE" to the left or
to the right to select "CT ON" (auto-
matic mode) or "CT OFF" (manual
mode).
) After selecting the mode, you can
exit the "Functions setting mode"
menu by pressing button B "TUNE"
for approximately 2 seconds.
If no action is carried out within
10 seconds, the system will exit
the "Functions setting mode" menu
automatically.
I
MO
NIT
O
RIN
G
4
1
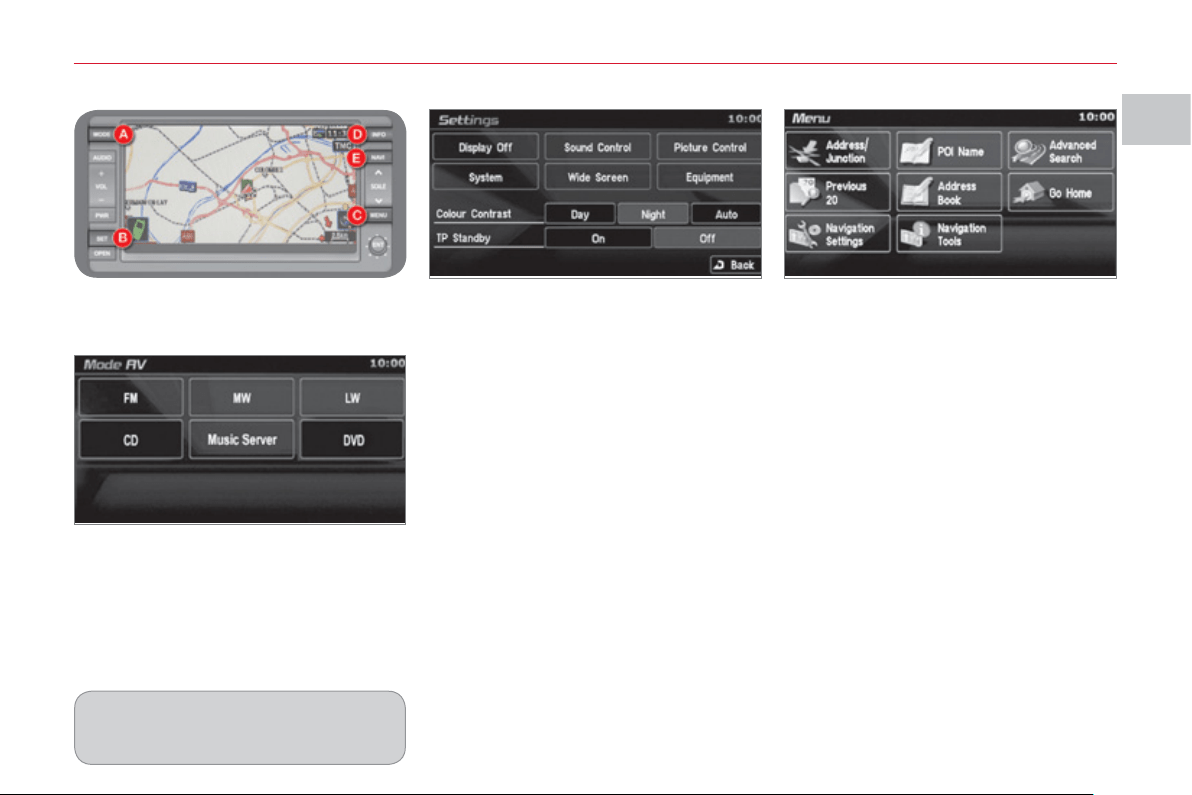
COLOUR SCREEN
This permits display of the following
main menus:
On the control panel, press button B
(SET) to access the "Settings" screen
and select:
- "Display Off" to switch off the display,
- "Sound control" for the sound dis-
tribution or volume, the type of music
and the sound fi eld (surround),
- "Picture control" to set the colour,
the intensity, the brightness, the
contrast and the level of black,
- "System" to change the time zone,
the language, the units and other
settings,
- "Wide Screen" to change the size
of the DVD picture to 4/3 format,
wide screen mode, centred wide
screen mode or enlargement,
- "Equipment" to set certain equip-
ment offered in the vehicle,
- "Colour Contrast" to select the
contrast of the display in relation
to the ambient light (Day, Night or
Auto),
- "TP standby" to activate or deacti-
vate the traffi c information.
"Audio-video" menu
"Navigation-guidance" menu
On the control panel, press button A
(MODE) to access the "AV mode"
screen and select:
- radio (FM, MW, LW),
- CD (audio, MP3 or WMA),
- Music Server,
- DVD.
"Settings" menu
On the control panel, press button C
(MENU) to access the "Menu" screen
and select:
-
"Address/Junction" to search for
a location using the address or the
name of the street,
- "POI name" to search for a location
using the name of a point of interest
(POI),
- "Advanced search" to search for a
location using an advanced search
based on a POI,
- "Previous 20" to search for a loca-
tion using one of the 20 previous
destinations,
- "Address book" to search for a
location using a stored address,
- "Home" to navigate to your home
address,
- "Navigation settings" to set func-
tions linked with the navigation,
- "Navigation tools" to access the
basic information or a pre-set dem-
onstration.
The "CD" and "DVD" buttons are
active if you insert a CD or DVD in
the player.
I
4
2
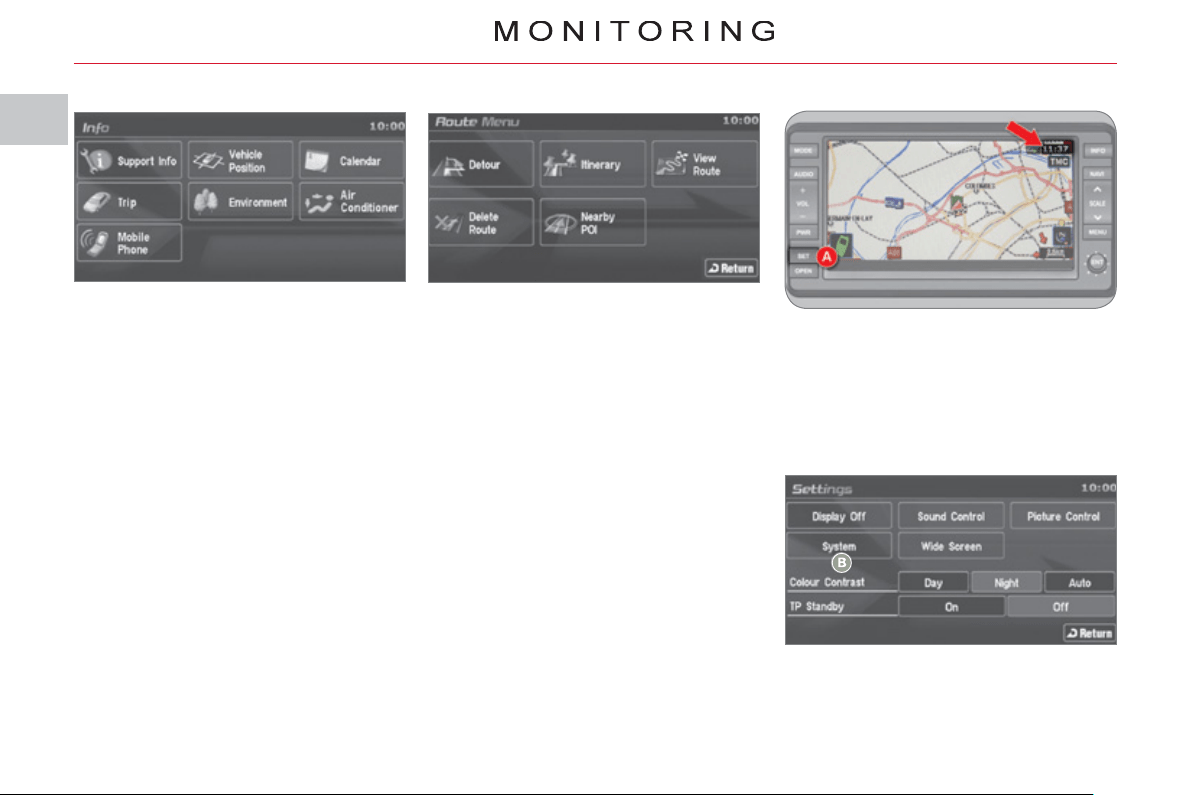
Settin
g
the time
The digital clock is set automatically .
This mode enables the system to set
the local time automatically using the
signal from the RDS stations.
) On the control panel, press button A
(SET) to access the "Settings"
menu.
) On the touch screen, press button B
to access the "System" menu.
The system settings screen is displayed.
"Info" menu
On the control panel, press button D
(INFO) to access the "Info" screen and
consult:
- "Support info" to display the soft-
ware and data versions,
- "Vehicle position" to display the
GPS location of the vehicle,
- "Calendar" to make a note of
events, birthdays, etc.,
- "Journey" to display the average
speed, fuel consumption, distances
and driving time,
- "Environment" to display the alti-
tude, the atmospheric pressure, the
exterior temperature (the ice symbol
is displayed if there is a risk of ice),
- "Air conditioning" to display the
information relating to the air condi-
tioning,
- "Mobile phone" to enter a number,
delete a character, make or receive
a call.
"Route" menu
On the control panel, press button E
(NAVI) to access the "Route Menu"
screen and select:
- "Detour" to make a detour through
a specifi ed region,
- "Itinerary" to change the route,
- "View route" to display a route in
different ways,
- "Delete route" to delete a route,
- "Nearby POI" to search for the
POIs in the surrounding area.

I
MO
NIT
O
RIN
G
4
3
1. RDS Auto Correct:
Activate/deactivate automatic ad-
justment.
2. GMT/GMT+1/GMT+2
Select the time zone.
3. Summer Time:
Summer time On/Off.
) Press button D to confi rm and re-
turn to the previous menu.
) Press button C to access the "Time"
menu .
You must deactivate automatic
adjustment (RDS Auto Correct) to
change the time zone and summer
time settings.
On each screen, you can return to
the previous screen by pressing
button D "Return" .
Once this menu has been selected, you
can access the following functions:
L
IGHTING RHEO
S
TAT
With the lighting on or off, press the
button to change the intensity of the
lighting of the instruments and controls
in "day" or "night" mode.
When the lighting reaches the maximum
setting, press again to change to the
minimum setting.
When the lighting reaches the required
intensity, release the button.
The setting is saved when the ignition
switch is turned to OFF.
An audible signal is heard and the
intensity of the lighting increases
each time the button is pressed.
System for manual adjustment of the
brightness of the instruments and
controls in relation to the exterior
brightness.

II
CO
MF
O
R
T
44
For even air distribution, take care not
to obstruct the exterior air intake grille
located at the bottom of the windscreen,
the vents, the air outlets under the front
seats and the air extractor located be-
hind the fl aps in the boot.
The water formed by the air conditioning
condensation is discharged via an open-
ing provided for this purpose. Therefore,
a puddle of water may form underneath
the vehicle when stationary.
If the system does not produce cold air,
do not use it and have it checked by a
CITROËN dealer or a qualifi ed work-
shop.
AUTOMATIC REGULATION OF
T
HE DIGITAL AIR CONDITIONING
Do not cover the temperature and hu-
midity sensor 2 and the sunshine sen-
sor 7 .
They are required for regulation of the
air conditioning.
Ad
v
i
ce on operat
i
on
In hot weather, in order to obtain in-
tense ventilation, it is advisable to
use vents 1 and 4 only.
If, when the vehicle has been parked
in the sun for a long time, the interior
temperature remains very high, fi rst
ventilate the passenger compart-
ment for a few minutes.
Switch off the air conditioning
when the climatic conditions
permit.
Use of the automatic regulation of the
air conditioning is recommended. It per-
mits automatic and optimised control of
all of the following functions: air fl ow,
passenger compartment temperature
and air distribution, by means of various
sensors (ambient temperature, interior
temperature, sunshine), so preventing
the need for you to change your set-
tings other than the value displayed.
In certain cases of particularly arduous
use (towing the maximum load on a
steep gradient in hot weather), switch-
ing off the air conditioning saves engine
power and therefore improves the tow-
ing capacity.
Close the windows to benefi t from the
full effectiveness of the air conditioning.
Ensure that the passenger compart-
ment fi lter is in good condition. Have
the fi lter elements replaced periodically.
If you drive in a dusty environment, re-
place it twice as often.
The air conditioning system does not
contain chlorine and is not harmful to
the ozone layer.
Operate the air conditioning system for
5 to 10 minutes, once or twice a month,
to keep it in good working order.
1. Central vents.
2. Temperature sensor.
3. Air outlet to passenger footwells.
4. Side vents.
5. Front window demisting/defrosting
vents.
6.
Windscreen demisting/defrosting vents.
7. Sunshine sensor.

II
4
5

II
CO
MF
O
R
T
4
6
AUTOMATIC AIR
CONDITIONING
Automatic operation
) Set the temperature control dial 3 to
the temperature required.
) Place the air fl ow control dial 2 in
the "AUTO" position.
) Place the air distribution adjustment
dial 1 in the "AUTO" position.
When the engine is cold, to avoid an
excessive distribution of cold air, the
ventilation will reach its optimum lev-
el gradually.
On entering the vehicle, the interior
temperature may be much colder (or
warmer) than the comfort tempera-
ture. There is no need to change the
temperature displayed in order to
reach the comfort required rapidly.
The automatic regulation of the air
conditioning will operate to correct
the temperature difference as quickly
as possible.
1. Air distribution adjustment
2. Air fl ow adjustment
3. Temperature adjustment
4. Rear screen demisting/defrosting
5. Air conditioning On/Off
6. Intake of exterior air/Recirculation
of interior air
In automatic mode:
) when the temperature is set to max-
imum (Rapid heating), the intake of
exterior air is activated and the air
conditioning stops.
)
when the temperature is set to mini-
mum (Rapid cooling), the air recircula-
tion is activated and the air conditioning
operates.
The system controls the air distribu-
tion, air fl ow, temperature and air intake
to ensure the level of comfort and ad-
equate air circulation in the passenger
compartment. No further action on your
part is required.
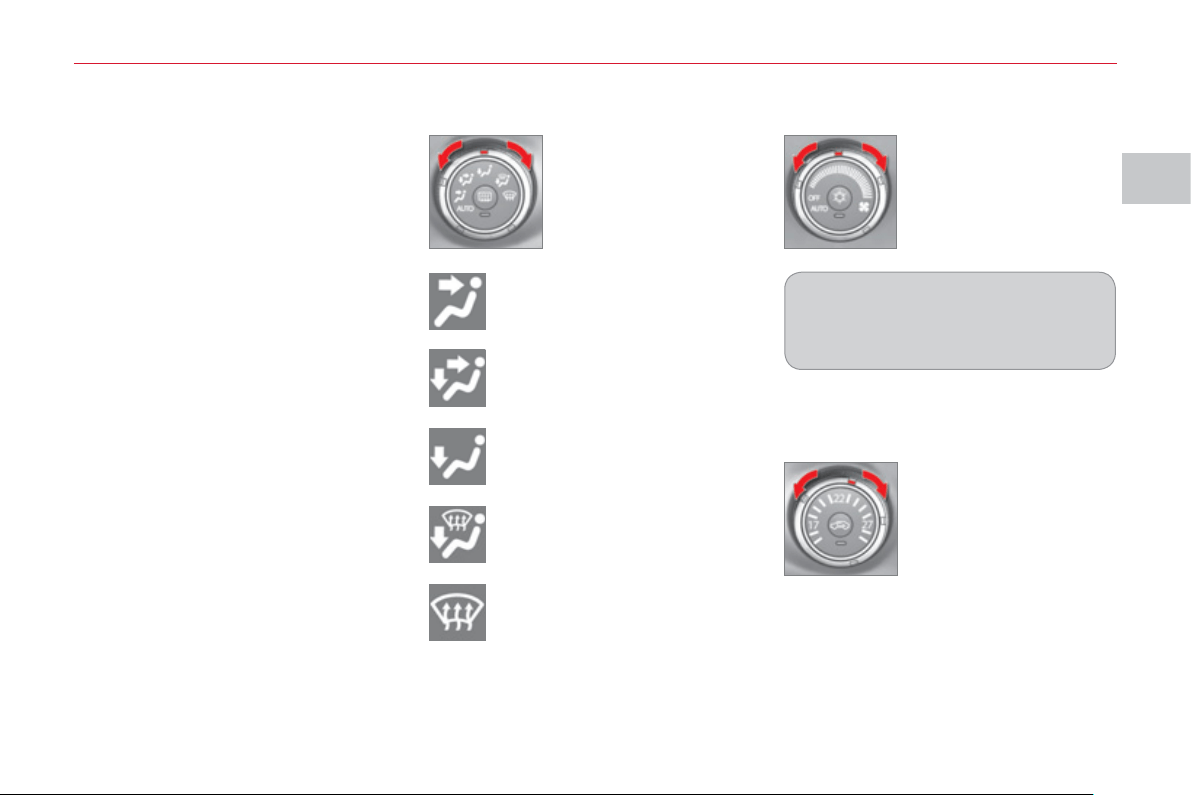
II
CO
MF
O
R
T
47
Manual operation
It is possible to set one or more func-
tions manually while leaving the other
functions in automatic mode.
Switching to manual mode may result
in discomfort (temperature, humidity,
odour, condensation) and does not of-
fer optimum comfort.
Temperature adjustment (3)
Air fl ow adjustment (2)
) Turn the dial to the
right to increase the
air fl ow or to the left
to decrease it.
) Turn the temperature
control dial to the right
to increase the tem-
perature and to the
left to decrease it.
) Place the dial in the
position required to
direct the air towards:
To avoid condensation and deterio-
ration of the quality of the air in the
passenger compartment, ensure that
a suffi cient fl ow of air is maintained.
the central and side vents,
the central and side vents and
the footwells,
the footwells,
the windscreen, the side win-
dows and the footwells,
the windscreen and the side
windows.
The air distribution can be adapted by
placing the adjustment dial in the inter-
mediate positions.
Air distribution adjustment (1)
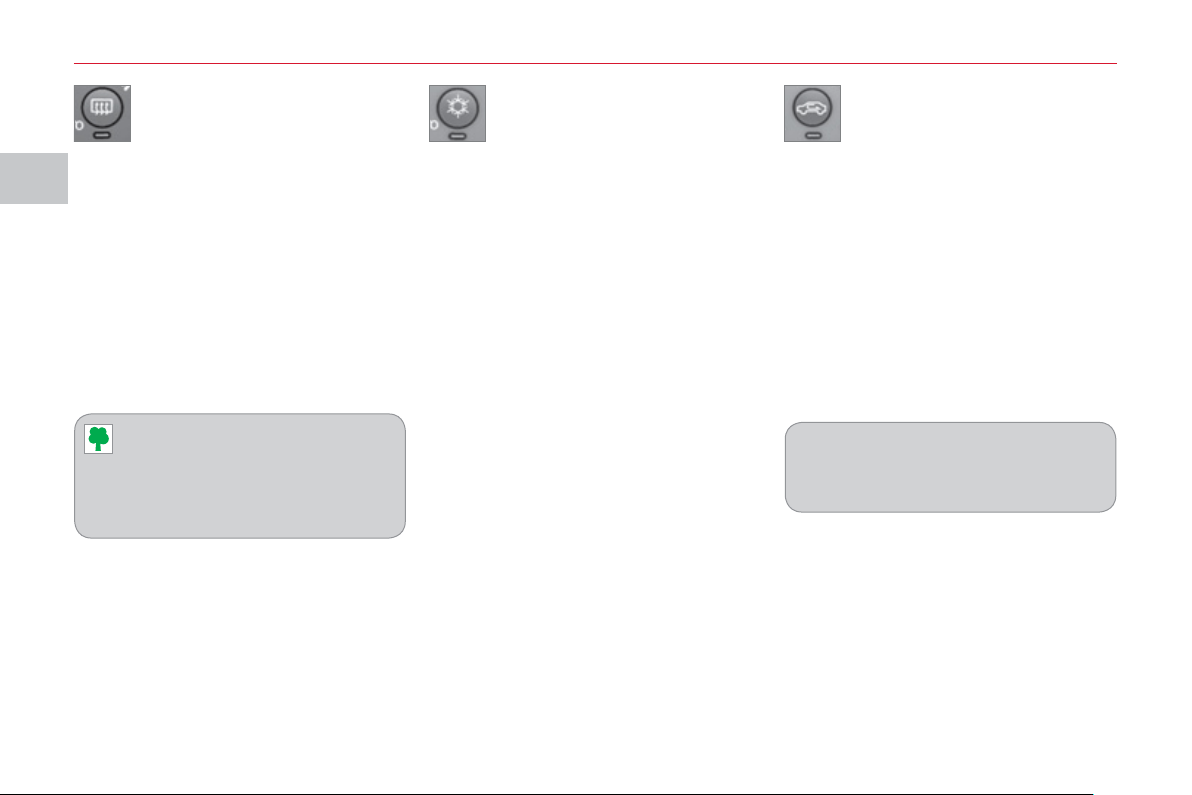
II
CO
MF
O
R
T
4
8
Air conditioning On/Off (5)
) Press button 5 to activate the air
conditioning.
The indicator lamp comes on.
Intake of exterior air/
Recirculation of interior air (6)
This function insulates the passenger
compartment from exterior odours and
smoke.
) Press button 6 to select the air in-
take mode.
When the indicator lamp in button 6 is
off, the exterior air intake function is ac-
tivated.
When the indicator lamp in button 6 is
on, the intake of exterior air is deacti-
vated and the system is in air recircula-
tion mode.
Do not drive for long periods in interior
air recirculation mode, except in truly
exceptional atmospheric conditions.
Personalisation of the Air
Conditioning On/Off function
This function is controlled automatical-
ly. However, you can deactivate its au-
tomatic control if you wish to switch the
air conditioning on or off at any time.
Changing the status
Press the Air Conditioning On/Off but-
ton for at least 10 seconds.
When the status changes from active to
inactive, three bleeps are heard and the
indicator lamp fl ashes three times.
When the status changes from inactive
to active, two bleeps are heard and the
indicator lamp fl ashes three times.
Automatic control active
If the air distribution adjustment dial and
the air fl ow adjustment dial are placed
in the "AUTO" position, or if the temper-
ature control dial is set to the minimum
temperature, the air conditioning sys-
tem is controlled automatically.
Automatic control inactive
The air conditioning system is no longer
controlled automatically.
Rear screen demisting/
defrosting (4)
With the engine running, press button
4 to activate the demisting/defrosting of
the rear screen and door mirrors.
The indicator lamp on the button comes
on while demisting/defrosting is in op-
eration.
Demisting/defrosting switches off auto-
matically to prevent an excessive con-
sumption of current.
Demisting/defrosting can be stopped
before it is switched off automatically
by pressing the button again.
It is advisable to switch off rear
screen demisting/defrosting as
soon as possible as lower current
consumption reduces fuel consumption.
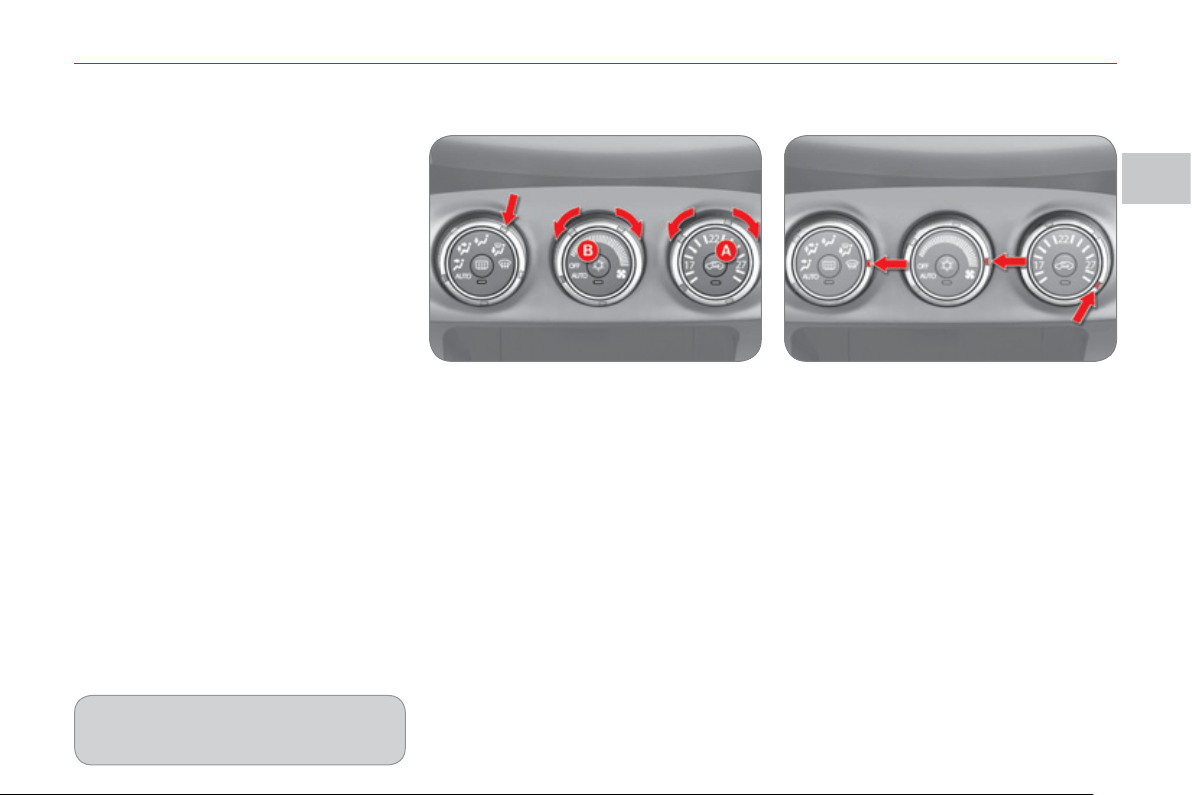
II
CO
MF
O
R
T
4
9
Personalisation of the Exterior
air intake/Interior air recirculation
function
This function is controlled automati-
cally. However, you can deactivate its
automatic control if you wish to change
the air intake mode at any time.
The settings are retained, even after
switching off the ignition.
Changing the status
Press the Air intake/Interior air recircu-
lation button for at least 10 seconds.
When the status changes from active to
inactive, three bleeps are heard and the
indicator lamp fl ashes three times.
When the status changes from inactive
to active, two bleeps are heard and the
indicator lamp fl ashes three times.
Automatic control active
If the air distribution adjustment dial and
the air fl ow adjustment dial are placed
in the "AUTO" position, the Air intake/
Interior air recirculation function is also
controlled automatically.
Automatic control inactive
Even if the air distribution adjustment
dial and the air fl ow adjustment dial are
placed in the "AUTO" position, the Air
intake/Interior air recirculation function
is no longer controlled automatically.
Windows and windscreen demisting/defrosting
Demisting/defrosting
1. Press button A to select "exterior air
intake". The indicator lamp in this
button is goes off.
2. Place the air distribution dial in the
"windscreen, side windows and
footwells" position.
3. Select the air fl ow required.
4. Select the temperature required.
5. Press the "air conditioning on/off"
button B to activate the air condi-
tioning. The indicator lamp in this
button comes on.
Rapid demisting/defrosting
1. Place the air distribution dial in the
"windscreen and side windows" po-
sition.
2. Select maximum air fl ow.
3. Select maximum temperature.
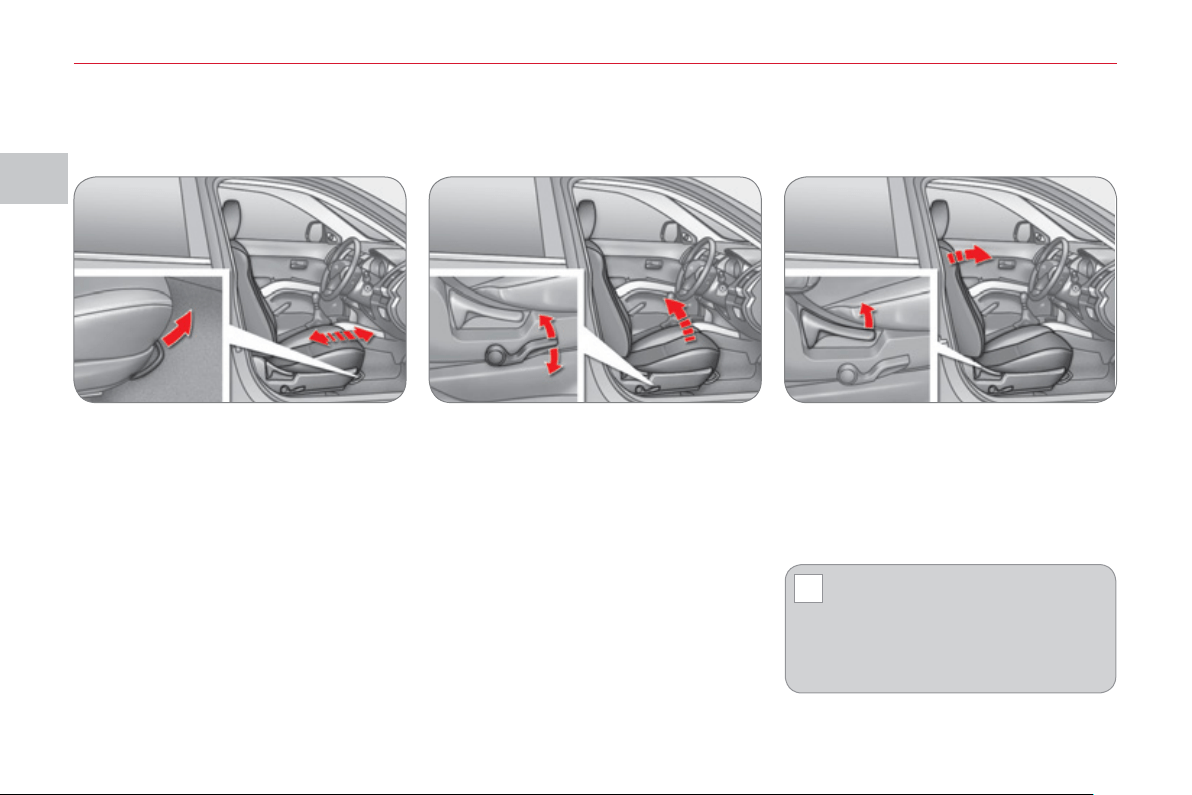
II
!
CO
MF
O
R
T
50
FRONT
S
EAT
S
Forwards-backwards adjustment
Raise the control bar and slide the seat
forwards or backwards.
When your seat is at the correct dis-
tance, move it forwards and backwards
slightly without using the control bar to
check that it is secured correctly.
Driver's seat cushion height and
angle adjustment
Pull and/or push the control several
times to adjust the height of the seat.
Seat back angle adjustment
Pull the control upwards to adjust the
seat back.
When the seat back is at the correct angle,
release the control.
Manual mode
To prevent the seat back from
moving forward sharply and
knocking you, press on it with
your back or push it with your hand
while operating the lever.
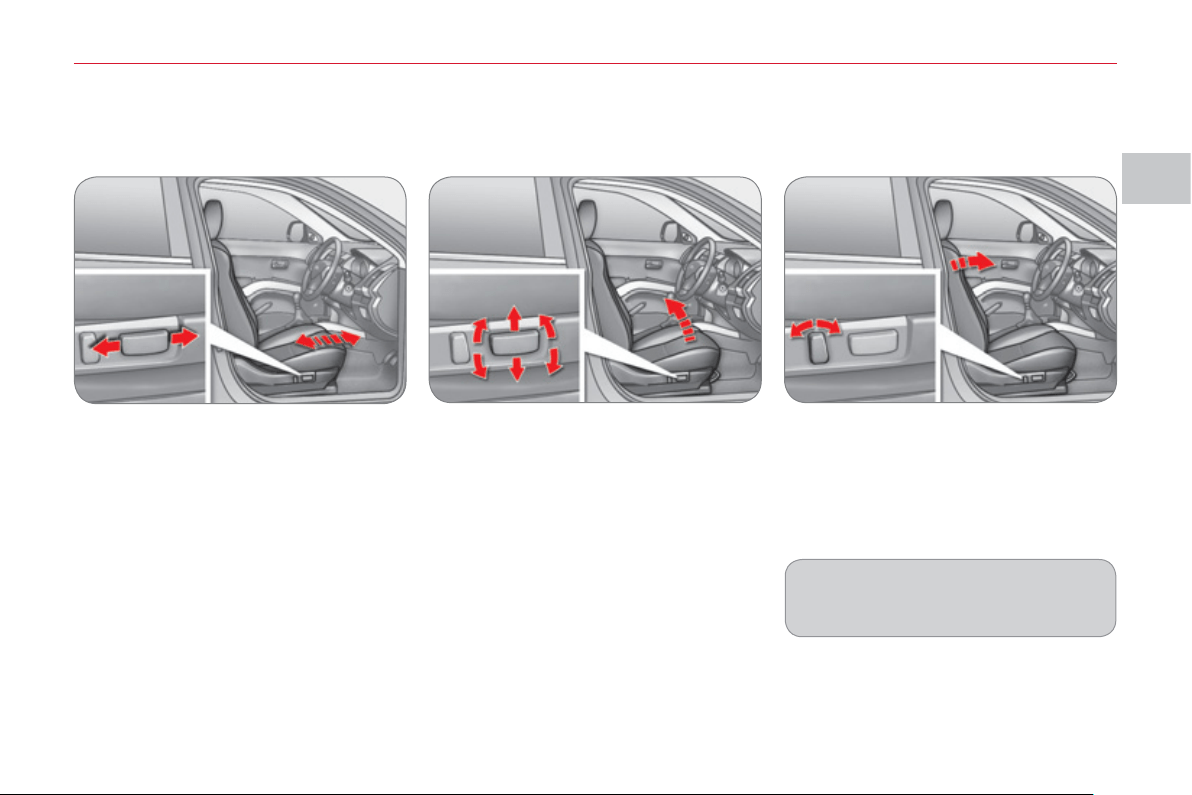
II
CO
MF
O
R
T
5
1
Electric mode
(
driver's seat onl
y)
Forwards-backwards adjustment
Push the control forwards or rearwards
to move the seat to the position re-
quired.
Driver's seat cushion height and
angle adjustment
Pull or push the front of the control to raise
or lower the front of the seat cushion.
Pull or push the rear of the control to raise
or lower the rear of the seat cushion.
Pull or push the entire control to raise or
lower the entire seat cushion.
Seat back angle adjustment
Tilt the control forwards or rearwards to
straighten or tilt the seat back.
FRONT
S
EAT
S
To avoid discharging the battery, use
the electric mode with the engine
running.
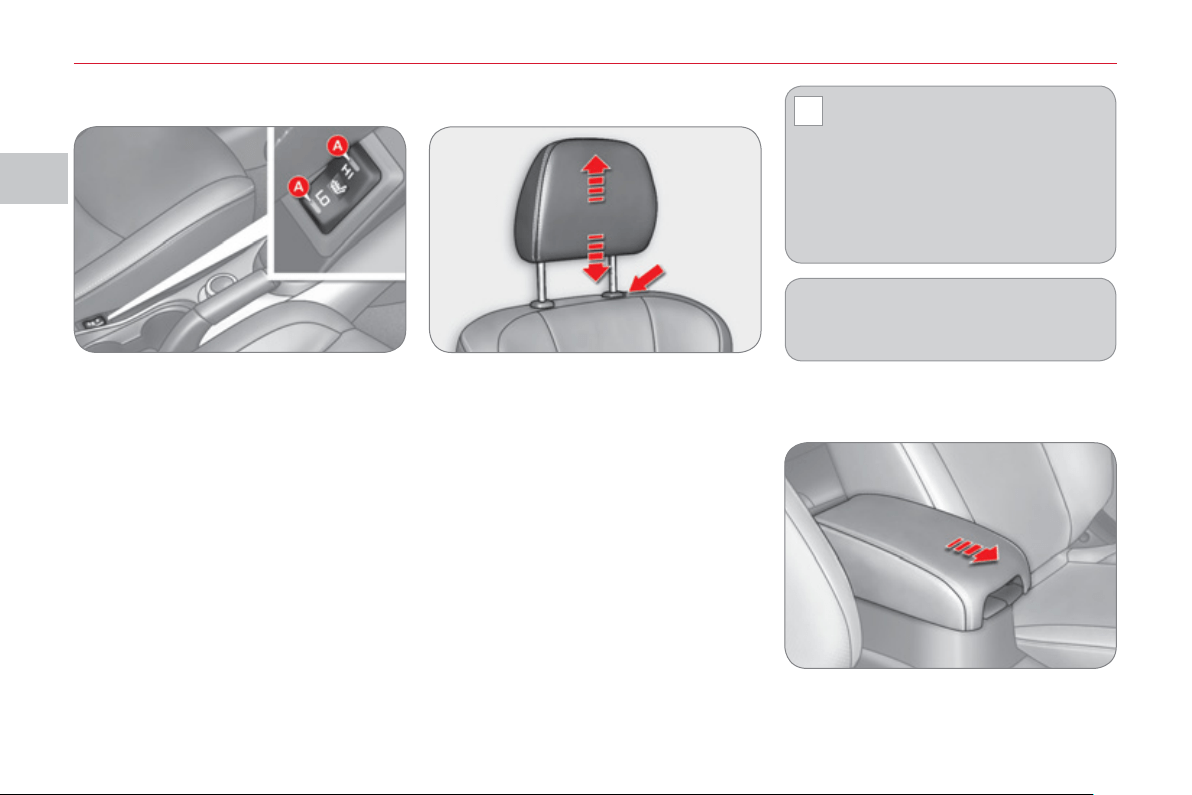
II
!
CO
MF
O
R
T
52
F
ront armrest
You can move the console housing cover
in order to use it as an armrest.
With the engine running , tilt the button
to the position required.
The temperature of the seat is regulated
automatically.
There are two setting positions:
- "HI": High heating
- "LO": Low heating
When the button is in the intermediate
position, the heating is switched off.
The indicator lamps A come on when
the system is activated.
Heated seats adjustment
) To raise it, pull upwards.
) To lower it, push it downwards,
pressing the height adjustment but-
ton at the same time.
) To remove it, raise it to the high
position, then remove it pressing
the height adjustment button at the
same time.
) To re fi t it, engage the rods of the
head restraint in the apertures,
pressing the height adjustment but-
ton at the same time.
Head restraint height adjustment
Never drive with the removed head
restraints in the vehicle as they
could be thrown around the vehi-
cle on sharp braking. They must always
be in place and adjusted correctly.
After installing the head restraint,
check that the height adjustment but-
ton has engaged correctly.
The adjustment is correct when the top
of the head restraint is aligned with the
top of the head of the seated person.
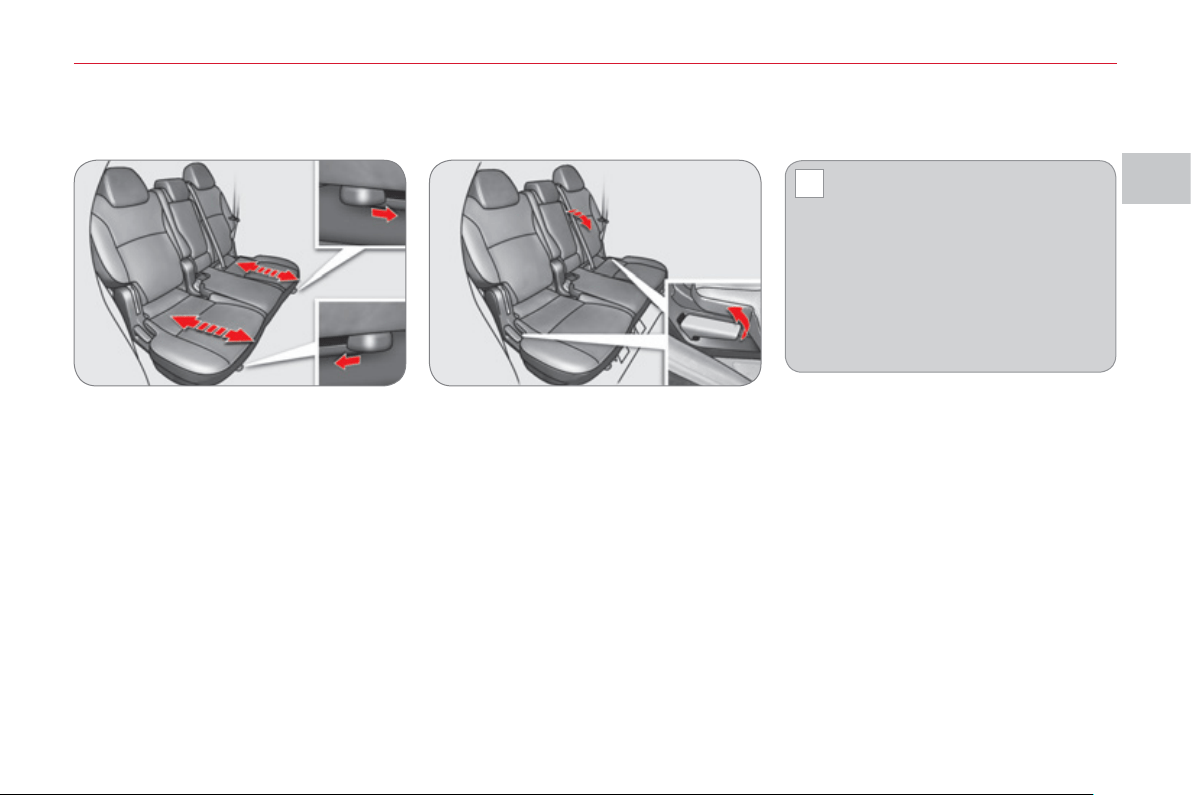
II
!
CO
MF
O
R
T
53
REAR SEATS
(
ROW 2
)
Seat back angle adjustment
Pull the control and adjust.
When the seat back is at the correct
angle, release the control.
Sit in the centre of the rear bench seat
to check that the two seats are at the
same level and that the angle of their
seat backs is the same.
Forwards-backwards adjustment
Pull the control towards the outside and
adjust.
When your seat is at the correct dis-
tance, release the control.
To ensure that the seat is secured cor-
rectly, move it forwards and backwards
slightly without using the control.
When operating the seats, en-
sure that no person or object
is in the vicinity of the moving
parts to avoid any risk of injury or
damage.
To prevent the seat back from moving
forwards sharply and knocking you,
press on it with your back or push it with
your hand while operating the lever.
The rear seats can be folded in two parts
(1/3 - 2/3).
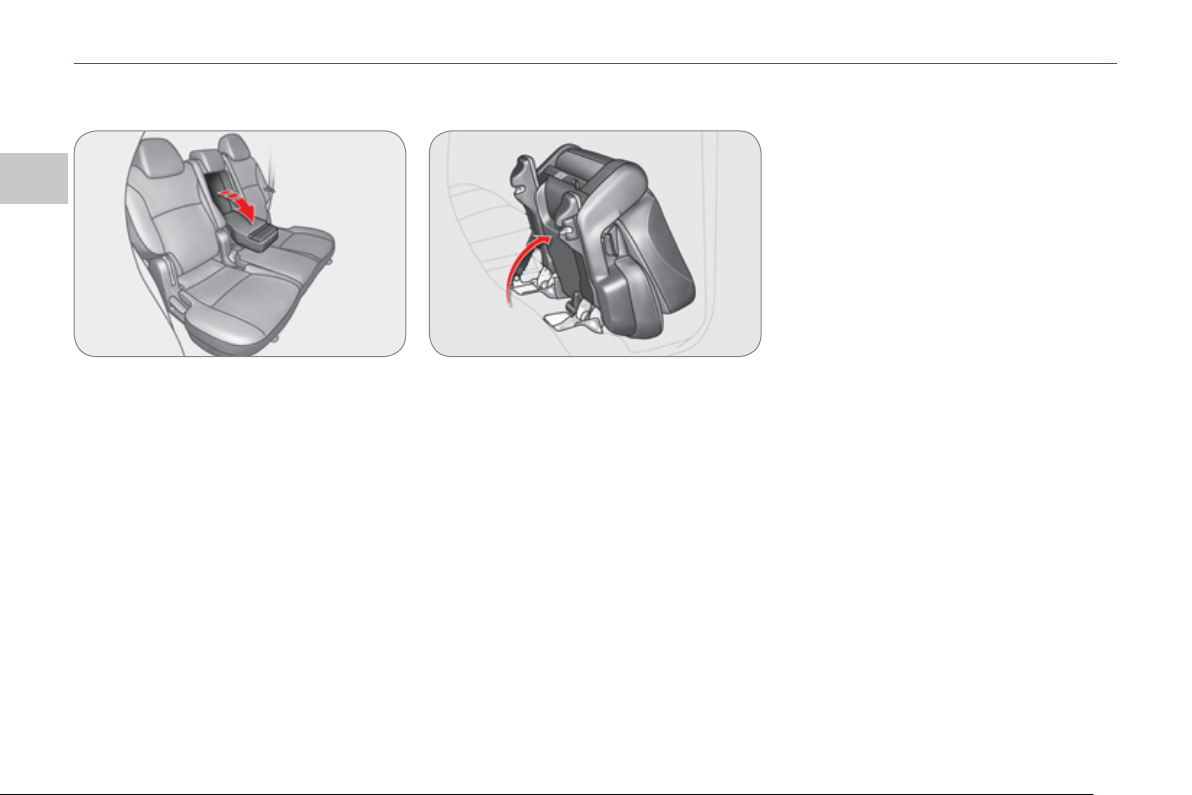
II
CO
MF
O
R
T
5
4
Rear armrest
Lower the armrest to use it.
To return to the initial confi guration, push
the armrest until it locks in its vertical
position.
Access to the third row
The passenger gains access to the
third row of seats by tilting a second
row seat.
To put this seat back in place, refer to
the following pages.
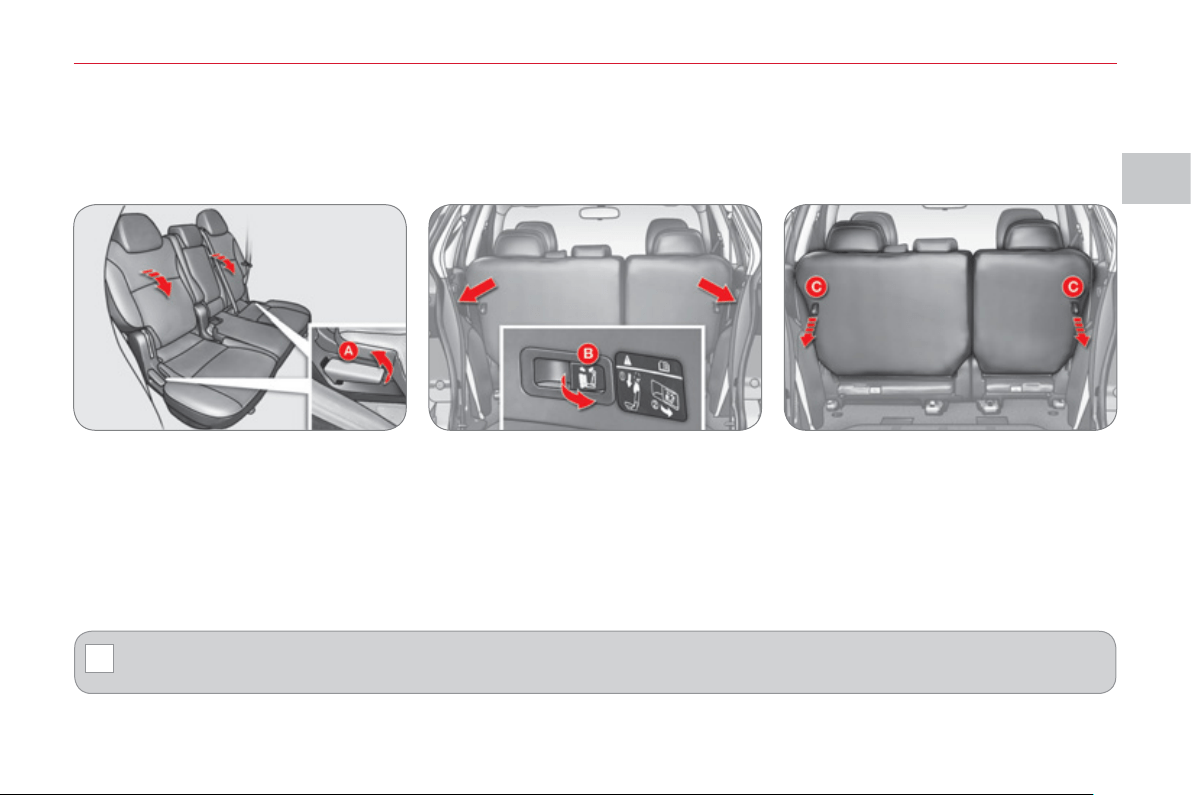
II
!
CO
MF
O
R
T
55
Foldin
g
the second row *
1. Raise the rear seat lever A , or
Pull the button in the boot B for at least one second, or
Pull the rear seat releasing strap C towards you.
2. The seat backs fold forwards then the cushion rises and folds forwards.
3. After carrying out these operations, press on the seat lightly to check that it is secured correctly.
Before folding the seats, lower the head restraints fully.
Before folding the seat backs forwards, insert the seat belt buckles in the slots provided for this purpose in the rear seat
cushion.
Before folding the seats , ensure that no object or person is hindering the execution of the operations.
Do not place luggage on the folded seats.
* According to version.

II
CO
MF
O
R
T
56
Returnin
g
the second row to the normal position
1. Lower the seat pulling simulta-
neously on the releasing strap A
located at the rear of the cushion
and supporting the seat with your
hand.
Force may be necessary to carry out these operations.
On vehicles fi tted with a third row, the rear of the cushion of the second row is fi tted with a low level lamp B .
When the releasing strap is pulled, the lamp comes on for approximately 10 seconds to illuminate the fl oor at the base of
the third row.
2. Press on the cushion to put it in
place until it engages.
3. Pull the seat back upright pulling si-
multaneously on the releasing strap
located at the rear of the seat back.
4. After putting the seat back back in
place, push the seat and the seat
back lightly to ensure that they are
secured correctly.
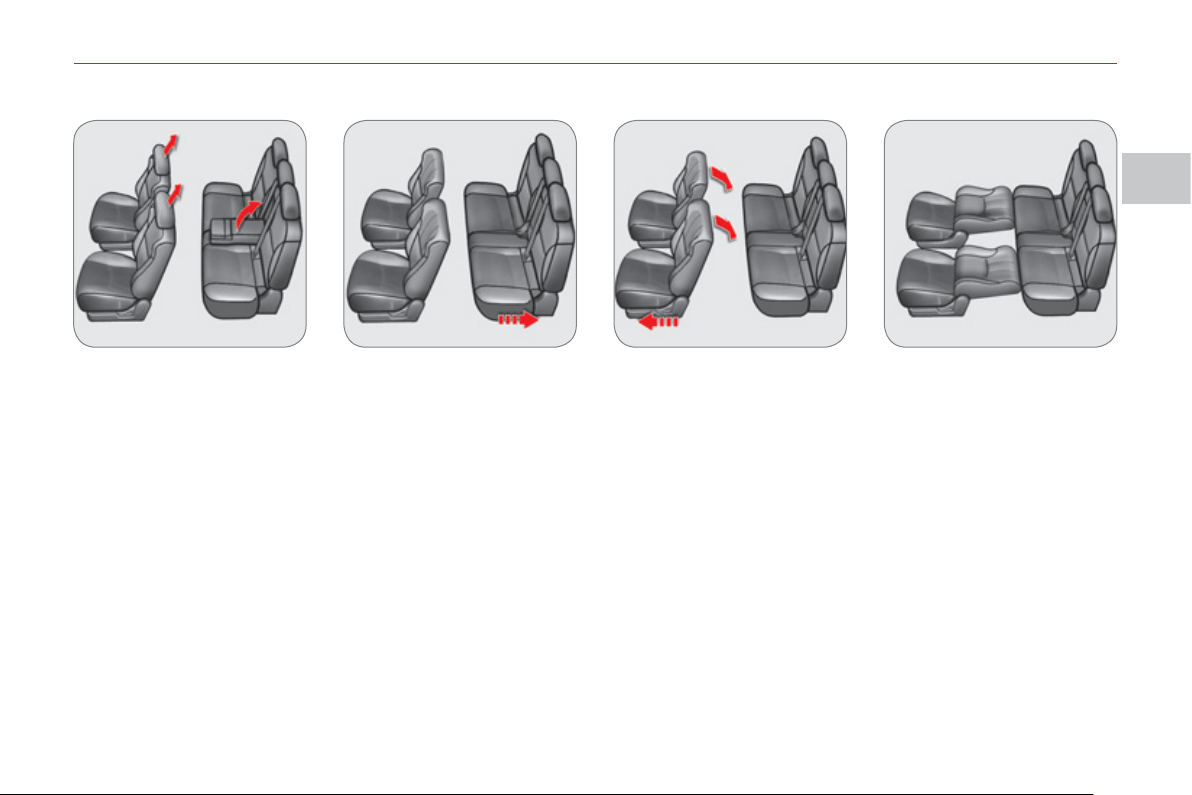
II
CO
MF
O
R
T
5
7
"Lowered seats" confi
g
uration
1. Remove the head restraints from the front seats.
2. Raise the rear armrest and remove the load space cover.
3. Move the rear seats as far back as possible.
4. Move the front seats as far forward as possible and tilt their seat backs fully.
5. Tilt the seat back of the rear seats.
To return the seats to their normal position, carry out these operations in reverse order.
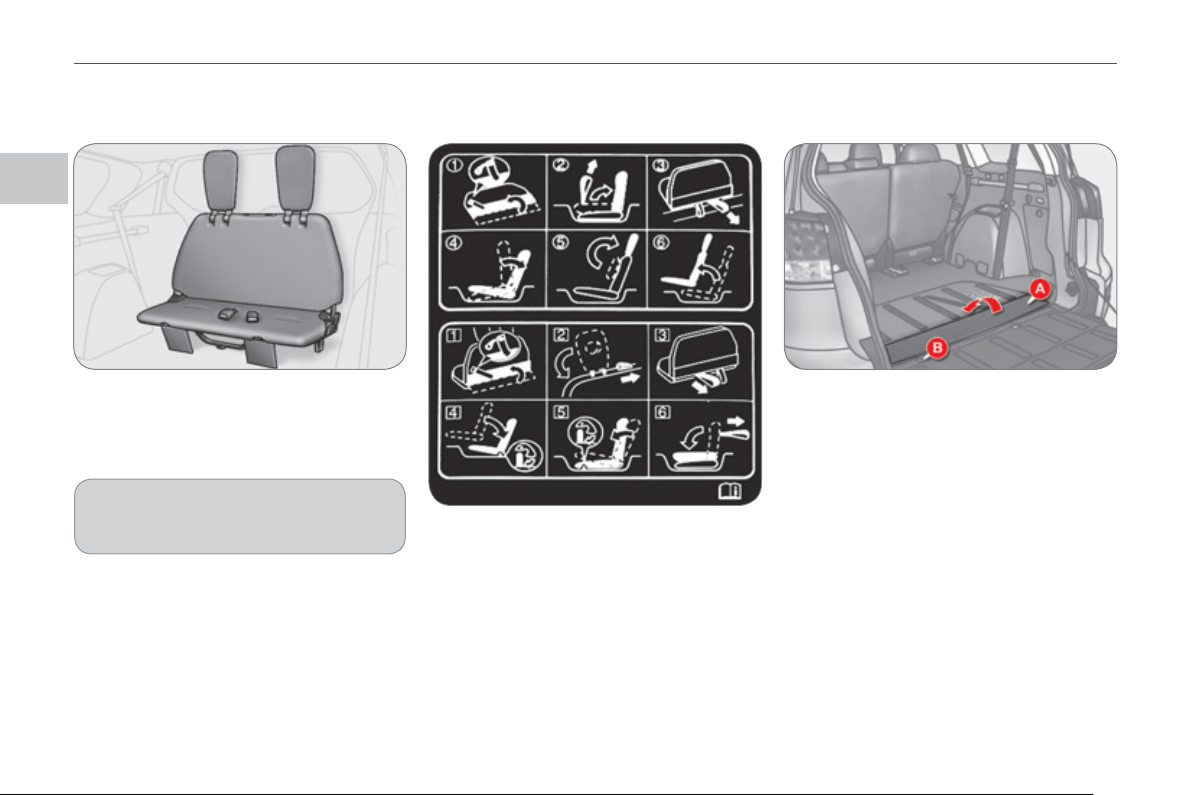
II
CO
MF
O
R
T
58
REAR BENCH SEAT
(
ROW 3
)
The rear bench seat can be folded. It is
stowed in a location in the fl oor of the
vehicle.
The label on the bench seat back illus-
trates the various steps to the followed
when unfolding and folding the rear
bench seat.
1. Open the tailgate and the lower tail-
gate (refer to the "Access" section).
2. Pull the cover A from the rear and
fi x it to the seat back using the press
stud of the band B .
Unfoldin
g
the bench seat
For comfort, it is advisable to stow
the bench seat when its is not is use.

II
CO
MF
O
R
T
59
3. Pull the black strap C located at the
centre of the seat back to raise the
seat back.
4. Pull the black strap D to release the
bench seat cushion.
5. Tilt the bench seat rearwards.
6. Raise the head restraints. 7. Lift and push the bench seat as-
sembly forwards until it locks.
Undo the press stud of band B to re-
lease the cover.
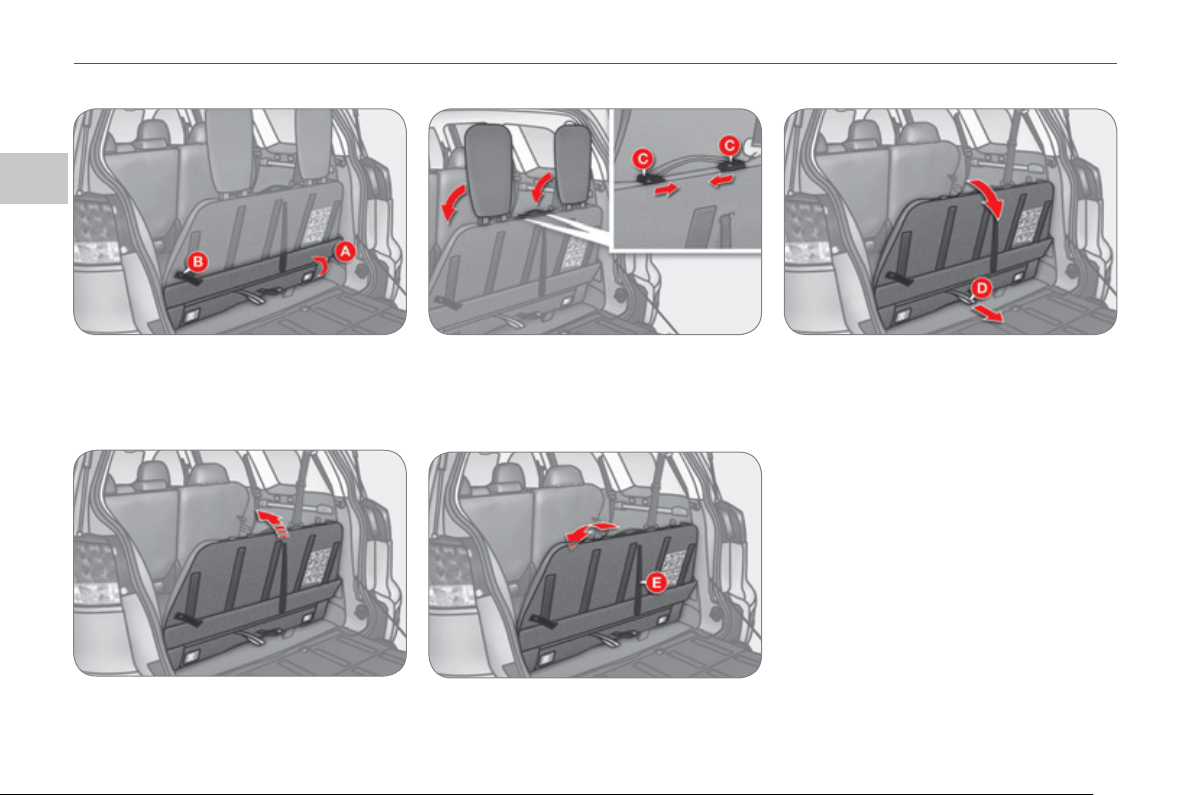
II
CO
MF
O
R
T
60
1. Open the tailgate and the lower tail-
gate (refer to the "Access" section).
2. Lift the cover A and fi x it to the seat
back using the press stud of the
band B .
3. Unlock the head restraints by slid-
ing the controls C and fold them
onto the seat back.
4. Pull the grey strap D and bring the
bench seat towards you. Press on
the bench seat to lock it.
5. Tilt and push the bench seat for-
wards.
6. Pull the black strap E located at the
centre of the seat back to fold the
seat back.
Undo the press stud of the band B to
put the cover back in place.
Foldin
g
the bench seat
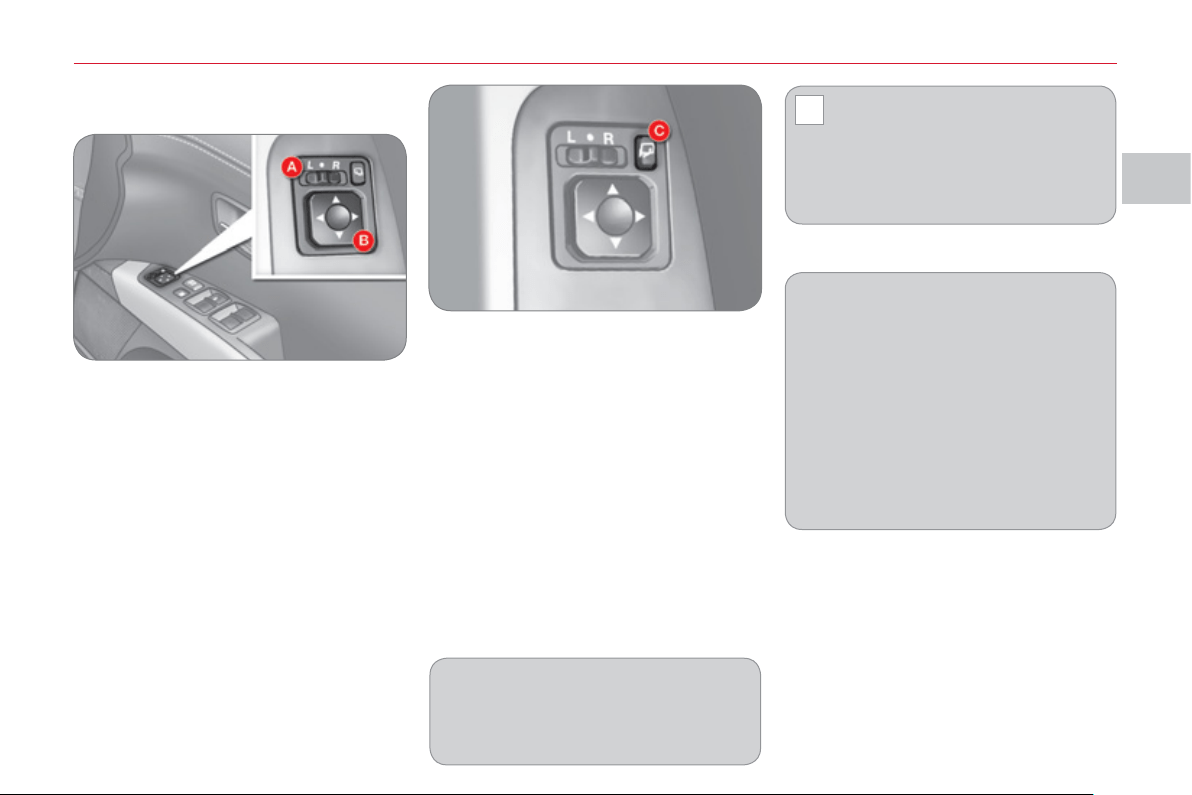
II
!
CO
MF
O
R
T
61
D
OOR MIRROR
S
Ad
j
ustment
The mirrors can be adjusted when the
ignition switch is in the "ON" or "ACC"
position.
) Move control A to the right or to the left
to select the corresponding mirror.
) Direct control B in all four directions
to adjust the mirror.
When adjustment is complete, return
control A to the central position.
Electric folding/unfolding
- from inside, with the ignition switch
in the "ON" or "ACC" position
) by pressing the control C .
- from inside, with the ignition switch
in the "LOCK" position:
) by pressing the control C, within
30 seconds.
- from outside using the remote control:
) by pressing the "closed pad-
lock button briefl y 3 times to fold
them,
) by pressing the "open padlock"
button briefl y 3 times to unfold
them.
The folding and unfolding of the door
mirrors can be confi gured via the co-
lour screen "Equipment" menu or de-
activated by a CITROËN dealer or a
qualifi ed workshop.
The mirrors can also be folded
manually.
If you have folded the mirrors using
the control C , you must use this con-
trol to unfold them, otherwise the mir-
rors will not be lock in place correctly.
If you switch the engine off then re-
start it with the mirrors folded, they
will unfold automatically when the
vehicle reaches 20 mph (30 km/h).
If the mirrors have been folded man-
ually or electrically after starting the
engine, they are not unfolded auto-
matically.
In this case:
) Press the control C to unfold
them.
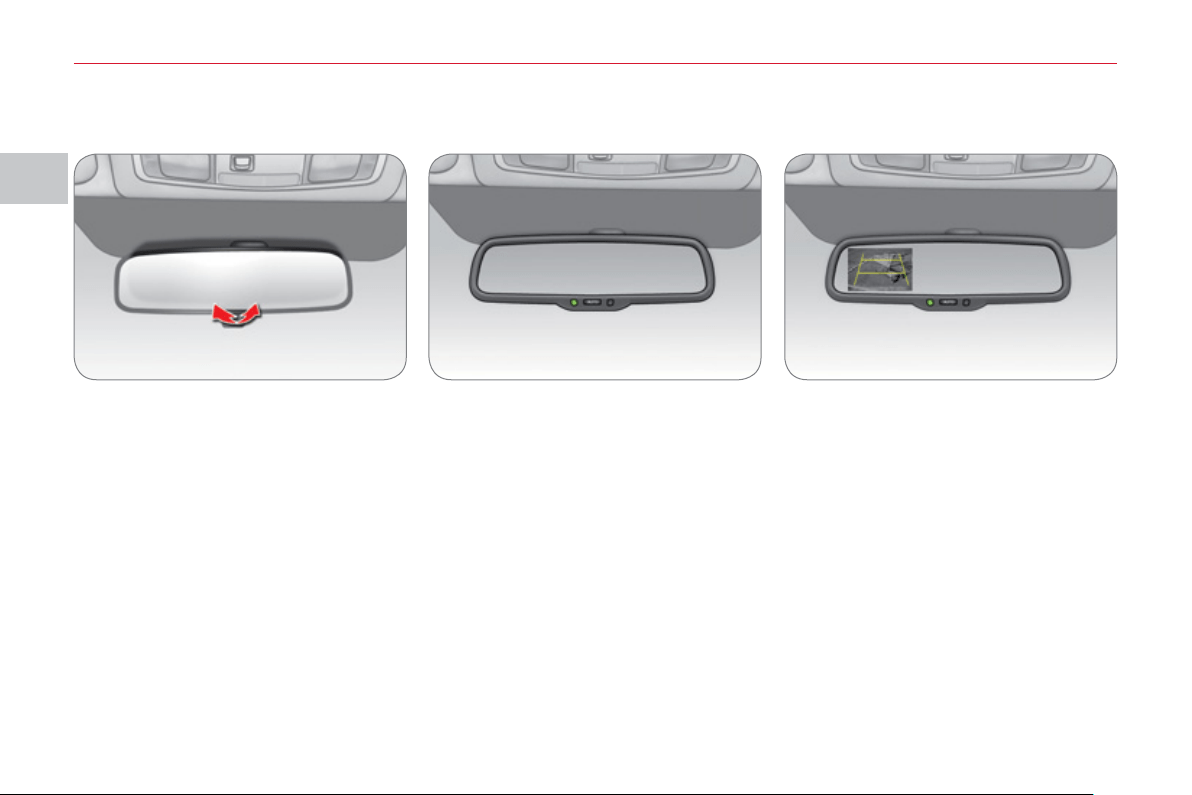
II
CO
MF
O
R
T
6
2
REAR VIEW MIRROR
Adjust the mirror by moving it up or
down and/or to the left or right.
The rear view mirror has two positions:
- day (normal),
- night (anti-dazzle).
To change from one to the other, push
or pull the lever on the lower edge of
the mirror.
AUTOMATIC REAR VIEW
M
IRROR *
A
UTOMATIC REAR VIEW
M
IRROR WITH REVER
S
ING
C
AMERA*
This automatically and gradually chang-
es between the day and night positions.
To prevent dazzling, the glass of the
mirror darkens automatically depend-
ing on the intensity of the light from be-
hind. It clears as the light (headlamps of
following vehicles, sunlight) decreases,
ensuring maximum visibility.
You can deactivate automatic mode by
pressing the " AUTO " button.
Combined with a camera fi tted at the
rear of the vehicle, this mirror allows the
driver to see what there is behind the
vehicle when reversing.
With reverse engaged, is screen is dis-
played automatically in the mirror glass.
A warning message appears suggesting
that you check around your vehicle.
The screen disappears when another
gear is engaged.
You can deactivate automatic mode by
pressing the " AUTO " button.
* According to country of sale.
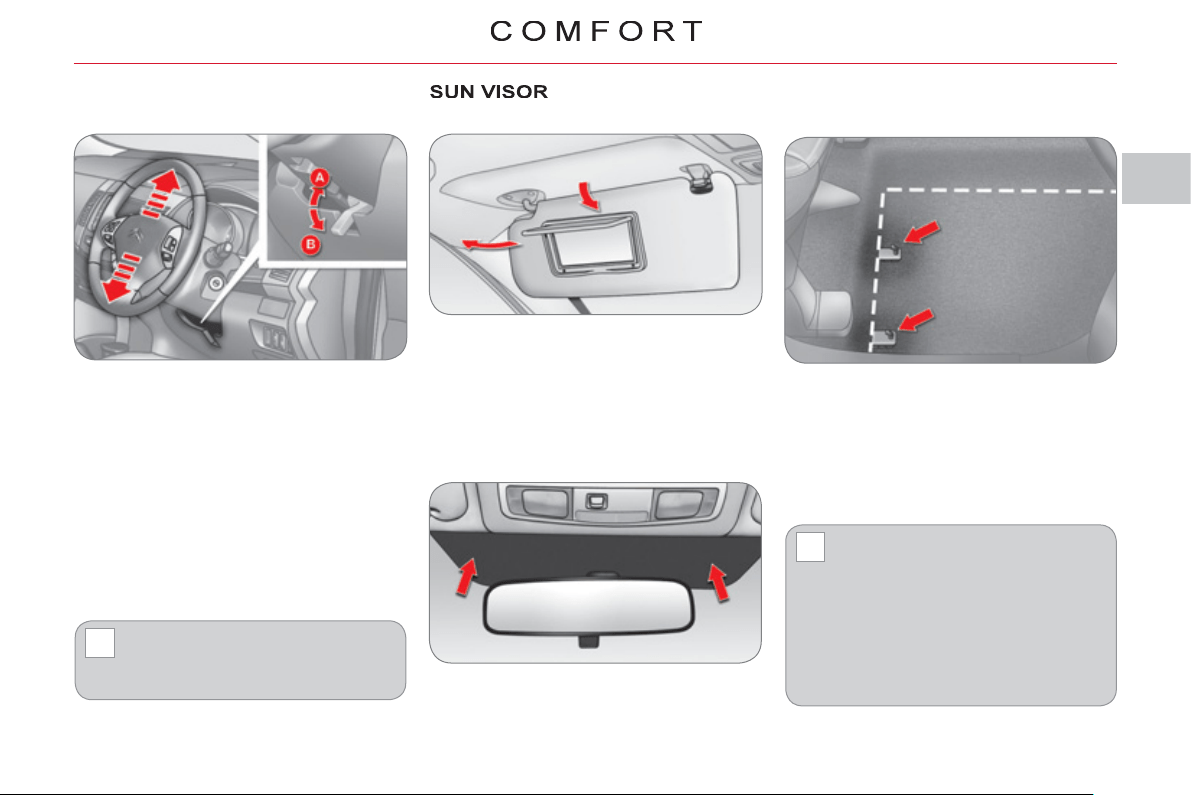
II
!
!
63
S
TEERING WHEEL MANUAL
HEIGHT ADJU
S
TMENT
) Pull the locking lever downwards
(position B ) while supporting the
steering wheel.
) Adjust the steering wheel to the re-
quired height.
)
Lock the steering wheel adjustment by
pushing the lever upwards (position A ).
The sun visors fold forwards, and to the
side when they are unhooked.
They are fi tted with a courtesy mirror
and a ticket holder.
As a safety precaution, these op-
erations must only be carried out
while the vehicle is stationary.
AREAS FOR TOLL CARDS/CAR
P
ARK TICKETS
The athermic windscreen has a non-
refl ective zone located above the base
of the rear view mirror.
It is intended for affi xing toll cards and/
or car park tickets.
MAT
When removing the mat on the driver's
side, move back the seat as far as pos-
sible and remove the fi xings.
When refi tting, position the mat cor-
rectly on the pins and clip the fi xings.
Check that the mat is secured fi rmly.
To prevent any risk of jamming
under the pedals:
- only use mats suited to the
fi xings already present in
the vehicle; it is imperative
that these fi xings are used.
- never fi t one mat on top of
another.
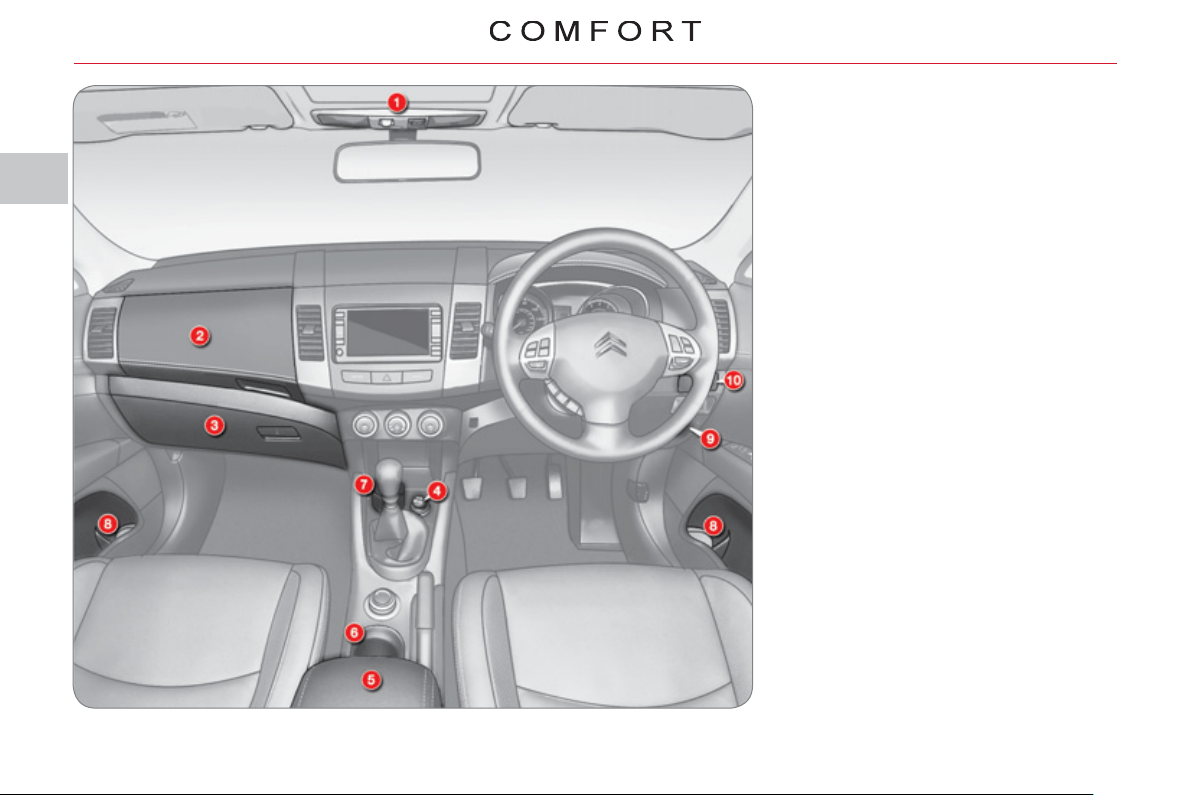
II
6
4
FRONT INTERIOR FITTING
S
1. Spectacles storage.
2. Cooled upper glove box.
3. Lockable lower glove box.
4. 12 V socket (120 W max).
5. Armrest with storage compartments
12 V socket (120 W max).
6. Cup holder.
7. Removable ashtray.
8. Bottle holder.
9. Enclosed storage compartment.
10. Cup holder.

II
CO
MF
O
R
T
65
Spectacles storage
Press the cover to open it.
To close it, push the cover until it locks.
Cooled upper glove box
Press button A on the lid to open it.
To close it, push the lid up.
It is fi tted with a ventilation nozzle which
can be closed by means of a dial, dis-
tributing conditioned air at the same
temperature as the vents in the passen-
ger compartment.
In cold weather, it is advisable to close
this vent to conserve the ambient air in-
side the passenger compartment.
Lower glove box
This is fi tted with a lock.
To unlock it, turn the key to the left.
To open it, pull the handle A .
To close it, push the lid up.
To lock it, turn the key to the right.
It is fi tted with a pen holder and a card
holder.
It is illuminated on opening when the
vehicle lighting is on.
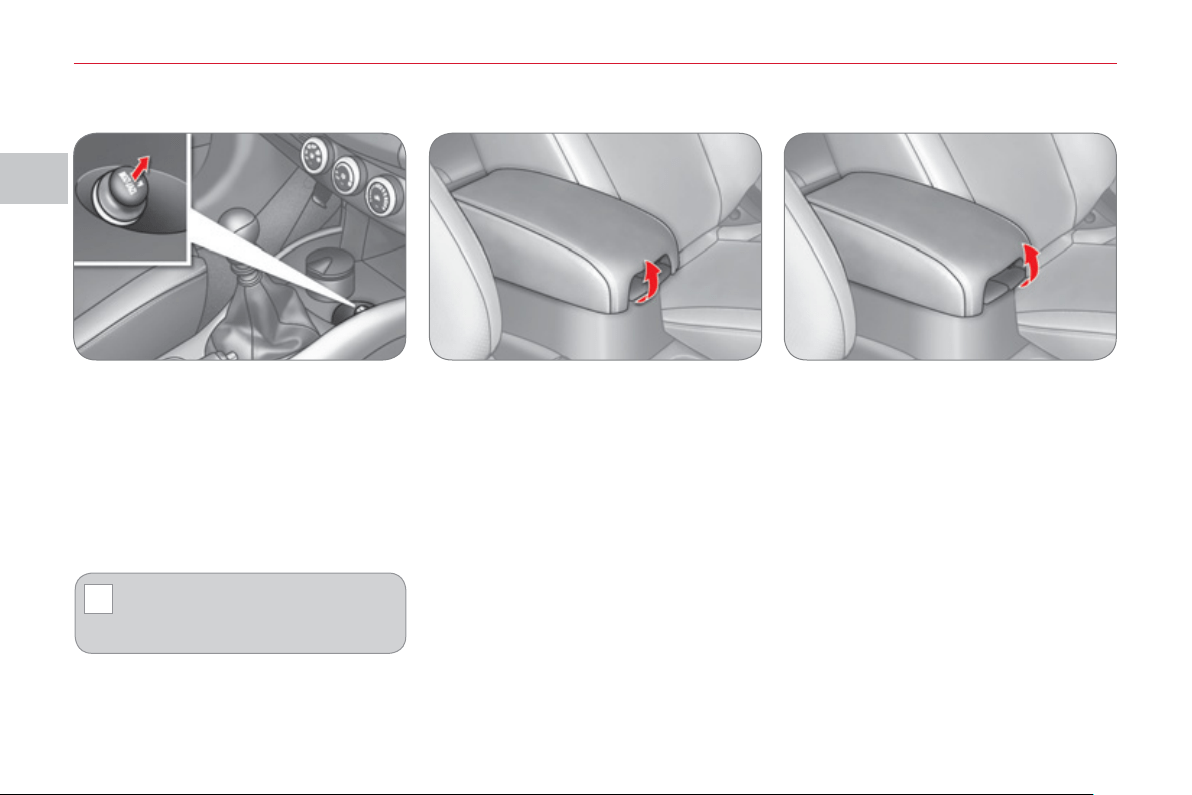
II
!
CO
MF
O
R
T
66
Upper storage compartment
Pull the right-hand lever to open the
storage compartment lid, which serves
as an armrest.
To close, fold down the lid until it locks.
Lower storage compartment
Pull the left-hand lever to open the lid.
To close, fold down the lid until it locks.
12 V socket (120 W max)
This is operational when the ignition
switch is in the "LOCK", "ON" or "ACC"
position.
Check that the electrical equipment op-
erates on 12 volts and that its electrical
power is 120 W maximum.
The prolonged use of electrical
equipment without running the en-
gine may discharge the battery.
Armrest with storage compartments
12 V socket (120 W max)
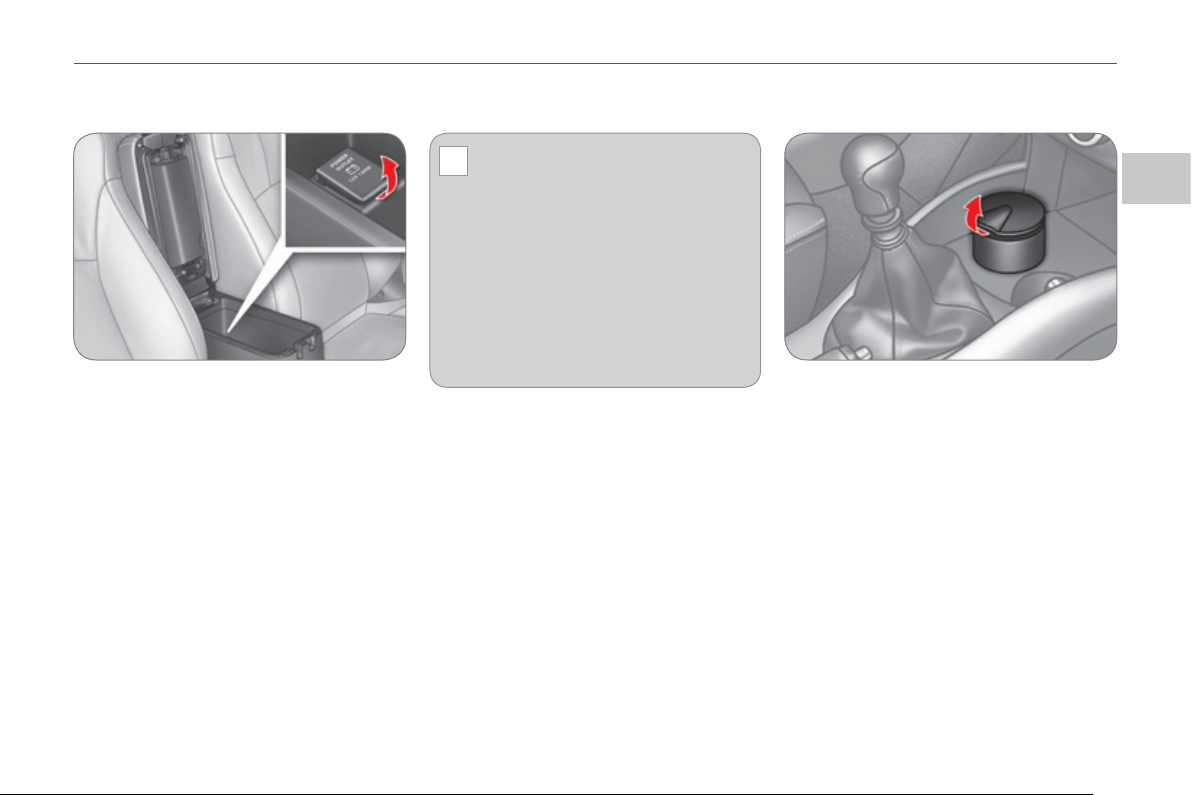
II
!
CO
MF
O
R
T
6
7
12 V socket (120 W max) Removable ashtray
This operates when the ignition switch is
in the "LOCK", "ACC" or "ON" position.
Open the cover to gain access to the
socket.
Check that the electrical equip-
ment operates on 12 V and that
its maximum electrical power is
120 W.
When you use the two sockets at the
same time, ensure that the two items
of equipment together operate on 12 V
and that their combined electrical power
is 120 W maximum.
The prolonged use of electrical equip-
ment without running the engine may
discharge the battery.
Pull the cover to open the ashtray.
To empty, remove the ashtray by pulling
it upwards.

II
CO
MF
O
R
T
68
Enclosed storage compartment
Pull the storage compartment lid to
open it.
Cup holder
There is a cup holder fi tted in the dash-
board on the driver's side.
Press on the centre of the cover to extract
the plate.
Pull it fully to use it.
Push it fully to store it.
Two further cup holders are available in
front of the front armrest.
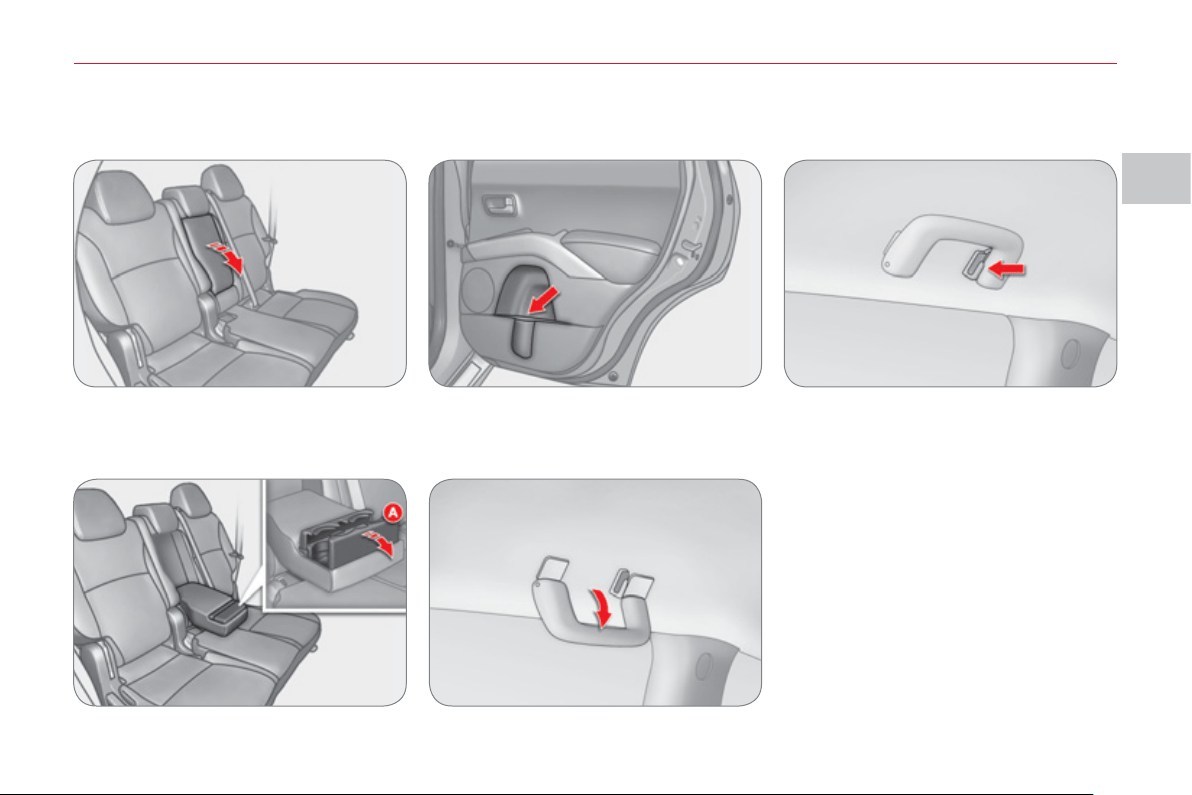
II
CO
MF
O
R
T
69
REAR INTERIOR FITTING
S
Rear armrest
Pull the armrest forwards to lower it.
Cup holder
Open the cover A located at the end of
the armrest holding the side with your
hand.
Bottle holder
There is a bottle holder in each rear
door.
Grab handle
Pull the handle downwards to lower it.
Coat hook
The rear left grab handle is fi tted with a
coat hook.
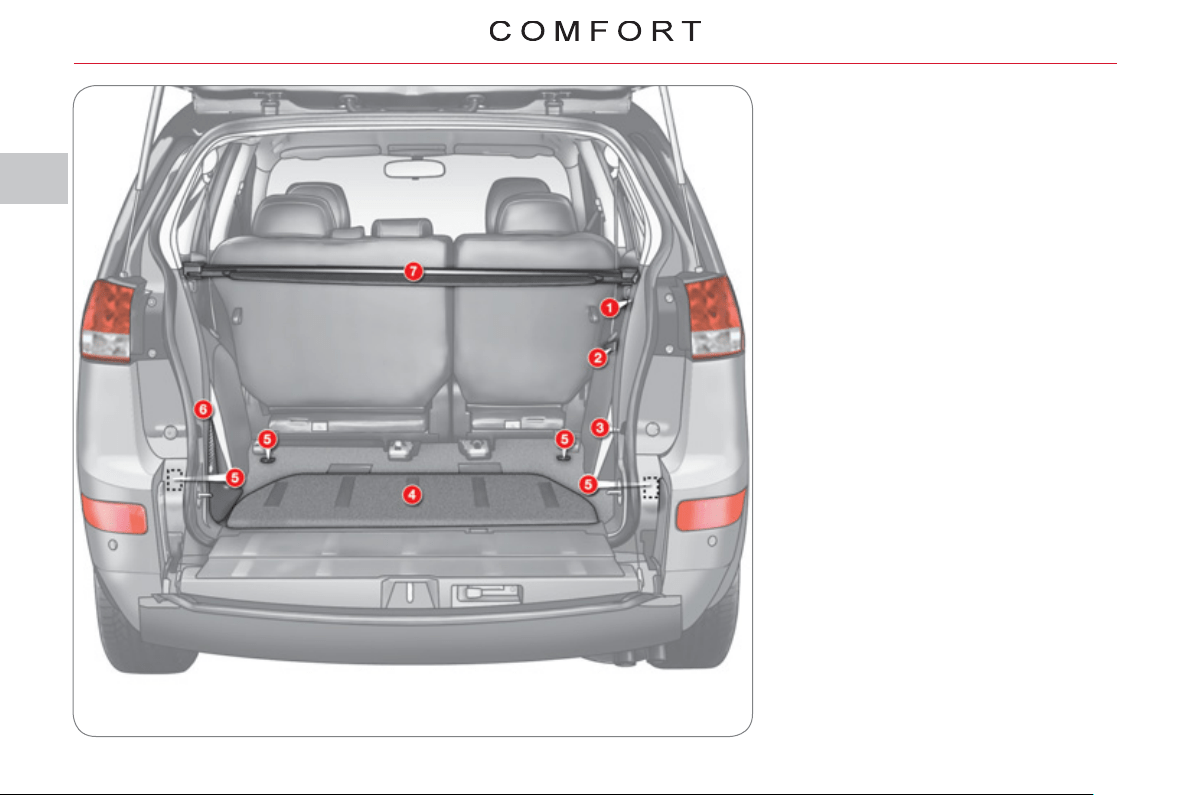
II
7
0
BOOT FITTING
S
1. 12 V socket (120 W max).
2. Open storage compartment.
3. Right-hand side enclosed storage
compartment.
4. Storage compartment in the fl oor * .
5. Stowing rings.
6. Left-hand side storage
compartment or audio equipment.
7. Load space cover.
* 5-seat version only.

II
!
CO
MF
O
R
T
71
* On 5-seat version only.
Raise the boot fl oor to gain access to
this compartment.
Right-hand side enclosed storage
compartment
This storage compartment contains the
tools for changing a wheel.
Storage compartment in the fl oor * 12 V socket (120 W max)
There are four stowing rings in the boot
for securing luggage:
- two rings are located on the boot fl oor,
- two rings are located on the rear
side pillars.
This operates when the ignition switch
is in the "ON" or "ACC" position.
Lift the cover to gain access to the
socket.
Check that the electrical equip-
ment operates on 12 V and that
its maximum electrical power is
120 W.
The prolonged use of electrical equip-
ment without running the engine may
discharge the battery.
Stowing rings
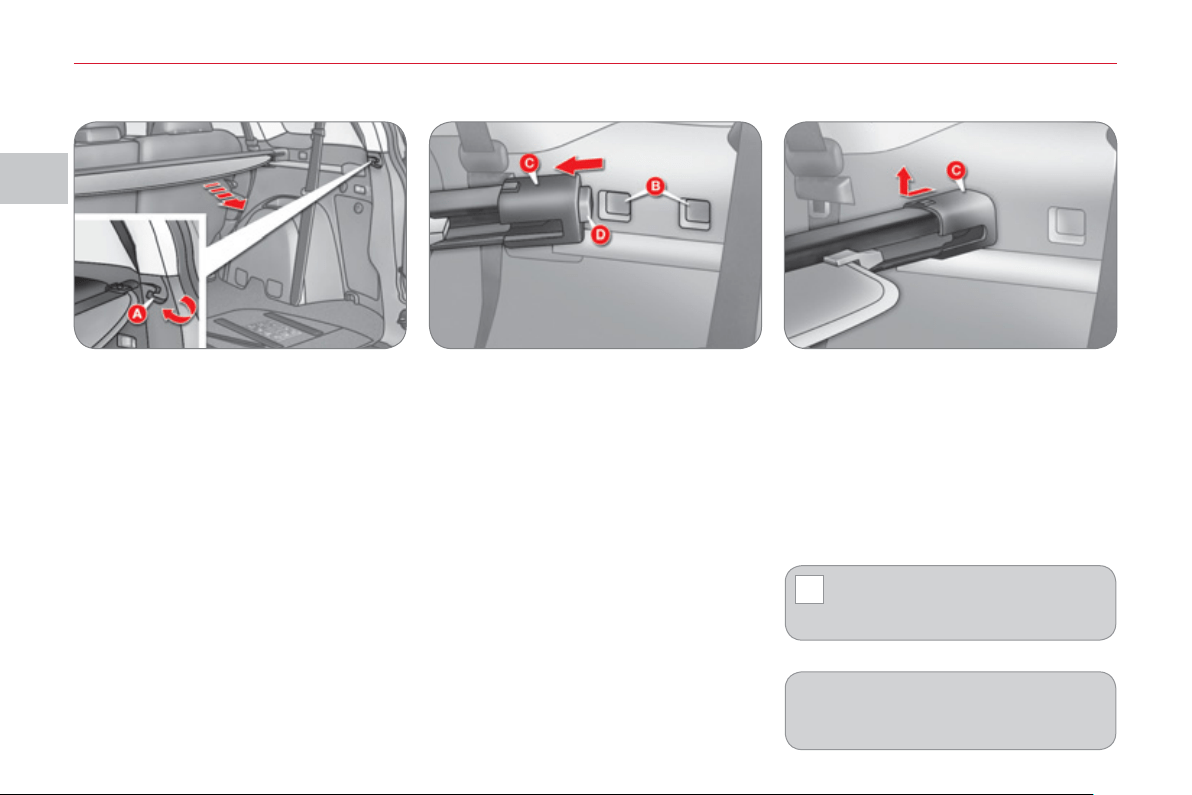
II
!
CO
MF
O
R
T
72
Second installation position
The load space cover can be secured
in two different positions B , so that the
row 2 seat backs can be tilted.
1. Reel in the load space cover.
2. Move one of the slides C towards
the inside of the vehicle and insert
the tab D in the installation hole to
be used.
Move the opposite slide in the same
way.
3. After changing the position, check
that the load space cover is secured
correctly.
Removing the load space cover
1. Reel in the load space cover.
2. Move one of the slides C towards the
inside of the vehicle and raise it.
Release the opposite slide in the
same way.
To put the load space cover in place, carry
out the operations in reverse order.
Load space cover
Unroll the load space cover and install it
in the housing A .
To store the load space cover, release it
from the housing, it reels in to its initial
position.
Take care not to place heavy
objects on the load space cover
when it is unfolded.
The load space cover can be stored
along the lower tailgate, unless audio
equipment is present.
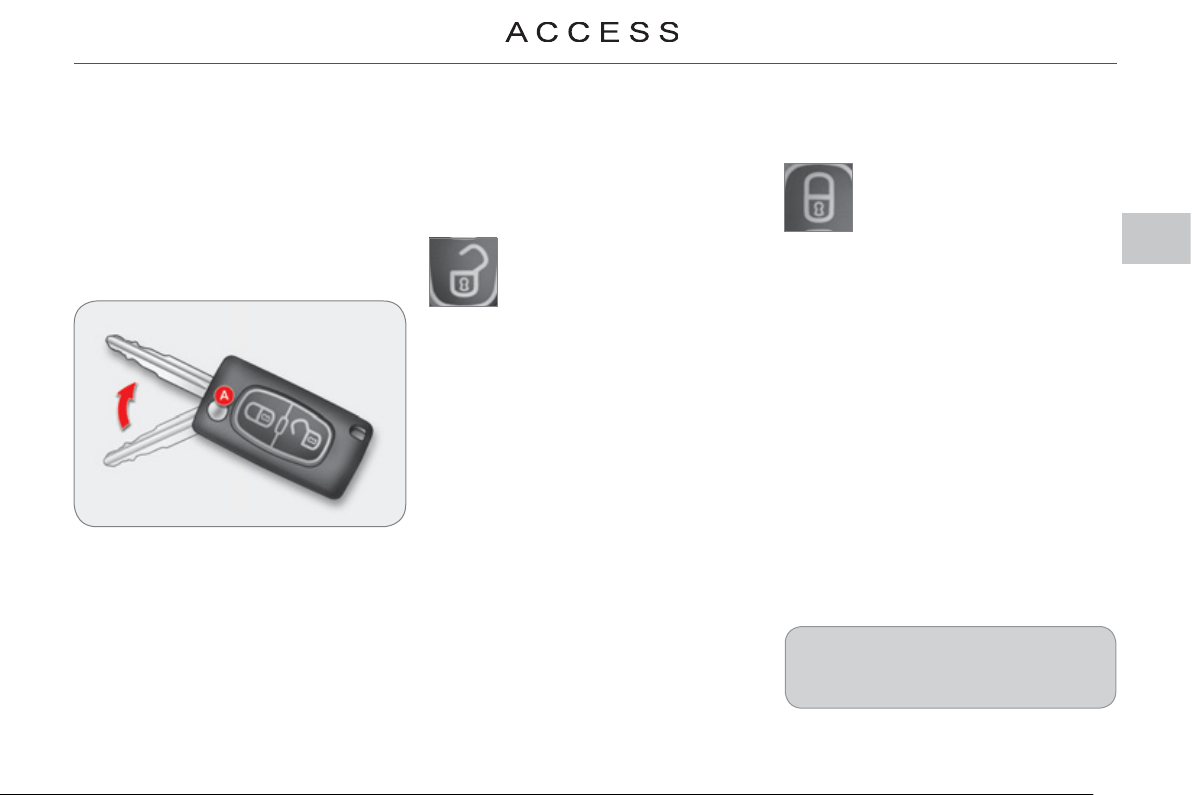
III
73
Unfolding the key
) First press button A to unfold the
key.
Unlockin
g
the vehicle
) Press the open padlock to
unlock the vehicle.
Unlocking using the remote control
REMOTE CONTROL KEY
System which permits central unlock-
ing or locking of the vehicle using the
lock or from a distance. It also folds and
unfolds the mirrors, closes the electric
windows and starts the vehicle, as well
as providing protection against theft.
Lockin
g
the vehicle
Unlocking using the key
) Turn the key to the right in the driver's
door lock to unlock the vehicle.
) Press the closed padlock
to lock the vehicle.
If one of the doors or the tailgate is
still open, the central locking will not
take place.
Unlocking is confi rmed by the interior
lighting which comes on for approxi-
mately 15 seconds and the direction
indicators which fl ash twice .
If you press the open padlock twice in
succession within 30 seconds after
unlocking the vehicle, the door mirrors
unfold.
Normal locking using the key
) Turn the key to the left in the driver's
door lock to lock the vehicle.
Locking is confi rmed by the direction in-
dicators which come on once .
If you press the closed padlock twice
in succession within 30 seconds af-
ter locking the vehicle, the door mirrors
fold.
An extended press on the closed pad-
lock within 30 seconds after locking the
vehicle closes the windows automati-
cally.
Normal locking using the remote
control
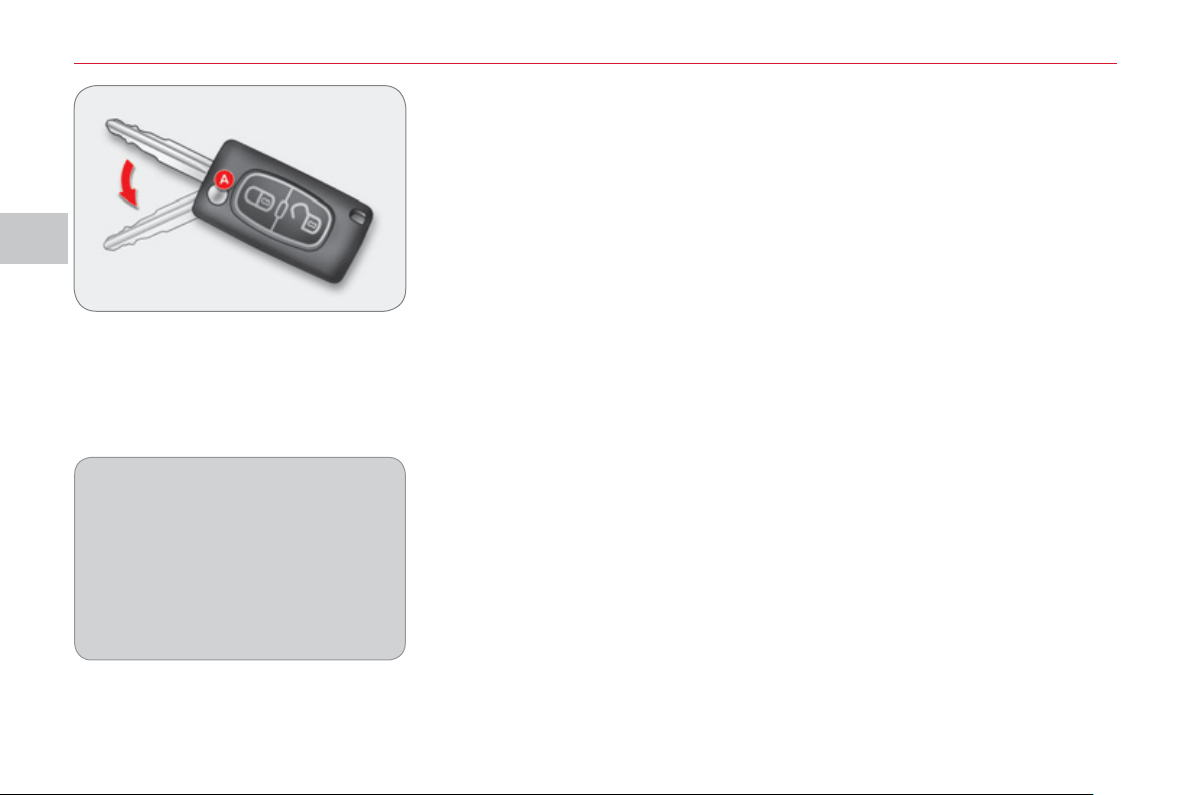
III
A
CC
E
SS
74
The vehicle will relock automatically
after thirty seconds unless a door or
the tailgate is opened. This function
prevents inadvertent unlocking.
The duration which precedes the au-
tomatic relocking of the vehicle can
be confi gured via the colour screen
"Equipment" menu.
Folding the key
) First press button A to fold the key.
Electronic engine immobiliser
The key contains an electronic chip
which has a special code. When the
ignition is switched on, this code must
be recognised to permit starting.
This electronic engine immobiliser locks
the engine management system a few
moments after the ignition is switched
off and prevents starting of the engine
by anyone who does not have the key.
Anti-theft
p
rotection
In the event of a malfunction and if
your vehicle does not start, contact a
CITROËN dealer as soon as possible.
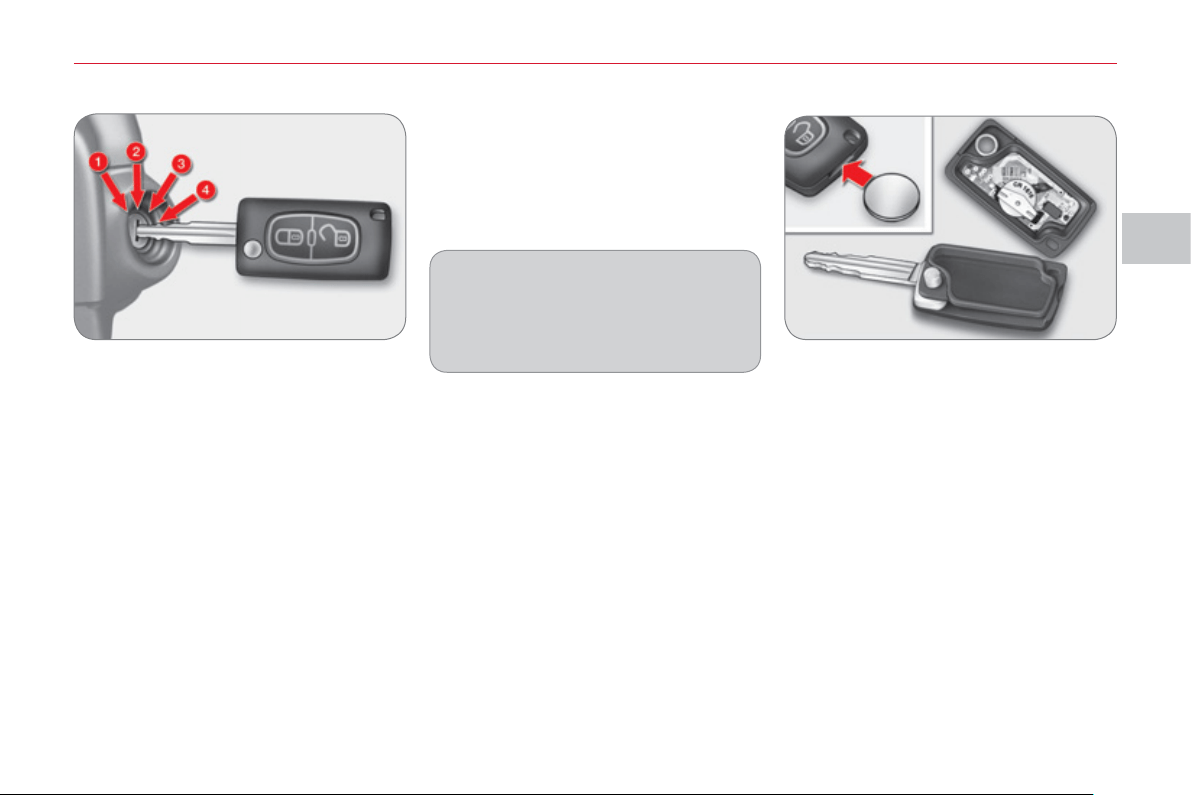
III
A
CC
E
SS
75
Startin
g
the vehicle
) Insert the key in the ignition switch.
) Operate the starter by turning the
key to position 4 (START) .
) When the engine turns over, release
the key. The ignition switch is placed
in position 3 (ON) automatically.
Switchin
g
the vehicle off
) Park the vehicle.
) While pressing the key, turn it to-
wards you to position 1 (LOCK) .
) Remove the key from the ignition
switch.
Changing the battery
Battery reference: CR1616/3 volts.
) Unclip the casing using a coin at the
notch.
) Slide the fl at battery out of its housing.
) Slide the new battery into its hous-
ing observing the original direction.
) Clip the casing.
K
e
y
in i
g
nition
A buzzer sounds on opening the
driver's door, if the key has been left
in the ignition.

III
!
A
CC
E
SS
7
6
Do not throw the remote control batteries away, they contain metals which are harmful to the environment.
Take them to an approved collection point.
K
e
y
s
Make a careful note of the number of each key. This number is coded on the label attached to the key.
If the keys are lost, a CITROËN dealer can supply you with new keys.
R
emote contro
l
The high frequency remote control is a sensitive system; do not operate it while it is in your pocket as there is a possibility
that it may unlock the vehicle, without you being aware of it.
Do not repeatedly press the buttons of your remote control out of range and out of sight of your vehicle. You run the risk
of stopping it from working.
The remote control does not operate when the key is in the ignition, even when the ignition is switched off.
Loc
ki
n
g
t
h
e ve
hi
c
l
e
Driving with the doors locked may make access to the passenger compartment by the emergency services more diffi cult
in an emergency.
As a safety precaution (with children on board), remove the key from the ignition when you leave the vehicle, even for a
short time.
Anti-theft
p
rotection
Do not make any modifi cations to the electronic engine immobiliser system, this could cause malfunctions.
When purchasin
g
a second-hand vehicle
Have the key codes memorised by a CITROËN dealer, to ensure that the keys in your possession are the only ones which
can start the vehicle.
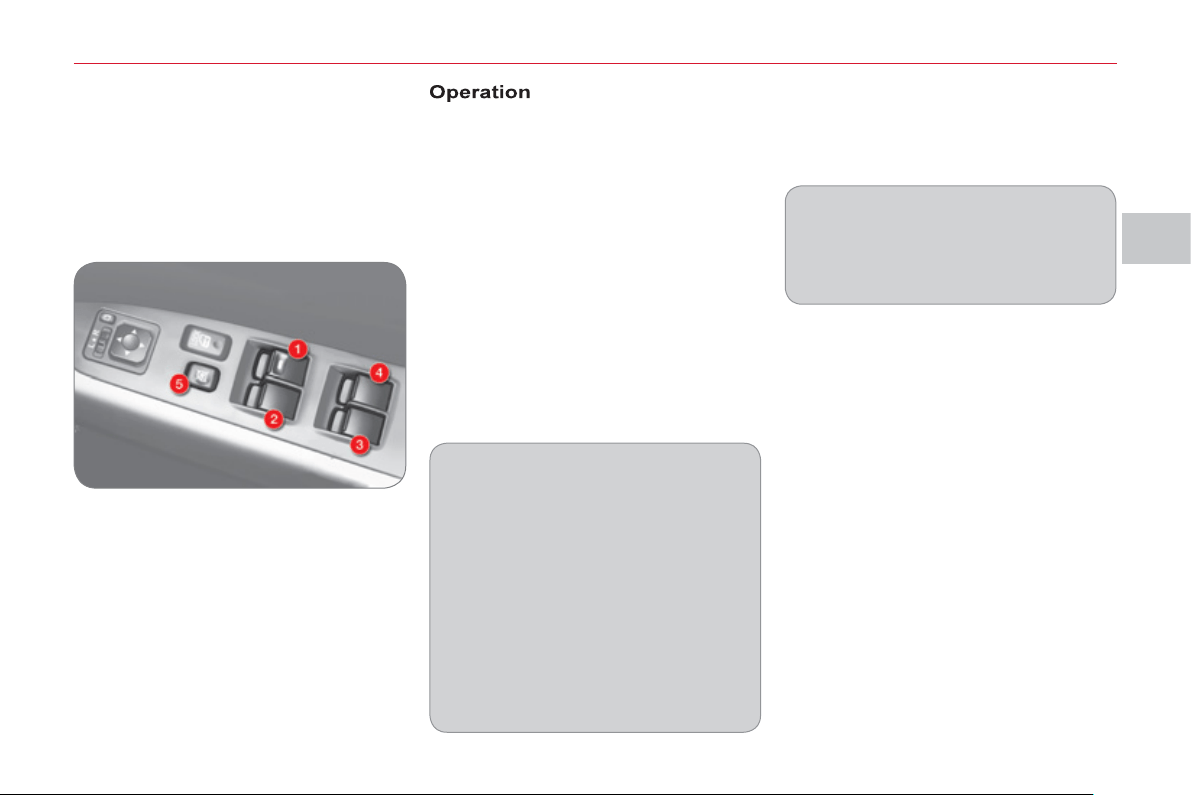
III
A
CC
E
SS
7
7
The electric window switches can
be confi gured via the colour screen
"Equipment" menu.
The electric window switches re-
main operational for approximate-
ly 30 seconds after the ignition is
switched off and the switch on the
driver's door remains operational for
a further 30 seconds when the door
is opened.
The windows can no longer be
opened or closed after the driver's
door is closed.
The rear windows do not lower fully.
ELECTRIC WINDOW
S
1. Driver's electric window switch.
2.
Passenger's electric window
switch.
3. Rear right electric window
switch.
4. Rear left electric window switch.
5. Deactivating the passenger and
rear electric window switches.
In the event of unwanted opening of
the window on closing (for example
in the presence of frost), reinitialise
the electric windows (refer to the cor-
responding paragraph).
Safety anti-pinch
In automatic mode, when the window
rises and meets an obstacle, it stops
and lowers again.
With the ignition on, you have two op-
tions:
- manual mode
) Press the switch gently to open or
pull it gently to close. The window
stops as soon as the switch is re-
leased.
- automatic mode
) Press the switch fully to open or
pull it fully to close. The window
opens or closes completely when
the switch is released.
) Pressing the switch again stops
the movement of the window.
System which opens or closes a window
manually or automatically. It is fi tted with
a system which provides protection if an
obstacle is detected on one-touch mod-
els and a deactivation system to prevent
misuse of the rear controls.
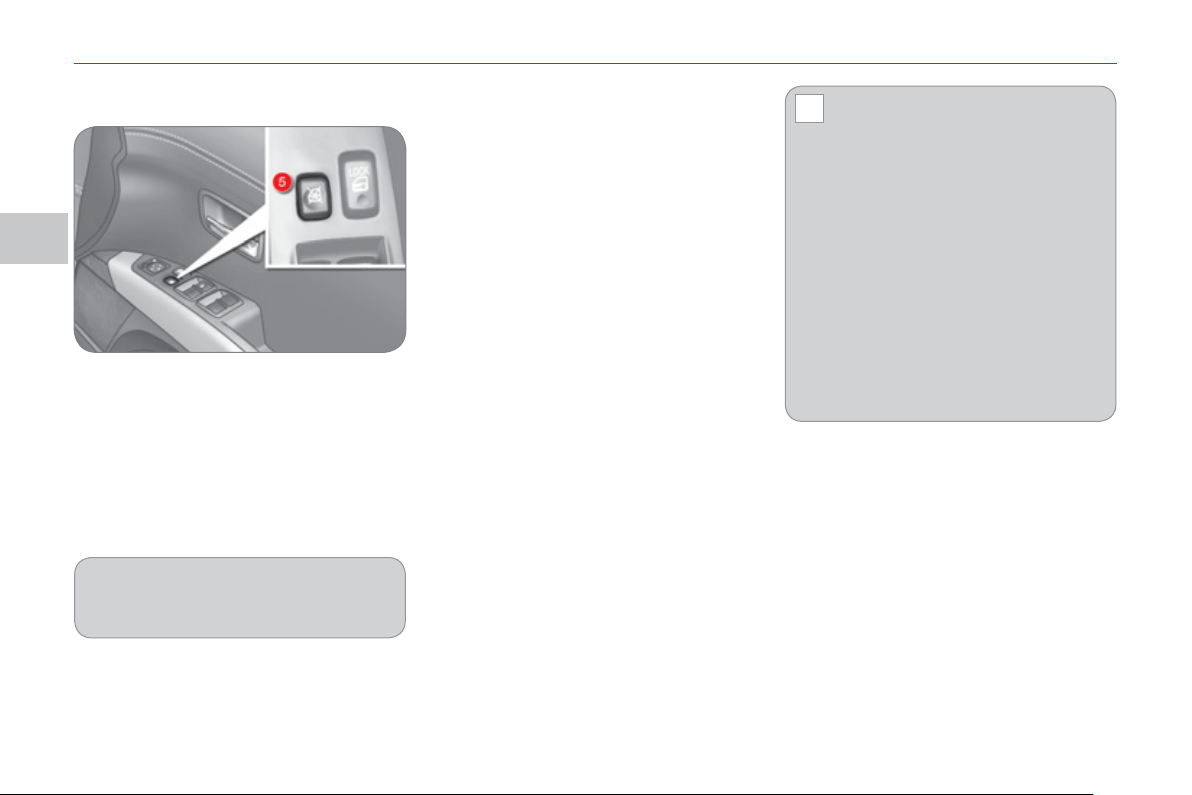
III
!
A
CC
E
SS
7
8
Deactivating the passenger and rear
electric window switches
Reinitialisin
g
the electric
windows
Following reconnection of the battery or
after the safety anti-pinch has been trig-
gered three times in succession, you
must reinitialise the safety anti-pinch
function:
)
with the door closed, lower the window
completely then raise it again, it will rise
in steps of a few centimetres each time
the switch is pressed, repeat the op-
eration until the window is fully closed,
)
continue to press the switch for at least
one second after reaching the window
closed position.
Always remove the key from the
ignition when leaving the vehi-
cle, even for a short time.
In the event of contact during opera-
tion of the windows, you must reverse
the movement of the window. To do
this, press the switch concerned.
When the driver operates the pas-
senger electric window switches, they
must ensure that no one is preventing
correct closing of the windows.
The driver must ensure that passen-
gers use the electric windows cor-
rectly.
Be aware of children when operating
the windows.
) For the safety of your children, press
switch 5 to prevent operation of the
passenger and rear electric windows
irrespective of their position.
When the button is pressed down, the
switches are deactivated.
When the button is raised, the switches
are activated.
When the button is pressed down, you
can open or close all of the windows
using the switches on the driver's
door.
The safety anti - pinch function is not
active during these operations.
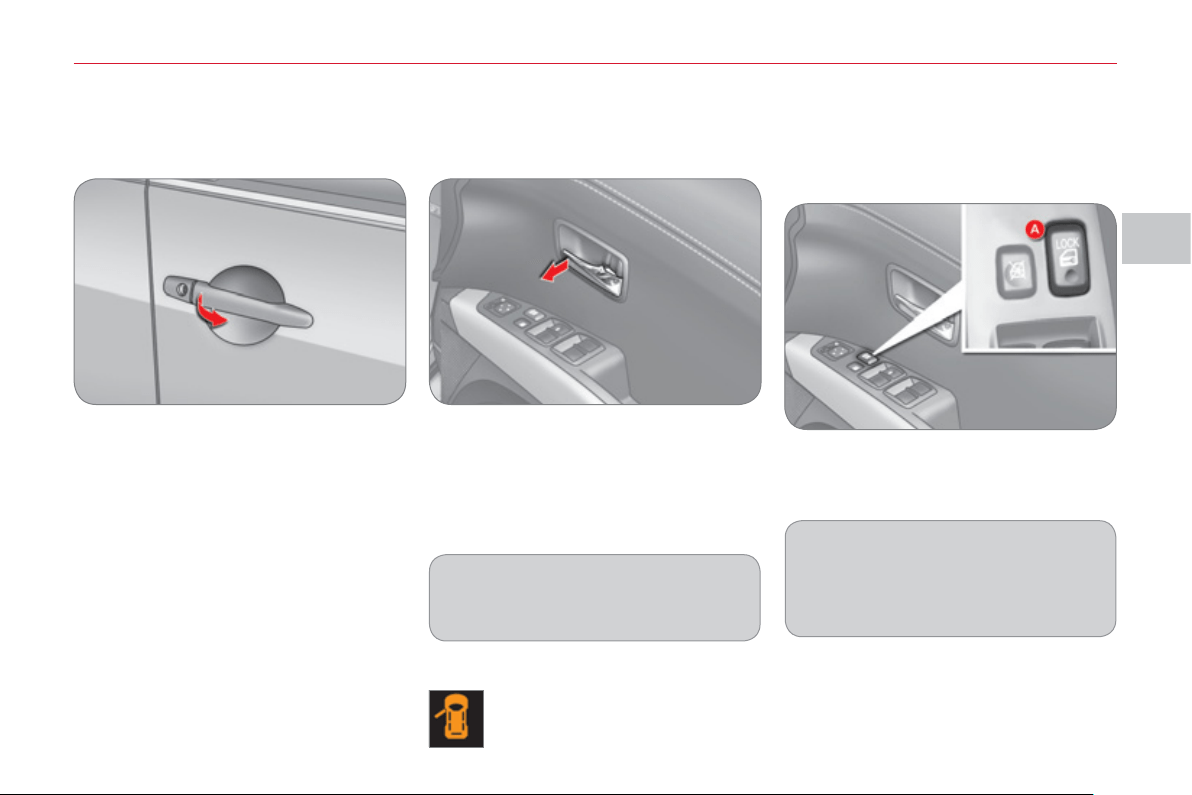
III
A
CC
E
SS
79
D
OOR
S
From outside
) After unlocking the vehicle using the
remote control or the key, pull the
door handle.
From inside
) Pull the front or rear door control to
open the door.
The front passenger door or the rear
doors must fi rst be unlocked manually
using the locking control before being
opened.
Closin
g
If a door is not closed correctly,
this warning lamp comes on
in the instrument panel screen
until the door concerned is
closed.
Manual centralised control
System which provides full manual
locking or unlocking of the doors and
tailgate from the inside.
Locking
) Press the front of button A to lock
the vehicle.
If the driver's door is open when you
operate the central locking from in-
side, all of the doors lock with the ex-
ception of the driver's door.
Unlocking
) Press the rear of button A to unlock
the vehicle.
Openin
g
If the doors are locked, opening the
driver's door does not unlock the
other doors.
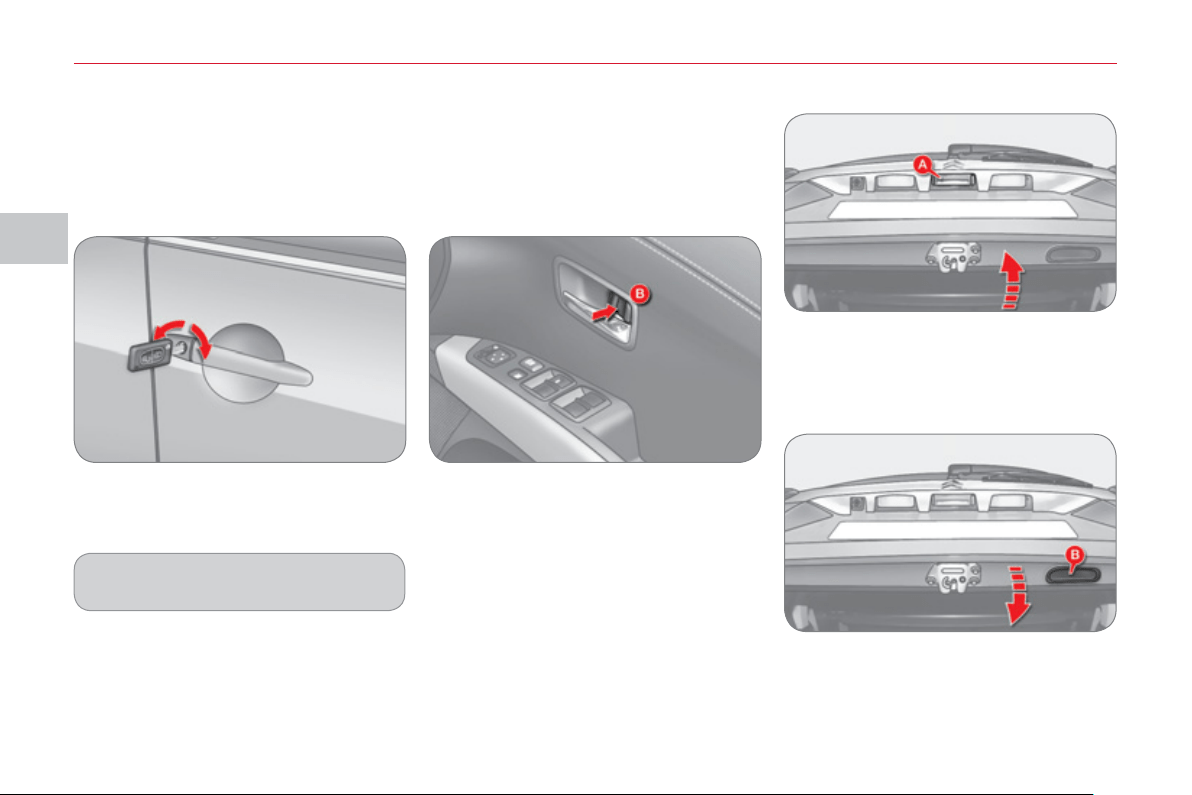
III
A
CC
E
SS
80
Openin
g
) After unlocking the vehicle using the
remote control or the key, press the
handle A and raise the tailgate.
T
AILGATE
Closin
g
) Pull the handle B downwards to
guide the tailgate,
) release the handle and press the ex-
terior surface of the tailgate gently to
close it.
Emer
g
enc
y
control
System which locks or unlocks mechan-
ically the driver's door only in the event
of a malfunction of the central locking.
Locking the driver's door
) Insert the key in the lock, then turn it
to the left.
Unlocking the driver's door
) Insert the key in the lock, then turn it
to the right.
Unlocking the front and rear doors
(from inside)
) Tilt the interior control B rearwards.
Using the key
Locking the front passenger door
and the rear doors (from inside)
) Tilt the interior control B forwards.
The other doors are not unlocked.
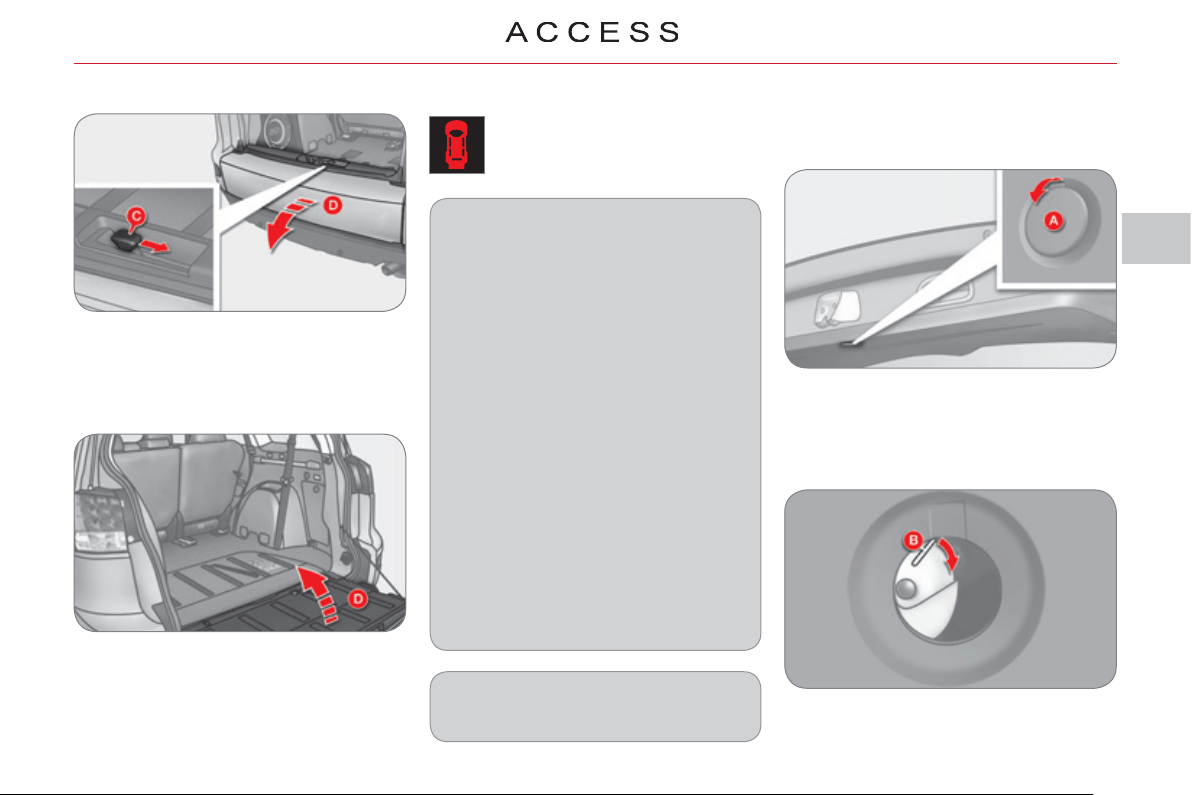
III
81
"Tailgate open" warning
This warning lamp comes on on
the instrument panel screen when
the tailgate is not closed correctly.
L
OWER TAILGATE
Openin
g
) Push the handle C to the right and
tilt the tailgate D gently.
Closin
g
) Raise the tailgate D , push it to close
it, then check that it is secured
correctly.
Before opening the tailgate, ensure
that no one is within the radius of
opening.
For reasons of safety and correct op-
eration, do not drive with the tailgate
open.
If the battery is disconnected, the
tailgate cannot be opened.
Do not climb onto the lower tailgate
and do not subject it to heavy knocks,
it may be damaged.
Always close the lower tailgate and
check that it is secured correctly be-
fore closing the main tailgate.
When closing the lower tailgate, en-
sure that no person or object is in the
proximity of the moving parts to avoid
any risk of injury or damage.
Do not open the lower tailgate when
a towbar is fi tted.
Maximum authorised weight on the
lower tailgate when open: 200 kg .
T
ail
g
ate release
This enables the tailgate to be unlocked
in the event of a central locking fault.
- Fold back the rear seats to gain ac-
cess to the tailgate release from in-
side the boot.
- Remove the plastic cap from the
opening A in the tailgate interior
pillar.
- Move the control B to the right to
unlock and open the tailgate.

III
A
CC
E
SS
82
S
UNROOF
Complete closing
) With the ignition on, push the con-
trol forwards (in the direction 2 ).
The defl ector folds down gradually on
closing.
Complete opening
) With the ignition on, push the con-
trol rearwards (in the direction 1 ).
A defl ector is deployed gradually on open-
ing to prevent unwanted gusts of air.
Temporary stop
) To stop opening or closing, press
part 3 of the control or push the con-
trol in the opposite direction.
Partial opening
) To open , with the ignition on, press
part 3 of the control.
The rear part of the sunroof opens.
) To close , with the ignition on, press
part 3 of the control.
The rear part of the sunroof closes.
Safety anti-pinch and reinitialisation
If the roof meets an obstacle while it is
closing, it stops and opens again.
The sunroof stops automatically just
before complete opening. Push the
control again for complete opening.
O
p
eration
In the event of unwanted opening of
the roof on closing (for example, in
the presence of ice) and immediately
after the roof has stopped, or after
the safety anti-pinch has been trig-
gered fi ve times in succession:
) press part 3 of the control several
times to partially open the roof,
) when the roof partially opens,
continue to press for more than
3 seconds ,
) open and close the sunroof com-
pletely.
The safety anti - pinch function is not
operational during t hese operations.
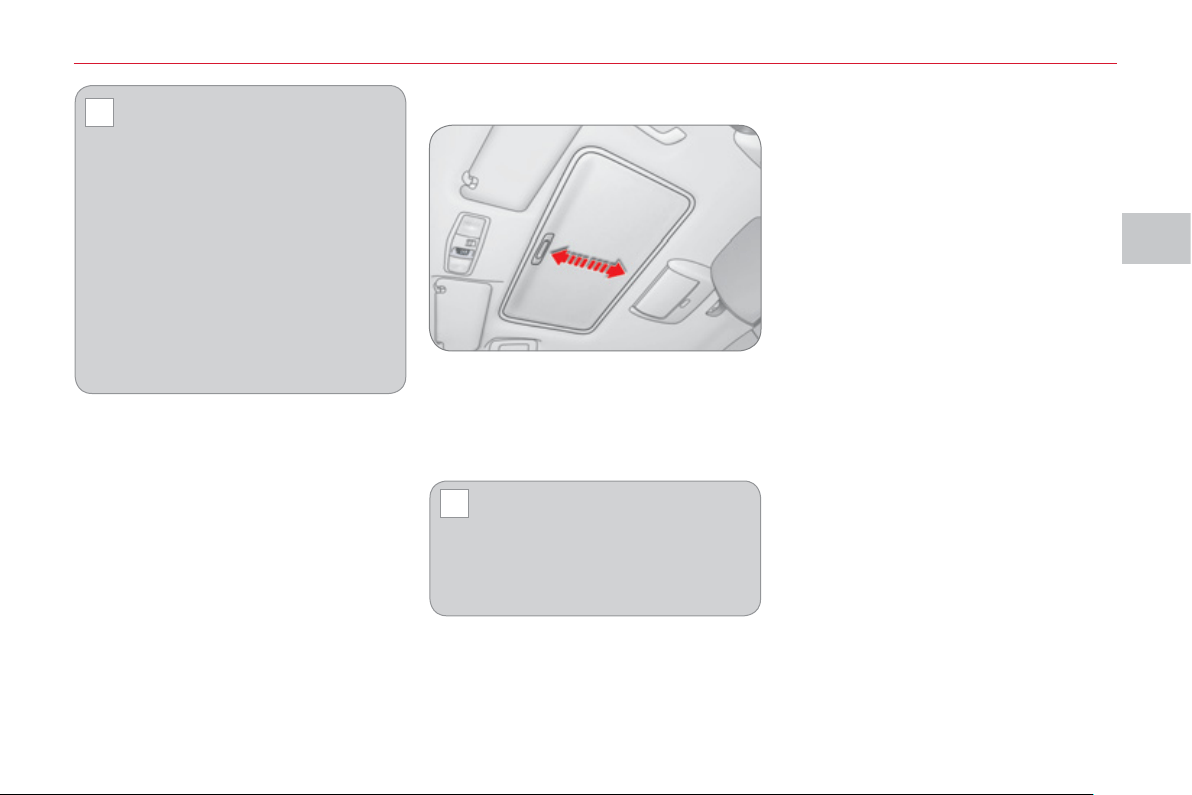
III
!
!
A
CC
E
SS
83
BLIND
The blind is manual, slide it backwards
and forwards.
It opens automatically when the roof is
opened.
Check that the sunroof is not
open in tilt mode before clos-
ing the blind.
The blind cannot be closed when the
sunroof is open in sliding mode .
Always remove the key from the
ignition when leaving the vehi-
cle, even for a short time.
If the roof meets an obstacle dur-
ing operation, you must reverse the
movement of the roof. To do this,
press the control concerned.
When the driver operates the roof
control, they must ensure that no
one is preventing the roof from clos-
ing correctly.
The driver must ensure that passen-
gers use the sunroof correctly.
Be aware of children when operating
the roof.
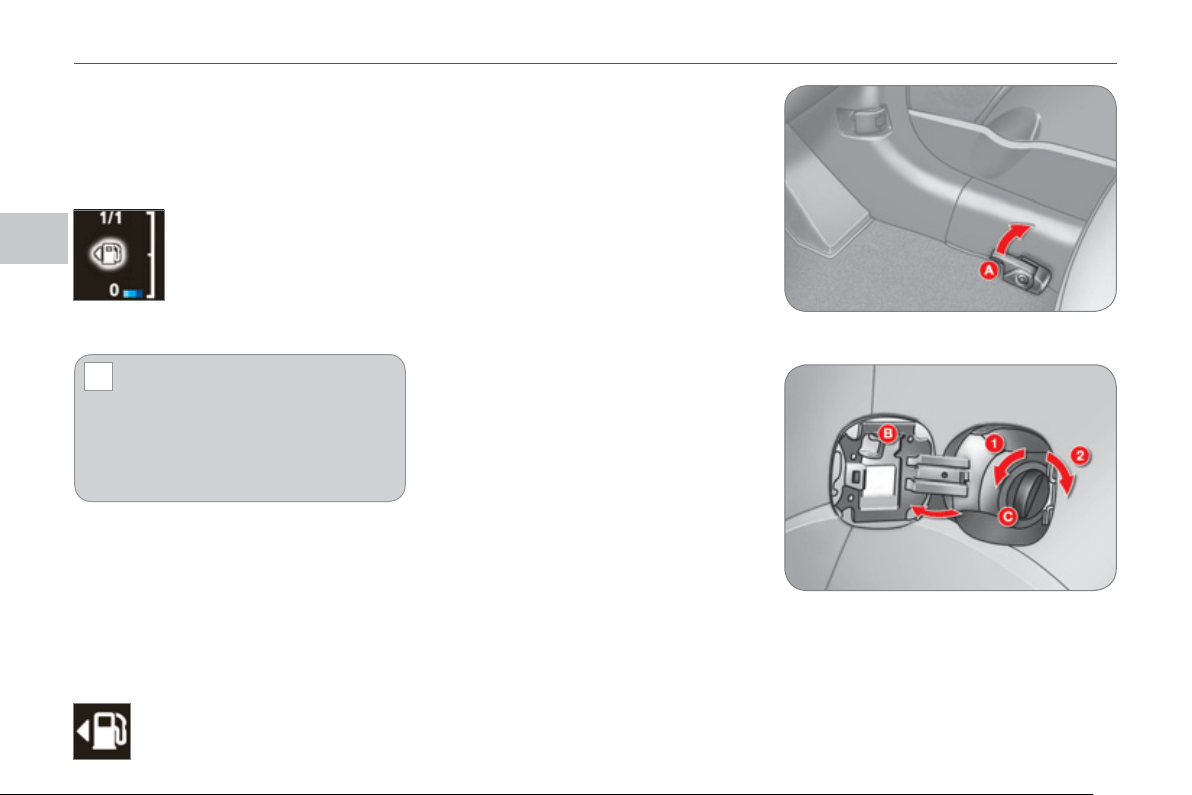
III
!
A
CC
E
SS
8
4
FUEL TANK
Opening the cap may cause an inrush
of air. This vacuum, which is completely
normal, is caused by the sealing of the
fuel system.
To fi ll the tank safely:
) the engine must be switched off,
) pull the control A located at the bot-
tom right of the driver’s seat to re-
lease the fuel fi ller fl ap,
) open the fuel fi ller fl ap B ,
) turn the fi ller cap C to the left,
When you have fi lled the tank:
) refi t the fi ller cap, inserting the up-
per part fi rst,
) screw in the fi ller cap to the right,
) close the fl ap.
Ensure that the fuel fi ller fl ap is closed
correctly.
) remove the fi ller cap C ,
) fi ll the tank, but do not continue af-
ter the 3rd cut-off of the nozzle ;
this could cause malfunctions.
Low fuel level
Filli
n
g
A label, affi xed on the inside of the fl ap,
reminds you of the type of fuel to be
used according to your engine.
More than 5 litres of fuel must be add-
ed in order to be registered by the fuel
gauge.
When the low fuel level is
reached, this indication ap-
pears on the instrument
panel screen. When it fi rst
comes on, approximately
10 litres of fuel remain.
The symbol fl ashes slowly (approxi-
mately once per second).
When the symbol begins to
fl ash rapidly (approximately
twice per second), there is not
much fuel remaining in your tank (ap-
proximately 5 litres).
You must fi ll the tank to avoid running
out of fuel.
This symbol indicates that the
fuel tank cap is located on the
left-hand side of the vehicle.
Location of the ca
p
1. Opening.
2. Closing.
Capacity of the tank: approximately
60 litres.
III
A
CC
E
SS
85
Qualit
y
of the fuel used for
D
iesel en
g
ines
The Diesel engines are perfectly com-
patible with biofuels which conform to
current and future European standards
(Diesel fuel which complies with stan-
dard EN 590 mixed with a biofuel which
complies with standard EN 14214)
available at the pumps (containing up
to 7 % Fatty Acid Methyl Ester).
The B30 biofuel can be used in cer-
tain Diesel engines; however, this use
is subject to strict application of the
special servicing conditions. Contact a
CITROËN dealer or a qualifi ed work-
shop.
The use of any other type of (bio)fuel
(vegetable or animal oils, pure or dilut-
ed, domestic fuel...) is strictly prohibited
(risk of damage to the engine and fuel
system).
p
etrol en
g
ines
The petrol engines are perfectly compat-
ible with E10 or E24 type petrol biofuels
(containing 10 % or 24 % ethanol), con-
forming to European standards EN 228
and EN 15376.
E85 type fuels (containing up to 85 %
ethanol) are reserved exclusively for ve-
hicles marketed for the use of this type
of fuel (BioFlex vehicles). The quality of
the ethanol must comply with European
standard EN 15293.
For Brazil only, special vehicles are
marketed to run on fuels containing up
to 100 % ethanol (E100 type).
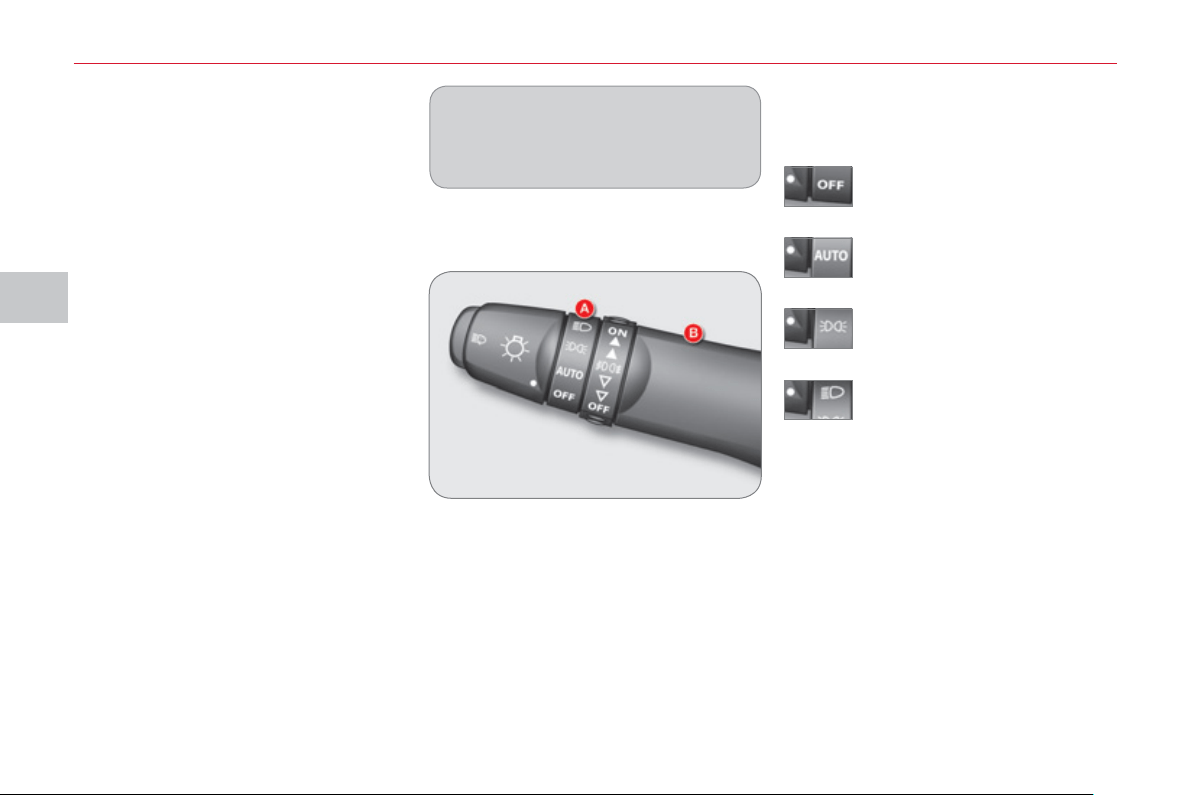
IV
VI
S
IBILITY
86
L
IGHTING
S
TALK
Addi
t
i
ona
l
ligh
t
i
n
g
Other lamps are installed to fulfi l the re-
quirements of particular driving conditions:
-
rear foglamps to be seen from a distance,
- front foglamps for even better visibility,
- daytime running lamps to be seen
during the day.
Certain functions of the lighting stalk
(automatic illumination of headlam-
ps, sensitivity) can be confi gured
via the colour screen "Equipment"
menu.
Manual controls
The lighting is controlled directly by the
driver by means of the ring A and the
stalk B .
Lamps off.
Automatic illumination of head-
lamps.
Sidelamps.
B. Stalk for switching headlamps: pull
the stalk towards you to switch the
lighting between dipped and main
beam headlamps.
In the lamps off and sidelamps modes,
the driver can switch on the main beam
headlamps temporarily ("headlamp
fl ash") by maintaining a pull on the
stalk.
Displa
y
s
Illumination of the corresponding indica-
tor lamp in the instrument panel confi rms
that the lighting selected is on.
A. Main lighting mode selection ring:
turn it to position the symbol re-
quired facing the mark.
Dipped headlamps or main
beam headlamps.
Main li
g
htin
g
The various front and rear lamps of the
vehicle are designed to adapt the driv-
er's visibility progressively in relation to
the climatic conditions:
- sidelamps, to be seen,
- dipped beam headlamps to see
without dazzling other drivers,
- main beam headlamps to see clearly
when the road is clear.
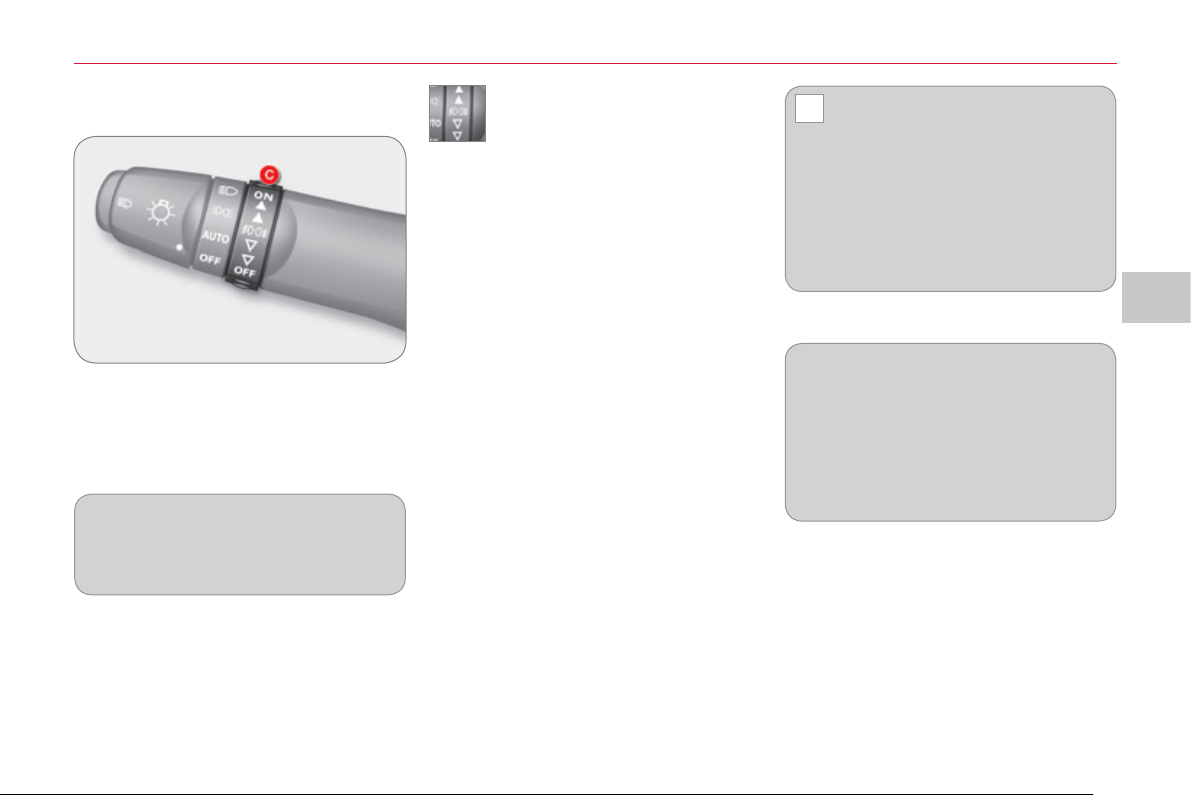
IV
!
VI
S
IBILITY
8
7
Front and rear fo
g
lamps
C. foglamps selection ring.
The foglamps operate with the dipped
and main beam headlamps.
front and rear foglamps
) To switch on the front foglamps, turn
the ring C forwards once.
) To switch on the rear foglamps, turn
the ring C forwards twice.
) To switch off the rear foglamps, turn
the ring C rearwards once.
) To switch off the front foglamps, turn
the ring C rearwards twice.
The ring C returns to its initial position
automatically.
The front foglamps are switched on au-
tomatically when you switch on the rear
foglamps.
The rear foglamps are switched off
automatically when you switch off the
dipped/main beam headlamps or the
front foglamps.
On vehicles fi tted with daytime run-
ning lamps, the rear foglamps can be
switched on even if the lighting stalk is
in the "OFF" position.
In good or rainy weather, both
day and night, the front fo-
glamps and the rear foglamps
are prohibited. In these situations,
the power of their beams may dazzle
other drivers.
Do not forget to switch off the front fo-
glamps and the rear foglamps when
they are no longer necessary.
Lighting on reminder
An audible signal when the driver's door
is opened warns the driver if the vehicle
lighting is on, with the ignition off.
Switching off the lighting stops the
audible signal.
If condensation is present, switch the
headlamps on for a few minutes in
order to clear it.
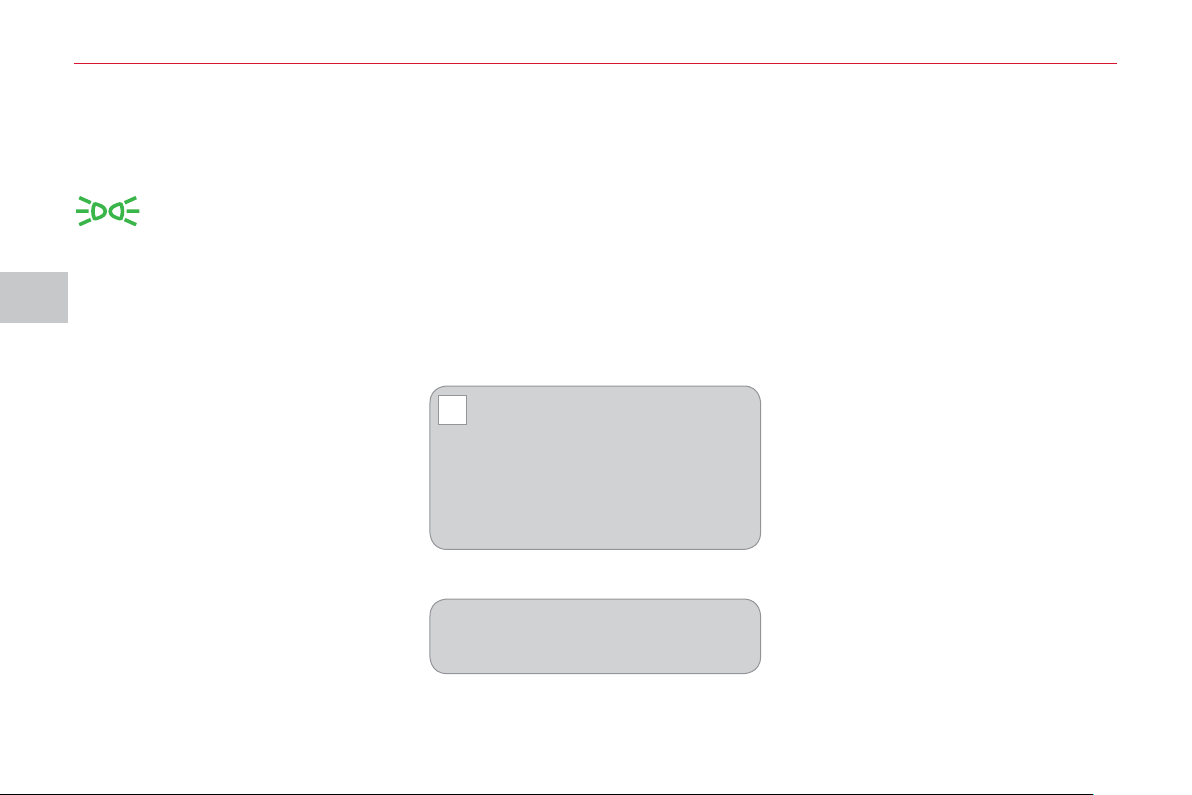
IV
!
VI
S
IBILITY
88
Automatic illumination of headlam
p
s
Da
y
time runnin
g
lamps *
* According to country.
A
utomatic switchin
g
off
When the lights stalk is at "dipped head-
lamps or main beam headlamps", if the
ignition switch is at "LOCK" or "ACC" or
if the key has been removed from the
ignition switch, the lights switch off auto-
matically when the driver's door is
opened .
On vehicles which are equipped with day-
time running lamps, the dipped beam head-
lamps come on when the vehicle is started.
This warning lamp comes on
in the instrument panel.
The instruments and controls (instrument
panel, multifunction screen, air condition-
ing control panel, ...) are illuminated.
The sidelamps and the dipped beam
headlamps come on automatically, with-
out any action on the part of the driver,
if a low level of exterior light is detected
or if the wipers are switched on.
When the light returns to a suffi cient
level or the wipers are switched off, the
lighting is switched off automatically.
The sensor is located at the base of the
windscreen.
Contact a CITROËN dealer or a qualifi ed work-
shop to adjust the sensitivity of the sensor.
In foggy weather or in snow, the
sunshine sensor may detect suf-
fi cient light. The lighting will not
come on automatically.
Do not cover the sunshine sensor, the
associated functions will no longer be
controlled.
The sensitivity of the automatic illumina-
tion of headlamps can be confi gured via
the colour screen "Equipment" menu.
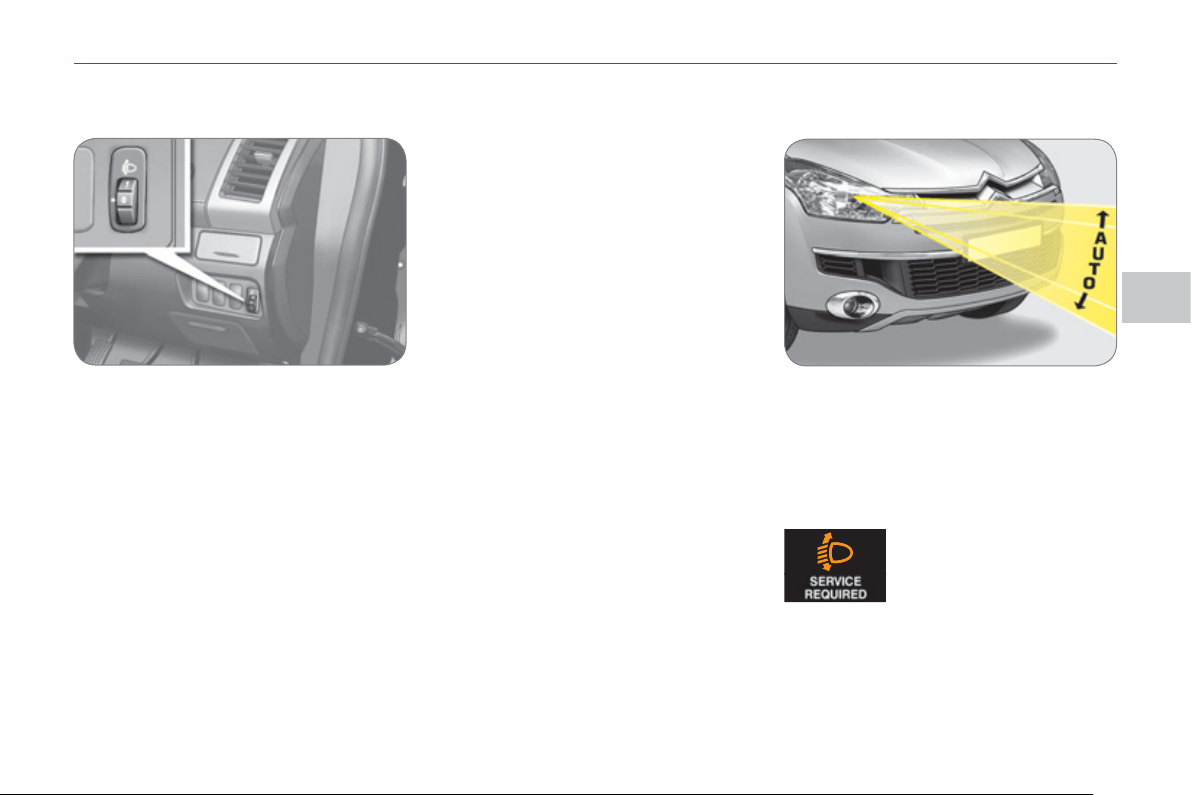
IV
VI
S
IBILITY
89
M
ANUAL HEADLAMP
ADJU
S
TMENT
To avoid dazzling other road users,
the height of the headlamps must be
adjusted in relation to the load in the
vehicle.
AUTOMATIC HEADLAMP
ADJU
S
TMENT
On vehicles with xenon bulbs: when
stationary , the system automatically
corrects the height of the beam, what-
ever the load of the vehicle. The driv-
er is then assured of having optimum
lighting and not causing a nuisance to
other road users.
In cases of malfunction ,
this message appears in
the multifunction screen.
7-seat version
0. Driver only or Driver + 1 passenger
in the front.
1 or 2. Driver + 1 passenger in the front
+ 2 passengers on the third
bench seat.
3. 7 occupants (including the driver
with or without maximum authorised
load).
4. Driver + maximum authorised load.
5-seat version
0. Driver only or Driver + 1 passenger
in the front.
1 or 2. 5 occupants (including the driver).
3. 5 occupants (including the driver) +
maximum authorised load.
4. Driver + maximum authorised load.
Do not touch the xenon bulbs. Contact
a CITROËN dealer or a qualifi ed work-
shop.
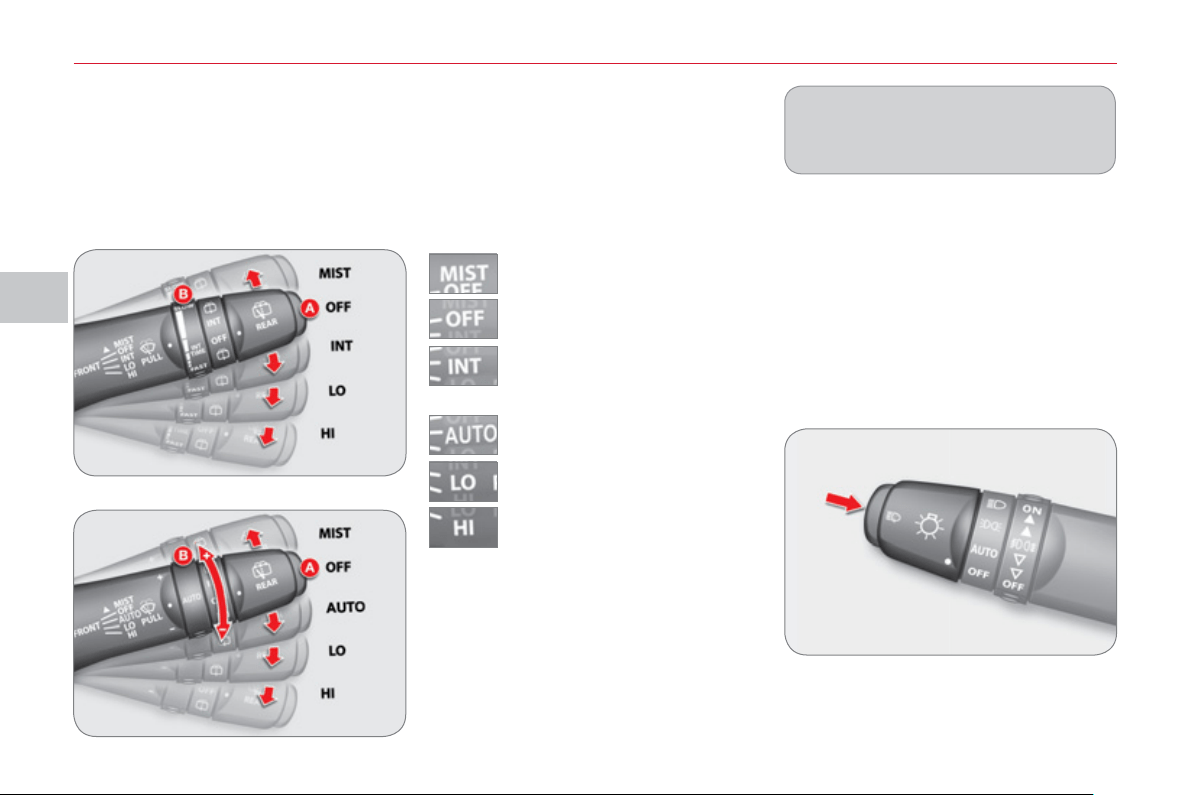
IV
VI
S
IBILITY
90
WIPER CONTROL
S
Manual controls
The wiper commands are issued direct-
ly by the driver by means of the stalk A
and the ring B .
single wipe.
Windscreen wipers
A. wiping speed selection stalk:
park.
intermittent (the speed can be
set manually),
slow.
fast.
B. intermittent operation or rain sensor
sensitivity adjustment ring.
You can increase or decrease:
● the wiping frequency when the in-
termittent mode is active,
● the sensitivity of the rain sensor
when the automatic mode is active.
- "+": high sensitivity.
- "-": low sensitivity.
Headlamp wash
Press the end of the lighting stalk to
activate the headlamp wash, when the
dipped beam headlamps are on.
Programming
An automatic control mode is also avail-
able, the automatic rain sensitive wind-
screen wipers.
Windscreen wash
Pull the wiper stalk towards you. The wind-
screen wash then the wipers operate for a
set time.
The headlamp wash is also activated if
the dipped beam headlamps are on .
Certain windscreen wiper func-
tions (intermittent operation, ...) can
be confi gured via the colour screen
"Equipment" menu.
Model with intermittent wiping
Model with AUTO wiping
or
automatic rain sensitive wipers
(the speed can be set manually).
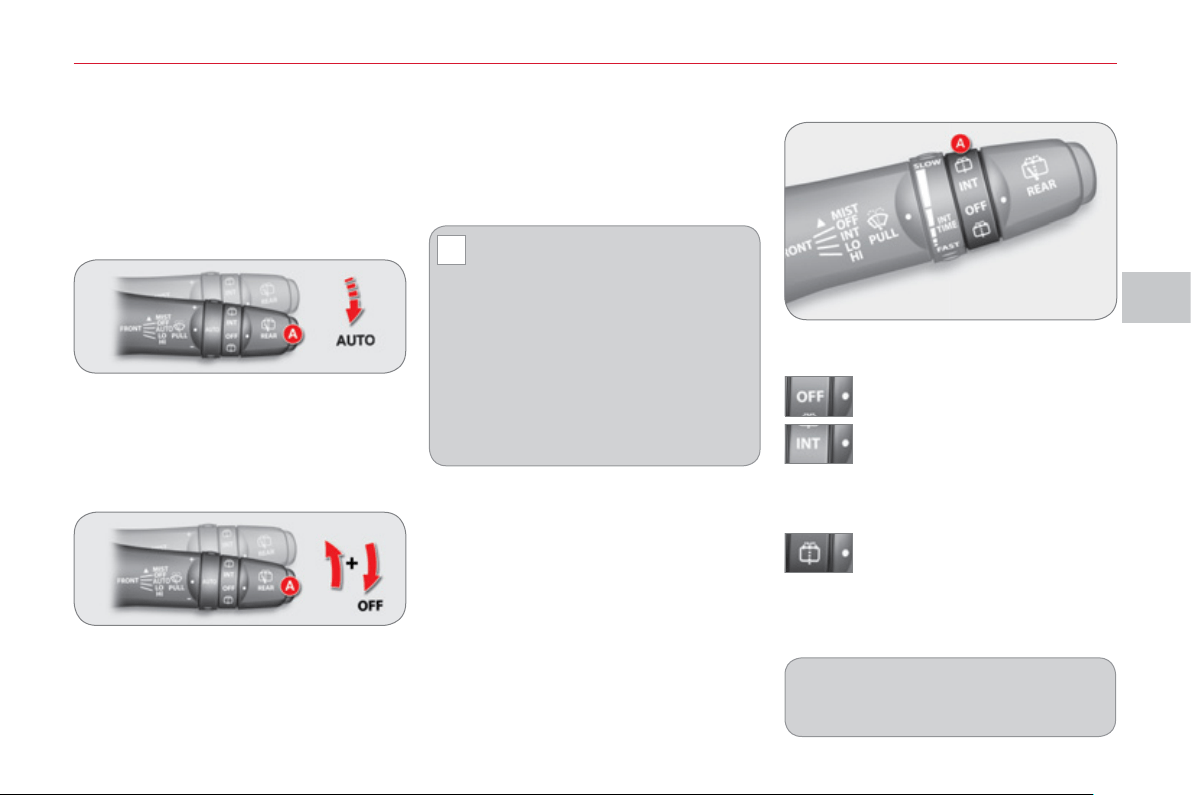
IV
!
VI
S
IBILITY
9
1
B. rear wiper selection ring:
park.
intermittent wipe.
wipe with screen wash.
Rear wiper
The wiper wipes twice then switches to
intermittent mode with an interval of a
few seconds.
Keep the ring in this position to operate
the screen wash with several wipes of
the wiper.
The intermittence of the rear wip-
er can be confi gured via the colour
screen "Equipment" menu.
Automatic rain sensitive wi
p
ers
The windscreen wipers operate auto-
matically, without any action on the part
of the driver, if rain is detected (sensor
behind the rear view mirror), adapting
their speed to the intensity of the rain-
fall.
Activation
) Move the stalk A to the "AUTO" po-
sition.
A message appears on the multifunction
screen.
Deactivation
) Move the stalk A to the "OFF" posi-
tion.
A message appears on the multifunction
screen.
Operating fault
Do not cover the rain sensor, linked
with the sunshine sensor and located in
the centre of the windscreen behind the
rear view mirror.
Switch off the automatic rain
sensitive wipers when using an
automatic car wash.
To protect the rubber of the wiper, it is
advisable to deactivate the automatic
mode when the vehicle is parked and
when the ambient temperature is be-
low 0 ° C.
In winter, it is advisable to wait until
the windscreen is completely clear
of ice before activating the automatic
rain sensitive wipers.
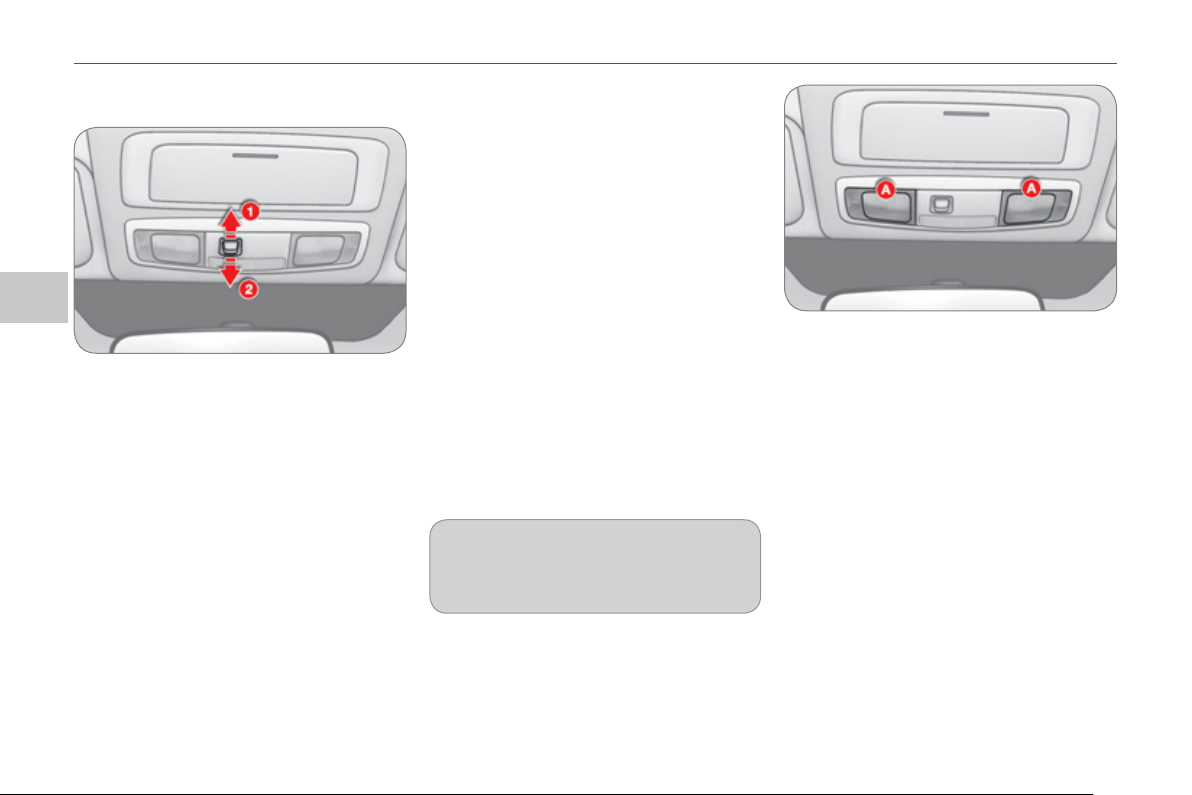
IV
VI
S
IBILITY
9
2
COURTE
S
Y LAMP
S
Front courtes
y
lamp
M
ap rea
di
n
g
l
amps
There are two map reading lamps, one
on each side of the courtesy lamp.
Press the corresponding lamp lens A .
Position 1
The courtesy lamp comes on when a
door or the tailgate is opened.
When the door or the tailgate is closed
again, the lighting gradually dims for a
few seconds before switching off.
However, the courtesy lamp is switched
off automatically in the following cases:
- When the doors and the tailgate
are closed and the ignition switch is
placed in the "ON" position.
- When the doors and the tailgate are
closed and you lock the vehicle from
inside or using the remote control.
Position 2
The courtesy lamp is off, regardless of wheth-
er the doors or tailgate are open or closed.
The durations of lighting of the front
courtesy lamps can be confi gured
via the colour screen "Equipment"
menu.
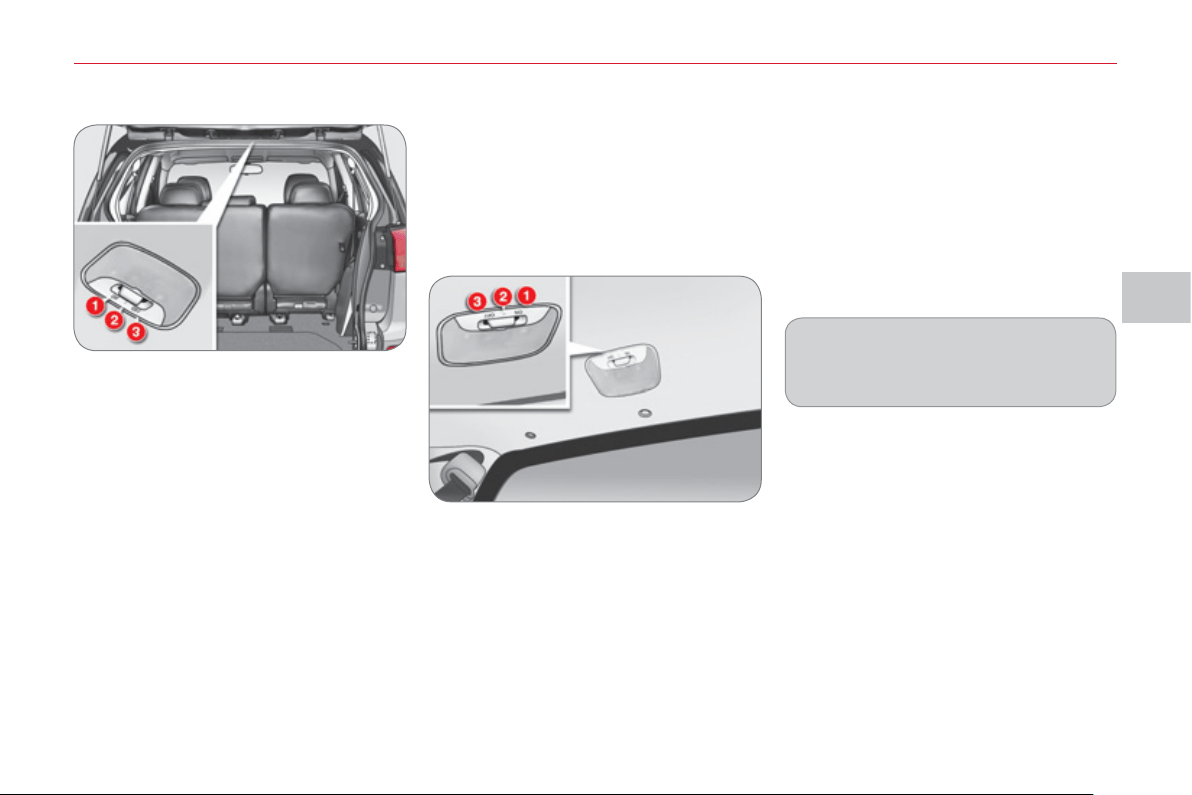
IV
VI
S
IBILITY
93
Position 1 "ON"
The courtesy lamp is permanently on.
Position 2 "●"
The courtesy lamp comes on when a
door or the tailgate is opened. When
the door or the tailgate is closed again,
the lighting gradually dims for a few
seconds before switching off.
However, the courtesy lamp is switched
off immediately in the following cases:
- When the doors and the tailgate
are closed and the ignition switch is
placed in the "ON" position.
- When the doors and the tailgate are
closed and you lock the vehicle from
inside or using the remote control.
Position 1 "ON"
The boot lamp is on, regardless of
whether the tailgate is open or closed.
Position 2 "●"
The boot lamp comes on if the tailgate
is opened and switches off when the
tailgate is closed.
Position 3 "OFF"
The courtesy lamp is permanently off.
B
oot
l
am
p
Position 3 "OFF"
The boot lamp is off, regardless of
whether the tailgate is open or closed.
Courtes
y
lamps automatic
switch off
To prevent discharging of the battery,
the courtesy lamps, map reading lamps
and boot lamp switch off automatically
after 30 minutes.
The courtesy lamps are switched on
again if the ignition switch is placed
in the "ON" or "ACC" position, if you
open then close a door or the tailgate or
if you use the remote control.
The duration of lighting of the rear
courtesy lamps can be confi gured
via the colour screen "Equipment"
menu.
Rear courtes
y
lamp

V
!
C
HILD
S
AFETY
9
4
"Rearwards-facing" "Forwards-facing"
* The rules for carrying children are
specifi c to each country. Refer to the
current legislation in your country.
G
ENERAL POINT
S
RELATING
T
O CHILD
S
EAT
S
Intermediate longitudinal position
CITROËN recommends that children
should travel in the rear seats of your ve-
hicle:
-
"rearwards-facing" up to the age of 2,
- "forwards-facing" over the age of 2.
When a "rearwards-facing" child
seat is installed on the front
passenger seat , it is essential
that the passenger airbag is deacti-
vated. Otherwise, the child would
risk being seriously injured or
killed if the airbag were to infl ate .
CHILD
S
EAT IN THE FRONT
When a "forwards-facing" child seat is
installed on the front passenger seat ,
adjust the vehicle's seat to the interme-
diate longitudinal position with the seat
back upright and leave the passenger
airbag activated.
Although one of CITROËN's main cri-
teria when designing your vehicle, the
safety of your children also depends on
you.
For maximum safety, please observe
the following recommendations:
- in accordance with European reg-
ulations, all children under the
age of 12 or less than one and a
half metres tall must travel in ap-
proved child seats suited to their
weight , on seats fi tted with a seat
belt or ISOFIX mountings * ,
- statistically, the safest seats in
your vehicle for carrying children
are the rear seats,
- a child weighing less than 9 kg
must travel in the "rearwards-
facing" position both in the front
and in the rear.
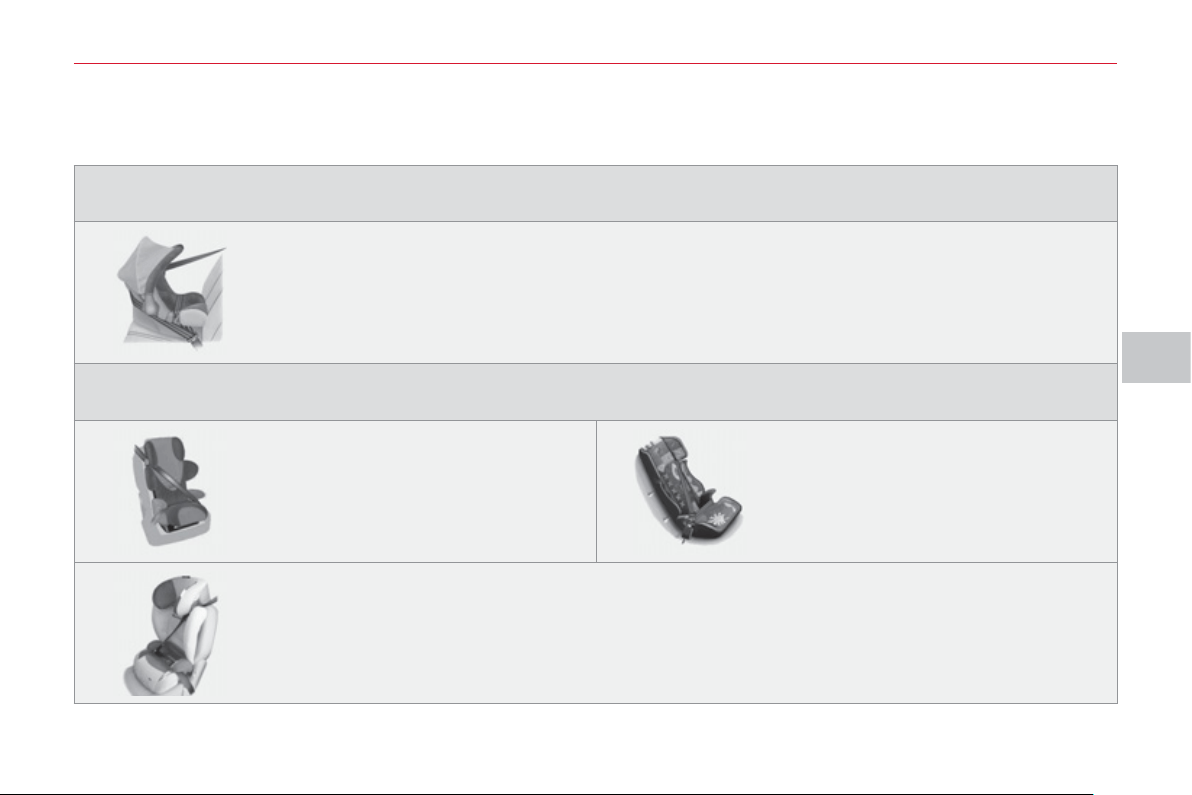
V
C
HILD
S
AFETY
95
CHILD
S
EAT
S
RECOMMENDED BY CITROËN
CITROËN offers a complete range of recommended child seats which are se-
cured using a three point seat belt :
Group 0+: from birth to 13 kg
L1
"RÖMER Baby-Safe Plus"
Installed in the rearwards-facing position.
Groups 2 and 3: from 15 to 36 kg
L3
"RECARO Start''
L4
"KLIPPAN Optima"
From the age of 6 years
(approximately 22 kg), the booster is
used on its own.
L5
"RÖMER KIDFIX"
Can be fi tted to the vehicle's ISOFIX mountings.
The child is restrained by the seat belt.
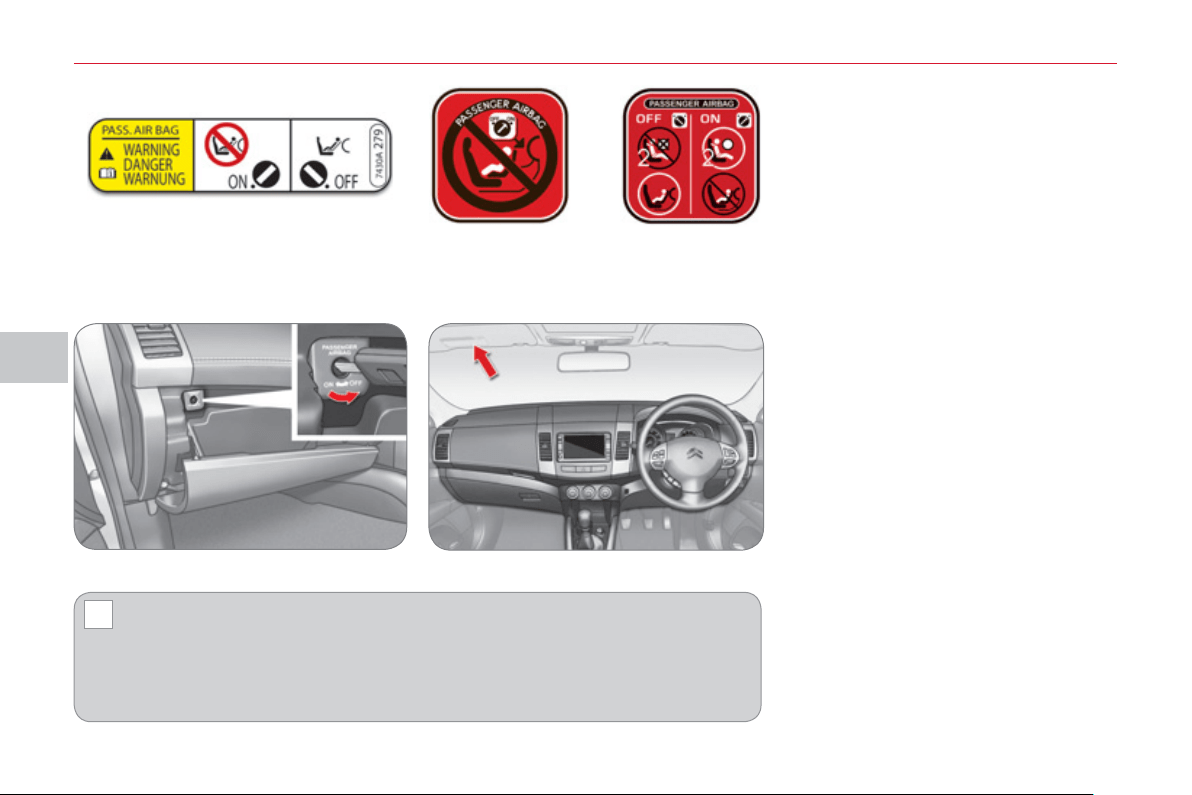
V
!
C
HILD
S
AFETY
96
Passenger airbag OFF Refer to the advice given on the label
present on both sides of the passen-
ger's sun visor.
To assure the safety of your child, you must deactivate the passenger's
front airbag when you install a child seat in the rearwards facing position
on the front passenger's seat.
Otherwise, there is a risk that the child could be seriously injured or killed if the
airbag were deployed.
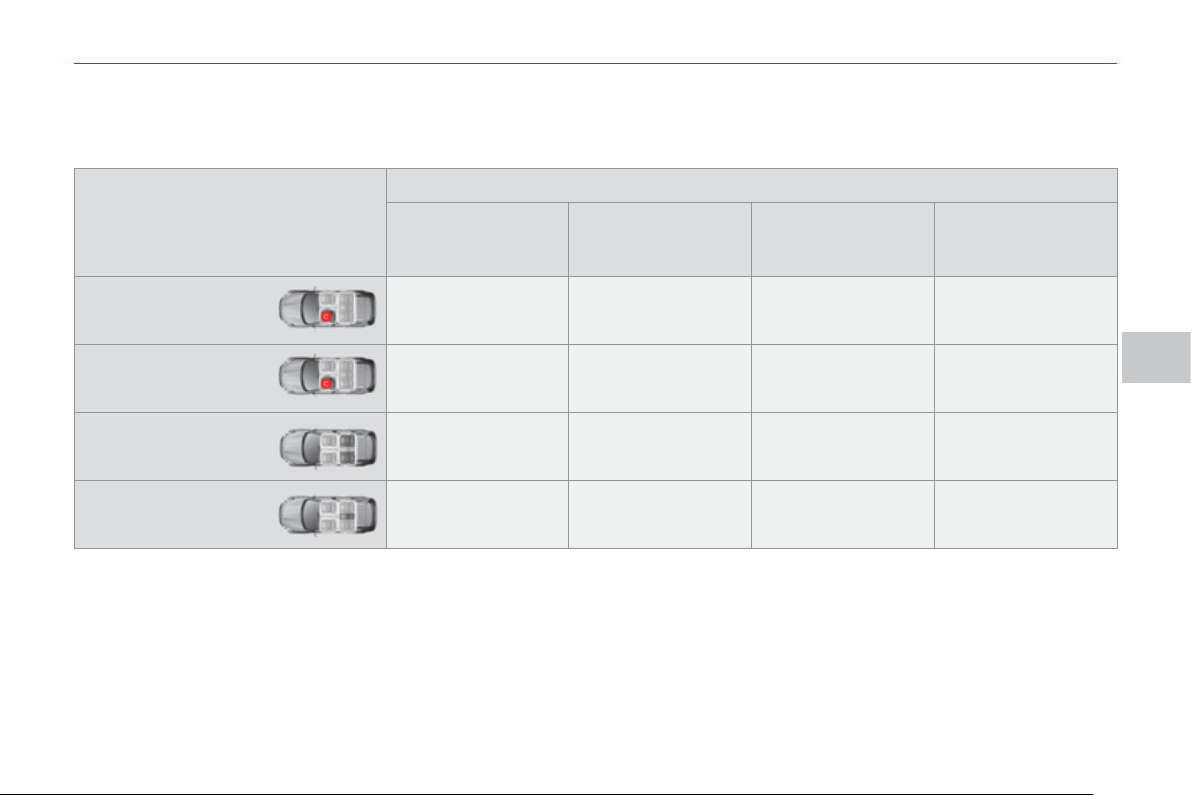
V
C
HILD
S
AFETY
9
7
L
OCATION
S
FOR CHILD
S
EAT
S
S
ECURED U
S
ING THE
S
EAT BELT
In accordance with European regulations, this table indicates the options for installing child seats secured using a seat belt
and universally approved (a) in relation to the weight of the child and the seat in the vehicle.
(a) Universal child seat: child seat which can be installed in all vehicles using the seat belt.
(b) Group 0: from birth to 10 kg. Infant car seats and "car cots" cannot be installed on the front passenger seat.
(c) Consult the legislation in force in your country before installing your child on this seat.
U: seat suitable for the installation of a child seat secured using the seat belt and universally approved, "rear facing" and/or
"forward facing".
X: seat not suitable for the installation of a child seat of the weight group indicated.
L-: only the child seats indicated can be installed on the seat concerned (according to country).
Seat
Weight of the child and indicative age
Less than 13 kg
(groups 0 (b) and 0+)
Up to ≈ 1 year
From 9 to 18 kg
(group 1)
From 1 to ≈ 3 years
From 15 to 25 kg
(group 2)
From 3 to ≈ 6 years
From 22 to 36 kg
(group 3)
From 6 to ≈ 10 years
Front passenger
seat (c) with
passenger airbag
activated
X X L3, L4 ** , L5 *** L3, L4 ** , L5 ***
Front passenger
seat (c) with
passenger airbag
deactivated
L1 X L3, L4 ** , L5 *** L3, L4 ** , L5 ***
Outer rear seats
(row 2)
L1 X U * U *
Centre rear seat
(row 2)
L1 X L4 * , L5 * L4 * , L5 *
* Remove the rear head restraint before fi tting a child seat at this position.
** Place the head restraint in the fully up position before fi tting a child seat at this position.
*** Remove the front head restraint before fi tting a child seat at this position.
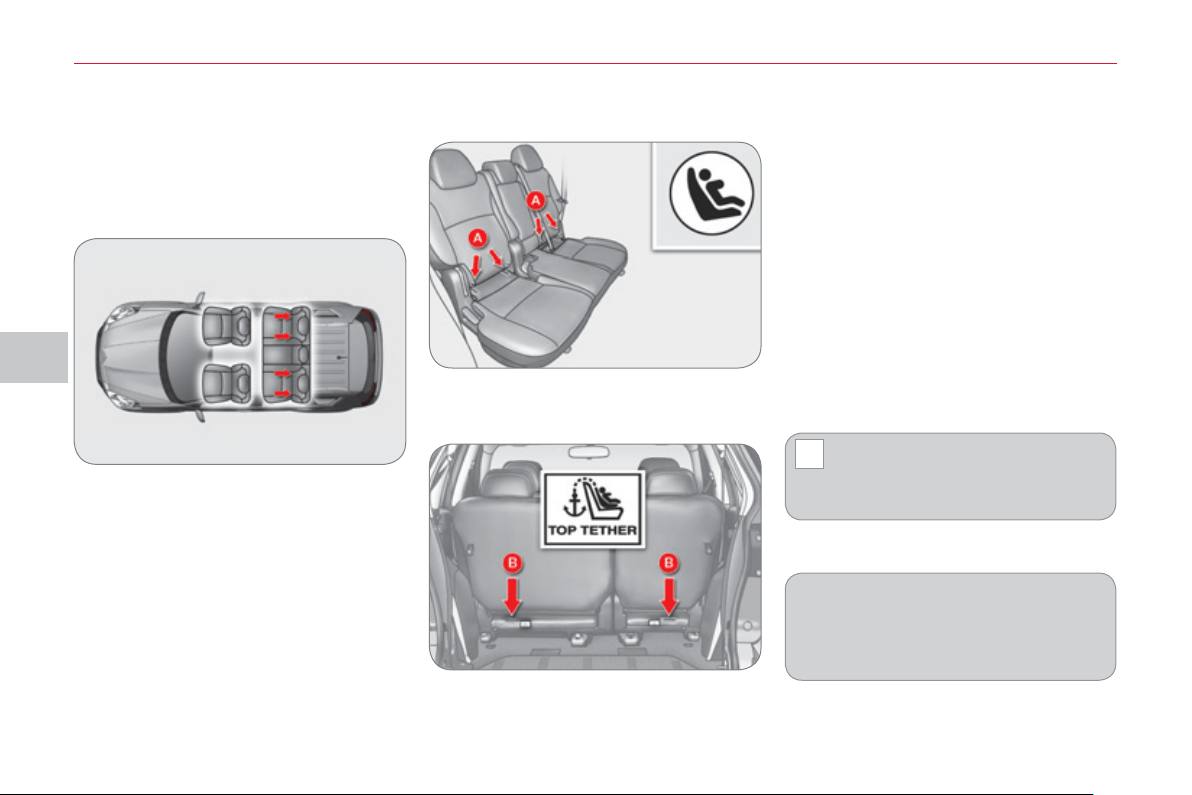
V
!
C
HILD
S
AFETY
98
The incorrect installation of a
child seat in a vehicle compro-
mises the child's protection in
the event of an accident.
For information regarding the ISOFIX
child seats which can be installed in
your vehicle, refer to the table show-
ing the locations for ISOFIX child
seats.
"ISOFIX" mountin
g
s
These are three rings for each seat:
- two rings A , located between the
vehicle seat back and cushion, indi-
cated by a label,
- a ring B , used to fi x the upper strap,
referred to as the TOP TETHER , in-
dicated by a label.
This ISOFIX mounting system provides
fast, reliable and safe fi tting of the child
seat in your vehicle.
The ISOFIX child seats are fi tted with
two latches which are secured easily on
the two rings A .
Some also have an upper strap which
is attached to the ring B .
To attach this strap, remove the vehicle
seat's head restraint. Then fi x the hook
on the ring B and tighten the upper
strap.
Your vehicle has been approved in accor-
dance with the new ISOFIX regulation .
The seats, represented below, are fi tted
with regulation ISOFIX mountings:
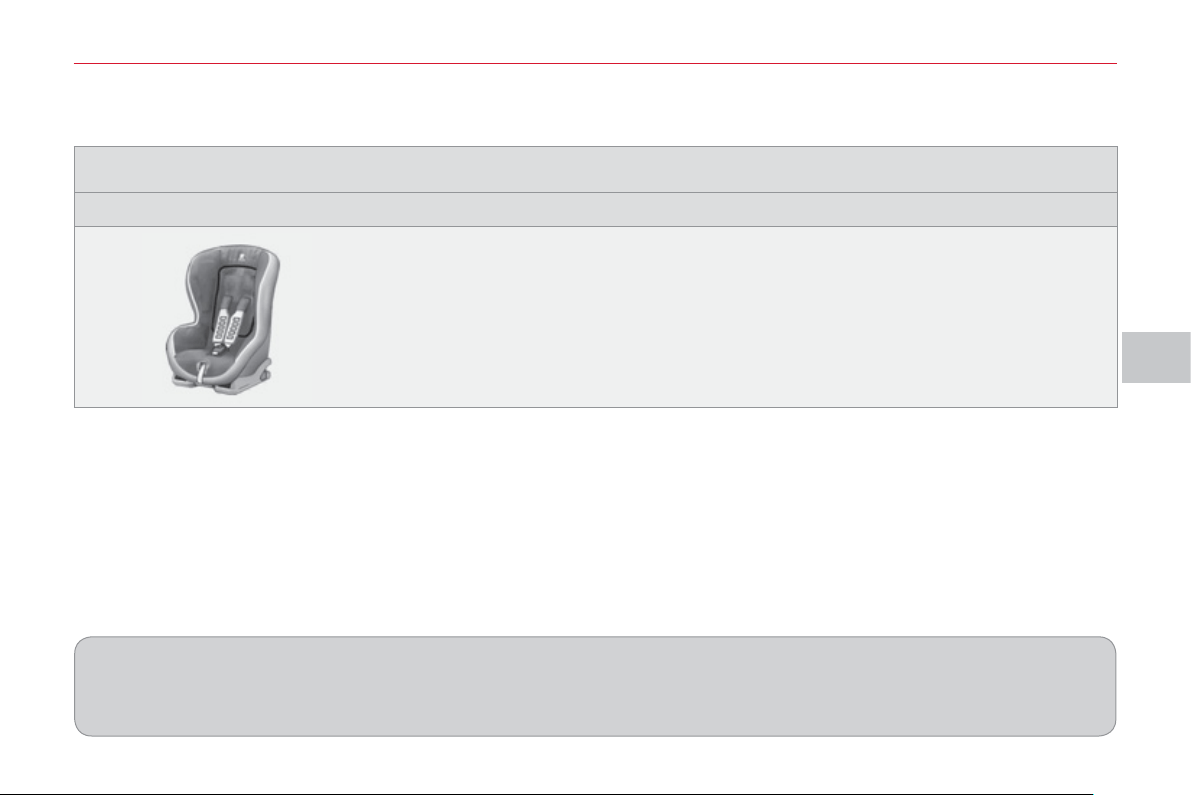
V
C
HILD
S
AFETY
99
This child seat can also be used on seats which are not fi tted with ISOFIX mountings.
In this case, it must be attached to the vehicle seat using the three point seat belt.
Follow the instructions for fi tting the child seat given in the seat manufacturer's installation guide.
ISOFIX RÖMER Duo Plus
(size category B1 )
Group 1: from 9 to 18 kg
Installed in the forward facing position.
Fitted with an upper strap to be secured on the ISOFIX upper ring, referred to as the
TOP TETHER.
Three seat body angles: sitting, reclining, lying.
Before fi tting this child seat to the outer rear seats of your vehicle, you should:
- incline the front seat backrest as far back as possible or,
- place the rear head restraint in the fully up position.
I
S
OFIX CHILD
S
EAT RECOMMENDED BY CITROËN AND APPROVED FOR YOUR VEHICLE

V
C
HILD
S
AFETY
1
00
LOCATION
S
FOR I
S
OFIX CHILD
S
EAT
S
IUF: seat suitable for the installation of an I sofi x U niversal seat, " F orward facing" secured using the "Top Tether" upper
strap.
IL-SU: seat suitable for the installation of an Isofi x S emi- U niversal seat either:
- "rear facing" fi tted with a "Top Tether" upper strap or a support,
- "forward facing" fi tted with a support.
For advice on securing of the "Top Tether" upper strap, refer to the "ISOFIX mountings" section.
X: seat not suitable for the installation of an ISOFIX seat of the size category indicated.
The head restraint of the vehicle's ISOFIX seat must be removed and stored.
In accordance with European Regulations (ECE 16), this table indicates the options for installing ISOFIX child seats on seats
in the vehicle fi tted with ISOFIX mountings.
In the case of universal and semi-universal ISOFIX child seats, the ISOFIX size category, determined by a letter from A to G ,
is indicated on the child seat next to the ISOFIX logo.
Weight of the child /indicative age
Less than 10 kg
(group 0)
Up to approx.
6 months
Less than 10 kg
(group 0)
Less than 13 kg
(group 0+)
Up to approx. 1 year
From 9 to 18 kg (group 1)
From approx. 1 to 3 years
Type of ISOFIX child seat infant car seat "rear facing" "rear facing" "forward facing"
ISOFIX size category F G
C D E C D A B B1
Universal and semi-
universal ISOFIX child seats
which can be installed on
the outer rear seats
X IL-SU IL-SU
IUF
IL-SU

V
!
C
HILD
S
AFETY
1
0
1
A
DVICE ON CHILD SEATS
Installing a booster seat
The chest part of the seat belt must
be positioned on the child's shoulder
without touching the neck.
Ensure that the lap part of the seat
belt passes correctly over the child's
thighs.
CITROËN recommends the use of
a booster seat which has a back, fi t-
ted with a seat belt guide at shoulder
level.
As a safety precaution, do not leave:
- one or more children alone and un-
supervised in a vehicle,
- a child or an animal in a vehicle
which is exposed to the sun, with
the windows closed,
- the keys within reach of children
inside the vehicle.
To prevent accidental opening of the
doors, use the "Child lock".
Take care not to open the rear win-
dows by more than one third.
To protect young children from the
rays of the sun, fi t side blinds on the
rear windows.
CHILD LOCK
) Lower the control A to position 1 .
Child lock on
Child lock off
) Raise the control A to position 2 .
Mechanical system to prevent open-
ing of the rear doors using their interior
controls.
The control is located on the edge of
each rear door.
The incorrect installation of a child
seat in a vehicle compromises the
child's protection in the event of an ac-
cident.
Remember to fasten the seat belts or
the child seat harnesses keeping the
slack in relation to the child's body to
a minimum , even for short journeys.
For optimum installation of the "for-
ward facing" child seat, ensure that
the back of the child seat is in contact
with the back of the vehicle's seat and
that the head restraint does not cause
any discomfort.
If the head restraint has to be removed,
ensure that it is stored or attached se-
curely to prevent it from being thrown
around the vehicle in the event of sharp
braking.
Children under the age of 10 must not
travel in the "forward facing" position
on the front passenger seat, unless
the rear seats are already occupied
by other children, cannot be used or
are absent.
Deactivate the passenger's airbag
when a "rear facing" child seat is in-
stalled on the front seat. Otherwise,
the child would risk being seriously
injured or killed if the airbag were to
infl ate.
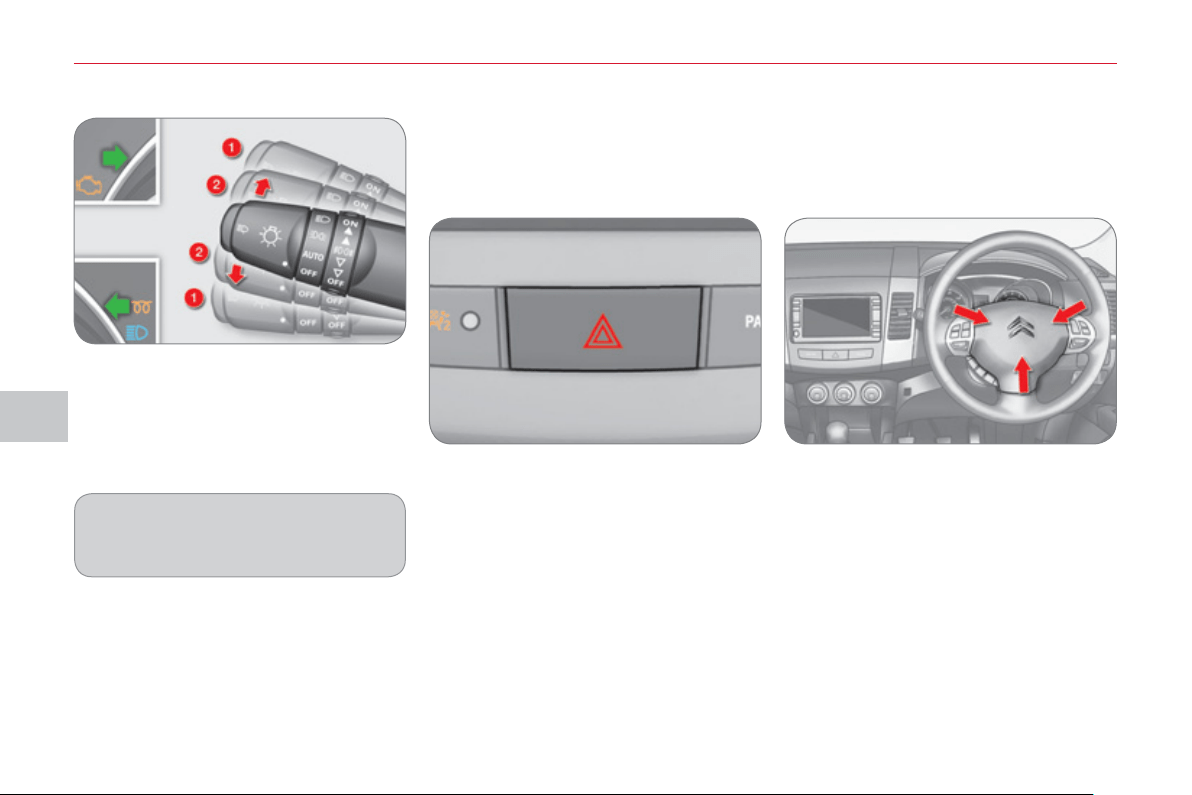
VI
S
AFETY
1
0
2
D
IRECTION INDICATOR
S
HAZARD WARNING LAMP
S
HORN
) Left: lower the lighting stalk passing
the point of resistance.
) Right: raise the lighting stalk passing
the point of resistance.
) Press one of the spokes of the
steering wheel.
"Motorwa
y
" function
) Press briefl y upwards or down-
wards, without going beyond the
point of resistance; the direction
indicators will fl ash 3 times.
Audible warning to alert other road users
to an imminent danger.
The audible signal can be confi gured
via the colour screen "Equipment"
menu.
) Press this button, the direction indi-
cators fl ash.
They can operate with the ignition off.
Automatic o
p
eration of hazard
warnin
g
lamps
When braking in an emergency, de-
pending on the deceleration, the hazard
warning lamps come on automatically.
They switch off automatically the fi rst
time you accelerate.
) You can also switch them off by
pressing the button.
A visual warning by means of the direc-
tion indicators to alert other road users to
a vehicle breakdown, towing or accident.
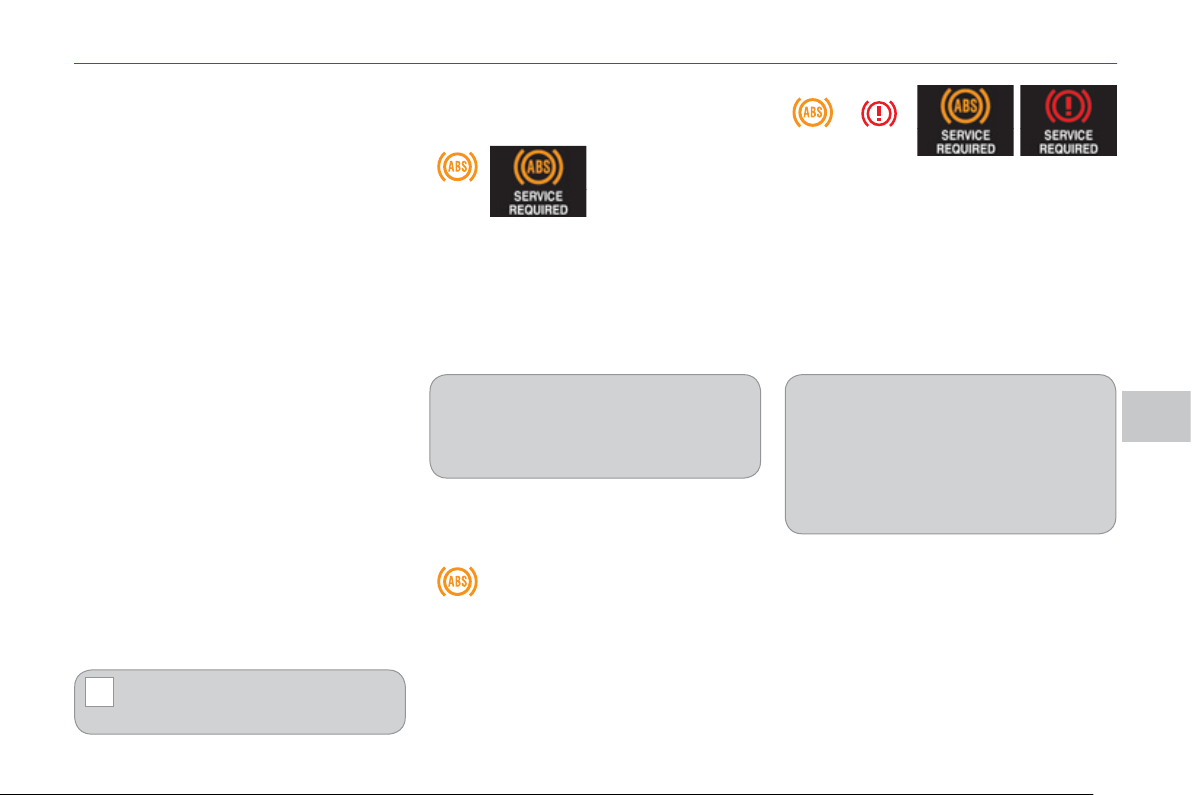
VI
!
S
AFETY
1
03
BRAKING A
SS
I
S
TANCE
S
Y
S
TEM
S
Group of supplementary systems which
help you to obtain optimum braking in
complete safety in emergency situations:
- anti-lock braking system (ABS),
- electronic brake force distribution
(EBFD).
When braking in an emergency,
press very fi rmly without releas-
ing the pressure.
The two warning lamps comes on
at the same time and the two warn-
ings are displayed alternately in the
instrument panel screen.
When replacing wheels (tyres and
rims), ensure that they conform to the
manufacturer's recommendations.
Operating fault
If this warning lamp comes on, accompa-
nied by the indication on the instrument
panel screen, it indicates a malfunction of
the anti-lock braking system which could
result in a loss of control of the vehicle
when braking.
Contact a CITROËN dealer or a quali-
fi ed workshop.
If these two warning lamps come on,
linked with the warnings on the instru-
ment panel screen, they indicate a mal-
function of the electronic brake force
distribution which could result in a loss
of control of the vehicle on braking.
You MUST stop as soon as it is safe
to do so.
Contact a CITROËN dealer or a quali-
fi ed workshop.
Anti-lock brakin
g
s
y
stem
a
nd electronic brake force
d
istribution
Linked systems which improve the sta-
bility and manoeuvrability of your vehi-
cle when braking, in particular on poor
or slippery surfaces.
The warning lamp comes on for a few
seconds when the ignition is switched on
(ON position). If it does not switch off or
does not come on, contact a CITROËN
dealer or a qualifi ed workshop.
When the vehicle is stationary
When the vehicle is moving
If this warning lamp comes on
continuously it indicates a mal-
function of the anti-lock braking
system which could result in a
loss of control of the vehicle on braking.
You MUST stop as soon as it is safe
to do so.
Contact a CITROËN dealer or a quali-
fi ed workshop.
Activation
The anti-lock braking system is active if
the vehicle speed is higher than 6 mph
(10 km/h). It is deactivated when the ve-
hicle speed falls below 3 mph (5 km/h).
The anti-lock braking system comes
into operation automatically when there
is a risk of wheel lock.
Normal operation of the ABS may make
itself felt by slight vibration of the brake
pedal.

VI
!
S
AFETY
1
0
4
The ASC/TCL systems offer ex-
ceptional safety in normal driving,
but this should not encourage the
driver to take extra risks or drive at
high speed.
The correct functioning of these sys-
tems depends on observation of the
manufacturer’s recommendations on:
- wheels (tyres and rims),
- braking components
- electronic components,
- assembly and repair procedures.
After an impact, have these systems
checked by a CITROËN dealer or a
qualifi ed workshop.
Deactivation
In exceptional conditions (starting a
vehicle which is bogged down, stuck
in snow, on soft ground, ...), it may be
better to deactivate the ASC system, so
that the wheels can move freely and re-
gain grip.
) Press the "ASC OFF" button, locat-
ed to the right of the steering wheel,
until the ASC OFF symbol appears
in the instrument panel screen.
The display of this symbol in the top
right corner of the instrument panel
screen indicates that the ASC and TCL
systems are deactivated.
Reactivation
These systems are not reactivated au-
tomatically above 30 mph (50 km/h).
) Press the "ASC OFF" button again
to reactivate them manually.
Switching off of the symbol in the top
right corner of the instrument panel
screen indicates the reactivation of the
ASC and TCL systems.
Operating fault
The display of this message
in the instrument panel
screen indicates a malfunc-
tion of these systems.
Contact a CITROËN deal-
er or a qualifi ed workshop to have the
ASC/TCL systems checked.
T
RAJECTORY CONTROL
SYSTEMS
Activation
These systems are activated automati-
cally each time the vehicle is started.
They operate when the vehicle speed is
higher than 10 mph (15 km/h).
Traction control and automatic
stabilit
y
control
Traction control optimises traction to
prevent wheel spin, by acting on the
brakes of the driving wheels and on the
engine.
Automatic stability control acts on the
brake of one or more wheels and on the
engine to keep the vehicle on the tra-
jectory required by the driver.
They come into operation in
the event of a grip or trajectory
problem.
This is indicated by fl ashing
of this symbol on the instrument panel
screen.
Associated systems which guarantee
the directional stability of the vehicle
within the limits of the laws of physics:
- traction control (TCL),
- automatic stability control (ASC).

VI
S
AFETY
1
05
S
EAT BELT
S
Height adjustment Fastening
) Pull the strap, then insert the tongue
in the buckle A .
) Check that the seat belt is fastened
correctly by pulling the strap.
) to lower the attachment point, press
the control B and slide the fi xing C
down,
) to raise the attachment point, press
the control B and slide the fi xing C up.
Unfastening
) Press the red button on the buckle A .
F
ront seat
b
e
l
ts
The front seat belts are fi tted with a pre-
tensioning and force limiting system.
This system improves safety in the front
seats in the event of a front or side im-
pact. Depending on the severity of the
impact, the pretensioning system instant-
ly tightens the seat belts against the body
of the occupants.
The pretensioning seat belts are active
when the ignition is on.
The force limiter reduces the pres-
sure of the seat belt on the chest of the
occupant, so improving their protection.
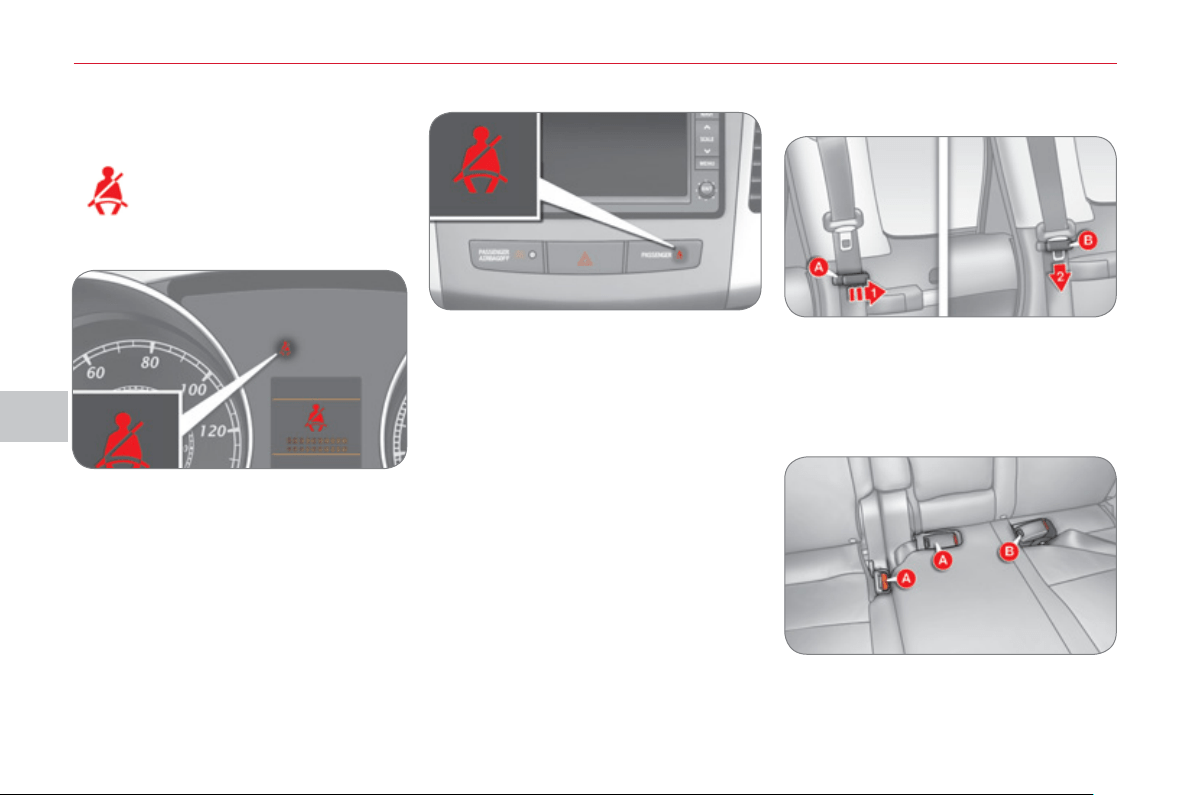
VI
S
AFETY
1
06
Front seat belt not fastened/
unfastened warning lamp
When the ignition is switched
on, this warning lamp comes
on accompanied by an au-
dible signal for a few seconds
if the driver has not fastened
their seat belt.
R
ear seat belts
Each rear seat is fi tted with a three-point
inertia reel seat belt with force limiter.
Fastening
) Pull the strap, then insert the tongue
in the buckle.
) Check that the seat belt is fastened
correctly by pulling the strap.
Unfastening
) Press the red button on the buckle.
If the driver does not fasten their seat
belt within one minute after switching on
the ignition, the warning lamp fl ashes
accompanied by an intermittent audible
signal and a display on the instrument
panel screen.
The warning lamp, the audible signal
and the display stop after approximate-
ly 90 seconds and return until the driver
fastens their seat belt.
If the seat belt is unfastened while the
vehicle is moving , you are alerted by
the same warnings.
Storin
g
after use
1. Pass the seat belt under the support A
located on each rear side pillar,
2. Insert the tongue in the slot B of the
support.
Rear buckles
) Store the buckles in the locations A
and B provided for this purpose in
the rear seat cushion.
Driver's seat belt
Outer rear seat belts
Front passenger's seat belt
When the ignition is switched on, this
warning lamp comes on the centre
console panel.
It is accompanied by an audible signal
for a few seconds if the passenger has
not fastened their seat belt.
If the seat belt is unfastened while the
vehicle is moving , you are alerted by
the same warnings.
VI
!
1
0
7
The driver must ensure that pas-
sengers use the seat belts correct-
ly and that they are all restrained
securely before setting off.
Wherever you are seated in the vehicle,
always fasten your seat belt, even for
short journeys.
Do not interchange the seat belt buck-
les as they will not fulfi l their role fully.
The seat belts are fi tted with an inertia
reel permitting automatic adjustment
of the length of the strap to your size.
The seat belt is stowed automatically
when not in use.
Before and after use, ensure that the
seat belt is reeled in correctly.
The lower part of the strap must be
positioned as low as possible on the
pelvis.
The upper part must be positioned in
the hollow of the shoulder.
The inertia reels are fi tted with an auto-
matic locking device which comes into
operation in the event of a collision,
emergency braking or if the vehicle
rolls over. You can release the device
by pulling fi rmly on the strap and re-
leasing it so that it reels in slightly.
Recommendations for children
Use a suitable child seat if the passen-
ger is less than 12 years old or shorter
than one and a half metres.
Never use the same seat belt to se-
cure more than one person.
Never allow a child to travel on your lap.
In order to be effective, a seat belt
must:
- be tightened as close to the body
as possible,
- be pulled in front of you with a
smooth movement, checking that
it does not twist,
- be used to restrain only one person,
- not bear any trace of cuts or fraying,
- not be converted or modifi ed to
avoid affecting its performance.
In accordance with current safety reg-
ulations, for all repairs on your vehicle,
go to a qualifi ed workshop with the
skills and equipment needed, which a
CITROËN dealer is able to provide.
Have your seat belts checked regu-
larly by a CITROËN dealer or a quali-
fi ed workshop, particularly if the straps
show signs of damage.
Clean the seat belt straps with soapy
water or a textile cleaning product,
sold by CITROËN dealers.
After folding or moving a seat or rear
bench seat, ensure that the seat belt is
positioned and reeled in correctly.
In the event of an impact
Depending on the nature and serious-
ness of the impact , the pretensioning
device may be deployed before and in-
dependently of the airbags. Deployment
of the pretensioners is accompanied by
a slight discharge of harmless smoke
and a noise, due to the activation of the
pyrotechnic cartridge incorporated in
the system.
In all cases, the airbag warning lamp
comes on.
Following an impact, have the seat
belts system checked, and if neces-
sary replaced, by a CITROËN dealer
or a qualifi
ed workshop.

VI
!
S
AFETY
1
08
AIRBAG
S
The airbags do not operate
when the ignition is switched
off.
This equipment will only operate
once. If a second impact occurs (dur-
ing the same or a subsequent acci-
dent), the airbag will not operate.
Front airba
g
s
System which protects the head and
chest of the driver and front passenger
in the event of a front impact.
The driver's airbag is fi tted in the centre
of the steering wheel; the front passen-
ger's airbag is fi tted in the dashboard
above the glove box.
Deployment
The airbags are deployed simultane-
ously, unless the passenger's front
airbag is deactivated, in the event of
a serious front impact applied to all or
part of the front impact zone A , in the
longitudinal centreline of the vehicle on
a horizontal plane and directed from the
front to the rear of the vehicle.
The front airbag infl ates between the
front occupant of the vehicle and the
dashboard to cushion their forward
movement.
Impact detection zones
A. Front impact zone.
B. Side impact zone.
Deployment of the airbag(s) is ac-
companied by a slight emission of
harmless smoke and a noise, due to
the activation of the pyrotechnic car-
tridge incorporated in the system.
This smoke is not harmful, but sensi-
tive individuals may experience slight
irritation.
The noise of the detonation may re-
sult in a slight loss of hearing for a
short time.
System designed to maximise the safety
of the occupants (with the exception of
the rear centre passenger) in the event
of violent collisions. It supplements the
action of the force-limiting seat belts.
If a collision occurs, the electronic de-
tectors record and analyse the front
and side impacts sustained in the im-
pact detection zones:
- in the case of a serious impact, the
airbags are deployed instantly and
protect the occupants of the vehicle
(with the exception of the rear cen-
tre passenger); immediately after the
impact, the airbags defl ate rapidly so
that they do not hinder visibility or the
exit of the occupants,
- in the case of a minor or rear impact
or in certain roll-over conditions, the
airbags will not be deployed; the
seat belt alone is suffi cient to pro-
vide optimum protection in these
situations.
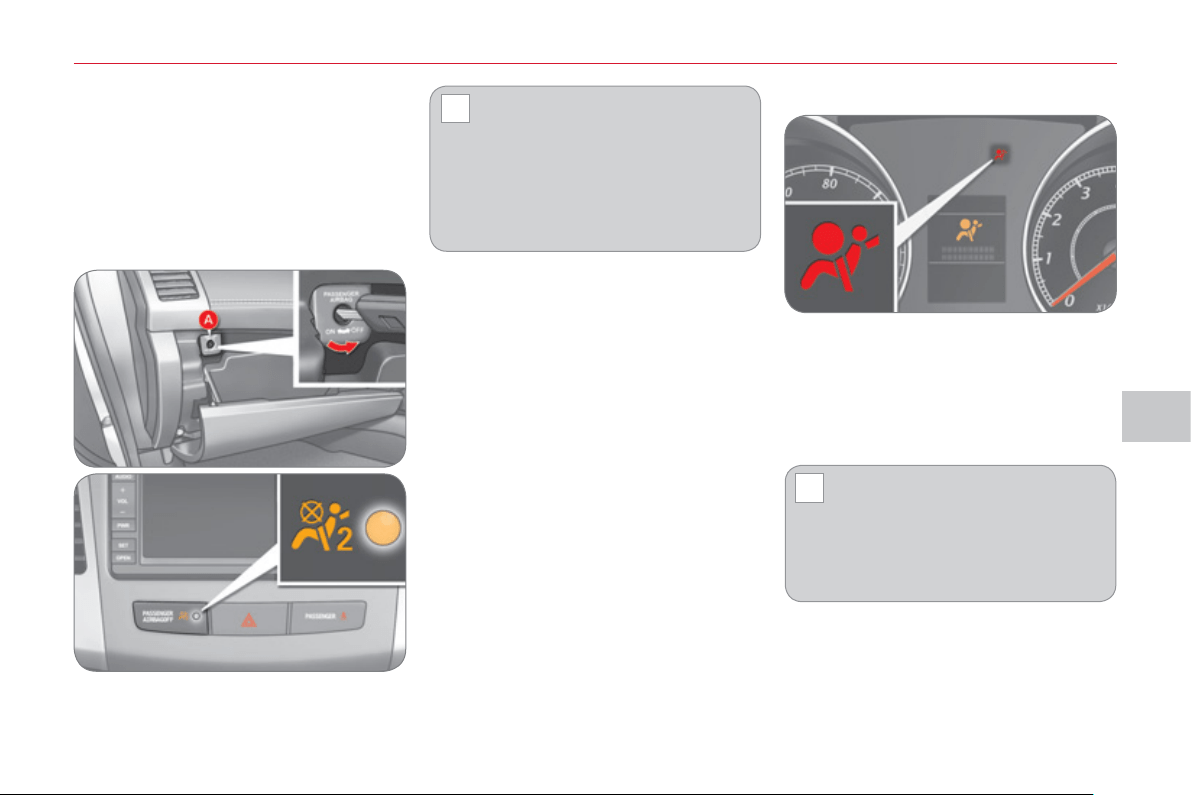
VI
!
!
S
AFETY
1
09
If the airbag warning lamp and
the display come on continuously,
do not install a "rear facing" child
seat on the front passenger seat.
Contact a CITROËN dealer or a
qualifi ed workshop.
Operating fault
If this warning lamp comes on on the
instrument panel and this display ap-
pears on the instrument panel screen,
contact a CITROËN dealer or a qualifi ed
workshop to have the system checked.
The airbags may no longer be deployed
in the event of a serious impact.
To ensure the safety of your
child, the passenger's airbag
must be deactivated when you
install a "rear facing" child seat on
the front passenger seat.
Otherwise, the child would risk being
seriously injured or killed if the airbag
were triggered.
This warning lamp comes on in the cen-
tre console panel when the ignition is
on and until the airbag is reactivated.
Reactivation
When you remove the child seat, turn
switch A to the "ON" position to reacti-
vate the airbag and so ensure the safe-
ty of your front passenger in the event
of an impact.
The associated warning lamp goes off.
Deactivation
Only the front passenger's airbag can
be deactivated:
) with the ignition off , insert the key
in the passenger airbag deactiva-
tion switch A ,
) turn it to the "OFF" position,
) remove the key.
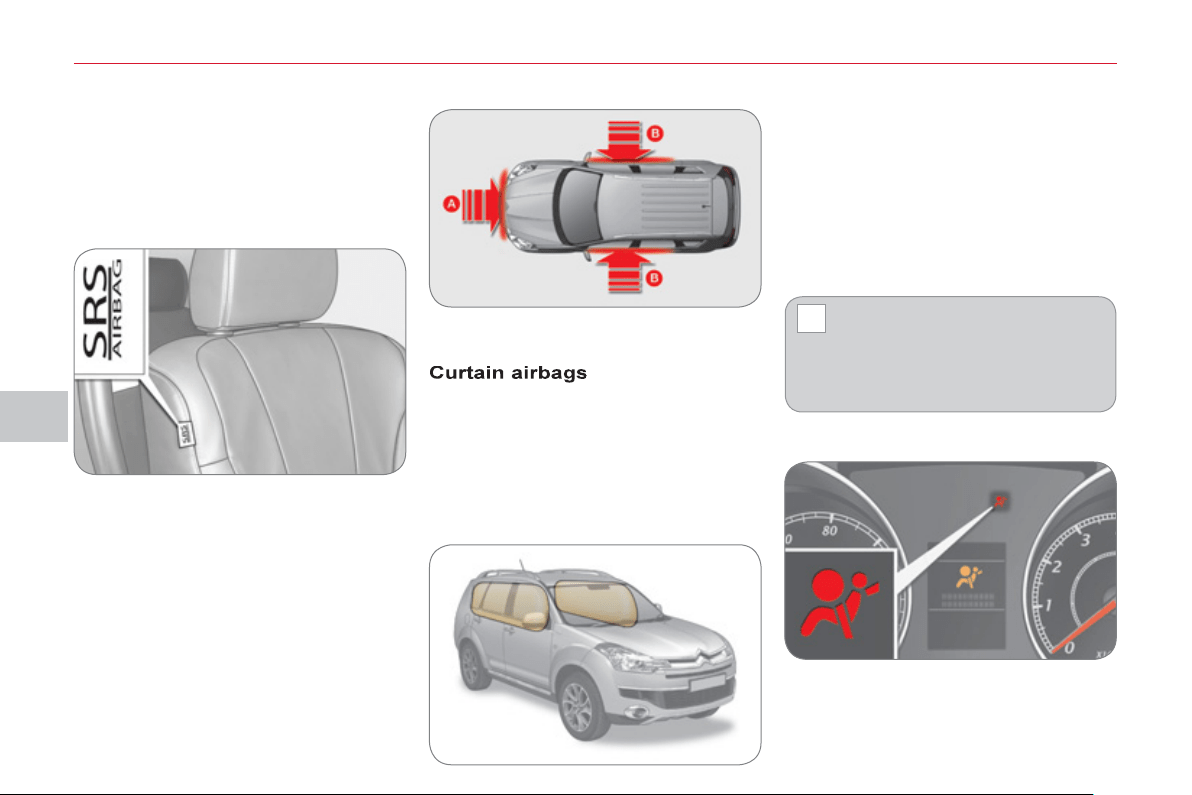
VI
!
S
AFETY
110
L
ateral airba
g
s
System which protects the driver and
passenger in the event of a serious side
impact in order to limit the risk of injury
to the chest.
Each lateral airbag is fi tted in the front
seat back frame, on the door side.
Activation
The lateral airbag is triggered unilater-
ally in the event of a serious side impact
applied to all or part of the side impact
zone B , perpendicular to the longitudinal
centreline of the vehicle on a horizontal
plane and directed from the outside to-
wards the inside of the vehicle.
The lateral airbag infl ates between the
front occupant of the vehicle and the
corresponding door trim panel.
System which protects the driver and
passengers (with the exception of the
rear centre passenger and the passen-
gers in row 3) in the event of a serious
side impact in order to limit the risk of
injury to the head.
Each curtain airbag is fi tted in the pillars
and the upper section of the passenger
compartment.
Deployment
The curtain airbag is deployed at the
same time as the corresponding lateral
airbag in the event of a serious side im-
pact applied to all or part of the side impact
zone B , perpendicular to the longitudinal
centreline of the vehicle on a horizontal
plane and directed from the outside to-
wards the inside of the vehicle.
The curtain airbag infl ates between the
front or rear occupant of the vehicle and
the windows.
In the event of a minor impact or
bump on the side of the vehicle
or if the vehicle rolls over, the
airbag may not be deployed.
In the event of a rear or front colli-
sion, the airbag is not deployed.
Impact detection zones
A. Front impact zone.
B. Side impact zone.
Operating fault
If this warning lamp comes on in the instru-
ment panel and this display appears in the
instrument panel screen, contact a CITROËN
dealer or a qualifi ed workshop to have the
system checked. The airbags may no longer
be deployed in the event of a serious impact.
VI
!
111
Lateral airbags
Use only approved covers on the seats, compatible with the deployment the
lateral airbags. For information on the range of seat covers suitable for your
vehicle, you can contact a CITROËN dealer (see "Practical information - §
Accessories").
Do not fi x or attach anything to the seat backs (clothing...). This could cause
injury to the chest or arms if the lateral airbag is deployed.
Do not sit with the upper part of the body any nearer to the door than necessary.
For the airbags to be fully
effective, observe the
following safety rules:
Sit in a normal upright position.
Wear a correctly adjusted seat belt.
Do not leave anything between the
occupants and the airbags (a child,
pet, object...). This could hamper the
operation of the airbags or injure the
occupants.
After an accident or if the vehicle has
been stolen or broken into, have the
airbag systems checked.
All work on the airbag system must be
carried out by a CITROËN dealer or a
qualifi ed workshop.
Even if all of the precautions men-
tioned are observed, a risk of injury
or of minor burns to the head, chest
or arms when an airbag is deployed
cannot be ruled out. The bag infl ates
almost instantly (within a few millisec-
onds) then defl ates within the same
time discharging the hot gas via open-
ings provided for this purpose.
Curtain airbags
Do not fi x or attach anything to the roof. This could cause injury to the head if
the curtain airbag is deployed.
If fi tted on your vehicle, do not remove the grab handles installed on the roof,
they play a part in securing the curtain airbags.
Front airbags
Do not drive holding the steering wheel by its spokes or resting your hands on
the centre part of the wheel.
Passengers must not place their feet on the dashboard.
If possible, do not smoke as deployment of the airbags can cause burns or the
risk of injury from a cigarette or pipe.
Never remove or pierce the steering wheel or hit it violently.

VII
DRIVIN
G
112
P
ARKING BRAKE
Releasing
)
Pull the lever up and press the button A
to release the parking brake.
5-
S
PEED MANUAL GEARBOX
Engaging 5 th or 6 th gear
) Move the gear level fully to the right
to change to 5 th or 6 th gear.
Applying
) Pull the parking brake lever up to
immobilise your vehicle.
When parking on a slope, direct your
wheels towards the pavement and apply
the parking brake.
When the vehicle is being
driven, the display of this
message indicates that the
parking brake is still on or has
not been properly released.
6-
S
PEED MANUAL GEARBOX
Engaging reverse
) Lift the sleeve below the gear knob
and move the gear lever to the left
and then towards the front.
Reverse gear can only be engaged
when the vehicle is stationary with
the engine idling.
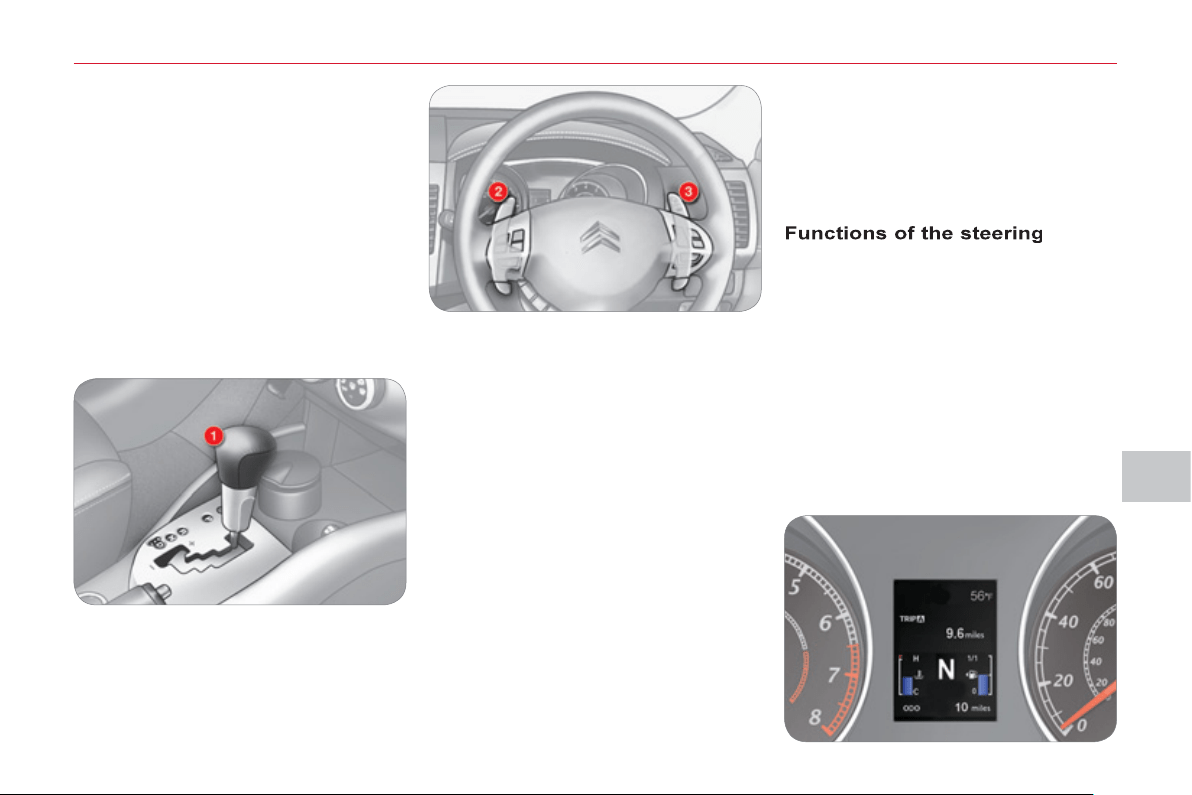
VII
DRIVIN
G
11
3
Gear lever
p
ositions
N : neutral.
With your foot on the brake, select this
position to start.
R : reverse gear.
With the vehicle stationary, keep your
foot on the brake pedal and push the
gear lever forwards.
D : automated mode.
Move the lever backwards to select this
mode.
+/-: sequential mode with manual gear
changing.
m
ounted control
p
addles
+ : manual gear changing in sequential
mode.
Press behind the "+" steering mounted
control paddle to change up.
- : manual gear changing in sequential
mode.
Press behind the "-" steering mounted
control paddle to change down.
-
a "-" steering mounted control paddle 2
for sequential downward gear changes,
- a "+" steering mounted control
paddle 3 for sequential upward gear
changes.
Move the lever backwards, then to the
left to select this mode, then:
- push forward to change up,
- push backward to change down.
Movin
g
off
Select position N .
CVT GEARBOX
The six-speed automatic gearbox of-
fers a choice between the comfort of
automatic regulation or the pleasure of
manual gear changing.
This gearbox has two driving modes:
- an automated mode for automatic
control of the gears by the gearbox
and therefore without any action on
the part of the driver,
- a sequential mode for manual
changing of the gears by the driver
using the steering mounted controls
or the gear lever.
It consists of the following controls:
- a gear lever 1 on the centre console
for selecting the driving mode, reverse
gear and neutral or for changing gear
in sequential mode,

VII
DRIVIN
G
114
Stoppin
g
- Startin
g
on a slope
Do not use the accelerator pedal to im-
mobilise the vehicle on a slope, apply
the parking brake instead.
When starting on a slope, accelerate
gradually while releasing the parking
brake.
Switchin
g
to sequential mode
Once you have moved off, you can
switch to sequential mode by selecting
position +/- .
"D" disappears and the gears engaged
appear in succession in the instrument
panel screen.
The gear change requests are only carried
out if the engine speed permits it.
Take your foot off the accelerator pedal
gently to engage the gear.
Switchin
g
to automated mode
Automated mode
After using the sequential mode, you
can return to the automated mode by
selecting position D .
"D" appears in the instrument panel
screen.
The gearbox then operates in auto-active
mode, without any action on the part of
the driver.
It continuously selects the gear most
suited to the conditions of:
- driving style,
- road characteristics,
- vehicle load.
To optimise driving comfort and obtain
the most suitable gear, avoid sharp
variations in the pressure on the accel-
erator pedal.
Auto sequential mode
In the automated mode, you can take
over control temporarily at any time using
the steering mounted controls.
The use of these controls permits manual
selection of the gears in situations which
require a faster changedown than that
offered in automated mode (arrival at a
roundabout, exit from a car park with a
steep gradient, overtaking...).
Stoppin
g
the vehicle
Before switching off the engine, you can:
- move to position N to leave the
gearbox in neutral.
- leave a gear engaged, such as fi rst
or reverse.
In both cases, you must apply the parking
brake to immobilise the vehicle.
Operatin
g
anomal
y
With the ignition on, if the message "Slow
down" or "Maintenance required" ap-
pears in the multifunction screen, this indi-
cates a gearbox malfunction.
When a message is displayed, carry
out the following operations:
- slow down and stop your vehicle in
a safe place,
- place the lever in position N and let
the engine run,
- open the bonnet to allow the engine
to cool.
If the message disappears for a long
period, you can set off again.
If the message remains displayed or
appears frequently, contact a CITROËN
dealer or a qualifi ed workshop without
delay.
Press the brake pedal fi rmly
while starting the engine.
Start the engine. "N" appears in the in-
strument panel screen.
Select fi rst gear (position D or +/- ) or reverse
(position R ).
Release the parking brake.
Release the brake pedal then accelerate.
"D" or "1" or "R" appear in the instrument
panel screen.
The gearbox engages the gear re-
quested if the engine speed permits it.
The gear engaged appears.
To return to the automated mode, press
the back of the "+/OFF" control for ap-
proximately 2 seconds.
At low speeds, when approaching a
stop or traffi c lights for example, the
gearbox changes down to fi rst gear au-
tomatically.
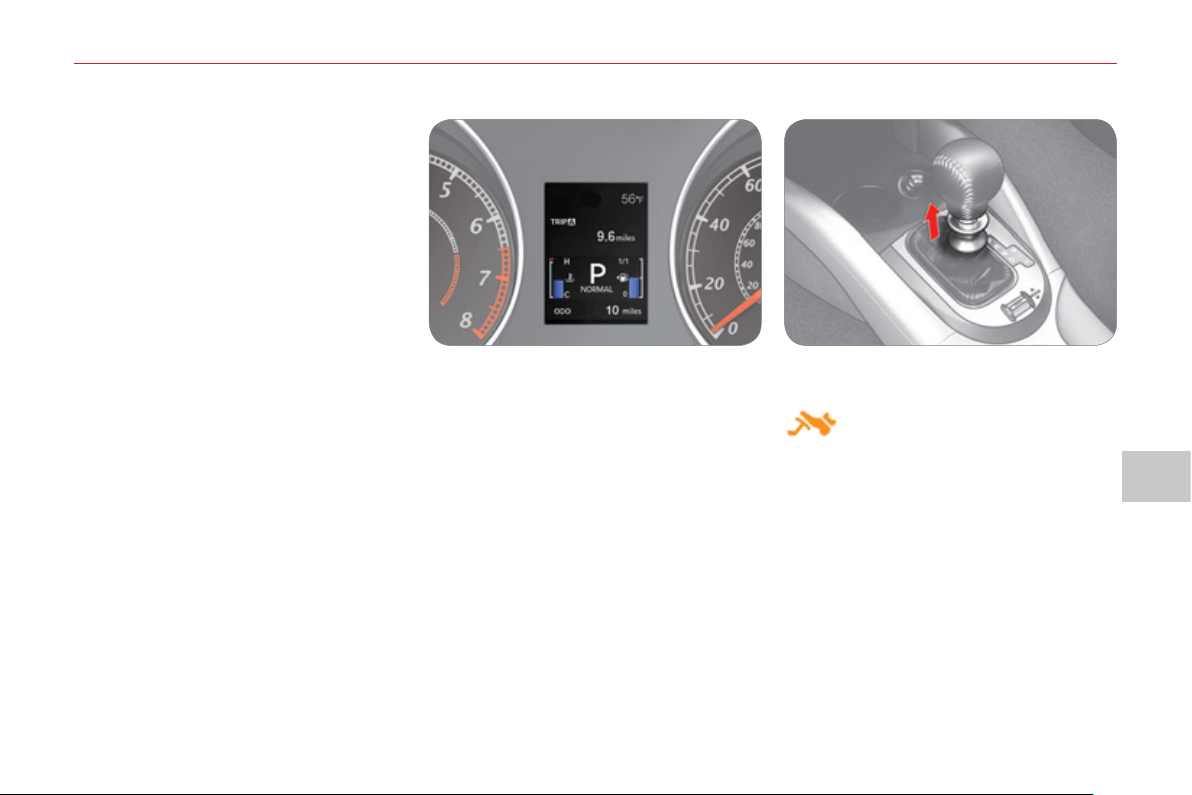
VII
DRIVIN
G
11
5
D
C
S
GEARBOX
The six-speed electronically controlled
gearbox offers a choice between the
comfort of automatic regulation or the
pleasure of manual gear changing.
This gearbox has three driving modes:
- a manual mode for changing of the
gears by the driver using the steering
mounted controls or the gear lever,
- a " Normal " automatic mode for eco-
nomical control of the gears (every-
day use),
- a " Sport " automatic mode which
permits a more dynamic style of
driving, with improved acceleration
and optimised engine braking.
When you move the lever in the gate
to select a position, the corresponding
indicator or message is displayed in the
instrument panel.
P. Park.
R. Reverse.
N. Neutral.
D. Drive (Automatic mode).
NORMAL. Normal mode.
SPORT. Sport mode.
1,2,3,4,5,6. Gear engaged during manual
operation.
Displa
y
s in the instrument panel
P : park.
Gear lever
p
ositions
With your foot on the brake, this
position permits starting of the
vehicle.
To exit position P , raise the ring on the
gear lever.
R : reverse gear.
With the vehicle stationary, keep your
foot on the brake pedal and push the
gear lever forwards.
N : neutral.
With your foot on the brake, this position
also permits starting of the vehicle.
D : automatic mode.
Move the lever rearwards.
+/- : manual mode with gear changing
using the lever.
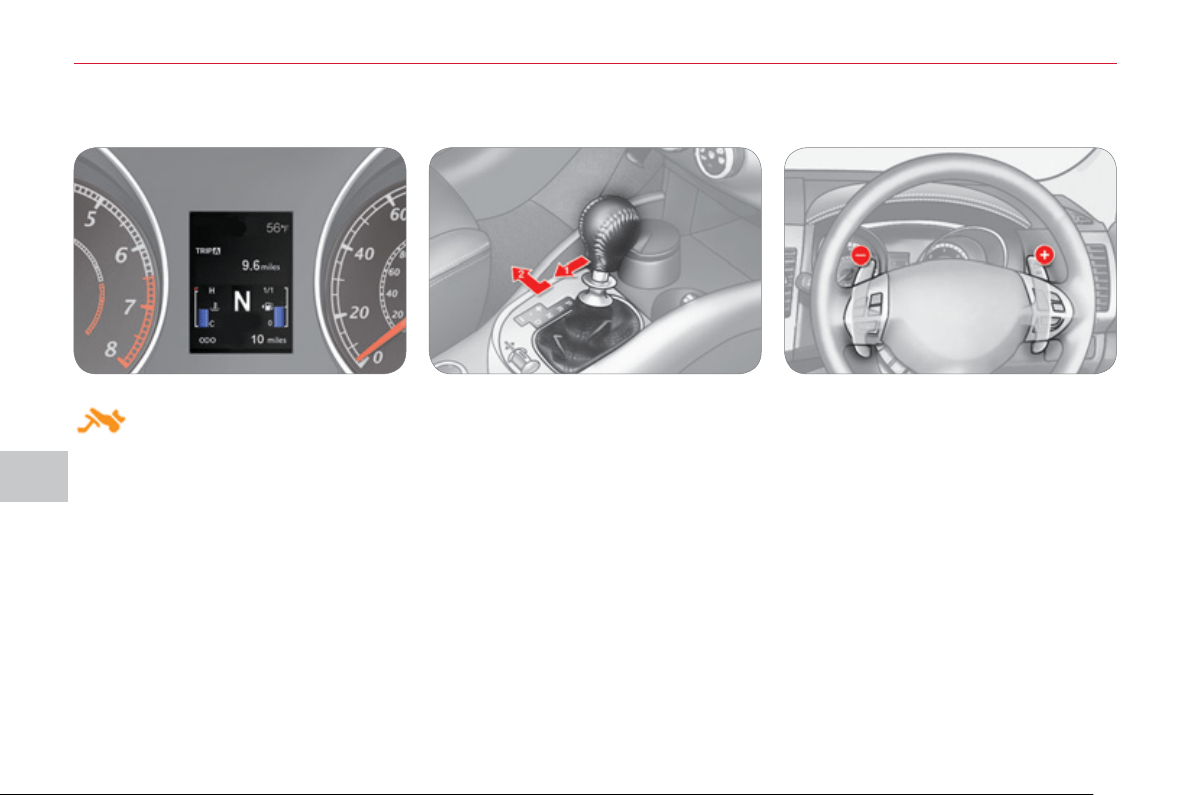
VII
DRIVIN
G
11
6
Press the brake pedal fi rmly
while starting the engine.
Movin
g
off
Select position P or N .
Start the engine.
"P" or "N" appears in the instrument
panel screen.
Select fi rst gear ( D or +/- ) or reverse ( R ).
Release the parking brake.
Release the brake pedal then accelerate.
"D" or "1" or "R" appears in the instrument
panel screen.
Manual mode
Move the gear lever backwards, then to
the left to select position +/- .
Push forwards ( + ) to change up.
Push backwards ( - ) to change down.
Using the gear lever Using the steering mounted controls
Press behind the "+" steering mounted
control paddle to change up.
Press behind the "-" steering mounted
control paddle to change down.
The gear change requests are only carried
out if the engine speed permits it.
Take your foot off the accelerator pedal
gently to engage the gear.
At low speeds, when approaching a
stop or traffi c lights for example, the
gearbox changes down to fi rst gear au-
tomatically.

VII
117
"Normal" automatic mode
Select position D .
"D" appears in the instrument panel
screen.
The gearbox then operates in automatic
mode, without any action on the part of
the driver.
To optimise driving comfort and obtain the
most suitable gear, avoid sharp variations
in the pressure on the accelerator pedal.
"Temporary" manual mode
In automatic mode, you can take control
temporarily at any time using the steering
mounted controls.
The use of these controls permits man-
ual selection of the gears in situations
which require a faster change down than
that offered in automatic mode (arrival at
a roundabout, exit from a car park with a
steep gradient, overtaking...).
The gearbox engages the gear re-
quested if the engine speed permits it.
The gear engaged appears.
To return to the automatic mode, press
the back of the "+/OFF" control for at
least 2 seconds.
"S
p
ort" automatic mode
From automatic mode, you can engage
"Sport" mode.
With the vehicle moving or stationary,
push the thumb wheel A forward.
"SPORT" appears in the instrument
panel screen.
Switching off "Sport" automatic mode
You can return to "Normal" automatic
mode at any time:
Push the thumbwheel A rearward
once.
Before switching off the engine, you
must engage position P or N to place
the gearbox in neutral.
You must apply the parking brake to im-
mobilise the vehicle.
The gear lever must be in position P to
remove the ignition key.
Stoppin
g
the vehicle
Hill start assist
To assist you when starting on a gradi-
ent, your vehicle is fi tted with a system
which immobilises it briefl y (approxi-
mately 2 seconds), the time required to
move your foot from the brake pedal to
the accelerator pedal. This function is
only active when the vehicle has been
completely immobilised with your foot
on the brake pedal and on certain gra-
dients.
Do not get out of the vehicle during
the hill start assist temporary immo-
bilisation phase.
To immobilise the vehicle on a gradient
for a longer period, you must use the
parking brake, not the accelerator.
When starting on a gradient, accelerate
gradually while releasing the parking
brake.

VII
DRIVIN
G
11
8
Operatin
g
fault
Reverse gear
Flashing of the indicator R in the instru-
ment panel screen, accompanied by an
audible signal, indicates a malfunction
on engaging the gear:
Press the brake pedal, position the gear
lever in position N and engage reverse
gear again.
With the ignition on, if this warning
light comes on, accompanied by vi-
bration in the pedals and the message
"Maintenance required" on the in-
strument panel display, this indicates a
gearbox malfunction.
If the message is displayed, carry out
the following operations:
- slow down and stop your vehicle in
a safe place,
- place the lever in position P or N ,
apply the parking brake and let the
engine run,
- open the bonnet to allow the engine
to cool.
If the message disappears for a long
period, you can set off again.
If the message remains displayed or
appears frequently, contact a CITROËN
dealer or a qualifi ed workshop without
delay.
Overheating of the engine may re-
sult in unwanted declutching of the
gearbox.
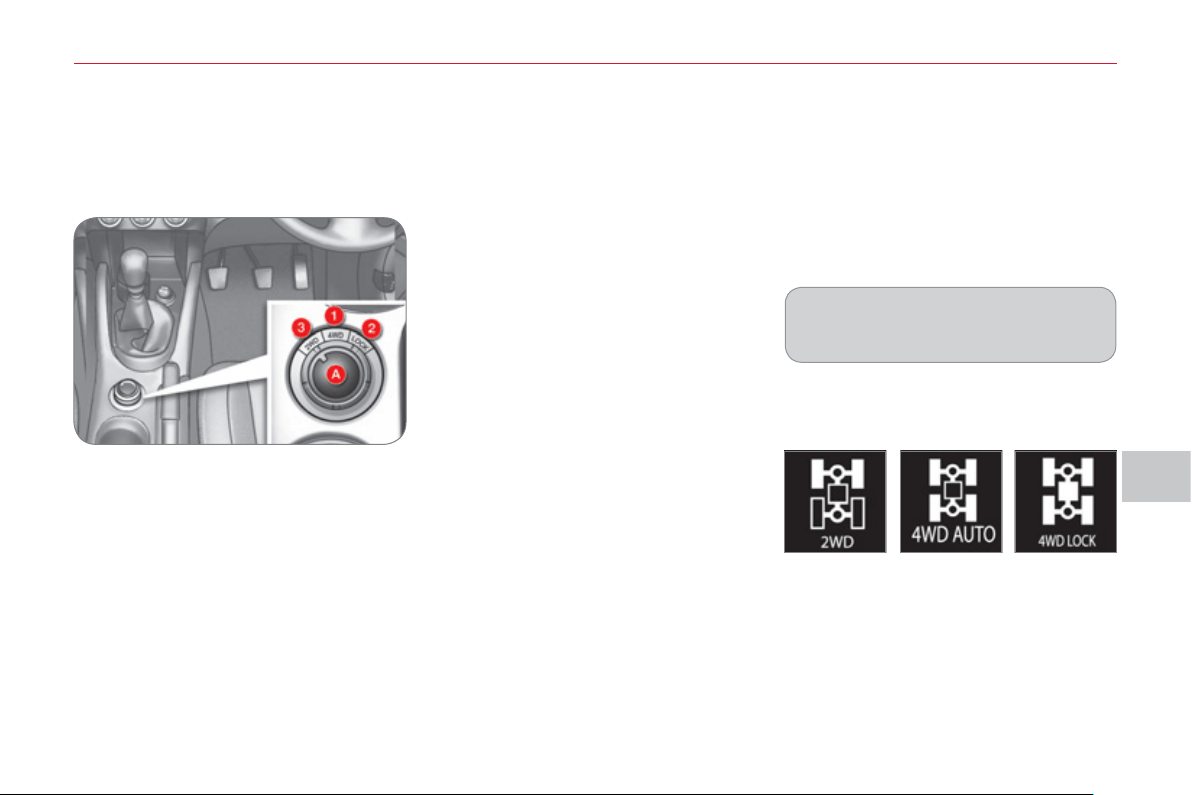
VII
DRIVIN
G
11
9
FOUR WHEEL DRIVE
S
Y
S
TEM
WITH ELECTRONIC CONTROL
4WD AUTO (position 1)
The vehicle operates with four wheel
drive and provides optimum traction re-
gardless of the level of grip.
This is the vehicle's normal and regular
operating mode, the distribution of the
torque between the front and rear axles
is controlled automatically.
The distribution favours the front wheels,
the transfer of torque to the rear wheels
is managed electronically by the control
unit in relation to the level of grip, so
providing optimum road holding.
Three transmission modes are available
and can be selected manually by the driv-
er in accordance with his requirements.
You can change transmission mode
when stationary or while driving at a
speed below 60 mph (100 km/h) .
The transmission mode can be selected
by turning the control A .
Displa
y
in the instrument panel
The transmission mode is displayed
in the form of an intermittent display in
the instrument panel screen when the
transmission mode is selected.
Selectin
g
the transmission
m
ode
The selection of this mode is recom-
mended when the level of grip permits.
2WD (position 3)
The vehicle operates with front two
wheel drive.
This mode corresponds to use on a tar-
macked road on which the driver considers
that there is no risk of loss of grip (dry road).
4WD LOCK (position 2)
The vehicle operates with four wheel
drive in this mode also.
It is recommended when grip is particularly
poor or diffi cult (sand, mud, slopes, ...).
System which permits the selection of
a transmission mode in relation to the
driving conditions.

VII
!
DRIVIN
G
120
Operating faults
If the selected transmission mode display
fl ashes, the vehicle switches automati-
cally to front "2WD" transmission mode.
It is then no longer possible to select the
transmission mode using the control A .
Do not subject the vehicle to excessive
conditions while driving.
As the engine torque is applied to
all four wheels, the condition of the
tyres has a considerable impact on
the performance of the vehicle.
Ensure that all four tyres are in good
condition.
Avoid driving the vehicle in sandy
or muddy areas or in other areas in
which the wheels could spin.
Spinning the wheels places the
transmission components under
pressure and could cause a serious
malfunction.
Do not drive the vehicle through
deep water.
Avoid driving over excessively un-
even terrain (risk of scraping under
the body or of grounding on crossing
a bridge).
Have your vehicle towed on a fl at-
bed.
The vehicle must not be towed with
the front or rear wheels on the ground
even if it is in front "2WD" (2 wheel
drive) mode.
If the message "SLOW DOWN" is dis-
played on the instrument panel, let the
transmission cool down then wait for the
display to clear before setting off again.
If "4WD" and "LOCK" are displayed
alternately and if "MAINTENANCE
REQUIRED" is displayed in the instru-
ment panel, the system has failed and
the safety system has been activated.
Contact a CITROËN dealer or a quali-
fi ed workshop without delay.
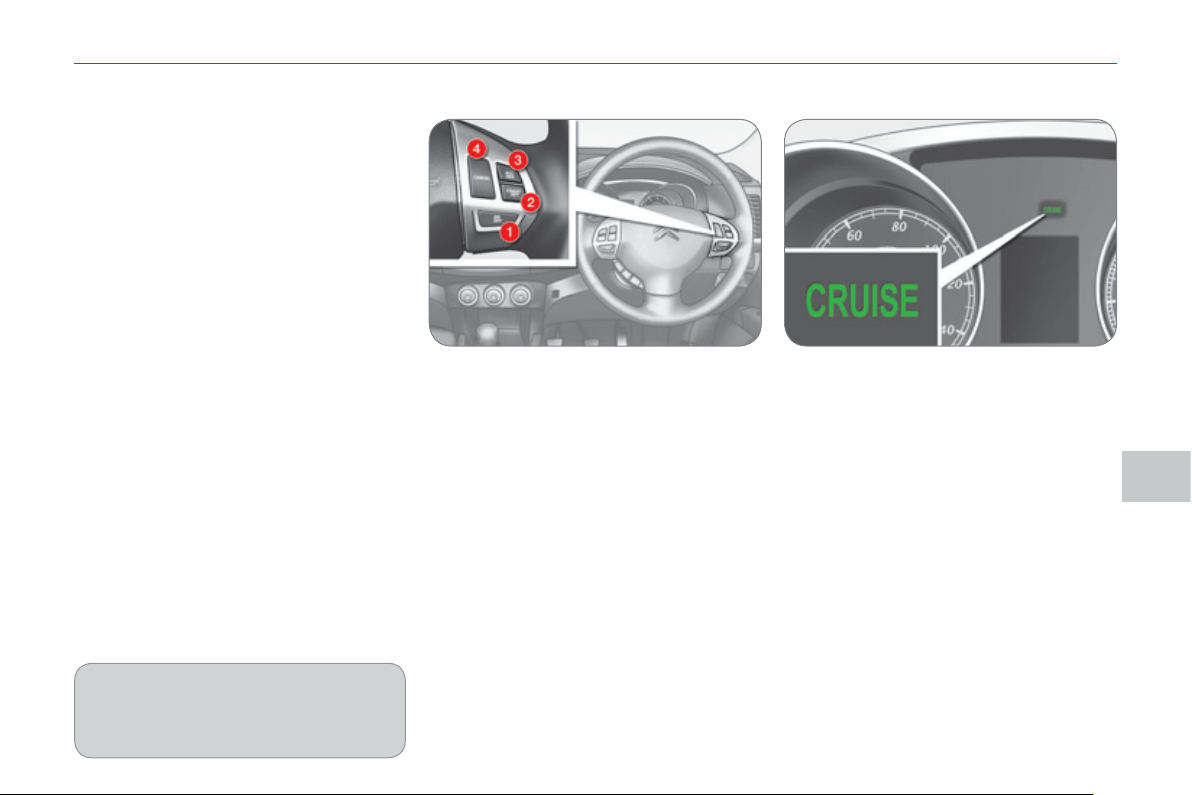
VII
DRIVIN
G
121
Pro
g
rammin
g
) Press button 1 .
) Set the programmed speed by ac-
celerating to the required speed,
then press button 2 "COAST SET" .
CRUI
S
E CONTROL
The controls of this system are grouped
together on the steering wheel.
1. "ON/OFF" button: activation / deac-
tivation of the cruise control mode.
2. "COAST SET" button: storing of a
driving speed and decreasing of the
cruising speed.
3. "ACC RES" button: increasing of
the cruising speed and recalling of
the stored speed.
4. "CANCEL" button: switching off of
the cruise control.
When you press button 1 , the "CRUISE"
indicator comes on in the instrument
panel.
Steerin
g
mounted controls Displa
y
on the instrument panel
The cruise control cannot, in any cir-
cumstances, take the place of the
need to comply with speed limits or
of the vigilance and responsibility of
the driver.
System which automatically maintains the
vehicle speed at the value programmed
by the driver, without any action on the
accelerator pedal.
The cruise control is switched on man-
ually: the vehicle speed must be 25 mph
(40 km/h) minimum and second gear
must be engaged in the case of a man-
ual gearbox.
The cruise control is switched off man-
ually, by an action on the brake or clutch
pedal or if the ASC system is triggered.
The programmed speed can be ex-
ceeded temporarily by pressing the ac-
celerator pedal.
To return to the programmed speed,
simply release the accelerator pedal.
Switching off the ignition cancels any
programmed speed value.
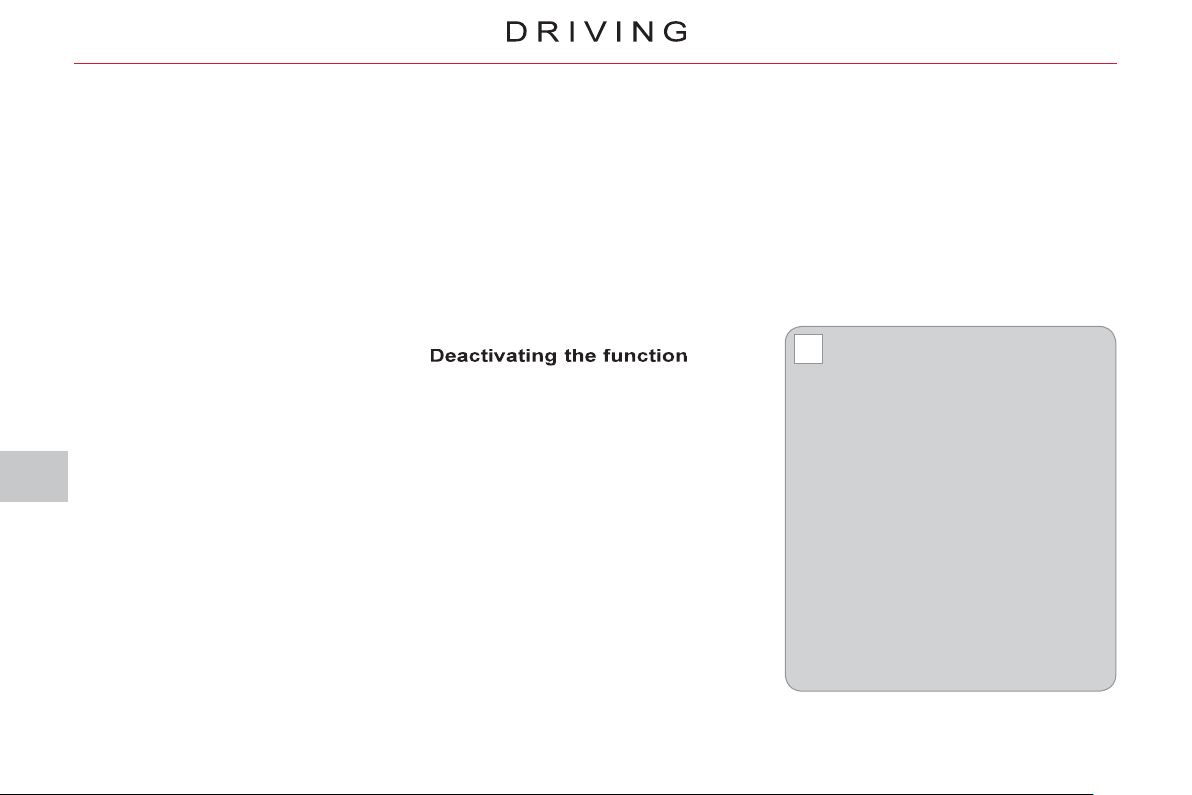
VII
!
122
When the cruise control is in
operation, pay attention if you
press and hold one of the pro-
grammed speed adjustment buttons:
this can result in a very rapid change
in the speed of your vehicle.
Do not use the cruise control on slip-
pery roads or in heavy traffi c.
On a steep descent, the cruise control will
not be able to prevent the vehicle from
exceeding the programmed speed.
To prevent the mat from becoming
caught under the pedals:
- ensure that the mat is positioned
correctly,
- never fi t one mat on top of another.
To deactivate the cruise control:
) Press the brake or clutch pedal, or
) Press button 1 "ON OFF" , or
) Press button 4 "CANCEL" .
The cruise control may be deactivated
automatically:
) When the vehicle reaches a speed
below 20 mph (35 km/h).
)
When the active stability control system
(ASC) comes into operation.
Reactivatin
g
the function
When the cruise control has been de-
activated, you can return to the stored
speed by pressing button 3 "ACC RES"
when you reach a minimum speed of
25 mph (40 km/h).
Decreasin
g
the pro
g
rammed
s
p
eed
) Using button 2 "COAST SET" :
- successive presses decrease the
speed in steps of approximately
1 mph (1.6 km/h).
- a maintained press of this button
decreases the speed progressively.
Once the speed required has been
reached, release the button, the new
speed is stored.
) Using the brake pedal:
- brake to deactivate the cruise control,
then press button 2 "COAST SET" .
Release to store the new speed.
Temporar
y
acceleration
/
deceleration
Increasin
g
the pro
g
rammed
s
p
eed
) Using button 3 "ACC RES" :
- successive presses increase the
speed in steps of approximately
1 mph (1.6 km/h).
- a maintained press of this button
increases the programmed speed
progressively.
Once the speed required has been
reached, release the button, the new
speed is stored.
) Using the accelerator pedal:
- accelerate to reach the speed re-
quired, then press button 2 "COAST
SET" . Release the button to store
the new speed.
Temporary acceleration
Press the accelerator pedal as normal.
When the pedal is released, you return
to the stored speed.
Temporary deceleration
Press the brake pedal to reduce the
speed. To return to the stored speed,
press button 3 "ACC RES" .
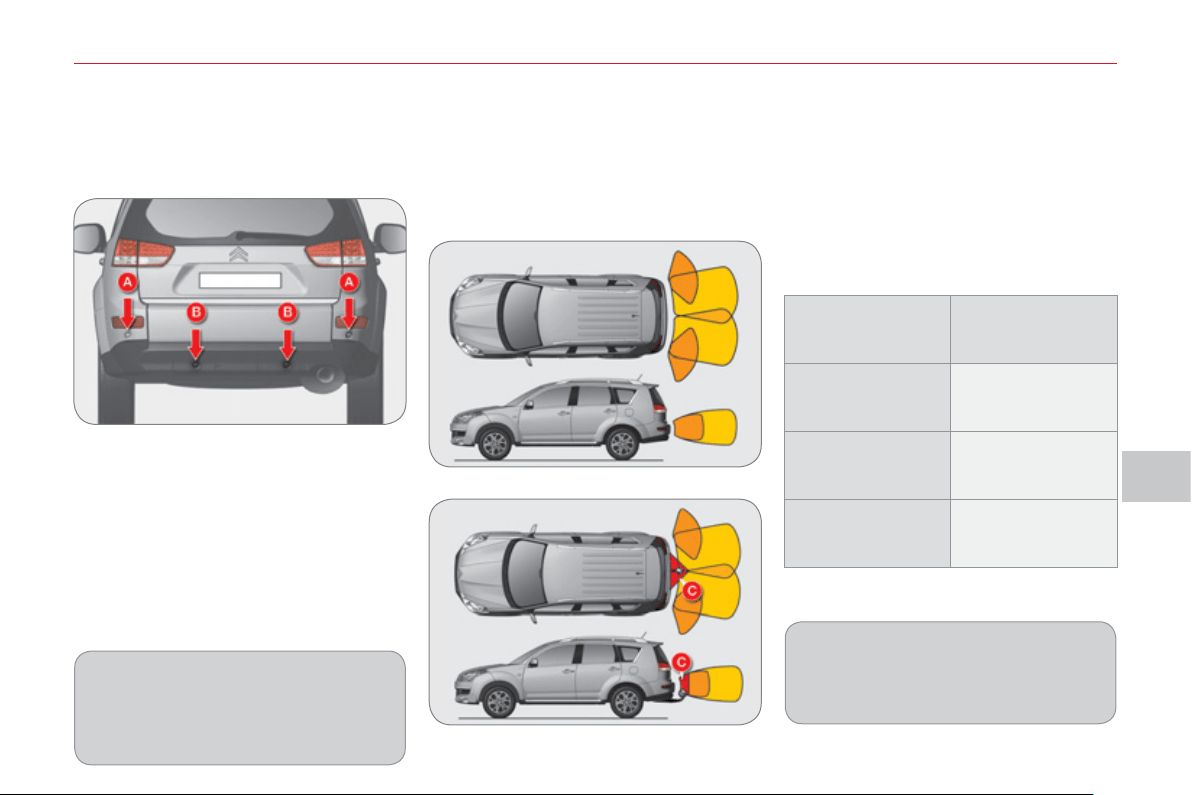
VII
DRIVIN
G
123
AUDIBLE REAR PARKING
S
EN
S
OR
S
It detects obstacles (person, vehicle,
tree, gate, ...) located behind the vehicle,
but it cannot detect obstacles located
immediately below the bumper.
Activation
The parking sensors are activated by
engaging reverse gear.
The proximity information is indicated
by an audible signal which becomes
more frequent as the vehicle approach-
es the obstacle.
When a certain distance between the
rear of the vehicle and the obstacle is
reached, the audible signal becomes
continuous:
An object such as a stake, a road
works cone or any other similar ob-
ject may be detected at the beginning
of the manoeuvre but may no longer
be detected when the vehicle moves
closer to it.
Location of the sensors
The vehicle is fi tted with four sensors:
- two side sensors A
- two central sensors B .
Vehicle only
Vehicle fi tted with a towbar
Detection zones
The detection zones differ depending
on whether the vehicle is fi tted with a
towbar.
If you select towbar mode, the towbar
zone C is excluded from the detection
zones.
The parking sensor system cannot,
in any circumstances, take the place
of the need for vigilance and respon-
sibility on the part of the driver.
Sensors
Distance between
vehicle and
obstacle less than:
Side A
Approximately 25 cm
Central B without
towbar
Approximately 40 cm
Central B with
towbar
Approximately 60 cm
System consisting of proximity sensors
installed in the rear bumper.
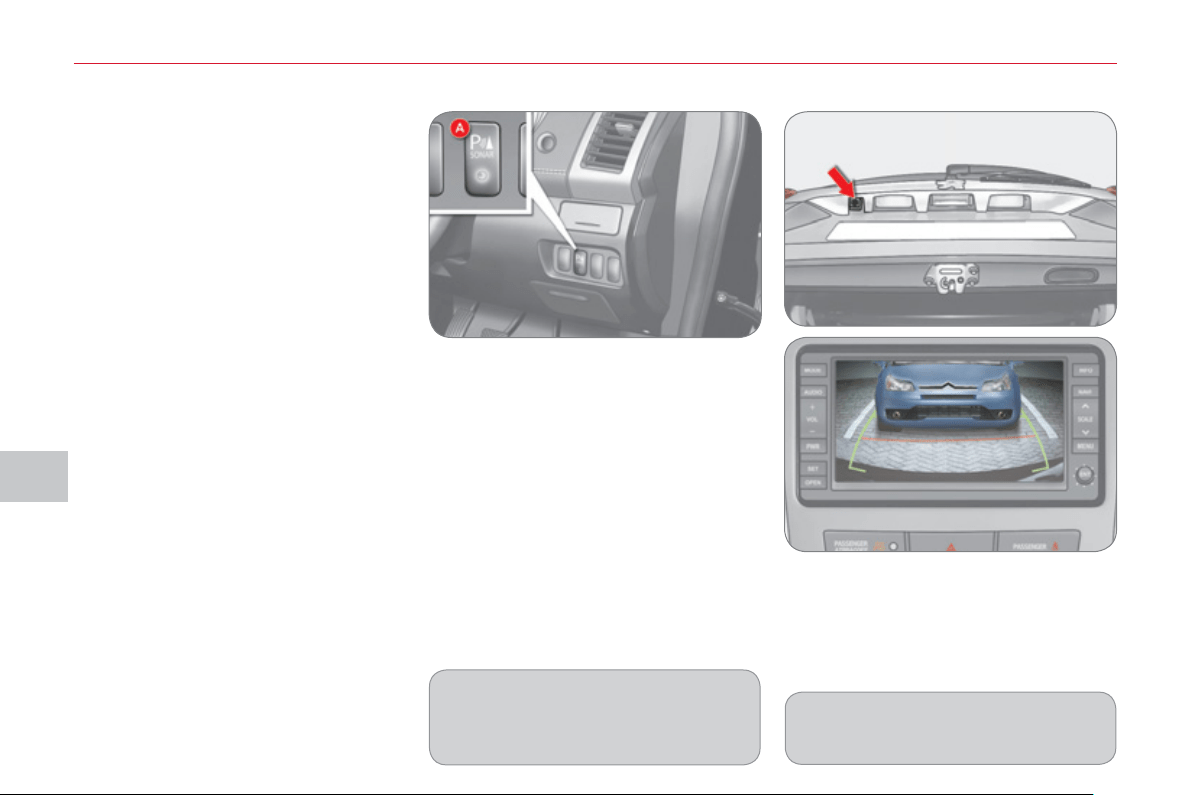
VII
DRIVIN
G
124
REVER
S
ING CAMER
A
Linked with the navigation option, a
reversing camera is activated automati-
cally when reverse gear is engaged.
The colour image is provided on the naviga-
tion screen with indication of the limit of the
rear bumper and of the general direction of
the vehicle.
Operating fault
If an operating fault occurs, the indicator
lamp in button A fl ashes when reverse
gear is engaged.
Contact a CITROËN dealer or a qualifi ed
workshop.
In bad weather or in winter, check
that the sensors are not covered with
mud, ice or snow.
Deactivation
) With reverse gear engaged, press
button A , the indicator lamp goes
off, the system is fully deactivated.
Reactivation
) With reverse gear engaged, press
button A again, the indicator lamp
comes on, the system is reactivated.
Modifi cation of the detection zones
) Press button A to deactivate the
system.
) Press button A again for a few seconds
and release it.
The detection zone modifi cation information
is indicated by an audible signal:
- double signal on vehicles fi tted with
a towbar,
- single signal on vehicles which are
not fi tted with a towbar.
The red line indicates the distance re-
quired to open the lower tailgate.
VIII
C
HE
C
K
S
12
5
Innovation in the search for
performance
For over 40 year, the TOTAL Research and
Development departments have developed
for CITROËN, lubricants to match the latest
technical innovations on CITROËN vehi-
cles, both for competition and for everyday
motoring.
For you, this is an assurance that you will
obtain of the best performance for your en-
gine.
Optimum protection for your
engine
By having your CITROËN ve-
hicle serviced with TOTAL lu-
bricants, you are contributing
towards improving the life and
performances of your engine,
while also protecting the envi-
ronment.
prefers
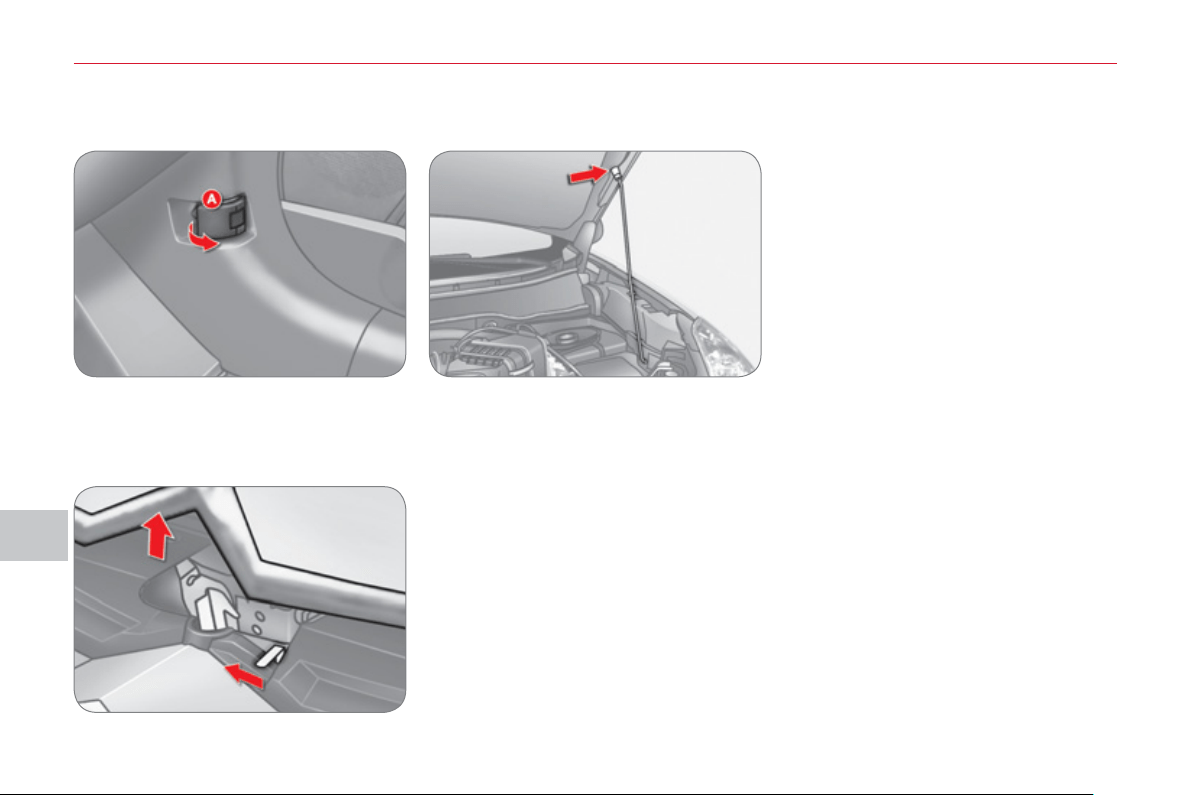
VIII
C
HE
C
K
S
12
6
Bonnet sta
y
OPENING THE BONNET
To close
Lower the bonnet and release it at the
end of its travel. Check that the bonnet
is properly latched.
From outside: move the safety catch
to the left then raise the bonnet.
Secure the stay in its housing to hold
the bonnet open.
Before closing the bonnet, replace the
stay in its clip.
This operation must only be carried out
when the vehicle is stationary.
When the engine is hot, handle the ex-
terior safety catch and the bonnet stay
with care (risk of burns).
RUNNING OUT OF FUEL
From inside: pull the release lever A ,
on the right-hand side below the door,
towards you.
If you run out of fuel, fi ll the tank and
operate the starter until the engine
starts.
Several attempts may be needed before
the engine re-starts.
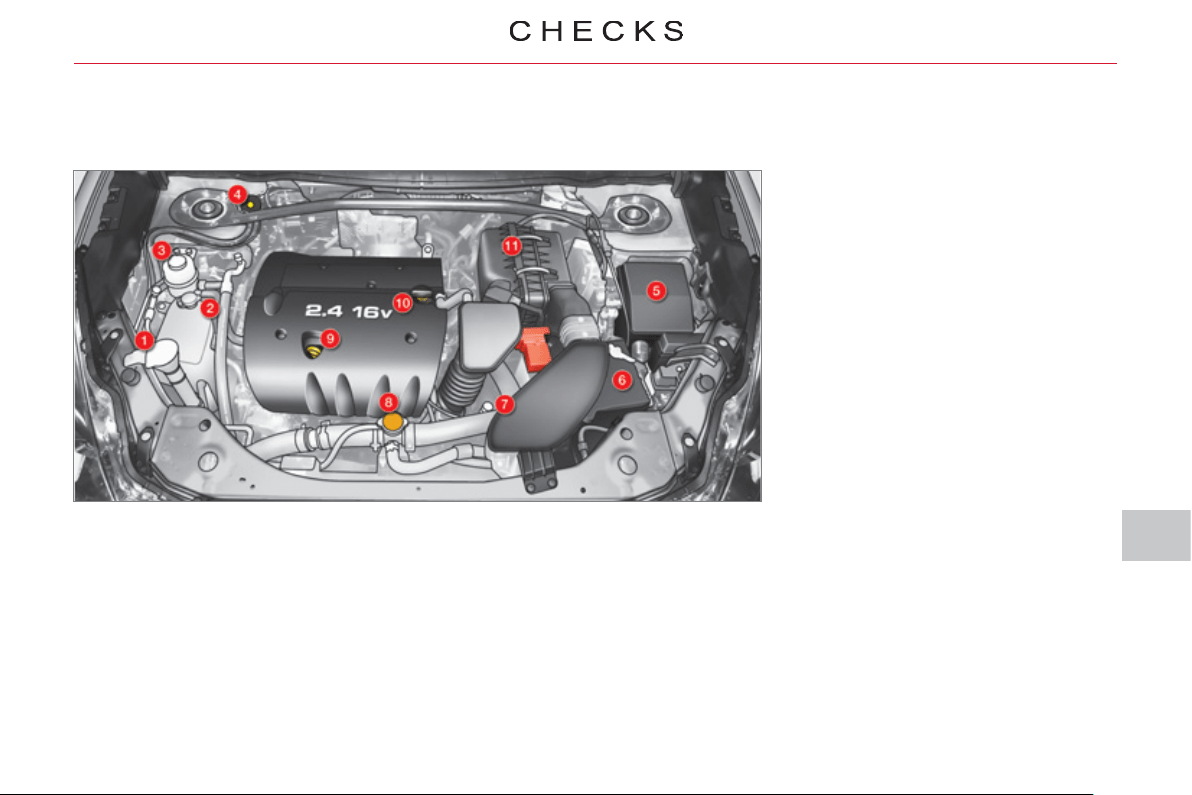
VIII
127
P
ETROL ENGINE
1. Screenwash and headlamp wash
reservoir.
2. Coolant reservoir.
3. Power steering fl uid reservoir.
4. Brake fl uid reservoir.
5. Fusebox.
6. Battery.
7. CVT gearbox dipstick.
8. Radiator cap.
9. Engine oil dipstick.
10. Engine oil fi ller cap.
11. Air fi lter.
Access for checking the levels of the various fl uids and the replacement of certain components.
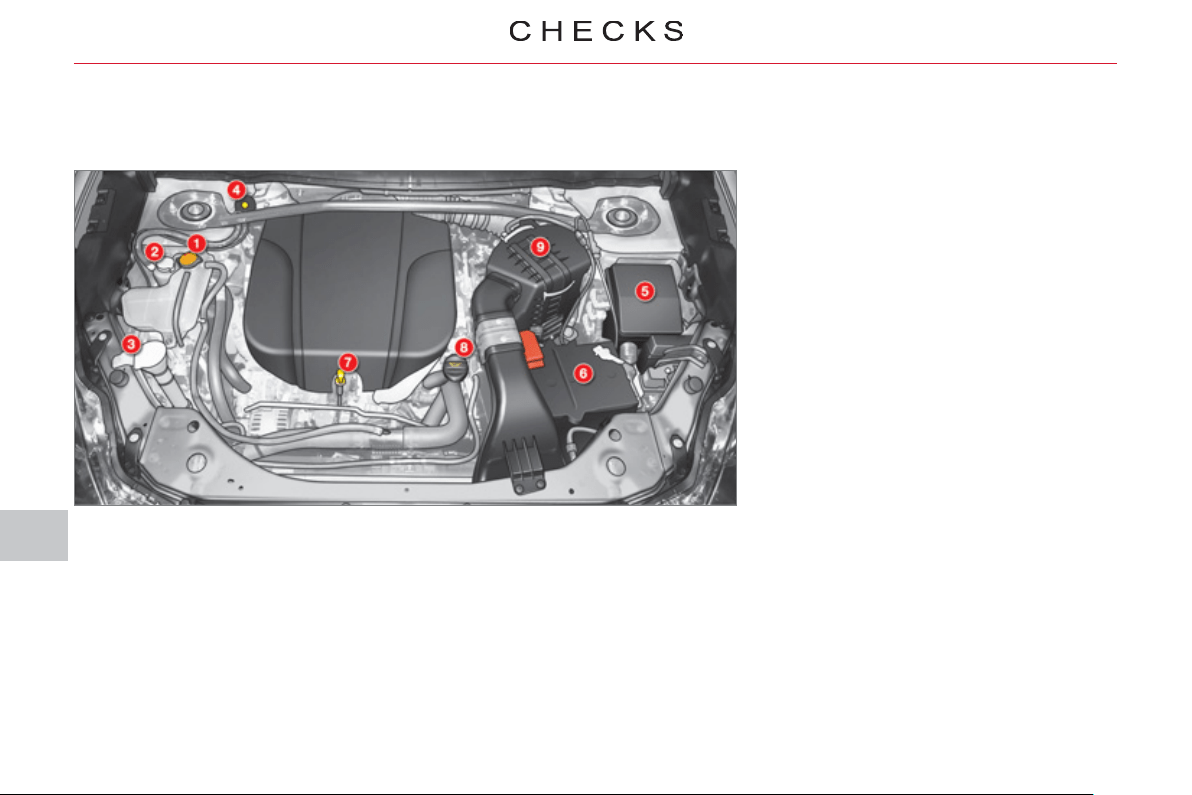
VIII
12
8
D
IE
S
EL ENGINE
Access for checking the levels of the various fl uids and the replacement of certain components.
1. Coolant reservoir.
2. Power steering fl uid reservoir.
3. Screenwash and headlamp wash
reservoir.
4. Brake fl uid reservoir.
5. Fusebox.
6. Battery.
7. Engine oil dipstick.
8. Engine oil fi ller cap.
9. Air fi lter.
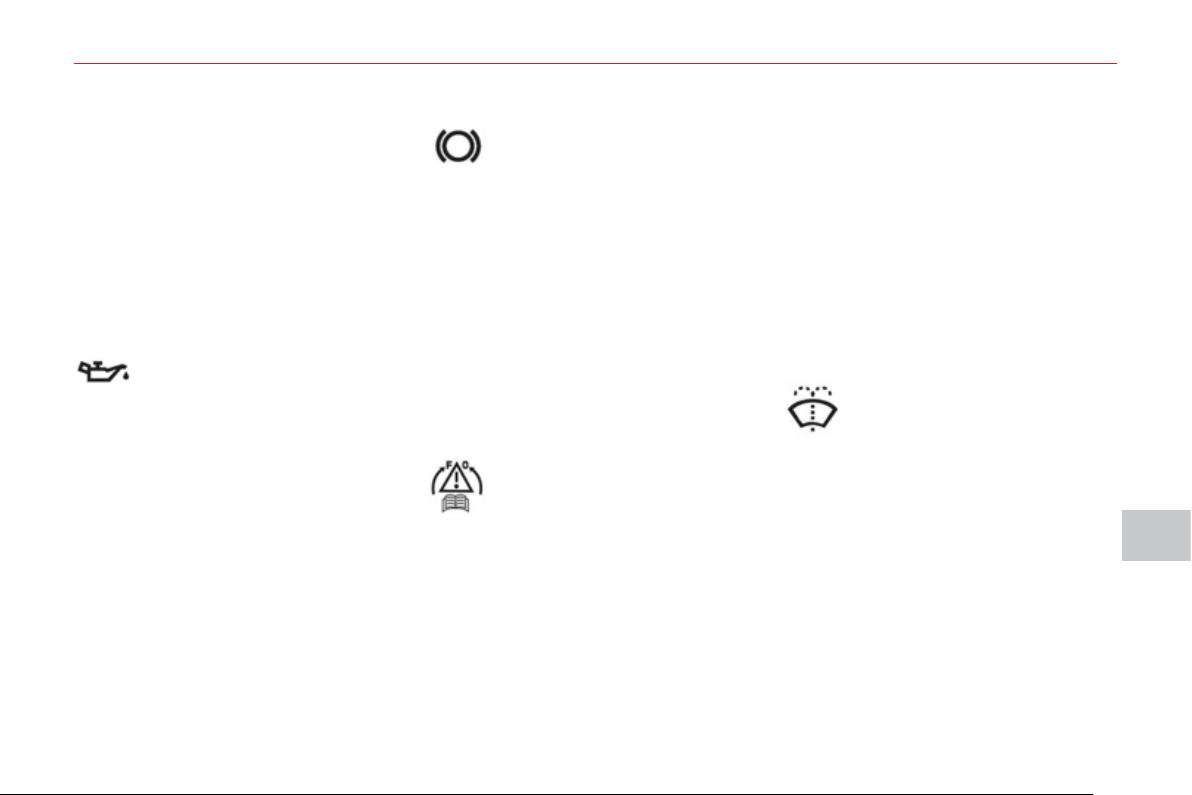
VIII
C
HE
C
K
S
12
9
CHECKING LEVEL
S
Brake fluid level
To avoid any risk of scalding, unscrew
the cap by two turns to allow the pres-
sure to drop. When the pressure has
dropped, remove the cap and top up
the level.
Oil level
The reading will only be correct
if the vehicle is on level ground
and the engine has been off for
more than 30 minutes.
The check is carried out either when
the ignition is switched on using the oil
level indicator on the instrument panel,
or using the dipstick.
It is normal to top up the engine oil between
services. The manufacturer recommends
that the oil level be checked, and topped up
if necessary, every 3 000 miles (5 000 km).
The brake fl uid level should be
between the "MAX" and "MIN"
marks.
If it is not, check the brake pad
wear.
Changing the brake fl uid
Refer to the servicing booklet for details
of the interval for this operation.
Coolant level
The coolant level must be mea-
sured when the engine is cold
and should be between the
"LOW" and "FULL" marks.
When the engine is warm, the
temperature of the coolant is regulated
by the fan. This can operate with the ig-
nition off.
On vehicles which are fi tted with a
particle emission fi lter, the fan may
operate after the vehicle has been
switched off, even if the engine is
cold.
In addition, as the cooling system is
pressurised, wait at least one hour after
switching off the engine before carrying
out any work.
Screenwash and headlam
p
wash * fluid
Check the fl uid level regularly,
using the gauge.
* According to country.
Changing the engine oil
Refer to the servicing booklet for details
of the interval for this operation.
In order to maintain the reliability of the
engine and emission control system,
the use of additives in the engine oil is
prohibited.
Oil specifi cation
The oil must correspond to your engine
and conform to the manufacturer's recom-
mendations.
Fluid specifi cation
The brake fl uid must conform to the
manufacturer's recommendations and
fulfi l the DOT4 standards.
Changing the coolant fl uid
Refer to the servicing booklet for details
of the interval for this operation.
Fluid specifi cation
The coolant must conform to the manu-
facturer's recommendations.
Fluid specifi cation
This fl uid must conform to the manufac-
turer's recommendations for optimum
cleaning.
Power steerin
g
fluid level
Check the fl uid level with the engine at
idle.
Check that the power steering fl uid
level is always between the "MAX" and
"MIN" marks and top up if necessary.
Fluid specifi cation
This fl uid must conform to the manufac-
turer's recommendations.
Check all of these levels regularly and
top them up if necessary, unless other-
wise indicated.
If a level drops signifi cantly, have the
corresponding system checked by a
CITROËN dealer or a qualifi ed work-
shop.
When working under the bonnet, take
care as certain areas of the engine may
be extremely hot (risk of burns).
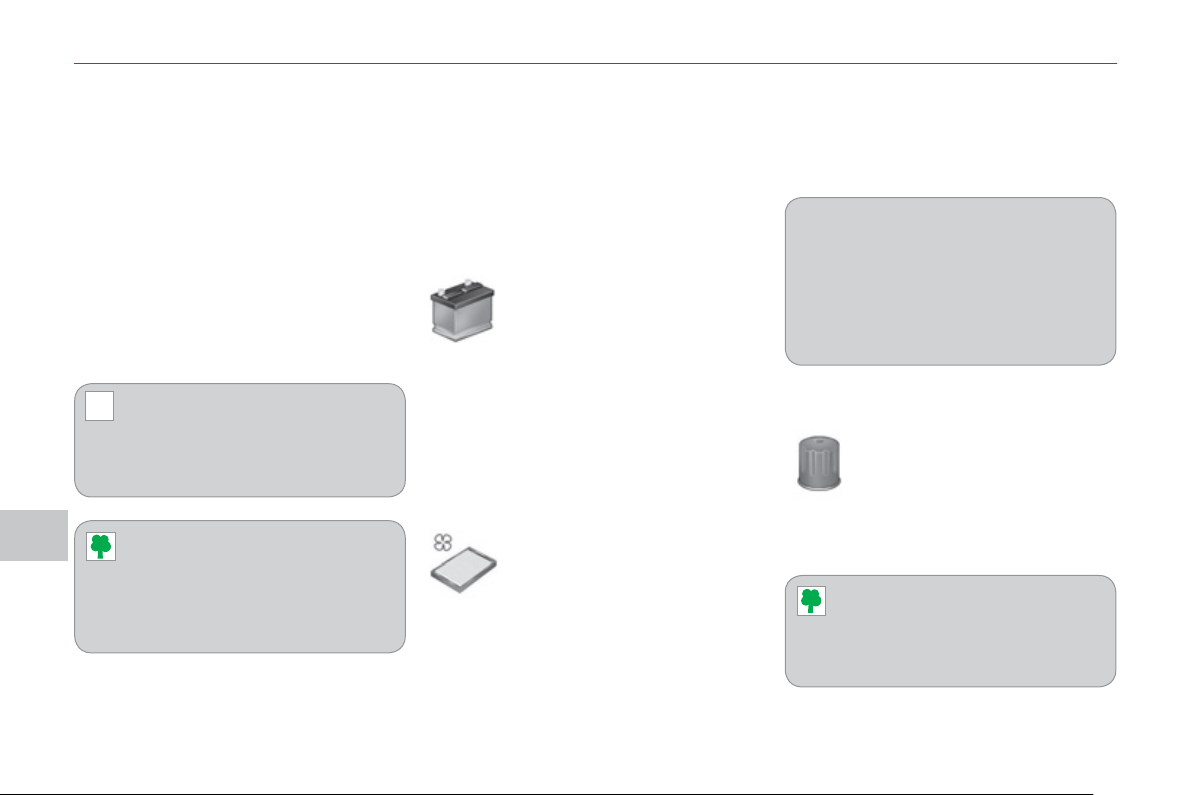
VIII
!
C
HE
C
K
S
1
30
Diesel additive level
(
Diesel
with particle emission filter
)
The minimum level of this additive is indicat-
ed by lighting of the service warning lamp,
accompanied by an audible signal and a
message on the multifunction screen.
Topping up
This additive must be topped up by a
CITROËN dealer or a qualifi ed work-
shop without delay.
W
aste pro
d
ucts
CHECK
S
Batter
y
Check the electrolyte level
regularly. If necessary, top up
the level with distilled water.
Check that the terminals are
clean and correctly tightened,
particularly in summer and winter.
When carrying out work on the battery,
refer to the "Practical information" sec-
tion for details of the precautions to be
taken before disconnecting the battery
and following its reconnection.
Air filter and passen
g
er compartment filter
Refer to the servicing booklet
for details of the replacement
intervals for these compo-
nents.
Depending on the environ-
ment (dusty atmosphere...) and the use
of the vehicle (city driving...), replace
them twice as often if necessary (refer
to the "Engines" paragraph).
A clogged passenger compartment fi l-
ter may have an adverse effect on the
performance of the air conditioning sys-
tem and generate undesirable odours.
Oil filte
r
Replace the oil fi lter each time
the engine oil is changed.
Refer to the servicing booklet
for details of the replacement
interval for this component.
Particle emission filter
(
Diesel
)
Maintenance of the particle emission fi l-
ter must be carried out by a CITROËN
dealer or a qualifi ed workshop.
Following prolonged operation of
the vehicle at very low speed or at
idle, you may, exceptionally, notice
the emission of water vapour at the
exhaust on acceleration. This does
not have any adverse effect on the
performance of the vehicle or on the
environment.
Avoid any prolonged contact of
used oil or fl uids with the skin.
Most of these fl uids are harmful to
health or indeed very corrosive.
Do not discard used oil or fl uids
into sewers or onto the ground.
Empty used oil into the contain-
ers provided for this purpose at
CITROËN dealers (France) or a
qualifi ed workshop, or take them to
an authorised waste disposal site.
Do not discard the oil fi lter through public
channels, deposit it in the containers dedi-
cated to this use in the CITROËN network
(France) or a qualifi ed workshop or take them to
an authorised waste disposal site.
Unless otherwise indicated, check
these components in accordance with
the servicing booklet and in relation to
your engine.
Otherwise, have them checked by a
CITROËN dealer or a qualifi ed workshop.
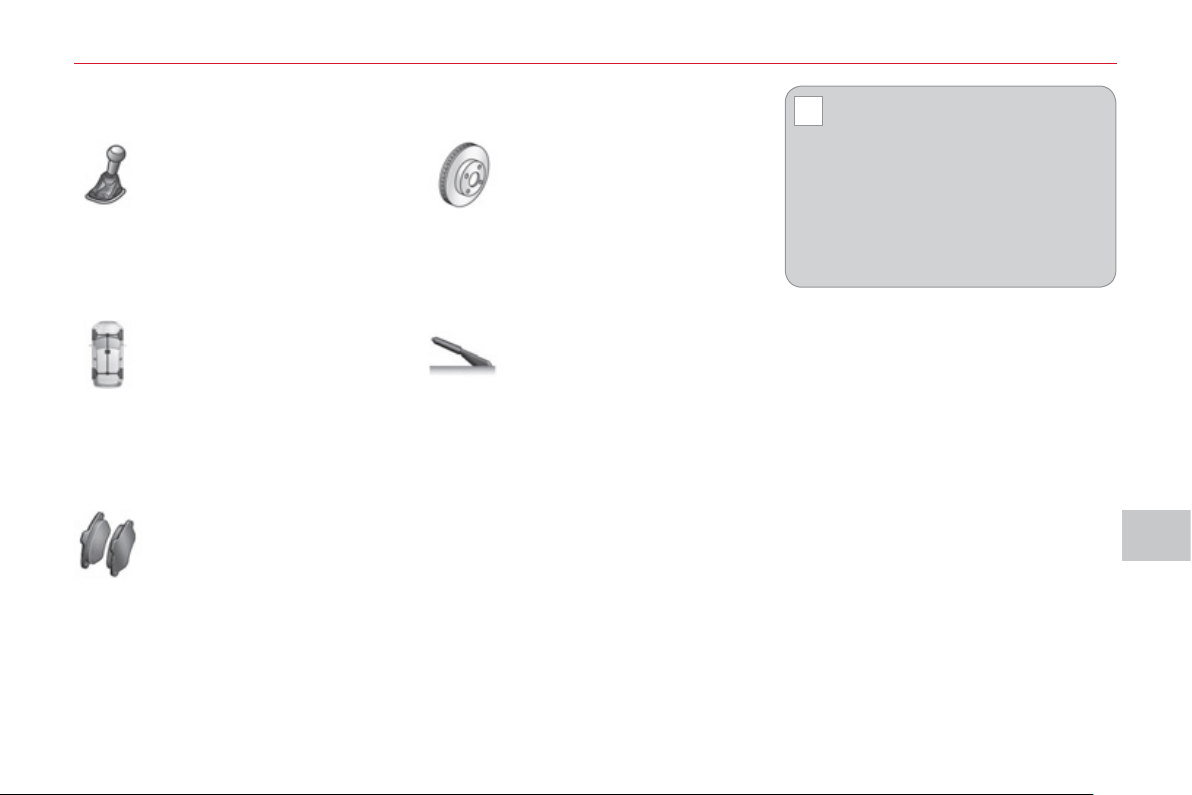
VIII
!
C
HE
C
K
S
1
3
1
Manual
g
earbox
Refer to the servicing booklet
for details of gearbox mainte-
nance.
B
ra
k
e
p
a
d
s
Brake wear depends on the
style of driving, particularly in
the case of vehicles used in
town, over short distances. It
may be necessary to have the
condition of the brakes checked, even
between vehicle services.
Unless there is a leak on the circuit, a
drop in the brake fl uid level indicates
that the brake pads are worn.
Brake disc wear
For information on checking
brake disc wear, contact a
CITROËN dealer or a quali-
fi ed workshop.
P
ar
ki
n
g
b
ra
k
e
If the parking brake travel is
too long or if you notice a loss
of effectiveness of this sys-
tem, the parking brake must
be adjusted, even between
two services.
This system must be checked by a
CITROËN dealer or a qualifi ed workshop.
Only use products recommended by
CITROËN or products of equivalent
quality and specifi cations.
In order to optimise the operation
of units as important as the braking
system, CITROËN selects and
offers very specifi c products.
To avoid damaging the electrical
units, the use of a high pressure
washer in the engine compartment is
strictly prohibited.
Transfer box and rear
d
ifferential
Refer to the servicing booklet
for details of the service inter-
val for these components.
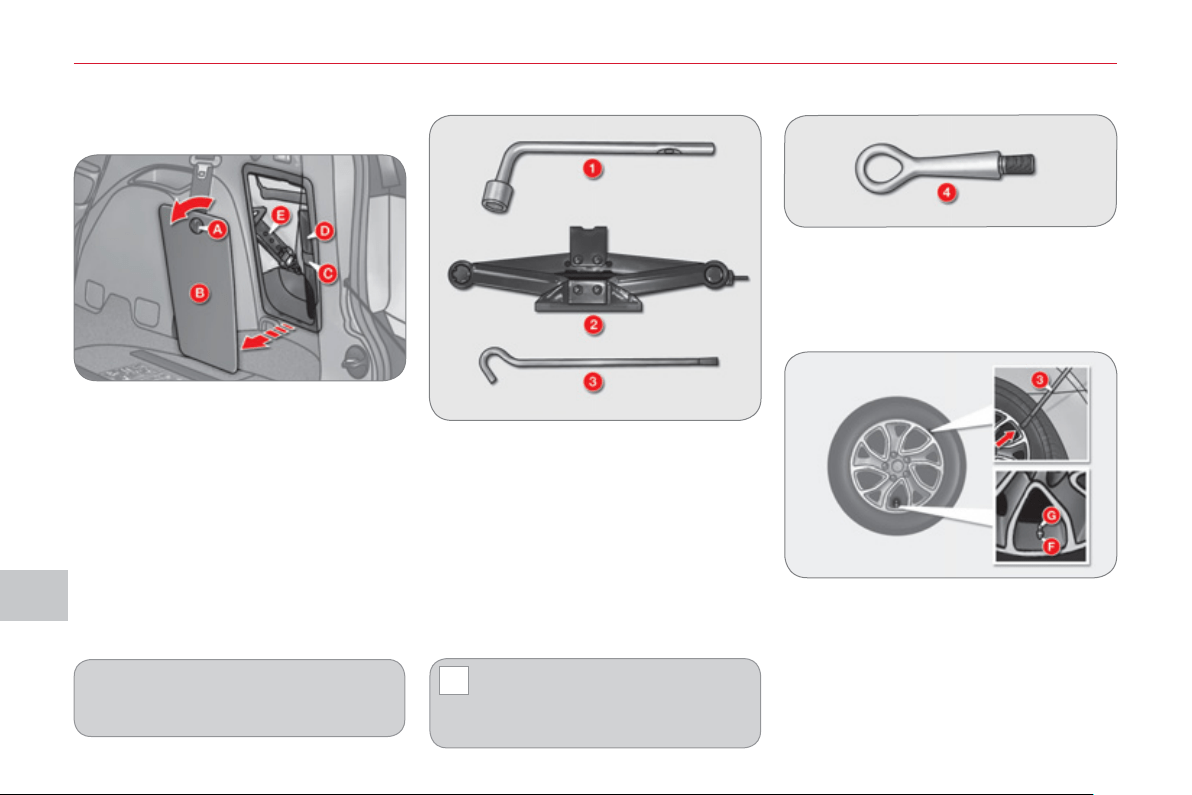
IX
!
PRA
C
TI
C
AL INF
O
RMATI
ON
1
3
2
CHANGING A WHEEL
1. Wheelbrace.
Used to remove the wheel trim and
the wheel fi xing bolts.
2. Jack.
Used to raise the vehicle.
3. Handle.
Used to extend the jack.
4. Removable towing eye.
Refer to the "Towing" paragraph.
Other accessories
Wheel with trim
When removing the wheel , remove
the trim fi rst using the handle 3 , pulling
at the notch.
When refi tting the wheel , refi t the trim
starting by placing its notch F (indicated
on the back of the trim) opposite the
valve G and press on its outer edge
with the palm of your hand.
List of tools
When changing a wheel, ensure
that the four wheels are of identi-
cal specifi cation and brand.
When storing, take care to secure
the tool bag D fi rmly using the fi xing
band C .
Access to the tools
The tools are stored in the storage
compartment in the boot right-hand trim.
To gain access to them:
) open the boot,
) turn button A to the left,
) remove the cover B ,
) remove the fi xing band C and take
out the tool bag D containing the
tools,
) take the jack E in your hand and re-
move it from its fi xing position.
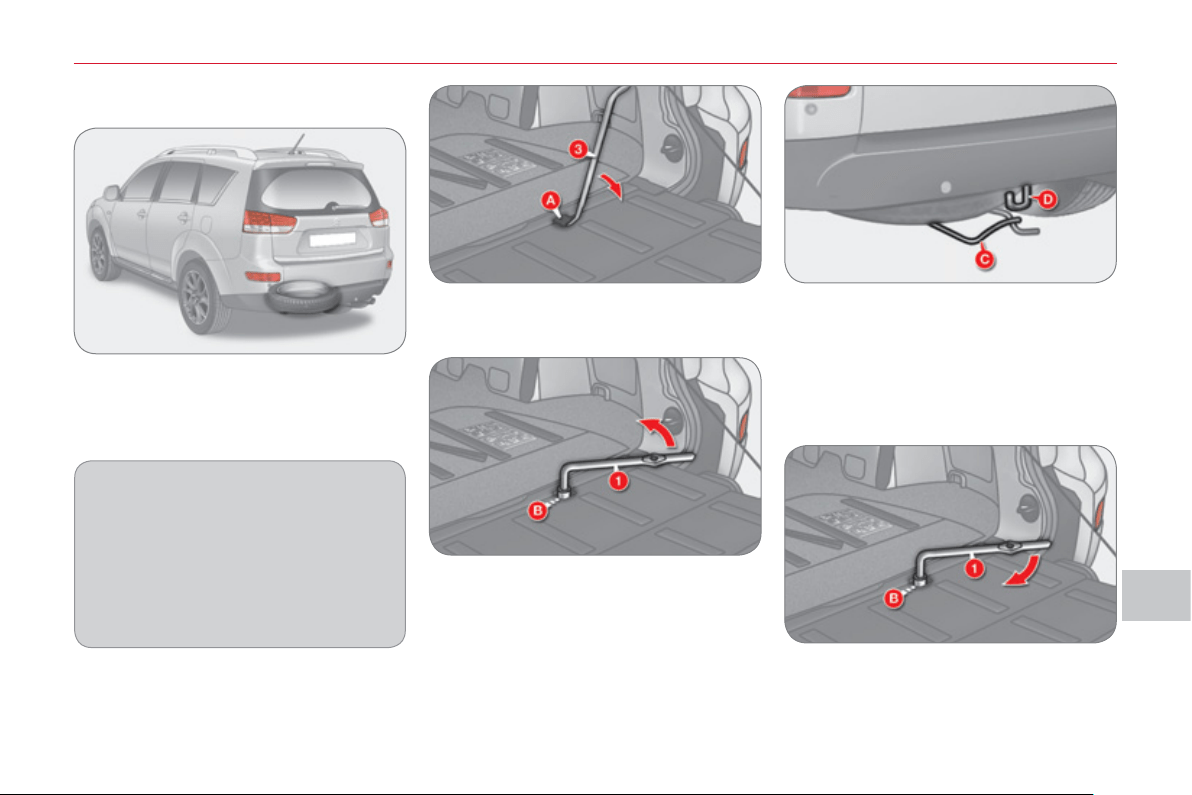
IX
PRA
C
TI
C
AL INF
O
RMATI
O
N
1
33
Fixing the "space-saver" spare
wheel
If your vehicle is fi tted with alloy
wheels, it is normal to notice that the
washers do not come into contact
with the "space-saver" spare wheel
when tightening the bolts on fi tting.
The wheel is retained by the conical
contact of each bolt.
Access to the s
p
are wheel in
the 7 seat confi
g
uration
The "space-saver" spare wheel is in-
stalled on the outside, under the boot,
supported by a metal carrier.
To gain access to the tools, refer to the
"Access to the tools" paragraph.
Putting the wheel back in place
) Put the wheel back in place in its
carrier.
) Lift the carrier C and reposition the
hook D .
) Open the lower tailgate (refer to the
"Access" section).
) Remove the plastic cover A using
the handle 3 .
) Unscrew the spare wheel carrier re-
taining bolt B using the wheelbrace 1 .
) Close the lower tailgate (refer to the
"Access" section).
) Lift the carrier C to detach the
hook D then allow it to lower.
) Tighten the spare wheel carrier re-
taining bolt B fully using the wheel-
brace 1 .
) Refi t the plastic cover A , close the
lower tailgate and store the tools.
Removing the wheel
) Open the tailgate and the lower tail-
gate (refer to the "Access" section).
) Take out the handle 3 (refer to the
"Access to the tools" paragraph).

IX
PRA
C
TI
C
AL INF
O
RMATI
ON
1
3
4
Access to the s
p
are wheel in
the 5 seat confi
g
uration
The pressed steel spare wheel is installed
on the outside, under the boot, supported
by a winch and a plastic carrier.
To gain access to the tools, refer to the
"Access to the tools" paragraph.
Fixing the pressed steel spare
wheel
If your vehicle is fi tted with alloy
wheels, it is normal to notice that the
washers do not come into contact
with the pressed steel spare wheel
when tightening the bolts on fi tting.
The wheel is retained by the conical
contact of each bolt.
Removing the wheel
) Open the tailgate and the lower tail-
gate (refer to the "Access" section).
) Take out the handle 3 (refer to the
"Access to the tools" paragraph).
) Remove the plastic cover A using
the handle 3 .
Putting the wheel back in place
) Put the wheel back in place in its
carrier.
) Pass the hook C into the chain.
) Open the lower tailgate (refer to the
"Access" section).
) Unscrew the retaining bolt B fully
using the wheelbrace 1 , to unwind
the winch cable.
) Close the lower tailgate (refer to the
"Access" section).
) Detach the hook C from the chain.
Unwind the winch cable fully to make
unhooking of the chain easier.
) Tighten the winch retaining bolt B
fully using the wheelbrace 1 .
) Refi t the plastic cover A , close the
lower tailgate and store the tools.
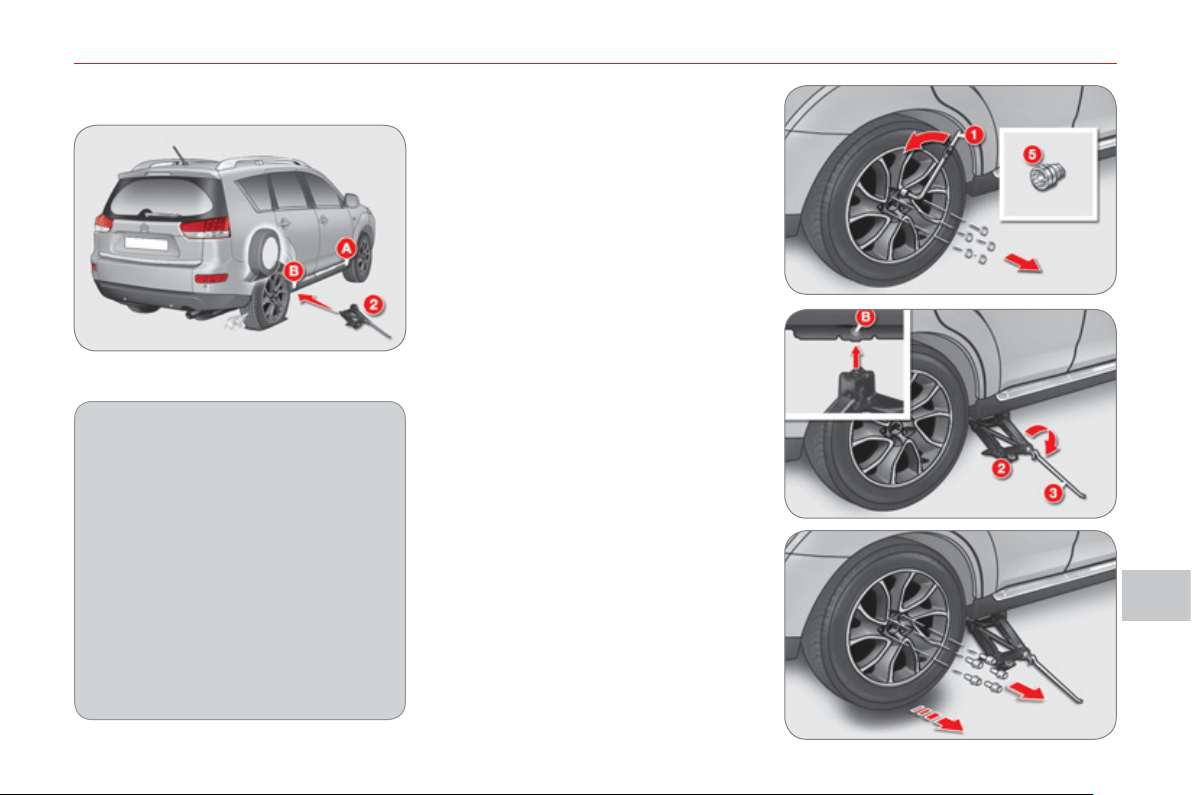
IX
PRA
C
TI
C
AL INF
O
RMATI
O
N
1
35
Parking the vehicle
Immobilise the vehicle where it does
not block traffi c: if possible, park the
vehicle on level, stable and non-slip-
pery ground.
Apply the parking brake, switch off
the ignition and engage fi rst gear to
lock the wheels.
If necessary, place a chock under
the wheel diagonally opposite the
wheel to be changed.
Never go underneath a vehicle
raised using a jack; use a stand.
Removin
g
a wheel
List of operations
) If your vehicle is equipped with secu-
rity wheel bolts (equipment available as
an accessory) fi t the security socket 5
on the wheelbrace 1 to slacken the
security bolt.
) Slacken the other bolts using the
wheelbrace 1 only.
) Place the jack 2 in contact with one
of the two front A or rear B locations
provided on the underbody, which-
ever is closest to the wheel to be
changed.
) Extend the jack 2 until its base plate
is in contact with the ground. Ensure
that the centreline of the jack base
plate is directly below the location A
or B used.
) Raise the vehicle until there is suffi -
cient space between the wheel and
the ground to admit the spare (not
punctured) wheel easily.
) Remove the bolts and store them in
a clean place.
) Remove the wheel.
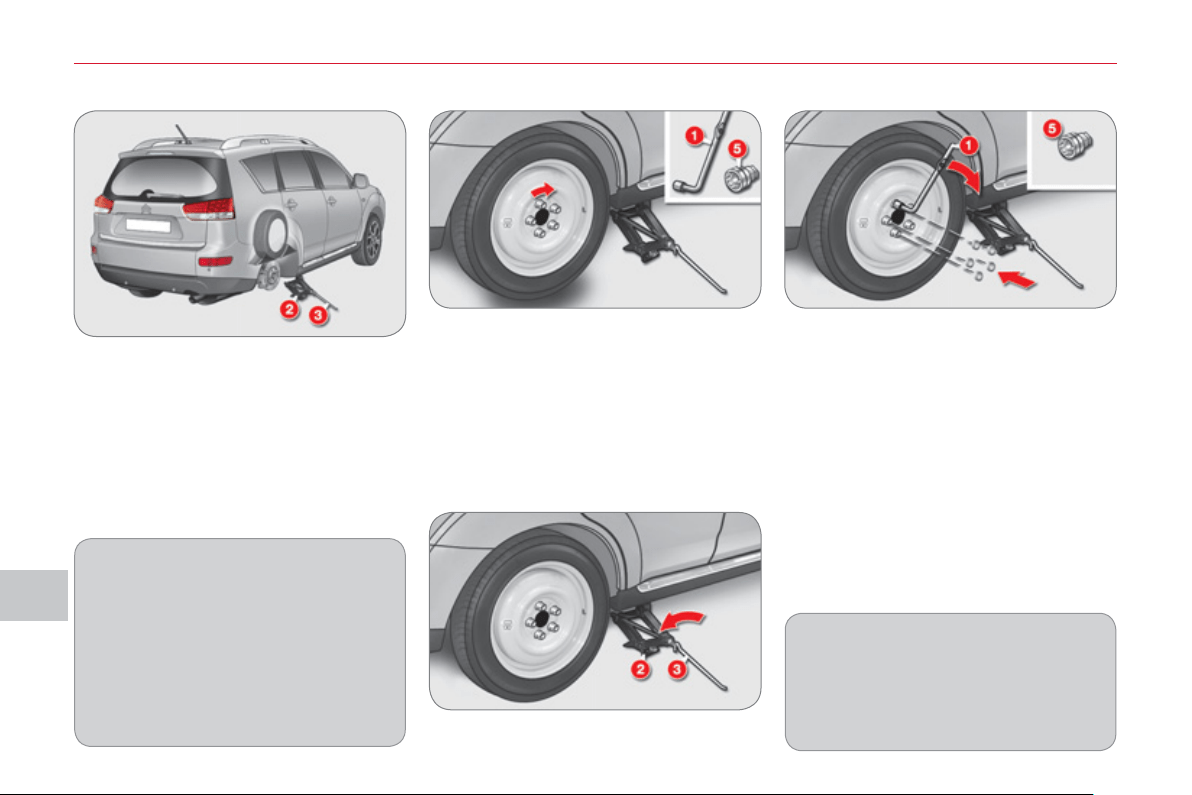
IX
PRA
C
TI
C
AL INF
O
RMATI
ON
1
36
After changing a wheel
When using the "space-saver" spare
wheel, do not exceed a speed of
50 mph (80 km/h).
Have the tightening of the bolts and
the pressure of the spare wheel
checked by a CITROËN dealer or a
qualifi ed workshop without delay.
Have the punctured wheel repaired
and replace it on the vehicle as soon
as possible.
Fittin
g
a wheel
List of operations
) Lower the vehicle fully.
) Fold the jack 2 and detach it.
) Tighten the security bolt using the
wheelbrace 1 fi tted with the security
socket 5 (if your vehicle is equipped
with security wheel bolts).
) Tighten the other bolts using the
wheelbrace 1 only.
) Store the tools (refer to the para-
graph "Access to the tools").
Fitting snow tyres
If you equip your vehicle with snow
tyres fi tted on steel wheel rims,
special bolts available from your
CITROËN dealer or a qualifi ed work-
shop must be used.
) Put the wheel in place on the hub.
) Screw in the bolts fully by hand.
) Pre-tighten the security bolt us-
ing the wheelbrace 1 fi tted with the
security socket 5 (if your vehicle is
equipped with security wheel bolts).
) Pre-tighten the other bolts using the
wheelbrace 1 only.
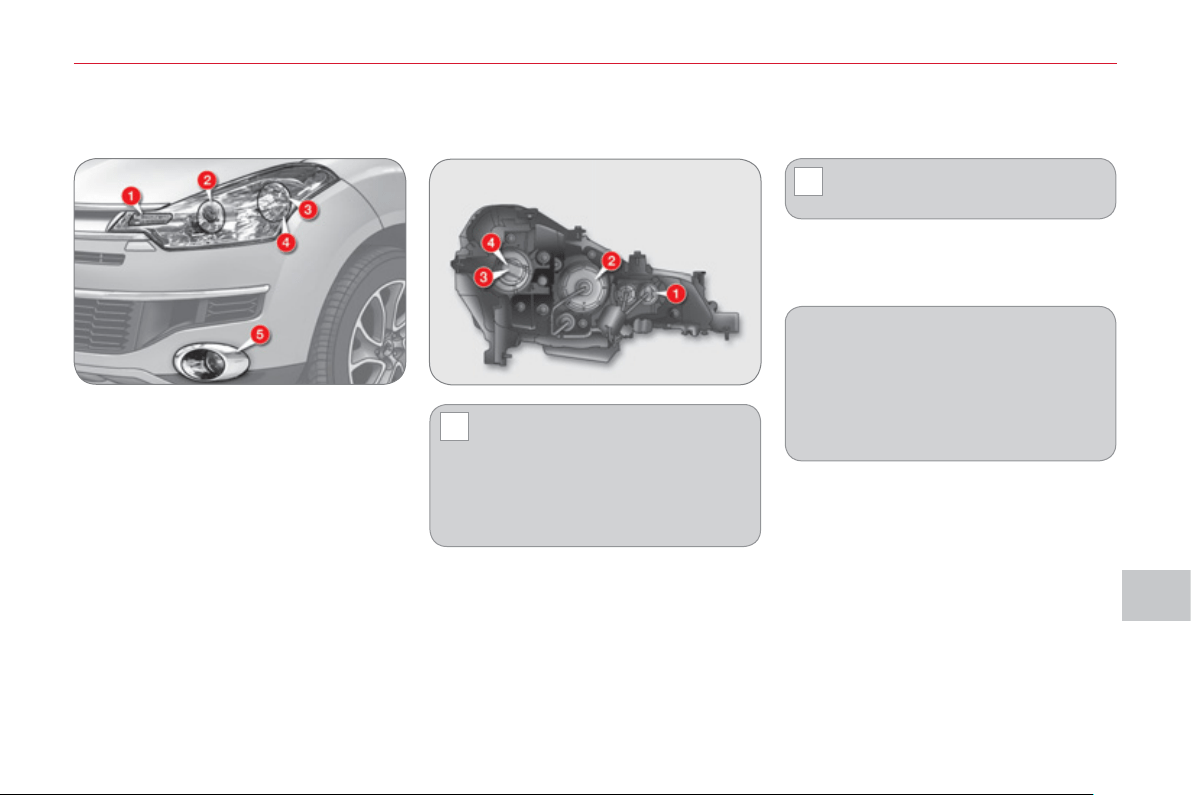
IX
!
!
PRA
C
TI
C
AL INF
O
RMATI
O
N
1
3
7
CHANGING A BULB
Handle the bulbs using a dry
cloth.
Do not clean the headlamps using
a dry or abrasive cloth, or using
detergent or solvent products, use
a sponge and soapy water.
In some weather conditions (e.g. low
temperature or humidity), the presence
of misting on the internal surface of the
glass of the headlamps and rear lamps
is normal; it disappears after the lamps
have been on for a few minutes.
F
ront
l
amps
1. Direction indicators
(PY21W - 21 W).
2. Dipped beam headlamps
(H11 - 55 W)
or xenon bulb (D2S - 35 W).
3. Sidelamps (W5W - 5 W).
4. Main beam headlamps
(H7 - 55 W).
5. Front foglamps
(H11 - 55 W).
WARNING: RISK OF
ELECTROCUTION
Xenon bulbs must be replaced by a
CITROËN dealer or a qualifi ed work-
shop.
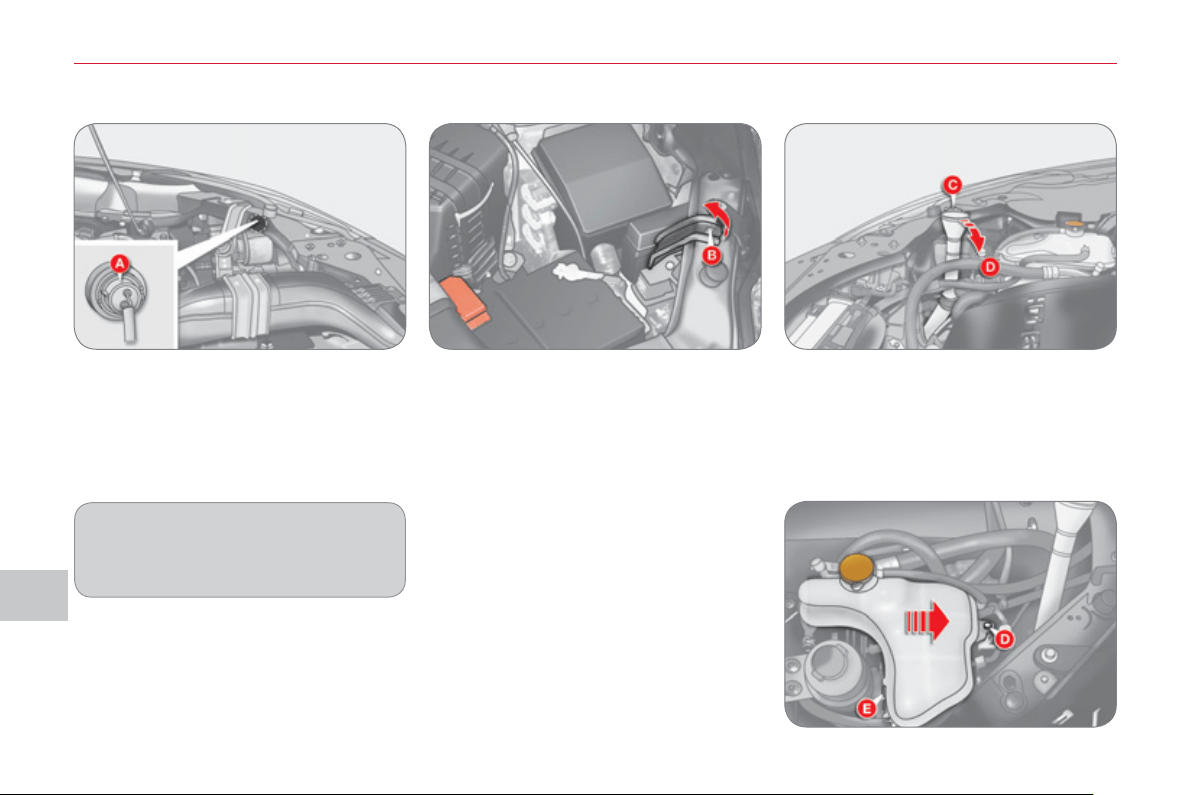
IX
PRA
C
TI
C
AL INF
O
RMATI
ON
1
38
Changing direction indicator bulbs (1)
Coloured bulbs must be replaced
with bulbs of identical specifi cation
and colour.
) Turn the bulb holder A to the left
and remove it.
) Pull the bulb and change it.
To refi t, carry out these operations in
reverse order.
Access to the bulbs on the left-hand
side
When you change a bulb on the left-
hand side, remove the relay box fi xing
nut B and move the relay box towards
the rear.
Access to the bulbs on the right-
hand side
When you change a bulb on the right-
hand side:
) Remove the screenwash reservoir
fi xing C and move the reservoir to-
wards the rear.
) Remove the coolant reservoir fi xing
nut D .
) Remove the clip E and raise the res-
ervoir moving it towards the front.
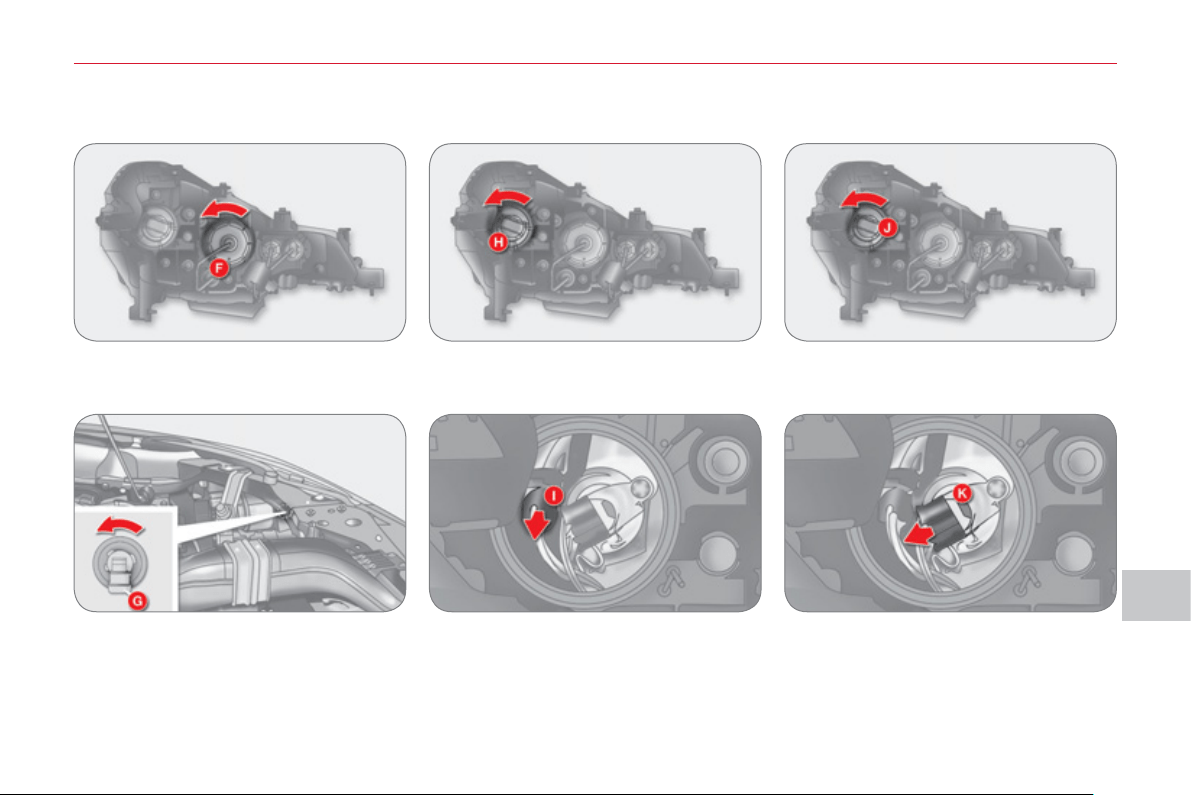
IX
PRA
C
TI
C
AL INF
O
RMATI
O
N
1
39
Changing sidelamp bulbs (3)
) Unscrew the cover H .
) Disconnect the connector.
) Turn the bulb holder I a quarter of a
turn and remove it.
) Pull the bulb and change it.
To refi t, carry out these operations in
reverse order.
) Unscrew the cover F .
) Disconnect the connector.
) Turn the bulb G to the left and re-
move it.
To refi t, carry out these operations in
reverse order.
Changing dipped beam headlamp
bulbs (2)
Changing main beam headlamp
bulbs (4)
) Unscrew the cover J .
) Disconnect the connector.
) Move aside the spring K to release
the bulb and remove it.
To refi t, carry out these operations in
reverse order.
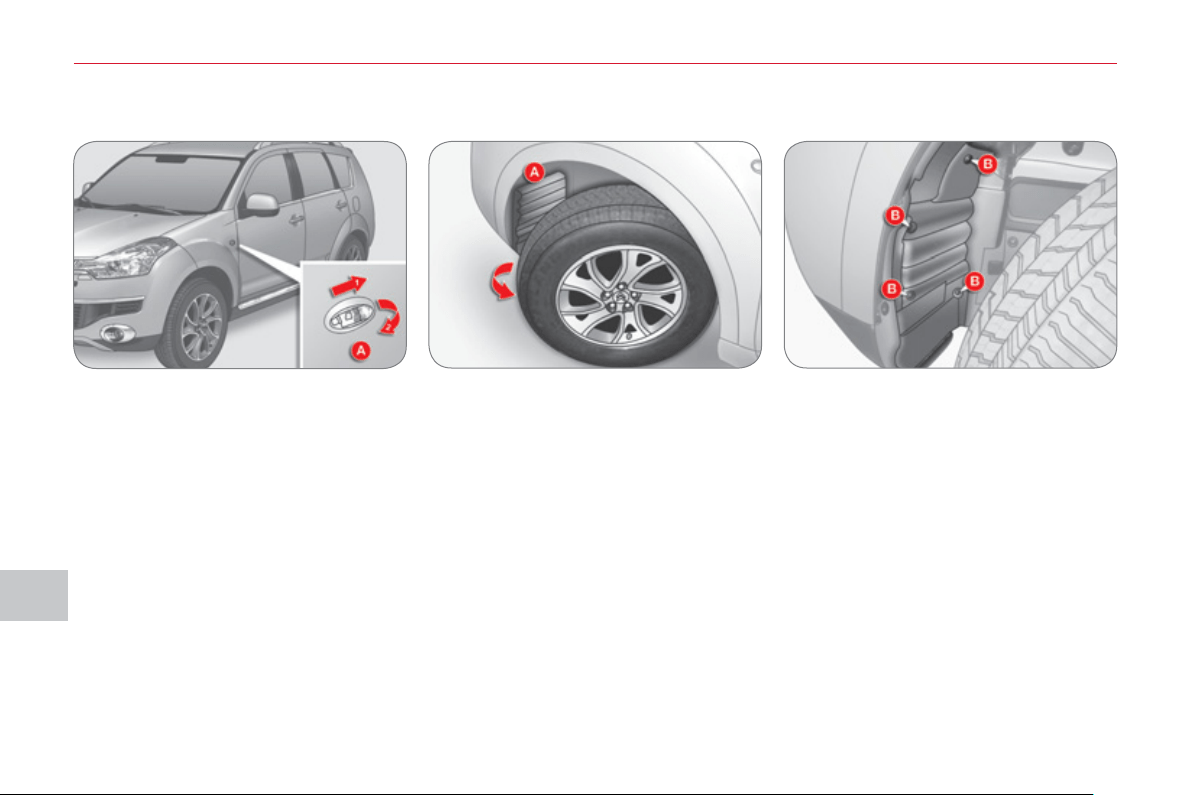
IX
PRA
C
TI
C
AL INF
O
RMATI
ON
1
4
0
Changing integrated direction
indicator side repeaters
Changing foglamp bulbs (5)
) Push the repeater A towards the
rear and detach it.
) Unclip the repeater.
) Disconnect the repeater connector
and change the repeater.
To refi t, carry out these operations in
reverse order.
To obtain repeaters, contact a CITROËN
dealer or a qualifi ed workshop.
) Turn the wheel fully out for easy
access to the fl ap A located in the
wheelarch.
) Using a screwdriver, remove the four
clips B located in the wheelarch.

IX
PRA
C
TI
C
AL INF
O
RMATI
O
N
1
4
1
) Using a screwdriver, remove the
three clips C located below the
bumper.
) Lift the access fl ap D located in the
wheelarch and slide it downwards.
) Disconnect the connector E .
) Turn the bulb F to the left and remove it.
To refi t, carry out these operations in
reverse order.
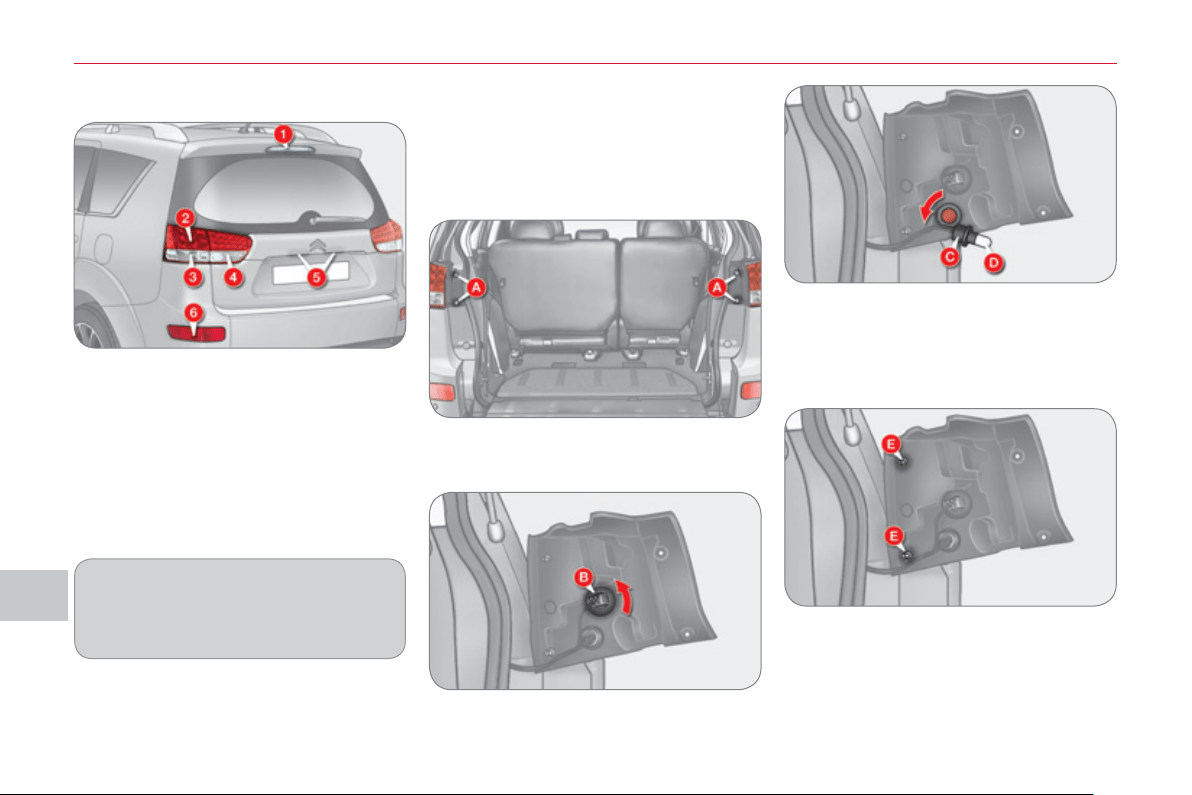
IX
PRA
C
TI
C
AL INF
O
RMATI
ON
1
4
2
Rear lam
p
s
1. Third brake lamp (LEDs).
2. Brake lamps/Sidelamps
(21/5 - W21W - 5 W).
3. Direction indicators
(WY21W - 21 W).
4. Reversing lamps (W21W - 21 W).
5. Number plate lamps
(W5W - 5W).
6. Foglamps
(W21W - 21 W).
Changing brake lamp/sidelamp and
direction indicator bulbs
These two bulbs are changed from out-
side with the tailgate open:
) Open the tailgate (refer to the "Access"
section),
) Remove the two lamp fi xing bolts A ,
) Extract the lamp unit from outside,
)
Turn the pin C to the left and remove it.
) Pull the bulb D out and change it.
To refi t, carry out these operations in
reverse order.
)
Turn the pin B to the left and remove it.
) Pull the bulb out and change it.
When refi tting the lamp unit, align the
two pins E with the openings on the ve-
hicle.
Amber coloured bulbs, such as the
direction indicators, must be replaced
with bulbs of identical specifi cation
and colour.
Changing the third brake lamp
(LEDs)
All work on the LED lamps must be
carried out by a CITROËN dealer or a
qualifi ed workshop.
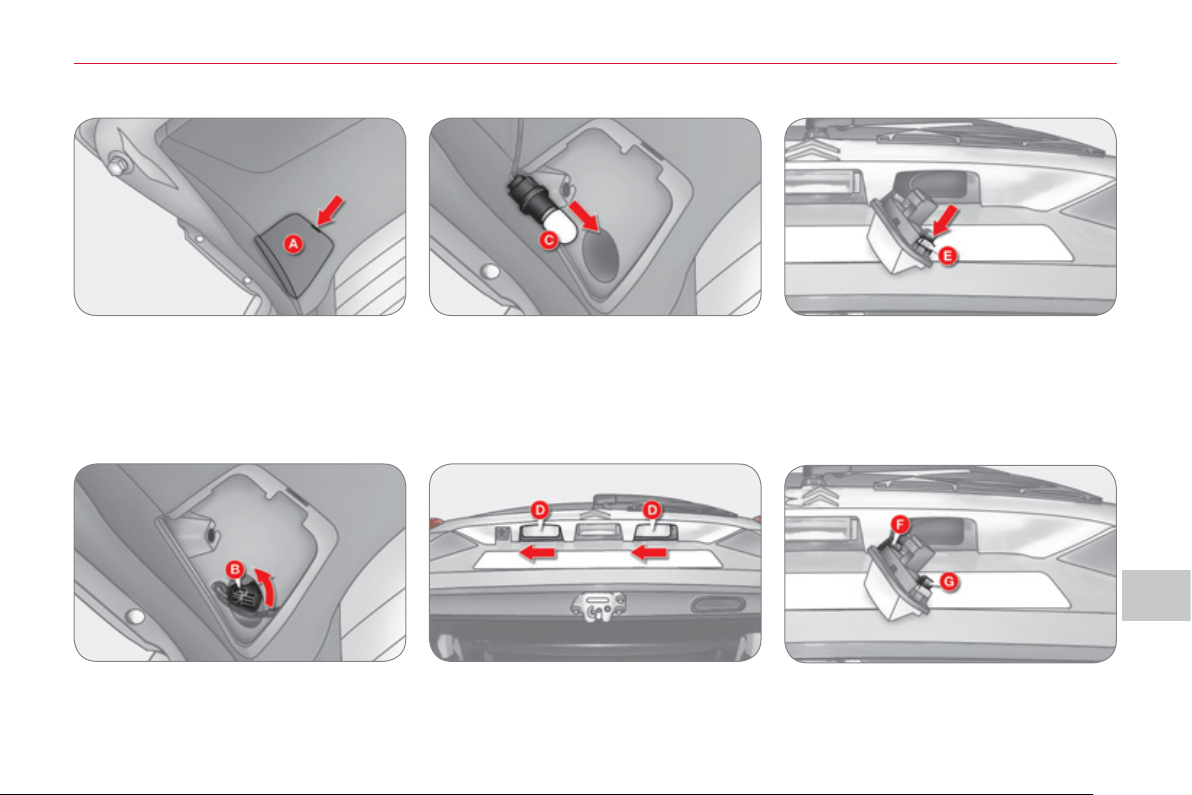
IX
PRA
C
TI
C
AL INF
O
RMATI
O
N
1
4
3
Changing reversing lamp bulbs
) Open the tailgate (refer to the "Ac-
cess" section),
) From the inside of the tailgate, in-
sert a screwdriver in the opening on
the cover A to use it as a lever to
open the cover.
Changing number plate lamp bulbs
) Open the tailgate (refer to the "Ac-
cess" section) to gain access to the
number plate lamps D ,
) Remove the lamp unit D while
pressing it to the left.
)
Turn the pin B to the left and remove it.
) Pull the bulb C out and change it.
To refi t, carry out these operations in
reverse order.
) Insert a thin screwdriver in the open-
ing on the lens to press the tab E .
) Remove the lens.
) Pull the bulb out and change it.
To refi t, carry out these operations in
reverse order.
) To refi t the lamp unit, insert the end of
the tab F fi rst, then align the tab G .
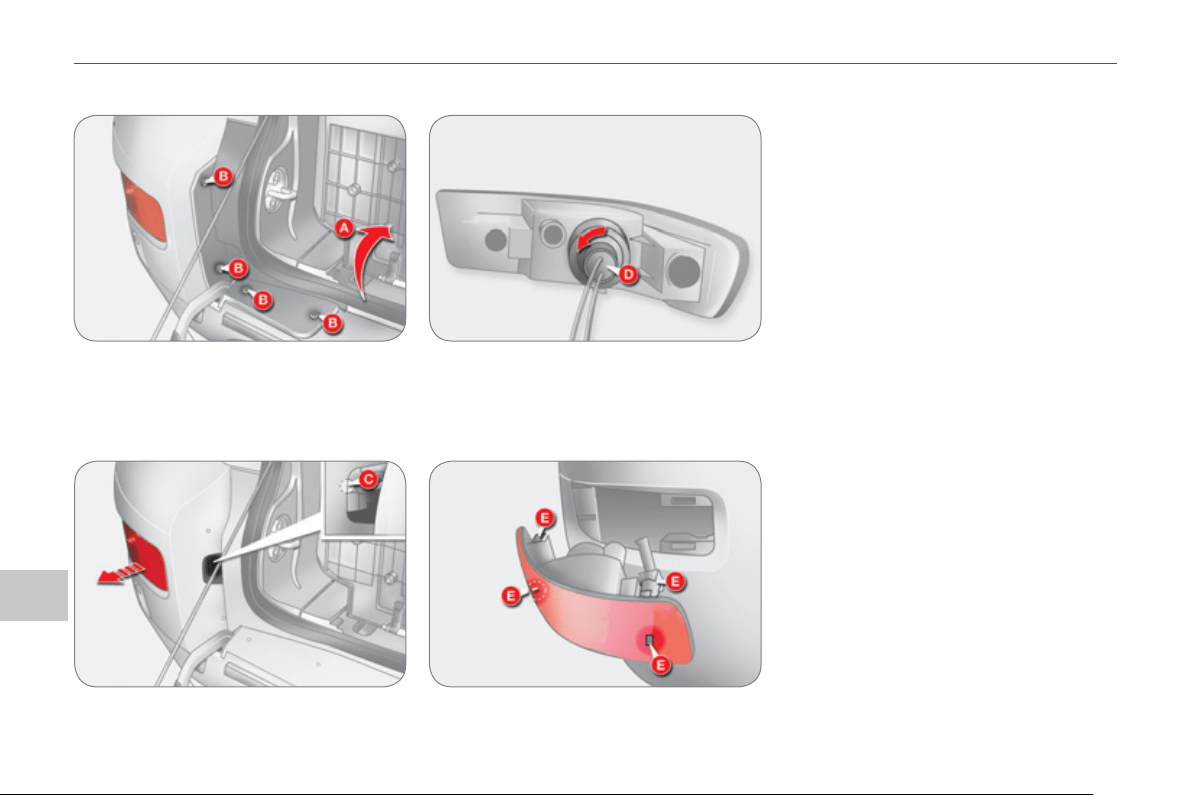
IX
PRA
C
TI
C
AL INF
O
RMATI
ON
144
Changing foglamp bulbs
) Open the tailgate and the lower tail-
gate (refer to the "Access" section)
and fold down the cover A .
) Remove the 4 clips B using a screw-
driver to detach the lamp cover.
) Remove the bolts C and remove the
lamp unit.
) Turn the pin and bulb assembly D to
the left.
) Remove the bulb.
To refi t, carry out these operations in
reverse order.
) When refi tting the lamp unit, align
the clips E with the openings on the
bodywork.
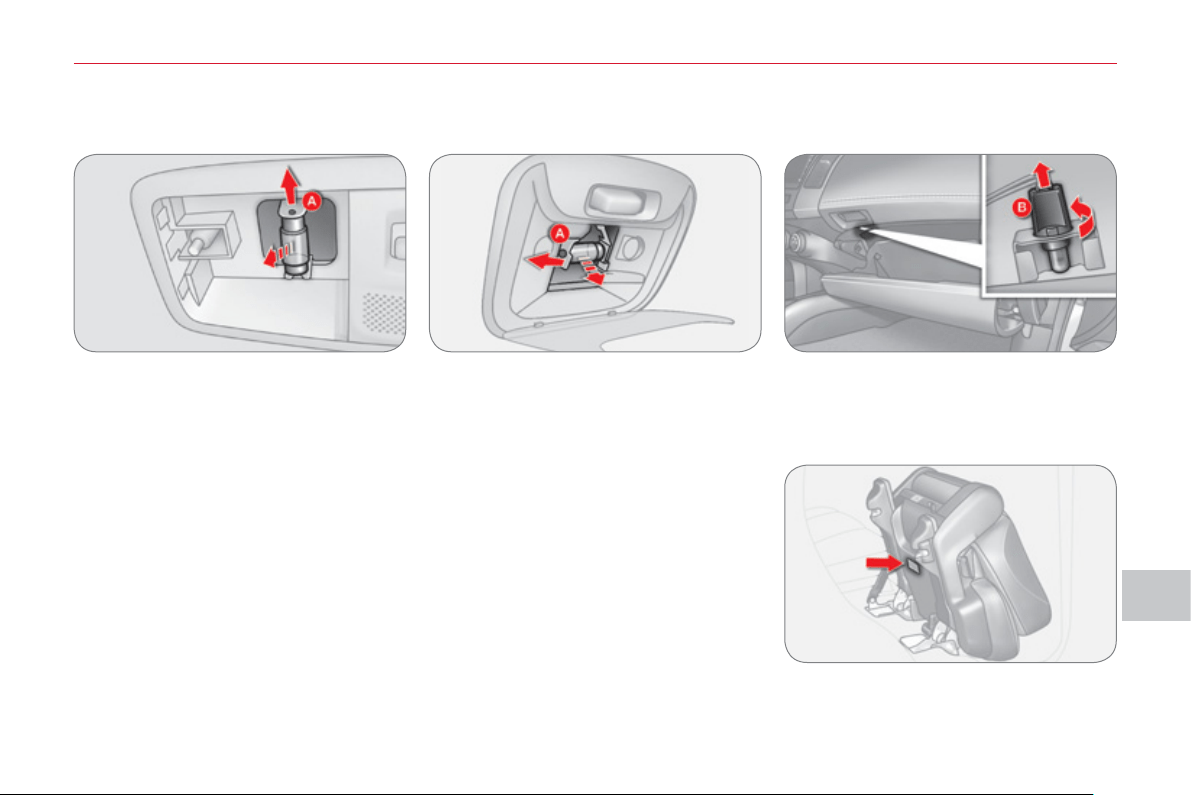
IX
PRA
C
TI
C
AL INF
O
RMATI
O
N
14
5
INTERIOR LAMP BULB
S
Front and rear courtes
y
lamps
) Insert a screwdriver to remove the courtesy lamp cover.
) Remove the bulb while pressing the tab A .
To refi t the cover, align the hooks on the holes located in the body of the vehicle.
Glove box lam
p
) Turn the pin B anticlockwise and re-
move it.
) Remove the bulb.
Low
l
eve
l
l
amp
) Insert a screwdriver to remove the
lamp cover.
) Remove the bulb.
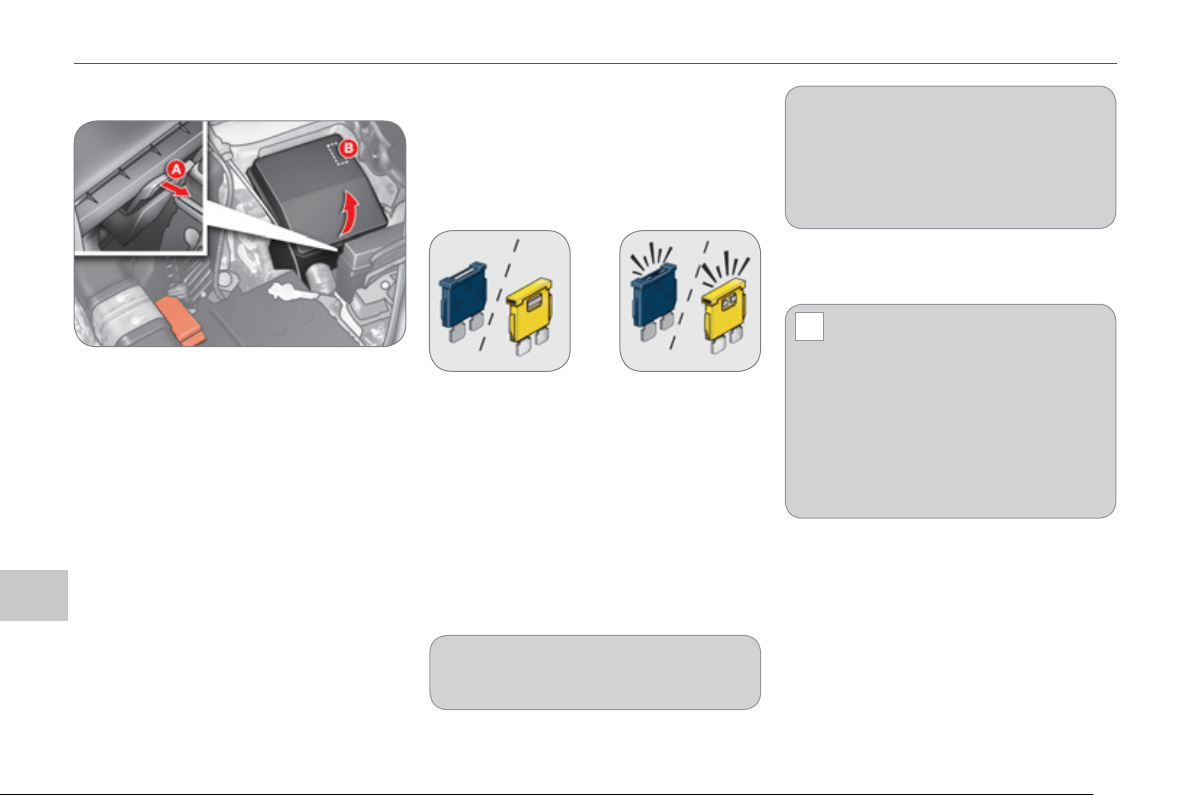
IX
!
PRA
C
TI
C
AL INF
O
RMATI
ON
14
6
CHANGING A FU
S
E Chan
g
in
g
a fuse
Before changing a fuse, the cause of
the failure must be identifi ed and recti-
fi ed.
) Identify the failed fuse by checking
the condition of its fi lament.
Access to the tools
The extraction tweezer is installed in
the engine compartment fusebox.
To gain access to it:
) Open the bonnet (refer to the "Ac-
cess" section),
) Press on the hook A and release
the catch,
) Remove the cover completely,
) Remove the tweezer B .
Good Failed
) Use the special tweezer to extract
the fuse from its location.
) Always replace the faulty fuse with
a fuse of the same rating.
) Check that the number marked on
the box, the rating marked on the
top of the fuse and the tables below
all agree.
The spare fuses are located on the
engine compartment fusebox cover.
Your vehicle’s electrical system is
designed to operate with standard or
optional equipment.
Before installing other electrical
equipment or accessories in your ve-
hicle, contact a CITROËN dealer or a
qualifi ed workshop.
CITROËN will not accept re-
sponsibility for the cost incurred
in repairing your vehicle or for
rectifying the malfunctions resulting
from the installation of accessories
not supplied and not recommended
by CITROËN and not installed in ac-
cordance with its instructions, in par-
ticular when the consumption of all of
the additional equipment connected
exceeds 10 milliamperes.
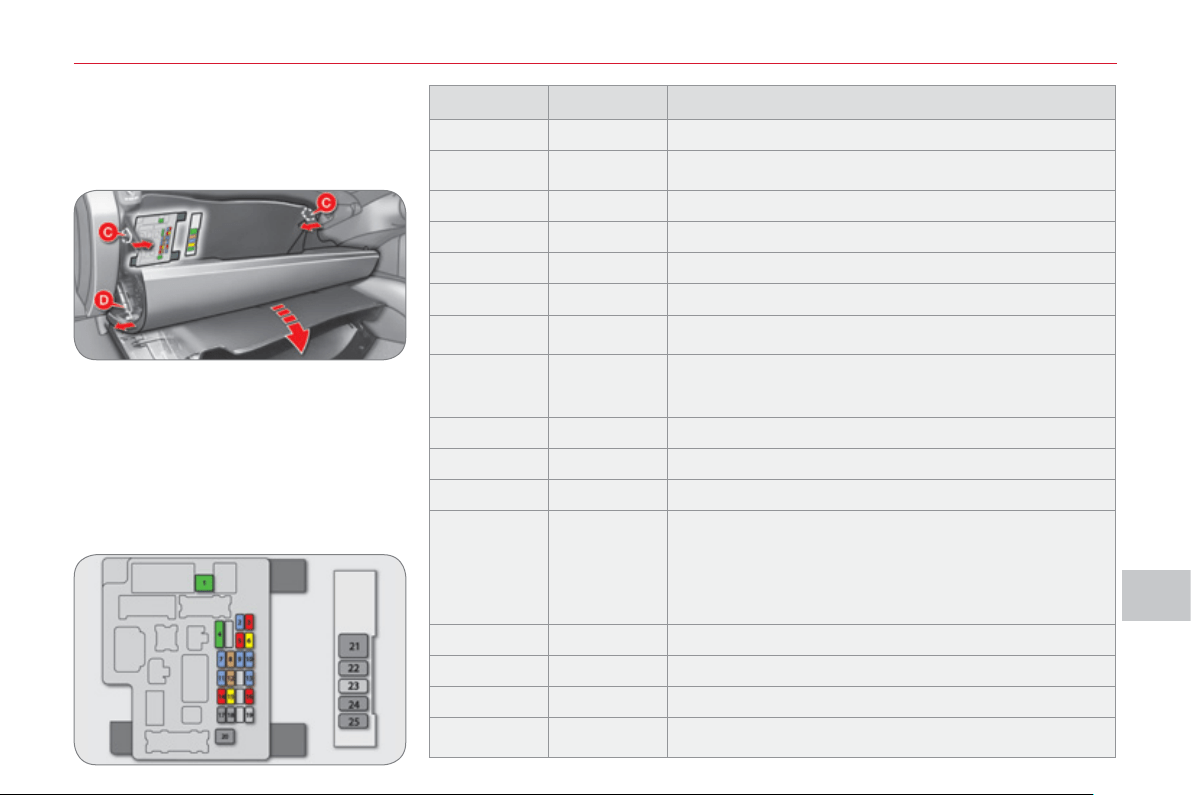
IX
PRA
C
TI
C
AL INF
O
RMATI
O
N
147
Dashboard fuses
The fuseboxes are placed in the lower
dashboard behind the glove box.
Access to the fuses
) Open the glove box,
) Push the two opening guides A in-
wards to pass the fi rst notch,
) Remove the retaining tab B pulling
it outwards,
) Support the cover and tilt it down-
wards,
) Change the fuse (refer to the cor-
responding paragraph).
Fuse N° Rating Functions
1* 30 A Heating.
2 15 A
Brake lamps, third brake lamp, built-in systems
interface.
3 10 A Rear foglamps.
4 30 A Windscreen wipers and screenwash.
5 10 A Diagnostic socket.
6 20 A Central locking, door mirrors.
7 15 A
Audio system, telematics, multifunction screen,
hands-free kit.
8 7.5 A
Remote control key, air conditioning control unit,
instrument panel, switch panel, steering mounted
controls.
9 15 A Multifunction screen, instrument panel.
10 15 A Built-in systems interface.
11 15 A Rear wiper.
12 7.5 A
Instrument panel, 4 wheel drive control unit,
air conditioning control panel, ABS control
unit, multifunction screen, automatic headlamp
adjustment, heated seats, airbag control unit,
steering wheel angle sensor, sunroof, rear screen
demisting, remote control.
13 - Not used.
14 10 A Ignition switch.
15 20 A Sunroof.
16 10 A Door mirrors, audio system, telematics.
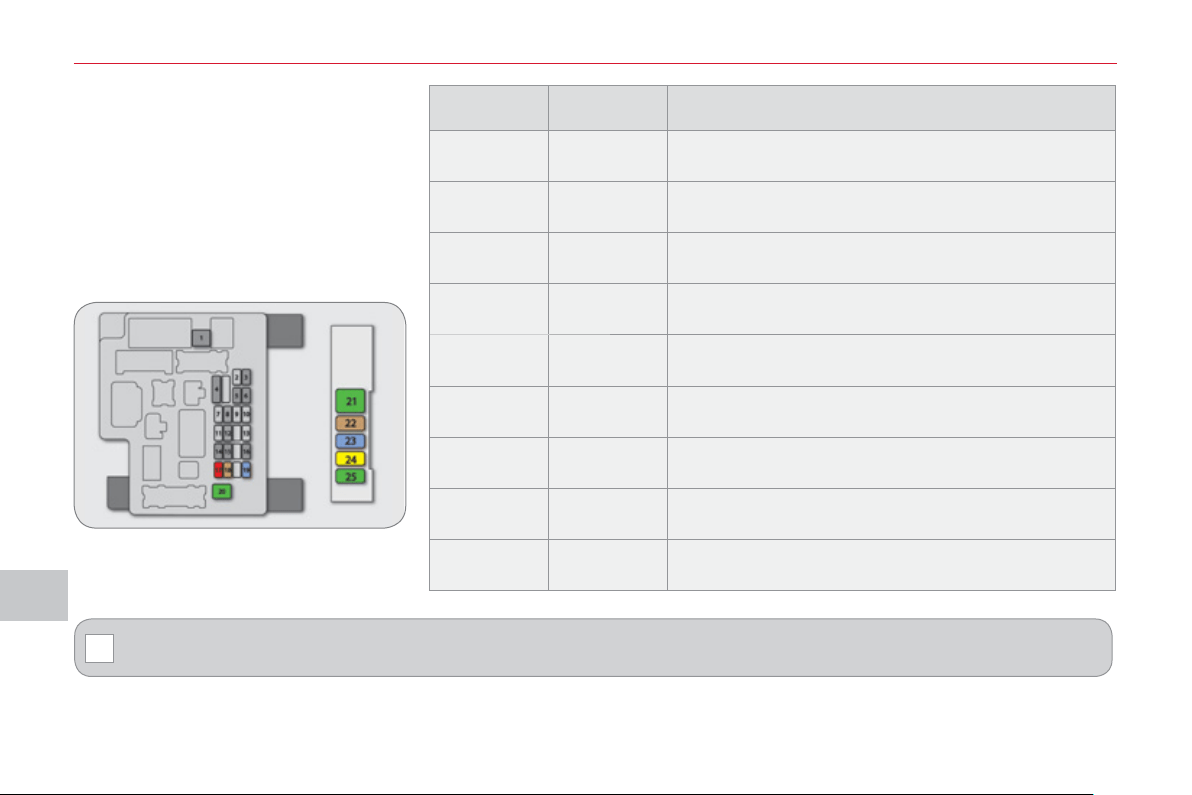
IX
!
PRA
C
TI
C
AL INF
O
RMATI
ON
1
4
8
Access to the fuses
) Open the glove box,
) Push the two opening guides A in-
wards to pass the fi rst notch,
) Remove the retaining tab B pulling
it outwards,
) Support the cover and tilt it down-
wards,
) Change the fuse (refer to the cor-
responding paragraph).
* The maxi-fuses provide additional protection for the electrical systems. All work on the maxi-fuses must be carried
out by a CITROËN dealer or a qualifi ed workshop.
Fuse N° Rating Functions
17 10 A 4 wheel drive control unit.
18 7.5 A
Reversing lamps, parking sensors control unit,
reversing camera, airbag control unit.
19 15 A Accessory socket.
20* 30 A Electric window controls.
21 * 30 A Rear screen demisting.
22 7.5 A Heated door mirrors.
23 - Not used.
24 25 A
Driver’s electric seat, footwell lighting, rear bench
seat release.
25 30 A Heated seats.
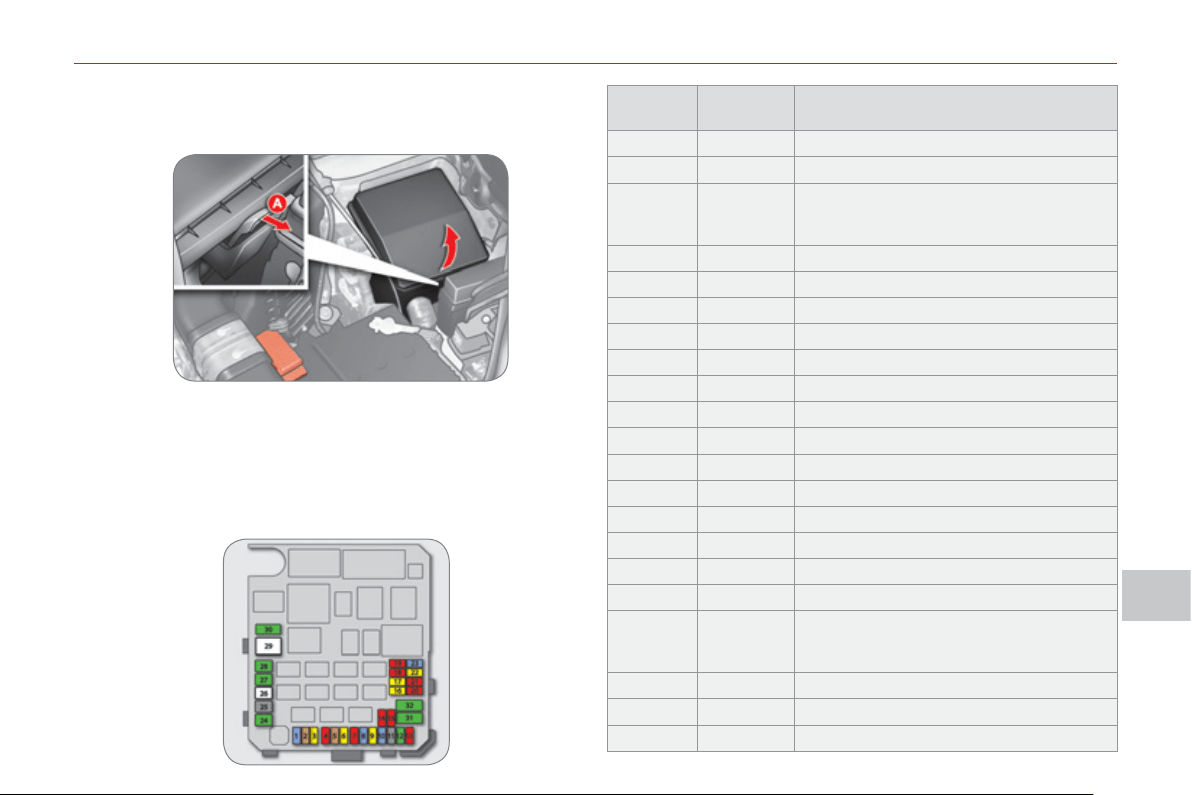
IX
PRA
C
TI
C
AL INF
O
RMATI
O
N
1
4
9
En
g
ine compartment fuses
The fuse box is placed in the engine compartment near the
battery (left-hand side).
Access to the fuses
) Open the bonnet (refer to the "Access" section),
) Press on the hook A to release the catch,
) Remove the cover completely,
) Change the fuse (refer to the corresponding paragraph).
) When you have fi nished, close the cover carefully to en-
sure sealing of the fusebox.
Fuse N° Rating Functions
1 15 A Front foglamps.
2 7 A 2.4 litre 16V engine control unit.
3 20 A
CVT automatic gearbox control unit,
CVT automatic gearbox control
relay.
4 10 A Horn.
5 7.5 A 2.4 litre 16V alternator.
6 20 A Headlamp wash.
7 10 A Air conditioning.
8 15 A 2.4 litre 16V engine control unit.
9 - Not used.
10 15 A Demisting, wipers.
11 - Not used.
12 - Not used.
13 - Not used.
14 10 A Left-hand main beam headlamp.
15 10 A Right-hand main beam headlamp.
16 20 A
Left-hand dipped beam headlamp (xenon).
17 20 A
Right-hand dipped beam headlamp (xenon).
18 10 A
Left-hand dipped beam headlamp,
manual and automatic headlamp
adjustment.
19 10 A Right-hand dipped beam headlamp.
20 - Not used.
21 10 A Ignition coils.
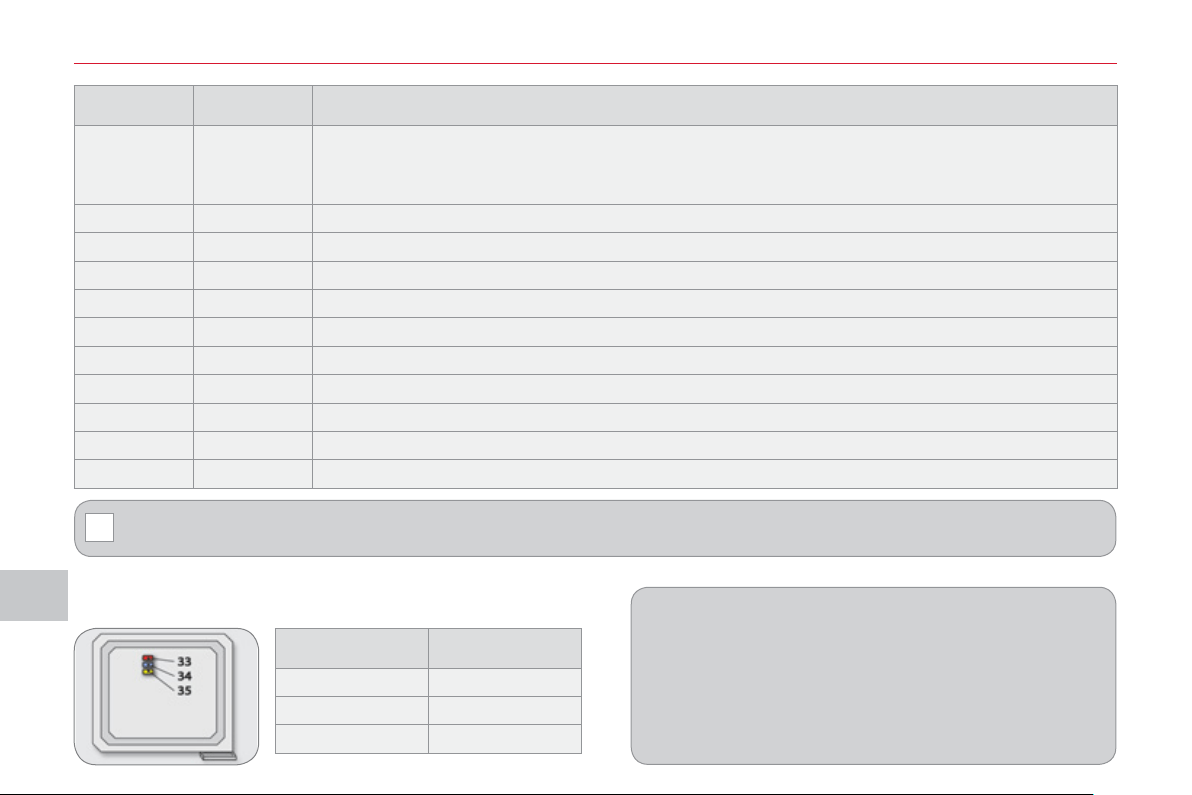
IX
!
PRA
C
TI
C
AL INF
O
RMATI
ON
1
50
Spare fuses
The spare fuses are located under the engine compartment
fuse box cover.
The cover does not contain spare fuses with an amperage
of 7.5 A, 25 A or 30 A. If one of the fuses with these amper-
ages develops a fault, replace it with the following fuse:
A 7.5 A fuse must be replaced with the 10 A spare fuse ,
a 25 A fuse with a 20 A spare fuse and a 30 A fuse with
the audio system fuse (N° 31) .
* The maxi-fuses provide additional protection for the electrical systems. All work on the maxi-fuses must be carried
out by a CITROËN dealer or a qualifi ed workshop.
Fuse N° Rating Functions
22 20 A
Engine control unit, water in Diesel detector, injection pump (Diesel), air fl ow sensor, water
presence sensors, oxygen sensor, camshaft position sensor, canister purge electrovalve,
vehicle speed sensor, variable timing (VTC) electrovalve, EGR electrovalve.
23 15 A Petrol pump, fuel gauge.
24 * 30 A Starter.
25 - Not used.
26 * 40 A ABS control unit, ASC control unit.
27* 30 A ABS control unit, ASC control unit.
28 * 30 A Condenser fan.
29 * 40 A Radiator fan.
30 30 A Passenger compartment fusebox.
31 30 A Audio amplifi er.
32 30 A Diesel engine control unit.
Fuse N° Rating
33 10 A
34 15 A
35 20 A
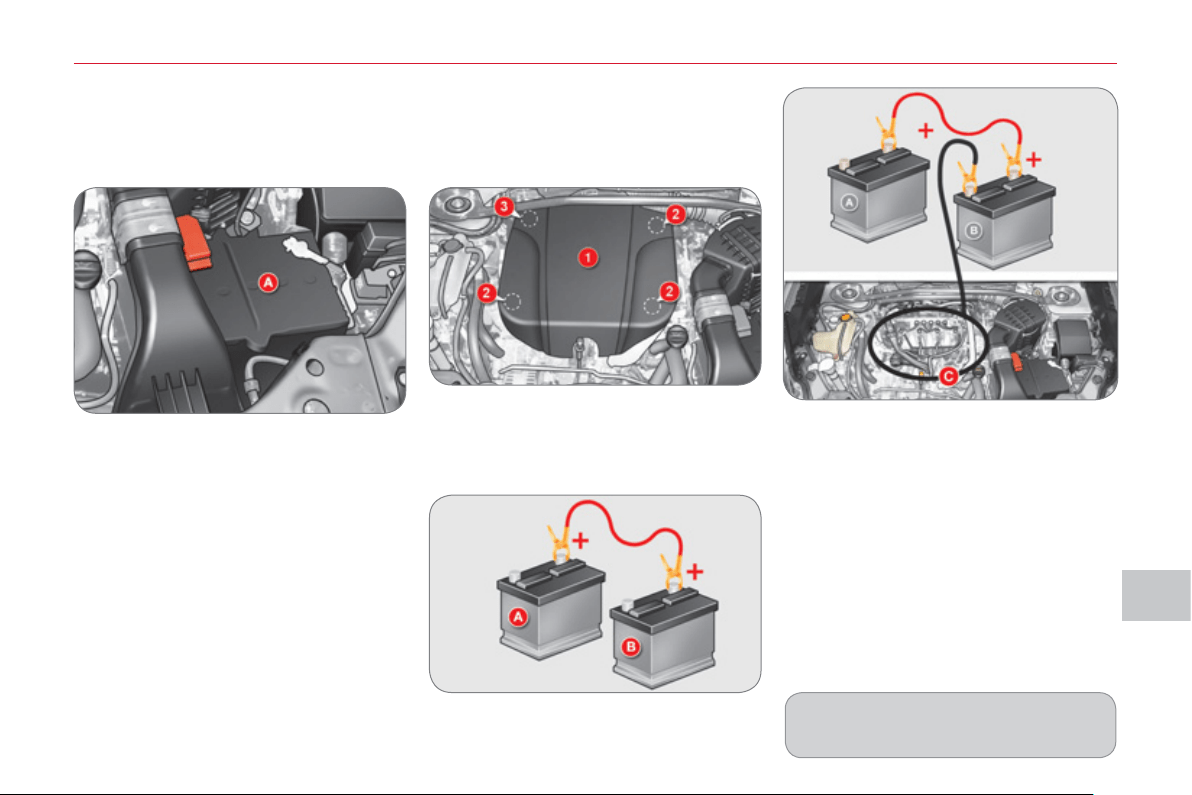
IX
PRA
C
TI
C
AL INF
O
RMATI
O
N
1
5
1
The battery A is located under the bon-
net on the left.
To gain access to it:
) open the bonnet using the interior re-
lease lever, then the exterior safety
catch,
) secure the bonnet stay.
BATTERY
Access to the batter
y
) Connect the red cable to the posi-
tive terminal (+) of the fl at battery A ,
then to the positive terminal (+) of
the slave battery B .
)
Connect one end of the green or black
cable to the negative terminal (-) of the
slave battery B .
) Connect the other end of the green
or black cable to an earth point C on
the broken down vehicle, as far as
possible from the battery (for exam-
ple, right-hand engine mounting).
) Start the engine of the assisting ve-
hicle.
) Operate the starter, let the engine
run.
) Wait until the engine returns to idle
and disconnect the cables.
) Raise the front of the cover 1 to re-
lease the three clips 2 .
) Then pull the cover 1 towards you
to release the clip 3 and remove the
cover.
Check the electrolyte level regularly.
If necessary, top up the level with dis-
tilled water.
Startin
g
usin
g
another batter
y
Lookin
g
for an earth point at
the ri
g
ht-hand en
g
ine mountin
g

IX
!
!
PRA
C
TI
C
AL INF
O
RMATI
ON
152
Char
g
in
g
the batter
y
usin
g
a
b
atter
y
char
g
er
) Disconnect the battery from the ve-
hicle.
) Remove the battery and place it in a
ventilated area.
) Remove the top-up caps and top up
the level with distilled water if nec-
essary.
) Connect the battery to the charger
observing the instructions for use
provided by the manufacturer and
start charging.
) Disconnect the battery from the
charger and let it to cool.
) If necessary, top up the level with
distilled water.
) Clean the top of the battery care-
fully.
) Put the top-up caps back in place.
) Check that the terminals and connec-
tors are clean. If they are covered with
sulphate (whitish or greenish deposit),
remove them and clean them.
) Reconnect the battery starting with
the positive terminal (+).
Do not charge the batteries with-
out disconnecting the terminals
fi rst.
Avoid prolonged contact of the
electrolyte with the skin.
Most of these fl uids are harmful to
health and very corrosive.
Do not disconnect the terminals while
the engine is running.
The batteries contain harmful sub-
stances such as sulphuric acid
and lead. They must be disposed
of in accordance with regulations and
must not, in any circumstances, be dis-
carded with household waste.
Take used remote control batteries
and vehicle batteries to a special col-
lection point.
It is advisable to disconnect the bat-
tery if the vehicle is to be left unused
for more than one month.
When charging the battery, it is normal
to observe an increase in temperature
and bubbling of the electrolyte.
Following reconnection of the
battery
Following reconnection of the battery,
switch on the ignition and wait 1 minute
before starting to permit initialisation
of the electronic systems. However, if
slight diffi culties are encountered follow-
ing this operation, contact a CITROËN
dealer or a qualifi ed workshop.
Referring to the corresponding section,
you must yourself reinitialise:
- the one-touch electric windows,
- the sunroof,
- the satellite navigation system.
Before disconnecting the battery
Wait 2 minutes after switching off the ig-
nition before disconnecting the battery.
Close the windows, the sunroof, the
doors and the tailgate before discon-
necting the battery.

IX
PRA
C
TI
C
AL INF
O
RMATI
O
N
153
CHANGING A WIPER BLADE
Removin
g
a front or rear wiper
b
lade
) Raise the corresponding wiper arm.
) Remove the wiper blade, sliding it
towards the outside.
Fittin
g
a front or rear wiper
b
lade
) At the front, check the size of the
wiper blade as the shorter blade is
fi tted on the right-hand side of the
vehicle.
) Put the corresponding new wiper
blade in place and fi x it.
) Fold down the wiper arm carefully.
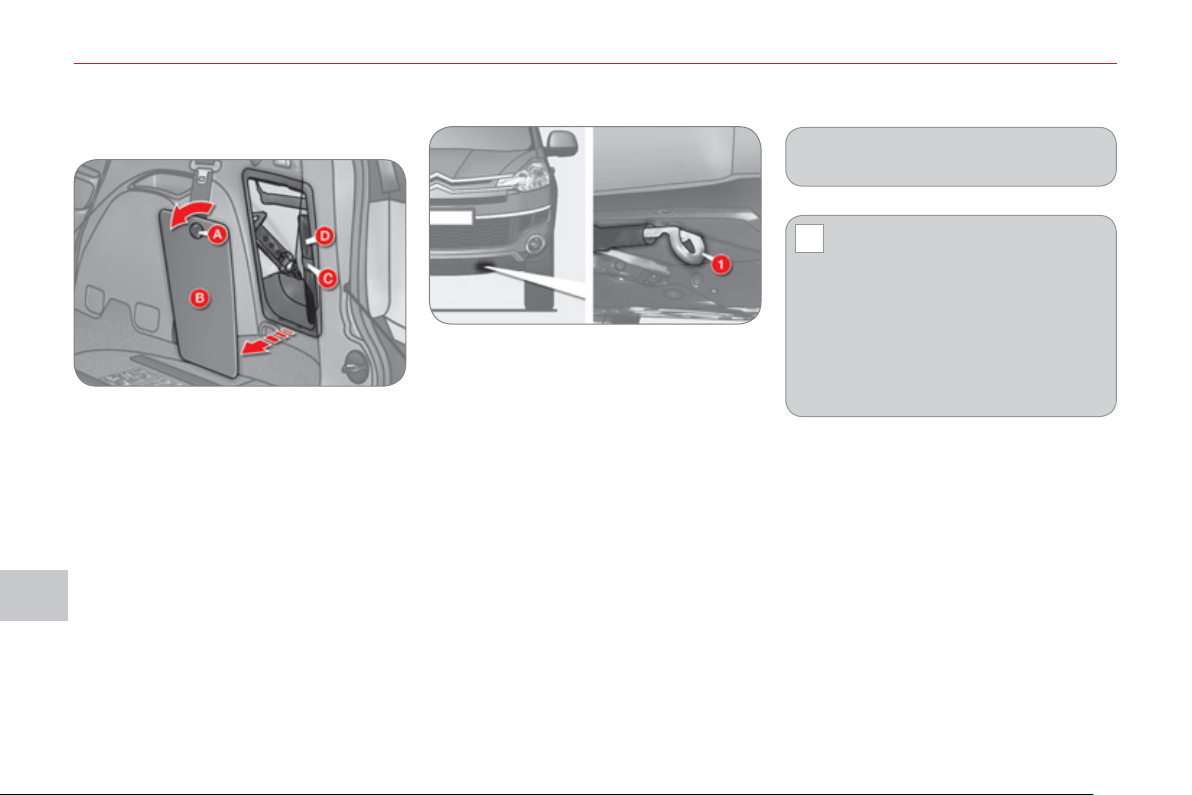
IX
!
PRA
C
TI
C
AL INF
O
RMATI
ON
15
4
T
OWING
Access to the tools
Havin
g
y
our vehicle towed on
a
flatbed
) Below the front bumper, install the
towing system on the towing eye 1 .
The towing eye and the tools are stored
in the storage compartment in the right-
hand boot trim.
To gain access to them:
) open the boot,
) turn button A to the left,
) remove the cover B ,
) remove the fi xing band C and take out
the tool bag D containing the tools,
) take the towing eye and the tools re-
quired out of the tool bag.
Place the gear lever in neutral.
Always have the vehicle
towed on a fl atbed.
Never have the vehicle towed with
the four wheels on the ground, this
could damage the transmission.
The vehicle must not be towed with
the front or rear wheels on the ground
even if it is in front "2WD" (2 wheel
drive) mode.
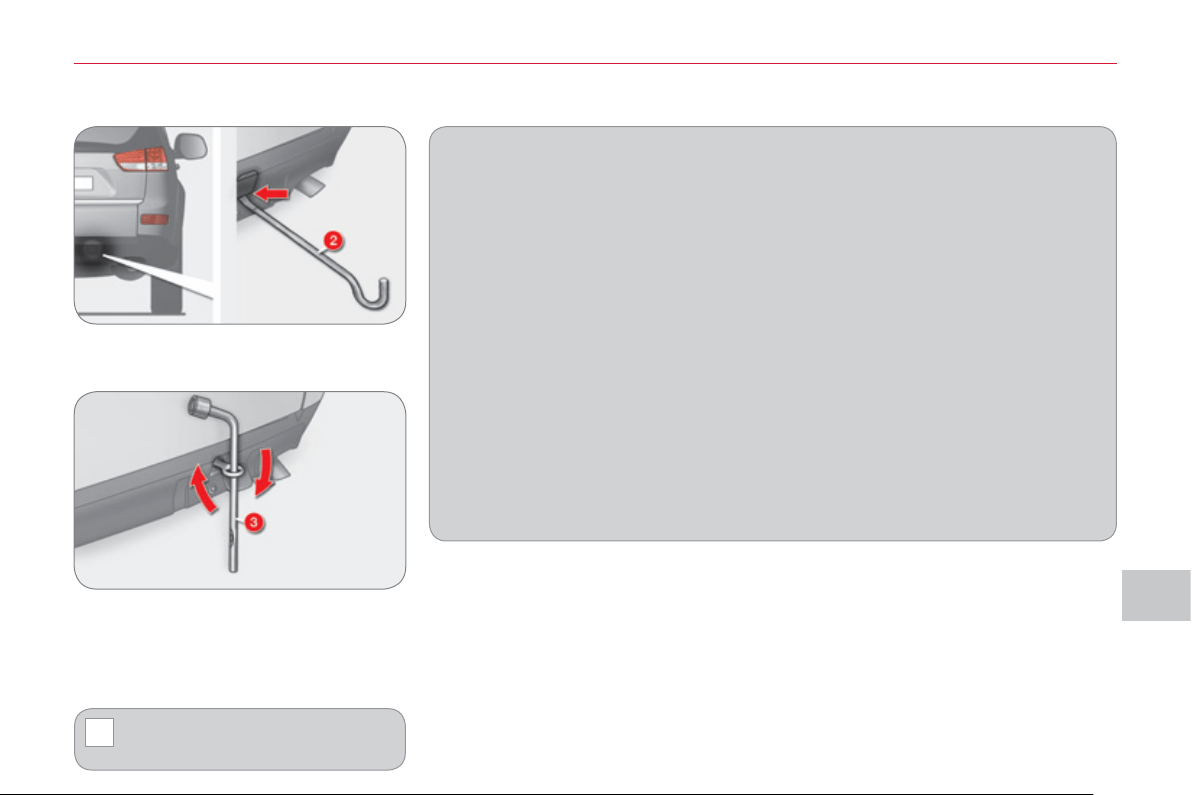
IX
!
PRA
C
TI
C
AL INF
O
RMATI
O
N
155
Towin
g
another vehicle
) On the rear bumper, remove the
cover by pulling at the bottom using
the jack handle 2 .
) Screw in the towing eye fully using
the wheelbrace 3 .
) Install the towbar.
) Switch on the hazard warning lamps
on the towed vehicle.
When being towed with the en-
gine off, there is no longer any
braking or steering assistance.
General recommendations
Observe the legislation in force in your country.
Ensure that the weight of the towing vehicle is higher than that of the towed
vehicle.
The driver must stay at the wheel of the towed vehicle.
Driving on motorways and fast roads is prohibited when towing.
When towing a vehicle with all four wheels on the ground, always use an ap-
proved towing bar; rope and straps are prohibited.
When towing a vehicle with the engine off, there is no longer any power assis-
tance for braking or steering.
In the following cases, you must always call on a professional recovery service:
- vehicle broken down on a motorway or fast road,
- when it is not possible to put the gearbox into neutral, unlock the steering,
or release the parking brake,
- towing with only two wheels on the ground,
- where there is no approved towing bar available...
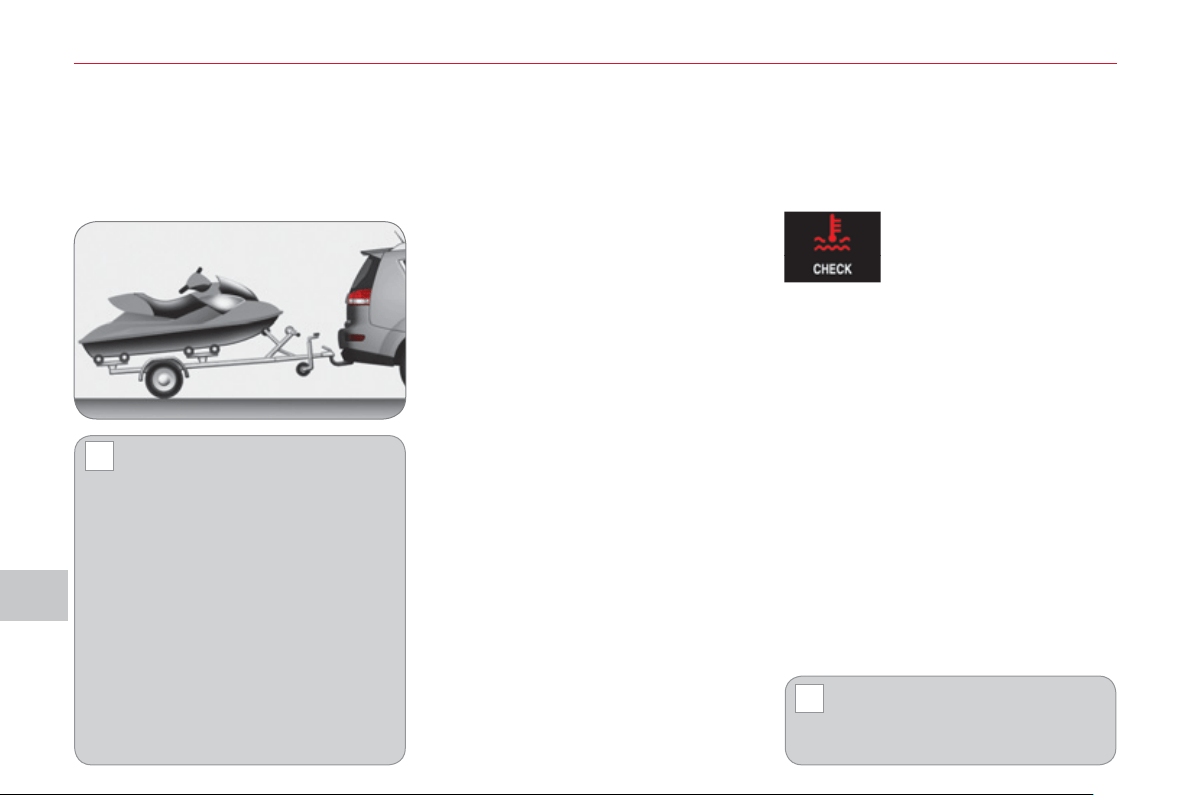
IX
!
!
PRA
C
TI
C
AL INF
O
RMATI
ON
156
T
OWING A TRAILER
,
CARAVAN
,
ETC.
Drivin
g
advice
The maximum towing load on a long
slope depends on the gradient and the
outside temperature.
In all cases, pay attention to the coolant
temperature.
Side wind
) Take into account the increased
sensitivity to side wind.
Cooling
Towing a trailer on a slope increases
the temperature of the coolant.
As the fan is electrically controlled, its
cooling capacity is not dependent on
the engine speed.
) To lower the engine speed, reduce
your speed.
Braking
Towing a trailer increases the braking
distance.
Tyres
) Check the tyre pressures of the towing
vehicle and of the trailer, observing the
recommended pressures.
Lighting
) Check the lighting and signalling on
the trailer.
) If this message is dis-
played, stop your ve-
hicle as soon as it is
safe to do so.
If the message fl ashes slowly, wait for
the engine to cool before topping up the
level, if necessary.
If the message fl ashes rapidly, contact
a CITROËN dealer or a qualifi ed work-
shop without delay.
Opening of the lower tailgate is
prohibited if a towbar is being
used.
We recommend the use of gen-
uine CITROËN towbars and
their harnesses that have been
tested and approved from the design
stage of your vehicle and that the fi t-
ting of the towbar is entrusted to a
CITROËN dealer or a qualifi ed work-
shop.
If the towbar is not fi tted by a
CITROËN dealer, it is imperative
that it is fi tted using the electrical pre-
equipment located at the rear of the
vehicle and in accordance with the
manufacturer's instructions.
Driving with a trailer subjects the
towing vehicle to more signifi cant
stress and its driver must be particu-
larly careful.
Your vehicle is primarily designed for
transporting people and luggage, but it
may also be used for towing a trailer.
Distribution of loads
) Distribute the load in the trailer so
that the heaviest items are as close
as possible to the axle and the nose
weight approaches the maximum
permitted without exceeding it.
Air density decreases with altitude, thus
reducing engine performance. Above
1 000 metres, the maximum towing
load must be reduced by 10 % of the
GTW and so on for every 1 000 metres
of altitude.
Refer to the "Technical Data" section for
details of the weights and towing loads
which apply to your vehicle.
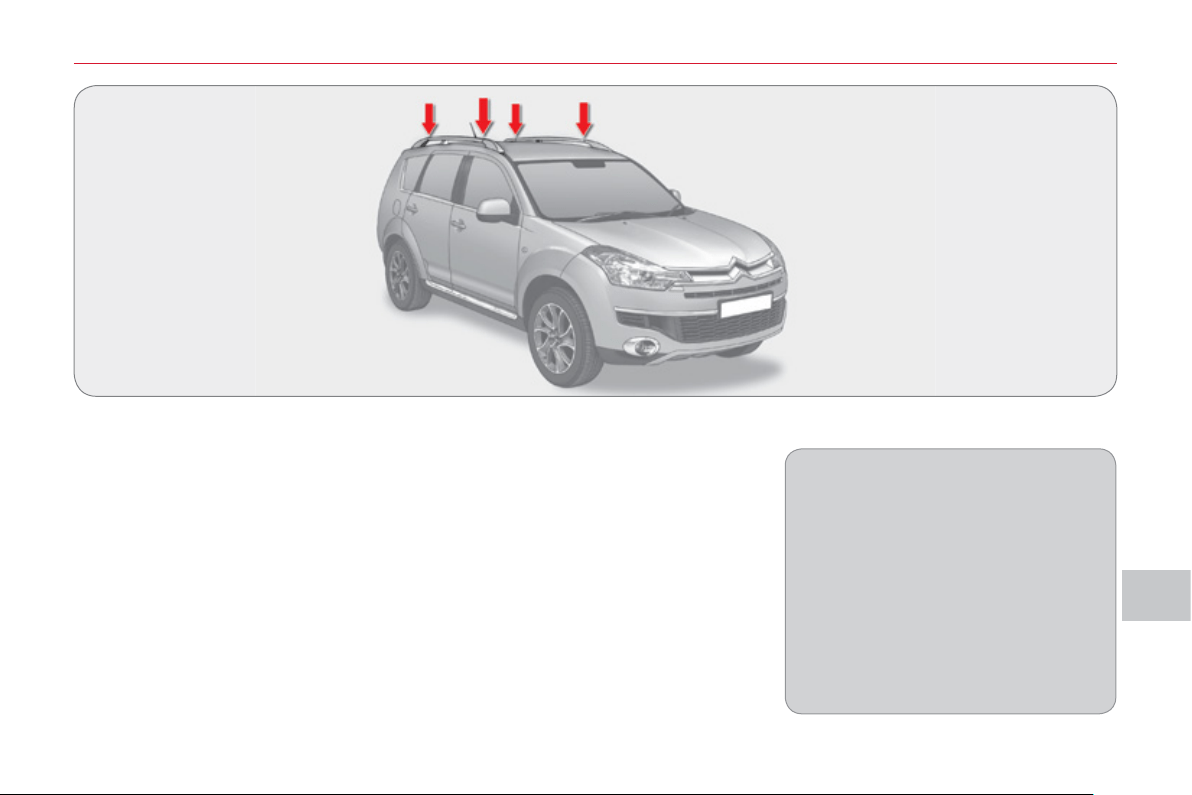
IX
PRA
C
TI
C
AL INF
O
RMATI
O
N
15
7
FITTING ROOF BARS
Maximum authorised weight on the roof
bars, for a loading height not exceeding
40 cm (except bicycle carriers): 80 kg.
If the height exceeds 40 cm, adapt
the speed of the vehicle to the con-
dition of the road, to avoid damaging
the roof bars and the fi xings on the
roof.
Please refer to national legislation
to comply with the regulations re-
garding the transportation of objects
which are longer than the vehicle.
Consult a CITROËN dealer or a quali-
fi ed workshop for the installation of lon-
gitudinal roof bars.
When fi tting transverse roof bars, en-
sure that they are positioned correctly
as shown by marks on the longitudinal
roof bars.
Use accessories recommended by
CITROËN and follow the accessory
manufacturer's fi tting instructions.
In order to place a load on the roof, your
vehicle must be fi tted with longitudinal
roof bars with transverse roof bars fi tted
on top of these.
The longitudinal roof bars cannot be re-
moved.

IX
!
PRA
C
TI
C
AL INF
O
RMATI
ON
158
A wide range of accessories and genu-
ine parts is available from the CITROËN
dealer network.
These accessories and parts have
been tested and approved for reliability
and safety.
They are all adapted to your vehicle and
benefi t from CITROËN's recommenda-
tion and warranty.
"Comfort":
rear parking sensors, side sun blinds,
insulated module...
"Trans
p
orts solutions":
boot liner, dog guard, roof bars, bicycle
carrier for roof bars, ski carrier, roof
box...
Trailer towbar which must be fi tted by
a CITROËN dealer or a qualifi ed work-
shop.
"Securit
y
and safet
y
":
anti-intrusion alarm, glass etching,
wheel security bolts, fi rst aid kit, warn-
ing triangle, high visibility vest, stolen
vehicle tracking system, child seats and
booster cushions, under-infl ation detec-
tion, anti-slip covers...
"Protection":
mat * , side protective mouldings...
"M
u
l
t
i
me
di
a
"
:
MP3/USB audio systems, audio-tele-
phone, amplifi ers, satellite navigation
systems, hands-free kit, speakers, DVD
player, connection kit for MP3 player or
portable CD player...
Depending on the legislation in force
in the country, it may be compulsory
to have a high visibility safety vest,
warning triangle and spare bulbs and
fuses available in the vehicle.
The fi tting of electrical equip-
ment or accessories which are
not recommended by CITROËN
may result in a failure of your vehi-
cle's electronic system and exces-
sive electrical consumption.
Please note this precaution. You are
advised to contact a CITROËN rep-
resentative to be shown the range
of recommended equipment and ac-
cessories.
Installation of radio
communication transmitters
Before installing any after-market ra-
dio communication transmitter, you
can contact a CITROËN dealer for
the specifi cation of transmitters which
can be fi tted (frequency, maximum
power, aerial position, specifi c instal-
lation requirements), in line with the
Vehicle Electromagnetic Compatibility
Directive (2004/104/EC).
* To prevent any risk of jamming of
the pedals:
- ensure that the mat is positioned
and secured correctly,
- never fi t one mat on top of another.
"St
y
le":
PVC door sill protectors, style rear
mudfl aps, Hortaz 18 inch alloy wheels,
chromed door handle shells, diffuser on
rear bumper, brushed aluminium look
boot sill protector...
ACCE
SS
ORIE
S

X
TE
C
HNI
C
AL DATA
1
59
E
NGINE
S
AND GEARBOXE
S
Model codes
VUSFY0 -
VVSFY0
VUSFY9 -
VVSFY9
V U4HK8 -
VV4HK8
VU4HK8
VU4HK8/1P
VV4HK8
VV4HK8/1P
Engine 2.4 litre 2.2 litre HDi PEF
Cubic capacity (cc) 2 360 2 179
Bore x stroke (mm) 88 x 97 85 x 96
EU standard maximum power (kW) 125 115
Max power engine speed (rpm) 6 000 4 000
EU standard max torque (Nm) 232 380
Max torque engine speed (rpm) 4 100 2 000
Fuel Unleaded Diesel
Catalytic converter yes yes
Particle emission fi lter (PEF) no yes
Gearbox
Manual
(5-speed)
CVT
(6-speed)
Manual
(6-speed)
DCS
(6-speed)
Oil capacity (in litres)
Engine - 5.25

X
TE
C
HNI
C
AL DATA
1
60
WEIGHTS AND TOWED LOADS
(
IN KG
)
* The kerb weight is equal to the weight without load + driver (75 kg).
** The speed of a towing vehicle must not exceed 60 mph (100 km/h) (comply with the legislation in force in your country).
*** The braked trailer value corresponds to the towing capacities of the vehicle on a 12 % gradient.
High ambient temperatures may result in a reduction in the performance of the vehicle in order to protect the engine; reduce
the towed weight by 450 kg when your altitude increases by 1 000 m.
Engines 2.4 litre 2.2 litre HDi PEF
Gearbox
Manual
(5-speed)
CVT
(6-speed)
Manual
(6-speed)
DCS
(6-speed)
Model codes VUSFY0 VVSFY0 VUSFY9 VVSFY9 VU4HK8 VV4HK8
VU4HK8
VU4HK8/
1P
VV4HK8
VV4HK8/
1P
Version
5
seats
7
seats
5
seats
7
seats
5
seats
7
seats
5
seats
7
seats
• Kerb weight * 1 650 1 685 1 680 1 715 1 790 1 825 1 810 1 845
• Gross vehicle weight (GVW) 2 290 2 410 2 410
• Gross train weight (GTW) ** 3 870 4 510 4 510
• Unbraked trailer 750 750 750
• Braked trailer *** 1 500 2 000 2 000
• Recommended nose weight 75 100 100
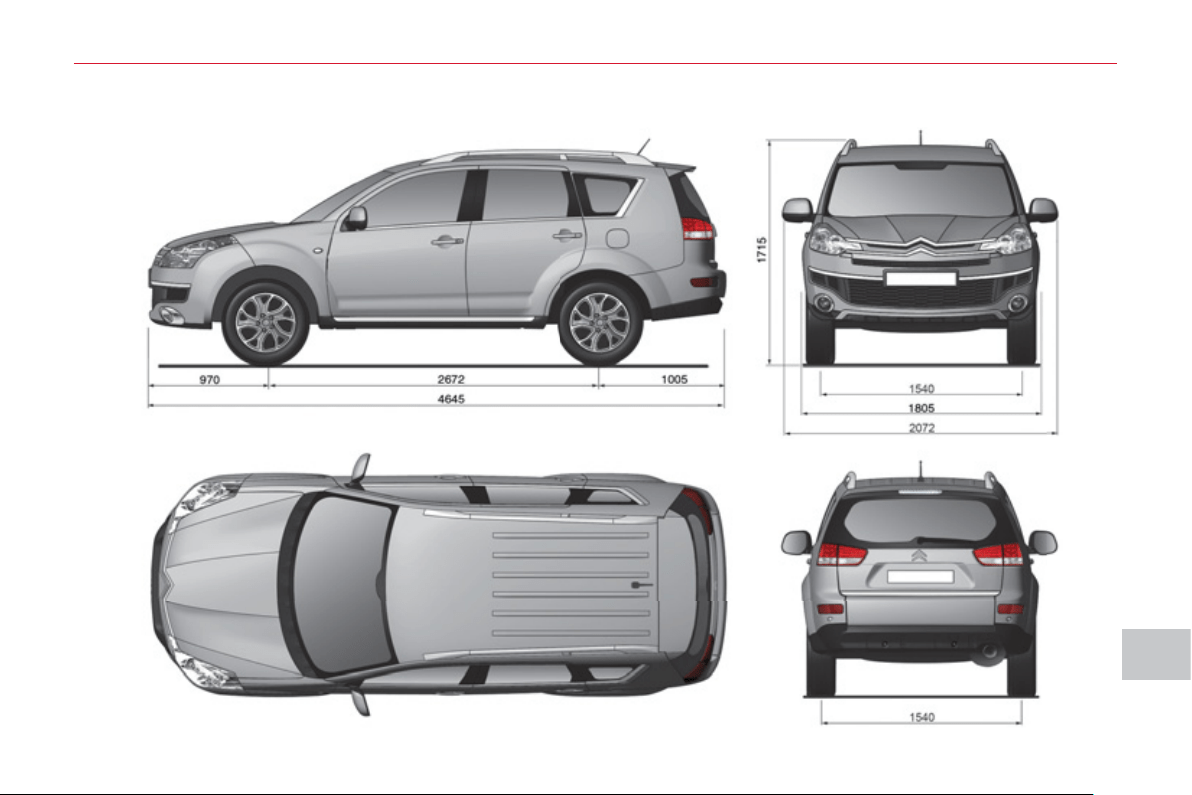
X
TE
C
HNI
C
AL DATA
1
6
1
D
IMENSIONS
(
IN MM
)
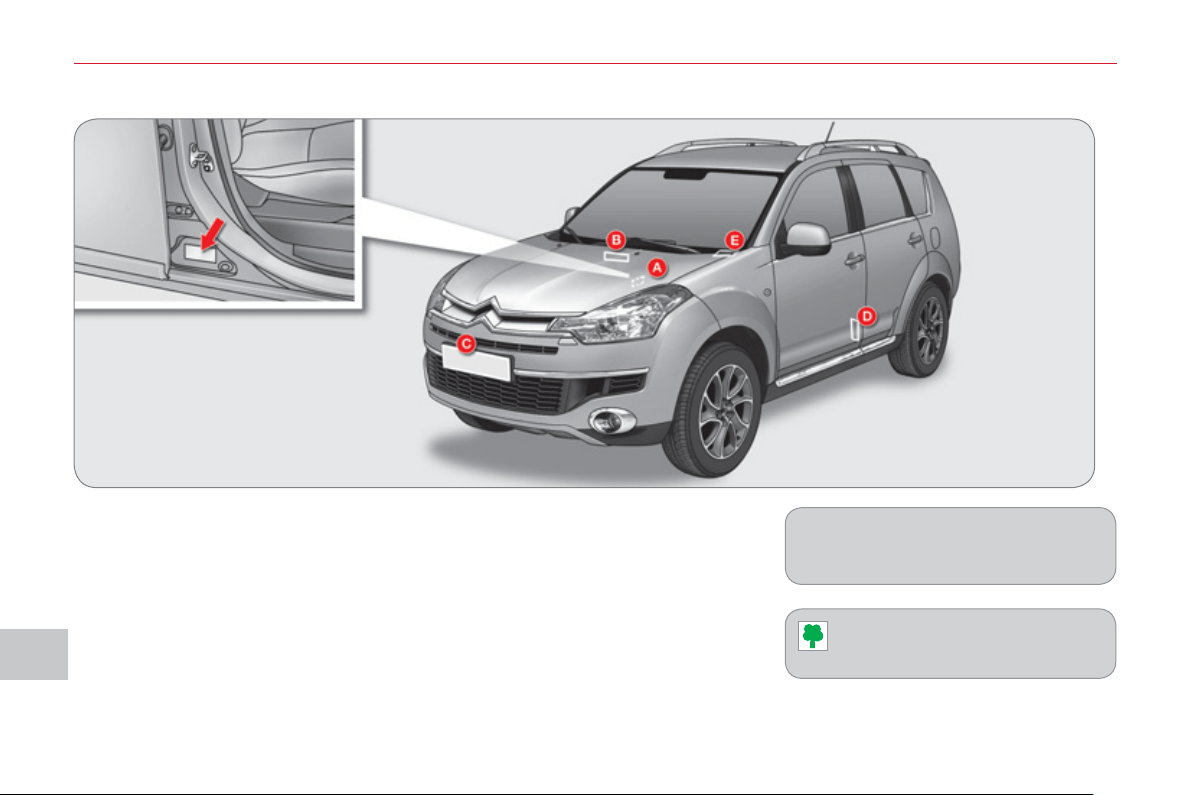
X
TE
C
HNI
C
AL DATA
1
6
2
A. Manufacturer’s plate.
The Vehicle Identifi cation Number
(VIN) is indicated on a plate on the
centre pillar, on the driver’s side.
B. Serial number under the bonnet.
The VIN is engraved on the body-
work near the windscreen.
C. Front number plate.
D. Tyres/paint label.
This label is affi xed to the passen-
ger’s door centre pillar.
It indicates the following information:
- tyres pressures, laden and unladen,
- wheel rim and tyre sizes,
- tyre pressure for the spare wheel,
- paint colour code.
E. Serial number behind the wind-
screen.
The VIN is engraved on the dash-
board, behind the windscreen.
IDENTIFICATION MARKING
S
The tyre pressures must be checked
when cold at least once a month.
Low tyre pressures increase
fuel consumption.

X
TE
C
HNI
C
AL DATA
1
63
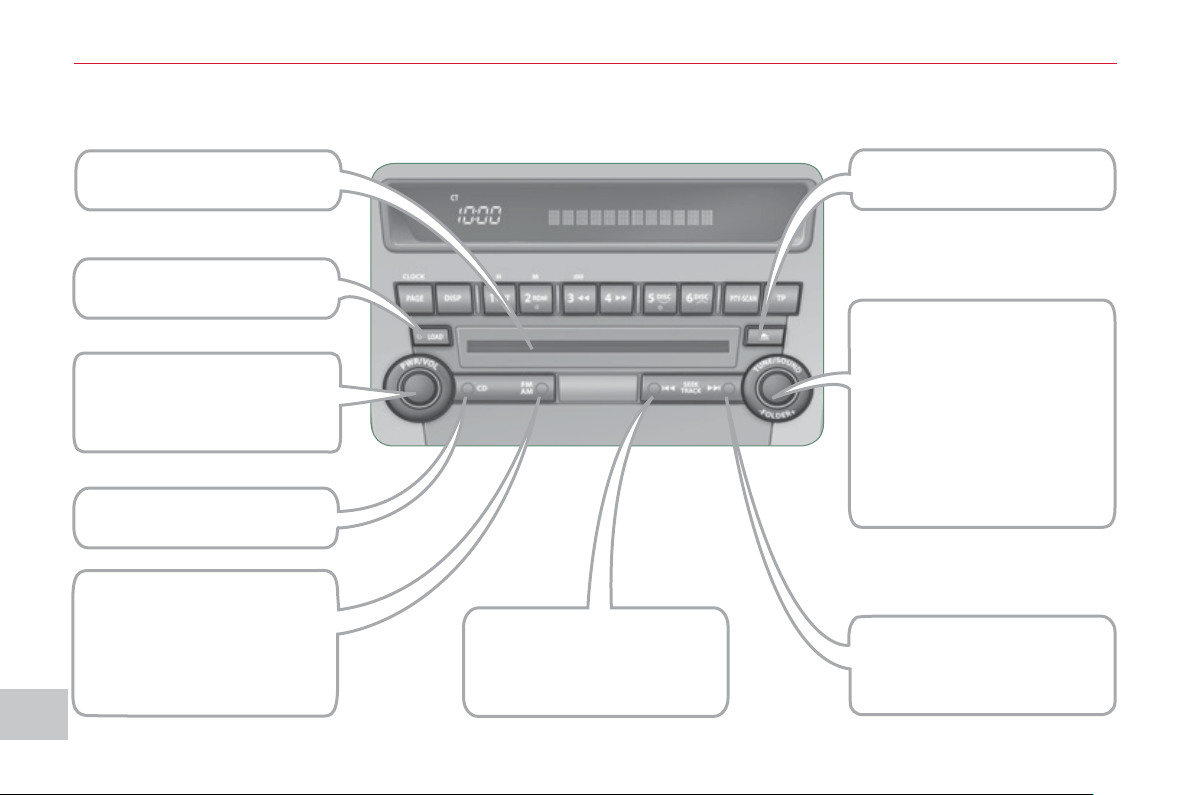
XI
1
6
4
AU
DI
O
and TELEMATI
CS
Audio system On/Off.
Decrease/Increase volume.
Selection of CD/
Changer mode.
Automatic search for
a lower radio frequency .
Search for the previous
track.
Selection and adjustment
of audio settings
(BASS, TREBLE, ...).
Manual search for a lower
or higher radio frequency/
PTY.
Functions setting mode
(AF, REG, TP, SCV, ...).
Search for the previous or
next MP3 folder.
Eject one or more CDs.
CD slot.
Load one or more discs.
AUDIO CD SYSTEM
Selection of radio mode.
Selection of waveband
(FM, MW, LW).
Automatic station storing
(autostore).
Automatic search for
a higher radio frequency.
Search for the next track.
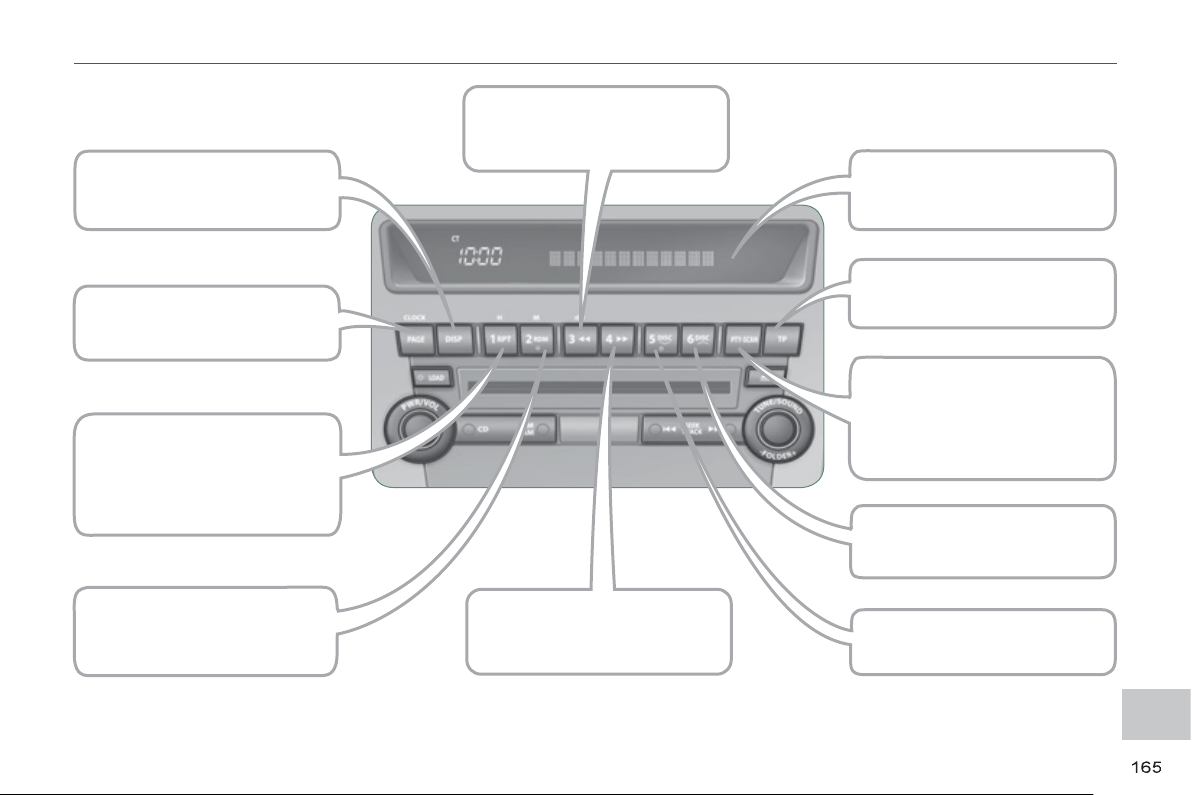
XI
AU
DI
O
and TELEMATI
CS
Scroll information by page.
Display CD-Text/MP3/
Tag ID3 information.
Repeat
(track/MP3 folder/disc).
Manual storing and recall of
radio stations/
PTY (12 to 17).
Random play
(tracks/MP3 folder/disc).
Multifunction screen.
Fast backwards play.
Fast forwards play.
Search for TP traffi c
information.
Activation/Deactivation
of PTY.
Play the beginning of each
track (MP3 folder/disc).
Selection of
the previous disc.
Selection of the next disc.
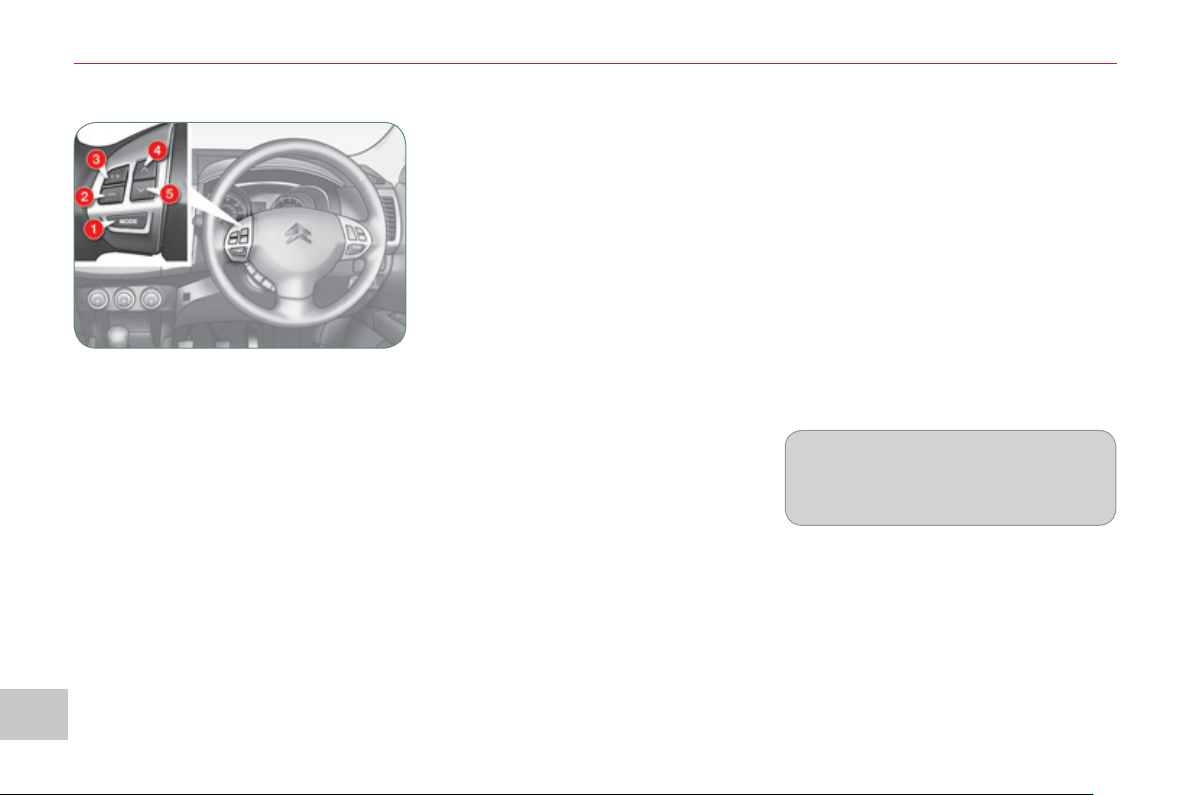
XI
1
66
AU
DI
O
and TELEMATI
CS
STEERING MOUNTED CONTROLS
1. On/Off and selection of radio or
CD mode
2. Volume decrease
3. Volume increase
4.
Search for a higher radio frequency/
Next track/Fast forwards play
5.
Search for a lower radio frequency/
Previous track/Fast backwards play
Switching off
Press button 1 for more than two seconds.
Selecting the source
Press button 1 .
The source changes in the following order:
FM1/FM2/FM3/MW/LW/CD/FM1...
Searching in radio mode
Press button 4 or 5 to search for a
higher or lower radio frequency respec-
tively.
Searching in CD mode
Press button 4 or 5 to select the next or
previous track on the CD respectively.
Press and hold button 4 or 5 for fast for-
wards or fast backwards playing of the
current track of the CD respectively.
Switching on
Press button 1 for more than two seconds.
The last source selected before switching
off comes back into operation.
Adjusting the volume
Press and hold button 2 or 3 to decrease
or increase the volume respectively.
While a track is being played, press
button 5 once to return to the beginning
of this track.
They can be used when the ignition
switch is in the "ON" or "ACC" position.

XI
1
6
7
AU
DI
O
and TELEMATI
CS
G
ENERAL FUNCTIONS
Switchin
g
on
Press the "PWR" button.
The last source selected be-
fore switching off resumes
operation.
Ad
j
ustin
g
the volume
Turn the "VOL" dial respec-
tively to the left to decrease
the volume or to the right to
increase it.
Switchin
g
off
Press the "PWR" button again.
Settin
g
the audio modes
Press the "SOUND" but-
ton several times; the audio
modes change in the follow-
ing order:
SUB PUNCH/TYPE/FIELD/
BASS/MID/TREBLE/FAD-
ER/BALANCE/OFF.
Quick access mode
To access the personalised sound func-
tions quickly, press and hold this button,
then turn it to reach the personalised
sound setting of your choice.
Release the button to store the setting.
"H
o
ld"
mo
d
e
If you press this button for more than
2 seconds in the audio setting mode,
the system switches to "Hold" mode.
The audio mode selected will be re-
tained until you press this button again
for more than 2 seconds.
Selectin
g
the musical ambience
"TYPE
"
Turn the "SOUND" dial; the
musical ambiences change
in the following order:
CLASSIC/JAZZ/POP/ROCK/
HIP-HOP.
Once the ambience has been selected,
press the "SOUND" button to confi rm.
"CLASSIC": optimises the acoustics to
obtain perfect equalisation of the sound
for classical music.
"JAZZ": optimises the acoustics to
obtain an ambient sound with specifi c
modulations in the bass, mid tone and
treble for jazz.
"POP": optimises the acoustics to
obtain clear vocals and modulation of
the bass and treble for pop music.
"ROCK": optimises the acoustics to
obtain a sound in harmony with the
rhythm which places the emphasis on
the mid tone for rock music.
"HIP-HOP": optimises the acoustics to
obtain a powerful sound and accentua-
tion of the bass for hip-hop music.
If the "TYPE" is changed, the sound
cuts out briefl y.
The audio setting mode is deactivat-
ed when the radio is operated or a
CD is played or after approximately
10 seconds without any action.
The audio equipment functions can be
used when the ignition switch is in the
"ON" or "ACC" position.
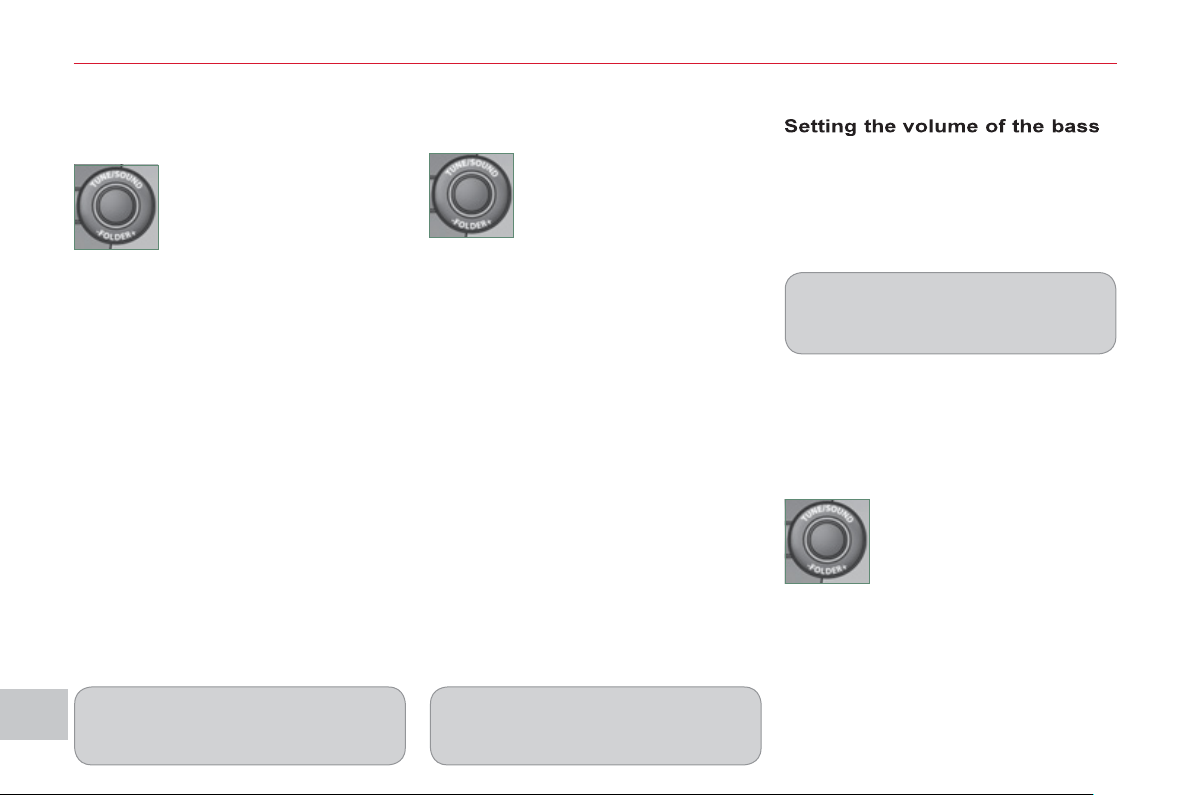
XI
1
68
AU
DI
O
and TELEMATI
CS
Selectin
g
the surround effect
"FIELD
"
Turn the "SOUND" dial; the
surround effects change in
the following order:
NORMAL/STAGE/LIVE/HALL.
"NORMAL": produces a sound in which
the voices are at the front and the in-
struments surround the listener.
"STAGE": produces a sound in which
the voices are immediately facing the
listener, as on a stage.
"LIVE": produces a sound similar to
that of a live show, in which the sound
reaches the listener from all directions.
"HALL": produces a sound similar to
that of a concert hall with defl ection of
the sound.
Settin
g
the bass "BASS"
Turn the "SOUND" dial to
set the required bass value.
Settin
g
the mid tone "MID"
Turn the "SOUND" dial to set the re-
quired mid tone value.
Settin
g
the treble "TREBLE"
Turn the "SOUND" dial to set the re-
quired treble value.
Settin
g
the front/rear sound
distribution "FADER"
Turn the "SOUND" dial to set the bal-
ance of the volume of the front and rear
speakers.
Settin
g
the ri
g
ht/left sound
distribution "BALANCE"
Turn the "SOUND" dial to set the bal-
ance of the volume of the right and left
speakers.
If the "FIELD" is changed, the sound
cuts out briefl y.
If the value "0" is set, an audible signal
will be heard.
Automatic volume ad
j
ustment
"S
CV"
This permits automatic adjustment of
the "VOLUME", "BASS", "MID" and
"TREBLE" settings in relation to the ve-
hicle speed.
Press the "SOUND" button
for more than two seconds
to gain access to the func-
tions setting mode.
Then, press this same button
several times; the functions
setting mode changes in the following
order:
AF/CT/REG/TP-S/PTY (languages)/SCV/
PHONE/OFF.
Turn the "SOUND" dial respectively to
the left to deactivate the function or to
the right to activate it.
If the "SUB PUNCH" is changed, the
sound cuts out briefl y.
u
nit "SUB PUNCH"
Turn the "SOUND" dial to set the vol-
ume of the bass unit.
Only vehicles fi tted with the "Premium
Sound" system can offer the "SUB
PUNCH" setting.
Once the surround effect has been se-
lected, press the "SOUND" button to
confi rm.
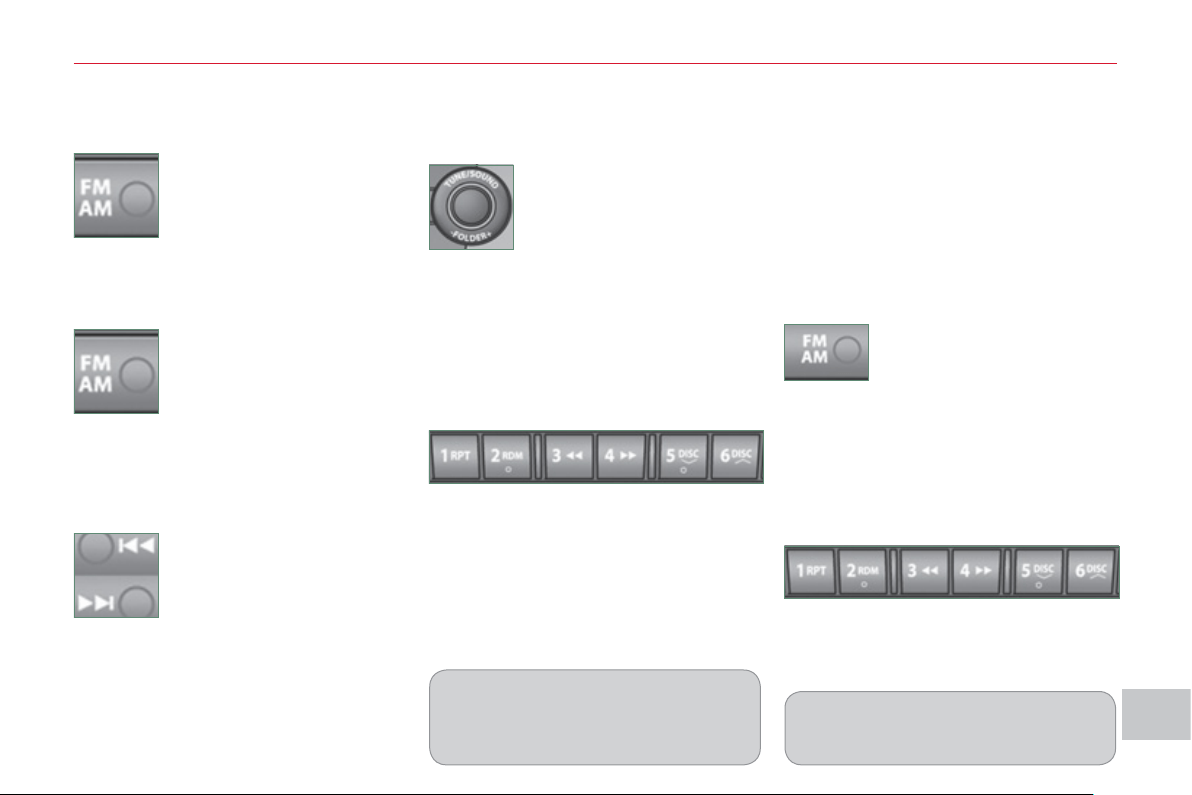
XI
1
69
AU
DI
O
and TELEMATI
CS
RADIO
Selectin
g
radio mode
Press the "PWR" button
or the "AM/FM" button to
switch on the radio.
Disconnecting the battery terminals
clears the stored radio stations.
Selectin
g
the waveband
Press the "AM/FM" button
several times in succession
to select the waveband; it
changes in the following
order: FM1/FM2/FM3/MW/
LW/FM1...
A
utomat
i
c stat
i
on searc
h
Press the "SEEK " or
"SEEK " button to search
the lower frequencies or the
higher frequencies respec-
tively.
Manual station search
Turn the "TUNE" dial re-
spectively to the left to
search the lower frequen-
cies or to the right to search
the higher frequencies.
Manual station storin
g
Press one of the six buttons "1" to "6"
until an audible signal is heard.
The sound cuts out then becomes au-
dible again when the station has been
stored.
The number of the button and the as-
sociated radio frequency appear on the
screen.
Automatic station storin
g
Press the "AM/FM" button
for more than two seconds.
Recallin
g
stored stations
Press one of the six buttons "1" to "6".
The station corresponding to the wave-
band selected appears on the screen.
The search begins automatically and
stops at the fi rst station found.
The six stations offering the best recep-
tion are stored and classifi ed from the
weakest to the strongest on the six cor-
responding buttons.
You can store up to six stations on each
waveband.
Storing a new station replaces the pre-
vious station.
Stations can only be stored automati-
cally on wavebands FM3, MW and LW.
Storing new stations replaces the pre-
vious stations.
This storing can be activated automatically
irrespective of the waveband selected.
To recall the pre-set stored setting,
press the button and release it within
two seconds.
XI
17
0
AU
DI
O
and TELEMATI
CS
"RD
S
"
Alternative fre
q
uencies "AF"
Your radio automatically checks and
selects the best frequency for the radio
station to which it is tuned (if the station
broadcasts on several transmitters or
frequencies).
The frequency of a radio station cov-
ers approximately 30 miles (50 km). The
change from one frequency to another
explains the temporary loss of reception
during a journey.
If the station to which you are listening does
not have several frequencies in the region in
which you are currently located, you can de-
activate the alternative frequency following.
Traffic information "TP"
The "Traffi c Program" (TP) function per-
mits automatic and temporary switching
to an FM station broadcasting traffi c in-
formation.
The radio station or the source that you
are listening to at this point is paused.
Once the traffi c information has ended,
the system switches back to the radio
station or the source that you were lis-
tening to initially.
Re
g
ional followin
g
mode "REG"
Some stations are organised in a network.
In different regions, they broadcast diffe-
rent or shared programmes depending
on the time of day.
You can follow:
- a regional station only,
- the entire network, with the possibility
that you will be listening to a different
programme.
The "AF", "REG" and "TP"
functions can be deacti-
vated or activated via the
"TUNE" button functions
setting mode.
Press the "TP" button.
"TP" appears on the display.
If the station is compatible,
"RDS" also appears.
If the radio detects traffi c information,
"TRAF INF" appears on the display,
followed by the frequency of the broad-
casting station, then its name.
The volume is different from that of the
previous source.
Following the broadcasting of the traffi c
information, the volume returns to that
of the source prior to the interruption.
When "TP" appears on the display,
the radio stops solely at RDS stations
broadcasting traffi c information.
On long distance journeys, when the
stored station becomes weak, the ra-
dio searches fi rst for another frequen-
cy for the same station (AF). Then, if
this fails, it searches for a frequency
broadcasting the regional programme
(REG). If this also fails, the radio re-
turns to the stored station.
The "Radio Data System" (RDS) function
on the FM waveband permits:
- access to the display of information,
such as the name of the station, ...
- tuning to the same station while trav-
elling through different regions,
- temporary tuning to traffi c information
announcements.
Most FM stations use RDS. These
stations transmit non-audible data in
addition to their programmes.
The data transmitted in this way allows
you access to various functions, mainly
displaying of the name of the station,
automatic station following or temporary
tuning to traffi c information announce-
ments.
The RDS allows you to continue listen-
ing to the same station by means of the
alternative frequency following. How-
ever, in certain conditions, this RDS
frequency following cannot be provided
throughout the country. Radio stations
do not cover the whole country, which
explains the loss of reception of the sta-
tion during a journey.
XI
171
AU
DI
O
and TELEMATI
CS
Themed t
y
pe of pro
g
ramme
"
PTY
"
Some stations offer the option of listen-
ing to a themed type of programme as a
priority, selected from the list available
below:
NEWS, AFFAIRS, INFO, SPORT, EDUCATE,
DRAMA, CULTURE, SCIENCE, VARIED,
POP M, ROCK M, EASY M, LIGHT M,
CLASSICS, OTHER M, WEATHER, FINANCE,
CHILDREN, SOCIAL, RELIGION, PHONE IN,
TRAVEL, LEISURE, JAZZ, COUNTRY,
NATION M, OLDIES, FOLK M, DOCUMENT.
Emer
g
enc
y
broadcasts
"
ALERT
"
An emergency broadcast automatically
and temporarily interrupts the FM station
or the source that you are listening to.
The message "ALERT" appears on the
display and the volume is different from
that of the previous source.
Following the emergency broadcast,
the message disappears and the volume
returns to that of the source prior to the
interruption.
Search for a "PTY" broadcast
Press the "PTY" button.
Turn the "TUNE" dial to se-
lect the type of programme
required.
Two seconds later, the radio searches
for a broadcast which corresponds to
your selection; the type of PTY selected
fl ashes on the display.
Once the station has been found, its
name appears on the display.
You can press the "SEEK " or "SEEK "
buttons to fi nd another station.
If no station is found corresponding
to your selected type of programme,
"NONE" appears on the display for
fi ve seconds and the radio returns to
the previous station.
You can store up to six PTY programmes.
Each new programme stored replaces
the previous one.
Storing a "PTY" programme
To recall the pre-set memory setting,
press the button and release it within
two seconds.
Changing the display language of
the "PTY" programme
Press the "TUNE" button for
more than two seconds to
access the functions setting
mode.
Then, press this button several times in
succession; the functions setting mode
changes in the following order:
AF/CT/REG/TP-S/PTY (languages)/SCV/
PHONE/OFF.
Turn the "TUNE" dial to the left or to the
right to select the language (ENGLISH,
FRANCAIS, DEUTSCH, SVENSK,
ESPAGNOL, ITALIANO).
The sound cuts out then becomes au-
dible again when the programme has
been stored.
The number of the button and the asso-
ciated PTY programme appear on the
display.
Turn the "TUNE" dial to set
the PTY programme to be
stored.
Press one of the six but-
tons "1" to "6" for more than
two seconds.
XI
1
7
2
AU
DI
O
and TELEMATI
CS
C
D PLAYER
This can play audio CDs (CD-DA, CD-
Text, CD-R/RW) or MP3 CDs.
Selectin
g
CD mode
If the player already con-
tains a disc, press the "CD"
button.
"CD", the track number and
the playing time appear on the screen.
Functions settin
g
mode
This permits activation or deactivation
of the functions below.
Press the "TUNE" button for
more than two seconds to
access the functions setting
mode.
Then, press this button sev-
eral times in succession;
the functions setting mode changes in
the following order:
AF/CT/REG/TO-S/PTY (languages)/SCV/
PHONE/OFF.
Turn the "TUNE" dial respectively to the
left to deactivate the function ("OFF") or
to the right to activate it ("ON").
The "PHONE" is not operational at
present.
The functions setting mode is deacti-
vated after approximately 10 seconds
without any action.
After inserting a disc, printed face up-
wards, the player starts automatically.
E
j
ectin
g
a disc
Press this button to remove
the disc from the player.
The system automatically
switches to radio mode.
Fast search
Press and hold button " "
or " " to carry out a fast
backwards or forwards
search respectively.
Play begins when the button is released.
Selecting a track
Press button " " or " " to
select the previous or next
track respectively.
Repeating a track
Press the "RPT" button to
repeat the play of the cur-
rent track. "RPT" appears
on the screen.
To exit this mode, press this button
again.
Random playing of a disc
Press the "RDM" button
to start random play of the
tracks on the disc. "RDM"
appears on the screen.
To exit this mode, press this button
again.
Insert circular compact discs only.
8 cm compact discs must be inserted
in the centre of the player slot.
Once ejected, if the compact disc is
not removed within fi fteen seconds, it
is reloaded into the player.
A
udio CDs
XI
1
7
3
AU
DI
O
and TELEMATI
CS
M
P3/TAG ID3 CD
Playing the beginning of each track
Press the "SCAN" button to
start playback of the fi rst ten
seconds of each track on
the disc. "SCAN" appears
on the screen and the corresponding
track number fl ashes.
To exit this mode, press this button again.
The CD player and the CD changer
are compatible with the playing of MP3
fi les.
These must be recorded in ISO9660
Level 1/Level 2, Joliet or Romeo format
on CD ROMs, CD-Rs or CD-RWs.
The CDs can contain a maximum of
255 fi les and 100 folders on 16 levels.
The Tag ID3 version 1 can be displayed
while playing MP3 fi les.
In the case of compact discs contain-
ing both CD-DA and MP3 fi les, play
automatically begins with the CD-DA
fi les.
To switch play between the two types
of fi le, press the "CD" button for more
than two seconds until an audible
signal is heard.
While using these compact discs, the
"Repeat", Random play" and "Play-
ing of the beginning of the tracks"
functions are only applied to fi les of
the same format.
Selecting an MP3 folder
Turn the "FOLDER" dial
respectively to the right to
select a folder in ascending
order or to the left to select a
folder in descending order.
Press the "DISP" button
several times in succession;
the CD-Text information ap-
pears in the following order:
DISC NAME/TRACK NAME/NORMAL
DISPLAY MODE.
CD-TEXT DI
S
PLAY
If the information exceeds
12 characters, press the
"PAGE" button to see the
rest.
In the absence of CD-Text information
to be displayed, "NOTITLE" appears on
the screen.
The CD player and the CD changer are
compatible with the display of CD-Text
information.
On CD-R/RWs, the quality of the
playback sound depends on the en-
coding software, the burning device
and the burning speed used.

XI
1
74
AU
DI
O
and TELEMATI
CS
When play begins, "READING" appears
in the screen then disappears to make
way for the folder number, the track
number, the playing time and "MP3".
Playing the beginning of each track
Press the "SCAN" button
to start playing the fi rst ten
seconds of each track in all
of the folders. "SCAN" ap-
pears in the screen and the correspond-
ing track number fl ashes.
To exit this mode, press this button
again.
MP3/Tag ID3 display
Press the "DISP" button sev-
eral times in succession; the
MP3 information appears in
the following order:
FOLDER NAME/TRACK NAME/NORMAL
DISPLAY MODE.
If the information exceeds
12 characters, press the
"PAGE" button to see the
rest.
In the absence of MP3 or Tag ID3 in-
formation to be displayed, "NOTITLE"
appears in the screen.
Press the "DISP" button for
more than two seconds to
activate the Tag ID3 infor-
mation. "TAG" appears in
the screen.
Press the "DISP" button several times
in succession; the Tag ID3 information
appears in the following order:
ALBUM NAME/TRACK NAME/ARTIST
NAME/NORMAL DISPLAY MODE.
To deactivate this information, press
the "DISP" button again for more than
two seconds.
Repeating the tracks in a folder
Press the "RPT" button for
more than two seconds to
repeat the playing of the
tracks contained in the cur-
rent folder. "D-RPT" appears in the
screen.
To exit this mode, press this button
again.
Random playing of a folder
Press the "RDM" button to
start random playing of the
tracks in the current fold-
er. "RDM" appears in the
screen.
To exit this mode, press this button
again.
Random playing of a disc
Press the "RDM" button for
more than two seconds to
start random playing of the
tracks in all of the folders.
"D-RDM" appears in the screen.
To exit this mode, press this button
again.
On CD-R/RWs, the quality of the
playing sound depends on the en-
coding software, the burning device
and the burning speed used.
Depending on the fl ow chart of the
MP3 folders and fi les on the disc,
play may not begin immediately.
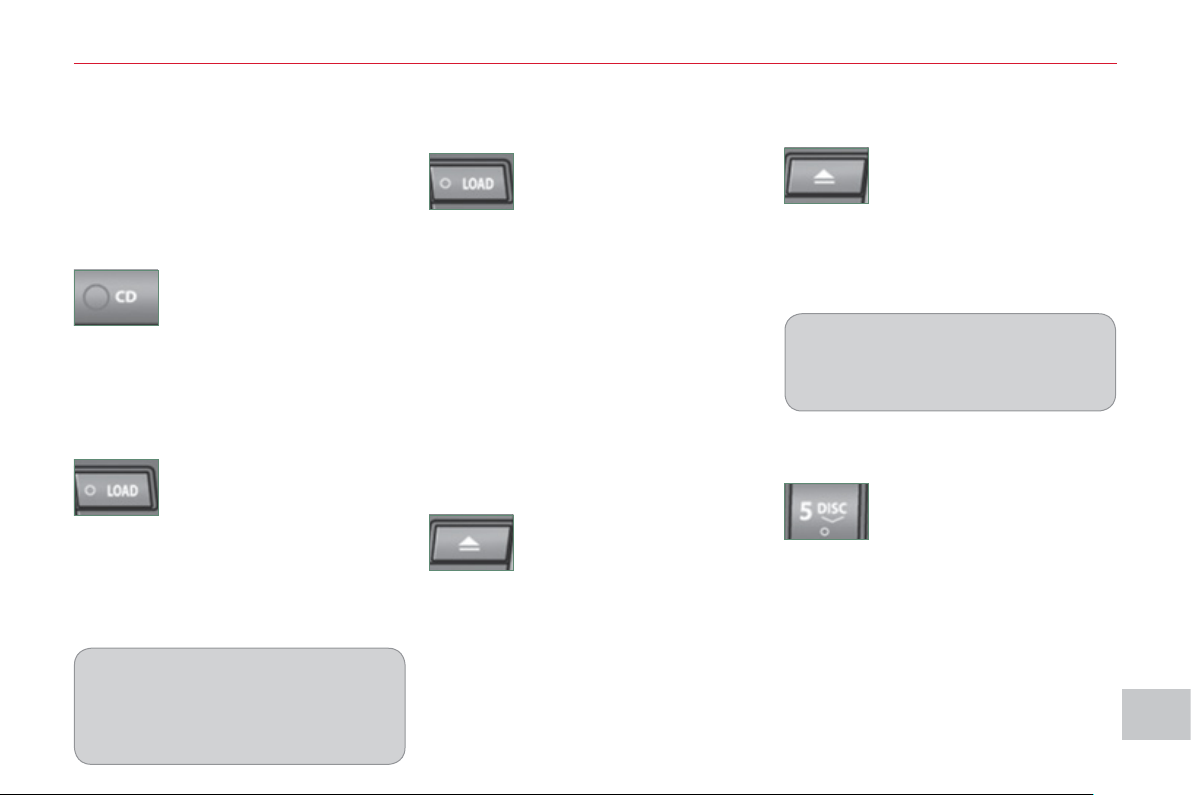
XI
1
7
5
AU
DI
O
and TELEMATI
CS
Selectin
g
chan
g
er mode
If the changer already
contains a disc, press the
"CD" button.
"CD", the disc and track
numbers and the playing time appear
in the screen.
After inserting at least one disc, printed
face upwards, the changer starts auto-
matically.
E
j
ectin
g
a disc
Press this button briefl y to
remove the current disc
from the changer.
Once ejected, if the compact disc is
not removed within fi fteen seconds it
is re-loaded into the changer.
Loa
di
n
g
a
di
sc
Press the "LOAD" button
briefl y. "WAIT" appears on
the display.
When the changer is ready,
the indicator lamp on the "LOAD" button
comes on and "LOAD DISC N° (1-6)"
appears in the screen.
If several slots are empty, select one
using one of the "DISC" buttons.
The CD changer can hold up to 6 CDs.
Insert circular compact discs only.
8 cm compact discs cannot be
played by the changer.
Loadin
g
all of the discs E
j
ectin
g
all of the discs
Press this button for more
than two seconds. The cur-
rent disc is ejected.
Once this disc has been
removed, the next disc is ejected auto-
matically in its turn.
Repeat these steps until unloading is
complete.
Selectin
g
a disc
Press one of the "DISC" but-
tons several times in suc-
cession until you reach the
disc required. The symbol
of the disc selected appears
in the screen.
See also "CD-Text display" and "MP3/
Tag ID3 CD".
Press the "LOAD" button for
more than two seconds.
The changer selects an
empty slot number from the
lowest to the highest and switches to
waiting for loading mode.
"LOAD DISC N° (1-6)" appears on the
display; insert the disc in the corre-
sponding slot.
The changer automatically selects the
next empty slot number and returns to
waiting for loading mode.
Repeat these steps until loading is
complete. Play begins with the last disc
inserted.
CD CHANGER
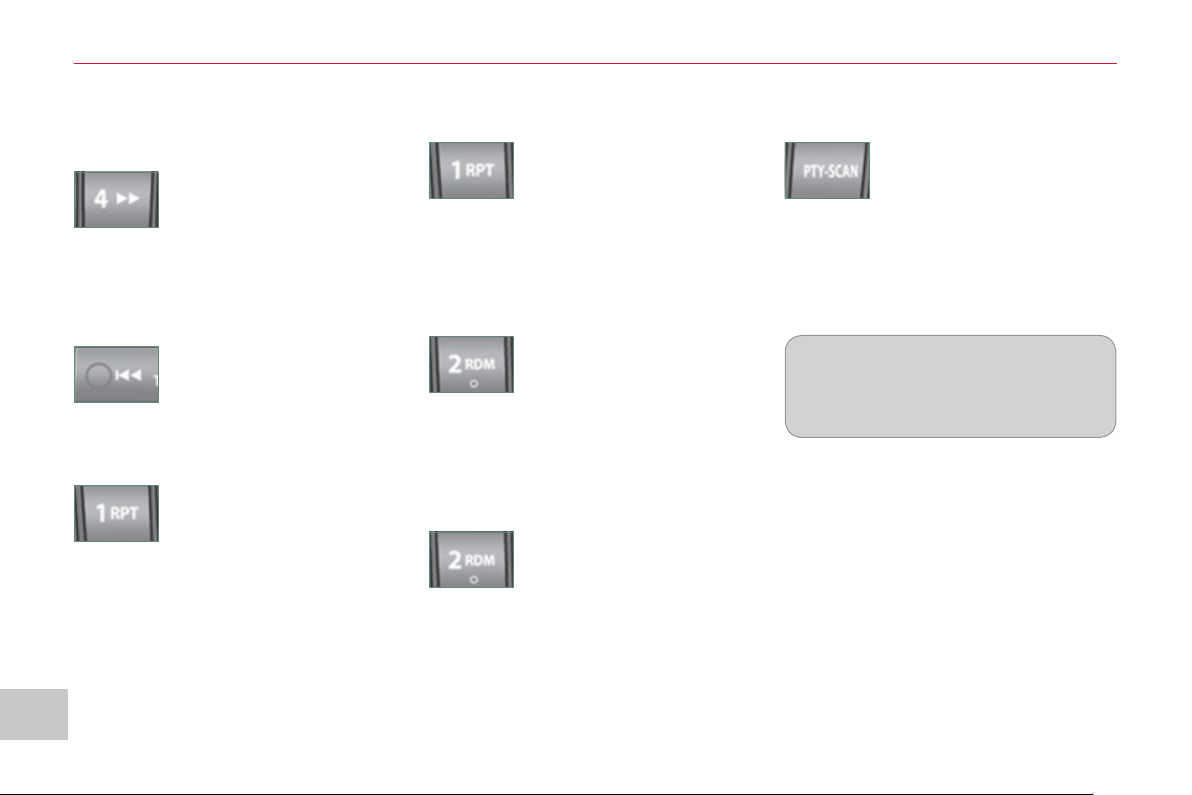
XI
17
6
AU
DI
O
and TELEMATI
CS
Playing of the beginning of each track
Press the "SCAN" button
to start play of the fi rst ten
seconds of each track on
the disc. "SCAN" appears in
the screen and the corresponding track
number fl ashes.
To exit this mode, press this button
again.
On CD-R/RWs, the playback sound
quality depends on the encoding
software, the burning device and the
burning speed used.
Random playing on all of the discs
Press the "RDM" button for
more than two seconds to
start random playing of the
tracks on all of the discs.
"D-RDM" appears in the screen.
To exit this mode, press this button
again.
Fast search
Press and hold button " "
or " " to carry out a fast
backwards or forwards
search respectively.
Play begins when the button is re-
leased.
Selecting a track
Press button " " or " " to
select the previous track or
next track respectively.
Repeating a track
Press the "RPT" button to
repeat the playing of the cur-
rent track. "RPT" appears in
the screen.
To exit this mode, press this button
again.
Random playing of a disc
Press the "RDM" button to
start random playing of the
tracks on the disc. "RDM"
appears in the screen.
To exit this mode, press this button
again.
Repeating a disc
Press the "RPT" button for
more than two seconds to
repeat the playing of the
tracks of the current disc.
"D-RPT" appears in the screen.
To exit this mode, press this button
again.
Audio CD

XI
177
A
UDI
O
and TELEMATI
CS
E
RROR MESSAGES
If an error message appears on the screen, refer to the table below to fi nd out what it means and the solution to be applied
in order to rectify it.
TEXT DESCRIPTION SOLUTION
NO DISC
No disc present.
Disc not compatible.
Insert a disc.
ERROR 01
Disc inserted incorrectly.
Disc with condensation.
Insert the disc with the printed face upwards.
Clean the dampness off the disc.
ERROR 02
Disc dirty, scratched or distorted.
Excessive vehicle vibration.
Clean or replace the disc.
Try again when the vibration has stopped.
ERROR 03
Error on insertion or ejection.
Playing head misaligned.
Eject the disc and insert it again. If it is not ejected,
have the audio equipment checked.
ERROR HOT
Triggering of the internal protection against high
temperatures.
Wait approximately 30 minutes to allow the audio
system to cool.
ERROR
Communication error between the audio system
and the external system.
External system supply error.
Consult a CITROËN dealer.
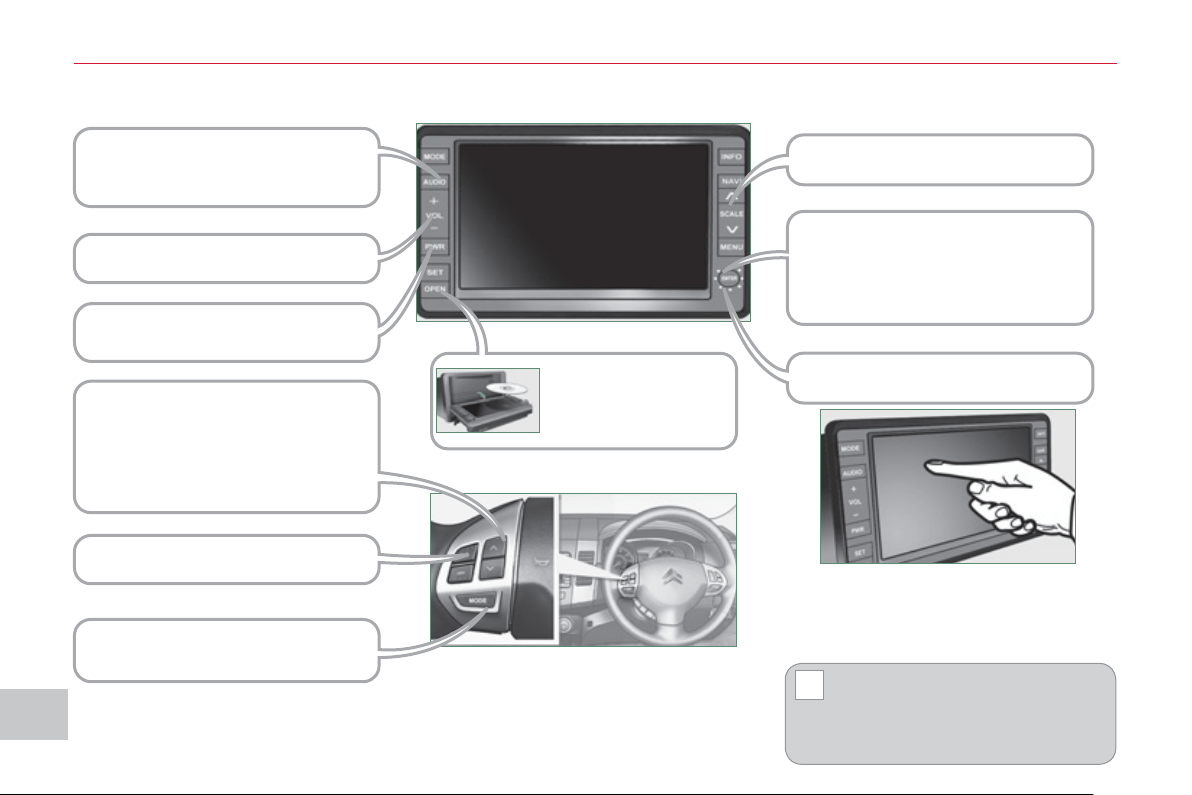
XI
!
17
8
AU
DI
O
and TELEMATI
CS
AUDIO: selection of Audio-video
(FM, CD, music server, ...) or Navi-
gation (map) display.
VOL: adjustment of audio-video
volume.
OPEN: tilts the screen
and permits access
to the CD/DVD. A
second press closes
the screen.
SCALE: changing the scale of the
map.
ENT: confi rms the choice of the
item selected on the screen.
For certain operations, confi rma-
tion is given by contact with the
touch screen.
Scrolling the map displayed or
selection of an item.
For safety reasons, the driver
must only carry out operations
which require prolonged atten-
tion with the vehicle stationary.
AUDIO-TELEMATIC SYSTEM
Changing the audio-video source
(FM, CD, music server, ...).
Mute on/off.
Next or previous selection for:
- a radio station,
- an audio track (CD),
- a chapter (DVD).
Move a fi nger over the screen to operate
the system.
Use the buttons offered on the screen.
POWER: audio system on/off
(only).
Setting the audio volume.
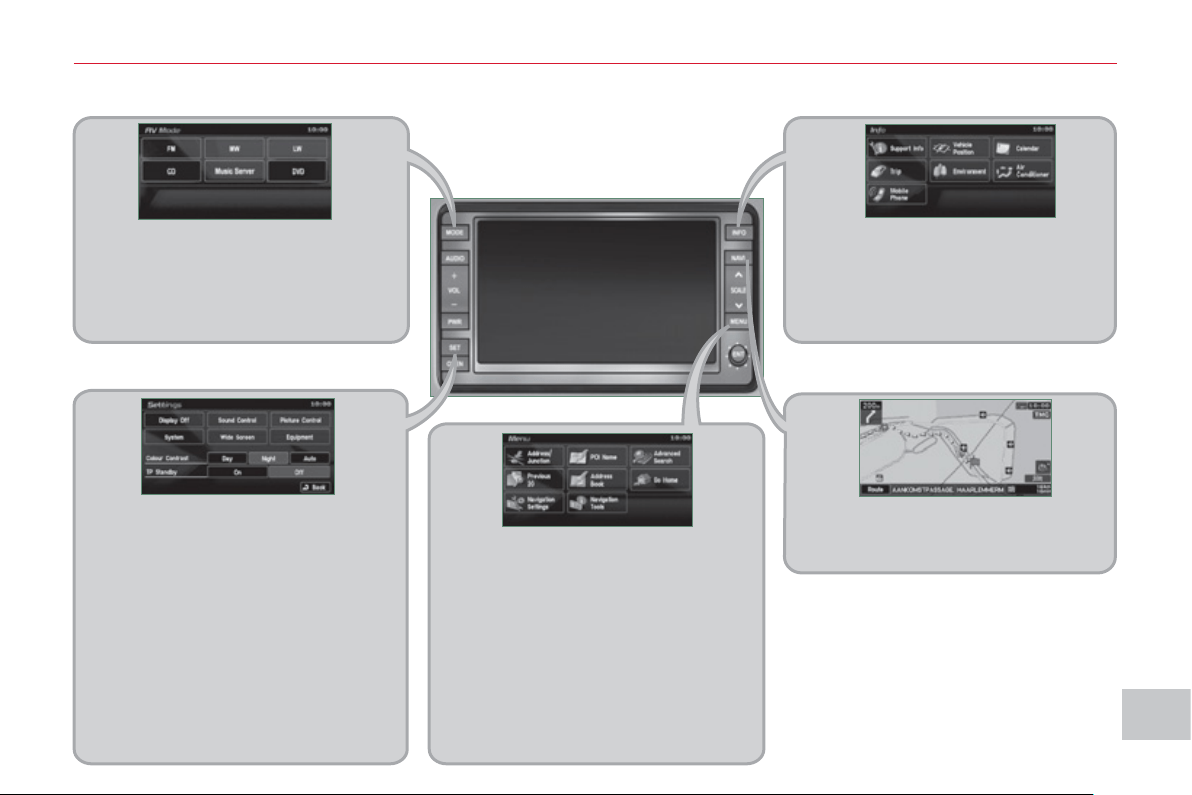
XI
17
9
A
UDI
O
and TELEMATI
CS
D
ESCRIPTION OF THE CONTROLS - MENUS
MODE: Audio-video menu for:
- radio,
- audio, MP3 or WMA CD,
- music server,
- DVD.
MENU: Navigation-guidance menu
for selecting:
- a destination,
- a point of interest (POI),
- an advanced search by POI,
-
one of the 20 previous destinations,
- an address stored in the ad-
dress book,
- the return home,
- certain navigation settings,
- a route demonstration.
NAVI: display of the current location
on the map .
SET: Settings menu for:
- switching off the screen,
- selecting the sound setting,
- selecting the picture quality,
- selecting the language, the time
zone or the units,
- selecting the size of the DVD
picture,
- selecting the guidance voice,
the screen colour schemes or
display of the audio-video icon,
- setting certain equipment avail-
able in your vehicle.
INFO: Information menu for the
consultation or adjustment of cer-
tain settings for your vehicle.
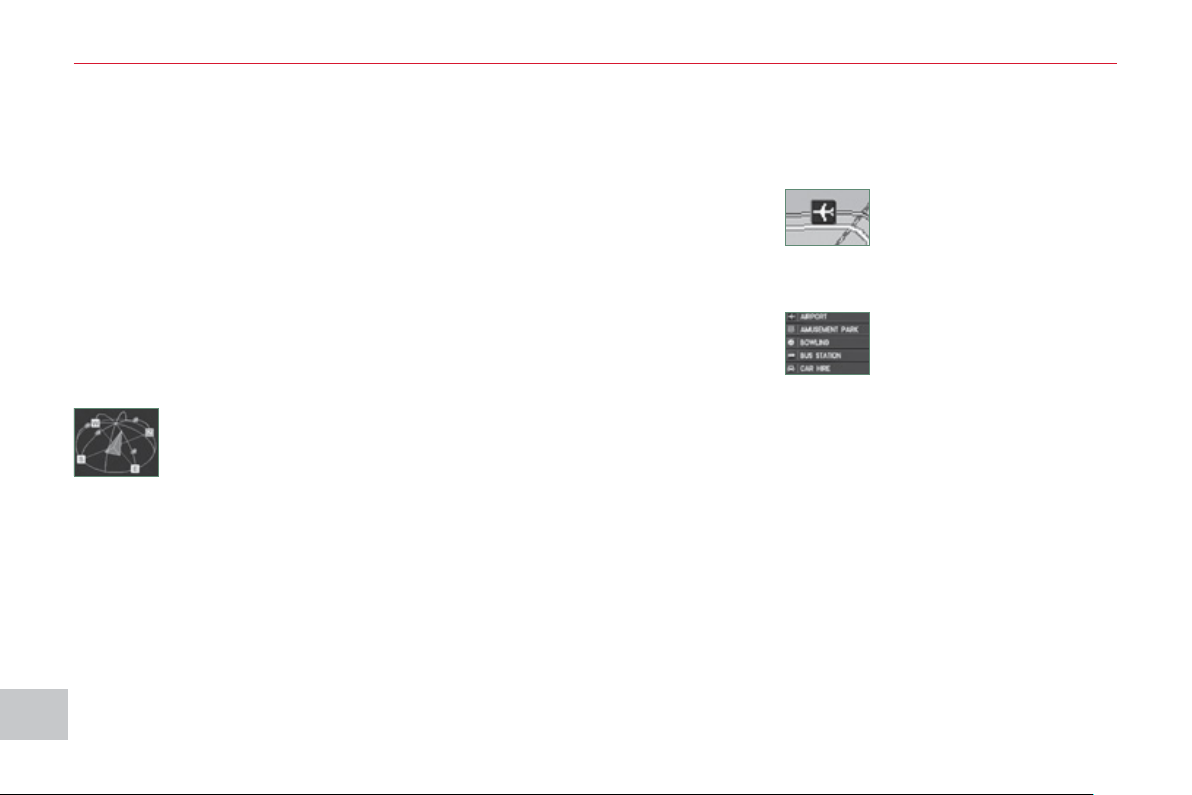
XI
180
AU
DI
O
and TELEMATI
CS
NAVIGATION-GUIDANCE
What is the navigation system and
the GPS?
The satellite navigation system guides
the driver to the destination that he has
set in accordance with a chosen route.
Initially, it searches for the destination
required by the user, then it calculates
the route and fi nally it provides the vi-
sual and audible guidance instructions.
What precautions should be
observed in order to make best use
of the system?
Do not place anything on or near the
GPS aerial.
Do not use any digital communication
equipment (personal computers, etc.)
near the GPS aerial.
Do not affi x any refl ective fi lms or fi lms
containing carbon to the windows.
The GPS (Global Position-
ing System) consists of
several satellites distribut-
ed around the earth. They
continuously transmit digi-
tal signals which travel at the speed of
light, on 2 different frequencies.
At any given time, the system receives
its position in relation to the satellites
detected and the time of transmission
of the signal.
This enables the telematic unit to cal-
culate its position and therefore that of
the vehicle.
A repositioning process using the map
database stored on the hard disk allows
the vehicle to be positioned on the road
network, so improving the accuracy of
the vehicle location function.
What is a point of interest
(POI)?
Up to 40 different icons may
be displayed (refer to the
section "Points of interest
icon").
They are classifi ed in
5 groups and identifi ed by one colour
for each group:
- Shops, fi nance and businesses
(Green),
- Vehicles and travel (Dark blue),
- Restaurants (Orange),
- Public places and emergency ser-
vices (Brown),
- Entertainment and attractions (Blue).
GPS
The system's measurements may be
inaccurate if the vehicle is:
- in a tunnel or underground car park,
- underneath a two-level motorway,
- in an area with several very high
buildings,
- surrounded by closely planted trees.
Depending on the vehicle's situation
and the reception of the GPS informa-
tion, the displayed information may dis-
appear from the screen temporarily.
A point of interest (POI) is
represented by an icon on
the map, it represents an
airport, a station, a town
hall, ...
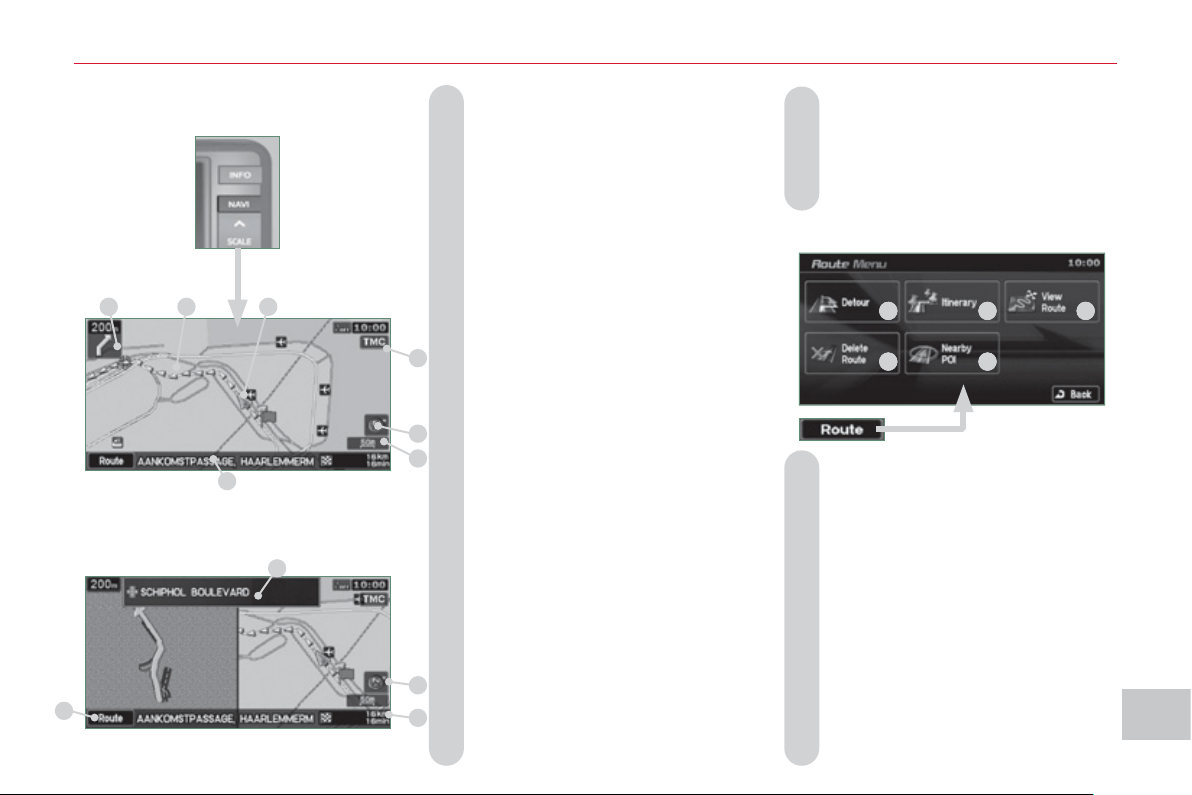
XI
181
AU
DI
O
and TELEMATI
CS
A. Manoeuvre icon: indicates whether
the driver should turn left or right at
the next junction indicated by the
guidance and the distance to this
junction.
B. Guidance route: indicates the route
to the destination.
C. Vehicle marker: indicates the posi-
tion of the vehicle while driving.
D. TMC icon: displays traffi c infor-
mation such as traffi c jams, road
works, etc.
When the icon is touched, detailed
TMC information can be viewed.
E. Orientation mark: indicates the ori-
entation of the map displayed.
F. Map scale: indicates the scale of
the map displayed.
G. Name of the street: indicates the
name of the current street.
H. Direction frame: displays the num-
ber of the next road or the name
of the next street which the driver
should turn into.
I. Destination/intermediate destina-
tion icon: indicates the direction
of the destination or intermediate
destination.
Two-map display.
Single map display.
Information displa
y
ed on the
m
ap durin
g
navi
g
ation
J. Destination/intermediate destination
information: indicates the distance
and the time remaining until the des-
tination or intermediate destination is
reached.
K. Press for access to the Route
Menu in order to:
K1 - change the route in favour of
another making a detour through
a specifi ed region,
K2 - change the position of the desti-
nation, add an intermediate des-
tination and change the route
calculation conditions,
K3 -
display a route by various methods,
K4 - delete a route created,
K5 - search for points of interest (POI)
around the current location.
K
1
K
2
K
3
K4
K
5
K
H
E
F
B
C
A
D
G
I
J
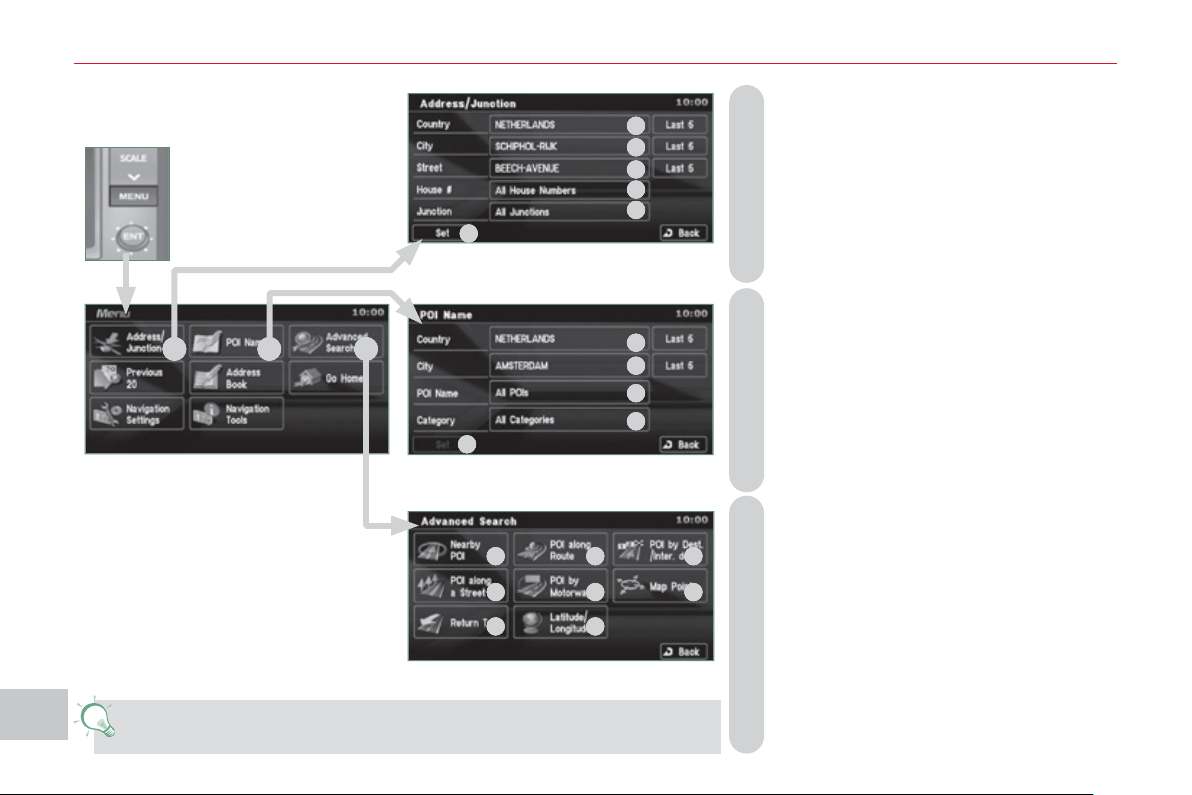
XI
1
8
2
A
UDI
O
and TELEMATI
CS
B - Select a location using the name of a
point of interest (POI).
Select:
B1 - the country,
B2 - the city,
B3 - the name of a stored POI,
B4 - a POI category (airport, bowling alley,
bus station, car park, service station,
hotel, cinema, ...),
B5 - a detailed POI list.
C - Select a location using an advanced
search based on a POI:
C1 - around the current location,
C2 - on the current route,
C3 - in the vicinity of the destination,
C4 - on a chosen street,
C5 - along a motorway or in the vicinity of
the exit,
C6 - by scrolling the map,
C7 - taking the point of departure of the current
route,
C8 - specifying the latitude/longitude coordi-
nates.
A - Select a location using the address or
street name of the destination. Select:
A1 - the country,
A2 - the city,
A3 - the street,
A4 - the house number,
A5 - the name of a junction,
A6 - to select the search using either a number
or a junction.
You have a maximum of 100 points of interest (POI) within a radius
of approximately 60 miles (100 km).
Searchin
g
for a destination
u
sin
g
an address or points of
i
nterest
(
POI
)
A
B
C
A4
A
3
A2
A
1
A6
A5
B1
B
2
B
3
B4
B5
C1
C2
C
3
C4
C5 C
6
C
7 C
8
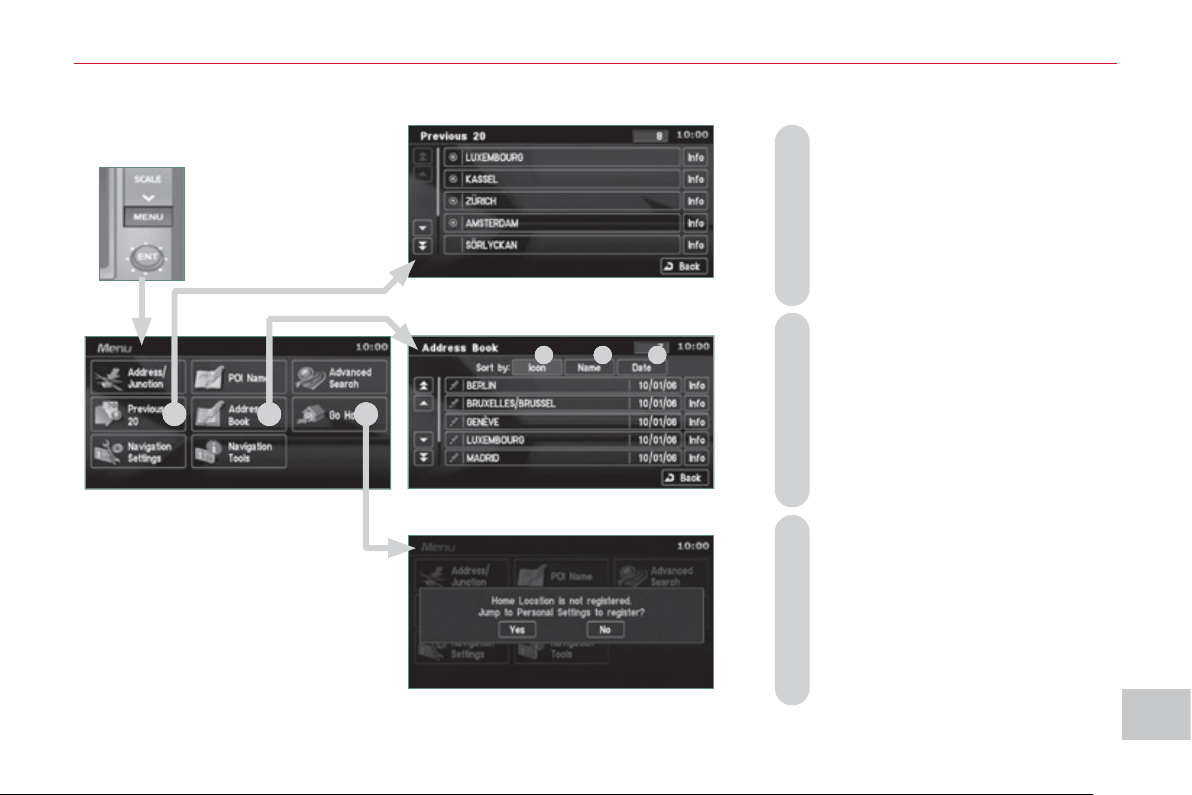
XI
1
83
A
UDI
O
and TELEMATI
CS
Searchin
g
usin
g
previous destinations, a stored address or a return home
E - Select a location using an ad-
dress stored in the address book.
Sort by:
E1 - Icon,
E2 - Name,
E3 - Date.
D - Select a location using one of the
20 previous destinations.
F - Select a return home directly.
Press YES to store your home
address (the fi rst time).
E
2
E1
E
3
D
E
F
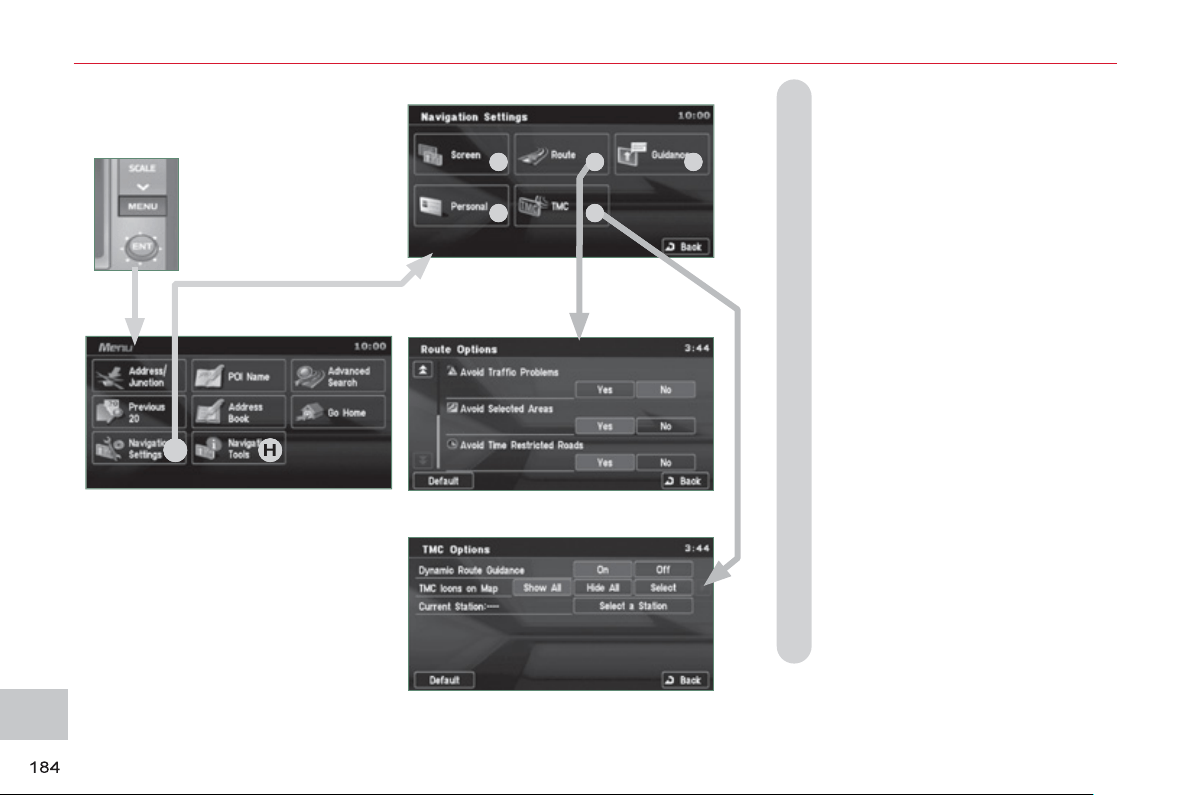
XI
AU
DI
O
and TELEMATI
CS
Navi
g
ation settin
g
s and
i
nformation
(
1/2
)
G - Select the settings of functions
linked with the navigation to:
G1 - set the screen display parameters
such as:
- display 1 or 2 maps,
- display or do not display the POIs
on the map, display selected icons,
- change the colours of the map,
- display or do not display the name
of the current street.
- display or do not display the ad-
dress of the current street.
G2 - set route conditions, such as,
- avoiding traffi c problems,
- avoiding selected areas,
- avoiding roads at a certain time.
G3 - set the route guidance mode and
the displaying of the results of the
route search,
G4 - save, change or delete a location
in the address book,
G5 - display and select the traffi c in-
formation such as traffi c jams or
road works by selecting dynamic
guidance.
G
H
G1
G2
G3
G4
G5
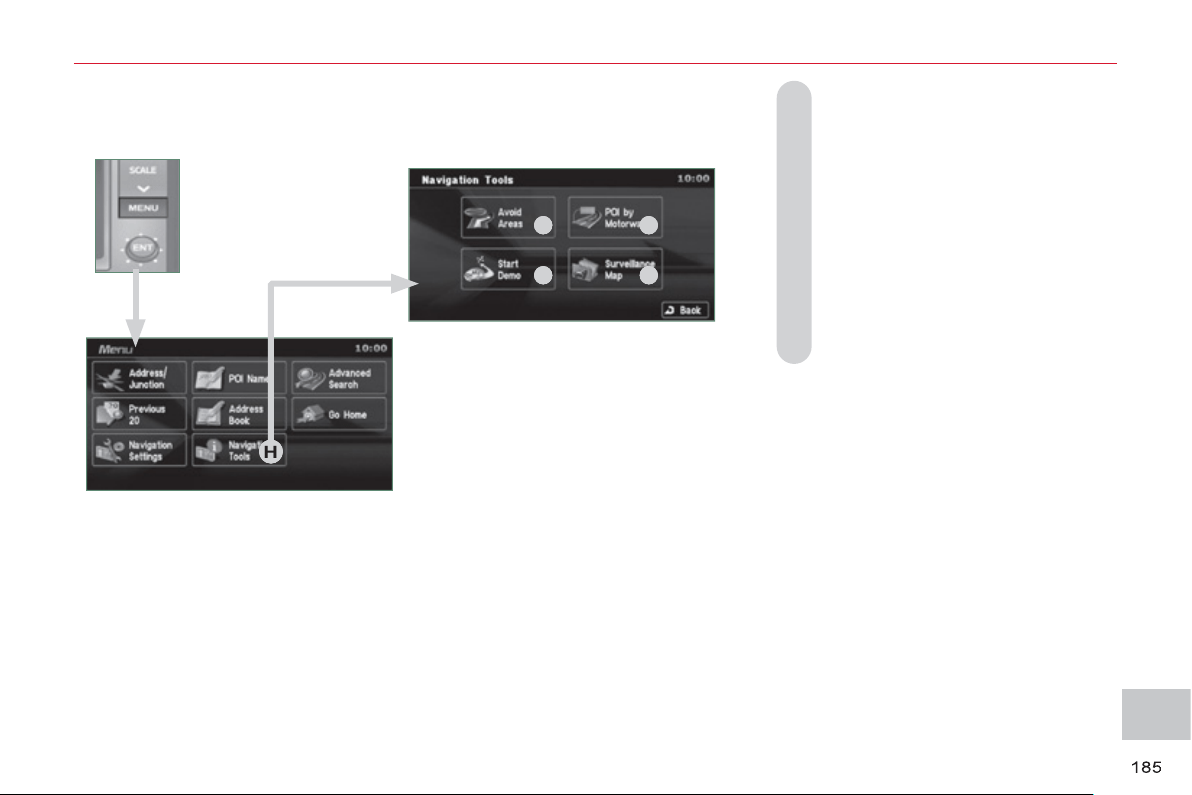
XI
AU
DI
O
and TELEMATI
CS
H - Select basic information relating
to the navigation as well as a pre-
set route demonstration to:
H1 - choose to divert your route to
avoid certain areas,
H2 - select a location using an ad-
vanced search based on a POI
along a motorway or in the vicinity
of the motorway exit,
H3 - start/stop the demonstration,
H4 - recall a stored map screen.
Navi
g
ation settin
g
s and
i
nformation
(
2/2
)
H
H1
H2
H3
H4
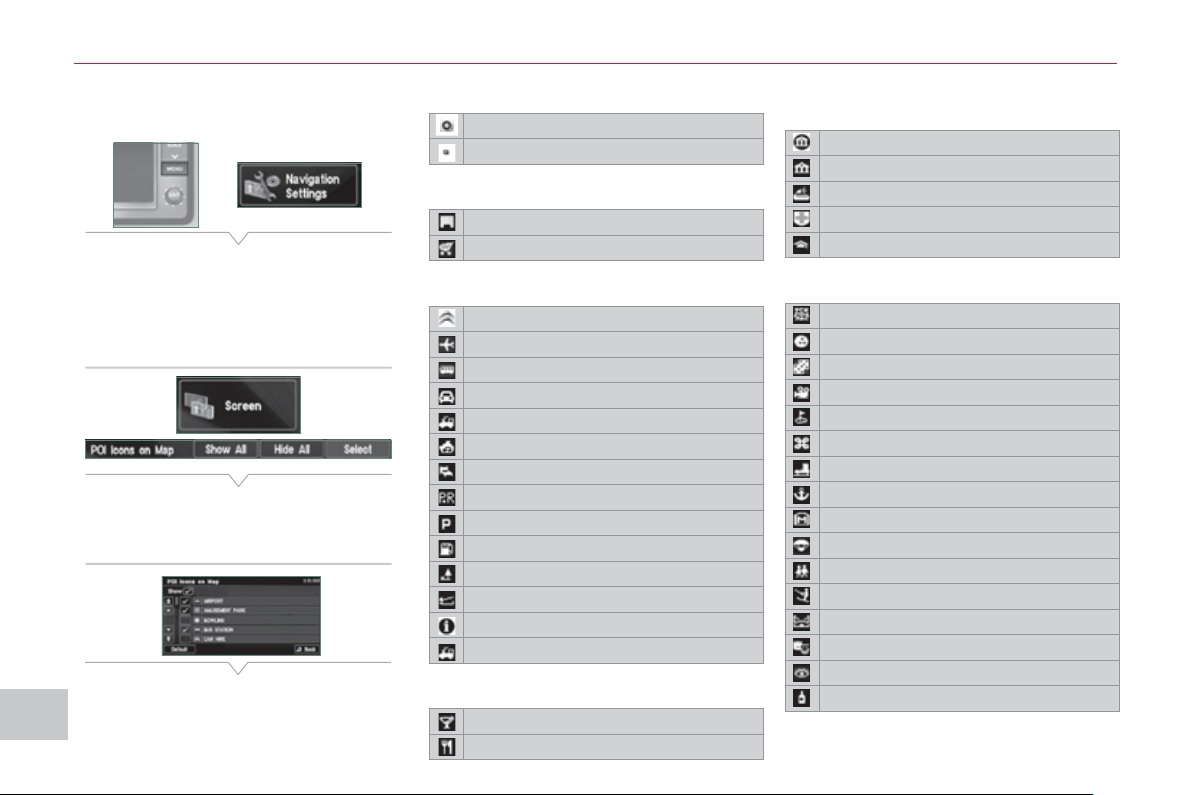
XI
186
AU
DI
O
and TELEMATI
CS
Selectin
g
points of interest
(
POI
)
i
cons displa
y
ed on the map
You can select up to 40 types of point
of interest icon which are displayed on
your map screen.
Press the MENU button then [Navigation
Settings].
Press [Screen] then [Select] on the POI
line.
Press [4] which is displayed.
Press each POI required.
At each contact with a POI, the display
of [α] changes (α = the POI will be dis-
played on the screen).
General
Town centre
Locality
Shops, fi nance and businesses (Green)
Major companies
Shopping centre
Vehicles and travel (Dark blue)
CITROËN
Airport
Bus stop
Vehicle hire
Suburban station/station
Ferry terminal
Hotel
Park and ride
Car park (press +)
Service station
Rest area
Toll booth
Tourist information
Railway station
Restaurant (Orange)
Night life/night club
Restaurant
Public places and emergency
services (Brown)
Town Hall
Community centre
Convention/exhibition centre
Hospital
University/college
Entertainment and attractions (Blue)
Theme park
Bowling alley
Casino
Cinema
Golf course
Historical monument
Skating rink
Marina
Museum
Flying club
Leisure area
Ski station
Sports centre
Theatre/opera
Tourist attraction
Vineyard/wine and spirit store
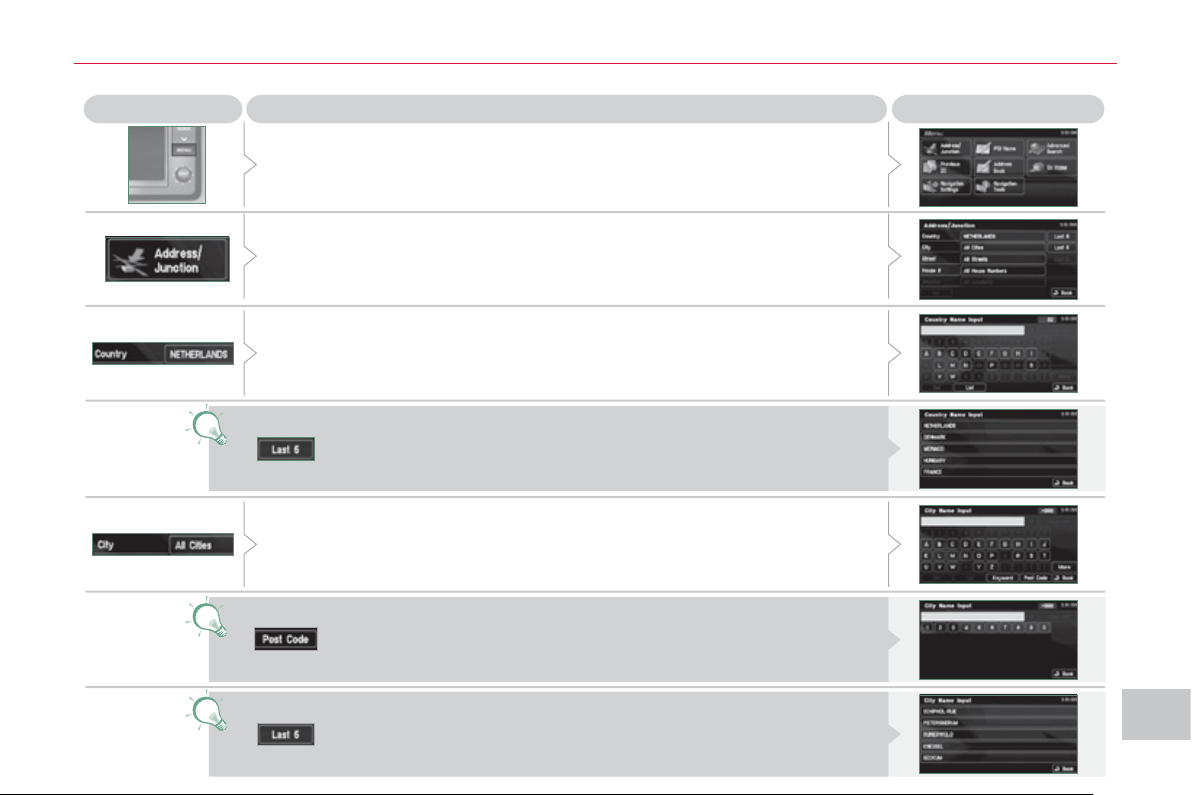
XI
18
7
AU
DI
O
and TELEMATI
CS
Press
Explanations
Result
Press the MENU button.
Press [Address/Junction].
Press [Country] and enter the name of the country using the touch keypad.
When a character of the name of the country is entered, if 5 countries
or fewer are recognised, you can select a country from a list which is
displayed or press [List].
You can select one of the 5 most recently selected countries by
pressing [Last 5] on the "Country" line.
Press [City] then [Keyword] and enter the name of the city using the touch
keypad.
When a character of the name of the city is entered, if 5 cities or fewer are
recognised, you can select a city from a list which is displayed or press
[List].
You can select a city using the post code.
Press [Post Code] and enter the number.
You can select one of the 5 most recently selected cities by
pressing [Last 5] on the "City" line.
Enterin
g
an address and startin
g
g
uidance
(
1/2
)
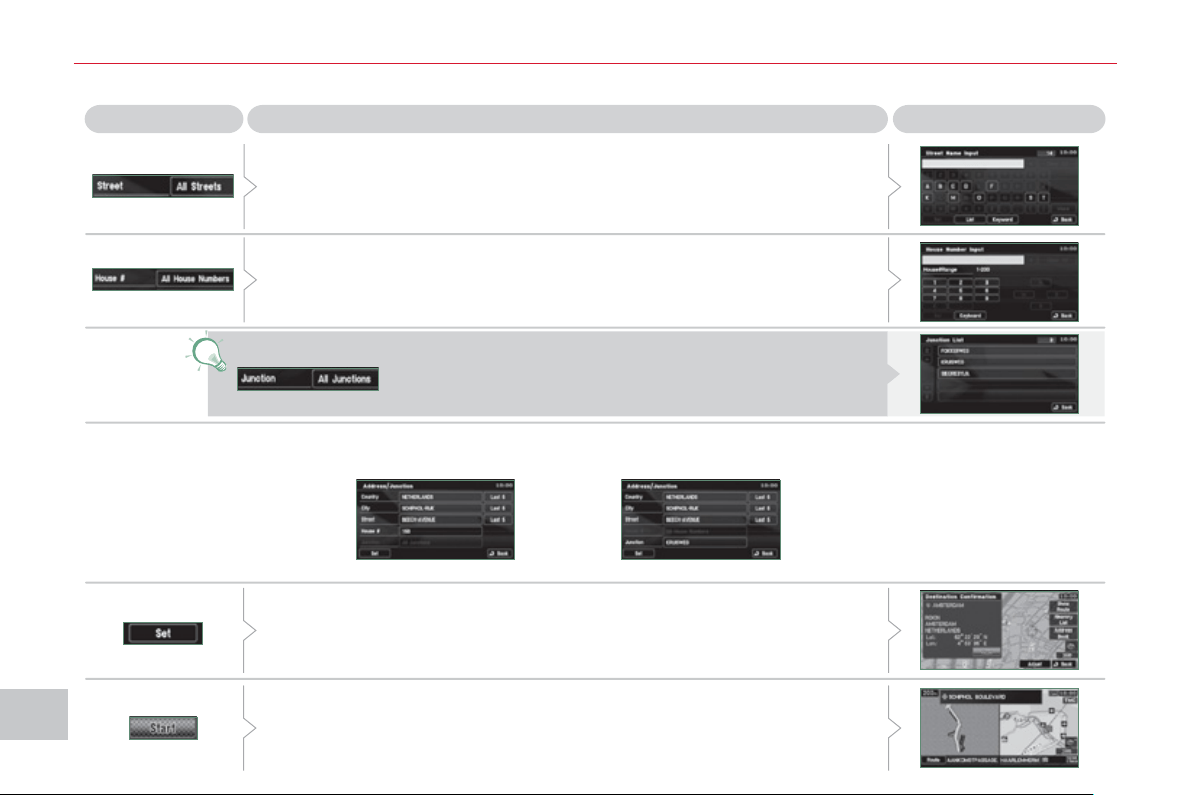
XI
/
188
AU
DI
O
and TELEMATI
CS
Enterin
g
an address and startin
g
g
uidance
(
2/2
)
Press
Explanations
Result
Press [Street] and enter the name of a street using the touch keypad.
When a character of the name of the street is entered, if 5 streets or fewer
are recognised, you can select a street from a list which is displayed or
press [List].
Press [House #] and enter the number of the house using the touch
keypad.
You can enter the name of a junction instead of the number
of the street. Press [Junction] and select the name from a
list which is displayed.
This is the result once all of the information has been entered:
If you agree with the information press [Set], otherwise press one of the
buttons to correct.
Press [Start] to start the navigation.
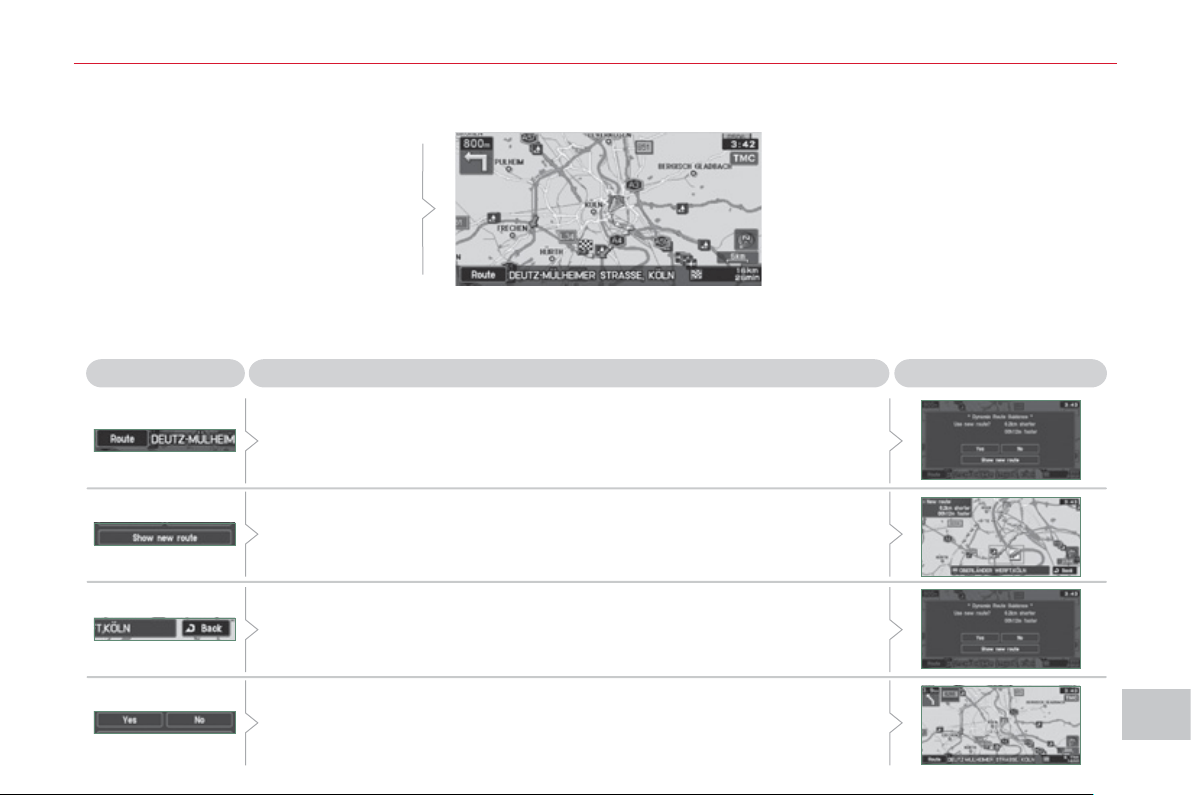
XI
189
AU
DI
O
and TELEMATI
CS
Press
Explanations
Result
Press [Route].
Press [Display new route].
The system offers a detour route (dynamic guidance).
Press [Back] and enter to return to the previous screen.
The system asks you to confi rm or not the new route.
Press [Yes] to confi rm your choice. The system displays the name of the
new route.
Press [No] to not register the route.
Traffic information
During navigation, the system gives you
traffi c information received in real time.
The system can then suggest a detour
route, if dynamic guidance has been
activated by pressing MENU, [Naviga-
tion settings] then [TMC].
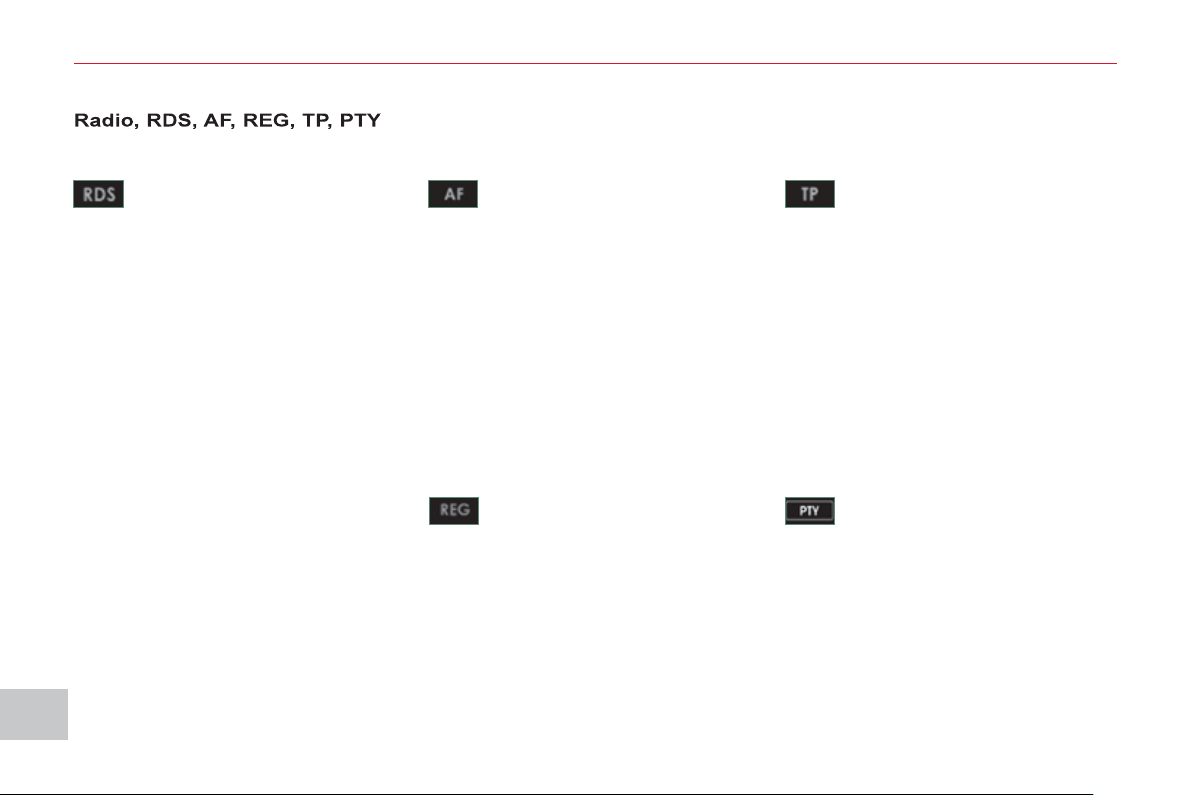
XI
190
AU
DI
O
and TELEMATI
CS
AUDIO-VIDEO
What is RDS? RDS station following Traffi c information function
Your radio automatically checks
and selects the best frequency
for the radio station to which it is
tuned (if the station broadcasts on sev-
eral transmitters or frequencies).
The frequency of a radio station covers
approximately 30 miles (50 km). The
change from one frequency to another
explains the loss of reception during a
journey.
If the station to which you are listening
does not have several frequencies in
the region in which you are currently lo-
cated, you can deactivate the automatic
frequency following.
Radio Data System (RDS) func-
tion on the FM waveband permits:
- tuning to the same station while
travelling through different regions
(if the transmitters of this station
cover the area through which you
are travelling),
- temporary tuning to traffi c informa-
tion announcements,
- display of the name of the station,
etc...
Most FM stations use RDS.
These stations transmit non-audible
data in addition to their programmes.
The data transmitted in this way allows
you access to various functions, mainly
displaying of the name of the station,
temporary tuning to traffi c information
announcements or automatic station
following.
RDS allows you to continue listening to the
same station by means of the frequency
following. However, in certain conditions,
this RDS frequency following cannot be
provided throughout the country. Radio
stations do not cover the whole country,
which explains the loss of reception of the
station during a journey.
The Traffic Program (TP) func-
tion permits automatic and
temporary switching to an FM
station broadcasting traffi c infor-
mation.
The radio station or the source that you
are listening to at this point is paused.
Once the traffi c information has ended,
the system switches back to the radio
station or the source that you were lis-
tening to initially.
Regional following mode
Some stations are organised in
a network.
In different regions, they broadcast dif-
ferent or shared programmes depend-
ing on the time of day.
You can follow:
- a regional station only,
- the entire network, with the possibility
that you will be listening to a different
programme.
Programme types
Some stations offer the option
of listening to a themed type of
programme as a priority, select-
ed from the list available below:
NEWS, AFFAIRS, INFOS, SPORT,
EDUCATE, DRAMA, CULTURE,
SCIENCE, VARIED, POP M, ROCK M,
EASY M, LIGHT M, CLASSICS, OTHER
M, WEATHER, FINANCE, CHILDREN,
SOCIAL, RELIGION, PHONE IN, TRAVEL,
LEISURE, JAZZ, COUNTRY, NATION M,
OLDIES, FOLK M, DOCUMENT.
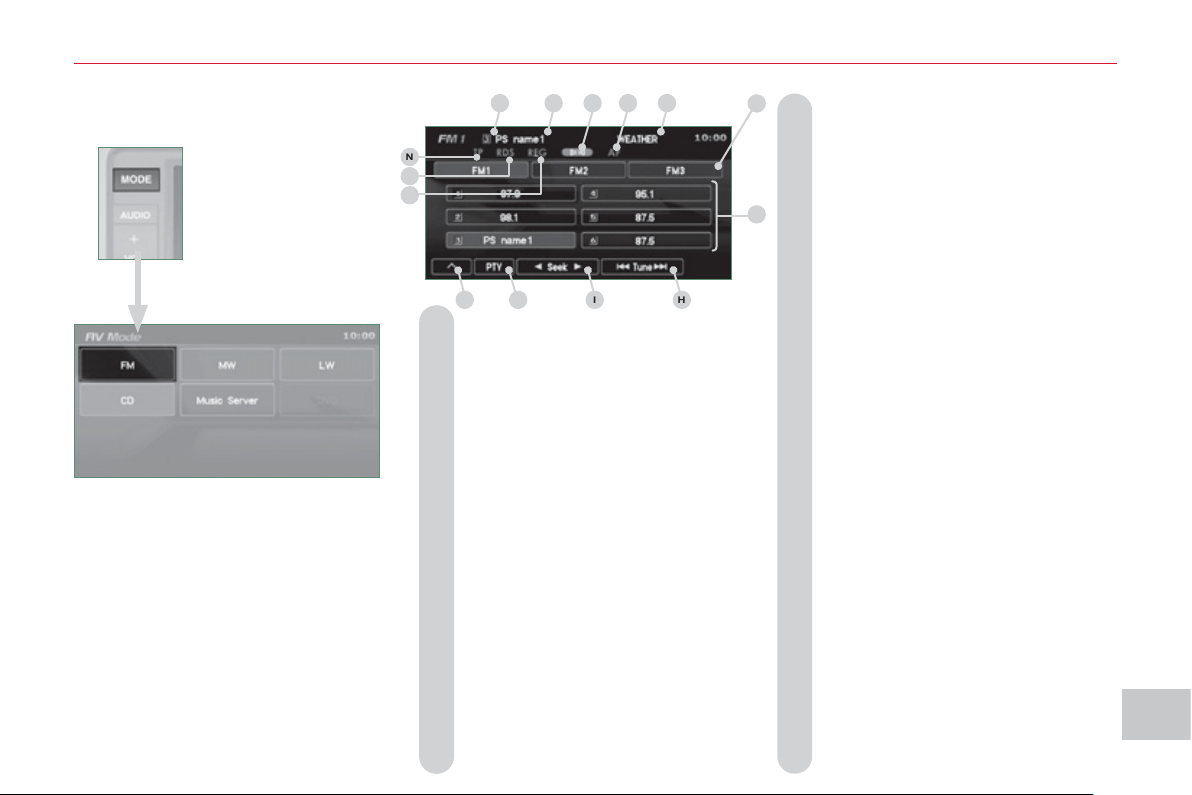
XI
191
AU
DI
O
and TELEMATI
CS
Information displa
y
ed in Radio mode
A. A pre-set number is displayed when
a pre-set channel has been selected.
B. The name of the station is displayed
during the reception of RDS data. If
the name has not been transmitted,
the frequency is displayed.
C. Stereo is displayed when a stereo
transmission is received.
D. AF is displayed when the AF control
function is activated.
E. PTY (programme type) is displayed
if the RDS data received is dis-
played.
TRAFINF is displayed, during an
interruption, for traffi c information.
ALARM is displayed, during an
interruption, for urgent information.
F. Display of 6 pre-set stored stations.
G. To receive the stored station.
Press and hold to store a station.
H. To change the frequency step by
step.
Press and hold for scrolling of the
frequency.
I. To search for currently broadcasting
stations which can be received in
the current location, until a station is
found.
J. To display the programme types
pre-setting screen, e.g.: sport, rock,
classical, news, ... Press PTY again
to exit.
K. Press this button to display the
secondary menu.
L. REG is displayed during the recep-
tion of regional frequencies data.
M.
RDS is displayed during the reception
of RDS data.
N. TP is displayed when the traffi c
information is in standby mode.
A
B
C
D
E
G
H
I
J
K
L
M
N
F
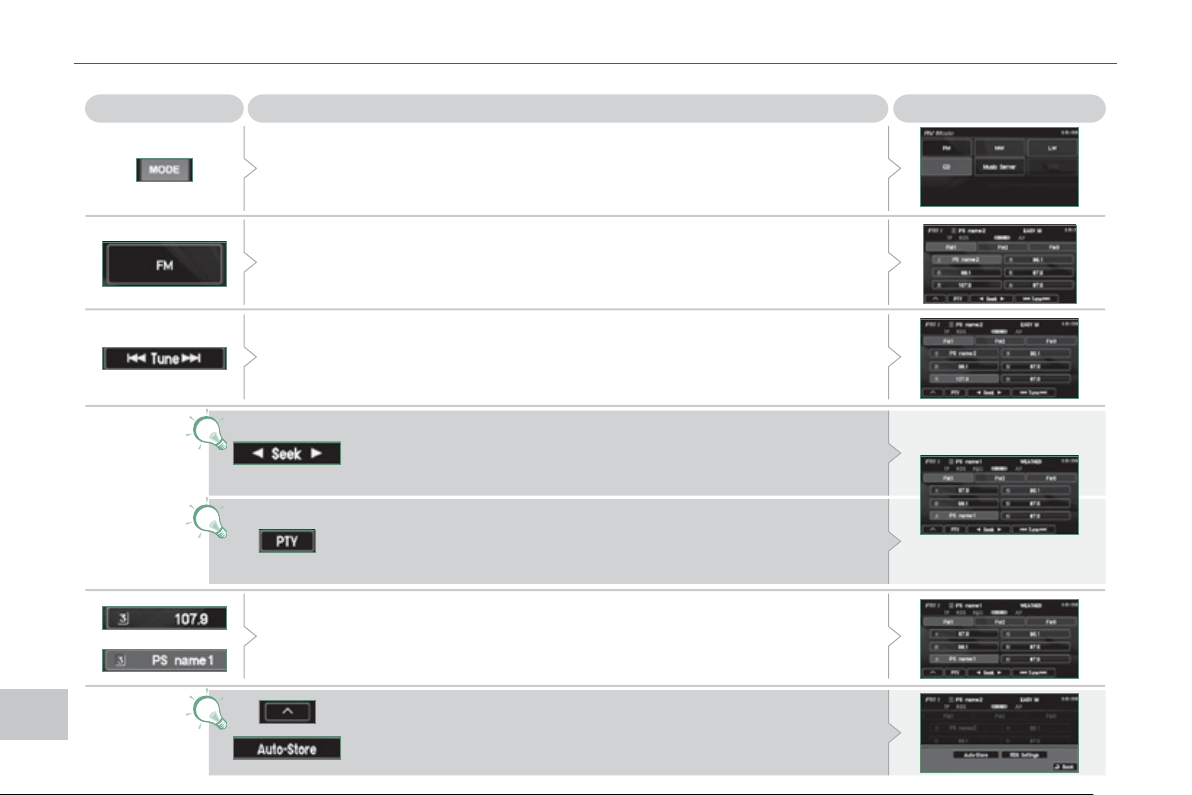
XI
1
9
2
A
UDI
O
and TELEMATI
CS
Radio, selectin
g
an FM station and storin
g
Press the MODE button.
Press Explanations Result
You can select [ Seek] or [Seek ] to start a continuous
search until the stations which can be received in the current
location are detected.
Press FM. By default the screen shows the FM1 stations.
Press [ Tune] to decrease the frequency or [Tune ] to increase the
frequency. The frequency is changed in steps of 0.1 MHz.
Continue to press to tune to a station automatically.
Once the frequency has been selected, a long press on the station (e.g. 3)
will store it.
The name of the station is displayed if it is available.
You can start automatic storing on FM3 for 6 stations, which
can be received in the current location, by pressing [^] then
[Auto-Store].
You can also start a search by type of programme by pressing
[PTY].
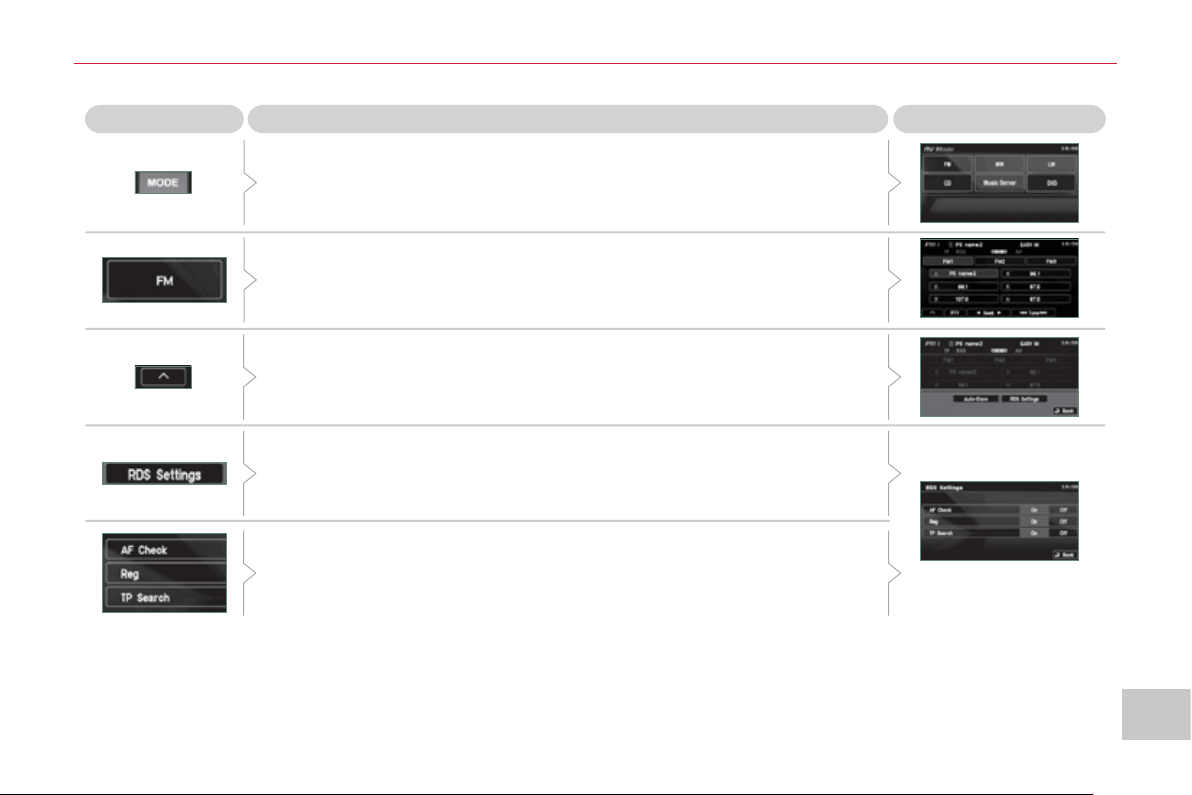
XI
1
93
A
UDI
O
and TELEMATI
CS
Radio, RDS settin
g
s
Press Explanations Result
Press the MODE button.
Press FM. By default the screen shows the stations on FM1.
Press [^].
Press [RDS Settings].
Press [On] or [Off] to activate or deactivate the functions:
- AF: automatic search for the best frequency,
- REG: switch to the regional frequencies,
- TP: automatic selection of stations broadcasting traffi c information.
XI
1
9
4
A
UDI
O
and TELEMATI
CS
CD pla
y
e
r
Your Audio-Telematic system allows
you to listen to audio CDs (CDDA, CD-
Text, CD-R/RW) or MP3 and WMA CDs.
Playing an audio CD
Switching off the engine or removing
the CD during recording will result in the
tracks being faulty.
The operation of the navigation system
may slow down during recording.
The recording speed may be slower
than 4x due to the processing load on
the equipment or the condition of the
audio CD.
If jumps or other errors occur, return to
the beginning of the track and start the
recording again.
Even if there is no gap between the
tracks on the CD, a brief silence be-
tween tracks is stored on the hard disk.
What is the Gracenote CDDB?
Copyright
Your Audio equipment may allow you
to listen to music which is usually pro-
tected by copyright in accordance with
current national and international stan-
dards. Please consult these standards
and comply with them.
Recording onto the music server
When the audio CD is
inserted in the player,
playing of the tracks is
automatic and they can
be recorded onto the
hard disk.
Simultaneous access to the music rec-
ognition service "Gracenote CDDB" on
the hard disk permits display of the title
information.
The tracks of audio CDs (not
MP3/WMA) can be recorded
onto the hard disk at approximately
4x speed (e.g.: 60 minutes converted
to 15 minutes) and stored on the music
server.
The sounds recorded may be altered
by the noise present and the quality of
the sound may differ from the original.
The tracks recorded on the music server
cannot be reproduced on another me-
dium (CD-R/RW, HDD, etc...).
Previously recorded tracks cannot be
recorded again from the same CD.
The title information for the
track currently being played
can be obtained from the
"Gracenote CDDB" database
stored on the hard disk.
The Gracenote company uses this
standard to identify the music and the
associated information such as:
- the title of the album,
- the name of the artist,
- the title of the tracks,
- the genre, ...
For further details, consult the site:
www.gracenote.com.
The Gracenote CDDB database incor-
porated in this equipment cannot guar-
antee the content of the data 100 %.
You can update this database using a
DVD sold separately.
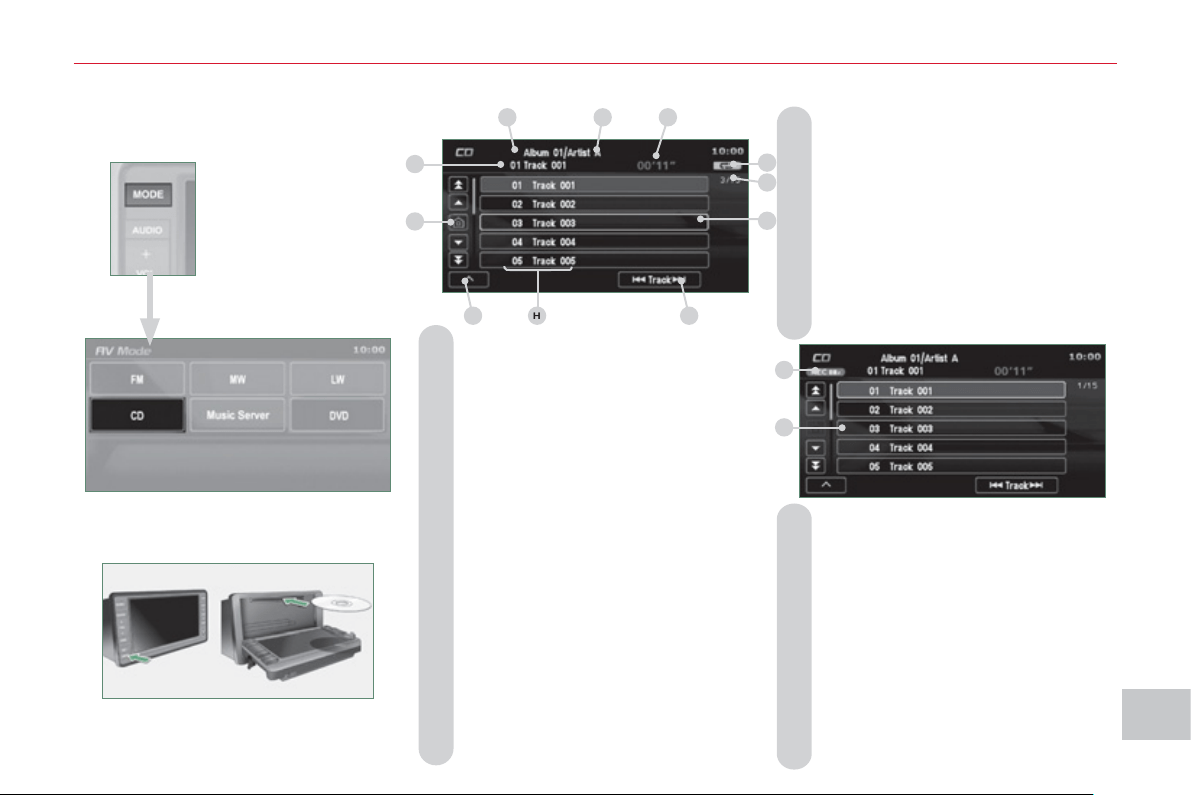
XI
1
95
A
UDI
O
and TELEMATI
CS
Information displa
y
ed in CD mode and recordin
g
a CD
A. The name of the album is displayed
for the track currently being played.
B. The name of the artist is displayed
for the album currently being played.
C. The playing time of the track currently
being played is displayed.
D. The playing mode currently selected
is displayed.
E. Position of the cursor and total number
of tracks on the album.
F. Displays the item currently selected.
G. To scroll up or down through the
tracks.
Press and hold for fast backwards
or forwards playing of a track.
H. Displays the number and the name of
the track. While driving, they are not
available and cannot be selected.
I. To display the secondary menu.
J. Move the cursor onto the track cur-
rently being played.
K. The number and the name of the
track currently being played are dis-
played.
L. During recording, this symbol is
displayed in red and it switches off
when all recording operations are
complete. The number indicates the
percentage of the total number of
tracks on the CD already recorded
onto the hard disc. 00 % when only
one track has been recorded.
M. The tracks which have not been
recorded are displayed in blue.
No symbol is displayed for tracks
which have been recorded.
The CD button is only active if the player
contains a CD.
Press Open to return the screen to the
vertical position.
A
B
C
D
E
F
G
H
I
J
K
L
M
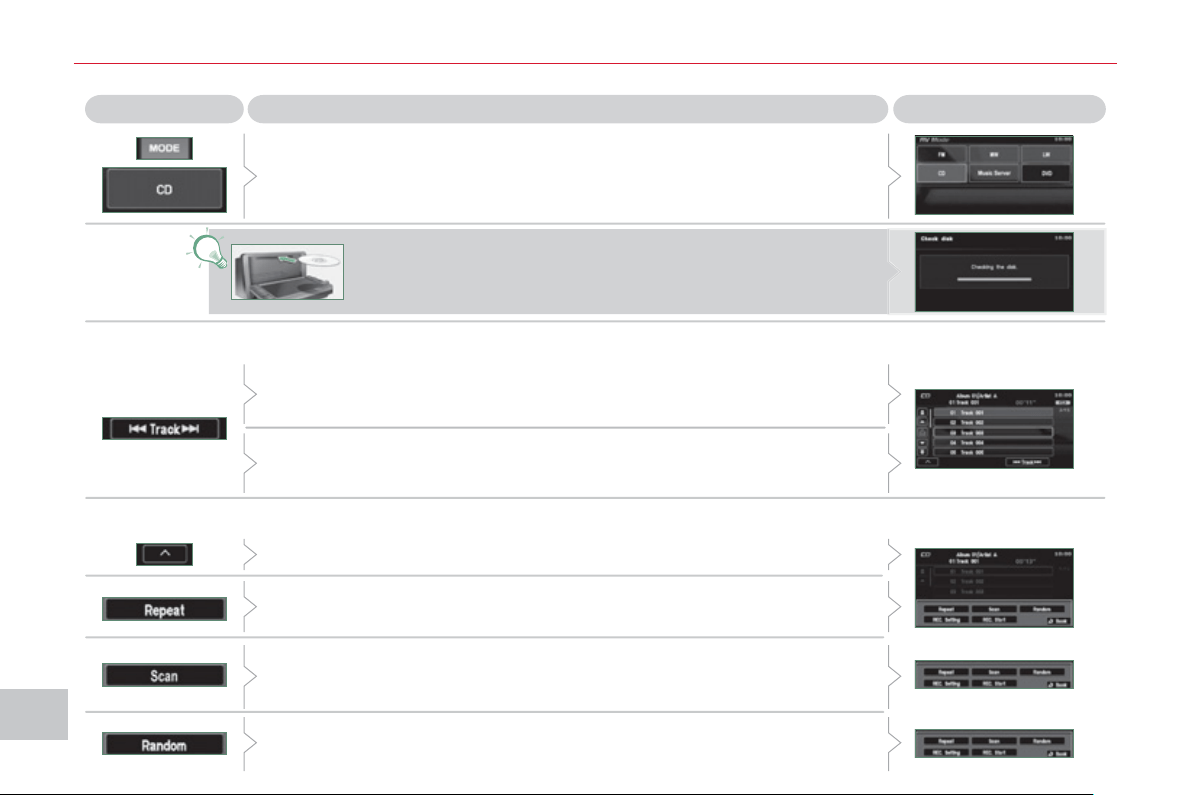
XI
196
AU
DI
O
and TELEMATI
CS
P
la
y
in
g
a CD
Press the MODE button then CD, if the player already contains a CD.
Press Explanations
Result
Otherwise, insert a CD in the player, play begins automatically.
Press [ Track] to select the previous track or return to the beginning of
the track currently being played.
Press and hold for fast backwards play.
Press [Track ] to select the next track.
Press and hold for fast forwards play.
Press [^] to access the secondary menu.
Press [Repeat] to play the track in a loop (repetition).
Press [^] then [Repeat] to stop.
Press [Scan] to play the beginning of each track for approximately
9 seconds (scan). Press [^] then [Scan] to stop or press the current track
(during the 9 seconds) and play begins.
Press [Random] to play the tracks in random order. Press [^] then
[Random] to stop.
Selecting a track
Changing the play mode
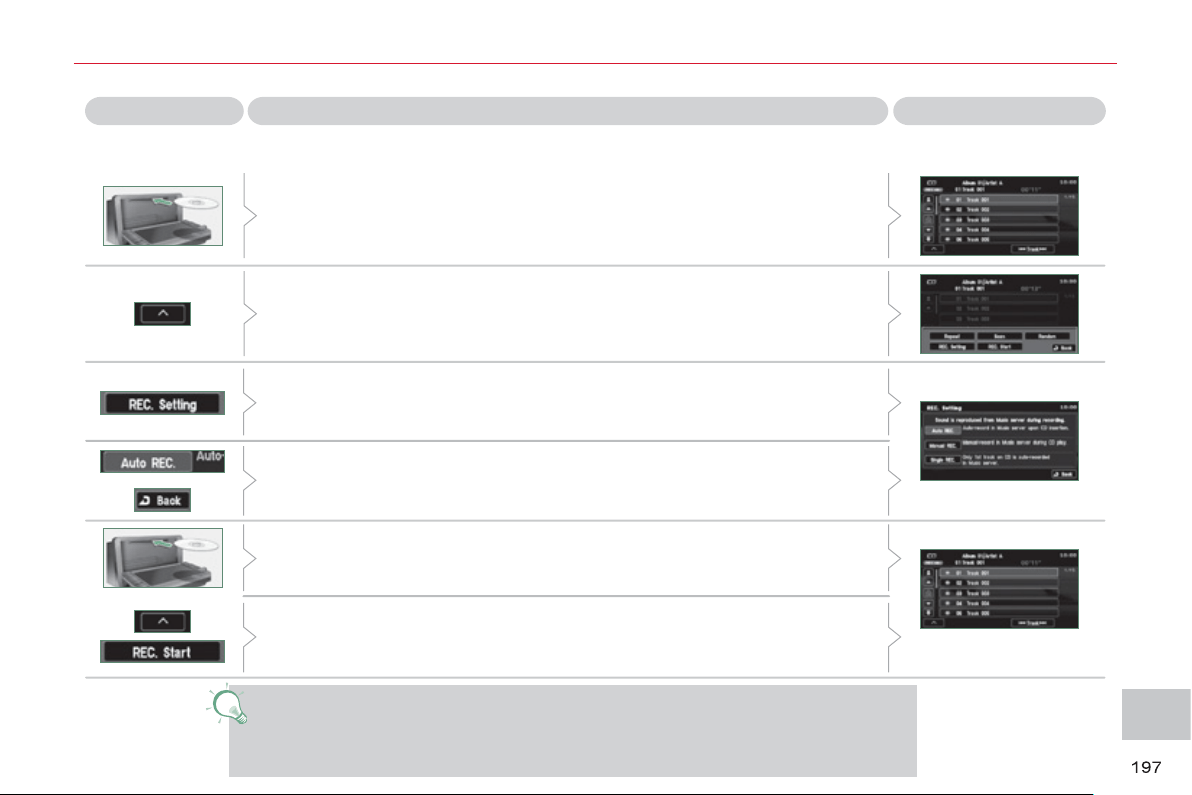
XI
AU
DI
O
and TELEMATI
CS
Recordin
g
a CD onto the music server
(
1/3
)
Press Explanations Result
All of the tracks are recorded automatically when a CD is inserted.
This automatic recording is programmed by default on leaving the factory.
Automatic recording of all of the tracks
If you have changed the recording mode (manual or fi rst track), while a
CD is being played press [^] to access to secondary menu.
Press [REC. Setting].
Press [Auto REC.] and confi rm by pressing [Back].
Next, eject the CD currently being played then insert a CD and the
recording of all of the tracks begins.
If you wish to record the CD which is currently being played, press [^] to
access the secondary menu and press [REC. Start].
If another track (already recorded) is selected during recording, the
recording continues and the new track selected is played.
If another track (not recorded) is selected, the recording which is in
progress stops and the recording of the new track selected begins. This
track is played during recording.

XI
AU
DI
O
and TELEMATI
CS
Recordin
g
a CD onto the music server
(
2/3
)
Press Explanations Result
Manual recording of individual tracks
You can record the tracks manually, one by one.
After inserting a CD and while it is being played, press [^] to access the
secondary menu.
Press [REC. Setting].
Press [Manual REC.] and confi rm by pressing [Back].
Once the manual programming has been carried out, select the track to
be recorded then press [^].
Press [REC. Start], the recording of the track selected begins.
If another track is selected during recording, the recording stops and the new
track selected is played.

XI
199
AU
DI
O
and TELEMATI
CS
Recordin
g
a CD onto the music server
(
3/3
)
Press Explanations Result
Automatic recording of the fi rst track
You can programme the automatic recording of the fi rst track when a CD
is inserted.
After inserting a CD and while it is being played, press [^] to access the
secondary menu.
Press [REC. Setting] then [Single REC.] and confi rm by pressing [Back].
Next, eject the CD which is currently being played then insert a CD and
the recording of the fi rst track begins.
If you wish to record the fi rst track of the CD which is currently being
played, press [^] to access the secondary menu and press [REC. Start].
If another track is selected during recording, the recording stops and the
track selected is played.
Stopping automatic or manual recording
During the recording of a CD or of a track on a CD, press [^] to access the
secondary menu.
Press [REC. Stop], the recording stops.
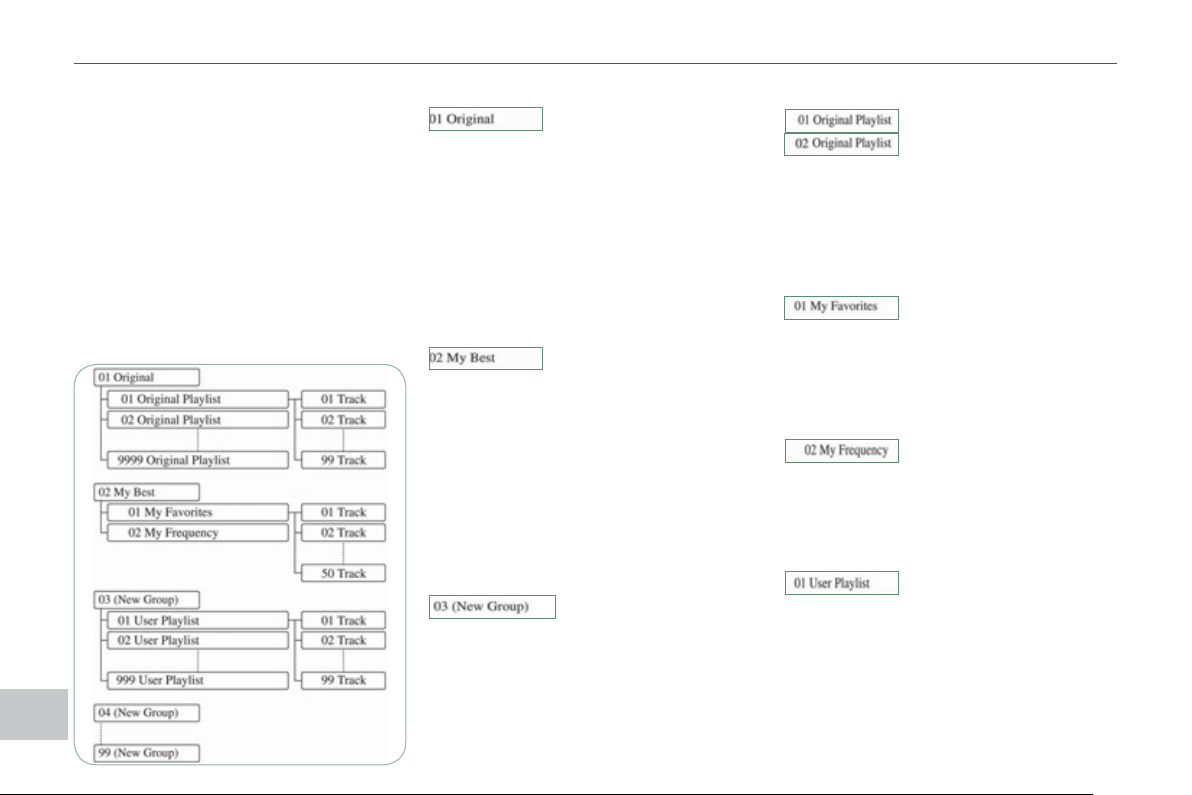
XI
2
00
A
UDI
O
and TELEMATI
CS
General notes on the Music
Serve
r
What is the music server?
Your Audio-Telematic system allows
you to copy audio CDs onto a music
server, up to 2,500 songs on a 10 Gb
hard disk.
The tracks on audio CDs (not MP3 or
WMA) can be recorded onto the hard
disk at approximately 4x speed and
stored on the music server.
Refer to the "Recording a CD" section.
The music server then allows you to
manage groups and lists of tracks.
"Original" group, number 01: "Original Playlist" lists:
"My Best" group, number 02:
"New Group" group for the user,
numbers 03 to 99:
"My Favorites" list:
"My Frequency" list:
"User Playlist" list:
This is the location of
the original playlist cre-
ated automatically (not manual) when a
track of an audio CD is recorded.
It is not possible to change its name or
delete it.
You can record up to 9999 playlists in
this group.
This is the location of the
playlists, etc... created
automatically from the information read
on the music server.
It is not possible to change its name or
delete it.
The groups "My Favorites" and "My
Frequency" are stored here.
This is the location of
the user's playlists.
You can record up to 9999 playlists in
this group.
The group can be created, renamed or
deleted.
These are original play
lists created automatical-
ly (not manual) when an
audio CD is recorded.
The lists and the artists can be renamed
or deleted. The genres can also be set.
This is the location of a
playlist of tracks selected
by the user from the original list.
If you delete a track from the original
list, it will be deleted from the user list.
The list and the artist can be renamed
or deleted.
It is possible to add tracks or change
their order.
This is the location of
the playlists used most
frequently from the original list.
It is not possible to add tracks or change
their order.
This is the location for
storing your favourite
tracks.
They can be deleted from the list and
the order in which they are played can
be changed.
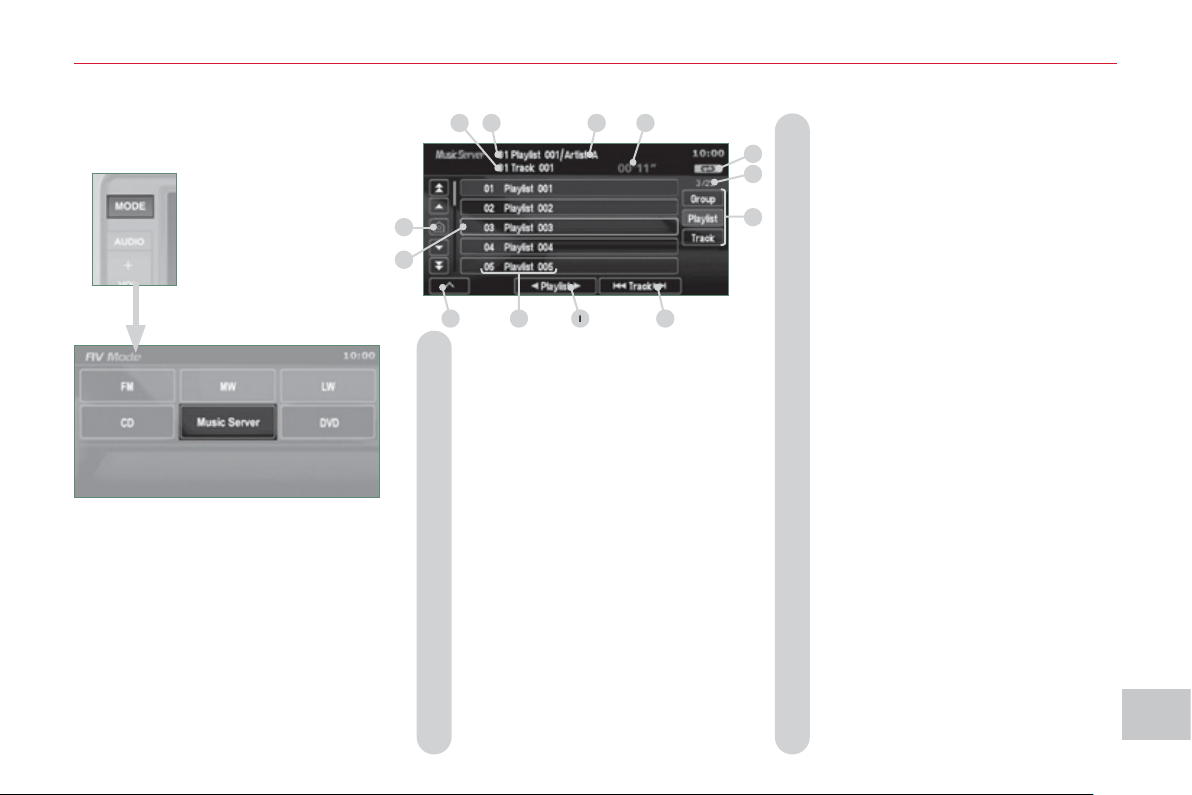
XI
2
0
1
A
UDI
O
and TELEMATI
CS
Information displa
y
ed in Music Server mode
A. The number and the name of the
track currently being played are dis-
played.
B. The number and the name of the
playlist currently being played are
displayed.
C. The name of the artist is displayed
for the playlist currently being played.
D. The playing time of the track cur-
rently being played is displayed.
E. The playing mode currently selected
is displayed.
F. Group lists: position of the cursor
and total number of groups.
Playlists: position of the cursor and
total number of playlists.
Track lists: position of the cursor
and total number of tracks.
G. To display the list of groups, the
playlist and the list of tracks.
H. To scroll up or down through the
tracks.
Press and hold for fast backwards
or forwards playing of a track.
I. To scroll up or down through the
playlists.
J. Group lists: number and name of
the group.
Playlists: number and name of the
playlist.
Track lists: number and name of the
track.
K. To display the secondary menu.
L. Displays the item currently selected.
M. Move the cursor onto the track cur-
rently being played.
A
B
C
D
E
F
G
H
I
J
K
L
M
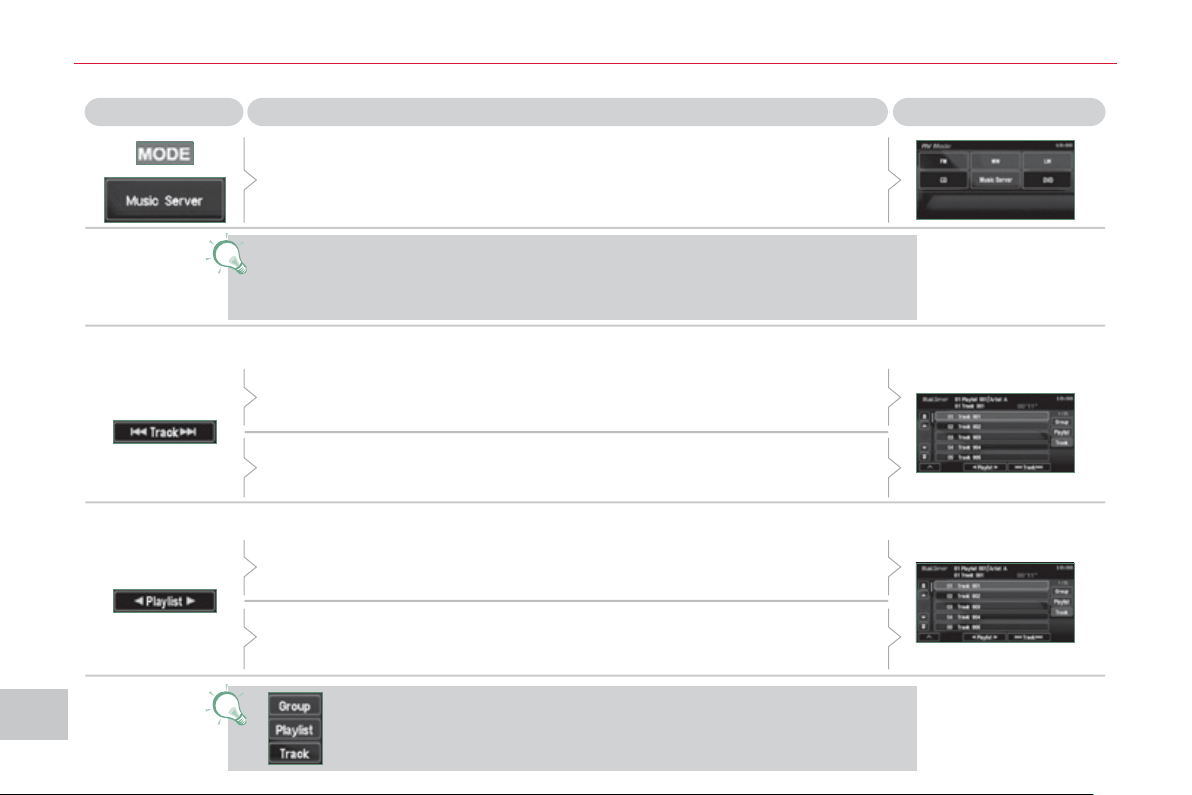
XI
2
0
2
A
UDI
O
and TELEMATI
CS
Explanations Result
P
la
y
in
g
a track or a pla
y
list on the Music Serve
r
Press
Press the MODE button then Music Server.
The playlists are played in a loop.
The server can play a track while recording another track from a CD. You
must wait until recording is complete before playing the recorded track.
Selecting a track
Press these buttons to switch between groups, playlists and
tracks.
You cannot switch directly from groups to tracks.
Press [ Track] to select the previous track or return to the beginning of
the track currently being played.
Press and hold for fast backwards play.
Press [Track ] to select the next track.
Press and hold for fast forwards play.
Selecting a playlist
Press [ Playlist] to select the previous playlist.
Press [Playlist ] to select the next playlist.
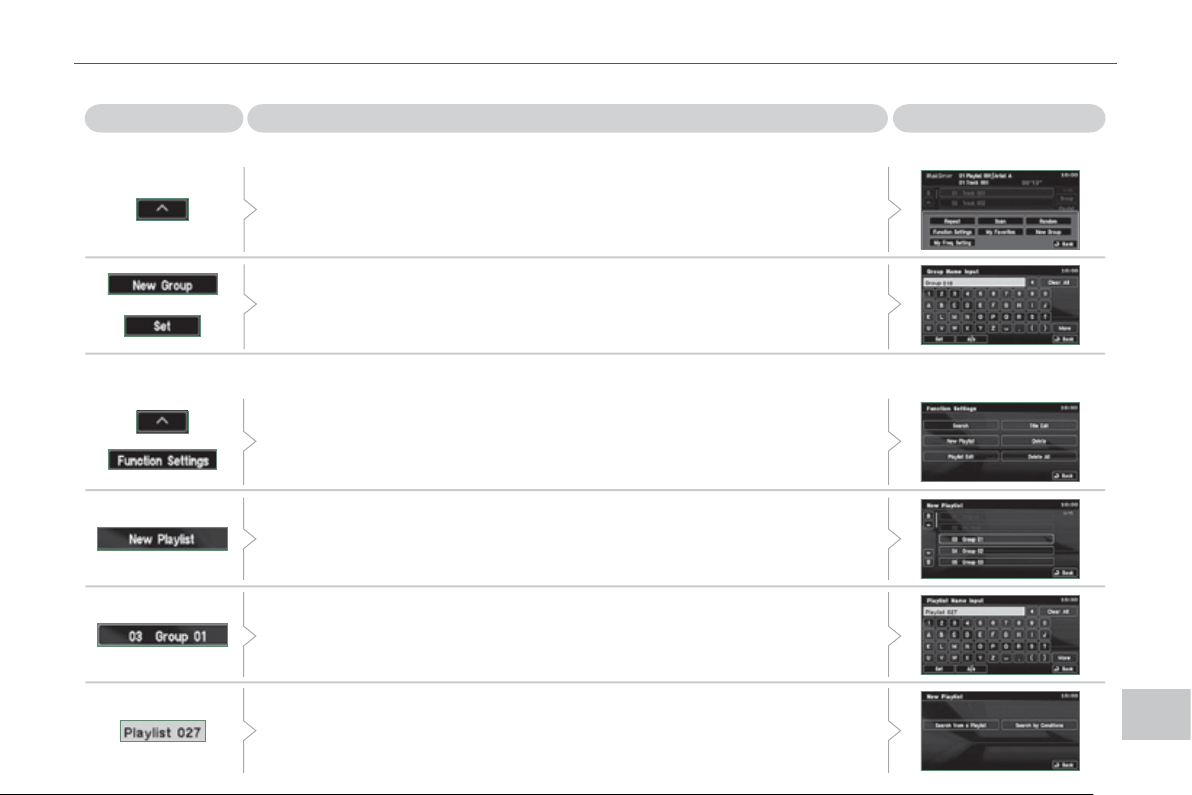
XI
2
03
A
UDI
O
and TELEMATI
CS
Creatin
g
a
g
roup and a pla
y
list on the Music Serve
r
Explanations Result
Press [^] to access the secondary menu.
Creating a group
Press [New Group], enter the name of the group and press [SET].
The group is stored on the server.
Creating a playlist
Press [^] to access the secondary menu then press [Function Settings].
Press [New Playlist].
Select the group to which the playlist is to be attached. The group must
be created fi rst.
Enter the name of the playlist and confi rm by pressing [SET].
Then select the search method attached to this new list (either from the
list or by conditions).
The list is stored on the server.
Press
XI
A
UDI
O
and TELEMATI
CS
G
eneral notes on MP3/WMA CDs
Playing an MP3/WMA CD
When the MP3/WMA CD is
inserted in the player, play-
ing of the tracks is automatic.
The tracks cannot be recorded
onto the music server.
You can play CDs with up to 8 levels,
255 folders and 400 fi les maximum.
Copyright
Your Audio equipment may allow you
to listen to music which is usually pro-
tected by copyright in accordance with
current national and international stan-
dards. Please consult these standards
and comply with them.
Acceptance of the fi les
Some blank CDs may not be played
by your equipment (quality, recording
speed...).
When you burn a CD-R or CD-RW,
select the ISO 9660 level 1.2 or Joliet
burning standard.
To obtain the best acoustic quality pos-
sible, select the lowest burning speed.
The MPEG1 and MPEG2 standards
are accepted.
Transmission speeds between 32 and
320 kbits/s and scans between 16 kHz
and 48 kHz are accepted.
To display the title information (the name
of the artist, the title of the album, etc...),
the information contained in the ID3 Tags
or the WMA Tags must be included in the
MP3/WMA fi les burned onto the disc.
What is the MP3/WMA fi le format?
MP3 is the abbreviation of MPEG-1
Audio Layer 3 and MPG is the abbrevia-
tion of Motion Pictures Experts Group, a
digital video data compression standard
used on media such as video CDs.
The MP3 compression reduces the
number of bytes in a song by eliminating
the long sound waves in the range of fre-
quencies which are imperceptible to the
human ear, so producing high quality au-
dio fi les with a low volume of data.
This compression divides the size of
the content of a conventional audio CD
by approximately 10, which means that
the content of 10 audio CDs can be
recorded onto a single CD-R or CD-RW.
WMA is the abbreviation of Windows
Media Audio, another audio data com-
pression standard offered by Microsoft.
It can be used to create and save audio
fi les at a compression rate higher than
that of the MP3 format.
Windows Media and Microsoft Corpo-
ration are trademarks registered in the
United States and/or other countries.
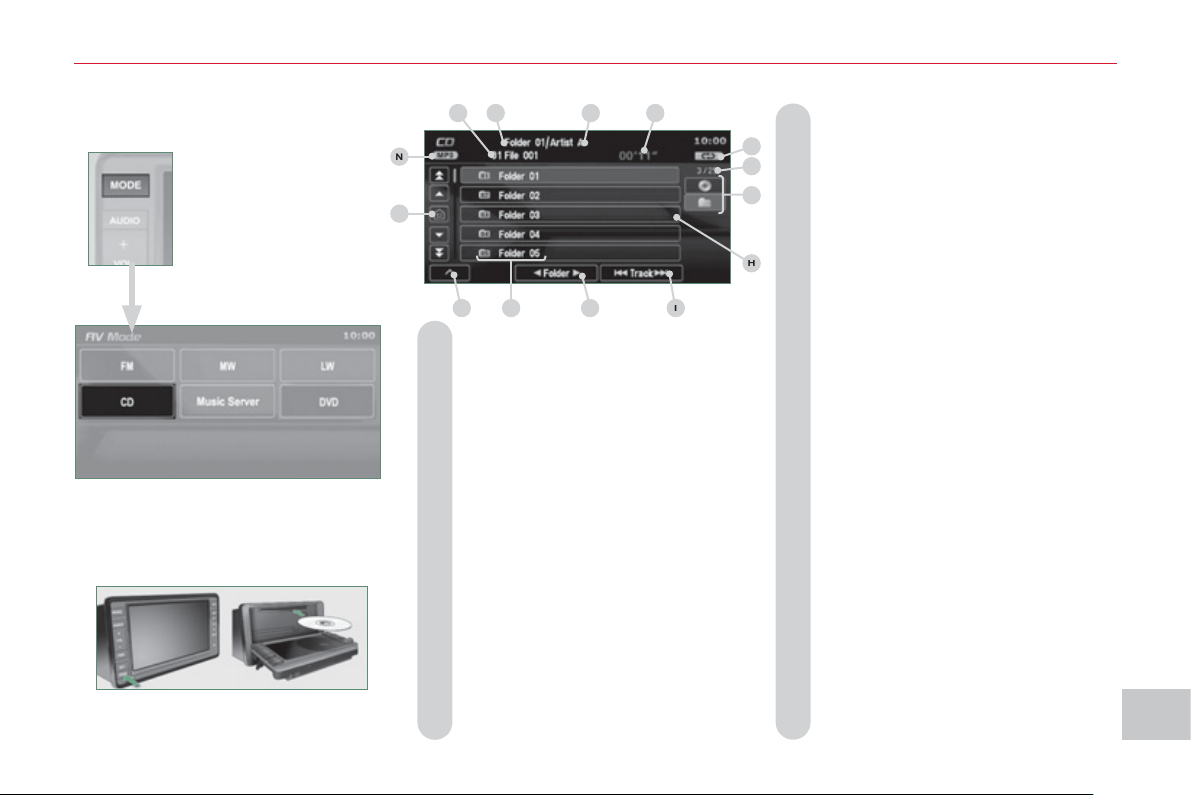
XI
2
05
A
UDI
O
and TELEMATI
CS
Information displa
y
ed in MP3/WMA CD mode
A. The number and the name of the track
currently being played are displayed.
B. The name of the album/folder is dis-
played for the track currently being
played.
C. The name of the artist is displayed
for the track currently being played.
D. The playing time of the current track
is displayed.
E. The playing mode currently selected
is displayed.
F. Position of the cursor and total num-
ber of folders or tracks on the current
level.
G. To display the list of folders of a higher
level.
H. Displays the item currently selected.
I. To scroll up or down through the
tracks.
Press and hold for fast backwards
or forwards playing of a track.
J. To scroll up or down through the
folders.
K. Displays the folder number and the
folder name. Plus the lists and num-
bers of tracks and the name of the
fi le (without extension).
L. To display the secondary menu.
M. Move the cursor onto the track cur-
rently being played.
N. Displays the type of medium, MP3
or WMA.
The CD button is only active if the player
contains a CD.
Press Open to return the screen to the
vertical position.
A
B
C
E
F
G
I
K
L
M
N
D
H
J
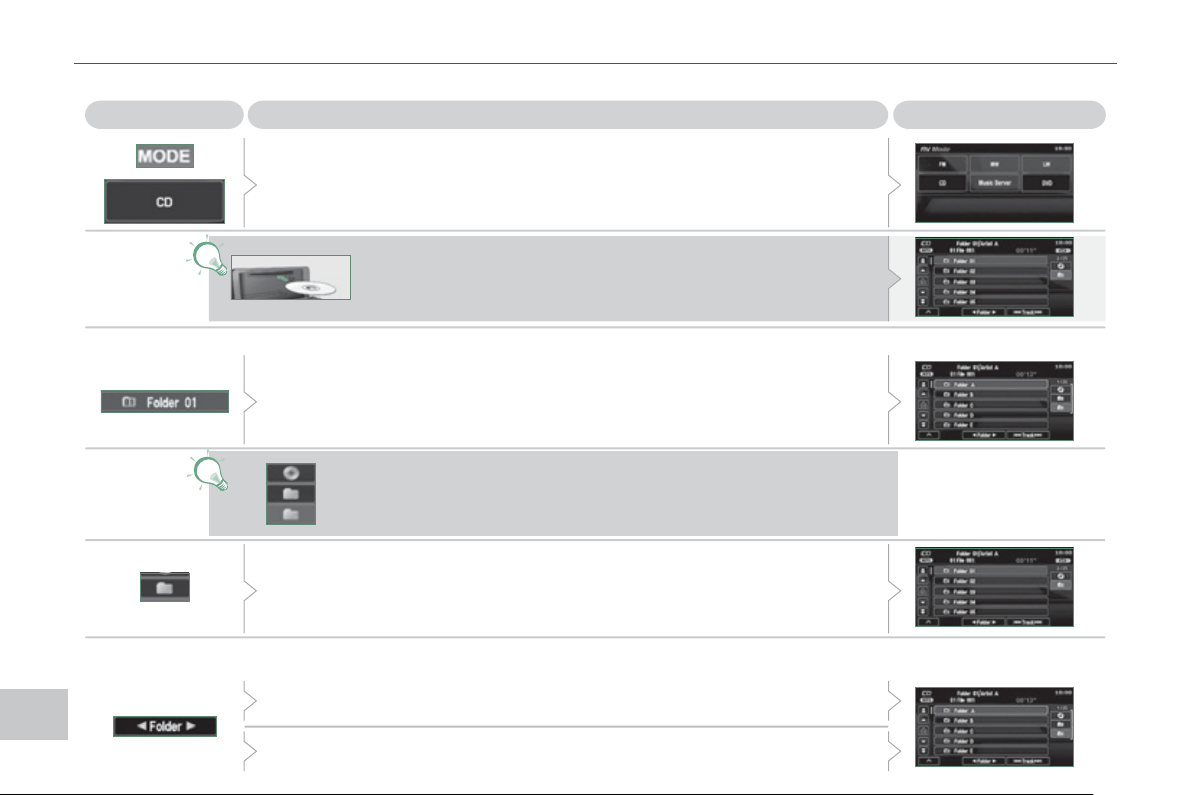
XI
206
AU
DI
O
and TELEMATI
CS
Pla
y
in
g
an MP3/WMA CD
(
1/2
)
Press Explanations Result
Press the MODE button then CD, if the player already contains a CD.
Moving around the folders
Selecting a folder
Otherwise, insert a CD in the player, play begins automatically.
You can move by one level at a time.
Press on the name of a folder and at each press the list of folders of the
level below is displayed.
Press on the folder above to move up and/or select a level.
Press [ Folder] to select the previous folder.
Press [Folder ] to select the next folder.
These displays indicate the current level:
CD: level 0, folder below: level, folder below that, level 2, etc...
Up to 8 levels maximum.
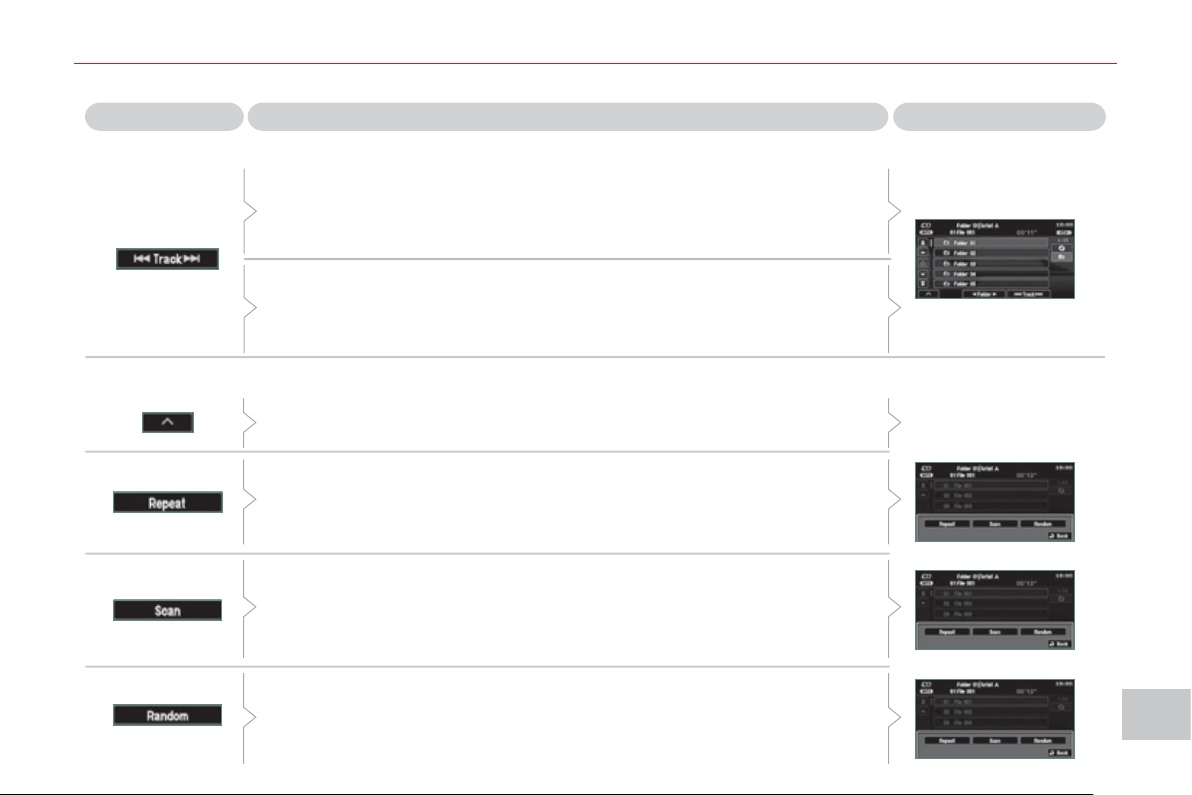
XI
20
7
AU
DI
O
and TELEMATI
CS
Changing the playing mode
Press [ Track] to select the previous track or return to the beginning of
the track currently being played.
Press and hold for fast backwards play.
Selecting a track
Press [Track ] to select the next track.
Press and hold for fast forwards play.
Press [Repeat] to play the track selected in a loop (repetition).
Press [Repeat] again to play all of the tracks in the selected folder in a loop.
Press again to stop.
Press [Scan] to play the beginning of each track in each folder for
approximately 10 seconds (scanning).
Press [Scan] again the play the beginning of each track in the selected
folder in a loop.
Press again to stop or press on the current track (during the 10 seconds)
and play begins.
Press [Random] to play all of the tracks in the selected folder in random
order.
Press [Random] again to play all of the tracks on the CD in random order.
Press again to stop.
Press [^] to access the secondary menu.
Press Explanations Result
Pla
y
in
g
an MP3/WMA CD
(
2/2
)
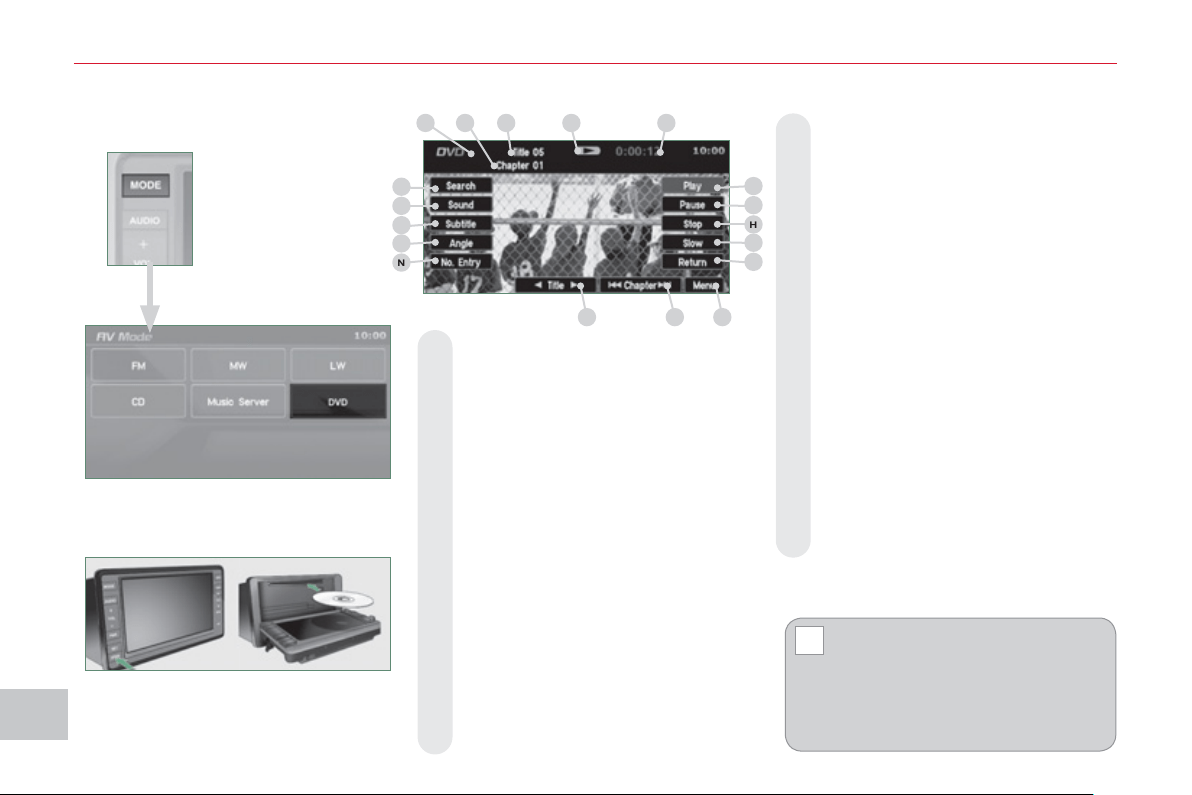
XI
!
208
AU
DI
O
and TELEMATI
CS
D
VD MODE
The DVD button is only active if the
player contains a DVD.
Press Open to return the screen to the
vertical position.
For safety reasons, the video
is not displayed while driving,
however the audio can be
played.
To display the picture and watch a
DVD, park the vehicle in a safe place.
K. To display the DVD title menu.
L. To scroll up or down through the
chapters.
Press and hold for fast backwards
or forwards play.
M. To scroll up or down through the titles.
N. To enter a title or chapter number.
O. To change the angle.
P. To change the language of the sub-
titles.
Q. To change the language.
R. To select a chapter or title or specify
a number.
A. This icon is displayed when the opera-
tion requested cannot be carried out.
B. The number of the chapter currently
being played is displayed.
C. The number of the title currently
being played is displayed.
D. Symbols display the current status
of the player.
E. The playing time is displayed.
F. To resume normal play when play is
paused or during slow-motion play.
G. To stop play temporarily.
H. To stop play. Press the screen to
access the menu.
I. For slow-motion play.
J. To play the previously selected zone
on the disc.
Information displa
y
ed in DVD
m
o
d
e
A
B
C
D
E
F
G
H
I
J
K
L
M
R
Q
P
O
N
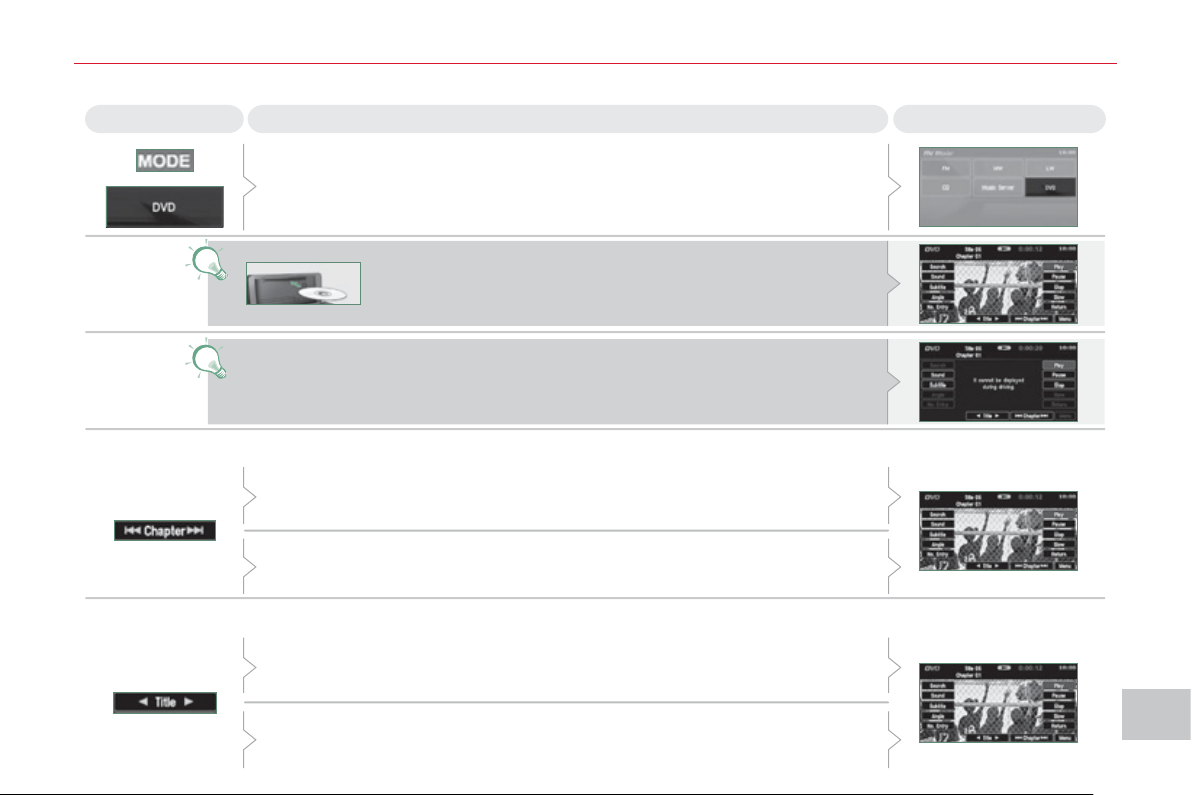
XI
209
AU
DI
O
and TELEMATI
CS
P
la
y
in
g
a DVD
Result Explanations
Selecting a chapter
Press the MODE button then DVD, if the player already contains a DVD.
Otherwise, insert a DVD in the player, the picture is displayed
automatically. Press the screen to access the menus.
While driving, only the soundtrack is played and no picture is displayed.
Press [ Chapter] to select the previous chapter or return to the beginning
of the chapter currently being played.
Press and hold for fast backwards play.
Press [Chapter ] to select the next chapter.
Press and hold for fast forwards play.
Selecting a title
Press [ Title] to select the previous title.
Press [Title ] to select the next title.
Press
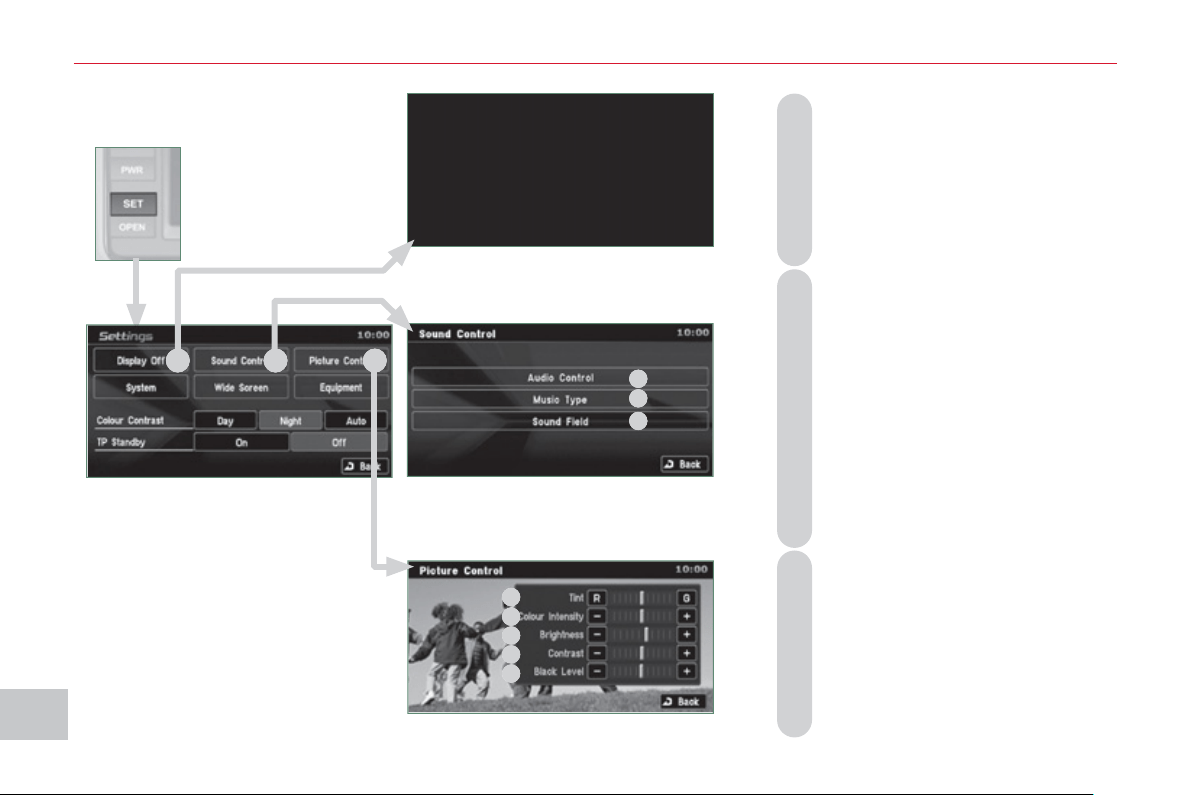
XI
21
0
A
UDI
O
and TELEMATI
CS
A - Choose to switch off the display.
To switch it back on, touch the
screen or press any button.
B - Choose the settings of the sound
in the vehicle, if an audio source
is selected (FM, CD, ...), for:
B1 - the sound distribution or the volume
such as the front-rear balance, the
bass, the medium, the treble, the
volume adjustment in relation to the
vehicle speed,
B2 - the type of music (with surround
option) such as classic, jazz, pop,
rock, hip hop, country, normal, ...
B3 - the sound fi eld (with surround op-
tion) such as stage, live, hall, nor-
mal, ...
C - Choose the quality of the picture for:
C1 - the colour (when playing DVDs),
C2 - the intensity of the colours (when
playing DVDs),
C3 - the brightness,
C4 - the contrast,
C5 - the level of black.
SETTINGS
Displa
y
, sound, picture
A
B
C
B
1
B2
B
3
C
1
C2
C
3
C4
C
5
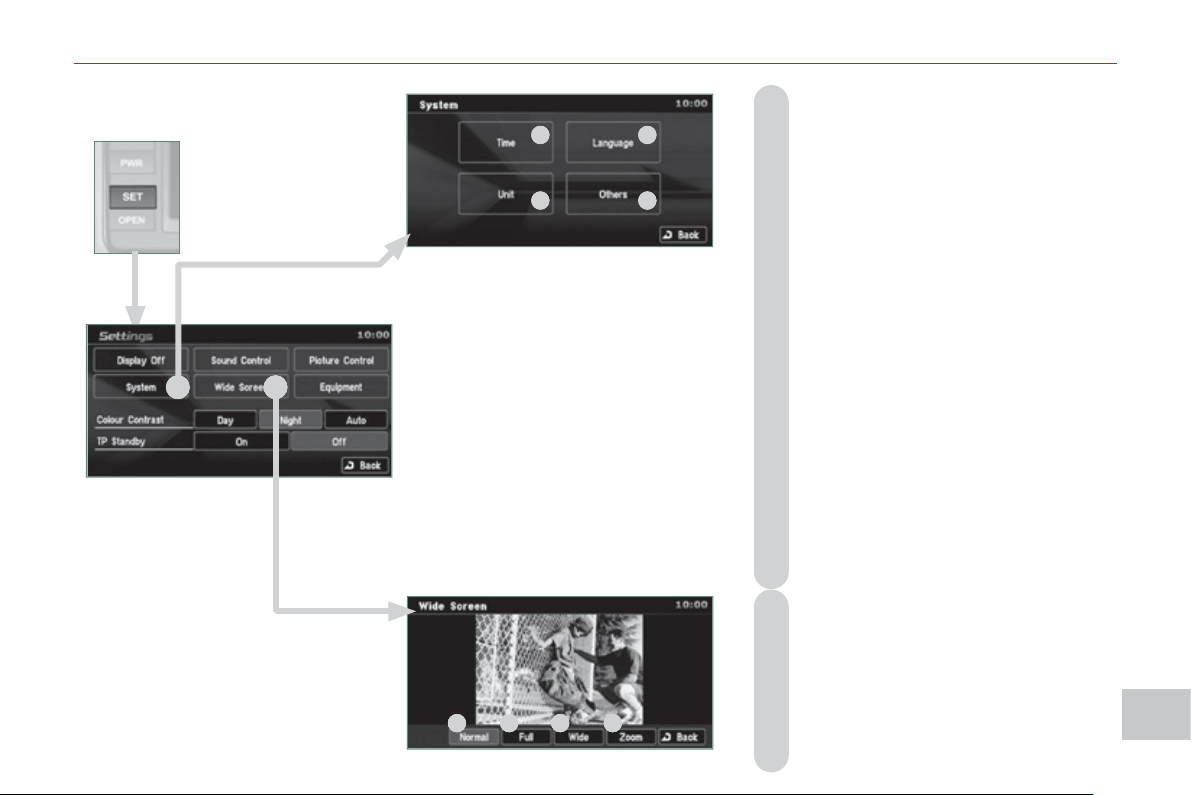
XI
211
A
UDI
O
and TELEMATI
CS
Time and date, lan
g
ua
g
e, unit,
p
icture size
E - Choose the size of the DVD picture for:
E1 - normal 4/3,
E2 - extends the picture evenly to the right
and to the left in wide screen mode,
E3 - extends the right and left parts only
leaving the centre as it stands in
wide screen mode,
E4 - enlarges the picture in 4/3 format.
The top and the bottom are outside
the frame.
D - Choose the base settings of the sys-
tem for:
D1 - setting of the time by the RDS signal,
time zone, summer time,
D2 - the language (English, Français,
Deutsch, Nederlands, Portuguese,
Español, Svenska, Italiano, Dansk),
D3 - the units for calculation of the dis-
tances (km or miles and °C or °F),
D4 - other settings such as:
- the voice guidance volume,
- the type of voice guidance voice
(female or male),
- the volume of the operation bleeps
(1 to 3 and 0=no bleep),
- the type of inputting keypad (alpha-
bet or PC),
- the range of menu colours (red or
blue),
- the displaying or not of the audio
playing icons on the map screen,
- the reinitialisation of the vehicle sensor,
- the interruption or not of the display
when the air conditioning is used.
D
E
E
1
E
2 E3
E4
D1
D2
D3
D
4
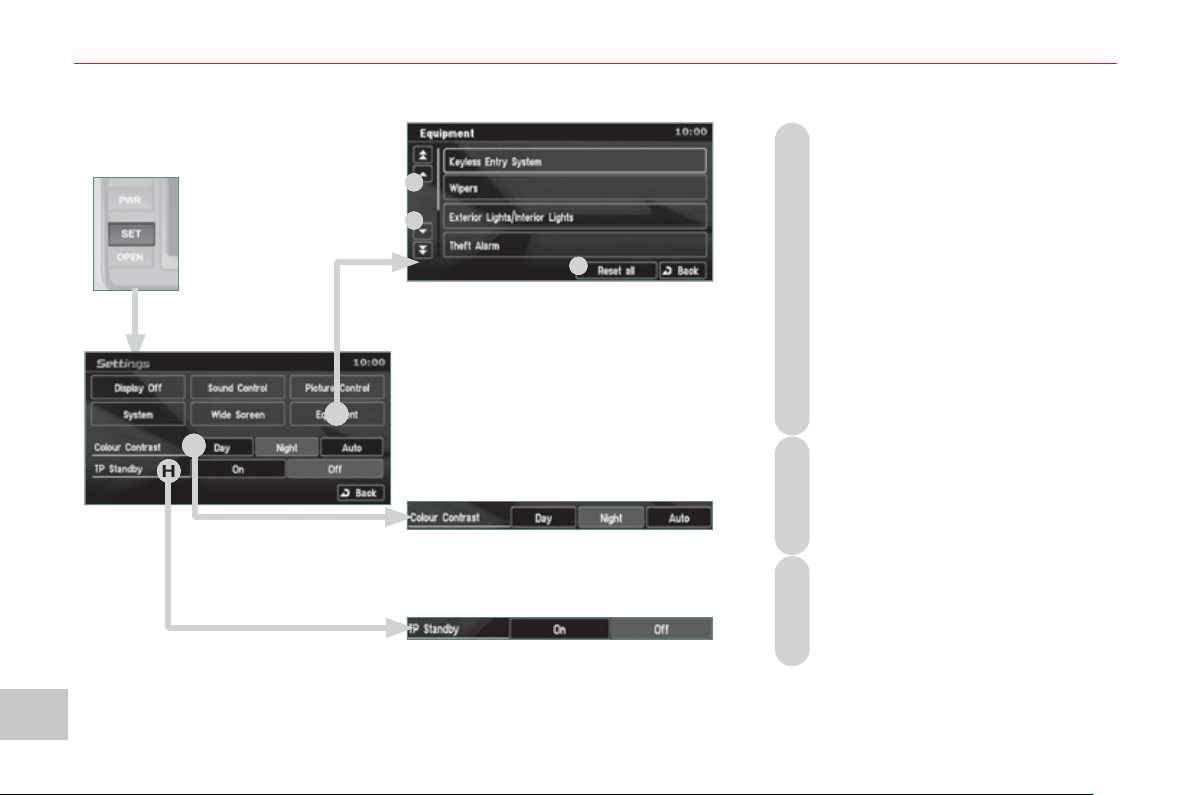
XI
212
A
UDI
O
and TELEMATI
CS
Equipment, contrast, traffic information
(
TP
)
F - Choose to adjust or set the param-
eters of certain equipment offered
in your vehicle (e.g.: unfolding/
folding of the mirrors, closing the
windows on locking, timing and
sensitivity of the automatic light-
ing, direction indicators motorway
function, ...):
F1 - to scroll up the list,
F2 - o scroll down the list,
F3 - to reinitialise all of the settings
(manufacturer's settings).
Press each setting to select or
change the parameters.
G -
Choose to adjust the contrast of the
display in relation to the ambient
light level (day, night or automatic).
H - Choose to activate or deactivate
the traffi c information (TP).
H
G
F
F1
F2
F
3
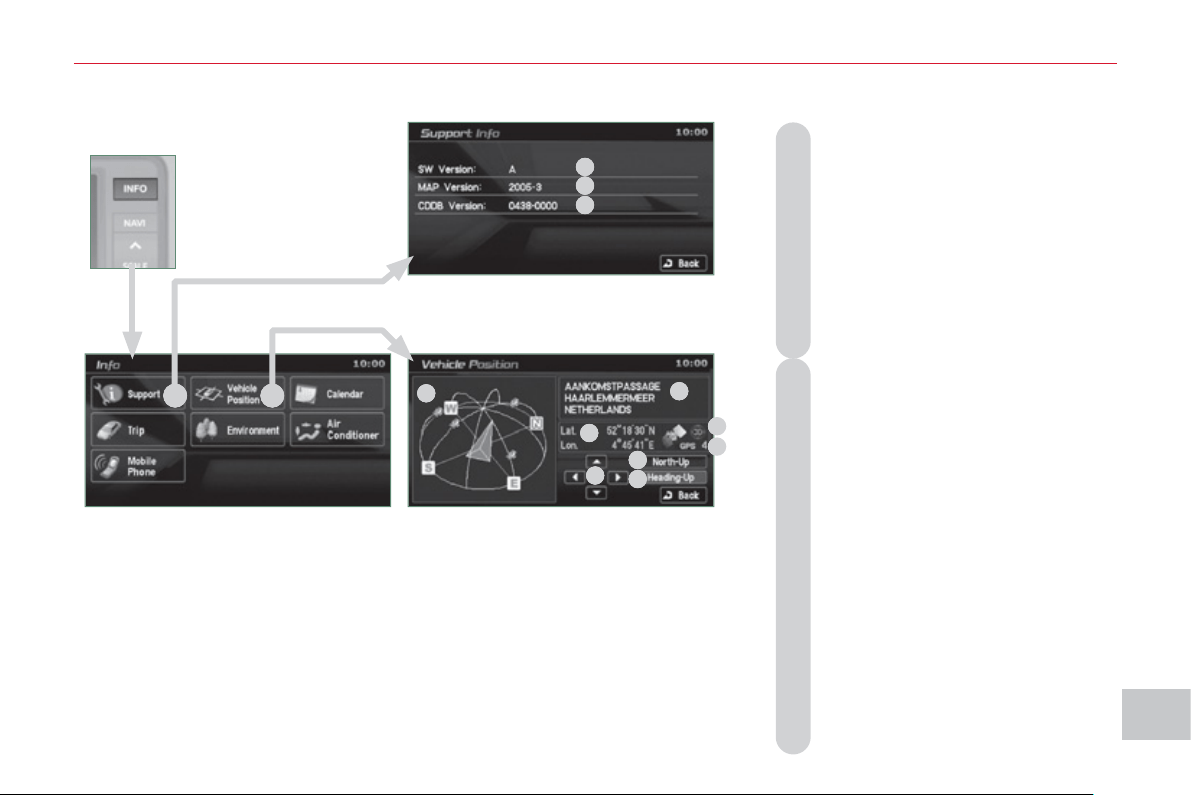
XI
21
3
A
UDI
O
and TELEMATI
CS
INFORMATION
A - Consult the system information:
A1 - the software version,
A2 - the map data version,
A3 - the system information database
version.
To update the versions, insert
the DVD containing the new data
and follow the instructions on the
screen.
B - Consult the GPS information:
B1 - the satellite positions diagram
with the direction of movement of
the vehicle. Plus the position of
the satellite signal receivers,
B2 - the name of the current location,
B3 - the longitude and latitude of the
current location,
B4 - the position measurement status
(2D=3 satellites or fewer, 3D=4
satellites or more),
B5 - the number of receiving satellites,
B6 - to have north at the top of the map,
B7 - to have the direction of the ve-
hicle at the top of the map,
B8 - to pivot the map from overhead
or change the angle of the map.
S
y
stem version, satellite
A
B
A2
A1
A
3
B1
B
2
B3
B4
B
5
B6
B7
B
8
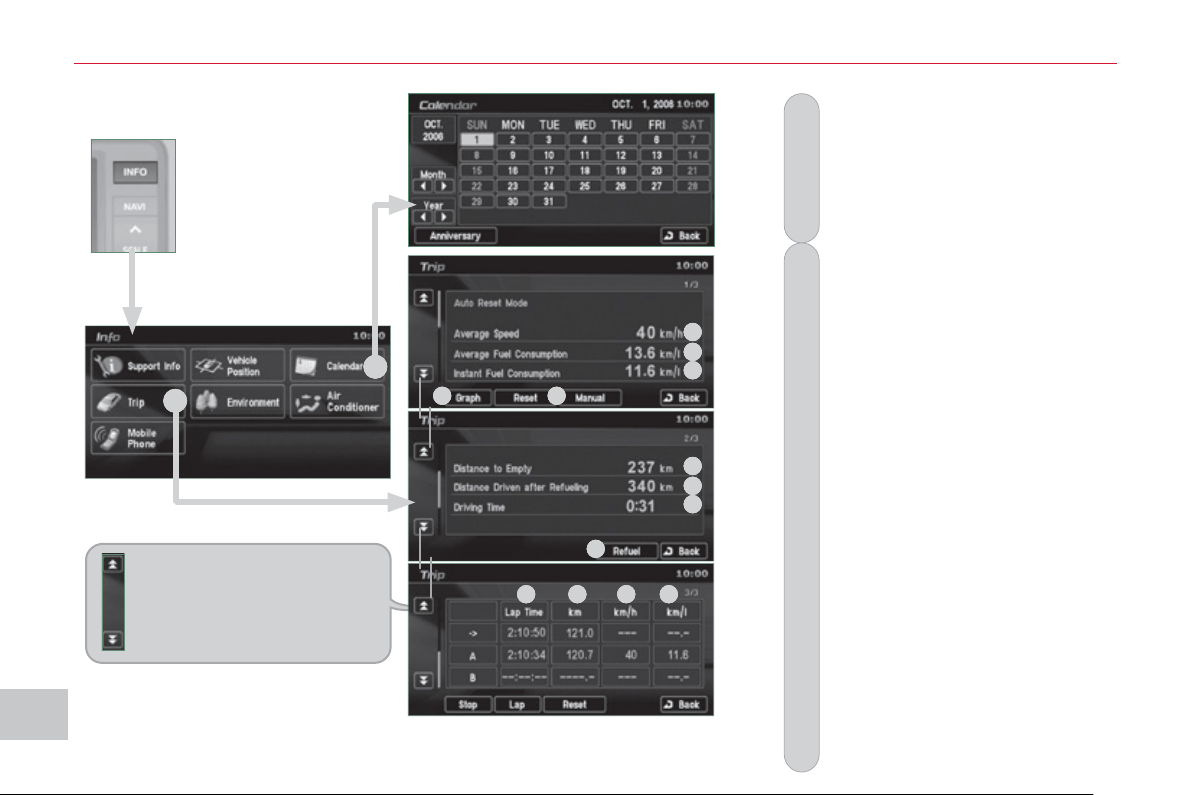
XI
214
A
UDI
O
and TELEMATI
CS
Calendar, tri
p
D - Consult the driving information:
D1 - the average speed,
D2 - the average fuel consumption,
D3 - the current fuel consumption,
D4 - for speed and fuel consumption
graphs in 5 minute intervals,
D5 - choose an automatic reinitiali-
sation (key at off for more than
4 hours) or manual reinitialisation
(press [Reset]),
D6 - the distance which can still be
travelled (in relation to the fuel re-
maining and the recent average
consumption),
D7 - the distance travelled since the
fuel tank was last fi lled (press
[Refuel] to reinitialise),
D8 - the driving time (duration be-
tween the key being turned to on
then to off).
- press [Start] to measure interme-
diate times with:
D9 - the duration,
D10
- the distance,
D11
- the speed,
D12
- the fuel consumption.
C - Make a note on the calendar of
special days, birthdays, ...
Use the arrows to fi nd a date and
press directly on the day required
to enter the event.
These double arrows permit
access to the driving infor-
mation screen, previous or
next.
D
C
D1
D
2
D3
D4
D
5
D6
D7
D
8
D7
D9
D
10
D11
D12
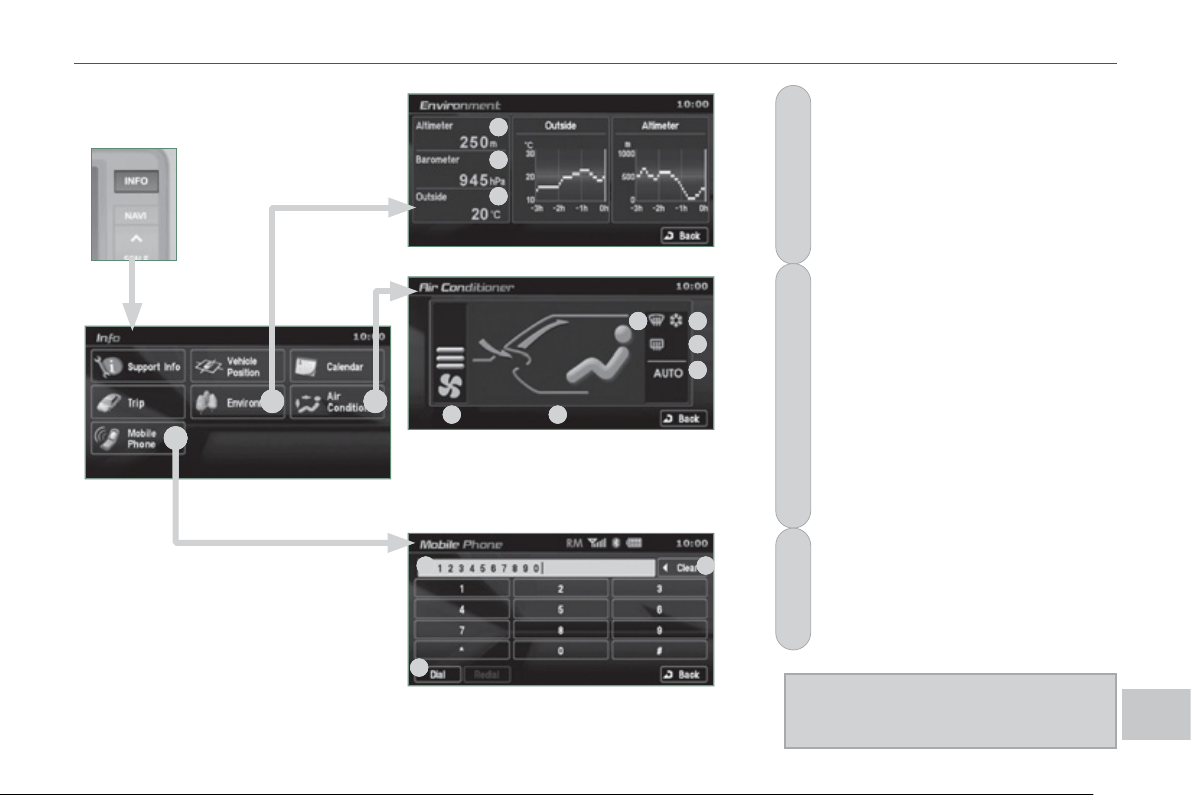
XI
21
5
A
UDI
O
and TELEMATI
CS
F - Consult the air conditioning con-
ditions:
F1 - the fan speed indicator,
F2 - the air selection indicator,
F3 - the windscreen demisting indicator,
F4 - the air conditioning indicator,
F5 - the rear screen demisting indicator,
F6 - the AUTO mode indicator.
E -
Consult the environment information:
E1 - the altitude,
E2 - the atmospheric pressure,
E3 - the ambient temperature. The ice
symbol fl ashes if there is a risk
of ice.
G - Make and receive telephone calls:
G1 - enter the telephone number,
G2 - delete a character,
G3 - make the call.
Refer to the hands-free telephone
section to connect your Bluetooth
®
mobile telephone.
E
nv
i
ronment, a
i
r con
di
t
i
on
i
n
g
,
te
l
e
ph
one
G
E
F
F1
F2
F
3
F4
F5
F
6
E1
E2
E
3
G1
G2
G
3

XI
216
AU
DI
O
and TELEMATI
CS
What is the Bluetooth® hands-free telephone with voice
recognition?
SPEAK
Pressing activates the voice recognition (“Listening” is displayed).
During voice recognition, a brief press pauses this recognition.
An extended press deactivates the recognition.
A brief press will activate the recognition even if a telephone call is
progress.
Audio system on/off.
PICK UP
Press to answer an incoming call.
If a second incoming call is received,
press this button to place the fi rst call on
hold and speak to the second caller.
In this case, a brief press switches be-
tween callers.
To establish a three-way conversation,
press the SPEAK button to switch to
voice recognition mode and say "In-
corporate the call".
HANG UP
Press to reject an incoming call.
During a call, pressing ends this call.
General notes
Decrease audio volume.
Increase audio volume.
HANDS-FREE TELEPHONE
You can make telephone calls using
a microphone, located in the courtesy
lamp making use of the steering mount-
ed controls or by the voice recognition
function using voice commands. Five
languages are available: English (by
default), Spanish, French, German and
Italian.
The system uses wireless communication technology referred to as
Bluetooth® which allows you to make hands-free telephone calls in
your vehicle via your Bluetooth® compatible mobile telephone.

XI
21
7
AU
DI
O
and TELEMATI
CS
Chan
g
in
g
the lan
g
ua
g
e,
p
ro
g
rammin
g
the voice
Changing the language of the voice
commands
By default, the recognition system is in
English.
Programming the user's voice
You can use the user's voice program-
ming function to create a voice model
for one person per language.
The characteristics of your voice and
your pronunciation are recorded in this
model for improved voice recognition.
It is essential that the vehicle is parked
in a safe place, with the parking brake
applied.
Switch off your telephone during the
process to avoid any interruption.
1 - Press the SPEAK button.
5 - The system says the fi rst of 45 typical
phrases.
If you do not start the program-
ming process within approximately
3 minutes after pressing the SPEAK
button, the process is cancelled.
If you press the SPEAK button with-
in 5 seconds following the reading of
a voice command, the recording of
this command is repeated.
1 - Press the SPEAK button.
2 - Say "Setup".
3 - Say "Language".
5 - Say the language of your
choice in English, example:
say "French" for French.
7 - Say "Yes" to start the change
of language process or say
"No" to return to steps 4 to 7.
2 - Say "Word training".
4 - When you are ready to start,
press and hold the SPEAK
button.
6 - Repeat each phrase in the
table on the next page.
The system records your voice and
moves on to the recording of the next
command.
Continue the process until all of the
phrases have been recorded.
4 - The system says "Select a language:
English, Spanish, French, German or
Italian".
6 - The system then says "French se-
lected. Is this correct?"
8 - The system repeats the language
chosen and completes the change
of language process.
3 - An explanation message is given.
7 - After reading all the voice com-
mands, the system says "The word
enrolment is complete" and ends the
process.

XI
218
AU
DI
O
and TELEMATI
CS
Trainin
g
voice commands
1 # 790 (for # = "Hash")
2 * 671 (for * = "Star")
3 212 - 4 903
4 235 - 3 494
5 315 - 5 657
6 456 - 7 930
7 793 - 5 462
8 794 - 1 826
9 826 - 3 145
10 962 - 7 305
11 (531) 742 - 9 860
12 (632) 807 - 4 591
13 (800) 222 - 5015
14 (888) 555 - 1 212
15 0 123 456 789
16 55 66 77 88 99
17 44 33 22 11 00
18 Call 293 - 5804
19 Call * 350
20 Call 1 (234) 567 - 8 901
21 Dial 639 - 1542
22 Dial # 780
23 Dial (987) 654 - 3210
24 1058# 3794# Send
25 27643# 4321# Send
26 Cancel
27 Continue
28 Emergency number
29 Clear all
30 Help
31 Home, Work, Mobile, Pager
32 List of names
33 No
34 Phone book: Delete
35 Phone book: New entry
36 Previous
37 Phone book: Clear all
38 Redial
39 Repeat the training
40
Confi gure the confi rmation requests
41 Confi gure the language
42 Confi gure the matching options
43 Match a telephone
44 Transfer the call
45 Yes
XI
219
AU
DI
O
and TELEMATI
CS
Matchin
g
y
our Bluetooth
®
tele
p
hone
The system can register up to 7 Bluetooth®
compatible mobile telephones.
The telephone which has the highest
level of priority is connected automati-
cally.
It is absolutely essential that the vehicle
is parked in a safe place with the park-
ing brake applied.
1 - Press the SPEAK button.
7 - Say a 4-digit number which
will be recorded as the match-
ing code.
11 - When it detects a Bluetooth®
compatible mobile telephone,
the system says "Please say
the name of the telephone
after the bleep".
If the system does not detect the
Bluetooth® compatible mobile tele-
phone, the matching process stops
accompanied by an audible signal.
If you select a level of priority which
has already been allocated to an-
other telephone, the system asks
you if you wish to replace this level
of priority.
Remember this matching code as
you must enter it in the telephone
in one of the following steps of the
matching procedure.
9 - The system says "Start the matching
procedure on the telephone. Con-
sult the instructions in the telephone
manual".
2 - Say "Confi gure".
3 - Say "Matching options".
5 - Say "Match a telephone".
8 - The system confi rms the va-
lidity of the number spoken,
answer "Yes". Say "No" to re-
turn to step 7.
10 - Consult your mobile tele-
phone's user manual and
enter the matching code
recorded in step 7 in the
telephone.
12 - After the audible signal, allo-
cate a name to the telephone
by saying the name of your
choice.
13 - The system says "Allocate an order
of priority between 1 and 7. One is
the highest level of priority".
14 - Say a number between 1
and 7 to establish the level
of priority of the mobile tele-
phone.
15 - The system says and confi rms the
<name of the telephone> and the
<number> of its priority.
4 - The system says "Do you wish to
match a telephone, delete a tele-
phone or obtain the list of matched
telephones?".
6 - The systems says "Please say the
4 digits of a matching code".
If the code is incorrect, the system
locks. To clear the code:
- check that the telephone's voice
recognition is not activated,
- with the ignition on and the audio
system active, press the HANG UP
button for 2 seconds, 3 times in
succession.
16 - Answer "Yes" or say "No" to
return to step 13.
17 - The systems says "Matching
complete" then emits an audible
signal and deactivates the voice
recognition.
XI
22
0
A
UDI
O
and TELEMATI
CS
M
akin
g
a telephone call usin
g
a number, phone book
A Bluetooth® compatible mobile telephone
must be matched with the system.
Using a telephone number
If your vehicle is fi tted with the audio-
telematics screen, you can use the
press buttons to dial a number then
make a call.
Recording a name in the system's
phone book
The system has its own phone book,
independent of that of the mobile tele-
phone.
It can contain up to 32 names for each
language.
Each name in the phone book is asso-
ciated with 4 locations: HOME, WORK,
MOBILE and PAGER.
1 - Press the SPEAK button.
7 - The system says "HOME, WORK,
MOBILE OR PAGER".
2 - Day "Dial".
4 - Say the telephone number.
5 - The system asks you to con-
fi rm this number, answer
"Yes". Say "No" to return to
the previous step.
2 - Say "Phone book".
4 - Say "New entry".
6 - Say the name of your choice.
8 - Say the location which cor-
responds to the number that
you wish to record.
10 - Answer "Yes" or say "No" to
return to step 7.
12 - If you do not wish to change
the telephone number, re-
peat the original number to
retain it, otherwise say the
new number.
14 - Answer "Yes" or say "No" to
return to step 11.
1 - Press the SPEAK button.
3 - The system says "Number please".
3 - The system says "Select one of the
following items: New Entry, Change,
List of names, Delete or Clear all,
or say Cancel to return to the main
menu".
5 - The system says "Name please".
To enter a new number:
9 - The system asks you to confi rm the
location.
11 - If a telephone number has already
been recorded for this location, the
system says "The current number
is <number>, number please".
13 - The system asks you to confi rm the
number.
XI
221
A
UDI
O
and TELEMATI
CS
Makin
g
a telephone call usin
g
a name in the phone book, receivin
g
a call
Using a name in the system's
phone book
The name must be recorded in the sys-
tem's phone book.
8 - Answer "Yes" or say "No" to
return to step 4.
Redialling the last number
Receiving a call
The telephone ring is transmitted on the
speaker by the front passenger's seat.
If an audio source (CD, radio, ...) is in
operation when the call is received, it is
placed on mute and only the incoming
call is heard.
When the ignition switch is in the ACC
or ON position, the audio system is acti-
vated automatically if an incoming call
is received, even if it was originally off.
1 - Press the PICK UP button.
At the end of the call, the audio system
returns to its previous status.
1 - Press the SPEAK button.
2 - Say "Call".
4 - Say the name of the person
that you wish to call.
6 - Say the location correspond-
ing to the number that you
wish to call.
1 - Press the SPEAK button.
2 - Say "Redial".
3 - The system says "Name please".
5 - If several telephone numbers have
been recorded for this person, the
system says "Do you wish to call
<name> {home}, {work}, {mobile} or
{pager]?".
7 - The system request confi rmation of
the name.
9 - The system says "Call to <name> at
<location>" and makes the call.

XI
222
AU
DI
O
and TELEMATI
CS
When the system is waiting for a voice command, say "Help" to obtain a list of commands which can be used in the current
situation.
V
oice commands
(
1/2
)
Press this button to start the voice recognition.
Confi gure
Phone book
Dial
Call
Redial
Emergency number
Matching options
Match a telephone
Delete a telephone
List of matched telephones
Select a telephone
Previous
Divert the call
Add a location
Confi gure the confi rmation requests
Language
New entry
Delete
Change
Call this number
Change another entry
Try again
Clear all
List of names
Home, at home
Work, at work
Mobile, on mobile
Pager, on pager
Help
Continue
All
Cancel
Mute
Deactivate mute
Yes
No

XI
223
AU
DI
O
and TELEMATI
CS
V
oice commands
(
2/2
)
Zero
One
Two
Three
Four
Five
Six
Seven
Eight
Nine
Star (*)
Hash (#)
Word training
PIN
Repeat training
Activate
Deactivate
Incorporate the call
<digits> Send
English
Phone book New entry
Phone book Change
Phone book Delete
Phone book Clear All
Phone book List of names
Confi gure the confi rmation requests
Confi gure Select a telephone
Confi gure the matching options
Delete a name
Confi gure the language
Confi gure the PIN
Press this button to start the voice recognition.
When the system is waiting for a voice command, say "Help" to obtain a list of commands which can be used in the current
situation.
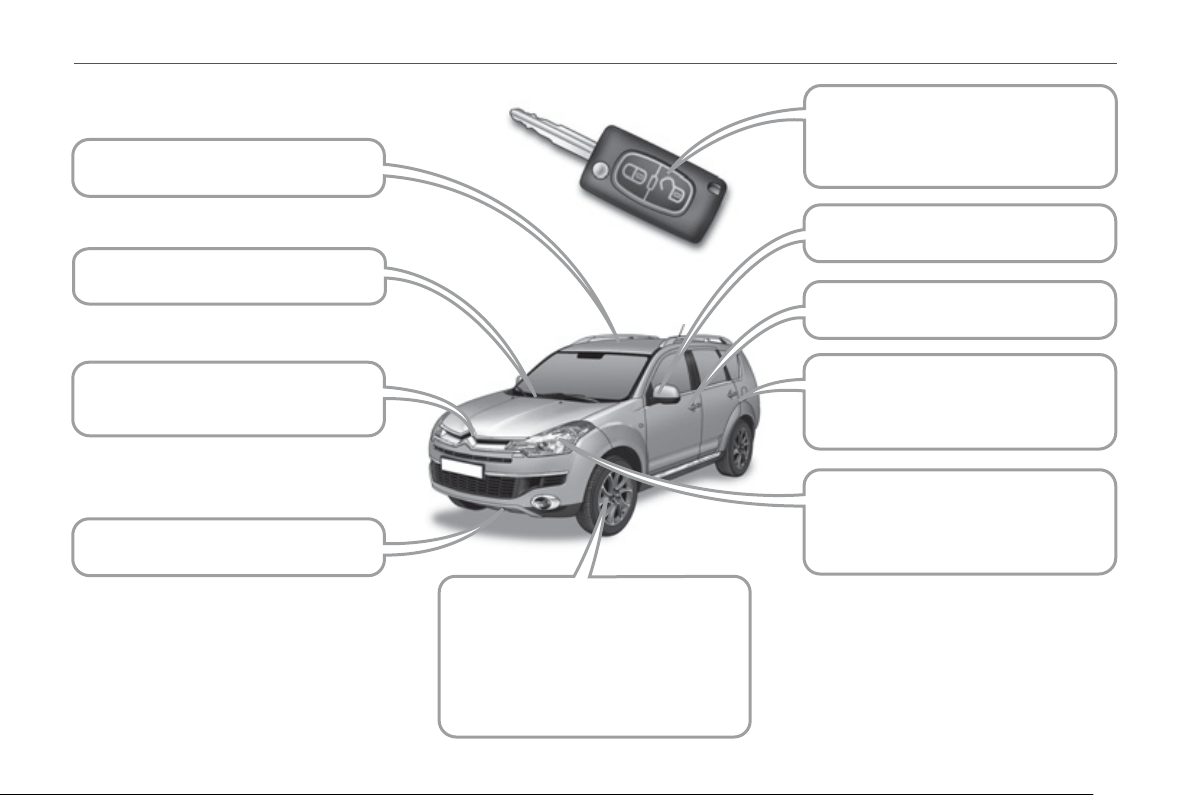
224
V
I
SU
AL
S
EAR
CH
EXTERIOR FRONT
Remote control key,
starting, battery ............................ 73-76
Central locking ...................................79
Sunroof ........................................ 82-83
Windscreen wipers ...................... 90-91
Rain sensor .......................................90
Opening the bonnet .........................126
Engine ..................................... 127-128
Towing .............................................154
Door mirrors .......................................61
Opening/closing the doors ........... 79-80
Filling with fuel ...................................84
Fuel gauge.........................................84
Lighting, direction indicators, foglamps,
headlamps ................................... 86-89
Changing bulbs........................ 137-141
Brakes .....................................112, 131
ABS .................................................103
Tyres, pressures ..............................162
Brake pads ......................................131
Alloy wheels.....................................132
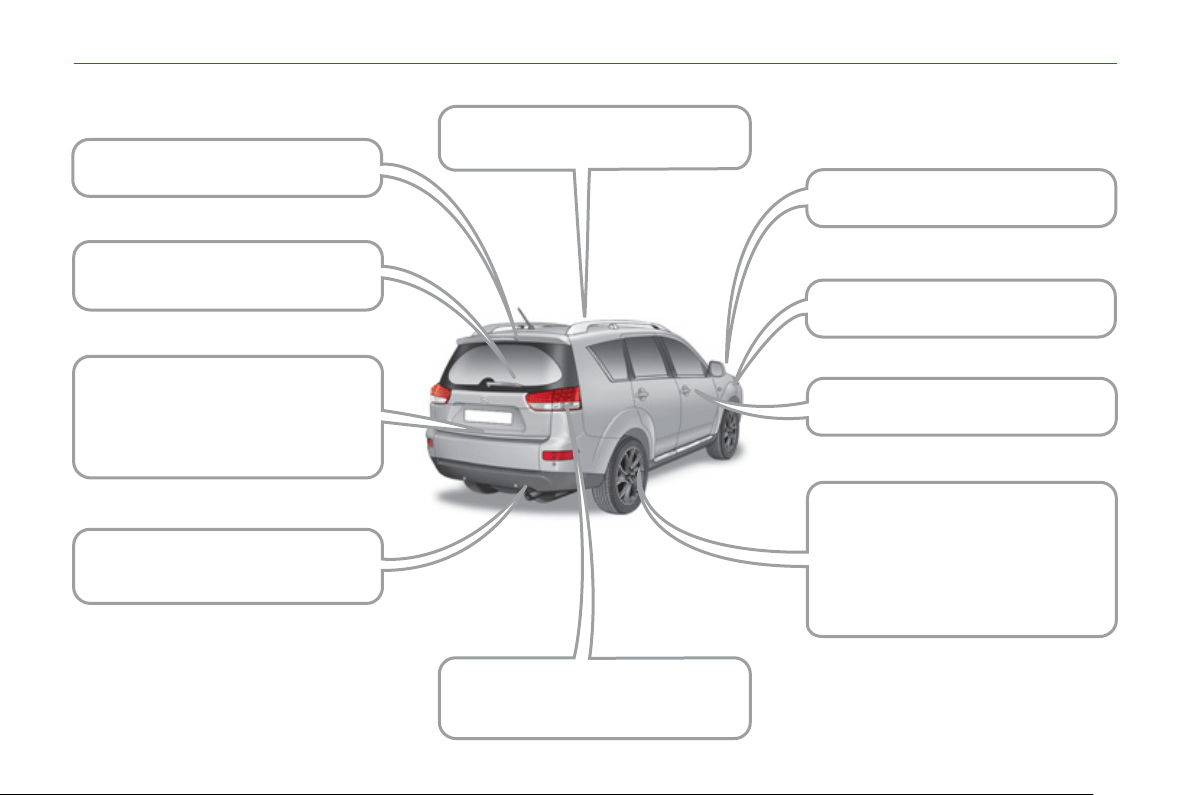
22
5
VI
SU
AL
S
EAR
CH
EXTERIOR REAR
3rd brake lamp.................................142
Tailgate ........................................ 80-81
Rear wiper .........................................91
Spare wheel, jack,
changing, fi tting ....................... 132-136
Lower tailgate ....................................81
Towbar .............................................156
Rear parking sensors .............. 123-124
Towing .............................................154
Rear lamps, direction indicators,
foglamps ...................................... 86-89
Changing bulbs........................ 142-144
Door mirror ........................................61
Side repeaters .................................140
Opening/closing the doors ........... 79-80
Brakes .....................................112, 131
ABS .................................................103
Tyres, pressures ..............................162
Brake pads ......................................131
Alloy wheels.....................................132
Accessories .....................................158
Roof bars .........................................157
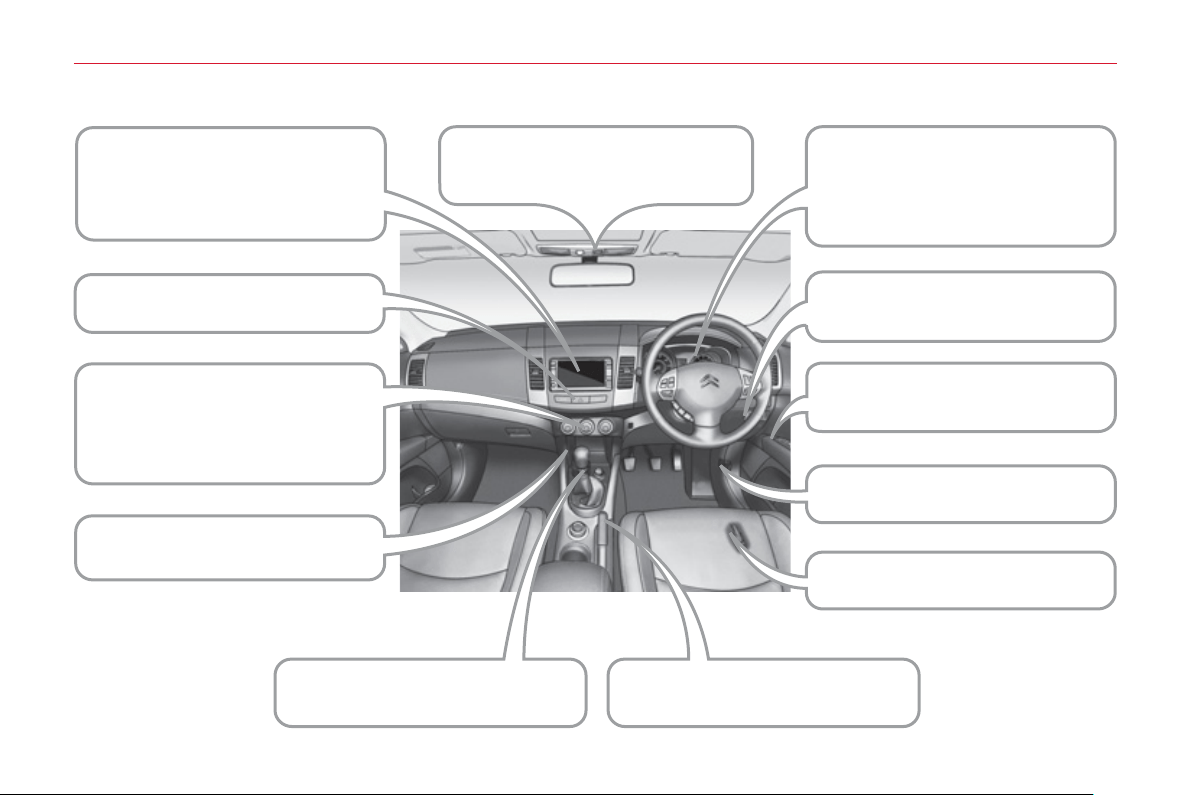
22
6
V
I
SU
AL
S
EAR
CH
INSTRUMENTS AND CONTROLS
Instrument panels, dials, speedometer
.......21
Warning lamps, messages .......... 22-30
Indicators, screens ...................... 31-38
Lighting dimmer .................................43
ASC .................................................104
Fuses ....................................... 146-150
Gearbox .................................... 112-118
Parking brake,
handbrake........................................112
Trip computer ....................................34
Screens ....................................... 39-43
Changing the time ....................... 39-43
Audio system ........................... 164-223
Heating ........................................ 44-49
- vents, demisting/defrosting,
- automatic air conditioning,
- air recirculation,
- ventilation.
Fittings ......................................... 64-68
- 12 V socket, ashtray.
Electric windows .......................... 77-78
Electric mirrors ...................................61
Opening the bonnet .........................126
Toll card window ................................63
Courtesy lamps............................ 92-93
Rear view mirror ................................62
Opening the fuel fi ller fl ap ..................84
Hazard warning lamps .....................102

227
VI
SU
AL
S
EAR
CH
STEERING MOUNTED CONTROLS
Lighting ........................................ 86-88
- dipped beam headlamps,
- main beam headlamps,
- foglamps.
Automatic illumination of headlamps
.........88
Headlamp wash .................................90
Audio equipment controls ........166, 178
Telephone controls ..........................216
Wipers ......................................... 90-91
Screenwash ................................. 90-91
Cruise control .......................... 121-122
Steering wheel, adjustment ...............63
Horn ................................................. 102
Airbags ..................................... 108-111
Headlamp adjustment........................89
Parking sensors ....................... 123-124
ASC .................................................104
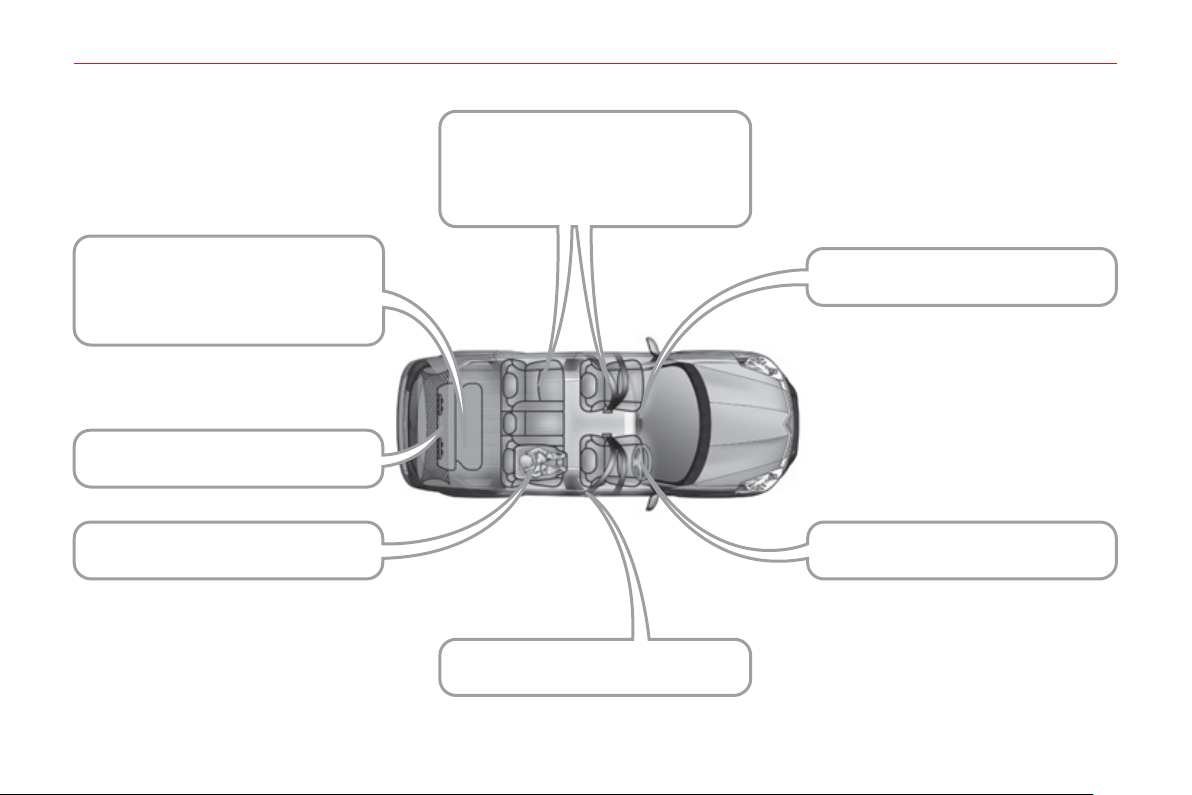
22
8
V
I
SU
AL
S
EAR
CH
INTERIOR
Rear fi ttings ................................. 69-72
- stowing rings,
- storage tray,
- load space cover.
Child seats ................................. 94-101
Seats ........................................... 50-52
- head restraint,
- heated seat controls.
Rear seats ................................... 53-57
Seat belts................................. 105-107
Courtesy lamp, interior lighting .... 92-93
Airbags ..................................... 108-111
Rear bench seat
(7-seat version)............................ 58-60
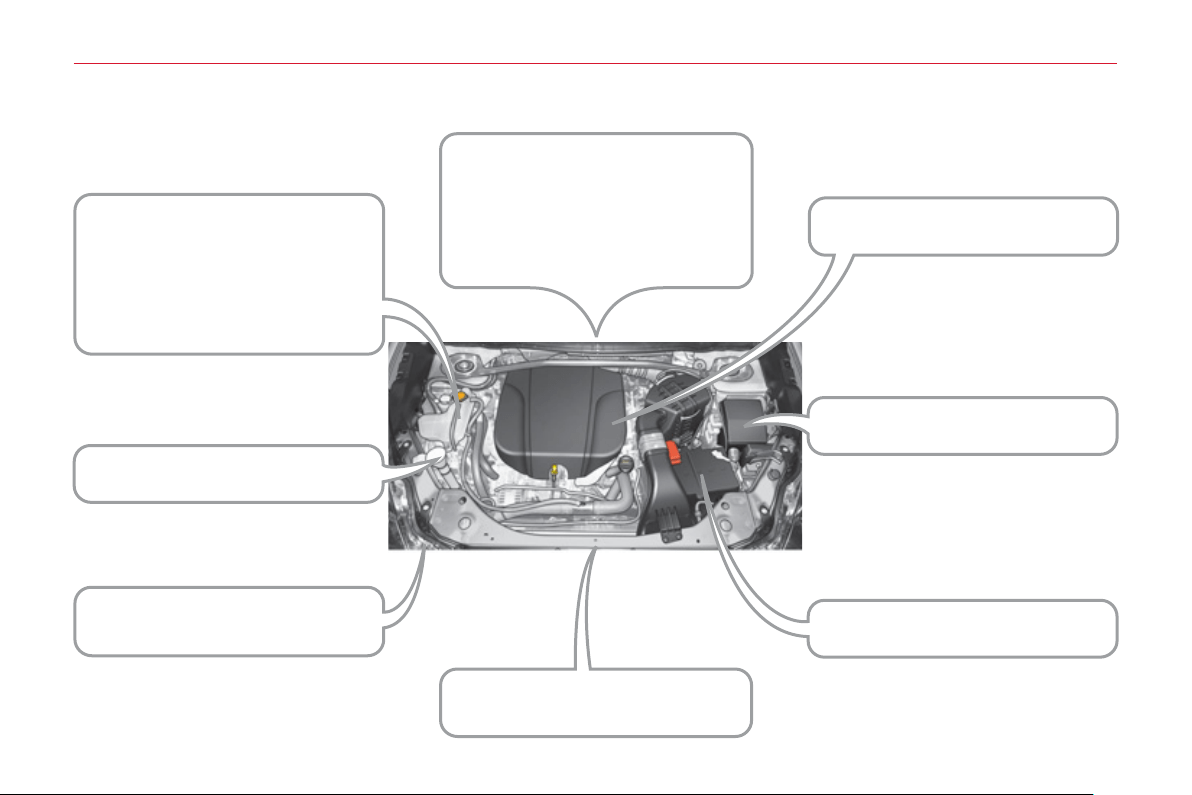
22
9
VI
SU
AL
S
EAR
CH
TECHNICAL DATA - MAINTENANCE
Checking the levels ................. 129-131
- fuel supply,
- engine oil dipstick,
- power steering fl uid,
- brake fl uid,
- coolant.
Screen/headlamp wash,
fi lling reservoir ......................... 127-129
Bulbs........................................ 137-145
Changing bulbs........................ 137-145
Engine technical data ......................159
Weights, loads .................................160
Dimensions ...................................... 161
Identifi cation markings .....................162
Opening the bonnet, stay ................126
Underbonnet view.................... 127-128
Air/oil fi lters, checks ................. 129-131
Fuses ....................................... 146-150
Battery ..................................... 151-152

2
30
A
LPHABETI
C
AL INDE
X
A ABS .......................................... 103
ABS and EBFD systems........... 103
Accessories .............................. 158
Accessory socket,
12 V ................. 64, 66, 67, 70, 71
Access to bulbs ........................ 137
Access to the 3rd row ................. 54
Adjusting headlamps .................. 89
Adjusting seat belt height ......... 105
Adjusting the steering wheel....... 63
Airbags, curtain..................110, 111
Airbags, front .....................108, 111
Airbags, lateral...................110, 111
Air conditioning ........................... 19
Air conditioning, digital................ 46
Air fl ow ........................................ 19
Air intake..................................... 46
Air vents...................................... 44
Anti-lock braking system (ABS) ... 103
Anti-pinch.................................... 82
Armrest, front .................. 52, 64, 66
Armrest, rear ......................... 54, 69
ASC .......................................... 104
Ashtray, portable ................... 64, 67
Athermic windscreen .................. 63
Audible warning ........................ 102
Audio-CD... 169, 170, 172, 175, 177
Audio-telematics ....... 178-182, 186,
190, 191, 194, 196, 197, 202-204,
208-210, 213, 216, 217, 220-222
Audio-video............................... 190
Audio system functions..... 178, 179
Audio systems ......... 164, 166, 167,
169, 170, 172, 173, 175, 177-182,
186, 190, 191, 194, 196, 197,
202-204, 208-210, 213, 216,
217, 220-222
Automatic illumination
of headlamps ..................... 86, 88
Automatic operation of hazard
warning lamps ....................... 102
Automatic rain sensitive
windscreen wipers ................... 91
Automatic switching off
of lighting ................................. 88
B Battery ...................................... 130
Battery, remote control ............... 76
Blind............................................ 83
Bluetooth (telephone) ........220-222
Boot lid........................................ 81
Bottle holder ......................... 64, 69
Brake discs ............................... 130
Brake lamps.............................. 142
Brake pads ............................... 130
Braking assistance system ....... 103
Bulbs (changing, type) ...... 137, 142
Capacity, fuel tank ...................... 84
CD changer ...................... 175, 177
CD MP3 ............................ 194, 196
Changing a bulb ............... 137, 142
Changing a wheel .............. 132-135
Changing a wiper blade ............ 153
Changing the time ................ 39, 41
Check, particle emission fi lter ... 130
Check, passenger
compartment fi lter .................. 130
Checking the air fi lter ................ 130
Checking the oil fi lter ................ 130
Checks...................................... 130
Child seats ............. 94, 95, 97, 101
Cigar lighter ................................ 66
Closing the boot.................... 80, 81
Colour screen ............. 41, 178, 179
Controls for air conditioning ........ 46
Coolant ................................. 31, 32
Coolant level ............................. 129
Coolant temperature
warning lamp ........................... 32
Cooled glove box .................. 64, 65
Courtesy lamp, front ................... 92
Courtesy lamp, rear .................... 92
Cruise control ........................... 121
Cup holder ...................... 64, 68, 69
CVT gearbox ............................ 113
CA

2
31
A
LPHABETI
C
AL INDE
X
Hazard warning lamps .............. 102
Headlamp adjustment................. 89
Headlamp wash .......................... 90
Head restraints ........................... 52
Heated seats .............................. 52
Heating ........................... 19, 44, 46
Height adjustment,
steering wheel ......................... 63
Horn .......................................... 102
E
Deactivating ASC...................... 104
Deactivating the passenger
airbag .................................... 108
Defrosting ................................... 46
Dials............................................ 21
Diesel........................................ 128
Diesel additive level .................. 129
Dimensions ............................... 161
Dipped beam ............................ 137
Direction indicators ... 102, 137, 142
Doors .......................................... 79
DVD (mode)...................... 208, 209
Dynamic stability control (ASC) ... 104
G.P.S. ........................180-182, 186
Gearbox, DCS .......................... 115
Gearbox, manual ...................... 130
Gear lever ................................... 19
Grab handles .............................. 69
Guidance ...................180-182, 186
EBFD ........................................ 103
Eco-driving ................................. 19
Economical driving .................... 19
Electronic brake force distribution
(EBFD) .................................. 103
Electronic engine immobiliser ... 74, 76
Emergency boot release............. 81
Emergency warning lamps ....... 102
Engine, Diesel .................... 85, 128
Engine, petrol ..................... 85, 127
Engine compartment ........ 127, 128
Engines..................................... 159
Environment ......................... 19, 76
Error messages (audio equipment)
... 177
Filling with fuel ...................... 84, 85
Fitting a wheel .......................... 135
Fittings, boot ............................... 70
Fittings, front ............................... 64
Fittings, rear................................ 69
Fitting the mat ............................. 63
Flashing
indicators ............... 102, 137, 142
Foglamps .................................... 87
Foglamps, rear ......................... 142
Folding/unfolding the
door mirrors ............................. 61
Folding the rear seats ................. 55
Four-wheel drive system .......... 119
Front foglamps.................... 87, 137
Front seats.............................50-52
Fuel................................. 19, 84, 85
Fuel consumption ....................... 19
Fuel fi ller cap .............................. 84
Fuel fi ller fl ap .............................. 84
Fuel gauge.................................. 84
Fuel tank ..................................... 84
G
H
Identifi cation plates ................... 162
Indicator lamps, status................ 22
Indicators, direction .................. 102
Infl ating tyres .............................. 19
Instrument panel ......................... 21
Instrument panel screen ............. 31
Interior fi ttings ....................... 64, 69
ISOFIX child seats ............... 98-100
ISOFIX mountings ...............98-100
I
J Jack .......................................... 132
K
Keeping children
safe .......................76, 94, 97-101
Key in ignition warning................ 75
Key with remote control .............. 76
DF

2
32
A
LPHABETI
C
AL INDE
X
L Labels, identifi cation ................. 162
Lamps, front.............................. 137
Lamps, rear .............................. 142
Level, battery ............................ 130
Level, brake fl uid ...................... 129
Level, headlamp wash .............. 129
Level, power steering fl uid ........ 129
Levels and checks .............127-130
Lighting bulbs
(replacement) ................ 137, 142
Lighting control stalk ................... 86
Lighting dimmer .......................... 43
Lighting on reminder ................... 87
Loading ....................................... 19
Load space cover ................. 70, 72
Main beam ................................ 137
Maintenance ............................... 19
Map (colour screen).................. 186
Map reading lamps ..................... 92
Mat.............................................. 63
Menus (audio)........................... 179
Mini fuel level .............................. 84
Mirror, rear view .......................... 62
Mirrors, door ............................... 61
Motorway function
(direction indicators) .............. 102
Mountings for ISOFIX seats ... 98-100
M
Navigation..................180-182, 186
Number plate lamps ................. 142
S
MP3 CD .................................... 204
Music server ..... 194, 197, 202, 203
Recirculation/exterior air intake ... 46
Recording a CD ................ 194, 197
Reinitialising the sunroof ............ 82
Remote control ........................... 76
Removing a wheel .................... 135
Removing the mat ...................... 63
Replacing bulbs ................ 137, 142
Replacing wiper blades ............ 153
Rev counter ................................ 21
Reversing camera .................... 124
Reversing lamps ....................... 142
Roof bars .................................. 157
Running out of fuel (Diesel) ...... 126
N
Safety for children..................... 101
Screen, instrument
panel ................ 21, 25, 26, 30, 31
Screen, monochrome ................. 39
Screenwash, front....................... 90
Screenwash fl uid level .............. 129
Seat, rear bench ......................... 58
Seat adjustment.............. 50, 51, 53
Seat belts.......................... 106, 107
Seat belts warning lamp ........... 105
Seat confi gurations ..................... 57
Seats, electric ............................. 51
Seats, rear .................................. 53
Serial number, vehicle .............. 162
Service indicator ................... 31, 33
MR
Oil level ..................................... 129
Opening the boot ........................ 80
Opening the fuel fi ller fl ap ........... 84
Opening the sunroof ................... 82
Opening the tailgate ............. 80, 81
Operation indicator lamps........... 22
O
Parking brake ................... 112, 130
Parking sensors, rear ............... 123
Player, CD MP3
... 166, 172, 177, 196
Protecting children ......... 94, 97-101
Puncture ............................132-134
P
Radio ................ 169, 170, 190, 191
Range ................................... 31, 32
Rear demisting ........................... 46
Rear foglamp .............................. 87
Rear screen (demisting) ............. 46
R

2
33
A
LPHABETI
C
AL INDE
X
VServicing ..................................... 19
Settings (Menus) ........................ 31
Setting the clock ................... 39, 41
Sidelamps ......................... 137, 142
Side repeater ............................ 137
Spare wheel.......................132-135
Speedometer .............................. 21
Starting the vehicle ..................... 75
Steering mounted controls,
audio ...................................... 166
Stopping the vehicle ................... 75
Storage ................................. 64, 70
Stowing rings ........................ 70, 71
Sunroof ....................................... 82
Sun visor..................................... 63
System, audio-CD ... 169, 170, 172,
175, 177
System,
audio-telematics ............178-182,
186, 190, 191, 194, 196, 197,
202-204, 208-210, 213, 216,
217, 220-222
Tailgate ....................................... 80
TCL ........................................... 104
Telephone,
hands-free ......216, 217, 220-222
Temperature, coolant .................. 32
Temperature adjustment ............. 46
Third brake lamp....................... 142
Tools ......................................... 132
Total distance recorder ......... 31, 32
Towbar ...................................... 156
Towed loads.............................. 159
Towing another vehicle ............. 154
TP (Traffi c information) ..... 170, 210
Traction control (TCL) ............... 104
Trajectory control systems ........ 104
Transfer box and rear
differential .............................. 130
Trip computer ....................... 31, 34
Tyre pressures .......................... 162
Tyres ........................................... 19
Vehicle identifi cation ................. 162
Ventilation ................................... 44
Video ................................ 208, 209
Voice commands .......217, 220-222
ST
W Warning lamp, low fuel level ....... 84
Warning lamps ............................ 22
Weights ..................................... 159
Wheel, changing ................ 132-135
Wheelbrace .............................. 132
Windscreen zones for toll/
car park cards .......................... 63
Wiper control stalk ................ 90, 91
Wipers .................................. 90, 91

2
3
4

2
35

2
36

2
37

2
38

2
39

24
0
This handbook describes all of the equipment
available in the whole range.
Your vehicle will be fi tted with some of this
equipment described in this document, depending
on its trim level, version and the specifi cation for the
country in which it is sold.
The descriptions and illustrations are given without
any obligation. Automobiles CITROËN reserves
the right to modify the technical specifi cations,
equipment and accessories without having to update
this edition of the handbook.
This document is an integral part of your vehicle. It
should be passed on to the new user in the event of
sale or transfer.
Automobiles CITROËN declares, by application of
the provisions of the European regulation
(Directive 2000/53) relating to End of Life Vehicles,
that it achieves the objectives set by this regulation
and that recycled materials are used in the
manufacture of the products that it sells.
Reproduction or translation of all or part of this
handbook is prohibited without written authorisation
from Automobiles CITROËN.
Printed in the EU
Anglais
For any work on your vehicle, use a qualifi ed
workshop that has the technical information,
competence and equipment required, which a
CITROËN dealer is able to provide.

CRÉATIVE TECHNOLOGIE
20
11
–
D
OC
UMENT
A
TI
O
N DE B
O
R
D
4
Dconcep
t
D
i
ade
i
s
Ed
i
p
ro
11
CC
R.
0030
An
g
lais