Dexter Rekeying Manual
Dexter Rekey MR1191.qxd 7/11/06 1:53 PM Page 1

Dexter Rekey MR1191.qxd 7/11/06 1:53 PM Page 2

1
Rekeying is easy with Dexter by SCHLAGE!
Since 1925, Schlage has led the industry in quality,
design and craftmanship. Dexter by Schlage builds upon
this tradition with a lockset line that features superior
security, quality and convenience. Dexter’s defining
characteristic in terms of convenience is ease of rekey-
ing. All Dexter locksets feature a Schlage ‘c’ keyway
and can be keyed to the same combination as any
Schlage lockset. This book offers step-by-step instruc-
tions to rekeying your Dexter lockset or deadbolt.
T
ABLE
OF
C
ONTENTS
Rekeying J–Series Knobs 3
Rekeying J–Series Levers 9
Rekeying J-Series Deadbolts 15
1
Dexter Rekey MR1191.qxd 7/11/06 1:53 PM Page 3
2
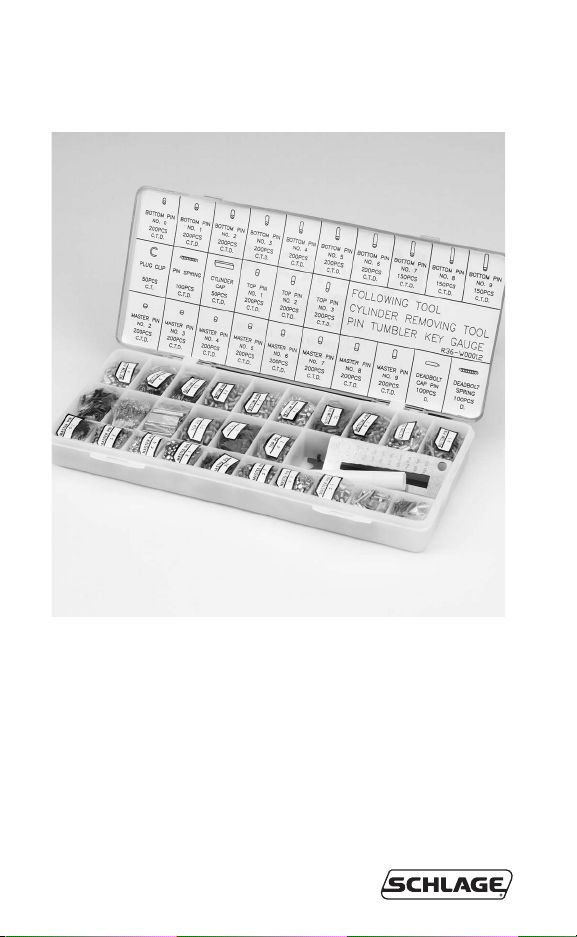
DEXTER Key Kits Provide
Everything You Need
To Get The Job Done!
Key Kit J250-007 Includes everything you need to
reykey the most popular Dexter knobs, levers and
JD-Series deadbolts. This kit includes bottom pins, top
pins, pin springs, cylinder caps, retaining clips, pins,
key gauge, follower bar and cap removal tool.
2
Dexter Rekey MR1191.qxd 7/11/06 1:53 PM Page 4

3
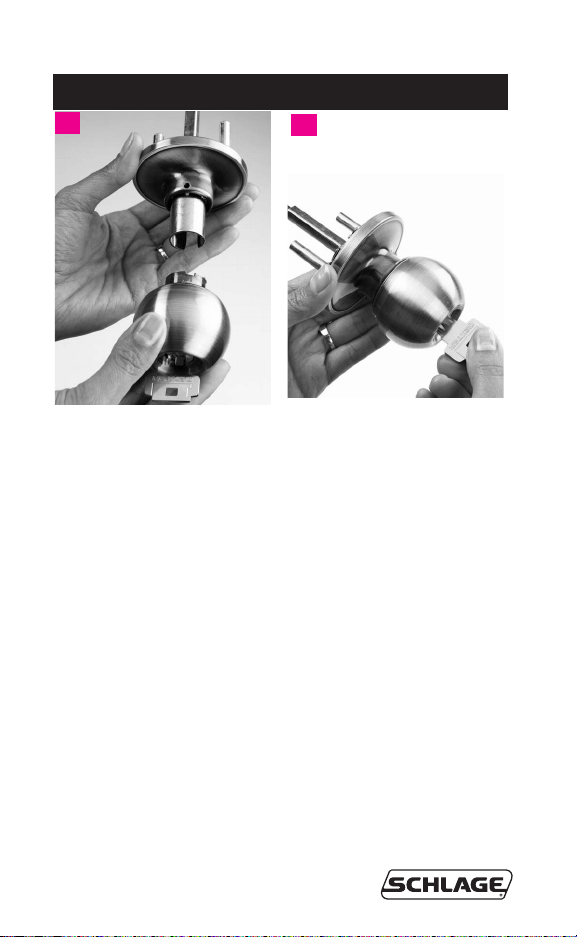
Rekeying J–Series Knobs
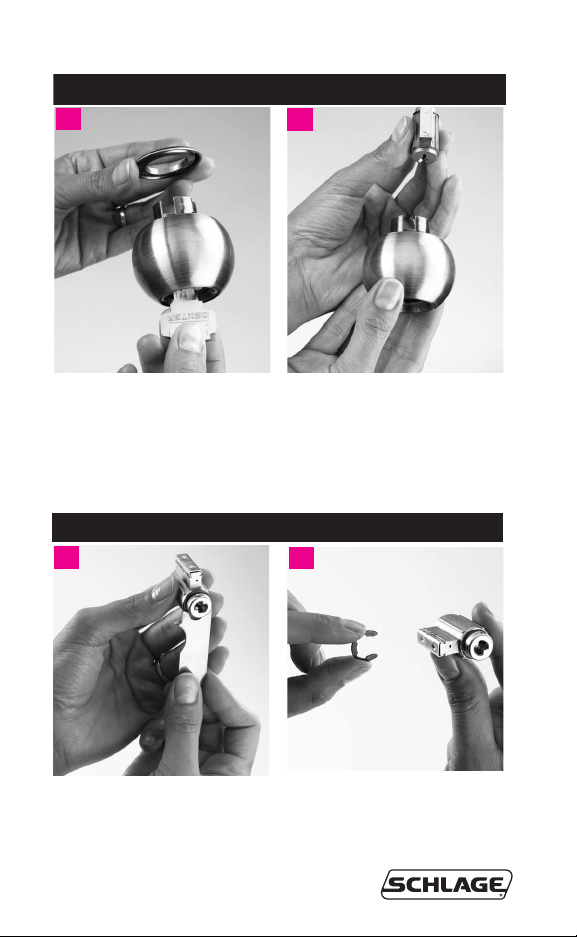
STEP #1 - REMOVE THE KNOB
Insert the key into the cylinder
(with teeth of key facing up).
Turn the outside knob counter-
clockwise until the knob catch
is visible and aligns under the
knob catch hole (as shown).
Use the knob catch tool to
depress and release the knob
catch.
Apply pressure to the rose
with your thumb and forefin-
ger, and pull the knob off the
spindle.
B
C
A
3
Dexter Rekey MR1191.qxd 7/11/06 1:53 PM Page 5
Rekeying J–Series Knobs
4
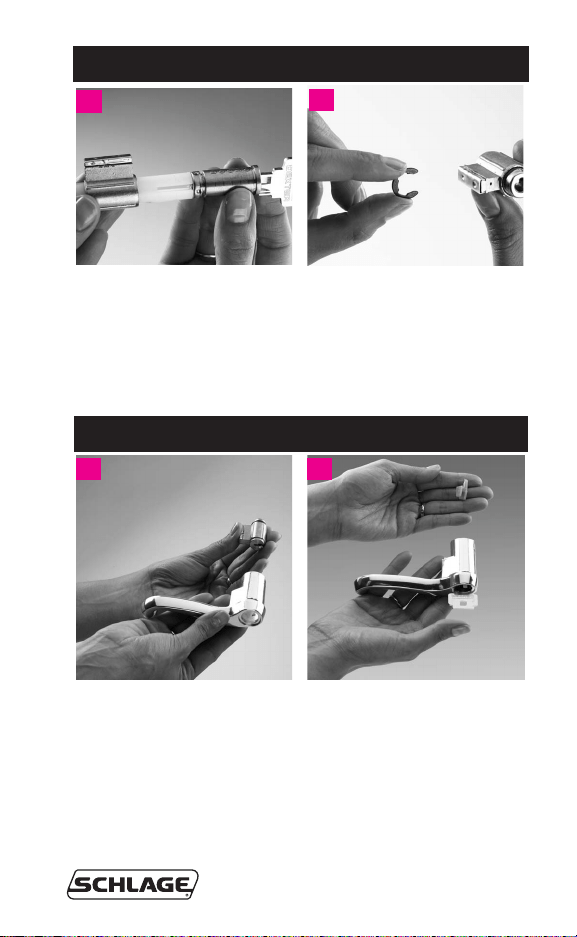
STEP #3 - REMOVE THE CYLINDER RETAINING CLIP
Re-insert the key into the plug.
Use the end of the removal tool
to push the clip out.
Remove the clip with the hook
of the removal tool.
Push forward on the key until
the knob sleeve disengages
from the back of the knob.
Remove the sleeve and set it
aside.
Remove the key from the cyl-
inder and remove the cylinder
from the back of the knob.
A
B
A
B
STEP #2 - REMOVE THE CYLINDER
4
Dexter Rekey MR1191.qxd 7/11/06 1:53 PM Page 6

Rekeying J–Series Knobs
5
STEP #4 - REMOVE THE CYLINDER PLUG
Turn the key clock-wise to the
3:00 position.
Empty the bottom pins from
the cylinder plug, and remove
the old key.
Hold the follower bar firmly
against the cylinder plug and
carefully slide it through the
cylinder body until the plug
and the front of the follower
have passed completely
through the cylinder body.
IMPORTANT: Ensure that the
follower bar remains inside the
cylinder body to prevent the
top pins from coming out of
the shell.
The cylinder body should end
up in the middle of the follower
bar. Set these items aside.
A B
C
5
Dexter Rekey MR1191.qxd 7/11/06 1:53 PM Page 7
Rekeying J–Series Knobs
6
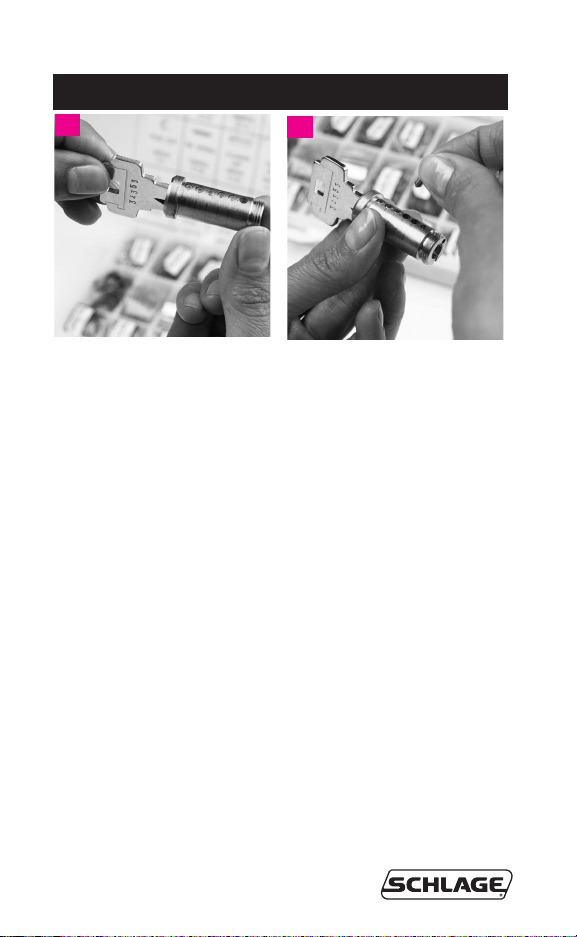
STEP #5 - LOAD NEW BOTTOM PINS
Use the numbers on the key
bow or the key gauge to
determine a new combination.
Insert a new key completely
into the key plug.
Load the new pins into the
cylinder plug with pins from
the rekeying kit that corre-
spond to the new key combi-
nation.
Example for key code 56234:
From the key kit insert a #5
size bottom pin into the first
hole closest to the key bow.
Load #6 bottom pin into the
second hole, and so on.
Verify that all inserted pins
are flush with the top of the
cylinder plug.
B
A
6
Dexter Rekey MR1191.qxd 7/11/06 1:53 PM Page 8
Rekeying J–Series Knobs
7
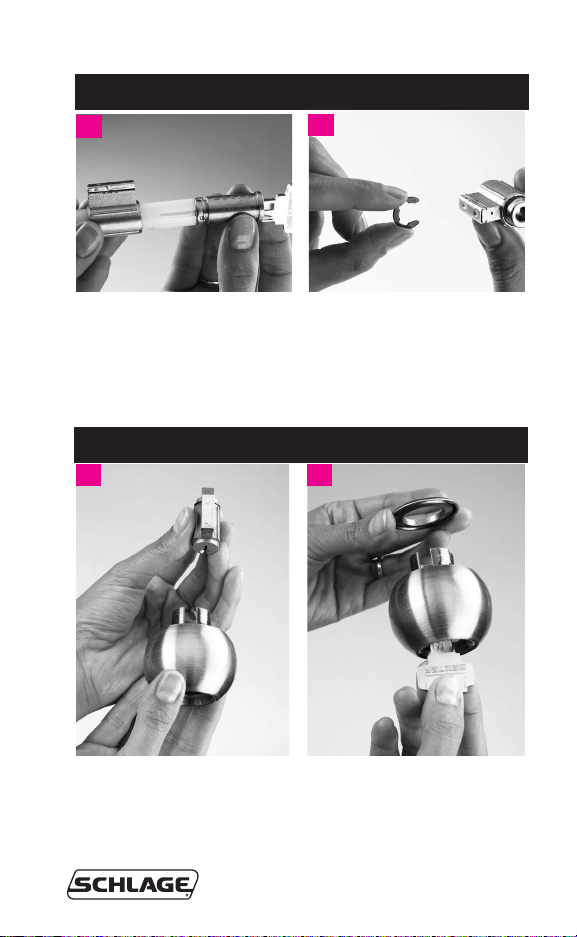
STEP #6 - REINSERT THE CYLINDER PLUG
Turn the key to the 3:00 posi-
tion. Push on the follower bar
to reinsert the cylinder plug
into the cylinder body.
Reattach the retaining clip to
the back of the cylinder plug
by pushing it into the groove
until it snaps back into place.
IMPORTANT: Remove key
only when the retaining key is
back in place.
STEP #7 - REASSEMBLE THE KNOB
Line up the cylinder body with
the opening on the backside
of the knob, keyway first.
To place the sleeve into the
backside of the knob, line up
the notched piece on the
sleeve with the opening and
press into place.
A
B
BA
7
Dexter Rekey MR1191.qxd 7/11/06 1:53 PM Page 9
Rekeying J–Series Knobs
8
STEP #8 - REATTACH THE KNOB
Align the slot of the knob
shank and rollback. Push the
knob all the way back until the
knob is firmly retained by the
knob catch.
Test the knob to ensure that it
functions correctly.
Reinsert the key to ensure
that it functions correctly.
A
B
8
Dexter Rekey MR1191.qxd 7/11/06 1:53 PM Page 10
9
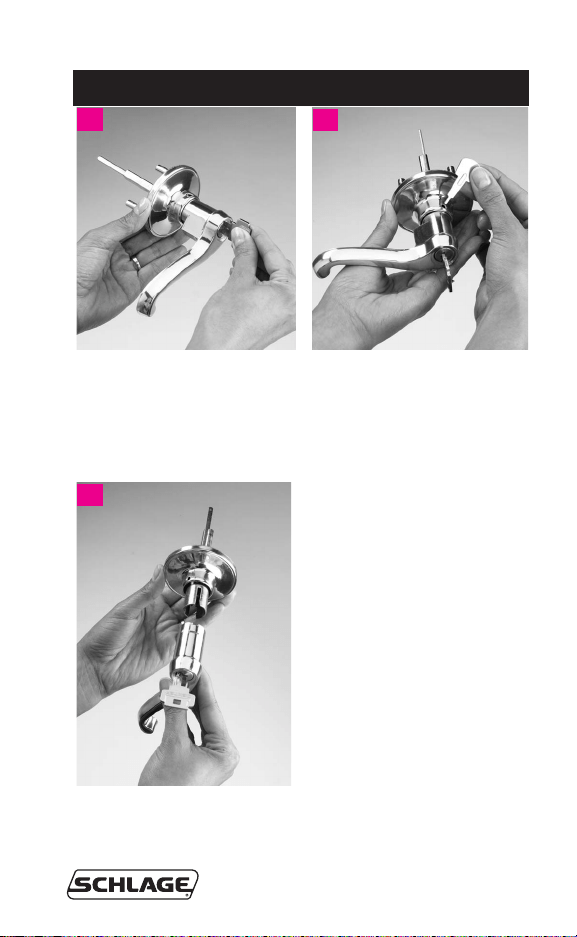
Rekeying J–Series Levers
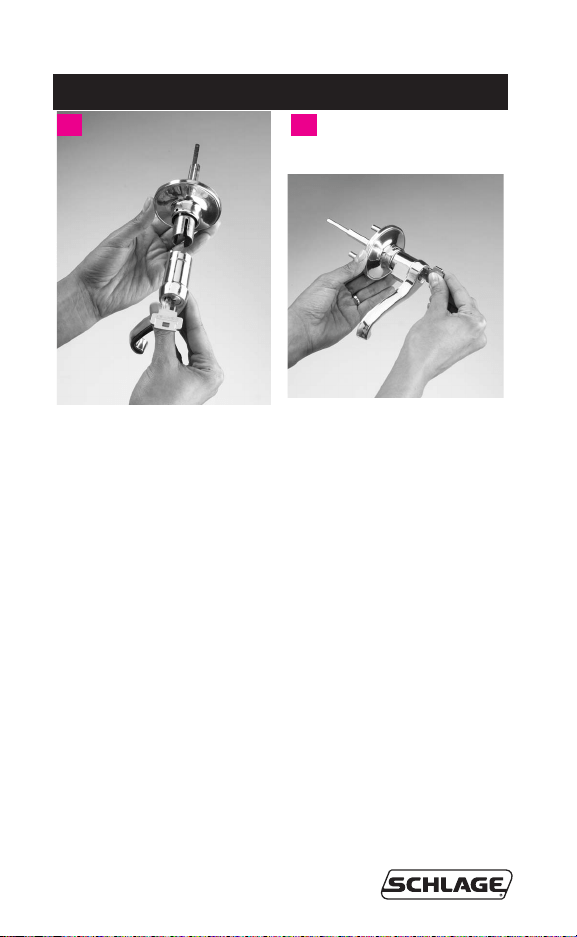
STEP #1 - REMOVE THE LEVER
Insert the key into the cylinder
(with teeth of key facing up).
Turn the outside lever counter-
clockwise until the lever catch
is visible an aligns under the
lever catch hole (as shown).
Use the lever catch tool to
depress and release the lever
catch.
Apply pressure to the rose
with your thumb and forefin-
ger, and pull the lever off the
spindle.
B
C
A
9
Dexter Rekey MR1191.qxd 7/11/06 1:53 PM Page 11
Rekeying J–Series Levers
10
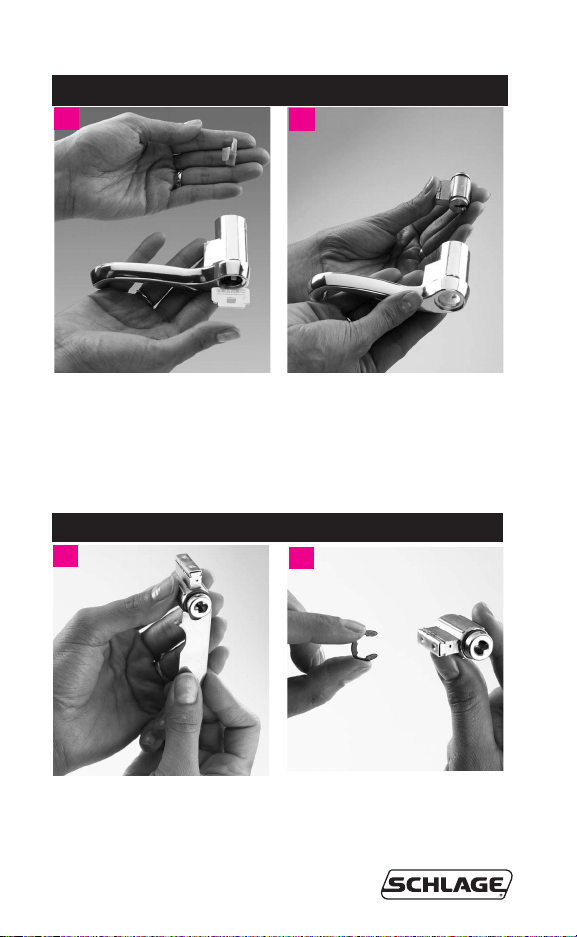
STEP #3 - REMOVE THE CYLINDER RETAINING CLIP
Re-insert the key into the plug.
Use the end of the removal tool
to push the clip out.
Remove the clip with the hook
of the removal tool.
Push forward on the key until
the cylinder retaining clip dis-
engages from the back of the
lever.
Remove the sleeve and set it
aside.
Remove the key from the cyl-
inder and remove the cylinder
from the back of the lever.
A
B
A
B
STEP #2 - REMOVE THE CYLINDER
10
Dexter Rekey MR1191.qxd 7/11/06 1:53 PM Page 12
Rekeying J–Series Levers
11
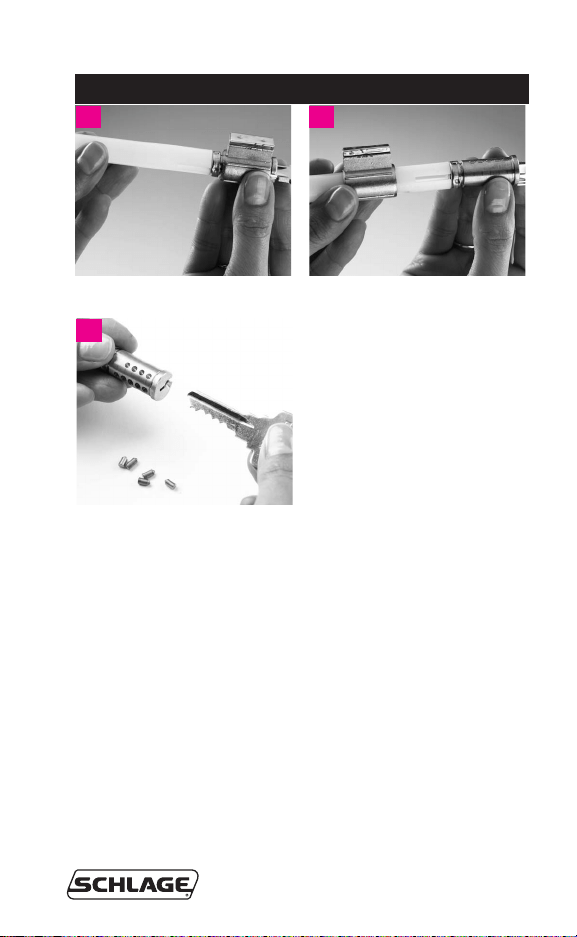
STEP #4 - REMOVE THE CYLINDER PLUG
Turn the key clock-wise to the
3:00 position.
Empty the bottom pins from
the cylinder plug, and remove
the old key.
Hold the follower bar firmly
against the cylinder plug and
carefully slide it through the
cylinder body until the plug
and the front of the follower
have passed completely
through the cylinder body.
IMPORTANT: Ensure that the
follower bar remains inside the
cylinder body to prevent the
top pins from coming out of
the shell.
The cylinder body should end
up in the middle of the follower
bar. Set these items aside.
A B
C
11
Dexter Rekey MR1191.qxd 7/11/06 1:53 PM Page 13

Rekeying J–Series Levers
12
STEP #5 - LOAD NEW BOTTOM PINS
Use the numbers on the key
bow or the key gauge to
determine a new combination.
Insert a new key completely
into the key plug.
Load the new pins into the
cylinder plug with pins from
the rekeying kit that corre-
spond to the new key combi-
nation.
Example for key code 56234:
From the key kit insert a #5
size bottom pin into the first
hole closest to the key bow.
Load #6 bottom pin into the
second hole, and so on.
Verify that all inserted pins
are flush with the top of the
cylinder plug.
B
A
12
Dexter Rekey MR1191.qxd 7/11/06 1:53 PM Page 14
13
S
TEP
#6 - R
EINSERT
T
HE
C
YLINDER
P
LUG
Turn the key to the 3:00 posi-
tion. Push on the follower bar
to reinsert the cylinder plug
into the cylinder body.
Reattach the retaining clip to
the back of the cylinder plug
by pushing it into the groove
until it snaps back into place.
IMPORTANT: Remove key
only when the retaining key is
back in place.
S
TEP
#7 - R
EASSEMBLE
T
HE
L
EVER
Line up the cylinder body with
the opening on the backside
of the lever, keyway first.
Place the cylinder into the
backside of the lever and slide
the cylinder retaining clip back
into the lever housing until it
snaps back into place.
A
B
BA
13
Dexter Rekey MR1191.qxd 7/11/06 1:53 PM Page 15
Rekeying J–Series Levers
14
STEP #8 - REATTACH THE LEVER
Align the slot of the lever
shank and rollback. Push the
lever all the way back until the
lever is firmly retained by the
lever catch.
Test the lever to ensure that it
functions correctly.
Reinsert the key to ensure
that it functions correctly.
A B
14
Dexter Rekey MR1191.qxd 7/11/06 1:53 PM Page 16
15
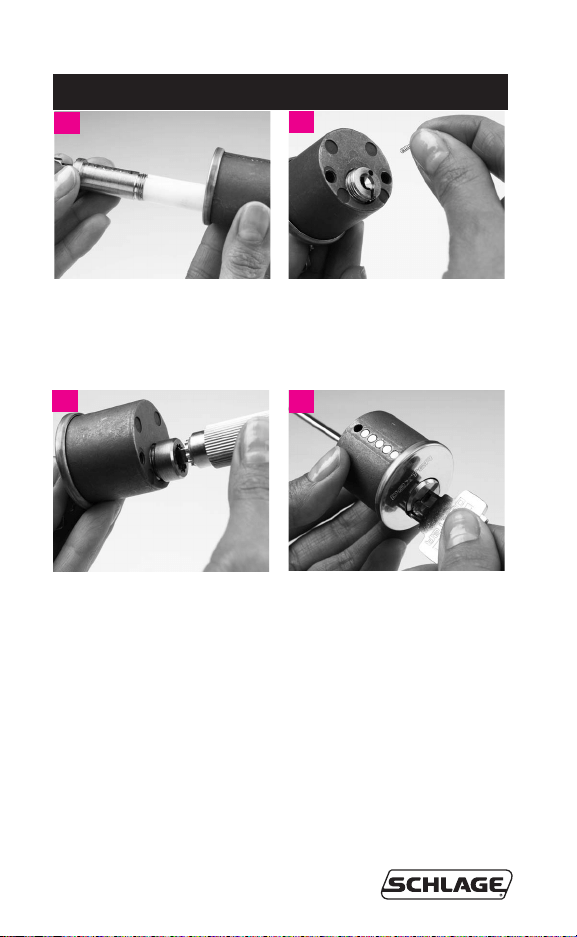
Rekeying J-Series Deadbolts
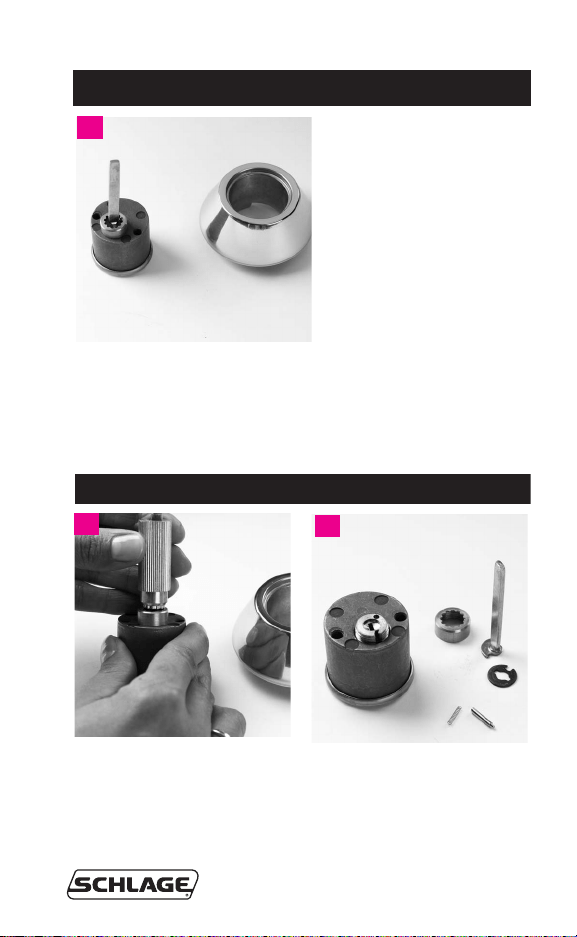
STEP #1 - PREPARATION
Remove the deadbolt cylinder
housing and insert the key.
Match the grooves on the cyl-
inder cap with the teeth on
the cylinder cap removal tool.
Push down and turn counter-
clock wise until the cap
comes off.
Remove the cylinder cap, tail-
piece, pin and spring from the
cylinder and set aside.
STEP #2 - REMOVE THE CYLINDER CAP
A
A
B
15
Dexter Rekey MR1191.qxd 7/11/06 1:53 PM Page 17
Rekeying J-Series Deadbolts
16
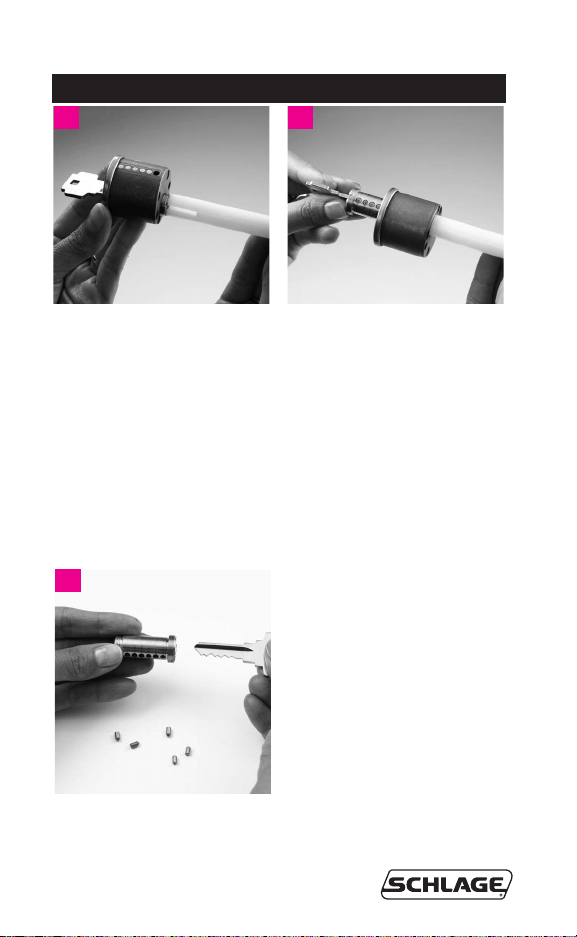
Empty the bottom pins from
the cylinder plug and remove
the old key.
Turn key clockwise to the 3:00
position.
Hold the follower bar firmly
against the cylinder plug and
carefully slide it through the
cylinder body until the plug
and the front of the follower
have passed completely
through the cylinder body.
IMPORTANT: Ensure that the
follower bar remains inside
the cylinder body to prevent
the top pins from coming out
of the shell.
The cylinder body should end
up in the middle of the follower
bar. Set these items aside.
STEP #3 - REMOVE THE CYLINDER PLUG
A B
C
16
Dexter Rekey MR1191.qxd 7/11/06 1:54 PM Page 18

Rekeying J-Series Deadbolts
17
STEP #4 - LOAD NEW BOTTOM PINS
Use the numbers on the key
bow or the key gauge to
determine a new combination.
Insert a new key completely
into the key plug.
Load the new pins into the
cylinder plug with pins from
the rekeying kit that corre-
spond to the new key combi-
nation.
Example for key code 56234:
From the key kit insert a #5
size bottom pin into the first
hole closest to the key bow.
Load #6 bottom pin into the
second hole, and so on.
Verify that all inserted pins
are flush with the top of the
cylinder plug.
A
B
17
Dexter Rekey MR1191.qxd 7/11/06 1:54 PM Page 19
Rekeying J-Series Deadbolts
18
STEP #5 - REINSERT THE CYLINDER PLUG
Turn the key to the 3:00 posi-
tion. Push on the follower bar
to reinsert the cylinder plug
into the cylinder body.
Reload retaining spring.
Reload retaining pin.
Screw on cylinder cap and
driver with the cylinder cap
removal tool.
IMPORTANT: Remove key
only when retaining clip is
back in place.
Reinsert and turn key to
ensure cylinder is working
properly. In the event of bind-
ing, loosen or tighten the cyl-
inder cap until the cylinder
works smoothly.
A
B
C
D
18
Dexter Rekey MR1191.qxd 7/11/06 1:54 PM Page 20

Glossary of Terms
Chassis The body of the lock itself without any trim.
Cylinder The portion of a lock containing plug with key-
way and a body with pin tumbler mechanism.
The properly cut key allows the cylinder to
rotate the driver mechanism which unlocks the
door.
Hand A term used to indicate how a door swings.
Pin Tumbler
Mechanism
Most key operated locks provide limited access
through the use of pin tumblers.
Pin Tumblers Small sliding pins in a lock cylinder that work
against coil springs. They prevent the cylinder
plug from rotating until the appropriate length
pin is raised to the proper height by correspond-
ing notch depth cut in the key. Pin tumblers
usually consist of bottom pins, top pins and
master pins.
Bottom Pins Usually a cylindrical shaped tumbler which is
often flat on both ends and is installed directly
under a coil spring in the spring stack.
To p Pi ns Usually a cylindrical shaped tumbler which is
often bullet shaped and comes in a variety of
lengths that correspond to the depth of the cut
of notch in the key.
Master Pin Usually a cylindrical shaped tumbler which is
often flat on both ends, placed between the top
and bottom pin to create an additional shear
line.
Rose A circular trim plate attached to the door under
the knob or lever.
Shear Line The area where the top surface of the plug and
cylinder housing meet. the height which the
bottom pins must be raised by the key in order
to rotate the key cylinder.
Spindle Bar which connect knobs or levers through
door and operates lock mechanism.
Trim Decorative as well as functional components of
a lockset, including knob, lever, rose, etc.
19
Dexter Rekey MR1191.qxd 7/11/06 1:54 PM Page 21

20
Dexter Rekey MR1191.qxd 7/11/06 1:54 PM Page 22

Dexter Rekey MR1191.qxd 7/11/06 1:54 PM Page 23

© 2006 Ingersoll Rand Company Limited MR-1191 Rev. 07/06
Ingersoll Rand’s Security Technologies Sector is a leading global provider
of products and services that make environments safe, secure and
productive. The Sector’s market-leading products include electronic and
biometric access control systems; time and attendance and personnel
scheduling systems; mechanical locks and portable security, door
closers and exit devices, steel doors and frames, architectural hardware
and technologies and services for global security markets.
www.schlage.com www.ingersollrand.com
Dexter Rekey MR1191.qxd 7/11/06 1:54 PM Page 24