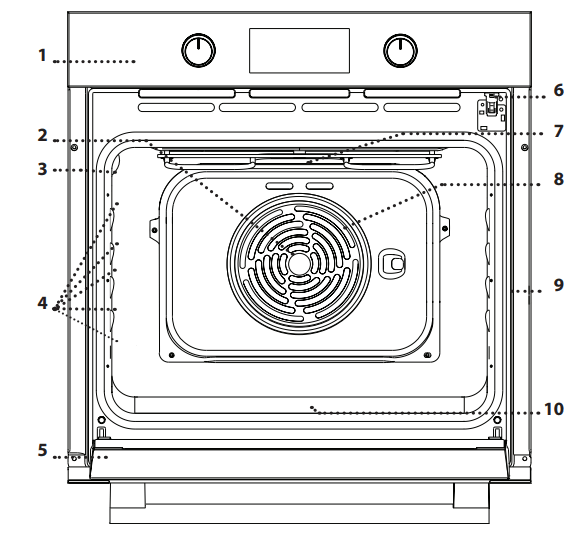
(the level is indicated on the wall of the cooking compartment)
5. Door
6. Door lock
(locks the door while automatic cleaning is in progress and afterwards)
7. Upper heating element/grill
8. Circular heating element
(not visible)
9. Identification plate
(do not remove)
10. Lower heating element
(not visible)
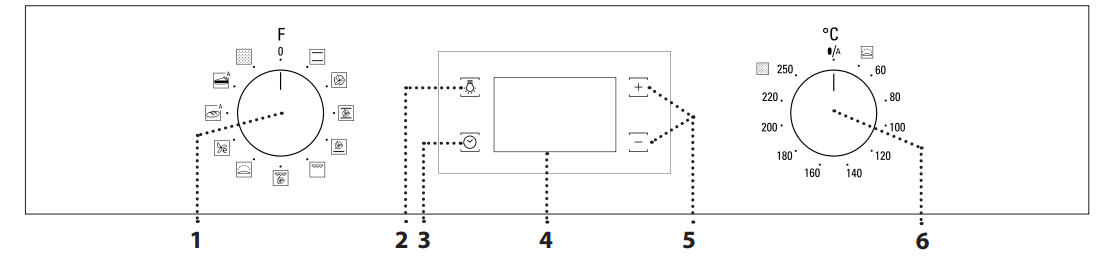
CONTROL PANEL
1. SELECTION KNOB
For switching the oven on by selecting a function. Turn to the position to switch the oven off.
2. LIGHT
With the oven switched on, press to turn the oven compartment lamp on or off.
3. SETTING THE TIME
For accessing the cooking time settings, delayed start and timer. For displaying the time when the oven is off.
4. DISPLAY
5. ADJUSTMENT BUTTONS
For changing the cooking time settings.
6. THERMOSTAT KNOB
Turn to select the temperature you require when activating manual functions. Automatic functions use .
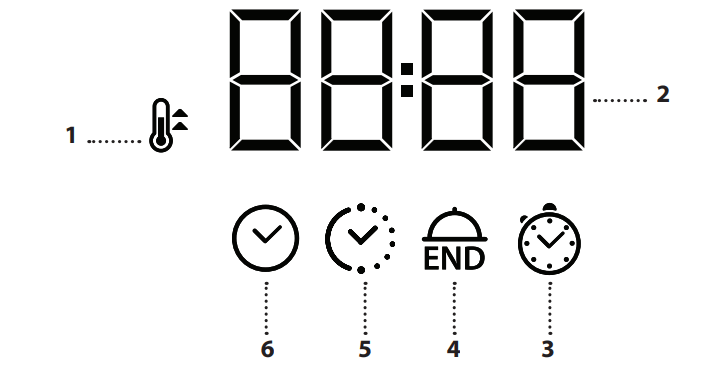
DESCRIPTION OF DISPLAY
Preheating symbol
Clock; information and function duration
Kitchen timer
End of cooking time
Duration
Clock
DAILY USE
1. SELECT A FUNCTION
To select a function, turn the selection knob to the symbol for the function you require: the display will light up and an audible signal will sound.
2. ACTIVATE A FUNCTION
MANUAL
To start the function you have selected, turn the thermostat knob to set the temperature you require.
Please note: During cooking you can change the function by turning the selection knob or adjust the temperature by turning the thermostat knob.
The function will not start if the thermostat knob is on 0 °C. You can set the cooking time, cooking end time (only if you set a cooking time) and a timer.
AUTOMATIC
To start the automatic function you have selected (“Bread” or “Pastry”), keep the thermostat knob at the position for automatic functions ( ).
To finish cooking, turn the selection knob to position 0.
RISING
To start the “Rising” function, turn the thermostat knob to the relevant symbol; if the oven is set to a different temperature, the function will not start.
3. PREHEATING
Once the function starts, an audible signal and a flashing icon on the display indicate that the preheating phase has been activated.
At the end of this phase, an audible signal and the fixed icon on the display will indicate that the oven has reached the set temperature: at this point, place the food inside and proceed with cooking.
Please note: Placing the food in the oven before preheating has finished may have an adverse effect on the final cooking result.
4. PROGRAMMING COOKING
You will need to select a function before you can start programming cooking.
DURATION
Keep pressing until the icon and “00:00” start flashing on the display.
Use or to set the cooking time you require, then press to confirm.
Activate the function by turning the thermostat knob to the temperature you require: An audible signal will sound and the display will indicate that cooking is complete.
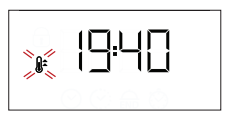
PROGRAMMING THE END COOKING TIME/ DELAYED START
After a cooking time has been set, starting the function can be delayed by programming its end time: press until the icon and the current time start flashing on the display
Use or to set the time you want cooking to end and press to confirm.
Activate the function by turning the thermostat knob to the temperature you require: the function will remain paused until it starts automatically after the period of time that has been calculated in order for cooking to finish at the time you have set.
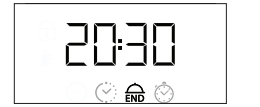
END OF COOKING
An audible signal will sound and the display will indicate that the function has finished.
Turn the selection knob to select a different function or to position “O ” to switch the oven off.
4. SETTING THE TIMER
This option does not interrupt or program cooking but allows you to use the display as a timer, either during while a function is active or when the oven is off.
Keep pressing until the icon and “00:00” start flashing on the display.
Use or to set the time you require and press to confirm.
An audible signal will sound once the timer has finished counting down the selected time.
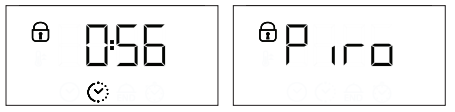
5. AUTOMATIC CLEANING FUNCTION – PYRO
Remove all accessories from the oven before activating the function. If the oven is installed below a hob, make sure that all the burners or electric hotplates are switched off while running the selfcleaning cycle.
For optimum cleaning results, remove the worst soiling with a damp sponge before using the Pyro function. We recommend only running the Pyro function if the appliance contains heavy soiling or gives off bad odours during cooking.
To activate the automatic cleaning function, turn the selection knob and the thermostat knob to the icon. The function will be activated automatically, the door locked and the light inside the oven switched off: The display will show the time remaining to the end, alternating with “Pyro”.
Once the cycle has been completed, the door remains locked until the temperature inside the oven has returned to a safe level. Air the room during and after running the Pyro cycle.
CLEANING
EXTERIOR SURFACES
Clean the surfaces with a damp microfibre cloth. If they are very dirty, add a few drops of pH-neutral detergent. Finish off with a dry cloth.
Do not use corrosive or abrasive detergents. If any of these products inadvertently comes into contact with the surfaces of the appliance, clean immediately with a damp microfibre cloth.
INTERIOR SURFACES
After every use, leave the oven to cool and then clean it, preferably while it is still warm, to remove any deposits or stains caused by food residues. To dry any condensation that has formed as a result of cooking foods with a high water content, leave the oven to cool completely and then wipe it with a cloth or sponge.
The door can be easily removed and refitted to facilitate cleaning of the glass.
Clean the glass in the door with a suitable liquid detergent.
ACCESSORIES
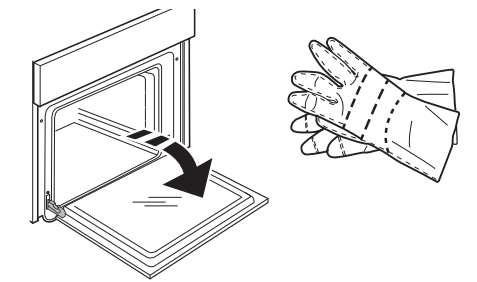
Soak the accessories in a washing-up liquid solution after use, handling them with oven gloves if they are still hot. Food residues can be removed using a washing-up brush or a sponge.
CLEANING THE COOKING COMPARTMENT WITH THE PYRO CYCLE
This function enables you to eliminate cooking spatters using a temperature of over 400 °C . At this temperature, food residues turn into deposits that can be easily wiped away with a damp sponge once the oven has cooled down .
If the oven is installed below a hob, make sure that all the burners or electric hotplates are switched off while running the self-cleaning cycle
Remove all accessories from the oven before running the Pyro function (including the shelf guides).
For optimum cleaning results, remove the larger bits of dirt with a damp sponge before using the Pyro function
It is advisable to run the Pyro function only when the appliance is very dirty or gives off bad odours during cooking .
Please note: The oven door cannot be opened while pyrolytic cleaning is in progress. It will remain locked until the temperature has returned to an acceptable level.
Ventilate the room during and after the pyrolytic cleaning cycle (until the room has been completely aired out)
MAINTENANCE
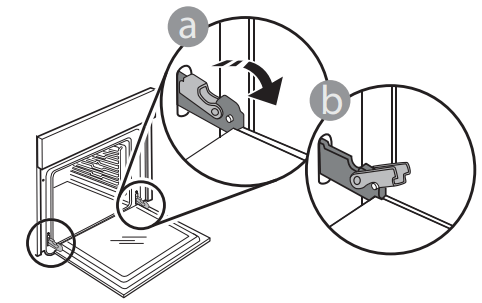
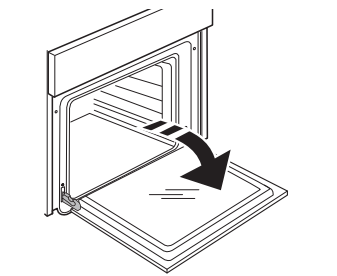
REMOVING THE DOOR
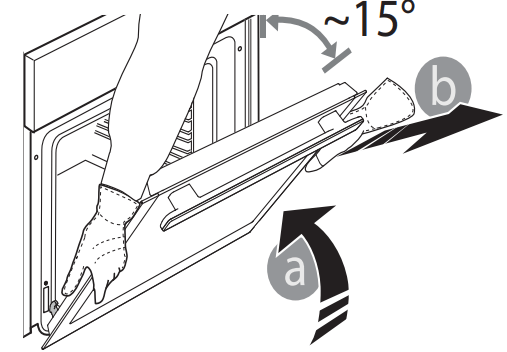
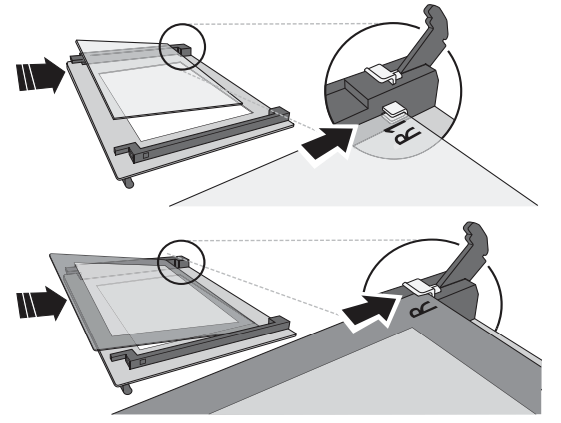
1. Open the door fully .
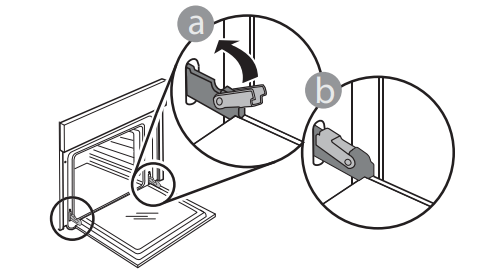
2. Lower the catches as far as possible .
3. Close the door as much as you can
4. Take a firm hold of the door with both hands – do not hold it by the handle . Simply remove the door by continuing to close it while pulling it upwards at the same time until it is released from its seating
5. Put the door to one side, resting it on a soft surface
REFITTING THE DOOR
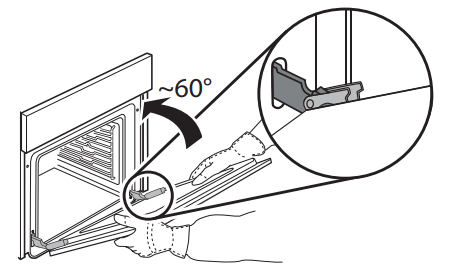
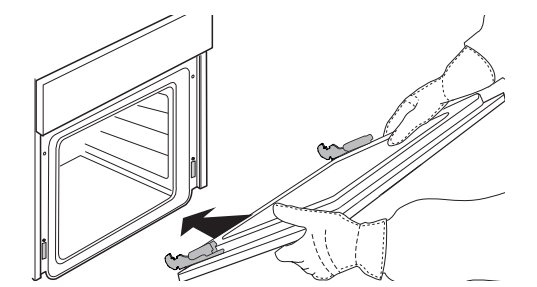
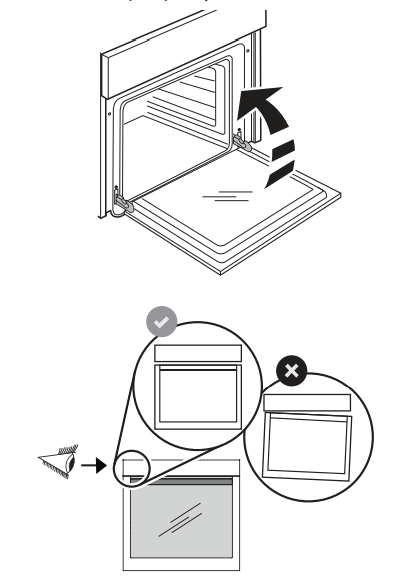
1. Move the door towards the oven, aligning the hooks of the hinges with their seating
2. Secure the upper part into its seating .
3. Lower the door and then open it fully .
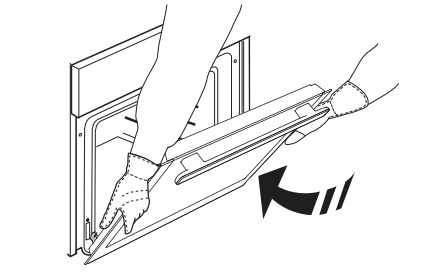
4. Lower the catches into their original position: Make sure that you lower them down completely
5. Try closing the door and check to make sure that it lines up with the control panel . If it does not, repeat the steps above: The door could become damaged if it does not work properly
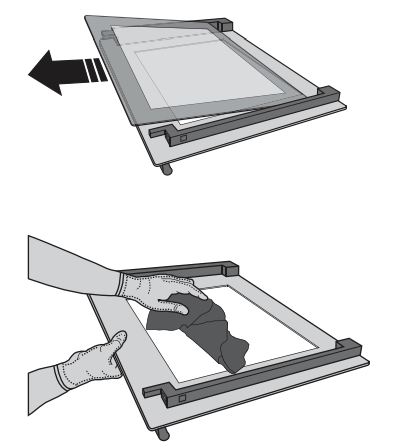
CLICK & CLEAN ‑ CLEANING THE GLASS
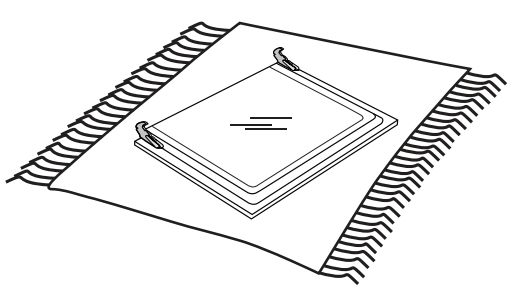
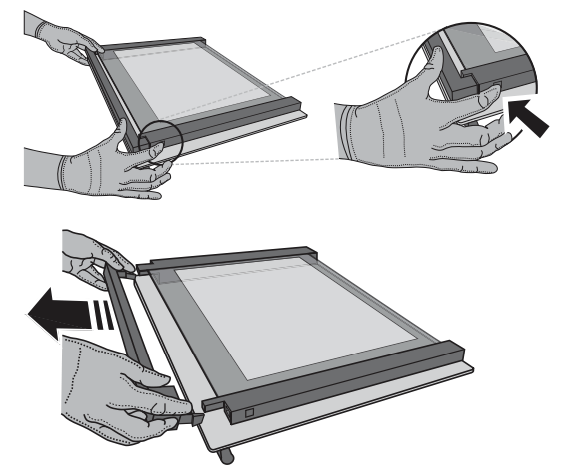
1. After removing the door and resting it on a soft surface with the handle downwards, simultaneously press the two retaining clips and remove the upper edge of the door by pulling it towards you
2. Lift and firmly hold the inner glass with both hands, remove it and place it on a soft surface before cleaning it
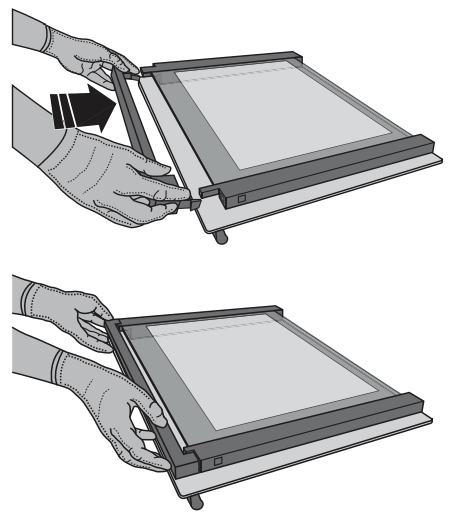
3. Refit the intermediate pane (marked with “R1”) before refitting the inside pane: To position the panes of glass correctly, make sure that the “R” mark can be seen in the left-hand corner. First insert the long side of the glass indicated by “R” into the support seats, then lower it into position. Repeat this procedure for both panes of glass.
4. Refit the upper edge: A click will indicate correct positioning . Make sure the seal is secure before refitting the door
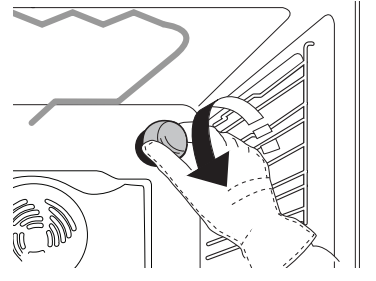
REPLACING THE LIGHT
1. Disconnect the oven from the power supply .
2. Unscrew the cover from the light, replace the bulb and screw the cover back on the light
3. Reconnect the oven to the power supply .
Please note: Use 25 W/230 V type G9, T300 °C halogen lamps.
The bulb used in the product is specifically designed for domestic appliances and is not suitable for general room lighting within the home (EC Regulation 244/2009).
Light bulbs are available from our After-sales Service.
Do not handle bulbs with your bare hands as your fingerprints could damage them. Do not use the oven until the light cover has been refitted
TROUBLESHOOTING
Any problems or malfunctions that may occur can often be easily resolved .
Before contacting the After-sales Service, check the following table to see whether you can resolve the problem yourself .
If the problem persists, contact your nearest After-sales Service Centre
PROBLEM
POSSIBLE CAUSE
REMEDY
The oven is not working .
Disconnection from the mains electricity.
Fault.
Make sure that the oven is connected to the main electricity supply.
Turn off the oven and restart it to see if the fault persists.
Cooking will not start
Temperature not set/thermostat knob in the wrong position.
Turn the thermostat knob to the temperature or the position you require to activate the function you have selected.
The time is flashing
Power cut.
You need to reset the time: Follow the instructions given in the “Using the appliance for the first time” section.
The display shows the letter “F” followed by a number
Software fault.
Contact you nearest Client After-sales Service Centre and state the number following the letter “F”.
The light is not working
Oven OFF.
Bulb gone.
Turn the selection knob to select a function and switch on the oven. If the fault persists, follow the instructions for replacing the bulb given in the “Maintenance” section.
The door will not open .
The door lock is malfunctioning
Turn off the oven and restart it to see if the problem persists.
Cleaning cycle is activated
Please wait until the function ends and the oven cools down.
 position to switch the oven off.
 .
.
 on the display indicate that the preheating phase has been activated.
 until the
  icon and “00:00” start flashing on the display.
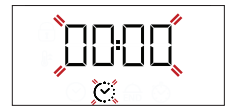
 or
or to set the cooking time you require, then press
  to confirm.
 icon and the current time start flashing on the display
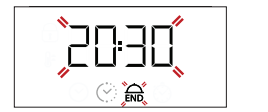

 icon and “00:00” start flashing on the display.
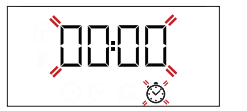
 icon. The function will be activated automatically, the door locked and the light inside the oven switched off: The display will show the time remaining to the end, alternating with “Pyro”.