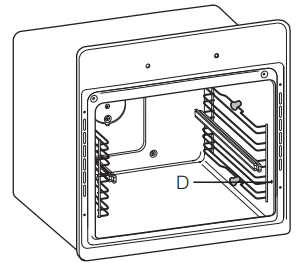
The bottom oven on this cooker can comes equipped with telescopic runners to facilitate inserting or removing accessories.
Assembling the telescopic runners*
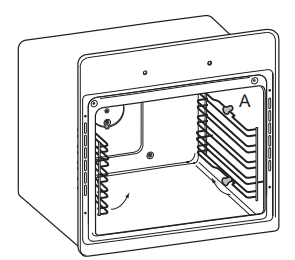
1. Remove the two frames, lifting them away from the spacers A (see figure).
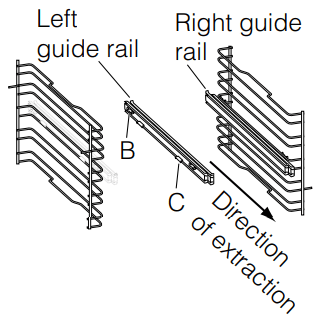
2. Choose which shelf to use with the sliding rack. Paying attention to the direction in which the sliding rack is to be extracted, position joint B and then joint C on the frame.
3. Secure the two frames with the guide rails using the holes provided on the oven walls (see diagram). The holes for the left frame are situated at the top, while the holes for the right frame are at the bottom.
4. Fit the frames on the spacers A.
CONTROLS
MULTIFUNCTION SELECTOR
Rotate the control knob in either direction to the required function. Many of the functions will also require the bottom oven thermostat to be set before the oven will heat up
TOP OVEN TEMPERATURE CONTROL
Turn the control clockwise to set the top oven thermostat to the required temperature. An indicator light will illuminate. This will remain on until the oven reaches the required temperature. This light will then cycle on and off as the thermostat maintains control of the oven thermostat
BOTTOM OVEN TEMPERATURE CONTROL
This is used in addition to the multifunction selector. This is used for the functions: fan oven, fan grill, half grill and full grill and conventional oven. Turn the control clockwise to set the oven thermostat to the required temperature. If the timer is set correctly and the selector switch set to a suitable function an indicator light will illuminate. This will remain on until the oven reaches the required temperature. This light will then cycle on and off as the thermostat maintains control of the oven temperature.
Slow Cooking
The bottom oven has a „Slow Cook Setting” this can be used for slow cooking, keeping food warm and warming plates for a short period.
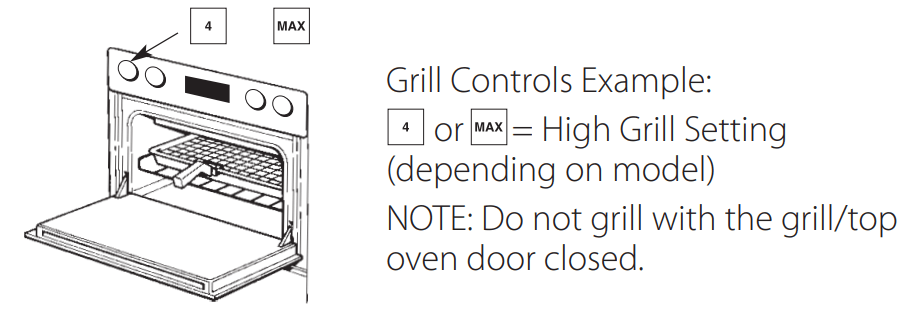
GRILL CONTROL
The grill control is designed to provide variable heat control of either both grill elements on together or the single left-hand grill element only. To set the grill power turn the grill control to any setting MIN (1) - MAX (4), clockwise for FULL grill and anticlockwise for HALF grill.
Step 1 Ensure oven timer is set to manual. Place the shelf in the correct position (see Grilling Guide). Place the food/ grill pan on the shelf, positioned centrally under the grill element. Leave the top oven door fully open.
Step 2 Turn knob (A), clockwise for FULL grill or anticlockwise for HALF grill, to select the grill setting MIN (1) = Low, MAX (4) = High.
Step 3 After use, turn the grill control (A) to the off position (0). The Grill Pilot Light is lit when grill is used. Ensure knob (B) is in „0 position”. The grill and the top oven cannot work simultaneously
COOLING FAN
A gentle flow of air will be blown below the control panel when the grill control is used and after a short period of time when the ovens are used.
Note: Whenever the appliance has been used, the cooling fan may run on or restart itself after all the controls have been turned off. This indicates that the appliance is still warm.
MULTIFUNCTION SELECTOR SWITCH
The Multifunction selector switch is used when operating the bottom oven.
With the exception of the O position the bottom oven light will remain on when this selector switch is used.
0 Off
With the selector in this position the bottom oven will not heat up. The timer will still operate.
Fan Oven
The oven fan and a rear element are controlled when this function is selected. Use the bottom oven thermostat control to set the required temperature.
Conventional Oven
Top and base elements are controlled when this function is selected. Use the bottom oven thermostat to set the required temperature.
Half Grill
With this function selected only the left hand side of the grill will be on. Use the oven thermostat control to set the required temperature.
Oven door must be open for grilling.
Full Grill
Both left and right hand grill elements will be on in this position. Use the oven thermostat control to set the required temperature.
Oven door must be open for grilling.
Fan Grill
The oven fan and fan grill element are controlled when this function is selected. Use the oven thermostat control to set the required temperature. Oven door must be closed for fan grilling.
Fan Only
The oven fan will operate when this function is selected. The oven thermostat control must be set in the off position.
Light Only
This function switches on the oven light only.
USING THE BOTTOM OVEN FOR OTHER FUNCTIONS
FAN ONLY SETTING
Defrosting frozen meat & Poultry
Joints of meat and whole birds should be defrosted slowly, preferably in a refrigerator (allowing 5-6 hours per lb.) or at room temperature (allowing 2-3 hours per lb.). Frozen meat or poultry must be completely defrosted before cooking in the oven. However, to decrease the amount of time required to defrost food items, a nonheating fan only setting may be selected for the bottom oven only.
Operation: To assist in defrosting
Place food in the oven and close the oven door. Turn the Multifunction Control (D) clockwise to the FAN ONLY setting.
Turn the bottom Oven Control (C) clockwise to the setting. This defrosts by circulating the air around the food, time to defrost will depend on type and size of the food.
,S' SLOW COOK SETTING
This is used for slow cooking, keeping food warm and warming plates for short periods.
OPERATION:
Place the prepared food in the bottom oven and ensure the door is fully closed.
Select Slow Cooking Temperature ,S' by turning the bottom Oven Temperature Control (C) and Multifunction Control (D) clockwise to Fan Oven mode.
Place the prepared food in the bottom oven and ensure the door is fully closed.
Select Slow Cooking Temperature ,S' by turning bottom Oven Temperature Control (C).
LIGHT ONLY SETTING
When the Multifunction Control (D) is turned clockwise to the LIGHT ONLY setting, the bottom oven light only will illuminate. When the Bottom Oven Control (C) is turned clockwise to the setting, the bottom oven light only will illuminate.
THE ELECTRONIC PROGRAMMER
The Top Oven and Bottom Oven can be controlled by the automatic timer. When the timer control has been set for one oven, it is possible to use the other oven only during the same automatic cooking programme.
Setting the clock
The clock may be set when the oven is switched off or when it is switched on, provided that a the end time of a cooking cycle has not been programmed previously.
After the appliance has been connected to the mains, or after a blackout, the icon and the four numerical digits on the DISPLAY will begin to flash.
Press the button several times until the icon and the four digits on the display begin to flash.
Use the "+" and “-” buttons to adjust the time; if you press and hold either button, the display will scroll through the values more quickly, making it quicker and easier to set the desired value.
Wait for 10 seconds or press the button again to finalise the setting.
Setting the minute minder
Setting the minute minder This function does not interrupt cooking and does not affect the oven; it is simply used to activate the buzzer when the set amount of time has elapsed.
Press the button several times until the icon and the three digits on the display begin to flash.
Use the "+" and "-" buttons to set the desired time; if you press and hold either button, the display will scroll through the values more quickly, making it quicker and easier to set the value.
Wait for 10 seconds or press the button again to finalize the setting. The display will then show the time as it counts down. When this period of time has elapsed the buzzer will be activated.
Programming cooking
A cooking mode must be selected before programming can take place.
Press the button several times until the icon and the three digits on the DISPLAY begin to flash.
Use the "+"and "-" buttons to set the desired duration; if you press and hold either button, the display will scroll through the values more quickly, making it quicker and easier to set the value.
Wait for 10 seconds or press the button again to finalise the setting.
When the set time has elapsed, the text END appears on the DISPLAY, the oven will stop cooking and a buzzer sounds. Press any button to stop the buzzer and turn all control knobs to 0 position.
For example: it is 9:00 a.m. and a time of 1 hour and 15 minutes is programmed. The programme will stop automatically at 10:15 a.m.
Setting the end time for a cooking mode *
A cooking duration must be set before the cooking end time can be scheduled.
Follow steps 1 to 3 to set the duration as detailed above.
Next, press the button until the icon and the four digits on the DISPLAY begin to flash.
Use the "+" and "-" buttons to adjust the cooking end time; if you press and hold either button, the display will scroll through the values more quickly, making it quicker and easier to set the desired value.
Wait for 10 seconds or press the button again to finalise the setting.
When the set time has elapsed, the text END appears on the DISPLAY, the oven will stop cooking and a buzzer sounds. Press any button to stop it. Programming has been set when the and buttons are illuminated.
The DISPLAY shows the cooking end time and the cooking duration alternately.
For example: It is 9:00 a.m. and a duration of 1 hour has been programmed. 12:30 is scheduled as the end time. The programme will start automatically at 11:30 a.m.
Cancelling a programme
Press the button until the icon corresponding to the setting you wish to cancel and the digits on the display are flashing. Press the "-" button until the digits 00:00 appear on the display.
Press and hold the "+"and "-" buttons; this will cancel all the settings selected previously, including timer settings.
*By selecting the grill function, you will not be able to set an end time.
USING THE TOP OVEN FOR SOLARPLUS GRILLING
Solarplus high speed grill is designed to reduce your grilling times. It is quicker because it takes less time to warm up from cold. Conventional grills require 5 minutes pre-heat before food can be placed beneath them, but for normal grilling the Solarplus grill can be used directly from cold without any pre-heat.
However, when toasting, optimum performance is achieved by pre-heating the grill for about 1 minute.
GRILL PAN AND HANDLE
The grill pan handle is detachable from the pan to facilitate cleaning and storage.
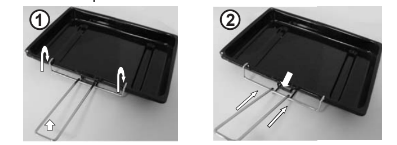
Fix the pan handle securely before use:
Fit the handle to the grill pan so that the external 'hooks' embrace the edge of the pan (fig. 1)
Make sure that the middle part of the handle fits exactly the protruding support of the pan (fig .2) and holds the pan from the bottom.
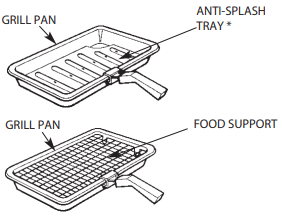
The food must be placed on the rack in the grill pan. Position the grill pan on top of the oven rack. The best results are achieved by placing the oven rack on the uppermost shelves. Pouring a little drinking water into the grill pan will make the collection of grease particles more efficient and prevent the formation of smoke.
Note: To stop fat splashing onto the grill mesh, it is important to use the antisplash tray as shown in the grilling chart. Always clean the grill pan, antisplash tray * and food support after each use.
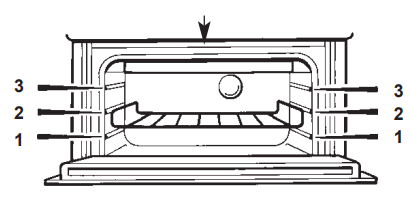
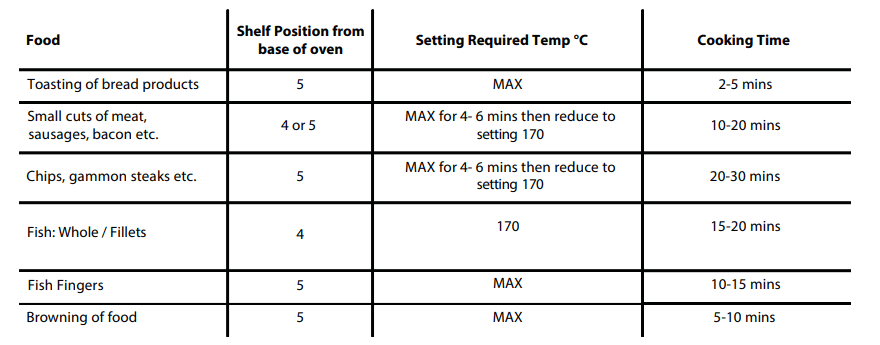
Top Oven Shelf Positioning for Grilling
NOTE:
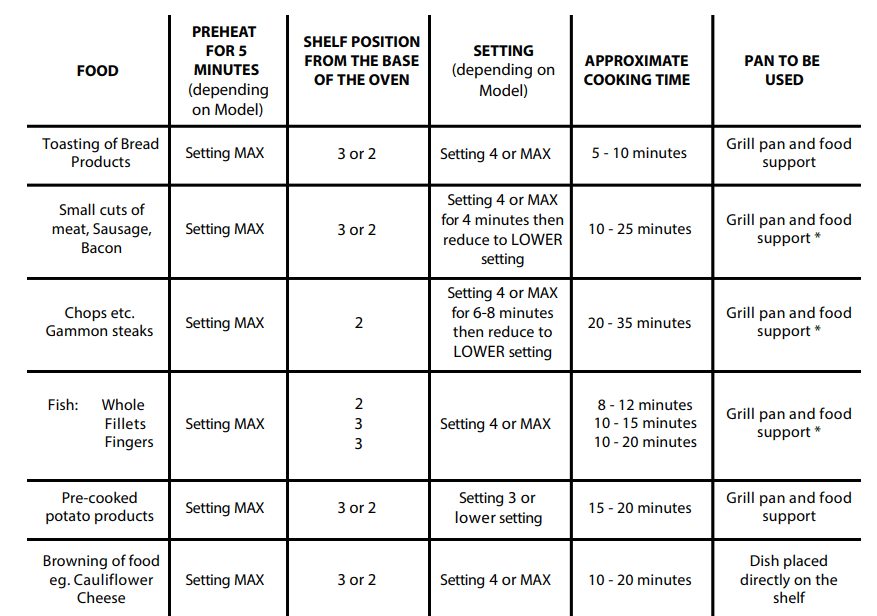
Preheat the grill if indicated on grill chart.
The grill pan must be placed on the correct shelf and positioned centrally under the grill element.
Leave the control at MAX for toast, and for fast cooking of foods.
For thicker foods requiring longer cooking, turn the switch to a lower setting after the initial sealing on both sides at MAX. The thicker the food, the lower the control should be set.
After use always return the grill control to the OFF (1) position.
USING THE TOP OVEN AS A CONVENTIONAL OVEN
The top oven should be used to cook small quantities of food. The oven is designed so that the grill element operates at a reduced heat output, this is combined with a heating element situated underneath the floor of the oven. To ensure even cooking of the food it is important that cooking utensils are positioned correctly on the oven shelf so that the element is directly above. As a guide, the front of the utensil should be approx.100mm (4") from the front of the shelf.
SHELF POSITIONING
There should always be at least 25mm (1 inch) between the top of the food and the grill element.
Operation when using the Top Oven as a Conventional Oven
Step 1 Check that the timer is in manual.
Step 2 Place the shelf in the correct position (see Oven Temperature Charts).
Step 3 Select the required cooking temperature (100 °C MAX) using control (B) (see Top Oven Temperature Charts). The pilot light will immediately come on, and remain on until the oven reaches the required temperature. The light will then automatically go off and on during cooking as the oven thermostat maintains the correct temperature.
Step 4 Place the food on the shelf directly below the element ensuring the oven door is closed.
NOTE: At the end of your cooking, always return control (B) to the OFF (O) position.
PLATE WARMING
Place the plates/dishes on shelf position 1 from the base of the top oven, and turn top oven temperature control (B) to 100°C for 10-15 minutes.
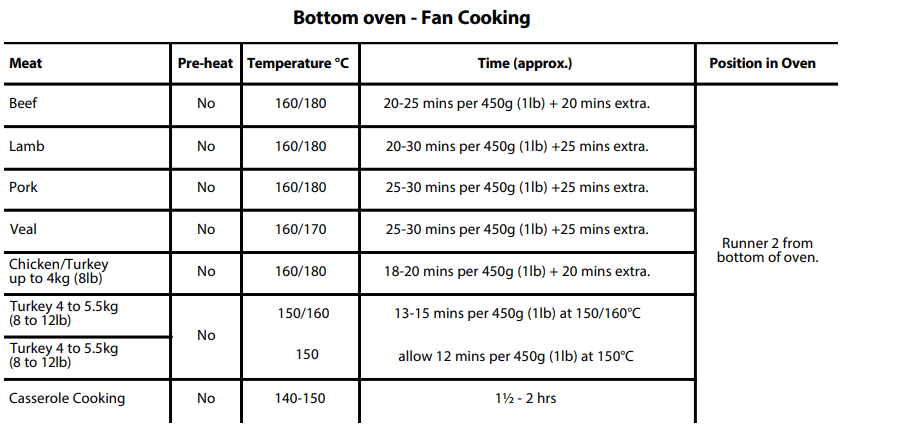
BOTTOM OVEN - FAN OVEN
Fan grilling is a combination of heat from the grill element and the oven fan circulating the hot air around the food. Joints of meat and poultry will be browned as if they were cooked on a rotisserie or spit but more economically as the door left closed. If required, fan grilling can be timed using the Oven Auto timer. Follow the timer instructions before selecting fan grill and the required temperature.
If Manual fan grilling is required always ensure the timer is set to Manual.
Operating procedure:
Open the oven door.
Select the correct shelf position, as stated in chart.
Turn the selector switch to the Fan grill position.
Turn the oven thermostat control to the required temperature (see Fan Grilling Roasting Chart).
Position the meat pan centrally under the grill elements.
Close the oven door.
After use always return both controls to the off position.
If the oven timer was used, reset to Manual. As with the fan oven cooking there is no need to preheat the oven yet another economy feature. Also you can cook more than one thing at a time even up to 4 small chickens.
Temperatures
These will be similar to those used for the more traditional form of roasting but the guide will give you an indication of which temperature to set the Thermostat.
But remember that because of the way the oven is heated this is a more economical way of roasting.
General Recommendations
Most types of meat and poultry cooked by this method will have an all over brownness and crispness on the outside. The only exceptions are very lean joints, such as veal, which, because of its low fat content, is better cooked using conventional heating.
Always place the pan on the shelf position recommended. (See Chart).
There is no need to preheat the oven before cooking and all fan grilling should be carried out with the oven door closed, this saves energy. The cooking temperatures and times are calculated from a cold oven.
After rinsing and drying meat, place on the food roasting support rack over the pan supplied.
Position meat in oven as recommended in the roasting chart.
Fan grilling is ideally suited for cooking all types of poultry and larger joints of meat (e.g.stuffed, rolled joints and legs of pork and lamb). Results will be as if you had cooked the food on a rotisserie. If you use frozen meat or poultry it must be completely defrosted before it is cooked.
When cooking a joint always grill it with the fat side uppermost in order to crisp it. For bigger joints or where there is little bone, grill at the lower tempe-rature given in the table and cook for a longer time per kg.
When cooking any type of poultry, start grilling the underside uppermost and turn breast uppermost about a third to halfway through the cooking pe-riod. If cooking stuffed poultry allow slightly longer cooking time.
BOTTOM OVEN - CONVENTIONAL OVEN
Operating Procedure
Ensure Oven Timer is set to Manual.
Position rod shelf as recommended in the chart for food being cooked.
Position food centrally under grill element.
Turn the selector switch to the conventional ovenposition.
Turn the oven thermostat control to the required temperature setting (see oven temperature charts). The oven light will remain on. The oven indicator light will remain on until the oven reaches the set temperature.
This light will then automatically cycle on and off during cooking as the oven temperature is controlled.
After use always return both controls to the off position and close the oven door.
BOTTOM OVEN - FAN OVEN
Important: The oven is heated by elements at the rear of the oven. A fan at the rear of the oven operates to circulate heated air within the oven.
Operating procedure:
Ensure Oven Timer is set to Manual.
Turn the selector switch to the fan oven position, then turn the oven thermostat control to the required temperature setting (see oven temperature charts).
The oven light will remain on. The oven indicator light will remain on until the oven reaches the set temperature. This light will then automatically cycle on and off during cooking as the oven temperature is controlled.
After use always return all controls to the off position and close the oven door.
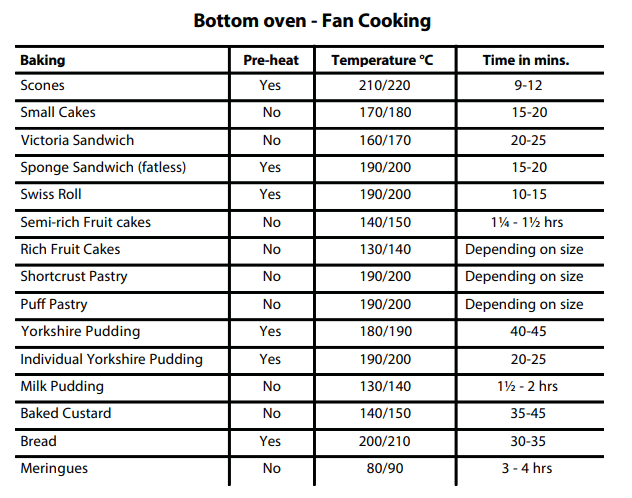
BOTTOM OVEN - FAN OVEN COOKERY NOTES
Since a fan oven heats up more quickly, and generally cooks food at a lower temperature than a conventional oven, pre-heating the oven is often unnecessary. However, foods such as bread, scones, Yorkshire pudding, do benefit from being placed in a pre-heated oven.
The charts are a guide only, giving approximate cooking temperatures and times. To suit personal taste and requirements, it may be necessary to increase or decrease temperatures by 10°C.
Because the fan oven cooks so efficiently, we recommend that when cooking any recipes not designed for a fan oven, you reduce the temperature by about 25°C and the time by about 10 minutes in the hour. If large quantities are being cooked it will be necessary to increase the cooking time somewhat to compensate for the extra oven load.
Unless otherwise indicated in the charts, food is placed in a cold oven, i.e. without preheating.
If food is placed in an already hot oven, the suggested cooking time should be reduced, depending on the type and quantity of food being cooked.
It should be noted that at the end of a cooking period there may be a momentary puff of steam when the oven door is opened, this will disperse in a few seconds and is a perfectly normal characteristic of an oven with a good door seal.
Oven Positions
Since the distribution of heat in the fan oven is very even, most foods will cook satisfactorily on any shelf position, but the shelves should be evenly spaced:
To ensure even circulation do not use meat pans larger than 390x300mm (15ins x 12ins) and baking trays no larger than 330x255mm (13ins x 10ins), these should be positioned centrally on the oven shelf.
Do not fit shelves upside down.
Never use more than 3 shelves in the oven as air circulation will be restricted.
Food or cooking utensils should not be placed on the floor of the oven. To avoid unnecessary cleaning, rod shelves which are not in use should be removed from the oven.
Temperature and Time
The oven is provided with two shelves. A third is available as an optional extra, contact Genuine Parts and Accessories Hotline (see back page) for further information.
If three shelves are used to cook large quantities of food for home freezing or parties, it may be necessary to increase the cooking times given in the charts by a few minutes, to allow for the loss of heat due to the extra time taken to load the oven, and the larger mass of food.
Baking trays should allow an equal gap on all sides of the oven.
To prepare meat and poultry for Roasting in your Fan Oven
(a) Wipe the meat or poultry, dry well and weigh it. Meat which has for been stored in a refrigerator should be allowed to come to room temperature before cooking, and frozen meat or poultry must be completely defrosted before placing in the oven.
(b) The weight of any stuffing used should be added before calculating the cooking time.
(c) Place meat/poultry in the bottom oven meat pan supplied with your cooker. Small joints weighing less than 1.75kg (31/2 lbs) should be roasted in a smaller meat pan/ tin or they may be, pot roasted' a small joint or a large meat pan causes unnecessary oven splashing and evaporation of meat juices.
(d) Additional fat should not be added, except for veal, very lean meat or poultry which can either be, larded' with fat bacon or brushed very sparingly with cooking oil or melted fat.
(e) Beef, lamb, mutton and poultry may be dusted lightly with seasoned flour to give a crisp outer surface. The skin of duck and goose should be pricked to release excess fat during cooking, and the rind of pork should be scored, brushed lightly with oil, and rubbed with salt to give crisp crackling.
(f) Meat and poultry wrapped in, or covered with a tent of aluminium foil will be juicy and tender. Roasting bags offer the same advantages. Always follow the manufacturer's pack instructions, and remember to reduce the temperatures given for conventional ovens by approximately 25°C and the time by approximately 10 minutes per hour.
(g) Potatoes for roasting only require to be brushed with cooking oil or melted fat.
(h) It is not necessary to baste when roasting in an electric oven and stock or liquid should not be added to the meat pan since this only causes unnecessary soiling, steam and condensation.
Frozen Meat and Poultry
Joints of meat and whole birds should be defrosted slowly, preferably in a domestic refrigerator (allowing 5-6 hours per 450g,1 lb), or at room temperature (allowing 2-3 hours per 450g, 1 lb).
Frozen meat or poultry must be completely defrosted before placing in the oven.
It is essential to wash thoroughly and cook meat and poultry immediately after defrosting.
BOTTOM OVEN GRILLING (Only in 4 knobs models)
GRILLING SHOULD NEVER BE UNDERTAKEN WITH THE DOOR CLOSED.
Do Not line the grill pan with aluminium foil.
Ensure that the grill pan is cleaned after every use.
Excess fat build-up in the bottom of the pan could cause a fire hazard.
Preheat the grill on the required setting for 5 minutes
Grilling Procedure:
Open the bottom oven door fully and position the rod shelf as recommended in the grilling chart for the food being cooked.
Turn the multifunction selector switch to HALF grill or FULL grill and then turn the bottom Oven temperature control to the required setting to pre-heat for approximately 5 minutes.
Position the grill pan centrally under the grill element and push back as far as the location stops on the rod shelf.
Leave the oven thermostat at setting MAX for toast and for fast cooking of foods. For thicker foods requiring longer cooking turn the thermostat to a lower setting, after initial sealing on both sides at MAX. The thicker the food, the lower the thermostat should be set. If excessive smoke is emitted, reduce the setting.
After use always return both controls to their OFF (O) position.
Grilling in top oven
* We recommend using the pan to collect the cooking juices: Position it below the food support and add 500 ml of drinking water.
Grilling in bottom oven
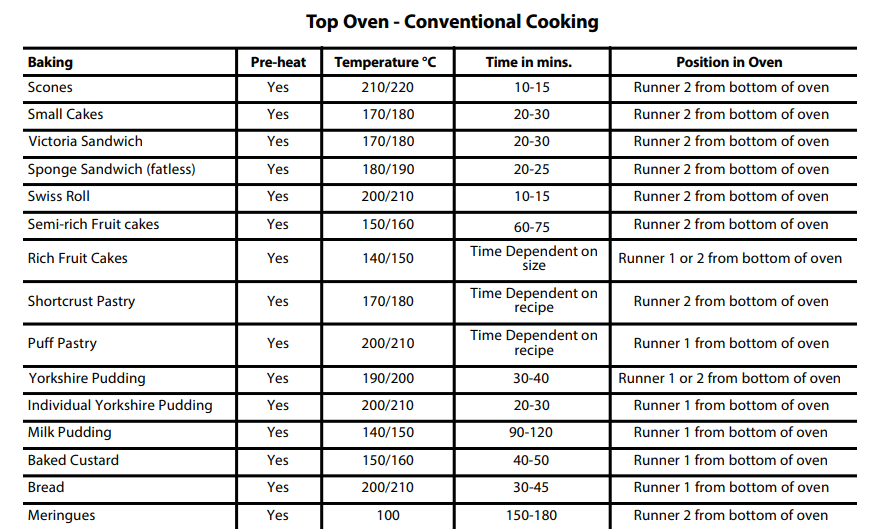
Top Oven Temperature Charts Baking
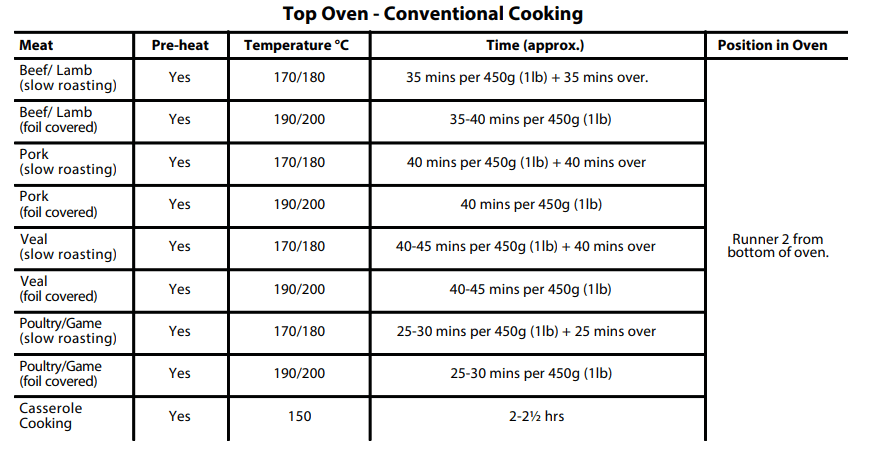
Top Oven Temperature Charts Meat
Care and Cleaning
Do not use steam cleaning equipment.
Use protective gloves during all operations.
Carry out the required operations with the oven cold.
Disconnect the appliance from the power supply.
Do not use wire wool, abrasive scourers or abrasive/ corrosive cleaning agents, as these could damage the surfaces of the appliance.
EXTERIOR SURFACES
Clean the surfaces with a damp microfibre cloth. If they are very dirty, add a few drops of pH-neutral detergent. Finish off with a dry cloth.
Do not use corrosive or abrasive detergents. If any of these products inadvertently comes into contact with the surfaces of the appliance, clean immediately with a damp microfibre cloth.
INTERIOR SURFACES
After every use, leave the oven to cool and then clean it, preferably while it is still warm, to remove any deposits or stains caused by food residues. To dry any condensation that has formed as a result of cooking foods with a high water content, allow the oven to cool completely and then wipe it with a cloth or sponge.
The door can be easily removed and refitted to facilitate cleaning of the glass.
Clean the glass in the door with a suitable liquid detergent.
ACCESSORIES
Soak the accessories in a washing-up liquid solution after use, handling them with oven gloves if they are still hot. Food residues can be removed using a washing-up brush or a sponge.
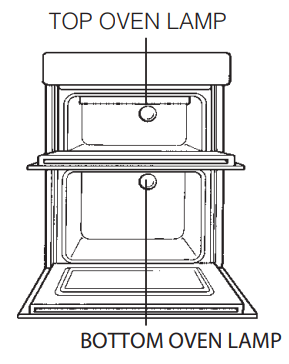
REPLACEMENT OF THE OVEN LAMP
Disconnect the oven from the power supply. Unscrew the cover from the light, replace the bulb (25W - 230V - T 300 °C - El 4) and screw the cover back on the light. Reconnect the oven to the power supply.
The bulb used in the product is specifically designed for domestic appliances and is not suitable for general room lighting within the home (EC Regulation 244/2009). Light bulbs are available from our After-sales Service.
If using halogen bulbs, do not handle them with your bare hands as your fingerprints could cause damage. Do not use the oven until the light cover has been refitted.
Catalitic Cleaning *
In some models, the most exposed internal vertical sides of the oven are coated with porous enamel, which is called catalytic enamel. When heated, this enamel destroys fat particles given off by the food. This „oxidation" of the fat particles occurs when the temperature of the sides exceeds 170°C. The porous quality of the catalytic enamel increases the surface area where the exchange vital to the oxidation of the fats takes place.
If there is still grime on the catalytic surfaces after the cooking programme has ended, leave the empty oven on with the door shut, turning the temperature adjustment knob to its maximum setting. Leave the oven like this for a period of time between 60 and 90 minutes, according to how much dirt was left inside. The cleaning process for more stubborn food residues may be quickened by using hot water and a soft brush.
*Only in some models
Troubleshooting
Any problems that arise or faults that occur can often be resolved easily.
Before contacting the After-sales Service, check the following table to see whether you can resolve the problem yourself.
If the problem persists, contact your nearest After-sales Service Centre.
PROBLEM
POSSIBLE CAUSE
REMEDY
The oven is not working
Power cut.
Disconnection from the mains. Malfunction
Check for the presence of mains electrical power and whether the oven is connected to the electricity supply. Turn off the oven and restart it to see if the problem persists
AFTER-SALES SERVICE
BEFORE CONTACTING OUR AFTER-SALES SERVICE
Check whether you can resolve the problem yourself using any of the measures described in the Troubleshooting section.
Turn off the oven and restart it to see if the problem persists.
To receive assistance, call the number given on the warranty leaflet enclosed with the product or follow the instructions on our website. Be prepared to provide:
a brief description of the problem;
the exact model type of your product;
the assistance code (the number following the word SERVICE on the identification plate attached to the product, which can be seen on the inside edge when the oven door is open);

 Fan Oven
 Conventional Oven
 Half Grill
 Full Grill
 Fan Grill
 Fan Only
 Light Only
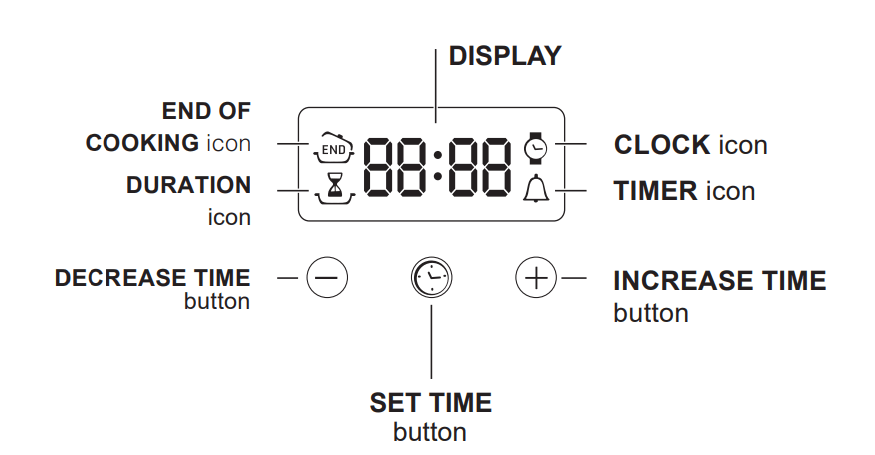
 icon and the four numerical digits on the DISPLAY will begin to flash.
 button several times until the
  icon and the three digits on the display begin to flash.
 icon and the three digits on the DISPLAY begin to flash.
 icon and the four digits on the DISPLAY begin to flash.