CITROËN
MULTISPACE
BERLINGO
Berlingo-2-VP_en_Chap00_couv-debut_ed01-2016
HANDBOOK
Berlingo-2-VP_en_Chap00_couv-debut_ed01-2016
On-line handbook
If the "MyCITROËN" function is not available on the CITROËN public website for your country,
youcanndyourhandbookatthefollowingaddress:
http://service.citroen.com/ddb/
FindyourhandbookontheCITROËNwebsite,under"MyCITROËN".
Select:
Selectoneofthefollowingmeansofaccessto
viewyourhandbookon-line...
Thispersonalandcustomisablespaceallowsyoutoestablishdirectandspecialcontactwiththe
manufacturer.
the language,
the vehicle, its body style,
theprinteditionofyourhandbookappropriateforthedateofregistrationofyourvehicle.
Scanthiscodefordirectaccesstoyourhandbook.
Referringtothehandbookon-linealsogivesyou
accesstothelatestinformationavailable,easily
identiedbythebookmark,associatedwiththis
symbol:
Berlingo-2-VP_en_Chap00a_Sommaire_ed01-2016
Welcome
CITROËN has a presence on every continent,
acompleteproductrange,
bringingtogethertechnologyandapermanentspiritofinnovation,
foramodernandcreativeapproachtomobility.
Wethankyouandcongratulateyouonyourchoice.
Happymotoring!
At the wheel of your new vehicle,
gettingtoknoweachsystem,
each control, each setting,
makesyourtrips,yourjourneys
morecomfortableandmoreenjoyable.

2
Contents
Berlingo-2-VP_en_Chap00a_Sommaire_ed01-2016
Key 18
Alarm 20
Doors 21
Tailgate 23
Rearroofap 26
Centrallocking 27
Instrumentpanel 28
Dateandtime 29
Warninglamps 32
Fuel gauge 40
Coolant 40
Under-ination
detection 41
Under-inationdetection
with reinitialisation 43
Serviceindicator 47
Lightingdimmer 48
Steeringwheeladjustment
49
Manualgearbox 49
Gear shift
indicator 50
6-speed electronic
gearbox 51
Stop & Start 53
Starting and stopping 55
Hill start assist 56
Drivingrecommendations 57
Lighting 58
Wipers 61
Tripcomputer 63
Cruise control 64
Speedlimiter 67
Heating/
Airconditioningmanual70
digital 72
Demistingand
defrosting 75
Frontseats 77
Rearbenchseat 79
Rear seats
(5 seat version) 82
Rear seats
(7seatversion) 85
Modularity 92
Frontttings 94
Modutoproof 98
Roof bars 103
Courtesylamps 104
Load space cover
(5 seat version) 105
Load space cover
(7seatversion) 109
Mirrors 111
Electric windows 113
3.
18-57
READY TO GO
5.
114-147
SAFETY
Exterior 5
Interior 6
left hand drive 6
righthanddrive 7
Instrumentsandcontrols 8
left hand drive 8
right hand drive 10
Technical data -
Maintenance 12
1.
4-14
OVERVIEW
Hazardwarninglamps 114
Horn 114
Parkingbrake 114
Parkingsensors 115
Reversingcamera 117
Anti-lockbraking
system(ABS) 118
EBA 118
ASRandDSC 119
Grip control 120
ActiveCityBrake 122
Seat belts 126
Airbags 129
Carrying children 133
Deactivating the passenger's
front airbag
136
Recommendedseats 139
Installation 141
ISOFIXmountings 143
Recommended
ISOFIX seat 144
ISOFIXlocations 145
Childlock 147
4.
58-113
EASE OF USE
and COMFORT
2.
15-17
ECO-DRIVING
Environment 15
Eco-driving 16
The "Visual search"
(visual index) section
assistsyouinndingthe
controls and functions
and their associated page
numbersontheschematic
outlinesofthevehicle.
Instrumentsandcontrols
left hand drive 13
right hand drive 14

3
Contents
CONTENTS
Berlingo-2-VP_en_Chap00a_Sommaire_ed01-2016
Corresponds to
a left hand drive
vehicle.
Corresponds to a
right hand drive
vehicle.
10.
201-286
TECHNOLOGY on
BOARD
6.
148-152
ACCESSORIES
7.
153-168
CHECKS
8.
169-191
QUICK HELP
7-inchtouch
screen tablet 201
Audiosystem 269
Towing a trailer 148
Towbar with detachable
swannecktowball 150
Other accessories 152
Opening the bonnet 154
Petrol engine 155
Diesel engine 156
Levels 157
Checks 159
Fuel 161
Fuel cut-off 162
Dieselprimingpump 162
BlueHDi and AdBlue
®
163
Battery 169
Temporarypuncture
repairkit 171
Changingawheel 172
Removablesnowscreen
178
Snowchains 179
Changing a bulb 180
a fuse 186
awiperblade 190
Beingtowed 191
9.
192-200
TECHNICAL
DATA
Dimensions 192
Engines 196
Weights 196
Identication
markings 200
The "Technology on board"
section presents the new
audio/navigationsystems.

4
Berlingo-2-VP_en_Chap01_vue-ensemble_ed01-2016
PRESENTATION
Withinthechapters,symbols
drawyourattentiontospecic
information:
directs you to the chapter and
section which contains detailed
informationconcerningafunction,
indicatesimportantinformation
relatingtouseoftheequipment,
alerts you to the safety of
individualsandequipmenton
board.
Foranyworkonyourvehicle,use
aqualiedworkshopthathasthe
technicalinformation,competenceand
equipmentrequired,whichaCITROËN
dealerisabletoprovide.
Theequipmentpresentedmaybe
standard, an option or not available,
dependingonthemodelandcanvary
fromonecountrytoanotherornotbe
availableinallcountriesofsale.
5
1
OVERVIEW
Location
Berlingo-2-VP_en_Chap01_vue-ensemble_ed01-2016
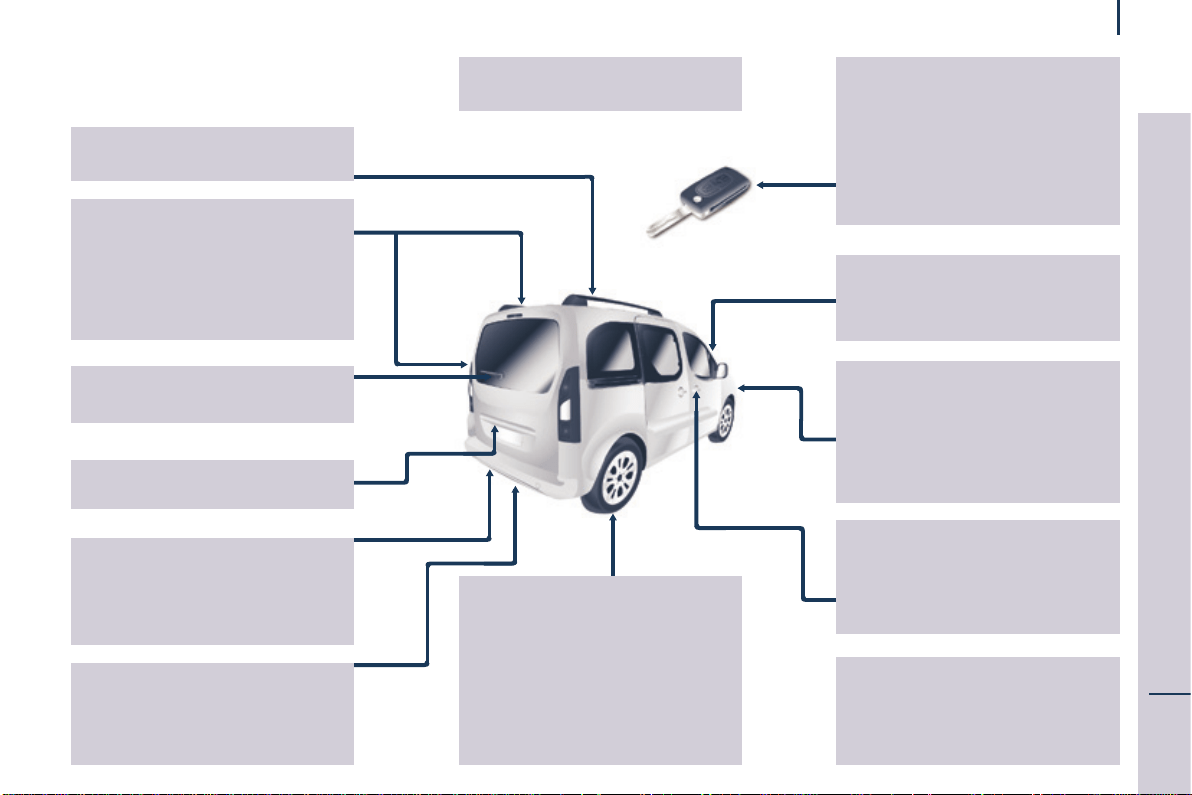
EXTERIOR
Remotecontrol 18-19
Changing the battery,
reinitialisation 19
Key 18
Starting 55
Hill start assist 56
Centrallocking/unlocking 18,27
Fillercap,fueltank 161-162
Fuelcut-off,Dieselpriming 162
AdBlue
®
,
toppingup 38-39,163-168
Wiperblades 190
Doormirrors 111
Side repeaters 183
ActiveCityBrake 122-125
Frontlamps,foglamps,direction
indicators 58-60, 180-183
Headlampbeamheight
adjustment 60
Changing front bulbs 180-183
Headlampwash 62,158
Snowcover 178
Front doors 21
Sliding side doors 22-23
Key 18
Opening the bonnet 154
Childlock 147
Towing,lifting 191
Towbar,swanneck
towball 148-151
Parkingsesnsors 115-116
Reversingcamera 117
Rearroofap 26
Emergencycontrol 23
Sparewheel,jack,changinga
wheel,tools 172-177
Temporarypuncturerepairkit 171
Ination,pressures 200
Modutoproof 98-99,102
Roof bars 103
Rearlamps,direction
indicators 58-59
3rdbrakelamp 185
Changing rear
bulbs 180-181, 184-185
Doors, tailgate 23-25
Accessories 152
Dimensions 192-195
Brakes,pads 114,157,159
Emergencybraking 118
ABS, EBFD 118
ASR,DSC 119
Grip control 120-121
ActiveCityBrake 122-125
Tyres, pressures 200
Snowchains 179
Tyreunder-inationdetection 41-42
Tyreunder-inationdetectionwith
reinitialisation 43-46
Numberplatelamps 185
6
Location
Berlingo-2-VP_en_Chap01_vue-ensemble_ed01-2016
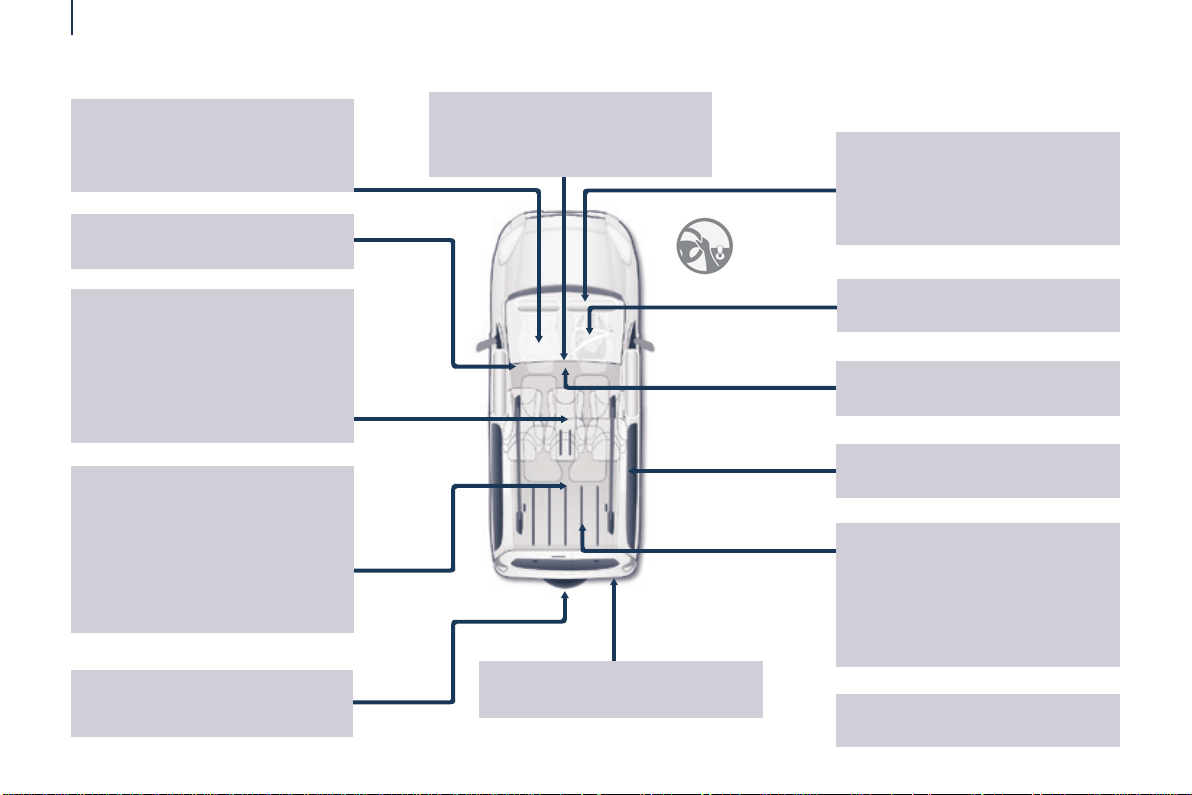
Rearviewmirror 112
Frontcourtesylamp 104
Changingcourtesylampbulbs183
Front, lateral , curtain
airbags 129-132
Deactivating the passenger's
front airbag 132, 136
Battery,charging,starting 169
Opening the bonnet 154
Rear windows 112
Frontseats,adjustments,head
restraint 77-78
Seat belts 108, 126-128
Accessories 152
INTERIOR
Rearbenchseat 79-81
Rear seats
(5-seatversion) 82-84,92
Seatconguration,benches 92-93
Rearcourtesylamp 104
Changingcourtesylampbulbs 183
Rearttings 97
- oorboxes,
- aircraft style table,
- side blinds,
Modutoproof 98-99
Scented air freshener 100-101
Load space cover (5-seat version)
105
Load space cover
(7-seatversion) 109-110
Child seats 133-142, 146
ISOFIXmountings,seats 143-145
Parkingbrake,handbrake 114
Rear seats
(7-seatversion) 85-91,93
Fittings(7-seatversion) 107-108
- cup holder,
- 12Vsocket,
- stowing rings,
- storageap.
Towing,llifting 191
Towableloads 196-199
Sparewheel,jack,changing
awheel,tools 172-177
7
1
OVERVIEW
Location
Berlingo-2-VP_en_Chap01_vue-ensemble_ed01-2016
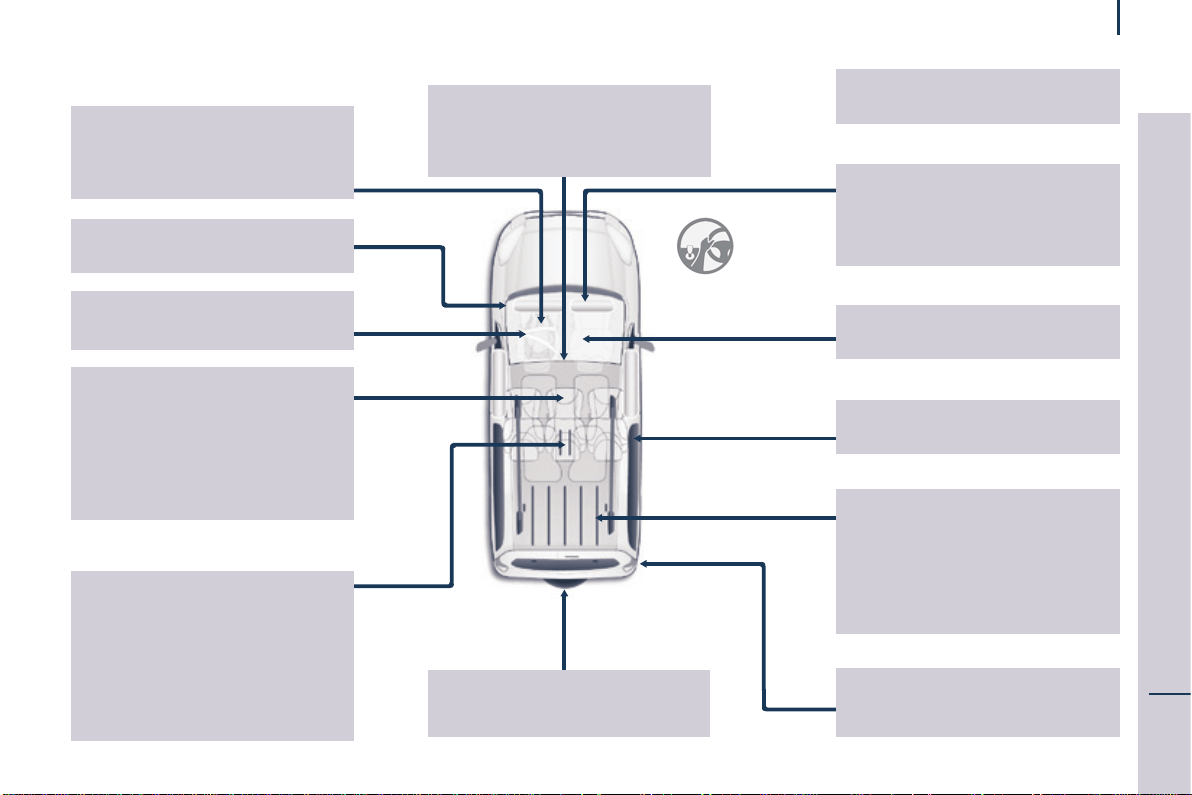
Rearviewmirror 112
Frontcourtesylamp 104
Changingcourtesylampbulbs183
Front, lateral , curtain
airbags 129-132
Deactivating the passenger's front
airbag 132, 136
Battery,charging,starting 169
Opening the bonnet 154
Rear windows 112
Frontseats,adjustments,head
restraint 77-78
Seat belts 108, 126-128
Accessories 152
INTERIOR
Rearbenchseat 79-81
Rear seats
(5-seatversion) 82-84,92
Seatconguration,benches 92-93
Rearcourtesylamp 104
Changingcourtesylampbulbs183
Rearttings 97
- oorboxes,
- aircraft style table,
- side blinds,
Modutoproof 98-99
Scented air freshener 100-101
Load space cover (5-seat version)
105
Load space cover
(7-seatversion) 109-110
Child seats 133-142, 146
ISOFIXmountings,seats 143-145
Parkingbrake,handbrake 114
Rear seats
(7-seatversion) 85-91,93
Fittings(7-seatversion) 107-108
- cup holder,
- 12Vsocket,
- stowing rings,
- storageap.
Towing,llifting 191
Towableloads 196-199
Sparewheel,jack,changinga
wheel,tools 172-177
8
Location
Berlingo-2-VP_en_Chap01_vue-ensemble_ed01-2016
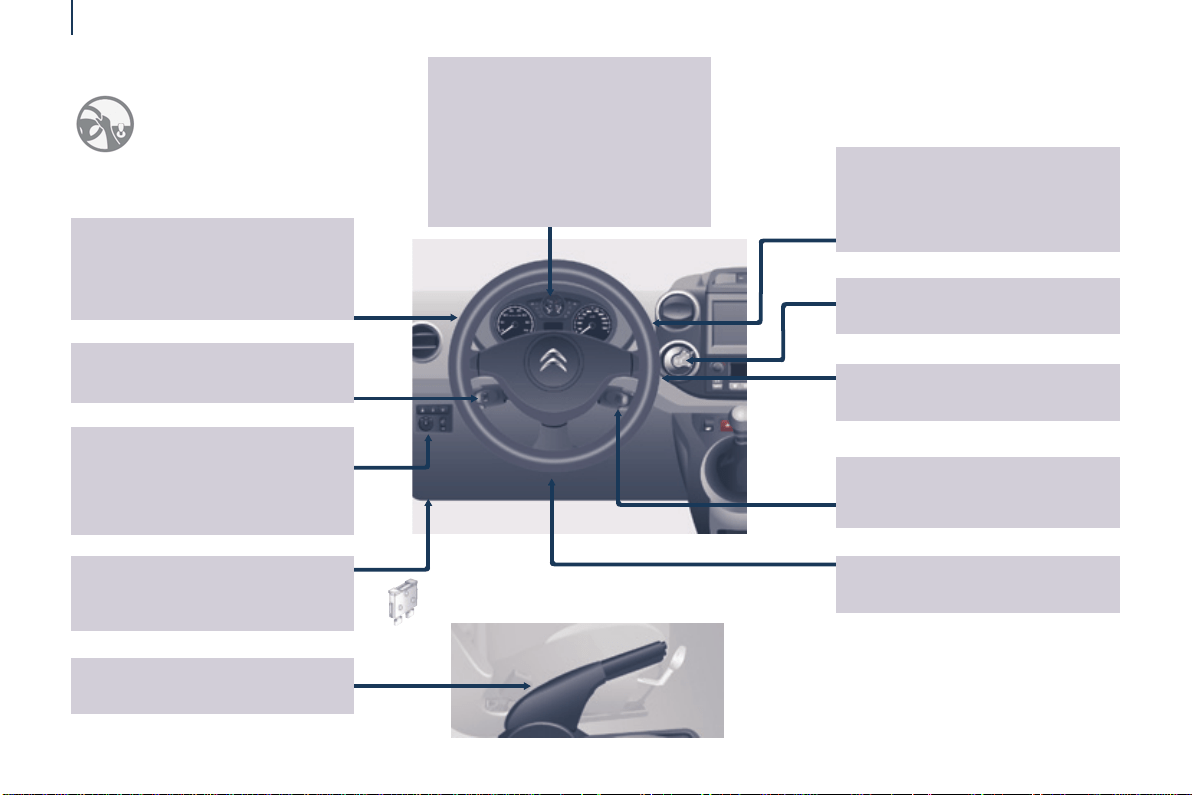
ASR-ESC 119
Parkingsensors 115-116
Electricmirrors 111
Headlampbeamheightadjustment
60
Stop & Start 53-55
Cruise control 64-66
Speedlimiter 67-69
Lighting 58-60
Foglamps 59
LEDdaytimerunninglamps 59
Automaticilluminationof
headlamps 59-60
INSTRUMENTS AND CONTROLS
Dashboard, passenger
compartmentfuses 186-188
Opening the bonnet 154
Parkingbrake 114
Instrumentpanels,screens,
dials 28-29
Settingthetimeintheinstrument
panel 29
Warninglamps,indicator
lamps 32-39
Indicators,fuelgauge 40,47-48
Lightingdimmer 48
Gear shift indicator 50
Wipers 61-62
Automaticrainsensitivewipers 61
Screenwash/headlamp
wash 62, 158
Tripcomputer 63
Steeringwheeladjustment 49
Horn 114
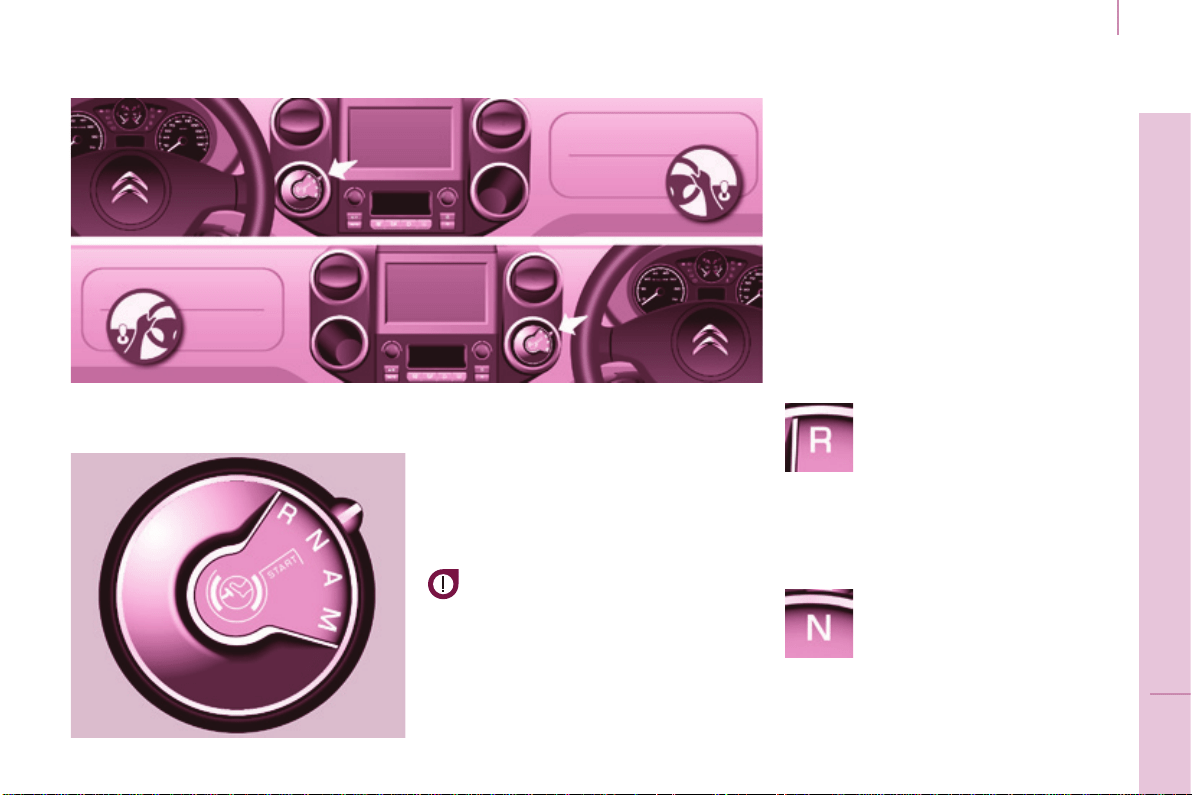
Ignition switch 55
6-speed electronic gearbox 51-52
Steeringmountedcontrols:
- Touch screen tablet 204
- Audiosystem 271

9
1
OVERVIEW
Location
Berlingo-2-VP_en_Chap01_vue-ensemble_ed01-2016
Rearviewmirror 112
Childsurveillancemirror 112
Screens,menus 28,205,272
Settingthetimein
the screen 30-31
Controls
- centrallocking 27
- electricchildlock 147
- electric windows 113
- hazardwarninglamps 114
Heating, ventilation
- heating 70-71,74
- airconditioningA/C 70-71,74
Digitalairconditioning 72-73,74
Demisting/defrosting 75-76
Courtesylamps 104,183
Frontttings 94-96
- storagecompartment.
- glove box,
- bottle holder,
- bag holder,
- centre console,
- overhead storage,
- sun visor,
- storage drawers,
Touch screen tablet 201-268
Audiosystem 269-286
Reversingcamera 117
Deactivating the passenger's
front airbag 132, 136
Manualgearbox 49
"Grip control" 120-121
10
Location
Berlingo-2-VP_en_Chap01_vue-ensemble_ed01-2016
INSTRUMENTS AND CONTROLS
Dashboard, passenger
compartmentfuses 186-188
Opening the bonnet 154
Frontttings 94-96
- storagecompartment.
- glove box,
- bottle holder,
- bag holder,
- centre console,
- overhead storage,
- sun visor,
- storage drawers,
Rearviewmirror 112
Childsurveillancemirror 112
Manualgearbox 49
Touch screen tablet 201-268
Audiosystem 269-286
Reversingcamera 117
Controls
- centrallocking 27
- electricchildlock 147
- electric windows 113
- hazardwarninglamps 114
"Grip control" 120-121
Heating, ventilation
- heating 70-71,74
- airconditioningA/C 70-71,74
Digitalairconditioning 72-73,74
Demisting/defrosting 75-76
Courtesylamps 104,183
Screens,menus 28,205,272
Settingthetimein
the screen 30-31
11
1
OVERVIEW
Location
Berlingo-2-VP_en_Chap01_vue-ensemble_ed01-2016
Cruise control 64-66
Speedlimiter 67-69
Lighting 58-60
Foglamps 59
LEDdaytimerunninglamps 59
Automaticilluminationof
headlamps 59-60
Parkingbrake 114
Instrumentpanels,screens,
dials 28-29
Settingthetimeintheinstrument
panel 29
Warninglamps,indicator
lamps 32-39
Indicators,fuelgauge 40,47-48
Lightingdimmer 48
Gear shift indicator 50
Steeringwheeladjustment 49
Horn 114
Ignition switch 55
Wipers 61-62
Automaticrainsensitivewipers 61
Screenwash/headlamp
wash 62, 158
Tripcomputer 63
Steeringmountedcontrols:
- Touch screen tablet 204
- Audiosystem 271
Deactivating the passenger's
front airbag 132, 136
ASR-ESC 119
Parkingsensors 115-116
Electricmirrors 111
Headlampbeamheightadjustment
60
Stop & Start 53-55
6-speed electronic gearbox 51-52
12
Location
Berlingo-2-VP_en_Chap01_vue-ensemble_ed01-2016
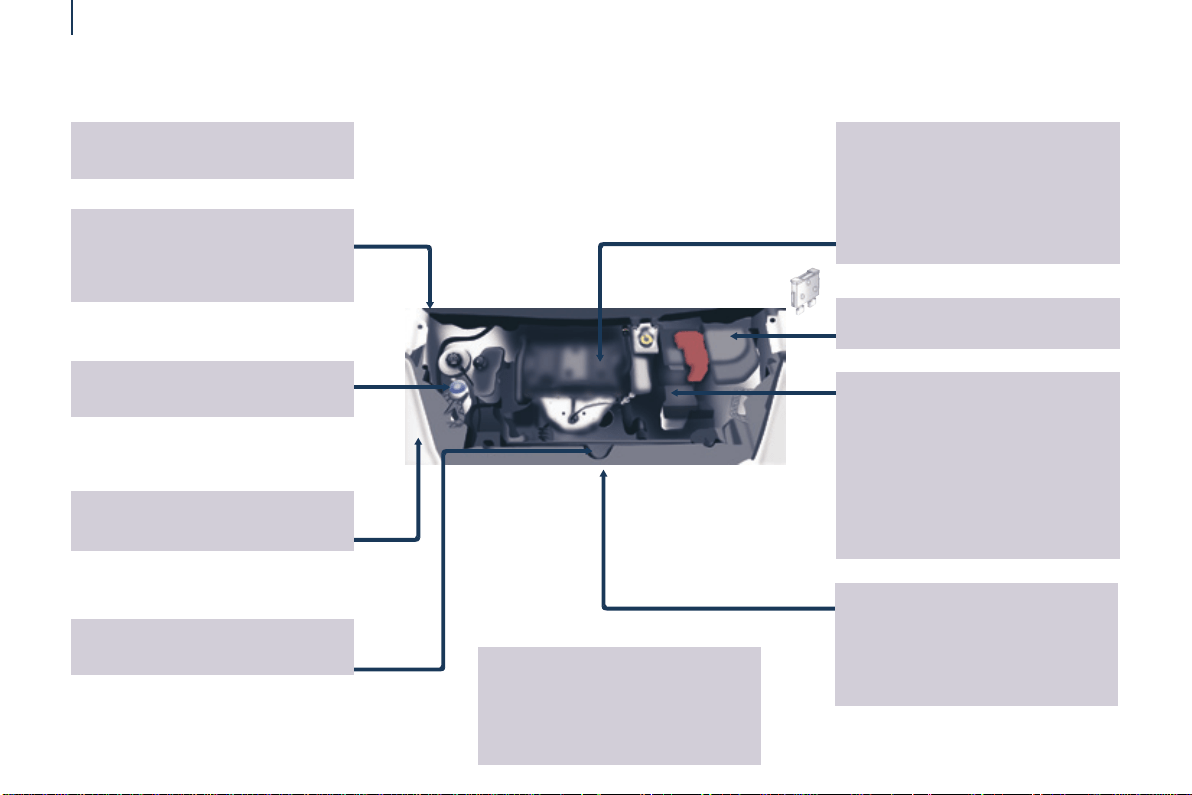
TECHNICAL DATA - MAINTENANCE
Identicationmarkings,serial
number,paintcode,tyres 200
Windscreen/headlampwash,
levels 158
Changing bulbs, lighting 180-185
Checks 159-160
- battery,
- brakepads,
- brakedrums,discs.
- parkingbrake,
-
carbon/passengercompartmentlter,
- oillter,
- particlelter,
- gearbox,
Emissionscontrol 41
Enginefuses 186,189
Opening the bonnet, stay 154
Levels 157-158
- engineoildipstick,
- brakeuid,
- coolant.
- powersteeringuid,
- Diesel additive,
Bleedingwater,Diesellter 160
Warninglamps 32-39
Under the bonnet
- Diesel 156
- petrol 155
Fuelcut-off,Dieselpriming 162
AdBlue
®
163-168
Dimensions 192-195
Petrolengines/weights 196-197
Dieselengines/
weights 196,198-199
13
1
OVERVIEW
Presentation
Berlingo-2-VP_en_Chap01_vue-ensemble_ed01-2016
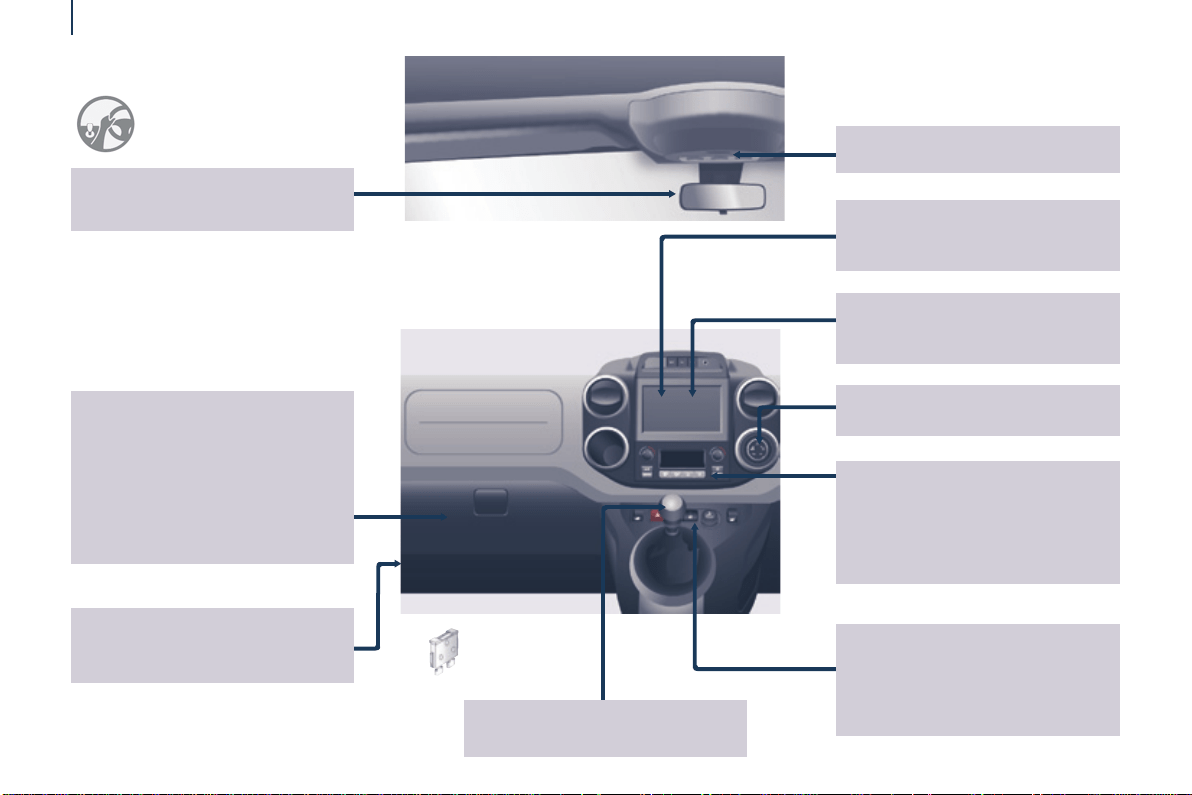
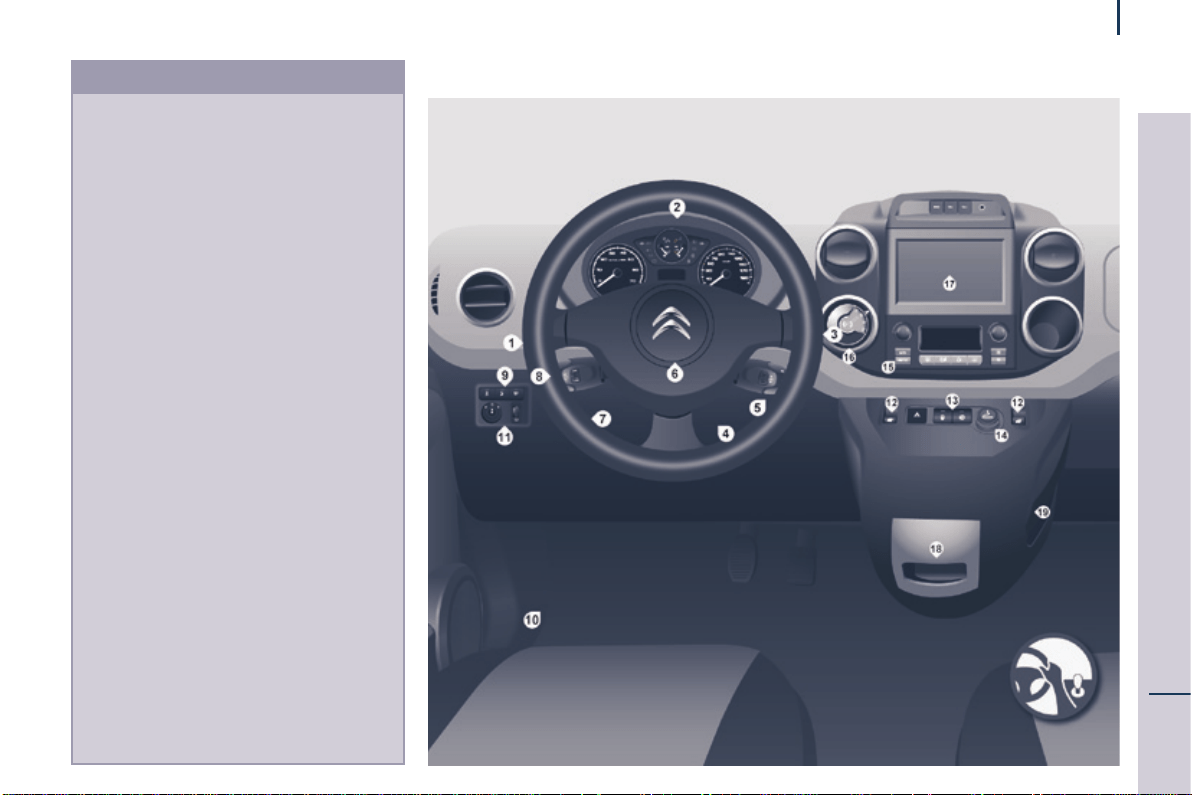
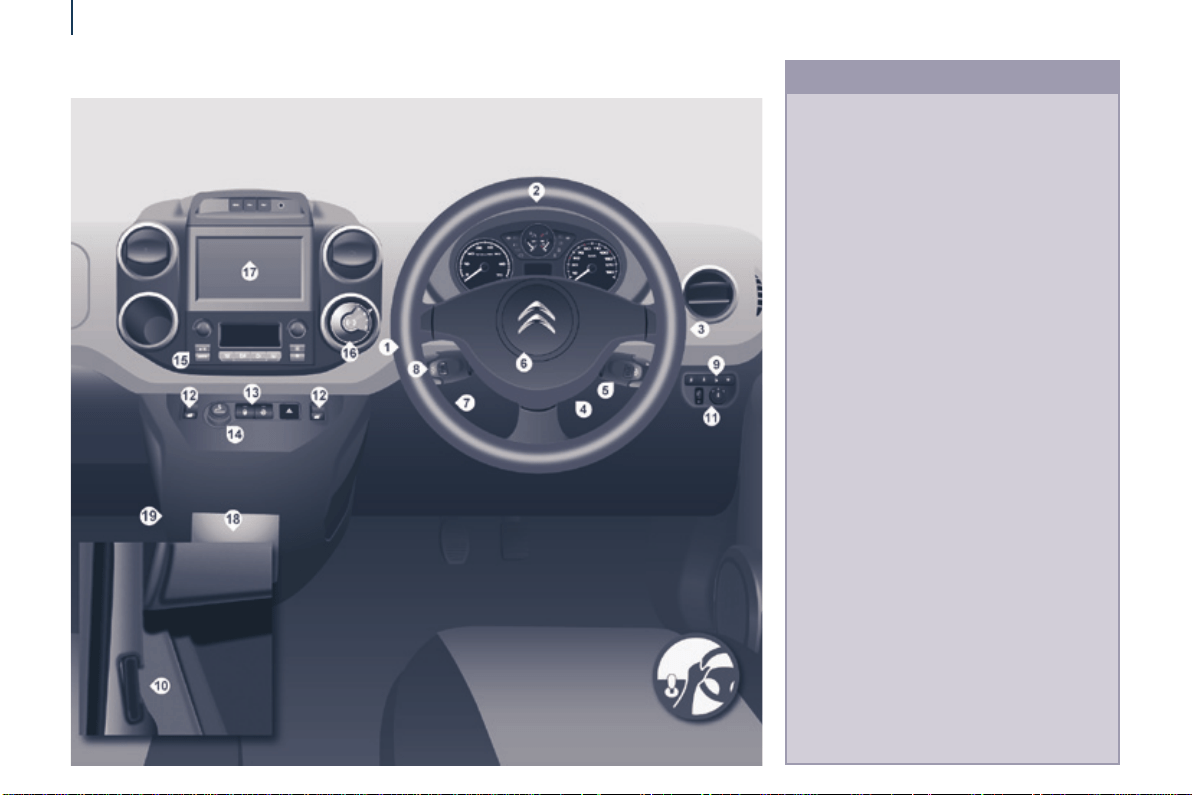
INSTRUMENTS AND CONTROLS
1. Lighting and direction indicator
stalk.
2. Instrumentpanelwithscreen.
3. Wipers,screenwash,tripcomputer
controlstalk.
4. Ignition.
5. Audiosystemcontrols.
6. Driver'sfrontairbag,horn.
7. Steering wheel height and reach
adjustment.
8. Cruisecontrol,speedlimiter
controls.
9. Switchpanel,parkingsensors,
headlampbeamadjustment,ESC,
Stop&Start.
10.Bonnetrelease.
11. Electricdoormirroradjustment.
12.Electricwindowswitches.
13.Switchpanel:hazardwarninglamps,
centrallocking,childlock.
14.Cigarettelighter.
15.Heating-ventilationcontrols.
16. Electronic gearbox controls or Grip
controlbutton.
17.TouchscreentabletScreen.
18.USBport(withelectronicgearbox).
19.USBport(withmanualgearbox).
14
Presentation
Berlingo-2-VP_en_Chap01_vue-ensemble_ed01-2016
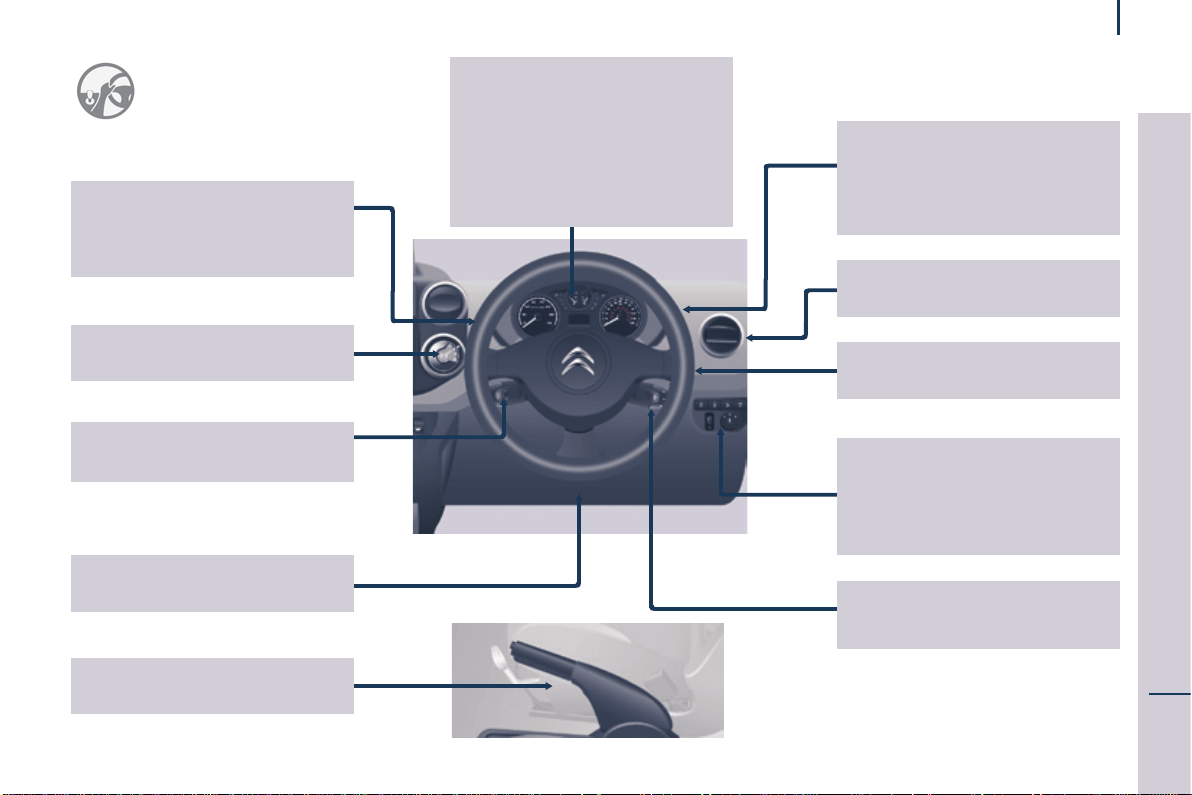
INSTRUMENTS AND CONTROLS
1. Lighting and direction indicator
controlstalk.
2. Instrumentpanelwithscreen.
3. Wiper,screenwash,tripcomputer
controlstalk.
4. Ignitionswitch.
5. Audiosystemcontrols.
6. Driver'sfrontairbag,horn.
7. Steering wheel height and reach
adjustment.
8. Cruisecontrol,speedlimiter
controls.
9. Switchpanel,parkingsensors,
headlampbeamadjustment,ESC,
Stop&Start,alarm.
10.Bonnetreleaselever.
11. Electricdoormirrorcontrols.
12.Electricwindowswitches.
13.Switchpanel:hazardwarning,central
locking,childlock.
14.Cigarettelighter.
15.Heating-ventilationcontrols.
16. Electronic gearbox controls or Grip
controlbutton.
17.Touchscreentablet.
18.USBport(withelectronicgearbox).
19.USBport(withmanualgearbox).
15
2
ECO-DRIVING
Motoring & the Environment
Berlingo-2-VP_en_Chap02_eco-conduite_ed01-2016
ENVIRONMENT
With you, CITROËN acts to protect the
environment.
We invite you to visit the
www.citroen.co.ukwebsite.
As the driver, you also can contribute
toprotectingtheenvironmentinthe
followingway:
- drivesmoothly,withoutfrequent
and harsh acceleration,
- observe the service intervals;
werecommendthatservicesare
carried out by a CITROËN dealer,
authorised to collect used batteries
anduids,
- in order to preserve the reliability
oftheengineandemissioncontrol
systems,donotuseengineoil
additives.
Refertoinformationoneco-driving
attheendofthissection.

16
Motoring & the Environment
Berlingo-2-VP_en_Chap02_eco-conduite_ed01-2016
Eco-driving is a range of everyday
practicesthatallowthemotoristto
optimisetheirfuelconsumptionand
CO
2
emissions.
Eco-driving
Optimise the use of your
gearbox
Withamanualgearbox,moveoff
gentlyandchangeupwithoutwaiting.
Duringaccelerationchangeupearly.
Withanautomaticorelectronic
gearbox,givepreferencetoautomatic
modeandavoidpressingthe
acceleratorpedalheavilyorsuddenly.
The gear shift indicator invites you
toengagethemostsuitablegear:as
soon as the indication is displayed in
theinstrumentpanel,followitstraight
away.
Forvehiclesttedwithanelectronic
orautomaticgearbox,thisindicator
appearsonlyinmanualmode.
Drive smoothly
Maintain a safe distance between
vehicles,useenginebrakingrather
thanthebrakepedal,andpressthe
acceleratorprogressively.These
practices contribute towards a
reductioninfuelconsumptionandCO
2
emissionsandalsohelptoreducethe
backgroundtrafcnoise.
Ifyourvehiclehascruisecontrol,make
useofthesystematspeedsabove
25mph(40km/h)whenthetrafcis
owingwell.
Control the use of your
electrical equipment
Switchoffthedemistingand
defrostingcontrols,ifnotautomatic.
Switch off the heated seat as soon as
possible.
Switchofftheheadlampsandfront
foglampswhentheleveloflightdoes
notrequiretheiruse.
Avoid running the engine before
movingoff,particularlyinwinter;your
vehiclewillwarmupmuchfaster
whiledriving.
As a passenger, if you avoid
connectingyourmultimediadevices
(lm,music,videogame...),you
willcontributetowardslimitingthe
consumptionofelectricalenergy,and
sooffuel.
Disconnect your portable devices
beforeleavingthevehicle.
Beforemovingoff,ifthepassenger
compartmentistoowarm,ventilateit
by opening the windows and air vents
beforeusingtheairconditioning.
Above30mph(50km/h),closethe
windowsandleavetheairventsopen.
Remembertomakeuseofequipment
thatcanhelpkeepthetemperature
inthepassengercompartmentdown
(sunroofandwindowblinds...).
Switch off the air conditioning, unless
ithasautomaticregulation,assoonas
thedesiredtemperatureisattained.

17
2
ECO-DRIVING
Motoring & the Environment
Berlingo-2-VP_en_Chap02_eco-conduite_ed01-2016
Limit the causes of excess
consumption
Spread loads throughout the vehicle;
placetheheaviestitemsinthebottom
of the boot, as close as possible to
therearseats.
Limittheloadscarriedinthe
vehicle and reduce wind resistance
(roofbars,roofrack,bicycle
carrier,trailer...).Usearoofboxin
preference.
Removeroofbarsandroofracks
afteruse.
Attheendofwinter,removesnow
tyresandretyoursummertyres.
Observe the recommendations
on maintenance
Checkthetyrepressuresregularly,
when cold, referring to the label in the
dooraperture,driver'sside.
Carryoutthischeckinparticular:
- beforealongjourney,
- at each change of season,
- afteralongperiodoutofuse.
Don't forget the spare wheel and the
tyresonanytrailerorcaravan.
Have your vehicle serviced regularly
(engineoil,oillter,airlter,passenger
compartmentlter...)andobservethe
scheduleofoperationsrecommended
inthemanufacturer'sserviceschedule.
With a BlueHDi Diesel engine, if the
SCRsystemisfaultyyourvehicle
becomespolluting;gotoaCITROËN
dealeroraqualiedworkshopwithout
delaytohavetheemissionsofnitrous
oxidesbroughtbacktothelegallevel.
When refuelling, do not continue after
the third cut-off of the nozzle to avoid
anyoverow.
At the wheel of your new vehicle,
itisonlyaftertherst1800miles
(3000kilometres)thatyouwillsee
thefuelconsumptionsettledowntoa
consistentaverage.

18
Access
Berlingo-2-VP_en_Chap03_Pret-a-partir_ed01-2016
Thislocksandunlocksthevehicle's
doors,opensandclosesthefuelller
cap, as well as starting and stopping
theengine.
KEY REMOTE CONTROL
Unlocking
Locking
Pressthisbuttontolockallof
yourvehicle'sdoors.
Thedirectionindicatorsashonce.
If one of the doors is open or is not
closedcorrectly,thecentrallockingwill
notwork.
Deadlocking
A second press on the closed
padlockontheremotecontrolwithin
vesecondsafterlockingchangesthe
lockingtodeadlocking.
Thisisconrmedbyxedlighting
of the direction indicators for
approximatelytwoseconds.
Deadlockingrenderstheexterior
and interior door opening handles
inoperative:donotleaveanyoneinside
thevehiclewhenitisdeadlocked.
Ifdeadlockingisactivatedfrominside
thevehicleusingtheremotecontrol,it
willchangetonormallockingwhenthe
vehicleisstarted.
Pressthisbuttontounlockall
ofyourvehicle'sdoors.
Thedirectionindicatorsashtwice.
19
Access
READY TO GO
3
Berlingo-2-VP_en_Chap03_Pret-a-partir_ed01-2016
Good practice
Takecarenottoallowtheremote
controltocomeintocontactwith
grease,dust,rainoradamp
environment.
Aheavyobjectattachedtothekey
(keyring,...)weighingontheshaft
ofthekeyintheswitch,maycausea
malfunction.
REMOTE CONTROL
Reinitialising the remote
control
Followingchangingoftheremote
control battery or disconnection of the
vehiclebattery,theremotecontrolmay
havetobereinitialised.
Waitatleastoneminutebeforeusing
theremotecontrol.
Insertthekeyintheignitionswitchwith
thebuttons(padlocks)oftheremote
controlfacingyou.
Switchontheignition.
Pressthelockingpadlockforat
leastvesecondswithinthenext
tenseconds.
Switchofftheignition.
Waitatleastoneminutebeforeusing
theremotecontrol.
Theremotecontrolisnowworking
again.
Use only identical batteries or
batteries of an equivalent type to
thoserecommendedbyCITROËN
dealers.
Donotdiscardtheremotecontrol
batteries,theycontainmetalswhich
areharmfultotheenvironment.
DepositthemataCITROËN
dealership, or at an authorised
collectionpoint.
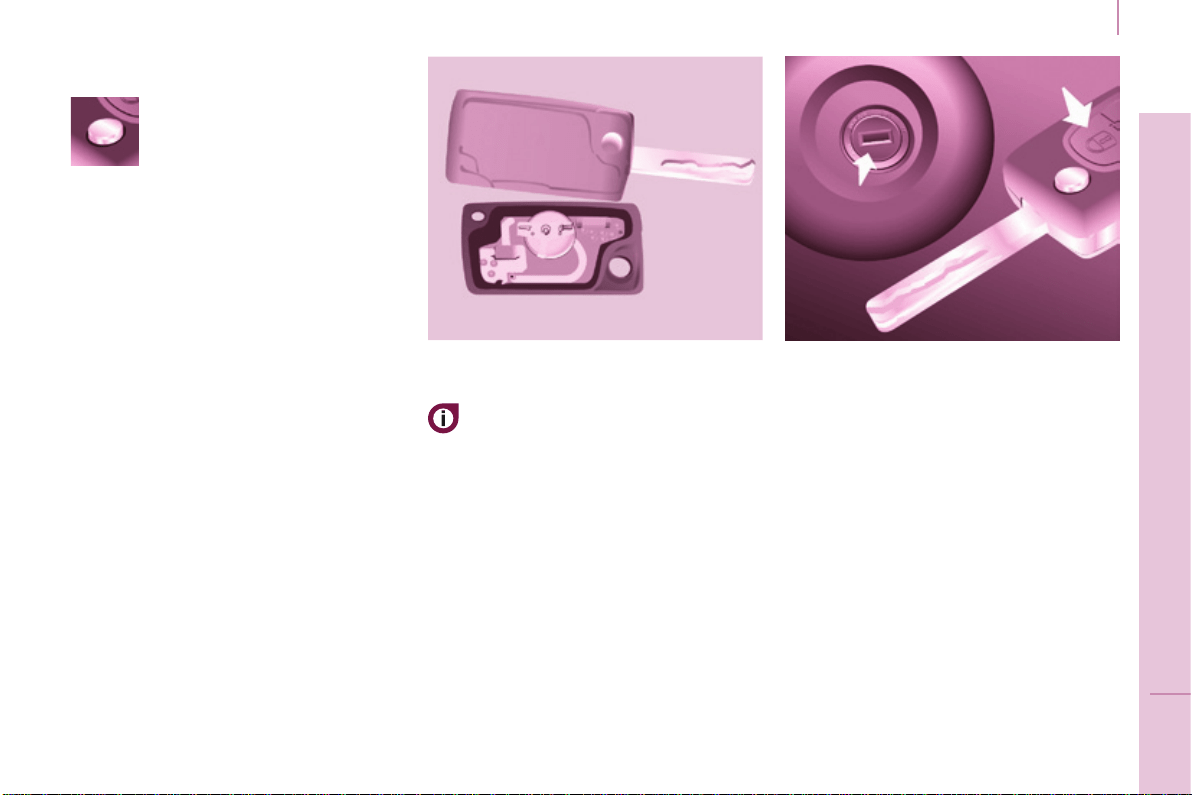
Unfolding / folding
Changing the battery
Batteryref.:CR1620/3volts.
The"batteryat"informationisgiven
byanaudiblesignal,accompaniedby
amessageinthescreen.
To replace the battery, unclip the
casingusingacoinatthering.
Iftheremotecontroldoesnotwork
after the battery has been changed,
reinitialisetheremotecontrol.
Thereisariskofdamageifthe
replacementbatteryisnotthecorrect
type.
If you do not press the button,
youmaydamagethekey's
foldingmechanism.
20
Access
Berlingo-2-VP_en_Chap03_Pret-a-partir_ed01-2016
Don't forget
Whenleavingthevehicle,checkthat
the lighting is off and nothing of value
isvisible.
As a safety precaution (with children
onboard),removethekeyfromthe
ignition when leaving the vehicle, even
forashorttime.
Good practice
Donotmakeanymodicationstothe
electronicimmobilisersystem.
Operatingtheremotecontrol,even
whenitisinyourpocket,mayresultin
involuntaryunlockingofthedoors.
Thesimultaneoususeofother
highfrequencyequipment(mobile
telephones,domesticalarms…),may
interfere with the operation of the
remotecontroltemporarily.
Theremotecontroldoesnotoperate
whilethekeyisintheignition,evenif
theignitionisoff.
ELECTRONIC
IMMOBILISER
If you lose your keys
Visit a CITROËN dealer with the
vehicle'sV5registrationcerticateand
youridenticationdocument.
A CITROËN dealer will be able
toretrievethekeycodeand
the transponder code so that a
replacementkeycanbeordered.
When purchasing a second-hand
vehicle,havethekeysmemorisedby
a CITROËN dealer, so as to be sure
thatthekeysinyourpossessionare
the only ones that can be used to start
thevehicle.
ALARM
Ifttedonyourvehicle,thisprovides
twotypesofprotection:
- exteriorprotection:itsoundsifa
front/reardoororthebonnetis
opened.
- interiorprotection:itsoundsif
thevolumeinsidethepassenger
compartmentchanges(breakingof
awindoworamovementinsidethe
vehicle).
Ifyourvehicleisttedwithaseparation
partition, the interior protection is not
activeintheloadspace.
Locking the vehicle with
complete alarm
Setting the alarm
- Switch off the ignition and get out of
thevehicle.
- Setthealarmwithinveminutesof
gettingoutofthevehicle,bylocking
ordeadlockingusingtheremote
control.TheredLED,locatedinthe
button,ashesoncepersecond.
Allofthekeyscontainanelectronic
immobiliserdevice.
Thisdevicelockstheenginesupply
system.Itisactivatedautomatically
whenthekeyisremovedfromthe
ignition.
After the ignition is switched on, a
dialogueisestablishedbetweenthekey
andtheelectronicimmobilisersystem.
Themetalpartofthekeymustbe
unfolded correctly for correct dialogue
totakeplace.
21
Access
READY TO GO
3
Berlingo-2-VP_en_Chap03_Pret-a-partir_ed01-2016
FRONT DOORS
From the inside
Usethedooropeningcontroltounlock
andopenthedoorconcerned.
From the outside
Usetheremotecontroltolock/unlock
thevehicle.
Insertthemetalpartofthekeyinthe
lockonthedriver'ssideiftheremote
controldoesnotwork.
Disarming
- Unlockthevehiclewiththeremote
control or switch on the ignition, the
redLEDgoesoff.
Locking the vehicle with
exterior protection only
If,whileyouareawayfromthevehicle,
you wish to leave a window partially
open or a pet inside the vehicle, you
shouldchooseexteriorprotectiononly.
- Switchofftheignition.
-
In the next ten seconds,
press the button until the
redLEDisoncontinuously.
- Getoutofthevehicle.
- Withinthenextveminutes,set
thealarmbylockingordeadlocking
usingtheremotecontrol(thered
LEDashesonceasecond).
Triggering
The siren sounds, the direction indicators
ashforapproximately30secondsand
theredLEDashesrapidly.
-
Toswitchitoff,insertthekeyand
switchontheignition.
Whenthealarmhasbeentriggeredten
timesinsuccession(whentriggeredforthe
eleventhtime)itisdeactivated.Repeatthe
procedureforsettingthealarm.
Locking the vehicle without
alarm
- Insertthekeyinthelockonthe
driver'sdoorandlockit.
Donotsetthealarmwhenwashing
yourvehicle.
Failure of the remote control
Whenthealarmissetbuttheremote
controldoesnotoperate:
-
Unlockthedoorswiththekeyand
openthedoor.Thealarmistriggered.
- Switch on the ignition in the
nexttenseconds.Thealarmis
disarmed.
Incorrect operation
When the ignition is switched on, if the
redLEDremainsonfortenseconds,
thereisafaultinthesirenconnection.
Contact a CITROËN dealer to have the
systemchecked.
Automatic setting of the alarm
Depending on the country in which
thevehicleissold,thealarmisset
automaticallyapproximately2minutes
afterthelastdoorisclosed.
Topreventtriggeringofthealarmwhen
a door is opened, you have to press
theremotecontrolunlockingbutton
again.
Donotmakeanymodications
tothealarmsystemasthiscould
causefaults.
22
Access
Berlingo-2-VP_en_Chap03_Pret-a-partir_ed01-2016
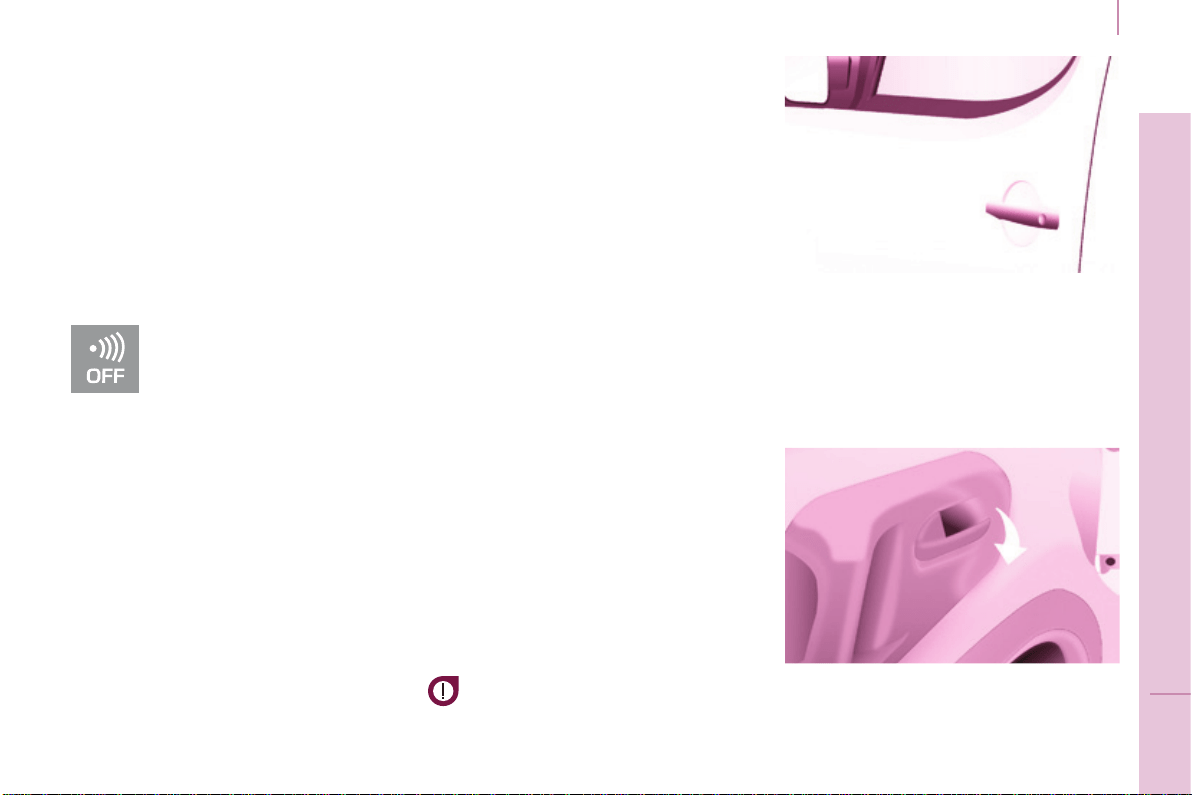
SLIDING SIDE DOORS
From the outside
Pull the handle towards you then
towards the rear and open the side
door guiding the rearward sliding to
beyond the point of resistance to hold
itopen.
Amechanicalsystempreventsopening
of the left-hand side door when the fuel
llerapisopen.
From the inside
Unlockthesidedoorusingthishandle
and open it, guiding the rearward
slidingtothepointofresistance.Pass
thispointtoholdthedooropen.
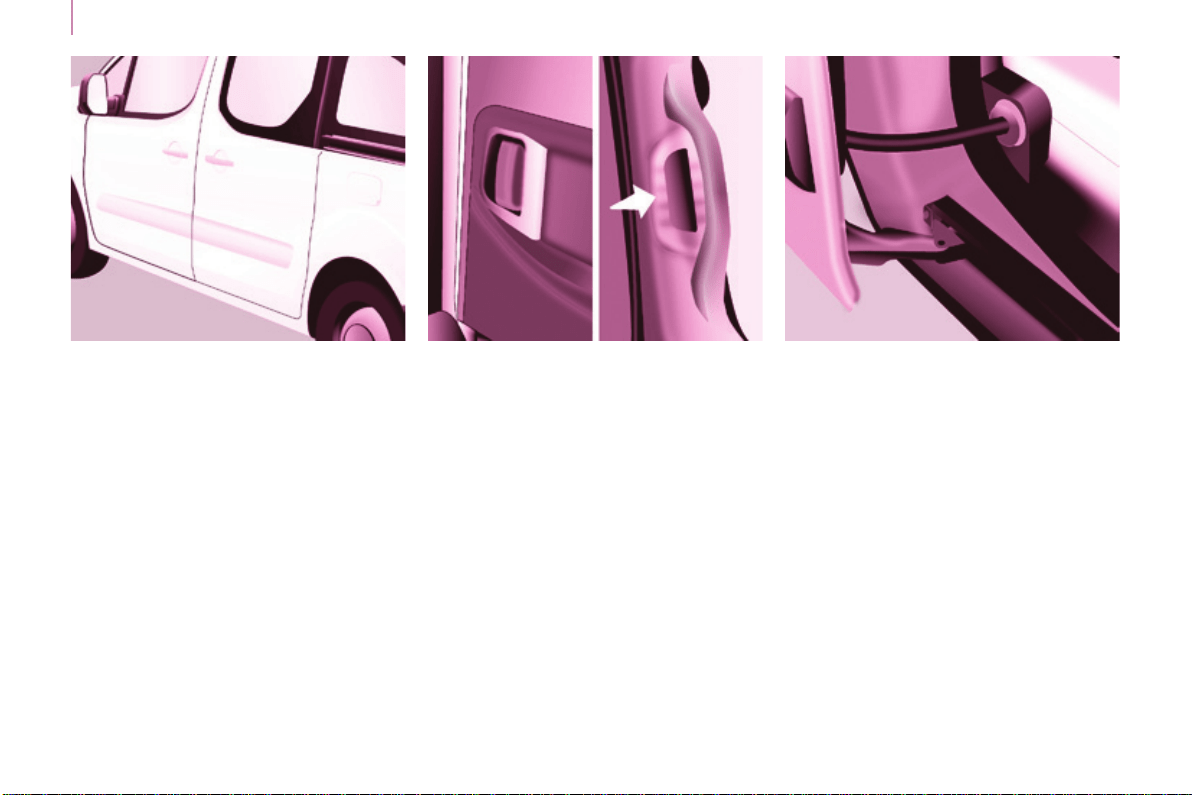
Close the side door using the handle
to start the sliding and pass the point
ofresistance.Then,usetheshaped
recess at the top of the door pillar to
guidethedooruntilitlocks.
Do not use the grab handle to slide the
door.
Good practice
Takecarenottoblocktheguidespace
ontheoortoallowthedoortoslide
correctly.
Ifyourvehicleisparkedonaslope,
guidetheslidingofthesidedoor.In
fact,thedoorcouldopenorclosemore
rapidly due to the slope of the ground
andcouldcauseinjury.
For safety and operation reasons, do
not drive with the sliding side doors
open.
23
Access
READY TO GO
3
Berlingo-2-VP_en_Chap03_Pret-a-partir_ed01-2016
Operation in the event
of a battery failure
Front and side passenger doors
In the event of a battery or of the
centrallockingfault,usethelockto
lockthedoorsmechanically.
- To open the door and get out of the
vehicle,pulltheinteriorcontrol.
- Tolockthedoor,insertthekeyin
thelock,locatedontheedgeofthe
door, then turn it one eighth of a
turn.
Driver's door
- Insertthekeyinthelock,thenturn
ittotherighttolockortotheleftto
unlock.
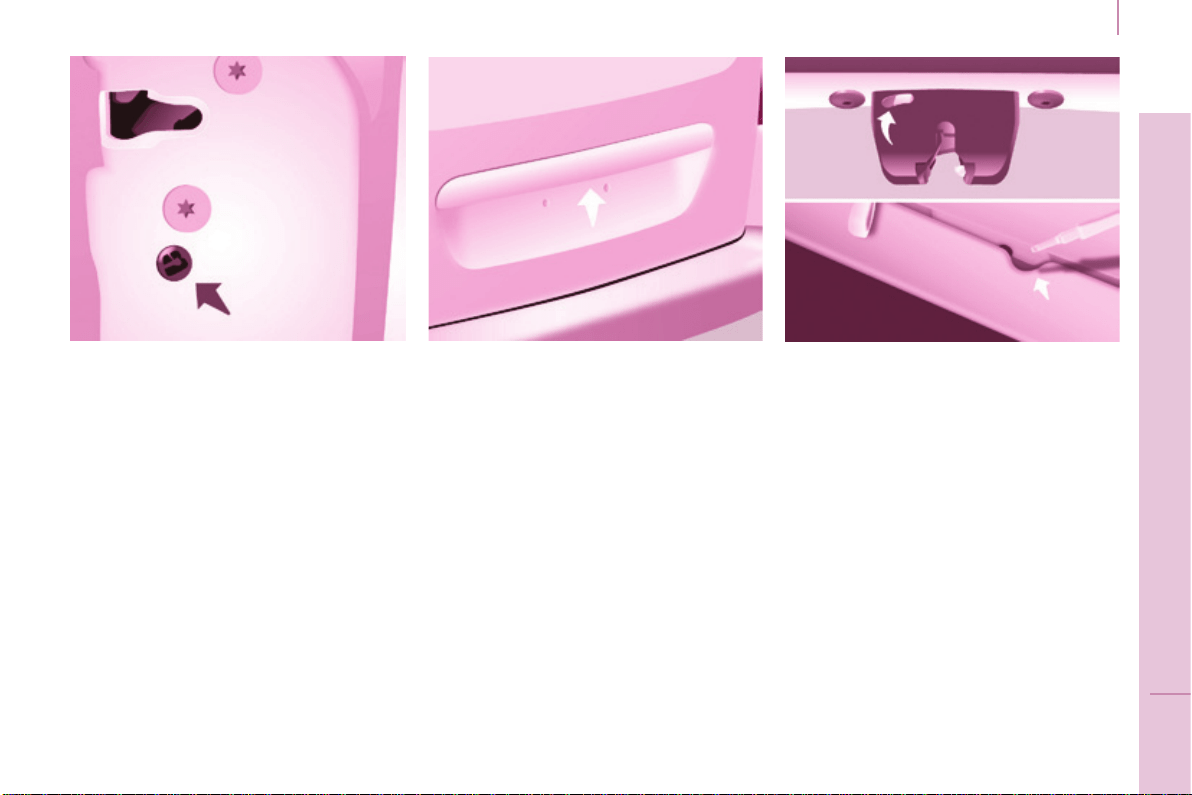
TAILGATE
From inside
(emergency control)
Intheeventofacentralunlocking
operatingfault,thispermitsunlocking
ofthetailgatefromtheinside.
Insertasmallscrewdriverinthe
opening, between the tailgate and the
oor.Tounlockthelock,movethe
catchtotheleftthenpushthetailgate.
Opening
From outside
Locking/unlockingisbymeansofthe
remotecontrol.
To open, press the control below the
trimthenraisethetailgate.
A pull strap is available to close the
tailgatefromthehighposition.
Guide the closing of the tailgate to the
balance point of its travel then push on
thetailgatetocloseitfully.
24
Access
Berlingo-2-VP_en_Chap03_Pret-a-partir_ed01-2016
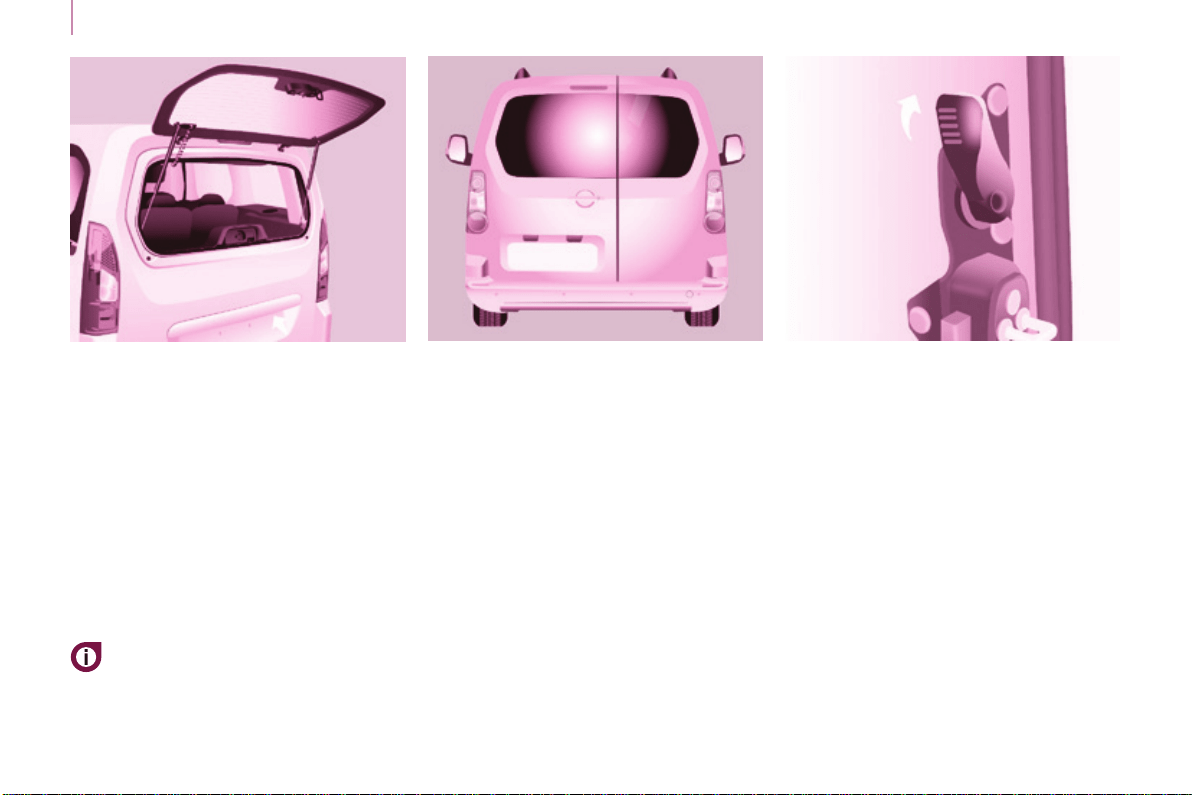
HINGED REAR DOORS
From outside
Toopen,pullthehandletowardsyou.
Pull the lever to open the right-hand
door.
To close, start with the right-hand door
thenclosetheleft-handdoor.
Withtheroofrearap,therearbumper
has been reinforced to serve as a
footrestwhenenteringthevehicle.
The hinged rear doors are
asymmetrical(2/3-1/3),withthe
smallerdoorontheright.
Theyarettedwithacentrallock.
Tailgate screen
The opening rear screen allows you to
access the rear of the vehicle directly,
withouthavingtoopenthetailgate.
Opening
Afterunlockingthevehicleusingthe
remotecontrolorthekey,pressthe
control and raise the rear screen to
openit.
Closing
Close the rear screen by pressing
the centre of the glass until it is fully
closed.
The tailgate and tailgate screen
cannot both be open at the
sametime,topreventdamageto
thescreen.
25
Access
READY TO GO
3
Berlingo-2-VP_en_Chap03_Pret-a-partir_ed01-2016
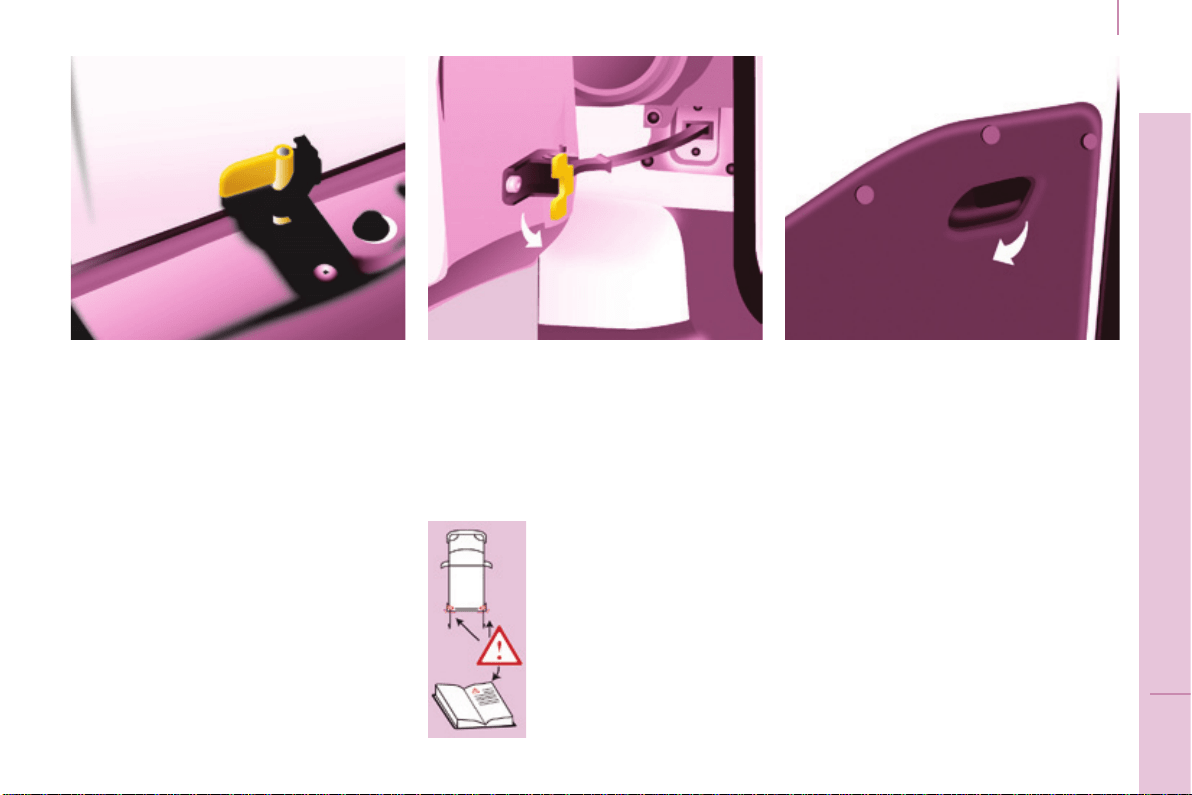
In practice
It is possible to drive with the right-
handdooropentomakeiteasierto
carrylongloads.Theleft-handdooris
keptclosedbythedistinctive"yellow"
lock,positionedatthebaseofthedoor.
Thiscloseddoormustnotbeusedas
aloadretainer.
Driving with the right-hand door open
isaspecialdispensation.Complywith
the usual safety indications to warn
otherdrivers.
From inside
When present on the vehicle, pulling
this handle towards you opens the left-
handdoor.
Opening to approximately 180°
Acheckstrapsystempermitsextension
oftheopeningfromapproximately90°
toapproximately180°.
Pull the yellow control when the door is
open.
Thecheckstrapwillengageagain
automaticallyonclosing.
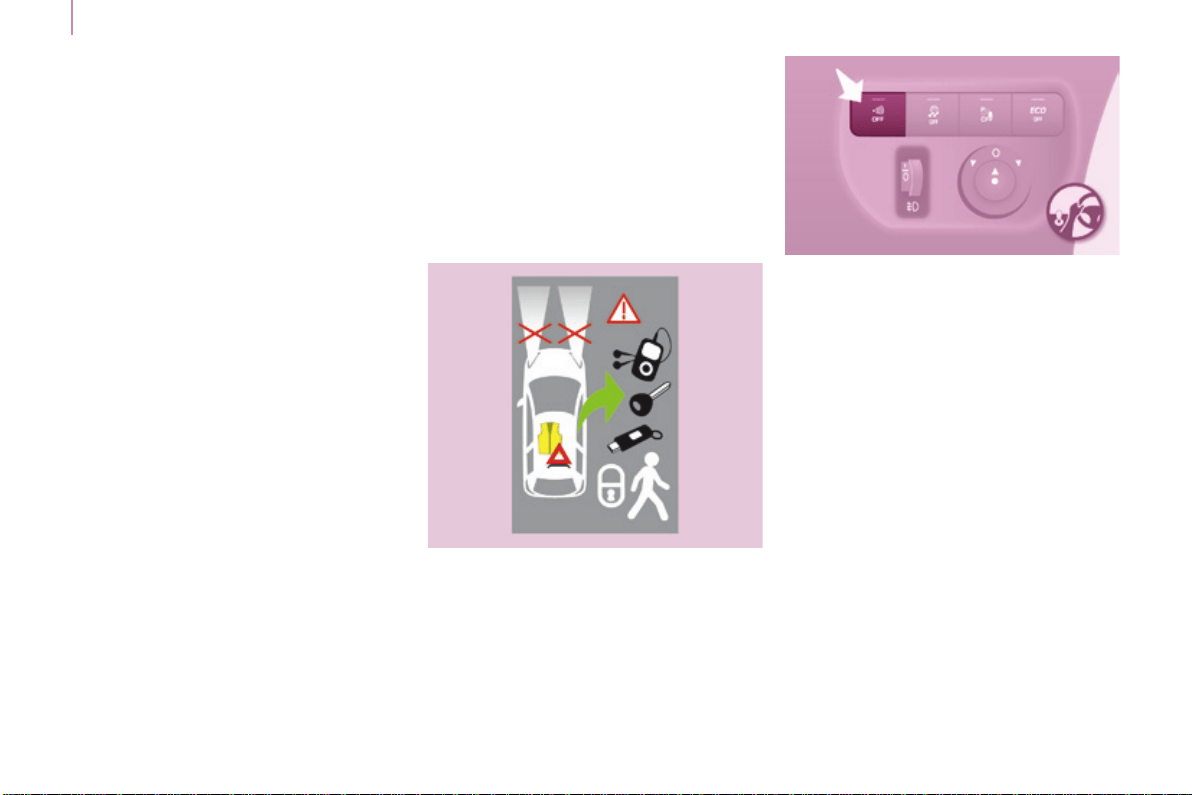
Whenparkedwiththe
reardoorsopento90°,
thedoorsmasktherear
lamps.Tosignalyour
position to other road
usersdrivinginthesame
directionwhomaynot
have seen your vehicle,
use a warning triangle
or other device required
by the legislation in your
country.
26
Access
Berlingo-2-VP_en_Chap03_Pret-a-partir_ed01-2016
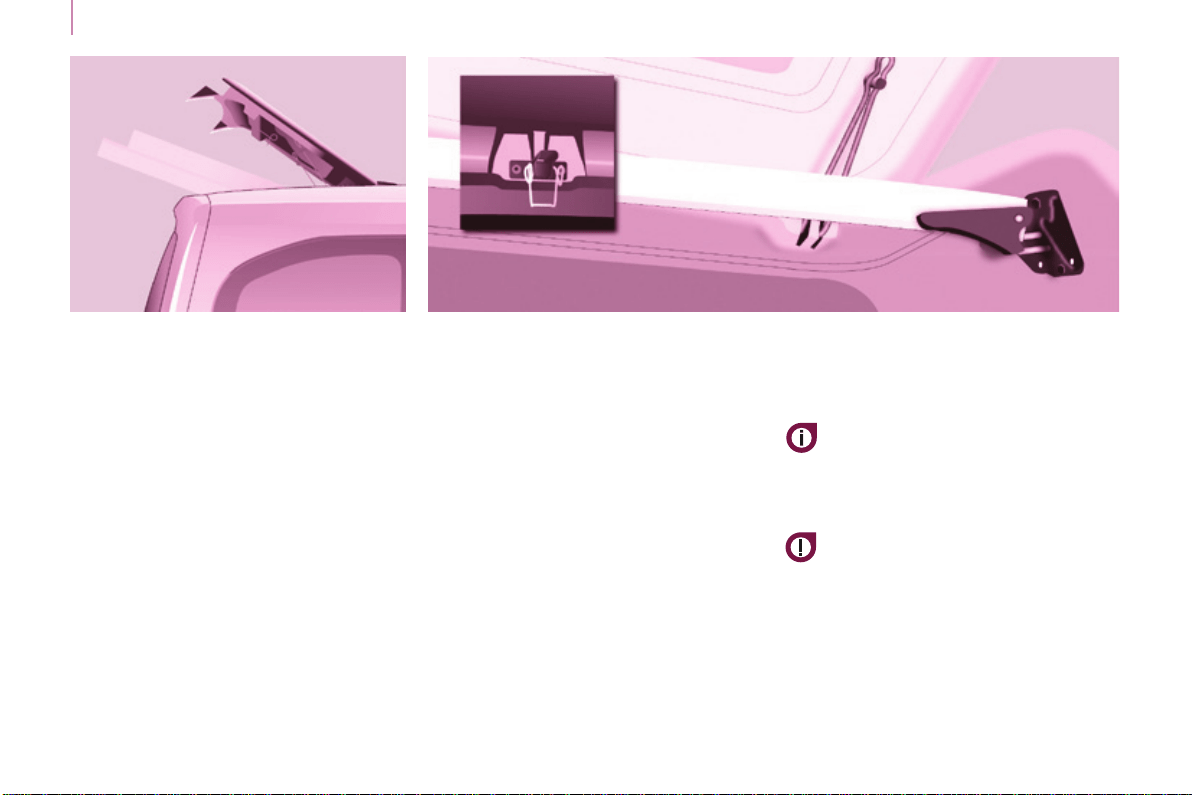
REAR ROOF FLAP
Support bar
A support bar is provided for
transporting long loads, after opening
therearroofap.
Foldbackthesupportbarbyliftingthe
lever.
Guideittothedoorpillar.
Support the long loads to be
transported,liftthemandrepositionthe
supportbarwithonehand.
Ensure that it is secured correctly by
pressing the handle downwards past
the point of resistance and secure the
loadsrmly.
Therearbumperhasbeen
reinforced to serve as a footrest
whenenteringthevehicle.
Thereardoorsonlylockwhenthe
supportbarisinstalled.
Whentherearroofapisopen,take
care when driving where height is
restricted.
Never rest loads directly on the rear
doors.
Complywiththeusualindications,to
warnotherdrivers.
Reservetheuseoftherearroofap
forshortjourneys.
The side supports can be used as
hookingpoints.
- lowertheblackpaddletosecure
therearroofap.
Securingtherearroofapplacesiton
the seal correctly and ensures sealing
withoutnoise.
Thisrearroofapisonlycompatible
withside-hingedreardoors.
Toopentherearroofap:
- raisetheblackpaddleofthetoggle,
- relieve the toggle by pressing the
rearroofap(downwards)then
releasethehook,
- lifttherearroofap,
- pass the point of resistance to
securetherearroofapusingthe
supportstays.
Neverdrivewithoutthestaysinplace.
Toclosetherearroofap:
- checkthatthesupportbaris
secured correctly,
- lowertherearroofap,
- whilepressingtherearroofap
(downwards),takeholdofthe
two loops of the spring then place
thehookinitshousing,
Never attach any load to the rear roof
ap.
Never drive without the support bar in
place.
27
Access
READY TO GO
3
Berlingo-2-VP_en_Chap03_Pret-a-partir_ed01-2016
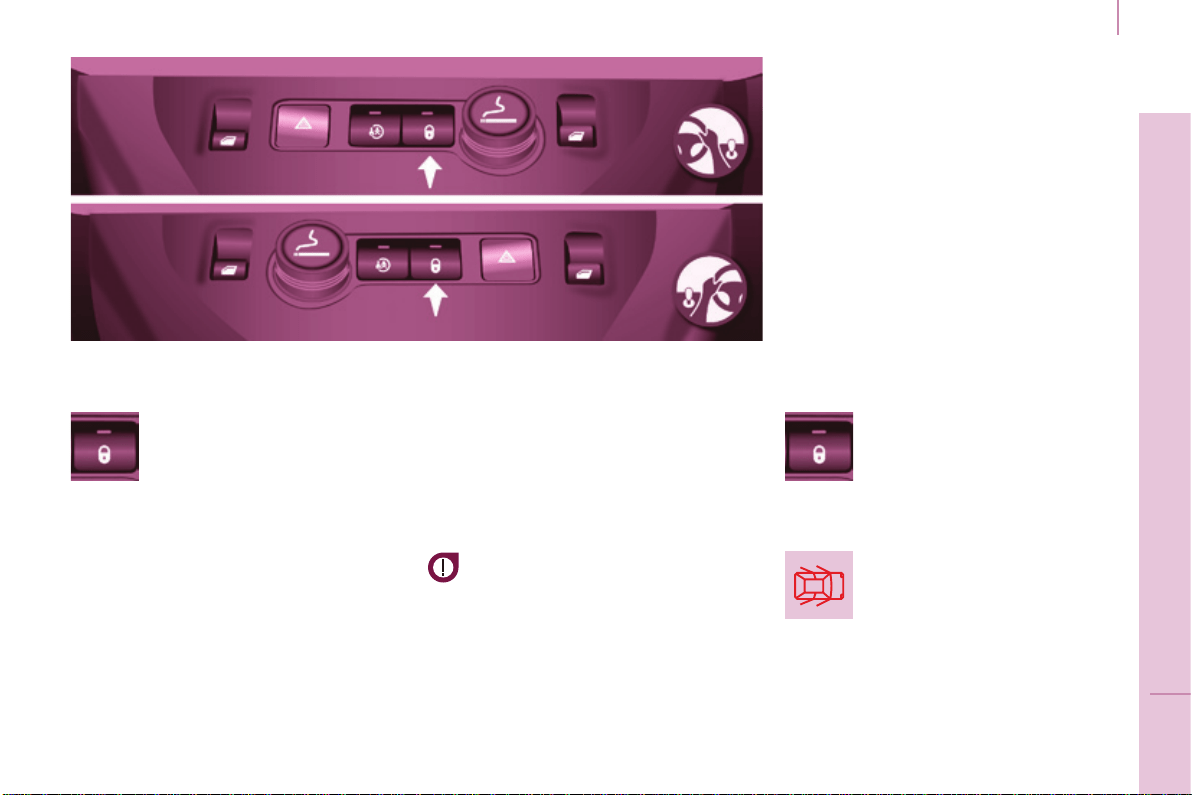
CENTRAL LOCKING
Aninitialpresspermits
centrallockingofthevehicle,
when all of the doors are
closed.
Door open warning lamp
ThecontrolswitchLED:
- asheswhenthedoorsarelocked
with the vehicle stationary and the
engine off,
- comesonwhenthedoorsare
lockedandfromthetimethe
ignitionisswitchedon.
Anti-intrusion security
Ifthiswarninglampcomes
on,checkthatallofyour
vehicle's doors are closed
correctly.
Locking while driving
Whenthevehiclemovesoff,assoon
asyoureachapproximately6mph
(10km/h),thesystemlocksthedoors.
Thecharacteristiccentrallockingnoise
isheard.TheLEDintheswitchonthe
dashboardcentralswitchpanelcomeson.
Duringthejourney,openingadoor
resultsincompleteunlockingofthe
vehicle.
Activating / deactivating the
function
With the ignition on, press
and hold this switch to
activate or deactivate the
function.
Drivingwiththedoorslockedmay
makeaccesstotheinteriormore
difcultinanemergency.
Asecondpresspermitscentral
unlockingofthevehicle.
The control is inactive when the vehicle
hasbeenlockedusingtheremote
controlorthekeyfromtheoutside.
Thedoorscanstillbeopenedfromthe
inside.
28
Berlingo-2-VP_en_Chap03_Pret-a-partir_ed01-2016
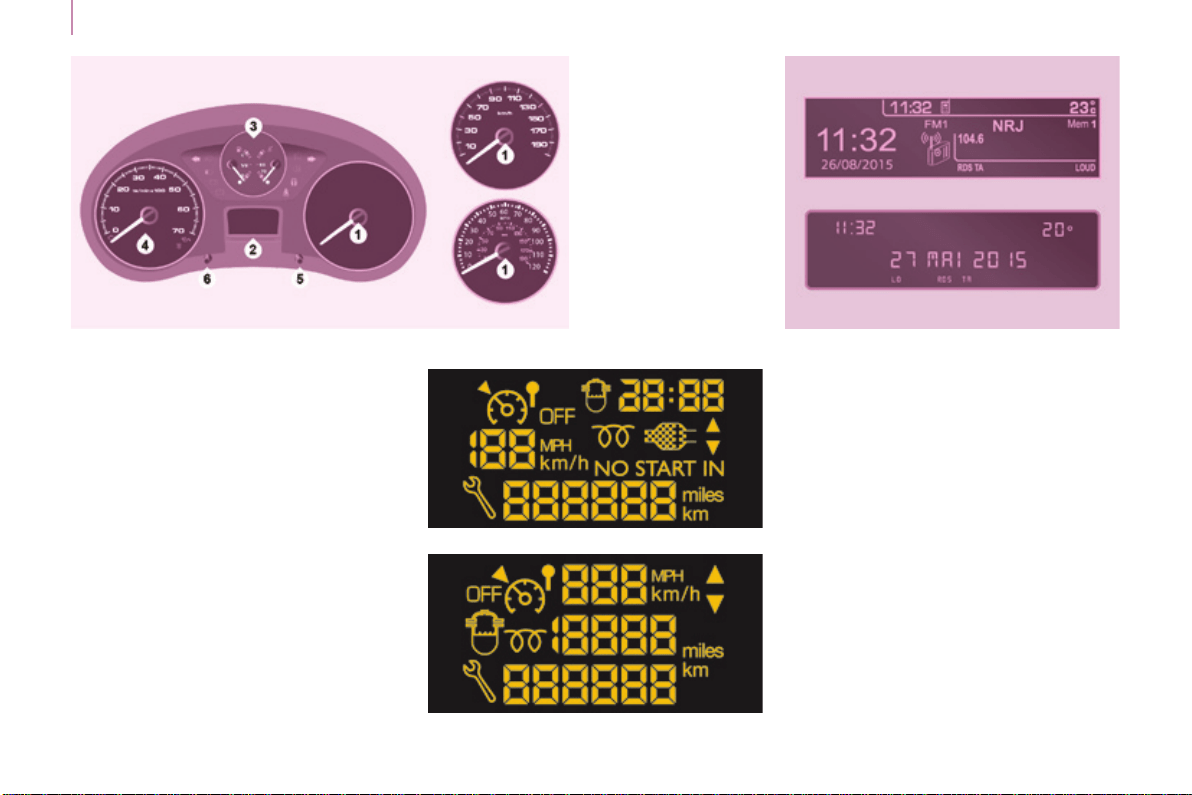
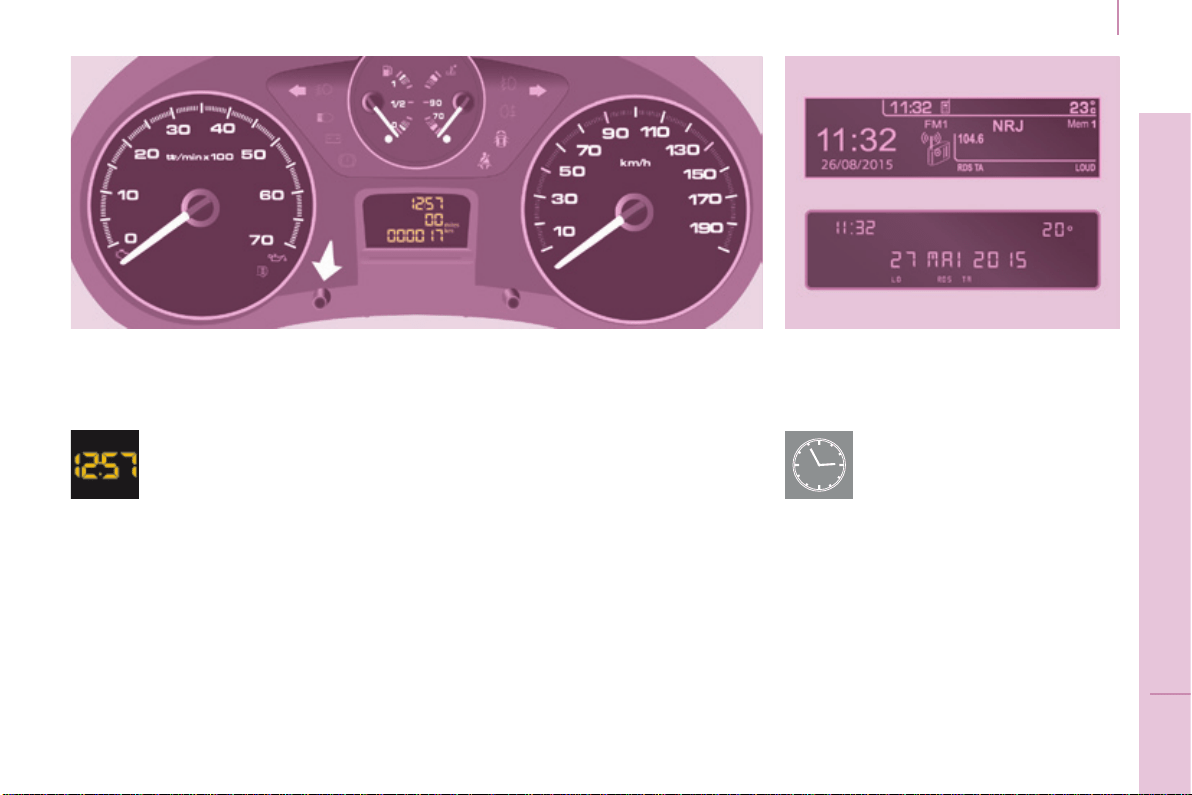
Instruments and controls
Dials
1. Distancerecorderinkilometres/
miles.
2. Displayscreen.
3. Fuelgauge,coolanttemperature
gauge.
4. Revcounter.
5. Tripdistancerecorder/service
indicatorreset.
6. Instrumentpanellightingdimmer.
Level 1
INSTRUMENT PANEL Display screens Screens
Theformatoftheinformation
presented in the screen depends on
thevehicle'sequipmentlevel.
Level 2
with the touch screen tablet
29
READY TO GO
3
Berlingo-2-VP_en_Chap03_Pret-a-partir_ed01-2016
Instruments and controls
Centre console with screen
Instrument panel without screen
- Turntotheleft:24Hor12His
displayed.
- Turn to the right to select 24H
or12H.
- Turntothelefttocompletethetime
adjustment.
Afterapproximately30seconds
without any action, the screen returns
tothenormaldisplay.
DATE AND TIME
Centre console without screen
Thedisplay-timesequence
islinkedaccordingtomodel
(version).Theaccessto
the"Date"adjustmentis
onlyactivewhenthemodel
versionoffersadateinwords.
Toadjustthetime,usethe
left-hand button on the
instrumentpanel:
- Turntotheleft:theminutesash.
- Turn to the right to increase the
minutes(holdthebuttontotheright
forrapidscrolling).
- Turntotheleft:thehoursash.
- Turn to the right to increase the
hours (hold the button to the right
forrapidscrolling).
30
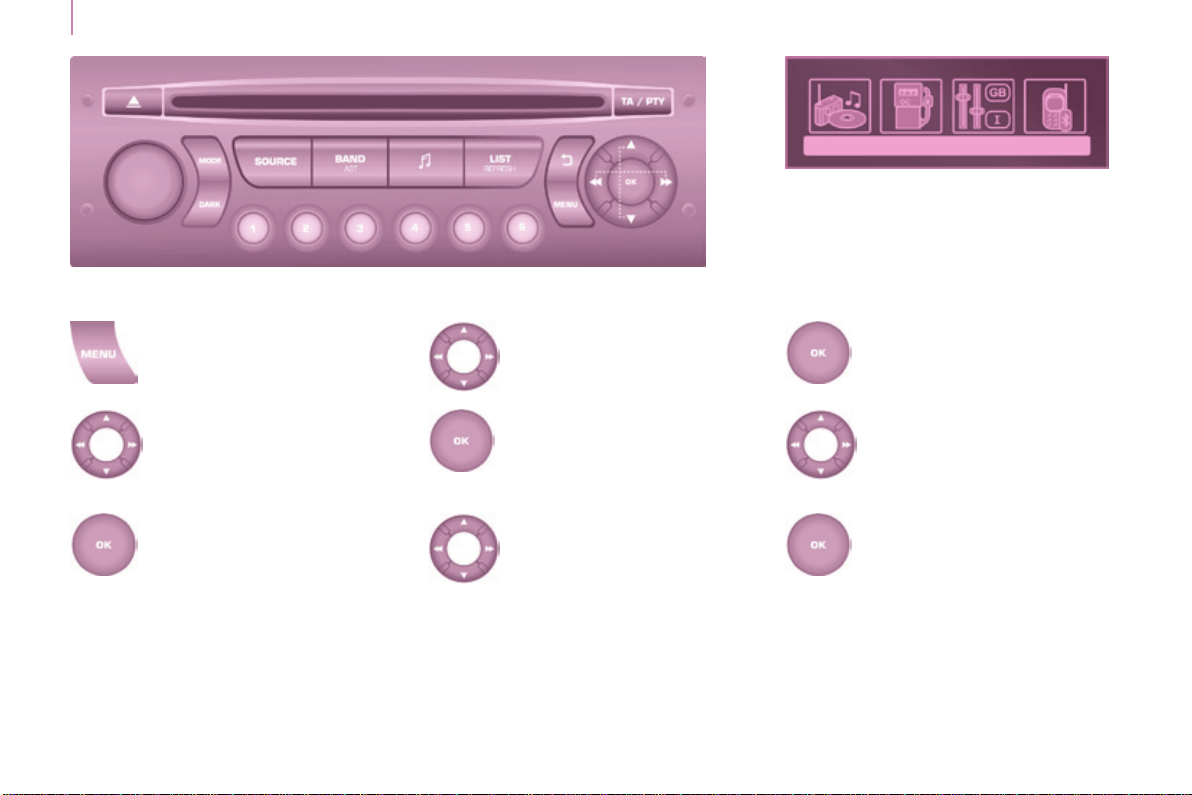
Berlingo-2-VP_en_Chap03_Pret-a-partir_ed01-2016
Instruments and controls
Screen C
Press the MENUbutton.
Using the arrows, select
PERSONALISATION
CONFIGURATION.
Presstoconrmthe
selection.
Using the arrows, select
DISPLAY CONFIGURATION.
Presstoconrmthe
selection.
Using the arrows, select
ADJUST DATE AND TIME.
Presstoconrmthe
selection.
Adjustthesettingsoneby
oneconrmingbypressing
the OKbutton.
Then select the OK tab in the
screenandconrm.

31
READY TO GO
3
Berlingo-2-VP_en_Chap03_Pret-a-partir_ed01-2016
Instruments and controls
Touch screen tablet
F Select the "Conguration"
menu.
F In the secondary page,
press on "Time/Date".
F Select "Adjust time" or "Adjust
date"andmodifythesettingsusing
thenumberkeypad,thenconrm.
F Press "Conrm"toquit.
32
Berlingo-2-VP_en_Chap03_Pret-a-partir_ed01-2016
Instruments and controls
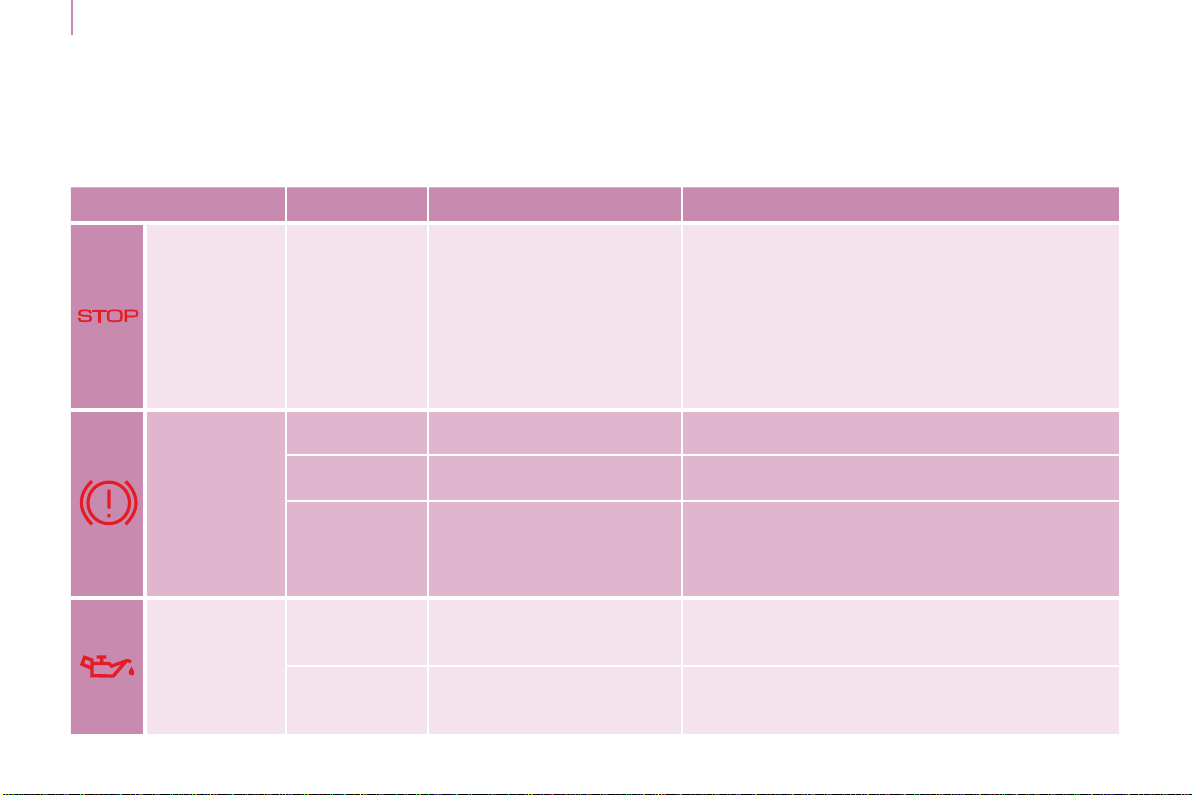
WARNING LAMPS
Warning lamp is indicates Solution - action
STOP
on, associated
with another
warning
lampand
accompanied
byamessage
inthescreen.
majorfaultslinkedwith
the"Brakeuidlevel",
"Engine oil pressure and
temperature","Coolant
temperature","Electronic
brakeforcedistribution"and
"Power steering" warning
lamps.
You must stop as soon as it is safe to do
so. Park and switch off the ignition. Have it
checked by a CITROËN dealer or a qualied
workshop.
Parking
brake / Brake
uid level /
EBFD
on.
thattheparkingbrakeisapplied
orhasnotbeenreleasedfully.
Releasingtheparkingbrakeswitchesoffthe
warninglamp.
on. lowbrakeuidlevel. TopupusingauidrecommendedbyCITROËN.
remainingoneven
though the level
is correct and
associated with the
ABSwarninglamp.
a fault with the electronic
brakeforcedistribution.
You must stop as soon as it is safe to do so.
Park and switch off the ignition.
Have it checked by a CITROËN dealer or a
qualied workshop.
Engine oil
pressure and
temperature
on while
driving.
low pressure or a high
temperature.
Parkandswitchofftheignitionthenallowtocool.
Visuallycheckthelevel.
Chapter7,"Levels"section.
remainingon,
even though the
leveliscorrect.
amajorfault.
HaveitcheckedbyaCITROËNdealerora
qualiedworkshop.
Eachtimethevehicleisstarted:aseriesofwarninglampscomesonapplyingaself-testcheck.Theygooffalmostimmediately.
Enginerunning:thelampbecomesawarningifitremainsoncontinuouslyorashes.
Thisinitialwarningmaybeaccompaniedbyanaudiblesignalandamessageinthescreen.
Donotignorethesewarnings.
33
READY TO GO
3
Berlingo-2-VP_en_Chap03_Pret-a-partir_ed01-2016
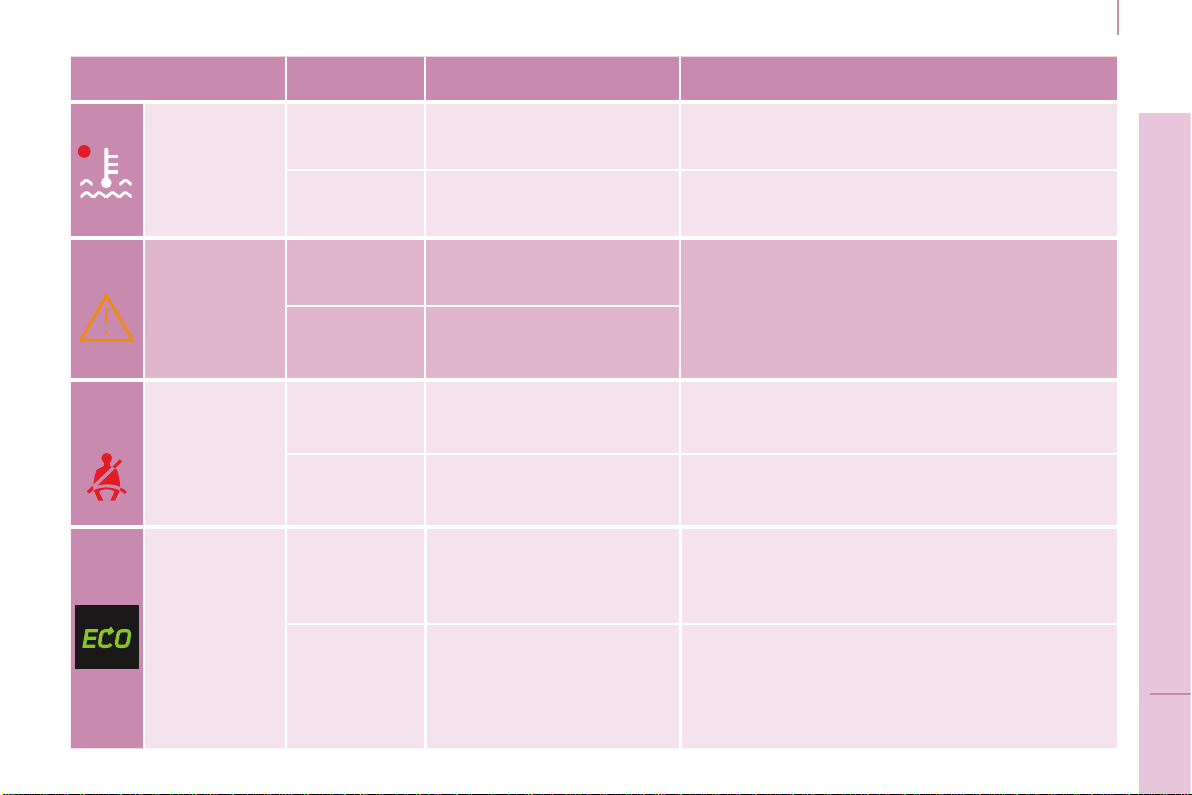
Instruments and controls
Warning lamp is indicates Solution - action
Coolant
temperature
and level
on with needle
in the red
zone.
anabnormalincreasein
temperature.
Parkandswitchofftheignitionthenallowtocool.
Visuallycheckthelevel.
ashing. adropinthecoolantlevel.
Chapter7,"Levels"section.
ContactaCITROËNdealeroraqualied
workshop.
Service
ontemporarily. minorfaultsorwarnings.
Consultthealertloginthedisplayorscreen.
Ifyourvehicleisequippedwithatripcomputeror
ascreen:refertothe"Steeringmountedcontrols"
sectioninChapter4.
ContactaCITROËNdealeroraqualied
workshop.
remainingon. majorfaults.
Seat belt not
fastened
on then
ashing.
thedriverand/orfront
passenger has not fastened
theirseatbelt.
Pullthestraptheninsertthetongueinthebuckle.
accompanied
by an audible
signal then
remainson.
thevehicleismovingwith
thedriver'sand/orfront
passenger's seat belt not
fastened.
Checkthattheseatbeltisfastenedbypullingthe
strap.
Chapter5,"Seatbelts"section.
ECO
on.
TheStop&Startsystem
has put the engine in
STOPmodefollowinga
vehiclestop(redlight,trafc
jam,etc...).
Assoonasyouwanttomoveoff,thewarning
lampgoesoffandtheenginerestarts
automaticallyinSTARTmode.
ashesfora
few seconds,
thengoesoff.
STOPmodeistemporarily
unavailable.
or
STARTmodehasbeen
invokedautomatically.
Chapter3,"Stop&Start"section.
34
Berlingo-2-VP_en_Chap03_Pret-a-partir_ed01-2016
Instruments and controls
Warning lamp is indicates Solution - action
Front /
lateral
airbag
ashingor
remainingon.
afailureofanairbag.
HavethesystemcheckedbyaCITROËNdealer
oraqualiedworkshopwithoutdelay.
Chapter5,"Airbags"section.
Front
passenger's
airbag
deactivated
on.
the intentional deactivation
of this airbag in the
presence of a rearward
facingchildseat.
Chapter5,"Airbags"or"childsafety"section.
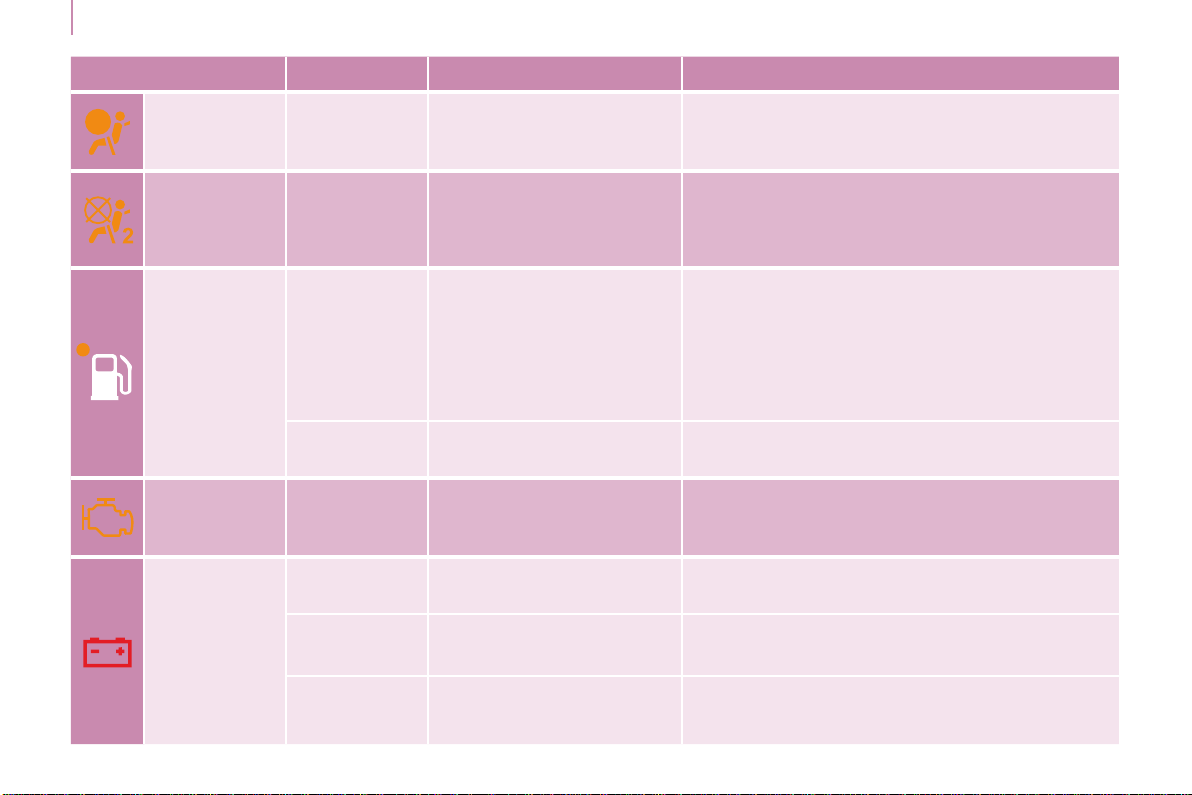
Low fuel
level
on with gauge
needle in the
redzone.
Whenitrstcomeson,
thereremainsaround
8litresoffuelinthetank.
The distance you can drive
on this fuel depends on
your style of driving and the
enginetype.
Youmustllupwithfueltoavoidrunningout.
Thiswarninglampcomesoneachtimeyou
switchontheignitionuntilyouhavelledup.
Capacityofthetank:approximately60litres.
Neverriskdrivinguntilthetankisempty,this
coulddamagetheemissionsandinjection
systems.
ashing.
cutting off of the fuel supply
followingaseriousimpact.
Restorethesupply.
Chapter7,"Fuel"section.
EOBD
emission
control
system
ashingor
remainingon.
afailureofthesystem.
Thereisariskofdamagetothecatalytic
converter.HaveitcheckedbyaCITROËN
dealeroraqualiedworkshop.
Battery
charge
on.
a fault in the charging
circuit.
Checkthebatteryterminals,…
Chapter8,"Battery"section.
ashing.
placing of the active
functions on standby
(economymode).
Chapter8,"Battery"section.
remainingon,
in spite of the
checks.
anignitionorinjection
malfunction.
HaveitcheckedbyaCITROËNdealerora
qualiedworkshop.
+
ABS
35
READY TO GO
3
Berlingo-2-VP_en_Chap03_Pret-a-partir_ed01-2016
Instruments and controls
Warning lamp is indicates Solution - action
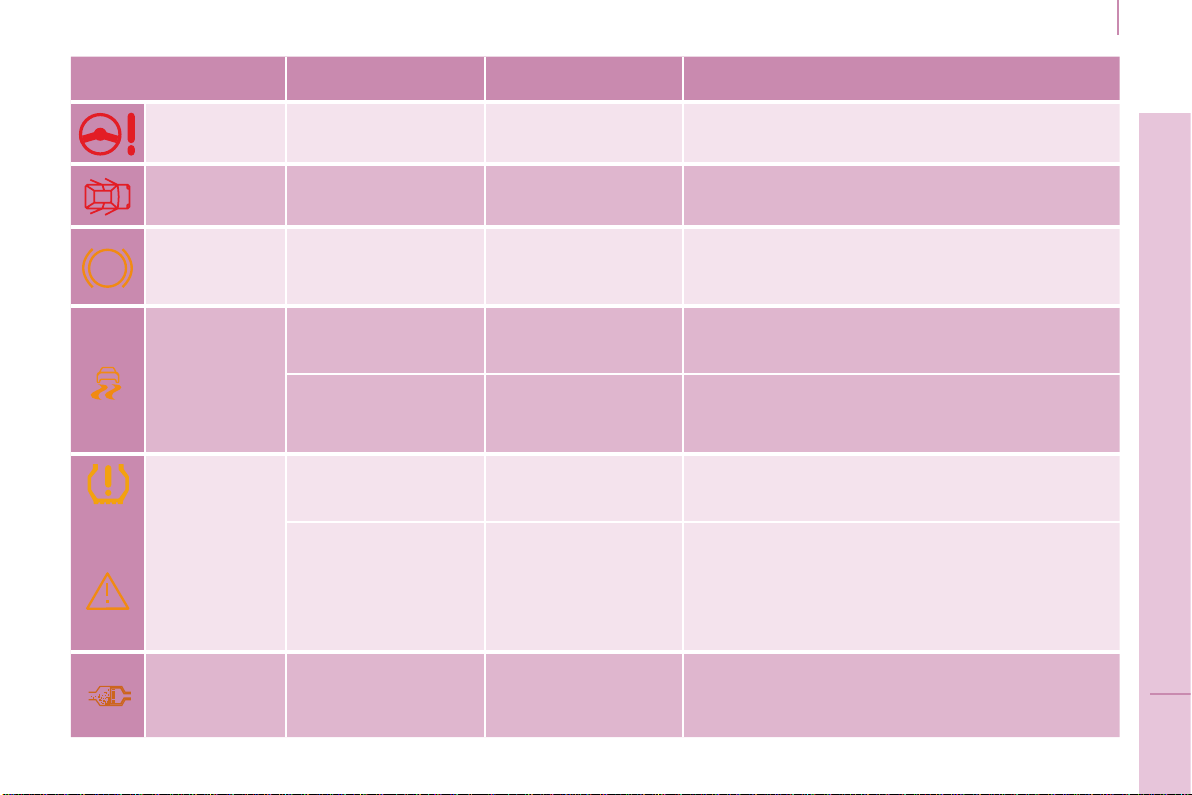
Power
steering
on.
a fault with the
system.
The vehicle retains conventional steering without
assistance.HaveitcheckedbyaCITROËN
dealeroraqualiedworkshop.
Door open
detection
onandaccompanied
byamessageinthe
screen.
that a door is not
closedcorrectly.
Checkthatallofthedoorsareclosed.
ABS remainingon.
a fault with the anti-
lockbrakingsystem.
Thevehicleretainsconventionalbraking.
HaveitcheckedbyaCITROËNdealerora
qualiedworkshop.
ESC
ashing.
triggering of the ASR
orDSCregulation.
Thesystemoptimisestractionandimprovesthe
directionalstabilityofthevehicle.
Chapter5,"Drivingsafety"section.
remainingon.
a fault with the
system.
E.g.:under-ination
ofthetyres.
E.g.:checkthepressureofthetyres.
HaveitcheckedbyaCITROËNdealerora
qualiedworkshop.(Wheelspeedsensor,
hydraulicvalveblock,...).
Under-
ination
on.
The tyre pressure is
toolowinormore
wheels.
Checkthetyrepressureassoonaspossible.
Thischeckmustbedonewiththetyrescold.
ashingthen
remainingon,
accompaniedbythe
Service warning
lamp,anddepending
onequipment,the
displayofamessage.
The tyre pressure
monitoringsystem
has a fault or one of
the wheels does not
haveasensor.
Detectionofunder-inationisnolongerassured.
HaveitcheckedbyaCITROËNdealerora
qualiedworkshop.
Particle
lter
on.
aproblemwiththe
particlelter(fuel
additivelevel,riskof
blockage,...).
HavetheltercheckedbyaCITROËNdealeror
aqualiedworkshop.
Chapter7,"Levels"section.
36
Berlingo-2-VP_en_Chap03_Pret-a-partir_ed01-2016
Instruments and controls
Warning lamp is indicates Solution - action
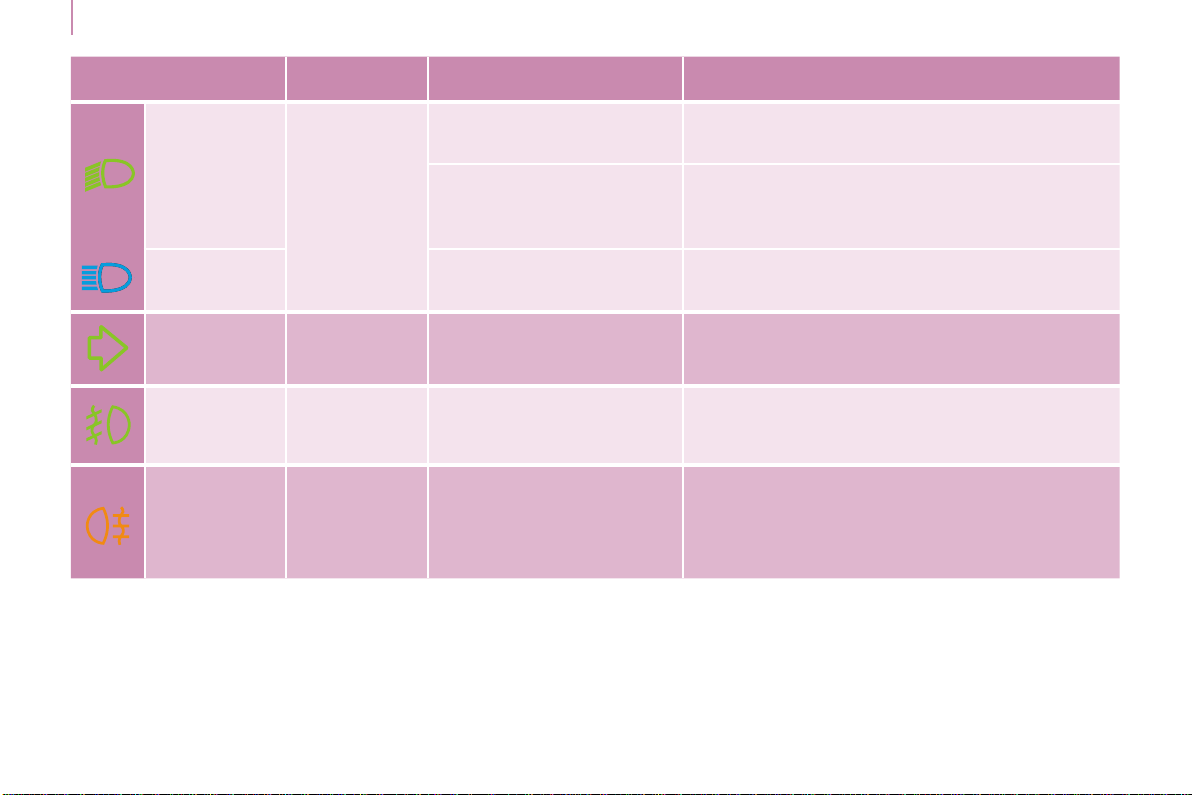
Dipped beam
headlamps /
Daytime
running
lamps
on.
amanualselectionor
automaticilluminationof
headlamps.
Turntheringonthelightingcontrolstalktothe
secondposition.
illuminationofthedippedbeamheadlamps
fromthetimetheignitionisswitchedon:
daytimerunninglamps(dependingonthe
countryinwhichthevehicleissold).
Chapter4,"Steeringmountedcontrols"section.
Main beam
headlamps
pullingofthestalktowards
you.
Pullthestalktoreturntodippedbeam
headlamps.
Direction
indicators
ashingwith
audiblesignal.
a change of direction via
thelightingstalk.
TotheRight:controltobepushedupwards.
TotheLeft:controltobepusheddownwards.
Front
foglamps
on. amanualselection.
Thefoglampsonlyoperateifthesidelampsor
dippedbeamheadlampsareon.
Rear
foglamps
on. amanualselection.
Thefoglampsonlyoperateifthesidelampsor
dippedbeamheadlampsareon.
Inconditionsofnormalvisibility,switchthemoff
toavoidbreakingthelaw.
"Thislampisadazzlingred".
37
READY TO GO
3
Berlingo-2-VP_en_Chap03_Pret-a-partir_ed01-2016
Instruments and controls
Warning lamp in the
screen
is indicates Solution - action
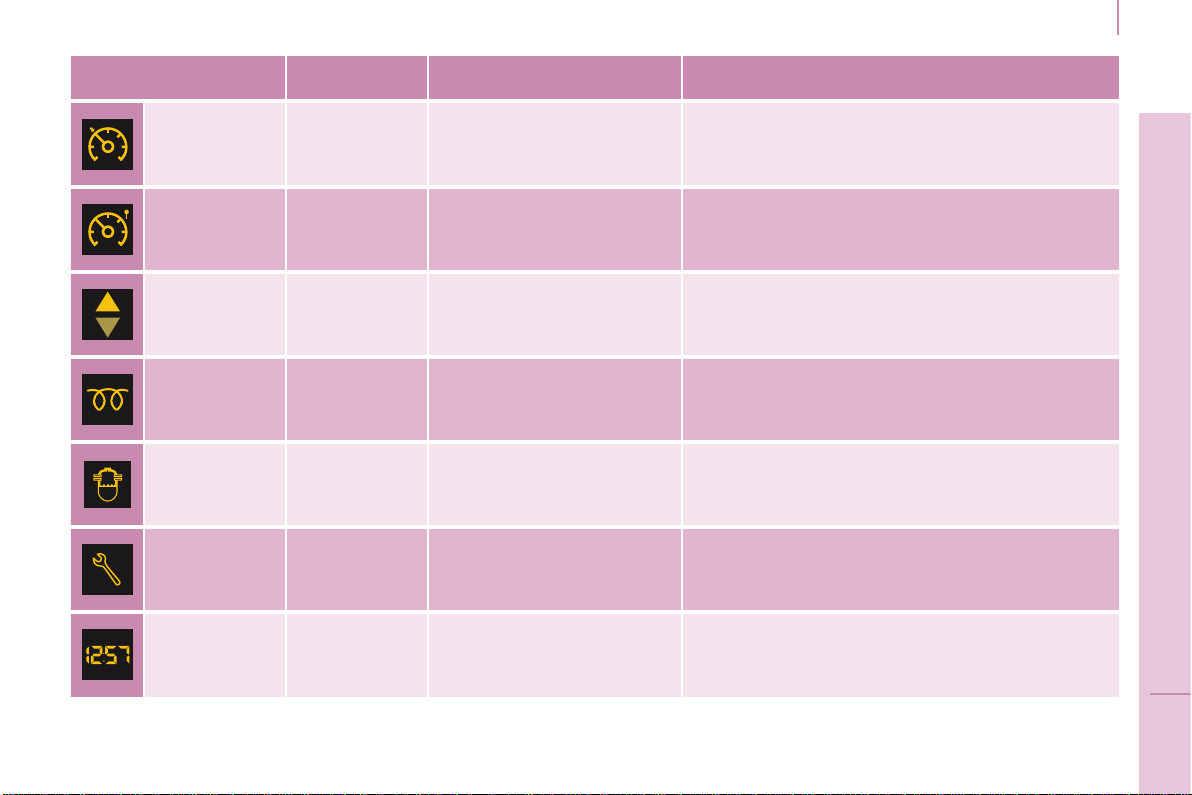
Cruise
control
on. cruisecontrolselected.
Manualselection.
Chapter4,"Steeringmountedcontrols"section.
Speed limiter on. speedlimiterselected.
Manualselection.
Chapter4,"Steeringmountedcontrols"section.
Gear shift
indicator
on.
arecommendation
independent of the type and
densityoftrafc.
Toreducefuelconsumption,changetoan
appropriategearwithamanualgearbox.
The driver retains responsibility to follow this
indicationornot.
Diesel pre-
heating
on.
climaticconditionsrequiring
pre-heating.
Waituntilthewarninglampgoesoffbefore
operatingthestarter.
Presence of
water in the
Diesel lter
on and
accompanied
byamessagein
thescreen.
waterintheDiesellter.
HavethelterbledbyaCITROËNdealerora
qualiedworkshopwithoutdelay.
Chapter7,"Checks"section.
Accordingtocountry.
Service
spanner
on.
that a service will be due
shortly.
Refertothelistofchecksinthemaintenanceand
warrantyguide.
Have the service carried out by a CITROËN
dealeroraqualiedworkshop.
Time ashing. adjustmentofthetime.
Usetheleft-handbuttonontheinstrumentpanel.
Chapter3,"Instrumentsandcontrols"section.
+
38
Berlingo-2-VP_en_Chap03_Pret-a-partir_ed01-2016
Instruments and controls
AdBlue
®
Formoreinformationonlling,refertothechapter7,AdBlue
®
section.
Alert Information Solution - action
1
st
level of alert
Thereisanaudiblesignalwhentheignitionisswitchedon.
Thewarningsareintermittentandthenbecome
permanentwhenswitchingontheignitionorwhendriving.
Theremainingdrivingrangeiscounteddownfrom
1500miles(2400km)to375miles(600km).
Therangegurereducesinstepsof200miles(300km).
The contents of the AdBlue
®
tankhasdroppedtoa
levelsufcientforarangeoflessthan1500miles
(2400km).
Havetheuidtopped-upusinganAdBlue
®
containerorbottles.
2
nd
level of alert
There is an audible signal when the ignition is
switchedon.
Thewarningsareintermittent(every30seconds)
andthenbecomepermanenteverytimetheignition
isswitchedonorwhendriving.
Theremainingdrivingrangeiscounteddownfrom350miles
(600km)tozero,reducinginstepsof30miles(50km).
You must have the AdBlue
®
topped-up and not wait
forabreakdown.
In the display
screen.
Temporarydisplay:"NO START IN".
In the touch
screentablet.
Select:
- "Drivingassistance".
- "Diagnostic".
Thedrivingrangeisdisplayed.
3
rd
level of alert
The AdBlue
®
tankisempty.
Starting is impossible.
It is essential to add at least 3.8 litres of AdBlue
®
additivetotheadditivetank.
+
+
39
READY TO GO
3
Berlingo-2-VP_en_Chap03_Pret-a-partir_ed01-2016
Instruments and controls
SCR emissions control system
Alerts Information Solution - action
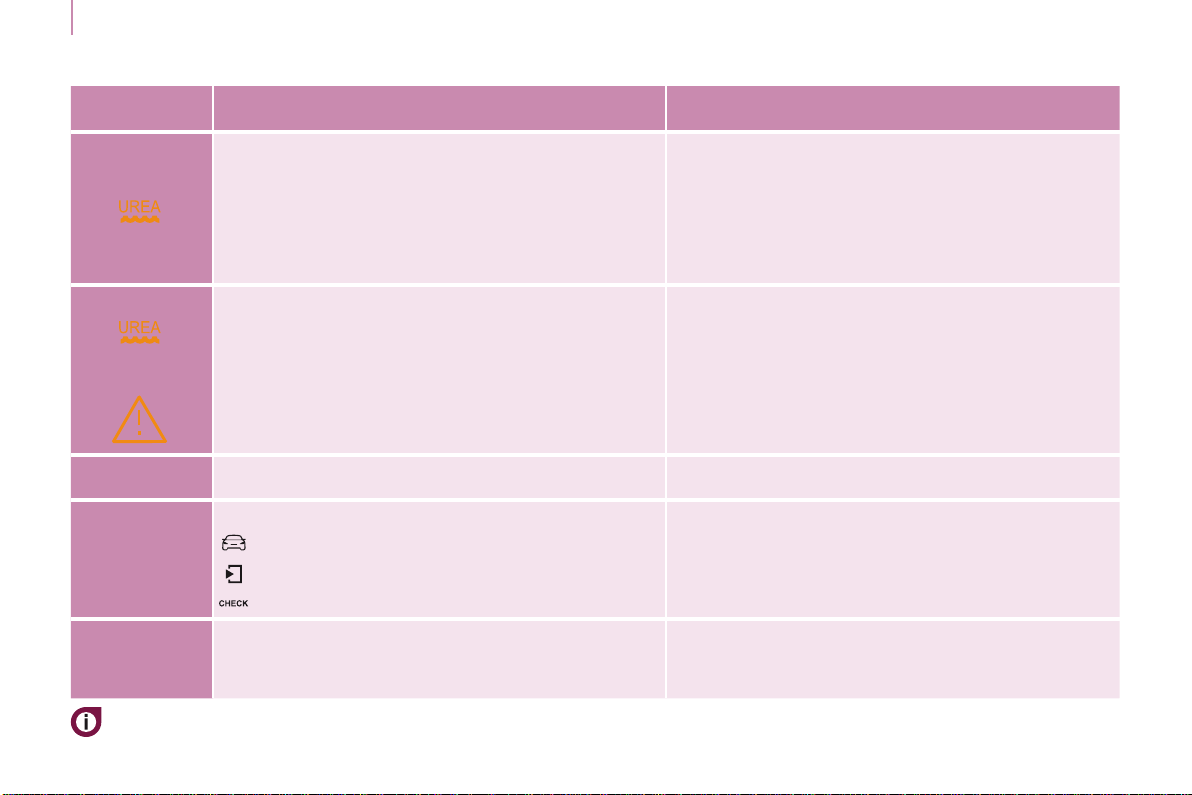
TheUREA,Serviceanddiagnosticwarninglamps
comeon,anSCRemissionscontrolsystemfault
hasbeendetected.
Thisisistemporaryfault,thealertdisappearsas
soonastheexhaustemissionsreturntonormal
levels.
After 30 miles (50 km) without AdBlue
®
Conrmationofthefaultwhichisnotrelatedtoa
lackofuid.
Theremainingdrivingrange700miles
(1100km).
GotoaCITROËNdealeroraqualiedworkshop
assoonaspossibletoavoidabreakdown.
Thefaultisconrmed.
Thenexttimetheignitionisswitchedon,the
authoriseddrivingrangewillbedisplayedinmiles
(kilometres)andthealertwillberepeatedevery
30seconds.
Thelimitofthedrivingrangehasbeenreached,
exhaustemissionslevelsareabovethelimits.
Startingisimpossible.
To restart the engine, you must contact a
CITROËNdealeroraqualiedworkshop.
- BlueHDi Diesel
40
Berlingo-2-VP_en_Chap03_Pret-a-partir_ed01-2016
Instruments and controls
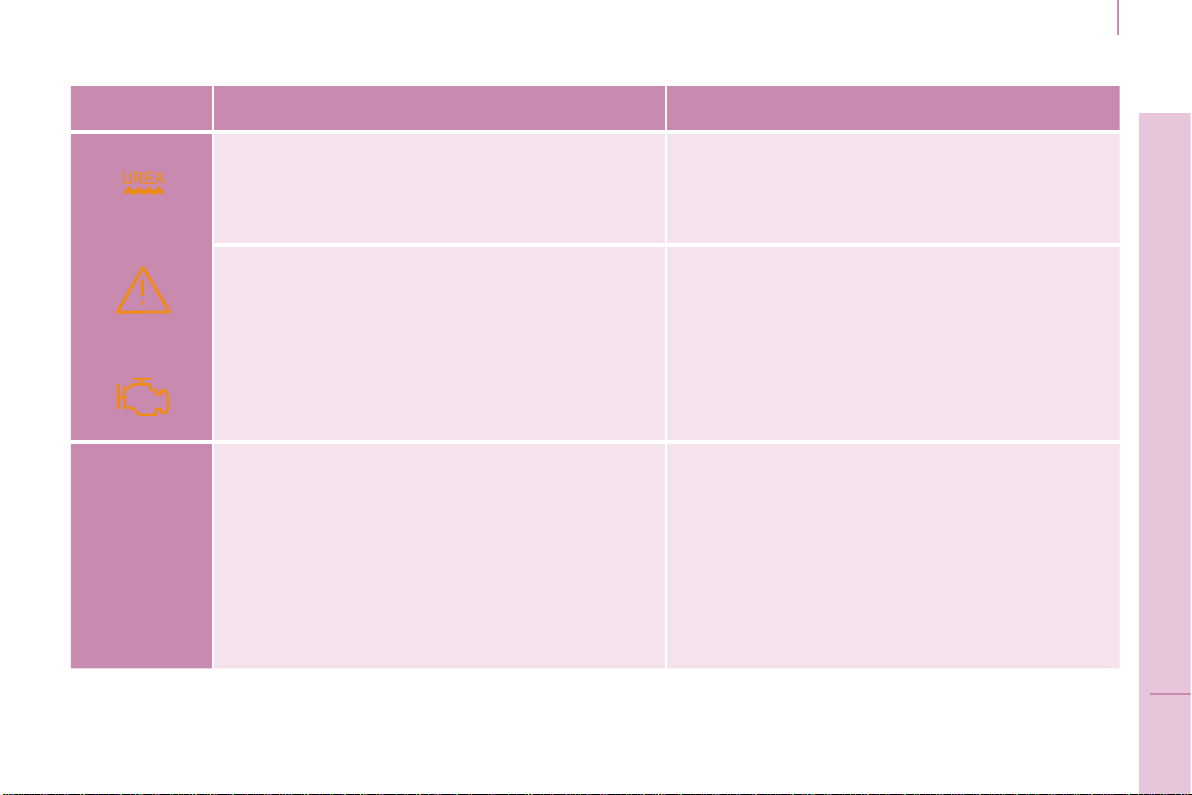
FUEL GAUGE COOLANT TEMPERATURE
The needle is positioned before the
red zone:normaloperation.
In arduous conditions of use or hot
climaticconditions,theneedlemay
moveclosetotheredgraduations.
What you should do if the needle
enters the red zone:
Reduce your speed or let the engine
runatidle.
What you should do if the warning
lamp comes on:
- stopimmediately,switchoffthe
ignition.Thefanmaycontinueto
operateforacertaintime,upto
approximately10minutes,
- wait for the engine to cool down in
ordertocheckthecoolantleveland
topitupifnecessary.
Asthecoolingsystemispressurised,
follow the procedure below to avoid the
riskofscalding:
- wait at least one hour after
switching off the engine before
carryingoutanywork,
- unscrewthecapby1/4turnto
allow the pressure to drop,
- when the pressure has dropped,
checkthelevelintheheadertank,
- ifnecessary,removethecapto
topup.
Iftheneedleremainsinthered
zone,havethesystemcheckedby
aCITROËNdealeroraqualied
workshop.
Refertochapter7,"Levels"
section.
Refertochapter7,"Fuel"section.
Thefuellevelistestedeachtimethe
keyisturnedtothe"running"position.
Thegaugeispositionedon:
- 1:thefueltankisfull,
approximately60litres.
- 0: the reserve is now being used,
thewarninglampcomeson
continuously.Thereservewhen
thewarningrstcomesonis
approximately8litres.
41
READY TO GO
3
Berlingo-2-VP_en_Chap03_Pret-a-partir_ed01-2016
Instruments and controls
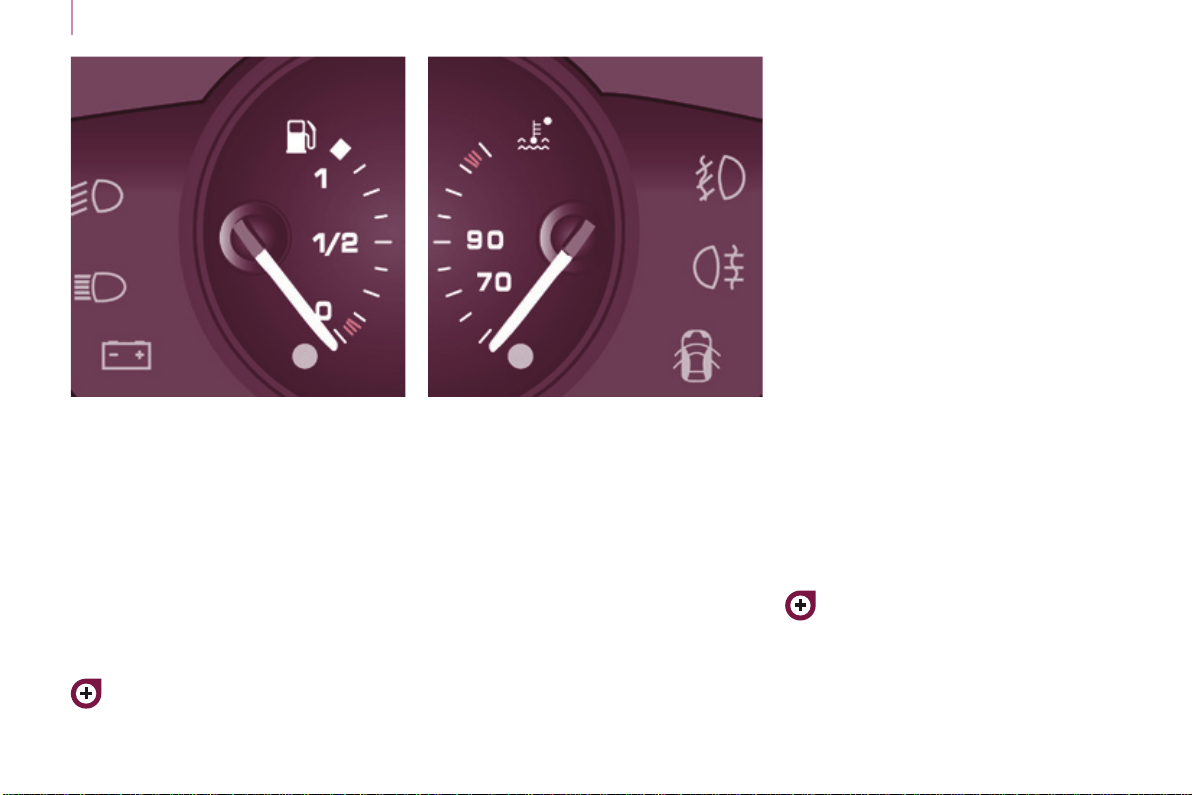
EMISSIONS CONTROLS
EOBD (European On Board
Diagnosis) is a diagnostics
systemwhichcomplies
with,amongothers,the
standards on the authorised
emissionsof:
- CO(carbonmonoxide),
- HC (unburnt hydrocarbons),
- NOx (nitrous oxides) or particles,
detected by oxygen sensors placed
upstreamanddownstreamofthe
catalyticconverters.
Thedriveriswarnedofanymalfunction
ofthisemissioncontrolsystembythe
illuminationofthisspecicwarning
lampintheinstrumentpanel.
Thereisariskofdamagetothe
catalyticconverter.Haveitchecked
byaCITROËNdealeroraqualied
workshop.
UNDER-INFLATION DETECTION
Thissystem
continuouslymonitors
the pressures of the four
tyres, as soon as the
vehicleismoving.
A pressure sensor is located in the
valve of each tyre (except the spare
wheel).
Thesystemtriggersanalertifadrop
inpressureisdetectedinoneormore
tyres.
Thetyreunder-inationdetection
systemisanaidtodrivingwhich
does not replace the need for
vigilanceonthepartofthedriver.
Thissystemdoesnotavoidthe
needtocheckthetyrepressures
regularly (including the spare
wheel)andbeforealongjourney.
Drivingwithunder-inatedtyres
adversely affects road holding,
extendsbrakingdistancesandcauses
prematuretyrewear,particularlyunder
arduous conditions (vehicle loaded,
highspeed,longjourney).
Drivingwithunder-inatedtyres
increasesfuelconsumption.
The tyre pressures for your vehicle
can be found on the tyre pressure
label.
Refertochapter9,"Identication
markings"section.
Thetyrepressuresmustbechecked
when the tyres cold (vehicle stopped
for 1 hour or after driving for less then
6miles(10km)atmoderatespeed).
Otherwise,add0.3bartothevalues
indicatedonthelabel.
42
Berlingo-2-VP_en_Chap03_Pret-a-partir_ed01-2016
Instruments and controls
Thealertismaintaineduntil
the tyre or tyres concerned is
reinated,repairedorreplaced.
The spare wheel (space-saver type or
asteelrim)doesnothaveasensor.
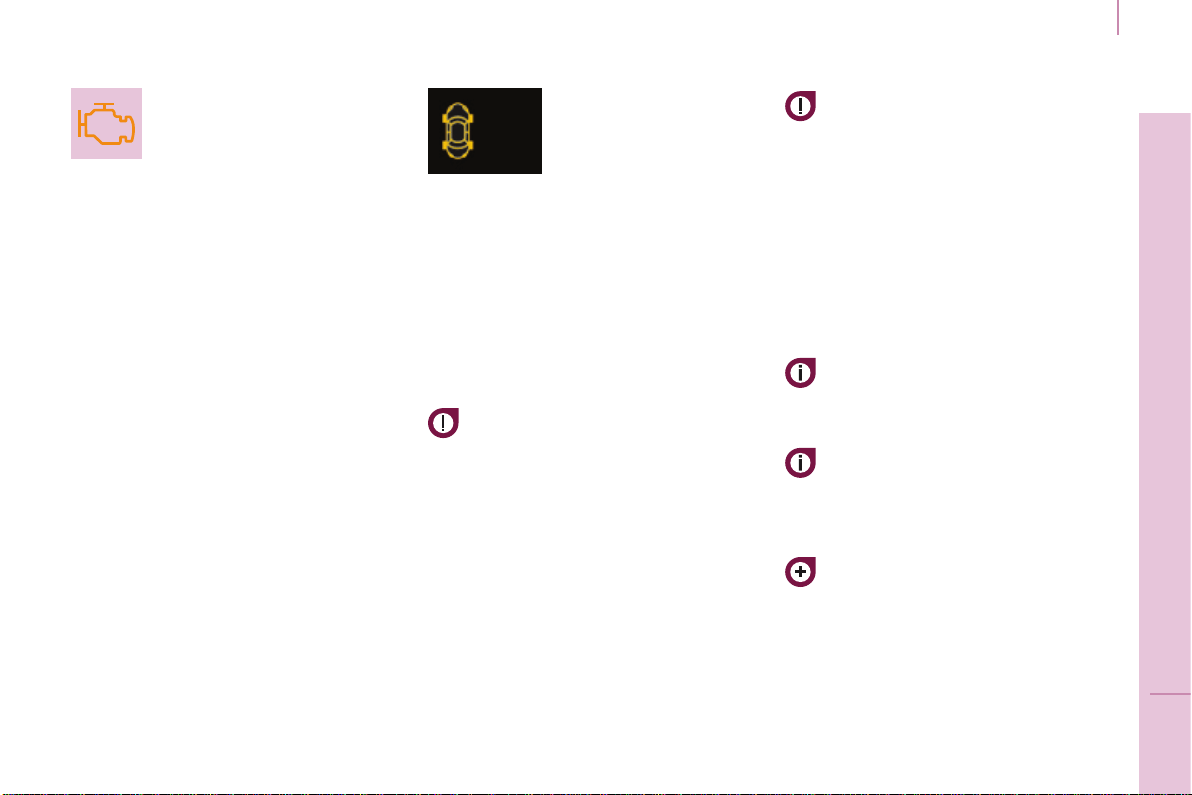
Operating faultUnder-inflation alert
The loss of pressure detected
does not always lead to visible
deformationofthetyre.Donotrely
onjustavisualcheck.
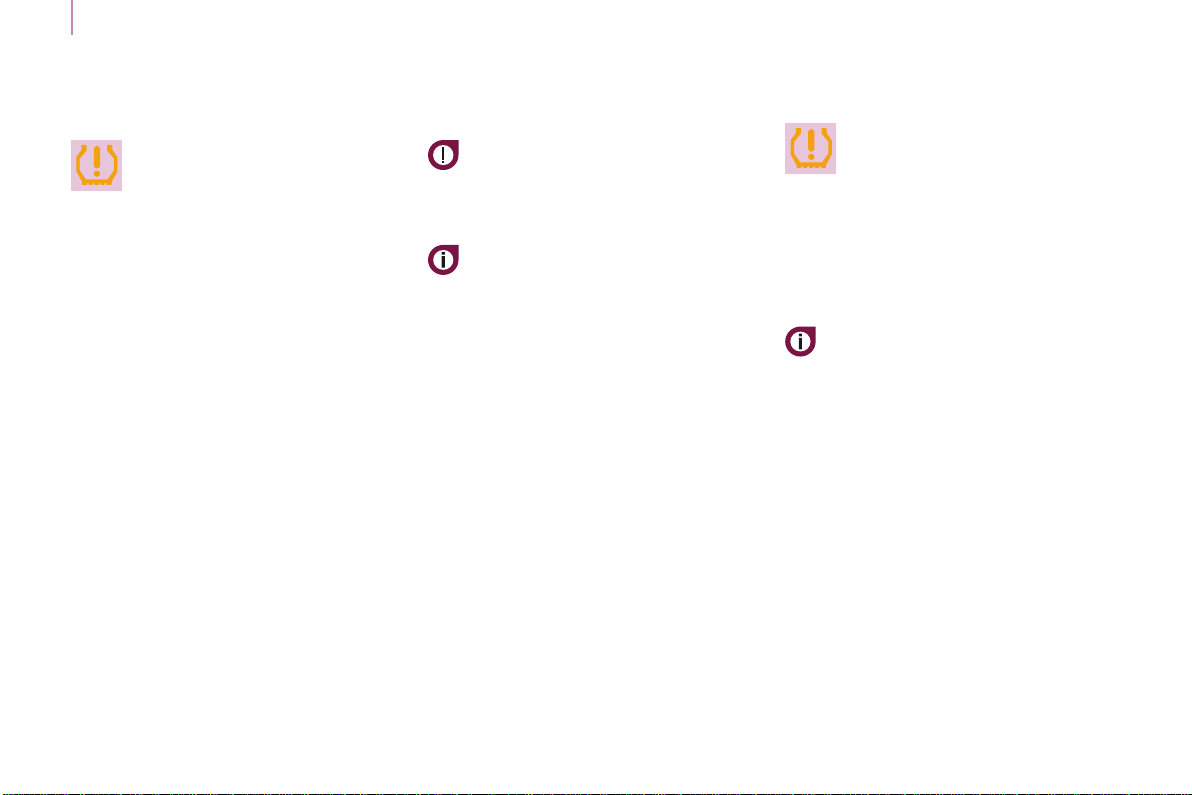
Thealertisgivenbythexed
illuminationofthiswarninglamp,
accompaniedbyanaudiblesignal,
anddependingonequipment,the
displayofamessage.
Theashingandthen
xedilluminationofthe
under-inationwarning
lampaccompaniedbythe
illuminationofthe"Service"warning
lamp,anddependingonequipment,
thedisplayofamessageindicatesa
faultwiththesystem.
Inthiscase,monitoringofthetyre
pressuresisnotassured.
Intheeventofaproblemononeof
thetyres,thesymbolorthemessage
appears,accordingtoequipment,to
identifyit.
- Reduce speed, avoid sudden
steeringmovementsorharshbrake
applications.
- Stopassoonasitissafetodoso.
- In the event of a puncture, use
thetemporarypuncturerepairkit
or the spare wheel (according to
equipment),
or
- ifyouhaveacompressor,theone
inthetemporarypuncturerepair
kitforexample,checkthefourtyre
pressures when cold,
or
- ifitisnotpossibletocheckthe
tyrepressuresatthetime,drive
carefullyatreducedspeed.
This alert is also displayed when
oneormorewheelsisnottted
withasensor(forexample,a
space-saverorsteelsparewheel).
GotoaCITROËNdealeroraqualied
workshoptohavethesystemchecked
or, following the repair of a puncture, to
have the original wheel, equipped with
asensor,retted.

43
READY TO GO
3
Berlingo-2-VP_en_Chap03_Pret-a-partir_ed01-2016
Instruments and controls
UNDER-INFLATION DETECTION WITH REINITIALISATION
Systemwhichautomaticallychecksthe
pressuresofthetyreswhiledriving.
Thesystemmonitorsthepressures
in the four tyres, once the vehicle is
moving.
Itcomparestheinformationgivenby
the four wheel speed sensors with
reference values, which must be
reinitialised every time the tyre
pressures are adjusted or a wheel
changed.
Thesystemtriggersanalertassoon
asitdetectsadropintheination
pressureofoneormoretyres.
Theunder-inationdetection
systemdoesnotreplacetheneed
for vigilance on the part of the
driver.
Thissystemdoesnotavoidtheneedto
checkthetyrepressures(includingthe
sparewheel)everymonthaswellas
beforealongjourney.
Drivingwithunder-inatedtyres
impairsroadholding,extendsbraking
distancesandcausespremature
tyre wear, particularly under arduous
condition (high loading, high speed,
longjourney).
Drivingwithunder-inatedtyres
increasesfuelconsumption.
Theinationpressuresdenedfor
your vehicle can be found on the
tyrepressurelabel.
Formoreinformationonthe
identicationmarkings,refertothe
correspondingsection.
Tyrepressuresshouldbechecked
when the tyres are "cold" (vehicle
stoppedfor1hourorafterajourneyof
lessthan6miles(10km)atmoderate
speeds).
Otherwise(whenhot),add0.3barto
thepressuresshownonthelabel.
44
Berlingo-2-VP_en_Chap03_Pret-a-partir_ed01-2016
Instruments and controls
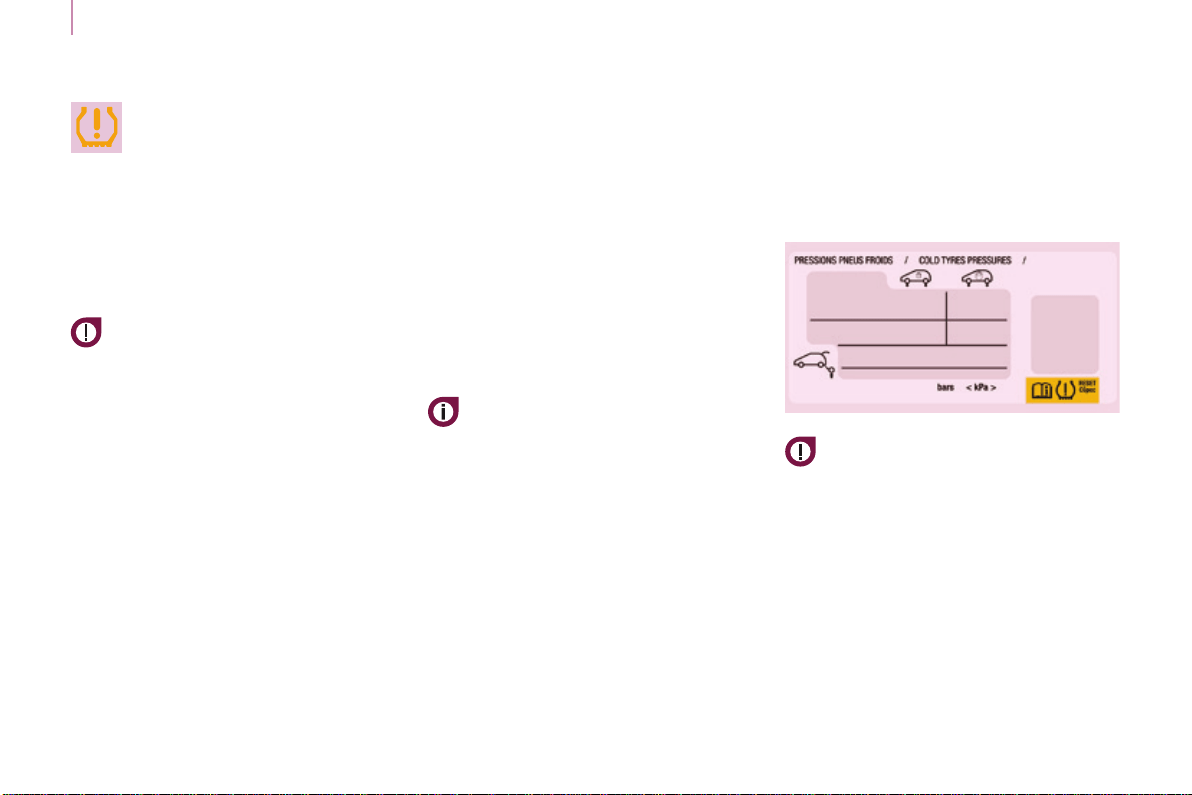
Under-inflation alert
Thisisgivenbyxed
illuminationofthiswarninglamp,
accompaniedbyanaudiblesignal
and,dependingonequipment,
thedisplayofamessage.
Beforereinitialisingthesystem,
ensure that the pressures of
the four tyres are correct for the
use of the vehicle and in line with the
recommendationsonthetyrepressure
label.
Theunder-inationalertcanonly
be relied on if the reinitialisation of
thesystemhasbeendonewiththe
pressures in the four tyres correctly
adjusted.
Theunder-inationdetectionsystem
does not give a warning if a pressure is
incorrectatthetimeofreinitialisation.
The loss of pressure detected
does not always cause visible
bulgingofthetyre.Donotsatisfy
yourselfwithjustavisualcheck.
Thealertismaintaineduntilthe
systemisreinitialised.
F Reducespeedimmediately,avoid
excessivesteeringmovementsand
suddenbraking
F Stop the vehicle as soon as it is
safetodoso.
F In the event of a puncture, use
thetemporarypuncturerepairkit
or the spare wheel (depending on
equipment),
or
F ifyouhaveacompressor,suchas
theoneinthetemporarypuncture
repairkit,checkthepressuresof
the four tyres when cold,
or
F ifitisnotpossibletomakethis
checkimmediately,drivecarefully
atreducedspeed.
Reinitialisation
Itisnecessarytoreinitialisethesystem
everytimeoneormoretyrepressures
areadjusted,andafterchangingone
ormorewheels.
45
READY TO GO
3
Berlingo-2-VP_en_Chap03_Pret-a-partir_ed01-2016
Instruments and controls
Reinitialisationofthesystemmustbedonewiththeignition on and the vehicle
stationary:
- inthevehiclecongurationmenuforvehiclettedwithadisplayscreen,
- usingthebuttononthedashboard,forvehicleswithoutdisplayscreen.
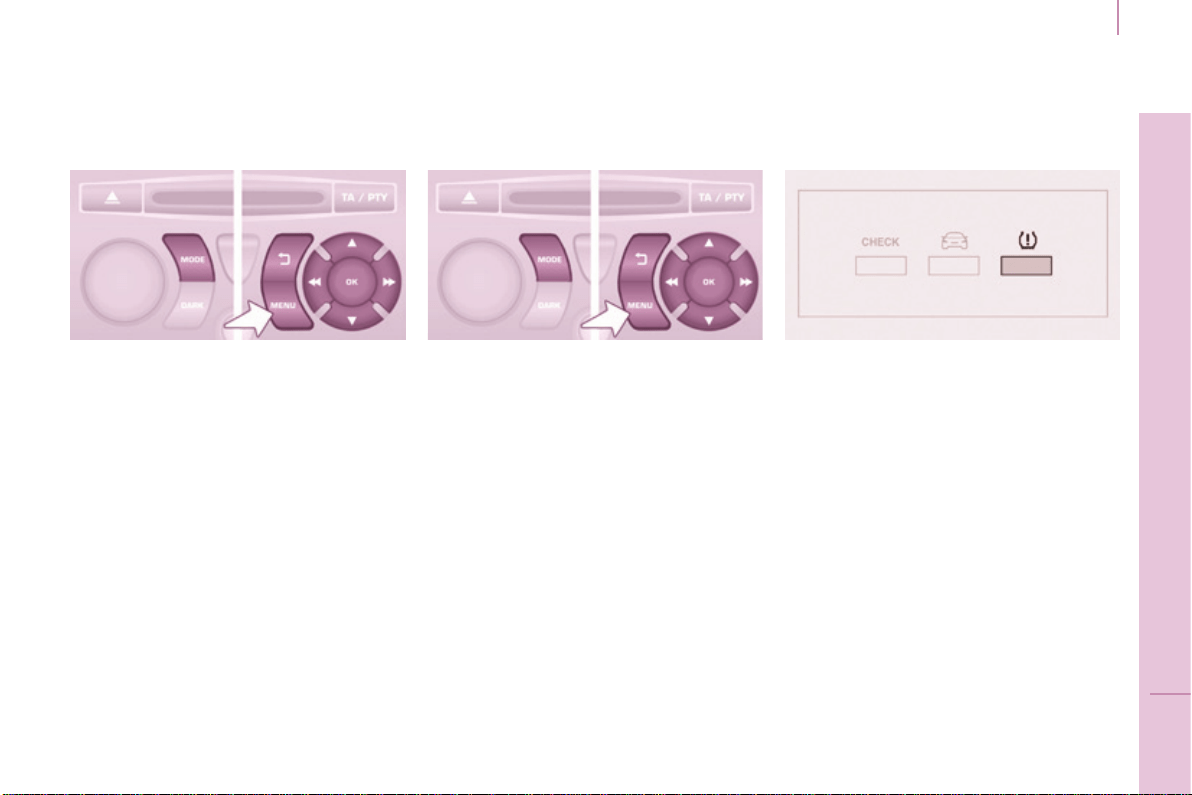
Screen A
F Press the MENU button for access
tothemainmenu.
F Press the "5" or "6" button to
selectthemenuVeh cong, then
conrmbypressingtheOKbutton.
F Press the "5" or "6" button to
select the "Reinit inat",menu,
thenconrmbypressingtheOK
button.
Amessageisdisplayedtoconrm
theinstruction.
F ConrmbypressingtheOKbutton.
Screen C
F Press the MENU button for access
tothemainmenu.
F Press the "5" or "6" button to
select the "Personalisation-
conguration"menu,thenconrm
by pressing the OKbutton.
F Press the "5" or "6" button
to select the "Dene vehicle
parameters"menu,thenconrm
by pressing the OKbutton.
F Press the "5" or "6" button to
select the "Tyre pressures"menu,
then the "Reinitialisation"menu,
thenconrmingbypressingthe
OKbutton.
Amessageconrmsthe
reinitialisation.
Touch screen tablet
F Press the MENUbutton.
F Select the "Driving"menu.
F In the secondary page, select
"Under-ination initialisation".
Amessageisdisplayedtoconrmthe
reinitialisationinstruction.
F Select "Yes" or "No",thenconrm.
Amessageconrmsthereinitialisation.
46
Berlingo-2-VP_en_Chap03_Pret-a-partir_ed01-2016
Instruments and controls
The new pressure settings registered
are considered to be reference values
bythesystem.
Theunder-inationalertcanonly
bereliedonifthesystemhas
been reinitialised with all four tyres
inatedtothecorrectpressures.
Before doing anything to the
system,thepressuresofthefour
tyresmustbecheckedandthe
systemreinitialised.
Snow chains
Thesystemdoesnothavetobe
reinitialisedafterttingorremoving
snowchains.
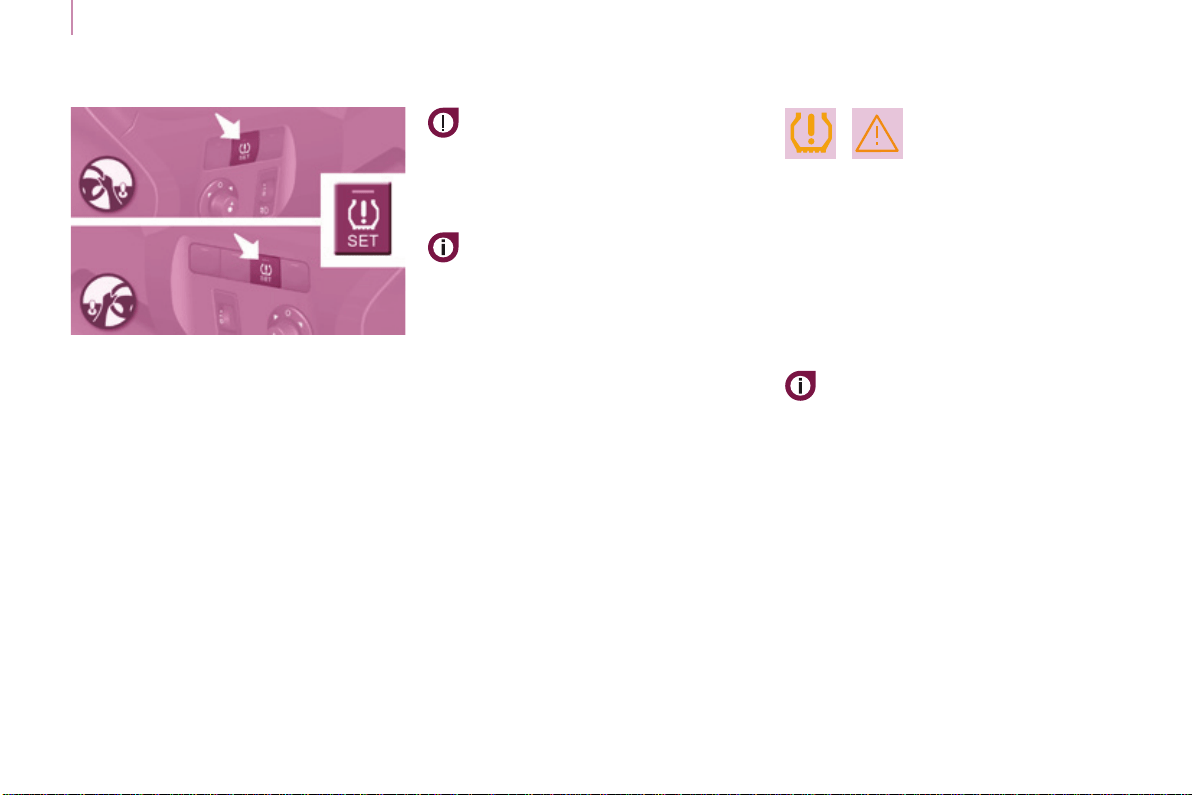
Dashboard button
F Makealongpressonthisbutton.
Ahightoneaudiblesignalconrmsthe
reinitialisation.
A low tone audible signal indicates that
thereinitialisationwasnotcompleted.
Operating fault
Theashingandthenxedillumination
oftheunder-inationwarninglamp
accompaniedbyilluminationofthe
Servicewarninglampindicatesafault
withthesystem.
Inthiscase,under-inationmonitoring
ofthetyresisnolongerassured.
Havethesystemcheckedbya
CITROËNdealeroraqualied
workshop.
47
READY TO GO
3
Berlingo-2-VP_en_Chap03_Pret-a-partir_ed01-2016
Instruments and controls
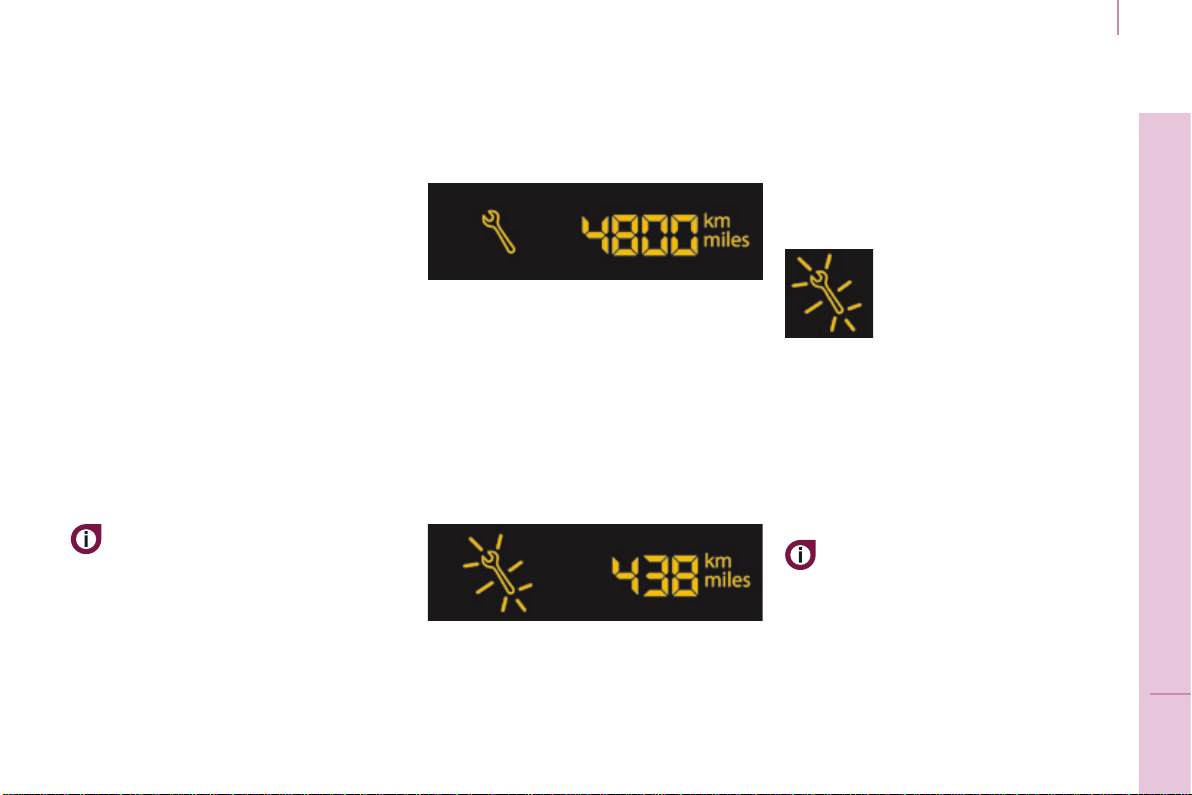
SERVICE INDICATOR
Thisprogrammesserviceintervals
accordingtotheuseofthevehicle.
More than 1 000 miles/km before the
next service is due
Example:4800miles/kmremain
beforethenextserviceisdue.When
the ignition is switched on and for a
fewseconds,thescreenshows:
A few seconds after the ignition is
switched on, the oil level is displayed
(depending on version), then the total
distancerecorderresumesnormal
operation showing the total and trip
distances.
Less than 1 000 miles/km before the
next service is due
Eachtimetheignitionisswitchedonandforafew
seconds,thespannerashesandthenumberof
miles/kilometresremainingisdisplayed:
A few seconds after the ignition is
switched on, the oil level is displayed
(depending on version), then the total
distancerecorderresumesnormal
operationandthespannerremainson.
This indicates that a service should be
carriedoutshortly.
Service overdue
Operation
Afewmomentsaftertheignition
has been switched on, the spanner
indicatingaserviceoperationcomes
on; the display for the total distance
recordergives(inroundgures)the
distanceremainingbeforethenext
service.
The points at which a service is due
arecalculatedfromthelastindicator
zeroreset.
The point at which a service is due is
determinedbytwoparameters:
- the distance travelled,
- thetimewhichhaselapsedsince
thelastservice.
Thedistanceremainingbeforethe
nextservicemaybeweightedby
thetimefactor,dependingonthe
typeofdriving.
With the engine running the spanner
remainsonuntiltheservicehasbeen
carriedout.
For BlueHDi Diesel versions, this
alertisalsoaccompaniedbythexed
illuminationoftheServicewarning
lamp,onswitchingontheignition.
Eachtimetheignitionis
switched on and for a few
seconds, the spanner
ashesandtheexcess
distanceisdisplayed.
For BlueHDi Diesel versions, the
spannercanalsocomeonearly,
according the level of deterioration
oftheengineoil.Deteriorationofthe
engine oil depends on the conditions of
useofthevehicle.
48
Berlingo-2-VP_en_Chap03_Pret-a-partir_ed01-2016
Instruments and controls
Trip recorder zero
reset button
After this operation, if you wish to
disconnectthebattery,lockthe
vehicleandwaitforatleastve
minutes,otherwisethezerore-setwill
notberegistered.
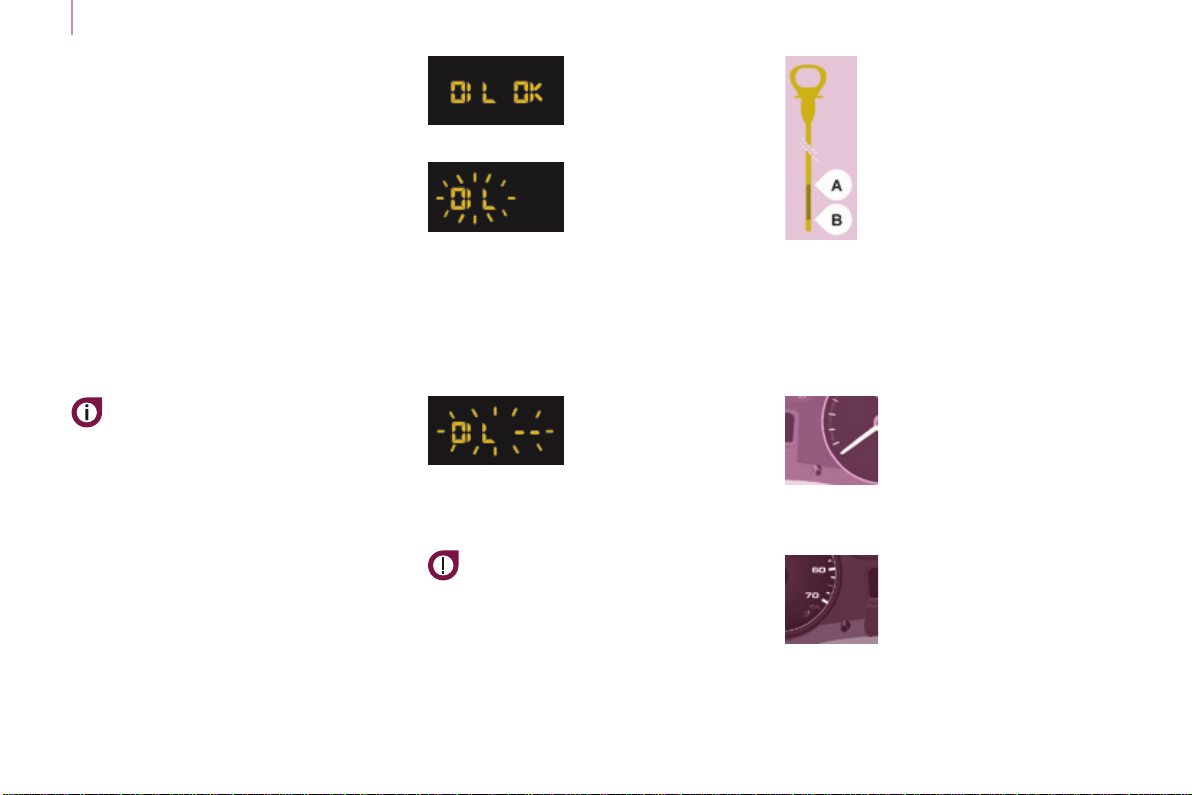
Engine oil level indicator
Depending on your vehicle's engine,
when the ignition is switched on,
the engine oil level is indicated for
a few seconds, after the service
information.
Oil level
correct
Low oil level
Flashing of "OIL",
linkedwiththe
servicewarninglamp,
accompaniedbyan
audiblesignalandamessageinthe
screen, indicates a low oil level which
coulddamagetheengine.
Ifthelowoillevelisconrmedbya
checkusingthedipstick,itisessential
thatthelevelistoppedup.
Oil level gauge
fault
Flashing of "OIL--"
indicates a
malfunctionofthe
engineoillevelindicator.Contact
aCITROËNdealeroraqualied
workshop.
The level read will only be correct
if the vehicle is on level ground
and the engine has been off for
morethan30minutes.
Dipstick
A=maximum,neverexceed
this level as a surplus of oil
maydamagetheengine.
Contact a CITROËN dealer
oraqualiedworkshop
withoutdelay.
B=minimum,topupthelevel
viatheoilllercap,usingthe
grade of oil suited to your
engine.
Lighting dimmer
With the ignition on, press
the button until the zeros
appear.
With the lighting on,
press the button to vary
the brightness of the
instrumentsandcontrols.
When the lighting reaches
theminimum
(ormaximum)setting,releasethe
button then press it again to increase
(orreduce)thebrightness.
As soon as the lighting is of the
requiredbrightness,releasethebutton.
Zero reset
YourCITROËNdealeroraqualied
workshopcarriesoutthisoperation
aftereachservice.
However, if you carry out the service
yourself, the re-set procedure is as
follows:
- switch off the ignition,
- press and hold the trip recorder
reset button,
- switchontheignition.
Thedisplaybeginsacountdown.
When the display shows "=0", release
thebutton;thespannerdisappears.
49
READY TO GO
3
Berlingo-2-VP_en_Chap03_Pret-a-partir_ed01-2016
Gearbox and steering wheel
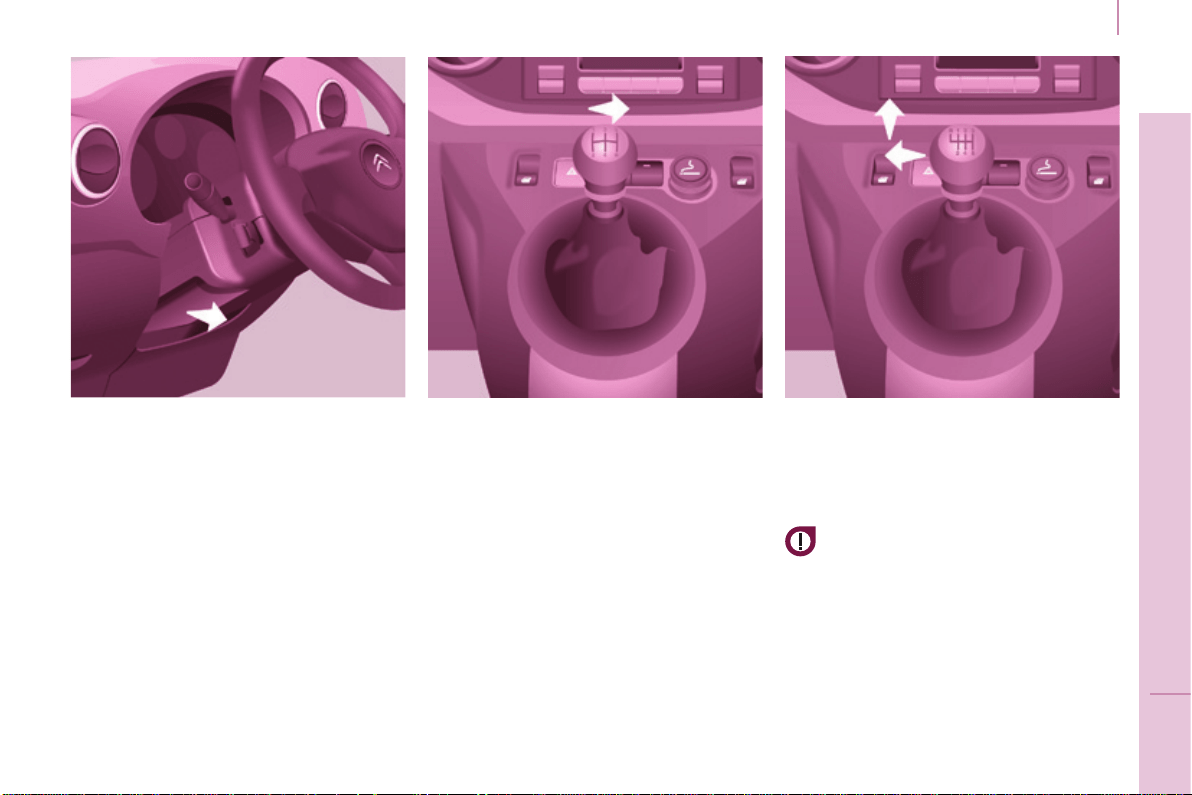
MANUAL GEARBOX
5-speed
6-speed
To change gear easily, always depress
theclutchpedalfully.
Topreventthematfrombecoming
caughtunderthepedal:
- ensurethatthematispositioned
andsecuredcorrectlyontheoor,
- nevertonematontopofanother.
When driving, avoid leaving your hand
onthegearknobastheforceexerted,
evenifslight,mayweartheinternal
componentsofthegearboxovertime.
Changing into 5
th
or 6
th
gear
Toengagethegearcorrectly,movethe
gearleverfullytotheright.
Engaging reverse gear
Thelevershouldbemovedslowly
toreducenoise.
To engage reverse gear, wait until the
vehiclehascometoacompletestop.
STEERING WHEEL ADJUSTMENT
When the vehicle is stationary,
releasethesteeringwheeladjustment
mechanismbypullingthelever.
Adjustthesteeringwheelforheight
andreach,thenlockthemechanismby
pushingtheleverfullyforward.
Inthe6-speedconguration,raisethe
collarbelowthegearknob.
50
Berlingo-2-VP_en_Chap03_Pret-a-partir_ed01-2016
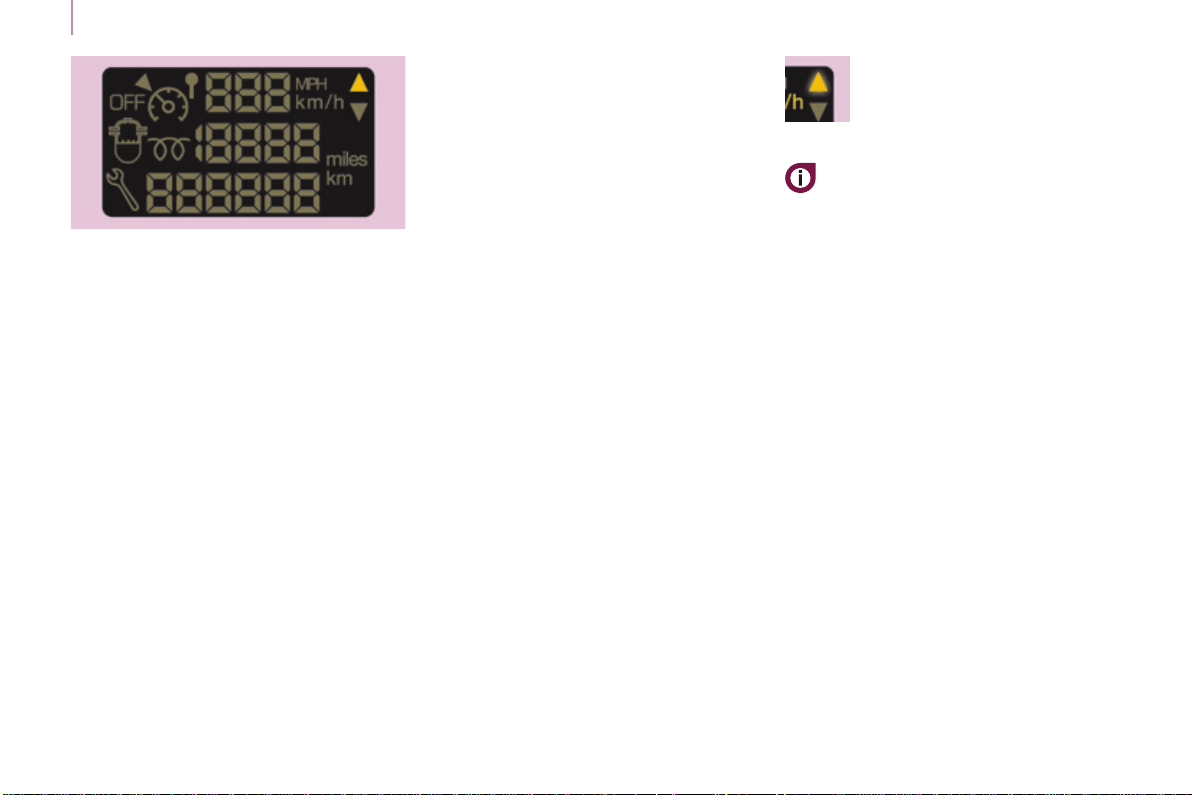
Gearbox and steering wheel
Theinformationappears
intheinstrumentpanel
intheformofanarrow.It
maybeaccompaniedbya
recommendedgear.
Thesystemadaptsitsgear
changerecommendation
according to the driving conditions
(slope,load,...)andthedemands
of the driver (power, acceleration,
braking,...).
Thesystemneversuggests:
- engagingrstgear,
- engagingreversegear.
Withanelectronicgearbox,thesystem
isonlyactiveinmanualmode.
GEAR SHIFT INDICATOR
Depending on the driving situation and
yourvehicle'sequipment,thesystem
mayadviseyoutoskipone(ormore)
gear(s).Youcanfollowthisinstruction
withoutengagingtheintermediate
gears.
Thegearengagement
recommendationsmustnotbe
consideredcompulsory.Thisis
becausethecongurationoftheroad,
thetrafcdensityandsafetyremain
determiningfactorswhenchoosing
thebestgear.Therefore,thedriver
remainsresponsiblefordeciding
whether or not to follow the indications
given.
Thisfunctioncannotbedeactivated.
Systemwhichreducesfuel
consumptionbyrecommendingthe
mostappropriategear.
51
READY TO GO
3
Berlingo-2-VP_en_Chap03_Pret-a-partir_ed01-2016
Gearbox and steering wheel
6-SPEED ELECTRONIC GEARBOX
- automaticmode:gearselectorin
position A.
- manualmode:gearselectorin
position M.
Forsafety:
Itisonlypossibletocomeout
of position Nifthebrakepedalis
pressed.
ThechangefrompositionA (driving in
automaticmode)topositionM (driving
inmanualmode)orviceversacanbe
madeatanytime.ThewarninglampA
goesoffintheinstrumentpanel.
Mode selection
Moving off
- To start the engine, the gear
selectormustbeinpositionN.
- Pressrmlyonthebrakepedal.
- Operatethestarter.
- When the engine is running, place
the gear selector on R, A or M as
desired.
- Releasethebrakepedaland
accelerate.
If the gear selector is not in position N,
and/orifthebrakepedalisnot
pressed,theenginewillnotstart.
Repeattheaboveprocedure.
Reverse gear
Engaging reverse gear
Move the gear selector to R.
Only attempt to select reverse gear
when the vehicle is stationary.
Neutral
Changing to neutral
Move the gear selector to N.Ifthe
vehicleismoving,donotselectthis
positionevenmomentarily.

52
Berlingo-2-VP_en_Chap03_Pret-a-partir_ed01-2016
Gearbox and steering wheel
Acceleration
Foroptimumacceleration(e.g.to
overtakeanothervehicle),simply
press the pedal beyond the point of
resistance at the end of its travel, by
pressingdownrmly.
Vehicle stationary, with the
engine running
In the event of a prolonged stop with
the engine running, the gearbox
changesautomaticallytoneutralN.
Stopping the vehicle
Before stopping the engine, put the
gear selector in position N.
In all cases, it is essential to apply
theparkingbrake.Checkthatthe
parkingbrakewarninglampisoninthe
instrumentpanel.
Before doing anything in the
enginecompartment,checkthat
the gear selector is in neutral N.
Changing gear
In situations of high engine speeds
(heavy acceleration), a change
up will not occur unless the driver
operates the electronic gearbox control
paddle.
Pull on the "+" control
paddletochangeup.
Pull on the "-" control
paddle to change
down.
- If the vehicle stops or reduces
speed(forexamplewhen
approaching a stop sign),
the gearbox changes down
automatically,torstgearif
needed.
- It is not necessary to release the
acceleratorcompletelyduringgear
changes.
- A gear change instruction is
accepted only if the engine speed
permits.
- For safety reasons, depending on
the engine speed, a change down
maybeperformedautomatically.
Manual mode
Changing to manual mode
Move the gear selector to M.
Automatic mode
Changing to automatic
mode
Move the gear selector to A.
The gearbox then operates in
automaticmode,withoutanyactionon
yourpart.
It constantly selects the gear that is
bestsuitedtothefollowingconditions:
- driving style,
- roadprole,
- optimumfuelconsumption.
53
READY TO GO
3
Berlingo-2-VP_en_Chap03_Pret-a-partir_ed01-2016
Stop & Start
STOP & START
TheStop&Startsystemputsthe
enginetemporarilyonstandby-STOP
mode-duringstopsinthetrafc(red
lights,trafcjams,orother...).
Theenginerestartsautomatically-
STARTmode-assoonasyouwantto
moveoff.
Therestarttakesplaceinstantly,
quicklyandsilently.
Perfect for urban use, the Stop & Start
systemreducesfuelconsumptionand
exhaustemissionsaswellasthenoise
levelwhenstationary.
Operation
Going into engine STOP mode
The "ECO"warninglamp
comesonintheinstrument
panel and the engine goes
intostandby:
- with a manual gearbox, at speeds
below12mph(20km/h),whenyou
put the gear lever into neutral and
release the clutch pedal,
- with a 6-speed electronic
gearbox,atspeedsbelow5mph
(8km/h),whenyoupressthebrake
pedal or put the gear lever into
position N.
Ifyourvehicleisttedwiththesystem,
atimecountercalculatesthesumof
theperiodsinSTOPmodeduringa
journey.Itrestsitselftozeroeverytime
theignitionisswitchedonwiththekey.
With a 6-speed electronic
gearbox,foryourcomfortduring
parkingmanoeuvres,STOPmode
is not available for a few seconds after
comingoutofreversegear.
STOPmodedoesnotaffectthe
functionality of the vehicle, such as
braking,powersteering,forexample.
Never refuel with the engine in
STOPmode;youmustswitchoff
theignitionwiththekey.
Special cases: STOP mode
unavailable
STOPmodeisnotinvokedwhen:
- the vehicle is on a steep slope
(rising or falling),
- the driver's door is open,
- the driver's seat belt is not
fastened,
- the vehicle has not exceeded
6mph(10km/h)sincethelast
enginestartusingthekey,
- theengineisneededtomaintain
acomfortabletemperatureinthe
passengercompartment,
- demistingison,
- somespecialconditions(battery
charge,enginetemperature,
brakingassistance,ambient
temperature...)wheretheengine
is needed to assure control of a
system.
In this case, the "ECO"
warninglampashesfora
fewseconds,thengoesoff.
This operation is perfectly normal.
54
Berlingo-2-VP_en_Chap03_Pret-a-partir_ed01-2016
Stop & Start
Going into engine START mode
The "ECO"warninglamp
goesoffandtheenginestarts:
- with a manual gearbox, when you
fully depress the clutch pedal,
- with a 6-speed electronic
gearbox:
● gearleverinpositionA or M,
whenyoureleasethebrake
pedal,
● orgearleverinpositionN and
thebrakepedalreleased,when
youmovethegearleverto
position A or M,
● orwhenyouengagereverse
gear.
WithamanualgearboxinSTOP
mode,ifagearisengagedwithout
fully depressing the clutch pedal, a
warninglampcomesonoramessage
isdisplayedaskingyoutodepressthe
clutchpedaltorestarttheengine.
Special cases: START invoked
automatically
Foryoursafetyandcomfort,STARTis
invokedautomaticallywhen:
- you open the driver's door,
- you unfasten the driver's seat belt,
In this case the "ECO"
warninglampashesforfew
seconds,thengoesoff.
This operation is perfectly normal.
Deactivation
Incertaincircumstances,suchastheneed
tomaintainacomfortabletemperaturein
thepassengercompartment,itmaybe
preferabletodeactivateStop&Start.
Atanytime,pressthe"ECO
OFF" switch to deactivate the
system.
Thisisconrmedbytheswitchwarning
lampcomingonaccompaniedbya
messageinthescreen.
Ifthesystemhasbeendeactivated
inSTOPmode,theenginerestarts
immediately.
Reactivation
Press the "ECO OFF"switchagain.
Thesystemisactiveagain;thisis
conrmedbytheswitchwarning
lampgoingoffandamessageinthe
instrumentpanel.
Thesystemisreactivated
automaticallyateverynewstart
usingthekey.
Operating fault
Intheeventofamalfunction
withthesystem,the"ECO
OFF"switchwarninglamp
ashes,thencomeson
continuously.
Thissystemrequiresaspecic
batterywithaspecialspecication
and technology (reference
numbersavailablefromaCITROËN
dealeroraqualiedworkshop).
Fitting a battery not listed by
CITROËNintroducestheriskof
malfunctionofthesystem.
haveitcheckedbyaCITROËNdealer
oraqualiedworkshop.
IntheeventofafaultinSTOPmode,
thevehiclemaystall.Allofthewarning
lampsintheinstrumentpanelcome
on.Itisthennecessarytoswitchoff
the ignition and start the engine again
usingthekey.
- the speed of the vehicle exceeds
15mph(25km/h)withamanual
gearboxor7mph(11km/h)with
the 6-speed electronic gearbox
system,
- somespecialconditions(battery
charge,enginetemperature,braking
assistance,ambienttemperature...)
where the engine is needed to
assurecontrolofasystem.
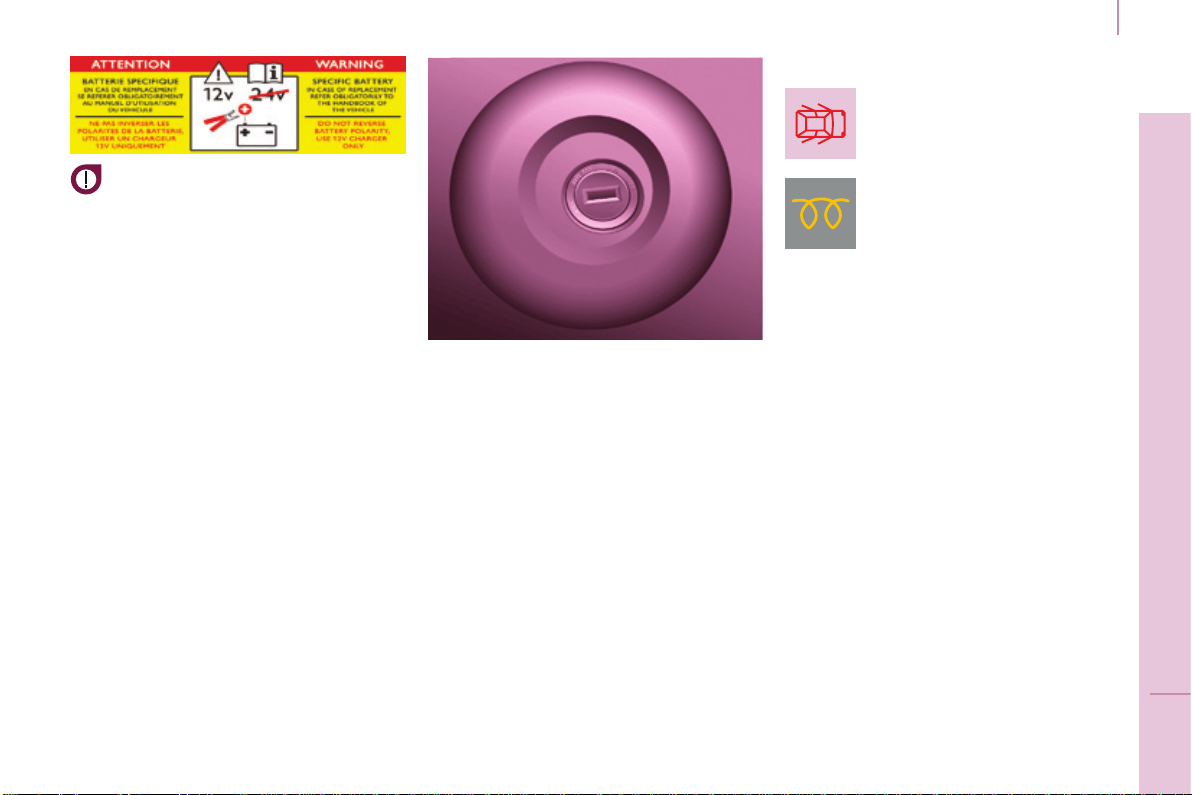
55
READY TO GO
3
Berlingo-2-VP_en_Chap03_Pret-a-partir_ed01-2016
Stop & Start
TheStop&Startsystem
requiresabatteryofspecic
characteristics.Allworkonthis
typeofbatterymustbedoneonly
byaCITROËNdealeroraqualied
workshop.
Formoreinformationonthe12V
battery,referto"Battery"insection8.
Good practice when stopping
Good practice when starting
Diesel pre-heating warning
lamp
Ifthetemperatureishigh
enough,thewarninglamp
comesonforlessthan
one second, you can start
withoutwaiting.
In cold weather, wait for this warning
lamptogooffthenoperatethestarter
(Starting position) until the engine
starts.
Door or bonnet open
warning lamp
Ifthiscomeson,adoororthebonnet
isnotclosedcorrectly,check!
Minimise engine and gearbox wear
When switching off the ignition, let the
engine run for a few seconds to allow
the turbocharger (Diesel engine) to
returntoidle.
Do not press the accelerator when
switchingofftheignition.
There is no need to engage a gear
afterparkingthevehicle.
STARTING AND STOPPING
Running and accessories position.
Tounlockthesteering,turnthe
steering wheel gently while turning the
key,withoutforcing.Inthisposition,
certainaccessoriescanbeused.
Starting position.
The starter is operated, the engine
turnsover,releasethekey.
STOP position:steeringlock.
Theignitionisoff.Turnthesteering
wheeluntilthesteeringlocks.Remove
thekey.
Opening the bonnet
Before doing anything under the
bonnet, deactivate the Stop & Start
systemtoavoidtheriskofinjury
relatedtoanautomaticchangeto
STARTmode.
Driving on ooded roads
Beforedrivingthroughaoodedroad,
itisstronglyrecommendedthatyou
deactivatetheStop&Startsystem.
Formoreadviceondriving,particularly
onoodedroads,refertothe
correspondingsection.
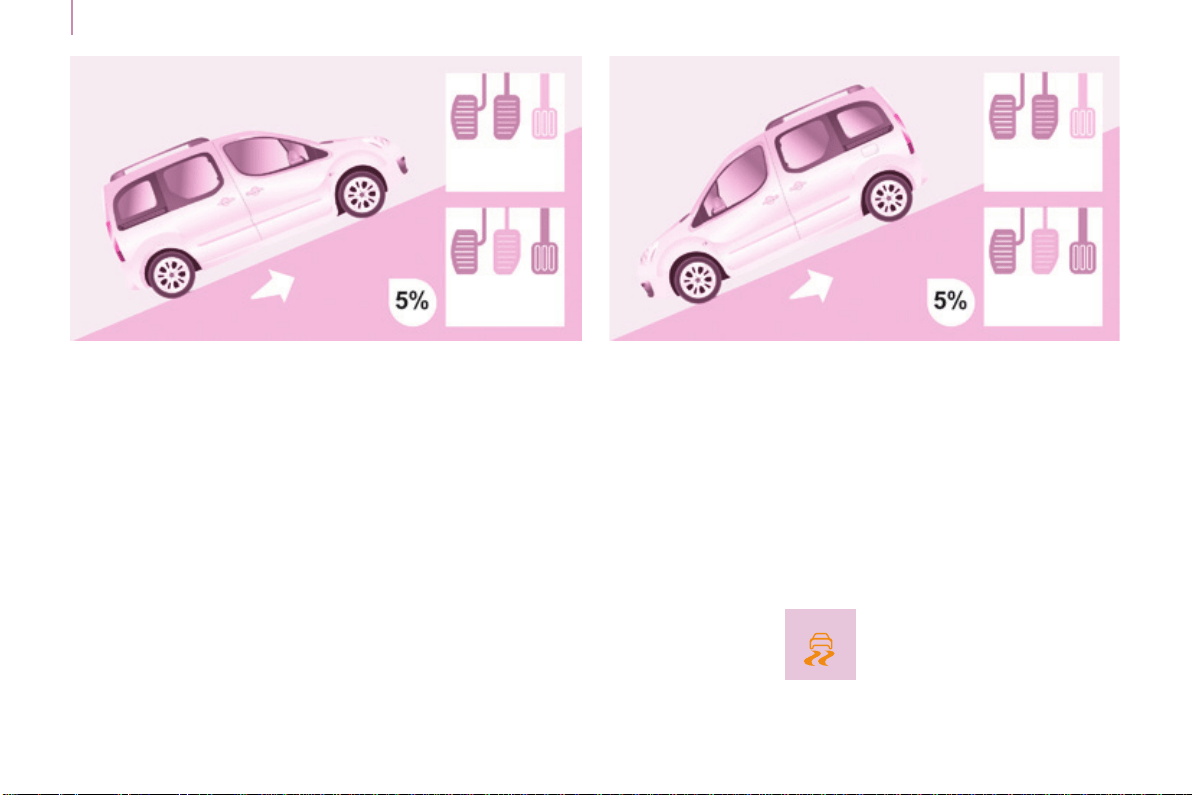
56
Berlingo-2-VP_en_Chap03_Pret-a-partir_ed01-2016
Starting and switching off
HILL START ASSIST
Thissystem(alsocalledHHC-Hill
HolderControl),linkedtothedynamic
stabilitycontrolsystem,makeshill
starts easier and is activated in the
followingconditions:
- thevehiclemustbestationary,
enginerunning,footonthebrake,
- thegradientoftheroadmustbe
steeper than 5%,
- uphill,thegearboxmustbein
neutral or in a gear other than
reverse,
- downhill,reversegearmustbe
engaged.
TheHillStartAssistsystemisadriving
aid.Itisnotanautomaticvehicle
parkingfunctionoranautomatic
parkingbrake.
Operation
Withthebrakepedalandclutchpedal
pressed,fromthetimeyourelease
thebrakepedal,withoutusingthe
parkingbrake,youhaveapproximately
2secondstomoveoffbeforethe
vehiclestartstorollback.
Duringthemovingoffphase,the
functionisdeactivatedautomatically,
graduallyreleasingthebraking
pressure.Duringthisphase,the
characteristicnoiseofmechanical
releaseofthebrakesmaybeheard,
indicatingtheimminentmovementof
thevehicle.
Operating fault
Hill start assist is deactivated in the
followingsituations:
- when the clutch pedal is released,
- whentheparkingbrakeisapplied,
- when the engine is switched off,
- whentheenginestalls.
Ifamalfunctionofthe
systemoccurs,this
warninglampcomeson
accompaniedbyanaudible
signalandconrmedby
amessageinthescreen.Havethe
systemcheckedbyaCITROËNdealer
oraqualiedworkshop.
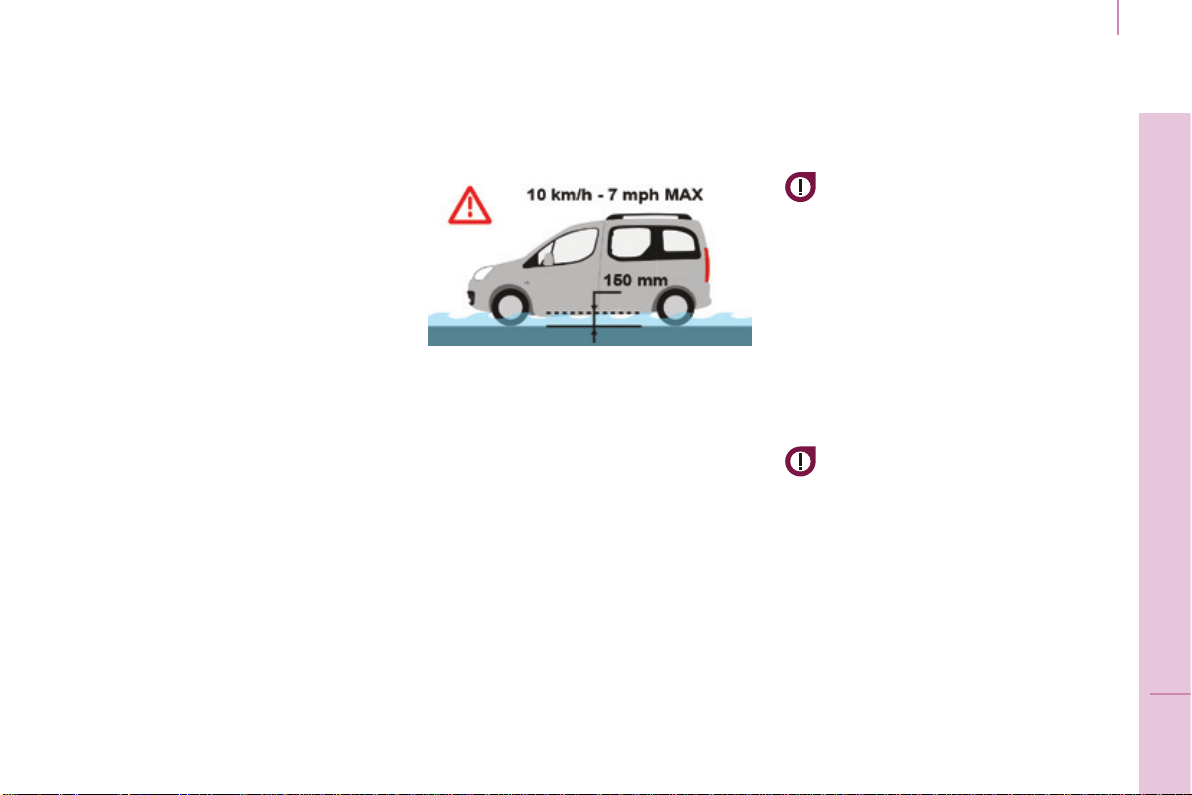
57
READY TO GO
3
Berlingo-2-VP_en_Chap03_Pret-a-partir_ed01-2016
Starting and switching off
DRIVING RECOMMENDATIONS
Observe the driving regulations and
remainvigilantwhateverthetrafc
conditions.
Paycloseattentiontothetrafcand
keepyourhandsonthewheelsothat
youarereadytoreactatanytimeto
anyeventuality.
Onalongjourney,abreakeverytwo
hoursisstronglyrecommended.
Indifcultweather,drivesmoothly,
anticipatetheneedtobrakeand
increasethedistancefromother
vehicles.
Driving on flooded roads
We strongly advise against driving
onoodedroads,asthiscouldcause
seriousdamagetotheengineor
gearbox, as well as to the electrical
systemsofyourvehicle.
If you are obliged to drive through
water:
- checkthatthedepthofwaterdoes
notexceed15cm,takingaccount
ofwavesthatmightbegenerated
by other users,
- deactivatetheStop&Startsystem,
- drive as slowly as possible without
stalling.Inallcases,donotexceed
6mph(10km/h),
- do not stop and do not switch off
theengine.
Onleavingtheoodedroad,assoon
ascircumstancesallow,makeseveral
lightbrakeapplicationstodrythebrake
discsandpads.
If in doubt on the state of your vehicle,
contact a CITROËN dealer or a
qualiedworkshop.
Neverdrivewiththeparkingbrake
applied-Riskofoverheatingand
damagetothebrakingsystem!
Riskofre!
Astheexhaustsystemofyourvehicle
isveryhot,evenseveralminutesafter
switchingofftheengine,donotpark
or run the engine over areas where
inammablesubstancesandmaterials
arepresent:grass,leaves,etc...)
Never leave a vehicle
unsupervised with the engine
running.Ifyouhavetoleave
your vehicle with the engine running,
applytheparkingbrakeandputthe
gearbox into neutral or position N or P,
dependingonthetypeofgearbox.
Important!
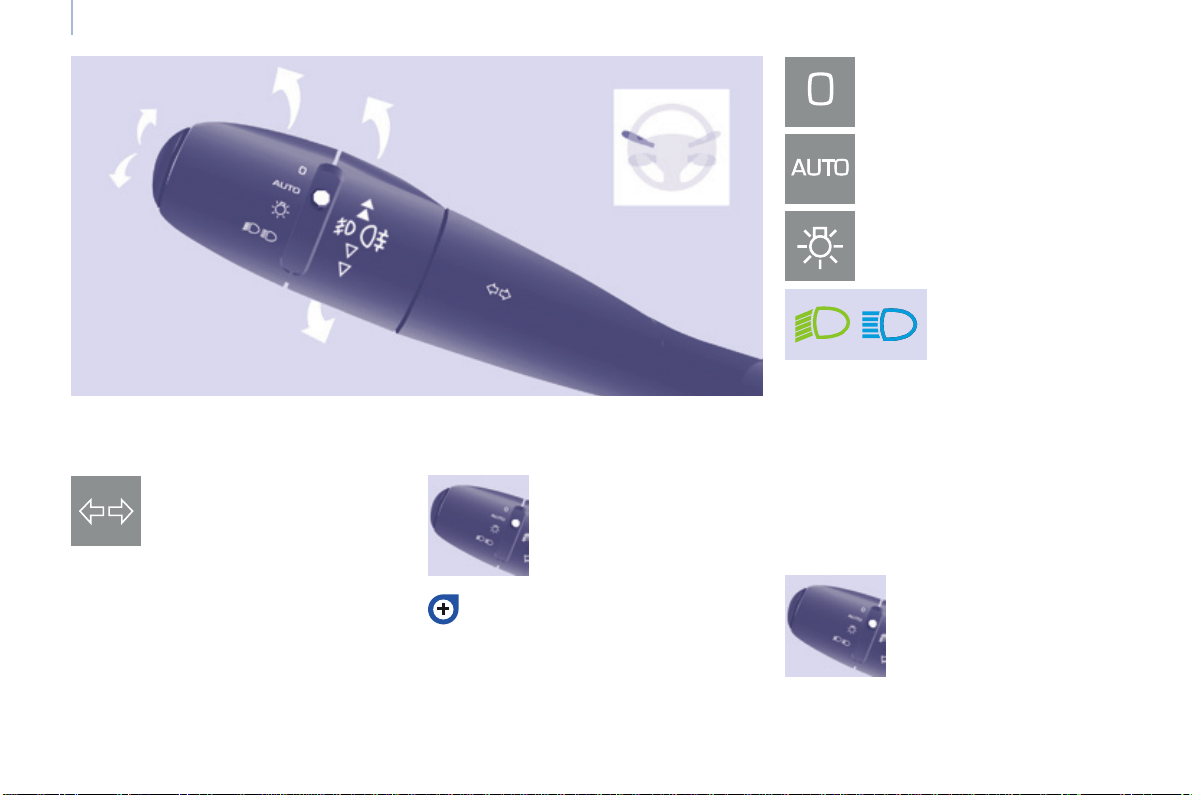
58
Steering mounted controls
Berlingo-2-VP_en_Chap04_Ergonomie_ed01-2016
DIRECTION INDICATORS
"Motorway" function
Pressthecontrolupordowntoash
the corresponding direction indicator
threetimes.
LIGHTING
Left:downwardspassingthe
pointofresistance.
Right:upwardspassingthe
pointofresistance.
Front and rear lighting
Lighting off
Automaticilluminationof
headlamps
Sidelamps
Dippedbeam(green)
Dipped beam/main beam change
Pullthestalkfullytowardsyou.
Lighting-on audible warning
On switching off the ignition, all of the
lampsturnoff,exceptdippedbeamif
automaticguide-me-homelightinghas
beenactivated.
Checkingbymeansoftheindicator
lampsintheinstrumentpanelis
describedinthe"Instrumentsand
controls"sectionofchapter3.
Direction indicators
Selection is by turning this
ring.
Mainbeam(blue)
To activate the lighting
control, turn this ring to
the lighting off position "0"
then to the selection of
yourchoice.
On opening the driver's door, there is
an audible warning if you have left the
lightingon.
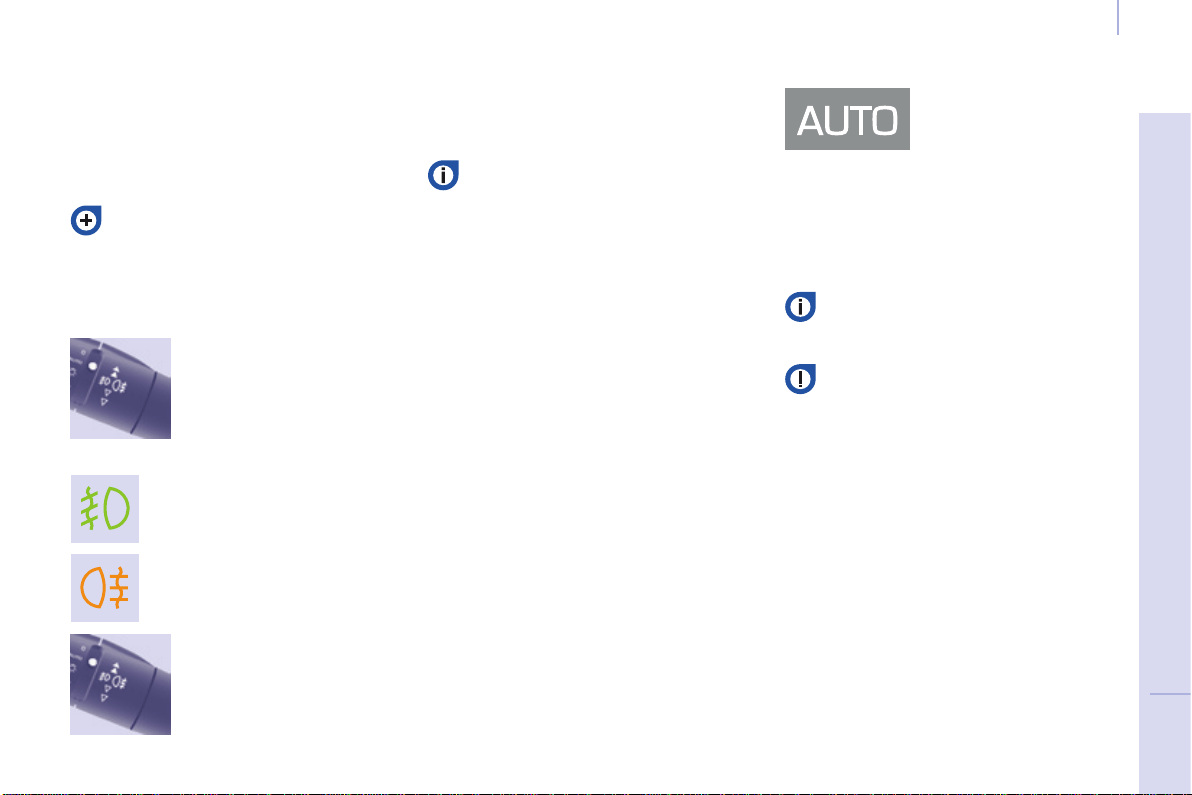
59
Steering mounted controls
EASE OF USE and COMFORT
4
Berlingo-2-VP_en_Chap04_Ergonomie_ed01-2016
LED DAYTIME RUNNING LAMPS
Rearfoglamps(amber,
2nd rotation of the ring
forwards).
Frontfoglamps(green,
1st rotation of the ring
forwards).
Rotate this ring forwards
to switch on and
rearwardstoswitchoff.
Theirstateisconrmedby
thewarninglampsinthe
instrumentpanel.
Donotforgettoswitchthemoff
whentheyarenolongerneeded.
Operationoftheautomaticillumination
ofheadlampsswitchesofftherear
foglamps,butthefrontfoglamps
remainon.
To switch off the front and
rearfoglamps,turnthe
ring rearwards twice in
succession.
Automatic illumination of headlamps
In foggy weather or in snow,
thesunshinesensormaydetect
sufcientlight.
As a consequence, the lighting
willnotcomeonautomatically.If
necessary,youmustswitchonthe
dippedbeamheadlampsmanually.
Do not cover the sunshine sensor
located on the windscreen, behind
themirror.Itisusedfortheautomatic
illuminationofheadlampsandforthe
automaticrainsensitivewipers.
Activation
Thesidelamps
anddippedbeam
headlampsswitch
onautomaticallyif
the light is poor, or
during operation of the windscreen
wipers.Theyswitchoffassoonasthe
lightbecomesbrightenoughorthe
windscreenwipersstop.
On starting the vehicle, in daylight the
LEDdaytimerunninglampscomeon
automatically.
Ifthesidelampsandheadlampsare
switchedonmanuallyorautomatically,
thedaytimerunninglampsgooff.
Programming
For countries where exterior lighting by
dayisnotalegalrequirement,youcan
activate or deactivate the function via
thecongurationmenu.
If the user does not operate any
equipmentfor30minutes,the
Economymodeengagestoavoid
dischargingthebattery.Electrical
functions are put on standby and the
batterywarninglampashes.
Sidelampoperationisnotaffectedby
Economymode.
In clear weather or in rain, both day
andnight,rearfoglampsdazzleand
theiruseisprohibited.
Refer to chapter 8, "Battery
section".
Front and rear foglamps
Theyoperatewiththesidelampsand
dippedbeamheadlamps.
Turn the ring to the AUTOposition.
The activation of this function is
accompaniedbyamessageinthe
screen.
Deactivation
Turntheringforwardsorrearwards.
The deactivation of this function is
accompaniedbyamessageinthe
screen.
Thisfunctionisnotcompatiblewith
daytimerunninglamps.
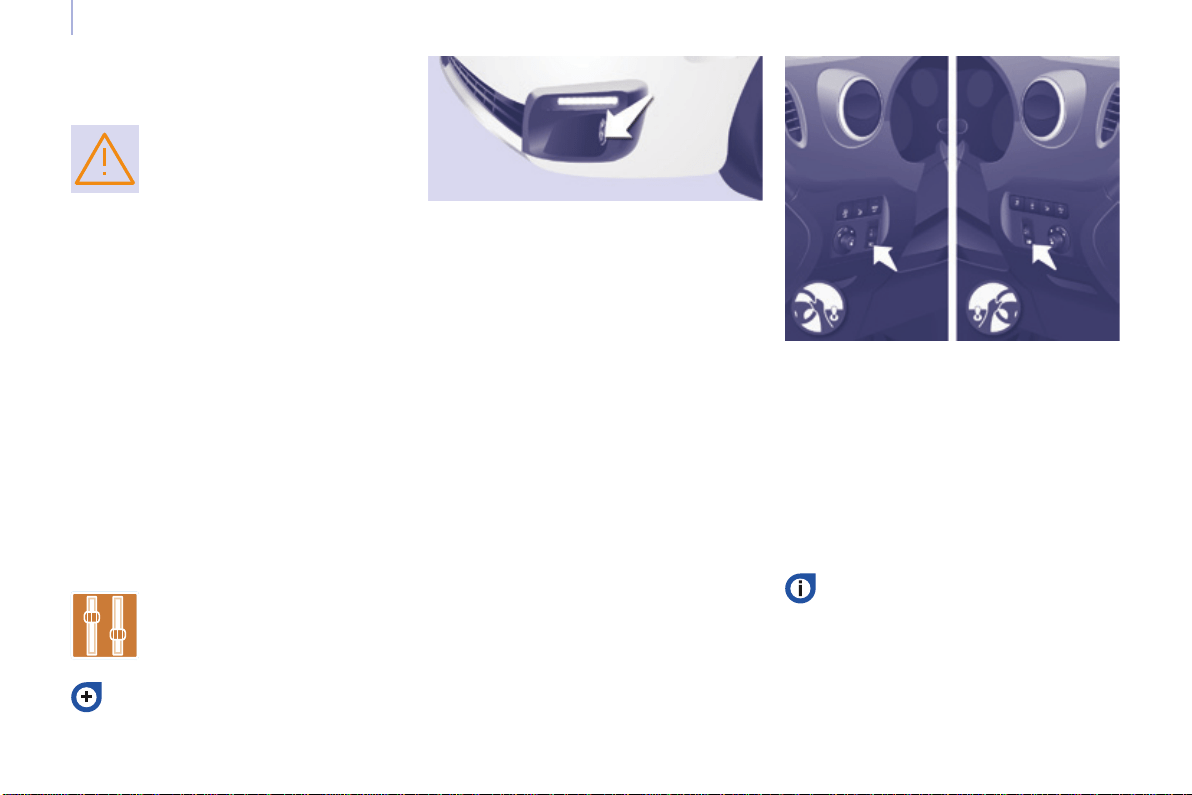
60
Steering mounted controls
Berlingo-2-VP_en_Chap04_Ergonomie_ed01-2016
If the sunshine sensor
does not function correctly,
thelightingcomeson
accompaniedbytheservice
warninglamp,anaudible
signalandamessageinthescreen.
Contact a CITROËN dealer or a
qualiedworkshop.
Guide-me-home lighting
Keepingthedippedbeamheadlamps
ontemporarilywiththeignitionoff,
makesthedriver'sexiteasierwhenthe
lightispoor.
HEADLAMP BEAM
Thebeamsettingmustbeadjustedto
suittheloadinthevehicle.
0 -Noload.
1 -Partialload.
2 -Averageload.
3 -Maximumauthorisedload.
Manual operation
- Withtheignitionoff,"ash"the
headlampswithinoneminuteafter
switchingofftheignition.
Theguide-me-homelightingswitches
offautomaticallyafterasettime.
Automatic operation
Refer to chapter 10, "Screen
menumap"section.
Initial setting is position 0.
Activate the function via the
vehiclecongurationmenu.
Programming
Thesystemisactivatedordeactivated
inthevehiclecongurationmenu.
Thesystemisactivatedbydefault.
Switching off
Thesystemdoesnotoperate:
- below a certain angle of rotation of
the steering wheel,
- above25mph(40km/h),
- whenreversegearisengaged.
Switching on
Thisfunctionstarts:
- when the corresponding direction
indicator is switched on,
or
- fromacertainangleofrotationof
thesteeringwheel.
Withdippedormainbeamheadlamps,
thisfunctionmakesuseofthebeam
fromafrontfoglamptoilluminatethe
inside of a bend, when the vehicle
speedisbelow25mph(approximately
40km/h)(urbandriving,windingroad,
intersections,parkingmanoeuvres...).
Cornering lighting
Travelling abroad
If using your vehicle in a country
that drives on the other side of the
road,theheadlampsmustbeadjusted
toavoiddazzlingon-comingdrivers.
Contact a CITROËN dealer or a
qualiedworkshop.
Thefunctionisdeactivatedtemporarily
whenyouusethemanuallighting
controlstalk.

61
Steering mounted controls
EASE OF USE and COMFORT
4
Berlingo-2-VP_en_Chap04_Ergonomie_ed01-2016
2 Fastwipe(heavyrain).
1 Normalwipe(moderaterain).
l Intermittentwipe.
0 Off.
â Single wipe
(pressdownwards).
In the Intermittentposition,thewiping
speed is in proportion to the vehicle
speed.
WIPERS
Manual wiping
Whenever the ignition has been
switchedoffformorethanoneminute,
withthewindscreenwiperstalkin
position2,1orI,thestalkmustbe
reactivated.
- Movethestalktoanyposition.
- Returnittothedesiredposition.
Do not cover the rain sensor,
located in the centre of the
windscreen,behindthemirror.
Activation
Pressthecontroldownwards.
Activation of the function is
accompaniedbyamessageinthe
screen.
Deactivation
Placethewindscreenwipersstalkin
position I, 1 or 2.
Deactivation of the function is
accompaniedbyamessageinthe
screen.
Intheeventofmalfunctionofthe
automaticwindscreenwipers,the
windscreen wipers will operate in
intermittentmode.
Contact a CITROËN dealer or a
qualiedworkshoptohavethesystem
checked.
In the AUTO position, the windscreen
wipersoperateautomaticallyand
adapt their speed to the intensity of the
rainfall.
When not in AUTOmode,forthe
otherpositions,refertothemanual
windscreenwiperssection.
Theautomaticrainsensitive
windscreenwipersfunctionmust
bereactivatedbypressingthestalk
downwards, if the ignition has been
switchedoffformorethanoneminute.
Whenusinganautomaticcar
wash, switch off the ignition to
avoidtriggeringtheautomatic
wiping.
In winter, it is advisable to wait for the
windscreentocompletelyclearofice
beforeoperatingtheautomaticwipers.
Automatic wipers
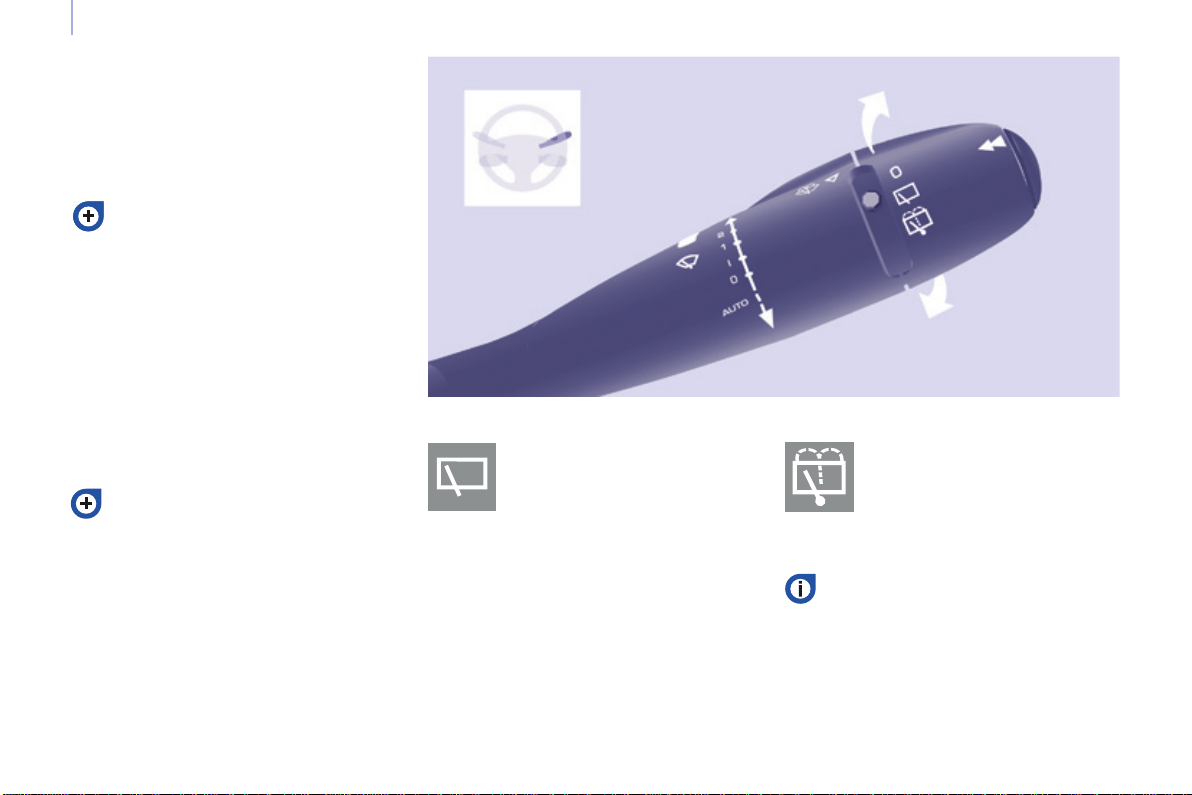
62
Steering mounted controls
Berlingo-2-VP_en_Chap04_Ergonomie_ed01-2016
Screenwash and headlamp wash
Pullthestalktowardsyou,thewash-
wipeisaccompaniedbyatimedsweep
ofthewipers.
Theheadlampwashislinkedwiththe
wash-wipe, it is triggered if the dipped
headlampsareon.
Turntheringpasttherst
position:therearscreenwash
then the rear wiper operates
foraxedtime.
In winter, in the event of a
considerableamountofsnow
or ice, switch on the heated
rearscreen.Oncethescreenis
clear,removethesnoworicewhich
hasaccumulatedontherearwiper
blade.Youcanthenoperatetherear
windscreenwiper.
To top up the levels, refer to the
"Levels"sectionofchapter7.
Special position of the
windscreen wipers
Intheminutefollowingswitching
off of the ignition, any action on the
stalkpositionsthewipersagainstthe
windscreenuprights.
This action enables you to position
thewiperbladesforwinterparking,
cleaningorreplacement.
Refer to the "Changing a windscreen
wiperblade"sectionofchapter8.
Toparkthewipersintheirnormal
position after this has been done,
switchontheignitionandmovethe
stalk.
Turntheringtotherst
position.
Rear wiper Rear screenwash
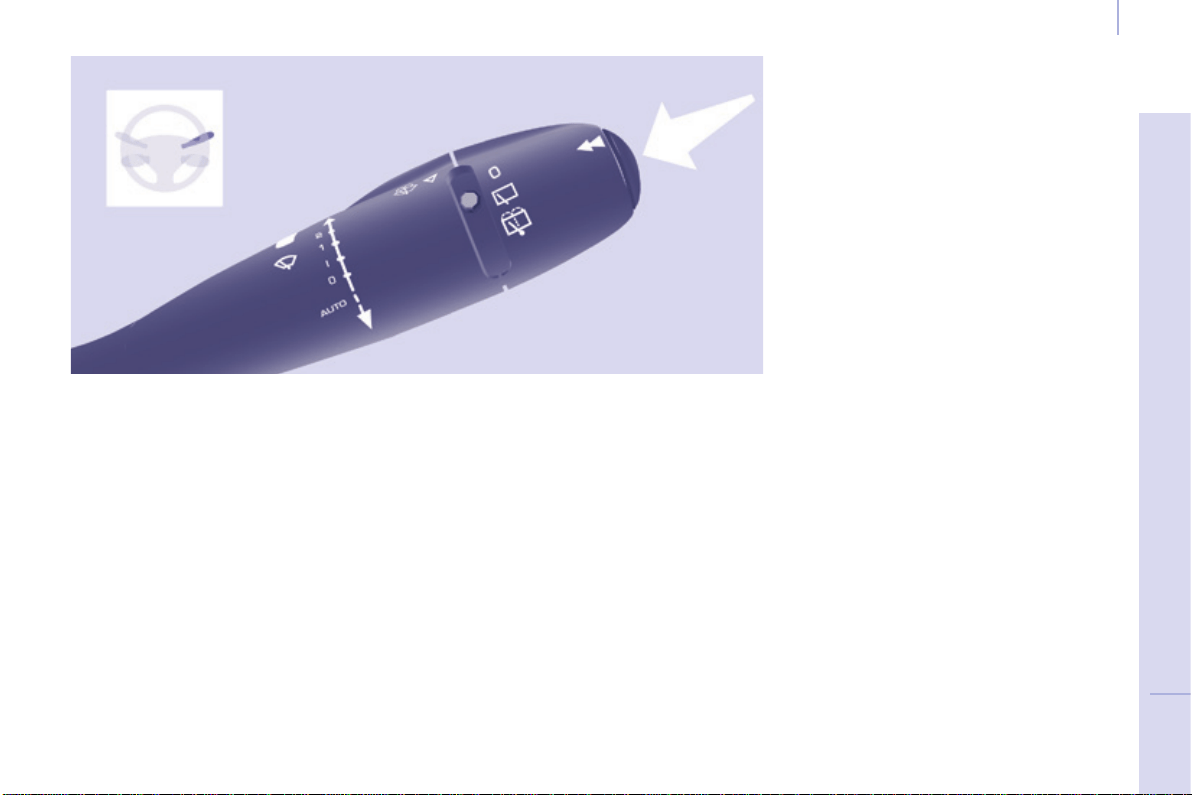
63
Steering mounted controls
EASE OF USE and COMFORT
4
Berlingo-2-VP_en_Chap04_Ergonomie_ed01-2016
TRIP COMPUTER
A few definitions
Range: displays the distance which
cantravelledwiththeremainingfuel
detectedinthetank,basdonthe
averageconsumptionoverthelastfew
miles(kilometres).
Thisdisplayedvaluemayvary
signicantlyfollowingachangeinthe
vehiclespeedorthereliefoftheroute.
Current fuel consumption: only
calculated and displayed above
20mph(30km/h).
Average fuel consumption: this is the
averagefuelconsumptionsincethe
lasttripcomputerzeroreset.
Distance travelled: calculated since
thelasttripcomputerzeroreset.
Distance remaining to the
destination: calculated with reference to
thenaldestination,enteredbytheuser.
If guidance is activated, the navigation
systemcalculatesitasacurrentvalue.
Average speed: this is the average
speed calculated since the last trip
computerzeroreset(ignitionon).
Each press of the button, located at
theendofthewiperstalk,displaysthe
differenttripcomputerinformationin
turn,dependingonthescreen.
When the required trip is displayed,
pressthecontrolformorethan
twoseconds.
Whentherangefallsbelow20miles
(30km),dashesaredisplayed.After
llingwithatleast10litresoffuel,the
range is recalculated and is displayed
whenitexceeds60miles(100km).
If, whilst driving, dashes are displayed
continuously in place of the digits,
contactaCITROËNdealer.
The "vehicle" tab with the range,
currentfuelconsumptionandthe
remainingdistancetorun.
The "1" tab (trip 1) with the average
speed,theaveragefuelconsumption
and the distance travelled in trip "1".
The"2"tab(trip2)withthesame
informationfora2
nd
trip.
Reset
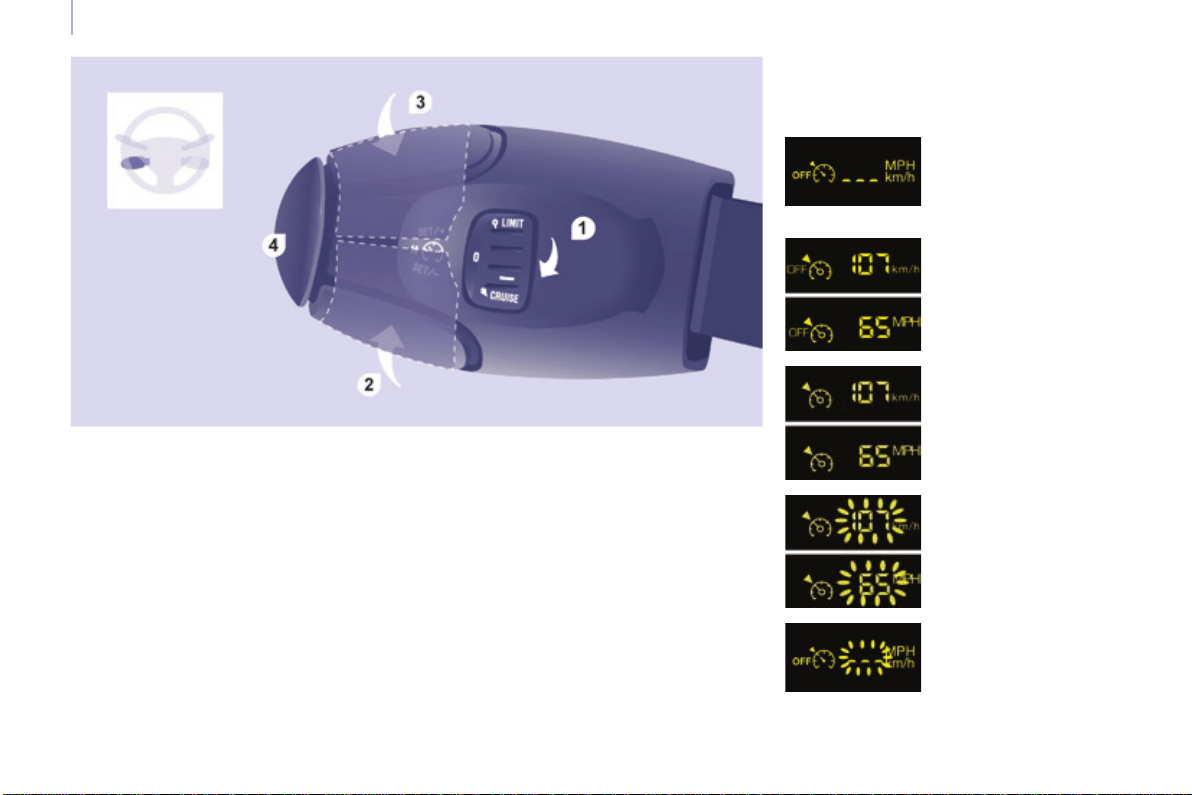
64
Steering mounted controls
Berlingo-2-VP_en_Chap04_Ergonomie_ed01-2016
CRUISE CONTROL
"CRUISE"
"This is the speed at which the driver
wishestodrive".
Thisaidtodrivinginfree-owing
trafcenablesthevehicletomaintain
thespeedprogrammedbythedriver,
unlessasteepgradientmakesthis
impossible.
Forthesystemtobeprogrammedor
activated,thevehiclespeedmustbe
greaterthan25mph(40km/h)with
4thgearorhigherengaged.
Thestateofthecruisecontrolsystem
canbeseenintheinstrumentpanel
togetherwiththetheprogrammed
speedsetting.
Function selected,
display of the "Cruise
Control"symbol.
Function off,
OFF
Functionon.
Vehicle speed above,
theprogrammed
speedashes.
Operating fault
detected,
OFF - the dashes
ash.
1. CruisecontrolmodeOn/Off.
2. Reducecruisespeedsetting.
3. Increasecruisespeedsetting.
4. Pause/Resumecruisecontrol.
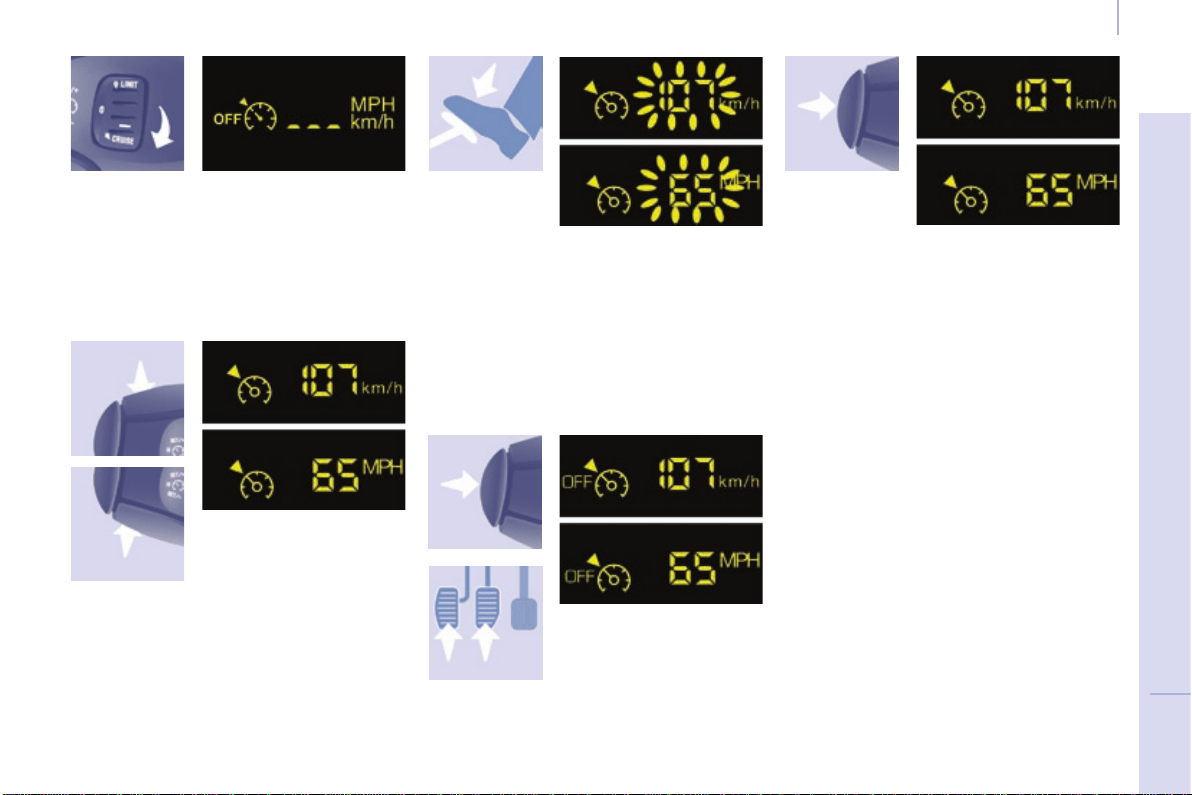
65
Steering mounted controls
EASE OF USE and COMFORT
4
Berlingo-2-VP_en_Chap04_Ergonomie_ed01-2016
Selecting the function
First activation /
Programming a
speed
Temporarily exceeding the
speed setting
Deactivation (off)
- Press this button or
thebrakeorclutch
pedal.
Reactivation
- Following deactivation of the cruise
control,pressthisbutton.
Your vehicle will return to the last
programmedspeed.
Alternatively,youcanrepeatthe"rst
activation"procedure.
It is possible to accelerate and drive
momentarilyataspeedgreaterthan
theprogrammedspeedsetting.The
valueprogrammedashes.
When the accelerator pedal is
released, the vehicle will return to the
programmedspeed.
- Reach the chosen speed by
pressingtheaccelerator.
- Press the SET - or SET +button.
Thisprogrammes/activatesthespeed
settingandthevehiclewillmaintain
thisspeed.
- Place the switch in the CRUISE
position.Thecruisecontrolis
selected but is not yet active and
nospeedhasbeenprogrammed.
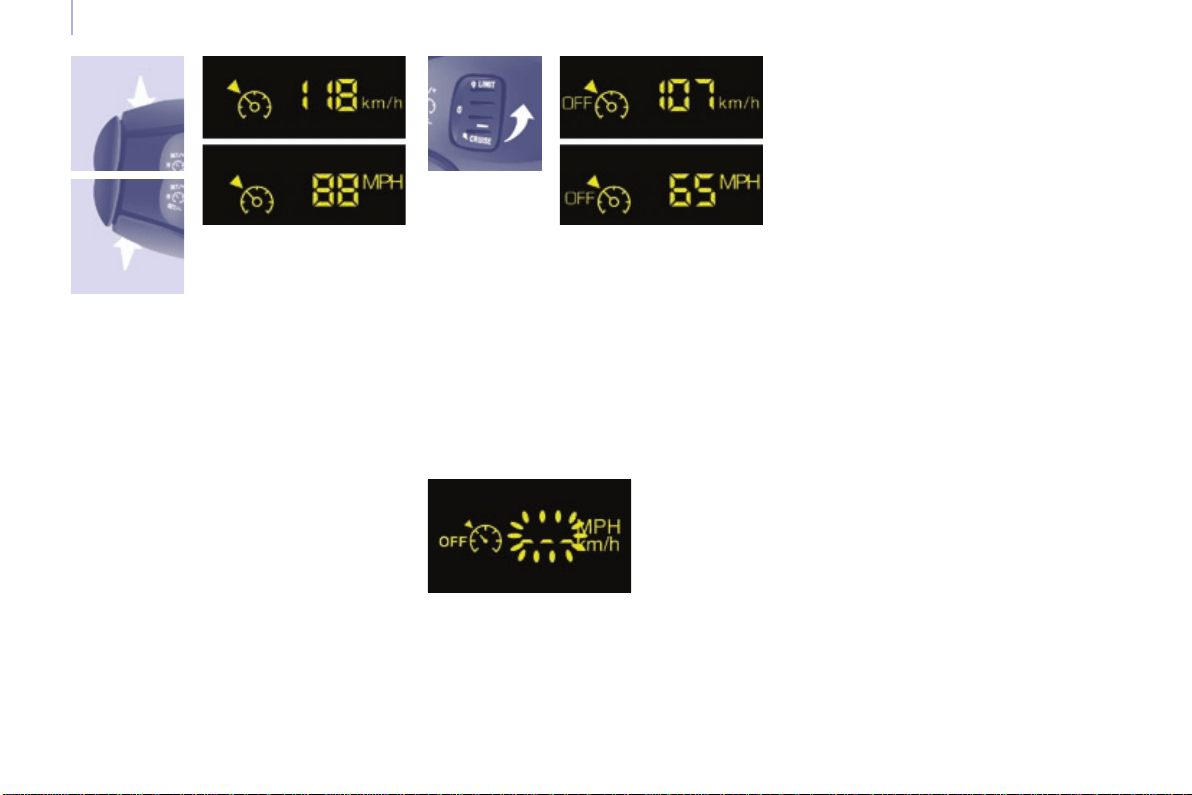
66
Steering mounted controls
Berlingo-2-VP_en_Chap04_Ergonomie_ed01-2016
Changing the
programmed speed
Switching the system off
Operating fault
Cancelling the programmed
speed setting
Whenthevehiclebecomesstationary,
after switching off the ignition, the
systemnolongermemorisesaspeed.
Therearetwomethodsofmemorising
a speed higherthanthepreviousone:
- Place the dial in position 0 or switch
off the ignition to switch everything
off.
Good practice
Without using the accelerator
- Press the SET +button.
Abriefpressincreasesthespeedby1mph(km/h).
Amaintainedpressincreasesthespeedin
stepsof5mph(km/h).
Using the accelerator
- Exceedthememorisedspeeduntil
the speed required is reached,
- Press the SET + or SET -button.
Tomemoriseaspeedlower than the
previousone:
- Press the SET -button.
A brief press decreases the speed by
1mph(km/h).
Amaintainedpressdecreasesthe
speedinstepsof5mph(km/h).
Theprogrammedspeedsettingis
clearedandreplacedbythreedashes.
Contact a CITROËN dealer or a
qualiedworkshoptohavethesystem
checked.
Whenchangingtheprogrammed
speedsettingbymeansofa
maintainedpress,payattentionas
the speed can increase or decrease
rapidly.
Do not use the cruise control on
slipperyroadsorinheavytrafc.
In the event of a steep slope, the cruise
controlcannotpreventthevehiclefrom
exceedingtheprogrammedspeed
setting.
In any event, the cruise control cannot
replace the need to observe the speed
limitsandtheneedforvigilanceonthe
partofthedriver.
Itisadvisabletokeepyourfeetnear
thepedals.
Toavoidanyjammingunderthe
pedals:
- ensurethatthematanditsxings
ontheoorarepositionedcorrectly,
- neverplaceonematontopof
another.
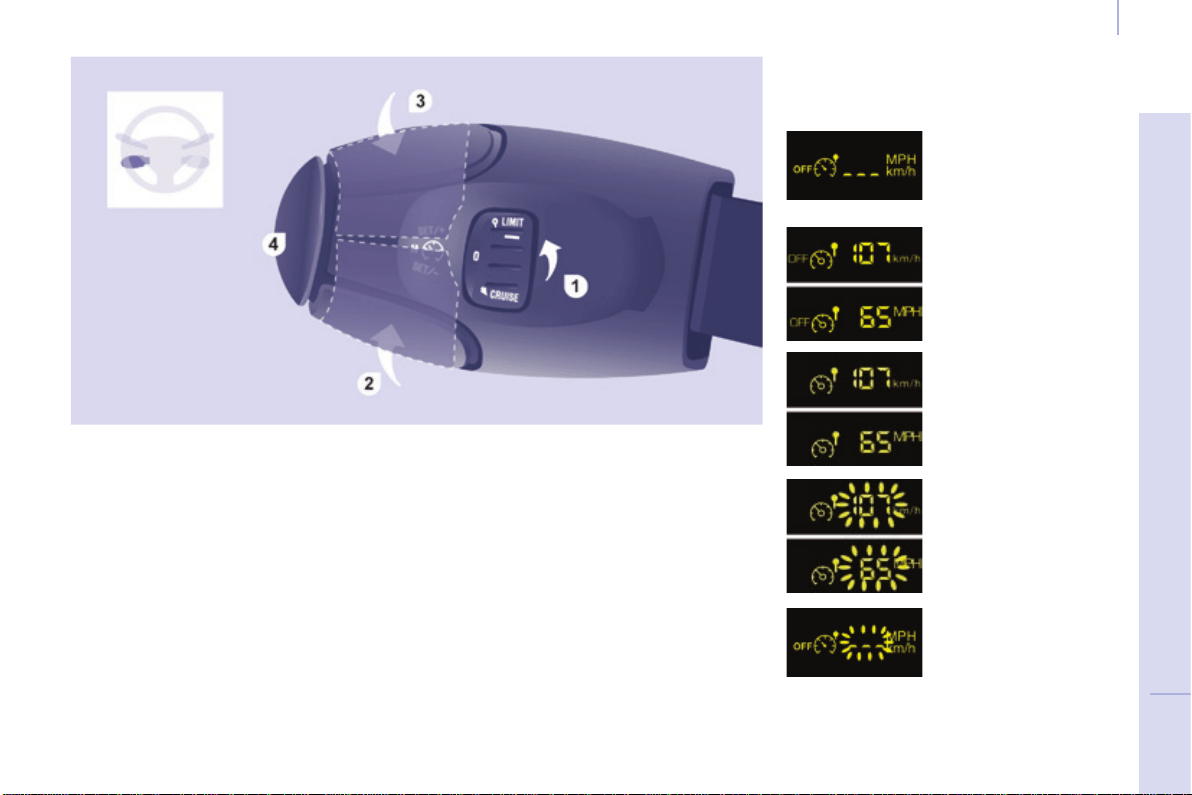
67
Steering mounted controls
EASE OF USE and COMFORT
4
Berlingo-2-VP_en_Chap04_Ergonomie_ed01-2016
The speed of the vehicle responds to
the pressure of the driver's foot, up
to the the accelerator pedal's point of
resistance, which indicates that the
programmedspeedhasbeenreached.
However, pressing the pedal beyond
thispointofresistancetotheoor
allowstheprogrammedspeedtobe
exceeded.Toresumeuseofthelimiter,
simplyreducethepressureonthe
accelerator pedal gradually and return
toaspeedbelowthatprogrammed.
Adjustments can be carried out
when stationary, with the engine
running, or with the vehicle moving.
Thisspeedlimitershowsthefunction
selectionstatusintheinstrumentpanel
anddisplaystheprogrammedspeed:
SPEED LIMITER
"LIMIT"
Function selected,
displaying of the
"SpeedLimiter"
symbol.
Function off,
lastprogrammed
speed - OFF.
Functionon.
Vehicle speed above,
theprogrammed
speed setting is
displayedashing.
Operating fault
detected,
OFF - the dashes
ash.
1. LimitermodeOn/Off.
2. Reduceprogrammedspeed
setting.
3. Increaseprogrammedspeed
setting.
4. SpeedlimiterOn/Pause.
"This is the selected speed which the
driverdoesnotwishtoexceed".
Thisselectionismadewiththeengine
running while stationary or with the vehicle
moving.Theminimumspeedwhichcan
beprogrammedis20mph(30km/h).
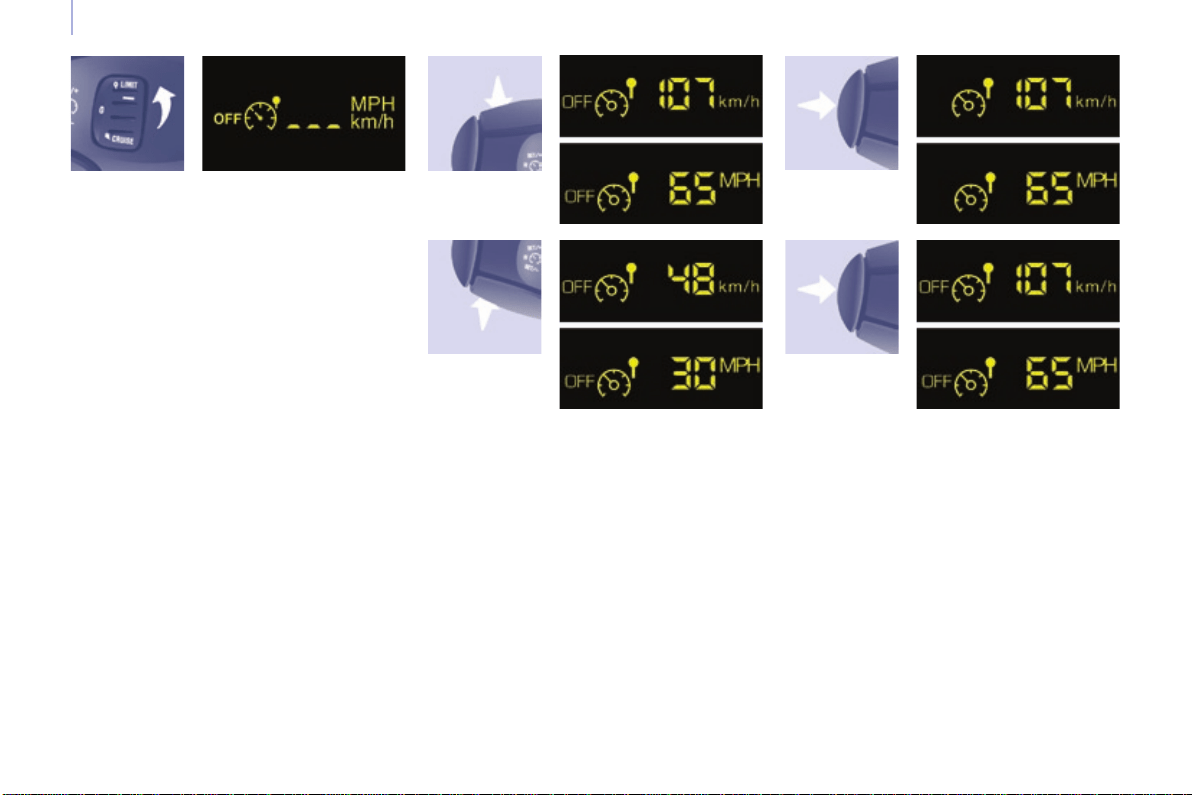
68
Steering mounted controls
Berlingo-2-VP_en_Chap04_Ergonomie_ed01-2016
Selecting the function
Programming a speed setting On / Off
- Place the switch in the LIMIT
position.Thelimiterisselected
butisnotyetactive.Thescreen
indicatesthelastprogrammed
speedsetting.
Aspeedcanbeprogrammedwithout
activatingthelimiterbutwiththe
enginerunning.
Tomemoriseaspeedhigher than the
previousone:
- Press the SET +button.
Abriefpressincreasesthespeedby1mph(km/h).
Amaintainedpressincreasesthespeedinstepsof
5mph(km/h).
Tomemoriseaspeedlower than the
previousone.
- Press the SET -button.
Abriefpressdecreasesthespeedby1mph(km/h).
Amaintainedpressdecreasesthespeedinstepsof
5mph(km/h).
Pressing this button once activates
thelimiter,pressingthebuttonagain
deactivates it (OFF).
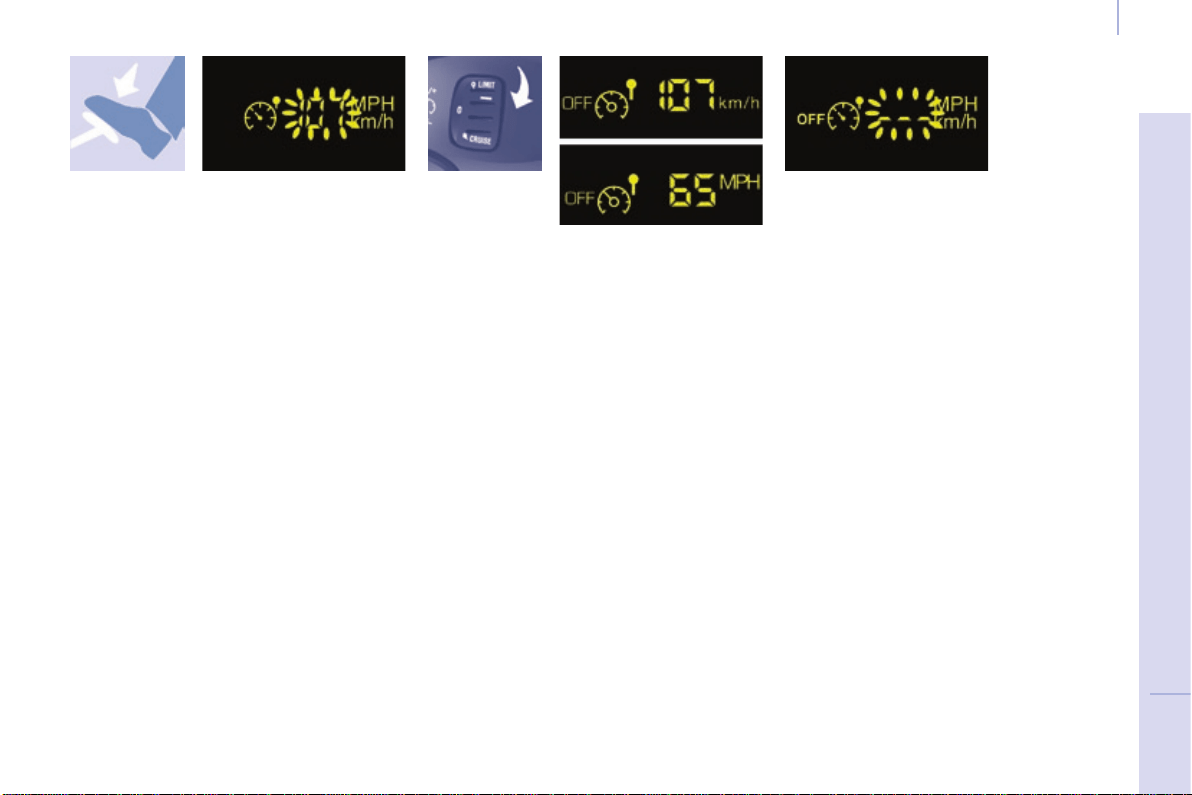
69
Steering mounted controls
EASE OF USE and COMFORT
4
Berlingo-2-VP_en_Chap04_Ergonomie_ed01-2016
Exceeding the programmed
speed
Switching the function off
Operating fault
Theprogrammedspeediscleared
thenreplacedbythreedashes.
Contact a CITROËN dealer or a
qualiedworkshoptohavethesystem
checked.
Flashing of the speed setting
Good practice
Inanyevent,thespeedlimitercannot
replace the need to observe speed
limits,norcanitreplacetheneedfor
vigilanceonthepartofthedriver.
Alwayspayattentiontotheprole
of the road and sharp acceleration
andstayincompletecontrolofyour
vehicle.
Toavoidanyjammingunderthe
pedals:
- ensurethatthematanditsxings
ontheoorarepositionedcorrectly,
- neverplaceonematontopof
another.
Pressing the accelerator pedal in order
toexceedtheprogrammedspeed
will have no effect unless you press
the pedal rmly beyond the point of
resistance.
Thelimiterisdeactivatedtemporarily
andtheprogrammedspeedashes
accompaniedbyanaudiblesignal.
Toreturntothelimiterfunction,reduce
yourspeedtobelowtheprogrammed
speed.
Thespeedsettingashes:
- following forcing of the accelerator
point of resistance,
- whenthelimitercannotpreventan
increase in the vehicle speed due
totheproleoftheroadorona
steep descent,
- intheeventofsharpacceleration.
- Place the switch in position 0 or
switch off the ignition to switch the
systemoff.
Thelastprogrammedspeedremainsin
thememory.
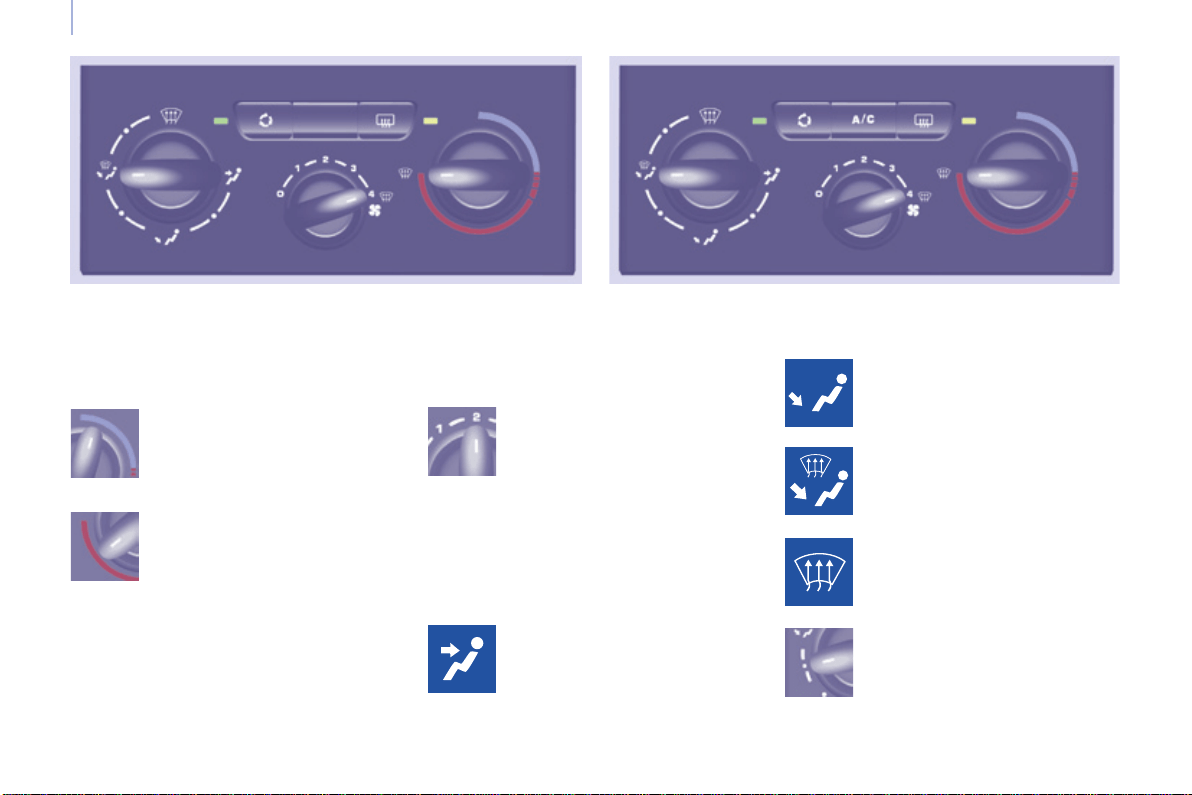
70
Berlingo-2-VP_en_Chap04_Ergonomie_ed01-2016
Ventilation
VENTILATION
the side vents and the central
vents,
Air flow
the footwells,
the windscreen and the footwells,
thewindscreen.
The air distribution can be
modulatedbyplacingthe
controlintheintermediate
positions,marked"●".
Air distribution
The air supply distribution is
determinedbythefollowingsymbols:
in the red zone, provides
heating of the passenger
compartment.
in the blue zone, provides
ambientair,
The speed of the blown air at
theventsvariesfrom1tothe
fastest4.Position0switches
itoff.
Adjustthiscontrolinorder
toattainthedesiredcomfort
level.
Heating Manual air conditioning
Temperature
Controlpositioned:
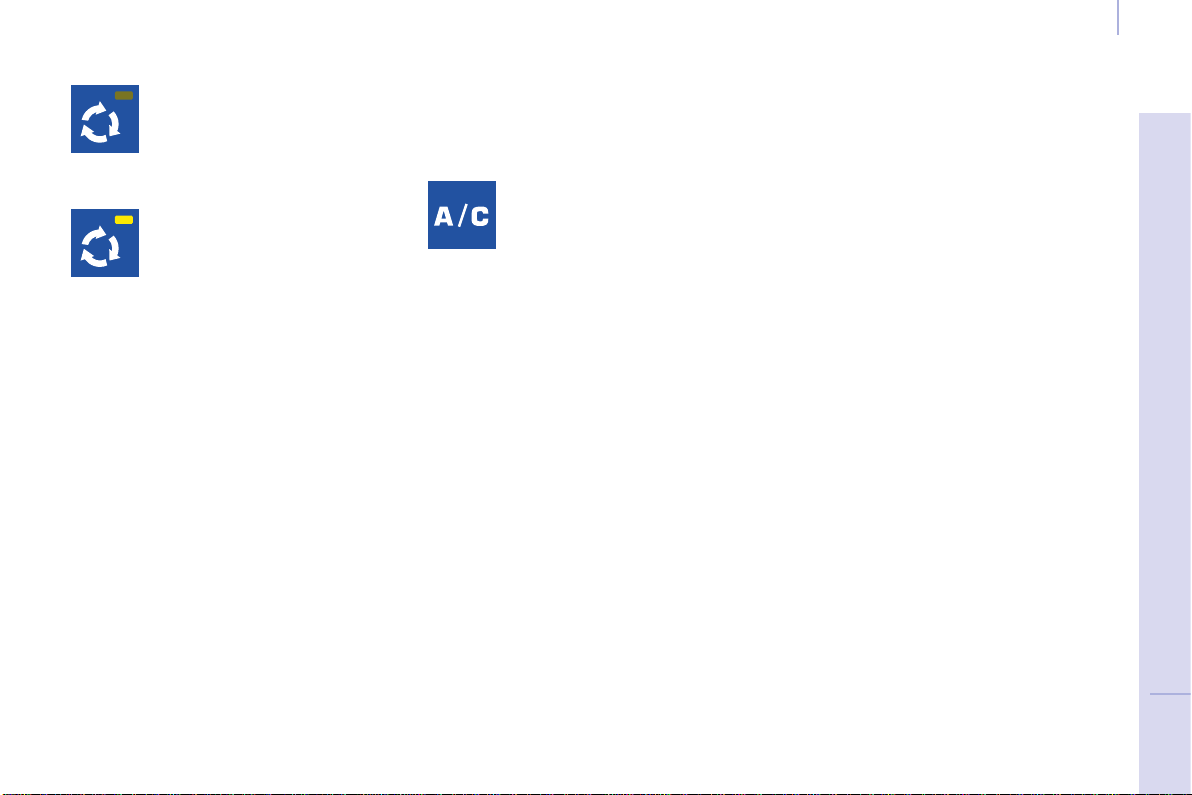
71
EASE OF USE and COMFORT
4
Berlingo-2-VP_en_Chap04_Ergonomie_ed01-2016
Ventilation
Intake of exterior air
Recirculation of interior air
Air conditioning A/C
The LED in the button is
off.Thisisthepreferred
operatingposition.
Pressing the button starts
theairconditioningsystem,
theLEDison.Pressingthe
button again switches the
function off and the LED
goesoff.
The air conditioning does not operate if
thefanspeedissetto0.
The air conditioning can only operate
withtheenginerunning.
TheLEDinthebuttonison.
Recirculationtemporarily
prevents exterior odours
andsmokefromenteringthe
passengercompartment.
Used with the setting of the fan speed
(from1to4),recirculationenablesyou
toattainthedesiredcomfortlevelmore
quicklywithbothhotorcoldsettings.
Thispositionshouldonlybetemporary.
Whenyourdesiredcomfortlevelhas
beenreached,returntotheintake
ofexteriorairpositiontopermit
renewal of the air in the passenger
compartmentandavoidmisting.Thisis
thepreferredoperatingmode.
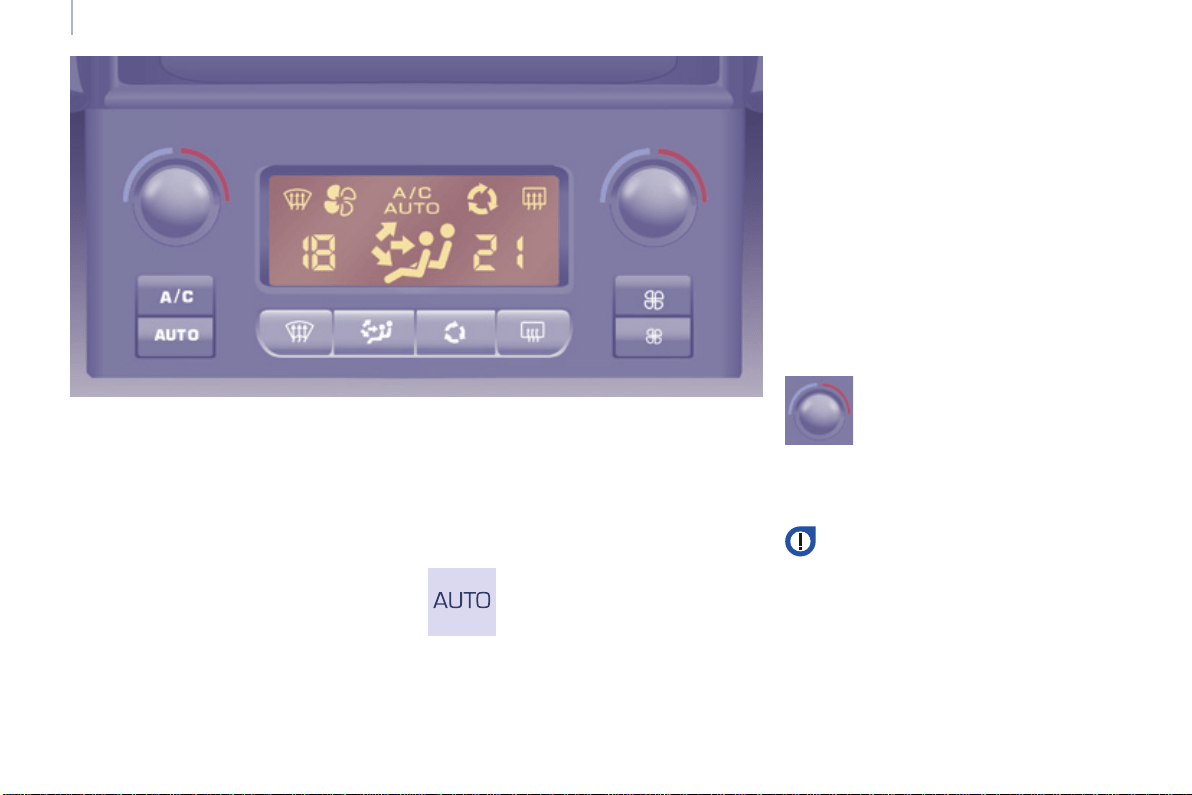
72
Berlingo-2-VP_en_Chap04_Ergonomie_ed01-2016
Ventilation
Good practice
Formaximumcoolingorheatingofthe
passengercompartment,itispossible
to exceed the value 15 by turning until
LOisdisplayedorthevalue27by
turninguntilHIisdisplayed.
On entering the vehicle, the inside
temperaturemaybemuchcolder
(orwarmer)thaniscomfortable.There
is no advantage in changing the value
displayedinordertoquicklyreachthe
levelofcomfortrequired.Thesystem
willuseitsmaximumperformanceto
reachthecomfortvalueset.
DIGITAL AIR CONDITIONING
Automatic operation
AUTO comfort programme
Thisisthenormalairconditioning
systemoperatingmode.
Driver or passenger side comfort
value
The value indicated in the screen
correspondstoalevelofcomfortand
notatemperatureindegreesCelsius
orFahrenheit.
Turn this control to the left
or to the right to decrease or
increasethevalue.Asetting
around the value 21 provides
optimumcomfort.However,
dependingonyourrequirements,a
settingbetween18and24isusual.
Do not cover the sunshine sensor
locatedonthedashboard.
Press this button, the AUTO
symbolisdisplayed.
Thesystemcontrolsthe
distribution,theowandthe
intakeofairtoguarantee
comfortandasufcientcirculation
ofairinthepassengercompartment
accordingtothecomfortvalueset.No
furtheractiononyourpartisrequired.
Airowwillincreasegraduallywhen
the engine is cold, to prevent excessive
distributionofcoldair.
Foryourcomfort,thesettingsare
stored when the ignition is switched off
andarereinstatedthenexttimethe
vehicleisstarted.
Theautomaticfunctionwillnolonger
bemaintainedifyouchangeasetting
manually(AUTOiscleared).
SEPARATE SETTINGS FOR DRIVER AND PASSENGER
73
EASE OF USE and COMFORT
4
Berlingo-2-VP_en_Chap04_Ergonomie_ed01-2016
Ventilation
Manual operation
You can, according to your
requirements,makeadifferentselection
fromthatofferedbythesystemby
changingasetting.Theotherfunctions
willstillbecontrolledautomatically.
Pressing the AUTO button restores fully
automaticoperation.
Air distribution
Pressing this button several
timesinsuccessiondirects
theairowtowards:
- the windscreen,
- the windscreen and footwells,
- the footwells,
- the side vents, central vents and
footwells,
- thesideventsandcentralvents.
Air ow
Press the small fan button to
reducetheoworthelarge
fan button to increase the
ow.
Onthedisplay,thebladesofthefanll
whentheowisincreased.
Switching the air
conditioning On / Off
Press this button, the A/C
symbolisdisplayedandthe
airconditioningisactivated.
Deactivating the system
Presstheairowsmall fan
buttonuntilthefansymbol
disappearsfromthedisplay.
This action deactivates all
ofthesystem'sfunctions,withthe
exception of the air recirculation and
rearscreendemisting(ifttedonyour
vehicle).Yourcomfortsettingisno
longermaintainedandisswitchedoff.
Intake of exterior air /
Recirculation of interior air
Press this button to
recirculatetheinteriorair.
Therecirculationsymbolis
displayed.
Pressing the large fan
button or the AUTO button
reactivatesthesystemwith
the values set before it was
deactivated.
Recirculation prevents exterior odours
andsmokefromenteringthepassenger
compartment.Avoidprolongedoperation
ininteriorairrecirculationmode(riskof
condensation,odourandhumidity).
Pressing this button again activates the
intakeofexteriorair.
Pressing this button again switches off
theairconditioning.
The ventilation outlet, located
in the glove box, diffuses cool
air (if the air conditioning is
on) regardless of the reference
temperaturerequestedinthe
passengercompartmentand
regardlessoftheexteriortemperature.
Foryourcomfort,donotdeactivatethe
systemforlongperiods.
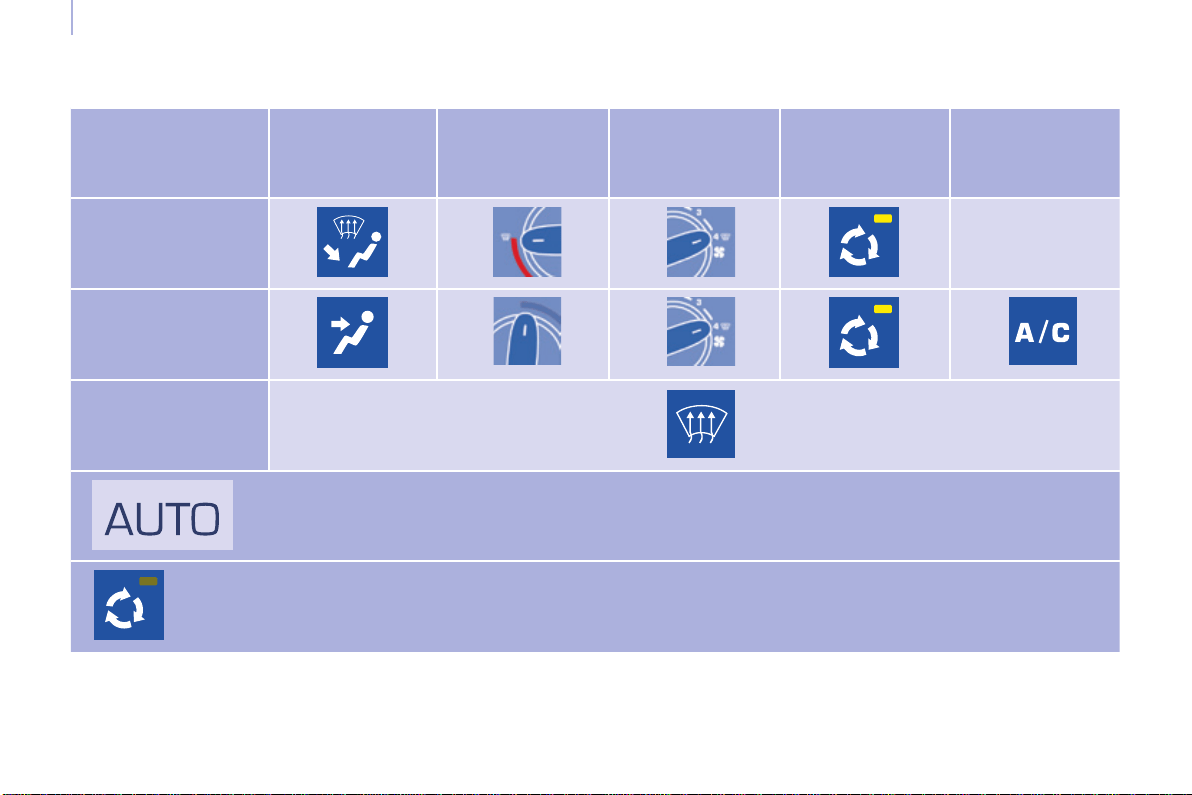
74
Berlingo-2-VP_en_Chap04_Ergonomie_ed01-2016
Ventilation
Recommended settings for air conditioning
If I require... Air distribution Temperature Air ow Air recirculation A/C
Heating -
Cooling
Demisting
Defrosting
Withautomaticdigitalairconditioning,operationinAUTOmodeisrecommended,
irrespectiveoftherequirement.
Remembertoswitchitoffwhentheambientairsuitsyourrequirements.
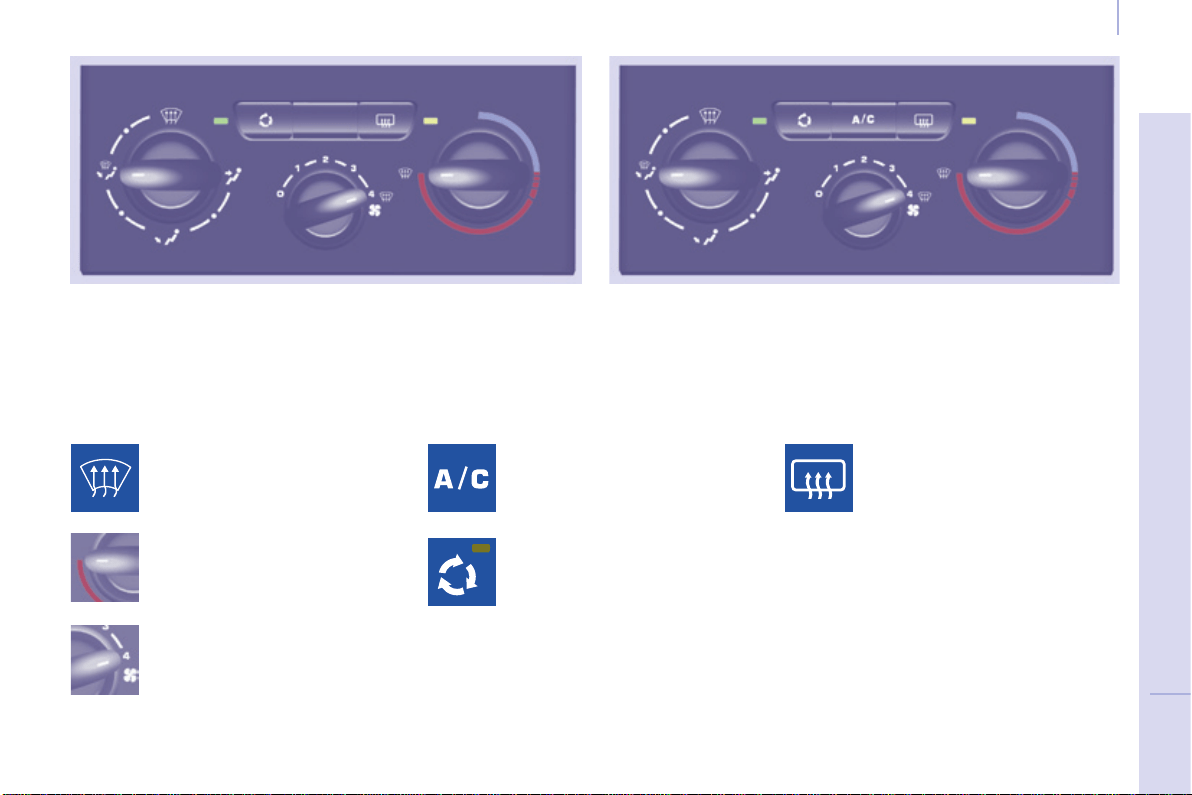
75
EASE OF USE and COMFORT
4
Berlingo-2-VP_en_Chap04_Ergonomie_ed01-2016
Ventilation
DEMISTING AND DEFROSTING
Manual mode
Turn the control to this
temperaturesetting.
Increasetheairowsetting.
Presstheairconditioningbutton.
Returning to exterior air
intakeopenpermitsrenewal
of the air in the passenger
compartment(LEDoff).
Turn the control to this air
distributionsetting.
Demisting the rear screen and/
or mirrors
Pressing this button, with the
engine running, activates the
rapiddemisting-defrostingof
therearscreenand/orelectric
mirrors.
Thisfunctionswitchesoff:
- when the button is pressed,
- when the engine is switched off,
- automaticallytopreventexcessive
energyconsumption.
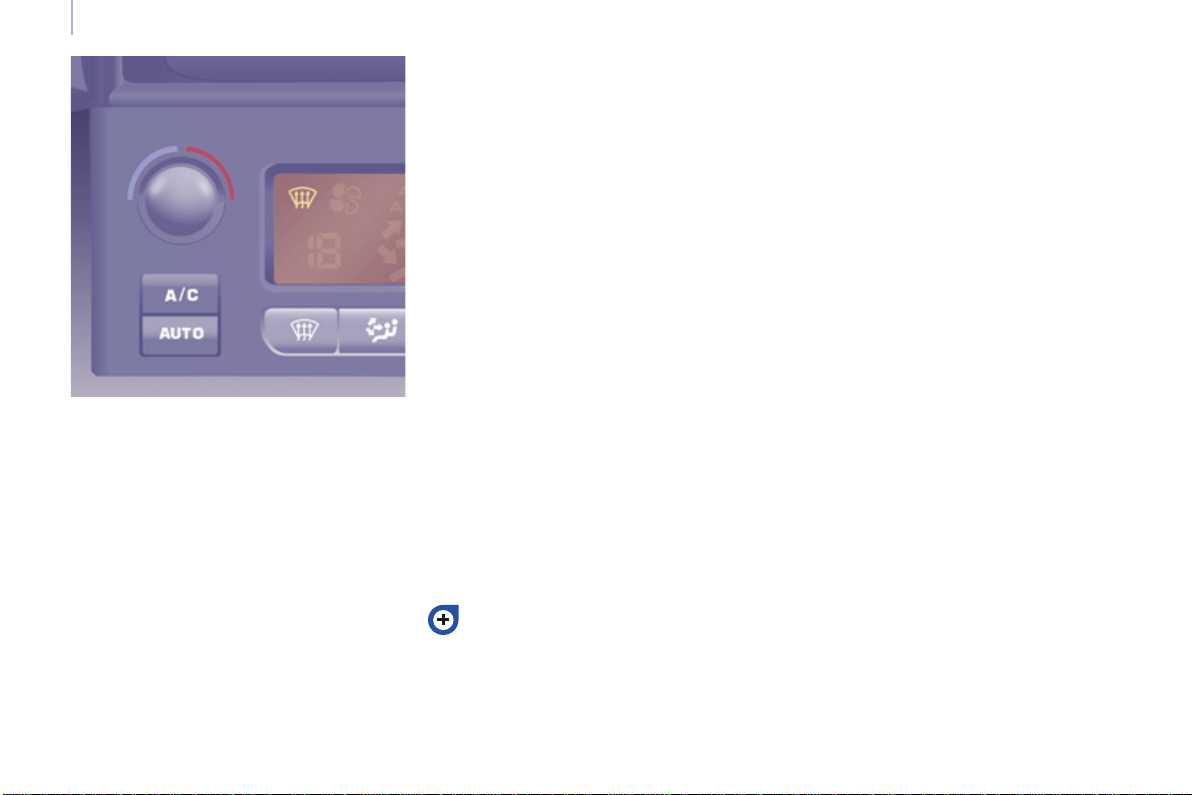
76
Berlingo-2-VP_en_Chap04_Ergonomie_ed01-2016
Ventilation
DEMISTING AND DEFROSTING
GOOD PRACTICE
Vents
"Leave them open"
Foroptimumdistributionanddiffusion
of hot or cool air in the passenger
compartment,thereareadjustable
central and side vents which can
be directed sideways (right or left)
orvertically(upordown).Foryour
comfortwhiledriving,donotclose
themanddirecttheowofairtowards
thewindowsinstead.
Air vents in the footwells and directed
towardsthewindscreencompletethe
equipment.
Donotblocktheventslocatedatthe
windscreen or the air extractor located
intheboot.
Dust filter, odour filter
(activated carbon)
Thisltertrapscertaindustandlimits
odours.
Ensurethatthislterisingood
conditionandhaveallofthelter
elementsreplacedregularly.
Refertothe"Checks"sectionof
chapter7.
Air conditioning
In all seasons, the air conditioning
should only be used with the
windowsclosed.However,ifthe
interiortemperatureremainshigh
afteraprolongedperiodparkedin
thesun,rstventilatethepassenger
compartmentforafewminutes.
UsetheAUTOmodeasmuchas
possibleasitpermitsoptimised
controlofallofthefunctions:airow,
passengercompartmentcomfort
temperature,airdistribution,air
intakemodeorairrecirculationinthe
passengercompartment.
Operatetheairconditioningsystemfor
5to10minutes,onceortwiceamonth,
tokeepitingoodworkingorder.
Ifthesystemdoesnotproducecoldair,
do not use it and contact a CITROËN
dealeroraqualiedworkshop.
Automatic mode: visibility
programme
Thecomfortprogramme(AUTO)may
notbesufcienttoquicklydemistor
defrostthewindows(humidity,several
passengers,ice).
In this case, select the visibility
programme.Thevisibilityprogramme
indicatorcomeson.
It activates the air conditioning, the air
owandprovidesoptimumdistribution
of the ventilation to the windscreen and
sidewindows.
Itdeactivatestheairrecirculation.
Itisnormalthatthecondensation
createdbytheairconditioningsystem
resultsinaowofwaterwhichmay
formapuddleunderthevehiclewhen
parked.

77
EASE OF USE and COMFORT
4
Berlingo-2-VP_en_Chap04_Ergonomie_ed01-2016
Seats
FRONT SEATS
Forwards/backwards Seat height (driver)
To raise the seat, pull the control
upwardsthentakeyourweightoffthe
seatcushion.
To lower the seat, pull the control
upwards then push on the seat
cushion.
Seat backrest angle
Lift the bar and slide the seat forwards
orbackwards.
Thefollowingadjustmentsare
available:
Withyourbackpressedagainstthe
seatbackrest,movetheleverforwards
andsettherequiredangle.
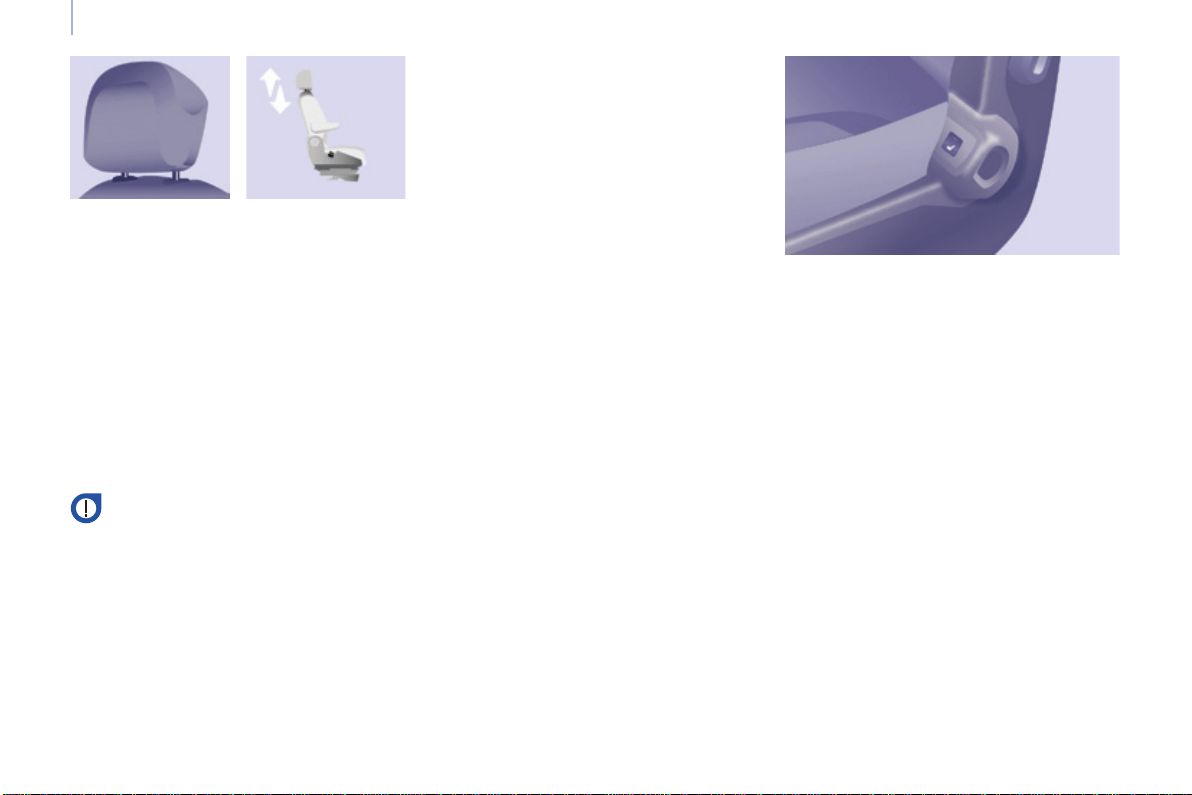
78
Berlingo-2-VP_en_Chap04_Ergonomie_ed01-2016
Seats
Never drive with the head
restraintsremoved;theymustbe
inplaceandcorrectlyadjusted.
Adjustable armrest
Front heated seats control
Eachfrontseatmaybettedwitha
control located on the side part of the
cushion.
Presstoswitchonthecushionheating.
Pressagaintoswitchitoff.
Head restraint height
To raise the head restraint, slide it vertically
upwards.
To lower the head restraint, press the
button and slide the head restraint
verticallydownwards.
Theadjustmentiscorrectwhentheupper
edge of the head restraint is level with the
topofthehead.
Toremovetheheadrestraint,pressthe
buttonandpulltheheadrestraintupwards.
To re-install the head restraint, engage
therodsintheholesmakingsuretheyare
alignedwiththeseatback.
To access the vertical position, raise
thearmrestuntilitlocks.
Lowerthearmresttoreturnittoa
positionforuse.
Toremovethearmrest,pressthe
releasebuttonfromtheverticalposition
andmoveasidethearmrest.
Toputthearmrestbackinplace,clipit
intheverticalposition.
Ifthevehicleisttedwiththeadditional
consoleandanarmrest,tofoldthe
passenger seat to the table position
removetheconsoleorthearmrest.
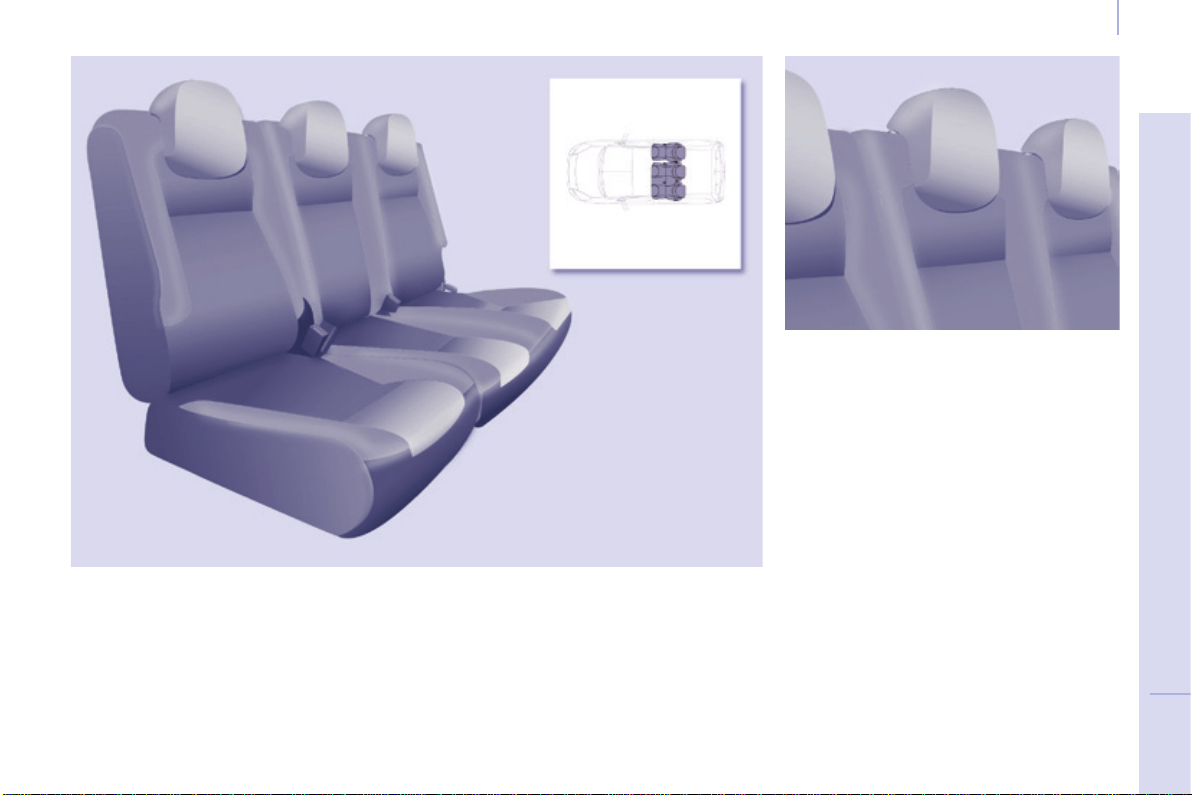
79
EASE OF USE and COMFORT
4
Berlingo-2-VP_en_Chap04_Ergonomie_ed01-2016
Seats
REAR BENCH SEAT
Each1/3-2/3sectioncanbefully
folded,thenremovedindividually.
Head restraint
The1/3-2/3splitrearbenchseatistted
with"comma"shapeheadrestraints.
Highposition:liftandraisethehead
restraint.
Lowposition:pressonthehead
restrainttolowerit.
Toremovetheheadrestraint,after
raising it press the tab and lift the head
restraint.
To install the head restraint, engage
the rods of the head restraint in the
holeskeepingitinlinewiththeseat
back.
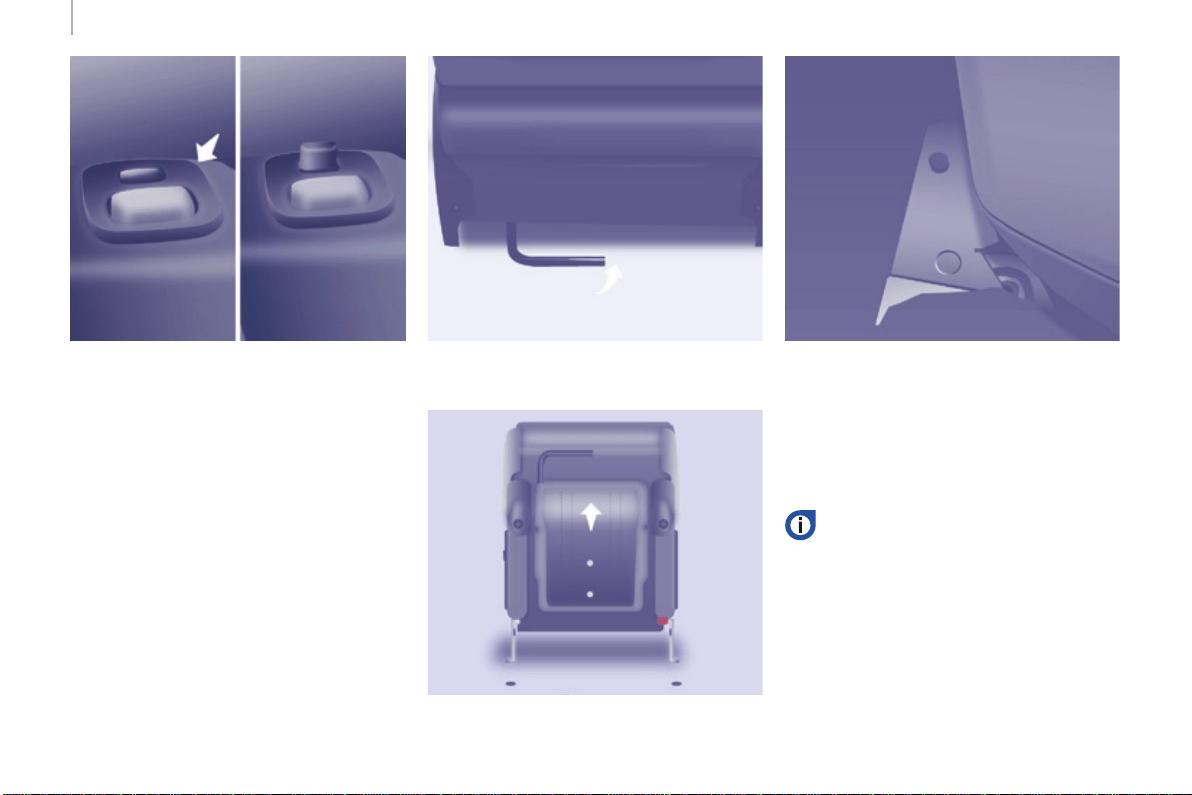
80
Berlingo-2-VP_en_Chap04_Ergonomie_ed01-2016
Seats
Fully folded position
Exampleofoperationsforthe
1/3section.Theyareidenticalforthe
2/3section.
- Raise the grey control bar, located
attherearoftheseatcushion.
- Tilttheentireseatforward.
Putting back in place
Checkthattheseatislocked
ontheoorsecurelywhenitis
returnedtothesittingposition.
- Place the head restraints in the low
position.
- Ifnecessary,movethefrontseats
forward.
- Press the grey control located on
theupperpartoftheseatbackrest.
- Foldtheseatbackrestontothe
seatcushion.
Tilt the entire seat rearwards until it
locksintoplace.
Raisetheseatbackrest.
Theseatislockedcorrectlywhenthe
control(atthetopoftheseatback)is
nolongervisible.
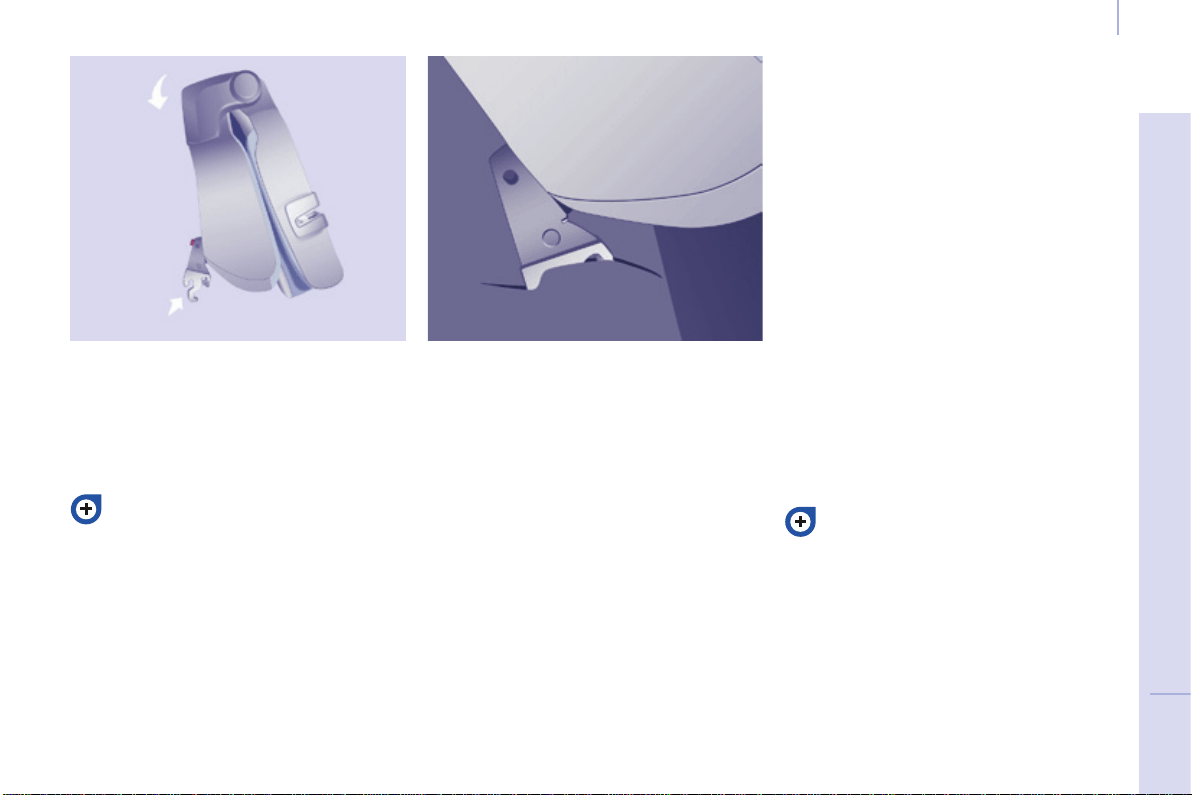
81
EASE OF USE and COMFORT
4
Berlingo-2-VP_en_Chap04_Ergonomie_ed01-2016
Seats
Removing the bench seat Refitting the bench seat
Refer to the "Fully folded position",
describedpreviously.
To return the bench seat
(1/3sectionand/or2/3section)to
the "passenger carrying" position,
refer to the "Fully folded position"
describedpreviously.
- Tilt the entire seat rearwards by
approximately45°.
- Lift the bench seat vertically to the
limitoftheanchorages.
- Straighten bench seat by tilting it
forwardsthenliftit.
- Ifnecessary,movethefrontseats
forward.
- Placethebenchseat(1/3section
and/or2/3section)inthefully
foldedposition.
- Offerupthebenchseat(1/3section
and/or2/3section)vertically.
- Placethehooksbetweenthe
twobars.
- Foldthebenchseatrearwards.
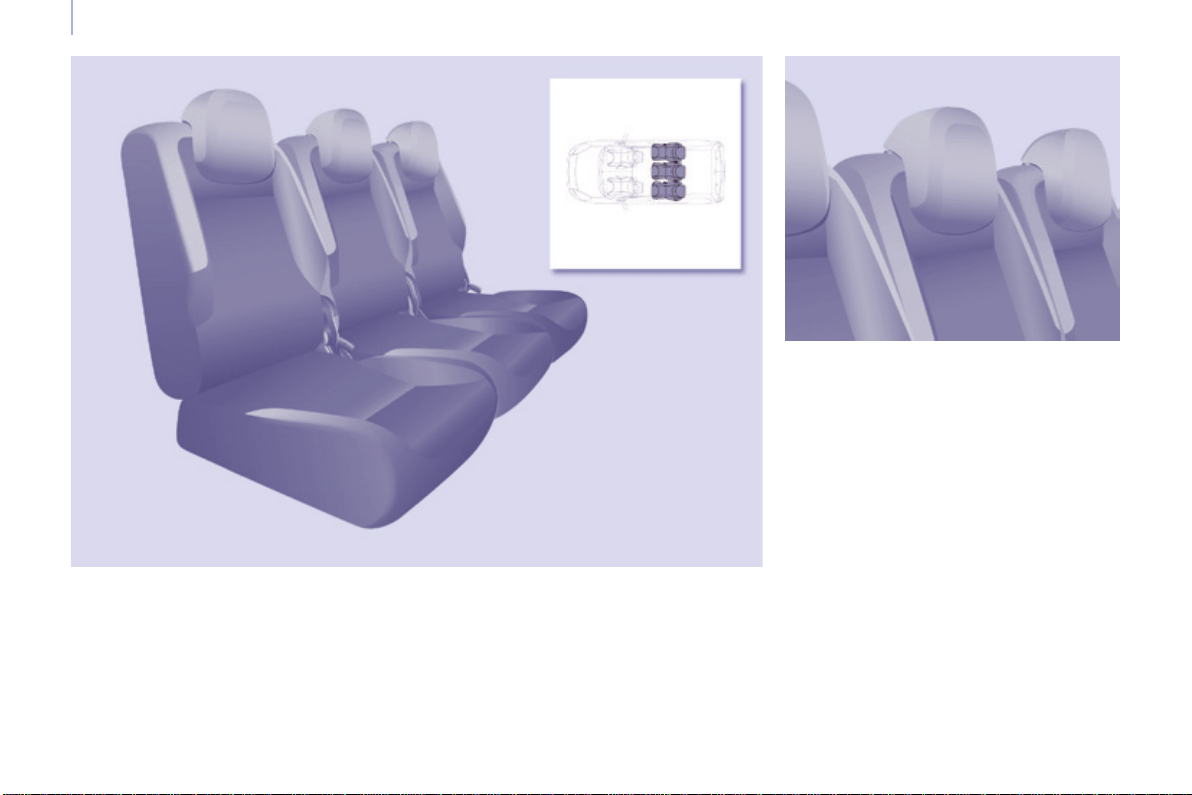
82
Berlingo-2-VP_en_Chap04_Ergonomie_ed01-2016
Seats
REAR SEATS (5 SEAT VERSION)
Head restraint
Eachseatcanberemovedindividually.
Eachtimeaseatisreturnedtothe
sittingpositionorafterremovingthen
rettingaseat,checkthatitislocked
ontheoorsecurely.
The three independent rear seats
arettedwith"comma"shapehead
restraints.
Thebackofthecentreseat,foldedonto
the seat cushion, has a shell which
servesasatablewithcupholder.
Highposition:liftandraisethehead
restraint.
Lowposition:pressonthehead
restrainttolowerit.
Toremovetheheadrestraint,after
raising it press the tab and lift the head
restraint.
To install the head restraint, engage
the rods of the head restraint in the
holeskeepingitinlinewiththeseat
back.
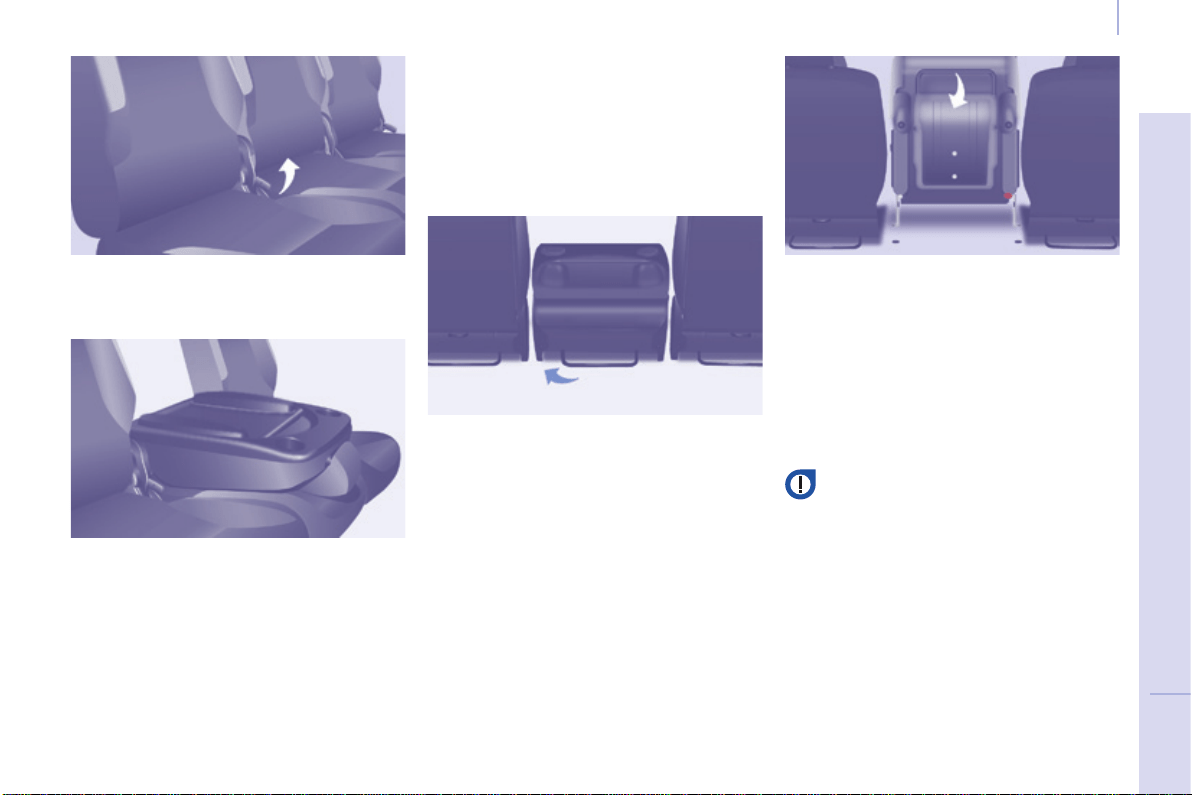
83
EASE OF USE and COMFORT
4
Berlingo-2-VP_en_Chap04_Ergonomie_ed01-2016
Seats
Adjusting the angle of the seat backrest
Placing the seat back in the
table position
Returning the seat back to the sitting position
Placing the seat in the fully
folded position
Returning the seat to its original position
- Operatethecontrolandadjustthe
angleoftheseatbackrest.
- Pullthecontroltofoldtheseatback
ontotheseatcushion.
Donotplacehardorheavyobjects
onthetable.Theycouldbecome
dangerousprojectilesintheeventof
sharpbrakingorimpact.
- Releasetheseatbackbypulling
the control, then return it to its
originalposition.
Whenreturningtheseatbackrestto
the sitting position, ensure that it is
lockedsecurely.
- Pull the control to place the seat
backinthetableposition.
- Raise the bar located behind the
seat to release the rear anchoring
points.
- Tilt the entire seat forwards, until it
locks.
- Pushtheredcontrol.
- Foldbacktheseattoxtherear
anchoringpoints.
- Raisetheseatbackrestbypulling
thecontrol.
- Checkthattheseathascorrectly
lockedintoplace.
Beforeunfoldingtheseat,check
thatnoobjectisobstructingthe
anchorage points or preventing
correctlockingoftheseats.
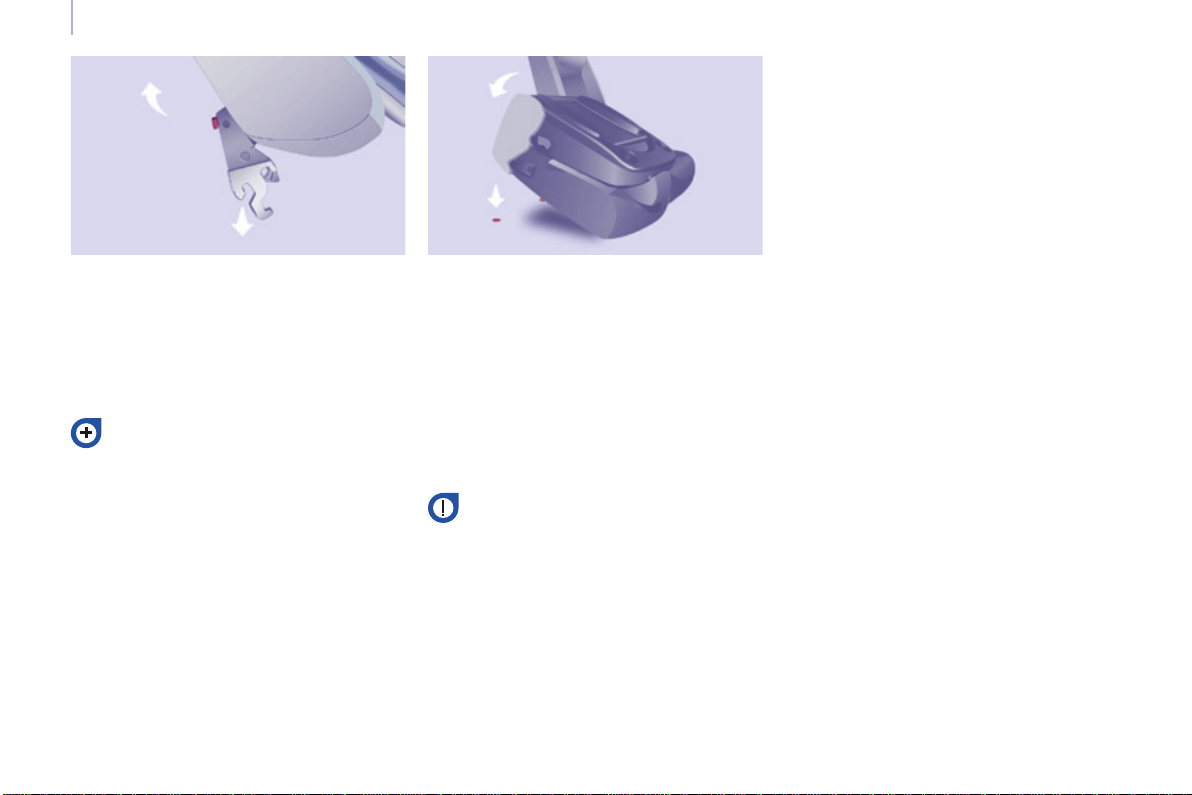
84
Berlingo-2-VP_en_Chap04_Ergonomie_ed01-2016
Seats
Removing the seat
- Ifnecessary,movethefront
seats forward and lower the head
restraint.
- Place the seat in the fully folded
position.
Good practice
Followingthevariousoperations:
- donotremoveaheadrestraint
withoutstoringitandxittoa
support,
- ensure that the passengers can
always access the seat belts and
fastenthemeasily,
- passengersmustnevertake
theirseatwithoutadjustingand
fasteningtheirseatbelt.
Refer to the "Fully folded position"
describedpreviously.
- Press the red lever to release the
frontfeet.
- Tilt the entire seat rearwards by
approximately45°withoutreleasing
thelever.
- Releasethelever.
- Lift the seat verticallytothelimitof
theanchorages.
- Straighten the seat by tilting it
forwardsthenliftit.
Refitting the seat
- Tilttheseatforwardby45°.
- Placethehooksbetweenthetwo
bars.
- Foldbacktheseattoxtherear
anchoringpoints.
- Pull the control to return the seat
backtoitsinitialposition.
- Raisetheheadrestraint.
Beforeunfoldingtheseat,check
thatnoobjectisobstructingthe
anchorage points or preventing
correctlockingoftheseats.

85
EASE OF USE and COMFORT
4
Berlingo-2-VP_en_Chap04_Ergonomie_ed01-2016
Seats
Head restraint
Thisisofthe"comma"shapetype.
Highposition:pressthetab,liftand
raisetheheadrestraint.
Lowposition:pushthetabandpress
thetopoftheheadrestrainttolowerit.
Toremovetheheadrestraint:placeitin
thehighposition,liftit,thenremoveit.
Store it inside the vehicle, securing it
rmly.
Toinstalltheheadrestraint:engage
the rods of the head restraint in the
holeskeepingitinlinewiththeseat
back.
Eachseatcanberemovedandmust
bereplacedinthespeciedposition,
indicatedbyasymbolonitslabel.
The seats of row 2 and row 3 are
independentandadjustable.
REAR SEATS (7 SEAT VERSION)
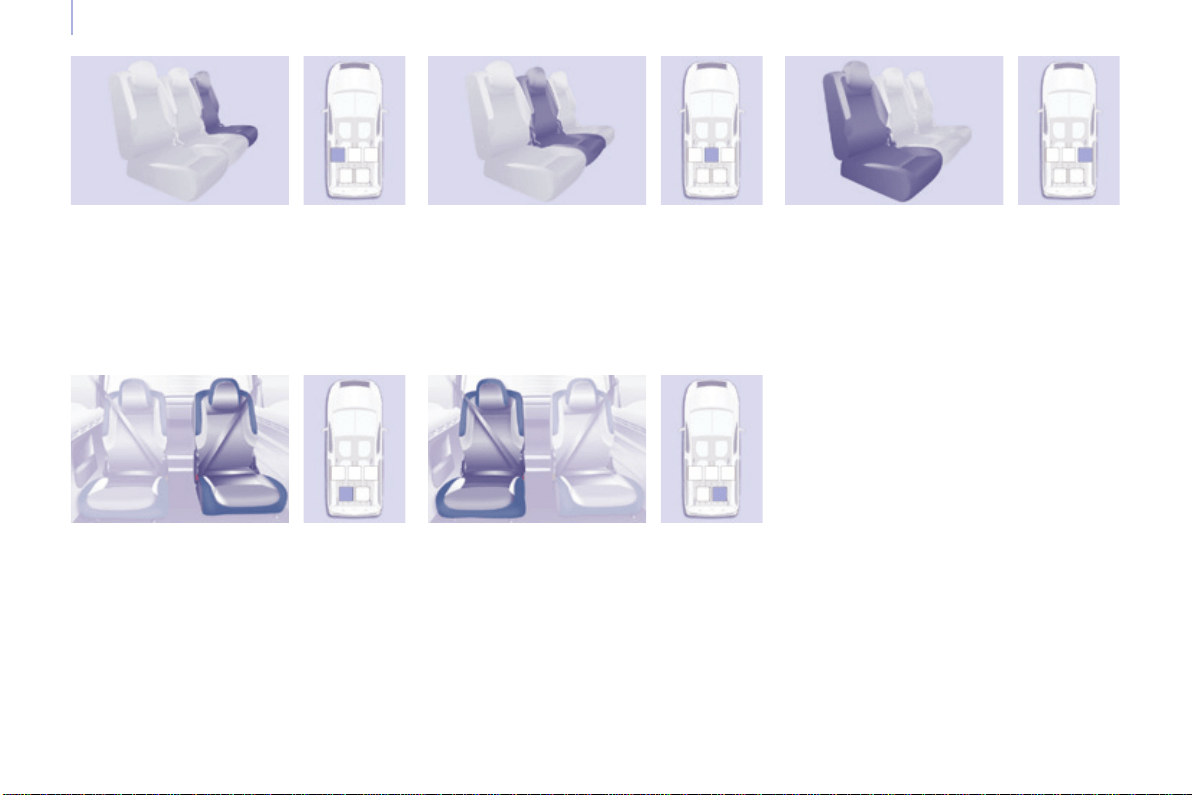
86
Berlingo-2-VP_en_Chap04_Ergonomie_ed01-2016
Seats
Left-hand outer seat
Types of Row 2 seat
Types of Row 3 seat
Centre seat Right-hand outer seat
Right-hand outer seatLeft-hand outer seat
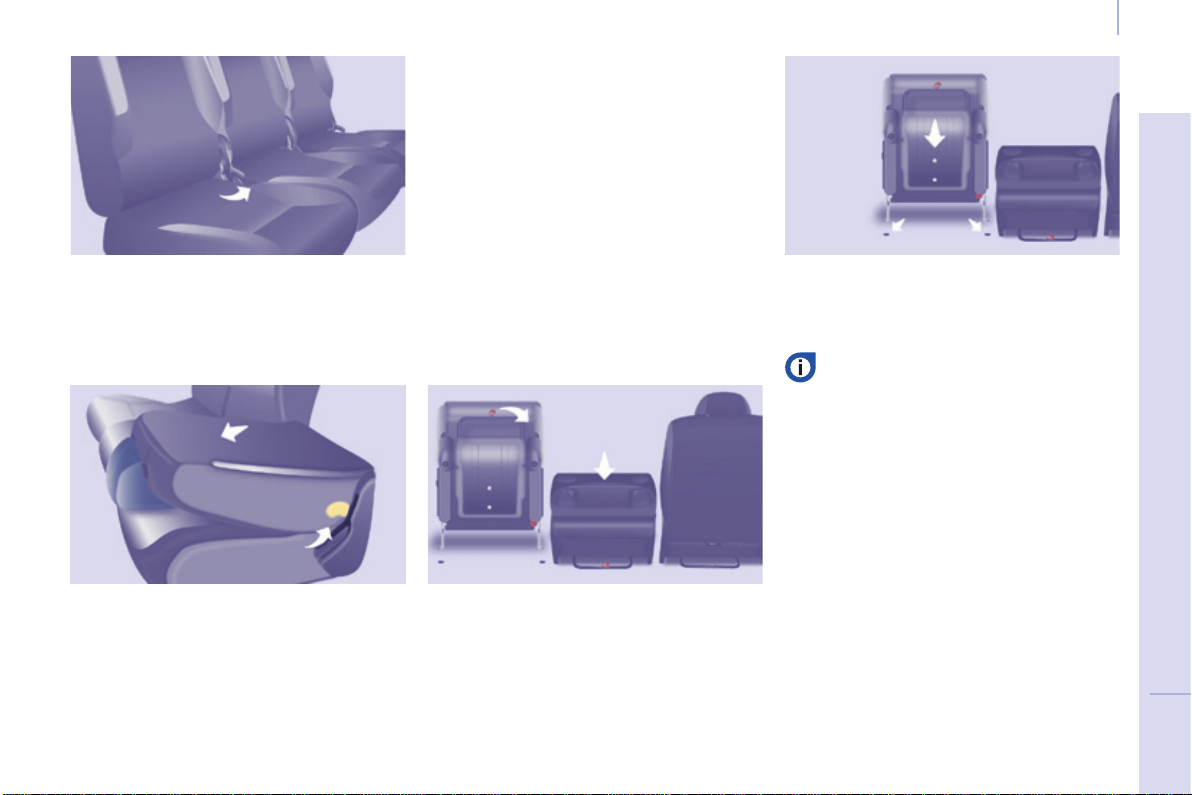
87
EASE OF USE and COMFORT
4
Berlingo-2-VP_en_Chap04_Ergonomie_ed01-2016
Seats
Adjusting the angle of the seat backrest
- Operatethecontrolandadjustthe
angle.
Placing the seat backrest in the
table position
- Lowertheheadrestraintfully.
- Operate the control to fold the seat
backontotheseatcushion.
Returning the seat backrest to the
sitting position
- Releasetheseatbackrestby
pulling the control, then return it to
itsoriginalposition.
- Ensurethatithascorrectlylocked
intoplace.
Placing the seat in the fully folded
position
- Placetheseatinthetableposition.
- Pull the red strap, located behind
the seat, to release the feet of the
seatfromtheiranchorageonthe
oor.
- Tilttheentireseatforwards.
Row 2 seat adjustments
Returning the seat to its original
position
- Unfoldtheentireseat.
Before folding the seat, ensure
that:
- in row 3, no passenger's
foot is at one of the seat
anchoragesontheoor,
- theseatislockedsecurelyon
theoor,
- the seat belt is available for
thepassenger.
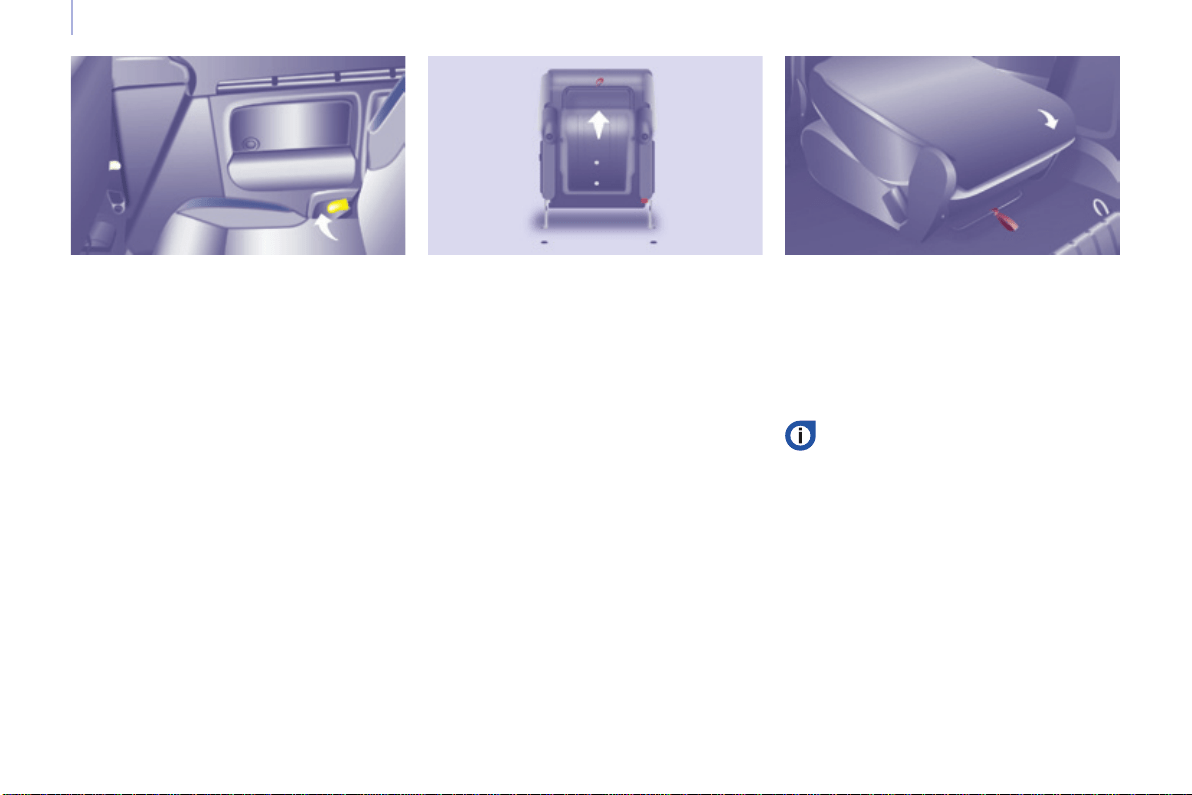
88
Berlingo-2-VP_en_Chap04_Ergonomie_ed01-2016
Seats
Row 3 seat adjustments
Placing the seat backrest in the
table position
- Lowertheheadrestraintfully.
- Operate the control to fold the seat
backrestontotheseatcushion.
Returning the seat backrest to the
sitting position
- Releasetheseatbackrestby
pulling the control, then return it to
itsoriginalposition.
- Checkthatithascorrectlylockedin
place.
Returning the seat to its original
position
- Pushtheredcontrol.
- Unfoldtheentireseat.
Placing the seat in the fully folded
position
- Placetheseatinthetableposition.
- Raisethebarttedwithared
strap, located behind the seat, to
releasefeetoftheseatfromtheir
anchorageontheoor.
- Tilttheentireseatforwards.
Ensurethat:
- theseatislockedsecurelyon
theoor,
- the seat belt is available for
thepassenger.
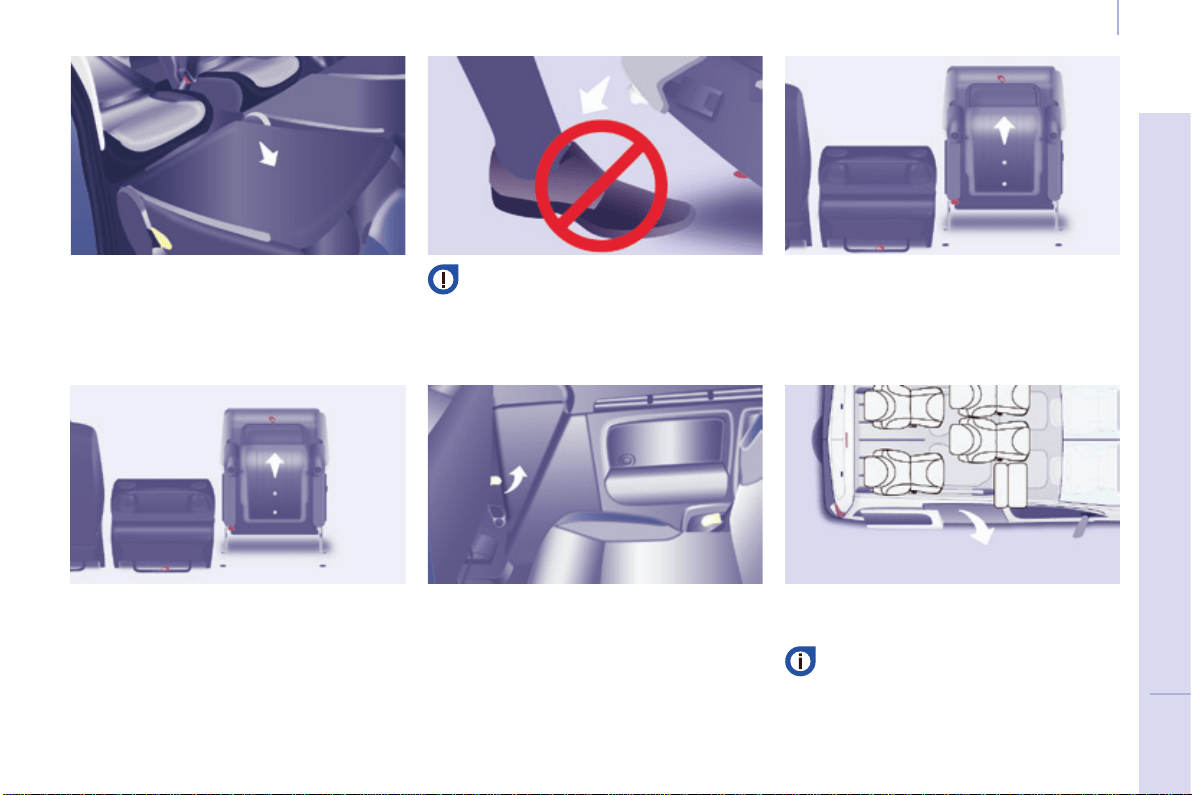
89
EASE OF USE and COMFORT
4
Berlingo-2-VP_en_Chap04_Ergonomie_ed01-2016
Seats
Entering, exiting from Row 3
Entering
- Place the row 2 seat in the table
position.
Exiting
- Lowertheheadrestraintfully.
- Operate the yellow control, located
onthebackoftherow2seat
backrest.
- Foldtheseatbackresttothetable
position.
Ensure that the centre seat belt is
stowed correctly in its housing in
theheadlining.
- Tilt it to the fully folded position to
allowaccess.
- Pull the red strap to place the seat
inthefullyfoldedposition.
- Tilttheentireseatforwards.
- Exitviathesidedoor.
Beforefoldingitback,ensurethat
the feet of the passenger in row 3
are not obstructing the row 2 seat
anchoringpoints.
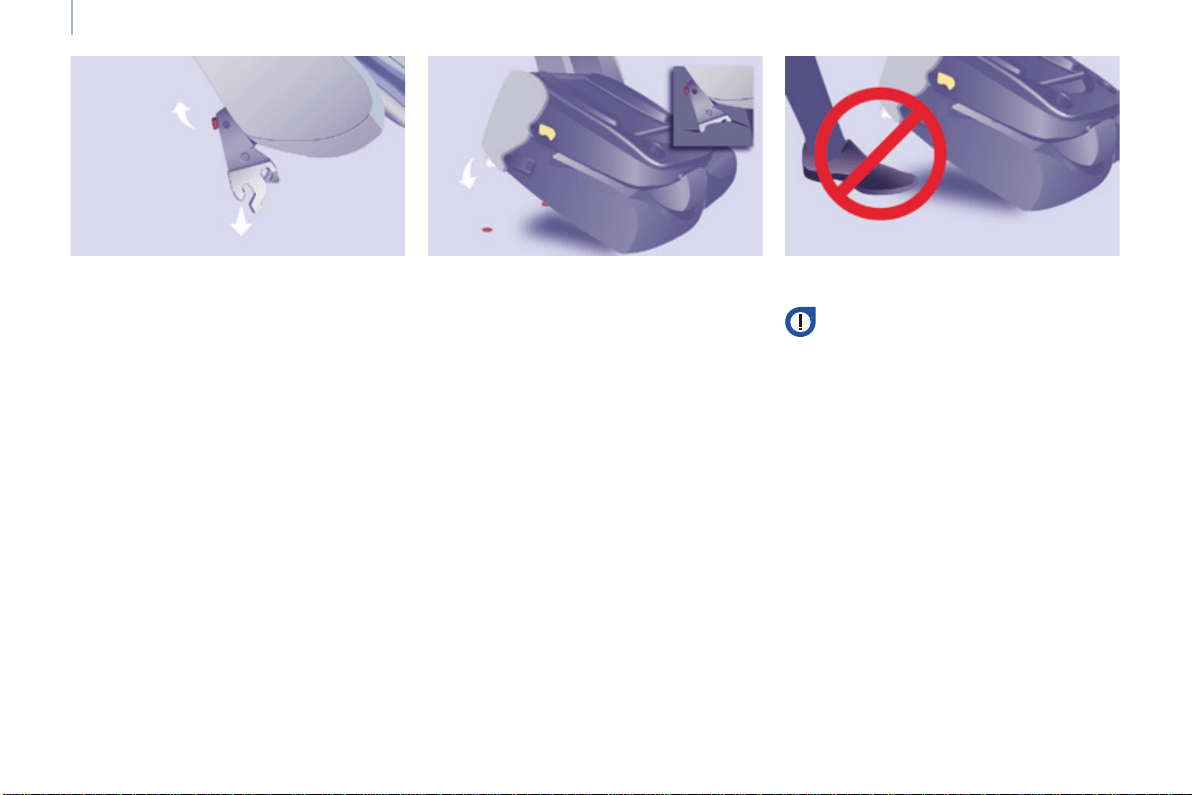
90
Berlingo-2-VP_en_Chap04_Ergonomie_ed01-2016
Seats
Removing a seat
- Ifnecessary,movethefrontseats
forward.
- Lowertheheadrestraint.
- Place the seat in the fully folded
position.
- Tilt the entire seat forwards then
liftit.
Retting the seat
The label on the seat indicates the
positioninwhichitmustbeinstalled.
- Placethehooksofthefrontfeet
betweenthetwobars.
- Foldbacktheseattoxtherear
anchoringpoints.
- Operate the control to raise the
seatbacktoitsinitialposition.
- Raisetheheadrestraint.
Ensurethatnoobjectorfootofa
passenger seated in the rear is
obstructing the anchorage points
orpreventingcorrectlockingof
theseat.
Operating the Row 2 seats
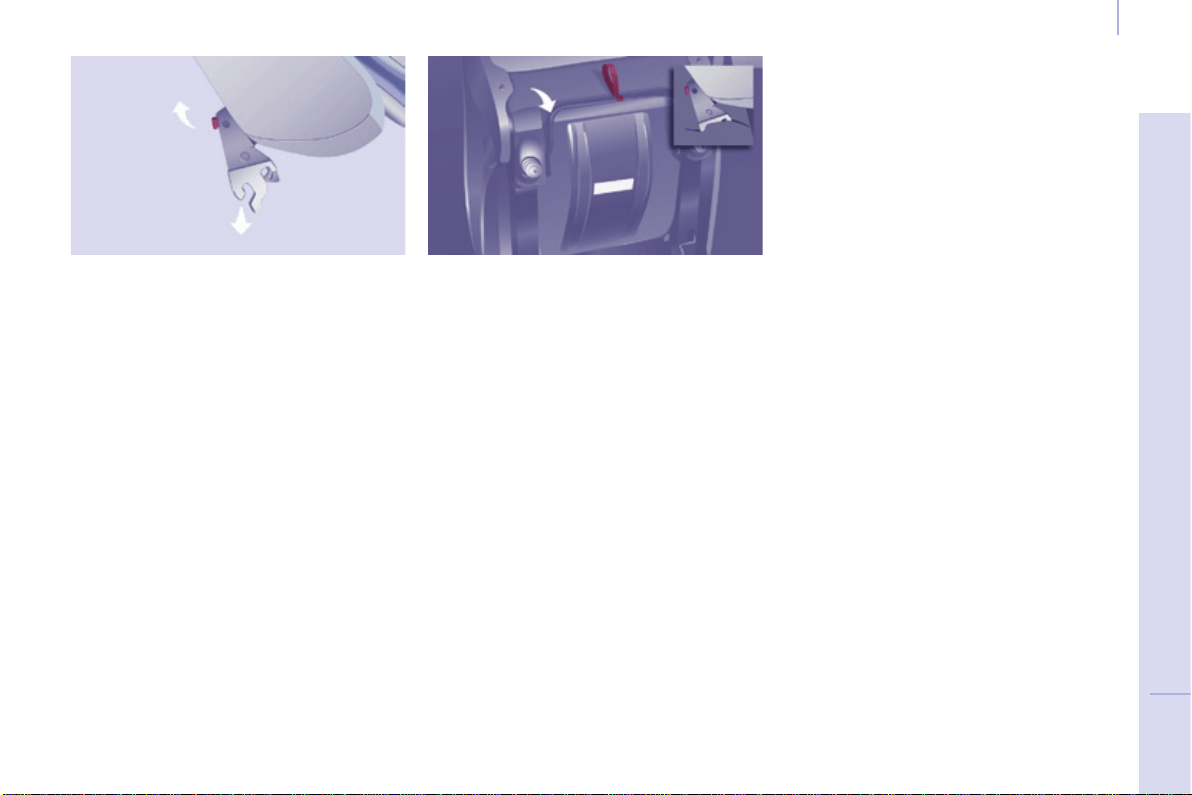
91
EASE OF USE and COMFORT
4
Berlingo-2-VP_en_Chap04_Ergonomie_ed01-2016
Seats
Operating the Row 3 seats
Removing the seat
- Lowertheheadrestraint.
- Place the seat in the fully folded
position.
- Tilttheentireseatforwards.
- Oneachside,takeholdofthe
uprights of the folded seat, tilting it
forwardslightly,andliftit.
Retting the seat
The label on the seat indicates the
positioninwhichitmustbeinstalled.
- Placethehooksofthefrontfeet
betweenthetwobars.
- Ensurethatnoobjectorfootis
obstructing the rear anchorage
points and that the seat belt is
positioned correctly and available
foruse.
- Foldbacktheseattoxitsrear
anchoringfeet.
- Operate the control to raise the
seatbacktoitsinitialposition.
- Raisetheheadrestraint.
Good practice
Followingthevariousoperations:
- donotremoveaheadrestraint
without stowing it; secure it inside
the vehicle,
- ensure that the passengers can
always access the seat belts and
fastenthemeasily,
- passengersmustnevertake
theirseatwithoutadjustingand
fasteningtheirseatbelt.
- apassengerseatedinrow3must
ensure that he does not obstruct
the row 2 seat anchorage points,
- apassengerseatedinrow3must
nothavetheseatinfrontofthemin
row 2 in the folded position; this is
in case the seat could tip towards
the passenger unexpectedly and
injurethem.
Donotplacehardorheavyobjectson
theseatbacksformingatable,they
couldbecomedangerousprojectilesin
theeventorsharpbrakingorimpact.

92
Berlingo-2-VP_en_Chap04_Ergonomie_ed01-2016
Seats
MODULARITY AND DIFFERENT SEAT CONFIGURATIONS
5 seat layouts
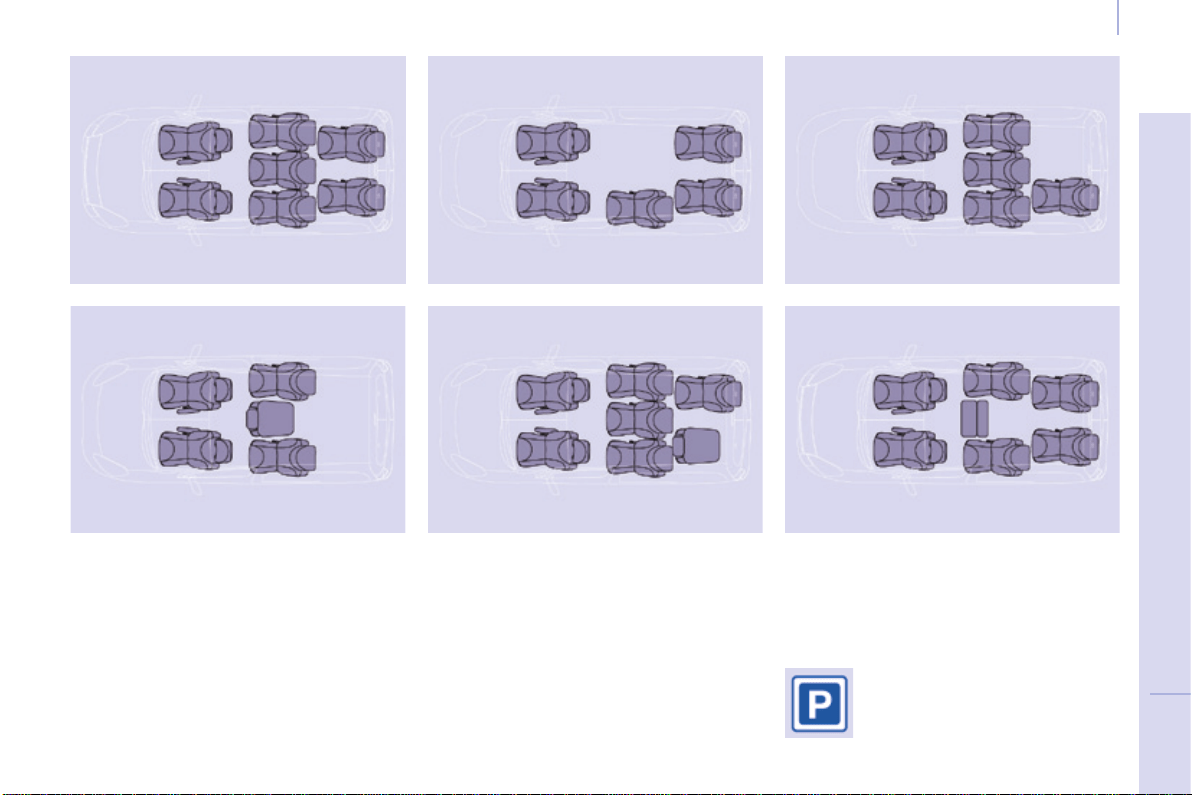
93
EASE OF USE and COMFORT
4
Berlingo-2-VP_en_Chap04_Ergonomie_ed01-2016
Seats
7 seat layouts
The various operations
mustbecarriedoutwhile
stationary.
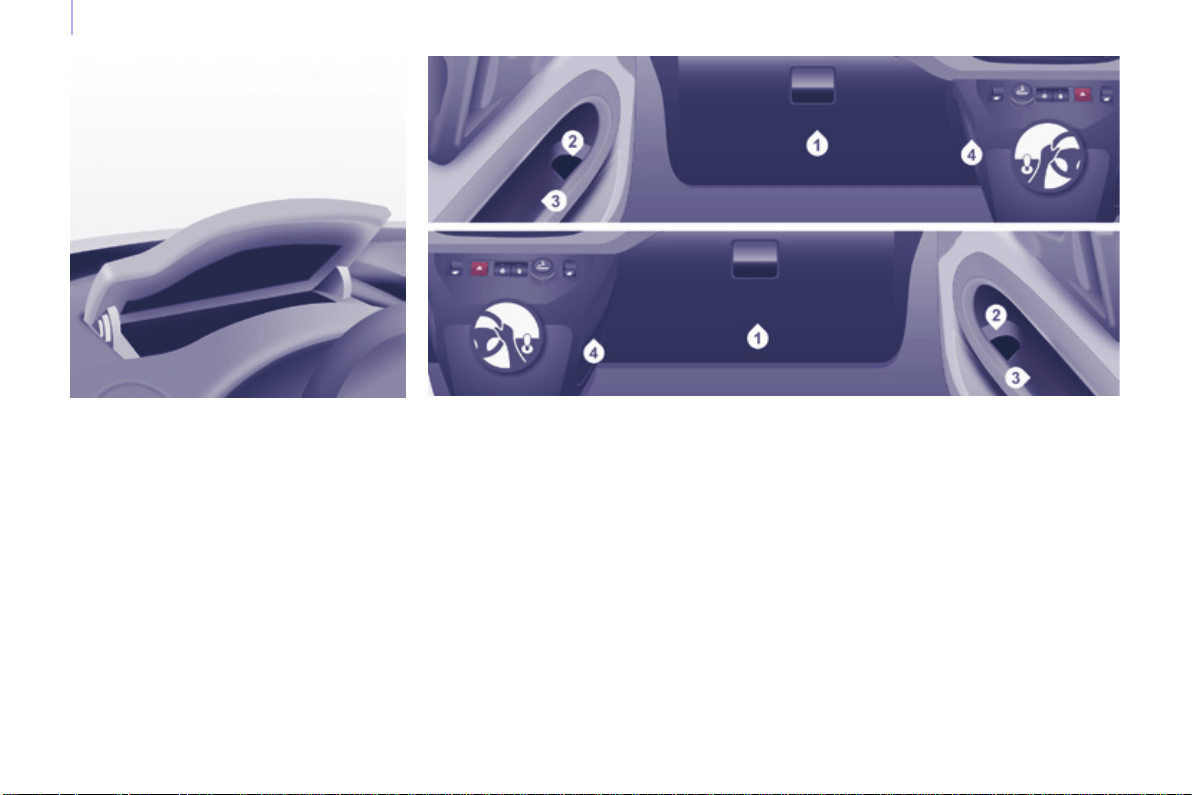
94
Berlingo-2-VP_en_Chap04_Ergonomie_ed01-2016
Practical information
FRONT FITTINGS
1. Lower glove box
Thismayormaynotbettedwithalid.
Upper storage compartment
This is located on the dashboard,
behindthesteeringwheel.
Arecessmakesliftingofthelideasier
whenopening.Guideittoitsrest
position.
To close, guide the lid then press the
centregently.
Anyliquidwhichcouldspillrisks
causing an electrical short circuit and
thereforeapotentialre.
3. Side storage compartment
4. Bag hook
Onlyhangexiblebagswhicharenot
tooheavyonthishook.
2. Storage pocket and bottle
holder (1.5 L)
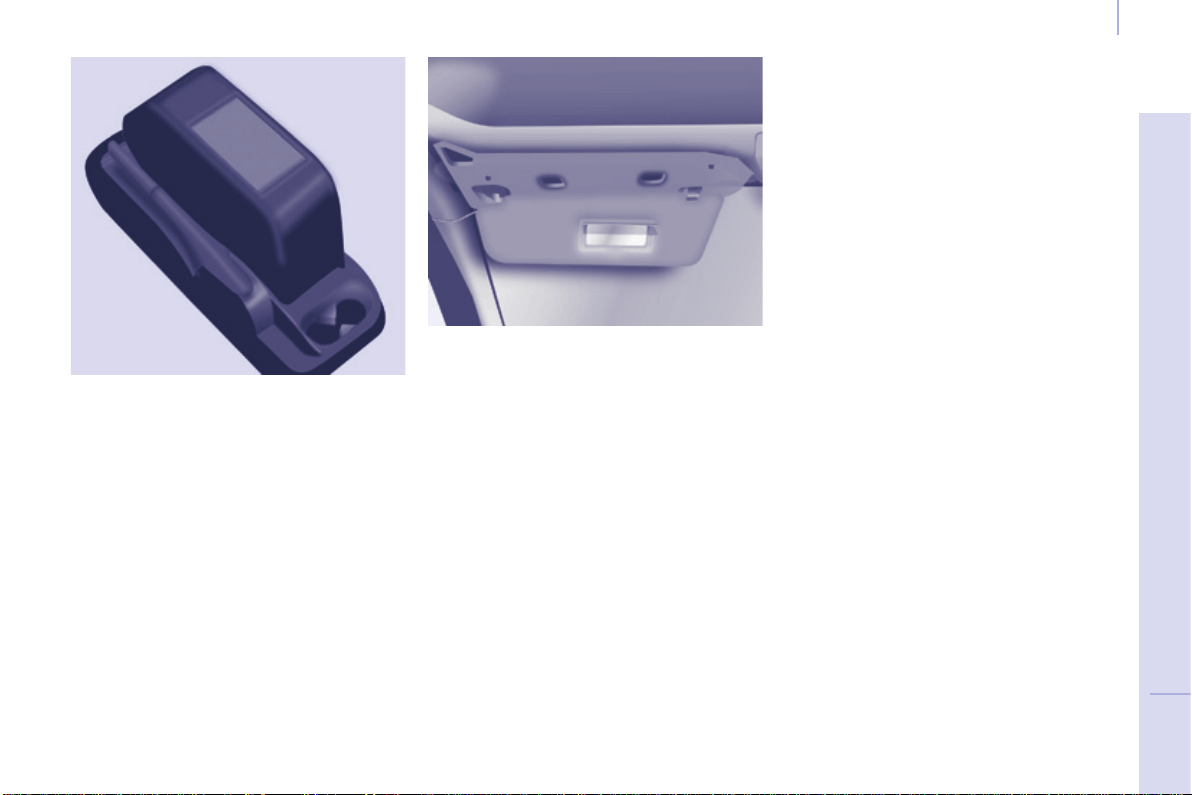
95
EASE OF USE and COMFORT
4
Berlingo-2-VP_en_Chap04_Ergonomie_ed01-2016
Practical information
Overhead storage unit
This is located above the sun visors
andcanaccommodatevariousobjects
(ajumper,le,gloves...).
The openings concealed by the sun
visors allow you to see and access the
objectsstoredintheoverheadstorage
unit.
Themaximumweightpermittedinthe
overheadstorageunitis5Kg.
Donotplaceobjectsinthisstorage
unitwhichcouldpresentarisktothe
occupants.
Central storage console
This console offers an appreciable
additionalstoragearea:itcanbe
removedandclipsontoabasewhich
also incorporates two cup holders at
therear.
Ensurethattheobject(bottle,can...)
placed in the cup holder is retained
securelyanddoesnotriskbeing
dislodgedwhiledriving.
Any liquid which could spill presents
ariskofdamageoncontactwiththe
instrumentpanelandcentreconsole
controls.
Takecare.
Sun visor
Topreventdazzlefromahead,foldthe
sunvisordown.
Apocketisprovidedinthedriver'ssun
visorforstoringtollcards,tickets,...
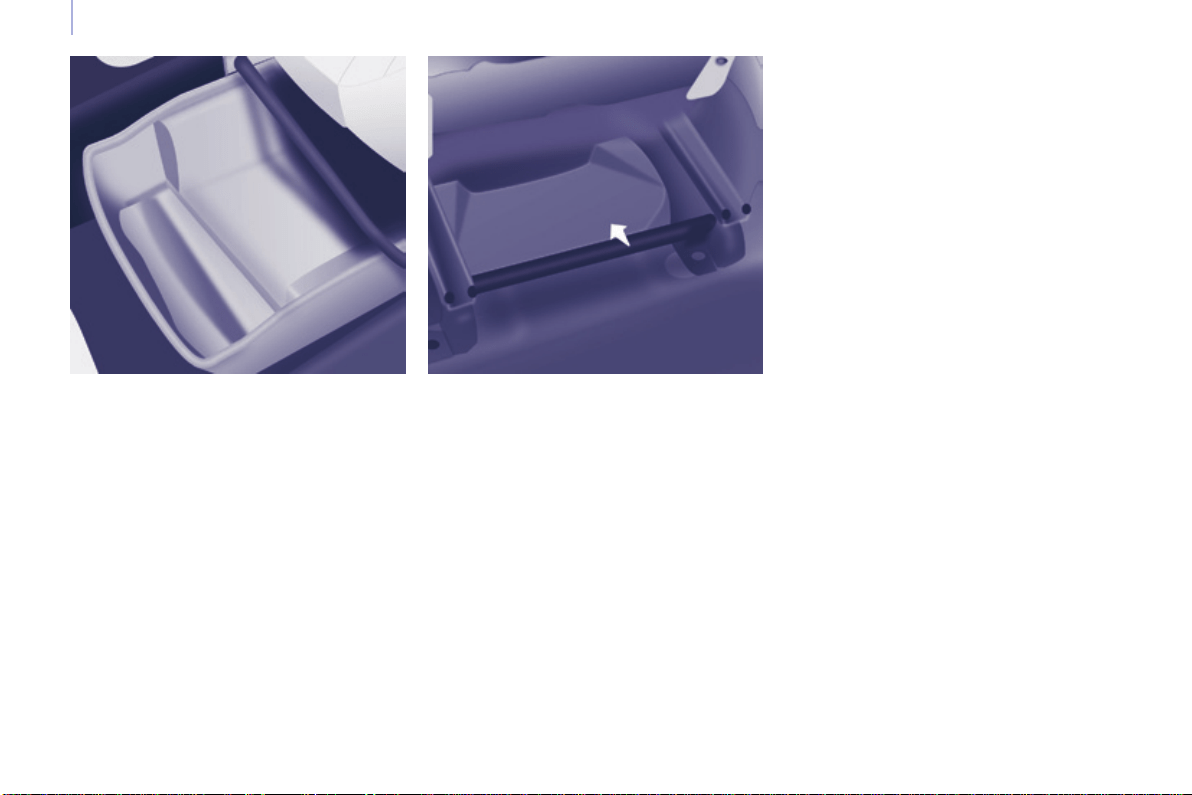
96
Berlingo-2-VP_en_Chap04_Ergonomie_ed01-2016
Practical information
Drawers under seats
Yourvehiclemaybettedwitha
drawer,undereachfrontseat.
Storage compartment under
seats
Storagecompartmentsareavailable,
withorwithoutlid,intheoorunderthe
frontseats.
Togainaccesstothem,movetheseat
forward.Thelidmustbeliftedfromthe
rearoftheseat.
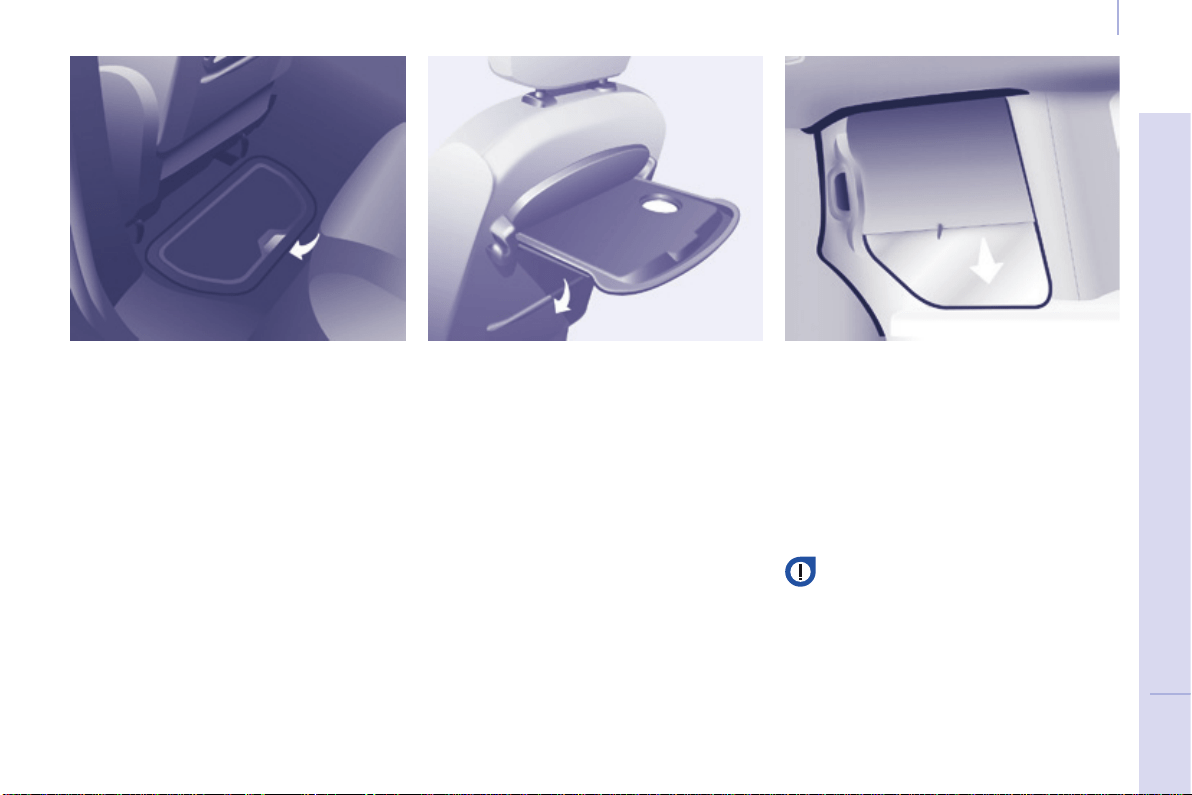
97
EASE OF USE and COMFORT
4
Berlingo-2-VP_en_Chap04_Ergonomie_ed01-2016
Practical information
SEATING AREA FITTINGS
Floor boxes
Two boxes are available, located under
therearpassengerfootwells.
Toopenthem,slideyourngersinto
therecessandliftthelid.
Aircraft style tables
To put the table in place, pull it
upwardsandfolditdown.
As a safety precaution, above a high
pressure, the table is designed to
unhook.
Toputitbackinplace,withthetable
vertical, engage one side then the
other,forcingslightly.
Donotplacehardorheavyobjects
onthetable.Theycouldbecome
dangerousprojectilesintheeventof
sharpbrakingorimpact.
Abaghookisprovidedonthesideof
eachtable.
Side blinds
Sideblindsmaybeavailableonthe
slidingsidedoors.
Pullthesideblindbythetabtoinstallit.
Toavoiddamagingtheblindwhen
openingthedoor,checkthatthetabis
hookedsecurely.
Always guide the blind slowly
using the tab, both when raising
andwhenlowering.
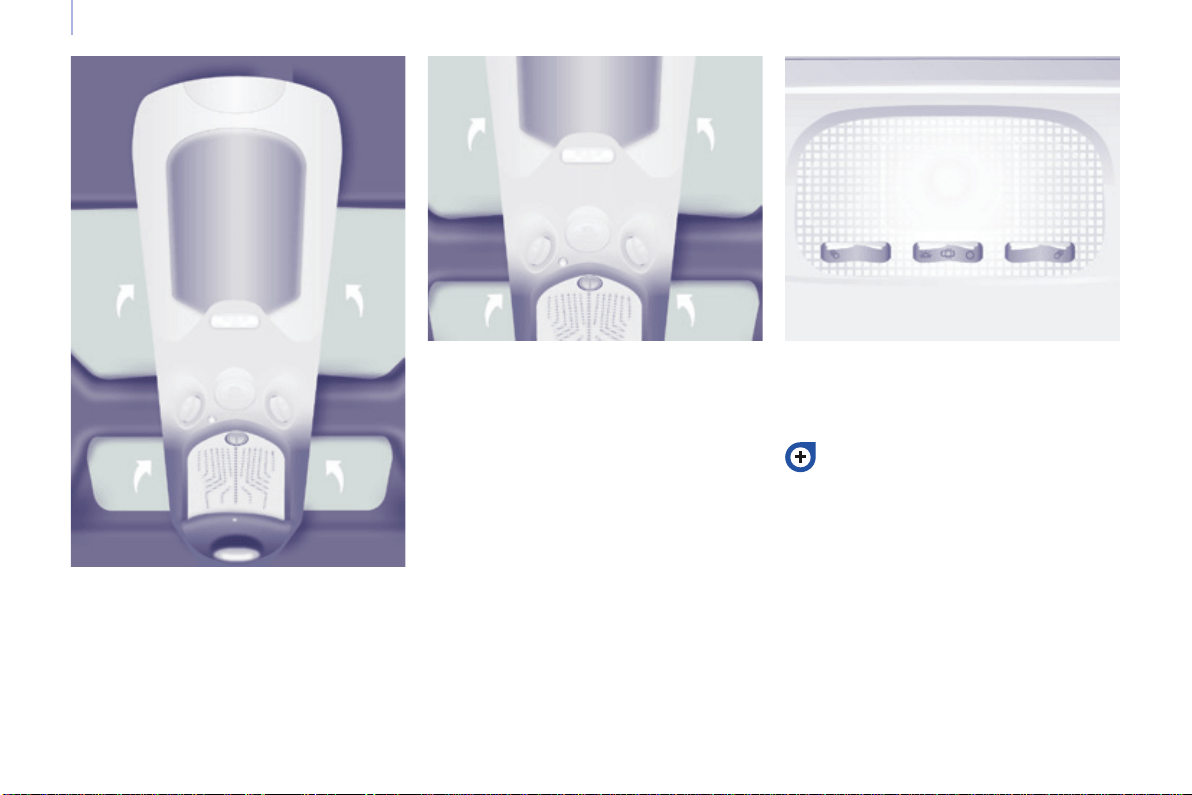
98
Berlingo-2-VP_en_Chap04_Ergonomie_ed01-2016
Practical information
MODUTOP ROOF
Themultifunctionroofextendsthe
overheadstorageunit.Itconsistsof
thefollowingcomponents:
Storage compartments
Storagecompartmentsareprovided
oneachsideoftheroof.Themaximum
authorisedloadis6kg.
The translucent base assists with
ndingobjectsstoredinside.
Donotstoreobjectswhichcould
presentarisktotheoccupants.
Courtesy lamp
Theoperationofthecourtesylampis
identicaltothatofthefrontcourtesylamp.
Refer to chapter 4 "Practical
information","Courtesylamps"
section.

99
EASE OF USE and COMFORT
4
Berlingo-2-VP_en_Chap04_Ergonomie_ed01-2016
Practical information
From inside From outside
Rear box
Thisroofboxcanbeaccessedfrom
therearseatsandtheboot.
Fromtherearseats,slidetheapsto
open.
Vents
A 3-position control allows you to
adjusttheairowthroughthevents.
Theventsarealsottedwithascented
airfreshener.
Fromtheboot,placeyourthumbon
the recess then pull the handle to
open.
Opencarefullytopreventobjects
storedinthisinteriorroofboxfrom
fallingout.
Themaximumauthorisedloadis10kg.
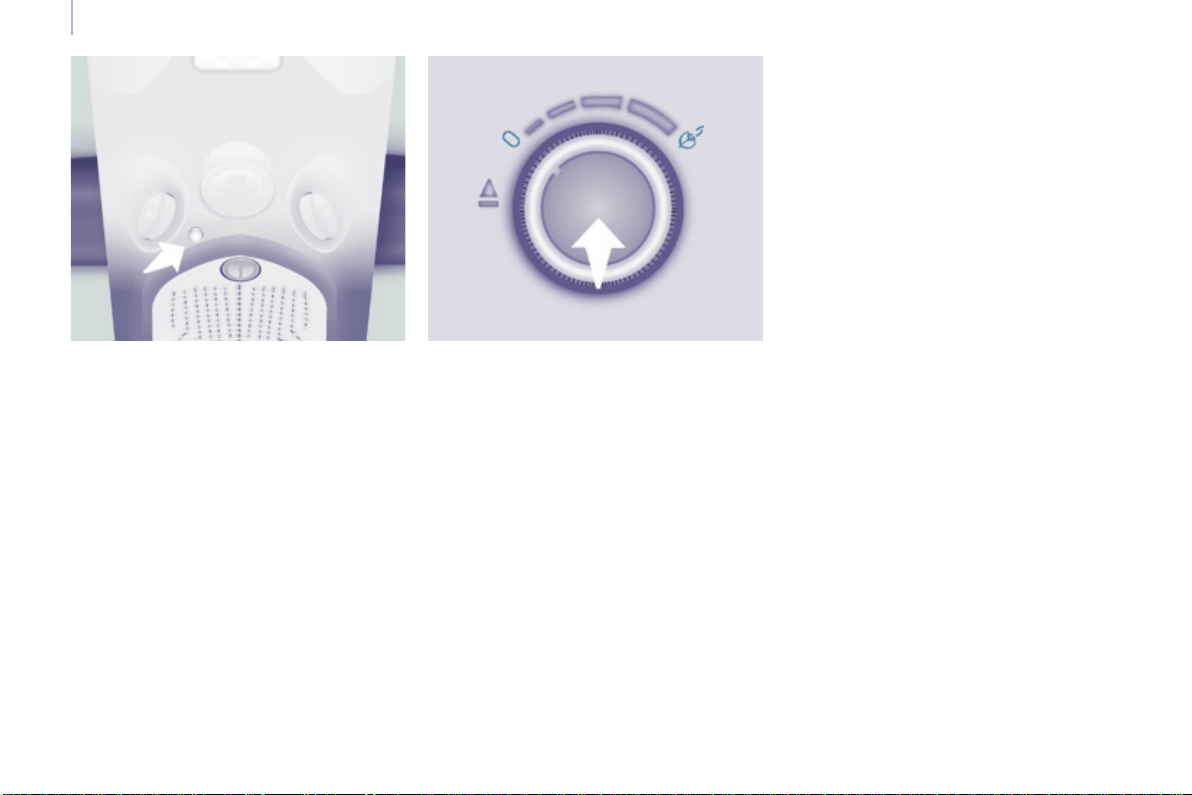
100
Berlingo-2-VP_en_Chap04_Ergonomie_ed01-2016
Practical information
SCENTED AIR FRESHENER
The scented air freshener diffuses
a fragrance in the passenger
compartmentfromtheroofconsole
vents.
Adjusting the flow
Turnthechromedbuttontoadjustthe
diffusion:
- to the left to decrease,
- totherighttoincrease.
Tostopthediffusion,turnthechromed
buttonfullytotheleft.
Removing the scented air
freshener
- Press the button down while turning
it a quarter of a turn to the left to
thestop.
- Removethescentedairfreshener
fromtheroofconsole.
- Replacethecartridge.
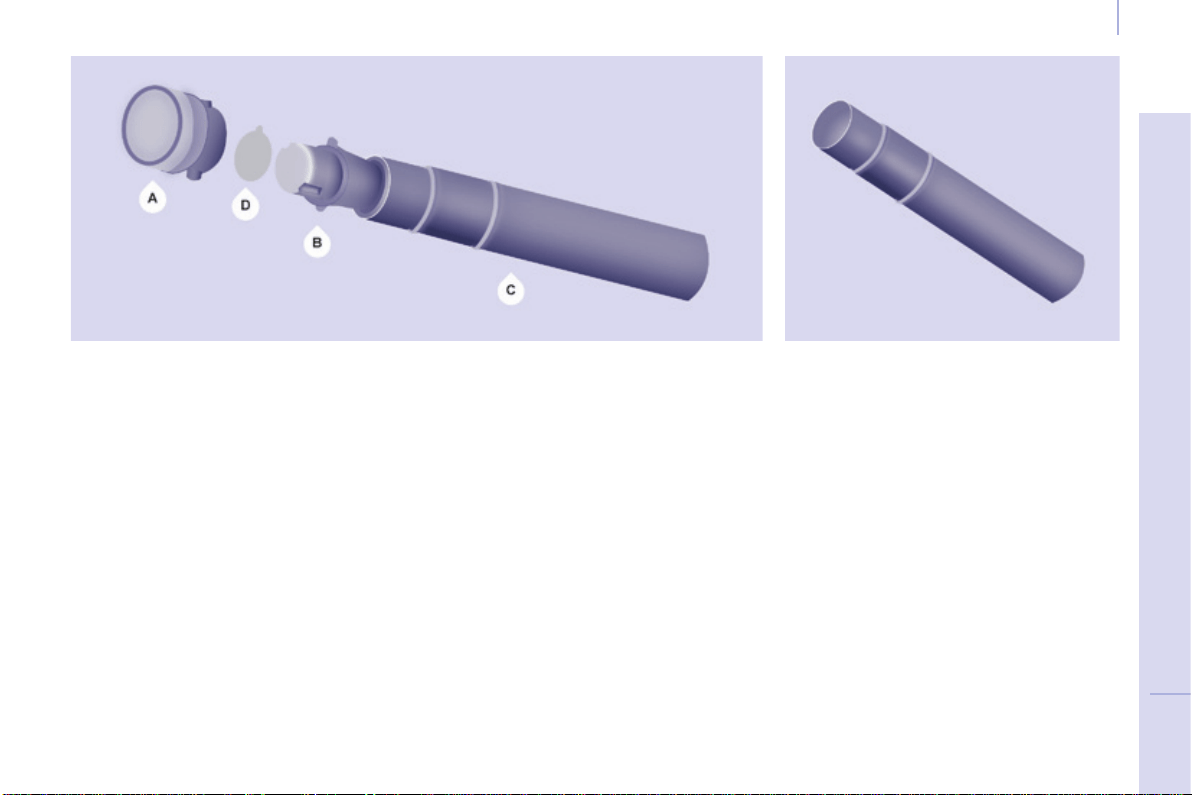
101
EASE OF USE and COMFORT
4
Berlingo-2-VP_en_Chap04_Ergonomie_ed01-2016
Practical information
Replacing a cartridge
Thescentedairfreshenerrellconsists
of a cartridge B and its sealing case C.
- RemovetheprotectivelmD.
- Place the head of the cartridge B
on the button A of the scented air
freshener.
- Turnitaquarterofaturntolockit
onthebuttonandremovethecase.
- Insert the scented air freshener in
itslocation.
You can change the cartridges at any
timeandstorecartridgeswhichhave
already been started in their original
case.
The scented air freshener button A is
independentofthecartridge.
The cartridges are supplied without the
button A.
Inserting the scented air
freshener
Afterttingorchangingthecartridge:
- Putthescentedairfreshenerback
inplaceinitslocation.
- Turn it a quarter of a turn to the
right.
Good practice
As a safety precaution, only use the
cartridgesprovidedforthispurpose.
Donotdismantlethecartridges.
Keep the cartridge sealing cases
whichareusedaspackagingwhenthe
cartridgesarenotinuse.
Nevertrytorellthecartridgeswith
fragrances other than those available
fromCITROËNdealers.
Keep out of reach of children and
animals.Avoidcontactwiththeskin
andeyes.Ifswallowed,consulta
doctorandshowhimthepackagingor
productlabel.
The scented air freshener button A can
onlybexedonthemultifunctionroof
consolewithacartridge.
Therefore, always retain button A and
acartridge.
Thecartridgesareavailablefrom
CITROËNdealers.
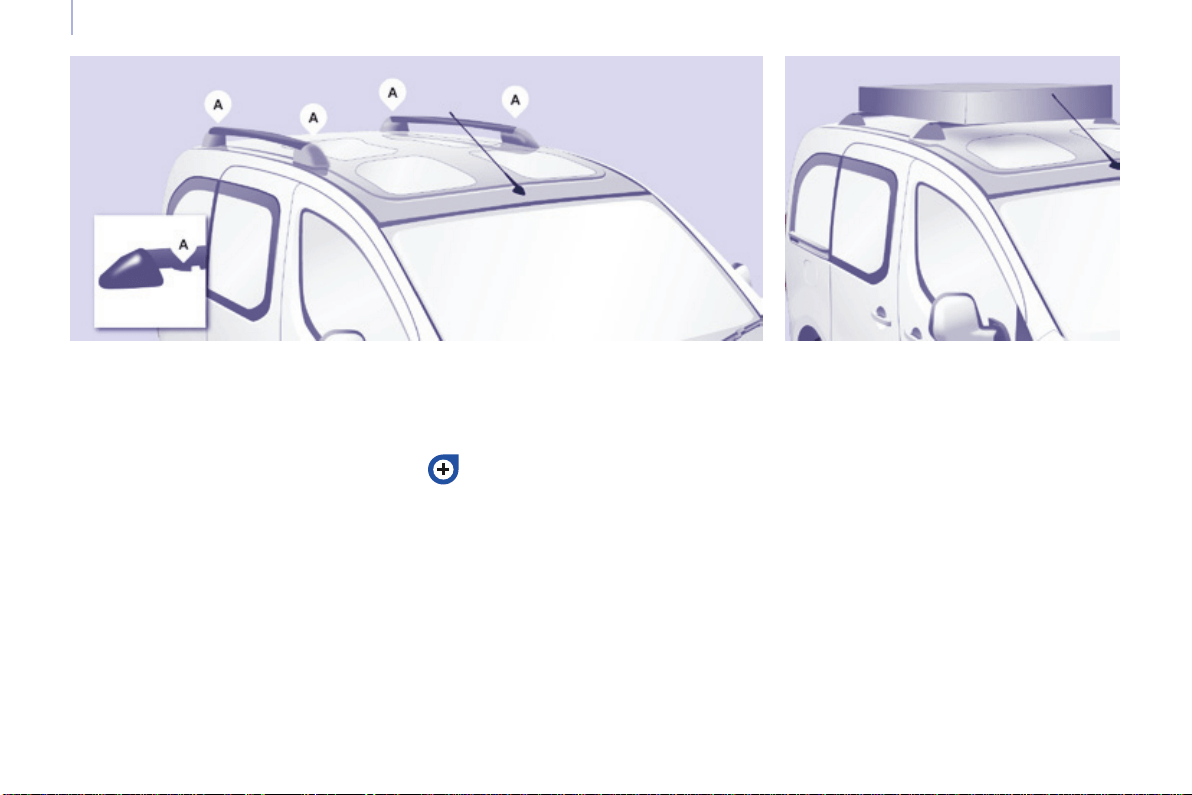
102
Berlingo-2-VP_en_Chap04_Ergonomie_ed01-2016
Practical information
MODUTOP ROOF BARS
Themaximumauthorisedweighton
eachroofbaris35kg.
Inallcases,theloadmustreston
the non-slip bands provided for this
purposeandmustnottouchtheroofor
theglazingoftheroof.
Recommendations for loading the
roof
This procedure requires the use of
a spanner supplied with the tools for
changingawheel.
These two longitudinal Modutop roof
barscanberemoved.
Chapter9,"Changingawheel"
section.
- Opentheprotectivecovers.
- Slackenthefourscrewsusingthe
spannerandremovethem.
- Turnthebars90°placingthe
hollowpartstowardsthefront.
- Retthethe4screwsandtighten
themusingthespanner.
- Closetheprotectivecovers.
- Use the strap passages A only to
securetheloadrmly.
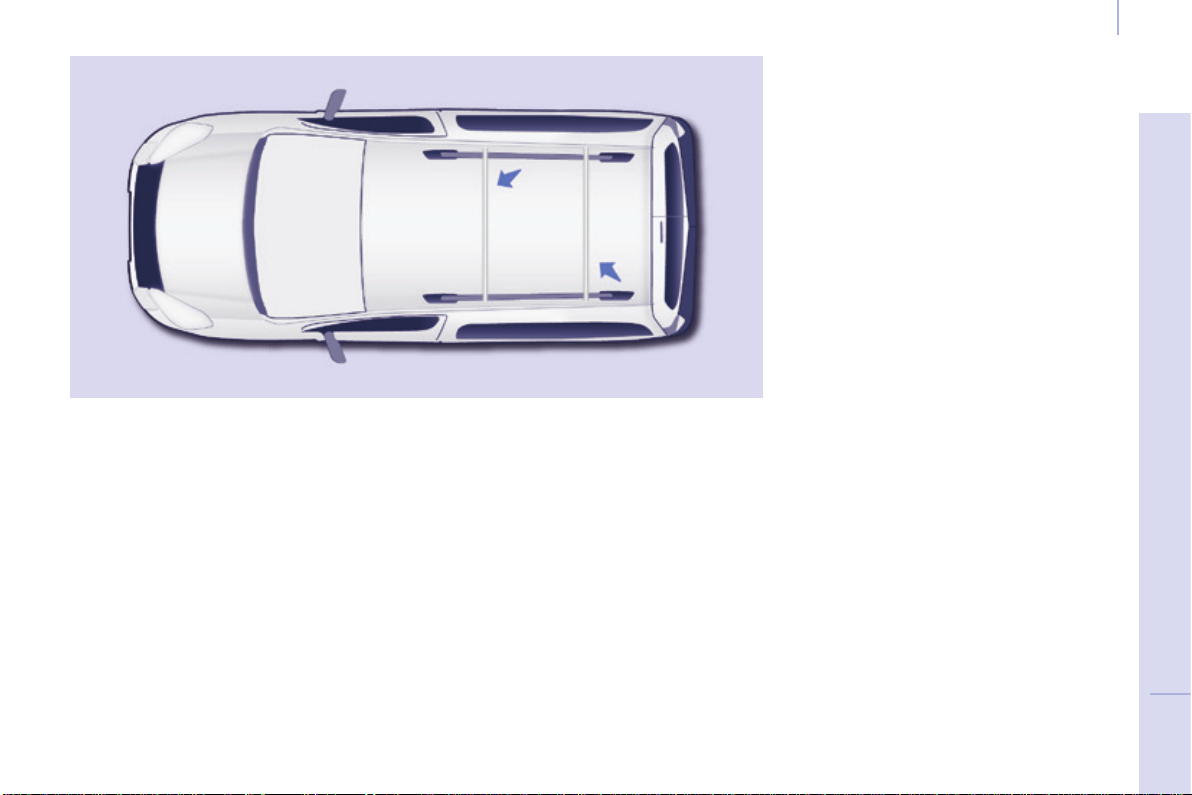
103
EASE OF USE and COMFORT
4
Berlingo-2-VP_en_Chap04_Ergonomie_ed01-2016
Practical information
EXTERIOR ROOF BARS
If you install transverse bars on these bars, refer to the weight values indicated
bythemanufacturerbutdonotexceed:75kg.
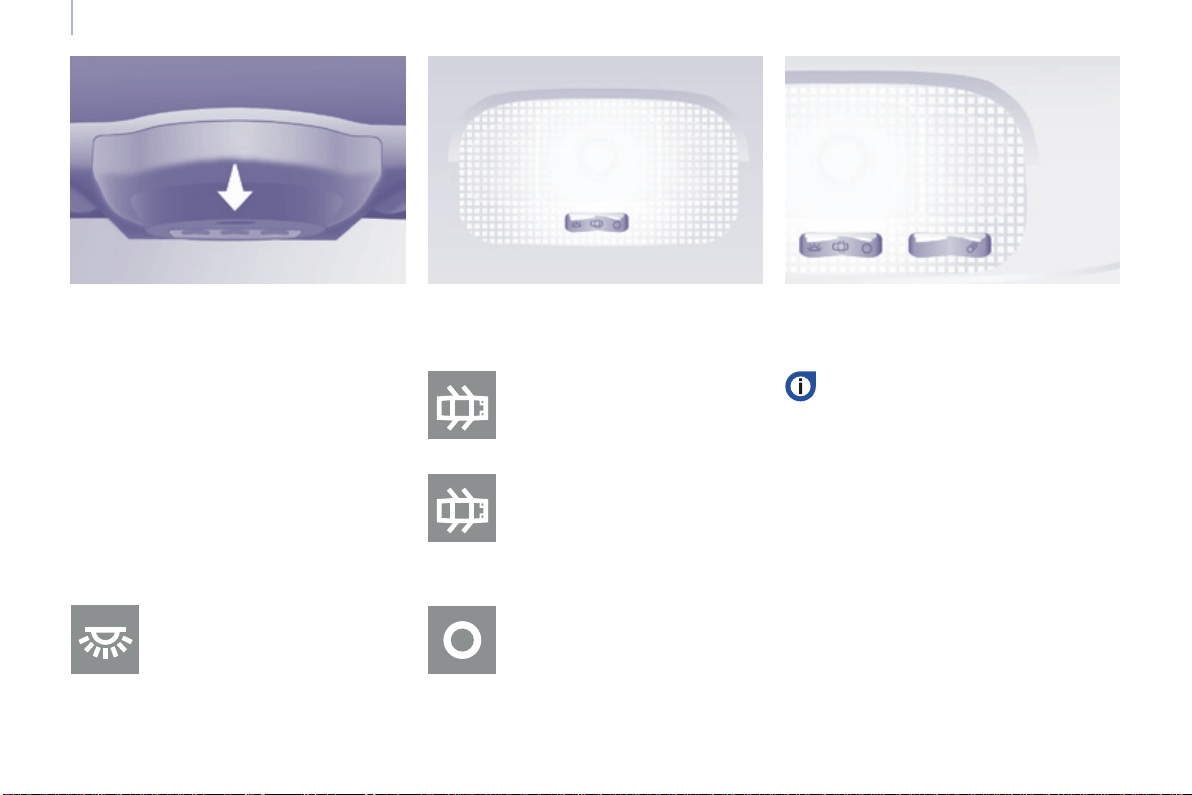
104
Berlingo-2-VP_en_Chap04_Ergonomie_ed01-2016
Practical information
Automatic switching on/off
Thefrontcourtesylampcomesonwhen
thekeyisremovedfromtheignition,when
thevehicleisunlocked,whenoneofthe
front doors is opened and for location of
thevehicleusingtheremotecontrol.
It goes off gradually after the ignition is
switched on and when the vehicle is
locked.
Frontseats:comesonwhen
one of the front doors is
opened.
These are switched on and off by
meansofamanualswitch,with
theignitionon.
Rearseats:comesonwhen
one of the rear doors is
opened.
Ifthedoorsremainopenfor
afewminutes,thecourtesy
lampsgooff.
Permanentlyoff.
Permanentlyon,ignitionon.
Front courtesy lamp
COURTESY LAMPS
Rear courtesy lamp Front individual reading lamps

105
EASE OF USE and COMFORT
4
Berlingo-2-VP_en_Chap04_Ergonomie_ed01-2016
Practical information
LOAD SPACE COVER (5 SEAT VERSION)
Thisrigidshelfconcealstheobjects
storedintheboot.
Removing
Foldtheloadspacecover.
DetachitfromthenotchesA and B
pullingittowardsyou.
Raiseitandremovetheassembly.
Retting
Place the load space cover in front
of A and B.
Push it forwards to insert the lugs in
thenotches.
Unfold and clip into the notches C.
Folding
Fromtheboot,foldthehalf-shelf,
raisingittodetachitfromthenotchC.
Storing (according to version)
Alocationisprovidedinthebackofthe
rearseatstoaccommodatetheload
spacecoverfoldedontoitself.
Slide it vertically between the side
guideslocatedatmidseatbackheight.
Insertthehingerst,withthefreeaps
turnedupwards.
This rigid load space cover can
formashelf.However,asasafety
measure,donotplaceobjects
onitwhichcouldbecomedangerous
projectilesintheeventofsharpbraking
orrearimpact.
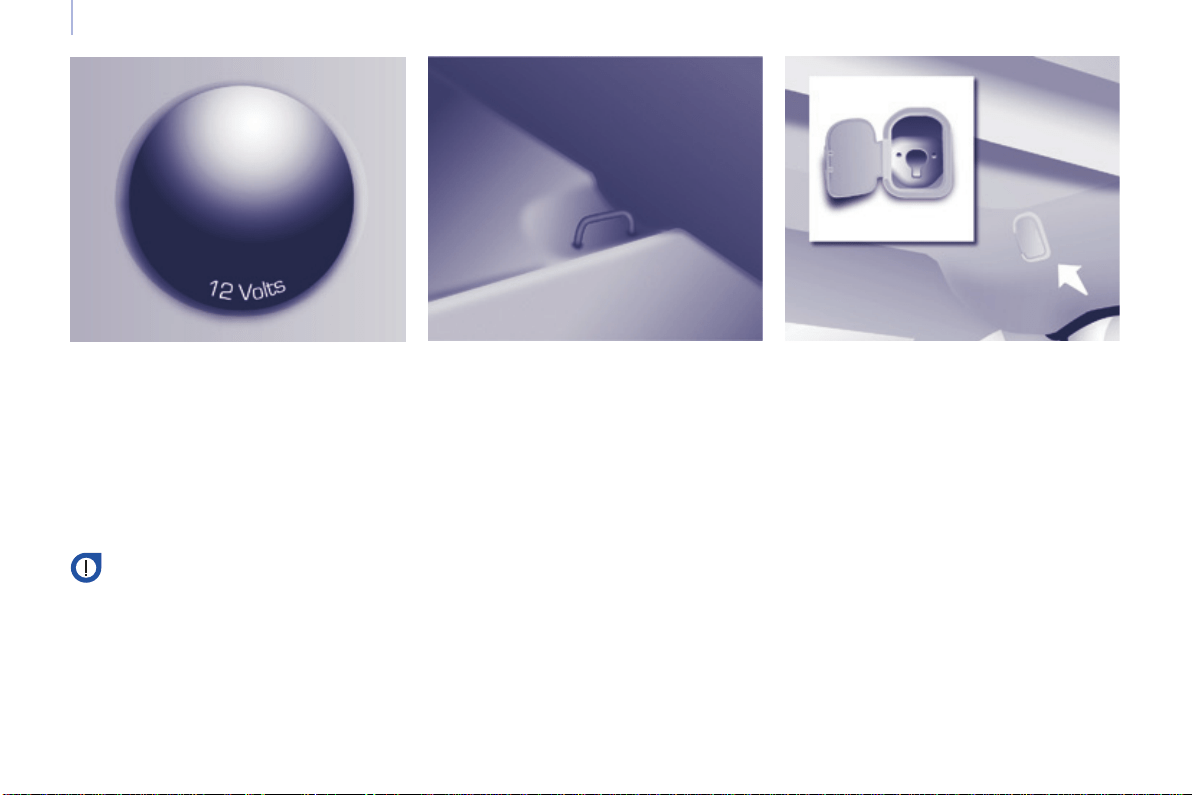
106
Berlingo-2-VP_en_Chap04_Ergonomie_ed01-2016
Practical information
12 volt socket (120 W max)
Itisadvisabletolimittheuseofthis
sockettoavoiddischargingthebattery.
Protective net
Openthecoverlocatedinthehook
support.
Fix the top of the net in the notches,
havingrstturnedthebar1/4ofaturn.
Ensure that the end of the bar engages
correctlyinthemetalpartofits
location.
Fix the straps in the locations provided
ontheoor.
Tightenthenetusingthestraps.
Stowing rings
Use these rings to secure loads on the
oor.
The connection of an electrical
device not approved by CITROËN,
suchasaUSBcharger,may
adversely affect the operation of
vehicleelectricalsystems,causing
faults such as poor telephone reception
or interference with displays in the
screens.
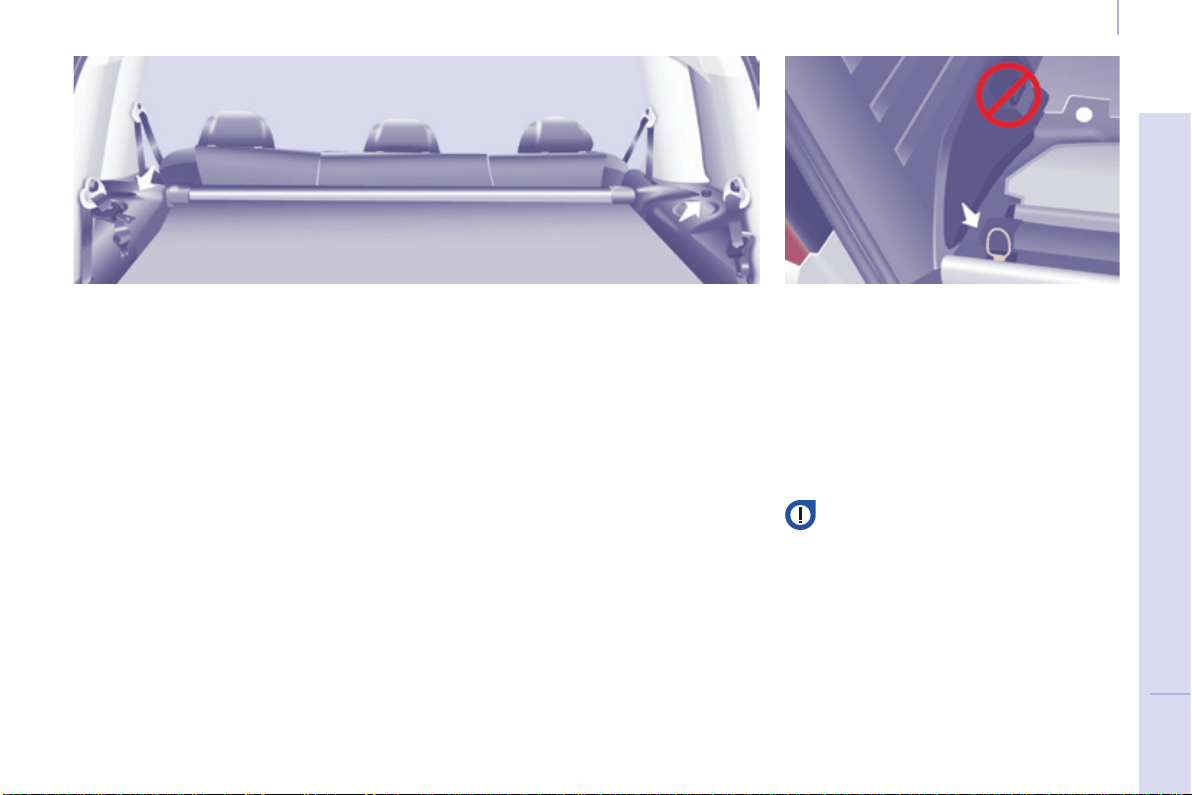
107
EASE OF USE and COMFORT
4
Berlingo-2-VP_en_Chap04_Ergonomie_ed01-2016
Practical information
REAR FITTINGS
(7 SEAT VERSION)
Cup holder
Anyliquidcarriedinacup(mugor
other) on board which could spill,
presentsarisk.
Takecare.
12 volt socket (120 W max)
Itisadvisabletolimittheuseofthis
sockettoavoiddischargingthebattery.
Stowing rings
Usethestowingringsontheoorto
secureandretainyourloadsrmly.
Theseatbeltanchoragesmustnotbe
usedforthispurpose.
Itisrecommendedthattheloadis
immobilisedbysecuringitrmly
using the stowing rings on the
oor.
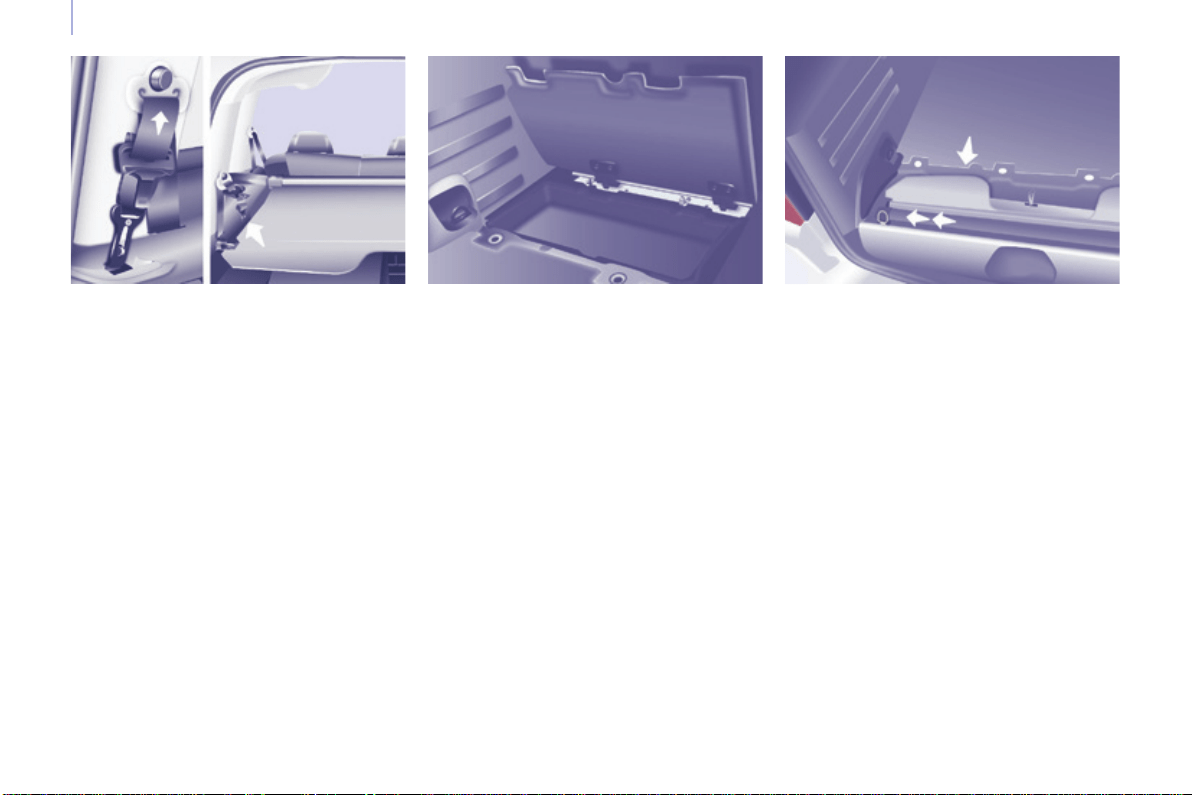
108
Berlingo-2-VP_en_Chap04_Ergonomie_ed01-2016
Practical information
Storage flaps
Raisethecorrespondingap.
Next to the boot sill, the recess is
intended to receive the roller tube
containingtheloadspacecover.
Seat belts
Ensure that the centre seat belt has
reeled in correctly to its carrier in the
roof.
Preventtherow3seatbeltbuckles
fromknockingbyraisingthemasclose
as possible to the anchorages in the
roof.
Theseatbeltbuckleattachmentrings
oneachsideofthebootmustnotbe
usedtoretainloads.
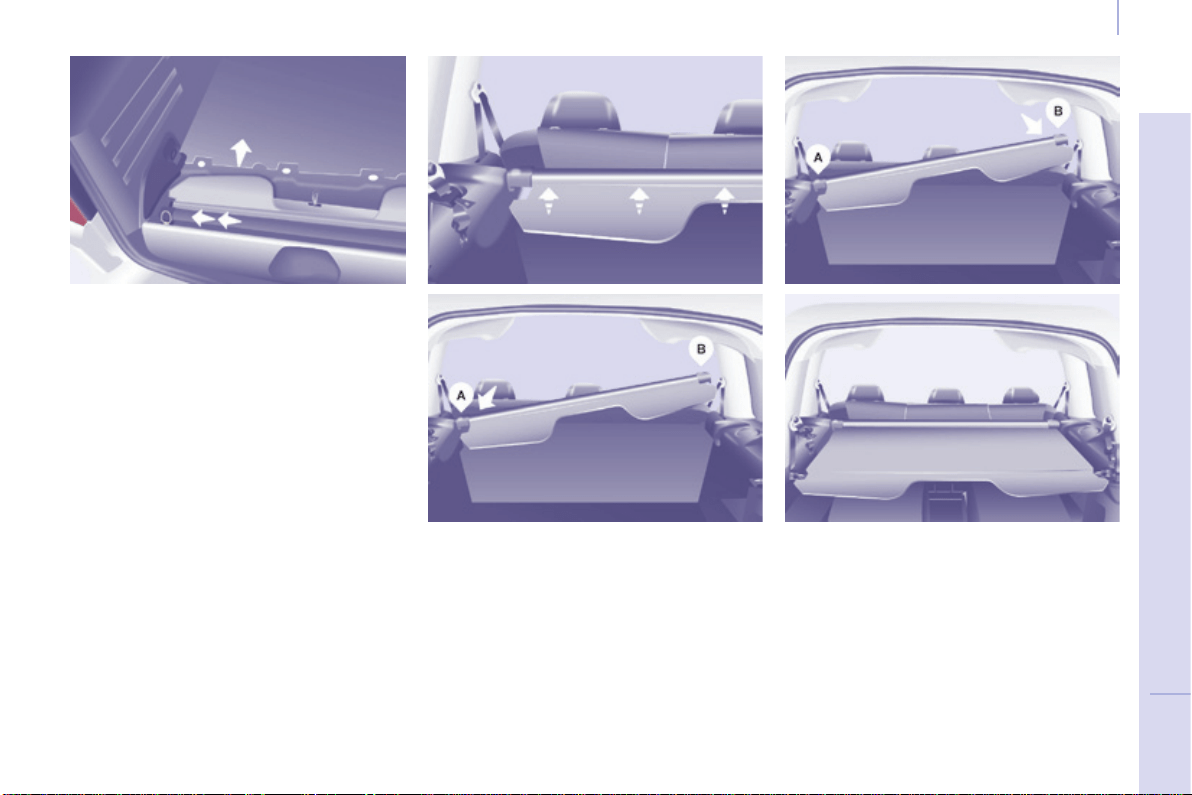
109
EASE OF USE and COMFORT
4
Berlingo-2-VP_en_Chap04_Ergonomie_ed01-2016
Practical information
BLIND, LOAD SPACE COVER
Position the load space screen so as to
presenttherearloadspacecoveraps
towardsyou.
Engage the left-hand lug of the roller in
the support A.
The load space cover is the roller blind
type.Takecarenottoplaceheavy
objectsontheloadspacecoverwhen
unreeled.
Compressthenplacetheright-hand
lug facing the support B.
Release to engage the roller in its
support.
Unroll the load space cover to the rear
sidepillars.
Engage the ends in the rear notches to
keepittaut.
To install it
Place the row 3 seats in the fully folded
position.
Raisethestorageapatthebootsill.
Takeholdoftherollerinthecentreand
compressittowardstheleft-handpillar.
Raisetheassembly.
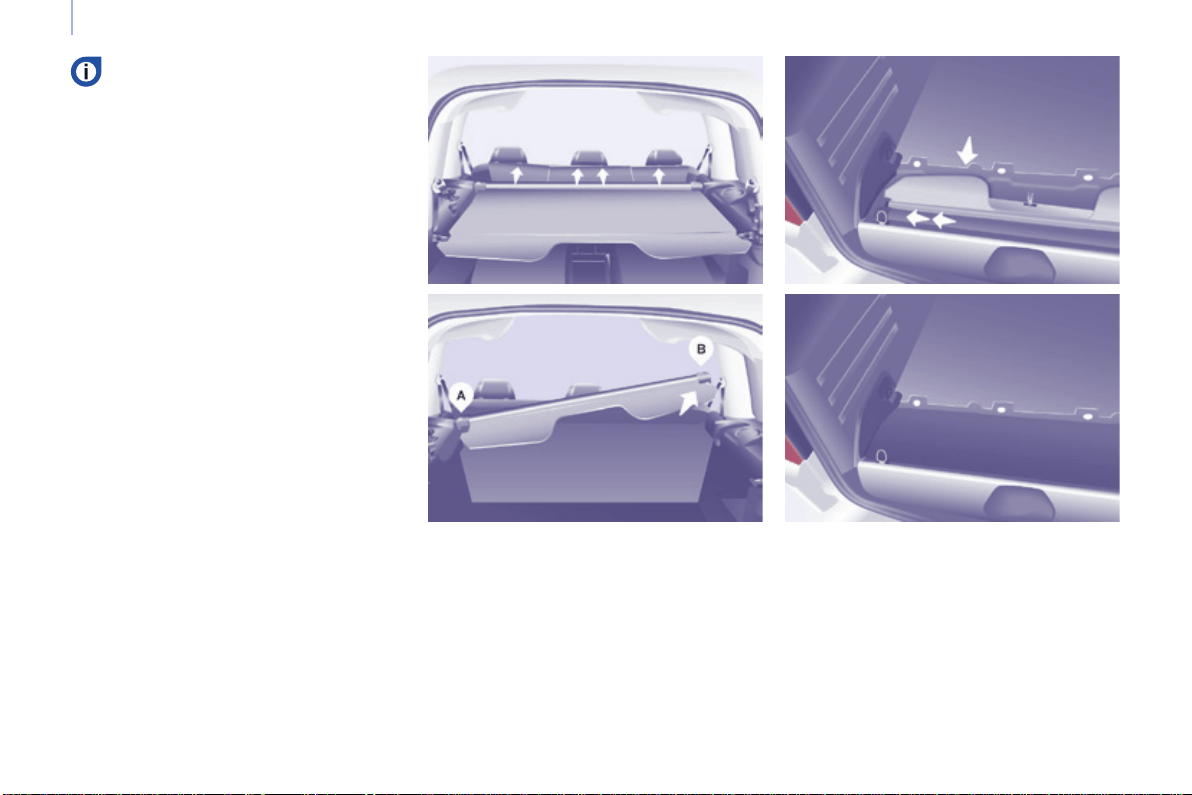
110
Berlingo-2-VP_en_Chap04_Ergonomie_ed01-2016
Practical information
To remove it
Fromtheboot,pulltheloadspace
covertowardsyoutoreleaseitfrom
thesidepillars.
Guidetheloadspacecoverasitrollsup.
Removetheclipsofthethreeaps
fromthebaseofeachrow2head
restraint.
Compresstherollertotheleftto
removeitfromthesupportB.
Raiseitandpivotitforwards.
To store it
Store it in the recess at the boot sill,
withthetworearapsuppermost.
First,compresstheloadspacescreen
totheleft.
Release.
Arrangethetwoapsandclosethe
storageap.
Therolleristtedwiththreeaps
permittingconcealmentofthe
boot, whether the row 2 seats
areinthenormalpositionorthe
comfortposition.
Eachaphastwoclipswhichare
hookedonthebaseofeachhead
restraint.
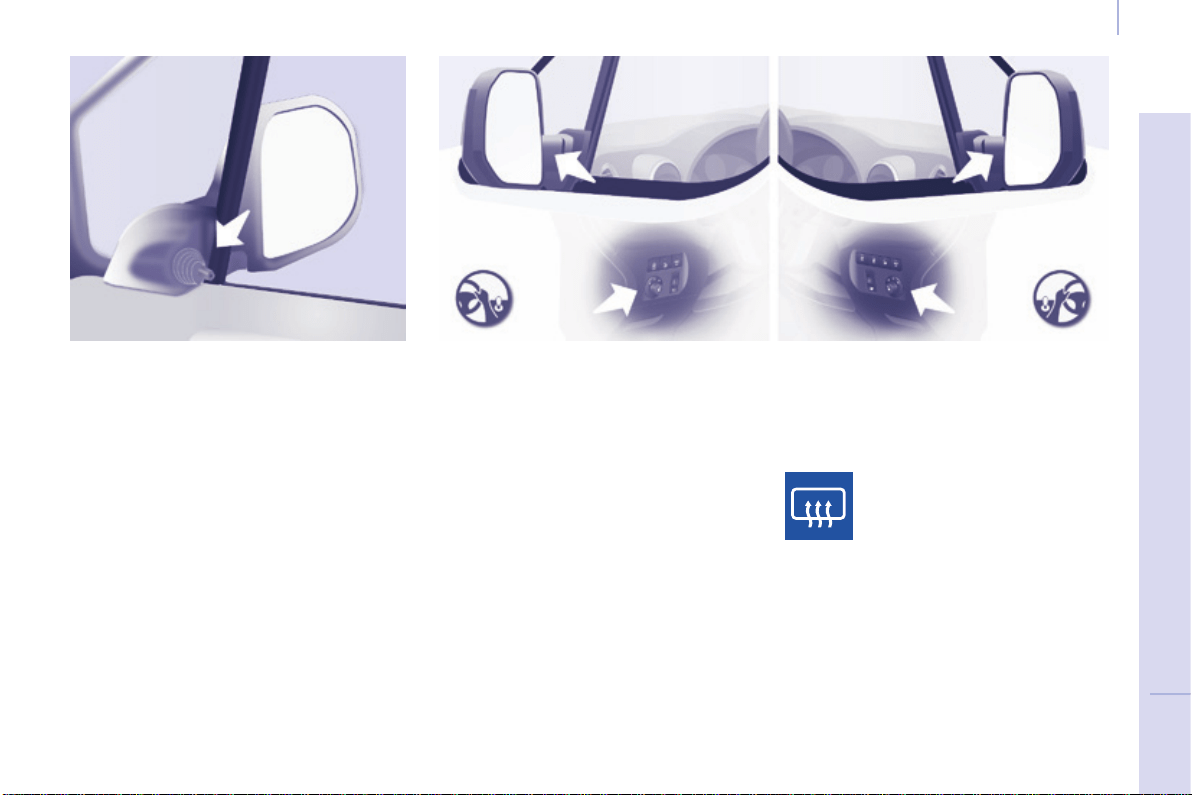
111
EASE OF USE and COMFORT
4
Berlingo-2-VP_en_Chap04_Ergonomie_ed01-2016
Mirrors and windows
Adjusting electric door mirrors
- Move the control to the right or to
the left to select the corresponding
mirror.
- Move the control in all four
directionstoadjust.
- Return the control to the central
position.
MIRRORS
Heated mirrorsAdjusting manual door mirrors
Forced folding
Ifthemirrorcasinghascomeoutof
its initial location, with the vehicle
stationaryrepositionthemirrorcasing
manuallyorusetheelectricfolding
control.
Press the heated rear screen
button.
Move the lever in all four directions to
adjust.
Whenthevehicleisparked,thedoor
mirrorscanbefoldedbackmanually.
Themirrorsarenotequippedwith
automaticheating.
Electric folding / unfolding
Themirrorscanbefoldedorunfolded
electricallyfromtheinside,withthe
vehicleparkedandtheignitionon:
- Place the control in the central
position.
- Turnthecontroldownwards.
Themirrorsthathaveelectricfolding/
unfoldingcanbeheated.
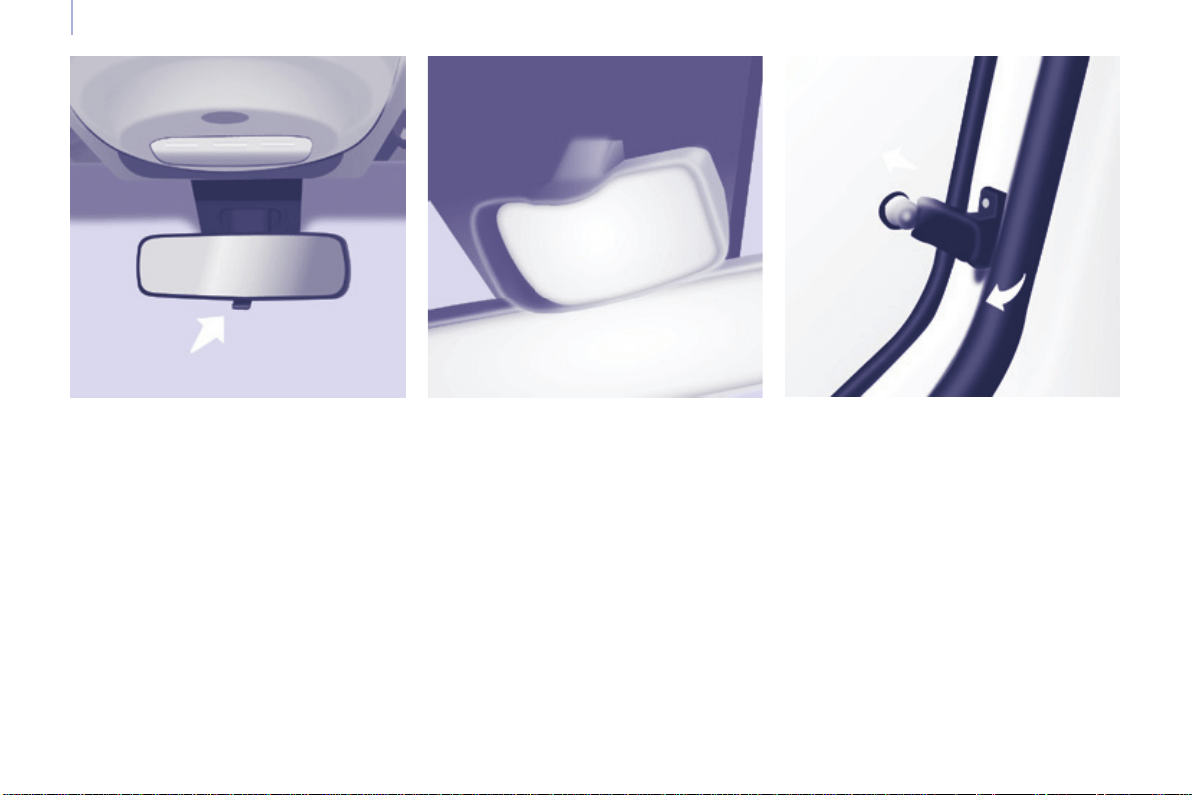
112
Berlingo-2-VP_en_Chap04_Ergonomie_ed01-2016
Mirrors and windows
SURVEILLANCE MIRROR
Thismirror,placedontopofthe
centralmirror,enablesthedriveror
front passenger to observe all the rear
seats.
Fittedonitsownballjoint,it'smanual
adjustmentissimpleandprovidesa
viewoftherearinteriorofthevehicle.
Itcanalsobeadjustedforimproved
visibilityduringmanoeuvresorwhen
overtaking.
REAR WINDOWS
To partially open the rear windows, tilt
theleverandpushitfullytolockthe
windowsintheopenposition.
Manual rear view mirror
Therearviewmirrorhastwopositions:
- day(normal),
- night(anti-dazzle).
Tochangefromonetotheother,push
or pull the lever on the lower edge of
themirror.
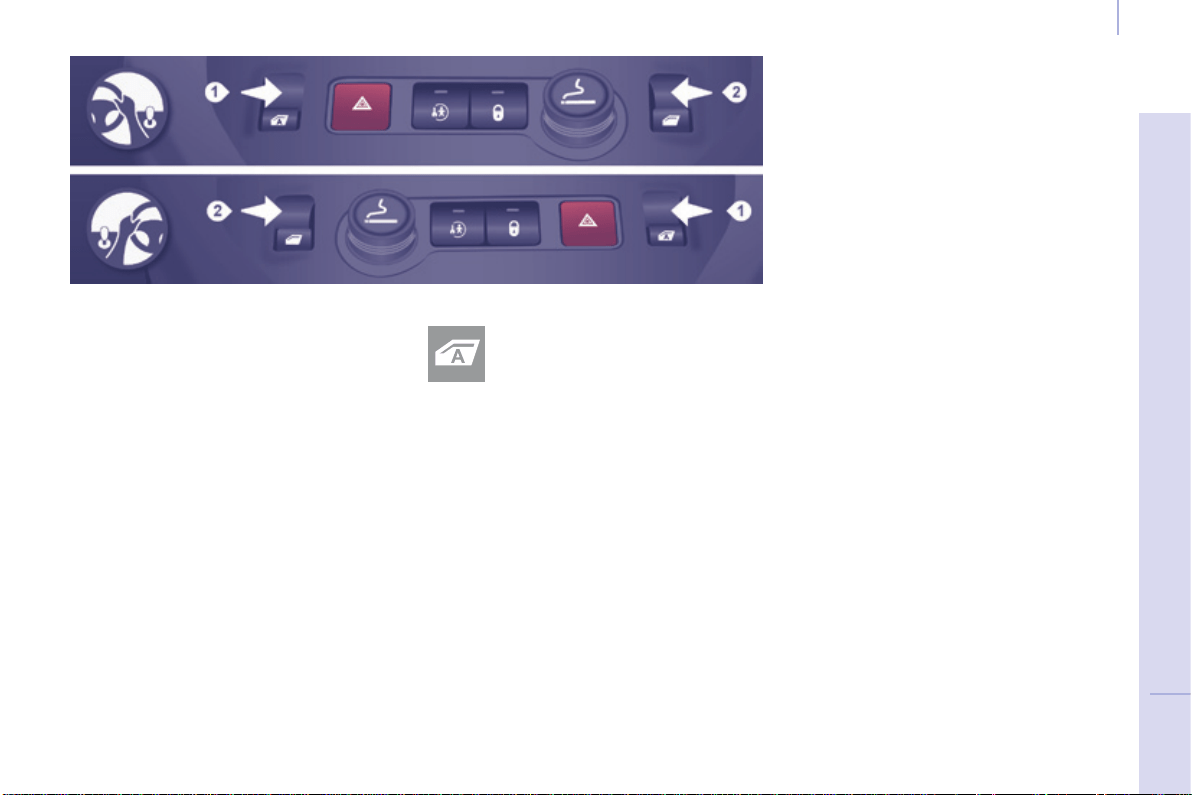
113
EASE OF USE and COMFORT
4
Berlingo-2-VP_en_Chap04_Ergonomie_ed01-2016
Mirrors and windows
ELECTRIC WINDOWS
Lower the window fully, then raise it, it
willriseinstepsofafewcentimetres
eachtimethecontrolispressed.
Repeat the operation until the window
isfullyclosed.
Continue to press the control for at
least one second after the window
closedpositionhasbeenreached.
The safety anti-pinch does not operate
duringtheseoperations.
Safety anti-pinch
Whenthewindowrisesandmeetsan
obstacle,itstopsandpartiallylowers.
Manual mode
Thismodeisavailable
dependingonequipment;itis
identiedbythissymbolonthe
controlinquestion.
Good practice
Iftheelectricwindowsmeetan
obstacleduringoperation,youmust
reversethemovementofthewindow.
Todothis,pressthecontrolconcerned.
When the driver operates the
passenger electric window controls,
theymustensurethatnooneis
preventing correct closing of the
windows.
Thedrivermustensurethatthe
passengers use the electric windows
correctly.
Be aware of children when operating
thewindows.
Followingseveralconsecutiveclosing/
opening operations of the electric
windowcontrol,aprotectionsystem
is triggered which only allows closing
ofthewindow.Afterclosing,wait
approximately40minutes.Oncethis
timehaselapsed,thecontrolbecomes
operationalagain.
1. Driver's side
2. Passenger's side
Reinitialisation
Following reconnection of the battery,
orintheeventofamalfunction,the
safetyanti-pinchfunctionmustbe
reinitialised.
The electrical functions of the electric
windowsaredeactivated:
- approximately45secondsafterthe
ignition is switched off,
- after one of the front doors is
opened,iftheignitionisoff.
Therearetwooperatingmodes:
Press or pull the control, without
passingthepointofresistance.
The window stops when you release
thecontrol.
One-touch mode
Press or pull the control, beyond the
pointofresistance.
The window opens or closes fully when
thecontrolisreleased.
Pressing or pulling the control again
stopsthemovementofthewindow.

114
Driving safely
Berlingo-2-VP_en_Chap05_Securite_ed01-2016
HAZARD WARNING LAMPS
HORN
Pressthecentreofthesteeringwheel.
PARKING BRAKE
Applying
Pulltheparkingbrakeleverupto
immobiliseyourvehicle.
Checkthattheparkingbrakeisapplied
rmlybeforeleavingthevehicle.
Pullontheparkingbrakelever,only
with the vehicle stationary.
In the exceptional case of use of the
parkingbrakewhenthevehicleis
moving,applythebrakebypulling
gentlytoavoidlockingtherearwheels
(riskofskidding).
Press this button, the direction
indicatorsash.
Theycanoperatewiththeignitionoff.
Thehazardwarninglampsshouldonly
be used in dangerous situations, when
stoppinginanemergencyorwhen
drivinginunusualconditions.
Whenparkingonaslope,directyour
wheelstowardsthepavementandpull
theparkingbrakeleverup.
There is no advantage in engaging
agearafterparkingthevehicle,
particularlyifthevehicleisloaded.
Iftheparkingbrakeisstillonorhas
not been released properly, this is
indicatedbythiswarninglampwhich
comesonintheinstrumentpanel.
Automatic operation of hazard
warning lamps
Whenbrakinginanemergency,
depending on the force of deceleration,
thehazardwarninglampscome
onautomatically.Theyswitchoff
automaticallythersttimeyou
accelerate.
Itisalsopossibletoswitchthemoffby
pressingtheswitchonthedashboard.
Releasing
Pull the lever up slightly and press the
buttontolowertheparkingbrakelever.
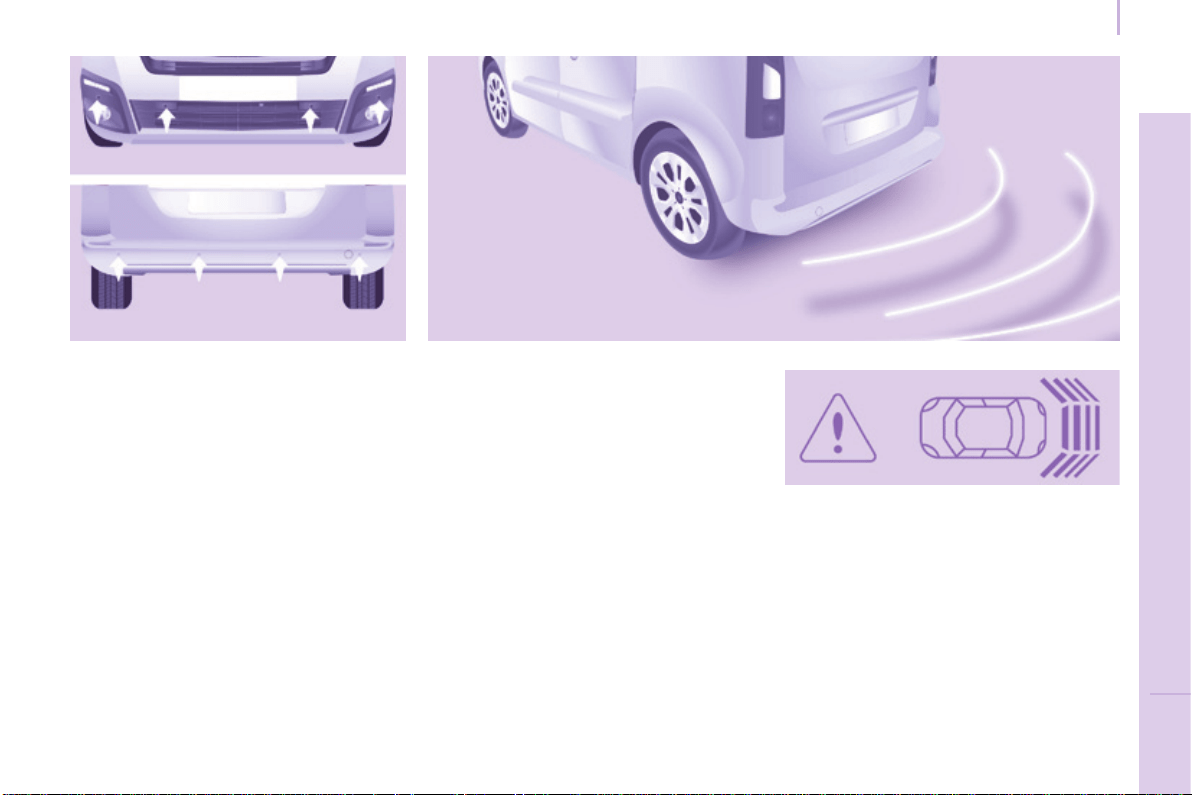
115
Parking sensors
SAFETY
5
Berlingo-2-VP_en_Chap05_Securite_ed01-2016
The audible (front and rear) and visual
(rear)parkingsensorsystemconsists
ofproximitysensors,installedinthe
rearbumper.
The sensors detect any obstacle which
entersitseldofoperation:person,
vehicle, tree, fence, behind the vehicle
duringthemanoeuvre.
Certainobjectsdetectedatthe
beginningofthemanoeuvrewillno
longer be detected at the end of the
manoeuvreduetotheblindspots
betweenandbelowthesensors.
Examples:stake,roadworksconeor
pavementpost.
Engage reverse gear
PARKING SENSORS
Display in the screen
Anaudiblesignalconrmsthe
activationofthesystembyengaging
reversegear.
Theproximityinformationisindicated
byanaudiblesignalwhichbecomes
morerapidasthevehicleapproaches
theobstacle.
When the distance between the rear
of the vehicle and the obstacle is less
thanapproximatelythirtycentimetres,
theaudiblesignalbecomes
continuous.
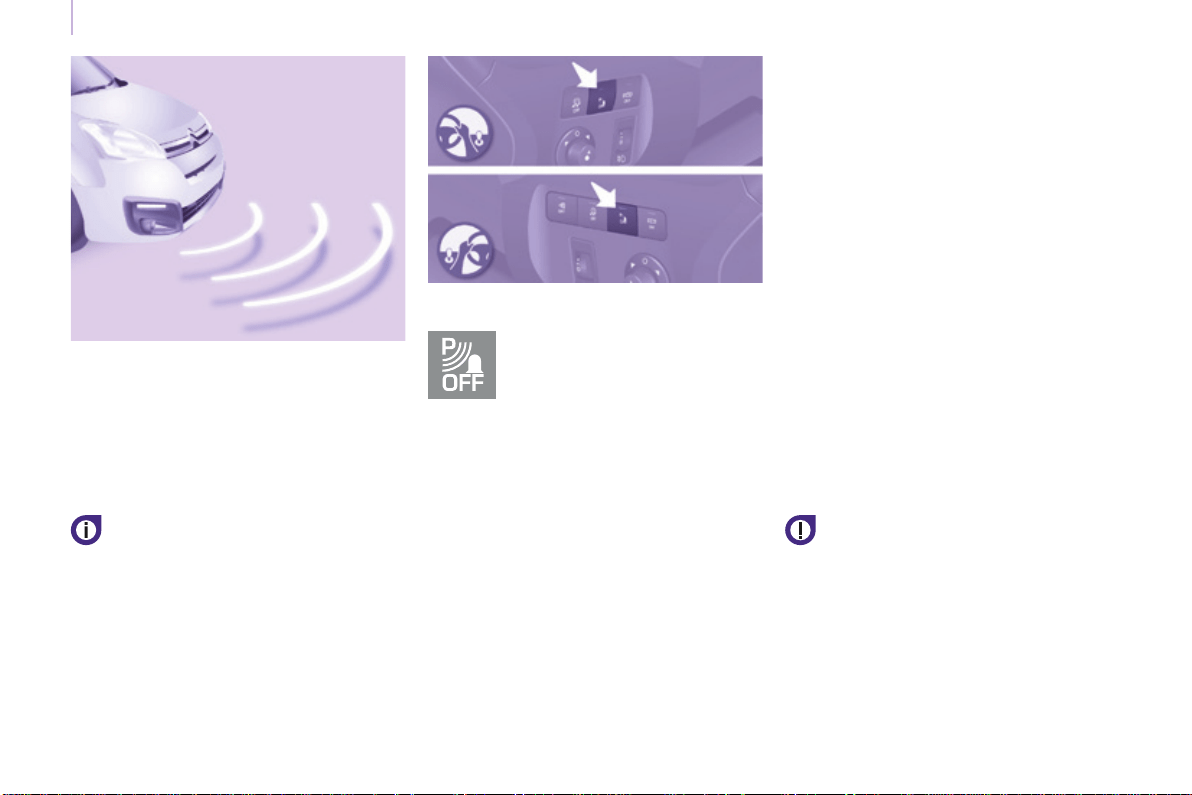
116
Parking sensors
Berlingo-2-VP_en_Chap05_Securite_ed01-2016
Activation / Deactivation
Malfunction
Intheeventofamalfunction,theLED
inthebuttoncomeson,accompanied
byanaudiblesignalandamessagein
thescreen.
ContactaCITROËNdealerorqualied
workshop.
Good practice
In bad weather or in winter, ensure that
thesensorsarenotcoveredwithmud,
iceorsnow.
Thesystemwillbedeactivated
automaticallyifatrailerisbeingtowed
orifabicyclecarrieristted(vehicle
ttedwithatowbarorbicyclecarrier
recommendedbyCITROËN).
You can activate or deactivate
thesystembypressingthis
button.
The activation or deactivation
ofthesystemisstoredwhen
thevehiclestops.
Engage forward gear
Inadditiontotherearparkingsensors,
thefrontparkingsensorsaretriggered
when an obstacle is detected in
front of the vehicle and the speed
ofthevehicleremainsbelow6mph
(10km/h).
Thetonefromthespeaker(front
or rear) allows an obstacle to be
identiedaseitherinfrontofor
behindthevehicle.
Stop the assistance
Changetoneutral.
Theparkingsensorsystem
cannot,inanycircumstances,
taketheplaceofthevigilanceand
responsibilityofthedriver.
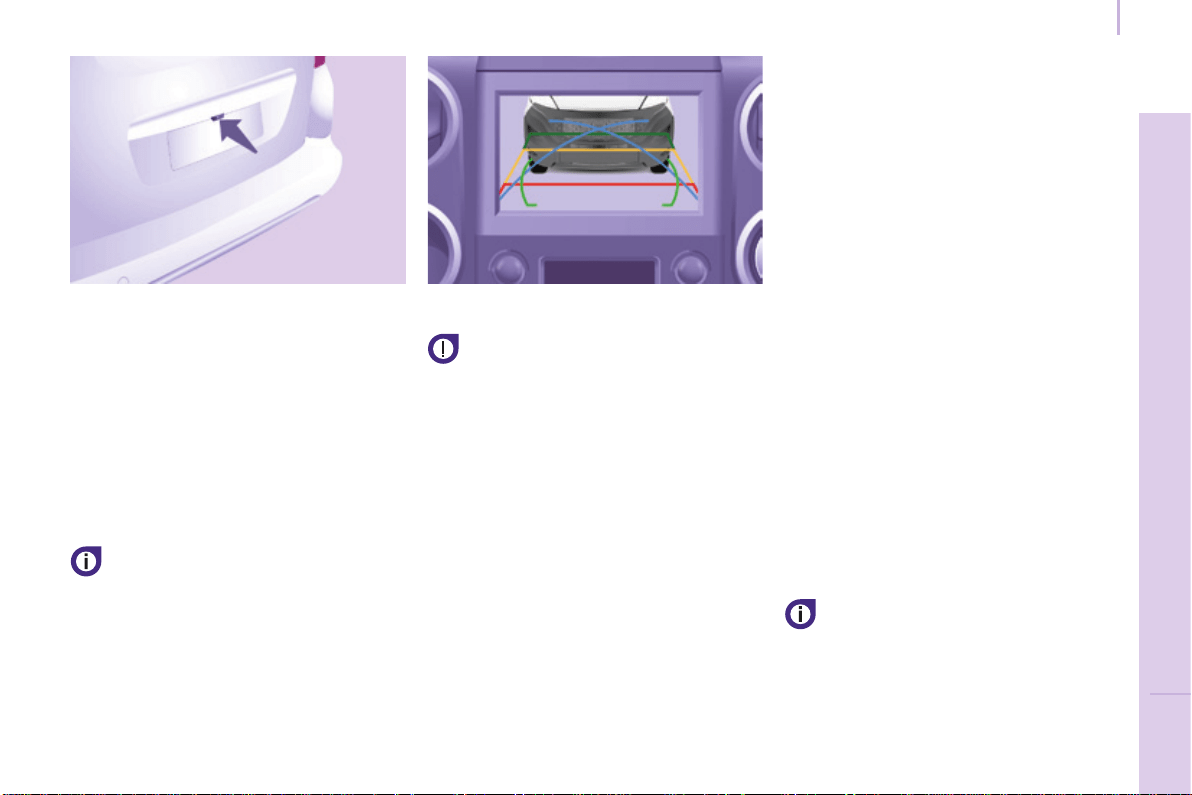
117
Parking sensors
SAFETY
5
Berlingo-2-VP_en_Chap05_Securite_ed01-2016
REVERSING CAMERA
Thereversingcameraisactivated
automaticallywhenreversegearis
engaged.
Theimageisdisplayedinthetouch
screentablet.
Thereversingcamerafunctionmaybe
completedwithparkingsensors.
Thereversingcameracannotin
anycircumstancesbeasubstitute
for vigilance on the part of the
driver.
High pressure jet washing
When washing your vehicle, do
notdirectthelancewithin30cmof
thecameralens.
Thesuperimposedrepresentationof
guidelineshelpswiththemanoeuvre.
Theyarerepresentedbylinesmarked
"on the ground" and do not allow the
positionofthevehicletobedetermined
relativetotallobstacles(forexample:
othervehicles,...).
Somedeformationoftheimageis
normal.
The blue lines represent the general
direction of the vehicle (the difference
corresponds to the width of your
vehiclewithoutthemirrors).
The red lines represent a distance of
about30cmbeyondtheedgeofyour
vehicle'srearbumper.
The green lines represent distances of
about1and2metresbeyondtheedge
ofyourvehicle'srearbumper.
The turquoise blue curves represent
themaximumturningcircle.
Opening the tailgate causes the
displaytodisappear.
Cleanthereversingcameraregularly
usingasoft,drycloth.

ABS
ABS
118
Driving safely
Berlingo-2-VP_en_Chap05_Securite_ed01-2016
ANTI-LOCK BRAKING SYSTEM
(ABS / EBFD)
TheABSandEBFD(electronicbrake
forcedistribution)systemsimprovethe
stabilityandmanoeuvrabilityofyour
vehicleonbraking,inparticularon
poororslipperysurfaces.
TheABSpreventslockingofthe
wheels, the EBFD provides control of
thebrakingpressurewheelbywheel.
Ifthiswarninglampcomes
on,accompaniedbyan
audiblesignalandamessage
in the screen, it indicates a
malfunctionoftheABSwhich
could result in a loss of control of the
vehicleonbraking.
Ifthiswarninglampcomes
on,togetherwiththebrake
andSTOPwarninglamps,
accompaniedbyanaudible
signalandamessageinthe
screen,itindicatesamalfunctionof
theelectronicbrakeforcedistribution
which could result in a loss of control of
thevehicleonbraking.
EMERGENCY BRAKING
ASSISTANCE (EBA)
Inanemergency,thissystemenables
theoptimumbrakingpressuretobe
reachedmorequickly,pressthepedal
rmlywithoutreleasingit.
It is triggered by the speed at which the
brakepedalispresseddown.
Thisalterstheresistanceofthebrake
pedalunderyourfoot.
Tomaintainoperationofthe
emergencybrakingassistancesystem:
keepyourfootonthebrakepedal.
Good practice
Theanti-lockbrakingsystemcomes
intooperationautomaticallywhen
thereisariskofwheellock.Itdoesnot
reducethebrakingdistance.
On very slippery surfaces (ice,
oil,etc...)theABSmayincreasethe
brakingdistance.Whenbrakingin
anemergency,donothesitateto
pressthebrakepedalrmly,without
releasing the pressure, even on a
slippery surface, you will then be able
tocontinuetomanoeuvrethevehicle
toavoidanobstacle.
NormaloperationoftheABSmaybe
feltbyslightvibrationofthebrake
pedal.
When changing wheels (tyres and
rims),ensurethatthesearelistedby
CITROËNforthevehicle.
Stop as soon as it is safe to do so.
In both cases, contact a CITROËN
dealeroraqualiedworkshop.
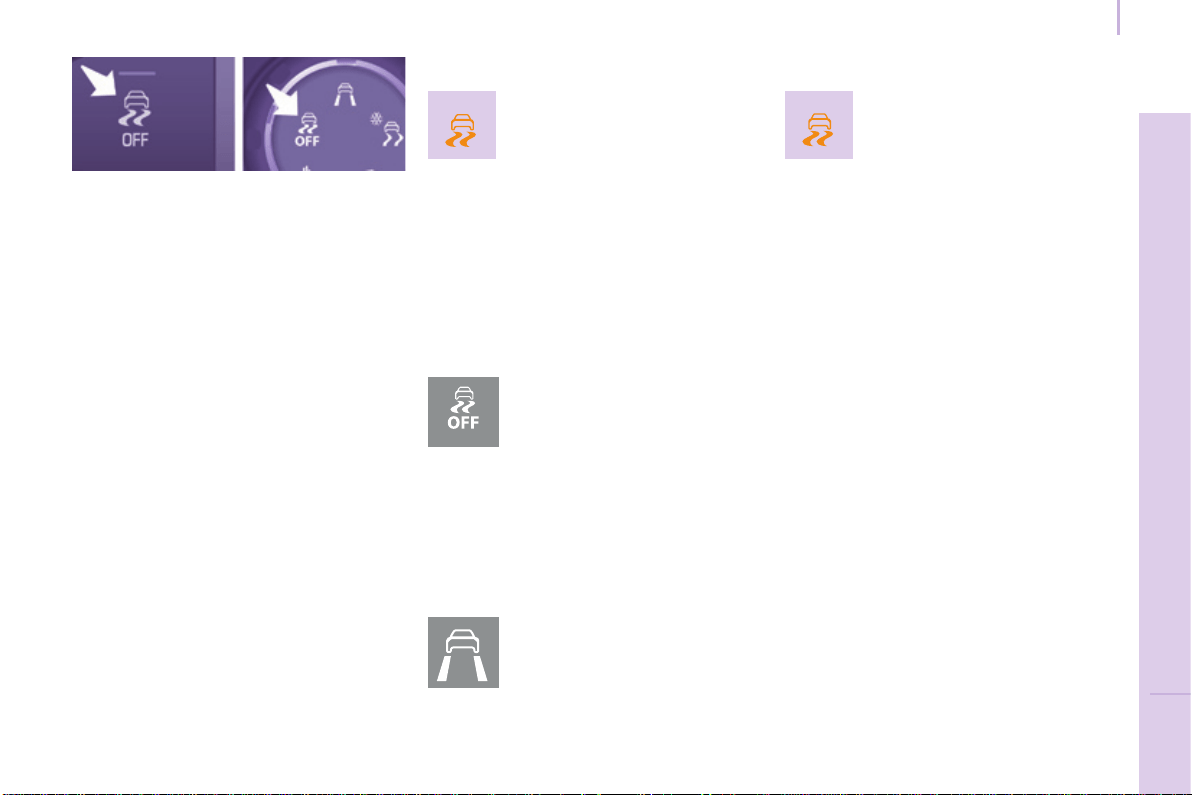
119
Driving safely
SAFETY
5
Berlingo-2-VP_en_Chap05_Securite_ed01-2016
ANTI-SLIP REGULATION (ASR)
AND DYNAMIC STABILITY
CONTROL (DSC)
Thesesystemsarelinkedand
complementtheABS.
TheASRsystemisveryusefulfor
maintainingoptimumdriveand
avoiding losses of control of the vehicle
onacceleration.
Thesystemoptimisesdrivetoprevent
thewheelsskidding,byactingonthe
brakesofthedrivewheelsandonthe
engine.Italsoallowsthedirectional
stabilityofthevehicletobeimproved
onacceleration.
Use the DSC to hold your course
withoutattemptingtocountersteer.
If there is a variation between the
trajectoryfollowedbythevehicleand
that required by the driver, the DSC
systemautomaticallyactsonthe
engineandthebrakeofoneormore
wheels,inordertoputthevehicleback
oncourse.
Deactivation
In certain exceptional conditions
(startingthevehiclewhenstuckinmud
orsnow,oronlooseground...),itcould
prove useful to deactivate the ASR and
DSCsystemstomakethewheelsspin
andregaingrip.
Operating fault
Good practice
TheASR/DSCsystemsofferincreased
safetyduringnormaldriving,but
shouldnotincitethedrivertotakerisks
ortodriveathighspeed.
Theoperationofthesesystemsis
ensurediftherecommendations
ofthemanufacturerregarding
thewheels(tyresandrims),the
brakingcomponents,theelectronic
componentsandthettingandrepair
proceduresareobserved.
Afteranimpact,havethesesystems
checkedbyaCITROËNdealerora
qualiedworkshop.
Operation
Thewarninglampashes
when operation of the ASR or
DSCistriggered.
They engage again:
- automaticallyabove30mph
(50km/h),
Whenamalfunctionofthe
systemsoccurs,thewarning
lampandtheLEDcomeon,
accompaniedbyanaudible
signalandamessageinthe
screen.
- Press the button or turn
the dial to the DSC OFF
position (depending on
model).
- TheLEDcomeson:theASRand
DSCsystemsnolongercomeinto
play.
- manuallybypressingthe
button again or by turning
the dial to this position
(dependingonmodel).
Contact a CITROËN dealer or a
qualiedworkshoptohavethesystem
checked.
Thewarninglampmayalsocomeonif
thetyresareunder-inated.Checkthe
pressureofeachtyre.

120
Driving safely
Berlingo-2-VP_en_Chap05_Securite_ed01-2016
GRIP CONTROL
Correct use
Your vehicle is designed principally to
driveontarmacroadsbutitallowsyou
to drive on other less passable terrain
occasionally.
However, particularly when your
vehicle is heavily laden, it does not
permitoff-roadactivitiessuchas:
- crossing and driving on ground
whichcoulddamagetheunderbody
ortearoffcomponents(fuelpipe,
fuelcooler,...),particularlyby
obstacles or stones,
- driving on ground with steep
gradients and poor grip,
- crossingastream.
Onsnow,mudorsand,tractioncontrol
isobtainedbyacompromisebetween
safety, grip, traction and appropriate
tyres.
Itadaptstoallowsmostconditionsof
poorgriptobeaccommodated.
Theacceleratorpedalmustbepressed
enough for there to be adequate
enginepowertomanagethevarious
parametersinthebestway.
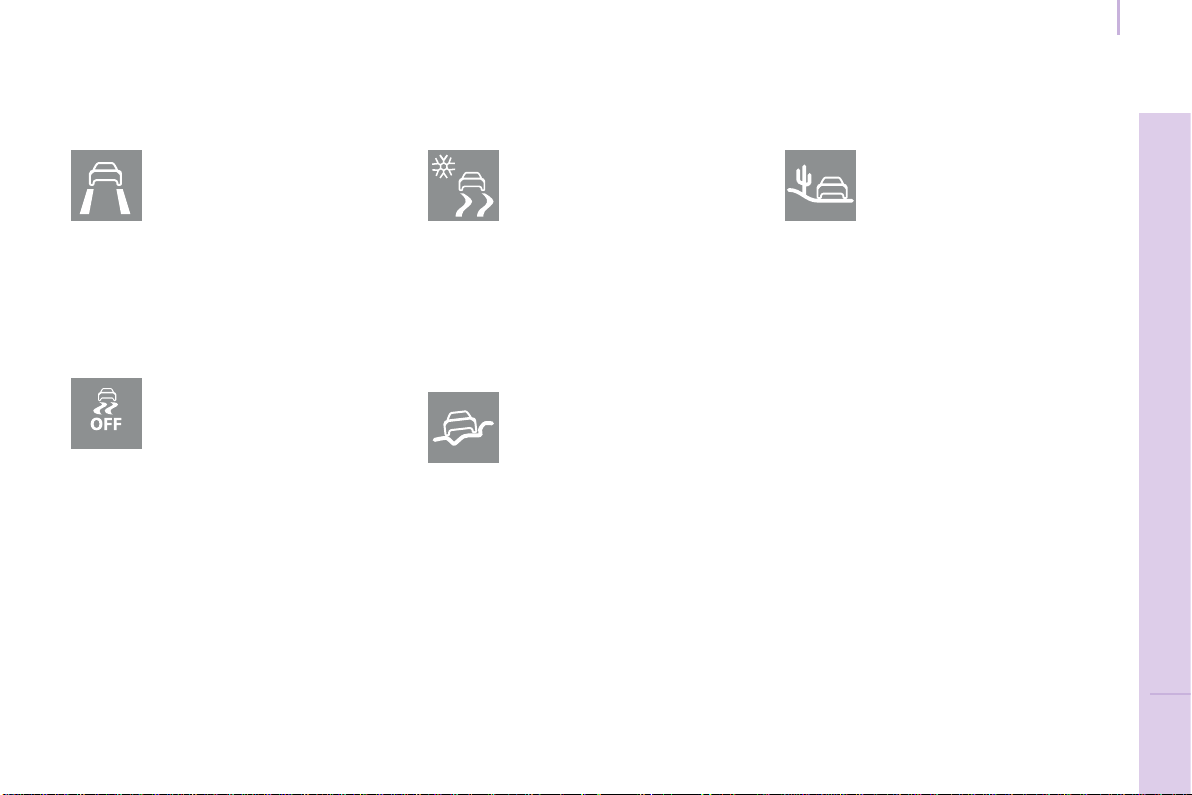
121
Driving safely
SAFETY
5
Berlingo-2-VP_en_Chap05_Securite_ed01-2016
Different modesareavailable:
Normal (ESC)
ESC OFF
Snow
Thismodeallowsthevehicle
to adapts its strategy to the
conditions of grip encountered
for each of the two front
wheels,onmovingoff.
Whenmoving,thesystemoptimises
wheelspin to provide the best
acceleration possible for the grip
available.
Off road
(mud, wet grass, ...)
Whenmovingoff,this
modeallowsconsiderable
wheelspin on the wheel
with the least grip to favour
clearingofthemudand
regain"grip".
Atthesametime,thewheelwiththe
mostgripiscontrolledinsuchawayas
totransmitasmuchtorqueaspossible.
Whenmoving,thesystemoptimises
wheelspintomeetthedriver's
requirementsasfullyaspossible.
Sand
Thismodeallowsalittle
wheelspin on the two driving
wheelsatthesametimeto
allowthevehicletomove
forwardandreducestherisk
ofgettingstuckinthesand.
Donotusetheothermodesonsand
asthevehiclemaybecomestuck.
Thismodeiscalibratedfora
lowlevelofskidding,based
on different conditions of grip
encounteredontheroad.
When the ignition is switched off, the
systemreturnsautomaticallytoDSC
mode.
Thismodeisonlysuitable
forspecicconditions
encounteredwhenmovingoff
oratlowspeed.
Above30mph(50km/h)
thesystemreturnstoDSCmode
automatically.
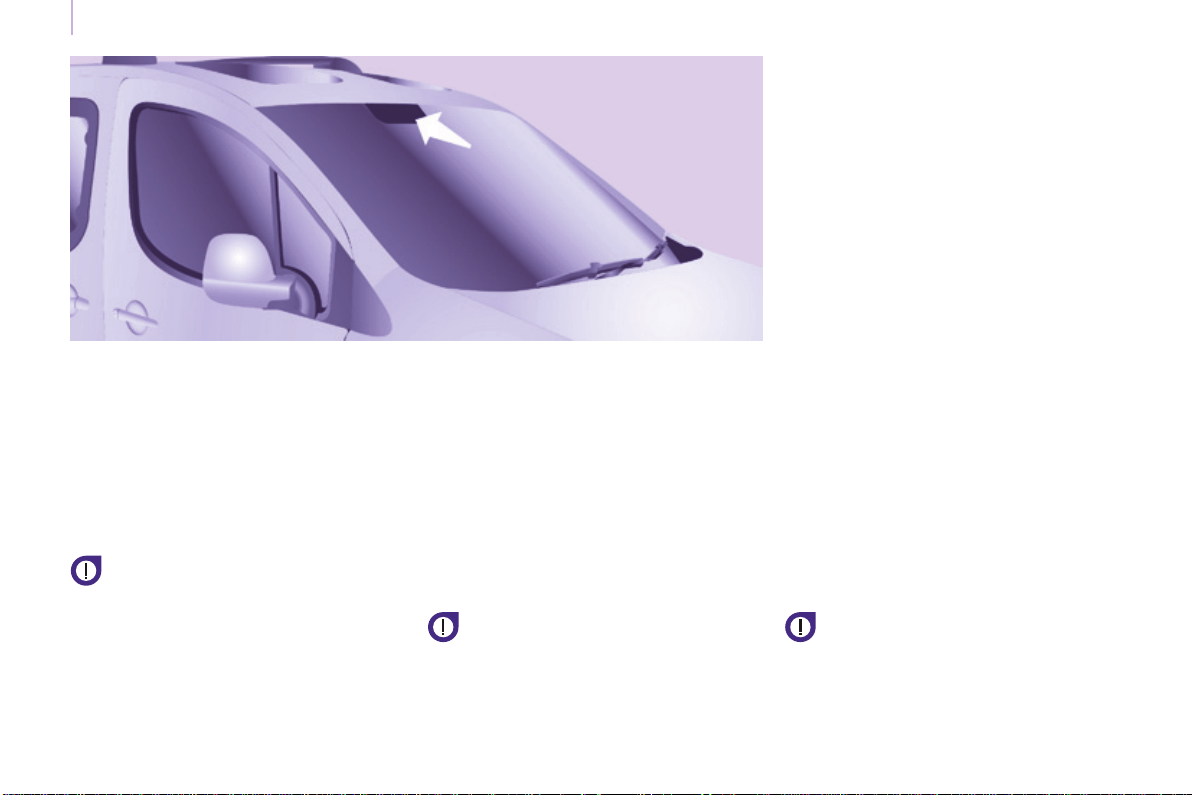
122
Driving safely
Berlingo-2-VP_en_Chap05_Securite_ed01-2016
ACTIVE CITY BRAKE
ActiveCityBrakeisadriving
assistancesystemthataimstoavoid
a frontal collision or reduce the speed
ofanimpactifthedriverdoesnot
reactsufciently(inadequatebrake
application).
Thissystemisdesignedto
improvedrivingsafety.
Itremainsthedriver'sresponsibilityto
continuouslymonitorthestateofthe
trafcandtoassessthedistancesand
relativespeedsofothervehicle.
ActiveCityBrakecaninno
circumstancesreplacetheneedfor
vigilanceonthepartofthedriver.
Neverlookatthelasersensor
throughanopticalinstrument
(magnifyingglass,microscope...)
at a distance of less than
10centimetres:riskofeyeinjury.
Principle
Using a laser sensor located at the top
ofthewindscreen,thissystemdetects
avehiclerunninginthesamedirection
orstationaryaheadofyourvehicle.
Whennecessary,thevehicle'sbraking
systemisoperatedautomatically
to avoid a collision with the vehicle
ahead.
Automaticbrakingoccurslater
than if done by the driver, so as
to intervene only when there is a
highriskofcollision.
Conditions for activation
ActiveCityBrakeonlyoperatesifthe
followingconditionsaremet:
● ignitionon,
● thevehicleisinaforwardgear,
● speedisbetweenabout3and
18mph(5and30km/h),
● thebrakingassistancesystems
(ABS,EBFD,emergencybraking
assistance) are not faulty,
● thetrajectorycontrolsystems
(ASR, DSC) are not deactivated or
faulty,
● thevehicleisnotinatightcorner,
● thesystemhasnotbeentriggered
duringtheprevious10seconds.

123
Driving safely
SAFETY
5
Berlingo-2-VP_en_Chap05_Securite_ed01-2016
Operation
When your vehicle is too close to or
approaches the vehicle ahead too
quicklythesystemautomatically
appliesthebrakestoavoidacollision.
You are then alerted by the display of a
message.
Thebrakelampsonyourvehiclecome
ontowarnotherroadusers.
The collision can be avoided
automaticallyifthedifferencein
speed between your vehicle and the
vehicleaheaddoesnotexceed9mph
(15km/h).
Abovethisthreshold,thesystemwill
do what is possible to avoid or reduce
the accident by lowering the speed of
impact.
Theautomaticbrakingmaybring
thevehicletoacompletestopifthe
situationrequiresit.
In this case, the vehicle is held
stationarytemporarily(forabout
1.5seconds)toallowthedrivertotake
backcontrolbypressingthebrake
pedal.
Thetriggeringofthesystemmay
cause the engine to stall, unless
the driver depresses the clutch
pedalquicklyenoughduringautomatic
braking.
Duringautomaticbraking,the
driver can always obtain a higher
rate of deceleration than that
controlledbythesystem,bypressing
rmlyonthebrakepedal.
Afteranimpact,thesystemis
automaticallyputoutofservice:it
nolongeroperates.
YoumustgotoaCITROËNdealerora
qualiedworkshoptohavethesystem
madeoperationalagain.
Operating limits
Thesystemonlydetectsvehiclesthat
arestationaryormovinginthesame
directionasyourvehicle.
Itdoesnotdetectsmallvehicles
(bicycles,motorcycles),
pedestriansoranimals,nornon-
reectivestationaryobjects.
Thesystemisnottriggeredoris
interruptedifthedriver:
- accelerates strongly
- or turns the steering wheel
suddenly(avoidingmanoeuvre).
Indifcultweatherconditions(very
heavyrain,snow,fog,hail...),
brakingdistancesincrease,which
canreducetheabilityofthesystemto
avoidacollision.
Thedrivermustthereforeremain
particularlyvigilant.
Neverleaveaccumulationsof
snoworanyobjectprojecting
above the bonnet or in front of
theroof:thismightfallintotheeldof
vision of the sensor and generate a
detection.
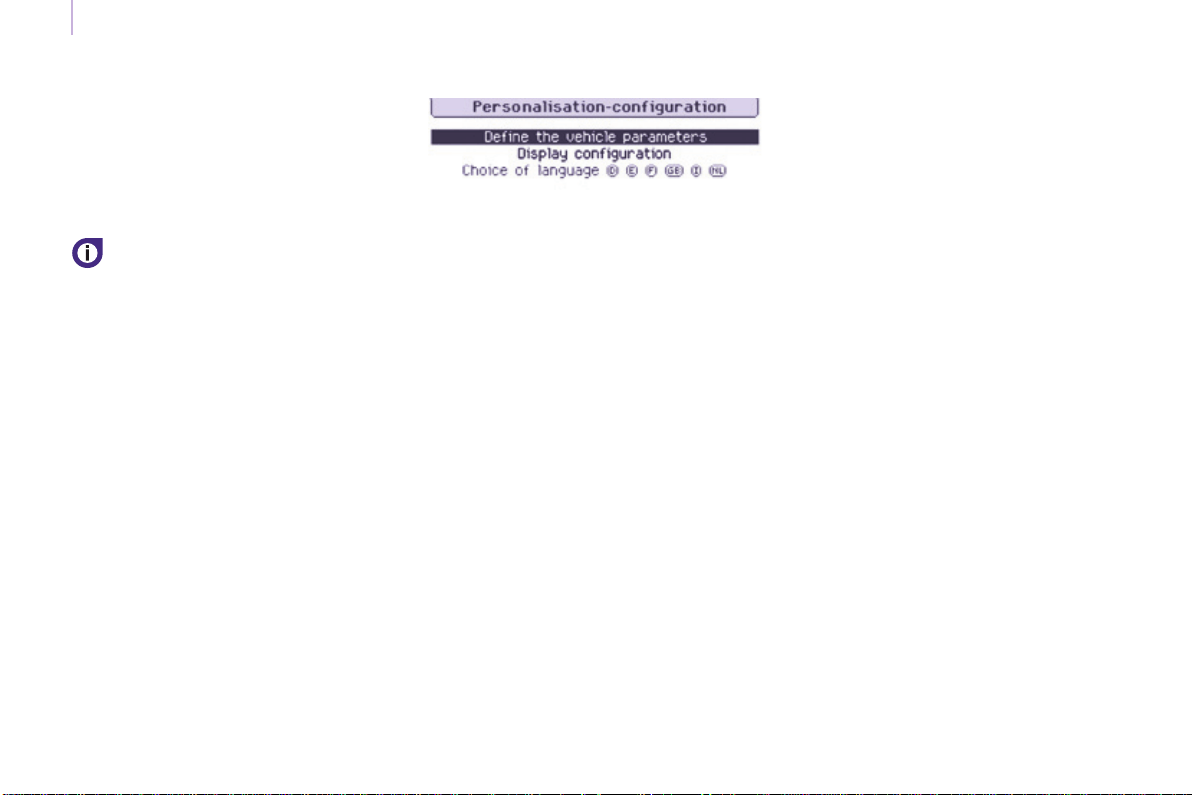
124
Driving safely
Berlingo-2-VP_en_Chap05_Securite_ed01-2016
Deactivation
Thesystemisdeactivatedinthe
vehiclecongurationmenu,accessible
withtheignitionon.
Itsstateismemorisedwhenthe
ignitionisswitchedoff.
Whenthesystemisdeactivated,
amessageisdisplayedevery
timetheignitionisswitchedon,
towarnyou.
With the monochrome screen C
F Press the MENU button for access
tothemainmenu.
F Select "Personalisation-
Conguration".
F Select "Dene vehicle
parameters".
F Select "Driving assistance".
F Select "Automatic emergency
braking: OFF" or "Automatic
emergency braking: ON".
F Press the "7" or "8" button to
checkorunchecktheboxand
activateordeactivatethesystem
respectively.
F Press the "5" or "6" button, then
the OK button to select the "OK"
boxandconrmortheBack button
tocancel.
With the touch screen tablet
F Press the "MENU"button.
F Select the "Driving"menu.
F In the secondary page, select
"Vehicle settings".
F Select the "Driving assistance"
tab.
F Checkoruncheckthe"Auto
emergency braking" box to
activateordeactivatethesystem.
F Conrm.

125
Driving safely
SAFETY
5
Berlingo-2-VP_en_Chap05_Securite_ed01-2016
Operating faults
Sensor fault
Theoperationofthelasersensormay
sufferinterferencefromaccumulations
ofdirtormistingofthewindscreen.
In this case you are warned by the
displayofamessage.
Usethewindscreendemisting
and regularly clean the area of the
windscreeninfrontofthesensor.
Donotstickorotherwisexany
objectonthewindscreeninfront
ofthesensor.
System fault
Intheeventofamalfunctionofthe
system,youarewarnedbyanaudible
signalandthedisplayofthemessage
Automatic braking system fault.
Havethesystemcheckedbya
CITROËNdealeroraqualied
workshop.
Intheeventofanimpactto
the windscreen at the sensor,
deactivatethesystemandcontact
aCITROËNdealeroraqualied
workshoptohaveyourwindscreen
replaced.
Nevertrytoremove,adjustortest
thesensor.
Only a CITROËN dealer or a
qualiedworkshopisabletowork
onthesystem.
When towing a trailer or when the
vehicleisbeingtowed,thesystem
mustbedeactivated.
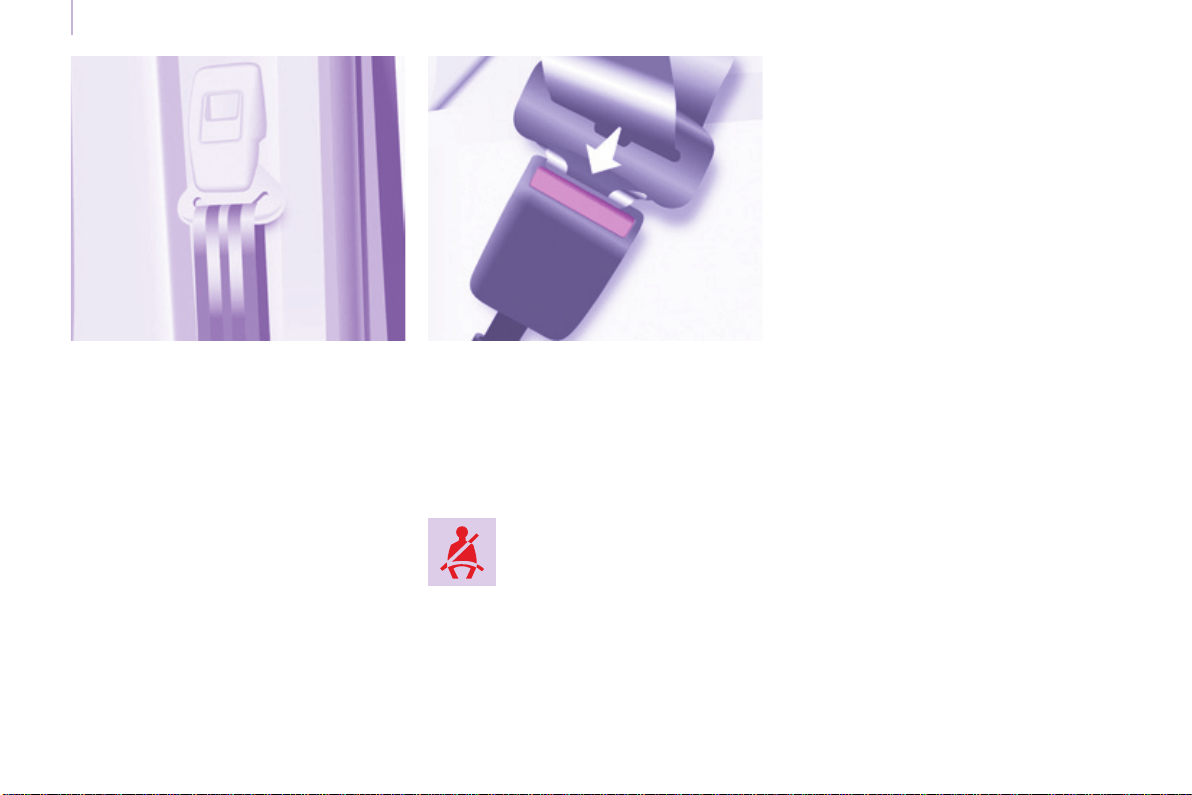
126
Berlingo-2-VP_en_Chap05_Securite_ed01-2016
126
Seat belts
SEAT BELTS
Height adjustment
Squeeze the control with the return and
slidetheassemblyonthedriver'sseat
side and on the individual passenger
seatside.
Fastening
Pull the strap, then insert the tongue
intothebuckle.
Checkthattheseatbeltisfastened
correctlybypullingthestrap.
Seat belt(s) not fastened
warning lamp
Unfastening
Presstheredbutton.
When the vehicle is started,
thiswarninglampcomeson
if a user at the front has not
fastenedtheirseatbelt.
Good practice
Thedrivermustensurethat
passengers use the seat belts correctly
and that they are all strapped in
securelybeforemovingoff.
Wherever you are seated in the
vehicle, always fasten your seat belt,
evenforshortjourneys.
Theseatbeltsarettedwithaninertia
reelwhichautomaticallyadjuststhe
lengthofthestraptoyoursize.
Do not use accessories (clothes pegs,
clips,safetypins,etc.)whichallowthe
seatbeltstrapstotloosely.
Ensure that the seat belt has reeled in
correctlyafteruse.
Afterfoldingormovingaseatorarear
bench seat, ensure that the seat belt
has reeled in correctly and that the
buckleisreadytoaccommodatethe
tongue.
Depending on the nature and
seriousnessofanyimpact,the
pretensioningdevicemaybedeployed
beforeandindependentlyofination
oftheairbags.Itinstantlytightens
the seat belts against the body of the
occupants.
Deploymentofthepretensionersis
accompaniedbyaslightdischarge
ofharmlesssmokeandanoise,due
to the activation of the pyrotechnic
cartridgeincorporatedinthesystem.
Thefrontpassenger'sseatmaybe
ttedwithapresencedetector,inwhich
case you should not place anything
heavy on this seat as this could trigger
thealert.

127
SAFETY
5
Berlingo-2-VP_en_Chap05_Securite_ed01-2016
Seat belts
Recommendations for children:
- use a suitable child seat if the
passenger is less than 12 years old
orshorterthanonemetrefty,
- never allow a child to travel on
your lap, even with the seat belt
fastened.
Formoreinformationonchild
seats, refer to the "Child safety"
sectionofchapter5.
Clean the seat belt straps with
soapy water or a textile cleaning
product, sold by CITROËN
dealers.
In accordance with current safety
regulations, your CITROËN dealer can
guaranteeallworkoranychecks,from
testingtomaintenance,onyourseat
beltequipment.
Havetheseatbeltscheckedregularly
(evenafteraminorimpact)bya
CITROËNdealeroraqualied
workshop:theymustnotshowany
signs of wear, cutting or fraying
andtheymustnotbeconvertedor
modied.
Theforcelimiterreducesthepressure
of the seat belt against the body of the
occupants.
The pretensioning seat belts are active
whentheignitionisswitchedon.
Theinertiareelsarettedwithadevice
whichautomaticallylocksthestrapin
theeventofacollisionoremergency
brakingorifthevehiclerollsover.
You can unfasten the seat belt by
pressingtheredbuttononthebuckle.
Guidetheseatbeltafterunfastening.
Theairbagwarninglampcomeson
ifthepretensionersaredeployed.
Contact a CITROËN dealer or a
qualiedworkshop.
Inordertobeeffective,aseatbelt:
- mustrestrainonepersononly,
- mustnotbetwisted,checkby
pulling in front of you with an even
movement,
- mustbetightenedasclosetothe
bodyaspossible.
The upper part of the seat belt should
be positioned in the hollow of the
shoulder.
The lap part should be placed as low
aspossibleonthepelvis.
Do not interchange the seat belt
bucklesastheywillnotfulltheirrole
properly.Iftheseatsarettedwith
armrests,thelappartoftheseatbelt
shouldalwayspassunderthearmrest.
Checkthattheseatbeltisfastened
correctlybypullingthestraprmly.
Front seat belts
Thefrontseatsarettedwith
pretensionersandforcelimiters.
Rear seat belts
(5 seat version)
Therearseatsarettedwiththree-
pointinertiareelseatbelts.
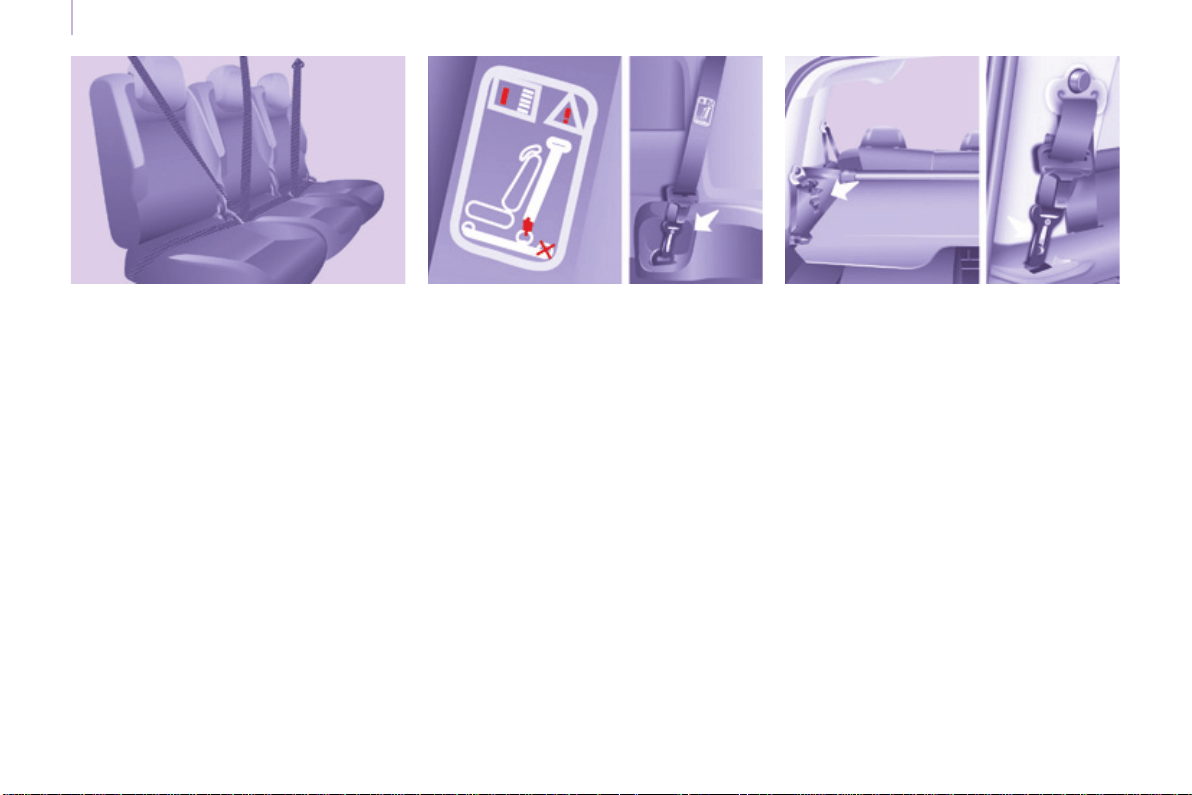
128
Berlingo-2-VP_en_Chap05_Securite_ed01-2016
128
Seat belts
Rear seat belts
(7 seat version)
In row 2
Thethreeseatsarettedwiththree-
pointinertiareelseatbelts.
When folding the side seats or the
seatbackstothetableposition,avoid
trapping the strap of the centre seat
belt.
When handling the side seats
(removing/installing)orwhen
accessingrow3,avoidhookingthe
centreseatbelt.
Ensure that the centre seat belt is
rolled up correctly in its strengthener
ontheroof.
In row 3
Thetwoseatsarettedwiththree-
pointinertiareelseatbelts.
Do not attach the seat belts to the
stowingringsmarkedwitharedcross,
representedonthelabel.
Takecaretohooktheseatbelts
correctly on the rings provided for this
purpose.
The row 3 seat belts which are not in
use can be stored to clear the load
spaceandmakeuseoftheloadspace
covereasier.
Hookthesnaphookinthelocation
providedontherearpillartrim.
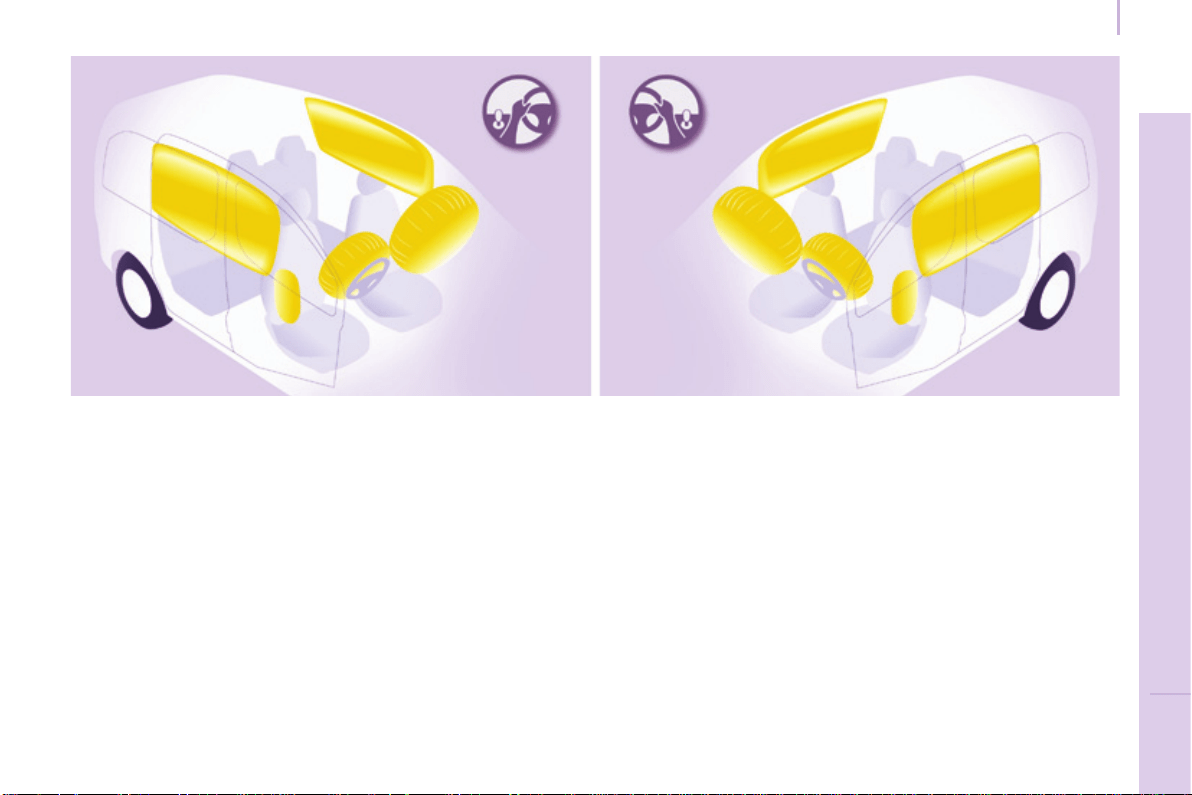
129
SAFETY
5
Berlingo-2-VP_en_Chap05_Securite_ed01-2016
129
Airbags
AIRBAGS
General information
The airbags have been designed to
maximisethesafetyoftheoccupants
in the event of a serious collision;
theyworkinconjunctionwiththeforce
limitingseatbelts.
In the event of a serious collision, the
electronic detectors record and analyse
thefrontandsideimpactssufferedin
theimpactdetectionzones:
- intheeventofaseriousimpact,
theairbagsinateinstantlyand
contribute towards better protecting
the occupants of the vehicle;
immediatelyaftertheimpact,the
airbagsdeaterapidly,sothatthey
do not hinder the visibility of the
occupants nor their possible exit
fromthevehicle.
- intheeventofaminororrear
impactandincertainroll-over
conditions, the airbags will not be
deployed; the seat belt alone is
sufcienttocontributetowardsyour
protectioninthesesituations.
The seriousness of the collision
depends on the nature of the obstacle
and the speed of the vehicle at the
momentofimpact.
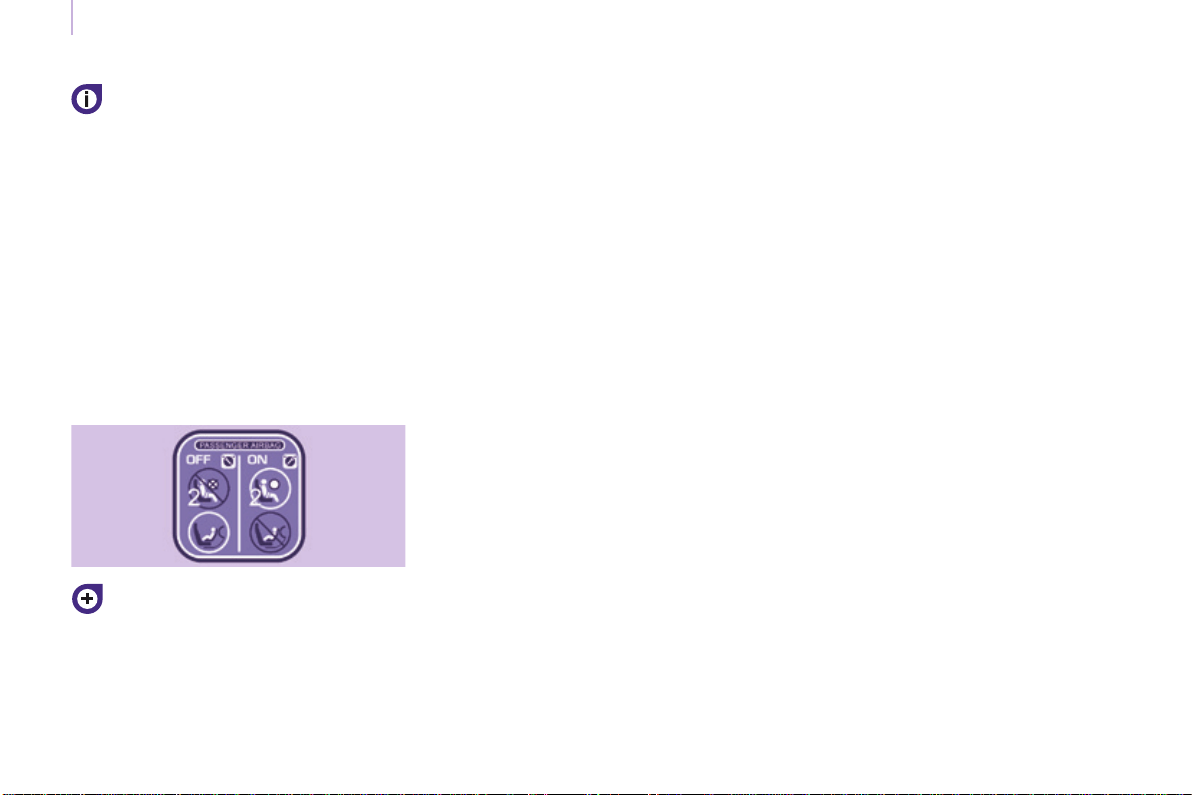
130
Berlingo-2-VP_en_Chap05_Securite_ed01-2016
130
Airbags
Advice
Sitinanormaluprightposition.
Wearacorrectlyadjustedseatbelt.
Donotallowanythingtocomebetween
the occupants and the airbags
(achild,pet,object...),donotattachor
xanythingneartotheairbagsortheir
trajectorieswheninatingasthiscould
causeinjurieswhentheairbagsare
deployed.
Nevermodifytheoriginaldenitionof
your vehicle, particularly in the area
directlyaroundtheairbags.
After an accident or if the vehicle has
beenstolenorbrokeninto,havethe
airbagsystemschecked.
Allworkontheairbagsystemmustbe
carried out by a CITROËN dealer or a
qualiedworkshop.
Even if all of the precautions
mentionedareobserved,ariskof
injuryorofminorburnstothehead,
chestorarmswhenanairbagis
deployedcannotberuledout.Thebag
inatesalmostinstantly(withinafew
milliseconds)thendeateswithinthe
sametimedischargingthehotgasvia
openingsprovidedforthispurpose.
Front airbags
Do not drive holding the steering wheel
byitsspokesorrestingyourhandson
thecentrepartofthewheel.
Passengersmustnotplacetheirfeet
onthedashboard.
Donotsmokeasdeploymentofthe
airbagscancauseburnsortheriskof
injuryfromacigaretteorpipe.
Neverremoveorpiercethesteering
wheelorhititviolently.
Donottorattachanythingtothe
steering wheel or dashboard, this could
causeinjurieswithdeploymentofthe
airbags.
Lateral airbags
Use only approved covers on the
seats,compatiblewiththedeployment
thelateralairbags.Forinformation
on the range of seat covers suitable
for your vehicle, you can contact a
CITROËNdealer.
Formoreinformationonaccessories,
refer to "Other accessories" in
section6.
Donotxorattachanythingtotheseat
backs(clothing...).Thiscouldcause
injurytothechestorarmsifthelateral
airbagisdeployed.
Do not sit with the upper part of the
body any nearer to the door than
necessary.
Airbags only operate when the
ignition is switched on.
Thisequipmentonlyoperatesonce.
Ifasecondimpactoccurs(duringthe
sameorasubsequentaccident),the
airbagwillnotoperate.
Thedeploymentofanairbagorairbags
isaccompaniedbyaslightdischarge
ofsmokeandanoise,duetothe
activation of the pyrotechnic cartridge
incorporatedinthesystem.
Thissmokeisnotharmful,but
sensitiveindividualsmayexperience
someirritation.
Thenoiseofthedetonationmayresult
in a slight loss of hearing for a short
time.
Thepassenger'sfrontairbagmust
be deactivated if a child seat is
installedrearwardfacing.
Chapter5,"Childsafety"section.
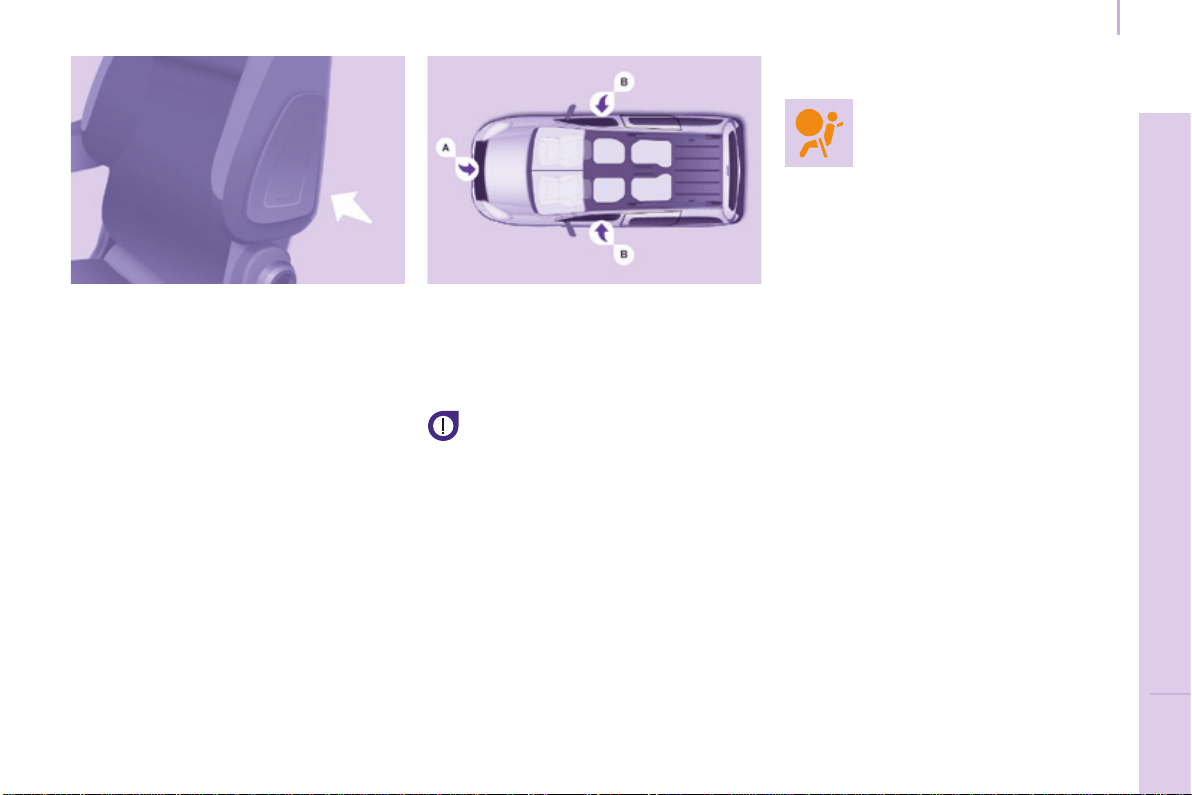
131
SAFETY
5
Berlingo-2-VP_en_Chap05_Securite_ed01-2016
131
Airbags
Curtain airbags
Thisisasystemwhichprotectsthe
driver and passengers (with the
exception of the centre seat of row 2)
intheeventofaserioussideimpactin
ordertolimittheriskofheadinjuries.
Each curtain airbag is incorporated in
the pillars and the upper part of the
passengercompartment.
Activation
Itistriggeredatthesametimeasthe
corresponding lateral airbag in the
eventofaserioussideimpactapplied
toallorpartofthesideimpactzoneB,
perpendicular to the longitudinal
centreline of the vehicle on a horizontal
planeanddirectedfromtheoutside
towardstheinsideofthevehicle.
Thecurtainairbaginatesbetweenthe
front or rear occupant of the vehicle
andthewindows.
Lateral airbags
Thisisasystemwhichprotectsthe
driver and front passenger in the event
ofaserioussideimpactinordertolimit
theriskofinjurytothechest.
Eachlateralairbagisttedinthefront
seatbackrestframe,onthedoorside.
Deployment
It is deployed unilaterally in the event
ofaserioussideimpactappliedto
allorpartofthesideimpactzoneB,
perpendicular to the longitudinal
centreline of the vehicle on a horizontal
planeanddirectedfromtheoutside
towardstheinsideofthevehicle.
Thelateralairbaginatesbetweenthe
front occupant of the vehicle and the
correspondingdoortrimpanel.
Impact detection zones
A. Frontimpactzone.
B. Sideimpactzone.
Operating fault
Ifthiswarninglampcomes
onintheinstrumentpanel,
accompaniedbyanaudible
signalandamessageinthe
screen, contact a CITROËN
dealeroraqualiedworkshoptohave
thesystemchecked.Theairbagsmay
no longer be deployed in the event of a
seriousimpact.
Intheeventofaminorimpactor
bumponthesideofthevehicleor
if the vehicle rolls over, the airbag
maynotbedeployed.
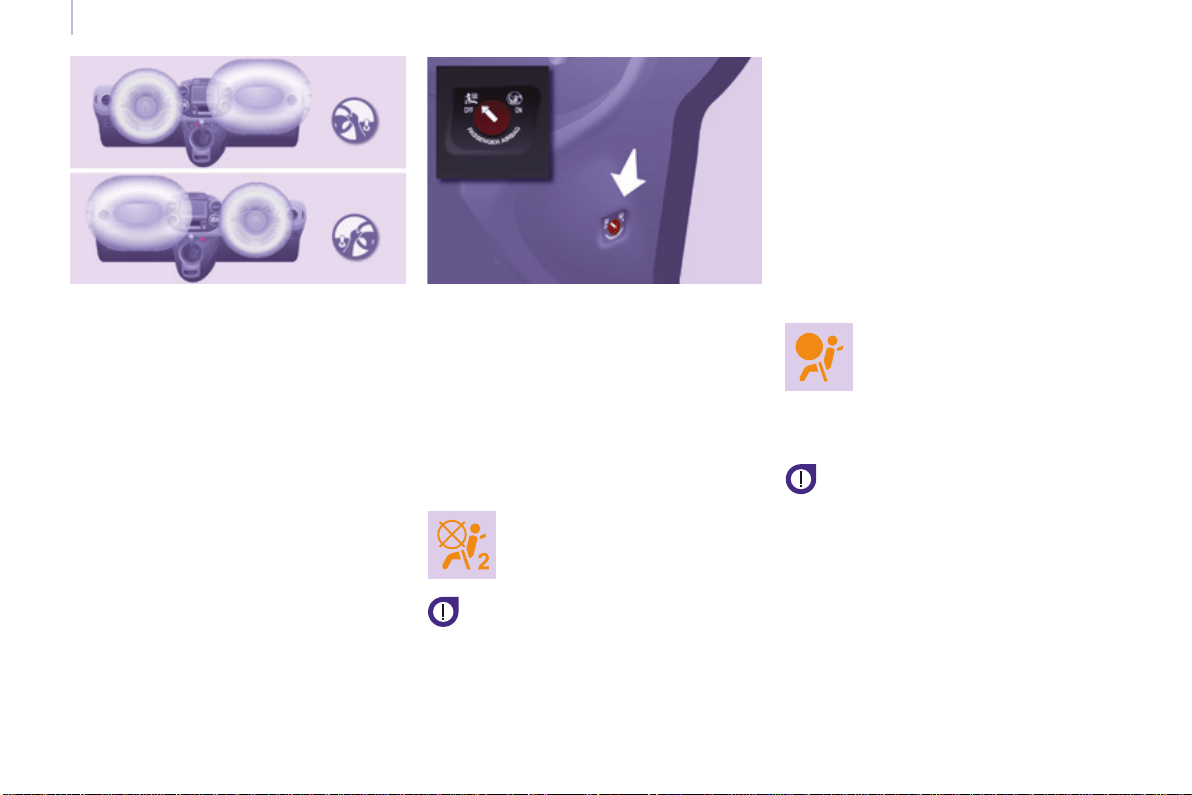
132
Berlingo-2-VP_en_Chap05_Securite_ed01-2016
132
Airbags
Front airbags
Deployment
They are deployed, except the
passenger's front airbag if it has been
deactivated, in the event of a serious
frontimpactappliedtoallorpartofthe
frontimpactzoneA in the longitudinal
centreline of the vehicle on a horizontal
planedirectedfromthefronttowards
therearofthevehicle.
Thefrontairbaginatesbetweenthe
front occupant of the vehicle and the
dashboard to cushion their forward
movement.
Deactivating the passengers front
airbag
Only the passenger's front airbag can
bedeactivated.
- With the ignition switched off,
insertthekeyintothepassenger's
frontairbagdeactivationswitch.
- Turn it to the "OFF"position.
- Removethekeykeepingtheswitch
inthenewposition.
The passenger's front airbag
warninglampintheinstrument
panelremainsonwhilethe
airbagisdeactivated.
Ifthetwoairbagwarninglamps
are on continuously, do not install
a rearward facing child seat and
contact a CITROËN dealer or a
qualiedworkshop.
Front airbag fault
To ensure the safety of your child,
it is essential to deactivate the
passenger's front airbag when you
install a rearward facing child seat on
thefrontpassengerseat.Otherwise,
thechildwouldriskbeingkilledor
seriouslyinjurediftheairbagwere
deployed.
Reactivation
In the "OFF" position, the passenger's
front airbag will not be deployed in the
eventofanimpact.
Assoonasthechildseatisremoved,
turn the passenger's front airbag switch
to the "ON" position to reactivate the
airbag and thus ensure the safety
of your passenger in the event of an
impact.
Ifthiswarninglampcomes
on,accompaniedbyan
audiblesignalandamessage
in the screen, consult a
CITROËN dealer or a
qualiedworkshoptohave
thesystemchecked.
Thefrontairbagsarettedinthe
centre of the steering wheel for the
driver and in the dashboard for the
frontpassenger.

133
SAFETY
5
Berlingo-2-VP_en_Chap05_Securite_ed01-2016
133
Child safety
CARRYING CHILDREN
General points
CITROËN recommends that
children should travel in the rear
seatsofyourvehicle:
- rearward facing up to the age of 3,
- forward facingovertheageof3.
AlthoughoneofCITROËN'smain
criteria when designing your vehicle,
the safety of your children also
dependsonyou.
* The regulations on carrying children
arespecictoeachcountry.Referto
thelegislationinforceinyourcountry.
Formaximumsafety,pleaseobserve
thefollowingrecommendations:
- in accordance with European
regulations, all children under the
age of 12 or less than one and
a half metres tall must travel in
approved child seats suited to
their weight,onseatsttedwitha
seatbeltorISOFIXmountings*,
- statistically, the safest seats in
your vehicle for carrying children
are the rear seats,
- a child weighing less than 9 kg
must travel in the rearward
facing position both in the front
and in the rear.

134
Berlingo-2-VP_en_Chap05_Securite_ed01-2016
134
Child safety
CHILD SEAT AT THE FRONT
Refer to the legislation in your
country before installing your child
inthisseatingposition.
Rearward facing Forward facing
When a forward facing child seat is
installed on the front passenger seat,
thepassenger'sfrontairbagmust
remainactive:
Adjustthevehicle'sseatto:
- thefullybackposition,withthe
backreststraightenedforaseat
withoutheightadjuster,
- thefullybackpositionand
highestposition,withthebackrest
straightened for a seat with height
adjuster.
Ensure that the seat belt is
correctlytensioned.
For child seats with a support leg,
ensure that this is in steady contact
withtheoor.Ifnot,adjustthe
passengerseat.
Passenger seat in the fully back and
highest position.
When a rearward facing child seat is
installed on the front passenger seat,
thepassenger'sfrontairbagmustbe
deactivated.Otherwisethe child risks
being seriously injured or killed if
the airbag is deployed.
Adjustthevehicle'sseatto:
- thefullybackposition,withthe
backreststraightenedforaseat
withoutheightadjuster,
- thefullybackandhighestposition,
withthebackreststraightenedfora
seatwithheightadjuster.
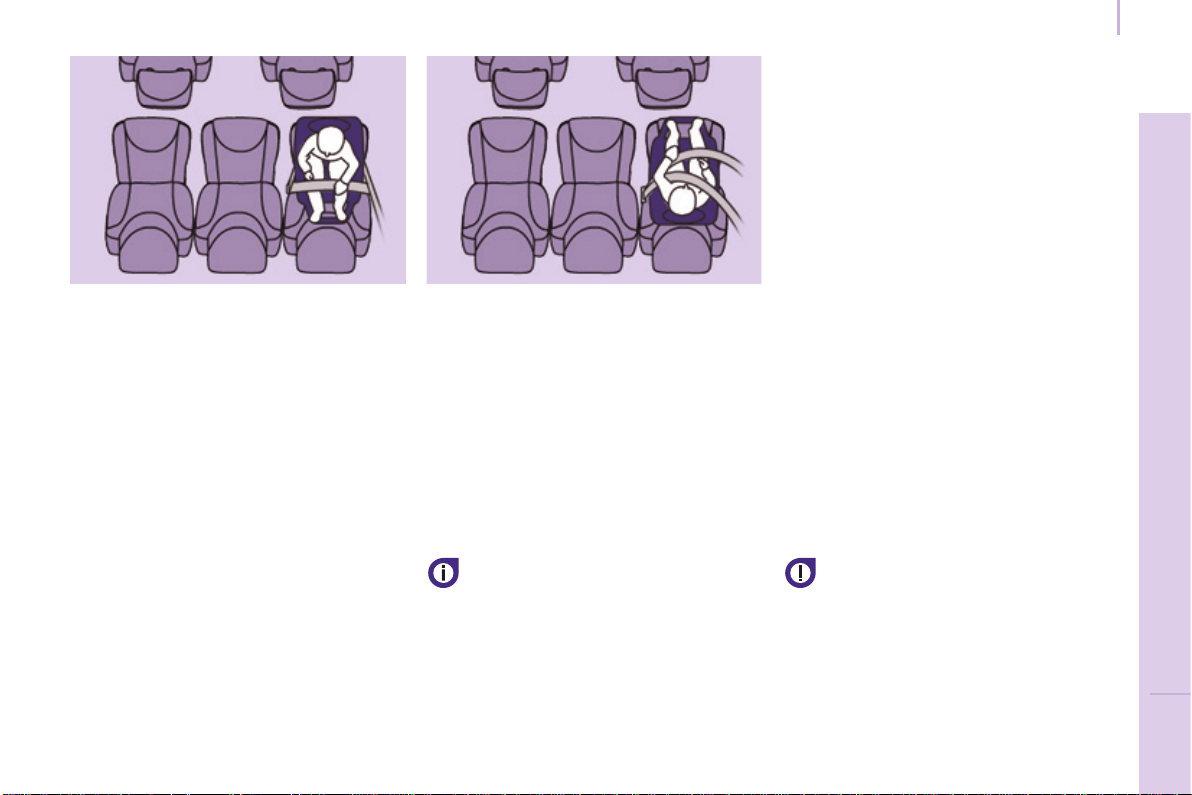
135
SAFETY
5
Berlingo-2-VP_en_Chap05_Securite_ed01-2016
135
Child safety
CHILD SEAT AT THE REAR
Rearward facing
When a rearward facing child seat is
installed on a rear passenger seat,
movethevehicle'sfrontseatforwards
andstraightenthebackrestsothatthe
rearward facing child seat does not
touchthevehicle'sfrontseat.
Forward facing
When a forward facing child seat is
installed on a rear passenger seat,
movethevehicle'sfrontseatforwards
andstraightenthebackrestsothatthe
legs of the child in the forward facing
child seat do not touch the vehicle's
frontseat.
Ensure that the seat belt is
correctlytensioned.
For child seats with a support leg,
ensurethatthisisinrmcontactwith
theoor.
When a child seat is installed on a
passenger seat in row 3, put the
backrestsoftheouterandcentreseats
in row 2 forward of the seat occupied
by the child seat, in the table position,
orifthisisnotsufcient,rermovethe
seats in row 2 so that the child seat or
the the legs of the child do not touch
theseatsinrow2.
Seats in row 3
A child seat with a support leg
mustneverbeinstalledona
passenger seat in row 3.
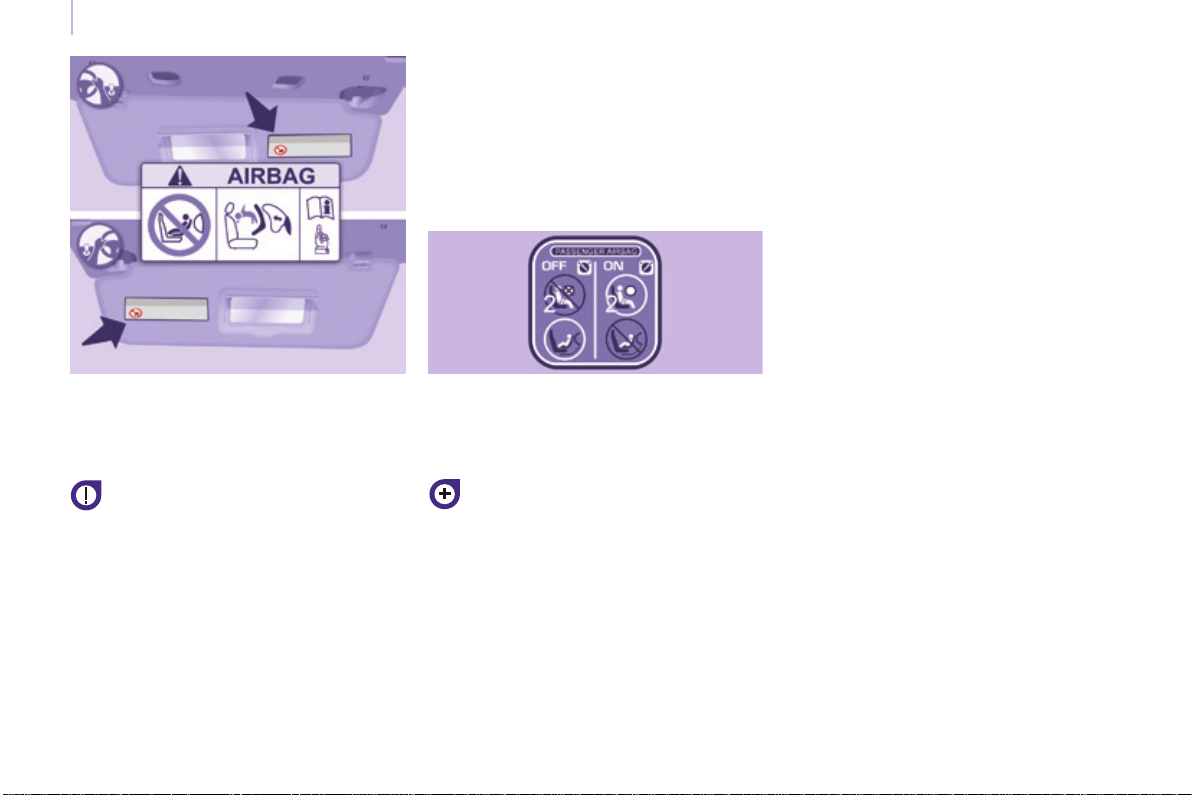
136
Berlingo-2-VP_en_Chap05_Securite_ed01-2016
136
Child safety
DEACTIVATING THE
PASSENGER'S FRONT AIRBAG
Never install a rearward facing
childrestraintsystemonaseat
protectedbyanactivefrontairbag.
This could cause the death of the child
orseriousinjury.
The warning label present on both
sides of the passenger's sun visor
repeatsthisadvice.Inlinewithcurrent
legislation, the following tables contain
this warning in all of the languages
required.
Forinformationondeactivating
the passenger's front airbag, refer
to the "Airbags" section in this
chapter.
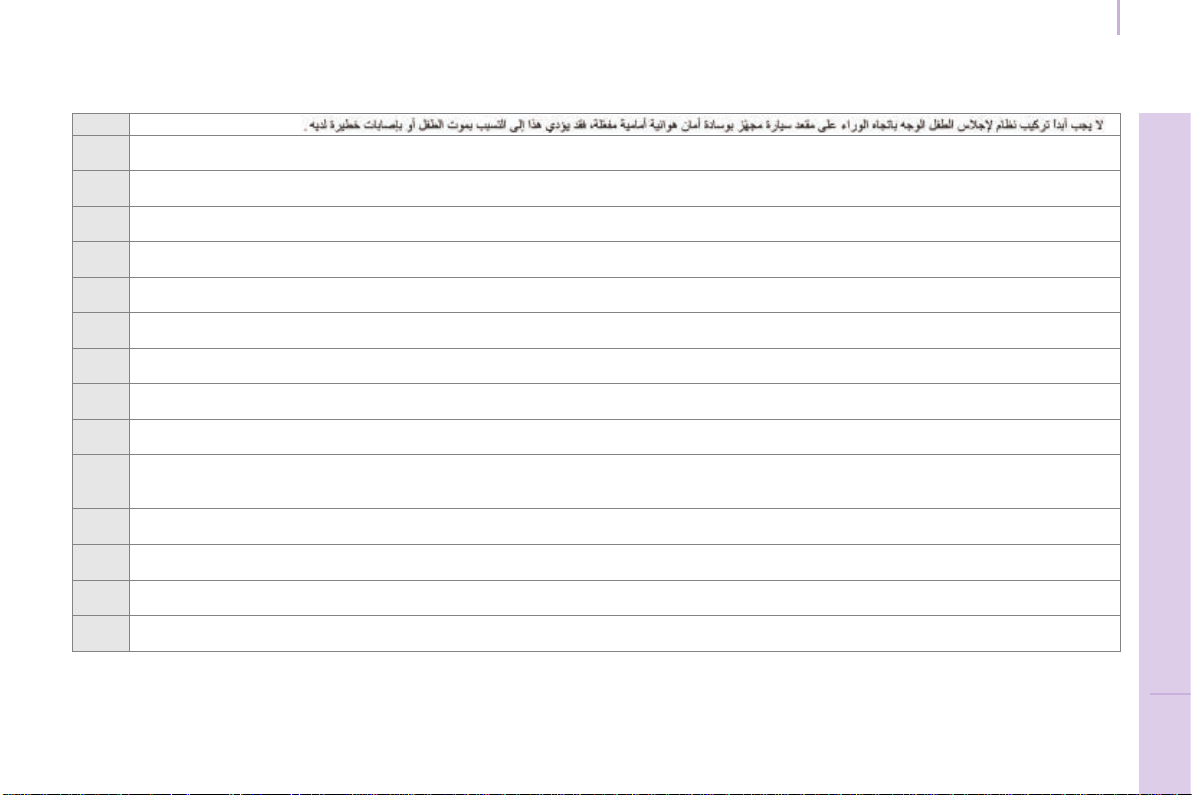
AR
BG
НИКОГАНЕинсталирайтедетскостолченаседалкасАКТИВИРАНАпреднаВЪЗДУШНАВЪЗГЛАВНИЦА.Товаможедапричини
СМЪРТилиСЕРИОЗНОНАРАНЯВАНЕнадетето.
CS
NIKDYneumisťujtedětskézádržnézařízeníorientovanésměremdozadunasedadlochráněnéAKTIVOVANÝMčelnímAIRBAGEM.Hrozí
nebezpečíSMRTIDÍTĚTEneboVÁŽNÉHOZRANĚNÍ.
DA
BrugALDRIGenbagudvendtbarnestolpåetsæde,dererbeskyttetafenAKTIVAIRBAG.BARNETrisikereratbliveALVORLIGTKVÆSTET
ellerDRÆBT.
DE
MontierenSieaufeinemSitzmitAKTIVIERTEMFront-AirbagNIEMALSeinenKindersitzodereineBabyschaleentgegenderFahrtrichtung,das
KindkönnteschwereodersogartödlicheVerletzungenerleiden.
EL
ΜηχρησιμοποιείτεΠΟΤΕπαιδικόκάθισμαμετηνπλάτητουπροςτοεμπρόςμέροςτουαυτοκινήτου,σεμιαθέσηπουπροστατεύεταιαπό
ΜΕΤΩΠΙΚΟαερόσακοπουείναιΕΝΕΡΓΟΣ.ΑυτόμπορείναέχεισανσυνέπειατοΘΑΝΑΤΟήτοΣΟΒΑΡΟΤΡΑΥΜΑΤΙΣΜΟτουΠΑΙΔΙΟΥ
EN
NEVER use a rearward facing child restraint on a seat protected by an ACTIVE AIRBAG in front of it, DEATH or SERIOUS INJURY to the
CHILD can occur
ES
NOINSTALARNUNCAunsistemaderetenciónparaniñosdeespaldasalsentidodelamarchaenunasientoprotegidomedianteunAIRBAG
frontalACTIVADO,yaquepodríacausarlesionesGRAVESoinclusolaMUERTEdelniño.
ET
ÄrgeMITTEKUNAGIpaigaldage“seljagasõidusuunas“lapseistetjuhikõrvalistmele,milleESITURVAPADIonAKTIVEERITUD.Turvapadja
avaneminevõiblastTÕSISELTvõiELUOHTLIKULTvigastada.
FI
ÄLÄKOSKAANasetalapsenturvaistuintaselkäajosuuntaanistuimelle,jonkaedessäsuojanaonkäyttöönaktivoituTURVATYYNY.Sen
laukeaminenvoiaiheuttaaLAPSENKUOLEMANtaiVAKAVANLOUKKAANTUMISEN.
FR
NEJAMAISinstallerdesystèmederetenuepourenfantsfaisantfaceversl’arrièresurunsiègeprotégéparunCOUSSINGONFLABLEfrontal
ACTIVÉ.
CelapeutprovoquerlaMORTdel’ENFANTouleBLESSERGRAVEMENT
HR
NIKADAnepostavljatidječjusjedaliculeđimausmjeruvožnjenasjedalozaštićenoUKLJUČENIMprednjimZRAČNIMJASTUKOM.Tobimoglo
uzrokovatiSMRTiliTEŠKUOZLJEDUdjeteta.
HU
SOHAnehasználjonmenetiránynakháttalbeszereltgyermeküléstAKTIVÁLT(BEKAPCSOLT)FRONTLÉGZSÁKKALvédettülésen.Eza
gyermekHALÁLÁTvagySÚLYOSSÉRÜLÉSÉTokozhatja.
IT
NONinstallareMAIseggioliniperbambiniposizionatiinsensocontrarioaquellodimarciasuunsedileprotettodaunAIRBAGfrontale
ATTIVATO.CiòpotrebbeprovocarelaMORTEoFERITEGRAVIalbambino.
LT
NIEKADAneįrenkitevaikoprilaikymopriemonėssuatgalatgręžtuvaikuantsėdynės,kurisaugomaVEIKIANČIOSpriekinėsOROPAGALVĖS.
IšsiskleidusoropagalveivaikasgalibūtiMIRTINAIarbaSUNKIAITRAUMUOTAS.
137
SAFETY
5
Berlingo-2-VP_en_Chap05_Securite_ed01-2016
137
Child safety

LV
NEKADNEuzstādietuzaizmugurivērstubērnusēdeklītipriekšējāpasažierasēdvietā,kurāirAKTIVIZĒTSpriekšējaisDROŠĪBASGAISA
SPILVENS.
TasvarizraisītBĒRNANĀVIvairadītNOPIETNUSIEVAINOJUMUS.
MT
Qattm’ghandekthallitifel/tiamarbutf’siggudahrulejnl-Airbagattiva,ghaliextista’tikkawzakorrimentserjujewankemewtlit-tifel/tia
NL
PlaatsNOOITeenkinderzitjemetderuginderijrichtingopeenzitplaatswaarvandeAIRBAGisINGESCHAKELD.Bijhetafgaanvandeairbag
kanhetKINDLEVENSGEVAARLIJKGEWONDRAKEN
NO
InstallerALDRIetbarnesetemedryggenmotkjøreretningenietsetesomerbeskyttetmedenfrontalAKTIVERTKOLLISJONSPUTE,BARNET
risikereråbliDREPTellerHARDTSKADET.
PL
NIGDYnieinstalowaćfotelikadziecięcegowpozycji"tyłemdokierunkujazdy"nasiedzeniuwyposażonymwCZOŁOWĄPODUSZKĘ
POWIETRZNĄwstanieAKTYWNYM.MożetodoprowadzićdoŚMIERCIDZIECKAlubspowodowaćuniegoPOWAŻNEOBRAŻENIACIAŁA.
PT
NUNCAinstaleumsistemaderetençãoparacriançasdecostasparaaestradanumbancoprotegidoporumAIRBAGfrontalACTIVADO.
EstainstalaçãopoderáprovocarFERIMENTOSGRAVESouaMORTEdaCRIANÇA.
RO
NuinstalatiNICIODATAunsistemderetinerepentrucopii,dispuscuspateleindirectiademers,peunlocdinvehiculprotejatcuAIRBAG
frontalACTIVAT.AceastaarputeaprovocaMOARTEACOPILULUIsauRANIREAluiGRAVA.
RU
ВОВСЕХСЛУЧАЯХЗАПРЕЩАЕТСЯиспользоватьобращенноеназаддетскоеудерживающееустройствонасиденье,защищенном
ФУНКЦИОНИРУЮЩЕЙПОДУШКОЙБЕЗОПАСНОСТИ,установленнойпередэтимсиденьем.
ЭтоможетпривестикГИБЕЛИРЕБЕНКАилиНАНЕСЕНИЮЕМУСЕРЬЕЗНЫХТЕЛЕСНЫХПОВРЕЖДЕНИЙ
SK
NIKDYneinštalujtedetskézádržnézariadenieorientovanésmeromdozadunasedadlochránenéAKTIVOVANÝMčelnýmAIRBAGOM.Mohlo
bydôjsťkSMRTEĽNÉMUaleboVÁŽNEMUPORANENIUDIEŤAŤA.
SL
NIKOLInenameščajteotroškegasedežashrbtomvsmerivožnje,čejeVARNOSTNABLAZINApredsprednjimsopotnikovimsedežem
AKTIVIRANA.TakšnanamestitevlahkopovzročiSMRTOTROKAaliHUDEPOŠKODBE.
SR
NIKADAnekoristitedečjesedištekojeseokrećeunazadnasedištuzaštićenimAKTIVNIMVAZDUŠNIMJASTUKOMisprednjega,jermogu
nastupitiSMRTiliOZBILJNAPOVREDADETETA.
SV
PassagerarkrockkuddenframMÅSTEvaraavaktiveradomenbakåtvändbilbarnstolinstalleraspådennaplats.Annarsriskerarbarnetatt
DÖDASellerSKADASALLVARLIGT.
TR
KESİNLKLEHAVAYASTIĞIAKTİFolanönkoltuğayüzüarkayadönükbirçocukkoltuğuyerleştirmeyiniz.BuÇOCUĞUNÖLMESİNEveyaÇOK
AĞIRYARALANMASINAsebepolabilir.
138
Berlingo-2-VP_en_Chap05_Securite_ed01-2016
138
Child safety
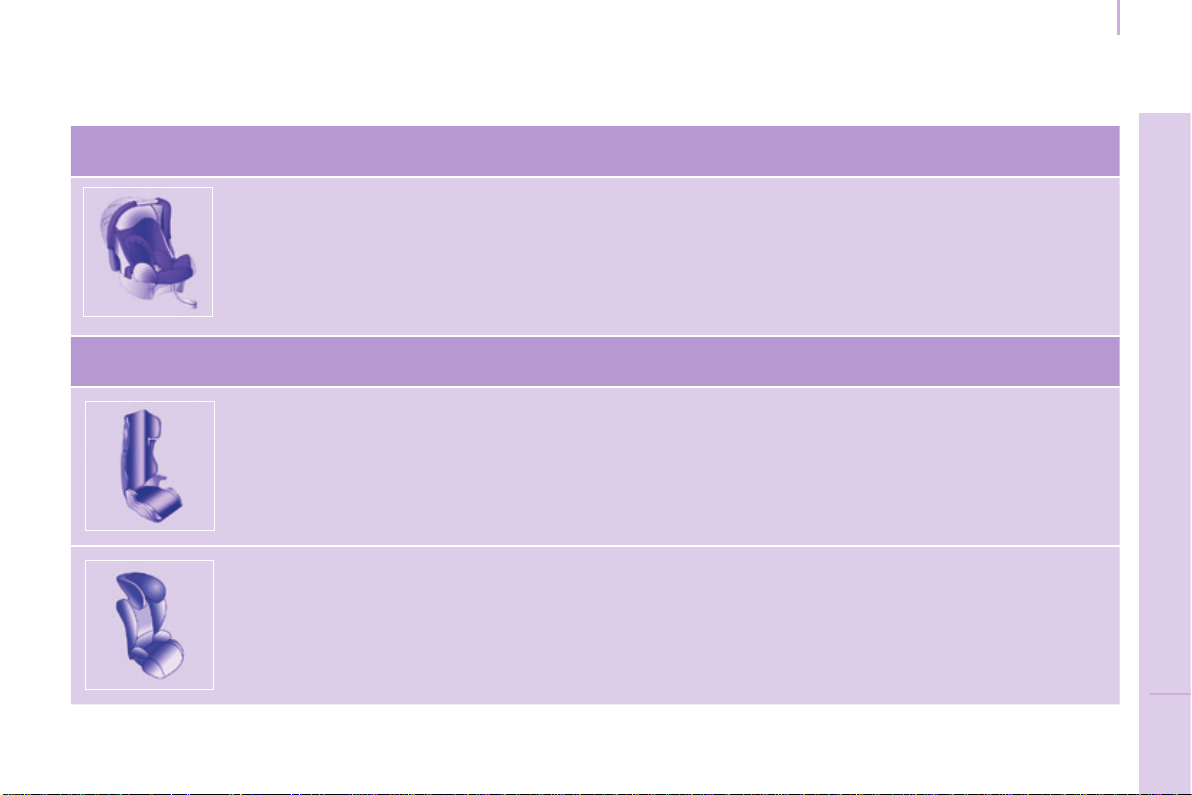
139
SAFETY
5
Berlingo-2-VP_en_Chap05_Securite_ed01-2016
139
Child safety
RECOMMENDED SEATS
Group 0+: from birth to 13 kg
L1
"ROMER Baby-Safe Plus"
Installedintherearwardfacingposition.
Groups 2 and 3: from 15 to 36 kg
L4
"KLIPPANOptima"
From22kg(about6years),theboosterisusedonitsown.
L5
"RÖMER KIDFIX"
Canbexedonthevehicle'sISOFIXmountings.
Thechildisrestrainedbytheseatbelt.
CITROËNoffersarangeofrecommendedchildseatswhicharesecured using a three point seat belt.
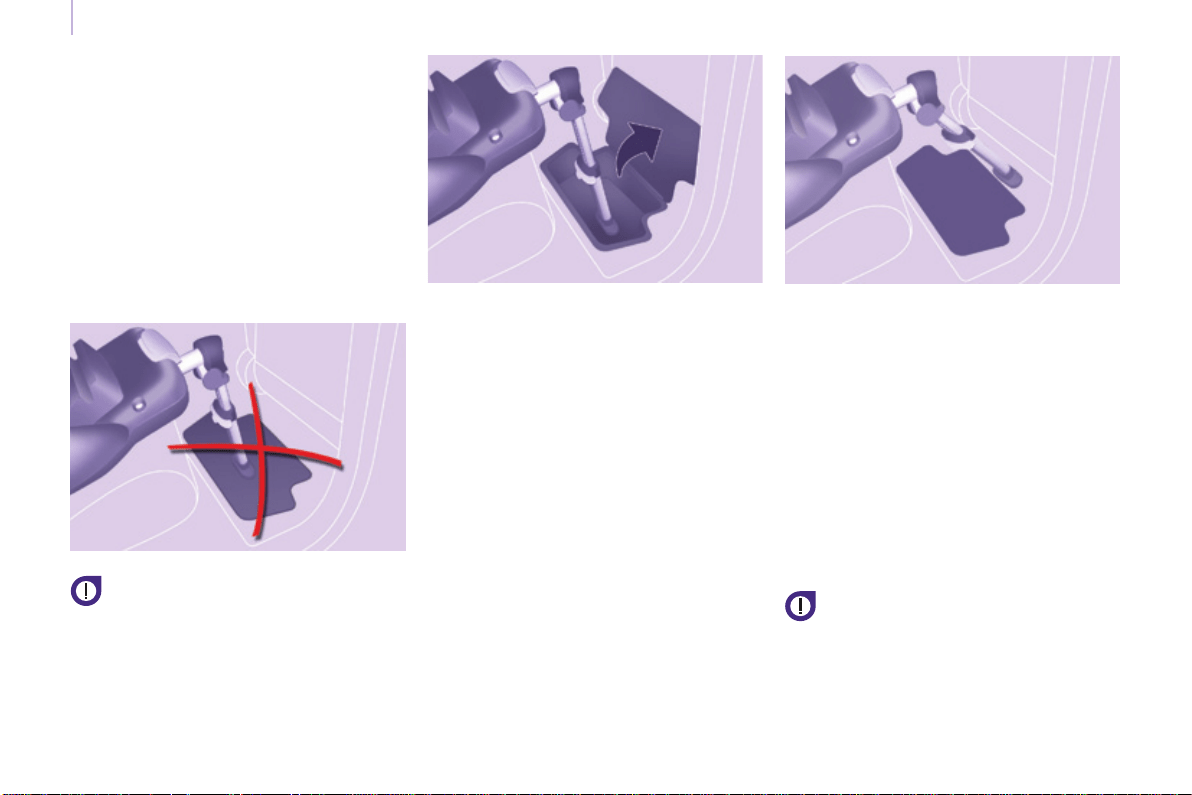
140
Berlingo-2-VP_en_Chap05_Securite_ed01-2016
140
Child safety
SEATS WITH A SUPPORT LEG
Caremustbetakenwheninstalling
a child seat with a support leg in
thevehicle.Inparticularyoushould
lookforthepresenceofastorage
compartmentbelowtherearseat
footwells.
The centre rear seat does not have
astoragecompartmentbelowthe
footwell.Youcanthereforeeasilyta
child seat with a support leg, whether
installedwiththeISOFIXmountingsor
usingthe3pointseatbelt.
Do not place the support leg on
the storage compartment cover;
itmightbreakinaseriousimpact.
Wheretheadjustmentsofthesupport
leg allow it, we suggest two other
possibilitiesforinstallation.
At the bottom of the storage
compartment
If the support leg is long enough, you
canadjustitsothatitcontactthe
bottomofthestoragecompartment.
Removeallobjectsfromthestorage
compartmentbeforeinstallingthe
supportleg.
Away from the storage
compartment area
If the support leg is long enough and
canbeinclinedsufciently(always
byfollowingtherecommendations
given in the installation instructions for
the child seat), you can position the
supportlegsothatitcontactstheoor
awayfromthestoragecompartment.
Adjustthelongitudinalpositionof
the front or rear seat to obtain a
satisfactory position for the support leg
awayfromthestoragecompartment.
If you cannot position the support
leg in the way described, you
shouldnottachildseatwith
supportlegtotheseat.
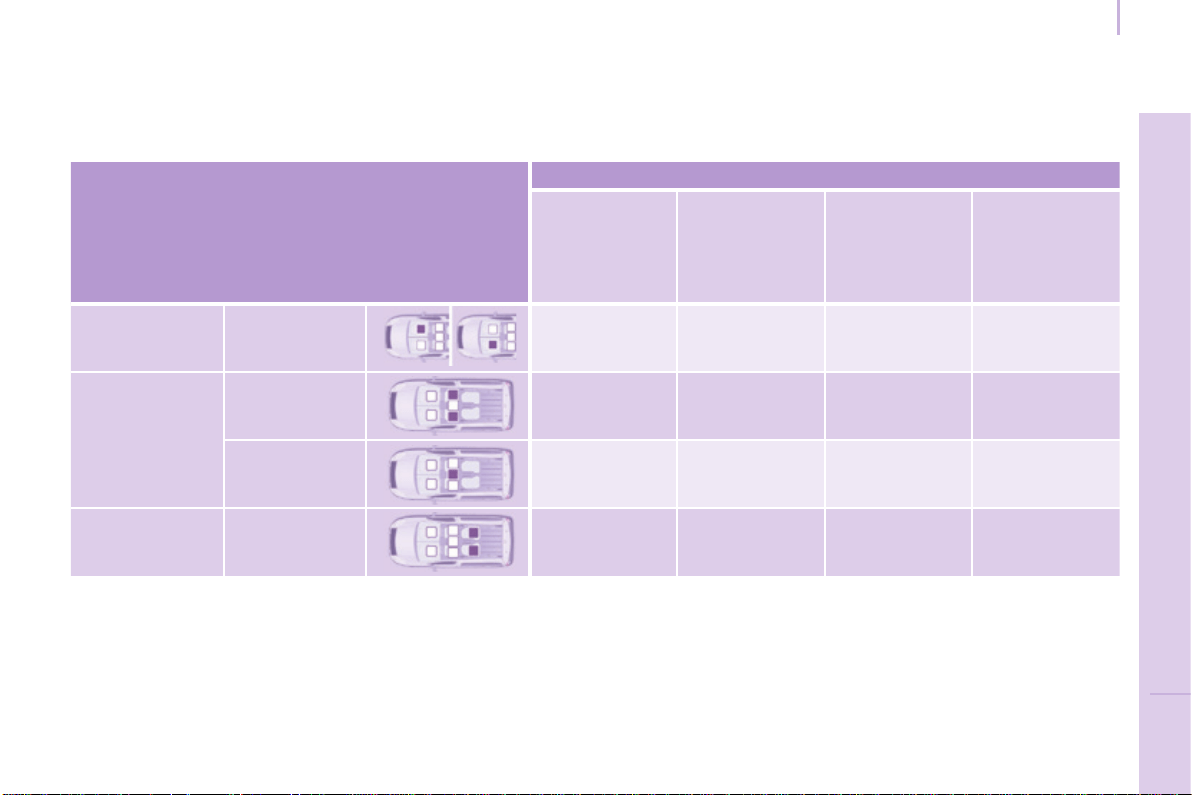
141
SAFETY
5
Berlingo-2-VP_en_Chap05_Securite_ed01-2016
141
Child safety
LOCATIONS FOR CHILD SEATS SECURED WITH THE SEAT BELT
*Achildseatwithsupportlegmustneverbeinstalledonanouterpassengerseatinrow2,unlessyouareabletoinstallit
inlinewiththerecommendationsunder"Installingachildseatwithasupportleg".
**Achildseatwithsupportlegmustneverbeinstalledonapassengerseatinrow3.
In accordance with European regulations, this table indicates the options for installing child seats secured using a seat belt
anduniversallyapproved(a)accordingtotheweightofthechildandtheseatinthevehicle.
U: seat suitable for the installation of a child seat secured using the seat belt and universally approved, rearward facing
and/orforwardfacing.
Seat(s)
Weight of the child and indicative age
Under 13 kg
(groups 0 (b)
and 0+)
Up to approx
1 year
From 9 to 18 kg
(group 1)
1 to 3 years
approx
From 15 to 25 kg
(group 2)
3 to 6 years
approx
From 22 to 36 kg
(group 3)
6 to 10 years
approx
Row 1 (c) (d)
Passenger
seat
U U U U
Row 2 (e)
(5and7seats)
Outer seats U* U* U U
Centre seat U U U U
Row 3 (f) (g)
(7seats)
All seats U** U** U U

142
Berlingo-2-VP_en_Chap05_Securite_ed01-2016
142
Child safety
(a)Universalchildseat:childseat
that can be installed in any vehicle
usingtheseatbelt.
(b)Group0:frombirthto10kg.
Cots and baby carriers cannot be
installed on the front passenger
seatorinrow3.Wheninstalledin
row2,theymaypreventtheuseof
oneormoreseatinthisrow.
(c) Refer to the legislation in force in
your country before installing your
childonthisseat.
(d) When a rearward facing child seat
is installed on a front passenger
seat, the passenger's front airbag
mustbedeactivated.Otherwise,
the child would risk being
seriously injured or killed if the
airbag is deployed.
When a forward facing child seat
is installed on a front passenger
seat, the passenger's front airbag
mustremainactive.
Removeandstowtheheads
restraint, before installing a child
seatwithbackrestonapassenger
seat.
Rettheheadrestraintoncethechild
seathasbeenremoved.
(e) When a child seat is installed at
the rear, forward facing or rearward
facing,movethevehicle'sseats
in the row in front forwards and
straightentheirbackreststoleave
enough space for the child seat or
thechild'slegs.
(f)Putthebackrestsoftheouterand
centre seats in row 2, located in
front of seat occupied by a child
seat, in the table position, or if this
isnotsufcient,removetheseatsin
row 2, so that the child seat or the
child's legs do not touch the seats in
row2.
(g) If the seats in row 3 are occupied,
do not leave a child seat installed
on the foldable row 2 seat, to allow
easyaccesstorow3.
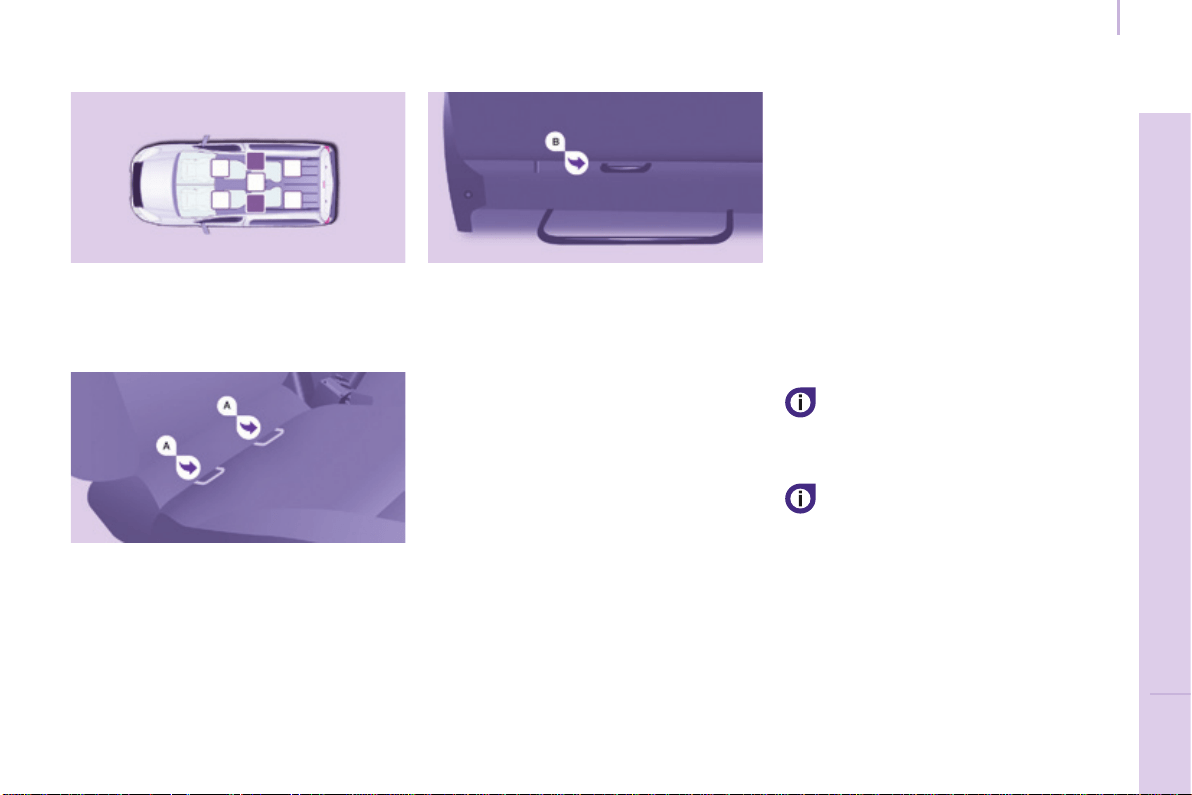
143
SAFETY
5
Berlingo-2-VP_en_Chap05_Securite_ed01-2016
143
Child safety
ISOFIX MOUNTINGS
Your vehicle has been approved in
accordance with the latest ISOFIX
regulation.
Themountingscomprisethreeringsfor
eachseat.
Two front rings A, located between
thevehicleseatbackrestandcushion,
indicatedbyamarking.
A rear ring B,locatedontheback
ofthevehicle'sseatbackrest,for
securing the upper strap referred to as
theTopTether.
The Top Tether is used to secure the
upper strap of child seats that have
one.Thisarrangementlimitsthe
forward tipping of the child seat in the
eventofafrontalimpact.
ThisISOFIXmountingsystem
guarantees you fast, reliable and safe
ttingofthechildseatinyourvehicle.
TheISOFIXchildseatsarettedwith
two latches which are secured on the
two front rings A.
Somealsohaveanupperstrapwhich
is attached to the rear ring B.
Follow strictly the instructions for
ttingchildseatscontainedinthe
manufacturer'sinstallationguide.
To secure the child seat to the
TopTether:
- removeandstowtheheadrestraint
before installing the child seat in
thisseatingposition(retitonce
thechildseathasbeenremoved),
- pass the upper strap of the child
seat over the top of the seat
backrest,betweentheaperturesfor
the head restraint rods,
- securethehookontheupperstrap
to the rear ring,
- tightentheupperstrap.
The incorrect installation of a child
seatinavehiclecompromisesthe
protection of the child in the event
ofanaccident.
Refertothetableforinformationon
the installation of ISOFIX child seats in
yourvehicle.

144
Berlingo-2-VP_en_Chap05_Securite_ed01-2016
144
Child safety
ThischildseatcanalsobeusedonseatswhicharenotttedwithISOFIX
mountings.
Inthiscase,itmustbeattachedtothevehicleseatusingthethreepointseat
belt.
Follow the instructions for tting the child seat given in the seat
manufacturer's installation guide.
Recommended ISOFIX seat
"ISOFIX RÖMER DUO plus"
(size category B1)
Group 1: from 9 to 18 kg
Installedonlyintheforwardfacingposition.
Secured to rings A, as well as ring B, called the Top Tether,
usinganupperstrap.
Threeseatbodyangles:sitting,reclining,lying.
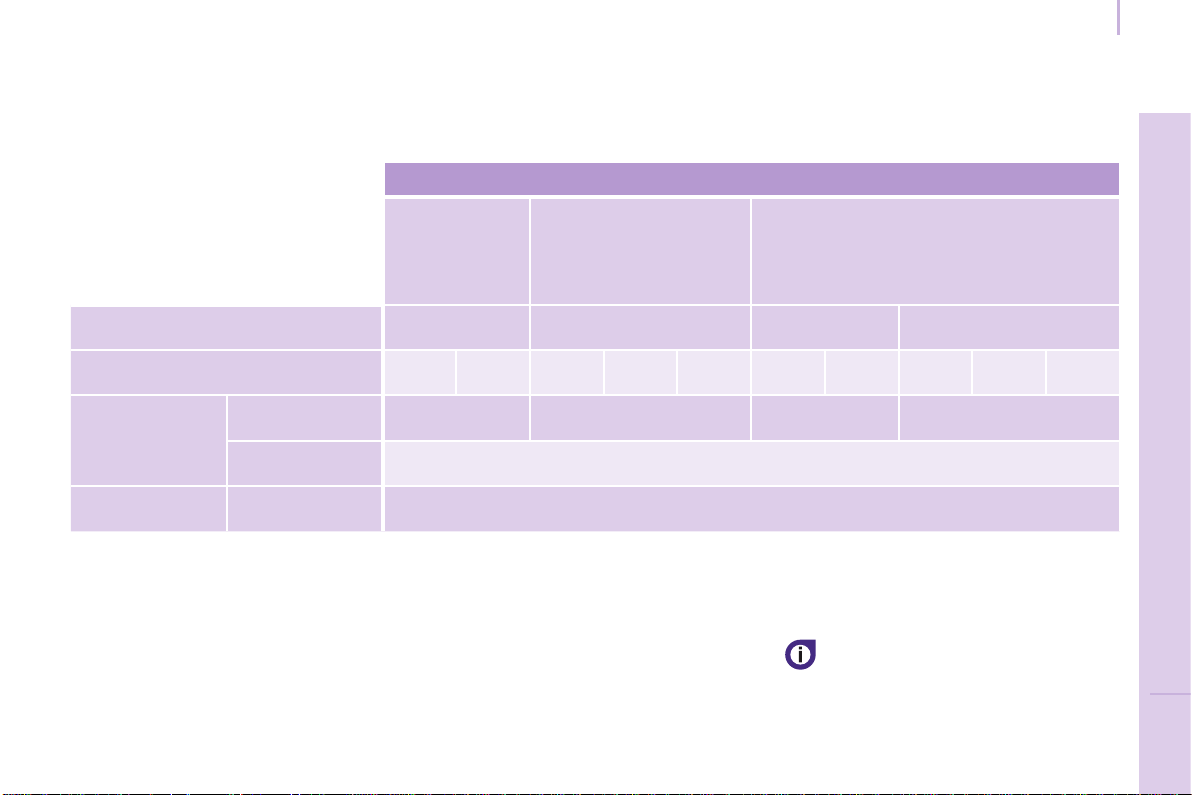
145
SAFETY
5
Berlingo-2-VP_en_Chap05_Securite_ed01-2016
145
Child safety
LOCATIONS FOR CHILD SEATS ISOFIX
*Inthe7seatversion,allthreeseats
inrow2mustbepresentwhenchild
seatsareinstalled.
**Achildseatwithsupportlegmust
never be installed on an outer
passenger seat in row 2, unless you
are able to install it in line with the
recommendationsunder"Installinga
childseatwithasupportleg".
In accordance with European regulations, this table indicates the options for the installation of ISOFIX child seats on the
vehicleseatsttedwithISOFIXmountings.
Inthecaseoftheuniversalandsemi-universalISOFIXchildseats,thechildseat'sISOFIXsizecategory,determinedbya
letterfromA to G,isindicatedonthechildseatnexttothelogoISOFIX.
Weight of the child/indicativeage
Less than
10 kg
(group 0)
Upto6months
approx
Less than 10 kg
(group 0)
Less than 13 kg
(group 0+)
Up to 1 year approx
From 9 to 18 kg
(group 1)
From1to3yearsapprox
Type of ISOFIX child seat Infant car seat rearward facing
rearward
facing
forward facing
ISOFIX size category F G C D E C D A B B1
Row 2
(5and7*seats)
Outer
seats**
IL-SU IL-SU IL-SU IUF, IL-SU
Centre seat Not ISOFIX
Row 3
(7seats)
All seats Not ISOFIX
IUF: seat suitable for the installation
of an ISOFIX Universal child seat,
Forward facing and secured with an
upperstrap.
IL-SU: seat suitable for the installation
of a ISOFIX Semi-Universal child seat,
either.
- rearward facing equipped with an
upper strap or a support leg,
- forward facing equipped with a
support leg,
Removeandstowthehead
restraint before installing a
childseatwithabackrestona
passengerseat.
Rettheheadrestraintoncethechild
seathasbeenremoved.
- a cot equipped with an upper strap
orasupportleg.
To attach the upper strap, refer to
chapter5,"ISOFIXmountings"section.

146
Berlingo-2-VP_en_Chap05_Securite_ed01-2016
146
Child safety
ADVICE ON CHILD SEATS
Attherear,alwaysleavesufcient
spacebetweenthefrontseatand:
- a rearward facing child seat,
- the feet of a child seated in a
forwardfacingchildseat.
Forthis,movethefrontseatforward
and, if necessary, straighten its
backrestaswell.
The incorrect installation of a child seat
inavehiclecompromisesthechild's
protectionintheeventofanaccident.
Checkthatthereisnoseatbeltorseat
beltbuckleunderthechildseat,asthis
coulddestabilisetheseat.
Remembertofastentheseatbeltsor
the child seat harnesses keeping the
slack relative to the child's body to a
minimum,evenforshortjourneys.
For the installation of a child seat using
the seat belt, ensure that the seat belt
is well tensioned on the child seat
and that it is holding the child seat
rmlyagainstthevehicle'sseat.Ifthe
passengerseatisadjustable,moveit
forwardifnecessary.
Fortheoptimuminstallationofa
forward facing child seat, ensure that
thebackofthechildseatisascloseas
possibletothebackrestofthevehicle's
seat,orincontactifpossible.
Theheadrestraintmustberemoved
before installing a child seat with a
backrestonthepassengerseat.
Ensure that the head restraint is
stowed or attached securely so that it
is not thrown around the vehicle in the
eventofsharpbraking.
Rettheheadrestraintassoonasthe
childseatisremoved.
Children at the front
The legislation on carrying a child on
thefrontpassengerseatisspecicto
eachcountry.Refertothelegislationin
forceinyourcountry.
Deactivate the passenger's airbag
when a rearward facing child seat is
installedonthefrontseat.
Otherwise,thechildwouldriskbeing
seriouslyinjuredorkillediftheairbag
weredeployed.
Installing a booster seat
Thechestpartoftheseatbeltmust
be positioned on the child's shoulder
withouttouchingtheneck.
Ensure that the lap part of the seat belt
passescorrectlyoverthechild'sthighs.
CITROËNrecommendstheuseofa
boosterseatwhichhasaback,tted
withaseatbeltguideatshoulderlevel.
Asasafetyprecaution,neverleave:
- oneormorechildrenaloneand
unsupervised in a vehicle,
- achildorananimalinavehicle
which is exposed to the sun, with
the windows closed,
- thekeyswithinreachofchildren
insidethevehicle.
To prevent accidental opening of the
doors,usethe"ChildLock".
Takecarenottoopentherearwindows
bymorethanonethird.
Toprotectyoungchildrenfromtherays
ofthesun,tsideblindstotherear
windows.
For an installation in row 3, put the
backrestsoftheouterandcentre
seats in row 2 in the table position, or
removetheseseatsinrow2,sothat
the child seat or the child's legs do not
touchtheseatsinrow2.
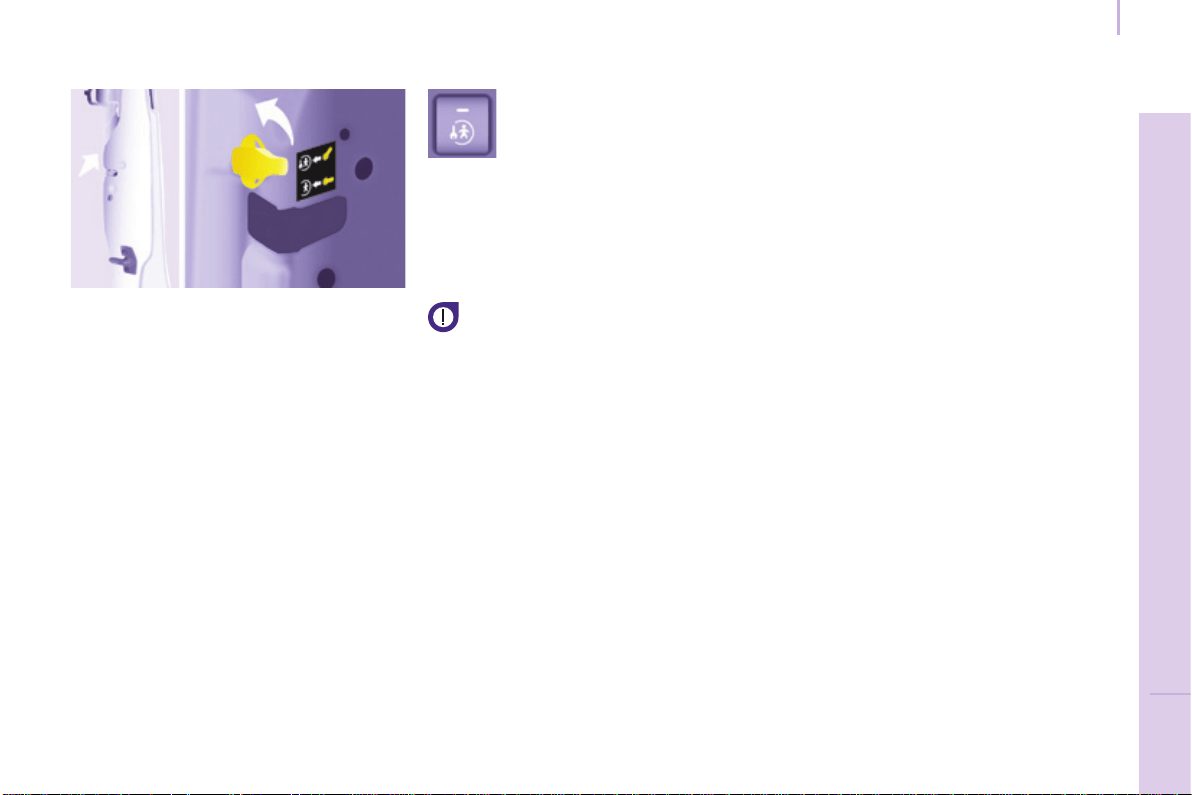
147
SAFETY
5
Berlingo-2-VP_en_Chap05_Securite_ed01-2016
147
Child safety
CHILD LOCK
This prevents opening of the siding
sidedoorsfromtheinside.
Manual
Electric
With the ignition on, press
thisbuttoninthemiddleof
thedashboard.
Indicatorlampon=childlock
on.
Pleasenote:thissystemis
independentofthecentrallocking
control.
Alwaysremovetheignitionkey
when leaving the vehicle, even for
ashorttime.
Itisadvisabletocheckthestateof
thechildlockeachtimetheignitionis
switchedon.
Intheeventofaseriousimpactthe
electricchildlockisdeactivated
automatically.
A label indicates the position of the
leverandthestateofthechildlock.
- Open fully past the point of
resistance.
- Tilt the lever, located on the rear
sectionofthedoor.
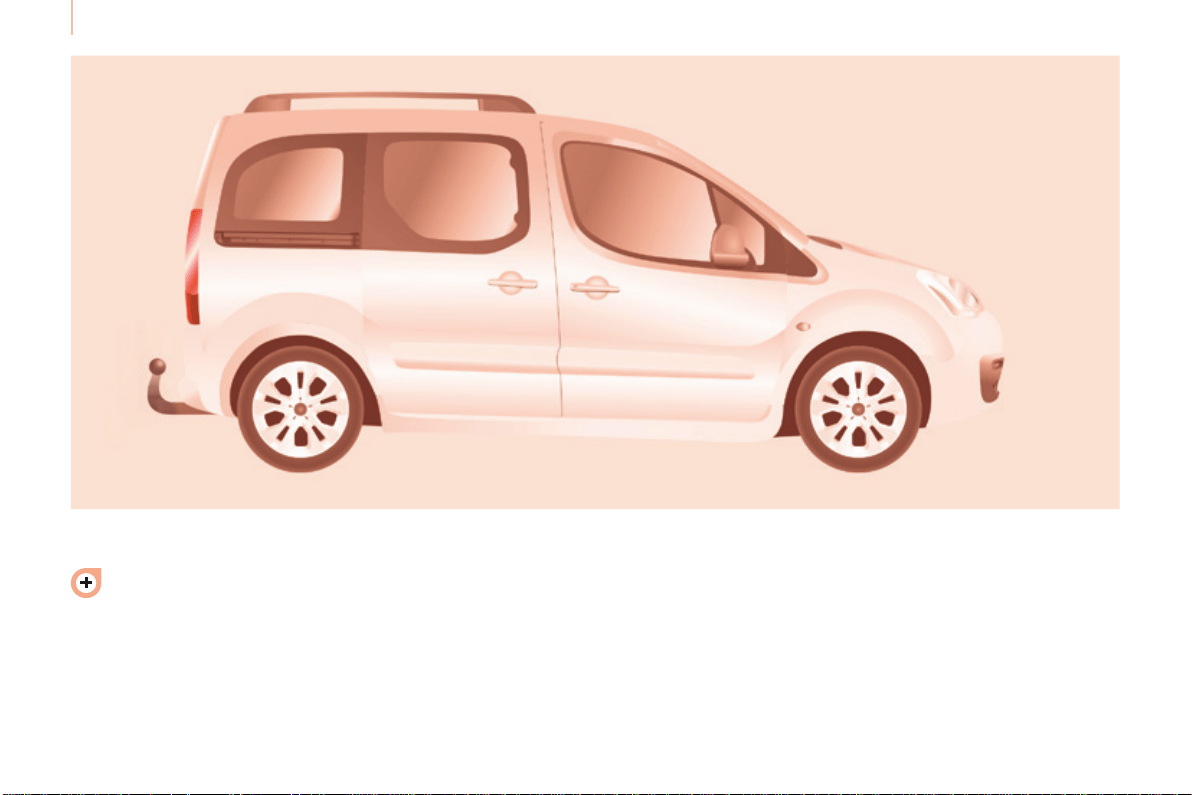
148
Towing a trailer
Berlingo-2-VP_en_Chap06_Accessoire_ed01-2016
Formoreinformationabout
weights and towed loads, refer to
chapter9,"Weights"section.
TOWING A TRAILER, A CARAVAN...
Distribution of loads
Distribute the load in the trailer so
thattheheaviestobjectsareas
close as possible to the axle and
the nose weight is close to the
maximumauthorisedwithout,however,
exceedingit.
Cooling
Towing a trailer on a slope increases
thecoolanttemperature.
As the fan is electrically controlled, its
cooling capacity is not dependent on
theenginespeed.
You should therefore use a high gear
to lower the engine speed and reduce
yourspeed.
In all cases, pay attention to the
coolanttemperature.
Driving advice
Atowedvehiclemustfreewheel:
gearboxinneutral.

149
Towing a trailer
ACCESSORIES
6
Berlingo-2-VP_en_Chap06_Accessoire_ed01-2016
Good Practice
In certain cases of particularly arduous
use(towingthemaximumloadupa
steepslopeinhightemperatures),the
engineautomaticallylimitsitspower.
In this case, the air conditioning is
automaticallycutofftosaveengine
power.
Tyres
Checkthetyrepressuresofthetowing
vehicle and of the trailer, observing the
recommendedpressures.
Chapter7,"Levels"section.
Ifthecoolanttemperature
warninglampcomeson,stop
the vehicle and switch off the
engineassoonaspossible.
Brakes
Towingincreasesthebrakingdistance.
Driveatamoderatespeed,change
downearlyandbrakegradually.
Towbar
Werecommendtheuseofgenuine
CITROËN towbars and their wiring
harnesses, which have been tested
andapprovedfromthedesignstageof
your vehicle, and that you entrust the
ttingofthisequipmenttoaCITROËN
dealer.
Ifthisequipmentisnotttedbya
CITROËNdealer,itisimperativethat
itisttedusingtheelectricalpre-
equipmentinstalledattherearofthe
vehicle and in accordance with the
manufacturer'sinstructions.
In accordance with the general
instructionsareminderofwhichhas
been given above, we draw your
attentiontotheriskassociatedwith
ttingatowbarorelectricalaccessory
notrecommendedbyCITROËN.
Fittingsuchequipmentcouldresultin
the failure of your vehicle's electronic
system.Pleaseobtaininformationfrom
theManufacturerbeforettingthistype
ofequipment.
Side wind
Sensitivitytosidewindisincreased.
Drivesmoothlyandatamoderate
speed.
ABS/DSC
TheABSorDSCsystemsonlycontrol
thevehicle,notthetrailerorcaravan.
Parking sensors
Therearparkingsensorssystemdoes
notfunctionwhilethevehicleistowing.
Chapter9,"Identication
markings"section.
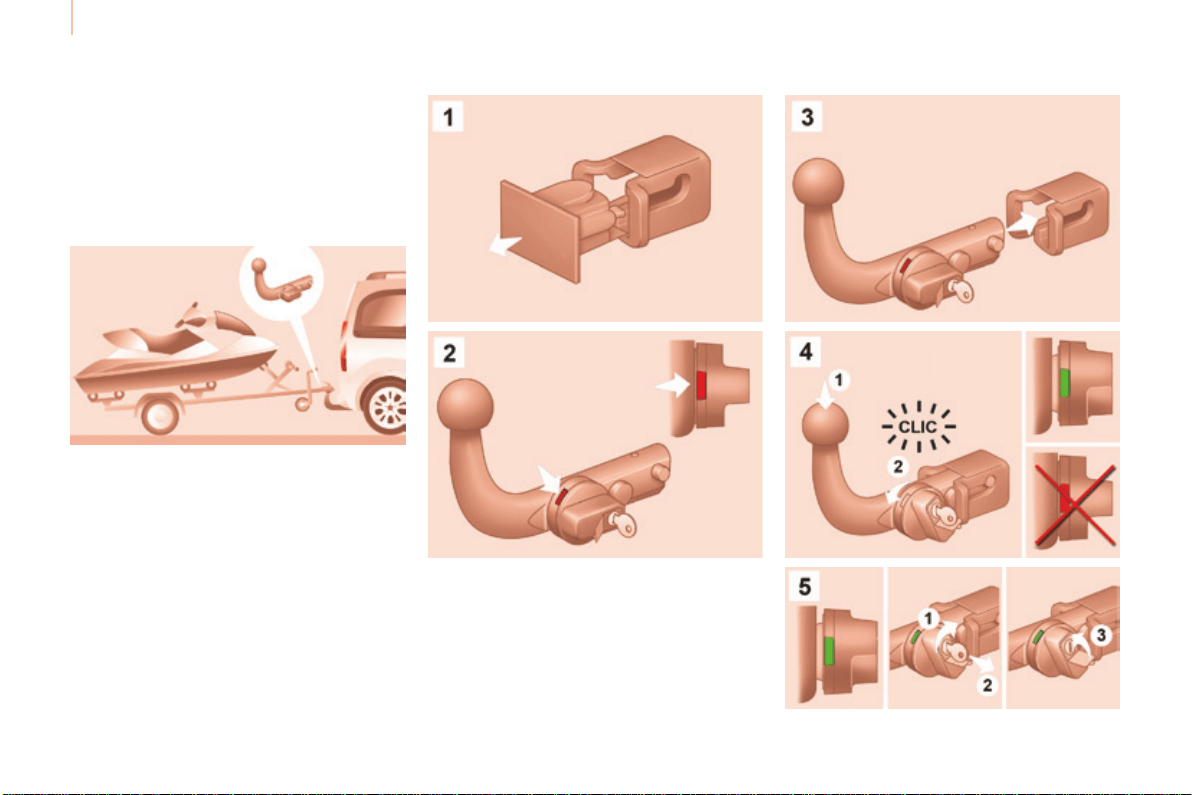
150
Towing a trailer
Berlingo-2-VP_en_Chap06_Accessoire_ed01-2016
TOWBAR WITH SWAN NECK
TOWBALL,
LOCKABLE AND QUICKLY
DETACHABLE
Presentation
Thisswannecktowbar,delivered
assembled,canberemovedandtted
easily.Notoolsareneeded.
Instructions for tting and before
every use
Checkthattheswanneckiscorrectly
lockedbyverifyingthefollowingpoints:
- thegreenmarkonthelocking
wheel is visible,
- thesafetylockonthelockingwheel
is directed toward the rear,
- thesafetylockisclosedandthe
keyremoved;thelockingwheelcan
no longer be operated,
- theswanneckmustnolonger
moveatallinitscarrier.
Whenhookingupthetrailer,don't
forgettoconnectthetrailerharness.
Fitting
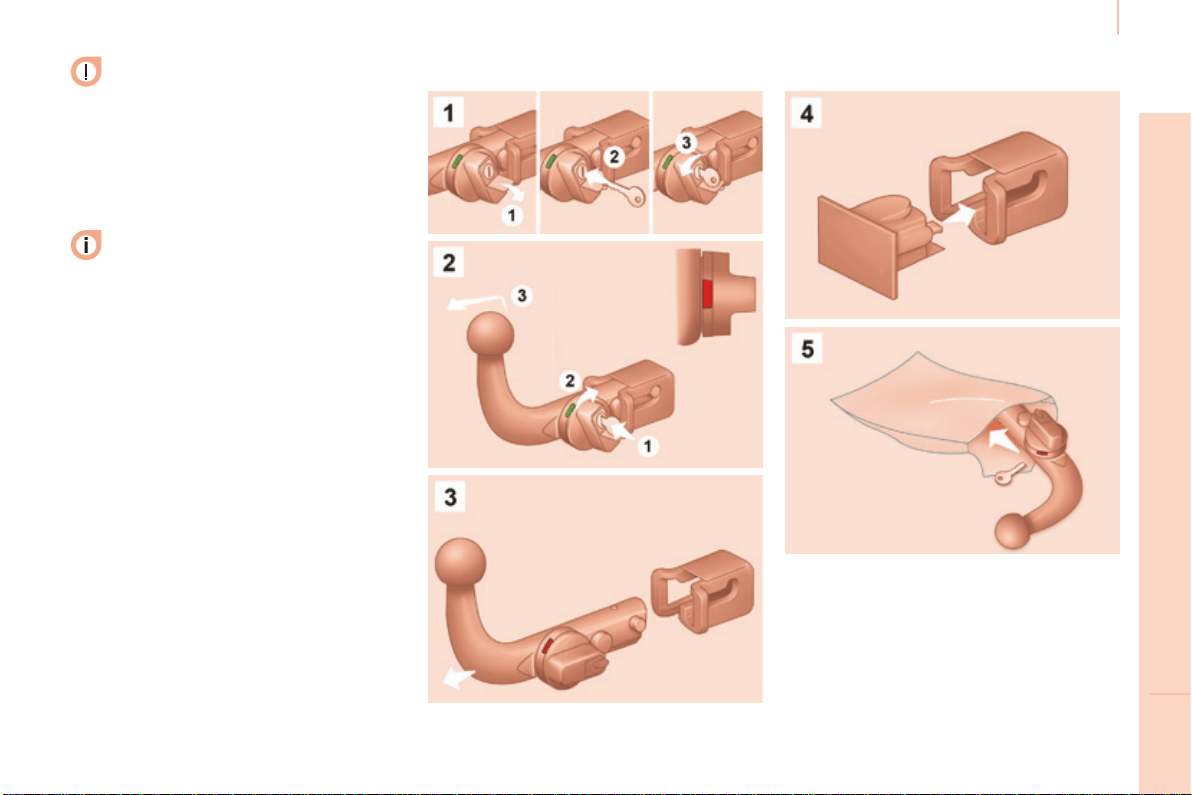
151
Towing a trailer
ACCESSORIES
6
Berlingo-2-VP_en_Chap06_Accessoire_ed01-2016
During use
Neverunlockthedevicewhen
atrailerorloadcarrieristtedtothe
swanneck.
After use
Forjourneysmadewithoutatrailer
orloadcarrier,theswanneckmust
beremovedandtheblankingplug
insertedinthecarrier.Thismeasure
appliesparticularlyiftheswanneck
couldhindervisibilityofthenumber
plateorlighting.
Removal
Maintenance
Correct operation is only possible if the
swanneckanditscarrierremainclean.
Before cleaning the vehicle with a high
pressurejetwash,theswanneckmust
beremovedandtheblankingplug
insertedinthecarrier.

152
Berlingo-2-VP_en_Chap06_Accessoire_ed01-2016
Equipment
OTHER ACCESSORIES
These accessories and parts, having
been tested and approved for reliability
and safety, are all adapted to your
vehicle.Awiderangeofrecommended
accessories and genuine parts is
available.
A further range is also available,
structuredaroundcomfort,leisureand
maintenance:
Anti-theftalarm,windowetching,rst
aidkit,highvisibilityvest,frontand
rearparkingsensors,warningtriangle,
securityboltsforalloywheels,...
Seatcoverscompatiblewithairbags
for the front seats, bench seat, rubber
mats,carpetmats,snowchains,blinds,
tailgatebicyclecarrier,...
Topreventthematfrombecoming
caughtunderthepedals:
- ensurethatthematanditsxings
are positioned correctly,
- nevertonematontopofanother.
Audioequipment,hands-freekit,
speakers,CDchanger,satellite
navigationsystem,USBbox,Videokit,...
Regardlessoftheaudioandtelematic
equipmentofferedonthemarket,the
technical constraints associated with
thettingofequipmentoftheseproduct
groupsmeanthatthespecialfeatures
oftheequipmentanditscompatibility
with the capacities of your vehicle's
standardequipmentmustbetakeninto
account.PleaseaskaCITROËNdealer
formoreinformationbeforettingsuch
equipment.
Maximum weights on bars
- Transverse bars on longitudinal
bars:75Kg(thesebarsarenot
compatiblewiththeModutoproof).
Installing radiocommunication
transmitters
You are advised to contact a CITROËN
dealer before installing accessory
radiocommunicationtransmitterswith
externalaerialonyourvehicle.
TheCITROËNdealernetwork
willinformyouofthespecication
(frequencyband,maximumoutput
power,aerialposition,specic
conditions of installation) of the
transmitterswhichcanbetted,in
accordance with the Motor Vehicle
ElectromagneticCompatibility
Directive(2004/104/EC).
Frontmudaps,rearmudaps,
15/17inchalloywheels,wheelarch
trim,leathersteeringwheel,...
Screenwash, interior and exterior
cleaningandmaintenanceproducts,
sparebulbs,...
Thettingofelectricalequipment
or accessories which are not
recommendedbyCITROËNmay
result in a failure of your vehicle's
electronicsystem.Pleasenotethis
specicwarning.Youareadvised
to contact a dealer to be shown the
rangeofrecommendedequipmentor
accessories.
Depending on the country in which
thevehicleissold,itiscompulsory
to have a high visibility vest, warning
triangle and spare bulbs available in
thevehicle.
153
CHECKS
7
Berlingo-2-VP_en_Chap07_Verication_ed01-2016
Maintenance with TOTAL
TOTAL & CITROËN
Partners in performance and
protecting the environment
Innovation in the search for
performance
For over 40 year, the TOTAL Research and
Developmentdepartmentshavedeveloped
forCITROËN,lubricantstomatchthelatest
technical innovations on CITROËN vehicles,
bothforcompetitionandforeverydaymotoring.
For you, this is an assurance that you will
obtainofthebestperformancefromyour
engine.
Optimum protection for your
engine
By having your CITROËN
vehicle serviced with TOTAL
lubricants, you are contributing
towardsimprovingthelifeand
performanceofyourengine,
while also protecting the
environment.
prefers
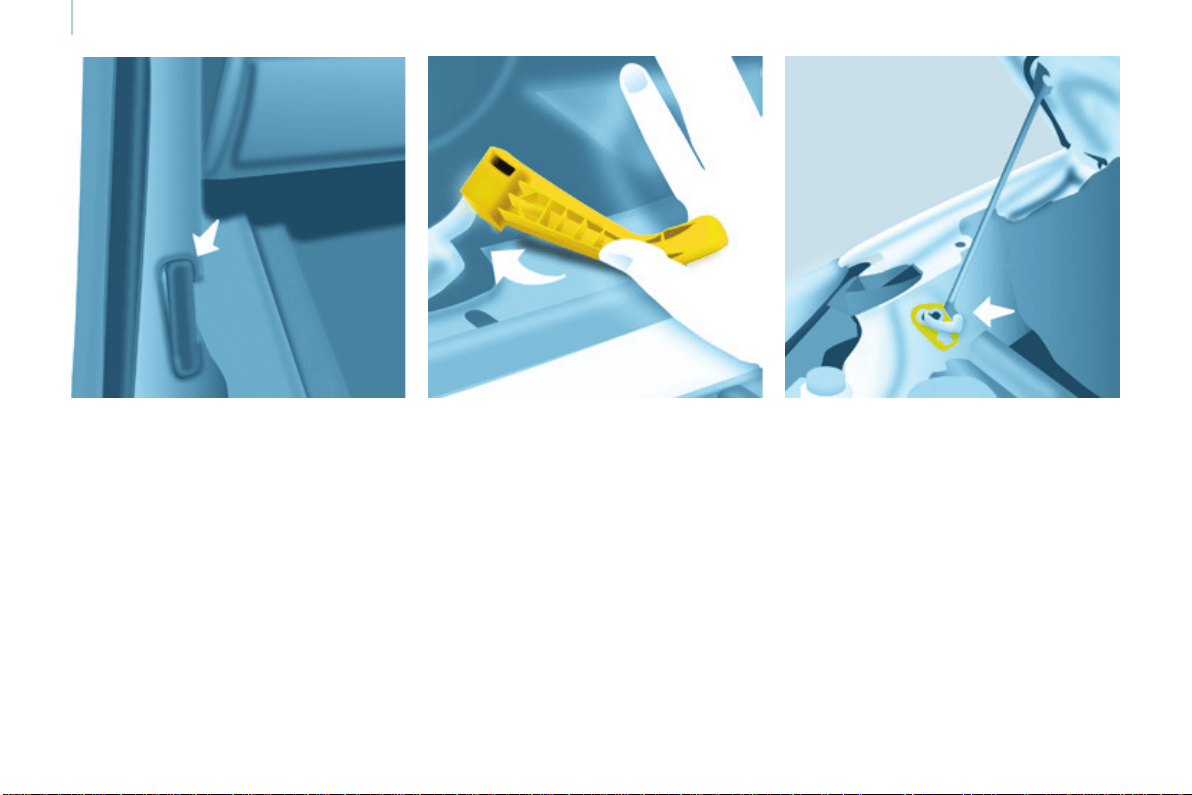
154
Opening the bonnet
Berlingo-2-VP_en_Chap07_Verication_ed01-2016
OPENING THE BONNET
Bonnet stay
Secure the stay in its location,
identiedbyastickerontheright-hand
side of the vehicle, to hold the bonnet
open.
Before closing the bonnet, put the stay
backinitsclipwithoutusingexcessive
force.
On the outside
Raise the bonnet slightly by reaching
inaathand,palmdown,tomake
accesstothelevereasier.
With this hand, push the safety catch
totheleft.Raisethebonnet.
On the inside
Pull the lever below the dashboard
towardsyou.Thebonnetisreleased.
To close
Lower the bonnet and release it at the
endofitstravel.Checkthatthebonnet
issecure.
Avoid opening the bonnet in strong
winds.

155
CHECKS
7
Berlingo-2-VP_en_Chap07_Verication_ed01-2016
Under the bonnet
PETROL ENGINE
1. Screenwashuidreservoir.
2. Fusebox.
3. Enginecoolantheadertank.
Batteryconnections:
+Positiveterminal.
-Negativepoint(earth).
Takecarewhenworkingunderthebonnet.
4. Brakeandclutchuidreservoir.
5. Airlter.
6. Engineoildipstick.
7. Engineoilllercap.
8. Powersteeringuidreservoir.
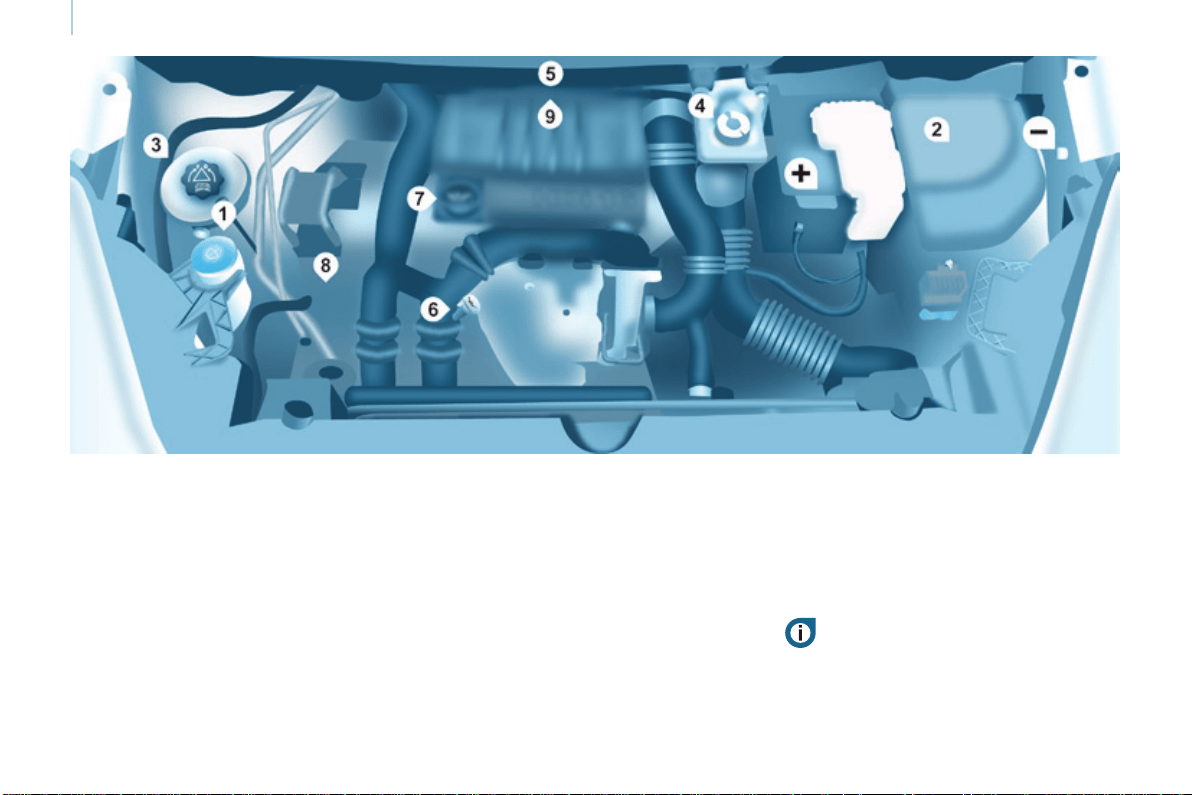
156
Berlingo-2-VP_en_Chap07_Verication_ed01-2016
Under the bonnet
DIESEL ENGINE
4. Brakeandclutchuidreservoir.
5. Airlter.
6. Engineoildipstick.
7. Engineoilllercap.
8. Powersteeringuidreservoir.
9. Primingpump
(exceptBlueHDiengines).
1. Screenwashuidreservoir.
2. Fusebox.
3. Enginecoolantheadertank.
Batteryconnections:
+Positiveterminal.
-Negativepoint(earth).
Takecarewhenworkingunderthebonnet.
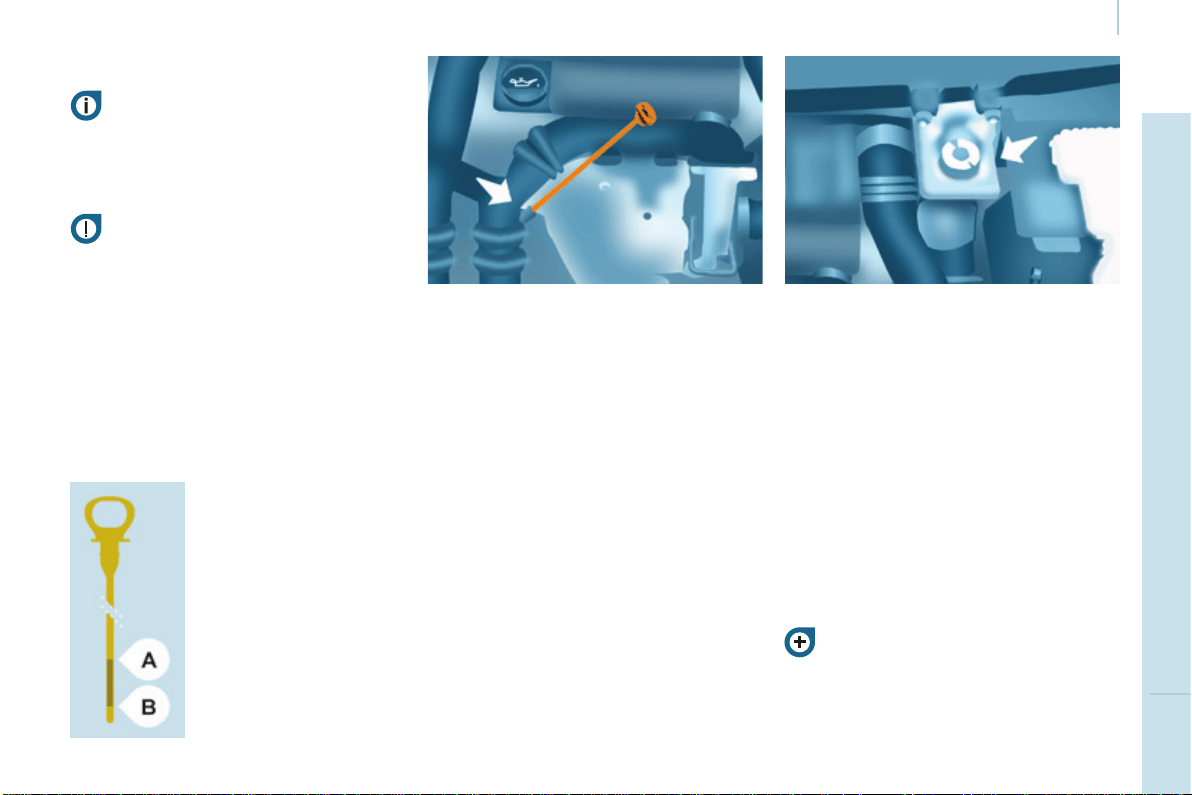
157
CHECKS
7
Berlingo-2-VP_en_Chap07_Verication_ed01-2016
Levels
LEVELS
Oil change
Thismustbecarriedoutat
theintervalsspeciedinthe
manufacturer'sservicingschedule.Ask
foradvicefromaCITROËNdealer.
Removethedipstickbeforelling.
Checkthelevelafterlling(never
exceedthemaxmark).
Rettheoilllercapbeforeclosingthe
bonnet.
Changing the brake fluid
Thebrakeuidmustbechangedat
the intervals stated, according to the
manufacturer'sservicingschedule.
Useuidsrecommendedbythe
manufacturer,whichmeettheDOT4
standard.
ThelevelmustbebetweentheMIN
andMAXmarksonthereservoir.
Ifuidhastobeaddedfrequently,
thisindicatesafaultwhichmustbe
checkedbyaCITROËNdealeror
aqualiedworkshopassoonas
possible.
Warning lamps
Ifyouhavetoremove/retthe
engine style cover, handle it with
caretoavoiddamagingthexing
clips.
Oil level
Itisrecommendedthattheoillevelbe
checkedevery3000miles(5000km)
and topped up if necessary between oil
changes.
Checkthelevelwiththevehiclelevel,
enginecold,usingthedipstick.
Dipstick
Viscosity selection
Inallcases,theoilselectedmust
meettherequirementsspeciedinthe
manufacturer'sserviceschedule.
Theseregularmaintenance
operationswillkeepyourvehicle
ingoodworkingorder.Askfor
advicefromaCITROËNdealerorrefer
tothemaintenanceandwarrantyguide
inthehandbookpack.
Checksusingthewarning
lampsintheinstrumentpanel
is described in chapter 3,
"Instrumentsandcontrols"
section.
Therearetwomarkson
thedipstick:
A=maximum
Ifyoullpastthismark,
contact a CITROËN
dealeroraqualied
workshop.
B=minimum
Never allow the level to
fallbelowthismark.
Tomaintainthereliability
ofenginesandemission
controlsystems,theuse
of additives in engine oil
isprohibited.

158
Berlingo-2-VP_en_Chap07_Verication_ed01-2016
Levels
Cooling system
Onlyusetheuidrecommendedbythe
manufacturer.
Otherwise,youriskseriouslydamaging
yourengine.
Whentheengineiswarm,the
temperatureofthecoolantiscontrolled
bytheenginefan.Asthisfancan
operatewiththeignitionkeyremoved
andbecausethecoolingsystemis
pressurised, wait for at least one hour
after the engine has stopped before
carryingoutanywork.
Slackenthecapby1/4ofaturnto
release the pressure to prevent any
riskofscalding.Whenthepressure
hasdropped,removethecapandtop
upthelevelwithcoolant.
Ifuidhastobeaddedfrequently,
thisindicatesafaultwhichmustbe
checkedbyaCITROËNdealeras
soonaspossible.
Power steering fluid level
Thevehiclemustbeparkedonlevel
groundwiththeenginecold.Unscrew
the cap integrated with the gauge and
checkthelevelwhichmustbebetween
theMINandMAXmarks.
Inordertoregeneratethelter,you
are advised to drive at a speed higher
than40mph(60km/h)foratleastve
minutesassoonaspossible,when
trafcconditionspermit(untilthe
messagedisappearsandtheservice
warninglampgoesoff).
During regeneration of the particle
emissionlter,thenoiseofarelay
operatingmaybeheardunderthe
dashboard.
Ifthemessageisstilldisplayedand
iftheservicewarninglampremains
on, contact a CITROËN dealer or a
qualiedworkshop.
Topping up
ThelevelmustbebetweentheMIN
andMAXmarksontheexpansion
bottle.Ifmorethan1litreofuidis
required to top up the level, have the
systemcheckedbyaCITROËNdealer
oraqualiedworkshop.
Screenwash and headlamp
wash level
For best quality cleaning and for your
safety, we would advise that you use
productsoftheCITROËNrange.
Foroptimumcleaningandtoavoid
freezing,thisuidmustnotbetopped
uporreplacedwithplainwater.
Capacityofthescreenwashreservoir:
approximately3litres.
Ifyourvehicleisttedwithheadlamp
washers, the capacity of the reservoir
is6litres.
Diesel additive level
(Diesel with particle
filter)
Topping up
Thisadditivemustbetoppedupby
aCITROËNdealeroraqualied
workshopwithoutdelay.
Waste products
Avoid prolonged contact of used oil
withtheskin.
Brakeuidisharmfultohealthand
verycorrosive.
Donotdisposeofusedoil,brakeuid
or coolant into drains or into the ground
but into the containers dedicated to this
use at a CITROËN dealer (France) or
anauthorisedwastedisposalsite.
Theminimumlevelofthisadditive
is indicated by lighting of the service
warninglamp,accompaniedbyan
audiblesignalandamessageinthe
screen.
When this occurs with the engine
running it is due to the start of
saturationoftheparticlelter
(exceptionally prolonged urban type
drivingconditions:lowspeed,long
trafcjams,...).
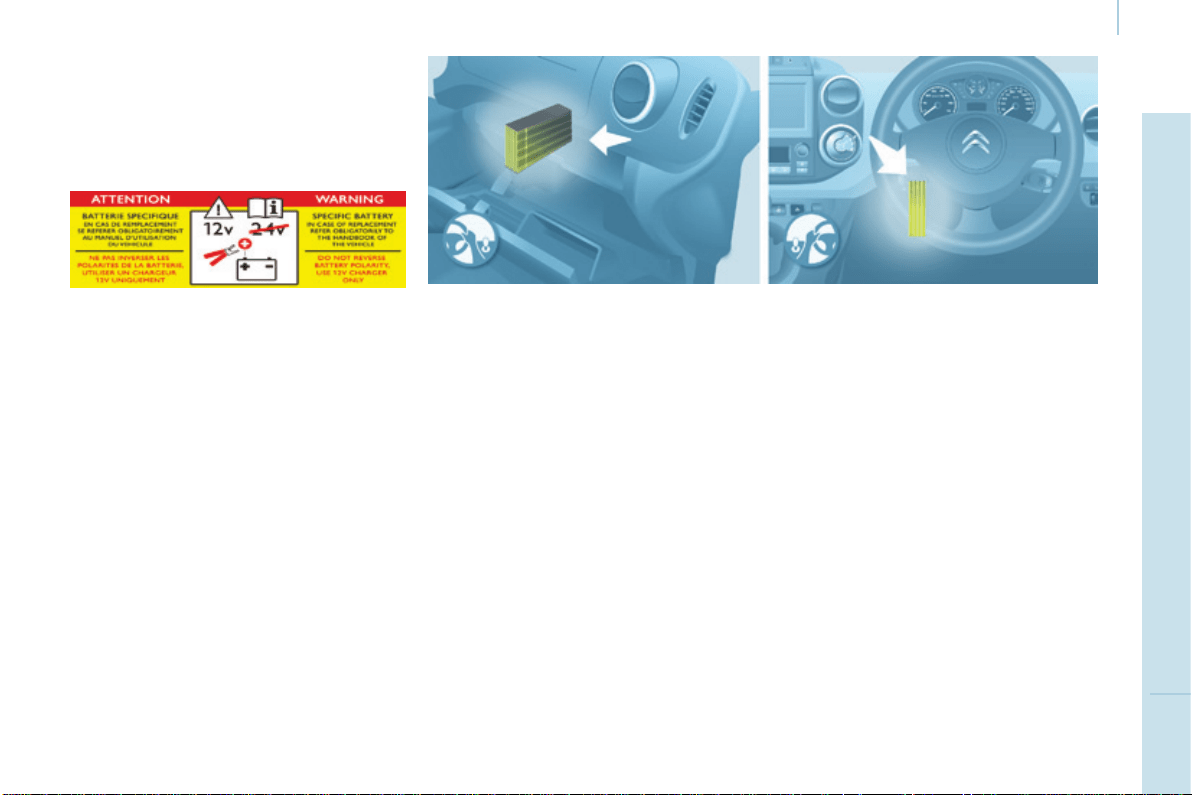
159
CHECKS
7
Berlingo-2-VP_en_Chap07_Verication_ed01-2016
Checks
CHECKS
Carbon filter and passenger compartment filter
Particle filter (Diesel)
Maintenanceoftheparticleltermust
becarriedoutbyaCITROËNdealer.
On acceleration after the vehicle has
been running for a prolonged period
atverylowspeedoratidle,youmay,
inexceptionalcircumstances,notice
theemissionofwatervapouratthe
exhaust.Thiswatervapourdoesnot
have any adverse effect on vehicle
handlingortheenvironment.
Battery
Atthestartofsummerorwinter,have
yourbatterycheckedbyaCITROËN
dealeroraqualiedworkshop.
Brake pads
Brakepadweardependsonthestyle
of driving, in particular for vehicles
which are used in town, over short
distances.Itmaybenecessaryto
checkthethicknessofthepads,even
betweenservices.
Unlessthereisaleakonthecircuit,a
dropinthebrakeuidlevelindicates
thatthebrakepadsareworn.
Brake disc / drum wear
Forinformationoncheckingthebrake
disc/drumwear,contactaCITROËN
dealer.
Parking brake
Wheretheparkingbraketravelistoo
great or there is a reduction in the
performanceofthesystem,theparking
brakeshouldbeadjusted,evenbetween
services.
HavethesystemcheckedbyaCITROËN
dealeroraqualiedworkshop.
Oil filter
Changethelterregularlyin
accordancewiththemanufacturer's
servicingschedule.
Anaccessapallowsreplacementof
thelters.
Thecarbonlterpermitscontinuous
andeffectivelteringofdust.
Ifthepassengercompartmentlter
becomesblocked,thismayreducethe
performanceoftheairconditioning
systemandgenerateunpleasant
odours.
Werecommendtheuseofacombined
passengercompartmentlter.By
meansofitssecondspecialactive
lter,itcontributestothepurication
of the air breathed by the occupants
and the cleanness of the passenger
compartment(reductionofallergic
symptoms,unpleasantodoursand
greasydeposits).
Refer to theservicing and warranty
bookletforthereplacementintervalfor
thesecomponents.
Dependingontheenvironment(dusty
atmosphere...)andtheuseofthe
vehicle(urbandriving...),changethem
twiceasoftenifnecessary.
160
Berlingo-2-VP_en_Chap07_Verication_ed01-2016
Checks
Good practice
Bleeding water from the Diesel
filter
Manual gearbox
Havethelevelcheckedinaccordancewith
themanufacturer'sservicingschedule.
Inordertoavoiddamagingthe
electrical units, we strongly
advise you not to use high
pressure washing to clean the engine
compartment.
Afterwashingthevehicledampness,
orinwinter,icemayformonthebrake
discsandpads:brakingefciencymay
bereduced.Makesomelightbrake
applications to dry and de-ice the
brakes.
Ifthiswarninglampcomes
on,bleedthelter.Otherwise
bleedregularlyeachtimethe
engineoilischanged.
HDi engines use advanced
technology.Allworkrequires
special training, so should be
entrustedtoaCITROËNdealer.
Dependingoncountryofsale.
To drain the water, unscrew the bleed
screwlocatedonthelter.
Operate until all of the water no longer
owsinthetransparentpipe,then
tightenthebleedscrew.
Onlyuseproductsrecommendedby
CITROËN or products of equivalent
qualityandspecication.
Inordertooptimisetheoperation
ofunitsasimportantasthebraking
system,CITROËNselectsandoffers
specicproducts.
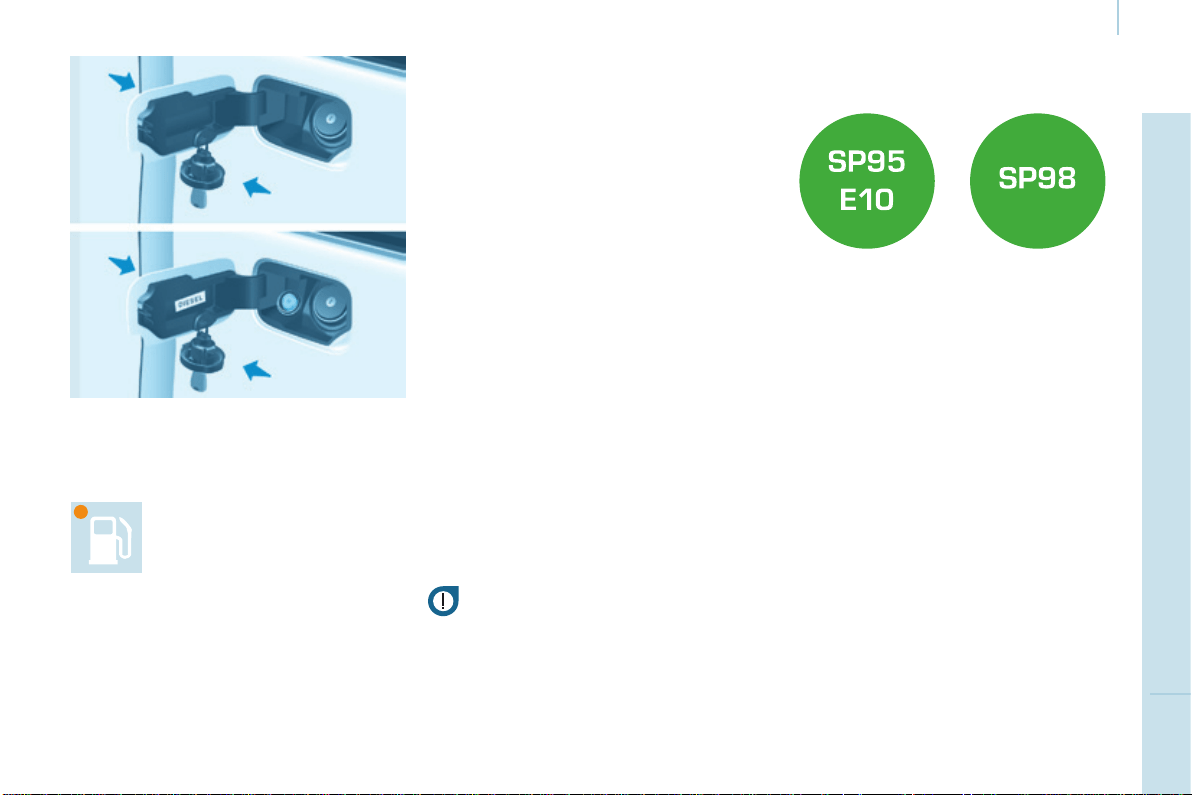
161
CHECKS
7
Berlingo-2-VP_en_Chap07_Verication_ed01-2016
Fuel
REFUELLING
Low fuel level
Filling
Thefueltankmustbelledwith
the engine off.
- Openthefuelllerap.
- Insertthekey,thenturnitaquarter
turn.
- Removethecapandhookitonto
the clip located on the inside of the
ap.
Whenllingwithfuel,
amechanicalsystemprevents
openingoftheleft-handsidedoor.
Whenthefuelllerapisopen,ensure
thatnoonetriestoslidethisdoor.
Oncetheaphasbeenclosed,the
slidingsidedoormayjam,pushthe
doortocloseitthenopenit.
When the low fuel level is
reached,thiswarninglamp
comeson.
Alabelafxedtotheinsideoftheap
remindsyouofthetypeoffueltobe
used.
Youmustllwithatleast5litresoffuel
forittoberegisteredbythefuelgauge.
Whenthefuelllercapisopened,
theremaybeaslightinrushofair.This
vacuumisentirelynormalandisdueto
thesealingofthefuelsystem.
Whenllingthefueltank,donot
continue after the 3
rd
cut-off of the
nozzle.Thiscouldcausemalfunctions.
Thecapacityofthefueltankis
approximately60litres.
- Afterllingthefueltank,lockthe
capandclosetheap.
Fuel used for petrol
engines
Thepetrolenginesarecompatible
with E10 bio-petrol (containing 10 %
ethanol),conformingtoEuropean
standardsEN228andEN15376.
E85 type fuels (containing up to 85 %
ethanol) are reserved exclusively for
vehiclesmarketedfortheuseofthis
typeoffuel(BioFlexvehicles).The
qualityoftheethanolmustcomplywith
EuropeanstandardEN15293.
You then have approximately 8 litres
offuelremaining.
Fill up without delay to avoid running
outoffuel.
Neverriskdrivinguntilyourunoutof
fuelasthismaydamagetheemissions
controlandinjectionsystems.

DIESEL
162
Berlingo-2-VP_en_Chap07_Verication_ed01-2016
Fuel
FUEL CUT-OFF
Inaseriouscollision,amechanism
automaticallypreventsfuelfrom
reachingtheengine.
Theashingofthiswarning
lampisaccompaniedbya
messageinthescreen.
Checkthatthereisnoodouror
leakageoffueloutsidethevehicleand
re-establishthefuelsupply:
- switch off the ignition
(STOP position),
- removethekey,
- putthekeybackintheignition,
- switchontheignitionandstart.
DIESEL PRIMING
PUMP
Fuel used for Diesel
engines
TheDieselenginesarecompatiblewith
biofuelsavailableatthepumpswhich
meetcurrentandfutureEuropean
standards:
- Dieselfuelthatmeetsstandard
EN590mixedwithabiofuelthat
meetsstandardEN14214,
- Dieselfuelthatmeetsstandard
EN16734mixedwithabiofuelthat
meetsstandardEN14214(possibly
containing up to 10 % Fatty Acid
Methyl Ester),
- ParafnicDieselfuelthatmeets
standardEN15940mixedwith
abiofuelthatmeetsstandard
EN14214 (possibly containing up to
7%FattyAcidMethylEster).
TheuseofB20orB30fuelmeeting
standardEN16709ispossiblein
yourDieselengines.However,this
use, even occasional, requires strict
application of the special servicing
conditions referred to as "Arduous
conditions".Formoreinformation,
contact a CITROËN dealer or a
qualiedworkshop.
If you run out of fuel, it is necessary to
primethefuelcircuit.
Other HDi engines
- Fillthefueltankwithatleastve
litresofDiesel.
- Squeezeandreleasethemanual
primingpump,underthebonnet,
undertheprotectivecover.
- Operate the starter until the engine
starts.
BlueHDi engine
- Fillthefueltankwithatleastve
litresofDiesel.
- Switch on the ignition (without
startingtheengine).
- Wait around 6 seconds and switch
offtheignition.
- Repeattheoperation10times.
- Operate the starter to run the
engine.
The use of any other type of (bio)
fuel(vegetableoranimaloils,pure
ordiluted,domesticfuel...)isstrictly
prohibited(riskofdamagetothe
engineandfuelsystem).
Only the use of Diesel fuel additives
thatmeetthestandardB715000is
authorised.
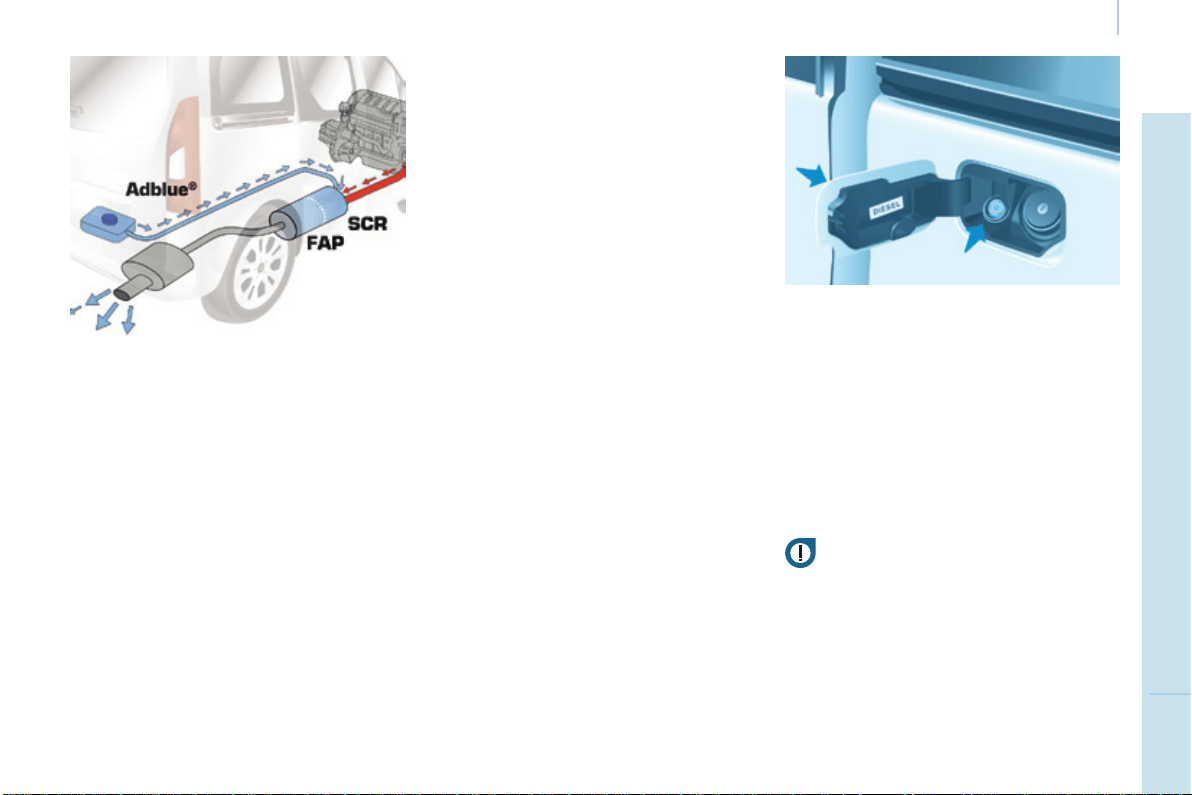
163
CHECKS
7
Berlingo-2-VP_en_Chap07_Verication_ed01-2016
AdBlue
®
BLUEHDI
AND ADBLUE
®
SCR technology
AdBlue
®
isthebrandnameofthe
solution needed for operation of the
SCRsystem.
TheaimofBlueHDiistoreducethe
emissionsofNOx(nitrousoxides)in
theairbyupto90%,usingasystem
that converts NOx into water vapour
and nitrogen in a dedicated catalytic
converter:SCR(SelectiveCatalytic
Reduction).
Thisobjectivemeetsthe"Euro6"
emissionsstandardadoptedbythe
EuropeanUnionaimedatlimitingthe
emissionsofpollutantsfrominternal
combustionengines.
The SCR technology used on BlueHDi
enginesinvolvestheinjectionof
AdBlue
®
intotheexhaustsystem.
BlueHDivehicleshaveaspecic
AdBlue
®
additivetankwithacapacity
of 17 litres.
Ithasanexteriorllerwithablue ller
cap, located to the left of the Diesel
fuelllercap.
Filling of the AdBlue
®
tankcanbe
done using 5 or 10 litre containers,
1.89litrebottles,orwhenatafuel
llingstationequippedwithaspecial
AdBlue
®
deliverypumpforlight
vehicles.
This operation can also be carried
out by a CITROËN dealer or a
qualiedworkshop.
Please note that the high delivery
pumpsatsomellingstations,
intended only for lorries and coaches,
are not suitable for cars or light
commercialvehicles.
Neverusethesepumps.
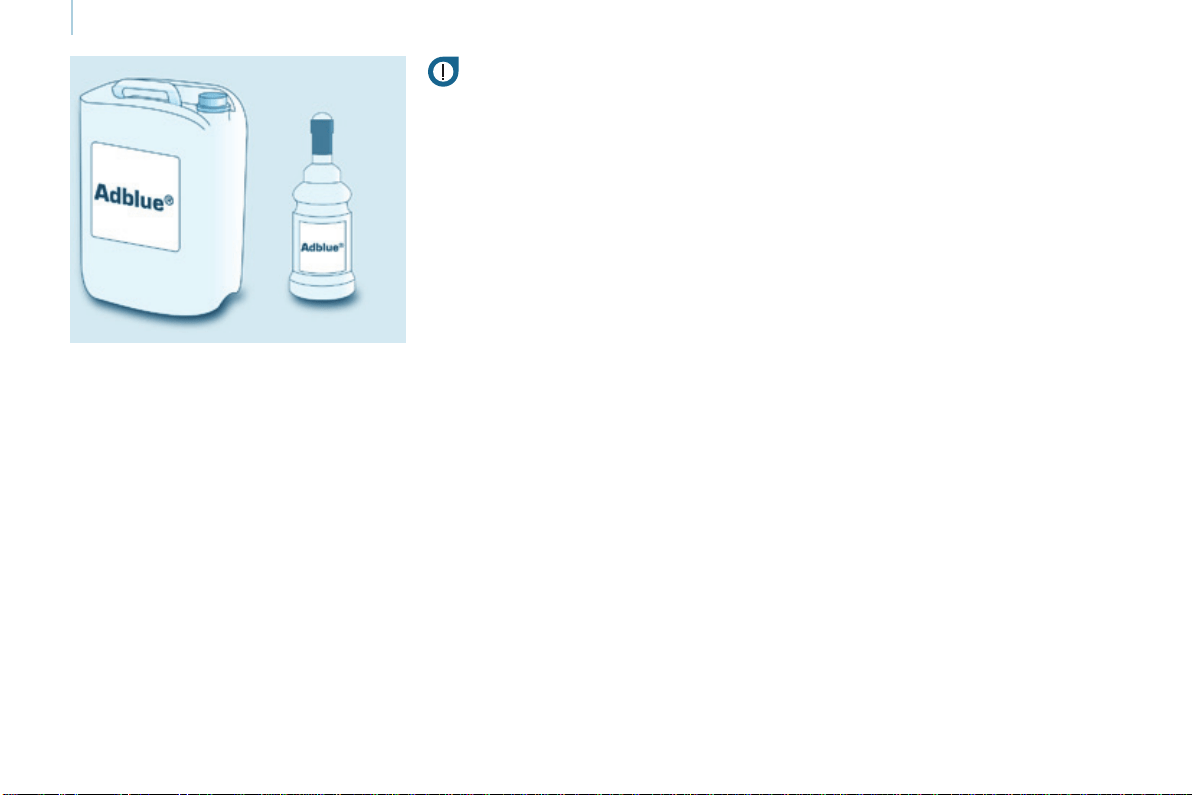
164
Berlingo-2-VP_en_Chap07_Verication_ed01-2016
AdBlue
®
Good practice
While the quantity of AdBlue
®
in
theadditivetankissufcient,no
informationisdisplayed.
Ontheotherhand,oncetheuid
level drops to the quantity needed
forarangeof1500miles(2400km)
driving, you are warned by different
temporarysignals(warninglamp,
message,audiblesignal).
Asmoremilesarecovered,these
signalsintensifyandthemessage
becomespermanent.
When the AdBlue
®
tankisempty,
restartingbecomesimpossible.
Itisstronglyrecommendedthatyou
do not wait for the successive alerts
before topping-up the AdBlue
®
additive,
butdothisassoonaspossible.
Filling the AdBlue
®
tank
For light vehicles, 5 or 10 litre
containersand1.89litre
(1/2USgallon)bottlesareavailable
fromCITROËNdealers,untiltheyare
equipped with AdBlue
®
deliverypumps.
IfyouwanttolltheAdBlue
®
tank
yourself, ensure that you have a
suitablellerpipe,whichmayormay
not be supplied with the additive
container.
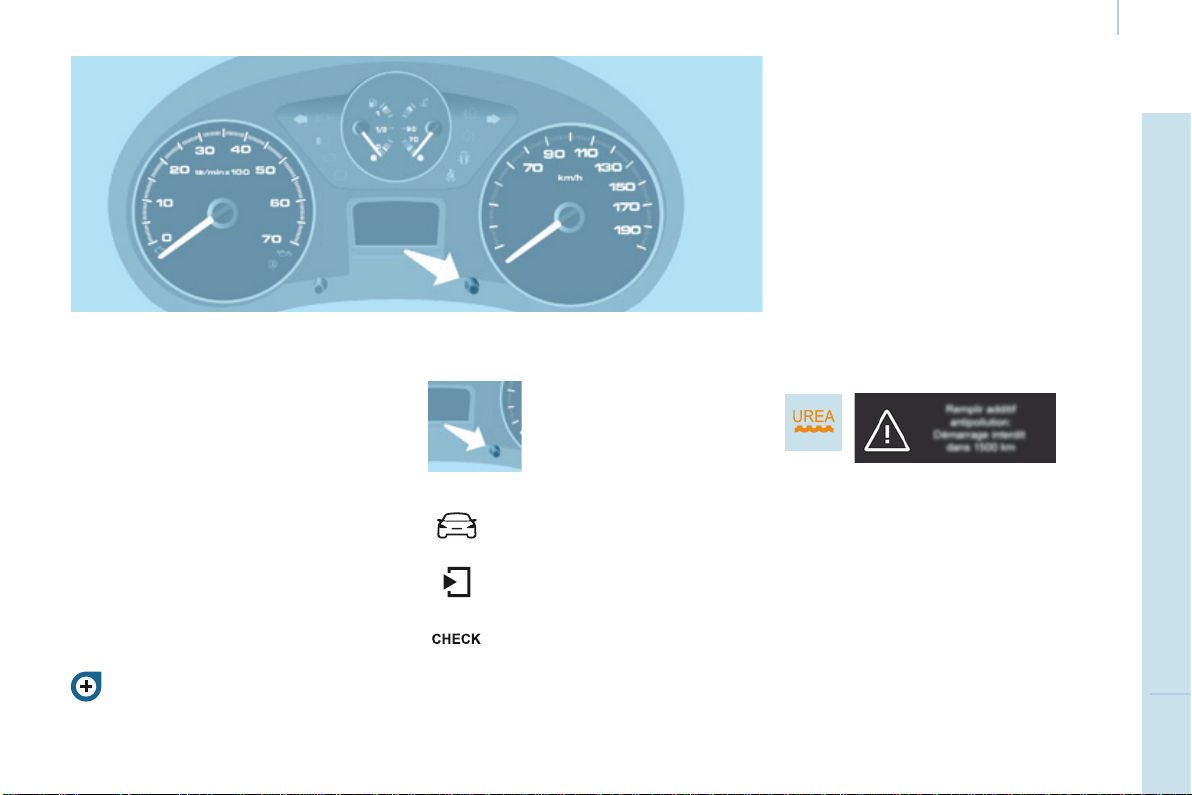
165
CHECKS
7
Berlingo-2-VP_en_Chap07_Verication_ed01-2016
AdBlue
®
Range indicators
Rules on the display of alerts
Formoreinformationonthe
displaysandwarninglamps,refer
tochapter3,"Instrumentsand
controls"section.
Range greater than 1 500 miles
(2 400 km)
Noinformationdisplayed.
Oncethe1500miles(2400km)
threshold is reached, the UREA
warninglampcomesontemporarily
andtheremainingrangemessageis
displayed.
Thealertisrepeatedevery200miles
(300km)untilthenextthresholdis
reached.
Everytimetheignitionisswitched
on, the alert is given, together with an
audiblesignal.
Remaining range less than
1 500 miles (2 400 km) and greater
than 350 miles (600 km)
Driving range
Withthetouchscreentablet:
Iftherangeisgreaterthan3100miles
(5000km),arangevalueisnotgiven.
Press this button to display
theinformation.
- select the "Driving
assistance"menu,
- select "Diagnostic",
- selectCHECK.
Different levels of alert are triggered
accordingtotheremainingdriving
range threshold
Youwillbeinformedaseachmileage
threshold is reached and the alerts will
changefromtemporarytopermanent.
- The 1
st
istriggeredataremaining
drivingrangeof1500miles
(2400km).
- The 2
nd
istriggeredataremaining
drivingrangeof350miles
(600km).
- Upto0miles,atwhichpointitwill
beimpossibletorestarttheengine
afterastop.
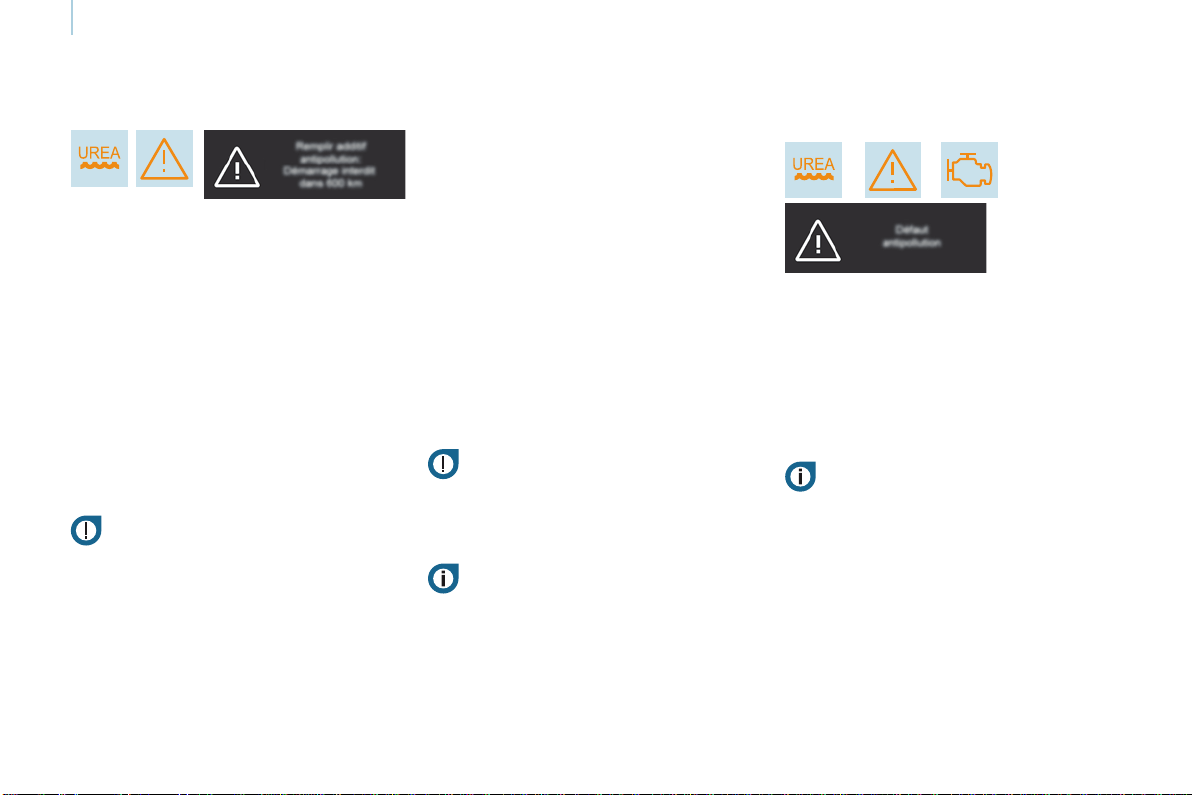
166
Berlingo-2-VP_en_Chap07_Verication_ed01-2016
AdBlue
®
Oncethe350miles(600km)threshold
isreached,theUREAwarninglamp
ashesandtheServicewarninglamp
comeson,accompaniedbyamessage
ontheremainingdrivingrange.
The alert is repeated every 30 seconds
withanupdateoftheremainingdriving
rangeinstepsof30miles(50km)
travelled.
Everytimetheignitionisswitched
on, the alert is given together with an
audiblesignal.
At 0 miles the system installed in
the vehicle to meet the emissions
standard will prevent engine
starting.
The0uidlevelhasbeenreached.
Yourvehicle'sexhaustemissionsno
longermeetthe"Euro6"standardand
theenginewillnotstart.
To be able to restart the vehicle, you
mustaddatleast4 litres of AdBlue
®
.
- Pourtheadditiveintothetank(by
thellerwiththebluecap).
- Switch on the ignition without
starting.
- Wait 10 seconds before starting the
engine.
Remaining range less than 350 miles
(600 km) and more than 0 miles
Starting prevented, breakdown
related to a lack of AdBlue
®
in the
special tank
Avoid waiting until the
remaining range is 0 miles!
The alert is repeated when driving until
the AdBlue
®
tankhasbeentopped-up
withsufcientadditive.
Unless the additive in the special
additivetankistopped-up,yourisk
immobilisationofthevehicle.
Followingthis,makeafurtherll
tothespecialadditivetank,the
capacity of which is 17 litres.
Fault with the SCR system
The UREA, Service and diagnostic
warninglampscomeson.
Everytimetheignitionisswitchedon,
theemissionsfaultisconrmedbyan
audiblesignalandamessage.
Ifitisatemporaryfault,thealert
disappears as soon as the exhaust
emissionsreturntothelevelsrequired
bythestandard.
Detection
On the other hand, if the warning
lampsarestillonafter30miles
(50km)ofdriving,thefaultis
conrmed.
Anenginestartpreventionsystem
willbeactivatedautomaticallyafter
650miles(1100km)travelled
followingthisconrmation.
GotoaCITROËNdealeroraqualied
workshop.
Or go to a CITROËN dealer or a
qualiedworkshop.
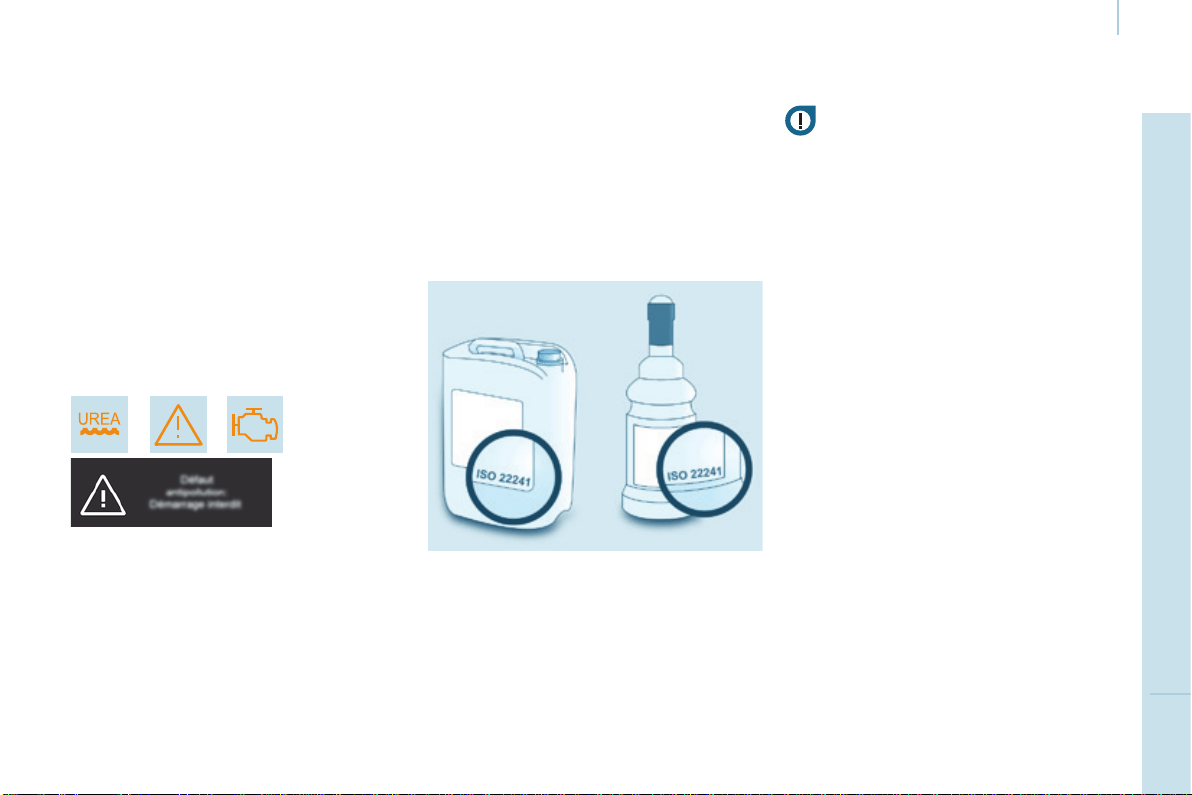
167
CHECKS
7
Berlingo-2-VP_en_Chap07_Verication_ed01-2016
AdBlue
®
Fault conrmed
In addition to the previous signals,
theUREAwarninglampashesand
theremainingrangeallowedwillbe
displayedinmiles(kilometres).
The alert will be repeated every
30 seconds with an update of the
drivingrangeinstepsof30miles
(50km).
GotoaCITROËNdealeroraqualied
workshopassoonaspossible.
Yourisknotbeingabletostartthe
engine.
Starting prevented, having
covered the 650 miles (1 100 km)
Ateachattemptatstarting,thealertis
activatedandthemessage"Emissions
fault:Startingprevented"isdisplayed.
Refilling / Topping-up the
AdBlue
®
Precautions to take
Use only AdBlue
®
thatmeetsthe
ISO22241standard.
The AdBlue
®
uidisanurea-based
solution.
Thisuidisnon-ammable,colourless
andodourless.
Tobekeptinacoolarea.
Containers (5 or 10 litres) and
bottles (1.89 litres) of AdBlue
®
Pleasechecktheuse-bydate.
Readtheinstructionsonthelabel.
Ensure that you have a suitable
llerpipe,whichmayormaynotbe
suppliedwiththecontainer.
Intheeventofanoverow,wipe
aroundthellermouthusinga
dampcloth.
If any AdBlue
®
uidissplitor
splashedontoyou,washimmediately
with cold water or wipe yourself with a
cleandampcloth.
Iftheuidhascrystallised,cleanitoff
usingaspongeandhotwater.

168
Berlingo-2-VP_en_Chap07_Verication_ed01-2016
AdBlue
®
Filling
Ensurethatthevehicleisparkedona
atandlevelsurface.
Pourthecontentsofthecontainer/
bottleintothededicatedtank.
AfterllingtheAdBlue
®
tank,observe
thefollowingprocedure:
- Switch on the ignition without
starting.
- Wait 10 seconds before starting the
engine.
NeverdisposeofemptyAdBlue
®
containers and bottles in the
householdwaste.
Placetheminaspecialcontainer
providedthispurposeortakethemto
yourdealer.
Keep AdBlue
®
out of the reach of
children,initsoriginalcontainer.
Never transfer AdBlue
®
to another
container:itwouldlooseitspurity.
Neverdilutetheuidwithwater.
NeverpourtheuidintotheDieselfuel
tank.
Recommendations on storage
Never store containers or bottles of
AdBlue
®
inyourvehicle.
Freezing of the AdBlue
®
AdBlue
®
freezesatabout-11°C(12.2°F)
anddeterioratesabove25°C(77°F).
Itisrecommendedthatcontainersand
bottles be stored in a cool area and
protectedfromdirectsunlight.
Undertheseconditions,theuidcan
bekeptforatleastayear.
Additive that has been frozen can
be used once it has thawed out in
ambientair.
TheSCRsystemincludesan
AdBlue
®
tankheaterthatensures
operationofthevehicleinnormal
conditions.
In exceptional situations, such
aswhenthevehicleiskeptat
temperaturesbelow-15°C(5°F)fora
longperiod,theremaybeanemission
fault alert related to freezing of the
AdBlue
®
additive.
Parkthevehicleinanareaatamore
moderatetemperatureforafewhours
until the AdBlue
®
becomesauid
again.
Theemissionswarninglampdoesnot
gooffimmediately,butdoessoaftera
fewmilesofdriving.
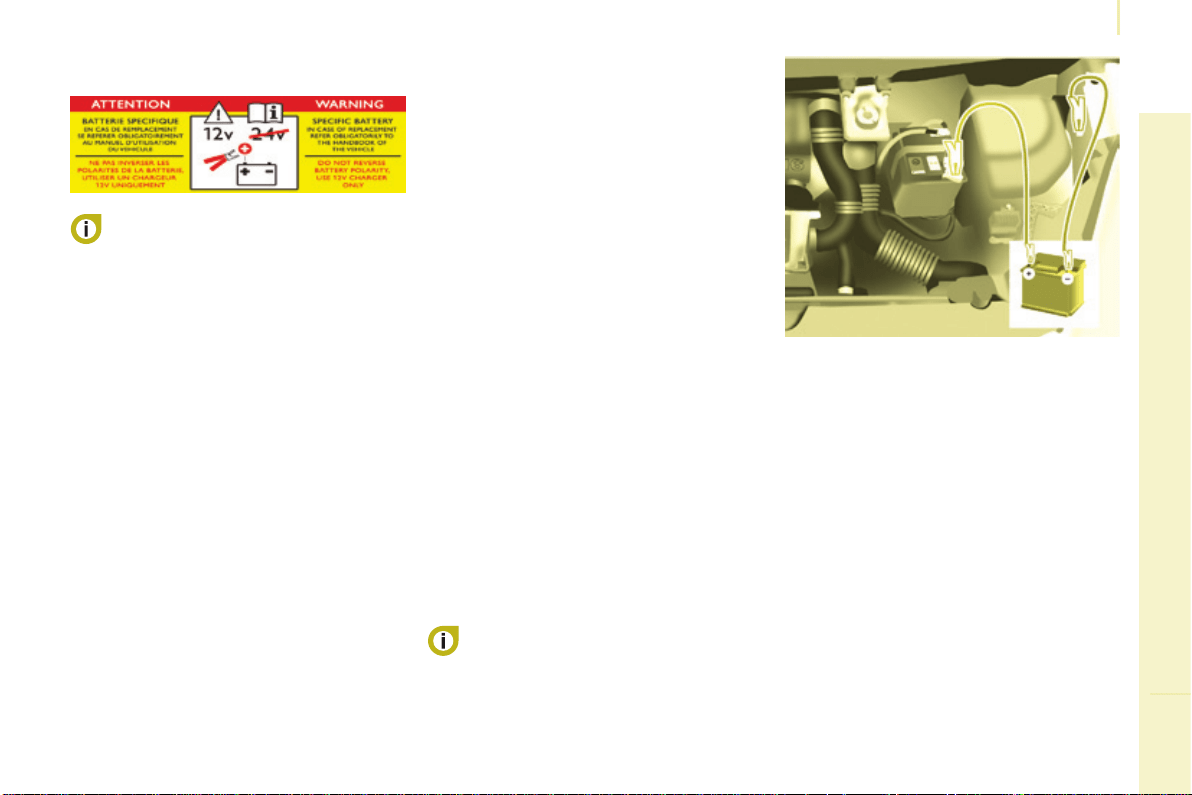
169
Battery
QUICK HELP
8
Berlingo-2-VP_en_Chap08_Aide-rapide_ed01-2016
BATTERY
Before disconnecting the battery, you
mustwaitfor2minutesafterswitching
offtheignition.
Neverdisconnectaterminalwhenthe
engineisrunning.
Neverchargeabatterywithoutrst
disconnectingtheterminals.
After every reconnection of the battery,
switchontheignitionandwait1minute
before starting to allow the electronic
systemstobeinitialised.Ifproblems
remainafterdoingthis,pleasecontact
aCITROËNdealeroraqualied
workshop.
After changing bulbs, wait
approximately3minutesbefore
reconnectingthebattery.
It is advisable to disconnect the
battery if the vehicle is not to be
usedforaperiodofmorethan
onemonth.
To charge the battery using a
battery charger
- Disconnectthebattery.
- Follow the instructions for use
given by the battery charger
manufacturer.
- Reconnect starting with the
negative(-)terminal.
- Checkthattheterminalsand
connectorsareclean.Iftheyare
covered with sulphate (white or
greenishdeposit),disconnectthem
andcleanthem.
To start the vehicle from
another battery
- Connect the red cable to the
positive(+)terminalsofthe
twobatteries.
- Connect one end of the green
orblackcabletothenegative(-)
terminaloftheslavebattery.
- Connect the other end of the green
orblackcabletoanearthpointon
thebrokendownvehicleasfaras
possiblefromthebattery.
- Operatethestarter,lettheenginerun.
- Wait for the engine to return to idle,
thendisconnectthecables.
The presence of this label
indicates the use of a 12 V
lead-acid battery with special
technologyandspecication,forwhich
theinvolvementofaCITROËNdealer
orqualiedworkshopisrequiredwhen
replacingordisconnectingthebattery.
Failuretoobservethisrecommendation
maycauseprematurewearofthe
battery.
Afterrettingthebattery,theStop&
Startsystemwillonlybeactiveafter
several hours depending on the
climaticconditionsandthestateof
charge of the battery (up to about
8hours).
The Stop & Start battery does not have
tobedisconnectedforcharging.

170
Battery
Berlingo-2-VP_en_Chap08_Aide-rapide_ed01-2016
ECONOMY MODE
After the engine has stopped, with
thekeyintheignitionposition,certain
functions (windscreen wiper, electric
windows,courtesylamps,audio
equipment,etc.)canonlybeusedfora
cumulativedurationofthirtyminutes,to
preventdischargingofthebattery.
Oncethethirtyminuteshaveelapsed,
the active functions are put on standby
andthebatterywarninglampashes
accompaniedbyamessageinthe
screen.
Toresumetheuseofthesefunctions
immediately,starttheengineandletit
runforafewminutes.
Thetimeavailablewillthenbedouble
thetimeforwhichtheenginewasleft
running.However,thistimewillalways
bebetweenveandthirtyminutes.
Aatbatterywillpreventthe
enginefromstarting.
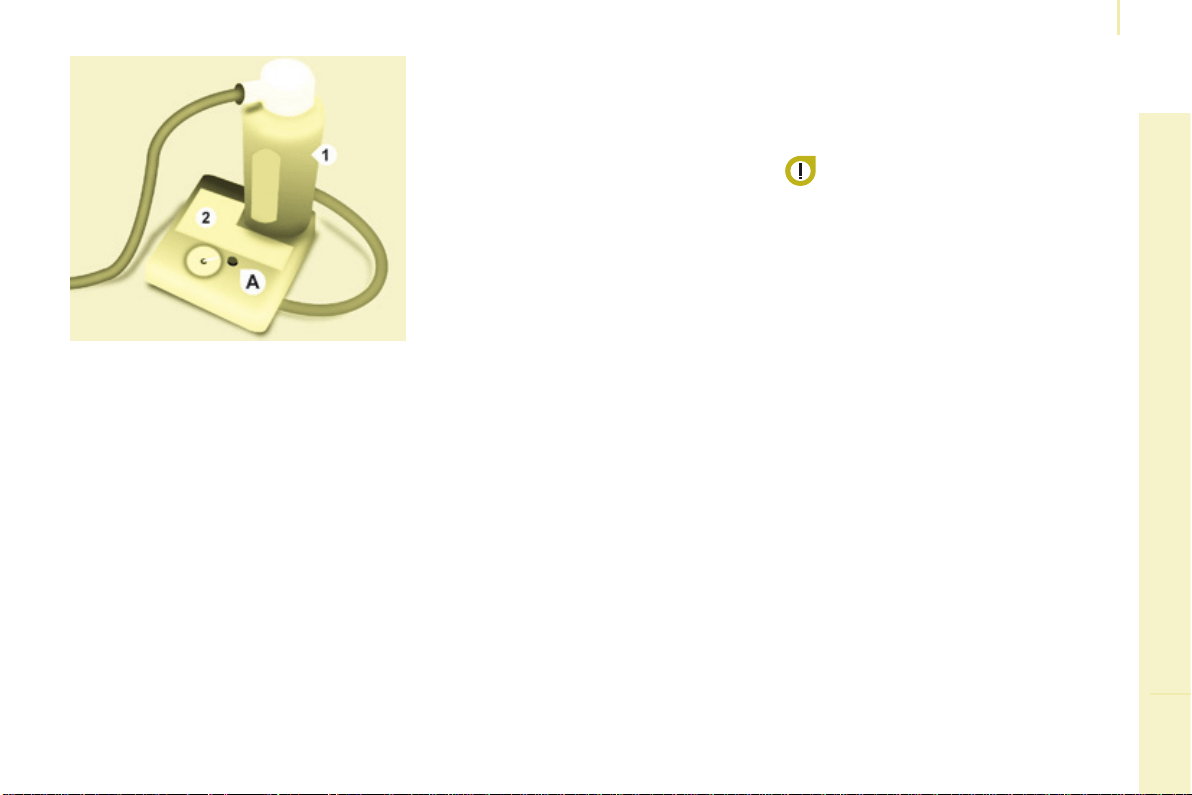
171
QUICK HELP
8
Berlingo-2-VP_en_Chap08_Aide-rapide_ed01-2016
Changing a wheel
Thetemporarytyrerepairkitconsists
ofacompressorandabottle
(containingasealant).
Using the kit
- Tickthedeatedwheelonthe
speedlimitationstickerthenafx
thestickertothevehicle'ssteering
wheeltoremindyouthatawheelis
intemporaryuse.
- Clip the bottle 1 on the
compressor2.
- Connect the bottle 1 to the valve of
thetyretoberepaired.
- Takecaretounwindthe
compressorpipebeforeconnecting
ittothebottle.
- Connect the power lead to one of
thevehicle's12Vsockets.
- Switchonthecompressorby
pressing button A until the tyre
pressurereaches2.0bars.Ifthis
pressure cannot be reached, the
tyrecannotberepaired.
- Removeandstorethecompressor.
- Driveimmediately,forafewmiles
(kilometres),atreducedspeed,to
llthepuncture.
- Adjustthepressureusingthe
compressorinaccordancewiththe
recommendationforthevehicleand
checkthattheleakislledcorrectly
(nofurtherlossofpressure).
- Driveatreducedspeed(50mph
[80km/h]).Thetyremustbe
examinedandrepairedbya
specialistassoonaspossible.
After use, the bottle can be stored in
aplasticbag,suppliedinthekit,to
avoid staining your vehicle with traces
ofuid.
Warning:thesealantproductis
harmfulifswallowedandcauses
irritationtotheeyes.
Keepitoutofreachofchildren.
After use, do not discard the bottle into
theenvironment,takeittoaCITROËN
dealer or to an specialised waste
disposalsite.
Replacementbottlesofsealantare
availablefromCITROËNdealers.
TEMPORARY PUNCTURE
REPAIR KIT
Thekitislocatedinoneofthe
twostoragecompartmentslocated
underthefrontseats.
Vehiclessuppliedwithatemporary
puncturerepairkitdonothaveaspare
wheelortooling(jack,wheelbrace,...).
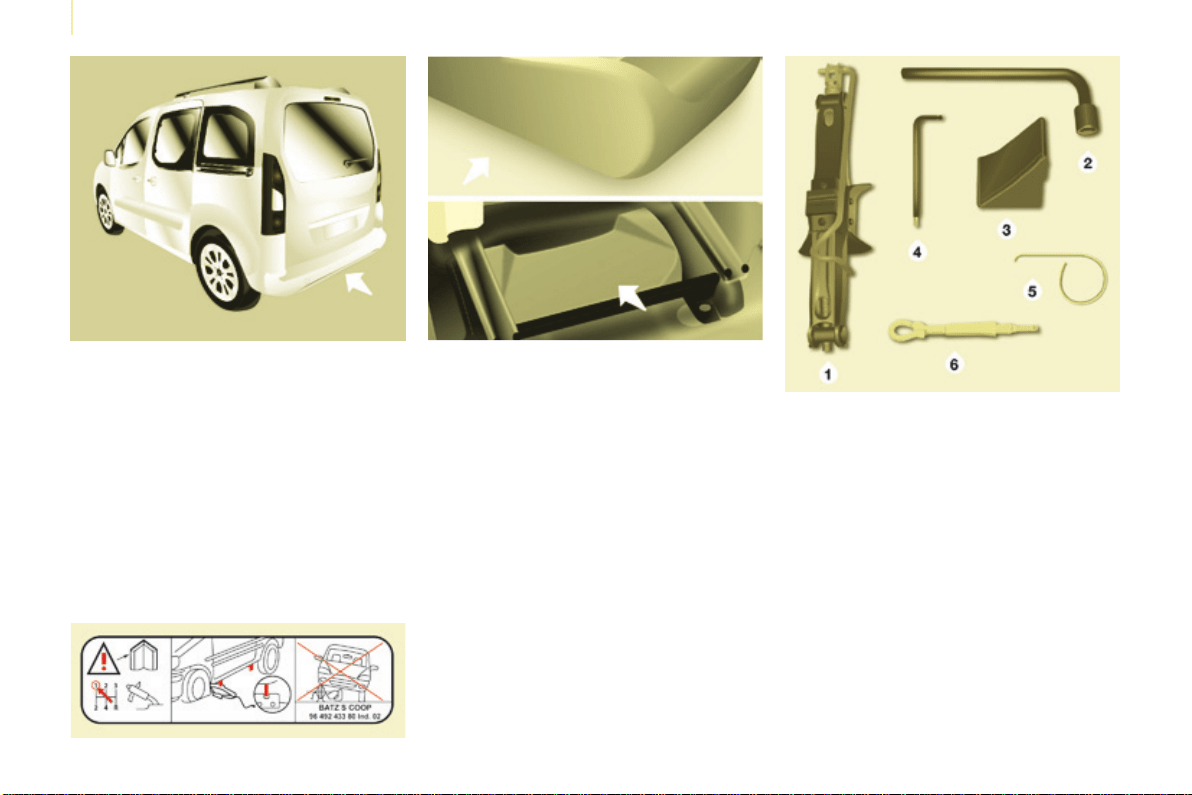
172
Berlingo-2-VP_en_Chap08_Aide-rapide_ed01-2016
Changing a wheel
1. Parking the vehicle
- Theoccupantsmustgetoutofthe
vehicleandwaitinasafelocation.
- Ifpossible,parkthevehicleon
level, stable and non-slippery
ground.
- Applytheparkingbrake,switch
offtheignitionandengagerstor
reversegear.
- Placeachockunderthewheel
diagonally opposite the one to be
changed.
CHANGING A WHEEL
2. Tools
The tools are stowed in a storage area
closedbyaapunderafrontseat.
- Ifnecessary,movetheseatforward
toaccessthestoragecompartment
fromtherear.
- Removetheapthentakeoutthe
jackandthetoolcarrier.
- Removethetoolsneededfromthe
carrier.
1. Jack.
2. Wheelbrace.
3. Chock.
4. Spanner for the Modutop roof bars
andrearlamps.
5. Alloywheeltrimremovaltool.
6. Towingeye.
Ifthevehicleisttedwithatowbar,
itissometimesnecessarytoraise
thevehicleslightlytomakeiteasier
toremovethesparewheelfromits
carrier.
Oncertaintypesofgroundand/
or if considerable loads are being
transported, call a CITROËN dealer or
aqualiedworkshop.
Thejackandtoolsarespecictoyour
vehicle.Donotusethemforother
purposes.
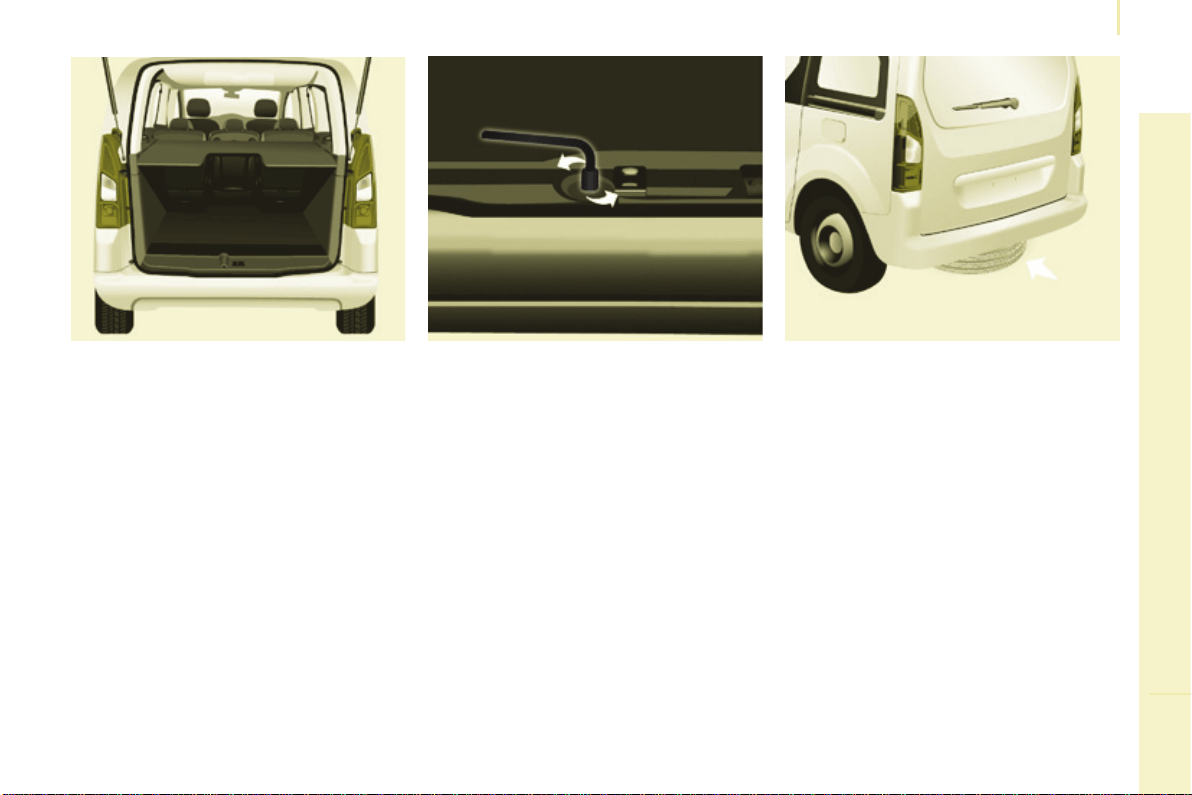
173
QUICK HELP
8
Berlingo-2-VP_en_Chap08_Aide-rapide_ed01-2016
Changing a wheel
3. Spare wheel
- Unscrew the bolt using the
wheelbrace until the carrier is
loweredfully.
- Open the rear doors to gain access
tothesparewheel.
- Detachthecarrierfromthehook
and place the spare wheel near the
wheeltobechanged.
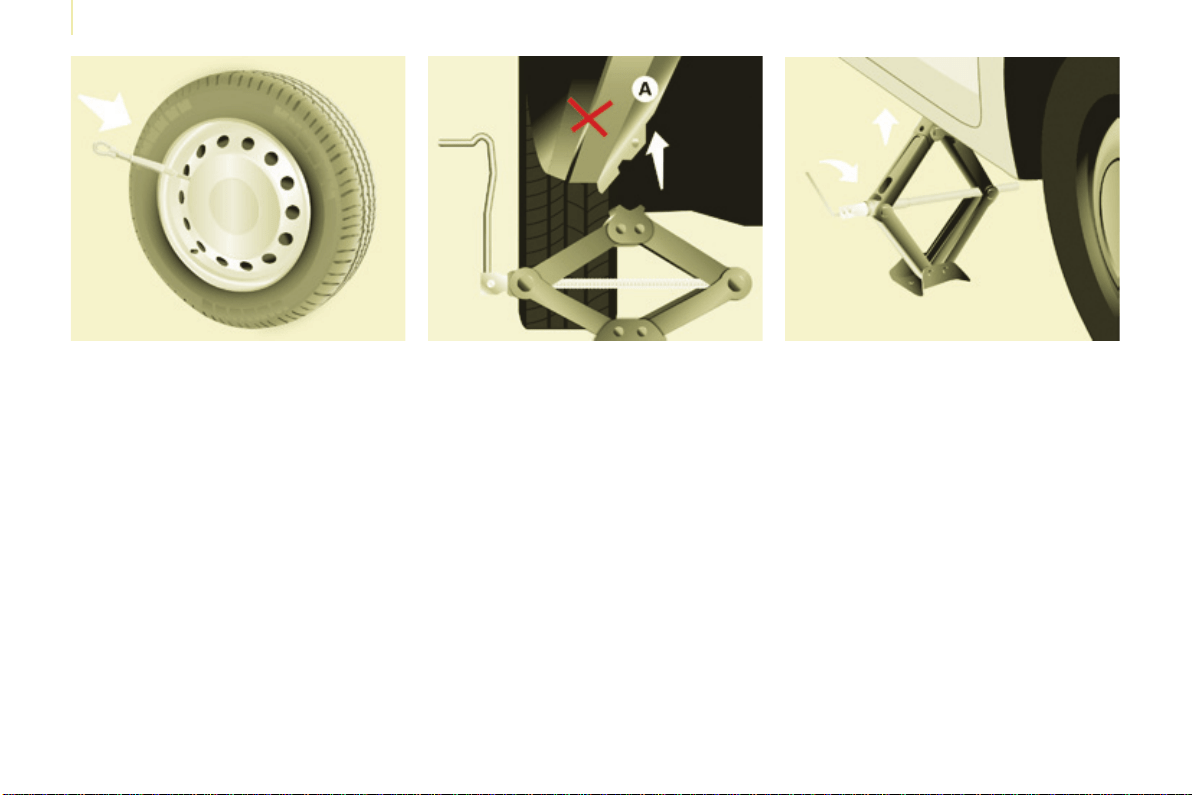
174
Berlingo-2-VP_en_Chap08_Aide-rapide_ed01-2016
Changing a wheel
4.
Removing the wheel with punctured tyre
- Positionthefootofthejackonthe
ground and ensure that it is directly
belowthefrontorrearjacking
point provided on the underbody,
whichever is closest to the wheel to
bechanged.
- Extendthejackuntilitshead
comesintocontactwiththejacking
point used; the vehicle's contact
area Amustbeengagedwiththe
headofthejack.
- Raise the vehicle until there is
sufcientspacebetweenthe
wheel and the ground, so that (not
punctured) spare wheel can be
easilytted.
- Resumeandcompletethe
unscrewingofthewheelbolts.
- Removetheboltsandremovethe
wheel.
- Removethewheeltrim.
- Loosen the wheel bolts and start
unscrewingthem.
Ensurethatthejackisstable,thefoot
ofthejackmustbeincontactwiththe
ground,anddirectlybelowthejacking
pointused.
If the ground is slippery or loose, the
jackmayslipordrop-Riskofinjury!
Ensurethatthejackispositionedonly
atoneofthejackingpointsunderthe
vehicle,makingsurethatthevehicle's
contact surface is centred on the head
ofthejack.
Otherwisethereisariskofdamage
tothevehicleand/orofthejack
dropping-Riskofinjury!
Donotextendthejackuntilyouhave
started unscrewing the bolts on the
wheel to be changed and have placed
thechockunderthewheeldiagonally
opposite.
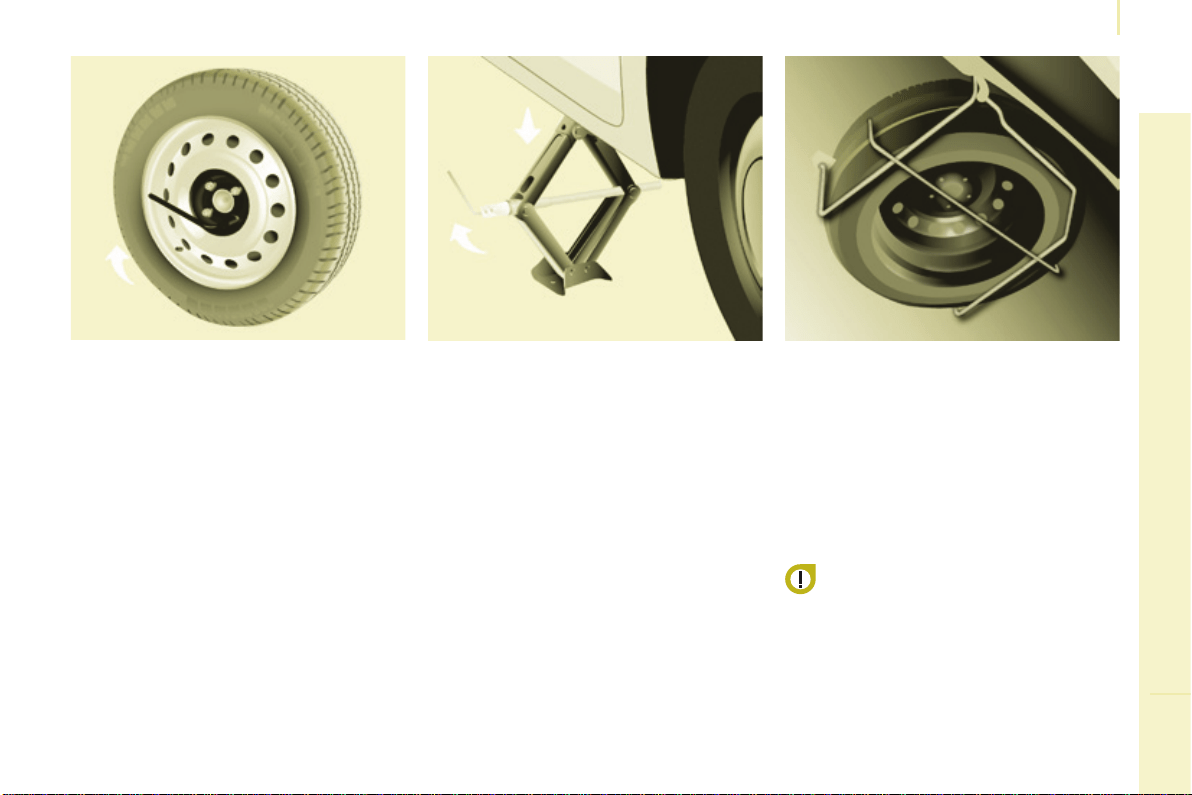
175
QUICK HELP
8
Berlingo-2-VP_en_Chap08_Aide-rapide_ed01-2016
Changing a wheel
- Position the wheel on the hub and
starttighteningtheboltsbyhand.
- Carry out an initial tightening of the
boltsusingthewheelbrace.
5. Fitting the spare wheel
- Lowerthevehiclecompletelyby
foldingthejack,thenremovethe
jack.
- Tighten the bolts again using the
wheelbrace,tightenthemfully
withoutforcingthem.
- Place the wheel to be repaired in
thecarrier.
- Securethecarrieronthehookthen
raise the carrier by tightening the
boltwiththewheelbrace.
- Fullytightenthebolt,thencheck
thatthewheelisheldatagainst
theoor.
If this is not the case, repeat the
operation.
Never go underneath a vehicle
thatissupportedonlybyajack
(useastand).
Never use a power driver in place of
thewheelbrace.
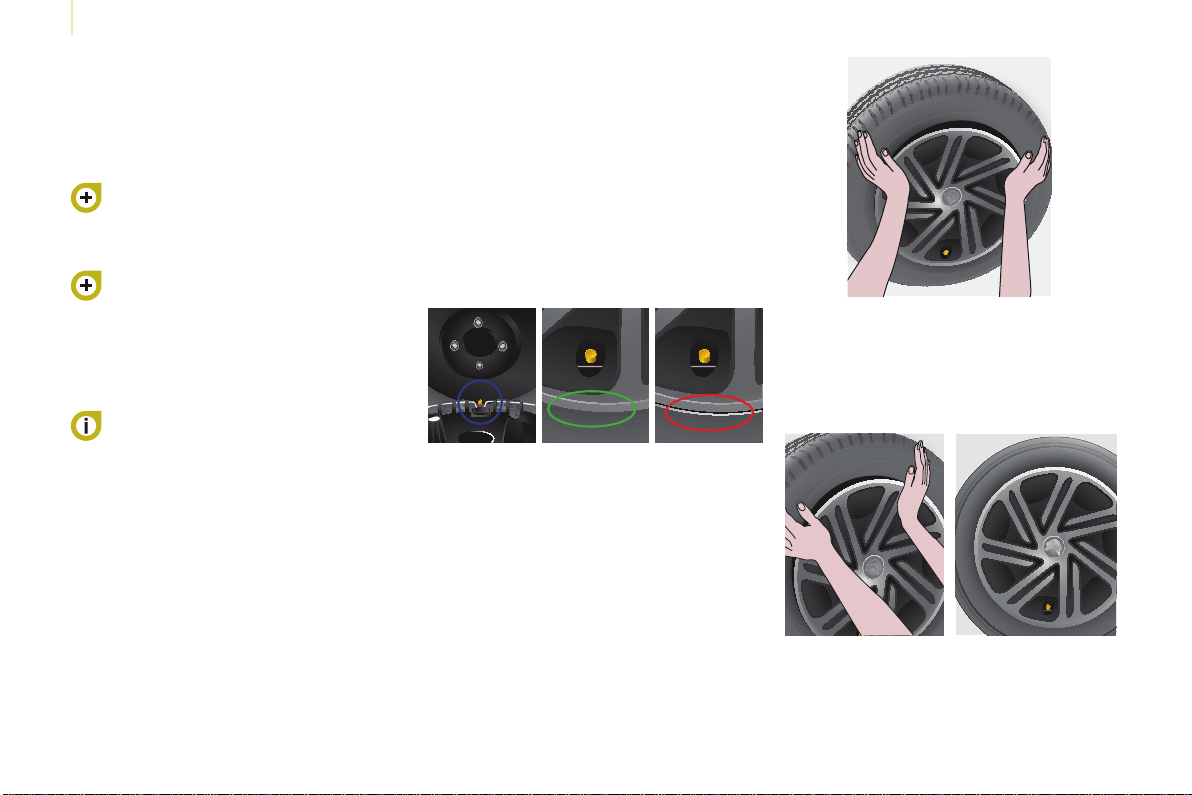
176
Berlingo-2-VP_en_Chap08_Aide-rapide_ed01-2016
Changing a wheel
FITTING THE WHEEL
TRIM
Thetyrevalvemustbecentredinthe
wheeltrimcut-out.
Thispositionisessentialforttingthe
wheeltrimcorrectlyonthesteelwheel.
(If the valve is not correctly aligned with
thecut-out,theanti-rotationsystem
will be in contact with the heads of the
wheelboltsandrisksbeingdamaged
iftheuserpersistsinttingthewheel
triminthisincorrectposition).
- Ensure that all of the clips are
engaged except the last one
(oppositethevalvehole).
- Strikethewheeltrimwiththepalm
of your hand, opposite the valve
intheareaofthelastxingclip
(alwaysinthedirectionofclipping).
- Ensure that the outer edge of
thewheeltrimisnotdeformedor
pushedintothewheel:
● Correct position for the edge of
thewheeltrim.
● Incorrect position for the edge of
thewheeltrim.
6. Refitting the repaired wheel
Thewheelisrettedasdescribedin
step5,notforgettingtoretthewheel
trim.
Refertothe"Instrumentsand
controls" section of chapter 3,
"Tyreunder-inationdetection"
part,forrecommendationsafter
changingawheelttedwithatyre
under-inationdetectionsensor.
Refertothe"Identication
markings"sectionofchapter9to
locatethetyrelabel.
The spare wheel is not designed
tobeusedoverlongdistances.
Have the tightening of the bolts
andthetyrepressurecheckedby
aCITROËNdealeroraqualied
workshopassoonaspossible.
Have the original wheel repaired
andrettedbyaCITROËNdealer
oraqualiedworkshopassoonas
possible.
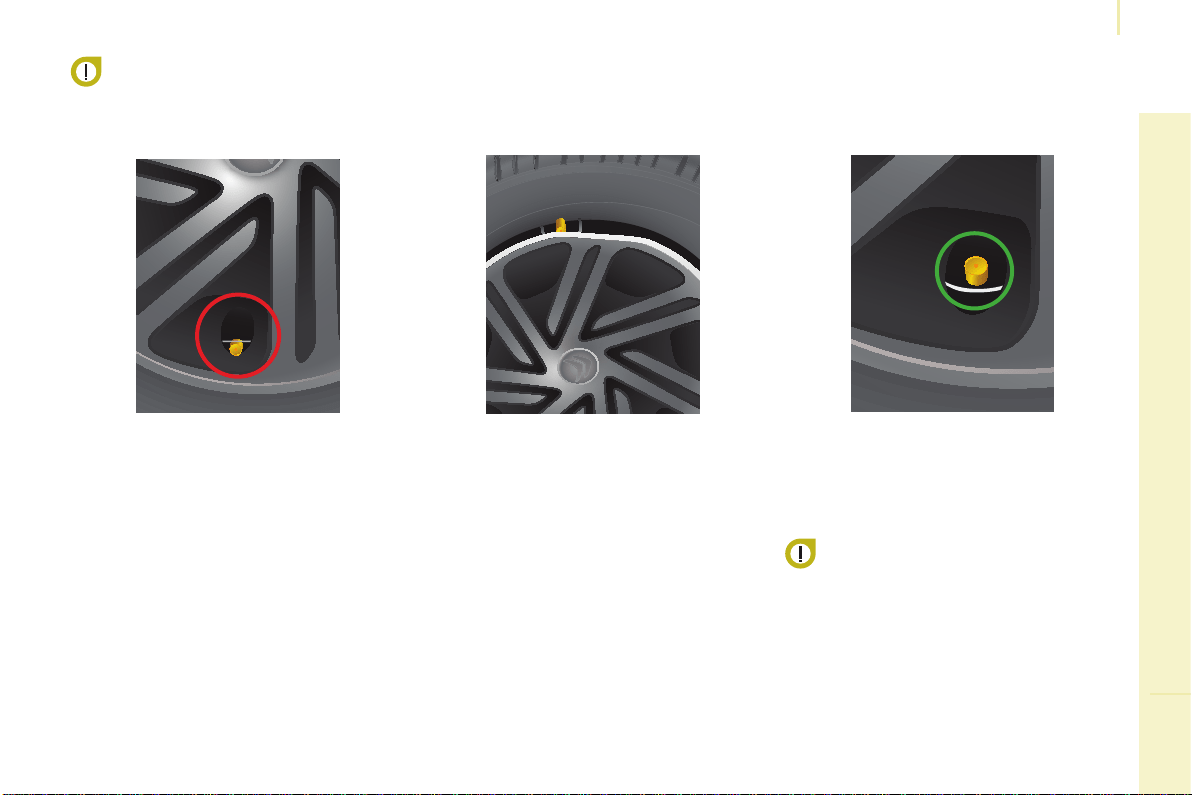
177
QUICK HELP
8
Berlingo-2-VP_en_Chap08_Aide-rapide_ed01-2016
Changing a wheel
Check the position of the tyre
valve relative to the ring of the
wheel trim.
Valve not positioned correctly:below
thering.
Observe the wheel trim tting
procedure, so as to avoid
breaking the xing clip and
deformation at the edge of the
wheel trim.
Deformationoftheedgeofthewheel
trimatthevalve,becauseitistted
incorrectly.
Valve positioned correctly:belowthe
ring.
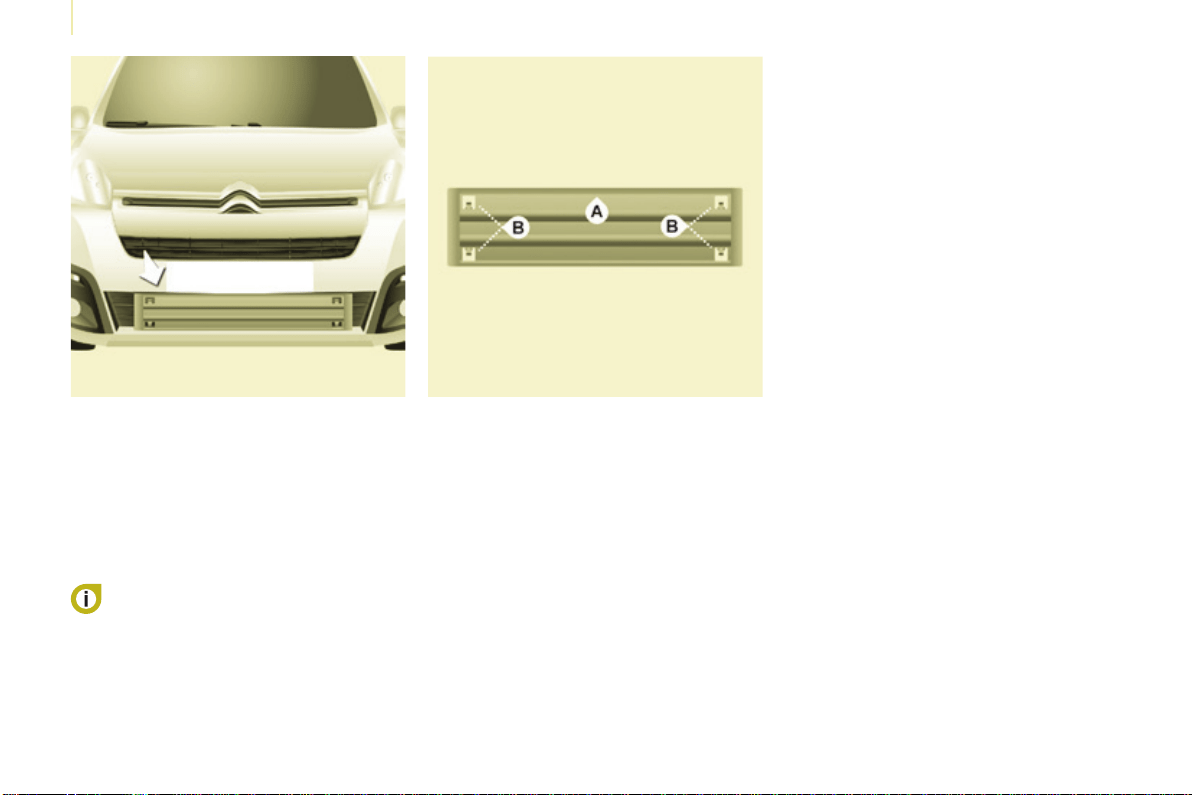
178
Berlingo-2-VP_en_Chap08_Aide-rapide_ed01-2016
Snow screen
REMOVABLE SNOW SCREEN
(BLANKING COVER)
Accordingtocountry,theremovable
snow screen is installed on the lower
partofthefrontbumpertopreventthe
accumulationofsnowattheradiator
coolingfan.
Fitting
Removal
- Offer up the snow screen facing its
centring pin Aonthefrontbumper.
- Put it in place by pressing at each
clip Blocatedinthefourcorners.
Donotforgettoremovethe
snow screen when the exterior
temperatureishigherthan10°C
(noriskofsnowfall)andwhentowing.
- Pass a screwdriver into the hole
locatedneareachoftheclips.
- Use the screwdriver as a lever to
unclip the four clips Binturn.
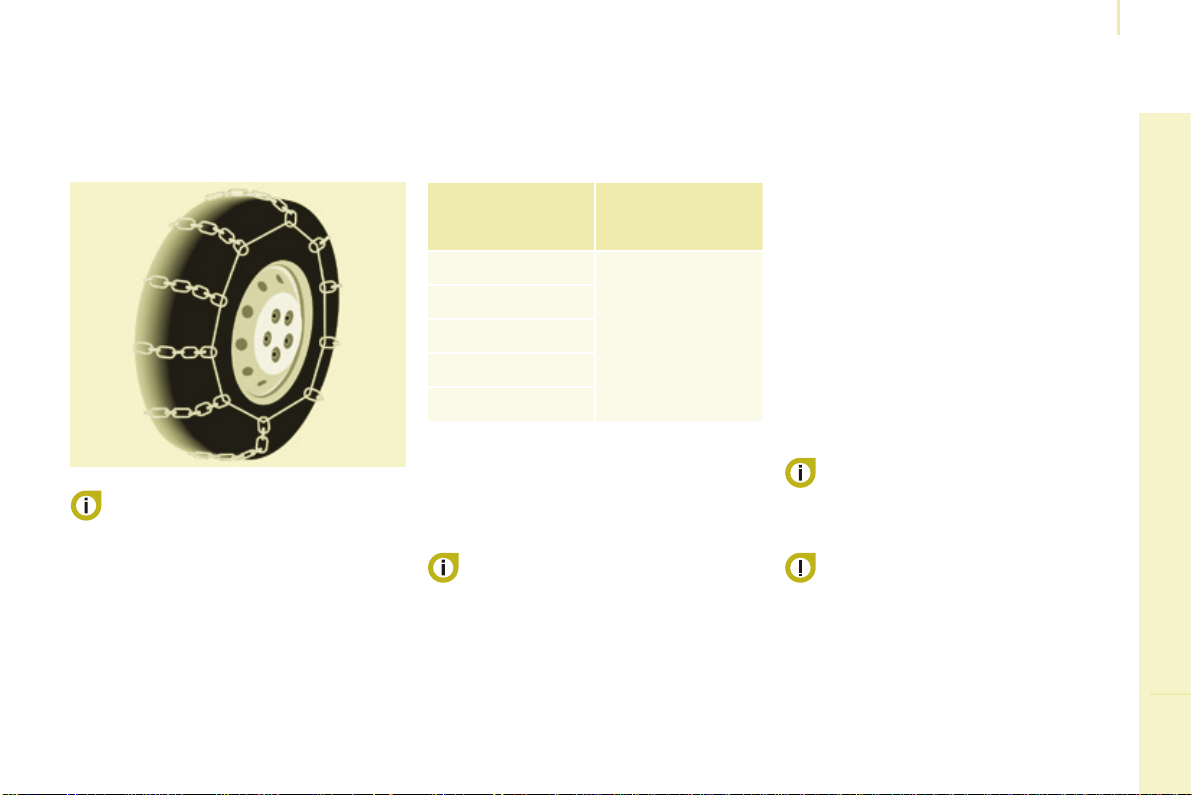
179
QUICK HELP
8
Berlingo-2-VP_en_Chap08_Aide-rapide_ed01-2016
Snow chains
SNOW CHAINS
In wintry conditions, snow chains
improvetractionaswellasthe
behaviourofthevehiclewhenbraking.
Thesnowchainsmustbetted
onlytothedrivingwheels.They
mustneverbettedto"space-
saver"typesparewheels.
Takeaccountofthelegislationin
force in your country on the use
ofsnowchainsandthemaximum
runningspeedauthorised.
Advice on installation
F Ifyouhavetotthechainsduring
ajourney,stopthevehicleonaat
surfaceonthesideoftheroad.
F Applytheparkingbrakeand
positionanywheelchocksto
preventmovementofyourvehicle.
F Fit the chains following the
instructions provided by the
manufacturer.
F Move off gently and drive for a
fewmoments,withoutexceeding
30mph(50km/h).
F Stopyourvehicleandcheckthat
the snow chains are correctly
tightened.
Itisrecommendedthatbeforeyou
leave,youpractisettingthesnow
chainsonalevelanddrysurface.
Use only the chains designed to be
ttedtothetypeofwheelttedtoyour
vehicle:
Formoreinformationonsnowchains,
contact a CITROËN dealer or a
qualiedworkshop.
Original
tyre size
Maximumlink
size.
195/65R15
9mm
195/70R15
205/65R15
215/55R16
215/50R17
Avoid driving with chains on roads
that have been cleared of snow,
toavoiddamagingyourvehicle'styres
andtheroadsurface.Ifyourvehicle
isttedwithalloywheels,checkthat
nopartofthechainoritsxingsisin
contactwiththewheelrim.
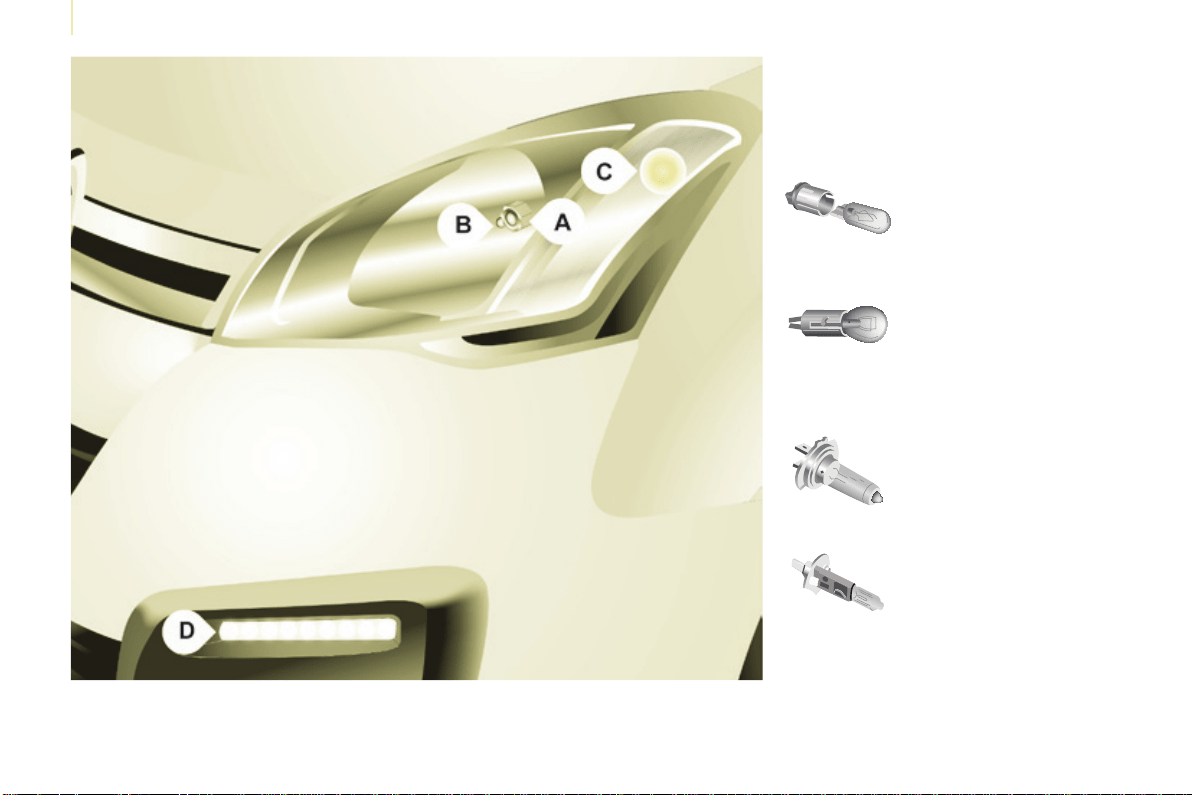
180
Berlingo-2-VP_en_Chap08_Aide-rapide_ed01-2016
Changing a bulb
CHANGING A BULB
Type A
Allglassbulb:pullgently
asitisttedbypressure.
Type C
Halogenbulb:releasethe
retainingspringfromits
housing.
Type B
Bayonetbulb:press
on the bulb then turn it
anticlockwise.
Types of bulb
Varioustypesofbulbarettedtoyour
vehicle.
Toremovethem:
Type D
Light-emittingdiode
(LED):forreplacement
ofthedaytimerunning
lamps,contacta
CITROËN dealer or a
qualiedworkshop.
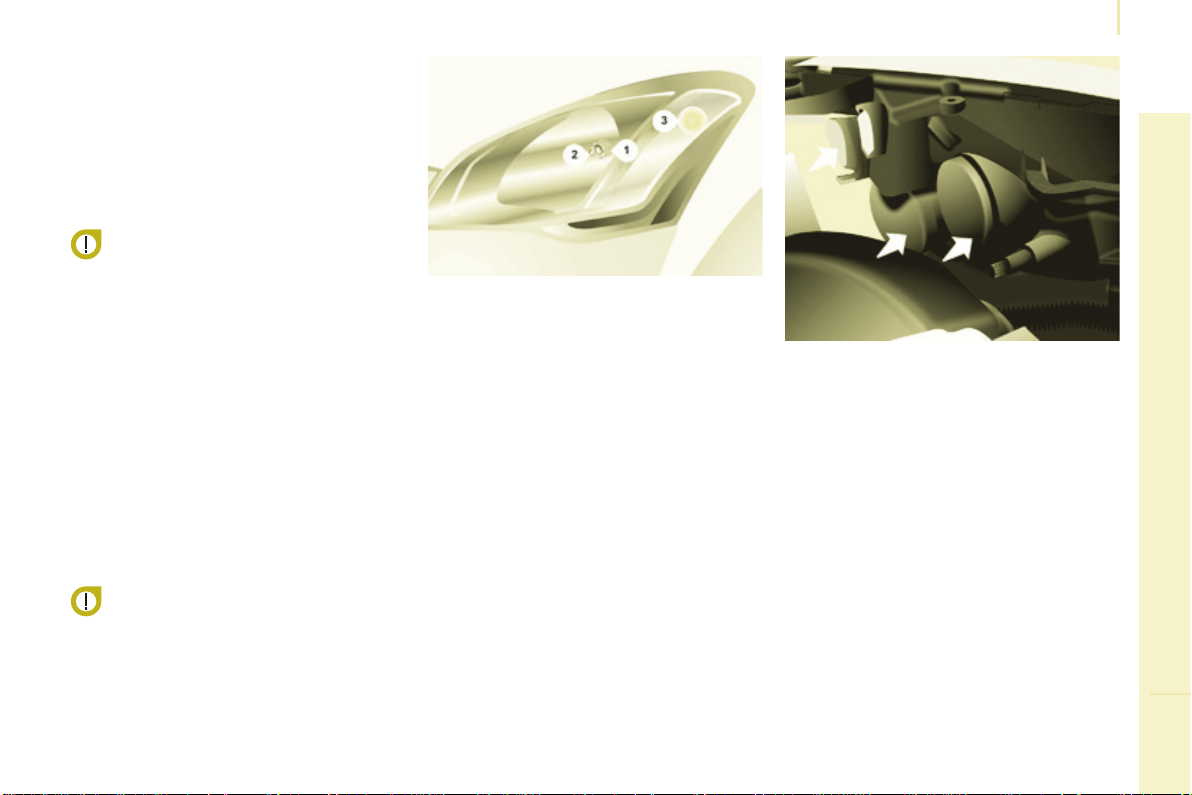
181
QUICK HELP
8
Berlingo-2-VP_en_Chap08_Aide-rapide_ed01-2016
Changing a bulb
2. Sidelamps
Type A, W5W - 5W
- Removethecoverbypullingthe
exiblerubbertab.
- Removethebulbholderttedby
pressurebypullingtheconnector.
- Changethebulb.
- Ensurethatthecoverisretted
correctly all round to assure correct
sealing.
Front lamps
1. Dipped / Main beam headlamps
Type C, H4 - 55W
- Removethecentrecoverbypulling
theexiblerubbertab.
- Disconnecttheelectricalconnector.
- Releasetheretainingtab.
- Changethebulbtakingcare
toalignthemetalpartwiththe
groovesonthelamp.
- Repositiontheretainingtab.
- Ensurethatthecoverisretted
correctly all round to assure correct
sealing.
High pressure washing
Openthebonnet.Toaccessthebulbs,
reachbehindtheheadlampunit.
Carry out the operations in reverse
ordertoreteachbulbandcheckthat
thebonnetisclosedsecurely.
Halogenbulbsmustbechanged
withtheheadlampoff.Waitafew
minutes(riskofseriousburns).
Do not touch the bulb directly with your
ngers,uselint-freecloths.
Itisnormalforcondensationtoform
insidetheheadlamps.Regularuseof
thevehicleeliminatesthismisting.
Thebulbsmustbechangedwith
the ignition off or with the battery
disconnected.Waitapproximately
3minutesafterchangingthebulb
beforereconnectingthebattery.
Checkthatthelampsoperatecorrectly
aftereachoperation.
When using this type of washing
on stubborn dirt, do not persist on
theheadlamps,thelampsandtheir
edgestoavoiddamagingtheircoating
andseals.
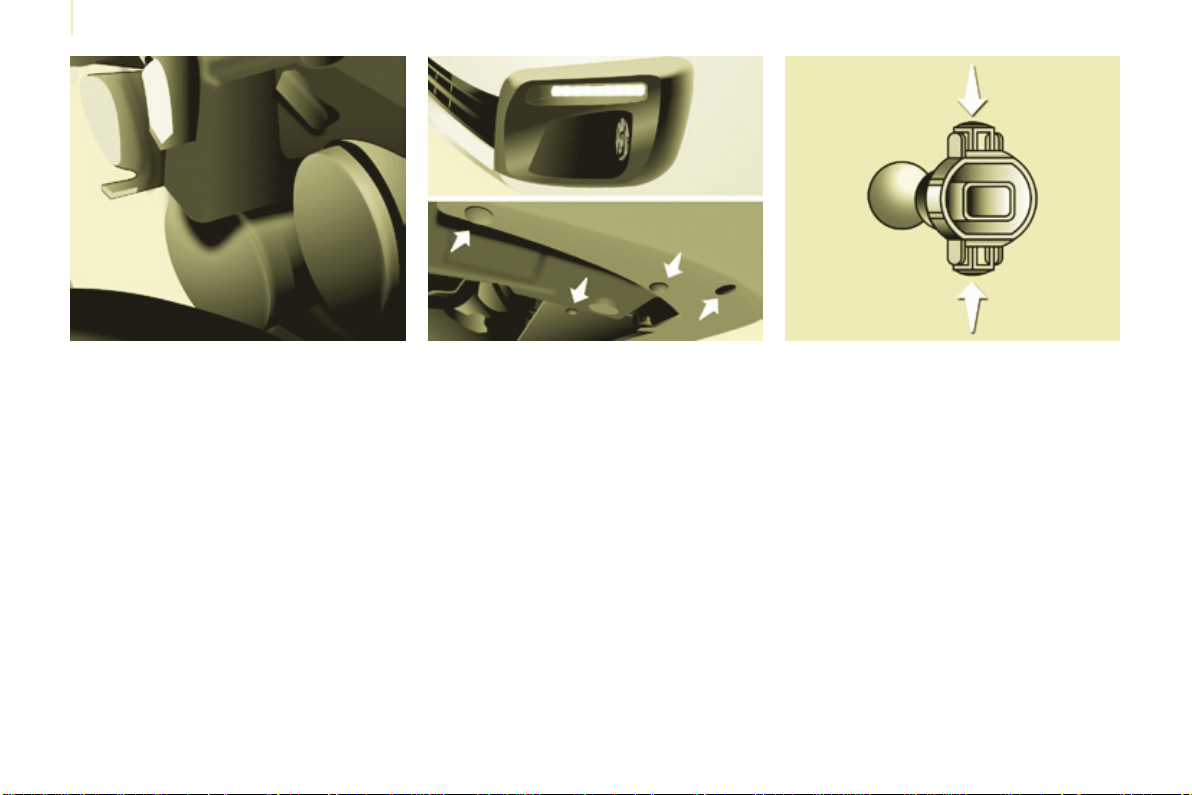
182
Berlingo-2-VP_en_Chap08_Aide-rapide_ed01-2016
Changing a bulb
3. Direction indicators
Type B,PY21W-21W(amber)
- Removethecoverbypullingthe
exiblerubbertab.
- Turn the bulb holder a quarter turn
anticlockwise.
- Removethebulbbypressingit
lightlywhileturningitanticlockwise.
- Changethebulb.
- Ensurethatthecoverisretted
correctly all round to assure correct
sealing.
4. Front foglamps
Type C, H1 - 55W
- Removethethreeclipsandthe
screw securing the wheel arch liner,
locatedbelowthebumper.
- Movethewheelarchlinerupwards.
- Disconnect the bulb holder
connector by pressing the tab at
thetop.
- Removethebulbholderby
squeezing the two clips (at top and
bottom)usingangerandthumb.
- Replacethemodule(bulbholder
andbulb).
- Carry out the operations in reverse
ordertotthemoduleandretthe
wheelarchliner.
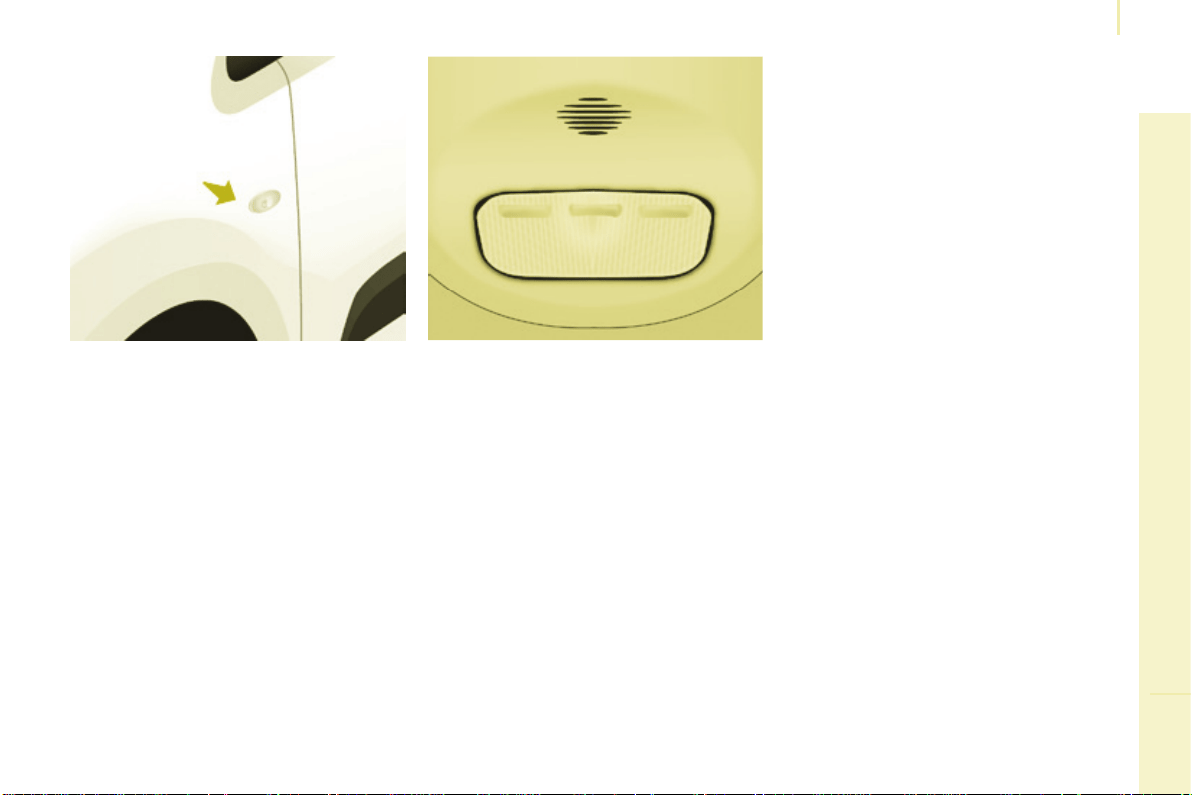
183
QUICK HELP
8
Berlingo-2-VP_en_Chap08_Aide-rapide_ed01-2016
Changing a bulb
Side repeater
Type A,WY5W-5W(amber)
- Push the repeater towards the rear
and disengage it by pulling the
front.
- Contact a CITROËN dealer to
obtain a new repeater which is a
sealedcomponent.
- Toret,engagetherepeater
towards the rear and bring it
towardsthefront.
Courtesy lamps
Type A, 12V5W - 5W
- Unclip the lens by sliding a
screwdriver in the slots on each
sideofthecourtesylamp.
- Pullthebulboutandchangeit.
- Clip the lens in its housing and
ensurethatitissecuredcorrectly.
Front / Rear
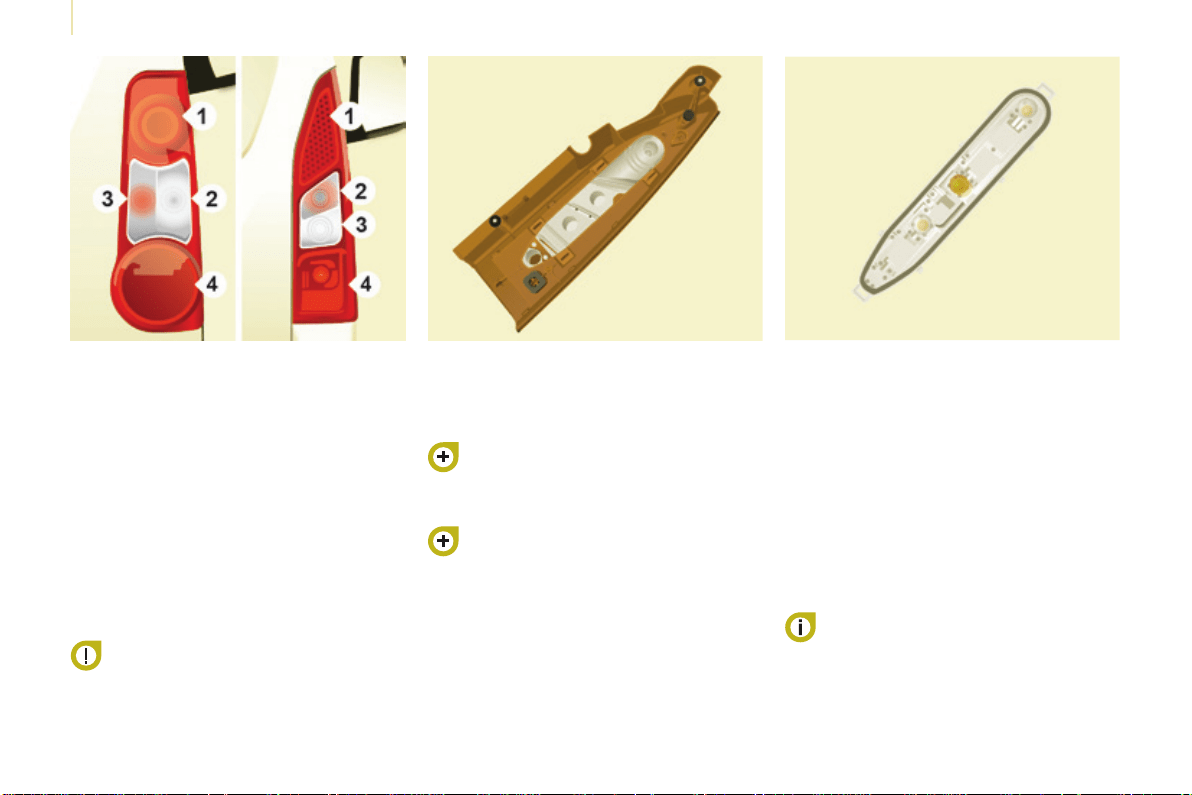
184
Berlingo-2-VP_en_Chap08_Aide-rapide_ed01-2016
Changing a bulb
Rear lamps
This procedure requires the use of
the spanner supplied with the tools for
changingawheel.
Whenretting,takecareto
reposition the tabs and the wiring
correctly to avoid trapping the
wiring.
After changing the rear direction
indicatorbulb,thereinitialisationtimeis
above2minutes.
- Move aside the 4 tabs then extract
thebulbholder.
- Removethefaultybulbby
pressing it lightly while turning it
anticlockwise.
- Changethebulb.
Whenremovingthelampunit:
- withtailgate,pullthelampunit
towards the centre of the vehicle,
- withhingeddoors,pullthelamp
unittowardsyou.
Formoreinformationonbulbs,referto
the"Typesofbulb".
1. Brake lamps / sidelamps
Type B,P21/5W-21/5W
2. Direction indicators
Type B,PY21W-21W(amber)
3. Reversing lamps
Type B, P21W - 21W
4. Foglamps
Type B, P21W - 21W
High pressure jet washing
When using this type of washing
on stubborn dirt, do not persist on
theheadlamps,theotherlamps
andtheiredgestoavoiddamaging
theircoatingandseals.
Chapter9,"Changingawheel"
section.
- Identify the failed bulb, then open
thereardoorsto180°.
Chapter3,"Access"section.
- Removethetwoxingboltsusing
thespannerprovided.
- Pullthelampunitfromtheoutside.
- Holdingthelamp,disconnectthe
electricalconnector.
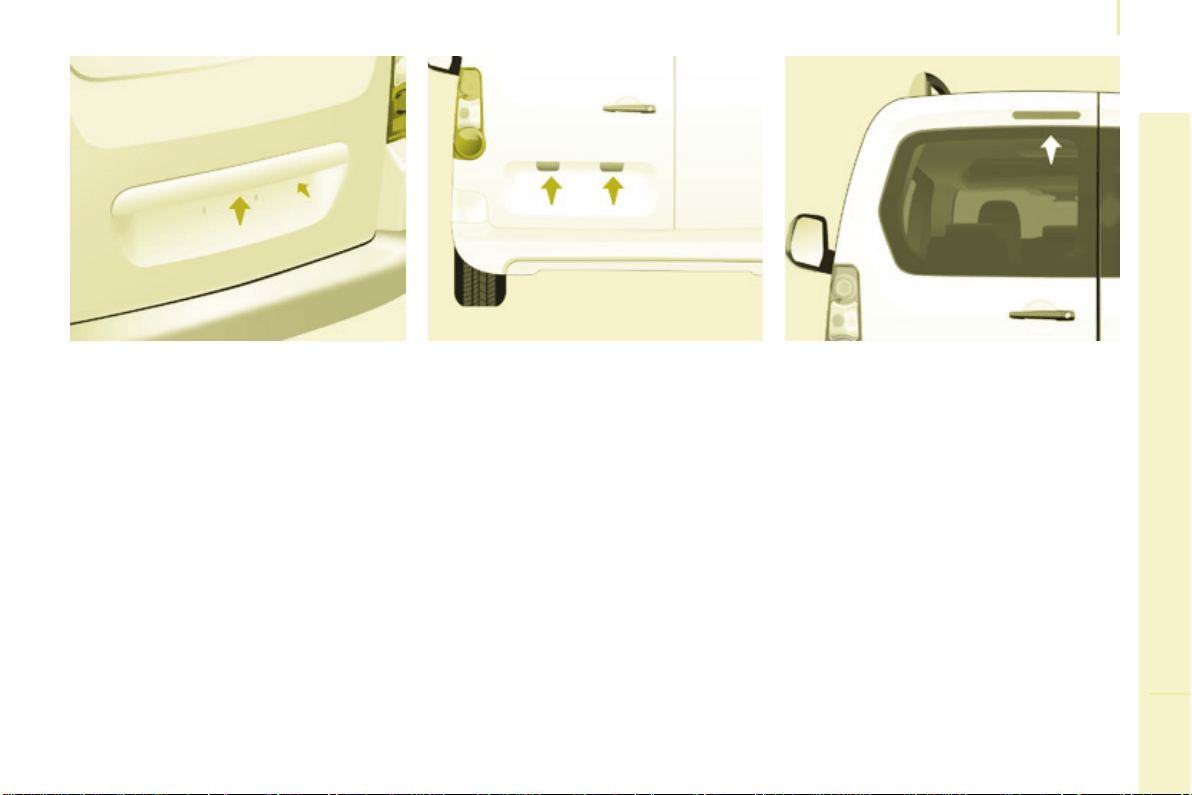
185
QUICK HELP
8
Berlingo-2-VP_en_Chap08_Aide-rapide_ed01-2016
Changing a bulb
Number plate lamps
- Unscrewthetwonuts.
- Pushthepins.
- If necessary, disconnect the
connectortoremovethelamp.
- Changethebulb.
Third brake lamp
Type A, W16W - 16W
Type A, W5W - 5W
With tailgate
- Disengage the plastic lens using a
screwdriver.
- Changethebulb.
- Replace the plastic lens and press
onit.
With hinged doors
- Uncliptheinteriortrim.
- Disconnect the connector by
movingasideitstab.
- Turn the bulb holder a quarter turn
anticlockwise.
- Changethebulb.
- Putthebulbholderbackinplace
andreconnecttheconnector.
- Putthetrimbackinplace.
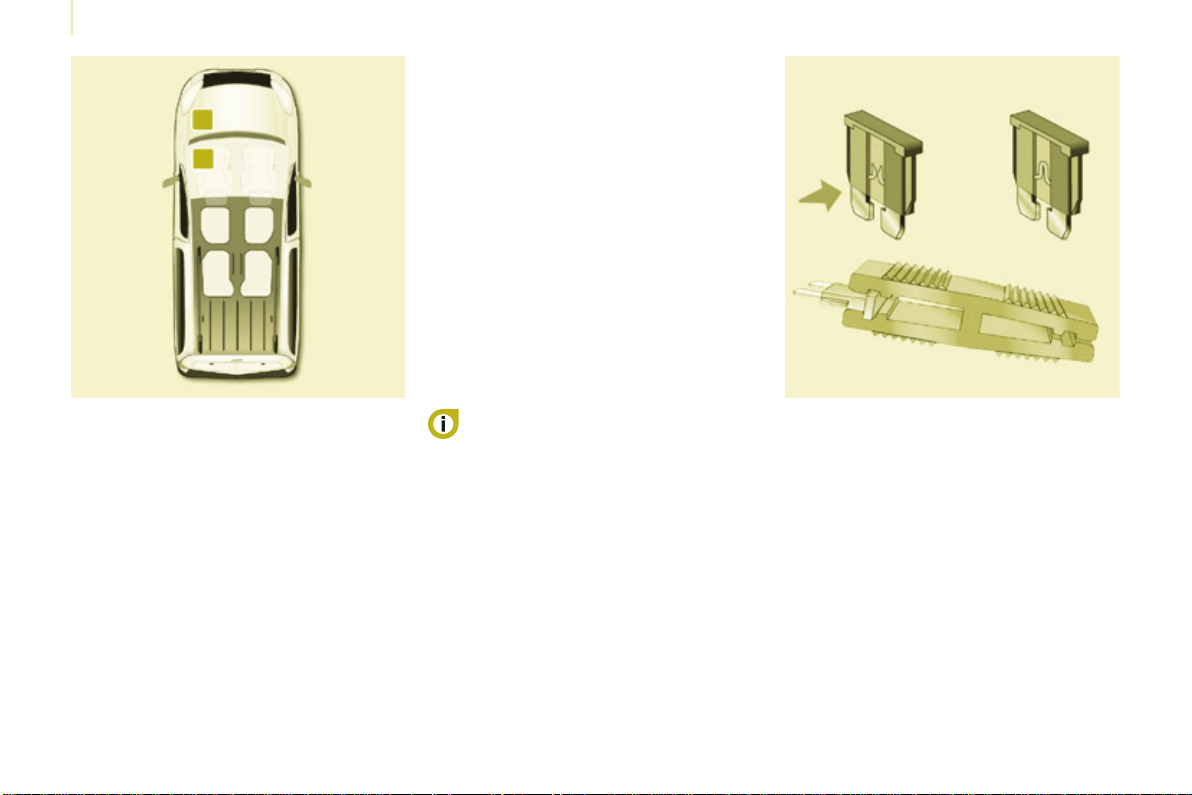
186
Berlingo-2-VP_en_Chap08_Aide-rapide_ed01-2016
Changing a fuse
CHANGING A FUSE
Thefuseboxesarelocated:
- in the lower dashboard on the
left-hand side (behind the cover),
- underthebonnet(nearthebattery).
Theinformationgivenconcernsonly
those fuses which can be changed by
the user using the tweezer, located
behind the dashboard storage
compartmentontheright-handside.
Foranyotherwork,visitaCITROËN
dealeroraqualiedworkshop.
Removing and fitting a fuse
Always replace a failed fuse with a
fuse of the same rating.
Motortradetechnicians:for
completeinformationonthefuses
and relays, refer to the "Repair
Manual"diagramsviathedealer
network.
CITROËN will not accept responsibility
for the cost incurred in repairing
your vehicle or for rectifying the
malfunctionsresultingfromthe
installation of accessories not
suppliedandnotrecommendedbythe
CITROËNnetworkandnotinstalled
in accordance with its instructions,
inparticularwhenthecombined
consumptionofalloftheadditional
equipmentconnectedexceeds
10milliamperes.
Before replacing a fuse, the cause of
theincidentmustbeidentiedand
rectied.
● Usethetweezer.
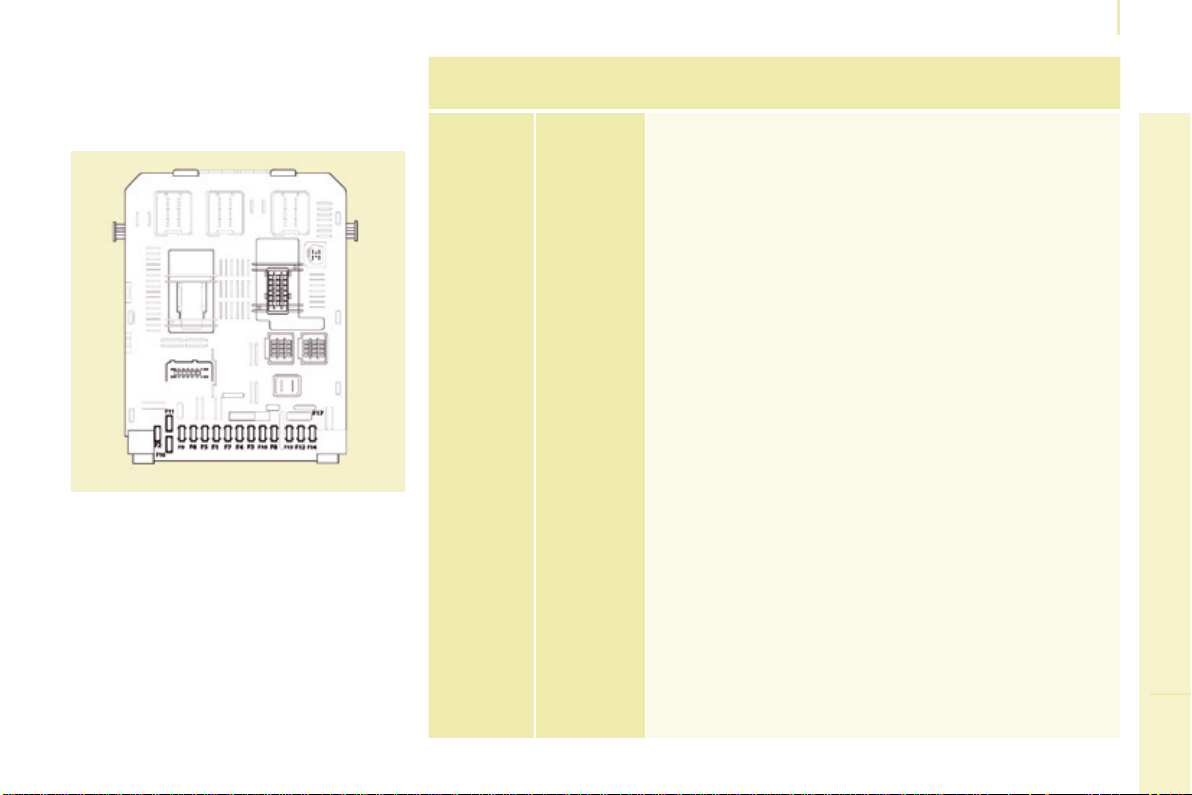
187
QUICK HELP
8
Berlingo-2-VP_en_Chap08_Aide-rapide_ed01-2016
Changing a fuse
Dashboard fuses
Tilt the cover to gain access to the
fuses.
Fuses
F
Amperes
A
Allocation
1 15 Rear wiper
2 - Not used
3 5 Airbag
4 10
Airconditioning,diagnosticsocket,mirrorcontrol,
headlampbeam
5 30 Electric windows
6 30 Locks
7 5
Rearcourtesylamp,frontmapreadinglamp,roof
console
8 20
Audioequipment,screen,tyreunder-ination
detection,alarmandsiren
9 30 Frontandrear12Vsocket
10 15 Centralcolumn
11 15 Low current ignition switch
12 15 Rain and sunshine sensor, airbag
13 5 Instrumentpanel
14 15
Parkingsensors,digitalairconditioningcontrols,
hands-freephonekit
15 30 Locks
16 - Not used
17 40 Rearscreen/mirrorsdemist/defrost
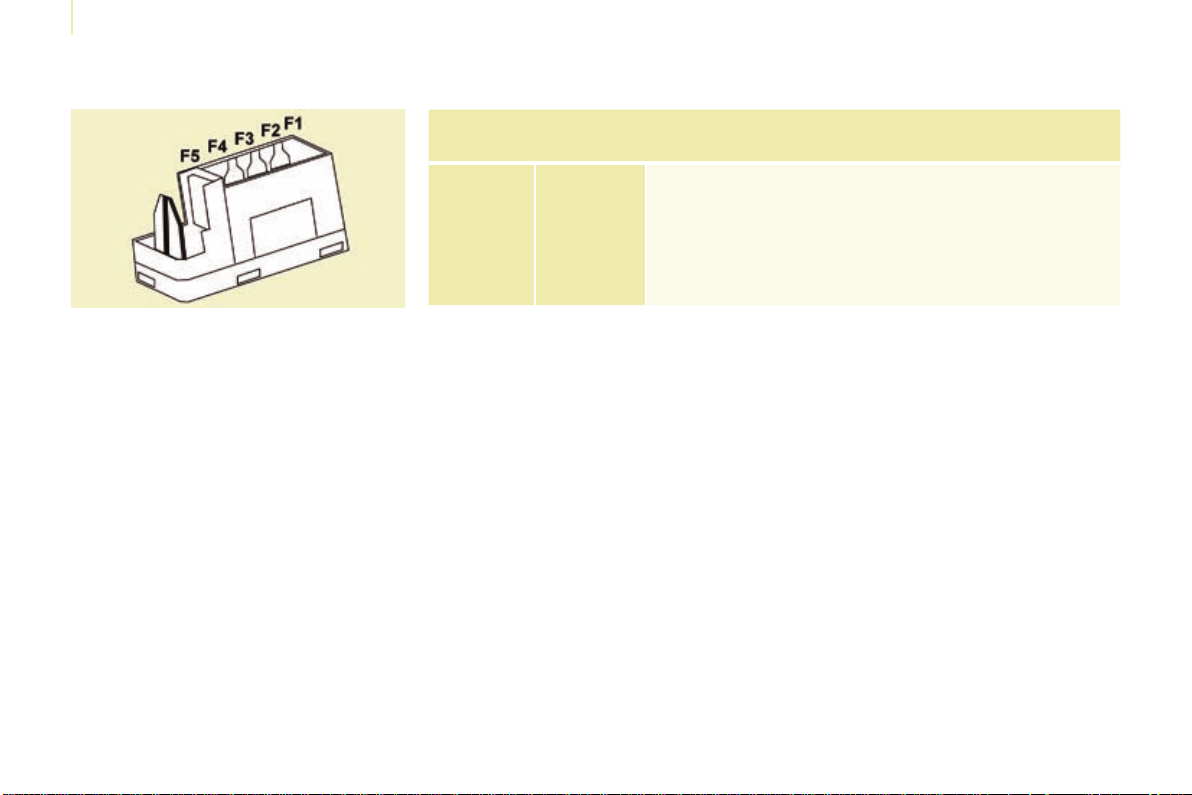
188
Berlingo-2-VP_en_Chap08_Aide-rapide_ed01-2016
Changing a fuse
Passenger compartment fuses
Fuses
F
Amperes
A
Allocation
1 - Not used
2 20 Heated seats
3 - Not used
4 15 Foldingmirrorsrelay
5 15 Refrigerationequipmentsocketrelay
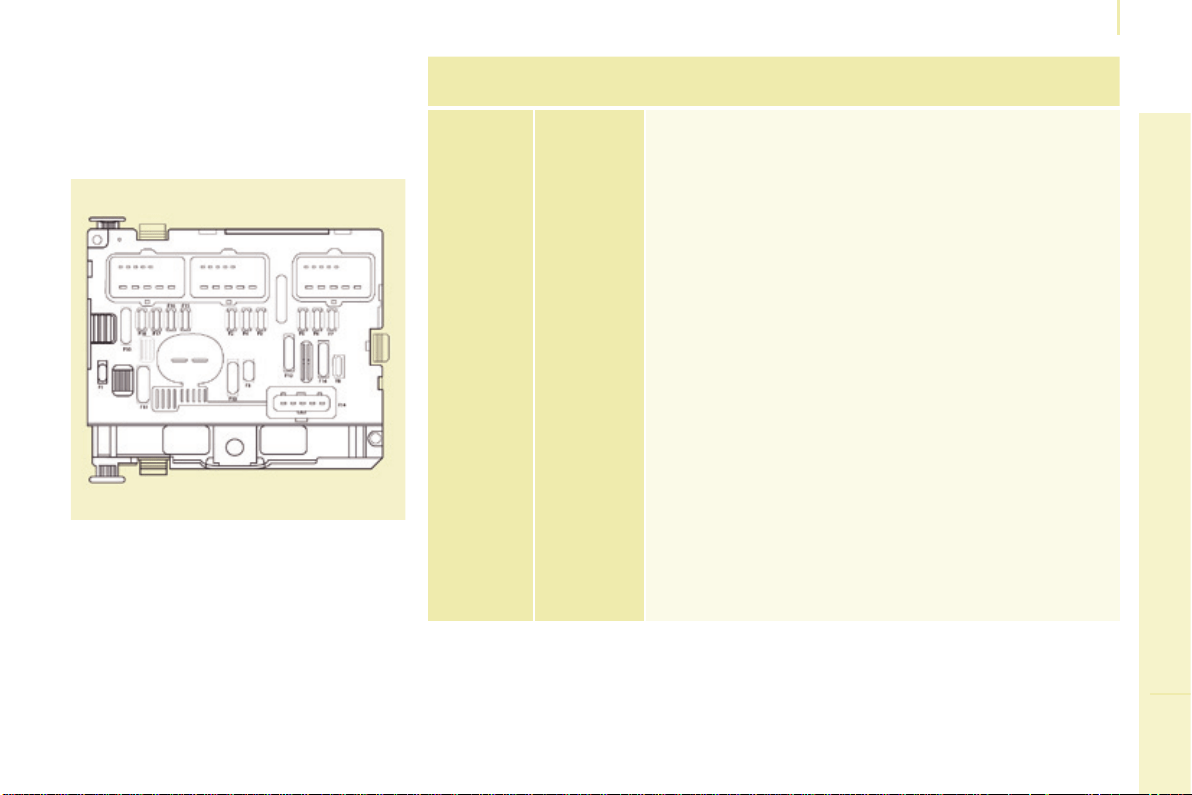
189
QUICK HELP
8
Berlingo-2-VP_en_Chap08_Aide-rapide_ed01-2016
Changing a fuse
Fuses under the bonnet
After opening the bonnet, unclip and tilt
the corresponding box to gain access
tothefuses.
Fuses
F
Amperes
A
Allocation
1 20 Enginemanagement
2 15 Horn
3 10 Frontandrearwash-wipepump
4 20 Headlampwashpump
5 15 Enginecomponents
6 10 Steering wheel angle sensor, DSC
7 10 Brakeswitch,clutchswitch
8 25 Startermotor
9 10 Headlampbeammotor,eetmanagementunit
10 30 Enginecomponents
11 40 Not used
12 30 Wipers
13 40 Built-insystemsinterface
14 30 Pump
15 10 Right-handmainbeamheadlamp
16 10 Left-handmainbeamheadlamp
17 15 Right-handdippedbeamheadlamp
18 15 Left-handdippedbeamheadlamp
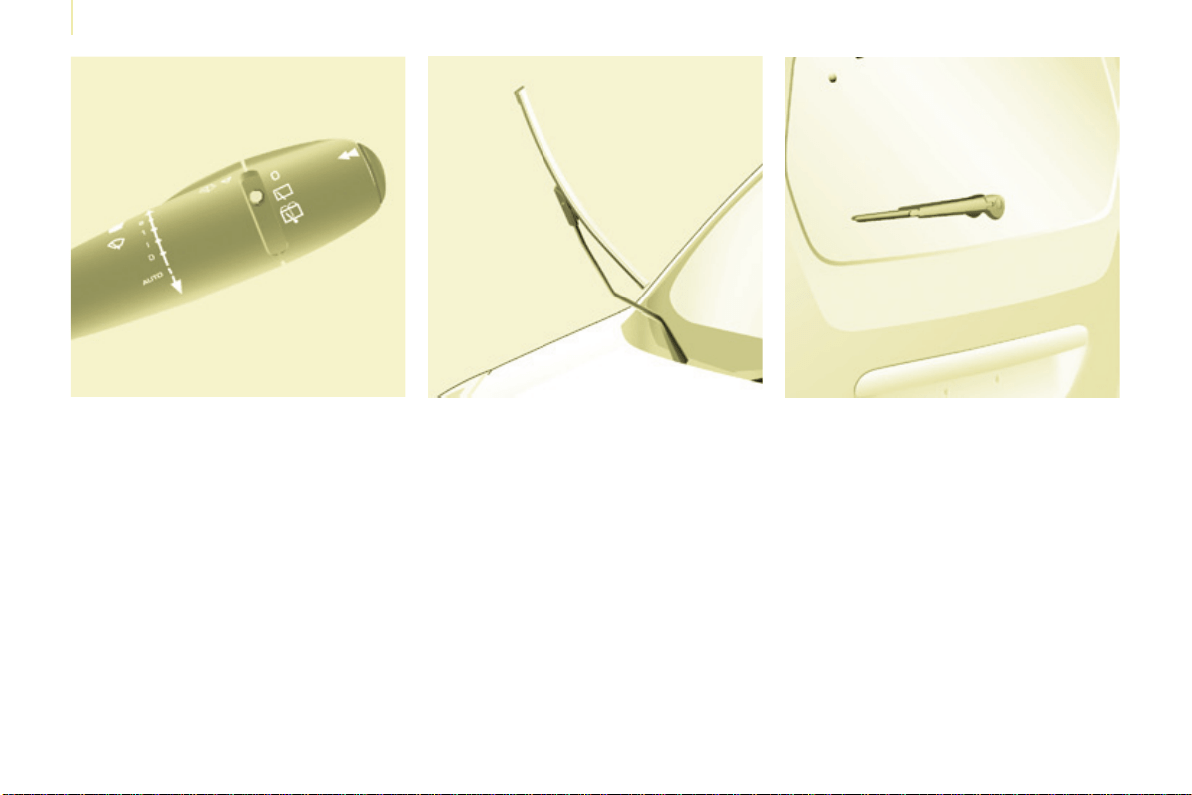
190
Berlingo-2-VP_en_Chap08_Aide-rapide_ed01-2016
Changing a wiper blade
Placing the windscreen wiper
blades in the special position
Changing a front wiper blade
- Liftthewiperarm.
- Unclipthebladeandremoveit.
- Fitthenewblade.
- Pushbackthewiperarm.
Changing the rear wiper blade
- Liftthewiperarm,thenunclipthe
bladeandremoveit.
- Fitthenewbladeandpushback
thewiperarm.
CHANGING A WIPER BLADE
- Withinaminuteafterswitchingoff
theignition,pressthewiperstalk
downwards to position the wiper
blades along the windscreen pillars
(specialposition).
To return the windscreen wipers to
theirnormalposition,switchonthe
ignitionandoperatethewiperstalk.
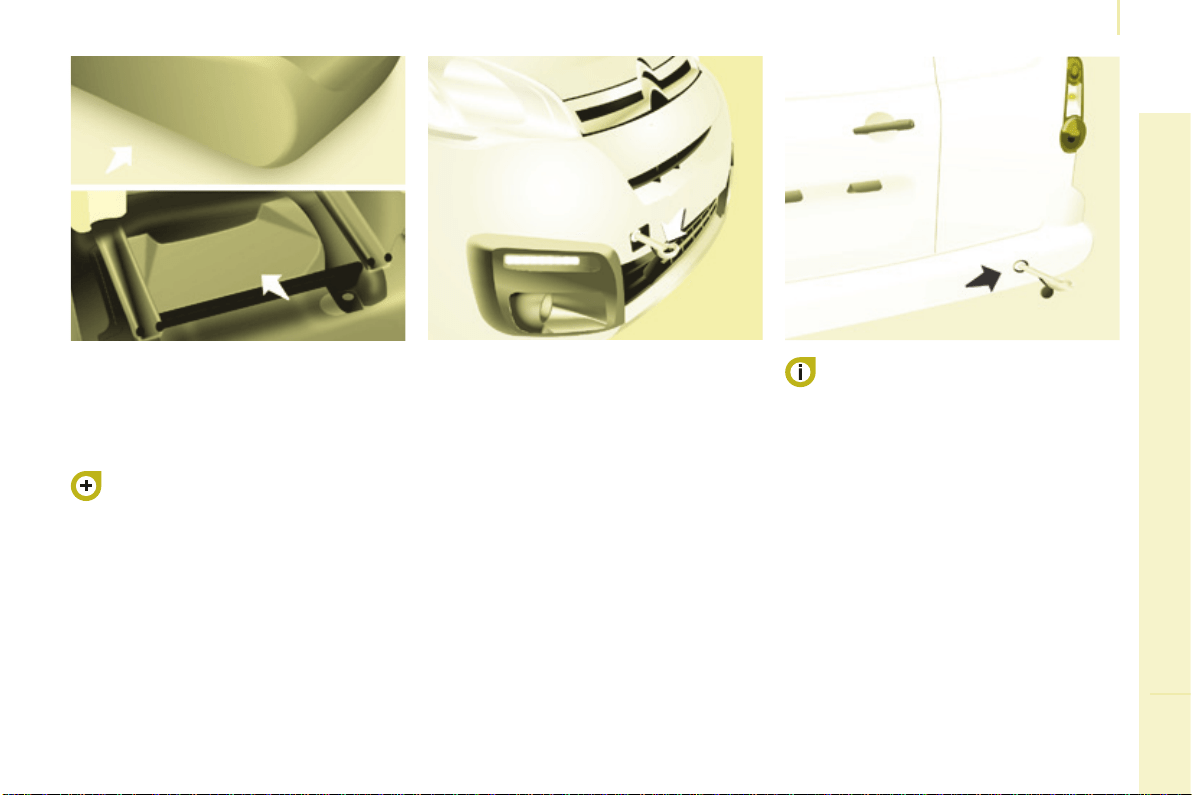
191
QUICK HELP
8
Berlingo-2-VP_en_Chap08_Aide-rapide_ed01-2016
Having your vehicle towed
Without lifting (4 wheels on the
road)
Youshouldalwaysuseatowingarm.
BEING TOWED
This procedure involves the use of
the towing eye supplied with the tools
forchangingawheel.
From the front
- Unclip the cover by pressing the
bottompart.
- Fullyscrewintheremovable
towingeye.
From the rear
- Unclip the cover using a coin or the
atpartofthetowingeye,
- Fullyscrewintheremovable
towingeye.
When towing with the engine
switchedoff,thereisnobrakingor
steeringassistance.
Lifting (only 2 wheels on the
road)
It is preferable to raise the vehicle
usingprofessionalliftingequipment.
Vehicles tted with a manual
gearbox (Diesel version)
Inthecaseofvehiclesttedwith
amanualgearbox,thegearlever
mustbeinneutral,failuretoobserve
thisspecialconditionmayresultin
damagetotransmissionandbraking
componentsandtheabsenceof
brakingassistancewhentheengineis
startedagain.
Section8,"Changingawheel".
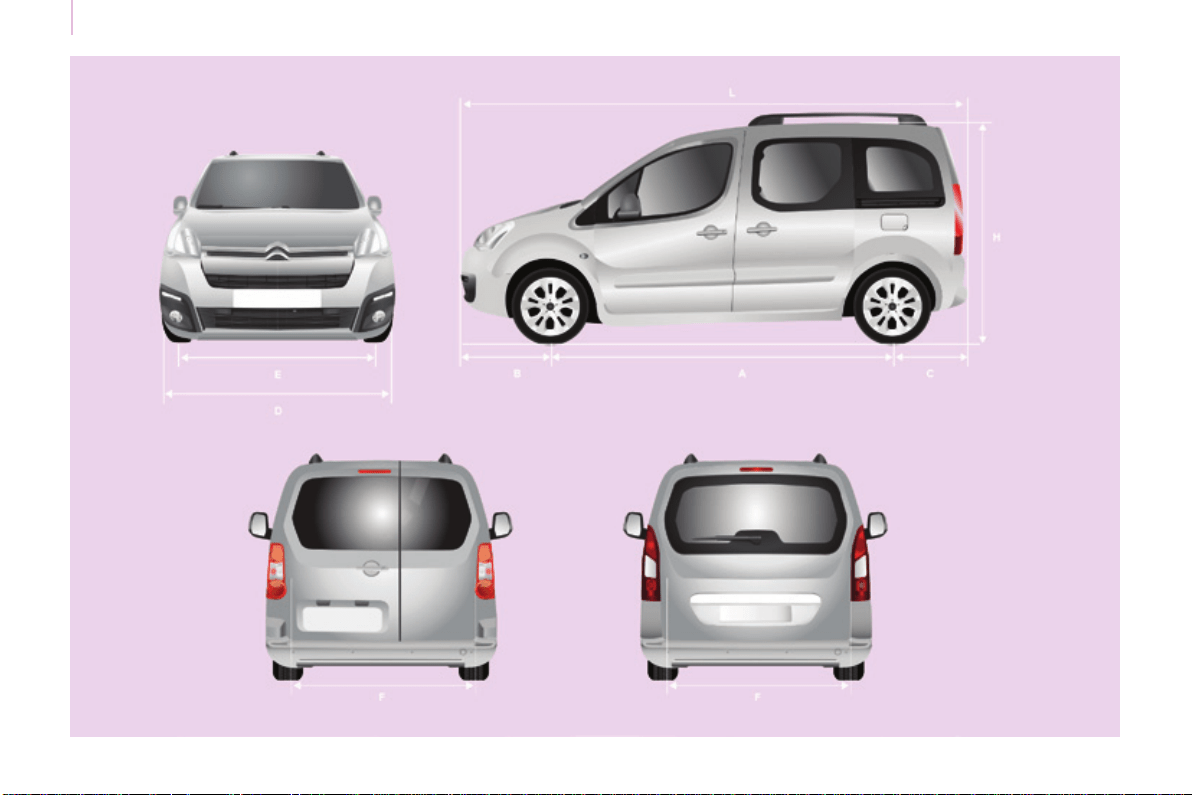
192
Dimensions
Berlingo-2-VP_en_Chap09_Caract-technique_ed01-2016
193
Dimensions
TECHNICAL DATA
9
Berlingo-2-VP_en_Chap09_Caract-technique_ed01-2016
DIMENSIONS (MM)
L Overall length 4380
H Overall height 1801-1862
A Wheelbase 2728
B Front overhang 925
C Rear overhang 727
D Widthoverpanels:
withoutmirrors 1810
withmirrors 2112
E Widthoffronttracks 1505-1507
F Widthofreartracks 1554-1556
-
Length of the loading surface to the
seat
Row 2 990
Row 2, seat fully folded 1343
With front passenger seat folded 3000

194
Dimensions
Berlingo-2-VP_en_Chap09_Caract-technique_ed01-2016
M Maxsillheightwith205/65R15tyresandtailgatetrim 582
Hinged doors Tailgate
Small Large
N Aperture height (under panel) 1118
O Aperture width 495 543 1582
Rear doors (mm)
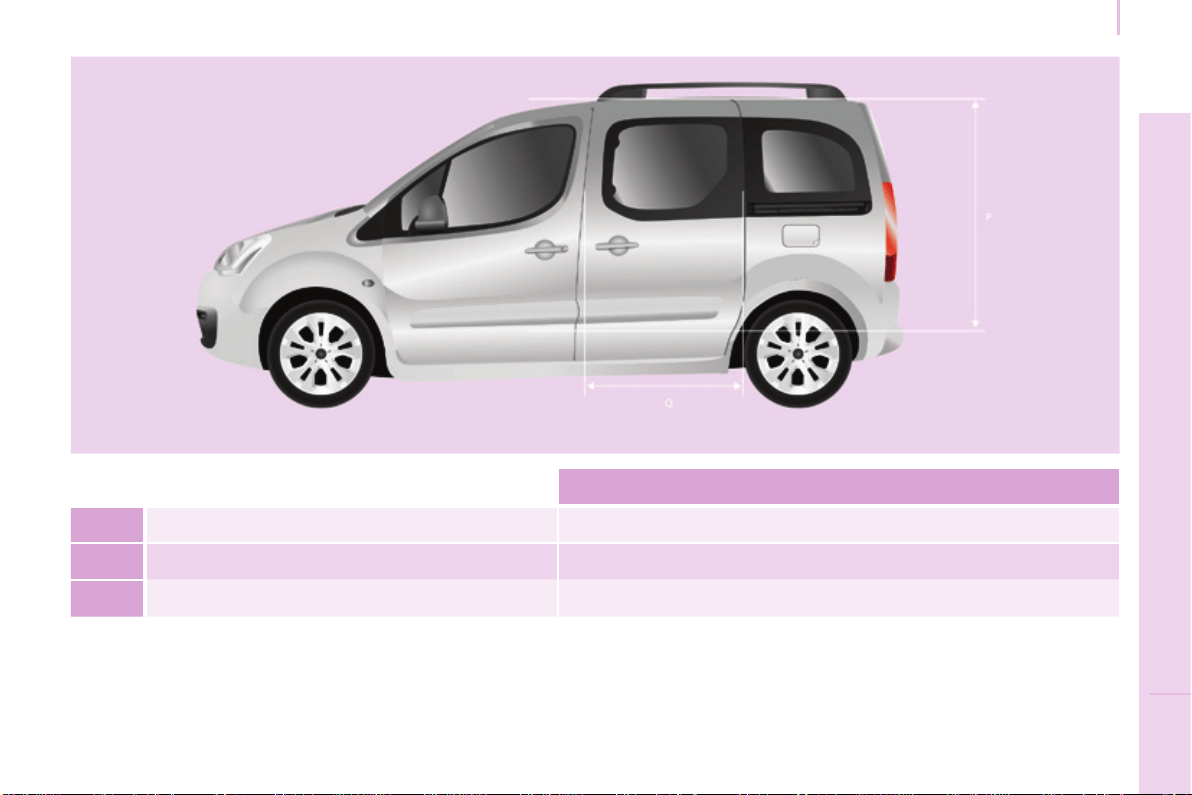
195
Dimensions
TECHNICAL DATA
9
Berlingo-2-VP_en_Chap09_Caract-technique_ed01-2016
P Aperture height 1009
Q Aperture width 640
- Height under raised tailgate 1892
Sliding side doors (mm)

196
Berlingo-2-VP_en_Chap09_Caract-technique_ed01-2016
Weights
ENGINE CHARACTERISTICS
The engine characteristics (capacity,
maximumpower,maximumpower
speed, fuel, CO
2
emissions...)foryour
vehicle are given in the registration
certicate.
These characteristics correspond
to the values type-approved
on a test bed, under conditions
denedinEuropeanlegislation
(Directive1999/99/EC).
Formoreinformation,refertothe
manufacturer'swebsiteorsales
brochureforthemodel.Contact
aCITROËNdealeroraqualied
workshop.
WEIGHTS AND TOWED LOADS
Thesevalues,expressedinkg,canbe
foundonthemanufacturer'sVINplate
orlabel.
Themaximumweightsandtowed
loads for your vehicle can be found on
thevehicle'sregistrationcerticate.
Thekerbweightisequaltotheweight
withoutload+driver(75kg)+fueltank
lledto90%.
The GTW and towed load values
indicatedarevaliduptoamaximum
altitudeof1000metres.Thevalueof
thetowedloadmentionedmustbe
reduced by 10 % for each additional
1000metres.
Withloadtransfer,thebrakedtrailer
weight can be increased, on condition
that the equivalent of this load is
removedfromthevehiclesothatthe
GTWisnotexceeded.
Highambienttemperatures
mayresultinareductioninthe
performanceofthevehiclein
ordertoprotecttheengine.Whenthe
ambienttemperatureishigherthan
37°C,limitthetowedweight.
Towing with a lightly loaded
vehicle can adversely affect road
holding.
Towingatrailerincreasesbraking
distances.
Whentowing,themaximumpermitted
speedisreduced(complywiththe
legislationinforceinthecountry).
Therecommendednoseweightis
the downward force on the towball
(removablewithorwithouttools).
GVW: gross vehicle weight, the
maximumauthorisedweight.
GTW:grosstrainweight,themaximum
weightforvehicleplustrailer.
Thelocationofthemanufacturer's
plateisgiveninchapter9,
"Identicationmarkings"section.
Ineachcountry,itisimperativethat
themaximumtowedloadsauthorised
bylocallegislationarecomplied
with.Tondoutyourvehicle'stowing
capacities and its gross train weight,
consultaCITROËNdealer.
197
TECHNICAL DATA
9
Berlingo-2-VP_en_Chap09_Caract-technique_ed01-2016
Weights
Petrol Engines / Weights
5-seat
Engine Gearbox
Engine oil
capacity with lter
replacement (litres)
Unbraked trailer (kg)
Recommended nose
weight (kg)
1.6 110 hp 5-speedmanual 3.25 750 55
1.6 VTi 100 hp 5-speedmanual 4.25 600 70
1.6 VTi 120 hp 5-speedmanual 4.25 690 70
1.6 VTi 120 hp
Euro 6
5-speedmanual 4.25 600 70
1.2 PureTech S&S
110 hp Euro 6
5-speedmanual 3.45 600 70
7-seat
Engine Gearbox
Engine oil
capacity with lter
replacement (litres)
Unbraked trailer (kg)
Recommended nose
weight (kg)
1.6 110 hp 5-speedmanual 3.25 750 70
198
Berlingo-2-VP_en_Chap09_Caract-technique_ed01-2016
Weights
Diesel Engines / Weights
5-seat
Engine Gearbox
Engine oil
capacity with lter
replacement (litres)
Unbraked
trailer (kg)
Recommended nose
weight (kg)
1.6 HDi 75 hp 5-speedmanual - 600 70
1.6 HDi 75 hp FAP 5-speedmanual - 715 70
1.6 BlueHDi 75 hp
Euro 6
5-speedmanual - 720 70
1.6 HDi 90 hp 5-speedmanual 3.75 735 70
1.6 HDi 92 hp FAP 5-speedmanual 3.75 715 70
1.6 e-HDi 92 hp FAP
5-speedmanual
3.75
690 70
6-speed electronic 750 70
1.6 BlueHDi 100 hp
Euro 6
5-speedmanual 3.75 600 70
1.6 BlueHDi 100 hp
S&S
5-speedmanual
3.75
600 70
6-speed electronic 600 70
1.6 HDi 115 hp FAP 5-speedmanual 3.75 735 70
1.6 BlueHDi 120 hp
Euro 6
6-speedmanual 3.75 600 70
FAP:particlelter.
e-HDi:modelequippedwithStop&Start.
199
TECHNICAL DATA
9
Berlingo-2-VP_en_Chap09_Caract-technique_ed01-2016
Weights
7-seat
Engine Gearbox
Engine oil
capacity with lter
replacement (litres)
Unbraked
trailer (kg)
Recommended nose
weight (kg)
1.6 HDi 92 hp FAP 5-speedmanual 3.75 750 70
1.6 BlueHDi 100 hp
Euro 6
5-speedmanual 3.75 600 70
1.6 BlueHDi 100 hp
Euro 6 S&S
5-speedmanual 3.75 600 70
1.6 HDi 115 hp FAP 5-speedmanual 3.75 750 70
1.6 BlueHDi 120 hp
Euro 6
6-speedmanual 3.75 600 70
FAP:particlelter.
e-HDi:modelequippedwithStop&Start.
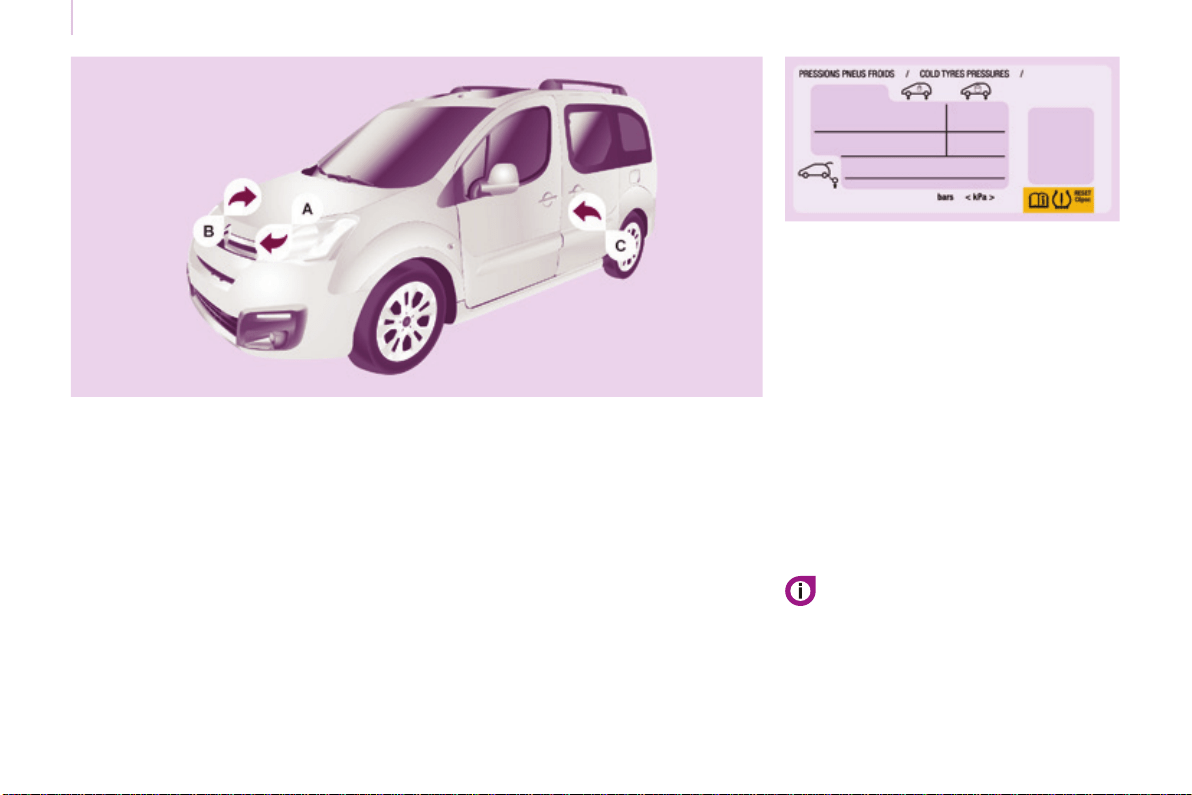
200
Berlingo-2-VP_en_Chap09_Caract-technique_ed01-2016
Identification markings
IDENTIFICATION MARKINGS
A. Manufacturer's plate.
C. Tyres and paint colour code.
The label C,onthefrontdoorgives:
- the wheel and tyre sizes,
- the tyre pressures, laden and
unladen,
- the tyre pressure of the spare
wheel,
- thepaintcolourcode.
Thetyrepressuresshouldbechecked
whencold,atleastonceamonth.
B. Serial number.
This is engraved on the front right
wheelarch.
Ifyourvehicleisttedwiththe
system,refertothe"Under-ination
detection"sectioninChapter3.
Audio and Telematics
201
TECHNOLOGY on BOARD
10
Berlingo-2-VP_en_Chap10a_SMEGplus_ed01-2016
7-inchtouchscreentablet
GPS satellite navigation - Multimedia audio - Bluetooth
®
telephone
Contents
First steps 202
Steeringmountedcontrols 204
Menus 205
Navigation 206
Navigation - Guidance 214
Traf c 218
Radio Media 220
Radio 226
DAB (Digital Audio Broadcasting) radio 228
Media 230
Settings 234
Connected services 242
Internet browser 243
MirrorLink
TM
246
CarPlay
®
250
Telephone 254
Frequentlyaskedquestions 262
Thesystemisprotectedinsuchawaythatitwillonlyoperatein
yourvehicle.
Asasafetymeasure,thedrivershouldonlycarryoutoperations
whichrequireprolongedattentionwhilethevehicleisstationary.
Thedisplayofanenergyeconomymodemessagesignalsthat
electricalsystemsoperatingaregoingintostandby.
Refertotheenergyeconomymodesection.
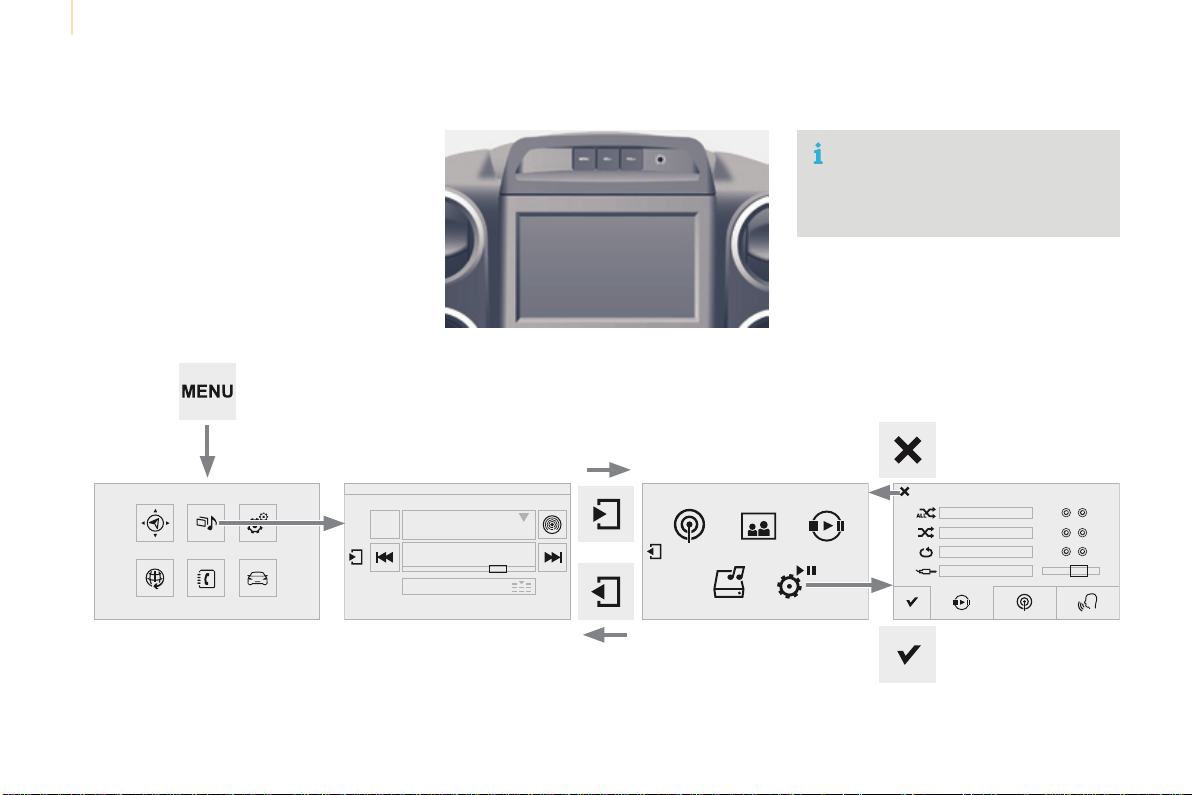
Audio and Telematics
202
Berlingo-2-VP_en_Chap10a_SMEGplus_ed01-2016
First steps
Use the buttons above the touch screen tablet
foraccesstothemenucarousel,thenpressthe
virtualbuttonsinthetouchscreentablet.
Eachmenuisdisplayedinoneortwopages
(primarypageandsecondarypage).
Secondary pagePrimarypage
Inveryhotconditions,thesystemmay
go into stand-by (screen and sound
completelyoff)foraminimumperiodof
5minutes.
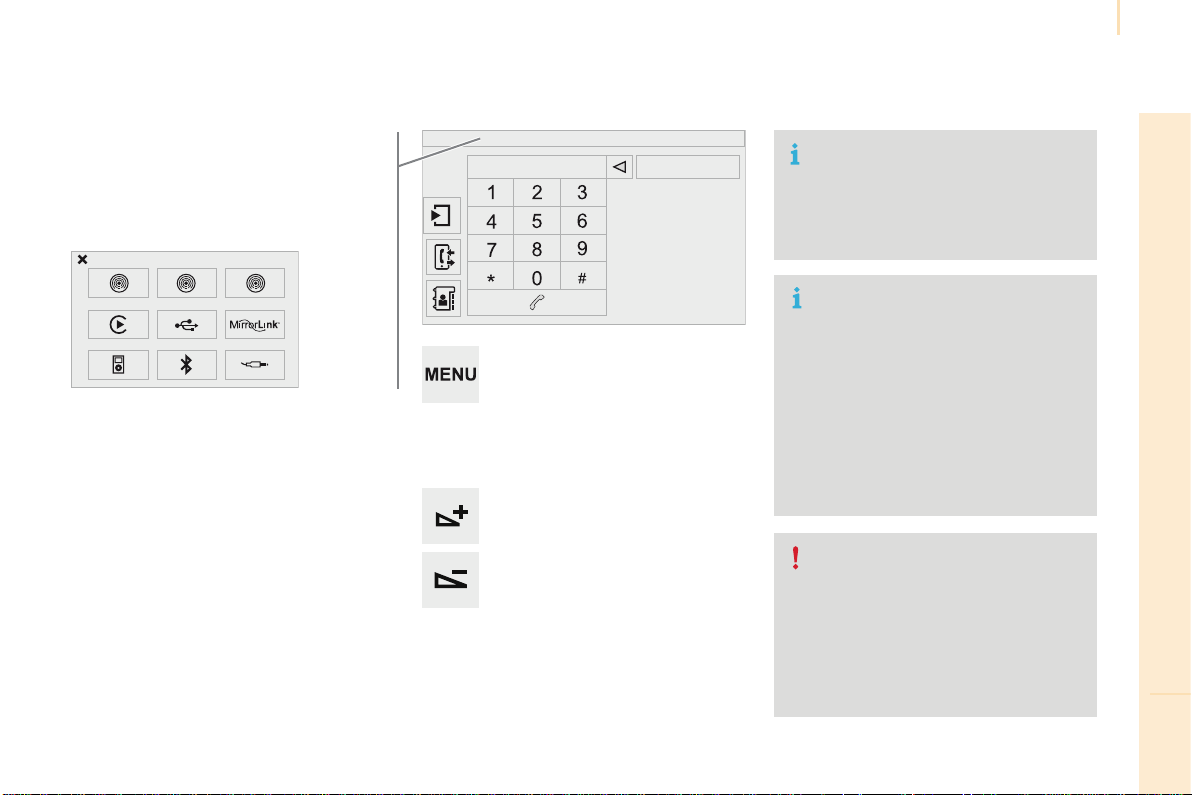
Audio and Telematics
203
TECHNOLOGY on BOARD
10
Berlingo-2-VP_en_Chap10a_SMEGplus_ed01-2016
Volumeadjustment(eachsourceis
independent,includingtrafficannouncements
(TA)andnavigationinstructions).
Mutethesoundbypressingsimultaneouslyon
thevolumeincreaseandreducebuttons.
Unmutethesoundbypressingoneofthetwo
volumebuttons.
Press Menutodisplaythemenu
carousel.
Increasevolume.
Reducevolume.
Selecting the audio source (depending on
version):
- "FM"/"DAB"/"AM"*stations.
- "USB"memorystick.
- SmartphoneviaMirrorLink
TM
or CarPlay
®
.
- Telephone connected by Bluetooth* and
Bluetoothaudiostreaming*.
- Media player connected to the auxiliary
socket(jack,cablenotsupplied).
- Jukebox*,afterfirstcopyingaudiofilesto
theinternalmemoryofthesystem.
*Dependingonequipment.
Short-cuts:usingthetouchbuttonsintheupper
band of the touch screen tablet, it is possible
to go directly to the selection of audio source,
the list of stations (or titles, depending on the
source).
The screen is of the "resistive" type, it
isnecessarytopressfirmly,particularly
for"flick"gestures(scrollingthrougha
list,movingthemap...).Asimplewipe
willnotbeenough.pressingwithmore
thanonefingerisnotrecognised.
The screen can be used when wearing
gloves.Thistechnologyallowsuseat
alltemperatures.
Following prolonged operation in very
hightemperatures,thevolumemaybe
limitedtoprotectthesystem.Thereturnto
normaltakesplacewhenthetemperature
inthepassengercompartmentdrops.
To clean the screen, use a soft
non-abrasive cloth (spectacles cloth)
withoutanyadditionalproduct.
Donotusepointedobjectsonthe
screen.
Do not touch the screen with wet
hands.
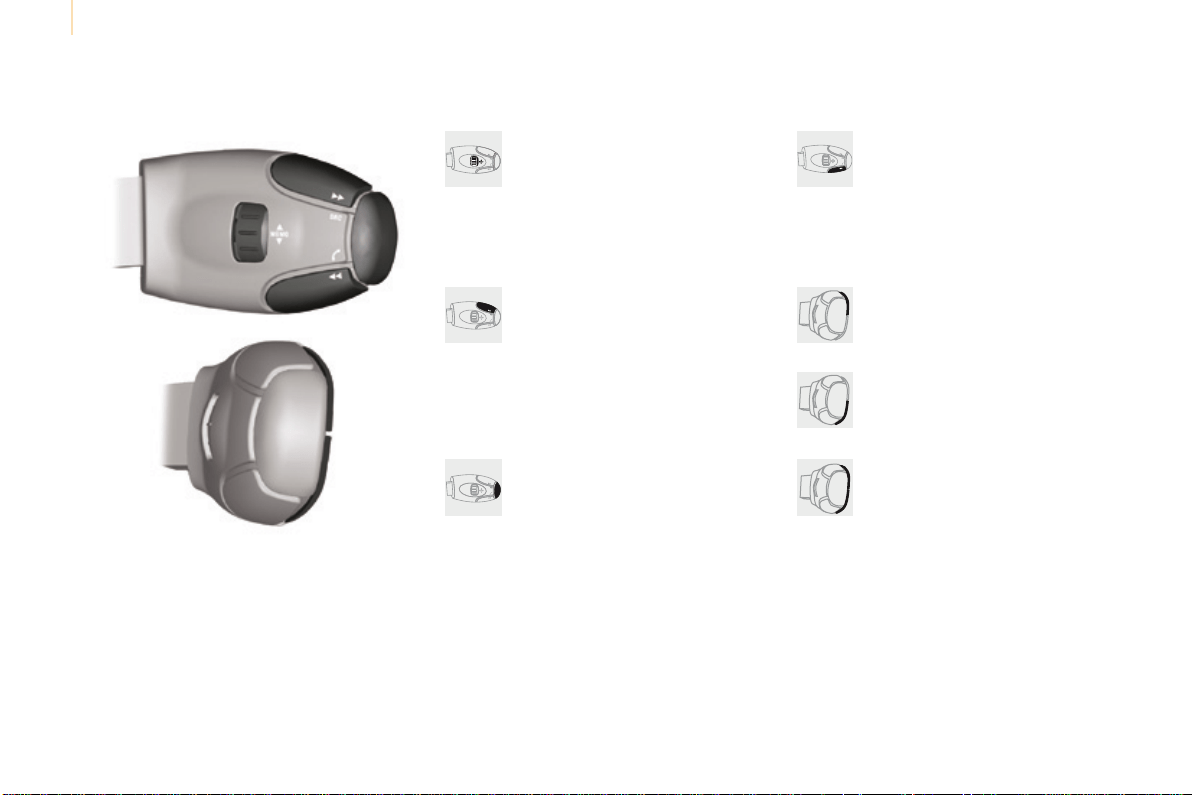
Audio and Telematics
204
Berlingo-2-VP_en_Chap10a_SMEGplus_ed01-2016
Steeringmountedcontrols
Radio:selecttheprevious/next
presetstation.
Media:selectagenre/artist/folder
fromthelist.
Selecttheprevious/nextentryin
amenu.
Decreasevolume.
Radio:automaticsearchforahigher
frequency.
Media:Selectnexttrack.
Media,pressandhold:fastforward.
Jumpinthelist.
Mute:cutthesoundbypressing
thevolumeincreaseanddecrease
buttonssimultaneously.
Restore the sound by pressing one of
thetwovolumebuttons.
Radio:automaticsearchforalower
frequency.
Media:selectprevioustrack.
Media,pressandhold:fastback.
Jumpinthelist.
Changetheaudiosource.
Confirmaselection.
Call/endcallonthetelephone.
Pressformorethan2seconds:
accesstothetelephonemenu.
Increasevolume.
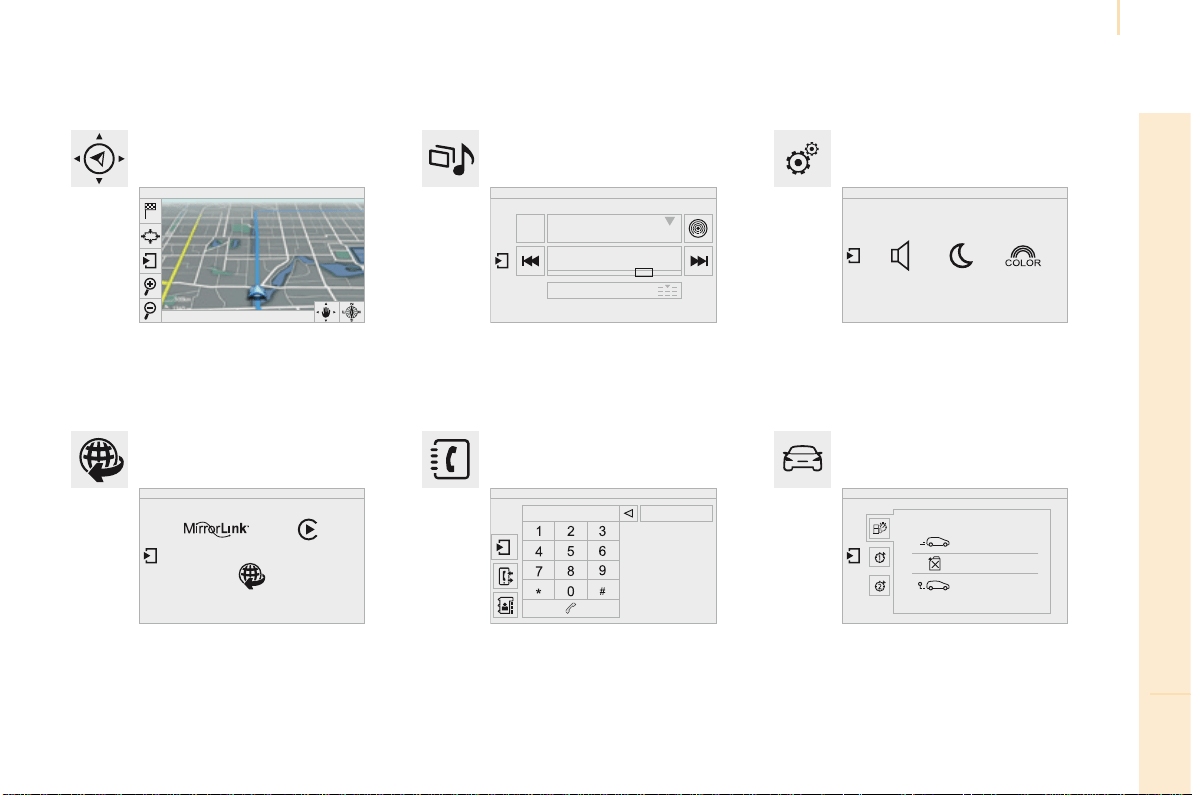
Audio and Telematics
205
TECHNOLOGY on BOARD
10
Berlingo-2-VP_en_Chap10a_SMEGplus_ed01-2016
Menus
Settings
Radio Media
Navigation
DrivingConnected services Telephone
Adjustthesettingsforsound(balance,
ambience,...),colourschemesandthedisplay
(language,units,date,time,...).
Select an audio source, a radio station, display
photographs.
Enter navigation settings and choose a
destination.
Accesstothetripcomputer.
Activate, deactivate or enter settings for certain
vehiclefunctions.
Connectusingthe"Internetbrowser".
Operate certain applications on your
smartphoneviaMirrorLink
TM
or CarPlay
®
.
Connect a telephone by Bluetooth
®
.
Access to the CarPlay
®
function after
connectionofyoursmartphonebyUSBcable.
(Dependingonequipment)
(Dependingonequipment)
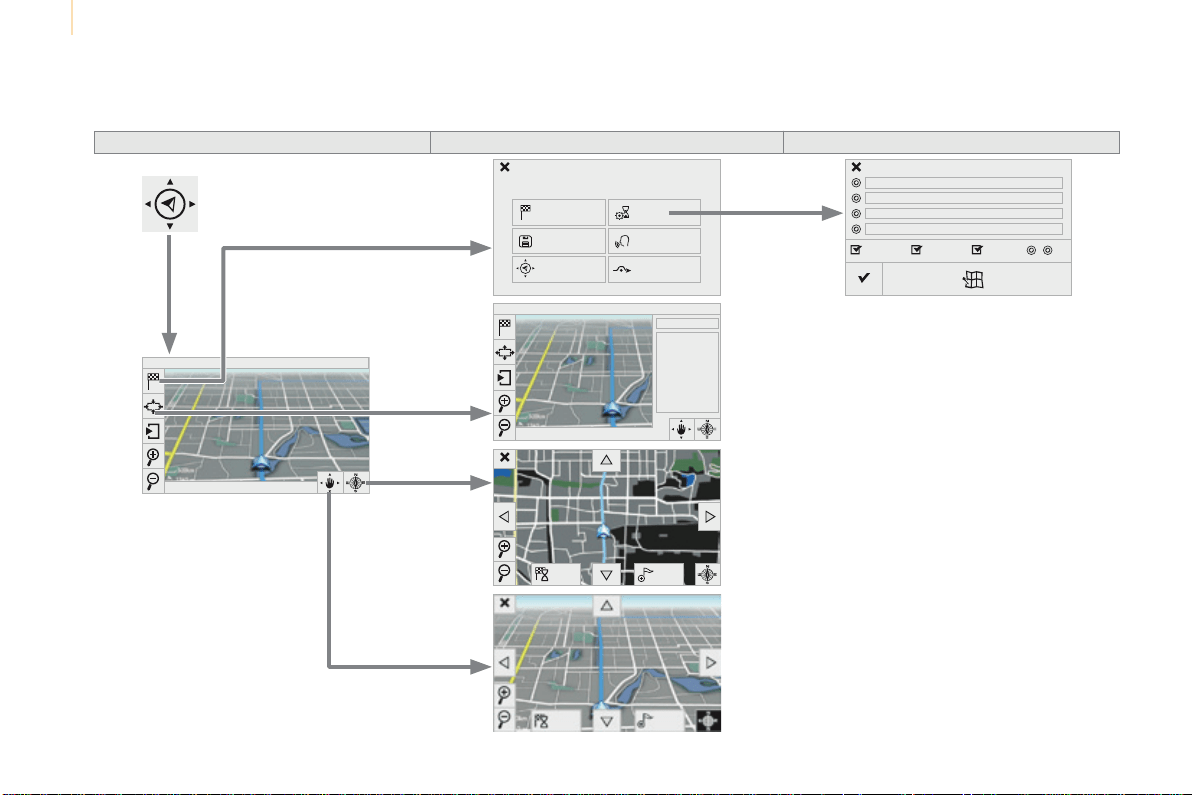
Audio and Telematics
206
Berlingo-2-VP_en_Chap10a_SMEGplus_ed01-2016
Level 1 Level 2 Level 3
Navigation
Navigation Route settings
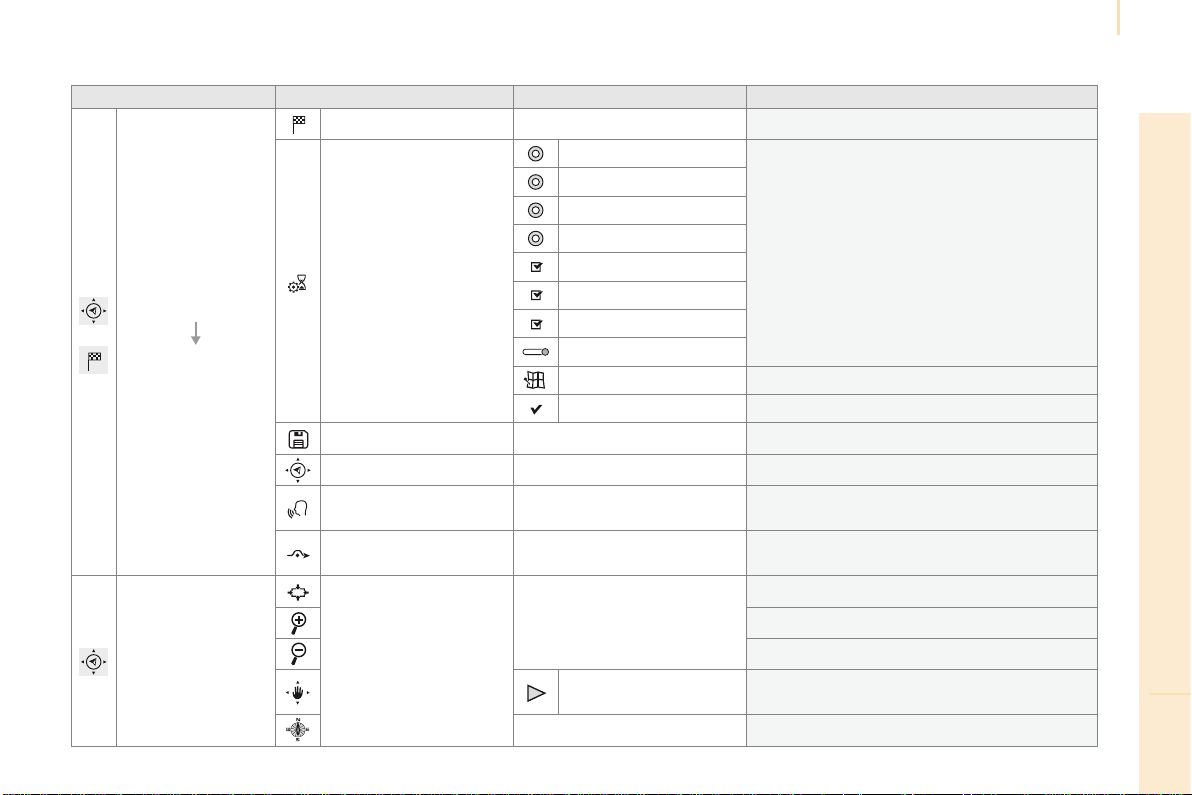
Audio and Telematics
207
TECHNOLOGY on BOARD
10
Berlingo-2-VP_en_Chap10a_SMEGplus_ed01-2016
Level 1 Level 2 Level 3 Comments
Navigation
Settings
Navigation
Enter destination Displayrecentdestinations.
Route settings
Fastest
Choosethenavigationcriteria.
Themapdisplaystheroutechosenaccordingto
thesecriteria.
Shortest
Time/distance
Ecological
Tolls
Ferries
Traffic
Strict-Close
Showrouteonmap Displaythemapandstartnavigation.
Confirm Savetheoptions.
Save current location Savethecurrentaddress.
Stop navigation Deletethenavigationinformation.
Voice synthesis
Choosethevolumeforvoiceandannouncement
ofstreetnames.
Diversion
Detourfromyourinitialroutebyadetermined
distance.
Navigation
Displayintextmode
Zoomin.
Zoomout.
Displayinfullscreenmode.
Usethearrowstomovethemap.
Switchto2Dmap.
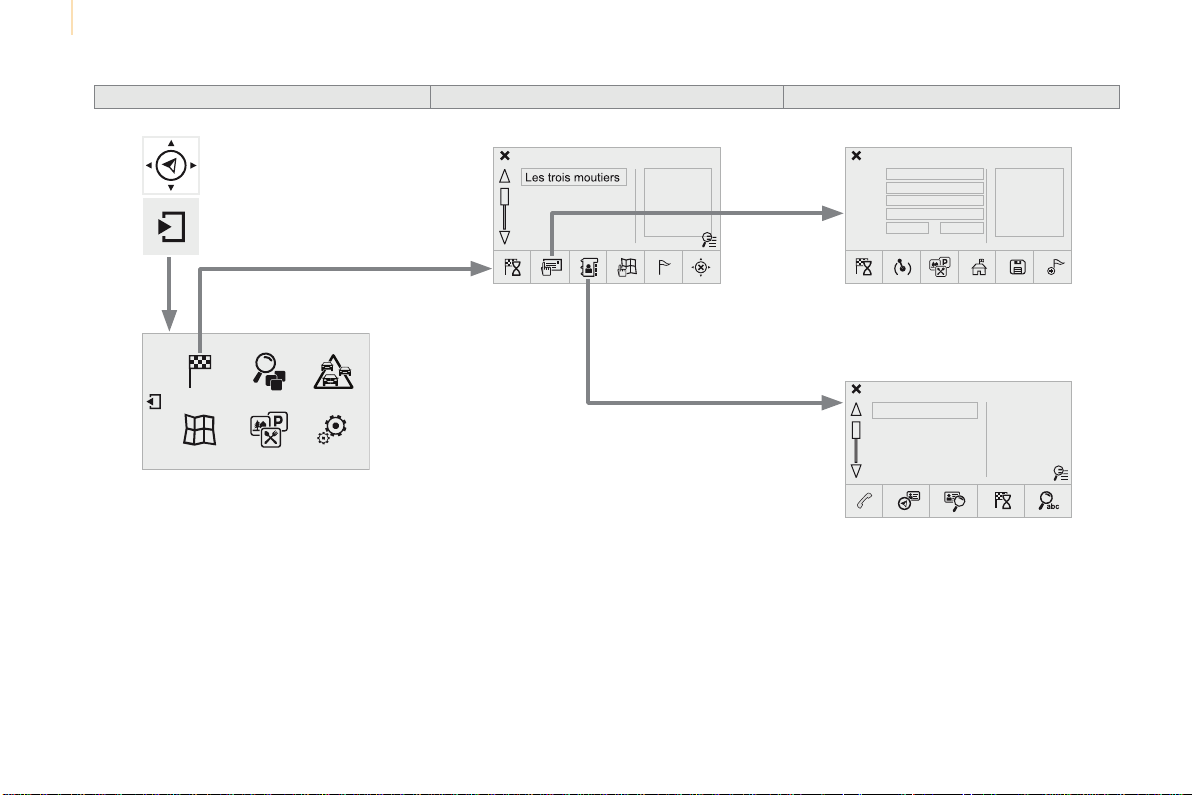
Audio and Telematics
208
Berlingo-2-VP_en_Chap10a_SMEGplus_ed01-2016
Level 1 Level 2 Level 3
To use the telephone functions,
refer to the "Telephone"section.
Formanagingcontactsand
their addresses, refer to the
"Telephone"section.
Navigation
Address
Enter destination
Contacts
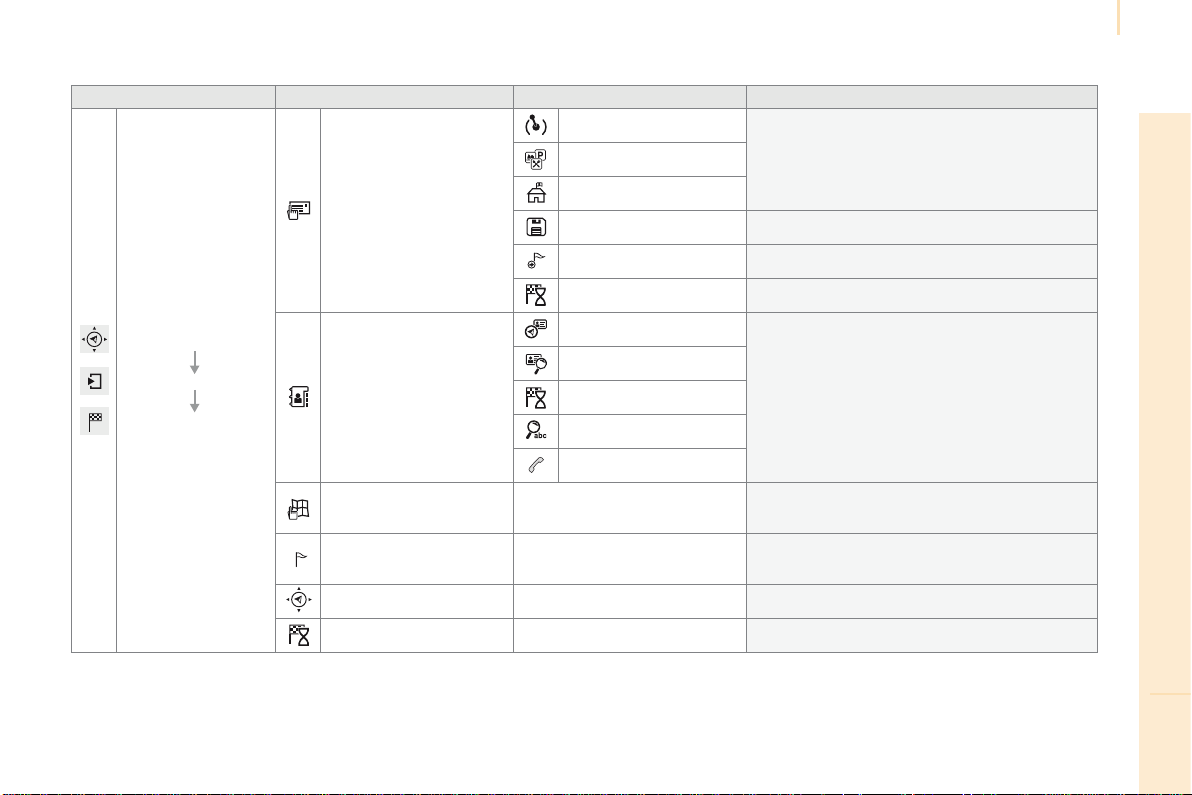
Audio and Telematics
209
TECHNOLOGY on BOARD
10
Berlingo-2-VP_en_Chap10a_SMEGplus_ed01-2016
Level 1 Level 2 Level 3 Comments
Navigation
Secondary page
Enter destination
Address
Currentloc.
Address settingsPoint of interest
Town center
Save Savethecurrentaddress.
Add waypoint Addawaypointtotheroute.
Navigate to Presstocalculatetheroute.
Contacts
Addresses
Selectacontactthencalculatetheroute.
View
Navigate to
Search for contact
Call
On the map
Displaythemapandzoomtoviewthe
roads.
Itinerary
Create, add or delete a waypoint or view the
itinerary.
Stop Deletenavigationinformation.
Navigate to Presstocalculatetheroute.
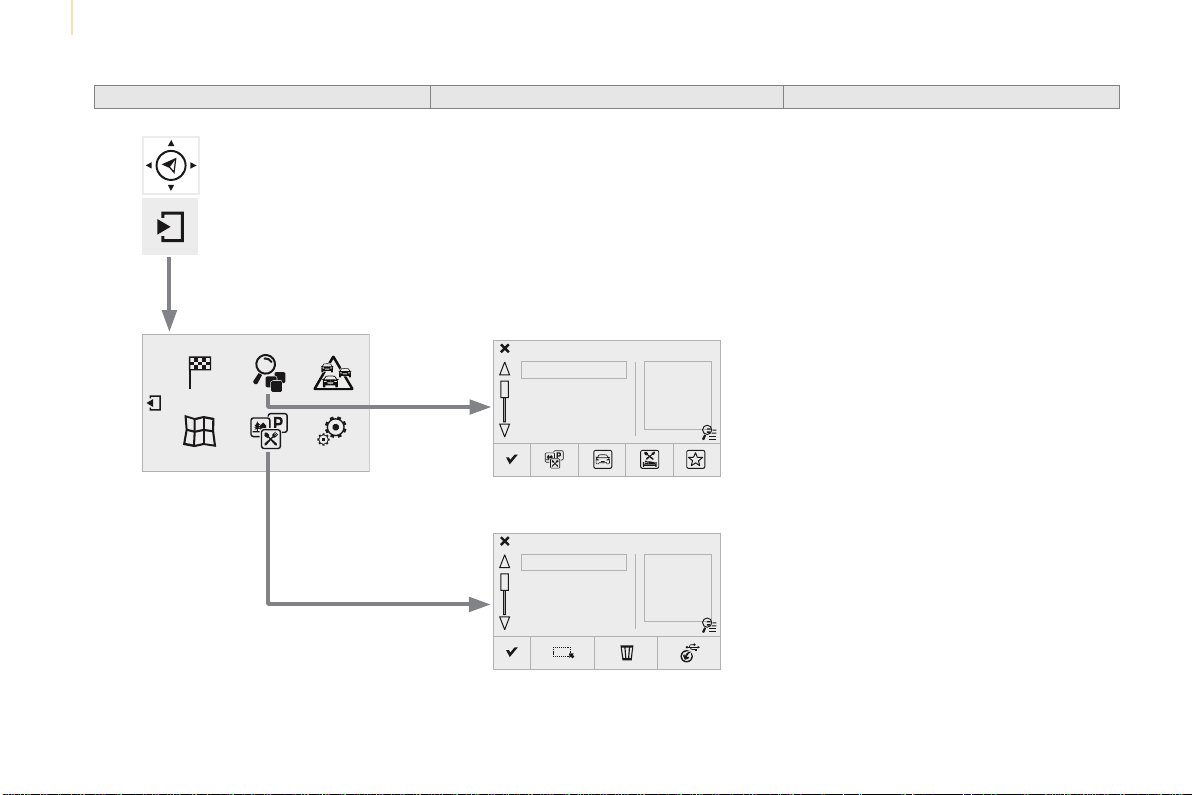
Audio and Telematics
210
Berlingo-2-VP_en_Chap10a_SMEGplus_ed01-2016
Search for a point of interest
Navigation
Point of interest displayed on the map
Level 1 Level 2 Level 3
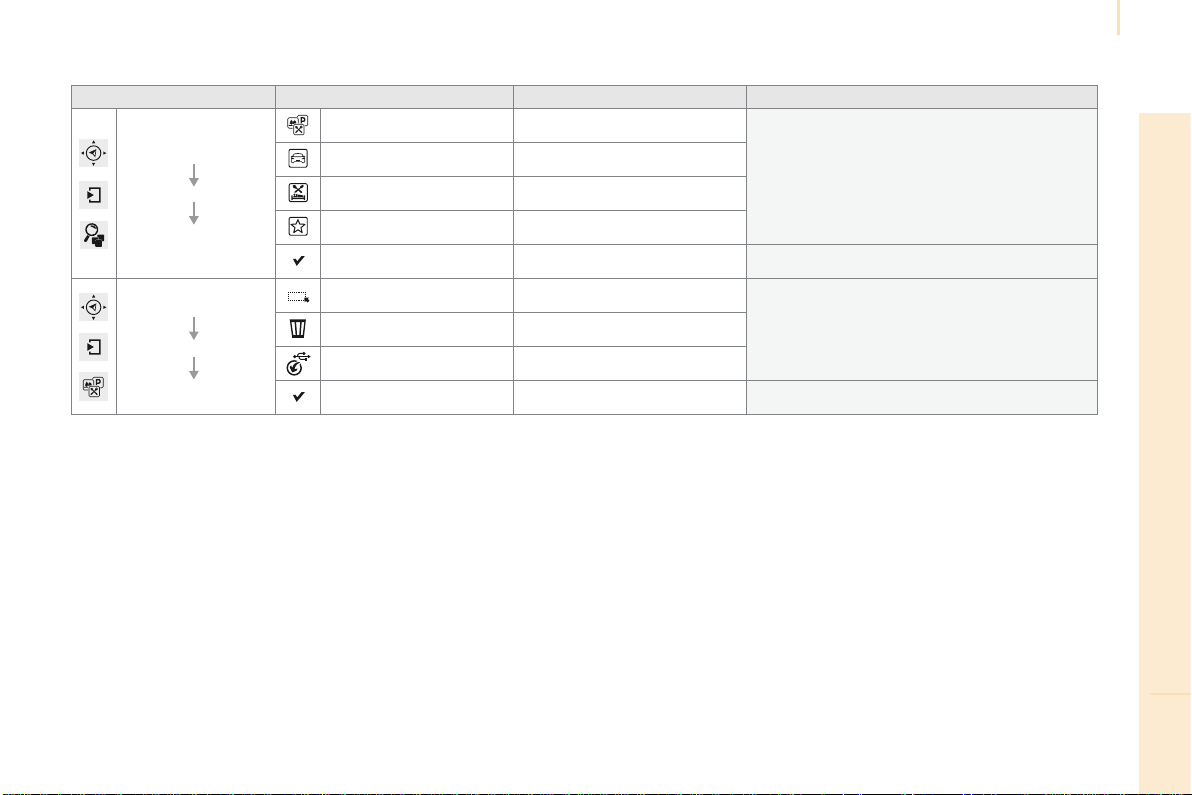
Audio and Telematics
211
TECHNOLOGY on BOARD
10
Berlingo-2-VP_en_Chap10a_SMEGplus_ed01-2016
Level 1 Level 2 Level 3 Comments
Navigation
Secondary page
Search for POI
All POIs
Listofcategoriesavailable.
After choosing the category, select the points of
interest.
Motor
Dining/hotels
Personal
Search Savethesettings.
Navigation
Secondary page
Show POIs
Select all
ChoosethedisplaysettingsforPOIs.Delete
Import POIs
Confirm Savetheoptions.
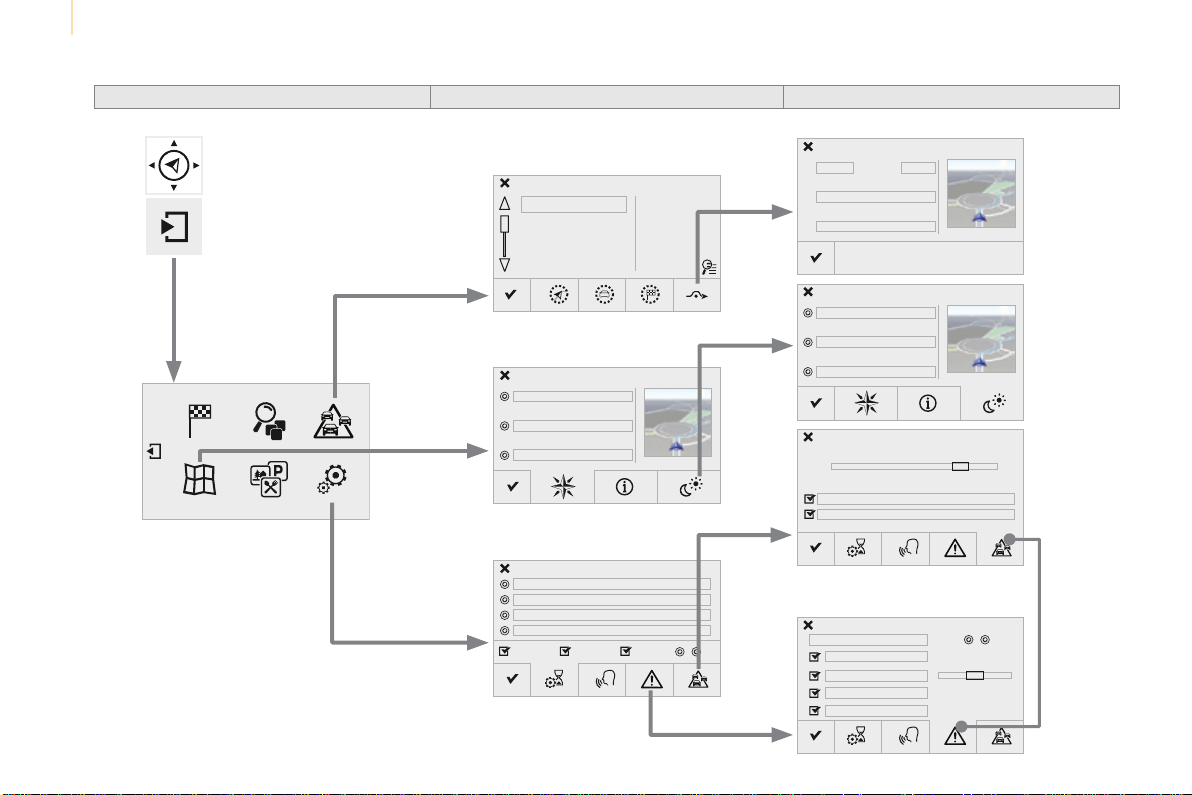
Audio and Telematics
212
Berlingo-2-VP_en_Chap10a_SMEGplus_ed01-2016
Moving
between
the two
menus.
Level 1 Level 2 Level 3
Traffic messages
Settings
Diversion
Map settings
Navigation
Map settings
Settings
Settings

Audio and Telematics
213
TECHNOLOGY on BOARD
10
Berlingo-2-VP_en_Chap10a_SMEGplus_ed01-2016
Level 1 Level 2 Level 3 Comments
Navigation
Secondary page
Traffic messages
On the route
Settingsforthechoiceofmessagesandthe
filterradius.
Around vehicle
Near destination
Detour
Detour over a distance
Recalculate route
Finish Saveyourselections.
Navigation
Secondary page
Map settings
Orientation
Flat view north heading
Choose the display and orientation of the
map.
Flat view vehicle heading
Perspective view
Maps
Aspect
"Day"mapcolour
"Night"mapcolour
Auomaticday/night
Confirm Savethesettings.
Navigation
Secondary page
Settings
Route settings
Entersettingsandchoosethevolumeforthe
voiceandannouncementofstreetnames.
Voice
Alarm!
Traffic options
Confirm Saveyourselections.
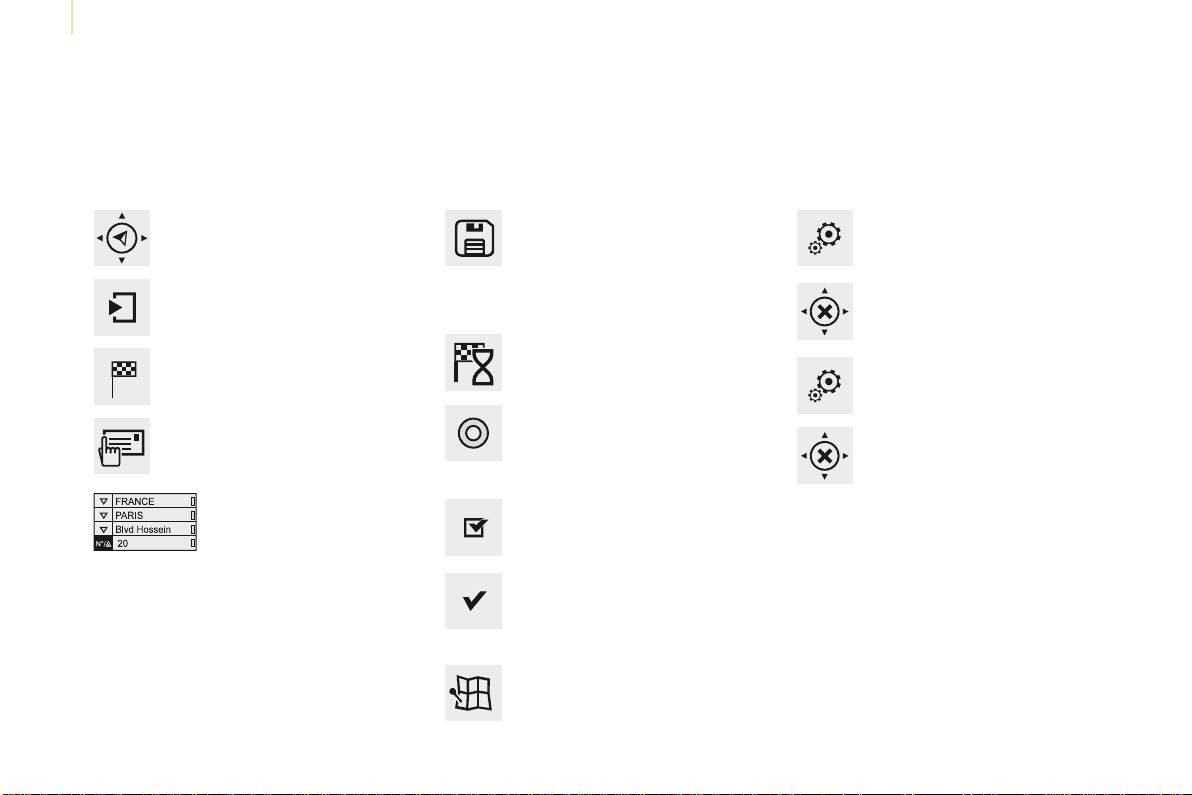
Audio and Telematics
214
Berlingo-2-VP_en_Chap10a_SMEGplus_ed01-2016
Navigation - Guidance
Choosing a new destination
Select "Enter destination".
Select "Save" to save the address
enteredasacontactentry.
Thesystemallowsupto200entries.
Select "Confirm".
Press on "Show route on map" to
startnavigation.
Select "Address".
Select the "Country:"fromthe
listoffered,theninthesame
way the "City:" or its post
code, the "Road:", the "N°:".
Confirmeachtime.
Select "Navigate to".
Choosetherestrictioncriteria:
"Tolls", "Ferries", "Traffic", "Strict",
"Close".
Choosethenavigationcriteria:
"Fastest" or "Shortest" or "Time/
distance" or "Ecological".
Todeletenavigationinformation,
press on "Settings".
Press on "Stop navigation".
Toresumenavigationpresson
"Settings".
Press on "Resume guidance".
Press on Navigation to display the
primarypage.
Pressonthesecondarypage.
Towards a new destination
Or
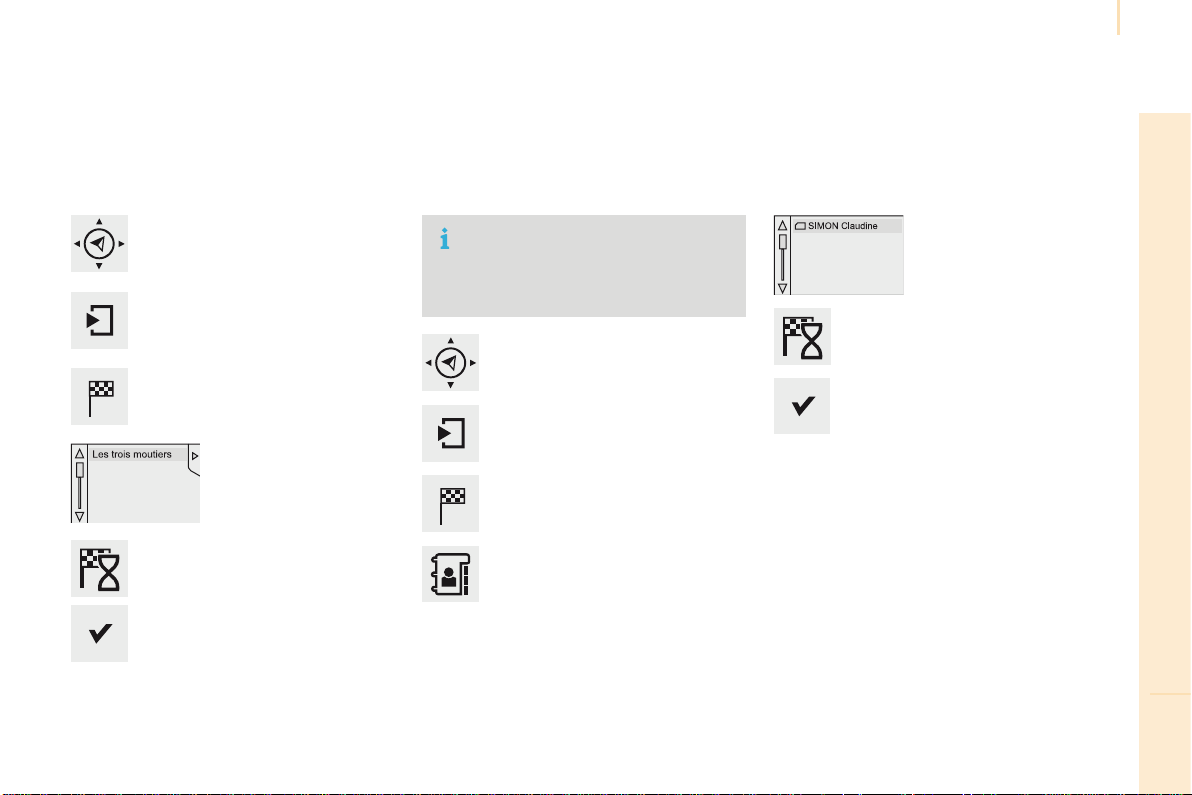
Audio and Telematics
215
TECHNOLOGY on BOARD
10
Berlingo-2-VP_en_Chap10a_SMEGplus_ed01-2016
Towards a recent destination
Select "Enter destination".
Selectanaddressfrom
thelistoffered.
Press on Navigation to display the
primarypage.
Pressonthesecondarypage.
Select "Navigate to".
Towards a contact
Select "Enter destination".
Select "Contacts".
Press on Navigation to display the
primarypage.
Pressonthesecondarypage.
Selectadestinationfrom
the contacts in the list
offered.
Select "Navigate to".
Select the criteria then "Confirm" to
startnavigation.
To be able to use navigation "towards
a contact in the directory", it is first
necessary to enter the address for your
contact.
Select the criteria then "Confirm" or
press "Show route on map" to start
navigation.
Audio and Telematics
216
Berlingo-2-VP_en_Chap10a_SMEGplus_ed01-2016
Towards GPS coordinates
Select "Enter destination".
Select "Address".
Enter the "Longitude:"
then the "Latitude:".
Select "Navigate to".
Select the criteria then "Confirm" or
press "Show route on map" to start
navigation.
Press on Navigation to display the
primarypage.
Pressonthesecondarypage.
Towards a point on the map
Select "Enter destination".
Select "On the map".
Press on Navigation to display the
primarypage.
Pressonthesecondarypage.
Zoominginonthemapshowspointswith
information.
Alongpressonapointopensitscontent.
Towards points of interest (POI)
Points of Interest (POI) are listed in different
categories.
Press on Navigation to display the
primarypage.
Pressonthesecondarypage.
Select "Search for POI".
Select "All POIs",
Or
"Motor",
Or
"Dining/hotels".

Audio and Telematics
217
TECHNOLOGY on BOARD
10
Berlingo-2-VP_en_Chap10a_SMEGplus_ed01-2016
Anannualmappingupdateallows
new points of interest to be presented
toyou.
YoucanalsoupdatetheRiskareas/
Dangerareaseverymonth.
Thedetailedprocedureisavailableon:
http://citroen.navigation.com.
Audio and Telematics
218
Berlingo-2-VP_en_Chap10a_SMEGplus_ed01-2016
Risk areas / Danger zone
alert settings
Press on Navigation to display the
primarypage.
Pressonthesecondarypage.
Select "Settings".
Select "Alarm!"(Alert).
ItisthenpossibletoactivateRiskareasalerts
then:
- "Audible warning"
- "Alert only when navigating"
- "Alert only for overspeed"
- "Displayspeedlimits"
- Timing:thechoiceoftimingallowsthe
timebeforegivingaRiskareasalerttobe
defined.
Select "Confirm".
This series of alerts and displays is
onlyavailableifRiskareashavefirst
been downloaded and installed on the
system.
Trafc
Traffic information
Display of messages
Press on Navigation to display the
primarypage.
Pressonthesecondarypage.
Select "Traffic messages".
Choosefiltersettingsfor:
"On the route",
"Around",
"Near destination", filters to fine-
tunethelistofmessages.
Pressagaintoremovethefilter.
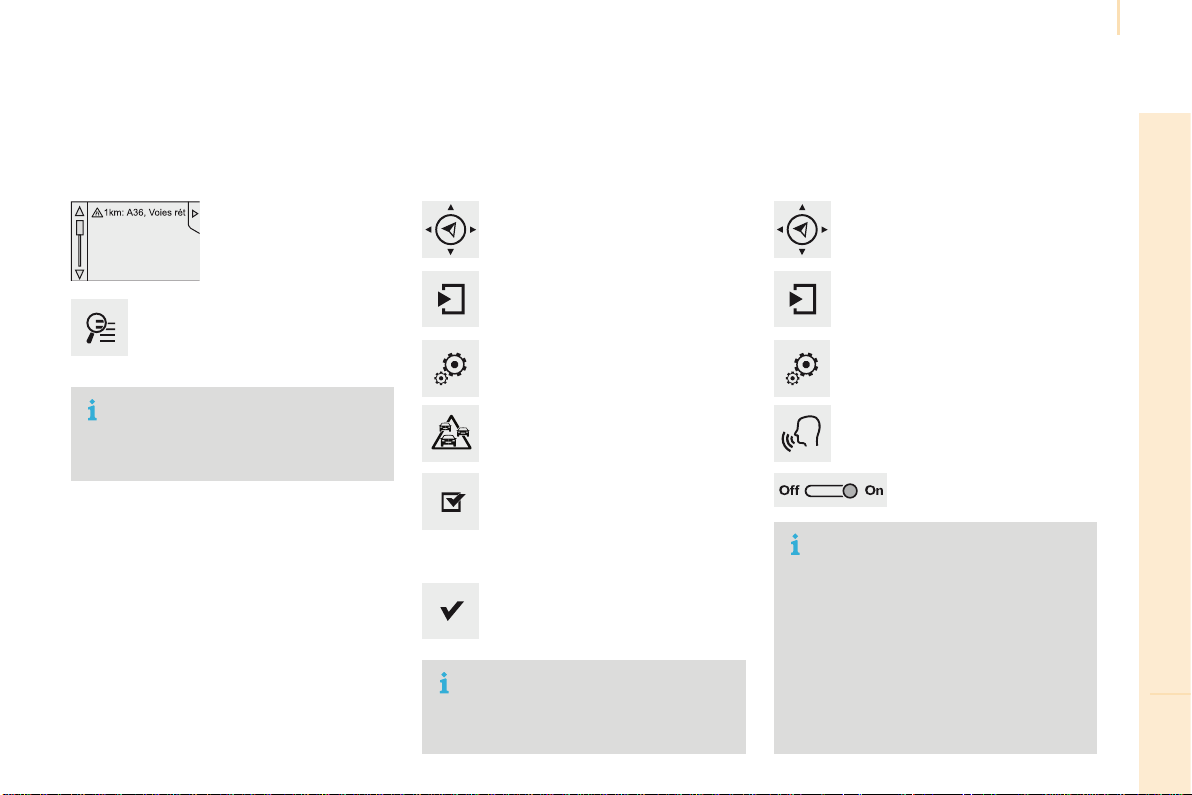
Audio and Telematics
219
TECHNOLOGY on BOARD
10
Berlingo-2-VP_en_Chap10a_SMEGplus_ed01-2016
Selectthemessagefrom
thelistoffered.
Selectthemagnifyingglasstohave
voiceinformation.
Setting lters
Press on Navigation to display the
primarypage.
Pressonthesecondarypage.
Select "Settings".
Select "Traffic options".
Select:
- "Be advised of new messages",
- "Speak messages".
Thenenterthefilterradius.
Select "Confirm".
Werecommendafilterradiusof:
- 12miles(20km)inurbanareas,
- 30miles(50km)onmotorways.
TMC (Traffic Message Channel)
messagesonGPS-Navigationcontain
trafficinformationtransmittedinreal
time.
TheTA(TrafficAnnouncement)
function gives priority to TA alert
messages.Tooperate,thisfunction
needs good reception of a radio station
transmittingthistypeofmessage.
Whenatrafficreportistransmitted,
the current audio source is interrupted
automaticallytoplaytheTAmessage.
Normalplaybackoftheaudiosource
resumesattheendofthetransmission
ofthemessage.
Receiving TA messages
Press on Navigation to display the
primarypage.
Pressonthesecondarypage.
Select "Settings".
Select "Voice".
Activate/Deactivate"Traffic
(TA)".
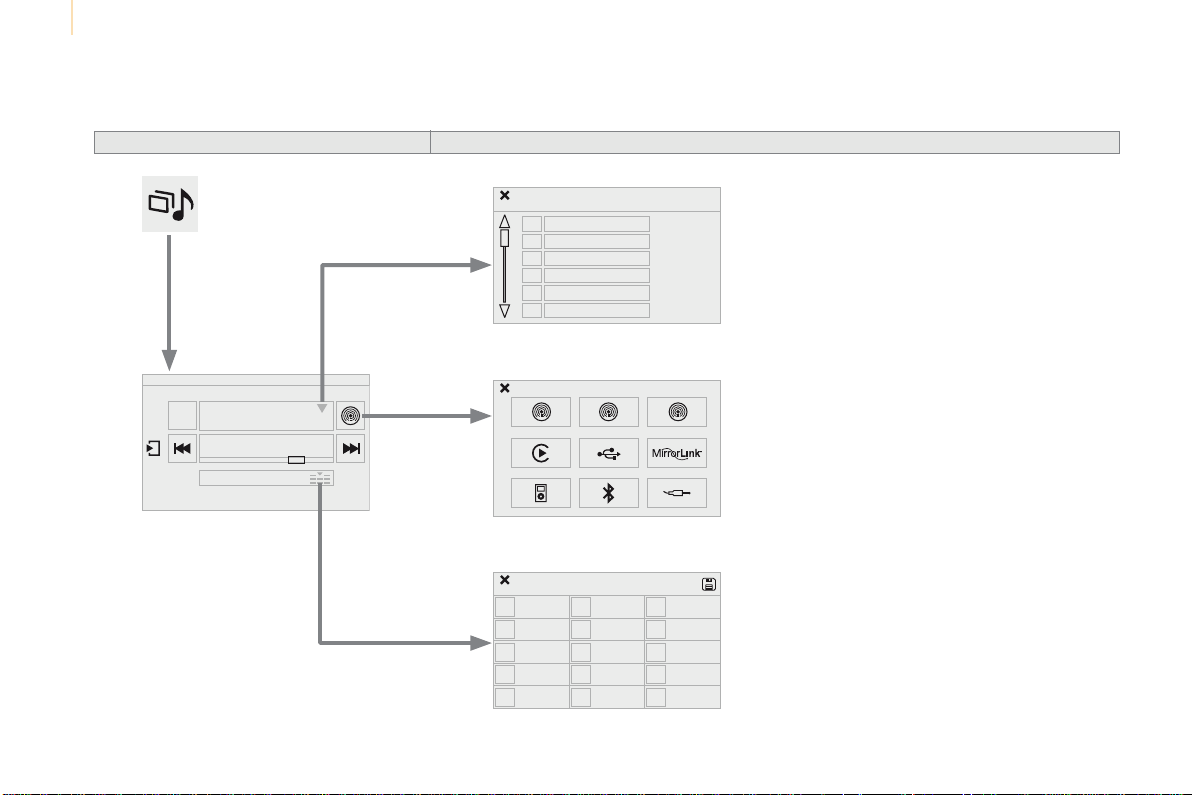
Audio and Telematics
220
Berlingo-2-VP_en_Chap10a_SMEGplus_ed01-2016
Radio Media
Level 1 Level 2
List of FM stations
Save
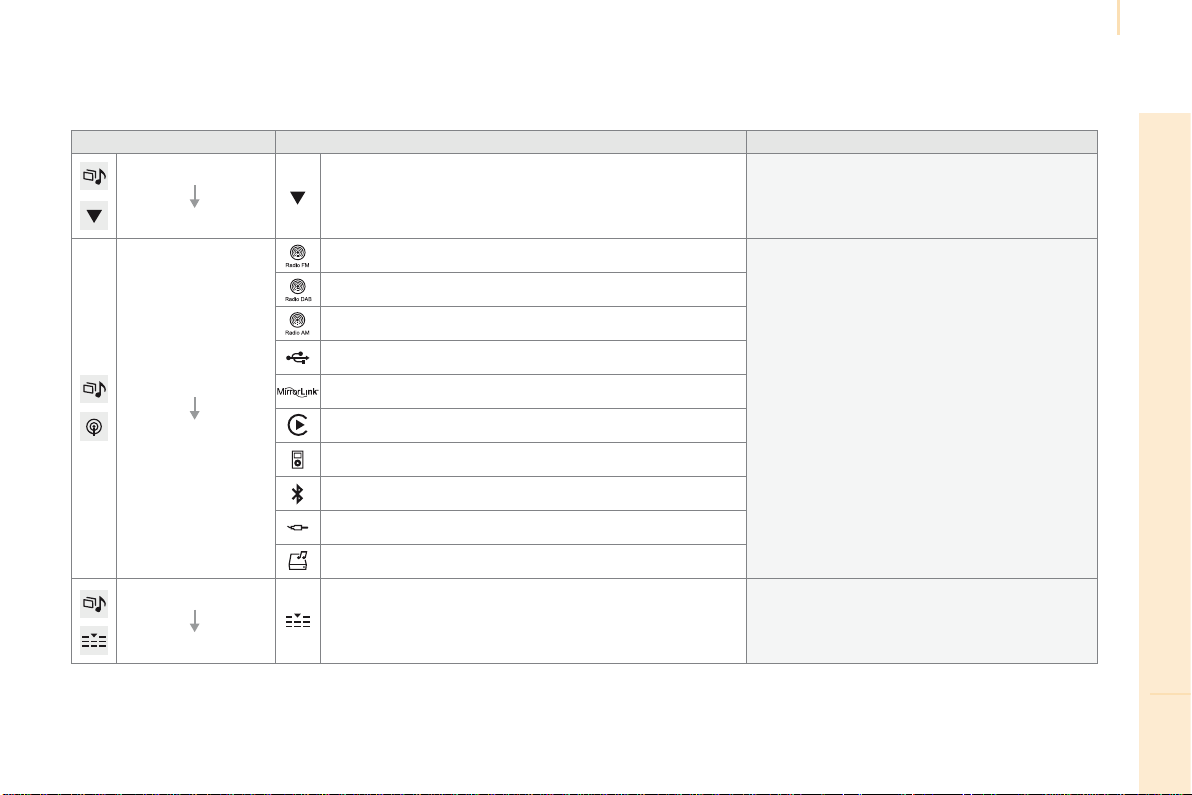
Audio and Telematics
221
TECHNOLOGY on BOARD
10
Berlingo-2-VP_en_Chap10a_SMEGplus_ed01-2016
Level 1 Level 2 Comments
Radio Media
List
List of FM stations Pressonaradiostationtoselectit.
Radio Media
Source
FM Radio
Select change of source
DAB Radio
AM Radio
USB
MirrorLink
CarPlay
iPod
Bluetooth
AUX
Jukebox
Radio Media
Save (preset)
PressanemptylocationtoSaveit.
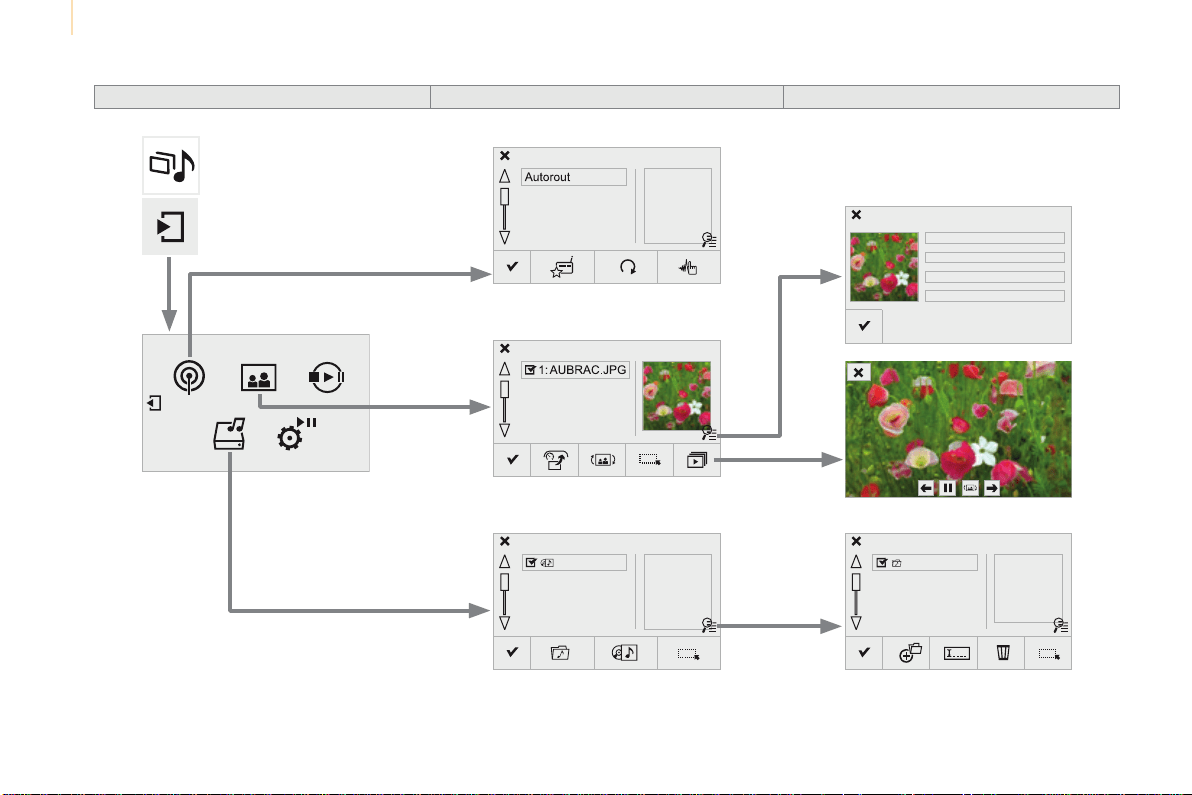
Audio and Telematics
222
Berlingo-2-VP_en_Chap10a_SMEGplus_ed01-2016
Level 1 Level 2 Level 3
Media
Photos
Manage Jukebox
List of FM stations
Copy to Jukebox
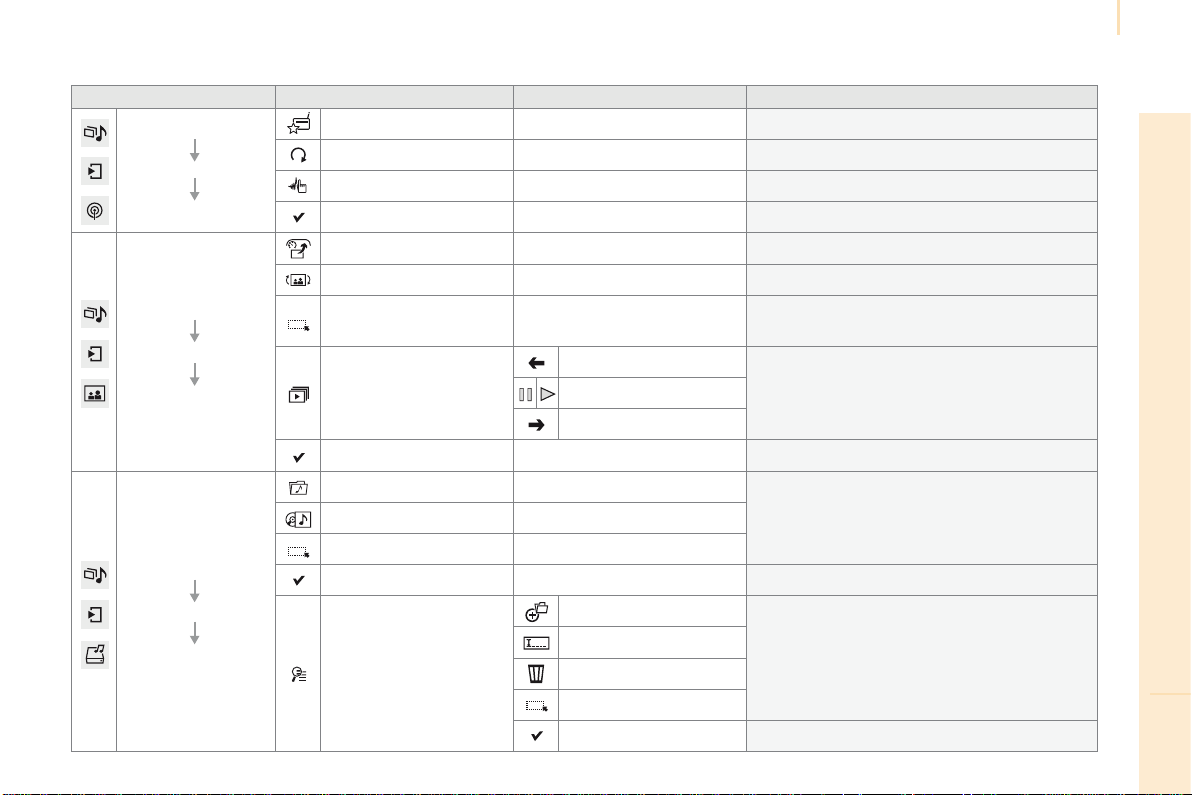
Audio and Telematics
223
TECHNOLOGY on BOARD
10
Berlingo-2-VP_en_Chap10a_SMEGplus_ed01-2016
Level 1 Level 2 Level 3 Comments
Radio Media
Secondary page
Radio list
Save Pressaradiostationtoselectit.
Update list Updatethelistofstationsreceived.
Frequency Enterthedesiredradiofrequency.
Confirm Savethesettings.
Radio Media
Secondary page
Photos
Home screen Displaytheselectedphotointhehomepage.
Rotate Rotatethephoto90°.
Select all
Selectallthephotosinthelist.
Pressagaintodeselect.
Slideshow
Previousphoto.
Displaythephotosinsequence,fullscreen.
Thesystemsupportsthefollowingimageformats:
.gif,.jpg,.bmp,.png.
Pause/Play.
Nextphoto.
Full screen Displaytheselectedphotofull-screen.
Radio Media
Secondary page
Manage Jukebox
Sort by folder
Chooseaselectionmode.Sort by album
Select all
Copy CopyfilestotheJukebox.
Magnifying glass
Create folder
Choosethedesiredfunction.
Rename
Delete
Select all
Confirm Savethesettings.
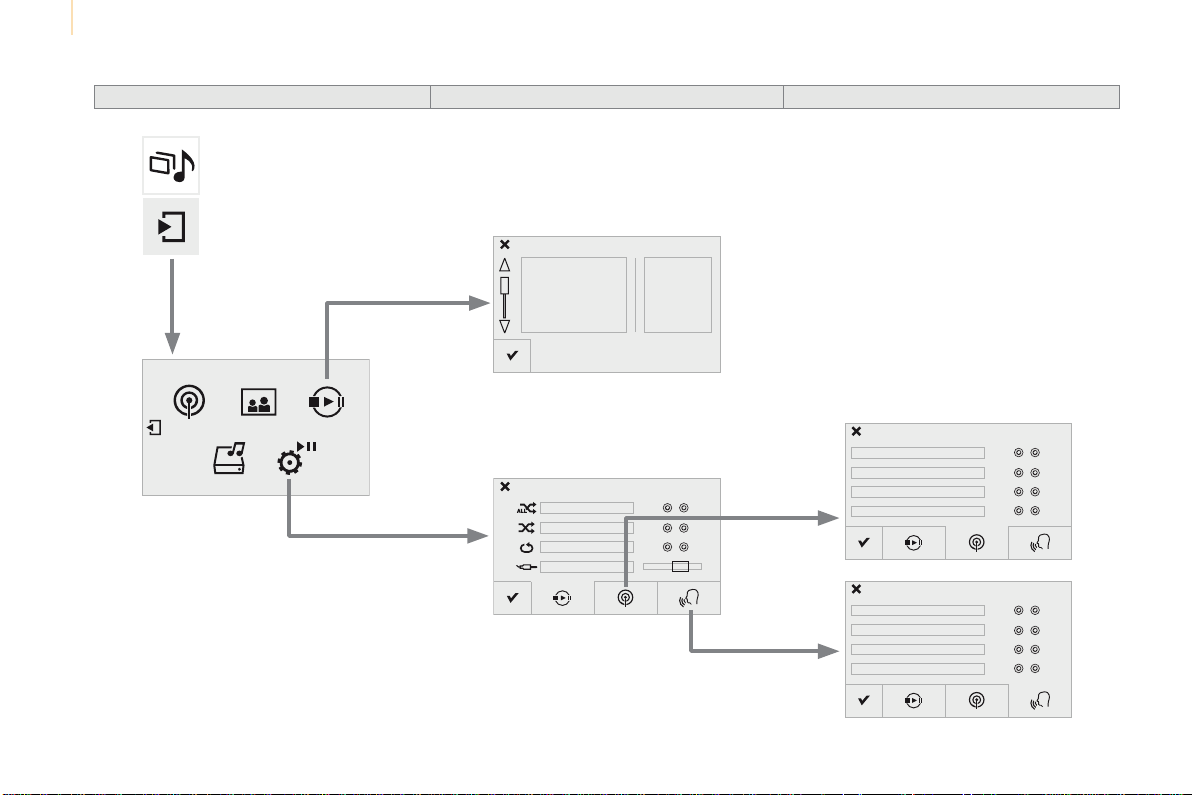
Audio and Telematics
224
Berlingo-2-VP_en_Chap10a_SMEGplus_ed01-2016
Level 1 Level 2 Level 3
Media
Settings
Settings
Settings
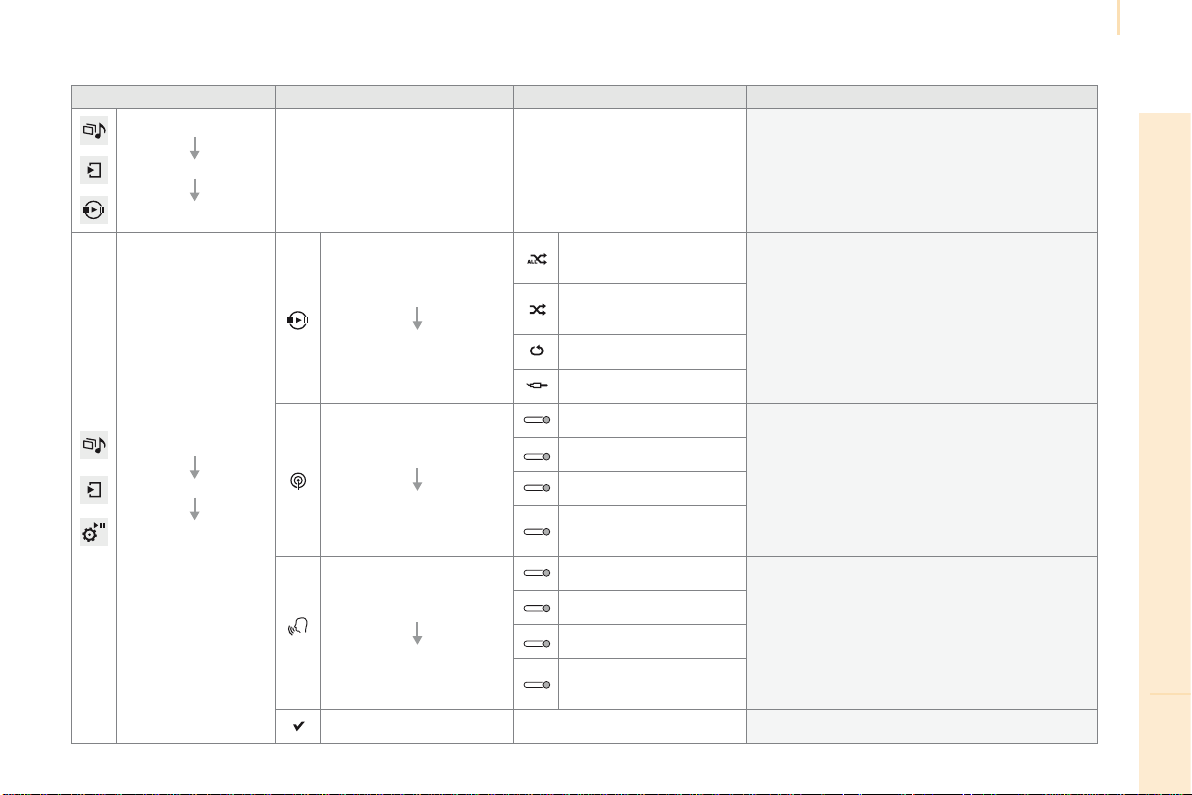
Audio and Telematics
225
TECHNOLOGY on BOARD
10
Berlingo-2-VP_en_Chap10a_SMEGplus_ed01-2016
Level 1 Level 2 Level 3 Comments
Radio Media
Secondary page
Media list
Presentationofthelastmediaused.
Radio Media
Secondary page
Settings
Media
Settings
Shuffle
(alltracks)
Choosetheplaysettings.
Shuffle
(currentalbum)
Repeat
Aux.amplification
Radio
Settings
RDS options
Activateordeactivatethesettings.
DAB/FMstationtracking
Display Radio Text
Digital radio slideshow
display
Announcements
Settings
Trafficannouncements(TA)
Activateordeactivatethesettings.
News - Weather
Sport-Programminfo
Flash - Unforeseen
events
Confirm Savethesettings.
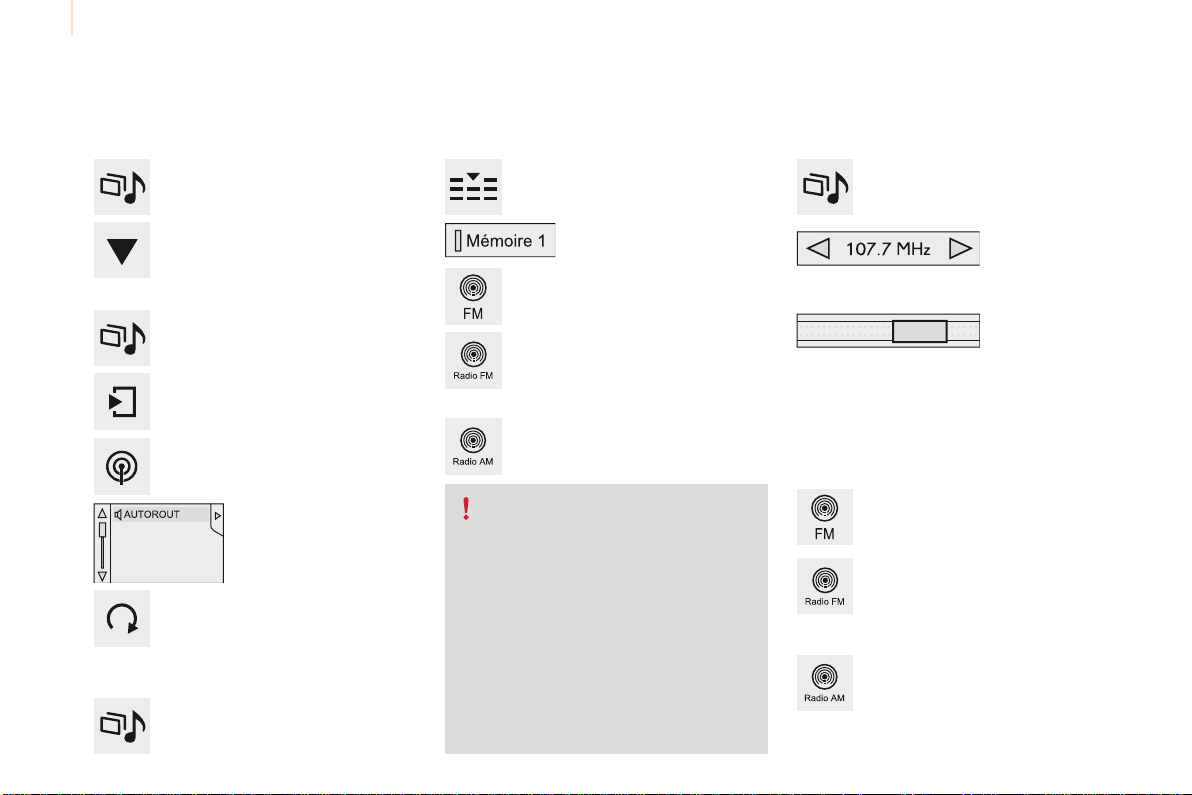
Audio and Telematics
226
Berlingo-2-VP_en_Chap10a_SMEGplus_ed01-2016
Press on Radio Media to display the
primarypage.
Press on Radio Media to display the
primarypage.
Select "Save".
If necessary, select change of
source.
Press on Radio Media to display the
primarypage.
Selectchangesource.
"AM Radio".
By automatic frequency search
Select "FM Radio".
"AM Radio".
Pressonthesecondarypage.
Or
Select a preset radio station
inthelist.
Select "FM Radio".
Selectaradiostationfrom
thelistoffered.
Select "Update list" to refresh the
list.
Select "List"intheprimarypage.
Press on Radio Media to display the
primarypage.
Radio
Changing a radio frequencySelecting a station
THEN
Radioreceptionmaybeaffectedby
theuseofelectricalequipmentnot
approved by CITROËN, such as a USB
chargerconnectedtothe12Vsocket.
Theexteriorenvironment(hills,
buildings,tunnel,carpark,below
ground...)maypreventreception,
eveninRDSstationtrackingmode.
Thisphenomenonisnormalinthe
propagation of radio waves and is in no
way indicative of a fault with the audio
system.
Select "Radio list" in the secondary
page.
Or
Press 3 or 4tomovethecursorforan
automaticsearchdownorupforaradio
frequency.
Or
Toselectapresetradiostation.
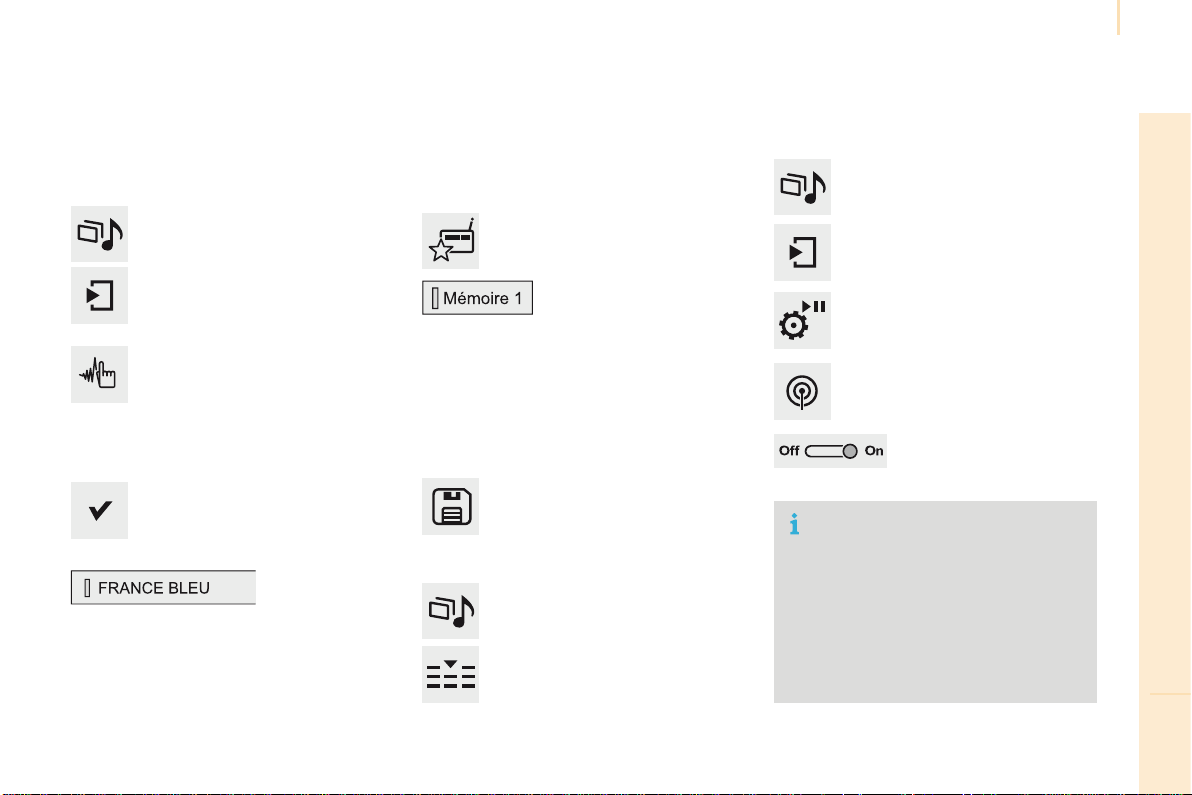
Audio and Telematics
227
TECHNOLOGY on BOARD
10
Berlingo-2-VP_en_Chap10a_SMEGplus_ed01-2016
Select a radio station or frequency (refer to the
correspondingsection).
Press on Radio Media to display the
primarypage.
Pressonthesecondarypage.
Select "Settings".
Select "Radio".
Activate/deactivate"RDS
options".
Press on Radio Media to display the
primarypage.
Pressonthesecondarypage.
Press on "Save"(preset).
Selectanumberinthelisttopresetthe
previouslychosenradiostation.
Alongpressonanumbersaves(presets)the
station.
Press on Frequency.
Enter the frequency in full
(e.g.:92.10MHz)usingthekeypad
then "Confirm".
Changing radio station
Pressingthenameofthecurrentradiostation
bringsupalist.
Tochangeradiostationpressthenameofthe
desiredstation.
Or
Press on Radio Media to display the
primarypage.
Select "Save"(preset).
Presetting a station Activating / Deactivating RDS
OR
THEN
A press on this button presets all of
thestationsoneaftertheother.
Recalling preset stations
RDS, if activated, allows you to continue
listeningtothesamestationbyautomatic
retuningtoalternativefrequencies.
However, in certain conditions, coverage
ofanRDSstationmaynotbeassured
throughout the entire country as radio
stations do not cover 100 % of the
territory.Thisexplainsthelossof
receptionofthestationduringajourney.
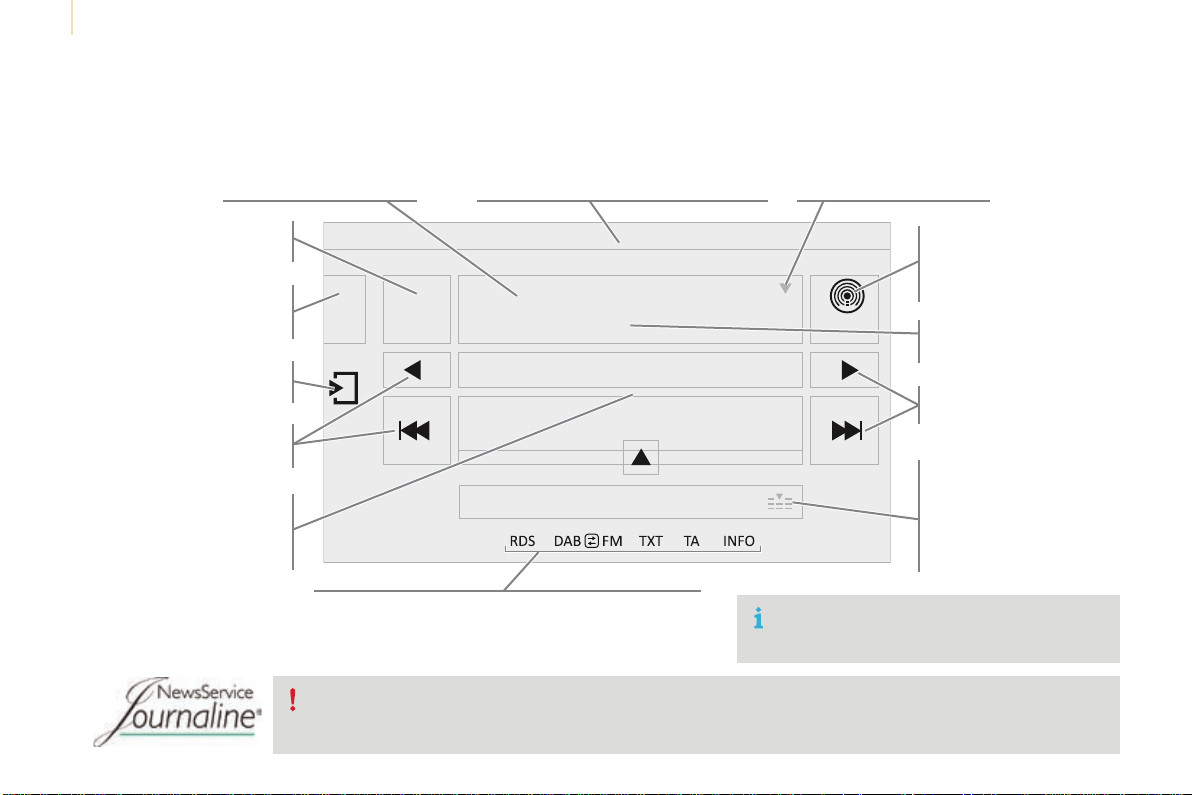
Audio and Telematics
228
Berlingo-2-VP_en_Chap10a_SMEGplus_ed01-2016
Displayofoptions:
if active but not available, the display will be greyed out,
ifactiveandavailable,thedisplaywillbeblank.
Display of "Radiotext" for
thecurrentstation.
ManagetheJukebox.
Displaycurrentaction.
Selecttheaudiosource.
Displaythe"DAB"band.
Displayofthenameofthe
currentstation.
Short-cut:accesstothechoiceofaudio
source and the list of stations (or titles,
dependingonthesource). Selecttheradiostation.
Anythumbnailbroadcastby
thestation.
Preset stations,
buttons 1 to 15
Shortpress:selectthe
presetradiostation.
Longpress:presetaradio
station.
Next"Multiplex".
Nextradiostation.
Secondarypage.
Displaythenameand
numberofthemultiplex
servicebeingused.
Previous"Multiplex".
Previousradiostation.
DAB (Digital Audio Broadcasting) radio
If the "DAB" radio station being listened to is not
availableon"FM",the"DABFM"optionisgreyedout.
Journaline
®
isatext-basedinformationservicedesignedfordigitalradiosystems.
Itprovidestext-basedinformationstructuredaroundtopicsandsub-topics.
Thisserviceisavailablefromthe"LISTOFDABSTATIONS"page.
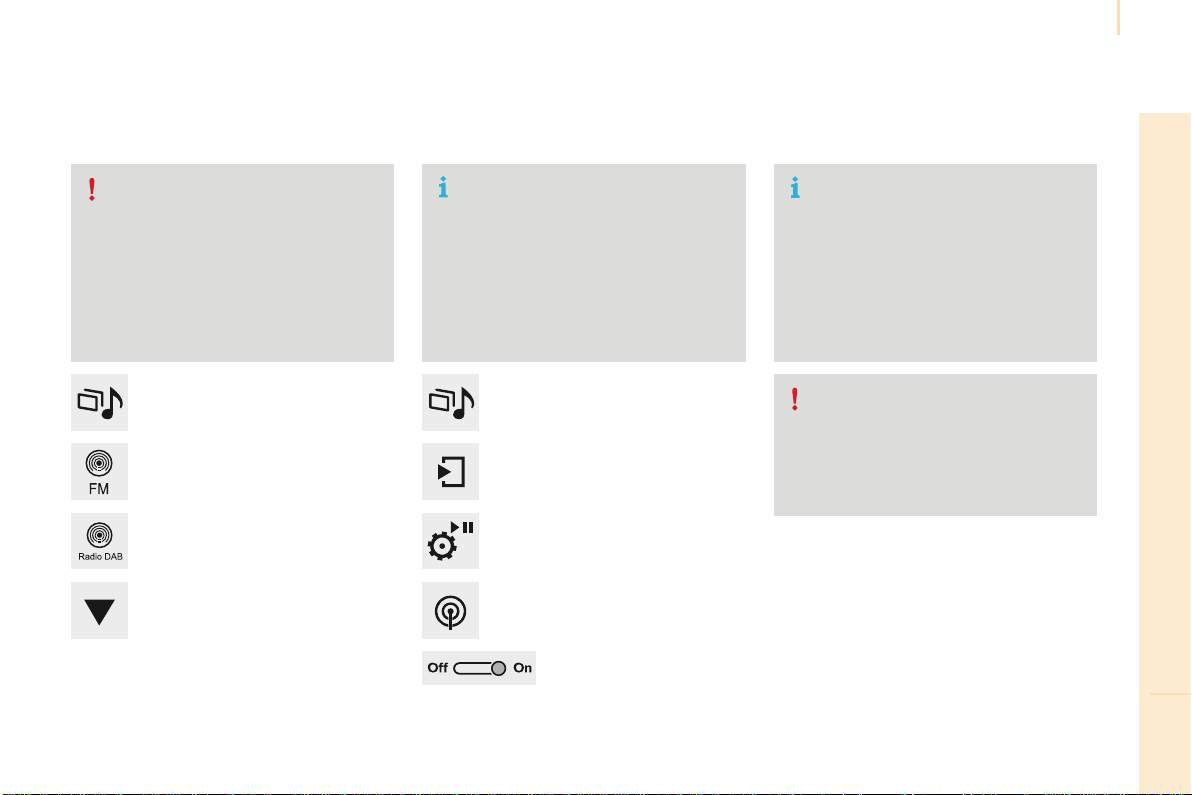
Audio and Telematics
229
TECHNOLOGY on BOARD
10
Berlingo-2-VP_en_Chap10a_SMEGplus_ed01-2016
Selectchangeofsource.
Press on Radio Media to display the
primarypage.
Select "DAB Radio".
Select "List"intheprimarypage.
Selecttheradiostationfromthelistoffered.
Press on Radio Media to display the
primarypage.
Pressonthesecondarypage.
Select "Settings".
Select "Radio".
Select "Digital/FM auto
tracking" then "Confirm".
DAB / FM auto trackingDigital radio
"DAB" does not cover 100% of the
territory.
When the digital radio signal is poor,
"DAB/FMstationtracking"allowsyouto
continuelisteningtothesamestation,
byautomaticallyswitchingtothe
corresponding "FM" analogue station
(ifthereisone).
If"DAB/FMstationtracking"is
activated, there is a difference of a
fewsecondswhenthesystemswitches
to"FM"analogueradiowithsometimes
avariationinvolume.
When the digital signal is restored,
thesystemautomaticallychangesback
to"DAB".
Digital radio provides higher quality
reception and also the graphical display
ofcurrentinformationontheradio
stationbeinglistenedto.Select"List"in
theprimarypage.
Therangeofmultiplexesavailableis
displayedinalphabeticalorder.
If the "DAB" station being listened to
is not available on "FM" ("DAB/FM"
optiongreyedout),or"DAB/FMstation
tracking"isnotactivated,thesound
will cut out while the digital signal is too
weak.
or
Select "Radio list" in the secondary
page.
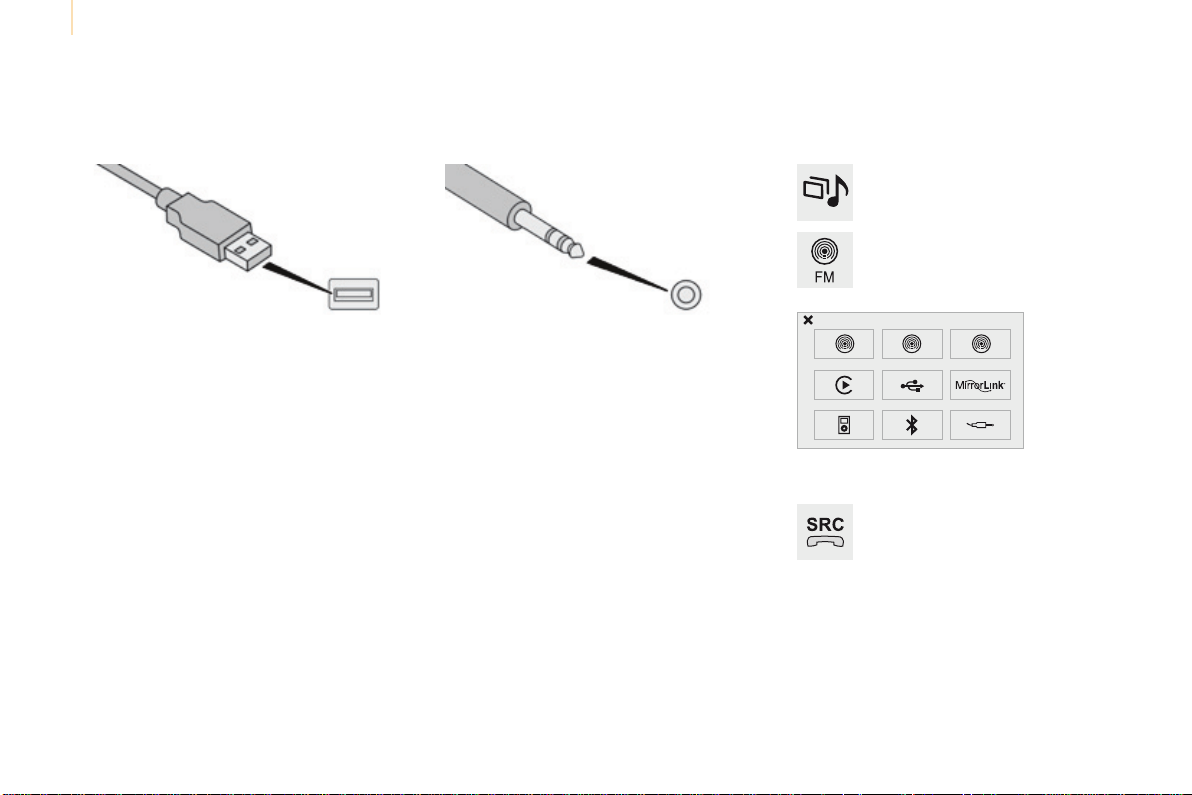
Audio and Telematics
230
Berlingo-2-VP_en_Chap10a_SMEGplus_ed01-2016
Media
USB player Selection of source
ThesteeringmountedSRC (source)
button can be used to go to the next
mediasource,availableifthesource
isactive.
Selectchangeofsource.
Press on Radio Media to display the
primarypage.
Thesystembuildsplaylists(intemporary
memory),anoperationwhichcantakefrom
afewsecondstoseveralminutesatthefirst
connection.
Reducethenumberofnon-musicfilesandthe
numberoffolderstoreducethewaitingtime.
Theplaylistsareupdatedeverytimethe
ignition is switched off or connection of a USB
memorystick.Thelistsarememorised:ifthey
arenotmodified,thesubsequentloadingtime
willbeshorter.
InserttheUSBmemorystickintotheUSBport
or connect the USB device to the USB port
usingasuitablecable(notsupplied).
Auxiliary (AUX) socket
Connecttheportabledevice(MP3player…)to
theauxiliaryJacksocketusinganaudiocable
(notsupplied).
Firstadjustthevolumeofyourportabledevice
(toahighlevel).Thenadjustthevolumeofyour
audiosystem.
Displayandmanagementofthecontrolsare
viatheportabledevice.
Choosethesource.
Audio and Telematics
231
TECHNOLOGY on BOARD
10
Berlingo-2-VP_en_Chap10a_SMEGplus_ed01-2016
Theaudioequipmentwillonlyplayaudiofiles
with".wma,.aac,.flac,.oggand.mp3"file
extensions and with a bit rate of between
32Kbpsand320Kbps.
ItalsosupportsVBR(VariableBitRate)mode.
Noothertypeoffile(.mp4,...)canbeplayed.
".wma"filesmustbeofthestandardwma9type.
Thesamplingratessupportedare32,44and
48KHz.
Itisadvisabletorestrictfilenamesto
20 characters, without using of special
characters(e.g.:""?;ù)toavoidanyplaying
anddisplayingproblems.
Information and advice
UseonlyUSBmemorysticksformattedFAT32
(fileallocationtable).
ThesystemsupportsUSBmass
storageportableplayers,BlackBerry
®
devices or Apple
®
players via USB
ports.Theadaptorcablenotsupplied.
Control of the peripheral device is with
theaudiosystemcontrols.
Other peripherals, not recognised on
connection,mustbeconnectedtothe
auxiliarysocketusingaJackcable(not
supplied).
ItisrecommendedthattheUSBcable
fortheportabledeviceisused.
Thesystemdoesnotsupportthe
simultaneousconnectionoftwo
identicaldevices(twomemorysticks
or two Apple
®
players) but it is possible
toconnectonememorystickandone
Apple
®
playeratthesametime.
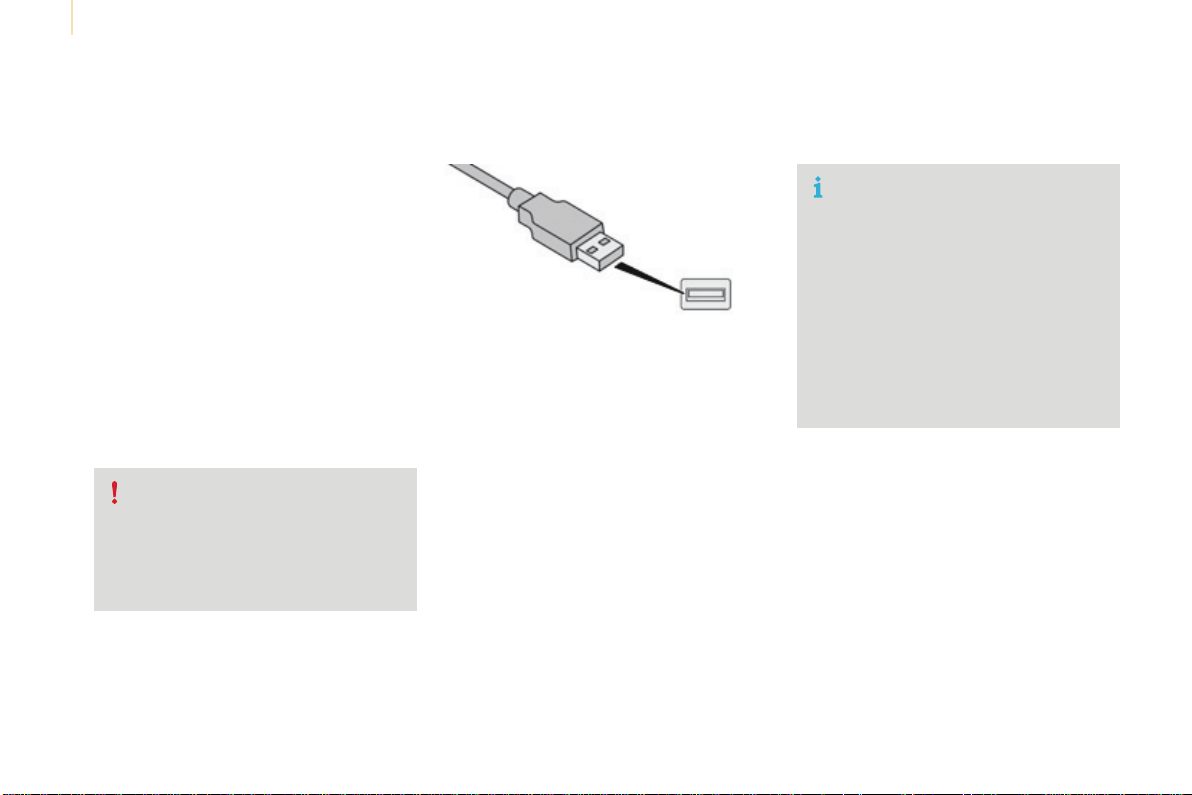
Audio and Telematics
232
Berlingo-2-VP_en_Chap10a_SMEGplus_ed01-2016
Bluetooth
®
audio streaming
Streamingallowsaudiofilesonyourtelephone
tobeplayedthroughthevehicle'sspeakers.
Connectthetelephone:seethe"Telephone"
section, then "Bluetooth".
Choose the "Audio" or "All"profile.
Ifplaydoesnotstartautomatically,itmaybe
necessarytostarttheaudioplaybackfromthe
telephone.
Controlisfromtheperipheraldeviceorby
usingtheaudiosystembuttons.
Onceconnectedinstreamingmode,
the telephone is considered to be a
mediasource.
Itisrecommendedthatyouactivate
"Repeat"ontheBluetoothperipheral.
Connecting Apple
®
players
Connect the Apple
®
player to the USB port
usingasuitablecable(notsupplied).
Playstartsautomatically.
Controlisviatheaudiosystem.
The classifications available are those
of the portable device connected
(artists/albums/genres/playlists/
audiobooks/podcasts).
The default classification used is by
artist.Tomodifytheclassificationused,
returntothefirstlevelofthemenu
then select the desired classification
(playlistsforexample)andconfirm
togodownthroughthemenutothe
desiredtrack.
Theversionofsoftwareintheaudiosystem
maynotbecompatiblewiththegenerationof
your Apple
®
player.
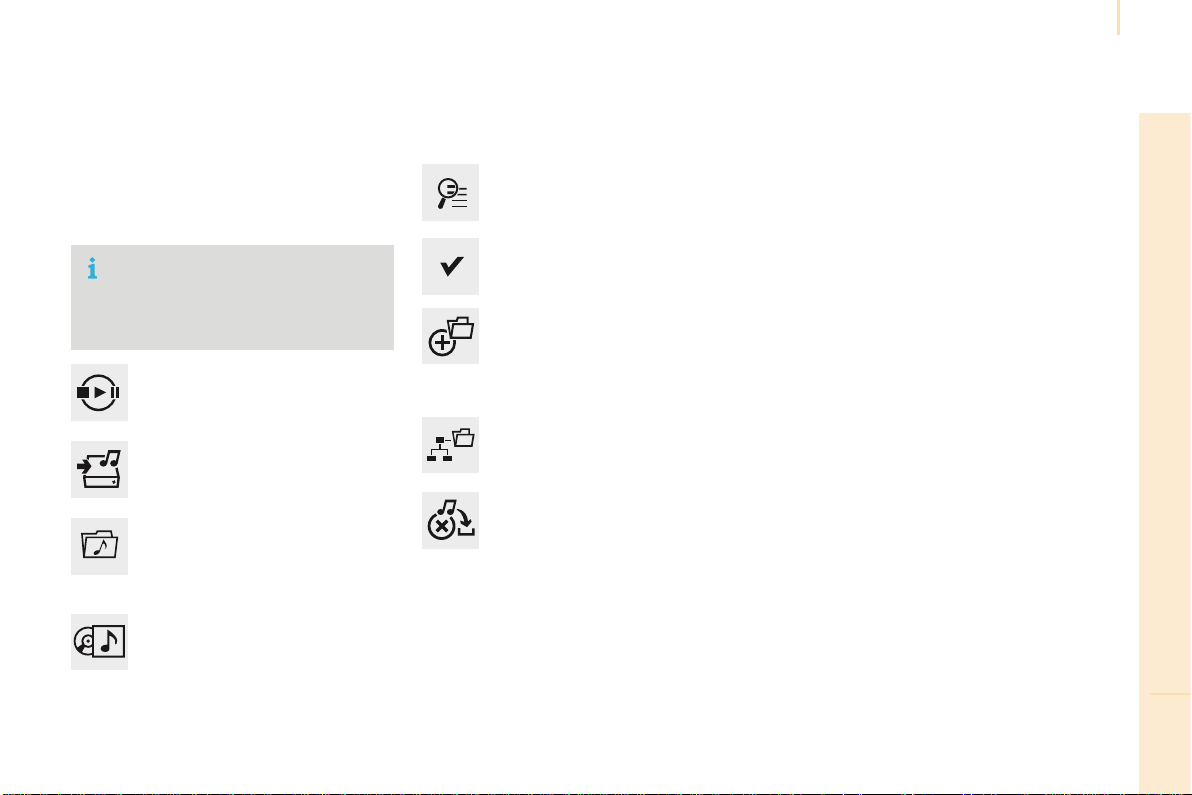
Audio and Telematics
233
TECHNOLOGY on BOARD
10
Berlingo-2-VP_en_Chap10a_SMEGplus_ed01-2016
Managing the Jukebox
Connectthedevice(MP3player...)totheUSB
portorauxiliaryJacksocketusingasuitable
audiocable.
When no audio file is copied to the
system,whichhasacapacityof8GB,
alloftheJukeboxfunctionsymbolsare
greyedandarenotavailable.
Select "Media list".
Selectthemagnifyingglasstoenter
thefolderoralbumandselectaudio
filebyaudiofile.
Select copy "Copy Jukebox".
Select "Confirm" then "Copy".
Select "Sort by folder".
Select "New folder" to create a
folderstructureintheJukebox.
"Sort by album".
Select "Keep structure" to retain the
structurefromthedevice.
Whilecopyingthesystemreturns
totheprimarypage;youcango
backtothecopyviewatanytimeby
selectingthisbutton.
Or
Or
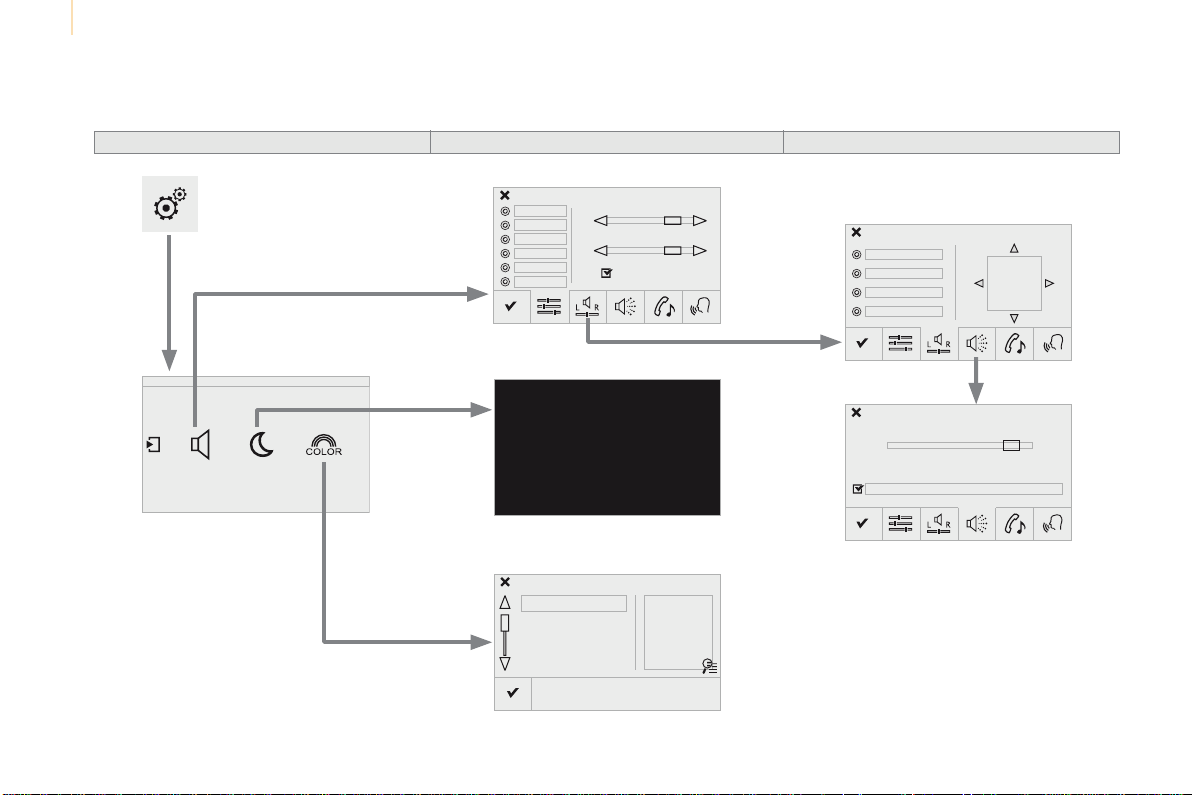
Audio and Telematics
234
Berlingo-2-VP_en_Chap10a_SMEGplus_ed01-2016
Level 1
Settings
Level 2 Level 3
Audio settings
Choice of color scheme
Audio settings
Audio settings
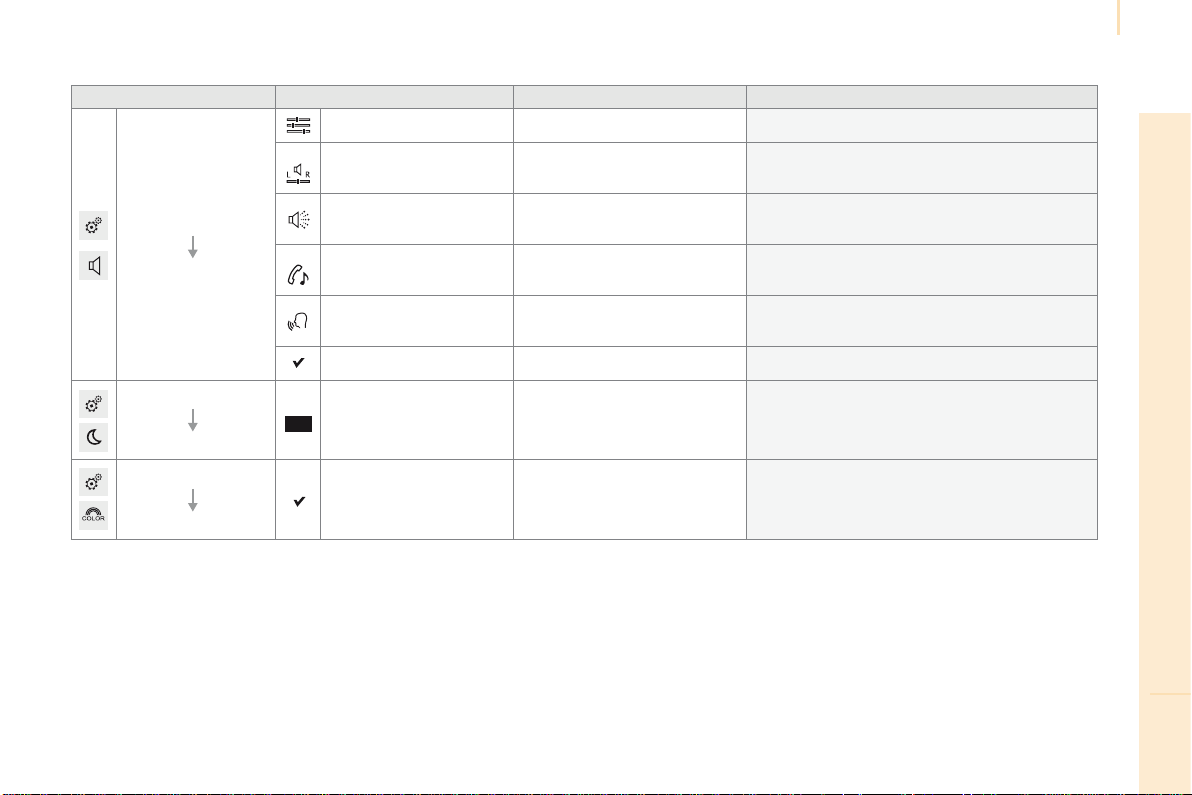
Audio and Telematics
235
TECHNOLOGY on BOARD
10
Berlingo-2-VP_en_Chap10a_SMEGplus_ed01-2016
Level 1 Level 2 Level 3 Comments
Settings
Audio settings
Ambience Choosethesoundambience.
Balance SounddistributionusingtheArkamys
®
system.
Sound effects
Setthevolumeoractivatethelinktovehicle
speed.
Ringtones Setthetelephoneringtoneandvolume.
Voice
Setthevolumeandvoiceforspeakingstreet
names.
Confirm Saveyoursettings.
Settings
Turn off screen
Function that turns off the
display.
Pressingthescreenreactivatesit.
Settings
Color schemes
Confirm
Choosethecolorscheme,thenconfirmtosave
thesetting.
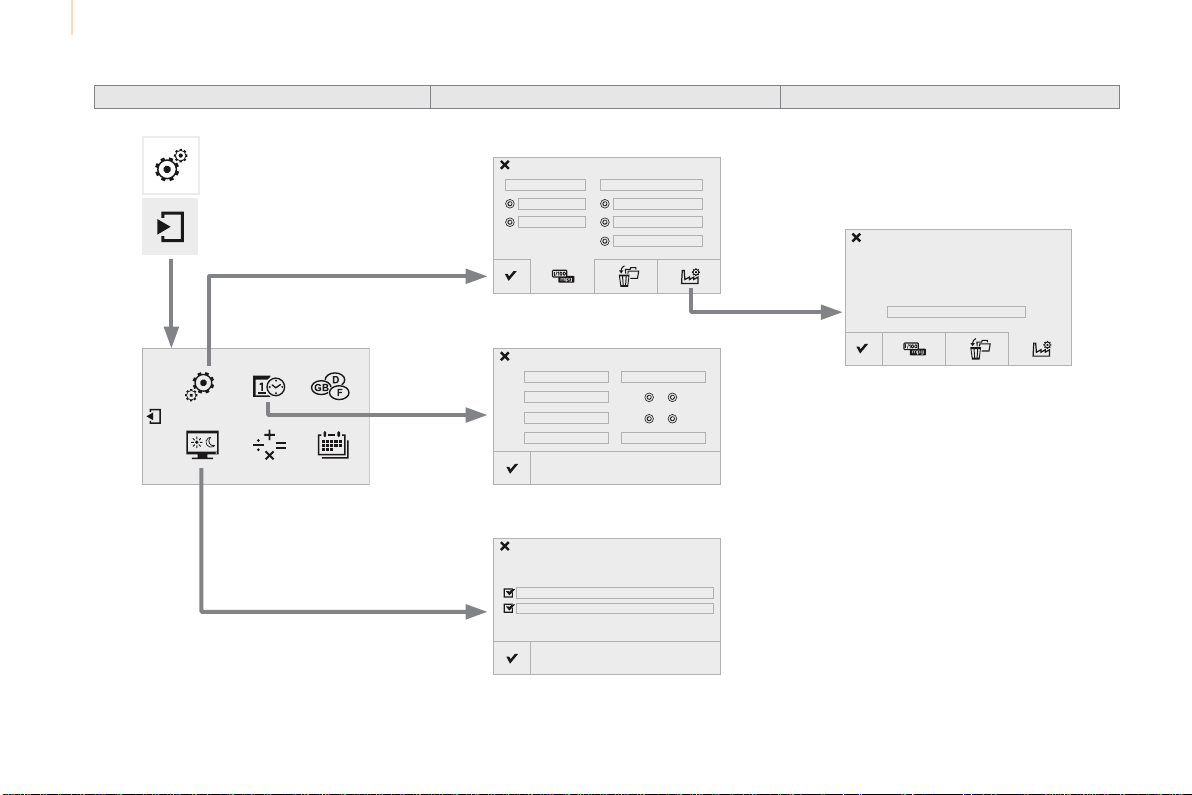
Audio and Telematics
236
Berlingo-2-VP_en_Chap10a_SMEGplus_ed01-2016
Units
Display screen
Configuration
Adjust date and time
Factory settings
Level 1 Level 2
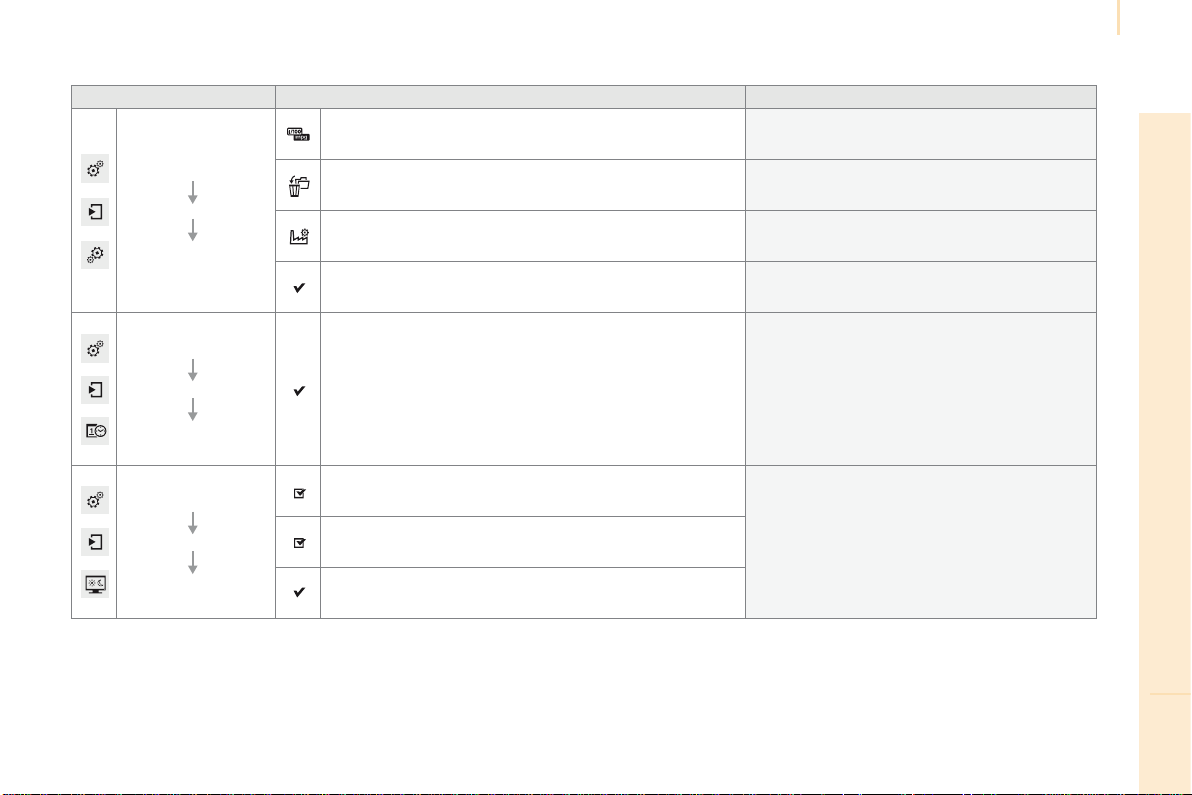
Audio and Telematics
237
TECHNOLOGY on BOARD
10
Berlingo-2-VP_en_Chap10a_SMEGplus_ed01-2016
Level 1 Level 2 Comments
Settings
Secondary page
System Settings
Units
Set the units used to display distance, fuel
consumptionandtemperature.
Delete data
Select the desired data in the list then press
Delete.
Factory settings Returntofactorysettings.
Confirm Savethesettings.
Settings
Secondary page
Time/Date
Confirm Setthedateandtimethenconfirm.
Settings
Secondary page
Screen settings
Activate automatic text scrolling
Activateordeactivatethesettingthenconfirm.Activate animations
Confirm
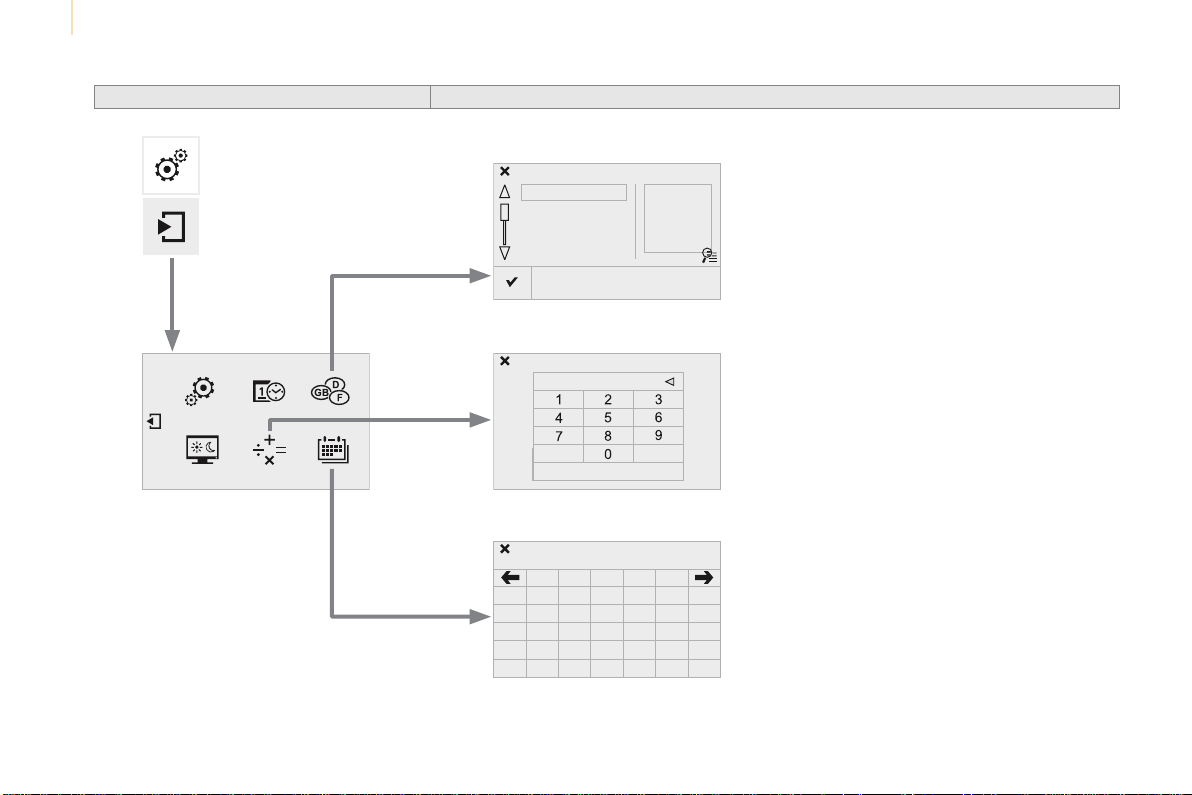
Audio and Telematics
238
Berlingo-2-VP_en_Chap10a_SMEGplus_ed01-2016
Choice of language
CalculatorConfiguration
Calendar
Level 1 Level 2
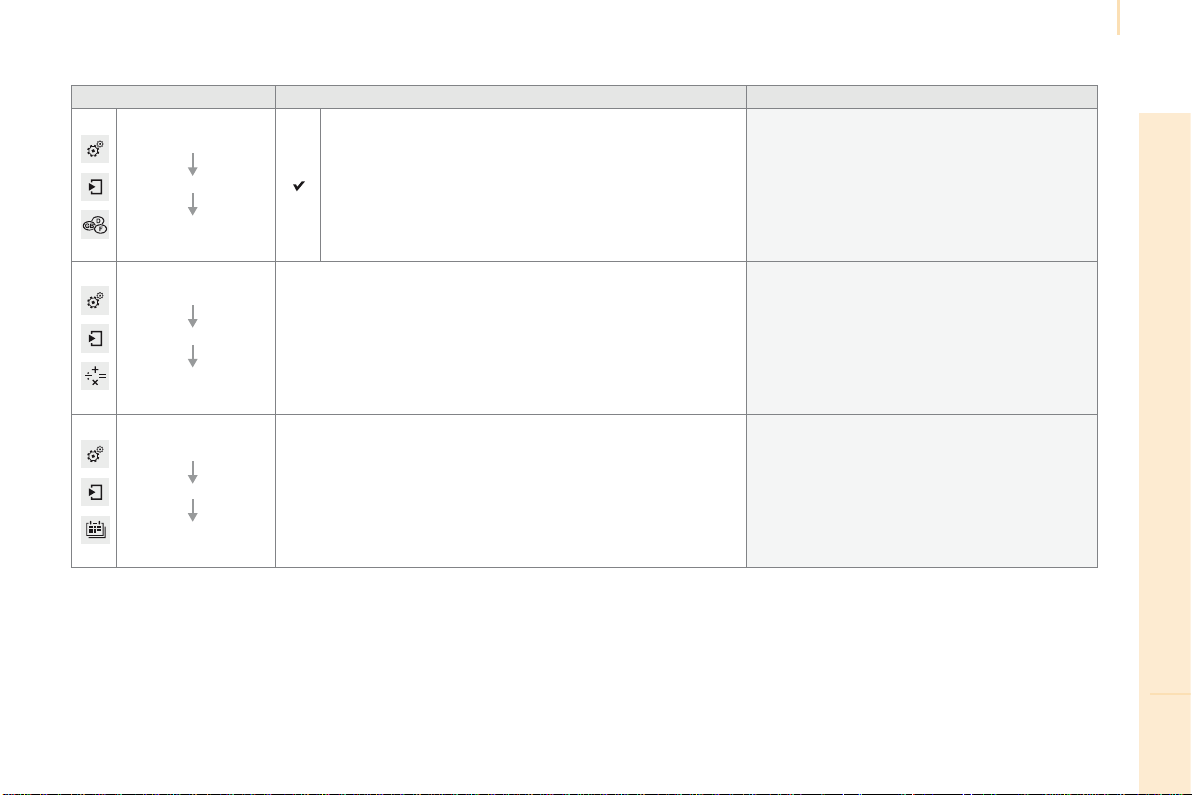
Audio and Telematics
239
TECHNOLOGY on BOARD
10
Berlingo-2-VP_en_Chap10a_SMEGplus_ed01-2016
Level 1 Level 2 Comments
Settings
Secondary page
Languages
Confirm Selectthelanguagethenconfirm.
Settings
Secondary page
Calculator
Selectthecalculator.
Settings
Secondary page
Calendar
Selectthecalendar.
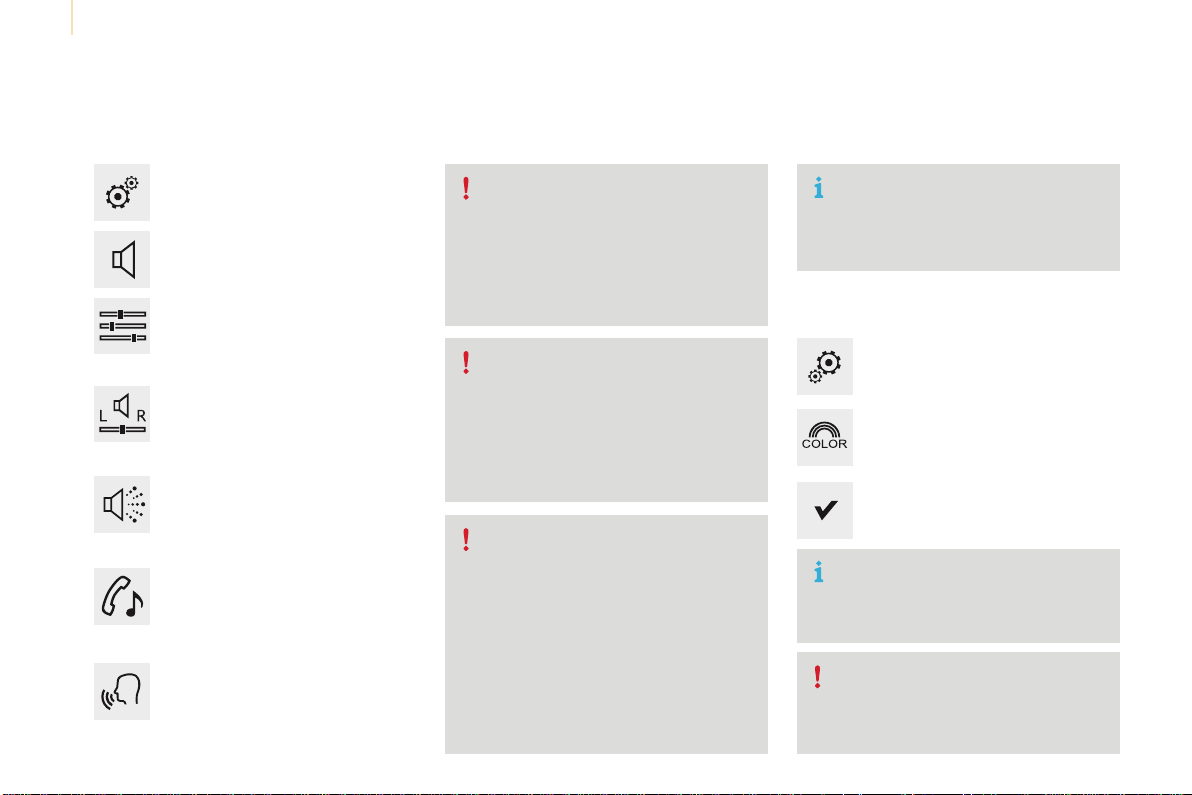
Audio and Telematics
240
Berlingo-2-VP_en_Chap10a_SMEGplus_ed01-2016
Audio settings
Press on Settings to display the
primarypage.
Select "Audio settings".
Select "Ambience"
Or
"Balance"
Or
"Sound effects"
Or
"Ringtones"
Or
"Voice".
On-boardaudio:Arkamys
©
Sound
Stagingoptimisessounddistributionin
thethepassengercompartment.
Ateachchangeofcolorschemethe
systemrestarts,showingablack
screenforafewmoments.
The distribution (or spatialisation using
theArkamys
®
system)ofsoundisan
audio process that allows the audio
qualitytobeadaptedtothenumberof
passengersinthevehicle.
Availableonlywiththe6-speaker
configuration.
Asasafetymeasure,theprocedure
forchangingthecolorschemeisonly
possiblewiththevehiclestationary.
The audio settings (Ambience, Bass:,
Treble: and Loudness) are different
and independent for each sound
source.
The settings for Distribution and
Balancearecommontoallsources.
- "Ambience"(choiceof6musical
ambiences)
- "Bass:"
- "Treble:"
- "Loudness"(Activate/Deactivate)
- "Distribution" ("Driver", "All
passengers", "Front only")
- "Audible response from touch
screen"
- "Volume linked to speed"
(Activate/Deactivate)
Color schemes
Press on Settings to display the
primarypage.
Select "Color schemes".
Selectthecolorschemeinthelist
then "Confirm".
Audio and Telematics
241
TECHNOLOGY on BOARD
10
Berlingo-2-VP_en_Chap10a_SMEGplus_ed01-2016
Press on Settings to display the
primarypage.
Press on Settings to display the
primarypage.
Press on Settings to display the
primarypage.
Pressonthesecondarypage. Pressonthesecondarypage.Pressonthesecondarypage.
Select "System Settings". Select "Time/Date" to change the
timezone,synchronisationwithGPS,
thetimeanditsformat,thenthedate.
Select "Screen settings".
Select "Units" to change the units
ofdistance,fuelconsumptionand
temperature.
Select "Languages" to change
language.
Activate or deactivate "Activate
automatic text scrolling" and
"Activate animations".
Select "Delete data" to delete the
list of recent destinations, personal
pointsofinterest,contactsinthelist.
Select "Calculator" to display
acalculator.
Choosetheitemthenselect"Delete".
Select "Calendar" to display
acalendar.
Select "Factory settings" to return
totheoriginalsettings.
Modifying system settings
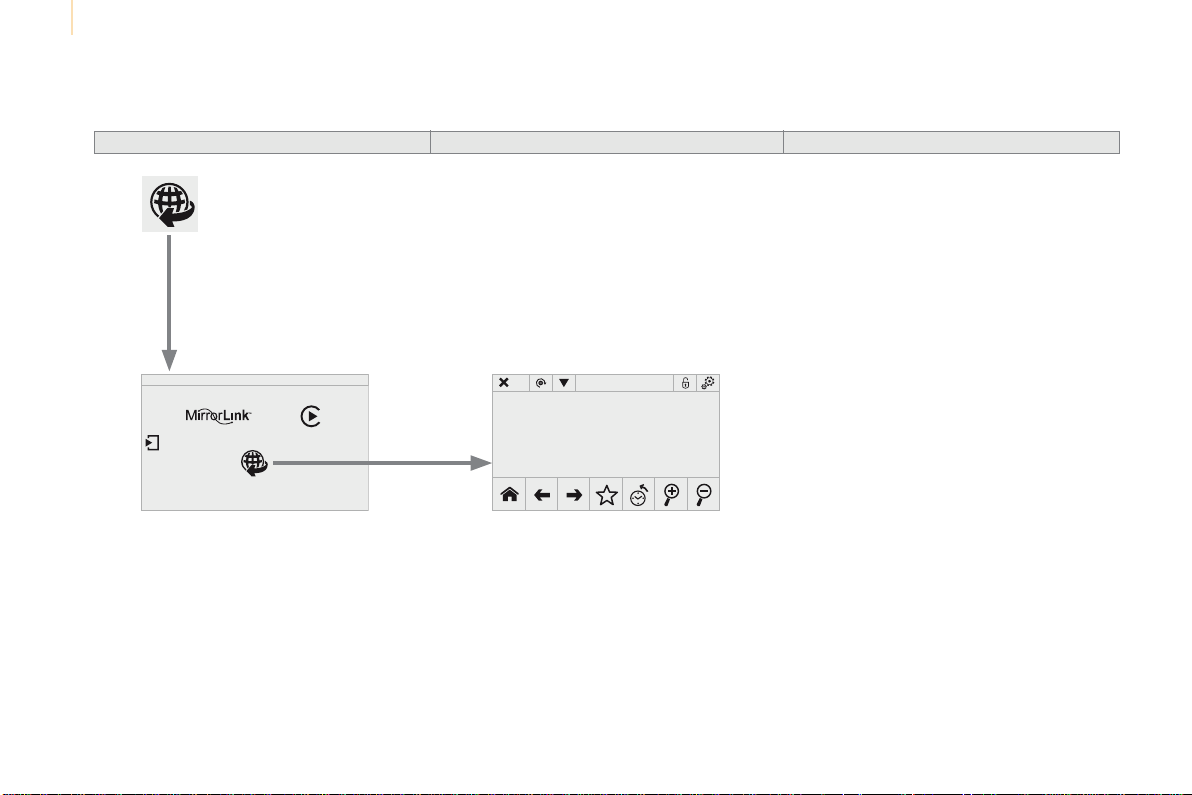
Audio and Telematics
242
Berlingo-2-VP_en_Chap10a_SMEGplus_ed01-2016
Connected services
Level 1 Level 2 Level 3

Audio and Telematics
243
TECHNOLOGY on BOARD
10
Berlingo-2-VP_en_Chap10a_SMEGplus_ed01-2016
Internet browser
Authentication for Internet browsing via
asmartphoneisdoneusingtheDial-Up
Networking(DUN)standard.
Press on "Internet browser" to
displaythebrowserhomepage;
firstconnectyoursmartphoneby
Bluetooth, "Internet" option, see the
"Telephone"section.
Somesmartphonesofthelatest
generation do not support this
standard.
Press on Connected services to
displaytheprimarypage.
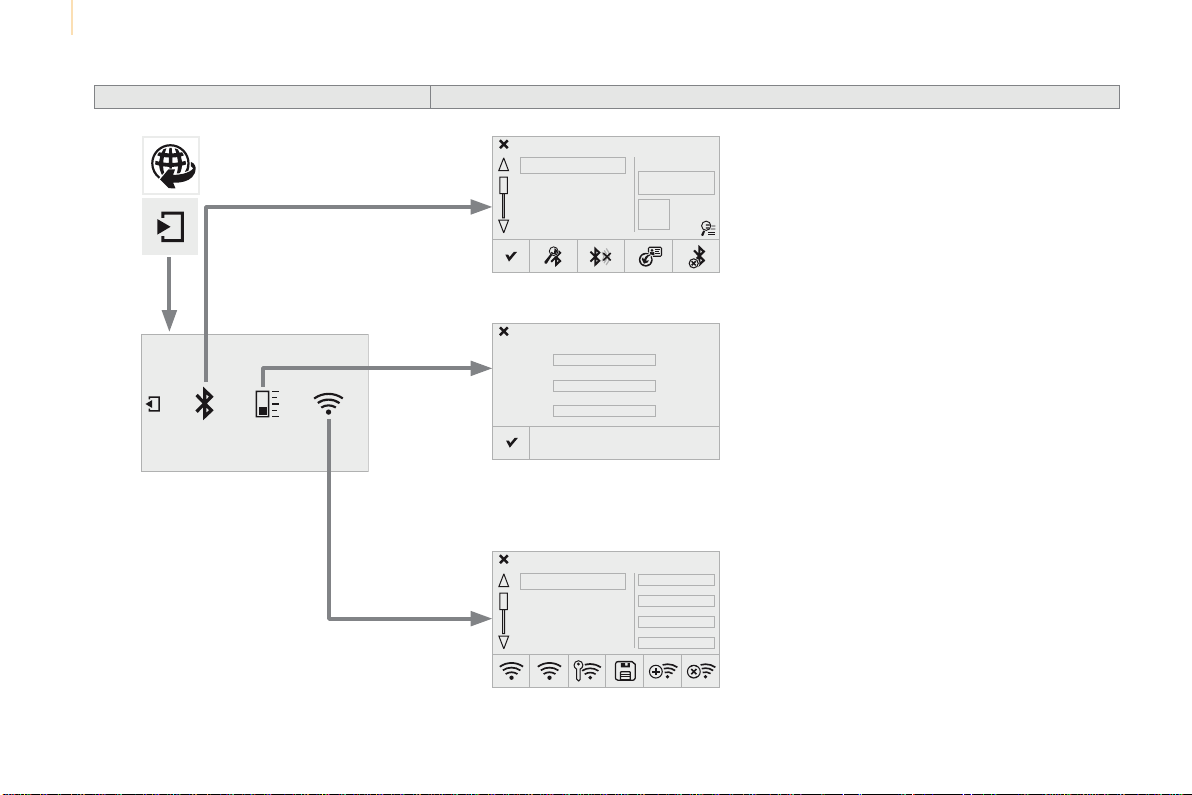
Audio and Telematics
244
Berlingo-2-VP_en_Chap10a_SMEGplus_ed01-2016
Level 1 Level 2
Internet connection settings
Wi-Fi connection
Bluetooth (devices)
Usage monitor
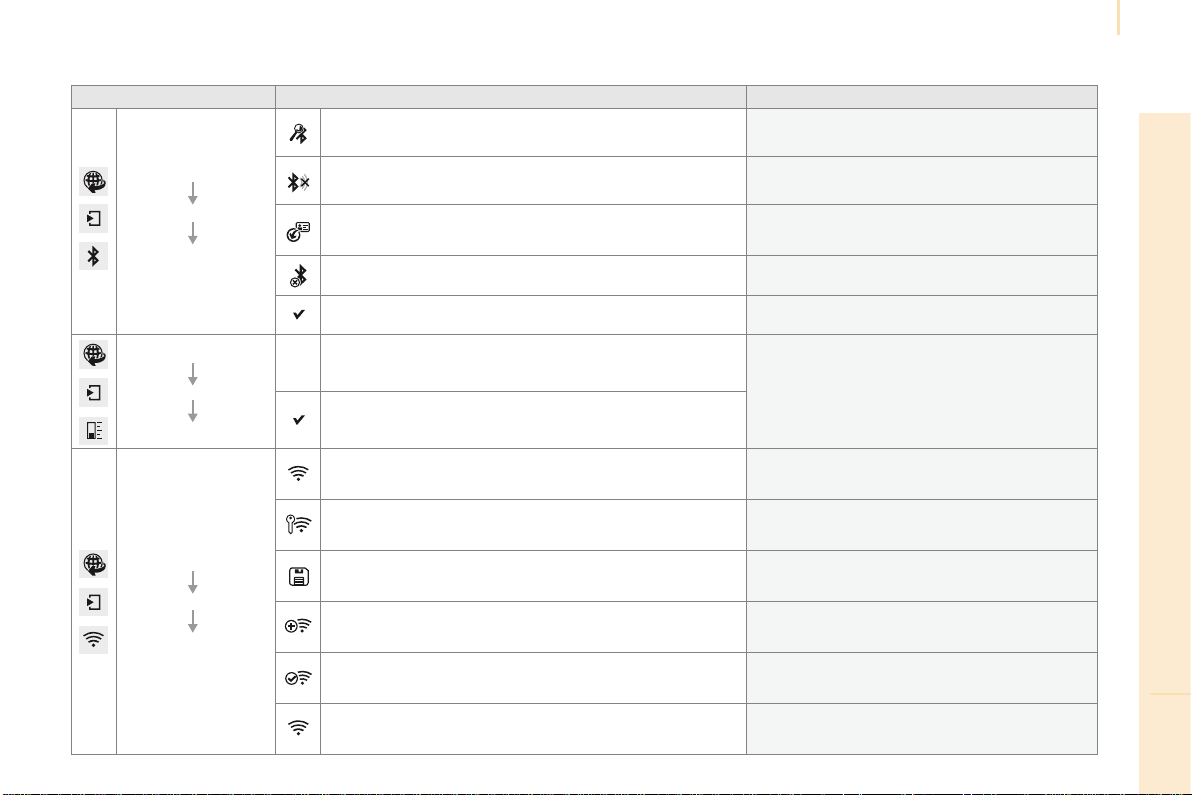
Audio and Telematics
245
TECHNOLOGY on BOARD
10
Berlingo-2-VP_en_Chap10a_SMEGplus_ed01-2016
Level 1 Level 2 Comments
Connected services
Secondary page
Bluetooth
connections
Search Startthesearchforadevicetoconnect.
Connect /Disconnect
Start or end the Bluetooth connection to the
selecteddevice.
Update
Importcontactsfromtheselectedtelephoneto
savethemintheaudiosystem.
Delete Deletetheselectedtelephone.
Confirm Savethesettings.
Connected services
Secondary page
Transfer rate
Reset
Resettheusagemonitor,themconfirm.
Confirm
Connected services
Secondary page
Wi-Fi connection
All DisplayallWi-Finetworks.
Secure DisplaysecureWi-Finetworks.
Remember MemorisetheselectedWi-Finetwork(s).
Add AddanewWi-Finetwork.
On/ Off ActivateordeactivateaWi-Finetwork.
Connect
SelectaWi-Finetworkfoundbythesystemand
connecttoit.
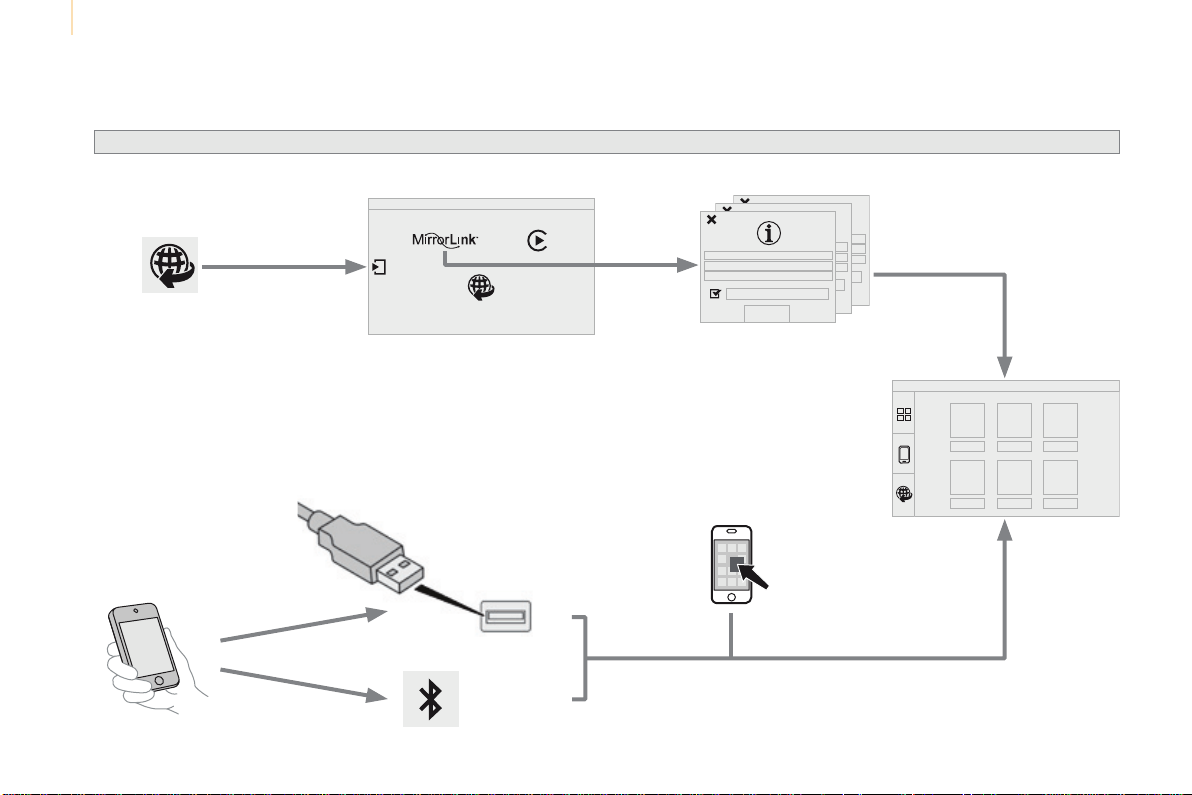
Audio and Telematics
246
Berlingo-2-VP_en_Chap10a_SMEGplus_ed01-2016
MirrorLink
TM
Optional depending on the
smartphoneandoperatingsystem.
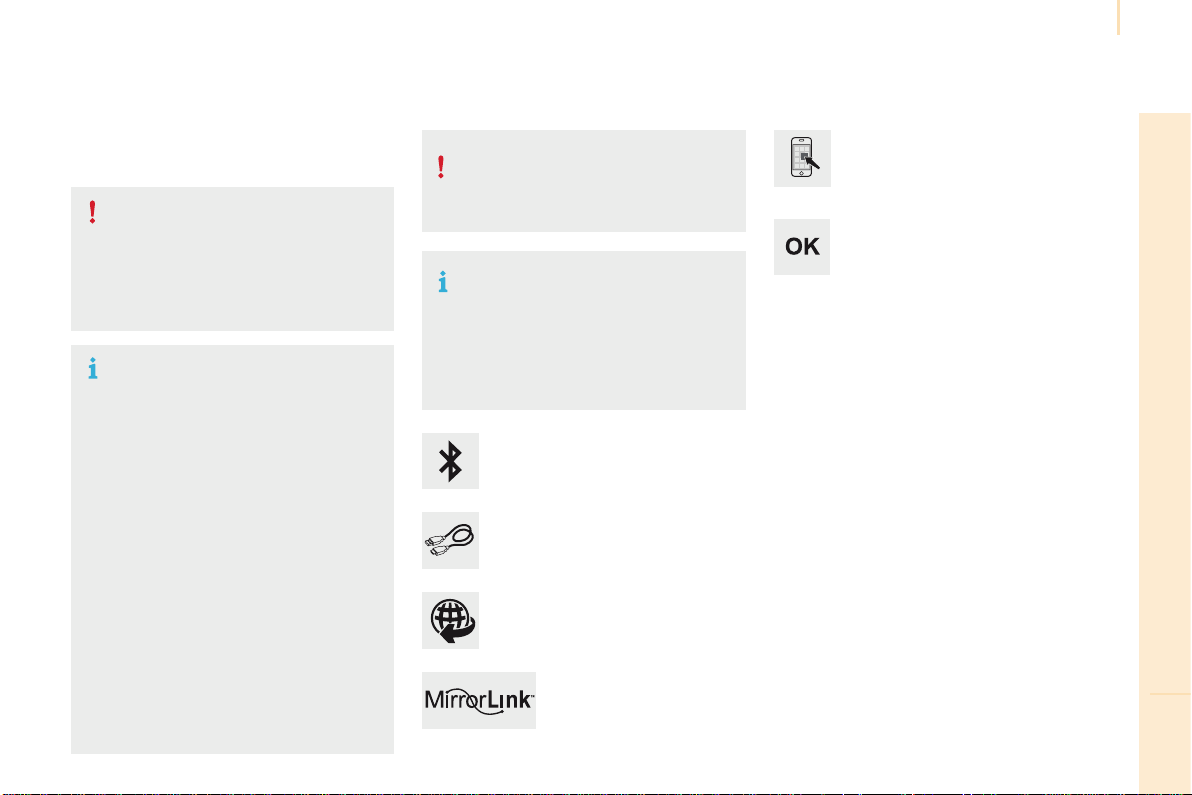
Audio and Telematics
247
TECHNOLOGY on BOARD
10
Berlingo-2-VP_en_Chap10a_SMEGplus_ed01-2016
Asasafetymeasureandbecauseit
requires sustained attention by the
driver,usingasmartphonewhen
drivingisprohibited.
Alloperationsmustbedonewiththe
vehicle stationary.
The synchronisation of a
smartphoneallowsapplicationsona
smartphonethatareadaptedtothe
MirrorLink
TM
technology to be displayed
inthevehicle'sscreen.
The principles and standards
areconstantlyevolving.Forthe
communicationprocessbetweenthe
smartphoneandthesystemtowork
correctly,thesmartphonemustbe
unlocked;updatetheoperatingsystem
ofyoursmartphoneaswellasthedate
andtimeinthesmartphoneandthe
system.
Forthelistofeligiblesmartphones,
connect to the brand's internet website
inyourcountry.
Asasafetymeasure,applications
can only be viewed with the vehicle
stationary; display is interrupted once
thevehicleismoving.
Whenconnectingasmartphonetothe
system,itisrecommendedthatBluetooth
®
bestartedonthesmartphone.
Start the application on the
smartphone(optional,depending
onthesmartphoneandoperating
system).
Accesstothedifferentaudiosourcesremains
accessibleinthemarginoftheMirrorLink
TM
display,usingtouchbuttonsintheupperbar.
Accesstothemenusforthesystemispossible
atanytimeusingthededicatedbuttons.
During the procedure, several screen
pages relating to certain functions
aredisplayed.
Accept to start and end the
connection.
ConnectaUSBcable.The
smartphonechargeswhen
connectedbyaUSBcable.
Press on "MirrorLink
TM
" to
start the application in the
system.
Once connection is established, an page
is displayed with the applications already
downloadedtoyoursmartphoneandadapted
toMirrorLink
TM
technology.
If only one application has been downloaded to
thesmartphone,itstartsautomatically.
MirrorLink
TM
smartphone
connection
Presstheendofthelightingcontrolstalkto
startvoicerecognitionofyoursmartphonevia
thesystem.
Voicerecognitionrequiresacompatible
smartphoneconnectedtothevehicleby
Bluetooth.
Voice recognition
Pleasenote:
- ifyoursmartphoneissupported,to
makeit"MirrorLink
TM
"compatible,
somephonemanufacturers
nevertheless invite you to first
downloadadedicatedapplication.
Fromthesystem,presson
"Connected services" to display the
primarypage.

Audio and Telematics
248
Berlingo-2-VP_en_Chap10a_SMEGplus_ed01-2016
Level 1 Level 2 Level 3
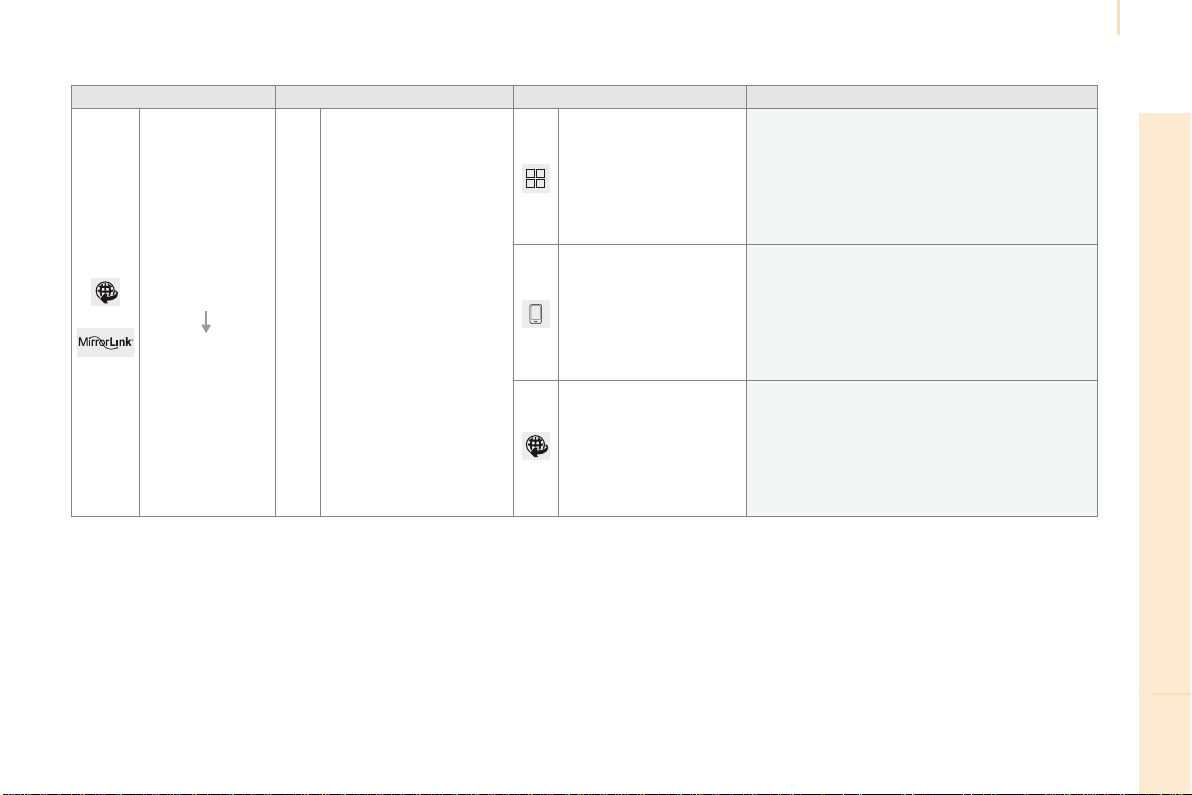
Audio and Telematics
249
TECHNOLOGY on BOARD
10
Berlingo-2-VP_en_Chap10a_SMEGplus_ed01-2016
Level 1 Level 2 Level 3 Comments
Connected
services
MirrorLink
TM
Access or return to the applications already
downloadedtoyoursmartphoneandadaptedto
MirrorLink
TM
technology.
Accesstoamenulistdependingonthe
applicationchosen.
"Back":abandonthecurrentoperation,goupone
level.
"Home":accessorreturntothe"Carmode"page.
Accesstothe"Connectedservices"primary
page.
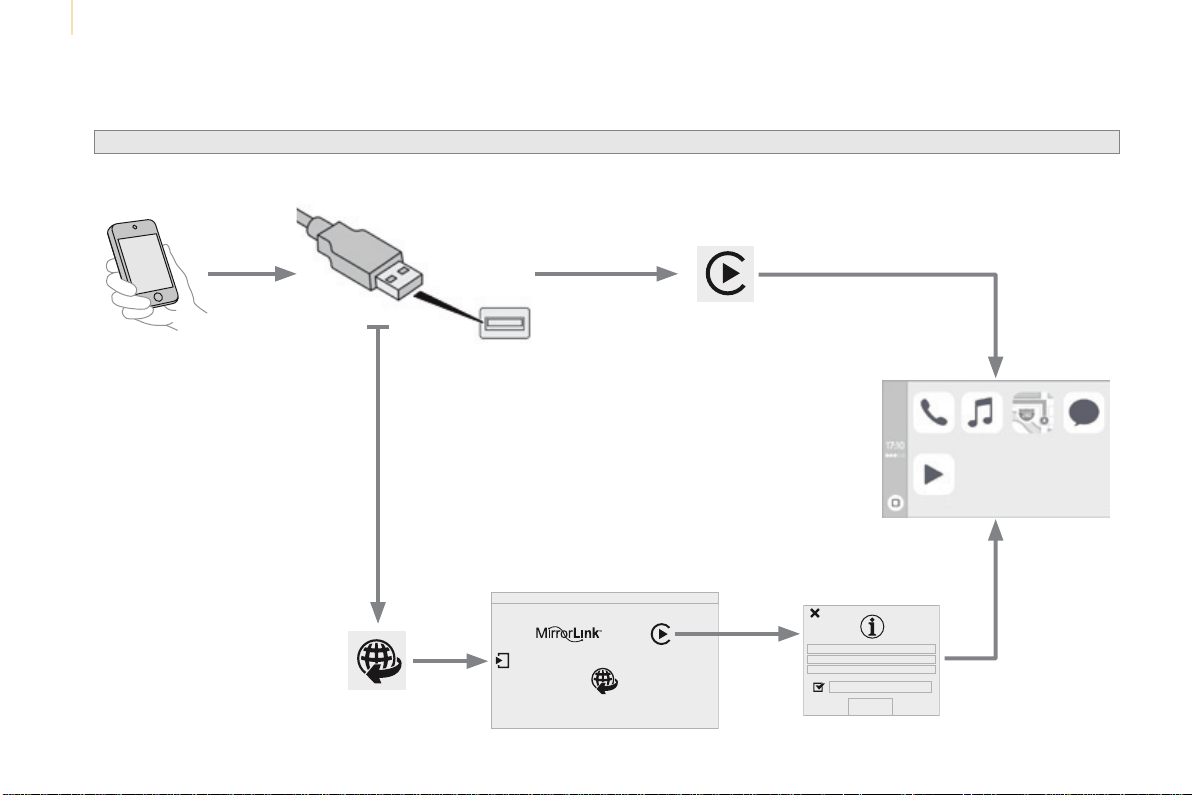
Audio and Telematics
250
Berlingo-2-VP_en_Chap10a_SMEGplus_ed01-2016
CarPlay
®
Audio and Telematics
251
TECHNOLOGY on BOARD
10
Berlingo-2-VP_en_Chap10a_SMEGplus_ed01-2016
Asasafetymeasureandbecauseit
requires sustained attention by the
driver,usingasmartphonewhen
drivingisprohibited.
Alloperationsmustbedonewiththe
vehicle stationary.
Asasafetymeasure,applications
can only be viewed with the vehicle
stationary; display is interrupted once
thevehicleismoving.
The synchronisation of a
smartphoneallowsapplicationsona
smartphonethatareadaptedtothe
CarPlay
®
technology to be displayed in
thevehicle'sscreen.
As the principles and standards are
constantlyevolving,itisrecommended
thatyouupdatetheoperatingsystemof
yoursmartphone.
Forthelistofeligiblesmartphones,
connect to the brand's internet website
inyourcountry.
On connecting the USB cable, the
"Telephone" function changes to
"CarPlay"inthemenucarrousel.
Press on "CarPlay" to display the
CarPlay
®
interface.
Press on "CarPlay" to display the
CarPlay
®
interface.
ConnectaUSBcable.The
smartphonechargeswhen
connectedbyaUSBcable.
Presstheendofthelightingcontrolstalkto
startvoicerecognitionofyoursmartphonevia
thesystem.
CarPlay
®
smartphone
connection
Duringtheprocedure,oneormore
screen pages relating to certain
functionsaredisplayedonconnection.
Fromthesystem,presson
"Connected services" to display the
primarypage.
ConnecttheUSBcable.The
smartphoneischargedwhile
connectedbytheUSBcable.
Or
Voice recognition
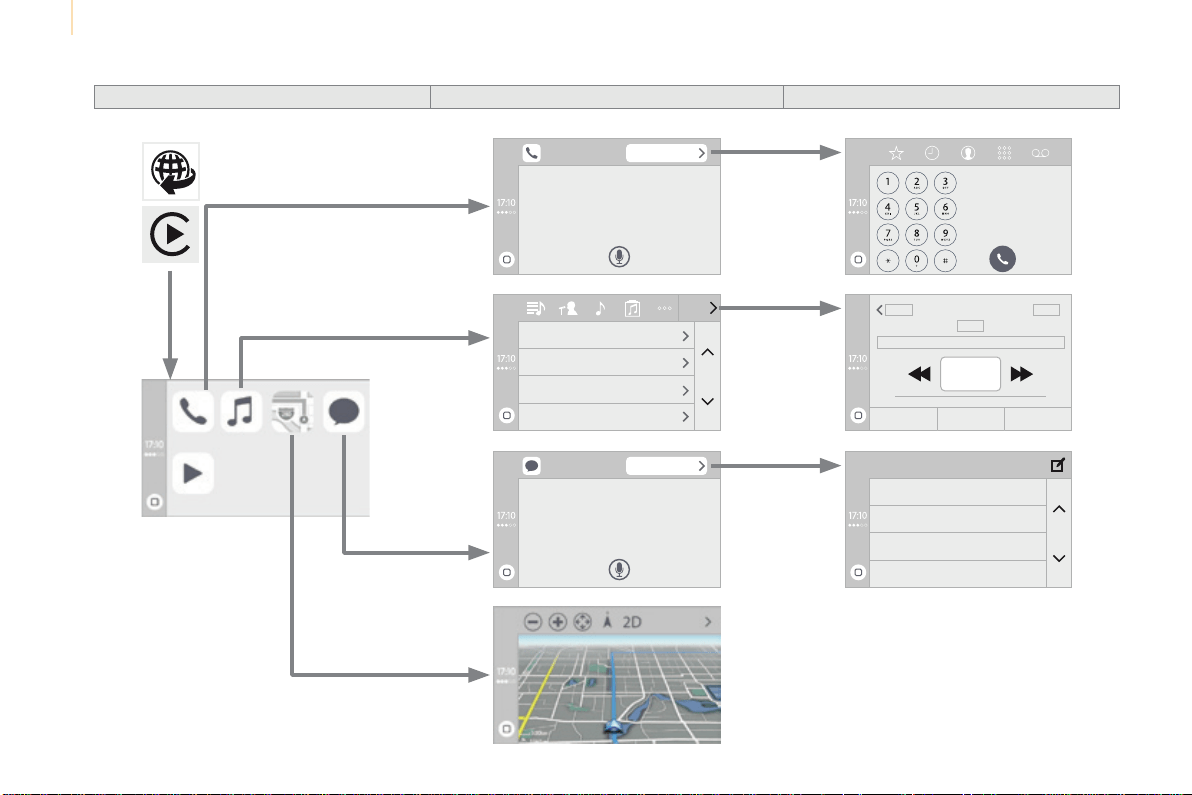
Audio and Telematics
252
Berlingo-2-VP_en_Chap10a_SMEGplus_ed01-2016
Level 1 Level 2 Level 3
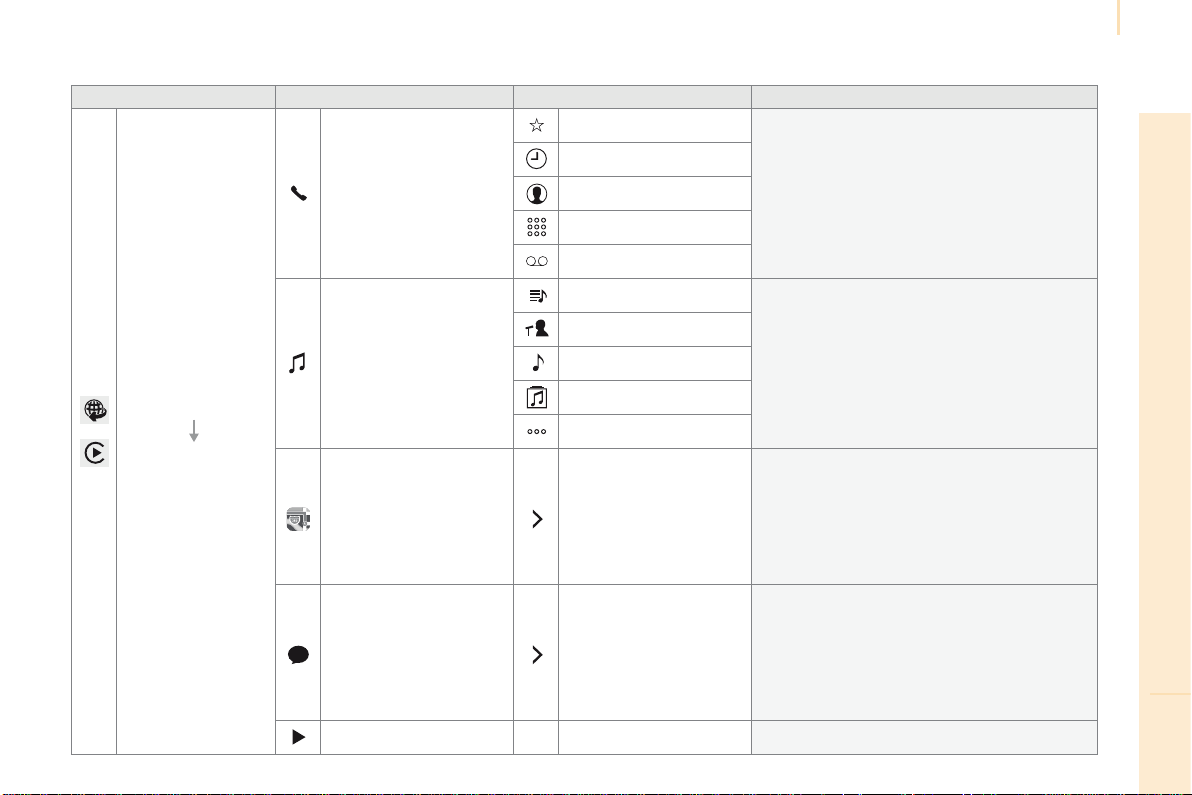
Audio and Telematics
253
TECHNOLOGY on BOARD
10
Berlingo-2-VP_en_Chap10a_SMEGplus_ed01-2016
Level 1 Level 2 Level 3 Comments
Connected services
Apple
®
CarPlay
®
Telephone
Favourites
The"Telephone"functionisplacedautomatically
in"Siri"voicemode.
Press on "Display contacts" for access to the
telephonemenus.
Calls
Contacts
Keypad
Messages
Music
Lists
Presson"Music"tobrowseandselectthetracks
onyoursmartphone.
Presson"Playing"foraccesstothetrack
currentlyplaying.
Artists
Tracks
Albums
Other...
Plan Destinations
Press on "Destinations" to search for an address
by"Siri"voicecommandorbyusingthekeypad.
The GPS function is through the telephone's 3G,
4GorWi-Fiinternetconnection.
Messages Display messages
The"Messages"functionisplaceautomatically
in"Siri"voicemodetospeakthemessageand
theaddressee.
Presson"Displaymessages"foraccesstothe
messages.
Playing Accesstothetrackcurrentlyplaying.
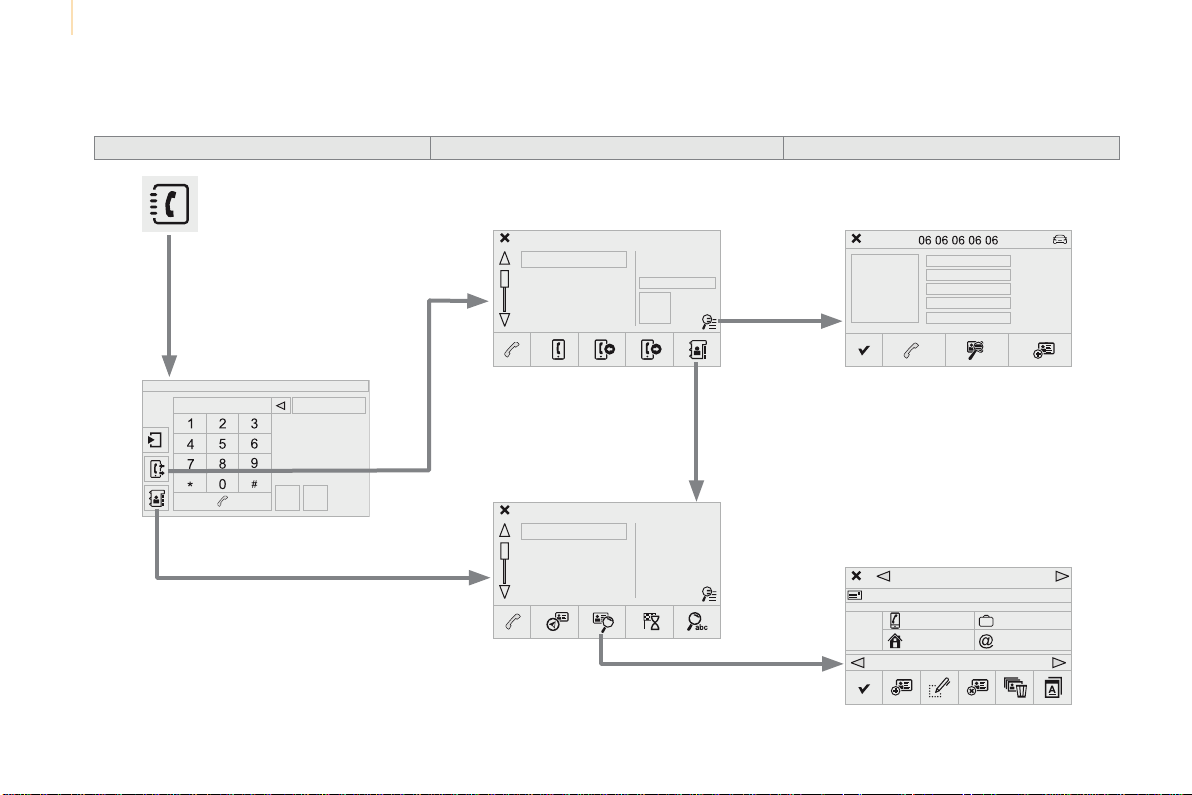
Audio and Telematics
254
Berlingo-2-VP_en_Chap10a_SMEGplus_ed01-2016
Level 1
Telephone
Level 2 Level 3
Contacts
Call log
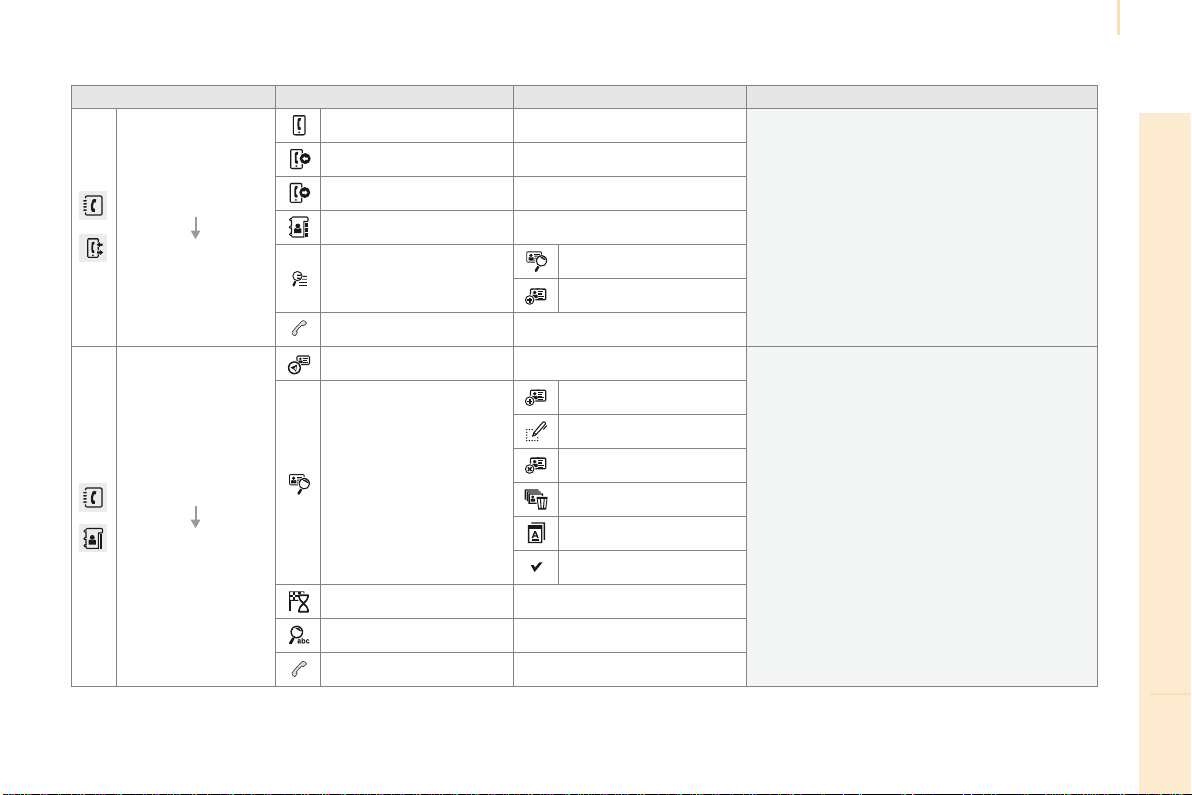
Audio and Telematics
255
TECHNOLOGY on BOARD
10
Berlingo-2-VP_en_Chap10a_SMEGplus_ed01-2016
Level 1 Level 2 Level 3 Comments
Telephone
Call log
All calls
Aftermakingchoices,startthecall.
Incoming calls
Outgoing calls
Contacts
Magnifying glass
View
Create
Call
Telephone
Contacts
Addresses
Aftermakingchoices,startthecall.
View
Create
Modify
Delete
Delete all
Byname
Confirm
Navigate to
Search for contact
Call
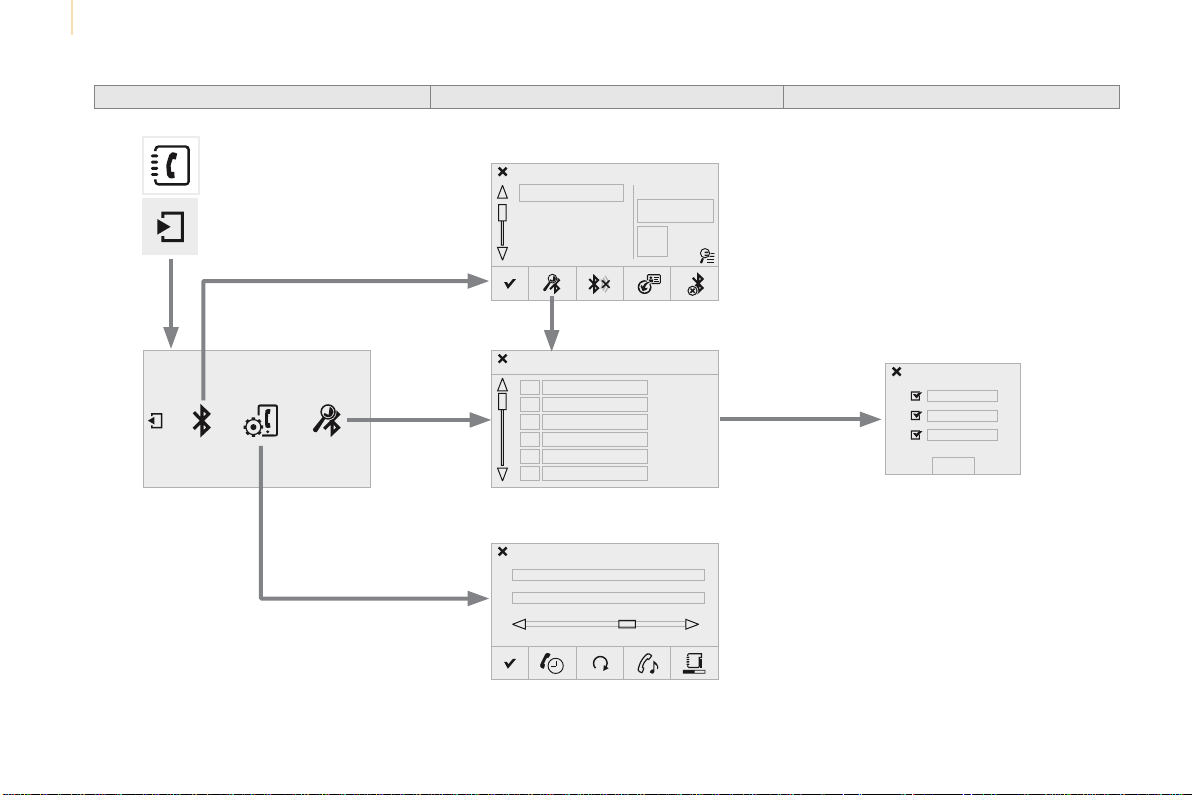
Audio and Telematics
256
Berlingo-2-VP_en_Chap10a_SMEGplus_ed01-2016
Bluetooth (devices)
Telephone Options
Devices detected
Telephone connection
Level 1 Level 2 Level 3
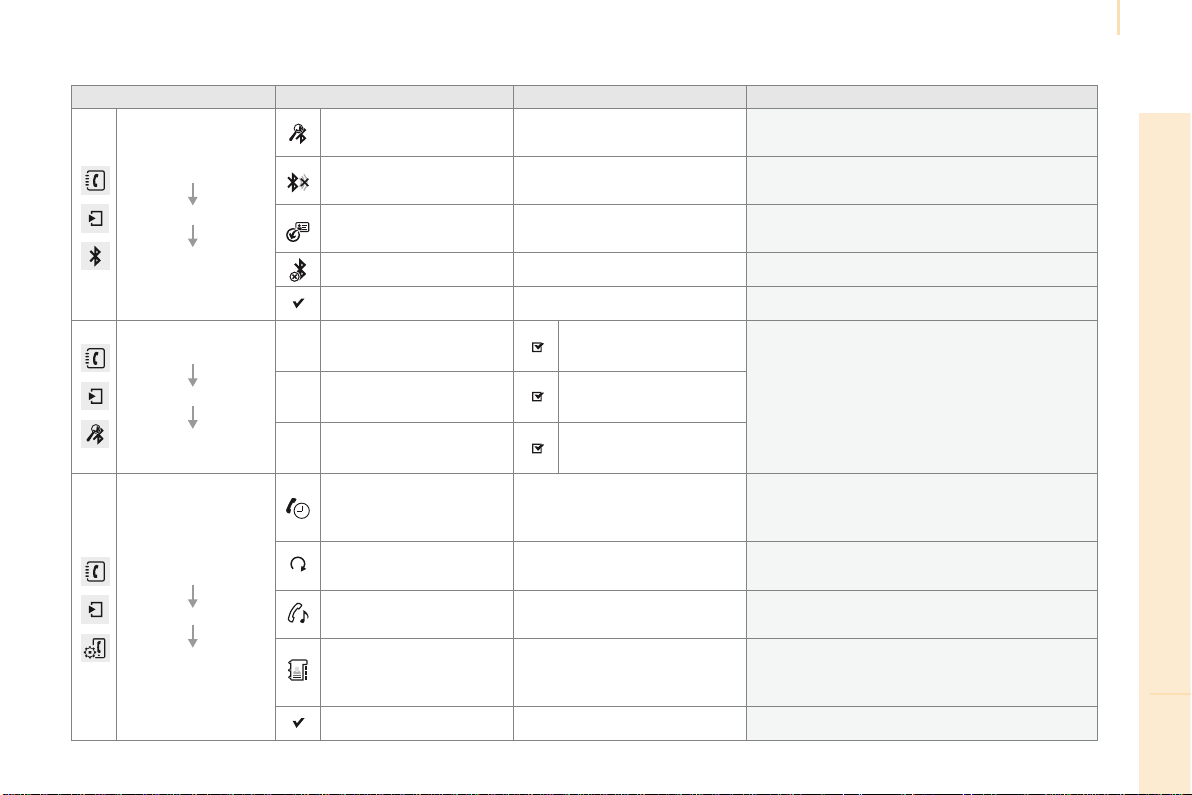
Audio and Telematics
257
TECHNOLOGY on BOARD
10
Berlingo-2-VP_en_Chap10a_SMEGplus_ed01-2016
Level 1 Level 2 Level 3 Comments
Telephone
connection
Secondary page
Bluetooth
connection
Search
Start the search for another peripheral device to
connect.
Connect / Disconnect
Start or stop the Bluetooth connection to the
selectedperipheraldevice.
Update
Importthecontactsfromtheselectedtelephone
tostorethemintheaudiosystem.
Delete Deletetheselectedtelephone.
Confirm Savethesettings.
Telephone
connection
Secondary page
Search
for devices
Devices detected
Telephone
Startthesearchforperipheraldevices.Audiostreaming
Internet
Telephone
connection
Secondary page
Telephone Options
Put on hold
Cutthemicrophonetemporarilysothatthe
contact cannot hear your conversation with a
passenger.
Update
Importthecontactsfromtheselectedtelephone
tosavethenintheaudiosystem.
Ringtones Choosethetelephoneringtoneandvolume.
Memory info.
Contact records used and free, percentage of
storage space used by internal contacts and
Bluetoothcontacts.
Confirm Savethesettings.
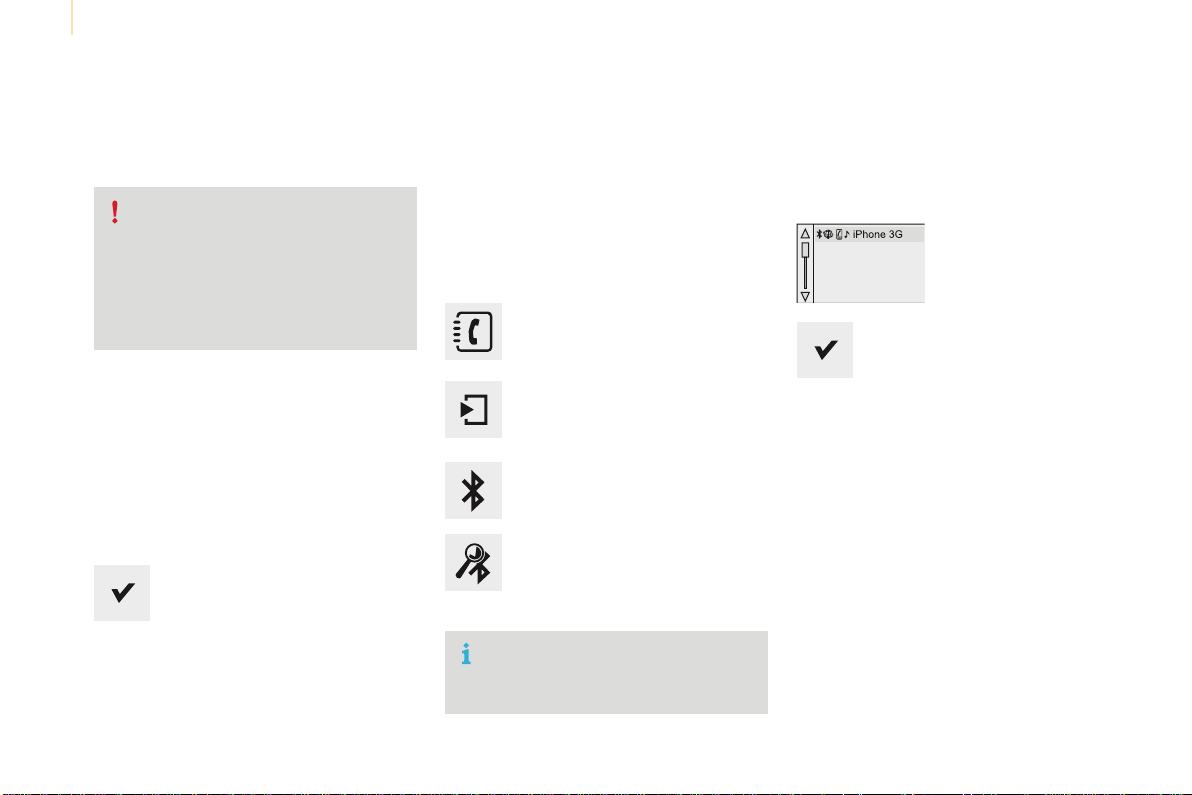
Audio and Telematics
258
Berlingo-2-VP_en_Chap10a_SMEGplus_ed01-2016
Pairing a Bluetooth
®
telephone
For reasons of safety and because they
require prolonged attention on the part
of the driver, the operations for pairing
theBluetoothmobiletelephonetothe
hands-freesystemoftheaudiosystem
mustbecarriedoutwiththevehicle
stationary.
Procedure (short) from the
telephone
IntheBluetoothmenuofyourdevice,selectthe
systemnameinthelistofdevicesdetected.
Enter a code of at least 4 figures in the device
andconfirm.
Enterthissamecodeinthesystem,
select "OK"andconfirm.
Procedure from the system
Activate the telephone's Bluetooth function
and ensure that it is "visible to all" (telephone
configuration).
Press on Telephone to display the
primarypage.
Pressonthesecondarypage.
Select "Bluetooth connection".
Select "Search for devices".
The list of telephones detected is
displayed.
If the telephone is not detected, it is
recommendedthatyouswitchtheBluetooth
functiononyourtelephoneoffandthenonagain.
Selectthenameofthe
desiredperipheralfromthe
list and "Confirm".
Enter a code of at least 4 figures for
the connection then "Confirm".
Enterthissamecodeinthetelephonethen
accepttheconnection.
Thesystemofferstoconnectthetelephone:
- in "Telephone"(hands-freekit,telephone
only),
- in "Audio streaming"(streaming:wireless
playingofaudiofilesfromthetelephone),
- in "Internet" (internet browsing, only if your
telephoneiscompatiblewiththe"DUN"
Dial-UpNetworkingBluetoothstandard).
Selectoneormoreprofilesandconfirm.
Audio and Telematics
259
TECHNOLOGY on BOARD
10
Berlingo-2-VP_en_Chap10a_SMEGplus_ed01-2016
The services available depend on
thenetwork,theSIMcardandthe
compatibilityoftheBluetoothtelephone
used.Checkthetelephonemanualand
withyournetworkproviderfordetailsof
theservicesavailabletoyou.
Theabilityofthesystemtoconnect
with only one profile depends on the
telephone.Thethreeprofilesmayall
connectbydefault.
Visitwww.citroen.co.ukformoreinformation
(compatibility,additionalhelp,...).
The recognised telephone
appearsinthelist.
Dependingonyourtelephone,youmaybe
askedtoacceptautomaticconnectionevery
timetheignitionisswitchedon.
On return to the vehicle, if the last telephone
connected is present again, it is reconnected
automaticallyandwithinaround30seconds
after switching on the ignition the pairing is
done without any action on your part, with
(Bluetoothactivated).
Tomodifytheautomaticconnectionmode,
select the telephone in the list then select the
desiredprofile.
Depending on the type of telephone,
thesystemwillaskyoutoacceptornot
thetransferofyourcontacts.
If not, select "Update".
Connecting a Bluetooth
®
peripheral device
Automatic reconnection
On switching on the ignition, the telephone
connected when the ignition was last switched
offisautomaticallyreconnected,ifthis
connectionmodehadbeenactivatedduringthe
pairingprocedure.
Theconnectionisconfirmedbythedisplayofa
messageandthenameofthetelephone.
Manual connection
Press on Telephone to display the
primarypage.
Pressonthesecondarypage.
Select "Bluetooth" to display the list
ofpairedperipherals.
Selecttheperipheraltoconnect.
Press on "Search for devices".
Theconnectionisconfirmedbythedisplayofa
messageandthenameofthetelephone.
Audio and Telematics
260
Berlingo-2-VP_en_Chap10a_SMEGplus_ed01-2016
Managing paired
telephones
This function allows the connection or
disconnection of a peripheral device as
wellasthedeletionofapairing.
Using the telephone is not
recommendedwhiledriving.
Parkthevehicle.
Makethecallusingthesteering
mountedcontrols.
Press on Telephone to display the
primarypage.
Pressonthesecondarypage.
Select "Bluetooth" to display the list
ofpairedperipheraldevices.
Selecttheperipheralinthelist.
Select "Search for devices"
Or
"Connect / Disconnect" to start or
end the Bluetooth connection with
theselecteddevice.
Or
"Delete"todeletethepairing.
Receiving a call
Anincomingcallisannouncedbyaringanda
superimposeddisplayinthescreen.
Makeashortpressonthesteering
mountedTEL button to accept an
incomingcall.
Makealongpress
onthesteeringmountedTEL button
torejectthecall.
Or
Select "End call".
Making a call
Calling a new number
Press on Telephone to display the
primarypage.
Enterthephonenumberusingthe
digitalkeypad.
Press "Call"tostartthecall.
Calling a contact
Press on Telephone to display the
primarypage.
Ormakealongpress
onthesteeringmountedTELbutton.
Audio and Telematics
261
TECHNOLOGY on BOARD
10
Berlingo-2-VP_en_Chap10a_SMEGplus_ed01-2016
Select "Contacts".
Selectthedesiredcontactfromthelistoffered.
Select "Call".
Calling a recently used number
Press on Telephone to display the
primarypage.
Select "Call log".
Selectthedesiredcontactfromthelistoffered.
Itisalwayspossibletomakeacall
directlyfromthetelephone;parkthe
vehiclefirstasasafetymeasure.
Managing contacts / entries
Press on Telephone to display the
primarypage.
Select "Contacts".
Select "View".
Select "Create"toaddanewcontact.
Or
"Modify"toedittheselectedcontact.
Or
"Delete" to delete the selected
contact.
Or
"Delete all"todeleteallinformation
fortheselectedcontact.
Select "By name" to view the list of
contacts.

Audio and Telematics
262
Berlingo-2-VP_en_Chap10a_SMEGplus_ed01-2016
Thetablebelowgivesanswerstothemostfrequentlyaskedquestionsonyouraudiosystem.
QUESTION ANSWER SOLUTION
The route calculation is not
successful.
Thenavigationsettingsmayconflictwiththecurrentlocation
(exclusionoftollroadsonatollmotorway).
Checkthesettingsinthe"Navigation"menu.
ThePOIsdonotappear. ThePOIshavenotbeenselected. SelectthePOIsinthelistofPOIs.
TheRiskareasaudible
warningdoesnotwork.
Theaudiblewarningisnotactive. Activate audible warnings in the "Navigation"
menu.
Thesystemdoesnot
suggest a detour around an
incidentontheroute.
TheguidancecriteriadonottakeaccountofTMCmessages. Selectthe"Information"functioninthelistof
guidancecriteria.
IreceiveaRiskareasalert
whichisnotonmyroute.
Otherthanguidance,thesystemannouncesallRiskareas
positionedinaconelocatedinfrontofthevehicle.Itmayprovidean
alertforRiskareaslocatedonnearbyorparallelroads.
Zoominonthemaptoviewtheexactpositionof
theRiskareas.Select"Ontheroute"tonolonger
receive alerts other than guidance or to reduce
thetimefortheannouncement.
Frequentlyaskedquestions
Navigation

Audio and Telematics
263
TECHNOLOGY on BOARD
10
Berlingo-2-VP_en_Chap10a_SMEGplus_ed01-2016
QUESTION ANSWER SOLUTION
Certaintrafficjamsalong
the route are not indicated
inrealtime.
Onstarting,itisseveralminutesbeforethesystembeginstoreceive
thetrafficinformation.
Waituntilthetrafficinformationisbeingreceived
correctly(displayofthetrafficinformationicons
onthemap).
Thefiltersaretoorestrictive. Modifythesettings.
Incertaincountries,onlymajorroutes(motorways...)arelistedfor
thetrafficinformation.
Thisphenomenonisnormal.Thesystemis
dependentonthetrafficinformationavailable.
The altitude is not
displayed.
Onstarting,theinitialisationoftheGPSmaytakeupto3minutesto
receivemorethan4satellitescorrectly.
Waituntilthesystemhascompletedstarting
up, so that there is GPS coverage of at least
4satellites.
Dependingonthegeographicalenvironment(tunnel...)orthe
weather,theconditionsofreceptionoftheGPSsignalmayvary.
Thisphenomenonisnormal.Thesystem
is dependent on the GPS signal reception
conditions.

Audio and Telematics
264
Berlingo-2-VP_en_Chap10a_SMEGplus_ed01-2016
Radio
QUESTION ANSWER SOLUTION
The quality of reception of
the radio station listened
to gradually deteriorates
or the stored stations do
not function (no sound,
87.5Mhzisdisplayed...).
Thevehicleistoofarfromthetransmitterusedbythestation
listenedtoorthereisnotransmitterinthegeographicalarea
throughwhichthevehicleistravelling.
Activatethe"RDS"functionbymeansofthe
short-cutmenutoenablethesystemtocheck
whetherthereisamorepowerfultransmitterin
thegeographicalarea.
Theenvironment(hills,buildings,tunnels,basementcarparks...)
blockreception,includinginRDSmode.
Thisphenomenonisnormalanddoesnotindicate
afaultwiththeaudiosystem.
Theaerialisabsentorhasbeendamaged(forexamplewhengoing
throughacarwashorintoanundergroundcarpark).
HavetheaerialcheckedbyaCITROËNdealer.
Icannotfindsomeradio
stations in the list of
stationsreceived.
Thestationisnotreceivedoritsnamehaschangedinthelist. Pressonthe"Updatelist"functioninthesystem
toupdatethelistofstationsreceived.
Someradiostationssendotherinformationinplaceoftheirname
(thetitleofthesongforexample).
Thesysteminterpretsthisinformationasthenameofthestation.
Thenameoftheradio
stationchanges.

Audio and Telematics
265
TECHNOLOGY on BOARD
10
Berlingo-2-VP_en_Chap10a_SMEGplus_ed01-2016
Media
QUESTION ANSWER SOLUTION
PlaybackofmyUSB
memorystickstartsonly
after a very long wait
(around2to3minutes).
Somefilessuppliedwiththememorystickmaygreatlyslowdown
accesstoreadingthememorystick(multiplicationby10ofthe
cataloguetime).
Deletethefilessuppliedwiththememorystick
andlimitthenumberofsub-foldersinthefile
structureonthememorystick.
WhenIconnectmyiPhone
as telephone and to the
USBportatthesametime,
Iamunabletoplaythe
musicfiles.
WhentheiPhoneconnectsautomaticallyasatelephone,itforces
thestreamingfunction.Thestreamingfunctiontakestheplaceof
the USB function which is then not useable, there is a period without
soundofthetrackbeingplayedwithApple
®
players.
Disconnect and reconnect to the USB port
(theUSBfunctiontakespriorityoverstreaming).
Somecharactersinthe
mediainformationarenot
displayed correctly while
playing.
Theaudiosystemdoesnotdisplaysometypesofcharacters. Usestandardcharacterstonametracksand
folders.
Playingofstreamingfiles
doesnotstart.
Theperipheraldeviceconnecteddoesnotsupportautomaticplay. Starttheplaybackfromthedevice.
Thenamesoftracksand
thetracklengtharenot
displayed on the screen
whenstreamingaudio.
TheBluetoothprofiledoesnotallowthetransferofthisinformation.

Audio and Telematics
266
Berlingo-2-VP_en_Chap10a_SMEGplus_ed01-2016
QUESTION ANSWER SOLUTION
In changing the setting
of treble and bass the
equalizer setting is
deselected.
Theselectionofanequalizersettingimposesthebalancesettings.
Modifyingonewithouttheotherisnotpossible.
Modify the balance or equalizer settings to obtain
thedesiredmusicalambience.
In changing the equalizer
setting, treble and bass
returntozero.
When changing the
balance settings, the
distribution setting is
deselected.
Theselectionofadistributionsettingimposesthebalancesettings.
Modifyingonewithouttheotherisnotpossible.
Modify the balance or distribution settings to
obtainthedesiredmusicalambience.
When changing a sound
distribution setting,
the balance setting is
deselected.
Settings

Audio and Telematics
267
TECHNOLOGY on BOARD
10
Berlingo-2-VP_en_Chap10a_SMEGplus_ed01-2016
QUESTION ANSWER SOLUTION
There is a difference in
sound quality between the
differentaudiosources.
Foroptimumsoundquality,theaudiosettingsforVolume:,Bass:,
Treble:,AmbienceandLoudnesscanbeadaptedtothedifferent
soundsources,whichmayresultinaudibledifferenceswhen
changingsource.
Checkthattheaudiosettingsfor(Volume:,Bass:,
Treble:,Ambience,Loudness)areadaptedtothe
sourceslistenedto.Itisadvisabletosettheaudio
functions(Bass:,Treble:,Balance)tothemiddle
position,selectthe"None"musicalambience
and set the loudness correction to the "Inactive"
positioninradiomode.
With the engine off, the
systemswitchesoffaftera
fewminutesofuse.
Whentheengineisswitchedoff,thesystem'soperatingtime
dependsonthestateofchargeofthebattery.
Theswitch-offisnormal:thesystemswitchestoeconomymodeand
switchesofftopreventdischargingofthevehicle'sbattery.
Start the vehicle's engine to increase the battery
charge.

Audio and Telematics
268
Berlingo-2-VP_en_Chap10a_SMEGplus_ed01-2016
QUESTION ANSWER SOLUTION
Icannotconnectmy
Bluetoothtelephone.
Thetelephone'sBluetoothfunctionmaybeswitchedofforthe
telephonemaynotbevisible.
- Checkthatyourtelephone'sBluetooth
functionisswitchedon.
- Checkinthetelephonesettingsthatitis
"visibletoall".
TheBluetoothtelephoneisnotcompatiblewiththesystem. Youcancheckthecompatibilityofyourtelephone
atwww.citroen.co.uk(services).
Thevolumeofthe
telephone connected
inBluetoothmodeis
inaudible.
Thevolumedependsbothonthesystemandonthetelephone. Increasethevolumeoftheaudiosystem,to
maximumifrequired,andincreasethevolumeof
thetelephoneifnecessary.
Theambientnoiselevelhasaninfluenceonthequalityoftelephone
communication.
Reducetheambientnoiselevel(closethe
windows, reduce the booster fan speed, slow
down...).
Somecontactsare
duplicatedinthelist.
The options for synchronizing contacts are synchronizing the
contactsontheSIMcard,thecontactsonthetelephone,orboth.
Whenbothsynchronizationsareselected,somecontactsmaybe
duplicated.
Select "Display SIM card contacts" or "Display
telephonecontacts".
Contacts are not shown in
alphabeticalorder.
Sometelephonesofferdisplayoptions.Dependingonthesettings
chosen,contactscanbetransferredinaspecificorder.
Modify the display setting in the telephone
directory.
Thesystemdoesnotreceive
SMStextmessages.
TheBluetoothmodedoesnotpermitsendingSMStextmessagesto
thesystem.
Telephone
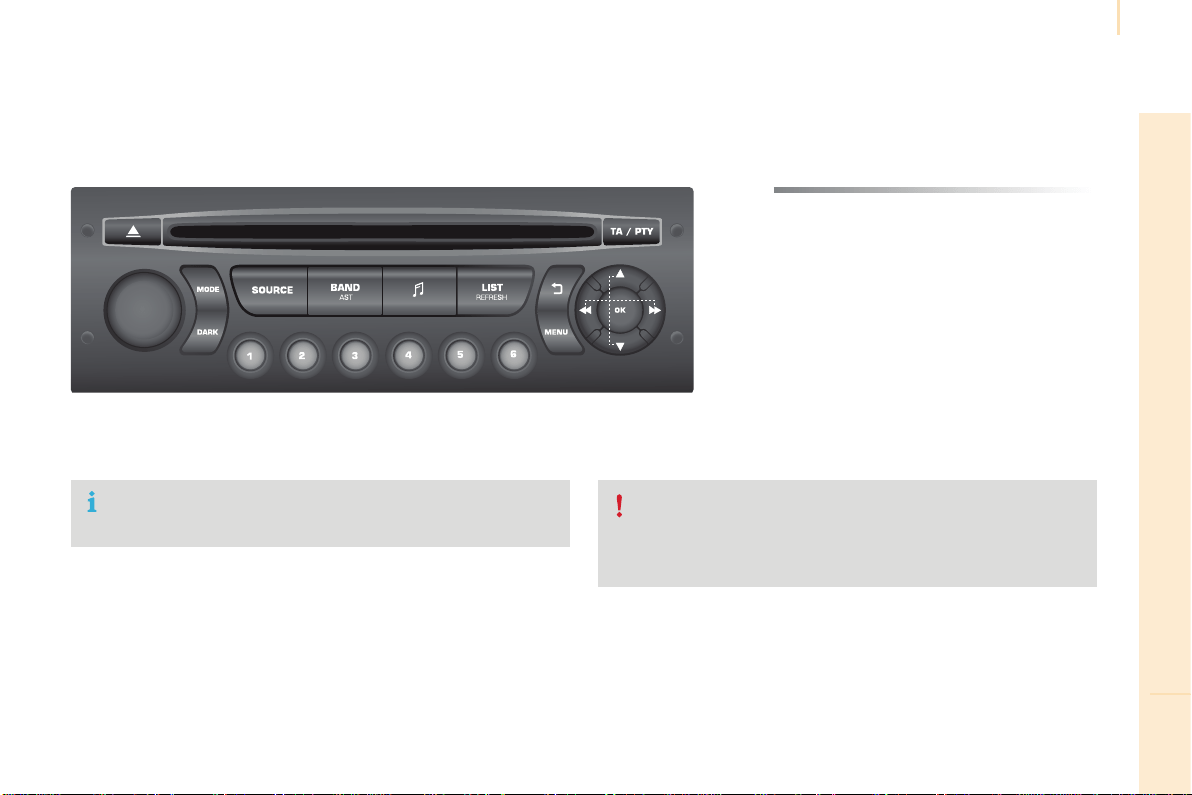
Audio and Telematics
269
TECHNOLOGY on BOARD
10
Berlingo-2-VP_en_Chap10b_RD45_ed01-2016
Audiosystem
Audio system / Bluetooth
®
Contents
Firststeps 270
Steeringmountedcontrols 271
Menus 272
Radio 272
Media 274
Telephone 278
Screenmenumap(s) 280
Frequentlyaskedquestions 284
YourAudiosystemiscodedinsuchawaythatitwillonlyoperate
inyourvehicle.
Asasafetymeasure,thedrivermustonlycarryoutoperations
whichrequireprolongedattentionwhilethevehicleisstationary.
When the engine is switched off and to prevent discharging of the
battery,theaudioequipmentmayswitchoffafterafewminutes.
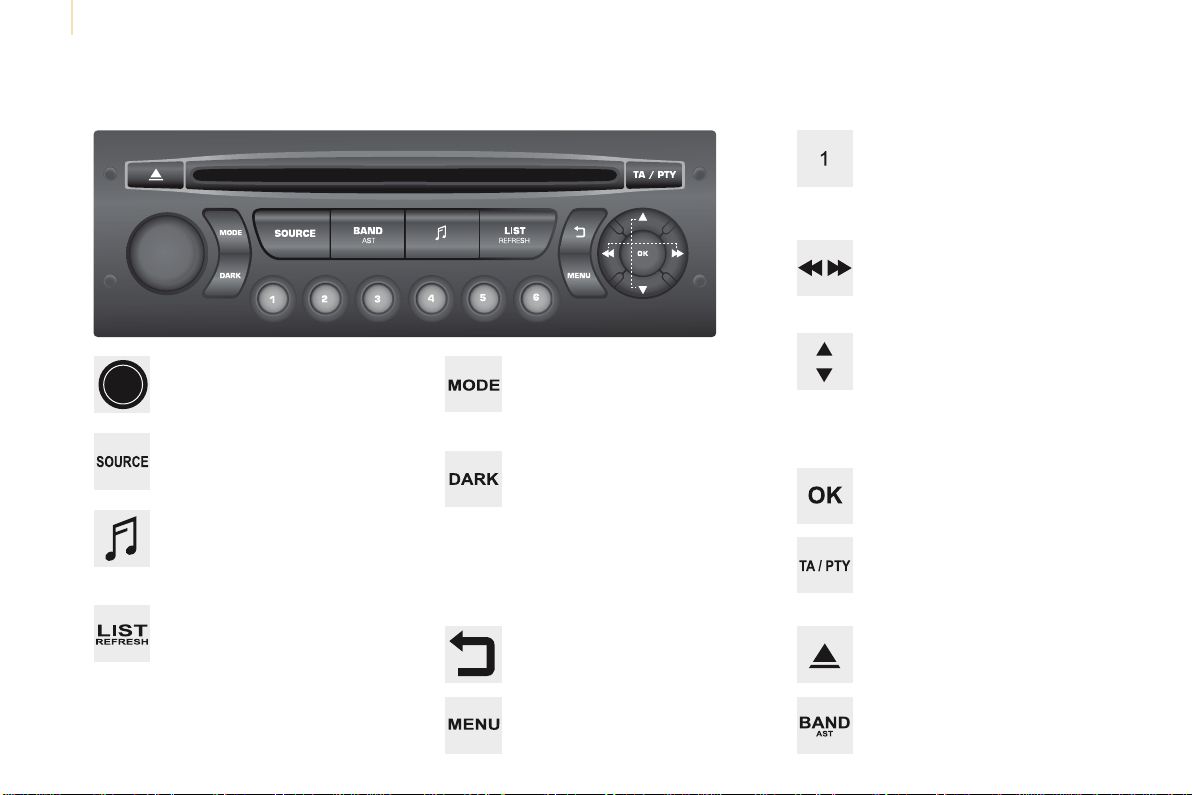
Audio and Telematics
270
Berlingo-2-VP_en_Chap10b_RD45_ed01-2016
First steps
*Availableaccordingtoversion.
On/Off,volumesetting.
Selectsource:
Radio;USB;AUX;CD;Streaming.
Displaythelistoflocalstations.
Longpress:CDtracksorMP3folders
(CD/USB).
Selectthescreendisplaymode:
Date,audiofunctions,tripcomputer,
telephone.
Audiosettings:
Front/rearfader,left/rightbalance,
bass/treble,loudness,audio
ambiences.
The DARK button changes the
screendisplayforimproveddriving
comfortatnight.
1
st
press:upperbaronlyilluminated.
2
nd
press:blackscreen.
3
rd
press:returntostandarddisplay.
Select next frequency
down/up.
Selectprevious/nextMP3
folder.
Selectprevious/nextfolder/genre/
artist/playlist(USB).
Abandonthecurrentoperation.
Confirm.
Buttons 1 to 6
Selectapre-setradiostation.
Longpress:pre-setastation.
Automaticfrequencysearch
down/up.
Selectprevious/nextCD,MP3or
USBtrack.
EjectCD.
Displaymainmenu.
TA(TrafficAnnouncements)
on/off.
Longpress:PTY*(radioProgramme
TYpe).
SelectAM/FMwavebands.
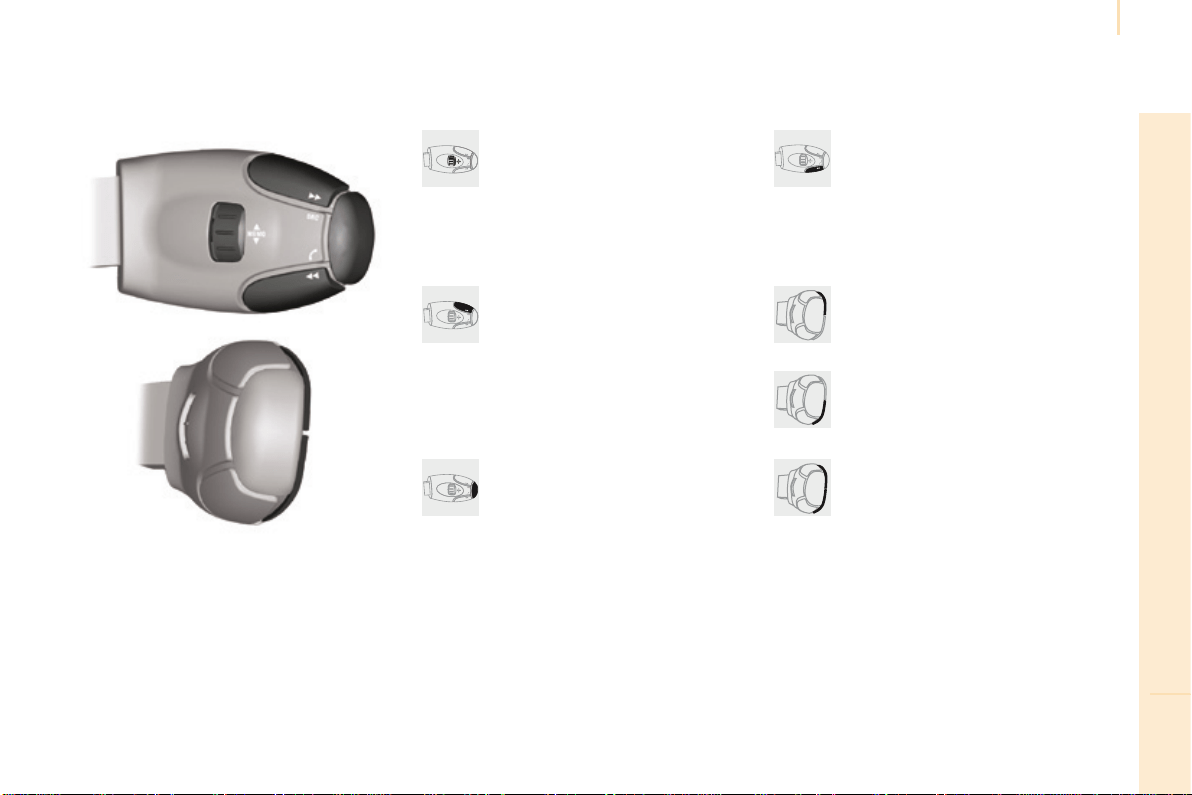
Audio and Telematics
271
TECHNOLOGY on BOARD
10
Berlingo-2-VP_en_Chap10b_RD45_ed01-2016
Steeringmountedcontrols
Radio:selecttheprevious/nextpre-
setstation.
USB:selectgenre/artist/folder
fromtheclassificationlist.
Selecttheprevious/nextitemina
menu.
Volumedecrease.
Radio:automaticsearchforahigher
frequency.
CD/MP3/USB:selectthenext
track.
CD/USB:continuouspress:fast
forward.
Moveinthelist.
Mute:pressthevolumeincrease
and decrease buttons
simultaneously.
The sound is restored by pressing
oneofthetwovolumebuttons.
Radio:automaticsearchforalower
frequency.
CD/MP3/USB:selecttheprevious
track.
CD/USB:continuouspress:fast
back.
Moveinthelist.
Changeaudiosource.
Confirmaselection.
Call/endcallonthetelephone.
Pressformorethan2seconds:
telephonemainmenu.
Volumeincrease.
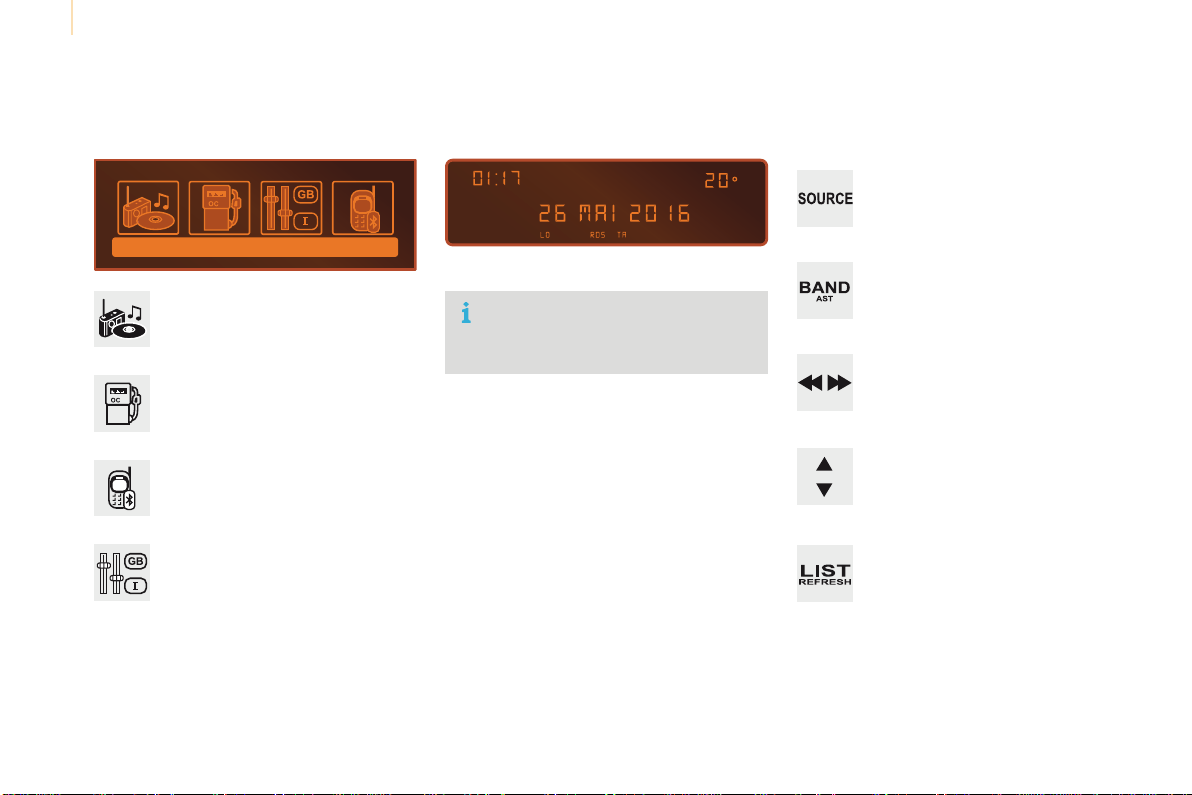
Audio and Telematics
272
Berlingo-2-VP_en_Chap10b_RD45_ed01-2016
Menus
Screen C
Audio functions
Radio;CD;USB;AUX.
Trip computer
Enter distances; Alerts; State of
functions.
Bluetooth
®
: Telephone - Audio
Pairing;Hands-freekit;Streaming.
Personalisation-configuration
Vehicleparameters;Display;
Languages.
Foranoverviewofthemenusavailable,
refertothe"Screenmenumap"
section.
Screen A
Radio
Selecting a station
Press the SOURCE button several
timesinsuccessionandselectthe
radio.
Press the BAND AST button to
selectawaveband.
Briefly press one of the buttons to
carryoutanautomaticsearchofthe
radiostations.
Press one of the buttons to carry out
amanualsearchup/downforradio
frequencies.
Press the LIST REFRESH button to
display the list of stations received
locally(30stationsmaximum).
Toupdatethislist,pressformore
thantwoseconds.
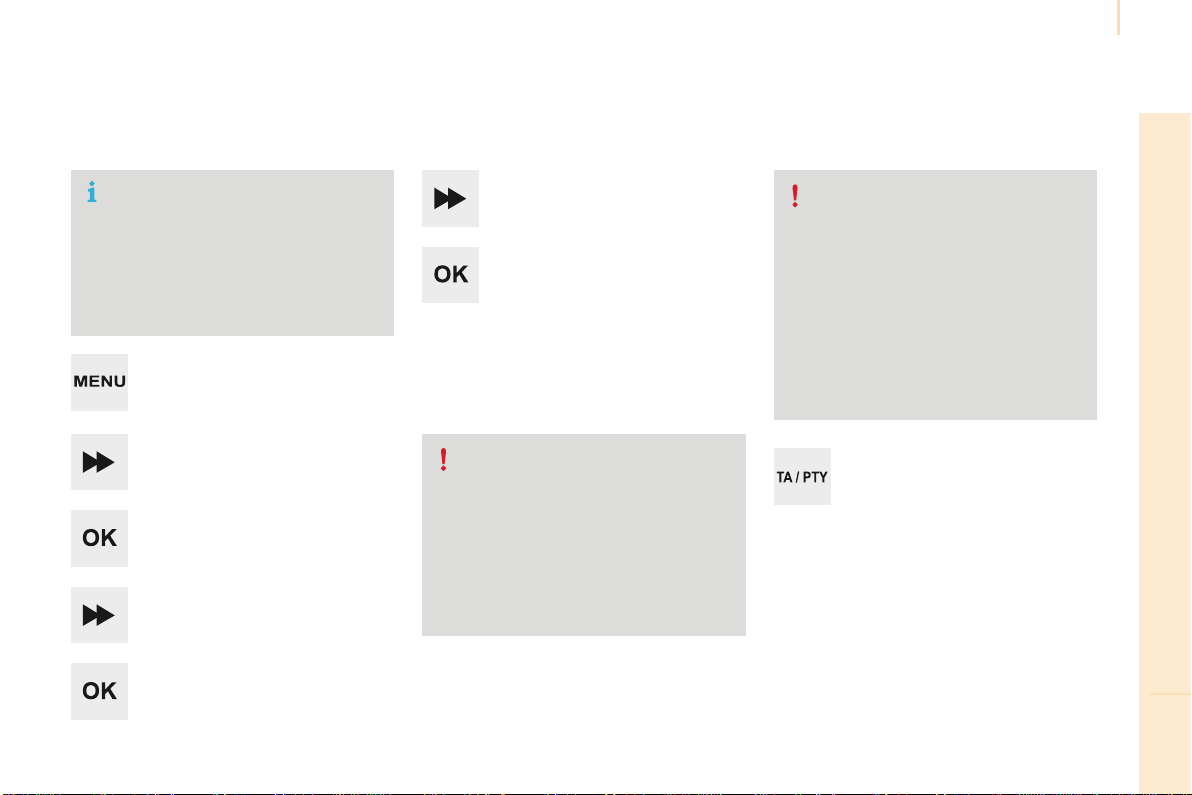
Audio and Telematics
273
TECHNOLOGY on BOARD
10
Berlingo-2-VP_en_Chap10b_RD45_ed01-2016
RDS
Theexternalenvironment(hills,
buildings,tunnels,basementcar
parks,...)mayblockreception,
includinginRDSmode.Thisisa
normaleffectofthewayinwhichradio
wavesaretransmittedanddoesnot
indicateanyfailureoftheaudiosystem.
Press the MENUbutton.
Select "Audio functions".
Press OK.
Select the "FM waveband
preferences"function.
Press OK.
Select "Activate RDS".
Press OK, RDS is displayed in the
screen.
In "Radio"mode,pressOKdirectlytoactivate/
deactivateRDSmode.
RDS, if displayed, enables you to continue
listeningtothesamestationbyautomatic
retuningtoalternativefrequencies.
However, in certain conditions, coverage
ofanRDSstationmaynotbeassured
throughout the country as radio stations
donotcover100%oftheterritory.This
explains the loss of reception of a station
thatcanoccurduringajourney.
Receiving TA messages
Press the TA button to activate or
deactivatetrafficmessages.
TheTA(TrafficAnnouncement)
function gives priority to TA alert
messages.Tooperate,thisfunction
needs good reception of a radio station
transmittingthistypeofmessage.
Whenatrafficreportistransmitted,the
currentaudiosource(Radio,CD,...)
isinterruptedautomaticallytoplaythe
TAmessage.Normalplaybackofthe
audiosourceresumesattheendofthe
transmissionofthemessage.
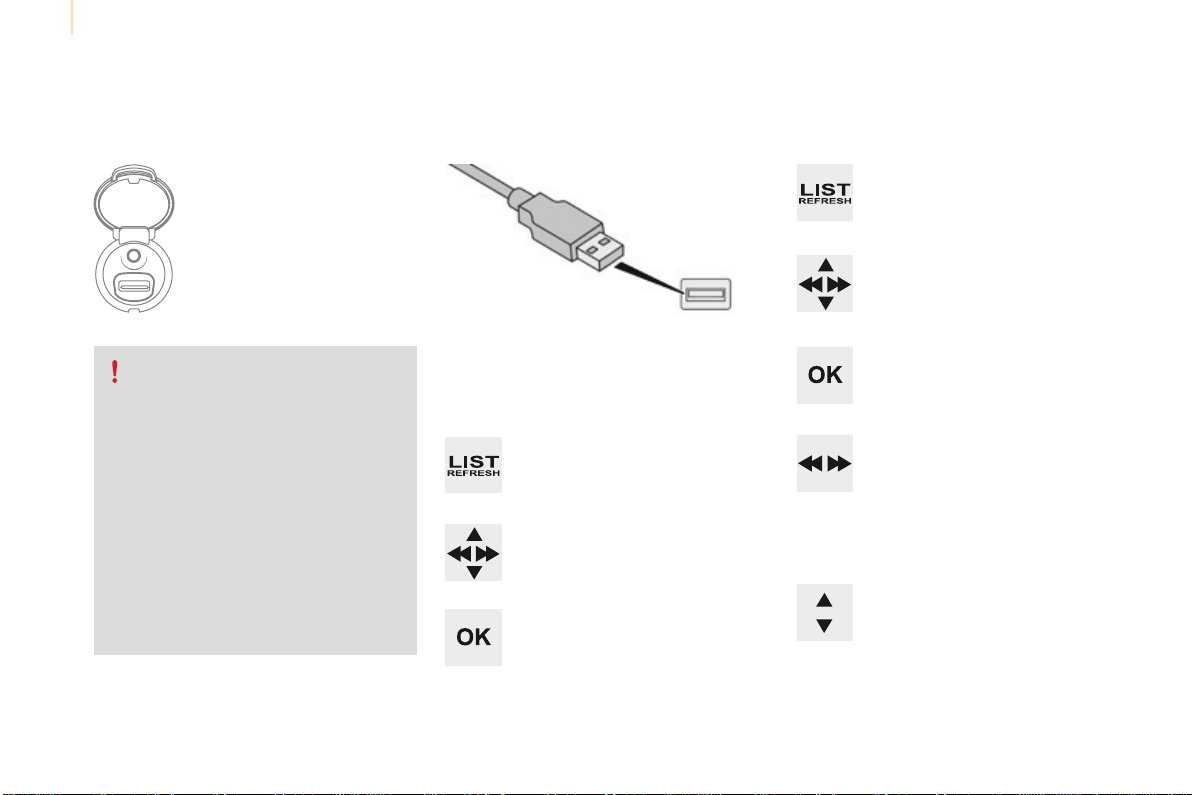
Audio and Telematics
274
Berlingo-2-VP_en_Chap10b_RD45_ed01-2016
Media
USB player
This unit consists of a USB port
andanauxiliaryJacksocket,
dependingonmodel.
InsertaUSBmemorystickintotheUSBport
or connect a USB peripheral device to the USB
portusingasuitablecable(notsupplied).
Thesystemcreatesplaylists
(temporarymemory),whichcantake
fromafewsecondstoseveralminutes
onthefirstconnection.
Reducingthenumberofnon-music
filesandthenumberoffoldersreduces
thiswaitingtime.Playlistsareupdated
everytimetheignitionisswitchedoffor
aUSBmemorystickisconnected.
Thelistsarememorised:ifthelistsare
not changed, the subsequent loading
timeisreduced.
Press and hold REFRESH LIST to
displaythedifferentclassifications.
Select by "Folder"/"Artist"/
"Genre"/"Playlist".
Press OK to select the classification
required, then press OK again to
confirm.
Press REFRESH LIST briefly to
display the previously selected
classification.
Navigate through the list using the
left/rightandup/downbuttons.
Confirmtheselectionby
pressing OK.
Press one of these buttons to gain
accesstotheprevious/nexttrackin
thelist.
Press and hold one of the buttons for
fastforwardorback.
Press one of these buttons to
gainaccesstotheprevious/next
"Folder"/"Artist"/"Genre"/
"Playlist"inthelist.
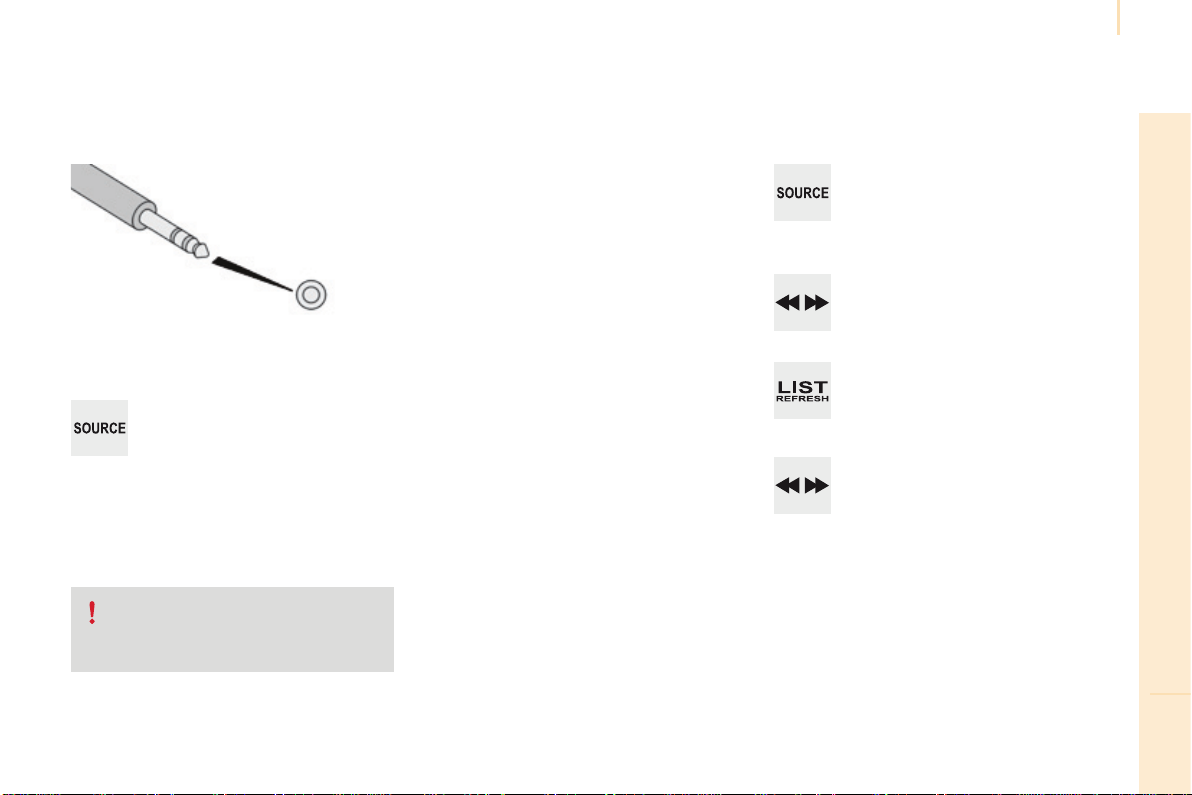
Audio and Telematics
275
TECHNOLOGY on BOARD
10
Berlingo-2-VP_en_Chap10b_RD45_ed01-2016
Auxiliary socket (AUX)
Connecttheportabledevice(MP3player,…)to
theauxiliaryJacksocketusinganaudiocable
(notsupplied).
Press the SOURCE button several
timesinsuccessionandselectAUX.
Firstadjustthevolumeonyourportabledevice
(toahighlevel).Thenadjustthevolumeon
youraudiosystem.Operationofcontrolsisvia
theportabledevice.
Do not connect a device to both the
JackauxiliarysocketandtheUSBport
atthesametime.
CD player
Insertcircularcompactdiscsonly.
Someanti-piratingsystems,onoriginaldiscs
orCDscopiedusingapersonalrecorder,may
cause faults which are no reflection on the
qualityofthevehicle'splayer.
Insert a CD in the player, play begins
automatically.
To play a disc which has already
been inserted, press the SOURCE
buttonseveraltimesinsuccession
and select CD.
Press one of the buttons to select a
trackontheCD.
Press the LIST REFRESH button to
displaythelistoftracksontheCD.
Press and hold one of the buttons for
fastforwardorfastback.
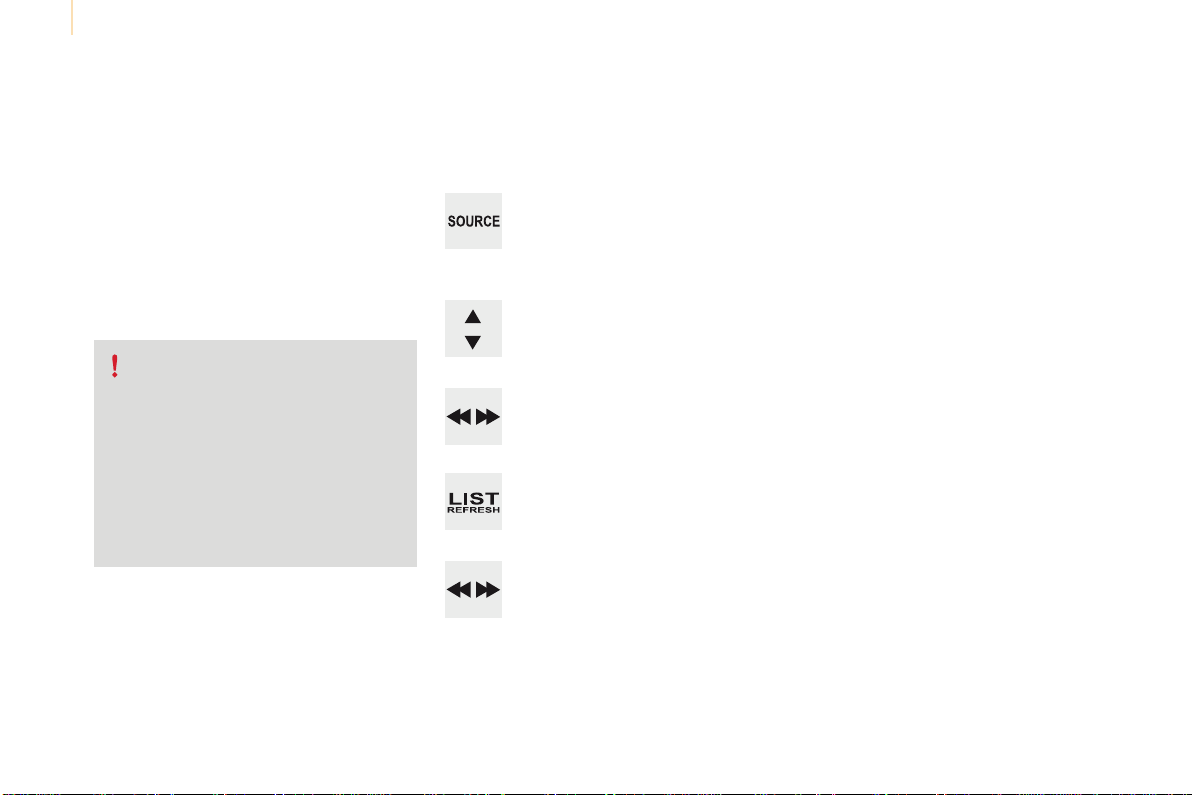
Audio and Telematics
276
Berlingo-2-VP_en_Chap10b_RD45_ed01-2016
Theaudiosystemwillonlyplayfileswith
theextension".mp3"withasamplingrate
of22.05KHzor44.1KHz.Noothertypeoffile
(.wma,.mp4,.m3u...)canbeplayed.
Itisadvisabletorestrictfilenamesto
20 characters without using special characters
(e.g."?;ù)toavoidanyplayingordisplaying
problems.
In order to be able to play a recorded CDR
orCDRW,whenrecording,theISO9660
level1.2orJolietfileformatisrecommended.
Ifthediscisrecordedinanotherformat,itmay
notbeplayedcorrectly.
Itisrecommendedthatthesamerecording
formatisalwaysusedforanindividualdisc,
withaslowaspeedaspossible(4xmaximum)
foroptimumsoundquality.
Intheparticularcaseofamulti-sessionCD,
theJolietformatisrecommended.
Information and advice
To play a disc which has already
been inserted, press the SOURCE
buttonseveraltimesinsuccession
and select CD.
Press one of the buttons to select a
folderontheCD.
Press one of the buttons to select a
trackontheCD.
Press the LIST REFRESH button to
display the list of directories of the
MP3compilation.
Press and hold one of the buttons for
fastforwardorbackwardplay.
Playing an MP3 CD
compilation
InsertanMP3CDcompilationintheplayer.
Theaudioequipmentsearchesforallofthe
musictracks,whichmaytakeanythingbetween
a few seconds and several tens of seconds,
beforeplaybegins.
On a single disc, the CD player can
read up to 255 MP3 files spread over
8folderlevels.However,itisadvisable
tokeeptoalimitoftwolevelstoreduce
theaccesstimebeforetheCDis
played.
While the CD is being played, the folder
structureisnotfollowed.
All of the files are displayed on a single
level.

Audio and Telematics
277
TECHNOLOGY on BOARD
10
Berlingo-2-VP_en_Chap10b_RD45_ed01-2016
UseonlyUSBmemorysticksformattedFAT32
(FileAllocationTable).
Itisrecommendedthatyouuse
genuine Apple
®
USB cables for correct
operation.
*Incertaincases,playoftheaudiofilesmust
beinitiatedfromthekeypad.
**Ifthetelephonesupportsthefunction.
Bluetooth
®
audio streaming
Streamingallowsmusicfilesonthetelephone
tobeplayedviatheaudiosystem.
Connectthetelephone:seethe"Telephone"
section.
Select in the "Bluetooth: Telephone - Audio"
menuthetelephonetobeconnected.
Theaudiosystemconnectstoanewlypaired
telephoneautomatically.
Controloftrackstobeplayedisviathebuttons
ontheaudiosystemcontrolpanelandthe
steeringmountedcontrols**.Thecontextual
informationcanbedisplayedinthescreen.
Activatethestreamingsourceby
pressing the SOURCEbutton*.
Connecting Apple
®
players
Connect the Apple
®
player to the USB port
usingasuitablecable(notsupplied).
Playstartsautomatically.
Controlisviatheaudiosystem.
The classifications available are those of the
portabledeviceconnected(artists/albums/
genres/playlists/audiobooks/podcasts).
Theversionofsoftwareintheaudiosystem
maynotbecompatiblewiththegenerationof
your Apple
®
player.
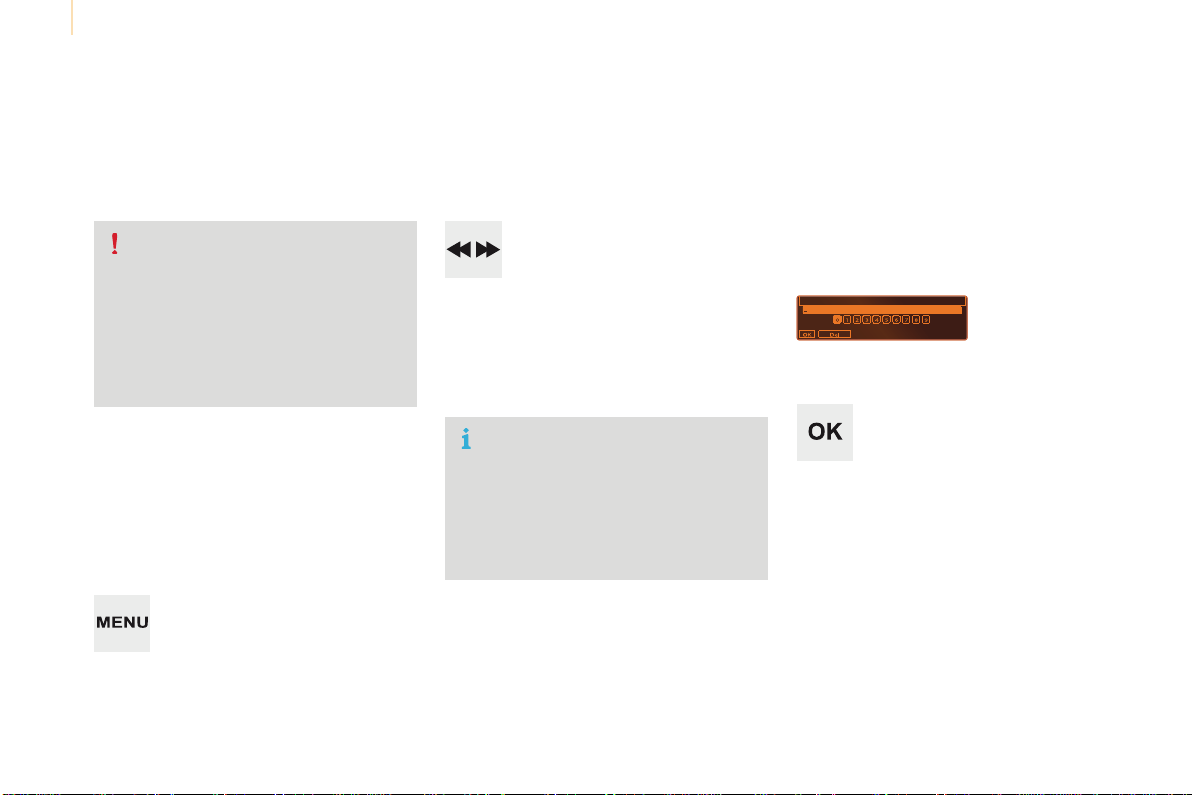
Audio and Telematics
278
Berlingo-2-VP_en_Chap10b_RD45_ed01-2016
Telephone
Pairing a Bluetooth
®
telephone
Screen C
(Available according to model and version)
Asasafetymeasureandbecausethey
require prolonged attention on the part
of the driver, the operations for pairing
oftheBluetoothmobiletelephonewith
theBluetoothhands-freesystemof
youraudioequipmentmustbecarried
out with the vehicle stationary and the
ignitionon.
Gotowww.citroen.co.ukformoreinformation
(compatibility,morehelp,...).
Activate the telephone's Bluetooth function
and ensure that it is "visible to all" (telephone
configuration).
Press the MENUbutton.
Inthemenu,select:
- "Bluetooth: Telephone - Audio"
- "Bluetooth configuration"
- "Perform a Bluetooth search"
Awindowisdisplayedwithamessagethata
searchisinprogress.
The services available depend on
thenetwork,theSIMcardandthe
compatibilityoftheBluetoothdevice
used.
Consultyourtelephone'smanualand
your operator to find out which services
areavailabletoyou.
*Ifyourtelephoneisfullycompatible.
The first 4 telephones recognised are displayed
inthiswindow.
The "Telephone"menupermitsaccesstothe
followingfunctionsinparticular:"Directory"*,
"Calls list", "Consult the paired equipment".
Selectthetelephonetobeconnectedfromthe
list.Onlyonetelephonecanbeconnectedat
atime.
Avirtualkeypadisdisplayedinthescreen:
enteracodewithatleast4digits.
ConfirmbypressingOK.
Amessageinthescreenindicatesthetelephone
chosen.Toacceptthepairing,enterthesame
codeonthetelephone,thenconfirmwithOK.
Ifpairingfails,thenumberofattemptsisnot
limited.
Amessagethatthepairinghasbeen
successfulappearsinthescreen.
Theautomaticconnectionauthorisedisonly
activeafterthetelephonehasbeenconfigured.
The directory and the call list can be accessed
afterthenecessarysynchronisationperiod.
Audio and Telematics
279
TECHNOLOGY on BOARD
10
Berlingo-2-VP_en_Chap10b_RD45_ed01-2016
Receiving a call
Anincomingcallisannouncedbyaringanda
superimposeddisplayinthescreen.
Select the YES tab on the display
usingthebuttons.
ConfirmbypressingOK.
Press this button at the steering
mountedcontrolstoacceptthecall.
Making a call
Fromthe"Bluetooth: Telephone - Audio"
menu.
Select "Manage the telephone call".
Select "Call".
Or
Select "Calls list".
Or
Select "Directory".
Pressthisbuttonformorethan
two seconds for access to your
directory, then navigate using the
thumbwheel.
Or
Todialanumber,useyourtelephone'skeypad,
withthevehiclestationary.
Ending a call
During a call, press this button for
morethan2seconds.
ConfirmwithOKtoendthecall.
Thesystemaccessesthetelephone's
contacts directory, depending on its
compatibility,andwhileitisconnected
byBluetooth.
With certain telephones connected by
Bluetooth you can send a contact to the
directoryoftheaudiosystem.
Contactsimportedinthiswayare
savedinapermanentdirectory
visible to all, whatever the telephone
connected.
Themenuforthedirectoryisnot
accessibleifitisempty.

Audio and Telematics
280
Berlingo-2-VP_en_Chap10b_RD45_ed01-2016
Screenmenumap(s)
Radio-CD
REG mode
CD repeat
Shuffle play
Vehicle cong*
R wiper in rev
Options
Diagnostic
RDS options
View
Abandon
1
2
3
3
1
2
2
2
2
1
2
Screen A
*Thesettingsvaryaccordingtothetrimlevelof
thevehicle.
Guide lighting
2
Units
Temperature: °Celsius / °Fahrenheit
Fuel consumption: KM/L - L/100 - MPG
1
2
2
Display adjust
Month
Day
Hour
Minutes
Year
12 H/24 H mode
Language
Italiano
Nederlands
Portuguès
Português do Brasil
Français
Deutsch
Čeština
English
Hrvatski
Español
Magyar
1
2
2
2
2
2
2
2
1
2
2
2
2
2
2
2
2
2
2

Audio and Telematics
281
TECHNOLOGY on BOARD
10
Berlingo-2-VP_en_Chap10b_RD45_ed01-2016
Screen C
Press the OK dial for access to
short-cutmenusaccordingtothe
displayonthescreen.
activate / deactivate RDS
activate / deactivate REG mode
activate / deactivate radiotext
Radio
activate / deactivate Intro
CD / MP3 CD
activate / deactivate track repeat
(the entire current CD for CD, the entire
current folder for MP3 CD)
activate / deactivate random play
(the entire current CD for CD, the entire
current folder for MP3 CD)
activate / deactivate track repeat
(ofthecurrentfolder/artist/genre/
playlist)
USB
activate / deactivate random play
(ofthecurrentfolder/artist/genre/
playlist)
1
1
1
1
1
1
1
1
Audio and Telematics
282
Berlingo-2-VP_en_Chap10b_RD45_ed01-2016
Screen C
Audio functions
Alternative frequencies (RDS)
Activate/deactivate
FM preferences
Regionalmode(REG)
Activate/deactivate
Radio-textinformation(RDTXT)
Activate/deactivate
1
2
3
4
3
4
3
4
Play modes
Albumrepeat(RPT)
Activate/deactivate
Trackrandomplay(RDM)
Activate/deactivate
2
3
4
3
4
Enter distance to destination
1
1
1
2
2
2
Pressing the MENUbuttondisplays:
Audio functions
Trip computer
Distance: x miles
Vehicle diagnosis
Warning log
Systems activated or deactivated
State of systems
Audio and Telematics
283
TECHNOLOGY on BOARD
10
Berlingo-2-VP_en_Chap10b_RD45_ed01-2016
Bluetooth conguration
1 1
1
2 2
2 2
2
3
3
3
2
3
Normalvideo
Brightness-video adjustment
Display conguration
Dene the vehicle
parameters*
Inverse video
Brightness(-+)adjustment
Date and time adjustment
Settingtheday/month/year
Settingthehour/minute
Choiceof12h/24hmode
Choice of units
l/100km-mpg-km/l
°Celsius/°Fahrenheit
1
1
3
3
2
3
2
3
3
2
3
3
3
Personalisation-
conguration
Bluetooth: Telephone -
Audio
Telephone function
Deleteapairedequipment
Connect/Disconnect an equipment
Audio Streaming function
Consultthepairedequipment
PerformaBluetoothsearch
Calls list
Call
Directory
Terminate the current call
Manage the telephone call
Activate secret mode
*Thesettingsvaryaccordingtovehicle.
Choice of language
1

Audio and Telematics
284
Berlingo-2-VP_en_Chap10b_RD45_ed01-2016
Thetablebelowgivesanswerstothemostfrequentlyaskedquestionsonyouraudiosystem.
QUESTION ANSWER SOLUTION
With the engine off, the
audiosystemswitchesoff
afterafewminutesofuse.
Whentheengineisswitchedoff,theaudiosystemoperatingtime
dependsonthestateofchargeofthebattery.
Theswitch-offisnormal:theaudioequipmentswitchestoeconomy
modeandswitchesofftopreventdischargingofthevehicle's
battery.
Start the vehicle's engine to increase the battery
charge.
Themessage"theaudio
systemisoverheated"
appearsonthedisplay.
Inordertoprotecttheinstallationifthesurroundingtemperature
istoohigh,theaudiosystemswitchestoanautomaticthermal
protectionmodeleadingtoareductioninvolumeorCDplay
stopping.
Switchtheaudiosystemoffforafewminutesto
allowthesystemtocool.
Frequentlyaskedquestions
QUESTION ANSWER SOLUTION
There is a difference in
sound quality between the
different audio sources
(radio,CD...).
Foroptimumsoundquality,theaudiosettings(Volume,Bass,
Treble,Ambience,Loudness)canbeadaptedtothedifferentsound
sources,whichmayresultinaudibledifferenceswhenchanging
source(radio,CD...).
Checkthattheaudiosettings(Volume,Bass,
Treble,Ambience,Loudness)areadaptedto
thesourceslistenedto.Itisadvisabletoset
the audio functions (Bass, Treble, Front-Rear
Balance,Left-RightBalance)tothemiddle
position,selectthemusicalambience"None"
and set the loudness correction to the "Active"
positioninCDmodeortothe"Inactive"position
inradiomode.
Radio

Audio and Telematics
285
TECHNOLOGY on BOARD
10
Berlingo-2-VP_en_Chap10b_RD45_ed01-2016
QUESTION ANSWER SOLUTION
The stored stations do not
function (no sound,
87.5Mhzisdisplayed...).
Anincorrectwavebandisselected. Press the BAND AST button to return to the
waveband (AM, FM1, FM2, FMAST) on which the
stationsarestored.
Thetrafficannouncement
(TA)isdisplayed.Ido
not receive any traffic
information.
Theradiostationisnotpartoftheregionaltrafficinformation
network.
Tune to a radio station which broadcasts traffic
information.
The quality of reception of
the radio station listened
to gradually deteriorates
or the stored stations do
not function (no sound,
87.5Mhzisdisplayed...).
Thevehicleistoofarfromthetransmitterusedbythestation
listenedtoorthereisnotransmitterinthegeographicalarea
throughwhichthevehicleistravelling.
ActivatetheRDSfunctiontoenablethesystem
tocheckwhetherthereisamorepowerful
transmitterinthegeographicalarea.
Theenvironment(hills,buildings,tunnels,undergroundcarparks...)
blockreception,includinginRDSmode.
Thisphenomenonisnormalanddoesnot
indicateafailureoftheaudioequipment.
Theaerialisabsentorhasbeendamaged(forexamplewhengoing
throughanautomaticcarwashorintoanundergroundcarpark).
HavetheaerialcheckedbyaCITROËNdealer.
Sound cut-outs of 1 to
2secondsinradiomode.
During this brief sound cut-out, the RDS searches for another
frequencygivingbetterreceptionofthestation.
DeactivatetheRDSfunctionifthephenomenon
istoofrequentandalwaysonthesameroute.
Audio and Telematics
286
Berlingo-2-VP_en_Chap10b_RD45_ed01-2016
Media
QUESTION ANSWER SOLUTION
Themessage"USB
peripheral error" is
displayedonthescreen.
The Bluetooth connection
iscut.
Thebatteryoftheperipheralmaynotbesufficientlycharged. Rechargethebatteryoftheperipheraldevice.
TheUSBmemorystickisnotrecognised.
TheUSBmemorystickmaybecorrupt.
ReformattheUSBmemorystick.
TheCDisejected
automaticallyorisnot
playedbytheplayer.
The CD is inserted upside down, is unplayable, does not contain
anyaudiodataorcontainsanaudioformatwhichtheplayercannot
play.
TheCDisprotectedbyananti-piratingprotectionsystemwhichis
notrecognisedbytheaudioequipment.
- CheckthattheCDisinsertedintheplayer
therightwayup.
- ChecktheconditionoftheCD:theCD
cannotbeplayedifitistoodamaged.
- Checkthecontentinthecaseofarecorded
CD:consulttheadviceinthe"Audio"section.
- Theaudioequipment'sCDplayerdoesnot
playDVDs.
- Due to their quality level, certain writeable
CDswillnotbeplayedbytheaudiosystem.
The CD player sound is
poor.
TheCDusedisscratchedorofpoorquality. InsertgoodqualityCDsandstorethemin
suitableconditions.
Theaudioequipmentsettings(bass,treble,ambiences)are
unsuitable.
Set the treble or bass level to 0, without selecting
anambience.
QUESTION ANSWER SOLUTION
Iamunabletoaccessmy
voicemail.
Fewtelephonesorserviceprovidersallowtheuseofthisfunction.
Telephone


02-16
Berlingo-2-VP_en_Chap11_couv-n_ed01-2016
Printed in the EU
Anglais
Yourvehiclewillbettedwithsomeofthis
equipmentdescribedinthisdocument,
dependingonitstrimlevel,versionandthe
specicationforthecountryinwhichitissold.
Thishandbookdescribesalloftheequipment
availableinthewholerange.
The descriptions and illustrations are given
withoutanyobligation.AutomobilesCITROËN
reservestherighttomodifythetechnical
specications,equipmentandaccessories
without having to update this edition of the
handbook.
Thisdocumentisanintegralpartofyour
vehicle.Itshouldbepassedontothenewuser
intheeventofsaleortransfer.
In addition, there are labels present in your
vehicle to warn you of the need for certain
precautionstotakeforyoursafety;don'tremove
them,theywillbeusefulagainforanewowner.
AutomobilesCITROËNdeclares,byapplication
of the provisions of the European regulation
(Directive2000/53)relatingtoEndofLife
Vehicles,thatitachievestheobjectivessetby
thisregulationandthatrecycledmaterialsare
usedinthemanufactureoftheproductsthatit
sells.
Reproduction or translation of all or part of
thisdocumentisprohibitedwithoutwritten
authorisationfromAutomobilesCITROËN.
We draw your attention to the following
points:
- Thettingofelectricalequipmentor
accessoriesnotlistedbyCITROËNmay
cause faults and failures with the electrical
systemofyourvehicle.ContactaCITROËN
dealerforinformationontherangeof
recommendedaccessories.
- Asasafetymeasure,accesstothe
diagnosticsocket,usedforthevehicle's
electronicsystems,isreservedstrictlyfor
CITROËNdealersorqualiedworkshops,
equipped with the special diagnostic
toolrequired(riskofmalfunctionsofthe
vehicle'selectronicsystemsthatcould
causebreakdownsorseriousaccidents).
Themanufacturercannotbeheld
responsibleifthisadviceisnotfollowed.
- Anymodicationoradaptationnotintended
orauthorisedbyAutomobilesCITROËNor
carriedoutwithoutmeetingthetechnical
requirementsdenedbythemanufacturer
would lead to the suspension of the legal
andcontractualwarranties.
Therearbodyworkcomponentsofyourvehicle
havebeendesignedtominimisespray.
*SubjecttoofcialpublicationoftheresultsbytheFIA.

2016 – DOCUMENTATION DE BORD
4Dconcept
Diadeis
Interak
Berlingo-2-VP_en_Chap11_couv-n_ed01-2016
16BGO.0040
Anglais