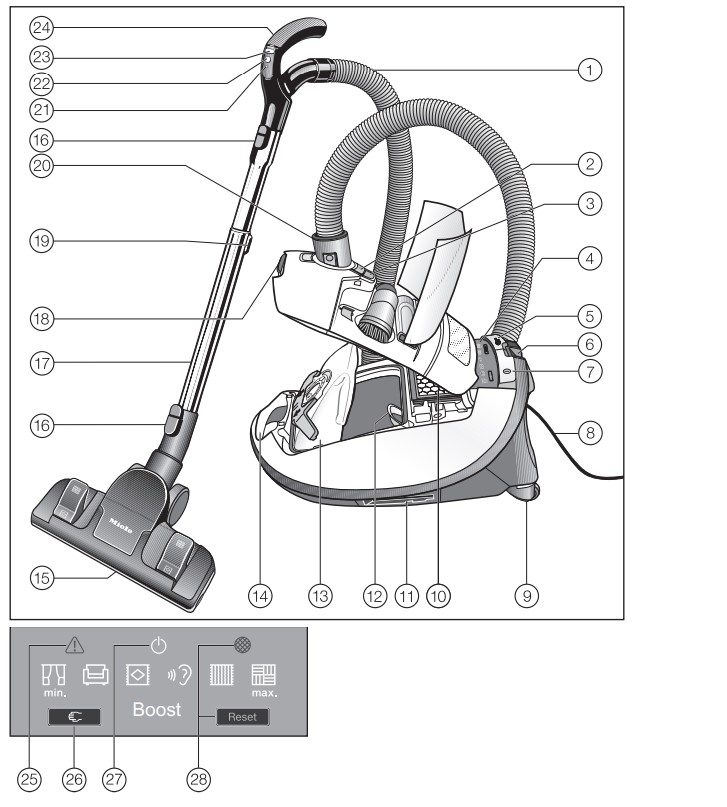
Park system for storage (on both sides of the vacuum cleaner)
Dust compartment filter (for motor protection)
Original Miele dustbag
Carrying handle
Floorhead *
Release buttons *
Telescopic suction tube *
Dust compartment release catch
Telescopic tube release button *
Hose connection socket
LED *
Standby button for pauses in vacuuming *
+ / - suction power controls *
Handle (some models have an air inlet valve in the handle) *
Overheating warning light *
Restart button *
Standby indicator light *
Maintenance indicator with reset button *
Features marked * depend on model and may vary or not be available on your vacuum cleaner.
Use
Unwind the mains cable (dia. 18)
Pull the mains cable out to the required length, max. cable length approx. 7.5 m. (Exception: the Complete C3 XXL SGSE1 and SGSG1 max. approx. 8.5 m).
Insert the plug into the socket correctly and switch on.
Rewinding the cable (dia. 19)
Switch off at the wall socket and withdraw the plug.
Step on the cable rewind foot switch. The cable will then retract itself into the vacuum cleaner.
To switch on and off (dia. 20)
Press the On/Off foot control
To regulate the suction power
The suction power can be regulated to suit the type of flooring being cleaned. Reducing the suction power reduces the amount of effort required to manoeuvre the floorhead.
The vacuum cleaner has symbols on the controls which indicate the type of use the settings are suitable for. The setting selected will light up yellow.
Curtains, fabric
Upholstery, cushions
Cut pile carpets, rugs and runners
Energy-saving vacuuming. This setting is also very quiet
Loop pile carpet and rugs
Hard flooring and heavily soiled carpets and rugs
Depending on the model, your vacuum cleaner will be fitted as standard with one of the following suction power selectors:
Foot controls
Radio-control handle
Foot controls (dia. 21)
The first time the vacuum cleaner is switched on, the highest setting will be selected automatically.
After that the vacuum cleaner will switch on at the setting which was used previously.
Press the + foot control to select a higher setting.
Press the - foot control to select a lower setting.
Footswitch with Boost function (dia. 22 + 23)
Some models also feature a Boost power function. This function uses increased power for a short period for vacuuming both fine and coarse stubborn soiling.
Press the + footswitch until the maximum power level has been reached.
Then press the + footswitch again. This activates the Boost function for 20 seconds. The Boost indicator will light up yellow. You now have the following options:
Press the - footswitch before the 20 seconds have elapsed. This switches the Boost function off and activates maximum power.
Press the + footswitch again once the 20 seconds have elapsed.
This activates the Boost function for another 20 seconds. It can be activated three times in a row. After that a pause of one minute is required before reactivating it.
Using the Boost power setting changes the actual power consumption (see "Notes on Delegated Regulation (EU) No. 665/2013 and 666/2013").
Radio-control handle (dia. 24)
When the vacuum cleaner is switched on with the On/Off foot control , the Standby indicator on the vacuum cleaner will light up yellow.
Press the Standby button on the handle. The Standby indicator on the vacuum cleaner will go out. The first time the vacuum cleaner is switched on, the highest setting will be selected automatically.
After that the vacuum cleaner will switch on at the setting which was used previously.
Press the + button to select a higher suction power level.
Press the - button to select a lower suction power level.
Radio-control handle with Boost function
Some models also feature a Boost power function. This function uses increased power for a short period for vacuuming both fine and coarse stubborn soiling.
Press the + control until the maximum power level has been reached.
Then press the + control again.
This activates the Boost function for 20 seconds. The Boost indicator on the vacuum cleaner will light up yellow You now have the following options:
Press the - control before the 20 seconds have elapsed This switches the Boost function off and activates maximum power.
Press the + control again once the 20 seconds have elapsed
This activates the Boost function for another 20 seconds. It can be activated three times in a row. After that a pause of one minute is required before reactivating it.
To open the air inlet valve (dia. 25 + 26) (not on models with radio-controls on the handle)
It is easy to reduce the suction power for a short time, e.g. to prevent rugs or other objects being sucked into the vacuum cleaner.
Open the air inlet valve on the handle far enough to reduce the suction power. The floorhead will be easier to manoeuvre.
During vacuuming
When vacuuming, pull the cleaner behind you on its wheels. You can stand it upright for vacuuming stairs and curtains etc
Interrupting operation (dia. 24) (for models with radio controls on the handle)
The vacuum cleaner can be paused for short breaks whilst vacuuming.
Press the Standby button on the handle.
An LED will indicate each time a button is pressed on the handle. At the end of the pause you can do one of the following:
Press the Standby button again to switch the vacuum cleaner back on at the setting you were using before pausing it.
Press the + button to switch the vacuum cleaner back on using the highest power setting.
Press the - button to switch the vacuum cleaner back on using the lowest power setting.
Setting down, transportation and storage
Park System for pauses during vacuuming (dia. 29)
The Park System allows you to conveniently park the suction tube and floorhead during pauses.
Slot the floorhead or floorbrush into the parking attachment on the vacuum cleaner.
Park system On/Off switch
Some models are fitted with an On/Off switch in the Park system. The vacuum cleaner switches off automatically when the floorhead or floorbrush is slotted into the parking attachment. When it is removed from the parking attachment, the vacuum cleaner switches back on at the previously selected power level.
Park system for storage (dia. 30)
Stand the vacuum cleaner upright. Retract the telescopic tube fully so that the vacuum cleaner takes up less room for storage.
Slot the floorhead downwards into one of the parking attachments on the side of the vacuum cleaner. This makes the vacuum cleaner easier to carry or store.
Maintenance
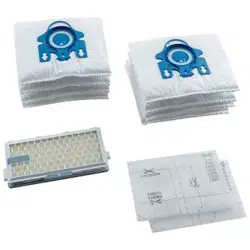
The Miele filtration system consists of three components:
Dustbag
Dust compartment filter (for motor protection)
Exhaust filter
These will need to be replaced from time to time to ensure that your vacuum cleaner performs efficiently.
Purchasing new dustbags and filters
Original Miele dustbags and filters can be ordered from Miele, your Miele dealer, or from the Miele Webshop.
Ordering the correct dustbags and filters
Only use original Miele G/N dustbags with a blue collar and original Miele filters. These are identified by the "Original Miele" logo on the packaging or directly on the dustbag
An AirClean filter and a dust compartment filter are supplied with every packet of Miele dustbags. These can also be purchased separately from your Miele Dealer, from Miele or from the Miele Webshop. Please quote the model number of your vacuum cleaner when ordering to make sure you get the correct filter.
When to change the dustbag
Change the dustbag when the colour marker in the dustbag change indicator turns red, or sooner if it is no longer effective (see possible reasons for this below).
To check the dustbag change indicator
Attach the standard adjustable floorhead to the vacuum cleaner.
Switch the vacuum cleaner on and select the highest power setting.
Lift the floorhead off the floor a little.
How the dustbag change indicator works
The dustbag change indicator is set for normal household dust. This generally contains a mixture of dust, hair, threads, carpet fluff, grit etc.
However, if the cleaner has been used to vacuum up fine dust, such as plaster, brick dust, cement or flour, the pores of the dustbag will become blocked very quickly. This affects the air permeability of the bag, and the marker will indicate that the bag is "full" even when it is not. If this happens you must still change the dustbag because suction power will be greatly reduced by blocked pores in the dustbag.
If, on the other hand, a large amount of hair and carpet fluff which typically contains a lot of air is vacuumed up, the indicator may fail to react even though the bag is full. You should still change it. Both these extremes can occur.
How to replace the dustbag
Press the release buttons at the side of the hose connector, and lift the hose from the socket (dia. 02).
Lift the release catch for the dust compartment lid and raise the lid as far as it will go (dia. 10).
The dustbag has a closing flap which closes automatically when the dust compartment lid is raised to prevent any dust escaping.
Pull the dustbag out by the grip on the collar.
Fit the new dustbag into the blue holder as far as it will go. Leave it folded up when you take it out of the box.
It should be unfolded as far as possible in the dust compartment.
Close the dust compartment lid securely, making sure it clicks into position. Take care not to trap the dustbag when doing so. The lid will not close without a dustbag in place. Do not force it!
Insert the hose connector into the suction socket on the vacuum cleaner until it clicks into position. To do this, line up the guides on the two pieces (dia. 01).
When to change the dust compartment filter (for motor protection)
Replace this filter every time you start a new packet of dustbags. A dust compartment filter is supplied with every packet of Miele dustbags.
How to change the dust compartment filter
Open the dust compartment lid.
Pull the dustbag out by the grip on the collar.
Open the blue filter frame fully and remove the old filter. Hold by the clean, unsoiled section to remove it.
Replace with a new dust compartment filter.
Close the filter frame.
Fit the dustbag into the blue holder as far as it will go
Close the dust compartment lid securely, making sure it clicks into position. Take care not to trap the dustbag when doing so.
When to replace the exhaust filter
Depending on model, your vacuum cleaner will be fitted as standard with one of the following exhaust filters (dia. 09).
a AirClean Replace this filter every time you start a new packet of Miele dustbags. An AirClean exhaust filter is supplied with every packet of Miele dustbags.
b Active AirClean 50 (black)
c AirClean Plus 50 (light blue)
d HEPA AirClean 50 (white)
Replace if the display for the exhaust filter change indicator is completely filled with red (dia. 14). This occurs after approx. 50 hours of operation which is equivalent to about a year of average use. The vacuum cleaner can still be used. However, the suction power will be reduced as will the effectiveness of the filter if it is not replaced in good time.
How to replace the AirClean filter
Open the dust compartment lid.
Press the release catch on the filter grille and open the grille until it clicks.
Grasp the used AirClean filter by one of the clean, unsoiled sections and take it out.
Replace it with a new AirClean filter
Close the filter grille.
Close the dust compartment lid.
Replacing the Active AirClean 50, AirClean Plus 50 and HEPA AirClean 50 exhaust filters(dia. 37 + 38)
Open the dust compartment lid.
Lift the exhaust filter and remove it.
Insert a new exhaust filter making it sure it goes in properly, then push it down into position.
Press the exhaust filter change indicator (dia. 12). After approx. 10 - 15 seconds a thin red line will appear in the left hand side of the display (dia. 13).
Replacing one type of exhaust filter with another
Depending on model, your vacuum cleaner will be fitted as standard with one of the following exhaust filters:
a AirClean
b Active AirClean 50 (black)
c AirClean Plus 50 (light blue)
d HEPA AirClean 50 (white)
When changing the filter please note
If you wish to replace exhaust filter a with filter b, c or d, it is essential that you remove the filter grille before you fit the new exhaust filter. You must also activate the exhaust filter change indicator (dia. 12).
If you wish to replace exhaust filter b, c or d with filter a, it is essential that you also fit the filter grille * (dia. 36). * Filter grille - see "Optional accessories".
Maintenance indicator with reset button
Some models are fitted with a maintenance indicator. The indicator lights up after approx. 50 hours of operation, which is equivalent to about a year of average use. The level of soiling of the dust compartment filter and the exhaust filter must be checked at this point.
If the filters are replaced, the indicator must be reset. To do this the vacuum cleaner must be switched on.
Press the reset button.
The maintenance indicator will go out and reset to zero.
When to change the battery in the radio-control handle
Approximately every 18 months. One 3 V battery (CR 2032) is required.
The vacuum cleaner can still be used when the battery has run out or if there is no battery fitted.
To do so, switch the vacuum cleaner on using the On/Off foot control . The Standby indicator on the vacuum cleaner will light up yellow.
Press the restart button on the vacuum cleaner (dia. 40). The vacuum cleaner can continue to be used in this way, but only at maximum power.
How to change the battery in the radio-control handle
Undo the screw cap on the battery compartment using a screwdriver and then remove the cover.
Replace the battery with a new one, making sure the polarity is correct.
Replace the cover and tighten the screw cap back up again.
Dispose of the old battery in a designated recycling bin for batteries.
When to change the thread lifters
The thread lifters on the suction inlet to the floorhead can be replaced. Check them from time to time and replace them if the pile has worn down.
How to replace the thread lifters
Use a suitable screwdriver to remove the thread lifters from the slots.
Fit new thread lifters.
Upholstery nozzle SPD 10 (depending on model) (dia. 44)
Disengage the thread lifter unit either side of the upholstery nozzle using a coin.
Fit a new thread lifter unit and lock into position
Cleaning the roller on the AllTeQ floorhead
Release the bearing (with bayonet fitting) using a coin.
Press the bearing out, and remove.
Remove the roller.
Remove any threads and hair, replace the roller and refit the bearing, locking it back into position.
Replacement parts are available from your Miele Dealer or from Miele (see end of booklet for contact details).
Cleaning and care
Note: Always disconnect the vacuum cleaner from the electrical supply before cleaning it. Switch off at the wall socket and unplug it.
Vacuum cleaner and accessories
The vacuum cleaner and all plastic accessories can be cleaned with a proprietary cleaner suitable for plastic. Note: Do not use abrasive cleaning agents, glass cleaning agents, allpurpose cleaners or oil-based conditioning agents.
Dust compartment
The dust compartment can, if necessary, be cleaned using a dry duster, brush or, if available, a second vacuum cleaner to vacuum the dust out.
Note: Do not let the vacuum cleaner get wet. If moisture gets into the appliance, there is a risk of electric shock.
What to do if...
Problem
Cause and remedy
The vacuum cleaner switches off automatically.
On certain models, the overheating warning light also comes on .
A temperature limiter switches the vacuum cleaner off automatically if it gets too hot. This can occur if, for instance, large articles block the suction tube or when the dustbag is full or contains particles of fine dust. A heavily soiled exhaust or dust compartment filter can also be the cause of overheating.
Switch the vacuum cleaner off immediately using the On/Off foot control . Disconnect from the electricity supply. Switch off at the wall socket and unplug it.
After removing the cause, wait for approximately 20 - 30 minutes to allow the vacuum cleaner to cool down. It can then be switched on again.
Optional accessories
You can order these and many other products via the Miele Webshop. They can also be purchased from your Miele Dealer or from Miele.
Floor brushes
AllergoTeQ floorhead (SBDH 285-3)
This floorhead is suitable for daily hygienic cleaning of all floor surfaces. The level of cleanliness of the floor shows in a colour "traffic light" display when vacuuming.
Turbo Comfort turbobrush (STB 205-3)
This brush is ideal for cleaning cut pile carpet.
Hard floorbrush (SBB 235-3)
This brush is designed for use on hard flooring such as tiled or stone floors.
Parquet floorbrush (SBB Parquet-3) (only available in selected countries)
This brush has natural bristles and is designed for use on smooth floors that are susceptible to scratching
Hard floor Twister floorbrush with swivel action (SBB 300-3)
This brush is suitable for a variety of hard floor surfaces and has a swivel joint enabling it to get into awkward corners.
Parquet Twister floorbrush with swivel action (SBB 300-3)
(only available in selected countries) With natural bristles for vacuuming smooth hard floors and small gaps.
Parquet Twister XL floorbrush with swivel action (SBB 400-3)
(only available in selected countries) This brush is extra wide making it suitable for large areas of flooring and has a swivel joint enabling it to get into awkward corners.
Other accessories
MicroSet (SMC 20)
This set is specially designed for cleaning small objects and difficult to reach areas (such as PC keyboards, stereo equipment, intricately carved furniture and ornaments, models etc).
CarCare Set (SCC 10)
Accessories for cleaning the interior of vehicles.
HomeCare set (SHC 10)
Accessories for cleaning the living areas of your home.
Mini Turbo XS (STB 20)
For vacuuming upholstery, mattresses or car seats etc.
Universal brush (SUB 20)
(only available in selected countries) For dusting books, shelves, etc.
Radiator brush (SHB 30)
For dusting radiators, narrow shelves and crevices.
Mattress nozzle (SMD 10)
For vacuuming upholstery, mattresses, cushions, curtains, covers etc.
Crevice nozzle, 300 mm (SFD 10)
Extra long crevice nozzle for cleaning in folds, crevices and corners.
Crevice nozzle, 560 mm (SFD 20)
Flexible crevice nozzle for vacuuming hard to reach places.
Upholstery nozzle, 190 mm (SPD 10)
Extra wide upholstery nozzle for cleaning upholstered furniture, mattresses and pillows.
Flexible hose extension (SFS 10)
For extending the suction hose by approximately 1.5 m.
Comfort handle with lighting (SGC 20)
Lights up the area being vacuumed.
Filters Active AirClean 50 exhaust filter (SF-AA 50)
Absorbs odours from the dirt in the dustbag.
HEPA AirClean 50 exhaust filter (SF-HA 50)
Excellent filtration level for very clean exhaust air. This filter is particularly suitable for allergy sufferers.
Filter grille
The filter grille is required if you wish to use an AirClean filter instead of an Active AirClean 50, an AirClean Plus 50 or a HEPA AirClean 50 filter.
#1 Does this vacuum cleaner come with a Mini turbobrush?
It is supposed to but I have now been waiting three months for the mini turbo brush.have written to suppliers twice but still waiting. Not very impressed
#2 do i need bags for c3 miele vacuum cleaner pets
Yes this vacuum requires non re-usable bags that can be purchased in boxes of 10. To be honest the last for 6-8 weeks at a time (have for me). You will also have to purchase an additional filter for this vacuum, which I have not needed to replace since I bought the vacuum cleaner. (over 6 months ago)
#3 I'm torn between getting a bagless vs bagged version. I have 2 big retrievers who shed all the time, how often are you changing these bags?
I have 2 dogs who don't shed a lot but bring a lot of muck into my house! My brother has big Labradors and a cat, which DO shed a lot. He recommended this model to me simply because it has huge suction power. I've used bagless in the past since they were first brought out and found that they left most of the dirt in the carpet even though they would pick up surface items. I felt - like you - that going back to a bagged Vacuum cleaner was a step back into the past. It wasn't my first choice! But my brother rated this model so much that I decided I'd give it a go. I was torn between the modern ones where the 'dirt' is held in a cylinder on the pole as they seem to be getting good reviews...though when I looked further into them I found the reviews were mixed. My first bag was full within a couple of weeks as the machine removed all of the ingrained dirt from my carpets. The second bag has been in about 3 months now and still doesn't need changing. My brother thinks probably once every 6-8 months is all that the bag needs changing. The bags are easily bought on Amazon or other outlets and don't cost a fortune. Since the EU indicated that our Vacuum cleaners needed to use a 'lot less power' we have gone through a phase where the new more politically correct vacs haven't really done the job. I've had a few. This design seems to bring real power even though the output is a lot less than I would have chosen in the past. I'm glad my brother bought it first because it's not exactly a cheap machine! I'm very happy with it - even though it seems to go back to basics! I recommend it totally and have no problems with it except for one - the slide over 'bag full' indicator only seems to work for the first time then doesn't go back to the off position. A lot of customers have found this. However, it's such a powerful machine that you will recognise as soon as the bag is full by the lack of amazing power it has and it's really very simple to check because there's no dust at all comes out of the bag. Just open the compartment and check it's fullness. It's a really good machine. Gosh, I hope I haven't said too much!!? I just wanted to give as good a review as possible. Oh - I must say, the other day I caught my dogs lead (this is about a 2" wide thick lead) in the vac and it sucked it up in a second! it didn't even alter the suction power! I was just glad my little dog wasn't on the end of it at the time lol!!
#4 which is the best miele vacume cleaner for picking upcats hair
The TurboTeQ brush picks up fluff, hair, and dust effortlessly, while the Active AirClean Filter absorbs unwanted odours. For a deep clean, this model comes with a turboteq floorhead, designed to tackle any stubborn pet hairs. With active charcoal to help absorb unpleasant odours, ideal for pet owners.

 *
*  Curtains, fabric
 Upholstery, cushions
  Cut pile carpets, rugs and runners
 Energy-saving vacuuming. This setting is also very quiet
  Loop pile carpet and rugs
  Hard flooring and heavily soiled carpets and rugs
 , the Standby indicator
  on the vacuum cleaner will light up yellow.
 .
. . Disconnect from the electricity supply. Switch off at the wall socket and unplug it.