de Gebrauchsanweisung Bodenstaubsauger
en Vacuum cleaner operating instructions
fr Mode d'emploi pour aspirateur traîneau
nl Gebruiksaanwijzing stofzuigers
it Istruzioni d'uso per aspirapolvere a traino
M.-Nr. 09 752 850
HS15

de ................................................................................................................... 3
en ................................................................................................................... 28
fr ................................................................................................................... 52
nl ................................................................................................................... 75
it ................................................................................................................... 98
2

Sicherheitshinweise und Warnungen
Ihr Beitrag zum Umweltschutz
Gerätebeschreibung
Vor dem Gebrauch
Verwendung des mitgelieferten Zubehörs
Gebrauch
Abstellen, Transportieren und Aufbewahren
Wartung
Wo bekomme ich Staubbeutel und Filter?. . . . . . . . . . . . . . . . . . . . . . . . . . . . . . . 18
Welche Staubbeutel und Filter sind richtig? . . . . . . . . . . . . . . . . . . . . . . . . . . . . . 18
Wann tausche ich den Staubbeutel aus? . . . . . . . . . . . . . . . . . . . . . . . . . . . . . . . 19
Funktion der Staubbeutel-Wechselanzeige. . . . . . . . . . . . . . . . . . . . . . . . . . . . . . 19
Wie tausche ich den Staubbeutel aus? . . . . . . . . . . . . . . . . . . . . . . . . . . . . . . . . . 19
Wann tausche ich den Motorschutzfilter aus?. . . . . . . . . . . . . . . . . . . . . . . . . . . . 20
Wie tausche ich den Motorschutzfilter aus? . . . . . . . . . . . . . . . . . . . . . . . . . . . . . 20
Wann tausche ich den Abluftfilter aus? . . . . . . . . . . . . . . . . . . . . . . . . . . . . . . . . . 20
Wie tausche ich den Abluftfilter Air Clean aus?. . . . . . . . . . . . . . . . . . . . . . . . . . . 20
Wie tausche ich die Abluftfilter ActiveAirClean 50 und HEPA AirClean 50 aus?. . 21
Abluftfilter umrüsten. . . . . . . . . . . . . . . . . . . . . . . . . . . . . . . . . . . . . . . . . . . . . . . . 21
Serviceanzeige mit Resettaste . . . . . . . . . . . . . . . . . . . . . . . . . . . . . . . . . . . . . . . 22
Wann tausche ich die Batterie am Funkhandgriff aus? . . . . . . . . . . . . . . . . . . . . . 22
Wie tausche ich die Batterie am Funkhandgriff aus? . . . . . . . . . . . . . . . . . . . . . . 22
Wann tausche ich die Fadenheber aus? . . . . . . . . . . . . . . . . . . . . . . . . . . . . . . . . 22
Wie tausche ich die Fadenheber aus? . . . . . . . . . . . . . . . . . . . . . . . . . . . . . . . . . 22
Laufrolle der Bodendüse reinigen . . . . . . . . . . . . . . . . . . . . . . . . . . . . . . . . . . . . . 23
Pflege
Störungen
Kundendienst
Garantiebedingungen
Nachkaufbares Zubehör
de - Inhalt
3

Dieser Staubsauger entspricht den vorgeschriebenen
Sicherheitsbestimmungen. Ein unsachgemäßer Ge
-
brauch kann zu Schäden an Personen und Sachen füh
-
ren.
Lesen Sie vor dem ersten Gebrauch des Staubsaugers
die Gebrauchsanweisung. Sie gibt wichtige Hinweise für
Sicherheit, Gebrauch und Wartung des Staubsaugers.
Dadurch schützen Sie sich und andere und vermeiden
Schäden an dem Staubsauger.
Bewahren Sie die Gebrauchsanweisung auf und geben
Sie diese an einen eventuellen Nachbesitzer weiter.
Bestimmungsgemäße Verwendung
~
Dieser Staubsauger ist dazu bestimmt, im Haushalt und
in haushaltsähnlichen Umgebungen verwendet zu werden.
~
Dieser Staubsauger ist nicht für den Gebrauch im Au-
ßenbereich bestimmt.
~
Benutzen Sie den Staubsauger ausschließlich zum Auf
-
saugen von trockenem Sauggut. Menschen und Tiere dür
-
fen Sie mit dem Staubsauger nicht absaugen. Alle anderen
Anwendungsarten, Umbauten und Veränderungen sind
unzulässig.
~
Personen, die aufgrund ihrer physischen, sensorischen
oder geistigen Fähigkeiten oder ihrer Unerfahrenheit oder
Unkenntnis nicht in der Lage sind, den Staubsauger sicher
zu bedienen, dürfen diesen Staubsauger nicht ohne Auf
-
sicht oder Anweisung durch eine verantwortliche Person
benutzen.
de - Sicherheitshinweise und Warnungen
4

Kinder im Haushalt
~
Kinder unter acht Jahren müssen vom Staubsauger fern
-
gehalten werden, es sei denn, sie werden ständig beauf
-
sichtigt.
~
Kinder ab acht Jahren dürfen den Staubsauger nur ohne
Aufsicht bedienen, wenn ihnen der Staubsauger so erklärt
wurde, dass sie diesen sicher bedienen können. Kinder
müssen mögliche Gefahren einer falschen Bedienung er
-
kennen und verstehen können.
~
Kinder dürfen den Staubsauger nicht ohne Aufsicht rei-
nigen oder warten.
~
Beaufsichtigen Sie Kinder, die sich in der Nähe des
Staubsaugers aufhalten. Lassen Sie Kinder niemals mit
dem Staubsauger spielen.
~
Bei Modellen mit Funkhandgriff: Die Batterien dürfen
nicht in Kinderhände gelangen.
Technische Sicherheit
~
Kontrollieren Sie den Staubsauger vor der Benutzung
auf sichtbare Schäden. Nehmen Sie einen beschädigten
Staubsauger nicht in Betrieb.
~
Vergleichen Sie die Anschlussdaten auf dem Typen
-
schild des Staubsaugers (Netzspannung und Frequenz)
mit denen des Elektronetzes. Diese Daten müssen unbe
-
dingt übereinstimmen.
~
Die Netzsteckdose muss über eine Sicherung 16 A oder
10 A träge abgesichert sein.
de - Sicherheitshinweise und Warnungen
5

~
Eine Reparatur des Staubsaugers während der Garan
-
tiezeit darf nur von einem von Miele autorisierten Kunden
-
dienst ausgeführt werden, da sonst bei nachfolgenden
Schäden kein Garantieanspruch besteht.
~
Benutzen Sie das Anschlusskabel nicht zum Tragen des
Staubsaugers und ziehen Sie den Netzstecker nicht am
Anschlusskabel aus der Steckdose.
Ziehen Sie das Anschlusskabel nicht über scharfe Kanten
und quetschen Sie es nicht ein.
Vermeiden Sie häufiges Überfahren des Anschlusskabels.
Anschlusskabel, Netzstecker und Steckdose können dabei
beschädigt werden und Ihre Sicherheit gefährden.
~
Benutzen Sie den Staubsauger nicht, wenn das An-
schlusskabel beschädigt ist. Lassen Sie ein beschädigtes
Anschlusskabel nur komplett mit der Kabeltrommel austau-
schen. Aus Sicherheitsgründen darf der Austausch nur von
einer von Miele autorisierten Fachkraft oder vom Miele
Werkkundendienst vorgenommen werden.
~
Die Steckdose am Staubsauger (je nach Modell) darf
nur für die in dieser Gebrauchsanweisung angegebenen
Miele Elektrobürsten verwendet werden.
~
Beim Saugen – vor allem von Feinstaub, wie z. B. Bohr-
staub, Sand, Gips, Mehl usw. – kommt es naturgemäß zu
elektrostatischen Aufladungen, die sich in bestimmten Si
-
tuationen entladen können. Um die unangenehme Wirkung
der elektrostatischen Entladungen zu vermeiden, ist an der
Unterseite des Handgriffes eine Metalleinlage eingearbei
-
tet. Achten Sie deshalb darauf, dass Ihre Hand diese Me
-
talleinlage beim Saugen dauerhaft berührt.
de - Sicherheitshinweise und Warnungen
6

~
Schalten Sie den Staubsauger immer nach dem Ge
-
brauch, vor jedem Zubehörwechsel und vor jeder Reini
-
gung / Wartung aus. Ziehen Sie den Netzstecker aus der
Steckdose.
~
Tauchen Sie den Staubsauger niemals in Wasser und
reinigen Sie ihn nur trocken oder mit einem leicht feuchten
Tuch.
~
Lassen Sie Reparaturen nur von einer von Miele autori
-
sierten Fachkraft ausführen. Durch unsachgemäße Repa-
raturen können erhebliche Gefahren für den Benutzer ent-
stehen.
Sachgemäßer Gebrauch
~
Benutzen Sie den Staubsauger nicht ohne Staubbeutel,
Motorschutzfilter und Abluftfilter.
~
Wenn kein Staubbeutel eingesetzt ist, kann der Staub-
raumdeckel nicht geschlossen werden. Wenden Sie keine
Gewalt an.
~
Saugen Sie keine brennenden oder glühenden Gegen
-
stände, wie z. B. Zigaretten oder scheinbar verloschene
Asche bzw. Kohle, auf.
~
Saugen Sie keine Flüssigkeiten und keinen feuchten
Schmutz auf. Lassen Sie feucht gereinigte oder schampu
-
nierte Teppiche und Teppichböden vor dem Absaugen
vollständig trocknen.
~
Saugen Sie keinen Tonerstaub auf. Toner, der z. B. bei
Druckern oder Kopiergeräten verwendet wird, kann elek
-
trisch leitfähig sein.
de - Sicherheitshinweise und Warnungen
7

~
Saugen Sie keine leicht entflammbaren oder explosiven
Stoffe oder Gase auf und saugen Sie nicht an Orten, an
denen solche Stoffe gelagert sind.
~
Vermeiden Sie beim Saugen mit einer Saugdüse oder
dem Saugrohr, in Kopfnähe zu kommen.
~
Wichtig für den Umgang mit der Batterie (bei Modellen
mit Funkhandgriff):
–
Batterie nicht kurzschließen, nicht aufladen und nicht ins
Feuer werfen.
–
Entsorgung der Batterie: Entnehmen Sie dem Funkhand-
griff die Batterie und entsorgen Sie diese über das öf-
fentliche Sammelsystem. Werfen Sie die Batterie nicht in
den Hausmüll.
Zubehör
~
Fassen Sie beim Saugen mit einer Miele Elektro- oder
Turbobürste nicht in die laufende Bürstenwalze.
~
Achten Sie beim Saugen mit dem Handgriff ohne aufge
-
stecktes Zubehör darauf, dass der Handgriff nicht beschä
-
digt ist.
~
Verwenden Sie nur Staubbeutel, Filter und Zubehör mit
dem "Original Miele"-Logo. Nur dafür kann der Hersteller
die Sicherheit gewährleisten.
Miele haftet nicht für Schäden, die durch bestimmungs
-
widrigen Gebrauch, falsche Bedienung und infolge von
Nichtbeachtung der Sicherheitshinweise und Warnun
-
gen verursacht werden.
de - Sicherheitshinweise und Warnungen
8
Entsorgung der Verkaufsver
-
packung
Die Verpackung schützt den Staubsau
-
ger vor Transportschäden. Die Verpa
-
ckungsmaterialien sind nach umwelt
-
verträglichen und entsorgungstechni
-
schen Gesichtspunkten ausgewählt
und deshalb recycelbar.
Das Rückführen der Verpackung in den
Materialkreislauf spart Rohstoffe und
verringert das Abfallaufkommen. Ge
-
ben Sie die Verpackung zur Entsor
-
gung in die dualen Systeme (z. B. gel
-
ber Sack / gelbe Tonne).
Entsorgung der Staubbeutel
und der eingesetzten Filter
Staubbeutel und Filter sind aus umwelt-
verträglichen Materialien hergestellt.
Die Filter können Sie über den norma-
len Hausmüll entsorgen. Dies trifft auch
auf den Staubbeutel zu, sofern er kei-
nen im Hausmüll verbotenen Schmutz
enthält.
Entsorgung des Altgerätes
Entnehmen Sie vor der Entsorgung des
Altgerätes den Staubbeutel und die ein
-
gesetzten Filter und geben Sie diese
Teile in den Hausmüll.
Elektrische und elektronische Altgeräte
enthalten vielfach noch wertvolle Mate
-
rialien. Sie enthalten aber auch schädli
-
che Stoffe, die für ihre Funktion und Si
-
cherheit notwendig waren. Im Restmüll
oder bei falscher Behandlung können
diese der menschlichen Gesundheit
und der Umwelt schaden. Geben Sie
Ihr Altgerät deshalb auf keinen Fall in
den Restmüll.
Nutzen Sie stattdessen die von Ihrem
Wohnort eingerichtete Sammelstelle zur
Rückgabe und Verwertung elektrischer
und elektronischer Altgeräte. Informie
-
ren Sie sich gegebenenfalls bei Ihrem
Händler.
Bitte sorgen Sie dafür, dass Ihr Altgerät
bis zum Abtransport kindersicher auf
-
bewahrt wird.
de - Ihr Beitrag zum Umweltschutz
9

de - Gerätebeschreibung
10

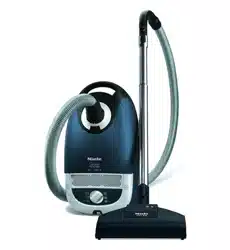
Die Abbildung zeigt die Maximalausstattung des Staubsaugers.
a Saugschlauch
b Entriegelungstaste für Zubehörfach
c Staubbeutel-Wechselanzeige
d Anzeigefeld *
e Fußtaste für automatische Kabelaufwicklung
f Park-System für Saugpausen
g Fußtaste Ein / Aus s
h Anschlusskabel
i Lenkrollen *
j Abluftfilter *
k Park-System zur Aufbewahrung (an beiden Seiten des Staubsaugers)
l Motorschutzfilter
m Halter für die Abdeckkappe der Steckdose für Elektrobürste
n Original Miele Staubbeutel
o Tragegriff
p Bodendüse *
q Entriegelungstasten
r Teleskopsaugrohr *
s Entriegelungstaste für Staubraumdeckel
t Verstellknöpfe für Teleskopsaugrohr *
u Steckdose für Elektrobürste *
v Saugstutzen
w LED *
x Taste Stand-by für kurze Saugpausen *
y Tasten + / - zum Einstellen der Saugleistung *
z Handgriff (je nach Modell mit Nebenluftsteller) *
{ Anzeigelampe Thermoschutz § *
| Taste Restart *
} Anzeigelampe Stand-by *
~ Serviceanzeige mit Resettaste *
* je nach Modell sind diese Ausstattungsmerkmale in ihrer Ausführung unter
-
schiedlich bzw. nicht vorhanden.
de - Gerätebeschreibung
11

Die in den Kapiteln angegebenen
Abbildungen finden Sie auf den Aus
-
klappseiten am Ende dieser Ge
-
brauchsanweisung.
Vor dem Gebrauch
Saugschlauch anschließen (Abb. 1)
^
Stecken Sie den Saugstutzen bis
zum deutlichen Einrasten in die
Saugöffnung des Staubsaugers. Füh
-
ren Sie dazu die Einführhilfen beider
Teile aufeinander zu.
Saugschlauch abnehmen (Abb. 2)
^ Drücken Sie die Entriegelungstasten
seitlich am Saugstutzen und ziehen
Sie ihn aus der Saugöffnung.
Saugschlauch und Handgriff zu-
sammenstecken (Abb. 3)
^ Stecken Sie den Saugschlauch bis
zum deutlichen Einrasten in den
Handgriff.
Handgriff und Saugrohr zusammen
-
stecken (Abb. 4)
^
Stecken Sie den Handgriff bis zum
deutlichen Einrasten in das Saugrohr.
Führen Sie dazu die Einführhilfen bei
-
der Teile aufeinander zu.
^
Drücken Sie die Entriegelungstaste,
wenn Sie die Teile voneinander tren
-
nen möchten und ziehen Sie den
Handgriff mit einer leichten Drehung
aus dem Saugrohr.
Je nach Modell verfügt Ihr Staubsauger
über eines der folgenden Teleskop
-
saugrohre.
–
zweiteiliges Teleskopsaugrohr
–
dreiteiliges Teleskopsaugrohr
Zweiteiliges Teleskopsaugrohr ein
-
stellen (Abb. 5)
Dieses Teleskopsaugrohr besteht aus
zwei ineinander gesteckten Rohrteilen,
die Sie auf die jeweils bequemste Län
-
ge auseinander ziehen können.
^
Drücken Sie den Verstellknopf und
stellen Sie das Teleskopsaugrohr auf
die gewünschte Länge ein.
Dreiteiliges Teleskopsaugrohr ein-
stellen (Abb. 5)
Dieses Teleskopsaugrohr besteht aus
drei ineinander gesteckten Rohrteilen.
a Drücken Sie die Entriegelungstaste
des unteren Rohrteils und ziehen Sie
es bis zum deutlichen Einrasten hin-
aus. Drücken Sie diese Entrie
-
gelungstaste auch, wenn Sie das
Rohrteil wieder einschieben möch
-
ten. Die Verriegelung rastet deutlich
ein.
b Drücken Sie den Verstellknopf und
stellen Sie das Teleskopsaugrohr auf
die gewünschte Länge ein.
de
12

Bodendüse aufstecken (Abb. 6)
^
Stecken Sie die Bodendüse nach
links und rechts drehend auf das Te
-
leskopsaugrohr, bis die Verriegelung
deutlich einrastet.
^
Drücken Sie die Entriegelungstaste,
wenn Sie die Bodendüse vom Tele
-
skopsaugrohr abnehmen möchten.
Bodendüse einstellen (Abb.7+8)
Die Bodendüse ist für das tägliche Sau
-
gen von Teppichen, Teppichböden und
unempfindlichen Hartböden geeignet.
Für andere Bodenbeläge empfehlen wir
die Verwendung spezieller Miele Bürs-
ten (siehe Kapitel "Nachkaufbares Zu-
behör").
Beachten Sie in erster Linie die Rei-
nigungs- und Pflegeanweisung Ihres
Bodenbelag-Herstellers.
Saugen Sie Teppiche und Teppichbö-
den mit versenkten Borsten:
^
Drücken Sie die Fußtaste %.
Saugen Sie unempfindliche Hartböden
mit herausgestellten Borsten:
^
Drücken Sie die Fußtaste ).
Saugen Sie Böden mit sehr tiefen
Fugen oder Ritzen immer mit der
Bodendüse mit herausgestellten
Borsten.
Bodendüse AirTeQ (Abb. 8)
Diese Bodendüse ist speziell darauf
ausgelegt, gute Reinigungsergebnisse
bei niedrigem Energiebedarf zu erzie
-
len. Sie ist besonders strömungsgüns
-
tig und saugstark.
,
Erscheint Ihnen die Schiebekraft
der Bodendüse AirTeQ zu hoch, so
reduzieren Sie die Saugleistung, bis
sich die Bodendüse leicht schieben
lässt (siehe Kapitel "Gebrauch -
Saugleistung wählen").
Aktivierung der Abluftfilter-Wechsel
-
anzeige
Je nach Modell ist serienmäßig einer
der folgenden Abluftfilter eingesetzt
(Abb. 9).
a Air Clean
b ActiveAirClean 50 (schwarz)
c HEPA AirClean 50 (weiß)
Ist Ihr Staubsauger mit einem Abluftfil-
ter b oder c ausgestattet, so ist die Ab-
luftfilter-Wechselanzeige zu aktivieren.
^ Drücken Sie die Entriegelungstaste in
der Griffmulde und klappen Sie den
Staubraumdeckel bis zum Einrasten
nach oben auf (Abb. 10).
^
Entfernen Sie den Hinweisstreifen
(Abb. 11).
^
Drücken Sie die Abluftfilter-Wechsel
-
anzeige ~ (Abb. 12).
^
Nach ca. 10 - 15 Sekunden erscheint
am linken Rand des Anzeigefeldes
ein schmaler roter Farbstreifen
(Abb. 13).
^
Schließen Sie den Staubraumdeckel
bis zum Einrasten der Verriegelung
und achten Sie darauf, dass der
Staubbeutel dabei nicht eingeklemmt
wird.
de
13
Funktion der Abluftfilter-Wechselan
-
zeige
Die Abluftfilter-Wechselanzeige zeigt
die Nutzungsdauer des Abluftfilters an.
Nach ca. 50 Betriebsstunden, was in
etwa der durchschnittlichen Nutzung ei
-
nes Jahres entspricht, ist das Anzeige
-
feld rot ausgefüllt (Abb. 14).
Verwendung des mitgelieferten
Zubehörs (Abb. 15)
Folgendes Zubehör liegt bei:
a Fugendüse
Zum Aussaugen von Falten, Fugen
und Ecken.
b Saugpinsel mit Naturborsten
Zum Absaugen von Profilleisten so-
wie verzierten, geschnitzten oder be-
sonders empfindlichen Gegenstän-
den.
Der Pinselkopf ist drehbar und kann
dadurch in die jeweils günstigste
Stellung gedreht werden.
c Polsterdüse
Zum Absaugen von Polstermöbeln,
Matratzen, Kissen, Vorhängen usw.
Einzelne Modelle sind serienmäßig mit
einem der folgenden Zubehörteile aus
-
gestattet, die nicht abgebildet sind.
–
Elektrobürste
–
Turbobürste
–
Bodendüse Classic Allergotec
Diesen Staubsaugern liegt eine separa
-
te Gebrauchsanweisung des entspre
-
chenden Zubehörteils bei.
Zubehör entnehmen (Abb. 16)
^
Drücken Sie die Entriegelungstaste.
Das Zubehörfach öffnet sich.
^
Entnehmen Sie das gewünschte Zu
-
behör.
^
Schließen Sie das Zubehörfach, in
-
dem Sie den Deckel zudrücken.
Bodendüse (Abb. 17)
Auch geeignet zum Absaugen von
Treppenstufen.
,
Saugen Sie Treppen aus Sicher
-
heitsgründen von unten nach oben
ab.
Gebrauch
Anschlusskabel herausziehen
(Abb. 18)
^ Ziehen Sie das Anschlusskabel bis
zur gewünschten Länge heraus
(max. ca. 7,5 m).
^
Stecken Sie den Netzstecker in die
Steckdose.
,
Das Anschlusskabel müssen Sie
bei einer Betriebszeit von länger als
30 Minuten komplett herausziehen.
Gefahr der Überhitzung und Schädi
-
gung.
Aufrollen (Abb. 19)
^
Ziehen Sie den Netzstecker aus der
Steckdose.
^
Treten Sie kurz die Fußtaste für die
automatische Kabelaufwicklung –
das Anschlusskabel rollt automatisch
auf.
de
14
Ein- und Ausschalten (Abb. 20)
^
Treten Sie die Fußtaste Ein / Aus s.
Saugleistung wählen
Sie können die Saugleistung des Staub
-
saugers der jeweiligen Saugsituation an
-
passen. Durch Reduzierung der Saug
-
leistung verringern Sie die Schiebekraft
an der Bodendüse deutlich.
Am Staubsauger sind den Leistungs
-
stufen Symbole zugeordnet, die bei
-
spielhaft zeigen, wofür die jeweilige
Leistungsstufe zu empfehlen ist.
Die gewählte Leistungsstufe leuchtet je-
weils gelb.
# - Gardinen, Textilien
$ - Polstermöbel, Kissen
% - hochwertige Veloursteppiche,
Brücken und Läufer
* - energiesparendes tägliches
Saugen bei geringer Geräusch-
entwicklung
( - Teppiche und Teppichböden aus
Schlingenware
) - Hartböden, stark verschmutzte
Teppiche und Teppichböden
,
Wenn Sie die Bodendüse AirTeQ
nutzen und Ihnen dabei die Schiebe
-
kraft zu hoch erscheint, so reduzieren
Sie die Saugleistung, bis sich diese
Bodendüse leicht schieben lässt.
Je nach Modell ist Ihr Staubsauger mit
einem der folgenden Saugleistungs
-
wähler ausgestattet.
Fußtasten (Abb. 21)
Bei der Erstinbetriebnahme schaltet
sich der Staubsauger in der höchsten
Leistungsstufe ein.
Ab dem nächsten Gebrauch schaltet
sich der Staubsauger jeweils in der zu
-
letzt gewählten Leistungsstufe ein.
^
Drücken Sie die Fußtaste +, wenn Sie
eine höhere Saugleistung wünschen.
^ Drücken Sie die Fußtaste -, wenn Sie
eine niedrigere Saugleistung wün-
schen.
Fußtasten Automatic (Abb. 22 + 23)
Bei der Erstinbetriebnahme schaltet
sich der Staubsauger in der Leistungs-
stufe "Auto" ein.
Auto = Automatische Anpassung der
Saugleistung an den Boden-
belag
,
Saugen Sie keine leichten Stoffe
oder Gardinen mit der Leistungsstu
-
fe "Auto". Solche Teile können ange
-
saugt und eventuell beschädigt wer
-
den.
^
Drücken Sie die Fußtaste +, wenn Sie
in die Maximalleistungsstufe "Turbo"
wechseln möchten.
^
Drücken Sie die Fußtaste -, wenn Sie
in die Minimalleistungsstufe "Min."
wechseln möchten.
Ab dem nächsten Gebrauch schaltet
sich der Staubsauger jeweils in der zu
-
letzt gewählten Leistungsstufe ein.
de
15

Funkhandgriff mit Automatic (Abb. 24)
Nach Einschalten des Staubsaugers
mit der Fußtaste Ein / Aus s, leuchtet
die Anzeigelampe Stand-by - am
Staubsauger gelb.
^
Drücken Sie die Taste Stand-by -
am Funkhandgriff.
Die Anzeigelampe Stand-by - am
Staubsauger erlischt.
Bei der Erstinbetriebnahme schaltet
sich der Staubsauger in der höchsten
Leistungsstufe ein.
Ab dem nächsten Gebrauch schaltet
sich der Staubsauger jeweils in der zu-
letzt gewählten Leistungsstufe ein.
^ Drücken Sie die Taste +, wenn Sie
eine höhere Saugleistung wünschen.
^ Drücken Sie die Taste -, wenn Sie eine
niedrigere Saugleistung wünschen.
Auto = automatische Anpassung der
Saugleistung an den Boden-
belag (Abb. 22)
,
Saugen Sie keine leichten Stoffe
oder Gardinen mit der Leistungsstu
-
fe "Auto". Solche Teile können ange
-
saugt und eventuell beschädigt wer
-
den.
Nebenluftsteller öffnen (Abb. 25 + 26)
(nicht vorhanden bei Modellen mit
Funkhandgriff)
Sie können die Saugleistung kurzzeitig
reduzieren, z. B. um ein Festsaugen an
textilen Bodenbelägen zu verhindern.
^
Öffnen Sie den Nebenluftsteller nur
so weit, bis sich die Saugdüse leicht
bewegen lässt.
Dadurch verringert sich die Schiebe
-
kraft an der jeweils verwendeten Saug
-
düse.
Beim Saugen (Abb. 27 + 28)
^
Ziehen Sie den Staubsauger beim
Saugen wie einen Schlitten hinter
sich her. Sie können den Staubsau
-
ger auch aufrecht stehend benutzen,
z. B. beim Absaugen von Treppen
oder Gardinen.
,
Beim Saugen – vor allem von
Feinstaub, wie z. B. Bohrstaub,
Sand, Gips, Mehl usw. – kommt es
naturgemäß zu elektrostatischen
Aufladungen, die sich in bestimmten
Situationen entladen können. Um
die unangenehme Wirkung der elek-
trostatischen Entladungen zu ver-
meiden, ist an der Unterseite des
Handgriffes eine Metalleinlage ein-
gearbeitet. Achten Sie deshalb da-
rauf, dass Ihre Hand diese Metall-
einlage beim Saugen dauerhaft be-
rührt.
Betrieb unterbrechen (Abb. 24)
(bei Modellen mit Funkhandgriff)
In kurzen Saugpausen können Sie den
Betrieb des Staubsaugers unterbre
-
chen.
^
Drücken Sie die Taste Stand-by -
am Funkhandgriff.
,
Lassen Sie den Staubsauger
nicht dauerhaft im Stand-by-Modus,
sondern nur für kurze Saugpausen.
Gefahr der Überhitzung und Schädi
-
gung.
de
16

Jeder Tastendruck am Funkhandgriff
wird durch Leuchten der LED ange
-
zeigt.
Nach der Unterbrechung haben Sie fol
-
gende Möglichkeiten.
^
Drücken Sie erneut die Taste Stand-
by -, so schaltet sich der Staubsau
-
ger in der zuletzt gewählten Leis
-
tungsstufe ein.
^
Drücken Sie die Taste +, so schaltet
sich der Staubsauger in der höchsten
Leistungsstufe ein.
^
Drücken Sie die Taste -, so schaltet
sich der Staubsauger in der niedrigs-
ten Leistungsstufe ein.
Abstellen, Transportieren und
Aufbewahren
Park-System für Saugpausen
(Abb. 29)
(nicht nutzbar bei Verwendung der
Elektrobürste Electro Premium
SEB 234 L)
In kurzen Saugpausen können Sie das
Saugrohr mit dem Saugvorsatz bequem
am Staubsauger abstellen.
^
Stecken Sie den Saugvorsatz mit
dem Parknocken in das Park-System.
Befindet sich der Staubsauger hier
-
bei auf einer schrägen Fläche, z. B.
auf einer Rampe, so schieben Sie
die Rohrteile des Teleskopsaugroh
-
res komplett ein.
Ein- / Ausschalter im Park-System
Einzelne Modelle sind mit einem Ein- /
Ausschalter im Park-System ausgestat
-
tet.
Der Betrieb des Staubsaugers wird au
-
tomatisch unterbrochen, wenn Sie den
Saugvorsatz mit dem Parknocken in
das Park-System stecken.
Beim Herausnehmen des Saugvorsat
-
zes schaltet sich der Staubsauger in
der zuletzt gewählten Leistungsstufe
wieder ein (nicht bei Modellen mit Funk
-
handgriff).
Park-System zur Aufbewahrung
(Abb. 30 + 31)
,
Schalten Sie den Staubsauger
nach Gebrauch aus. Ziehen Sie den
Netzstecker aus der Steckdose.
^ Stellen Sie den Staubsauger aufrecht
hin.
Es ist hilfreich, die Rohrteile des Tele
-
skopsaugrohres komplett einzuschie
-
ben.
^
Stecken Sie den Saugvorsatz mit
dem Parknocken von oben in einen
der beiden Saugrohrhalter (nicht
nutzbar bei Verwendung der Elektro
-
bürste SEB 234 L).
So können Sie den Staubsauger be
-
quem tragen oder zum Aufbewahren
abstellen.
de
17
Ist Ihr Staubsauger mit einem Handgriff
XXL ausgestattet, so haben Sie eine
weitere Möglichkeit zur platzsparenden
Aufbewahrung.
^
Trennen Sie anschließend den Hand
-
griff XXL von dem eingesteckten Te
-
leskopsaugrohr.
^
Wickeln Sie den Saugschlauch um
das Teleskopsaugrohr und stecken
Sie den Parknocken des Handgriffs
XXL von oben in den zweiten Saug
-
rohrhalter.
Wartung
,
Schalten Sie den Staubsauger
vor jeder Wartung aus und ziehen
Sie den Netzstecker aus der Steck-
dose.
Das Miele Filtersystem besteht aus drei
Komponenten.
– Staubbeutel
–
Motorschutzfilter
–
Abluftfilter
Um die einwandfreie Saugleistung des
Staubsaugers zu gewährleisten, müs
-
sen Sie diese Filter von Zeit zu Zeit aus
-
tauschen.
Verwenden Sie nur Staubbeutel, Fil
-
ter und Zubehör mit dem "Original
Miele"-Logo. Nur dann kann die
Saugleistung des Staubsaugers op
-
timal ausgenutzt und das bestmögli
-
che Reinigungsergebnis erreicht
werden.
,
Die Verwendung von Staubbeu
-
teln aus Papier oder papierähnlichen
Materialien sowie von Staubbeuteln
mit einer Halteplatte aus Pappe kann
ebenso zu schwerwiegenden Schä
-
den am Staubsauger führen und ei
-
nen Verlust der Garantie nach sich
ziehen wie der Einsatz von Staub
-
beuteln ohne "Original Miele"-Logo.
Wo bekomme ich Staubbeutel und
Filter?
Original Miele Staubbeutel und Filter er
-
halten Sie bei Ihrem Fachhändler oder
beim Miele Werkkundendienst sowie im
Miele Onlineshop.
Welche Staubbeutel und Filter sind
richtig?
Original Miele Staubbeutel mit blauer
Halteplatte vom Typ G/N und Original
Miele Filter erkennen Sie an dem "Origi
-
nal Miele"-Logo auf der Verpackung
oder direkt auf dem Staubbeutel.
de
18

In jeder Packung Miele Staubbeutel
liegt zusätzlich ein Abluftfilter Air Clean
und ein Motorschutzfilter.
Möchten Sie Original Miele Abluftfilter
einzeln nachkaufen, so nennen Sie Ih
-
rem Fachhändler oder dem Miele Werk
-
kundendienst die Modellbezeichnung
Ihres Staubsaugers, damit Sie die rich
-
tigen Teile bekommen. Sie können die
-
se Teile aber auch bequem im Miele
Onlineshop bestellen.
Wann tausche ich den Staubbeutel
aus? (Abb. 32)
Wenn die Farbskala das Sichtfenster
der Staubbeutel-Wechselanzeige rot
ausfüllt, müssen Sie den Staubbeutel
austauschen.
Staubbeutel sind Einwegartikel.
Entsorgen Sie volle Staubbeutel.
Verwenden Sie diese nicht mehr-
fach. Verstopfte Poren reduzieren
die Saugleistung des Staubsaugers.
Zur Prüfung
^
Stecken Sie die Bodendüse auf.
^
Schalten Sie den Staubsauger ein
und stellen Sie die maximale Saug
-
leistung ein.
^
Heben Sie die Bodendüse ein Stück
vom Fußboden ab.
Funktion der
Staubbeutel-Wechselanzeige
Die Funktion der Anzeige ist auf Misch
-
staub ausgelegt: Staub, Haare, Fäden,
Teppichfusseln, Sand usw.
Wenn Sie viel Feinstaub saugen, wie
z. B. Bohrstaub, Sand, eventuell auch
Gips oder Mehl, verstopfen die Poren
des Staubbeutels sehr schnell. Die An
-
zeige wird dann bereits "voll" anzeigen,
selbst wenn der Staubbeutel noch nicht
voll ist. Er muss dann ausgetauscht
werden.
Saugen Sie viele Haare, Teppich-, Woll-
fusseln usw., so kann die Anzeige erst
reagieren, wenn der Staubbeutel be-
reits prall gefüllt ist.
Wie tausche ich den Staubbeutel
aus? (Abb. 33 + 34)
^ Heben Sie die Entriegelungstaste an
und klappen Sie den Staubraumde-
ckel bis zum Einrasten nach oben auf
(Abb. 10).
Dabei schließt sich der Hygienever
-
schluss des Staubbeutels automatisch,
sodass kein Staub entweichen kann.
^
Ziehen Sie den Staubbeutel an der
Grifflasche aus der Aufnahme.
^
Stecken Sie den neuen Staubbeutel
bis zum Anschlag in die blaue Auf
-
nahme. Lassen Sie ihn dabei so zu
-
sammengefaltet, wie Sie ihn der Ver
-
packung entnehmen.
^
Entfalten Sie den Staubbeutel im
Staubraum so weit wie möglich.
de
19
^
Schließen Sie den Staubraumdeckel
bis zum Einrasten der Verriegelung
und achten Sie darauf, dass der
Staubbeutel dabei nicht eingeklemmt
wird.
Eine Leerbetriebssperre verhindert
das Schließen des Staubraumde
-
ckels, wenn kein Staubbeutel einge
-
steckt ist. Keine Gewalt anwenden!
Wann tausche ich den
Motorschutzfilter aus?
Immer dann, wenn Sie eine neue
Packung Miele Staubbeutel anbrechen.
In jeder neuen Packung Miele Staub-
beutel liegt zusätzlich ein Motorschutz-
filter.
Wie tausche ich den
Motorschutzfilter aus? (Abb. 35)
^ Öffnen Sie den Staubraumdeckel.
^ Ziehen Sie den Staubbeutel an der
Grifflasche aus der Aufnahme.
^
Klappen Sie den blauen Filterrah
-
men bis zum deutlichen Einrasten
auf und nehmen Sie den verbrauch
-
ten Motorschutzfilter an der sauberen
Hygienefläche heraus.
^
Setzen Sie einen neuen Motorschutz
-
filter ein.
^
Schließen Sie den Filterrahmen.
^
Stecken Sie den Staubbeutel bis zum
Anschlag in die blaue Aufnahme.
^
Schließen Sie den Staubraumdeckel
bis zum Einrasten der Verriegelung
und achten Sie darauf, dass der
Staubbeutel dabei nicht eingeklemmt
wird.
Wann tausche ich den Abluftfilter
aus?
Je nach Modell ist serienmäßig einer
der folgenden Abluftfilter eingesetzt
(Abb. 9).
a Air Clean
Tauschen Sie diesen Abluftfilter immer
dann, wenn Sie eine neue Packung
Miele Staubbeutel anbrechen. In jeder
Packung Miele Staubbeutel liegt zu
-
sätzlich ein Abluftfilter Air Clean.
b ActiveAirClean 50 (schwarz)
c HEPA AirClean 50 (weiß)
Wenn das Anzeigefeld der Abluftfil-
ter-Wechselanzeige am Abluftfilter rot
ausgefüllt ist (Abb. 14).
Die Anzeige leuchtet nach ca. 50 Be-
triebsstunden, was in etwa der durch-
schnittlichen Nutzung eines Jahres ent-
spricht. Sie können dann noch weiter-
saugen. Bedenken Sie jedoch, dass die
Saug- und Filterleistung nachlässt.
Wie tausche ich den Abluftfilter Air
Clean aus? (Abb. 36 + 37)
Achten Sie darauf, dass immer nur
ein Abluftfilter eingesetzt ist.
^
Öffnen Sie den Staubraumdeckel.
^
Drücken Sie die Entriegelung des Fil
-
tergitters zusammen und öffnen Sie
das Filtergitter bis zum Einrasten.
^
Nehmen Sie den verbrauchten Ab
-
luftfilter Air Clean an einer der beiden
sauberen Hygieneflächen heraus.
de
20

^
Legen Sie den neuen Abluftfilter Air
Clean ein.
Möchten Sie aber einen Abluftfilter
ActiveAirClean 50 oder HEPA
AirClean 50 einsetzen, so beachten
Sie dazu unbedingt das Kapitel
"Abluftfilter umrüsten".
^
Schließen Sie das Filtergitter.
^
Schließen Sie den Staubraumdeckel.
Wie tausche ich die Abluftfilter
ActiveAirClean 50 und HEPA
AirClean 50 aus? (Abb. 38 + 39)
Achten Sie darauf, dass immer nur
ein Abluftfilter eingesetzt ist.
^ Öffnen Sie den Staubraumdeckel.
^ Heben Sie den Abluftfilter an und ent-
nehmen Sie ihn.
^ Setzen Sie den neuen Abluftfilter
passgenau ein und drücken Sie ihn
nach unten.
^
Drücken Sie die Abluftfilter-Wechsel
-
anzeige ~ (Abb. 12).
^
Nach ca. 10 - 15 Sekunden erscheint
am linken Rand des Anzeigefeldes
ein schmaler roter Farbstreifen
(Abb. 13).
Möchten Sie aber einen Abluftfilter
Air Clean einsetzen, so beachten
Sie dazu unbedingt das Kapitel "Ab
-
luftfilter umrüsten".
^
Schließen Sie den Staubraumdeckel.
Abluftfilter umrüsten
Je nach Modell ist serienmäßig einer
der folgenden Abluftfilter eingesetzt
(Abb. 9).
a Air Clean
b ActiveAirClean 50 (schwarz)
c HEPA AirClean 50 (weiß)
Beim Umrüsten beachten
1. Wenn Sie anstelle des Abluftfilters a
einen Abluftfilter b oder c einsetzen, so
müssen Sie zusätzlich das Filtergitter
herausnehmen und dafür den entspre-
chenden neuen Abluftfilter einsetzen
(Abb. 39). Außerdem müssen Sie die
Abluftfilter-Wechselanzeige aktivieren
(Abb. 12).
2. Wenn Sie anstelle des Abluftfilters b
oder c einen Abluftfilter a einsetzen, so
müssen Sie diesen unbedingt in ein Fil-
tergitter * einlegen (Abb. 37).
* Filtergitter - siehe Kapitel "Nachkauf-
bares Zubehör"
Achten Sie darauf, dass immer nur
ein Abluftfilter eingesetzt ist.
de
21

Serviceanzeige mit Resettaste
(Abb. 40)
Einzelne Modelle sind mit einer Service
-
anzeige ausgestattet.
Die Anzeige leuchtet nach ca. 50 Be
-
triebsstunden, was in etwa der durch
-
schnittlichen Nutzung eines Jahres ent
-
spricht. Zu diesem Zeitpunkt soll der
Verschmutzungszustand des Motor
-
schutzfilters und des Abluftfilters über
-
prüft werden.
Die Anzeige müssen Sie nach jedem
Austausch dieser Teile zurücksetzen.
Dazu muss der Staubsauger einge-
schaltet sein.
^ Drücken Sie die Resettaste.
Die Serviceanzeige und die Resettaste
erlöschen und befinden sich wieder in
der Ausgangsposition.
Das Zurücksetzen der Anzeige er-
folgt nur, wenn Sie die Resettaste
nach dem Leuchten der Anzeige
drücken, nicht aber, wenn die Re
-
settaste zwischendurch gedrückt
wird.
Wann tausche ich die Batterie am
Funkhandgriff aus?
Ca. alle 18 Monate. Halten Sie dazu
eine 3 V Batterie (Knopfzelle CR 2032)
bereit.
Ist die Batteriekapazität erschöpft
oder keine Batterie eingelegt, so
können Sie den Staubsauger weiter
betreiben.
^
Schalten Sie dazu den Staubsauger
über die Fußtaste Ein / Aus s ein.
Die Anzeigelampe Stand-by - am
Staubsauger leuchtet gelb.
^
Drücken Sie die Taste Restart am
Staubsauger (Abb. 41).
Der Staubsauger kann so weiter betrie
-
ben werden, jedoch ausschließlich bei
maximaler Saugleistung.
Wie tausche ich die Batterie am
Funkhandgriff aus? (Abb. 42)
^
Entriegeln Sie die Abdeckung des
Batteriefachs, z. B. mit einem Schrau-
bendreher.
^ Ersetzen Sie die Batterie durch eine
neue. Achten Sie auf die Polarität.
^ Setzen Sie die Abdeckung wieder
ein.
^ Entsorgen Sie die alte Batterie über
das öffentliche Sammelsystem.
Wann tausche ich die Fadenheber
aus?
Die Fadenheber am Saugmund der Bo
-
dendüse sind austauschbar.
Erneuern Sie die Fadenheber, wenn der
Flor verschlissen ist.
Wie tausche ich die Fadenheber aus?
(Abb. 43 + 44)
^
Heben Sie die Fadenheber, z. B. mit
einem Schlitz-Schraubendreher, aus
den Einsteckschlitzen.
^
Ersetzen Sie die Fadenheber durch
neue.
de
22

Polsterdüse SPD 10 (Abb. 45)
^
Entriegeln Sie die Fadenhebereinheit
an beiden Seiten der Polsterdüse mit
einer Münze.
^
Ersetzen Sie die Fadenhebereinheit
durch eine neue und verriegeln Sie
diese.
Laufrolle der Bodendüse reinigen
(Abb. 46)
(nicht notwendig bei der Bodendüse
AirTeQ)
a Entriegeln Sie die Rollenachse (Bajo
-
nettverschluss) mit einer Münze.
b Drücken Sie die Rollenachse heraus
und entnehmen Sie diese.
c Entnehmen Sie die Laufrolle.
^ Entfernen Sie anschließend Fäden
und Haare, setzen Sie die Laufrolle
wieder ein und verriegeln Sie die Rol-
lenachse.
Ersatzteile bekommen Sie bei Ihrem
Miele Fachhändler oder über den Miele
Werkkundendienst.
Pflege
,
Schalten Sie den Staubsauger
vor jeder Reinigung aus und ziehen
Sie den Netzstecker aus der Steck
-
dose.
Staubsauger und Zubehörteile
Den Staubsauger und alle Zubehörteile
aus Kunststoff können Sie mit einem
handelsüblichen Kunststoffreiniger pfle
-
gen.
,
Verwenden Sie keine Scheuer
-
mittel, keine Glas- oder Allzweckrei-
niger und keine ölhaltigen Pflegemit-
tel!
Staubraum
Den Staubraum können Sie bei Bedarf
mit einem zweiten Staubsauger, falls
vorhanden, aussaugen oder einfach mit
einem trockenen Staubtuch oder
Staubpinsel reinigen.
,
Tauchen Sie den Staubsauger
niemals in Wasser! Feuchtigkeit im
Staubsauger birgt die Gefahr eines
elektrischen Schlages.
de
23

Störungen
Der Staubsauger schaltet selbsttätig
ab.
Bei einzelnen Modellen leuchtet zu
-
sätzlich die Anzeigelampe Thermo
-
schutz ,.
Ein Temperaturbegrenzer schaltet den
Staubsauger aus, wenn er zu warm
wird. Bei einzelnen Modellen wird das
von einer Anzeigelampe Thermoschutz
, angezeigt.
Die Störung kann auftreten, wenn z. B.
sperriges Sauggut die Saugwege ver
-
stopft oder der Staubbeutel voll bzw.
durch Feinstaub luftundurchlässig ist.
Die Ursache kann auch ein stark ver-
schmutzter Motorschutzfilter oder Ab-
luftfilter sein. Schalten Sie den Staub-
sauger dann aus (Fußtaste Ein / Aus s
drücken) und ziehen Sie den Netzste-
cker aus der Steckdose.
Nach Beseitigung der Ursache und ei-
ner Wartezeit von ca. 20 - 30 Minuten
hat sich der Staubsauger so weit abge
-
kühlt, dass Sie ihn wieder einschalten
und benutzen können.
Kundendienst
Sollten Sie den Kundendienst benöti
-
gen, so wenden Sie sich bitte an
–
Ihren Miele Fachhändler
oder
–
den Miele Werkkundendienst unter
der Telefonnummer
Deutschland 0800 - 22 44 622
Österreich 050 800 300 *
(* österreichweit zum Ortstarif)
Luxemburg (00352) 4 97 11-20/22
Schweiz 0 800 800 222
Garantiebedingungen
Die Garantiezeit des Staubsaugers be-
trägt 2 Jahre.
Nähere Angaben zu den Garantiebe-
dingungen in Ihrem Land erhalten Sie
unter der oben stehenden Telefonnum-
mer. Garantiebedingungen in Schrift-
form können Sie dort ebenfalls anfor
-
dern.
de
24
Nachkaufbares Zubehör
Beachten Sie in erster Linie die Rei
-
nigungs- und Pflegeanweisung Ihres
Bodenbelag-Herstellers.
Sie können diese und viele weitere Pro
-
dukte im Internet bestellen.
Sie erhalten sie aber auch bei Ihrem
Miele Fachhändler oder über den Miele
Werkkundendienst.
Einzelne Modelle sind bereits serienmä-
ßig mit einem oder mehreren der fol-
genden Zubehörteile ausgestattet.
Elektrobürsten
Anzuschließen nur an Modelle, die mit
einer Steckdose für Elektrobürste aus-
gestattet sind, erkennbar durch einen
Druckpunkt auf der Abdeckkappe.
Elektrobürste Electro Comfort
(SEB 216-3)
Zur intensiven Reinigung robuster texti
-
ler Bodenbeläge. Sie beseitigt fest ein
-
getretene Verschmutzungen und ver
-
hindert die Bildung von Laufstraßen.
Elektrobürste Electro Premium
(SEB 234 L)
Im Vergleich zu der SEB 216-3 ist diese
Elektrobürste 60 mm breiter, leistungs
-
stärker und dadurch besonders für die
Reinigung großer Flächen geeignet.
Sie verfügt im Vergleich zur SEB 216-3
u. a. zusätzlich über
–
eine Höhenverstellung zur Anpas
-
sung an unterschiedliche Florhöhen
–
LEDs zum Ausleuchten des Arbeits
-
bereiches
–
eine Multifunktions-Kontrollleuchte.
Bodendüsen / -bürsten
Bodendüse Classic Allergotec
(SBDH 285-3)
Zur täglichen hygienischen Reinigung
aller Bodenbeläge. Beim Saugen wird
der Reinigungsfortschritt über ein Farb-
display (Ampelanzeige) sichtbar.
Turbobürste Turbo Comfort
(STB 205-3)
Zum Saugbürsten kurzfloriger textiler
Bodenbeläge.
Bodenbürste Hardfloor (SBB 235-3)
Zum Absaugen strapazierfähiger Hart-
böden, wie z. B. Fliesen.
Bodenbürste Parquet (SBB Parquet-3)
Mit Naturborsten zum Absaugen kratz
-
empfindlicher Hartböden, wie z. B. Par
-
kett.
Bodenbürste Hardfloor Twister mit
Drehgelenk (SBB 300-3)
Zum Absaugen verschiedener Hartbo
-
denflächen und kleiner Nischen.
Bodenbürste Parquet Twister XL mit
Drehgelenk (SBB 400-3)
Zum Absaugen großer Hartbodenflä
-
chen und kleiner Nischen.
de
25

Sonstiges Zubehör
Zubehörkoffer MicroSet (SMC 20)
Zubehör für die Reinigung kleiner Ge
-
genstände und schwer zugänglicher
Stellen, wie z. B. Stereoanlagen, Tasta
-
turen, Modellbau.
Zubehörkoffer CarCare (SCC 10)
Zubehör für die Innenreinigung von
Kraftfahrzeugen.
Zubehörkoffer Cat&Dog (SCD 10)
Zubehör für die Reinigung von Haus-
halten mit Haustieren.
Zubehörkoffer HomeCare (SHC 10)
Zubehör für die Reinigung von Wohn-
räumen.
Handturbobürste Turbo Mini Compact
(STB 20)
Zum Saugbürsten von Polstermöbeln,
Matratzen oder Autositzen.
Universalbürste (SUB 20)
Zum Absaugen von Büchern, Regalbö
-
den und ähnlichem.
Lamellen- / Heizkörperbürste (SHB 30)
Zum Entstauben von Heizkörperrippen,
schmalen Regalen oder Fugen.
Matratzendüse (SMD 10)
Zum bequemen Absaugen von Matrat
-
zen und Polstermöbeln und deren Fu
-
gen.
Fugendüse, 300 mm (SFD 10)
Extralange Fugendüse zum Aussaugen
von Falten, Fugen und Ecken.
Fugendüse, 560 mm (SFD 20)
Flexible Fugendüse zum Aussaugen
schwer zugänglicher Stellen.
Polsterdüse, 190 mm (SPD 10)
Extrabreite Polsterdüse zum Absaugen
von Polstermöbeln, Matratzen und Kis
-
sen.
Flexible Schlauchverlängerung
(SFS 10)
Zur Verlängerung des Saugschlauches
um ca. 1,5 m.
Hygieneverschluss mit Aktivkohle
Vermindert den Austritt von Staub und
Gerüchen bei abgenommenem Saug-
schlauch.
Comfort-Handgriff mit Beleuchtung
(SGC 20)
Zum Ausleuchten des Arbeitsberei
-
ches.
de
26

Filter
Abluftfilter ActiveAirClean 50
(SF-AA 50)
Nimmt Gerüche auf, die durch den
Schmutz im Staubbeutel entstehen.
Abluftfilter HEPA AirClean 50
(SF-HA 50)
Ausgezeichneter Abluftfilter für reinste
Ausblasluft. Besonders für Allergiker
geeignet.
Filtergitter
Wird benötigt, wenn Sie anstelle eines
Abluftfilters ActiveAirClean 50 oder
HEPA AirClean 50 einen Abluftfilter Air
Clean einsetzen möchten.
de
27

Warning and Safety instructions ....................................29
Description of the appliance........................................34
Caring for our environment ........................................36
Preparing for use .................................................37
Using the accessories supplied .....................................39
Use ............................................................39
Setting down, transportation and storage.............................42
Maintenance .....................................................43
Purchasing new dustbags and filters ..................................43
Ordering the correct dustbags and filters ...............................43
When to change the dustbag ........................................43
How the dustbag change indicator works...............................44
How to replace the dustbag .........................................44
When to change the dust compartment filter (for motor protection) ...........44
How to change the dust compartment filter .............................44
When to change the exhaust filter .....................................45
How to replace the Air Clean filter .....................................45
How to replace an ActiveAirClean 50 filter or a HEPA AirClean 50 filter........45
Replacing one type of exhaust filter with another .........................46
Maintenance indicator with reset button ................................46
When to change the battery in the radio-operated handle ..................46
How to change the battery in the radio-operated handle ...................47
When to change the thread lifters .....................................47
How to replace the thread lifters ......................................47
Cleaning the roller on the floorhead ...................................47
Cleaning and care ................................................47
Problem solving guide ............................................48
After sales service ................................................48
Guarantee .......................................................48
Optional accessories..............................................48
Electrical connection for the UK ....................................51
Electrical connection AU, NZ .......................................51
en - Contents
28

This vacuum cleaner complies with statutory safety
requirements. Improper use can, however, lead to
personal injury and damage to property.
To avoid the risk of accidents and damage to the
vacuum cleaner, please read these instructions carefully
before using it for the first time. They contain important
information on its safety, operation and maintenance.
Keep these instructions in a safe place and ensure new
users are familiar with the content. Pass them on to any
future owner.
Correct application
~
This vacuum cleaner is not designed for commercial
use. It is intended for use in domestic households and
similar working and residential environments.
~
The vacuum cleaner is not intended for outdoor use.
~
The vacuum cleaner must only be used for domestic
household purposes to vacuum dry floor surfaces. Do not
use on people or animals. Any other usage, modification or
alteration is not supported by the manufacturer and could
be dangerous.
~
This appliance can only be used by people with
reduced physical, sensory or mental capabilities, or lack of
experience or knowledge, if they are supervised whilst
using it, or have been shown how to use it in a safe way
and recognise and understand the consequences of
incorrect operation.
en - Warning and Safety instructions
29

Safety with children
~
Children under 8 years of age must be kept away from
the appliance unless they are constantly supervised.
~
Children 8 years and older may only use the vacuum
cleaner unsupervised if they have been shown how to use
it in a safe way and recognise and understand the
consequences of incorrect operation.
~
Children must not be allowed to clean or maintain the
appliance unsupervised.
~
Please supervise children in the vicinity of the vacuum
cleaner and do not let them play with it.
~
Models with radio controls on the handle: Keep batteries
out of the reach of children.
Technical safety
~
Before using the vacuum cleaner, check for any visible
signs of damage. Do not use a damaged appliance.
~
Ensure that the connection data on the data plate
(voltage and frequency) match the mains electricity supply
exactly
~
The plug must be fitted with a 13 A fuse (UK).
~
While the vacuum cleaner is under guarantee, repairs
should only be undertaken by a Miele authorised service
technician. Otherwise the guarantee will be invalidated.
en - Warning and Safety instructions
30

~
Do not pull or carry the appliance by the cable, and be
careful not to damage the cable when withdrawing the
plug from the socket.
Keep the cable away from sharp edges and do not let it be
squashed, for example, under a door.
Avoid running the vacuum cleaner over the cable. This
could damage the cable, plug or socket. The appliance
must not be used if any of these have suffered damage. A
damaged cable, plug or socket is a safety hazard.
~
Do not use the vacuum cleaner if the cable is damaged.
If the cable is damaged it must be replaced together with a
complete cable rewind. For safety reasons this work must
be done by the Miele Service Department or a Miele
authorised service technician.
~
The socket on the vacuum cleaner (depending on
model) must only be used for the Miele Electrobrush
specified for use with this appliance.
~
When vacuuming especially fine dust, e.g. sawdust,
sand, plaster, flour, talcum powder etc., electrostatic
charges build up naturally. Under certain conditions these
charges will be released. To avoid the unpleasant effects
of these discharges, a metal inlay has been incorporated
into the underside of the handle. Please make sure that you
keep your hand in constant contact with this metal strip
during vacuuming.
en - Warning and Safety instructions
31

~
Always disconnect the vacuum cleaner from the mains
supply when you have finished using it, before changing
over accessories, as well as for maintenance work and
cleaning. Switch the vacuum cleaner off at the wall socket
and unplug it.
~
Do not let the vacuum cleaner get wet. Clean only with a
dry cloth or slightly damp cloth when disconnected from
the mains supply.
~
Repairs should only be carried out by a Miele authorised
service technician. Repairs and other work by unqualified
persons can cause considerable danger to users.
Correct use
~
To avoid the risk of damage, do not use the vacuum
cleaner without the dustbag, dust compartment filter and
exhaust filter in place.
~
If the dustbag is not fitted correctly, the dust compartment
cover does not normally close. Do not force it.
~
Do not vacuum up anything which has been burning or
is still glowing e.g. cigarettes, ashes or coal, whether
glowing or apparently extinguished.
~
Do not vacuum up any water, liquid or damp dirt. Wait
until any freshly cleaned or shampooed carpets or floor
coverings are completely dry before attempting to vacuum.
~
Do not vacuum toner dust. Toner, such as that used in
printers and photocopiers, can conduct electricity.
en - Warning and Safety instructions
32

~
Do not vacuum up any inflammable or combustible
matter or gases and do not vacuum in areas where such
substances are stored.
~
Floor attachments, accessories and tubes must not be
used at head level to avoid the risk of injury, e.g. to eyes
and ears.
~
Important information on the handling of batteries (for
models with radio controls on the handle):
–
Do not short circuit or recharge the battery, or throw it
into a fire.
–
Disposing of batteries: Remove the battery from the radio
control handle and dispose of it in your recycling bin. Do
not dispose of it with the normal household waste.
Accessories
~
To avoid the risk of injury when vacuuming with a Miele
Electrobrush or Turbobrush, do not touch the rotating roller
brush.
~
It is not advisable to vacuum directly with the handle,
i.e. without an accessory attached, as the rim could get
damaged and you could hurt yourself on sharp edges.
~
Only use genuine dustbags, filters, accessories and
optional accessories with the "Original Miele" logo on them.
This will ensure optimum performance of the appliance
throughout its life.
Miele cannot be held liable for damage caused by
incorrect use or operation or by non-compliance with
these Warning and Safety instructions.
en - Warning and Safety instructions
33

en - Description of the appliance
34

The illustration shows the maximum number of features available on these Miele
vacuum cleaners.
a Suction hose
b Release button for accessories compartment
c Dustbag change indicator
d Display *
e Foot control for automatic cable rewind
f Parking system for pauses in vacuuming
g On/Off foot control s
h Mains cable
i Roller wheels *
j Exhaust filter *
k Parking attachment (on both sides of the vacuum cleaner)
l Dust compartment filter (for motor protection)
m Electrobrush socket cover holder
n Original Miele dustbag
o Carrying handle
p Floorhead *
q Release buttons
r Telescopic or triscopic tube *
s Dust compartment release catch
t Release buttons for the telescopic or triscopic tube *
u Socket for Electrobrush *
v Connection socket
w LED *
x Stand-by button for pauses in vacuuming *
y Suction power selector + / -*
z Handle (some models have an air inlet valve in the handle) *
{ Overheating warning light § *
| Restart button *
} Stand-by indicator light *
~ Maintenance indicator with reset button *
Those features marked * depend on model, and may vary or not be available on
your model.
en - Description of the appliance
35

Disposal of packing material
The packaging is designed to protect
the vacuum cleaner from damage
during transportation. The packaging
materials used are selected from
materials which are environmentally
friendly for disposal and should be
recycled.
Recycling the packaging reduces the
use of raw materials in the
manufacturing process and also
reduces the amount of waste in landfill
sites.
Ensure that any plastic wrappings,
bags, etc. are disposed of safely and
kept out of the reach of babies and
young children. Danger of suffocation.
Disposing of the dustbag and
filters
These are made from environmentally
friendly materials. The filters can be
disposed of with the normal household
waste. The dustbag can also be
disposed of in this way if it has been
used exclusively for general household
dust.
Disposing of your old
appliance
Before disposing of your old appliance
remove the dustbag and all the filters
and dispose of them with your normal
household waste.
Electrical and electronic appliances
often contain valuable materials. They
also contain materials which, if handled
or disposed of incorrectly, could be
potentially hazardous to human health
and to the environment. They are,
however, essential for the correct
functioning of your appliance. Please
do not therefore dispose of it with your
household waste.
Please dispose of it at your local
community waste collection/recycling
centre, or contact your dealer for
advice.
Ensure that it presents no danger to
children while being stored for
disposal.
en - Caring for our environment
36

The illustrations referred to in the text
are shown on the fold-out pages at the
end of these operating instructions.
Preparing for use
Attaching the suction hose (dia. 1)
^
Insert the hose connector into the
socket on the vacuum cleaner until it
clicks into position. To do this, line up
the guides on the two pieces.
Removing the suction hose (dia. 2)
^ Press the release buttons at the side
of the hose connector and lift the
hose from the socket.
Connecting the handle to the suction
hose (dia. 3)
^ Insert the suction hose into the
handle until it clicks into position.
Connecting the handle to the suction
tube (dia. 4)
^
Insert the handle into the suction tube
until it clicks into position. To do this,
line up the guides on the two pieces.
^
To release the handle from the
suction tube, press the release
button and pull the handle away from
the suction tube.
Your vacuum cleaner is fitted with one
of the following telescopic tubes,
depending on the model:
–
Telescopic tube
–
Triscopic tube
Adjusting the telescopic suction tube
(dia. 5)
One part of the telescopic tube is
packed inside the other and can be
adjusted to suit your height for
comfortable vacuum cleaning.
^
Press the release button to release
the tubes and adjust to the required
height.
Adjusting the triscopic suction tube
(dia. 5)
The triscopic tube has three sections.
Two sections are packed together
inside a third outer tube.
a Press the release button to release
the lower tube and pull it right out
until it clicks. Press the button again
when you want to retract the tube.
The tube will click into place.
b Press the release button to release
the tubes and adjust to the required
height.
Fitting the floorhead (dia. 6)
^
Push the suction tube into the
floorhead and turn it clockwise or
anti-clockwise until it clicks into
position.
^
To release the floorhead from the
suction tube, press the release
button and pull the suction tube away
from the floorhead.
en
37

Adjusting the floorhead (dia.7+8)
The floorhead can be used for all
normal cleaning of carpets and rugs. It
can also be used with the brush
protruding to vacuum hard flooring. For
hard flooring, such as stone and
parquet, we recommend using one of
the special Miele floor brushes (see
"Optional accessories").
It is important to observe the flooring
manufacturer's cleaning and care
instructions.
Vacuum carpets and rugs with the
brush retracted:
^ Press the foot control %.
Clean hard flooring which is not
susceptible to scratching with the brush
protruding:
^ Press the foot control ).
Clean flooring which has deep
crevices or grooves with the brush
protruding.
AirTeQ floorhead (dia. 8)
This floorhead has been specially deve
-
loped to achieve excellent cleaning
results using low energy. It has
particularly low power consumption and
high suction capability.
,
Warning: If the suction power of
the AirTeQ floorhead seems too
high, reduce the suction until the
floorhead is easier to manouevre
(see "Use - regulating the suction").
Activating the exhaust filter change
indicator
Depending on model, your vacuum
cleaner will be fitted as standard with one
of the following exhaust filters (dia. 9):
a Air Clean
b ActiveAirClean 50 (black)
c HEPA AirClean 50 (white)
If your vacuum cleaner is fitted with
filter b or c, the exhaust filter change
indicator needs to be activated.
^
Lift the release catch for the dust
compartment lid and raise the lid as
far as it will go (dia.10).
^ Remove the label (dia.11).
^ Press the exhaust filter change indi-
cator ~ (dia. 12).
^ After approx. 10 - 15 seconds a thin
red stripe will appear in the left hand
side of the strip (dia. 13).
^
Close the dust compartment lid
securely, making sure it clicks into
position. Take care not to trap the
dustbag when doing so.
The exhaust filter change indicator
The exhaust filter change indicator
shows the remaining functional life of
the exhaust filter. After approx. 50
operating hours, or approx. one year of
average use, the strip will be
completely red (dia. 14).
en
38

Using the accessories
supplied (dia. 15)
The following accessories are supplied:
a Crevice nozzle
For cleaning in folds, crevices or
corners.
b Dusting brush with natural bristles
(only available in selected countries)
For cleaning skirting boards, ornate
or carved objects.
The head can be swivelled to adjust
the angle.
c Upholstery nozzle
For cleaning upholstery, mattresses,
cushions, curtains, covers etc.
Certain models are supplied as
standard with the following accessories
which are not illustrated on this page.
– Electrobrush
– Turbobrush
– Classic Allergotec floorhead
These floorheads and brushes are
supplied with their own operating
instructions.
Removing the accessories (dia. 16)
^
Press the release button to open the
accessories compartment lid.
The accessories compartment will then
open.
^
Take out the accessory you require.
^
Press down firmly on the lid to close
it.
Floorhead (dia. 17)
For general use and also for vacuuming
stairs.
,
For safety reasons when
vacuuming stairs it is best to start at
the bottom of the stairs and move
upwards.
Use
Unwinding the cable (dia. 18)
^
Pull the mains cable out to the
required length (max. approx. 7.5 m).
^ Insert the plug in the socket correctly
and switch on.
,
If vacuuming for longer than 30
minutes, the mains cable must be
pulled out to its fullest extent.
Otherwise there is a danger of
overheating and damage.
Rewinding the cable (dia. 19)
^
Switch the vacuum cleaner off at the
wall socket and unplug it.
^
Press the rewind foot switch briefly.
The cable will rewind automatically.
Switching on and off (dia. 20)
^
Press the On/Off foot control s.
Regulating the suction
The suction power can be regulated to
suit the type of flooring being cleaned.
Reducing the suction power reduces
the amount of effort required to
manoeuvre the floorhead.
en
39

Some models also have symbols on the
controls. The symbols indicate the type
of use the settings are suitable for.
The setting selected will light up yellow.
# - curtains, lightweight fabrics
$ - upholstery, cushions
% - thick pile carpets, rugs and
runners
* - for energy-saving vacuuming
(this setting is also very quiet)
( - loop-pile carpets
) - heavily soiled hard flooring and
for intensive cleaning of carpets
,
When using the AirTeQ
floorhead, if the suction seems too
high, reduce the suction until the
floorhead is easier to manouevre.
Depending on the model, your vacuum
cleaner will be fitted as standard with
one of the following suction power
selectors:
+ /- foot controls (dia. 21)
The first time the vacuum cleaner is
switched on, the highest power setting
will be selected automatically.
After that, the vacuum cleaner will
switch on at the setting which was used
previously.
^
Press the + foot control to select a
higher setting.
^
Press the - foot control to select a
lower setting.
Foot controls with Automatic (dia. 22
+ 23)
The first time the vacuum cleaner is
switched on, the "Auto" power setting
will be selected automatically.
Auto = suction power is automatically
adjusted for the type of floor
being vacuumed
,
Do not use the "Auto" setting to
vacuum lightweight materials or
curtains. These could be sucked in
and possibly damaged.
^ Press the + control to change to
"Turbo", the highest power setting.
^ Press the - foot control to change to
"Min.", the lowest power setting.
After that, the vacuum cleaner will
switch on at the setting which was used
previously.
Radio-control handle with Automatic
(dia. 24)
When the vacuum cleaner is switched
on with the On/Off foot control s, the
Stand-by - indicator on the vacuum
cleaner will light up yellow.
^
Press the Stand-by button - on the
handle.
The Stand-by indicator - on the
vacuum cleaner will go out.
The first time the vacuum cleaner is
switched on, the highest power setting
will be selected automatically.
After that, the vacuum cleaner will
switch on at the setting which was used
previously.
en
40
^
Press the + button to select a higher
suction power level.
^
Press the - button to select a lower
suction power level.
Auto = suction power is automatically
adjusted for the type of floor
being vacuumed (dia. 22)
,
Do not use the "Auto" setting to
vacuum lightweight materials or
curtains. These could be sucked in
and possibly damaged.
Opening the air inlet valve (dia. 25 +
26)
(not on models with radio-controls on
the handle)
It is easy to reduce the suction power
for a short time, e.g. to prevent rugs or
other objects being sucked into the
vacuum cleaner.
^ Open the air inlet valve far enough to
reduce the suction power.
The floorhead will be easier to
manoeuvre. Close the valve when you
are ready to use full power again.
During vacuuming (dia. 27 + 28)
^
When vacuuming, pull the cleaner
behind you on its wheels. You can
stand it upright for vacuuming stairs
and curtains etc.
,
When vacuuming especially fine
dust, e.g. sawdust, sand, plaster,
flour, talcum powder etc.,
electrostatic charges build up
naturally. Under certain conditions
these charges will be released. To
avoid the unpleasant effects of
these discharges, a metal inlay has
been incorporated into the
underside of the handle. Please
make sure that you keep your hand
in constant contact with this metal
strip during vacuuming.
Pauses in use (dia. 24)
(for models with radio controls on the
handle)
To pause the vacuum cleaner during
operation:
^ Press the Stand-by button - on the
handle.
,
The Stand-by button is designed
to pause the vacuum cleaner for
short periods of time whilst
vacuuming. After vacuuming, the
vacuum cleaner must be switched
off and unplugged from the mains
electricity supply.
Otherwise there is a danger of
overheating and damage.
The LED will light up each time a button
is pressed on the handle.
en
41
At the end of the pause, you can do
one of the following:
^
Press the Stand-by button again to
switch the vacuum cleaner back on
at the setting you were using before
pausing it.
^
Press the + button to switch the
vacuum cleaner back on using the
highest power setting.
^
Press the - button to switch the
vacuum cleaner back on using the
lowest power setting.
Setting down, transportation
and storage
Parking system for pauses in
vacuuming (dia. 29)
(cannot be used with the SEB 234 L
Electro Premium Electrobrush)
A parking system has been designed
for conveniently parking the suction
tube and floorhead during pauses.
^
Slot the floorhead into the parking
attachment at the back of the
vacuum cleaner.
If the vacuum cleaner is on a
sloping surface, e.g. a ramp, retract
the telescopic tube fully.
Switching on and off with the parking
system
Some models are fitted with an On/Off
switch in the parking system.
The vacuum cleaner switches off
automatically when the floor head is
slotted into the parking system with the
parking attachment.
When the floorhead is removed from
the parking system the vacuum cleaner
switches back on at the last selected
power level (not on models with
radio-operated handle).
Parking system for storage (dia. 30 +
31)
,
Always disconnect the vacuum
cleaner from the electrical supply
when you have finished using it.
Switch the vacuum cleaner off at the
wall socket and unplug it.
^ Stand the vacuum cleaner upright
when it is not being used and when it
is being stored.
Retract the telescopic tube fully.
^ Slot the floorhead downwards into
one of the parking attachments on
either side of the vacuum cleaner
(the parking attachments cannot be
used with the SEB 234 L Electro
Premium Electrobrush).
This makes the vacuum cleaner easier
to carry or store.
If your vacuum cleaner has an XXL
handle, you can detach this so that the
vacuum cleaner requires less storage
space.
^
Detach the XXL handle from the
retracted suction tube.
^
Wind the suction hose around the
suction tube and then slot the XXL
handle into the second parking
attachment.
en
42
Maintenance
,
Always disconnect the vacuum
cleaner from the electrical supply for
maintenance work and for cleaning.
Switch off at the wall socket and
unplug it.
The Miele filtration system consists of
three filters which must be replaced
from time to time to ensure that your
vacuum cleaner performs efficiently.
–
Dustbag
– Dust compartment filter (for motor
protection)
– Exhaust filter
Only use genuine dustbags, filters,
accessories and optional
accessories with the "Original Miele"
logo on them. Only this will ensure
that the suction power of the
vacuum cleaner is maintained,
giving the best possible cleaning
results.
,
The use of dustbags made from
paper or paper-based materials, or
dustbags with a cardboard collar, or
dustbags that do not carry the
"Original Miele" logo, can seriously
damage the vacuum cleaner and
invalidate the warranty.
Purchasing new dustbags and filters
Original Miele dustbags and filters can
be ordered from your Miele retailer,
from Miele or online at:
Ordering the correct dustbags and
filters
Only use original Miele G/N dustbags
with a blue collar. Using any other
dustbags will damage the vacuum
cleaner. Original Miele dustbags are
identified by the "Original Miele" logo on
the packaging or directly on the
dustbag.
An Air Clean filter and a dust
compartment filter are supplied with
every packet of Miele dustbags.
These can also be purchased
separately.
When to change the dustbag (dia. 32)
Change the dustbag when the colour
marker in the dustbag change indicator
fills the display, or sooner if it is no
longer effective (see possible reasons
for this below).
en
43
Miele dustbags are disposable and
designed for single use only.
Dispose of the dustbag when it is
full. Do not attempt to reuse as
suction would be reduced.
Checking the dustbag change
indicator
^
Attach the standard floorhead to the
suction tube.
^
Switch the vacuum cleaner on and
select the maximum power setting.
^ Lift the floorhead off the floor a little.
How the dustbag change indicator
works
The dustbag change indicator is set for
normal household dust. This generally
contains a mixture of: dust, hair,
threads, carpet fluff, grit etc.
However, if the cleaner has been used
to vacuum up fine dust, such as
plaster, brick dust, cement or flour, the
pores of the dustbag will become
blocked very quickly. This affects the
air permeability of the bag, and the
marker will indicate that the bag is "full"
even when it is not. If this happens you
must still change the dustbag because
suction power will be greatly reduced
by blocked pores in the dustbag.
If, on the other hand, a large amount of
hair and carpet fluff which typically
contains a lot of air is vacuumed up, the
indicator may fail to react even though
the bag is full. You should still change
it. Both these extremes can occur.
How to replace the dustbag (dia. 33 +
34)
^
Lift the release catch for the dust
compartment lid and raise the lid as
far as it will go.
The dustbag has a closing flap which
closes automatically when the dust
compartment lid is raised to prevent
any dust escaping.
^
Pull the dustbag out by the grip on
the collar.
^
Insert the new dustbag into the blue
holder as far as it will go. Leave it
folded up when you take it out of the
box.
^ It should be unfolded as far as
possible in the dust compartment.
^ Close the dust compartment lid
securely, making sure it clicks into
position. Take care not to trap the
dustbag when doing so.
Warning: The lid will not close
without a dustbag in place. Do not
use force.
When to change the dust
compartment filter (for motor
protection)
Replace this filter every time you start a
new packet of dustbags. A dust
compartment filter is supplied with
every packet of Miele dustbags.
How to change the dust
compartment filter (dia. 35)
^
Open the dust compartment lid.
^
Pull the dustbag out by the grip on
the collar.
en
44

^
Open the blue filter frame and
remove the old filter. Hold by the
clean, unsoiled section to remove it.
^
Replace with a new dust
compartment filter.
^
Close the filter frame.
^
Insert the dustbag into the holder as
far as it will go.
^
Close the dust compartment lid
securely, making sure it clicks into
position. Take care not to trap the
dustbag when doing so.
When to change the exhaust filter
Depending on model, your vacuum
cleaner will be fitted as standard with one
of the following exhaust filters (dia. 9):
a Air Clean
Replace this filter every time you start a
new packet of Miele dustbags. An Air
Clean exhaust filter is supplied with
every packet of Miele dustbags.
b ActiveAirClean 50 (black)
c HEPA AirClean 50 (white)
Replace the exhaust filter if the exhaust
change filter indicator is completely red
(dia. 14).
This occurs after approx. 50 operating
hours, or approx. one year of average
use. The vacuum cleaner can still be
used. However, the suction power will
be reduced as will the effectiveness of
the filter if it is not replaced in good
time.
How to replace the Air Clean filter
(dia. 36 + 37)
Do not use more than one exhaust
filter at a time.
^
Open the dust compartment lid.
^
Press the release catch on the filter
grille and open the grille until it clicks.
^
Hold the used Air Clean filter by one
of the clean, unsoiled sections.
^
Replace it with a new Air Clean filter.
If you wish to replace the Air Clean
filter with an ActiveAirClean 50 filter
or with an HEPA AirClean 50 filter,
see "Replacing one type of exhaust
filter with another".
^ Close the filter grille.
^ Close the dust compartment lid.
How to replace an ActiveAirClean 50
filter or a HEPA AirClean 50 filter
(dia. 38 + 39)
Do not use more than one exhaust
filter at a time.
^
Open the dust compartment lid.
^
Lift the filter and remove it.
^
Replace with a new filter, and push it
down into place.
^
Press the exhaust filter change
indicator ~ (dia. 12).
^
After approx. 10 - 15 seconds a thin
red stripe will appear in the left hand
side of the strip (dia. 13).
en
45
If you wish to use an Air Clean filter,
see "Replacing one type of exhaust
filter with another".
^
Close the dust compartment lid.
Replacing one type of exhaust filter
with another
Depending on model, your vacuum
cleaner will be fitted as standard with one
of the following exhaust filters (dia. 9):
a Air Clean
b ActiveAirClean 50 (black)
c HEPA AirClean 50 (white)
Please note:
1. If you wish to replace the Air Clean
filter a with an ActiveAirClean 50 filter b
or an HEPA AirClean 50 filter c,itis
essential that you remove the filter grille
before fitting the new type of filter (dia.
39). Press the reset button ~ for the
exhaust filter change indicator (dia. 12).
2. If you wish to replace the ActiveAir
-
Clean 50 filter b or the HEPA AirClean
50 filter c with an Air Clean filter a, then
it is essential that you also fit the filter
grille *, see dia. 37.
* Filter grille - see "Optional accesso
-
ries".
Do not use more than one exhaust
filter at a time.
Maintenance indicator with reset
button (dia. 40)
Some models are fitted with a
maintenance indicator.
The indicator lights up after approx.
50 hours of operation, which is
equivalent to about a year of average
use. The level of soiling of the dust
compartment filter and the exhaust filter
must be checked at this point and if the
filters are replaced, the indicator must
be reset. To do this the vacuum cleaner
must be switched on.
^ Press the reset button.
The maintenance indicator and reset
button will go out and reset to zero.
The indicator can only be reset by
pressing the reset button after the
light has come on. Pressing the
button at any other time will have no
effect.
When to change the battery in the
radio-operated handle
Approx. every 18 months. One 3 V
battery (CR 2032) is required.
The vacuum cleaner can still be
used when the battery has run out or
if there is no battery fitted.
^
Switch the vacuum cleaner on using
the On/Off foot control s. The
Stand-by indicator - on the vacuum
cleaner will light up yellow.
^
Press the restart button on the
vacuum cleaner (dia. 41).
The vacuum cleaner can continue to be
used, but only at maximum power.
en
46

How to change the battery in the
radio-operated handle (dia. 42)
^
Open the cover to the battery
compartment using a screwdriver.
^
Replace with a new battery, making
sure the polarity is correct.
^
Replace the cover.
^
Dispose of the old battery
responsibly.
When to change the thread lifters
The thread lifters on the suction inlet of
the floorhead can be replaced.
Check them from time to time and
replace them if the pile has worn down.
How to replace the thread lifters (dia.
43 + 44)
^ Use a suitable screwdriver to remove
the thread lifters from the slots.
^ Fit new thread lifters.
Upholstery nozzle SPD 10 (dia. 45)
^
Disengage the thread lifter unit at
each side of the upholstery nozzle
using a coin.
^
Fit a new thread lifter unit and lock
into position.
Cleaning the roller on the floorhead
(dia. 46)
(Not necessary for the AirTeQ floorhead)
a Release the bearing (with bayonet
fitting) using a coin.
b Press the bearing out, and remove it.
c Take out the roller.
^
Remove any threads and hair,
replace the roller and refit the
bearing.
Replacement parts are available from
your Miele retailer or from Miele (see
back cover for contact details).
Cleaning and care
,
Always disconnect the vacuum
cleaner from the electrical supply
before cleaning it. Switch off at the
wall socket and unplug it.
Vacuum cleaner and accessories
External surfaces of the vacuum
cleaner and of the accessories can be
cleaned with a proprietary cleaner
suitable for plastic.
,
Do not use abrasive cleaning
agents, glass cleaning agents,
all-purpose cleaners or oil-based
conditioning agents.
Dust compartment
The dust compartment can, if necessary,
be cleaned using a dry duster, brush
or, if available, a second vacuum
cleaner to vacuum the dust out.
,
Do not let the vacuum cleaner
get wet. If moisture gets into the
appliance, there is a risk of electric
shock.
en
47
Problem solving guide
The vacuum cleaner switches off
automatically.
On certain models, the overheating
warning light also comes on ,.
A temperature limiter switches the
vacuum cleaner off automatically if it
gets too hot. Some models also have a
warning light , which comes on to
indicate that it has overheated.
This can occur if, for instance, large
articles block the suction tube or when
the filter bag is full or contains particles
of fine dust. A heavily soiled dust
compartment or exhaust filter can also
be the cause of overheating. Switch the
vacuum cleaner off immediately using
the On/Off foot control s. Disconnect it
from the electricity supply. Switch it off
at the wall socket and unplug it.
After removing the cause, wait for
approx. 20 - 30 minutes to allow the
vacuum cleaner to cool down. It can
then be switched on again.
After sales service
In the event of a fault that you cannot
easily remedy, please contact
–
your Miele Dealer
or
–
Miele (see back cover for contact
details).
Please note that telephone calls may be
monitored or recorded for training
purposes (UK only).
Guarantee
For information on the appliance
guarantee specific to your country
please contact Miele. See back cover
for contact details.
In the U.K. your appliance is
guaranteed for 2 years from the date of
purchase. However, you must activate
your cover by calling 0845 365 6640 or
registering online at www.miele.co.uk.
Optional accessories
Please observe the flooring
manufacturer's cleaning and care
instructions.
Miele accessories, including
floorheads, filters and dustbags are
available to order through your Miele
retailer, Miele or online at:
Certain models are supplied as
standard with one or more of the
following accessories:
Electrobrushes
Electrobrushes can only be used on
models fitted with an electrobrush
socket.
Electrobrush Electro Comfort
(SEB 216-3)
This electrobrush is particularly suitable
for intensive vacuuming of carpets
which are subject to hard wear. It is
very effective at removing deep seated
dirt and preventing areas of frequent
use being trodden into a path.
en
48

Electrobrush Electro Premium
(SEB 234-L)
This electrobrush is 60 mm wider than
the SEB 216-3, and is more powerful,
making it ideal for cleaning larger floor
areas.
It has the following additional features
compared to the SEB 216-3:
–
Adjustable height settings
–
LEDs to light up the area being
vacuumed
–
A multi-function indicator light
Floorheads / brushes
Classic Allergotec floorhead
(SBDH 285-3)
This floorhead is suitable for daily
hygienic cleaning of all floor surfaces.
The level of cleanliness of the floor
shows in a colour "traffic light" display
when vacuuming.
Turbo Comfort Turbobrush
(STB 205-3)
This turbobrush is ideal for cleaning cut
pile carpet.
Hard floor brush (SBB 235-3)
This brush is designed for use on hard
flooring such as tiled or stone floors.
Parquet floor brush (SBB Parquet-3)
(only available in selected countries)
This brush has natural bristles and is
designed for use on parquet floors and
other surfaces which are susceptible to
scratching such as laminate flooring.
Hard floor Twister swivel-action floor
brush (SBB 300-3)
This brush is suitable for a variety of
hard floor surfaces and has a swivel
joint enabling it to get into awkward
corners.
Parquet Twister XL swivel-action
floor brush (SBB 400-3)
(only available in selected countries)
This brush is extra wide making it
suitable for large areas of flooring and
has a swivel joint enabling it to get into
awkward corners.
Other accessories
MicroSet (SMC 20)
This set is specially designed for
cleaning small objects and difficult to
reach areas (such as PC keyboards,
stereo equipment, intricately carved
furniture and ornaments, models etc).
CarCare Set (SCC 10)
For valeting the interior of cars.
Cat&Dog Set (SCD 10)
Especially for households with pets.
HomeCare Set (SHC 10)
Accessories for cleaning the living
areas of your home.
Hand Turbobrush Turbo Mini
Compact (STB 20)
For cleaning upholstery, mattresses,
car seats etc.
en
49

Universal brush (SUB 20)
(only available in selected countries)
For dusting books, shelves, etc.
Radiator brush (SHB 30)
For cleaning radiators, narrow shelves
and crevices.
Mattress nozzle (SMD 10)
For cleaning upholstery, mattresses,
cushions, curtains, covers etc.
Crevice nozzle, 300 mm (SFD 10)
Extra long crevice nozzle for cleaning in
folds, crevices or corners.
Crevice nozzle, 560 mm (SFD 20)
Flexible crevice nozzle for accessing
awkward to reach areas.
Upholstery nozzle, 190 mm (SPD 10)
Extra wide nozzle for cleaning
upholstery, mattresses, car seats etc.
Flexible extension hose (SFS 10)
For extending the suction hose by
approx. 1.5 m.
Hygiene seal with active charcoal
Helps prevent dust and odours
escaping when the suction hose has
been removed from the cleaner.
Comfort handle with lighting
(SGC 20)
For lighting up the work area.
Filters
ActiveAirClean 50 exhaust filter
(SF-AA 50)
This filter absorbs odours from the dirt
collected in the dustbag.
HEPA AirClean 50 exhaust filter
(SF-HA 50)
Excellent filtration level for very clean
exhaust air. This filter is particularly
suitable for allergy sufferers.
Filter grille
The filter grille is required if you wish to
fit an Air Clean filter instead of an
ActiveAirClean 50 filter or an HEPA
AirClean 50 filter.
en
50

Electrical connection for the
UK
All electrical work should be carried out
by a suitably qualified and competent
person in strict accordance with current
national and local safety regulations
(BS 7671 in the UK).
The voltage and frequency are given on
the data plate located underneath the
vacuum cleaner. Please ensure that
these match the household mains
supply. The fuse rating is quoted on the
plug.
The appliance is supplied with a cable
and moulded plug ready for connection
to a 230-240 V/50 Hz a.c. single phase
supply.
Non-rewireable plugs BS 1363
The fuse cover must be re-fitted when
changing the fuse, and if the fuse cover
is lost the plug must not be used until a
suitable replacement is obtained. The
colour of the correct replacement cover
is that of the coloured insert in the base
of the plug, or the colour that is
embossed in words on the base of the
plug, (as applicable to the design of
plug fitted).
Replacement fuses should be ASTA
approved to BS1362 and have the
correct rating. Replacement fuses and
fuse covers may be purchased from
your local electrical supplier.
Electrical connection AU, NZ
All work should be carried out by a
suitably qualified and competent
person in strict accordance with
national and local safety regulations.
The voltage and rated load are given
on the data plate located underneath
the vacuum cleaner. Please ensure that
these match the household mains
supply. The fuse rating is quoted on the
plug.
The appliance is supplied with a cable
and moulded plug ready for connection
to a 230V/50Hz AC single phase
supply.
Test Marks Electrical safety
RCM Mark
Electrically suppressed
according to AS/NZS 1044
en
51

Prescriptions de sécurité et mises en garde...........................53
Description de l'appareil ...........................................58
Votre contribution à la protection de l'environnement ..................60
Avant utilisation ..................................................61
Utilisation des accessoires fournis avec l'aspirateur ...................63
Utilisation .......................................................63
Transport et rangement............................................66
Entretien ........................................................66
Où se procurer les sacs et les filtres ? ..................................67
Quels sacs à poussière et quels filtres choisir ? ..........................67
Quand remplacer le sac à poussière ? .................................67
Fonctionnement de la jauge de remplacement du sac à poussière ...........68
Comment remplacer le sac à poussière ?...............................68
Quand remplacer le filtre moteur ? ....................................68
Comment remplacer le filtre moteur ? ..................................68
Quand remplacer le filtre d'évacuation ? ...............................69
Comment remplacer le filtre d'évacuation Air Clean ? .....................69
Comment remplacer le filtre d'évacuation ActiveAirClean 50 et
HEPA AirClean 50 ? ................................................69
Changement de type de filtre d'évacuation .............................70
Voyant de saturation des filtres avec touche Reset .......................70
Quand faut-il remplacer la pile sur la poignée avec commande à distance ? ....70
Comment remplacer la pile sur la commande à distance ? .................71
Quand remplacer les ramasse-fils ? ...................................71
Comment remplacer le ramasse-fils ? ..................................71
Nettoyage des roulettes.............................................71
Entretien ........................................................71
Anomalies.......................................................72
Service après vente ...............................................72
Conditions de garantie ............................................72
Accessoires en option.............................................72
fr - Table des matières
52

Cet appareil répond aux réglementations de sécurité en
vigueur. Une utilisation non conforme comporte des ris
-
ques pour les personnes et l'appareil.
Lisez attentivement ce mode d'emploi avant d'utiliser
l'aspirateur pour la première fois. Il vous apporte des in
-
dications importantes concernant la sécurité, l'utilisation
et l'entretien de votre aspirateur. Vous vous protégerez
ainsi et éviterez de détériorer votre aspirateur.
Conservez ce mode d'emploi et remettez-le à un éventu-
el futur propriétaire.
Utilisation conforme
~
Cet aspirateur est destiné à une utilisation à la maison
ou de type domestique.
~
Cet aspirateur ne convient pas à une utilisation en exté-
rieur.
~
N'utilisez l'aspirateur que dans le cadre domestique,
pour aspirer des poussières sèches. N'utilisez pas cet
aspirateur sur les hommes et les animaux. Toute autre ap
-
plication, adaptation ou modification de l'aspirateur est ir
-
recevable.
~
Les personnes qui ne sont pas en mesure d'utiliser
l'aspirateur en toute sécurité en raison de déficiences phy
-
siques, sensorielles ou mentales, de leur inexpérience ou
de leur ignorance ne doivent pas l'utiliser sans la surveil
-
lance ou les instructions d'une personne responsable.
fr - Prescriptions de sécurité et mises en garde
53

Précautions à prendre avec les enfants
~
Les enfants de moins de 8 ans doivent être tenus à
l'écart de l'aspirateur à moins d'être constamment surveil
-
lés.
~
Les enfants à partir de huit ans sont autorisés à utiliser
l'appareil sans surveillance uniquement si vous leur avez
expliqué comment l'utiliser sans danger. Les enfants doi
-
vent être en mesure d'appréhender et de comprendre les
risques encourus en cas de mauvaise manipulation.
~
Les enfants ne doivent pas nettoyer ou intervenir sur
l'appareil sans être sous la surveillance d'un adulte.
~
Surveillez les enfants lorsqu'ils jouent à proximité de
l'aspirateur. Ne laissez jamais les enfants jouer avec l'aspi-
rateur.
~
Modèles avec commande à distance : ne pas laisser les
enfants jouer avec les piles.
Sécurité technique
~
Contrôlez si l'aspirateur ne présente pas de détériora
-
tions visibles avant de l'utiliser. N'utilisez pas et ne mettez
pas sous tension un aspirateur endommagé.
~
Comparez les données de raccordement indiquées sur
la plaque signalétique de l'appareil (tension et fréquence)
avec celles du réseau. Ces données doivent absolument
coïncider.
~
La prise électrique doit être protégée par un fusible 16 A
ou 10 A.
fr - Prescriptions de sécurité et mises en garde
54

~
La réparation de l'aspirateur pendant la période de ga
-
rantie doit être effectuée exclusivement par un service
après vente agréé par le fabricant, sinon vous perdrez le
bénéfice de la garantie en cas de pannes ultérieures.
~
Ne vous servez pas du câble d'alimentation pour porter
l'aspirateur et ne tirez pas sur le câble pour débrancher la
prise.
Ne tirez pas le câble sur des arêtes vives et ne le coincez
pas sous une porte !
Evitez de rouler trop souvent sur le câble.
Le câble, la fiche et la prise risqueraient d'être endomma-
gés et de vous mettre en danger.
~
N'utilisez pas l'aspirateur lorsque le câble d'alimentation
est endommagé. Ne faites remplacer un câble endomma-
gé que par un enrouleur de câble complet. Pour des rai-
sons de sécurité, ce remplacement ne doit être effectué
que par des techniciens qualifiés ou par le SAV Miele.
~
La prise sur l'aspirateur (selon modèle) ne doit être utili-
sé qu'avec l'électrobrosse Miele évoquée dans ce mode
d'emploi.
~
Lorsque vous aspirez des poussières fines telles que
sciure, sable, farine, etc., des décharges électrostatiques
peuvent se produire dans certaines situations. Pour éviter
les désagréments causés par ces décharges, cet aspira
-
teur est équipé d'une pièce métallique au bas de la poig
-
née. Veillez à bien positionner votre main sur cette pièce
pendant que vous aspirez.
~
Arrêtez et débranchez l'aspirateur avant chaque net
-
toyage / entretien. Débranchez la fiche de l'aspirateur.
fr - Prescriptions de sécurité et mises en garde
55

~
Ne plongez jamais l'aspirateur dans l'eau. Nettoyez-le
avec un chiffon sec ou légèrement humide.
~
Les réparations ne doivent être effectuées que par des
techniciens Miele agréés. Les réparations incorrectes peu
-
vent entraîner de graves dangers pour l’utilisateur.
Bonne utilisation
~
N'utilisez pas l'aspirateur sans sac à poussière, sans fil
-
tre moteur et sans filtre d'évacuation !
~
Vous ne pouvez pas fermer le couvercle de l'aspirateur
si vous n'avez pas inséré de sac à poussière. Ne forcez
pas.
~
N'aspirez pas d'objets incandescents comme par exem-
ple les cendres, le charbon qui semblent éteints.
~
N'aspirez pas de liquides ou d'éléments humides ! Lais-
sez sécher complètement les tapis et moquettes sham-
pouinés avant de les aspirer.
~
N'aspirez pas de toner ! Le toner utilisé pour les impri
-
mantes et les photocopieurs peut être conducteur.
~
N'aspirez pas de produits ni de gaz inflammables ou ex
-
plosifs. N'utilisez pas l'aspirateur dans des locaux dans
lesquels sont stockés ces produits.
~
N'utilisez pas le tube d'aspiration équipé d'une brosse à
proximité de la tête.
fr - Prescriptions de sécurité et mises en garde
56

~
Informations importantes concernant la pile (pour modè
-
les avec poignées avec commande à distance) :
–
Ne pas court-circuiter la pile, ne pas la recharger et ne
pas la jeter dans le feu.
–
Elimination de la pile : retirez la pile de la télécommande
et débarrassez-vous en auprès de la collecte de pile
communale. Ne jetez pas la pile dans les ordures ména
-
gères.
Accessoires
~
N'introduisez pas vos doigts dans l'électrobrosse ou la
turbobrosse quand celles-ci sont en marche !
~
Lorsque vous passez l'aspirateur avec le tube à poignée
sans accessoire, veillez à ne pas abîmer ce dernier.
~
N'utilisez que des sacs à poussière, des filtre et des ac-
cessoires portant le logo "Original Miele". Le fabricant ne
peut garantir votre sécurité que dans ces conditions.
Miele ne peut pas être tenu pour responsable pour les
dommages qui résulteraient d'une mauvaise utilisation et
qui iraient à l'encontre des prescriptions de sécurité.
fr - Prescriptions de sécurité et mises en garde
57

fr - Description de l'appareil
58

Le croquis présente l’équipement maximal de l’aspirateur.
a Flexible d'aspiration
b Touche de déverrouillage du compartiment des accessoires
c Jauge de remplacement pour sac à poussière
d Afficheur *
e Pédale pour enrouleur de câble automatique
f Système Idéal Pause pour petites pauses
g Pédale Marche / Arrêt s
h Câble d'alimentation
i Roulettes *
j Filtre d’évacuation *
k Système Idéal Pause pour rangement (des deux côtés de l'appareil)
l Filtre moteur
m Support pour le cache de la prise de l'électrobrosse
n Sac à poussière d'origine Miele
o Poignée de transport
p Brosse double position *
q Touches de déverrouillage
r Tube d'aspiration télescopique *
s Touche de déverrouillage du couvercle compartiment à poussière
t Boutons de réglage pour tube télescopique *
u Prise pour l'électrobrosse *
v Raccord d'aspiration
w LED *
x Touche Veille pour les courtes pauses *
y Touches + / -pour le réglage de la puissance d'aspiration.*
z Poignée (en fonction du modèle avec réglage d'air additionnel) *
{ Voyant protection thermique § *
| Touche Restart *
} Veille (stand-by) *
~ Voyant de saturation des filtres avec touche Reset *
* les équipements peuvent être différents ou non disponibles suivant les modèles.
fr - Description de l'appareil
59
Elimination de l'emballage
L'emballage protège l'aspirateur des
avaries de transport. Les matériaux uti
-
lisés sont choisis en fonction de critères
écologiques de façon à en faciliter le
recyclage.
Le recyclage de l'emballage économi
-
se les matières premières et réduit le
volume des déchets à éliminer. Jetez
l'emballage dans la poubelle adaptée
(en fonction du matériau).
Elimination des sacs à pous-
sière et des filtres usés.
Les sacs à poussière et les filtres sont
composés de matériaux recyclables.
Vous pouvez vous débarasser des fil-
tres par le biais de vos ordures ména-
gères. Cela s'applique également aux
sacs à poussière dans la mesure où ils
ne contiennent pas de salissures inter-
dites.
Elimination de l'ancien appa
-
reil
Avant l'élimination de votre ancien ap
-
pareil, retirez le sac à poussière et les
filtres insérés et jetez ces éléments
dans les ordures ménagères.
Les appareils électriques et électroni
-
ques contiennent souvent encore des
matériaux recyclables. Ils contiennent
également des matériaux nocifs, né
-
cessaires au bon fonctionnement et à la
sécurité de l'appareil. Ces matériaux
peuvent être dangereux pour les hom
-
mes et l'environnement s'ils restent
dans la collecte de déchets ou s'ils
sont mal manipulés. Ne jetez par con-
séquent en aucun cas votre appareil
avec les déchets.
Faites appel au service d'enlèvement
mis en place par votre commune ou
rapportez votre appareil dans un point
de collecte spécialement adapté à
l'évacuation de ce type d'appareil. In
-
formez-vous le cas échéant auprès de
votre revendeur.
Gardez l'ancien appareil hors de portée
des enfants jusqu'à son enlèvement,
pour éviter tout accident.
Votre contribution à la protection de l'environnement
60

Vous trouverez les croquis signalés
dans les différents chapitres dans les
volets, à la fin de ce mode d'emploi.
Avant utilisation
Raccordement du flexible d'aspirati
-
on (croquis 1)
^
Insérez le flexible dans l'ouverture
d'aspiration jusqu'au déclic. Super
-
posez les deux marques de guidage
pour vous aider.
Pour dégager le flexible de l’appareil
(croquis 2)
^ Pressez les touches de déverrouilla-
ge aménagées sur les côtés du rac-
cord et dégagez-le de l’orifice.
Assemblage du flexible et de la poig-
née (croquis 3)
^ Insérez le flexible dans la poignée
jusqu'au déclic.
Raccordement du flexible et du tube
d'aspiration (croquis 4)
^
Insérez la poignée jusqu'au déclic
dans le tube. Superposez les deux
marques de guidage pour vous ai
-
der.
^
Appuyez sur la touche de déverrouil
-
lage lorsque vous voulez séparer les
éléments et retirez la poignée en ef
-
fectuant un léger mouvement de rota
-
tion.
En fonction du modèle, votre aspirateur
est équipé d'un des tubes d'aspiration
suivants.
–
tube télescopique
–
tube triscopique
Réglage du tube télescopique
(croquis 5)
Le tube télescopique se compose de
deux parties emboîtées l’une dans
l’autre, qu’il faut adapter à la longueur
la plus commode pour effectuer les tra
-
vaux d’aspiration.
^ Appuyez sur le bouton de réglage et
ajustez le tube télescopique à la lon-
gueur souhaitée.
Réglage du tube triscopique
(croquis 5)
Le tube triscopique se compose de
trois parties emboîtées les unes dans
les autres.
a Pressez la touche de déverrouillage
du tube inférieur et tirez celui-jus
-
qu'au déclic. Pressez également cet
-
te touche de déverrouillage pour fai
-
re de nouveau coulisser le tube à
l'intérieur. Un déclic vous indique
que le tuyau est verrouillé.
b Appuyez sur le bouton de réglage et
ajustez le tube télescopique à la lon
-
gueur souhaitée.
Montage de la brosse (croquis 6)
^
Emboîtez la brosse sur le tube téles
-
copique en tournant légèrement dans
les deux sens. Le verrouillage doit
s’enclencher.
^
Appuyez sur la touche de déverrouil
-
lage pour dégager la brosse du tube.
fr
61

Réglage de la brosse (croquis7+8)
La brosse sert au nettoyage quotidien
des moquettes, tapis et sols durs peu
fragiles. Pour nettoyer d'autres types de
sols, nous vous recommandons d'utili
-
ser des brosses Miele spéciales (voir le
chapitre "Accessoires en option).
Veuillez vous conformer aux con
-
seils de nettoyage et d’entretien du
fabricant du revêtement de sol.
Aspirez tapis et moquettes avec la
brosse rentrée :
^ Appuyez sur la pédale %.
Aspirez les sols durs peu fragiles avec
la brosse sortie :
^ Appuyez sur la pédale ).
Lorsque vous passez l'aspirateur
sur des sols présentant des intersti-
ces, sortez la brosse.
Brosse AirTeQ (croquis 8)
Cette brosse est spécialement conçue
pour obtenir de bons résultats d'aspira
-
tion avec une consommation d'énergie
réduite. Elle permet d'obtenir des flux
d'air optimisés et par conséquent une
performance d'aspiration accrue.
,
S'il est difficile de faire glisser la
brosse AirTeQ, réduisez la puissan
-
ce d'aspiration jusqu'à ce que la
brosse glisse plus facilement (voir
chapitre "Utilisation - Sélection de la
puissance d'aspiration").
Activation de l'indicateur de saturati
-
on du filtre
Différents filtres d’évacuation sont insé
-
rés dans l'aspirateur suivant les modè
-
les (croquis 9).
a Filtre Air Clean
b Filtre ActiveAirClean 50 (noir)
c Filtre HEPA AirClean 50 (blanc)
Si votre aspirateur est équipé d'un filtre
à évacuation b ou c, il faut activer l'indi
-
cateur de saturation de filtre.
^
Pressez la touche de déverrouillage
et relevez le couvercle du comparti-
ment à poussière jusqu'au déclic
(croquis 10).
^ Enlevez la bande d'avertissement
(croquis 11).
^ Appuyez sur l'indicateur de saturati-
on du filtre ~ (croquis 12).
^ Après env. 10 - 15 secondes, une
bande étroite rouge apparaît sur le
côté gauche de l'indicateur (croquis
13).
^
Refermez le couvercle du comparti
-
ment à poussière jusqu'au déclic et
veillez à ce que le sac ne reste pas
coincé.
Fonction de l'indicateur de saturation
du filtre
L'indicateur de saturation du filtre
d'évacuation indique la durée d'utilisati
-
on du filtre. Après environ 50 heures de
fonctionnement, ce qui correspond en
-
viron à l'utilisation moyenne d'une an
-
née, le voyant est rempli de rouge (cro
-
quis 14).
fr
62

Utilisation des accessoires
fournis avec l'aspirateur
(croquis 15)
Les accessoires suivants sont fournis
avec l'aspirateur :
a Suceur long
pour aspirer plis, plinthes et coins.
b Brosse à meubles avec poils natu
-
rels
pour plinthes, moulures, encadre
-
ments, objets de décoration, etc.
La tête de la brosse pivote et s'adap
-
te à la forme des objets.
c Suceur à coussins
pour aspirer canapés, matelas,
coussins, doubles rideaux, revête-
ments etc.
Certains modèles sont équipés de série
avec un des accessoires suivants qui
ne sont pas représentés dans ce mode
d'emploi.
– Electrobrosse
–
Turbobrosse
–
Brosse Allergotec
Dans ce cas un mode d’emploi séparé
correspondant à chaque type de bros
-
se est fourni.
Retirer les accessoires (croquis 16)
^
Appuyez sur la touche de déverrouil
-
lage.
Le compartiment d'accessoires s'ouvre.
^
Prenez l’accessoire dont vous avez
besoin.
^
Refermez le compartiment en ap-
puyant fermement sur le couvercle.
Brosse double position (croquis 17)
Egalement adaptée pour aspirer les
marches.
,
Pour des raisons de sécurité,
aspirez les marches d'escalier du
bas vers le haut.
Utilisation
Débrancher le câble d'alimentation
(croquis 18)
^
Tirez sur le câble d'alimentation jus
-
qu'à la longueur désirée (max. env.
7,5 m).
^ Branchez la fiche de l'appareil dans
la prise.
,En cas d'utilisation de l'aspira-
teur supérieure à 30 minutes, il faut
tirer sur le câble d'alimentation jus-
qu'à ce qu'il soit complètement sor-
ti. Risque de surchauffe et de dom-
mage.
Enroulement du câble (croquis 19)
^
Débranchez la fiche de l'aspirateur.
^
Appuyez sur la pédale d'enroule
-
ment : le câble s’enroule automati
-
quement.
Mise en marche et arrêt (croquis 20)
^
Appuyez sur la pédale "Marche-Arrêt"
s.
63
fr

Sélection de la puissance
d’aspiration
Ce sélecteur permet d’adapter la puis
-
sance de l’aspirateur aux sols ou objets
à aspirer. Pour diminuer la force à exer
-
cer sur la brosse, réduisez la puissance
d’aspiration.
Chez certains modèles, les niveaux de
puissance sont associés à des symbo
-
les qui indiquent par exemple quelle
puissance est adaptée à telle ou telle
application.
Le niveau de puissance sélectionné
s'allume en jaune.
# - Rideaux, textiles
$ - Meubles, coussins
% - Tapis de valeur, carpettes
* - Aspiration quotidienne à faible
consommation et bruit réduit
( - Tapis et moquettes en
bouclettes
) - Sols durs, tapis et moquettes très
sales
,
Lorsque vous utilisez la brosse
AirTeQ et que la force de glisse
vous paraît trop élevée, réduisez la
puissance d'aspiration jusqu'à ce
que la brosse glisse plus facilement.
En fonction du modèle, votre aspirateur
est équipé en série de l'un des sélec
-
teurs de puissance suivants :
Pédales (croquis 21)
Lors de la première mise en service,
l'aspirateur passe à la puissance maxi
-
male.
Lors des utilisations suivantes, l'aspira
-
teur s'active respectivement dans le
dernier niveau de puissance sélection
-
né.
^
Appuyez sur la pédale +, si vous sou
-
haitez augmenter la puissance.
^
Appuyez sur la pédale -, si vous sou
-
haitez réduire la puissance.
Pédales Automatic (croquis 22 + 23)
Lors de la première mise en service,
l'aspirateur s'enclenche au niveau de
puissance "Auto".
Auto = adaptation automatique de la
puissance d'aspiration au type
de revêtement du sol
,
N'aspirez pas de tissus ou de ri-
deaux fins et fragiles avec le niveau
de puissance "Auto". Ces pièces
pourraient être aspirées dans l'ap-
pareil et risqueraient d'être endom-
magées.
^
Appuyez sur la pédale +, lorsque
vous voulez changer en mode Turbo.
^
Appuyez sur la pédale -, lorsque
vous voulez changer en mode de
puissance minimale.
Lors des utilisations suivantes, l'aspira
-
teur s'active respectivement dans le
dernier niveau de puissance sélection
-
né.
Poignée avec commande à distance
et fonction Automatic (croquis 24)
Après mise en marche de l'aspirateur
avec la pédale Marche / Arrêt s,le
voyant de Veille - s'allume en jaune.
fr
64

^
Appuyez sur la touche Veille - sur la
poignée.
La diode d'affichage Veille - sur l'aspi
-
rateur s'éteint.
Lors de la première mise en service,
l'aspirateur passe à la puissance maxi
-
male.
Lors des utilisations suivantes, l'aspira
-
teur s'active respectivement dans le
dernier niveau de puissance sélection
-
né.
^
Appuyez sur la touche +, si vous sou
-
haitez augmenter la puissance.
^ Appuyez sur la touche -, si vous sou-
haitez diminuer la puissance.
Auto = adaptation automatique de la
puissance d'aspiration au type
de revêtement du sol
,
N'aspirez pas de tissus ou de ri-
deaux fins et fragiles avec le niveau
de puissance "Auto". Ces pièces
pourraient être aspirées dans l'ap
-
pareil et risqueraient d'être endom
-
magées.
Ouvrir le curseur d'air additionnel
(croquis 25 + 26)
(indisponible pour les modèles avec
commande à distance)
Ce curseur permet de réduire briève
-
ment la puissance d'aspiration pour
éviter que la brosse ne reste "collée"
sur le revêtement du sol.
^
Ouvrez le curseur jusqu’à ce que la
brosse glisse facilement.
L’ouverture du curseur réduit la force
qui s’exerce sur la brosse.
En aspirant (croquis 27 + 28)
^
Tirez l’aspirateur derrière vous ou
bien tenez-le à la verticale, pour aspi
-
rer des escaliers ou des rideaux par
exemple.
,
Lorsque vous aspirez des pous
-
sières fines telles que sciure, sable,
farine, etc., des décharges électro
-
statiques peuvent se produire dans
certaines situations. Pour éviter les
désagréments causés par ces dé
-
charges, cet aspirateur est équipé
d'une pièce métallique au bas de la
poignée. Veillez à bien positionner
votre main sur cette pièce pendant
que vous aspirez
Interrompre le fonctionnement de
l'aspirateur (croquis 24)
(pour modèles avec poignée à distance)
Vous pouvez momentanément arrêter
l'aspirateur pour de courtes pauses.
^ Appuyez sur la touche Veille - sur la
poignée.
,
Ne laissez pas l'aspirateur en
mode Veille pour des périodes trop
longues. Ne faites que de courtes
pauses. Risque de surchauffe et de
dommage.
A chaque pression sur la télécomman
-
de la diode s'allume.
Après la pause vous avez les possibili
-
tés suivantes.
^
En appuyant à nouveau sur la touche
Veille - l'aspirateur se met en mar
-
che avec la dernière puissance sé
-
lectionnée.
fr
65
^
En appuyant sur la touche +, l'aspira
-
teur se met en marche à la puissance
supérieure.
^
En appuyant sur la touche -, l'aspira
-
teur se met en marche à la puissance
inférieure.
Transport et rangement
Système Idéal Pause - pour les pau
-
ses (croquis 29)
(inutilisable avec l'électrobrosse
SEB 234 L)
Vous pouvez fixer le tube et la brosse
sur l’aspirateur en cas d’interruption
momentanée.
^ Insérez la brosse grâce à l'ergot
dans le support du système Idéal
Pause.
Si vous passez l'aspirateur sur une
surface en pente, emboîtez les élé-
ments du tube télescopique le plus
possible les uns dans les autres.
Marche / Arrêt avec le système "Idéal
Pause"
Certains modèles sont équipés d'un in
-
terrupteur Marche / Arrêt dans le systè
-
me Idéal Pause.
Le fonctionnement de l'aspirateur est
interrompu automatiquement, lorsque
vous insérez le raccord avec l'ergot
dans le dispositif Idéal Pause.
Lorsque vous retirez l'ergot, l'aspirateur
se remet en marche à la dernière puis
-
sance sélectionnée (pas sur modèles
avec poignée avec commande à dis
-
tance).
Système Idéal Pause pour le range
-
ment (croquis 30 + 31)
,
Après utilisation, arrêtez l'aspira
-
teur et débranchez la prise.
^
Posez l’aspirateur à la verticale.
Il pourra être utile d'emboîter complè
-
tement les éléments du tube télesco
-
pique.
^
Insérez la brosse avec l'ergot prévu à
cet effet dans l'un des deux supp
-
orts, sur les côtés de l'aspirateur (ina
-
dapté à l'utilisation de l'électrobrosse
SEB 234 L).
Ceci est plus pratique pour transporter
ou ranger votre aspirateur.
Si votre aspirateur est équipé d'une
poignée XXL, vous avez une autre pos-
sibilité pour le ranger en gagnant de la
place.
^ Séparez la poignée XXL du tube té-
lescopique inséré.
^
Enroulez le flexible d'aspiration auto
-
ur du tube et insérez l'ergot de la
poignée XXL par le haut dans le deu
-
xième support de tube d'aspiration.
Entretien
,
Mettez l'aspirateur hors tension
avant tout entretien et débranchez
l'appareil.
L’aspirateur est équipé d'un triple sys
-
tème de filtrage.
–
Sac à poussière
–
Filtre moteur
–
Filtre d’évacuation
fr
66
Pour que l’aspirateur fonctionne avec la
puissance d’aspiration maximale, ces
filtres doivent être remplacés régulière
-
ment.
N'utilisez que des sacs à poussière,
des filtres et des accessoires por
-
tant le logo "Original Miele". Ce n'est
qu'à cette seule condition que l'effi
-
cacité de l'aspirateur peut être ex
-
ploitée de manière optimale et que
les meilleurs résultats d'aspiration
seront obtenus.
,
Les sacs à poussière en papier
ou en matériaux similaires ainsi que
les sacs avec plaquette de support
en carton ou les sacs à poussière
ne portant pas le logo "Original
Miele" peuvent rompre et gravement
endommager votre appareil.
Où se procurer les sacs et les filtres ?
Les sacs à poussière portant le logo
"Original Miele" sont disponibles auprès
de votre revendeur, auprès du SAV
Miele ainsi que sur le site Internet
www.boutique.miele.fr
Quels sacs à poussière et quels
filtres choisir ?
Vous reconnaîtrez les sacs à poussière
d'origine Miele avec plaque bleue de
type G/N ainsi que les filtres d'origine
Miele grâce au logo "Original Miele" ap
-
posé sur l'emballage ou directement
sur le sac à poussière.
Chaque pochette de sacs à poussière
comporte en plus un filtre d'évacuation
Air Clean et un filtre moteur.
Lorsque vous souhaitez racheter des
filtres d'évacuation, indiquez le modèle
de votre aspirateur au revendeur ou au
SAV ainsi vous serez certains d'obtenir
les bonnes pièces. Vous avez par ail
-
leurs la possibilité d'acheter tous ces
éléments sur notre boutique Accessoi
-
res en ligne.
Quand remplacer le sac à
poussière ? (croquis 32)
Lorsque la jauge de remplacement du
sac à poussière est entièrement rem-
plie de rouge, le sac à poussière doit
être remplacé.
Les sacs à poussière sont des pro-
duits à usage unique. Jetez les sacs
à poussière pleins. Ne les réutilisez
pas. Les pores obstrués réduisent la
puissance d'aspiration de l'aspira
-
teur.
Vérification
^
Emboîtez la brosse double position.
^
Mettez l'aspirateur en marche et ré
-
glez le sélecteur sur la puissance
maximum.
^
Eloignez la brosse double position du
sol.
fr
67

Fonctionnement de la jauge de
remplacement du sac à poussière
La jauge est paramétrée sur une pous
-
sière mixte (poussière, cheveux, fils, fi
-
bres de moquette, sable etc.).
Si vous aspirez beaucoup de poussière
fine telle que des sciures, du sable et
éventuellement du plâtre ou de la fari
-
ne, les pores du sac se bouchent très
rapidement. La jauge indiquera alors
que le sac est plein alors qu'il ne l'est
peut être pas encore.
Si au contraire vous aspirez beaucoup
de cheveux, de peluches de tapis ou
de laine, la jauge de remplacement ne
réagira que lorsque le sac sera plein à
craquer.
Comment remplacer le sac à
poussière ? (croquis 33 + 34)
^ Appuyez sur la touche de verrouilla-
ge et relevez le couvercle jusqu'au
déclic.
La fermeture "hygiène" du sac à poussiè
-
re se ferme automatiquement de façon à
éviter toute émission de poussière.
^
Retirez le sac de son logement par la
poignée.
^
Insérez le nouveau sac à poussière
jusqu'à la butée dans le logement
bleu. Laissez-le plié tel qu'il sort de
l'emballage.
^
Dans le compartiment à poussière,
dépliez-le autant que possible.
^
Refermez le couvercle du comparti
-
ment à poussière jusqu'au déclic et
veillez à ce que le sac ne reste pas
coincé.
Un verrouillage spécial permet
d'éviter que le couvercle du comp
-
artiment à poussière puisse être fer
-
mé s'il ne contient pas de sac. Ne
jamais forcer !
Quand remplacer le filtre moteur ?
Dès que vous ouvrez une nouvelle po
-
chette de sacs à poussière Miele. Dans
chaque nouvelle pochette de sacs
Miele, vous trouverez un filtre moteur.
Comment remplacer le filtre moteur ?
(croquis 35)
^ Ouvrez le compartiment à poussière.
^ Retirez le sac de son logement par la
poignée.
^ Ouvrez la grille de filtre bleue jus-
qu'à ce qu'elle se bloque et retirez le
filtre moteur usagé en le saisissant
par la surface hygiène propre.
^ Mettez en place le nouveau filtre mo-
teur.
^
Refermez la grille.
^
Placez le nouveau sac à poussière et
enfoncez-le jusqu'à la butée dans le
logement bleu.
^
Refermez le couvercle du comparti
-
ment à poussière jusqu'au déclic et
veillez à ce que le sac ne reste pas
coincé.
fr
68

Quand remplacer le filtre
d'évacuation ?
Différents filtres d’évacuation sont insé
-
rés dans l'aspirateur suivant les modè
-
les (croquis 9).
a Air Clean
Remplacez le filtre d'évacuation à cha
-
que fois que vous ouvrez un nouveau
paquet de sacs à poussière. Chaque
pochette des sacs à poussière Miele
comporte en plus un filtre d'évacuation
Air Clean.
b Filtre ActiveAirClean 50 (noir)
c Filtre HEPA AirClean 50 (blanc)
Lorsque l'indicateur de saturation du fil-
tre d'évacuation est rempli de rouge
(croquis 14).
L'indicateur s'allume après environ
50 heures de fonctionnement, ce qui
correspond à une utilisation moyenne
pendant un an. Vous pouvez continuer
à aspirer, mais l'efficacité d'aspiration
et de filtrage est moindre.
Comment remplacer le filtre
d'évacuation Air Clean ? (croquis 36
+ 37)
Attention à ne mettre qu'un seul filtre
d'évacuation.
^
Ouvrez le compartiment à poussière.
^
Comprimez le déverrouillage de la
grille de filtre et ouvrez la grille de fil
-
tre jusqu'à ce qu'elle se bloque.
^
Retirez le filtre d'évacuation Air Clean
usagé par le coin carré "hygiène".
^
Insérez le nouveau filtre Air Clean.
Si vous souhaitez mettre en place
un filtre d'évacuation ActiveAirClean
50 ou HEPA AirClean 50 reportez
vous au chapitre "Changement de
type de filtre d'évacuation".
^
Fermez la grille du filtre.
^
Fermez le compartiment à poussière.
Comment remplacer le filtre
d'évacuation ActiveAirClean 50 et
HEPA AirClean 50 ? (croquis 38 + 39)
Attention à ne mettre qu'un seul filtre
d'évacuation.
^ Ouvrez le compartiment à poussière.
^ Soulevez le filtre d'évacuation et reti-
rez-le.
^ Insérez le nouveau filtre d'évacuation
et poussez-le vers le bas.
^ Appuyez sur l'indicateur de saturati-
on du filtre ~ (croquis 12).
^
Après env. 10 - 15 secondes, une
bande étroite rouge apparaît sur le
côté gauche de l'indicateur (croquis
13).
Si vous souhaitez mettre en place
un filtre d'évacuation Air Clean re
-
portez vous au chapitre "Change
-
ment de type de filtre d'évacuation".
^
Fermez le compartiment à poussière.
fr
69
Changement de type de filtre
d'évacuation
Différents filtres d’évacuation sont insé
-
rés dans l'aspirateur suivant les modè
-
les (croquis 9).
a Filtre Air Clean
b Filtre ActiveAirClean 50 (noir)
c Filtre HEPA AirClean 50 (blanc)
A observer lors du changement
1. Si vous souhaitez utiliser un filtre b
ou c au lieu du filtre a, vous devez reti
-
rer la grille pour filtre et utiliser le nou-
veau filtre d'évacuation adéquat. (cro-
quis 39). Vous devez également activer
l'indicateur de saturation du filtre d'éva-
cuation (croquis 12).
2. Si vous souhaitez utiliser un filtre a au
lieu du filtre b ou c, vous devez obliga-
toirement remonter une grille de filtre *
(croquis 37).
* Grille de filtre - voir section "Accessoi-
res en option"
Attention à ne mettre qu'un seul filtre
d'évacuation.
Voyant de saturation des filtres avec
touche Reset (croquis 40)
Certains modèles sont équipés d'un
voyant de saturation des filtres.
Le voyant de saturation des filtres s'al
-
lume après environ 50 heures de foncti
-
onnement, ce qui correspond à l'utilisa
-
tion moyenne de l'aspirateur pendant
un an. Il faut alors vérifier à quel point le
filtre moteur et le filtre d'évacuation sont
sales.
Vous devez annuler le compteur du
voyant après chaque remplacement de
ces pièces. A cet effet la prise de cou
-
rant doit être branchée.
^
Appuyez sur la touche Reset.
Le voyant de saturation des filtres et la
touche Reset s'éteignent ; ils sont réini
-
tialisés.
Le voyant de saturation des filtres
ne pourra être réinitialisé que si
vous avez appuyé sur la touche Re
-
set après que le voyant se soit allu
-
mé mais ne sera pas réinitialisé si
vous avez appuyé sur cette touche
avant.
Quand faut-il remplacer la pile sur la
poignée avec commande à distance ?
Environ tous les 18 mois. Préparez pour
cela une pile 3V (pile ronde CR 2032).
Si la pile est épuisée ou si aucune
pile n'est insérée, l'aspirateur foncti-
onnera quand même.
^
Mettez l'aspirateur sous tension en
appuyant sur la pédale Marche /
Arrêt s. Le voyant Veille - sur
l'aspirateur s'allume en jaune.
^
Appuyez sur la touche Restart de
l'aspirateur (croquis 41)
L'aspirateur peut être utilisé ainsi mais
à puissance maximum uniquement.
fr
70

Comment remplacer la pile sur la
commande à distance ? (croquis 42)
^
Déverrouiller le cache du logement à
pile avec un tournevis par exemple.
^
Remplacez la pile par une nouvelle.
^
Remontez le cache.
^
Rapportez l'ancienne pile à un en
-
droit de collecte spécial.
Quand remplacer les ramasse-fils ?
Les ramasse-fils au niveau de la fente
d'aspiration de la brosse peuvent être
remplacés.
Remplacez le ramasse-fils lorsque le
velours est usé.
Comment remplacer le ramasse-fils ?
(croquis 43 + 44)
^ Dégagez les ramasse-fils des fentes
avec un tournevis par exemple.
^ Remplacez-les par des nouveaux.
Suceur à coussin SPD 10 (croquis 45)
^
Déverrouillez les ramasse-fils sur les
deux côtés de la brosse à coussins à
l'aide d'une pièce.
^
Remplacez les ramasse-fils et ver
-
rouillez les à nouveau.
Nettoyage des roulettes (croquis 46)
(pas nécessaire pour la brosse AirTeQ)
a Déverrouillez l'axe de la roulette à
l'aide d'une pièce de monnaie.
b Retirez l'axe de la roulette.
c Retirez la roulette.
^
Retirez les fils et cheveux, replacez la
roulette et verrouillez l'axe à roulette.
Vous pouvez vous procurer les pièces
de rechange chez votre revendeur ou
au SAV Miele.
Entretien
,
Mettez l'aspirateur hors tension
avant tout nettoyage et débranchez
l'appareil.
Aspirateur et accessoires
Vous pouvez nettoyer l’aspirateur et
tous les accessoires en plastique avec
un nettoyant pour plastique classique,
vendu dans le commerce.
,
N'utilisez jamais de produits ab-
rasifs, de nettoyants pour vitres ou
multi-usages ni de produit conte-
nant de l'huile ou des graisses !
Compartiment à poussière
Si nécessaire et si vous disposez d’un
deuxième aspirateur vous pouvez aspi-
rer l’intérieur du compartiment à pous
-
sière ou simplement le nettoyer avec un
chiffon sec ou un pinceau.
,
Ne plongez jamais l'aspirateur
dans l'eau. La présence d'humidité
dans l'appareil peut provoquer des
décharges électriques.
fr
71
Anomalies
L'aspirateur s'arrête automatique
-
ment.
Sur certains modèles, le voyant de
protection thermique , s'allume.
Un limiteur de température arrête l'aspi
-
rateur en cas de surchauffe. Sur cer
-
tains modèles, un voyant de protection
contre la surchauffe , s'allume.
Ce problème peut notamment survenir
lorsqu'un objet obstrue le tuyau d'aspi
-
ration ou lorsque le sac à poussière est
plein ou rempli de poussières fines qui
ne laissent pas passer l'air. Un encras-
sement du filtre d'évacuation ou du fil-
tre du compartiment à poussière peut
également entraîner une surchauffe.
Dans ce cas, arrêtez l'aspirateur (en
appuyant sur la touche Marche / Arrêt
s) et débranchez-le!
Après élimination de la cause du pro-
blème, attendez env. 20-30 minutes
que l'appareil se soit suffisamment re-
froidi avant de le remettre en marche.
Service après vente
Si vous avez besoin du service après
vente, contactez
–
votre revendeur Miele
ou
–
le SAV Miele : F 09 74 50 1000
B 02 451 1680
CH 0 800 800 222
Conditions de garantie
La garantie est accordée pour cet aspi
-
rateur selon les modalités de vente par
le revendeur ou par Miele pour une pé-
riode de 24 mois.
Vous pourrez obtenir plus d'informa-
tions concernant les conditions de ga-
rantie au n° de téléphone ci-dessus.
Vous pourrez également y demander
les conditions de garantie sous forme
écrite.
Accessoires en option
Veuillez vous conformer aux con
-
seils de nettoyage et d’entretien du
fabricant du revêtement de sol.
Vous pouvez commander ces articles
sur Internet dans la boutique Accessoi
-
res sur le site www.miele.fr
Vous pouvez également les comman
-
der chez votre revendeur Miele et par
le service après-vente Miele.
fr
72

Certains modèles sont équipés en série
avec l'un ou plusieurs des accessoires
suivants :
Electrobrosses
seulement pour modèles équipés d'une
prise pour électrobrosse, reconnaissa
-
ble par un point de pression sur le ca
-
pot.
Electrobrosse Electro Comfort
(SEB 216-3)
Pour le nettoyage en profondeur des ta
-
pis et moquettes robustes. Elle permet
d'éliminer facilement les salissures in-
crustées sans laisser de marques de
passage.
Electrobrosse Electro Premium
(SEB 234 L)
Cette électrobrosse est plus large de
60 mm et plus puissante. Elle est donc
particulièrement adaptée au nettoyage
de surfaces plus grandes.
Par rapport à la brosse SEB 216-3, elle
dispose en plus
–
d'un réglage en hauteur pour l'adap
-
tation à différentes hauteurs de sol
–
de diodes pour éclairer la surface à
aspirer.
–
d'un voyant lumineux multifonction.
Brosses / suceurs
Brosse Allergotec (SBDH 285-3)
Pour le nettoyage quotidien de tous les
revêtements de sol. Lors de l'aspiration,
le degré de propreté est indiqué par un
affichage chromatique (tricolore).
Turbobrosse (STB 205-3)
Pour aspirer sur des revêtements de sol
à poils courts.
Brosse pour sols durs (SBB 235-3)
Spécialement conçue pour aspirer sur
les sols durs et peu fragiles comme les
carrelages.
Brosse Parquet (SBB Parquet -3)
Brosse équipée de poils naturels pour
aspirer sur les sols durs fragiles, com
-
me le parquet et le stratifié.
Brosse Twister (SBB 300-3) pour sols
durs
Pour nettoyer les sols durs tels que car-
relages et les recoins difficiles d'accès.
Brosse Parquet Twister XL
(SBB 400-3)
Pour nettoyer les grandes surfaces de
sols durs et les recoins difficiles d'ac-
cès.
Autres accessoires
Mallette d'accessoires (SMC 20)
Pour nettoyer les petits objets et les en
-
droits difficiles d'accès (chaîne stéréo,
claviers, maquettes etc.)
Mallette d'accessoires CarCare
(SCC 10)
Spécialement conçue pour nettoyer les
habitacles de voitures.
fr
73

Mallette d'accessoires Cat&Dog
(SCD 10)
Accessoires pour le nettoyage des foy
-
ers avec animaux domestiques.
Mallette d'accessoires HomeCare
(SHC 10)
Accessoire pour le nettoyage des piè
-
ces d'habitation.
Mini-turbobrosse (STB 20)
Pour nettoyer les coussins, matelas ou
les sièges de voiture.
Brosse universelle (SUB 20)
Pour dépoussiérer les livres, des étagè-
res, etc.
Brosse à radiateurs et à interstices
(SHB 30)
Pour dépoussiérer les éléments des ra-
diateurs, les étagères étroites ou les
plinthes.
Suceur plat pour matelas (SMD 10)
Pour nettoyer confortablement les ma
-
telas et les canapés jusque dans les re
-
coins.
Suceur plat, 300 mm (SFD10)
Suceur long XXL pour nettoyer plis,
plinthes et coins.
Suceur long 560 mm (SFD 20)
Suceur long flexible pour aspirer dans
les endroits difficiles d'accès.
Suceur à coussins 190 mm (SPD 10)
Pour aspirer les coussins, matelas etc.
Rallonge de flexible (SFS 10)
Pour rallonger le tube d'aspiration d'en
-
viron 1,5 m.
Fermeture "hygiène" avec charbon
actif
Permet d'éviter l'émission de poussière
et d'odeurs désagréables lorsque le
tube d'aspiration est enlevé.
Poignée Confort avec fonction
Spotlight (SGC 20)
Pour éclairer la surface à aspirer.
Filtres
Filtre d'évacuation ActiveAirClean 50
(SF-AA 50)
Absorbe les odeurs résultant de la sale-
té accumulée dans le sac à poussière.
Filtre d'évacuation HEPA AirClean 50
(SF-HA 50)
Filtre de haute qualité qui garantit la pu
-
reté de l'air d'évacuation. Convient par
-
ticulièrement bien aux personnes aller
-
giques.
Grille pour filtre
Nécessaire lorsque vous souhaitez
remplacer un filtre ActiveAirClean 50 ou
HEPA AirClean 50 par un filtre Air
Clean.
fr
74

Veiligheidsinstructies en waarschuwingen............................76
Een bijdrage aan de bescherming van het milieu.......................81
Algemeen .......................................................82
Vóór gebruik.....................................................84
Gebruik van de accessoires ........................................86
Gebruik .........................................................86
Transporteren en opbergen ........................................89
Onderhoud ......................................................90
Waar kunt u nieuwe stofcassettes en filters krijgen? .......................90
Welke stofcassettes en filters zijn de juiste? .............................90
Wanneer moet u de stofcassette vervangen? ............................90
Wat u moet weten over de stofstandindicator ............................91
Zo vervangt u stofcassettes..........................................91
Wanneer moet u het motorfilter vervangen? .............................91
Het vervangen van het motorfilter .....................................91
Wanneer moet u het uitblaasfilter vervangen? ...........................92
Het vervangen van het Air Clean-filter..................................92
Het vervangen van het ActiveAirClean 50- of het HEPA AirClean 50-filter.......92
Een ander uitblaasfilter plaatsen ......................................93
Controlelampje met reset-toets .......................................93
Wanneer moet de batterij in de handgreep worden vervangen? .............93
Het vervangen van de batterij in de handgreep ..........................93
Wanneer moet u de korte draadopnemers vervangen? ....................94
Het vervangen van de korte draadopnemers ............................94
Loopwieltje van de zuigmond reinigen .................................94
Onderhoud ......................................................94
Storingen .......................................................94
Miele Service ....................................................95
Garantie ........................................................95
Bij te bestellen accessoires ........................................95
nl - Inhoud
75

Dit apparaat voldoet aan de geldende veiligheidsvoor
-
schriften. Onjuist gebruik kan persoonlijk letsel of be
-
schadiging van het apparaat tot gevolg hebben.
Lees eerst de gebruiksaanwijzing voordat u het appa
-
raat voor het eerst gebruikt. Dat is veiliger voor uzelf en
u voorkomt schade aan het apparaat. In de gebruiks-
aanwijzing vindt u belangrijke instructies met betrekking
tot de veiligheid, het gebruik en het onderhoud.
Bewaar de gebruiksaanwijzing en geef deze door aan
een eventuele volgende eigenaar.
Verantwoord gebruik
~
Dit apparaat is uitsluitend bestemd voor particulier huis-
houdelijk gebruik (of daarmee vergelijkbaar).
~
Het apparaat mag niet buiten worden gebruikt.
~
Deze stofzuiger is uitsluitend voor het opzuigen van
droog stof. Ieder ander gebruik is voor eigen risico en kan
gevaarlijk zijn. Mensen en dieren (kleding, vacht, etc.) mo
-
gen niet met de stofzuiger worden gezogen. De specifica
-
ties van het apparaat mogen niet worden gewijzigd.
Wij attenderen u erop dat het opzuigen van vloeistoffen
(bijvoorbeeld water) of fijn stof (zoals boorgruis, zand,
meel en gips) ernstige schade aan de stofzuiger kan
toebrengen en tot gevolg heeft dat de garantie op uw
Miele-stofzuiger vervalt.
nl - Veiligheidsinstructies en waarschuwingen
76

~
Dit apparaat mag alleen worden gebruikt door personen
die in staat zijn het apparaat veilig te bedienen en die vol
-
ledig op de hoogte zijn van de inhoud van de gebruiksaan
-
wijzing!
Kinderen
~
Houd kinderen onder acht jaar op een afstand, tenzij u
voortdurend toezicht houdt.
~
Kinderen vanaf acht jaar mogen het apparaat alleen
zonder toezicht gebruiken als ze weten hoe ze het appa-
raat veilig moeten bedienen. De kinderen moeten zich be-
wust zijn van de gevaren van een foutieve bediening.
~
Kinderen mogen het apparaat niet zonder toezicht reini-
gen of onderhouden
~
Houd kinderen in de gaten wanneer deze zich in de
buurt van het apparaat bevinden. Laat kinderen nooit met
het apparaat spelen.
~
Bij modellen met bediening in de handgreep: Zorg dat
kinderen niet met de batterijen in aanraking komen.
Technische veiligheid
~
Controleer het apparaat voor gebruik op zichtbare be
-
schadigingen. Neem een beschadigde stofzuiger niet in
gebruik.
~
Voordat u de stofzuiger aansluit, dient u de aansluitge
-
gevens (spanning en frequentie) op het typeplaatje te ver
-
gelijken met de waarden van het elektriciteitsnet. Deze ge
-
gevens moeten beslist overeenstemmen.
nl - Veiligheidsinstructies en waarschuwingen
77

~
De contactdoos moet met ten minste 16 A of 10 A traag
zijn beveiligd.
~
Als dit apparaat binnen de garantieperiode defect raakt,
mag het alleen door Miele worden gerepareerd, anders
vervalt de garantie.
~
Gebruik het aansluitsnoer niet om de stofzuiger te dra
-
gen en trek de stekker niet aan het snoer uit de contact
-
doos. Het snoer mag niet over scherpe randen worden ge
-
trokken of onder deuren of iets dergelijks beklemd raken.
Trek de stofzuiger niet onnodig over het snoer.
Het aansluitsnoer, de stekker en de contactdoos kunnen
anders beschadigd raken, met alle risico's van dien.
~
Gebruik de stofzuiger niet als het aansluitsnoer bescha-
digd is. Laat een beschadigd aansluitsnoer alleen com-
pleet met kabeltrommel vervangen. Om veiligheidsredenen
mag dit alleen door een door Miele geautoriseerde vakman
of door Miele worden gedaan.
~
De contactdoos op het apparaat (afhankelijk van het
model) mag alleen worden gebruikt voor de in deze ge
-
bruiksaanwijzing genoemde elektrische borstels van Miele.
~
Tijdens het zuigen wordt vaak een elektrostatische la
-
ding opgebouwd die zich onder bepaalde omstandighe
-
den kan ontladen. Om de onaangename effecten van een
dergelijke ontlading te voorkomen, bevindt zich aan de on
-
derkant van de handgreep een metalen strip. Zorg dat u
die strip tijdens het zuigen steeds aanraakt. De elektrostati
-
sche lading wordt dan afgevoerd zonder dat u het merkt.
nl - Veiligheidsinstructies en waarschuwingen
78

~
Schakel na gebruik, vóór het wisselen van hulpstukken
en vóór onderhoudswerkzaamheden de stofzuiger uit. Trek
de stekker uit de contactdoos.
~
Dompel de stofzuiger nooit in water en reinig het appa
-
raat alleen droog of met een iets vochtige doek.
~
Reparaties mogen alleen door vakmensen worden uitge
-
voerd die door Miele zijn geautoriseerd. Ondeskundig uit
-
gevoerde reparaties kunnen voor de gebruiker gevaar
opleveren.
Veilig gebruik
~
Gebruik de stofzuiger niet zonder stofcassette, motorfil-
ter en uitblaasfilter.
~
U kunt het deksel niet sluiten als zich geen stofcassette
in het apparaat bevindt. Druk het deksel niet met geweld
dicht.
~
Zuig nooit brandende of gloeiende voorwerpen op (zo-
als sigarettenpeuken, as en kolen).
~
Zuig nooit vloeistoffen of vochtig vuil op. Laat met water
of sop gereinigde oppervlakken eerst helemaal opdrogen,
voordat u gaat zuigen.
~
Zuig geen toner-resten op. Toner van bijvoorbeeld prin
-
ters of kopieerapparaten kan elektriciteit geleiden.
~
Zuig nooit licht ontvlambare of explosieve stoffen of gas
-
sen op in verband met explosiegevaar. Zuig ook nooit in
een ruimte waar dergelijke stoffen opgeslagen liggen.
nl - Veiligheidsinstructies en waarschuwingen
79

~
Houd zuigmonden en buizen niet te dicht bij het hoofd
als de stofzuiger aanstaat.
~
Belangrijk voor de omgang met de batterij (bij modellen
met bediening in de handgreep):
–
Sluit batterijen niet kort, laad ze niet weer op en gooi ze
niet in het vuur.
–
Haal lege batterijen uit de greep en lever deze op de
daarvoor bestemde plaats in. Doe de batterijen niet bij
het gewone huisvuil.
Accessoires
~
Raak tijdens het stofzuigen met een elektrische borstel
of turboborstel van Miele niet de draaiende borstelas aan.
~
De handgreep mag niet beschadigd zijn, als u voor het
zuigen alleen de greep gebruikt.
~
Gebruik uitsluitend stofcassettes, filters en accessoires
met het "Original Miele"-logo. Alleen daarvan kan Miele de
veiligheid waarborgen.
Miele kan niet aansprakelijk worden gesteld voor schade
die ontstaat door onjuist gebruik, door foutieve bedie
-
ning en door het niet opvolgen van de veiligheidsinstruc
-
ties en waarschuwingen.
nl - Veiligheidsinstructies en waarschuwingen
80

Het verpakkingsmateriaal
De verpakking beschermt het apparaat
tegen transportschade. Het verpak
-
kingsmateriaal is uitgekozen met het
oog op een zo gering mogelijke belas-
ting van het milieu en de mogelijkheden
voor recycling.
Hergebruik van het verpakkingsmateri
-
aal remt de afvalproductie en het ge
-
bruik van grondstoffen. Vaak neemt de
leverancier de verpakking terug. Als u
de verpakking zelf wegdoet, informeer
dan bij de reinigingsdienst van uw ge
-
meente waar u die kunt afgeven.
Gebruikte stofcassettes en fil-
ters
De stofcassettes en filters zijn van
milieuvriendelijke materialen. De filters
kunnen met het gewone huisvuil wor-
den weggegooid. Dit geldt ook voor de
stofcassettes, voor zover er geen stof-
fen in zitten die niet bij het gewone
huisvuil mogen.
Het afdanken van een apparaat
Verwijder de stofcassette en de ge
-
plaatste filters voordat u het apparaat
afdankt. U kunt deze onderdelen bij het
gewone huisvuil doen.
Oude elektrische en elektronische ap
-
paraten bevatten meestal nog waarde
-
volle materialen. Ze bevatten echter
ook schadelijke stoffen die nodig zijn
geweest om de apparaten goed en vei
-
lig te laten functioneren. Wanneer u uw
oude apparaat bij het gewone afval
doet of er op een andere manier niet
goed mee omgaat, kunnen deze stoffen
schadelijk zijn voor de gezondheid en
het milieu.
Verwijder uw oude apparaat dan ook
nooit samen met het gewone afval,
maar lever het in bij een gemeentelijk
inzameldepot voor elektrische en elek
-
tronische apparatuur. Vraag uw hande
-
laar indien nodig om inlichtingen.
Het afgedankte apparaat moet buiten
het bereik van kinderen worden opge-
slagen.
nl - Een bijdrage aan de bescherming van het milieu
81

nl - Algemeen
82

De afbeelding toont de stofzuiger met alle verkrijgbare accessoires.
a Zuigslang
b Ontgrendeling accessoirevak
c Stofstandindicator
d Display *
e Voetpedaal automatische snoerhaspel
f Parkeersysteem voor zuigpauzes
g Voetpedaal Aan / Uit s
h Aansluitsnoer
i Wieltjes *
j Uitblaasfilter *
k Parkeersysteem (zuigbuishouder aan beide kanten van de stofzuiger)
l Motorfilter (bescherming motor)
m Houder afdekking aansluitpunt elektrische borstel
n Originele Miele-stofcassette
o Draagbeugel
p Zuigmond *
q Ontgrendelingsknoppen
r Telescopische zuigbuis *
s Ontgrendeling bovenzijde
t Verstelknoppen telescopische zuigbuis *
u Aansluitpunt voor elektrische borstel *
v Aansluitstuk
w LED *
x Stand-by-toets voor korte zuigpauzes *
y Toetsen + / - voor het instellen van het zuigvermogen *
z Handgreep (afhankelijk van het model met zuigkrachtregelaar) *
{ Controlelampje veiligheidsvoorziening § *
| Restart-toets *
} Controlelampje stand-by *
~ Controlelampje met reset-toets *
Afhankelijk van het model kunnen de met * aangeduide onderdelen afwijken of
ontbreken.
nl - Algemeen
83

De afbeeldingen waarnaar met num
-
mers wordt verwezen, vindt u op de
uitklappagina's achter in deze ge
-
bruiksaanwijzing.
Vóór gebruik
Zuigslang aansluiten (afb. 1)
^
Steek het aansluitstuk in de zuigope
-
ning van de stofzuiger. Het aansluits
-
tuk moet vastklikken. Zorg dat de
nokjes op elkaar aansluiten (zie af
-
beelding).
Zuigslang loshalen (afb. 2)
^ Druk op de knoppen aan weerszijden
van het aansluitstuk en trek het aan-
sluitstuk uit de zuigopening.
Zuigslang en greep in elkaar schui-
ven (afb. 3)
^ Steek de slang in de handgreep. De
slang moet vastklikken.
Greep en zuigbuis in elkaar schuiven
(afb. 4)
^
Steek de handgreep in de zuigbuis.
Richt daarbij het puntje op de greep
op het gaatje in de zuigbuis (zie af
-
beelding). De greep zit goed als u
een klik hoort.
^
Om de delen weer uit elkaar te halen,
drukt u op de ontgrendelingsknop en
trekt u de handgreep iets draaiend
uit de zuigbuis (zie afbeelding).
Afhankelijk van het model heeft uw stof
-
zuiger een van de volgende telescopi
-
sche zuigbuizen.
–
Telescopische zuigbuis (2-delig)
–
Telescopische zuigbuis (3-delig)
Telescopische zuigbuis (2-delig) in
-
stellen (afb. 5)
Deze telescopische zuigbuis bestaat uit
twee in elkaar geschoven buizen waar
-
mee u de zuigbuis op de gewenste
lengte kunt instellen.
^
Druk op de verstelknop en stel de
juiste lengte in.
Telescopische zuigbuis (3-delig) in
-
stellen (afb. 5)
Deze telescopische zuigbuis bestaat uit
drie in elkaar geschoven buizen.
a Druk op de ontgrendelingsknop van
de onderste buis en trek de buis zo-
ver uit dat deze vastklikt. Druk ook
op de ontgrendelingsknop als u de
buis weer wilt inschuiven. De ver-
grendeling moet hoorbaar vastklik-
ken.
b Druk op de verstelknop en stel de
juiste lengte in.
Zuigmond aanbrengen (afb. 6)
^
Zet de zuigmond links- en rechtsom
-
draaiend op de zuigbuis. De zuig
-
mond zit goed als u een klik hoort.
^
Druk de ontgrendelingsknop in om
de delen weer uit elkaar te halen.
nl
84

Zuigmond instellen (afb.7+8)
De zuigmond is geschikt voor het da
-
gelijks zuigen van tapijt, vaste vloerbe
-
dekking en robuuste harde vloeren.
Voor andere vloerbedekkingen advise
-
ren wij het gebruik van speciale
Miele-borstels (zie "Bij te bestellen ac
-
cessoires").
Houdt u zich in de eerste plaats aan
de reinigings- en onderhoudsin
-
structies van de fabrikant van de
vloerbedekking!
Zuig vloerkleden en vaste vloerbedek-
king met ingetrokken borstel:
^ Zet de zuigmond op het symbool %.
Zuig harde vloeren met uitgeschoven
borstel:
^ Zet de zuigmond op het symbool ).
Zuig vloeren met zeer diepe voegen
en naden altijd met uitgeschoven
borstel.
Zuigmond AirTeQ (afb. 8)
Deze zuigmond is speciaal ontwikkeld
om uitstekende reinigingsresultaten te
combineren met een laag energiever
-
bruik. De luchtstroming in de zuigmond
is optimaal, waardoor de zuigkracht ex
-
tra groot is.
,
Als u de zuigmond AirTeQ
slechts met moeite kunt verplaatsen,
verlaagt u het zuigvermogen, totdat
u de zuigmond wel gemakkelijk kunt
verplaatsen (zie "Gebruik - Zuigver
-
mogen kiezen").
Activering indicator uitblaasfilter
Afhankelijk van het model heeft uw stof
-
zuiger één van de volgende uitblaasfil
-
ters (afb. 9):
a een Air Clean-filter
b een ActiveAirClean 50-filter (zwart)
c een HEPA AirClean 50-filter (wit)
Gebruikt u filter b of c, dan moet u de
indicator op het uitblaasfilter activeren.
^
Druk de ontgrendelingsknop bij de
draagbeugel in en klap het deksel
omhoog tot u een klik hoort (afb. 10).
^ Verwijder de strip van het uitblaasfil-
ter (afb. 11).
^ Druk op de indicator van het filter ~
(afb. 12).
^ Na 10 - 15 seconden verschijnt links
op de indicator een smalle, rode
streep (afb. 13).
^ Druk het deksel omlaag tot u de ver-
grendeling hoort klikken. De stofcas
-
sette mag niet klem zitten.
Functie indicator uitblaasfilter
De indicator geeft de gebruiksduur van
het uitblaasfilter aan. Na ca. 50 be
-
drijfsuren (wat overeenkomt met een
gemiddelde gebruiksduur van een jaar)
is de indicator helemaal rood (afb. 14).
nl
85

Gebruik van de accessoires
(afb. 15)
De volgende accessoires worden bij
het apparaat geleverd:
a Kierenzuiger
Voor het zuigen van naden, kieren,
hoeken, etc.
b Reliëfborstel met natuurhaar
Voor het zuigen van sierlijsten, hout-
snijwerk, kwetsbare voorwerpen en
dergelijke.
De borstel kan in elke gewenste
stand worden gedraaid.
c Meubelzuigmond
Voor gestoffeerde meubels, matras-
sen, kussens, gordijnen, bekleding
en dergelijke.
Enkele modellen worden standaard ge-
leverd met een van de volgende acces-
soires die hier niet worden afgebeeld.
– Elektrische borstel
– Turboborstel
–
Zuigmond Classic Allergotec
Bij deze stofzuigers hoort een aparte
gebruiksaanwijzing voor het betreffen
-
de accessoire.
Het uitnemen van de accessoires
(afb. 16)
^
Druk op de ontgrendelingsknop.
Het accessoirevak gaat open.
^
Haal het gewenste hulpstuk eruit.
^
Sluit het deksel en druk het goed
dicht.
Universele zuigmond (afb. 17)
Ook voor het zuigen van trappen.
,
Zuig trappen voor de veiligheid
van beneden naar boven.
Gebruik
Aansluitsnoer uitrollen (afb. 18)
^
Trek aan het snoer totdat u de ge
-
wenste lengte heeft (max. ca. 7,5 m).
^
Steek de stekker goed in de contact
-
doos.
,
Om oververhitting en beschadi-
ging te voorkomen, moet u het
snoer helemaal uitrollen als u de
stofzuiger langer dan 30 minuten
gebruikt.
Oprollen (afb. 19)
^ Trek de stekker uit de contactdoos.
^
Druk kort het pedaal voor de snoer
-
haspel in. Het snoer wordt automa
-
tisch opgerold.
In- en uitschakelen (afb. 20)
^
Druk op het voetpedaal Aan/Uit s.
Zuigvermogen kiezen
U kunt de zuigkracht van de stofzuiger
aan de situatie aanpassen. Als u het
zuigvermogen verlaagt, kunt u de zuig
-
mond gemakkelijker heen en weer be
-
wegen.
Op de stofzuiger geven de symbolen
duidelijk aan waarvoor de betreffende
stand is:
nl
86

De gekozen vermogensstand licht geel
op.
# - voor gordijnen en textiel
$ - voor gestoffeerde meubels en
kussens
% - voor hoogwaardig velourstapijt,
kleedjes en lopers
* - voor dagelijks zuigen,
energiebesparend en stil
( - voor tapijten en vloerbedekkingen
met poollussen
) - voor harde vloeren en sterk
verontreinigde tapijten en
vloerbedekkingen
,
Als u de zuigmond AirTeQ
slechts met moeite kunt verplaatsen,
verlaagt u het zuigvermogen, totdat
u de zuigmond wel gemakkelijk kunt
verplaatsen.
Afhankelijk van het model heeft uw stof-
zuiger een van de volgende schake
-
laars voor het instellen van de vermo
-
gensstand.
Voetpedalen (afb. 21)
Bij de eerste ingebruikneming wordt de
stofzuiger op de hoogste stand inge
-
schakeld.
Bij elk volgend gebruik wordt de stof
-
zuiger op de vermogensstand inge
-
schakeld die het laatst is gebruikt.
^
Druk op + voor een hoger vermogen.
^
Druk op - voor een lager vermogen.
Voetpedalen met automatic-stand
(afb. 22 + 23)
Bij de eerste ingebruikneming wordt de
stofzuiger op de automatic-stand
("Auto") ingeschakeld.
Auto = automatische aanpassing van
de zuigkracht aan de
vloerbedekking
,
Zuig met de automatic-stand
nooit lichte stoffen of gordijnen.
Deze kunnen worden vastgezogen
en daardoor beschadigd raken.
^ Druk op + als u het maximale vermo-
gen "Turbo" wilt inschakelen.
^ Druk op - als u het minimale vermo-
gen "Min." wilt inschakelen.
Bij elk volgend gebruik wordt de stof-
zuiger op de vermogensstand inge-
schakeld die het laatst is gebruikt.
Handgreepbediening met automatic-
stand (afb. 24)
Na het inschakelen van de stofzuiger
met het voetpedaal Aan/Uit s, licht het
stand-by-lampje - op de stofzuiger
geel op.
^
Druk op de stand-by-toets - op de
handgreep.
Het stand-by-lampje - op de stofzuiger
dooft.
Bij de eerste ingebruikneming wordt de
stofzuiger op de hoogste stand inge
-
schakeld.
nl
87

Bij elk volgend gebruik wordt de stof
-
zuiger op de vermogensstand inge
-
schakeld die het laatst is gebruikt.
^
Druk op de toets + voor een hoger
vermogen.
^
Druk op de toets - voor een lager ver
-
mogen.
Auto = automatische aanpassing van
de zuigkracht aan de
vloerbedekking (afb. 22)
,
Zuig met de automatic-stand
nooit lichte stoffen of gordijnen.
Deze kunnen worden vastgezogen
en daardoor beschadigd raken.
Mechanische zuigkrachtregelaar
(afb. 25 + 26)
(niet bij modellen met bediening in de
handgreep)
Met deze regelaar kunt u het vermogen
van de stofzuiger kortstondig verlagen,
bijvoorbeeld om te voorkomen dat het
apparaat zich aan een kleed vastzuigt.
^
Zet de regelaar zo ver open dat u de
zuigmond gemakkelijk kunt bewe
-
gen.
Als de regelaar openstaat, hoeft u min
-
der kracht te zetten om de zuigmond
over de vloer te bewegen.
Tijdens het zuigen (afb. 27 + 28)
^
Trek de stofzuiger tijdens het zuigen
als een slede achter u aan en zet het
apparaat rechtop als u bijvoorbeeld
trappen en gordijnen wilt zuigen.
,
Tijdens het zuigen wordt vaak
een elektrostatische lading opge
-
bouwd die zich onder bepaalde om
-
standigheden kan ontladen. Om de
onaangename effecten van een der
-
gelijke ontlading te voorkomen, be
-
vindt zich aan de onderkant van de
handgreep een metalen strip. Zorg
dat u die strip tijdens het zuigen
steeds aanraakt. De elektrostatische
lading wordt dan afgevoerd zonder
dat u het merkt.
Pauzeren (afb. 24)
(bij modellen met bediening in de
handgreep)
Tijdens korte zuigpauzes kunt u de stof-
zuiger op stand-by zetten.
^ Druk op de stand-by-toets - op de
handgreep.
,
Laat de stofzuiger niet langdurig
stand-by staan om oververhitting en
beschadiging te voorkomen. Ge
-
bruik de stand-by-functie alleen
voor korte pauzes.
Telkens als u op een toets op de hand
-
greep drukt, wordt dit door de LED
aangegeven.
Na de onderbreking heeft u de volgen
-
de mogelijkheden:
^
Als u opnieuw op de stand-by-toets
- drukt, wordt de stofzuiger op de
laatst gebruikte stand ingeschakeld.
^
Als u op de toets + drukt, wordt de
stofzuiger op de hoogste stand inge
-
schakeld.
nl
88

^
Als u op de toets - drukt, wordt de
stofzuiger op de laagste stand inge
-
schakeld.
Transporteren en opbergen
Parkeersysteem voor zuigpauzes
(afb. 29)
(niet geschikt voor de elektrische
borstel Electro Premium SEB 234 L)
Als u tijdens het stofzuigen even pau
-
zeert, kunt u de zuigbuis met de zuig
-
mond op de stofzuiger "parkeren".
^ Steek de zuigmond met de parkeer-
aansluiting van bovenaf in de ope-
ning aan de achterkant van de stof-
zuiger.
Let op! Schuif de buisdelen van de
telescopische zuigbuis helemaal in
als de stofzuiger op een hellende
ondergrond staat.
Aan/Uit-schakelaar parkeersysteem
Bij sommige modellen is het parkeer
-
systeem voorzien van een
Aan/Uit-schakelaar.
De stofzuiger wordt automatisch uitge
-
schakeld als u de zuigmond in de
parkeerstand zet.
Zodra u de zuigmond uit de parkeer
-
stand haalt, gaat de stofzuiger weer
aan op de vermogensstand die het
laatst is gebruikt (niet bij modellen met
bediening in de handgreep).
Zuigbuishouder (afb. 30 + 31)
,
Schakel de stofzuiger na ge
-
bruik uit. Trek de stekker uit de con
-
tactdoos.
^
Zet de stofzuiger rechtop.
Schuif de telescopische zuigbuis bij
voorkeur helemaal in.
^
Steek de zuigmond met de parkeer-
aansluiting van boven in een van de
twee zuigbuishouders aan de zijkant
van de stofzuiger (niet mogelijk bij de
elektrische borstel SEB 234 L).
Op deze manier kunt u de stofzuiger ge-
makkelijk transporteren en opbergen.
Heeft uw stofzuiger de handgreep XXL,
dan kunt u bij het opbergen nog meer
ruimte besparen.
^ Haal de handgreep los van de
telescopische zuigbuis.
^ Wikkel de zuigslang om de zuigbuis
en steek de parkeeraansluiting van
de handgreep van boven in de twee
-
de zuigbuishouder.
nl
89
Onderhoud
,
Schakel de stofzuiger voor elk
onderhoud uit en trek de stekker uit
de contactdoos.
Het Miele-filtersysteem bestaat uit 3 fil
-
ters:
–
de stofcassette
–
het motorfilter
–
het uitblaasfilter
Voor een optimale werking moet u deze
filters van tijd tot tijd vervangen.
Gebruik uitsluitend stofcassettes, fil-
ters en accessoires met het "Original
Miele"-logo. Alleen met deze pro-
ducten benut u de zuigkracht van
de stofzuiger optimaal en bereikt u
het beste reinigingsresultaat.
,
Het gebruik van stofcassettes
van papier of papierachtige materia-
len en van stofcassettes met een kar
-
tonnen greep kan ernstige schade
aan de stofzuiger veroorzaken en het
vervallen van de garantie tot gevolg
hebben. Hetzelfde geldt voor het ge
-
bruik van stofcassettes zonder het
"Original Miele"-logo.
Waar kunt u nieuwe stofcassettes en
filters krijgen?
Originele stofcassettes en filters van
Miele zijn verkrijgbaar bij de vakhandel,
bij Miele en via de Miele-onlineshop.
Welke stofcassettes en filters zijn de
juiste?
Originele Miele-stofcassettes met blau
-
we greep van het type G/N en originele
Miele-filters herkent u aan het "Original
Miele"-logo op de verpakking of op de
stofcassettes.
In elke verpakking Miele-stofcassettes
vindt u tevens een uitblaasfilter (Air
Clean-filter) en een motorfilter.
Als u originele uitblaasfilters los wilt be-
stellen, geef dan aan de vakhandelaar
of aan Miele het typenummer van uw
stofzuiger door, zodat u de juiste filters
ontvangt. Maar u kunt deze onderdelen
ook gemakkelijk via de Miele-online-
shop bestellen.
Wanneer moet u de stofcassette
vervangen? (afb. 32)
U moet de stofcassette vervangen als
de stofstandindicator aangeeft dat de
cassette vol is (het venster is dan hele
-
maal rood).
Stofcassettes zijn wegwerpartikelen.
Verwijder volle cassettes en gebruik
ze niet opnieuw. Verstopte poriën
leiden tot een aanzienlijke verminde
-
ring van de zuigkracht.
nl
90

Controle of de stofcassette vol is
^
Plaats de universele zuigmond.
^
Schakel de stofzuiger in en kies het
maximale vermogen.
^
Til de zuigmond een stukje van de
vloer.
Wat u moet weten over de stofstand
-
indicator
Over het algemeen bestaat huisstof uit
een mengsel van stof, haren, pluizen,
draadjes, zand, etc. Op die samenstel
-
ling is de stofstandindicator afgesteld.
Wanneer u veel fijn stof opzuigt, zoals
boorgruis, zand, gips en meel, dan ra-
ken de poriën van de stofcassette snel
verstopt. De indicator zal dan "vol" aan-
geven, ook al is de cassette nog niet
vol. U moet de cassette dan toch ver-
vangen.
Als u veel tapijtpluizen en haren op-
zuigt, kan het voorkomen dat de indica-
tor pas reageert als de stofcassette al
overvol is.
Zo vervangt u stofcassettes (afb. 33
+ 34)
^
Trek de ontgrendeling van de boven
-
zijde omhoog en klap het deksel om
-
hoog tot u een klik hoort (afb. 10).
Daarbij wordt de stofafsluiting van de
cassette automatisch gesloten, zodat er
geen stof vrijkomt.
^
Pak de stofcassette bij het lipje vast
en trek de cassette uit de houder.
^
Steek de nieuwe stofcassette tot de
aanslag in de blauwe houder. Laat
de cassette samengevouwen zoals
deze in de verpakking zit.
^
Ontvouw de stofcassette vervolgens
zover mogelijk.
^
Druk het deksel omlaag tot u de ver
-
grendeling hoort klikken. De stofcas
-
sette mag niet klem zitten.
Een beveiliging voorkomt dat u het
deksel kunt sluiten als zich geen
stofcassette in het apparaat bevindt.
Druk het deksel niet met geweld
dicht!
Wanneer moet u het motorfilter
vervangen?
Steeds als u een nieuwe verpakking met
Miele-stofcassettes aanbreekt. In iedere
verpakking zit ook een motorfilter.
Het vervangen van het motorfilter
(afb. 35)
^
Open het deksel van de bovenzijde
van de stofzuiger.
^
Pak de stofcassette bij het lipje vast
en trek de cassette uit de houder.
^
Klap de blauwe filterhouder open
(tot de klik) en haal het oude motorfil
-
ter eruit (aan het schone hoekje).
^
Plaats het nieuwe filter.
^
Sluit de filterhouder.
^
Steek de stofcassette tot de aanslag
in de blauwe houder.
^
Druk het deksel omlaag tot u de ver
-
grendeling hoort klikken. De stofcas
-
sette mag niet klem zitten.
nl
91
Wanneer moet u het uitblaasfilter
vervangen?
Afhankelijk van het model heeft uw stof
-
zuiger één van de volgende uitblaasfil
-
ters (afb. 9):
a een Air Clean-filter
Vervang het uitblaasfilter steeds als u
een nieuwe verpakking stofcassettes
aanbreekt. In iedere verpakking
Miele-stofcassettes zit een Air Clean-fil
-
ter.
b een ActiveAirClean 50-filter (zwart)
c een HEPA AirClean 50-filter (wit)
Vervang het betreffende uitblaasfilter
als de indicator op het filter helemaal
rood is geworden (afb. 14). Dit gebeurt
na circa 50 bedrijfsuren, wat neerkomt
op een gebruiksduur van gemiddeld
een jaar. U kunt wel blijven zuigen,
maar houdt u er rekening mee dat de
zuigkracht en de filtercapaciteit afne-
men.
Het vervangen van het Air Clean-filter
(afb. 36 + 37)
Plaats nooit meer dan één filter.
^
Open het deksel van de bovenzijde
van de stofzuiger.
^
Druk de ontgrendeling van het filter
-
rooster samen en open het rooster
(totdat het vastklikt).
^
Haal het oude Air Clean-filter er aan
een van de schone kanten uit (zie
pijltjes).
^
Leg het nieuwe Air Clean-filter erin.
Als u een ActiveAirClean 50- of een
HEPA AirClean 50-filter wilt plaat
-
sen, volg dan beslist de aanwijzin
-
gen onder "Een ander uitblaasfilter
plaatsen".
^
Sluit het filterrooster.
^
Sluit het deksel van de stofzuiger.
Het vervangen van het ActiveAirClean
50- of het HEPA AirClean 50-filter
(afb. 38 + 39)
Plaats nooit meer dan één filter.
^ Open het deksel van de bovenzijde
van de stofzuiger.
^ Haal het uitblaasfilter omhoog en ver-
wijder het.
^ Plaats het nieuwe filter en druk het
omlaag.
^ Druk op de indicator van het filter ~
(afb. 12).
^
Na 10 - 15 seconden verschijnt links
op de indicator een smalle, rode
streep (afb. 13).
Als u een Air Clean-filter wilt plaat
-
sen, volg dan beslist de aanwijzin
-
gen onder "Een ander uitblaasfilter
plaatsen".
^
Sluit het deksel van de stofzuiger.
nl
92

Een ander uitblaasfilter plaatsen
Afhankelijk van het model heeft uw stof
-
zuiger één van de volgende uitblaasfil
-
ters (afb. 9):
a een Air Clean-filter
b een ActiveAirClean 50-filter (zwart)
c een HEPA AirClean 50-filter (wit)
Belangrijk!
1. Als u het uitblaasfilter a door filter b
of c wilt vervangen, moet u ook het fil
-
terrooster verwijderen. Voor het nieuwe
filter (afb. 39) is het rooster niet nodig.
Daarnaast moet u de indicator op het
filter activeren (afb. 12).
2. Als u uitblaasfilter b of c door filter a
wilt vervangen, moet u het filter beslist
in een filterrooster * plaatsen (afb. 37)!
* Filterrooster - zie "Bij te bestellen ac-
cessoires"
Plaats nooit meer dan één filter.
Controlelampje met reset-toets
(afb. 40)
Sommige modellen hebben een speci
-
aal controlelampje.
Het controlelampje licht na circa 50 be
-
drijfsuren op. Dit komt neer op een ge
-
bruiksduur van gemiddeld een jaar. Op
dat moment moet de verontreiniging
van het motorfilter en het uitblaasfilter
worden gecontroleerd.
U moet de elektronica na het vervan
-
gen van de onderdelen resetten. Hier
-
voor moet het apparaat ingeschakeld
zijn.
^
Druk op de reset-toets.
Het controlelampje en de reset-toets do
-
ven en het systeem staat weer op nul.
Het systeem wordt alleen op nul ge
-
zet als u op de reset-toets drukt, na
-
dat het controlelampje is gaan bran
-
den. Als u tussendoor op de re
-
set-toets drukt, wordt het systeem
niet op nul gezet.
Wanneer moet de batterij in de
handgreep worden vervangen?
Ongeveer eens per 18 maanden (bij
modellen waarop dit van toepassing is).
Zorg dat u op tijd een nieuwe batterij in
huis heeft (3 V-batterij, knoopcel,
CR 2032).
Ook als de batterij leeg is of als u
geen batterij plaatst, kunt u de stof-
zuiger blijven gebruiken.
^ Schakel hiervoor de stofzuiger met
het voetpedaal Aan/Uit s in. Het
stand-by-lampje - op de stofzuiger
licht geel op.
^
Druk op de restart-toets op de stof
-
zuiger (zie afb. 41).
U kunt de stofzuiger nu gebruiken,
maar alleen op maximaal vermogen.
Het vervangen van de batterij in de
handgreep (afb. 42)
^
Haal het deksel van het batterijvak
los, bijvoorbeeld met een schroeven
-
draaier.
^
Vervang de batterij door een nieuwe.
Let daarbij op de polariteit.
^
Plaats het deksel weer terug.
^
Lever de oude batterij op het daar
-
voor bestemde inzamelpunt in.
nl
93

Wanneer moet u de korte draad
-
opnemers vervangen?
U kunt de draadopnemers van de uni
-
versele zuigmond vervangen.
Vervang de draadopnemers als de pool
versleten is.
Het vervangen van de korte draad
-
opnemers (afb. 43 + 44)
^
Haal de draadopnemers met een
schroevendraaier of iets dergelijks uit
de insteekopeningen (zie afbeel
-
ding).
^ Vervang de draadopnemers.
Meubelzuigmond SPD 10 (afb. 45)
^ Ontgrendel het element met de
draadopnemers aan beide kanten
van de meubelzuigmond met een
munt.
^ Vervang het element met de
draadopnemers door een nieuw ele-
ment en vergrendel het.
Loopwieltje van de zuigmond
reinigen (afb. 46)
(niet nodig bij de zuigmond AirTeQ)
a Ontgrendel de as van het loopwieltje
(bajonetsluiting) met een muntstuk.
b Druk de as eruit en verwijder deze.
c Verwijder het loopwieltje.
^
Verwijder de draden en/of haren, zet
het loopwieltje er weer in en vergren
-
del de as.
Nieuwe onderdelen zijn verkrijgbaar bij
de Miele-vakhandelaar of rechtstreeks
bij Miele.
Onderhoud
,
Schakel de stofzuiger uit en trek
de stekker uit de contactdoos als u
het apparaat wilt reinigen.
Buitenkant en toebehoren
De buitenkant van de stofzuiger en de
kunststof toebehoren kunt u reinigen
met een normaal reinigingsmiddel voor
kunststof.
,
Gebruik geen schuurmiddelen
en geen glas- of allesreinigers. Ge
-
bruik ook geen oliehoudende onder-
houdsmiddelen!
Stofruimte
De ruimte voor de stofcassette kunt u
met een eventuele tweede stofzuiger
reinigen of met een droge stofdoek,
een stoffer of een plumeau.
,
Dompel de stofzuiger nooit in
water! Als er vocht in de stofzuiger
komt, kunt u een elektrische schok
krijgen!
Storingen
De stofzuiger wordt uitgeschakeld.
Bij sommige modellen brandt dan
ook het controlelampje ,.
De stofzuiger heeft een veiligheidsvoor
-
ziening die het apparaat uitschakelt als
het oververhit raakt. Bij een aantal mo
-
dellen wordt dit door het controlelampje
, aangegeven.
nl
94
Oververhitting kan ontstaan als de
zuigopeningen verstopt zijn of als de
stofcassette vol is, dan wel geen lucht
meer doorlaat (door fijn stof). Ook het
motor- of uitblaasfilter kan ernstig ver
-
vuild zijn. Schakel de stofzuiger uit
(voetpedaal Aan/Uit s) en trek de stek
-
ker uit de contactdoos.
Als u de storing heeft verholpen, wacht
dan 20 - 30 minuten totdat de stofzui
-
ger voldoende is afgekoeld. Daarna
kunt u het apparaat weer inschakelen
en gebruiken.
Miele Service
Voor storingen die u zelf niet kunt ver-
helpen, waarschuwt u
– uw Miele-vakhandelaar
of:
– Miele.
De gegevens van Miele vindt u op de
achterzijde van deze gebruiksaan-
wijzing.
Garantie
De garantietermijn voor deze stofzuiger
bedraagt 2 jaar.
Voor meer informatie over de garantie
-
bepalingen voor uw land kunt u het
aangegeven telefoonnummer bellen.
Via dit telefoonnummer kunt u de ga
-
rantiebepalingen ook in gedrukte vorm
aanvragen.
Bij te bestellen accessoires
Houdt u zich in de eerste plaats aan
de reinigings- en onderhoudsin
-
structies van de fabrikant van de
vloerbedekking!
U kunt de volgende en vele andere pro
-
ducten via internet bestellen.
Maar de producten zijn ook ver
-
krijgbaar bij de Miele-vakhandelaar en
rechtstreeks bij Miele.
Sommige modellen zijn standaard al
voorzien van een of meer van de vol-
gende accessoires.
Elektrische borstels
Sluit elektrische borstels alleen aan op
modellen met een aansluitpunt voor
elektrische borstels. Deze modellen
herkent u aan een drukpunt op de af
-
dekkap.
Elektrische borstel Electro Comfort
(SEB 216-3)
Deze borstel is geschikt voor het inten
-
sief reinigen van robuuste, textiele
vloerbedekkingen. De borstel verwijdert
ingelopen verontreinigingen en voor
-
komt het ontstaan van looppaden.
nl
95

Elektrische borstel Electro Premium
(SEB 234 L)
Vergeleken met de SEB 216-3 is deze
borstel 60 mm breder, krachtiger en
daardoor ideaal voor het reinigen van
grote oppervlakken.
Naast de mogelijkheden van de
SEB 216-3 biedt deze borstel onder
meer:
–
hoogte-instelling voor aanpassing
aan de poolhoogte.
–
LED's voor de verlichting van het te
reinigen oppervlak.
– een multifunctioneel controlelampje.
Zuigmonden / borstels
Zuigmond Classic Allergotec
(SBDH 285-3)
Deze zuigmond is voor de dagelijkse
hygiënische reiniging van alle vloerbe-
dekkingen. Tijdens het zuigen is het rei-
nigingsresultaat op een kleurendisplay
(stoplichtsysteem) te zien.
Turboborstel Turbo Comfort
(STB 205-3)
Voor het zuigen en borstelen van laag
-
polige vloerbedekking en tapijten.
Borstel Hardfloor (SBB 235-3)
Met deze borstel kunt u robuuste, har
-
de vloeren zuigen (bijvoorbeeld plavui
-
zen).
Borstel Parquet (SBB Parquet-3)
Met deze borstel met natuurhaar kunt u
krasgevoelige, harde vloeren zuigen
(bijvoorbeeld parket).
Borstel Hardfloor Twister met draai
-
gewricht (SBB 300-3)
Met deze borstel kunt u harde vloeren
zuigen. Ideaal voor het uitzuigen van
nissen.
Borstel Parquet Twister XL met draai
-
gewricht (SBB 400-3)
Met deze extra grote borstel kunt u gro-
te, harde vloeren zuigen. Ook ideaal
voor het uitzuigen van nissen.
Overige accessoires
Accessoirekoffer MicroSet (SMC 20)
Voor het reinigen van kleine voorwer-
pen en moeilijk toegankelijke plekken
(stereo-installatie, toetsenbord, model-
bouw, etc.).
Accessoirekoffer CarCare (SCC 10)
Speciaal voor het reinigen van auto-in
-
terieurs.
Accessoirekoffer Cat&Dog (SCD 10)
Ideaal voor mensen met huisdieren.
Accessoirekoffer HomeCare (SHC 10)
Speciaal voor het reinigen van woon
-
ruimten.
nl
96

Handturboborstel Turbo Mini Com
-
pact (STB 20)
Voor het zuigen en borstelen van ge
-
stoffeerde meubels, matrassen en auto
-
stoelen.
Universele borstel (SUB 20)
Met deze borstel kunt u boeken, boe
-
kenplanken en dergelijke schoonzui
-
gen.
Lamellen- / radiatorborstel (SHB 30)
Met de radiatorborstel kunt u radiato
-
ren, voegen en lamellen schoonzuigen.
Matraszuigmond (SMD 10)
Voor het zuigen van matrassen en ge-
stoffeerde meubels tot in de naden.
Kierenzuiger, 300 mm (SFD 10)
Een extra lange kierenzuiger voor het
zuigen van naden, kieren, hoeken, etc.
Kierenzuiger, 560 mm (SFD 20)
Een flexibele kierenzuiger voor het zui
-
gen van moeilijk toegankelijke plekken.
Meubelzuigmond, 190 mm (SPD 10)
Een extra brede zuigmond voor het zui
-
gen van gestoffeerde meubels, matras
-
sen en kussens.
Flexibel verlengstuk voor de slang
(SFS 10)
Voor het verlengen van de zuigslang
met ca. 1,5 m.
Stofafsluiting
Vermindert het vrijkomen van stof en
geurtjes als de zuigslang is verwijderd.
Comfort-greep met verlichting
(SGC 20)
Voor het verlichten van het te reinigen
oppervlak.
Filters
Uitblaasfilter ActiveAirClean 50
(SF-AA 50)
Dit filter neemt geurtjes op die door het
vuil in de stofcassette ontstaan.
Uitblaasfilter HEPA AirClean 50
(SF-HA 50)
Dit uitblaasfilter zorgt voor de aller-
schoonste lucht. Zeer geschikt voor
mensen met een allergie.
Filterrooster
Het filterrooster is nodig als u in plaats
van het ActiveAirClean 50- of het HEPA
AirClean 50-filter een Air Clean-filter wilt
gebruiken.
nl
97

Consigli e avvertenze .............................................99
Descrizione apparecchio..........................................104
Tutela dell’ambiente .............................................106
Prima di usare l'aspirapolvere .....................................107
Uso degli accessori in dotazione ...................................109
Uso ...........................................................109
Trasportare e sistemare l'aspirapolvere .............................112
Manutenzione ...................................................113
Dove acquistare sacchetti per la polvere e filtri .........................113
Sacchetti e filtri corretti ............................................113
Quando sostituire il sacchetto per la polvere ...........................114
Funzione indicatore sostituzione sacchetto polvere ......................114
Come sostituire il sacchetto per la polvere .............................114
Quando sostituire il filtro salvamotore .................................114
Come sostituire il filtro salvamotore ...................................115
Quando sostituire il filtro di sfiato.....................................115
Come sostituire il filtro di sfiato AirClean ...............................115
Come sostituire i filtri di sfiato ActiveAirClean 50 e HEPA AirClean 50 .........116
Sostituire il filtro di sfiato con un altro diverso ...........................116
Spia di servizio con tasto reset .......................................116
Quando cambiare la batteria dell'impugnatura con comando remoto ........117
Come cambiare la batteria dell'impugnatura con comando remoto ............117
Quando sostituire le spazzole per fili..................................117
Come sostituire le spazzole per fili ...................................117
Pulire il rullo della bocchetta per pavimenti.............................117
Manutenzione ...................................................118
Anomalie.......................................................118
Servizio assistenza ..............................................118
Condizioni di garanzia............................................118
Accessori acquistabili ............................................119
it - Indice
98

Questo aspirapolvere è fabbricato conformemente alle
vigenti norme di sicurezza. Usi non consoni a quelli pre
-
visti possono comportare pericoli per l'utente e danneg
-
giare l'aspirapolvere.
Leggere attentamente le istruzioni prima di usarlo per la
prima volta. Il libretto contiene importanti istruzioni per la
sicurezza, l'uso e la manutenzione dell'aspirapolvere per
evitare di infortunarsi e di danneggiarlo.
Conservare il libretto delle istruzioni. Potrebbe rendersi
necessario consultarlo o servire a un altro utente!
Uso specifico
~
Questo aspirapolvere è destinato esclusivamente ad uso
domestico o in altri ambienti simili.
~
Questo aspirapolvere non è destinato per essere usato
all'aperto.
~
Usare l'aspirapolvere solo come si utilizza in casa per
aspirare residui asciutti di sporco. Evitare assolutamente di
usare l'aspirapolvere su persone e animali. Altri usi, modifi
-
che e trasformazioni dell'aspirapolvere non sono consentiti.
~
Le persone che a causa delle loro condizioni fisiche,
sensoriali, mentali e anche per inesperienza non sono in
grado di far funzionare l'aspirapolvere da sole possono
usarlo solo se sorvegliate e istruite da una persona compe
-
tente.
it - Consigli e avvertenze
99

Sorvegliare i bambini
~
Tenere i bambini di età inferiore a otto anni lontani
dall'aspirapolvere a meno che non siano sorvegliati.
~
I più piccoli da otto anni in poi possono far funzionare
l'aspirapolvere senza essere sorvegliati solo se sono stati
adeguatamente istruiti sulle modalità d'uso. I bambini do-
vranno essere al corrente dei pericoli derivanti da un'errata
manipolazione dei comandi e riconoscerli.
~
I bambini non devono eseguire lavori di manutenzione e
pulizia senza essere sorvegliati.
~
Sorvegliare i bambini se sono vicini all'aspirapolvere
quando è in funzione. Evitare che i bambini giochino con
l'aspirapolvere.
~
Per i modelli con impugnatura con comando remoto Le
batterie non devono trovarsi in prossimità dei bambini.
Sicurezza tecnica
~
Prima di usare l'aspirapolvere, controllare se si notano
danni visibili. Non usare l'aspirapolvere se è danneggiato.
~
Controllare se i dati di collegamento (voltaggio e fre
-
quenza) nella targhetta di matricola dell'aspirapolvere cor
-
rispondono a quelli della rete elettrica. I dati devono asso
-
lutamente corrispondere tra loro.
~
La presa elettrica deve essere dotata di protezione di
16Ao10A.
it - Consigli e avvertenze
100

~
Gli interventi durante il periodo di garanzia dell'aspira-
polvere devono essere eseguiti esclusivamente dal servi
-
zio assistenza autorizzato da Miele. Diversamente, per
eventuali guasti successivi, la garanzia non è più valida.
~
Evitare di trasportare l'aspirapolvere afferrando il cavo
elettrico e di togliere la spina dalla presa elettrica tirando il
cavo.
Evitare di far passare il cavo su spigoli vivi e osservare che
non rimanga incastrato o schiacciato.
Nel limite del possibile non far passare l'aspirapolvere so-
pra il cavo. Il cavo, la spina e la presa potrebbero rimanere
danneggiati e costituire quindi una fonte di pericolo per
l'utente.
~
Non usare l'aspirapolvere se il cavo elettrico è danneg-
giato. Se il cavo elettrico è danneggiato va sostituito com-
pletamente con il rullo avvolgicavo. Il cavo elettrico dovrà
essere sostituito solo da una persona qualificata autorizza-
ta da Miele o meglio dal servizio assistenza Miele.
~
La presa incorporata nell'aspirapolvere (a seconda del
modello) deve venire usata solo per le spazzole elettriche
Miele, riportate in questo libretto delle istruzioni.
~
Quando si passa l'aspirapolvere, soprattutto se si aspira
polvere fine, ad es. polverina del trapano, sabbia, gesso,
farina e altro, è inevitabile che si formino cariche elettrosta
-
tiche che in certe situazioni possono scaricarsi. Per neutra
-
lizzare le scariche elettrostatiche, sulla parte inferiore
dell'impugnatura si trova un inserto metallico. Impugnare
permanentemente l'inserto metallico quando si passa
l'aspirapolvere.
it - Consigli e avvertenze
101

~
Spegnere sempre l'aspirapolvere dopo averlo usato, per
cambiare gli accessori, per la manutenzione e per pulirlo.
Togliere la spina dalla presa elettrica.
~
Evitare di immergere l'aspirapolvere in acqua e pulirlo
solo con uno straccio asciutto oppure appena umido.
~
Far eseguire le riparazioni solo da una persona specia
-
lizzata, autorizzata da Miele. Interventi fatti in modo non
adeguato possono costituire una fonte di pericolo per
l'utente.
Uso corretto
~
Non usare l'aspirapolvere senza il sacchetto per la pol-
vere, senza il filtro di sfiato e quello salvamotore.
~
Se il sacchetto per la polvere non è in sede, non è possi-
bile chiudere il coperchio del vano polvere. Evitare quindi
di chiuderlo con forza.
~
Non aspirare oggetti accesi o incandescenti, ad es.
mozziconi di sigarette o cenere e carboni apparentemente
spenti.
~
Evitare assolutamente di aspirare liquidi o residui di
sporco umidi. Prima di passare l'aspirapolvere, aspettare
che i tappeti e le moquettes trattate con shampoo o deter
-
sivi liquidi siano perfettamente asciutti.
~
Evitare altresì di aspirare toner per fotocopiatrici o stam
-
panti. Il toner, infatti, potrebbe condurre l'elettricità.
it - Consigli e avvertenze
102

~
Non aspirare sostanze o gas facilmente infiammabili o
esplosivi. Non usare l'aspirapolvere nei locali dove queste
sostanze sono conservate.
~
Fare attenzione a non mettere le bocchette o il tubo di
aspirazione in prossimità della testa.
~
Avvertenza se si usano batterie (per i modelli con impu
-
gnatura con comando remoto)
–
Non collegare le batterie a tensioni di corto circuito, non
ricaricarle o gettarle nel fuoco.
–
Smaltimento batterie usate: togliere la batteria
dall'impugnatura con comando remoto e smaltirla negli
appositi contenitori. Non smaltirle coi rifiuti di casa.
Accessori
~
Se si usa la spazzola elettrica o turbo Miele, evitare as-
solutamente di toccare con le mani il rullo quando è in mo-
vimento.
~
Se si aspira la polvere solo con l'impugnatura senza
bocchette, verificare che non sia danneggiata.
~
Usare solo sacchetti per la polvere, filtri e accessori con
il contrassegno "Original Miele". Solo a questa condizione
vengono soddisfatte le norme di sicurezza garantite dalla
casa produttrice.
Miele declina ogni responsabilità per guasti causati da
usi non corretti, da manipolazioni sbagliate o
dall'inosservanza delle avvertenze per l'uso e la sicurez
-
za.
it - Consigli e avvertenze
103

it - Descrizione apparecchio
104

Nella figura è riprodotta la versione completa dell'aspirapolvere.
a flessibile di aspirazione
b tasto di sblocco vano accessori
c indicatore sostituzione sacchetto polvere
d indicatore *
e tasto a pedale avvolgimento automatico cavo
f Park-System per le pause di lavoro
g tasto a pedale "On/Off" s
h cavo elettrico
i rulli direzionali *
j filtro di sfiato *
k Park-System su entrambi i lati per mettere a posto l'aspirapolvere
l filtro salvamotore
m fissaggio coperchio della presa per spazzola elettrica
n sacchetto polvere Original Miele
o impugnatura trasporto aspirapolvere
p bocchetta per pavimenti *
q tasti di sblocco
r tubo telescopico *
s tasto di sblocco coperchio vano polvere
t pulsanti regolazione tubo telescopico *
u presa per spazzola elettrica *
v manicotto di aspirazione
w spia LED *
x tasto stand-by per gli intervalli brevi di lavoro *
y tasti + / - per regolare la potenza di aspirazione *
z impugnatura (a seconda del modello con valvola di regolazione) *
{ spia controllo surriscaldamento § *
| tasto restart*
} spia controllo stand-by *
~ spia di servizio con tasto reset *
* A seconda del modello, gli elementi contrassegnati da un asterisco possono
essere diversi o non essere in dotazione.
it - Descrizione apparecchio
105

Smaltimento imballaggio
L'imballaggio protegge l'aspirapolvere
da danni durante il trasporto. Le diver
-
se parti dell'imballaggio sono fatte con
materiali conformi alla tutela dell'am-
biente e sono pertanto riciclabili.
Se le diverse parti dell’imballaggio ven
-
gono smaltite correttamente, si contri
-
buirà a ridurre il consumo di materie
prime e a diminuire il volume dei rifiuti.
Smaltire l'imballaggio conformemente
alle disposizioni in materia.
Smaltimento sacchetto per la
polvere e filtri usati
Il sacchetto per la polvere e i filtri sono
fabbricati con materiali consoni alla tu-
tela ambientale. I filtri si possono smalti-
re coi rifiuti normali di casa. Anche il
sacchetto per la polvere si può smaltire
coi rifiuti di casa a meno che non con-
tenga sostanze nocive.
Smaltimento apparecchio fuori
uso
Togliere dall'aspirapolvere fuori uso il
sacchetto per la polvere e i filtri e smal
-
tirli coi rifiuti di casa.
In generale gli apparecchi elettrici ed
elettronici fuori uso contengono mate
-
riali riutilizzabili. Contengono pure com
-
ponenti nocive per l'ambiente ma ne
-
cessarie per il corretto funzionamento e
la sicurezza degli apparecchi. Se smal
-
tite coi rifiuti di casa o non correttamen
-
te, queste componenti possono dan
-
neggiare la salute delle persone e
l'ambiente. Evitare quindi assolutamen-
te di smaltire il vecchio apparecchio coi
rifiuti convenzionali.
Si raccomanda quindi espressamente
di depositarlo nei punti di raccolta uffi
-
ciali riservati alle apparecchiature elet
-
triche ed elettroniche fuori uso. Se ne
-
cessario, informarsi presso il rivendito
-
re.
Fino a quando il vecchio apparecchio
non viene smaltito, accertarsi che non
costituisca una fonte di pericolo per i
bambini.
it - Tutela dell’ambiente
106

Le illustrazioni citate nei capitoli sono
riportate sui risvolti alla fine del libret
-
to delle istruzioni.
Prima di usare l'aspirapolvere
Collegare il flessibile di aspirazione
(fig. 1)
^
Inserire il manicotto di aspirazione
nell'apertura di aspirazione fino alla
battuta di arresto. Per assemblare le
due parti, collegare i rispettivi innesti.
Staccare il flessibile di aspirazione
(fig. 2)
^ Premere i tasti laterali di sblocco sul
manicotto di aspirazione ed estrarre il
flessibile dall'apertura.
Assemblare il flessibile e l'impugna-
tura (fig. 3)
^ Inserire il flessibile nell'impugnatura
fino alla battuta di arresto.
Assemblare l'impugnatura e il flessi
-
bile (fig. 4)
^
Inserire l'impugnatura nel tubo di
aspirazione fino alla battuta di arre-
sto. Per assemblare le due parti, col
-
legare i rispettivi innesti.
^
Premere il tasto di sblocco per stac
-
care le parti ed estrarre l'impugnatu
-
ra dal tubo di aspirazione girandola
leggermente.
A seconda del modello, l'aspirapolvere
è dotato di uno dei seguenti tubi tele-
scopici di aspirazione:
–
tubo telescopico formato da due par
-
ti,
–
tubo telescopico formato da tre parti.
Regolare il tubo telescopico di due
parti (fig. 5)
Questo tubo telescopico è formato da
due parti, inserite una nell'altra, regola
-
bili in lunghezza fino ad ottenere la po
-
sizione più comoda.
^ Premere il pulsante e regolare ade-
guatamente la lunghezza del tubo te-
lescopico.
Regolare il tubo telescopico di tre
parti (fig. 5)
Questo tubo di aspirazione telescopico
è formato da tre parti inserite una
nell'altra.
a Premere il pulsante di sblocco del
tubo inferiore ed estrarlo fino alla bat
-
tuta di arresto. Premere il tasto anche
se si desidera far rientrare nuovamen
-
te il tubo inferiore. Il dispositivo di
blocco s'incastra nettamente.
b Premere il pulsante e regolare ade
-
guatamente la lunghezza del tubo
telescopico.
Inserire la bocchetta per pavimenti
(fig. 6)
^
Inserire la bocchetta per pavimenti
nel tubo di aspirazione telescopico e
girarla a destra e a sinistra finché si
incastra correttamente.
it
107

^
Per togliere la bocchetta per pavi
-
menti dal tubo telescopico, premere
il pulsante di sblocco.
Regolare la bocchetta per pavimenti
(figg.7+8)
La bocchetta per pavimenti è indicata
per le pulizie giornaliere di tappeti, mo
-
quettes e pavimenti duri non delicati.
Per altri tipi di pavimento si consiglia di
usare le altre spazzole speciali Miele
(v. voce "Accessori acquistabili").
Si consiglia espressamente di atte-
nersi alle modalità di pulizia della casa
produttrice del tipo di pavimento.
Far rientrare la spazzola della bocchet-
ta per pulire tappeti e moquettes.
^ Premere il tasto a pedale %.
Per pulire pavimenti duri non delicati,
far uscire la spazzola.
^ Premere il tasto a pedale ).
Se il pavimento ha fughe e fessure
profonde far uscire sempre la spaz
-
zola della bocchetta.
Bocchetta per pavimenti AirTeQ (fig. 8)
La bocchetta consente di pulire a fondo
i pavimenti con poco consumo di ener
-
gia elettrica. È particolarmente efficien
-
te ed economica per consumo di cor
-
rente.
,
Se l'attrito della bocchetta Air
-
TeQ col pavimento è troppo forte, ri
-
durre la potenza di aspirazione fin
-
ché la bocchetta scorre facilmente
(v. voce "Uso - Selezionare la poten
-
za d'aspirazione").
Attivazione indicatore sostituzione
filtro di sfiato
A seconda del modello, l'aspirapolvere
è dotato di serie di uno dei seguenti fil
-
tri (fig. 9):
a AirClean
b ActiveAirClean 50 (nero)
c HEPA AirClean 50 (bianco)
Se l'aspirapolvere è dotato di un filtro di
sfiato b o c, si dovrà attivare l'indicatore
sostituzione filtro di sfiato.
^
Premere il pulsante di sblocco
nell'incavatura del coperchio e solle-
vare il coperchio fino alla battuta di
arresto (fig. 10).
^ Togliere la striscia con le avvertenze
(fig. 11).
^ Premere l'indicatore sostituzione filtro
di sfiato ~ (fig. 12).
^ Dopo circa 10 - 15 secondi nel bordo
sinistro dell'indicatore appare una
sottile striscia color rosso (fig. 13).
^
Chiudere il coperchio del vano polve
-
re bloccandolo correttamente. Osser
-
vare che il sacchetto non rimanga in
-
castrato nel coperchio.
Funzione indicatore sostituzione fil
-
tro di sfiato
L'indicatore sostituzione filtro di sfiato
mostra la durata d'uso del filtro di sfia
-
to. Dopo circa 50 ore di esercizio, pari,
in media, all'uso dell'aspirapovere per
un anno, l'indicatore è completamente
rosso (fig. 14).
108
it

Uso degli accessori in
dotazione (fig. 15)
Accessori in dotazione
a Bocchetta a lancia
Per togliere la polvere da pieghe, in
-
terstizi, angoli.
b Pennello con setole naturali
Per eliminare la polvere da listelli
profilati e oggetti delicati, intagliati o
con applicazioni.
La testina del pennello è orientabile
e si può girare nella posizione più
comoda.
c Bocchetta per imbottiture
Per togliere la polvere da imbottiture,
materassi, cuscini, tende, ecc.
Alcuni modelli sono dotati di serie di
uno dei seguenti accessori che non
sono riprodotti.
– spazzola elettrica
– turbospazzola
– bocchetta pavimenti Classic
Allergotec
A questi modelli di aspirapolvere sono
allegate le istruzioni d'uso per l'acces
-
sorio in dotazione.
Togliere di sede gli accessori (fig. 16)
^
Premere il tasto di sblocco.
Il coperchio del vano si apre.
^
Togliere l'accessorio che si desidera.
^
Abbassare il coperchio e chiuderlo
premendolo verso il basso.
Bocchetta per pavimenti (fig. 17)
Indicata anche per pulire i gradini delle
scale.
,
Per motivi di sicurezza, passare
l'aspirapolvere sulle scale dal basso
in alto.
Uso
Estrarre il cavo elettrico (fig. 18)
^
Estrarre il cavo fino alla lunghezza
desiderata (max. 7,5 m circa).
^ Inserire la spina nella presa.
,
Se si usa l'aspirapolvere per ol-
tre 30 minuti si dovrà estrarre com-
pletamente il cavo. L'aspirapolvere,
altrimenti, può surriscaldarsi e rima-
nere danneggiato.
Avvolgere il cavo (fig. 19)
^ Togliere la spina dalla presa elettrica.
^
Premere brevemente col piede il pe
-
dale per l'avvolgimento automatico. Il
cavo si avvolge automaticamente.
Accendere e spegnere l'aspirapolvere
(fig. 20)
^
Premere col piede il tasto a pedale
"On/Off" s.
Selezionare la potenza d'aspirazione
È possibile adattare la potenza di aspi
-
razione secondo le esigenze del mo
-
mento. Riducendo la potenza di aspira
-
zione, la bocchetta per pavimenti scivo
-
la più facilmente.
it
109

Sull'aspirapolvere, oltre alle indicazioni
numeriche del grado di aspirazione,
sono riportati simboli che indicano l'uso
corretto della potenza impostata.
Il livello di aspirazione selezionato si
accende di giallo.
# - tendine, tessuti
$ - mobili imbottiti, cuscini
% - tappeti delicati, passatoie,
scendiletto
* - uso giornaliero con poco consumo
di elettricità e rumore contenuto
( - tappeti e moquettes bouclé
) - pavimenti resistenti, tappeti e
moquettes piuttosto sporchi
,Se si usa la bocchetta per pavi-
menti AirTeQ e si nota un certo attri-
to col pavimento, si potrà ridurre la
potenza di aspirazione per far scor-
rere facilmente la bocchetta.
A seconda del modello, gli aspirapolve
-
re Miele sono dotati di uno dei seguenti
selettori di potenza.
Tasti a pedale (fig. 21)
Alla prima messa in funzione dell'aspira-
polvere si attiva il livello di aspirazione
più alto.
Successivamente, ogni volta che si usa
l'aspirapolvere, si attiva il livello selezio
-
nato la volta precedente.
^
Premere il tasto + per aumentare la
potenza d'aspirazione.
^
Premere il tasto - per abbassare la
potenza d'aspirazione.
Tasto automatic (figg. 22 + 23)
Alla prima messa in funzione dell'aspira-
polvere si attiva il livello di aspirazione
"Auto".
Auto = adattamento automatico della
potenza di aspirazione al tipo
di pavimento
,
Non usare il livello di aspirazione
automatico per togliere la polvere
da tessuti leggeri o tendine. Potreb
-
bero venire aspirati e rovinarsi.
^
Premere il tasto a pedale + se si desi
-
dera attivare il livello massimo di
aspirazione "Turbo".
^ Premere il tasto a pedale - se si desi-
dera attivare il livello minimo di aspi-
razione "Min.".
Successivamente, ogni volta che si usa
l'aspirapolvere, si attiva il livello selezio-
nato la volta precedente.
Impugnatura con comando remoto e
automatic (fig. 24)
Dopo aver acceso l'aspirapolvere col
tasto a pedale On/Off s, la spia di con
-
trollo stand-by - si accende di giallo.
^
Premere il tasto stand-by -
sull'impugnatura con comando remo
-
to.
La spia stand-by - sull'aspirapolvere si
spegne.
Alla prima messa in funzione dell'aspira-
polvere si attiva il livello di aspirazione
più alto.
it
110

Successivamente, ogni volta che si usa
l'aspirapolvere, si attiva il livello selezio
-
nato la volta precedente.
^
Premere il tasto + per aumentare la
potenza d'aspirazione.
^
Premere il tasto - per abbassare la
potenza d'aspirazione.
Auto = adattamento automatico della
potenza di aspirazione al tipo
di pavimento (fig. 22)
,
Non usare il livello di aspirazione
automatico per togliere la polvere
da tessuti leggeri o tendine. Potreb-
bero venire aspirati e rovinarsi.
Regolatore secondario (figg. 25 + 26)
(non presente nei modelli con impugna-
tura con comando remoto)
Per ridurre la potenza di aspirazione se,
ad es., si passa l'aspirapolvere su tap-
peti leggeri che altrimenti si attaccher-
ebbero alla bocchetta.
^
Aprire la valvola per regolare l'aspira
-
zione fino a che la bocchetta scivola
facilmente sul tappeto senza alzarlo.
In tal modo l'attrito delle diverse boc
-
chette di aspirazione viene ridotto.
Quando si passa l'aspirapolvere
(figg. 27 + 28)
^
Per aspirare la polvere, trascinare
l'aspirapolvere come se si trattasse
di una slitta. L'aspirapolvere si può
usare anche in posizione verticale
per togliere, ad es. la polvere da sca
-
le, tende o tendine.
,
Quando si passa l'aspirapolve
-
re, soprattutto se si aspira polvere
fine, ad es. polverina del trapano,
sabbia, gesso, farina e altro, è inevi
-
tabile che si formino cariche elettro
-
statiche che in certe situazioni pos
-
sono scaricarsi. Per neutralizzare le
scariche elettrostatiche, sulla parte
inferiore dell'impugnatura si trova un
inserto metallico. Impugnare perma
-
nentemente l'inserto metallico quan
-
do si passa l'aspirapolvere.
Interrompere il lavoro (fig. 24)
(per i modelli con impugnatura con co-
mando remoto)
Nei brevi intervalli è possibile interrom-
pere il funzionamento dell'aspira-
polvere.
^ Premere il tasto stand-by -
sull'impugnatura con comando remo-
to.
,
Non lasciare attivata a lungo la
funzione stand-by ma solo nei brevi
intervalli di lavoro. L'apparecchio,
altrimenti, può surriscaldarsi e rima
-
nere danneggiato.
Ad ogni pressione del tasto
sull'impugnatura con comando remoto
si accende la spia LED.
Dopo l'intervallo, si può riaccendere
l'aspirapolvere nei seguenti modi:
^
premendo nuovamente il tasto stan
-
d-by -. L'aspirapolvere si riaccende
con l'ultima potenza impostata;
it
111

^
premendo il tasto +. L'aspirapolvere si
riaccende con la potenza massima;
^
premendo il tasto -. L'aspirapolvere si
riaccende con la potenza minima.
Trasportare e sistemare
l'aspirapolvere
Park-System per le pause di lavoro
(fig. 29)
(non attivabile con la spazzola elettrica
Electro Premium SEB 234 L)
Nelle brevi pause di lavoro, il tubo di
aspirazione con la bocchetta per pavi-
menti può venire agganciato in posizio-
ne verticale all'aspirapolvere.
^ Inserire la sporgenza di aggancio
della bocchetta nel dispositivo
Park-System.
Se l'aspirapolvere si trova su una
superficie inclinata, ad es. una ram-
pa, inserire completamente una
nell'altra le diverse parti del tubo di
aspirazione.
Interruttore On/Off abbinato al dispo
-
sitivo Park-System
Alcuni modelli sono dotati di interruttore
On/Off collegato al dispositivo
Park-System.
L'aspirapolvere si spegne automatica
-
mente se si inserisce il gancio della
bocchetta nel Park-System.
Se si toglie la bocchetta, l'aspirapolvere
si accende di nuovo con la potenza
precedentemente selezionata (non coi
modelli dotati di impugnatura con co
-
mando remoto).
Park-System per sistemare a posto
l'aspirapolvere (figg. 30 + 31)
,
Dopo i lavori di pulizia, spegne
-
re l'aspirapolvere. Togliere la spina
dalla presa elettrica.
^
Sistemare l'aspirapolvere in posizio
-
ne verticale.
Per maggiore comodità si consiglia
di inserire una nell'altra le diverse
parti del tubo di aspirazione telesco
-
pico.
^ Inserire dall'alto la sporgenza della
bocchetta in uno dei due supporti
per il tubo di aspirazione (il dispositi-
vo non si può usare con la spazzola
elettrica SEB 234 L).
Sarà così più facile trasportare o siste-
mare l'aspirapolvere al suo posto con-
sueto.
Se l'aspirapolvere è dotato di impugna-
tura formato XXL si può sistemarlo in
poco spazio in un altro modo.
^
Dopo aver sistemato l'aspirapolvere,
togliere l'impugnatura XXL dal tubo di
aspirazione inserito.
^
Avvolgere il flessibile di aspirazione
intorno al tubo telescopico e inserire
dall'alto il dispositivo di aggancio
dell'impugnatura XXL nel secondo
aggancio per il tubo di aspirazione.
it
112
Manutenzione
,
Prima di effettuare i lavori di ma
-
nutenzione, spegnere l'aspirapolve
-
re e togliere la spina dalla presa.
Il sistema di filtraggio Miele è costituito
da tre componenti:
–
sacchetto per la polvere
–
filtro salvamotore
–
filtro di sfiato
Per garantire la massima potenza di
aspirazione dell'aspirapolvere si do-
vranno sostituire periodicamente i filtri e
il sacchetto per la polvere.
Usare solo sacchetti per la polvere,
filtri e accessori con il contrassegno
"Original Miele". Solo in tal modo vie-
ne sfruttata in modo ottimale la po-
tenza di aspirazione e i lavori di puli-
zia risulteranno più accurati.
,
Se si usano sacchetti per la pol
-
vere in carta, materiali simili o con
supporto di fissaggio in cartone anzi
-
ché sacchetti per la polvere contrad
-
distinti dal contrassegno "Original
Miele", l'aspirapolvere può rimanere
danneggiato e i diritti di garanzia an
-
dranno persi.
Dove acquistare sacchetti per la
polvere e filtri
I sacchetti per la polvere e i filtri "Origi
-
nal Miele" si possono acquistare presso
il concessionario, il servizio assistenza
Miele oppure direttamente online in In
-
ternet.
Sacchetti e filtri corretti
I sacchetti per la polvere con placca di
fissaggio blu tipo G/N e i filtri originali
Miele sono contraddistinti dal marchio
"Original Miele" riportato sulla confezio-
ne o sul sacchetto per la polvere.
Ogni confezione di sacchetti per la pol
-
vere "Original Miele" contiene pure un
filtro di sfiato AirClean e un filtro salva
-
motore.
Se si desidera acquistare solo il filtro di
sfiato "Original Miele", comunicare al
concessionario o al servizio assistenza
Miele il modello dell'aspirapolvere per
ricevere il filtro corretto. I diversi acces
-
sori si possono ordinare anche online
per Internet.
it
113
Quando sostituire il sacchetto per la
polvere (fig. 32)
Si dovrà sostituire il sacchetto quando
la barra colorata occupa completamen
-
te l'indicatore sostituzione sacchetto
polvere.
Il sacchetto per la polvere è monou
-
so. Smaltire il sacchetto pieno di
polvere. Evitare quindi di vuotarlo e
di riutilizzarlo. Se i pori della carta
sono intasati, la potenza di aspira
-
zione rimane compromessa.
Controllo contenuto sacchetto
^ Inserire la bocchetta per pavimenti.
^ Accendere l'aspirapolvere e imposta-
re col selettore la massima potenza
di aspirazione.
^ Alzare quel tanto che basta la boc-
chetta per pavimenti.
Funzione indicatore sostituzione
sacchetto polvere
L'indicatore è tarato per polvere mista,
ossia: polvere, peli, peluria, fili, terra e
altro.
Se si aspira polvere fine, ad es. quella
del trapano, sabbia, gesso, farina e al
-
tro, i pori del sacchetto per la polvere si
intasano in fretta. Ne consegue che l'in
-
dicatore segnala che il sacchetto è pie
-
no anche se in effetti non è il caso. Il
sacchetto, comunque, si dovrà sostitui
-
re.
D'altro canto, se si aspirano molti peli,
capelli, lanugine dei tappeti, può verifi
-
carsi che l'indicatore reagisca solo
quando il sacchetto per la polvere è
pieno zeppo.
Come sostituire il sacchetto per la
polvere (figg. 33 + 34)
^
Premere il pulsante di chiusura e al
-
zare il coperchio del vano polvere
fino alla battuta di arresto (fig. 10).
La chiusura igienica del sacchetto si
chiude automaticamente evitando che
la polvere esca.
^
Afferrare la linguetta accanto alla
chiusura ed estrarre di sede il sac
-
chetto.
^
Inserire il nuovo sacchetto nel sup
-
porto blu fino alla battuta di arresto.
Lasciare il sacchetto piegato come si
trova nella confezione.
^ Allargare poi il più possibile il sac-
chetto nel vano polvere.
^ Chiudere il coperchio del vano polve-
re bloccandolo correttamente. Osser-
vare che il sacchetto non rimanga in-
castrato nel coperchio.
Grazie a uno speciale dispositivo di
sicurezza non è possibile chiudere il
coperchio del vano polvere se il
sacchetto non è in sede. Evitare
quindi di chiudere il coperchio con
forza!
Quando sostituire il filtro
salvamotore
Ogni volta che si apre una nuova
confezione di sacchetti per la polvere
"Original Miele". Ogni confezione di
sacchetti per la polvere "Original Miele"
contiene anche un filtro salvamotore.
it
114
Come sostituire il filtro salvamotore
(fig. 35)
^
Aprire il coperchio del vano polvere.
^
Afferrare la linguetta accanto alla
chiusura ed estrarre di sede il sac
-
chetto.
^
Aprile il telaio blu portafiltro fino a
sentire un clic e togliere il vecchio fil
-
tro salvamotore afferrando la parte
igienica.
^
Sistemare in sede il nuovo filtro salva
-
motore.
^ Chiudere il telaio portafiltro.
^ Inserire il sacchetto per la polvere nel
supporto blu fino alla battuta di arre-
sto.
^ Chiudere il coperchio del vano polve-
re bloccandolo correttamente. Osser-
vare che il sacchetto non rimanga in-
castrato nel coperchio.
Quando sostituire il filtro di sfiato
A seconda del modello, l'aspirapolvere
è dotato di serie di uno dei seguenti fil
-
tri (fig. 9):
a AirClean
Sostituire questo filtro ogni volta che si
apre una nuova confezione di sacchetti
per la polvere "Original Miele". Ogni
confezione di sacchetti per la polvere
"Original Miele" contiene anche un filtro
di sfiato AirClean.
b ActiveAirClean 50 (nero)
c HEPA AirClean 50 (bianco)
Quando l'indicatore sostituzione filtro di
sfiato è completamente rosso (fig. 14).
L'indicatore si accende dopo circa
50 ore di esercizio pari, in media,
all'uso dell'aspirapolvere per un anno.
È comunque possibile continuare ad
usare l'aspirapolvere. Si dovrà comun
-
que tenere presente che la potenza di
aspirazione è notevolmente compro
-
messa.
Come sostituire il filtro di sfiato
AirClean (figg. 36 + 37)
Usare sempre solo un filtro di sfiato
per volta.
^ Aprire il coperchio del vano polvere.
^ Premere lo sblocco della griglia por-
tafiltro e aprirla fino al punto di arre-
sto.
^ Togliere il vecchio filtro AirClean affer-
rando una delle due parti igieniche.
^ Inserire in sede il nuovo filtro di sfiato
AirClean.
Se si desidera usare un filtro di sfia
-
to ActiveAirClean 50 oppure HEPA
AirClean 50, attenersi alle istruzioni
riportate alla voce "Sostituire il filtro
di sfiato con un altro diverso".
^
Chiudere la griglia portafiltro.
^
Chiudere infine il coperchio del vano
polvere.
it
115

Come sostituire i filtri di sfiato
ActiveAirClean 50 e HEPA AirClean 50
(figg. 38 + 39)
Usare sempre solo un filtro di sfiato
per volta.
^
Aprire il coperchio del vano polvere.
^
Sbloccare il filtro di sfiato e toglierlo
di sede.
^
Inserire correttamente il nuovo filtro di
sfiato e premerlo verso il basso.
^
Premere l'indicatore sostituzione filtro
di sfiato ~ (fig. 12).
^ Dopo circa 10 - 15 secondi nel bordo
sinistro dell'indicatore appare una
sottile striscia color rosso (fig. 13).
Se si desidera usare un filtro di sfia-
to AirClean, attenersi alle istruzioni
riportate alla voce "Sostituire il filtro
di sfiato con un altro diverso".
^
Chiudere infine il coperchio del vano
polvere.
Sostituire il filtro di sfiato con un
altro diverso
A seconda del modello, l'aspirapolvere
è dotato di serie di uno dei seguenti fil
-
tri (fig. 9):
a AirClean
b ActiveAirClean 50 (nero)
c HEPA AirClean 50 (bianco)
Al momento di sostituire un filtro con
un altro procedere come segue:
1. Se al posto del filtro di sfiato a si de
-
sidera usare un filtro tipo b oppure c è
indispensabile togliere la griglia porta
-
filtro prima di sistemare in sede il nuovo
filtro di sfiato (fig. 39). Inoltre si dovrà
attivare l'indicatore sostituzione filtro di
sfiato (fig. 12).
2. Se al posto del filtro di sfiato b oppu
-
re c si usa il filtro di sfiato a è indispen
-
sabile sistemarlo nella griglia portafiltro
* (fig. 37).
* griglia portafiltro: v. voce "Accessori
acquistabili"
Usare sempre solo un filtro di sfiato
per volta.
Spia di servizio con tasto reset (fig. 40)
Alcuni modelli sono dotati di una spia di
servizio.
L'indicatore si accende dopo circa 50
ore di esercizio, pari, in media, all'uso
dell'aspirapovere per un anno. In que-
sto momento deve essere controllato il
livello di sporco del filtro salvamotore e
del filtro di sfiato.
Dopo ogni sostituzione di questi filtri si
dovrà azzerare l'indicatore. Per
quest'operazione l'aspirapolvere dovrà
essere acceso.
^
Premere il tasto reset.
La spia di servizio e il tasto reset si
spengono e l'indicatore viene azzerato.
it
116

L'azzeramento dell'indicatore funzio
-
na solo se si preme il tasto reset
dopo che si accende la spia di con
-
trollo ma non nel caso in cui si pre
-
me prima del tempo.
Quando cambiare la batteria
dell'impugnatura con comando
remoto
Ogni 18 mesi circa. Tenere in riserva
una batteria di 3 V (batteria a bottone
CR 2032).
Se la batteria è scarica o non è in
sede, si potrà ugualmente usare
l'aspirapolvere.
^ Accendere l'aspirapolvere col tasto a
pedale On/Off s. La spia stand-by -
sull'aspirapolvere si accende di giallo.
^ Premere il tasto "restart" sull'aspira-
polvere (fig. 41).
L'aspirapolvere si potrà usare come di
consueto, tuttavia solo con la massima
potenza di aspirazione.
Come cambiare la batteria
dell'impugnatura con comando remoto
(fig. 42)
^
Sbloccare il coperchio della sede
della batteria, usando ad es. un cac
-
ciavite.
^
Sostituire la batteria. Attenzione a si-
stemarla coi poli corretti.
^
Rimettere in sede il coperchio.
^
Smaltire la batteria usata negli appo
-
siti contenitori.
Quando sostituire le spazzole per fili
Le spazzole per i fili sull'imboccatura
della bocchetta per pavimenti si do-
vranno sostituire quando i peli raccogli
-
fili sono consumati.
Come sostituire le spazzole per fili
(figg. 43 + 44)
^
Servendosi, ad es., di un cacciavite
convenzionale, estrarre dalle scana
-
lature le spazzole per i fili.
^
Sostituire le spazzole con quelle nuo
-
ve.
Bocchetta per imbottiture SPD 10
(fig. 45)
^ Servendosi di una moneta, sbloccare
il dispositivo raccoglifili su entrambi i
lati della bocchetta per mobili imbotti-
ti.
^ Sostituire il dispositivo raccoglifili con
uno nuovo e bloccarlo in sede.
Pulire il rullo della bocchetta per
pavimenti (fig. 46)
(non necessario per la bocchetta
AirTeQ)
a Sbloccare l'asse del rullo (chiusura a
baionetta) servendosi di una moneta,
b premere fuori sede l'asse del rullo ed
estrarlo,
c togliere il rullo di scorrimento.
^
Eliminare fili e peli. Sistemare in sede
il rullo e bloccare l'asse del rullo.
I pezzi di ricambio sono disponibili
presso il concessionario o presso il ser
-
vizio assistenza Miele.
it
117

Manutenzione
,
Prima di effettuare i lavori di puli
-
zia, spegnere l'aspirapolvere e to
-
gliere la spina dalla presa.
Aspirapolvere e accessori
L'aspirapolvere e gli accessori di mate
-
riale sintetico vanno puliti con uno
straccio umido o con un prodotto spe
-
cifico per materiali sintetici.
,
Non usare prodotti abrasivi, per
vetri, prodotti universali per le puli
-
zie o prodotti oleosi!
Vano polvere
Se a disposizione si può pulirlo con un
secondo aspirapolvere oppure sempli-
cemente con uno straccio asciutto oil
pennello per la polvere.
,
Non immergere mai l'aspirapol-
vere nell'acqua! Se l'umidità penetra
all'interno, possono verificarsi scos
-
se elettriche o addirittura folgorazio
-
ni.
Anomalie
L'aspirapolvere si spegne automati
-
camente.
In alcuni modelli si accende inoltre la
spia di controllo protezione surriscal
-
damento ,.
Un limitatore di temperatura provvede a
disinserire automaticamente l'aspirapol
-
vere se si surriscalda. Alcuni modelli,
inoltre, sono dotati di una luce spia ,
che segnala un eventuale surriscalda
-
mento dell'aspirapolvere.
Tale anomalia si verifica, ad esempio,
se il tubo di aspirazione è ostruito op
-
pure se il sacchetto per la polvere è
pieno o intasato di polvere fine. Un'altra
causa può dipendere dallo sporco ec
-
cessivo depositatosi nel filtro di sfiato o
in quello salvamotore. In questo caso,
spegnere l'aspirapolvere col tasto a pe
-
dale "On/Off" s e togliere la spina dalla
presa.
Dopo aver eliminato le cause
dell'anomalia, prima di usare l'aspira
-
polvere aspettare dai 20 ai 30 minuti
finché si è raffreddato.
Servizio assistenza
In caso di necessità contattare
– la centrale di assistenza Miele a
Spreitenbach:
Svizzera 0 800 800 222
Condizioni di garanzia
La garanzia dell'aspirapolvere ha la du
-
rata di 2 anni.
Per ulteriori informazioni sulle condizio
-
ni di garanzia nel paese dell'utente, te
-
lefonare al numero telefonico indicato
sopra. A questo numero si possono ri
-
chiedere le condizioni di garanzia scrit
-
te.
it
118
Accessori acquistabili
Si consiglia espressamente di atte-
nersi alle modalità di pulizia della
casa produttrice del tipo di pavi
-
mento.
È possibile ordinare questi prodotti e al
-
tri accessori in Internet.
Sono pure disponibili presso il conces
-
sionario Miele o il servizio assistenza
Miele.
Alcuni modelli sono dotati alla conse-
gna di uno o più dei seguenti accesso-
ri.
Spazzole elettriche
Le spazzole elettriche si possono usare
esclusivamente coi modelli dotati di ri-
spettiva presa elettrica, contraddistinti
da un pulsante sul coperchio superiore.
Spazzola elettrica ElectroComfort
(SEB 216-3)
Per pulire a fondo pavimenti coperti da
moquette resistenti. Elimina lo sporco
tenace ed evita che si formino tracce di
passaggio.
Spazzola elettrica ElectroPremium
(SEB 234 L)
Paragonata alla spazzola SEB 216-3, è
60 mm più larga e più potente. È indi
-
cata per pulire accuratamente pavi
-
menti grandi.
A differenza del modello SEB 216-3, è
inoltre dotata di
–
un dispositivo per regolare l'altezza a
seconda dei tappeti,
–
LED per illuminare la superficie da
aspirare,
–
spia di controllo multifunzioni.
Bocchette/spazzole per pavimenti
Bocchetta per pavimenti
ClassicAllergotec (SBDH 285-3)
Per pulire e igienizzare ogni giorno i pa
-
vimenti di ogni tipo. Al momento di pas-
sare l'aspirapolvere, il livello di pulizia
viene visualizzato a colori in un display.
Turbospazzola Turbo Comfort
(STB 205-3)
Per pulire pavimenti coperti da tappeti
a pelo corto.
Spazzola per pavimenti Hardfloor
(SBB 235-3)
Indicata per pulire pavimenti resistenti
ad es. in cotto o piastrelle.
Spazzola per pavimenti Parquet
(SBB Parquet-3)
Spazzola con setole naturali per pavi
-
menti facilmente graffiabili, ad es. par
-
quet.
Spazzola per pavimenti Hardfloor
Twister con giunto snodabile
(SBB 300-3)
Per pulire pavimenti duri di tipo diverso
e angoli.
it
119

Spazzola per pavimenti Parquet
Twister XL con giunto snodabile
(SBB 400-3)
Per pulire pavimenti grandi e resistenti
e angoli.
Altri accessori
Valigetta accessori MicroSet
(SMC 20)
Per pulire oggetti piccoli e punti di diffi
-
cile accesso, ad es. impianti stereo,
tastiere, modelli.
Valigetta accessori CarCare (SCC 10)
Realizzata espressamente per pulire
l'interno dell'automobile.
Valigetta accessori Cat&Dog
(SCD 10)
Accessori per pulire la casa con anima-
li domestici.
Valigetta accessori HomeCare
(SHC 10)
Accessori per pulire l'abitazione.
Turbospazzola a mano Turbo Mini
Compact (STB 20)
Per pulire mobili imbottiti, materassi e
sedili dell'automobile.
Spazzola universale (SUB 20)
Per togliere la polvere da libri, scaffali,
mensole e altro.
Spazzola per lamelle e termosifoni
(SHB 30)
Per togliere la polvere tra gli elementi
dei termosifoni, intercapedini degli
scaffali, interstizi.
Bocchetta per materassi (SMD 10)
Per togliere facilmente la polvere da
materassi, mobili imbottiti e intercapedi
-
ni.
Bocchetta a lancia, 300 mm (SFD 10)
Bocchetta a lancia extra-lunga per to
-
gliere la polvere da pieghe, interstizi,
angoli.
Bocchetta a lancia, 560 mm (SFD 20)
Bocchetta flessibile per togliere la pol-
vere da superfici di difficile accesso.
Bocchetta per imbottiture, 190 mm
(SPD 10)
Bocchetta extra-larga per pulire mobili
imbottiti, materassi e cuscini.
Prolunga per flessibile (SFS 10)
Per prolungare il flessibile di aspirazio
-
ne di circa 1,5 m.
Chiusura igienica con carbone attivo
Evita che gli odori sgradevoli e la pol
-
vere escano quando si toglie il flessibile
di aspirazione.
Impugnatura Comfort con illumina
-
zione (SGC 20)
Per illuminare la superficie da aspirare.
it
120

Filtri
Filtro di sfiato ActiveAirClean 50
(SF-AA 50)
Assorbe gli odori che si sviluppano dal
-
lo sporco nel sacchetto per la polvere.
Filtro di sfiato HEPA AirClean 50
(SF-HA 50)
Purifica a fondo l'aria espulsa; indicato
in particolare per le persone allergiche.
Griglia portafiltro
Da usare se al posto del filtro di sfiato
ActiveAirClean 50 oppure HEPA
AirClean 50 si usa il filtro AirClean.
it
121

122
en - Alteration rights reserved
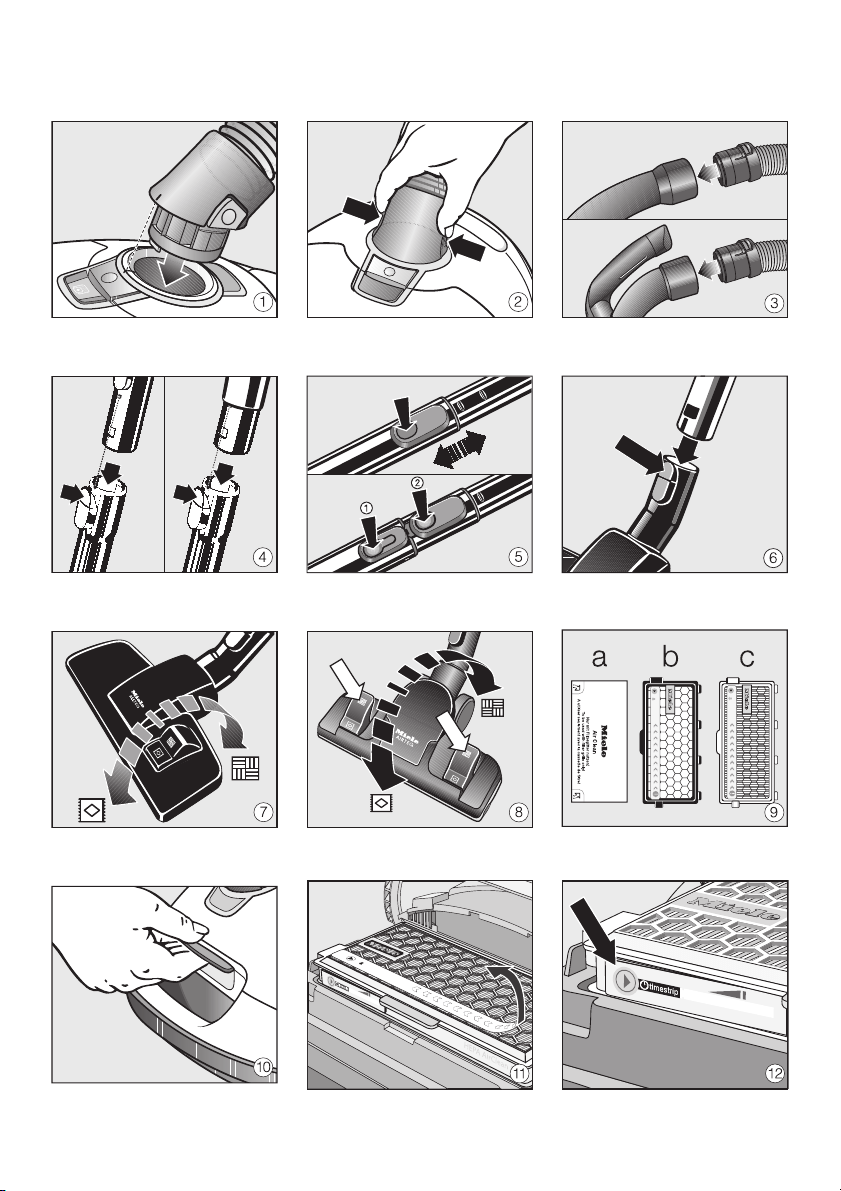
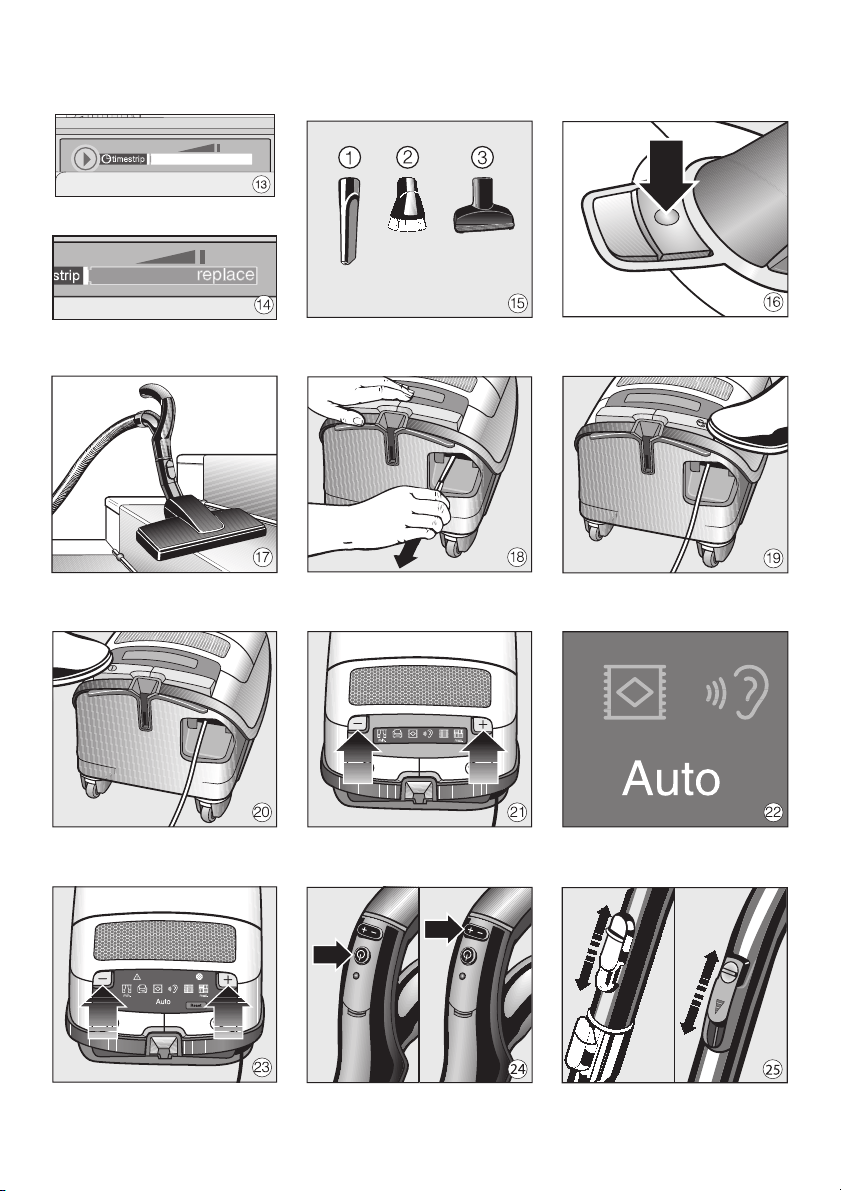
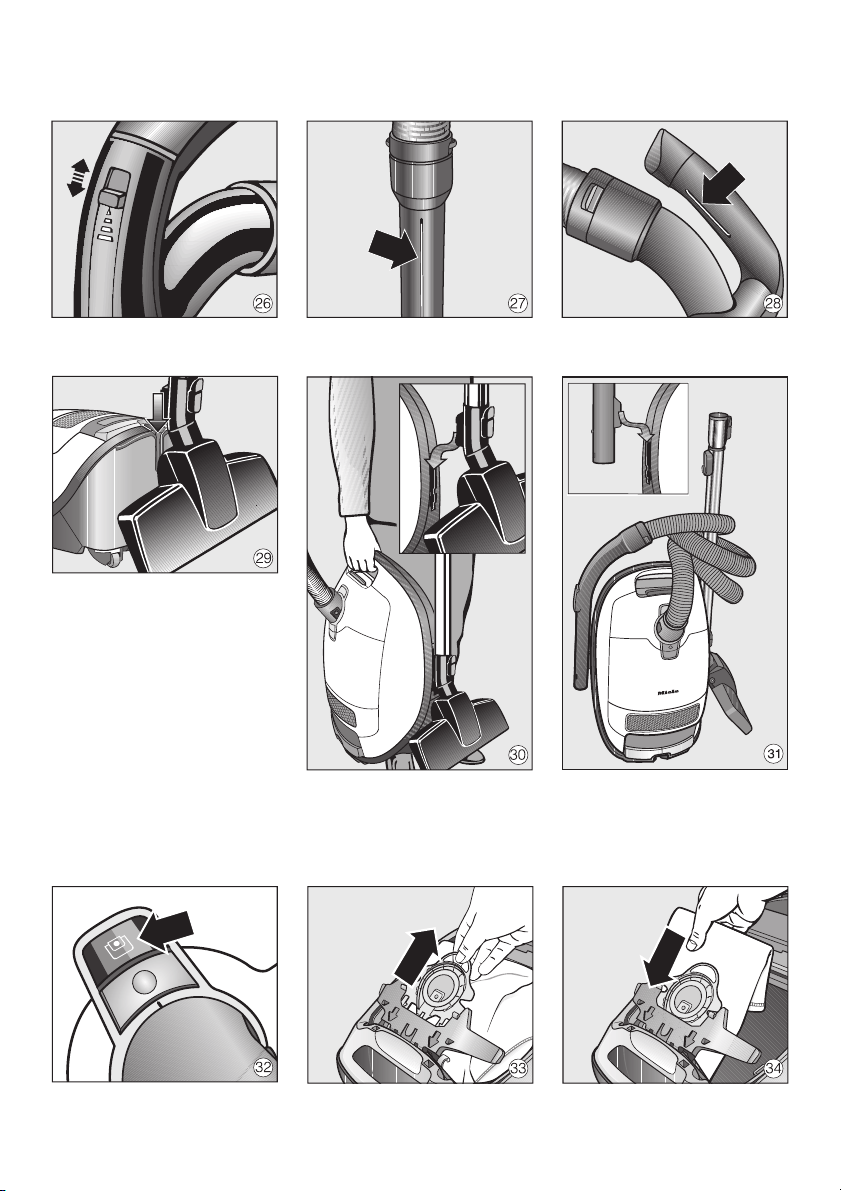
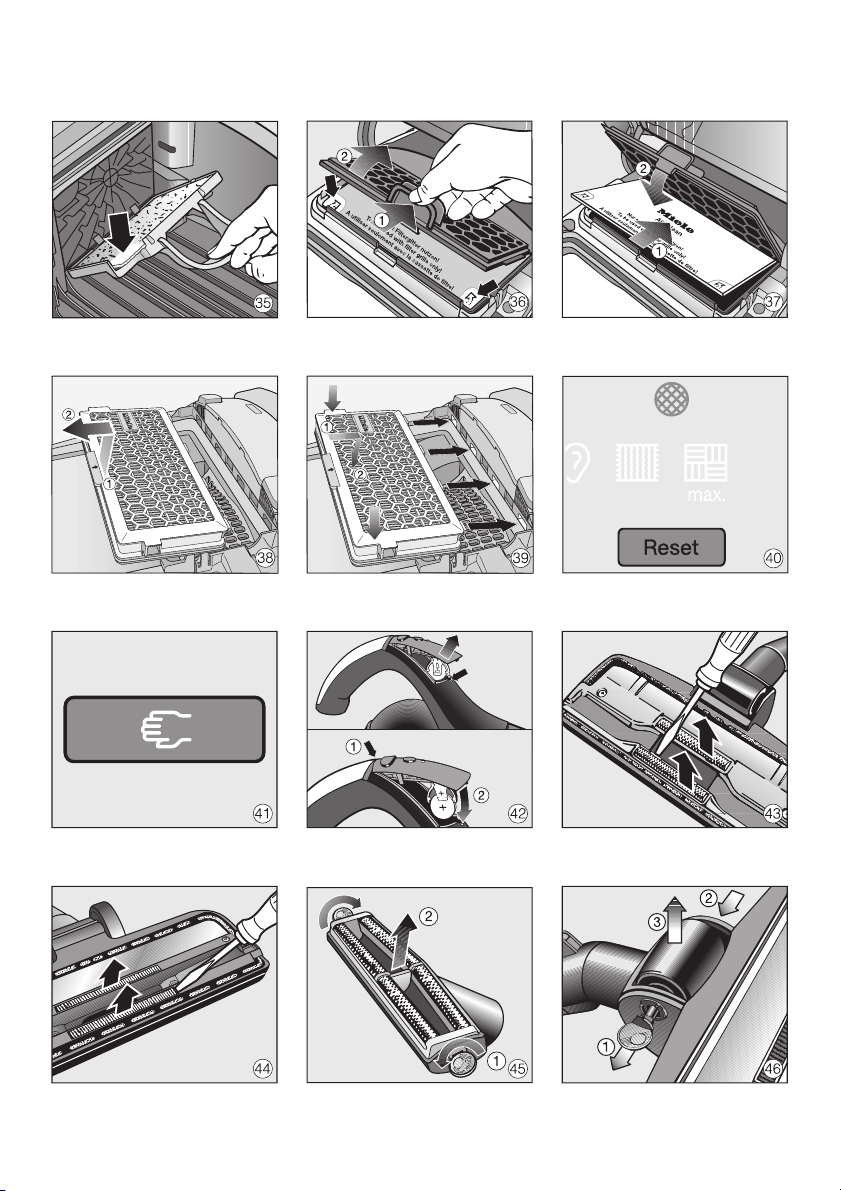
de - Änderungen vorbehalten (S 8310 - S 8790) / 2813
fr - Sous réserve de modifications
nl - Wijzigingen voorbehouden
it - Con riserva di modifiche
M.-Nr. 09 752 850 / 00
M.-Nr. 09 752 850 / 00