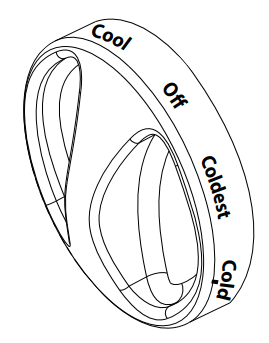
The temperature control maintains the temperature in the refrigerator. Setting the control at COOL is the warmest setting. Setting the control at COLDEST is the coldest setting. Set the control at COLD.
Allow 24 hours for the refrigerator to reach the desired temperature. If you want a colder or warmer temperature, move the dial one setting at a time. Moving the control to OFF stops cooling but does not turn off the power to the refrigerator. Setting the control too high may cause freezing in the refrigerator depending on the room temperature
After changing the control, allow 24 hours for the refrigerator to reach the temperature you have set.
Features
Shelves
To remove a shelf, lift up the back slightly and pull forward. All models have multi-position shelves that can be moved to different levels.
Door Shelves
Shelves on the door provide convenient storage for frequently used items. this model has doors that are deep enough to store large bottles.
CARE AND CLEANING
Directions for Cleaning Outside Surfaces, Door Handles, and Trim
DO USE
DO NOT USE
Soft, clean cloth or sponge
Abrasive cloths, scrubbing sponges, scouring or steel wool pads
Mild detergent mixed with warm water
Approved stainless steel cleaners; Visit the Café Appliances parts store for approved stainless steel cleaners: geapplianceparts.com or call
Cleaners with oxalic acid such as Bar Keepers Friend Soft CleaneserTM can be used to remove surface rust, tarnish and small blemishes.
Abrasive powders or sprays
Window Sprays or Ammonia
Citrus or plant oil-based cleaners
Acidic or vinegar-based cleaners
Oven cleaners
Cleaners containing acetone (propanone)
Any cleaner with WARNING about plastic contact
NOTE: DO NOT allow stainless steel cleaner to come in contact with any plastic parts such as trim pieces, handle hardware and liners. If unintentional contact of cleaners with plastic parts does occur, clean plastic part with a sponge and mild detergent mixed with warm water.
Cleaning the Inside
To help prevent odors, leave an open box of baking soda in the fresh food and freezer compartments.
Remove power from refrigerator before cleaning.
Either disconnect main DC power supply wires at rear of unit, remove refrigerator circuit fuse, or turn off circuit breaker in DC voltage distribution panel. If this is not practical, wring excess moisture out of sponge or cloth when cleaning around switches, lights or controls.
Use warm water and baking soda solution—about a tablespoon (15 ml) of baking soda to a quart (1 liter) of water. This both cleans and neutralizes odors. Rinse and wipe dry.
Other parts of the refrigerator—including door gaskets, fruit and vegetable drawers, and all plastic parts—can be cleaned the same way.
After cleaning the door gaskets. apply a thin layer of petroleum jelly to the door gaskets at the hinge side. This helps keep the gaskets from sticking and bending out of shape. Do not use clean: powders or other abrasive cleaners.
CAUTION: Do not clean glass shelves or covers with warm water when they are cold. Glass shelves and covers may break if exposed to sudden temperature changes or impact such as bumping or dropping. Tempered glass is designed to shatter into many small pieces if it breaks.
Do not wash any plastic refrigerator parts in the dishwasher.
Replacing LED Lighting
WARNING: Do not change the LED light by yourself. Please contact the after-sales service for replacement. Failure to heed this warning could result in injury or death from electric shock.
Defrosting
Defrost whenever frost on the walls of the freezer compartment become 1/4”thick. Never use a sharp or metallic instrument to remove frost as it may damage the cooling coils. (A punctured cooling coil will cause serious problems and void the warranty.) We recommend using a plastic scraper. Do not use any electrical device in defrosting your refrigerator.
To defrost:
Remove foods and ice trays from the freezer compartment
Set the temperature control dial to OFF.
Defrosting usually takes a few hours. To defrost faster. keep the freezer door open. Also, pouring warm (not hot) water on the frosted part may speed defrosting. Do not use boiling water—it may damage plastic parts.
After defrosting
Wipe the freezer compartment with a damp cloth
Tum the temperature control to the desired setting and return food and ice trays to the refrigerator.
NOTE: If ice buildup is very thick, it may keep the freezer door from opening or closing completely. After defrosting, the door will close easily.
Preparing for Storage
For long storage or absences when refrigerator will not be used. remove food and either disconnect main DC power supply wires at rear of unit. or remove refrigerator circuit fuse or turn off circuit breaker in DC voltage distribution panel. Move the control to the OFF position, and clean the interior with a baking soda solution of one tablespoon (15ml) of baking soda to one quart (1 liter) of water. Leave the door open.
Preparing to Move
Remove food. remove refrigerator circuit fuse or turn off circuit breaker in DC voltage distribution panel. and disconnect main DC power supply wires at rear of unit. Secure all loose items such as shelves and drawers by taping them securely in place to prevent damage.
Be sure the refrigerator stays in an upright position during moving.
Installation Instructions
Refrigerator Location and Operating Range
Do not install the refrigerator in a location exposed to water (rain, etc.) or direct sunlight
Install it on a floor strong enough to support it fully loaded
This refrigerator is designed to function properly in room temperatures ranging from 55°F (12.7°C) to 110°F (43°C). Operating the refrigerator in room temperatures outside this range will cause inadequate cooling.
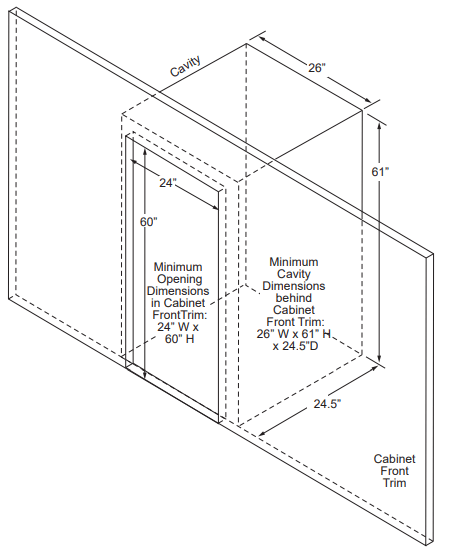
Clearances
For proper air circulation. allow the following clearances between the refrigerator and adjacent cabinetry.
Sides 1” (25.4 mm) Top = 1” (25.4 mm) Back 2” (50.8 mm)
The 1" side and top clearances are not necessary between the refrigerator and the cabinet front trim. The minimum opening size in the cabinet front trim for installing the refrigerator should be 24” (61mm) wide by 60” (153mm) tall.
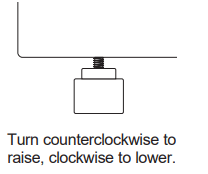
Leveling Legs
Adjustable legs at the front corners of the refrigerator should be set so the refrigerator is firmly positioned on the floor and the front is raised just enough that the door closes easily when opened about halfway.
To adjust the leveling legs, turn the legs counterclockwise to raise the refrigerator, clockwise to lower it.
Reverse Door Swing
Left/Right Door Opening Method
This product allows you to reverse the door opening from left to right and back. You can select your preference of door opening by following the procedure to make the change.
Tools Required
Phillips and Flat Head Screwdrivers, Ratchet Wrench with 8 mm and 10 mm sockets.
Dismantling
1. Affix refrigerator and freezer door by sticking adhesive tape on both sides to hold doors in place.
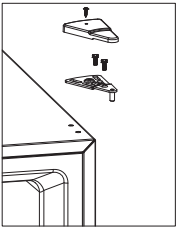
2. Remove the upper hinge cover by using Phillips head screwdriver. Then remove two screws using ratchet wrench with 10 mm socket. Take out hinge by pulling it vertically and keep it in safe place. Remove the top hinge plug from the opposite side of the cabinet top.
3. Remove the adhesive tape on freezer door, lift it and take off the door and carefully put it aside.
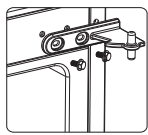
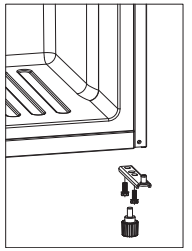
4. Remove two screws of middle hinge using ratchet wrench with 8 mm socket, and keep them in a safe place.
5. Remove the adhesive tape on refrigerator door, lift it and take refrigerator door, and carefully put it aside.
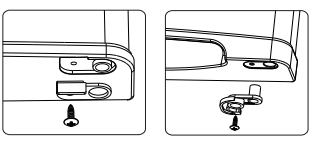
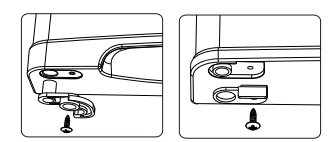
6. Remove the doorstoppers from the refrigerator and freezer doors.
7. Insert left side doorstoppers (provided in your packing) on the left side bottom hole of the refrigerator door and on the left side bottom hole of the freezer door. Fasten with screws provided.
Reinstallation
Tilt refrigerator on a 45 - degree angle to have access to the bottom front.
2. Remove both left and right front feet from bottom.
3. Remove the screws holding the bottom hinge with 10 mm scoket.
4. Align the holes in the bottom hinge to the corresponding holes on the opposite side of the cabinet. Insert and tighten the screws. Reinstall both front feet.
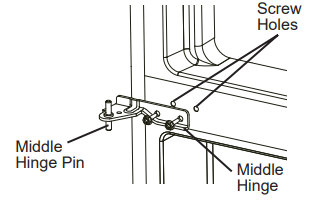
5. To install refrigerator door: Line up the left bottom hole of the refrigerator compartment door over the bottom hinge pin. Move door forward to make it straight and align with middle hinge. Install the middle hinge again, and turn the hinge pin until it completely enters the door body. Secure it with the screws provided.
NOTE: Remove plugs from doorframe and install on other side.
6. To install freezer door: Line up left bottom hole of the door over the middle hinge middle pin. Move door forward to make it straight and align with freezer compartment. Place the hinge cover over the left side of the top hinge, align holes with hole on the refrigerator top and tighten with the screws provided. Insert the top hinge plug into the holes on the cabinet top from which you previously removed the 2 hinge screws
Floor Brackets (Not provided)
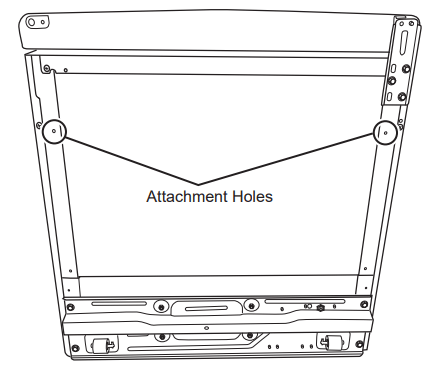
Some RV appliance installations use floor or wall brackets to secure the appliance to the adjacent cabinetry in order to prevent movement during RV transportation. This refrigerator has provisions on the underside bottom surface for attaching floor brackets (Not provided)
To install floor brackets to the refrigerator, place the refrigerator on its back and locate the attachment holes provided, as shown, on the underside of the refrigerator.
Attached one bracket on each side at these locations using sheet metal screws (not provided). It is recommended that #8-16 x ½" sheet metal screws be used.
Return refrigerator to the upright position. Wait at least 4 hours after returning the refrigerator to the upright position before completing the electrical connections.
Electrical Connection
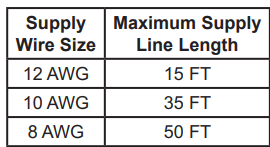
Long lengths for DC voltage supply lines combined with small gauge wiring can lead to excessive voltage drop at the refrigerator connection which decreases the cooling performance of the refrigerator, and cause the wires to overheat possibly causing a fire. The below supply wire size is recommended.
Before beginning the installation. disconnect power by removing refrigerator circuit fuse or turning off circuit breaker in the DC voltage distribution panel.
Turn the control knob to the OFF position.
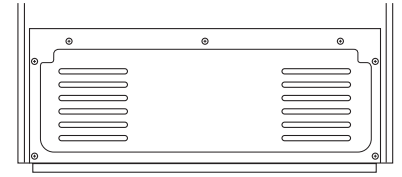
Locate and remove the seven screws of the lower rear unit cover as indicated using a Phillips screwdriver.
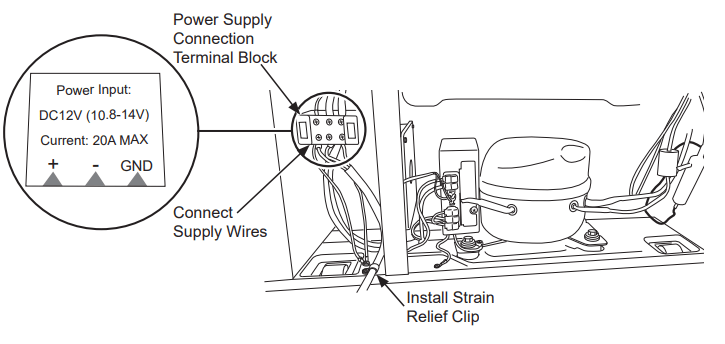
Locate the power supply connection terminal block on the left side of the compressor compartment.
Unsnap the clear plastic cover from the terminal block to access terminal screws. Loosen the supply side terminal screws on the lower side of the block with a Phillips screwdriver. Attach supply wires to the appropriate polarity and ground terminals as indicated on label: connect positive wire to terminal marked +, negative wire to terminal marked -, and ground to terminal marked GND. Retighten terminal block screws and replace clear plastic cover.
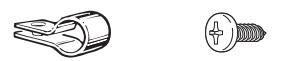
A wiring strain relief clip must be installed for the supply wires. From the selection of wire clips provided in the Owner's Manual bag. select the appropriate size clip needed to fit the supply wires used.
Use the screw also provided in the Owner's Manual bag to mount the strain relief clip at the location shown on the bottom rail of the compressor compartment. The wires must be completely snug after clip is installed with no movement or slippage of the wires within the clip when the wires are tugged.
Replace the rear unit cover, routing the supply wires through the opening provided.
Move unit into its final position taking care not to roll over or damage the main power supply line.
After completing installation. energize the appliance by replacing refrigerator circuit fuse or turning on circuit breaker in the DC voltage distribution panel. Return the control knob to the COLD position.
TROUBLESHOOTING TIPS
Before you call for service...
Troubleshooting Tips: Save time and money! Review the chart below first and you may not need to call for service.
Problem
Possible Causes
What To Do
Refrigerator does not operate
Control in OFF position.
Move the control to a temperature setting.
The fuse is blown/circuit breaker is tripped.
Replace fuse or reset the breaker.
Vibration or rattling (slight vibration is normal)
Front leveling legs need adjusting.
See Leveling Legs.
Motor operates for long periods of cycles
Normal when refrigerator is first turned on.
Wait 24 hours for the refrigerator to completely cool down.
Often occurs when large amounts of food are placed in refrigerator.
This is normal.
Door left open
Check to see if package is holding door open.
Hot weather or frequent door openings.
This is normal.
Temperature control set at the coldest setting.
See About the control.
Refrigerator too warm
Temperature control not set cold enough.
See About the control.
Warm weather or frequent door openings.
Set the temperature control one step colder. See About the control.
'Door left open.
Check to see if package is holding door open.
Refrigerator has odor
Foods transmitting odor to refrigerator.
Foods with strong odors should be tightly wrapped.
Keep an open box of banking soda in the refrigerator; replace every three months.
Interior needs cleaning.
See Care and cleaning.
Moisture forms on outside of refrigerator
Not unusual during periods of high humidity.
Wipe surface dry.
Moisture collects inside (in humid weather, air carries moisture into refrigerator when door is opened)