Inlet Hose Connection Instructions for Steam Dryers
Instrucciones para la conexión de la manguera
de entrada para secadoras con vapor
Instructions de raccordement du tuyau d’arrivée
d’eau pour les sécheuses avec vapeur
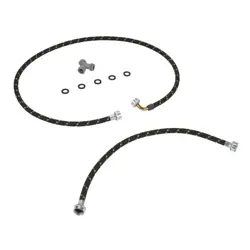
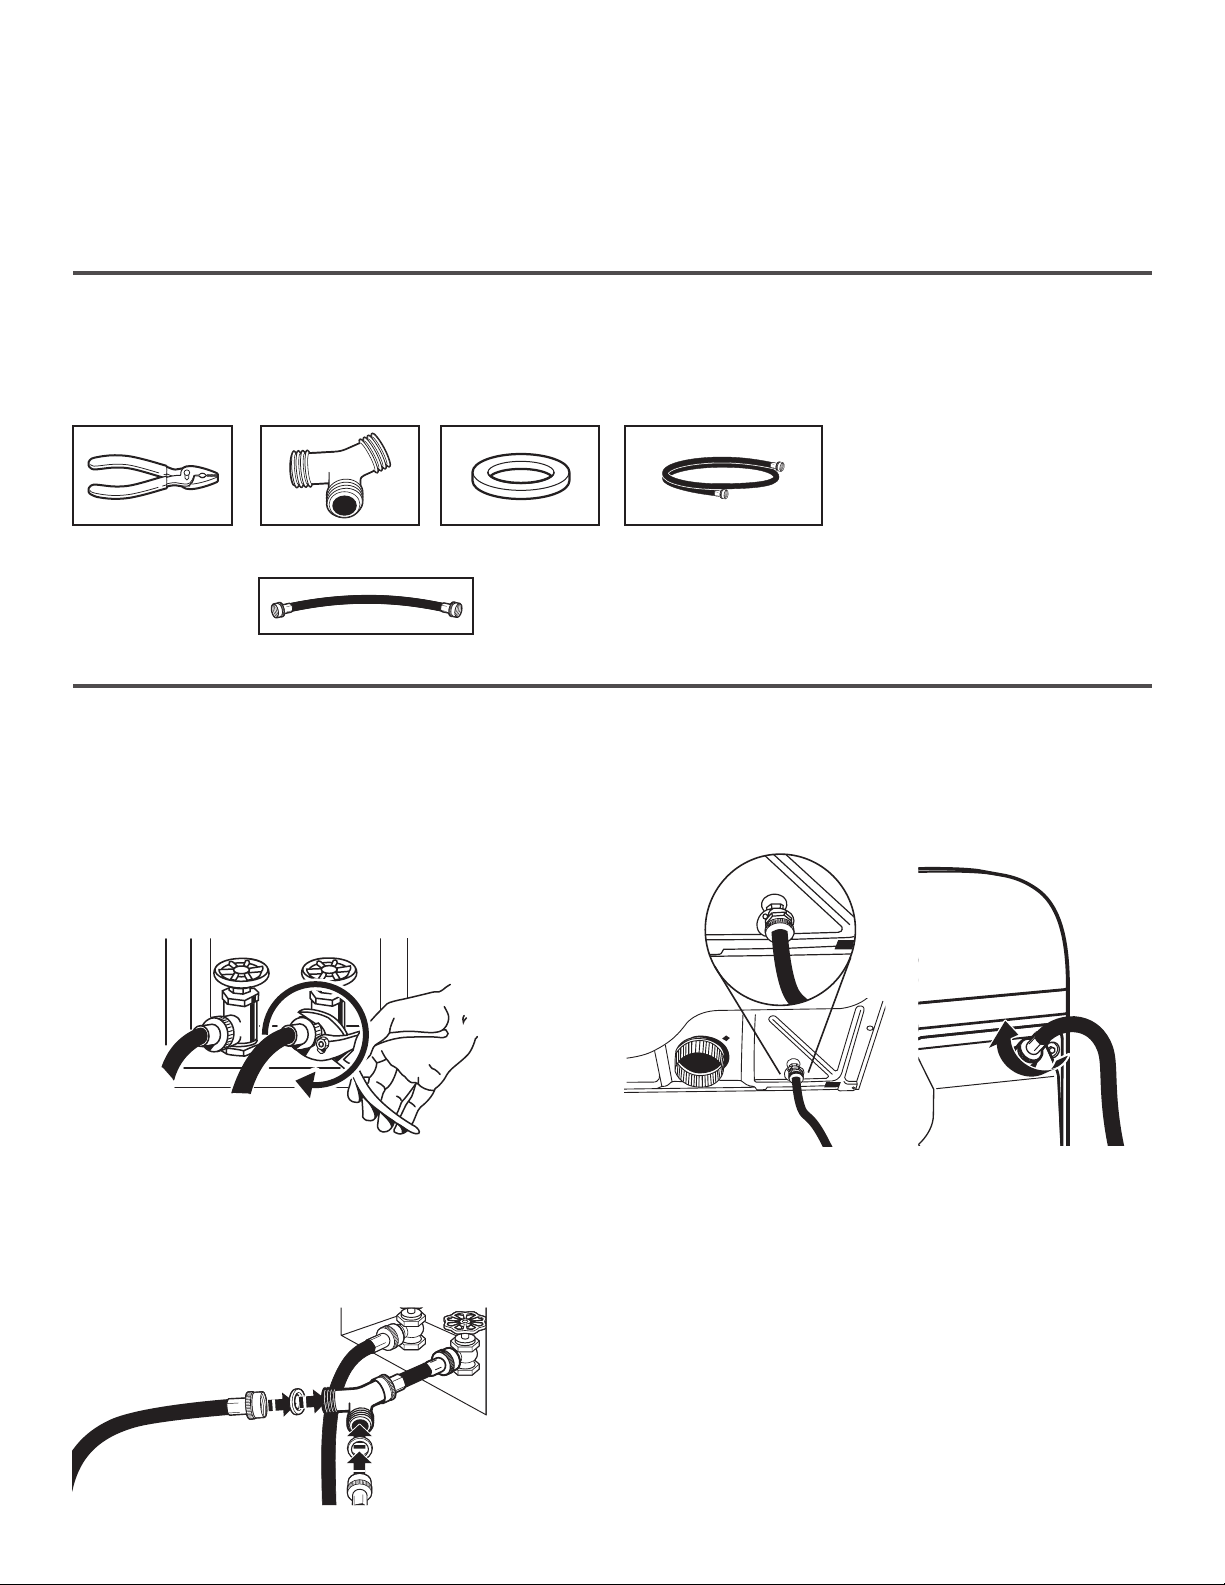
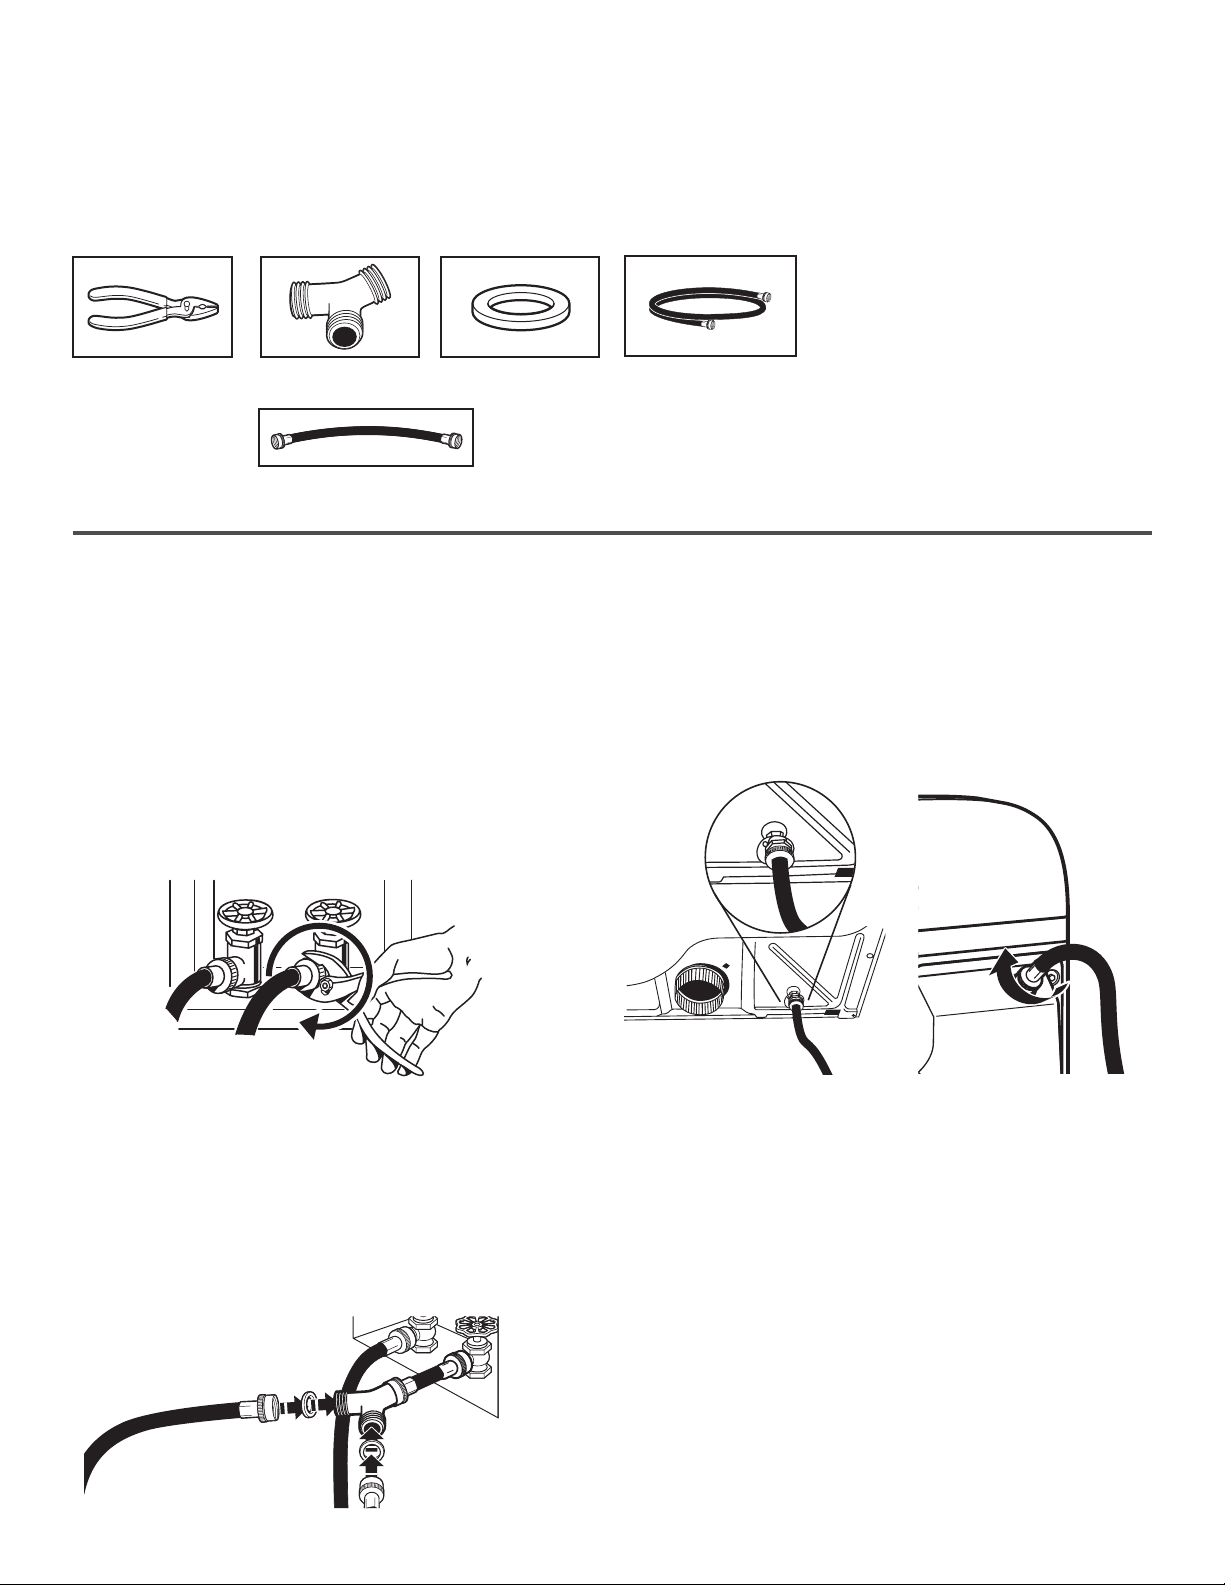
TOOLS AND PARTS
Gather the required tools and parts before starting installation. The dryer must be
connected to the cold water faucet using the new inlet hoses. Do not use old hoses.
INSTALLATION REQUIREMENTS
2' (0.6 m) Inlet hose
5' (1.5 m) Inlet HoseRubber washer
Parts needed: (Not supplied with dryer)
Pliers
W10701405A
CONNECT INLET HOSES
1. Turn cold water faucet off and remove washer inlet hose.
2. Remove old rubber washer from inlet hose and replace
with new rubber washer provided. Inspect hoses to be sure
rubber washers are in place.
3. Attach 2' (0.6 m) inlet hose to cold water faucet. Screw on
coupling by hand until it is seated on faucet.
4. Using pliers, tighten the couplings with an additional
two-thirds turn.
NOTE: Do not overtighten. Damage to the coupling can result.
5. Attach “Y” connector to the end of small hose. Screw on
coupling by hand until it is seated on connector.
6.
Attach dryer 5 ft (1.5 m) inlet hose ends to the “Y” connector.
Attach washer cold inlet hose to other side of “Y” connector.
Screw on coupling by hand until it is seated on connector.
Using pliers, tighten the couplings an additional two-thirds turn.
NOTE: Do not overtighten. Damage to the coupling can result.
7.
Using pliers, tighten the couplings an additional two-thirds turn
.
NOTE: Do not overtighten. Damage to the coupling can result.
8. Attach other end of 5' (1.5 m) inlet hose to ll valve at bottom
or top of dryer back panel (depending on model). Screw on
coupling by hand until it is seated on ll valve connector.
9.
Using pliers, tighten the couplings an additional two-thirds turn
.
NOTE: Do not overtighten. Damage to the coupling can result.
10. Check that the water faucets are on.
11. Check for leaks around “Y” connector, faucet, and hoses.
“Y” connector
Parts Supplied:
Your installation may require
additional parts. To order,
please contact the dealer
from whom you purchased
your dryer or an authorized
service company.
Tools needed:
REQUISITOS DE INSTALACIÓN
1. Cierre el grifo de agua fría y quite la manguera de entrada
a la lavadora.
2. Revise si la arandela de goma está en el conector en “Y”.
Quite la arandela vieja de goma de la manguera de entrada
y reemplácela con la arandela nueva de goma provista.
Inspeccione las mangueras para asegurarse de que las
arandelas de goma estén en su lugar.
3. Sujete la manguera de entrada de 2 pies (0,6 m) al grifo de
agua fría. Atornille el acoplamiento con la mano hasta que
quede asentado en el grifo.
4. Usando las pinzas, apriete los acoplamientos dos tercios
de vuelta adicional.
NOTA: No apriete demasiado. Se puede dañar
el acoplamiento.
5. Luego je el conector en “Y” al extremo de la manguera
corta. Atornille el acoplamiento con la mano hasta que quede
asentado en el conector.
6.
Fije los extremos de la manguera de entrada de 5 pies
(1,5 m) de la secadora al conector en “Y”. Fije la manguera
de entrada de agua fría de la lavadora al otro lado del conector
en “Y”. Atornille el acoplamiento con la mano hasta que quede
asentado sobre el conector. Usando las pinzas, apriete los
acoplamientos dos tercios de vuelta adicional.
NOTA: No apriete demasiado. Se puede dañar
el acoplamiento.
7. Usando las pinzas, apriete los acoplamientos dos tercios
de vuelta adicional.
NOTA: No apriete demasiado. Se puede dañar
el acoplamiento.
8. Fije el otro extremo de la manguera de entrada de 5 pies
(1,5 m) a la válvula de llenado en la parte inferior o superior
del panel posterior de la secadora (según el modelo).
Atornille el acoplamiento con la mano hasta que quede
asentado en el conector de la válvula de llenado.
9. Usando las pinzas, apriete el acoplamiento dos tercios
de vuelta adicional.
NOTA: No apriete demasiado. Se puede dañar
el acoplamiento.
10. Verique que los grifos de agua estén abiertos.
11. Revise si hay fugas alrededor del conector en “Y”,
de los grifos y de las mangueras.
CONEXIÓN DE LAS MANGUERAS DE ENTRADA
HERRAMIENTAS Y PIEZAS
Reúna todas las herramientas y piezas necesarias antes de comenzar la instalación.
La secadora debe conectarse al grifo de agua fría usando las mangueras de entrada
nuevas. No use mangueras viejas.
Manguera de entrada
de corta 2' (0,6 m)
Manguera de entrada
larga de 5' (1,5 m)
Arandela de goma
Pièces nécessaires : (Non fourni avec la sécheuse)
Pinzas Conector en “Y”
Herramientas necesarias:
Il se peut que l’installation
nécessite des pièces
supplémentaires. Pour
commander, contacter soit le
marchand auprès duquel la
sécheuse a été achetée, soit un
service d’entretien autorisé.
Piezas
suministradas:

EXIGENCES D’INSTALLATION
Outils
nécessaires :
Pièces fournies :
RACCORDEMENT DES TUYAUX D’ALIMENTATION
1. Arrêter le robinet d’eau froide et retirer le tuyau d’alimentation
de la laveuse.
2. Retirer l’ancienne rondelle de caoutchouc du tuyau
d’alimentation et la remplacer par la nouvelle rondelle fournie.
Inspecter les tuyaux pour s’assurer que les rondelles en
caoutchouc sont bien installées.
3. Fixer le tuyau d’arrivée de 2 pi (0,6 m) au robinet d’eau froide.
Visser complètement le raccord à la main pour qu’il repose
sur le robinet.
4. À l’aide d’une pince, serrer les raccords en effectuant deux
tiers de tour supplémentaires.
REMARQUE : Ne pas serrer excessivement. Le raccord
risque d’être endommagé.
5. Fixer le connecteur en “Y” à l’embout du tuyau court. Visser
complètement le raccord à la main pour qu’il soit scellé au
connecteur en “Y”.
6. Fixer les extrémités du tuyau d’alimentation de 5 pi (1,5 m)
au connecteur en “Y”. Fixer le tuyau d’alimentation en eau
froide de la laveuse à l’autre extrémité du raccord en “Y”.
Visser le raccord à la main pour qu’il repose sur le connecteur.
Terminer le serrage des raccords de deux tiers de tour
supplémentaire avec une pince.
REMARQUE : Ne pas serrer excessivement. Le raccord
risque d’être endommagé.
7. Terminer le serrage des raccords - deux tiers de tour
supplémentaires avec une pince.
REMARQUE : Ne pas serrer excessivement. Le raccord
risque d’être endommagé.
8. Fixer l’autre extrémité du tuyau d’arrivée à l’électrovanne de
remplissage située au bas ou au sommet du panneau arrière
de la sécheuse (en fonction du modèle). Visser le raccord
à la main jusqu’à ce qu’il repose sur le connecteur de
l’électrovanne.
9. Terminer le serrage des raccords - deux tiers de tour
supplémentaires avec une pince.
REMARQUE : Ne pas serrer excessivement. Le raccord
risque d’être endommagé.
10. Vérier que les robinets d’eau sont ouverts.
11. Vérier s’il y a des fuites autour du connecteur en “Y”,
du robinet et des tuyaux d’alimentation.
OUTILLAGE ET PIÈCES
Rassembler les outils et composants nécessaires avant d’entreprendre l’installation.
La sécheuse doit être raccordée au robinet d’eau froide à l’aide des tuyaux d’arrivée
d’eau neufs. Ne pas utiliser de tuyaux usagés.
Tuyau d’alimentation de 2' (0,6 m)
Tuyau d’alimentation
de 5' (1,5 m)
Rondelle en
caoutchouc
Piezas necesarias: ((No se provee con la secadora) )
Pince Raccord en “Y”
Su instalación puede requerir
piezas adicionales. Para hacer un
pedido, contacte al distribuidor en
donde compró la secadora o a una
compañía de servicio autorizada.

W10701405A
©2014 Whirlpool Corporation
All rights reserved.
Todos los derechos reservados.
Tous droits réservés.
04/14
Printed in U.S.A.
Impreso en EE.UU.
Imprimé aux É.-U.