FlexWash™
User manual
WV60M9900A*
FlexWash_WV9900M_DC68-03768A-04_EN.indd 1 2017-05-22 7:03:24

Contents
English2
Contents
Safety information 4
What you need to know about the safety instructions 4
Important safety symbols 4
Important safety precautions 5
Critical installation warnings 6
Installation cautions 8
Critical usage warnings 8
Usage cautions 10
Critical cleaning warnings 14
Regulatory notice 15
Installation 18
Unpacking your washer 18
What’s included 19
Installation requirements 21
Step-by-step installation 25
Before you start 35
Initial settings 35
Laundry guidelines 35
Guide to cleaning agents 38
Operations 43
Upper washer 43
Lower washer 45
Simple steps to start 50
Samsung Smart Home 51
Special features 53
Maintenance 56
General considerations 56
Upper washer 59
Lower washer 61
FlexWash_WV9900M_DC68-03768A-04_EN.indd 2 2017-05-22 7:03:24


Safety information
SAVE THESE INSTRUCTIONS
English4
Safety information
Congratulations on your new Samsung washer. This manual contains important
information on the installation, use and care of your appliance. Please take some time to
read this manual to take full advantage of your washer’s many benets and features.
What you need to know about the safety instructions
Please read this manual thoroughly to ensure that you know how to safely and efciently
operate the extensive features and functions of your new appliance. Please store the
manual in a safe location close to the appliance for future reference. Use this appliance
only for its intended purpose as described in this instruction manual.
Warnings and Important Safety Instructions in this manual do not cover all possible
conditions and situations that may occur. It is your responsibility to use common sense,
caution, and care when installing, maintaining and operating your washer.
Because the following operating instructions cover various models, the characteristics of
your washer may differ slightly from those described in this manual and not all warning
signs may be applicable. If you have any questions or concerns, contact your nearest
service center or nd help and information online at www.samsung.com.
Important safety symbols
What the icons and signs in this user manual mean:
WARNING
Hazards or unsafe practices that may result in severe personal injury, death and/or
property damage.
CAUTION
Hazards or unsafe practices that may result in personal injury and/or property damage.
NOTE
Indicates that a risk of personal injury or material damage exists.
These warning signs are here to prevent injury to yourself and others.
Please follow them explicitly.
After reading this manual, store it in a safe place for future reference.
Read all instructions before using the appliance.
As with any equipment that uses electricity and moving parts, potential hazards exist.
To safely operate this appliance, familiarize yourself with its operation and exercise care
when using it.
FlexWash_WV9900M_DC68-03768A-04_EN.indd 4 2017-05-22 7:03:24

Safety information
SAVE THESE INSTRUCTIONSSAVE THESE INSTRUCTIONS
English 5
Important safety precautions
WARNING
To reduce the risk of re, electric shock, or injury to persons
when using your appliance, follow basic precautions, including the
following:
1. Read all instructions before using the appliance.
2. Do not wash or dry articles that have been previously cleaned in, washed in, soaked
in, or spotted with gasoline, dry-cleaning solvents, other ammable or explosive
substances as they give off vapors that could ignite or explode.
3. Do not allow children to play on or in the appliance. Close supervision of children is
necessary when the appliance is used near children.
4. Before the appliance is removed from service or discarded, remove the door to the
washing or drying compartment.
5. Do not reach into the appliance if the drum is moving.
6. Do not install or store this appliance where it will be exposed to the weather.
7. Do not tamper with controls.
8. Do not repair or replace any part of the appliance or attempt any servicing unless
specically recommended in the user-maintenance instructions or in published user
repair instructions that you understand and have the skills to carry out.
9. Do not add gasoline, dry-cleaning solvents, or other ammable or explosive substances
to the wash water. These substances give off vapors that could ignite or explode.
10. Under certain conditions, hydrogen gas may be produced in a hot water system
that has not been used for 2 weeks or more. HYDROGEN GAS IS EXPLOSIVE. If the
hot water system has not been used for such a period, before using a washer or
combination washer-dryer, turn on all hot water faucets and let the water ow from
each for several minutes. This will release any accumulated hydrogen gas. As the gas is
ammable, do not smoke or use an open ame during this time.
FlexWash_WV9900M_DC68-03768A-04_EN.indd 5 2017-05-22 7:03:24

Safety information
SAVE THESE INSTRUCTIONS
Safety information
SAVE THESE INSTRUCTIONS
English6
Critical installation warnings
State of California Proposition 65 Warning (US only)
This product contains chemicals known to the State of California to
cause cancer and birth defects or other reproductive harm.
The installation of this appliance must be performed by a qualied technician or service
company.
• Failure to do so may result in electric shock, re, an explosion, problems with the
product, or injury.
The appliance is heavy, therefore take care when lifting it.
Plug the power cord into a wall socket that meets local electrical specications. Use the
socket for this appliance only, and do not use an extension cord.
• Sharing a wall socket with other appliances, using a power strip, or extending the
power cord may result in electric shock or re.
• Ensure that the voltage, frequency, and current supplied to the washer matches those
listed in the product specications. Failure to do so may result in electric shock or re.
Plug the power plug into the wall socket rmly.
Have this appliance installed by a qualied technician or service company.
• Failing to do so may result in electric shock, re, an explosion, problems with the
product, or injury.
Remove all foreign substances such as dust or water from the power plug terminals and
contact points using a dry cloth on a regular basis.
• Unplug the power plug and clean it with a dry cloth.
• Failure to do so may result in electric shock or re.
Plug the power plug into the wall socket so that the cord is running towards the oor.
• If you plug the power plug into the socket in the opposite direction, the electric wires
within the cable may be damaged and this may result in electric shock or re.
Keep all packaging materials out of the reach of children as these may be dangerous.
• If a child places a plastic bag over his or her head, he or she can suffocate.
FlexWash_WV9900M_DC68-03768A-04_EN.indd 6 2017-05-22 7:03:24

Safety information
SAVE THESE INSTRUCTIONSSAVE THESE INSTRUCTIONS
English 7
If the appliance, power plug, or power cord is damaged, contact your nearest Samsung
service center for service.
This appliance must be properly grounded.
Do not ground the appliance to a gas pipe, plastic water pipe, or telephone line.
• This may result in electric shock, re, an explosion, or problems with the product.
• Never plug the power cord into a socket that is not grounded correctly. Make sure that
the socket is in accord with local and national regulations.
Do not install this appliance near a heater or any ammable material.
Do not install this appliance in a humid, oily or dusty location, or in a location exposed to
direct sunlight or water (rain drops).
Do not install this appliance in a location exposed to low temperatures.
• Frost may cause the tubes to burst.
Do not install this appliance in a location where gas may leak.
• This may result in electric shock or re.
Do not use an electric transformer to power the washer.
• This may result in electric shock or re.
Do not use a damaged power plug, damaged power cord, or loose wall socket.
• This may result in electric shock or re.
Do not pull or bend the power cord excessively.
Do not twist or tie the power cord.
Do not hook the power cord over a metal object, place a heavy object on the power cord,
insert the power cord between objects, or push the power cord into the space behind the
appliance.
• This may result in electric shock or re.
Do not pull the power cord when unplugging the power plug.
• Unplug the power plug by pulling the plug.
• Failure to do so may result in electric shock or re.
This appliance should be positioned so that the power plug, the water supply taps, and the
drain pipes are accessible.
FlexWash_WV9900M_DC68-03768A-04_EN.indd 7 2017-05-22 7:03:24

Safety information
SAVE THESE INSTRUCTIONS
Safety information
SAVE THESE INSTRUCTIONS
English8
Installation cautions
CAUTION
This appliance should be positioned in such a way that the power plug is easily accessible.
• Failure to do so may result in electric shock or re due to electric leakage.
Install your appliance on a solid, level oor that can support its weight.
• Failure to do so may result in abnormal vibrations, movement, noise, or problems with
the product.
Critical usage warnings
WARNING
If the appliance is ooded, turn off the water and power supplies immediately and contact
your nearest Samsung service center.
• Do not touch the power plug with wet hands.
• Failure to do so may result in electric shock.
If the appliance generates a strange noise, a burning smell, or smoke, unplug the power
plug immediately and contact your nearest Samsung service center.
• Failure to do so may result in electric shock or re.
In the event of a gas leak (such as propane gas, LP gas, etc.), ventilate the room
immediately without touching the power plug. Do not touch the appliance or power cord.
• Do not use a ventilating fan. Do not turn on a light.
• A spark may result in an explosion or re.
Do not let children play in or on the washer. In addition, when disposing of the appliance,
remove the washer door lever.
• Children can suffocate to death if trapped inside the product.
Make sure to remove the packaging (sponge, styrofoam) attached to the bottom of the
washer before using it.
Do not wash items contaminated with gasoline, kerosene, benzene, paint thinner, alcohol
or other ammable or explosive substances in the washer.
• This may result in electric shock, re, or an explosion.
FlexWash_WV9900M_DC68-03768A-04_EN.indd 8 2017-05-22 7:03:24

Safety information
SAVE THESE INSTRUCTIONSSAVE THESE INSTRUCTIONS
English 9
Do not open the washer door by force while it is operating (high-temperature washing/
drying/spinning).
• Water owing out of the washer may result in burns or cause the oor to be slippery.
This may result in injury.
• Opening the door by force may result in damage to the product or injury.
Do not insert your hand under the washer while an operation is in progress.
• This may result in injury.
Do not touch the power plug with wet hands.
• This may result in electric shock.
Do not operate the appliance with wet hands.
• This may result in electric shock.
Do not turn the appliance off by unplugging the power plug while an operation is in
progress.
• Plugging the power plug into the wall socket again may cause a spark and result in
electric shock or re.
Do not let children or the inrm use this washer without proper supervision. Do not let
children climb in or onto the appliance.
• This may result in electric shock, burns, or injury.
Do not insert your hand or a metal object under the washer while it is operating.
• This may result in injury.
Do not unplug the appliance by pulling the power cord. Always grip the plug rmly and
pull it straight out of the outlet.
• Damage to the power cord may cause a short-circuit, re, and/or electric shock.
Do not attempt to repair, disassemble, or modify the appliance yourself.
• Do not use a fuse (such as copper, steel wire, etc.) other than a standard fuse.
• If the appliance needs to be repaired or reinstalled, contact your nearest Samsung
service center.
• Failure to do so may result in electric shock, re, problems with the product, or injury.
If the water supply hose comes loose from the faucet and oods the appliance, unplug the
power plug.
• Failure to do so may result in electric shock or re.
FlexWash_WV9900M_DC68-03768A-04_EN.indd 9 2017-05-22 7:03:24
Safety information
SAVE THESE INSTRUCTIONS
Safety information
SAVE THESE INSTRUCTIONS
English10
Unplug the power plug when the appliance is not being used for long periods of time or
during a thunder or lightning storm.
• Failure to do so may result in electric shock or re.
If any foreign substance enters the appliance, unplug the power plug and contact your
nearest Samsung service center.
• This may result in electric shock or re.
Do not let children (or pets) play in or on your washer. The washer door does not open
easily from the inside and children may be seriously injured if trapped inside.
Usage cautions
CAUTION
If the washer is contaminated by a foreign substance such as detergent, dirt, food waste,
etc., unplug the power plug and clean the washer using a damp, soft cloth.
• Failure to do so may result in discoloration, deformation, damage, or rust.
The front glass (or lid) may be broken by a strong impact. Take care when using the
washer.
• If the glass is broken, it may result in injury.
After a water supply failure or when reconnecting the water supply hose, open the faucet
slowly.
Open the faucet slowly after a long period of non-use.
• The air pressure in the water supply hose or the water pipe may damage a product
part or result in a water leak.
If a draining error occurs during an operation, check if there is a draining problem.
• If the washer is used when it is ooded because of a draining problem, it may result in
electric shock or re.
Insert the laundry into the washer completely so that the laundry does not get caught in
the door.
• If laundry gets caught in the door, it may result in damage to the laundry or the
washer, or result in a water leak.
Turn the water supply off when the washer is not being used.
• Ensure that the water supply hose connectors are properly tightened.
FlexWash_WV9900M_DC68-03768A-04_EN.indd 10 2017-05-22 7:03:24

Safety information
SAVE THESE INSTRUCTIONSSAVE THESE INSTRUCTIONS
English 11
Ensure that the rubber seal and front door glass are not contaminated by a foreign
substance (e.g. waste, thread, hair, etc.).
• If a foreign substance is caught in the door or the door is not completely closed, it may
cause a water leak.
Open the faucet and check if the water supply hose connectors are rmly tightened and
that there are no water leaks before using the product.
• If the connectors on the water supply hoses are loose, it may result in a water leak.
The product you have purchased is designed for domestic use only.
Using the product for business purposes qualies as product misuse. If the product is used
for business purposes, the product will not be covered by the standard warranty provided
by Samsung and no responsibility can be attributed to Samsung for malfunctions or
damages resulting from such misuse.
Do not stand on the appliance or place objects (such as laundry, lighted candles, lighted
cigarettes, dishes, chemicals, metal objects, etc.) on the appliance.
• This may result in electric shock, re, problems with the product, or injury.
Do not spray volatile material such as insecticide onto the surface of the appliance.
• As well as being harmful to humans, this may result in electric shock, re, or problems
with the product.
Do not place objects that generate electromagnetic elds near the washer.
• This may result in injury due to a malfunction.
Water drained during a high-temperature wash or drying cycle is hot. Do not touch the
water.
• This may result in burns or injury.
Do not wash, spin, or dry water-proof seats, mats, or clothing (*) unless your appliance has
a special cycle for washing these items.
For waterproof fabrics, only use the WATERPROOF cycle. Do not use other cycles for
waterproof fabrics (WATERPROOF cycle-featured models only).
(*): Woollen bedding, rain covers, shing vests, ski pants, sleeping bags, diaper covers,
sweat suits, and bicycle, motor cycle and car covers, etc.
• Do not wash thick or hard mats even if the washer mark is on the care label. This may
result in injury or damage to the washer, walls, oor, or clothing due to abnormal
vibrations.
FlexWash_WV9900M_DC68-03768A-04_EN.indd 11 2017-05-22 7:03:24

Safety information
SAVE THESE INSTRUCTIONS
Safety information
SAVE THESE INSTRUCTIONS
English12
• Do not wash throw rugs or doormats with rubber backing in the washer. The rubber
backing may come off and stick to inside the drum, and this may result in a malfunction
such as a drainage error.
Do not operate the washer when the detergent drawer is removed.
• This may result in electric shock or injury due to a water leak.
Do not touch the insides of the drum during or just after drying as it is hot.
• This may result in burns.
Do not insert your hand into the detergent drawer.
• This may result in injury as your hand may be caught by the detergent input device.
• Do not use the liquid detergent container (on applicable models only) for powdered
detergent. Remove the container and put powdered detergent directly into the Main
wash compartment.
Do not place any objects (such as shoes, food waste, animals) other than laundry into the
washer.
• This may result in damage to the washer, or injury and death in the case of pets due to
abnormal vibrations.
Do not press the buttons using sharp objects such as pins, knifes, ngernails, etc.
• This may result in electric shock or injury.
Do not wash laundry contaminated by oils, creams, or lotions usually found in skincare
shops or massage clinics.
• This may cause the rubber seal to become deformed and result in a water leak.
Do not leave metal objects such as safety pins or hair pins in the drum for long periods of
time. Do not leave bleach in the drum for long periods of time.
• Doing either may cause the drum to rust.
• If rust starts appearing on the surface of the drum, apply a (neutral) cleansing agent to
the surface and use a sponge to clean it. Never use a metal brush.
Do not use dry cleaning detergent in the washer and do not wash, rinse, or spin laundry
contaminated by dry cleaning detergent.
• This may result in spontaneous combustion or ignition due to the heat from the
oxidation of the oil.
Do not use water from water cooling/heating devices.
• This may result in problems with the washer.
FlexWash_WV9900M_DC68-03768A-04_EN.indd 12 2017-05-22 7:03:24

Safety information
SAVE THESE INSTRUCTIONSSAVE THESE INSTRUCTIONS
English 13
Do not use natural hand-washing soap in the washer.
• If it hardens and accumulates inside the washer, it may result in problems with the
product, discoloration, rust, or bad odors.
Place socks and brassieres in a washing net and wash them with the other laundry.
Do not wash large laundry items such as bedding in the washing net.
• Failure to do so may result in injury due to abnormal vibrations.
• Place smaller items, such as lace socks and lingerie in the washing net.
Do not use hardened detergent.
• If it accumulates inside the washer, it may result in a water leak.
Make sure that the pockets of all the clothing items to be washed are empty.
• Hard, sharp objects such as coins, safety pins, nails, screws, or stones can cause
extensive damage to the washer.
Do not wash clothing with large buckles, buttons, or other heavy metal objects in the
washer.
Sort the laundry by color on the basis of its colorfastness and select the recommended
cycle, water temperature, and additional functions.
• Failure to do this may result in discoloration or fabric damage.
Take care that children’s ngers are not caught in the door when you close it.
• Failure to do so may result in injury.
FlexWash_WV9900M_DC68-03768A-04_EN.indd 13 2017-05-22 7:03:24

Safety information
SAVE THESE INSTRUCTIONS
Safety information
SAVE THESE INSTRUCTIONS
English14
Critical cleaning warnings
WARNING
Do not clean the appliance by spraying water directly onto it.
Do not use a strong acidic cleaning agent.
Do not use benzene, thinner, or alcohol to clean the appliance.
• This may result in discoloration, deformation, damage, electric shock, or re.
Before cleaning the washer or performing maintenance, unplug it from the wall socket.
• Failure to do so may result in electric shock or re.
FlexWash_WV9900M_DC68-03768A-04_EN.indd 14 2017-05-22 7:03:25

Regulatory notice
SAVE THESE INSTRUCTIONS
English 15
Regulatory notice
FCC Notice
CAUTION
Any changes or modications not expressly approved by the party responsible for
compliance could void the user’s authority to operate the equipment.
This device complies with Part 15 of FCC Rules. Operation is Subject to following two
conditions:
1. This device may not cause harmful interference, and
2. This device must accept any interference received including interference that cause
undesired operation.
For products sold in the US and Canadian markets, only channels 1–11 are available. You
cannot select any other channels.
FCC STATEMENT:
This equipment has been tested and found to comply within the limits for a Class B
digital device, pursuant to part 15 of the FCC Rules. These limits are designed to provide
reasonable protection against harmful interference in a residential installation.
This equipment generates, uses, and can radiate radio frequency energy and, if not
installed and used in accordance with the instructions, may cause harmful interference
to radio communications. However, there is no guarantee that interference will not occur
in a particular installation. If this equipment does cause harmful interference to radio or
television reception, which can be determined by turning the equipment off and on, the
user is encouraged to try to correct the interference by one or more of the following
measures:
• Reorienting or relocating the receiving antenna
• Increasing the separation between the equipment and receiver
• Connecting the equipment to an outlet that is on a different circuit than the radio or TV.
• Consulting the dealer or an experienced radio/TV technician for help.
FCC RADIATION EXPOSURE STATEMENT:
This equipment complies with FCC radiation exposure limits set forth for an uncontrolled
environment. This equipment should be installed and operated so there is at least 8 inches
(20 cm) between the radiator and your body. This device and its antenna(s) must not be
colocated or operated in conjunction with any other antenna or transmitter.
FlexWash_WV9900M_DC68-03768A-04_EN.indd 15 2017-05-22 7:03:25

Regulatory notice
SAVE THESE INSTRUCTIONS
Regulatory notice
English16
IC Notice
The term IC” before the radio certication number only signies that Industry Canada
technical specications were met. Operation is subject to the following two conditions:
1. This device may not cause interference, and
2. This device must accept any interference, including interference that may cause
undesired operation of the device.
This Class B digital apparatus complies with Canadian ICES-003.
Cet appareil numérique de la classe B est conforme á la norme NMB-003 du Canada.
For products sold in the US and Canadian markets, only channels 1–11 are available. You
cannot select any other channels.
IC RADIATION EXPOSURE STATEMENT:
This equipment complies with IC RSS-102 radiation exposure limits set forth for an
uncontrolled environment. This equipment should be installed and operated so there is at
least 8 inches (20 cm) between the radiator and your body. This device and its antenna(s)
must not be colocated or operated in conjunction with any other antenna or transmitter.
FlexWash_WV9900M_DC68-03768A-04_EN.indd 16 2017-05-22 7:03:25
Regulatory notice
SAVE THESE INSTRUCTIONS
English 17
Open Source License Notice
The software included in this product contains open source software. You may obtain the
complete corresponding source code for a period of three years after the last shipment of
this product by sending an email to mailto:[email protected].
It is also possible to obtain the complete corresponding source code in a physical medium
such as a CD-ROM; a minimal charge will be required.
The following URL http://opensource.samsung.com/opensource/SimpleConnectTP/seq/0
leads to the download page of the source code made available and open source license
information as related to this product. This offer is valid to anyone in receipt of this
information.
FlexWash_WV9900M_DC68-03768A-04_EN.indd 17 2017-05-22 7:03:25
Installation
English18
Installation
Follow these instructions carefully to ensure proper installation of the washer and to
prevent accidents when doing laundry.
WARNING
Control board, heat sink, motor, inlet valve, and pump are intentionally not grounded and
may present a risk of electric shock only during servicing.
Unpacking your washer
Unpack your washer and inspect it for shipping damage. Make sure you have received all
the items shown below. If your washer was damaged during shipping, or you do not have
all of the items, contact 1-800-SAMSUNG (1-800-726-7864). To prevent personal injury or
strain, wear protective gloves whenever lifting or carrying the unit.
WARNING
Packing materials can be dangerous to children; Keep all packing material (plastic bags,
polystyrene, etc.) well out of children’s reach.
CAUTION
When unpacking the washer, a 2 person
collaboration is needed. To remove the
cushion bottom of the packing materials,
do not tip the washer over on its front.
When you lay the washer down to remove
the carton base, protect the sides of the
washer and lay it down carefully. Never
lay your washer on its back or front.
CAUTION
Do not yank out or remove the sealing
of the inner door. This may cause a leak
during the washing process.
FlexWash_WV9900M_DC68-03768A-04_EN.indd 18 2017-05-22 7:03:25
Installation
English 19
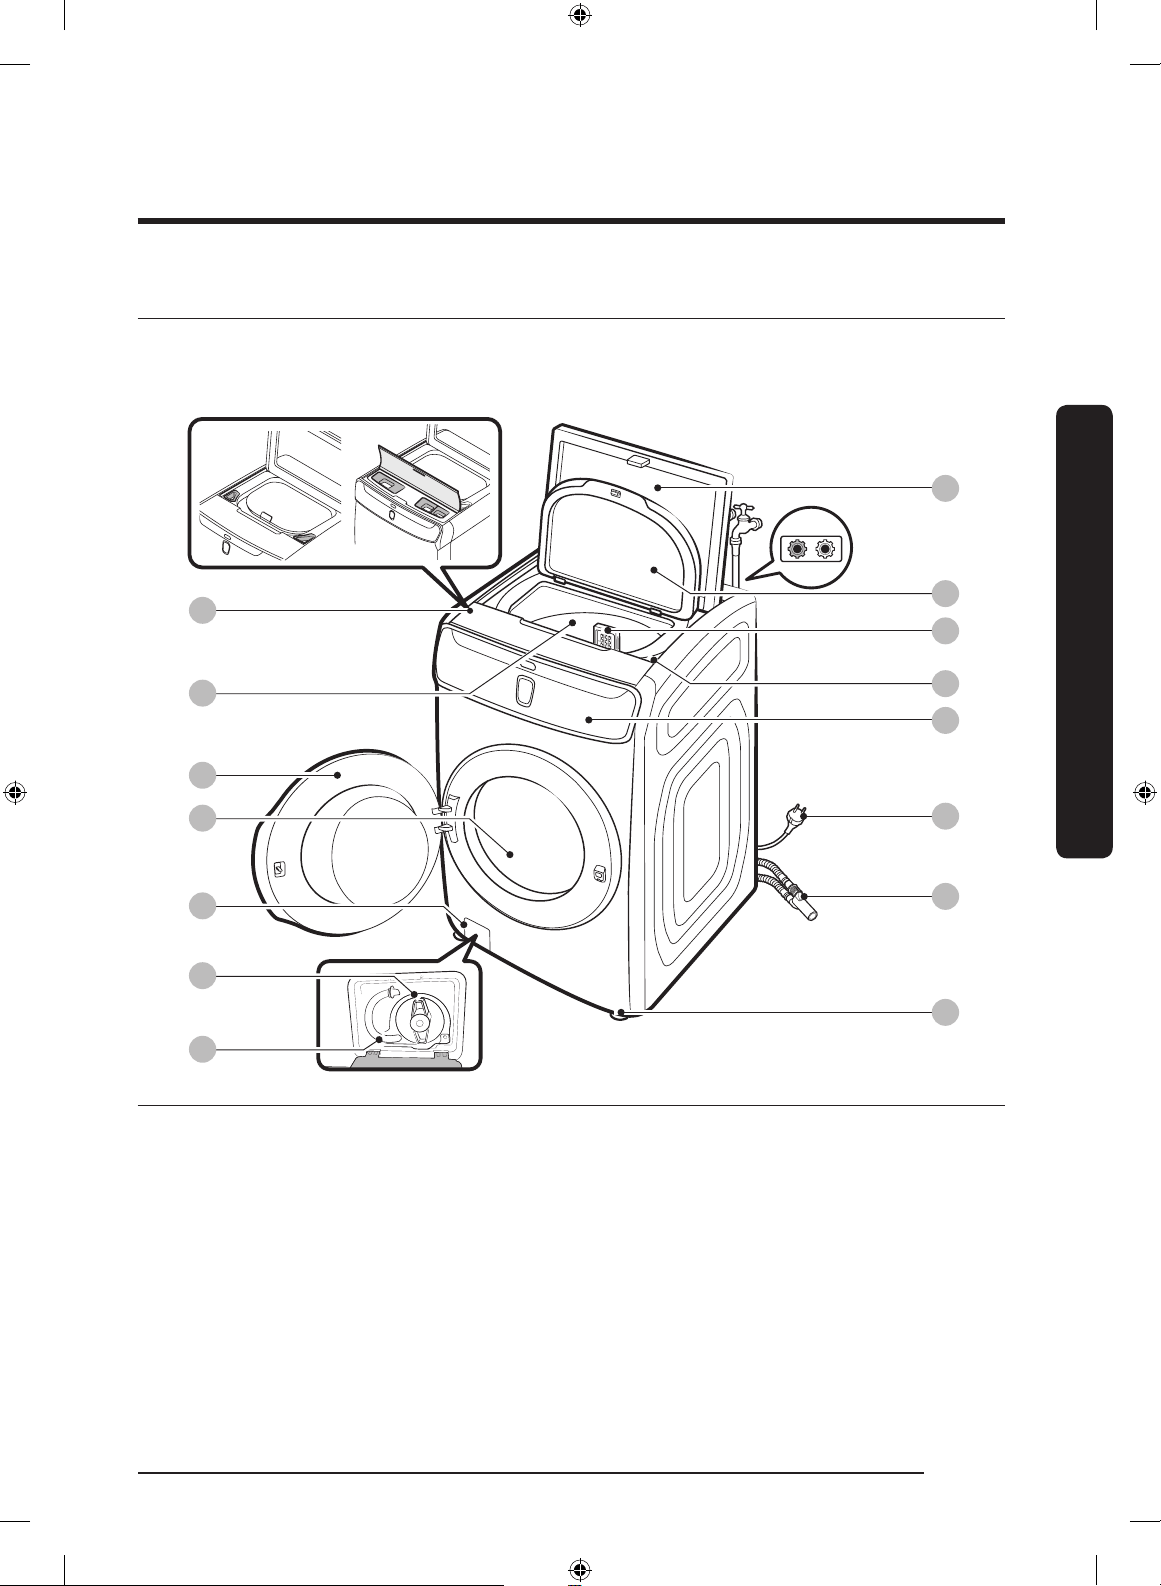
What’s included
Make sure all the parts are included in the product package. If you have a question about
the washer or the parts, contact a local Samsung customer center or your retailer.
12
10
08
09
11
13
14
15
01
03
04
02
05
06
07
01 Lower detergent
compartment
02 Tub 03 Front door
04 Drum 05 Filter cover 06 Pump lter
07 Emergency drain tube 08 Top door 09 Protective cover (inner)
10 Lint lter 11 Upper detergent
compartment
12 Main panel
13 Power plug 14 Pipe connector
(Upper drain hose &
lower drain hose)
15 Levelling legs
FlexWash_WV9900M_DC68-03768A-04_EN.indd 19 2017-05-22 7:03:25
Installation
Installation
English20
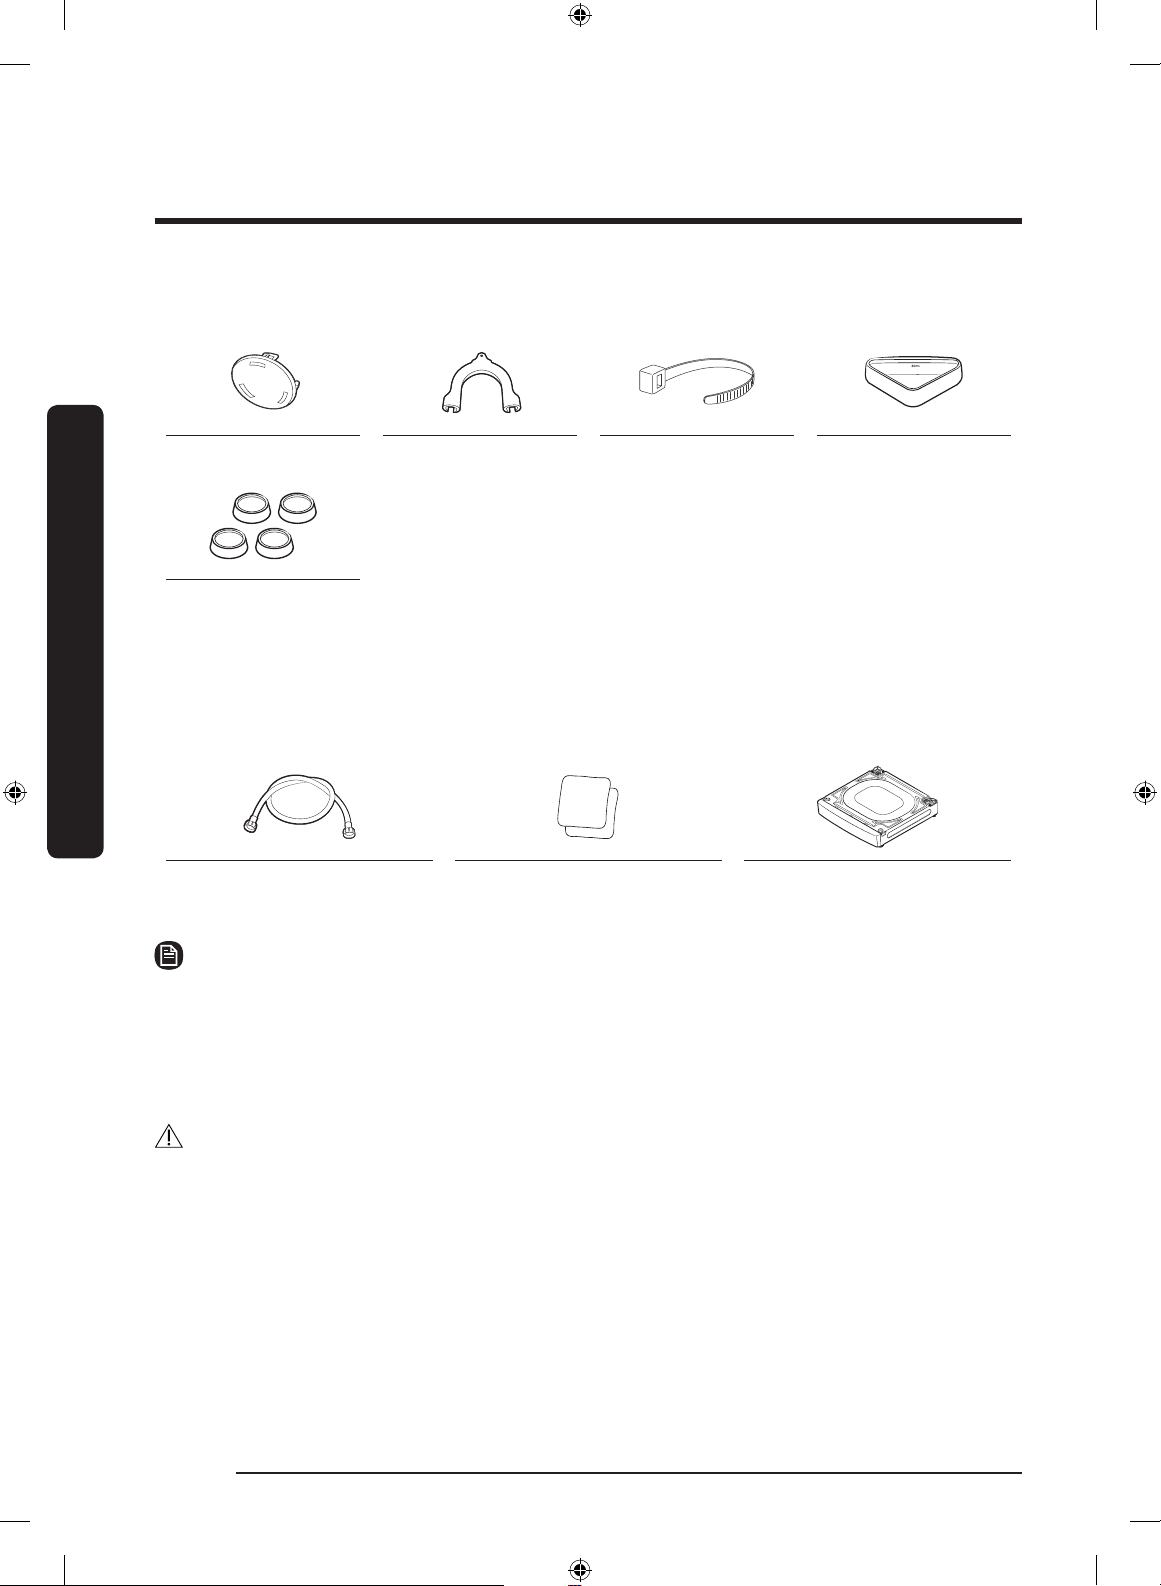
Accessories (supplied)
Bolt caps Hose guide (x 2) Tie straps Aqua Pebble
* Rubber cups
* When not using the pedestal, use the rubber cups for soft oors or surfaces.
Accessories (not supplied)
You must purchase these items at a local service center.
Water hoses (sold
separately)
Anti-slip pads (sold
separately)
Pedestal (ex system only)
NOTE
• The number (7 to 9) of bolt caps provided depends on the model.
• The appearance of the washer and provided accessories may differ by model.
• To purchase an accessory or lost part, contact a local Samsung service center or your
retailer.
• “WE272N*” is a pedestal dedicated to the ex system.
CAUTION
• Do not reuse old water hoses, which may leak or burst, causing ooding and/or
property damage.
• Make sure rubber washers are inserted in each coupling of both water hoses.
FlexWash_WV9900M_DC68-03768A-04_EN.indd 20 2017-05-22 7:03:27

Installation
English 21
Tools required for installation (not supplied)
Measuring tape Philips screwdriver Level Adjustable pliers
Installation requirements
Electrical supply and grounding
• AC 120 V / 60 Hz fuse or circuit breaker
is required.
• Use an individual branch circuit.
Connect only the washer to the circuit.
WARNING
• Do NOT use an extension cord.
• Use only the power cord that comes
with the washer.
• Do NOT connect the ground wire to
plastic plumbing, gas lines, or hot water
pipes.
• Improperly connected grounding
conductors may cause electric shock.
• To ensure proper grounding, the washer
comes with a power cord featuring a
three-prong grounding plug for use in a
properly installed and grounded outlet.
Check with a qualied electrician or
service person if you are not sure about
the grounding.
• Do not modify the provided plug. If it
does not t the outlet, call a qualied
electrician to install a proper outlet.
• To prevent unnecessary risk of re,
electrical shock, or personal injury, all
wiring and grounding must be done in
accordance with local codes, or in the
absence of local codes, in accordance
with the National Electrical Code, ANSI/
NFPA No. 70-Latest Revision (for the
U.S.) or the Canadian Electrical Code CSA
C22.1 – Latest Revisions and local codes
and ordinances. It is your responsibility
to provide adequate electrical service
for your washer.
FlexWash_WV9900M_DC68-03768A-04_EN.indd 21 2017-05-22 7:03:27

Installation
Installation
English22
Water supply
Water pressure less than 20 psi (137 kPa)
may cause the water valve not to close
completely. Or, it may take longer to ll
the drum, causing the washer to turn
off. Taps must be within 4 feet (122 cm)
from the rear of the washer so that the
provided inlet hoses reach the washer. To
reduce the risk of leaks:
• Make sure taps are easily accessible.
• Turn off the taps when the washer is
not in use.
• Check for any leaks at the water inlet
hose ttings on a regular basis.
CAUTION
Before using the washer for the rst time,
check all connections at the water valve
and taps for any leaks.
Drain
Samsung recommends a standpipe 18 in
(46 cm) high. The drain hose must be
connected through the hose clip to the
standpipe, and the standpipe must fully
cover the drain hose.
Flooring
For best performance, the washer must
be installed on a solid oor. Wood oors
may need to be reinforced to minimize
vibration and/or unbalanced loads.
Carpeting and soft tile surfaces do not
provide good resistance to vibrations and
may cause the washer to move slightly
during the spin cycle.
CAUTION
Do NOT install the washer on a platform or
a poorly supported structure.
Water temperature
Do not install the washer in areas where
water may freeze as the washer always
retains some water in its water valves,
pumps, and/or hoses. Frozen water left in
the connection parts may cause damage to
belts, the pump, and other components of
the washer.
FlexWash_WV9900M_DC68-03768A-04_EN.indd 22 2017-05-22 7:03:27

Installation
English 23
Alcove or closet installation
Minimum clearance for stable operation:
Sides 1 in. (25 mm) Rear 6 in. (152 mm)
Top 21 in. (533 mm) Front 2 in. (51 mm)
If both the washer and a dryer are installed in the same location, the front of the alcove or
closet must have at least a 72 in² (465 cm²) unobstructed air opening. Your washer alone
does not require a specic air opening.
Installation on a pedestal
A
B
D
E
F
C
A 54.6 in. (1386 mm) D 27 in. (686 mm)
B 34 in. (864 mm) E 46.9 in. (1192 mm)
C 6 in. (152 mm) F 52.2 in. (1326 mm)
FlexWash_WV9900M_DC68-03768A-04_EN.indd 23 2017-05-22 7:03:27

Installation
Installation
English24
Side by side installation
A
E
A
A
C
B B
F
D
A 1 in. (25 mm) D 34 in. (864 mm)
B 27 in. (686 mm) E 2 in. (51 mm)
C 21 in. (533 mm) F 6 in. (152 mm)
*This clearance is not applicable to standalone washers.
A
A 61 in. (1550 mm)
FlexWash_WV9900M_DC68-03768A-04_EN.indd 24 2017-05-22 7:03:27

Installation
English 25
Step-by-step installation
STEP 1 Select a location
Location requirements:
• A solid, level surface without carpeting or ooring that may obstruct ventilation
• No direct sunlight
• Adequate room for ventilation and wiring
• Ambient temperature always higher than the freezing point (32 ˚F/0 ˚C)
• Away from heat sources
STEP 2 Remove the shipping bolts
WARNING
• Packaging materials can be dangerous to children. Dispose all packaging material
(plastic bags, polystyrene, etc.) out of children’s reach.
• To ensure proper installation, all 7 shipping bolts must be removed.
Unpack the product package and remove
all shipping bolts (x7).
1. Loosen all shipping bolts on the rear of
the machine using the wrench.
NOTE
An adjustable wrench or 10 mm open-
end wrench is required for removing
the shipping bolts.
2. Fill the holes with the supplied plastic
bolt caps. Keep the shipping bolts for
future use.
FlexWash_WV9900M_DC68-03768A-04_EN.indd 25 2017-05-22 7:03:28

Installation
Installation
English26
STEP 3 Adjust the levelling legs
1. Gently slide the washer into position.
Excessive force may damage the
levelling legs.
2. Level the washer by manually adjusting
the levelling legs.
3. When levelling is complete, tighten the
nuts using the wrench.
NOTE
An adjustable wrench or 17 mm open-
end wrench is required to loosen or
tighten the leveling legs.
STEP 4 Put the rubber cups on the legs (Only for soft oor or surface)
To protect a soft oor or surface, use the
provided rubber cups. You don’t need to
use the rubber cups on a hard oor or on a
pedestal.
1. Let two or more persons hold both
sides of the washer.
2. While slanting the washer to one side,
put the rubber cups under each leg of
the washer one by one.
CAUTION
Make sure you have two or more persons
insert the rubber cups. Otherwise, the
washer may fall, causing physical or
property damage.
FlexWash_WV9900M_DC68-03768A-04_EN.indd 26 2017-05-22 7:03:28

Installation
English 27
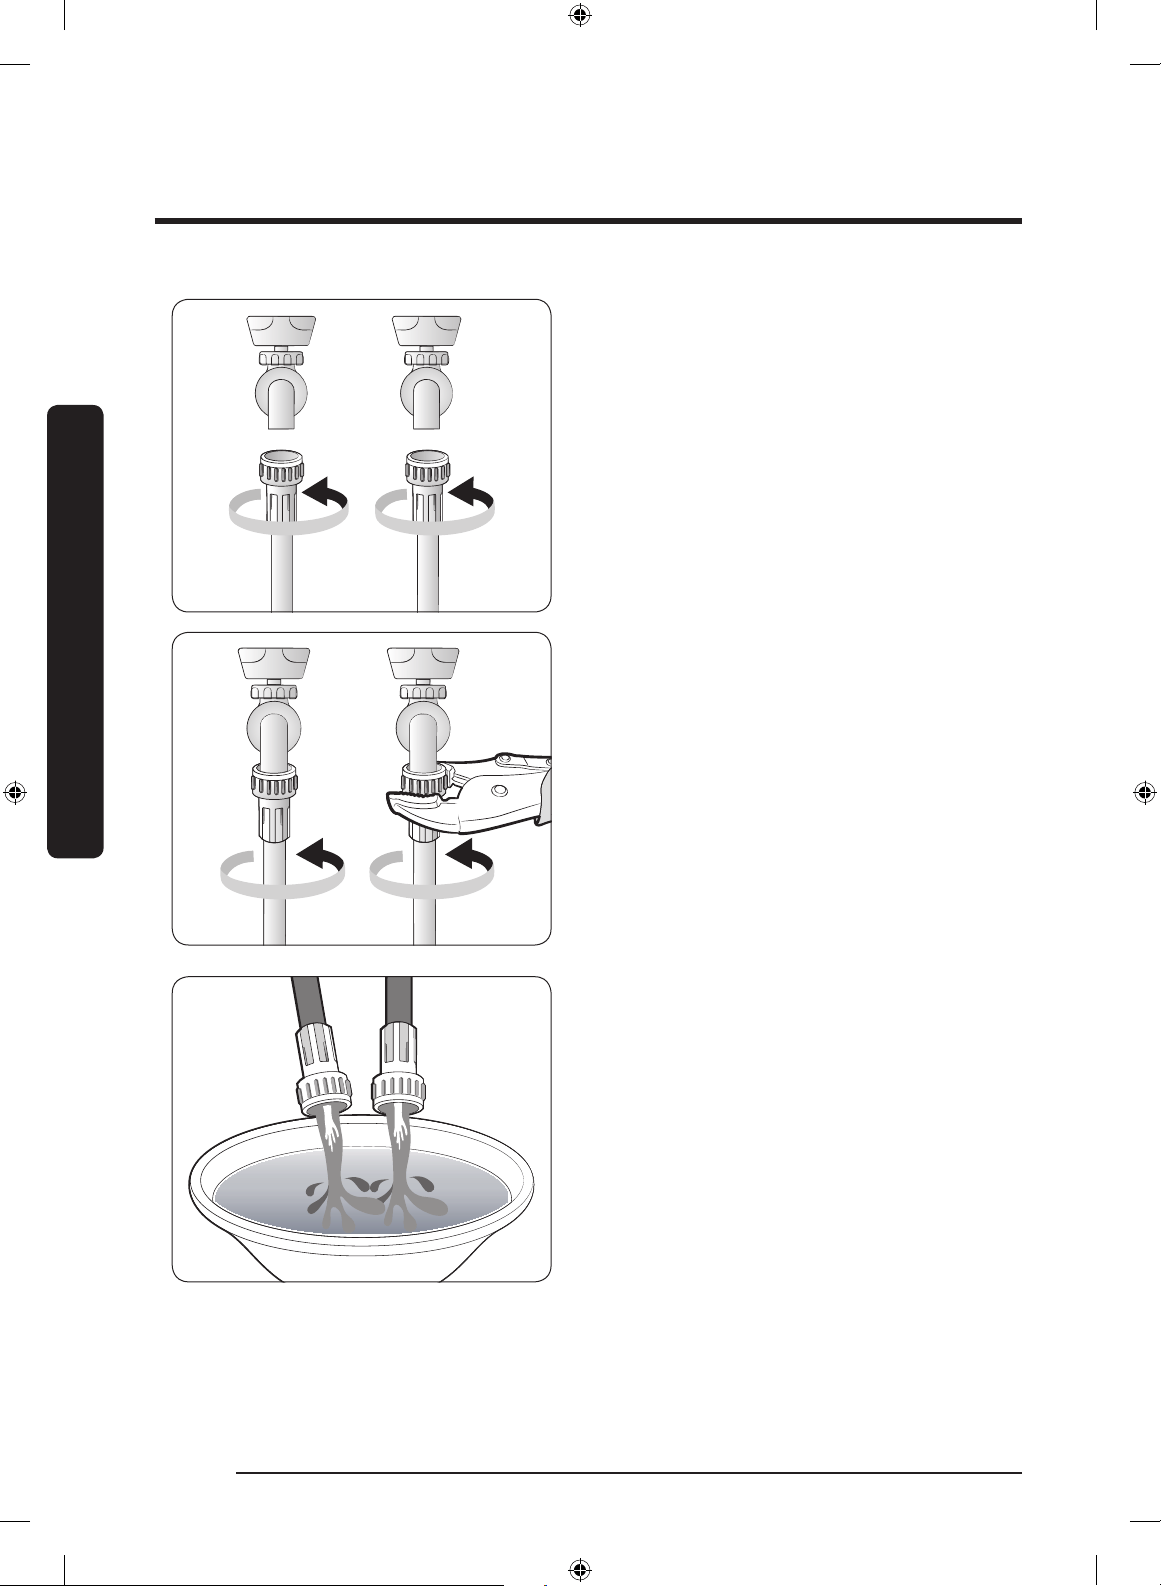
STEP 5 Connect the water hoses
B
A
CAUTION
• Make sure you use a new water hose
and that there are rubber gaskets (B)
inside the couplings (A) at either end of
each water hose. A water hose without
the gasket may leak.
• If there is a water leak, stop using the
washer and contact a local Samsung
service center. A water leak may cause
electric shock.
• Do not stretch the water hose by force.
If the hose is too short, replace the hose
with a longer, high-pressure hose.
• To prevent leaks, make sure both water
hoses are not bent or kinked. A water
leak may cause electric shock.
FlexWash_WV9900M_DC68-03768A-04_EN.indd 27 2017-05-22 7:03:28
Installation
Installation
English28
BA
To connect the water hoses to the taps:
1. Connect one end of each water hose to
the Hot or Cold tap.
2. Turn the ttings by hand until they
are tight, and then tighten them an
additional two-thirds of a turn with
a pliers. To prevent damage, do not
overtighten the ttings.
3. When done, pull the water hoses up
and down to check if they are properly
connected.
4. Put the other ends of the hoses into
a bucket and open the taps for 10-15
seconds to remove impurities. When
done, close the taps.
FlexWash_WV9900M_DC68-03768A-04_EN.indd 28 2017-05-22 7:03:29

Installation
English 29
5. Connect the other ends of the water
hoses to the corresponding inlets on the
rear of the machine as specied. Make
sure the hot water hose is connected to
the hot inlet, and the cold water hose to
the cold inlet.
6. Repeat step 2 above on the other
ttings. Make sure both water hoses
are connected properly. See the ‘4C’
information code for troubleshooting.
7. Open both taps, and then check if there
is a leak.
CAUTION
To prevent water hoses from being bent or
kinked, make sure there is at least a 6-inch
(150 mm) space between the washer and
the rear wall.
NOTE
If you do not want to use hot water, insert
the inlet cap into the hot water inlet. You
must purchase the inlet cap.
If the hot water inlet is closed with
the inlet cap, you must select Cold for
the water temperature. All other water
indicators turn off.
FlexWash_WV9900M_DC68-03768A-04_EN.indd 29 2017-05-22 7:03:29
Installation
Installation
English30
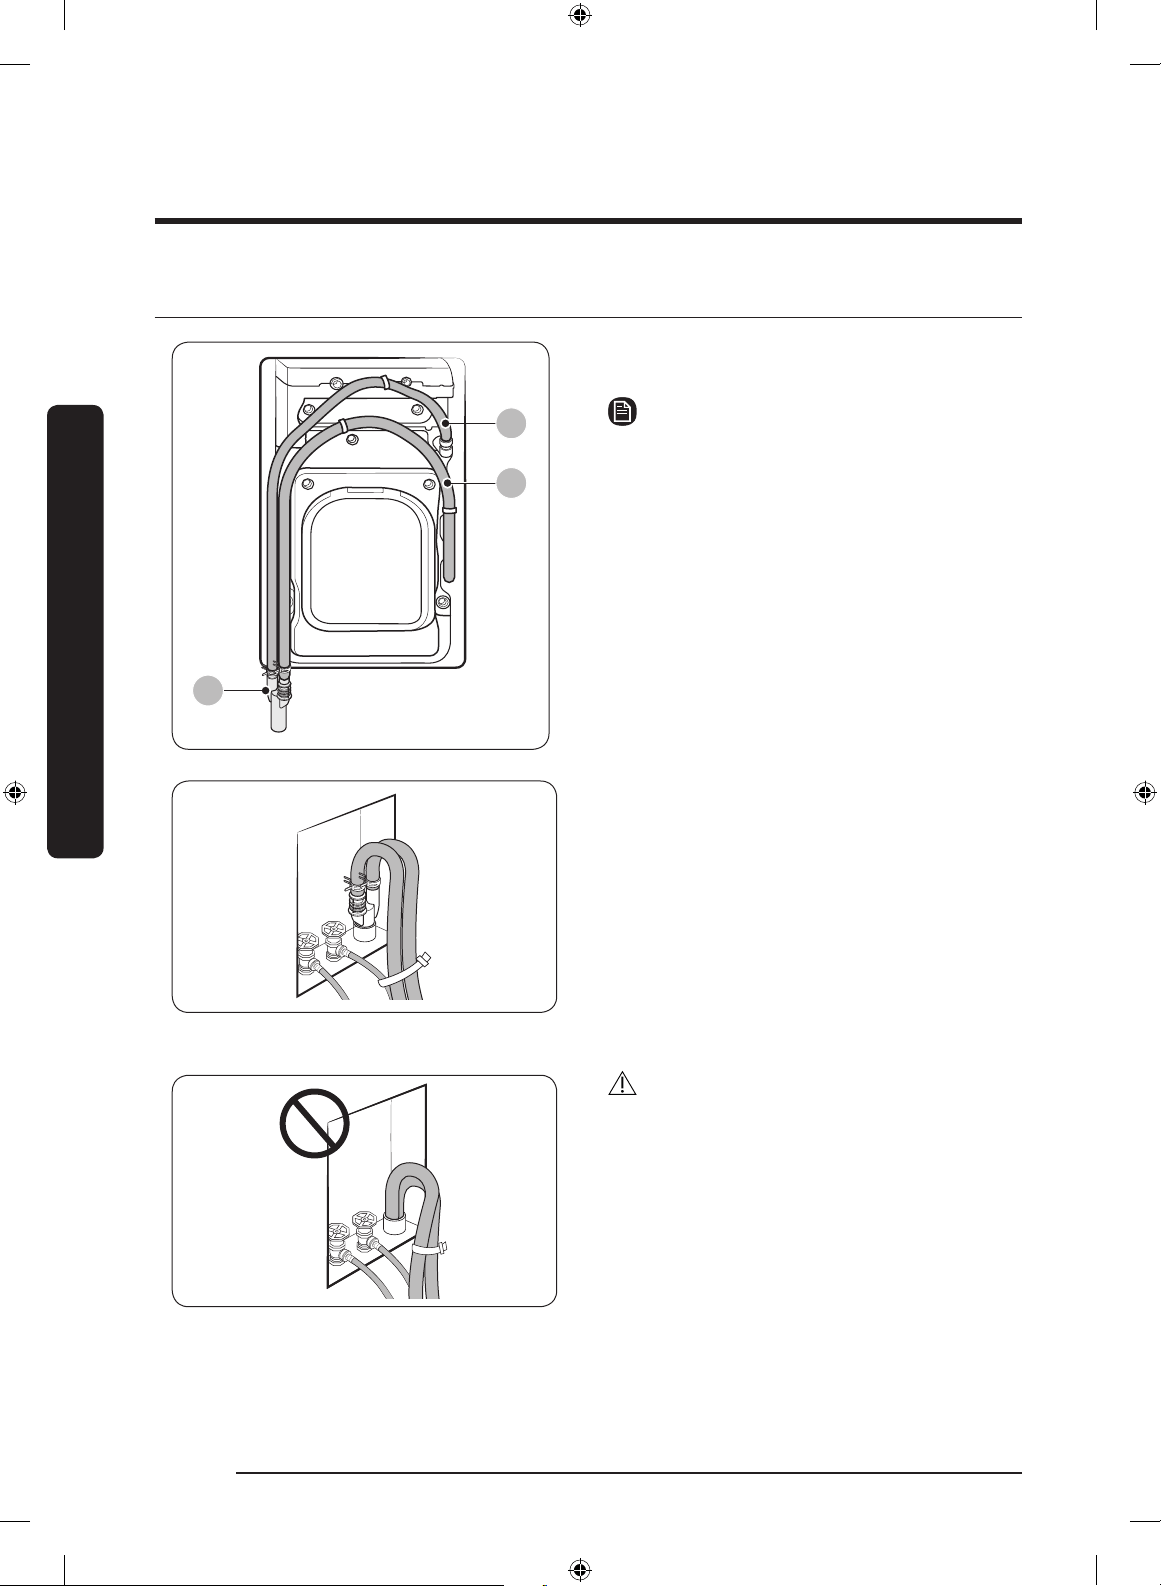
STEP 6 Position the drain system
A
B
C
The pipe connector is attached on the
product.
NOTE
A : Upper drain hose
B : Lower drain hose
C : Pipe Connector
In a wall standpipe drain system
The drain hose must be placed into a wall
standpipe drain system.
After inserting 2 drain hoses into the pipe
connector, use tie straps to bind the drain
hoses, and then insert the pipe connector
into the wall standpipe.
When complete, use the tie straps to bind
the drain hose to the water hose.
WARNING
Make sure to use the pipe connector
before inserting the drain hoses. Without
the pipe connector, the drain hose will
not be positioned securely inside the wall
standpipe, causing a water leak.
FlexWash_WV9900M_DC68-03768A-04_EN.indd 30 2017-05-22 7:03:30

Installation
English 31
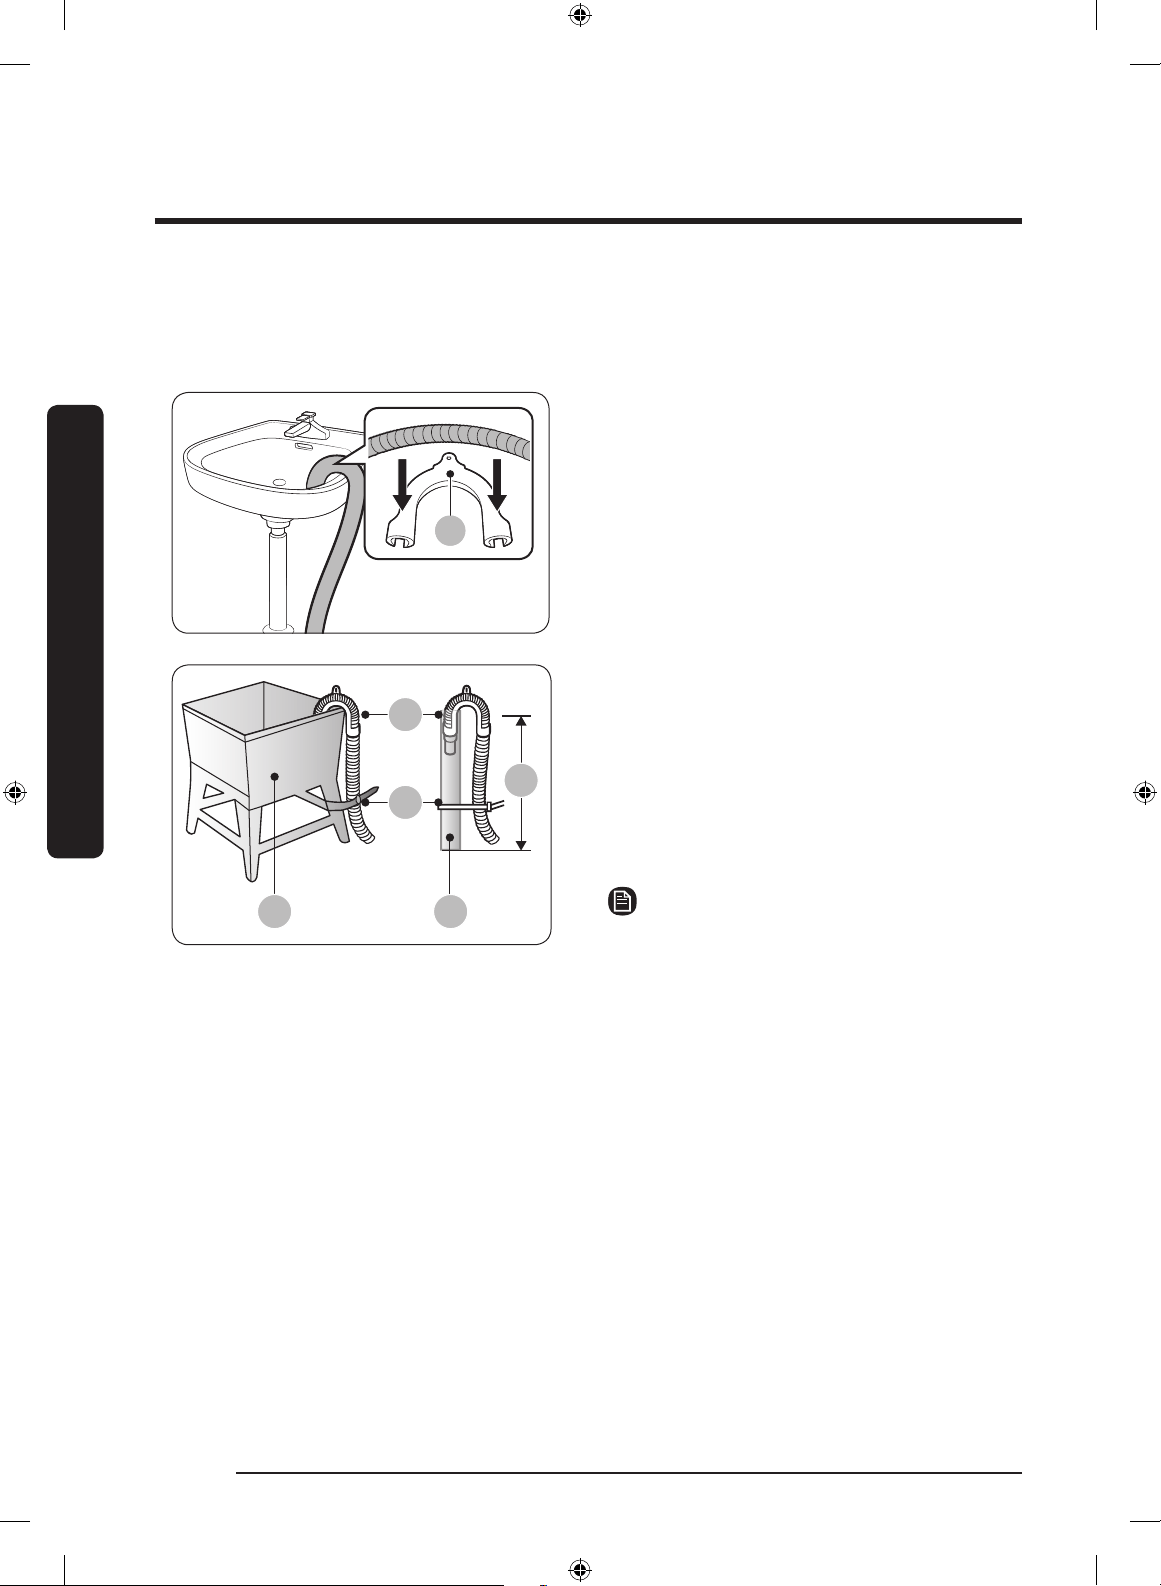
The pipe connector can be positioned in the following ways:
A
B
Over the edge of a wash basin
The pipe connector (B) must be placed at
a height of between 24 in. (60 cm) and
35 in. (90 cm) from the oor. To keep
the spout of the drain hose bent, use the
supplied plastic hose guide (A). Secure the
guide to the wall using a hook to ensure
stable drainage.
NOTE
B : Pipe Connector
A
F
D
G
E
B C
ln a standpipe or laundry tub
The laundry tub (B) or standpipe (C) must
be no shorter than 18 in. (46 cm) and no
higher or longer than 96 inches (245 cm).
Make sure the pipe connector and the
standpipe are not airtight. The height of
the standpipe (E) must be 43 in. (1100
mm) or higher from the oor.
NOTE
A: Hose guide / D: Tie straps / F : Pipe
Connector / G: 85 mm
CAUTION
• Do not extend the (Y-shaped) pipe
connector using an extension hose.
• Make sure you face the tip of the pipe
connector downwards to the drain hole.
Positioning the connector tip elsewhere
can cause the drained water to ow
backward.
A
E
F
D
B
C
Dimensions of the pipe connector
A 172 mm D 67 mm
B 112.5 mm E Ø 35
C 85 mm F 60 mm
FlexWash_WV9900M_DC68-03768A-04_EN.indd 31 2017-05-22 7:03:30
Installation
Installation
English32
To position without the pipe connector
If you do not use the pipe connector, each drain hose can be positioned in the following
ways:
AA
Over the edge of a wash basin
The drain hose must be placed at a height
of between 24 in. (60 cm) and 35 in.
(90 cm) from the oor. To keep the spout
of the drain hose bent, use the supplied
plastic hose guide (A). Secure the guide
to the wall using a hook to ensure stable
drainage.
A
D
B C
E
ln a standpipe or laundry tub
The laundry tub (B) or standpipe (C)
must be no shorter than 18 in. (46 cm)
and no higher or longer than 96 inches
(245 cm). Make sure the drain hose and
the standpipe are not airtight. The height
of the standpipe (E) must be 43 in. (1100
mm) or higher from the oor.
NOTE
A: Hose guide / D: Tie straps
FlexWash_WV9900M_DC68-03768A-04_EN.indd 32 2017-05-22 7:03:30

Installation
English 33
*
A
CAUTION
• Connect the hose guide (A) within 3–5
in. (7.6–12.7 cm)* from the end of the
drain hose. If the drain hose is extended
beyond the end of the hose guide, mold
or microorganisms could spread inside
the washer.
• The drain hose can be installed up to
96 in. (245 cm) high, but the draining
capability can be reduced at the
maximum height. Water remaining in
the drain system may cause an odor.
• If the drain hose is installed less than
18 in. (46 cm) high, water can be
drained during the process due to a
siphon phenomenon. If this happens, a
‘4C’ information code appears on the
display.
FlexWash_WV9900M_DC68-03768A-04_EN.indd 33 2017-05-22 7:03:31
Installation
Installation
English34
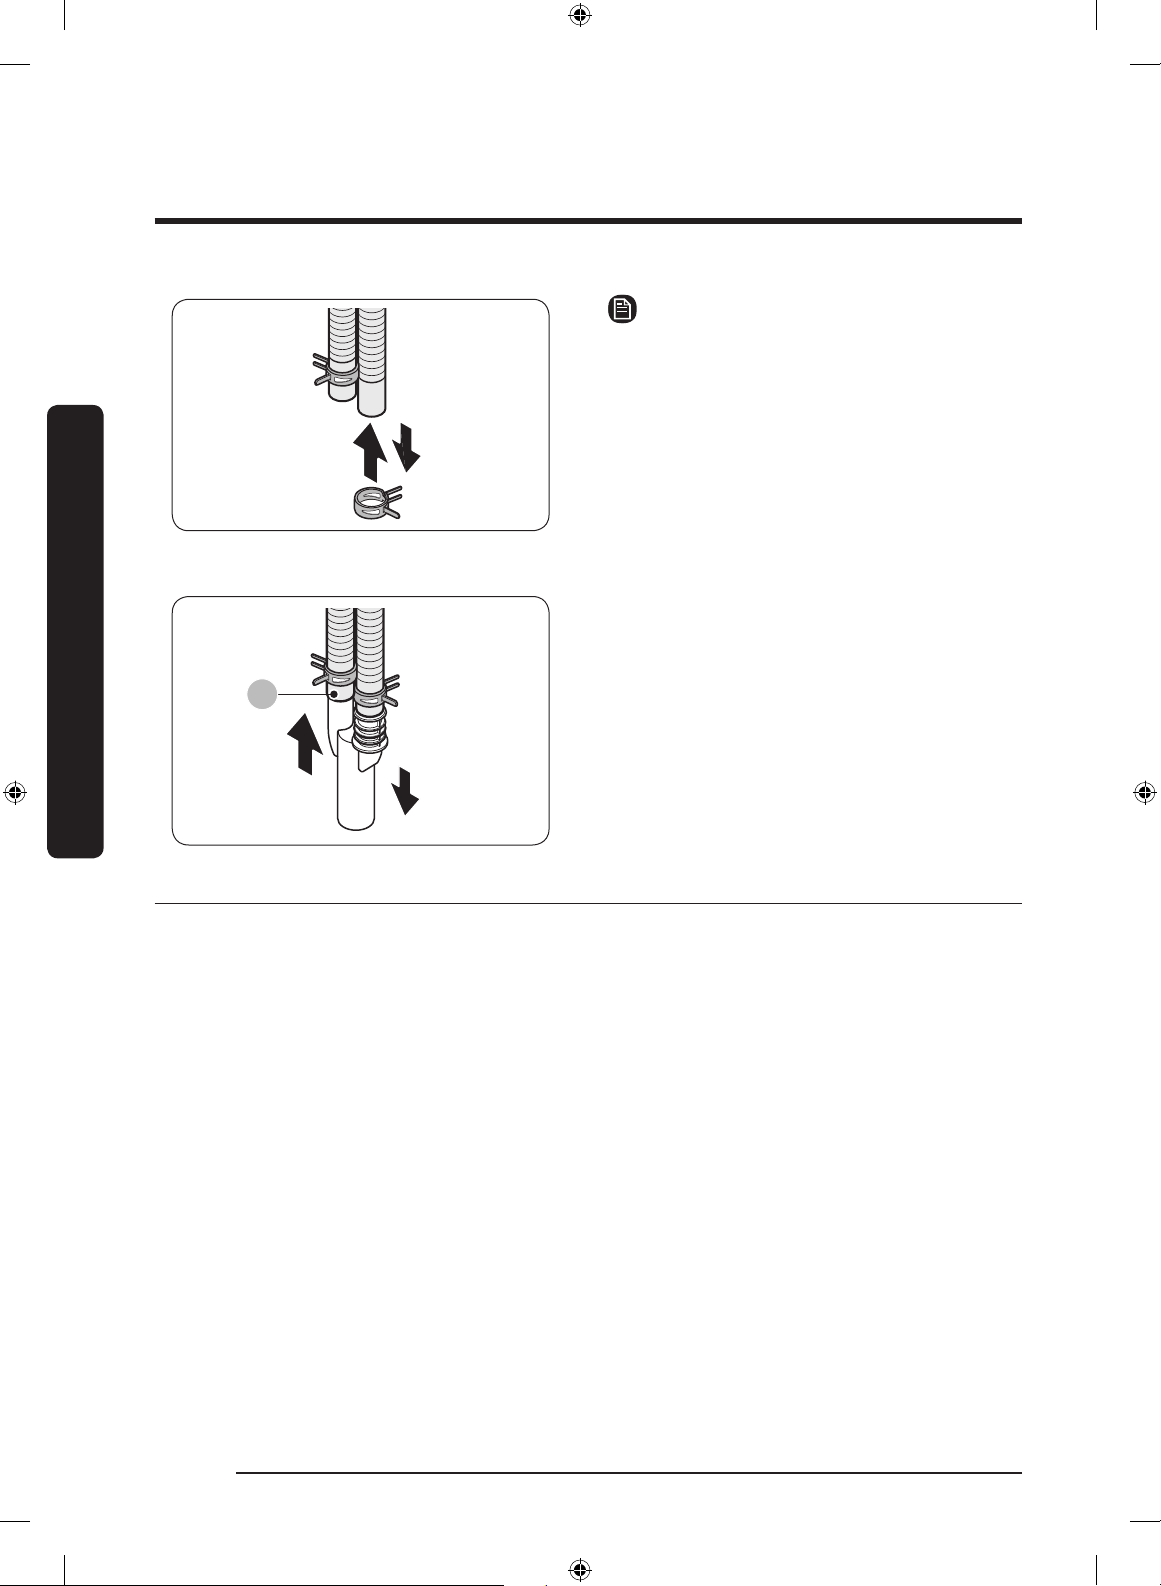
NOTE
To position using the pipe connector
You washer comes with a pipe connector
that is designed to join the upper drain
hose and the lower drain hose. You can
choose to use the connector to combine
two drain hoses into a single outlet.
1. Insert the clamp ring on the end of the
drain hose, one for each drain hose.
A
2. Insert the pipe connector into the drain
hoses. Make sure the longer side (A) ts
into the drain hose running from the
lower washer.
3. Fix the position of the clamp rings near
the end of each hose.
• To remove the pipe connector, follow
these steps above in the reverse order.
STEP 7 Final check and power on
• Before using your washer, make sure to remove the dehumidifying agent (silica gel)
from inside the upper washer.
• Do not eat or swallow the dehumidifying agent (silica gel).
• The protective cover may form moisture on its surface after the washer has checked
for a leak to ensure normal operation. This is normal, and does not indicate a defective
part. Open the cover for a moment to remove the moisture.
• Plug the power cord into an AC 120 V / 60 Hz approved electrical outlet protected by a
fuse or circuit breaker. Then, press POWER to turn on the washer.
FlexWash_WV9900M_DC68-03768A-04_EN.indd 34 2017-05-22 7:03:31
Before you start
English 35
Before you start
Initial settings
Run Calibration (recommended)
Calibration ensures accurate weight
detection by the washer. Make sure the
tub or drum is empty before running
Calibration.
To calibrate the upper washer
1. Press POWER on the control panel of
the upper washer to turn the washer
on.
2. Press and hold NORMAL and Temp.
simultaneously for 3 seconds.
3. Press START/PAUSE to start Calibration.
- The door is locked during the
operation.
- The tub keeps rotating clockwise
and counter clockwise for several
minutes.
4. When complete, the upper washer turns
off automatically.
To calibrate the lower washer
1. Press POWER on the control panel of
the lower washer to turn the washer on.
2. Press and hold Temp. and Delay End
on the lower washer control panel
simultaneously for 3 seconds.
3. Press START/PAUSE on the lower
washer control panel to start
Calibration.
4. When complete, the lower washer turns
off automatically.
NOTE
Instead of rotating the tub, the lower
washer rotates the drum.
Laundry guidelines
STEP 1 Sort
Sort the laundry according to these
criteria:
• Care Label: Sort the laundry into
cottons, mixed bres, synthetics, silks,
wools, and rayon.
• Color: Separate whites from colors.
• Size: Mixing different sized items
together in the drum or tub improves
the washing performance.
• Sensitivity: Wash delicate items
separately. For pure, new woollen
items, curtains, and silk items, check the
labels for washing instructions.
NOTE
Make sure to check the care label on all
clothing, and sort clothing accordingly
before starting the wash.
FlexWash_WV9900M_DC68-03768A-04_EN.indd 35 2017-05-22 7:03:31

Before you start
Before you start
English36
STEP 2 Empty pockets
Empty all the pockets of your laundry
items
• Metal objects such as coins, pins, and
buckles on clothing may damage other
laundry items as well as the drum or
tub.
Turn clothing with buttons and
embroideries inside out
• If pants or jacket zippers are open
while washing, the drum or tub may be
damaged. Zippers should be closed and
xed with a string.
• Clothing with long strings may become
entangled with other clothes. Make sure
to tie the strings before starting the
wash.
STEP 3 Use a laundry net
• Brassieres (water washable) must be
placed in a laundry net. Metal parts of
the brassieres may break through and
tear other laundry items.
• Small, light clothing such as socks,
gloves, stockings, and handkerchiefs
may become caught around the door.
Place them inside a ne laundry net.
• Do not wash the laundry net by itself
without other laundry. This may cause
abnormal vibrations that could move
the washer and result in injury.
STEP 4 Determine the load capacity
Lower washer
Do not overload the washer. Overloading
may cause the washer to wash improperly.
NOTE
When washing bedding or bedding
covers, the wash time may be lengthened
or the spin efciency may be reduced.
For bedding or bedding covers, the
recommended maximum spin level is “Low
or Medium Spin”, and the load capacity is
3.0 kg or less.
CAUTION
If the laundry is unbalanced and the “Ub”
information code is displayed, redistribute
the load. Unbalanced laundry may reduce
the spinning performance.
FlexWash_WV9900M_DC68-03768A-04_EN.indd 36 2017-05-22 7:03:31

Before you start
English 37
Upper washer
Laundry guidelines
Use the upper washer for small loads
under 3.3 lbs (1.5 kg).
Load Shorts
Blue
Jeans
Cotton
pants
Shirts
Short-
sleeved
T-shirts
3.3 lb ↓
(1.5 kg ↓)
4 1 3 4 9
Load
T-shirts
Sports
wear
(upper)
Sports
wear
(pants)
Shower
towel
Towel
(small)
3.3 lb ↓
(1.5 kg ↓)
4 3 3 2 10
NOTE
• Use the recommended load for optimal
washing performance. Overloads may
reduce the performance.
• Use the lower washer for stubborn or
heavily soiled loads or loads larger than
recommended.
STEP 5 Add the correct detergent
type
The type of detergent depends on the
type of fabric (cotton, synthetic, delicate
items, wool), color, wash temperature, and
degree of soiling. Always use “low suds”
HE laundry detergent which is designed
for automatic washers.
NOTE
• Follow the detergent manufacturer’s
recommendations based on the weight
of the laundry, the degree of soiling,
and the hardness of the water in your
local area. If you are not sure about
the water hardness, contact your local
water authority.
• Do not use detergent that has hardened
or solidied. This detergent may remain
after the rinse cycle, blocking the drain
outlet.
Use HE detergent only
Your washer is designed to use high
efciency (HE) detergents.
• For the best cleaning results, use a high
efciency detergent such as Tide HE,
Wisk HE, Cheer HE or Gain HE*. High
efciency detergents contain suds
suppressors that reduce or eliminate
suds. When fewer suds are produced,
the load tumbles more efciently and
cleaning is maximized. (* Brand names
are trademarks of their respective
manufacturers.)
WARNING
Regular detergent is not recommended.
Use HE detergents only.
FlexWash_WV9900M_DC68-03768A-04_EN.indd 37 2017-05-22 7:03:31
Before you start
Before you start
English38
Guide to cleaning agents
Upper washer
A B
The upper washer provides two cleaning
agent compartments: the left-side
compartment for bleach, and the right
side for fabric softener. You can apply
detergent manually into the tub using the
provided Aqua Pebble.
• Bleach compartment (A): Add non-
chlorine bleach as instructed by the
manufacturer.
• Softener compartment (B): Add a
recommended amount of fabric softener
as instructed by the manufacturer.
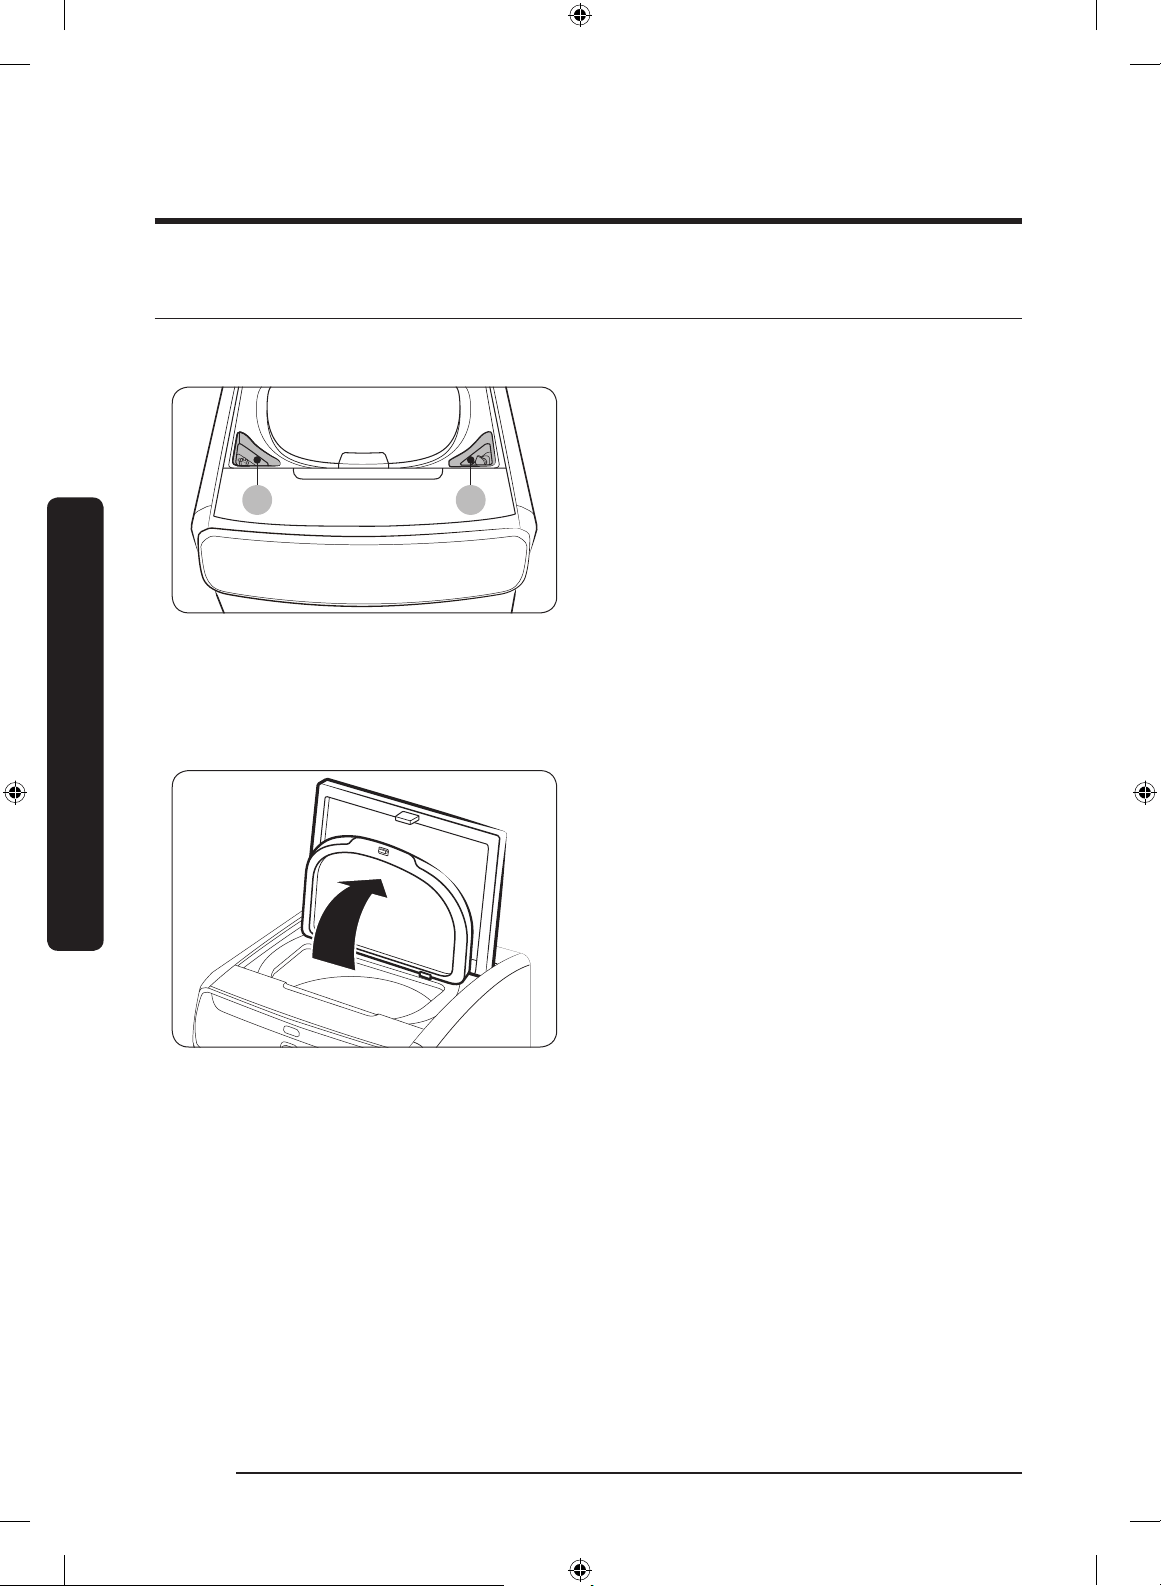
To apply cleaning agents to the upper washer
1. Open the top door, and then the
protective cover. Remove the Aqua
Pebble from the fabric softener
container.
FlexWash_WV9900M_DC68-03768A-04_EN.indd 38 2017-05-22 7:03:31
Before you start
English 39
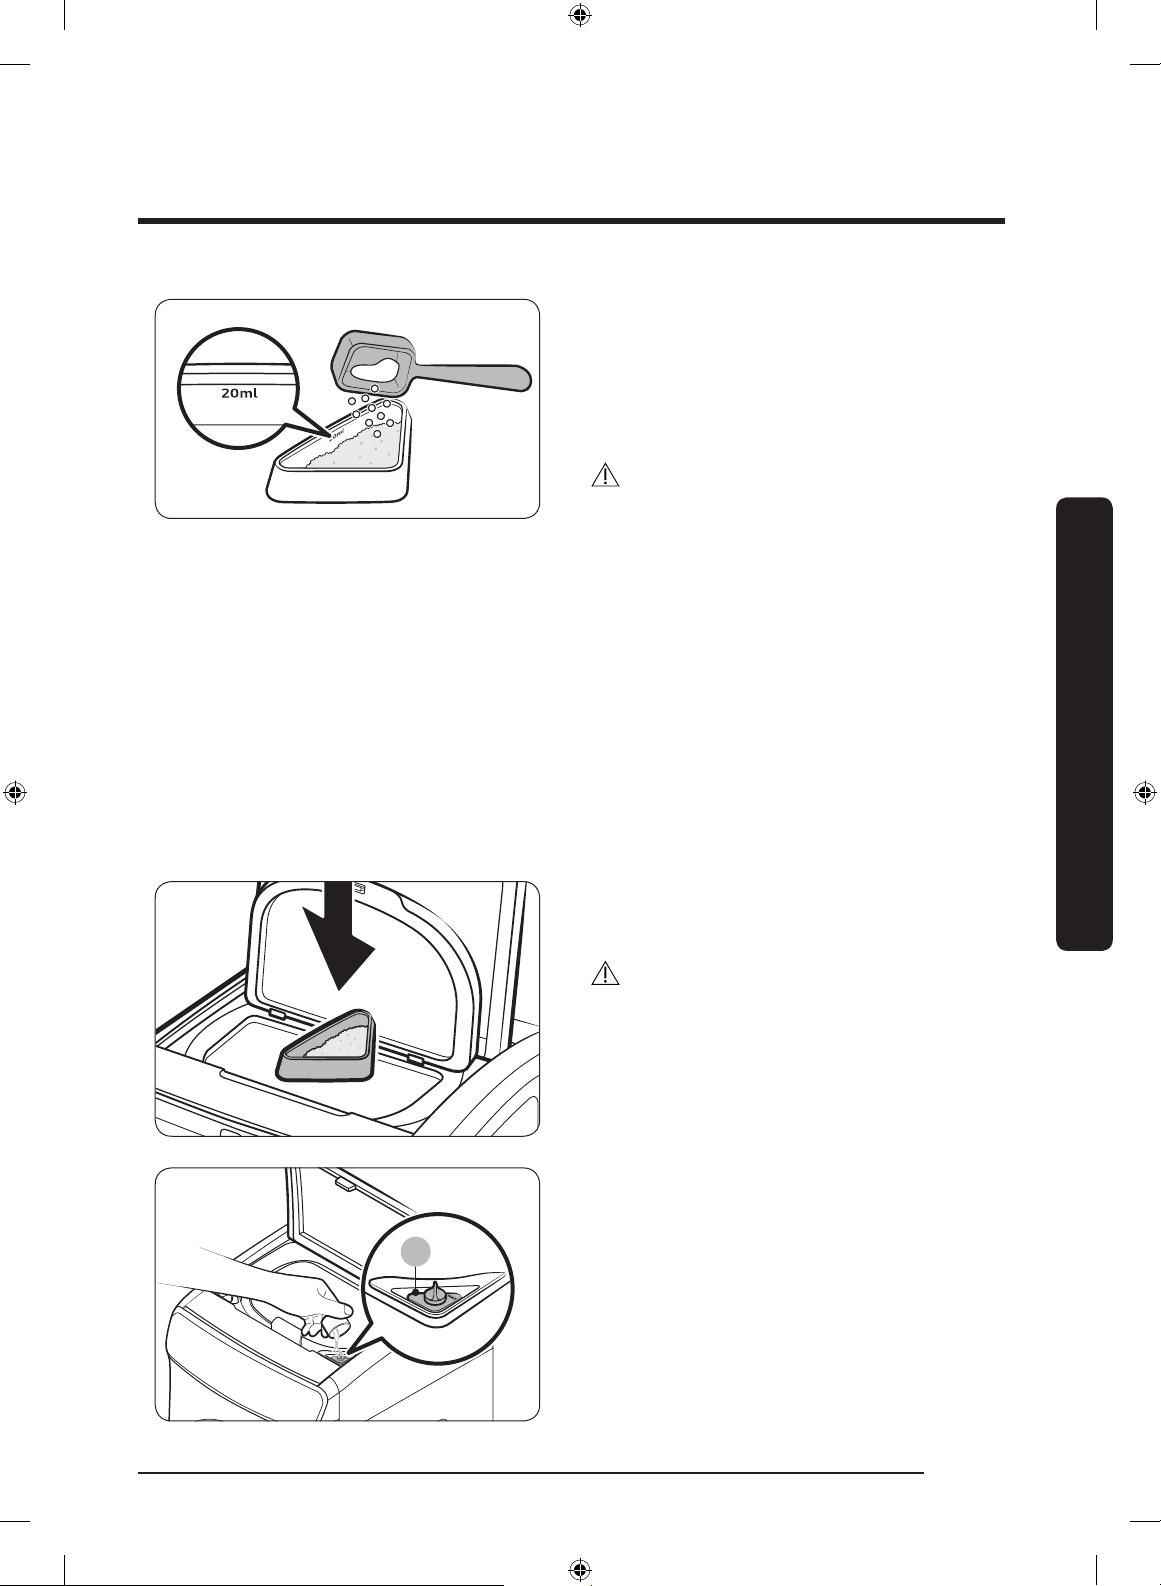
2. Put a recommended amount of liquid or
powdered detergent into the provided
Aqua Pebble. The Aqua Pebble has a
guide line (marked ‘20 ml’) near its top,
which is the max line. Do not exceed
the max line.
CAUTION
• Any detergent to be added to the upper
washer must be put in the provided
Aqua Pebble.
• Use HE detergent only.
• If you are adding powdered detergent,
use the provided detergent cup,
and add only one cup of detergent.
Excessive amounts of detergent may
cause detergent residue.
• Make sure the powdered detergent you
add is a nely ground variety.
• Do not use the Aqua Pebble for bleach
and/or fabric softener.
3. Insert the Aqua Pebble around the
center of the tub, and then put the
laundry over the Aqua Pebble.
CAUTION
Make sure the Aqua Pebble is input rst so
it is placed under the laundry. Otherwise,
detergent may not dissolve fully, causing
residue after the wash is complete.
A
4. Add a recommended amount of fabric
softener to the softener compartment.
Do not exceed the max line (A).
FlexWash_WV9900M_DC68-03768A-04_EN.indd 39 2017-05-22 7:03:32

Before you start
Before you start
English40
5. Add a recommended amount of
non-chlorine bleach to the bleach
compartment. Use caution not to
overll the compartment.
6. Close the protective cover, and then the
top door.
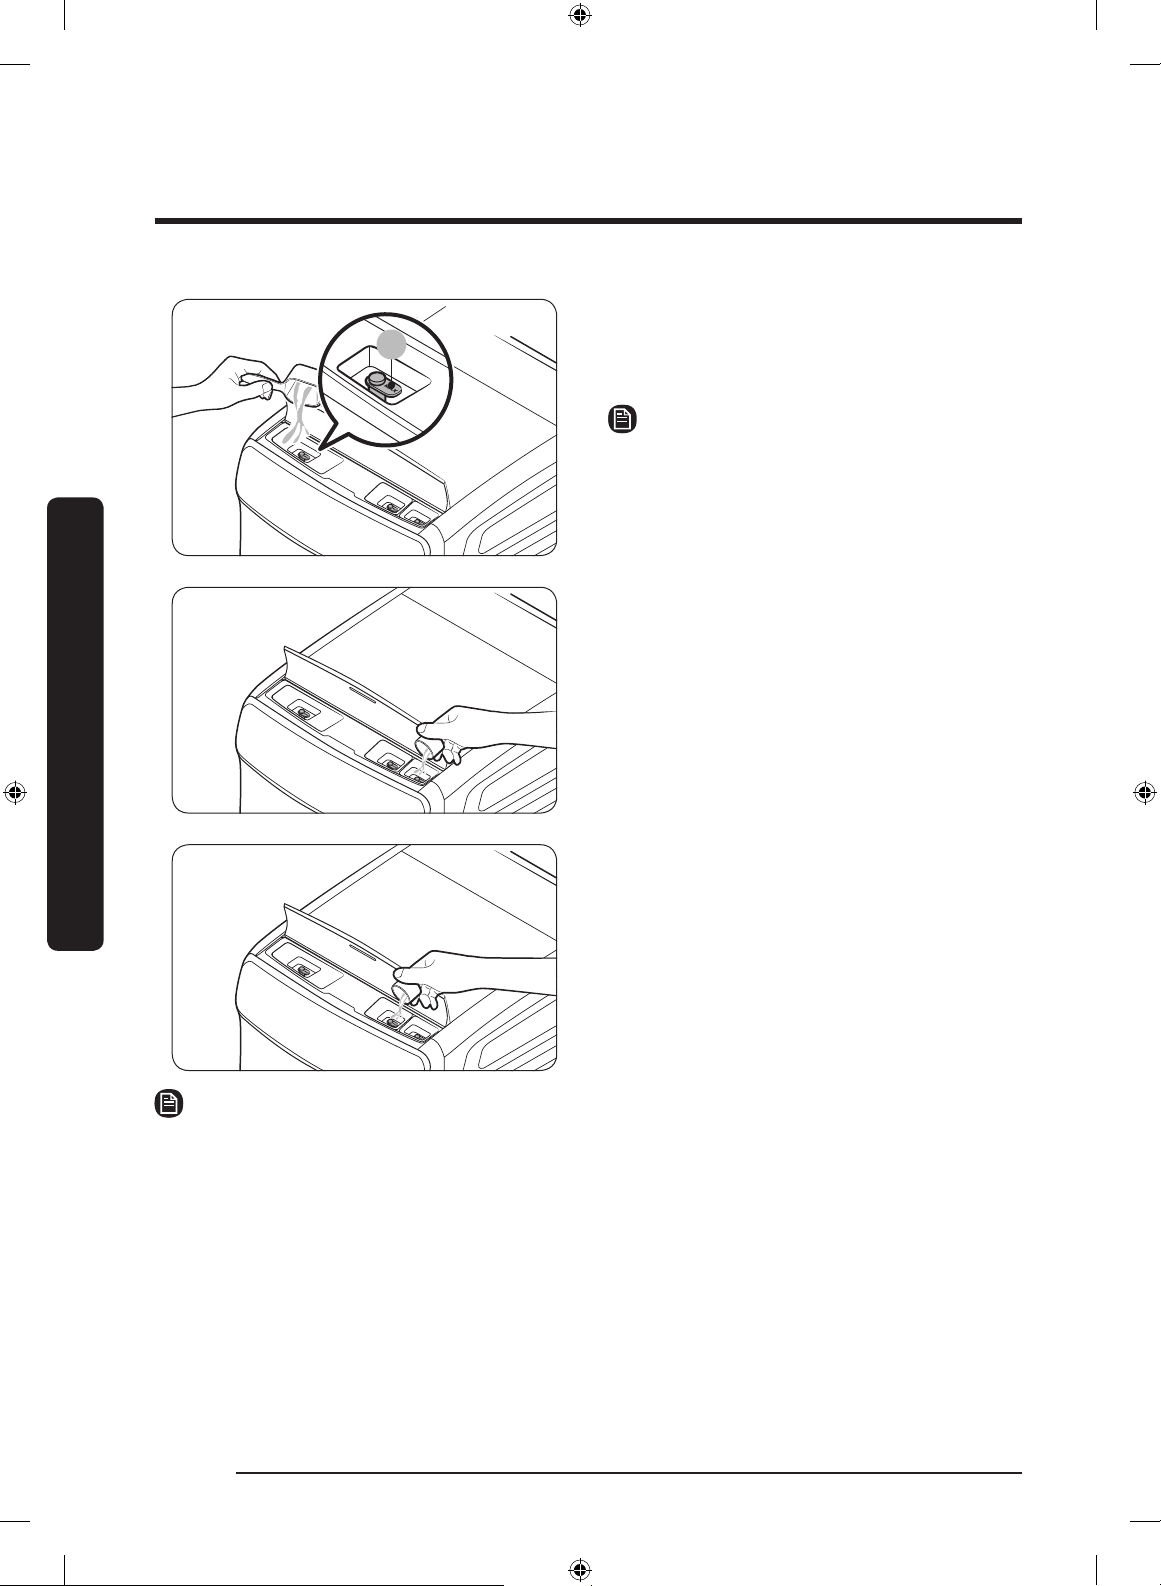
NOTE
When the cycle is complete, take out the
Aqua Pebble, turn it over, and put it on the
softener compartment for later use (see
the gure). The Aqua Pebble is designed to
t in the softener compartment after it has
been turned over.
CAUTION
• Do not use chlorine bleach, which may damage the laundry.
• Use caution when inserting the Aqua Pebble as it is supposed to be balanced on top of
the laundry at the beginning of the wash. Tipping the Aqua Pebble before the start of
a wash may cause detergent residue to remain on the laundry at the end of the wash,
causing discoloration of the laundry and/or reduced washing performance.
• Before each wash, make sure to clean the Aqua Pebble before adding fresh detergent.
• Do not insert the Aqua Pebble into a folded item or between different laundry items.
• Do not use liquid or powdered chlorine bleach.
• Do not put or store cleaning agents such as detergent, bleach, and fabric softener on
top of your washer. Wipe up any spills immediately to prevent damage to the washer,
especially the nish and the control panels.
NOTE
• It is normal for a small amount of water to remain in the detergent compartments at
the end of a cycle.
• When adding color-safe bleach, we recommend you also use liquid detergent.
• When the wash is complete, remove the Aqua Pebble from the tub and clean it so that
it is readily available for later use.
FlexWash_WV9900M_DC68-03768A-04_EN.indd 40 2017-05-22 7:03:32
Before you start
English 41
Lower washer
A B C
The lower washer provides three cleaning
agent compartments: the left-most
compartment for the main wash, the right-
rst one for bleach, and the far right for
fabric softener.
• Main wash compartment (A): Add a
recommended amount of liquid (or
powdered) detergent to the main wash
compartment.
• Bleach compartment (B): Add
chlorine bleach as instructed by the
manufacturer.
• Softener compartment (C): Add a
recommended amount of fabric
softener to the softener compartment.
CAUTION
• Do not use ball or net types of detergent.
• Do not put tablet or capsule types of detergent in the detergent compartment. Tablet
or capsule types of detergent must be put directly in the drum.
• To prevent the compartment from clogging, concentrated or highly-enriched agents
(fabric softener or detergent) must be diluted with water before being added.
To apply cleaning agents to the lower washer
1. Open the top-front cover.
FlexWash_WV9900M_DC68-03768A-04_EN.indd 41 2017-05-22 7:03:32
Before you start
Before you start
English42
A
2. Add a recommended amount of liquid
or powdered detergent to the detergent
compartment. Do not exceed the max
line (A).
NOTE
To apply powdered detergent, rst remove
the liquid detergent container.
3. Add a recommended amount of fabric
softener to the softener compartment.
Do not exceed the max line.
4. If you want to add bleach, add a
recommended amount of chlorine
bleach to the bleach compartment. Do
not exceed the max line.
5. Close the top-front cover.
NOTE
• If you use a high efciency (HE) detergent, apply
2
/3 of the recommended amount to
the main wash compartment.
• Oxygen boosters can increase washing performance. Make sure to add the oxygen
booster after putting the laundry into the drum.
• To use both powdered detergent and powdered oxygen booster, it is more effective to
put them together into the drum before loading the laundry.
FlexWash_WV9900M_DC68-03768A-04_EN.indd 42 2017-05-22 7:03:33
Operations
English 43
Operations
Your dual loading washer features upper and the lower washers for your convenience.
The upper washer is an automatic tub loader that is designed to wash relatively small
loads while the lower washer is a drum loader that takes care of normal or relatively
heavy loads. The main panel is divided into 2 independent control panels.
WARNING
To reduce the risk of re, electric shock, or injury to persons, read the IMPORTANT SAFETY
INSTRUCTIONS before operating this washer.
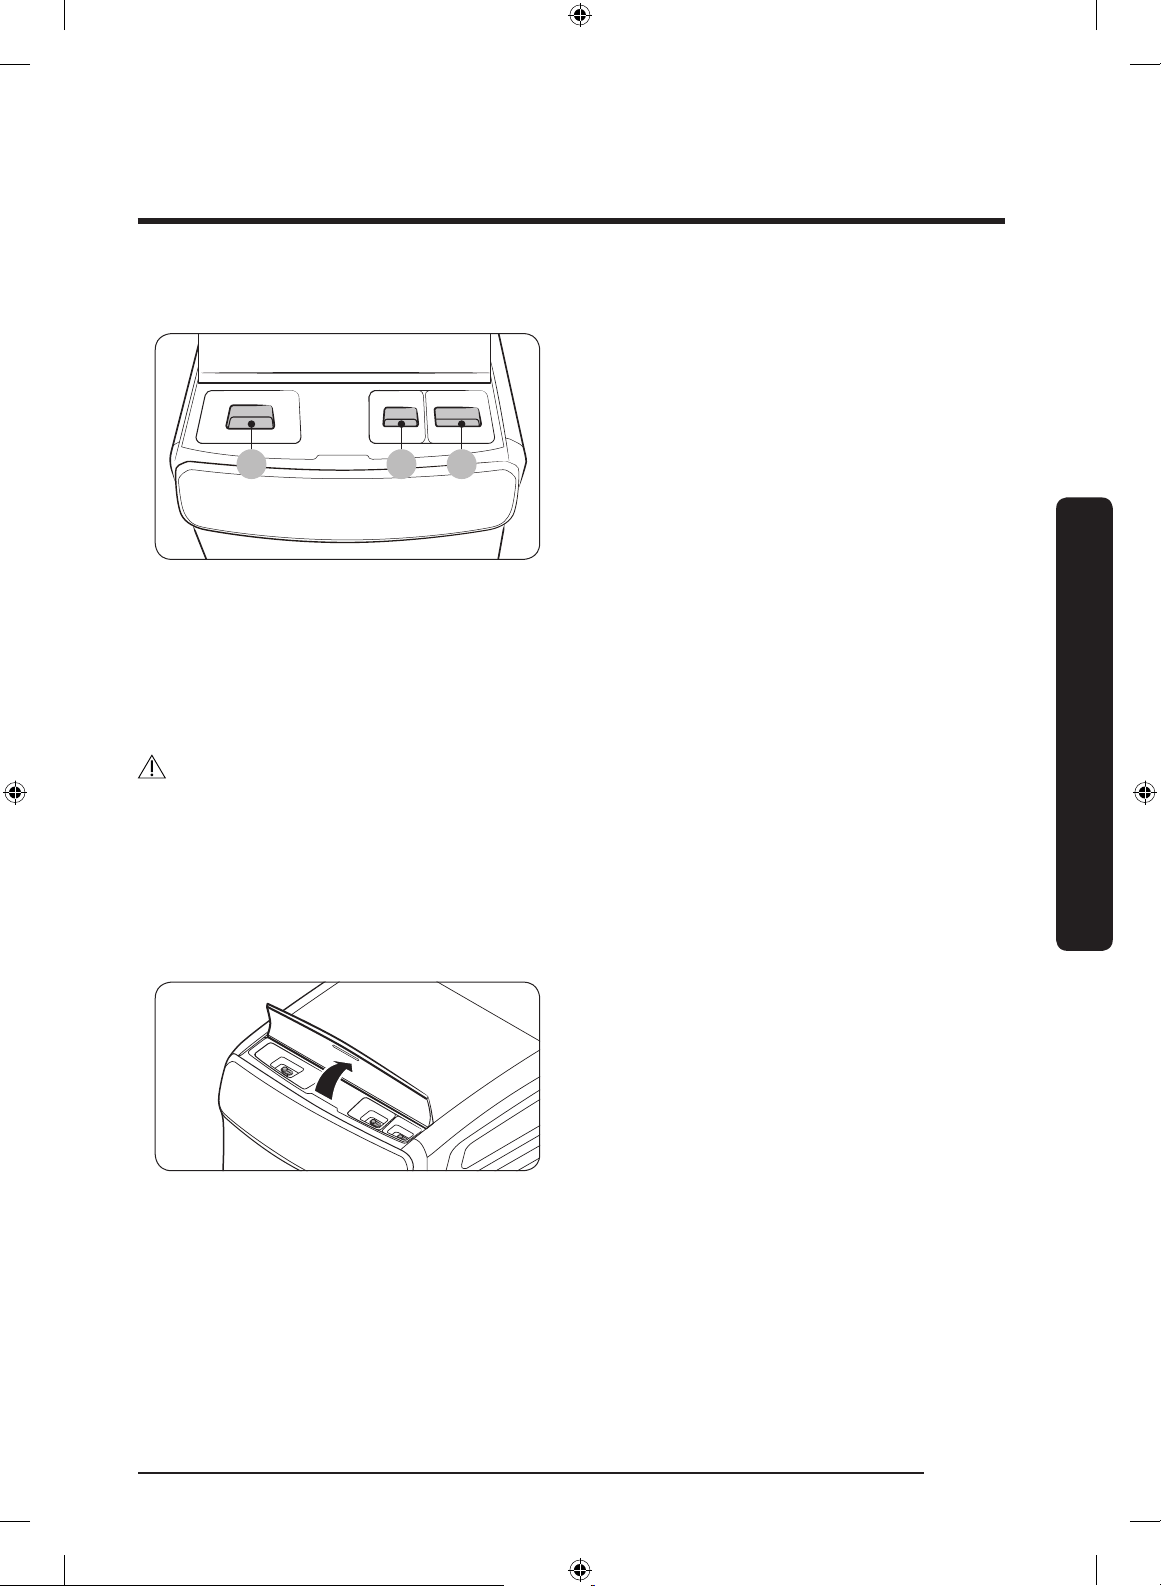
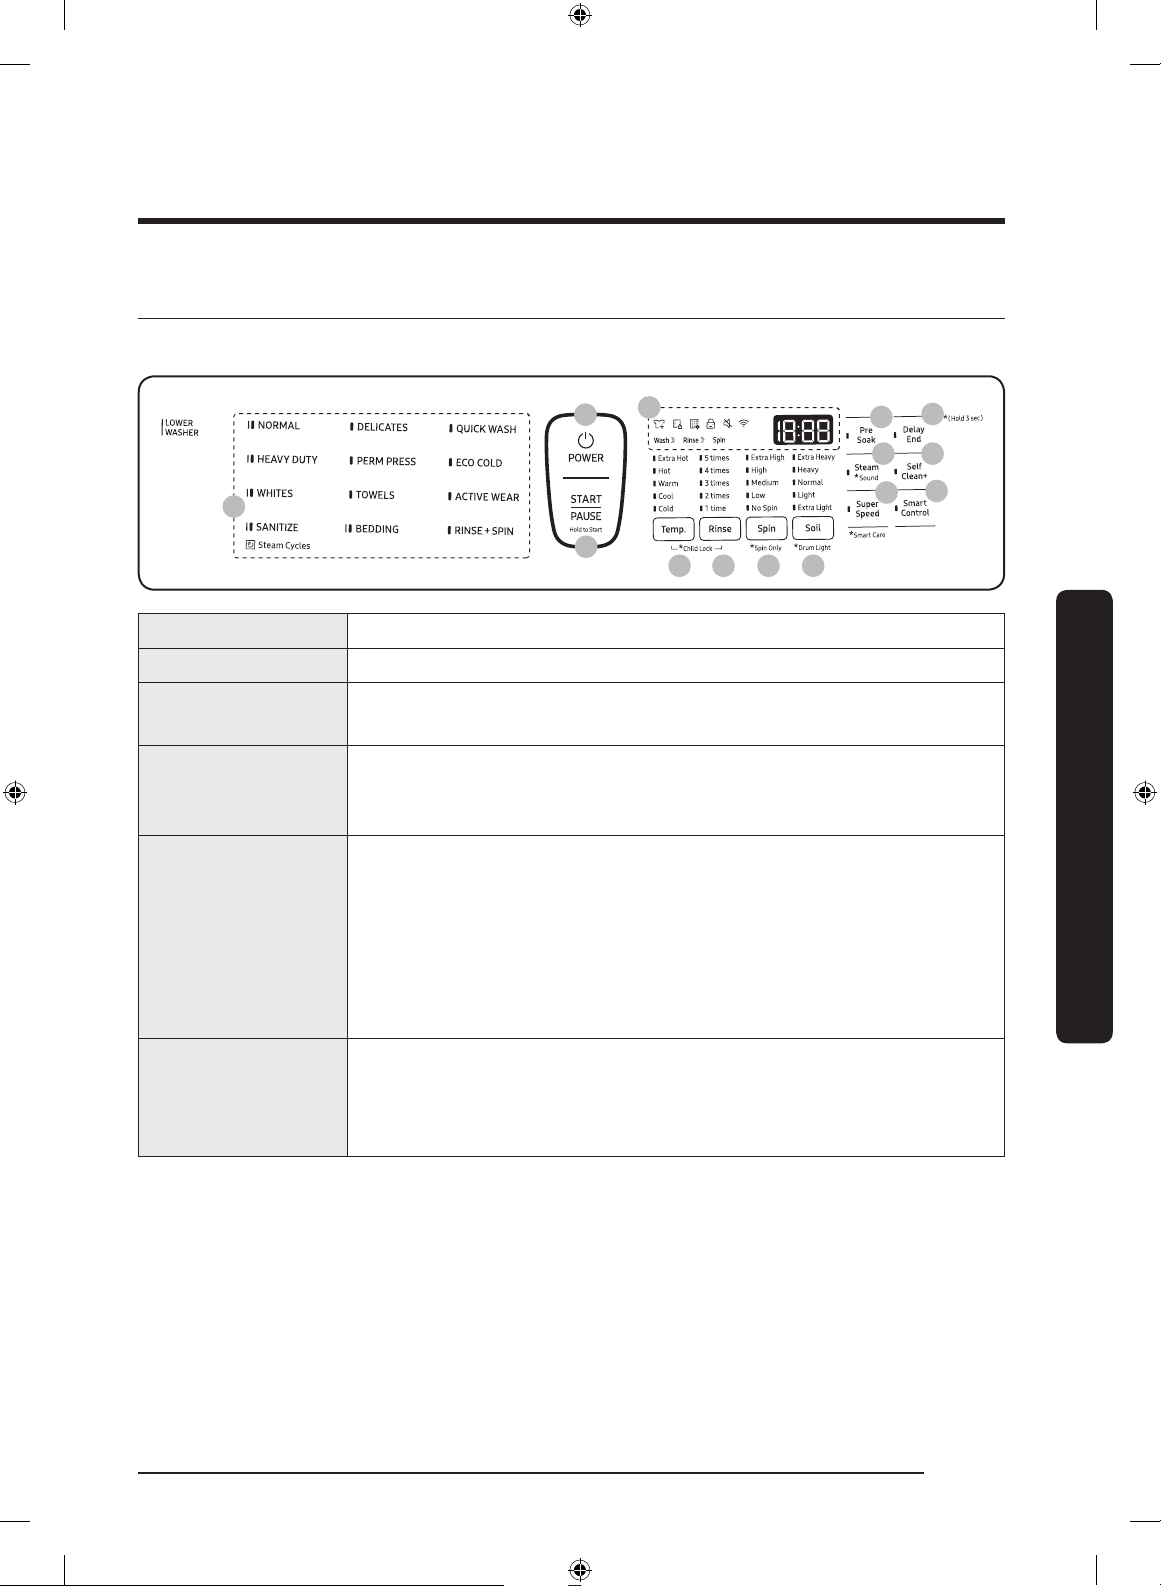
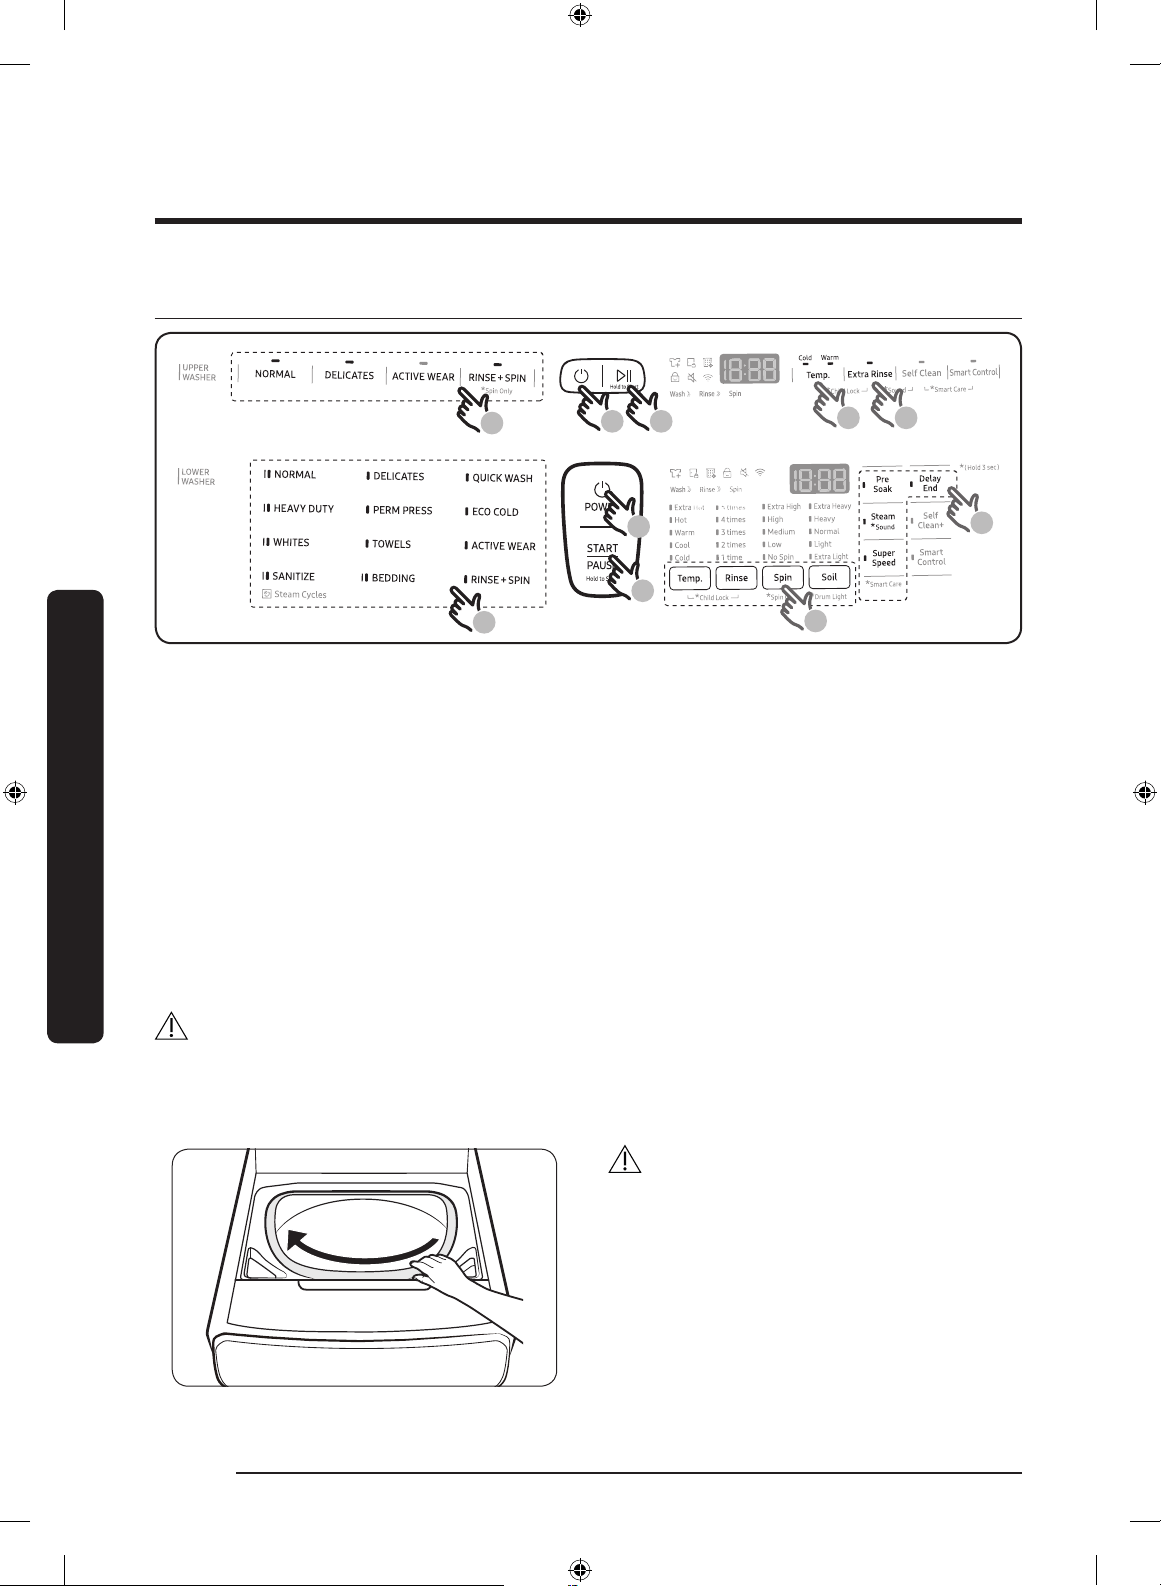
Upper washer
Control panel
01
03
04
05 06 07 08
02
01 Cycle bar Press to select a cycle.
02 POWER Press to turn the upper washer on or off.
03 START/PAUSE
(Hold to Start)
Press and hold to start operation or press to stop operation
temporarily.
04 Status bar
The status bar shows current cycle information and estimated time
remaining, or an information code if the upper washer needs to be
checked.
05 Temp.
Press to toggle between two different water temperature options.
• Warm: Colorfast items.
• Cold: Brightly colored, very lightly soiled items.
06 Extra Rinse
Use to add an additional rinse at the end of the cycle to remove
laundry additives more thoroughly.
07 Self Clean
Use to clean dirt and bacteria from the tub. Regular use (after
every 20 washes) is recommended. No detergent or bleach is
needed. Make sure the tub is empty.
08 Smart Control
After connecting the upper washer to your home network using
the Samsung Smart Home app, you can control the washer
remotely. When started, the Smart Control indicator blinks and
the top door locks. The washer enters waiting mode and waits for
remote commands. For more information, visit the Samsung Smart
Home page.
FlexWash_WV9900M_DC68-03768A-04_EN.indd 43 2017-05-22 7:03:33
Operations
Operations
English44
Cycle overview
Cycle Description
NORMAL
• For lightly soiled cotton, t-shirts, towels, and mixed loads.
• Use to wash lightly soiled normal items, except delicate fabrics
such as silk or handwash-only fabrics.
DELICATES
• For sheer fabrics, bras, lingerie, silks, and other handwash-only
fabrics. For best results, use liquid detergent.
ACTIVE WEAR
• For exercise wear such as training pants, shirts/tops, and
other performance clothing. This cycle provides effective soil
removal with controlled tub rotation for special fabric care.
RINSE+SPIN
• For loads that need rinsing only or for loads you want to add
rinse-aided fabric softener to.
NOTE
Spin Only: This cycle runs a spin cycle only. Press and hold
RINSE+SPIN for 3 seconds.
FlexWash_WV9900M_DC68-03768A-04_EN.indd 44 2017-05-22 7:03:33
Operations
English 45
Lower washer
Control panel
01
03
04
05 06 07 08
09
10
11
12
13
14
02
01 Cycle area Press to select a cycle.
02 POWER Press to turn the lower washer on or off.
03 START/PAUSE
(Hold to Start)
Press and hold to start operation or press to stop operation
temporarily.
04 Status bar
The status bar shows current cycle information and estimated time
remaining or an information code if the lower washer needs to be
checked.
05 Temp.
• Extra Hot: Heavily soiled, colorfast items. Only available with
NORMAL, HEAVY DUTY, SANITIZE and Self Clean+.
• Hot: Whites and heavily soiled, colorfast items.
• Warm: Colorfast items.
• Cool: Brightly colored, very lightly soiled items.
• Cold: Uses only cold water without driving the heater. No warm
water is supplied.
06 Rinse
• Press to specify the total number of rinses for the current
cycle. Keep pressing to cycle through the rinse count options
available. For more information about the options available to
a specic cycle, see the Cycle chart on page 80.
FlexWash_WV9900M_DC68-03768A-04_EN.indd 45 2017-05-22 7:03:33
Operations
Operations
English46
07 Spin
• Extra High: Extends the spinning process to effectively remove
moisture from the load. Extra High uses a stronger spinning
process to remove moisture, so it is not suitable for wrinklefree
or non-iron fabrics, or overloads.
• High: Underwear, t-shirts, jeans, and sturdy cottons.
• Medium: Jeans, wrinkle-free or wash-and-wear items and
synthetics.
• Low: Delicate items that require a lower spinning speed.
• No Spin: The drum does not spin after the nal drain process.
• Rinse Hold (No lamp turns on): The nal rinse process is
suspended so that the laundry remains in the water. To unload
the laundry, run a drain or spin process.
NOTE
* Spin Only: This cycle runs a spin cycle only. Press and hold Spin
for 3 seconds. With the cycle time on the display, press Spin
repeatedly until a desired spinning speed is selected. Then, press
and hold START/PAUSE to start the cycle.
08 Soil
Press the button to select the soil level/washing time.
• Extra Heavy: For extremely soiled loads.
• Heavy: For heavily soiled loads.
• Normal: For moderately soiled loads. This setting is best for
• most loads.
• Light: For lightly soiled loads.
• Extra Light: For barely soiled loads.
09 Pre Soak
This adds 30 minutes of soaking time at the start of the wash
cycle for better stain removal.
FlexWash_WV9900M_DC68-03768A-04_EN.indd 46 2017-05-22 7:03:34

Operations
English 47
10 Steam
With the Steam option selected, the washer senses the weight of
the load and controls the steam effect according to the load size.
This improves washing performance. Cycles available with the
Steam option are: NORMAL, HEAVY DUTY, BEDDING, WHITES, and
SANITIZE.
1. Select a cycle. For applicable cycles, see above.
2. Press Steam.
3. Add detergent and fabric softener as instructed.
4. Press and hold START/PAUSE to start the cycle.
NOTE
Steam may not be visible or present during the cycle, which is
normal.
11 Super Speed
Press this button if you need to shorten the washing time,
applicable for NORMAL, HEAVY DUTY, or BEDDING. The shortened
time may differ depending on the selected cycle/load/options.
12 Delay End
You can set the washer to nish your wash automatically at a
later time by choosing a delay of between 1 to 24 hours (in 1 hour
increments). The hour displayed indicates the time the wash will
nish.
1. Select a cycle. Then, change the cycle settings if necessary.
2. Press Delay End repeatedly until a desired end time is set.
3. Press and hold START/PAUSE. The lamp indicator next to the
Delay End button turns on with the clock running.
4. To cancel Delay End, restart the washer by pressing POWER.
Real-life case
You want to nish a two-hour cycle 3 hours from now. To do
this, you add the Delay End option to the current cycle with a
3-hour setting, and then press and hold START/PAUSE at 2:00 p.m.
The washer starts operating at 3:00 p.m. and ends at 5:00 p.m.
Provided below is the time line for this example.
2:00 pm
Set the Delay End to 3 hours
3:00 pm
Start
5:00 pm
End
FlexWash_WV9900M_DC68-03768A-04_EN.indd 47 2017-05-22 7:03:34

Operations
Operations
English48
13 Self Clean+
Cleans the drum by removing dirt and mold from the drum.
• Perform once every 40 washes with no detergent or bleach
added.
• Make sure the drum is empty.
• Do not add any drum cleaning agents.
14 Smart Control
After connecting the lower washer to your home network using
the Samsung Smart Home app, you can control the washer
remotely. When started, the Smart Control indicator blinks and the
front door locks. The washer enters waiting mode and waits for
remote commands. For more information, visit the Samsung Smart
Home page.
FlexWash_WV9900M_DC68-03768A-04_EN.indd 48 2017-05-22 7:03:34
Operations
English 49
Cycle overview
Standard cycles
Cycle Description
DELICATES
• For sheer fabrics, bras, lingerie, silks, and other handwash-only
fabrics. For best performance, use liquid detergent.
PERM PRESS
• For wash-and-wear, synthetic fabrics, and lightly to normally
soiled items.
TOWELS • For bath towels, washcloths (facecloths) and mats.
QUICK WASH • For lightly soiled items that you want to nish washing quickly.
ECO COLD
• For normally and lightly soiled items. This cycle uses only cold
water to save energy. Cold water also helps prevent fabric
damage.
ACTIVE WEAR
• For active wear such as sports jerseys, training pants, shirts/
tops, and other performance clothing. This cycle provides
effective soil removal with controlled drum rotation for special
fabric care.
RINSE+SPIN
• For loads that need rinsing only or for loads you want to add
rinse-aided fabric softener to.
Steam cycles
Cycle Description
NORMAL
• For cottons, bed linens, table linens, underwear, towels, or
shirts. The washing time and the rinse count are automatically
adjusted according to the load.
HEAVY DUTY • For sturdy, colorfast fabrics and heavily soiled items.
WHITES • For white items with or without bleach.
SANITIZE
• For heavily soiled, colorfast items. This cycle heats the water to
150 °F to eliminate bacteria.
BEDDING
• For bulky items such as comforters, blankets, and sheets.
• For best results, wash only a single type of bedding.
• For bulky items, use liquid detergent and do not roll the items
when you place them in the drum because they might get
stuck.
FlexWash_WV9900M_DC68-03768A-04_EN.indd 49 2017-05-22 7:03:34
Operations
Operations
English50
Simple steps to start
03
01 06
06
04 05
01
03
04
05
1. Press POWER on the control panel of a desired washer (upper/lower) to turn the
washer on.
2. Put laundry into the washer.
3. Select a cycle.
4. Change the cycle settings (temperature and/or soil level) as appropriate to the laundry.
5. Select cycle options as needed.
6. Press and hold START/PAUSE.
To change the cycle during operation
1. Press START/PAUSE to stop operations temporarily.
2. Select a different cycle.
3. Press and hold START/PAUSE again to start the new cycle.
WARNING
• Do not put anything on top of your washer while it is running.
• While the lower washer is operating, the protective cover may have wet steam due to
the temperature difference between the upper and lower parts of the washer.
CAUTION
When using the upper washer, you may
not see all the remaining clothes after a
cycle is nished, especially those in the
front area of the tub.
When the cycle is complete, turn the tub
manually to check if there are any clothes
remaining in the tub.
FlexWash_WV9900M_DC68-03768A-04_EN.indd 50 2017-05-22 7:03:34

Operations
English 51
This product is a smart washer that supports the Samsung
Smart Home service.
The amount of time the EZ setup function (for connecting the
washer to your network) can take to complete the network
connection varies, depending on your network conditions.
Samsung Smart Home
Installation
Visit the Google Play Store, Galaxy Apps, or Apple App Store and search for “Samsung
Smart Home”. Download and install the Samsung Smart Home app provided by Samsung
Electronics to your smart device.
NOTE
• The Samsung Smart Home app is designed for Android 4.0 (ICS) or higher, or iOS 8.0 or
higher, and is optimized for Samsung smartphones (Galaxy S and Galaxy Note series).
• On other devices, some functions may operate differently.
• For improved performance, the Samsung Smart Home app is subject to change without
notice.
Registering a Samsung account
To use the Samsung Smart Home app, you must rst sign in to your Samsung account. If
you don’t have a Samsung account, select Register in the app, and then follow the on-
screen instructions to create an account.
NOTE
• If you have a registered Samsung account, log into your Samsung account. If you have
a Samsung smartphone, you can go to the Settings menu on your smartphone, select
Accounts, and then sign in to your Samsung account. This will allow you to log in
without additional authentication.
• For third-party smart phones, the app account must be the same as the EZ Setup
account.
FlexWash_WV9900M_DC68-03768A-04_EN.indd 51 2017-05-22 7:03:34

Operations
Operations
English52
Getting started
Using Samsung Smart Home, you can control your washer from your smart device
remotely. For improved performance, the content and design of the app is subject to
change without notice.
1. Launch the Samsung Smart Home App on your smartphone.
2. If ‘Washer’ is not listed, tap Add Device > Select other device > Washer on the app
screen.
3. Press and hold Smart Control on your washer’s control panel for more than 5 seconds
until the ‘AP’ message appears on the display.
4. When the device registration is complete, turn on the Smart Control function on your
washer and control your washer remotely.
FlexWash_WV9900M_DC68-03768A-04_EN.indd 52 2017-05-22 7:03:34

Operations
English 53
Special features
Child Lock
To prevent children or infants from accidently starting or setting the washer, Child
Lock locks all buttons except for the POWER button. Note that each washer operates
independently and has its own Child Lock function. If you want to activate Child Lock for
the upper or lower washer, you must press the appropriate buttons on the upper or lower
washer’s control panel.
To activate Child Lock
• Press and hold Temp. and Rinse (or Temp. and Extra Rinse for the upper washer)
simultaneously for 3 seconds. The door locks and the Child Lock indicator turns on.
Then, press START/PAUSE to activate.
To deactivate Child Lock temporarily
• You can deactivate Child Lock temporarily for 1 minute. To do this, press and hold
Temp. and Rinse (or Temp. and Extra Rinse for the upper washer) simultaneously for 3
seconds. The door is unlocked for 1 minute and the Child Lock indicator blinks.
NOTE
• If you open the door 1 minute or more after deactivating Child Lock, an alarm sounds
for up to 2 minutes.
• If you close the door within 2 minutes, the door locks and Child Lock is reactivated. If
you do not close the door or the door is not properly closed, the alarm keeps sounding
for 2 minutes.
• To add laundry after activating Child Lock, rst deactivate Child Lock or restart the
washer.
To cancel Child Lock
• Press and hold Temp. and Rinse (or Temp. and Extra Rinse for the upper washer) for
3 seconds to deactivate, and then press and hold the buttons again for 3 seconds to
release Child Lock. The door unlocks and the Child Lock indicator turns off.
FlexWash_WV9900M_DC68-03768A-04_EN.indd 53 2017-05-22 7:03:35

Operations
Operations
English54
Smart Care
The Smart Care function helps you diagnose and troubleshoot your washer if it has an
issue. To enable this function, you must rst download the Samsung Smart Washer app
from the Play Store or the Apple Store, and install it on a mobile device that has a built-
in camera. The Smart Care function has been optimized for: Galaxy and iPhone series
devices. (It is not supported by some models.)
As the washer operates, it runs self-diagnosis in the background. If it senses an issue to
check, it displays an information code on the display which you can scan using the app’s
Smart Care function, which then displays detailed information about the code for your
reference.
1. Press and hold Super Speed (or Self Clean and Smart Control for the upper washer) on
the washer for 3 seconds to enter the Smart Care mode.
2. Run the Samsung Smart Washer app on your mobile device, and then tap Smart Care.
3. Hold the mobile device so that the mobile device and the washer’s status bar face each
other. The app will recognize the information code automatically.
4. When the information code is recognized correctly, the app provides detailed
information about the symptom and recommends further action.
NOTE
• The function name, Smart Care, may differ depending on your language.
• If the washer display is reecting light, the app may fail to recognize the information
code.
• If the app fails to recognize the information code a number of times consecutively,
enter the information code manually into the app screen.
• The information code history stored in the washer will be deleted after you use this
function.
FlexWash_WV9900M_DC68-03768A-04_EN.indd 54 2017-05-22 7:03:35

Operations
English 55
Sound
Mute or unmute the sound (button beeps, indicator beeps, and chimes, etc.)
Upper washer
• To mute the alarm sound or beep on the upper washer, press and hold Extra Rinse and
Self Clean for 3 seconds. To unmute, press and hold the buttons for 3 seconds again.
Lower washer
• To mute the alarm sound or beep on the lower washer, press and hold Steam for 3
seconds. To unmute, press and hold the button for 3 seconds again.
Drum Light (lower washer only)
The drum light turns on when the door is opened, and turns off after 2 minutes. To
manually turn the drum light on or off, press and hold Soil for 3 seconds.
ATC (Auto Temperature Control)
ATC enables the washer to control water temperatures in each washing cycle using the
washer’s internal thermistor. It is designed to maintain certain washing temperatures for
best results.
• If you select NORMAL or HEAVY DUTY, you may notice the washer supplying cold
water. This is normal because the washer is designed to reduce power consumption.
• In these cycles, the Hot temperature is similar to bath-water temperatures and the
Warm temperature to comfortable swimming pool temperatures.
• To wash laundry at a specic temperature, you must choose a different cycle rst.
FlexWash_WV9900M_DC68-03768A-04_EN.indd 55 2017-05-22 7:03:35

Maintenance
English56
Maintenance
Keep the washer clean to prevent its performance from deteriorating and to preserve its
life cycle.
WARNING
Control board, heat sink, motor, inlet valve and pump are intentionally not grounded and
may present a risk of electric shock only during servicing.
General considerations
Cleaning
Surface of the washer
Use a soft cloth with a nonabrasive household detergent. Do not spray water onto the
washer.
Exterior
1. Turn off the water taps after nishing the day’s washing.
This will shut off the water supply to your washer and prevent the unlikely possibility
of damage from escaping water. Leave the door open to allow the inside of your
washer to dry out.
2. Use a soft cloth to wipe up all detergent, bleach, or other spills as they occur.
Clean the following as recommended below:
- Control panels – Clean with a soft, damp cloth. Do not use abrasive powders or
cleaning pads. Do not spray cleaners directly on the panels.
- Cabinet – Clean with soap and water.
Interior
Clean the interior of your washer periodically to remove any dirt, soil, odor, mold, mildew,
or bacterial residue that may remain in your washer as a result of washing clothes.
CAUTION
Failure to follow these instructions may result in unpleasant conditions, including odors
and/or permanent stains on your washer or laundry.
NOTE
Hard water deposits may be removed, if needed. Use a cleaner labeled “Washer safe”.
FlexWash_WV9900M_DC68-03768A-04_EN.indd 56 2017-05-22 7:03:35
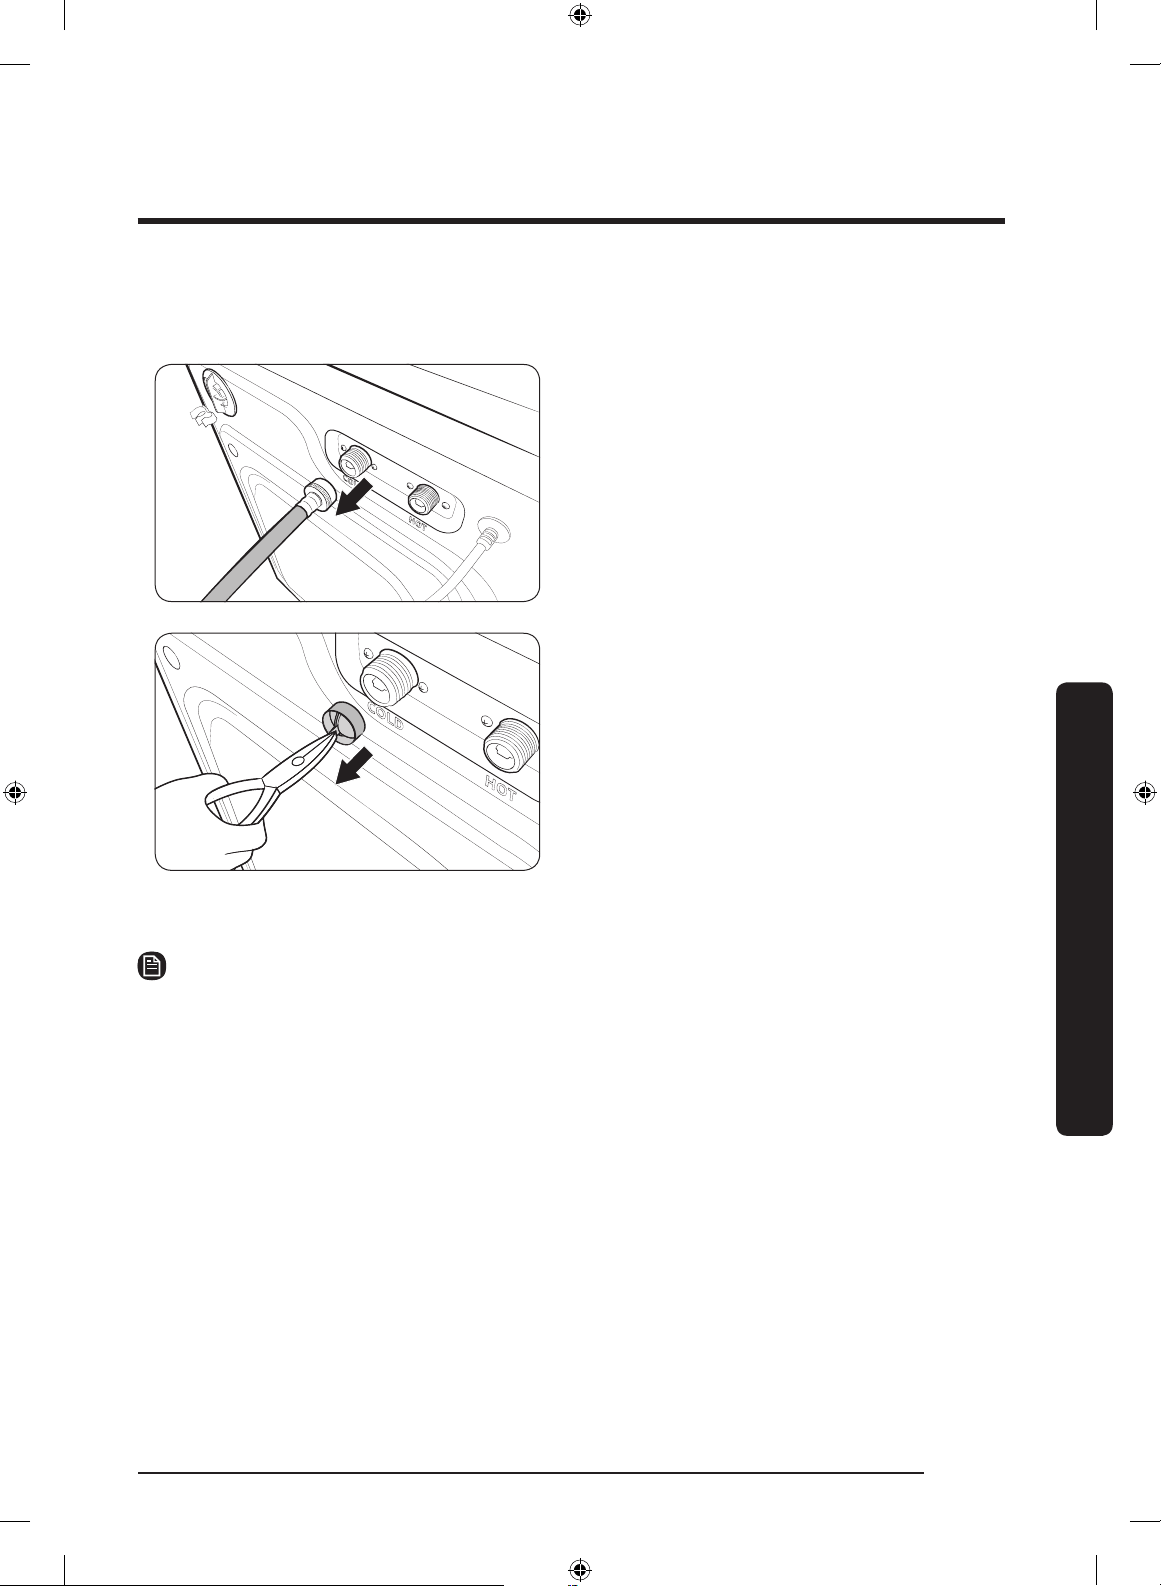
Maintenance
English 57
Mesh lter
Clean the mesh lter of the water hose once or twice a year.
1. Turn off the washer, and then unplug
the power cord.
2. Close the taps.
3. Loosen and disconnect the water hose
from the back of the washer. Cover the
hose with a cloth to prevent water from
gushing out.
4. Use pliers to pull out the mesh lter
from the inlet valve.
5. Submerge the mesh lter deeply in
water so that the threaded connector is
also submerged.
6. Dry the mesh lter completely in a
shaded area.
7. Reinsert the mesh lter into the inlet
valve, and reconnect the water hose to
the inlet valve.
8. Open the tap.
NOTE
If the mesh lter is clogged, the “4C” information code appears on the the washer’s
display.
FlexWash_WV9900M_DC68-03768A-04_EN.indd 57 2017-05-22 7:03:35

Maintenance
Maintenance
English58
Recovery from freezing
The washer may freeze when the temperature in its location drops below 32 °F (0 °C).
1. Turn off the washer, and then unplug the power cord.
2. Pour warm water over the tap to loosen the water hose.
3. Disconnect the water hose, and soak it in warm water.
4. Pour warm water into the drum (tub) and leave it for about 10 minutes.
5. Reconnect the water hose to the tap.
NOTE
If the washer still doesn’t operate normally, repeat the steps above until it operates
normally.
If the washer will not be used for an extended period of time
Avoid leaving the washer unused for an extended time. If you intend to leave the washer
unused for a long period of time, follow the directions below:
1. Press POWER, and then select RINSE+SPIN.
2. Empty both the drum and the tub, close the door, and then press START/PAUSE.
3. When the cycle is complete, close the tap and disconnect the water hoses.
4. Turn off the washer, and then unplug the power cord.
5. Open the doors to let air circulate through the drum and the tub.
FlexWash_WV9900M_DC68-03768A-04_EN.indd 58 2017-05-22 7:03:35
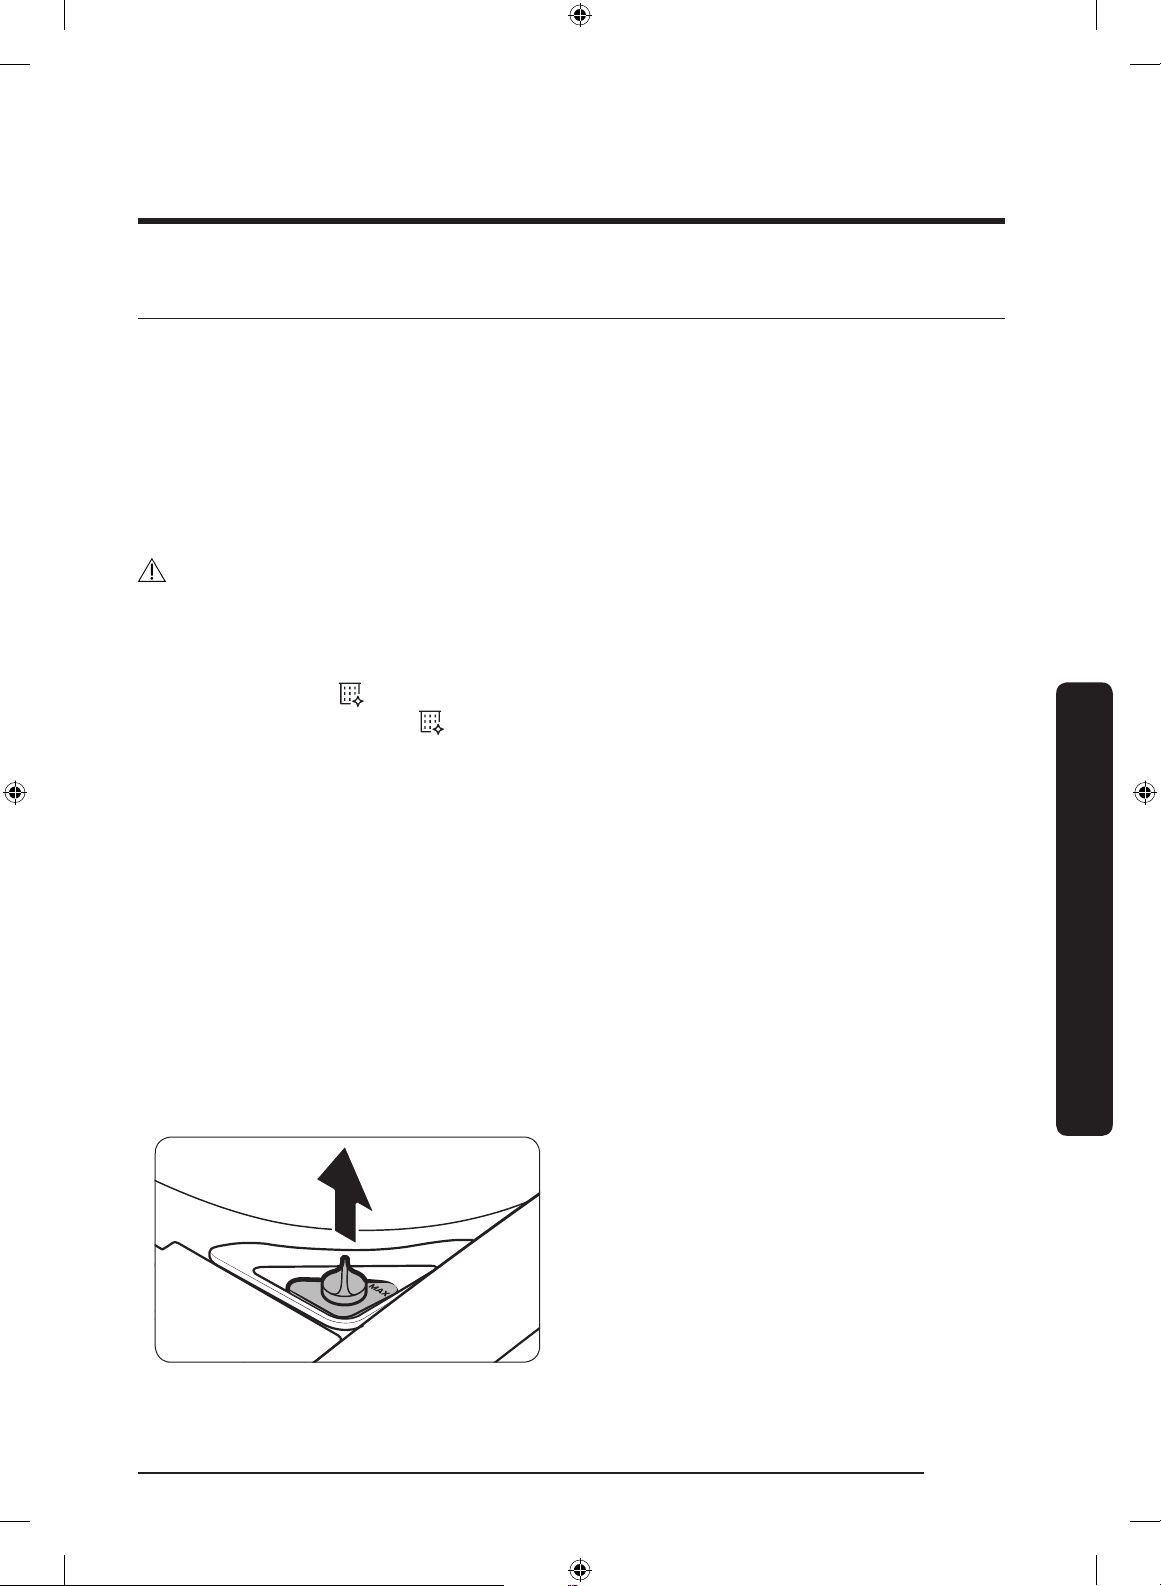
Maintenance
English 59
Upper washer
Self Clean
Self Clean is a self-cleaning cycle that removes dirt and bacteria that may occur inside the
tub. We recommend running Self Clean every 20 washes.
1. Make sure the tub is empty.
2. Press POWER.
3. Press Self Clean.
4. Press and hold START/PAUSE.
CAUTION
• With Self Clean, you can clean the tub without using detergent or bleach.
• Only use Self Clean when the tub is empty. This may cause damage to the laundry or a
problem with the washer.
Self Clean reminder (
)
• The Self Clean+ reminder ( ) appears on the main display once every 20 washes. We
strongly recommend that you perform the Self Clean+ regularly. Remove the laundry
from the washer, turn the washer on, and clean the tub by running Self Clean.
• If you do not run Self Clean, the Self Clean indicator turns off. However, the indicator
will light again after ve washes. Not running Self Clean at this point will not cause a
problem with the washer. However, we strongly recommend running Self Clean at this
point.
• Although the Self Clean indicator turns on once a month or so, the frequency may
differ depending on the number of times the washer is used.
Fabric softener/bleach compartment
Both the fabric softener compartment and the bleach compartment on the upper washer
are not removable by design to facilitate visual feedback to users. To clean the softener
compartment, follow these instructions. Cleaning the bleach compartment is basically the
same.
1. Open the top door, and then remove
the softener cap.
FlexWash_WV9900M_DC68-03768A-04_EN.indd 59 2017-05-22 7:03:35
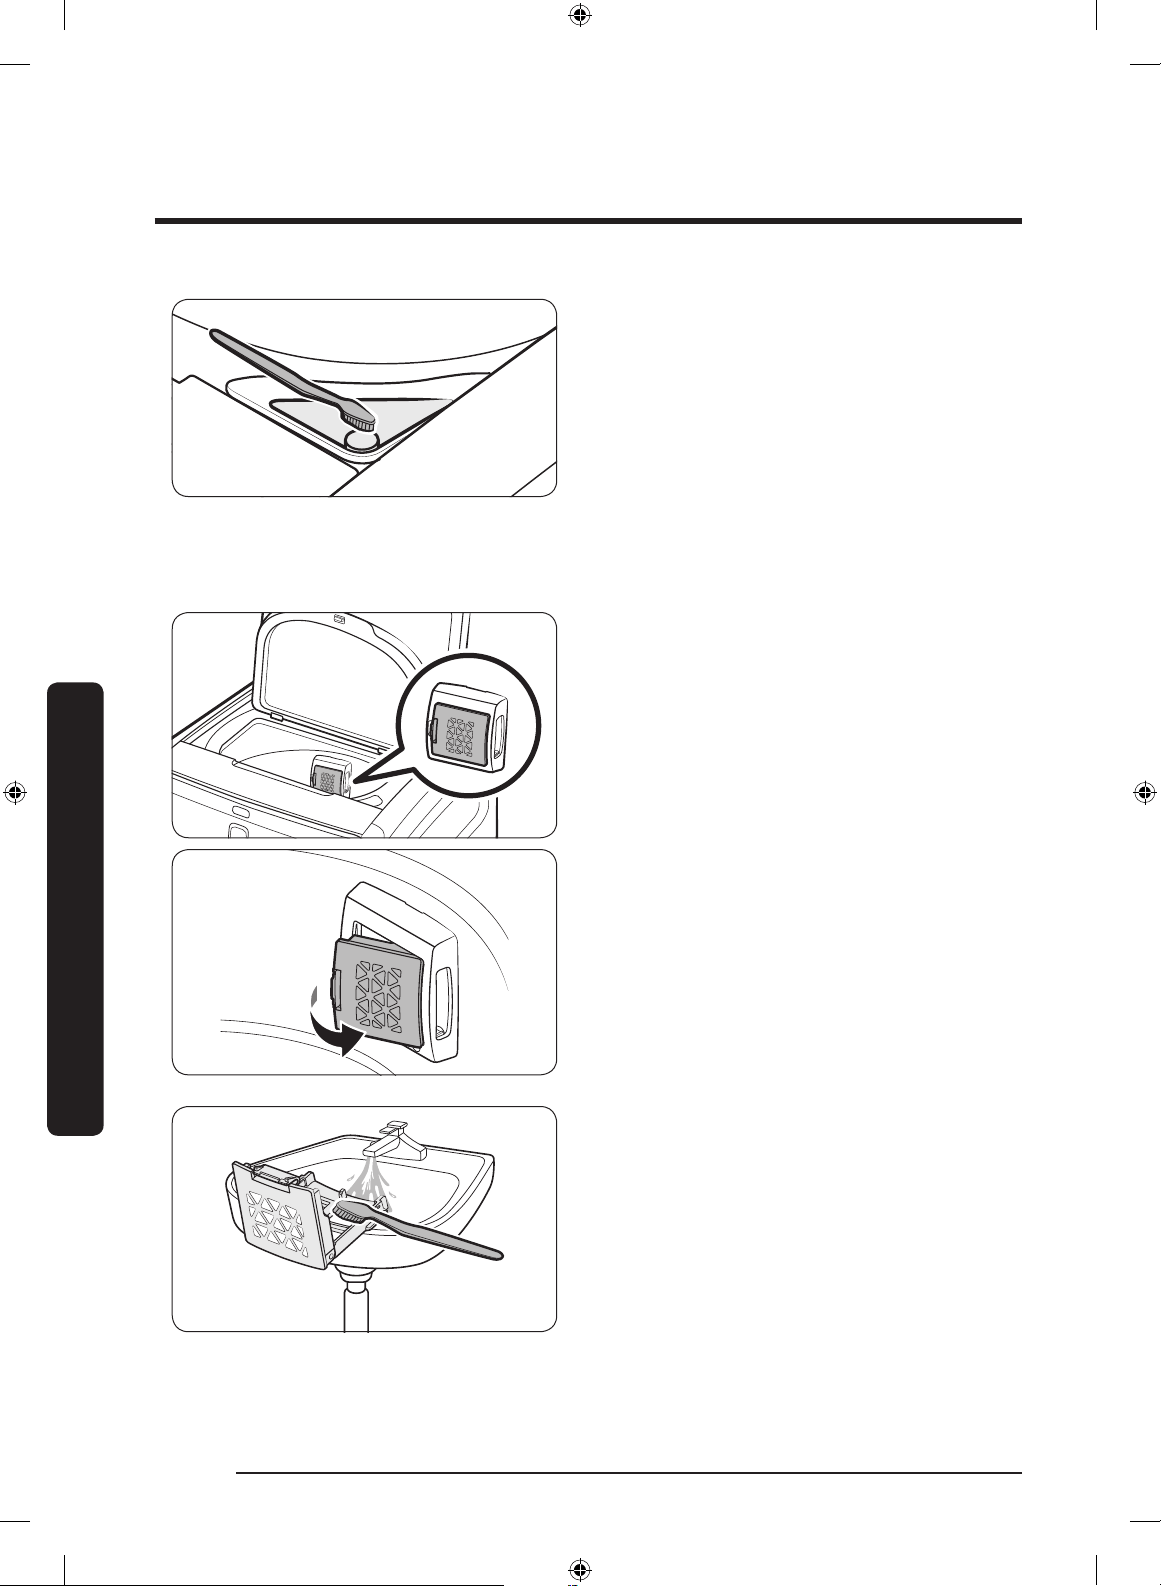
Maintenance
Maintenance
English60
2. Use a soft brush (for example, a
toothbrush) to clean inside the
compartment and remove impurities.
3. Run the RINSE+SPIN cycle to rinse the
compartment. After supplying water
and draining 5 times, the 18-minute
cycle completes with the nal spin
process.
Lint lter
We recommend cleaning the lint lter every 10 washes.
1. Remove the lint lter from the lter
case on the tub of the upper washer.
2. Open the lter, and clean it with
running water and a brush.
3. When cleaning is complete, close the
lter and reinsert it in its original
position. You will hear a clicking sound
when the lter is inserted correctly.
FlexWash_WV9900M_DC68-03768A-04_EN.indd 60 2017-05-22 7:03:35
Maintenance
English 61
Lower washer
Self Clean+
Perform this cycle regularly to clean the drum and to remove mold from it.
1. Make sure the drum is empty.
2. Press POWER to turn on the washer.
3. Press Self Clean+.
4. Press and hold START/PAUSE.
CAUTION
• Do not use any cleaning agents. Do not add detergent or bleach. Chemical residue in
the drum degrades the cleaning performance.
• Only use Self Clean+ when the drum is empty. Do not use Self Clean+ if the drum
contains laundry. This may cause damage to the laundry or a problem with the washer.
NOTE
The water temperature for Self Clean+ is set to Extra Hot, which cannot be changed.
Self Clean+ reminder (
)
• The Self Clean+ reminder ( ) appears on the main display once every 40 washes. We
strongly recommend that you perform the Self Clean+ regularly.
• If you do not run Self Clean+ after every 40 washes, the Self Clean+ reminder turns off
after one hour.
• When you rst see this reminder, you can ignore the reminder for 6 consecutive
washes. From the 7
th
wash, the reminder no longer appears. However, it appears again
after the second batch of 40 washes.
FlexWash_WV9900M_DC68-03768A-04_EN.indd 61 2017-05-22 7:03:36

Maintenance
Maintenance
English62
Main wash compartment
The main wash compartment needs to be cleaned periodically to remove buildup of
laundry additives.
1. Open the top-front cover. Grasp the
main wash compartment, and then pull
up to remove.
2. Remove all residue and traces of
accumulated laundry agents from the
compartment. Rinse it with warm water.
3. To clean the recess of the compartment,
use a small, non-metal brush. Remove
all residue from all sides of the recess.
4. Reinsert the compartment into place.
FlexWash_WV9900M_DC68-03768A-04_EN.indd 62 2017-05-22 7:03:36
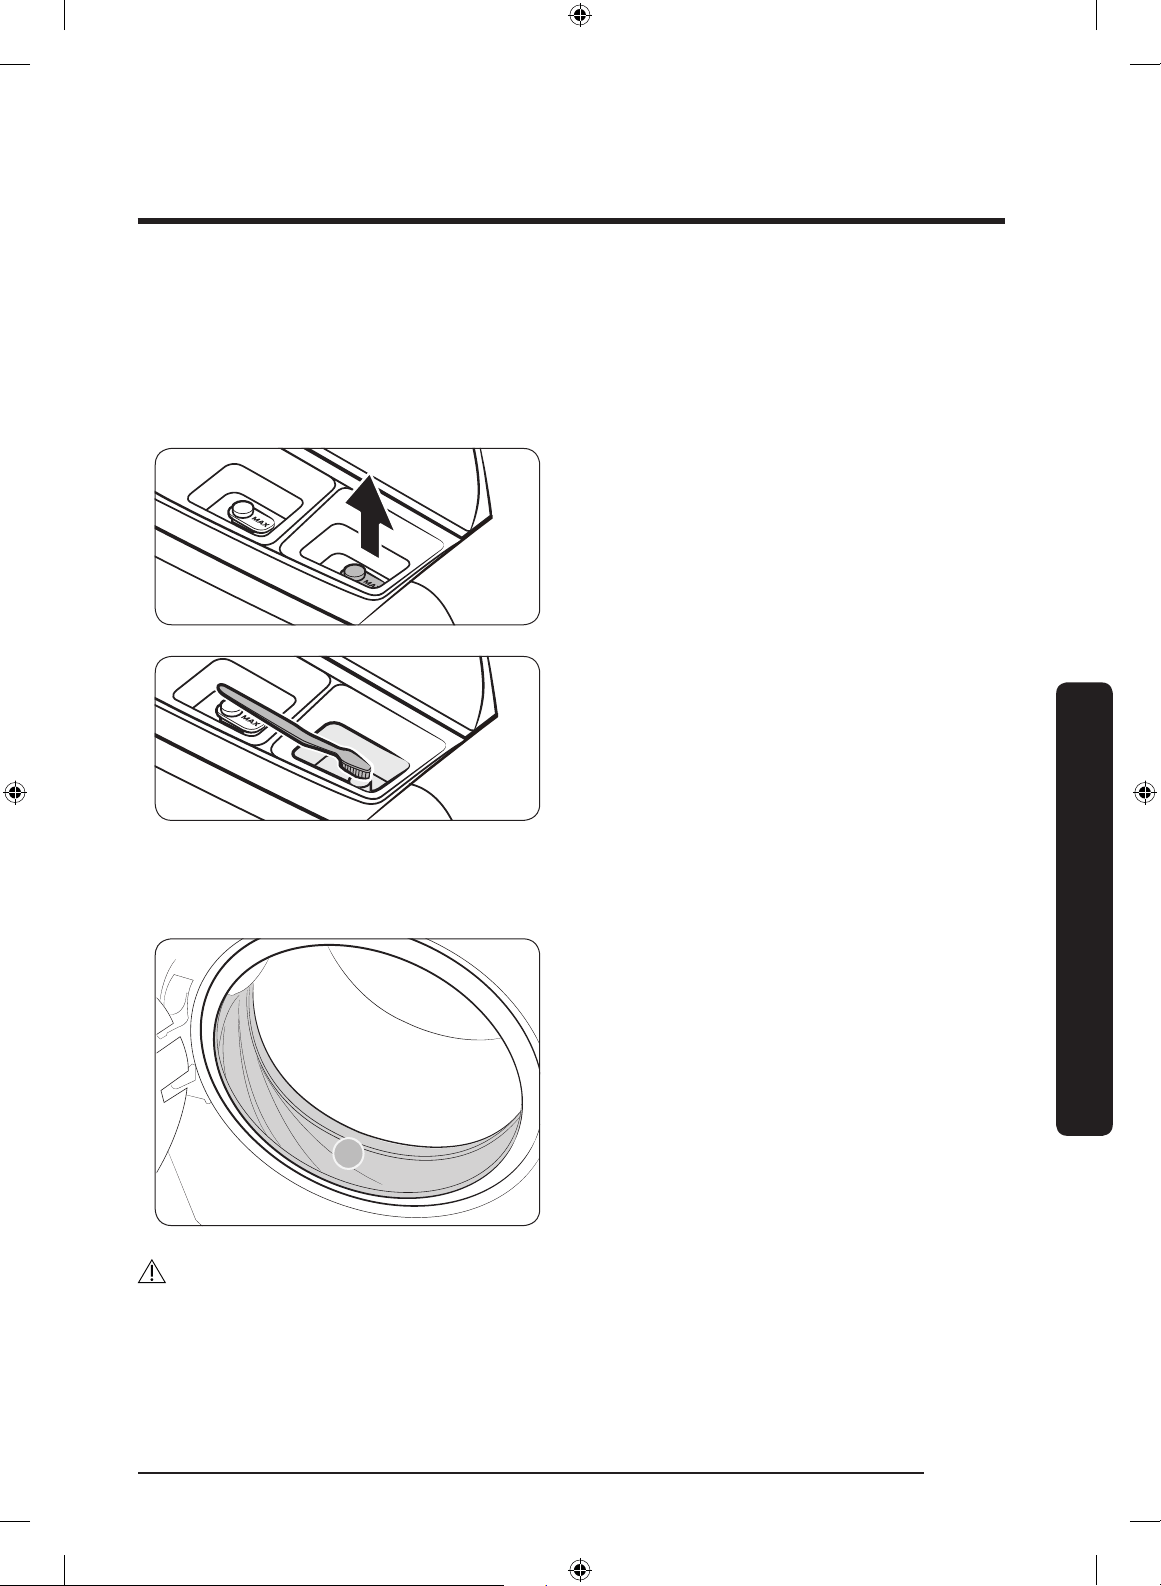
Maintenance
English 63
Fabric softener/bleach compartment
Both the fabric softener compartment and the bleach compartment on the lower washer
are not removable by design to facilitate visual feedback to users. To clean the softener
compartment, follow these instructions. Cleaning the bleach compartment is basically the
same.
1. Open the top-front cover, and then
remove the softener cap.
2. Use a soft brush (for example, a
toothbrush) to clean inside the
compartment and remove impurities.
3. Run the RINSE+SPIN cycle to rinse the
compartment. After supplying water
and draining 5 times, the 19-minute
cycle completes with the nal spin
process.
Door diaphragm
A
1. Open the door and empty the drum.
2. Turn out the diaphragm (sealing or
gasket of the drum (A)), and check if it
is stained. If so, follow the steps below.
3. Combine 3/4 cups of liquid chlorine
bleach and 1 gallon of warm tap water.
4. Wearing rubber gloves, use a soft, clean
cloth dipped in the water and chlorine
solution to clean the diaphragm.
5. Let stand for 5 minutes, and then wipe
up and dry well.
CAUTION
Use bleach carefully and be sure to follow the bleach manufacturer’s use and care
instructions.
FlexWash_WV9900M_DC68-03768A-04_EN.indd 63 2017-05-22 7:03:36
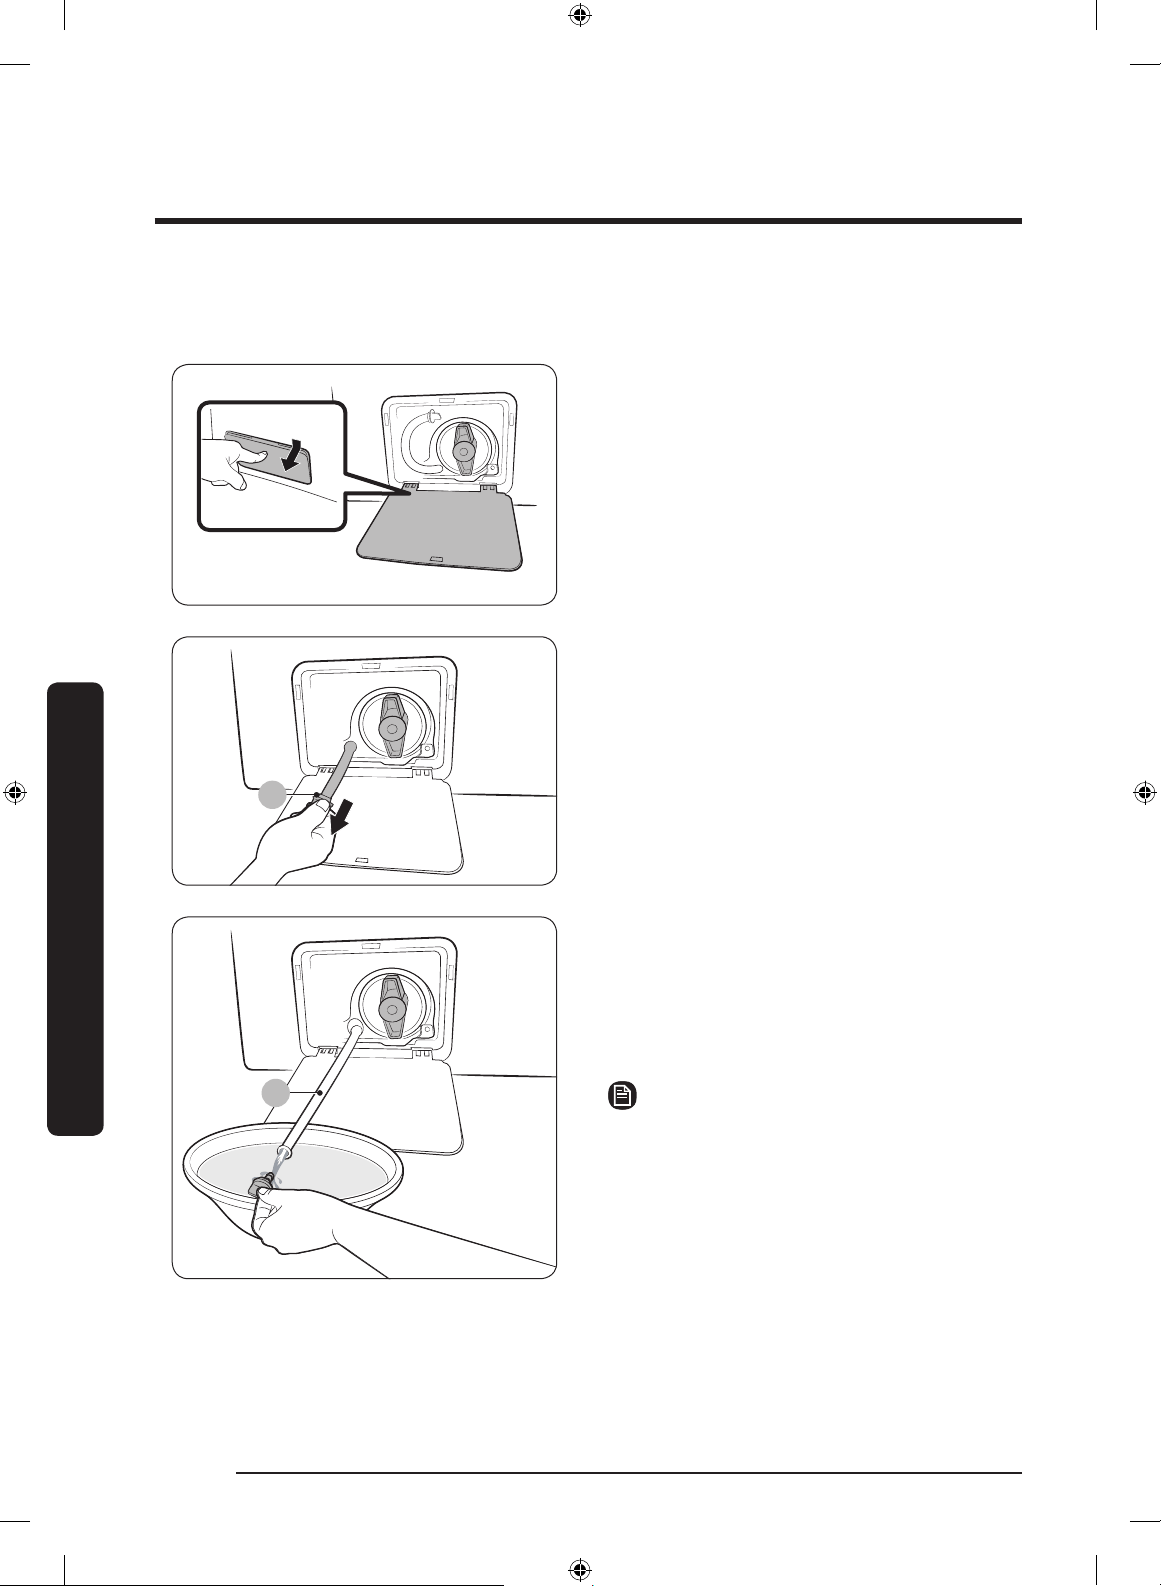
Maintenance
Maintenance
English64
Emergency drain
In case of a power failure, drain the water inside the drum before taking out the laundry.
1. Power off the washer, and then unplug
it from the electrical outlet.
2. Gently press the top area of the lter
cover to open.
A
3. Put an empty, spacious container in
front of the cover, and stretch the
emergency drain tube to the container
while holding the tube cap (A).
B
4. Open the tube cap and let water in the
Emergency drain tube (B) ow into the
container.
5. When done, close the tube cap, and
reinsert the tube. Then, close the lter
cover.
NOTE
Use a spacious container because the
water in the drum may be more than
expected.
FlexWash_WV9900M_DC68-03768A-04_EN.indd 64 2017-05-22 7:03:36
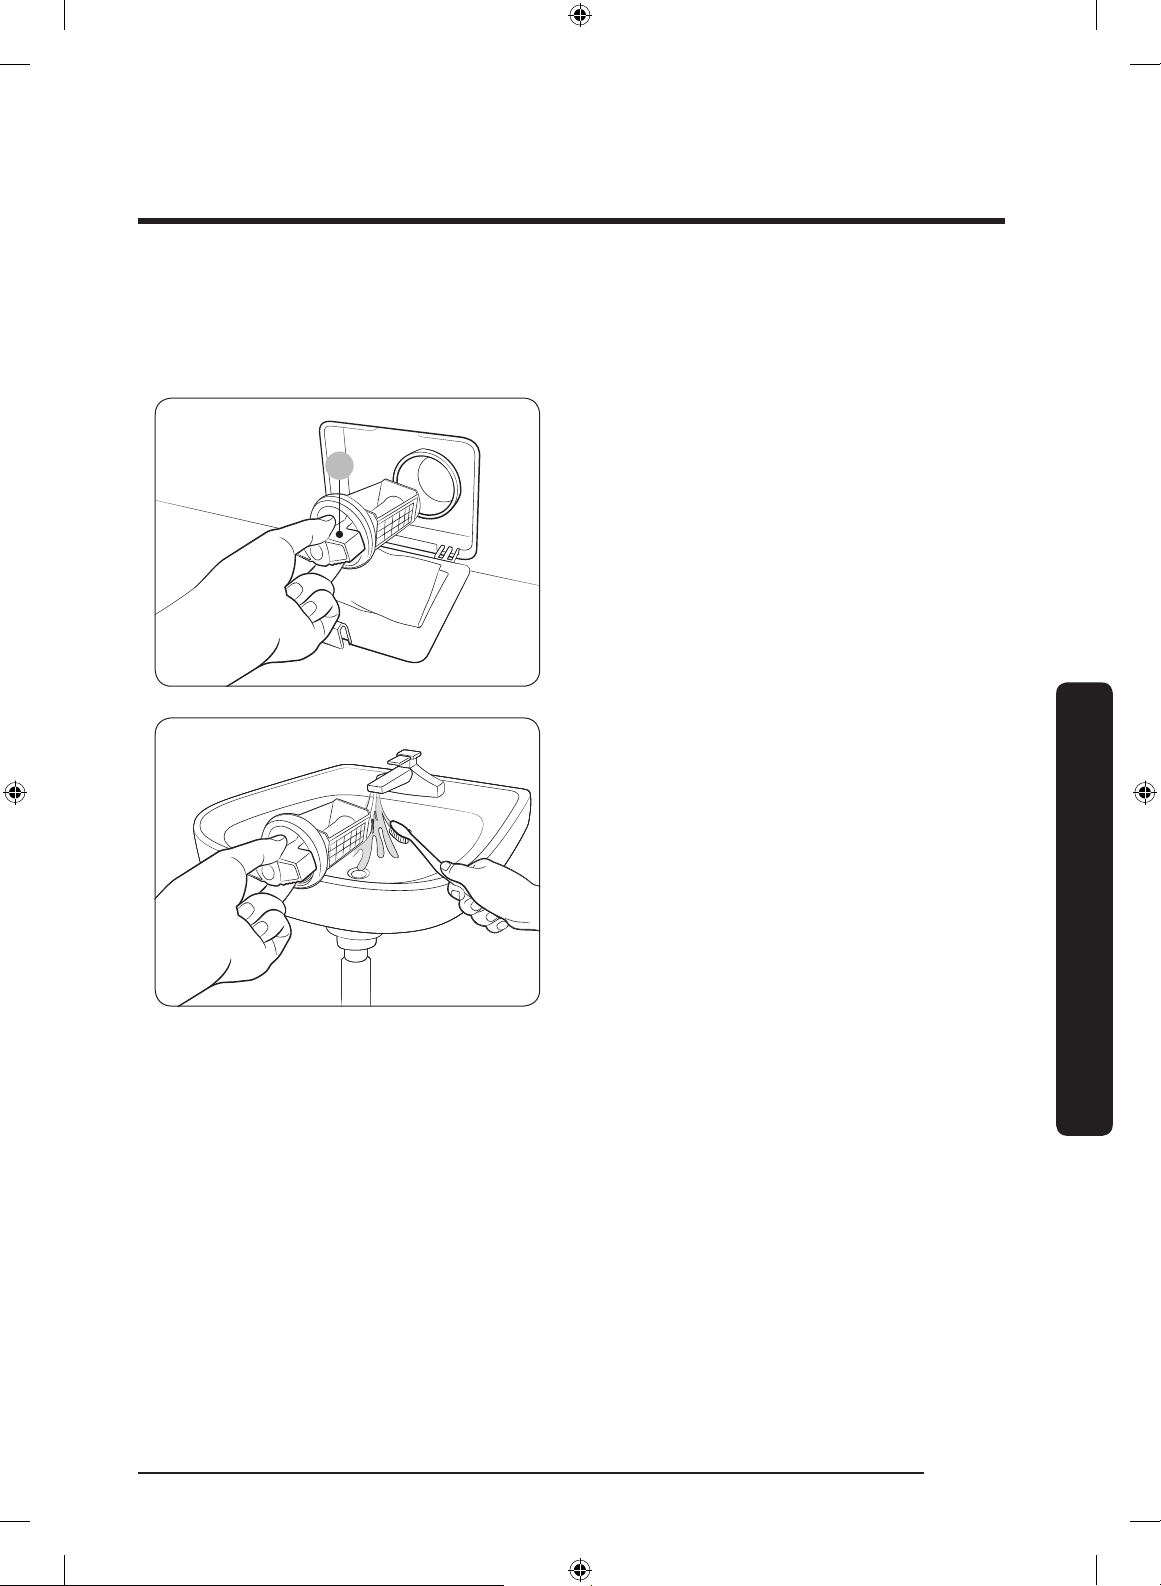
Maintenance
English 65
Pump lter
It is advisable to clean the pump lter 5 or 6 times a year to prevent it from clogging. A
clogged pump lter may reduce the bubble effect.
A
1. Turn off the washer, and then unplug
the power cord.
2. Drain the remaining water inside the
drum. See the Emergency drain section
on page 64.
3. Gently press the top area of the lter
cover to open.
4. Turn the pump lter knob (A) to the left,
and drain off the remaining water.
5. Clean the pump lter using a soft brush.
Make sure the drain pump propeller
inside the lter is not clogged.
6. Reinsert the pump lter, and then turn
the lter knob to the right.
7. Close the lter cover.
FlexWash_WV9900M_DC68-03768A-04_EN.indd 65 2017-05-22 7:03:37
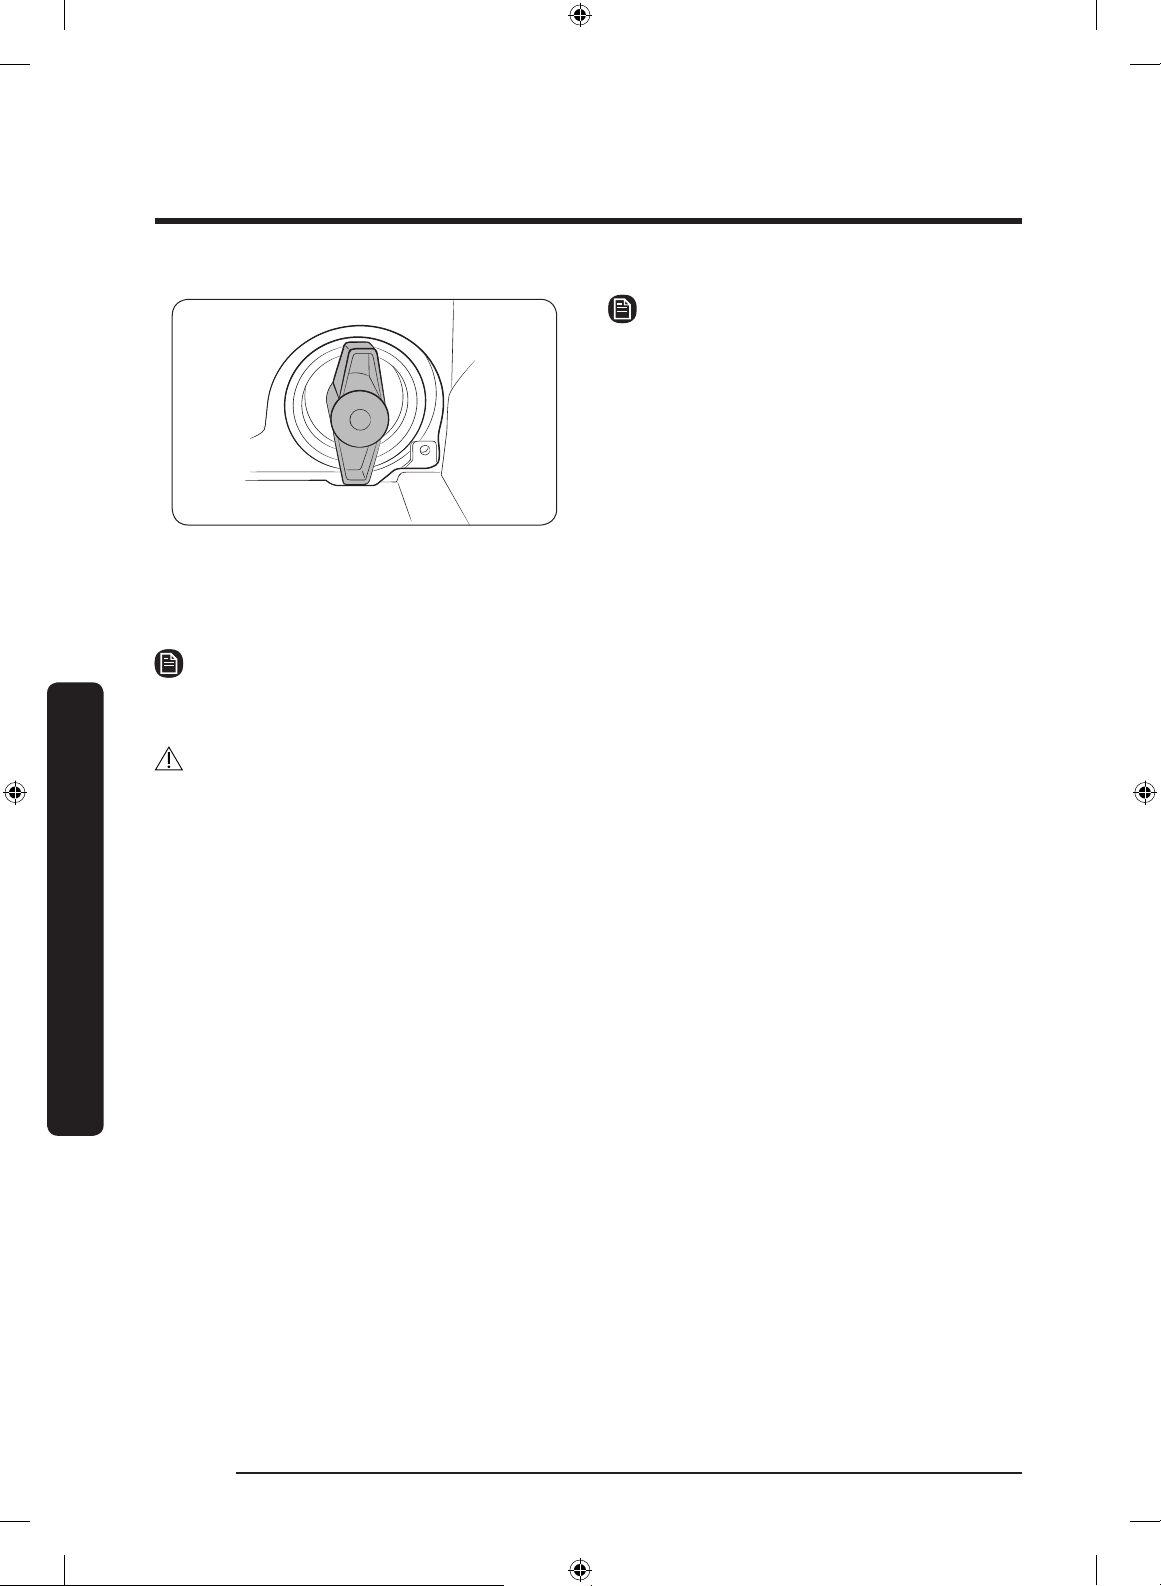
Maintenance
Maintenance
English66
NOTE
• Some pump lters feature a safety
knob that is designed to prevent
children from accidently opening the
lter compartment. To open the safety
knob of the pump lter, push in and
turn it counterclockwise. The spring
mechanism of the safety knob helps
open the lter.
• To close the safety knob of the pump
lter, turn it clockwise. The spring
makes a rattling sound, which is normal.
NOTE
If the pump lter is clogged, the “5C” information code appears on the washer’s display
screen.
CAUTION
• Make sure the lter knob is closed properly after cleaning the lter. Otherwise, this
may cause a leak.
• Make sure the lter is inserted properly after cleaning it. Otherwise, this may cause an
operational failure or a leak.
FlexWash_WV9900M_DC68-03768A-04_EN.indd 66 2017-05-22 7:03:37
Troubleshooting
English 67
Troubleshooting
Checkpoints
If you encounter an issue to check with the washer, rst check the table below and try the
suggestions.
Symptom Action
Does not turn on.
• Make sure your home electrical system is providing electrical
power that matches the requirements of the washer. See page
21.
• Make sure the power plug of the washer is completely
plugged in.
Does not start.
• Make sure the door is properly closed.
• Make sure the taps are open.
• Make sure to press and hold START/PAUSE to start the
washer.
• Make sure Child Lock is not activated.
• Before the washer starts to ll, it will make a series of
clicking noises to check the door lock and does a quick drain.
• Check the fuse or reset the circuit breaker.
• Check if the upper or lower washer displays an information
code on the respective status bar.
Water supply is
insufcient or no
water is supplied.
• Fully open the tap.
• Make sure the door is properly closed.
• Make sure the water supply hose is not frozen.
• Make sure the water supply hose is not kinked or clogged.
• Make sure there is sufcient water pressure.
After a cycle,
detergent remains
in the detergent
drawer.
• Make sure the washer is running with sufcient water
pressure.
• If you are using powdered detergent, do not use more than
recommended.
• If you are using liquid detergent, do not over ll the liquid
detergent compartment.
• Remove the liquid detergent and softener containers, and
then clean the detergent drawer.
FlexWash_WV9900M_DC68-03768A-04_EN.indd 67 2017-05-22 7:03:37

Troubleshooting
Troubleshooting
English68
Symptom Action
Excessive vibrations
or makes noise.
• Make sure the washer is installed on a level, solid oor that is
not slippery. If the oor is not level, use the levelling feet to
adjust the height of the washer.
• Make sure the shipping bolts are removed.
• Make sure the washer is not contacting any other object.
• Make sure the laundry load is balanced.
• The motor can cause noise during normal operation.
• Overalls or metal-decorated clothes can cause noise while
being washed. This is normal.
• Metal objects such as coins can cause noise. After washing,
remove these objects from the drum or tub or lter case.
Does not drain and/
or spin.
• Make sure the drain hose is neither kinked nor obsructed all
the way to the drain system. If there is a drain restriction, call
for service.
• Make sure the debris lter is not clogged.
• Close the door and press and hold START/PAUSE. For your
safety, the washer will not tumble or spin unless the door is
closed.
• Make sure the drain hose is not frozen or clogged.
• Make sure the drain hose is connected to a drain system that
is not clogged.
• If the washer is not supplied with sufcient power, the
washer temporarily will not drain or spin. As soon as the
washer regains sufcient power, it will operate normally.
Drains with noise.
• At the initial installation, or when the washer has not been
used for an extended period of time, the washer may make
deating noises while draining. This is not a system failure.
The door does not
open.
• Press START/PAUSE to stop the washer.
• It may take a few moments for the door lock mechanism to
disengage.
• The door will not open until 3 minutes after the washer has
stopped or the power has been turned off.
• Make sure all the water in the drum or tub is drained.
• The door may not open if water remains in the drum or tub.
Drain the drum or tub and open the door manually.
• Make sure the door lock light is off. The door lock light turns
off after the washer has drained.
FlexWash_WV9900M_DC68-03768A-04_EN.indd 68 2017-05-22 7:03:37

Troubleshooting
English 69
Symptom Action
Excessive suds.
• Make sure you use the recommended types of detergent.
• Use high efciency (HE) detergent to prevent oversudsing.
• Reduce the detergent amount for soft water, small loads, or
lightly soiled loads.
• Non-HE detergent is not recommended.
Cannot add additional
detergent.
• Do not ll the detergent or fabric softener compartments
beyond the marked max ll limit.
The washer stops.
• Plug the power cord into a live electrical outlet.
• Check the fuse or reset the circuit breaker.
• Close the door, and then press and hold START/PAUSE to start
the washer. For your safety, the washer will not tumble or
spin unless the door is closed.
• Before the washer starts to ll, it will make a series of
clicking noises to check the door lock and does a quick drain.
• There may be a pause or soak period in the cycle. Wait and
the washer may start.
• Make sure the mesh lters of the water supply hoses at the
taps are not clogged. Periodically clean the mesh lters.
• If the washer is not supplied with sufcient power, the
washer temporarily will not drain or spin. As soon as the
washer regains sufcient power, it will operate normally.
FlexWash_WV9900M_DC68-03768A-04_EN.indd 69 2017-05-22 7:03:37
Troubleshooting
Troubleshooting
English70
Symptom Action
The washer lls
with the wrong
temperature water.
• Fully open both taps.
• Make sure the temperature selection is correct.
• Make sure the hoses are connected to the correct taps. Flush
the water lines.
• Make sure your water heater is set to supply hot water with a
minimum temperature of 120 °F (49 °C) at the tap. Also, check
the water heater capacity and recovery rate.
• Disconnect the hoses and clean the mesh lters. The mesh
lters may be clogged.
• While the washer lls, the water temperature may change
as the automatic temperature control feature checks the
incoming water temperature. This is normal.
• While the washer lls, you may notice just hot and/or just
cold water going through the dispenser when cold or warm
temperatures are selected. This is a normal function of
the automatic temperature control feature as the washer
determines the water temperature.
The load is wet at the
end of a cycle.
• Use the High or Extra High spin speed.
• Use high efciency (HE) detergent to reduce oversudsing.
• The load is too small. Small loads (one or two items) may
become unbalanced and not spin completely.
• Make sure the drain hose is not kinked or clogged.
Leaks water.
• Make sure the door is properly closed.
• Make sure all hose connections are tight.
• Make sure the end of the drain hose is correctly inserted and
secured to the drain system.
• Avoid overloading.
• Use high efciency (HE) detergent to prevent oversudsing.
Has odors.
• Excessive suds collect in recesses and can cause foul odors.
• Run cleansing cycles to sanitize periodically.
• Clean the door seal (diaphragm).
• Dry the washer interior after a cycle has nished.
FlexWash_WV9900M_DC68-03768A-04_EN.indd 70 2017-05-22 7:03:37

Troubleshooting
English 71
Symptom Action
The tub or the water/
drain hose is frozen.
• For frozen hoses, use warm water to disconnect the frozen
hoses. Soak them in warm water.
• For a frozen tub, ll the tub with warm water, and then wait
for about 10 minutes.
• For the hose connector, put a hot towel on the drain hose
connector.
• After thawing the hoses, reconnect them.
Water drains out
immediately.
• Make sure the drain hose is not clogged, and is hung over
the drain hose hook. Fill the tub halfway with water, and try
spinning again.
• Lift the end of the drain hose to prevent water from draining.
Fill the tub halfway with water, and then run the spin cycle
after releasing the drain hose.
• Make sure the drain hose is installed correctly. See the
installation section of this manual and then adjust the position
of the drain hose as instructed.
• Make sure the washer drains completely if it is turned off
by force. If you operate the washer before it has drained
completely, the washer may supply water and drain
simultaneously.
If an issue continues to occur, contact a local Samsung service center.
FlexWash_WV9900M_DC68-03768A-04_EN.indd 71 2017-05-22 7:03:37
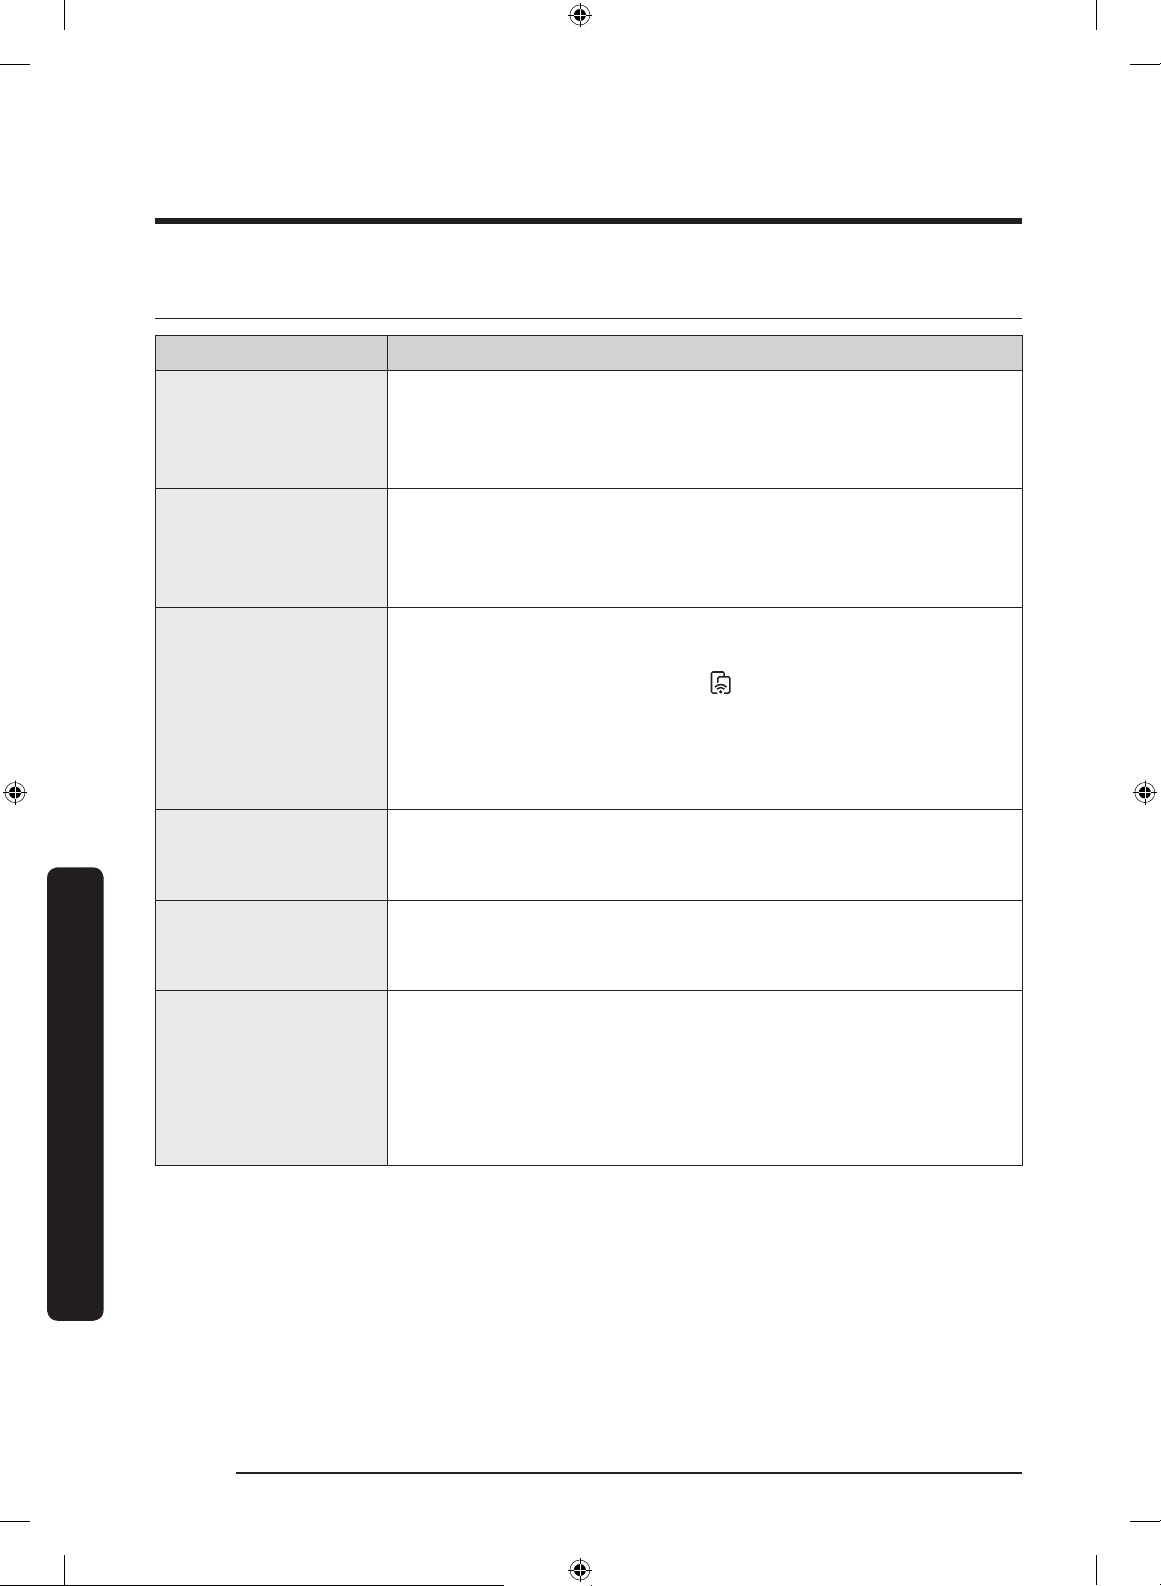
Troubleshooting
Troubleshooting
English72
Samsung Smart Home
Problem Action
I could not nd
“Samsung Smart
Home” in the app
market.
• The Samsung Smart Home app is available for smartphones
that run Android 4.0 (ICS) or higher, or iOS 7.0 or higher.
The Samsung Smart
Home app fails to
operate.
• The Samsung Smart Home app is available for applicable
models only.
• The old Samsung Smart Washer app cannot connect with
Samsung Smart Home models.
The Samsung Smart
Home app is installed
but is not connected
to my washer.
• You must log into your Samsung account to use the app.
• Make sure that your router is operating normally.
• If the Smart Control indicator
on the washer’s display
is off, this indicates that no network connection has been
established. Use the Samsung Smart Home app to connect
and register the washer with your home network access
point (AP).
Could not log into the
app.
• You must log into your Samsung account to use the app.
• If you don’t have a Samsung account, follow the app’s
onscreen instructions to create one.
An error message
appears when I try to
register my washer.
• The connection may fail due to the distance from your access
point (AP) or electrical interference from the surrounding
environment. Wait a moment and try again.
The Samsung
Smart Home app
is successfully
connected to my
washer but does not
run.
• Exit and restart the Samsung Smart Home app or unplug
your router and then reconnect it.
FlexWash_WV9900M_DC68-03768A-04_EN.indd 72 2017-05-22 7:03:37
Troubleshooting
English 73
Information codes
If the washer fails to operate, you may see an information code on the screen. Check the
table below and try the suggestions.
Code
Action
Upper
washer
Lower
washer
1 1C 1C
Check the water level sensor.
• Power off and then power the washer on after 2-3 minutes,
and then try again.
• Depending on the model, the drain system drains water
automatically. The POWER and START/PAUSE buttons may
be disabled during this process.
- DC
The door is open.
• Close the door, and then press START/PAUSE to resume
operation.
1 DC -
The top door is open.
• Close the top door, and then press START/PAUSE to resume
operation.
1 DC4 -
The protective cover is open.
• Close the protective cover, and then press START/PAUSE to
resume operation.
1 DC1 DC1
Check the door switch.
• Power off and then power the washer on after 2-3 minutes,
and then try again.
1 LC LC
Check for water leaks.
• Power the washer off, and then check the drain system for
any leaks. Once the leak issue is resolved, power the washer
on after 2-3 minutes.
• Depending on the model, the drain system drains water
automatically. The POWER and START/PAUSE buttons may
be disabled during this process.
FlexWash_WV9900M_DC68-03768A-04_EN.indd 73 2017-05-22 7:03:37
Troubleshooting
Troubleshooting
English74
Code
Action
Upper
washer
Lower
washer
1 LC1 LC1
Check the drain hose.
• Make sure the end of the drain hose is placed on the oor.
• Make sure the drain hose is not clogged.
• If the information code remains, contact a customer service
centre.
Others
• Use caution not to overll any of the compartments (main
wash/fabric softener/bleach).
• Do not spray or use water when cleaning the top door of the
upper washer. Use a cloth to wipe up.
1 4C 4C
Check the water supply line.
• Check the connection to the water line (including water
taps).
• Power off and then power the washer on after 2-3 minutes,
and then try again.
• Depending on the model, the drain system drains water
automatically. The POWER and START/PAUSE buttons may
be disabled during this process.
1 4C2 4C2
The water being supplied is too hot.
• Make sure the cold and hot water taps are properly
connected.
• Power off and then power the washer on after 2-3 minutes,
and then try again.
1 5C 5C
Check the drain system.
• Make sure the drain lter is not clogged.
• If the drain lter is clogged, clean the lter, and then restart
the washer.
1 HC HC
Check the washing heater.
• Power off the washer, and then contact a Samsung customer
service center.
FlexWash_WV9900M_DC68-03768A-04_EN.indd 74 2017-05-22 7:03:38

Troubleshooting
English 75
Code
Action
Upper
washer
Lower
washer
1 UB UB
Check the spinning process.
• The load may not be balanced inside the drum or tub. Load
is too small, or heavy items are mixed with light items.
Check the drum or tub and make sure the load is balanced.
• Avoid washing single items, adding few extra items help to
balance the load. Redistribute the load evenly.
• Press START/PAUSE to resume operation, or power off and
then power the washer on after 2-3 minutes, and then try
again.
1 8C
1 8C1
1 8C2
8C
8C1
8C2
Check the MEMS sensor.
• Power off and then power the washer on after 2-3 minutes,
and then try again.
1 OC OC
Water may overow.
• Close the water tap, and then call for service.
1 3C 3C
Check the motor.
• Power off and then power the washer on after 2-3 minutes,
and then try again.
1 AC6 AC6
Check the PBA communication status.
• Power off and then power the washer on after 2-3 minutes,
and then try again.
1 9C1
1 9C2
9C1
9C2
The electronic control needs to be checked.
• Check if power is supplied properly.
• If the information code remains, contact a Samsung service
center.
1 SF SF
System failed.
• Power off the washer, and then contact a Samsung service
center.
1 AC AC
Check communications between main and sub PBAs.
• Try powering off and restarting the cycle.
• If the information code remains, contact a customer service
center.
FlexWash_WV9900M_DC68-03768A-04_EN.indd 75 2017-05-22 7:03:38

Troubleshooting
Troubleshooting
English76
Code
Action
Upper
washer
Lower
washer
- AC7
Check communications between the lower main PBA and the
upper main PBA.
• Try powering off and restarting the cycle.
• If the information code remains, contact a customer service
center.
If any information code keeps appearing on the screen, contact a local Samsung service
center.
FlexWash_WV9900M_DC68-03768A-04_EN.indd 76 2017-05-22 7:03:38
Specications
English 77
Specications
Fabric care chart
The following symbols provide garment
care direction. The clothing care labels
include symbols for drying, bleaching,
drying and ironing, or dry cleaning when
necessary. The use of symbols ensures
consistency among garment manufacturers
of domestic and imported items. Follow
care label directions to optimize garment
life and reduce laundering problems.
Wash cycle
Normal
Permanent press / Wrinkle
resistant / Wrinkle control
Gentle / Delicates
Hand wash
Water temperature
Hot
Warm
Cold
NOTE
The temperature range for Hot is 135 °F
(57 °C) or below, 95 °F (35 °C) or below
for Warm, and 68 °F (20 °C) or below for
Cold. Wash water temperature must be a
minimum of 60 °F (16 °C) for detergent
activation and effective cleaning.
Bleach
Any bleach (when needed)
Only non-chlorine (color-safe)
bleach (when needed)
Tumble dry
Normal
Permanent press / Wrinkle
resistant / Wrinkle control
Gentle/Delicates
Special instructions
Line dry/Hang to dry
Drip dry
Dry at
Heat setting
High
Medium
Low
Any heat
No heat / Air
FlexWash_WV9900M_DC68-03768A-04_EN.indd 77 2017-05-22 7:03:39
Specications
Specications
English78
Iron dry or steam temperatures
High
Medium
Low
Warning symbols for laundering
Do not wash
Do not wring
Do not bleach
Do not tumble dry
No steam (added to iron)
Do not iron
Dry-clean
Dry-clean
Do not dry-clean
Line dry / Hang to dry
Drip dry
Dry at
Protecting the environment
• This appliance is manufactured from
recyclable materials. If you decide to
dispose of it, please observe local waste
disposal regulations. Cut off the power
cord so that the appliance cannot be
connected to a power source. Remove
the lid so that animals and small
children cannot get trapped inside the
appliance.
• Do not exceed the detergent quantities
recommended in the detergent
manufacturers’ instructions.
• Use stain removal products and
bleaches before the wash cycle only
when necessary.
• Save water and electricity by only
washing full loads (the exact amount
depends upon the program used).
Declaration of conformity
This appliance complies with UL2157.
FlexWash_WV9900M_DC68-03768A-04_EN.indd 78 2017-05-22 7:03:41
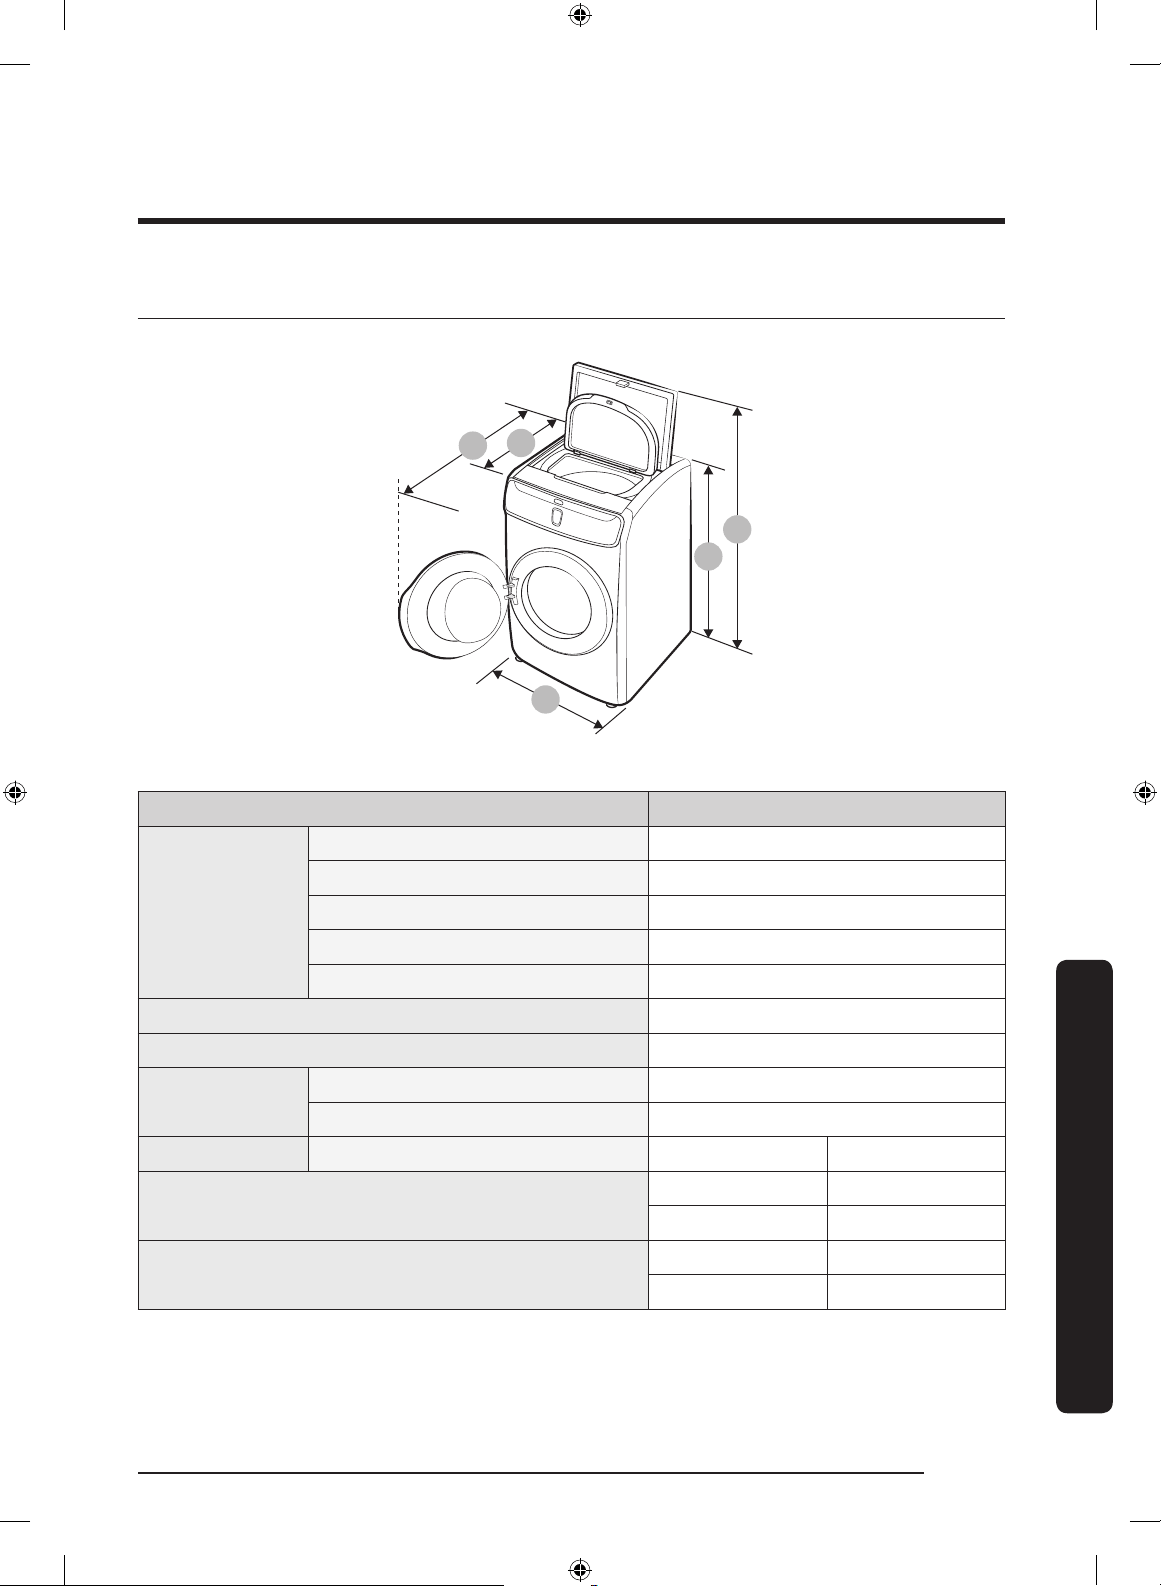
Specications
English 79
Specication sheet
A
B
C
D
E
Type Dual loading washer
Dimensions
(inches (mm))
A. Height - top door closed 46.9 in. (1192 mm)
B. Height - top door opened 61 in. (1550 mm)
C. Width 27 in. (686 mm)
D. Depth with door open 54.6 in. (1386 mm)
E. Depth 34 in. (864 mm)
Water pressure (psi (kPa)) 20 - 116 (137 - 800)
NET weight (lb (kg)) 308.6 (140)
Spin revolution
Upper washer 800 rpm
Lower washer 1300 rpm
Heater rating Washing and heating 120 V 900 W
Annual energy consumption
Upper washer 60 kWh/year
Lower washer 105 kWh/year
Annual water consumption
Upper washer 3540 gal/year
Lower washer 4278 gal/year
FlexWash_WV9900M_DC68-03768A-04_EN.indd 79 2017-05-22 7:03:41
Specications
Specications
English80
Cycle chart
Use this chart to set the best cycle and options for you laundry.
Upper washer
NOTE
Setting Temp.
: factory setting W : Warm
: can be selected C : Cold
Cycle
Functions Options
Temp.
Extra Rinse
W C
NORMAL
DELICATES
ACTIVE WEAR
RINSE+SPIN
FlexWash_WV9900M_DC68-03768A-04_EN.indd 80 2017-05-22 7:03:41
Specications
English 81
Lower washer
NOTE
Setting Temp. Rinse Spin Soil Level
: factory setting EH : Extra hot 5 : 5 times EH : Extra High EH : Extra Heavy
: can be selected H : Hot 4 : 4 times H : High H : Heavy
W : Warm 3 : 3 times M : Medium N : Noraml
CL : Cool 2 : 2 times L : Low L : Light
CD : Cold 1 : 1 times NS : No Spin EL : Extra Light
Cycle
Functions
Temp. Rinse Spin
EH H W CL CD 5 4 3 2 1 EH H M L NS
NORMAL
HEAVY DUTY
BEDDING
WHITES
SANITIZE
RINSE+SPIN
ACTIVE WEAR
DELICATES
PERM PRESS
QUICK WASH
ECO COLD
TOWELS
Self clean+
FlexWash_WV9900M_DC68-03768A-04_EN.indd 81 2017-05-22 7:03:41
Specications
Specications
English82
Cycle
Functions Options
Soil Level
Pre Soak Steam
Super
Speed
Delay End
EH H N L EL
NORMAL
HEAVY DUTY
BEDDING
WHITES
SANITIZE
RINSE+SPIN
ACTIVE WEAR
DELICATES
PERM PRESS
QUICK WASH
ECO COLD
TOWELS
Self clean+
FlexWash_WV9900M_DC68-03768A-04_EN.indd 82 2017-05-22 7:03:41

English 83
Warranty (U.S.A)
SAMSUNG WASHER
LIMITED WARRANTY TO ORIGINAL PURCHASER
This SAMSUNG brand product, as supplied and distributed by SAMSUNG ELECTRONICS
AMERICA, INC. (SAMSUNG) and delivered new, in the original carton to the original
consumer purchaser, is warranted by SAMSUNG against manufacturing defects in
materials and workmanship for a limited warranty period of:
One (1) year part and labor, Three (3) years stainless tub part (Part Only), Ten (10) years
washing DD motor part (Part Only)
This limited warranty begins on the original date of purchase, and is valid only on
products purchased and used in the United States. To receive warranty service, the
purchaser must contact SAMSUNG for problem determination and service procedures.
Warranty service can only be performed by a SAMSUNG authorized service center.
The original dated bill of sale must be presented upon request as proof of purchase to
SAMSUNG or SAMSUNG’s authorized service center. SAMSUNG will provide in-home
service during the warranty period at no charge, subject to availability within the
contiguous United States. In-home service is not available in all areas.
To receive in-home service, product must be unobstructed and accessible to the service
agent. If service is not available, SAMSUNG may elect to provide transportation of the
product to and from an authorized service center.
FlexWash_WV9900M_DC68-03768A-04_EN.indd 83 2017-05-22 7:03:41

Warranty (U.S.A)
English84
SAMSUNG will repair, replace, or refund this product at our option and at no charge as
stipulated herein, with new or reconditioned parts or products if found to be defective
during the limited warranty period specied above. All replaced parts and products
become the property of SAMSUNG and must be returned to SAMSUNG. Replacement parts
and products assume the remaining original warranty, or ninety (90) days, whichever is
longer.This limited warranty covers manufacturing defects in materials and workmanship
encountered in normal, noncommercial use of this product and shall not apply to the
following: damage that occurs in shipment; delivery and installation; applications and
uses for which this product was not intended; altered product or serial numbers; cosmetic
damage or exterior nish; accidents, abuse, neglect, re, water, lightning, or other acts
of nature or God; use of products, equipment, systems, utilities, services, parts, supplies,
accessories, applications, installations, repairs, external wiring or connectors not supplied
or authorized by SAMSUNG that damage this product or result in service problems;
incorrect electrical line voltage, uctuations and surges; customer adjustments and
failure to follow operating instructions, maintenance and environmental instructions that
are covered and prescribed in the instruction book; product removal and reinstallation;
problems caused by pest infestations. This limited warranty does not cover problems
resulting from incorrect electric current, voltage or supply, light bulbs, house fuses, house
wiring, cost of a service call for instructions, or xing installation errors. SAMSUNG does
not warrant uninterrupted or error-free operation of the product.
EXCEPT AS SET FORTH HEREIN, THERE ARE NO WARRANTIES ON THIS PRODUCT EITHER
EXPRESS OR IMPLIED, AND SAMSUNG DISCLAIMS ALL WARRANTIES INCLUDING, BUT
NOT LIMITED TO, ANY IMPLIED WARRANTIES OF MERCHANTABILITY, INFRINGEMENT OR
FITNESS FOR A PARTICULAR PURPOSE.
FlexWash_WV9900M_DC68-03768A-04_EN.indd 84 2017-05-22 7:03:41
English 85
NO WARRANTY OR GUARANTEE GIVEN BY ANY PERSON, FIRM, OR CORPORATION WITH
RESPECT TO THIS PRODUCT SHALL BE BINDING ON SAMSUNG. SAMSUNG SHALL NOT BE
LIABLE FOR LOSS OF REVENUE OR PROFITS, FAILURE TO REALIZE SAVINGS OR OTHER
BENEFITS, OR ANY OTHER SPECIAL, INCIDENTAL OR CONSEQUENTIAL DAMAGES CAUSED
BY THE USE, MISUSE, OR INABILITY TO USE THIS PRODUCT, REGARDLESS OF THE LEGAL
THEORY ON WHICH THE CLAIM IS BASED, AND EVEN IF SAMSUNG HAS BEEN ADVISED OF
THE POSSIBILITY OF SUCH DAMAGES.
NOR SHALL RECOVERY OF ANY KIND AGAINST SAMSUNG BE GREATER IN AMOUNT THAN
THE PURCHASE PRICE OF THE PRODUCT SOLD BY SAMSUNG AND CAUSING THE ALLEGED
DAMAGE. WITHOUT LIMITING THE FOREGOING, PURCHASER ASSUMES ALL RISK AND
LIABILITY FOR LOSS, DAMAGE, OR INJURY TO PURCHASER AND PURCHASER’S PROPERTY
AND TO OTHERS AND THEIR PROPERTY ARISING OUT OF THE USE, MISUSE, OR INABILITY
TO USE THIS PRODUCT. THIS LIMITED WARRANTY SHALL NOT EXTEND TO ANYONE OTHER
THAN THE ORIGINAL PURCHASER OF THIS PRODUCT, IS NONTRANSFERABLE AND STATES
YOUR EXCLUSIVE REMEDY.
Some states do not allow limitations on how long an implied warranty lasts, or the
exclusion or limitation of incidental or consequential damages, so the above limitations
or exclusions may not apply to you. This warranty gives you specic rights, and you may
also have other rights, which vary from state to state.
To obtain warranty service, please contact SAMSUNG at:
Samsung Electronics America, Inc.
85 Challenger Road
Ridgeeld Park, NJ 07660
1-800-SAMSUNG (726-7864)
www.samsung.com/us/support
Visits by a Service Engineer to explain functions, maintenance, or installation are not
covered by warranty.
Please contact the Samsung call center for help with any of these issues.
FlexWash_WV9900M_DC68-03768A-04_EN.indd 85 2017-05-22 7:03:42

English86
Warranty (CANADA)
SAMSUNG WASHER
LIMITED WARRANTY TO ORIGINAL PURCHASER
This SAMSUNG brand product, as supplied and distributed by SAMSUNG ELECTRONICS
CANADA, INC. (SAMSUNG) and delivered new, in the original carton to the original
consumer purchaser, is warranted by SAMSUNG against manufacturing defects in
materials and workmanship for a limited warranty period of:
One (1) year part and labor, Ten (10) years washing DD motor (Part only)
This limited warranty begins on the original date of purchase, and is valid only on
products purchased and used in the Canada. To receive warranty service, the purchaser
must contact SAMSUNG for problem determination and service procedures. Warranty
service can only be performed by a SAMSUNG authorized service center. The original
dated bill of sale must be presented upon request as proof of purchase to SAMSUNG or
SAMSUNG’s authorized service center. SAMSUNG will provide in-home service during the
warranty period at no charge, subject to availability within the Canada. In-home service is
not available in all areas.
To receive in-home service, product must be unobstructed and accessible to the service
agent. If service is not available, SAMSUNG may elect to provide transportation of the
product to and from an authorized service center.
FlexWash_WV9900M_DC68-03768A-04_EN.indd 86 2017-05-22 7:03:42

English 87
SAMSUNG will repair, replace, or refund this product at our option and at no charge as
stipulated herein, with new or reconditioned parts or products if found to be defective
during the limited warranty period specied above. All replaced parts and products
become the property of SAMSUNG and must be returned to SAMSUNG. Replacement parts
and products assume the remaining original warranty, or ninety (90) days, whichever is
longer.This limited warranty covers manufacturing defects in materials and workmanship
encountered in normal, noncommercial use of this product and shall not apply to the
following: damage that occurs in shipment; delivery and installation; applications and
uses for which this product was not intended; altered product or serial numbers; cosmetic
damage or exterior nish; accidents, abuse, neglect, re, water, lightning, or other acts
of nature or God; use of products, equipment, systems, utilities, services, parts, supplies,
accessories, applications, installations, repairs, external wiring or connectors not supplied
or authorized by SAMSUNG that damage this product or result in service problems;
incorrect electrical line voltage, uctuations and surges; customer adjustments and
failure to follow operating instructions, maintenance and environmental instructions that
are covered and prescribed in the instruction book; product removal and reinstallation;
problems caused by pest infestations. This limited warranty does not cover problems
resulting from incorrect electric current, voltage or supply, light bulbs, house fuses, house
wiring, cost of a service call for instructions, or xing installation errors. SAMSUNG does
not warranty uninterrupted or error-free operation of the product.
EXCEPT AS SET FORTH HEREIN, THERE ARE NO WARRANTIES ON THIS PRODUCT EITHER
EXPRESS OR IMPLIED, AND SAMSUNG DISCLAIMS ALL WARRANTIES INCLUDING, BUT
NOT LIMITED TO, ANY IMPLIED WARRANTIES OF MERCHANTABILITY, INFRINGEMENT OR
FITNESS FOR A PARTICULAR PURPOSE.
FlexWash_WV9900M_DC68-03768A-04_EN.indd 87 2017-05-22 7:03:42

Warranty (CANADA)
English88
NO WARRANTY OR GUARANTEE GIVEN BY ANY PERSON, FIRM, OR CORPORATION WITH
RESPECT TO THIS PRODUCT SHALL BE BINDING ON SAMSUNG. SAMSUNG SHALL NOT BE
LIABLE FOR LOSS OF REVENUE OR PROFITS, FAILURE TO REALIZE SAVINGS OR OTHER
BENEFITS, OR ANY OTHER SPECIAL, INCIDENTAL OR CONSEQUENTIAL DAMAGES CAUSED
BY THE USE, MISUSE, OR INABILITY TO USE THIS PRODUCT, REGARDLESS OF THE LEGAL
THEORY ON WHICH THE CLAIM IS BASED, AND EVEN IF SAMSUNG HAS BEEN ADVISED OF
THE POSSIBILITY OF SUCH DAMAGES.
NOR SHALL RECOVERY OF ANY KIND AGAINST SAMSUNG BE GREATER IN AMOUNT THAN
THE PURCHASE PRICE OF THE PRODUCT SOLD BY SAMSUNG AND CAUSING THE ALLEGED
DAMAGE. WITHOUT LIMITING THE FOREGOING, PURCHASER ASSUMES ALL RISK AND
LIABILITY FOR LOSS, DAMAGE, OR INJURY TO PURCHASER AND PURCHASER’S PROPERTY
AND TO OTHERS AND THEIR PROPERTY ARISING OUT OF THE USE, MISUSE, OR INABILITY
TO USE THIS PRODUCT. THIS LIMITED WARRANTY SHALL NOT EXTEND TO ANYONE OTHER
THAN THE ORIGINAL PURCHASER OF THIS PRODUCT, IS NONTRANSFERABLE AND STATES
YOUR EXCLUSIVE REMEDY.
Some provinces do not allow limitations on how long an implied warranty lasts, or the
exclusion or limitation of incidental or consequential damages, so the above limitations or
exclusions may not apply to you.
This warranty gives you specic rights, and you may also have other rights, which vary
from province to province.
To obtain warranty service, please contact SAMSUNG at:
Samsung Electronics Canada Inc.
2050 Derry Road West,
Mississauga, Ontario L5N 0B9 Canada
1-800-SAMSUNG (726-7864)
www.samsung.com/ca/support (English)
www.samsung.com/ca_fr/support (French)
FAX : 1-866-436-4617
Visits by a Service Engineer to explain functions, maintenance, or installation are not
covered by warranty.
Please contact the Samsung call center for help with any of these issues.
FlexWash_WV9900M_DC68-03768A-04_EN.indd 88 2017-05-22 7:03:42

Memo
English 89
FlexWash_WV9900M_DC68-03768A-04_EN.indd 89 2017-05-22 7:03:42

Memo
English90
FlexWash_WV9900M_DC68-03768A-04_EN.indd 90 2017-05-22 7:03:42

Memo
English 91
FlexWash_WV9900M_DC68-03768A-04_EN.indd 91 2017-05-22 7:03:42
Scan this with your smartphone
QUESTIONS OR COMMENTS?
COUNTRY CALL OR VISIT US ONLINE AT
U.S.A
- Consumer
Electronics
- Mobile
Phones
1-800-SAMSUNG (726-7864)
1-844-SAM-PAYS (726-7297)
www.samsung.com/us/support
CANADA
1-800-SAMSUNG(726-7864)
1-844-SAM-PAYS (726-7297)
www.samsung.com/ca/support (English)
www.samsung.com/ca_fr/support (French)
DC68-03768A-04
FlexWash_WV9900M_DC68-03768A-04_EN.indd 92 2017-05-22 7:03:42

FlexWash™
Manuel d'utilisation
WV60M9900A*
FlexWash_WV9900M_DC68-03768A-04_CFR.indd 1 2017-05-22 7:07:22

Sommaire
Français2
Sommaire
Consignes de sécurité 4
Remarques importantes sur les consignes de sécurité 4
Symboles de sécurité importants 4
Consignes de sécurité importantes 5
Avertissements importants concernant l'installation 6
Mises en garde pour l'installation 8
Avertissements importants concernant l'utilisation 8
Mises en garde concernant l'utilisation 10
Avertissements importants concernant le nettoyage 14
Notication de réglementation 15
Installation 18
Déballage de votre lave-linge 18
Ce qui est inclus 19
Conditions d'installation 21
Installation étape par étape 25
Avant de démarrer 35
Réglages initiaux 35
Instructions de lavage 35
Guide relatif aux produits de nettoyage 38
Opérations 43
Partie supérieure du lave-linge 43
Partie inférieure du lave-linge 45
Étapes simples pour commencer 50
Samsung Smart Home 51
Fonctions spéciales 53
Maintenance 56
Informations générales 56
Partie supérieure du lave-linge 59
Partie inférieure du lave-linge 61
FlexWash_WV9900M_DC68-03768A-04_CFR.indd 2 2017-05-22 7:07:22

Sommaire
Français 3
Dépannage 67
Contrôles à effectuer 67
Samsung Smart Home 72
Codes d'information 73
Caractéristiques techniques 77
Tableau des symboles textiles 77
Protection de l'environnement 78
Déclaration de conformité 78
Fiche de caractéristiques techniques 79
Tableau des cycles 80
FlexWash_WV9900M_DC68-03768A-04_CFR.indd 3 2017-05-22 7:07:22
Consignes de sécurité
CONSERVEZ SOIGNEUSEMENT CES CONSIGNES
Français4
Consignes de sécurité
Félicitations pour l'achat de votre nouveau lave-linge Samsung. Ce manuel contient de précieuses
informations concernant l'installation, l'utilisation et l'entretien de votre appareil. Prenez le temps de le
lire an de tirer pleinement prot de tous les avantages et les fonctionnalités qu'offre votre lave-linge.
Remarques importantes sur les consignes de sécurité
Veuillez lire attentivement ce manuel an d'utiliser efcacement votre appareil en toute sécurité
et de proter pleinement de toutes ses fonctionnalités. Conservez ce manuel dans un endroit
sûr situé à proximité de l'appareil an de pouvoir facilement vous y reporter en cas de besoin.
N'utilisez pas cet appareil autrement que pour l'usage auquel il est destiné, conformément aux
consignes de ce manuel.
Les consignes de sécurité et les avertissements décrits dans ce manuel ne sont pas exhaustifs. Il
est de votre responsabilité de faire preuve de bon sens, de prudence et de discernement lors de
l'installation, de l'entretien ou de l'utilisation de votre lave-linge.
Ces consignes d'utilisation couvrant plusieurs modèles, il se peut que les caractéristiques de
votre lave-linge diffèrent légèrement de celles décrites dans ce manuel ; ainsi, certaines icônes
d'avertissement peuvent ne pas s'appliquer à votre lave-linge. Pour toute question ou doute,
contactez votre centre de service le plus proche ou connectez-vous sur www.samsung.com.
Symboles de sécurité importants
Signication des icônes et signes repris dans ce manuel d'utilisation :
AVERTISSEMENT
Risques ou pratiques inadaptées susceptibles de causer des blessures graves, la mort et/ou des
dommages matériels.
ATTENTION
Risques ou pratiques inadaptées susceptibles de causer des blessures et/ou des dommages matériels.
REMARQUE
Indique la présence d'un risque de blessures ou de dommages matériels.
Ces symboles d'avertissement ont pour but d'éviter tout risque de blessure corporelle, pour vous
ou d'autres personnes.
Respectez-les en toutes circonstances.
Lisez attentivement ce manuel et conservez-le en lieu sûr an de pouvoir le consulter
ultérieurement.
Lisez attentivement toutes les consignes avant d'utiliser l'appareil.
Comme avec tout équipement électrique ou comportant des parties mobiles, il existe un certain
nombre de dangers potentiels. Pour utiliser cet appareil en toute sécurité, familiarisez-vous avec
son fonctionnement et restez prudent lorsque vous l'employez.
FlexWash_WV9900M_DC68-03768A-04_CFR.indd 4 2017-05-22 7:07:22

Consignes de sécurité
CONSERVEZ SOIGNEUSEMENT CES CONSIGNESCONSERVEZ SOIGNEUSEMENT CES CONSIGNES
Français 5
Consignes de sécurité importantes
AVERTISSEMENT
An de réduire les risques d'incendie, d'électrocution ou de blessures
physiques lors de l'utilisation de l'appareil, des précautions de base doivent
être prises :
1. Lisez attentivement toutes les consignes avant d'utiliser l'appareil.
2. Ne lavez et ne faites sécher aucun article ayant été en contact de quelque manière que ce soit
(nettoyage, lavage, trempage ou tache) avec de l'essence, des solvants de nettoyage à sec ou
toute autre substance inammable ou explosive. Ces substances dégagent en effet des vapeurs
qui risquent de s'enammer ou d'exploser.
3. Ne laissez pas les enfants jouer sur ou dans l'appareil. Une surveillance attentive s'impose
lorsque l'appareil est utilisé à proximité d'enfants.
4. Avant la mise hors service ou au rebut de l'appareil, retirez le hublot du compartiment de
lavage ou de séchage.
5. Ne tentez pas d'ouvrir l'appareil lorsque le tambour est en mouvement.
6. N'installez et n'entreposez jamais cet appareil dans un endroit exposé aux intempéries.
7. Ne jouez pas avec les commandes de l'appareil.
8. Ne procédez pas à la réparation ou au remplacement des pièces de l'appareil et ne tentez pas
non plus de le réparer vous-même, sauf si le manuel d'entretien ou de réparation contient des
recommandations spéciques en la matière que vous comprenez et êtes en mesure d'exécuter.
9. N'ajoutez jamais d'essence, de solvant de nettoyage à sec ou d'autres substances inammables
ou explosives dans l'eau du lave-linge. Ces substances dégagent en effet des vapeurs qui
risquent de s'enammer ou d'exploser.
10. Dans certaines conditions, de l'hydrogène peut être dégagé dans les systèmes d'eau chaude
qui n'ont pas été utilisés depuis au moins 2 semaines. L'HYDROGÈNE EST UN GAZ EXPLOSIF.
Si votre système d'eau chaude n'a pas été utilisé pendant au moins deux semaines, ouvrez
tous les robinets d'eau chaude de votre maison et laissez l'eau couler plusieurs minutes avant
d'utiliser votre lave-linge ou votre lave-linge/sèche linge combinés. Cela permettra d'éliminer
l'éventuelle accumulation d'hydrogène. L'hydrogène étant un gaz inammable ; ne fumez pas
et ne créez aucune amme ni étincelle pendant cette opération.
FlexWash_WV9900M_DC68-03768A-04_CFR.indd 5 2017-05-22 7:07:22

Consignes de sécurité
CONSERVEZ SOIGNEUSEMENT CES CONSIGNES
Consignes de sécurité
CONSERVEZ SOIGNEUSEMENT CES CONSIGNES
Français6
Avertissements importants concernant l'installation
Avertissement concernant la proposition 65 de l'État de la
Californie (États-Unis uniquement)
Cet appareil contient des produits chimiques connus de l'État de la
Californie pour causer le cancer et des anomalies congénitales ou des
effets nocifs sur la reproduction.
L'installation de cet appareil doit être effectuée par un technicien ou un centre de service qualié.
• Le non-respect de cette consigne peut entraîner une électrocution, un incendie, une explosion,
des problèmes avec l'appareil ou des blessures.
Cet appareil étant très lourd ; prenez toutes les précautions nécessaires pour le soulever.
Branchez le cordon d'alimentation à une prise murale qui respecte les caractéristiques techniques
électriques locales. Utilisez la prise uniquement pour cet appareil et n'utilisez pas de rallonge.
• Le fait de partager une prise murale avec d'autres appareils à l'aide d'une multiprise ou d'une
rallonge peut entraîner des chocs électriques ou des incendies.
• Assurez-vous que la tension, la fréquence et le courant alimentant le lave-linge sont identiques
à ceux inscrits sur les caractéristiques techniques de l'appareil. Le non-respect de cette
consigne peut entraîner une électrocution ou un incendie. Branchez fermement la che
d'alimentation dans la prise murale.
Cet appareil doit être installé par un technicien qualié ou un centre de réparation agréé.
• Le non-respect de cette consigne peut entraîner des chocs électriques, des incendies, une
explosion, des problèmes avec le produit ou des blessures.
Éliminez régulièrement toute eau, poussière ou corps étranger au niveau des prises murales et
zones de contact à l'aide d'un chiffon sec.
• Débranchez la che d'alimentation et nettoyez-la à l'aide d'un chiffon sec.
• Le non-respect de cette consigne peut entraîner une électrocution ou un incendie.
Branchez la che d'alimentation dans la prise murale de sorte que le cordon pende en direction
du sol.
• Si vous branchez la che d'alimentation sur la prise dans l'autre sens, les ls électriques à
l'intérieur du câble peuvent être endommagés, entraînant un risque d'électrocution ou d'incendie.
Conservez tous les matériaux d'emballage hors de la portée des enfants car ils pourraient être
dangereux.
• Un enfant risque de s'étouffer s'il se met un sac plastique sur la tête.
FlexWash_WV9900M_DC68-03768A-04_CFR.indd 6 2017-05-22 7:07:22

Consignes de sécurité
CONSERVEZ SOIGNEUSEMENT CES CONSIGNESCONSERVEZ SOIGNEUSEMENT CES CONSIGNES
Français 7
Si la che d'alimentation, le cordon d'alimentation ou l'appareil est endommagé(e), contactez le
centre de service Samsung le plus proche.
Cet appareil doit être correctement mis à la terre.
Ne reliez pas le conducteur de terre de l'appareil à un tuyau de gaz, un conduit d'eau en plastique
ou une ligne téléphonique.
• Cela présenterait des risques d'électrocution, d'incendie, d'explosion ou de dysfonctionnement.
• Ne branchez jamais le cordon d'alimentation sur une prise qui n'est pas correctement mise à la
terre. Assurez-vous que la prise est conforme aux normes locales et nationales.
N'installez jamais cet appareil près d'un radiateur ou de matériaux inammables.
N'installez pas cet appareil dans un endroit humide, huileux ou poussiéreux, dans un endroit
exposé directement au soleil ou à l'eau (de pluie).
N'installez pas cet appareil dans une pièce exposée à de basses températures.
• Le gel risquerait de faire éclater les tuyaux.
N'installez pas l'appareil dans un lieu où une fuite de gaz est susceptible de se produire.
• Cela pourrait entraîner une électrocution ou un incendie.
N'utilisez pas de transformateur électrique pour alimenter le lave-linge.
• Cela pourrait entraîner une électrocution ou un incendie.
N'utilisez pas de prise ou de cordon d'alimentation endommagé(e) ou de prise murale mal xée.
Cela pourrait entraîner une électrocution ou un incendie.
Ne tirez pas et ne pliez pas excessivement le cordon d'alimentation.
Ne vrillez pas et n'attachez pas le cordon d'alimentation.
N'accrochez pas le cordon d'alimentation sur un objet métallique, ne posez pas d'objet lourd sur
le cordon d'alimentation, ne l'insérez pas entre des objets et ne le coincez pas dans l'espace situé
derrière l'appareil.
• Cela pourrait entraîner une électrocution ou un incendie.
Ne tirez pas sur le cordon d'alimentation pour le débrancher.
• Débranchez le cordon en tirant la prise.
• Le non-respect de cette consigne peut entraîner une électrocution ou un incendie.
L'appareil doit être positionné de telle manière que la prise de courant, les robinets d'arrivée
d'eau et les tuyaux d'évacuation restent accessibles en permanence.
FlexWash_WV9900M_DC68-03768A-04_CFR.indd 7 2017-05-22 7:07:23

Consignes de sécurité
CONSERVEZ SOIGNEUSEMENT CES CONSIGNES
Consignes de sécurité
CONSERVEZ SOIGNEUSEMENT CES CONSIGNES
Français8
Mises en garde pour l'installation
ATTENTION
Cet appareil doit être positionné de façon à permettre l'accès à la prise d'alimentation.
• Le non-respect de cette consigne peut entraîner une électrocution en cas de fuites de courant.
Installez l'appareil sur un sol plan et solide, capable de supporter son poids.
• Le non-respect de cette consigne peut entraîner des vibrations, des mouvements et des bruits
anormaux ou des problèmes avec l'appareil.
Avertissements importants concernant l'utilisation
AVERTISSEMENT
En cas d'inondation, coupez immédiatement l'alimentation en eau et l'alimentation électrique et
contactez votre centre de service Samsung le plus proche.
• Ne touchez pas la prise d'alimentation avec des mains mouillées.
• Vous risqueriez de vous électrocuter.
Si l'appareil émet des bruit anormaux ou dégage une odeur de brûlé ou de la fumée, débranchez-
le immédiatement et contactez votre centre de service Samsung le plus proche.
• Le non-respect de cette consigne peut entraîner une électrocution ou un incendie.
En cas de fuite de gaz (propane, gaz LP, etc.) aérez immédiatement la pièce sans toucher à la prise
d'alimentation. Ne touchez pas l'appareil ou le cordon d'alimentation.
• N'utilisez pas de ventilateur. N'allumez pas d'ampoules.
• Une étincelle peut entraîner une explosion ou un incendie.
Ne laissez pas les enfants jouer sur ou dans le lave-linge. Avant de vous débarrasser de votre
lave-linge, démontez-en le hublot
• Les enfants peuvent s'étouffer s'ils se retrouvent coincés à l'intérieur de l'appareil.
Assurez-vous de retirer l'emballage (mousse, polystyrène) xé au bas du lave-linge avant
d'utiliser celui-ci.
Ne lavez jamais de linge ayant été en contact avec de l'essence, du kérosène, du benzène, des
diluants de peinture ou toute autre substance inammable ou explosive.
• Risque d'électrocution, d'incendie ou d'explosion.
FlexWash_WV9900M_DC68-03768A-04_CFR.indd 8 2017-05-22 7:07:23

Consignes de sécurité
CONSERVEZ SOIGNEUSEMENT CES CONSIGNESCONSERVEZ SOIGNEUSEMENT CES CONSIGNES
Français 9
Ne forcez pas l'ouverture du hublot pendant le fonctionnement de l'appareil (lavage à haute
température/séchage/essorage).
• Une fuite peut entraîner des brûlures ou rendre le sol glissant. Cela pourrait entraîner des
blessures.
• L'ouverture forcée du hublot peut entraîner des dommages sur l'appareil et des blessures.
N'insérez pas votre main sous le lave-linge lorsque la machine est en cours de fonctionnement.
• Cela pourrait entraîner des blessures.
Ne touchez pas la prise d'alimentation avec des mains mouillées.
• Cela pourrait entraîner une électrocution.
Ne faites pas fonctionner l'appareil avec des mains mouillées.
• Cela pourrait entraîner une électrocution.
Ne débranchez pas l'appareil si celui-ci est en cours de fonctionnement.
• Le fait de rebrancher la prise d'alimentation dans la prise murale peut provoquer une étincelle
et entraîner une électrocution ou un incendie.
Ne laissez pas les enfants ou les personnes handicapées utiliser ce lave-linge sans une
surveillance adéquate. Ne laissez pas les enfants monter dans ou sur l'appareil.
• Cela pourrait entraîner une électrocution, des brûlures ou des blessures.
N'insérez pas votre main ou un objet métallique sous le lave-linge pendant son fonctionnement.
• Cela pourrait entraîner des blessures.
Ne débranchez pas l'appareil en tirant le cordon d'alimentation. Tenez toujours fermement la prise
et tirez-la tout droit de la prise murale.
• Un cordon d'alimentation endommagé risque de provoquer un court-circuit, un incendie ou une
électrocution.
Ne tentez pas de réparer, de démonter ou de modier l'appareil vous-même.
• N'utilisez pas de fusible (cuivre, l d'acier, etc.) autres que le fusible standard.
• Si l'appareil doit être réparé ou réinstallé, contactez votre centre de service Samsung le plus
proche.
• Le non-respect de cette consigne peut entraîner une électrocution, un incendie, des problèmes
avec le produit ou des blessures.
Si le tuyau d'arrivée d'eau se déconnecte du robinet et inonde l'appareil, débranchez le lave-linge.
• Le non-respect de cette consigne peut entraîner une électrocution ou un incendie.
FlexWash_WV9900M_DC68-03768A-04_CFR.indd 9 2017-05-22 7:07:23

Consignes de sécurité
CONSERVEZ SOIGNEUSEMENT CES CONSIGNES
Consignes de sécurité
CONSERVEZ SOIGNEUSEMENT CES CONSIGNES
Français10
Débranchez la prise d'alimentation lorsque l'appareil n'est pas utilisé pendant des périodes
prolongées ou lors d'orages violents.
• Le non-respect de cette consigne peut entraîner une électrocution ou un incendie.
Si une substance étrangère pénètre dans l'appareil, débranchez-le et contactez le centre de
service Samsung le plus proche.
• Cela pourrait entraîner une électrocution ou un incendie.
Ne laissez pas les enfants (ou les animaux domestiques) jouer sur ou dans votre lave-linge. Le
hublot du lave-linge ne s'ouvre pas facilement de l'intérieur ; un enfant peut donc se blesser
gravement s'il est enfermé dans l'appareil.
Mises en garde concernant l'utilisation
ATTENTION
Si le lave-linge est contaminé par des corps étrangers (ex. : détergent, saletés, déchets
alimentaires etc.), débranchez-le et nettoyez-le à l'aide d'un chiffon doux humide.
• À défaut, une décoloration, une déformation, des dommages ou de la rouille peuvent
apparaître.
La vitre du hublot (ou couvercle) peut être endommagée en cas d'impact important. Utilisez le
lave-linge avec précaution.
• Si la vitre du hublot est endommagée, il existe un risque de blessure.
Après une interruption d'arrivée d'eau ou en rebranchant le tuyau d'arrivée d'eau au robinet,
ouvrez celui-ci lentement.
Ouvrez le robinet d'arrivée d'eau lentement après une période prolongée de non-utilisation.
• La pression d'air dans le tuyau d'arrivée d'eau ou la canalisation d'eau peut entraîner des
dommages à certaines pièces ou une fuite d'eau.
En cas de vidange défaillante durant un cycle, vériez s'il y a un problème de vidange.
• En cas d'inondation (problème de vidange), il existe un risque d'électrocution ou d'incendie.
Introduisez complètement le linge dans le lave-linge an qu'il ne reste pas coincé dans le hublot.
• Si du linge reste coincé dans le hublot, il peut être endommagé, ainsi que le lave-linge, ou une
fuite d'eau peut survenir.
Coupez l'alimentation en eau lorsque le lave-linge n'est pas en cours d'utilisation.
• Assurez-vous que les raccords du tuyau d'arrivée d'eau sont correctement serrés.
FlexWash_WV9900M_DC68-03768A-04_CFR.indd 10 2017-05-22 7:07:23

Consignes de sécurité
CONSERVEZ SOIGNEUSEMENT CES CONSIGNESCONSERVEZ SOIGNEUSEMENT CES CONSIGNES
Français 11
Veillez à ce que le joint en caoutchouc et la vitre du hublot ne soient pas contaminés par des
substances étrangères (ex. : déchets, ls, cheveux, etc.).
• Si des substances étrangères sont prises dans le hublot, celui-ci ne pourra pas fermer
correctement et risque de provoquer des fuites.
Ouvrez les robinets et vériez que les raccords des tuyaux d'arrivée d'eau sont fermement serrés
et qu'il n'y a aucune fuite d'eau avant d'utiliser l'appareil.
• Si les vis sur le raccord des tuyaux d'arrivée d'eau sont desserrées, des fuites peuvent se
produire.
Le produit que vous avez acheté est prévu pour une utilisation domestique uniquement.
L'utilisation à des ns professionnelles est considérée comme une utilisation non conforme du
produit. S'il est utilisé à des ns commerciales, le produit ne sera pas couvert par la garantie
standard prévue par Samsung et Samsung ne saura en aucun cas être tenu pour responsable en
cas de dysfonctionnements ou dommages résultant d'une utilisation non conforme.
Ne montez pas sur l'appareil et ne placez pas d'objets (tels que linge, bougies allumées, cigarettes
allumées, vaisselle, produits chimiques, objets métalliques, etc.) sur l'appareil.
• Cela pourrait causer une électrocution, un incendie, des problèmes avec l'appareil ou des
blessures.
Ne pulvérisez pas de matières volatiles telles que de l'insecticide sur la surface de l'appareil.
• En plus d'être nocives pour l'être humain, elles peuvent également entraîner une électrocution,
un incendie ou des problèmes avec l'appareil.
Ne placez pas d'objets générant un champ électromagnétique à proximité du lave-linge.
• Ceci pourrait entraîner des blessures résultant de dysfonctionnements.
L'eau vidangée durant un cycle de séchage ou de lavage à haute température est chaude. Ne
touchez pas cette eau.
• Cela pourrait entraîner des brûlures ou des blessures.
Ne lavez pas, n'essorez pas et ne séchez pas de sièges, de tapis ou de vêtements imperméables
(*), sauf si votre appareil possède un cycle spécial pour ce genre d'articles.
Pour les tissus imperméables, utilisez uniquement le cycle WATERPROOF (IMPERMÉABLES).
N’utilisez aucun autre cycle pour les tissus imperméables (modèles adaptés au cycle WATERPROOF
(IMPERMÉABLES) uniquement).
FlexWash_WV9900M_DC68-03768A-04_CFR.indd 11 2017-05-22 7:07:23

Consignes de sécurité
CONSERVEZ SOIGNEUSEMENT CES CONSIGNES
Consignes de sécurité
CONSERVEZ SOIGNEUSEMENT CES CONSIGNES
Français12
(*) : Linge de lit en laine, vêtements de pluie, veste de pêche, pantalons de ski, sacs de couchage,
protections de langes, vêtements de sudation, de cyclisme, de motocyclisme, bâches automobiles,
etc.
• Ne lavez pas de tapis épais ou durs même s'ils portent le sigle lave-linge sur leur étiquette
d'entretien. Risque de vibrations anormales, de blessures ou de dégâts matériels (lave-linge,
murs, sol ou linge).
• Ne lavez pas les lingettes jetables ou les paillassons ayant des dos en caoutchouc. Les dos
en caoutchouc sont susceptibles de se détacher et d'adhérer à l'intérieur du tambour, ce qui
pourrait entraîner un dysfonctionnement tel qu'une erreur de vidange.
Ne faites jamais fonctionner le lave-linge sans le tiroir à lessive.
• Ceci pourrait entraîner une électrocution ou des blessures résultant de la fuite d'eau.
Ne touchez pas l'intérieur du tambour alors qu'il est chaud, durant ou juste après le séchage.
• Cela pourrait entraîner des brûlures.
N'insérez pas votre main dans le tiroir à lessive.
• Ceci pourrait entraîner des blessures si votre main reste bloquée par le système d'arrivée de
lessive.
• N'utilisez pas le bac à lessive liquide (sur les modèles applicables uniquement) pour de
la lessive en poudre. Retirez le bac et mettez la lessive en poudre directement dans le
compartiment de lavage principal.
Ne placez pas d'objets (tels que chaussures, déchets alimentaires, animaux) autres que du linge
dans le lave-linge.
• Ceci pourrait endommager le lave-linge ou provoquer des vibrations anormales entraînant des
blessures, voire la mort dans le cas d'animaux domestiques.
N'actionnez pas les boutons à l'aide d'objets tranchants tels que des aiguilles, des couteaux, les
ongles etc.
• Cela pourrait entraîner une électrocution ou des blessures.
Ne lavez pas de linge entré en contact avec des huiles, crèmes ou lotions utilisées dans les salons
de beauté ou de massage.
• Ceci pourrait provoquer une déformation du joint en caoutchouc, entraînant des fuites d'eau.
Ne laissez pas d'objets métalliques tels que des épingles de sûreté, à cheveux, etc. dans le
tambour pendant des périodes prolongées. Ne laissez pas d'agent de blanchiment dans le
tambour pendant des périodes prolongées.
• Ceci pourrait entraîner l'apparition de rouille sur le tambour.
FlexWash_WV9900M_DC68-03768A-04_CFR.indd 12 2017-05-22 7:07:23

Consignes de sécurité
CONSERVEZ SOIGNEUSEMENT CES CONSIGNESCONSERVEZ SOIGNEUSEMENT CES CONSIGNES
Français 13
• Si de la rouille commence à se former à la surface du tambour, appliquez un produit de
nettoyage (neutre) et frottez à l'aide d'une éponge. N'utilisez jamais de brosse métallique.
N'utilisez pas directement de solvants de nettoyage à sec et ne lavez, ne rincez et n'essorez pas
de linge entré en contact avec des solvants de nettoyage à sec.
• Risque de combustion ou d'inammation spontanée résultant de la chaleur dégagée par
l'oxydation de l'huile.
N'utilisez pas d'eau provenant d'appareils de refroidissement/de réchauffement d'eau.
• Ceci pourrait entraîner des dysfonctionnements du lave-linge.
N'utilisez pas de savon pour les mains dans le lave-linge.
• Risque de dysfonctionnement, de décoloration, d'oxydation ou de dégagement de mauvaises
odeurs.
Placez les chaussettes et les soutiens-gorge dans un let de lavage et lavez-les avec le reste du
linge.
Ne lavez pas d'articles de grande taille tels que du linge de lit dans un let de lavage.
• Dans le cas contraire, des vibrations anormales peuvent se produire et engendrer des
blessures.
• Placez les plus petits objets, tels que des chaussettes délicates et de la lingerie, dans le let de
lavage.
N'utilisez pas de détergent solidié.
• S'il s'accumule dans le lave-linge, des fuites d'eau peuvent en résulter.
Assurez-vous que toutes les poches des vêtements à laver sont vides.
• Les objets durs et pointus, comme les pièces de monnaie, les épingles de sûreté, les clous, les
vis ou les pierres, peuvent occasionner d'importants dégâts à l'appareil.
Ne lavez pas de vêtements ayant de grandes boucles, boutons ou autres parties métalliques
lourdes avec ce lave-linge.
Triez le linge par couleur en fonction de la solidité de la teinture et sélectionnez le cycle, la
température de l'eau et les fonctions supplémentaires recommandées.
• Le non-respect de cette consigne peut entraîner une décoloration ou une détérioration des
tissus.
Veillez à ce que les doigts des enfants ne soient pas pris dans le hublot lorsque vous la fermez.
• Le non-respect de cette consigne peut entraîner des blessures.
FlexWash_WV9900M_DC68-03768A-04_CFR.indd 13 2017-05-22 7:07:23

Consignes de sécurité
CONSERVEZ SOIGNEUSEMENT CES CONSIGNES
Consignes de sécurité
CONSERVEZ SOIGNEUSEMENT CES CONSIGNES
Français14
Avertissements importants concernant le nettoyage
AVERTISSEMENT
Ne nettoyez pas l'appareil en pulvérisant directement de l'eau dessus.
N'utilisez pas de produit nettoyant agressif.
N'utilisez pas de benzène, de diluant ou d'alcool pour nettoyer l'appareil.
• Cela pourrait entraîner des décolorations, des déformations, des dommages, des chocs
électriques ou un incendie.
Avant d'effectuer un nettoyage ou une opération de maintenance, débranchez le cordon
d'alimentation de la prise murale.
• Le non-respect de cette consigne peut entraîner une électrocution ou un incendie.
FlexWash_WV9900M_DC68-03768A-04_CFR.indd 14 2017-05-22 7:07:23

Notication de réglementation
CONSERVEZ SOIGNEUSEMENT CES CONSIGNES
Français 15
Notication de réglementation
Avis concernant la FCC
ATTENTION
Tous les changements ou modications non expressément approuvé(e)s par l'autorité responsable
de la conformité à la réglementation peut annuler le droit de l'utilisateur à utiliser cet appareil.
Cet appareil est conforme aux dispositions de la section 15 du règlement de la FCC. Le
fonctionnement est soumis aux deux conditions suivantes :
1. Cet appareil ne doit pas causer d'interférences nuisibles ; et
2. Cet appareil doit accepter toute autre interférence reçue, y compris les interférences pouvant
entraîner un fonctionnement non désiré.
Pour les appareils disponibles sur le marché américain/canadien, seuls les canaux 1 à 11 peuvent
être utilisés. La sélection des autres canaux est impossible.
DÉCLARATION DE LA FCC :
Cet équipement a été testé et s'est avéré conforme aux limites d'un dispositif numérique de
classe B, conformément à la section 15 du règlement de la FCC. Ces limites sont conçues pour
assurer la protection raisonnable contre des interférences nuisibles dans une installation
résidentielle.
Cet appareil génère, utilise et peut émettre de l'énergie radio électrique et, s'il n'est pas installé
et utilisé conformément aux instructions, peut provoquer des interférences nuisibles aux
communications par signal radio. Cependant, il n'y a aucune garantie que des interférences ne se
produiront pas dans une installation particulière. Si cet appareil cause des interférences nuisibles
à la réception des signaux de radio ou de télévision, ce qui peut être déterminé en allumant et
en éteignant l'appareil, l'utilisateur est encouragé à essayer de corriger l'interférence par une ou
plusieurs des mesures suivantes :
• Réorienter ou déplacer l'antenne de réception
• Espacer davantage l'appareil du récepteur
• Brancher l'équipement sur la prise d'un circuit différent que celui de la radio ou de la
télévision.
• Consulter le revendeur ou un technicien expérimenté en radio/télévision pour obtenir de l'aide.
DÉCLARATION DE LA FCC SUR L'EXPOSITION AUX RADIATIONS :
Cet appareil est conforme aux limitations prévues par la FCC pour l'exposition aux radiations
dans le cadre d'un environnement d'accès libre. Cet appareil doit être installé et utilisé avec
une distance minimale de 8 pouces (20 cm) entre le radiateur et votre corps. Ce dispositif et
son(ses) antenne(s) ne doivent pas être coimplantés ni utilisés à proximité d'une autre antenne ou
émetteur.
FlexWash_WV9900M_DC68-03768A-04_CFR.indd 15 2017-05-22 7:07:23

Notication de réglementation
CONSERVEZ SOIGNEUSEMENT CES CONSIGNES
Notication de réglementation
Français16
Notication IC
Le terme « IC » précédant le numéro d'homologation radio signie uniquement que les
spécications techniques d'Industry Canada ont été atteintes. Le fonctionnement est soumis aux
deux conditions suivantes :
1. Cet appareil ne doit pas causer d'interférences ; et
2. Cet appareil doit accepter toute autre interférence, y compris les interférences pouvant
entraîner un fonctionnement non désiré de l'appareil.
Cet appareil numérique de classe B est conforme à la norme ICES-003 canadienne.
Cet appareil numérique de classe B est conforme à la norme NMB-003 du Canada.
Pour les appareils disponibles sur le marché américain/canadien, seuls les canaux 1 à 11 peuvent
être utilisés. La sélection des autres canaux est impossible.
DÉCLARATION IC SUR L'EXPOSITION AUX RADIATIONS :
Cet appareil est conforme aux limitations prévues par la norme IC RSS-102 pour l'exposition aux
radiations dans le cadre d'un environnement d'accès libre. Cet appareil doit être installé et utilisé
avec une distance minimale de 8 pouces (20 cm) entre le radiateur et votre corps. Ce dispositif et
son(ses) antenne(s) ne doivent pas être coimplantés ni utilisés à proximité d'une autre antenne ou
émetteur.
FlexWash_WV9900M_DC68-03768A-04_CFR.indd 16 2017-05-22 7:07:23
Notication de réglementation
CONSERVEZ SOIGNEUSEMENT CES CONSIGNES
Français 17
Notication de licence de source libre
Le logiciel inclus dans cet appareil contient un logiciel de source libre (open source). Vous pouvez
vous procurer le code source complet correspondant pendant une période de trois ans après
la dernière expédition de cet appareil, en envoyant un e-mail à l'adresse mailto:oss.request@
samsung.com.
Il est également possible d'obtenir le code source complet correspondant sur un support physique,
tel qu'un CD-ROM ; des frais minimum seront facturés.
L'URL suivante http://opensource.samsung.com/opensource/SimpleConnectTP/seq/0 vous
donne accès à la page de téléchargement du code source mis à votre disposition, ainsi qu'aux
informations sur la licence de source libre (open source) relative à cet appareil. Cette offre est
valable pour toute personne ayant reçu ces informations.
FlexWash_WV9900M_DC68-03768A-04_CFR.indd 17 2017-05-22 7:07:23
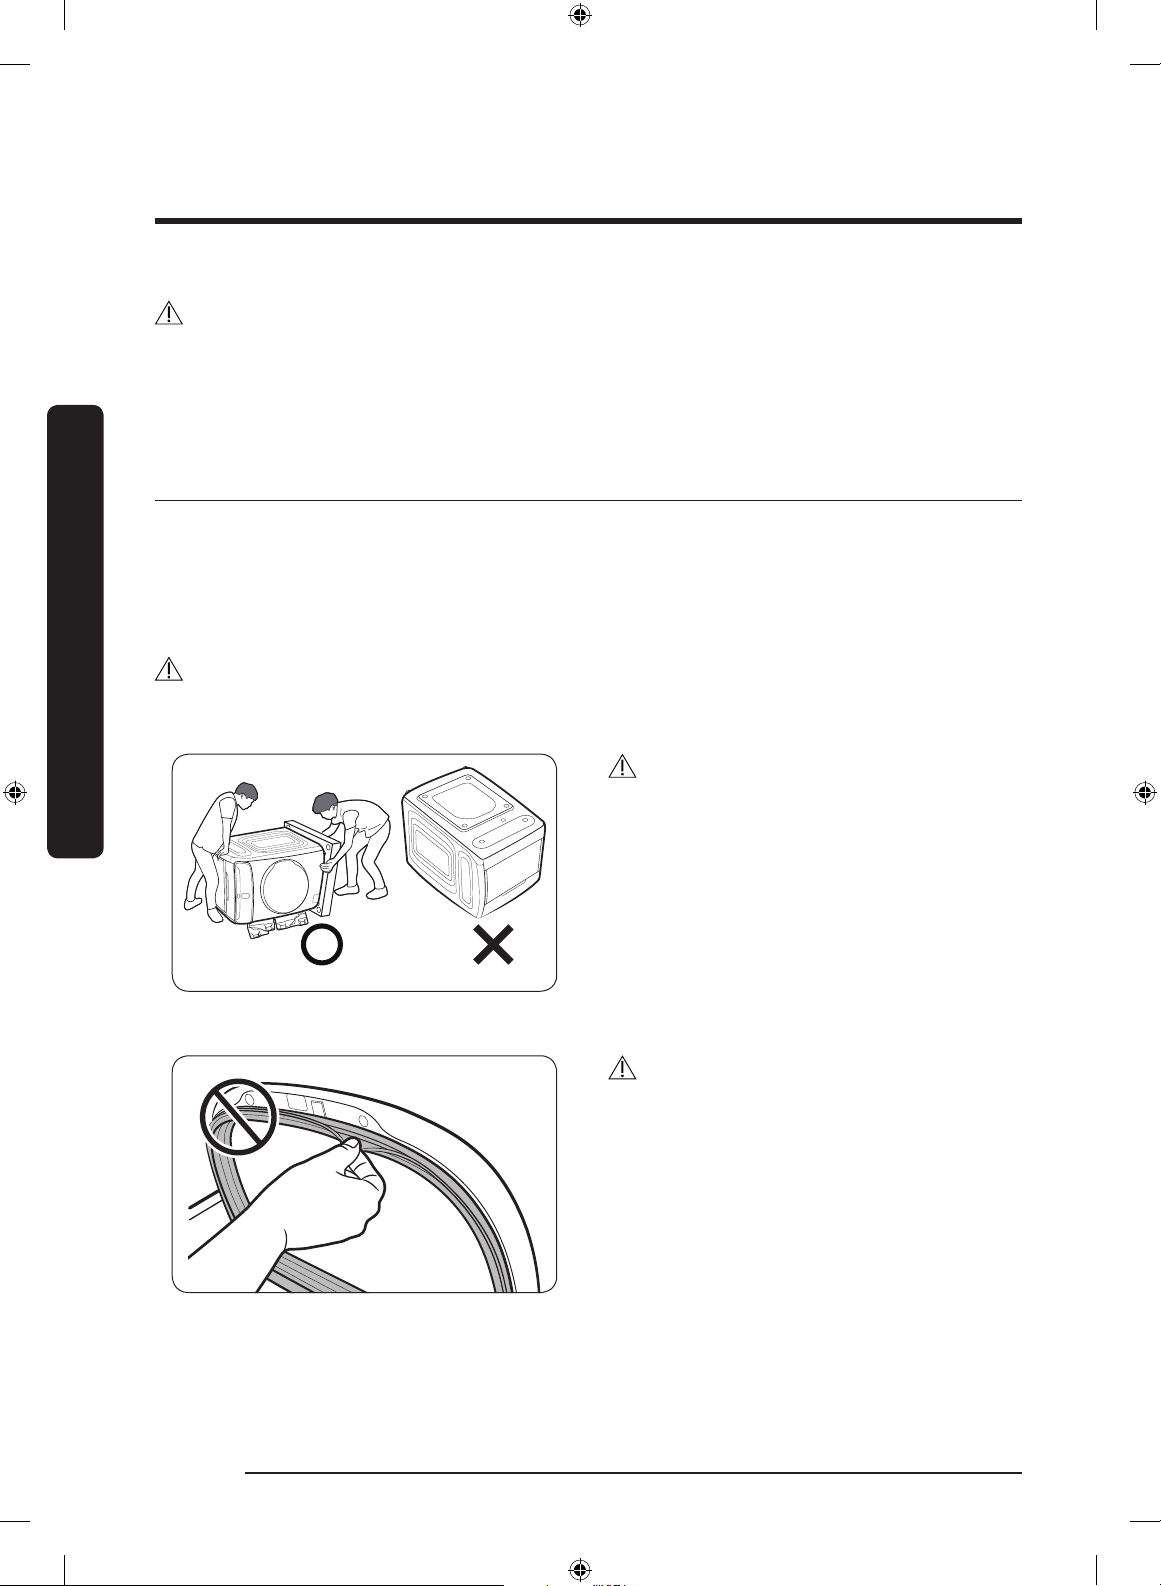
Installation
Français18
Installation
Suivez attentivement ces instructions an de garantir la bonne installation du lave-linge et
d'éviter des accidents lors de son utilisation.
AVERTISSEMENT
La mise à la terre du panneau de commande, du dissipateur thermique, du moteur, de la vanne
d'arrivée d'eau et de la pompe n'a volontairement pas été effectuée ; ces éléments peuvent donc
présenter un risque d'électrocution (lors de l'entretien uniquement).
Déballage de votre lave-linge
Déballez votre lave-linge et vériez qu'il n'a pas été endommagé pendant le transport. Vériez
que vous disposez de tous les éléments illustrés ci-dessous. Si votre lave-linge a été endommagé
pendant le transport ou si vous ne disposez pas de tous les éléments, appelez immédiatement le
1-800-SAMSUNG (1-800-726-7864). An de prévenir tout risque de blessures, munissez-vous de
gants de protection pour soulever ou porter le lave-linge.
AVERTISSEMENT
Tenez tous les matériaux d'emballage (sacs plastique, polystyrène, etc.) hors de portée des
enfants.
ATTENTION
Lors du déballage du lave-linge, il est
nécessaire d'être 2. Pour retirer le cache du
bas des matériaux d'emballage, n'inclinez pas
le lave-linge sur l'avant.
Lorsque vous couchez le lave-linge au sol pour
retirer le fond du carton, protégez le côté de
l'appareil et couchez-le avec précaution. Ne
posez jamais le lave-linge sur la façade avant
ou arrière.
ATTENTION
N'arrachez pas ou ne retirez pas le joint
d'étanchéité de la porte intérieure. Cela risque
de provoquer une fuite lors du processus de
lavage.
FlexWash_WV9900M_DC68-03768A-04_CFR.indd 18 2017-05-22 7:07:23
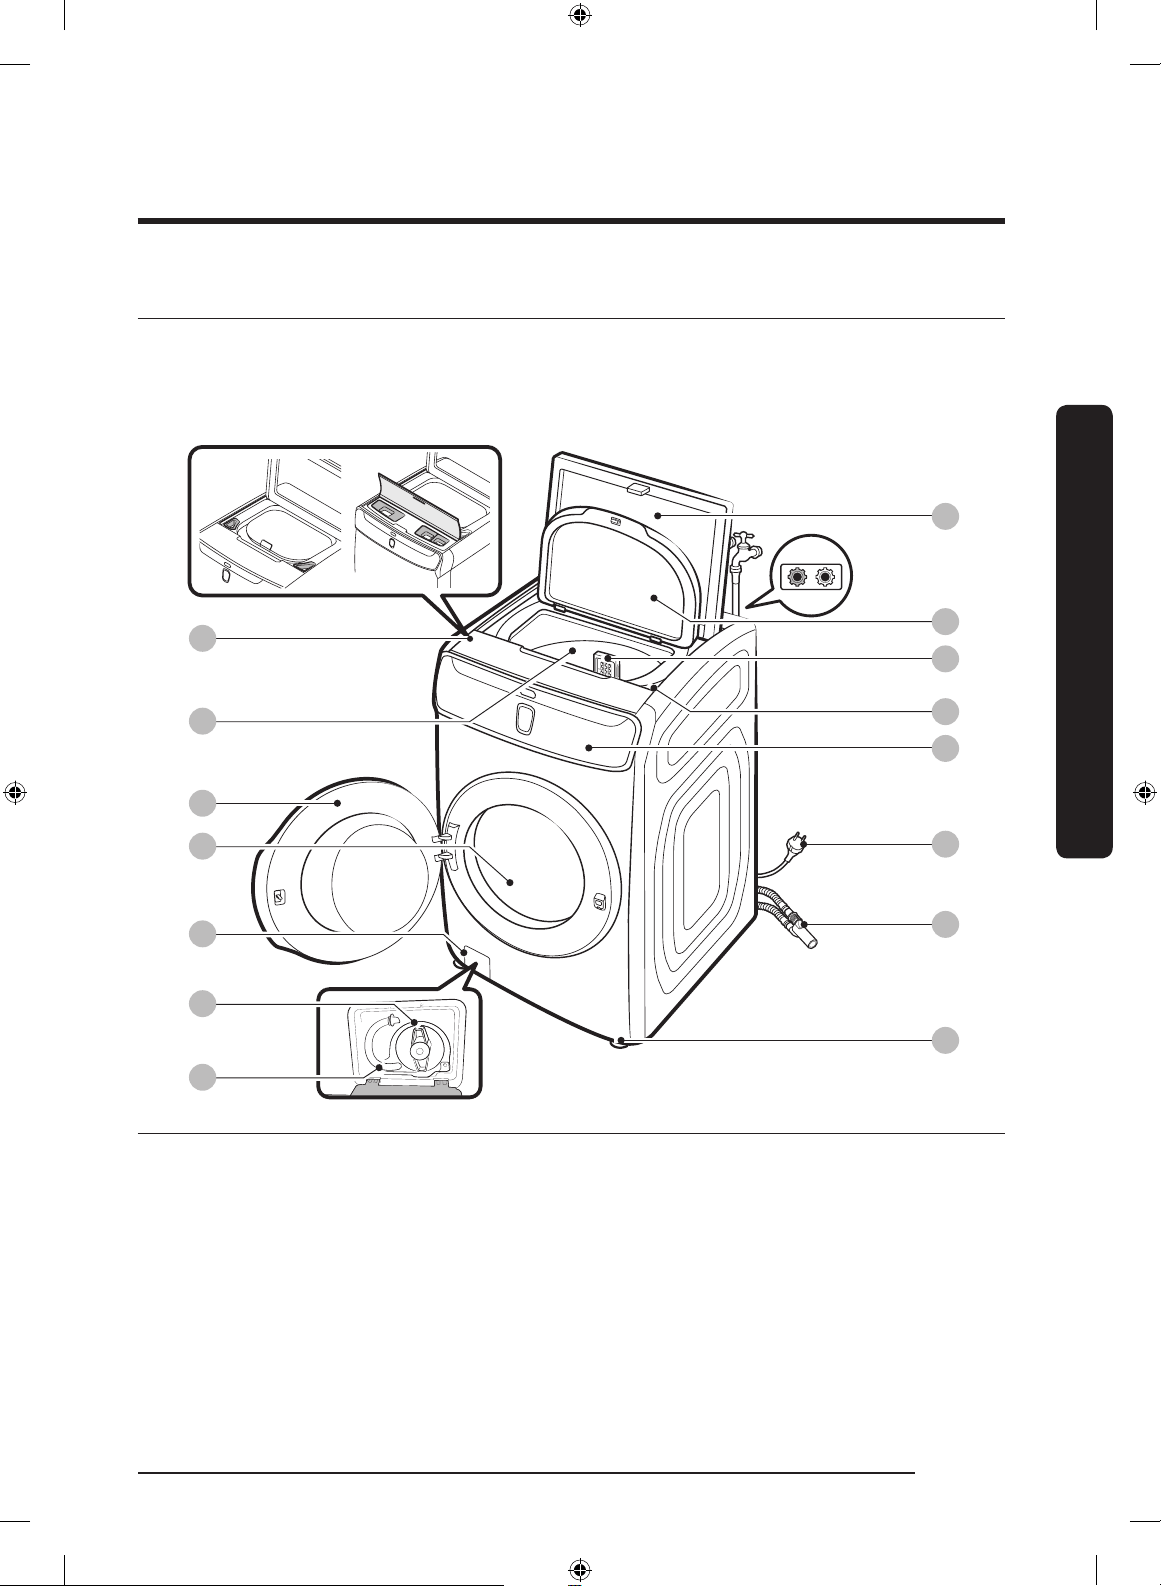
Installation
Français 19
Ce qui est inclus
Assurez-vous que toutes les pièces sont incluses dans l'emballage de l'appareil. Pour toute
question relative au lave-linge ou aux pièces, contactez un centre d'assistance clientèle Samsung
local ou le magasin.
12
10
08
09
11
13
14
15
01
03
04
02
05
06
07
01 Bac à lessive inférieur 02 Cuve 03 Hublot
04 Tambour 05 Cache du ltre 06 Filtre de la pompe
07 Tuyau de vidange
d'urgence
08 Trappe de chargement par le
haut
09 Couvercle de protection
(intérieur)
10 Filtre à peluches 11 Bac à lessive supérieur 12 Panneau principal
13 Prise d'alimentation 14 Raccord de conduite
(Tuyau de vidange supérieur et
tuyau de vidange inférieur)
15 Pieds réglables
FlexWash_WV9900M_DC68-03768A-04_CFR.indd 19 2017-05-22 7:07:24
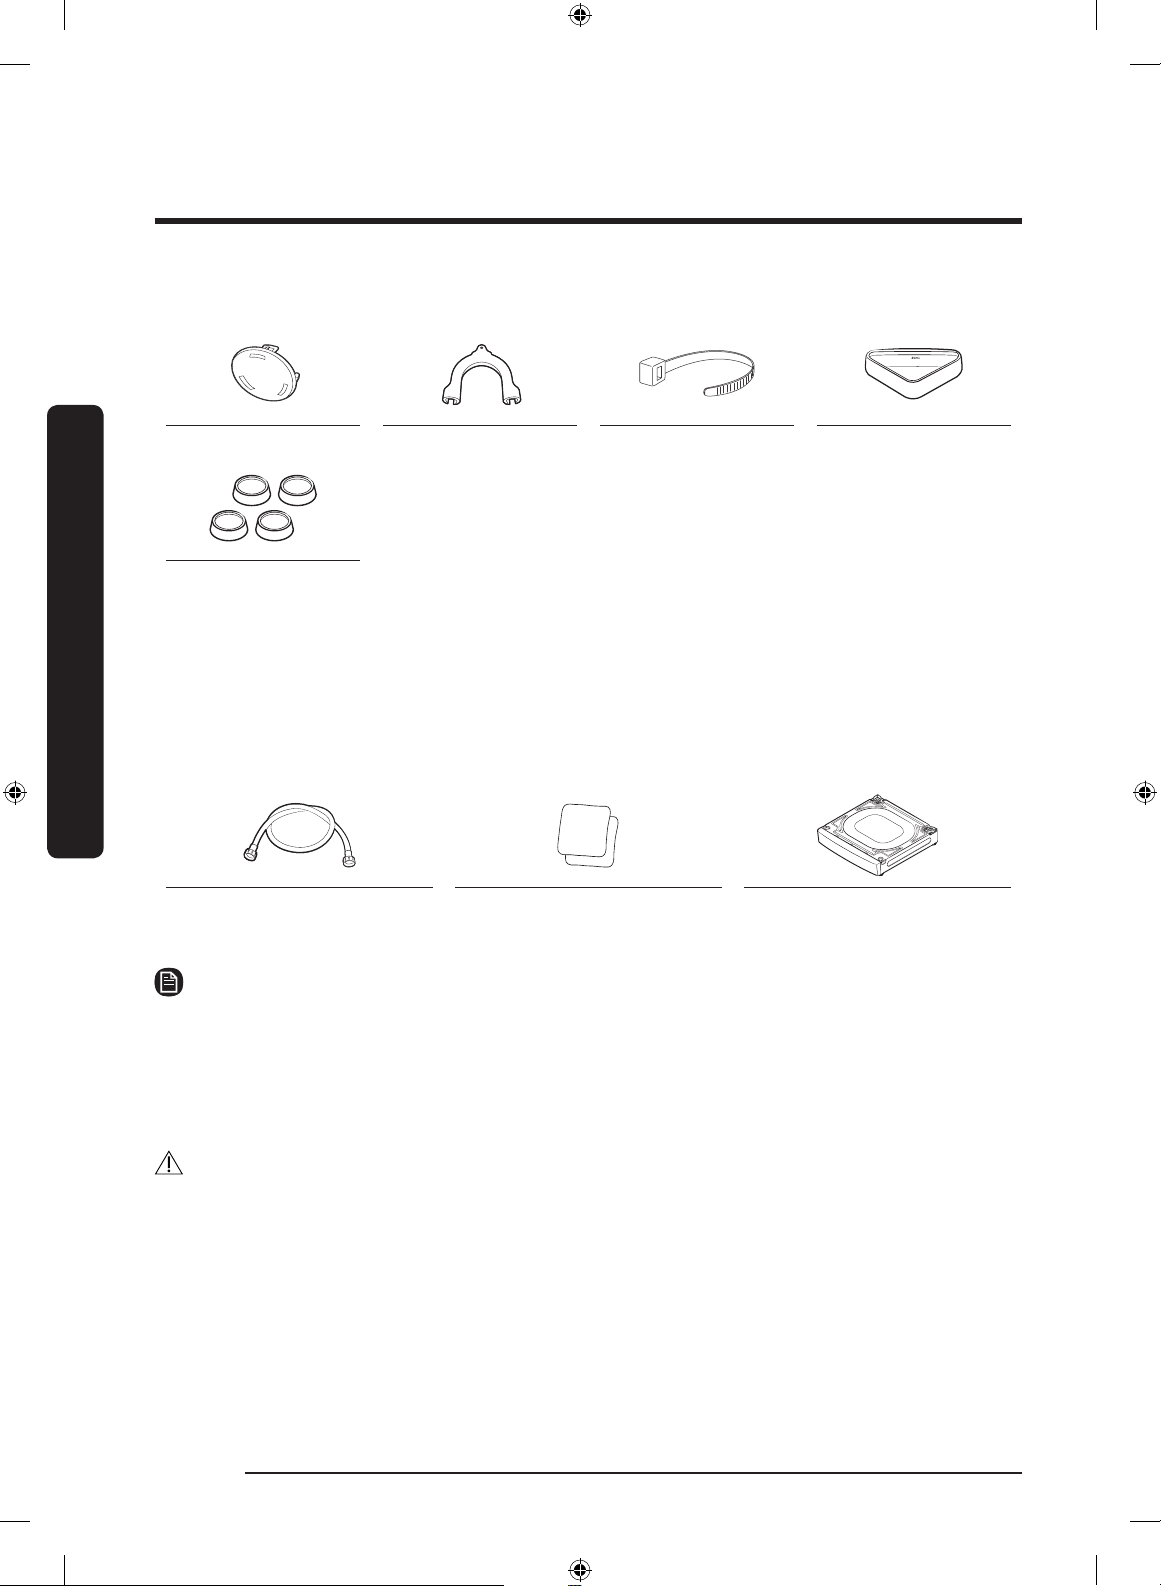
Installation
Installation
Français20
Accessoires (fournis)
Cache-boulons Guides de tuyaux (x2) Colliers de xation Boule doseuse
* Compartiments en
caoutchouc
* Lorsque vous n'utilisez pas le socle, utilisez les compartiments en caoutchouc pour les surfaces
ou sols mous.
Accessoires (non fournis)
Vous devez vous procurer ces éléments auprès de votre centre de service local.
Tuyaux d'eau
(vendus séparément)
Patins antidérapants
(vendus séparément)
Socle (système exible
uniquement)
REMARQUE
• Le nombre de cache-boulons fournis (de 7 à 9) dépend du modèle.
• L'apparence du lave-linge et des accessoires fournis peut différer selon le modèle.
• Pour acheter un accessoire ou une pièce perdue, prenez contact avec un centre de service
Samsung local ou avec le magasin.
• « WE272N* » est un socle destiné au système exible.
ATTENTION
• Ne réutilisez pas de vieux tuyaux d'eau qui peuvent fuir ou éclater, ce qui entraînerait une
inondation et/ou des dégâts matériels.
• Assurez-vous que les rondelles en caoutchouc sont insérées dans chaque raccord du tuyau
d'eau.
FlexWash_WV9900M_DC68-03768A-04_CFR.indd 20 2017-05-22 7:07:25
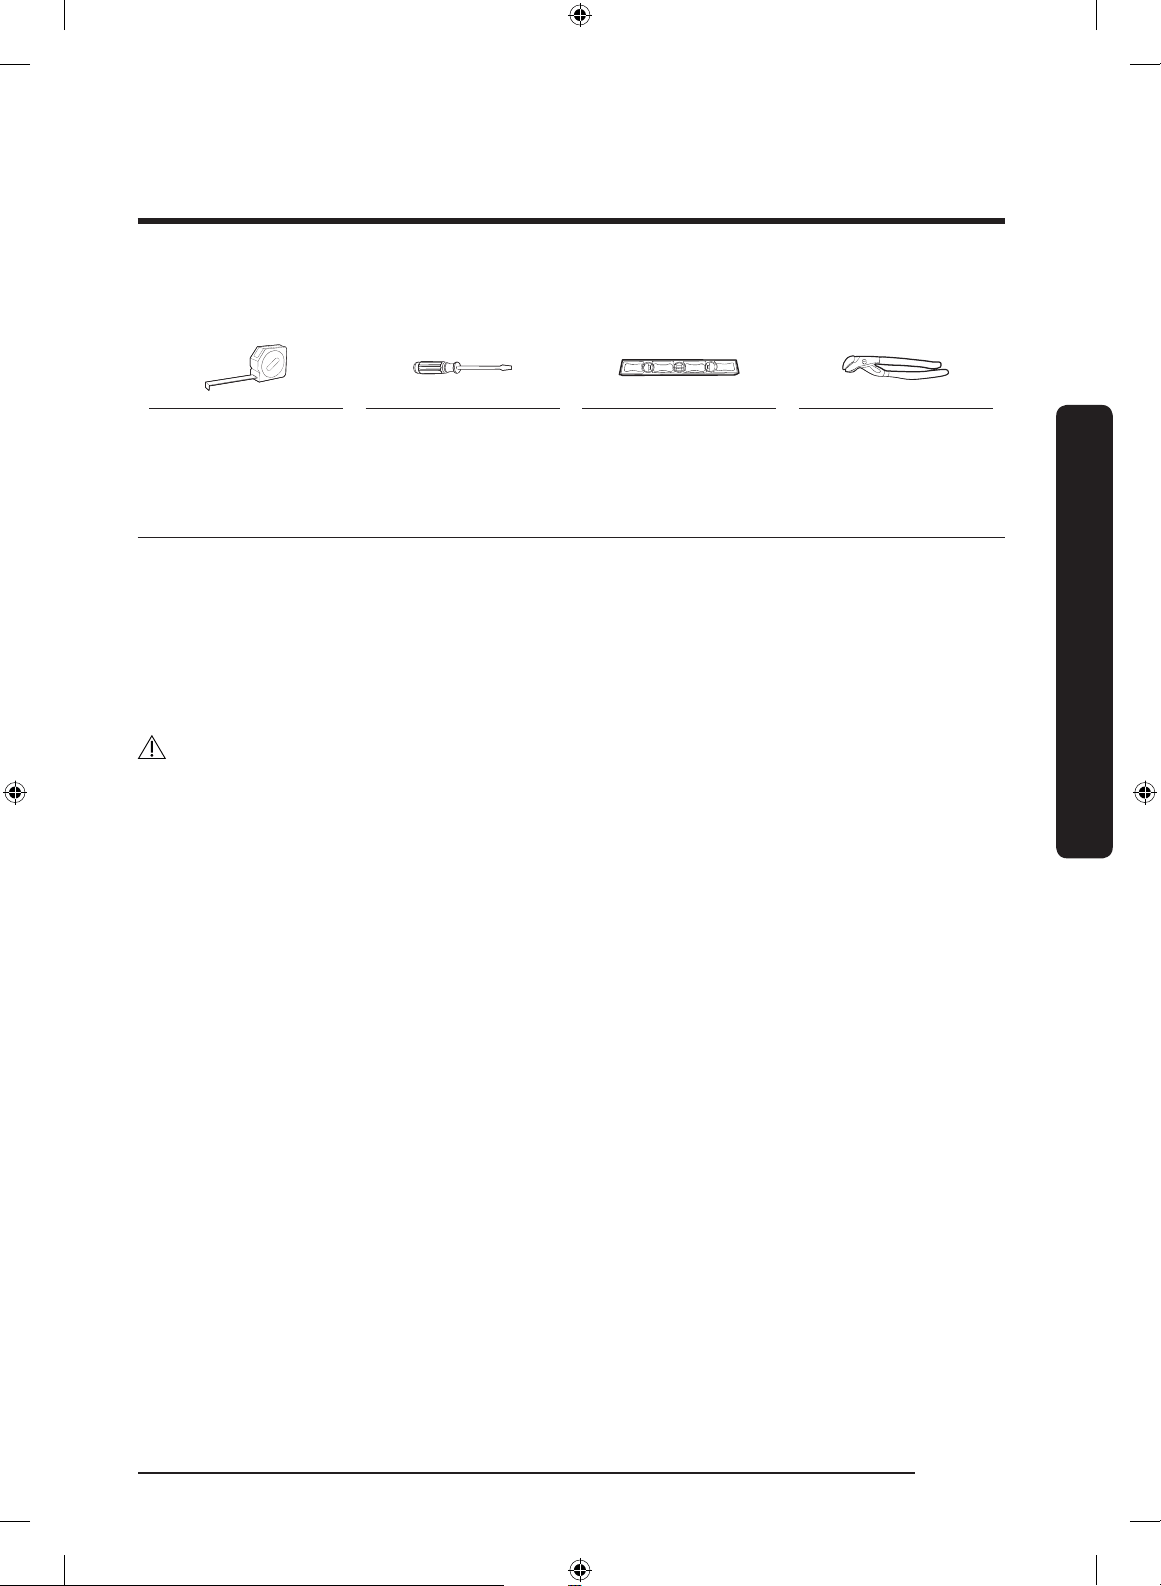
Installation
Français 21
Outils requis (non fournis)
Mètre ruban Tournevis cruciforme Niveau Pince ajustables
Conditions d'installation
Alimentation électrique et mise à la terre
• Un fusible ou un disjoncteur 120 V CA /
60 Hz est requis.
• Utilisez un circuit de dérivation individuel.
Branchez uniquement le lave-linge sur le
circuit.
AVERTISSEMENT
• N'utilisez PAS de rallonge avec cet appareil.
• Utilisez uniquement le cordon
d'alimentation fourni avec votre lave-linge.
• Ne reliez PAS un conducteur de terre à une
plomberie en plastique, un conduit de gaz
ou un conduit d'eau chaude.
• Un mauvais branchement des conducteurs
peut entraîner une électrocution.
• An d'assurer la bonne mise à la terre de
l'appareil, le lave-linge est équipé d'un
cordon d'alimentation doté d'une prise à
3 broches avec conducteur de terre destinée
à être branché sur une prise murale
correctement installée et reliée à la terre.
En cas de doute, demandez à un électricien
qualié ou à un réparateur de vérier si
l'appareil est correctement mis à la terre.
• Ne modiez pas la prise fournie. Si elle ne
rentre pas dans la prise, appelez un électricien
qualié pour installer une prise appropriée.
• Pour prévenir tout risque d'incendie,
d'électrocution ou de blessure, l'intégralité du
câblage et des mises à la terre doit être réalisée
conformément aux réglementations locales ou,
en l'absence de ces dernières, au code électrique
national (National Electrical Code) ANSI/NFPA
dernière révision n°70 (pour les États-Unis) ou
aux dispositions canadiennes sur l'électricité CSA
C22.1 (dernières révisions) et aux réglementations
locales. Il relève de votre responsabilité de fournir
un service électrique adapté à votre lave-linge.
FlexWash_WV9900M_DC68-03768A-04_CFR.indd 21 2017-05-22 7:07:25

Installation
Installation
Français22
Arrivée d'eau
Une pression d'eau inférieure à 20 psi
(137 kPa) peut entraîner l'impossibilité de
fermer complètement la vanne d'arrivée d'eau.
Sinon, le risque est que le tambour mette
plus de temps à se remplir, ce qui entraîne
l'arrêt du lave-linge. Les robinets doivent se
trouver à une distance maximale de 4 pieds
(122 cm) de l'arrière du lave-linge de sorte
que les tuyaux d'arrivée d'eau fournis puissent
atteindre le lave-linge. Pour réduire le risque
de fuites :
• Assurez-vous que les robinets sont faciles
d'accès.
• Fermez les robinets d'arrivée d'eau lorsque
vous n'utilisez pas le lave-linge.
• Vériez régulièrement l'absence de toute
fuite au niveau des raccords du tuyau
d'arrivée d'eau.
ATTENTION
Avant d'utiliser le lave-linge pour la première
fois, vériez l'absence de fuites au niveau des
raccords avec la vanne d'arrivée d'eau et les
robinets.
Vidange
Samsung recommande de placer le tuyau
d'évacuation mural à une hauteur de
18 pouces (46 cm). Le tuyau de vidange
doit être raccordé en passant par le collier
de serrage vers le tuyau d'évacuation et ce
dernier doit recouvrir entièrement le tuyau de
vidange.
Sol
Pour un fonctionnement optimal, le lave-linge
doit être installé sur un sol stable. Si le sol
est en bois, il est possible que vous deviez le
renforcer an de réduire les vibrations et les
problèmes de déséquilibre. Les moquettes ou
les surfaces molles ne sont pas très résistantes
aux vibrations et peuvent entraîner un léger
déplacement du lave-linge durant l'essorage.
ATTENTION
N'installez PAS le lave-linge sur une plate-
forme ou sur une structure instable.
Température de l'eau
N'installez pas le lave-linge dans un endroit
qui risque d'être exposé au gel : il reste
en effet toujours une certaine quantité
d'eau dans sa vanne, sa pompe ou ses
tuyaux. La présence d'eau gelée dans les
pièces de raccordement peut entraîner
l'endommagement des courroies, de la pompe
et d'autres composants du lave-linge.
FlexWash_WV9900M_DC68-03768A-04_CFR.indd 22 2017-05-22 7:07:25
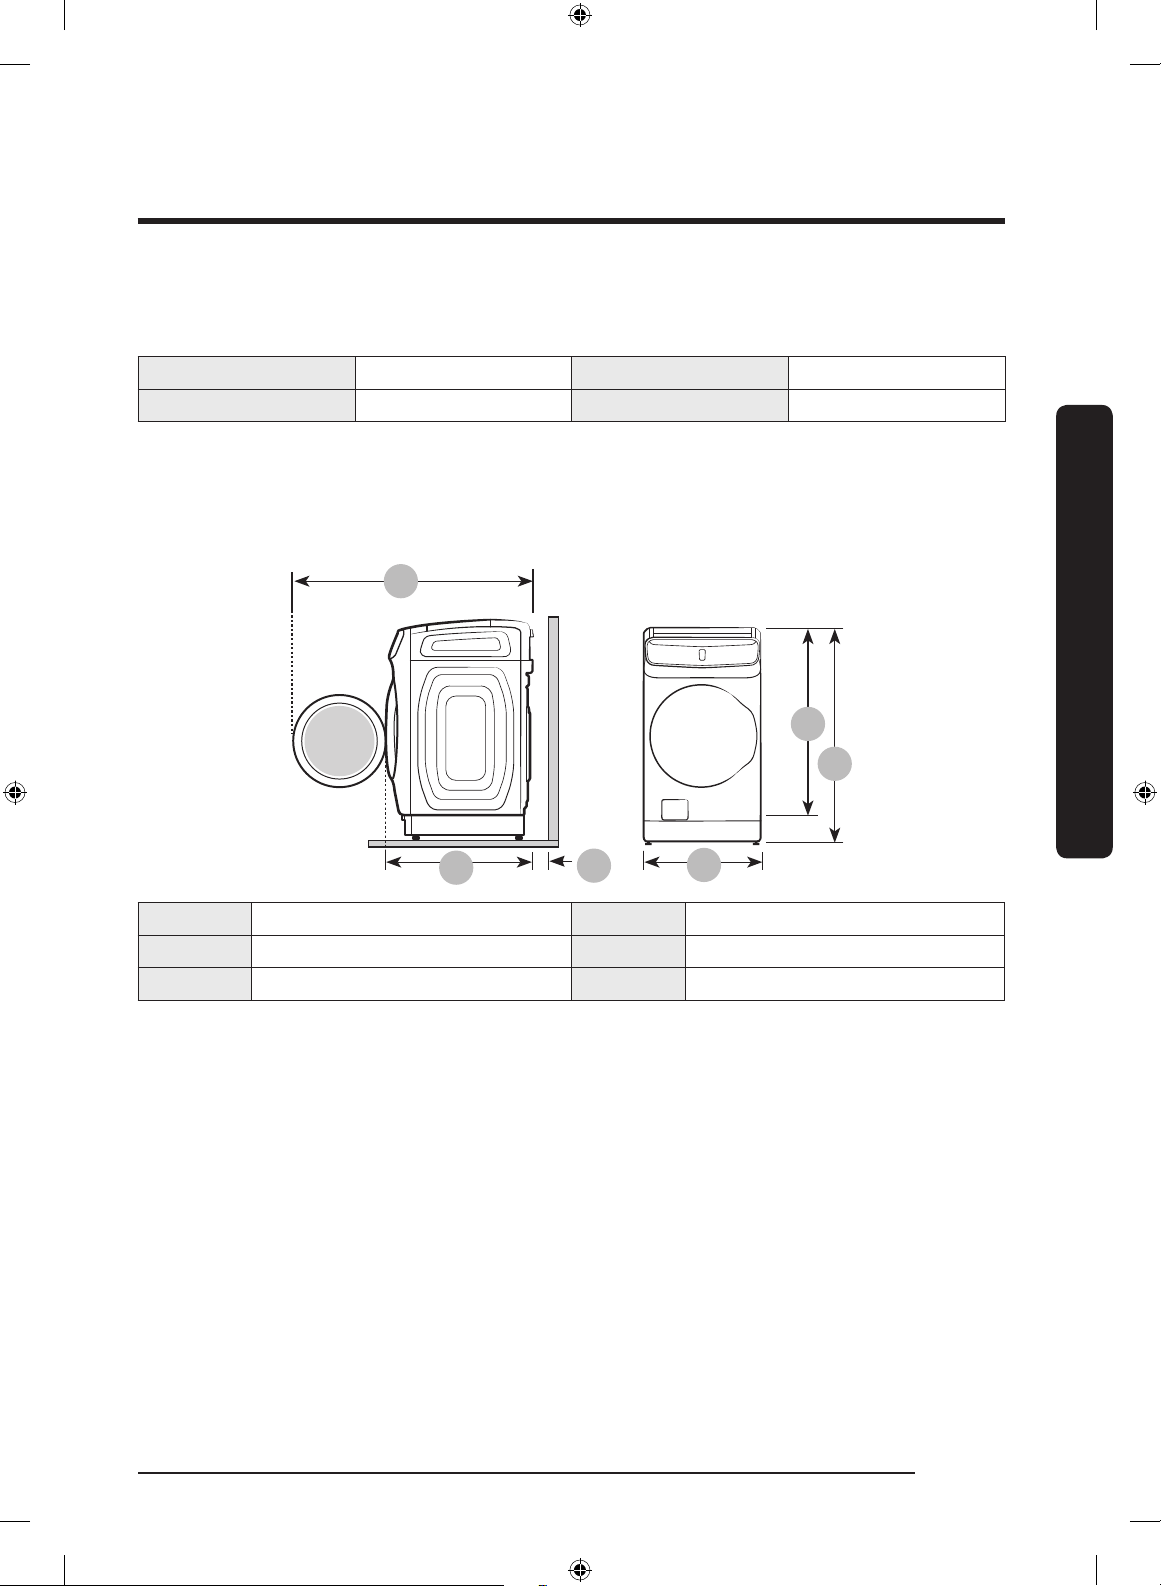
Installation
Français 23
Encastrement dans une niche ou installation dans un placard
Dégagement minimal pour un fonctionnement stable :
Côtés 1 pouce (25 mm) Arrière 6 pouces (152 mm)
Haut 21 pouces (533 mm) Avant 2 pouces (51 mm)
Si vous souhaitez installer le lave-linge et le sèche-linge au même endroit, veillez à laisser un
espace libre d'au moins 72 po² (465 cm²) à l'avant de la niche ou de l'armoire. Installé seul, votre
lave-linge ne nécessite aucun dégagement.
Installation sur un socle
A
B
D
E
F
C
A 54,6 pouces (1386 mm) D 27 pouces (686 mm)
B 34 pouces (864 mm) E 46,9 pouces (1192 mm)
C 6 pouces (152 mm) F 52,2 pouces (1326 mm)
FlexWash_WV9900M_DC68-03768A-04_CFR.indd 23 2017-05-22 7:07:25
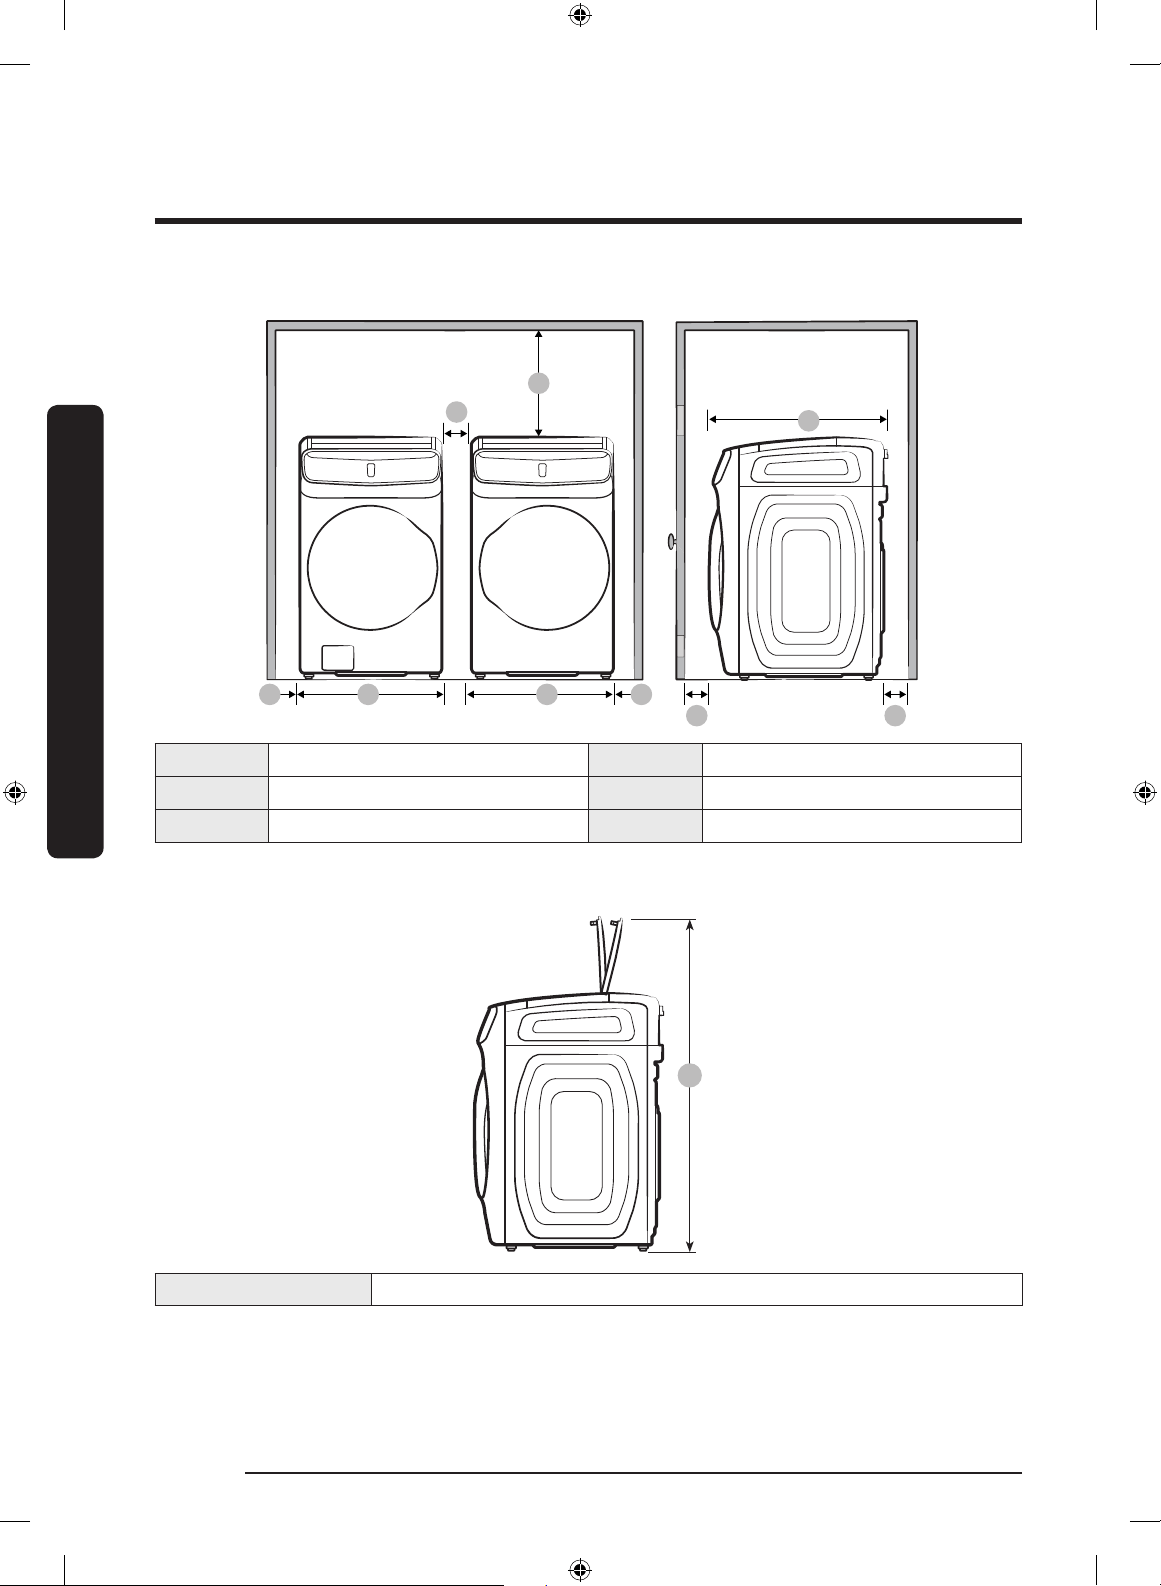
Installation
Installation
Français24
Installation côte à côte
A
E
A
A
C
B B
F
D
A 1 pouce (25 mm) D 34 pouces (864 mm)
B 27 pouces (686 mm) E 2 pouces (51 mm)
C 21 pouces (533 mm) F 6 pouces (152 mm)
*Ce dégagement n'est pas applicable aux lave-linges autonomes.
A
A 61 pouces (1550 mm)
FlexWash_WV9900M_DC68-03768A-04_CFR.indd 24 2017-05-22 7:07:26

Installation
Français 25
Installation étape par étape
ÉTAPE 1 Choisir un emplacement
Choix de l'emplacement :
• Une surface dure et à niveau, sans moquette ou autre revêtement de sol susceptible d'obstruer
l'aération
• Non exposé directement au soleil
• Une pièce adéquate pour une bonne ventilation et un câblage approprié ;
• La température ambiante est toujours supérieure au point de congélation (32 °F/0 °C)
• Un lieu éloigné de toute source de chaleur.
ÉTAPE 2 Retirer les vis de transport
AVERTISSEMENT
• Les matériaux d'emballage peuvent être dangereux pour les enfants. Tenez tous les matériaux
d'emballage (sacs en plastique, polystyrène, etc.) hors de la portée des enfants.
• Pour assurer une bonne installation, toutes les 7 vis de transport doivent être retirées.
Enlevez l'emballage de l'appareil ainsi que
toutes les vis de transport (x 7).
1. Desserrez toutes les vis de transport
situées à l'arrière du lave-linge à l'aide de
la clé.
REMARQUE
Une clé réglable ou une clé à fourche de
10 mm est requise pour retirer les vis de
transport.
2. Bouchez les trous avec les cache-boulons
en plastique fournis. Conservez les vis de
transport pour une prochaine utilisation.
FlexWash_WV9900M_DC68-03768A-04_CFR.indd 25 2017-05-22 7:07:26

Installation
Installation
Français26
ÉTAPE 3 Ajustez les pieds réglables
1. Faites glisser doucement le lave-linge à
l'emplacement choisi. N'exercez pas de
force excessive sous peine d'endommager
les pieds réglables.
2. Mettez le lave-linge à niveau en ajustant
manuellement les pieds réglables.
3. Une fois la mise à niveau terminée, serrez
les écrous à l'aide de la clé.
REMARQUE
Une clé réglable ou une clé à fourche de
17 mm est requise pour desserrer ou serrer
les pieds réglables.
ÉTAPE 4 Placez les compartiments en caoutchouc sur les pieds (Uniquement
pour une surface ou un sol mou)
Pour protéger des surfaces ou des sols mous,
utilisez les compartiments en caoutchouc
fournis. Vous n'avez pas besoin d'utiliser les
compartiments en caoutchouc sur un sol dur
ou sur le socle.
1. Faites appel à deux personnes ou plus pour
tenir le lave-linge des deux côtés.
2. Tout en inclinant le lave-linge d'un côté,
placez les compartiments en caoutchouc un
par un sur chaque pied du lave-linge.
ATTENTION
Assurez-vous que deux personnes ou plus
insèrent les compartiments en caoutchouc.
Autrement, le lave-linge peut se renverser et
provoquer des blessures ou des dommages
matériels.
FlexWash_WV9900M_DC68-03768A-04_CFR.indd 26 2017-05-22 7:07:27

Installation
Français 27
ÉTAPE 5 Raccordez les tuyaux d'eau
B
A
ATTENTION
• Assurez-vous d'utiliser un tuyau d'eau
neuf et que les joints en caoutchouc (B)
se trouvent à l'intérieur des raccords (A)
à l'une des extrémités du tuyau d'eau. Un
tuyau d'eau sans joint peut fuir.
• Si vous observez une fuite d'eau, arrêtez-
la à l'aide de la rondelle et prenez contact
avec un centre de service Samsung
local. Une fuite d'eau peut entraîner une
électrocution.
• Ne tendez pas le tuyau d'eau avec force. Si
le tuyau est trop court, remplacez-le par un
tuyau haute pression plus long.
• Pour éviter les fuites, assurez-vous que les
deux tuyaux d'eau ne sont pas courbés ou
entortillés. Une fuite d'eau peut entraîner
une électrocution.
FlexWash_WV9900M_DC68-03768A-04_CFR.indd 27 2017-05-22 7:07:27
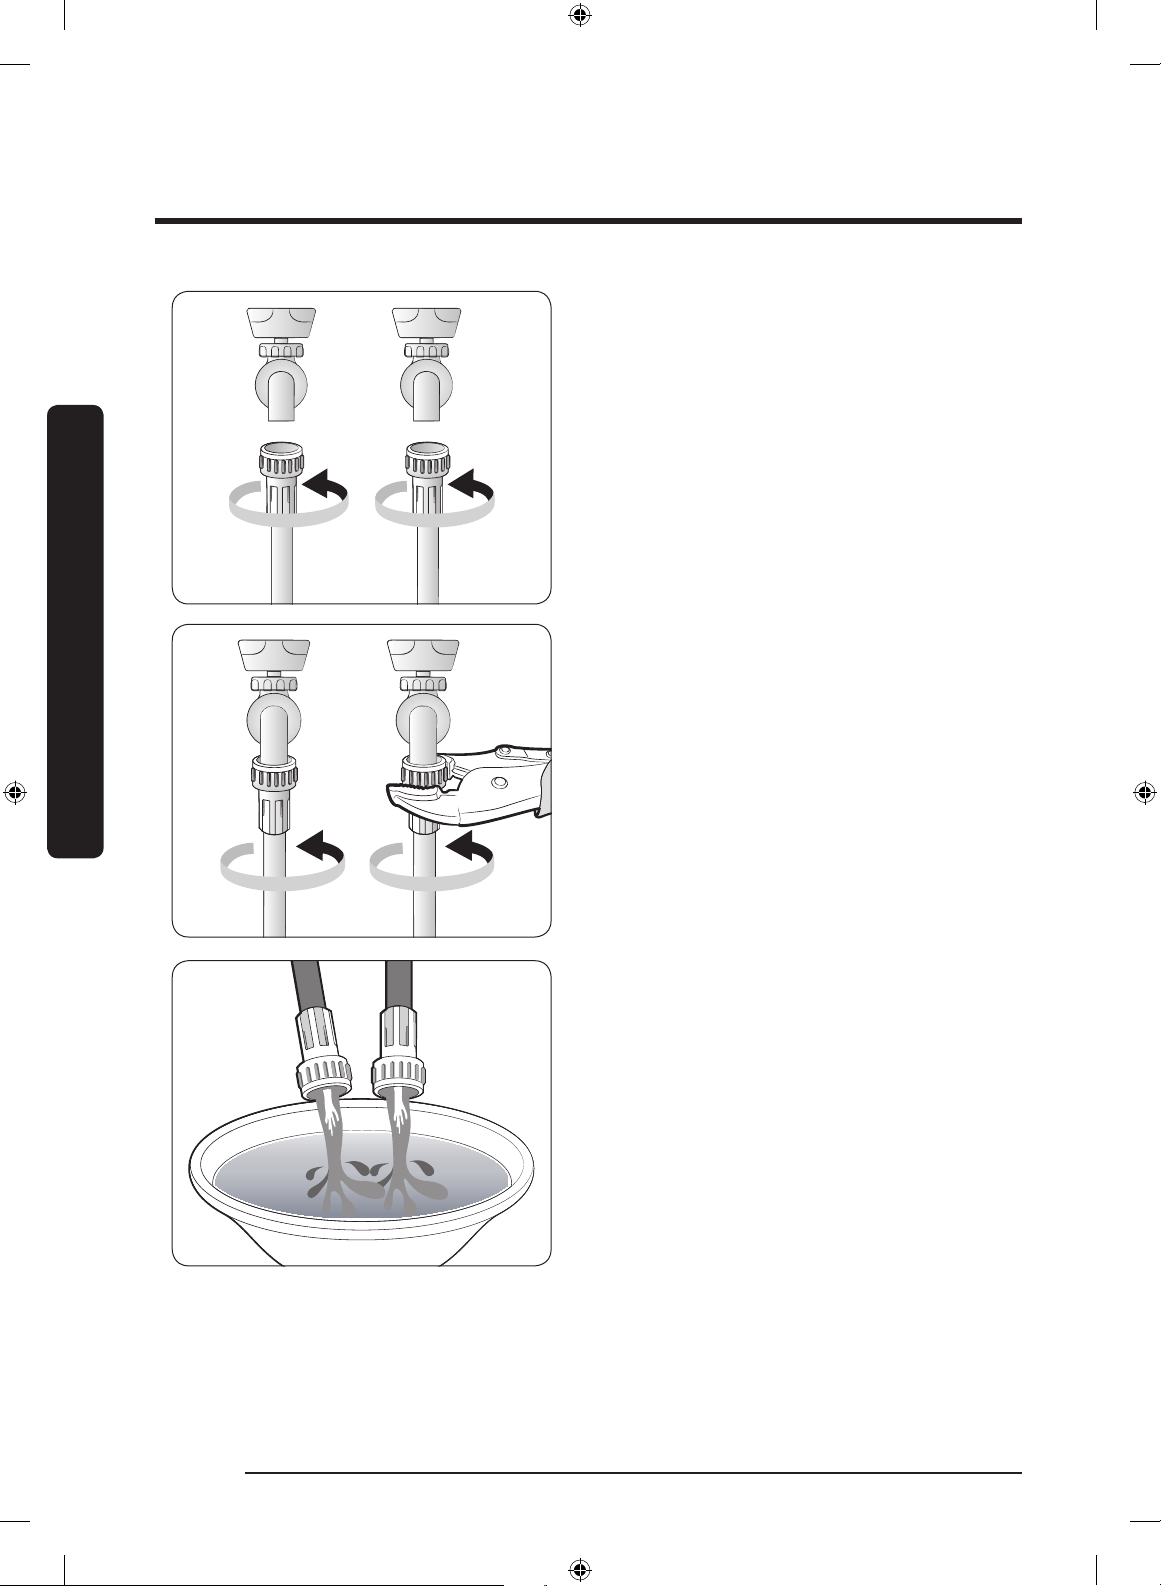
Installation
Installation
Français28
BA
Pour raccorder les tuyaux d'eau aux
robinets :
1. Raccordez une extrémité de chaque tuyau
d'eau sur le robinet d'eau Hot (Chaude) ou
d'eau Cold (Froide).
2. Tournez autant que possible les
raccords à la main, puis procédez au
serrage en effectuant deux tiers de tour
supplémentaires à l'aide d'une pince. Pour
prévenir tout dommage, ne serrez pas
excessivement les raccords.
3. Une fois l'opération terminée, tirez les
tuyaux d'eau vers le haut et le bas pour
vérier s'ils sont bien raccordés.
4. Placez les autres extrémités des tuyaux
dans une bassine et ouvrez les robinets
pendant 10 à 15 secondes, an d'éliminer
les impuretés. Une fois l'opération
terminée, fermez les robinets.
FlexWash_WV9900M_DC68-03768A-04_CFR.indd 28 2017-05-22 7:07:27
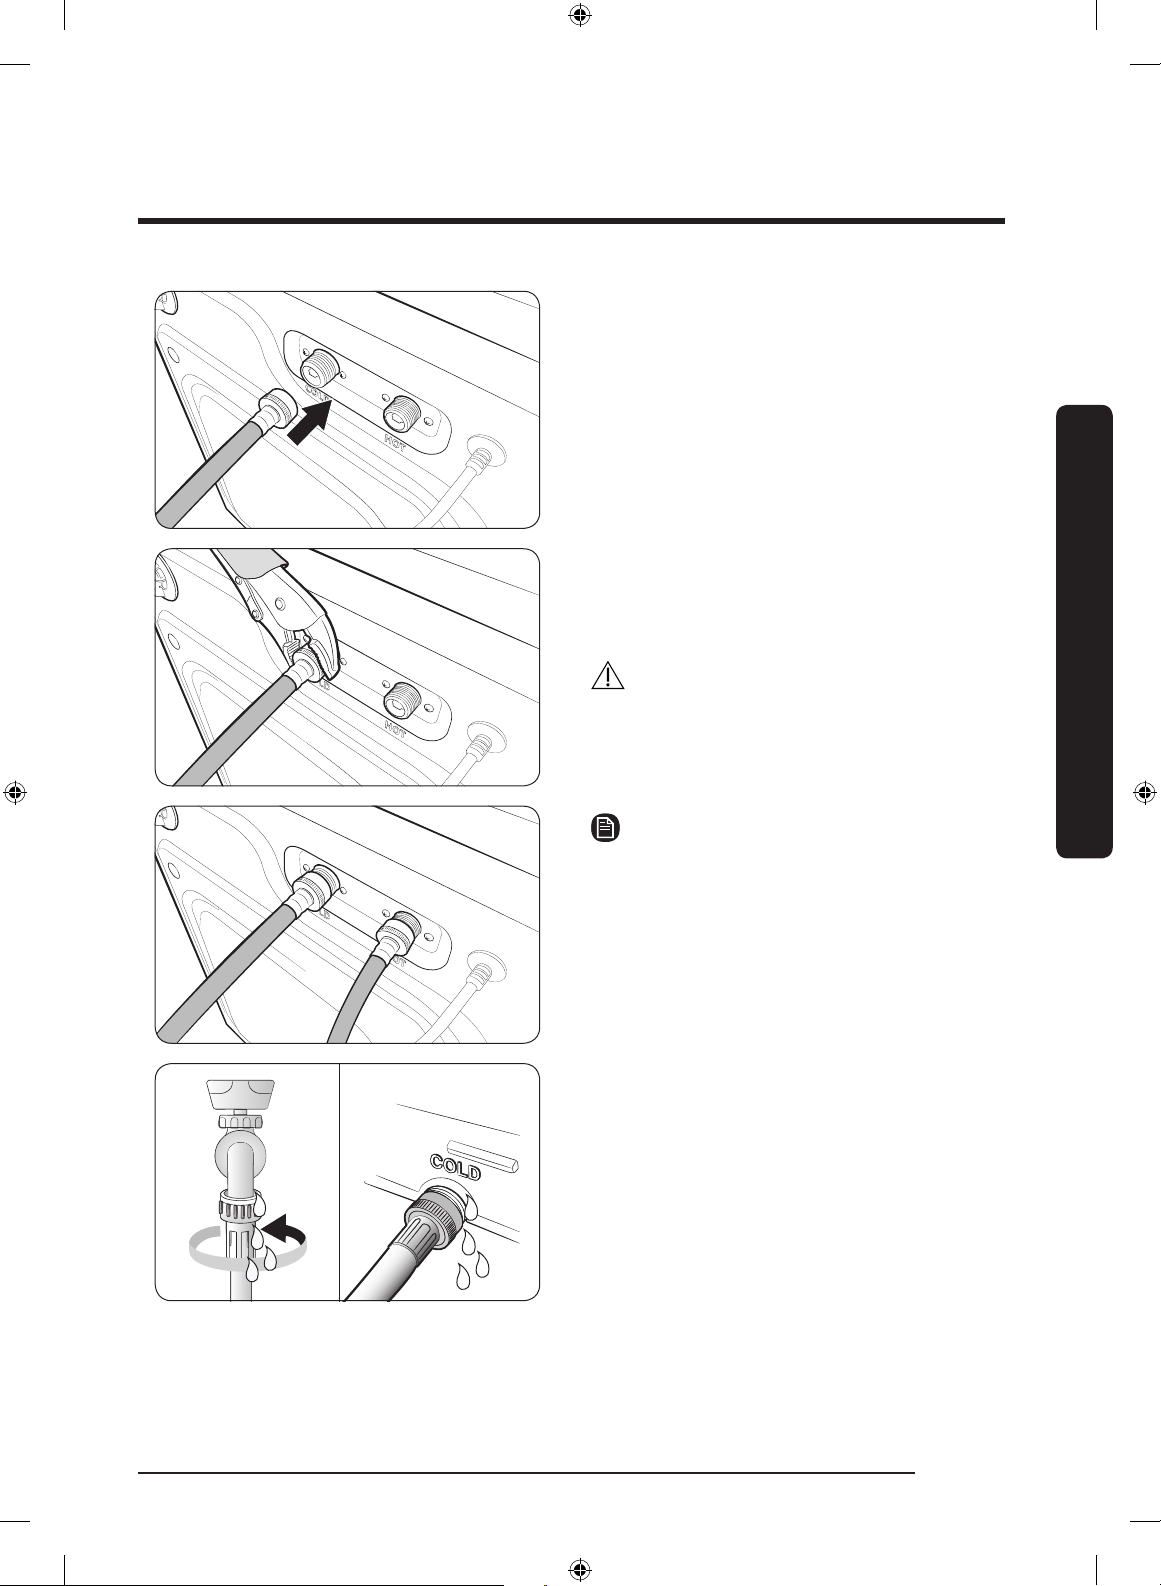
Installation
Français 29
5. Raccordez les autres extrémités des tuyaux
d'eau sur les arrivées correspondantes
à l'arrière du lave-linge, comme indiqué.
Assurez-vous que le tuyau d'eau chaude
est raccordé à l'arrivée d'eau chaude et le
tuyau d'eau froide à l'arrivée d'eau froide.
6. Recommencez l'étape 2 ci-dessus sur les
autres xations. Assurez-vous que les deux
tuyaux d'eau sont bien raccordés. Reportez-
vous au code d'information « 4C » pour le
dépannage.
7. Ouvrez les deux robinets et vériez
l'absence de fuite.
ATTENTION
Pour éviter que les tuyaux d'eau ne soient
courbés ou entortillés, veillez à conserver une
distance d'au moins 6 pouces (150 mm) entre
le lave-linge et la paroi arrière.
REMARQUE
Si vous ne souhaitez pas utiliser le tuyau
d'eau chaude, insérez le bouchon d'arrivée
dans l'arrivée d'eau chaude. Vous devez vous
procurer le bouchon d'arrivée.
Si l'arrivée d'eau chaude est fermée avec le
bouchon d'arrivée, vous devez sélectionner
Cold (Froide) pour la température de l'eau.
Tous les autres voyants relatifs à l'eau
s'éteignent.
FlexWash_WV9900M_DC68-03768A-04_CFR.indd 29 2017-05-22 7:07:28
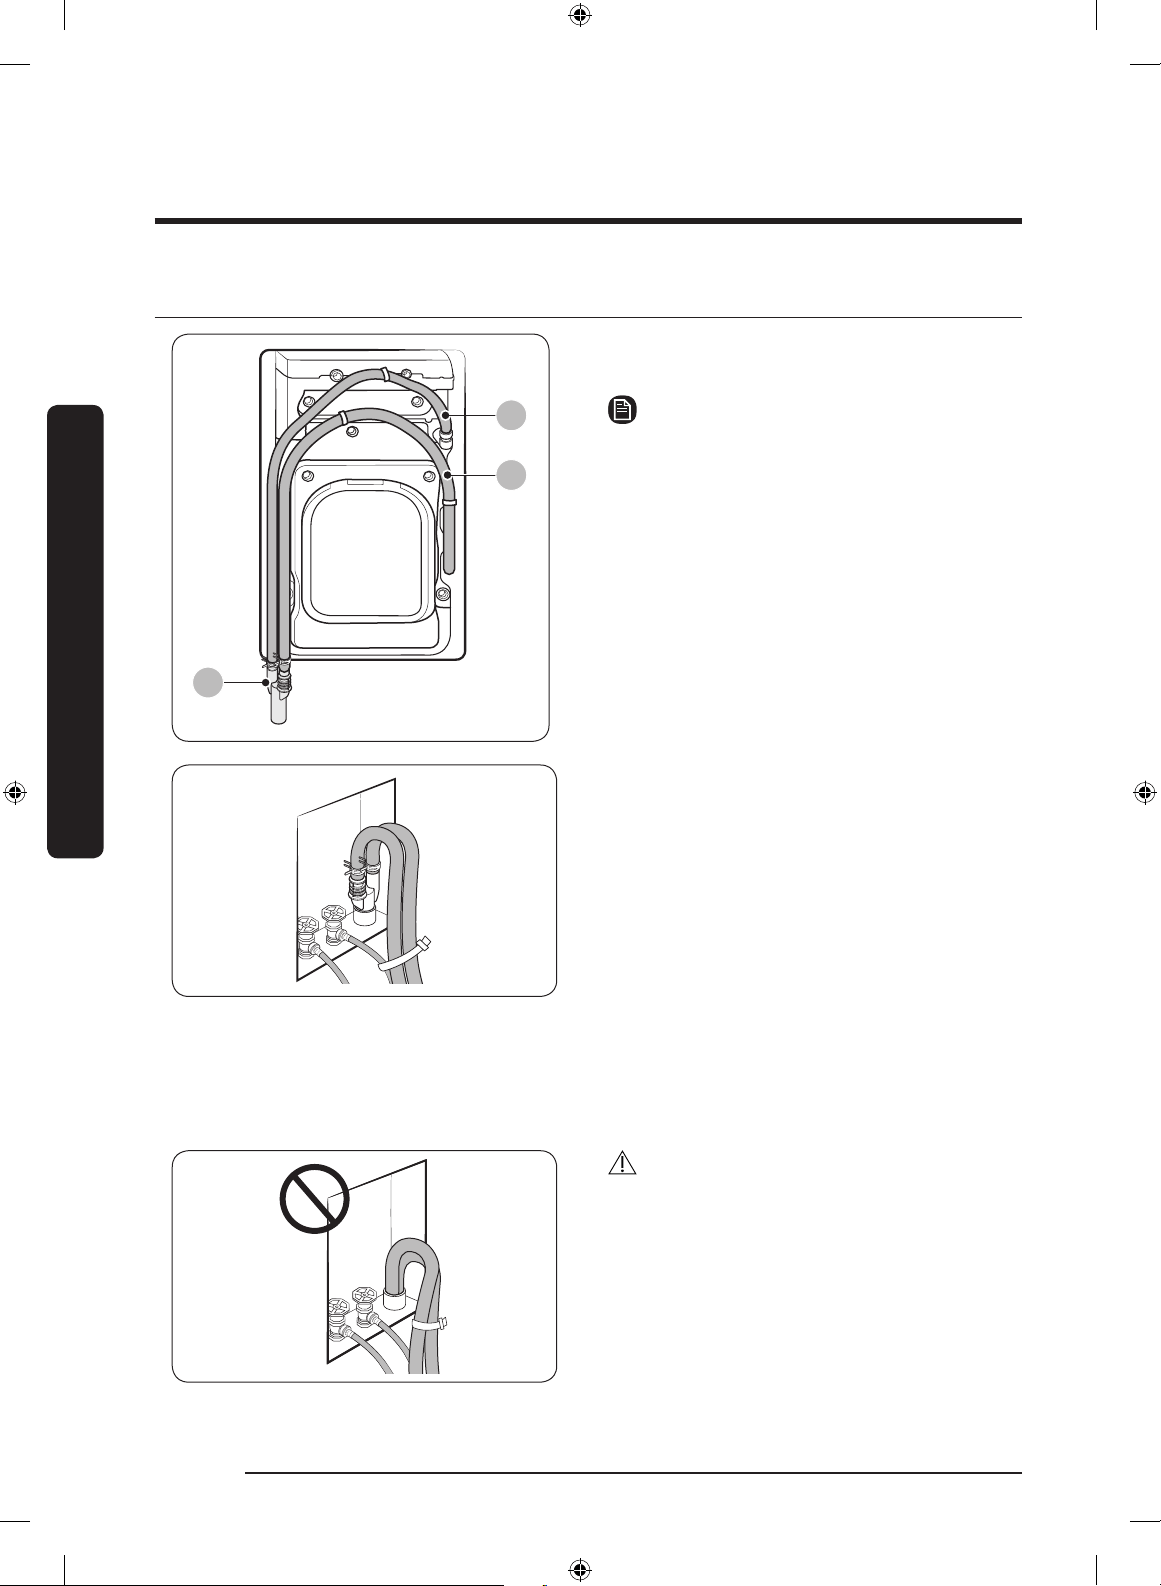
Installation
Installation
Français30
ÉTAPE 6 Positionner le système de vidange
A
B
C
Le raccord de conduite est attaché sur
l'appareil.
REMARQUE
A : Tuyau de vidange supérieur
B : Tuyau de vidange inférieur
C : Raccord de conduite
Dans un système de vidange à
conduite verticale murale
Le tuyau de vidange doit être placé dans
un système de vidange à conduite verticale
murale.
Après avoir inséré les 2 tuyaux de vidange
dans le raccord de conduite, utilisez des
colliers de xation pour courber les tuyaux de
vidange, puis insérez le raccord de conduite
dans la conduite verticale murale.
Une fois l'opération terminée, utilisez des
colliers de xation pour courber le tuyau de
vidange vers le tuyau d'eau.
AVERTISSEMENT
Assurez-vous d'utiliser le raccord de conduite
avant d'insérer les tuyaux de vidange. Sans
le raccord de conduite, le tuyau de vidange
ne sera pas positionné correctement et
fermement à l'intérieur de la conduite
verticale murale. Cela risque de provoquer une
fuite d'eau.
FlexWash_WV9900M_DC68-03768A-04_CFR.indd 30 2017-05-22 7:07:28

Installation
Français 31
Le raccord de conduite peut être positionné comme suit :
A
B
Sur le bord d'un lavabo
Le raccord de conduite (B) doit être placé à une
hauteur située entre 24 pouces (60 cm) et 35 pouces
(90 cm) du sol. An que l'embout du tuyau de vidange
reste courbé, utilisez le guide du tuyau de vidange (A)
en plastique fourni. Fixez le guide au mur à l'aide d'un
crochet an d'assurer une vidange stable.
REMARQUE
B : Raccord de conduite
A
F
D
G
E
B C
Dans une conduite d'évacuation ou un
bac à laver
La longueur du bac à laver (B) ou de la conduite
d'évacuation (C) doit être comprise entre 18 pouces
(46 cm) et 96 pouces (245 cm). Assurez-vous que le
raccord de conduite et la conduite d'évacuation ne
sont pas étanches à l'air. La hauteur de la conduite
d'évacuation (E) doit être égale ou supérieure à
43 pouces (1100 mm) au-dessus du sol.
REMARQUE
A : Guide du tuyau / D : Colliers de xation /
F : Raccord de conduite / G : 85 mm
ATTENTION
• Ne rallongez pas le raccord de conduite (en
forme de Y) à l'aide d'une rallonge de tuyau.
• Assurez-vous d'orienter l'extrémité du
raccord de conduite vers le bas sur l'orice
de vidange. Si l'extrémité du raccord de
conduite est positionnée à un autre endroit,
l'eau vidangée risque d'être refoulée.
A
E
F
D
B
C
Dimensions du raccord de conduite
A 172 mm D 67 mm
B 112,5 mm E Ø 35
C 85 mm F 60 mm
FlexWash_WV9900M_DC68-03768A-04_CFR.indd 31 2017-05-22 7:07:29
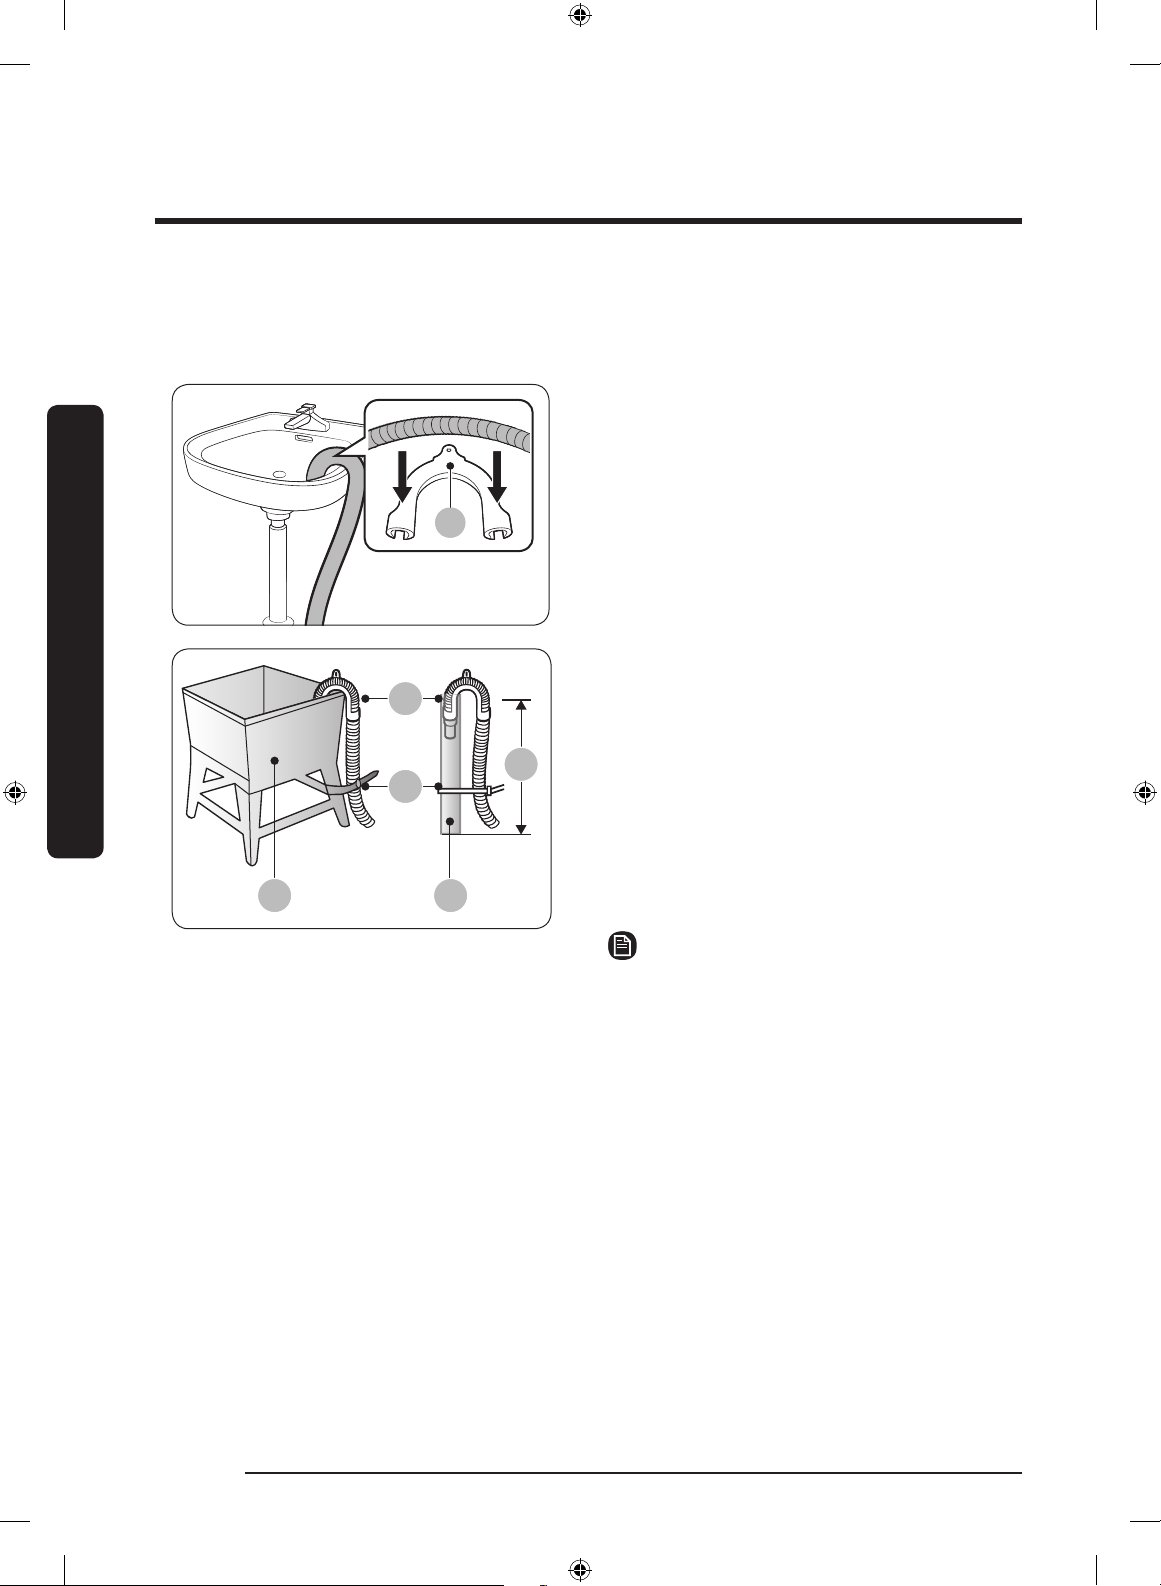
Installation
Installation
Français32
Positionner sans raccord de conduite
Si vous n'utilisez pas de raccord de conduite, chaque tuyau de vidange peut être placé comme
suit :
AA
Sur le bord d'un lavabo.
Le tuyau de vidange doit être placé à une
hauteur située entre 24 pouces (60 cm) et
35 pouces (90 cm) du sol. An que l'embout
du tuyau de vidange reste courbé, utilisez le
guide du tuyau de vidange (A) en plastique
fourni. Fixez le guide au mur à l'aide d'un
crochet an d'assurer une vidange stable.
A
D
B C
E
Dans une conduite d'évacuation ou un
bac à laver
La longueur du bac à laver (B) ou du tuyau
d'évacuation mural (C) doit être comprise
entre 18 pouces (46 cm) et 96 pouces
(245 cm). Assurez-vous que le tuyau de
vidange et le tuyau d'évacuation ne sont pas
étanches à l'air. La hauteur de la conduite
d’évacuation (E) doit être égale ou supérieure
à 43 pouces (1 100 mm) au-dessus du sol.
REMARQUE
A : Guide du tuyau / D : Colliers de xation
FlexWash_WV9900M_DC68-03768A-04_CFR.indd 32 2017-05-22 7:07:29
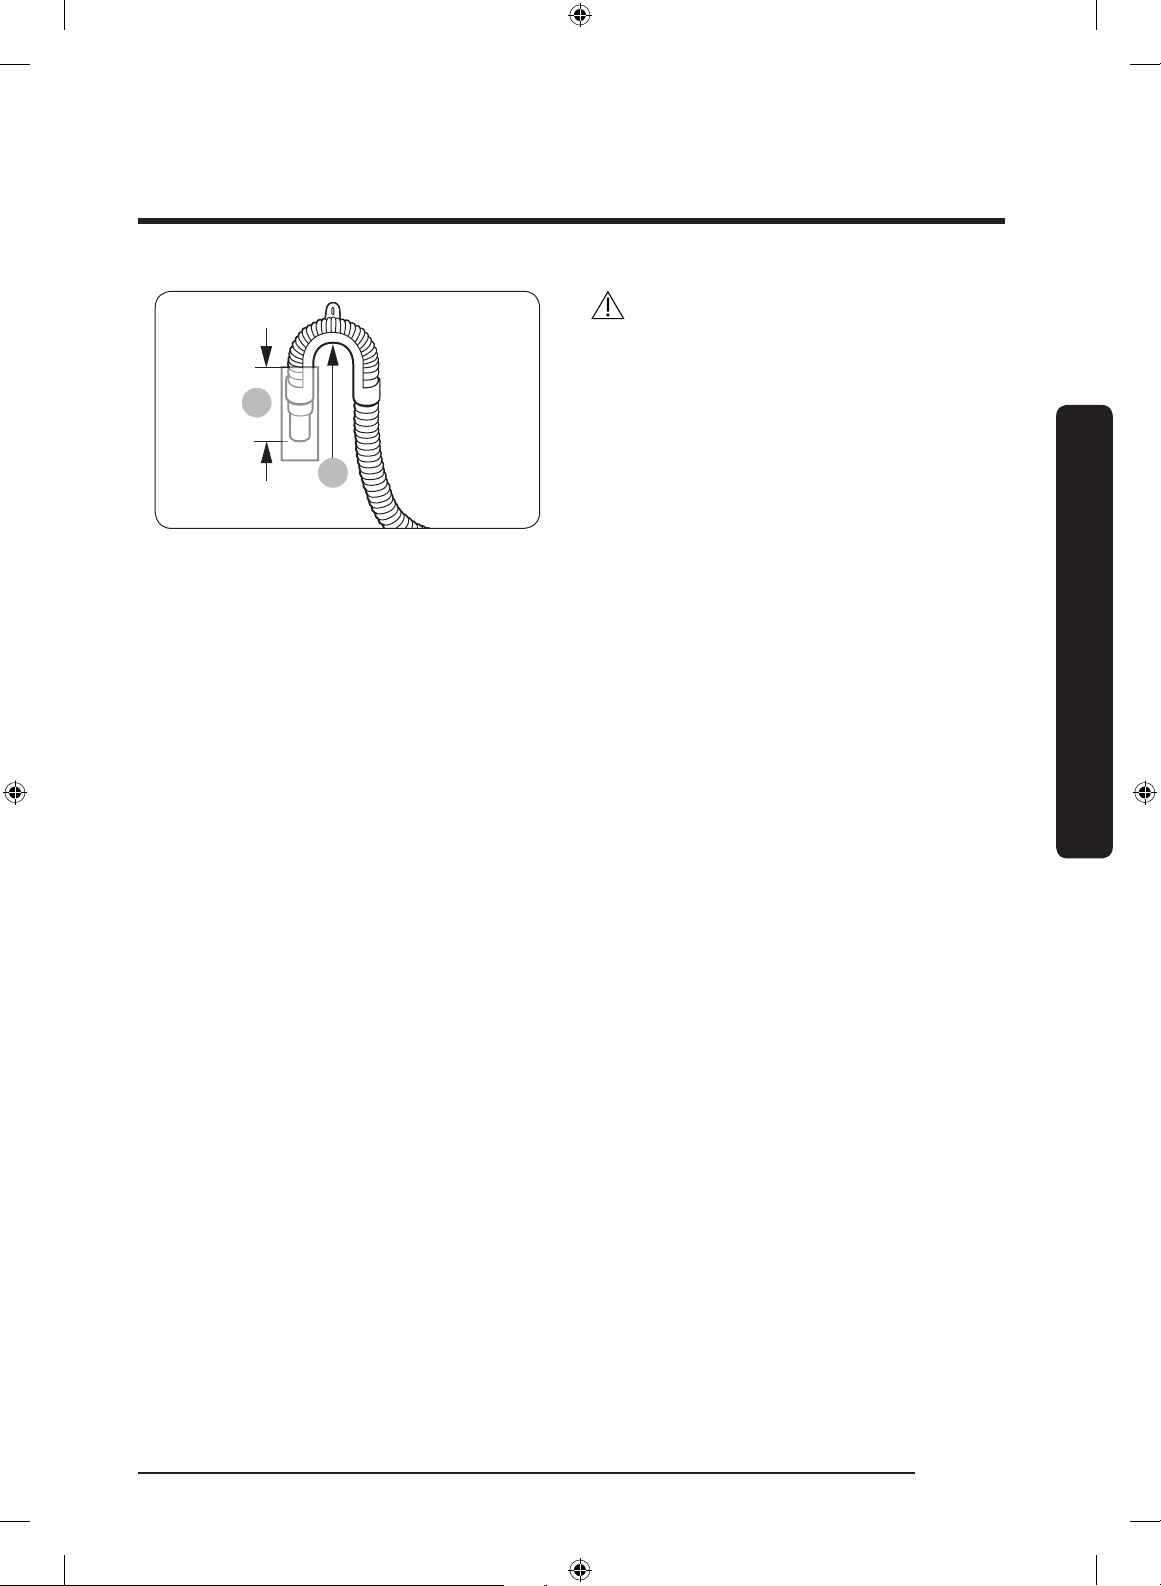
Installation
Français 33
*
A
ATTENTION
• Raccordez le guide du tuyau de vidange (A)
à maximum 3 à 5 pouces (7,6 à 12,7 cm)*
de distance de l'extrémité du tuyau de
vidange. Si le tuyau de vidange est étendu
après l'extrémité du guide du tuyau, de
la moisissure ou des microorganismes
peuvent se répandre à l'intérieur du lave-
linge.
• Le tuyau de vidange peut être installé à
maximum 96 pouces (245 cm) de hauteur,
mais la capacité de vidange peut être
réduite à cette hauteur maximale. L'eau
restant dans le système de vidange peut
générer une mauvaise odeur.
• Si le tuyau de vidange est installé à
moins de 18 pouces (46 cm) de hauteur,
alors l'eau peut être vidangée pendant
le processus en raison du phénomène
de siphon. Si cela se produit, le code
d'information « 4C » apparaît sur l'écran.
FlexWash_WV9900M_DC68-03768A-04_CFR.indd 33 2017-05-22 7:07:29
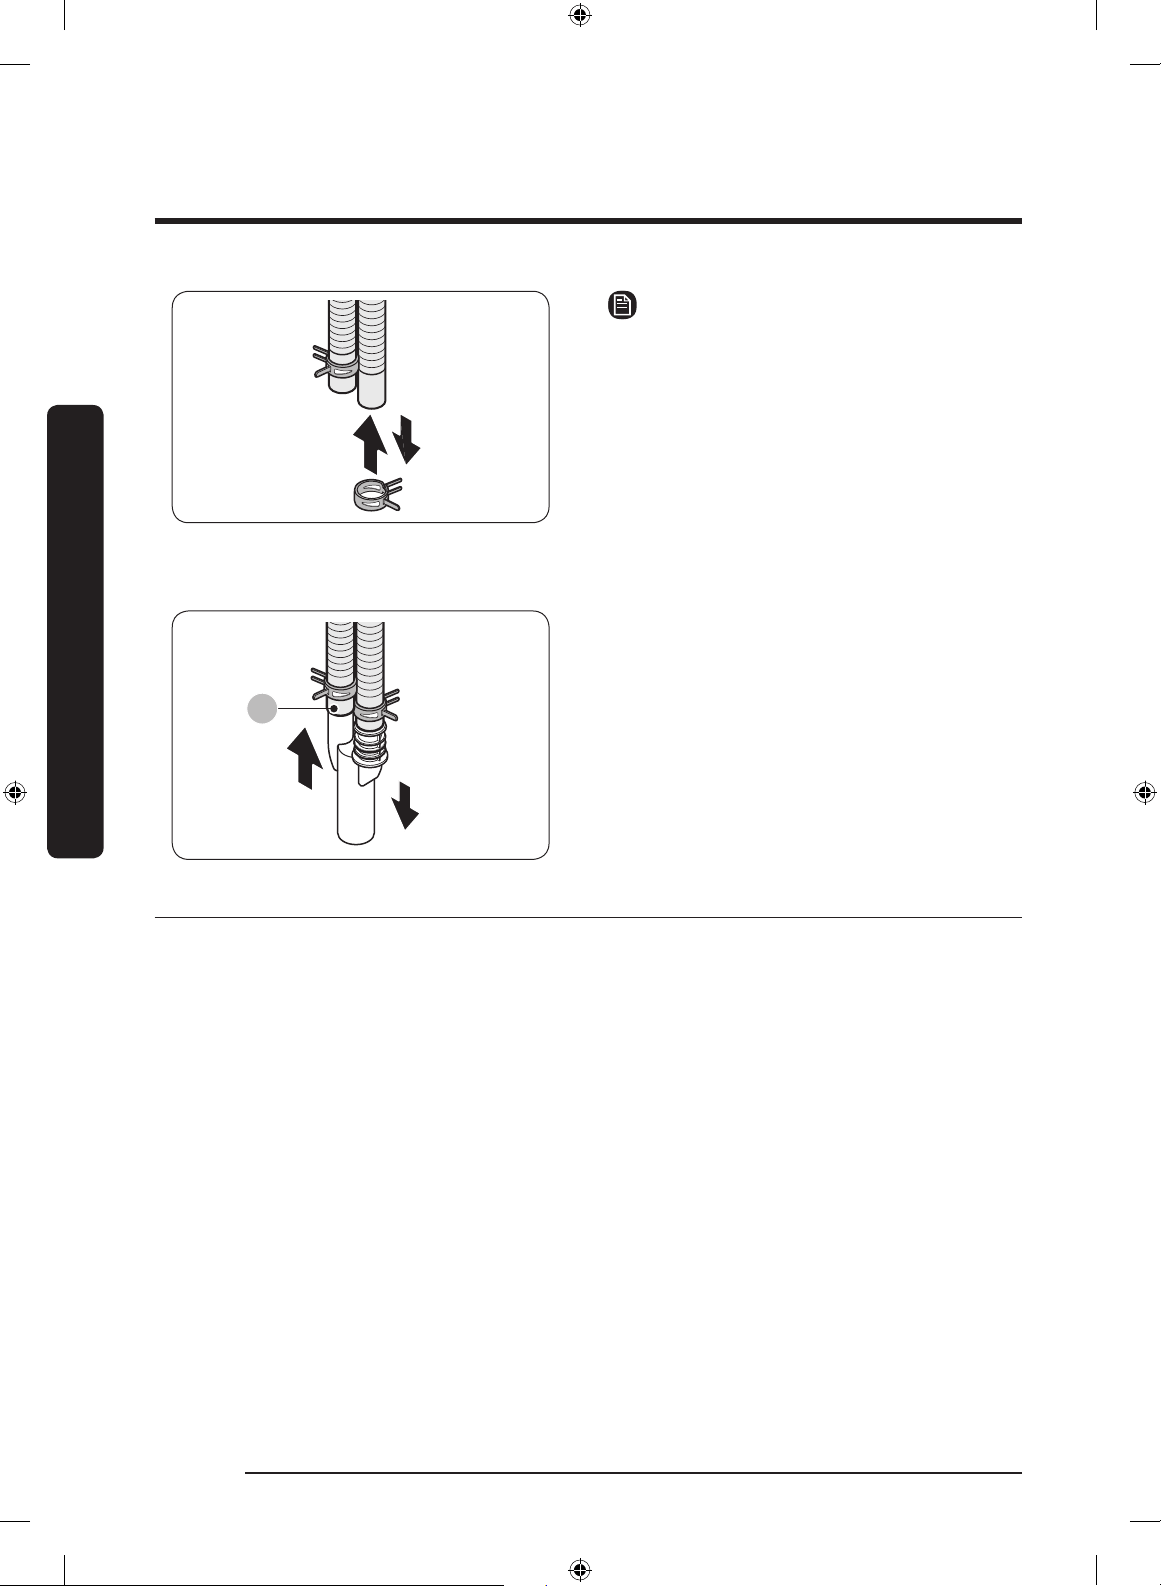
Installation
Installation
Français34
REMARQUE
Positionner à l'aide du raccord de
conduite
Votre lave-linge est doté d'un raccord de
conduite conçu pour relier le tuyau de vidange
supérieur au tuyau de vidange inférieur. Vous
pouvez utiliser le raccord pour associer deux
tuyaux de vidange en une seule sortie.
1. Insérez une bague de serrage à l'extrémité
de chacun des tuyaux de vidange.
A
2. Insérez le raccord de conduite dans les
tuyaux de vidange. Assurez-vous que le
côté le plus long (A) est adapté au tuyau de
vidange de la partie inférieure du lave-
linge.
3. Fixez les bagues de serrage près de chaque
extrémité des tuyaux.
• Pour retirer le raccord de conduite, suivez
les étapes ci-dessus dans l'ordre inverse.
ÉTAPE 7 Vérication nale et mise sous tension
• Avant d'utiliser votre lave-linge, assurez-vous de retirer l'agent de déshumication (gel de
silice) à l'intérieur de la partie supérieure du lave-linge.
• Ne mangez pas et n'ingérez pas d'agent de déshumidication (gel de silice).
• Une fois que le lave-linge a terminé la recherche de fuites pour assurer un fonctionnement
normal, il se peut qu'il y ait de l'humidité sur la surface du couvercle de protection. C'est tout
à fait normal ; cela n'est pas un signe de pièce défectueuse. Ouvrez le couvercle pendant un
moment pour éliminer l'humidité.
• Branchez le cordon d'alimentation sur une prise électrique murale agréée de 120 V CA / 60 Hz,
protégée par un fusible ou un disjoncteur. Puis, appuyez sur le bouton POWER (MARCHE/
ARRÊT) pour allumer votre lave-linge.
FlexWash_WV9900M_DC68-03768A-04_CFR.indd 34 2017-05-22 7:07:29

Avant de démarrer
Français 35
Avant de démarrer
Réglages initiaux
Exécuter le calibrage (recommandé)
Le calibrage permet d'assurer une détection
précise du poids par le lave-linge. Assurez-
vous que la cuve ou le tambour sont vides
avant d'exécuter le calibrage.
Pour calibrer la partie supérieure du lave-linge
1. Appuyez sur POWER (MARCHE/ARRÊT) sur le
panneau de commande de la partie supérieure
du lave-linge pour le mettre sous tension.
2. Maintenez simultanément enfoncés les
boutons Temp. et NORMAL pendant
3 secondes.
3. Appuyez sur le bouton START/PAUSE
(DÉPART/PAUSE) pour lancer le Calibrage.
- Le hublot est fermé pendant l'utilisation.
- La cuve continue de tourner dans le
sens horaire et antihoraire pendant
plusieurs minutes.
4. Une fois l'opération terminée, la partie
supérieure du lave-linge s'éteint
automatiquement.
Pour calibrer la partie inférieure du lave-linge
1. Appuyez sur POWER (MARCHE/ARRÊT)
sur le panneau de commande de la partie
inférieure du lave-linge pour le mettre sous
tension.
2. Maintenez simultanément enfoncés les
boutons Temp. et Delay End (Arrêt différé)
pendant 3 secondes sur le panneau de
commande de la partie inférieure du lave-
linge.
3. Appuyez sur le bouton START/PAUSE
(DÉPART/PAUSE) sur le panneau de
commande de la partie inférieure du lave-
linge pour commencer un cycle Calibrage.
4. Une fois l'opération terminée, la
partie inférieure du lave-linge s'éteint
automatiquement.
REMARQUE
Au lieu de faire tourner la cuve, la partie
inférieure du lave-linge fait tourner le
tambour.
Instructions de lavage
ÉTAPE 1 Trier
Triez le linge selon les critères suivants :
• Étiquette d'entretien : séparez le coton, les
bres mélangées, les synthétiques, la soie,
la laine et les rayonnes.
• Couleur : séparez le blanc des couleurs.
• Taille : mélanger des articles de tailles
différentes dans le tambour ou la cuve
améliore les performances du lave-linge.
• Sensibilité : Lavez les vêtements délicats
séparément. Pour les rideaux et les
vêtements neufs en laine vierge et en soie,
suivez les instructions de lavage gurant
sur leurs étiquettes.
REMARQUE
Assurez-vous de vérier l'étiquette d'entretien
sur tous les vêtements et de trier ces derniers
en fonction avant de lancer le lavage.
FlexWash_WV9900M_DC68-03768A-04_CFR.indd 35 2017-05-22 7:07:29

Avant de démarrer
Avant de démarrer
Français36
ÉTAPE 2 Vider les poches
Videz toutes les poches des vêtements à laver.
• Les objets métalliques tels que les pièces
de monnaie, les broches et les boucles sur
les vêtements peuvent endommager les
autres articles, ainsi que le tambour ou la
cuve.
Retournez les vêtements disposant de boutons
et de broderies.
• Veillez à fermer les fermetures éclairs des
pantalons ou des vestes an de ne pas
endommager le tambour ou la cuve. Les
fermetures éclairs doivent être fermées et
maintenues comme tel à l'aide d'un l.
• Les vêtements pourvus de lanières peuvent
s'emmêler avec d'autres vêtements. Veillez
à attacher les lanières avant de lancer le
cycle de lavage.
ÉTAPE 3 Utiliser un let à linge
• Les soutiens-gorge (lavables à l'eau)
doivent être placés dans un let à linge.
Les pièces métalliques des soutiens-gorge
peuvent percer et déchirer les autres
articles.
• Les vêtements légers et de petite taille,
tels que les chaussettes, gants, bas et
mouchoirs, peuvent se coincer entre le
hublot et la paroi du lave-linge. Placez-les
dans un sac à linge n.
• Ne lavez pas le sac à linge seul, sans linge.
Ceci pourrait provoquer des vibrations
anormales susceptibles d'entraîner des
déplacements intempestifs du lave-linge ou
des blessures.
ÉTAPE 4 Évaluer la capacité de
chargement
Partie inférieure du lave-linge
Ne surchargez pas le lave-linge. Une surcharge
de linge peut entraîner de mauvaises
performances de lavage du lave-linge.
REMARQUE
Lorsque vous lavez des draps ou des couettes,
il se peut que la durée de lavage soit allongée
ou que l'efcacité de l'essorage soit moindre.
Pour les couettes ou housses de couette,
la vitesse du cycle d'essorage maximale
recommandée est « vitesse d'essorage Basse
ou Moyenne » et la capacité de chargement
est de 3,0 kg maximum.
ATTENTION
Si le linge est mal équilibré et que le code
d'information « Ub » s'afche, redistribuez
la charge. Une mauvaise répartition du linge
peut réduire les performances d'essorage.
FlexWash_WV9900M_DC68-03768A-04_CFR.indd 36 2017-05-22 7:07:29
Avant de démarrer
Français 37
Partie supérieure du lave-linge
Instructions de lavage
Utilisez la partie supérieure du lave-linge pour
les petites charges de moins de 3,3 lb (1,5 kg).
Charger Shorts Jeans
Pantalons
en coton
Chemises
T-shirts à
manches
courtes
3,3 lb ↓
(1,5 kg ↓)
4 1 3 4 9
Charger T-shirts
Vêtements
de sport
(hauts)
Vêtements
de sport
(pantalons)
Serviettes
de bain
Serviette
(petite)
3,3 lb ↓
(1,5 kg ↓)
4 3 3 2 10
NOTE
• Utilisez la charge recommandée pour
des performances de lavage optimales.
Les surcharges peuvent réduire les
performances.
• Utilisez la partie inférieure du lave-linge
pour du linge très sale ou taché ou pour
les charges plus importantes que celles
recommandées.
ÉTAPE 5 Ajouter le type correct de
lessive
La lessive à utiliser dépend du type de tissu
(coton, synthétiques, vêtements délicats,
laine), de la couleur, de la température de
lavage et du degré de salissure. Utilisez
toujours une lessive HE qui mousse peu,
prévue pour les lave-linges automatiques.
REMARQUE
• Respectez les recommandations du fabricant
de la lessive ; celles-ci ont été élaborées
en fonction du poids du linge, du degré de
salissure et de la dureté de l'eau de votre
région. Si vous avez des doutes concernant
la dureté de l'eau, prenez contact avec une
autorité locale en charge de l'eau.
• N'utilisez pas de lessives qui ont tendance
à se durcir ou à se solidier. Ce type de
lessives reste après le cycle de rinçage,
bloquant alors la sortie de vidange.
Utiliser uniquement une lessive HE
Votre lave-linge est conçu pour fonctionner
avec des lessives haute efcacité (HE).
• Pour des résultats de lavage optimaux,
utilisez une lessive haute efcacité telle
que Tide HE, Wisk HE, Cheer HE ou
Gain HE*. Les lessives haute efcacité
contiennent des agents anti-mousse
chargés de réduire, voire d'éliminer la
mousse. Lorsqu'il y a moins de mousse,
la charge tourne plus efcacement et le
lavage est optimisé. (* Les noms de marque
sont des marques déposées de leurs
fabricants respectifs.)
AVERTISSEMENT
Les lessives classiques ne sont pas
recommandées. Utilisez uniquement des
lessives HE.
FlexWash_WV9900M_DC68-03768A-04_CFR.indd 37 2017-05-22 7:07:30
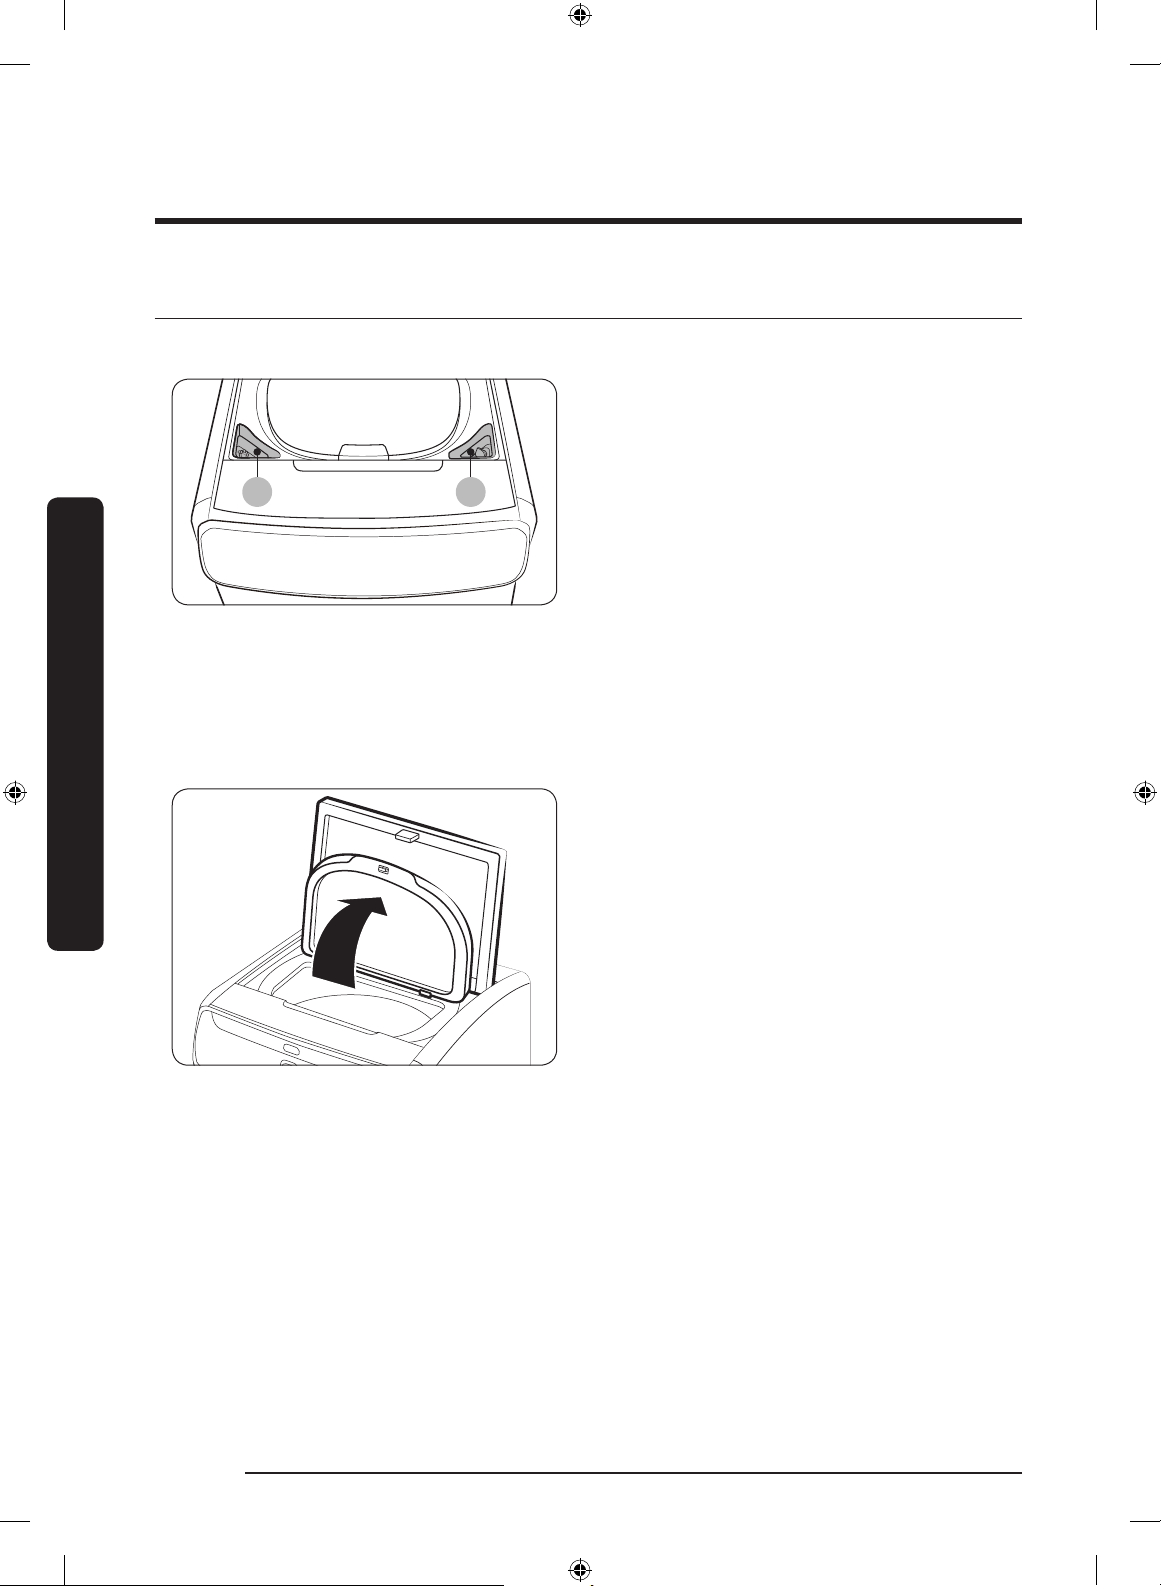
Avant de démarrer
Avant de démarrer
Français38
Guide relatif aux produits de nettoyage
Partie supérieure du lave-linge
A B
La partie supérieure du lave-linge se compose
de deux bacs à lessive : celui de gauche pour
l'agent de blanchiment, celui de droite pour
l'adoucissant. Vous pouvez mettre la lessive
manuellement dans la cuve.
• Compartiment d'agent de blanchiment
(A) : Ajoutez un agent de blanchiment non
chloré conformément aux instructions du
fabricant.
• Compartiment pour les adoucissants
(B) : Ajoutez la quantité recommandée
d'adoucissant conformément aux
instructions du fabricant.
Pour verser des produits de nettoyage à partir de la partie supérieure du lave-linge.
1. Ouvrez la trappe de chargement par le
haut et le couvercle de protection. Retirez
la boule doseuse du bac à adoucissant.
FlexWash_WV9900M_DC68-03768A-04_CFR.indd 38 2017-05-22 7:07:30

Avant de démarrer
Français 39
2. Versez la quantité recommandée de produit
ou de lessive en poudre dans la boule
doseuse. La boule doseuse dispose d'un
repère (20 ml) correspondant à la dose
maximale. Ne dépassez pas le repère.
ATTENTION
• Toute lessive versée dans la partie
supérieure du lave-linge doit être contenue
dans la boule doseuse fournie.
• Utilisez uniquement une lessive HE.
• Si vous ajoutez de la lessive en poudre,
utilisez le compartiment de lessive fourni
puis ajoutez uniquement une dose de
lessive. Une quantité excessive de lessive
peut laisser des traces après lavage.
• Assurez-vous que la lessive en poudre
ajoutée n'est pas constituée d'amas de
poudre.
• N'utilisez pas la boule doseuse pour l'agent
de blanchiment et/ou l'adoucissant.
3. Insérez la boule doseuse au centre de la
cuve et recouvrez-la avec votre linge.
ATTENTION
Assurez-vous que la boule doseuse est
préalablement introduite et placée sous le
linge. Autrement, la lessive risque de ne pas
de dissoudre correctement et de laisser des
traces après lavage.
A
4. Versez la quantité recommandée
d'adoucissant dans le compartiment
correspondant. Ne dépassez pas la ligne
maximale (A).
FlexWash_WV9900M_DC68-03768A-04_CFR.indd 39 2017-05-22 7:07:30

Avant de démarrer
Avant de démarrer
Français40
5. Versez la quantité recommandée d'agent
de blanchiment non chloré dans le
compartiment correspondant. Veillez à ne
pas dépasser la quantité recommandée
dans le bac.
6. Fermez le couvercle de protection ainsi que
la trappe de chargement par le haut.
REMARQUE
À la n d'un cycle, retirez la boule doseuse
et placez-la au-dessus du compartiment
d'adoucissant pour une utilisation ultérieure
(voir l'illustration). La boule doseuse est
conçue pour s'insérer dans le compartiment
d'adoucissant une fois retourné.
ATTENTION
• N'utilisez pas d'agent de blanchiment chloré susceptible d'abîmer votre linge.
• Insérez la boule doseuse avec précaution car celle-ci est censée se trouver en équilibre sur le
linge au début du lavage. Si la boule doseuse se renverse avant le début du lavage, la lessive
peut rester sur le linge à la n du lavage et décolorer le linge et/ou réduire les performances
de lavage.
• Avant chaque lavage, assurez-vous de nettoyer la boule doseuse avant d'ajouter de la lessive.
• N'insérez pas la boule doseuse dans un vêtement plié ni entre différents vêtements.
• N'utilisez pas d'agent de blanchiment chloré en poudre ou liquide.
• Ne placez pas et ne stockez pas de produits de nettoyage (lessive, agent de blanchiment,
adoucissant, etc.) sur votre lave-linge. Essuyez immédiatement tout liquide renversé pour
prévenir tout dommage du lave-linge, notamment les panneaux de commande et les nitions.
REMARQUE
• Il est normal qu'une petite quantité d'eau subsiste dans les bacs à lessive à la n du cycle.
• Lorsque vous ajoutez un agent de blanchiment non décolorant, il est recommandé d'utiliser
une lessive liquide.
• Lorsque le lavage est terminé, retirez la boule doseuse de la cuve et nettoyez-la pour une
utilisation ultérieure.
FlexWash_WV9900M_DC68-03768A-04_CFR.indd 40 2017-05-22 7:07:31

Avant de démarrer
Français 41
Partie inférieure du lave-linge
A B C
La partie inférieure du lave-linge se compose
de trois bacs à lessive : celui de gauche pour
la lessive, le premier à droite pour l'agent
de blanchiment et le plus à droite pour
l'adoucissant.
• Compartiment de lavage principal (A) :
Versez la quantité recommandée de
lessive liquide (ou en poudre) dans le
compartiment correspondant.
• Compartiment d'agent de blanchiment
(B) : Ajoutez un agent de blanchiment
chloré conformément aux instructions du
fabricant.
• Compartiment d'adoucissant (C) : Versez la
quantité recommandée d'adoucissant dans
le compartiment correspondant.
ATTENTION
• N'utilisez pas de boules ou de lets de lessive.
• Ne placez pas de tablettes ou de capsules de lessive dans le bac à lessive. Les tablettes et les
capsules de lessive peuvent être placées directement dans le tambour.
• An d'éviter que le compartiment ne se bouche, les agents concentrés ou fortement enrichis
(adoucissants pour tissus ou lessives) doivent être dilués dans l'eau avant d'être ajoutés.
Pour verser des produits de nettoyage à partir de la partie inférieure du lave-linge.
1. Ouvrez le couvercle du haut.
FlexWash_WV9900M_DC68-03768A-04_CFR.indd 41 2017-05-22 7:07:31
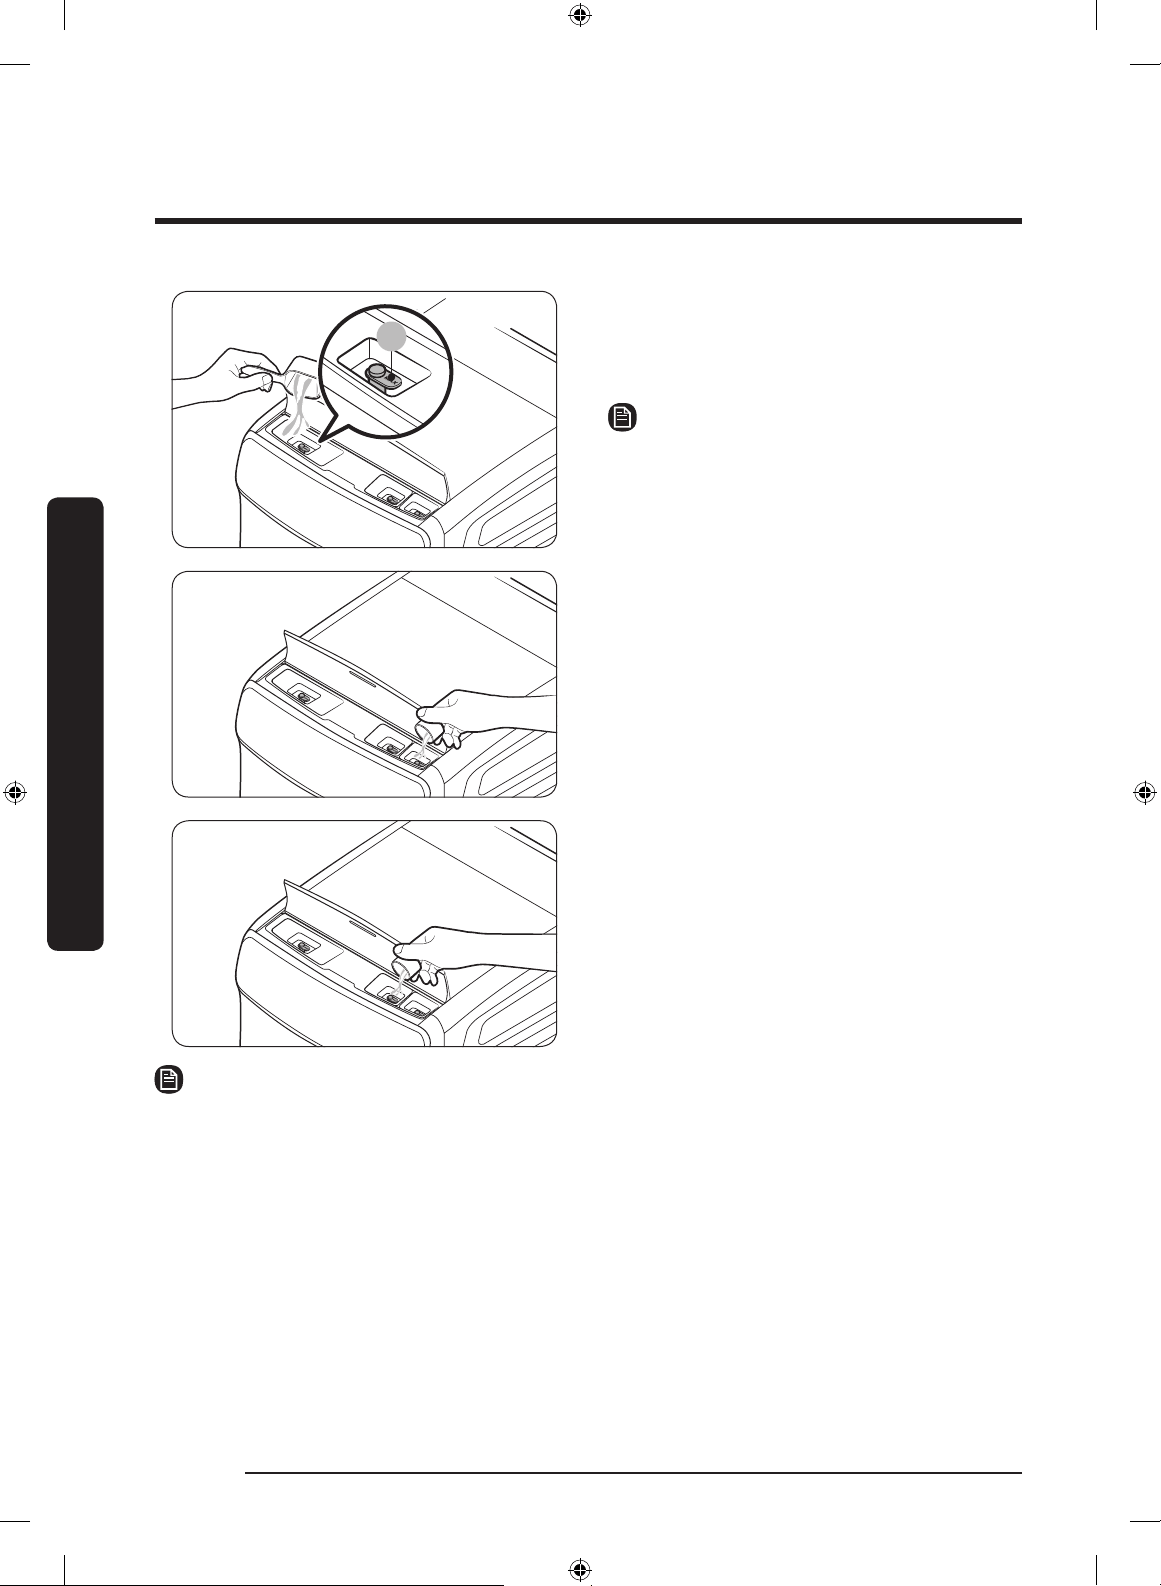
Avant de démarrer
Avant de démarrer
Français42
A
2. Versez la quantité recommandée de
lessive liquide (ou en poudre) dans le
compartiment correspondant. Ne dépassez
pas la ligne maximale (A).
REMARQUE
Pour utiliser de la lessive en poudre, retirez
d'abord le bac à lessive liquide.
3. Versez la quantité recommandée
d'adoucissant dans le compartiment
correspondant. Ne dépassez pas le repère.
4. Versez la quantité recommandée d'agent de
blanchiment chloré dans le compartiment
correspondant si vous souhaitez en utiliser.
Ne dépassez pas le repère.
5. Fermez le couvercle du haut.
REMARQUE
• Versez les
2
/3 de la quantité recommandée de lessive haute efcacité (HE) dans le
compartiment correspondant si vous souhaitez en utiliser.
• Les agents de suroxygénation peuvent augmenter les performances de lavage. Assurez-vous
d'ajouter l'agent de suroxygénation après avoir mis le linge dans le tambour.
• Pour utiliser à la fois de la lessive en poudre et un agent de suroxygénation en poudre, il est
plus efcace de les mettre ensemble dans le tambour avant de charger le linge.
FlexWash_WV9900M_DC68-03768A-04_CFR.indd 42 2017-05-22 7:07:31
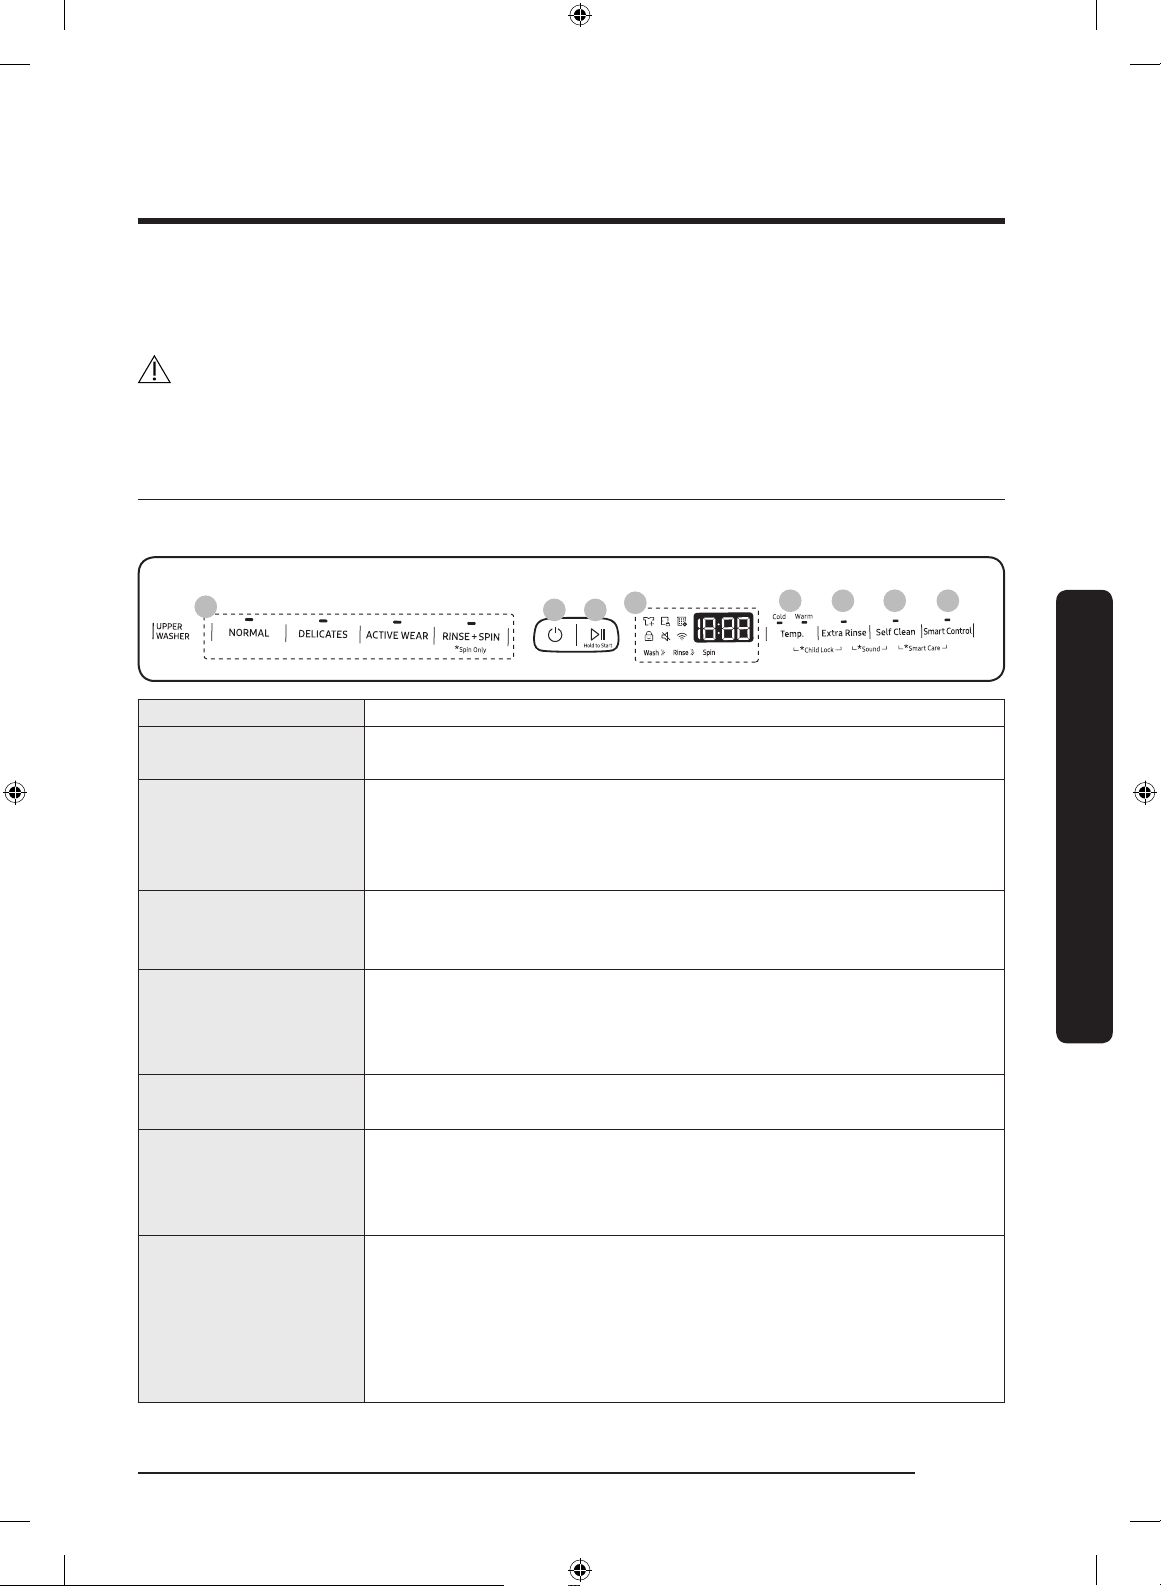
Opérations
Français 43
Opérations
Votre lave-linge à double chargement présente une partie inférieure et une partie supérieure pour plus de
praticité. La partie supérieure est un chargeur de cuve automatique conçu pour laver des petites quantités
tandis que la partie inférieure est un chargeur de tambour prenant en charge des quantités normale ou
relativement importantes. Le panneau principal est divisé en 2 panneaux de commande indépendants.
AVERTISSEMENT
An de limiter les risques d'incendie, d'électrocution ou de blessures, consultez la section
CONSIGNES IMPORTANTES DE SÉCURITÉ avant d'utiliser ce lave-linge.
Partie supérieure du lave-linge
Panneau de commande
01
03
04
05 06 07 08
02
01 Barre des cycles
Appuyez sur le cycle souhaité.
02 MARCHE/ARRÊT
Appuyez sur ce bouton pour allumer ou éteindre la partie supérieure
du lave-linge.
03 DÉPART/PAUSE
(Hold to Start
(Maintenir enfoncé
pour commencer))
Maintenez ce bouton enfoncé pour démarrer le fonctionnement, ou
appuyez sur ce bouton pour arrêter l'opération.
04 Barre d'état
La barre d'état afche les informations du cycle actuel et le temps
restant estimé, ou un code d'information si la partie supérieure du
lave-linge doit être vériée.
05 Temp.
Appuyez sur ce bouton pour basculer entre deux options de
température de l'eau.
• Warm (Tiède) : tissus grand teint.
• Cold (Froide) : linge très peu sale, couleurs vives.
06 Extra Rinse
(Rinçage intensif)
Cette option permet d'ajouter un cycle de rinçage supplémentaire à la
n du cycle an de mieux éliminer les additifs dans le linge.
07 Self Clean
(Auto-nettoyage)
Utilisez cette option pour nettoyer la saleté et les bactéries dans
la cuve. Une utilisation régulière (toutes les 20 lessives) est
recommandée. Aucun produit de nettoyage ou agent de blanchiment
n'est nécessaire. Assurez-vous que la cuve est vide.
08 Smart Control
Après avoir raccordé la partie supérieure du lave-linge à votre réseau
domestique à l'aide de l'application Samsung Smart Home, vous
pouvez contrôler le lave-linge à distance. Le témoin Smart Control
clignote et la trappe de chargement par le haut se verrouille. Le lave-
linge est prêt à recevoir les commandes à distance. Pour en savoir
plus, accédez à la page d'accueil de Samsung Smart Home.
FlexWash_WV9900M_DC68-03768A-04_CFR.indd 43 2017-05-22 7:07:32
Opérations
Opérations
Français44
Présentation des cycles
Cycle Description
NORMAL
• Pour les tissus en coton, les t-shirts, les serviettes et les charges
mixtes légèrement sales.
• Ce cycle permet de laver du linge légèrement sale normal et ne doit
pas être utilisé pour les tissus délicats (soie ou lavage à la main).
DELICATES (DÉLICAT)
• Textiles transparents, soutien-gorge, lingerie ne, soie et autres
textiles délicats à laver à la main. Pour de meilleurs résultats, utilisez
de la lessive liquide.
ACTIVE WEAR
(VÊTEMENTS DE SPORT)
• Pour les vêtements de sport (shorts, hauts/t-shirts et autres
vêtements de sport). Ce cycle permet d'éliminer la saleté du linge
délicat de manière efcace avec une rotation contrôlée de la cuve.
RINSE+SPIN
(RINÇAGE+ESSORAGE)
• Textiles ayant besoin d'un rinçage uniquement ou ajout d'un
adoucissant.
REMARQUE
Spin Only (Essorage uniquement) : Cycle d'essorage uniquement.
Maintenez le bouton RINSE+SPIN (RINÇAGE+ESSORAGE) enfoncé
pendant 3 secondes.
FlexWash_WV9900M_DC68-03768A-04_CFR.indd 44 2017-05-22 7:07:32

Opérations
Français 45
Partie inférieure du lave-linge
Panneau de commande
01
03
04
05 06 07 08
09
10
11
12
13
14
02
01 Espace cycles
Appuyez sur le cycle souhaité.
02 POWER
(MARCHE/ARRÊT)
Appuyez sur ce bouton pour allumer ou éteindre la partie inférieure
du lave-linge.
03 START/PAUSE
(DÉPART/PAUSE)
(Maintenir enfoncé
pour commencer)
Maintenez ce bouton enfoncé pour démarrer le fonctionnement, ou
appuyez sur ce bouton pour arrêter l'opération.
04 Barre d'état
La barre d'état afche les informations du cycle actuel et le temps
restant estimé, ou un code d'information si la partie inférieure du
lave-linge doit être vériée.
05 Temp.
• Extra Hot (Très chaude) : articles très sales et grand teint.
Uniquement disponible avec les cycles NORMAL, HEAVY DUTY
(GRAND RENDEMENT), SANITIZE (STÉRILISATION) et Self Clean+
(Auto-nettoyage+).
• Hot (Chaude) : linge blanc et très sale, grand teint.
• Warm (Tiède) : tissus grand teint.
• Cool (Frais) : linge très peu sale, couleurs vives.
• Cold (Froide) : utilise de l'eau froide uniquement sans actionner
l'élément chauffant. Pas une goutte d'eau tiède n'est fournie.
06 Rinse (Rinçage)
• Appuyez sur ce bouton pour spécier le nombre total de cycles de
rinçage pour le cycle. Maintenez ce bouton enfoncé pour parcourir
toutes les options disponibles pour le nombre de cycles de rinçage.
Pour en savoir plus les options disponibles pour un cycle en
particulier, consultez le Tableau des cycles à la page 80.
FlexWash_WV9900M_DC68-03768A-04_CFR.indd 45 2017-05-22 7:07:32
Opérations
Opérations
Français46
07 Spin (Essorage)
• Extra High (Très élevée) : prolonge le processus d'essorage an
de retirer efcacement l'humidité présente dans le linge. L'option
Extra High (Très élevée) est un processus d'essorage plus intensif
permettant de retirer l'humidité. Par conséquent, elle n'est adaptée
ni aux tissus infroissables ou sans repassage, ni aux surcharges.
• High (Élevée) : sous-vêtements, T-shirts, jeans et linge en coton
épais.
• Medium (Moyenne) : jeans, articles infroissables ou sans repassage,
linge synthétique.
• Low (Basse) : articles délicats qui nécessitent une vitesse
d'essorage plus basse.
• No Spin (Sans essorage) : le tambour n'essore pas après le
processus de vidange nal.
• Rinse Hold (Arrêt cuve pleine) (aucun voyant ne s'allume) : le
processus de rinçage nal est suspendu de sorte que le linge reste
immergé. Pour sortir le linge, lancez un processus de vidange ou
d'essorage.
REMARQUE
* Spin Only (Essorage uniquement) : Cycle d'essorage uniquement.
Maintenez le bouton Spin (Essorage) enfoncé pendant 3 secondes. Une
fois la durée du cycle afchée à l'écran, appuyez plusieurs fois sur le
bouton Spin (Essorage) jusqu'à ce que la vitesse d'essorage souhaitée
soit sélectionnée. Ensuite, appuyez sur le bouton START/PAUSE
(DÉPART/PAUSE) pour commencer le cycle.
08 Soil
(Niveau de saleté)
Permet de sélectionner le degré de salissure/temps de lavage.
• Extra Heavy (Très sale) : linge très sale.
• Heavy (Sale) : linge sale.
• Normal : linge moyennement sale. Ce réglage convient à
• la plupart des lessives.
• Light (Peu sale) : linge peu sale.
• Extra Light (Très peu sale) : linge à peine sale.
FlexWash_WV9900M_DC68-03768A-04_CFR.indd 46 2017-05-22 7:07:32

Opérations
Français 47
09 Pre Soak
(Pré-trempage)
Cette option ajoute 30 minutes de trempage au début du cycle de
lavage pour obtenir une meilleure élimination des tâches.
10 Steam (Vapeur)
Avec l'option Steam (Vapeur), le lave-linge détecte le poids du linge et contrôle
l'effet de vapeur en fonction de la charge. Ce cycle permet d'améliorer les
performances de lavage. Les cycles disponibles avec l'option Steam (Vapeur)
sont les suivants : NORMAL, HEAVY DUTY (GRAND RENDEMENT), BEDDING
(DRAPS), WHITES (VÊTEMENTS BLANCS) et SANITIZE (STÉRILISATION).
1. Sélectionnez un cycle. Pour les cycles applicables, voir ci-dessus.
2. Appuyez sur Steam (Vapeur).
3. Ajoutez de la lessive et de l'adoucissant pour tissus comme
indiqué.
4. Appuyez sur le bouton START/PAUSE (DÉPART/PAUSE) et
maintenez-le enfoncé pour démarrer le cycle.
REMARQUE
Il se peut que vous ne voyiez ou qu'il n'y ait pas de vapeur pendant le
cycle, ce qui est normal.
11 Super Speed
(Haute vitesse)
Appuyez sur ce bouton si vous avez besoin de raccourcir le temps
de lavage. Applicable pour les cycles NORMAL, HEAVY DUTY (GRAND
RENDEMENT) et BEDDING (DRAPS). Le temps raccourci peut varier
selon le cycle, la charge et les options sélectionnés.
FlexWash_WV9900M_DC68-03768A-04_CFR.indd 47 2017-05-22 7:07:32
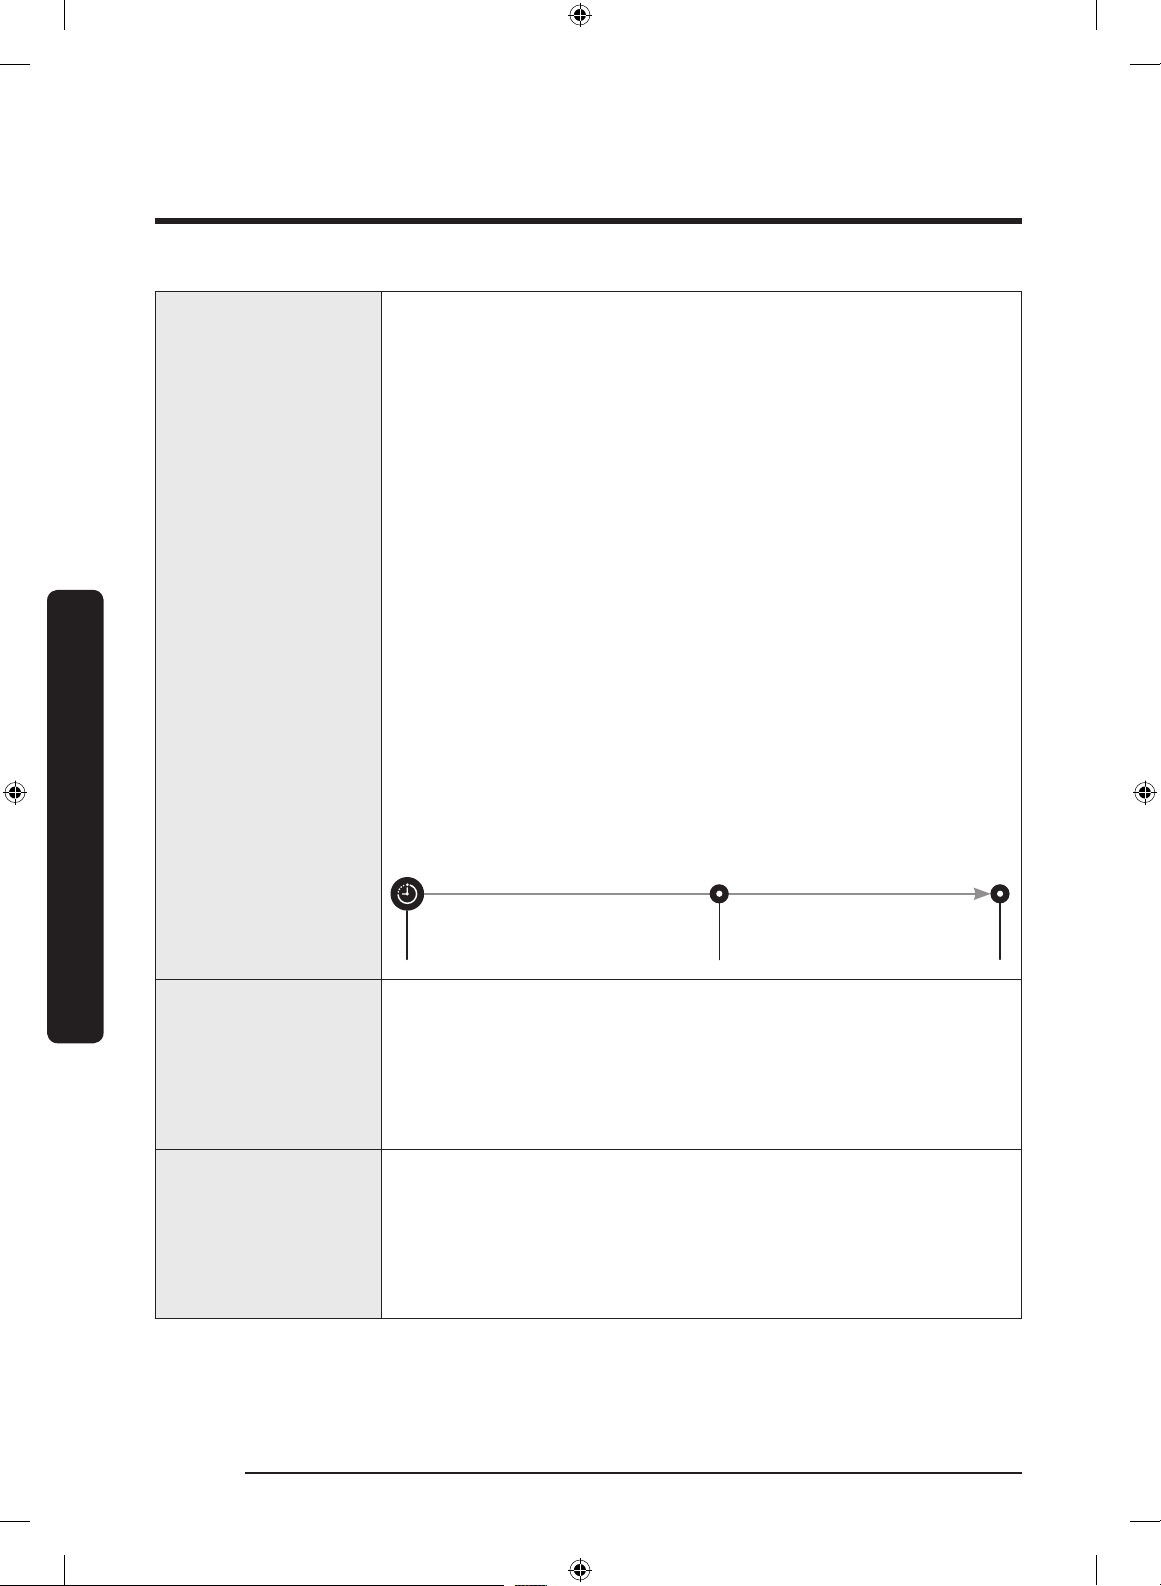
Opérations
Opérations
Français48
12 Delay End
(Arrêt différé)
Vous pouvez programmer votre lave-linge pour que le cycle de lavage
se termine automatiquement plus tard, en choisissant un départ
différé de 1 à 24 heures (par tranches d'une heure). L'heure afchée
correspond à celle à laquelle le lavage se terminera.
1. Sélectionnez un cycle. Ensuite, modiez les réglages du cycle si
nécessaire.
2. Appuyez plusieurs fois sur le bouton Delay End (Arrêt différé)
jusqu'à obtenir l'heure de n souhaitée.
3. Appuyez sur le bouton START/PAUSE (DÉPART/PAUSE) et
maintenez-le enfoncé. Le voyant situé à côté du bouton Delay End
(Arrêt différé) s'allume et l'horloge se met en marche.
4. Pour annuler le cycle Delay End (Arrêt différé), redémarrez le lave-
linge en appuyant sur le bouton POWER (MARCHE/ARRÊT).
Exemple de mise en situation
Vous souhaitez qu'un cycle de deux heures nisse dans 3 heures. Pour ce
faire, ajoutez l'option Delay End (Arrêt différé) au cycle actuel en réglant
3 heures puis appuyez sur le bouton START/PAUSE (DÉPART/PAUSE) et
maintenez-le enfoncé sur 14 h 00. Le lave-linge démarre à 15 h 00 et
s'arrête à 17 h 00. Ci-dessous, vous trouverez la chronologie pour cet
exemple.
14h00
Dénissez la fonction Arrêt différé
sur 3 heures
15h00
Départ
17h00
Fin
13 Self Clean+
(Auto-nettoyage+)
Ce cycle permet de nettoyer le tambour en éliminant la saleté et les
moisissures qu'il contient.
• Effectuez ce cycle une fois tous les 40 lavages, sans ajouter de
lessive ou d'agent de blanchiment.
• Assurez-vous que le tambour est vide.
• N'ajoutez aucun produit de nettoyage du tambour.
14 Smart Control
Après avoir raccordé la partie inférieure du lave-linge à votre réseau
domestique à l'aide de l'application Samsung Smart Home, vous
pouvez contrôler le lave-linge à distance. Le témoin Smart Control
clignote et le hublot se verrouille. Le lave-linge est prêt à recevoir
les commandes à distance. Pour en savoir plus, accédez à la page
d'accueil de Samsung Smart Home.
FlexWash_WV9900M_DC68-03768A-04_CFR.indd 48 2017-05-22 7:07:32
Opérations
Français 49
Présentation des cycles
Cycles standards
Cycle Description
DELICATES (DÉLICAT)
• Textiles transparents, soutien-gorge, lingerie ne, soie et autres
textiles délicats à laver à la main. Pour des performances optimales,
utilisez de la lessive liquide.
PERM PRESS
(INFROISSABLES)
• Pour les articles sans repassage, les tissus synthétiques et le linge
peu à normalement sale.
TOWELS (SERVIETTES) • Serviettes, gants de toilette et tapis de bain.
QUICK WASH
(LAVAGE EXPRESS)
• Pour les articles peu sales que vous souhaitez nir de laver
rapidement.
ECO COLD
(ÉCO - FROID)
• Pour les articles normalement à peu sales. Ce cycle utilise
uniquement de l'eau froide pour économiser de l'énergie. L'eau
froide aide également à éviter d'abîmer les tissus.
ACTIVE WEAR
(VÊTEMENTS DE SPORT)
• Pour les vêtements de sport (maillots, shorts, T-shirts, etc.). Ce cycle
permet d'éliminer la saleté du linge délicat de manière efcace avec
une rotation contrôlée du tambour.
RINSE+SPIN
(RINÇAGE+ESSORAGE)
• Textiles ayant besoin d'un rinçage uniquement ou ajout d'un
adoucissant.
Cycles vapeur
Cycle Description
NORMAL
• Pour les articles en coton, les draps, le linge de table, les sous-vêtements,
les serviettes ou les chemises. La durée de lavage et le nombre de cycles
de rinçage sont automatiquement ajustés selon la charge.
HEAVY DUTY
(GRAND RENDEMENT)
• Pour le linge très sale et les textiles épais grand teint.
WHITES
(VÊTEMENTS BLANCS)
• Pour les vêtements blancs, avec ou sans agent de blanchiment.
SANITIZE
(STÉRILISATION)
• Pour les articles très sales et grand teint. La température de l'eau
atteint 150 °F an d'éliminer les bactéries.
BEDDING (DRAPS)
• Pour les articles volumineux, comme les couettes, les couvertures
et les draps.
• Pour des résultats optimaux, lavez 1 seul type de draps.
• Pour les articles volumineux, utilisez de la lessive liquide et
n'enroulez pas les articles lorsque vous les placez dans le tambour
pour éviter qu'ils ne se collent.
FlexWash_WV9900M_DC68-03768A-04_CFR.indd 49 2017-05-22 7:07:32
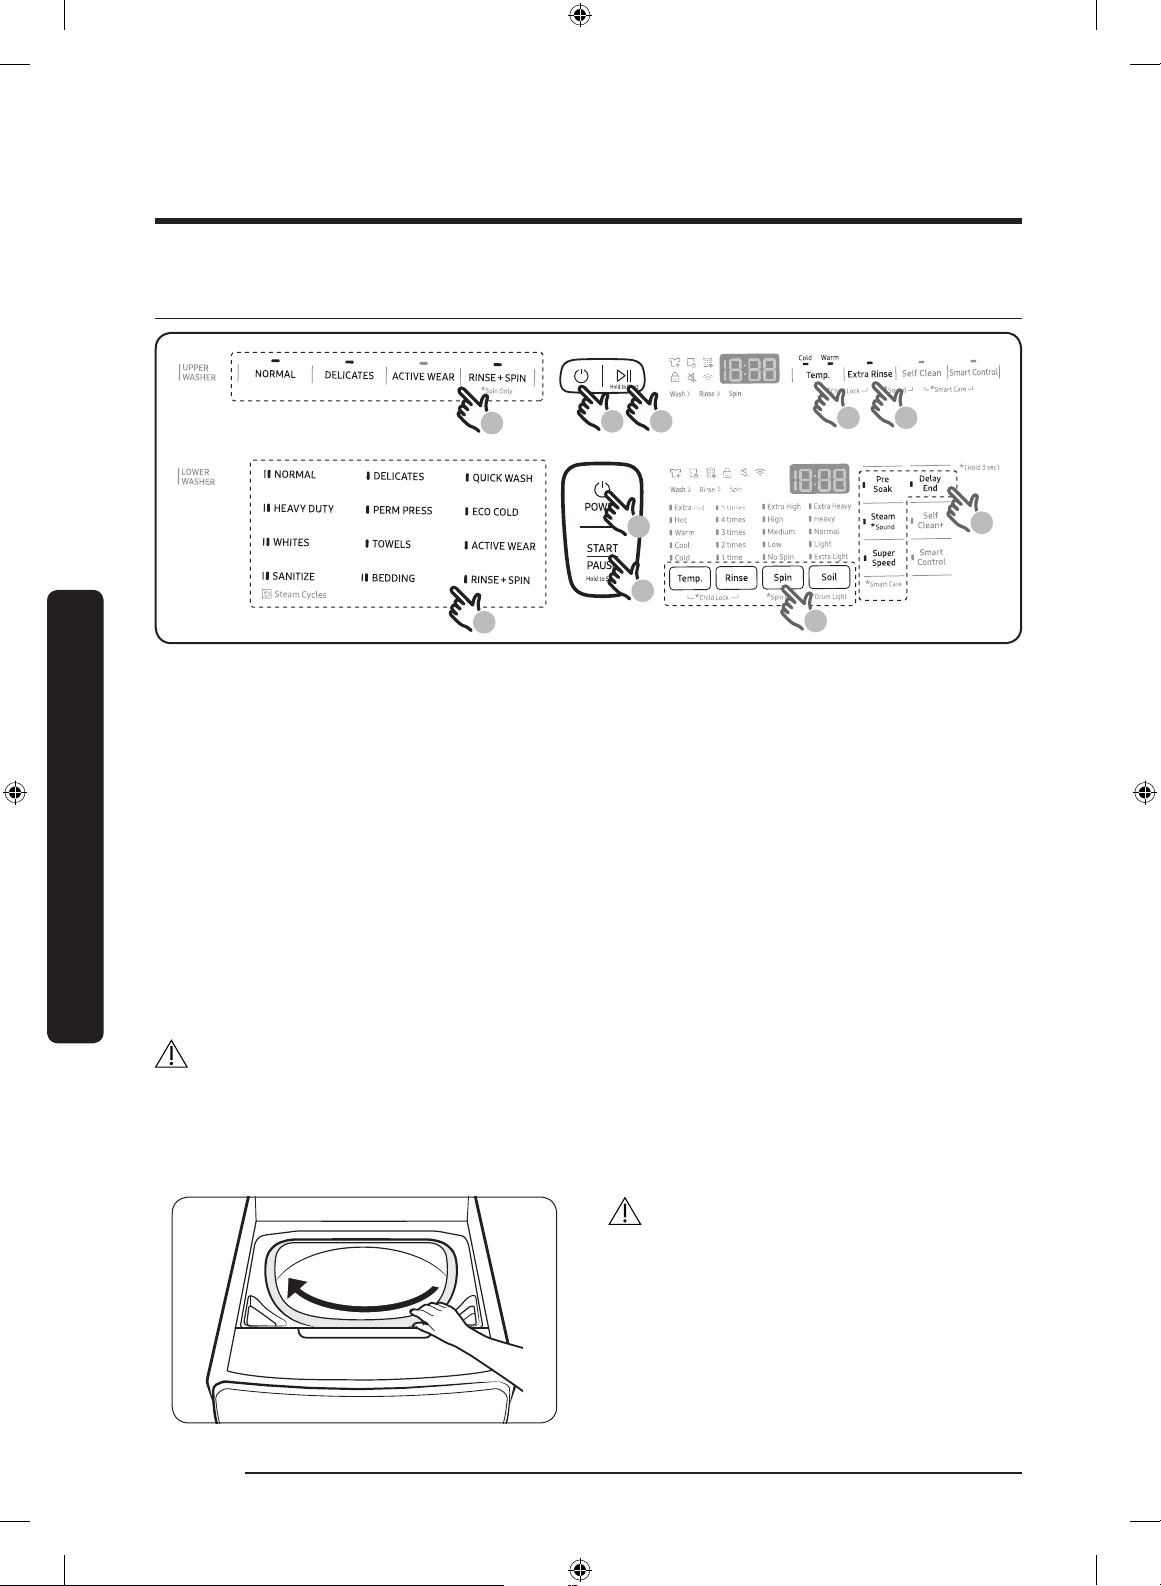
Opérations
Opérations
Français50
Étapes simples pour commencer
03
01 06
06
04 05
01
03
04
05
1. Appuyez sur POWER (MARCHE/ARRÊT) sur le panneau de commande de la partie inférieure ou
supérieure du lave-linge pour le mettre sous tension.
2. Placez votre linge dans le lave-linge.
3. Sélectionnez un cycle.
4. Modiez les réglages du cycle (température et/ou niveau de saleté) en fonction du linge.
5. Sélectionnez les options de cycle nécessaires.
6. Appuyez sur le bouton START/PAUSE (DÉPART/PAUSE) et maintenez-le enfoncé.
Pour changer de cycle pendant l'utilisation
1. Appuyez sur START/PAUSE (DÉPART/PAUSE) pour interrompre temporairement le fonctionnement.
2. Sélectionnez un autre cycle.
3. Appuyez à nouveau sur le bouton START/PAUSE (DÉPART/PAUSE) et maintenez-le enfoncé
pour démarrer le nouveau cycle.
AVERTISSEMENT
• Ne posez aucun objet sur le lave-linge lorsque celui-ci est en fonctionnement.
• Lorsque la partie inférieure du lave-linge est en fonctionnement, le couvercle de protection
peut dégager de la vapeur humide en raison de la différence de température entre la partie
inférieure et la partie supérieure du lave-linge.
ATTENTION
Lorsque vous utilisez la partie supérieure du
lave-linge, il se peut que ne voyiez pas les
éventuels vêtements restants dans la zone
avant de la cuve.
Une fois le cycle terminé, tournez la cuve
manuellement pour vériez si des vêtements
sont restés dans la cuves.
FlexWash_WV9900M_DC68-03768A-04_CFR.indd 50 2017-05-22 7:07:33

Opérations
Français 51
Cet appareil est un lave-linge intelligent qui prend en charge
le service Samsung Smart Home.
Le temps nécessaire à la fonction de conguration EZ
(connexion du lave-linge au réseau) peut varier selon l'état de
votre réseau.
Samsung Smart Home
Installation
Rendez-vous sur Google Play Store, Galaxy Apps ou Apple App Store et recherchez « Samsung
Smart Home ». Téléchargez et installez l’application Samsung Smart Home fournie par Samsung
Electronics sur votre appareil intelligent.
REMARQUE
• L’application Samsung Smart Home est conçue pour Android 4.0 (ICS) ou versions supérieures,
et pour iOS 8.0 ou versions supérieures. Elle est également optimisée pour les smartphones
Samsung (séries Galaxy S et Galaxy Note).
• Sur d’autres appareils, certaines fonctions peuvent opérer différemment.
• Pour des performances optimales, l’application Samsung Smart Home peut faire l’objet de
modications sans préavis.
Enregistrer un compte Samsung
Pour utiliser l’application Samsung Smart Home, vous devez d’abord vous connecter à votre
compte Samsung. Si vous n’avez pas de compte Samsung, sélectionnez Register (S’enregistrer)
dans l’application puis suivez les instructions afchées sur l’écran pour créer un compte.
REMARQUE
• Si vous avez un compte Samsung enregistré, connectez-vous à votre compte Samsung. Si
vous avez un smartphone Samsung, accédez au menu des paramètres de votre smartphone,
sélectionnez Comptes et connectez-vous à votre compte Samsung. Vous pourrez ainsi vous
connecter sans authentication complémentaire.
• Pour les autres smartphones, le compte de l’application doit être identique au compte de
conguration facile.
FlexWash_WV9900M_DC68-03768A-04_CFR.indd 51 2017-05-22 7:07:33

Opérations
Opérations
Français52
Mise en marche
Grâce à l’application Samsung Smart Home, vous pouvez contrôler à distance votre lave-linge en
utilisant votre appareil intelligent. Pour des performances optimales, le contenu et la conception
de l’application peuvent faire l’objet de modications sans préavis.
1. Lancez l’application Samsung Smart Home sur votre smartphone.
2. Si « Washer » (Lave-linge) ne gure pas dans la liste, appuyez sur Add Device (Ajouter un
appareil) > Select other device (Sélectionner un autre appareil) > Washer (Lave-linge) sur
l’écran de l’application.
3. Sur le panneau de commande de votre lave-linge, maintenez le bouton Smart Control enfoncé
pendant plus de 5 secondes, jusqu’à ce que le message « AP » (Point d’accès) apparaisse à
l’écran.
4. Une fois l'enregistrement de l'appareil terminé, activez la fonction Smart Control sur votre
lave-linge pour le contrôler à distance.
FlexWash_WV9900M_DC68-03768A-04_CFR.indd 52 2017-05-22 7:07:33

Opérations
Français 53
Fonctions spéciales
Sécurité enfant
An d'éviter que les enfants ne démarrent ou ne congurent le lave-linge par mégarde, la
fonction Child Lock (Sécurité enfant) verrouille tous les boutons, sauf le bouton POWER (MARCHE/
ARRÊT). Notez que chaque lave-linge fonctionne indépendamment et dispose de sa propre
fonction Child Lock (Sécurité enfant). Si vous souhaitez activer la fonction Child Lock (Sécurité
enfant) sur la partie inférieure ou supérieure du lave-linge, vous devez appuyer sur les boutons
correspondants sur le panneau de commande de la partie inférieure ou supérieure du lave-linge.
Pour activer la fonction Sécurité enfant
• Appuyez simultanément sur les boutons Temp. et Rinse (Rinçage) (ou Temp. et Extra Rinse
(Rinçage intensif) pour la partie supérieure du lave-linge) et maintenez-les enfoncés pendant
3 secondes. Le hublot se verrouille et le voyant de la fonction Child Lock (Sécurité enfant)
s'allume. Ensuite, appuyez sur le bouton START/PAUSE (DÉPART/PAUSE) pour l'activer.
Pour désactiver temporairement la fonction Sécurité enfant
• Vous pouvez désactiver temporairement la fonction Child Lock (Sécurité enfant) pendant
1 minute. Pour ce faire, appuyez simultanément sur les boutons Temp. et Rinse (Rinçage) (ou
Temp. et Extra Rinse (Rinçage intensif) pour la partie supérieure du lave-linge) et maintenez-
les enfoncés pendant 3 secondes. Le hublot est déverrouillé pendant 1 minute et le voyant de
la fonction Child Lock (Sécurité enfant) clignote.
REMARQUE
• Si vous ouvrez le hublot 1 minute ou plus après avoir désactivé la fonction Child Lock (Sécurité
enfant), une alarme retentit pendant 2 minutes maximum.
• Si vous fermez le hublot avant que les 2 minutes ne se soient écoulées, il se verrouille et la
fonction Child Lock (Sécurité enfant) est réactivée. Si vous ne fermez pas le hublot ou s'il est
mal fermé, l'alarme continue de retentir pendant 2 minutes.
• Pour ajouter du linge après avoir activé la fonction Child Lock (Sécurité enfant), désactivez
d'abord cette fonction ou redémarrez le lave-linge.
Pour désactiver la fonction Sécurité enfant
• Appuyez sur les boutons Temp. et Rinse (Rinçage) (ou Temp. et Extra Rinse (Rinçage intensif)
pour la partie supérieure du lave-linge) en les maintenant enfoncés pendant 3 secondes pour
désactiver, puis appuyez à nouveau sur les boutons en les maintenant enfoncés pendant
3 secondes pour désactiver la fonction Child Lock (Sécurité enfant). Le hublot se déverrouille
et le voyant de la fonction Child Lock (Sécurité enfant) s'éteint.
FlexWash_WV9900M_DC68-03768A-04_CFR.indd 53 2017-05-22 7:07:33

Opérations
Opérations
Français54
Smart Care
La fonction Smart Care vous aide à diagnostiquer et à dépanner votre lave-linge s'il rencontre
un problème. Pour activer cette fonction, vous devez d'abord télécharger l'application Samsung
Smart Washer sur Play Store ou sur Apple Store et l'installer sur un appareil mobile disposant d'un
appareil photo intégré. La fonction Smart Care a été optimisée pour : les appareils des gammes
Galaxy et iPhone. (Elle n'est pas prise en charge par certains modèles.)
Lorsque le lave-linge est en marche, il exécute un autodiagnostic en arrière-plan. S'il détecte un
problème, il afche un code d'informations sur l'écran que vous pouvez scanner en utilisant la
fonction Smart Care de l'application ainsi que les informations détaillées relatives au code à titre
indicatif.
1. Appuyez sur le bouton Super Speed (Haute vitesse) (ou Self Clean (Auto-nettoyage) et Smart
Control pour la partie supérieure du lave-linge) du lave-linge et maintenez-le enfoncé pendant
3 secondes pour passer en mode Smart Care.
2. Exécutez l'application Samsung Smart Washer sur votre appareil mobile, puis appuyez
légèrement sur Smart Care.
3. Tenez l'appareil mobile de sorte qu'il se trouve face à la barre d'état du lave-linge. L'application
reconnaîtra automatiquement le code d'informations.
4. Une fois le code d'information correctement reconnu, l'application fournit des informations
détaillées concernant le problème ainsi que les mesures à prendre.
REMARQUE
• Le nom de la fonction, Smart Care, peut varier selon la langue.
• Si l'écran du lave-linge rééchit de la lumière, l'application peut ne pas parvenir à reconnaître
le code d'information.
• Si l'application ne parvient pas à reconnaître le code d'informations à plusieurs reprises,
saisissez le code d'informations manuellement sur l'écran de l'application.
• L'historique des codes d'informations est supprimé après l'utilisation de cette fonction.
FlexWash_WV9900M_DC68-03768A-04_CFR.indd 54 2017-05-22 7:07:33

Opérations
Français 55
Son
Activez ou désactivez le son (signaux sonores des boutons, des voyants etc.)
Partie supérieure du lave-linge
• Pour désactiver le son de l'alarme ou du signal de la partie supérieure du lave-linge, appuyez
sur les boutons Extra Rinse (Rinçage intensif) et Self Clean (Auto-nettoyage) et maintenez-les
enfoncés pendant 3 secondes. Pour le réactiver, appuyez et maintenez à nouveau enfoncés ces
boutons pendant 3 secondes.
Partie inférieure du lave-linge
• Pour désactiver le son de l'alarme ou du signal de la partie inférieure du lave-linge, appuyez
sur le bouton Steam (Vapeur) et maintenez-le enfoncé pendant 3 secondes. Pour le réactiver,
appuyez et maintenez à nouveau enfoncé ce bouton pendant 3 secondes.
Éclairage du tambour (partie inférieure du lave-linge uniquement)
L'éclairage du tambour s'allume lorsque le hublot est ouvert et s'éteint après 2 minutes. Pour
allumer ou éteindre l'éclairage du tambour manuellement, maintenez le bouton Soil (Niveau de
saleté) enfoncé pendant 3 secondes.
ATC (Contrôle automatique de la température)
La fonction ATC permet au lave-linge de contrôler la température de l'eau dans chaque cycle de
lavage à l'aide de la thermistance interne du lave-linge. Elle est conçue pour maintenir certaines
températures pour l'eau de lavage an de garantir des résultats optimaux.
• Si vous sélectionnez le cycle NORMAL ou HEAVY DUTY (GRAND RENDEMENT), il se peut que
vous constatiez que votre lave-linge fournit de l'eau froide. Ceci est normal car le lave-linge
est conçu pour réduire la consommation d'énergie.
• Avec ces cycles, le réglage de température Hot (Chaude) est similaire à l'eau d'un bain et le
réglage de température Warm (Tiède) à des températures de piscine agréables.
• Pour laver le linge à une température spécique, vous devez d'abord choisir un cycle différent.
FlexWash_WV9900M_DC68-03768A-04_CFR.indd 55 2017-05-22 7:07:33

Maintenance
Français56
Maintenance
Gardez le lave-linge propre an d'éviter la détérioration de ses performances et de préserver son
cycle de vie.
AVERTISSEMENT
La mise à la terre du panneau de commande, du dissipateur thermique, du moteur, de la vanne
d'arrivée d'eau et de la pompe n'a volontairement pas été effectuée ; ces éléments peuvent donc
présenter un risque d'électrocution (lors de l'entretien uniquement).
Informations générales
Nettoyage
Surface du lave-linge
Utilisez un chiffon doux avec un produit d'entretien ménager non abrasif. Ne versez pas d'eau sur
le lave-linge.
Extérieure
1. Fermez les robinets d'eau après avoir terminé la lessive de la journée.
Cela permettra de couper l'arrivée d'eau dans votre lave-linge et d'empêcher tout dégât des
eaux potentiel. Laissez le hublot ouvert pour permettre à l'intérieur de votre lave-linge de
sécher.
2. Utilisez un chiffon doux pour essuyer les traces de lessive, d'agent de blanchiment ou d'autres
produits sur les parois de la machine.
Conseils de nettoyage recommandés :
- Panneaux de commande : nettoyez-les avec un chiffon doux et humide. N'utilisez pas
de poudres abrasives ni de tampons à récurer. Ne vaporisez aucun produit d'entretien
directement sur les panneaux de l'appareil.
- Châssis : nettoyez-le à l'eau et au savon.
Intérieure
Nettoyez régulièrement le tambour pour enlever la poussière, la saleté, les odeurs, les moisissures
ou les bactéries qui pourraient s'y être accumulées après une lessive.
ATTENTION
Le non-respect de ces instructions peut avoir des conséquences désagréables, comme le
dégagement d'odeurs désagréables ou le transfert de traces indélébiles sur le lave-linge ou le
linge.
REMARQUE
Éliminez les dépôts calcaires si besoin. Utilisez un produit adapté aux lave-linge.
FlexWash_WV9900M_DC68-03768A-04_CFR.indd 56 2017-05-22 7:07:33
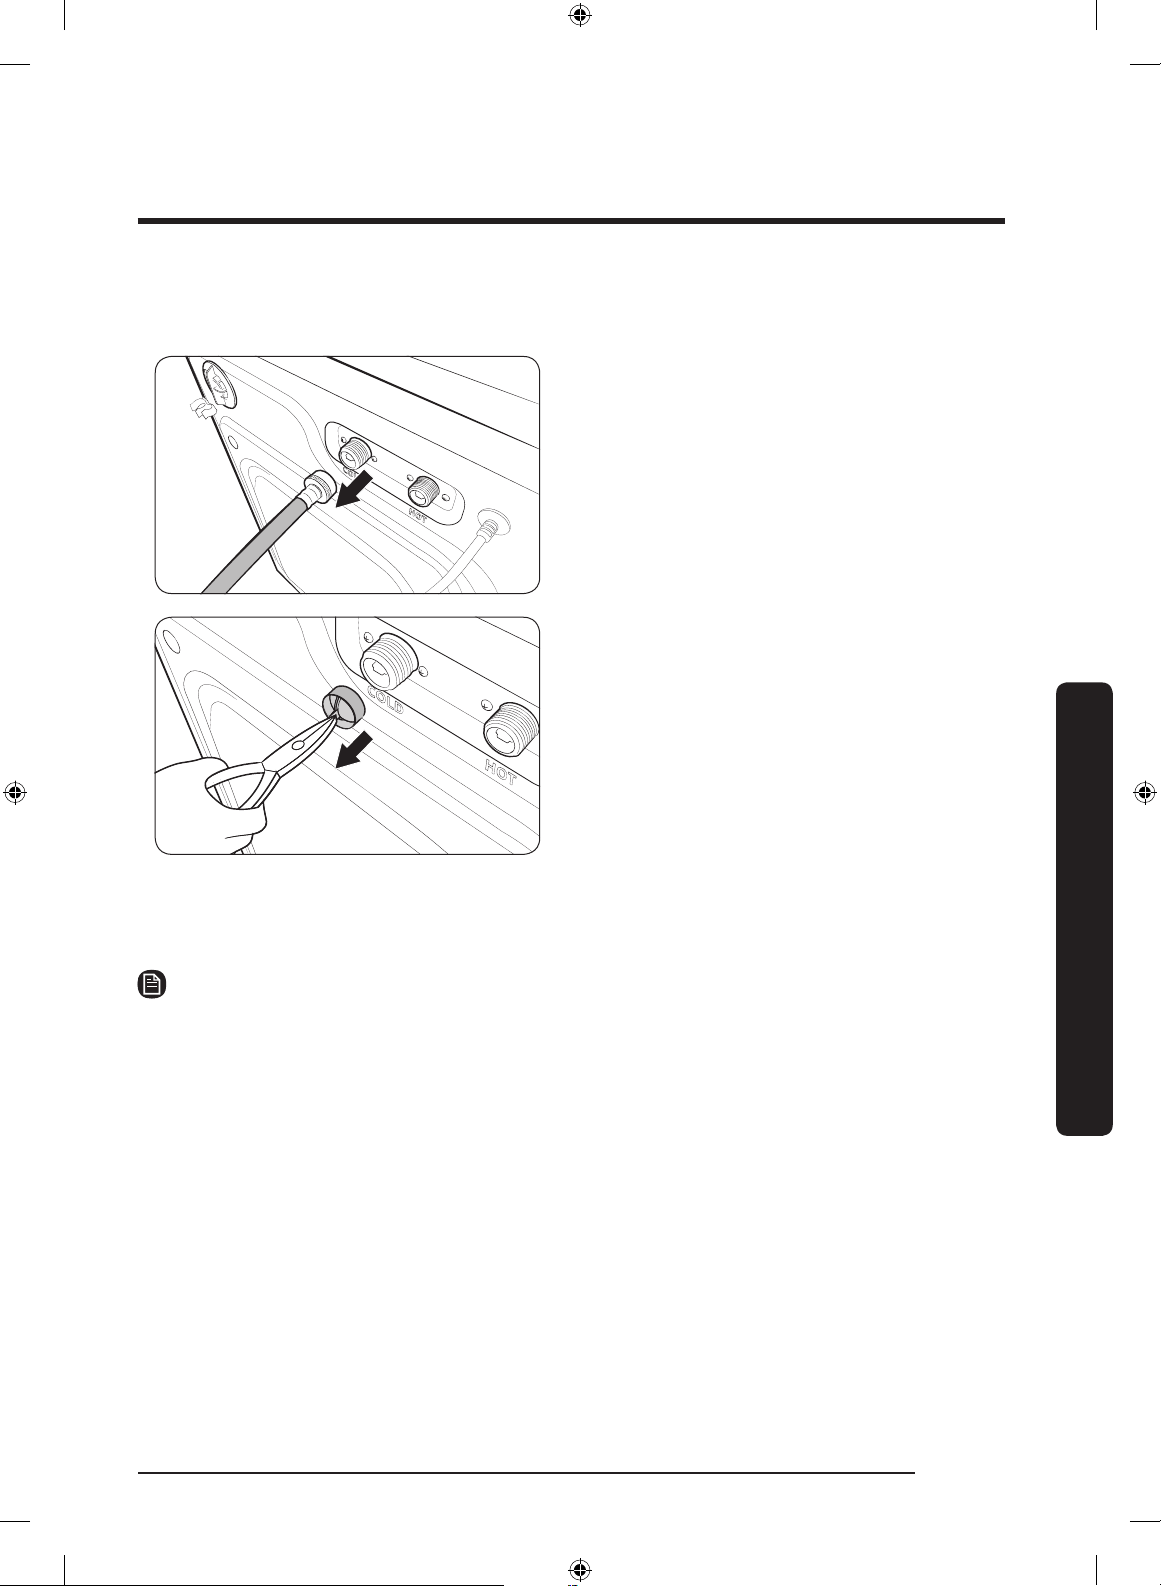
Maintenance
Français 57
Filtre à maille
Nettoyez le ltre à maille du tuyau d'eau une fois ou deux par an.
1. Éteignez le lave-linge et débranchez le
cordon d'alimentation.
2. Fermez les robinets.
3. Desserrez et débranchez le tuyau d'eau à
l'arrière du lave-linge. Recouvrez le tuyau à
l'aide d'un chiffon an d'éviter que de l'eau
ne coule à ots.
4. Utilisez une pince pour retirer le ltre à
maille au niveau de la vanne d'arrivée
d'eau.
5. Plongez le ltre à maille en profondeur
dans de l'eau de sorte que le raccord leté
soit lui aussi submergé.
6. Faites sécher complètement le ltre à
maille à l'ombre.
7. Réinstallez le ltre à maille dans la vanne
d'arrivée d'eau et rebranchez le tuyau d'eau
sur cette dernière.
8. Ouvrez le robinet.
REMARQUE
Si le ltre à maille est colmaté, le code d'information « 4C » apparaît sur l'écran du lave-linge.
FlexWash_WV9900M_DC68-03768A-04_CFR.indd 57 2017-05-22 7:07:33

Maintenance
Maintenance
Français58
Reprise après gel
Le lave-linge peut geler lorsque la température environnante chute en dessous de 32 °F (0 °C).
1. Éteignez le lave-linge et débranchez le cordon d'alimentation.
2. Versez de l'eau chaude sur le robinet pour assouplir le tuyau d'arrivée d'eau.
3. Débranchez le tuyau d'eau et plongez-le dans de l'eau tiède.
4. Versez de l'eau tiède dans le tambour (cuve) et laissez-la agir pendant environ 10 minutes.
5. Rebranchez le tuyau d'eau sur le robinet.
REMARQUE
Si le lave-linge ne fonctionne toujours pas normalement, recommencez les étapes ci-dessus
jusqu'à ce qu'il fonctionne normalement.
Entretien en cas d'inutilisation prolongée
Évitez de laisser le lave-linge inutilisé pendant une période prolongée. Si vous savez que vous
n'allez pas utiliser le lave-linge pendant une période prolongée, suivez la procédure ci-dessous :
1. Appuyez sur POWER (MARCHE/ARRÊT) puis sélectionnez RINSE+SPIN (RINÇAGE+ESSORAGE).
2. Videz le tambour et la cuve, fermez le hublot puis appuyez sur le bouton START/PAUSE
(DÉPART/PAUSE).
3. Une fois le cycle terminé, fermez le robinet et débranchez les tuyaux d'eau.
4. Éteignez le lave-linge et débranchez le cordon d'alimentation.
5. Ouvrez les hublots pour laisser l'air circuler à travers le tambour et la cuve.
FlexWash_WV9900M_DC68-03768A-04_CFR.indd 58 2017-05-22 7:07:33
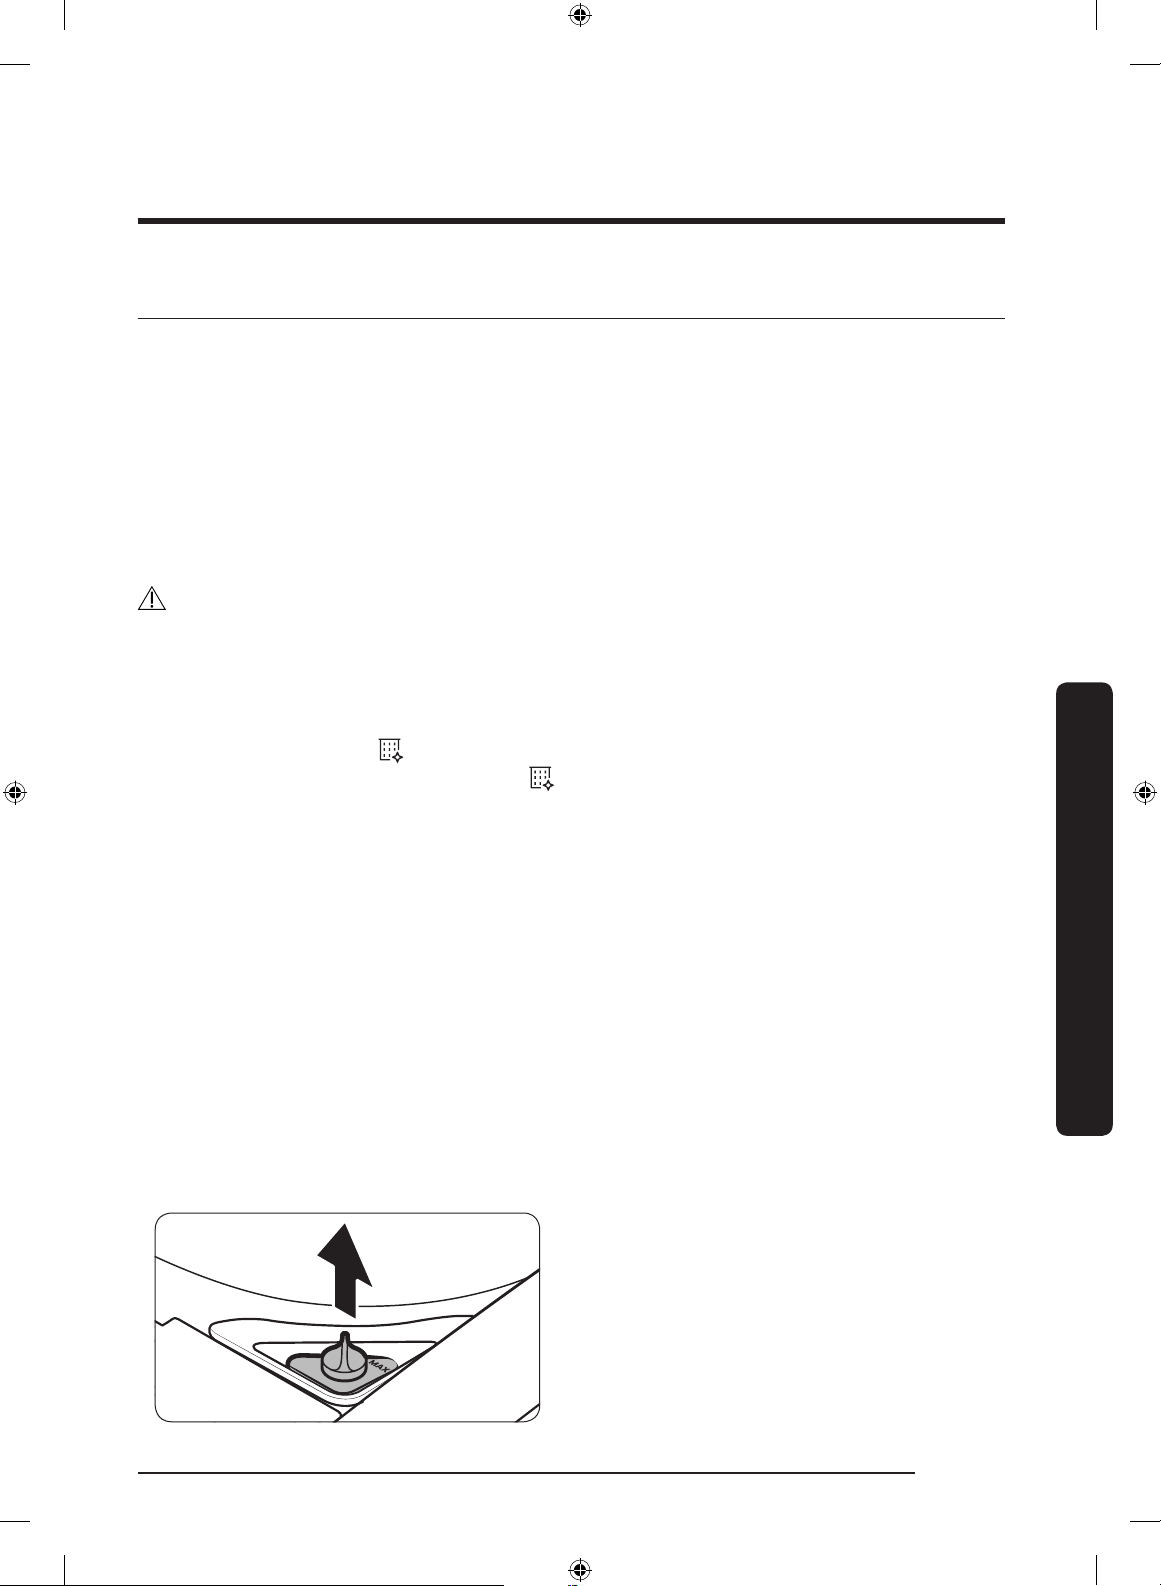
Maintenance
Français 59
Partie supérieure du lave-linge
Auto-nettoyage
Self Clean (Auto-nettoyage) est un cycle d'auto-nettoyage permettant d'éliminer les bactéries et la
saleté pouvant se former à l'intérieur de la cuve. Nous vous recommandons d'utiliser la fonction
Self Clean (Auto-nettoyage) tous les 20 lavages.
1. Assurez-vous que la cuve est vide.
2. Appuyez sur POWER (MARCHE/ARRÊT).
3. Appuyez sur le bouton Self Clean (Auto-nettoyage).
4. Appuyez sur le bouton START/PAUSE (DÉPART/PAUSE) et maintenez-le enfoncé.
ATTENTION
• Grâce au programme Self Clean (Auto-nettoyage), vous pouvez nettoyer la cuve sans utiliser
de produit de nettoyage ni d'agent de blanchiment.
• Utilisez uniquement le programme Self Clean (Auto-nettoyage) lorsque la cuve est vide. Cela
risquerait d'endommager le linge ou le lave-linge.
Rappel Auto-nettoyage ( )
• Le rappel Self Clean+ (Auto-nettoyage+) ( ) apparaît sur l'écran principal une fois tous les
20 lavages. Nous vous recommandons vivement d'effectuer Self Clean+ (Auto-nettoyage+)
régulièrement. Dans ce cas, retirez le linge du lave-linge, allumez la machine puis nettoyez la
cuve en lançant le cycle Self Clean (Auto-nettoyage).
• Si vous ne lancez pas de cycle Self Clean (Auto-nettoyage), le voyant Self Clean (Auto-nettoyage)
s'éteint. Toutefois, le voyant s'allumera à nouveau après cinq lavages. Ne pas lancer de cycle Self
Clean (Auto-nettoyage) à ce stade ne met pas en péril le bon fonctionnement du lave-linge. Toutefois,
nous vous recommandons vivement de lancer un cycle Self Clean (Auto-nettoyage) à ce stade.
• Bien que le voyant Self Clean (Auto-nettoyage) s'allume environ une fois par mois, il est possible
que la fréquence d'apparition varie en fonction de la fréquence d'utilisation du lave-linge.
Compartiment d'adoucissant/agent de blanchiment
Le compartiment d'adoucissant et le compartiment d'agent de blanchiment de la partie supérieure
du lave-linge ne sont amovibles à des ns de praticité visuelle pour les utilisateurs. Pour nettoyer
le compartiment d'adoucissant, suivez ces instructions. Le nettoyage du compartiment d'agent de
blanchiment est sensiblement le même.
1. Ouvrez la trappe de chargement par le haut
puis retirez le bouchon de l'adoucissant.
FlexWash_WV9900M_DC68-03768A-04_CFR.indd 59 2017-05-22 7:07:34
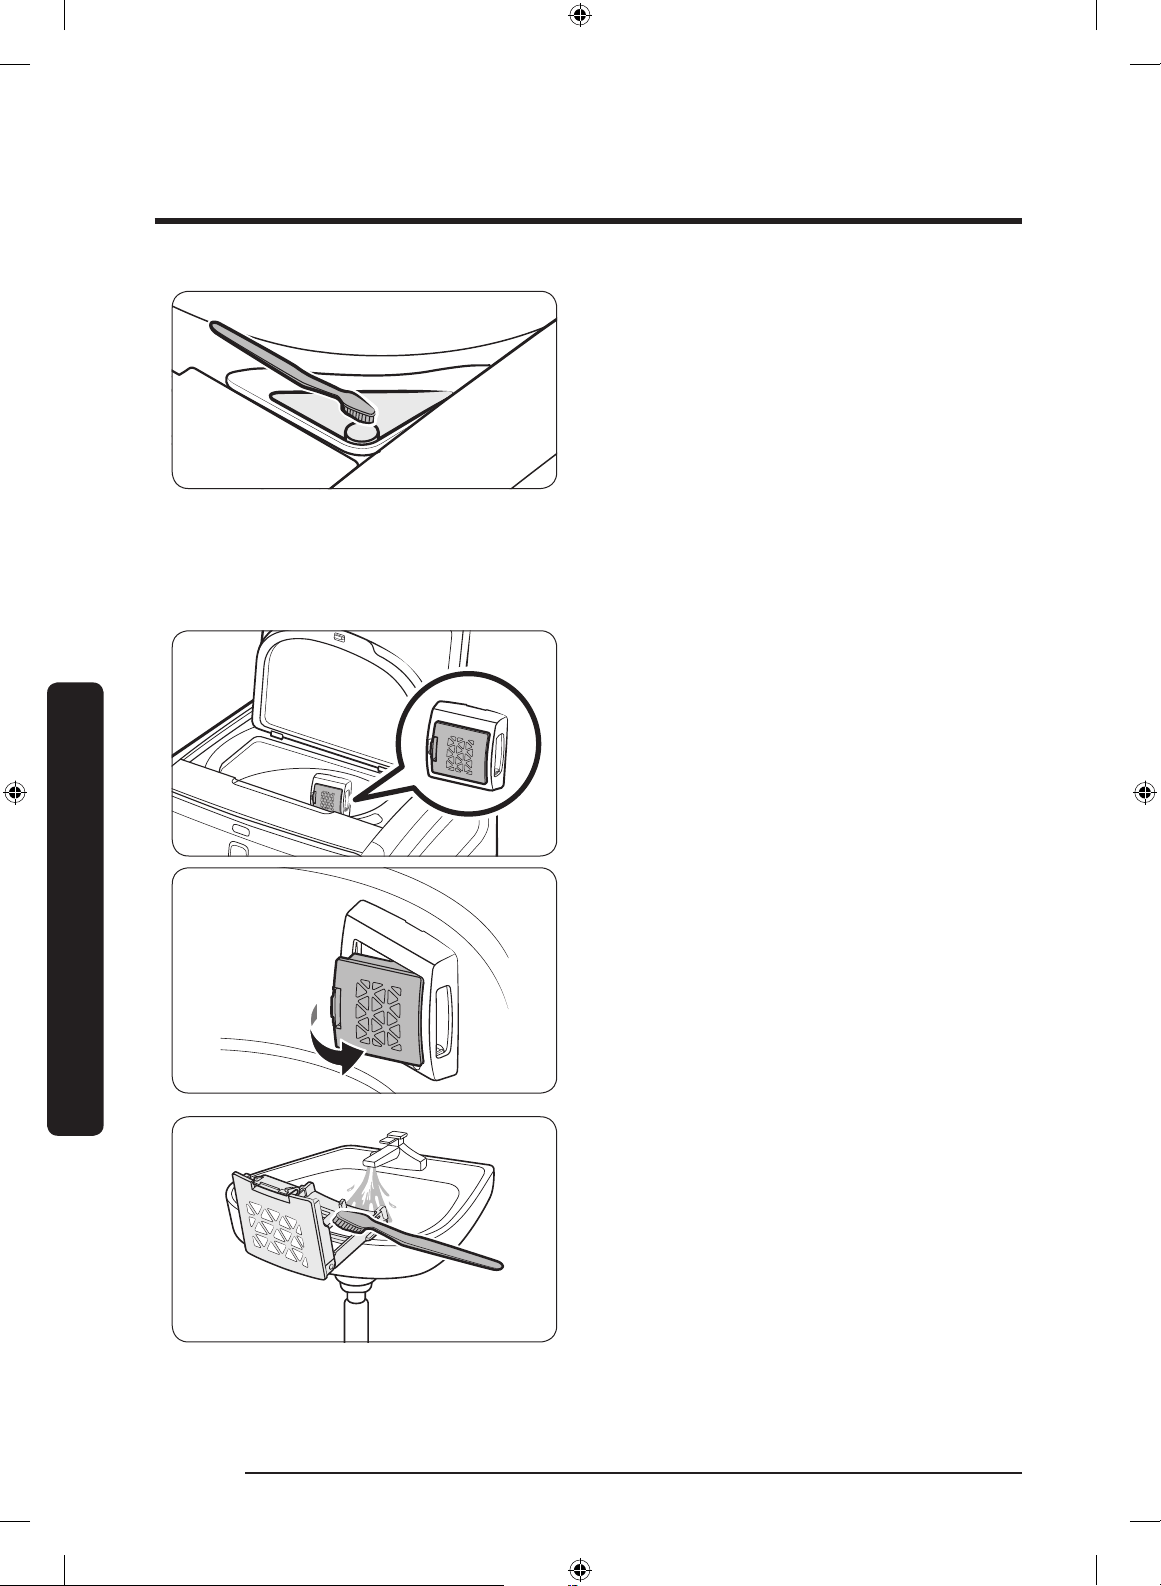
Maintenance
Maintenance
Français60
2. Utilisez une brosse douce (une brosse à
dent par exemple) pour nettoyer l'intérieur
du compartiment et retirer les impuretés.
3. Lancez le cycle RINSE+SPIN
(RINÇAGE+ESSORAGE) pour rincer le
compartiment. Après les 5 périodes
d'alimentation en eau et de vidange, le
cycle de 18 minutes s'achève avec le
processus d'essorage nal.
Filtre à peluches
Nous vous recommandons de nettoyer le ltre à peluches tous les 10 lavages.
1. Retirez le ltre à peluches du boîtier du
ltre sur la cuve de la partie supérieure du
lave-linge.
2. Ouvrez le ltre puis nettoyez-le à l'eau
claire avec une brosse.
3. Une fois le nettoyage terminé, fermez
le ltre et réinsérez-le dans sa position
initiale. Le « clic » sonore indique que le
ltre est bien installé.
FlexWash_WV9900M_DC68-03768A-04_CFR.indd 60 2017-05-22 7:07:34

Maintenance
Français 61
Partie inférieure du lave-linge
Auto-nettoyage+
Lancez régulièrement ce cycle pour nettoyer le tambour et éliminer les moisissures qu'il contient.
1. Assurez-vous que le tambour est vide.
2. Appuyez sur le bouton POWER (MARCHE/ARRÊT) pour allumer le lave-linge.
3. Appuyez sur le bouton Self Clean+ (Auto-nettoyage+).
4. Appuyez sur le bouton START/PAUSE (DÉPART/PAUSE) et maintenez-le enfoncé.
ATTENTION
• N'utilisez aucun produit de nettoyage. N'ajoutez aucune lessive ni agent de blanchiment. Les
résidus chimiques dans le tambour détériorent les performances de nettoyage.
• Utilisez uniquement le programme Self Clean+ (Auto-nettoyage+) lorsque le tambour est vide.
N'utilisez pas le programme Self Clean+ (Auto-nettoyage+) si le tambour contient du linge. Cela
risquerait d'endommager le linge ou le lave-linge.
REMARQUE
La température de l'eau pour le programme Self Clean+ (Auto-nettoyage+) est réglée sur Extra Hot
(Très chaude), ce qui ne peut être modié.
Rappel Auto-nettoyage+ ( )
• Le rappel Self Clean+ (Auto-nettoyage+) ( ) apparaît sur l'écran principal une fois tous les
40 lavages. Il est recommandé de lancer régulièrement le cycle Self Clean+ (Auto-nettoyage+).
• Si vous ne lancez pas le programme Self Clean+ (Auto-nettoyage+) tous les 40 lavages, le
rappel Self Clean+ (Auto-nettoyage+) se désactive après une heure.
• Lorsque ce rappel s'afche pour la première fois, vous pouvez l'ignorer pendant 6 lavages
consécutifs. À partir du 7
ème
lavage, le rappel n'apparaît plus. Toutefois, il réapparaît au
40
ème
lavage.
FlexWash_WV9900M_DC68-03768A-04_CFR.indd 61 2017-05-22 7:07:34
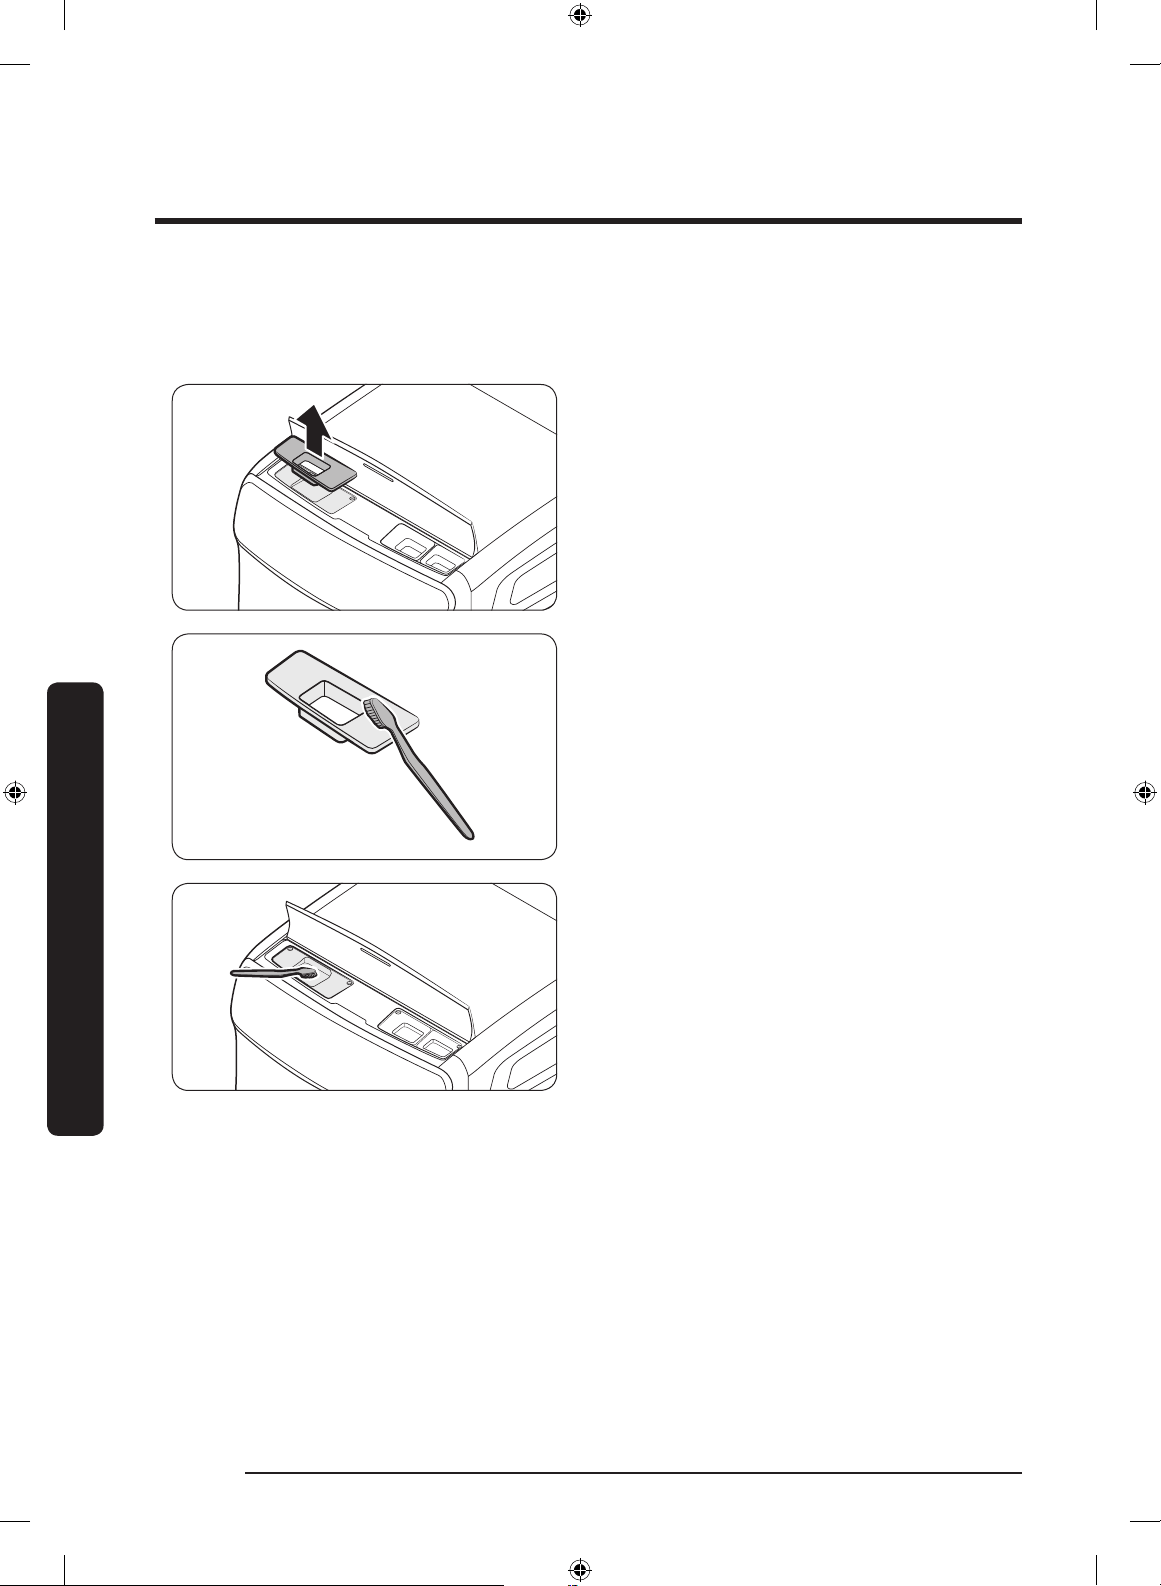
Maintenance
Maintenance
Français62
Compartiment de lavage principal
Le compartiment de lavage principal doit être nettoyé périodiquement an d'éliminer
l'accumulation d'additifs dans le linge.
1. Ouvrez le couvercle du haut. Tenez le
compartiment de lavage principal puis
tirez-le pour le retirer.
2. Éliminez tous les résidus et toutes les
traces d'agents accumulés dans le linge à
partir du compartiment. Rincez-le avec de
l'eau tiède.
3. Pour nettoyer les parois du compartiment,
utilisez une petite brosse non métallique.
Retirez tous les résidus de chaque côté du
compartiment.
4. Remettez le compartiment à sa place.
FlexWash_WV9900M_DC68-03768A-04_CFR.indd 62 2017-05-22 7:07:34
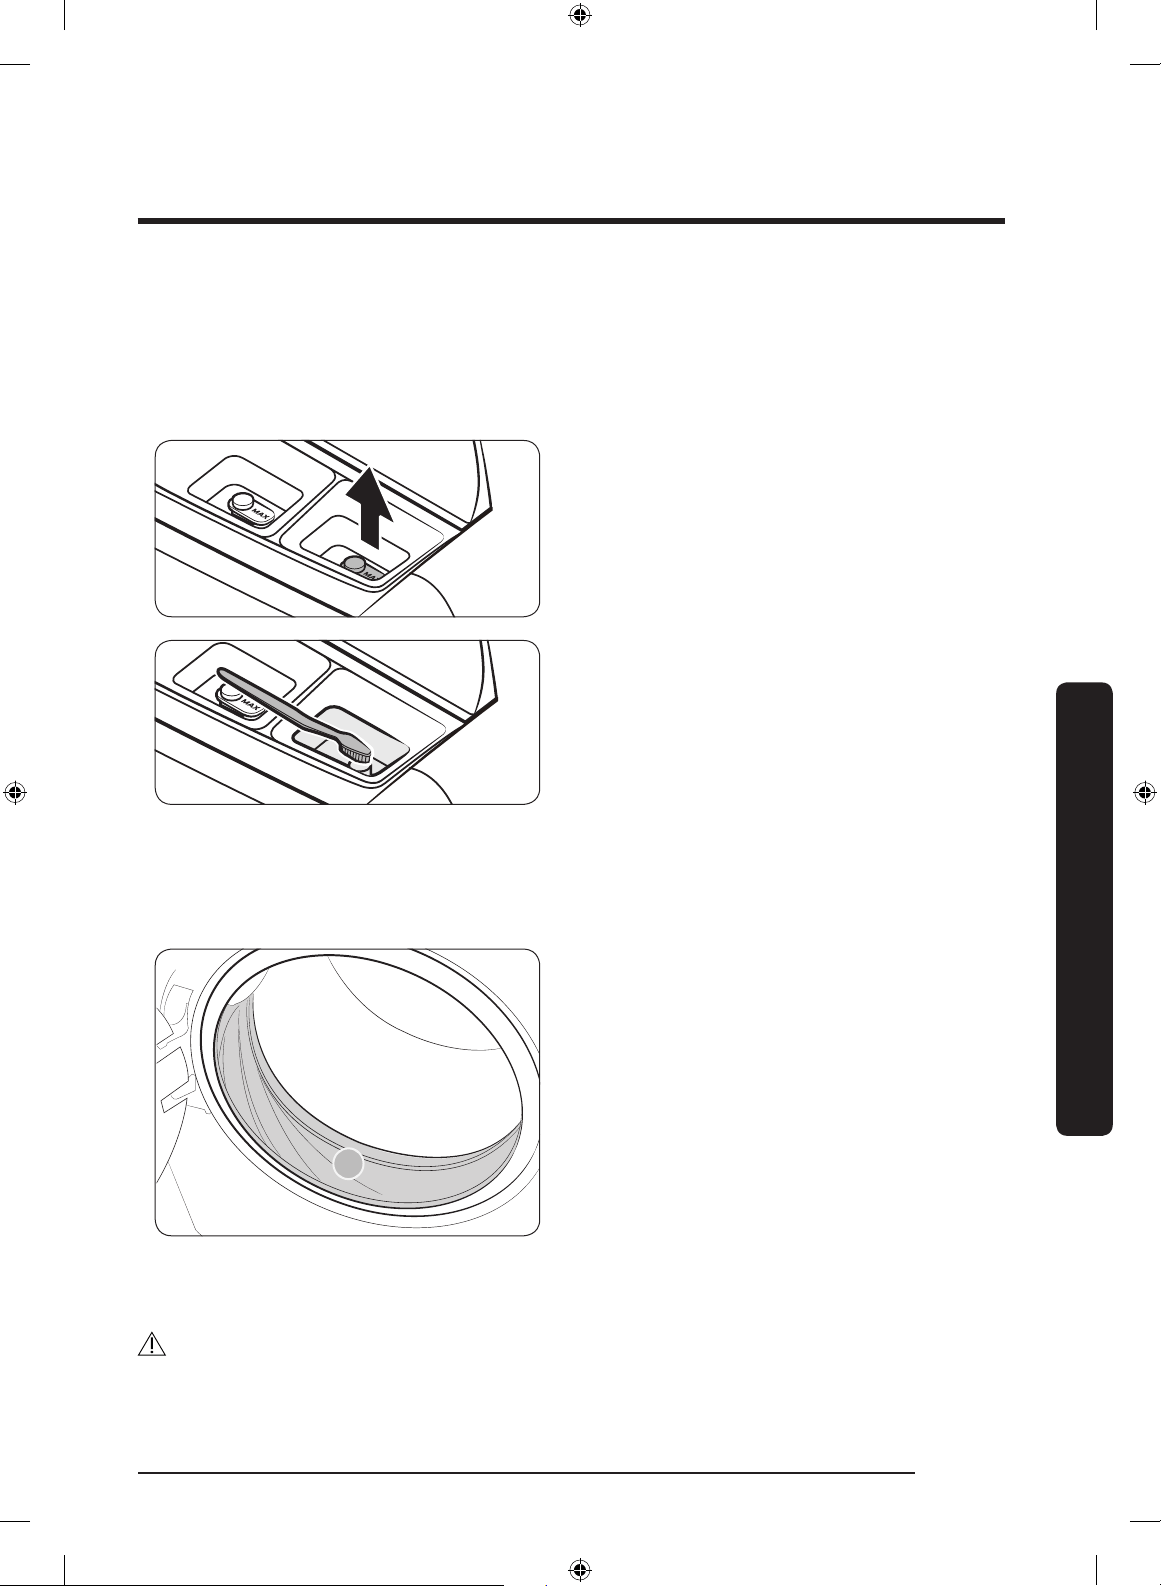
Maintenance
Français 63
Compartiment d'adoucissant/agent de blanchiment
Le compartiment d'adoucissant et le compartiment d'agent de blanchiment de la partie inférieure
du lave-linge ne sont amovibles à des ns de praticité visuelle pour les utilisateurs. Pour nettoyer
le compartiment d'adoucissant, suivez ces instructions. Le nettoyage du compartiment d'agent de
blanchiment est sensiblement le même.
1. Ouvrez le couvercle du haut puis retirez le
bouchon de l'adoucissant.
2. Utilisez une brosse douce (une brosse à
dent par exemple) pour nettoyer l'intérieur
du compartiment et retirer les impuretés.
3. Lancez le cycle RINSE+SPIN
(RINÇAGE+ESSORAGE) pour rincer le
compartiment. Après les 5 périodes
d'alimentation en eau et de vidange, le
cycle de 19 minutes s'achève avec le
processus d'essorage nal.
Diaphragme du hublot
A
1. Ouvrez le hublot et videz le tambour.
2. Retournez le diaphragme (isolant ou joint
d'étanchéité du tambour (A)) et vériez s'il
est taché. Si oui, suivez les étapes ci-dessous.
3. Mélangez 3/4 de tasse d'agent de
blanchiment au chlore liquide et 1 gallon
d'eau tiède du robinet.
4. Après vous être équipé de gants en
caoutchouc, utilisez un chiffon propre et
doux imbibé d'eau et de solution chlorée
pour nettoyer le diaphragme.
5. Laissez poser 5 minutes, puis essuyez le
tout et laissez bien sécher.
ATTENTION
Utilisez l'agent de blanchiment avec précaution et assurez-vous de suivre les instructions
d'entretien et d'utilisation du fabricant de l'agent de blanchiment.
FlexWash_WV9900M_DC68-03768A-04_CFR.indd 63 2017-05-22 7:07:34

Maintenance
Maintenance
Français64
Vidange d'urgence
En cas de panne de courant, vidangez l'eau à l'intérieur du tambour avant de sortir le linge.
1. Mettez le lave-linge hors tension puis
débranchez-le de la prise électrique.
2. Appuyez doucement sur la partie
supérieure du cache du ltre pour l'ouvrir.
A
3. Placez un récipient vide et volumineux
devant le cache et étirez le tuyau de
vidange d'urgence vers le récipient, tout en
tenant le bouchon du tuyau (A) en place.
B
4. Ouvrez le bouchon du tuyau et laissez l'eau
s'écouler du tuyau de vidange d'urgence (B)
dans le récipient.
5. Une fois l'opération terminée, fermez le
bouchon du tuyau et réinsérez le tuyau.
Ensuite, fermez le cache du ltre.
REMARQUE
Utilisez un récipient volumineux car la
quantité d'eau présente dans le tambour peut
être plus importante que prévu.
FlexWash_WV9900M_DC68-03768A-04_CFR.indd 64 2017-05-22 7:07:35
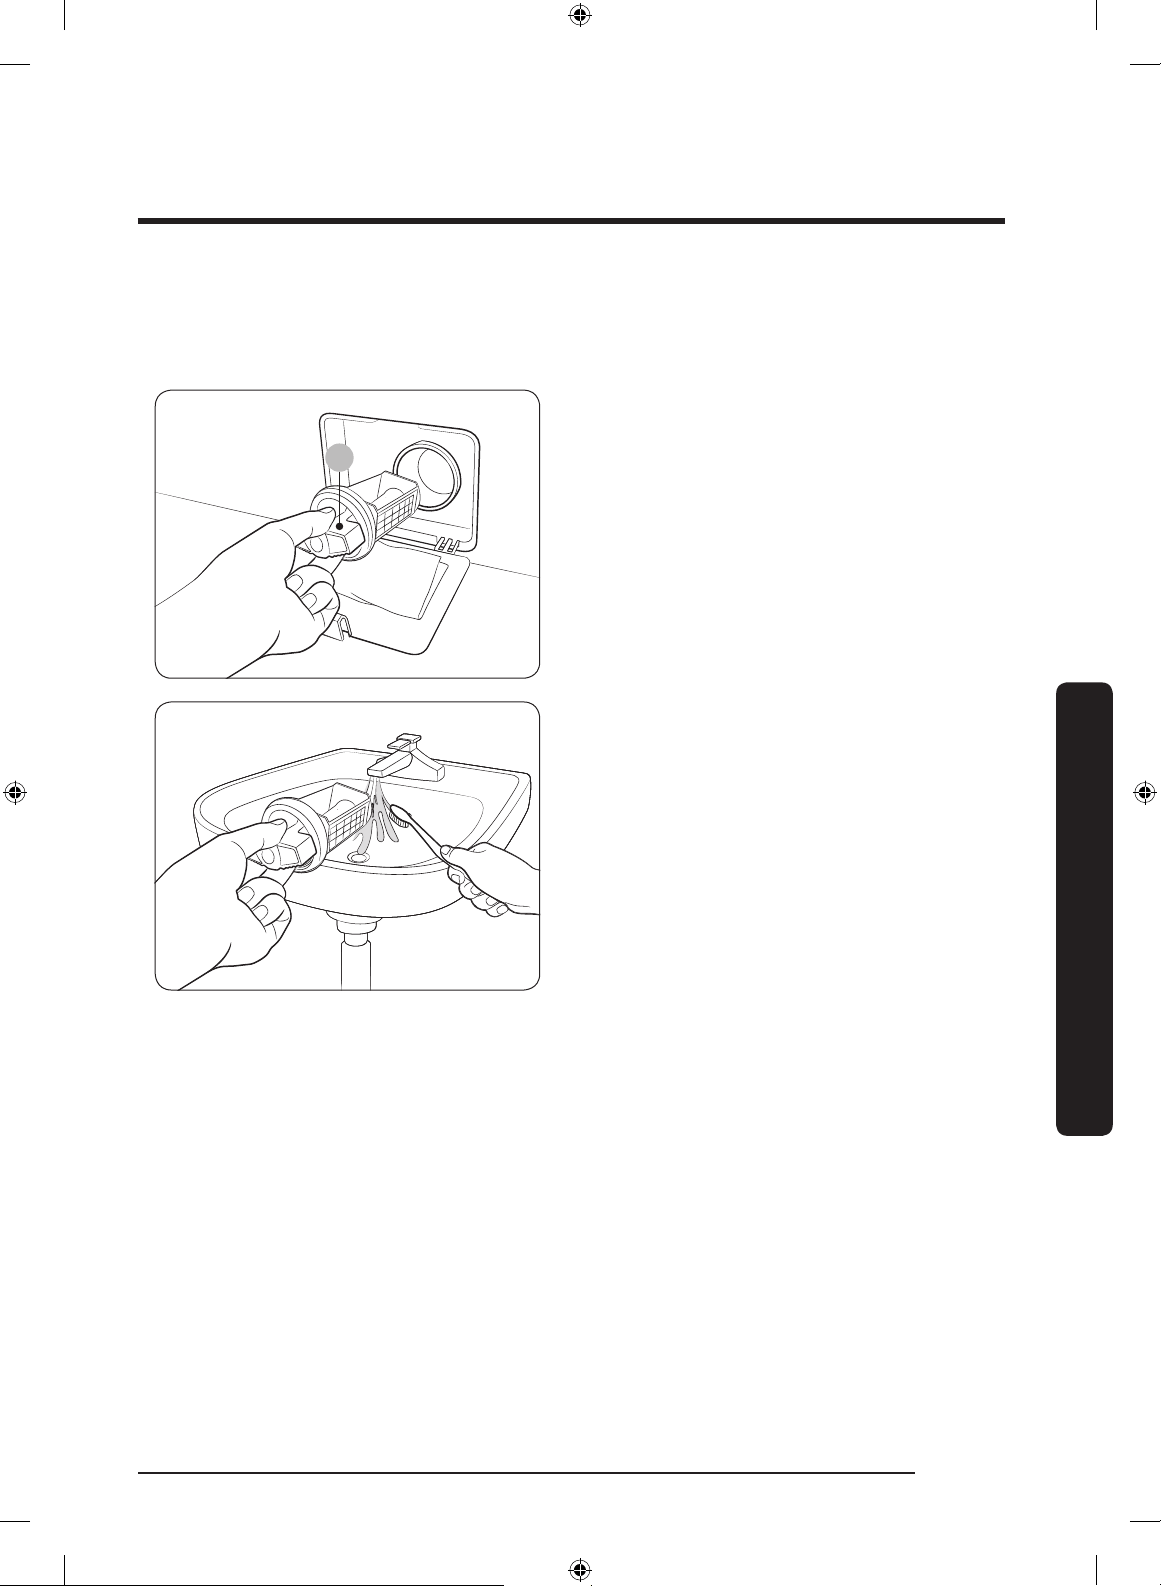
Maintenance
Français 65
Filtre de la pompe
Il est recommandé de nettoyer le ltre de la pompe 5 ou 6 fois par an, an d'éviter qu'il ne se
bouche. Un ltre de pompe bouché peut réduire l'effet des bulles.
A
1. Éteignez le lave-linge et débranchez le
cordon d'alimentation.
2. Vidangez le reste d'eau à l'intérieur du
tambour. Reportez-vous à la section
« Vidange d'urgence » à la page 64.
3. Appuyez doucement sur la partie
supérieure du cache du ltre pour l'ouvrir.
4. Tournez le bouton du ltre de la pompe (A)
sur la gauche et vidangez le reste d'eau.
5. Nettoyez le ltre de la pompe à l'aide d'une
brosse souple. Assurez-vous que l'hélice de
la pompe de vidange située à l'intérieur du
ltre n'est pas bloquée.
6. Réinstallez le ltre de la pompe et tournez
le bouton du ltre sur la droite.
7. Fermez le cache du ltre.
FlexWash_WV9900M_DC68-03768A-04_CFR.indd 65 2017-05-22 7:07:35

Maintenance
Maintenance
Français66
REMARQUE
• Certains ltres de pompe sont équipés
d'un bouton de sécurité qui est conçu
pour éviter que les enfants n'ouvrent
accidentellement le compartiment du ltre.
Pour ouvrir le bouton de sécurité du ltre
de la pompe, pressez-le et faites-le tourner
dans le sens antihoraire. Le mécanisme à
ressort du bouton de sécurité aide à ouvrir
le ltre.
• Pour fermer le bouton de sécurité du ltre
de la pompe, faites-le tourner dans le sens
horaire. Le ressort émet un son de cliquetis,
ce qui est normal.
REMARQUE
Si le ltre de la pompe est colmaté, le code d'information « 5C » apparaît sur l'écran d'afchage
du lave-linge.
ATTENTION
• Assurez-vous que le bouton du ltre est correctement fermé après le nettoyage du ltre. Si ce
n'est pas le cas, une fuite peut survenir.
• Assurez-vous que le ltre est correctement installé après son nettoyage. Si ce n'est pas le cas,
cela peut provoquer une panne opérationnelle ou une fuite.
FlexWash_WV9900M_DC68-03768A-04_CFR.indd 66 2017-05-22 7:07:35
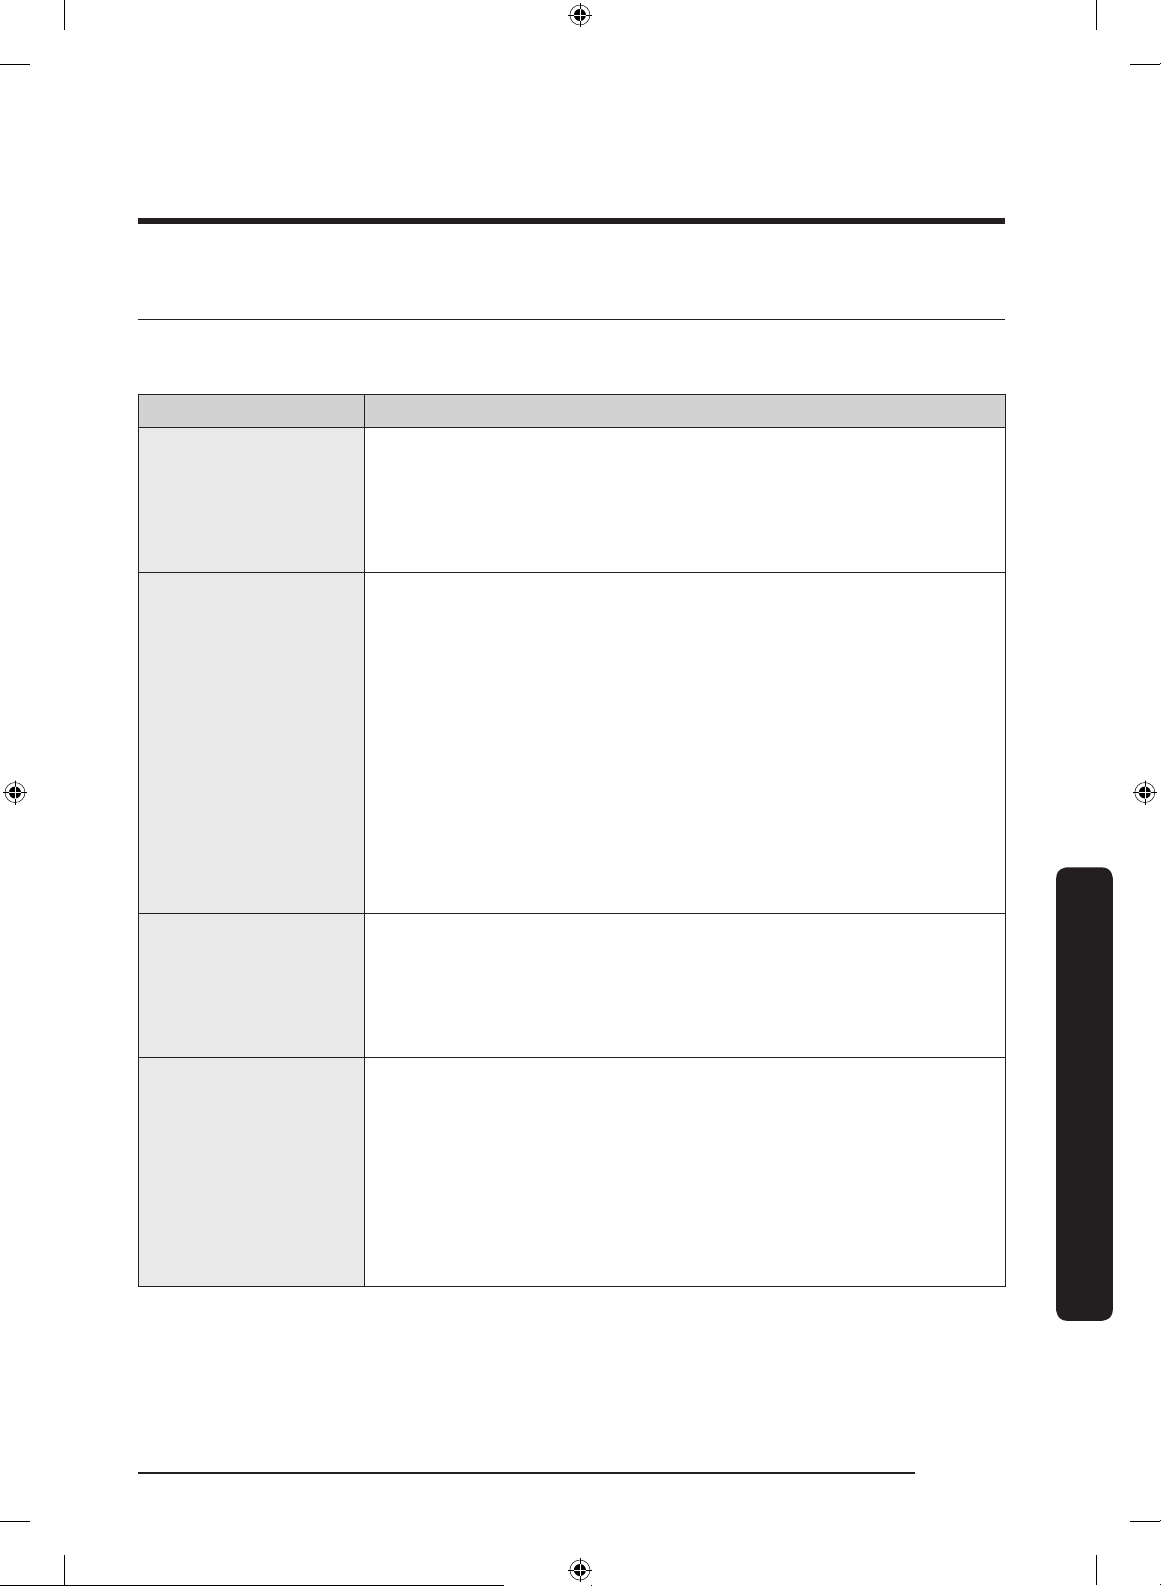
Dépannage
Français 67
Dépannage
Contrôles à effectuer
Si vous rencontrez un problème avec le lave-linge, consultez d'abord le tableau ci-dessous et
essayez les actions suggérées.
Signe Action
Le lave-linge ne s'allume
pas.
• Assurez-vous que le système électrique de votre domicile fournit une
alimentation électrique correspondant aux exigences pour le lave-linge.
Reportez-vous à la page 21.
• Assurez-vous que la prise d'alimentation du lave-linge est correctement
branchée.
L'appareil ne démarre
pas.
• Assurez-vous que le hublot est correctement fermé.
• Assurez-vous que les robinets sont ouverts.
• Assurez-vous de maintenir enfoncé le bouton START/PAUSE (DÉPART/
PAUSE) pour démarrer le lave-linge.
• Assurez-vous que la fonction Child Lock (Sécurité enfant) n'est pas
activée.
• Avant de commencer à se remplir, le lave-linge émet une série de
cliquetis pour vérier le bon verrouillage du hublot et il effectue une
vidange rapide.
• Vériez les fusibles ou réarmez le disjoncteur.
• Vériez si la partie supérieure ou inférieure du lave-linge afche un
code d'information sur la barre d'état.
L'arrivée d'eau est
insufsante ou
interrompue.
• Ouvrez entièrement le robinet.
• Assurez-vous que le hublot est correctement fermé.
• Assurez-vous que le tuyau d'arrivée d'eau n'est pas gelé.
• Assurez-vous que le tuyau d'arrivée d'eau n'est pas entortillé ou bouché.
• Assurez-vous que la pression de l'eau est sufsante.
En n de programme, de
la lessive subsiste dans
le tiroir à lessive.
• Assurez-vous que la pression d'eau est sufsante pour faire fonctionner
le lave-linge.
• Si vous utilisez de la lessive en poudre, respectez le dosage
recommandé.
• Si vous utilisez de la lessive liquide, ne remplissez pas excessivement le
bac à lessive.
• Retirez les compartiments de lessive liquide et d'adoucissant puis
nettoyez le tiroir à lessive.
FlexWash_WV9900M_DC68-03768A-04_CFR.indd 67 2017-05-22 7:07:35
Dépannage
Dépannage
Français68
Signe Action
Le lave-linge vibre d'une
manière excessive ou
émet du bruit.
• Assurez-vous que le lave-linge est installé sur un sol plat, solide et non
glissant. Si le sol n'est pas plat, utilisez les pieds réglables pour ajuster
la hauteur du lave-linge.
• Assurez-vous que les vis de transport ont été retirées.
• Assurez-vous que le lave-linge n'est en contact avec aucun autre objet.
• Assurez-vous que la charge de linge est bien équilibrée.
• Le moteur peut générer du bruit lors du fonctionnement normal.
• Des salopettes ou des vêtements comportant des éléments métalliques
peuvent générer du bruit lors du lavage. Ceci est tout à fait normal.
• Des objets tels que des pièces de monnaie peuvent provoquer du bruit.
Après le lavage, retirez ces objets du tambour, de la cuve ou du boîtier
du ltre.
Le lave-linge ne se
vidange pas et/ou
n'essore pas.
• Assurez-vous que le tuyau de vidange n'est ni entortillé ni bouché
dans le système de vidange. Si la vidange ne s'effectue pas, appelez le
service de dépannage.
• Assurez-vous que le ltre à impuretés n'est pas bouché.
• Fermez le hublot et appuyez sur le bouton START/PAUSE (DÉPART/
PAUSE) en le maintenant enfoncé. Pour des raisons de sécurité, le lave-
linge ne tourne et n'essore pas tant que le hublot n'est pas fermé.
• Assurez-vous que le tuyau de vidange n'est pas gelé ou bouché.
• Assurez-vous que le tuyau de vidange est raccordé à un système de
vidange non obstrué.
• Si l'alimentation électrique du lave-linge n'est pas sufsante, le
lave-linge ne se vidange pas ou n'essore pas temporairement. Dès
que l'alimentation électrique est à nouveau sufsante, le lave-linge
fonctionne normalement.
Se vide en faisant du
bruit.
• Lors de la première installation, ou lorsque le lave-linge n’a pas été
utilisé pendant une période prolongée, le lave-linge peut émettre
des bruits de dégonement lors de sa vidange. Il ne s’agit pas d’un
dysfonctionnement du système.
FlexWash_WV9900M_DC68-03768A-04_CFR.indd 68 2017-05-22 7:07:35
Dépannage
Français 69
Signe Action
Le hublot ne s'ouvre pas.
• Appuyez sur le bouton START/PAUSE (DÉPART/PAUSE) pour arrêter
votre lave-linge.
• Le mécanisme de verrouillage du hublot se débloque après quelques
minutes.
• Le hublot ne s'ouvre que 3 minutes après l'arrêt ou la mise hors tension
du lave-linge.
• Vériez que toute l'eau du tambour ou de la cuve a été vidangée.
• Le hublot ne s'ouvre pas si de l'eau reste dans le tambour ou dans la
cuve. Vidangez le tambour ou la cuve et ouvrez le hublot manuellement.
• Vériez que le voyant de verrouillage du tambour est éteint. Le voyant
de verrouillage du hublot s'éteint après la vidange du lave-linge.
Quantité de mousse trop
importante.
• Assurez-vous d'utiliser les types de lessive recommandés.
• Utilisez une lessive haute efcacité pour empêcher la surproduction de
mousse.
• Réduisez la quantité de lessive pour les lavages à l'eau douce, les
petites charges ou pour le linge peu sale.
• Il est vivement conseillé d'utiliser une lessive haute efcacité.
Impossible de
mettre de la lessive
supplémentaire.
• Ne remplissez pas les compartiments de lessive et d'adoucissant au-
delà du repère.
Le lave-linge s'arrête.
• Branchez le cordon d'alimentation sur une prise électrique qui
fonctionne.
• Vériez les fusibles ou réarmez le disjoncteur.
• Fermez le hublot et appuyez sur le bouton START/PAUSE (DÉPART/
PAUSE) en le maintenant enfoncé pour démarrer le lave-linge. Pour des
raisons de sécurité, le lave-linge ne tourne et n'essore pas tant que le
hublot n'est pas fermé.
• Avant de commencer à se remplir, le lave-linge émet une série de
cliquetis pour vérier le bon verrouillage du hublot et il effectue une
vidange rapide.
• Le cycle peut comporter une phase de pause ou de trempage. Il se peut
que le lave-linge se remette en marche après quelques minutes.
• Assurez-vous que le ltre à maille du tuyau d'arrivée d'eau sur les
robinets n'est pas bouché. Nettoyez le ltre à maille régulièrement.
• Si l'alimentation électrique du lave-linge n'est pas sufsante, le
lave-linge ne se vidange pas ou n'essore pas temporairement. Dès
que l'alimentation électrique est à nouveau sufsante, le lave-linge
fonctionne normalement.
FlexWash_WV9900M_DC68-03768A-04_CFR.indd 69 2017-05-22 7:07:36
Dépannage
Dépannage
Français70
Signe Action
La température de l'eau
lors du remplissage
du lave-linge n'est pas
correcte.
• Ouvrez entièrement les deux robinets.
• Vériez le choix de la température.
• Assurez-vous que les tuyaux sont branchés sur les bons robinets. Rincez
les canalisations d'eau.
• Assurez-vous que le chauffe-eau est réglé pour fournir de l'eau chaude
à une température minimale de 120 °F (49 °C) au robinet. Vériez
également la capacité et le taux de récupération du chauffe-eau.
• Débranchez les tuyaux et nettoyez le ltre à maille. Le ltre à maille
peut être obstrué.
• Lors du remplissage du lave-linge, la température de l'eau est
susceptible de varier car la fonction de contrôle automatique de la
température vérie la température de l'eau entrante. Ceci est tout à fait
normal.
• Lors du remplissage du lave-linge, vous pouvez remarquer que de l'eau
chaude et/ou froide passe par le distributeur alors qu'une température
de lavage contraire est sélectionnée. Ceci est tout à fait normal ;
ce phénomène est dû à la fonction de contrôle automatique de la
température chargée d'établir la température de l'eau.
Le linge n'est pas essoré
correctement à la n du
cycle.
• Utilisez la vitesse de l'essorage High (Élevée) ou Extra High (Très
élevée).
• Utilisez une lessive haute efcacité (HE) pour réduire la production de
mousse.
• Il n'y a pas assez de linge. De petites charges (un ou deux articles)
risquent de mal se répartir et donc de mal être essorées.
• Assurez-vous que le tuyau de vidange n'est pas emmêlé ou bouché.
De l'eau fuit du lave-
linge.
• Assurez-vous que le hublot est correctement fermé.
• Vériez que tous les raccordements des tuyaux sont bien serrés.
• Assurez-vous que l'extrémité du tuyau de vidange est bien insérée et
xée au système de vidange.
• Éviter toute surcharge.
• Utilisez une lessive haute efcacité pour empêcher la surproduction de
mousse.
Présence d'odeurs.
• De la mousse trop importante s'accumule dans les renfoncements et
peut entraîner de mauvaises odeurs.
• Exécutez des programmes de lavage pour stériliser de manière
périodique.
• Nettoyez le joint du hublot (diaphragme).
• Faites séchez l'intérieur du lave-linge lorsqu'un cycle est terminé.
FlexWash_WV9900M_DC68-03768A-04_CFR.indd 70 2017-05-22 7:07:36

Dépannage
Français 71
Signe Action
La cuve ou le tuyau
d'eau/de vidange est
gelé(e).
• Versez de l'eau chaude sur les tuyaux gelés pour les débrancher.
Trempez-les dans de l'eau tiède.
• Remplissez la cuve gelée avec de l'eau chaude puis patientez durant
environ 10 minutes.
• Posez une serviette chaude sur le raccord du tuyau de vidange.
• Rebranchez les tuyaux une fois qu'ils sont dégelés.
L'eau se vidange
immédiatement.
• Assurez-vous que le tuyau de vidange n'est pas bouché et qu'il est
suspendu au crochet qui lui est destiné. Remplissez d'eau à moitié la
cuve et relancez le programme d'essorage.
• Soulevez l'extrémité du tuyau de vidange pour éviter que l'eau ne soit
vidangée. Remplissez d'eau à moitié la cuve puis lancez l'essorage après
avoir libéré le tuyau de vidange.
• Assurez-vous que le tuyau de vidange est correctement installé.
Reportez-vous à la section Installation de ce manuel et ajustez la
position du tuyau de vidange en suivant les instructions.
• Assurez-vous que le lave-linge effectue une vidange complète s'il est
éteint de manière forcée. Si vous faites fonctionner le lave-linge avant
qu'il ait effectué la vidange complète, l'appareil risque de s'alimenter en
eau et de vidanger simultanément.
Si un problème persiste, contactez le centre de service Samsung local.
FlexWash_WV9900M_DC68-03768A-04_CFR.indd 71 2017-05-22 7:07:36

Dépannage
Dépannage
Français72
Samsung Smart Home
Problème
Action
Je n'arrive pas à
trouver « Samsung
Smart Home »
sur le marché des
applications.
• L'application Samsung Smart Home est disponible sur les
smartphones qui utilisent Android 4.0 (ICS) ou versions
supérieures, ou iOS 7.0 ou versions supérieures.
L'application
Samsung Smart Home
ne fonctionne pas.
• L'application Samsung Smart Home est disponible
uniquement sur les modèles applicables.
• L'ancienne application Samsung Smart Washer ne peut pas
se connecter aux modèles Samsung Smart Home.
L'application
Samsung Smart Home
est installée mais
n'est pas connectée à
mon lave-linge.
• Vous devez vous connecter à votre compte Samsung pour
utiliser l'application.
• Assurez-vous que votre routeur fonctionne normalement.
• Si le témoin de la fonction Smart Control
est éteint sur
l'écran du lave-linge, cela indique qu'aucune connexion au
réseau n'a encore été établie. Utilisez l'application Samsung
Smart Home pour connecter et enregistrez le lave-linge sur
votre point d'accès au réseau domestique (PA).
Je n'arrive pas à
me connecter à
l'application.
• Vous devez vous connecter à votre compte Samsung pour
utiliser l'application.
• Si vous n'avez pas de compte Samsung, suivez les
instructions afchées sur l'écran de l'application pour en
créer un.
Un message d'erreur
s'afche lorsque
j'essaie d'enregistrer
mon lave-linge.
• La connexion peut échouer à cause de la distance par
rapport au point d'accès ou d'interférences électriques
provenant de l'environnement autour. Patientez un moment
puis réessayez.
L'application
Samsung Smart Home
est bien connectée à
mon lave-linge mais
elle ne se lance pas.
• Quitter l'application Samsung Smart Home et redémarrez-la,
ou débranchez puis rebranchez le routeur.
FlexWash_WV9900M_DC68-03768A-04_CFR.indd 72 2017-05-22 7:07:36

Dépannage
Français 73
Codes d'information
Si le lave-linge ne parvient pas à fonctionner, vous pouvez voir un code d'information s'afcher à
l'écran. Consultez le tableau ci-dessous et essayez les actions suggérées.
Code
Action
Partie
supérieure
du lave-
linge
Partie
inférieure
du lave-
linge
1 1C 1C
Vériez le capteur de niveau d'eau.
• Mettez le lave-linge hors tension puis, après 2 ou 3 minutes,
remettez-le sous tension et réessayez.
• En fonction du modèle, le système de vidange purge l'eau
automatiquement. Les boutons POWER (MARCHE/ARRÊT) et
START/PAUSE (DÉPART/PAUSE) peuvent être désactivés pendant
ce processus.
- DC
Le hublot est ouvert.
• Fermez le hublot et appuyez sur le bouton START/PAUSE
(DÉPART/PAUSE) pour reprendre le fonctionnement.
1 DC -
La trappe de chargement par le haut est ouverte.
• Fermez la porte du haut et appuyez sur le bouton START/PAUSE
(DÉPART/PAUSE) pour reprendre le fonctionnement.
1 DC4 -
Le couvercle de protection est ouvert.
• Fermez le couvercle de protection et appuyez sur le bouton
START/PAUSE (DÉPART/PAUSE) pour reprendre le fonctionnement.
1 DC1 DC1
Vériez l'interrupteur du hublot.
• Mettez le lave-linge hors tension puis, après 2 ou 3 minutes,
remettez-le sous tension et réessayez.
1 LC LC
Vériez l'absence de fuites d'eau.
• Mettez le lave-linge hors tension et vériez l'absence de fuites au
niveau du système de vidange. Une fois la fuite réparée, mettez
le lave-linge sous tension après 2 ou 3 minutes.
• En fonction du modèle, le système de vidange purge l'eau
automatiquement. Les boutons POWER (MARCHE/ARRÊT) et
START/PAUSE (DÉPART/PAUSE) peuvent être désactivés pendant
ce processus.
FlexWash_WV9900M_DC68-03768A-04_CFR.indd 73 2017-05-22 7:07:36
Dépannage
Dépannage
Français74
Code
Action
Partie
supérieure
du lave-
linge
Partie
inférieure
du lave-
linge
1 LC1 LC1
Vériez le tuyau de vidange.
• Assurez-vous que l'extrémité du tuyau de vidange est placée sur
le sol.
• Assurez-vous que le tuyau de vidange n'est pas bouché.
• Si le code d'information subsiste, contactez un centre de
réparation.
Autres
• Veillez à ne pas dépasser la quantité recommandée de tous les
bacs (lessive/assouplissant/agent de blanchiment).
• N'utilisez pas et ne projetez pas de l'eau lorsque vous nettoyez la
porte supérieure de la partie supérieure du lave-linge. Essuyez
avec un chiffon.
1 4C 4C
Vériez le conduit d'arrivée d'eau.
• Vériez le raccordement du conduit d'eau (y compris les robinets
d'eau).
• Mettez le lave-linge hors tension puis, après 2 ou 3 minutes,
remettez-le sous tension et réessayez.
• En fonction du modèle, le système de vidange purge l'eau
automatiquement. Les boutons POWER (MARCHE/ARRÊT) et
START/PAUSE (DÉPART/PAUSE) peuvent être désactivés pendant
ce processus.
1 4C2 4C2
L'eau fournie est trop chaude.
• Assurez-vous que les robinets d'eau froide et d'eau chaude sont
correctement raccordés.
• Mettez le lave-linge hors tension puis, après 2 ou 3 minutes,
remettez-le sous tension et réessayez.
1 5C 5C
Vériez le système de vidange.
• Assurez-vous que le ltre de vidange n'est pas bouché.
• Si le ltre de vidange est bouché, nettoyez-le et redémarrez le
lave-linge.
1 HC HC
Vériez l'élément chauffant de lavage.
• Mettez le lave-linge hors tension et prenez contact avec un centre
de service clientèle Samsung.
FlexWash_WV9900M_DC68-03768A-04_CFR.indd 74 2017-05-22 7:07:36
Dépannage
Français 75
Code
Action
Partie
supérieure
du lave-
linge
Partie
inférieure
du lave-
linge
1 UB UB
Vériez le processus d'essorage.
• Il se peut que la charge ne soit pas équilibrée à l'intérieur du
tambour ou de la cuve. La charge est trop faible ou des éléments
lourds sont mélangés avec des éléments légers. Vériez le
tambour ou la cuve et assurez-vous que la charge est équilibrée.
• Évitez de laver un seul élément. Le fait d'ajouter quelques
éléments supplémentaires permet d'équilibrer davantage la
charge. Répartissez la charge de façon uniforme.
• Appuyez sur le bouton START/PAUSE (DÉPART/PAUSE) pour
reprendre le fonctionnement, ou mettez le lave-linge hors tension
puis sous tension après 2 ou 3 minutes et réessayez.
1 8C
1 8C1
1 8C2
8C
8C1
8C2
Vériez le capteur MEMS.
• Mettez le lave-linge hors tension puis, après 2 ou 3 minutes,
remettez-le sous tension et réessayez.
1 OC OC
De l'eau peut déborder.
• Fermez le robinet d'eau, puis appelez le centre de service pour
demander l'entretien.
1 3C 3C
Vériez le moteur.
• Mettez le lave-linge hors tension puis, après 2 ou 3 minutes,
remettez-le sous tension et réessayez.
1 AC6 AC6
Vériez l'état des communications de la carte de circuit imprimé.
• Mettez le lave-linge hors tension puis, après 2 ou 3 minutes,
remettez-le sous tension et réessayez.
1 9C1
1 9C2
9C1
9C2
La commande électronique doit être vériée.
• Vériez si l'alimentation électrique est correctement fournie.
• Si le code d'information subsiste, contactez un centre de service
Samsung.
1 SF SF
Le système est en panne.
• Mettez le lave-linge hors tension et prenez contact avec un centre
de service Samsung.
FlexWash_WV9900M_DC68-03768A-04_CFR.indd 75 2017-05-22 7:07:36

Dépannage
Dépannage
Français76
Code
Action
Partie
supérieure
du lave-
linge
Partie
inférieure
du lave-
linge
1 AC AC
Vériez les communications entre les cartes de circuit imprimé
principal et auxiliaire.
• Essayez de mettre hors tension puis de redémarrer le programme.
• Si le code d'information subsiste, contactez le service clientèle.
- AC7
Vériez les communications entre la carte de circuit imprimé
principal et la carte de circuit imprimé principal supérieur.
• Essayez de mettre hors tension puis de redémarrer le programme.
• Si le code d'information subsiste, contactez le service clientèle.
Si un code d'information continue d'apparaître à l'écran, contactez un centre de service Samsung
local.
FlexWash_WV9900M_DC68-03768A-04_CFR.indd 76 2017-05-22 7:07:36
Caractéristiques techniques
Français 77
Caractéristiques techniques
Tableau des symboles textiles
Les symboles suivants fournissent des conseils
d'entretien des vêtements. Les étiquettes
d'entretien des vêtements incluent des symboles
relatifs au séchage, au blanchiment, au séchage
et repassage ou au nettoyage à sec, le cas
échéant. L'utilisation de ces symboles garantit la
cohérence des informations entre les fabricants
de vêtements (articles domestiques ou importés).
Suivez les directives gurant sur l'étiquette
d'entretien an d'optimiser la durée de vie de
votre linge et d'éviter des problèmes de lavage.
Cycle de lavage
Normal
Tissus infroissables / Infroissable /
Anti-froissage
Gentle / Délicat
Lavage main
Température de l'eau
Chaude
Tiède
Froide
REMARQUE
La plage de température pour Hot (Chaude) est
égale ou inférieure à 135 °F (57 °C), inférieure
ou égale à 95 °F (35 °C) pour Warm (Tiède), et
inférieure ou égale à 68 °F (20 °C) pour Cold
(Froide). La température de l'eau de lavage
doit être d'au moins 60 °F (16 °C) pour activer
les agents nettoyants et obtenir un lavage
efcace.
Agent de blanchiment
Tout type (si nécessaire)
Agent de blanchiment non chloré
(non décolorant) uniquement (si
nécessaire)
Séchage en machine
Normal
Tissus infroissables) / Infroissable
/ Anti-froissage
Gentle / Délicat
Instructions spéciales
Séchage en suspension
Séchage sans essorage
Séchage à plat
Température
Élevée
Moyenne
Basse
Toutes températures
Sans chaleur / À l'air libre
FlexWash_WV9900M_DC68-03768A-04_CFR.indd 77 2017-05-22 7:07:38
Caractéristiques techniques
Caractéristiques techniques
Français78
Températures de repassage facile ou
vapeur
Élevée
Moyenne
Basse
Symboles d'avertissement pour le lavage
Ne pas laver
Ne pas tordre
Pas de chlorage
Séchage en machine interdit
Pas de vapeur (ajoutée au fer à
repasser)
Pas de repassage
Nettoyage à sec
Nettoyage à sec
Pas de nettoyage à sec
Séchage sur corde / En suspension
Séchage sans essorage
Séchage à plat
Protection de l'environnement
• Cet appareil a été fabriqué à partir de
matériaux recyclables. Si vous décidez de
vous en débarrasser, veuillez respecter
les normes locales en matière de
traitement des déchets. Coupez le cordon
d'alimentation de façon à ce que l'appareil
ne puisse pas être raccordé à une source
électrique. Enlevez le couvercle pour que
des animaux et des jeunes enfants ne
se retrouvent pas piégés à l'intérieur de
l'appareil.
• Ne dépassez pas les quantités de lessive
préconisées par le fabricant de la lessive.
• N'utilisez de produits détachants et
blanchissants avant le programme de
lavage qu'en cas de nécessité.
• Économisez de l'eau et de l'électricité en
ne faisant tourner que des charges pleines
(la charge exacte dépend du programme
utilisé).
Déclaration de conformité
Cet appareil est conforme à la norme UL2157.
FlexWash_WV9900M_DC68-03768A-04_CFR.indd 78 2017-05-22 7:07:39
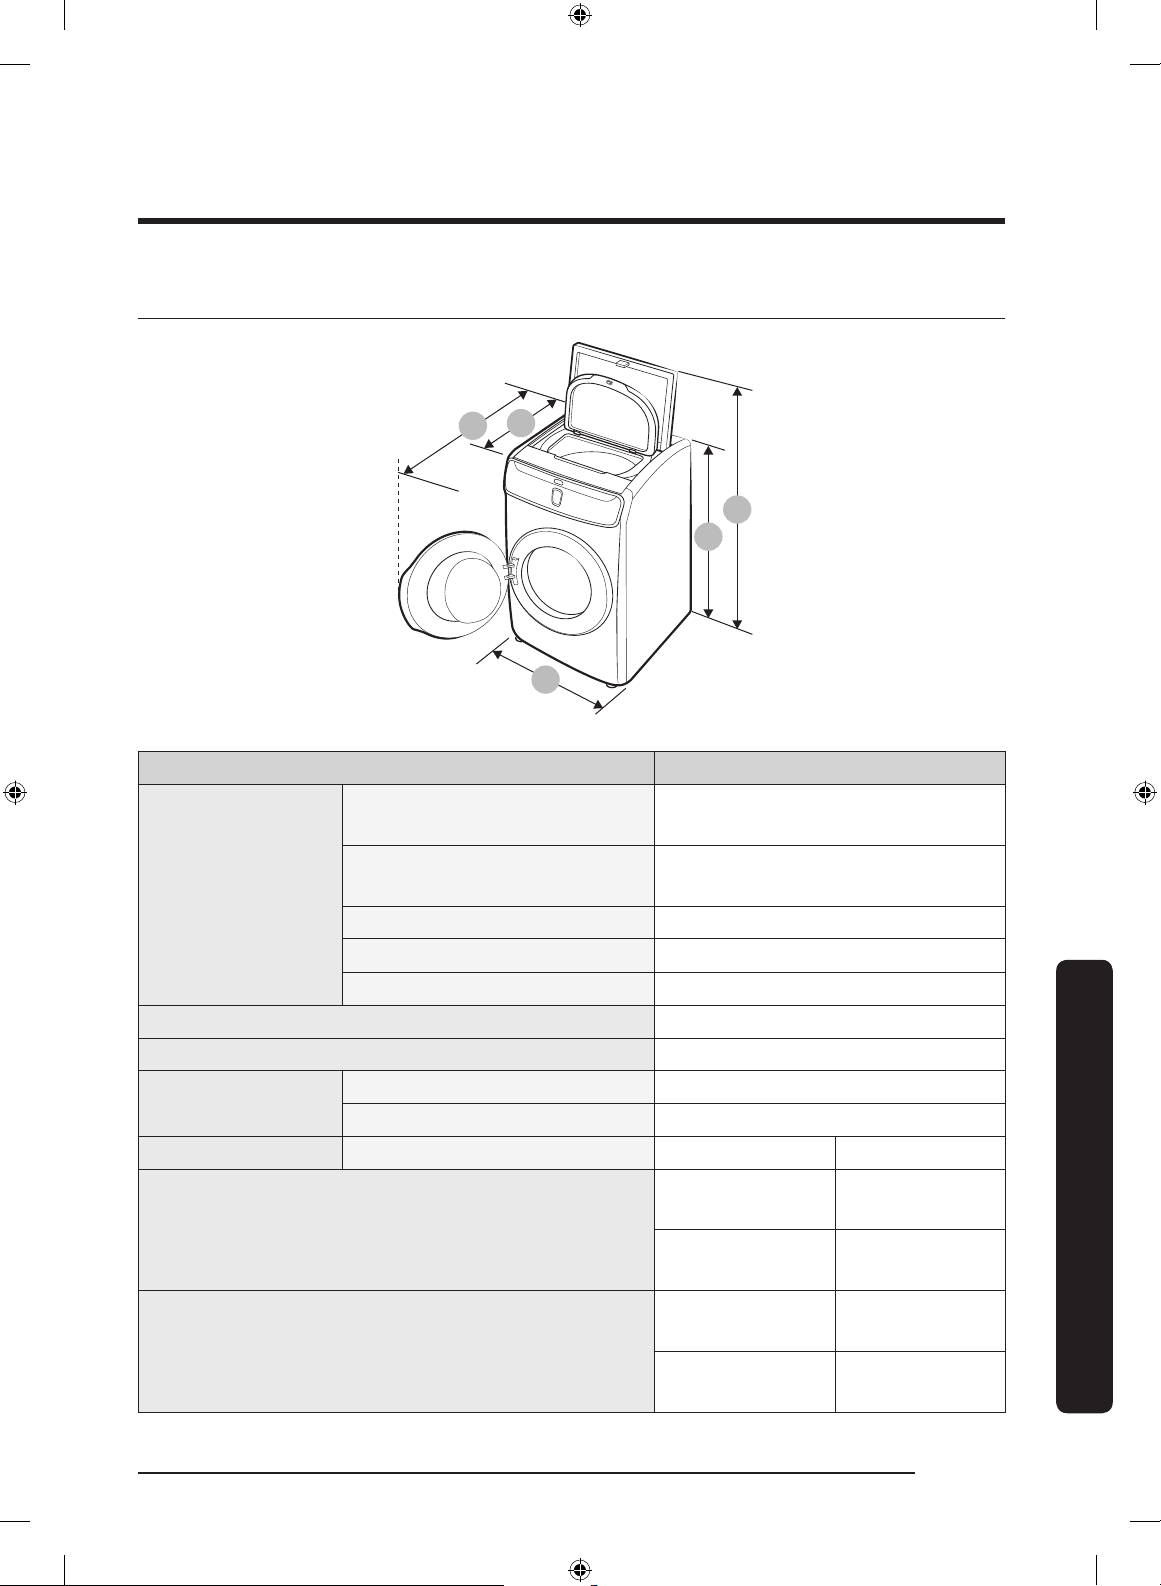
Caractéristiques techniques
Français 79
Fiche de caractéristiques techniques
A
B
C
D
E
Type Lave-linge à double chargement
Dimensions (pouces
(mm))
A. Hauteur, trappe de
chargement par le haut fermée
46,9 pouces (1192 mm)
B. Hauteur, trappe de
chargement par le haut ouverte
61 pouces (1550 mm)
C. Largeur 27 pouces (686 mm)
D. Profondeur avec hublot ouvert 54,6 pouces (1386 mm)
E. Profondeur 34 pouces (864 mm)
Pression d'eau (psi (kPa)) 20 à 116 (137 à 800)
Poids NET (lb (kg)) 308,6 (140)
Vitesse d'essorage
Partie supérieure du lave-linge 800 tr/min
Partie inférieure du lave-linge 1300 tr/min
Puissance de chauffe Lavage et chauffage 120 V 900 W
Consommation d'énergie annuelle
Partie supérieure
du lave-linge
60 kWh/an
Partie inférieure
du lave-linge
105 kWh/an
Consommation d'eau annuelle
Partie supérieure
du lave-linge
3540 gal/an
Partie inférieure
du lave-linge
4278 gal/an
FlexWash_WV9900M_DC68-03768A-04_CFR.indd 79 2017-05-22 7:07:39

Caractéristiques techniques
Caractéristiques techniques
Français80
Tableau des cycles
Utilisez ce tableau an de dénir les programmes et options les mieux adaptés à votre linge.
Partie supérieure du lave-linge
REMARQUE
Réglage Temp.
: réglage d'usine
W : Warm (Tiède)
: peut être sélectionné
C : Cold (Froide)
Cycle
Fonctions Options
Temp.
Extra Rinse
(Rinçage intensif)
W C
NORMAL
DELICATES (DÉLICAT)
ACTIVE WEAR
(VÊTEMENTS DE SPORT)
RINSE+SPIN
RINÇAGE+ESSORAGE
FlexWash_WV9900M_DC68-03768A-04_CFR.indd 80 2017-05-22 7:07:40

Caractéristiques techniques
Français 81
Partie inférieure du lave-linge
REMARQUE
Réglage Temp. Rinse (Rinçage) Spin (Essorage)
Soil Level
(Degré de salissure)
: réglage d'usine
EH : Extra Hot
(Très chaude)
5 : 5 fois
EH : Extra High
(Très élevée)
EH : Extra Heavy
(Très sale)
: peut être sélectionné
H : Hot (Chaude) 4 : 4 fois H : High (Élevée) H : Heavy (Sale)
W : Warm (Tiède) 3 : 3 fois
M : Medium
(Moyenne)
N : Normal
CL : Cool (Frais) 2 : 2 fois L : Low (Basse) L : Light (Peu sale)
CD : Cold (Froide) 1 : 1 fois
NS : No spin
(Sans essorage)
EL : Extra Light
(Très peu sale)
Cycle
Fonctions
Temp. Rinse (Rinçage) Spin (Essorage)
EH H W CL CD 5 4 3 2 1 EH H M L NS
NORMAL
HEAVY DUTY
(GRAND RENDEMENT)
BEDDING (DRAPS)
WHITES
(VÊTEMENTS BLANCS)
SANITIZE (STÉRILISATION)
RINSE+SPIN
(RINÇAGE+ESSORAGE)
ACTIVE WEAR
(VÊTEMENTS DE SPORT)
DELICATES (DÉLICAT)
PERM PRESS
(INFROISSABLES)
QUICK WASH
(LAVAGE EXPRESS)
ECO COLD (ÉCO - FROID)
TOWELS (SERVIETTES)
Self Clean+
(Auto-Nettoyage+)
FlexWash_WV9900M_DC68-03768A-04_CFR.indd 81 2017-05-22 7:07:40
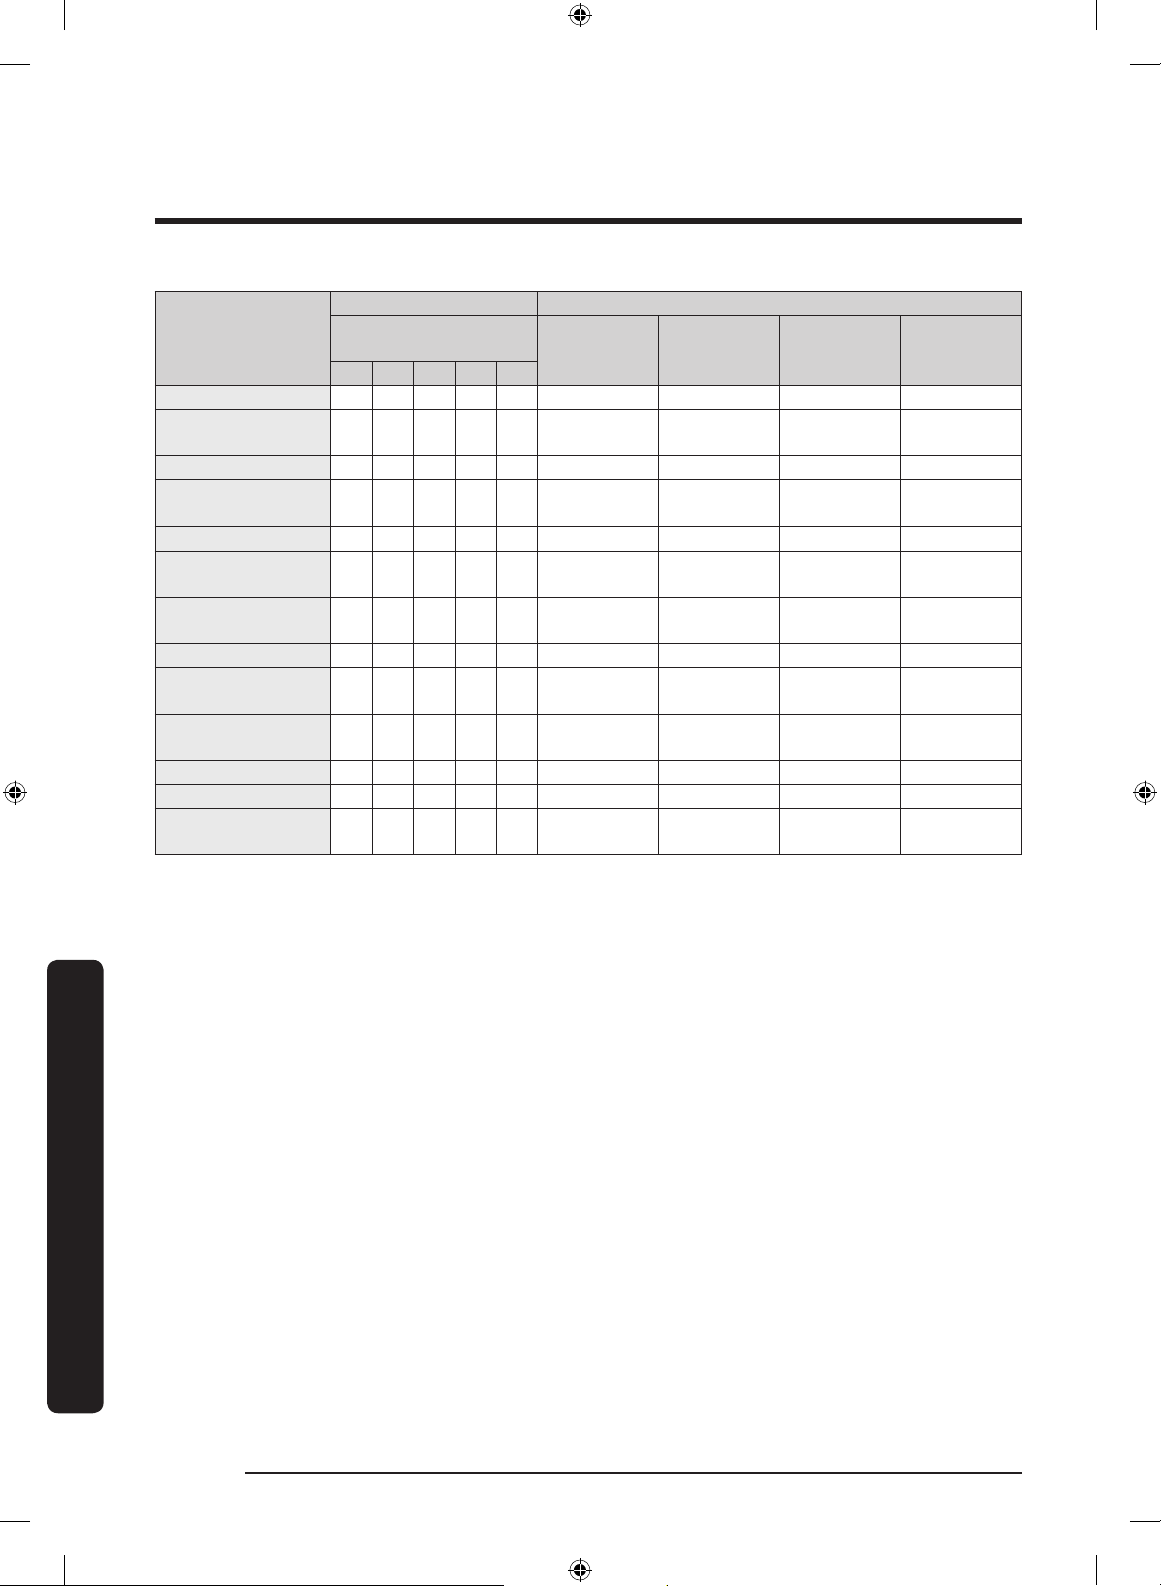
Caractéristiques techniques
Caractéristiques techniques
Français82
Cycle
Fonctions Options
Soil Level
(Degré de salissure)
Pre Soak
(Pré-trempage)
Steam (Vapeur)
Super Speed
(Haute vitesse)
Delay End
(Arrêt différé)
EH H N L EL
NORMAL
HEAVY DUTY
(GRAND RENDEMENT)
BEDDING (DRAPS)
WHITES
(VÊTEMENTS BLANCS)
SANITIZE (STÉRILISATION)
RINSE+SPIN
(RINÇAGE+ESSORAGE)
ACTIVE WEAR
(VÊTEMENTS DE SPORT)
DELICATES (DÉLICAT)
PERM PRESS
(INFROISSABLES)
QUICK WASH
(LAVAGE EXPRESS)
ECO COLD (ÉCO - FROID)
TOWELS (SERVIETTES)
Self Clean+
(Auto-Nettoyage+)
FlexWash_WV9900M_DC68-03768A-04_CFR.indd 82 2017-05-22 7:07:40

Français 83
Garantie (ÉTATS-UNIS)
LAVE-LINGE SAMSUNG
GARANTIE LIMITÉE À L'ACHETEUR INITIAL
Ce produit de la marque SAMSUNG, fourni, distribué par SAMSUNG ELECTRONICS AMERICA,
INC. (SAMSUNG) et livré neuf, s'accompagne d'une garantie de SAMSUNG contre tout vice de
fabrication au niveau des pièces et de la main d'œuvre pendant une période limitée de :
Un (1) an pour les pièces et la main d'œuvre ; Trois (3) ans pour les pièces de la cuve en acier
inoxydable (pièces uniquement) ; Dix (10) ans pour les pièces du moteur de lavage à entraînement
direct (pièces uniquement).
Cette garantie limitée prend effet à la date originale d'achat. Elle ne s'applique qu'aux produits
achetés et utilisés aux États-Unis. Pour bénécier de réparations dans le cadre de la présente
garantie, l'acheteur doit contacter la société SAMSUNG an qu'elle détermine l'origine du
problème et une procédure de réparation. Les services de garantie peuvent être pris en charge
uniquement par un centre de service agréé SAMSUNG. Lors de la remise d'un produit défectueux
à SAMSUNG ou à un centre de service agréé SAMSUNG, l'acheteur est tenu de présenter le coupon
d'achat d'origine à la demande des intéressés à titre de preuve d'achat. SAMSUNG s'engage à
assurer un service de réparation gratuit à domicile pendant la période de garantie. Ce service est
soumis à disponibilité sur le territoire des États-Unis. Le service à domicile n'est pas disponible
pour toutes les zones.
Pour bénécier du service à domicile, l'appareil doit être situé dans un emplacement accessible à
notre personnel. Si ce service n'est pas disponible, SAMSUNG peut choisir de prendre à sa charge
le transport aller/retour du produit vers un centre de service agréé.
FlexWash_WV9900M_DC68-03768A-04_CFR.indd 83 2017-05-22 7:07:40

Garantie (ÉTATS-UNIS)
Français84
La société SAMSUNG prendra en charge, à sa convenance, la réparation, le remplacement ou
le remboursement du produit tel que stipulé dans les présentes conditions et procédera au
remplacement ou au reconditionnement des pièces ou des produits si ces derniers s'avèrent
défectueux dans la limite de la période de garantie mentionnée précédemment. Toutes les pièces
et tous les produits remplacés deviennent la propriété de SAMSUNG et doivent être retournés
à SAMSUNG. Les pièces de rechange et les produits sont couverts pour la période restante de
garantie ou quatre-vingt-dix (90) jours, si la période de garantie est inférieure à 90 jours. La
garantie limitée couvre les vices de fabrication relatifs aux matériaux et à la qualité d'exécution
survenus dans le cadre d'une utilisation normale et non commerciale du produit et ne s'applique
pas aux causes suivantes, comprenant, mais ne se limitant pas à : tout dommage survenant au
cours de l'expédition, de la livraison et de l'installation ; toute utilisation de l'appareil contraire
au but auquel il était destiné ; tout numéro de produit ou de série effacé ; tout dommage du
revêtement extérieur ou de l'aspect du produit ; tout dommage causé par un accident, une
utilisation non conforme, une négligence, un incendie ou une inondation, la foudre ou une autre
catastrophe naturelle ; toute utilisation de produits, d'équipements, de systèmes, d'appareils, de
services, de pièces, de fournitures, d'accessoires, d'applications, d'installations, de réparations,
de câblages externes ou de connecteurs non fournis ou autorisés par SAMSUNG et susceptibles
d'endommager ledit appareil ou de nuire à son fonctionnement ; toute surtension, uctuation ou
tension de ligne électrique incorrecte ; tout réglage effectué par l'acheteur et tout non-respect des
consignes d'utilisation, de maintenance et de respect de l'environnement couvertes ou prescrites
dans le présent carnet d'entretien ; tout démontage ou toute réinstallation de l'appareil ; tout
problème résultant d'une prolifération d'insectes nuisibles. Cette garantie limitée ne couvre pas
les problèmes résultant d'un courant, d'une tension ou d'une alimentation électrique incorrects,
ainsi que d'ampoules électriques, de fusibles ou de câblage domestiques inappropriés. Elle ne
couvre pas non plus le coût des appels au service d'assistance pour obtenir des instructions ou la
réparation des erreurs d'installation. SAMSUNG ne garantit pas que l'appareil sera exempt de tout
problème ou qu'il fonctionnera sans interruption.
SAUF EXCEPTION MENTIONNÉE DANS LE PRÉSENT DOCUMENT, SAMSUNG NE FOURNIT AUCUNE
GARANTIE EXPRESSE OU IMPLICITE QUANT À CET APPAREIL, Y COMPRIS, MAIS SANS S'Y LIMITER,
LES GARANTIES IMPLICITES DE QUALITÉ MARCHANDE, DE CONTREFAÇON OU D'APTITUDE À UN
USAGE PARTICULIER.
FlexWash_WV9900M_DC68-03768A-04_CFR.indd 84 2017-05-22 7:07:40
Français 85
AUCUNE GARANTIE, QU'ELLE SOIT DONNÉE PAR UN TIERS, UNE ENTREPRISE OU UNE PERSONNE
MORALE, NE POURRA ÊTRE CONSIDÉRÉE COMME UN ENGAGEMENT VIS-À-VIS DE SAMSUNG.
SAMSUNG NE SERA AUCUNEMENT RESPONSABLE EN CAS DE PERTE DE BÉNÉFICES, DE MANQUE
À GAGNER, D'INCAPACITÉ À RÉALISER DES ÉCONOMIES OU TOUT AUTRE AVANTAGE FINANCIER
OU D'AUTRES DOMMAGES SPÉCIAUX, ACCESSOIRES OU INDIRECTS RÉSULTANT DE L'UTILISATION
OU D'UNE MAUVAISE UTILISATION DE CET APPAREIL OU D'UNE INCAPACITÉ À UTILISER CET
APPAREIL, QUELLE QUE SOIT LA BASE JURIDIQUE INVOQUÉE POUR JUSTIFIER L'ASSERTION ET
MÊME SI SAMSUNG A ÉTÉ AVISÉ DE L'ÉVENTUALITÉ DE TELS DOMMAGES.
LES INDEMNITÉS FINANCIÈRES EXIGÉES AUPRÈS DE SAMSUNG NE POURRONT EN AUCUN CAS
EXCÉDER LE PRIX D'ACHAT DU PRODUIT VENDU PAR SAMSUNG ET À L'ORIGINE DES DOMMAGES
INVOQUÉS. SANS LIMITATION AUX DISPOSITIONS SUSDITES, L'ACHETEUR ASSUME TOUS LES
RISQUES ET TOUTES LES RESPONSABILITÉS EN CAS DE PERTE, DE DOMMAGES OU DE BLESSURES
ÉVENTUELLES INFLIGÉS À L'ACHETEUR ET AUX BIENS DE CELUI-CI ET À TOUTE AUTRE PERSONNE
ET AUX BIENS DE CELLE-CI RÉSULTANT DE L'UTILISATION OU DE LA MAUVAISE UTILISATION
DE L'APPAREIL OU DE L'INCAPACITÉ À L'UTILISER. CETTE GARANTIE LIMITÉE N'EST VALABLE
POUR PERSONNE D'AUTRE QUE L'ACHETEUR INITIAL DU PRODUIT, N'EST PAS TRANSFÉRABLE ET
ÉNONCE VOTRE RECOURS EXCLUSIF.
Certains états n'autorisent pas les limitations de durée de garantie implicite, ou l'exclusion ou la
limitation des dommages accidentels ou indirects. Dans un tel cas, les limitations ou exclusions
spéciées ci-dessus ne s'appliquent pas. La présente garantie vous octroie des droits spéciques,
ainsi que d'autres variant d'un état à un autre.
Pour bénécier d'un service d'assistance couvert par votre garantie, contactez SAMSUNG à
l'adresse suivante :
Samsung Electronics America, Inc.
85 Challenger Road
Ridgeeld Park, NJ 07660
1-800-SAMSUNG (726-7864)
www.samsung.com/us/support
Les visites des techniciens de maintenance destinées à expliquer les fonctions, la maintenance
ou l'installation ne sont pas couvertes par la garantie.
Veuillez prendre contact avec votre centre d'appels Samsung pour obtenir de l'aide sur l'un de
ces problèmes.
FlexWash_WV9900M_DC68-03768A-04_CFR.indd 85 2017-05-22 7:07:40

Français86
Garantie (CANADA)
LAVE-LINGE SAMSUNG
GARANTIE LIMITÉE À L'ACHETEUR INITIAL
Ce produit de la marque SAMSUNG, tel que fourni et distribué par SAMSUNG ELECTRONICS
CANADA, INC. (SAMSUNG) et livré neuf, s'accompagne d'une garantie de SAMSUNG contre tout
vice de fabrication au niveau des pièces et de la main d'œuvre pendant une période limitée de :
Un (1) an pour les pièces et la main d'œuvre ; Dix (10) ans pour les pièces du moteur de lavage à
entraînement direct (pièces uniquement).
Cette limite de garantie s'applique à compter de la date d'acquisition et couvre uniquement
les produits achetés et utilisés au Canada. Pour bénécier de réparations dans le cadre de la
présente garantie, l'acheteur doit contacter la société SAMSUNG an qu'elle détermine l'origine du
problème et une procédure de réparation. Les services de garantie peuvent être pris en charge
uniquement par un centre de service agréé SAMSUNG. Lors de la remise d'un produit défectueux
à SAMSUNG ou à un centre de service agréé SAMSUNG, l'acheteur est tenu de présenter le coupon
d'achat d'origine à la demande des intéressés à titre de preuve d'achat. SAMSUNG assurera un
service de réparation gratuit à domicile pendant la période de garantie sujet à la disponibilité au
Canada. Le service à domicile n'est pas disponible pour toutes les zones.
Pour bénécier du service à domicile, l'appareil doit être situé dans un emplacement accessible à
notre personnel. Si ce service n'est pas disponible, SAMSUNG peut choisir de prendre à sa charge
le transport aller/retour du produit vers un centre de service agréé.
FlexWash_WV9900M_DC68-03768A-04_CFR.indd 86 2017-05-22 7:07:40

Français 87
La société SAMSUNG prendra en charge, à sa convenance, la réparation, le remplacement ou
le remboursement du produit tel que stipulé dans les présentes conditions et procédera au
remplacement ou au reconditionnement des pièces ou des produits si ces derniers s'avèrent
défectueux dans la limite de la période de garantie mentionnée précédemment. Toutes les pièces
et tous les produits remplacés deviennent la propriété de SAMSUNG et doivent être retournés
à SAMSUNG. Les pièces de rechange et les produits sont couverts pour la période restante de
garantie ou quatre-vingt-dix (90) jours, si la période de garantie est inférieure à 90 jours. La
garantie limitée couvre les vices de fabrication relatifs aux matériaux et à la qualité d'exécution
survenus dans le cadre d'une utilisation normale et non commerciale du produit et ne s'applique
pas aux causes suivantes, comprenant, mais ne se limitant pas à : tout dommage survenant au
cours de l'expédition, de la livraison et de l'installation ; toute utilisation de l'appareil contraire
au but auquel il était destiné ; tout numéro de produit ou de série effacé ; tout dommage du
revêtement extérieur ou de l'aspect du produit ; tout dommage causé par un accident, une
utilisation non conforme, une négligence, un incendie ou une inondation, la foudre ou une autre
catastrophe naturelle ; toute utilisation de produits, d'équipements, de systèmes, d'appareils, de
services, de pièces, de fournitures, d'accessoires, d'applications, d'installations, de réparations,
de câblages externes ou de connecteurs non fournis ou autorisés par SAMSUNG et susceptibles
d'endommager ledit appareil ou de nuire à son fonctionnement ; toute surtension, uctuation ou
tension de ligne électrique incorrecte ; tout réglage effectué par l'acheteur et tout non-respect des
consignes d'utilisation, de maintenance et de respect de l'environnement couvertes ou prescrites
dans le présent carnet d'entretien ; tout démontage ou toute réinstallation de l'appareil ; tout
problème résultant d'une prolifération d'insectes nuisibles. Cette garantie limitée ne couvre pas
les problèmes résultant d'un courant, d'une tension ou d'une alimentation électrique incorrects,
ainsi que d'ampoules électriques, de fusibles ou de câblage domestiques inappropriés. Elle ne
couvre pas non plus le coût des appels au service d'assistance pour obtenir des instructions ou la
réparation des erreurs d'installation. SAMSUNG ne garantit pas que l'appareil sera exempt de tout
problème ou qu'il fonctionnera sans interruption.
SAUF EXCEPTION MENTIONNÉE DANS LE PRÉSENT DOCUMENT, SAMSUNG NE FOURNIT AUCUNE
GARANTIE EXPRESSE OU IMPLICITE QUANT À CET APPAREIL, Y COMPRIS, MAIS SANS S'Y LIMITER,
LES GARANTIES IMPLICITES DE QUALITÉ MARCHANDE, DE CONTREFAÇON OU D'APTITUDE À UN
USAGE PARTICULIER.
FlexWash_WV9900M_DC68-03768A-04_CFR.indd 87 2017-05-22 7:07:40

Garantie (CANADA)
Français88
AUCUNE GARANTIE, QU'ELLE SOIT DONNÉE PAR UN TIERS, UNE ENTREPRISE OU UNE PERSONNE
MORALE, NE POURRA ÊTRE CONSIDÉRÉE COMME UN ENGAGEMENT VIS-À-VIS DE SAMSUNG.
SAMSUNG NE SERA AUCUNEMENT RESPONSABLE EN CAS DE PERTE DE BÉNÉFICES, DE MANQUE
À GAGNER, D'INCAPACITÉ À RÉALISER DES ÉCONOMIES OU TOUT AUTRE AVANTAGE FINANCIER
OU D'AUTRES DOMMAGES SPÉCIAUX, ACCESSOIRES OU INDIRECTS RÉSULTANT DE L'UTILISATION
OU D'UNE MAUVAISE UTILISATION DE CET APPAREIL OU D'UNE INCAPACITÉ À UTILISER CET
APPAREIL, QUELLE QUE SOIT LA BASE JURIDIQUE INVOQUÉE POUR JUSTIFIER L'ASSERTION ET
MÊME SI SAMSUNG A ÉTÉ AVISÉ DE L'ÉVENTUALITÉ DE TELS DOMMAGES.
LES INDEMNITÉS FINANCIÈRES EXIGÉES AUPRÈS DE SAMSUNG NE POURRONT EN AUCUN CAS
EXCÉDER LE PRIX D'ACHAT DU PRODUIT VENDU PAR SAMSUNG ET À L'ORIGINE DES DOMMAGES
INVOQUÉS. SANS LIMITATION AUX DISPOSITIONS SUSDITES, L'ACHETEUR ASSUME TOUS LES
RISQUES ET TOUTES LES RESPONSABILITÉS EN CAS DE PERTE, DE DOMMAGES OU DE BLESSURES
ÉVENTUELLES INFLIGÉS À L'ACHETEUR ET AUX BIENS DE CELUI-CI ET À TOUTE AUTRE PERSONNE
ET AUX BIENS DE CELLE-CI RÉSULTANT DE L'UTILISATION OU DE LA MAUVAISE UTILISATION
DE L'APPAREIL OU DE L'INCAPACITÉ À L'UTILISER. CETTE GARANTIE LIMITÉE N'EST VALABLE
POUR PERSONNE D'AUTRE QUE L'ACHETEUR INITIAL DU PRODUIT, N'EST PAS TRANSFÉRABLE ET
ÉNONCE VOTRE RECOURS EXCLUSIF.
Certaines provinces n'autorisent pas de limitations quant à la durée des garanties implicites ni
l'exclusion ou la limitation de dommages accessoires ou indirects ; il se peut par conséquent que
les limitations et exclusions énoncées ci-dessus ne s'appliquent pas à votre cas.
La présente garantie vous octroie des droits spéciques, ainsi que d'autres variant d'une province
à une autre.
Pour bénécier d'un service d'assistance couvert par votre garantie, contactez SAMSUNG à
l'adresse suivante :
Samsung Electronics Canada Inc.
2050 Derry Road West,
Mississauga, Ontario L5N 0B9 Canada
1-800-SAMSUNG (726-7864)
www.samsung.com/ca/support (English)
www.samsung.com/ca_fr/support (French)
FAX : 1-866-436-4617
Les visites des techniciens de maintenance destinées à expliquer les fonctions, la maintenance
ou l'installation ne sont pas couvertes par la garantie.
Veuillez prendre contact avec votre centre d'appels Samsung pour obtenir de l'aide sur l'un de
ces problèmes.
FlexWash_WV9900M_DC68-03768A-04_CFR.indd 88 2017-05-22 7:07:40

Mémo
Français 89
FlexWash_WV9900M_DC68-03768A-04_CFR.indd 89 2017-05-22 7:07:40

Mémo
Français90
FlexWash_WV9900M_DC68-03768A-04_CFR.indd 90 2017-05-22 7:07:40

Mémo
Français 91
FlexWash_WV9900M_DC68-03768A-04_CFR.indd 91 2017-05-22 7:07:40

Scan this with your smartphone
DES QUESTIONS OU DES COMMENTAIRES ?
PAYS APPELEZ LE OU RENDEZ-VOUS SUR LE SITE
U.S.A
- Consumer
Electronics
- Mobile
Phones
1-800-SAMSUNG (726-7864)
1-844-SAM-PAYS (726-7297)
www.samsung.com/us/support
CANADA
1-800-SAMSUNG(726-7864)
1-844-SAM-PAYS (726-7297)
www.samsung.com/ca/support (English)
www.samsung.com/ca_fr/support (French)
DC68-03768A-04
FlexWash_WV9900M_DC68-03768A-04_CFR.indd 92 2017-05-22 7:07:40

FlexWash™
Manual del usuario
WV60M9900A*
FlexWash_WV9900M_DC68-03768A-04_MES.indd 1 2017-05-22 7:06:49

Contenido
Español2
Contenido
Información sobre seguridad 4
Lo que necesita saber sobre las instrucciones de seguridad 4
Símbolos de seguridad importantes 4
Precauciones de seguridad importantes 5
Advertencias fundamentales para la instalación 6
Precauciones para la instalación 8
Advertencias fundamentales para el uso 8
Precauciones de uso 10
Advertencias fundamentales para la limpieza 14
Aviso regulatorio 15
Instalación 18
Desempaque de la lavadora 18
Componentes 19
Requisitos de instalación 21
Instalación paso a paso 25
Antes de comenzar 35
Conguración inicial 35
Pautas de lavado 35
Guía sobre los agentes de limpieza 38
Funcionamiento 43
Lavadora superior 43
Lavadora inferior 45
Sencillos pasos para comenzar 50
Samsung Smart Home 51
Funciones especiales 53
Mantenimiento 56
Consideraciones generales 56
Lavadora superior 59
Lavadora inferior 61
FlexWash_WV9900M_DC68-03768A-04_MES.indd 2 2017-05-22 7:06:49

Contenido
Español 3
Solución de problemas 67
Vericaciones 67
Samsung Smart Home 72
Códigos de información 73
Especicaciones 77
Tabla de indicaciones sobre telas 77
Protección del medio ambiente 78
Declaración de conformidad 78
Hoja de especicaciones 79
Tabla de ciclos 80
FlexWash_WV9900M_DC68-03768A-04_MES.indd 3 2017-05-22 7:06:49
Información sobre seguridad
CONSERVE ESTAS INSTRUCCIONES
Español4
Información sobre seguridad
Felicitaciones por la compra de la nueva lavadora Samsung. Este manual contiene información
importante acerca de la instalación, el uso y el cuidado del electrodoméstico. Lea detenidamente
estas instrucciones a n de aprovechar al máximo los múltiples benecios y funciones de la
lavadora.
Lo que necesita saber sobre las instrucciones de seguridad
Lea este manual detenidamente para aprender a utilizar con seguridad y ecacia todas las
características y funciones de su nuevo electrodoméstico. Conserve el manual en un lugar seguro
cerca del electrodoméstico para consultas futuras. Utilice este electrodoméstico solo para el
propósito para el que fue destinado como se describe en este manual.
Las advertencias y las instrucciones de seguridad importantes de este manual no cubren todas las
posibles condiciones y situaciones que pueden ocurrir. Es su responsabilidad actuar con sentido
común, precaución y cuidado cuando instale, realice el mantenimiento y ponga en funcionamiento
la lavadora.
Puesto que las siguientes instrucciones de funcionamiento sirven para varios modelos, las
características de su lavadora pueden diferir ligeramente de las que se describen en este manual
y es posible que no todos los signos de advertencia sean aplicables. Si tiene alguna consulta o
duda, comuníquese con el centro de servicio más cercano o busque ayuda e información en línea
en www.samsung.com.
Símbolos de seguridad importantes
Los iconos y las señales incluidas en este manual del usuario signican lo siguiente:
ADVERTENCIA
Peligros o prácticas inseguras que podrían causar lesiones físicas graves o la muerte y/o daños
materiales.
PRECAUCIÓN
Peligros o prácticas inseguras que podrían causar lesiones físicas y/o daños materiales.
NOTA
Indica que existe el riesgo de lesiones físicas o daños materiales.
Estas señales de advertencia tienen por objeto evitar que usted u otras personas sufran lesiones.
Siga las instrucciones completamente.
Después de leer este manual, guárdelo en un lugar seguro para consultas futuras.
Lea todas las instrucciones antes de usar el electrodoméstico.
FlexWash_WV9900M_DC68-03768A-04_MES.indd 4 2017-05-22 7:06:49

Información sobre seguridad
CONSERVE ESTAS INSTRUCCIONESCONSERVE ESTAS INSTRUCCIONES
Español 5
Al igual que con cualquier equipo que usa electricidad y piezas movibles, existen riesgos
potenciales. Para usar este electrodoméstico en forma segura, familiarícese con su funcionamiento
y manéjelo con cuidado cuando lo use.
Precauciones de seguridad importantes
ADVERTENCIA
Para reducir el riesgo de incendio, descarga eléctrica o lesiones físicas
cuando usa este electrodoméstico, siga las instrucciones de seguridad
básicas que guran a continuación:
1. Lea todas las instrucciones antes de usar el electrodoméstico.
2. No lave ni seque prendas que se han limpiado, lavado, remojado o salpicado previamente con
gasolina, solventes de limpieza en seco u otras sustancias inamables o explosivas, ya que
emiten vapores que pueden encenderse o explotar.
3. No permita que los niños jueguen sobre el electrodoméstico ni dentro de él. Se requiere de
supervisión cuando el electrodoméstico es utilizado cerca de los niños.
4. Antes de descartar el electrodoméstico o de trasladarlo para que se le efectúe el servicio
técnico, retire la puerta del compartimiento de la lavadora o la secadora.
5. No introduzca la mano en el electrodoméstico si la tina está en movimiento.
6. No instale ni almacene este electrodoméstico donde quede expuesto a los factores climáticos.
7. No modique los controles.
8. No repare, reemplace ni intente realizar el mantenimiento de ninguna pieza del
electrodoméstico salvo que esté recomendado especícamente en las instrucciones de
mantenimiento del usuario o en las instrucciones de reparación para el usuario publicadas y
que, a su juicio, usted tenga la habilidad para llevarlas a cabo.
9. No agregue gasolina, solventes de limpieza en seco u otras sustancias inamables o explosivas
al agua del lavado. Estas sustancias emiten vapores que pueden encenderse o explotar.
10. En ciertas circunstancias, puede producirse gas hidrógeno en un sistema de agua caliente que
no se ha usado durante 2 semanas o más. EL GAS HIDRÓGENO ES EXPLOSIVO. Si el sistema de
agua caliente no fue utilizado durante dicho período, antes de usar la lavadora o la lavadora
y la secadora combinadas, abra las llaves del agua caliente y deje correr el agua por varios
minutos. De esta manera, se eliminará el gas hidrógeno acumulado. Dado que el gas es
inamable, no fume ni use una llama abierta en ese momento.
FlexWash_WV9900M_DC68-03768A-04_MES.indd 5 2017-05-22 7:06:49

Información sobre seguridad
CONSERVE ESTAS INSTRUCCIONES
Información sobre seguridad
CONSERVE ESTAS INSTRUCCIONES
Español6
Advertencias fundamentales para la instalación
Advertencia sobre la State of California Proposition 65 (solo EE.UU.)
Este producto contiene productos químicos reconocidos en el estado de
California como capaces de provocar cáncer y defectos de nacimiento u
otras afecciones reproductivas.
La instalación de este electrodoméstico la debe efectuar un técnico calicado o una empresa de
servicios.
• De lo contrario, se puede provocar una descarga eléctrica, un incendio, una explosión,
problemas con el producto o lesiones.
El electrodoméstico es pesado, tenga cuidado cuando lo levante.
Enchufe el cable de alimentación a un tomacorriente de pared que cumpla las especicaciones
eléctricas locales. Utilice el tomacorriente solo con este electrodoméstico y no use un cable prolongador.
• Compartir el tomacorriente de pared con otros electrodomésticos, utilizando un multicontacto
o prolongando el cable de alimentación, puede provocar una descarga eléctrica o un incendio.
• Asegúrese de que el voltaje, la frecuencia y la corriente suministradas a la lavadora coincidan
con las indicadas en las especicaciones del producto. De lo contrario, se puede provocar
una descarga eléctrica o un incendio. Enchufe el cable de alimentación rmemente en el
tomacorriente de pared.
Este electrodoméstico debe ser instalado por un técnico calicado o una empresa de servicios.
• De lo contrario, se puede provocar una descarga eléctrica, un incendio, una explosión,
problemas con el producto o lesiones.
Retire regularmente todas las sustancias extrañas, como polvo o agua, de los terminales y los
puntos de contacto de la alimentación con un paño seco.
• Desenchufe el cable de alimentación y límpielo con un paño seco.
• De lo contrario, se puede provocar una descarga eléctrica o un incendio.
Enchufe el cable de alimentación en un tomacorriente de pared de manera que el cable baje hacia
el piso.
• Si enchufa el cable de alimentación en el tomacorriente en la dirección opuesta, los cables
eléctricos del interior del cable pueden dañarse y provocar una descarga eléctrica o un incendio.
Mantenga los materiales de empaque fuera del alcance de los niños, ya que son peligrosos para
ellos.
• Si un niño mete la cabeza en una bolsa de plástico, se puede asxiar.
FlexWash_WV9900M_DC68-03768A-04_MES.indd 6 2017-05-22 7:06:49

Información sobre seguridad
CONSERVE ESTAS INSTRUCCIONESCONSERVE ESTAS INSTRUCCIONES
Español 7
Si el electrodoméstico, el enchufe o el cable de alimentación están dañados, comuníquese con el
centro de servicio Samsung más cercano.
Este electrodoméstico debe conectarse a tierra correctamente.
La toma de tierra no se debe conectar a una conducción de gas, una cañería de agua de plástico ni
a la línea telefónica.
• Puede provocar una descarga eléctrica, un incendio, una explosión o problemas con el producto.
• Nunca enchufe el cable de alimentación en un tomacorriente que no esté conectado a tierra
correctamente. Asegúrese de que el tomacorriente guarde conformidad con las normativas
locales y nacionales.
No instale este electrodoméstico cerca de un calefactor o de materiales inamables.
No instale este electrodoméstico en un lugar húmedo, grasiento o cubierto de polvo, ni lo
exponga a la luz directa del sol o al agua (gotas de lluvia).
No instale este electrodoméstico en un lugar donde se registren bajas temperaturas.
• El hielo puede reventar los tubos.
No instale este electrodoméstico en un lugar donde pueda haber fugas de gas.
• Se podría provocar una descarga eléctrica o un incendio.
No utilice transformadores eléctricos para alimentar la lavadora
• Se podría provocar una descarga eléctrica o un incendio.
No utilice un cable de alimentación o un enchufe dañado ni un tomacorriente de pared que esté
ojo.
• Se podría provocar una descarga eléctrica o un incendio.
No jale el cable de alimentación ni lo doble excesivamente.
No tuerza ni ate el cable de alimentación.
No cuelgue el cable de alimentación de un objeto metálico, no coloque objetos pesados sobre él, no
inserte el cable de alimentación entre objetos ni lo empuje en un espacio detrás del electrodoméstico.
• Se podría provocar una descarga eléctrica o un incendio.
No jale el cable de alimentación para desenchufarlo.
• Para desenchufar el cable de alimentación, jálelo sujetándolo por el enchufe.
• De lo contrario, se puede provocar una descarga eléctrica o un incendio.
El electrodoméstico debe colocarse en una posición en la que el tomacorriente, las llaves de
suministro de agua y los tubos de drenaje sean accesibles.
FlexWash_WV9900M_DC68-03768A-04_MES.indd 7 2017-05-22 7:06:50

Información sobre seguridad
CONSERVE ESTAS INSTRUCCIONES
Información sobre seguridad
CONSERVE ESTAS INSTRUCCIONES
Español8
Precauciones para la instalación
PRECAUCIÓN
Este electrodoméstico debe estar ubicado de manera tal que se pueda acceder fácilmente al
enchufe.
• De lo contrario, se puede provocar un incendio o una descarga debido a las fugas eléctricas.
Instale el electrodoméstico sobre una supercie sólida y nivelada que pueda soportar su peso.
• Si no lo hace pueden producirse vibraciones anormales, movimientos, ruidos o problemas con
el producto.
Advertencias fundamentales para el uso
ADVERTENCIA
Si el electrodoméstico se inunda, corte inmediatamente el suministro de agua y la alimentación y
comuníquese con el centro de servicio Samsung más cercano.
• No toque el enchufe con las manos mojadas.
• Se puede provocar una descarga eléctrica.
Si el electrodoméstico genera ruidos extraños, olor a quemado o humo, desconéctelo de inmediato
y llame al centro de servicio Samsung más cercano.
• De lo contrario, se puede provocar una descarga eléctrica o un incendio.
En caso de fugas de gas (como propano, LP, etc.), ventile inmediatamente el lugar sin tocar el
enchufe. No toque el electrodoméstico ni el cable de alimentación.
• No utilice un ventilador. No encienda ninguna luz.
• Una chispa puede provocar un incendio o una explosión.
No permita que los niños jueguen sobre la lavadora o dentro de ella. Además, cuando se deshaga
del electrodoméstico, quite el cierre de la puerta de la lavadora.
• Los niños pueden asxiarse y morir si quedan atrapados dentro del producto.
Asegúrese de quitar el empaque (goma espuma, poliestireno) del fondo de la lavadora antes de
utilizarla.
No utilice la lavadora para lavar prendas contaminadas con gasolina, queroseno, benceno,
disolventes de pinturas, alcohol u otras sustancias inamables o explosivas.
• Puede provocar una descarga eléctrica, un incendio o una explosión.
FlexWash_WV9900M_DC68-03768A-04_MES.indd 8 2017-05-22 7:06:50

Información sobre seguridad
CONSERVE ESTAS INSTRUCCIONESCONSERVE ESTAS INSTRUCCIONES
Español 9
No abra la puerta de la lavadora por la fuerza mientras esté en funcionamiento (lavado a alta
temperatura/secado/centrifugado).
• El agua que salga de la lavadora puede causar quemaduras o convertir el suelo en resbaladizo.
Puede provocar lesiones personales.
• Abrir la puerta por la fuerza puede dañar el producto o causar lesiones personales.
No introduzca las manos bajo la lavadora cuando esté en funcionamiento.
• Puede provocar lesiones personales.
No toque el enchufe con las manos mojadas.
• Se podría provocar una descarga eléctrica.
No haga funcionar el electrodoméstico con las manos mojadas.
• Se podría provocar una descarga eléctrica.
No apague el electrodoméstico desenchufándolo mientras esté en funcionamiento.
• Si vuelve a enchufar el electrodoméstico en el tomacorriente puede originar una chispa y
causar una descarga eléctrica o un incendio.
No deje que los niños ni las personas discapacitadas utilicen la lavadora sin la supervisión
adecuada. No permita que los niños se suban al electrodoméstico.
• Esto puede provocar una descarga eléctrica, quemaduras o lesiones personales.
No introduzca la mano ni objetos de metal bajo la lavadora mientras esté en funcionamiento.
• Puede provocar lesiones personales.
No desenchufe el electrodoméstico jalando el cable de alimentación. Sujete siempre el enchufe
rmemente y extráigalo en línea recta.
• Un cable de alimentación dañado puede provocar un cortocircuito, un incendio o una descarga
eléctrica.
No trate de reparar, desensamblar ni modicar el electrodoméstico usted mismo.
• No utilice un fusible (de cobre, cable de acero, etc.) que no sea el estándar.
• Si es necesario reparar o volver a instalar el electrodoméstico, comuníquese con el centro de
servicio Samsung más cercano.
• De lo contrario, se puede provocar una descarga eléctrica, un incendio, problemas con el
producto o lesiones.
Si se aoja la manguera de suministro de agua de la llave del agua y se inunda el
electrodoméstico, desenchufe el cable de alimentación.
• De lo contrario, se puede provocar una descarga eléctrica o un incendio.
FlexWash_WV9900M_DC68-03768A-04_MES.indd 9 2017-05-22 7:06:50

Información sobre seguridad
CONSERVE ESTAS INSTRUCCIONES
Información sobre seguridad
CONSERVE ESTAS INSTRUCCIONES
Español10
Desenchufe el electrodoméstico si no lo va a utilizar durante un período prolongado o durante
una tormenta eléctrica.
• De lo contrario, se puede provocar una descarga eléctrica o un incendio.
Si entra alguna sustancia extraña en el electrodoméstico, desenchufe el cable de alimentación y
comuníquese con el centro de servicio Samsung más cercano.
• Se podría provocar una descarga eléctrica o un incendio.
No permita que los niños (ni las mascotas) jueguen encima o dentro de la lavadora. La puerta de
la lavadora no se abre con facilidad desde el interior, y los niños podrían lastimarse gravemente
si quedaran atrapados adentro.
Precauciones de uso
PRECAUCIÓN
Si la lavadora está contaminada por sustancias extrañas, tales como detergente, tierra, restos
de alimentos, etc., desenchufe el cable de alimentación y limpie la lavadora con un paño suave
humedecido.
• Si no lo hace se puede producir decoloración, deformación, daños u óxido.
El vidrio frontal (o la tapa) se puede romper con un impacto fuerte. Tenga cuidado cuando utilice
la lavadora.
• La rotura del vidrio puede causar lesiones.
Tras una falla del suministro de agua o cuando se vuelve a conectar la manguera de suministro,
abra lentamente la llave del agua.
Abra lentamente la llave del agua tras un periodo prolongado de falta de uso.
• La presión del aire de la manguera de suministro o de la conducción de agua puede dañar una
pieza o provocar fugas de agua.
Si durante el funcionamiento hay una falla en el drenaje, revise el drenaje.
• Si se utiliza la lavadora inundada por una falla en el drenaje, se puede provocar una descarga
eléctrica o un incendio.
Introduzca completamente la ropa en la lavadora para que no pueda quedar atrapada por la puerta.
• Si la ropa queda atrapada por la puerta, puede dañarse la ropa o la lavadora, o puede provocar
fugas de agua.
FlexWash_WV9900M_DC68-03768A-04_MES.indd 10 2017-05-22 7:06:50

Información sobre seguridad
CONSERVE ESTAS INSTRUCCIONESCONSERVE ESTAS INSTRUCCIONES
Español 11
Cierre el suministro de agua cuando la lavadora no esté en uso.
• Asegúrese de que los conectores de la manguera de suministro de agua estén correctamente
ajustados.
Asegúrese de que la arandela de goma y el vidrio de la puerta frontal no estén contaminados por
sustancias extrañas (como restos, hilos, cabellos, etc.)
• Si una sustancia extraña queda atrapada en la puerta o si la puerta no está bien cerrada, se
puede producir una fuga de agua.
Antes de utilizar el producto, abra la llave del agua y verique que los conectores de la manguera
de suministro estén bien ajustados y que no haya fugas de agua.
• Si los conectores de la manguera de suministro de agua están ojos, puede haber fugas de
agua.
El producto adquirido está diseñado exclusivamente para uso doméstico.
El uso del producto con nes comerciales se considera un uso incorrecto del producto. Si se hace
un uso comercial del producto, este no quedará cubierto por la garantía estándar que ofrece
Samsung y no se podrá atribuir a Samsung ninguna responsabilidad por el mal funcionamiento o
los daños resultantes de este uso incorrecto.
No se pare encima del electrodoméstico ni le coloque encima objetos (como ropa, velas o
cigarrillos encendidos, platos, productos químicos, objetos metálicos, etc.).
• Se podría provocar una descarga eléctrica, un incendio, problemas con el producto o lesiones.
No rocíe materiales volátiles, como insecticidas, en la supercie del electrodoméstico.
• Además de ser perjudiciales para las personas, también pueden provocar una descarga
eléctrica, un incendio o problemas con el producto.
No coloque objetos que generen campos electromagnéticos cerca de la lavadora.
• Puede causar lesiones por un mal funcionamiento.
El agua que se drena durante el lavado a alta temperatura o durante el ciclo de secado está
caliente. No toque el agua.
• Puede causar lesiones personales o quemaduras.
FlexWash_WV9900M_DC68-03768A-04_MES.indd 11 2017-05-22 7:06:50

Información sobre seguridad
CONSERVE ESTAS INSTRUCCIONES
Información sobre seguridad
CONSERVE ESTAS INSTRUCCIONES
Español12
No lave, centrifugue ni seque asientos, alfombrillas o prendas impermeables (*) a menos que su
electrodoméstico tenga un ciclo especial para lavar estos artículos.
Para telas impermeables, utilice solo el ciclo WATERPROOF (PRENDAS IMPERMEABLES). No utilice
otros ciclos para las telas impermeables (solo modelos que disponen del ciclo WATERPROOF
(PRENDAS IMPERMEABLES).
(*): Ropa de cama de lana, fundas de lluvia, ropa para pescar, pantalones de esquí, bolsas de
dormir, cubiertas de pañales, chándales, cubiertas de bicicletas, motos y automóviles, etc.
• No lave alfombrillas gruesas o espesas aunque lleven la marca de lavado en la etiqueta. Se
pueden producir lesiones o dañar la lavadora, las paredes, el suelo o la ropa debido a las
vibraciones anormales.
• No lave alfombras ni felpudos con forro de goma. El forro de goma se puede desprender y
adherirse a la tina, lo que podría provocar un mal funcionamiento, por ejemplo una falla en el
drenaje.
No haga funcionar la lavadora sin el dosicador de detergente.
• Se puede provocar una descarga eléctrica o lesiones debido a fugas de agua.
No toque el interior de la tina durante o inmediatamente después del secado, ya que está caliente.
• Se podría causar quemaduras.
No introduzca las manos en el cajón del detergente.
• Se puede dañar la mano ya que ésta puede quedar atrapada por el dispositivo de introducción
del detergente.
• No utilice detergente en polvo en el compartimiento para detergente líquido (únicamente
para los modelos aplicables). Retire el compartimiento y coloque el detergente en polvo
directamente en el compartimiento de lavado principal.
No introduzca ningún objeto (como zapatos, restos de comida, animales) que no sea ropa en la
lavadora.
• Se pueden producir daños en la lavadora o causar lesiones personales o la muerte en el caso
de las mascotas debido a las vibraciones anormales.
No presione los botones con objetos alados, como alleres, cuchillos, las uñas, etc.
• Se podría provocar una descarga eléctrica o lesiones personales.
No lave ropa contaminada por aceites, cremas o lociones que se utilizan normalmente en los
establecimientos para el cuidado de la piel o en las clínicas de masajes.
• Se puede deformar la arandela de goma y provocar fugas de agua.
FlexWash_WV9900M_DC68-03768A-04_MES.indd 12 2017-05-22 7:06:50

Información sobre seguridad
CONSERVE ESTAS INSTRUCCIONESCONSERVE ESTAS INSTRUCCIONES
Español 13
No deje objetos de metal, como horquillas o clips, en la tina durante periodos prolongados. No
deje blanqueador en la tina durante periodos prolongados.
• Estas dos acciones pueden oxidar la tina.
• Si comienza a aparecer óxido en la supercie de la tina, aplique un agente limpiador (neutro)
sobre la supercie y utilice una esponja para limpiarla. Nunca utilice un cepillo de metal.
No utilice detergentes de limpieza en seco directamente ni lave, enjuague ni centrifugue ropa
contaminada por detergentes de limpieza en seco.
• Se puede producir una combustión espontánea o un incendio por el calor de la oxidación del
aceite.
No utilice agua de los dispositivos de calentamiento o enfriamiento del agua.
• Podría causar problemas en la lavadora.
No utilice jabón natural para lavado a mano en la lavadora.
• Si se endurece y se acumula en el interior de la lavadora, puede causar problemas en el
producto, como decoloración, óxido y malos olores.
Coloque medias y brassieres en una red y lávelas junto con otra ropa.
No lave prendas grandes como ropa de cama dentro de una red.
• De no hacerlo se pueden producir lesiones personales por las vibraciones anormales.
• Coloque los artículos más pequeños, como las medias y la lencería, dentro de una red.
No utilice detergente endurecido.
• Si se acumula en el interior de la lavadora, puede provocar fugas de agua.
Asegúrese de que los bolsillos de las prendas que vaya a lavar estén vacíos.
• Los objetos duros o alados, tales como monedas, clips, clavos, tornillos o piedras pueden
causar daños considerables en la lavadora.
No utilice la lavadora para lavar ropa que contenga hebillas o botones grandes u otros objetos de
metal pesados.
Clasique las prendas según la solidez del color y seleccione el ciclo, la temperatura del agua y
las funciones adicionales recomendadas.
• De lo contrario, se pueden decolorar o dañar las telas.
Al cerrar la puerta tenga cuidado de no atrapar los dedos de los niños.
• Si no lo hace, se pueden provocar lesiones personales.
FlexWash_WV9900M_DC68-03768A-04_MES.indd 13 2017-05-22 7:06:50

Información sobre seguridad
CONSERVE ESTAS INSTRUCCIONES
Información sobre seguridad
CONSERVE ESTAS INSTRUCCIONES
Español14
Advertencias fundamentales para la limpieza
ADVERTENCIA
No limpie el electrodoméstico rociando directamente agua dentro de él.
No utilice un agente limpiador muy ácido.
No utilice benceno, disolventes ni alcohol para limpiar el electrodoméstico.
• Puede provocar decoloración, deformación, daños, incendio o descarga eléctrica.
Antes de la limpieza de la lavadora o las tareas de mantenimiento, desenchúfela del
tomacorriente de la pared.
• De lo contrario, se puede provocar una descarga eléctrica o un incendio.
FlexWash_WV9900M_DC68-03768A-04_MES.indd 14 2017-05-22 7:06:50

Aviso regulatorio
CONSERVE ESTAS INSTRUCCIONES
Español 15
Aviso regulatorio
Aviso para FCC
PRECAUCIÓN
Todos los cambios y modicaciones que no cuenten con la aprobación expresa de la parte
responsable del cumplimiento invalidará la autoridad del usuario para operar el equipo.
Este dispositivo cumple con el Apartado 15 de las Normas de la FCC. El funcionamiento se
encuentra sujeto a las siguientes dos condiciones:
1. Este electrodoméstico no puede causar interferencia dañina, y
2. Este electrodoméstico debe aceptar la recepción de cualquier interferencia, incluidas aquellas
que puedan causar un funcionamiento indeseado.
Producto disponible en el mercado de Estados Unidos/Canadá, solo puede operarse el canal 1-11.
No es posible seleccionar otros canales.
DECLARACIÓN DE LA FCC:
Este equipo ha sido sometido a pruebas y se ha determinado que se encuentra dentro de los
límites para los dispositivos digitales clase B, de acuerdo con el apartado 15 de las Normas de
la FCC. Dichos límites han sido diseñados para proporcionar una protección razonable contra la
interferencia dañina en una instalación residencial.
Este equipo genera, utiliza y puede irradiar energía de frecuencias de radio y, si no se lo instala y
utiliza de acuerdo con las instrucciones, puede provocar interferencia dañina a las comunicaciones
de radio. Sin embargo, no existe garantía alguna de que no habrá interferencia en una instalación
determinada. Si el equipo provoca interferencia dañina a la recepción de radio o televisión, que
puede determinarse al encender y apagar el equipo, se sugiere que el usuario trate de corregir la
interferencia mediante una o más de las siguientes medidas:
• Reorientar o reubicar la antena receptora.
• Aumentar la distancia entre el equipo y el receptor.
• Conectar el equipo a un tomacorriente que esté en un circuito diferente al de la radio o el
televisor.
• Consultar al distribuidor o a un técnico experimentado en radio/TV para obtener ayuda.
DECLARACIÓN DE LA FCC SOBRE LA EXPOSICIÓN A LA RADIACIÓN:
Este equipo cumple con los límites de exposición a la radiación establecidos por la FCC para un
entorno no controlado. Este equipo debe instalarse y utilizarse con una distancia mínima de 8
pulgadas (20 cm) entre el radiador y su cuerpo. Este electrodoméstico y su/s antena/s no deben
ubicarse ni utilizarse junto con ninguna otra antena o transmisor.
FlexWash_WV9900M_DC68-03768A-04_MES.indd 15 2017-05-22 7:06:50

Aviso regulatorio
CONSERVE ESTAS INSTRUCCIONES
Aviso regulatorio
Español16
Aviso IC
El término “IC” antes del número de certicación de radio signica únicamente que se han
cumplido las especicaciones técnicas del Ministerio de Industria del Canadá. El funcionamiento
se encuentra sujeto a las siguientes dos condiciones:
1. Este electrodoméstico no puede causar interferencia, y
2. Este electrodoméstico debe aceptar cualquier interferencia, incluidas aquellas que puedan
causar un funcionamiento indeseado del dispositivo.
Este aparato digital Clase B cumple con la norma canadiense ICES-003.
Cet appareil numérique de la classe B est conforme á la norme NMB-003 du Canada.
Producto disponible en el mercado de Estados Unidos/Canadá, solo puede operarse el canal 1-11.
No es posible seleccionar otros canales.
DECLARACIÓN DE LA IC SOBRE LA EXPOSICIÓN A LA RADIACIÓN:
Este equipo cumple con los límites de exposición a la radiación RSS-102 establecidos por la IC
para un entorno no controlado. Este equipo debe instalarse y utilizarse con una distancia mínima
de 8 pulgadas (20 cm) entre el radiador y su cuerpo. Este electrodoméstico y su/s antena/s no
deben ubicarse ni utilizarse junto con ninguna otra antena o transmisor.
FlexWash_WV9900M_DC68-03768A-04_MES.indd 16 2017-05-22 7:06:50
Aviso regulatorio
CONSERVE ESTAS INSTRUCCIONES
Español 17
Aviso de licencia de código abierto
El software incluido en este producto contiene software de código abierto, Puede obtener el
correspondiente código fuente completo para un periodo de tres años a partir del último envío de
este producto enviando un correo electrónico a mailto:oss.r[email protected]om.
Asimismo es posible obtener el correspondiente código fuente completo en un soporte físico
como un CD-ROM; se le cobrará una tasa mínima.
La siguiente URL http://opensource.samsung.com/opensource/SimpleConnectTP/seq/0 lleva a la
página de descarga del código fuente disponible y a la información de licencia de código abierto
relacionada con este producto. Esta oferta es válida para quienes reciban esta información.
FlexWash_WV9900M_DC68-03768A-04_MES.indd 17 2017-05-22 7:06:50
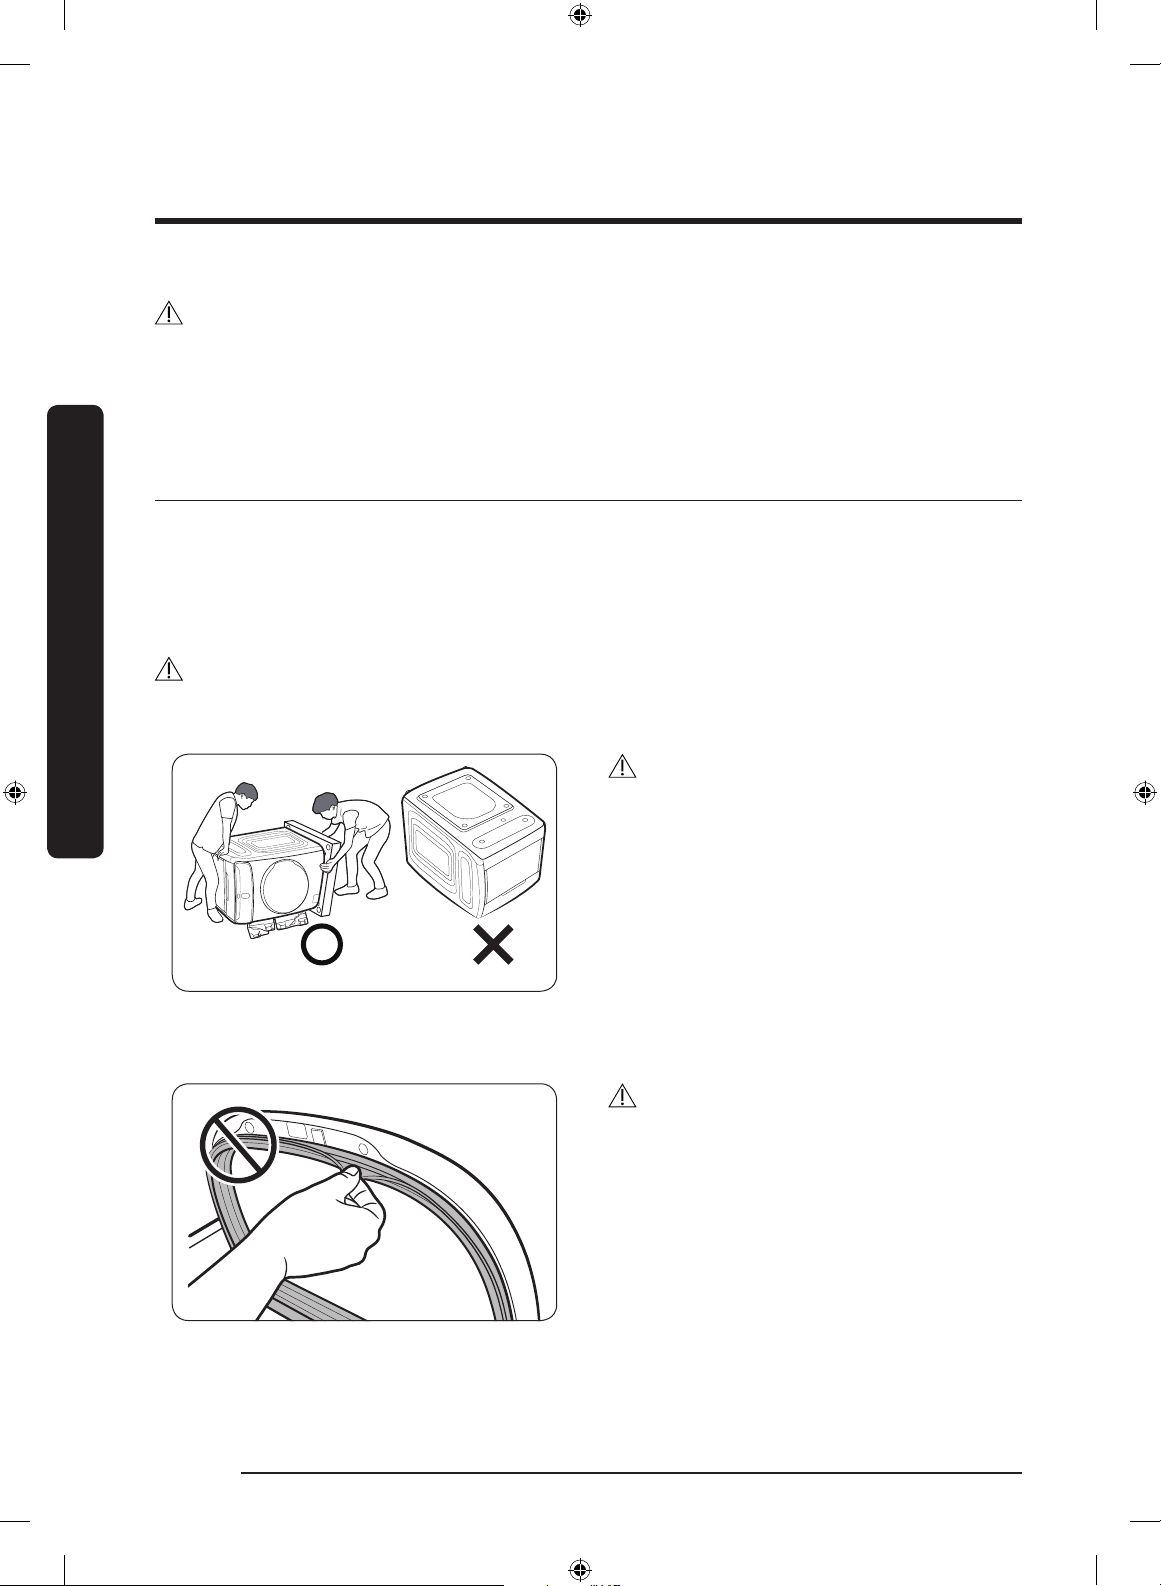
Instalación
Español18
Instalación
Siga detenidamente estas instrucciones para asegurar una adecuada instalación de la lavadora y
evitar accidentes al lavar la ropa.
ADVERTENCIA
El panel de control, el tambor de centrifugado, el motor, la válvula de entrada y la bomba no
están conectados a tierra intencionalmente y pueden presentar un riesgo de descarga eléctrica
solo durante el servicio técnico.
Desempaque de la lavadora
Desempaque la lavadora e inspecciónela para controlar que no se hayan producido daños durante
el transporte. Asegúrese de haber recibido todos los elementos que se muestran a continuación.
Si la lavadora sufrió daños durante el transporte, o si falta algún elemento, comuníquese con el
1-800-SAMSUNG (1-800-726-7864). Para evitar lesiones físicas o distensiones musculares, use
guantes protectores cada vez que levante o transporte la unidad.
ADVERTENCIA
Los materiales de empaque pueden ser peligrosos para los niños. Mantenga todo el material de
empaque (bolsas de plástico, poliestireno, etc.) fuera del alcance de los niños.
PRECAUCIÓN
Para desempacar la lavadora se necesita la
colaboración de 2 personas. No incline la
lavadora hacia adelante al retirar la protección
de la parte inferior de los materiales de
empaque.
Al acostar la lavadora sobre el piso para
retirar la base de cartón, se debe proteger el
lateral de la lavadora y apoyarla con cuidado.
Nunca apoye la lavadora sobre la parte frontal
ni posterior.
PRECAUCIÓN
No arranque el sellado de la puerta interior. Se
puede originar una fuga durante la operación
de lavado.
FlexWash_WV9900M_DC68-03768A-04_MES.indd 18 2017-05-22 7:06:51

Instalación
Español 19
Componentes
Asegúrese de que todos los componentes estén incluidos en el paquete. Si tiene alguna pregunta acerca de
la lavadora o las piezas, comuníquese con un centro de atención al cliente de Samsung o con el vendedor.
12
10
08
09
11
13
14
15
01
03
04
02
05
06
07
01 Compartimiento inferior
para el detergente
02 Tambor 03 Puerta frontal
04 Tina 05 Cubierta del ltro 06 Filtro de la bomba
07 Tubo de drenaje de
emergencia
08 Puerta superior 09 Cubierta protectora
(interna)
10 Filtro para pelusas 11 Compartimiento superior para el
detergente
12 Panel principal
13 Enchufe 14 Conector de tuberías
(Manguera de drenaje superior y
manguera de drenaje inferior)
15 Patas niveladoras
FlexWash_WV9900M_DC68-03768A-04_MES.indd 19 2017-05-22 7:06:51

Instalación
Instalación
Español20
Accesorios (provistos)
Tapas de los tornillos Guías de la manguera
(x2)
Correa de sujeción Aqua Pebble
* Protectores de goma
* Cuando no utilice el pedestal, utilice los protectores de goma en pisos o supercies blandos.
Accesorios (no provistos)
Estos elementos deben adquirirse por separado en un centro de servicio local.
Mangueras de agua
(se venden por separado)
Almohadillas antideslizantes
(se venden por separado)
Pedestal
(solo sistema ex)
NOTA
• La cantidad de tapas para tornillos (7 a 9) provista depende del modelo.
• El aspecto de la máquina y los accesorios provistos puede diferir dependiendo del modelo.
• Para comprar accesorios o piezas perdidas, comuníquese con un centro de servicio Samsung
local o con el vendedor.
• “WE272N*” es un pedestal especial para el sistema ex.
PRECAUCIÓN
• No vuelva a utilizar las mangueras viejas, ya que pueden tener fugas o se pueden reventar y
provocar inundaciones o daños materiales.
• Asegúrese de que las arandelas de goma estén insertadas en cada unión de la manguera de
agua.
FlexWash_WV9900M_DC68-03768A-04_MES.indd 20 2017-05-22 7:06:51

Instalación
Español 21
Herramientas necesarias (no provistas)
Cinta de medir Destornillador Philips Nivel Pinzas ajustables
Requisitos de instalación
Suministro eléctrico y conexión a tierra
• Fusible o interruptor de 120 V CA / 60 Hz
requerido.
• Utilice un circuito derivado individual.
Conecte solo la lavadora al circuito.
ADVERTENCIA
• NO utilice un cable prolongador.
• Utilice únicamente el cable de alimentación
que viene con la lavadora.
• NO conecte el cable a tierra a las tuberías
de plástico, las tuberías de gas o a las
cañerías de agua caliente.
• La conexión no adecuada de los
conductores de descarga a tierra puede
generar una descarga eléctrica.
• Para asegurar una conexión a tierra adecuada,
la lavadora está equipada con un cable de
alimentación que cuenta con un enchufe de
tres pines con conexión a tierra para utilizar
en un tomacorriente con conexión a tierra
correctamente instalado. Si tiene dudas sobre
la correcta conexión a tierra, consulte con un
electricista o un técnico de servicio acreditados.
• No modique el enchufe provisto. Si no entra
en el tomacorriente, solicite a un electricista
calicado que instale el tomacorriente apropiado.
• Para evitar el riesgo innecesario de
incendio, descarga eléctrica o lesiones
físicas, todo el cableado y la conexión a
tierra deben realizarse de conformidad
con los códigos locales o, en ausencia
de ellos, de conformidad con el Código
Eléctrico Nacional, ANSI/NFPA Nro. 70, su
última revisión (para EE.UU.) o el Código
Eléctrico Canadiense CSA C22.1, sus últimas
revisiones y los códigos y ordenanzas
locales. Es su responsabilidad proveer el
servicio eléctrico adecuado para su lavadora.
FlexWash_WV9900M_DC68-03768A-04_MES.indd 21 2017-05-22 7:06:52
Instalación
Instalación
Español22
Suministro de agua
Una presión de agua inferior a 20 psi
(137 kPa) puede impedir que la válvula
de agua se cierre completamente.
También puede hacer que la tina demore
demasiado en llenarse y se apague la
lavadora. Las llaves del agua deben
estar a menos de 4 pies (122 cm) de la
parte posterior de la lavadora para que
puedan llegar las mangueras de entrada
provistas. Para reducir el riesgo de fugas:
• Asegúrese de que las llaves del agua se
encuentren en un lugar accesible.
• Cierre las llaves cuando la lavadora no esté
en uso.
• Revise periódicamente que no haya
pérdidas de agua en los accesorios de la
manguera de entrada de agua.
PRECAUCIÓN
Antes de utilizar la lavadora por primera
vez, controle que todas las conexiones
de la válvula y de la llave del agua no
presenten pérdidas.
Drenaje
Samsung recomienda un tubo vertical
de 18 in. (46 cm) de altura. La manguera
de drenaje debe conectarse a la toma de
agua a través del gancho, y la toma de
agua debe cubrir totalmente la manguera
de drenaje.
Piso
Para un mejor desempeño, la lavadora
debe estar instalada sobre un piso
sólido. Posiblemente los pisos de madera
necesiten reforzarse para minimizar
la vibración y/o el desequilibrio de la
carga. Las supercies alfombradas o
con revestimiento sintético no ofrecen
una buena resistencia a las vibraciones
y pueden causar que la lavadora se
desplace levemente durante el ciclo de
centrifugado.
PRECAUCIÓN
NO instale la lavadora sobre una
plataforma o sobre una estructura con
soportes poco resistentes.
Temperatura del agua
No instale la lavadora en áreas donde el
agua se congele, dado que la lavadora
siempre retiene algo de agua en las
válvulas de agua, la bomba y las
mangueras. El agua congelada dentro de
los conductos puede dañar las correas,
la bomba y otros componentes de la
lavadora.
FlexWash_WV9900M_DC68-03768A-04_MES.indd 22 2017-05-22 7:06:52
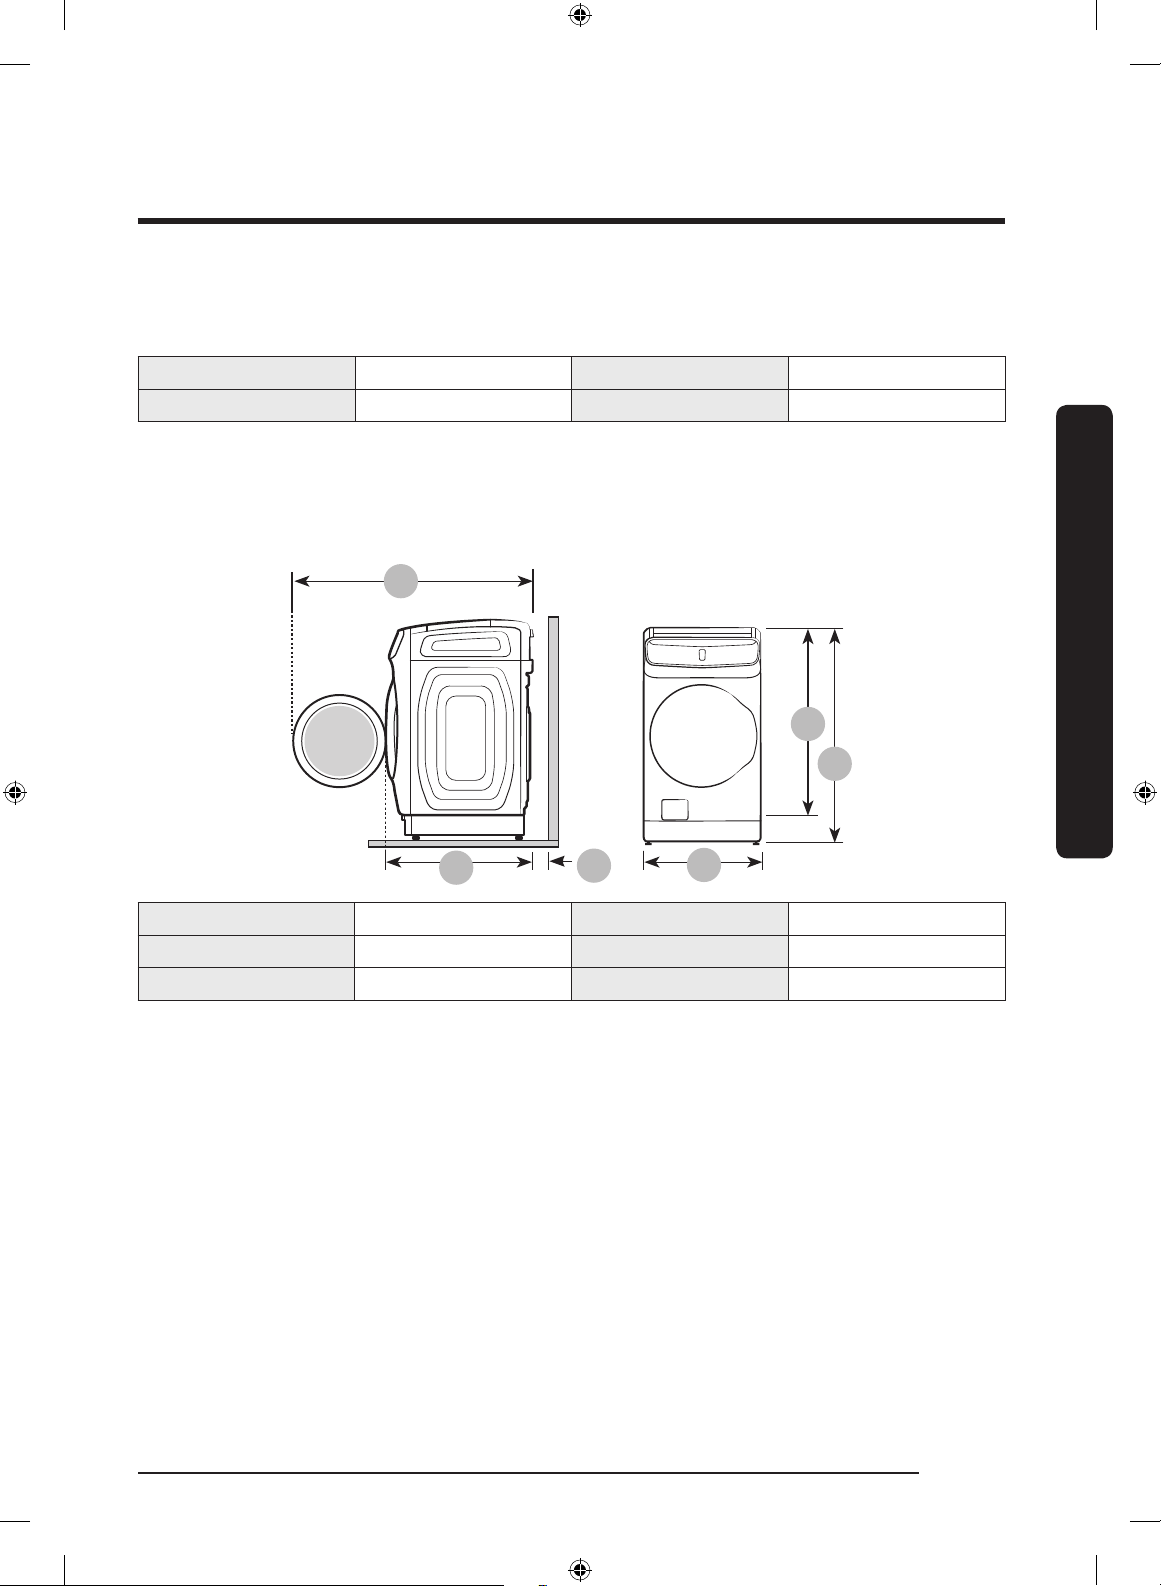
Instalación
Español 23
Instalación en un gabinete o en un hueco
Espacio libre mínimo para un funcionamiento estable:
Laterales 1 in. (25 mm) Posterior 6 in. (152 mm)
Arriba 21 in. (533 mm) Frente 2 in. (51 mm)
Si se instalan una lavadora y una secadora en la misma ubicación, el frente del gabinete o hueco
debe tener una abertura de al menos 72 in² (465 cm²) sin obstrucciones. La lavadora sola no
requiere una abertura de aire especíca.
Instalación sobre pedestal
A
B
D
E
F
C
A 54.6 in. (1386 mm) D 27 in. (686 mm)
B 34 in. (864 mm) E 46.9 in. (1192 mm)
C 6 in. (152 mm) F 52.2 in. (1326 mm)
FlexWash_WV9900M_DC68-03768A-04_MES.indd 23 2017-05-22 7:06:52
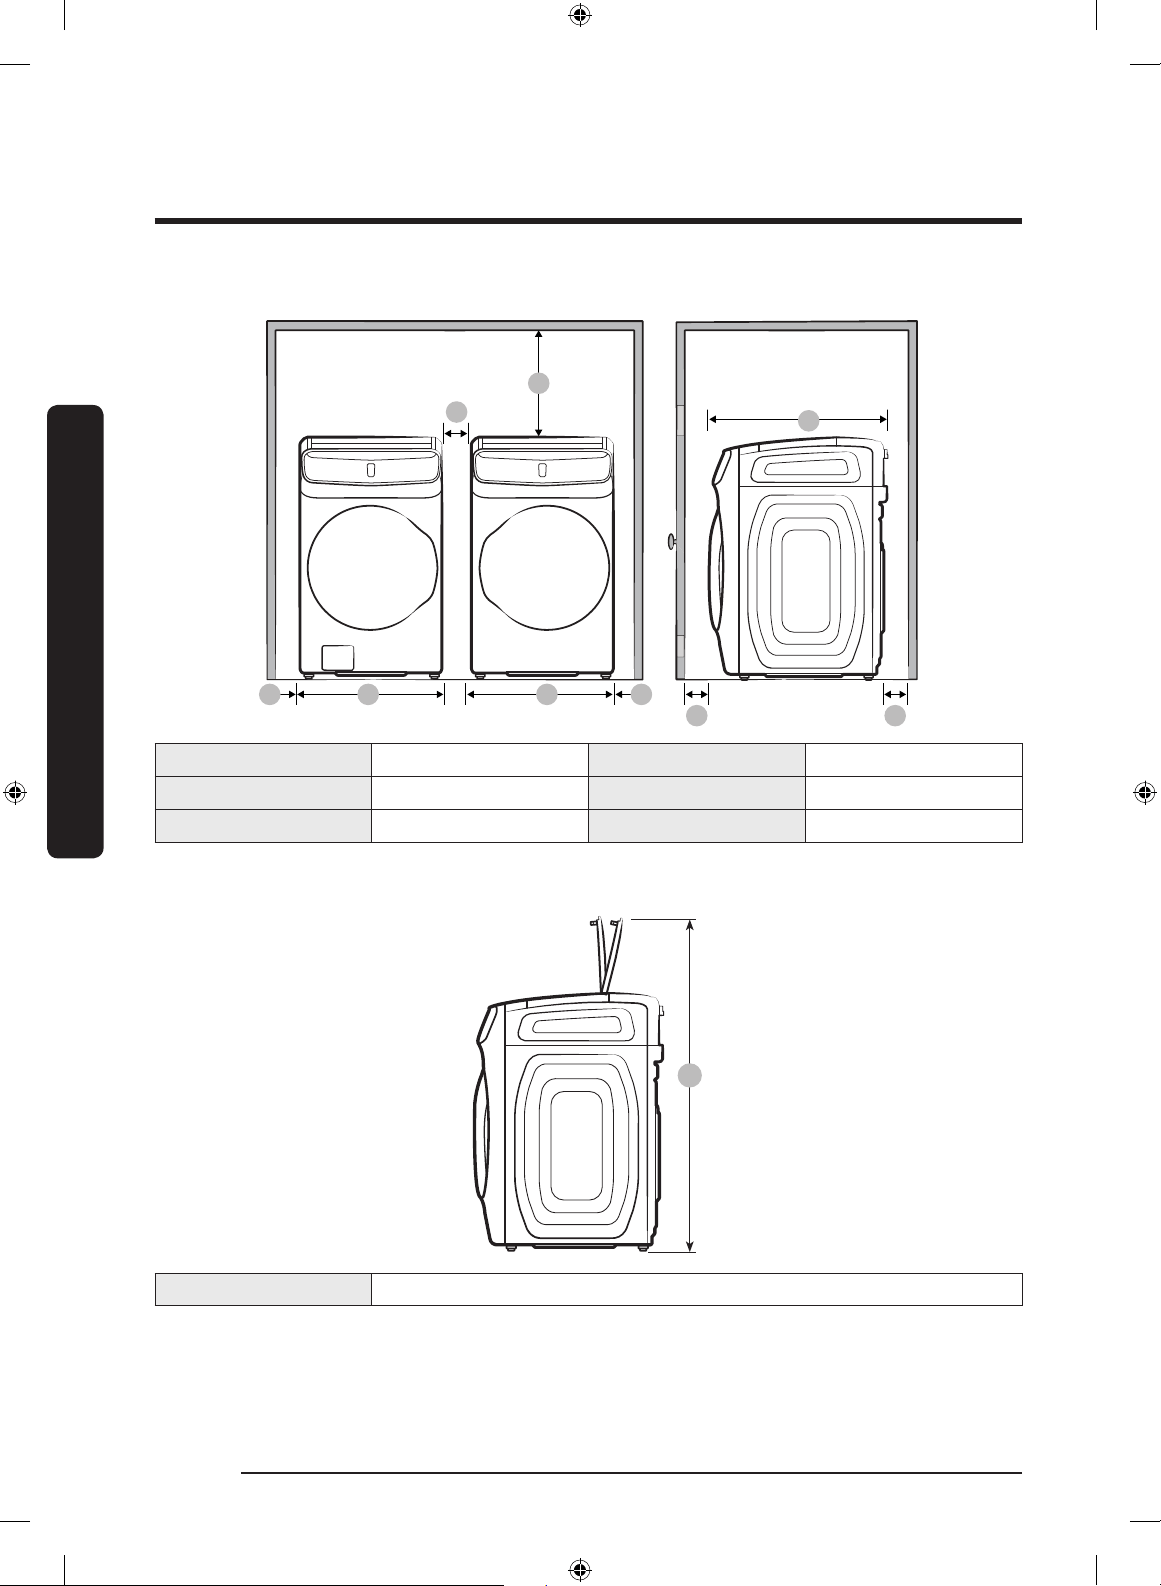
Instalación
Instalación
Español24
Instalación lado a lado
A
E
A
A
C
B B
F
D
A 1 in. (25 mm) D 34 in. (864 mm)
B 27 in. (686 mm) E 2 in. (51 mm)
C 21 in. (533 mm) F 6 in. (152 mm)
*Espacio libre no aplicable a las lavadoras independientes.
A
A 61 in. (1550 mm)
FlexWash_WV9900M_DC68-03768A-04_MES.indd 24 2017-05-22 7:06:53
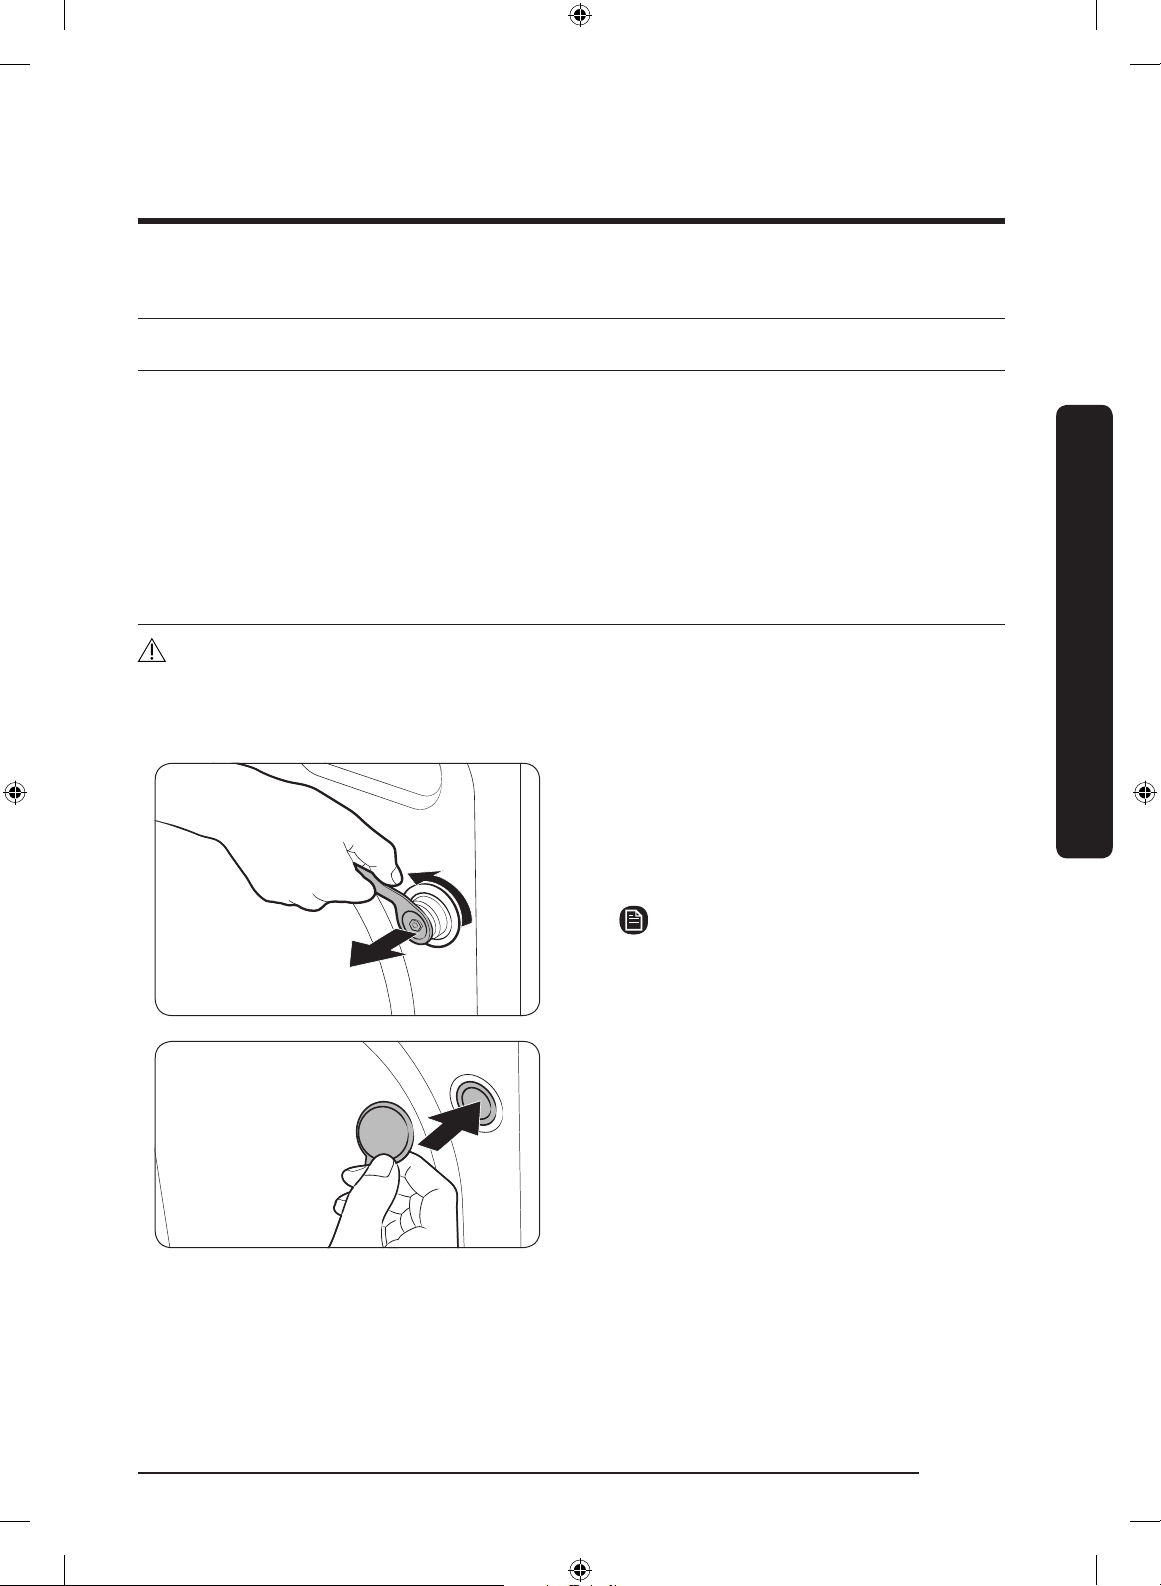
Instalación
Español 25
Instalación paso a paso
PASO 1 Seleccionar una ubicación
Requisitos de la ubicación:
• Una supercie sólida y nivelada sin alfombras ni revestimientos para pisos que puedan
obstruir los oricios de ventilación
• No expuesta a la luz directa del sol
• Espacio suciente para la ventilación y el cableado
• La temperatura ambiente debe ser siempre superior al punto de congelación (32 ˚F / 0 ˚C)
• Alejada de fuentes de calor
PASO 2 Retirar los tornillos de transporte
ADVERTENCIA
• Los materiales de empaque pueden ser peligrosos para los niños. Deseche todos los materiales
de empaque (bolsas de plástico, poliestireno, etc.) lejos del alcance de los niños.
• Para garantizar una instalación adecuada, se deben retirar los 7 tornillos de transporte.
Desempaque el producto y retire todos los
tornillos de transporte (x7).
1. Aoje todos los tornillos de transporte de
la parte posterior de la máquina con la
llave inglesa.
NOTA
Es necesaria una llave ajustable o una
llave de boca abierta de 10 mm para
retirar los tornillos.
2. Cubra los oricios con las tapas de plástico
para tornillos provistas. Conserve los
tornillos de transporte en caso de que los
necesite en el futuro.
FlexWash_WV9900M_DC68-03768A-04_MES.indd 25 2017-05-22 7:06:53
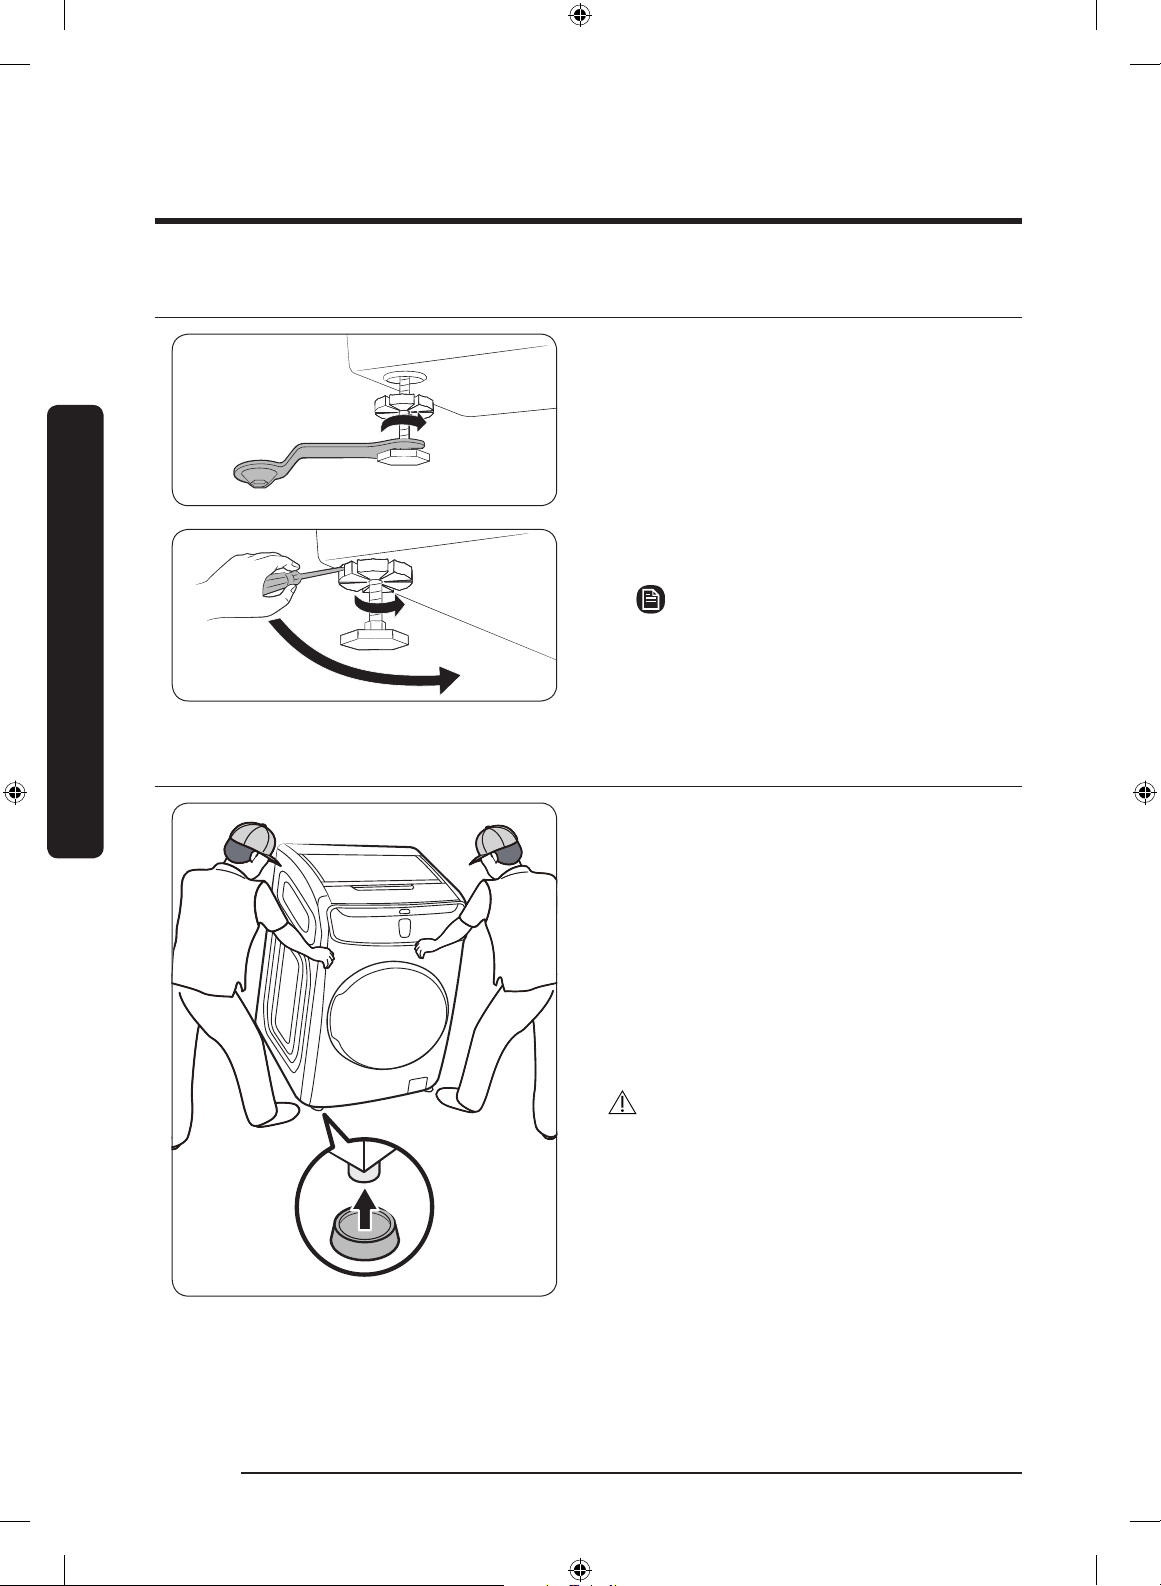
Instalación
Instalación
Español26
PASO 3 Ajustar las patas niveladoras
1. Deslice con cuidado la lavadora hasta
dejarla en su lugar. Una fuerza excesiva
puede dañar las patas niveladoras.
2. Nivele la lavadora ajustando manualmente
las patas niveladoras.
3. Luego de nivelar la lavadora, apriete las
tuercas con la llave.
NOTA
Se necesita una llave ajustable o una
llave de boca abierta de 17 mm para
aojar o ajustar las patas niveladoras.
PASO 4 Colocar los protectores de goma en las patas (solo en pisos o
supercies blandos)
Para proteger los pisos o las supercies
blandas, utilice los protectores de goma
provistos. No es necesario usar los protectores
de goma sobre supercies duras o sobre un
pedestal.
1. Dos o más personas deben sujetar ambos
lados de la lavadora.
2. Al inclinar la lavadora, coloque los
protectores de goma en cada pata, una por
una.
PRECAUCIÓN
Asegúrese de contar con la ayuda de dos
personas o más al insertar los protectores
de goma. De lo contrario, la lavadora podría
caerse y provocar lesiones físicas o daños
materiales.
FlexWash_WV9900M_DC68-03768A-04_MES.indd 26 2017-05-22 7:06:53
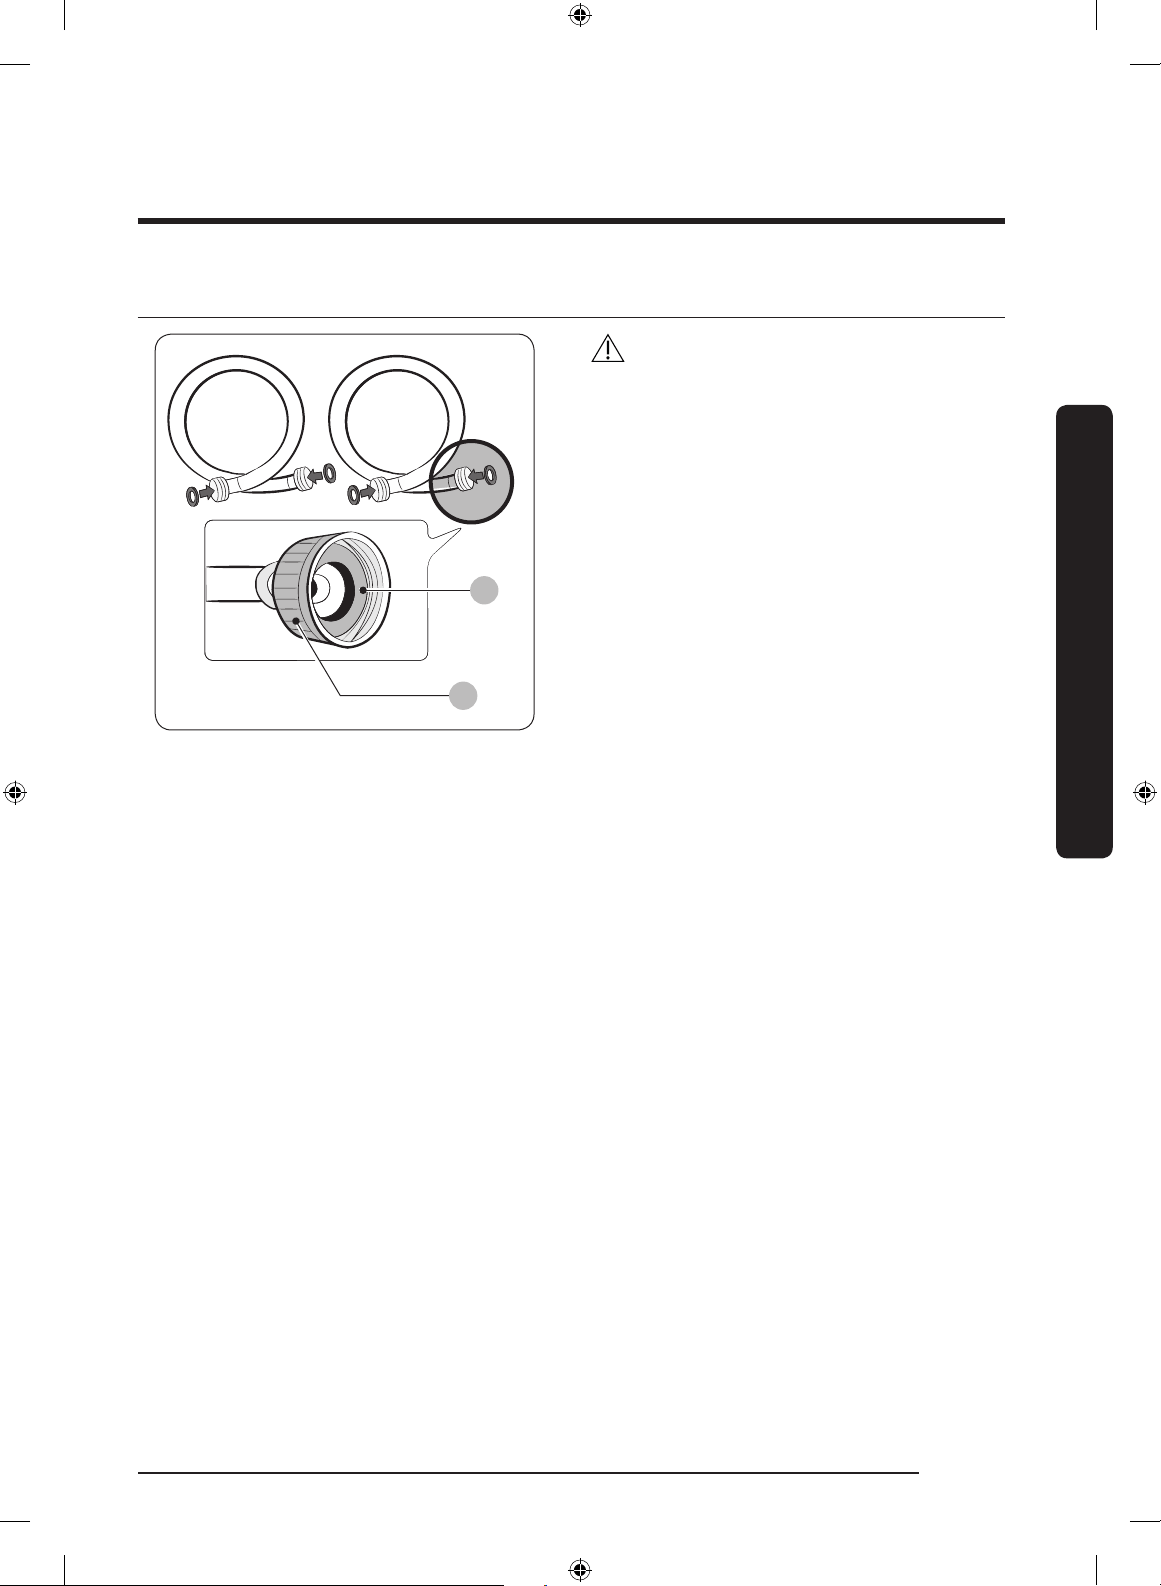
Instalación
Español 27
PASO 5 Conectar las mangueras de agua
B
A
PRECAUCIÓN
• Asegúrese de usar una manguera de agua
nueva, y de que las juntas de goma (B)
estén dentro de los acoplamientos (A)
en cada extremo de la manguera. Una
manguera de agua sin la junta puede
causar una fuga de agua.
• Si hay una fuga de agua, deje de utilizar
la lavadora y comuníquese con un centro
de servicio local de Samsung. Una fuga
de agua puede provocar una descarga
eléctrica.
• No estire a la fuerza la manguera de agua.
Si la manguera resulta demasiado corta,
reemplácela por otra manguera de alta
presión más larga.
• Para evitar fugas, asegúrese de que las
mangueras de agua no estén dobladas
ni enroscadas. Una fuga de agua puede
provocar una descarga eléctrica.
FlexWash_WV9900M_DC68-03768A-04_MES.indd 27 2017-05-22 7:06:54

Instalación
Instalación
Español28
BA
Para conectar las mangueras de agua
a las llaves del agua:
1. Conecte un extremo de cada manguera a la
llave del agua Hot (Caliente) o Cold (Fría).
2. Gire los conectores a mano hasta que
queden ceñidos y, luego, ajústelos dos
tercios adicionales con pinzas. Para
prevenir daños, no ajuste demasiado los
conectores.
3. Luego, jale hacia arriba y hacia abajo las
mangueras de agua para vericar que
estén conectadas correctamente.
4. Coloque los otros extremos de las
mangueras en una cubeta y abra las llaves
del agua durante 10 o 15 segundos para
eliminar las impurezas. Cuando haya
terminado, cierre las llaves del agua.
FlexWash_WV9900M_DC68-03768A-04_MES.indd 28 2017-05-22 7:06:54

Instalación
Español 29
5. Conecte los otros extremos de las
mangueras de agua a las correspondientes
entradas ubicadas en la parte posterior de
la lavadora como se especica. Asegúrese
de que la manguera de agua caliente esté
conectada a la entrada de agua caliente, y
la manguera de agua fría a la entrada de
agua fría.
6. Repita el paso 2 anterior con las otras
conexiones. Asegúrese de que ambas
mangueras de agua estén bien conectadas.
Consulte el código de información ‘4C’ para
la solución de problemas.
7. Abra las dos llaves y revise si hay una
fuga.
PRECAUCIÓN
Para evitar que las mangueras de agua se
enrosquen o se doblen, asegúrese de dejar
una distancia mínima de 6 pulgadas (150 mm)
entre la lavadora y la pared trasera.
NOTA
Si no desea usar agua caliente, inserte el tapón
en la entrada de agua caliente. Debe comprar
el tapón de entrada.
Si la entrada de agua caliente está cerrada
con el tapón de entrada, debe seleccionar Cold
(Fría) para la temperatura del agua. Los demás
indicadores se apagan.
FlexWash_WV9900M_DC68-03768A-04_MES.indd 29 2017-05-22 7:06:54
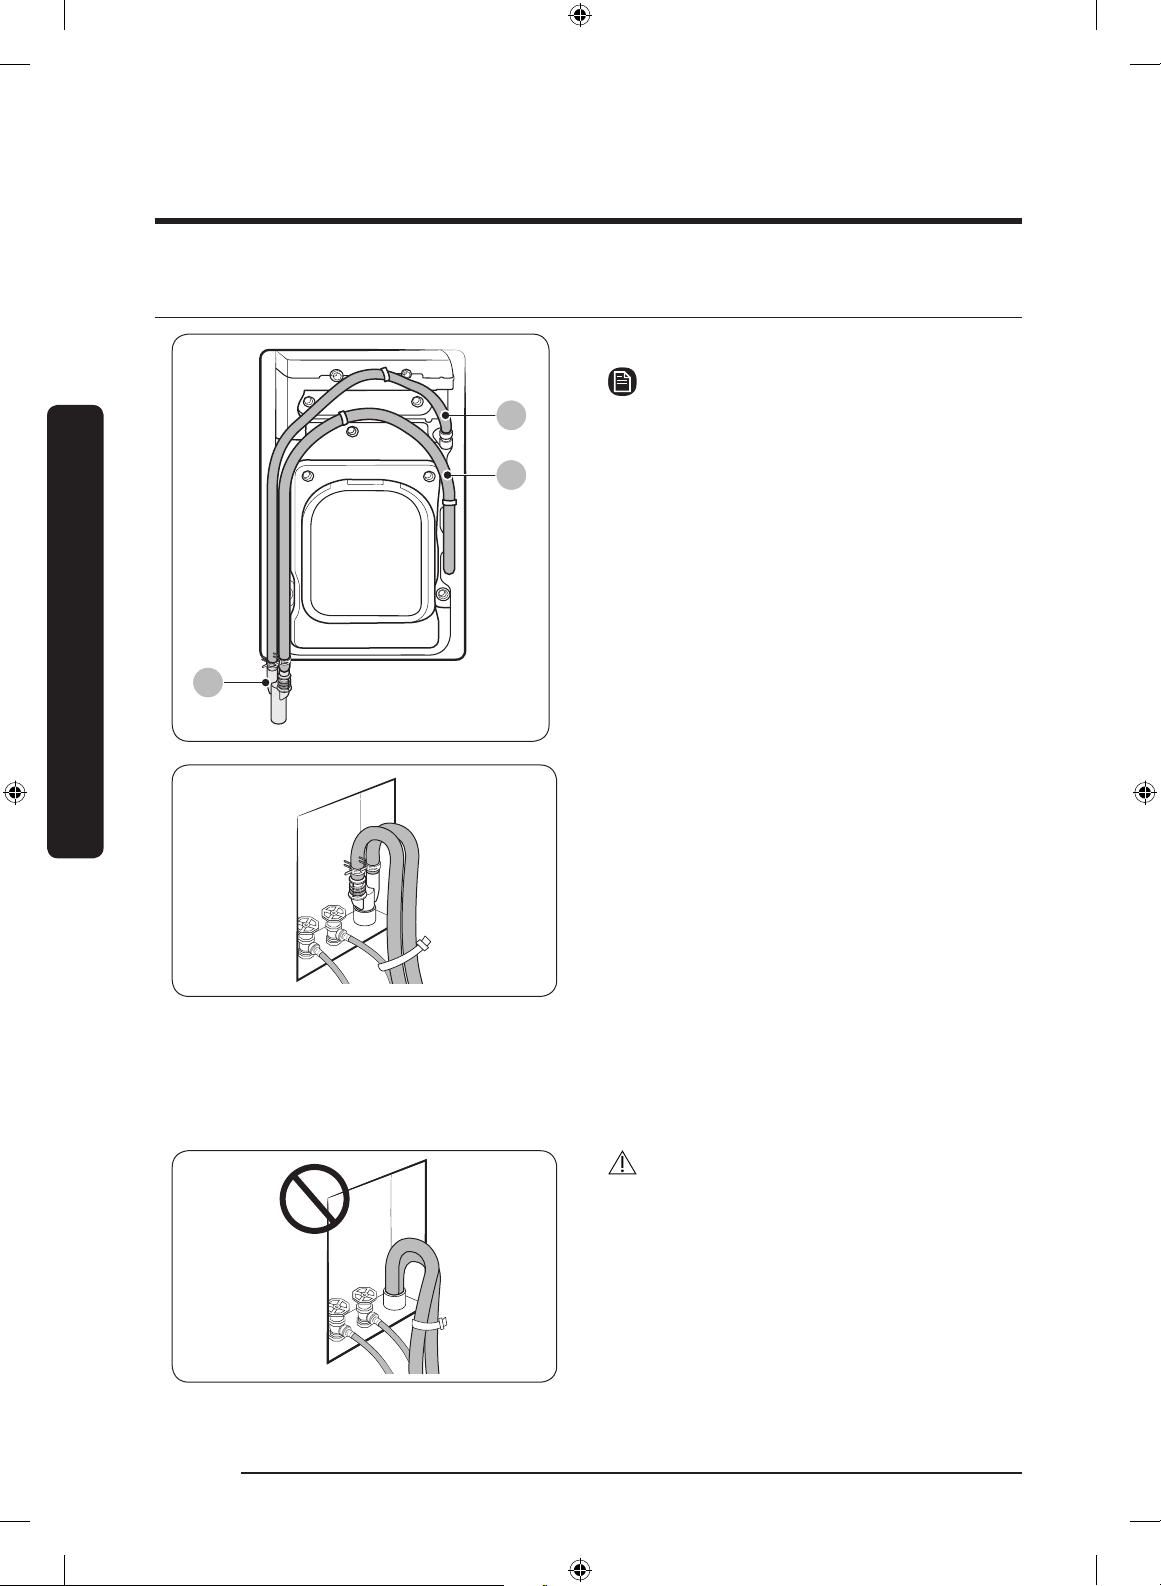
Instalación
Instalación
Español30
PASO 6 Colocar el sistema de drenaje
A
B
C
El conector de tuberías está jado al producto.
NOTA
A: Manguera de drenaje superior
B: Manguera de drenaje inferior
C: Conector de tuberías
En un sistema de drenaje de una toma
de agua de pared
La manguera de drenaje debe colocarse en el
sistema de drenaje de una toma de agua de
pared.
Después de insertar 2 mangueras de drenaje
en el conector de tuberías, use correas de
sujeción para atarlas y luego inserte el
conector de tuberías en la toma de agua de
pared.
Cuando nalice, utilice las correas de sujeción
para atar la manguera de drenaje a la
manguera de agua.
ADVERTENCIA
Asegúrese de usar el conector de tuberías
antes de insertar las mangueras de drenaje.
Sin el conector de tuberías, la manguera de
drenaje no quedará jada rmemente dentro
de la toma de agua de pared y puede causar
pérdidas de agua.
FlexWash_WV9900M_DC68-03768A-04_MES.indd 30 2017-05-22 7:06:55
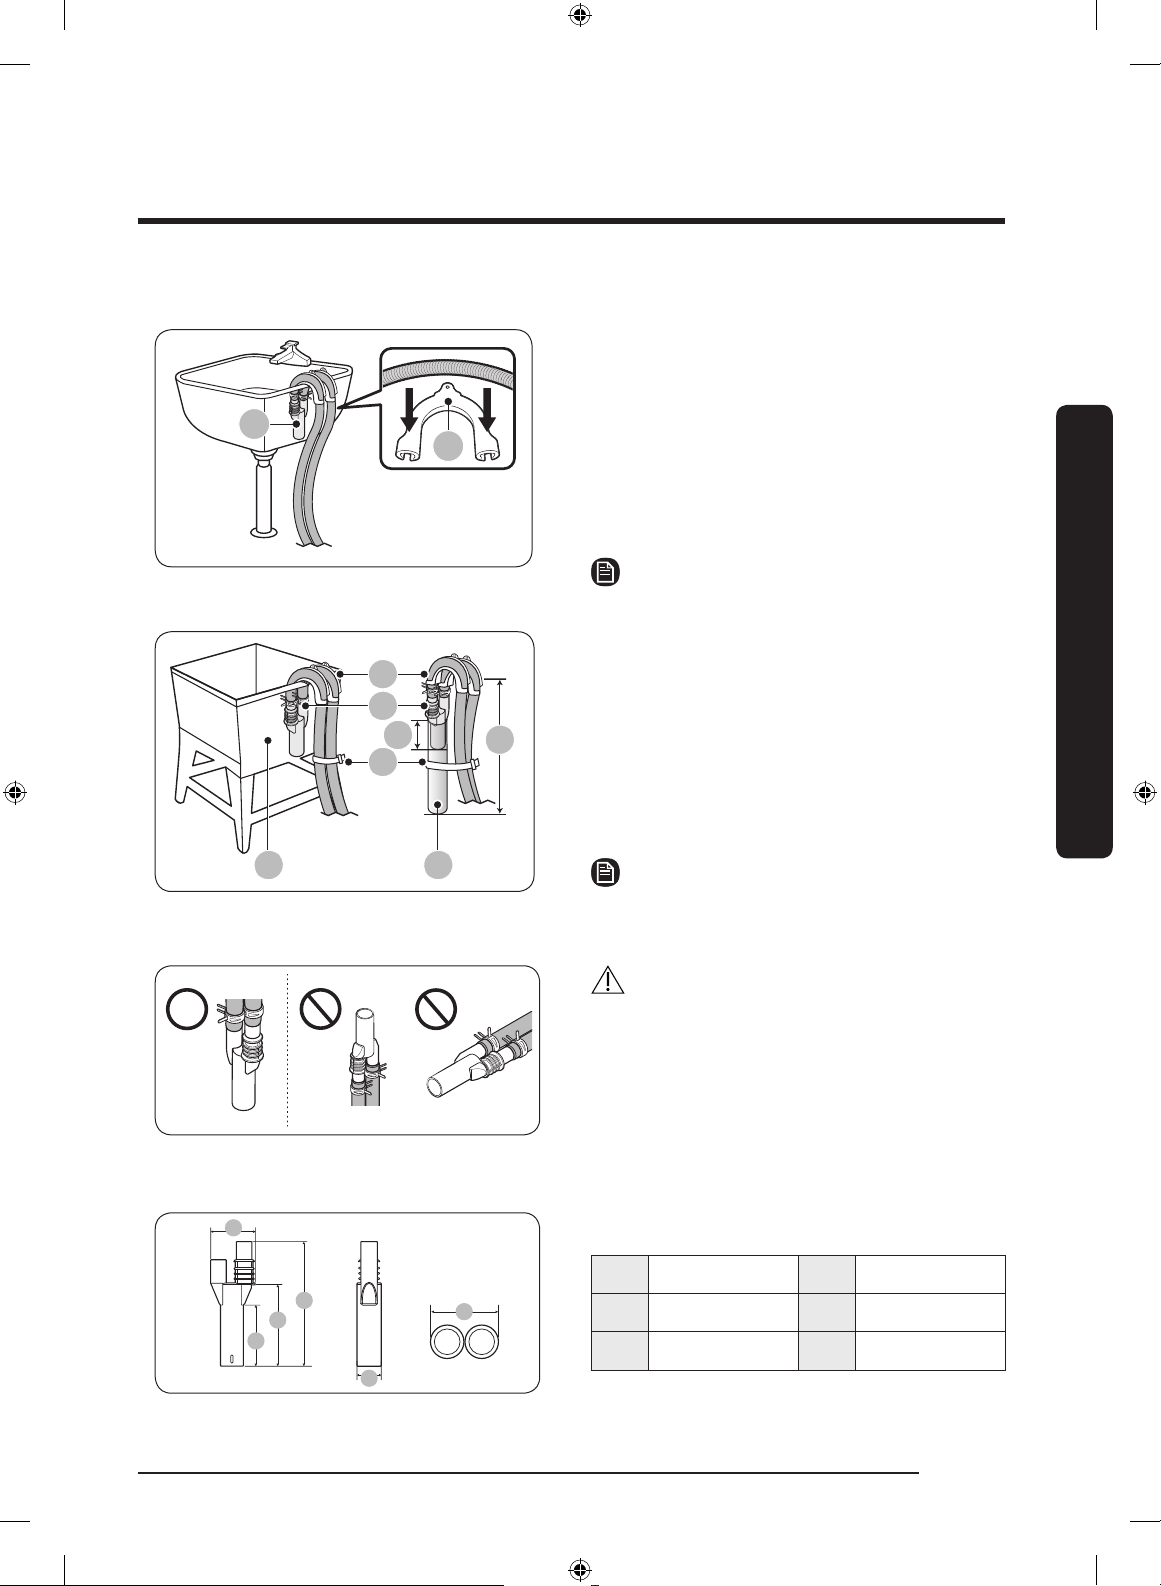
Instalación
Español 31
El conector de tuberías puede colocarse de las siguientes formas:
A
B
Sobre el borde de un lavamanos
El conector de tuberías (B) debe colocarse
a una altura entre 24 in. (60 cm) y 35 in.
(90 cm) del piso. Para mantener doblado el
extremo de salida de la manguera, utilice la
guía de plástico suministrada (A). Fije la guía
a la pared con un gancho para asegurar la
estabilidad durante el drenaje.
NOTA
B: Conector de tuberías
A
F
D
G
E
B C
En una toma de agua o un tambor de
lavado
El tambor de lavado (B) o el tubo vertical (C) no
deben ser más cortos que 18 in. (46 cm) ni más
altos o largos que 96 in. (245 cm). Asegúrese de
que el conector de tuberías y la toma de agua no
sean herméticas. La altura de la toma de agua (E)
debe ser de 43 in. (1100 mm) o más desde el piso.
NOTA
A: Guía de la manguera / D: Correas de
sujeción / F: Conector de tuberías / G: 85 mm
PRECAUCIÓN
• No prolongue el conector de tuberías (en
forma de Y) con una manguera prolongadora.
• Asegúrese de colocar la punta del conector
de tuberías en dirección al oricio de
drenaje. Colocar la punta del conector en
otra dirección puede provocar un reujo
del agua de drenaje.
A
E
F
D
B
C
Dimensiones del conector de tuberías
A 172 mm D 67 mm
B 112.5 mm E Ø 35
C 85 mm F 60 mm
FlexWash_WV9900M_DC68-03768A-04_MES.indd 31 2017-05-22 7:06:55
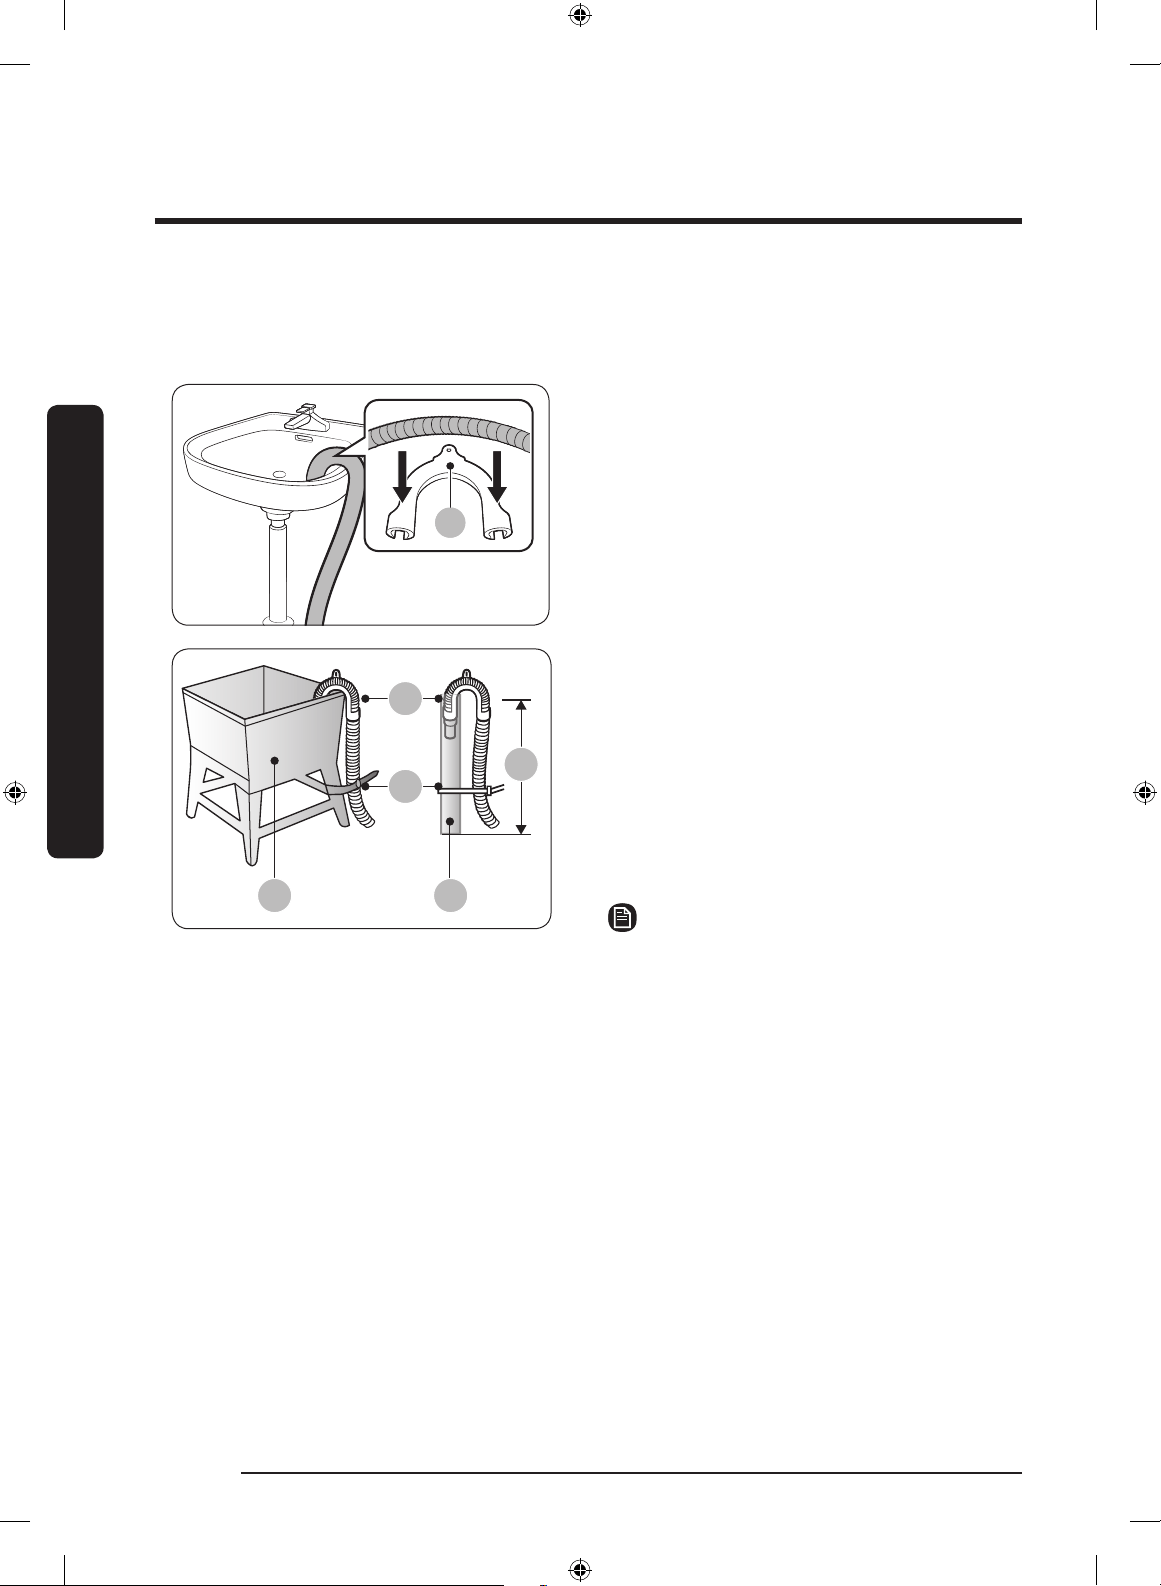
Instalación
Instalación
Español32
Colocación sin el conector de tuberías
Si no utiliza el conector de tuberías, cada manguera de drenaje puede colocarse de las siguientes
formas:
AA
Sobre el borde de un lavamanos
La manguera de drenaje debe colocarse
a una altura entre 24 in. (60 cm) y 35 in.
(90 cm) del piso. Para mantener doblado el
extremo de salida de la manguera, utilice la
guía de plástico suministrada (A). Fije la guía
a la pared con un gancho para asegurar la
estabilidad durante el drenaje.
A
D
B C
E
En una toma de agua o un tambor de
lavado
El tambor de lavado (B) o el tubo vertical (C)
no deben ser más cortos que 18 in. (46 cm)
ni más altos o largos que 96 in. (245 cm).
Asegúrese de que la manguera de drenaje y
la toma de agua no sean herméticas. La altura
de la toma de agua (E) debe ser de 43 pulg.
(1100 mm) o más desde el piso.
NOTA
A: Guía de la manguera / D: Correa de sujeción
FlexWash_WV9900M_DC68-03768A-04_MES.indd 32 2017-05-22 7:06:55

Instalación
Español 33
*
A
PRECAUCIÓN
• Conecte la guía de la manguera (A) dentro
de las 3–5 in (7.6–12.7 cm)* desde el
extremo de la manguera de drenaje.
Si la manguera de drenaje se extiende
más allá del extremo de la guía de la
manguera, puede propagarse moho o
microorganismos al interior de la lavadora.
• La manguera de drenaje puede instalarse
hasta una altura de 96 in. (245 cm) pero su
capacidad de drenaje puede verse reducida
a la altura máxima. Si queda agua en el
sistema de drenaje puede generar malos
olores.
• Si la manguera de drenaje se instala por
debajo de una altura de 18 in. (46 cm), el
agua puede drenarse durante el proceso
por un efecto sifón. Si esto sucede, en
la pantalla se muestra el código de
información ‘4C’.
FlexWash_WV9900M_DC68-03768A-04_MES.indd 33 2017-05-22 7:06:56

Instalación
Instalación
Español34
NOTA
Colocación con el conector de tuberías
Su lavadora viene con un conector de tuberías
que tiene por objeto unir la manguera de
drenaje superior y la manguera de drenaje
inferior. Puede elegir utilizar el conector para
combinar las dos mangueras de drenaje en la
misma salida.
1. Inserte una junta de ajuste en el extremo
de cada una de las mangueras de drenaje.
A
2. Inserte el conector de tuberías en las
mangueras de drenaje. Asegúrese de
encajar el lado más largo (A) en la
manguera de drenaje que sale de la
lavadora inferior.
3. Fije las juntas de ajuste cerca del extremo
de cada manguera.
• Para retirar el conector de tuberías, siga los
pasos anteriores en orden inverso.
PASO 7 Vericación nal y encendido
• Antes de utilizar la lavadora, asegúrese de retirar el agente deshumidicador (gel de sílice) del
interior de la lavadora superior.
• No ingiera el agente deshumidicador (gel de sílice).
• Es posible que la cubierta protectora forme humedad en la supercie después de que la
lavadora haya revisado si hay una fuga para asegurar el funcionamiento normal. Esto es
normal y no signica que haya alguna pieza defectuosa. Abra la cubierta un momento para
eliminar la humedad.
• Enchufe el cable de alimentación a un tomacorriente de 120 V CA / 60 Hz aprobado y
protegido por un disyuntor o fusible. Luego, presione POWER (ENCENDER/APAGAR) para
poner en funcionamiento la lavadora.
FlexWash_WV9900M_DC68-03768A-04_MES.indd 34 2017-05-22 7:06:56

Antes de comenzar
Español 35
Antes de comenzar
Conguración inicial
Ejecutar la calibración (recomendado)
La calibración asegura que la lavadora
detecte el peso con precisión. Asegúrese
de que el tambor o tina esté vacío antes
de ejecutar la calibración.
Para calibrar la lavadora superior
1. Presione POWER (ENCENDER/APAGAR)
en el panel de control de la lavadora
superior para encender la lavadora.
2. Mantenga presionados
simultáneamente NORMAL y Temp.
(Temperatura) durante 3 segundos.
3. Presione START/PAUSE (INICIO/PAUSA)
para iniciar la calibración.
- La puerta permanece bloqueada durante
el funcionamiento.
- El tambor sigue girando hacia la
derecha y hacia la izquierda durante
varios minutos.
4. Cuando naliza, la lavadora superior
se apaga automáticamente.
Para calibrar la lavadora inferior
1. Presione POWER (ENCENDER/APAGAR)
en el panel de control de la lavadora
inferior para encender la lavadora.
2. Mantenga presionados
simultáneamente Temp. (Temperatura)
y Delay End (Término Retardado) en el
panel de control de la lavadora inferior
durante 3 segundos.
3. Presione START/PAUSE (INICIO/PAUSA)
en el panel de control de la lavadora
inferior para iniciar la calibración.
4. Cuando naliza, la lavadora inferior se
apaga automáticamente.
NOTA
En lugar de girar el tambor, la lavadora
inferior gira la tina.
Pautas de lavado
PASO 1 Clasicar
Clasique las prendas de acuerdo con los
siguientes criterios:
• Etiqueta de indicaciones: Clasique la ropa
según su composición: algodón, mezclas,
sintética, seda, lana y rayón.
• Color: Separe la ropa blanca de la de color.
• Tamaño: Mezclar prendas de distintos
tamaños en la tina o el tambor mejora el
desempeño del lavado.
• Sensibilidad: Lave las prendas delicadas
por separado. Para las prendas nuevas
de lana pura, cortinas y prendas de seda,
verique las etiquetas para conocer las
instrucciones de lavado.
NOTA
Antes de iniciar el lavado, lea las
etiquetas de cuidado de la ropa y
clasique los artículos en consecuencia.
FlexWash_WV9900M_DC68-03768A-04_MES.indd 35 2017-05-22 7:06:56

Antes de comenzar
Antes de comenzar
Español36
PASO 2 Vaciar los bolsillos
Vacíe los bolsillos de todas las prendas.
• Los objetos metálicos como monedas, clips
y hebillas pueden dañar las otras prendas
y la tina o el tambor.
Dé la vuelta a las prendas con botones o
bordados
• Si los cierres de los pantalones o las
chaquetas están abiertos durante el lavado,
la tina o el tambor puede dañarse. Los
cierres deben cerrarse y ajustarse con un
cordón.
• Las prendas con cordones largos pueden
enredarse con otras prendas. Asegúrese de
sujetar los cordones antes de comenzar el
lavado.
PASO 3 Utilizar una red para ropa
• Los brassieres (lavables con agua) se deben
colocar dentro de una red para ropa. Las
partes metálicas de las brassieres pueden
atravesar la tela y dañar otras prendas.
• Las prendas pequeñas y livianas como las
medias, los guantes, las medias de nylon y
los pañuelos pueden trabarse en la puerta.
Colóquelas dentro de una red para ropa.
• No lave la red sin ropa dentro de ella. Se
podrían producir vibraciones anormales
que podrían desplazar la lavadora y causar
lesiones personales.
PASO 4 Calcular la capacidad de
carga
Lavadora inferior
No sobrecargue la lavadora. Si sobrecarga
la lavadora, la ropa puede no lavarse
correctamente.
NOTA
Cuando se lave ropa de cama o
cobertores, el tiempo de lavado
se puede alargar o la ecacia del
centrifugado puede reducirse. Para
ropa de cama o cobertores, el nivel
máximo de centrifugado recomendado
es “Centrifugado Bajo o Medio” y la
capacidad de carga es 3.0 kg o menos.
PRECAUCIÓN
Si la carga está desequilibrada y se
muestra el código de información
“Ub”, redistribuya la carga. Una carga
desequilibrada puede disminuir el
desempeño del centrifugado.
FlexWash_WV9900M_DC68-03768A-04_MES.indd 36 2017-05-22 7:06:56
Antes de comenzar
Español 37
Lavadora superior
Pautas de lavado
Use la lavadora superior para pequeñas
cargas de menos de 3.3 lbs (1.5 kg).
Carga Shorts Jeans
Pantalones
de algodón
Camisas
Camisetas
de manga
corta
3.3 lb ↓
(1.5 kg ↓)
4 1 3 4 9
Carga Camisetas
Ropa
deportiva
(parte
superior)
Ropa
deportiva
(pantalones)
Toalla de
ducha
Toalla
(pequeña)
3.3 lb ↓
(1.5 kg ↓)
4 3 3 2 10
NOTE
• Siga las recomendaciones de la carga para
un desempeño óptimo de lavado. Las cargas
excesivas pueden reducir el rendimiento.
• Utilice la lavadora inferior para prendas
con manchas difíciles o muy sucias, o
para cargas más voluminosas que las
recomendadas.
PASO 5 Agregar el tipo de
detergente adecuado
El tipo de detergente adecuado depende
del tipo de tejido (algodón, sintético,
prendas delicadas, lana), color, temperatura
de lavado y grado de suciedad. Use
siempre detergente de alta ecacia (HE,
por sus siglas en inglés) y “baja espuma”,
diseñado para lavadoras automáticas.
NOTA
• Siga las recomendaciones del fabricante
del detergente en función del peso de la
ropa, el grado de suciedad y la dureza del
agua en su zona. Si desconoce la dureza
del agua de su zona, comuníquese con las
autoridades locales.
• No utilice un detergente que tenga tendencia
a endurecerse o solidicarse. Este detergente
puede permanecer durante el ciclo de
enjuague y bloquear la salida de drenaje.
Utilice solo detergente de alta ecacia (HE).
La lavadora fue diseñada para usar
detergentes de alta ecacia (HE, por su
sigla en inglés).
• Para obtener un lavado de óptima calidad,
use un detergente de alta ecacia, por
ejemplo: Tide HE, Wisk HE, Cheer HE o
Gain HE*. Los detergentes de alta ecacia
contienen supresores que reducen o
eliminan la espuma. Cuando se produce
menos espuma, la carga se mueve con
mayor ecacia y el lavado se maximiza.
(* Los nombres de las marcas son marcas
comerciales de sus respectivos fabricantes).
ADVERTENCIA
No se recomienda un detergente
convencional. Utilice solo detergentes de
alta ecacia (HE).
FlexWash_WV9900M_DC68-03768A-04_MES.indd 37 2017-05-22 7:06:56

Antes de comenzar
Antes de comenzar
Español38
Guía sobre los agentes de limpieza
Lavadora superior
A B
La lavadora superior cuenta con dos
compartimientos para detergente: el del lado
izquierdo para el blanqueador, y el del lado
derecho para el suavizante. Puede colocar el
detergente de forma manual en el tambor.
• Compartimiento para el blanqueador (A):
Agregue el blanqueador sin cloro según las
instrucciones del fabricante.
• Compartimiento para el suavizante (B):
Agregue la cantidad de suavizante que
se recomienda en las instrucciones del
fabricante.
Para agregar agentes de limpieza a la lavadora superior.
1. Abra la puerta superior y, luego, la cubierta
protectora. Retire el Aqua Pebble del
compartimiento para el suavizante de telas.
FlexWash_WV9900M_DC68-03768A-04_MES.indd 38 2017-05-22 7:06:56
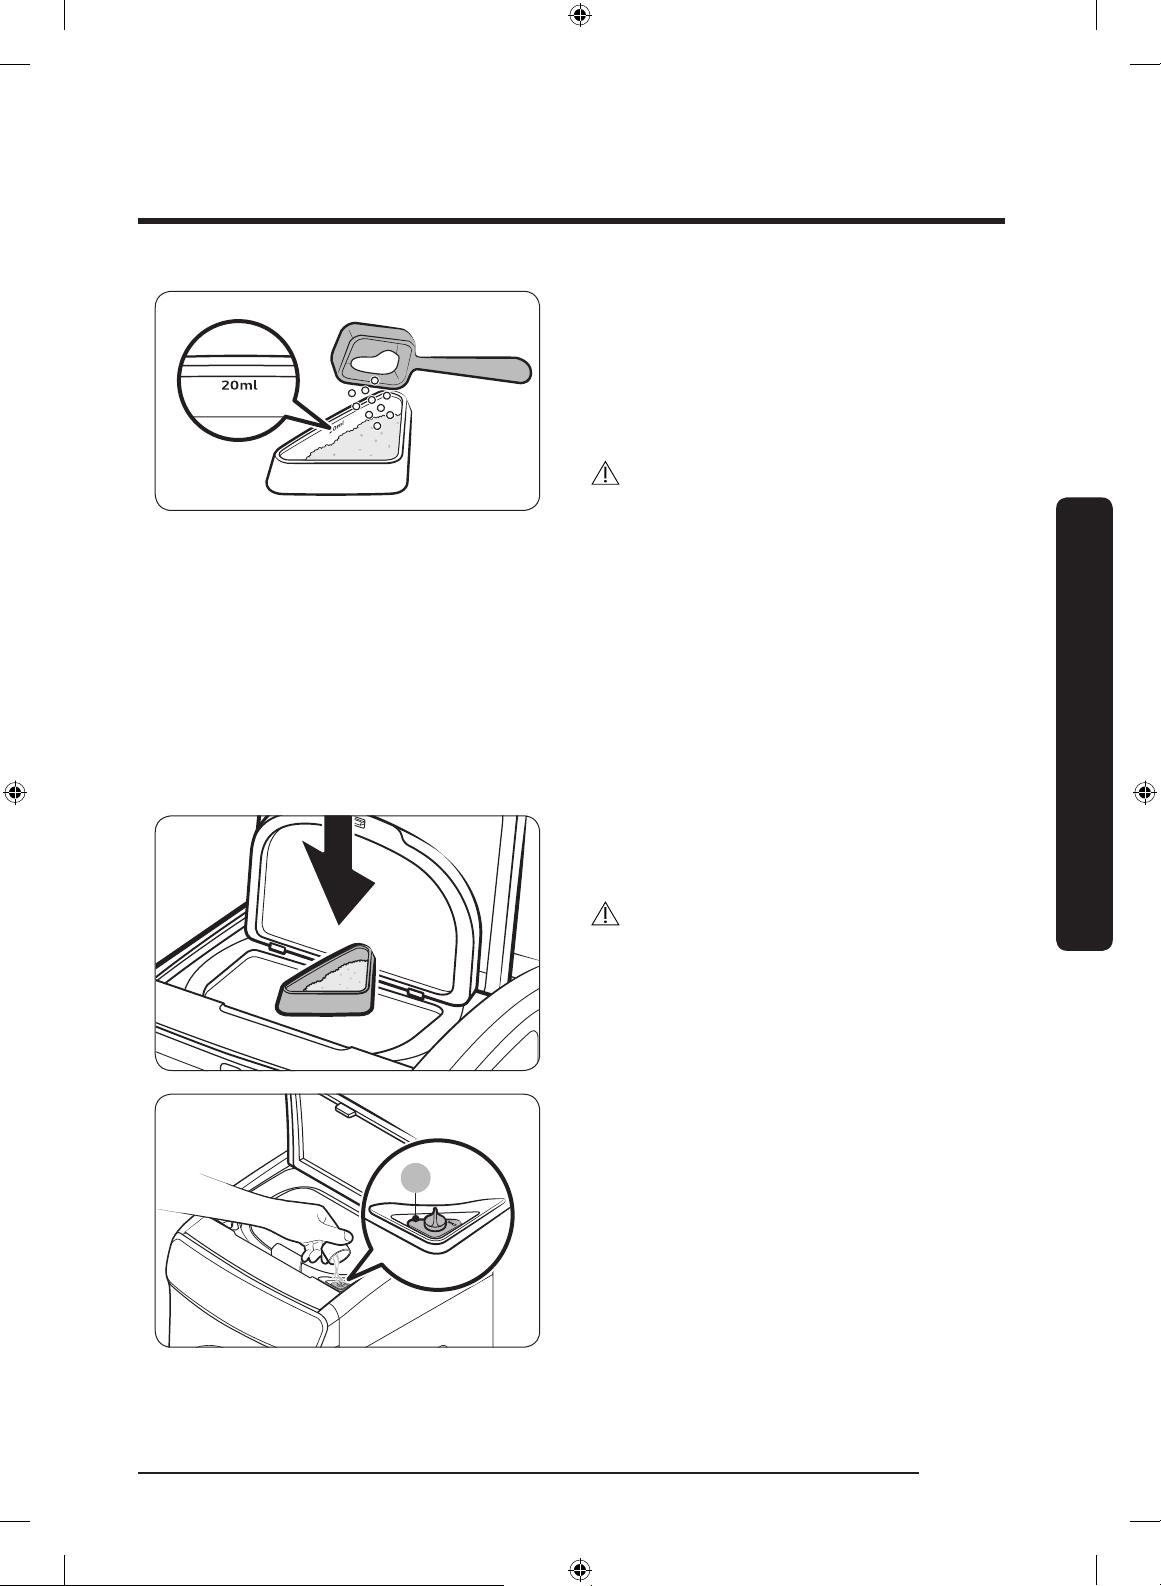
Antes de comenzar
Español 39
2. Coloque la cantidad recomendada de
detergente en polvo o líquido en el Aqua
Pebble provisto. El Aqua Pebble tiene una
línea de guía (con la marca de ‘20 ml’)
cerca de la parte superior, que es la línea
máxima. No sobrepase esta línea máxima.
PRECAUCIÓN
• El detergente agregado a la lavadora superior
debe contenerse en el Aqua Pebble provisto.
• Utilice solo detergente de alta ecacia (HE).
• Si agrega detergente en polvo, utilice la
taza de detergente provista y aplique
solo una taza. Una cantidad excesiva de
detergente puede dejar residuos.
• Asegúrese de agregar detergente en polvo
de la variedad de grano no.
• No utilice el Aqua Pebble para el
blanqueador y/o el suavizante de telas.
3. Inserte el Aqua Pebble alrededor del centro
del tambor y luego coloque la ropa sobre el
Aqua Pebble.
PRECAUCIÓN
Asegúrese de colocar el Aqua Pebble primero
para que quede debajo de la ropa. De lo
contrario, el detergente podría no disolverse
totalmente y dejar residuos después del
lavado.
A
4. Vierta la cantidad recomendada de
suavizante en el compartimiento para el
suavizante. No sobrepase la línea máxima
(A).
FlexWash_WV9900M_DC68-03768A-04_MES.indd 39 2017-05-22 7:06:57
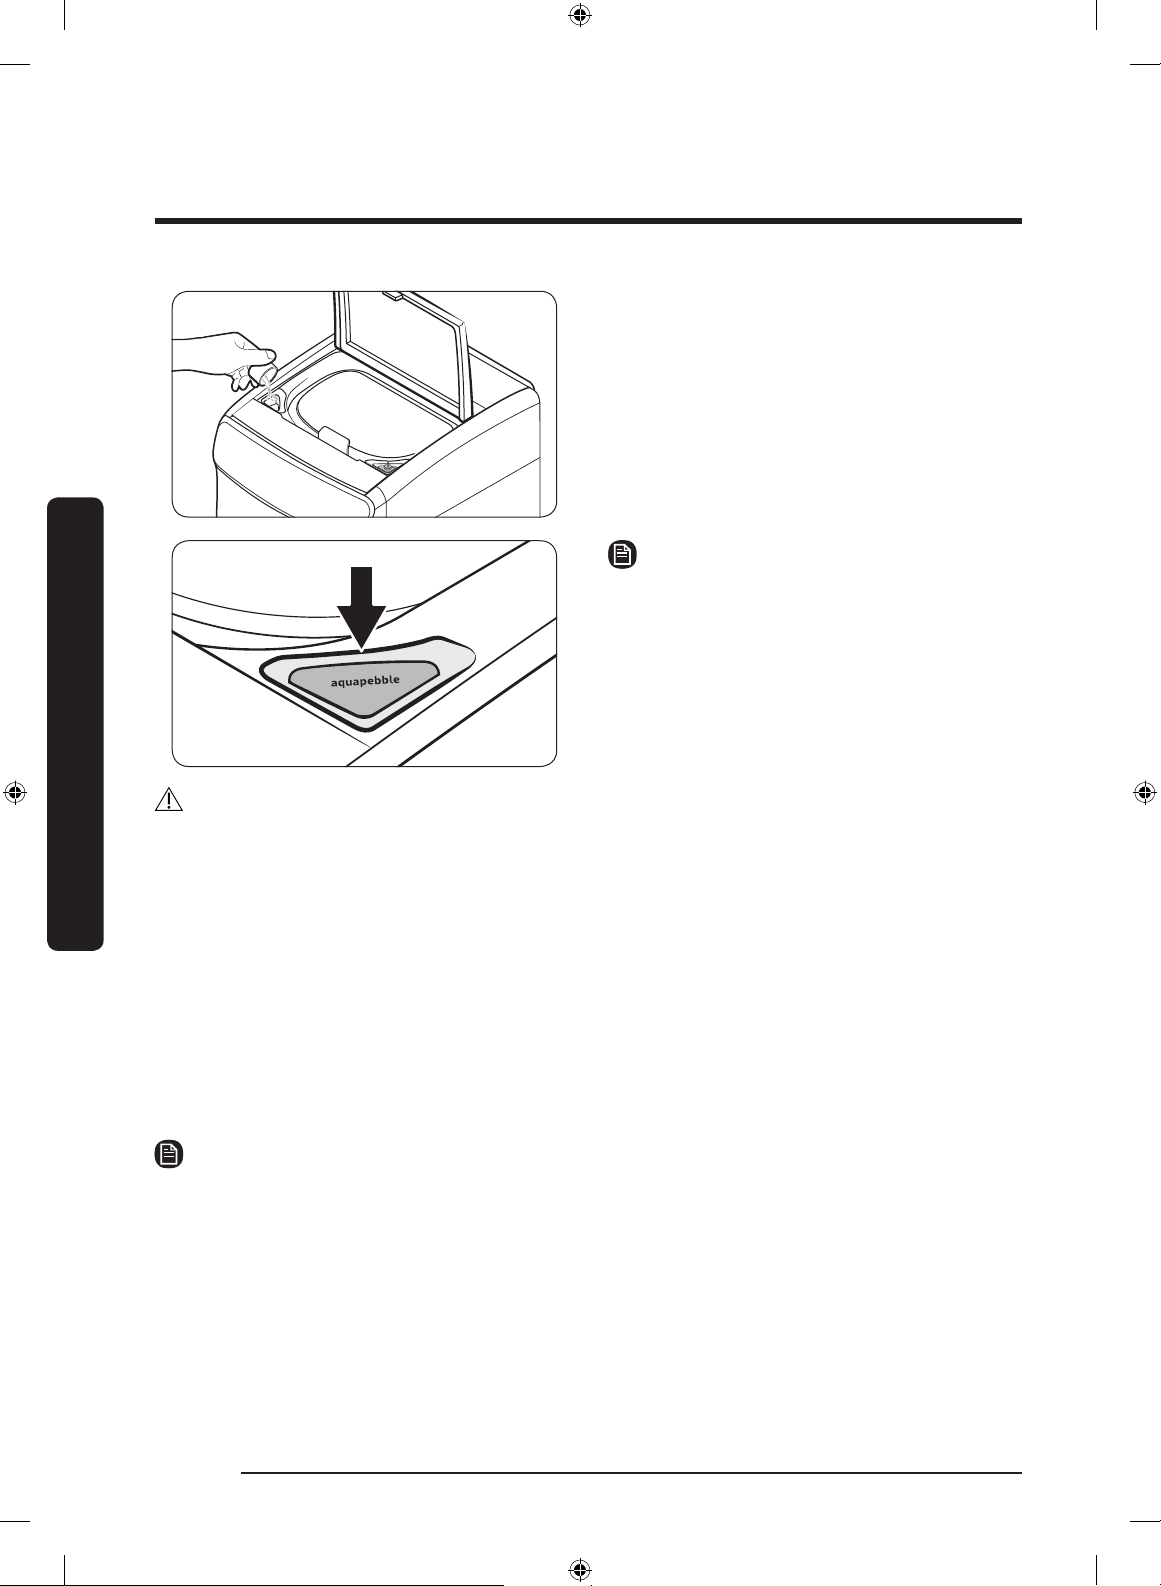
Antes de comenzar
Antes de comenzar
Español40
5. Vierta la cantidad recomendada de
blanqueador sin cloro en el compartimiento
para el blanqueador. Tenga cuidado de no
llenar en exceso el compartimiento.
6. Cierre la cubierta protectora y, luego, la
puerta superior.
NOTA
Al completar un ciclo, retire el Aqua Pebble
y colóquelo sobre el compartimiento para
el suavizante para un uso posterior (vea la
gura). El Aqua Pebble está diseñado para
encajar en el compartimiento del suavizante
después de darle la vuelta.
PRECAUCIÓN
• No utilice blanqueador con cloro ya que puede dañar las prendas.
• Tenga cuidado al insertar el Aqua Pebble, ya que se supone que debe quedar equilibrado
encima de la ropa al comienzo del lavado. Si el Aqua Pebble se inclina antes del comienzo del
lavado, pueden quedar residuos de detergente en la ropa al nal del lavado, lo que causaría
una decoloración de las prendas y/o una reducción del rendimiento del lavado.
• Antes de cada lavado, asegúrese de limpiar el Aqua Pebble antes de agregar nuevo detergente.
• No inserte el Aqua Pebble dentro de una prenda plegada o entre diferentes prendas.
• No use blanqueador con cloro, ya sea líquido o en polvo.
• No coloque ni almacene agentes de limpieza como detergentes, blanqueadores y suavizantes
en la parte superior de la lavadora. Limpie de inmediato cualquier derrame para evitar daños
a la lavadora, en especial el acabado o los paneles de control.
NOTA
• Es normal que al nal del ciclo quede una pequeña cantidad de agua en los compartimientos
para el detergente.
• Al agregar blanqueador para prendas de color, se recomienda utilizar un detergente líquido.
• Al completar el lavado, retire el Aqua Pebble del tambor y límpielo para un uso posterior.
FlexWash_WV9900M_DC68-03768A-04_MES.indd 40 2017-05-22 7:06:57

Antes de comenzar
Español 41
Lavadora inferior
A B C
La lavadora inferior cuenta con tres
compartimientos para el detergente: el del
extremo izquierdo para el lavado principal, el
primero a la derecha para el blanqueador y el
del extremo derecho para el suavizante.
• Compartimiento para el lavado principal
(A): Agregue la cantidad recomendada
de detergente líquido (o en polvo) en el
compartimiento para el lavado principal.
• Compartimiento para el blanqueador (B):
Agregue el blanqueador con cloro según
las instrucciones del fabricante.
• Compartimiento para suavizante de telas (C):
Vierta la cantidad recomendada de suavizante
en el compartimiento para el suavizante.
PRECAUCIÓN
• No use detergentes en bola o en red.
• No coloque detergente en pastillas o cápsulas en el compartimiento para el detergente. Los
detergentes en pastillas o cápsulas deben colocarse directamente en el tambor.
• Para impedir que el compartimiento se obstruya, diluya los productos concentrados o muy
densos (suavizantes o detergentes) en agua antes de agregarlos.
Para agregar agentes de limpieza a la lavadora inferior
1. Abra la cubierta frontal superior.
FlexWash_WV9900M_DC68-03768A-04_MES.indd 41 2017-05-22 7:06:57

Antes de comenzar
Antes de comenzar
Español42
A
2. Agregue la cantidad recomendada de
detergente líquido o en polvo en el
compartimiento para el detergente. No
sobrepase la línea máxima (A).
NOTA
Antes de aplicar detergente en polvo retire el
contenedor para detergente líquido.
3. Vierta la cantidad recomendada de
suavizante en el compartimiento para el
suavizante. No sobrepase la línea máxima.
4. Si desea agregar blanqueador, aplique la
cantidad recomendada de blanqueador
con cloro en el compartimiento para el
blanqueador. No sobrepase esta línea
máxima.
5. Cierre la cubierta frontal superior.
NOTA
• Si utiliza un detergente de alta eciencia (HE), agregue
2
/3 de la cantidad recomendada en el
compartimiento de lavado principal.
• Los potenciadores de lavado pueden aumentar el rendimiento del lavado. Asegúrese de
agregar el potenciador de lavado después de colocar las prendas en la tina.
• Para usar tanto detergente en polvo como potenciador de lavado, resulta más efectivo
colocarlos juntos en la tina antes de cargar las prendas.
FlexWash_WV9900M_DC68-03768A-04_MES.indd 42 2017-05-22 7:06:58

Funcionamiento
Español 43
Funcionamiento
La lavadora de carga doble cuenta con tambores para lavado superior e inferior para su
comodidad. La lavadora superior es un tambor de carga automática diseñado para lavar cargas
relativamente pequeñas, mientras que la lavadora inferior es una tina para cargas normales o
relativamente pesadas. El panel principal está dividido en 2 paneles de control independientes.
ADVERTENCIA
Para reducir el riesgo de incendios, descargas eléctricas o lesiones personales, lea las
INSTRUCCIONES DE SEGURIDAD IMPORTANTES antes de poner en funcionamiento la lavadora.
Lavadora superior
Panel de control
01
03
04
05 06 07 08
02
01 Barra de ciclos
Presione para seleccionar un ciclo.
02 ENCENDER/APAGAR Presione para encender o apagar la lavadora.
03 INICIO/PAUSA
(Hold to Start
(Presione para iniciar))
Mantenga presionado para iniciar el funcionamiento, o presione para
detenerlo temporalmente.
04 Barra de estado
La barra de estado muestra la información y el tiempo restante
del ciclo que se está ejecutando, o un código de información si la
lavadora superior necesita revisión.
05 Temp. (Temperatura)
Presione para alternar entre dos opciones de temperatura de agua
diferentes.
• Warm (Tibia): Prendas que no destiñen.
• Cold (Fría): Prendas de colores vivos, ligeramente sucias.
06 Extra Rinse
(Enjuague extra)
Se usa para agregar un enjuague adicional al nal del ciclo para
remover los aditivos del lavado con mayor ecacia.
07 Self Clean
(Autolimpieza)
Se usa para limpiar suciedad y bacterias del tambor. Se recomienda
el uso regular (después de 20 lavados). No es necesario usar
detergente ni blanqueador. Asegúrese de que el tambor esté vacío.
08 Smart Control
Después de conectar la lavadora superior a la red doméstica
mediante la aplicación Samsung Smart Home, puede controlar la
lavadora de forma remota. El indicador de Smart Control parpadea
y la puerta superior se cierra. La lavadora entra en modo de espera
para los comandos remotos. Para obtener más información, visite la
página de Samsung Smart Home.
FlexWash_WV9900M_DC68-03768A-04_MES.indd 43 2017-05-22 7:06:58

Funcionamiento
Funcionamiento
Español44
Descripción de los ciclos
Ciclo Descripción
NORMAL
• Para prendas de algodón, camisetas, toallas y cargas mixtas
ligeramente sucias.
• Se utiliza para lavar prendas normales ligeramente sucias,
salvo telas delicadas como seda u otras telas que deben
lavarse únicamente a mano.
DELICATES (DELICADA)
• Para telas nas, brassieres, lencería, seda y otras telas que
deben lavarse únicamente a mano. Para obtener mejores
resultados, use detergente líquido.
ACTIVE WEAR (ROPA
DEPORTIVA)
• Para ropa de ejercicio, como pantalones deportivos,
camisetas/camisas y otras prendas de entrenamiento. Este
ciclo proporciona una eliminación efectiva de la suciedad
con un giro controlado del tambor para prendas que
requieren un cuidado especial.
RINSE+SPIN
(ENJUAGUE+CENTRIFUGADO)
• Para cargas que necesitan únicamente enjuague o para
agregar suavizante de telas que se añade durante el
enjuague.
NOTA
Spin Only (Solo centrifugado): Este ciclo ejecuta solamente
un centrifugado. Mantenga presionado RINSE+SPIN
(ENJUAGUE+CENTRIFUGADO) durante 3 segundos.
FlexWash_WV9900M_DC68-03768A-04_MES.indd 44 2017-05-22 7:06:58
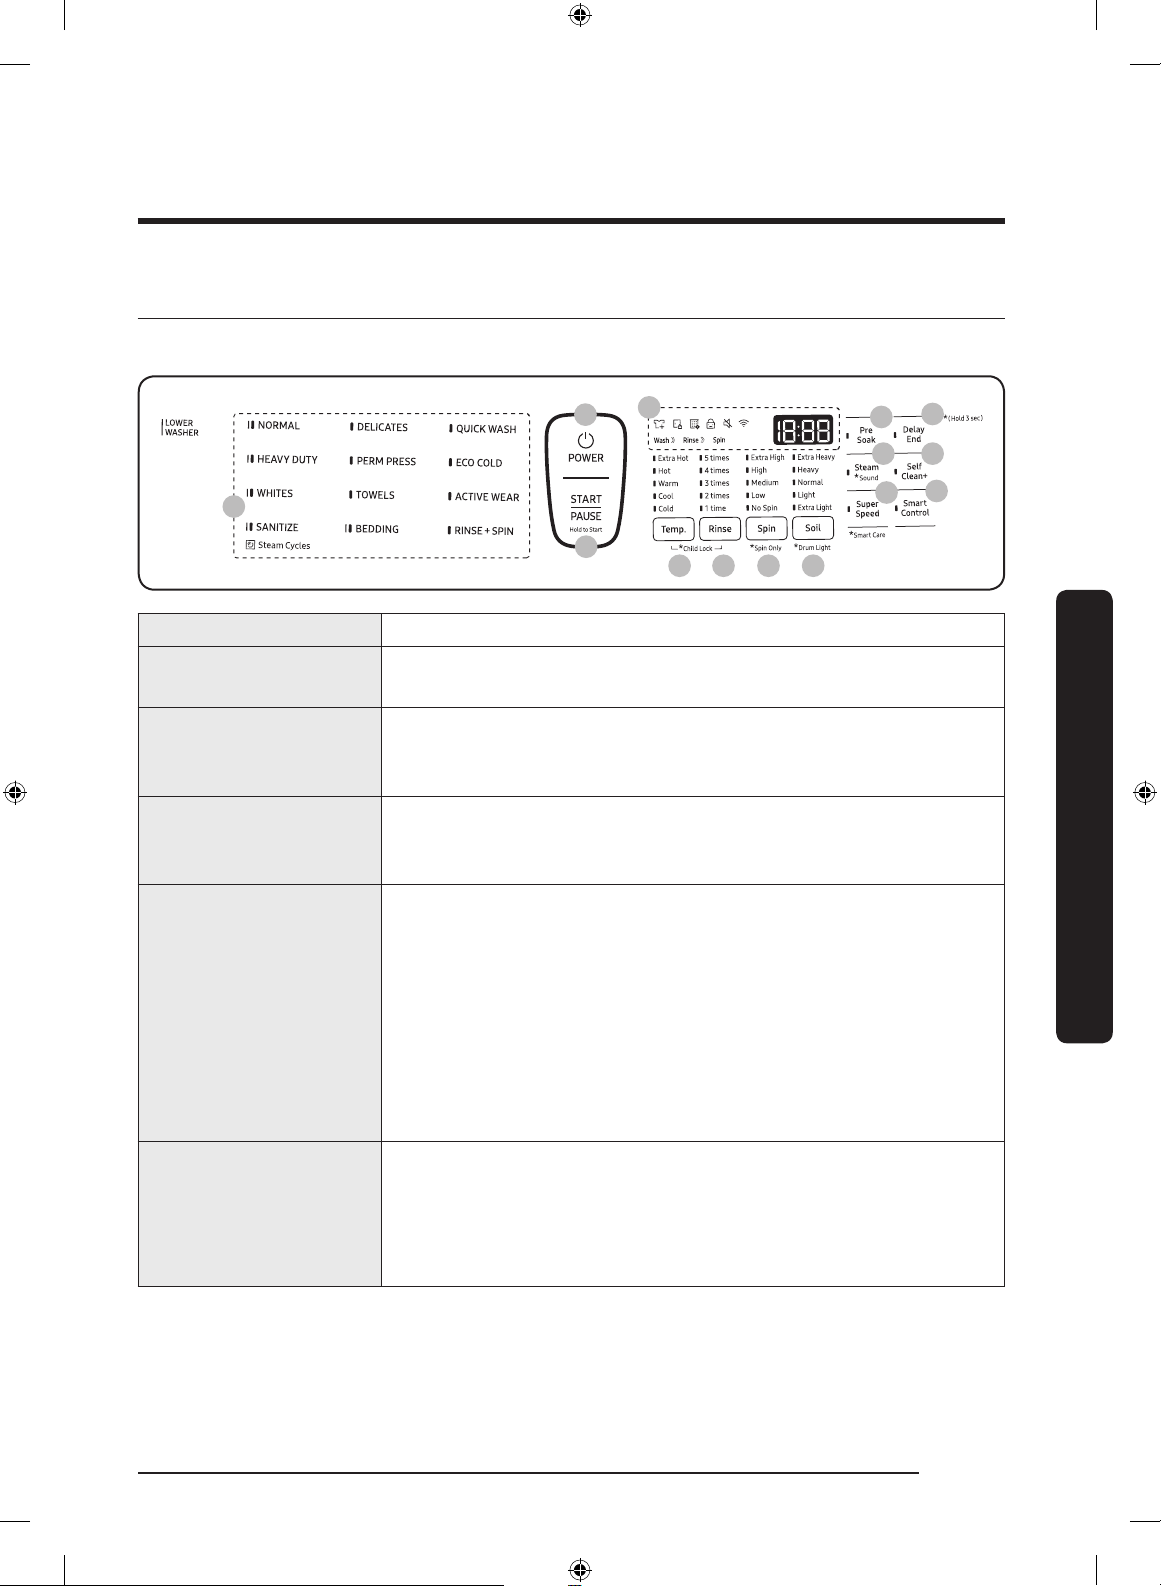
Funcionamiento
Español 45
Lavadora inferior
Panel de control
01
03
04
05 06 07 08
09
10
11
12
13
14
02
01 Área de los ciclos
Presione para seleccionar un ciclo.
02 POWER
(ENCENDER/APAGAR)
Presione para encender o apagar la lavadora inferior.
03 START/PAUSE
(INICIO/PAUSA)
(Presione para iniciar)
Mantenga presionado para iniciar el funcionamiento, o presione
para detenerlo temporalmente.
04 Barra de estado
La barra de estado muestra la información y el tiempo restante
del ciclo que se está ejecutando, o un código de información si la
lavadora inferior necesita revisión.
05 Temp. (Temperatura)
• Extra Hot (Muy caliente): Prendas muy sucias y que no destiñen.
Solo disponible con NORMAL, HEAVY DUTY (ACCIÓN FUERTE),
SANITIZE (DESINFECCIÓN) y Self Clean+ (Autolimpieza+).
• Hot (Caliente): Ropa blanca y prendas muy sucias de colores
sólidos.
• Warm (Tibia): Prendas que no destiñen.
• Cool (Fresca): Prendas de colores vivos, ligeramente sucias.
• Cold (Fría): Usa solo agua fría sin encender el calentador. No se
suministra agua tibia.
06 Rinse (Enjuagar)
• Presione para especicar el número total de enjuagues del ciclo
que se está ejecutando. Mantenga presionado para seleccionar
una de las opciones de conteo de enjuagues disponibles. Para
obtener más información sobre las opciones disponibles para un
ciclo especíco, consulte Tabla de ciclos en la página 80.
FlexWash_WV9900M_DC68-03768A-04_MES.indd 45 2017-05-22 7:06:58
Funcionamiento
Funcionamiento
Español46
07 Spin (Centrifugar)
• Extra High (Muy alto): Extiende el proceso de centrifugado para
eliminar con ecacia la humedad de la carga. El ajuste Extra High
(Muy alto) utiliza un proceso de centrifugado más fuerte que
elimina la humedad, por lo que no es adecuado para telas sin
arrugas y que no necesitan planchado ni para sobrecargas.
• High (Alto): Ropa interior, camisetas, jeans y algodones
resistentes.
• Medium (Medio): Jeans, prendas sin arrugas o que no necesitan
planchado y telas sintéticas.
• Low (Bajo): Prendas delicadas que necesitan una velocidad baja
de centrifugado.
• No Spin (Sin centrifugado): La tina no centrifuga después del
proceso de drenaje nal.
• Rinse Hold (Mantener en remojo) (No se enciende ningún
indicador): El proceso de enjuague nal se interrumpe para que
la carga permanezca en el agua. Para sacar la ropa, ejecute el
proceso de drenaje o de centrifugado.
NOTA
* Spin Only (Solo centrifugado): Este ciclo ejecuta solamente un
centrifugado. Mantenga presionado Spin (Centrifugar) durante
3 segundos. Con el tiempo del ciclo en la pantalla, presione Spin
(Centrifugar) repetidamente hasta que se seleccione la velocidad de
centrifugado deseada. A continuación, mantenga presionado START/
PAUSE (INICIO/PAUSA) para iniciar el ciclo.
08 Soil (Suciedad)
Presione el botón para seleccionar el nivel de suciedad y el tiempo
de lavado.
• Extra Heavy (Extra sucia): Para prendas extremadamente sucias.
• Heavy (Muy sucia): Para prendas muy sucias.
• Normal: Para prendas moderadamente sucias. Esta opción es la
mejor para
• la mayoría de las cargas.
• Light (Poco sucia): Para prendas ligeramente sucias.
• Extra Light (Extra limpia): Para prendas apenas sucias.
09 Pre Soak (Remojo)
Esto agrega 30 minutos de tiempo de remojo al inicio del ciclo de
lavado para una mejor remoción de manchas.
FlexWash_WV9900M_DC68-03768A-04_MES.indd 46 2017-05-22 7:06:58
Funcionamiento
Español 47
10 Steam (Vapor)
Con la opción Steam (Vapor) seleccionada, la lavadora detecta el
peso de la carga y controla el efecto del vapor de acuerdo con la
carga. Esto mejora el desempeño del lavado. Los ciclos disponibles
con la opción Steam (Vapor) son: NORMAL, HEAVY DUTY (ACCIÓN
FUERTE), BEDDING (ROPA DE CAMA), WHITES (ROPA BLANCA) y
SANITIZE (DESINFECCIÓN).
1. Seleccione un ciclo. Consulte más arriba los ciclos aplicables.
2. Presione Steam (Vapor).
3. Agregue el detergente y el suavizante de telas siguiendo las
instrucciones.
4. Mantenga presionado START/PAUSE (INICIO/PAUSA) para iniciar
el ciclo.
NOTA
El vapor puede no estar presente o visible durante el ciclo, lo cual
es normal.
11 Super Speed
(Súper velocidad)
Presione este botón si necesita acortar el tiempo de lavado,
aplicable a NORMAL, HEAVY DUTY (ACCIÓN FUERTE) o BEDDING
(ROPA DE CAMA). El tiempo acortado puede variar dependiendo de
la selección de ciclo/carga/opciones.
FlexWash_WV9900M_DC68-03768A-04_MES.indd 47 2017-05-22 7:06:58
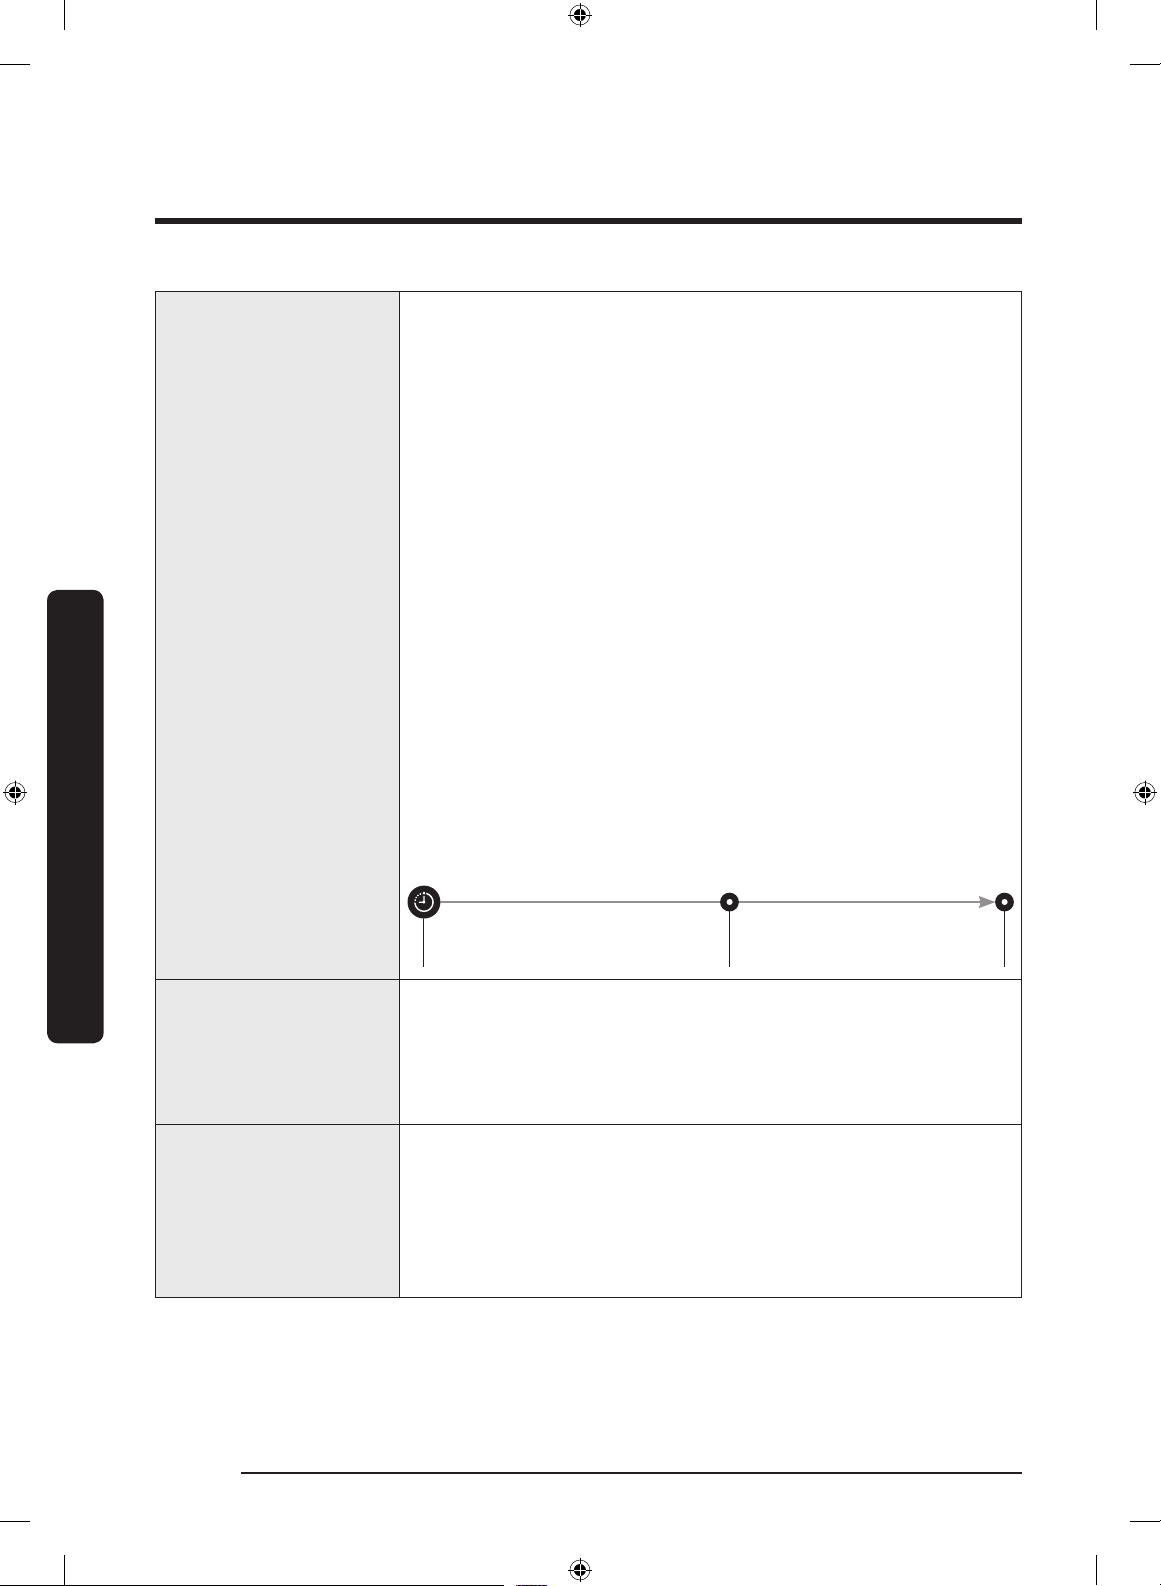
Funcionamiento
Funcionamiento
Español48
12 Delay End
(Término Retardado)
Puede hacer que la lavadora nalice automáticamente el lavado más
tarde al seleccionar un tiempo de retardo de entre 1 y 24 horas (en
incrementos de 1 hora). La pantalla indica la hora a la que nalizará
el lavado.
1. Seleccione un ciclo. Luego, cambie los ajustes del ciclo si es
necesario.
2. Presione Delay End (Término Retardado) repetidamente hasta
establecer el tiempo de nalización deseado.
3. Mantenga presionado START/PAUSE (INICIO/PAUSA). El indicador
junto al botón Delay End (Término Retardado) se enciende con el
reloj en funcionamiento.
4. Para cancelar el Delay End (Término Retardado), reinicie la
lavadora presionando POWER (ENCENDER/APAGAR).
Caso real
Desea que un ciclo que dura 2 horas nalice dentro de 3 horas. Para
hacerlo, se agrega la opción al ciclo actual con un ajuste de 3 horas
y, luego, se mantiene presionado START/PAUSE (INICIO/PAUSA) a las
2:00 p.m. La lavadora comienza a funcionar a las 3:00 p.m. y naliza
a las 5:00 p.m. A continuación se proporciona la línea de tiempo
para este ejemplo.
2:00 pm
Congure Término retardado a las 3 h
3:00 pm
Inicio
5:00 pm
Fin
13 Self Clean+
(Autolimpieza+)
Limpia la tina al eliminar la suciedad y el moho presentes.
• Ejecútelo una vez cada 40 lavados sin detergente ni
blanqueador.
• Asegúrese de que la tina esté vacía.
• No agregue agentes de limpieza para la tina.
14 Smart Control
Después de conectar la lavadora inferior a la red doméstica
mediante la aplicación Samsung Smart Home, puede controlar la
lavadora de forma remota. El indicador de Smart Control parpadea
y la puerta frontal se cierra. La lavadora entra en modo de espera
para los comandos remotos. Para obtener más información, visite la
página de Samsung Smart Home.
FlexWash_WV9900M_DC68-03768A-04_MES.indd 48 2017-05-22 7:06:59
Funcionamiento
Español 49
Descripción de los ciclos
Ciclos normales
Ciclo Descripción
DELICATES (DELICADA)
• Para telas nas, brassieres, lencería, seda y otras telas que
deben lavarse únicamente a mano. Para obtener mejor
desempeño, use detergente líquido.
PERM PRESS
(PLANCHA PERMANENTE)
• Para telas sintéticas que no necesitan planchado y prendas
ligera o moderadamente sucias.
TOWELS (TOALLAS) • Para toallas de baño, toallas pequeñas (para la cara) y tapetes.
QUICK WASH
(LAVADO RÁPIDO)
• Para prendas ligeramente sucias que desea que se laven
rápidamente.
ECO COLD (ECO FRÍO)
• Para prendas ligera o medianamente sucias. Este ciclo usa solo agua fría
para ahorrar energía. Además, el agua fría ayuda a conservar la ropa.
ACTIVE WEAR
(ROPA DEPORTIVA)
• Para ropa de ejercicio, como buzos y pantalones deportivos,
camisetas y otras prendas de entrenamiento. Este ciclo proporciona
una eliminación efectiva de la suciedad con un giro controlado del
tambor para prendas que requieren un cuidado especial.
RINSE+SPIN
(ENJUAGUE+CENTRIFUGADO)
• Para cargas que necesitan únicamente enjuague o para agregar
suavizante de telas que se añade durante el enjuague.
Ciclos de vapor
Ciclo Descripción
NORMAL
• Para ropa de algodón, de cama y de mesa, ropa interior, toallas
o camisas. La duración del lavado y el número de enjuagues se
ajustan automáticamente de acuerdo con la carga.
HEAVY DUTY
(ACCIÓN FUERTE)
• Para telas resistentes de colores sólidos y prendas muy sucias.
WHITES (ROPA BLANCA)
• Para prendas blancas con o sin blanqueador.
SANITIZE
(DESINFECCIÓN)
• Para prendas muy sucias de colores sólidos. Este ciclo calienta el
agua a 150 °F para eliminar las bacterias.
BEDDING
(ROPA DE CAMA)
• Para prendas voluminosas como edredones, cobijas y sábanas.
• Para obtener los mejores resultados, lave un solo tipo de ropa de
cama.
• Para prendas voluminosas, utilice detergente líquido y no enrolle las
prendas al colocarlas en la tina porque podrían atascarse.
FlexWash_WV9900M_DC68-03768A-04_MES.indd 49 2017-05-22 7:06:59

Funcionamiento
Funcionamiento
Español50
Sencillos pasos para comenzar
03
01 06
06
04 05
01
03
04
05
1. Presione POWER (ENCENDER/APAGAR) en el panel de control de la lavadora deseada
(superior/inferior) para encenderla.
2. Coloque las prendas en la lavadora.
3. Seleccione un ciclo.
4. Cambie los ajustes del ciclo (temperatura y/o nivel de suciedad) de acuerdo con las prendas.
5. Seleccione las opciones del ciclo según sea necesario.
6. Mantenga presionado START/PAUSE (INICIO/PAUSA).
Para cambiar el ciclo durante el funcionamiento
1. Presione START/PAUSE (INICIO/PAUSA) para detener el funcionamiento temporalmente.
2. Seleccione otro ciclo.
3. Mantenga presionado START/PAUSE (INICIO/PAUSA) nuevamente para iniciar el nuevo ciclo.
ADVERTENCIA
• No coloque ningún objeto en la parte superior de la lavadora cuando esté en funcionamiento.
• Mientras la lavadora inferior está en funcionamiento, es posible que la cubierta protectora
acumule vapor húmedo debido a la diferencia de temperatura entre las secciones superior e
inferior de la lavadora.
PRECAUCIÓN
Cuando utilice la lavadora superior, es
posible que no vea ninguna prenda restante,
especialmente en el área frontal del tambor.
Al nalizar el ciclo, gire el tambor
manualmente para vericar si queda alguna
prenda en el interior.
FlexWash_WV9900M_DC68-03768A-04_MES.indd 50 2017-05-22 7:06:59

Funcionamiento
Español 51
Este producto es una lavadora inteligente que admite el
servicio Samsung Smart Home.
El tiempo que la función de conguración EZ (para conectar la
lavadora a la red) necesita para completar la conexión a la red
varía dependiendo de la condición de la red.
Samsung Smart Home
Instalación
Visite la Google Play Store, Galaxy Apps o Apple App Store y busque “Samsung Smart Home”.
Descargue e instale en su dispositivo inteligente la aplicación Samsung Smart Home provista por
Samsung Electronics.
NOTA
• La aplicación Samsung Smart Home está diseñada para Android 4.0 (ICS) o superior, o iOS8.0 o
superior, y está optimizada para teléfonos inteligentes de Samsung (series Galaxy S y Galaxy
Note).
• En otros dispositivos, algunas funciones pueden operar de una manera distinta.
• Para un mejor desempeño, la aplicación Samsung Smart Home está sujeta a cambios sin previo
aviso.
Registro de una cuenta Samsung
Para utilizar la aplicación Samsung Smart Home, antes debe iniciar sesión en su cuenta Samsung.
Si no dispone de una cuenta Samsung, seleccione Register (Registro) en la aplicación y luego siga
las instrucciones en pantalla para crear una cuenta.
NOTA
• Si dispone de una cuenta Samsung registrada, inicie sesión en su cuenta Samsung. Si dispone
de un teléfono inteligente Samsung, puede ir al menú Settings (Ajustes) de su teléfono,
seleccionar Accounts (Cuentas) e iniciar sesión en su cuenta Samsung. Esto le permitirá iniciar
sesión sin una autenticación adicional.
• Para teléfonos inteligentes de otras marcas, la cuenta de la aplicación debe ser la misma que la
cuenta de Easy Setup (Conguración fácil).
FlexWash_WV9900M_DC68-03768A-04_MES.indd 51 2017-05-22 7:06:59

Funcionamiento
Funcionamiento
Español52
Cómo comenzar
Con Samsung Smart Home, puede controlar remotamente su lavadora desde su dispositivo
inteligente. Para un mejor desempeño, el contenido y el diseño de la aplicación están sujetos a
cambios sin previo aviso.
1. Ejecute la aplicación Samsung Smart Home en su teléfono inteligente.
2. Si en la lista no aparece ‘Washer (Lavadora)’, toque Add Device (Agregar dispositivo) > Select
other device (Seleccionar otro dispositivo) >Washer (Lavadora) en la pantalla de la aplicación.
3. Mantenga presionado Smart Control en el panel de control de la lavadora durante más de 5
segundos hasta que el mensaje ‘AP’ aparezca en la pantalla.
4. Una vez completado el registro del dispositivo, active la función Smart Control de la lavadora
para controlarla en forma remota.
FlexWash_WV9900M_DC68-03768A-04_MES.indd 52 2017-05-22 7:06:59

Funcionamiento
Español 53
Funciones especiales
Seguro para niños
Para evitar que los niños enciendan o conguren accidentalmente la lavadora, Child Lock (Seguro
para niños) bloquea todos los botones excepto POWER (ENCENDER/APAGAR). Tenga en cuenta
que cada lavadora funciona de manera independiente y tiene su propia función Child Lock
(Seguro para niños). Si desea activar el Child Lock (Seguro para niños) de la lavadora superior o
inferior, debe presionar los botones apropiados del panel de control de la lavadora superior o
inferior.
Para activar Seguro para niños
• Mantenga presionados Temp. (Temperatura) y Rinse (Enjuagar) (o Temp. (Temperatura) y
Extra Rinse (Enjuague extra) para la lavadora superior) simultáneamente durante 3 segundos.
Se bloquea la puerta y se enciende el indicador de Child Lock (Seguro para niños). Luego,
presione START/PAUSE (INICIO/PAUSA) para activarlo.
Para desactivar Seguro para niños temporalmente
• Puede desactivar Child Lock (Seguro para niños) temporalmente durante 1 minuto. Para
hacerlo, mantenga presionados Temp. (Temperatura) y Rinse (Enjuagar) (o Temp. (Temperatura)
y Extra Rinse (Enjuague extra) para la lavadora superior) simultáneamente durante 3
segundos. La puerta se desbloquea durante 1 minuto y el indicador de Child Lock (Seguro para
niños) parpadea.
NOTA
• Si abre la puerta 1 minuto o más después de desactivar el seguro para niños, suena una
alarma durante 2 minutos.
• Si cierra la puerta antes de transcurrir los 2 minutos, esta se bloquea y el seguro para niños se
reactiva. Si no cierra la puerta o no se cierra correctamente, la alarma sigue sonando durante 2
minutos.
• Para agregar prendas después de activar Child Lock (Seguro para niños), primero desactive la
función o reinicie la lavadora.
Para cancelar Seguro para niños
• Mantenga presionado Temp. (Temperatura) y Rinse (Enjuagar) (o Temp. (Temperatura) y Extra
Rinse (Enjuague extra) para la lavadora superior) durante 3 segundos para desactivar, y luego
mantenga presionados los botones nuevamente durante 3 segundos para liberar Child Lock
(Seguro para niños). Se desbloquea la puerta y se apaga el indicador de Child Lock (Seguro
para niños).
FlexWash_WV9900M_DC68-03768A-04_MES.indd 53 2017-05-22 7:06:59

Funcionamiento
Funcionamiento
Español54
Smart Care
La función Smart Care le ayuda a diagnosticar y solucionar problemas de la lavadora en caso de
que sea necesario. Para activar esta función, primero debe descargar la aplicación Samsung Smart
Washer desde Play Store o Apple Store e instalarla en un dispositivo móvil que cuente con la
función de cámara incorporada. La función Smart Care se ha optimizado para: Dispositivos Galaxy
e iPhone. (No es compatible con algunos modelos).
Durante el funcionamiento de la lavadora, se ejecuta un autodiagnóstico en segundo plano. Si
detecta un problema a vericar, muestra un código de información en la pantalla que usted puede
escanear con la función Smart Care de la aplicación, que luego muestra información detallada
sobre el código para su referencia.
1. Mantenga presionado Super Speed (Súper velocidad) (o Self Clean (Autolimpieza) y Smart
Control para la lavadora superior) en la lavadora durante 3 segundos para ingresar al modo
Smart Care.
2. Ejecute la aplicación Samsung Smart Washer en su dispositivo móvil y, luego, toque Smart
Care.
3. Sujete el dispositivo móvil de modo que quede de frente a la barra de estado de la lavadora.
La aplicación reconocerá el código de información automáticamente.
4. Cuando el código de información se reconoce correctamente, la aplicación proporciona
información detallada sobre el síntoma y recomienda las medidas que se deben tomar.
NOTA
• El nombre de la función, Smart Care, puede variar según el idioma.
• Si hay reejos de luz en la pantalla de la lavadora, es posible que la aplicación no reconozca el
código de información.
• Si la aplicación no reconoce el código de información varias veces consecutivas, ingréselo
manualmente en la pantalla de la aplicación.
• El historial de códigos de información se borra luego de usar esta función.
FlexWash_WV9900M_DC68-03768A-04_MES.indd 54 2017-05-22 7:06:59

Funcionamiento
Español 55
Sonido
Active o desactive el sonido (sonidos de los botones, indicadores y timbres, etc.)
Lavadora superior
• Para silenciar las alarmas o sonidos de la lavadora superior, mantenga presionados Extra Rinse
(Enjuague extra) y Self Clean (Autolimpieza) durante 3 segundos. Para activar el sonido, vuelva
a mantener presionados los botones durante 3 segundos.
Lavadora inferior
• Para silenciar las alarmas o sonidos de la lavadora inferior, mantenga presionado Steam
(Vapor) durante 3 segundos. Para activar el sonido, vuelva a mantener presionado el botón
durante 3 segundos.
Luz del tambor (solo la lavadora inferior)
La luz de la tina se enciende cuando se abre la puerta, y se apaga después de 2 minutos. Para
encender o apagar manualmente la luz de la tina, mantenga presionado Soil (Suciedad) durante 3
segundos.
ATC (control automático de la temperatura)
La función ATC permite a la lavadora controlar la temperatura del agua en cada ciclo de lavado
mediante el termistor interno de la lavadora. Está diseñada para mantener ciertas temperaturas
de lavado a n de obtener los mejores resultados.
• Si selecciona NORMAL o HEAVY DUTY (ACCIÓN FUERTE), es posible que advierta que la
lavadora suministra agua fría. Esto es normal, ya que la lavadora está diseñada para reducir el
consumo energético.
• En dichos ciclos, la temperatura caliente es similar a una temperatura de agua de ducha, y la
temperatura tibia es similar a la temperatura agradable de una piscina.
• Para lavar prendas a una temperatura especíca, primero debe elegir un ciclo diferente.
FlexWash_WV9900M_DC68-03768A-04_MES.indd 55 2017-05-22 7:06:59

Mantenimiento
Español56
Mantenimiento
Mantenga la lavadora limpia para prevenir el deterioro del desempeño y para preservar su vida
útil.
ADVERTENCIA
El panel de control, el tambor de centrifugado, el motor, la válvula de entrada y la bomba no
están conectados a tierra intencionalmente y pueden presentar un riesgo de descarga eléctrica
solo durante el servicio técnico.
Consideraciones generales
Limpieza
Supercie de la lavadora
Use un paño suave y un detergente doméstico que no sea abrasivo. No rocíe agua sobre la
lavadora.
Exterior
1. Cierre las llaves del agua después de nalizar el lavado del día.
Esto cerrará el suministro de agua a la lavadora y evitará la improbable posibilidad de que
se produzcan daños a causa del derrame de agua. Deje la puerta abierta para permitir que el
interior de la lavadora se seque.
2. Use un paño suave para limpiar todo el detergente, el blanqueador u otros derrames a medida
que ocurran.
Limpie lo siguiente tal como se recomienda:
- Paneles de control: limpie con un paño suave y húmedo. No use polvos abrasivos ni
toallitas limpiadoras. No rocíe los paneles directamente con limpiadores en aerosol.
- Gabinete: lave con agua y jabón.
Interior
Limpie el interior de la lavadora periódicamente para eliminar todo vestigio de suciedad, polvo,
olor, moho, hongos o bacterias que pueda permanecer en la lavadora como consecuencia del
lavado de ropa.
PRECAUCIÓN
El incumplimiento de estas instrucciones puede dar como resultado situaciones poco
satisfactorias, tales como olor y/o manchas permanentes en la lavadora o en las prendas.
NOTA
Se pueden retirar los depósitos de agua dura si fuera necesario. Use un limpiador que en el rótulo
indique que es seguro para lavadoras.
FlexWash_WV9900M_DC68-03768A-04_MES.indd 56 2017-05-22 7:07:00
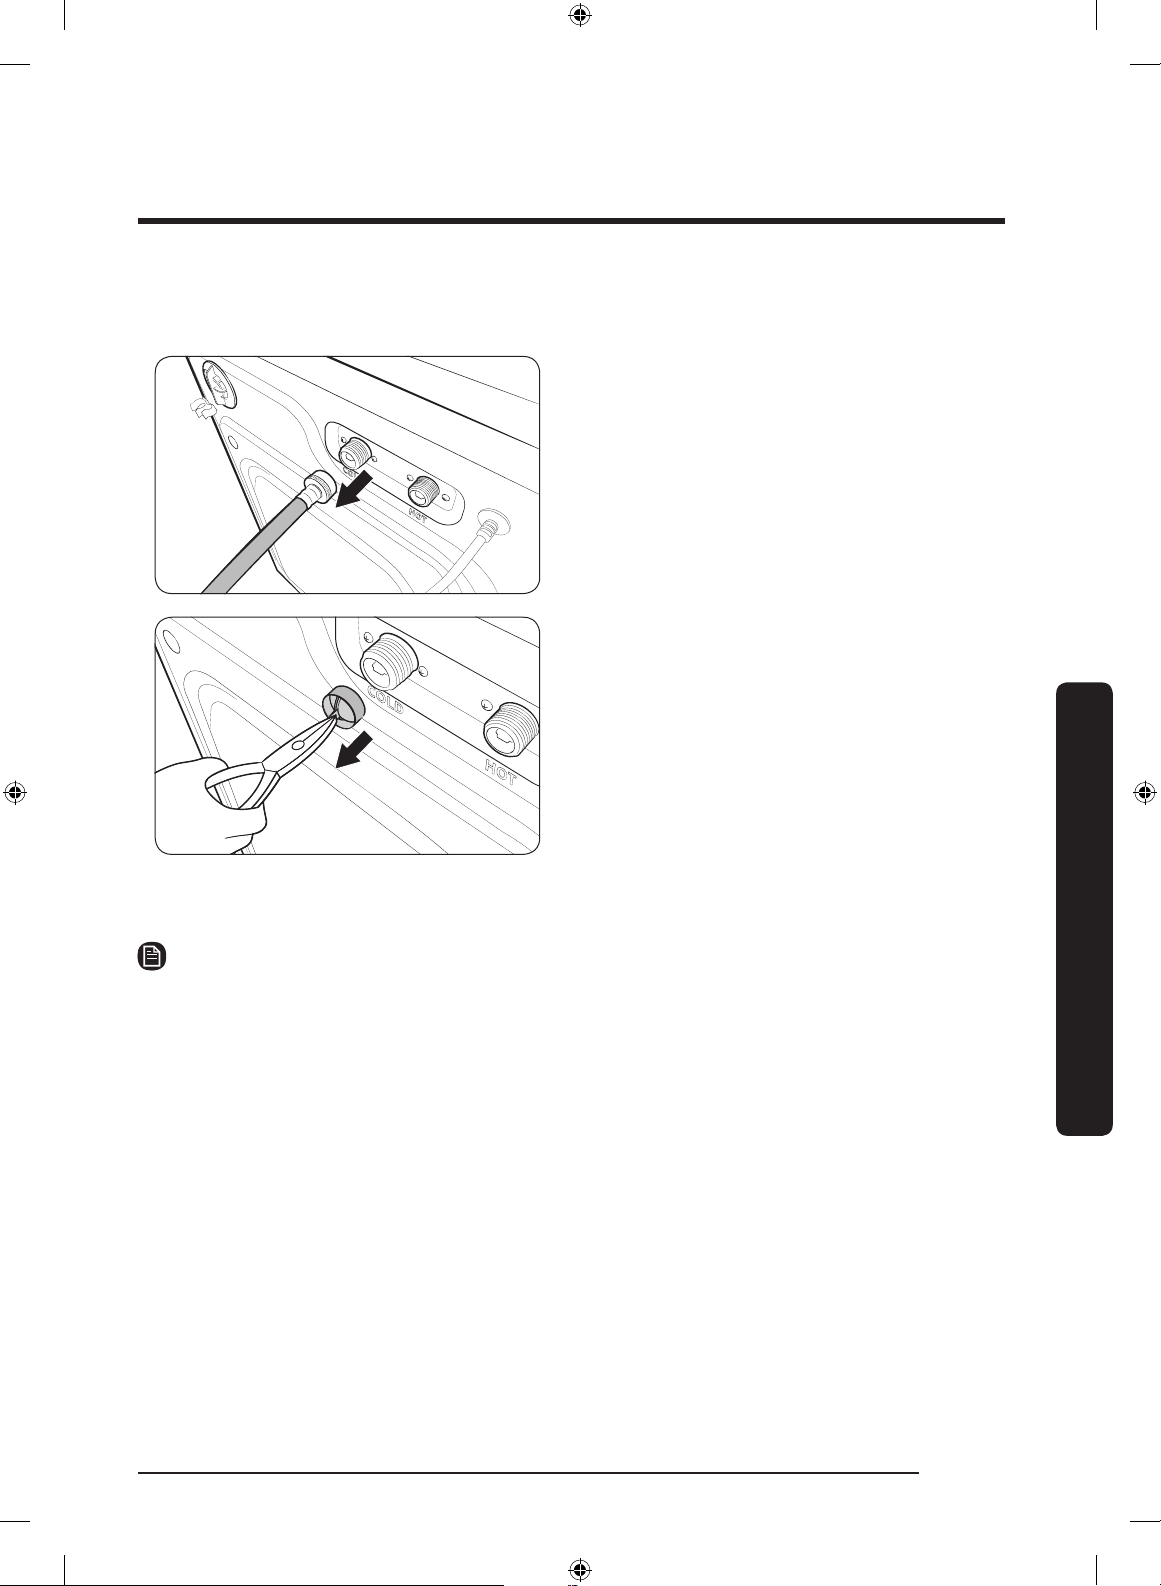
Mantenimiento
Español 57
Filtro de malla
Limpie el ltro de malla la manguera de agua una o dos veces por año.
1. Apague la lavadora y, luego, desenchufe el
cable de alimentación.
2. Cierre las llaves del agua.
3. Aoje y desconecte la manguera de agua
de la parte trasera de la lavadora. Cubra la
manguera con un paño para evitar la fuga
de agua.
4. Use unas pinzas para sacar el ltro de
malla de la válvula de entrada.
5. Sumerja el ltro de malla en agua de modo
que el conector roscado quede también
sumergido.
6. Seque el ltro de malla completamente a la
sombra.
7. Vuelva a insertar el ltro de malla en
la válvula de entrada y reconecte la
manguera de agua en la válvula.
8. Abra la llave del agua.
NOTA
Si el ltro de malla está obstruido, aparece el código de información “4C” en la pantalla de la
lavadora.
FlexWash_WV9900M_DC68-03768A-04_MES.indd 57 2017-05-22 7:07:00

Mantenimiento
Mantenimiento
Español58
Recuperación de un congelamiento
La lavadora puede congelarse cuando la temperatura del lugar cae por debajo de 32 °F (0 °C).
1. Apague la lavadora y, luego, desenchufe el cable de alimentación.
2. Vierta agua caliente sobre la llave del agua para aojar la manguera de suministro.
3. Desconecte la manguera y sumérjala en agua tibia.
4. Vierta agua tibia en la tina (tambor) y déjela 10 minutos aproximadamente.
5. Vuelva a conectar la manguera a la llave del agua.
NOTA
Si la lavadora sigue sin funcionar correctamente, repita los pasos anteriores hasta que funcione
con normalidad.
Mantenimiento luego de un periodo prolongado sin utilizar la lavadora
Evite dejar la lavadora inactiva durante un periodo de tiempo prolongado. Si no la va a utilizar
durante mucho tiempo, siga las instrucciones a continuación:
1. Presione POWER (ENCENDER/APAGAR) y, luego, seleccione RINSE+SPIN
(ENJUAGUE+CENTRIFUGADO).
2. Vacíe la tina y el tambor, cierre la puerta y presione START/PAUSE (INICIO/PAUSA).
3. Al completar el ciclo, cierre la llave del agua y desconecte las mangueras de suministro.
4. Apague la lavadora y, luego, desenchufe el cable de alimentación.
5. Abra las puertas para que el aire circule por la tina y el tambor.
FlexWash_WV9900M_DC68-03768A-04_MES.indd 58 2017-05-22 7:07:00
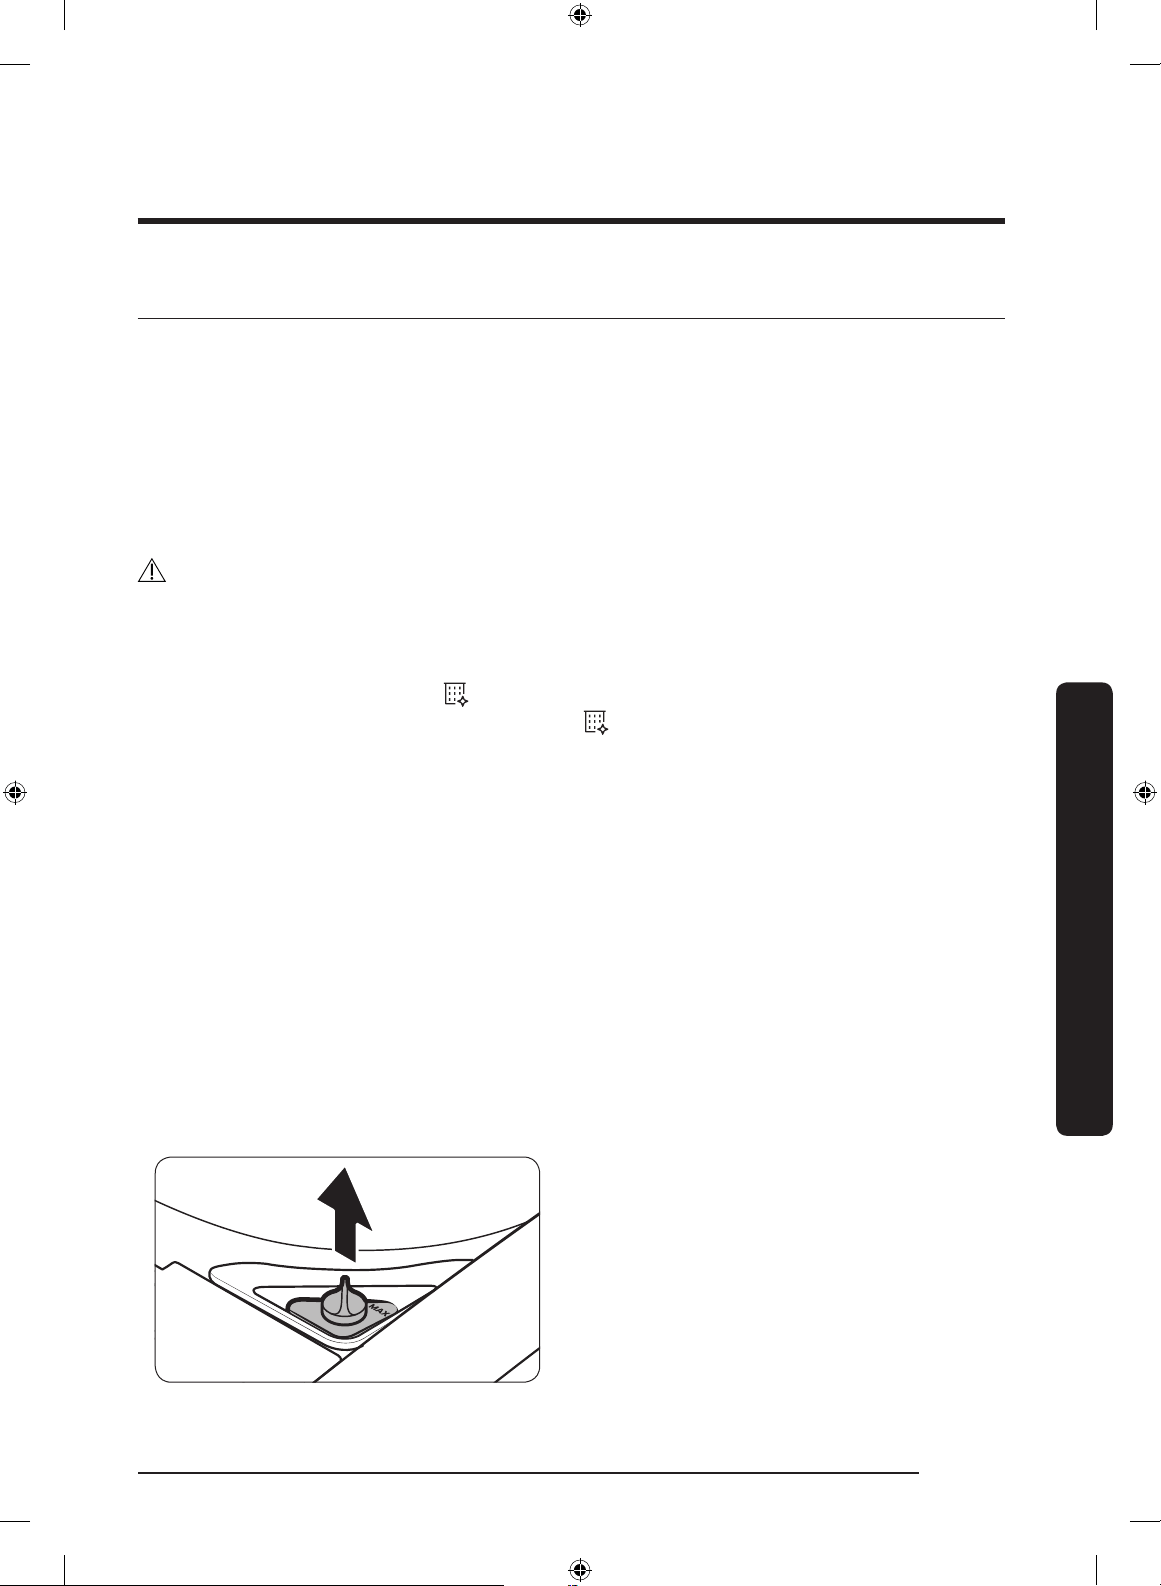
Mantenimiento
Español 59
Lavadora superior
Autolimpieza
Self Clean (Autolimpieza) es un ciclo de autolimpieza que elimina la suciedad y las bacterias que
pueden producirse dentro del tambor. Recomendamos realizar la autolimpieza cada 20 lavados.
1. Asegúrese de que el tambor esté vacío.
2. Presione POWER (ENCENDER/APAGAR).
3. Presione Self Clean (Autolimpieza).
4. Mantenga presionado START/PAUSE (INICIO/PAUSA).
PRECAUCIÓN
• Con la autolimpieza puede limpiar el tambor sin usar un agente limpiador o un blanqueador.
• Solo utilice la autolimpieza cuando el tambor esté vacío. Esto puede dañar las prendas o
causar un problema en la lavadora.
Recordatorio de Autolimpieza ( )
• El recordatorio de Self Clean+ (Autolimpieza+) ( ) se muestra en la pantalla principal cada
20 lavados. Le recomendamos rmemente que ejecute Self Clean+ (Autolimpieza+) con
regularidad. En este caso, retire las prendas de la lavadora, enciéndala y limpie el tambor
ejecutando la autolimpieza.
• Si no se ejecuta la autolimpieza, el indicador se apaga. No obstante, el indicador se encenderá
nuevamente después de cinco lavados. No ejecutar la autolimpieza en este momento no
causará ningún problema en la lavadora. No obstante, recomendamos ejecutar la autolimpieza
en este momento.
• Si bien el indicador se enciende una vez por mes aproximadamente, la frecuencia puede variar
dependiendo de la cantidad de veces que se utilice la lavadora.
Compartimiento para el suavizante/blanqueador
Los compartimientos para el suavizante y el blanqueador en la lavadora superior no son
extraíbles a n de facilitar la información visual para los usuarios. Para limpiar el compartimiento
para el suavizante, siga estas instrucciones. La limpieza del compartimiento para el blanqueador
es básicamente igual.
1. Abra la puerta superior y, luego, retire la
tapa del suavizante.
FlexWash_WV9900M_DC68-03768A-04_MES.indd 59 2017-05-22 7:07:00
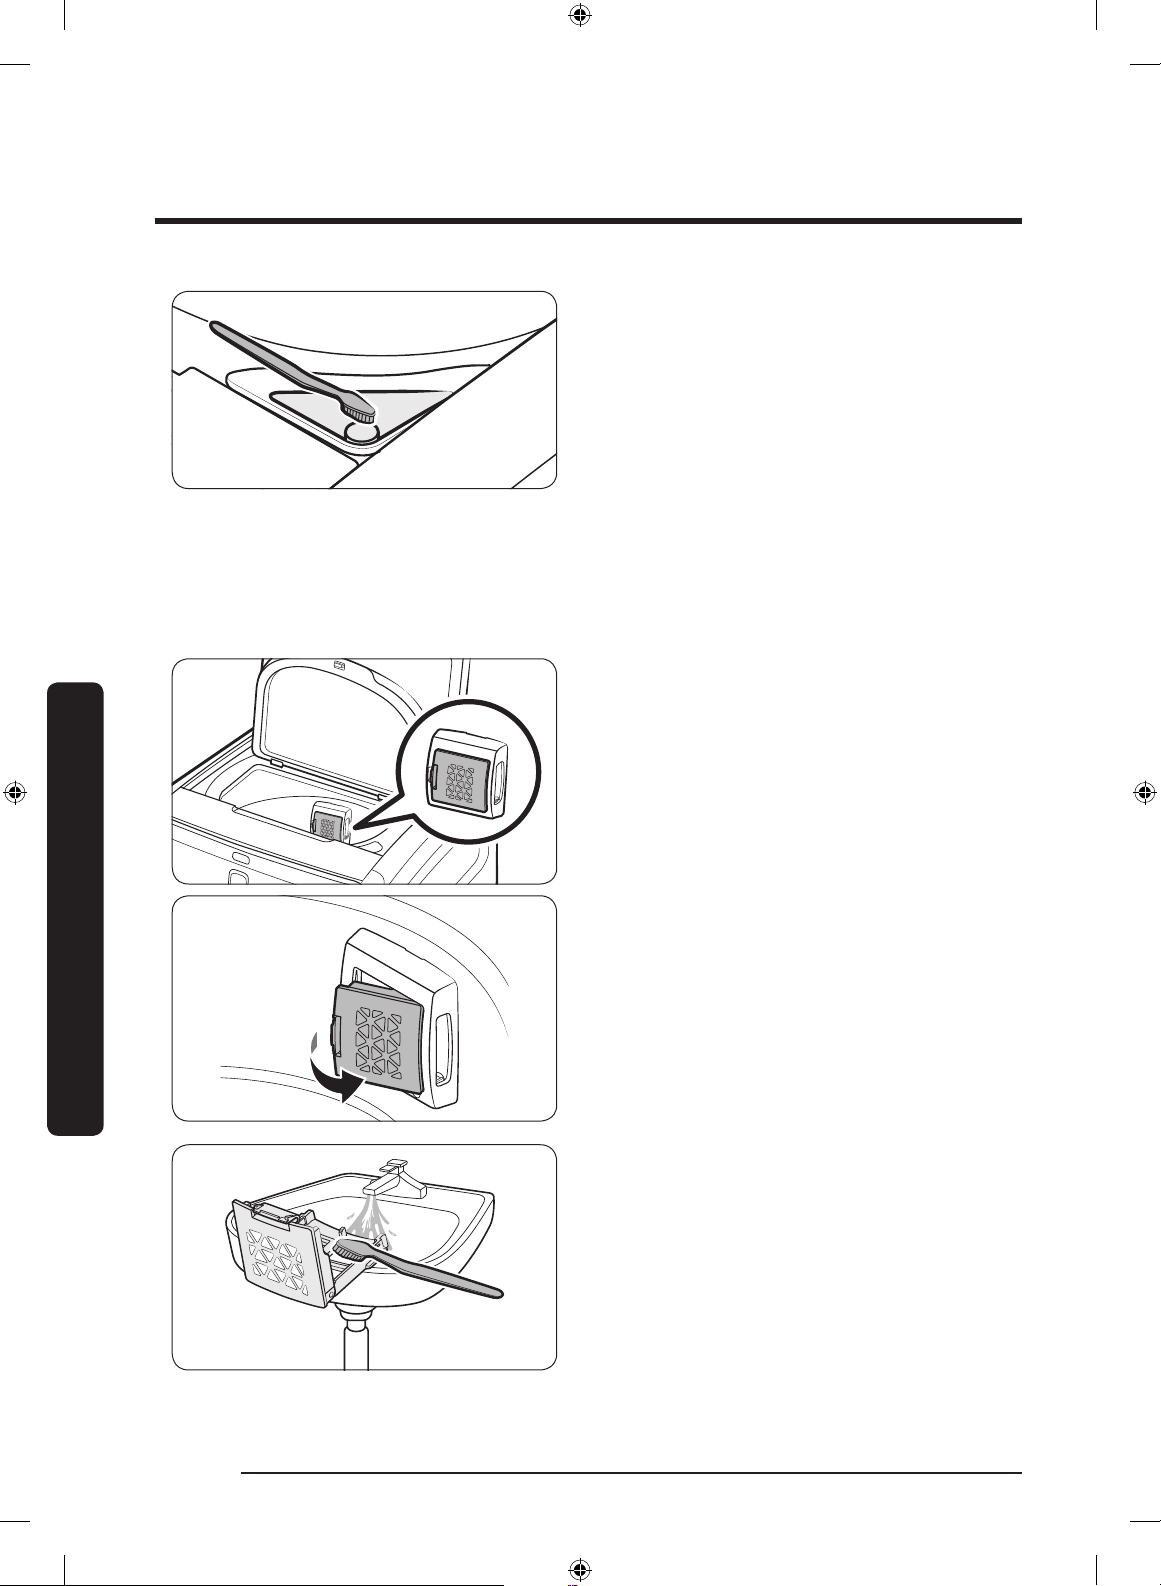
Mantenimiento
Mantenimiento
Español60
2. Utilice un cepillo suave (por ejemplo,
cepillo de dientes) para limpiar el interior
del compartimiento y eliminar las
impurezas.
3. Ejecute el ciclo RINSE+SPIN
(ENJUAGUE+CENTRIFUGADO) para
enjuagar el compartimiento. Después de
suministrar agua y drenar 5 veces, se
completa el ciclo de 18 minutos con el
proceso de centrifugado nal.
Filtro para pelusas
Recomendamos limpiar el ltro para pelusas cada 10 lavados.
1. Retire el ltro para pelusas de la caja que
está en el tambor de la lavadora superior.
2. Abra el ltro y límpielo con agua corriente
y un cepillo.
3. Al nalizar la limpieza, cierre el ltro y
vuelva a insertarlo en su posición original.
Se escuchará un clic cuando el ltro encaje.
FlexWash_WV9900M_DC68-03768A-04_MES.indd 60 2017-05-22 7:07:00

Mantenimiento
Español 61
Lavadora inferior
Autolimpieza+
Ejecute este ciclo regularmente para limpiar la tina y eliminar el moho de su interior.
1. Asegúrese de que la tina esté vacía.
2. Presione POWER (ENCENDER/APAGAR) para poner en funcionamiento la lavadora.
3. Presione Self Clean+ (Autolimpieza+).
4. Mantenga presionado START/PAUSE (INICIO/PAUSA).
PRECAUCIÓN
• No utilice agentes limpiadores. No agregue detergente ni blanqueador. Los residuos químicos
que quedan en la tina degradan el desempeño de la limpieza.
• Solo utilice Self Clean+ (Autolimpieza+) cuando la tina esté vacía. No lo utilice si hay prendas
en la tina. Esto puede dañar las prendas o causar un problema en la lavadora.
NOTA
La temperatura del agua para Self Clean+ (Autolimpieza+) está congurada en Extra Hot (Muy
caliente) y no se puede cambiar.
Recordatorio de Autolimpieza+ ( )
• El recordatorio de Self Clean+ (Autolimpieza+) ( ) se muestra en la pantalla principal cada 40
lavados. Es aconsejable ejecutar Self Clean+ (Autolimpieza+) regularmente.
• Si no se ejecuta cada 40 lavados, el recordatorio se apaga después de una hora.
• Cuando vea este recordatorio por primera vez, puede ignorarlo hasta 6 lavados consecutivos.
A partir del séptimo lavado, el recordatorio deja de aparecer. Sin embargo, vuelve a aparecer
cuando se alcanzan los 40 lavados por segunda vez.
FlexWash_WV9900M_DC68-03768A-04_MES.indd 61 2017-05-22 7:07:00

Mantenimiento
Mantenimiento
Español62
Compartimiento para el lavado principal
El compartimiento para el lavado principal debe limpiarse periódicamente a n de eliminar la
acumulación de aditivos del lavado.
1. Abra la cubierta frontal superior. Sujete el
compartimiento para el lavado principal y,
luego, jale hacia arriba para retirarlo.
2. Elimine todos los residuos y restos de
agentes de lavado acumulados que haya
en el compartimiento. Enjuáguelo con agua
tibia.
3. Para limpiar la cavidad del compartimiento,
utilice un cepillo pequeño no metálico.
Elimine los residuos en todos los laterales
de la cavidad.
4. Vuelva a insertar el compartimiento en su
lugar.
FlexWash_WV9900M_DC68-03768A-04_MES.indd 62 2017-05-22 7:07:01
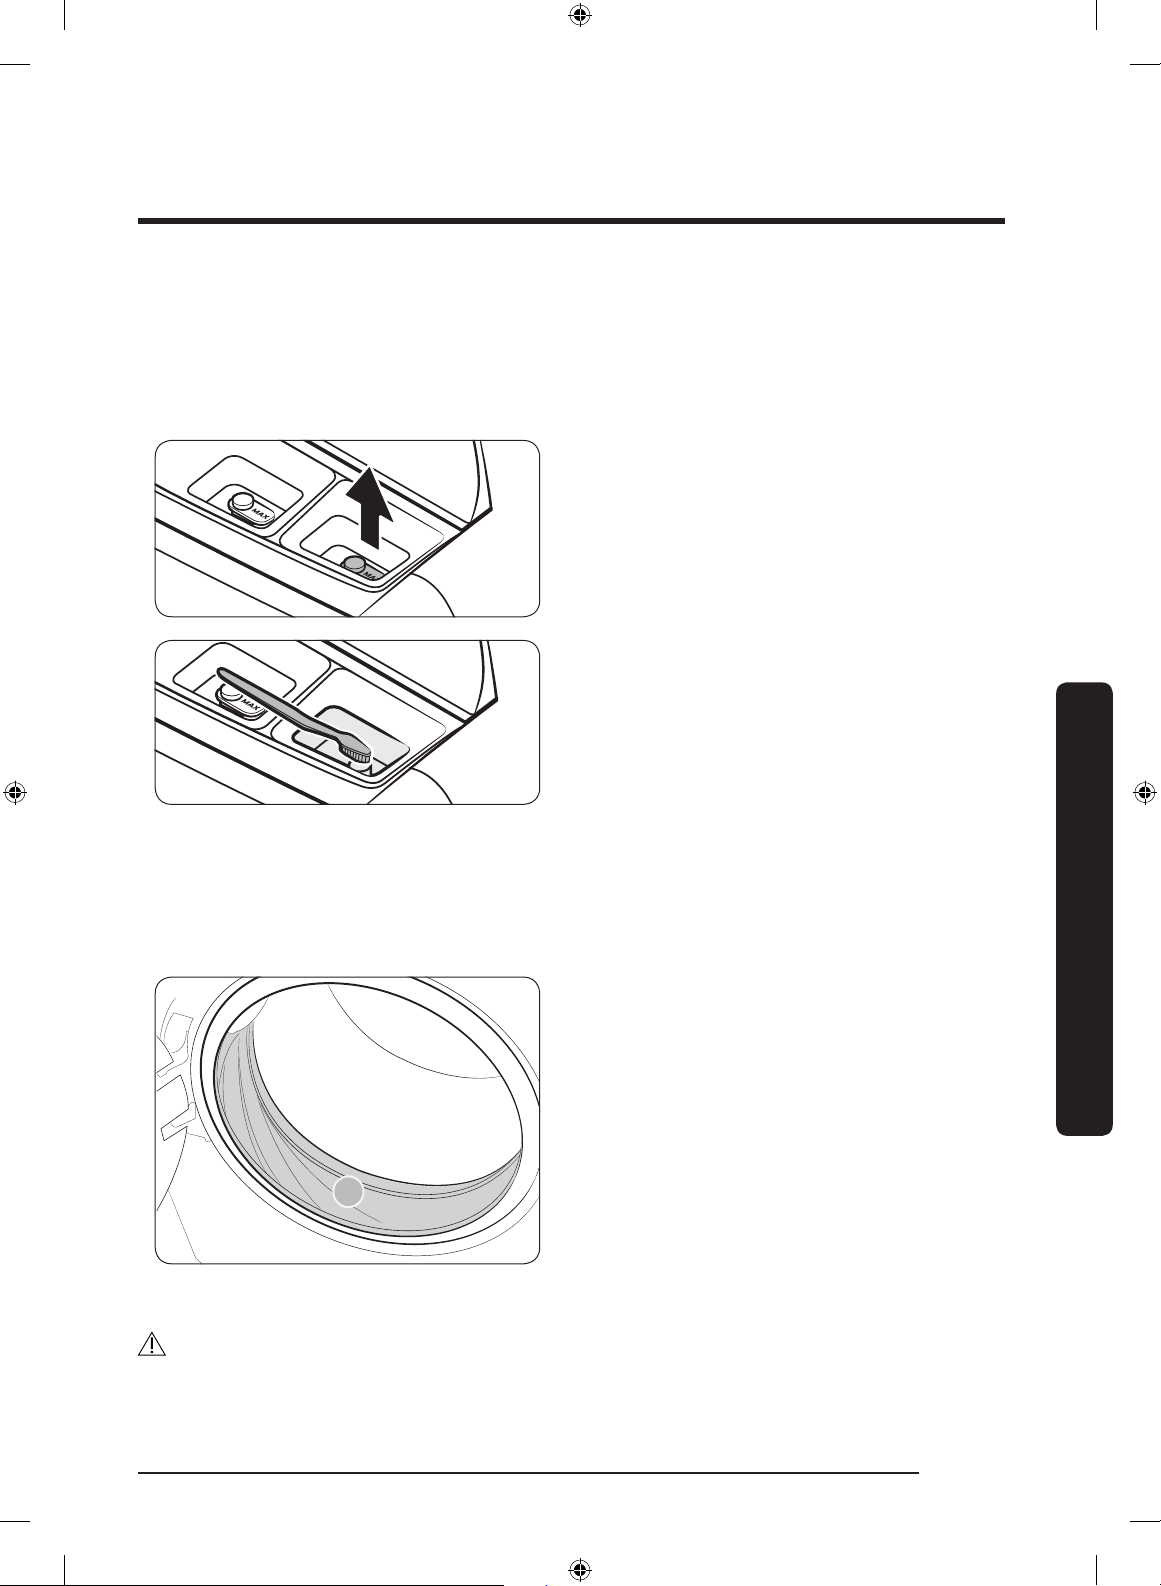
Mantenimiento
Español 63
Compartimiento para el suavizante/blanqueador
Los compartimientos para el suavizante y el blanqueador en la lavadora inferior no son extraíbles
a n de facilitar la información visual para los usuarios. Para limpiar el compartimiento para
el suavizante, siga estas instrucciones. La limpieza del compartimiento para el blanqueador es
básicamente igual.
1. Abra la cubierta frontal superior y, luego,
retire la tapa del suavizante.
2. Utilice un cepillo suave (por ejemplo,
cepillo de dientes) para limpiar el interior
del compartimiento y eliminar las
impurezas.
3. Ejecute el ciclo RINSE+SPIN
(ENJUAGUE+CENTRIFUGADO) para
enjuagar el compartimiento. Después de
suministrar agua y drenar 5 veces, se
completa el ciclo de 19 minutos con el
proceso de centrifugado nal.
Diafragma de la puerta
A
1. Abra la puerta y vacíe la tina.
2. Dé la vuelta al diafragma (sello o junta de
la tina (A)) y revise si está sucio. Si es así,
siga los pasos que guran a continuación.
3. Mezcle 3/4 de taza de blanqueador líquido
a base de cloro y 1 galón de agua tibia de
la llave.
4. Usando guantes de goma, limpie el
diafragma con un paño limpio y suave
humedecido en la solución de agua y cloro.
5. Deje reposar durante 5 minutos y, luego,
limpie y seque bien.
PRECAUCIÓN
Utilice con cuidado el blanqueador y asegúrese de seguir las instrucciones de uso y cuidado del
fabricante.
FlexWash_WV9900M_DC68-03768A-04_MES.indd 63 2017-05-22 7:07:01
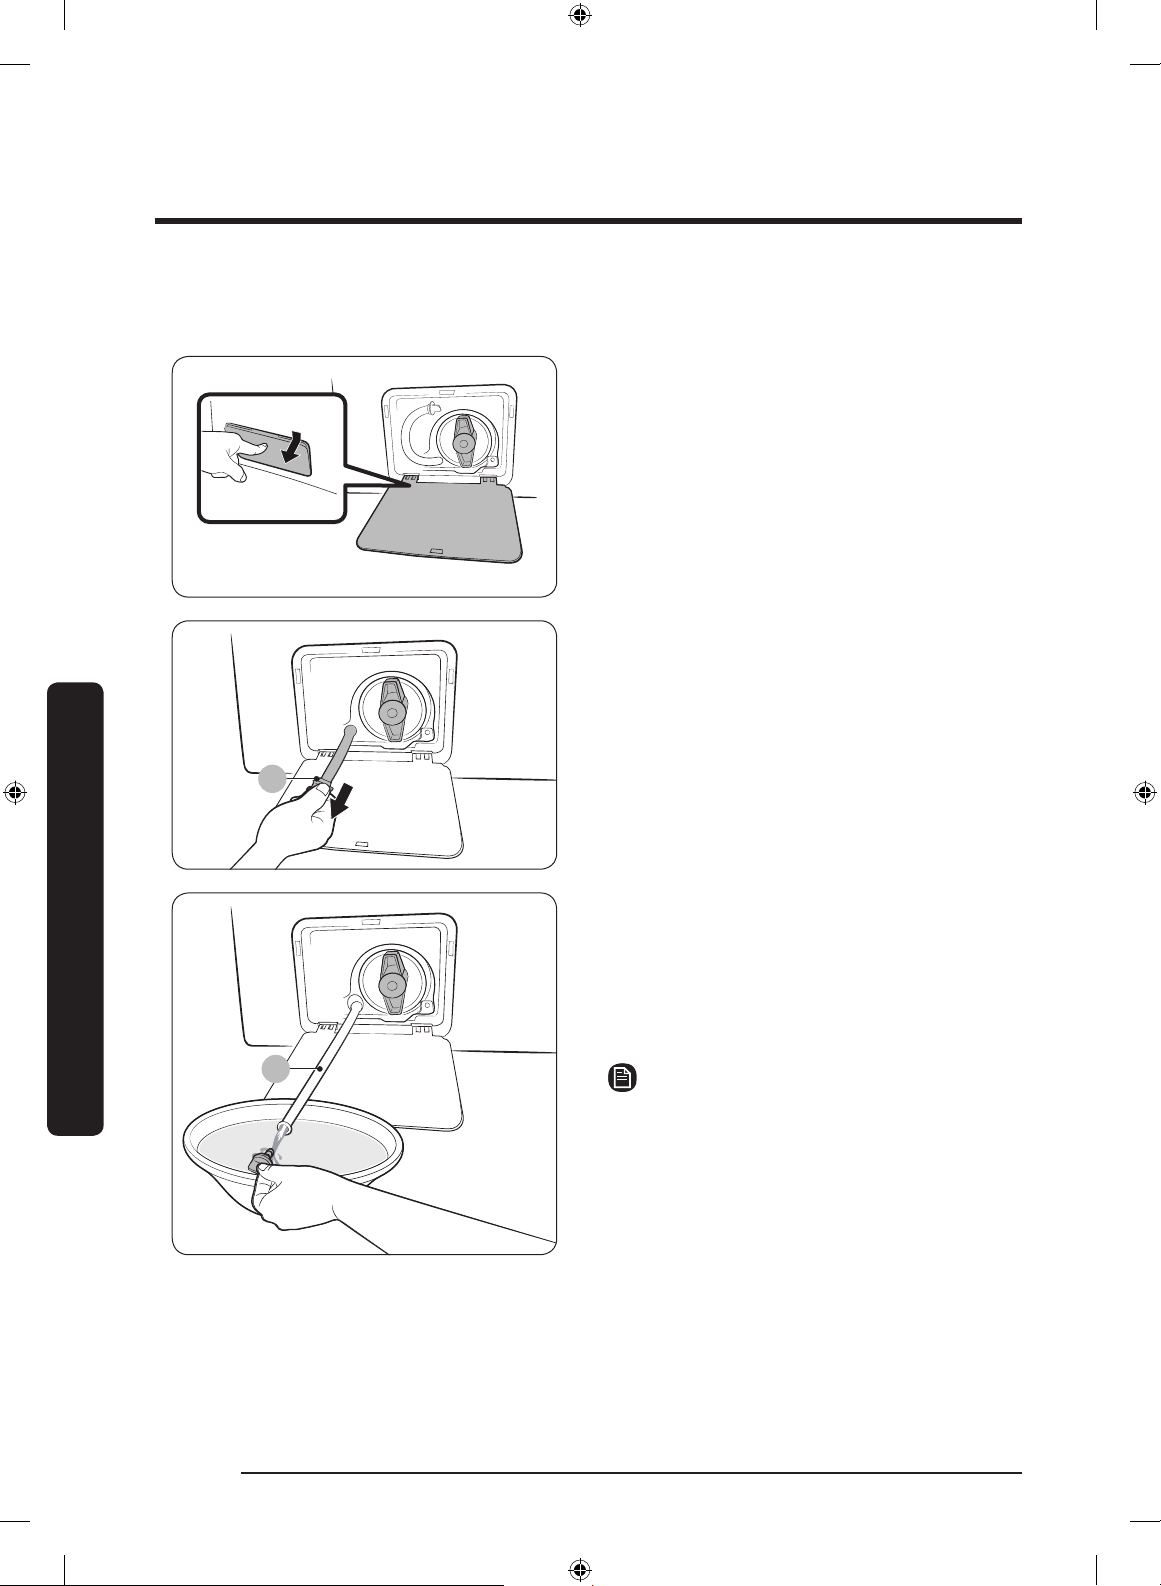
Mantenimiento
Mantenimiento
Español64
Drenaje de emergencia
Si se produce una falla en el suministro eléctrico, vacíe el agua de la tina antes de retirar la ropa.
1. Apague la lavadora y, luego, desenchúfela
del tomacorriente.
2. Presione suavemente la parte superior de
la tapa del ltro para abrirla.
A
3. Coloque un recipiente grande y vacío
delante de la tapa y extienda el tubo de
drenaje de emergencia hacia el recipiente
mientras sujeta el tapón del tubo (A).
B
4. Abra el tapón del tubo y deje caer el agua
del tubo de drenaje de emergencia (B) en
el recipiente.
5. Al nalizar, cierre el tapón y vuelva a
insertar el tubo. Luego, cierre la tapa del
ltro.
NOTA
Use un recipiente grande, ya que la tina puede
contener más agua de la esperada.
FlexWash_WV9900M_DC68-03768A-04_MES.indd 64 2017-05-22 7:07:01

Mantenimiento
Español 65
Filtro de la bomba
Es recomendable limpiar el ltro de la bomba 5 o 6 veces por año para evitar que se obstruya. Un
ltro de bomba obstruido puede reducir el efecto de las burbujas.
A
1. Apague la lavadora y, luego, desenchufe el
cable de alimentación.
2. Drene el agua restante de la tina. Consulte
la sección Drenaje de emergencia en la
página 64.
3. Presione suavemente la parte superior de
la tapa del ltro para abrirla.
4. Gire la perilla del ltro de la bomba (A)
hacia la izquierda y vacíe el agua restante.
5. Limpie el ltro de la bomba con un cepillo
suave. Asegúrese de que no esté bloqueada
la bomba de drenaje dentro del ltro.
6. Vuelva a colocar el ltro de la bomba y,
luego, gire la perilla del ltro hacia la
derecha.
7. Cierre la tapa del ltro.
FlexWash_WV9900M_DC68-03768A-04_MES.indd 65 2017-05-22 7:07:02
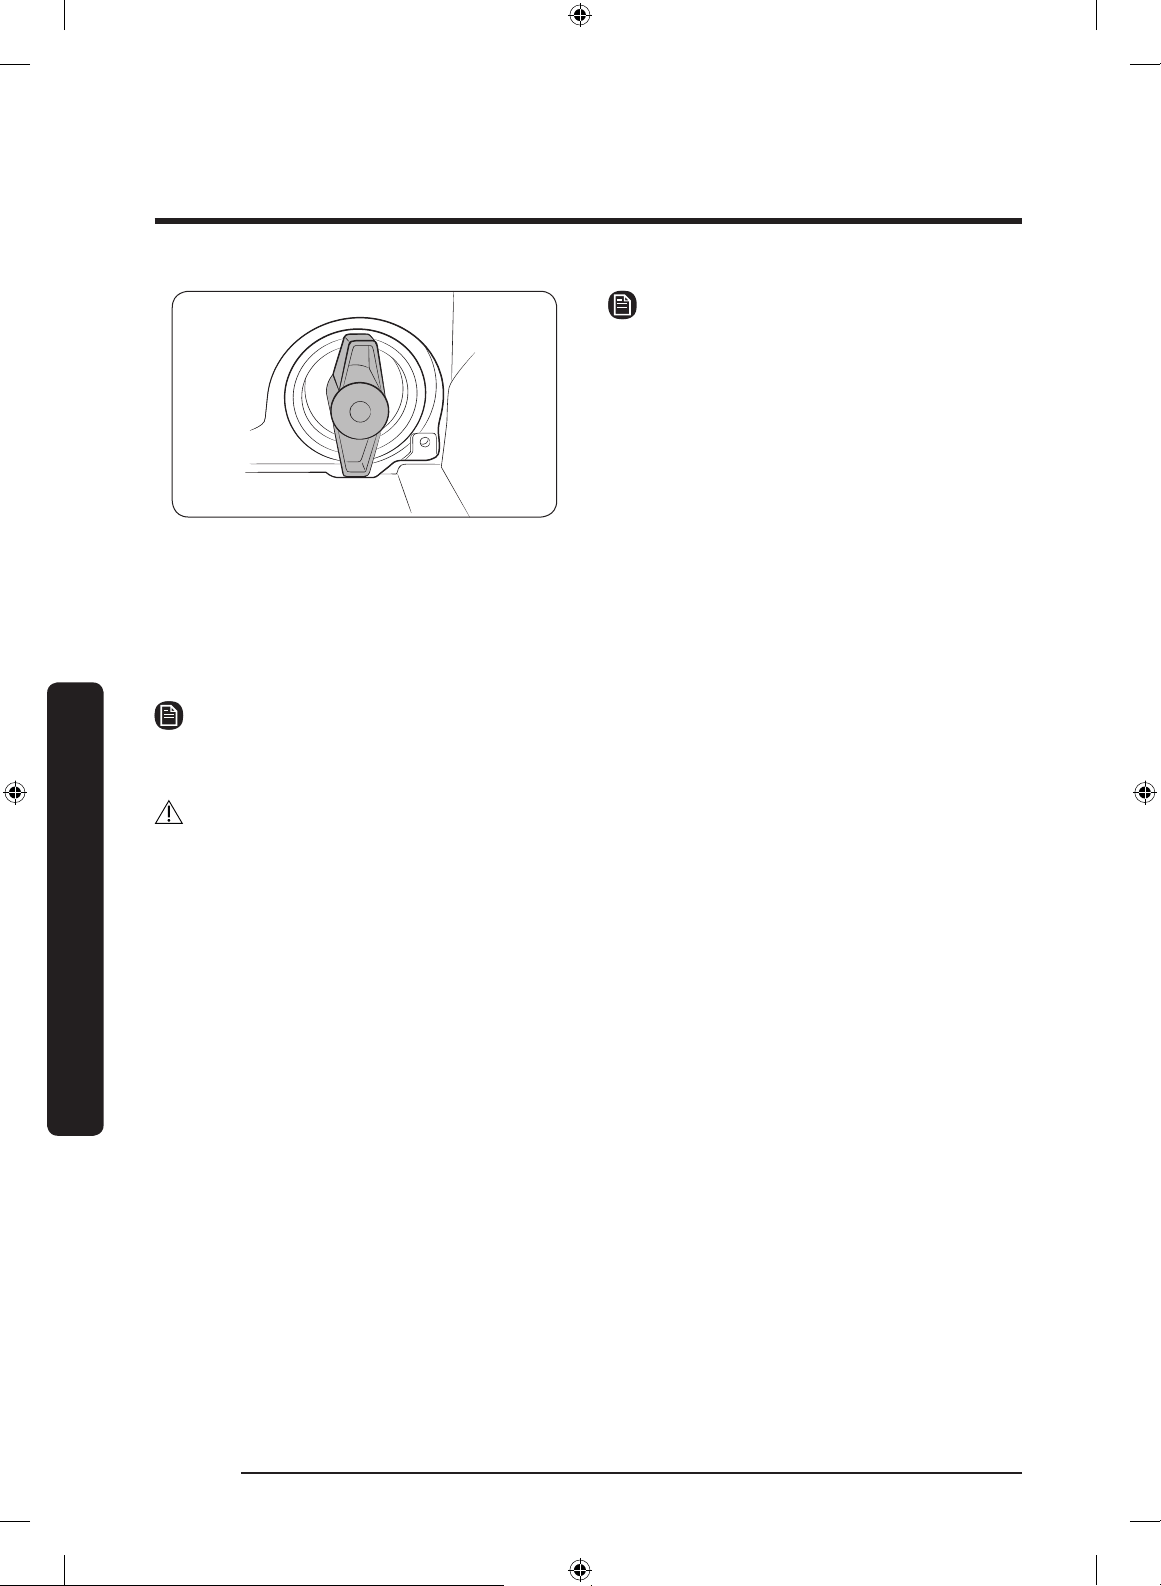
Mantenimiento
Mantenimiento
Español66
NOTA
• Algunos ltros de bomba cuentan con una
perilla de seguridad diseñada para evitar
que los niños abran accidentalmente el
compartimiento del ltro. Para abrir la
perilla de seguridad del ltro de la bomba,
presiónela y gírela en el sentido contrario
al de las agujas del reloj. El mecanismo de
muelle de la perilla de seguridad ayuda a
abrir el ltro.
• Para cerrar la perilla de seguridad del ltro
de la bomba, gírela en el sentido de las
agujas del reloj. El muelle emite un ruido
metálico que es normal.
NOTA
Si el ltro de la bomba está obstruido, aparece el código de información “5C” en la pantalla de la
lavadora.
PRECAUCIÓN
• Asegúrese de cerrar bien la perilla del ltro luego de limpiarlo. De lo contrario, puede originar
una fuga.
• Asegúrese de insertar correctamente el ltro luego de limpiarlo. De lo contrario, puede
originar una falla en el funcionamiento o una fuga.
FlexWash_WV9900M_DC68-03768A-04_MES.indd 66 2017-05-22 7:07:02
Solución de problemas
Español 67
Solución de problemas
Vericaciones
Si tiene algún problema a vericar con la lavadora, primero consulte la siguiente tabla y pruebe
las sugerencias.
Síntoma Acción
No enciende.
• Asegúrese de que la corriente que provee el sistema eléctrico
doméstico coincide con los requisitos de la lavadora. Consulte la
página 21.
• Asegúrese de que el enchufe de la lavadora esté completamente
conectado.
No se inicia.
• Asegúrese de que la puerta esté perfectamente cerrada.
• Asegúrese de que las llaves del agua estén abiertas.
• Asegúrese de mantener presionado START/PAUSE (INICIO/PAUSA)
para iniciar la lavadora.
• Asegúrese de que Child Lock (Seguro para niños) no esté activado.
• Antes de que la lavadora comience a llenarse, se oirá una serie de
sonidos semejantes a un "clic" para controlar la traba de la puerta
y que se efectúe un drenaje rápido.
• Revise el fusible o reinicie el disyuntor.
• Revise si la lavadora superior o inferior muestra un código de
información en la barra de estado respectiva.
No hay suministro de
agua o el suministro de
agua es insuciente.
• Abra por completo la llave del agua.
• Asegúrese de que la puerta esté perfectamente cerrada.
• Asegúrese de que la manguera de suministro de agua no esté
congelada.
• Asegúrese de que la manguera de suministro de agua no esté
enroscada u obstruida.
• Asegúrese de que la presión del agua sea suciente.
Después de un ciclo,
queda detergente en el
cajón para detergente.
• Asegúrese de que la lavadora funcione con suciente presión de
agua.
• Si utiliza detergente en polvo, utilice solo la cantidad recomendada.
• Si utiliza detergente líquido, no llene demasiado el compartimiento.
• Retire los compartimientos para el detergente líquido y el
suavizante y, luego, limpie el cajón para el detergente.
FlexWash_WV9900M_DC68-03768A-04_MES.indd 67 2017-05-22 7:07:02

Solución de problemas
Solución de problemas
Español68
Síntoma Acción
Vibra de forma
excesiva o hace ruido.
• Asegúrese de que la lavadora esté instalada sobre un piso nivelado
y rme que no sea resbaladizo. Si el piso está desnivelado, use las
patas niveladoras para ajustar la altura de la lavadora.
• Asegúrese de que se hayan retirado los tornillos de transporte.
• Asegúrese de que la lavadora no esté en contacto con ningún otro
objeto.
• Verique que la carga de ropa sea equilibrada.
• El motor puede hacer ruido durante el funcionamiento normal.
• La ropa de trabajo y las prendas con decoraciones de metal pueden
generar ruidos durante el lavado. Esto es normal.
• Los objetos metálicos como las monedas pueden generar ruidos.
Después del lavado, retire estos objetos de la tina, tambor o caja
del ltro.
No drena y/o no
centrifuga.
• Asegúrese de que la manguera de drenaje no esté enroscada ni
obstruida en algún punto hasta el sistema de drenaje. Si existe
alguna restricción en cuanto al drenaje, comuníquese con el
servicio técnico.
• Verique que el ltro de residuos no esté obstruido.
• Cierre la puerta y mantenga presionado START/PAUSE (INICIO/
PAUSA). Por su seguridad, la lavadora no girará ni centrifugará
salvo que la puerta esté cerrada.
• Asegúrese de que la manguera de drenaje no esté congelada ni
obstruida.
• Asegúrese de que la manguera de drenaje esté conectada a un
sistema de drenaje que no esté obstruido.
• Si no se suministra suciente energía a la lavadora, esta no
drenará ni centrifugará temporalmente. En cuanto la lavadora
recupere la energía suciente, funcionará con normalidad.
Hace ruido al drenar.
• Después de la instalación inicial, o cuando la lavadora no se ha
utilizado durante un período prolongado, pueden producirse ruidos
de desinamiento durante el drenaje. No se trata de una falla de
sistema.
FlexWash_WV9900M_DC68-03768A-04_MES.indd 68 2017-05-22 7:07:02
Solución de problemas
Español 69
Síntoma Acción
La puerta no se abre.
• Presione START/PAUSE (INICIO/PAUSA) para detener la lavadora.
• Puede llevar algunos minutos que el mecanismo de cierre de la
puerta se desconecte.
• La puerta no se abrirá hasta 3 minutos después de que la lavadora
se haya detenido o apagado.
• Asegúrese de que se haya drenado toda el agua de la tina o del
tambor.
• Es posible que la puerta no se abra si queda agua en la tina o el
tambor. Drene la tina o el tambor y abra la puerta manualmente.
• Asegúrese de que la luz de la traba de la puerta se apague. La
luz de la traba de la puerta se apaga después de que la lavadora
realiza el drenaje.
Exceso de espuma.
• Asegúrese de utilizar los tipos de detergente recomendados.
• Use un detergente de alta ecacia (HE, por su sigla en inglés) para
evitar la formación de espuma en exceso.
• Reduzca la cantidad de detergente para el agua blanda, las cargas
pequeñas o ligeramente sucias.
• No se recomienda un detergente de baja ecacia.
No se puede agregar
detergente adicional.
• No llene los compartimientos para el detergente o el suavizante
más allá del límite de llenado máximo marcado.
La lavadora se detiene.
• Enchufe el cable de alimentación a un tomacorriente que funcione.
• Revise el fusible o reinicie el disyuntor.
• Cierre la puerta y mantenga presionado START/PAUSE (INICIO/
PAUSA) para iniciar la lavadora. Por su seguridad, la lavadora no
girará ni centrifugará salvo que la puerta esté cerrada.
• Antes de que la lavadora comience a llenarse, se oirá una serie de
sonidos semejantes a un "clic" para controlar la traba de la puerta
y que se efectúe un drenaje rápido.
• Se puede producir una pausa o un período de remojo en el ciclo.
Espere para ver si la lavadora comienza a funcionar.
• Asegúrese de que el ltro de malla de la manguera de suministro
de agua en las llaves del agua no esté obstruido. Limpie el ltro de
malla periódicamente.
• Si no se suministra suciente energía a la lavadora, esta no
drenará ni centrifugará temporalmente. En cuanto la lavadora
recupere la energía suciente, funcionará con normalidad.
FlexWash_WV9900M_DC68-03768A-04_MES.indd 69 2017-05-22 7:07:02
Solución de problemas
Solución de problemas
Español70
Síntoma Acción
La lavadora se llena
con agua a una
temperatura incorrecta.
• Abra por completo ambas llaves del agua.
• Asegúrese de que la selección de temperatura sea la correcta.
• Asegúrese de que las mangueras estén conectadas a las llaves
correctas. Purgue las cañerías.
• Asegúrese de que el calentador de agua esté congurado para
suministrar agua caliente desde la llave a una temperatura mínima
de 120 °F (49 °C) Asimismo, verique la capacidad del calentador
de agua y la velocidad de recuperación.
• Desconecte las mangueras y limpie el ltro de malla. El ltro de
malla puede estar obstruido.
• Mientras la lavadora se llena, la temperatura del agua puede variar
debido a que la función de control automático de la temperatura
verica la temperatura del agua que ingresa. Esto es normal.
• Mientras la lavadora se llena, es posible que observe que por el
dosicador pasa solo agua caliente y/o solo agua fría cuando se
seleccionan las temperatura fría o tibia. Esta es una función normal
que cumple el control de temperatura automático dado que la
lavadora determina la temperatura del agua.
La carga está húmeda
al nalizar un ciclo.
• Use la velocidad de centrifugado High (Alto) o Extra High (Muy
alto).
• Use un detergente de alta ecacia (HE, por su sigla en inglés) para
reducir la formación de espuma en exceso.
• La carga es demasiado pequeña. Las cargas pequeñas (una o dos
prendas) se pueden desequilibrar y no centrifugarse en absoluto.
• Asegúrese de que la manguera de drenaje no esté enroscada ni
obstruida.
Pierde agua.
• Asegúrese de que la puerta esté perfectamente cerrada.
• Asegúrese de que todas las conexiones de las mangueras estén
ajustadas.
• Asegúrese de que el extremo de la manguera de drenaje esté
correctamente conectado y asegurado al sistema de drenaje.
• Evite sobrecargar la lavadora.
• Use un detergente de alta ecacia (HE, por su sigla en inglés) para
evitar la formación de espuma en exceso.
FlexWash_WV9900M_DC68-03768A-04_MES.indd 70 2017-05-22 7:07:02

Solución de problemas
Español 71
Síntoma Acción
Tiene olor.
• El exceso de espuma se acumula en los huecos y puede causar
malos olores.
• Realice ciclos de limpieza para desinfectar periódicamente.
• Limpie el sello de la puerta (diafragma).
• Seque el interior de la lavadora una vez nalizado el ciclo.
El tambor o la
manguera de drenaje/
agua están congelados.
• Si las mangueras están congeladas, utilice agua tibia para
desconectarlas. Remójelas en agua tibia.
• Si el tambor está congelado, llénelo con agua tibia y, luego, espere
aproximadamente 10 minutos.
• Si el conector de la manguera está congelado, coloque una toalla
caliente sobre el conector de la manguera de drenaje.
• Después de descongelar las mangueras, vuelva a conectarlas.
El agua se drena
inmediatamente.
• Asegúrese de que la manguera de drenaje no esté obstruida y que
esté colgada en el gancho para la manguera. Llene el tambor con
agua hasta la mitad e intente centrifugar de nuevo.
• Levante el extremo de la manguera de drenaje para evitar que el
agua se drene. Llene el tambor con agua hasta la mitad y, luego,
ejecute el centrifugado después de liberar la manguera de drenaje.
• Asegúrese de que la manguera de drenaje esté instalada
correctamente. Consulte la sección de instalación de este manual y
ajuste la posición de la manguera de drenaje según se indica.
• Asegúrese de que la lavadora drene completamente si se apagó
por la fuerza. Si la lavadora comienza a funcionar sin que haya
drenado completamente, podría suministrar agua y drenar al
mismo tiempo.
Si el problema persiste, póngase en contacto con un centro de servicio local de Samsung.
FlexWash_WV9900M_DC68-03768A-04_MES.indd 71 2017-05-22 7:07:02
Solución de problemas
Solución de problemas
Español72
Samsung Smart Home
Problema
Acción
No encuentro la
aplicación “Samsung
Smart Home”
en la tienda de
aplicaciones.
• La aplicación Samsung Smart Home está disponible para
teléfonos inteligentes con Android 4.0 (ICS) o superior, o iOS
7.0 o superior.
La aplicación
Samsung Smart Home
no funciona.
• La aplicación Samsung Smart Home solo está disponible
para los modelos aplicables.
• La antigua aplicación Samsung Smart Washer no puede
conectarse con modelos Samsung Smart Home.
La aplicación
Samsung Smart Home
está instalada pero
no se conecta con mi
lavadora.
• Para usar la aplicación debe registrarse en su cuenta
Samsung.
• Asegúrese de que el enrutador funcione normalmente.
• Si el indicador de Smart Control
en la pantalla de la
lavadora está apagado, esto indica que no se ha establecido
ninguna conexión de red. Utilice la aplicación Samsung
Smart Home para conectar y registrar la lavadora con su
punto de acceso (AP) de la red doméstica.
No puedo registrarme
en la aplicación.
• Para usar la aplicación debe registrarse en su cuenta
Samsung.
• Si no dispone de una cuenta Samsung, siga las instrucciones
en pantalla de la aplicación para crear una.
Cuando intento
registrar mi lavadora,
aparece un mensaje
de error.
• La conexión puede fallar debido a la distancia de su punto
de acceso (AP) o a interferencias eléctricas del entorno.
Espere un momento y vuelva a intentarlo.
La aplicación
Samsung Smart
Home está conectada
correctamente a mi
lavadora, pero no
funciona.
• Salga y reinicie la aplicación Samsung Smart Home, o
desconecte y vuelva a conectar el enrutador.
FlexWash_WV9900M_DC68-03768A-04_MES.indd 72 2017-05-22 7:07:02
Solución de problemas
Español 73
Códigos de información
Si la lavadora no funciona bien, puede ver un código de información en la pantalla. Consulte la
siguiente tabla y pruebe las sugerencias.
Código
Acción
Lavadora
superior
Lavadora
inferior
1 1C 1C
Revise el sensor del nivel del agua.
• Apague la lavadora, enciéndala de nuevo después de 2 o 3
minutos y, luego, vuelva a intentarlo.
• Dependiendo del modelo el sistema de drenaje drena el agua
automáticamente. Los botones POWER (ENCENDER/APAGAR) y
START/PAUSE (INICIO/PAUSA) pueden desactivarse durante este
proceso.
- DC
La puerta está abierta.
• Cierre la puerta y, luego, presione START/PAUSE (INICIO/PAUSA)
para reanudar el funcionamiento.
1 DC -
La puerta superior está abierta.
• Cierre la puerta superior y, luego, presione START/PAUSE (INICIO/
PAUSA) para reanudar el funcionamiento.
1 DC4 -
La cubierta protectora está abierta.
• Cierre la cubierta protectora y, luego, presione START/PAUSE
(INICIO/PAUSA) para reanudar el funcionamiento.
1 DC1 DC1
Revise el interruptor de la puerta.
• Apague la lavadora, enciéndala de nuevo después de 2 o 3
minutos y, luego, vuelva a intentarlo.
1 LC LC
Revise si hay fugas de agua.
• Apague la lavadora y, luego, revise el sistema de drenaje para
ver si hay fugas. Una vez solucionado el problema de la fuga,
encienda la lavadora después de 2 o 3 minutos.
• Dependiendo del modelo el sistema de drenaje drena el agua
automáticamente. Los botones POWER (ENCENDER/APAGAR) y
START/PAUSE (INICIO/PAUSA) pueden desactivarse durante este
proceso.
FlexWash_WV9900M_DC68-03768A-04_MES.indd 73 2017-05-22 7:07:02
Solución de problemas
Solución de problemas
Español74
Código
Acción
Lavadora
superior
Lavadora
inferior
1 LC1 LC1
Verique la manguera de drenaje.
• Asegúrese de que el extremo de la manguera de drenaje esté en
el suelo.
• Asegúrese de que la manguera de drenaje no esté obstruida.
• Si el código de información permanece, comuníquese con un
centro de servicio al cliente.
Varios
• Tenga cuidado de no llenar en exceso los compartimientos
(lavado principal/suavizante de telas/blanqueador).
• No rocíe ni use agua para limpiar la puerta superior de la
lavadora superior. Use un paño para limpiarla.
1 4C 4C
Revise el conducto de suministro de agua.
• Revise la conexión de las cañerías de agua (incluidas las llaves
del agua).
• Apague la lavadora, enciéndala de nuevo después de 2 o 3
minutos y, luego, vuelva a intentarlo.
• Dependiendo del modelo el sistema de drenaje drena el agua
automáticamente. Los botones POWER (ENCENDER/APAGAR) y
START/PAUSE (INICIO/PAUSA) pueden desactivarse durante este
proceso.
1 4C2 4C2
El agua suministrada está demasiado caliente.
• Asegúrese de que las llaves del agua fría y caliente estén
conectadas correctamente.
• Apague la lavadora, enciéndala de nuevo después de 2 o 3
minutos y, luego, vuelva a intentarlo.
1 5C 5C
Revise el sistema de drenaje.
• Asegúrese de que el ltro de drenaje no esté obstruido.
• Si el ltro de drenaje está obstruido, límpielo y, luego, vuelva a
encender la lavadora.
1 HC HC
Revise el calentador de lavado.
• Apague la lavadora y, luego, comuníquese con un centro de
servicio al cliente de Samsung.
FlexWash_WV9900M_DC68-03768A-04_MES.indd 74 2017-05-22 7:07:03
Solución de problemas
Español 75
Código
Acción
Lavadora
superior
Lavadora
inferior
1 UB UB
Revise el proceso de centrifugado.
• Es posible que la carga no esté equilibrada dentro de la tina o
el tambor. La carga es demasiado pequeña o se han mezclado
artículos pesados y livianos. Revise la tina o el tambor y
asegúrese de que la carga esté equilibrada.
• Evite lavar una sola prenda y agregue algunas prendas
adicionales para equilibrar la carga. Redistribuya la carga
uniformemente.
• Presione START/PAUSE (INICIO/PAUSA) para reanudar la
operación, o apague la lavadora, enciéndala de nuevo después de
2 o 3 minutos y, luego, vuelva a intentarlo.
1 8C
1 8C1
1 8C2
8C
8C1
8C2
Revise el sensor MEMS.
• Apague la lavadora, enciéndala de nuevo después de 2 o 3
minutos y, luego, vuelva a intentarlo.
1 OC OC
El agua puede desbordar.
• Cierre la llave del agua y, luego, comuníquese con el servicio
técnico.
1 3C 3C
Revise el motor.
• Apague la lavadora, enciéndala de nuevo después de 2 o 3
minutos y, luego, vuelva a intentarlo.
1 AC6 AC6
Verique el estado de comunicación de la PBA.
• Apague la lavadora, enciéndala de nuevo después de 2 o 3
minutos y, luego, vuelva a intentarlo.
1 9C1
1 9C2
9C1
9C2
Se debe revisar el control electrónico.
• Revise si la alimentación se suministra normalmente.
• Si el código de información permanece, comuníquese con un
centro de servicio de Samsung.
1 SF SF
Falla del sistema.
• Apague la lavadora y, luego, comuníquese con un centro de
servicio de Samsung.
FlexWash_WV9900M_DC68-03768A-04_MES.indd 75 2017-05-22 7:07:03
Solución de problemas
Solución de problemas
Español76
Código
Acción
Lavadora
superior
Lavadora
inferior
1 AC AC
Verique las comunicaciones entre las PBA primaria y secundaria.
• Pruebe con apagar la lavadora y reiniciar el ciclo.
• Si el código de información permanece, comuníquese con un
centro de servicio al cliente.
- AC7
Verique las comunicaciones entre la PBA principal inferior y la PBA
principal superior.
• Pruebe con apagar la lavadora y reiniciar el ciclo.
• Si el código de información permanece, comuníquese con un
centro de servicio al cliente.
Si un código de información sigue apareciendo en la pantalla, comuníquese con un centro de
servicio local de Samsung.
FlexWash_WV9900M_DC68-03768A-04_MES.indd 76 2017-05-22 7:07:03
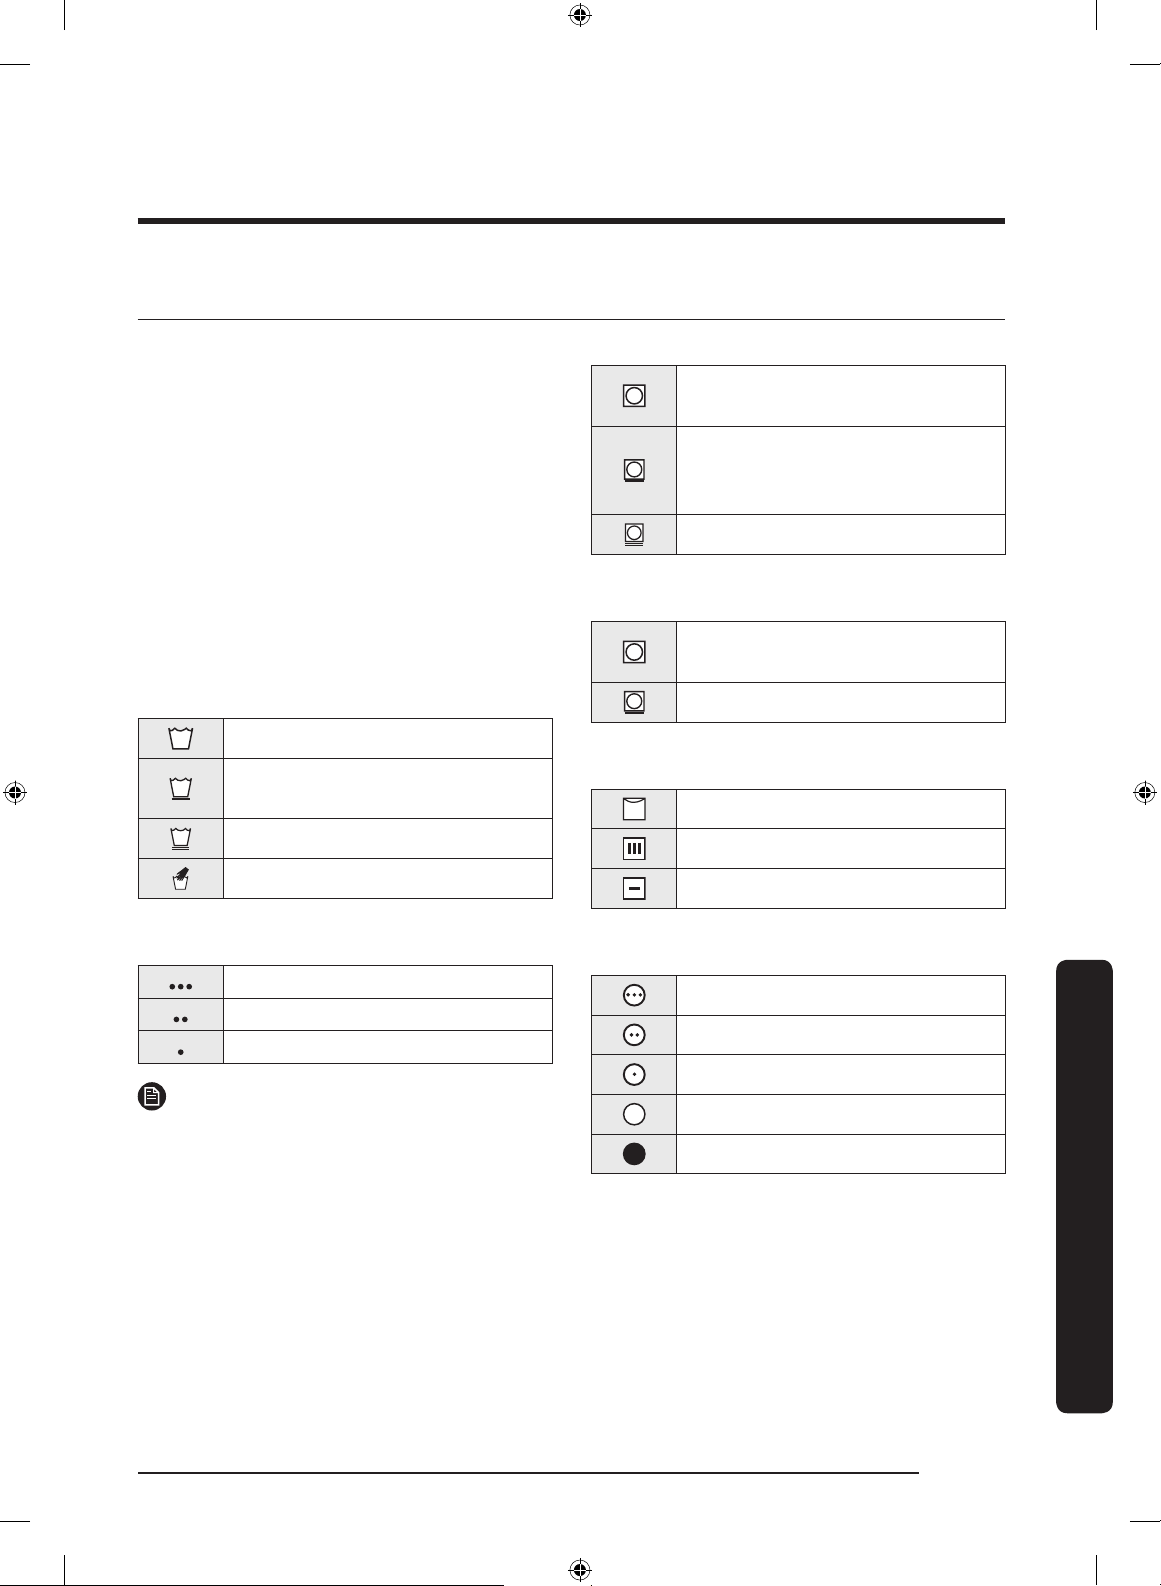
Especicaciones
Español 77
Especicaciones
Tabla de indicaciones sobre telas
Los siguientes símbolos ofrecen
indicaciones acerca de las prendas.
La etiqueta de indicaciones de la
prenda incluye símbolos para secado,
blanqueado, secado y planchado, o
limpieza en seco cuando son necesarios.
El uso de símbolos garantiza la
consistencia entre los fabricantes textiles
de artículos nacionales e importados.
Siga las indicaciones de la etiqueta para
optimizar la vida útil de la prenda y
reducir los problemas del lavado.
Ciclo de lavado
Normal
Planchado permanente /
Antiarrugas / Control de arrugas
Prendas suaves / Delicadas
Lavado a mano
Temperatura del agua
Caliente
Tibia
Fría
NOTA
El rango de temperatura para Caliente
es de 135 °F (57 °C) o inferior, 95 °F (35
°C) o inferior para Tibia y 68 °F (20 °C)
o inferior para Fría. La temperatura del
agua del lavado debe alcanzar un mínimo
de 60 °F (16 °C) para que se active el
detergente y se logre un lavado ecaz.
Blanqueador
Cualquier blanqueador (cuando sea
necesario)
Solo blanqueador sin cloro
(protección del color) (si es
necesario)
Secar en secadora
Normal
Planchado permanente /
Antiarrugas / Control de arrugas
Prendas suaves/delicadas
Instrucciones especiales
Secar colgado / Tender
Colgar para que escurra
Secar en posición horizontal
Ajuste del calor
Alto
Medio
Bajo
Cualquier calor
Sin calor / Aire
FlexWash_WV9900M_DC68-03768A-04_MES.indd 77 2017-05-22 7:07:04
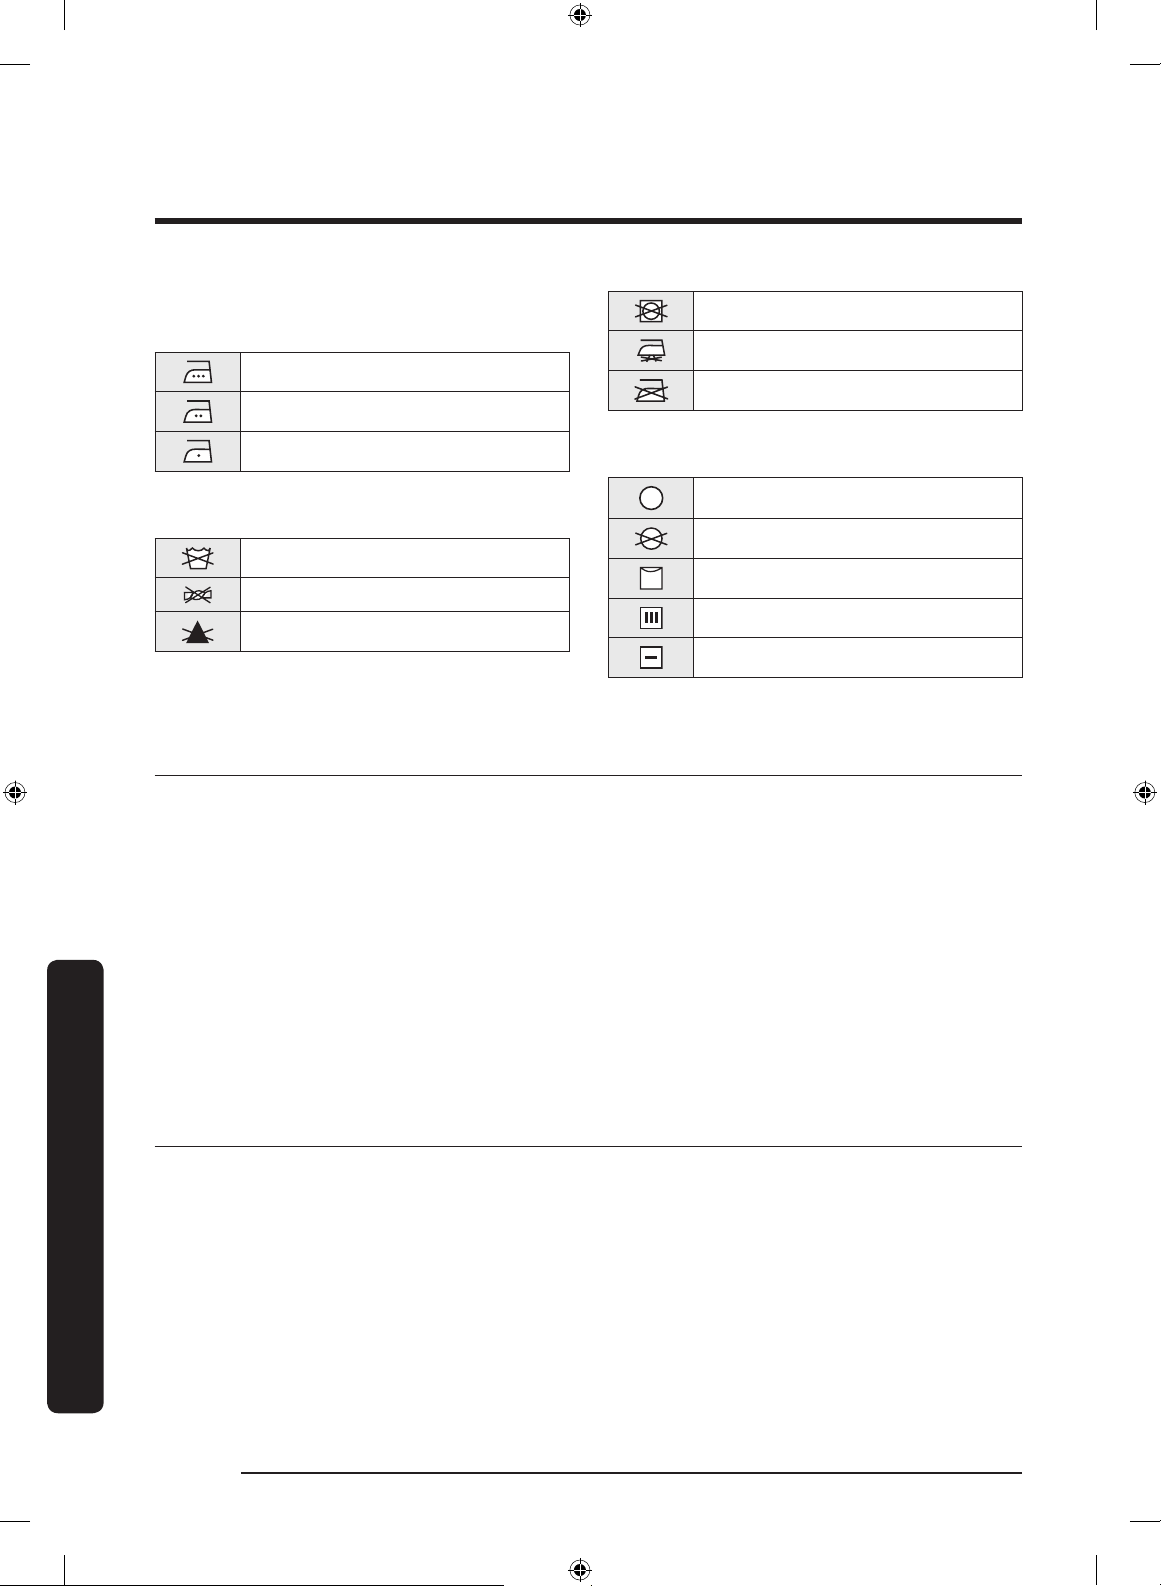
Especicaciones
Especicaciones
Español78
Temperaturas de secado con plancha o
vapor
Alto
Medio
Bajo
Símbolos de advertencia para el lavado
No lavar
No retorcer
No usar blanqueador
No secar en secadora
Sin vapor (agregado a la plancha)
No planchar
Limpiar en seco
Limpiar en seco
No limpiar en seco
Secar colgado/tender
Colgar para que escurra
Secar en posición horizontal
Protección del medio ambiente
• Este electrodoméstico se fabrica con
materiales reciclables. Si decide deshacerse
de él, siga la normativa local relacionada
con la eliminación de desechos. Corte
el cable de alimentación para que el
electrodoméstico no pueda conectarse a
una fuente de alimentación. Quite la tapa
para que los animales y los niños pequeños
no puedan quedar atrapados dentro de la
máquina.
• No utilice cantidades de detergente
mayores a las recomendadas por el
fabricante del detergente.
• Utilice productos quitamanchas y
blanqueadores antes del ciclo de lavado y
solo cuando sea necesario.
• Ahorre agua y electricidad utilizando
solo la capacidad total de la lavadora (la
cantidad exacta depende del programa que
se utilice).
Declaración de conformidad
Este electrodoméstico cumple con la
norma UL2157.
FlexWash_WV9900M_DC68-03768A-04_MES.indd 78 2017-05-22 7:07:06
Especicaciones
Español 79
Hoja de especicaciones
A
B
C
D
E
Tipo Lavadora de carga doble
Dimensiones
(pulgadas (mm))
A. Altura: con la puerta superior
cerrada
46.9 in. (1192 mm)
B. Altura: con la puerta superior
abierta
61 in. (1550 mm)
C. Ancho 27 in. (686 mm)
D. Profundidad con la puerta abierta 54.6 in. (1386 mm)
E. Profundidad 34 in. (864 mm)
Presión de agua (psi (kPa)) 20 - 116 (137 - 800)
Peso NETO (lb (kg)) 308.6 (140)
Revolución del
centrifugado
Lavadora superior 800 rpm
Lavadora inferior 1300 rpm
Potencia del
calentador
Lavado y calentamiento 120 V 900 W
Consumo anual de energía
Lavadora superior 60 kWh/año
Lavadora inferior 105 kWh/año
Consumo anual de agua
Lavadora superior 3540 gal/año
Lavadora inferior 4278 gal/año
FlexWash_WV9900M_DC68-03768A-04_MES.indd 79 2017-05-22 7:07:06
Especicaciones
Especicaciones
Español80
Tabla de ciclos
Use esta tabla para congurar el mejor ciclo y las mejores opciones para su ropa.
Lavadora superior
NOTA
Ajuste Temp. (Temperatura)
: conguración de fábrica
W : Warm (Tibia)
: se puede seleccionar
C: Cold (Fría)
Ciclo
Funciones Opciones
Temp. (Temperatura)
Extra Rinse
(Enjuague extra)
W C
NORMAL
DELICATES (DELICADA)
ACTIVE WEAR
ROPA DEPORTIVA
RINSE+SPIN
ENJUAGUE+CENTRIFUGADO
FlexWash_WV9900M_DC68-03768A-04_MES.indd 80 2017-05-22 7:07:06

Especicaciones
Español 81
Lavadora inferior
NOTA
Ajuste
Temp.
(Temperatura)
Rinse (Enjuagar) Spin (Centrifugar)
Soil Level
(Nivel de suciedad)
: conguración de fábrica
EH : Extra hot
(Muy caliente)
5 : 5 veces
EH : Extra High
(Muy alto)
EH : Extra Heavy
(Extra sucia)
: se puede seleccionar
H : Hot (Caliente) 4 : 4 veces H : High (Alto)
H : Heavy
(Muy sucia)
W : Warm (Tibia) 3 : 3 veces
M : Medium
(Medio)
N : Normal
CL : Cool (Fresca) 2 : 2 veces L : Low (Bajo)
L : Light
(Poco sucia)
CD : Cold (Fría) 1 : 1 vez
NS : No spin
(Sin centrifugado)
EL : Extra Light
(Extra limpia)
Ciclo
Funciones
Temp. (Temperatura) Rinse (Enjuagar) Spin (Centrifugar)
EH H W CL CD 5 4 3 2 1 EH H M L NS
NORMAL
HEAVY DUTY
(ACCIÓN FUERTE)
Bedding (Ropa de cama)
WHITES (ROPA BLANCA)
SANITIZE (DESINFECCIÓN)
RINSE+SPIN
ENJUAGUE+CENTRIFUGADO
ACTIVE WEAR
(ROPA DEPORTIVA)
DELICATES (DELICADA)
PERM PRESS
(PLANCHA PERMANENTE)
QUICK WASH
(LAVADO RÁPIDO)
ECO COLD (ECO FRÍO)
TOWELS (TOALLAS)
Self Clean+
(Autolimpieza+)
FlexWash_WV9900M_DC68-03768A-04_MES.indd 81 2017-05-22 7:07:06
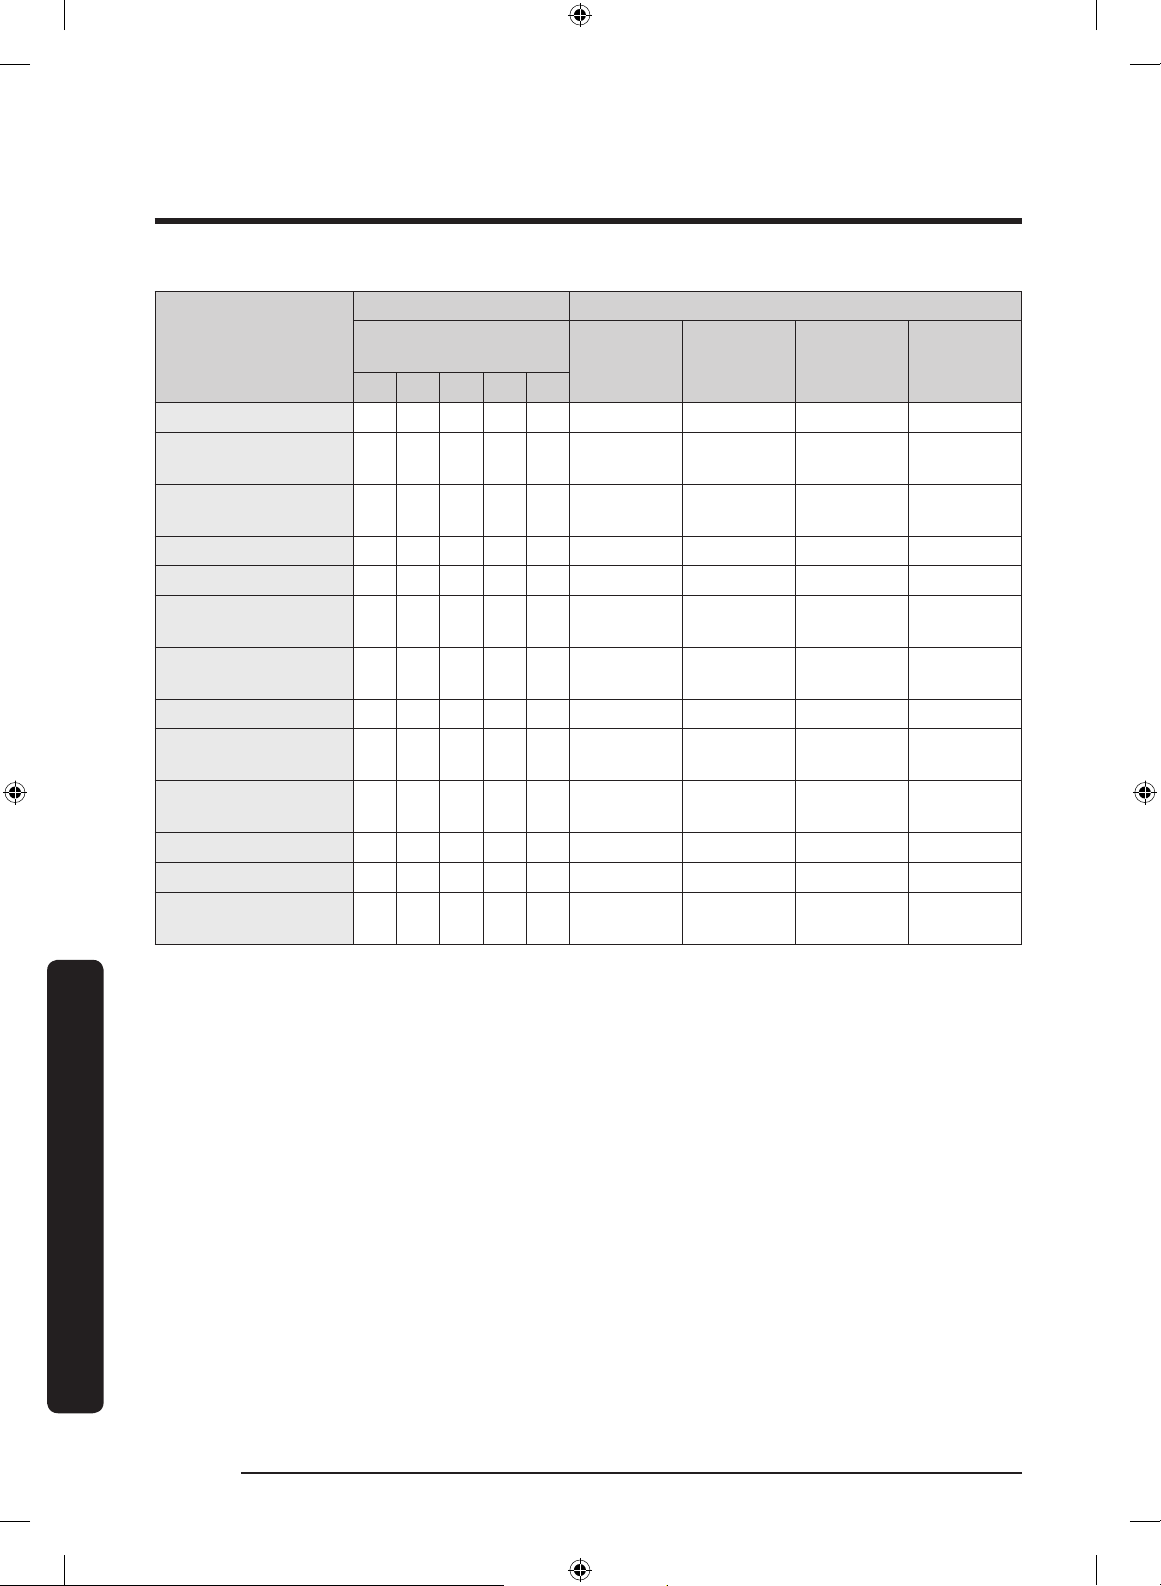
Especicaciones
Especicaciones
Español82
Ciclo
Funciones Opciones
Soil Level
(Nivel de suciedad)
Pre Soak
(Remojo)
Steam
(Vapor)
Super Speed
(Súper
velocidad)
Delay End
(Término
Retardado)
EH H N L EL
NORMAL
HEAVY DUTY
(ACCIÓN FUERTE)
BEDDING
(ROPA DE CAMA)
WHITES (ROPA BLANCA)
SANITIZE (DESINFECCIÓN)
RINSE+SPIN
(ENJUAGUE+CENTRIFUGADO)
ACTIVE WEAR
(ROPA DEPORTIVA)
DELICATES (DELICADA)
PERM PRESS
(PLANCHA PERMANENTE)
QUICK WASH
(LAVADO RÁPIDO)
ECO COLD (ECO FRÍO)
TOWELS (TOALLAS)
Self Clean+
(Autolimpieza+)
FlexWash_WV9900M_DC68-03768A-04_MES.indd 82 2017-05-22 7:07:06

Español 83
Garantía (Estados Unidos)
LAVADORA SAMSUNG
GARANTÍA LIMITADA PARA EL COMPRADOR ORIGINAL
El presente producto de la marca SAMSUNG, tal como lo provee y distribuye SAMSUNG
ELECTRONICS AMERICA, INC. (SAMSUNG) y lo entrega como nuevo, en su caja de cartón original al
comprador o consumidor original, está garantizado por SAMSUNG contra defectos de fabricación
de los materiales y la mano de obra durante el período limitado de la garantía de:
Un (1) año para las piezas y la mano de obra, Tres (3) años para las piezas del tambor inoxidable
(solo repuestos), Diez (10) años para el motor DD (solo repuestos)
La presente garantía limitada comienza en la fecha original de compra y es válida únicamente
para productos comprados y usados en Estados Unidos. Para recibir el servicio técnico de
la garantía, el comprador debe comunicarse con SAMSUNG con el n de que se determine el
problema y los procedimientos del servicio. El servicio técnico de la garantía solo puede ser
prestado por un centro de servicio técnico autorizado de SAMSUNG. Se debe presentar la factura
de compra original como prueba de compra a SAMSUNG o al servicio técnico autorizado de
SAMSUNG. SAMSUNG prestará servicio técnico a domicilio durante el período de la garantía sin
costo, sujeto a la disponibilidad dentro de los Estados Unidos contiguos. El servicio técnico a
domicilio no está disponible en todas las áreas.
Para recibir el servicio técnico a domicilio, el producto no debe presentar obstrucciones y
debe ser accesible para el agente del servicio técnico. Si el servicio técnico no está disponible,
SAMSUNG puede optar por transportar el producto hasta y desde el servicio técnico autorizado.
FlexWash_WV9900M_DC68-03768A-04_MES.indd 83 2017-05-22 7:07:06

Garantía (Estados Unidos)
Español84
SAMSUNG reparará, reemplazará el producto u ofrecerá un reembolso a su criterio y sin cargo
adicional, tal como se establece en la presente garantía, con piezas o productos nuevos o
reacondicionados si se verica que es defectuoso durante el período limitado de la garantía
especicado anteriormente. Todas las piezas y los productos reemplazados pasan a ser propiedad
de SAMSUNG y deben ser devueltos a SAMSUNG. Las piezas y los productos reemplazados
asumen la garantía original que resta, o noventa (90) días, el período que sea el más prolongado.
La presente garantía limitada cubre defectos de fabricación de los materiales y la mano de
obra encontrados durante el uso normal y doméstico de este producto y no será válida para lo
siguiente: daños que ocurran durante el envío; entrega e instalación; aplicaciones y usos para los
cuales el presente producto no fue destinado; números de serie o de producto alterados; daño
cosmético o de acabado exterior; accidentes, abuso, descuido, incendio, inundación, caída de
rayos, u otros casos fortuitos o de fuerza mayor; uso de productos, equipos, sistemas, utilidades,
servicios, piezas, suministros, accesorios, aplicaciones, instalaciones, reparaciones, cableado
externo o conectores no provistos ni autorizados por SAMSUNG que dañen este producto o
que acarreen problemas en el servicio; voltaje de la línea eléctrica incorrecto, uctuaciones y
sobrevoltaje; ajustes del cliente e incumplimiento de lo establecido en el manual de instrucciones,
instrucciones de mantenimiento y ambientales que están cubiertas y recomendadas en el manual
de instrucciones; traslado y reinstalación del producto; problemas causados por plagas. La
presente garantía limitada no cubre problemas derivados de la corriente, el voltaje o el suministro
eléctrico incorrectos, las bombillas de luz, los fusibles de la casa, el cableado de la casa, el costo
del servicio técnico para recibir instrucciones o corregir errores en la instalación. SAMSUNG no
garantiza el funcionamiento ininterrumpido o sin errores del producto.
SALVO LO ESTABLECIDO EN LA PRESENTE GARANTÍA, NO EXISTEN GARANTÍAS SOBRE EL
PRESENTE PRODUCTO, YA SEAN EXPRESAS O TÁCITAS, Y SAMSUNG DESCONOCE TODAS LAS
GARANTÍAS QUE INCLUYEN, AUNQUE NO EN CARÁCTER TAXATIVO, CUALQUIER GARANTÍA
TÁCITA DE QUE EL PRODUCTO SE ENCUENTRA EN CONDICIONES APTAS PARA LA VENTA, DE
DEFRAUDACIÓN DE DERECHOS O DE QUE EL PRODUCTO SE ADECUA A LOS FINES ESPECÍFICOS
PARA LOS CUALES SE ADQUIERE.
FlexWash_WV9900M_DC68-03768A-04_MES.indd 84 2017-05-22 7:07:07

Español 85
NINGÚN AVAL O GARANTÍA OTORGADOS POR PERSONA, COMPAÑÍA O CORPORACIÓN
ALGUNA CON RESPECTO AL PRESENTE PRODUCTO REVESTIRÁ CARÁCTER VINCULANTE PARA
SAMSUNG. SAMSUNG NO SERÁ RESPONSABLE POR PÉRDIDAS DE INGRESOS O LUCRO CESANTE,
IMPOSIBILIDAD DE GENERAR AHORROS U OBTENER OTROS BENEFICIOS, O CUALQUIER DAÑO
DERIVADO DE CIRCUNSTANCIAS ESPECIALES, DAÑO IMPREVISTO O DERIVADO CAUSADO
POR EL USO, USO INCORRECTO, O INCAPACIDAD PARA USAR EL PRESENTE PRODUCTO,
INDEPENDIENTEMENTE DE LA TEORÍA LEGAL EN QUE SE FUNDE EL RECLAMO Y AUN CUANDO SE
LE HAYA NOTIFICADO A SAMSUNG DE LA POSIBILIDAD DE TALES DAÑOS.
NINGÚN RESARCIMIENTO DE NINGUNA ÍNDOLE CONTRA SAMSUNG SUPERARÁ EL MONTO DE
COMPRA DEL PRODUCTO VENDIDO POR SAMSUNG Y CAUSANTE DEL PRESUNTO DAÑO. SIN
LIMITAR LO PRECEDENTE, EL COMPRADOR ASUME TODO EL RIESGO Y LA RESPONSABILIDAD POR
PÉRDIDA, DAÑO O LESIÓN AL COMPRADOR Y A LOS BIENES DEL COMPRADOR Y A TERCEROS Y A
SUS BIENES DERIVADOS DEL USO, USO INCORRECTO O INCAPACIDAD PARA USAR EL PRESENTE
PRODUCTO. LA PRESENTE GARANTÍA LIMITADA NO SE EXTENDERÁ A NINGUNA PERSONA
DISTINTA DEL COMPRADOR ORIGINAL DEL PRESENTE PRODUCTO, ES INTRANSFERIBLE Y
ESTABLECE SU EXCLUSIVA REPARACIÓN.
Algunos estados no permiten limitaciones en cuanto al plazo de una garantía implícita, o
la exclusión o limitación de daños imprevistos o derivados, por lo tanto las limitaciones o
exclusiones antedichas pueden no aplicarse en su caso. Esta garantía le otorga derechos
especícos, y además puede tener otros derechos que varían según el Estado en el que se
encuentre.
Para recibir servicio técnico de garantía, comuníquese con SAMSUNG a:
Samsung Electronics America, Inc.
85 Challenger Road
Ridgeeld Park, NJ 07660
1-800-SAMSUNG (726-7864)
www.samsung.com/us/support
Las visitas del personal de servicio técnico para explicar funciones, mantenimiento o instalación
no están cubiertas por la garantía.
Póngase en contacto con el centro de llamadas de Samsung para obtener ayuda con cualquiera
de estos problemas.
FlexWash_WV9900M_DC68-03768A-04_MES.indd 85 2017-05-22 7:07:07

Español86
Garantía (CANADÁ)
LAVADORA SAMSUNG
GARANTÍA LIMITADA PARA EL COMPRADOR ORIGINAL
El presente producto de la marca SAMSUNG, tal como lo provee y distribuye SAMSUNG
ELECTRONICS CANADA, INC. (SAMSUNG) y lo entrega como nuevo, en su caja de cartón original al
comprador o consumidor original, está garantizado por SAMSUNG contra defectos de fabricación
de los materiales y la mano de obra durante el período limitado de la garantía de:
Un (1) año para las piezas y la mano de obra. Diez (10) años para el motor DD (solo el repuesto)
La presente garantía limitada comienza en la fecha original de compra y es válida únicamente
para productos comprados y usados en Canadá. Para recibir el servicio técnico de la garantía,
el comprador debe comunicarse con SAMSUNG con el n de que se determine el problema y
los procedimientos del servicio. El servicio técnico de la garantía solo puede ser prestado por
un centro de servicio técnico autorizado de SAMSUNG. Se debe presentar la factura de compra
original como prueba de compra a SAMSUNG o al servicio técnico autorizado de SAMSUNG.
SAMSUNG prestará servicio técnico a domicilio durante el período de la garantía sin costo, sujeto
a la disponibilidad dentro de Canadá. El servicio técnico a domicilio no está disponible en todas
las áreas.
Para recibir el servicio técnico a domicilio, el producto no debe presentar obstrucciones y
debe ser accesible para el agente del servicio técnico. Si el servicio técnico no está disponible,
SAMSUNG puede optar por transportar el producto hasta y desde el servicio técnico autorizado.
FlexWash_WV9900M_DC68-03768A-04_MES.indd 86 2017-05-22 7:07:07

Español 87
SAMSUNG reparará, reemplazará el producto u ofrecerá un reembolso a su criterio y sin cargo
adicional, tal como se establece en la presente garantía, con piezas o productos nuevos o
reacondicionados si se verica que es defectuoso durante el período limitado de la garantía
especicado anteriormente. Todas las piezas y los productos reemplazados pasan a ser propiedad
de SAMSUNG y deben ser devueltos a SAMSUNG. Las piezas y los productos reemplazados
asumen la garantía original que resta, o noventa (90) días, el período que sea el más prolongado.
La presente garantía limitada cubre defectos de fabricación de los materiales y la mano de
obra encontrados durante el uso normal y doméstico de este producto y no será válida para lo
siguiente: daños que ocurran durante el envío; entrega e instalación; aplicaciones y usos para los
cuales el presente producto no fue destinado; números de serie o de producto alterados; daño
cosmético o de acabado exterior; accidentes, abuso, descuido, incendio, inundación, caída de
rayos, u otros casos fortuitos o de fuerza mayor; uso de productos, equipos, sistemas, utilidades,
servicios, piezas, suministros, accesorios, aplicaciones, instalaciones, reparaciones, cableado
externo o conectores no provistos ni autorizados por SAMSUNG que dañen este producto o
que acarreen problemas en el servicio; voltaje de la línea eléctrica incorrecto, uctuaciones y
sobrevoltaje; ajustes del cliente e incumplimiento de lo establecido en el manual de instrucciones,
instrucciones de mantenimiento y ambientales que están cubiertas y recomendadas en el manual
de instrucciones; traslado y reinstalación del producto; problemas causados por plagas. La
presente garantía limitada no cubre problemas derivados de la corriente, el voltaje o el suministro
eléctrico incorrectos, las bombillas de luz, los fusibles de la casa, el cableado de la casa, el costo
del servicio técnico para recibir instrucciones o corregir errores en la instalación. SAMSUNG no
garantiza el funcionamiento ininterrumpido o sin errores del producto.
SALVO LO ESTABLECIDO EN LA PRESENTE GARANTÍA, NO EXISTEN GARANTÍAS SOBRE EL
PRESENTE PRODUCTO, YA SEAN EXPRESAS O TÁCITAS, Y SAMSUNG DESCONOCE TODAS LAS
GARANTÍAS QUE INCLUYEN, AUNQUE NO EN CARÁCTER TAXATIVO, CUALQUIER GARANTÍA
TÁCITA DE QUE EL PRODUCTO SE ENCUENTRA EN CONDICIONES APTAS PARA LA VENTA, DE
DEFRAUDACIÓN DE DERECHOS O DE QUE EL PRODUCTO SE ADECUA A LOS FINES ESPECÍFICOS
PARA LOS CUALES SE ADQUIERE.
FlexWash_WV9900M_DC68-03768A-04_MES.indd 87 2017-05-22 7:07:07

Garantía (CANADÁ)
Español88
NINGÚN AVAL O GARANTÍA OTORGADOS POR PERSONA, COMPAÑÍA O CORPORACIÓN
ALGUNA CON RESPECTO AL PRESENTE PRODUCTO REVESTIRÁ CARÁCTER VINCULANTE PARA
SAMSUNG. SAMSUNG NO SERÁ RESPONSABLE POR PÉRDIDAS DE INGRESOS O LUCRO CESANTE,
IMPOSIBILIDAD DE GENERAR AHORROS U OBTENER OTROS BENEFICIOS, O CUALQUIER DAÑO
DERIVADO DE CIRCUNSTANCIAS ESPECIALES, DAÑO IMPREVISTO O DERIVADO CAUSADO
POR EL USO, USO INCORRECTO, O INCAPACIDAD PARA USAR EL PRESENTE PRODUCTO,
INDEPENDIENTEMENTE DE LA TEORÍA LEGAL EN QUE SE FUNDE EL RECLAMO Y AUN CUANDO SE
LE HAYA NOTIFICADO A SAMSUNG DE LA POSIBILIDAD DE TALES DAÑOS.
NINGÚN RESARCIMIENTO DE NINGUNA ÍNDOLE CONTRA SAMSUNG SUPERARÁ EL MONTO DE
COMPRA DEL PRODUCTO VENDIDO POR SAMSUNG Y CAUSANTE DEL PRESUNTO DAÑO. SIN
LIMITAR LO PRECEDENTE, EL COMPRADOR ASUME TODO EL RIESGO Y LA RESPONSABILIDAD POR
PÉRDIDA, DAÑO O LESIÓN AL COMPRADOR Y A LOS BIENES DEL COMPRADOR Y A TERCEROS Y A
SUS BIENES DERIVADOS DEL USO, USO INCORRECTO O INCAPACIDAD PARA USAR EL PRESENTE
PRODUCTO. LA PRESENTE GARANTÍA LIMITADA NO SE EXTENDERÁ A NINGUNA PERSONA
DISTINTA DEL COMPRADOR ORIGINAL DEL PRESENTE PRODUCTO, ES INTRANSFERIBLE Y
ESTABLECE SU EXCLUSIVA REPARACIÓN.
Algunas provincias no permiten limitaciones en cuanto al plazo de una garantía implícita, o la
exclusión o limitación de daños imprevistos o derivados, por lo que las limitaciones o exclusiones
antedichas pueden no aplicarse en su caso.
Esta garantía le otorga derechos especícos, y además puede tener otros derechos que varían
según la provincia en la que se encuentre.
Para recibir servicio técnico de garantía, comuníquese con SAMSUNG a:
Samsung Electronics Canada Inc.
2050 Derry Road West,
Mississauga, Ontario L5N 0B9 Canada
1-800-SAMSUNG (726-7864)
www.samsung.com/ca/support (English)
www.samsung.com/ca_fr/support (French)
FAX: 1-866-436-4617
Las visitas del personal de servicio técnico para explicar funciones, mantenimiento o instalación
no están cubiertas por la garantía.
Póngase en contacto con el centro de llamadas de Samsung para obtener ayuda con cualquiera
de estos problemas.
FlexWash_WV9900M_DC68-03768A-04_MES.indd 88 2017-05-22 7:07:07

Notas
Español 89
FlexWash_WV9900M_DC68-03768A-04_MES.indd 89 2017-05-22 7:07:07

Notas
Español90
FlexWash_WV9900M_DC68-03768A-04_MES.indd 90 2017-05-22 7:07:07

Notas
Español 91
FlexWash_WV9900M_DC68-03768A-04_MES.indd 91 2017-05-22 7:07:07

Scan this with your smartphone
¿TIENE ALGUNA PREGUNTA O COMENTARIO?
PAÍS LLAME AL O VISÍTENOS EN LÍNEA EN
U.S.A
- Consumer
Electronics
- Mobile
Phones
1-800-SAMSUNG (726-7864)
1-844-SAM-PAYS (726-7297)
www.samsung.com/us/support
CANADA
1-800-SAMSUNG(726-7864)
1-844-SAM-PAYS (726-7297)
www.samsung.com/ca/support (English)
www.samsung.com/ca_fr/support (French)
DC68-03768A-04
FlexWash_WV9900M_DC68-03768A-04_MES.indd 92 2017-05-22 7:07:07