Home
Bookmarks
Home
Neff
Neff D61MAC1X0B/01 User Manual
Page 5
User Manual - Page 5
For D61MAC1X0B/01.
Page 5/20
Page 1
Page 2
Page 3
Page 4
Page 5
Page 6
Page 7
Page 8
Page 9
Page 10
Page 11
Page 12
Page 13
Page 14
Page 15
Page 16
Page 17
Page 18
Page 19
Page 20
Contents
Table of Contents
Search
Previous
Next
Bookmarks
Loading ...
Loading ...
Loading ...
D
2
1
E
2
1
[
Loading ...
Loading ...
Loading ...
<
2
3
4
5
6
7
>
File type: PDF
File name: 78338647_d61mac1x0-01.pdf
File size: 1.29 MB
File Language: English
Pages: 20
Author: Neff
Published: 2020-06-07
Updated: 2023-08-05
Download File
Table of Contents
×
DEM63AC00, DEM63AC00B, DEM66AC00, DEM66AC00B, LE63MAC00, LE63MAC00B, LE66MAC00, LE66MAC00B, D61MAC1X0, D61MAC1X0B, D64MAC1X0, D64MAC1X0B, 2MIB60L
1
Ø Montageanleitung
9
: Wichtige Sicherheitshinweise
9
Lebensgefahr!
9
Lebensgefahr!
9
Erstickungsgefahr!
9
Stromschlaggefahr!
9
Brandgefahr!
9
Brandgefahr!
9
Verletzungsgefahr!
9
Verletzungsgefahr!
9
Verletzungsgefahr!
9
Allgemeine Hinweise
9
Abluftbetrieb
9
Hinweis
9
Abluftleitung
9
Hinweis
9
Umluftbetrieb
9
Hinweis
9
Elektrischer Anschluss
9
: Stromschlaggefahr!
9
Installation vorbereiten
10
Gerätemaße und Sicherheitsabstände
10
Gerät vorbereiten
10
1. Schirm öffnen. (Bild 1a)
10
2. Metallfettfilter entnehmen. (Bild 1b)
10
3. Verriegelung auf beiden Seiten lösen. (Bild 1c)
10
4. Schirm entnehmen.
10
Abluftbetrieb durch die Geräterückseite
10
1. Verblendung an der Geräterückseite entfernen. (Bild 2a)
10
2. Verschraubung des Motors lösen. (Bild 2b)
10
3. Motor entnehmen.
10
4. Motor mit Öffnung zur Wand einsetzen. (Bild 2c)
10
5. Verblendung auf Oberseite befestigen. (Bild 2d)
10
6. Motor festschrauben. (Bild 2e)
10
7. Rückstauklappen an Luftstutzen befestigen. (Bild 2f)
10
8. Luftstutzen an Geräterückseite montieren. (Bild 2g)
10
Abluftbetrieb durch die Geräteoberseite
10
1. Luftstutzen an Geräteoberseite befestigen. (Bild 3)
10
Umluftbetrieb
10
1. Luftleitgitter befestigen. (Bild 4)
10
2. Aktivkohlefilter montieren. (Bild 5)
10
Möbel überprüfen
10
Möbel vorbereiten
10
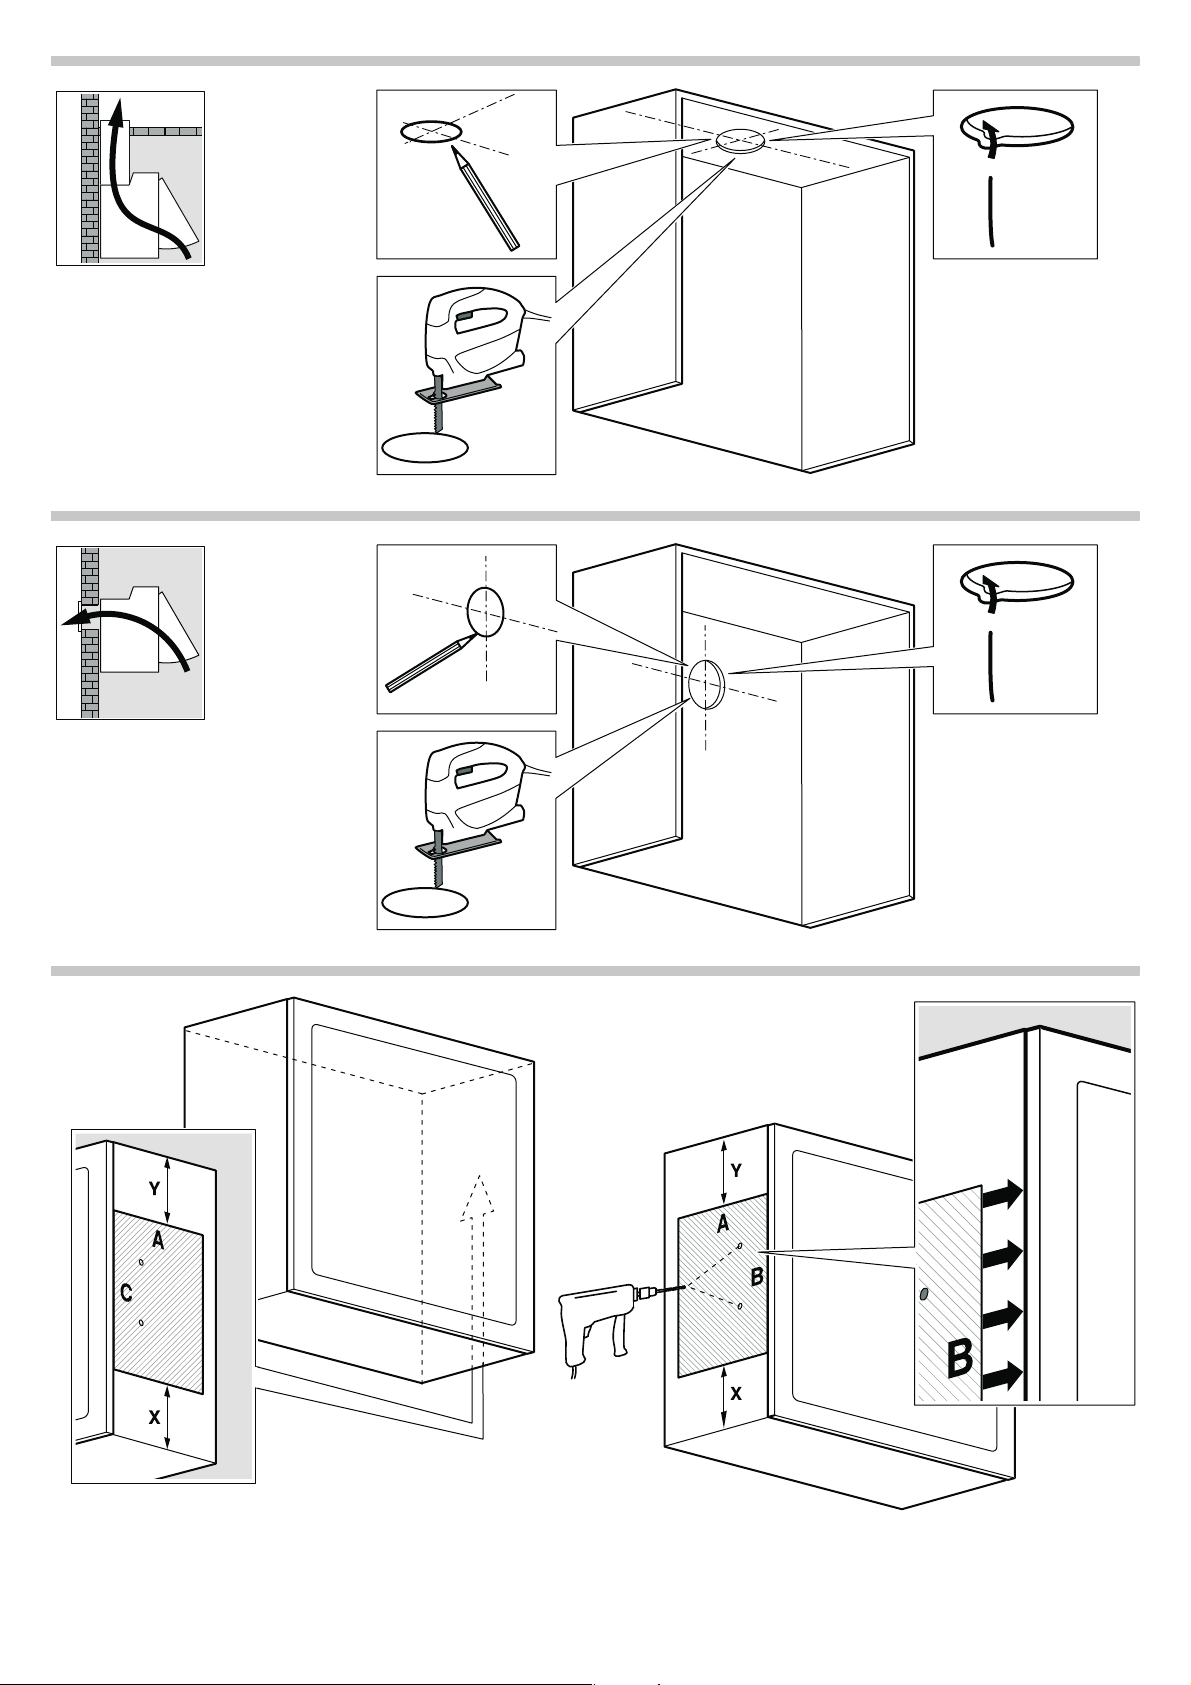
1. Ausschnitt für das Abluftrohr herstellen:
10
2. Schablone an Möbel anbringen. (Bild 7)
10
3. Löcher bohren.
10
4. Schablone an der Rückseite der Schirmverkleidung anbringen. (Bild 8)
10
5. Löcher bohren.
10
Hinweis
10
6. Schirm befestigen.
10
Wand überprüfen
10
Wand vorbereiten
10
Achtung!
10
1. Bohrungen anzeichnen. (Bild 9)
10
2. Löcher bohren.
10
3. Dübel wandbündig eindrücken.
10
4. Haltewinkel anschrauben.
10
Gerät montieren
10
: Verletzungsgefahr!
10
1. Schutzfolie vom Gerät zuerst an der Rückseite und nach der Montage vollständig abziehen.
10
2. Halterungen an Geräterückseite befestigen. (Bild 10a)
10
3. Gerät einhängen. (Bild 10b)
10
4. Gerät mit Gewindebolzen waagerecht ausrichten.
10
5. Gerät an Möbel befestigen. (Bild 11)
10
6. Blende an Geräteunterseite und Wand befestigen. (Bild 12)
10
7. Schirm befestigen. (Bild 13)
10
8. Metallfettfilter einbauen.
10
Gerät anschließen
10
Abluftverbindung und Stromanschluss herstellen
10
Hinweise
10
Abluftverbindung herstellen
10
Hinweis
10
1. Abluftrohr direkt am Luftstutzen befestigen.
10
2. Verbindung zur Abluftöffnung herstellen.
10
3. Verbindungsstellen geeignet abdichten.
10
Stromanschluss herstellen
10
1. Netzstecker in die Schutzkontaktsteckdose stecken.
10
2. Bei einem erforderlichen Festanschluss, bitte die Hinweise im Kapitel Elektrischer Anschluss beachten.
10
Gerät demontieren
10
1. Gerät vom Stromnetz trennen.
10
2. Abluftleitungen lösen.
10
3. Metallfettfilter entfernen.
10
4. Schirm entfernen.
10
5. Verschraubung zum Möbel lösen.
10
6. Gerät abnehmen.
10
7. Haltewinkel entfernen.
10
Ù Οδηγίες εγκατάστασης
11
: Σημαντικές υποδείξεις ασφαλείας
11
Θανατηφόρος κίνδυνος!
11
Θανατηφόρος κίνδυνος!
11
Κίνδυνος ασφυξίας!
11
Κίνδυνος ηλεκτροπληξίας!
11
Κίνδυνος πυρκαγιάς!
11
Κίνδυνος πυρκαγιάς!
11
Κίνδυνος τραυματισμού!
11
Κίνδυνος τραυματισμού!
11
Κίνδυνος τραυματισμού!
11
Γενικές υποδείξεις
11
Λειτουργία εξαερισμού
11
Υπόδειξη
11
Αγωγός απαγωγής του αέρα
11
Υπόδειξη
11
Λειτουργία ανακύκλωσης αέρα
11
Υπόδειξη
11
Ηλεκτρική σύνδεση
11
: Κίνδυνος ηλεκτροπληξίας!
11
Προετοιμασία εγκατάστασης
12
Διαστάσεις συσκευής και αποστάσεις ασφαλείας
12
Προετοιμασία συσκευής
12
1. Ανοίξτε το κάλυμμα. (Εικ. 1a)
12
2. Αφαιρέστε το μεταλλικό φίλτρο λίπους. (Εικ. 1b)
12
3. Λύστε την ασφάλιση και στις δύο πλευρές. (Εικ. 1c)
12
4. Αφαιρέστε το κάλυμμα.
12
Λειτουργία εξαερισμού μέσω της πίσω πλευράς της συσκευής
12
1. Αφαιρέστε την επένδυση από την πίσω πλευρά της συσκευής. (Εικ. 2a)
12
2. Λύστε την κοχλιοσύνδεση του κινητήρα. (Εικ. 2b)
12
3. Αφαιρέστε τον κινητήρα.
12
4. Τοποθετήστε τον κινητήρα με το άνοιγμα προς τον τοίχο. (Εικ. 2c)
12
5. Στερεώστε την επένδυση στην επάνω πλευρά. (Εικ. 2d)
12
6. Βιδώστε καλά τον κινητήρα. (Εικ. 2e)
12
7. Στερεώστε τα πλαπέτα αντεπιστροφής στο στόμιο του αέρα. (Εικ. 2f)
12
8. Συναρμολογήστε το στόμιο αέρα στην πίσω πλευρά της συσκευής. (Εικ. 2 γρ.)
12
Λειτουργία εξαερισμού μέσω της επάνω πλευράς της συσκευής
12
1. Στερεώστε το στόμιο αέρα στην επάνω πλευρά της συσκευής. (Εικ. 3)
12
Λειτουργία ανακύκλωσης αέρα
12
1. Στερεώστε το πλέγμα του αέρα. (Εικ. 4)
12
2. Συναρμολογήστε το φίλτρο ενεργού άνθρακα. (Εικ. 5)
12
Έλεγχος του ντουλαπιού
12
Προετοιμασία του ντουλαπιού
12
1. Φτιάξτε το άνοιγμα για το σωλήνα εξαερισμού:
12
2. Τοποθετήστε το δείγμα στο ντουλάπι. (Εικ. 7)
12
3. Ανοίξτε τις τρύπες.
12
4. Τοποθετήστε το δείγμα στην πίσω πλευρά της επένδυσης του καλύμματος. (Εικ. 8)
12
5. Ανοίξτε τις τρύπες.
12
Υπόδειξη
12
6. Στερεώστε το κάλυμμα.
12
Έλεγχος τοίχου
12
Προετοιμασία του τοίχου
12
Προσοχή!
12
1. Σημαδέψτε τις τρύπες. (Εικ. 9)
12
2. Ανοίξτε τις τρύπες.
12
3. Πιέστε μέσα τα βύσματα ισόπεδα με τον τοίχο.
12
4. Βιδώστε τις γωνίες συγκράτησης.
12
Τοποθέτηση συσκευής
12
: Κίνδυνος τραυματισμού!
12
1. Αφαιρέστε την προστατευτική μεμβράνη από τη συσκευή αρχικά από την πίσω μεριά και μετά την τοποθέτηση αφαιρέστε την εντελώς.
12
2. Στερεώστε τα στηρίγματα στην πίσω πλευρά της συσκευής. (Εικ. 10a)
12
3. Αναρτήστε τη συσκευή. (Εικ. 10b)
12
4. Ευθυγραμμίστε οριζόντια τη συσκευή με τους κοχλιοτομημένους πείρους.
12
5. Στερεώστε τη συσκευή στο ντουλάπι. (Εικ. 11)
12
6. Στερεώστε τη λωρίδα κάλυψης στην κάτω πλευρά της συσκευής και στον τοίχο. (Εικ. 12)
12
7. Στερεώστε το κάλυμμα. (Εικ. 13)
12
8. Τοποθετήστε το μεταλλικό φίλτρο λίπους.
12
Σύνδεση της συσκευής
12
Αποκατάσταση της σύνδεσης εξαερισμού και της σύνδεση ρεύματος
12
Υποδείξεις
12
Κατασκευή της σύνδεσης εξαερισμού
12
Υπόδειξη
12
1. Στερεώστε το σωλήνα εξαερισμού απευθείας στο στόμιο αέρα.
12
2. Κατασκευάστε τη σύνδεση στο άνοιγμα εξαερισμού.
12
3. Στεγανοποιήστε κατάλληλα τα σημεία σύνδεσης.
12
Κατασκευή της σύνδεσης ρεύματος
12
1. Τοποθετήστε το ρευματολήπτη (φις) στην πρίζα σούκο.
12
2. Σε περίπτωση μιας απαραίτητης σταθερής σύνδεσης, προσέξτε παρακαλώ τις υποδείξεις στο κεφάλαιο Ηλεκτρική σύνδεση.
12
Αποσυναρμολόγηση της συσκευής
12
1. Αποσυνδέστε τη συσκευή από το δίκτυο του ρεύματος.
12
2. Λύστε τους αγωγούς εξαερισμού.
12
3. Αφαιρέστε το μεταλλικό φίλτρο λίπους.
12
4. Αφαιρέστε το κάλυμμα.
12
5. Λύστε την κοχλιοσύνδεση με το ντουλάπι.
12
6. Αφαιρέστε τη συσκευή.
12
7. Αφαιρέστε τη γωνία συγκράτησης.
12
Ú Installation instructions
13
: Important safety information
13
Danger of death!
13
Risk of death!
13
Danger of suffocation!
13
Risk of electric shock!
13
Risk of fire!
13
Risk of fire!
13
Risk of injury!
13
Risk of injury!
13
Risk of injury!
13
General information
13
Exhaust air mode
13
Note
13
Exhaust duct
13
Note
13
Circulating-air mode
13
Note
13
Electrical connection
13
: Risk of electric shock!
13
Preparing for installation
14
Appliance dimensions and safety clearances
14
Preparing the appliance
14
1. Open the cover. (Fig. 6a)
14
2. Remove the metal grease filter. (Fig. 6b)
14
3. Undo the catches on both sides. (Fig. 6c)
14
4. Remove the cover.
14
Air extraction through the side of the appliance
14
1. Remove the facing from the underside of the appliance. (Fig. 7a)
14
2. Undo the screw union on the motor. (Fig. 7b)
14
3. Remove the motor.
14
4. Position the motor with the opening towards the wall. (Fig. 7c)
14
5. Secure the facing to the top. (Fig. 7d)
14
6. Screw the motor in place. (Fig. 2e)
14
7. Secure the back-flow traps to the air-pipe connector. (Fig. 2f)
14
8. Fit the air-pipe connector to the rear of the appliance. (Fig. 2g)
14
Air extraction through the top of the appliance
14
1. Secure the air trunking to the top of the appliance. (Fig. 8)
14
Air recirculation mode
14
1. Secure the air grille in place. (Fig. 9)
14
2. Fit the activated charcoal filter. (Fig. 10)
14
Checking the fitted unit
14
Preparing the units
14
1. Make the cut-out for the exhaust air pipe:
14
2. Place the template on the unit. (Fig. 4)
14
3. Drill the holes.
14
4. Place the template on the back of the cover cladding. (Fig. 5)
14
5. Drill the holes.
14
Note
14
6. Secure the cover in place.
14
Checking the wall
14
Preparing the wall
14
Caution!
14
1. Mark the holes. (Fig. 9)
14
2. Drill the holes.
14
3. Press in the wall plugs flush with the wall.
14
4. Screw on the angle bracket.
14
Installing the appliance
14
: Risk of injury!
14
1. First remove the protective film from the back of the appliance and, following installation, remove the rest of the film.
14
2. Secure the brackets on the back of the appliance. (Fig. 11a)
14
3. Hang the appliance on the wall. (Fig. 11b)
14
4. Align the appliance horizontally using threaded pins. (Fig. 11c)
14
5. Secure the appliance to the unit. (Fig. 12)
14
6. Secure the cover to the bottom of the appliance and the wall. (Fig. 12)
14
7. Secure the cover in place.
14
8. Fit the metal grease filter. (Fig. 14)
14
Connecting the appliance
14
Connecting the air extractor and establishing a connection to the mains
14
Notes
14
Connecting the exhaust air pipe
14
Note
14
1. Attach the exhaust air pipe directly to the air pipe connector.
14
2. Connect it to the exhaust air opening.
14
3. Use suitable means to seal the joints.
14
Connecting the power supply
14
1. Plug the mains plug into the earthed socket.
14
2. If a fixed connection is required, follow the instructions in the Electrical connection section.
14
Removing the appliance
14
1. Disconnect the appliance from the power supply.
14
2. Loosen the exhaust air lines.
14
3. Remove the metal grease filter.
14
4. Remove the cover.
14
5. Undo the screw union to the unit.
14
6. Remove the appliance.
14
7. Remove the angle bracket.
14
Þ Notice de montage
15
: Précautions de sécurité importantes
15
Danger de mort !
15
Danger de mort !
15
Risque d'asphyxie !
15
Risque de choc électrique !
15
Risque d’incendie !
15
Risque d'incendie !
15
Risque de blessure !
15
Risque de blessure !
15
Risque de blessure !
15
Consignes générales
15
Mode Évacuation de l’air
15
Remarque
15
Conduit d'évacuation
15
Remarque
15
Fonctionnement en mode recyclage
16
Remarque
16
Branchement électrique
16
: Risque de choc électrique !
16
Préparer l’installation
16
Dimensions de l'appareil et distances de sécurité
16
Préparation de l'appareil
16
1. Ouvrez l'écran. (fig. 1a)
16
2. Retirez le filtre à graisse métallique. (fig. 1b)
16
3. Desserrez le verrouillage des deux côtés. (fig. 1c)
16
4. Retirez l'écran.
16
Mode évacuation de l'air au dos de l'appareil
16
1. Retirez le recouvrement au dos de l'appareil. (fig. 2a)
16
2. Desserrez le raccord vissé du moteur. (fig. 2b)
16
3. Retirez le moteur.
16
4. Engagez le moteur avec l'ouverture vers la paroi. (fig. 2c)
16
5. Fixez le recouvrement sur le haut. (fig. 2d)
16
6. Vissez le moteur. (fig. 2e)
16
7. Fixez le volet anti-refoulement au clapet anti-retour. (fig. 2f)
16
8. Montez le manchon d'évacuation sur l'arrière de l'appareil. (fig. 2g)
16
Mode évacuation de l'air via le haut de l'appareil
16
1. Fixer le manchon d'évacuation sur le haut de l'appareil. (fig. 3)
16
Mode recirculation de l'air
16
1. Fixez la grille. (fig. 4)
16
2. Montez le filtre à charbon actif. (fig. 5)
16
Vérifier l'état du meuble
16
Préparation du meuble
16
1. Réalisez la découpe pour le conduit d'évacuation :
16
2. Placez le gabarit sur le meuble. (fig. 7)
16
3. Percez les trous.
16
4. Posez le gabarit au dos du revêtement d'écran. (fig. 8)
16
5. Percez les trous.
16
Remarque
16
6. Fixez l'écran.
16
Vérifier le mur
16
Préparation du mur
16
Attention !
16
1. Marquer les perçages. (fig. 9)
16
2. Percer les trous.
16
3. Enfoncer les chevilles à fleur du mur.
16
4. Visser les cornières.
16
Monter l'appareil
16
: Risque de blessure !
16
1. Retirer d’abord la pellicule protectrice au dos de l'appareil, puis intégralement une fois le montage achevé.
16
2. Fixez les fixations au dos de l'appareil. (fig. 10a)
16
3. Accrochez l'appareil. (fig. 10b)
16
4. Alignez l'appareil à l'horizontale à l'aide de boulons filetés.
16
5. Fixez l'appareil au meuble. (fig. 11)
16
6. Fixer le bandeau de commande au bas de l'appareil et au mur. (fig. 12)
16
7. Fixez l'écran. (fig. 13)
16
8. Mettez en place le filtre à graisse métallique.
16
Brancher l'appareil
16
Réaliser le raccordement de l'évacuation de l'air et le raccordement électrique
16
Remarques
16
Réaliser le raccordement de l'évacuation de l'air
16
Remarque
16
1. Fixer le conduit d'évacuation directement sur le manchon d'évacuation.
16
2. Réaliser la jonction vers l'orifice d'évacuation d'air.
16
3. Étancher les zones de jonction de façon appropriée.
16
Réaliser le raccordement électrique
16
1. Brancher la fiche secteur sur la prise avec terre.
16
2. Si un raccordement fixe est nécessaire, respecter les consignes du chapitre Branchement électrique.
16
Démonter l'appareil
16
1. Débrancher l’appareil du réseau électrique.
16
2. Détacher les conduits d'évacuation.
16
3. Retirer le filtre à graisse métallique.
16
4. Retirez l'écran.
16
5. Desserrez le raccord vissé pour le meuble.
16
6. Enlever l'appareil.
16
7. Retirez les cornières de retenue.
16
â Istruzioni per il montaggio
17
: Importanti avvertenze di sicurezza
17
Pericolo di morte!
17
Pericolo di morte!
17
Pericolo di soffocamento!
17
Pericolo di scossa elettrica!
17
Pericolo di incendio!
17
Pericolo di incendio!
17
Pericolo di lesioni!
17
Pericolo di lesioni!
17
Pericolo di lesioni!
17
Indicazioni generali
17
Modalità aspirazione
17
Avvertenza
17
Scarico dell'aria
17
Avvertenza
17
Funzionamento a ricircolo d'aria
17
Avvertenza
17
Collegamento elettrico
17
: Pericolo di scossa elettrica!
17
Preparazione dell'installazione
18
Dimensioni dell'apparecchio e distanze di sicurezza
18
Preparazione dell'apparecchio
18
1. Aprire la copertura (fig. 1a)
18
2. Rimuovere il filtro grassi metallico. (fig. 1b)
18
3. Sganciare il bloccaggio su entrambi i lati. (fig. 1c)
18
4. Rimuovere la copertura.
18
Funzionamento a estrazione d'aria dal lato posteriore dell'apparecchio
18
1. Rimuovere il rivestimento sul lato posteriore dell'apparecchio. (fig. 2a)
18
2. Allentare le viti del motore. (fig. 2b)
18
3. Prelevare il motore.
18
4. Inserire il motore con l'apertura verso la parete. (fig. 2c)
18
5. Fissare il rivestimento sul lato superiore. (fig. 2d)
18
6. Fissare il motore. (fig. 2e)
18
7. Fissare i raccordi alettati sui manicotti. (fig. 2f)
18
8. Montare il manicotto dell'aria sul lato posteriore dell'apparecchio. (fig. 2g)
18
Funzionamento a estrazione d'aria dal lato superiore dell'apparecchio
18
1. Fissare il manicotto dell’aria sul lato superiore dell'apparecchio. (fig. 3)
18
Funzionamento a ricircolo d'aria
18
1. Fissare le griglie per l'aria. (fig. 4)
18
2. Montare il filtro a carbone attivo. (fig. 5)
18
Controllare il mobile
18
Preparazione dei mobili
18
1. Realizzare un'apertura per il tubo di scarico:
18
2. Applicare il modello al mobile. (fig. 7)
18
3. Praticare i fori.
18
4. Applicare il modello al lato posteriore del rivestimento della copertura. (fig. 8)
18
5. Praticare i fori.
18
Avvertenza
18
6. Fissare la copertura.
18
Controllare la parete
18
Preparazione della parete
18
Attenzione!
18
1. Segnare la posizione dei fori. (fig. 9)
18
2. Praticare i fori.
18
3. Inserire i tasselli a filo del muro.
18
4. Avvitare le staffe di supporto.
18
Montaggio dell’apparecchio
18
: Pericolo di lesioni!
18
1. Rimuovere la pellicola protettiva dall’apparecchio prima solo sul lato posteriore e completamente dopo il montaggio.
18
2. Fissare i supporti sul lato posteriore dell'apparecchio. (fig. 10a)
18
3. Agganciare l'apparecchio. (fig. 10b)
18
4. Livellare l'apparecchio servendosi di bulloni filettati.
18
5. Fissare l’apparecchio al mobile. (fig. 11)
18
6. Fissare i pannelli sul lato inferiore dell'apparecchio e la parete. (fig. 12)
18
7. Fissare la copertura. (fig. 13)
18
8. Montare il filtro grassi metallico.
18
Collegare l'apparecchio
18
Realizzazione del collegamento allo scarico dell'aria e del collegamento elettrico
18
Avvertenze
18
Realizzazione del collegamento allo scarico dell'aria
18
Avvertenza
18
1. Fissare il tubo di scarico direttamente al manicotto dell’aria.
18
2. Realizzare il collegamento all'apertura per lo scarico dell'aria.
18
3. Sigillare ermeticamente i punti di collegamento.
18
Realizzazione del collegamento elettrico
18
1. Inserire la spina nella presa con contatto di terra.
18
2. In caso di allacciamento fisso, prestare attenzione alle avvertenze contenute nel capitolo Allacciamento elettrico.
18
Smontaggio dell'apparecchio
18
1. Staccare l'apparecchio dalla rete elettrica.
18
2. Staccare i condotti dell'aria di scarico.
18
3. Rimuovere il filtro grassi metallico.
18
4. Rimuovere la copertura.
18
5. Allentare le viti del mobile.
18
6. Rimuovere l'apparecchio.
18
7. Rimuovere le staffe di supporto.
18
é Installatievoorschrift
19
: Belangrijke veiligheidsvoorschriften
19
Levensgevaar!
19
Levensgevaar!
19
Verstikkingsgevaar!
19
Gevaar van een elektrische schok!
19
Risico van brand!
19
Brandgevaar!
19
Risico van letsel!
19
Risico van letsel!
19
Risico van letsel!
19
Algemene aanwijzingen
19
Gebruik met afvoerlucht
19
Aanwijzing
19
Luchtafvoer
19
Aanwijzing
19
Gebruik met circulatielucht
19
Aanwijzing
19
Elektrische aansluiting
20
: Gevaar van een elektrische schok!
20
Installatie voorbereiden
20
Apparaatafmetingen en veiligheidsafstanden
20
Apparaat voorbereiden
20
1. Scherm openen. (Afb. 1a)
20
2. Metalen vetfilter verwijderen. (Afb. 1b)
20
3. Vergrendeling aan beide kanten opheffen. (Afb. 1c)
20
4. Scherm verwijderen.
20
Luchtafvoer via de achterkant van het apparaat
20
1. Afscherming aan de achterkant van het apparaat verwijderen. (Afb. 2a)
20
2. Schroeven van de motor losdraaien. (Afb. 2b)
20
3. Motor verwijderen.
20
4. Motor inbrengen met de opening naar de muur. (Afb. 2c)
20
5. Afscherming aanbrengen aan de bovenkant. (Afb. 2d)
20
6. Motor vastschroeven. (Afb. 2e)
20
7. Terugslagklep bevestigen aan het aansluitstuk. (Afb. 2f)
20
8. Luchtafvoeraansluitstuk vastmaken aan de achterkant van het apparaat. (Afb. 2g)
20
Luchtafvoer via de bovenkant van het apparaat
20
1. Luchtafvoerbuis aan de bovenkant van het apparaat bevestigen. (Afb. 3)
20
Luchtcirculatie
20
1. Luchtrooster bevestigen. (Afb. 4)
20
2. Actieve koolfilter monteren. (Afb. 5)
20
Meubel controleren
20
Meubel voorbereiden
20
1. Uitsnijding voor de luchtafvoerbuis maken:
20
2. Sjabloon aanbrengen op het meubel. (Afb. 7)
20
3. Gaten boren.
20
4. Sjabloon aanbrengen op de achterkant van de schermafdekking. (Afb. 8)
20
5. Gaten boren.
20
Aanwijzing
20
6. Scherm bevestigen.
20
Wand controleren
20
Wand voorbereiden
20
Attentie!
20
1. Boorgaten aftekenen. (Afb. 9)
20
2. Gaten boren.
20
3. De pluggen volledig in de wand drukken.
20
4. Bevestigingshoek vastschroeven.
20
Apparaat monteren
20
: Risico van letsel!
20
1. De beschermfolie eerst van de achterkant van het apparaat trekken en na de montage volledig verwijderen.
20
2. Houders aan de achterkant van het apparaat bevestigen. (Afb. 10a)
20
3. Apparaat plaatsen. (Afb. 10b)
20
4. Apparaat met draadtappen horizontaal uitlijnen.
20
5. Apparaat vastmaken aan het meubel. (Afb. 11)
20
6. Afscherming aan onderkant apparaat en muur bevestigen. (Afb. 12)
20
7. Scherm bevestigen. (Afb. 13)
20
8. Metalen vetfilter inbrengen.
20
Apparaat aansluiten
20
Luchtafvoerverbinding en stroomaansluiting maken
20
Aanwijzingen
20
Luchtafvoerverbinding maken
20
Aanwijzing
20
1. Luchtafvoerbuis rechtstreeks op het luchtafvoeraansluitstuk bevestigen.
20
2. Verbinding maken met de luchtafvoeropening.
20
3. Verbindingspunten goed afdichten.
20
Stroom aansluiten
20
1. Netstekker in het geaarde stopcontact steken.
20
2. Is een vaste aansluiting noodzakelijk, volg dan de aanwijzingen in het hoofdstuk Elektrische aansluiting op.
20
Apparaat demonteren
20
1. Apparaat loskoppelen van het stroomnet.
20
2. Luchtafvoerleidingen losmaken.
20
3. Metalen vetfilter verwijderen.
20
4. Scherm verwijderen.
20
5. Schroeven van het meubel losdraaien.
20
6. Apparaat verwijderen.
20
7. Bevestigingshoek verwijderen.
20
Search:
×
Search