Owner’s Manual Vacuum Cleaner
About Your RoboVac
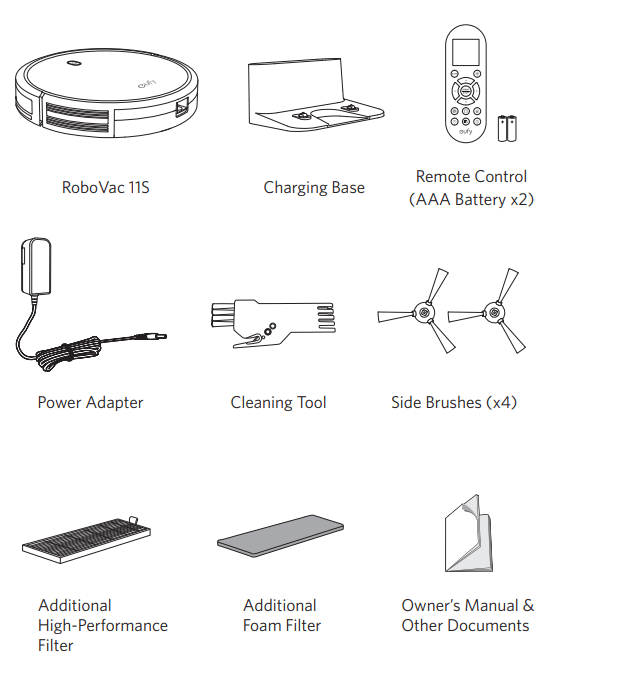
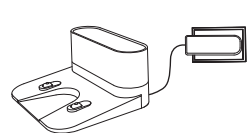
What's in the Box
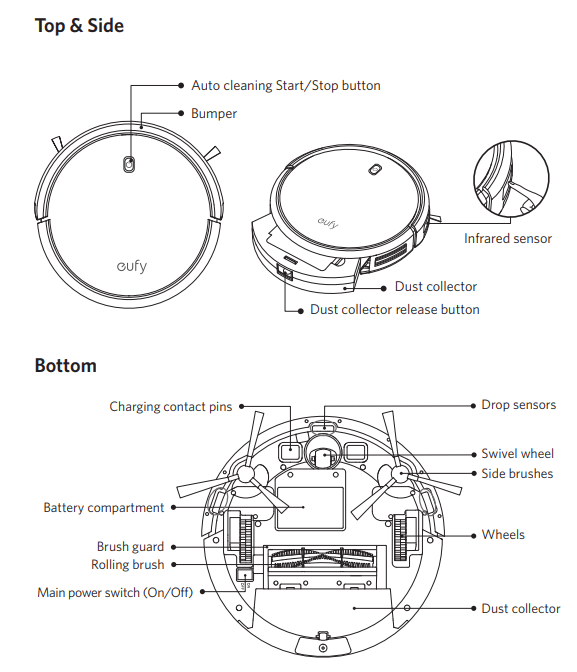
RoboVac Anatomy
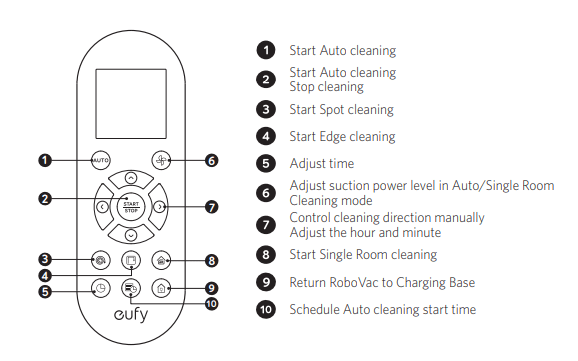
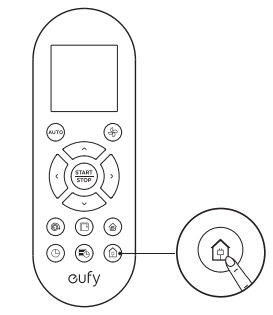
Remote Control
Remote Control Display
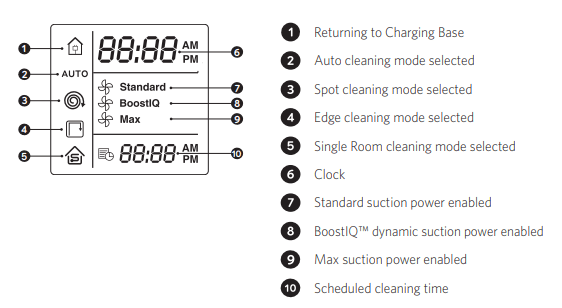
LED Indication
You can see the status of RoboVac from the LED indicator.
 (Status Light) (Status Light) |
Status |
| Breathing orange |
Charging |
| Solid blue |
Standby / Cleaning / Fully charged |
| Solid orange |
Low power and returning to Charging Base |
| Off |
RoboVac is off.
To conserve power, the light automatically turns off when RoboVac is not docked to the Charging Base and has been inactive for 1 minute.
|
| Flashing / Solid red + Beeping |
RoboVac has an error. Refer to the “Troubleshooting>Error Tone” section in this manual for solutions. |
Using Your RoboVac
Important Tips Before Use
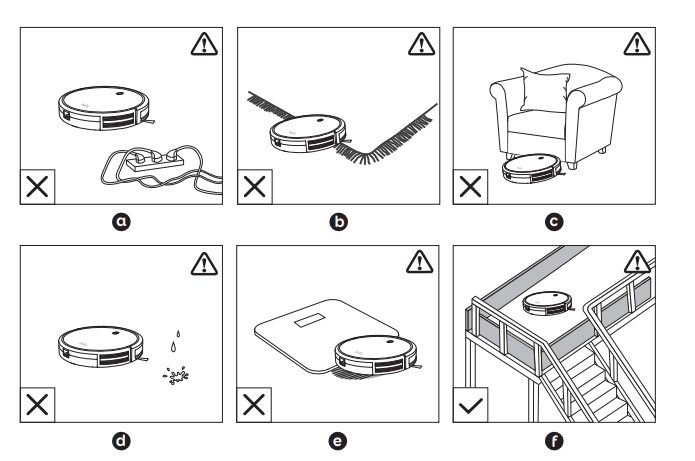
a. Remove power cords and small objects from the floor that may entangle RoboVac.
b. Fold tasseled edges of area rugs underneath to prevent tangling RoboVac. Avoid cleaning very dark-colored high-pile rugs or rugs thicker than 1.02 in/26 mm as they may cause RoboVac to malfunction.
c. Keep RoboVac away from spaces lower than 2.87 in/73 mm to prevent RoboVac from getting stuck. If necessary, place a physical barrier to block off the problem areas.
d. Keep RoboVac away from wet areas.
e. RoboVac may climb on top of objects less than 0.63 in/16 mm in height. Remove these objects if possible.
f. Anti-drop sensors prevent RoboVac from tumbling down stairs and steep drops. They may work less effectively if dirty or used on reflective/very dark-colored floors. It is recommended to place physical barriers to block off areas where RoboVac may fall.
Place physical barriers in front of fireplaces and areas that may cause damage to RoboVac if entered.
Preparation
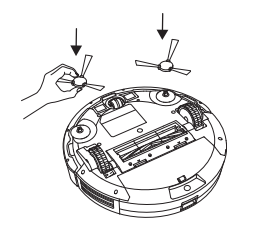
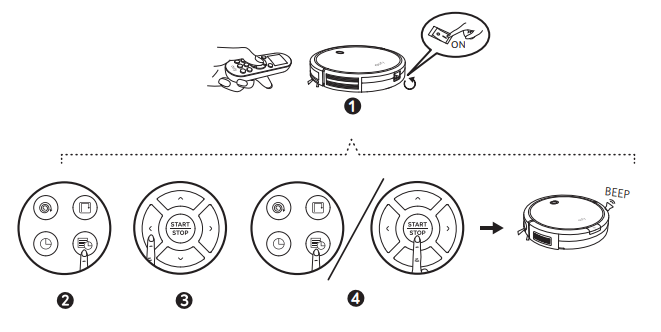
1. Install the side brushes before use.
2. Turn on the main power switch on the bottom of RoboVac.
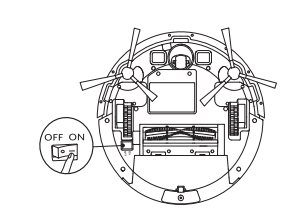
Remove the sticker next to the power switch, and the foam blocks beside the bumper before use.
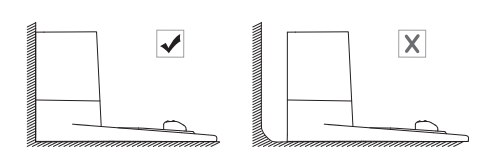
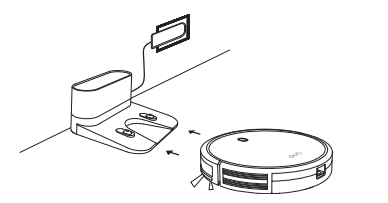
3. Place the Charging Base on a hard, level surface and against a wall.
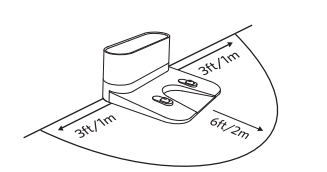
4. Remove objects within 3 ft/1 m of the left and right side and within 6 ft/2 m of the front of the charging base.
5. Connect the round connector of the adapter into the power socket on the Charging Base and the other end into a wall outlet.
- When the Charging Base connects to AC power, the LED indicator on the Charging Base is SOLID WHITE.
Install the Charging Base in a location that RoboVac can easily access. It is recommended to place the Charging Base against a wall, and on a hard-level surface rather than on rugs or carpets.
Always keep the Charging Base plugged in, otherwise RoboVac will not automatically return to it.
Charge Your RoboVac
- RoboVac has a pre-installed rechargeable battery that has to be fully charged before use.
- RoboVac returns to the Charging Base at the end of a cleaning cycle or when its battery is running low.
Method 1: Attach RoboVac to the Charging Base by aligning its charging pins with the charging pins on the base.
Method 2: Press  on the remote control to return RoboVac to the Charging Base.
Turn off the main power switch if RoboVac will not be used for a long period of time. To preserve the battery’s lifespan, recharge at least once every 6 months
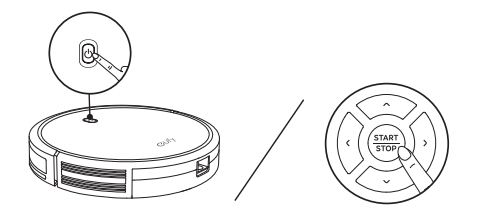
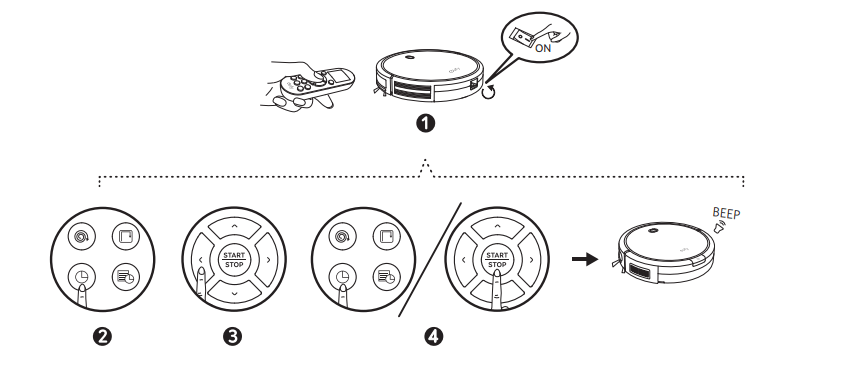
Start / Stop Cleaning
Make sure the main power switch on the bottom of RoboVac is turned on before use.
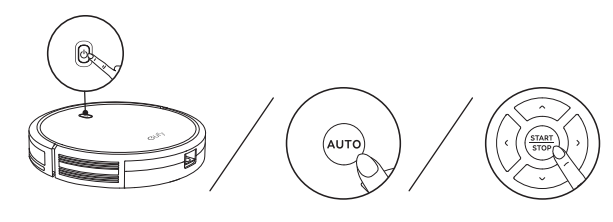
1. Press  on RoboVac or
  /
/  on the remote control to start cleaning in Auto Mode.
2. Press on RoboVac or on the remote control to stop cleaning.
Select a Cleaning Mode
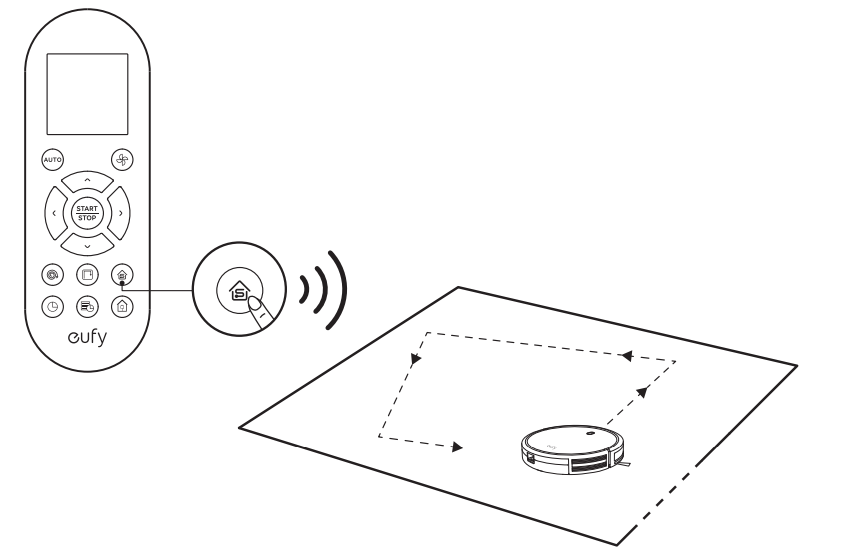
1. Auto cleaning
- RoboVac optimizes its cleaning path by selecting different cleaning modes automatically until cleaning is complete. This is the most commonly used cleaning mode.
- Press on RoboVac or / on the remote control to start cleaning in Auto Mode.
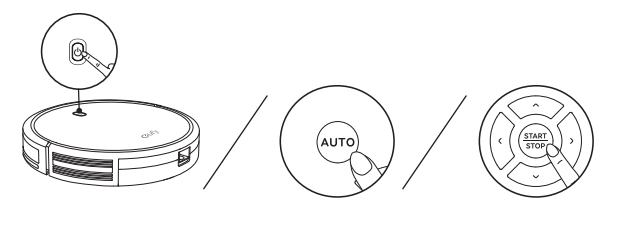
RoboVac will return to the Charging Base automatically when the battery level becomes low or when RoboVac finishes cleaning.
By default, RoboVac starts in Auto cleaning mode when it is turned on.
BoostIQ™ Feature: When the BoostIQ™ feature is enabled, RoboVac will automatically increase the suction power if it detects stronger power is needed to ensure the best clean. BoostIQ™ is ideal for cleaning thicker carpets and hard-to-sweep messes, which will reduce the total cleaning time, but increase the noise level. If the vacuuming noise caused by BoostIQ™ disturbs you, you can disable this feature. This feature only works in Auto and Single Room cleaning modes. In Auto or Single Room cleaning mode, press  on the remote control repeatedly to adjust the suction power level.
- The corresponding icon is displayed on the remote control.
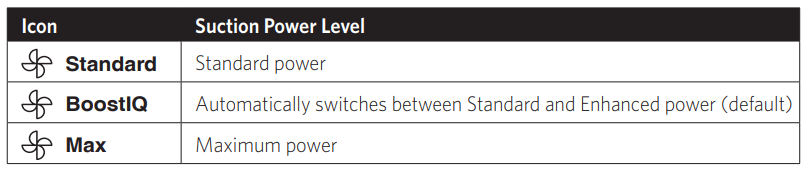
- When RoboVac starts cleaning in Auto or Single Room mode the next time, it will clean according to the suction power level you previously selected.
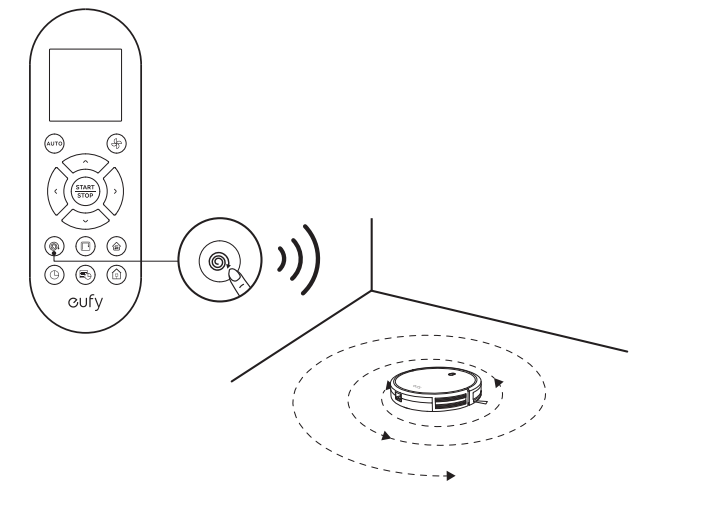
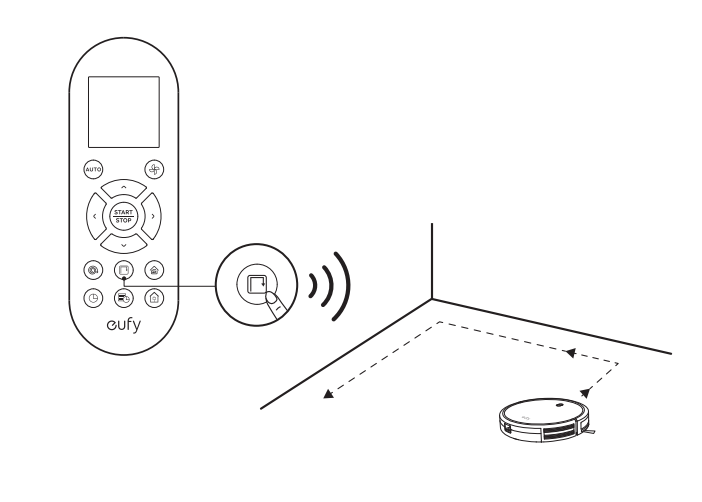
2. Spot cleaning
- RoboVac intensively cleans a specific area in a spiral pattern, useful if there is a concentrated area of dust or debris. In Spot mode, RoboVac will stop cleaning after 2 minutes.
- Press
 on the remote control to start cleaning in Spot mode.
3. Edge cleaning
- RoboVac reduces its speed when it detects a wall and then follows the wall to ensure the edge is cleaned thoroughly. In Edge mode, RoboVac will clean for 20 minutes and return to the Charging Base.
- Press
 on the remote control to start cleaning in Edge mode.
4. Single Room cleaning
- RoboVac intensively cleans one single room and stops after 30 minutes. Select this mode only when one specific room needs to be cleaned. Make sure to confine RoboVac to the room by closing the door.
- Press
 on the remote control to start cleaning in Single Room Mode.
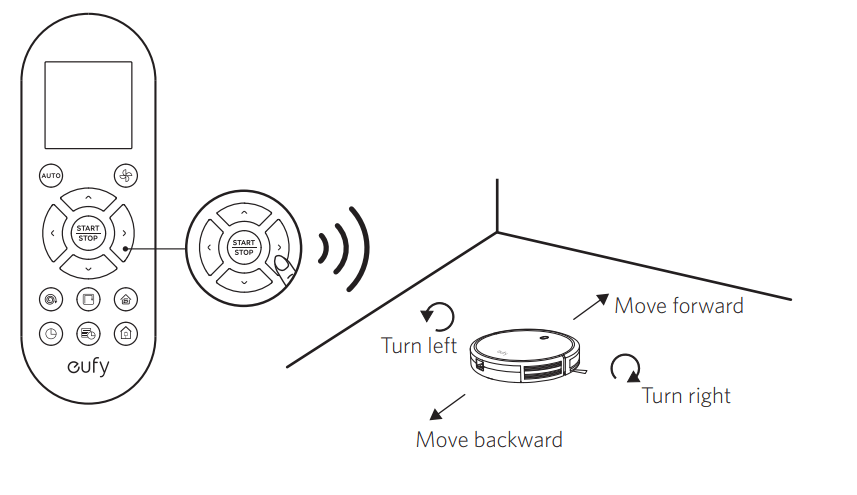
5. Manual cleaning
- You can direct RoboVac to clean a particular area by using the directional buttons on the remote control.
Set Time and Scheduled Cleaning
Set Time: Make sure the time is set correctly to your local time before setting a scheduled cleaning.
- Make sure the main power switch on the bottom of RoboVac is turned on.
- Press
 on the remote control. The time will blink on the display.
- Press
 to set the “hour” and “minute”. Note: Make sure AM/PM is set correctly.
- Press or to save the setting. RoboVac will BEEP ONCE to indicate the time has been set.
To ensure the time is set successfully, make sure RoboVac is turned on. You will hear a beep when the time has been set.
Set a Scheduled Cleaning
You can schedule RoboVac to start cleaning at a specified time. To cancel a previously scheduled cleaning, press and hold  for 3 seconds until RoboVac beeps twice and
  disappears.
Note: Before setting a scheduled cleaning, make sure the time has been set correctly to your local time; refer to the previous section “Set Time” for how to set the time.
- Make sure the main power switch on the bottom of RoboVac is turned on.
- Press on the remote control. will blink on the display.
- Press to set the “hour” and “minute”. Note: Make sure AM/PM is set correctly.
- Press or to save the setting. RoboVac will BEEP ONCE to indicate the schedule has been set.
To ensure the schedule is set successfully, make sure RoboVac is turned on. You will hear a beep when the schedule has been set.
Cleaning and Maintenance
For optimal performance, follow the instructions below to clean and maintain RoboVac regularly. The cleaning/replacement frequency will depend on your usage habits of RoboVac.
Recommended cleaning/replacement frequency:
| RoboVac Part |
Cleaning Frequency |
Replacement Frequency |
| Dust Collector |
After each use |
- |
| Filters |
Once every week |
Every 2 months |
| Rolling Brush |
Once every week |
Every 6-12 months |
| Side Brushes |
Once every month |
Every 3-6 months (or when visibly worn) |
| Brush Guard |
Once every month |
Every 3-6 months (or when the silicone rubber strip on the brush guard becomes visibly worn) |
| Sensors |
Once every month |
- |
| Charging Pins |
Once every month |
- |
| Swivel Wheel |
Once every month |
- |
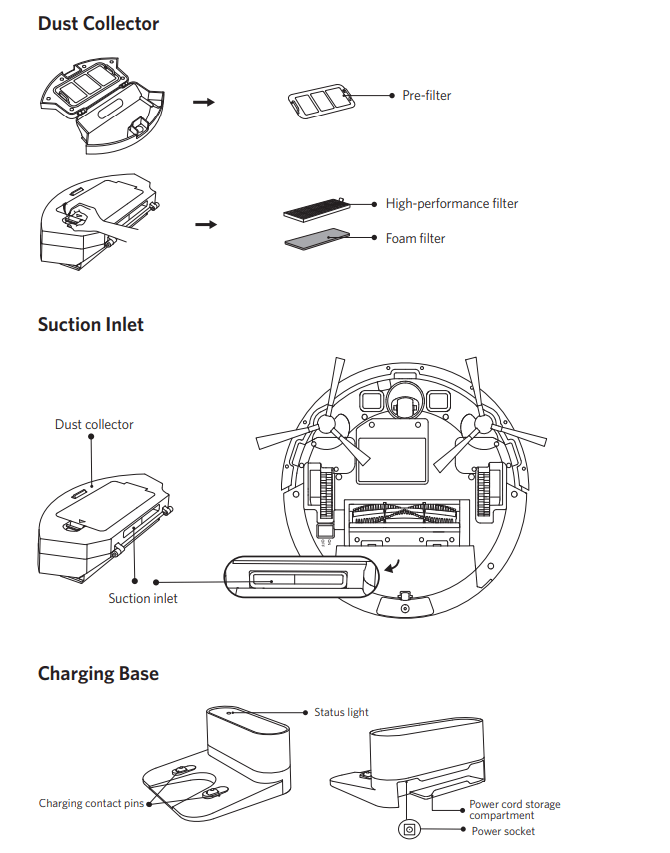
Clean the Dust Collector and Filters
1. Press the dust collector release button to pull the dust collector out.
2. Open and empty the dust collector.
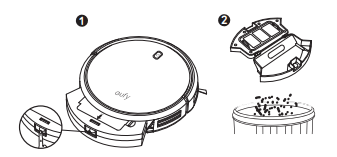
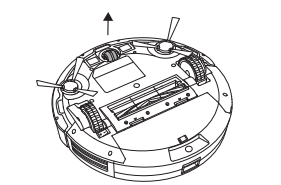
3. Remove the pre-filter by pulling the hooks as shown.

4. Take out the foam filter and high-performance filter.
5. Clean the dust collector and filters with a vacuum cleaner or a cleaning brush.
6. Put the filters and pre-filter back together in the dust collector.

7. Push the dust collector back into the main unit.

You can wash the dust collector, pre-filter and foam filter with water. Be sure to air-dry them thoroughly before reassembling. Do not wash the high-performance filter with water, as it may damage the filter and reduce the suction power
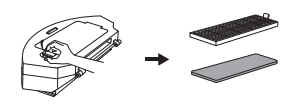
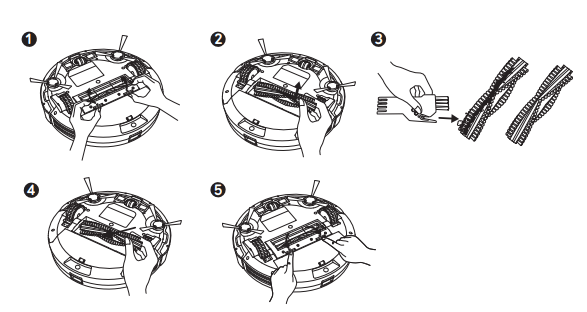
Clean the Rolling Brush
- Pull on the release tabs to unlock the brush guard as shown.
- Lift the rolling brush to remove.
- Clean the rolling brush with the provided cleaning tool or a vacuum cleaner.
- Reinstall the rolling brush by inserting the fixed protruding end first and then clicking into place.
- Press down to snap the brush guard into place.
Clean the Side Brushes
Foreign substances, such as hair, can easily get tangled in the side brushes, and dirt may adhere to them. Be sure to clean them regularly.
- Remove the side brushes.
- Carefully unwind and pull off any hair or string that is wrapped between the main unit and the side brushes.
- Use a cloth dampened with warm water to remove dust from the brushes or to gently reshape them.
Only use the side brushes when they are completely dry
Replace the Side Brushes
- The side brushes may become bent or damaged after being used for a period of time. Follow the instructions below to replace them.
- Pull off the old side brushes and snap the new ones into place.
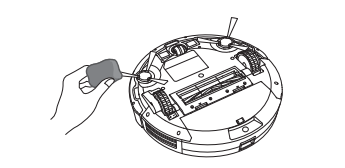
Clean the Sensors and Charging Pins
To maintain the best performance, clean the drop sensors and charging pins regularly.
- Dust off the drop sensors and charging contact pins using a cloth or cleaning brush.

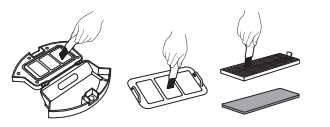
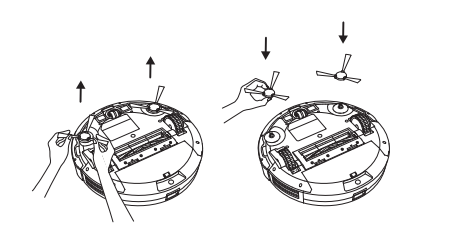
Clean the Swivel Wheel
Hair or dust particles can easily get entangled in the swivel wheel. Be sure to clean the swivel wheel periodically and as needed.
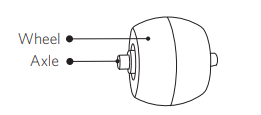
- Pull out the swivel wheel.
- Clean any hair or debris wrapped around the wheel or entangled inside the wheel cavity.
- Reinstall the wheel and push in until it clicks into place.
You can clean the swivel wheel with water.
Use the swivel wheel only when it is completely dry.
Troubleshooting
Frequently asked questions
| Problems |
Solutions |
| RoboVac cannot be activated. |
- Make sure the main power switch is in the ON position.
- Make sure the battery is fully charged.
- Replace the batteries (2 AAA) in the remote control.
- Make sure the remote control is within range (16 ft/5 m) of RoboVac.
- If you still have trouble, turn off the main power switch and then turn it back on.
|
| The remote control does not work. |
- Replace the batteries in the remote control.
- Make sure RoboVac is turned on and fully charged.
|
| RoboVac stops working suddenly. |
- Check if RoboVac is trapped or stuck on an obstacle.
- Check if the battery level is too low.
- If you still have trouble, turn off the main power switch, wait for 2 seconds, and then turn it back on
|
| You cannot schedule cleanings. |
- Make sure the main power switch on the bottom of RoboVac is turned on.
- Make sure the time, time of day (AM/PM), and the scheduled time have been set correctly.
- Check if RoboVac’s power is too low to start cleaning
|
| Suction power is weak. |
- Check if any obstructions are blocking the suction inlet.
- Empty the dust collector.
- Clean the filters with a vacuum cleaner or a cleaning brush.
- Check if the filters are wet due to water or other liquid on the floor. Air-dry the filters completely before use.
|
| RoboVac cannot be charged. |
- Check if the indicator on the Charging Base lights up. If not, contact the eufy service center to repair or replace the Charging Base.
- Dust off the charging contact pins with a dry cloth.
- Check if you can hear a beep when RoboVac is docked onto the Charging Base. If not, contact the eufy service center to repair or replace the Charging Base
|
| RoboVac cannot return to the Charging Base. |
- Remove objects within 3 ft/1 m to the left and right side and within 6 ft/2 m of the front of the Charging Base.
- When RoboVac is in the vicinity of the Charging Base, it will return more quickly. However, if the Charging Base is located far away, RoboVac will need more time to return. Please be patient as it works its way back.
- Clean the charging contact pins.
|
| The rolling brush does not rotate. |
- Clean the rolling brush.
- Check if the rolling brush and brush guard have been installed properly.
|
| RoboVac’s movements or travel path are abnormal. |
- Clean the sensors carefully with a dry cloth.
- Restart RoboVac by turning the power switch off and on.
|
Error Tones
When RoboVac is in trouble, it will emit a series of short or long beeps and the red indicator on RoboVac will be solid or flashing.
Flashing red indicator light
| Error Tone |
Cause |
Solution |
| One beep |
- RoboVac is stuck and one of the wheels is not making contact with the floor (hanging in mid-air).
- RoboVac may be in an extremely large room and the bumper is not registering obstacles
|
Restart cleaning in a new location |
| Two beeps |
RoboVac’s bumper is stuck |
Tap RoboVac’s bumper several times to dislodge any debris that may be trapped underneath |
| Three beeps |
- RoboVac’s drop sensors are dirty.
- RoboVac is stuck on the ledge of a staircase and cannot reverse.
|
- Clean the drop sensors gently with a dry cloth.
- Place RoboVac in a new location.
- Use a physical barrier to block off the problem area.
|
| Four beeps |
RoboVac’s power level is too low |
Manually charge RoboVac for at least 5 hours. |
Solid red indicator light
| Error Tone |
Cause |
Solution |
| One beep |
RoboVac’s left/right wheel is stuck |
Turn off RoboVac and remove any hair or debris from the left/right wheel. |
| Two beeps |
RoboVac’s side brush is stuck. |
Turn off RoboVac and remove any hair or debris from the side brush |
| Three beeps |
RoboVac’s suction fan is stuck |
- Turn off RoboVac, then remove and empty the dust collector.
- Make sure the suction inlet is not blocked by any hair or debris.
|
| Four beeps |
RoboVac’s rolling brush is stuck |
Turn off RoboVac and remove any hair or debris from the rolling brush. |
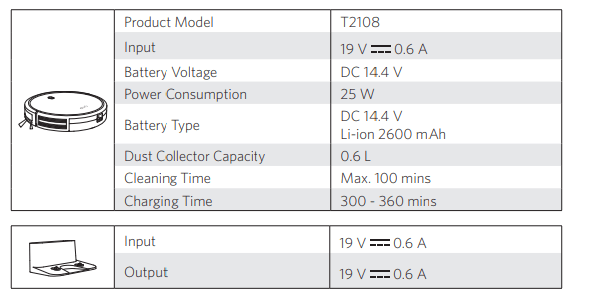
Specifications