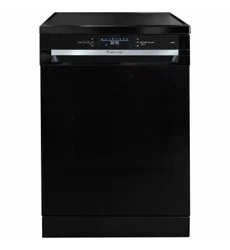
ADW5000X
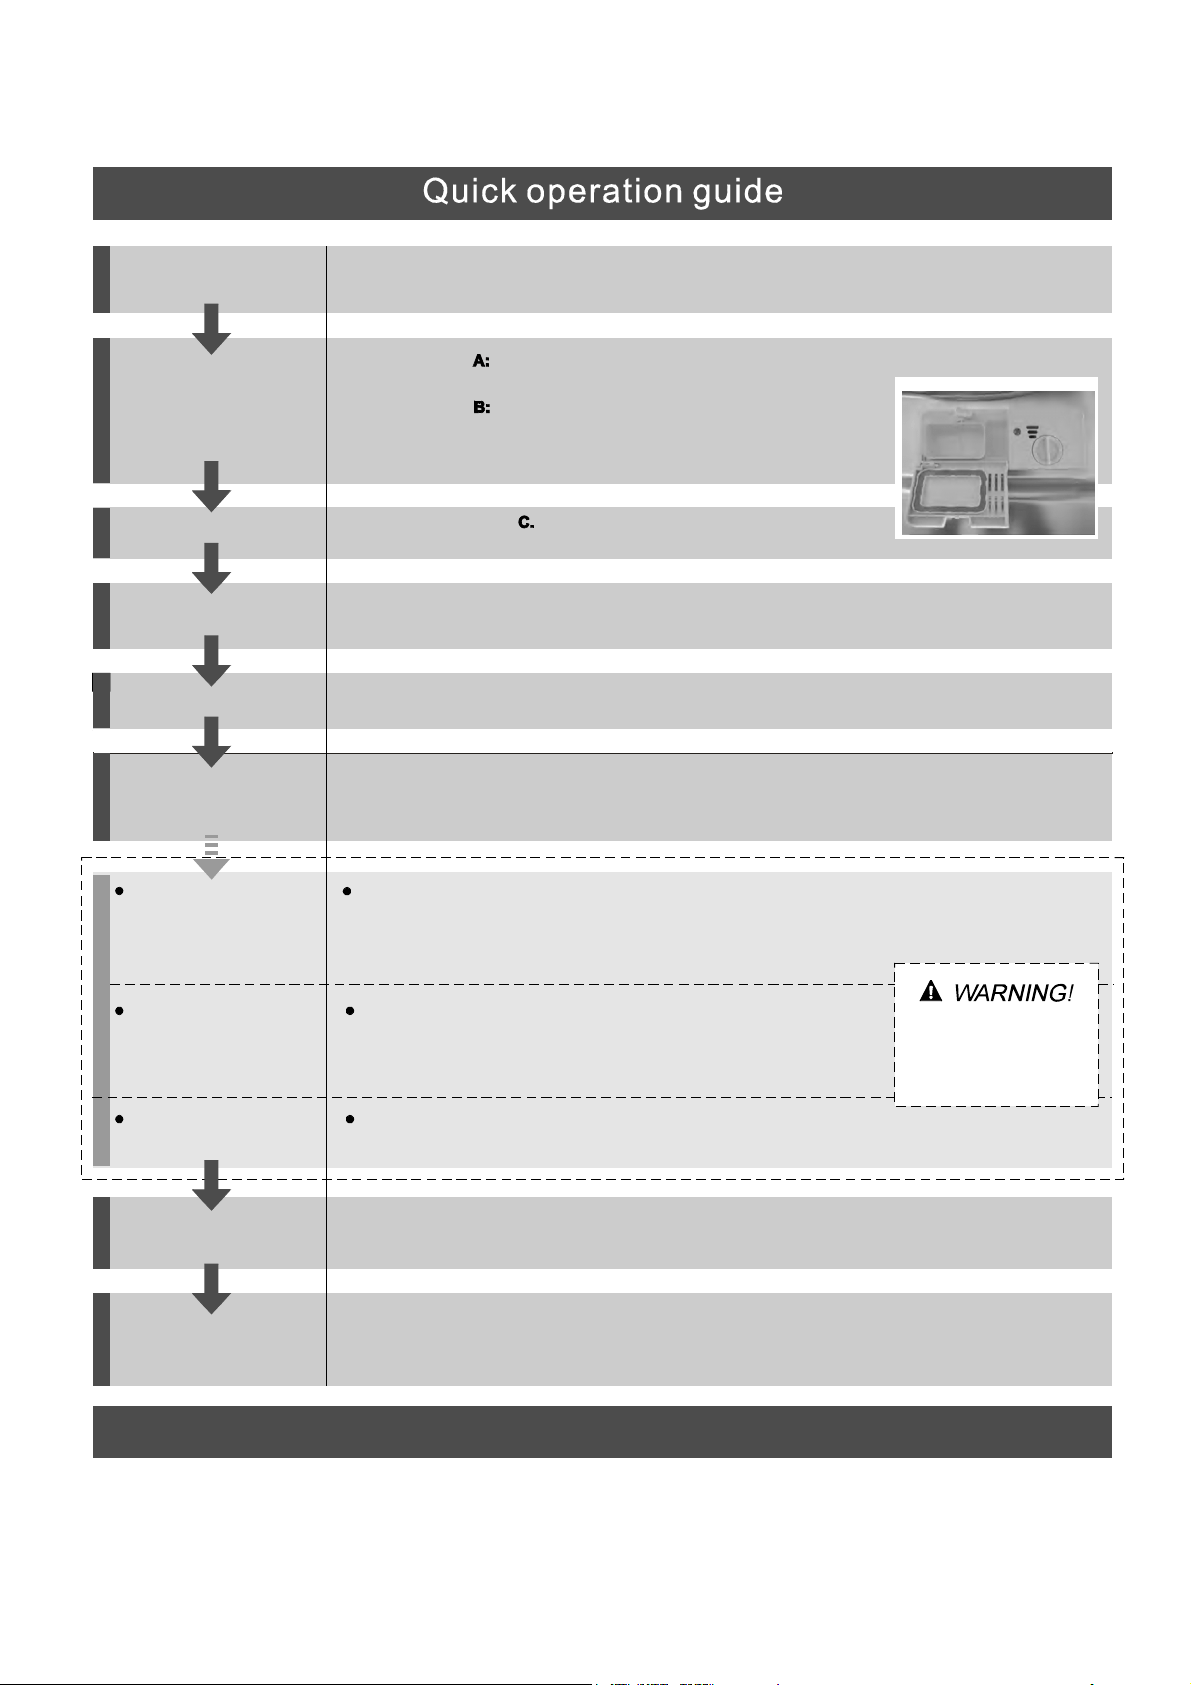
Compartmen t
Fill main-wash detergent.
Compartmen t
Fill pre-wash detergent.
(Follow the user instructions!)
Mechanical i ndicator
Check the rinse aid level
Load the baskets
Select a programme
Close the door, t urn on th e water tap and press the S tart/Reset button. The machine will start working
after about 10 seconds.
Running the dishwasher
Switch off th e appliance
Tu r n o f f t h e w a t e r t a p ,
unload the baskets
Fill the detergent dispenser
Wa r n in g: w a it a f e w mi n u t e s (a b o u t 1 5 m in u t e s ) b e f o r e u n l o a di n g t h e d i s h wa s h e r to a v o i d h a n d l i n g
the dishes and utensils while they are still hot and more susceptible to break.
They will also dry better. Unload the appliance, starting from the lower basket.
Changing the programme
Add forgotten dishes in the
dishwasher.
Scrape off any large amount of leftover food. Soften remnants of burnt food in pans,
then load the baskets. Refer to the dishwasher loading instruc tions.
Press the Programme button until the selected programme lights up.
(Seethe sectionentitled Operationinstruction )
When the working cycle has finished, the buzzer of the dishwasher will sound 8 times, then stop.
Turn off the appli ance using the ON/O FF button.
If the appliance is switched
off during a wash cycle.
Open the door carefully.
Hot st eam m ay escape
when the doo r is opened!
If the appliance is switched off during a wash cycle, when switched
on again, please re-select the washing cycle and operate the dishwasher
according to the original Power-on state.
Switch on the appliance Press the On/Off button to switch on the appliance, Open the door.
1.Open the door a little to stop the dishwasher.
2.After the spray arms stop working, you can open the door completely .
3.Add the forgotten dishes.
4.Close the door , the dishwasher will start running again after 10 seconds.
Electric indicator on control panel (if provided).
For detailed operating method read the corresponding content on the instruction manual.
1. A running cycle can only be modified if it has been running for a short time. Otherwise the detergent
may have already been released and the water already drained. If this is the case, the detergent
dispenser must be refilled.
2. Press the Start/Reset button for more than 3 seconds to cancel the running programme.
3. Select a new programme.
4. Restart the dishwasher.
A
B
C
To r e v i e w th e s e c t i o n o n t r o u b l e s h o o t i n g Ti p s
wil l hel p yo u t o so l ve s ome co mmo n pr o blems
by y o u rs elf .
Dear Cu s to m er,
Please carefully read this manual before using the
dishwasher, it will help you to use and maintain t he
dishwasher properly.
Pass it on to any subsequent owner of the appliance.
Thi s ma nua l con tain s sec t ion s on safety In stru ct ion s ,
Opera tin g I n struc t io ns, Insta l lati on Inst ru cti ons an d
Troubles hooti ng Tips, etc.
Th e m anu fac tu re r, f ollo wi ng a p oli cy of c on sta nt
develo pment a nd u pdati ng of the product, may
make modifications without giving prior notice.
Keep it to refer to it at a later date.
If you can not solve the problems by yourself ,
pl e ase a s k f or t h e he l p of pro fes s i on al te ch nici ans.
Di shw as h er Fe at u res.. . ... .. .... . .. ...... ... . .. ....... .. . ..2
Attention before or after loading the Dishwasher
Baskets..........................................................6
Filtering System.............................................11
Car ing f or the Di shw ash er. ...... ... . .... .. .. . . . .. . .. . ..12.
AFilltheRinseAidDispenser............. ....3 ... . . . . .
BFunctionofDetergent .........................4 ........
Loa di n g the up p er .. . .. . ... .. . ... . ... . . .... .. . .. 7Basket ...
Loading the Lower ...................... .........7Basket ..
Cutlery Basket................................................8
Wash Cycle Tab l e..... ... .... . ... . . ......... . ... . . .. ..... . . .9
Tu rnin g on the Applian ce .. ... . .. ... ... . .. ... ... .. .... ... 10
Ch an ge the Pr ogra mm e. ... .. .... ... . .. .... . ... .. .... 10....
At the E nd of t he Wash C ycle ... ... ... ... ..... .... ... ... 10
Positioning the Appliance................... ..........13..
Water Conne ction... .. ... .... .. . . ... .. . ...... .. . ... .. . . . .. 14.
About P ower Connection........................ .......13.
Sta r t o f dis hwash er... ...... ......... ...... ... ... .. . .... .15..
Be fo re c all ing fo r se rvi c e. . ... ... .. ... . ... ... . .... .. . ....16.
Error codes.................................... ..............17.
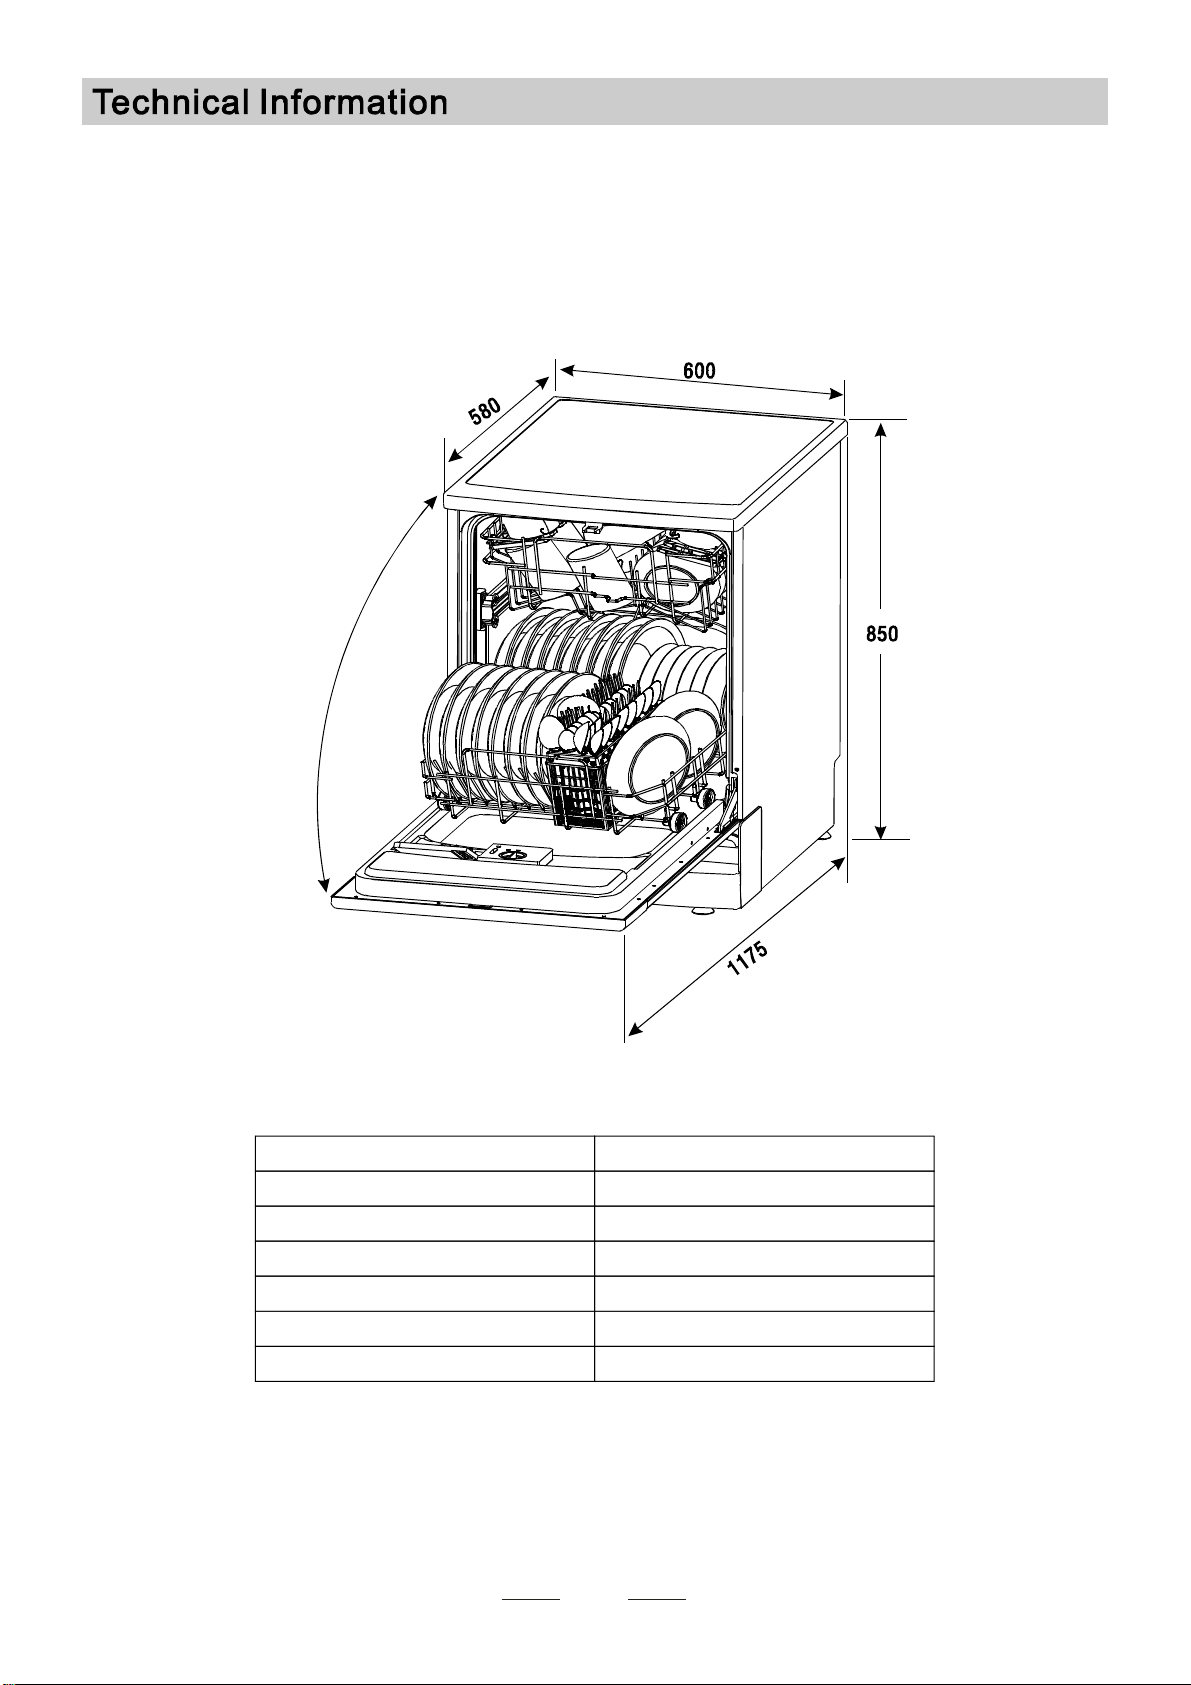
Tec h nic a l in fo rm at i on . . . . .. . .. . .. . .. . ... .. . .. . . . . .. . . .. . 18..
Control Panel...................................................2
This appli ance is intended to b e us ed in hou sehold and
similar applicat io ns s uch as:
staff kitche n a re as i n shops, offices a nd othe r working
environm ents;
farm h ouse s;
by cl ients i n hot els , mote ls and other re sidential t ype
environm ents;
bed and break fas t typ e e nvironm ent s.
1
This appliance must be grounded. In the event of a
malfunction or breakdown, grounding will reduce
the risk of anelectric shock by providing a path of
least resistance of electric current. This appliance
is equipped with a cord having an equipment-
grounding conductor and a grounding plug.
The plug must be plugged into an appropriate outlet
that is instal led and g rounded in accordance with
all local codes and ordinances.
Improper connection of the equipment-grounding
conductor can result in the risk of an electric shock.
Check with a qualified electrician or service
representative if you are in doubt whether the
appliance is properly grounded. Do not modify the
plug provided with the appliance; If it does not fit
the o utlet. Have a proper outlet installed by a
qualified electrician.
Keep children away from detergent and rinse aid, keep
child away from the open door of the dishwasher,
there could still be some detergent left inside.
ren
Do not abuse, sit on, or stand on the door or dish
rack of the dishwasher.
Do not touch the heating element during or
immediately after use.
(This instruction is on ly applicable to machines
with a visual heating element.)
Do not wash plastic items unless they are marked
dishwasher safe or the equi valent. For plastic items
n
ot so marked, check the manufacturer's
recommendations.
Use only detergent and rinse additives
design ed for an aut omatic d ishwasher.
Never use soap, laundry detergent, or hand
washing detergent in your dishwasher. Keep
these products out of the reach of children.
Dur i ng inst a lla ti o n, the pow e r suppl y mus t n o t
be exc es sively o r d ang er o u sly bent or flatt e ne d.
Do not tamper with controls.
Do not operate your dishwasher unless all
enclosure panels are properly in place. Open
the door very carefully if the dishwasher is
operating, there is a risk of water squirting out.
Do not place any heavy objects the
door when it is open. The appliance could tip
forward.
on or stand on
Wh en load ing items t o be wash e d:
1) Loc ate sh ar p i te ms s o t h at th ey are n ot li k ely
to damage the door seal;
2Warning:Knivesandotherutensilswith
sharp points must be loaded in the basket
with their points down or placed in a
horizonta l position.
)
When us ing you r dishwasher, you should
preve nt plast ic items from comin g int o co ntac t
with the heating element.(This instruction is only
applica ble to machines with a visual heat in g
ele ment.)
If the supply cord is damaged, it must be replaced
by th e m anu facturer or it s se rv ice ag ent or a
simi larly quali fie d person i n or de r to avoid a
hazar d.
Pleas e dispose o f pa c k in g materials prop e rly.
Use the dishwasher only for its intended function.
Remove the door to the washing compartment when
removing an old d ishwasher from service or discarding i t.
Dishwa sher de terge nts are s tron gl y a lka line, they
can be ext rem ely dang er ous i f s w a l l owe d. A voi d
conta c t wi th ski n an d e y es and kee p c h i l dr en aw ay
from t h e di shw ashe r wh en t he d oor is op en.
Check that the detergent comparment is empty
aft er completio n o f the w ash cycle.
The a pplia nc e i s to be con nected to the wa ter
ma i ns us ing new ho se se ts and t h at o l d ho se-se ts
shoul d no t be reu sed .
The max imum number of p lace setti ng s to b e
was hed is 1 2 .
The max imum permissibl e inl et water p ressure is
1Mp a .
The mini m um per missible i nlet wa ter pres su re i s
0. 04 M pa.
Children should be supervised to ensure that they do
not play with the appliance.
This appliance is not intended for use by persons
(inclu ding children with reduced physical, sensory or
mental capabilities, or lack of experience and
knowledge ,unless they have been given supervision
or instruction concerning use of the appliance by a
person responsible for their safety .
)
When u sin g your dishwas he r, fo l l ow the p rec aut ions li s t ed b elow:
The do or should n o t be le f t ope n ,
si n ce this c oul d i nc re a s e th e ri sk of trip p ing .
Ba ck Vie w
Fron t v iew
2
bef ore us in g it fo r the f irst time.
To g e t t h e be st p e rfo r m an ce f r om y o u r d i sh w as he r, r e a d all o p er at i n g i ns tr u ct i o n s
Mai n Fil ter
Dete rge nt D ispe nser
Cup She lf
Cutlery Basket
Coarse Filter
Rinse Aid Dispenser
Inlet pipe connector
Drain pipe connector
Lower Baske t
Spray A rms
Upper Basket
1
5
6
7
8
9
10
11
3
2
4
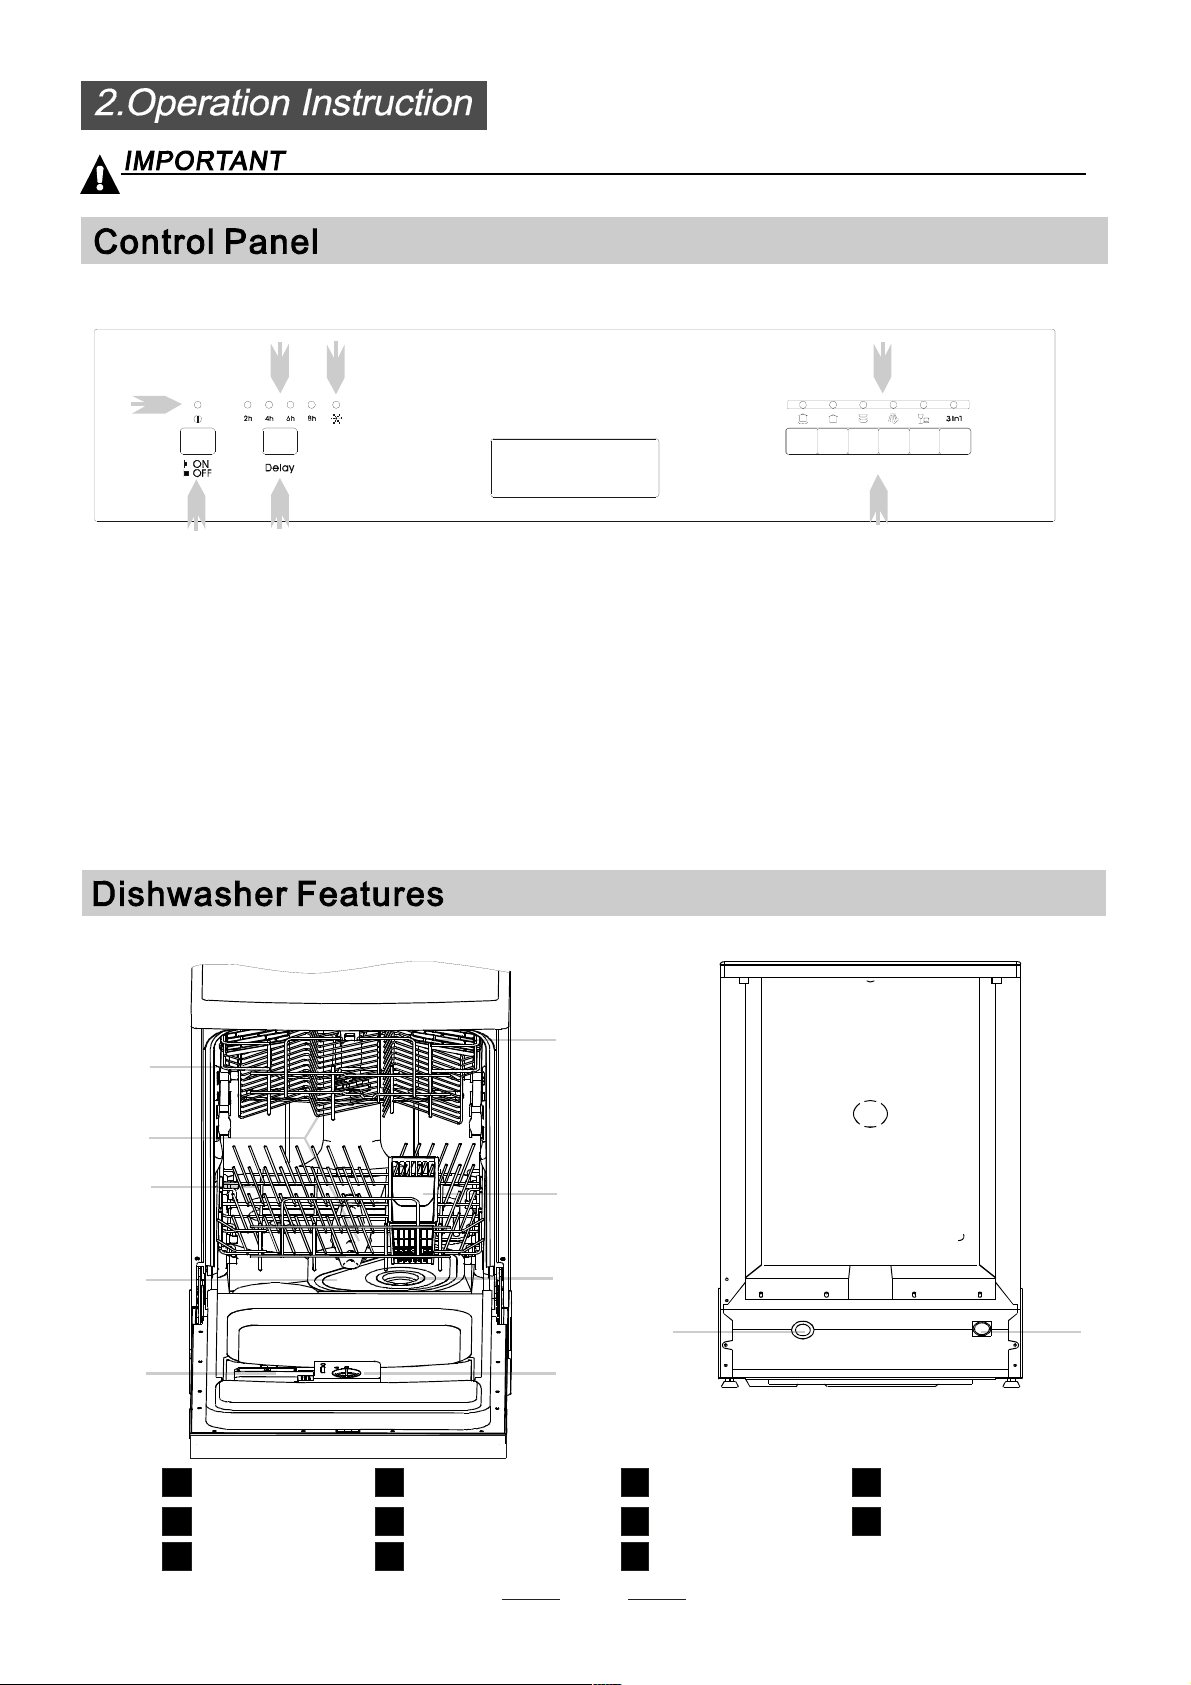
5ProgramButton:Toselectwashingprogram
when press the button.
6DelayedStartButton:Pressthisbuttontosetthe
delayed hours for washing. There are 4 choices.
2PowerLight:TobeonwhentheON/OFFButtonis
Press ed down .
3RinseAidWarningLight:Tobeonwhenthe
ri n se a id d i spe n s er n ee d s to be r efi l l e d.
1ON/OFFButton:Toturnon/offthepowersupply.
4Programindicatorlight.
7Delayindicator:differentindicatormeansdifferentdelay
time.
Inten. H ea vy Nor mal Rinse Rapid 3 in 1
Bef or e u s in g your dish w as h er fo r t he fi rs t time:
3
A.Filltherinseaiddispenser
B.Fillindetergent
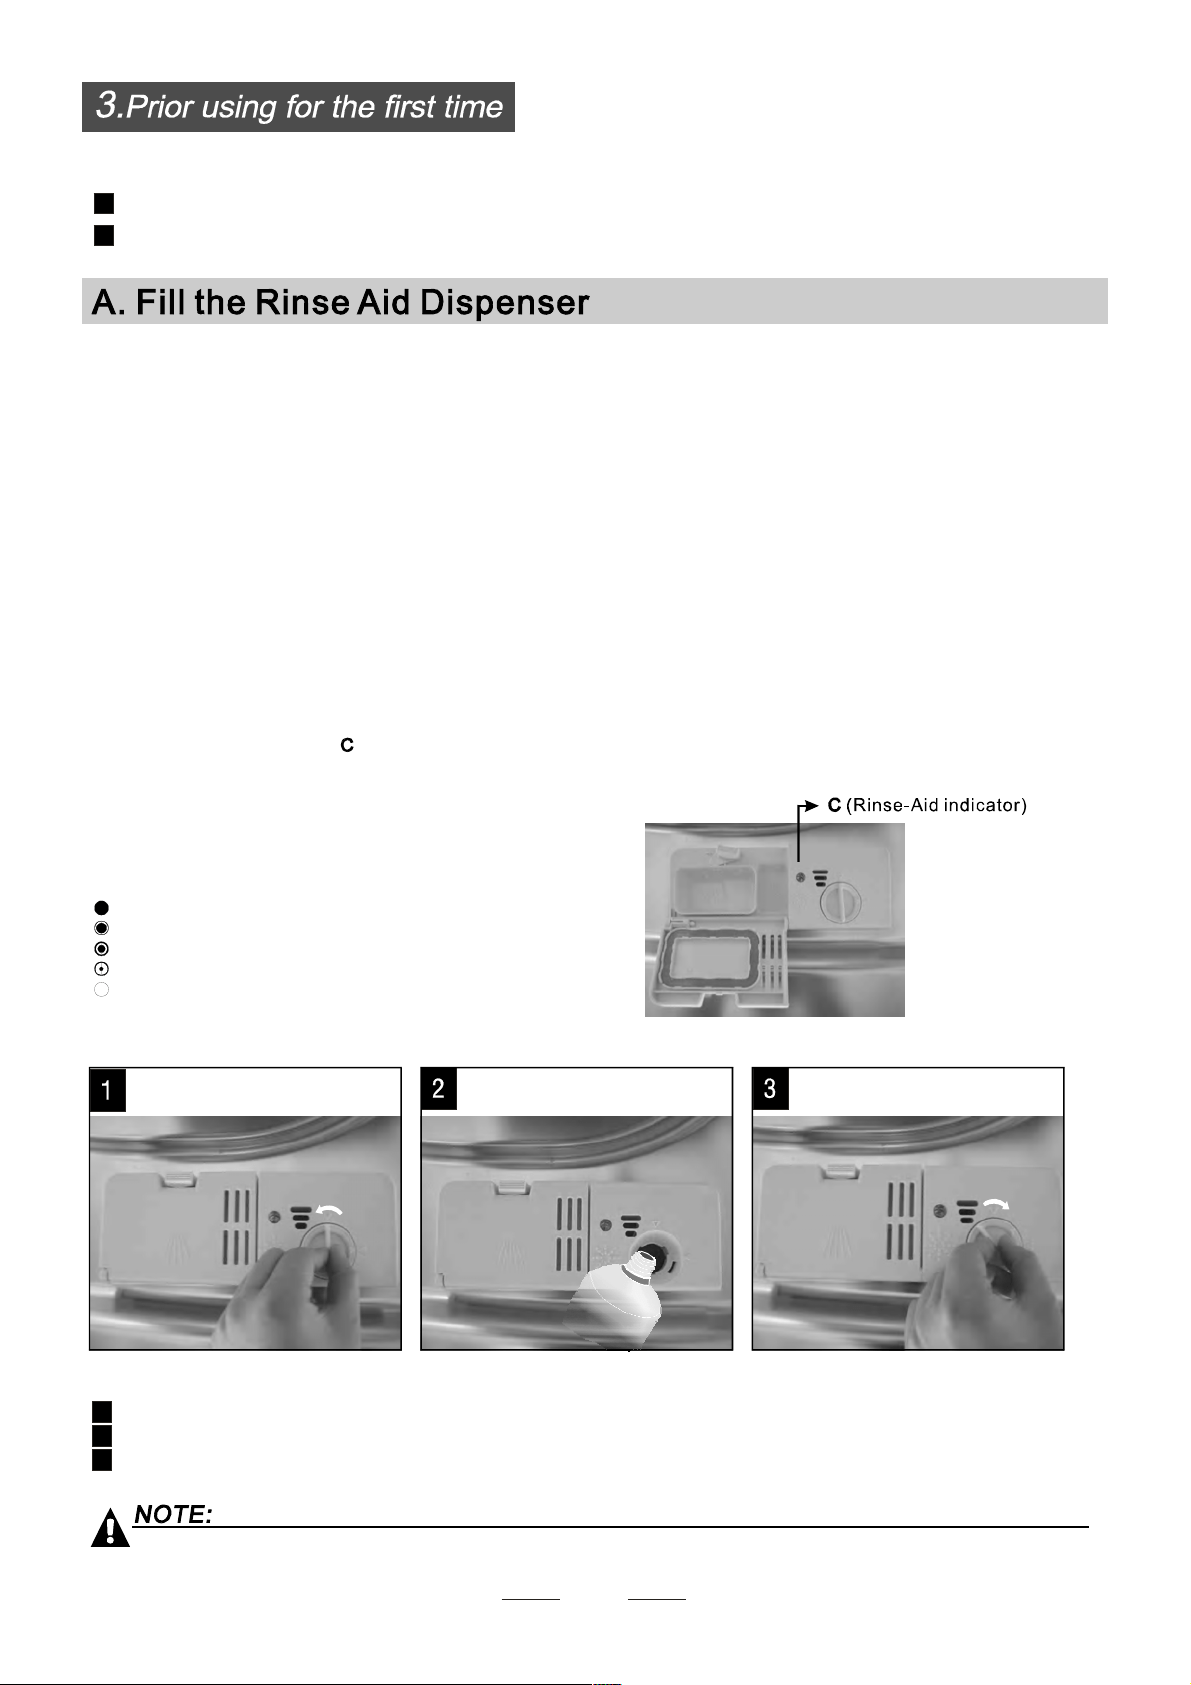
Th e r i nse a id i s r elea se d d u ri ng the final rin se to prevent water fro m forming droplet s on y our dis hes, whic h can l eave
spots and s trea ks. It al so improve s dryi ng by allow in g water to roll off the dishes . Your di shwa sher is des igned to
use l iquid rins e a ids. The rinse aid di spense r is l ocated i nside the d oor next to the det ergent di spense r. To fill the
dispens er, ope n the cap an d pour t he rinse aid i nto the dispenser u ntil the le vel i ndicator turns c ompletel y bla ck.
The vo lume o f the r ins e aid contai ner is about 110ml.
Rinse Aid Dispenser
Function of Rinse Aid
Ri ns e aid is aut oma t ica lly a dded d u rin g the la st ri ns e, ensur in g th oro ugh rin si ng, and spo t an d s t reak fr ee dryi ng.
Attention!
Only us e bran d ed rins e ai d for di s hwash er. Ne ver fi ll th e rin se aid dispens er wi th a ny other sub s tan ces
(e .g. Di shw as her cle an i ng ag en t, liq uid d ete rg e nt ). T h is wou l d dam ag e th e appliance .
To open the di spenser, turn t he cap to the " open" ( le ft) ar row and l ift it o ut .
Po ur t he rinse ai d int o the disp ens er, b eing car eful n ot to o ver fill .
Re pl ac e the ca p b y in se rti ng i t ali gne d wi th " ope n " arr ow a nd t urn in g it t o the cl ose d (ri ght) arr ow.
1
2
3
As the rin se ai d di mini sh es, the size of the b la ck dot
on th e rin se a id le ve l indic ato r change s, as i llustra ted b elow.
Full
3/4full
1/2full
1/4full-Shouldrefilltoeliminatespotting
Em pt y
When to Refill the Rinse Aid D ispen ser
during the next wash.
Don 't f or get t o re plac e the cap be fore you cl ose dis hwa she r d oor.
Clean up any rinse aid spilt while during filling with an absorbent cloth to avoid excessive foaming
If ther e i s no rinse- ai d warni ng li gh t in t he c ont r ol p ane l, y ou ca n esti mat e th e amou nt fro m the colo ur
of t he o pt ic a l le v el in d ic a tor l o c ate d n ex t t o th e c ap . Wh en t he r inse - ai d co n ta ine r is f u ll , th e whol e
indi cator wil l be d ark . As t he r inse-a id dim inish es, th e si ze of t he dar k do t de cr eases. You shou ld nev er l et
the rins e aid level fa ll 1 / 4 ful l.
4
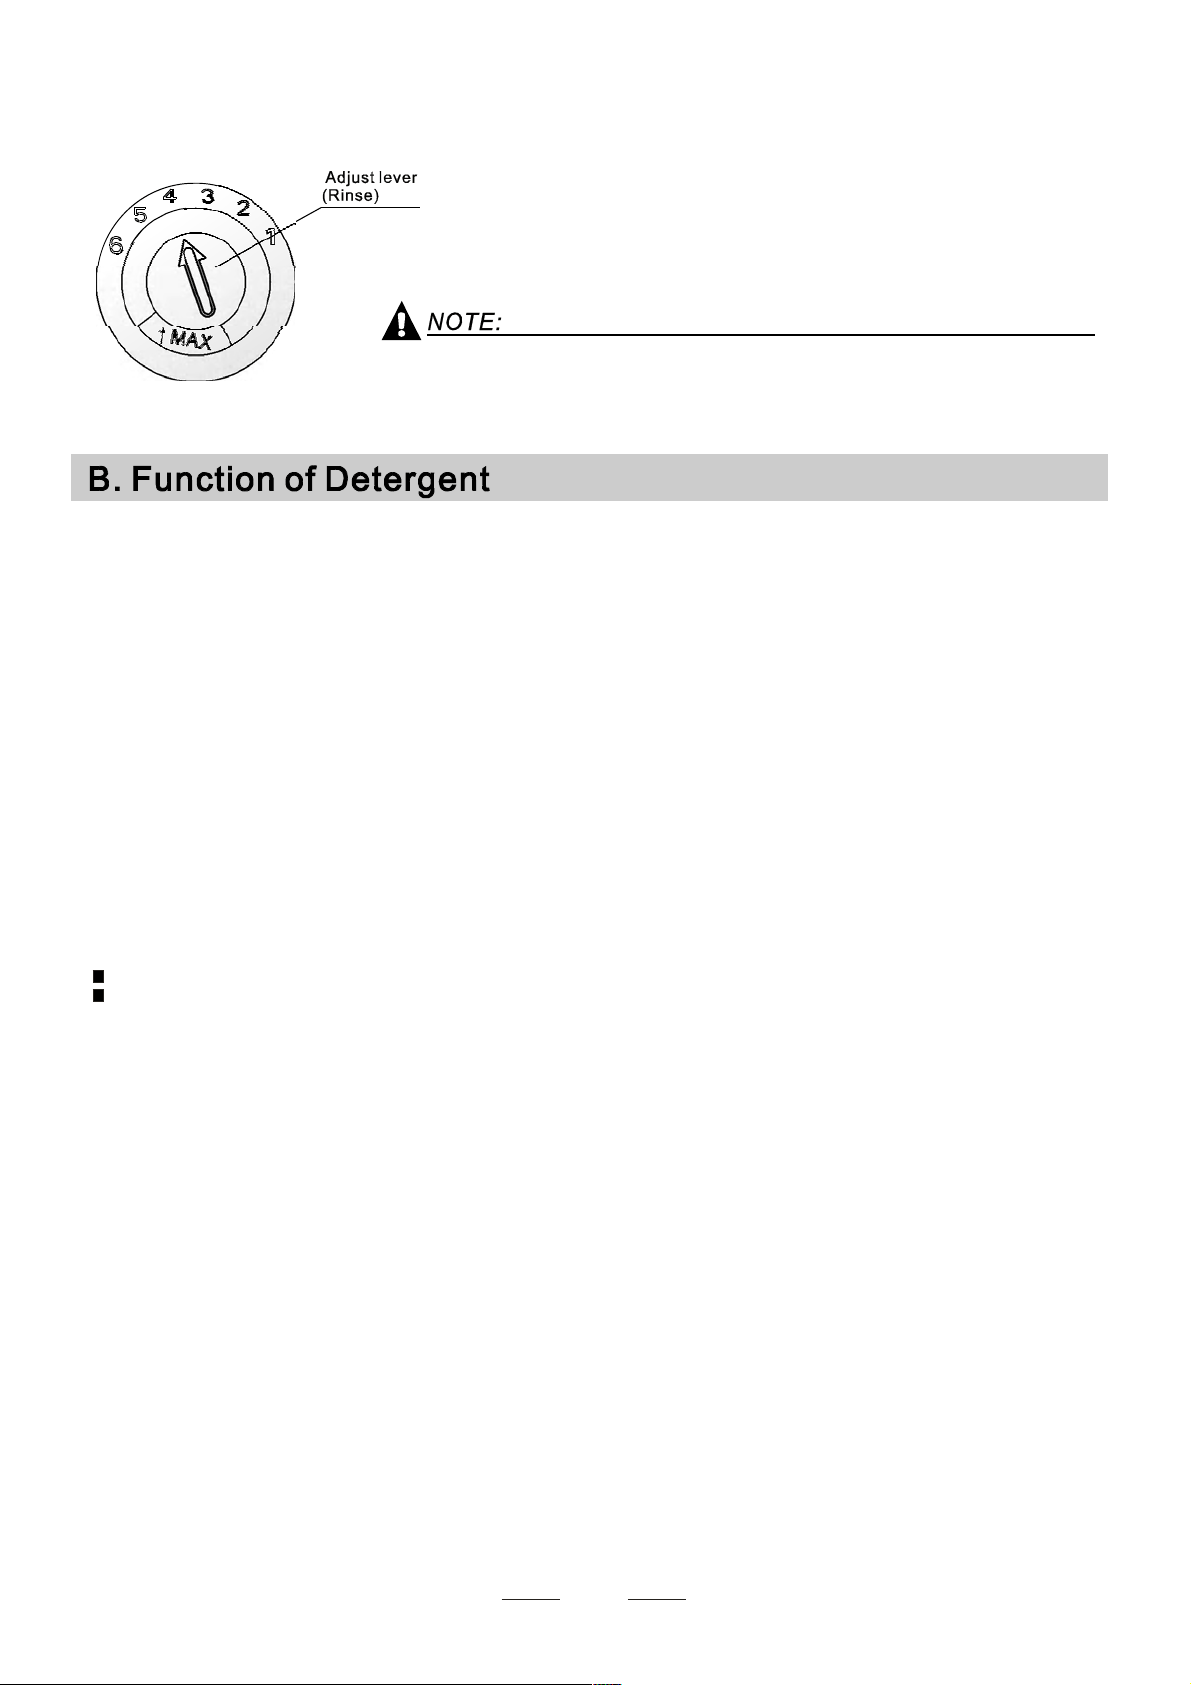
Ad ju sti ng R ins e Aid D isp ense r
The r i n se a i d di sp enser has six or four settings. Alwa ys st art w ith t h e d ispen se r
set on "4". If spots and p oor drying are a p roblem, increa se t he amount o f r inse
aid dispensed by removin g the d ispe nser l id an d rotat ing the dial to "5". If t he
dishes st ill are no t d ryi ng prope rly o r ar e show spots , a djust t he dial to the next
highe r lev er until your dish es are sp ot-free. Th e r ecom men ded setting is "4".
(Factory value is "4".)
Increase the dose if there are drops of water or lime spots on the dishes after washing.
Reduce i t if there are sticky whitish stains on your dishes or a bluish film on glassware or
kn ife bl ades .
Detergents with its chemical ingredients are necessary to remove dirt, c rush dirt and transport it out of the dishwasher.
Most of th e commercial quality deterge nts are suitable for this purpose.
Detergents
The re are 3 sort s of dete rgent s
1.Wi th p hos phate an d wit h ch lori ne
2.With phos phate and without c hlorine
3.Wi thout ph osphate and with out chlo rine
Base d on their chemica l c o mposition, de terg ent s can be spl it i n t w o ba si c typ es:
Th e us e o f norma l w ashi ng p rograms i n c omb inatio n with conc entr at e d de ter g e nts
reduces pollution and is good for your dishes; these wash p rograms are specifically matche d
to the d irt-d isso lving proper tie s of th e en zymes o f th e co nce ntr at ed d eter ge nt. For t his reason
norma l wash prog ram s i n whic h co nce ntra ted dete rge nts ar e used c an a chieve t he s ame
results that c an otherwise onl y be ach ieve d using intensive programs.
Deterge nt ta ble t s of differen t bran d s d is solve at di ffer e nt sp ee ds. F or t his r eas on so me
deterg ent tabl e ts c anno t d is so lve and develo p t h ei r ful l c l eaning p ow e r du ri ng sho r t
pr o gram s. T h e ref o re ple ase u se lon g pr ogr ams when usi ng d ete r gen t tab lets, to
ensure the com plete remova l of de t erg e n t re sidu al s.
Th e di s pense r mu st be r efi l led before the st a rt o f eac h w a sh cycle foll ow in g th e i nstru ction s
pr o vide d i n the wash cy c le tabl e . Your d i shw ash e r uses les s dete r ge n t an d r i n se ai d th an
Con ven t ional dis hwashe r. G e ner ally, only o ne ta b les poon of d eter g ent is n eed e d for
anormalwashload.Moreheavilysoileditemsneedmoredetergent.Alwaysaddthe
deterg ent ju st before sta rti n g th e di s hwa she r, oth er wi se it co uld g et dam p a nd wil l n ot
di s sol v e pr ope r ly.
Concentrated Detergent
Detergent Tablets
Detergent Dispenser
co nventio nal, alkaline dete rgen ts w ith caus tic comp onents
low alkaline co ncentrated detergents with n atural enzymes
Nor ma lly ne w pu l ver is ed det e rge nt is wi th out phos ph a te. T hus the wat e r so ft en er fu nct i on of
phos ph ate i s not give n. In this ca se w e r ecom me nd t o fi ll s a lt i n th e sa lt conta in er even whe n
the h ard ne ss of water is o nly 6 dH. If dete rgents w itho ut phosphate are used in the case of hard water
of t en whit e s p o ts ap pea r o n dishe s a nd g l a s s es. I n thi s c a se plea s e ad d more det e rge nt to rea c h
better r esu l ts . Dete rgen ts with o ut chl or ine do on l y bl e ac h a l it tle. St ro ng a nd c olo u red sp o t s wi ll no t
be r emove d co mple t ely. In thi s c ase p l e a se c hoose a p ro gr a m wi t h a h igh e r temp e rat u r e.
Amount of Detergent to Use
Prop er U se of De terg e nt
Use only detergent s pecifically m ade for the use in dishwashers. Keep your detergent fresh and dry.
Don't pu t powdered d etergent into the dispenser until you're re ady to wash dishes.
Dishwasher detergent is corrosive! Take care to keep it out of reach of children.
Al way s a dd th e dete rg en t j us t b efo re st ar tin g ea ch w as h cycl e.
Only use branded detergent aid f or dishwasher.
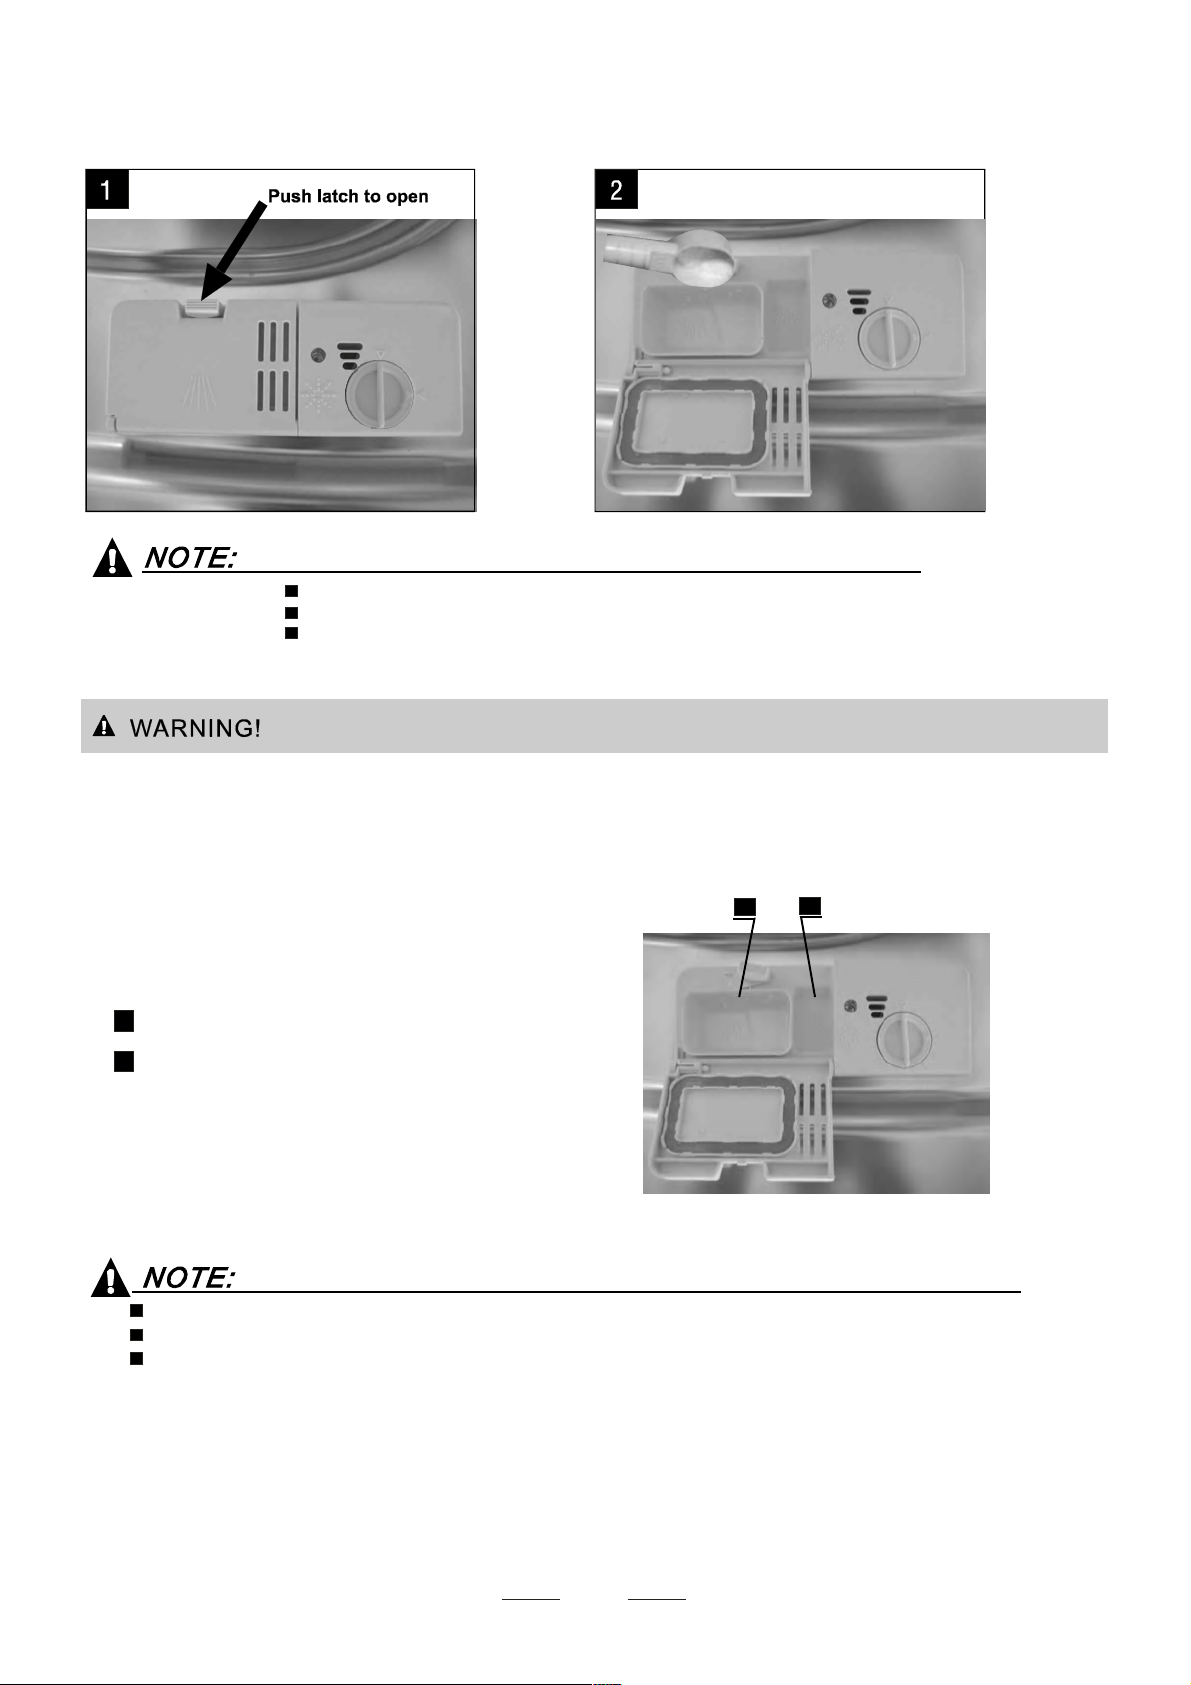
If the lid is closed: press release button. T he lid will sp ring open.
5
Please observe the manufacturer's recommendations on the detergent packaging.
Please aware, that according to the level soiling and the specific hardness of water d ifferences are possible.
You find information about the amount o f detergent for the single program me on this p age.
dete rgen t do se i n the pre- was h de terg ent c ham ber. Th is d et er gen t will take effe ct d uri ng the pre -wa sh p has e.
If the dish es are heavily soiled, place an a dditiona l
Close the lid and press until it locks in place.
Recommenda tions as stated on the detergent packaging.
Pl ease o b ser ve t h e m anu fa ct ur ers do sing a nd sto ra ge
approxim ate ly 5g of detergent
The place of pre-wash cycle detergent placed ,
B
MIN means approximately 20g of detergent.
The place of main wash cycle detergent placed ,
A
illustrate d on the right:
The mar ki ng indic a te s the dos ing le vels , a s
Fi ll t h e d e ter gent disp ens er w it h d eter gen t.
Fill in Detergent
A
B
Cutlery with wooden, horn china or
mother-of-pearl handles
Plast ic ite ms that are n ot h eat resis tant
Older cut lery with glued parts t hat are n ot
te m per at u re res ist a nt
Bonded c utl er y item s or dish es
Pewter or coo per i tems
Crystal glass
Steel items subj ect to r usting
Wo od e n p l a tt e rs
It e ms ma de fr o m sy nthe t ic f ibr e s
Som e type s of g la sse s ca n be co me
dull af ter a lar ge n um b e r of w ash e s
Si lv e r and alu min u m p arts h av e a
tende nc y to disc olou r d ur ing was hing
Glaz ed pat tern s may fad e if ma ch ine
was hed freq ue ntly
Are not suitable
Are of limited suitability
Dishes and items of cutlery must not lie inside one another, or cover each other.
To avoid d a ma ge to gl asse s, th ey mus t not touc h.
Load large items which are most difficult to clean into the lower basket.
The upper basket is designed to ho ld more delicate and lighter dishware such as glasses, coffee
and tea cups
Long bladed knives stored in an upright position are a potential hazard!
Long and/or sharp items of cutlery such as carving knives must be positioned
horizontally in the upper basket.
Please do not overload your dishwasher. This is important for good results and for
reasonable consumption of energy.
Load holl ow ite ms suc h as cup s, glasses, pans etc. With t he ope ning f aci ng downwa rd s s o that
water can not collect in the con tainer or a deep b ase.
Use a mild detergent that is described as 'kind to dishes'. If necessary, seek further
inf orma tion fro m t he deter ge nt m anu factur ers.
Fo r particu lar items, select a p rogram w ith a s lo w a tempera ture a s p oss ib le.
To preven t da mage, take g lass and cut lery ou t of the dis hwa sher as so on as poss ible
aft er the pr ogram h as ended.
Consider buying utensils which are identified as dishwasher-proof.
(F or b e st p er f or m an ce o f th e dishw a sh er, fol l ow t hese lo ad i ng g u id eli ne s.
Featu res and ap pearance of baske ts and cutler y ba sket s may vary fr om your mod el.)
Sc ra pe off any la rg e a mo unt s of le ft over foo d. Sof ten re mna n ts of bur nt fo od in pa ns.
It is not necess ary to rinse t he d ishes u nder running water.
Pl ace ob je cts i n t he dis hwa s her in fol l owi ng wa y :
1.I tems su ch a s cu ps, g la sses, po ts /pa ns, etc. a re f a ced dow nwa rds.
2.Cu rved it ems, or on es with reces s es, s hou ld b e l oade d a sla nt so th at wate r can run off.
3.Al l u tens ils are st acked secu r ely and can not ti p o ver.
4.Al l u tens ils are pl aced in t he way t hat t he spray ar ms can rot ate free ly d urin g w a shi ng.
Very sm al l it ems s ho uld n ot b e w ashe d i n the dish washe r as th ey c ould ea s ily fall out of th e basket.
To pr e ve n t wa t er d r ip p i n g f r om t h e u p pe r ba s k e t i n t o t h e lo w e r ba ske t , w e re c om m e n d th a t yo u
empt y the lowe r bask et f irst an d t he n the upp er ba sk et.
6
7
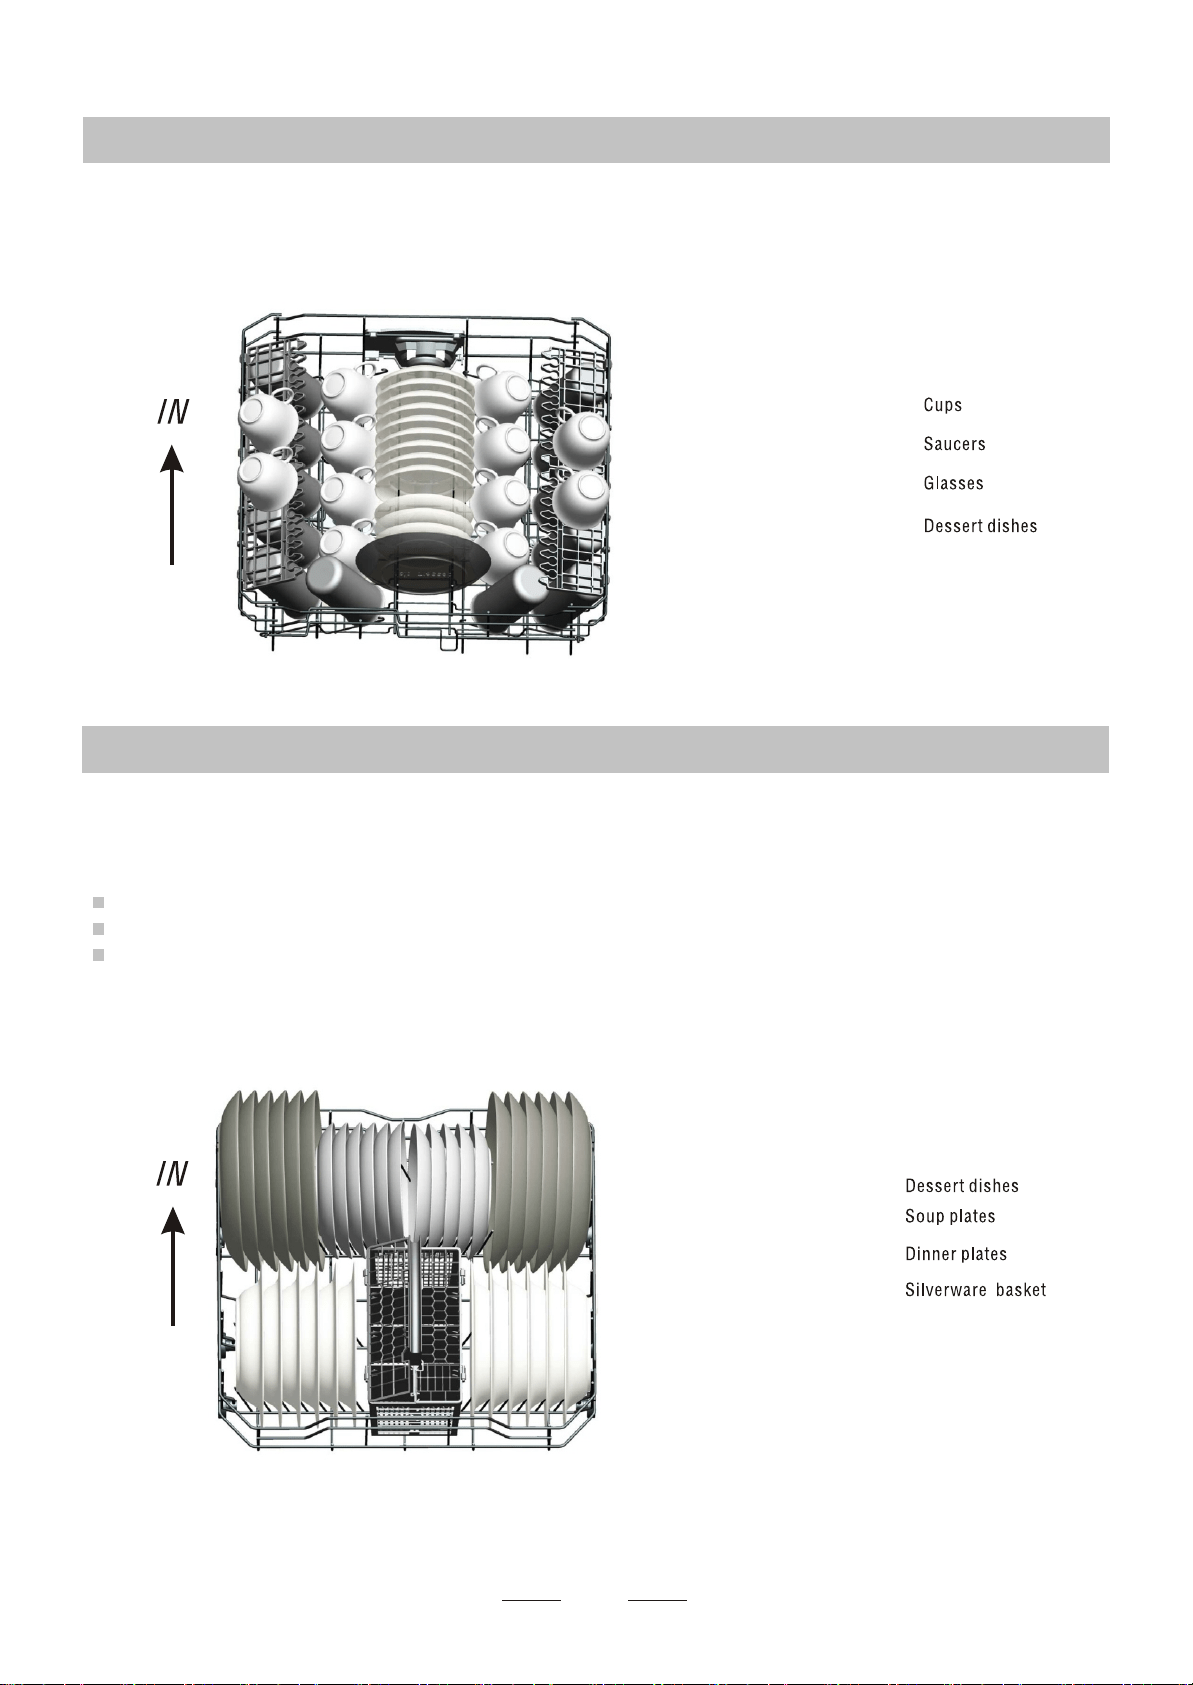
The upper basket is designed to hold more delicate and lighter dishware such as glasses, coffee
and tea cups and saucers, as well as plates, small bowls and shallow pans (as long as they are
not too dirty).
Position the dishes and cookware so that they will not be moved by the spray of water.
Loading the Upper BasketLoading the Upper Basket
We suggest that you place large items and items that are the most difficult to clean into the lower basket
such as: pots, pans, lids, serving dishes and bowls, as shown in the figure below.
It is preferable to place serving dishes and lids on the side of the racks in order to avoid blocking the rotation of the
top spray arm.
Loading the Lower BasketLoading the Lower Basket
Pots, serving bowls, etc, must always be placed top down.
Deep pots should be slanted to allow water to flow out.
Please be reminded that:
The Bottom Basket features folding spikes so that larger or more pots and pans can be loaded.
4
5
6
7
1
2
3
4
1
3
3
2
4
4 4
5 5
7
6
6
1
1
1
8
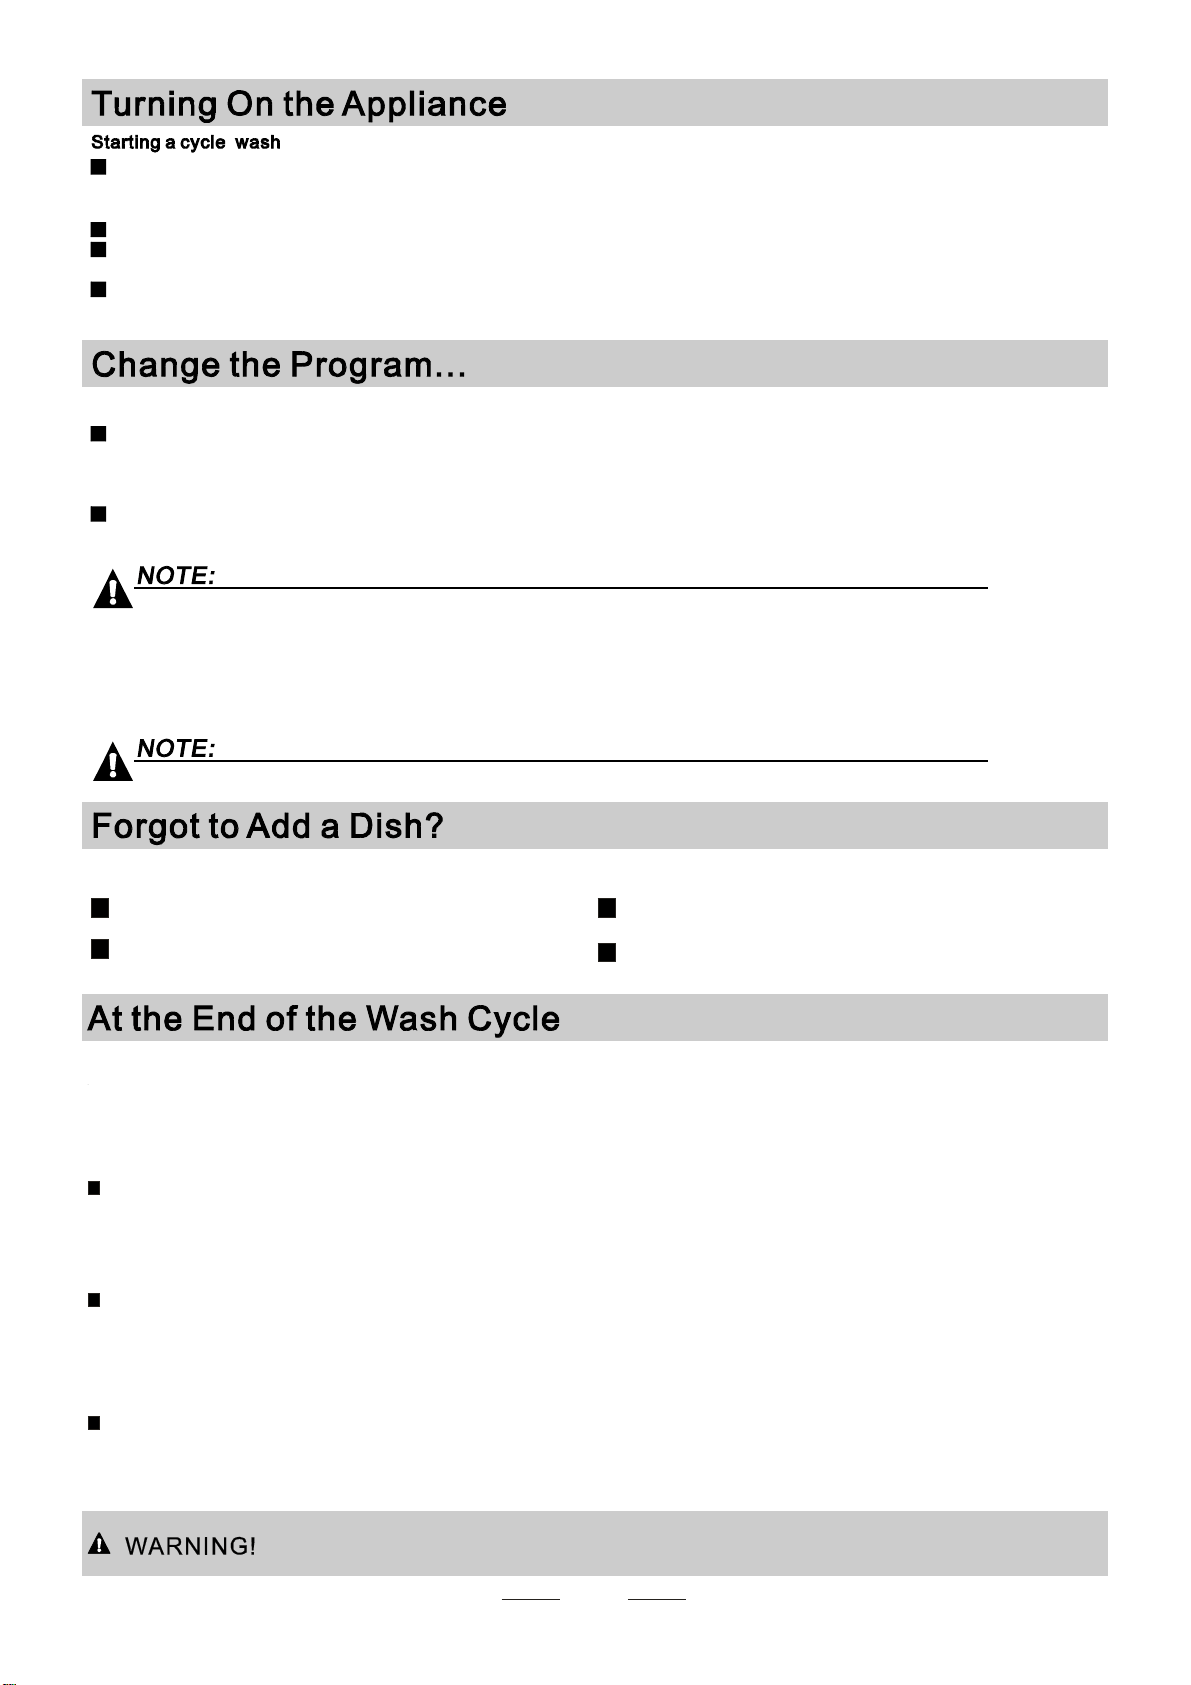
Cutlery should be placed in the cutlery basket with the handles at the bottom. If the rack has side baskets, the
spoons should be loaded separately into the appropriate slots, especially long utensils should be placed in the
horizontal position at the front of the upper basket as shown in the picture.
Folding Spikes of Lower Basket
For better stacking of pots and pans,
the spikes can be folded down as
show in the picture right.
Cutlery BasketCutlery Basket
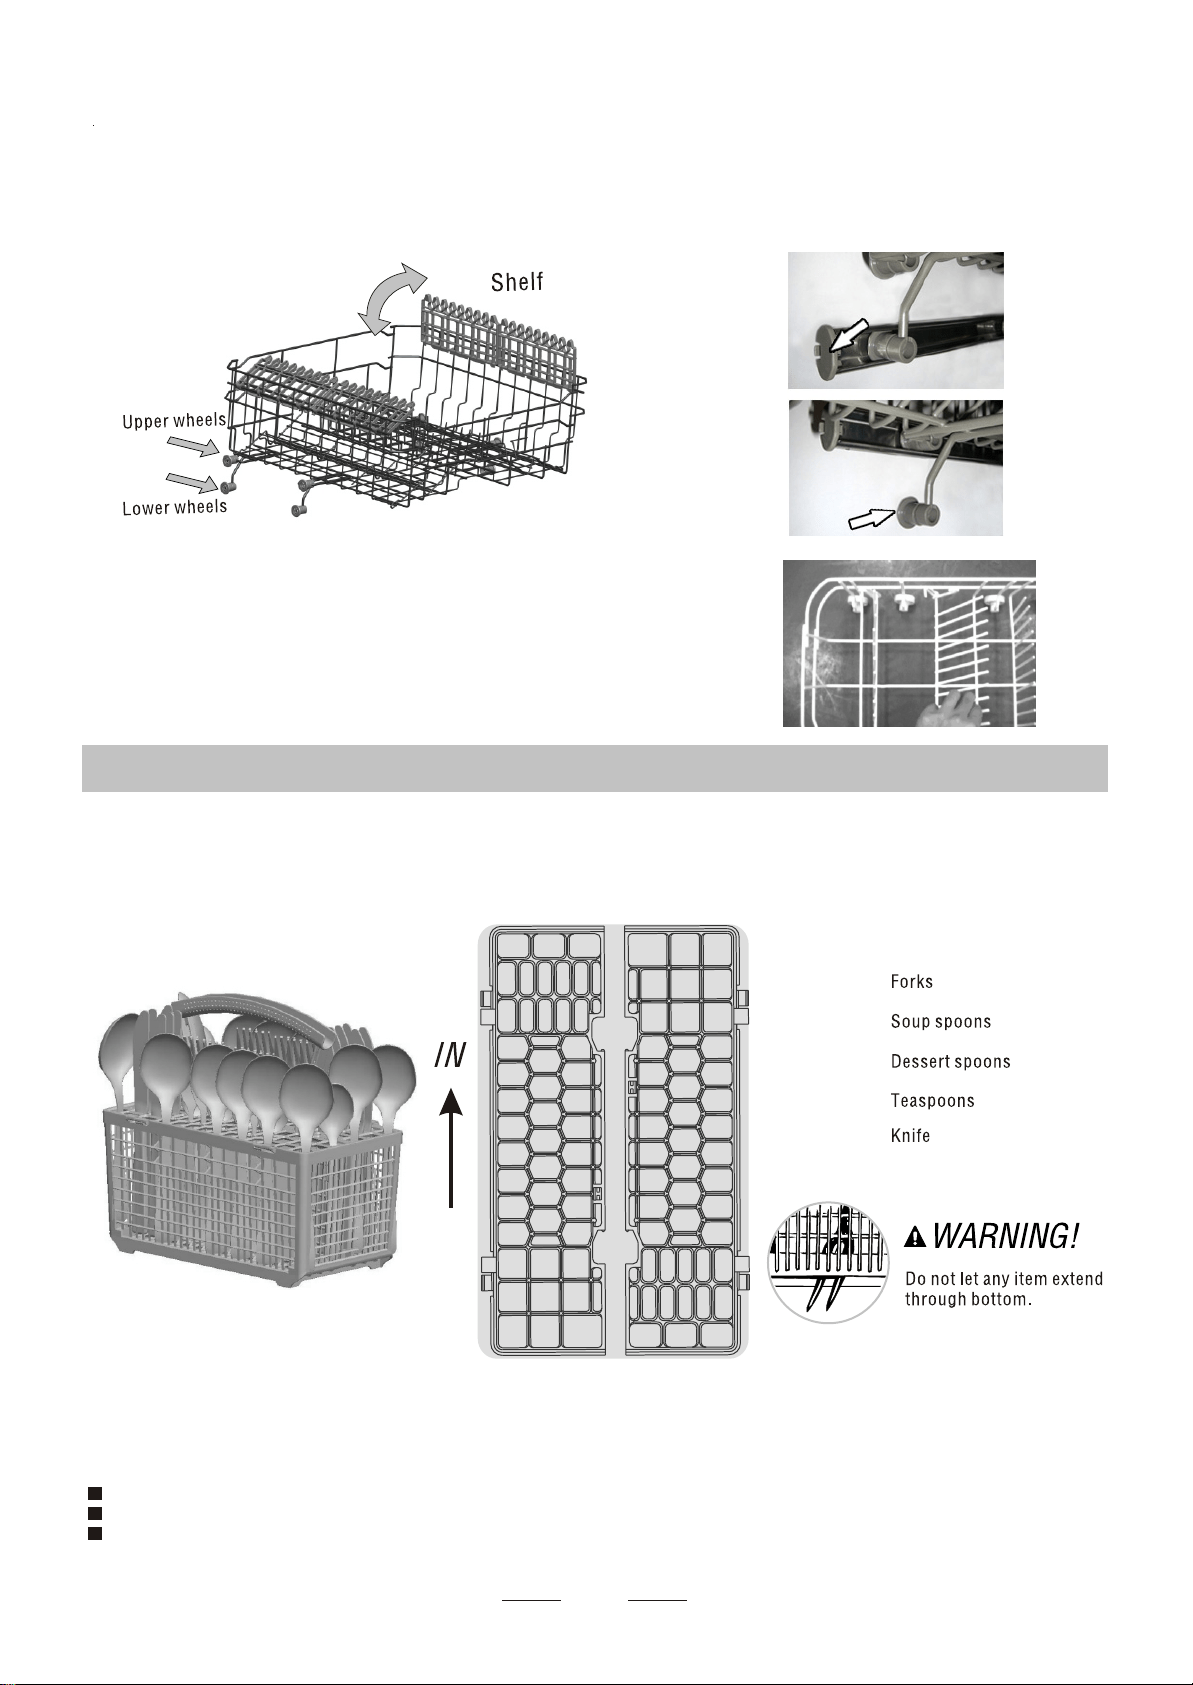
Adjusting the Upper Basket
The height of the upper basket can be adjusted in order to create more space for large utensils
both for the upper/lower basket. The height of the upper basket can be adjusted by placing the
wheels on different height of the rails. Long items, serving cutlery, salad servers and knives
should be placed on the shelf so that they do not obstruct the rotation of the spray arms.
The shelf can be folded back or be removed when not required for use.
For personal safety and a top quality cleaning, place the silverware in the basket
making sure that:
For personal safety and a top quality cleaning, place the silverware in the basket
making sure that:
They do not nest together.They do not nest together.
Silverware is placed with the handles-down.Silverware is placed with the handles-down.
But place knives and other potentially dangerous utensils are placed handles-up. But place knives and other potentially dangerous utensils are placed handles-up.
4
2
1
5
3
4
3
5
2
5 5
4 4 4 4
41
2
3
2
3
2
3
2
3
2
1
1
1
1
1
5 5 5
3
5 5 5
4
444244
2
1
2
3
2
3
2
3
2
3
3
5 5 5
1
1
1
1
1
3

9
We re com mend you op en the d oor s lightly 50mm to assi st in dryin g of the di shes after every wash.
*AS/NZS 2007.1: Thi s progr amme is the test cycle. T he information for comparabilit y te st
in a cco rdan ce w it h A S/N ZS 2007. 1 , as fol lows :
Capacity: 12 setting
Po sit io n Upp er bas ket : upp er wh eel s o n ra ils
Rinse aid setting: 6
Meaning: need to fill rinse into the Rinse-Aid Dispenser.
()
For heavi l y soi l ed load s,
such as pot s, plat es, g la sses
and l ight ly so ile d pan s.
stand ard da ily cy cle .
For norm al ly s oi led loads,
such as pla tes, gl asses ,
bow ls and nor m ally
soiled pans.
For the he a vie st soi l ed loads ,
such as pots, pan s,casser ole
dis hes a nd dis he s that have
bee n sitt ing w it h dri ed foo d
on the m fo r a w hile.
Ashorterwashforlightly
soiled l oads t hat do not
nee d drying .
For di shes that need to be
rin sed and d rie d only.
Pr e-wa s h(5 0 )
Pr e-wa s h
Wa s h ( 65 )
Rinse
Rinse
Rinse (55 )
Drying
Pr e-wa s h(5 0 )
Wa s h ( 50 )
Rinse
Rinse (65 )
Drying
Wa s h ( 55 )
Rinse
Rinse
Rinse (50 )
Drying
Wa s h ( 40 )
Rinse
Rinse (45 )
5/25 g.
5/25 g.
5/25 g.
20 g.
160
110
130
30
80
15
12
23
8
Wa sh ( 4 0 )
Rinse (70 )
Drying
For normally soiled loads,
such as pots, plates,glasses
and lightly soiled pans.
standard daily cycle.
Pre-wash 50
Wash(50 )
Rinse
Rinse 70
Drying
3in1
1Pcs
160
15
12
1.3
0.82
1.5
0.5
1. 0
1.3
(*AS/NZS 2007.1)
3in1
In te ns iv e
Heavy
Normal
Rinse
Rapid
It is d an gero us to ope n the do or w hen washi ng , beca use the hot wate r may s cald you .
When the wo rking cycle h as fi nished, the buzz er of the dishwasher will soun d fo r 8 seconds, then sto p. Turn off
the appliance using the ON/OFF button, shut off the water supply and open the door of the dishwasher.
Wai t for a f e w m i n ut e s b efor e u nl oadi ng the d i s hw ashe r to a v oid h andl i ng t h e dis h es a n d u t e ns i l s w h i le they
are still hot and more susceptible to breakage. They will also dry better.
Switch Off the Dishwasher
1.Switch off the dishwasher by pressing the ON/OFF button.
2.Turn off the water tap!
The buzzer of the dishwasher moos for 8 seconds, only in this case the programme has ended.
Open the door carefully.
Hot dishes are sensitive to knocks. The dishes should therefore be allowed to cool down around 15 minutes
bef ore rem ovi ng f rom the app lia nce.
Open the dishwasher's door, leave it ajar and wait a few minutes before removing the dishes. In this way they
will be cooler and the drying will be improved.
Unloading the dishwasher
It is normal that the dishwasher is wet inside.
Emp ty th e low er ba ske t firs t a n d the n t he up per on e. T h is wil l avo id wat er d ripp in g fro m the up pe r Bas ket on to
the dishes in the lower one.
the machine will keep on working after 10 seconds.
off the ma in power and wate r s upply before c allin g a serv ice.
If yo u op en the do or dur ing was hin g, the ma chi ne w i ll pa us e. W h en y ou clo se the doo r ,
.
If a ll th e li g hts b egin to gl im me r, th a t i n d ica te s th e ma chi n e is ou t of o rd e r, plea se tu rn
.
10
1Drawoutthelowerandupperbasket,loadthedishesandpushthemback.
It is comm ended t o l oad th e lo wer baske t f irst, then th e u pper o ne (se e th e se ct ion entitle d
Loading the Dishwasher ).
2Pourinthedetergent(seethesectionentitledSalt,DetergentandRinseAid).
3Inserttheplugintothesocket.Thepowersupplyis220-240VAC/50HZ,thespecificationofthe
sock e t i s 10 A 25 0VAC. M ak e su re t hat the w ate r sup ply i s turn ed on to fu ll pr es su re.
4Closethedoor,andselectthedesiredprogrammebypressingthecorrespondingbutton,thenthe
di sh was he r wi ll st ar t t o wo rk i n 3 s ec on d.
Premise:
You can modif y th e wa s hing pro gram , W he n the dis hwas he r just ru n s fo r a short ti me .
Otherwise , the detergent may have already been released, and the appliance may have
alr eady dr aine d th e wash wate r. If this is the ca se, t he det ergen t d ispe nse r mu st be
refil led ( see the se ction enti tled " L oadin g the De tergent " ).
nt itle d " St art i ng a wa sh c ycl e. . . " ).
1
2 Pres s the bu tt on of de sir ed p ro gr am mor e t ha n 3 seco nds u nt il it's In d ica to r is on , af te r
10 sec ond s th e ma chin e w ill kee p wo rki ng. E
Aforgottendishcanbeaddedatanytimebeforethedetergent cupopens.
Load the forgotten dishes.
Close the door, the dishwasher will start running again
after 10 seconds.
After th e spray arms stop working, yo u can open the door
completely .
2
Open t he door a little to stop the washing.
1
3
4
The program lights show the state of the dishwasher:
a) All pro gram lights off---------------stand by
b) One of the program lights on----------pause
c) One of the program lights blinking----- r un
The filter prevents larger remnants of food or other objects from getting inside the pump.
The residues may block the filter, in this case they must be removed.
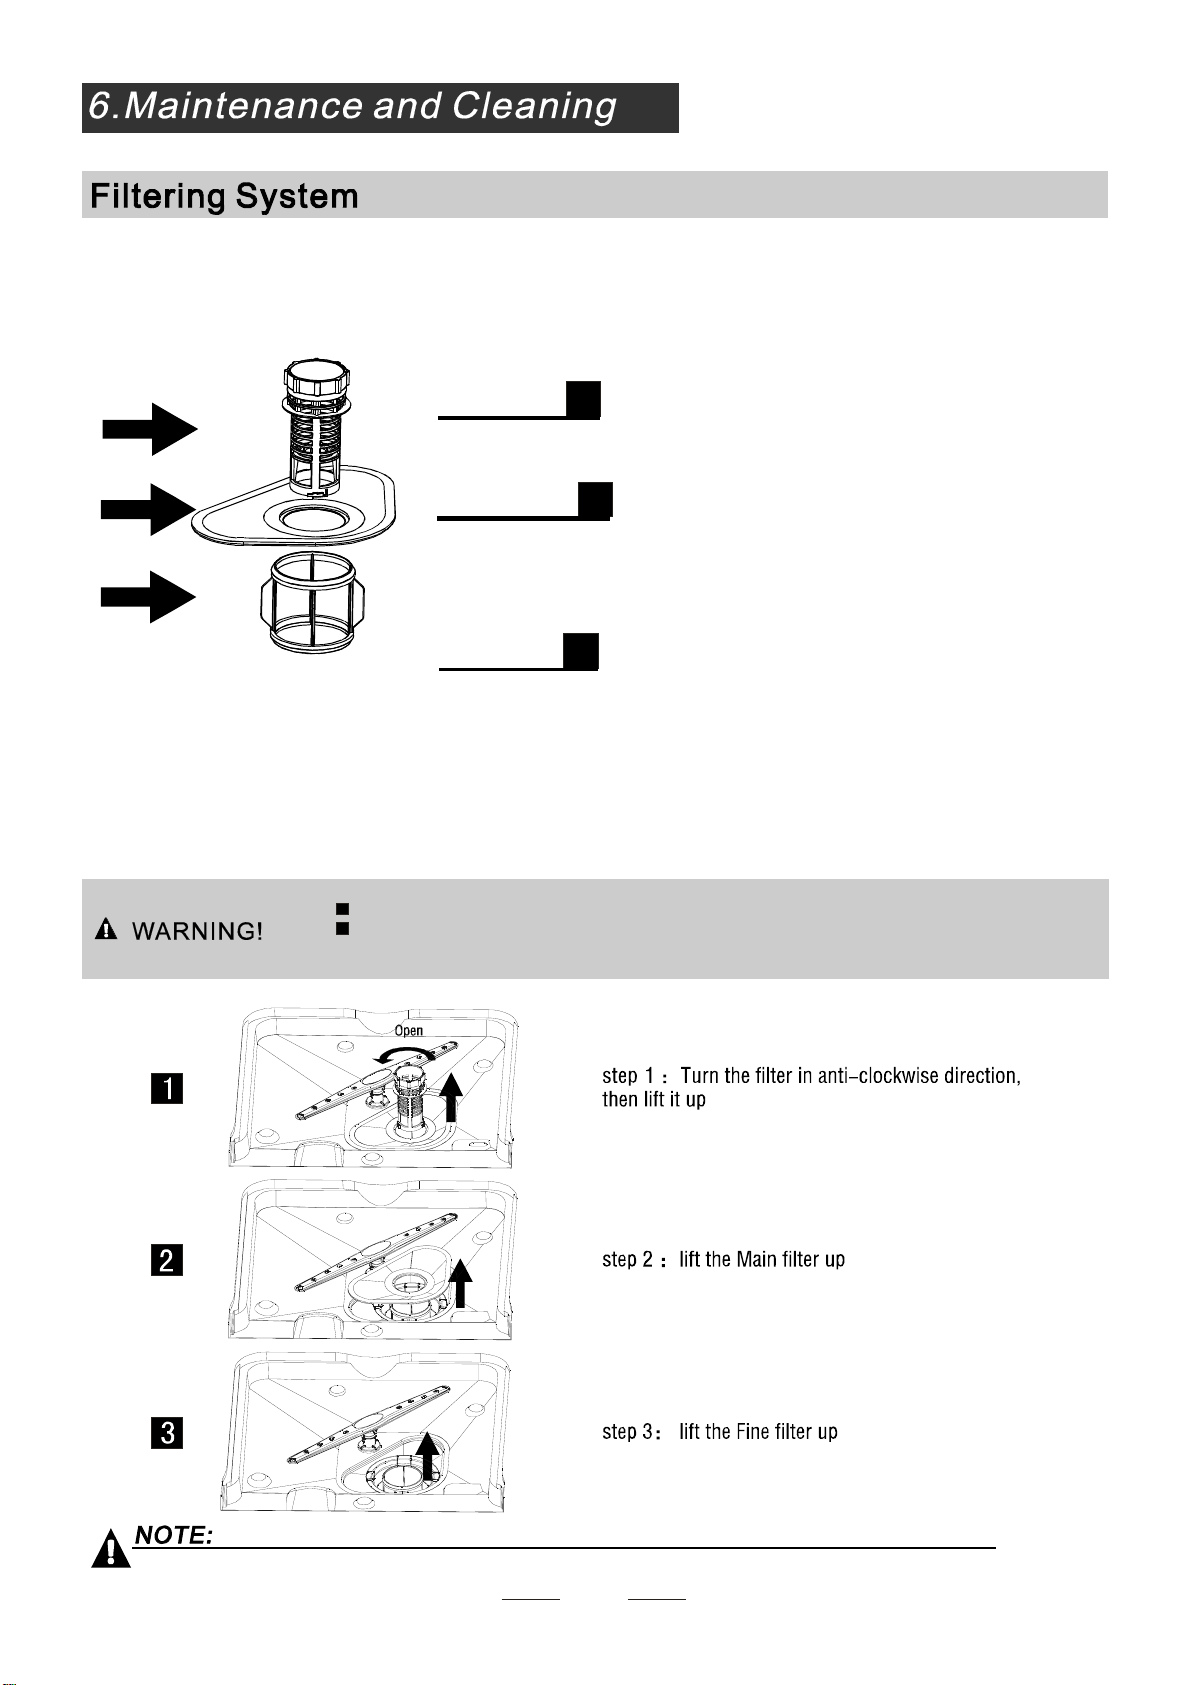
The filter system consists of a coarse filter,a flat (Main filter)
And a microfilter(Fine filter).
Fo od and soil part icles trap ped in th is fi lter are p ulve rize d b y a
specia l jet on t he l ower spray arm a nd w ashe d d own to d rain.
La rger ite ms, such as p ieces of bon es o r gla ss, t hat coul d b lock
the drain are trapped in the coa rse filter. To remove the i tems
caugh t by the filter, ge ntly s que eze the tap on th e t op of this
filter a nd lift out.
Th is f ilt er holds soi l and food residu es in the sump a rea a nd
pr eve nts i t from be ing r ede posi t o n the dish es d uri ng wa sh c ycle .
Ma i n fi lt er
1
Coarse filter
2
Fine filter
3
2
3
1
Filter assembly
The filter efficiently
For best performance and results, the filter must be cleaned regularly. this reason, it is a good idea to
remove the larger food particles trapped in the filter after each wash cycle by rinsing the semicircular filter and
cup under running water. To remove the filter device, pull the cup handle in the upward direction.
remov es foo d pa r t i cles fr o m t h e wash wat e r, al l ow ing it t o b e recy cled d u r ing the cyc l e .
For
The d ishwasher must never be used without the filters.
Improper replacement of the filter may reduce the performance level of the appliance
and damage dishes and utensils.
11
When following th is proc edure from step1 to step 3, the filter system will be removed;
when following it fr om Step 3 to Step 1, the filter system will be installed.
Th e co ntro l pan el can be cl e ane d by u sin g a light ly da mp e ne d clot h.
After cleaning, make sure to dry it thoroughly.
For the e xte ri or, use a good appli anc e poli s h wax .
Nev er us e s h arp o bj ect s, sc o uri ng pa ds o r h arsh c lea n ers on a ny p art o f t he di s hw ash er.
Protect Against Freezing
1.Cut off the electrical power to the dishwasher.
2.Turn off the water supply and disconnect the water inlet pipe from the water valve.
3.Drain the water from the inlet pipe and water valve. (Use a pan to catch the water)
4.Reconnect the water inlet pipe to the water valve.
5.Remove the filter at the bottom of the tub and use a sponge to soak up water in the sump.
please take frost protection measures on the dishwasher in winter. Every fter washing cycles,
please operate as follows
time a
-Inspectthefiltersforblockingaftereverytimethedishwasherhasbeenused.
-Byunscrewingthecoarsefilter,youcanremovethefiltersystem.Removeanyfoodremnantsand
clea n the fil ters under runn in g water .
Remarks:
Cleaning the Filter
Cleaning The Door
To c l e an the coar s e f i lt er a nd t he f i n e f il te r, us e a c lea n i n g b ru s h. R e as s emb le t h e f i lt er p ar ts as s how n in the f i gu r es
on t he last pa ge a nd r ein sert t he e nti re assem bly in the dis hwa sher, po sitio ning i t in i ts s eat and pres sing dow nwa r ds .
The entir e filter ass embly sh ould be cle aned on ce a week.
Wh en c lea ni n g the fi l ter s, don 't k noc k on t h em. O t her w i se, th e fi l t e rs c o uld be
co ntorte d a nd the per for man c e of t he di sh wa s h er co uld b e dec r eas e d .
To c le a n th e e dge ar o u n d t he d oor, y o u s h o u l d u s e o n ly a so f t wa r m, d am p cl ot h.
To av oi d p e ne tr at i o n o f wa te r i n t o t h e d o o r l o ck and e l ec t r ica l co m po n en t s, d o no t
use a spray cle aner of any ki nd.
Nev er u se a spr ay c leane r t o cl ean t he door pan el as i t m ay dam age the door loc k
and elect r i cal c omponent s .
Abra s ive a gen ts or so me p aper to wel s s houl d n ot be used bec a use of the risk of
sc r a t c hi ng o r leaving spot s on the s tain les s steel surfa ce.
Cleaning the Spray Arms
12
If your dishwasher cannot work because of t he ice, please contact professional service person s.
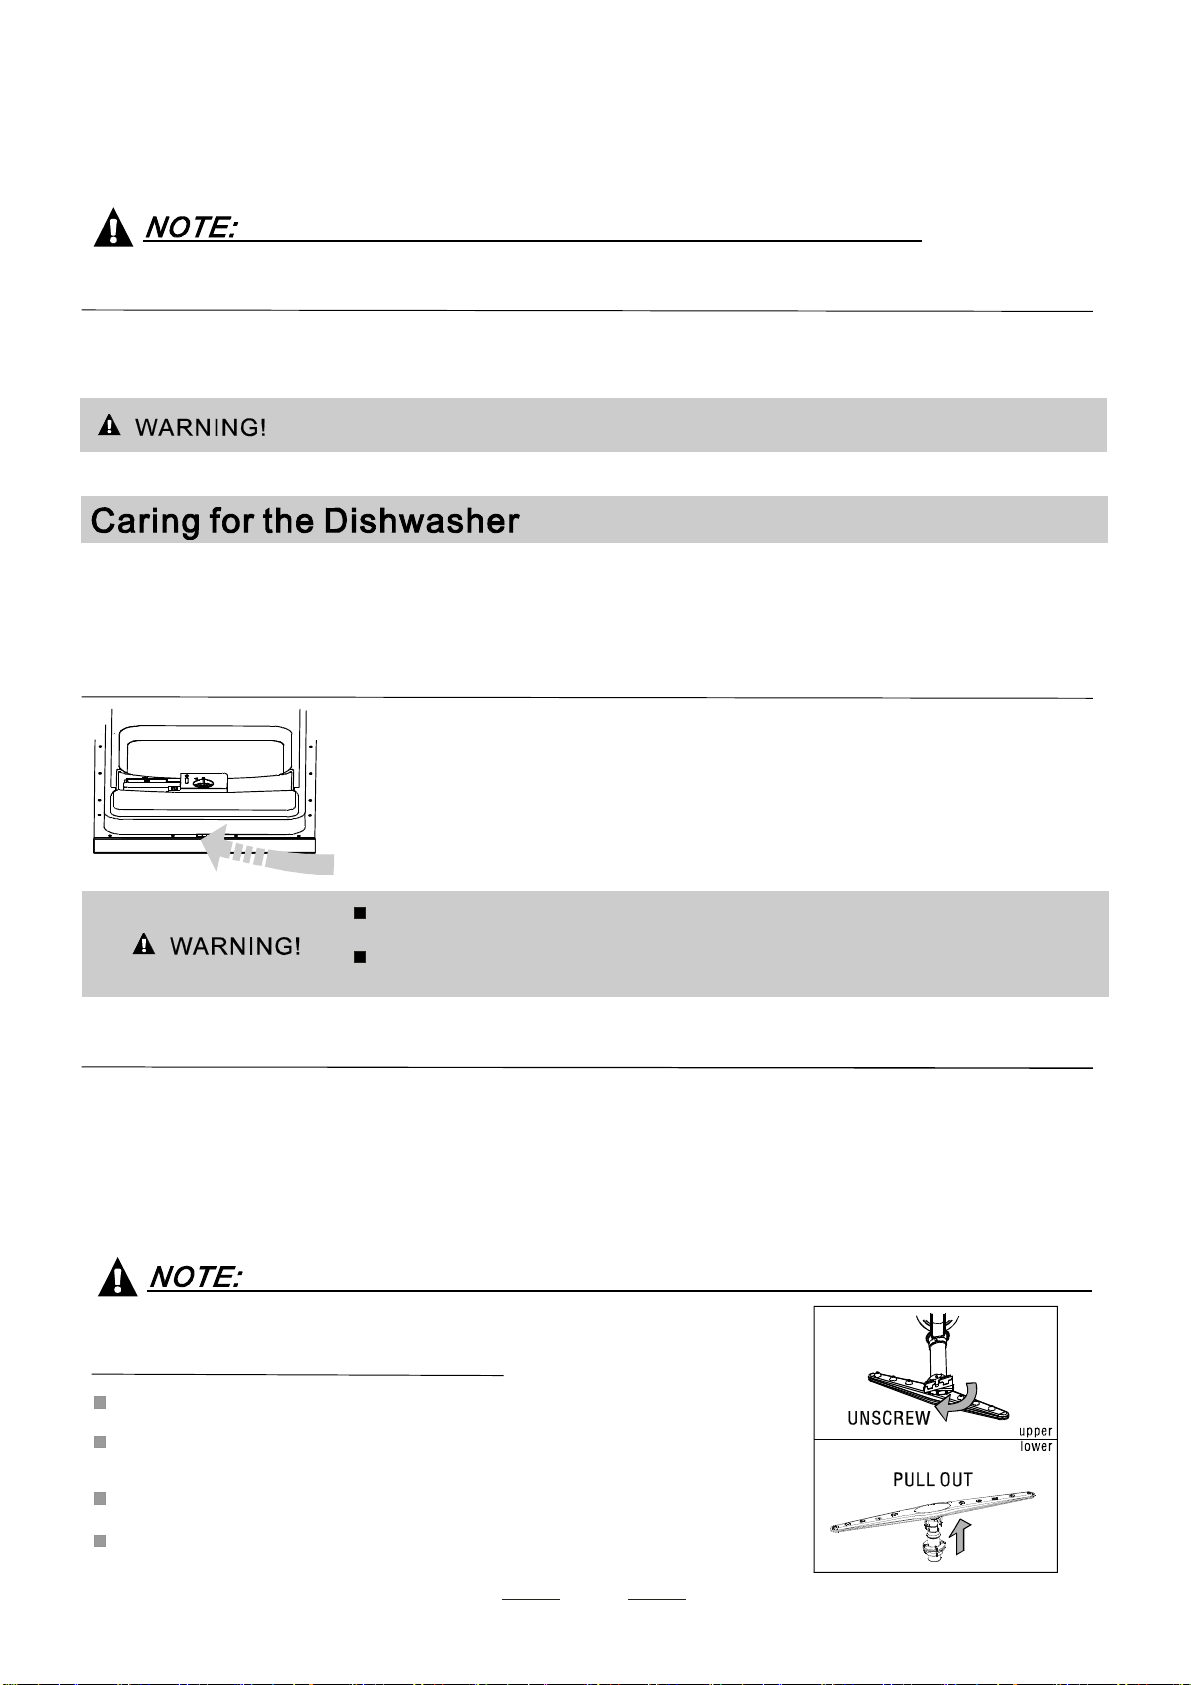
It is necessary to clean the spra y arms regularly for hard
water chemicals will clog the spray arm jets and bearings.
To rem ove the spra y ar m s, scre w off the n ut cl ockwis e to
take out the washer on top of the spray a rm and remove t he
arm.
Wash the arms in soapy an d warm w ater and u se a s oft
brush to clean the jets.
Replace them after rinsing them thoroughly.
It is recommend t hat y ou run a was h cy cle with the
di s hwa s h er e m p ty a nd t h en r emo ve the p l ug fr om th e
soc ket , tu r n off t h e wate r sup ply a nd l e av e th e do or of
the a ppliance slightly open. This will help the d oor
seals to l as t lon ge r and prev ent o do u r s f r om for m ing
wit hi n t h e a p pli an ce .
If the appliance must be moved, tr y to keep it in the
vertical position. If absolutely necessary, it can be
positioned on its back.
One of th e fa c to rs tha t cau se odou rs to form in t he
dishwasher is f ood th at re main s tr appe d i n the seal s.
Periodic clea ning with a damp sponge will p reve nt t his
from occurring.
Ensure the voltage and frequency of the power being corresponds to
those on the rating plate. Only insert the plug into an electrical socket which is earthed
properly. If the electrical socket to which the appliance must be connected is not
appropriate for the plug , replace the socket, rather than using a adaptors or the like as
they could cause overheating and burns.
Plea se look at th e r ating labe l to know the r at ing v oltage and conn ect the dishwash er to the appropr iate pow er s uppl y.
Use the required fuse 10 amp , time delay f use or c ircuit breaker recommended and provide separate circuit serving
only this appl ianc e.
This appliance must be earthed. In the event of a malfun ction or breakdown, earthing will reduce the risk of
electric shock by providing a path of least resistance for the electric current. This appli ance is equipped with a
cord having an equipment-earthing conductor and an earthing plug. The plug mu st be plugged into an
ap propriate outlet that is installed and earthed in accordance with all local standards and requirements.
Posi tion the appli anc e in the d esired locati on. T he back should r est against the w all behind it, and the side s,
along the adj acent cabine ts o r wa lls. T he dis hwasher i s equ ippe d with water supply and drain hoses th at can
be positio ned ei th er to t he r igh t or the l eft s ide s to facilit ate prop er i nstall atio n.
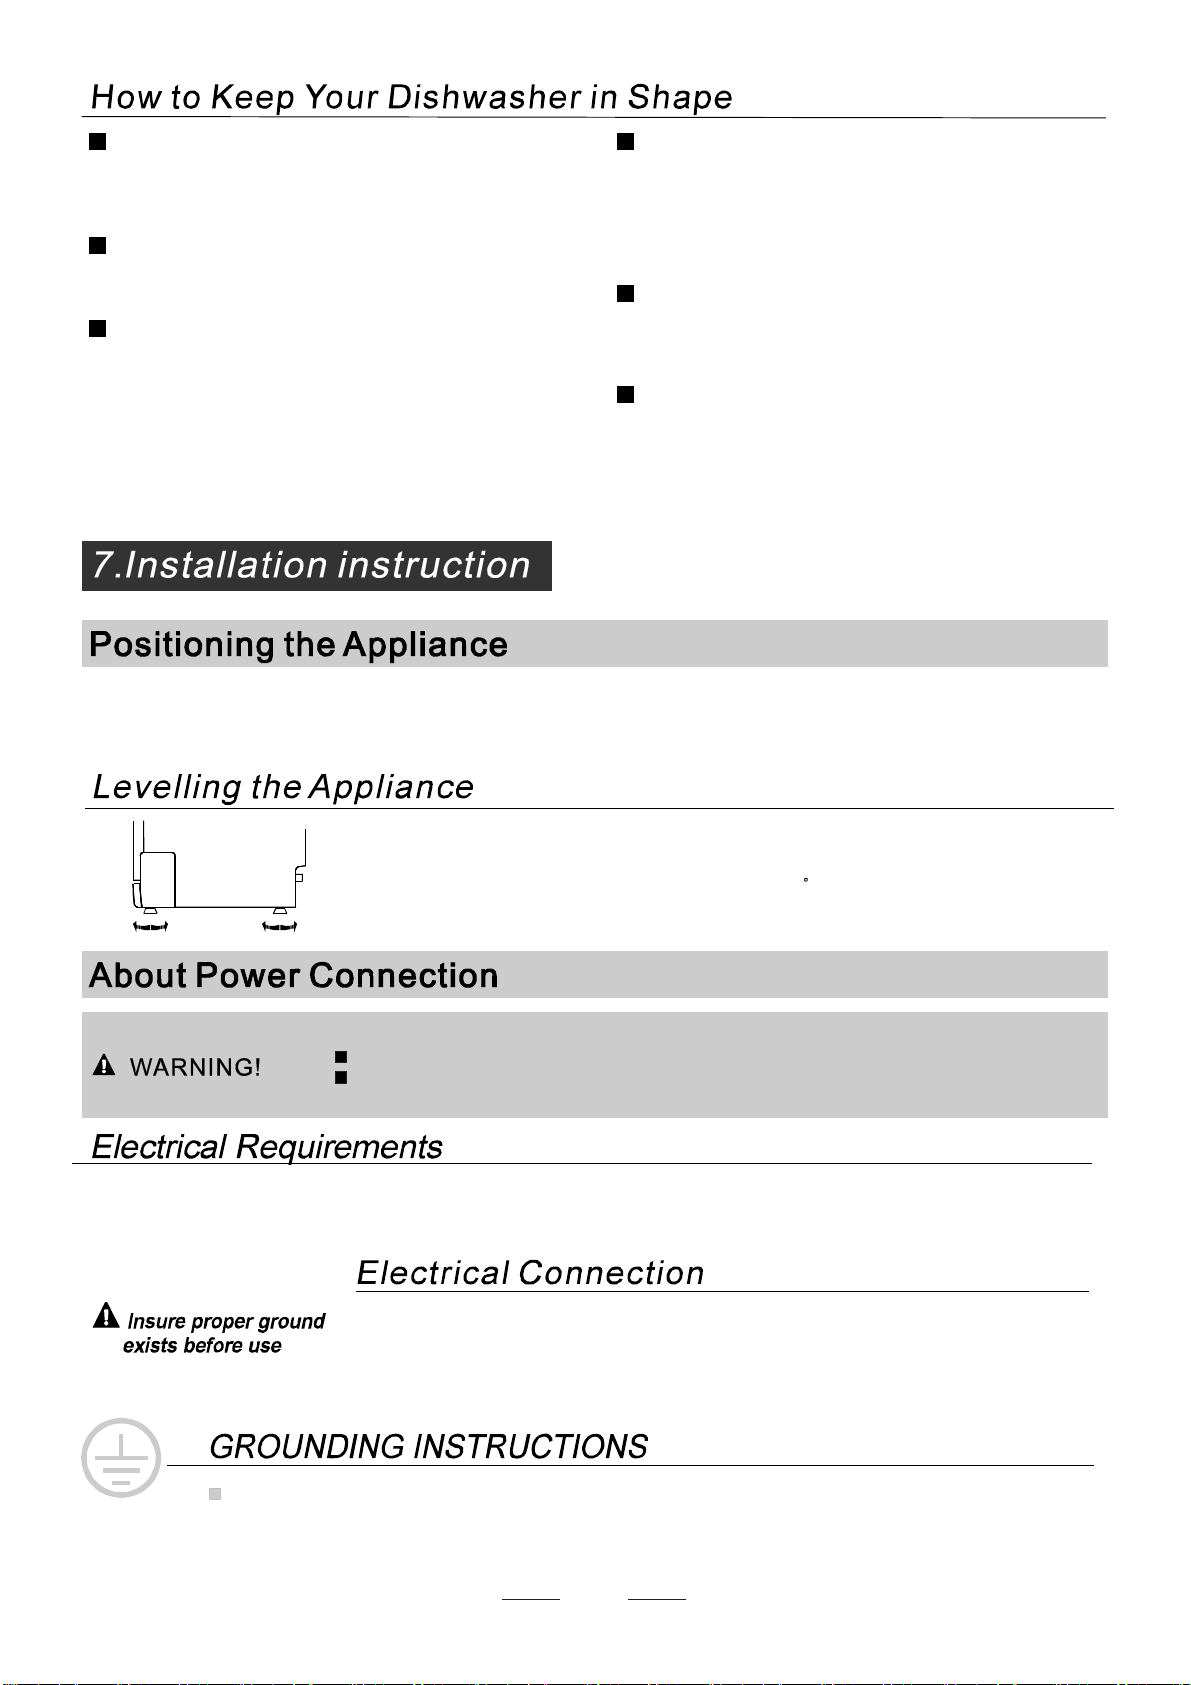
Once the appliance is positioned for levelling, the height of the dishwasher
may be altered via adjustment of the screwing level of the feet. In any case,
the applia nce should not be inclin ed more than 2 .
For personal safety:
DO NOT USE AN EXTENSION CORD OR AN ADAPTER PLUG WITH THIS APPLIANCE.
DO NOT, UNDER ANY CIRCUMST ANCES, CUT OR REMOVE THE EARTHING
CONNECTION FROM THE POWER CORD.
After every wash, turn off the water supply to the
appliance and leave the door slightly open so that
moisture and odours are not trapped inside.
Befo re cleaning or p erformi ng ma inten ance, always
remove the plug from the socket.
To cle an the e xte ri or a nd r ub ber p arts of the di shw ashe r,
do not use solvents or abrasive cleaning products.
Only use a cloth with warm soapy water.
To rem ov e spots o r st ains from the sur f ace of t he
interior, use a cloth dampened with wa ter an a little
vinegar, or a cleaning product made specifically for
dishwashers.
After Every Wash
Remove the Plug
No Solvents or Abrasive Cleaning
Mov ing t he A ppli ance
Seals
When not in Use for a LongTime
13
for personal safety:
DO NOT USE AN EXTENSIO N CORD OR AN ADAPTER PLUG WITH THIS APPLIAN CE.
DO NOT, UNDER ANY CI RCUMSTANCES, CUT OR REMOVE THE
FROM THE POWER CO RD .
EAR THING
CONNECTION
Connect the cold water supply hose to a threaded 3/4(inch) connector and make sure
that it is fastened tightly in place.
If the water pipes are new or have not been used for an extended period of time, let the
water run to make sure that the water is clear. This precaution is needed to avoid the
risk of the water inlet to be blocked and damage the appliance.
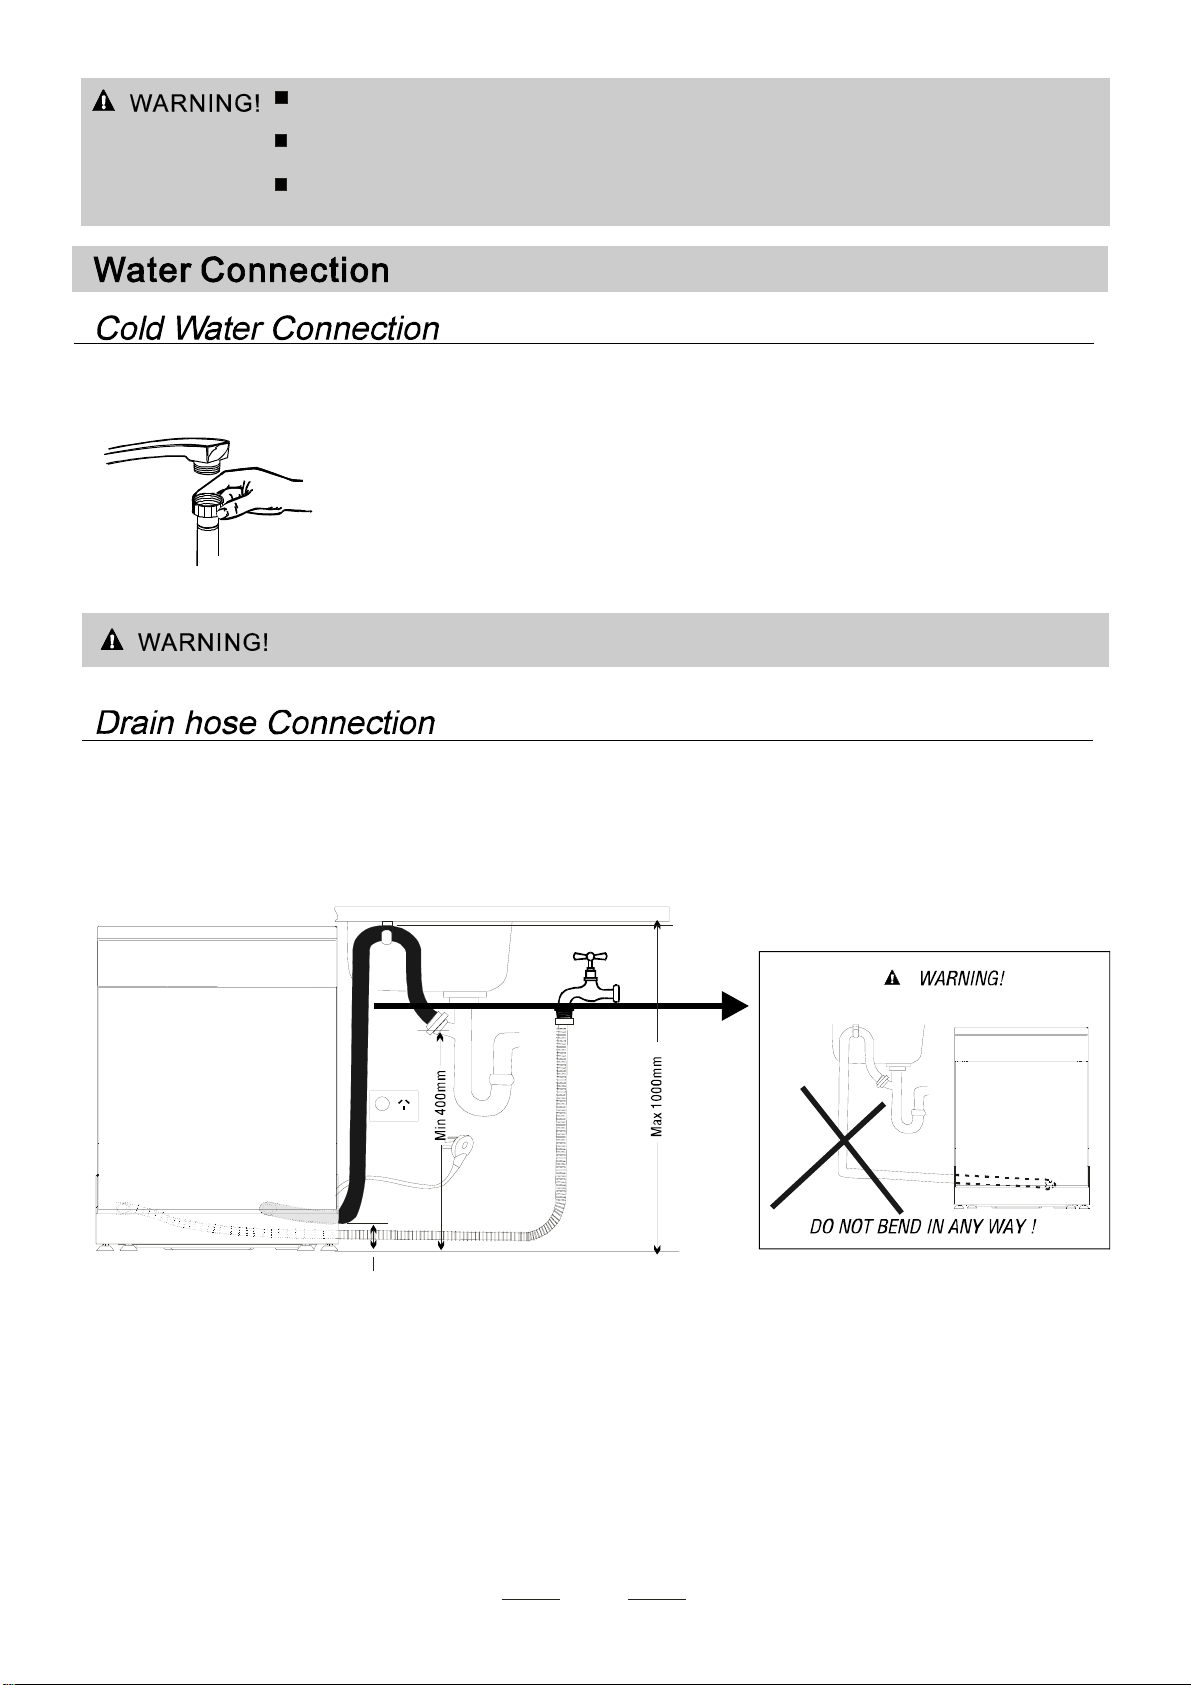
Insert the drain ho se into a dra in pipe with a minimum diameter o f 4 cm, o r let it run into the sink, making sure to
avoid bendin g or crimping. Use th e spe cial plastic s uppo rt th at comes wit h the appli ance. T he f ree e nd of th e hos e
must be a t a h eight between 40 and 100cm and must not be immersed in w ater.
Improper connection of the equipment earthing conductor can result in the risk o f an
electric shock.
Check with a qualified electrician or service representative if you are in doubt whether the
appliance is properly earthed.
Do not modify the plug provided with the appliance. If the plug does not fit properly to the
outlet, please have a qualified electrician to install a proper outlet.
Plea se clos e the h ydrant af ter us ing.
14
FRONT VIEW
15
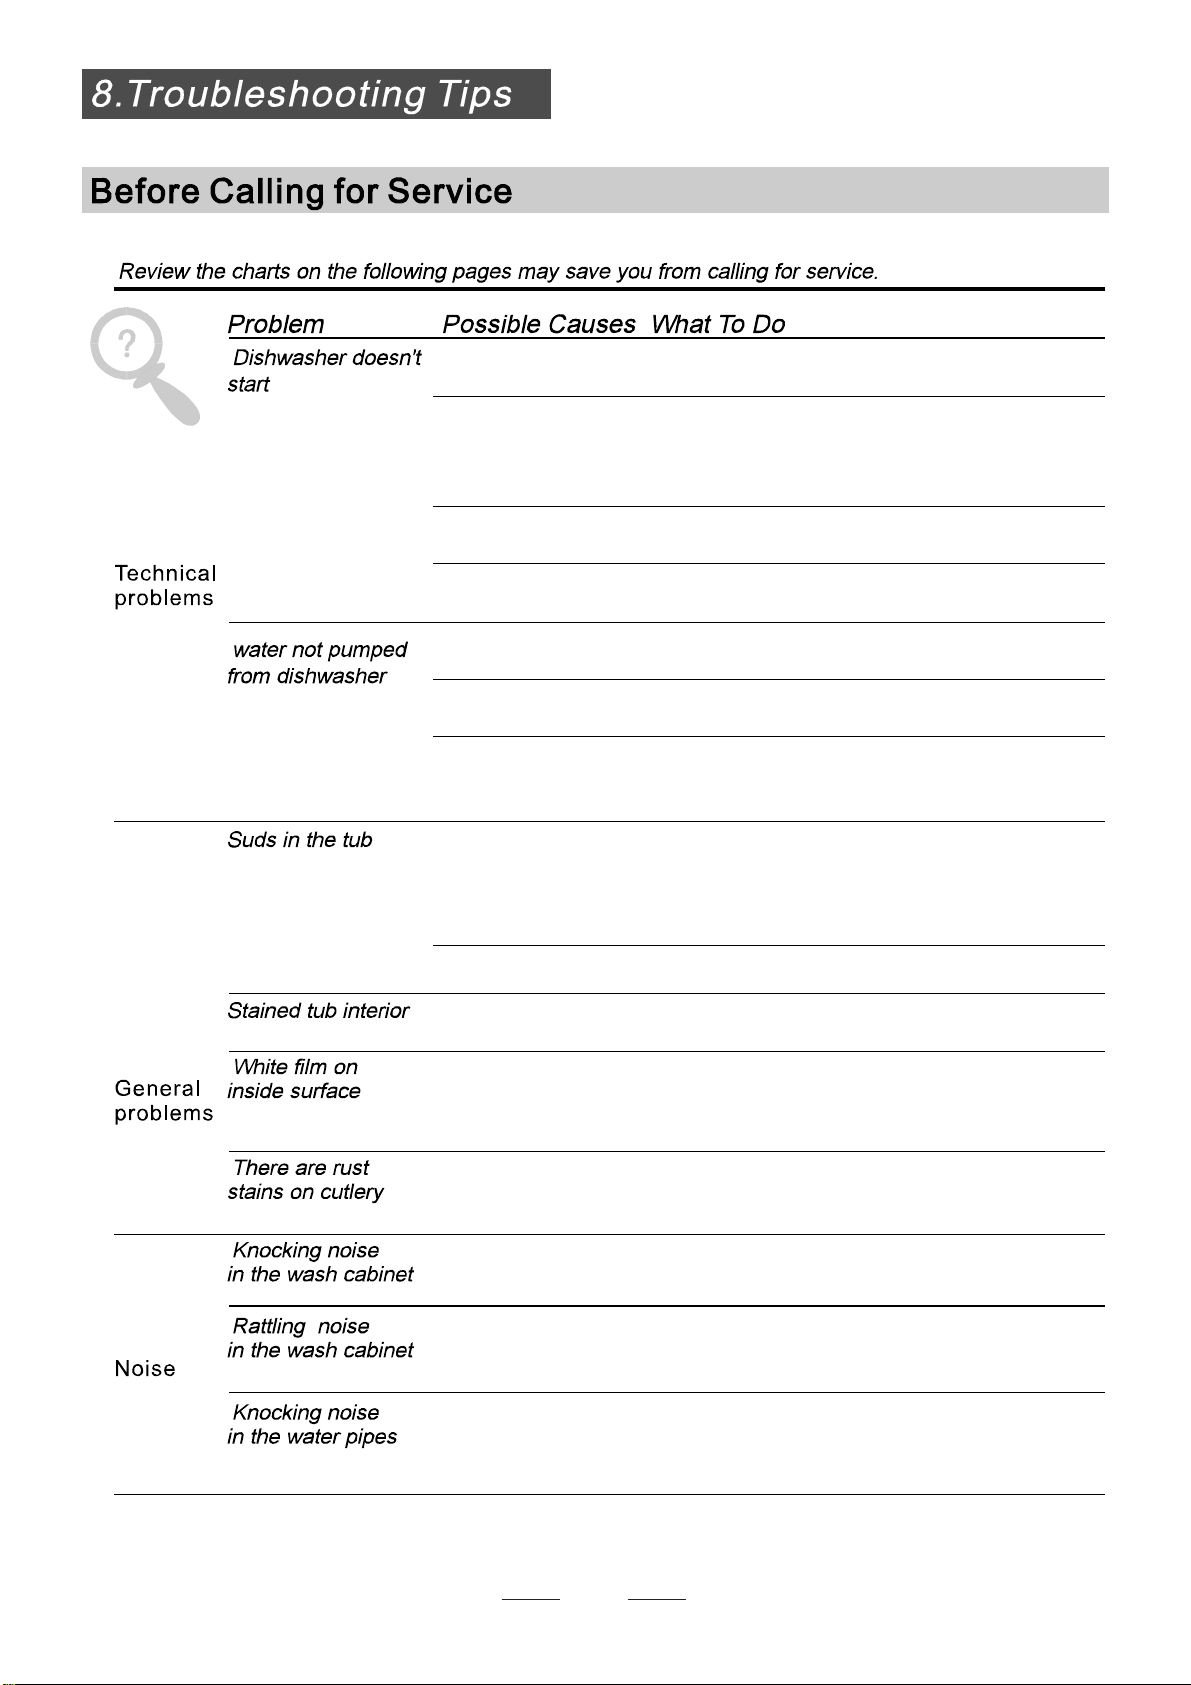
The following things should be checked before st artin g the dishwasher.
Syphon Connection
The waste connection must be at a he ight of be tween 50 cm (minimum) and 100 cm (maximum)
from the bottom of the di sh. T he water drain hose s hould b e fixed by a ho se clip.
The content of this manual is very helpful to the users.
After in stall ation, pl ease make sure to keep t his manual.
Extension Hose
If y ou ne ed a dr ai n h ose ext ens io n, make su re to use a sim ilar dr ain hos e.
It m ust b e no lo n ger than 4 met res; ot he rwise the cle ani ng effe ct of t he dish was he r c oul d be re duce d.
1
The dishwasher is level and fixed properly
2
The inlet valve is open
3
There is a leakage at the connections of the conducts
4
The wires are tightly connected
5
The power is switched on
6
The inlet and drain hoses are knotted
7
All packing materials and printings should be taken out from the dishwasher
Wa t e r O ut l e t
Connect the water drain hose. The drain hose must be correctly fitted t o avoid water lea ks.
Ens ur e that t he w ater in let h os e is not k in k ed or sq u a sh ed .
If th e sink is 1000mm higher from the floor, the excess water in hoses c annot be dra ined directly
into the sink. It will be necessary to drain excess water from hoses into a bowl o r suitable
conta ine r tha t is held out side and lower than t he si nk.
How to Drain Excess Water From Hoses
Fuse blown, or the
circuit breaker triggered
Re place fuse or reset circuit breaker. Remove any other
appliances sharing the same circuit with the dishwasher
Spilled rinse-aid Always wipe up rinse-aid spills immediately.
Hard water minerals
The affected items are
not corrosion resistant.
Aspayarmis
knocking against
an item in a basket
r
Items of crockery
are loose in the
wash cabinet
This m ay be caused
by on-site installation
or the cross-section of
the piping.
To clean the interior, use a damp sponge with
dishwasher detergent and wear rubber gloves.
Never use any other cleaner than dishwasher
detergent for the risk of foaming or suds.
Inte r rupt the programme, and rearrange the items
whic h are obstructing the s p ay arm.r
Inte r rupt the programme,
and rearrange the items of crockery.
This has no influence on the dishwasher function.
if in doubt, contac t a su itably qu alified plumber.
Detergent with
colourant was used
Make sure that the d eterg ent is the one without
colourant.
Improper deterge nt
Make sure the dishwasher is turned on and the door is
closed securely.
Ch eck that the water supply is connected properly and
the water is turned on.
Make sure to close the door properly and latch it.
Make sure the power cord is properly plugged into the
wa ll socket.
Power supply is not
turned on
Error code:E1;
Water pressure is low
Door of dishwasher
not properly closed.
Kink in drain hose
Filter clogged
Kitchen sink clogged
Check drain hose.
Ch eck coarse the filter
(see section titled )"CleaningTheFilter"
Ch eck the kitchen sink to make sure it is draining well.
If the problem is the kitchen sink not dr aining ,you m ay
need a plumber rather than a serviceman for dishwashers.
Use only the special dishwasher detergent to avoid
suds. If this occurs, open the dishwasher and let suds
evaporate. Add 1 gallon of cold water to the tub. Close
and latch t he dishwasher, then Start the "soak" wash
cycle to drain out the water . Repeat if necessary.
16
Th e i tems sh ould be c orr osi on r esis ta nt.
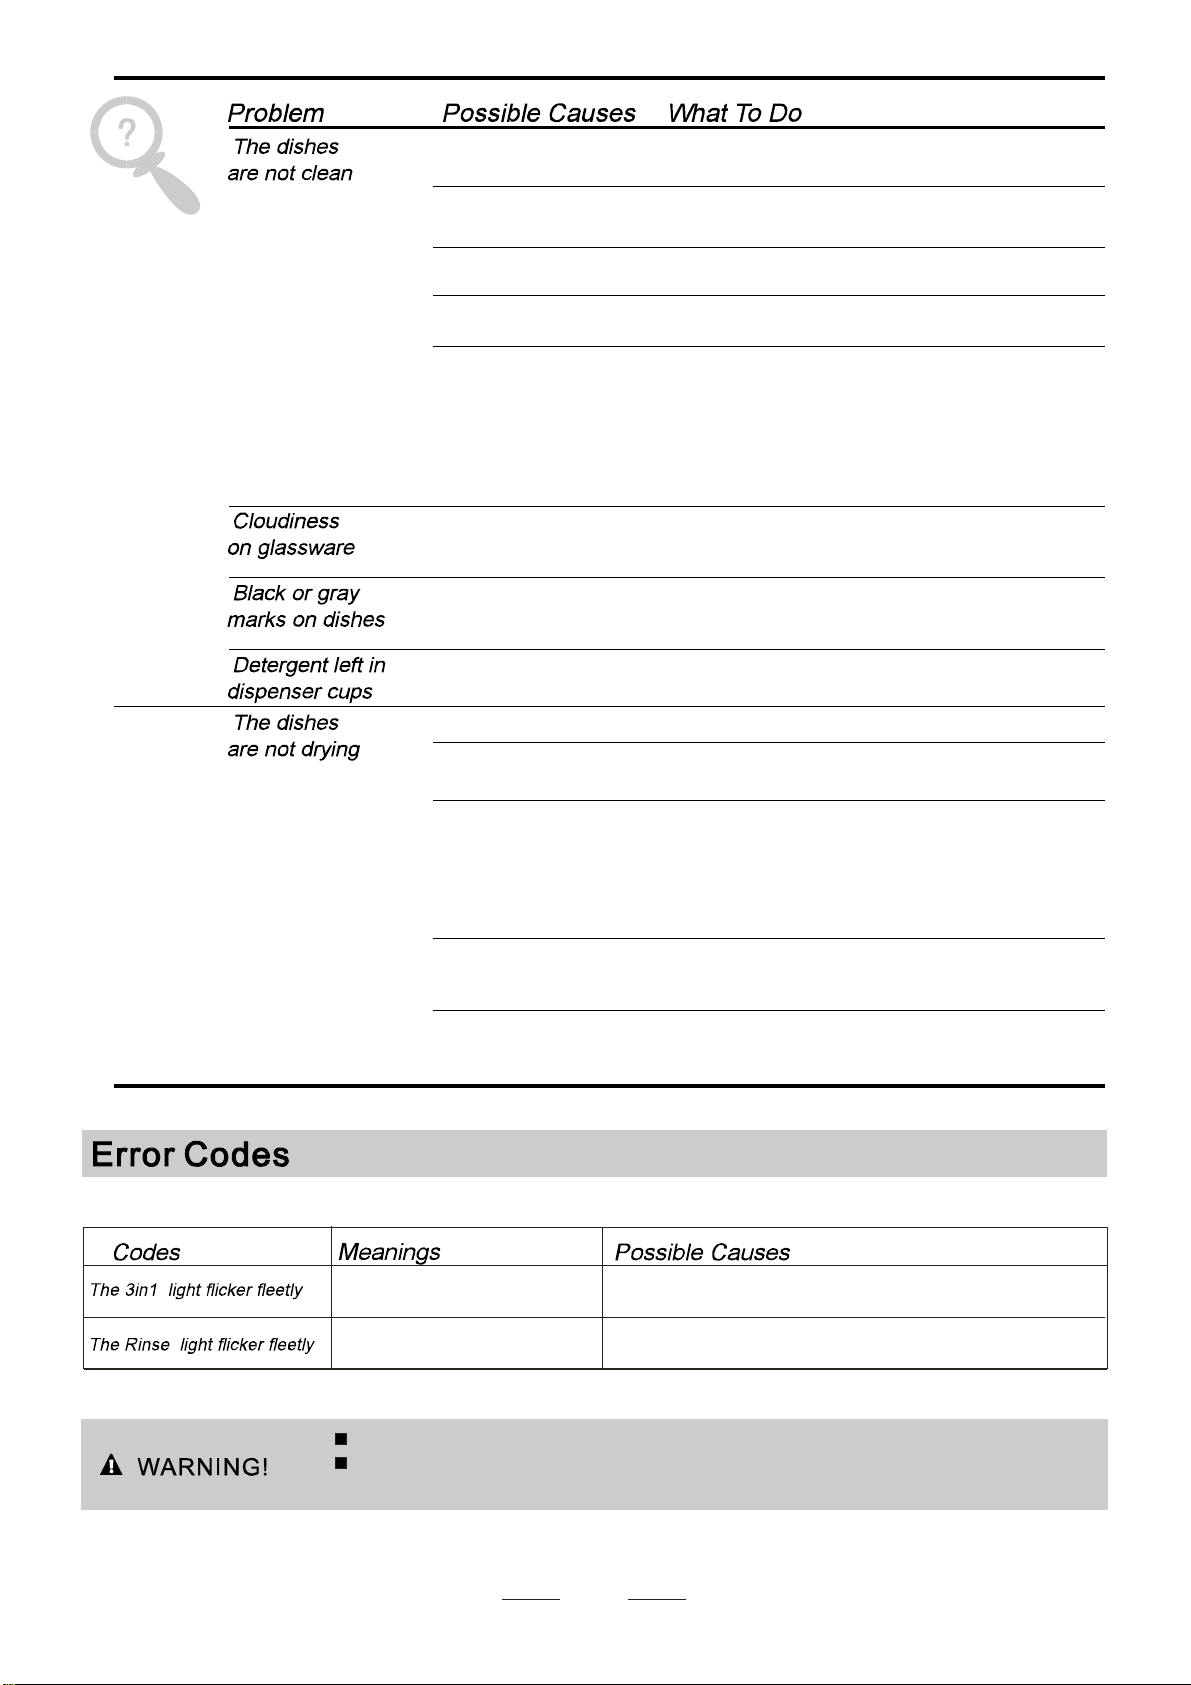
The dishes were not
loa ded correctly.
See notes in " Loading the Dishwasher Baskets ".
Select a more intensive programme.
See" Wash Cycle Table ."
Use more detergent, o r change your detergent.
Rearrange the items so that the sp ay c an rotate freely.r
Clean and/or fit the filter combination correctly.
Clean the sp ay arm jets. See "Cleaning the Spray
Arms".
r
Use less detergent if you have soft water and select
a shortest cycle to wash the glassware and to get
them clean.
Use a mild abrasive cleaner to eliminate those marks.
Re-loading the dishes properly.
Load the dishwasher as suggested in the directions.
Increase the amount of rinse-aid/refill the rinse-aid
dispenser.
Do not empty your dishwasher immediately after
washing. Open the door slightly so that the steam can
escape. Begin unloading the dishwasher only once t
he dishes are barely warm to the touch. Empty the low
basket first. This prevents water form dropping off
dishes in the upper basket.
In short program the washing temperature is lower.
This also lowers cleaning performance. Choo se
a program with a long washing time.
Water drainage is more difficult with these items.
Cutlery or dishes of this type are not suitable for
washing in the dishwasher.
The programme was
not powerful enough.
Not enough detergent
was dispensed.
Items are blocking
the path of sp ay arms.r
The filter combination
in the base of wash
cabinet is not clean or
is not correctly fit ted.
This m ay cause
the sp ay arm jet s
to ge t bl ocked.
r
Combination of soft
water and too much
detergent.
Aluminum utensils
have rubbed against
dishes.
Dishes block
detergent cups.
Improper loading
Too litt le rinse-aid
Dishes are removed
too soo n
Wrong program
has been selected
Use of cutlery with
a low-quality coating
When some malfunctions come on, the appliance will display error codes to warn you:
If overflow occurs, turn off the main water supply before calling a s ervice.
If there is water in the base pan because of an overfill or small leak,
the water should be removed before restarting the dishwasher .
17
Uns a ti s
-fa ct ory
was hin g
res u lt
Uns a ti s
-fa ct ory
dry i ng
res u lt
Longer inlet time.
Faucets is not opened, or water intake is restricted,
or water pressure is too low.
Some element of dishwasher leaks .
Overflow .
18

Warranty Card
Worldwide Appliances Pty Limited
A.B.N. 45868077422
48-50 Moore Street, Leichhardt N.S.W 2040
Locked Bag 3000, Annandale, N.S.W 2038
WARRANTY REGISTRATION
Your ongoing satisfaction with your artusi
product is important to us. We ask that you
complete the enclosed Warranty Registration
Card and return it to us so that we have a record
of the artusi product purchased by you.
PRIVACY
Worldwide Appliances respects your
privacy and is committed to handling your
personal information in accordance with the
National Privacy Principles and the Privacy
Act 1988 (Cth). A copy of the Worldwide
Appliances Privacy Policy is available at
www.artusi.com.au. Worldwide Appliances will
not disclose any personal information set out
in the Warranty Registration Card (“Personal
Information”) without your consent unless
required by:
1. law;
2. any Worldwide Appliances related company;
3. any service provider which provide services
to artusi or assist artusi in providing services
(including repair and warranty services) to
customers. Our purpose in collecting the
Personal Information is
to keep a record of the artusi product purchased
by you, in order to provide a better warranty
service to you in the unlikely event that there is
a problem with your artusi product. Worldwide
Appliances may contact you at any one or more
of the address, email address or telephone
numbers set out in the Warranty Registration
Card. Please contact artusi on 1300 694
583 should you not wish to be contacted by
Worldwide Appliances.
WARRANTY
1. Warranty
Worldwide Appliances warrants that each artusi
product will remain, for a period of either 12
months or 24 months of warranty. All Warranties
are valid from the original date of purchase, And
warranty claims must be accompanied by the
proof of purchase.
All Built-in Appliances – Limited to Ovens,
Gas, Induction and Electric Cooktops, and All
Rangehoods
Freestanding Cookers - Gas and Electric Models
(900mm Width)
artusi.com.au
Dishwashers - Freestanding, Fully Integrated,
Semi Integrated and built-in
Freestanding Cookers - Gas and Electric Models
in 50cm, 54cm and 60cm Widths
Portable Appliances* – Benchtop Models and
Portable Gas Models
2. What is not Covered by the Warranty.
The Warranty does not apply if an artusi product
is defective by a factor other than a defect arising
in the manufacture of the artusi product, including
but not limited to:
(a) damage through misuse (including failure
to maintain, service or use with proper care),
neglect, accident or ordinary wear and tear
(including deterioration of parts and accessories
and glass breakage);
(b) use for purpose for which the artusi product
was not sold or designed;
(c) use or installation which is not in accordance
installation;
(d) use or operation after a defect has occurred or
been discovered;
(e) damage through freight, transportation or
handling in transit (other than when Worldwide
Appliances is responsible);
(f) damage through exposure to chemicals, dusts,
residues, excessive voltage, heat, atmospheric
conditions or other forces or environmental
factors outside the control or Worldwide
Appliances;
purchaser or any person other than Worldwide
Appliances, an employee of Worldwide
Appliances or an authorised artusi service
contractor*;
(h) use of parts, components or accessories
approved by artusi.
(i) damage to surface coatings caused by cleaning
or maintenance using products not recommended
in the artusi product handbook provided to the
purchaser upon purchase of the artusi product;
(j) damage to the base of an electric oven due to
items having been placed on the base of the oven
cavity or covering the base, such as aluminium
foil (this impedes the transfer of heat from the
element to the oven cavity and can result in
irreparable damage); or
(k) damages, dents or other cosmetic
artusi in respect of an artusi product purchased
as a “factory second” or from display
The Warranty does not extend to light globes
used in artusi products.
3. Domestic Use
Each artusi product is made for domestic use.
This Warranty may not extend to artusi products
used for commercial purposes.
Continued over...
Artusi Warranty March 2014.indd 1 6/03/2014 10:08 am

4. Time for Claim under the Warranty
You must make any claim under this Warranty
within twenty eight (28) days after the occurrence
of an event which gives rise to a claim pursuant
to the Warranty, by booking a service call on the
telephone number below.
5. Proof of Purchase
Customers must retain proof of purchase in order
to be eligible to make a warranty claim in respect
of an artusi product.
6. Claiming under the Warranty
Customers will bear the cost of claiming under
this Warranty unless Worldwide Appliances
determines the expenses are reasonable, in which
case the customer must claim those expenses
by providing written evidence of each expense
to Worldwide Appliances at the address on the
Warranty Registration Card.
7. Statutory Rights
statutory rights.
(b) The limitations on the Warranty set out in this
document do not exclude or limit the application
of the consumer guarantees set out in the Act or
any other equivalent or corresponding legislation
in the relevant jurisdiction where to do so would:
(i) contravene the law of the relevant jurisdiction;
or
(ii) cause any part of the Warranty to be void.
(c) Worldwide Appliances excludes indirect or
consequential loss of any kind (including, without
limitation, loss of use of the artusi product) and
(other than expressly provided for in these terms
and conditions) subject to all terms,
conditions and warranties implied by custom, the
general law, the Act or other statute.
(d) The liability of Worldwide Appliances to you
for a breach of any express or non-excludable
implied term, condition or warranty is limited at
the option of Worldwide Appliances to:
(i) replacing or repairing the defective part of the
artusi product;
(ii) paying the cost of replacing or repairing the
defective part of the artusi product;
(iii) replacing the artusi product; or
(iv) paying the cost of replacing the artusi
product.
(e) Our goods come with guarantees that cannot
be excluded under the Australian Consumer
Law. You are entitled to a replacement or refund
for a major failure and for compensation for any
other reasonably foreseeable loss or damage.
You are also entitled to have the goods repaired
or replaced if the goods fail to be of acceptable
quality and the failure does not amount to a
major failure.
8. Defects
Any part of an artusi product deemed to be
defective and replaced by Worldwide Appliances
is the property of Worldwide Appliances.
Worldwide Appliances reserves the right to
inspect and test artusi products in order to
determine the extent of any defect and the
validity of a claim under the Warranty.
*To locate your closest artusi authorised service
agent please contact us on 1300 652 100 or visit
www.artusi.com.au
ALL SERVICE CALLS MUST BE BOOKED
THROUGH AN AUTHORISED DEALER OR
OR stokesaps.com.au/artusi-service
Warranty Card continued
artusi.com.au
2
Please complete and send to ARTUSI at: REPLY PAID 83617
LEICHHARDT NSW 2040
Last Name: First Name:
Address:
State: Postcode: Email:
Home Phone: Mobile:
Purchase Date: / / (Please attach proof of purchase to validate warranty)
MODEL NUMBER
SERIAL NUMBER
(if you cannot locate the serial number please call ARTUSI on 1300 694 583)
1
2
3
4
WARRANTY REGISTRATION CARD
01052013
01032014
Warranty Card tear off
Artusi Warranty March 2014.indd 2 6/03/2014 10:08 am