User manual Blender
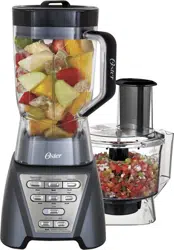
Learning About The Oster ProTM 1200 Blender With 6 Cup Glass Jar
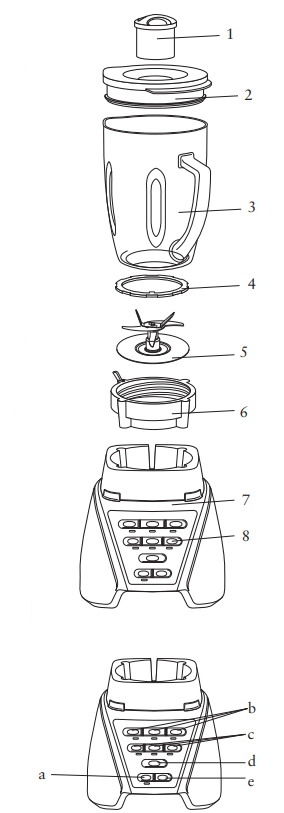
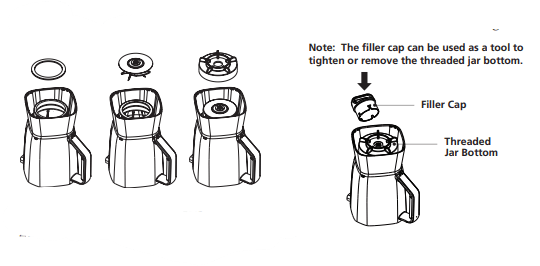
- Filler Cap / 2 Ounce Measuring Cup: – Allows you to add ingredients during use. Also allows you to open to allow steam to escape when blending hot foods.
- Jar lid – Seals the blender jar.
- Jar – 6-cup Dishwasher Safe Boroclass glass jar withstands Thermal shock. Glass Jar Blade Assembly – With locking feature to secure blade assembly to threaded jar bottom. Seals the jar to the blade for leak-proof operation.
- Sealing Ring :
- Blade – Creates a forward and reverse action when the Programmed Settings are in use.
- Threaded Jar Bottom With Locking Lever – Advanced design for simple assembly to jar.
- Motor Base – Holds the jar securely. Contains a powerful, reversible, variable speed motor.
- Control Panel
a. Power Button (On/Off button) – Turns the product On and Off.
b. Pre-Programmed Settings: Use for flawless results at the touch of a button. Select the desired setting and watch the Oster ProTM 1200 blender cycle through the program, spinning the blade forward and backwards for expert results at the touch of a button. Unit will shut after running through the cycle. Select From: Green/ Frozen Smoothies Food Chop / Salsa Milkshakes
c. Manual Controls: Select from Low-MedHigh
d. Pulse button – Press to pulse and release to stop.
e. Stop Button: Press to stop any cycle or manual control setting..
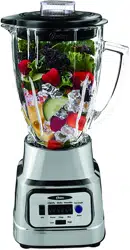
Learning About The Oster ProTM 1200 Blender With 8 Cup Plastic TritanTM Jar
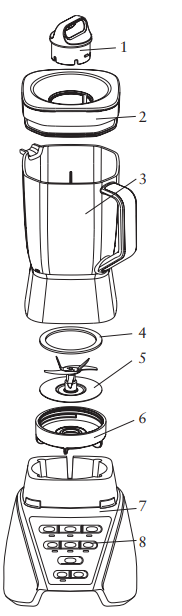
- Filler Cap – Allows you to add ingredients during use. Also, allows you to open to allow steam to escape when blending hot foods. In addition, it can be used as a tool to remove or tighten the threaded jar bottom.
- Jar lid – Seals the blender jar.
- Jar – 8-Cup Break Resistant BPA-Free TritanTM Plastic.
- Sealing Ring – Seals the jar to the blade for leak-proof operation.
- Blade – Creates a forward and reverse action when the Programmed settings are in use or when the Reverse Blend button is pressed.
- Threaded Jar Bottom
- Motor Base – Holds the jar securely. Contains a powerful, reversible, variable speed motor.
- Control Panel
- Power Button (On/Off button) – Turns the product On and Off.
- Pre-Programmed Settings: Use for flawless results at the touch of a button. Select the desired setting and watch the Oster ProTM 1200 blender cycle through the program, spinning the blade forward and backwards for expert results at the touch of a button. Unit will shut after running through the cycle. Select From: Green/ Frozen Smoothies Food Chop / Salsa Milkshakes
- Manual Controls: Select from Low-Med-High
- Pulse button – Press to pulse and release to stop.
- Stop Button: Press to stop any cycle or manual control setting.
Using The Oster ProTM 1200 Blender
Before you use the product for the first time, separate the lid, filler cap and blade from the jar. Wash in warm, soapy water, or top rack in the dishwasher. Rinse and dry well.
WARNING: Blade is sharp. Handle with care.
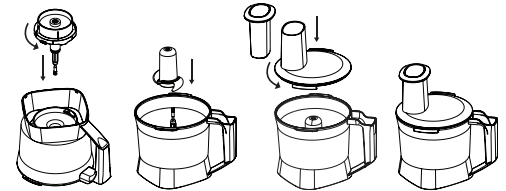
6 Cup glass Jar Assembly
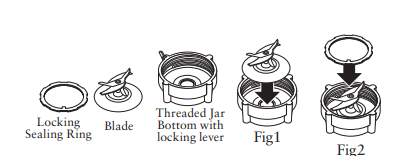
- Place Blade into Threaded Jar Bottom (Fig.1).
- Place sealing ring over blade assembly. Carefully press and tuck sealing ring into locking groove (Fig2).
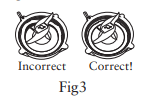
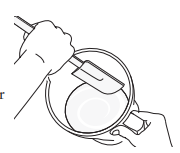
- Ensure the locking sealing ring is fully and evenly tucked in place and holding the blade assembly to the threaded jar bottom. For correct assembly see (Fig3).
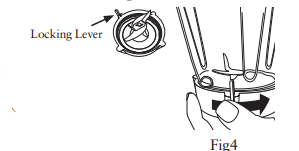
- Install the Integrated Blade Assembly onto the Jar. Turn clockwise to tighten. Be sure the Integrated Blade Assembly is tightened to the jar before using. NOTE: For proper installation onto Blender Motor base, make sure locking lever rotates past the anti-rotation tabs on the Blender jar or smoothie cup. See (Fig4). CAUTION: If Locking Lever is damaged or missing, do not operate blender, and contact Customer Service for a replacement.
- Put the ingredients into the jar.
- Secure the lid and filler cap.
- Place the jar onto the base.
- Plug the power cord into a standard household 120/127-volt, 60 hz. AC outlet. You are now ready to start. ALWAYS PLACE HAND ON CONTAINER COVER WHILE OPERATING BLENDER.
8 Cup TritanTM Jar Assembly
- Install the sealing ring over the blade.
- Turn the jar upside down and place it on a flat and stable surface.
- Turn the blade with sealing ring upside down and place into the bottom of the jar.
- Install the threaded jar bottom over the blade assembly. Turn clockwise to tighten. Be sure the threaded jar bottom is tightened to the jar before using.
- Choose a recipe from the recipe book provided.
- Put the ingredients into the jar.
- Secure the lid and filler cap.
- Slide the jar onto the base.
- Plug the power cord into a standard household 120/127-volt, 60 hz. AC outlet. You are now ready to start.
Using the Pre-Programmed Settings
- Press the ON/OFF power button to turn the product on. The power light will blink, indicating the product is active and ready to use. The light will stay on when the motor is running.
- Select and Press the desired Pre-Programmed Setting Button:
- “Green/Frozen Smoothie”
- “Food Chop/Salsa”
- “Milkshakes”
- To change your selection, press Stop followed by another Pre-Programmed Setting button (“Frozen Drinks & Shakes” or “Food Chop”)
- Once the program is finished the product automatically stops. Please note: You may press the “Stop” button to cancel the program at any time. The blinking bule light indicates that the blender is ready.
- Press the ON/OFF power button to turn the product off. This product is pre-programmed to turn off automatically if not used for a period of several minutes. All lights will turn off when the unit automatically powers down.
Using the Manual Controls
The Manual Controls include:
Use these controls for personal recipes or to continue blending after a Programmed Setting is finished.
- Press the ON/OFF power button to turn the product on. The power light will blink, meaning the product is active and ready to use. The light will stay on when the motor is running.
- Put the ingredients into the jar.
- Secure the lid and the filler cap.
Using High
- Press the “High” button to run the product at a high speed.
- Press the “Stop” button to cancel the operation at any time.
- Press the ON/OFF power button to turn the product off.
Using the Medium
- Press the “Medium” button to run the product at a medium speed.
- Press the “Stop” button to cancel the program at any time.
- Press the ON/OFF power button to turn the product off.
Using the Low
- Press the “Low” button to run the product at a low speed.
- Press the “Stop” button to cancel the program at any time.
- Press the ON/OFF power button to turn the product off.
Using the Pulse
- Verify that the blue light is blinking. This indicates that the blender is turned on.
- Press and release the “Pulse” button.
- Release the pulse button to stop.
- Press the ON/OFF power button to turn the product off.
Use pulse button to crush ice or chop food.
Caring for Your Product
After Use
- Press the OFF button and unplug blender. Lift the jar straight up from the base, remove the lid and empty the jar.
- If necessary, use a rubber spatula to scrape foods away from the sides of the jar.
Cleaning
- WARNING: Blades are sharp. Handle carefully. CAREFULLY release the blade from the bottom of the jar by turning the threaded jar bottom counterclockwise. The jar lid, filler cap and blade are dishwasher safe.
- Use the top rack of the dishwasher for the jar lid, filler cap, and blade. Place sealing ring into bottom basket of dishwasher. You can also wash the parts in warm, soapy water. Rinse well and dry. Wipe the base with a soft, damp cloth to clean. Never submerge the blender base in a liquid.
- Check the parts as you put them back together.
- TIP: Run blender with soapy water for 20-30 seconds at Low or Medium Speed for cleaning without disassembly. Follow with clean water rinse.
Storing
- Reassemble the blender for storage. Leave the lid open a gap so no odors are retained.
- NOTICE: Never put the jar, or any other parts, in a microwave oven. Never store foods or drinks in the jar.
Servicing
- This appliance has no user serviceable parts. Any servicing beyond the cleaning described in the Cleaning section should be performed by an authorized service representative only.
- If repairs are needed, send your appliance only to an authorized OSTER® Appliance Service Center. Replacement parts are available on www.oster.com or call 1-800-334-0759.
Blending Tips
Liquids
- Put liquids into the jar first, unless the recipe says otherwise. Add more liquid if ingredients are not blending properly.
Using the Filler Cap
- Do not remove the lid while in use. Instead, open the filler cap to add smaller ingredients.
Ice Crushing
- Without Liquid: use pulse button until you achieve desired results.
- With Liquid: Add desired amount of ice cubes and water until ice floats. Blend on High until you achieve desired results then strain off water.
Working with Hot Foods or Liquids
- WARNING: When you work with HOT FOODS, remove the filler cap to vent steam. Tilt the lid away from you partially covering the opening. Keep hands and other exposed skin away from the lid opening to prevent possible burns.
- WARNING:When you work with HOT LIQUIDS, remove the filler cap and start at a low speed, and then gradually increase to a faster speed. Do not add liquid over the 4 cup (1L) level. Always keep hands away from steam.
Ingredient Quantities
- Use only the amount of food suggested in the recipes. If you want greater amounts, prepare in batches. Using larger amounts may overload and strain the motor. You might also get different results from those described.
Frequently Asked Questions
1. Why doesn’t the blender turn on?
- Make sure the base is plugged in an active power receptacle.
- Verify blinking blue light is active after pushing on/off button.
2. How can I prevent liquids from leaking out?
- Check to see that the sealing ring is correctly assembled in between the blade and the jar.
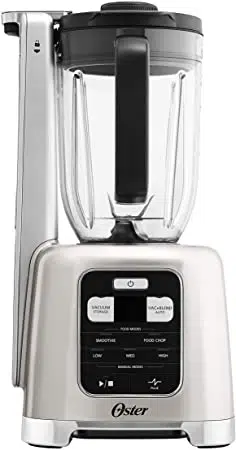
Food Processor Accessory (Select Models Only)
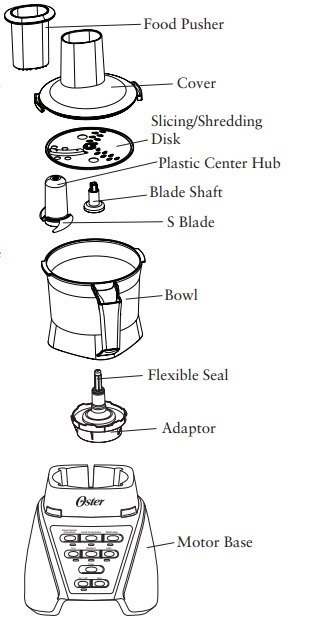
- Food Pusher – Use to safely push ingredients into Slicing/Shredding Disk.
- Cover – The feed tube allows the addition of ingredients while processing.
- Slicing/Shredding Disk – Specially designed for slicing and shredding. WARNING: The blade is very sharp, handle carefully.
- Blade Shaft – For use with Slicing/ Shredding Disk.
- S Blade – Specially designed for chopping and mincing. Grasp the plastic Center Hub when handling the Blade. CAUTION: The blade is very sharp. Handle carefully.
- Bowl – 5-cup capacity allows for fast processing of hard-to-chop foods.
- Adaptor – Transfers the power of your Motor Base to the Food Processor Accessory
Before Using for the First Time – After unpacking, disassemble unit before using for the first time.
Wash all parts (except Adaptor) in warm, soapy water.
Rinse and dry immediately.
CAUTION: DO NOT IMMERSE ADAPTOR IN ANY LIQUID.
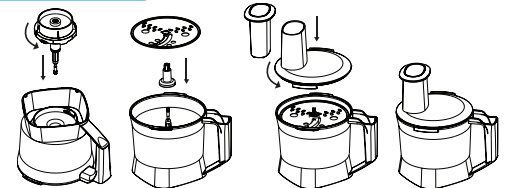
Assembling and Using Your Food Processor
- Before assembly, make sure Adaptor is operating correctly. Unplug Motor Base during assembly.
- Place Adaptor in bowl and turn counterclockwise to lock.
- Place Bowl with Adaptor on Motor Base.
To Chop or Mince
4. Hold S Blade by the plastic Center Hub and place over post of Bowl. Caution: Blade is very sharp, handle carefully. Rotate the S Blade to make certain it is seated on the post as far as it will go. Always place S blade in Food Processor before adding ingredients.
5. Place food in Processing Bowl. Food to be processed should always be cut into 1-inch (2.5 cm) pieces.
6. Using alignment marks on the lid, place cover on bowl and press down firmly while turning counterclockwise to lock.
DO NOT OPERATE UNIT UNLESS COMPLETELY ASSEMBLED
7. Turn unit “ON.” (Select Pulse, Low, or Med setting on the Motor Base.) ALWAYS HOLD FOOD PROCESSOR FIRMLY WITH ONE HAND WHEN STARTING UNIT AND WHEN PROCESSING. Process until desired results are achieved by running the unit continuously or Fast Pulsing. Fast Pulsing is the technique used to control the size of the food being processed with the Food Processor Accessory. Press and release the Pulse button very quickly. Refer to Processing Chart for proper techniques, quantities and end results. NOTE: Only the “Food Chop/Salsa” Pre-Programmed setting is functional when Food Processor is attached.
To Slice or Shred
8. Place Blade Shaft over post. Place Slicing/Shredding Disk over Blade Shaft with the blade of your choice facing up. Caution: Blade is very sharp, handle carefully.
9. Using alignment marks on the lid, place cover on bowl and press down firmly while turning counterclockwise to lock.
10. Load the feed tube with ingredients before turning the food processor “ON”.
11.Rest the Food Pusher in the feed tube. Turn unit “ON”. (Select medium speed setting.) While holding the Food Pusher with one hand and the feed tube in the other, push gently down on the Food Pusher. Always use the Food Pusher to yield more evenly sliced or shredded foods. – NEVER USE YOUR FINGERS. When finished, turn the unit “OFF”.
NOTE: Med - High Manual settings are recommended for slicing and shredding
How To Disassemble
- Turn unit “OFF” and unplug Motor Base.
- Always wait for the S Blade or Slicing/Shredding Disk to stop spinning.
- Remove Food Processor Accessory from Motor Base.
- Turn Cover clockwise to remove from Bowl.
- Remove S Blade or Disk carefully. Be careful not to let Blade or Disk fall out of the container. The cutting edges are very sharp. Scrape any remaining food from the Blade and Processing Bowl.
- Unlock Bowl from Adaptor by turning Bowl clockwise.
Cleaning
- Unplug Motor Base Before Cleaning.
- WARNING: Do Not Immerse Adaptor in Water. Always Remove Adaptor from processor Bowl Before cleaning.
- Keep S Blade and Disk out of the reach of children. Store the S Blade and Disk in the Bowl or in a convenient, safe location when not in use. This Blade and Disk should be treated with the same caution as a sharp knife.
- Remove stains caused by processing large amounts of carrots or similar vegetables with baking soda. Rinse stained parts in water and sprinkle with baking soda. Rub with a soft, damp cloth. Rinse and dry. Do not use abrasive cleaners on any parts.
Maintenance
- This unit is designed with a safety interlock. The interlock requires that the Cover be in place before the blade will rotate. (The interlock does not control operation of the Motor.) To ensure that the interlock is operating correctly, hold the Adaptor and rotate the Drive Shaft several turns. The metal Star Drive on the bottom of the Adaptor should NOT turn. If it does turn, DO NOT USE. Return the unit to an authorized service facility for repair. DO NOT USE THE INTERLOCK FEATURE AS A SUBSTITUTE for turning the power unit “OFF” and unplugging the power unit before disassembling and cleaning. Never put S Blade on Adaptor without Processor Bowl. Do not operate if the flexible seal is damaged or missing. The safety interlock could become jammed.
Processing Tips
- Cut all fruits and vegetables, cooked meats, fish, seafoods and cheeses into pieces 1 inch or smaller.
- Do not exceed the quantities indicated in the Food Processing Charts.
- Always hold hand firmly on the Cover when starting and running Motor.
- Do not process hot liquids or frozen foods.
- Do not process whole spices (except peppercorns) such as nutmeg or cinnamon. They may cause damage to the surface of the Processor Bowl.
- Process the hardest foods first, using only a few Fast Pulses to begin chopping. Add more delicate foods and continue to process using the Fast Pulse technique. The harder foods will continue to be chopped along with the softer foods.
- Processing of Parmesan cheese, dried dates or other extremely hard foods is not recommended. If a knife cannot easily pierce the food, it should NOT be processed in the Food Processor Accessory.
- The Food Processor Accessory is not designed to whip cream, whip egg whites or process dough. Use a standard mixer for those tasks.
- If liquid leaks from Cover, there is too much liquid in the recipe. Adjust the liquid level to prevent leakage.
- The temperature of cheese will affect how it processes. Cheese for spreads should be at room temperature for a smooth, creamy texture. “Grated” cheese should be refrigerator cold.
- Large, harder pieces of food can be processed with several Fast Pulses to coarsely chop. Then process continuously for a fine texture. Only the “Food Chop/Salsa” Pre-Programmed setting is functional when Food processor is attached.
To Convert a Recipe
- Total the amount of dry and liquid ingredients. If the total exceeds 5 cups, decide if the recipe can be made easily in batches. Do not attempt to process large recipes.
- If total is under 1 cup (250 ml), process dry ingredients or the most finely chopped foods first.
- Then add remaining ingredients and combine with several Fast Pulses to mix together.
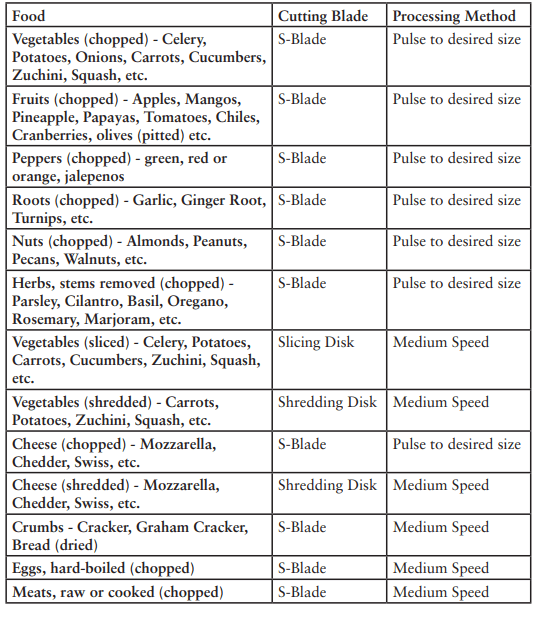
Food Processing Chart
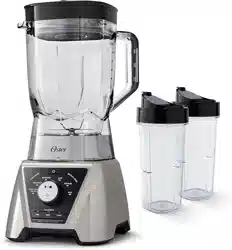
Blend-N-Go® Smoothie Cup Accessory (Select Models Only)
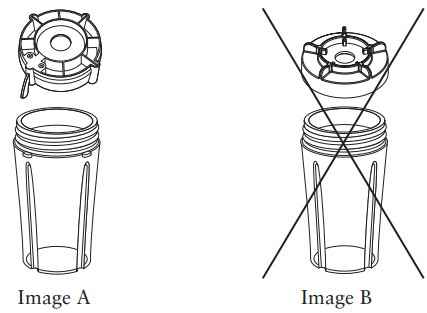
NOTE: For proper installation onto Blender Motor base, make sure locking lever rotates past the anti-rotation tabs on the smoothie cup.
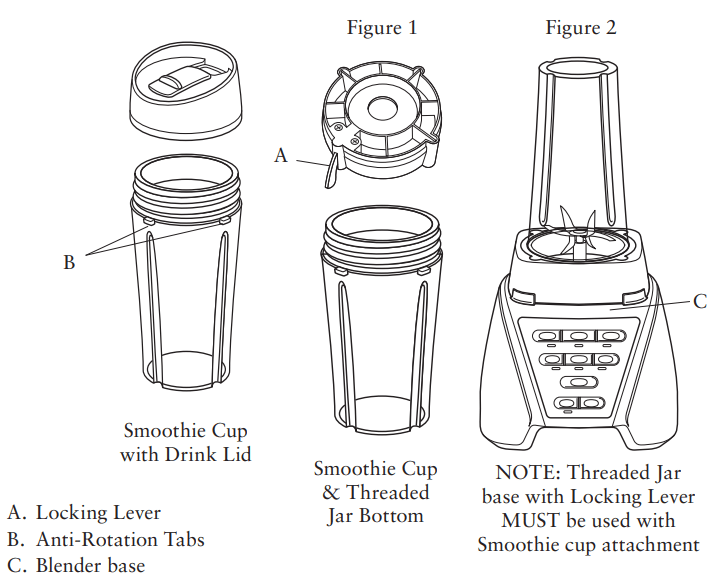
NOTE: Blend-N-Go® Smoothie cup attachment is only compatible with threaded jar bottom with locking lever, See Images below
Using Your Blend-N-Go® Cup With Your Oster ProTM 1200 Blender
- Before washing ensure the blender is off and unplugged. Wash all components except blender base with soapy water with a soft sponge and a bottle brush. Do not use abrasive cleansers or sponges for cleaning. Rinse well and dry. Parts are also dishwasher safe. Do not blend hot liquids.
- Place desired ingredients into smoothie cup according to the following order: Liquids, fresh ingredients, frozen fruit, ice, yogurt and ice cream. (Cut all firm fruits, vegetables and other foods into pieces no larger than 1/2-inch (1.25 cm) by 2 inches (5.0 cm).
- Place Blade into Threaded Jar Bottom or adapter.
- Place sealing ring over blade assembly. Carefully press and tuck sealing ring into locking groove. (See page 7 for more detailed instructions for blade assembly)
- Place blade assembly into cup. (See Figure 1 on Page 17)
- Be sure the Integrated Blade Assembly is tightened to the jar before using.
- Place cup assembly onto Blender base. (See Figure 2 on Page 17)
- Hold cup in position. Operate Blender according to the instructions in your Blender User Manual. Blend until desired consistency.
- Place lid on cup and turn clockwise to tighten.
- Enjoy your blended drink!