Loading ...
Notes:
●
When you disconnect the unit from the AC
outlet or when you have a power failure, the
sleep time will be lost.
●
To cancel the sleep timer, hit [SLEEP]
repeatedly until “SLEEP 0” is displayed.
●
The Sleep Timer Setting display will disap-
pear automatically after 10 seconds of the
operation.
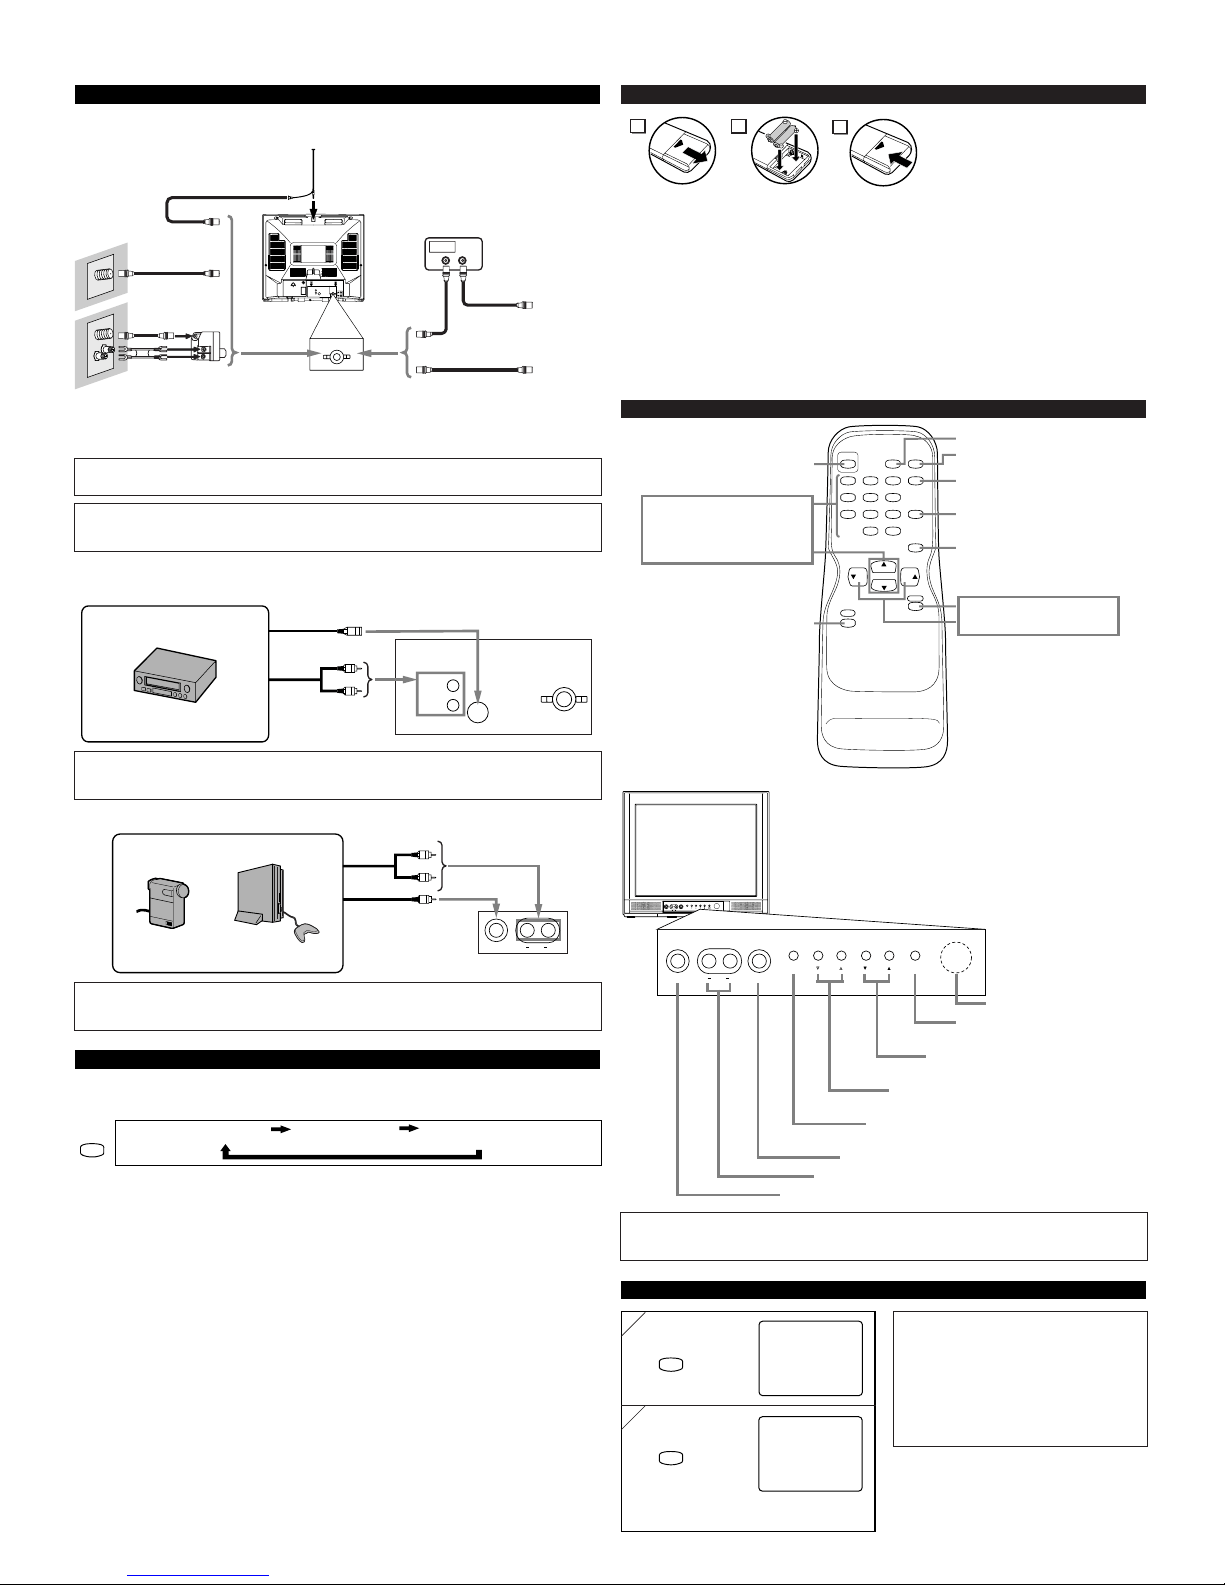
INSTALLING THE BATTERIES
Install two AA batteries (supplied)
matching the polarity indicated inside
battery compartment of the remote con-
trol.
[BATTERY PRECAUTIONS]
• Be sure to follow the correct polarity as indicated in the battery compartment.
Reversed batteries may cause damage to the device.
• Do not mix different types of batteries together (e.g. Alkaline and Carbon-Zinc) or old batteries
with fresh ones.
• If the device is not to be used for a long period of time, remove the batteries to prevent
damage or injury from possible battery leakage.
• Do not try to recharge batteries not intended to be recharged; they can overheat and rupture.
PREPARATION FOR USE
[ANTENNA CONNECTION] [CATV/SATELLITE CONNECTION]
2
1
3
CONNECTIONS
VIDEO1 input (Rear)
AUDIO IN
L
R
S-VIDEO
ANT.IN
SELECTING AUDIO/VIDEO INPUT
When you use the AUDIO/VIDEO input jacks, select “VIDEO1” or “VIDEO2” mode by hit-
ting [INPUT SELECT] on the remote control. The input mode changes by hitting the button
as following:
•To use the jacks on the rear of the TV, select “VIDEO1”.
•To use the jacks on the front of the TV, select “VIDEO2”.
TV channel VIDEO1 (Rear) VIDEO2 (Front)
OPERATIONS
VIDEO2 input (Front)
VIDEO
AUDIO RL
SLEEP TIMER SETTING
Note:
●
If some digits appear in the corner of the screen when the unit is turned on for the first time, hit
[POWER] without unplugging the power cord.
Audio Cable
Video Cassette Recorder
Note:
●
The AUDIO L jack is for mono input. The sound is heard from both speakers. Use this jack for
connecting monaural audio equipment.
Video Cable
Audio Cable
Video GameVideo Camera
Front of this TV
Rear of this TV
Note:
●
The AUDIO L jack is for mono input. The sound is heard from both speakers. Use this jack for
connecting monaural audio equipment.
REMOTE CONTROL AND FRONT PANEL FUNCTION
123
456
789
0 +100
DISPLAY
VOL
CH
CH
VOL
SLEEP
CHANNEL
RETURN
INPUT
SELECT
MUTE
GAME
POWER
MENU
POWER button
To turn TV on/off
Channel number buttons
CH(ANNEL)
KK
/
LL
buttons
MENU button
To view on-screen menu
GAME button
SLEEP button
DISPLAY button
To display CH No./Audio Status
CHANNEL RETURN button
To return previous screen
INPUT SELECT button
To select TV or external input
MUTE button
VOL(UME)
KK
/
LL
buttons
To select channels
To adjust volume
VIDEO
HEADPHONE
MENU VOLUME CHANNEL
POWER
AUDIO RL
VIDEO
HEADPHONE
MENU POWERVOLUME CHANNEL
AUDIO RL
Infrared Sensor Window
POWER button
To turn TV on/off
CHANNEL ▲ /▼ buttons
To select channels
VOLUME
XX
/
YY
buttons
To adjust volume
MENU button
To view on-screen menu
AUDIO L/R input jacks
VIDEO input jack
CAUTION: TO PREVENT ELECTRIC SHOCK, MATCH WIDE BLADE OF PLUG TO
WIDE SLOT AND FULLY INSERT.
[EXTERNAL CONNECTION]
ex.
ex.
INPUT
SELECT
Cables used here are available on the market.
1
1
2
2
SLEEP
SLEEP
SLEEP 0
SLEEP 10
The time increases by 10 minutes
up to 90.
repeatedly
*Some cable TV systems use scrambled signals and
require a special converter to receive these channels.
Consult your local cable company.
UHF
VHF
VHF/UHF
OUT IN
ANT. IN
VHF/UHF
Combiner
OR
OR
75-ohm
Coaxial Cable
From Cable
System
From Cable
System
or Satellite
Antenna
CATV Box
*
or Satellite Box
UHF/VHF Rod Antenna
(Not supplied)
OR
HEADPHONE jack
S-Video Cable
(OUT)
(OUT)
(IN)
(IN)
(OUT)
(OUT)
(IN)
(IN)
Note:
•
For your safety and to avoid damages to the unit, unplug the antenna cable from the
ANT. IN jack before moving the unit.
RF Cable
RF Cable
Flat twin-
lead cable
Downloaded from www.ManualsFile.com manuals search engine
Loading ...
Loading ...