
MINI MAKER
WAFFLE
Instruction Manual & Recipe Guide Model DMW001

TABLE OF CONTENTS
table of contents ∙ 3
Important Safeguards ...........................................................4-5
Parts & Features ........................................................................ 6
Using Your Wafe Maker ......................................................7-9
Maintenance & Cleaning ......................................................10
Troubleshooting ............................................................... 11-12
Recipes .............................................................................. 13-21
Customer Support .................................................................22
Warranty ..................................................................................23
MINI MAKER
WAFFLE

• Do not place appliance on or near a
hot gas burner, hot electric burner, or
in a heated oven.
• Be cautious when moving an
appliance containing hot oils or
other hot liquids.
• Refrain from using attachments
that are not recommended by the
appliance manufacturer, as this may
result in re, electric shock,
or personal injury.
• Allow Mini Maker Wafe to cool
completely before moving, cleaning,
or storing.
• Close supervision is necessary when
any appliance is used by or near
children.
• Do not let the cord touch hot
surfaces or hang over the edge
of tables or counters.
• Always be sure to unplug the
appliance from outlet prior to
moving, cleaning, storage, and
when not in use.
• StoreBound shall not accept liability
for damages caused by improper
use of the appliance.
• Improper use of the Mini Maker
Wafe can result in property damage
or even in personal injury.
• This appliance has a polarized plug
(one blade is wider than the other).
To reduce the risk of electric shock,
this plug will t in a polarized outlet
only one way. If the plug does not
completely t in the outlet, reverse
the plug. If it still does not t, contact
a qualied electrician. Do not
attempt to modify the plug in
any way.
• A short power supply cord is to
be provided to reduce the risk
resulting from becoming entangled
in or tripping over a longer cord.
An extension cord may be used
if care is exercised in its use. If an
extension cord is used, the marked
electrical rating of the extension
cord should be at least as great as
the electrical rating of the appliance.
If the appliance is of the grounded
type, the extension cord should
be a grounding 3-wire cord. The
extension cord should be arranged
so that it will not drape over the
countertop or tabletop where it can
be pulled on by children or tripped
over unintentionally.
important safeguards ∙ 54 ∙ important safeguards
IMPORTANT SAFEGUARDSIMPORTANT SAFEGUARDS
When using electrical appliances, basic safety precautions should be followed,
including:
• Read all instructions.
• Remove all bags and packaging from
appliance before use.
• Never leave appliance unattended
when in use.
• Make sure the appliance is cleaned
thoroughly before using.
• Do not use appliance for other than
intended use. For household use
only.
Do not use outdoors.
• Warning: Hot surfaces! Never touch
the Cooking Surface or Cover
while appliance is in use. Always lift
and lower the Cover by the Cover
Handle.
• DO NOT lift the Cover so that your
arm is over the Cooking Surface as it
is hot and may cause injury. Lift from
the side.
• To prevent the risk of re, electric
shock, or personal injury, do not
put cord, plug, or appliance in or
near water or other liquids. The Mini
Maker Wafe is NOT dishwasher safe.
• Never use abrasive cleaning agents
to clean your appliance as this may
damage the Mini Maker Wafe and
its non-stick Cooking Surface.
• Do not operate this appliance with
a damaged cord, damaged plug,
after the appliance malfunctions,
is dropped, or damaged in any
manner. Return appliance to the
nearest authorized service facility for
examination, repair or adjustment.
• DO NOT use the Mini Maker Wafe
near water or other liquids, with wet
hands, or while standing on a wet
surface.
• For maintenance other
than cleaning, please contact
StoreBound directly at
1-800-898-6970 from 7AM – 7PM
PST Monday – Friday or by email at
• Do not use metal utensils on the
Cooking Surface as this will damage
the non-stick surface.
• This appliance is not intended for
use by persons (including children)
with reduced physical, sensory,
or mental capabilities, or lack of
experience and knowledge unless
they are provided with supervision
and instruction concerning use of the
appliance by a person responsible
for their safety.
PLEASE READ AND SAVE THIS
INSTRUCTION AND CARE MANUAL
using your wafe maker ∙ 7
USING YOUR WAFFLE MAKER
6 ∙ parts & features
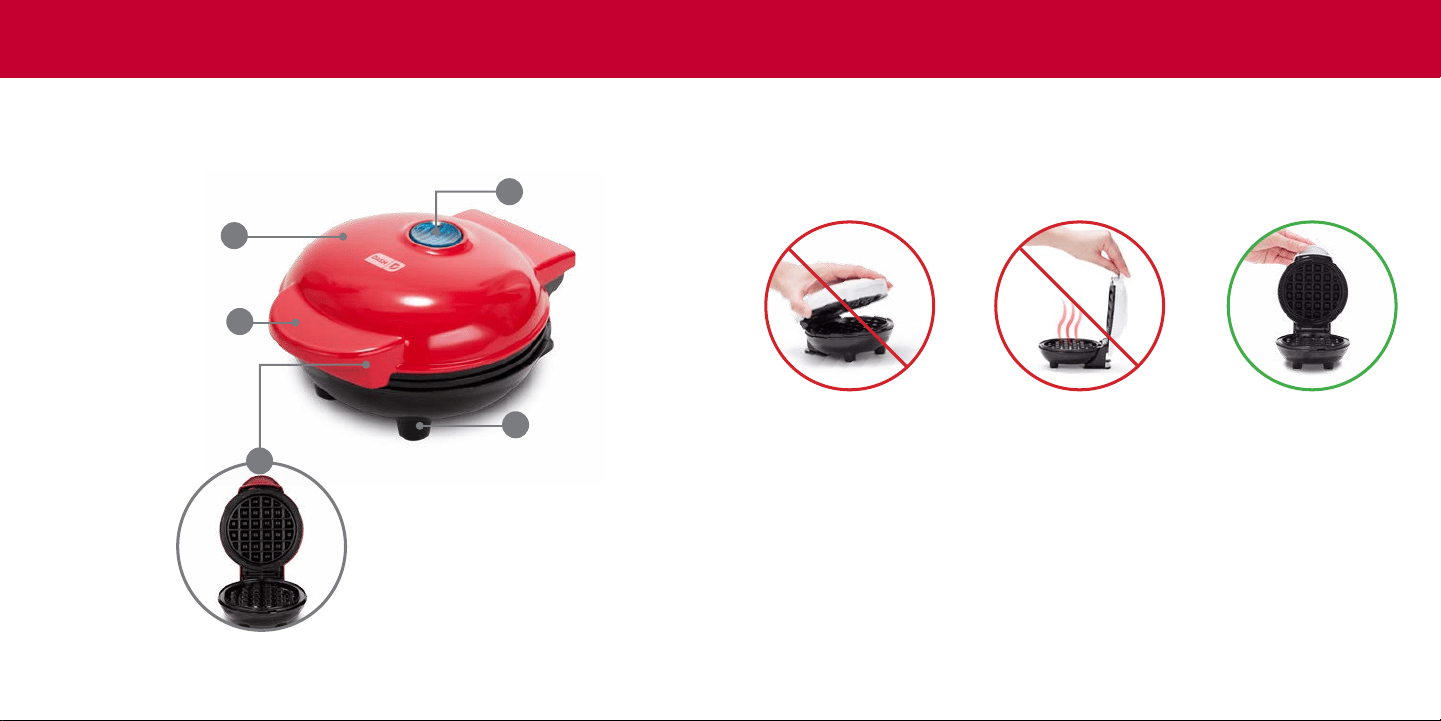
PARTS & FEATURES
DO NOT lift the Cover
so that your arm is
over the Cooking
Surface as it is hot and
may cause injury.
Always lift and lower
the Cover by the
Cover Handle. Lift
from the side.
Never touch the
Cooking Surface or
Cover while appliance
is in use.
Indicator Light
1
Cover
2
Non-slip Feet
4
Cover Handle
3
5
Cooking Surface
Before rst use, remove all packaging material and thoroughly clean Wafe
Maker.
using your wafe maker ∙ 98 ∙ using your wafe maker
USING YOUR WAFFLE MAKERUSING YOUR WAFFLE MAKER
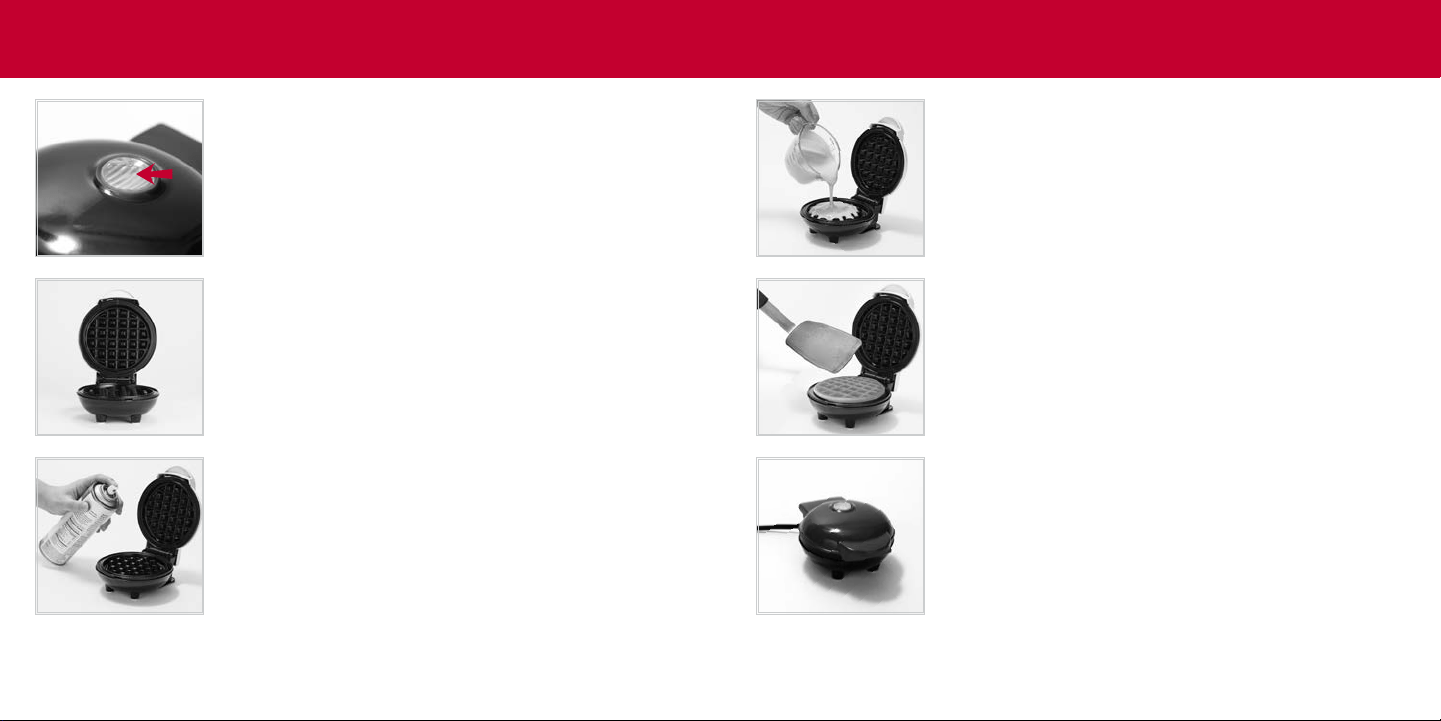
1. Place the appliance on a stable and dry surface.
Plug the cord into a power outlet. The Indicator
Light will illuminate, signaling that the Mini Maker
Wafe is heating up.
2. Once the Cooking Surface reaches the optimal
cooking temperature, the Indicator Light will
automatically shut off. Now, you’re ready to get
cooking!
3. Carefully lift the Cover by the Cover Handle and
spray both Cooking Surfaces with a little cooking
spray.
4. Place food or pour batter onto the Cooking
Surface and close the Cover.
5. Once food is cooked to your preference,
carefully remove it from the Cooking Surface with
a heat-resistant nylon or silicone cooking utensil.
Do not use metal utensils to remove or place food
on the Cooking Surface as this will damage the
non-stick surface.
6. When you have nished cooking, unplug your Mini
Maker Wafe and allow it to cool before moving or
cleaning.

TROUBLESHOOTING
troubleshooting ∙ 11
MAINTENANCE & CLEANING
10 ∙ maintenance & cleaning
While Dash products are durable, you may encounter one or more of the
problems listed below. If the issue is either not solved by the solutions
recommended below or not included on this page, please contact our
Customer Support Team at 1-800-898-6970 or [email protected].
1. The light on the Mini Maker Wafe keeps shutting off.
• This is normal. During the cooking process, the heating element will
automatically turn on and off to regulate the temperature and ensure
that the Cooking Surface does not get too hot or cold. When this occurs,
the Indicator Light turns on and off.
2. How do I know when the Mini Maker Wafe is heated and ready to use?
• When the Wafe Maker reaches the optimal temperature, the Indicator
Light shuts off and that means you’re ready to get cooking!
3. There is no On/Off Button. How do I turn the Mini Maker Wafe off
and on?
• To turn on, simply plug in the power cord. When you’re done cooking,
turn off the Mini Maker Wafe by unplugging it.
4. When using my Mini Maker Wafe, the Cover gets very hot. Is this normal?
• Yes, this is completely normal. When using your Wafe Maker, always lift
and lower the Cover by the Cover Handle. To prevent personal injury,
DO NOT lift the Cover so that your arm is over the Cooking Surface as it
is hot and may cause injury. Lift from the side.
Always allow the appliance to cool completely before moving, cleaning, or
storing. Do not submerge appliance in water or any other liquids. Never use
abrasive cleaning agents to clean your appliance as this may damage the Mini
Maker Wafe.
In order to keep your Mini Maker Wafe in pristine working order, thoroughly
clean the appliance after each use. This will prevent the build-up of food or oil.
• Unplug Mini Maker Wafe and allow it to cool completely.
• Using a damp, soapy cloth, wipe down the Cooking Surface and Cover.
Thoroughly rinse the cloth and wipe again.
• Thoroughly dry Mini Maker Wafe before storing.
• If there is food burned onto the Cooking Surface, pour on a little cooking
oil and let sit for 5 to 10 minutes. Scrub the Surface with a sponge or soft
bristled brush to dislodge food. Use a damp, soapy cloth to wipe down the
Cooking Surface. Thoroughly rinse the cloth and wipe again. If any food
remains, pour on cooking oil and let sit for a few hours, then scrub and wipe
clean.
• Never use abrasive cleaning agents to clean your appliance as this may
damage the Mini Maker Wafe and its non-stick Cooking Surface.

12 ∙ troubleshooting
TROUBLESHOOTING
recipes ∙ 13
RECIPES
delicious & satisfying ideas for everyday meals
5. After using my Mini Maker Wafe a few times, food is starting to stick to
the surface. What is happening?
• There is probably a build-up of burnt food residue on the Cooking
Surface. This is normal, especially when cooking with sugar. Allow the
appliance to cool fully, pour on a little cooking oil and let sit for 5–10
minutes. Scrub Surface with a sponge or soft bristled brush to dislodge
food. Use a damp, soapy cloth to wipe down the Cooking Surface. Rinse
the cloth and wipe again. If food remains, pour on cooking oil and let sit
for a few hours, then scrub and wipe clean.
6. The Indicator Light will not turn on and the Cooking Surface is failing to
heat.
• Ensure that the power cord is plugged into the power outlet.
• Check to make sure the power outlet is operating correctly.
• Determine if a power failure has occurred in your home, apartment or
building.

TROUBLESHOOTING
troubleshooting ∙ 15
RECIPES
14 ∙ recipes
Classic Waffles
DIRECTIONS
In a medium bowl, sift the our, sugar, baking powder, and salt. Whisk the
egg, milk, and melted butter in a separate bowl. Add the wet ingredients
to the dry and mix until just incorporated.
Grease the Wafe Maker with butter or coat with a light coat of cooking
spray. Pour ¼ cup of the batter into the Mini Maker Wafe and cook until
golden brown. Repeat with the remaining batter.
Serve with a drizzle of maple syrup and fresh berries.
INGREDIENTS
• 1 cup our
• 1 tbsp sugar
• 2 tsp baking powder
• ¼ tsp salt
• 1 egg
• 1 cup milk
• 2 tbsp melted butter or vegetable
oil

16 ∙ recipes
RECIPES RECIPES
recipes ∙ 17
DIRECTIONS
In a medium bowl, sift together the our, sugar, cocoa powder, baking
powder, and baking soda.
Whisk the egg, butter, and buttermilk in a separate bowl. Mix the wet
ingredients with the dry. Gently fold in the chocolate chips.
Spray or grease the Wafe Maker with oil. Pour 2 tablespoons of the batter
into the Wafe Maker and cook until crispy. Repeat until all of the batter
is used.
Serve the wafes with vanilla ice cream, strawberries, and powdered sugar.
Chocolate Waffles
INGREDIENTS
• ¾ cup all-purpose our
• 2 tbsp sugar
• ¼ cup unsweetened
cocoa powder
• 2 tbsp melted butter
• 1 cup buttermilk
• ½ tsp baking powder
• ¼ tsp baking soda
• 1 large egg
• ½ cup chocolate chips

RECIPES
18 ∙ recipes
buttermilk fried chicken and waffles
INGREDIENTS
Buttermilk Wafes
• 1 cup all-purpose our
• 1 tbsp sugar
• 1 tsp baking powder
• ½ tsp baking soda
• 1 cup buttermilk
• 2 tbsp unsalted butter, melted
• 1 tsp vanilla extract
• 1 egg
• ½ tsp salt
Fried Chicken
• 1 lb boneless chicken tenderloins
• ½ cup and 3 tbsp buttermilk,
divided
• ¾ cup all-purpose our
• ½ tsp black pepper
• ½ tsp garlic powder
• ½ tsp paprika
• 1 tsp baking powder
• 2 cups vegetable oil, for cooking
• 1 tsp salt
RECIPES
recipes ∙ 19
buttermilk fried chicken and waffles
DIRECTIONS
Make the breading by sifting together
the our, salt, pepper, garlic powder,
paprika, and baking powder in a
shallow dish. Stir in 3 tablespoons of
buttermilk. Pour ½ cup of buttermilk in
a separate shallow dish.
Dip the chicken tenders rst in the
buttermilk and then in the breading.
Place on a baking sheet lined with
aluminum foil.
Pour ¾ inch of vegetable oil in a
high-sided pot and heat on high until
the oil shimmers. Use tongs to place
chicken in the oil. Cook until golden
brown and then ip to cook the other
side. Remove chicken tenders from oil
and put on a paper towel lined plate
to drain.

RECIPES
20 ∙ recipes
buttermilk fried chicken and waffles
DIRECTIONS CONTINUED...
In a medium bowl, sift together our, sugar, baking powder, baking soda,
and salt. Whisk egg, buttermilk, vanilla, and melted butter in a separate
bowl. Add the wet ingredients to the dry and mix until just incorporated.
Spray or grease the Wafe Maker with oil. Pour ¼ cup of batter into the
Wafe Maker and cook until golden brown. Repeat until all of the batter is
used.Serve with buttermilk fried chicken and a drizzle of maple syrup.
RECIPES
recipes ∙ 21
Hash browns
DIRECTIONS
Combine ingredients in a large bowl and mix until well-combined.
Scoop out small amounts of the mixture and form into patties. Spray or
grease the Wafe Maker with oil. Cook patties one at a time in the
Wafe Maker. Serve with Greek yogurt and applesauce.
INGREDIENTS
• 2 medium potatoes,
peeled and shredded
• ½ yellow onion, nely
diced
• 1 egg
• 2 tbsp our
• ½ tsp onion powder
• ½ tsp salt
• ¼ tsp cracked black
pepper
22 ∙ recipes
RECIPES
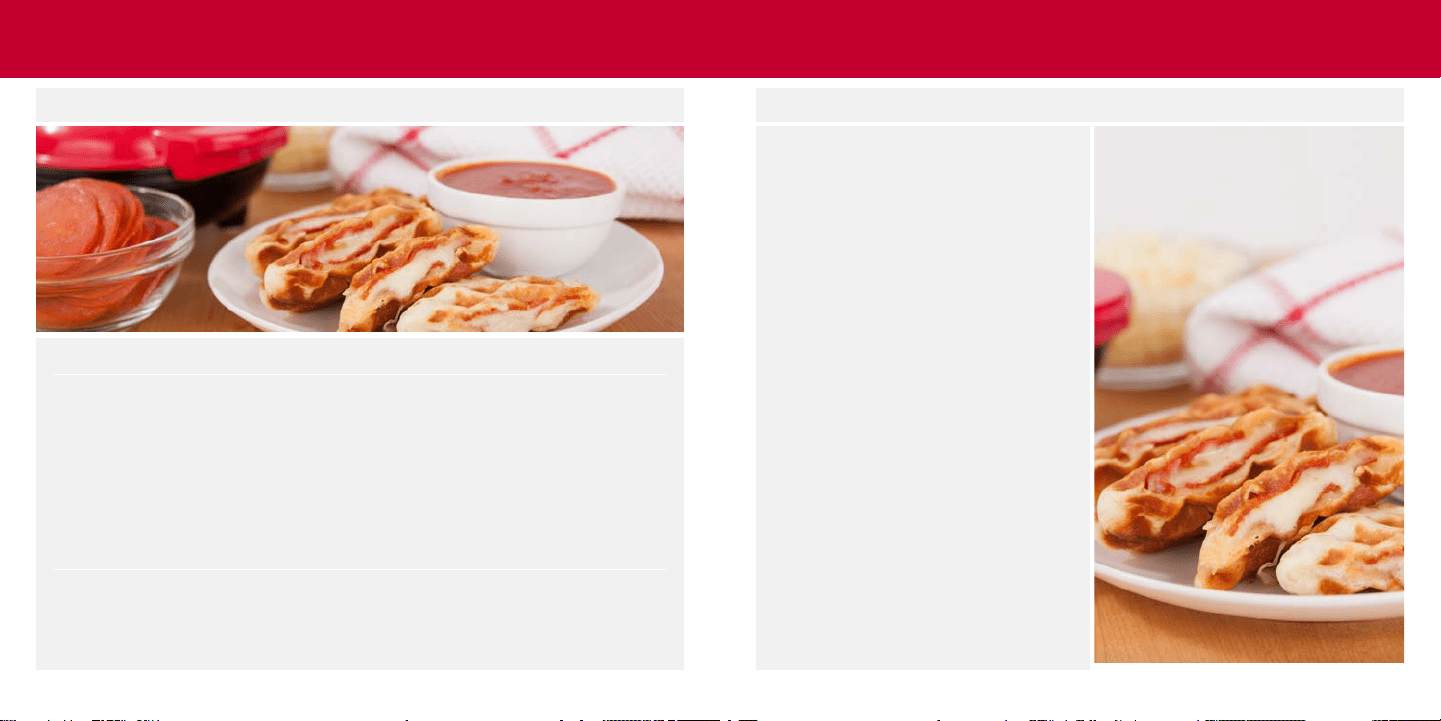
WAFFLE BISCUIT PIZZA
INGREDIENTS
• 2 cups all-purpose our
• 1 tbsp baking powder
• ¾ cup milk
• ½ tsp salt
• ½ cup (1 stick) cold butter,
cut into small chunks
• pepperoni and shredded
mozzarella cheese (or preferred
llings)
DIRECTIONS
Sift together the our, baking powder, and salt. Add the butter and use a
pastry cutter or fork to cut butter into the our until it is a coarse crumb.
recipes ∙ 23
WAFFLE BISCUIT PIZZA
Directions CONTINUED...
Stir in the milk. Roll your dough out
on a oured surface so that it is ½
inch thick. Cut out as many 3 inch
circles as possible. Alternatively,
you can use premade biscuit dough
instead of making dough from
scratch. Slice each premade biscuit
in half so that they are about ½ thick
and then proceed with directions.
Cut dough circles horizontally just
enough so that you can stuff the
biscuit with the pepperoni and
mozzarella.
After you have put in your llings,
seal the biscuit by pinching the
edges of the dough. Cook them in
the Mini Maker Wafe until golden
and crispy. Serve with a side of
marinara sauce for dipping.

24 ∙ recipes
RECIPES
Cinnamon Roll Waffles
INGREDIENTS
Cinnamon Wafes
• Classic Wafe recipe
• 1¼ tsp cinnamon
• ½ tsp vanilla extract
Cream Cheese Icing
• 2 tbsp butter, melted
• 2 tbsp cream cheese, softened
• ½ cup powdered sugar
• ¼ tsp vanilla extract
• 2-3 tbsp milk
recipes ∙ 25
Cinnamon Roll Waffles
Directions
Make the Classic Wafes
batter (see recipe on page
14). Stir in the cinnamon and
½ teaspoon of vanilla extract.
Pour ¼ cup of the batter
into the Mini Maker Wafe
and cook until golden brown.
Repeat with the remaining
batter.
In a medium bowl, mix the
butter and cream cheese
until well-combined. Stir in
the powdered sugar, vanilla
extract, and milk.
Drizzle the icing over the
wafes and serve warm.

TECHNICAL SPECIFICATIONS
Model DMW001
Voltage 120V ~ 60Hz
Power Rating 350 W
Stock#: DMW_20150507_V3
26 ∙ customer support
CUSTOMER SUPPORT
For product support, warranty and maintenance related questions, please
contact StoreBound directly at: 1-800-898-6970 from 7AM - 7PM PST,
Monday - Friday, or by email at [email protected].
REPAIRS
DANGER! Risk of electric shock! The Dash Go Mini Maker Wafe is an electrical
appliance. Do not attempt to repair the appliance yourself under any
circumstances.
Contact Customer Support regarding repairs to the device.
warranty ∙ 27
WARRANTY
STOREBOUND, LLC – 1 YEAR LIMITED WARRANTY
Your StoreBound product is warranted to be free from defects in material and
workmanship for a period of one (1) year from the date of the original purchase
when utilized for normal and intended household use. Should any defect
covered by the terms of the limited warranty be discovered within one (1) year,
StoreBound, LLC will repair or replace the defective part. To process a warranty
claim, contact Customer Support at 1-800-898-6970 for further assistance and
instruction. A Customer Support agent will conduct troubleshooting in an
attempt to x any minor problems. If troubleshooting fails to x the problem,
a return authorization will be issued. Proof of purchase indicating date and
place of purchase is required and should accompany the return. You must also
include your full name, shipping address, and telephone number. We are unable
to ship returns to a PO Box. StoreBound will not be responsible for delays or
unprocessed claims resulting from a purchaser’s failure to provide any or all of
the necessary information. Freight costs must be prepaid by the purchaser.
Send all inquiries to: support@storebound.com
There are no express warranties except as listed above.
REPAIR OR REPLACEMENT AS PROVIDED UNDER THIS WARRANTY IS THE
EXCLUSIVE REMEDY OF THE CUSTOMER. STOREBOUND SHALL NOT BE LIABLE
FOR ANY INCIDENTAL OR CONSEQUENTIAL DAMAGES OR FOR BREACH OF
ANY EXPRESS OR IMPLIED WARRANTY ON THIS PRODUCT EXCEPT TO THE
EXTENT PROHIBITED BY APPLICABLE LAW. ANY IMPLIED WARRANTY OF
MERCHANTABILITY OR FITNESS FOR A PARTICULAR PURPOSE ON THIS
PRODUCT IS LIMITED IN DURATION TO THE DURATION OF THIS WARRANTY.
Some states do not allow the exclusion or limitation of incidental or consequential
damages, or limitations on how long an implied warranty lasts. Therefore, the
above exclusions or limitations may not apply to you. This warranty gives you
specic legal rights and you may also have other rights, which vary from state
to state.

For more information, please visit bydash.com.
Customer Support 1-800-898-6970