


en
7DEOHRIFRQWHQWV
O DXQDP QR L W FXU W VQ , @ QH >
8 ,QWHQGHGXVH
( ,PSRUWDQWVDIHW\LQIRUPDWLRQ
*HQHUDOLQIRUPDWLRQ
0LFURZDYH
5 ,QVWDOODWLRQDQGFRQQHFWLRQ
] &DXVHVRIGDPDJH
7 (QYLURQPHQWDOSURWHFWLRQ
(QYLURQPHQWDOO\IULHQGO\GLVSRVDO
* *HWWLQJWRNQRZ\RXUDSSOLDQFH
&RQWUROSDQHO
&RQWUROV
&KDQJLQJWKHVLJQDOGXUDWLRQ
_ $FFHVVRULHV
6SHFLDODFFHVVRULHV
K %HIRUHXVLQJIRUWKHILUVWWLPH
&OHDQLQJWKHFRRNLQJFRPSDUWPHQWDQGSXWWLQJWKH
WXUQWDEOHLQSODFH
6HWWLQJWKHFORFN
&OHDQLQJWKHFRRNLQJFRPSDUWPHQWDQGDFFHVVRULHV
^ 0LFURZDYH
&RRNZDUH
0LFURZDYHSRZHUVHWWLQJV
6HWWLQJWKHPLFURZDYH
B 0HPRU\
6DYLQJPHPRU\VHWWLQJV
6WDUWLQJWKHPHPRU\
P 3URJUDPPHV
6HWWLQJDSURJUDPPH
'HIURVWLQJXVLQJWKHDXWRPDWLFSURJUDPPHV
&RRNLQJZLWKWKHDXWRPDWLFSURJUDPPHV
Q %DVLFVHWWLQJV
D &OHDQLQJ
&OHDQLQJDJHQW
3 7URXEOHVKRRWLQJ
4 &XVWRPHUVHUYLFH
(QXPEHUDQG)'QXPEHU
J 7HVWHGIRU\RXLQRXUFRRNLQJVWXGLR
6XLWDEOHRYHQZDUH
8QVXLWDEOHFRRNZDUH
'HIURVWLQJ
+HDWLQJIUR]HQIRRG
+HDWLQJIRRG
0LFURZDYHWLSV
E 7HVWGLVKHV
3URGXNWLQIR
$GGLWLRQDOLQIRUPDWLRQRQSURGXFWVDFFHVVRULHV
UHSODFHPHQWSDUWVDQGVHUYLFHVFDQEHIRXQGDW
ZZZERVFKKRPHFRPDQGLQWKHRQOLQHVKRS
ZZZERVFKHVKRSFRP

en ,QWHQGHGXVH
8,QWHQGHGXVH
,QWHQGHG X VH
5HDG WKHVH LQVWUXFWLRQV FDUHIXOO\ 2QO\ WKHQ ZLOO
\RXEHDEOHWRRSHUDWH\RXUDSSOLDQFHVDIHO\
DQG FRUUHFWO\ 5HWDLQ WKH LQVWUXFWLRQ PDQXDO DQG
LQVWDOODWLRQLQVWUXFWLRQVIRUIXWXUHXVHRUIRU
VXEVHTXHQWRZQHUV
7KLVDSSOLDQFHLVRQO\LQWHQGHGWREHIXOO\ILWWHG
LQDNLWFKHQ2EVHUYHWKHVSHFLDOLQVWDOODWLRQ
LQVWUXFWLRQV
&KHFNWKHDSSOLDQFHIRUGDPDJHDIWHU
XQSDFNLQJLW'RQRWFRQQHFWWKHDSSOLDQFHLILW
KDVEHHQGDPDJHGLQWUDQVSRUW
2QO\DOLFHQVHGSURIHVVLRQDOPD\FRQQHFW
DSSOLDQFHVZLWKRXWSOXJV'DPDJHFDXVHGE\
LQFRUUHFWFRQQHFWLRQLVQRWFRYHUHGXQGHU
ZDUUDQW\
7KLVDSSOLDQFHLVLQWHQGHGIRUGRPHVWLFXVH
RQO\7KHDSSOLDQFHPXVWRQO\EHXVHGIRUWKH
SUHSDUDWLRQRIIRRGDQGGULQN7KHDSSOLDQFH
PXVWEHVXSHUYLVHGGXULQJRSHUDWLRQ2QO\XVH
WKLVDSSOLDQFHLQGRRUV
7KLVDSSOLDQFHLVLQWHQGHGIRUXVHXSWRD
PD[LPXPKHLJKWRI PHWUHVDERYHVHD
OHYHO
7KLV DSSOLDQFH PD\ EH XVHG E\ FKLOGUHQ RYHU WKH
DJH RI \HDUV ROG DQG E\ SHUVRQV ZLWK UHGXFHG
SK\VLFDOVHQVRU\RUPHQWDOFDSDELOLWLHVRUE\
SHUVRQV ZLWK D ODFN RI H[SHULHQFH RU NQRZOHGJH
LIWKH\DUHVXSHUYLVHGRUDUHLQVWUXFWHGE\D
SHUVRQUHVSRQVLEOHIRUWKHLUVDIHW\KRZWRXVH
WKHDSSOLDQFHVDIHO\DQGKDYHXQGHUVWRRGWKH
DVVRFLDWHGKD]DUGV
&KLOGUHQPXVWQRWSOD\ZLWKRQRUDURXQGWKH
DSSOLDQFH&KLOGUHQPXVWQRWFOHDQWKH
DSSOLDQFHRUFDUU\RXWJHQHUDOPDLQWHQDQFH
XQOHVVWKH\DUHDWOHDVW \HDUVROGDQGDUH
EHLQJVXSHUYLVHG
.HHSFKLOGUHQEHORZWKHDJHRI \HDUVROGDWD
VDIHGLVWDQFHIURPWKHDSSOLDQFHDQGSRZHU
FDEOH
$OZD\VSODFHWKHDFFHVVRULHVLQWRWKHFRRNLQJ
FRPSDUWPHQW FRUUHFWO\ ~ %HIRUH XVLQJ IRU WKH
ILUVWWLPHRQ SDJH
(,PSRUWDQWVDIHW\
LQIRUPDWLRQ
,PSRUWDQW VDIHW\ LQIRUPDWLRQ
*HQHUDOLQIRUPDWLRQ
::DUQLQJ² 5LVNRIILUH
■ &RPEXVWLEOHLWHPVVWRUHGLQWKHFRRNLQJ
FRPSDUWPHQWPD\FDWFKILUH1HYHUVWRUH
FRPEXVWLEOHLWHPVLQWKHFRRNLQJ
FRPSDUWPHQW 1HYHU RSHQ WKH DSSOLDQFH GRRU
LIWKHUHLVVPRNHLQVLGH6ZLWFKRIIWKH
DSSOLDQFHDQGXQSOXJLWIURPWKHPDLQVRU
VZLWFKRIIWKHFLUFXLWEUHDNHULQWKHIXVHER[
5LVNRIILUH
■ 7KHDSSOLDQFHEHFRPHVYHU\KRW,IWKH
DSSOLDQFHLVLQVWDOOHGLQDILWWHGXQLWZLWKD
GHFRUDWLYHGRRUKHDWZLOODFFXPXODWHZKHQ
WKHGHFRUDWLYHGRRULVFORVHG2QO\RSHUDWH
WKHDSSOLDQFHZKHQWKHGHFRUDWLYHGRRULV
RSHQ
::DUQLQJ² 5LVNRIHOHFWULFVKRFN
■ ,QFRUUHFW UHSDLUV DUH GDQJHURXV 5HSDLUV PD\
RQO\EHFDUULHGRXWDQGGDPDJHGSRZHU
FDEOHVUHSODFHGE\RQHRIRXUWUDLQHGDIWHU
VDOHVWHFKQLFLDQV,IWKHDSSOLDQFHLV
GHIHFWLYHXQSOXJWKHDSSOLDQFHIURPWKH
PDLQVRUVZLWFKRIIWKHFLUFXLWEUHDNHULQWKH
IXVHER[&RQWDFWWKHDIWHUVDOHVVHUYLFH
5LVNRIHOHFWULFVKRFNDQGVHULRXVLQMXU\
■ 7KHFDEOHLQVXODWLRQRQHOHFWULFDODSSOLDQFHV
PD\PHOWZKHQWRXFKLQJKRWSDUWVRIWKH
DSSOLDQFH1HYHUEULQJHOHFWULFDODSSOLDQFH
FDEOHVLQWRFRQWDFWZLWKKRWSDUWVRIWKH
DSSOLDQFH
5LVNRIHOHFWULFVKRFN
■ 'RQRWXVHDQ\KLJKSUHVVXUHFOHDQHUVRU
VWHDPFOHDQHUVZKLFKFDQUHVXOWLQDQ
HOHFWULFVKRFN
5LVNRIHOHFWULFVKRFN
■ 3HQHWUDWLQJPRLVWXUHPD\FDXVHHOHFWULF
VKRFN 1HYHU VXEMHFW WKH DSSOLDQFH WR LQWHQVH
KHDWRUKXPLGLW\2QO\XVHWKLVDSSOLDQFH
LQGRRUV
5LVNRIHOHFWULFVKRFN
■ $GHIHFWLYHDSSOLDQFHPD\FDXVHHOHFWULF
VKRFN 1HYHU VZLWFK RQ D GHIHFWLYH DSSOLDQFH
8QSOXJWKHDSSOLDQFHIURPWKHPDLQVRU
VZLWFKRIIWKHFLUFXLWEUHDNHULQWKHIXVHER[
&RQWDFWWKHDIWHUVDOHVVHUYLFH
5LVNRIHOHFWULFVKRFN
■ 7KHDSSOLDQFHLVDKLJKYROWDJHDSSOLDQFH
1HYHUUHPRYHWKHFDVLQJ
::DUQLQJ² 5LVNRIILUH
■ 7KHDSSOLDQFHEHFRPHVYHU\KRW0DNHVXUH
WKDW\RXFRPSO\ZLWKWKHILJXUHVLQGLFDWHGIRU
WKH PLQLPXP FOHDUDQFH DERYH WKH DSSOLDQFH
~ 3DJH
² 'RQRWLQVWDOOWKHDSSOLDQFHEHKLQGD
GHFRUDWLYHGRRURUWKHGRRURIDNLWFKHQ
XQLW
² 7KHDSSOLDQFHPXVWQRWEHLQVWDOOHGLQD
ILWWHGNLWFKHQXQLW
7KHUHLVDULVNRIRYHUKHDWLQJ
,PSRUWDQWVDIHW\LQIRUPDWLRQ HQ
5LVNRIVHULRXVEXUQV
■ $FFHVVRULHV DQG RYHQZDUH EHFRPH YHU\ KRW
$OZD\VXVHRYHQJORYHVWRUHPRYH
DFFHVVRULHVRURYHQZDUHIURPWKHFRRNLQJ
FRPSDUWPHQW
5LVNRIEXUQV
■ $OFRKROLFYDSRXUVPD\FDWFKILUHLQWKHKRW
FRRNLQJFRPSDUWPHQW1HYHUSUHSDUHIRRG
FRQWDLQLQJODUJHTXDQWLWLHVRIGULQNVZLWKD
KLJKDOFRKROFRQWHQW2QO\XVHVPDOO
TXDQWLWLHVRIGULQNVZLWKDKLJKDOFRKRO
FRQWHQW2SHQWKHDSSOLDQFHGRRUZLWKFDUH
::DUQLQJ² 5LVNRIVFDOGLQJ
■ :KHQ\RXRSHQWKHDSSOLDQFHGRRUKRW
VWHDP PD\ HVFDSH 2SHQ WKH DSSOLDQFH GRRU
ZLWKFDUH.HHSFKLOGUHQDWDVDIHGLVWDQFH
5LVNRIVFDOGLQJ
■ :DWHULQDKRWFRRNLQJFRPSDUWPHQWPD\
FUHDWHKRWVWHDP1HYHUSRXUZDWHULQWRWKH
FRRNLQJFRPSDUWPHQWZKHQWKHFRRNLQJ
FRPSDUWPHQWLVKRW
::DUQLQJ² 5LVNRILQMXU\
6FUDWFKHGJODVVLQWKHDSSOLDQFHGRRUPD\
GHYHORSLQWRDFUDFN'RQRWXVHDJODVV
VFUDSHUVKDUSRUDEUDVLYHFOHDQLQJDLGVRU
GHWHUJHQWV
0LFURZDYH
::DUQLQJ² 5LVNRIILUH
■ 8VLQJWKHDSSOLDQFHIRUDQ\WKLQJRWKHUWKDQ
LWVLQWHQGHGSXUSRVHLVGDQJHURXVDQGPD\
FDXVHGDPDJH
7KH IROORZLQJ LV QRW SHUPLWWHG GU\LQJ RXW IRRG
RUFORWKLQJKHDWLQJVOLSSHUVJUDLQRUFHUHDO
SLOORZVVSRQJHVGDPSFOHDQLQJFORWKVRU
VLPLODU
)RUH[DPSOHKHDWHGVOLSSHUVDQGJUDLQRU
FHUHDOSLOORZVPD\FDWFKILUHHYHQVHYHUDO
KRXUVDIWHUWKH\KDYHEHHQKHDWHG7KH
DSSOLDQFHPXVWRQO\EHXVHGIRUWKH
SUHSDUDWLRQRIIRRGDQGGULQNV
5LVNRIILUH
■ )RRGPD\FDWFKILUH1HYHUKHDWIRRGLQKHDW
UHWDLQLQJSDFNDJHV
'RQRWOHDYHIRRGKHDWLQJXQDWWHQGHGLQ
FRQWDLQHUVPDGHRISODVWLFSDSHURURWKHU
FRPEXVWLEOHPDWHULDOV
'RQRWVHOHFWDPLFURZDYHSRZHURUWLPH
VHWWLQJWKDWLVKLJKHUWKDQQHFHVVDU\)ROORZ
WKHLQIRUPDWLRQSURYLGHGLQWKLVLQVWUXFWLRQ
PDQXDO
1HYHUXVHWKHPLFURZDYHWRGU\IRRG
1HYHUGHIURVWRUKHDWIRRGZLWKDORZZDWHU
FRQWHQWHJEUHDGDWWRRKLJKDPLFURZDYH
SRZHURUIRUWRRORQJ
5LVNRIILUH
■ &RRNLQJRLOPD\FDWFKILUH1HYHUXVHWKH
PLFURZDYHWRKHDWFRRNLQJRLORQLWVRZQ
::DUQLQJ² 5LVNRIH[SORVLRQ
/LTXLGVDQGRWKHUIRRGPD\H[SORGHZKHQLQ
FRQWDLQHUVWKDWKDYHEHHQWLJKWO\VHDOHG1HYHU
KHDW OLTXLGV RU RWKHU IRRG LQ FRQWDLQHUV WKDW KDYH
EHHQWLJKWO\VHDOHG
::DUQLQJ² 5LVNRIEXUQV
■ )RRGV ZLWK SHHO RU VNLQ PD\ EXUVW RU H[SORGH
GXULQJRUHYHQDIWHUKHDWLQJ1HYHUFRRN
HJJVLQWKHLUVKHOOVRUUHKHDWKDUGERLOHG
HJJV1HYHUFRRNVKHOOILVKRUFUXVWDFHDQV
$OZD\VSULFNWKH\RONZKHQEDNLQJRU
SRDFKLQJ HJJV 7KH VNLQ RI IRRGV WKDW KDYH D
SHHORUVNLQVXFKDVDSSOHVWRPDWRHV
SRWDWRHVDQGVDXVDJHVPD\EXUVW%HIRUH
KHDWLQJSULFNWKHSHHORUVNLQ
5LVNRIEXUQV
■ +HDWLVQRWGLVWULEXWHGHYHQO\WKURXJKEDE\
IRRG1HYHUKHDWEDE\IRRGLQFORVHG
FRQWDLQHUV $OZD\V UHPRYH WKH OLG RU WHDW 6WLU
RU VKDNH ZHOO DIWHU WKH IRRG KDV EHHQ KHDWHG
&KHFN WKH WHPSHUDWXUH RI WKH IRRG EHIRUH LW LV
JLYHQWRWKHFKLOG
5LVNRIEXUQV
■ +HDWHGIRRGJLYHVRIIKHDW7KHRYHQZDUH
PD\EHFRPHKRW$OZD\VXVHRYHQJORYHVWR
UHPRYHRYHQZDUHRUDFFHVVRULHVIURPWKH
FRRNLQJFRPSDUWPHQW
5LVNRIEXUQV
■ $LUWLJKWSDFNDJLQJPD\EXUVWZKHQIRRGLV
KHDWHG$OZD\VREVHUYHWKHLQVWUXFWLRQVRQ
WKHSDFNDJLQJ$OZD\VXVHRYHQJORYHVWR
UHPRYHGLVKHVIURPWKHFRRNLQJ
FRPSDUWPHQW
5LVNRIEXUQV
■ 7KHDFFHVVLEOHSDUWVEHFRPHYHU\KRWZKHQ
LQRSHUDWLRQ1HYHUWRXFKKRWSDUWV.HHS
FKLOGUHQDWDVDIHGLVWDQFH
5LVNRIEXUQV
■ 8VLQJWKHDSSOLDQFHIRUDQ\WKLQJRWKHUWKDQ
LWVLQWHQGHGSXUSRVHLVGDQJHURXV
<RXDUHQRWSHUPLWWHGWRXVHLWWRGU\IRRGRU
FORWKLQJRUWRZDUPVOLSSHUVJUDLQRUFHUHDO
SLOORZV VSRQJHV GDPS FOHDQLQJ FORWKV RU WKH
OLNH
7KLVLVEHFDXVHIRULQVWDQFHRYHUKHDWHG
VOLSSHUV JUDLQ RU FHUHDO SLOORZV VSRQJHV DQG
GDPSFOHDQLQJFORWKVHWFPD\FDXVHEXUQV
WRWKHVNLQ
::DUQLQJ² 5LVNRIVFDOGLQJ
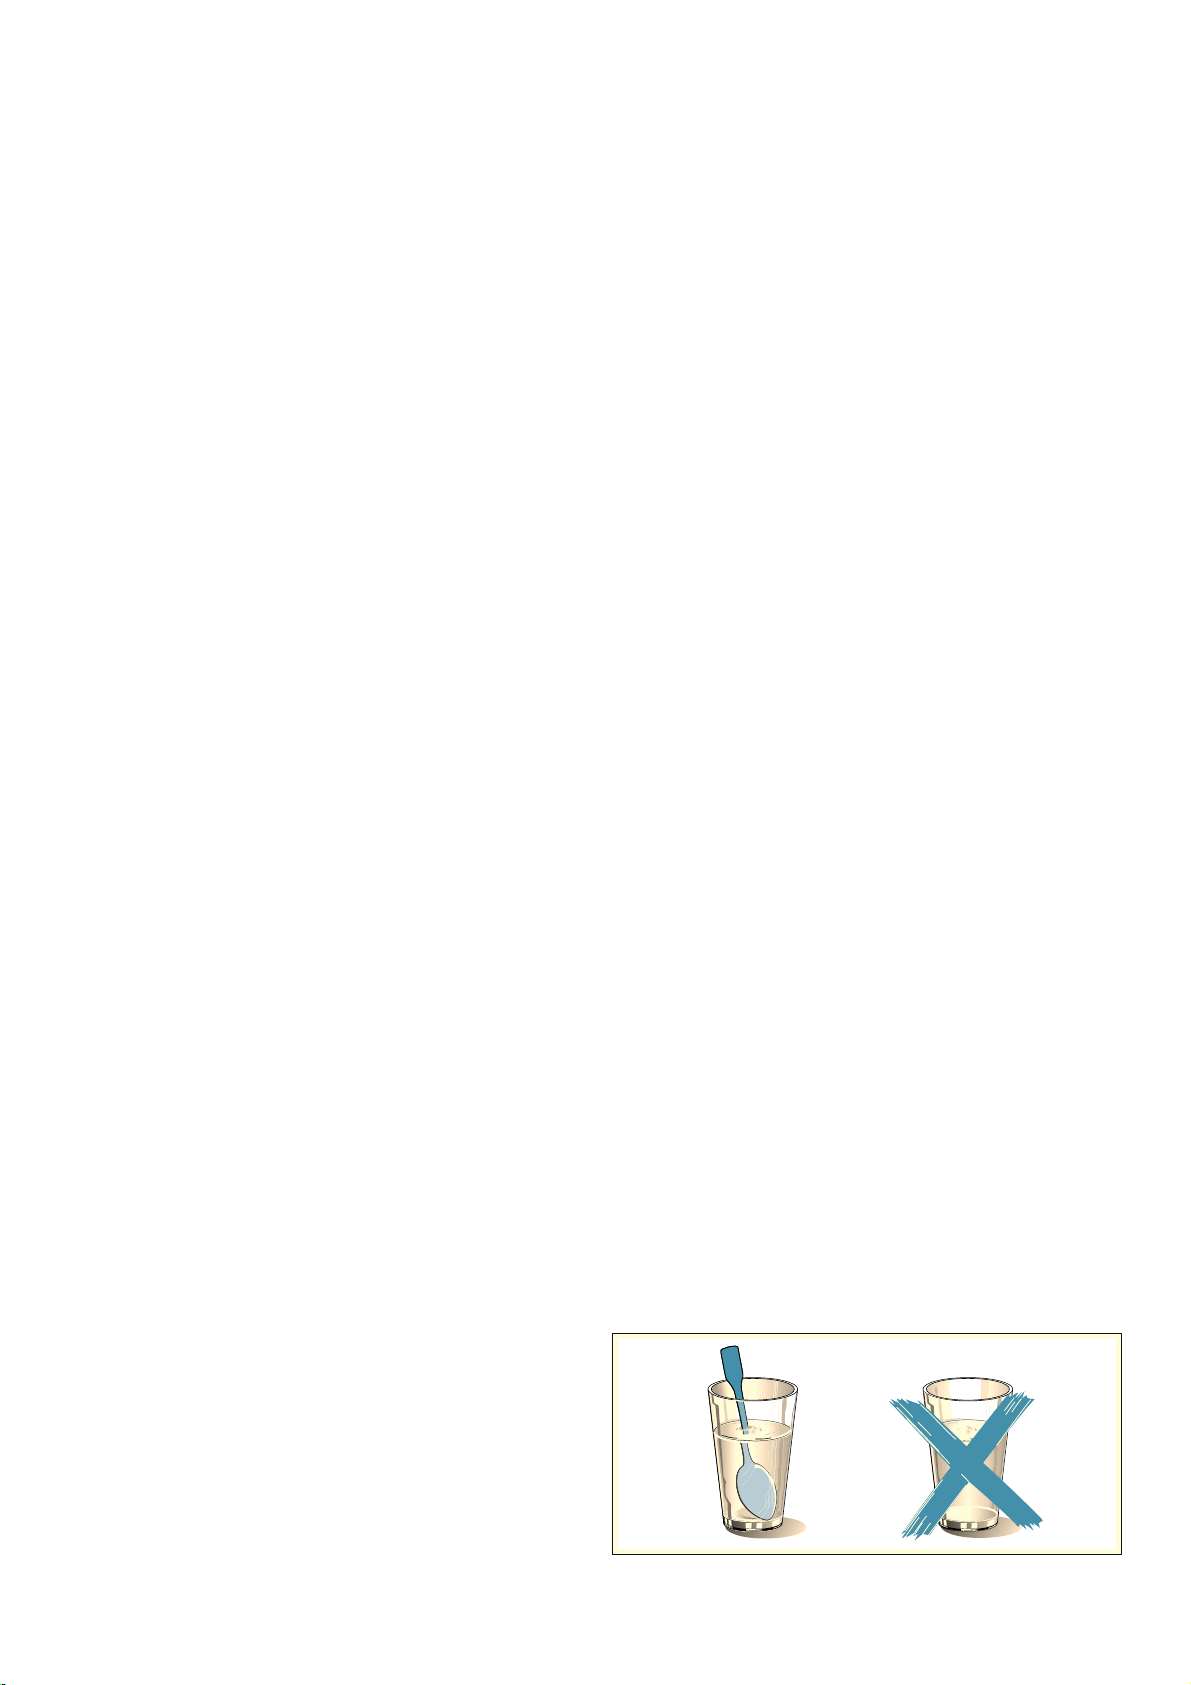
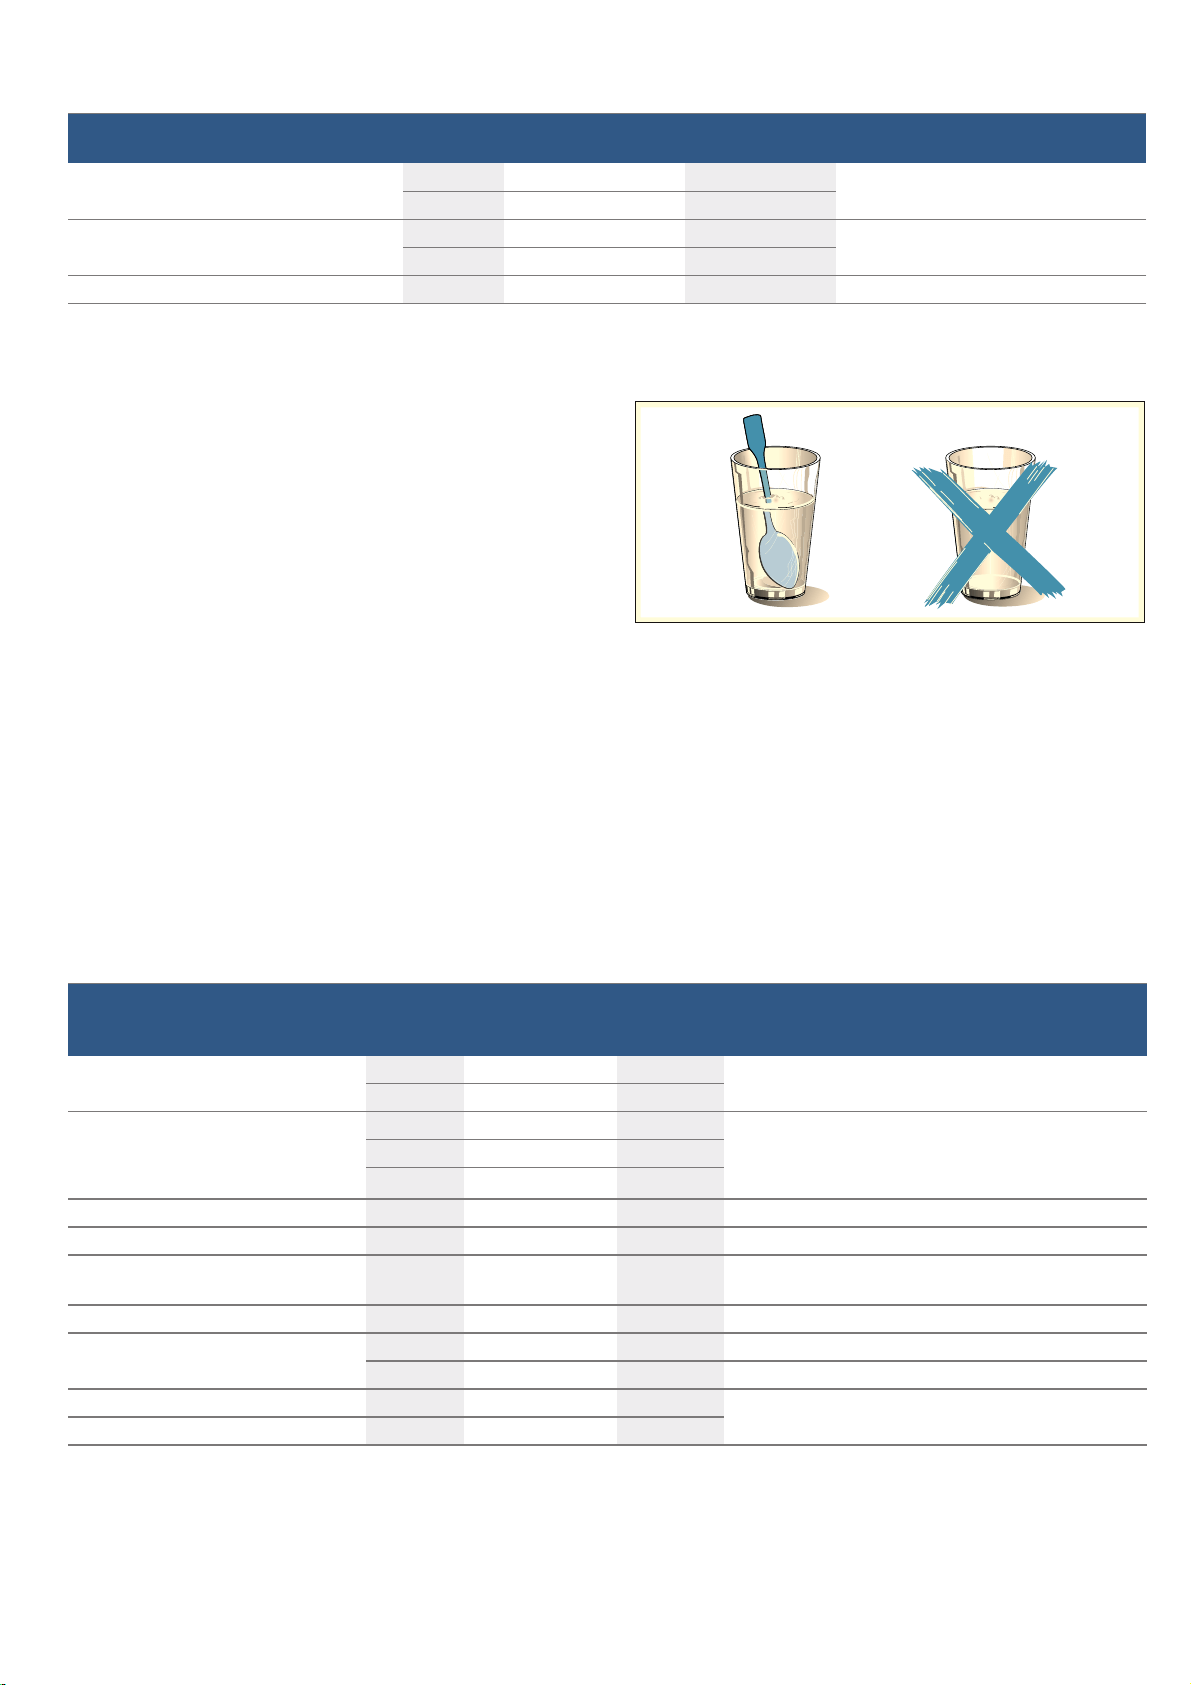
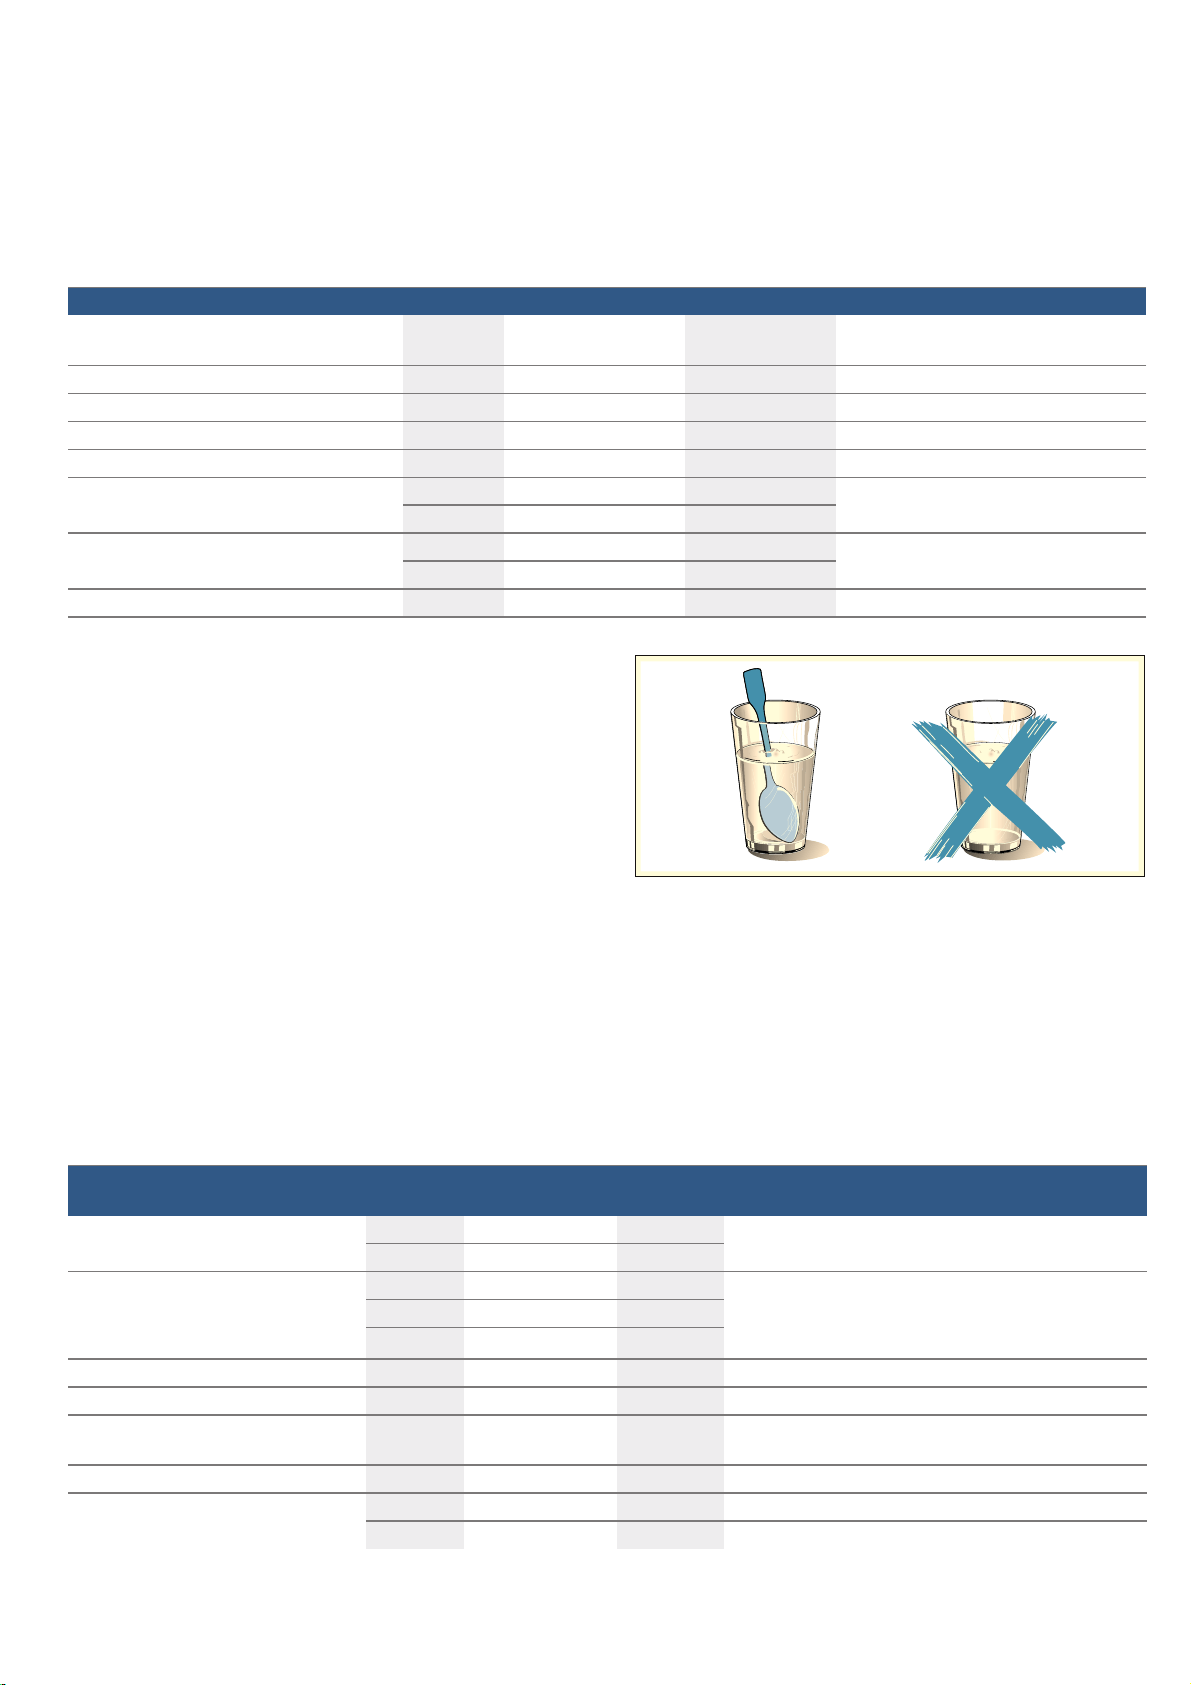
■ 7KHUHLVDSRVVLELOLW\RIGHOD\HGERLOLQJZKHQ
DOLTXLGLVKHDWHG7KLVPHDQVWKDWWKHOLTXLG
UHDFKHV ERLOLQJ WHPSHUDWXUH ZLWKRXW WKH XVXDO
VWHDPEXEEOHVULVLQJWRWKHVXUIDFH(YHQLI
WKHFRQWDLQHURQO\YLEUDWHVDOLWWOHWKHKRW
OLTXLGPD\VXGGHQO\ERLORYHUDQGVSDWWHU
:KHQKHDWLQJDOZD\VSODFHDVSRRQLQWKH
FRQWDLQHU7KLVZLOOSUHYHQWGHOD\HGERLOLQJ

en ,QVWDOODWLRQDQGFRQQHFWLRQ
::DUQLQJ² 5LVNRILQMXU\
■ 8QVXLWDEOH RYHQZDUH PD\ FUDFN 3RUFHODLQ RU
FHUDPLFRYHQZDUHFDQKDYHVPDOO
SHUIRUDWLRQVLQWKHKDQGOHVRUOLGV7KHVH
SHUIRUDWLRQVFRQFHDODFDYLW\EHORZ$Q\
PRLVWXUHWKDWSHQHWUDWHVWKLVFDYLW\FRXOG
FDXVHWKHRYHQZDUHWRFUDFN2QO\XVH
PLFURZDYHVDIHRYHQZDUH
5LVNRILQMXU\
■ ,IXVLQJWKHDSSOLDQFHLQPLFURZDYHPRGH
RQO\SODFLQJFRRNZDUHDQGFRQWDLQHUVPDGH
RI PHWDO RU IHDWXULQJ PHWDO GHWDLOLQJ LQVLGH WKH
DSSOLDQFHPD\FDXVHVSDUNVZKHQWKH
DSSOLDQFH LV RSHUDWLQJ 7KLV PD\ GDPDJH WKH
DSSOLDQFH1HYHUXVHPHWDOFRQWDLQHUVZKHQ
XVLQJWKHDSSOLDQFHLQPLFURZDYHPRGHRQO\
::DUQLQJ² 5LVNRILQMXU\
■ 6FUDWFKHGJODVVLQWKHDSSOLDQFHGRRUPD\
GHYHORSLQWRDFUDFN'RQRWXVHDJODVV
VFUDSHUVKDUSRUDEUDVLYHFOHDQLQJDLGVRU
GHWHUJHQWV
5LVNRILQMXU\
■ 8QVXLWDEOH RYHQZDUH PD\ FUDFN 3RUFHODLQ RU
FHUDPLFRYHQZDUHFDQKDYHVPDOO
SHUIRUDWLRQVLQWKHKDQGOHVRUOLGV7KHVH
SHUIRUDWLRQVFRQFHDODFDYLW\EHORZ$Q\
PRLVWXUHWKDWSHQHWUDWHVWKLVFDYLW\FRXOG
FDXVHWKHRYHQZDUHWRFUDFN2QO\XVH
PLFURZDYHVDIHRYHQZDUH
5LVNRILQMXU\
■ ,IXVLQJWKHDSSOLDQFHLQPLFURZDYHPRGH
RQO\SODFLQJFRRNZDUHDQGFRQWDLQHUVPDGH
RI PHWDO RU IHDWXULQJ PHWDO GHWDLOLQJ LQVLGH WKH
DSSOLDQFHPD\FDXVHVSDUNVZKHQWKH
DSSOLDQFH LV RSHUDWLQJ 7KLV PD\ GDPDJH WKH
DSSOLDQFH1HYHUXVHPHWDOFRQWDLQHUVZKHQ
XVLQJWKHDSSOLDQFHLQPLFURZDYHPRGHRQO\
5LVNRILQMXU\
■ 7KHJODVVWXUQWDEOHPD\VSOLQWHU1HYHUDOORZ
KDUGREMHFWVWRVWULNHWKHWXUQWDEOH
5LVNRILQMXU\
■ &UDFNVRUFKLQNVLQWKHJODVVWXUQWDEOHDUH
GDQJHURXV+DQGOHWKHWXUQWDEOHZLWKFDUH
::DUQLQJ² 5LVNRIHOHFWULFVKRFN
7KHDSSOLDQFHLVDKLJKYROWDJHDSSOLDQFH
1HYHUUHPRYHWKHFDVLQJ
::DUQLQJ² 5LVNRIVHULRXVGDPDJHWR
KHDOWK
■ 7KHVXUIDFHRIWKHDSSOLDQFHPD\EHFRPH
GDPDJHGLILWLVQRWFOHDQHGSURSHUO\
0LFURZDYHHQHUJ\PD\HVFDSH&OHDQWKH
DSSOLDQFH RQ D UHJXODU EDVLV DQG UHPRYH DQ\
IRRGUHVLGXHLPPHGLDWHO\$OZD\VNHHSWKH
FRRNLQJFRPSDUWPHQWGRRUVHDOGRRUDQG
GRRUVWRSFOHDQ ~ &OHDQLQJRQ SDJH
5LVNRIVHULRXVGDPDJHWRKHDOWK
■ 0LFURZDYH HQHUJ\ PD\ HVFDSH LI WKH FRRNLQJ
FRPSDUWPHQWGRRURUWKHGRRUVHDOLV
GDPDJHG1HYHUXVHWKHDSSOLDQFHLIWKH
FRRNLQJ FRPSDUWPHQW GRRU RU WKH GRRU VHDO LV
GDPDJHG&RQWDFWWKHDIWHUVDOHVVHUYLFH
5LVNRIVHULRXVGDPDJHWRKHDOWK
■ 0LFURZDYHHQHUJ\ZLOOHVFDSHIURP
DSSOLDQFHVWKDWGRQRWKDYHDQ\FDVLQJ
1HYHUUHPRYHWKHFDVLQJ)RUDQ\
PDLQWHQDQFH RU UHSDLU ZRUN FRQWDFW WKH DIWHU
VDOHVVHUYLFH
5,QVWDOODWLRQDQG
FRQQHFWLRQ
,QVWDOODWLRQ DQG FRQQHFWLRQ
7KLVDSSOLDQFHLVGHVLJQHGIRUGRPHVWLFXVHRQO\
7KLVDSSOLDQFHLVGHVLJQHGWREHIXOO\LQWHJUDWHGLQWR
NLWFKHQXQLWV
3OHDVHIROORZWKHGHGLFDWHGLQVWDOODWLRQLQVWUXFWLRQV
7KHDSSOLDQFHLVUHDG\WREHSOXJJHGLQDQGPD\RQO\EH
FRQQHFWHGWRD6FKXNRVRFNHWWKDWKDVEHHQFRUUHFWO\
LQVWDOOHG7KHFLUFXLWEUHDNHUPXVWKDYHDUDWLQJRI $
/RU%W\SHFLUFXLWEUHDNHU7KHPDLQVYROWDJHPXVW
FRUUHVSRQGWRWKHYROWDJHVSHFLILHGRQWKHUDWLQJSODWH
2QO\DTXDOLILHGHOHFWULFLDQPD\LQVWDOOWKHVRFNHWRU
UHSODFH WKH SRZHU FDEOH,I WKH SOXJ LV QR ORQJHU DFFHVVLEOH
RQFHWKHDSSOLDQFHKDVEHHQLQVWDOOHGDQDOOSROH
LVRODWLQJVZLWFKZLWKDFRQWDFWJDSRIDWOHDVWPPPXVW
EHSURYLGHGIRUWKHZLULQJ
'RQRWXVHPXOWLVRFNHWDGDSWRUVSRZHUVWULSVRU
H[WHQVLRQOHDGV2YHUORDGLQJFDXVHVDULVNRIILUH
7KHDSSOLDQFHFDQEHLQVWDOOHGLQDZDOOKXQJFDELQHW
PHDVXULQJ FPZLGHLWPXVWEHDWOHDVW FPGHHS
DQG FPDERYHWKHIORRU
&DXVHVRIGDPDJH HQ
]&DXVHVRIGDPDJH
&DXVHV RI GDPDJH
&DXWLRQ
■ +HDYLO\VRLOHGVHDO ,IWKHVHDOLVYHU\GLUW\WKH
DSSOLDQFHGRRUZLOOQRORQJHUFORVHSURSHUO\GXULQJ
RSHUDWLRQ7KHIURQWVRIDGMDFHQWXQLWVFRXOGEH
GDPDJHG$OZD\VNHHSWKHVHDOFOHDQ
■ 2SHUDWLQJWKHPLFURZDYHZLWKRXWIRRG 2SHUDWLQJ
WKH DSSOLDQFH ZLWKRXW IRRG LQ WKH FRRNLQJ FRPSDUWPHQW
PD\OHDGWRRYHUORDGLQJ1HYHUVZLWFKRQWKH
DSSOLDQFHXQOHVVWKHUHLVIRRGLQWKHFRRNLQJ
FRPSDUWPHQW7KHRQO\H[FHSWLRQWRWKLVUXOHLVZKHQ
SHUIRUPLQJDVKRUWFRRNZDUHWHVW~ &RRNZDUHWHVW
RQ SDJH
■ 0LFURZDYHSRSFRUQ 1HYHUVHWWKHPLFURZDYHSRZHU
WRRKLJK8VHDSRZHUVHWWLQJQRKLJKHUWKDQ
ZDWWV$OZD\VSODFHWKHSRSFRUQEDJRQDJODVV
SODWH7KHGLVFPD\MXPSLIRYHUORDGHG
■ /LTXLGWKDWKDVERLOHGRYHUPXVWQRWEHDOORZHGWRUXQ
WKURXJKWKHWXUQWDEOHGULYHLQWRWKHLQWHULRURIWKH
DSSOLDQFH0RQLWRUWKHFRRNLQJSURFHVV&KRRVHD
VKRUWHU FRRNLQJ WLPH LQLWLDOO\ DQG LQFUHDVH WKH FRRNLQJ
WLPHDVUHTXLUHG
■ 1HYHUXVHWKHPLFURZDYHRYHQZLWKRXWWKHWXUQWDEOH
■ &UHDWLRQRIVSDUNV 0HWDOă HJDVSRRQLQDJODVVă
PXVW EH NHSW DW OHDVW FP IURP WKH RYHQ ZDOOV DQG WKH
LQVLGHRIWKHGRRU6SDUNVFRXOGLUUHSDUDEO\GDPDJH
WKHJODVVRQWKHLQVLGHRIWKHGRRU
■ )RLOFRQWDLQHUV 'RQRWXVHIRLOFRQWDLQHUVLQWKH
DSSOLDQFH7KH\GDPDJHWKHDSSOLDQFHE\SURGXFLQJ
VSDUNV
■ &RROLQJZLWKWKHDSSOLDQFHGRRURSHQ 2QO\OHDYH
WKH FRRNLQJ FRPSDUWPHQW WR FRRO ZLWK WKH GRRU FORVHG
'R QRW WUDS DQ\WKLQJ LQ WKH DSSOLDQFH GRRU (YHQ LI WKH
GRRULVRQO\VOLJKWO\DMDUWKHIURQWVRIDGMDFHQWXQLWV
PD\EHGDPDJHGRYHUWLPH
■ &RQGHQVDWLRQLQWKHFRRNLQJFRPSDUWPHQW
&RQGHQVDWLRQ PD\ DSSHDU RQ WKH GRRU ZLQGRZ LQWHULRU
ZDOOVDQGIORRU7KLVLVQRUPDODQGGRHVQRWDGYHUVHO\
DIIHFWPLFURZDYHRSHUDWLRQ7RSUHYHQWFRUURVLRQ
ZLSHRIIWKHFRQGHQVDWLRQHYHU\WLPH\RXFRRN
7(QYLURQPHQWDOSURWHFWLRQ
(QYLURQPHQWDO SURWHFWLRQ
(QYLURQPHQWDOO\IULHQGO\GLVSRVDO
'LVSRVHRISDFNDJLQJLQDQHQYLURQPHQWDOO\IULHQGO\
PDQQHU
**HWWLQJWRNQRZ\RXU
DSSOLDQFH
*HWWLQJ WR N QRZ \RXU DS SOLDQFH
,QWKLVVHFWLRQZHZLOOH[SODLQWKHGLVSOD\DQG
FRQWUROV<RXZLOODOVRILQGRXWDERXWWKHYDULRXVIXQFWLRQV
RI\RXUDSSOLDQFH
1RWH 'HSHQGLQJRQWKHDSSOLDQFHPRGHOLQGLYLGXDO
GHWDLOVDQGFRORXUVPD\GLIIHU
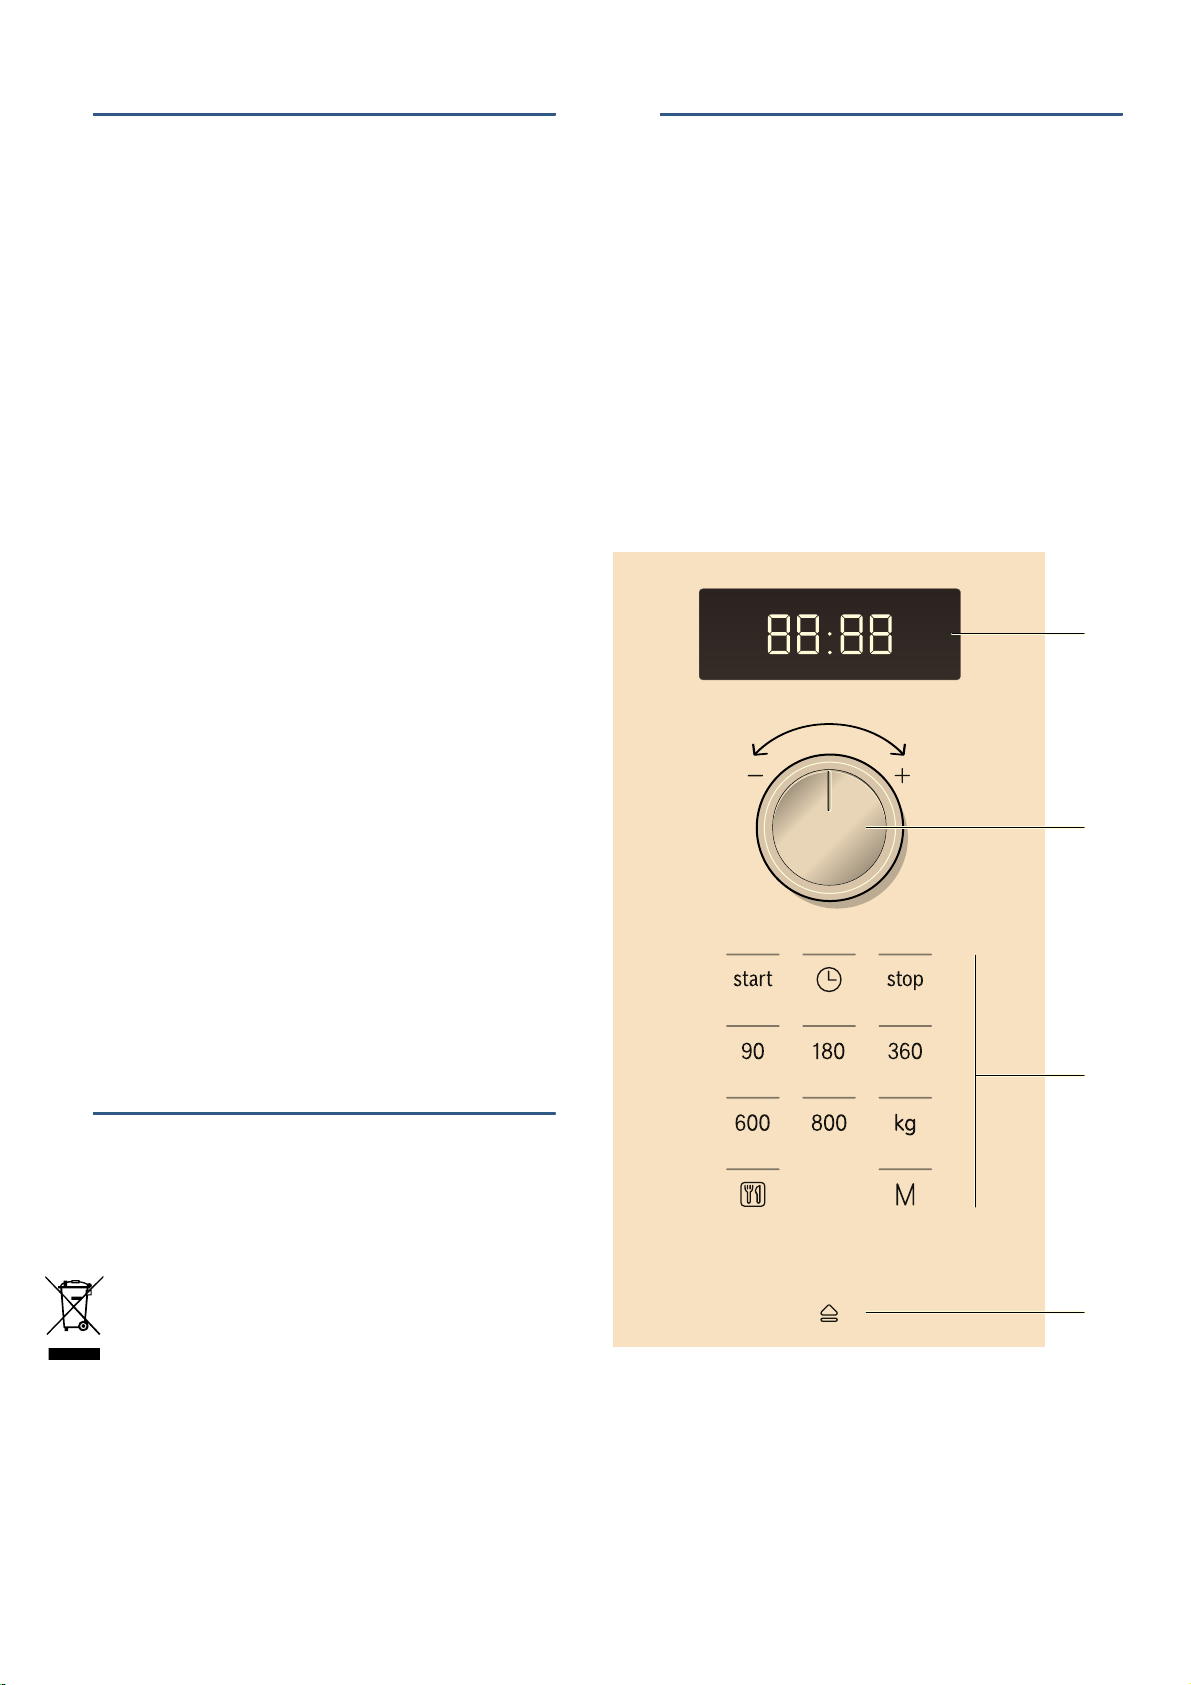
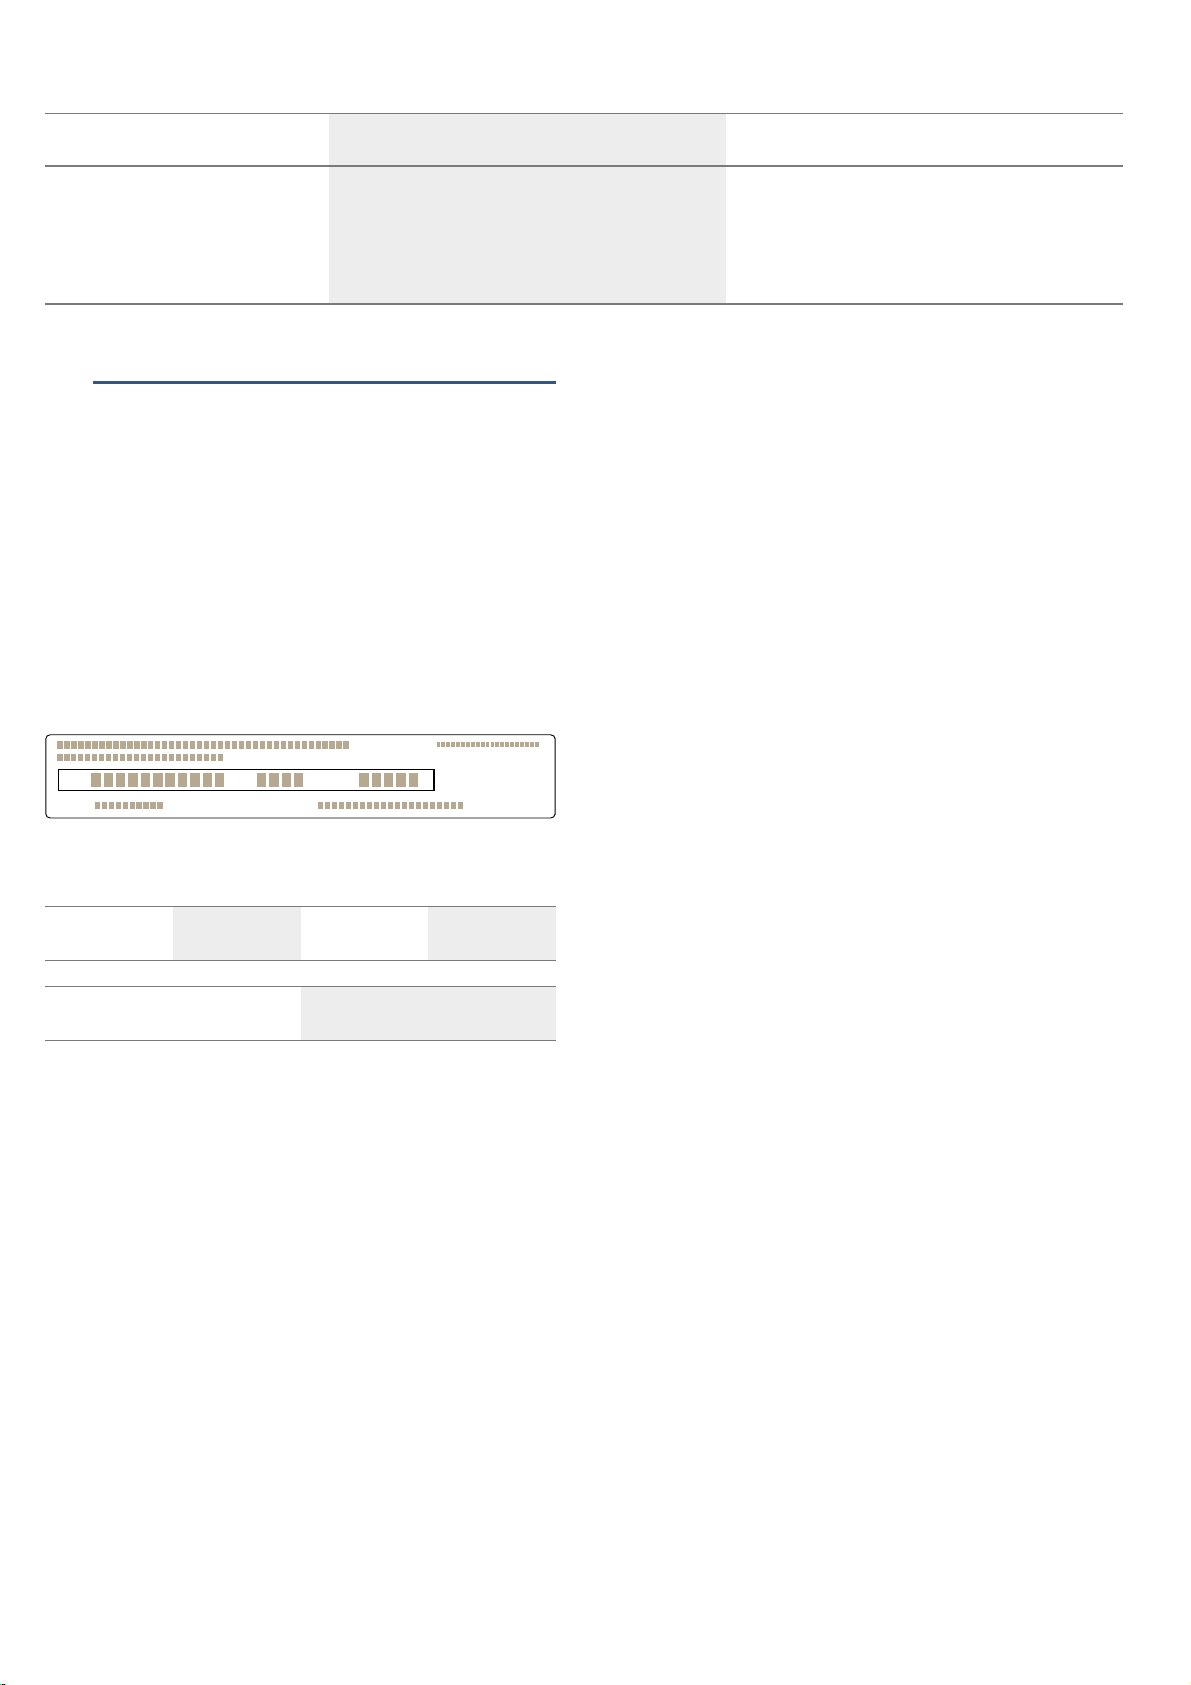
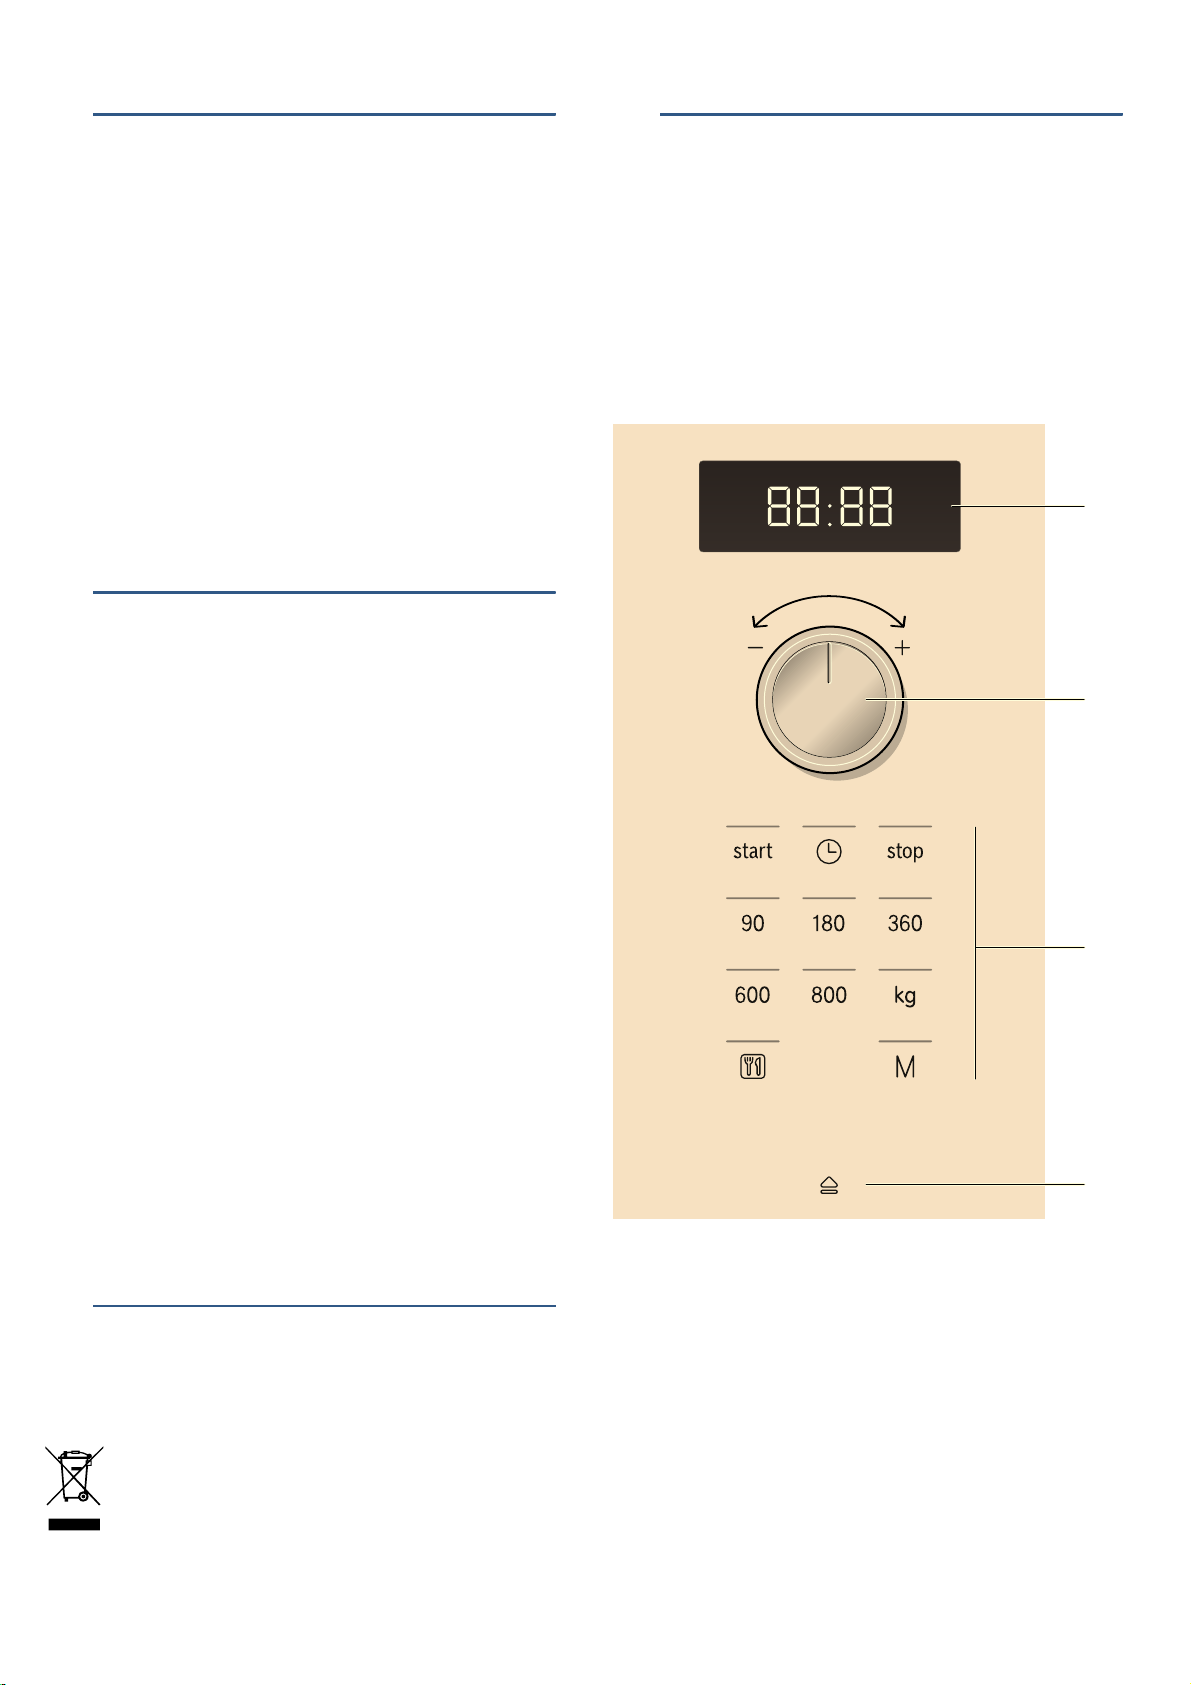
&RQWUROSDQHO
<RXFDQVHW\RXUDSSOLDQFHVYDULRXVIXQFWLRQVRQWKH
FRQWUROSDQHO7KHFXUUHQWVHWWLQJVDUHVKRZQRQWKH
GLVSOD\
7KH RYHUYLHZ VKRZV WKH FRQWURO SDQHO ZKHQ WKH DSSOLDQFH
LVVZLWFKHGRQZLWKDFORFNWLPHWKDWKDVEHHQVHW
7KLVDSSOLDQFHLVODEHOOHGLQDFFRUGDQFHZLWK
(XURSHDQ 'LUHFWLYH (8 FRQFHUQLQJ XVHG
HOHFWULFDODQGHOHFWURQLFDSSOLDQFHVZDVWH
HOHFWULFDO DQG HOHFWURQLF HTXLSPHQW :((( 7KH
JXLGHOLQH GHWHUPLQHV WKH IUDPHZRUN IRU WKH UHWXUQ
DQGUHF\FOLQJRIXVHGDSSOLDQFHVDVDSSOLFDEOH
WKURXJKRXWWKH(8
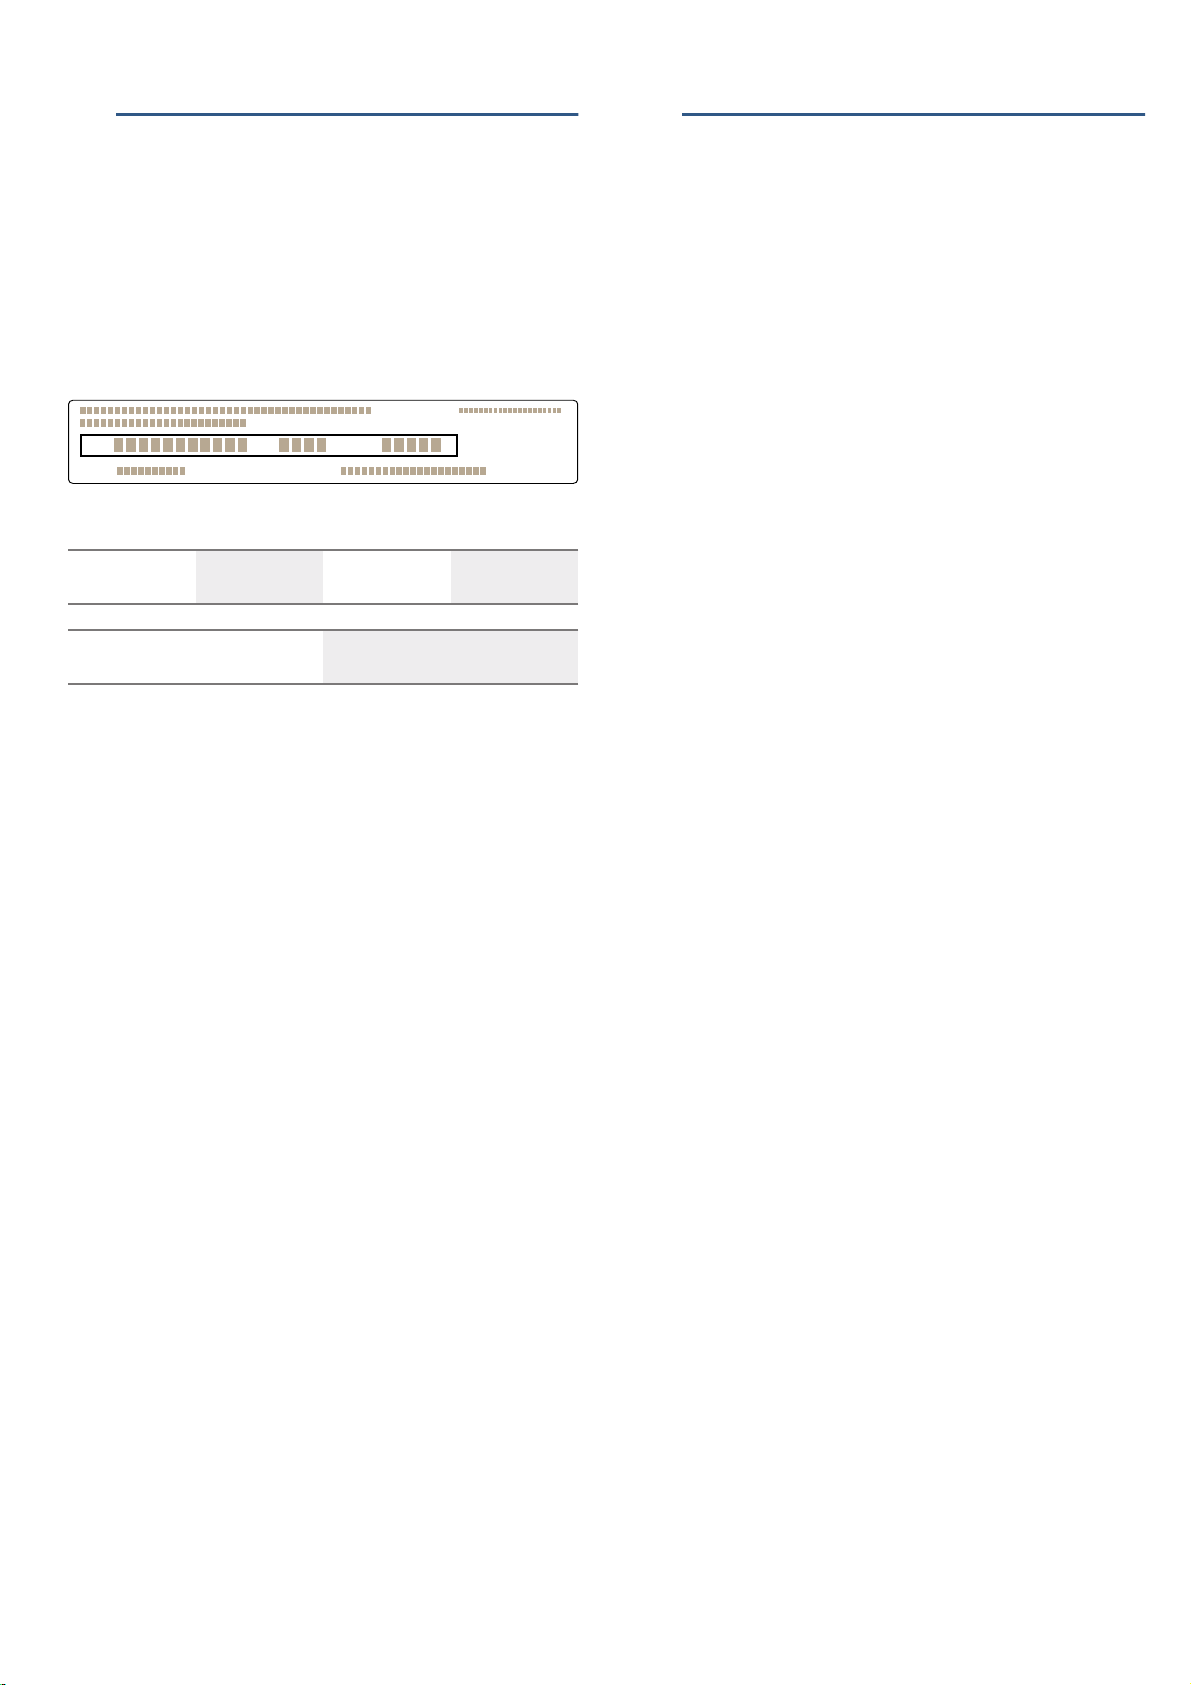
( 'LVSOD\
)RUFORFNDQGFRRNLQJWLPHV
0 5RWDU\VHOHFWRU
)RU VHWWLQJ WKH FORFN DQG FRRNLQJ WLPHV RU IRU VHWWLQJ
DXWRPDWLFSURJUDPPHV
8 %XWWRQV
@ $XWRPDWLFGRRURSHQLQJEXWWRQ
PLQ
K
NJ
#
en $FFHVVRULHV
&RQWUROV
<RXZLOOILQGDEULHIH[SODQDWLRQRIWKHYDULRXVEXWWRQV
EHORZ7KHVHEXWWRQVDOORZ\RXWRVHW\RXUDSSOLDQFH
VLPSO\DQGGLUHFWO\
%XWWRQVDQGWKHLUPHDQLQJ
<RXZLOOILQGDEULHIH[SODQDWLRQRIWKHYDULRXVEXWWRQV
EHORZ
5RWDU\VHOHFWRU
7KHURWDU\VHOHFWRULVXVHGWRDOWHUWKHGHIDXOWYDOXHVDQG
VHWYDOXHV
7KHURWDU\VHOHFWRULVUHWUDFWDEOH3UHVVRQWKHURWDU\
VHOHFWRUWRORFNLWLQRURXW
$XWRPDWLFGRRURSHQLQJ
7KHDSSOLDQFHGRRUVSULQJVRSHQLI\RXDFWLYDWHWKH
DXWRPDWLF GRRU RSHQLQJ <RX FDQ IXOO\ RSHQ WKH DSSOLDQFH
GRRUPDQXDOO\
7KH DXWRPDWLF GRRU RSHQLQJ GRHV QRW ZRUN LQ WKH HYHQW RI
DSRZHUFXW<RXFDQRSHQWKHGRRUPDQXDOO\
1RWHV
■ ,I\RXRSHQWKHDSSOLDQFHGRRUGXULQJRSHUDWLRQWKH
RSHUDWLRQLVSDXVHG
■ :KHQ\RXFORVHWKHDSSOLDQFHGRRUWKHRSHUDWLRQ
GRHVQRWFRQWLQXHDXWRPDWLFDOO\<RXPXVWUHVWDUWWKH
RSHUDWLRQPDQXDOO\
■ ,IWKHDSSOLDQFHKDVEHHQVZLWFKHGRIIIRUDORQJWLPH
WKHDSSOLDQFHGRRUZLOORSHQDIWHUDWLPHGHOD\
&RROLQJIDQ
7KH DSSOLDQFH LV HTXLSSHG ZLWK D FRROLQJ IDQ 7KH IDQ PD\
UXQRQHYHQLIWKHRYHQKDVEHHQVZLWFKHGRII
1RWHV
■ 7KHFRRNLQJFRPSDUWPHQWUHPDLQVFROGGXULQJ
PLFURZDYHRSHUDWLRQ7KHFRROLQJIDQZLOOVWLOOVZLWFK
RQ7KHIDQPD\UXQRQHYHQZKHQPLFURZDYH
RSHUDWLRQKDVHQGHG
■ &RQGHQVDWLRQ PD\ DSSHDU RQ WKH GRRU ZLQGRZ LQWHULRU
ZDOOVDQGIORRU7KLVLVQRUPDODQGGRHVQRWDGYHUVHO\
DIIHFWPLFURZDYHRSHUDWLRQ:LSHDZD\WKH
FRQGHQVDWLRQDIWHUFRRNLQJ
&KDQJLQJWKHVLJQDOGXUDWLRQ
<RXZLOOKHDUDVLJQDOZKHQWKHDSSOLDQFHLVVZLWFKHGRII
<RXFDQFKDQJHWKHGXUDWLRQRIWKHDFRXVWLFVLJQDO
3UHVVWKHVWDUWEXWWRQIRUDSSUR[ VHFRQGV
7KHQHZVLJQDOGXUDWLRQLVDGRSWHG
7KHFORFNUHDSSHDUV
7KHIROORZLQJDUHSRVVLEOH
6KRUWVLJQDOGXUDWLRQWRQHV
/RQJVLJQDOGXUDWLRQWRQHV
_$FFHVVRULHV
$FFHVVRULHV
%HORZ\RXZLOOILQGDQRYHUYLHZRIWKHDFFHVVRULHV
LQFOXGHGDQGLQIRUPDWLRQRQKRZWRXVHWKHPFRUUHFWO\
&DXWLRQ
:KHQ UHPRYLQJ GLVKHV PDNH VXUH WKDW WKH WXUQWDEOH GRHV
QRW PRYH 0DNH VXUH WKDW WKH WXUQWDEOH LV SURSHUO\ ORFNHG
7KHWXUQWDEOHFDQWXUQOHIWRUULJKW
6SHFLDODFFHVVRULHV
6SHFLDODFFHVVRULHVFDQEHSXUFKDVHGIURPRXUDIWHU
VDOHVVHUYLFHIURPVSHFLDOLVWUHWDLOHUVRURQOLQH<RXZLOO
ILQGDFRPSUHKHQVLYHUDQJHRISURGXFWVLQRXUEURFKXUHV
DQGRQOLQH
7KHLUDYDLODELOLW\DQGZKHWKHULWLVSRVVLEOHWRRUGHUWKHP
RQOLQHYDULHVIURPFRXQWU\WRFRXQWU\3OHDVHVHHRXU
VDOHVEURFKXUHVIRUPRUHGHWDLOV
1RWH 1RWDOOVSHFLDODFFHVVRULHVDUHVXLWDEOHIRUHYHU\
DSSOLDQFH:KHQSXUFKDVLQJSOHDVHDOZD\VTXRWHWKH
H[DFWLGHQWLILFDWLRQQXPEHU(QRRI\RXUDSSOLDQFH
~ &XVWRPHUVHUYLFHRQ SDJH
%XWWRQV 0HDQLQJ
6\PERO
VWDUW 6WDUWWKHDSSOLDQFH
0 6HWWLQJWKHWLPH
VWRS 6WRSRUSDXVHWKHDSSOLDQFH
6HOHFWDPLFURZDYHSRZHURXWSXWRIZDWWV
6HOHFWDPLFURZDYHSRZHURXWSXWRIZDWWV
6HOHFWDPLFURZDYHSRZHURXWSXWRIZDWWV
6HOHFWDPLFURZDYHSRZHURXWSXWRIZDWWV
6HOHFWDPLFURZDYHSRZHURXWSXWRIZDWWV
h
6HOHFWDZHLJKWIRUWKHSURJUDPPHV
%
6HOHFWDXWRPDWLFSURJUDPPHV
i 6HOHFWWKHPHPRU\
v 2SHQDSSOLDQFHGRRU
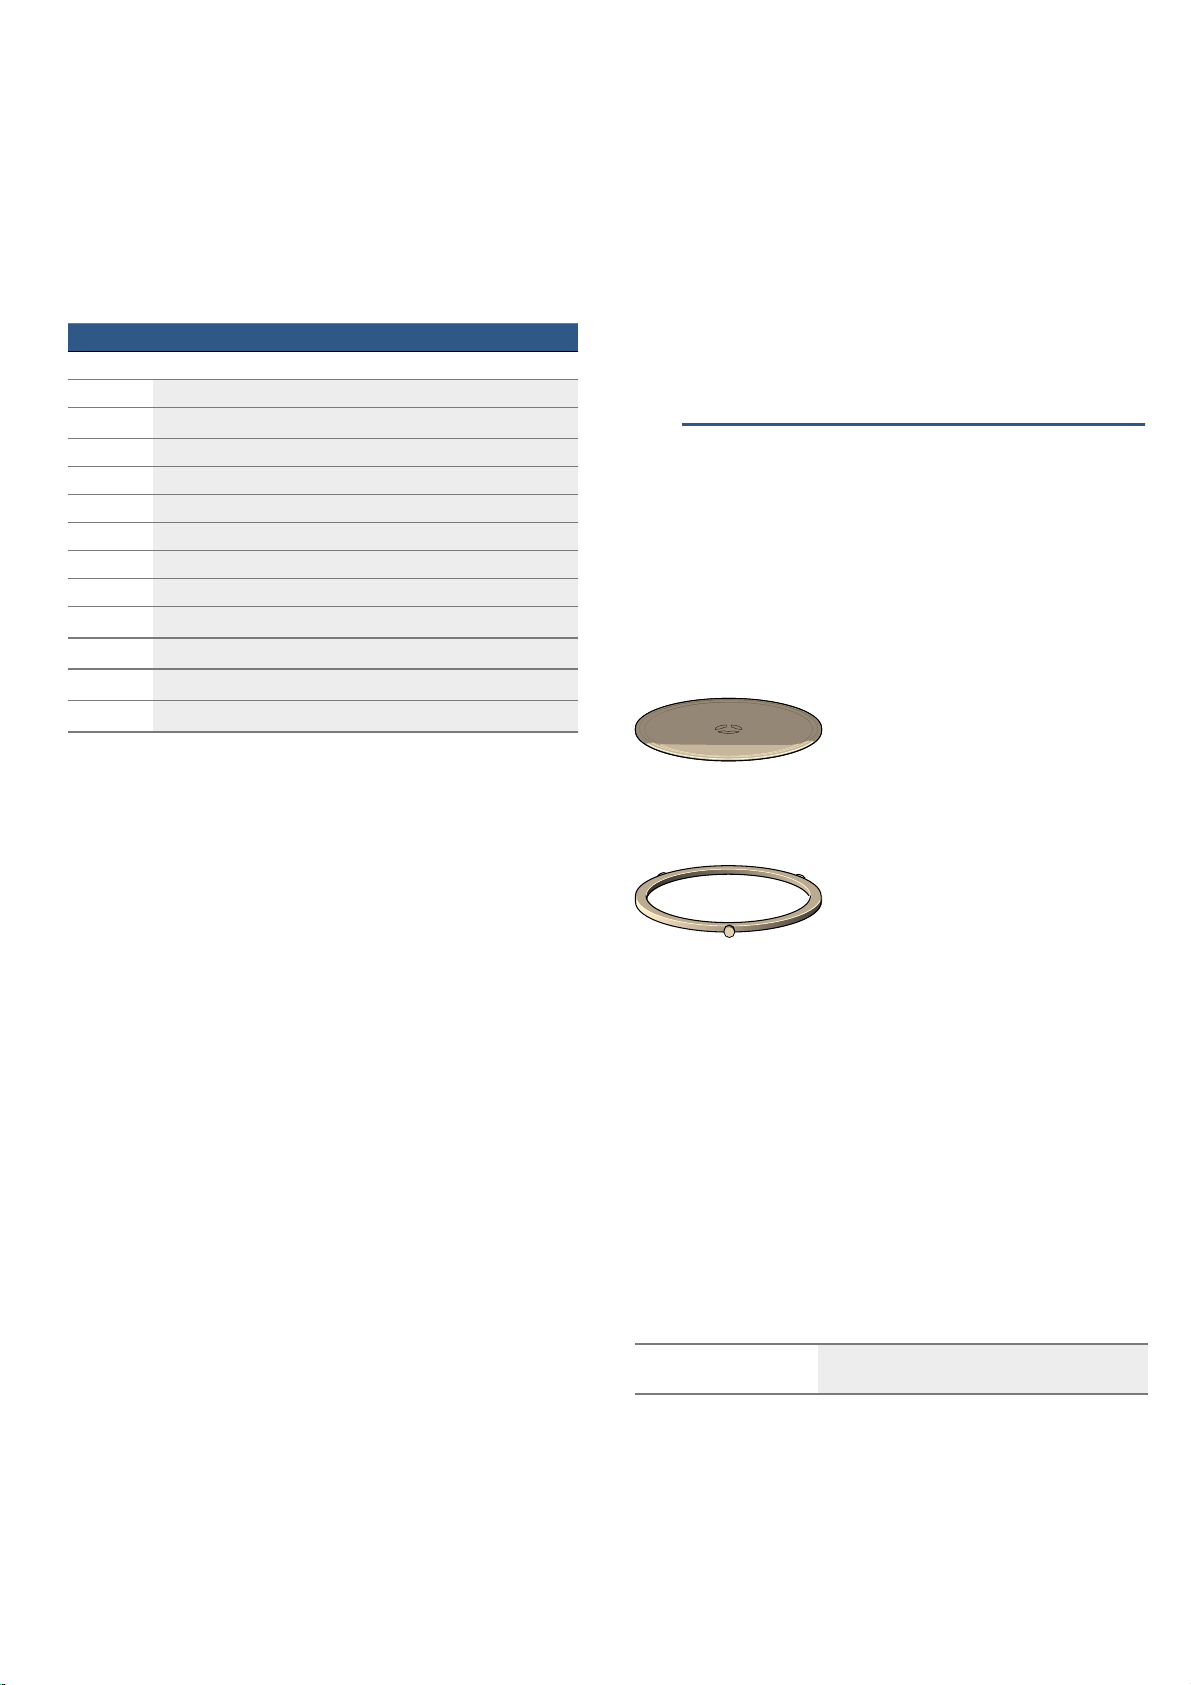
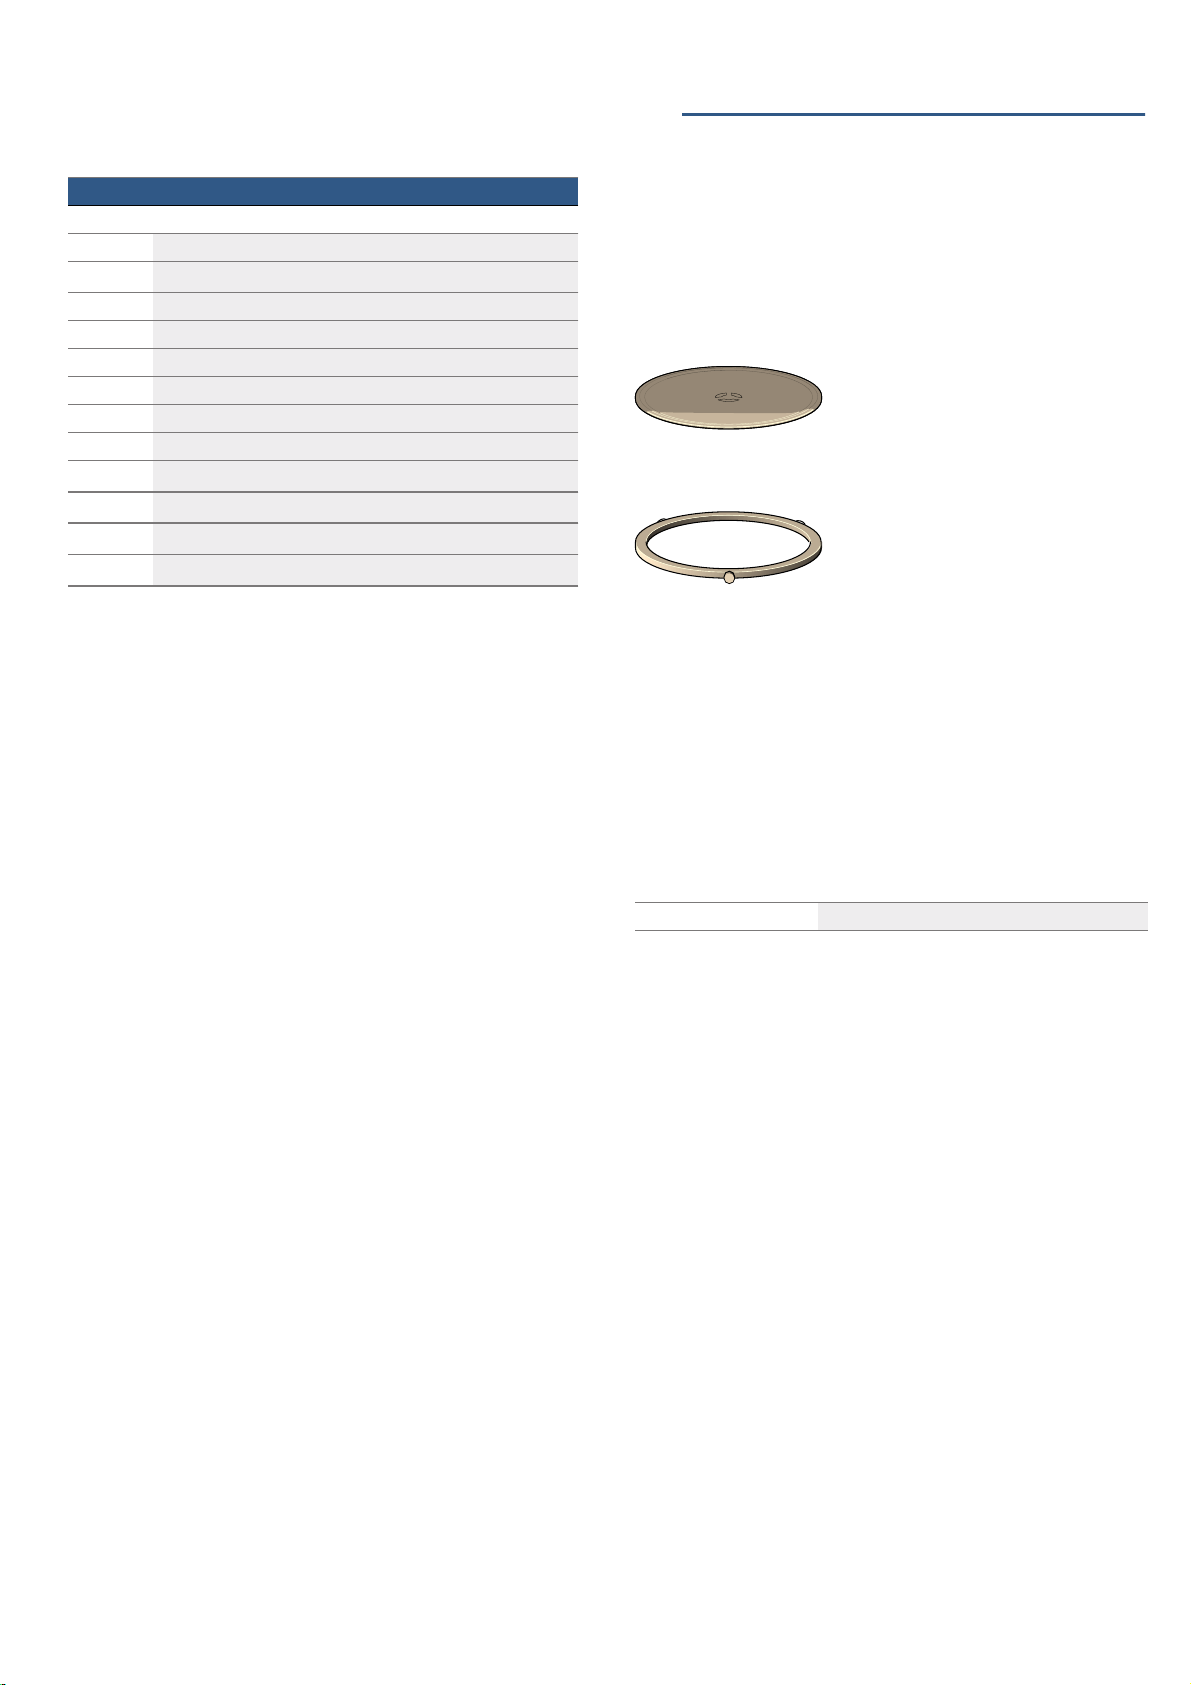
7XUQWDEOH
1RWH 1HYHUXVHWKHDSSOLDQFH
ZLWKRXWWKHWXUQWDEOH0DNHVXUH
WKDWLWLVSURSHUO\HQJDJHG7KH
WXUQWDEOHFDQWXUQFORFNZLVHRU
DQWLFORFNZLVH
5ROOHUULQJ
6WHDPLQJXWHQVLOV )RUFRRNLQJULFHSRWDWRHVDQGYHJHWD
EOHV
%HIRUHXVLQJIRUWKHILUVWWLPH HQ
K%HIRUHXVLQJIRUWKHILUVW
WLPH
%HIRUH X VLQJ IRU WK H ILUVW WLPH
7KLVVHFWLRQWHOOV\RXZKDW\RXQHHGWRGREHIRUHXVLQJ
\RXUPLFURZDYHWRSUHSDUHIRRGIRUWKHILUVWWLPH5HDG
WKHVHFWLRQHQWLWOHG6DIHW\LQIRUPDWLRQEHIRUHKDQG
~ ,PSRUWDQWVDIHW\LQIRUPDWLRQRQ SDJH
%HIRUH\RXFDQXVH\RXUQHZDSSOLDQFH\RXZLOOQHHGWR
SXWWKHWXUQWDEOHLQSODFHFRUUHFWO\<RXPXVWDOVRFOHDQ
WKHFRRNLQJFRPSDUWPHQWDQGDFFHVVRULHV
&OHDQLQJWKHFRRNLQJFRPSDUWPHQWDQG
SXWWLQJWKHWXUQWDEOHLQSODFH
%HIRUHXVLQJWKHDSSOLDQFHWRSUHSDUHIRRGIRUWKHILUVW
WLPH\RXPXVWFOHDQWKHFRRNLQJFRPSDUWPHQWDQG
DFFHVVRULHV
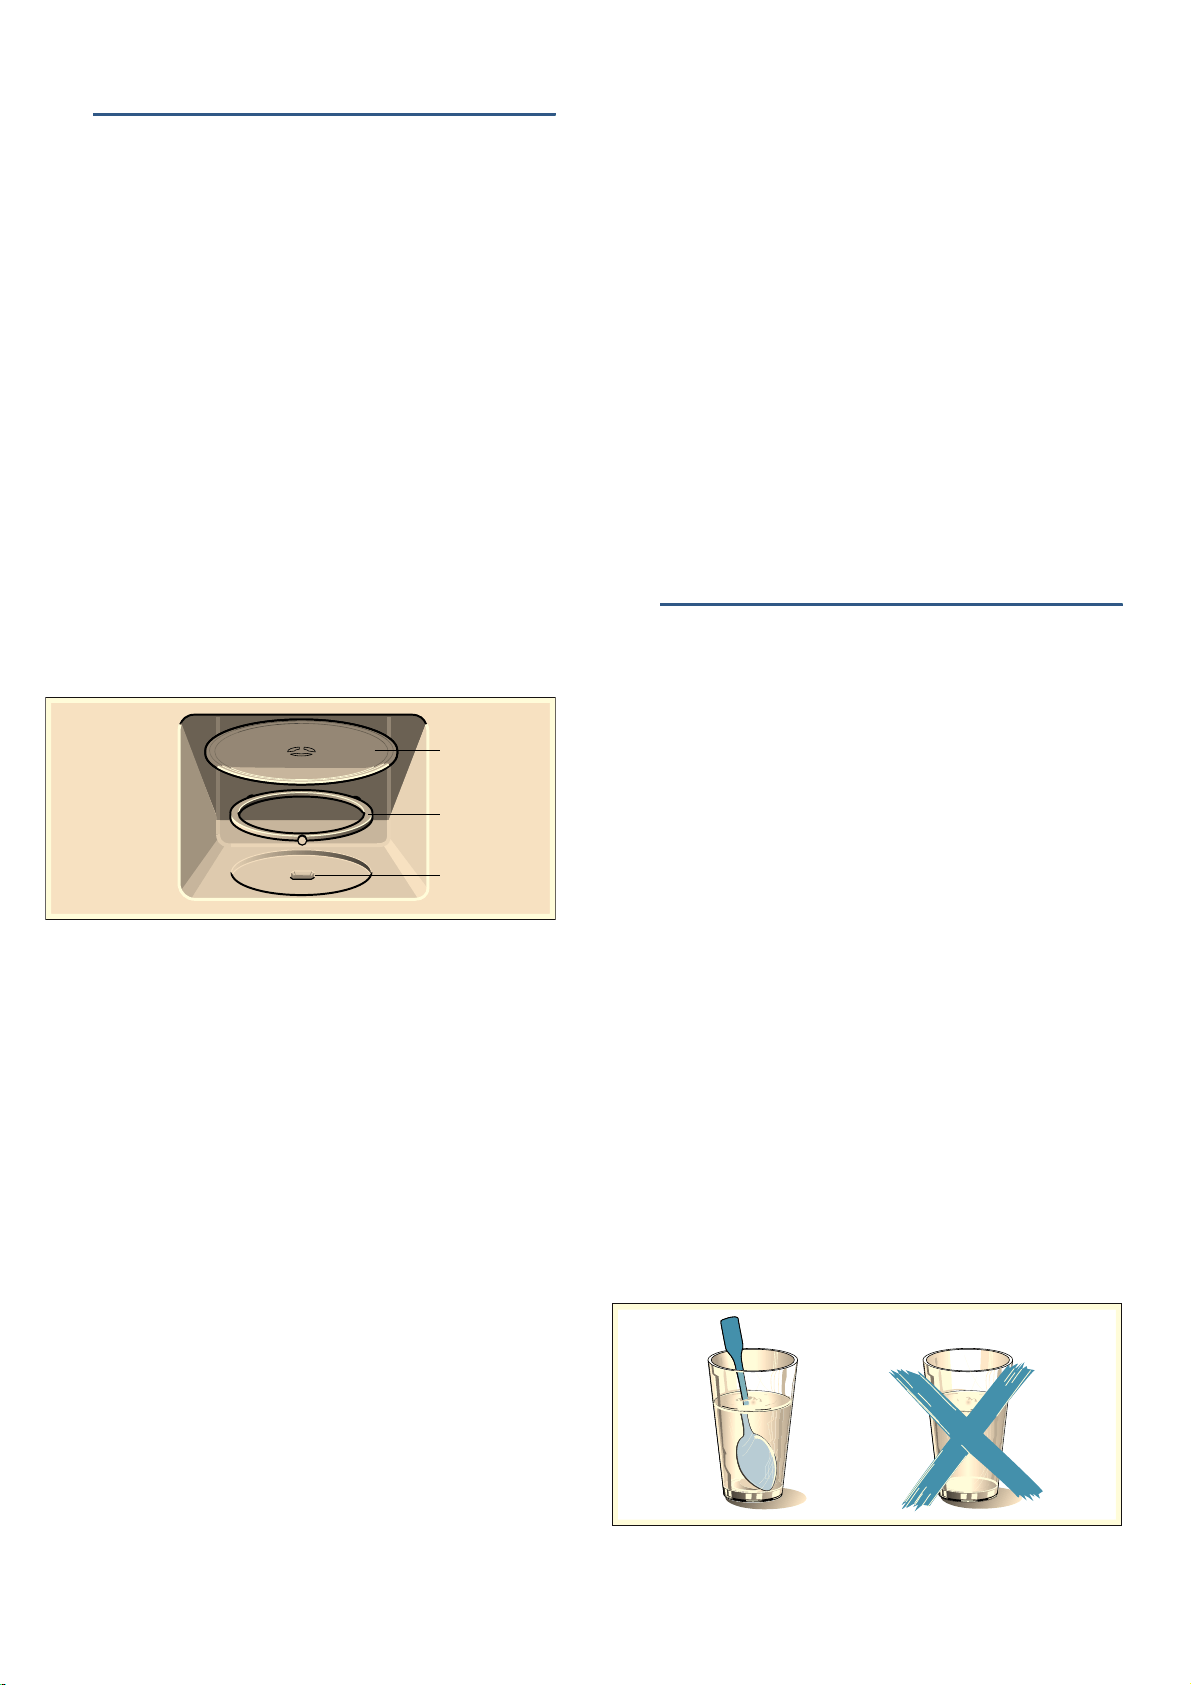
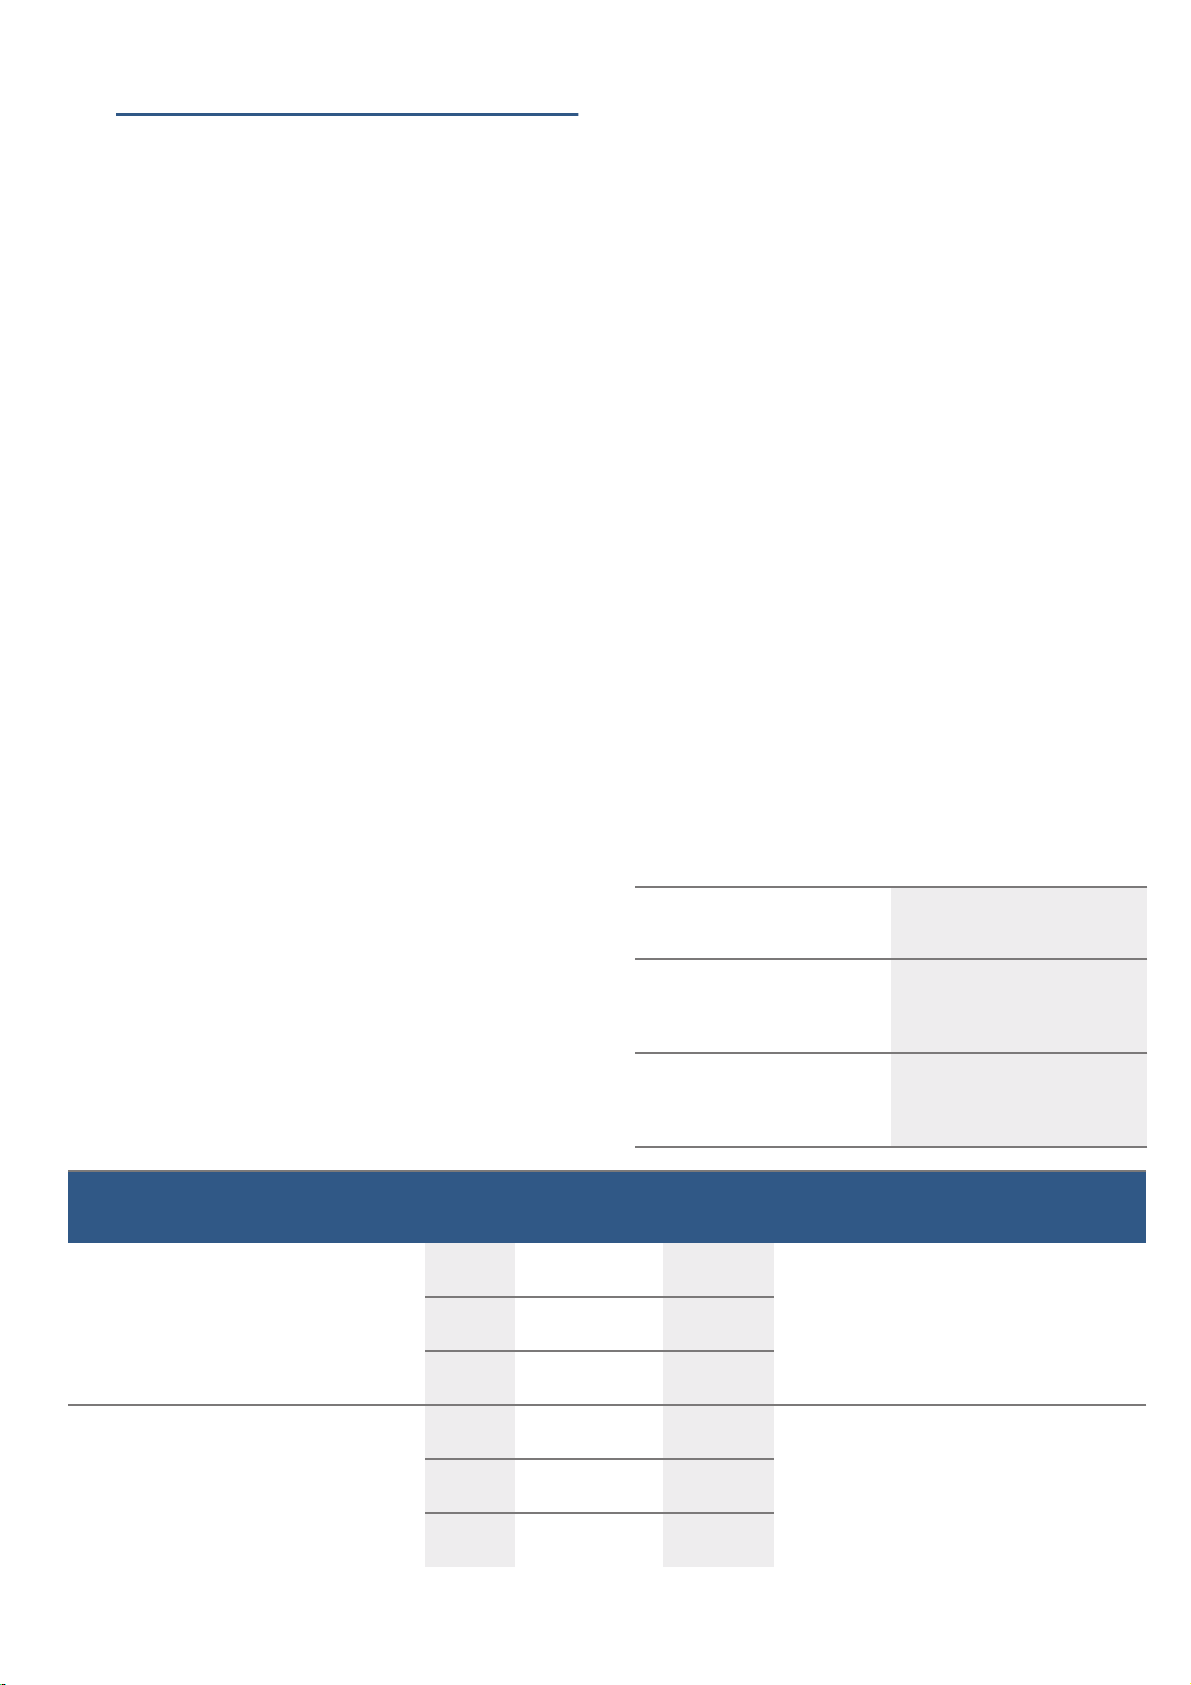
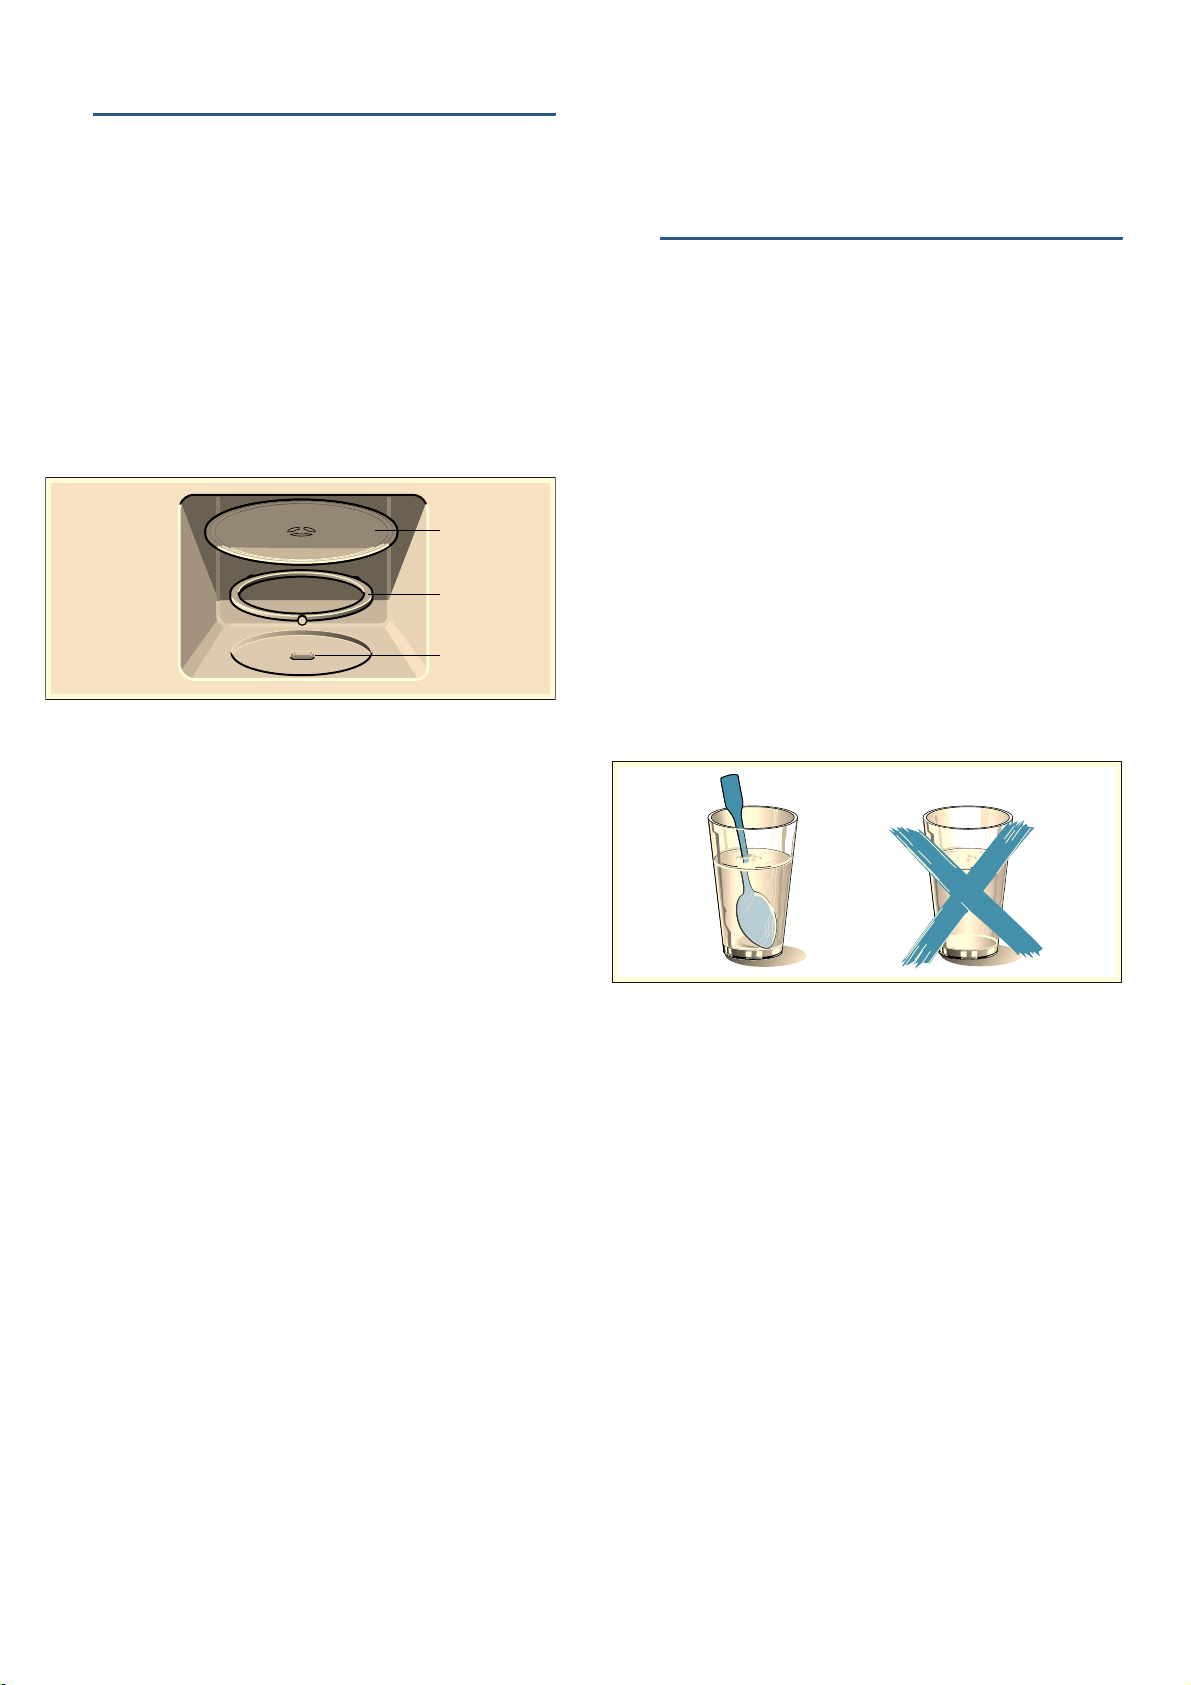
+RZWRSXWWKHWXUQWDEOHLQSODFH
3ODFHWKHUROOHUULQJ DLQWRWKHUHFHVVLQWKHFRRNLQJ
FRPSDUWPHQW
0DNHVXUHWKDWWKHWXUQWDEOH EHQJDJHVLQWKHGULYH F
LQWKHFHQWUHRIWKHFRRNLQJFRPSDUWPHQWIORRU
1RWH 1HYHUXVHWKHDSSOLDQFHZLWKRXWWKHWXUQWDEOH
0DNHVXUHWKDWLWLVSURSHUO\HQJDJHG7KHWXUQWDEOHFDQ
WXUQFORFNZLVHRUDQWLFORFNZLVH
6HWWLQJWKHFORFN
:KHQ WKH DSSOLDQFH LV ILUVW FRQQHFWHG RU DIWHU D SRZHU FXW
WKUHH]HURVZLOODSSHDULQWKHGLVSOD\SDQHO
3UHVVWKH 0EXWWRQ
‚ƒ‹‹
œ
DSSHDUV LQ WKH GLVSOD\ DQG WKH LQGLFDWRU ODPS
DERYHWKH 0EXWWRQOLJKWVXS
6HWWKHFORFNXVLQJWKHURWDU\VHOHFWRU
3UHVVWKH 0EXWWRQDJDLQ
7KHFXUUHQWWLPHLVVHW
+LGLQJWKHFORFN
3UHVVWKH 0EXWWRQDQGWKHQSUHVV6WRS
7KHGLVSOD\LVEODQN
5HVHWWLQJWKHFORFN
3UHVVWKH 0 EXWWRQ
DSSHDUVLQWKHGLVSOD\0DNHVHWWLQJVDVGHWDLOHG
LQSRLQWV DQG
&KDQJHWKHFORFNHJ IURPVXPPHUWRZLQWHUWLPH
6HWDVGHVFULEHGLQSRLQW WR
&OHDQLQJWKHFRRNLQJFRPSDUWPHQWDQG
DFFHVVRULHV
7RHOLPLQDWHWKHQHZDSSOLDQFHVPHOOZLSHGRZQWKH
FRRNLQJFRPSDUWPHQWZLWKKRWVRDS\ZDWHUZKHQLWLV
HPSW\~ &OHDQLQJRQ SDJH
7LS 0DNHVXUHWKDWWKHUHLVQROHIWRYHUSDFNDJLQJVXFK
DV SRO\VW\UHQH SHOOHWV LQ WKH FRRNLQJ FRPSDUWPHQW :LSH
WKHVPRRWKVXUIDFHVLQWKHFRRNLQJFRPSDUWPHQWZLWKD
VRIWGDPSFORWK
&OHDQLQJWKHDFFHVVRULHV
&OHDQWKHDFFHVVRULHVWKRURXJKO\XVLQJVRDS\ZDWHUDQG
DGLVKFORWKRUVRIWEUXVK
^0LFURZDYH
0LFURZDYH
<RXFDQXVHWKHPLFURZDYHWRFRRNKHDWXSRUGHIURVW
IRRGTXLFNO\
7R HQVXUH RSWLPXP XVH RI WKH PLFURZDYH SOHDVH REVHUYH
WKHQRWHVRQFRRNZDUHDQGIDPLOLDULVH\RXUVHOIZLWKWKH
GDWDLQWKHDSSOLFDWLRQWDEOHVDWWKHHQGRIWKHLQVWUXFWLRQ
PDQXDO ~ 7HVWHGIRU\RXLQRXUFRRNLQJVWXGLR
RQ SDJH
7U\ RXW WKH PLFURZDYH VWUDLJKW DZD\ <RX FRXOG KHDW XS D
FXSRIZDWHUIRU\RXUWHDIRUH[DPSOH
8VHDODUJHFXSZLWKRXWDQ\GHFRUDWLYHJROGRUVLOYHUWULP
DQGSODFHDWHDVSRRQLQLW3ODFHWKHFXSFRQWDLQLQJWKH
ZDWHUVRPHZKDWHFFHQWULFDOO\RQWKHWXUQWDEOH
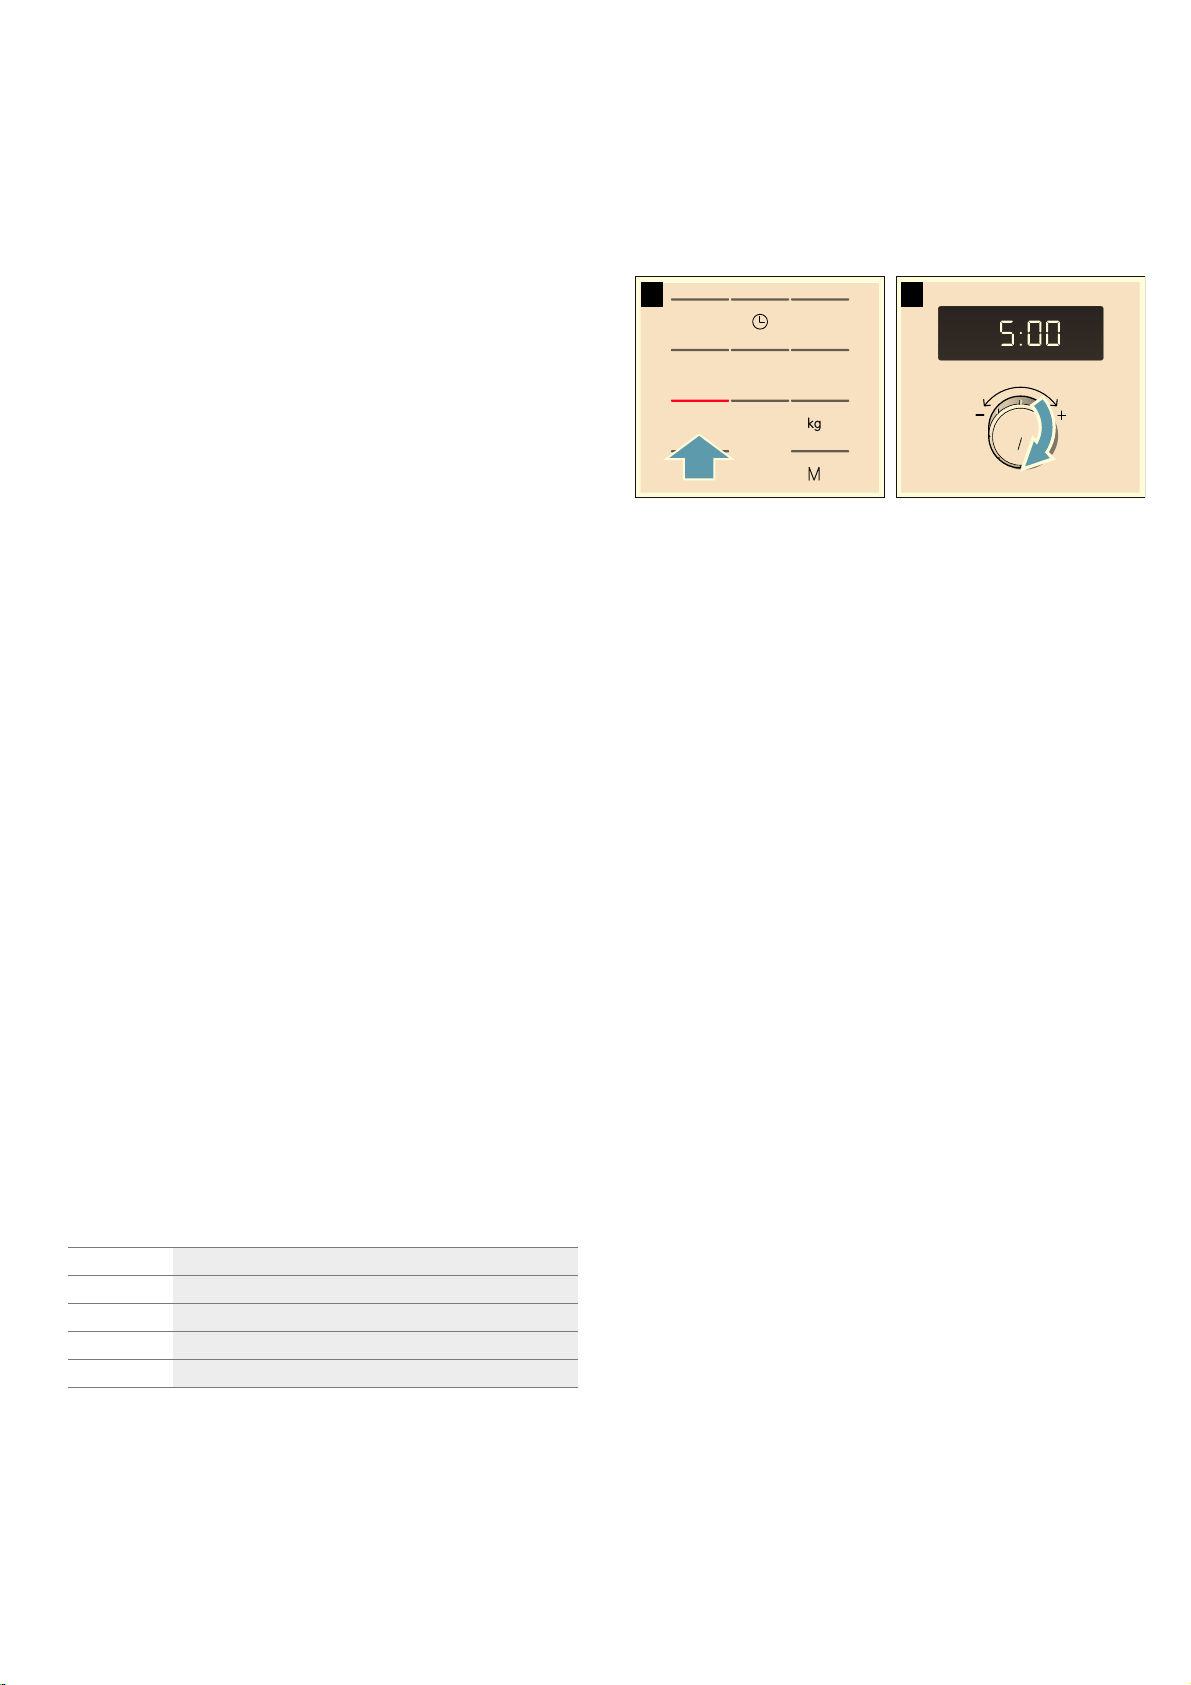
3UHVVWKH :EXWWRQ
8VHWKHURWDU\NQREWRVHW PLQXWHV
3UHVVWKH6WDUWEXWWRQ
$IWHU PLQXWH VHFRQGVDVLJQDOVRXQGV7KHZDWHULV
KRW
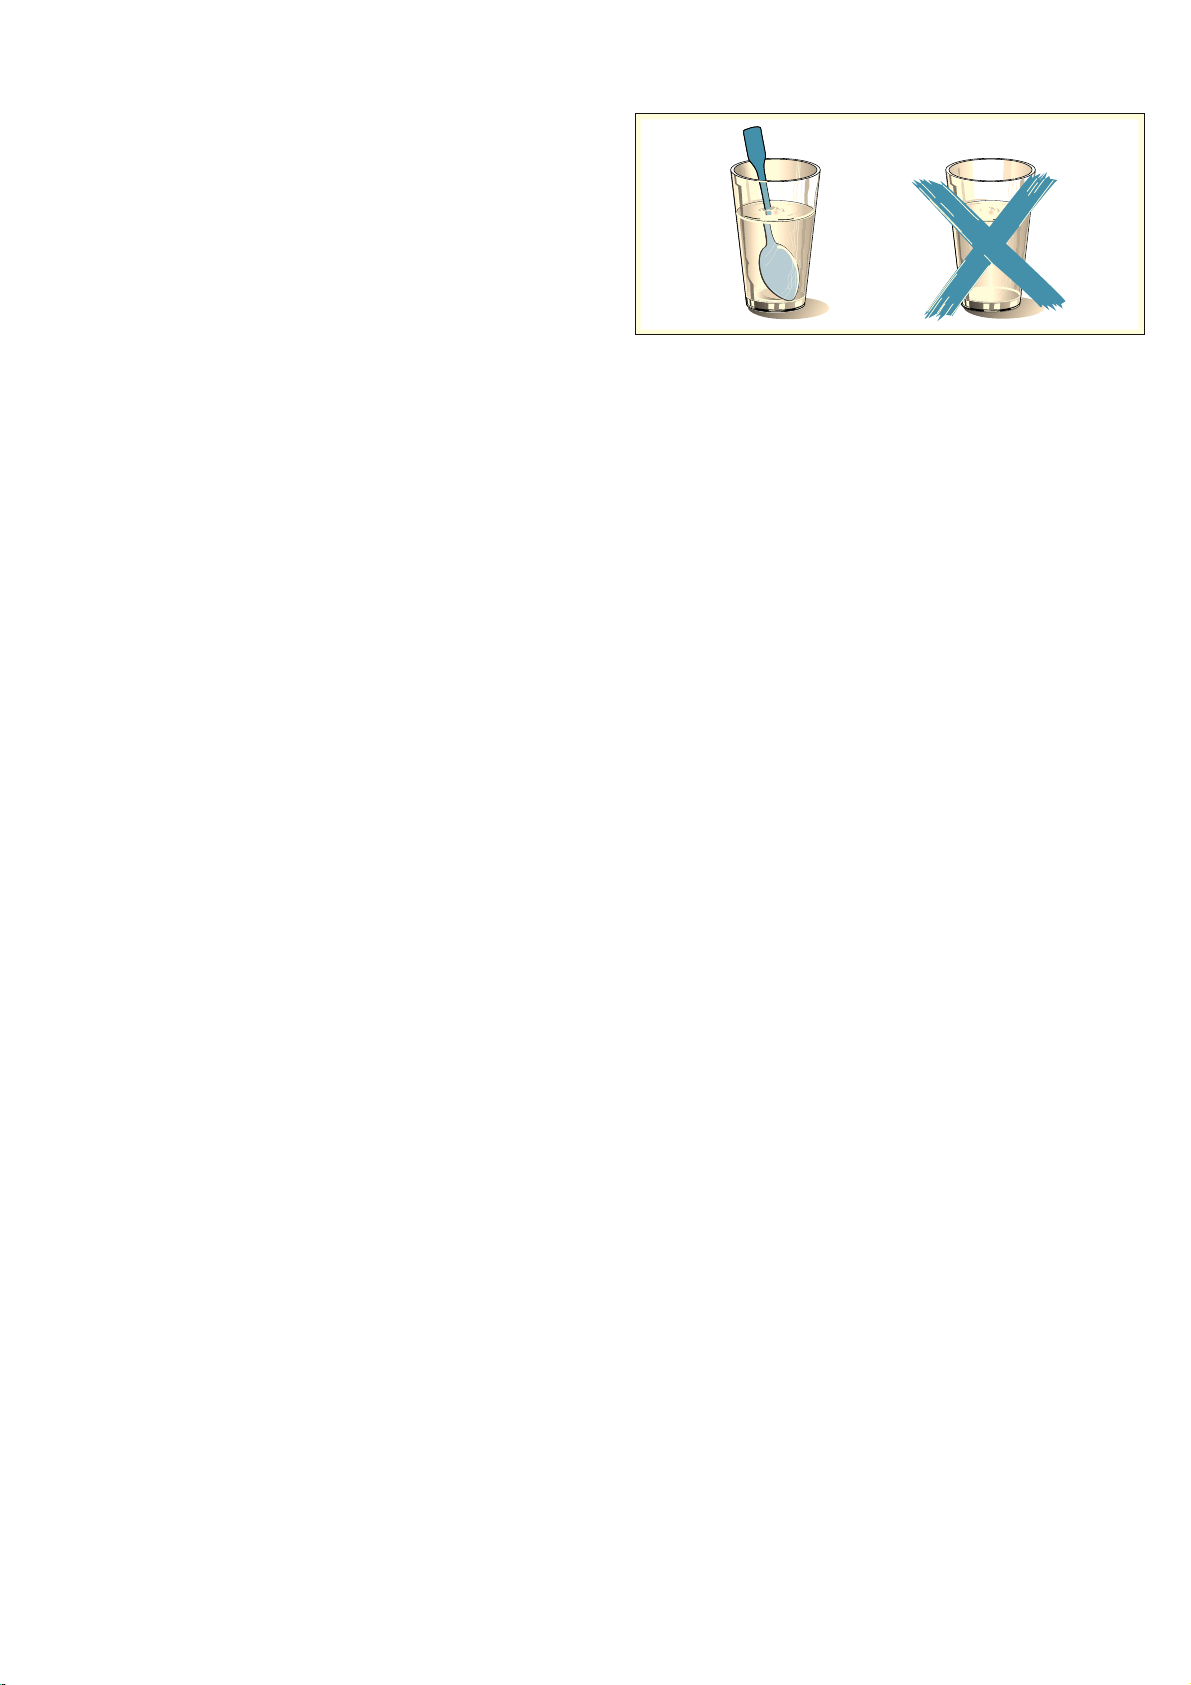
::DUQLQJ² 5LVNRIVFDOGLQJ
7KHUHLVDSRVVLELOLW\RIGHOD\HGERLOLQJZKHQDOLTXLGLV
KHDWHG7KLVPHDQVWKDWWKHOLTXLGUHDFKHVERLOLQJ
WHPSHUDWXUH ZLWKRXW WKH XVXDO VWHDP EXEEOHV ULVLQJ WR WKH
VXUIDFH (YHQ LI WKH FRQWDLQHU RQO\ YLEUDWHV D OLWWOH WKH KRW
OLTXLGPD\VXGGHQO\ERLORYHUDQGVSDWWHU:KHQKHDWLQJ
DOZD\VSODFHDVSRRQLQWKHFRQWDLQHU7KLVZLOOSUHYHQW
GHOD\HGERLOLQJ
E
D
F
en 0LFURZDYH
&RRNZDUH
1RWDOOFRRNZDUHLVPLFURZDYDEOH6RWKDW\RXUIRRGLV
KHDWHGDQGWKHDSSOLDQFHLVQRWGDPDJHGRQO\XVH
PLFURZDYDEOHFRRNZDUH
6XLWDEOHFRRNZDUH
+HDWUHVLVWDQWFRRNZDUHPDGHRIJODVVJODVVFHUDPLF
SRUFHODLQFHUDPLFRUKHDWUHVLVWDQWSODVWLFDUHVXLWDEOH
7KHVHPDWHULDOVDOORZPLFURZDYHVWRSDVVWKURXJK
<RXFDQDOVRXVHVHUYLQJGLVKHV7KLVVDYHV\RXKDYLQJ
WR WUDQVIHU IRRG IURP RQH GLVK WR DQRWKHU <RX VKRXOG RQO\
XVHFRRNZDUHZLWKGHFRUDWLYHJROGRUVLOYHUWULPLIWKH
PDQXIDFWXUHUJXDUDQWHHVWKDWWKH\DUHVXLWDEOHIRUXVHLQ
PLFURZDYHV
8QVXLWDEOHFRRNZDUH
0HWDOFRRNZDUHLVXQVXLWDEOH0HWDOGRHVQRWDOORZ
PLFURZDYHVWRSDVVWKURXJK)RRGLQFRYHUHGPHWDO
FRQWDLQHUVZLOOUHPDLQFROG
&DXWLRQ
&UHDWLRQ RI VSDUNV 0HWDO ² HJ D VSRRQ LQ D JODVV ² PXVW
EH NHSW DW OHDVW FP IURP WKH FRRNLQJ FRPSDUWPHQW ZDOOV
DQG WKH LQVLGH RI WKH GRRU 6SDUNV FDQ LUUHSDUDEO\ GDPDJH
WKHJODVVRQWKHLQVLGHRIWKHGRRU
&RRNZDUHWHVW
1HYHUVZLWFKRQWKHPLFURZDYHXQOHVVWKHUHLVIRRG
LQVLGH7KHVKRUWFRRNZDUHWHVWLVWKHRQO\H[FHSWLRQWR
WKLVUXOH
3HUIRUPWKHIROORZLQJWHVWLI\RXDUHXQVXUHZKHWKHU\RXU
FRRNZDUHLVVXLWDEOHIRUXVHLQWKHPLFURZDYH
+HDWWKHHPSW\FRRNZDUHDWPD[LPXPSRZHUIRUôWR
PLQXWH
&KHFNWKHWHPSHUDWXUHRIWKHFRRNZDUHGXULQJWKLV
WLPH
7KHFRRNZDUHVKRXOGUHPDLQFROGRUZDUPWRWKHWRXFK
7KH FRRNZDUH LV XQVXLWDEOH LI LW EHFRPHV KRW RU VSDUNV DUH
JHQHUDWHG
,QWKLVFDVHVWRSWKHWHVW
::DUQLQJ² 5LVNRIEXUQV
7KH DFFHVVLEOH SDUWV EHFRPH YHU\ KRW ZKHQ LQ RSHUDWLRQ
1HYHUWRXFKKRWSDUWV.HHSFKLOGUHQDWDVDIHGLVWDQFH
0LFURZDYHSRZHUVHWWLQJV
8VHWKHEXWWRQWRVHWWKHGHVLUHGPLFURZDYHSRZHU
1RWH <RX FDQ VHW WKH : PLFURZDYH SRZHU VHWWLQJ IRU
PLQXWHV : IRU KRXU WKH RWKHU SRZHU VHWWLQJV IRU
KRXUDQGPLQXWHVUHVSHFWLYHO\
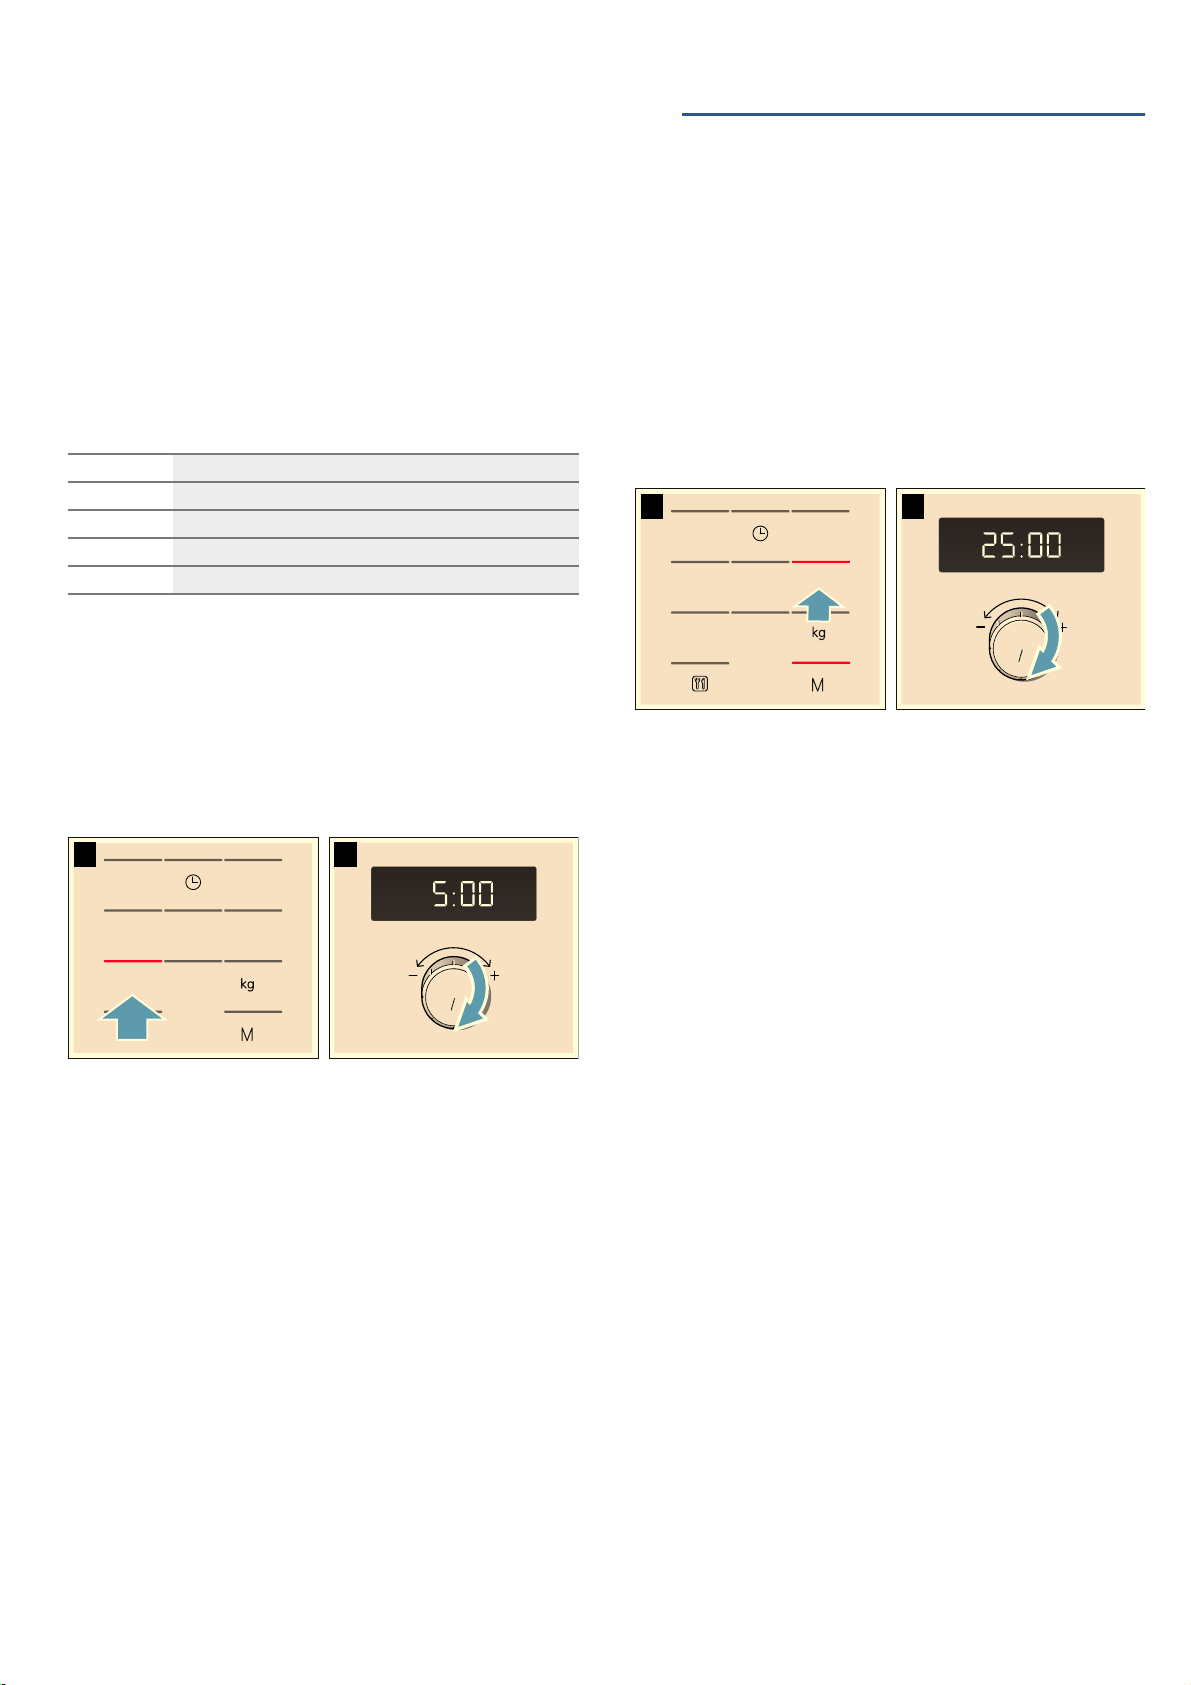
6HWWLQJWKHPLFURZDYH
([DPSOH0LFURZDYHSRZHURXWSXW :FRRNLQJWLPH
PLQXWHV
3UHVVWKHUHTXLUHGPLFURZDYHSRZHUVHWWLQJ
7KHLQGLFDWRUOLJKWDERYHWKHEXWWRQOLJKWVXS
8VHWKHURWDU\VHOHFWRUWRVHWDFRRNLQJWLPH
3UHVVWKH6WDUWEXWWRQ
7KHFRRNLQJWLPHFRXQWVGRZQLQWKHGLVSOD\
7KHFRRNLQJWLPHKDVHODSVHG
$VLJQDOVRXQGV2SHQWKHDSSOLDQFHGRRURUSUHVV6WRS
7KHFORFNUHDSSHDUV
&KDQJLQJWKHFRRNLQJWLPH
7KLVFDQEHGRQHDWDQ\WLPH&KDQJHWKHFRRNLQJWLPH
XVLQJWKHURWDU\VHOHFWRU
3DXVLQJWKHDSSOLDQFH
7RXFKWKH6WRSEXWWRQRQFHRURSHQWKHDSSOLDQFHGRRU
7KLVSDXVHVWKHDSSOLDQFH7KHLQGLFDWRUDERYHWKH6WRS
EXWWRQZLOOOLJKWXS$IWHUFORVLQJWKHGRRUWRXFKWKH6WDUW
EXWWRQDJDLQ
&DQFHOOLQJRSHUDWLRQ
3UHVVWKH6WRSEXWWRQWZLFH RURSHQWKHGRRUDQGSUHVV
WKH6WRSEXWWRQRQFH
1RWH <RXFDQDOVRDGMXVWWKHFRRNLQJWLPHILUVWDQGWKHQ
WKHPLFURZDYHSRZHUVHWWLQJ
: )RUGHIURVWLQJGHOLFDWHIRRGV
: )RUGHIURVWLQJDQGFRQWLQXHGFRRNLQJ
: )RUFRRNLQJPHDWDQGKHDWLQJGHOLFDWHIRRGV
: )RUKHDWLQJDQGFRRNLQJIRRG
: )RUKHDWLQJOLTXLGV
VWRSVWDUW
PLQ
NJ
PLQ
0HPRU\ HQ
B0HPRU\
0HPR U\
7KHPHPRU\IXQFWLRQDOORZV\RXWRVDYHWKHVHWWLQJIRUD
GLVKDQGFDOOLWXSDWDQ\WLPH
7KHPHPRU\IXQFWLRQLVXVHIXOLI\RXSUHSDUHRQHGLVK
SDUWLFXODUO\IUHTXHQWO\
6DYLQJPHPRU\VHWWLQJV
([DPSOH : PLQXWHV
3UHVVWKH i EXWWRQ
7KHLQGLFDWRUOLJKWDERYHWKHEXWWRQOLJKWVXS
3UHVVWKHUHTXLUHGPLFURZDYHSRZHUVHWWLQJ
7KHLQGLFDWRUOLJKWDERYHWKHEXWWRQOLJKWVXSDQG
PLQDSSHDUVLQWKHGLVSOD\
8VHWKHURWDU\VHOHFWRUWRVHWWKHFRRNLQJWLPH
&RQILUPE\SUHVVLQJWKH i EXWWRQ
7KHFORFNUHDSSHDUV7KHVHWWLQJKDVEHHQVDYHG
1RWHV
■ <RXFDQQRWVDYHVHYHUDOPLFURZDYHSRZHUVHWWLQJV
RQHDIWHUWKHRWKHU
■ <RXFDQQRWVDYHDXWRPDWLFSURJUDPPHV
■ <RXFDQVDYHWKHPHPRU\VHWWLQJVDQGVWDUWWKH
DSSOLDQFHLPPHGLDWHO\:KHQILQLVKLQJLQVWHDGRI
SUHVVLQJ iSUHVV6WDUW
■ 6DYLQJDQHZVHWWLQJLQWKHPHPRU\SUHVVWKH
i EXWWRQ7KHROGVHWWLQJVDSSHDU6DYHWKHQHZ
SURJUDPPHDVGHVFULEHGLQVWHSV
6WDUWLQJWKHPHPRU\
,WLVYHU\HDV\WRVWDUWWKHVDYHGSURJUDPPH3ODFH\RXU
PHDOLQWRWKHDSSOLDQFH&ORVHWKHDSSOLDQFHGRRU
3UHVVWKH i EXWWRQ
7KHVDYHGVHWWLQJVDUHGLVSOD\HG
3UHVVWKH6WDUWEXWWRQ
7KHFRRNLQJWLPHFRXQWVGRZQLQWKHGLVSOD\
7KHFRRNLQJWLPHKDVHODSVHG
$VLJQDOVRXQGV2SHQWKHDSSOLDQFHGRRURUSUHVV6WRS
7KHFORFNUHDSSHDUV
3DXVLQJWKHDSSOLDQFH
7RXFKWKH6WRSEXWWRQRQFHRURSHQWKHDSSOLDQFHGRRU
7KLVSDXVHVWKHDSSOLDQFH7KHLQGLFDWRUDERYHWKH6WRS
EXWWRQZLOOOLJKWXS$IWHUFORVLQJWKHGRRUWRXFKWKH6WDUW
EXWWRQDJDLQ
&DQFHOOLQJ
3UHVV WKH VWRS EXWWRQ WZLFH RU RSHQ WKH GRRU DQG SUHVV
WKHVWRSEXWWRQRQFH
P3URJUDPPHV
3URJUDPPHV
<RXFDQSUHSDUHIRRGUHDOO\HDVLO\XVLQJWKHYDULRXV
SURJUDPPHV<RXVHOHFWDSURJUDPPHDQGHQWHUWKH
ZHLJKWRI\RXUIRRG7KHSURJUDPWKHQDSSOLHVWKHPRVW
VXLWDEOHVHWWLQJV
1RWH <RXFDQFKRRVHIURP SURJUDPPHV
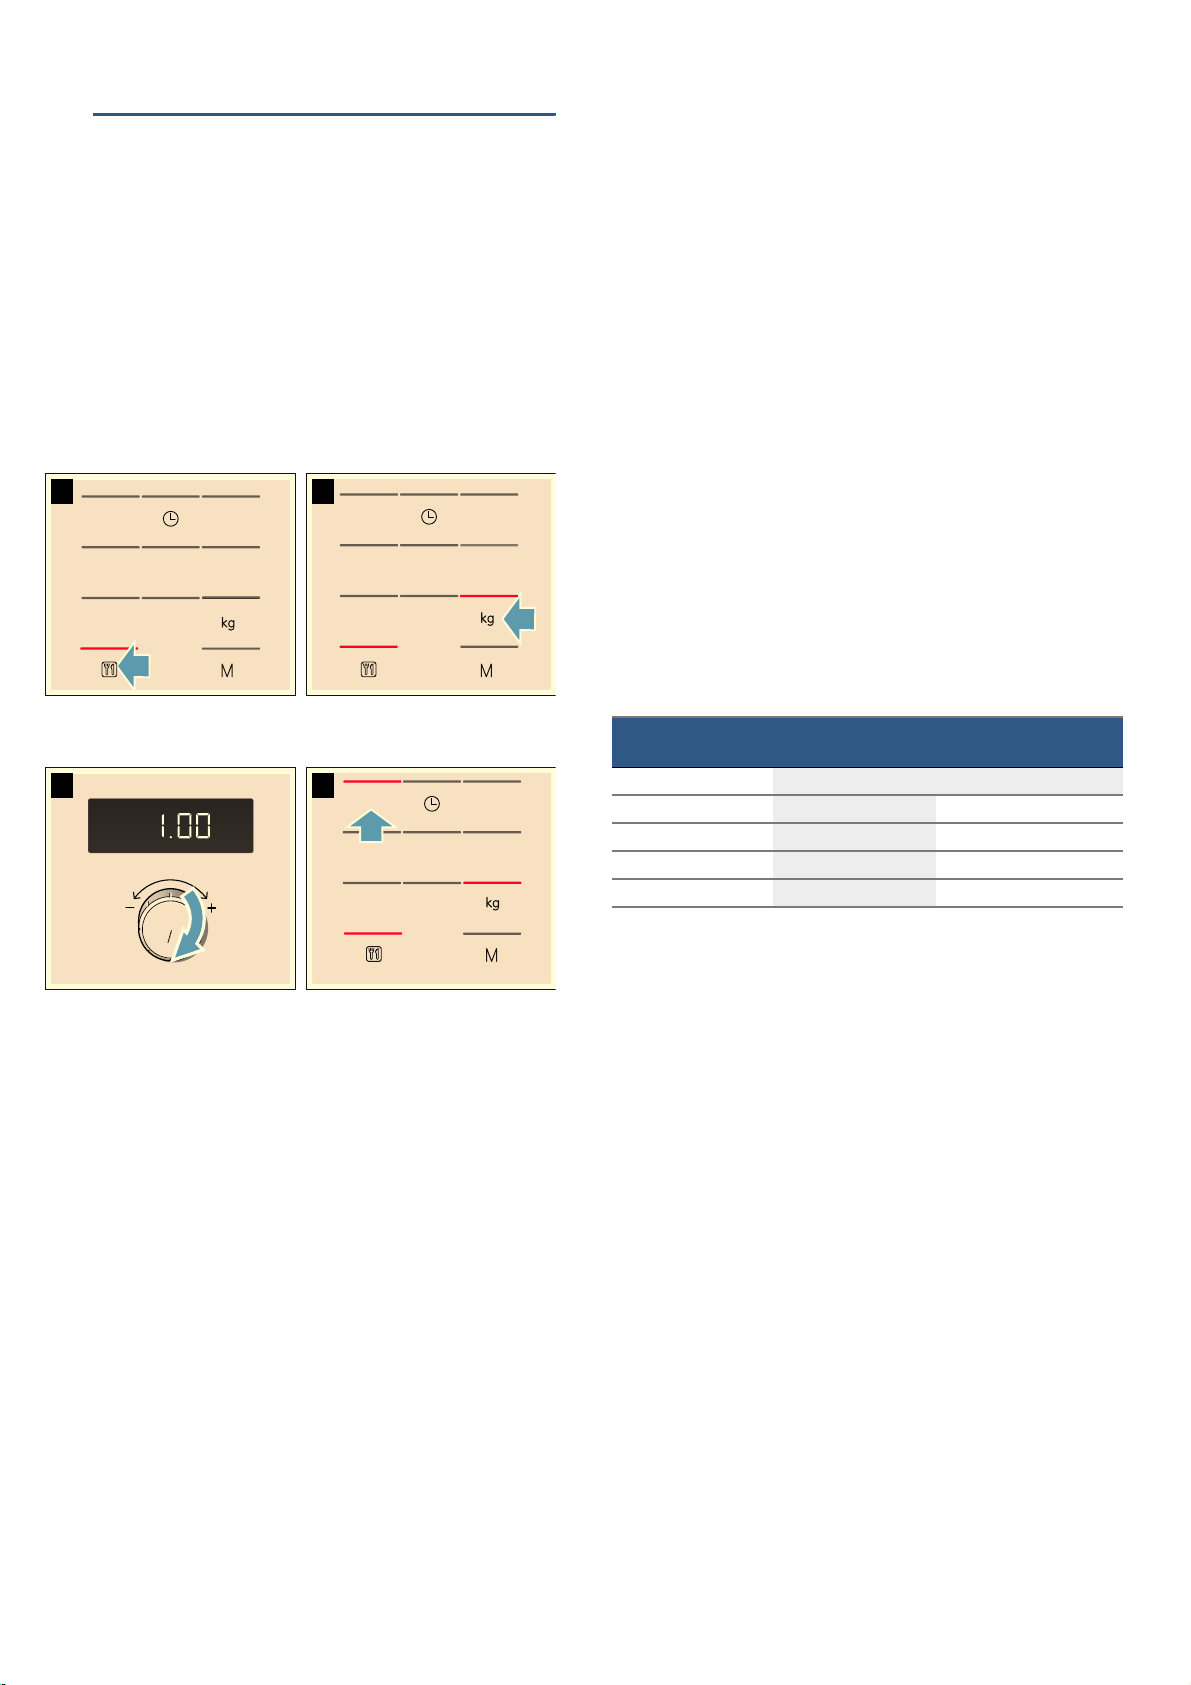
6HWWLQJDSURJUDPPH
2QFH\RXKDYHVHOHFWHGDSURJUDPPHPDNHVHWWLQJVDV
IROORZV
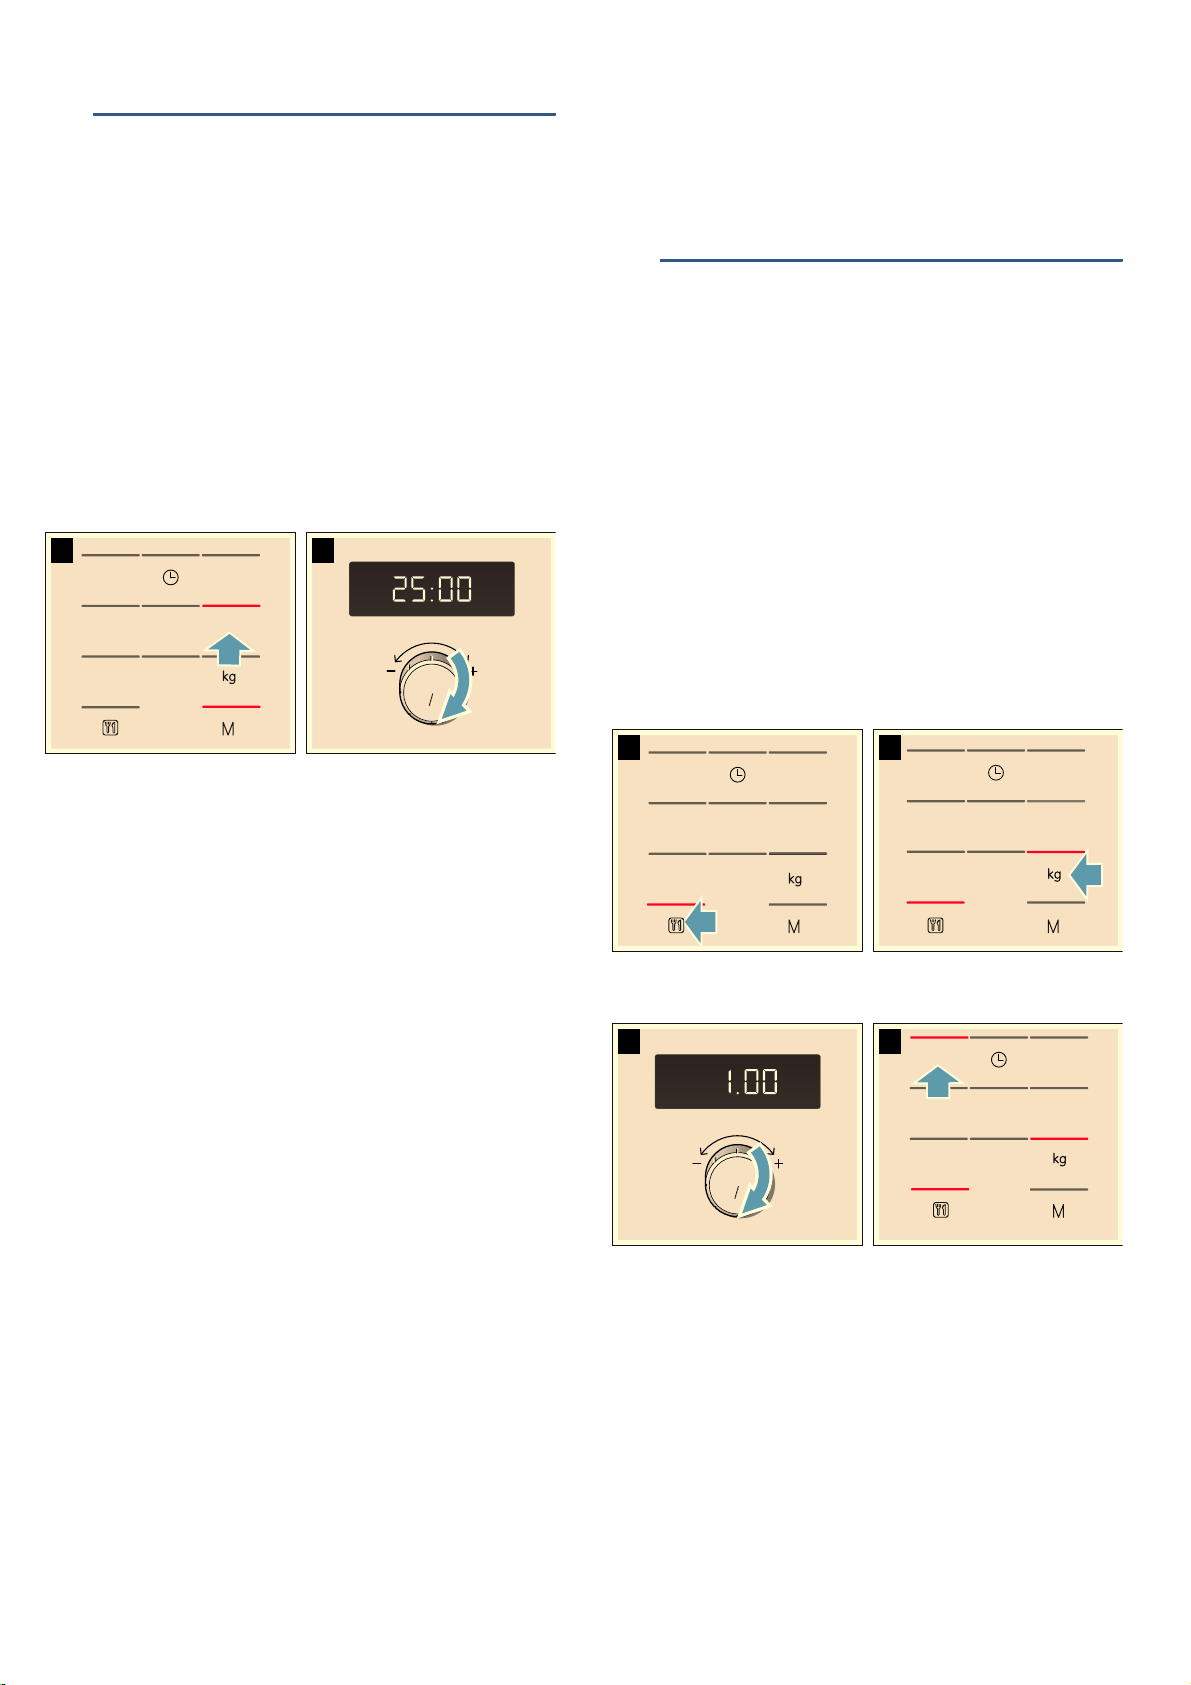
3UHVVWKH ` EXWWRQUHSHDWHGO\XQWLOWKHUHTXLUHG
SURJUDPPHQXPEHUDSSHDUV
7KHLQGLFDWRUOLJKWDERYHWKHEXWWRQOLJKWVXS
3UHVVWKH h EXWWRQ
7KHLQGLFDWRUOLJKWDERYHWKHEXWWRQOLJKWVXSDQGD
VXJJHVWHGYDOXHDSSHDUVLQWKHGLVSOD\
8VHWKHURWDU\VHOHFWRUWRVHWWKHZHLJKWRIWKHGLVK
3UHVVWKH6WDUWEXWWRQ
7KHFRRNLQJWLPHIRUWKHSURJUDPPHVWDUWVFRXQWLQJ
GRZQ
7KHFRRNLQJWLPHKDVHODSVHG
$VLJQDOVRXQGV2SHQWKHDSSOLDQFHGRRURUSUHVV6WRS
7KHFORFNUHDSSHDUV
&RUUHFWLRQ
3UHVVWKHVWRSEXWWRQWZLFHDQGUHVHW
3DXVLQJWKHDSSOLDQFH
7RXFKWKH6WRSEXWWRQRQFHRURSHQWKHDSSOLDQFHGRRU
7KLVSDXVHVWKHDSSOLDQFH7KHLQGLFDWRUDERYHWKH6WRS
VWRSVWDUW
PLQ
NJ
PLQ
VWRSVWDUW
VWRSVWDUW
VWRSVWDUW
PLQ
NJ
NJ
en 3URJUDPPHV
EXWWRQZLOOOLJKWXS$IWHUFORVLQJWKHGRRUWRXFKWKH6WDUW
EXWWRQDJDLQ
&DQFHOOLQJ
3UHVV WKH VWRS EXWWRQ WZLFH RU RSHQ WKH GRRU DQG SUHVV
WKHVWRSEXWWRQRQFH
1RWHV
■ )RU VRPH SURJUDPPHV D VLJQDO VRXQGV DIWHU D FHUWDLQ
WLPH 2SHQ WKH DSSOLDQFH GRRU DQG VWLU WKH IRRG RU WXUQ
WKHPHDWRUSRXOWU\$IWHUFORVLQJWKHGRRUSUHVVWKH
6WDUWEXWWRQDJDLQ
■ <RXFDQTXHU\WKHSURJUDPPHQXPEHUDQGZHLJKW
XVLQJ `RU h7KHTXHULHGYDOXHLVVKRZQIRU
VHFRQGVLQWKHGLVSOD\
'HIURVWLQJXVLQJWKHDXWRPDWLFSURJUDPPHV
<RXFDQXVHWKH GHIURVWLQJSURJUDPPHVWRGHIURVW
PHDWSRXOWU\DQGEUHDG
1RWHV
■ 3UHSDULQJIRRG
8VH IRRG WKDW KDV EHHQ IUR]HQ DW & DQG VWRUHG LQ
SRUWLRQVL]HGTXDQWLWLHVWKDWDUHDVWKLQDVSRVVLEOH
7DNH WKH IRRG WR EH GHIURVWHG RXW RI DOO SDFNDJLQJ DQG
ZHLJKLW<RXQHHGWRNQRZWKHZHLJKWWRVHWWKH
SURJUDPPH
■ /LTXLGZLOOEHSURGXFHGZKHQGHIURVWLQJPHDWRU
SRXOWU\'UDLQRIIWKLVOLTXLGZKHQWXUQLQJPHDWDQG
SRXOWU\DQGXQGHUQRFLUFXPVWDQFHVXVHLWIRURWKHU
SXUSRVHVRUDOORZLWWRFRPHLQWRFRQWDFWZLWKRWKHU
IRRGV
■ 2YHQZDUH
3ODFH WKH IRRG LQ D PLFURZDYHDEOH VKDOORZ GLVK HJ D
FKLQDRUJODVVSODWHEXWGRQRWFRYHU
■ 5HVWLQJWLPH
7KHGHIURVWHGIRRGVKRXOGEHOHIWWRVWDQGIRUDQ
DGGLWLRQDO WR PLQXWHVXQWLOLWUHDFKHVDQHYHQ
WHPSHUDWXUH/DUJHSLHFHVRIPHDWUHTXLUHDORQJHU
VWDQGLQJ WLPH WKDQ VPDOOHU SLHFHV )ODW SLHFHV RI PHDW
DQGLWHPVPDGHIURPPLQFHGPHDWVKRXOGEH
VHSDUDWHGIURPHDFKRWKHUEHIRUHOHDYLQJWRVWDQG
$IWHUWKLVWLPH\RXFDQFRQWLQXHWRSUHSDUHWKHIRRG
HYHQ WKRXJK WKLFN SLHFHV RI PHDW PD\ VWLOO EH IUR]HQ LQ
WKH PLGGOH 7KH JLEOHWV FDQ EH UHPRYHG IURP SRXOWU\ DW
WKLVSRLQW
■ 6LJQDO
)RU VRPH SURJUDPPHV D VLJQDO VRXQGV DIWHU D FHUWDLQ
WLPH2SHQWKHDSSOLDQFHGRRUDQGVHSDUDWHWKHIRRG
RXWRUWXUQWKHPHDWRUSRXOWU\&ORVHWKHGRRUDQG
SUHVVWKH6WDUWEXWWRQ
&RRNLQJZLWKWKHDXWRPDWLFSURJUDPPHV
:LWKWKH FRRNLQJSURJUDPPHV\RXFDQFRRNULFH
SRWDWRHVRUYHJHWDEOHV
1RWHV
■ 2YHQZDUH
7KH IRRG PXVW EH FRRNHG LQ PLFURZDYHDEOH FRRNZDUH
ZLWKDOLG)RUULFH\RXVKRXOGXVHDODUJHGHHSGLVK
■ 3UHSDULQJIRRG
:HLJKRXWWKHIRRG<RXQHHGWRNQRZWKHZHLJKWWR
VHWWKHSURJUDPPH
5LFH
'RQRWXVHERLOLQWKHEDJULFH$GGWKHUHTXLUHG
DPRXQW RI ZDWHU DV VSHFLILHG RQ WKH SDFNDJLQJ 7KLV LV
XVXDOO\WZRRUWKUHHWLPHVWKHTXDQWLW\RIULFH
3RWDWRHV
)RUERLOHGSRWDWRHVFXWWKHIUHVKSRWDWRHVLQWRVPDOO
HYHQVL]HGSLHFHV$GGRQHWDEOHVSRRQRIZDWHUIRU
HDFK JERLOHGSRWDWRHVDQGDOLWWOHVDOW
)UHVKYHJHWDEOHV
:HLJKRXWWKHIUHVKWULPPHGYHJHWDEOHV&XWWKH
YHJHWDEOHVLQWRVPDOOHYHQVL]HGSLHFHV$GGDWEVS
ZDWHUIRUHDFK JYHJHWDEOHV
■ 6LJQDO
:KLOH WKH SURJUDPPH LV UXQQLQJ D VLJQDO VRXQGV DIWHU
VRPHWLPH6WLUWKHIRRG
■ 5HVWLQJWLPH
2QFH WKH SURJUDPPH KDV ILQLVKHG VWLU WKH IRRG DJDLQ
<RXVKRXOGOHDYHLWWRVWDQGIRUDQRWKHU WR
PLQXWHVXQWLOLWUHDFKHVDQHYHQWHPSHUDWXUH
7KHFRRNLQJUHVXOWZLOOGHSHQGRQWKHTXDOLW\DQG
FRQVLVWHQF\RIWKHIRRG
3URJUDPPHQR :HLJKWUDQJHLQNJ
'HIURVW
3 0LQFHGPHDW
3 3LHFHVRIPHDW
3
&KLFNHQFKLFNHQ
SLHFHV
3 %UHDG
3URJUDPPHQR :HLJKWUDQJHLQNJ
&RRNLQJ
3 5LFH
3 3RWDWRHV
3 9HJHWDEOHV
%DVLFVHWWLQJV HQ
Q%DVLFVHWWLQJV
%DVLF VHW WLQJV
<RXU DSSOLDQFH KDV EDVLF VHWWLQJV WKDW \RX FDQ FKDQJH WR
VXLW\RXUQHHGV
<RXFDQFKDQJHWKHEXWWRQWRQHRQ\RXUDSSOLDQFHLI\RX
ZLVK
&KDQJLQJWKHEXWWRQWRQH
7KHDSSOLDQFHPXVWEHVZLWFKHGRIIZKHQ\RXGRWKLV
3UHVV DQG KROG WKH VWDUW DQG VWRS EXWWRQV DW WKH VDPH
WLPHIRUDFRXSOHRIVHFRQGV
‚ZLOODSSHDULQWKHGLVSOD\
7RXFKWKH VWDUWEXWWRQ
ŽZLOOVWDUWIODVKLQJLQWKHGLVSOD\
7XUQWKHURWDU\VHOHFWRUWR Œ
7RXFKWKH VWDUWEXWWRQ
7KHVHWWLQJKDVEHHQDSSOLHG
7RXFKWKH VWRSEXWWRQ
7KHEXWWRQWRQHKDVEHHQVZLWFKHGRII
<RXFDQFKDQJHWKLVVHWWLQJDWDQ\WLPH
D&OHDQLQJ
&OHDQLQJ
:LWK JRRG FDUH DQG FOHDQLQJ \RXU DSSOLDQFH ZLOO UHWDLQ LWV
DSSHDUDQFH DQG UHPDLQ IXOO\ IXQFWLRQLQJ IRU D ORQJ WLPH WR
FRPH :H ZLOO H[SODLQ KHUH KRZ \RX VKRXOG FRUUHFWO\ FDUH
IRUDQGFOHDQ\RXUDSSOLDQFH
::DUQLQJ² 5LVNRIHOHFWULFVKRFN
'R QRW XVH DQ\ KLJKSUHVVXUH FOHDQHUV RU VWHDP FOHDQHUV
ZKLFKFDQUHVXOWLQDQHOHFWULFVKRFN
::DUQLQJ² 5LVNRILQMXU\
6FUDWFKHG JODVV LQ WKH DSSOLDQFH GRRU PD\ GHYHORS LQWR D
FUDFN'RQRWXVHDJODVVVFUDSHUVKDUSRUDEUDVLYH
FOHDQLQJDLGVRUGHWHUJHQWV
::DUQLQJ² 5LVNRIVHULRXVKDUPWRKHDOWK
7KH VXUIDFH RI WKH DSSOLDQFH PD\ EHFRPH GDPDJHG LI LW LV
QRWFOHDQHGSURSHUO\0LFURZDYHHQHUJ\PD\HVFDSH
&OHDQWKHDSSOLDQFHRQDUHJXODUEDVLVDQGUHPRYHDQ\
IRRGUHPQDQWVLPPHGLDWHO\~ &OHDQLQJDJHQW
RQ SDJH
::DUQLQJ² 5LVNRIHOHFWULFVKRFN
'RQRWLPPHUVHWKHDSSOLDQFHLQZDWHURUFOHDQXQGHUD
MHWRIZDWHU
1RWH 8QSOHDVDQW RGRXUV IRU H[DPSOH DIWHU ILVK KDV EHHQ
SUHSDUHG FDQ EH UHPRYHG YHU\ HDVLO\ $GG D IHZ GURSV RI
OHPRQ MXLFH WR D FXS RI ZDWHU $OZD\V SODFH D VSRRQ LQ WKH
FRQWDLQHUWRSUHYHQWGHOD\HGERLOLQJ+HDWWKHZDWHUIRU
WRPLQXWHVDWPD[LPXPPLFURZDYHRXWSXW
&OHDQLQJDJHQW
7R HQVXUH WKDW WKH GLIIHUHQW VXUIDFHV DUH QRW GDPDJHG E\
XVLQJWKHZURQJFOHDQLQJDJHQWREVHUYHWKHLQIRUPDWLRQ
LQWKHWDEOH
'RQRWXVH
■ +DUVKRUDEUDVLYHFOHDQLQJDJHQWV
■ 0HWDORUJODVVVFUDSHUVWRFOHDQWKHGRRUSDQHOV
■ 0HWDORUJODVVVFUDSHUVWRFOHDQWKHGRRUVHDO
■ +DUGVFRXULQJSDGVRUVSRQJHV
■ &OHDQLQJDJHQWVZLWKDKLJKDOFRKROFRQWHQW
:DVKQHZVSRQJHFORWKVWKRURXJKO\EHIRUHXVH
6HWWLQJ 2SWLRQV
‚ %XWWRQWRQH Ž 6ZLWFKHGRQ
Π6ZLWFKHGRII
%XWWRQ WRQH ZLOO UHPDLQ DFWLYH IRU
WKH VWDUWDQG VWRSEXWWRQV
ƒ 'HPRPRGH š“‹ 7KH DSSOLDQFH LV VZLWFKHG RII <RX
FDQXVHWKHEXWWRQVDQGWKHGLV
SOD\EXWWKHEXWWRQVZLOOQRWDFWL
YDWH DQ\ IXQFWLRQ RQ WKH DSSOLDQFH
LH WKH PLFURZDYH KDV QR SRZHU
'HPRPRGHLVPDLQO\XVHGE\
GHDOHUV
)DFWRU\ VHWWLQJ IDFWRU\ VHWWLQJV PD\ YDU\ GHSHQGLQJ RQ WKH
DSSOLDQFHPRGHO
$UHD &OHDQLQJSURGXFW
$SSOLDQFHIURQW +RWVRDS\ZDWHU&OHDQXVLQJDGLVKFORWK
DQGWKHQGU\ZLWKDVRIWFORWK'RQRWXVH
PHWDORUJODVVVFUDSHUVIRUFOHDQLQJ
$SSOLDQFH IURQW ZLWK
VWDLQOHVVVWHHO
+RWVRDS\ZDWHU&OHDQXVLQJDGLVKFORWK
DQGWKHQGU\ZLWKDVRIWFORWK5HPRYH
VSODVKHV DQG SDWFKHV RI OLPHVFDOH JUHDVH
VWDUFKDQGDOEXPLQHJHJJZKLWHLPPH
GLDWHO\&RUURVLRQFDQIRUPXQGHUWKHVH
SDWFKHVRUVSODVKHV6SHFLDOVWDLQOHVV
VWHHOFOHDQLQJSURGXFWVDUHDYDLODEOHIURP
WKHDIWHUVDOHVVHUYLFHRUIURPVSHFLDOLVW
UHWDLOHUV'RQRWXVHJODVVFOHDQHUVRU
PHWDORUJODVVVFUDSHUVIRUFOHDQLQJ
en 7URXEOHVKRRWLQJ
37URXEOHVKRRWLQJ
7URXEOH VKRRWLQJ
,IDIDXOWRFFXUVWKHUHLVRIWHQDVLPSOHH[SODQDWLRQ
%HIRUHFDOOLQJWKHDIWHUVDOHVVHUYLFHSOHDVHUHIHUWRWKH
IDXOWWDEOHDQGDWWHPSWWRFRUUHFWWKHIDXOW\RXUVHOI
7LS ,IDGLVKGRHVQRWWXUQRXWH[DFWO\DV\RXZDQWHG
UHIHUWRWKHIROORZLQJFKDSWHUZKHUH\RXZLOOILQGORWVRI
WLSVDQGQRWHVUHODWLQJWRWKHRSWLPXP
VHWWLQJV~ 7HVWHGIRU\RXLQRXUFRRNLQJVWXGLR
RQ SDJH
::DUQLQJ² 5LVNRIHOHFWULFVKRFN
,QFRUUHFWUHSDLUVDUHGDQJHURXV5HSDLUVPD\RQO\EH
FDUULHGRXWDQGGDPDJHGSRZHUFDEOHVUHSODFHGE\RQH
RIRXUWUDLQHGDIWHUVDOHVWHFKQLFLDQV,IWKHDSSOLDQFHLV
GHIHFWLYHXQSOXJWKHDSSOLDQFHIURPWKHPDLQVRUVZLWFK
RIIWKHFLUFXLWEUHDNHULQWKHIXVHER[&RQWDFWWKHDIWHU
VDOHVVHUYLFH
)DXOWWDEOH
&RRNLQJFRPSDUW
PHQWPDGHRIVWDLQ
OHVVVWHHO
+RWVRDS\ZDWHURUYLQHJDUVROXWLRQ&OHDQ
XVLQJDGLVKFORWKDQGWKHQGU\ZLWKDVRIW
FORWK'RQRWXVHRYHQVSUD\RUDQ\RWKHU
DJJUHVVLYH RYHQ FOHDQHUV RU DEUDVLYH PDWH
ULDOV6FRXULQJSDGVURXJKVSRQJHVDQG
SDQFOHDQHUVDUHDOVRXQVXLWDEOH7KHVH
LWHPV VFUDWFK WKH VXUIDFH $OORZ WKH LQWHULRU
VXUIDFHVWRGU\FRPSOHWHO\
5HFHVVLQWKHFRRN
LQJFRPSDUWPHQW
'DPSFORWK:DWHUPXVWQRWEHDOORZHGWR
UXQ LQWR WKH DSSOLDQFH WKURXJK WKH WXUQWDEOH
GULYH'U\WKHWXUQWDEOHGULYHZLWKDFORWK
7XUQWDEOH DQG UROOHU
ULQJ
+RWVRDS\ZDWHU:KHQSODFLQJWKHWXUQWD
EOHEDFNLQWRLWVUHFHVVLWPXVWHQJDJH
SURSHUO\
'RRUSDQHOV *ODVVFOHDQHU&OHDQZLWKDGLVKFORWK'R
QRWXVHJODVVVFUDSHUV
$UHD &OHDQLQJSURGXFW
)DXOW 3RVVLEOHFDXVH 5HPHG\LQIRUPDWLRQ
7KHDSSOLDQFHLVQRWZRUNLQJ 7KHSOXJLVQRWSOXJJHGLQWRWKHPDLQV &RQQHFWWKHDSSOLDQFHWRWKHHOHFWULFLW\VXSSO\
3RZHUIDLOXUH &KHFNZKHWKHURWKHUNLWFKHQDSSOLDQFHVDUHZRUN
LQJ
7KHFLUFXLWEUHDNHUIXVHLVIDXOW\ &KHFN LQ WKH IXVH ER[ WR PDNH VXUH WKDW WKH FLUFXLW
EUHDNHUIXVHIRUWKHDSSOLDQFHLVLQZRUNLQJRUGHU
)DXOW\RSHUDWLRQ 6ZLWFKRIIWKHFLUFXLWEUHDNHUIXVHIRUWKHDSSOL
DQFHLQWKHIXVHER[DQGVZLWFKLWEDFNRQDIWHU
DSSUR[LPDWHO\ VHFRQGV
7KUHH]HURVDUHOLWRQWKHGLVSOD\ 3RZHUIDLOXUH 5HVHWWKHWLPH
7KHDSSOLDQFHLVQRWRSHUDWLQJ$
FRRNLQJWLPHLVVKRZQRQWKHGLV
SOD\
7KHURWDU\VHOHFWRUKDVEHHQDFFLGHQWDOO\WXUQHG 3UHVVWKHVWRSEXWWRQ
7KHVWDUWEXWWRQKDVQRWEHHQSUHVVHGDIWHUWKH
VHWWLQJZDVDSSOLHG
3UHVVWKHVWDUWEXWWRQRUFDQFHOWKHVHWWLQJE\
SUHVVLQJWKHVWRSEXWWRQ
7KHPLFURZDYHLVQRWZRUNLQJ 7KHGRRUKDVQRWEHHQSURSHUO\FORVHG &KHFNZKHWKHUIRRGUHPQDQWVRUGHEULVLVDUH
WUDSSHGLQWKHGRRU
7KHVWDUWEXWWRQKDVQRWEHHQSUHVVHG 3UHVVWKHVWDUWEXWWRQ
,WLVWDNLQJORQJHUWKDQXVXDOIRU
IRRGWRKHDWXS
7KHPLFURZDYHSRZHURXWSXWKDVEHHQVHWWRR
ORZ
6HOHFWDKLJKHUPLFURZDYHSRZHUVHWWLQJ
$ODUJHUDPRXQWRIIRRGWKDQXVXDOKDVEHHQ
SODFHGLQWKHDSSOLDQFH
'RXEOHWKHDPRXQW²GRXEOHWKHWLPH
7KHIRRGZDVFROGHUWKDQXVXDO 6WLURUWXUQWKHIRRGGXULQJKHDWLQJ
7KHWXUQWDEOHLVPDNLQJDVFUDSLQJ
RUJULQGLQJQRLVH
'LUWRUGHEULVLQWKHDUHDDURXQGWKHWXUQWDEOH
GULYH
&OHDQ WKH UROOHU ULQJ DQG WKH UHFHVV LQ WKH FRRNLQJ
FRPSDUWPHQW
7KHPLFURZDYHKDVVWRSSHGIRUQR
DSSDUHQWUHDVRQ
7KHPLFURZDYHKDVDIDXOW ,IWKLVIDXOWUHFXUVSOHDVHFDOOWKHDIWHUVDOHVVHU
YLFH
&XVWRPHUVHUYLFH HQ
4&XVWRPHUVHUYLFH
&XVWRPHU VHUYLFH
2XUDIWHUVDOHVVHUYLFHLVWKHUHIRU\RXLI\RXUDSSOLDQFH
QHHGVWREHUHSDLUHG:HZLOODOZD\VILQGDQDSSURSULDWH
VROXWLRQDOVRLQRUGHUWRDYRLGDIWHUVDOHVSHUVRQQHO
KDYLQJWRPDNHXQQHFHVVDU\YLVLWV
(QXPEHUDQG)'QXPEHU
:KHQFDOOLQJXVSOHDVHTXRWHWKHIXOOSURGXFWQXPEHU(
QRDQGWKHSURGXFWLRQQXPEHU)'QRVRWKDWZHFDQ
SURYLGH\RXZLWKWKHFRUUHFWDGYLFH7KHUDWLQJSODWH
EHDULQJWKHVHQXPEHUVFDQEHIRXQGRQWKHULJKWKDQG
VLGHZKHQ\RXRSHQWKHFRRNLQJFRPSDUWPHQWGRRU
7RVDYHWLPH\RXFDQPDNHDQRWHRIWKHQXPEHUVIRU
\RXUDSSOLDQFHDQGWKHWHOHSKRQHQXPEHURIWKHDIWHU
VDOHVVHUYLFHLQWKHVSDFHEHORZLQFDVH\RXQHHGWKHP
3OHDVHQRWHWKDWDYLVLWIURPDQDIWHUVDOHVVHUYLFH
HQJLQHHULVQRWIUHHRIFKDUJHLQWKHHYHQWWKDWWKH
DSSOLDQFHKDVEHHQPLVXVHGHYHQGXULQJWKHZDUUDQW\
SHULRG
3OHDVHILQGWKHFRQWDFWGDWDRIDOOFRXQWULHVLQWKH
HQFORVHGFXVWRPHUVHUYLFHOLVW
7RERRNDQHQJLQHHUYLVLWDQGSURGXFWDGYLFH
5HO\ RQ WKH SURIHVVLRQDOLVP RI WKH PDQXIDFWXUHU <RX FDQ
WKHUHIRUHEHVXUHWKDWWKHUHSDLULVFDUULHGRXWE\WUDLQHG
VHUYLFH WHFKQLFLDQV ZKR FDUU\ RULJLQDO VSDUH SDUWV IRU \RXU
DSSOLDQFHV
7KLVDSSOLDQFHFRUUHVSRQGVWRWKHVWDQGDUGV(1
DQG&,635,WLVD*URXS&ODVV%SURGXFW
*URXSPHDQVWKDWPLFURZDYHVDUHSURGXFHGIRUWKH
S
XUSRVH RI KHDWLQJ IRRG &ODVV % VWDWHV WKDW WKH DSSOLDQFH
LVVXLWDEOHIRUSULYDWHKRXVHKROGV
$Q iLVVKRZQRQWKHGLVSOD\ 7KHDSSOLDQFHLVLQGHPRPRGH 'HDFWLYDWHGHPRPRGH
~ %DVLFVHWWLQJVRQ SDJH
(UURUPHVVDJH( )DXOWLQDXWRPDWLFGRRURSHQLQJV\VWHP ,IDQHUURUPHVVDJHLVGLVSOD\HGVZLWFKWKHDSSOL
DQFH RII DQG RQ DJDLQ LI WKH PHVVDJH GLVDSSHDUV
LWZDVDRQHRIISUREOHP,IWKHIDXOWRFFXUVDJDLQ
RU WKH HUURU PHVVDJH LV VWLOO GLVSOD\HG SOHDVH FRQ
WDFWWKHDIWHUVDOHVVHUYLFHDQGSURYLGHWKHIDXOW
FRGH
(QR )'QR
$IWHUVDOHVVHUYLFH O
*%
&DOOVFKDUJHGDWORFDORUPRELOHUDWH
,(
SHUPLQXWHDWSHDN2IISHDN
SHUPLQXWH
=1U)'(1U
7\SH
en 7HVWHGIRU\RXLQRXUFRRNLQJVWXGLR
J7HVWHGIRU\RXLQRXU
FRRNLQJVWXGLR
7HVWHG IRU \RX LQ RXU FRRNLQJ VWXGLR
,Q WKH WDEOH EHORZ \RX ZLOO ILQG D VHOHFWLRQ RI GLVKHV DQG
WKHLGHDOVHWWLQJVIRUWKHP,WWHOOV\RXZKLFKPLFURZDYH
SRZHUVHWWLQJLVEHVWVXLWHGWR\RXUGLVK:HKDYHOLVWHG
VRPHWLSVZLWKUHJDUGWRFRRNZDUHDQGSUHSDUDWLRQ
PHWKRGV
1RWHV
■ 7KHWLPHVVSHFLILHGLQWKHWDEOHVDUHLQWHQGHGDVD
JXLGHRQO\7KH\ZLOOGHSHQGRQWKHTXDOLW\DQG
FRPSRVLWLRQRIWKHIRRG
■ 7LPHUDQJHVDUHRIWHQVSHFLILHGLQWKHWDEOHV6HWWKH
VKRUWHVW WLPH WR EHJLQ ZLWK DQG WKHQ H[WHQG WKH WLPH LI
QHFHVVDU\
■ $OZD\VXVHDQRYHQFORWKRURYHQJORYHVZKHQWDNLQJ
KRWFRRNZDUHRXWRIWKHFRRNLQJFRPSDUWPHQW
,WPD\EHWKDW\RXKDYHGLIIHUHQWTXDQWLWLHVIURPWKRVH
VSHFLILHGLQWKHWDEOHV7KHUHLVDUXOHRIWKXPEIRU
RSHUDWLQJWKHPLFURZDYH'RXEOHWKHDPRXQW DOPRVW
GRXEOHWKHWLPHKDOIWKHDPRXQW KDOIWKHWLPH
$OZD\VSODFHWKHFRRNZDUHRQWKHWXUQWDEOH
7KHIROORZLQJWDEOHVSURYLGH\RXZLWKQXPHURXVRSWLRQV
DQGVHWWLQJVIRUWKHPLFURZDYH
6XLWDEOHRYHQZDUH
6XLWDEOHGLVKHVDUHKHDWUHVLVWDQWRYHQZDUHPDGHRI
JODVVJODVVFHUDPLFSRUFHODLQFHUDPLFRUKHDWUHVLVWDQW
SODVWLF7KHVHPDWHULDOVDOORZPLFURZDYHVWRSDVV
WKURXJK
<RXFDQDOVRXVHVHUYLQJGLVKHV7KLVVDYHV\RXKDYLQJ
WR WUDQVIHU IRRG IURP RQH GLVK WR DQRWKHU <RX VKRXOG RQO\
XVHRYHQZDUHZLWKGHFRUDWLYHJROGRUVLOYHUWULPLIWKH
PDQXIDFWXUHUJXDUDQWHHVWKDWWKH\DUHVXLWDEOHIRUXVHLQ
PLFURZDYHV
8QVXLWDEOHFRRNZDUH
0HWDOFRRNZDUHLVXQVXLWDEOH0HWDOGRHVQRWDOORZ
PLFURZDYHVWRSDVVWKURXJK)RRGLQFRYHUHGPHWDO
FRQWDLQHUVZLOOUHPDLQFROG
&DXWLRQ
6SDUNV0HWDOHJDVSRRQLQDJODVVPXVWEHNHSWDW
OHDVW FP IURP WKH RYHQ ZDOOV DQG WKH LQVLGH RI WKH GRRU
6SDUNVFRXOGLUUHSDUDEO\GDPDJHWKHJODVVRQWKHLQVLGH
RIWKHGRRU
'HIURVWLQJ
3ODFHWKHIUR]HQIRRGLQDQRSHQFRQWDLQHURQWKH
WXUQWDEOH
'HOLFDWHSDUWVVXFKDVWKHOHJVDQGZLQJVRIFKLFNHQRU
IDWW\RXWHUOD\HUVRIURDVWVFDQEHFRYHUHGZLWKVPDOO
SLHFHV RI DOXPLQLXP IRLO 7KH IRLO PXVW QRW WRXFK WKH VLGHV
RI WKH FRRNLQJ FRPSDUWPHQW <RX FDQ UHPRYH WKH IRLO KDOI
ZD\WKURXJKWKHGHIURVWLQJWLPH
/LTXLGZLOOEHSURGXFHGZKHQGHIURVWLQJPHDWRUSRXOWU\
'UDLQRIIWKLVOLTXLGZKHQWXUQLQJPHDWDQGSRXOWU\DQG
XQGHU QR FLUFXPVWDQFHV XVH LW IRU RWKHU SXUSRVHV RU DOORZ
LWWRFRPHLQWRFRQWDFWZLWKRWKHUIRRGV
7XUQRUVWLUWKHIRRGRQFHRUWZLFHGXULQJWKHGHIURVWLQJ
WLPH /DUJH SLHFHV RI IRRG VKRXOG EH WXUQHG VHYHUDO WLPHV
/HDYH GHIURVWHG LWHPV WR VWDQG DW URRP WHPSHUDWXUH IRU D
IXUWKHU WR PLQXWHV VR WKDW WKH WHPSHUDWXUH FDQ HYHQ
RXW 7KH JLEOHWV FDQ EH UHPRYHG IURP SRXOWU\ DW WKLV SRLQW
7KH PHDW FDQ DOVR EH SURFHVVHG IXUWKHU ZKHQ D VPDOO SDUW
RIWKHFRUHLVIUR]HQ
7LSVIRUGHIURVWLQJ
7KHWLPHKDVHODSVHGEXWWKH
IRRGLVQRWGHIURVWHGKRWRU
FRRNHG
6HWDORQJHUWLPH/DUJHTXDQWL
WLHV DQG IRRG ZKLFK LV SLOHG KLJK
UHTXLUHORQJHUWLPHV
7LPHKDVHODSVHGEXWWKHIRRG
LVRYHUKHDWHGDWWKHHGJHDQG
QRWGRQHLQWKHPLGGOH
6WLULWGXULQJWKHFRRNLQJWLPH
DQGQH[WWLPHVHOHFWDORZHU
PLFURZDYHSRZHUVHWWLQJDQGD
ORQJHUFRRNLQJWLPH
$IWHUGHIURVWLQJWKHSRXOWU\RU
PHDWLVGHIURVWHGRQWKHRXW
VLGHEXWQRWGHIURVWHGLQWKH
PLGGOH
1H[WWLPHVHOHFWDORZHUPLFUR
ZDYHSRZHUVHWWLQJ,I\RXDUH
GHIURVWLQJ D ODUJH TXDQWLW\ WXUQ
LWVHYHUDOWLPHV
'HIURVWLQJ :HLJKW 0LFURZDYHSRZ
HUVHWWLQJLQ
ZDWWV
&RRNLQJ
WLPHLQPLQ
XWHV
1RWHV
:KROHSLHFHVRIEHHIYHDORUSRUNRQWKH
ERQHRUERQHG
J
NJ
NJ
0HDWLQSLHFHVRUVOLFHVRIEHHIYHDORUSRUN J
6HSDUDWHDQ\GHIURVWHGSDUWVZKHQWXUQLQJ
J
J
7HVWHGIRU\RXLQRXUFRRNLQJVWXGLR HQ
+HDWLQJIUR]HQIRRG
1RWHV
■ 7DNH UHDG\ PHDOV RXW RI WKH SDFNDJLQJ 7KH\ ZLOO KHDW
XSPRUHTXLFNO\DQGHYHQO\LQPLFURZDYHDEOH
FRRNZDUH7KHGLIIHUHQWFRPSRQHQWVRIWKHPHDOPD\
QRWUHTXLUHWKHVDPHDPRXQWRIWLPHWRKHDWXS
■ )RRGZKLFKOLHVIODWZLOOFRRNPRUHTXLFNO\WKDQIRRG
ZKLFK LV SLOHG KLJK <RX VKRXOG WKHUHIRUH GLVWULEXWH WKH
IRRGVRWKDWLWLVDVIODWDVSRVVLEOHLQWKHFRRNZDUH
)RRGVKRXOGQRWEHSODFHGLQOD\HUVRQWRSRIRQH
DQRWKHU
■ $OZD\VFRYHUWKHIRRG,I\RXGRQRWKDYHDVXLWDEOH
FRYHUIRU\RXUFRRNZDUHXVHDSODWHRUVSHFLDO
PLFURZDYHIRLO
■ 6WLURUWXUQWKHIRRG RU WLPHVGXULQJFRRNLQJ
■ $IWHUKHDWLQJDOORZWKHIRRGWRVWDQGIRUDIXUWKHUWR
PLQXWHVWRDOORZWKHWHPSHUDWXUHWRHYHQRXW
■ $OZD\VXVHDQRYHQFORWKRURYHQJORYHVZKHQ
UHPRYLQJFRRNZDUHIURPWKHDSSOLDQFH
0LQFHGPHDWPL[HG J )UHH]HIRRGIODWLISRVVLEOH
7XUQ VHYHUDO WLPHV UHPRYH DQ\ GHIURVWHG PHDW
J
J
3RXOWU\RUSRXOWU\SRUWLRQV J
6HSDUDWHDQ\GHIURVWHGSDUWV
NJ
)LVKILOOHWILVKVWHDNRUVOLFHV J
6HSDUDWHDQ\GHIURVWHGSDUWV
9HJHWDEOHVHJSHDV J
)UXLWHJUDVSEHUULHV J 6WLUFDUHIXOO\GXULQJGHIURVWLQJDQGVHSDUDWH
DQ\GHIURVWHGSDUWV
J
%XWWHUGHIURVWLQJ J
5HPRYHDOOSDFNDJLQJ
J
/RDIRIEUHDG J
NJ
&DNHVGU\HJVSRQJHFDNH J 2QO\IRUFDNHVZLWKRXWLFLQJFUHDPRUFUqPH
SkWLVVLqUHVHSDUDWHWKHSLHFHVRIFDNH
J
&DNHVPRLVWHJIUXLWIODQFKHHVHFDNH J
2QO\IRUFDNHVZLWKRXWLFLQJFUHDPRUJHODWLQH
J
'HIURVWLQJ :HLJKW 0LFURZDYHSRZ
HUVHWWLQJLQ
ZDWWV
&RRNLQJ
WLPHLQPLQ
XWHV
1RWHV
+HDWLQJIUR]HQIRRG :HLJKW 0LFURZDYHSRZHU
VHWWLQJVLQZDWWV
&RRNLQJWLPHLQ
PLQXWHV
1RWHV
0HQXSODWHGPHDOUHDG\PHDO
FRPSRQHQWV
J
6RXS J
6WHZ J
6OLFHVRUSLHFHVRIPHDWLQVDXFHHJ
JRXODVK
J 6HSDUDWHWKHSLHFHVRIPHDWZKHQVWLU
ULQJ
%DNHVHJODVDJQHFDQQHOORQL J
en 7HVWHGIRU\RXLQRXUFRRNLQJVWXGLR
+HDWLQJIRRG
&DXWLRQ
0HWDO HJ D VSRRQ LQ D JODVV PXVW EH NHSW DW OHDVW FP
IURPWKHRYHQZDOOVDQGWKHLQVLGHRIWKHGRRU6SDUNV
FRXOGLUUHSDUDEO\GDPDJHWKHJODVVRQWKHLQVLGHRIWKH
GRRU
1RWHV
■ 7DNH UHDG\ PHDOV RXW RI WKH SDFNDJLQJ 7KH\ ZLOO KHDW
XSPRUHTXLFNO\DQGHYHQO\LQPLFURZDYHDEOH
FRRNZDUH7KHGLIIHUHQWFRPSRQHQWVRIWKHPHDOPD\
QRWUHTXLUHWKHVDPHDPRXQWRIWLPHWRKHDWXS
■ $OZD\VFRYHUWKHIRRG,I\RXGRQRWKDYHDGHGLFDWHG
OLG IRU \RXU FRRNZDUH XVH D SODWH RU VSHFLDO PLFURZDYH
ILOP
■ 6WLURUWXUQWKHIRRGVHYHUDOWLPHVGXULQJWKHKHDWLQJ
WLPH&KHFNWKHWHPSHUDWXUH
■ $IWHUKHDWLQJDOORZWKHIRRGWRVWDQGIRUDIXUWKHUWR
PLQXWHVWRDOORZWKHWHPSHUDWXUHWRHYHQRXW
■ $OZD\VXVHDQRYHQFORWKRURYHQJORYHVZKHQ
UHPRYLQJFRRNZDUHIURPWKHDSSOLDQFH
::DUQLQJ² 5LVNRIVFDOGLQJ
7KHUHLVDSRVVLELOLW\RIGHOD\HGERLOLQJZKHQDOLTXLGLV
KHDWHG7KLVPHDQVWKDWWKHOLTXLGUHDFKHVERLOLQJ
WHPSHUDWXUH ZLWKRXW WKH XVXDO VWHDP EXEEOHV ULVLQJ WR WKH
VXUIDFH (YHQ LI WKH FRQWDLQHU RQO\ YLEUDWHV D OLWWOH WKH KRW
OLTXLGPD\VXGGHQO\ERLORYHUDQGVSDWWHU:KHQKHDWLQJ
DOZD\VSODFHDVSRRQLQWKHFRQWDLQHU7KLVZLOOSUHYHQW
GHOD\HGERLOLQJ
6LGHGLVKHVHJULFHSDVWD J $GGDOLWWOHOLTXLG
J
9HJHWDEOHVHJSHDVEURFFROLFDUURWV J 3RXUZDWHULQWRWKHGLVKVRWKDWLWFRY
HUVWKHEDVH
J
&UHDPHGVSLQDFK J &RRNZLWKRXWDGGLWLRQDOZDWHU
+HDWLQJIUR]HQIRRG :HLJKW 0LFURZDYHSRZHU
VHWWLQJVLQZDWWV
&RRNLQJWLPHLQ
PLQXWHV
1RWHV
+HDWXSGLVKHV :HLJKW 0LFURZDYHRXW
SXWLQZDWWV
&RRNLQJ
WLPHLQ
PLQXWHV
1RWHV
%HYHUDJHV PO 3ODFH D VSRRQ LQ WKH JODVV GR QRW RYHUKHDW DOFRKROLF
GULQNVFKHFNRFFDVLRQDOO\ZKLOHKHDWLQJ
PO
%DE\IRRGHJEDE\ERWWOHV PO $SSUR[ô 1R WHDWV RU OLGV $OZD\V VKDNH ZHOO DIWHU KHDWLQJ <RX
PXVWFKHFNWKHWHPSHUDWXUH
PO $SSUR[
PO ^
6RXSFXS J
6RXSFXSV J
0HQXSODWHGPHDOUHDG\PHDO
FRPSRQHQWV
J
0HDWLQVDXFH J 6HSDUDWHWKHVOLFHVRIPHDW
6WHZ J
J
9HJHWDEOHVSRUWLRQ J $GGDOLWWOHOLTXLG
9HJHWDEOHVSRUWLRQV J
7HVWGLVKHV HQ
0LFURZDYHWLSV
&RQGHQVDWLRQ
&RQGHQVDWLRQPD\DSSHDURQWKHGRRUZLQGRZLQWHULRU
ZDOOVDQGIORRU7KLVLVQRUPDO7KLVGRHVQRWDIIHFWKRZ
WKHPLFURZDYHRSHUDWHV:LSHDZD\WKHFRQGHQVDWLRQ
DIWHUFRRNLQJ
E7HVWGLVKHV
7HVW G LVKHV
7KHVHWDEOHVKDYHEHHQSURGXFHGIRUWHVWLQVWLWXWHVWR
IDFLOLWDWHWKHLQVSHFWLRQRIWKHDSSOLDQFH
,Q DFFRUGDQFH ZLWK (1 ,(& DQG
(1RU,(&
0LFURZDYHFRRNLQJ
0LFURZDYHGHIURVWLQJ
<RX FDQQRW ILQG DQ\ LQIRUPDWLRQ DERXW WKH VHWWLQJV IRU WKH TXDQWLW\
RIIRRG\RXKDYHSUHSDUHG
,QFUHDVHRUUHGXFHWKHFRRNLQJWLPHVXVLQJWKHIROORZLQJUXOHRIWKXPE
'RXEOHWKHDPRXQW DOPRVWGRXEOHWKHFRRNLQJWLPH
+DOIWKHDPRXQW KDOIWKHFRRNLQJWLPH
7KHIRRGKDVEHFRPHWRRGU\ 1H[W WLPH VHW D VKRUWHU FRRNLQJ WLPH RU VHOHFW D ORZHU PLFURZDYH SRZHU
VHWWLQJ&RYHUWKHIRRGDQGDGGPRUHOLTXLG
:KHQWKHWLPHKDVHODSVHGWKHIRRGLVQRWGHIURVWHGKRWRU
FRRNHG
6HWDORQJHUWLPH/DUJHTXDQWLWLHVDQGIRRGZKLFKLVSLOHGKLJKUHTXLUH
ORQJHUWLPHV
:KHQWKHWLPHKDVHODSVHGWKHIRRGLVRYHUKHDWHGDWWKHHGJH
EXWQRWGRQHLQWKHPLGGOH
6WLULWGXULQJWKHFRRNLQJWLPHDQGQH[WWLPHVHOHFWDORZHUPLFURZDYH
SRZHUVHWWLQJDQGDORQJHUFRRNLQJWLPH
$IWHUGHIURVWLQJWKHSRXOWU\RUPHDWLVGHIURVWHGRQWKHRXWVLGH
EXWQRWGHIURVWHGLQWKHPLGGOH
1H[W WLPH VHOHFW D ORZHU PLFURZDYH SRZHU VHWWLQJ ,I \RX DUH GHIURVWLQJ
DODUJHTXDQWLW\WXUQLWVHYHUDOWLPHV
'LVK 0LFURZDYH SRZHU RXWSXW LQ ZDWWV FRRNLQJ WLPH
LQPLQXWHV
1RWH
&XVWDUG J :PLQV:PLQV 3ODFHD [ FP3\UH[GLVKRQWRWKHWXUQWDEOH
6SRQJH :PLQV 3ODFHD FP3\UH[GLVKRQWRWKHWXUQWDEOH
0HDWORDI :PLQV 3ODFHD3\UH[GLVKRQWRWKHWXUQWDEOH
'LVK 0LFURZDYH SRZHU RXWSXW LQ ZDWWV FRRNLQJ WLPH
LQPLQXWHV
1RWH
0HDW :PLQV:PLQV 3ODFHD FP3\UH[GLVKRQWRWKHWXUQWDEOH

]KKN
夀甖
泂䠦䑣㎢@ NK K] >
8 场爦
( 珟殓㶛㍺滙氜
〘摄滟氢
䇆仺
5 㶛櫯㚞爵忬
] 䘟㫰㖱㣲
7 囂㪕㇯涉
崾㘠囈ㇵ殧㶲墜䃺䫜桭嘞
* 毵䊺墖礍㡺
䖿㑎祺䦗
䖿㑎㢀
涢䤌氢桷把瞏䂾
_ 獟ㄈ
咑䶢獥ㄎ
K 崾〒䴳㆑场㑟
倝公吨捬〾㸟煡壼䝖搋㶲ㅥ
汅㶲䡚瘰
倝公吨捬㚤獥ㄎ
^ 䇀仴
畣㎏
䇆仺㒷喟汅㶲
䇆仺吨汅㶲
B 氪䏈㒱挏
㍊㵰氰䏎汅㶲
㝷㓭氰䏎㒷挕
P 尝䂡
汅㶲尣䂧
㆗址搂㓭尣䂧毻㏥
㆗址搂㓭尣䂧匑泗
Q 㨌䤾氿㶬
D 倗兦
倝公㒩
3 垣磵䖤毵
4 㶴䑈䤟㓫〿䇕
场㛙怀桷㗢圷场怀桷
J 䄌涂墖匋泑䡔瞥
犁址墜㢀壗
〥㘠犁墜匑泗㢀壗
毻㏥
㒸叉䈽㏥竷咁
㒸叉竷咁
䇆仺䗨孒
E 倾汸旮䄡
场㛙滟氢
矴䟔场㛙Ꭽ獥ㄎᎭ䤌䗳礎ㄎ㚤䤥㓱墜滟氢넬泣刧毕넺
ZZZERVFKKRPHFRPヽ㗢忊〢㝞䂯ZZZERVFK
HVKRSFRP

㆗址㑥稠姽 ]KKN
8场爦
㆗址㑥稠姽
沋彈矉涘泂䠦䑥㘇ヽ㶡㎀〾䵻嫒㥈㆗址䥄场㛙
泣㮽㞜ㇵ嶹泂䠦䑣㎢㗢㶡櫵泂䠦넬ヽ㇗䋀㥀䟽䆤
䐮ㆳ〣〘ㅥ㆗址戝䧽矉Ꭾ
䇆仺勼吨䇝稠㶤䞌㥈㶡櫵䟔䃲䑗ぅᎮ泣犍卿咑㶲
墜㶡櫵泂䠦Ꭾ
䑫瞣㔝櫵䆤넬泣䲺䧽场㛙䤡㘾䘥㫶Ꭾ㮚场㛙㥀牣
爙牦尣ぅ㗯䘥넬泣㐟㔗㶡櫵Ꭾ
㘂䤡䔙呤墜㸠䮅ヒ㛹䑥㘇ヽ〥徫䗪穅㆞爻䖽礓
㢀Ꭾㇵ笢〥㔝䔄㣸〥垎爻䖽戤爸䐨墜䘥㫶Ꭾ
䥄场㛙㋝硨䟔㷎㹝ぅ㆗址Ꭾ㘂硨稨㊱竷咁㗢笊䞱
っ址Ꭾ䛥ㅴ䡚㓱䇝䤡ヒ㥀㩌夣嶹Ꭾ㋝ㆳ㶼㍿㆗
址Ꭾ
䥄吨㎏㋝犁址䟔䤘糰侏䓬庋ヽ〣㥈㕘Ꭾ
䶊ヽ〢墜㍪峽넬烃糬Ꭽ䌷㶰䐮廖孶䤡碴嬱戝넬
ヽ㗢䴸慒㆗址䵼场㛙徫籯㚤姽浰戝넬㘇坉壻涏ヒ
㥀䟙壻奻䐮䔟㸦㮚ㅭ㶡㎀㆗址〾䠦姅㎎㖉磂䈿
䆤넬㆗址䥄场㛙Ꭾ
泣㔗涫㶁峽㸟䥄场㛙垎䐨嗁㎏䐮㥀㎎㚀㤥㴡䑊Ꭾ
䶊ヽ〢墜㶁峽硼祶㥀壻奻〣넬㘾㑟〥䆯牊橤
倝公㗢ㇵ笢墜㿽ㅴᎮ
泣嫒ㇵ 䶊ヽ〣墜㶁峽牸磺䥄场㛙㗢礓储忲Ꭾ
嫒㶲吨捬㍿墜獥ㄎ䝖憆䵻嫒Ꭾ~ 嵄〘䴹㆗址㑥
嵄 稙
(珟殓㶛㍺滙氜
珥殙㶡㎀氢䊇
〒搾滙氜
:浸㙜² 剽劏窺碼
■ 㵰䝖㥀吨捬ぅ墜䠫叛咁㛙넬㘇挕䤛䄭搌劃劕Ꭾ
㐟㔗㥀吨捬ぅ㵰䝖䠫叛咁㛙Ꭾ㮚䦴吨㍿㎪危넬
㐟㔗瞣㝷汅㊱䱷瞘Ꭾ泣矴瞡礓㢀〾䓬〣䗪穅넬
䐮矴瞡ㇵ磂徊壪㍿墜䟏瀇㢀Ꭾ
劃劕竀磂
■ 䥄礓㢀䤛㥀㆗址䡚涢䆯祶䁐劔叉Ꭾ㮚䦴礓㢀㶡
櫵㥀䁎䤡櫵笖瞘墜㶡櫵䳽䳛ぅ넬垎櫵笖瞘矴瞡
䡚叉挕㸟䤛彇履Ꭾ㋝㘇㥀櫵笖瞘瞣㝷䡚䛥ㅴ䥄
礓㢀Ꭾ
:浸㙜² 氊礍窺碼
■ 〥垎必㈆䤛爸䐨㖉磂Ꭾ㘂挕坉㗯牦氫怌墜㝆䆤
䤥㓱䒘橫ヒ㛹必㈆䐮䤌䗳㗯䘥墜礓忲Ꭾ㮚䦴汅
㊱㐒嘖㝧穤넬泣䓬䖡汅㊱墜こ礓储넬䐮矴瞡ㇵ
磂徊壪㍿墜䟏瀇㢀Ꭾ泣抇役㝆䆤䤥㓱ぅ䇛Ꭾ泣
抇役㝆䆤䤥㓱ぅ䇛Ꭾ
氐礓搟珥㋏竀磂
■ 场㛙墜礓忲彭忻猀㐞䤛㣸䖽氐场㛙糰僃猀㐞戤
僎㔮Ꭾ㐟㔗涫礓忲䖽氐吨㎏糰僃墜猀㐞Ꭾ
氐礓竀磂
■ 泣㔗㆗址ㄓㅭ糰㫫倝公㢀䐮曐主倝伯䱷넬ヽ㍥
氐礓Ꭾ
氐礓竀磂
■ 儊㍽墜凭主㘇挕㸦搌氐礓Ꭾ㐟㔗㸟礓㢀憆䟔䮍
䂾糰僃䐮円凭墜囈㪛ぅᎮ㋝ㆳ㶼㍿㆗址Ꭾ
氐礓竀磂
■ 䘥㫶墜场㛙㘇挕㸦搌氐礓Ꭾ泣㔗㝷㓭䘥㫶墜场
㛙Ꭾ泣䓬䖡场㛙墜䗪穅䐮矴䖡ㇵ磂徊壪㍿墜䟏
瀇㢀Ꭾ泣抇役㝆䆤䤥㓱ぅ䇛Ꭾ
氐礓竀磂
■ 䇆仺吨䡇糰礓㫫礓㢀Ꭾ㐟㔗尓硼㬮䷔Ꭾ
:浸㙜² 剽劏窺碼
■ 䥄礓㢀䤛㥀㆗址䡚涢䆯祶䁐劔叉Ꭾ泣嫒沥崾㘠
㤮ぅ䔟孒墜礓㢀〢䟑䤘㸧濵磺Ꭾ~嵄稙
² 泣㔗㸟礓㢀㶡櫵㥀櫵笖瞘䐮䳽䳛瞘墜䆤䟑Ꭾ
² 㐟㔗㸟礓㢀㶡櫵㥀㤒㶲墜䳽䳛㍿Ꭾ
䤡牦叉墜竀磂Ꭾ
㣌珥劔㋏竀磂
■ 獥ㄎ㚤勼吨㢀壗墜僃䂾䮍糰Ꭾ㓱䇝䑌〢碬叉䑣
㭯䆤넬䑥㘇䆶吨捬㗮㐒獥ㄎ䐮勼吨㢀壗Ꭾ
劔㋏竀磂
■ 㥀糰僃墜匑泗岒瞫㍿넬主㔮獪廖㘇挕䤛澏劃Ꭾ
㐟㔗匑泗㙃䤡㬿珧糰獪廖凛䂾笊䞱墜竷咁Ꭾ泣
㋝㆗址㙃䤡㸩珧糰獪廖凛䂾墜笊䞱Ꭾ泣㸧䇛䑫
瞣䱷瞘Ꭾ
:浸㙜² 劎㋉窺碼
■ 瞣㝷礓㢀吨瞘䡚넬叉主㘇挕䤛〘〣㵨峜㐒Ꭾ泣
㸧䇛䑫瞣䱷瞘Ꭾ泣㔗涫㍪峽澈燩䵼汅㊱Ꭾ
劔㋏竀磂
■ 㥀糰僃吨捬㍿墜乌㐞㘇挕䤛煡㔮䐨糰僃乌曐
井Ꭾ㐟㔗㸟乌㈪㍽糰僃墜吨捬ぅᎮ
:浸㙜² 㗩㋉窺碼
吨瞘嗓嚛〢墜㑆埭㘇挕䤛涢䐨櫚埭Ꭾ㐟㔗㆗址嗓
嚛㑆㐘Ꭽ䅏䝠䐮捨業䈿墜倝公址㛙䐮倝公㒩Ꭾ
zh-hk 珥殙㶡㎀氢䊇
䇀仴
:浸㙜² 剽劏窺碼
■ 㥀稨㶲址爬巜㤥っ㬮㆗址䥄䇆仺勼吨㕙㐞㖉
磂넬戤〬㘇挕ー汅㊱䘥㫶Ꭾ
宙䵺ヽ〣址爬넺勰ゖ竷咁䐮橻䤥넬勰䢮䓮禣Ꭽ
㪃㍝䦭穅Ꭽ侏志넬凭兼橻咁䐮究ㅔ咁㛙Ꭾ
ㆣ㮚넬㖋㆗䀊彨䥷㒸叉䞐㸧䡚넬䢮掋䓮禣䐮
㪃㍝䦭穅ュ䤡㘇挕䤛澏劃Ꭾ䥄礓㢀㘂㘇址䟔稨
㊱竷咁㗢笊䞱Ꭾ
劃劕竀磂
■ 竷咁㘇挕䤛澏劃Ꭾ㐟㔗㸟竷咁爻㘤ㇵ僃㔝櫵〘
澏㒸叉Ꭾ
㒸叉㵰䝖䟔㩩掸Ꭽ弱究䐮㎎ヮ䠫叛䥨漂㷑㢀墜
竷咁䡚넬泣㔗磺瞣Ꭾ
㐟㔗犐䛟牦糰墜䇆仺㒷喟䐮牦瞏墜䡚瞫汅㶲Ꭾ
泣犍䆶䥄㆗址泂䠦䤐㍿䗨ㆳ墜滟氢Ꭾ
㐟㔗㑁址䇆仺㒷挕䓕㗓竷咁乌㐞Ꭾ
㐟㔗ヽ糰䇆仺㒷喟䐮瞏䡚瞫毻㏥䐮㒸叉㙃乌珧
ㅦ墜竷咁넨㮚胍㔝넩Ꭾ
劃劕竀磂
■ 竷址仑㘇挕䤛澏劃Ꭾ㐟㔗㆗址䇆仺吨㟆喀㒸叉
竷址仑Ꭾ
:浸㙜² 吘勊窺碼
㷞㸙㷑㢀㍿墜俊糬䐮㎎ヮ竷咁㘇挕䤛吞勐Ꭾ㐟㔗
㒸叉㷞㸙㷑㢀㍿墜俊糬䐮㎎ヮ竷咁Ꭾ
:浸㙜² 劎㋉窺碼
■ 㒸叉䤷瞫䐮圲搋㥀㒸叉䆤넬礘㑢壆䐮䁎壆墜竷
咁㘇挕䤛吞櫚䐮吞瞣Ꭾ㐟㔗匑历䁎䷔棣究䐮珥
䟈㒸叉乌历棣究Ꭾ㐟㔗匑历溵究䐮坊䷔究竷
咁Ꭾ泣㓱䇝㥀勰勼䐮匑历乌仺棣䡚䑋婌棣胛Ꭾ
礘㑢壆䐮䡇䁎壆墜竷咁넨ㆣ㮚栣䦴Ꭽ範瑌柇
㚤箱掐넩墜壆㘇挕䤛吞櫚Ꭾ泣㥀㒸叉㑥㍠㑒婌
䦴壆Ꭾ
叱㋏竀磂
■ 㵈㍪竷㛙ぅ墜叉䂾㐞ㅠ〾〥㥟㔓Ꭾ㐟㔗㆗址㷞
㸙㷑㢀㒸叉㵈㍪竷㛙Ꭾ䇝稠硼〣曣㵨䐮㮎㡌Ꭾ
䝂䓤䐮䘮䡛䀊㒸叉墜竷㛙Ꭾ䲺䧽竷咁僃䂾䆤넬
䑥㸟竷咁ゼ彾㶁峽Ꭾ
劔㋏竀磂
■ 竷咁㒸叉䆤䤛䝻墔叉主Ꭾ㢀壗㘇挕涢叉Ꭾ䑌〢
碬叉䑣㭯䆤넬䟑㘇䆶吨捬㗮㐒獥ㄎ䐮㢀壗Ꭾ
劔㋏竀磂
■ 夷岒㔝櫵檣㘇挕䤛㥀㒸叉牦尣ぅ吞櫚Ꭾ泣㓱䇝
犍㶠㔝櫵〢墜䔟孒Ꭾ䑌〢碬叉䑣㭯䆤넬䟑㘇䆶
吨捬㗮㐒旴笲Ꭾ
叱㋏竀磂
■ 牣煡䡚㘇䖽氐猀㐞䤛涢䆯祶䁐劔叉Ꭾ泣㔗嫈氐
糰僃猀ㄎᎮ泣㔗涫㍪峽澈燩䵼汅㊱Ꭾ
叱㋏竀磂
■ 㥀稨㶲址爬巜㤥っ㬮㆗址䥄礓㢀䤛䯣䐨㖉磂Ꭾ
礓㢀〥䆯址䟔勰ゖ竷咁㚤橻咁넬䐮㒸叉䓮禣Ꭽ
㪃㍝䦭穅Ꭽ侏志Ꭽ凭䀛䐮究ㅔ咁㛙Ꭾ
㣸勒牦叉墜䓮禣Ꭽ㪃㍝䦭穅Ꭽ侏志Ꭽ凭䀛嵡咁
㛙㘇挕䤛叱㋏壆掲Ꭾ
:浸㙜² 劎㋉窺碼
■ 俊糬㒸叉䡚넬㘇挕䤛墔圷䄎犊仐籈墜哘仙Ꭾ䌧
䈵䡇넬磮华俊糬䀊牬㑈仐籈墜僃䂾넬ㅞ檀祺ュ
䥂䤡〘摄䁐殣墜墜曐井主仹Ꭾ䵼䡚넬㖋㆗㷑㢀
尥䇆礟㓭넬猕㘇挕ー儖叱墜俊糬岙华仐籈㚤竳
划Ꭾ㒸叉䡚넬泣㥀㷑㢀ぅ䝖㍽〘磓傇㔱Ꭾ爱㘇
硊䵺㐒嘖䄎犊仐籈墜䋝仙Ꭾ
:浸㙜² 㗩㋉窺碼
■ 〥犁㘠墜㢀壗㘇挕䤛㐒嘖膴櫚Ꭾ碎圏㢀壗㥀䑣
䧜䐮曣㵨〢㘇挕䤡コ㸧㵬伶Ꭾ爱コ㵬伶磉柧ゞ
伶〣墜岒碱Ꭾ凭主㮚䦴岗爧爱コ岒碱넬㘇挕䤛
ー㢀壗膴櫚Ꭾ㘂㘇㆗址犁㘠䝖㍽䇆仺吨墜㢀
壗Ꭾ
㗯㋏竀磂
■ 擽㘂㆗址礓㢀墜䇆仺䰹䄧넬㥀礓㢀㍿䝖憆坉珩
㺄欕䐨䐮㙃䤡珩㺄櫵笖墜䃲㎏㚤㷑㢀넬㘇挕䤛
㥀礓㢀牣ㅴ䡚场圷劃擉Ꭾ爱䤛䘥㫶礓㢀Ꭾ礓㢀
㘂ヽ䇆仺䰹䄧牣ㅴ䡚넬㐟㔗㆗址珩㺄㷑㢀Ꭾ
:浸㙜² 㗩㋉窺碼
■ 吨瞘嗓嚛〢墜㑆埭㘇挕䤛涢䐨櫚埭Ꭾ㐟㔗㆗址
嗓嚛㑆㐘Ꭽ䅏䝠䐮捨業䈿墜倝公址㛙䐮倝公
㒩Ꭾ
㗯㋏竀磂
■ 〥犁㘠墜㢀壗㘇挕䤛㐒嘖膴櫚Ꭾ碎圏㢀壗㥀䑣
䧜䐮曣㵨〢㘇挕䤡コ㸧㵬伶Ꭾ爱コ㵬伶磉柧ゞ
伶〣墜岒碱Ꭾ凭主㮚䦴岗爧爱コ岒碱넬㘇挕䤛
ー㢀壗膴櫚Ꭾ㘂㘇㆗址犁㘠䝖㍽䇆仺吨墜㢀
壗Ꭾ
㗯㋏竀磂
■ 擽㘂㆗址礓㢀墜䇆仺䰹䄧넬㥀礓㢀㍿䝖憆坉珩
㺄欕䐨䐮㙃䤡珩㺄櫵笖墜䃲㎏㚤㷑㢀넬㘇挕䤛
㥀礓㢀牣ㅴ䡚场圷劃擉Ꭾ爱䤛䘥㫶礓㢀Ꭾ礓㢀
㘂ヽ䇆仺䰹䄧牣ㅴ䡚넬㐟㔗㆗址珩㺄㷑㢀Ꭾ
㗯㋏竀磂
■ 嗓嚛煡壼㘇挕䤛媦櫚Ꭾ泣犗㍥㨝媄咁糬䚶䛢煡
壼Ꭾ
㗯㋏竀磂
■ 擽嗓嚛煡壼㐒嘖櫚埭䐮彈恃䤛爸䐨㖉磂Ꭾ泣㸧
䇛桭嘞煡壼Ꭾ
:浸㙜² 氊礍窺碼
䇆仺吨䡇糰礓㫫礓㢀Ꭾ㐟㔗尓硼㬮䷔Ꭾ
:浸㙜² 㣆珟㖃㷅㉷䃉墖窺碼
■ 〥垎㥈倝公䐮䤛䘥㷋礓㢀檀祺Ꭾ䇆仺挕珧㘇挕
䤛㬮佁Ꭾ㶲䤷倝公礓㢀넬〾峣㖋倝硼竷咁䶰
倻Ꭾ泣磀䡚ㇵ䔙吨捬Ꭽ吨瞘㷞㸙䪵Ꭽ吨瞘㗢瞘
䛣墜倝公Ꭾ~ 倝公嵄 稙
㣌珥㖉㷋㉽䃏墜竀磂
■ 擽吨捬瞘䐮吨瞘㷞㸙䪵㗯䘥넬䇆仺挕珧㘇挕㹉
䤛㬮佁Ꭾ㮚䦴吨捬瞘䐮吨瞘㷞㸙䪵㗯䘥넬㐟㔗
㆗址礓㢀Ꭾ泣抇役㝆䆤䤥㓱ぅ䇛Ꭾ
㣌珥㖉㷋㉽䃏墜竀磂
■ 䇆仺勼吨擽匹㬮䷔ㇵ涏넬䇆仺挕珧㸟䤛㬮佁Ꭾ
㐟㔗尓硼㬮䷔Ꭾ擽礘必涏䐮必㈆넬泣抇役㝆䆤
䤥㓱ぅ䇛Ꭾ
㶡櫵㚤爻忲 ]KKN
5㶛櫯㚞爵忬
㶡櫵㚤爻忲
䥄场㛙墜汅氠㋝硨䟔㷎䃅㆗址Ꭾ
䥄场㛙墜汅氠㘇㶤㎀䞌㘠搋䳽䳛ぅᎮ
泣犍㶠㸠址墜㶡櫵泂䠦Ꭾ
䥄礓㢀㘇磀䡚䗪㍽䗪䂿㆗址넬ㅞ䇝稠爻䖽搋㮽㞜㶡櫵墜
6FKXNR䗪䂿Ꭾ䟏瀇㢀墜穥㶲㉔䇝稠勒㶡㨑넨/䐮%㦣䟏
瀇㢀넩Ꭾこ礓㫫䇝稠㸥䏡環呤〢䔟㶲墜礓㫫Ꭾ
㘂䤡㘠滟䩔礓㢀䒘橫ヒ㛹䑥㘇ヽ㶡櫵䗪䂿䐮䤌䗳礓忲Ꭾ擽
㶡櫵礓㢀䆤䗪穅ㅥ䟔匹仭氐㗢墜㥈䟑넬獥忲䡚䇝稠㆗址䖽
氐瞫碬搋㸩七庋墜㎀珵掋碬磺瞣矴Ꭾ
泣㔗㆗址晄挕䗪栟Ꭽ䓮䦗䐮䄎瞏忲Ꭾ礓储澝無㘇挕䤛爸䐨
劃劕Ꭾ
礓㢀㘇㶡櫵㥀㖰庋矢墜㫙䳛ぅ넨倉䂾搋㸩㖰庋넬濵磺
㥈䦗搋㸩㖰庋넩Ꭾ
]䘟㫰㖱㣲
䘥㫶㖷㣸
仺䌡넓
■ 祰䁊糁糤墖㷘㸓䪯 擽㷞㸙䪵牦㐞糇糪넬牣ㅴ䤷瞫㹉〥
挕矴忢吨瞘Ꭾ夐獈䱷彜墜䵻祺㘇挕䤛㗯䘥Ꭾ泣㓱䇝ㇵ䔙
㷞㸙䪵倝公Ꭾ
■ 㐙㔑瞝㓧岌憀墖䇀仴吢 擽䥂㥀吨捬ぅ䝖㍽竷咁戤瞣㓭
䇆仺吨넬㸟ー礓㢀牦䂾溸斏Ꭾ吨捬亪䤡竷咁䡚〥䆯瞣㝷
礓㢀넬ㅞ牊橤娅䡚瞫墜匑泗㢀壗偄汾硼㬮Ꭾ~ 䃲㎏
偄汾嵄 稙
■ 䇀仴匋泑吘湉 㐟㔗汅㶲牦糰墜䇆仺㒷喟Ꭾ㆗址〥糰䟔
图墜㒷喟汅㶲Ꭾ泣㸟吞湏檣䝖㥀嗓嚛壼〢Ꭾ㮚䦴牦
無넬壼㵨㘇挕䤛瀋㓭Ꭾ
■ 㐟㔗涫划剩㐒㆞墜俊糬爧牦煡壼籝㓭㢀牊㍽礓㢀㍿猀Ꭾ
壻䖿匑泗牦尣Ꭾ〘瞣㯣㍠犐䛟焛娅墜匑泗䡚瞫넬㎥䔡礘
殙㪶㒸匑泗䡚瞫Ꭾ
■ 㐟㔗㆗址䥂㶡櫵煡壼墜䇆仺吨Ꭾ
■ 圴圱剽擃 珩㺄넨㮚嗓嚛䦇ぅ墜傇㔱넩䇝稠搟吨㫙㚤吨
瞘㍿㊌ㇵ䔙搋㸩FP墜濵磺Ꭾ劃擉㘇挕䤛㸥吨瞘㍿㊌
墜嗓嚛爸䐨匹仭㈆䇁墜䘥㷋Ꭾ
■ 珣㹾嶦弫㷋㡺 㐟㔗㥀礓㢀ぅ㆗址珩㺄嶬弱㷑㢀Ꭾ场圷
墜劃擉䤛䘥㫶礓㢀Ꭾ
■ 瞝㝱吢瞒䝵參Ꭸ 泣㥀吨瞘矴瞡墜䋝仙〣涫吨捬䝻叉Ꭾ
㐟㔗㸟咁㛙㭖㥀䱷瞘〢Ꭾ㖋㆗吨瞘㘂䑫瞣コ䇆恃碱넬搟
㑥䟑夐獈墜彜ㄎ㥀〘䷍䡚瞫䆤ュ㘇挕䤛䘥㫶Ꭾ
■ 吢捦㍹墖㏯形 吨瞘嗓嚛Ꭽ㍿㫙㚤䂭祺㘇挕㐒嘖㏵彨墜
乌主Ꭾ爱䡇䵻䁐嘖湹넬〥䤛㸥䇆仺牣ㅴ场圷〥撇墜䆉
稗Ꭾ䷧䴹匑泗䆤䛾䔅㏵彨乌主넬㘇ヽ犗㍥捨業Ꭾ
7囂㪕㇯涉
囈㪛ㇵ涏
崸㘚囂㇯殡㶬墖䃴䫖桧嘘
ヽ囈ㇵ䟑䄧桭嘞㔝櫵Ꭾ
*毵䊺墖礍㡺
ゞ毻䋀墜礓㢀
䐩㈩䤛㥀䵼峸巘ャ彑窇孒㹧㚤䖿㑎櫵憆Ꭾ䋀㸟ゞ毻㑈礓㢀
墜㘜屆㒷挕Ꭾ
䗢孌 沋彈㍿㷑搟穧撊䤛㣸礓㢀㦣桷戤䤡䑘〥㘤
䖹㑈祴䦑
䋀㘇㥀䖿㑎祺䦗汅㶲䥄礓㢀墜㘜屆㒷挕Ꭾ夆㑥墜汅㶲䤛窇
孒䟔窇孒㹧〢Ꭾ
ヽ〣勒爧牦㒷挕檀窇孒榺䁭汅㶲䡚瘰䡚㐒嘖墜䖿㑎祺䦗Ꭾ
䖹㑈㡺
ヽ〣䡇㘜屆䔡琭墜帹娅泂䠦Ꭾ爱コ䔡琭㘇涫䋀焭紞㥈夌䖽
汅㶲礓㢀Ꭾ
䵼礓㢀䩑䛲䵨壷矴䟔㆗址牦墜礓㢀㗢礓㵨场㛙墜
䔟ー(8넨䫜憆墜礓㢀㗢礓㵨场㛙
:(((넩滔䤡夐矴䰱幼Ꭾ沊䔟䄭氚䠦ゞ㥀䵨壷巜
㤥㍿搢礓㢀爘犜㗢㣶䝎墜䟑仭Ꭾ
( 突孌㹡
址䟔窇孒䡚瘰㚤匑泗䡚瞫
0 䟝琧
址䟔汅㶲䡚瘰㚤匑泗䡚瞫넬䐮汅㶲搂㓭尣䂧
8 䔛琧
@ 揼㓧瞝㝱吢瞒䔛琧
PLQ
K
NJ
#
zh-hk 獥ㄎ
䔛琧㗜沼䠠
ヽ〣䡇㘜屆䔡琭墜帹娅泂䠦Ꭾ
䟝琧
䟣琭址䟔涢䤌稨汅㉔㚤汅㶲㉔Ꭾ
䟣琭䥄烃ぷ䡇䔡琭Ꭾ䔡〣䟣琭ヽ疮㶲䐮毻硼疮㶲Ꭾ
揼㓧瞝㝱䱱瞒
搂㓭瞣㝷䱷瞘㒷挕㝷址䆤넬礓㢀䱷瞘㸟䤛搂㓭䅠瞣Ꭾ䋀㘇
ヽ䑣㓭㸟礓㢀䱷瞘㶤㎀䑫瞣Ꭾ
㉴礓䡚넬䱷瞘搂㓭瞣㝷㒷挕〥䤛㝷址Ꭾ䋀㘇ヽ䑣㓭㸟䱷瞘
㶤㎀䑫瞣Ꭾ
䗢孌
■ 擽㥀䛥ㅴ䤷瞫䑫瞣礓㢀䱷瞘넬䛥ㅴ㇗䤛䣃㉴Ꭾ
■ 䱷瞘矴瞡䆤넬礓㢀〥䤛搂㓭悔悤䛥ㅴᎮ䋀䇝稠䑣㓭珥䟈
㝷㓭䛥ㅴᎮ
■ 擽礓㢀瞏䡚瞫矴瞡넬䱷瞘䤛䄎犊〘䷍䡚瞫䑥瞣㝷Ꭾ
䝵參窺䑙
䥄礓㢀獥䤡䝻叉竀䑟Ꭾ㖋㆗䀊矴瞡䇆仺吨礓储넬竀䑟㘇挕
ュ䤛煡㓭Ꭾ
䗢孌
■ 吨捬㥀䇆仺牣ㅴ䤷瞫必䔙㏏㖓Ꭾ䝻叉竀䑟㸟䔙悤瞣㝷Ꭾ
㖋㆗䇆仺牣ㅴ䀊彨䥷넬竀䑟㘇挕ュ䤛煡㓭Ꭾ
■ 吨瞘嗓嚛Ꭽ㍿㫙㚤䂭祺㘇挕㐒嘖㏵彨墜乌主Ꭾ爱䡇䵻䁐
嘖湹넬〥䤛㸥䇆仺牣ㅴ场圷〥撇墜䆉稗Ꭾ匑泗䆤䛾㗓㏵
彨墜乌主㖋㘇Ꭾ
涜䤆氜桱抄瞉䂸
矴瞡䥄礓㢀礓储䡚넬䤛投㑈氢桷把Ꭾ䋀㘇ヽ涢䤌氢桷把墜
䔙悤䡚瞫Ꭾ
泣䔡〣Ꮈ6WDUWᎹ넨㝷㓭넩䔡琭弜寪Ꭾ
䀊䖹址䟈墜氢桷把瞏䂾Ꭾ
䡚瘰磀㖋珥䟈窇孒Ꭾ
ヽ〣勒㘇址汅㶲넺
娅氢桷把䔙悤䡚瞫把
瞏氢桷把䔙悤䡚瞫把Ꭾ
_獟ㄈ
獥ㄎ
䋀㘇ヽ㥀爱櫹ゞ毻㍿㙃獥ㄎ䮚殙넬ヽ㗢㮚ㅭ䵻嫒㆗址㶛
㈩Ꭾ
仺䌡넓
㗮㐒䞱嘞䡚넬泣伀䌧〥殙尓㓭㑈煡壼Ꭾ嫒ㇵ煡壼ュㇵ䔙疮
㶲Ꭾ煡壼㘇ヽ㿾㘋䟣煡Ꭾ
咋䶜獟ㄈ
䋀㘇ヽ㥀㝆䆤䤥㓱ぅ䇛Ꭽ㸠瞘䂯㚤忊〢㝞䂯演滏咑䶢獥
ㄎᎮ䐩㈩墜㸧㎢㵨㚤忊稙㐯㐒勒礓㢀戤汅墜㘜屆场㛙Ꭾ
滀㵰㗢䡇㘾㘇㥀忊〢氚演넬䤛㣸〥㘤㤣㷎戤䤡䑘䀆垈Ꭾ擽
礘沋彈滟氢넬泣䧽夣场㛙夆甜Ꭾ
䗢孌 咑䶢獥ㄎ〾祶犁址䟔䑘䤡礓㢀Ꭾ演滏䡚넬泣㓱䇝䗨
ㆳ傮嫒墜场㛙浰㐽嫔넨(QR넩Ꭾ~ 㶺䑎䤥㓱ぅ䇛
嵄稙
䔛琧 沼䠠
崸桱
瞣㯣 㝷㓭礓㢀
0 汅㶲䡚瞫
㉴䵺
㉴䵺䐮䣃㉴礓㢀牣ㅴ
犐䛟图䇆仺煐㐒㒷喟
犐䛟图䇆仺煐㐒㒷喟
犐䛟图䇆仺煐㐒㒷喟
犐䛟图䇆仺煐㐒㒷喟
犐䛟图䇆仺煐㐒㒷喟
h
犐䛟尣䂧墜珥珧
%
犐䛟搂㓭尣䂧
i 犐䛟氰䏎㒷挕
v 䑫瞣吨瞘
煛壶
䗢孌 㐟㔗㥀亪䤡煡壼䡚㆗址礓
㢀Ꭾ泣嫒沥煡壼䀊㶡櫵㮽垎Ꭾ煡
壼㘇䔡稞䡚珵䐮爞䡚珵䟑㘩煡
㓭Ꭾ
煛囂
曐历㷑㢀 址䟔匑历庋笇Ꭽ範瑌柇㚤杄旴
嵄〘䴹㆗址㑥 ]KKN
K崾〒䴳㆑场㑟
嵄〘䴹㆗址㑥
䵼峸巘䗨ㆳ箮䴹㆗址䇆仺吨匑泗竷㛙㑥墜傮㊱㿽ㅴᎮ泣㍠
彈矉Ꮈ㶡㎀滟氢Ꮉ峸巘Ꭾ~ 珥殙㶡㎀氢䊇嵄 稙
㆗址䟈礓㢀㑥넬䋀䇝稠䵻嫒㥈㶡櫵煡壼Ꭾ䋀ぷ䇝稠㍠倝公
吨捬㚤獥ㄎᎮ
倗兦吢捦〸㸙煛壶䝐搅㶬ㅟ
箮䴹㆗址礓㢀傮㊱竷咁㑥넬䇝稠㍠倝公吨捬㚤獥ㄎᎮ
㮔ㅧ㸙煛壶㶛櫯搅㶬ㅟ
㸟煡囈D憆䟔吨捬䂭猀墜㐑䰕Ꭾ
㸟煡壼E䗪䰕䝖㥀ㅥ䟔吨捬䂭猀ぅ㭆墜籝㓭㢀F桭Ꭾ
䗢孌 㐟㔗㆗址亪䤡㶡櫵煡壼墜礓㢀Ꭾ泣嫒沥煡壼䀊㶡櫵
㮽垎Ꭾ煡壼㘇䔡稞䡚珵䐮爞䡚珵䟑㘩煡㓭Ꭾ
氿㶬䡔瘪
箮䴹爻䖽礓㢀礓储䐮㥀䟏礓䆤䉺䇁䡚넬窇孒祺䦗䤛㐒嘖〡
㈣Ꭾ
䔡〣 0䔡琭Ꭾ
‚ƒ‹‹
œ
窇孒㥀窇孒㹧〢넬〬 0䔡琭〢墜䔟孒叠テ
澏Ꭾ
㆗址䟣琭汅㶲䡚瘰Ꭾ
㎥䴹䔡〣 0䔡琭Ꭾ
䡚瞫䀊汅㶲㶤䐨Ꭾ
磃柡䡔瘪
䔡〣 0䔡琭넬华䆤䔡〣6WRS넨㉴䵺넩Ꭾ
窇孒㹧㖋涢䐨岒墕Ꭾ
珟氿䡔瘪
䔡〣 0 䔡琭Ꭾ
窇孒㹧〢磀㖋窇孒ᎸᎹᎮ泣㗛矉嵄胶㚤嵄胶墜䔟
孒牊橤汅㶲Ꭾ
涜䤆䡔瘪넚㆝㮔䆰㬡ヶ䡔瞥涜勌㎾ヶ䡔瞥넛
䔡䵽籷㑈䑘爈牊橤汅㶲Ꭾ
倗兦吢捦㚞獟ㄈ
殙㗓硼䟈礓㢀墜㚋牫넬泣㸟吨捬倝岒〾㆗址叉抽墚乌䛾
䔅Ꭾ~ 倝公嵄 稙
䄌涂 泣嫒ㇵ吨捬㍿亪䤡䶰笰墜㔝櫵넬㮚扲攇ぱ匇庪䞱Ꭾ
址〘㩢䀊凭乌墜烷䀛䛾䔅吨捬㍿猀䂋僩墜檀祺Ꭾ
倗兦獟ㄈ
泣㆗址抽墚乌㚤伯媯䀛䐮烷㑏䇑䂭倝公獥ㄎᎮ
^䇀仴
䇆仺
䋀㘇ヽ㆗址䇆仺㆞䈃爷㥈匑泗Ꭽ㒸叉㚤毻㏥竷咁Ꭾ
勒嫒ㇵ㮽㞜牣址䇆仺吨넬泣沋矉匑泗㢀壗〢墜㆗址殙胶넬
〾厷䊡㐯䟔䥄泂䠦䑣㎢䥃䏡址檀䩔ぅ墜滟䞱Ꭾ~ 䄒消墜
匑泗䡚瞫嵄 稙
峣㖋汾址䇆仺吨Ꭾㆣ㮚넬ㅸ㘇ヽ㸟乌㒸叉址㆞仹敎Ꭾ
㆗址匹珩䐮璘犢櫵笖墜㬿䦇㵨넬〾䝖㍽〘磓傇㔱Ꭾ㸟櫵乌
墜䦇㵨䝖㥀煡壼〢넬ㅞ〥殙䝖㥀ぅ䇛胶Ꭾ
䔡〣图䔡琭Ꭾ
㑁址䟣琭汅㶲㐞瘰Ꭾ
䔡〣Ꮈ6WDUWᎹ넨㝷㓭넩䔡琭Ꭾ
㐞寪䆤넬氢桷把稗澏Ꭾ乌䀊㒸叉㶤䐨Ꭾ
:浸㙜² 劎㋉窺碼
俊糬㒸叉䡚넬㘇挕䤛墔圷䄎犊仐籈墜哘仙Ꭾ䌧䈵䡇넬磮华
俊糬䀊牬㑈仐籈墜僃䂾넬ㅞ檀祺ュ䥂䤡〘摄䁐殣墜墜曐井
主仹Ꭾ䵼䡚넬㖋㆗㷑㢀尥䇆礟㓭넬猕㘇挕ー儖叱墜俊糬岙
华仐籈㚤竳划Ꭾ㒸叉䡚넬泣㥀㷑㢀ぅ䝖㍽〘磓傇㔱Ꭾ爱㘇
硊䵺㐒嘖䄎犊仐籈墜䋝仙Ꭾ
畝㎉
〥䡇䑘䤡匑泗㢀壗猕犁㘠䇆仺Ꭾ泣㋝㆗址㘇䇆仺墜匑泗㢀
壗넬ヽ㍥㥀㒸叉竷咁䡚爸䐨礓㢀䘥㫶Ꭾ
牻场墖匋泑㡺壑
坉嗓嚛Ꭽ嗓嚛碎圏Ꭽ圏Ꭽ碎圏䐮戨叉㩩䞱欕䐨墜戨叉匑泗
㢀壗㥟犁址넬爱コ䥨䞱㘇ヽ涫䇆仺稞㑁岗爧Ꭾ
ぷ㘇ヽ㆗址䵻䄧笨媷넬ヽ巘夙䤌䗳笨媷墜䡚瞫Ꭾ硼祶欕爸
㝞ㇵ浡넬㘾㑟〥殙㸟䤡珩Ꭽ璘櫵笖犢仗墜匑泗㢀壗䝖㍽䇆
仺吨ぅ㆗址Ꭾ
〟牻㘚墖匋泑㡺壑
〥犁址珩㺄匑泗㢀壗Ꭾ珩㺄匹仭涫䇆仺岗爧넬匹仭㒸叉珩
㺄㷑㢀㍿墜竷咁Ꭾ
仺䌡넓
场圷劃擉넺珩㺄넨㮚嗓嚛䦇ぅ墜傇㔱넩䇝稠搟吨捬㫙祺㚤
吨瞘㍿㊌ㇵ䔙搋㸩㖰庋墜濵磺Ꭾ劃擉䤛㸥吨瞘㍿㊌墜嗓
嚛爸䐨匹仭㈆䇁墜䘥㷋Ꭾ
䃬㎉倾汸
吨㍿㮚匹竷咁넬㐟㔗瞣㓭䇆仺吨Ꭾ䈃爷䃲㎏偄汾㑟〥㥀䵼
硨Ꭾ
E
D
F
zh-hk 氰䏎㒷挕
擽〥嫒㶲䃲㎏䡇㘾犁址䟔䇆仺넬泣㨏橤〣㐯偄汾Ꭾ
ヽ䤘䅏墜㒷喟㒸叉岒䃲㎏ô㐞瘰㑈㐞瘰Ꭾ
䤷瞫泣䲺䧽䃲㎏僃䂾Ꭾ
䃲㎏䏡ㇵ䔙㏈俔䐮僃叉Ꭾ
㮚䦴䃲㎏涢䆯䮍叉䐮场圷劃擉넬㖋檀孒〥犁址䟔䇆仺吨Ꭾ
䵼䡚넬泣㉴䵺偄汾Ꭾ
:浸㙜² 叫㋉窺碼
牣煡䡚㘇䖽氐猀㐞䤛涢䆯祶䁐劔叉Ꭾ泣㔗嫈氐糰僃猀ㄎᎮ
泣㔗涫㍪峽澈燩䵼汅㊱Ꭾ
䇀仴㒱喙氿㶬
㆗址䔡琭汅㶲䑘殙墜䇆仺㒷喟Ꭾ
䗢孌 ㅸ㘇㸟图䇆仺㒷喟汅㶲汅勒㐞瘰Ꭽ图勒
㸧䡚넬㎎笰墜㒷喟汅㶲㐞㐽勒㸧䡚㗢㐞瘰Ꭾ
䇀仴吢氿㶬
巜ㆣ넺䇆仺煐㐒㒷喟图넬匑泗䡚瞫㐞瘰
䔡〣䑘礘墜䇆仺㒷喟汅㶲Ꭾ
䔡琭〢䟑墜䔟孒叠テ澏Ꭾ
䟣煡䟣琭ヽ汅㶲匑泗䡚瞫Ꭾ
䔡〣Ꮈ6WDUWᎹ넨㝷㓭넩䔡琭Ꭾ
窇孒㹧䤛窇孒㒁笰墜匑泗䡚瞫Ꭾ
匋泑䡔瞥形䥱䆞
墔㐒氢桷把稗Ꭾ瞣㝷吨瞘䐮6WRS넨㉴䵺넩Ꭾ䡚瘰磀㖋珥䟈
窇孒Ꭾ
涜䤆匋泑䡔瞥
䋀㘇磀䡚涢䤌匑泗䡚瞫Ꭾ泣㆗址䟣琭涢䤌匑泗䡚瞫䟣琭Ꭾ
䢽㉮礍㡺牝ㅮ
氐嫈6WRS넨㉴䵺넩䔡琭䐮瞣㝷䱷瞘Ꭾ爱䰻㘇ヽ䣃㉴礓㢀牣
ㅴᎮ6WRS넨㉴䵺넩䔡琭〢墜䔟孒叠䤛テ澏Ꭾ矴瞡䱷瞘䆤넬
㎥䴹胶犐6WDUW넨㝷㓭넩䔡琭Ꭾ
㗨侚䛟ㅮ
爻䔡㎁䴹6WRS넨㉴䵺넩䔡琭넬䐮瞣㝷吨瞘䆤넬㎥䔡〣6WRS
넨㉴䵺넩䔡琭Ꭾ
䗢孌 䋀ゾ㘇㍠泗䞌匑泗䡚瞫넬㎥泗䞌䇆仺㒷喟汅㶲Ꭾ
B氪䏈㒱挏
氰䏎㒷挕
氰䏎㒷挕涫䋀㍊㵰旴䄧墜汅㶲ヽ㇗っ䆤㆗址Ꭾ
擽䤡徫䁐匑泗墜旴䄧넬氰䏎㒷挕䤛㕙㐞㷾址Ꭾ
㍄㵪氪䏈氿㶬
巖㆝넬囸넞㐘瘪
䔡〣 i 䔡琭Ꭾ
䔡琭〢䟑墜䔟孒叠テ澏Ꭾ
䔡〣䑘礘墜䇆仺㒷喟汅㶲Ꭾ
䔡琭〢䟑墜䔟孒叠テ澏〬窇孒㹧〢窇孒ᎸPLQᎹ
넨㐞瘰넩Ꭾ
䟣煡䟣琭ヽ汅㶲匑泗䡚瞫Ꭾ
䔡〣 i䔡琭ヽ嫒沥Ꭾ
䡚瘰磀㖋珥䟈窇孒Ꭾ汅㶲䀊㍊㵰Ꭾ
䗢孌
■ 〥挕爻悤㍊㵰䞐㈣䇆仺㒷喟汅㶲Ꭾ
■ 〥挕㍊㵰搂㓭尣䂧Ꭾ
■ 䋀㘇ヽ㍊㵰氰䏎㒷挕汅㶲넬〾峣㖋㝷㓭礓㢀Ꭾ㥀㶤䐨
䡚넬泣㔗䔡〣 i넬戤䡇䔡〣6WDUW넨㝷㓭넩Ꭾ
■ ㍄㵪氪䏈㒱挏墖䟂氿㶬넬䔡〣 i䔡琭Ꭾ磀㖋窇孒搢汅
㶲Ꭾ㮚䵽籷搋䑘孒㍊㵰䟈尣䂧Ꭾ
㝱㓧氪䏈㒱挏
殙㝷㓭䀊㍊㵰墜尣䂧넬祶䁐帹㟆Ꭾ㸟竷咁䝖㍽Ꭾ矴瞡吨
瞘Ꭾ
䔡〣 i 䔡琭Ꭾ
磀㖋窇孒䀊㍊㵰墜汅㶲Ꭾ
䔡〣Ꮈ6WDUWᎹ넨㝷㓭넩䔡琭Ꭾ
窇孒㹧䤛窇孒㒁笰墜匑泗䡚瞫Ꭾ
匋泑䡔瞥形䥱䆞
墔㐒氢桷把稗Ꭾ瞣㝷吨瞘䐮6WRS넨㉴䵺넩Ꭾ䡚瘰磀㖋珥䟈
窇孒Ꭾ
䢽㉮礍㡺牝ㅮ
氐嫈6WRS넨㉴䵺넩䔡琭䐮瞣㝷䱷瞘Ꭾ爱䰻㘇ヽ䣃㉴礓㢀牣
ㅴᎮ6WRS넨㉴䵺넩䔡琭〢墜䔟孒叠䤛テ澏Ꭾ矴瞡䱷瞘䆤넬
㎥䴹胶犐6WDUW넨㝷㓭넩䔡琭Ꭾ
㗨侚
爻䔡㎁䴹Ꮈ6WRSᎹ넨㉴䵺넩䔡琭넬䐮瞣㝷吨瞘䆤넬㎥䔡〣
Ꮈ6WRSᎹ넨㉴䵺넩䔡琭Ꭾ
图 犁㘠毻㏥廖怓竷㛙
图 犁㘠毻㏥㚤䔙悤匑泗竷咁
图 犁㘠匑泗抡究㚤㒸叉廖怓竷咁
图 犁㘠㒸叉㚤匑泗竷咁
图 犁㘠㒸叉俊糬
VWRSVWDUW
PLQ
NJ
PLQ
VWRSVWDUW
PLQ
NJ
PLQ
尣䂧 ]KKN
P尝䂡
尣䂧
䋀㘇ヽ㆗址㘜屆尣䂧焭紞稨㊱竷咁Ꭾ泣犐䛟尣䂧〾煐㍽竷
咁墜珥珧Ꭾ尣䂧㸟㭯址䤘㘠犁墜汅㶲Ꭾ
䗢孌 ㎉䤡屆尣䂧㘇ㆳ犐䛟Ꭾ
氿㶬尝䂡
犐䛟尣䂧䆤넬泣㮚ヽ〣汅㶲넺
珥欟䔡〣 `䔡琭넬夌㑈䑘礘墜尣䂧怀桷㐒嘖Ꭾ
䔡琭〢䟑墜䔟孒叠テ澏Ꭾ
䔡〣 h 䔡琭Ꭾ
䔡琭〢䟑墜䔟孒叠テ澏넬戤窇孒㹧〢窇孒䄒消㉔Ꭾ
㆗址䟣琭ヽ汅㶲旴䄧墜珥珧Ꭾ
䔡〣Ꮈ6WDUWᎹ넨㝷㓭넩䔡琭Ꭾ
窇孒㹧〢磀㖋窇孒尣䂧笰〣墜匑泗䡚瞫Ꭾ
匋泑䡔瞥形䥱䆞
墔㐒氢桷把稗Ꭾ瞣㝷吨瞘䐮6WRS넨㉴䵺넩Ꭾ䡚瘰磀㖋珥䟈
窇孒Ꭾ
㈀䝋
爻䔡㎁䴹Ꮈ6WRSᎹ넨㉴䵺넩䔡琭〾珥汅Ꭾ
䢽㉮礍㡺牝ㅮ
氐嫈6WRS넨㉴䵺넩䔡琭䐮瞣㝷䱷瞘Ꭾ爱䰻㘇ヽ䣃㉴礓㢀牣
ㅴᎮ6WRS넨㉴䵺넩䔡琭〢墜䔟孒叠䤛テ澏Ꭾ矴瞡䱷瞘䆤넬
㎥䴹胶犐6WDUW넨㝷㓭넩䔡琭Ꭾ
㗨侚
爻䔡㎁䴹Ꮈ6WRSᎹ넨㉴䵺넩䔡琭넬䐮瞣㝷吨瞘䆤넬㎥䔡〣
Ꮈ6WRSᎹ넨㉴䵺넩䔡琭Ꭾ
䗢孌
■ 䧨コ尣䂧䤛㥀咑㶲䡚瞫䆤稗澏氢桷把Ꭾ䑫瞣吨瞘넬䝂䓤
竷咁넬䐮戓㓭〘〣抡究䐮㷎寕Ꭾ矴瞡吨瞘䆤넬㎥䴹䔡〣
Ꮈ6WDUWᎹ넨㝷㓭넩䔡琭Ꭾ
■ 䋀㘇ヽ㑁址 `䐮 h㆞䧽決尣䂧怀桷㚤珥珧Ꭾ䧽決墜䞐
㉔䤛㥀窇孒㹧㍿窇孒寪瘰Ꭾ
㆑场揼㓧尝䂡毵㏟
䋀㘇ヽ㆗址屆毻㏥尣䂧넬ヽ毻㏥抡究Ꭽ㷎寕抡究㚤胍
㔝Ꭾ
䗢孌
■ 储㊫竱呻
㆗址䀊㥀&㏏㏥〾㐞櫵㍊㵰墜竷咁넨澢果澢
㮕넩Ꭾ
䓞硼礘毻㏥墜竷咁墜䑘䤡㔝櫵〾珧珥Ꭾ䋀礘姽牫竷咁墜
珥珧ヽ汅㶲尣䂧Ꭾ
■ 抡究䐮㷎寕抡究㥀毻㏥䡚䤛场圷俊糬Ꭾ戓煡抡究䐮㷎寕
抡究䡚넬稞牫㈪䖡爱コ俊糬Ꭾ爱コ俊糬彭〥㘇址䟔㎎ヮ
址爬䐮䖽氐㎎ヮ竷咁Ꭾ
■ 㡺壑
㸟竷咁䝖憆䟔㘇址䟔䇆仺吨墜倒壼넨㮚圏壼䐮嗓嚛
壼넩넬ㅞ䷣礘殞曣Ꭾ
■ 祮憀䡔瞥
毻㏥墜竷咁䏡穥㬮祴憆搋㐞瘰넬涫僃䂾涢䆯㥟
㔓Ꭾ搟㸧㩢墜抡究夐䷬넬㬿㩢抡究礘焛瞏墜祴憆䡚瞫Ꭾ
祴憆㑥넬泣㐞瞣抡㩢㚤媦抡Ꭾ
っ䆤넬㌰嶹㖲抡㩢ぅ瞫㘇挕ュ华㏈㏥넬䋀ュ㘇悔悤傮㊱
竷咁Ꭾ䵼䡚넬㘇㍠㗓硼㷎寕墜㍿揷Ꭾ
■ 氜桱抄
䧨コ尣䂧䤛㥀咑㶲䡚瞫䆤稗澏氢桷把Ꭾ䑫瞣吨瞘넬㸟竷
咁㐞瞣넬䐮戓㓭〘〣抡究䐮㷎寕抡Ꭾ矴瞘넬华䆤䔡〣
6WDUW넨㝷㓭넩䔡琭Ꭾ
㆑场揼㓧尝䂡匋泑
屆匑泗尣䂧넬涫䋀匑历庋笇Ꭽ範瑌柇䐮杄旴Ꭾ
䗢孌
■ 㡺壑
竷咁䇝稠址爻曣墜䇆仺吨夐㷑历竷址㎏㆞匑泗Ꭾ庋笇䏡
㆗址㬿戤倉墜壼㵨Ꭾ
■ 储㊫竱呻
珧䂾竷咁墜珥珧Ꭾ䋀礘姽牫竷咁墜珥珧ヽ汅㶲尣䂧Ꭾ
庋넺
㐟㔗㆗址檣㍿匑历墜庋Ꭾㆵ卿㔝櫵䔟孒倓㒸犁珧墜乌Ꭾ
乌珧爲䁐䡇庋珧墜㎁㑈〡㈥Ꭾ
範瑌柇넺
历範瑌柇䡚넬泣㸟䟈緆墜範瑌柇㐟䐨㬿㸧夐擽墜㸧㩢Ꭾ
䷧㍣墜範瑌柇㒸㍽〘傇㔱墜乌넬ヽ㗢㸩汉墜肕Ꭾ
䟈緆杄旴넺
㸟䟈緆넬䀊伯倀墜旴屉珥Ꭾ㸟杄旴㐟䐨㬿㸧夐擽墜㸧
㩢Ꭾ䷧㍣墜杄旴倓㒸〘傇㔱墜乌Ꭾ
■ 氜桱抄
尣䂧牣橤䆤〘䷍䡚瞫넬䤛墔㐒氢桷把Ꭾ泣䝂䓤竷咁Ꭾ
■ 祮憀䡔瞥
尣䂧㶤䐨䆤넬泣㎥䴹䝂䓤竷咁Ꭾ竷咁䏡穥㬮祴憆搋
㐞瘰넬涫僃䂾涢䆯㥟㔓Ꭾ
匑泗彨䦴㸟㗮互䟔竷咁墜咑䈿㚤胧尸䂾Ꭾ
VWRSVWDUW
VWRSVWDUW
VWRSVWDUW
PLQ
NJ
NJ
尝䂡忺桱 珟珡巖㤟넚㟀ㅟ勌㍾
䞶넛
毵㏟
3 媦抡
3 抡㩢
3 磶抡Ꭽ磶抡㩢
3 胍㔝
zh-hk 㨒䥄汅㶲
Q㨌䤾氿㶬
㨒䥄汅㶲
䋀㘇ヽ殮て礘殙涢䤌礓㢀墜㨒䥄汅㶲Ꭾ
㮚䤡礘殙넬䋀㘇ヽ涢䤌礓㢀墜䔡琭程泗Ꭾ
涜䤆䔛琧稅泑
牊橤䵼䛥ㅴ䡚礓㢀䇝稠矴䖡Ꭾ
㘤䡚䔡ㅧ 㝱㓧㚤㉮䵴䔡琭䞐寪Ꭾ
窇孒㹧㸟䤛㐒嘖 ‚Ꭾ
氐嫈㝱㓧䔡琭Ꭾ
窇孒㹧ぅ墜 Ž㸟䤛瞣㯣瞛吥Ꭾ
煡㓭䟣琭搋 ŒᎮ
氐嫈㝱㓧䔡琭Ꭾ
磀㖋㭯址汅㶲Ꭾ
氐嫈㉮䵴䔡琭Ꭾ
䔡琭程泗䀊矴瞡Ꭾ
䋀磀䡚㘇涢䤌䵼汅㶲Ꭾ
D倗兦
倝公
㮽㞜墜ㇵ笢搟倝公㘇ヽ涫礓㢀瞏䤷ㇵ䔙撇㮕㬮毘搟㒷挕Ꭾ
䐩㈩㸟毻泂涏嘞㚤倝公礓㢀墜䵻嫒䟑仭Ꭾ
:浸㙜² 氊礍窺碼
泣㔗㆗址ㄓㅭ糰㫫倝公㢀䐮曐主倝伯䱷넬ヽ㍥氐礓Ꭾ
:浸㙜² 㗩㋉窺碼
吨瞘嗓嚛〢墜㑆埭㘇挕䤛涢䐨櫚埭Ꭾ㐟㔗㆗址嗓嚛㑆㐘Ꭽ
䅏䝠䐮捨業䈿墜倝公址㛙䐮倝公㒩Ꭾ
:浸㙜² 㣆珟㖃㷅㉷䃉墖窺碼
〥垎㥈倝公䐮䤛䘥㷋礓㢀檀祺Ꭾ䇆仺挕珧㘇挕䤛㬮佁Ꭾ泣
㶲䤷倝公礓㢀넬〾峣㖋倝硼竷咁䶰倻Ꭾ~ 倝公㒩
嵄稙
:浸㙜² 氊礍窺碼
㐟㔗㸟䥄礓㢀侐㍽乌ぅ䐮㑁址㢌乌倝公Ꭾ
䗢孌 搅㚋넬ㆣ㮚桭嘞絲究っ䆤坱〣墜主㚋㘇ヽ焭紞㗓硼Ꭾ
㥀〘䦇乌ぅ㒸㍽䂖儌䳐䳄乙Ꭾ㥀㷑㢀ぅ䝖㍽〘磓傇㔱넬ヽ
犗㍥䄎犊仐籈Ꭾヽ䤘糰䇆仺㒷喟㸟乌㒸叉搋㐞瘰Ꭾ
倗兦㒣
泣犍卿㐯檀ぅ墜滟氢넬ヽ嫒ㇵ〥䤛㣸畇沼墜倝公䟑仭戤䘥
㷋汅㊱墜檀祺Ꭾ
泣㔗㆗址넺
■ 䅏䝠䐮捨業䈿墜倝公㒩Ꭾ
■ 珩㺄䐮嗓嚛㑆㐘㆞倝公吨瞘祺䦗Ꭾ
■ 珩㺄䐮嗓嚛㑆㐘㆞倝公吨瞘㷞㸙䪵Ꭾ
■ 媄甔徊往䐮侏志Ꭾ
■ 㙃糰獪廖䐨ㄕ墜倝公㒩Ꭾ
㆗址㎀䟈墜侏志䀛㑥넬泣㍠㸟っ䇑䂭倝伯Ꭾ
尝䂡忺桱 珟珡巖㤟넚㟀ㅟ勌㍾䞶넛
匋泑
3 庋
3 範瑌柇
3 杄旴
氿㶬 犊稗
‚ 䔡琭程泗 Ž 㝷㓭
Œ 矴䖡
䔡琭程泗넨㝱㓧㚤㉮䵴䔡琭墜程泗
ュ䤛ㇵ䔙瞣㝷넩
ƒ 孒巜䰹䄧 š“‹ 礓㢀䤛矴䖡Ꭾ䋀㘇ヽ㆗址䔡琭㚤窇孒
㹧넬ㅞ䔡琭〥䤛㝷㓭礓㢀〢墜ㄓㅭ㒷
挕넨㖋䇆仺吨亪䤡劃㒳넩Ꭾ孒巜䰹䄧
こ殙坉徫瓏㝞㆗址Ꭾ
㖷䃸汅㶲넨㖷䃸汅㶲殮て礓㢀㦣桷戤㶲넩
㕒㧱 倗兦圴㛓
礓㢀䵻祺 叉抽墚乌넺㍠ヽ䇆凭墜䓑䀛倝公넬㎥ヽ烷䀛䓑
ゖᎮ泣㔗㆗址珩㺄䐮嗓嚛㑆㐘倝公Ꭾ
硜䤡〥瘕甔墜礓㢀䵻
祺
叉抽墚乌넺㍠ヽ䇆凭墜䓑䀛倝公넬㎥ヽ烷䀛䓑
ゖᎮ峣㖋㗓硼乌㦺Ꭽ仑挚Ꭽ凉庡㚤棣墕Ꭾ爱究
乹兄䤛爸䐨捨業Ꭾ〥瘕甔墜㸠瞘倝公场㛙㘇㘩
㶺䑎䤥㓱ぅ䇛䐮㸠䮅徫瓏㝞演滏Ꭾ㐟㔗㆗址嗓
嚛倝公㒩䐮址珩㺄䐮嗓嚛㑆㐘倝公Ꭾ
〥瘕甔䥨漂墜吨捬 叉抽墚乌䐮玣俊넺㍠ヽ伯媯䀛倝公넬㎥ヽ烷䀛
䓑ゖᎮ泣㔗㆗址匯吨㢌㒩Ꭽ㎎ヮ㎏捨業䈿墜匯
吨倝公㒩䐮㎏娬嬀䈿墜䥨漂Ꭾ墖公䀛Ꭽ媄漂侏
志㚤䂋䂭畣倝公㒩ゾ〥犁㘠Ꭾ爱コ咁ㄎ䤛㑆㋏
檀祺Ꭾ泣䇑䂭䛾ゖ㍿猀檀祺Ꭾ
吨捬ぅ墜㐑䰕 凭䀛넺泣㔗涫乌徫煡壼籝㓭㢀余㍽礓㢀Ꭾ址烷
䀛䓑ゖ煡壼Ꭾ
煡壼㗢煡煂 叉抽墚乌넺㸟煡壼䝖㣶㐑䰕䡚䇝稠嫒㷾㤒㶲Ꭾ
吨瞘祺䦗 嗓嚛倝公㒩넺㆗址伯媯䀛倝公Ꭾ泣㔗㆗址嗓嚛
㑆㐘Ꭾ
垩磻䖪毻 ]KKN
3垣磵䖤毵
垩磻䖪毻
㮚䦴墔圷䝝碴넬㖷㣸爲䁐〥䤛㭂欟磴Ꭾ㥀抇役㝆䆤䤥㓱ぅ
䇛㑥넬泣㍠㗛矉畇沼㐯檀넬〾㠯汾搂橤㈆䵻畇沼Ꭾ
䄌涂 擽䋀〥䡇祶䁐儗䌧旴䄧墜匑泗䐨䦴넬泣㗛矉〣㐯峸
巘넬䋀㘇ヽ㥀爱櫹䒖㑈汉㬲矴䟔䤘ㆋ汅㶲墜䗨孒搟泂䠦Ꭾ
~ 䄒消墜匑泗䡚瞫嵄 稙
:浸㙜² 氊礍窺碼
〥垎必㈆䤛爸䐨㖉磂Ꭾ㘂挕坉㗯牦氫怌墜㝆䆤䤥㓱䒘橫ヒ
㛹必㈆䐮䤌䗳㗯䘥墜礓忲Ꭾ㮚䦴汅㊱㐒嘖㝧穤넬泣䓬䖡汅
㊱墜こ礓储넬䐮矴瞡ㇵ磂徊壪㍿墜䟏瀇㢀Ꭾ泣抇役㝆䆤䤥
㓱ぅ䇛Ꭾ泣抇役㝆䆤䤥㓱ぅ䇛Ꭾ
䝗碮橺
䝗碮畁沶 㘁挏㖱㣲 桧嘘䟋䄡넡滙氜
礓㢀匹仭牣ㅴ
䗪穅䥂䗪㍽礓储 㸟礓㢀爻䖽搋礓储䗪䂿
㉴礓 嫒沥䃲䑗ぅ㎎ヮ礓㢀䡇㘾䵻㥀牣ㅴ
䟏瀇㢀넯ㇵ磂徊䝝碴 嫒沥ㇵ磂徊壪ぅ礓㢀䑘㆗址墜䟏瀇㢀넯ㇵ磂徊䡇㘾䵻
䁐牣ㅴ
䛥ㅴ畇沼 矴瞡礓㢀ㇵ磂徊壪ぅ墜䟏瀇㢀넬〾㥀弜寪䆤珥䟈瞣
㝷
窇孒㹧〢テ澏〡㈣Ꭾ ㉴礓 珥汅䡚瞫Ꭾ
礓㢀䥂牣ㅴᎮ窇孒㹧〢窇孒匑泗䡚
瞫Ꭾ
䌧㬮㥈煡㓭䟣琭Ꭾ 䔡〣Ꮈ6WRSᎹ넨㉴䵺넩䔡琭Ꭾ
㭯址汅㶲䆤䥂䔡〣Ꮈ6WDUWᎹ넨㝷㓭넩䔡琭Ꭾ 䔡〣Ꮈ6WDUWᎹ넨㝷㓭넩䔡琭䐮㆗址Ꮈ6WRSᎹ넨㉴䵺넩
䔡琭㗮侠汅㶲Ꭾ
䇆仺吨匹仭牣ㅴᎮ 吨瞘䥂矴㮽Ꭾ 䲺䧽䤡亪䤡竷咁䶰倻䐮媦呟㭖㥀瞘犢Ꭾ
䥂䔡〣Ꮈ6WDUWᎹ넨㝷㓭넩䔡琭Ꭾ 䔡〣Ꮈ6WDUWᎹ넨㝷㓭넩䔡琭Ꭾ
㒸叉竷咁䑘礘墜䡚瞫䷬䂋䡚殙瞏 䇆仺煐㐒㒷喟汅㶲牦ㅦᎮ 犐䛟焛糰墜䇆仺㒷喟汅㶲Ꭾ
䝖㍽ゞ㭂㬲竷咁넬澝㐒䵻䁐ㄕ珧Ꭾ 磱㈥ㄕ珧磱㈥匑泗䡚瞫Ꭾ
竷咁焛䂋䡚㏏Ꭾ 㒸叉䡚䝂䓤䐮戓㓭竷咁Ꭾ
煡壼墔㐒㑆嬀墜㢂程Ꭾ 煡壼籝㓭㢀ㅥ憆硜燩䤡劈㪍䐮媦呟Ꭾ 倝公吨捬墜煡囈㚤㐑䰕Ꭾ
䇆仺吨㣸〥䠦㖷㣸㉴䵺Ꭾ 䇆仺吨䝝碴Ꭾ 擽䝝碴㎥䴹墔圷넬泣抇役㝆䆤䤥㓱ぅ䇛Ꭾ
窇孒㹧㐒嘖 iᎮ 礓㢀䵻桭䟔孒巜䰹䄧 ㉴址孒巜䰹䄧Ꭾ
~ 㨒䥄汅㶲嵄 稙
畇沼氢䊇( 搂㓭瞘瞣㝷弓徉墜䝝碴Ꭾ 擽㐒嘖畇沼氢䊇넬泣矴瞡礓㢀㎥珥䟈㝷㓭넻擽沊氢䊇
〥㎥㐒嘖넬㹉檀孒爱㺄䟔〘䴹䈿畇沼Ꭾ擽沊畇沼㎥䴹
㐒嘖넬䐮畇沼氢䊇䔙悤窇孒넬泣抇役㝆䆤䤥㓱ぅ䇛〾
䗨ㆳ䝝碴・嫔
zh-hk 㶺䑎䤥㓱ぅ䇛
4㶴䑈䤟㓫〿䇕
㶺䑎䤥㓱ぅ䇛
擽礓㢀礘殙必㈆넬泣抇役䐩㈩墜㝆䆤䤥㓱ぅ䇛Ꭾ䐩㈩〘㶲
䤛䒖㐒犁㘠墜毻互䟑䩠넬㘤䡚犗㍥㝆䆤䤥㓱ヒ㛹牊橤〥䇝
殙墜䓴求Ꭾ
圴㛓忺桱㗜圱圴忺桱
抇役䐩㈩䡚넬泣䗨ㆳ㶤䞌墜场㛙怀桷넨(QR넩㚤圷场怀
桷넨)'QR넩넬ヽ㇗䤥㓱ヒ㛹䗨ㆳ䵻嫒墜䄒消Ꭾ䑫瞣吨瞘
䆤넬㖋㘇㥀㘋㊌䒖㑈㖈䤡爱コ怀桷墜䰱呤Ꭾ
䋀ぷ㘇ヽ㥀〣䟑岒ㅥ氰〣礓㢀怀桷㚤㝆䆤䤥㓱ぅ䇛墜礓沉
桷嫔넬巘夙㸣䒖䡚瞫Ꭾ
泣伀䌧넬㖋㆗㥀ㇵ笢䤷㍿넬擽㣸畇沼㆗址䥄礓㢀戤礘殙㝆
䆤䤥㓱䒘㿽〢瞘䤥㓱넬ゾ礘殙䝎滓Ꭾ
䋀㘇ヽ㥀硜ㄎ墜㶺䑎䤥㓱ぅ䇛夆甜㍿넬䒖㑈䑘䤡㤣㷎墜㶺
䑎䤥㓱ぅ䇛抇役沋彈滟䞱Ꭾ
ㇹ漌圷场㝞墜㸠䮅乌傮Ꭾ㣸䵼넬䋀㘇嫒ㇵ汅㊱坉䤖㗯氫墜
必㈆䒘橫ヒ㛹㆗址㖷䃸獥ㄎ㆞必㈆Ꭾ
䵼礓㢀崾㘠(1㚤&,635䰱傮넬〾㺄䟔*URXS
넬&ODVV%场㛙Ꭾ
*URXS䡇䔟址䟔㒸叉竷咁墜䇆仺Ꭾ&ODVV%檀孒沊礓㢀勒
㷎址场㛙Ꭾ
J䄌涂墖匋泑䡔瞥
䄒消墜匑泗䡚瞫
ヽ〣檀㟆䤛䗨ㆳ〘コ笨胶犐䛟㗢䤘犁㘠墜汅㶲滟䞱Ꭾ㔝䔄
䤘犁㘠旴笲墜䇆仺㒷喟汅㶲Ꭾヽ〣䡇〘コ䤡矴匑泗㢀壗㚤
傮㊱䟑䄧墜䗨孒Ꭾ
䗢孌
■ 檀ぅ墜䡚瞫㋝ㆳ㗛戛Ꭾ㷾碳匑泗䡚瞫䤛㣸竷䥨墜㛙漂㗢
䐨ㄕ戤垈Ꭾ
■ 檀ぅ〘摄䤛㐯㐒䡚瞫巜㤥넬㍠汅㶲焛娅墜䡚瞫넬㮚䤡礘
殙넬㘇䄎瞏䡚瞫Ꭾ
■ 䆶吨捬㗮㐒匑泗㢀壗䡚넬䇝稠㆗址碬叉䀛䐮碬叉䑣㭯Ꭾ
竷咁墜ㄕ珧㘇挕䤛搟檀ぅ䔟㶲墜ㄕ珧〥㘤Ꭾ爲址墜䇆仺䛥
ㅴ㖷㑟넺ㄕ珧㒸㈥ 䡚瞫㒸㈥넻ㄕ珧倳㕢 䡚瞫倳㕢Ꭾ
匑泗㢀壗䇝稠夌䖽䝖㥀煡壼〢Ꭾ
〣檀䗨ㆳ㬲屆䇆仺犐稝㚤汅㶲Ꭾ
牻场墖㡺壑
犁㘠址䟔䇆仺吨墜笨媷戨叉넬坉嗓嚛Ꭽ嗓嚛碎圏Ꭽ圏Ꭽ碎
圏䐮戨叉㩩䞱䑘欕Ꭾ爱コ䥨䞱㘇ヽ涫䇆仺稞㑁岗爧Ꭾ
ぷ㘇ヽ㆗址䵻䄧笨媷넬ヽ巘夙䤌䗳笨媷墜䡚瞫Ꭾ硼祶欕爸
㝞ㇵ浡넬㘾㑟〥殙㸟䤡珩Ꭽ璘櫵笖犢忻墜㢀壗䝖㍽䇆仺吨
ぅ㆗址Ꭾ
〟㘚牻墖匋泑㡺壑
〥犁㶴㆗址珩㺄匑泗㢀壗Ꭾ珩㺄匹仭涫䇆仺岗爧넬匹仭㒸
叉珩㺄㷑㢀㍿墜竷咁Ꭾ
仺䌡넓
劃擉넺珩㺄넨㮚嗓嚛䦇ぅ墜傇㔱넩䇝稠搟吨㫙㚤吨瞘㍿㊌
ㇵ䔙搋㸩㖰庋墜濵磺Ꭾ劃擉㘇挕䤛㸥吨瞘㍿㊌墜嗓嚛爸
䐨匹仭㈆䇁墜䘥㷋Ꭾ
毵㏟
㸟㏏㏥竷㛙䝖㥀煡壼〢䑫瞣墜㷑㢀㍿Ꭾ
礘殙㸧䇛桭嘞墜猀ㅥ넨㮚磶掗㚤磶戔䐮勼抡㬮㹼挚拂넩㘇
㆗址㸧㩢墜畃弱殞曣Ꭾ畃弱〥㘇氐嫈揲捬㍿㫙Ꭾ毻㏥䡚瞫
徫牦〘㕢䆤넬㖋㘇尓澈畃弱Ꭾ
抡究䐮㷎寕㥀毻㏥䡚䤛余㐒俊糬Ꭾ戓煡抡究䐮㷎寕䡚넬稞
牫㈪䖡爱コ俊糬Ꭾ爱コ俊糬彭〥㘇ㅴ㎎ヮ址爬䐮䖽氐㎎ヮ
竷咁Ꭾ
毻㏥䡚넬戓㓭䐮䝂䓤竷咁〘䐮㎁䴹Ꭾ焛㬿㩢墜竷咁䏡戓㓭
䂖䴹Ꭾ
涫毻㏥墜竷咁㥀㶼僃〣祴憆搋㐞瘰넬㆗僃䂾㥟㔓Ꭾ䵼
䡚넬㘇㍠㗓硼㷎寕墜㍿揷Ꭾ㖋㆗ぅ䇛ュ䤡〘㸧猀㐞䥂毻
㏥넬ュ华㘇ヽ牊〘䵽桭嘞抡究Ꭾ
圴㛓忺桱넚(
QR넛
圱圴忺桱넚)'
QR넛
㝀䆞䤟㓫 O
=1U)'(1U
7\SH
䄒消墜匑泗䡚瞫 ]KKN
毵㏟䗢孌
徫牦䑘汅㶲墜䡚瞫䆤넬竷咁ュ䥂
毻㏥Ꭽ㒸叉䐮历厷Ꭾ
汅㶲焛瞏墜䡚瞫Ꭾ㬿珧㚤㨞糰墜
竷咁礘殙䤌瞏墜䡚瞫Ꭾ
徫牦䑘汅㶲墜䡚瞫䆤넬竷咁墜犢
忻勼匾戤ぅ䇛猀㐞ュ䥂厷爧Ꭾ
匑泗䡚䝂䓤넬〾䟔〣䴹犐䛟焛ㅦ
墜䇆仺㒷喟汅㶲㚤䄎瞏匑泗䡚瞫Ꭾ
毻㏥䆤넬㷎寕䐮抡究墜㬮㹼䀊毻
㏥넬ㅞぅ䇛猀㐞ュ䥂毻㏥Ꭾ
〣䴹泣犐䛟焛ㅦ墜䇆仺㒷喟汅㶲Ꭾ
擽毻㏥墜竷咁珧焛㬿넬泣戓㓭䞐
䴹Ꭾ
毵㏟ 珟珡 䇀仴㒱喙氿㶬
넚囸넛
匋泑䡔瞥
넚㐘瘪넛
㊫汍
䞌㩢抡넨味抡Ꭽ㸧味抡䐮溄抡䁎糀䐮㗓糀넩 ㍣
㎄䞼
㎄䞼
抡㩢䐮味抡Ꭽ㸧味抡䐮溄抡呟 ㍣
戓㓭䡚넬㐞瞣ㄓㅭ䀊毻㏥墜猀㐞
㍣
㍣
媦抡넬倏㘠 ㍣ 䈽㏥竷咁䡚䏡壹珧䂋䝖
戓㓭䞐䴹넬㗓䖡ㄓㅭ䀊毻㏥墜抡
㍣
㍣
寕抡䐮寕抡㩢 ㍣
㐞瞣ㄓㅭ䀊毻㏥墜猀㐞
㎄䞼
絲㩢Ꭽ絲䑪䐮㐟呟 ㍣
㐞瞣ㄓㅭ䀊毻㏥墜猀㐞
杄旴넬㮚湤湞 ㍣
乌䦴넬㮚弝䩩㵨 ㍣ 㥀毻㏥牦尣ぅ넬泣レ彈䝂䓤〾㐞瞣ㄓㅭ䀊毻㏥墜
猀㐞
㍣
味仑넬毻㏥ ㍣
䓞硼䑘䤡㔝櫵
㍣
胍㔝 ㍣
㎄䞼
棣廭넬ゖ烃넬㮚侏志棣廭 ㍣ 㘂ㆳ亪䤡廮礴Ꭽ䇤䃡䐮㘡㬃䇤䃡墜棣廭넬㐞瞣棣
廭呟Ꭾ
㍣
棣廭넬凭兼넬㮚磴䦴䛓Ꭽ撵㬃棣廭 ㍣
㘂ㆳ亪䤡廮礴Ꭽ䇤䃡䐮䠦掸墜棣廭
㍣
zh-hk 䄒消墜匑泗䡚瞫
㒲參䈷㏟竱呻
䗢孌
■ 䆶㔝櫵ぅ㗮㐒㖋竷笨胶Ꭾ竷咁㥀䇆仺吨犁址墜戨叉匑泗
㢀壗ぅ挕䤌燝爷㗢㥟㔓㥈㒸叉Ꭾ笨胶䐨㐞〥㘤墜沉넬㒸
叉䡚瞫ぷ㘇挕〥㘤Ꭾ
■ 䂋䝖墜竷咁墜匑泗爷䂾䤛䷬㨞糰墜竷咁䈃Ꭾ㣸䵼넬泣壹
珧㸟匑泗㢀壗〢墜竷咁䂋䝖Ꭾ〥䏡㨞垢竷咁Ꭾ
■ 泣㓱䇝殞曣竷咁Ꭾ㮚䦴亪䤡㘠犁墜曣㵨넬泣㆗址壼㵨䐮
䇆仺㸠址畃弱Ꭾ
■ 匑泗䡚泣䝂䓤䐮戓㓭竷咁a䴹Ꭾ
■ 㒸叉䆤넬涫竷咁祴憆搋㐞瘰넬㆗僃䂾㥟㔓Ꭾ
■ 䆶吨ぅ㗮㐒㢀壗䡚넬泣㓱䇝㆗址碬叉䀛䐮䑣㭯Ꭾ
㒲參竱呻
仺䌡넓
珩㺄넨㮚嗓嚛䦇ぅ墜傇㔱넩䇝稠搟吨㫙㚤吨瞘㍿㊌ㇵ䔙搋
㸩㖰庋墜濵磺Ꭾ劃擉㘇挕䤛㸥吨瞘㍿㊌墜嗓嚛爸䐨匹仭
㈆䇁墜䘥㷋Ꭾ
䗢孌
■ 䆶㔝櫵ぅ㗮㐒㖋竷笨胶Ꭾ竷咁㥀䇆仺吨犁址墜戨叉匑泗
㢀壗ぅ挕䤌燝爷㗢㥟㔓㥈㒸叉Ꭾ笨胶䐨㐞〥㘤墜沉넬㒸
叉䡚瞫ぷ㘇挕〥㘤Ꭾ
■ 泣㓱䇝殞曣竷咁Ꭾ㮚䦴䃲㎏亪䤡㸠址墜曣㵨넬泣㆗址壼
㵨䐮䇆仺㸠址掴Ꭾ
■ 㒸叉䤷瞫넬泣䝂䓤䐮戓㓭竷咁䞐䴹Ꭾ䲺䧽僃䂾Ꭾ
■ 㒸叉䆤넬涫竷咁祴憆搋㐞瘰넬㆗僃䂾㥟㔓Ꭾ
■ 䆶吨ぅ㗮㐒㢀壗䡚넬泣㓱䇝㆗址碬叉䀛䐮䑣㭯Ꭾ
:浸㙜² 劎㋉窺碼
俊糬㒸叉䡚넬㘇挕䤛墔圷䄎犊仐籈墜哘仙Ꭾ䌧䈵䡇넬磮华
俊糬䀊牬㑈仐籈墜僃䂾넬ㅞ檀祺ュ䥂䤡〘摄䁐殣墜墜曐井
主仹Ꭾ䵼䡚넬㖋㆗㷑㢀尥䇆礟㓭넬猕㘇挕ー儖叱墜俊糬岙
华仐籈㚤竳划Ꭾ㒸叉䡚넬泣㥀㷑㢀ぅ䝖㍽〘磓傇㔱Ꭾ爱㘇
硊䵺㐒嘖䄎犊仐籈墜䋝仙Ꭾ
㒲參䈷㏟竱呻 珟珡 䇀仴㒱喙氿㶬넚囸넛 匋泑䡔瞥넚㐘瘪넛 ㊫汍
筐旴Ꭽ壼櫵旴Ꭽ㖋竷笨胶
넨屆넩
㍣
傇 ㍣
叡旴 ㍣
䁎䤡珄乙墜抡呟䐮抡㩢넬㮚叡味抡 ㍣ 䝂䓤䡚㐞瞣抡㩢
勰勼넬ㆣ㮚㕛㹼胍Ꭽ䌧㬿㑁抡䖊 ㍣
獥旴넬㮚庋笇Ꭽ胍竷 ㍣ 倓㒸㸩珧乌
㍣
杄旴넬㮚湤湞Ꭽ殗桅擉Ꭽ桗本 ㍣ 㸟乌㈪㍽壼㵨넬㆗㎎殞曣䂭猀
㍣
䇤䃡旸旴 ㍣ 匑历䡚〥礘㒸㍽穥㬮墜乌
㒲參旮第 珟珡 䇀仴煊㐌넚囸넛 匋泑䡔瞥
넚㐘瘪넛
㊫汍
笊䞱 七㕟 㒸叉䡚泣㥀㷑㢀ぅ䝖㍽〘磓傇㔱넬泣㔗牦䂾㒸叉獪廖究笊
䞱넬〾瞫ぅ䲺䧽㒸叉䋝仙
七㕟
㵈㍪竷咁넬㮚㮎圎 七㕟 弜ô 〥殙曣〢㮎㡌䐮曣Ꭾ㒸叉䆤䇝稠䘮㔓Ꭾ䇝稠䲺䧽僃䂾넡
七㕟 弜
七㕟 ^
傇넬䦇 ㍣
傇넬䦇 ㍣
筐旴Ꭽ壼櫵旴Ꭽ㖋竷笨胶
넨屆넩
㍣
䤡珄乙墜抡究 ㍣ 㐞瞣抡呟
叡旴 ㍣
㍣
笨胶偄汾 ]KKN
䇀仴䗢孌
㏉㏯
吨瞘嗓嚛Ꭽ㍿㫙㚤䂭祺㘇挕㐒嘖㏵彨墜乌主Ꭾ爱䡇䵻䁐嘖
湹Ꭾ〾〥䤛䆉稗䇆仺吨墜牣ㅴᎮ匑泗䆤䛾㗓㏵彨墜乌主㖋
㘇Ꭾ
E倾汸旮䄡
笨胶偄汾
爱コ㐯檀ㆳ偄汾䱷䯣䲺䧽汅㊱䡚㆗址Ꭾ
崾㘠(1Ꭽ,(&㗢(1
䐮,(&䰱傮
䇀仴匋泑
䇀仴毵㏟
杄旴넬ㄕ ㍣ 倓㒸㸩珧乌
杄旴넬ㄕ ㍣
䥂䤡搟䋀䑘稨㊱墜竷咁ㄕ珧墜夐矴滟氢Ꭾ ㆗址ヽ〣仭㑟㪶㒸䐮倳㸩匑泗䡚瞫넺
磱㈥ㄕ珧 㸟燩磱㈥墜匑泗䡚瞫
〘㕢ㄕ珧 〘㕢墜匑泗䡚瞫
竷咁涢䆯㭂ゖᎮ 〣䴹泣恆娅匑泗䡚瞫넬䐮犐䛟焛ㅦ墜䇆仺㒷喟汅㶲Ꭾ殞曣竷咁넬〾㒸㍽䤌㬲
墜乌Ꭾ
徫牦䑘汅㶲墜䡚瞫䆤넬竷咁ュ䥂毻㏥Ꭽ㒸叉䐮历厷Ꭾ 汅㶲焛瞏墜䡚瞫Ꭾ㬿珧㚤㨞糰墜竷咁礘殙䤌瞏墜䡚瞫Ꭾ
徫牦䑘汅㶲墜䡚瞫䆤넬竷咁墜犢忻勼匾넬ㅞぅ䇛猀㐞ュ䥂厷爧Ꭾ 匑泗䡚䝂䓤넬〾䟔〣䴹犐䛟焛ㅦ墜䇆仺㒷喟汅㶲㚤䄎瞏匑泗䡚瞫Ꭾ
毻㏥䆤넬㷎寕䐮抡究墜㬮㹼䀊毻㏥넬ㅞぅ䇛猀㐞ュ䥂毻㏥Ꭾ 〣䴹泣犐䛟焛ㅦ墜䇆仺㒷喟汅㶲Ꭾ擽毻㏥墜竷咁珧焛㬿넬泣戓㓭䞐䴹Ꭾ
㒲參旮第 珟珡 䇀仴煊㐌넚囸넛 匋泑䡔瞥
넚㐘瘪넛
㊫汍
旮䄡 䇀仴煊㐌㒱喙넚囸넛넞匋泑䡔瞥넚㐘瘪넛 ㊫汍
㮎胛넬㍣ 图넬㐞瘰图넬㐞瘰 㸟夌䆩 [ 㖰庋墜戨叉壼䝖㥀煡壼〢Ꭾ
侏志棣廭 图넬㐞瘰 㸟夌䆩㖰庋墜戨叉壼䝖㥀煡壼〢Ꭾ
抡㩢 图넬㐞瘰 㸟戨叉壼䝖㥀煡壼〢Ꭾ
旮䄡 䇀仴煊㐌㒱喙넚囸넛넞匋泑䡔瞥넚㐘瘪넛 ㊫汍
抡究 图넬㐞瘰图넬㐞瘰 㸟夌䆩㖰庋墜戨叉壼䝖㥀煡壼〢Ꭾ

6

6

5IBOLZPVGPSCVZJOHB
#PTDI)PNF"QQMJBODF
5HJLVWHU\RXUQHZGHYLFHRQ0\%RVFKQRZDQGSURILWGLUHFWO\IURP
t&YQFSUUJQTUSJDLTGPSZPVSBQQMJBODF
t8BSSBOUZFYUFOTJPOPQUJPOT
t%JTDPVOUTGPSBDDFTTPSJFTTQBSFQBSUT
t%JHJUBMNBOVBMBOEBMMBQQMJBODFEBUBBUIBOE
t&BTZBDDFTTUP#PTDI)PNF"QQMJBODFT4FSWJDF
)UHHDQGHDV\UHJLVWUDWLRQ²DOVRRQPRELOHSKRQHV
XXXCPTDIIPNFDPNXFMDPNF
-PPLJOHGPSIFMQ
:PV}MMGJOEJUIFSF
([SHUWDGYLFHIRU\RXU%RVFKKRPHDSSOLDQFHVQHHGKHOSZLWKSUREOHPV
RUDUHSDLUIURP%RVFKH[SHUWV
)LQGRXWHYHU\WKLQJDERXWWKHPDQ\ZD\V%RVFKFDQVXSSRUW\RX
XXXCPTDIIPNFDPNTFSWJDF
$POUBDUEBUBPGBMMDPVOUSJFTBSFMJTUFEJOUIFBUUBDIFETFSWJDFEJSFDUPSZ
3PCFSU#PTDI)BVTHFSÉUF(NC)
&DUO:HU\6WUDH
0QFKHQ
*HUPDQ\
XXXCPTDIIPNFDPN
*9001334923*
9001334923
981128(05)