User Manual
OPERATING INSTRUCTIONS
LOCATION
- Place the dehumidifier on a smooth, level floor that is strong enough to support the appliance with a full bucket of water.
- To maintain efficiency, operate the appliance in an enclosed area. Keep nearby doors and windows closed.
- Maintain a minimum clearance of 20 cm (8 inches) on the sides and back of the appliance and 40 cm (16 inches) on the top of the appliance to allow for proper air circulation.
- The recommended ambient operating temperature is between 5°C (41°F) and 35°C (95°F).
- Do not force rollers to move over carpeting as the appliance may tip over and spill water.
- Any time the appliance is placed on its back or side, it must be allowed to stand upright for 6 hours before plugging in to avoid damage to internal components.
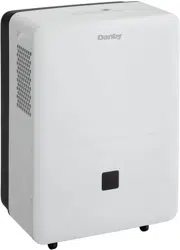
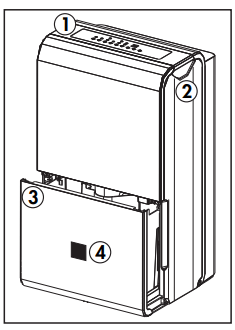
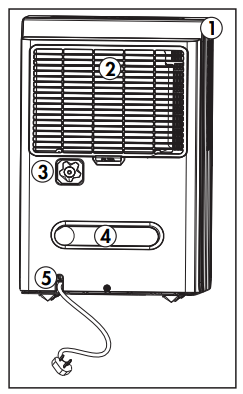
FEATURES
Front
- Control Panel
- Handles (both sides)
- Water Bucket
- Water Level Indicator
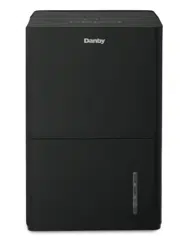
Back
- Air Outlet
- Air Filter
- Continuous Drain Outlet
- Power Cord Storage Band
- Power Cord
CONTROL PANEL
1. Defrost Indicator Light
- The defrost indicator light will illuminate when frost has accumulated on the interior of the appliance. This can indicate that the ambient temperature is too cold. The dehumidifying function will cease until the frost has melted.
2. Full Bucket Indicator Light
- The full bucket indicator light will illuminate when the bucket is full of water. Empty the bucket to resume regular functioning.
3. Display
- The display will show the set humidity, the ambient humidity or the timer function.
- The humidity can be set between 35-85% in increments. For drier air, set the humidity to a lower number. For damper air, set the humidity to a higher number.
- The ambient humidity display is accurate within +/- 5%.
4. Pump Button and Indicator Light
- Use this button to activate the drain pump. The indicator light will illuminate when the pump is active.
5. Smart Dehumidify Button and Indicator Light
- Use this button to activate smart dehumidify mode. Smart dehumidify mode will automatically set the humidity and fan speed based on the ambient temperature and humidity. The indicator light will illuminate when smart dehumidify is active.
6. Filter Button and Indicator Light
- The filter light will illuminate when the filter needs to be cleaned. Press the filter button once the filter has been cleaned to return to regular functioning.
7. Continuous Mode Button and Indicator Light
- Press this button to activate continuous mode. This will run the dehumidifying function continuously. The indicator light will turn on when continuous mode is active.
8. Fan Button and Indicator Light
- Press this button to set the fan speed to low or high. If the indicator light is off, the fan is set to low speed. If the indicator light is on, the fan is set to high speed.
9. Timer Button and Indicator Lights
- Use this button to set the timer function.
10. Up and Down Arrows
- The up and down arrows can adjust the set humidity or the timer setting.
11. Power Button
- Use this button to turn the appliance on or off.

TIMER FUNCTION
Auto On Function
- Press the timer button until the auto on indicator light illuminates.
- Use the up and down arrows to select the desired amount of time before the appliance should turn on. The up and down arrows will add or subtract 30 minutes of time up to hours, then at 1 hour increments up to a maximum of 24 hours.
- The time selected will appear on the display panel and will count down until the appliance turns on.
Auto Off Function
- Press the timer button until the auto off indicator light illuminates.
- Use the up and down arrows to select the desired amount of time before the appliance should turn on. The up and down arrows will add or subtract 30 minutes of time up to hours, then at 1 hour increments up to a maximum of 24 hours.
- The time selected will appear on the display panel and will count down until the appliance turns off.
Using Auto On and Auto Off Simultaneously
The auto on and auto off functions can be used at the same time by first setting one and then the other.
Both indicator lights will illuminate and the display will count down to the appliance either turning off or on, whichever function was set first.
Turning the appliance off, pressing the default button on the remote or unplugging the appliance will clear all memory settings, including the timer.
WATER REMOVAL
There are three ways to remove collected water from the appliance.
1. Water Bucket
The dehumidifi er will automatically collect condensed water in the water bucket. When the bucket is full, the compressor and fan will turn off and the full bucket indicator light will turn on. The display will show “P2”.
To empty the bucket, gently remove it from the appliance by gripping both sides and pulling outward. Be cautious when removing the bucket, it will be full and can be heavy.
Do not place the water bucket directly on the floor. The bottom of the bucket is uneven and it will fall over and spill water.
Empty the bucket and replace it in the appliance. The dehumidifier will not function without the bucket installed.

2. Continuous Drain
Water can be removed from the appliance using the continuous drain and a standard garden hose (not provided).
Before using any automatic drain functions, check that all drain ports are clean and free of debris. There is one drain port inside the bucket compartment of the appliance, remove the bucket to see it. There is one drain port on the back of the appliance where the drain hose attaches. All drain ports should be cleaned with a pipe cleaner prior to use.
Remove the cover from the continuous drain outlet and attach the female threaded end of the garden hose to the back of the appliance. Direct the other end of the garden hose to a bucket or floor drain.
Ensure that the garden hose is not bent and goes straight down from the back of the appliance. The continuous drain is only activated by gravity so any bends or upward motion in the hose will stop the water from draining.
The garden hose should be cut so that it is no more than 1.8 m (6 feet) long. If the drain hose is too long water may not drain completely which can lead to stagnant water and mildew build up inside the hose.
3. Pump Drain
If the continuous drain is inconvenient, water can be removed from the appliance using the pump drain.
When using the pump, the appliance will first fill the bucket with water and then the pump arm will pump water from the bucket through the drain and out the hose.
Remove the cover from the pump drain outlet and attach the provided drain hose. Direct the other end of the hose to a drain. Press the pump button to activate the pump function. When the bucket is full, the pump will begin to work.
Ensure that the drain hose is not bent, this can stop the water from draining correctly and overwork the pump.
Do not connect the provided hose together with another hose. The maximum length of the pump drain hose should be no more than 4.6 m (15 feet).
If the drain hose is too long water may not drain completely which can lead to stagnant water and mildew build up inside the hose.
When using the pump drain, the water bucket should be emptied every few days to ensure that the water in the bucket does not become stagnant or grow mildew.
CARE & MAINTENANCE
AIR FILTER
The air filter should be cleaned approximately every weeks. The air filter may require more frequent cleaning if there is significant dander or fur in the air.
Approximately every two weeks, the filter indicator light on the control panel will illuminate as a reminder to clean the filter. Follow the steps below to clean the filter and return the appliance to normal functioning.
- The air filter is located behind the rear intake grill. To remove the air filter, grasp the filter tab on the bottom of the grill and slide it downward.
- Use a vacuum cleaner with a soft brush attachment to remove any large debris or dust build up from the air filter.
- Wash the filter in lukewarm, soapy water, below 40°C (104°F), or use a neutral cleaning agent.
- Rinse the filter with clean water and dry thoroughly before reinstalling in the appliance.
- Press the filter button on the control panel to resume normal functioning.
ERROR CODES
If the display panel shows any of the below error codes, unplug the appliance, let it stand for 5-10 minutes and then plug it back in. If the error persists, call for service.
AS - Humidity sensor error
ES - Temperature sensor error
P2 - Full bucket
E3 - Sensor malfunction
Eb - Bucket removed or not in the correct position
EC - Cooling system error or sensor error
CLEANING
To avoid possible electric shock, ensure that the appliance is unplugged before performing any cleaning or maintenance.
The outside of the appliance can be wiped clean with a soft cloth or with a lukewarm, damp cloth if necessary.
Do not use gasoline, benzene, thinner or any other chemicals to clean this appliance as these substances can cause damage to the finish and deformation of plastic parts.
Never pour water directly onto the appliance as this will cause deterioration of electrical components and wiring insulation.
Ensure that the drain ports on the interior of the appliance and the drain ports on the back of the appliance are free of dirt and calcium build up.
END OF SEASON CARE
Before removing the appliance from service for the year, operate the appliance on high fan mode for half a day to ensure that the inside of the appliance is dry. This will help avoid the growth of mold or mildew inside the appliance. Ensure the filter is clean and dry. Store the appliance covered in a dry location.
DISPOSAL
This appliance may not be treated as regular household waste, it should be taken to the appropriate waste collection point for recycling of electrical components. Check for local regulatory compliance regarding approved and safe disposal of this appliance.
TROUBLESHOOTING
- Appliance will not operate
- Plug is not fully inserted into the wall outlet
- Blown fuse or circuit breaker
- Ambient humidity is lower than the set humidity
- Bucket is full or is not in the proper position
- Insufficient dehumidifying
- Air filter is dirty
- Blocked air flow
- Appliance size is too small for application
- Ambient humidity is lower than the set humidity
- Noise
- Air filter is dirty
- Bucket is not in proper position
- Floor surface is not level
- Odors
- Formation of mold or mildew on internal wet surfaces
- Place an algaecide tablet in the water bucket
- Water on floor
- Hose connection is loose
- Drain cover has been removed
- Frost build up
- When ambient temperature is below 5°C (41°F) frost may form
- Switch the appliance to fan only mode until the frost melts