Documents: Go to download!
User Manual
- User Manual - (English)
- owner's manual - (English)
- Operation Guide
- Maintenance
- Troubleshooting
- Information
- Specifications
Table of contents
User manual Adventure Scooter
Operation Guide
Operating Range
The operating range varies when the ignition switch is locked or unlocked. The Honda SMART Key system uses lowintensity radio waves. Therefore, the operating range may be wider or narrower, or the Honda SMART Key system may not work properly in the following situations:
- When the Honda SMART Key battery is depleted.
- When there are facilities nearby that generate strong radio waves or noise, such as TV towers, power stations, radio stations, or airports.
- When you carry the Honda SMART Key with a laptop or wireless communication device such as a radio or mobile phone.
- When the Honda SMART Key comes into contact with or is covered by metal objects.
When the ignition switch is unlocked: The system can be operated within the shaded area shown in the illustration.

When the ignition switch is locked: The system can be operated within the shaded area shown in the illustration.
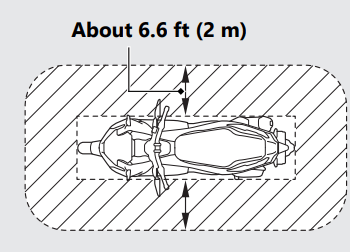
- Anyone can unlock the ignition switch and start the engine if your Honda SMART Key is within operating range of your vehicle, even if you are on the other side of a wall or window. If you are away from your vehicle but your Honda SMART Key is still within operating range, deactivate the Honda SMART Key system.
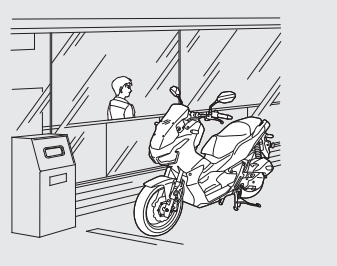
- To switching the Honda SMART Key system
Anyone in possession of the Honda SMART Key can perform the following operations if the Honda SMART Key is within operating range:
- Starting the engine
- Unlocking the ignition switch
- Releasing the seat lock
- Opening the fuel lid
- Unlocking the steering lock
You should always keep the Honda SMART Key on your person after you get on and off the vehicle or while riding.
Do not place the Honda SMART Key in the center compartment or front box.
If the ignition switch is in the ON position, the vehicle can be operated even by a person who does not have a verified Honda SMART Key.
Whenever you leave your vehicle, lock the steering and lock the ignition switch.
Make sure the ignition switch ring goes off and all turn signals flash once at this time.
Switching the ignition switch
To Unlock the Ignition Switch
- Make sure that the Honda SMART Key is activated.
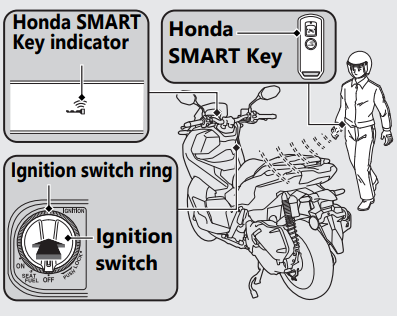
- To authenticate the Honda SMART Key system, push the ignition switch.
- When properly authenticated and the ignition switch is unlocked, the Honda SMART Key indicator and ignition switch ring come on.
- Turn the ignition switch to the ON position while the Honda SMART Key indicator comes on.
- If you do not turn the ignition switch to the ON position within 20 seconds after pushing in the ignition switch in, the Honda SMART Key indicator and ignition switch ring will go off, the turn signals flash 1 time, and then the ignition switch will be locked
When the Honda SMART Key system does not work properly
If someone without the Honda SMART Key tries to turn the ignition switch, the ignition switch rotates freely. If you notice the ignition switch is in a different position, turn the ignition switch to the original position (OFF or LOCK).
Maintenance
Maintenance Schedule
- The maintenance schedule specifies the maintenance requirements necessary to ensure safe, dependable performance, and proper emission control.
- Maintenance work should be performed in accordance with Honda's standards and specifications by properly trained and equipped technicians. Your dealer meets all of these requirements. All scheduled maintenance is considered a normal owner operating cost and will be charged to you by your dealer. Keeping an accurate maintenance record will help ensure your vehicle is properly maintained.
- Make sure whoever performs the scheduled maintenance completes the maintenance record. Retain all service documents. If you sell your vehicle, these service documents should be transferred with the vehicle to the new owner

Maintenance Level
 : Intermediate. We recommend service by your dealer, unless you have the necessary tools and are mechanically skilled. Procedures are provided in an official Honda Service Manual
 : Technical. In the interest of safety, have your vehicle serviced by your dealer
Maintenance Legend
 :Inspect (clean, adjust, lubricate, or replace, if necessary)
 :Replace
 :Clean
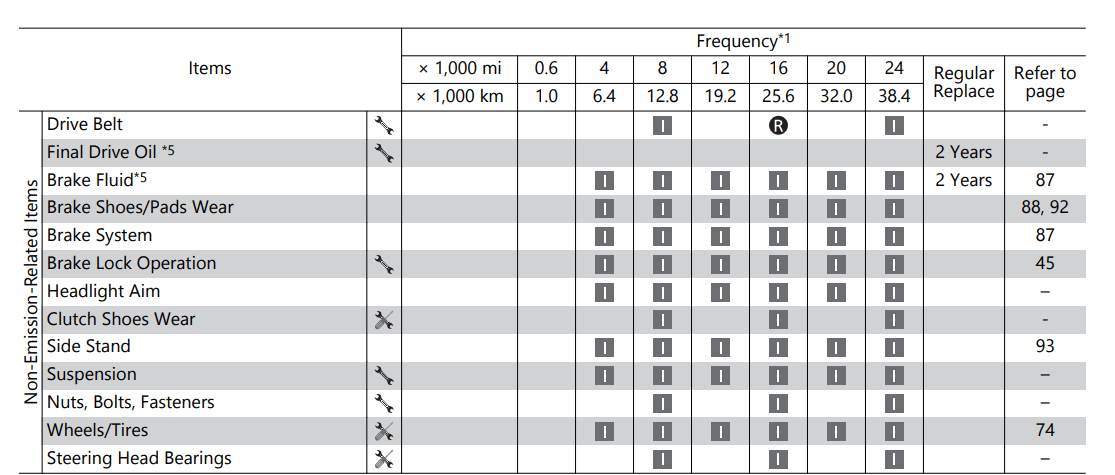
Notes:
- *1 : At higher odometer reading, repeat at the frequency interval established here.
- *2 : Service more frequently when riding in unusually wet or dusty areas.
- *3 : Service more frequently when riding in rain or at full throttle.
- *4 : 50 STATE (meets California).
- *5: Replacement requires mechanical skill.
Maintenance Fundamentals
Pre-ride Inspection
- To ensure safety, it is your responsibility to perform a pre-ride inspection and make sure that any problem you find is corrected. A preride inspection is a must, not only for safety, but because having a breakdown, or even a flat tire, can be a major inconvenience.
- Check the following items before you get on your vehicle:
- Tire tread wear and air pressures are within limits.
- Lights, horn, and turn signals operate normally.
- Check the following items if you are carrying a passenger or cargo:
- Combined weight is within load limits.
- Cargo is secured properly.
- Check the following items after you get on your vehicle:
- Throttle action moves smoothly without binding.
- Brake levers operate normally.
- Check the fuel level and refuel when needed.
- Engine stop switch functions properly.
- Check the following items at regular intervals:
- Oil level is between the upper and lower level marks.
- Brake fluid level is above the LOWER level mark.
- Engine coolant level is between the UPPER and LOWER level marks.
- Side stand functions properly.
- Rear brake lock works properly.
Periodic Checks
- You should also perform other periodic maintenance checks at least once a month regardless of how often you ride, or more often if you ride frequently.
- Also, check the odometer reading against the Maintenance Schedule and perform all maintenance that is due
- Tires and wheels: Check the air pressure, examine tread for wear and damage , and check the wheels for damage.
- Fluid levels: Check the engine oil level, engine coolant level, and brake fluid level
- Lights: Check that the headlight, accessory lamps, brake light, taillight, turn signals and license plate light are working properly.
- Controls: Check the freeplay of the rear brake lever, throttle grip and rear brake lock operate properly.
- Fuses: Check that you have a full supply of spare fuses.
- Nuts & bolts: Check the major nuts and bolts, and tighten as needed
Replacing Parts
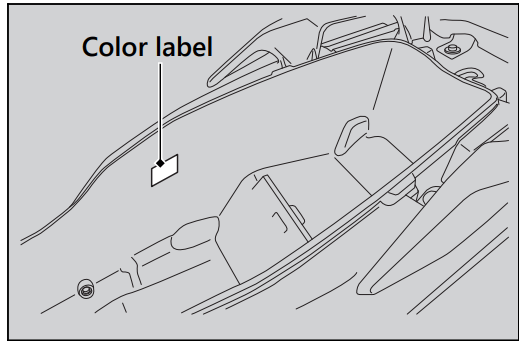
- Always use Honda Genuine Parts or their equivalents to ensure reliability and safety. When ordering colored components, specify the model name, color, and code mentioned on the color label.
- The color label is attached to the center compartment
- WARNING: Installing non-Honda parts may make your vehicle unsafe and cause a crash in which you can be seriously hurt or killed.
- Always use Honda Genuine Parts or equivalents that have been designed and approved for your vehicle.
Battery
- Your vehicle has a maintenance-free type battery. You do not have to check the battery electrolyte level or add distilled water. Clean the battery terminals if they become dirty or corroded.
- Do not remove the battery cap seals. There is no need to remove the cap when charging.
- NOTICE: An improperly disposed of battery can be harmful to the environment and human health. Always confirm local regulations for proper battery disposal instruction.
What to do in an emergency: If any of the following occur, immediately see your doctor
- Electrolyte splashes into your eyes:
- Wash your eyes repeatedly with cool water for at least 15 minutes. Using water under pressure can damage your eyes.
- Electrolyte splashes onto your skin:
- Remove affected clothing and wash your skin thoroughly using water.
- Electrolyte splashes into your mouth:
- Rinse mouth thoroughly with water, and do not swallow.
WARNING
- The battery gives off explosive hydrogen gas during normal operation.
- A spark or flame can cause the battery to explode with enough force to kill or seriously hurt you.
- Wear protective clothing and a face shield, or have a skilled mechanic do the battery servicing.
WARNING: Battery posts, terminals, and related accessories contain lead and lead compounds.
Wash your hands after handling.
Cleaning the Battery Terminals
- Remove the battery.
- If the terminals are starting to corrode and are coated with a white substance, wash with warm water and wipe clean.
- If the terminals are heavily corroded, clean and polish the terminals with a wire brush or sandpaper. Wear safety glasses.
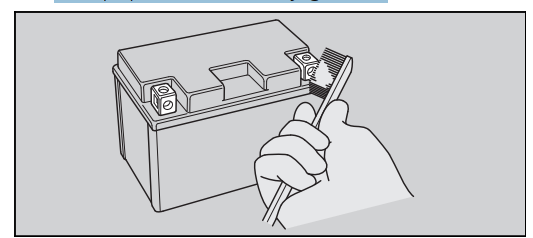
- After cleaning, reinstall the battery.
The battery has a limited life span. Consult your dealer about when you should replace the battery. Always replace the battery with another maintenance-free battery of the same type.
Charging
- If you use electrical accessories that drain the battery or you do not ride frequently, we recommend that you charge the battery every 30 days using a charger designed specifically for your Honda, which can be purchased from your dealer. Read the information that came with your battery charger and follow the instructions on the battery. Avoid using an automobile-type battery charger, as these can overheat a motorcycle battery and cause permanent damage.
- Make sure the ignition switch is in the OFF position before charging the battery.
- NOTICE: Improper charging can damage the battery. If you can’t charge the battery or it appears unable to hold a charge, contact your dealer.
- NOTICE: Jump starting using an automobile battery can damage your vehicle's electrical system and is not recommended. Bump starting is also not recommended.
- NOTICE: Installing non-Honda electrical accessories can overload the electrical system, discharging the battery and possibly damaging the system.
Removing & Installing Body Components
Battery
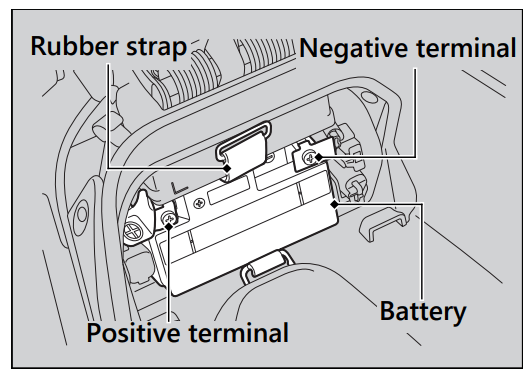
Removal
Make sure the ignition switch is in the OFF position.
- Remove the battery cover.
- Unhook the rubber strap.
- Disconnect the negative - terminal from the battery.
- Disconnect the positive + terminal from the battery.
- Remove the battery taking care not to drop the terminal nuts.
Installation
- Install the parts in the reverse order of removal.
- Always connect the positive + terminal first.
- Make sure that bolts and nuts are tight. Make sure the clock information is correct after the battery is reconnected.
- To activate the system, turn the ignition switch to the ON position once.
- For proper handling of the battery, see “Maintenance Fundamentals.” “Battery Goes Dead.
Battery Cover
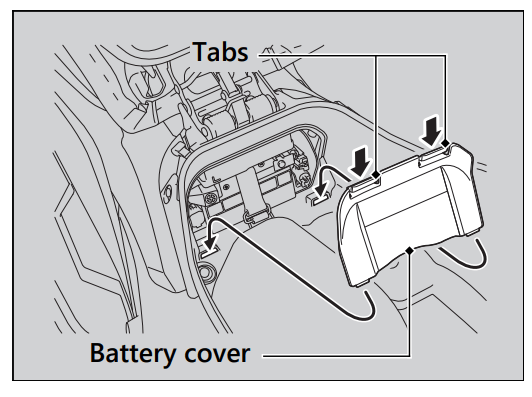
Removal
- Open the seat.
- Press the tabs and remove the battery cover.
Installation
- Install the parts in the reverse order of removal.
Engine Oil
Checking the Engine Oil
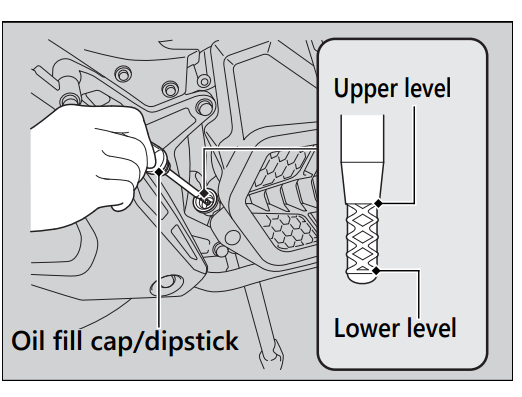
- If the engine is cold, idle the engine for 3 to 5 minutes.
- Turn the ignition switch to the OFF position and wait for 2 to 3 minutes.
- Place your vehicle on its center stand on a firm, level surface.
- Remove the oil fill cap/dipstick and wipe it clean.
- Insert the oil fill cap/dipstick until it seats, but don't screw it in.
- Check that the oil level is between the upper level and lower level marks on the oil fill cap/dipstick.
- Securely install the oil fill cap/dipstick.
Adding Engine Oil: If the engine oil is below or near the lower level mark, add the recommended engine oil.
- Remove the oil fill cap/dipstick. Add the recommended oil until it reaches the upper level mark.
- Place your vehicle on its center stand on a firm, level surface when checking the oil level.
- Do not overfill above the upper level mark.
- Make sure no foreign objects enter the oil filler opening.
- Wipe up any spills immediately.
- Securely reinstall the oil fill cap/dipstick.
NOTICE: Overfilling with oil or operating with insufficient oil can cause damage to your engine. Do not mix different brands and grades of oil.
For the recommended oil and oil selection guidelines, see “Maintenance Fundamentals.”
Coolant
Checking the Coolant: Check the coolant level in the reserve tank while the engine is cold.
- Place your vehicle on its center stand on a firm, level surface.
- Check that the coolant level is between the UPPER level and LOWER level marks on the reserve tank.
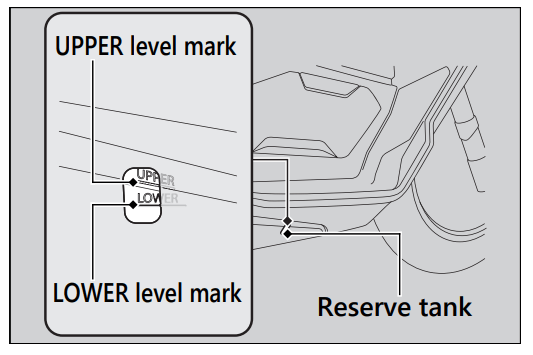
If the coolant level is dropping noticeably or the reserve tank is empty, you likely have a serious leak. Have your vehicle inspected by your dealer.
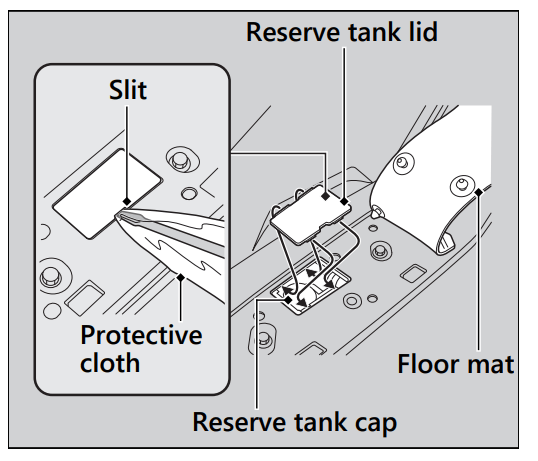
Adding Coolant: If the coolant level is below the LOWER level mark, add the recommended coolant until the level reaches the UPPER level mark. Add fluid only from the reserve tank cap and do not remove the radiator cap.
- Pull the floor mat off.
- Remove the reserve tank lid by inserting a flat head screwdriver covered with a protective cloth into the slit on the right side floor.
- Remove the reserve tank cap and add fluid while monitoring the coolant level.
- Do not overfill above the UPPER level mark.
- Make sure no foreign objects enter the reserve tank opening.
- Securely reinstall the reserve tank cap.
- Install the reserve tank lid and floor mat.
WARNING
- Removing the radiator cap while the engine is hot can cause the coolant to spray out, potentially scalding you.
- Always let the engine and radiator cool down before removing the radiator cap.
Brakes
Checking the Front Brake Fluid
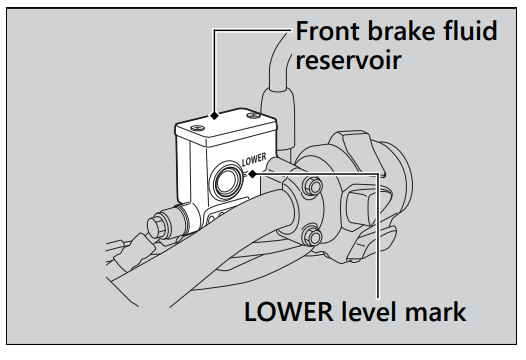
- Place your vehicle in an upright position on a firm, level surface.
- Check that the brake fluid reservoir is horizontal and that the fluid level is above the LOWER level mark.
If the brake fluid level in the reservoir is below the LOWER level mark or the brake lever freeplay becomes excessive, inspect the brake pads for wear.
If the brake pads are not worn, you most likely have a leak. Have your vehicle inspected by your dealer
Inspecting the Front Brake Pads
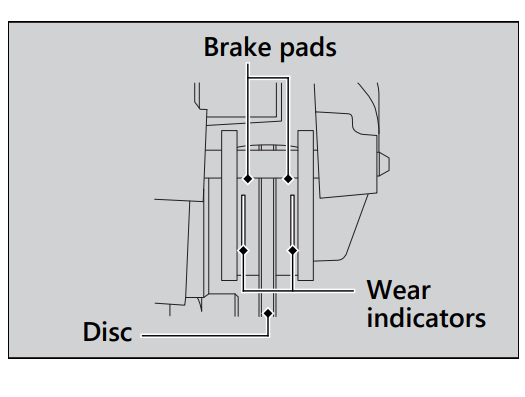
- Check the condition of the brake pad wear indicators.
- The pads need to be replaced if a brake pad is worn to the indicator.
- Inspect the brake pads from in front of the brake caliper.
- If necessary have the pads replaced by your dealer.
- Always replace both left and right brake pads at the same time.
Side Stand
Checking the Side Stand
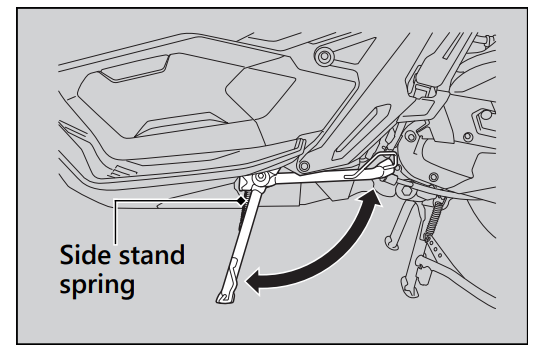
- Place your vehicle on its center stand on a firm, level surface.
- Check that the side stand operates smoothly. If the side stand is stiff or squeaky, clean the pivot area and lubricate the pivot bolt with clean grease.
- Check the spring for damage or loss of tension.
- Sit on the vehicle and raise the side stand.
- Start the engine.
- Lower the side stand all the way. The engine should stop as you lower the side stand. If the engine doesn't stop, have your vehicle inspected by your dealer.
Throttle
Checking the Throttle
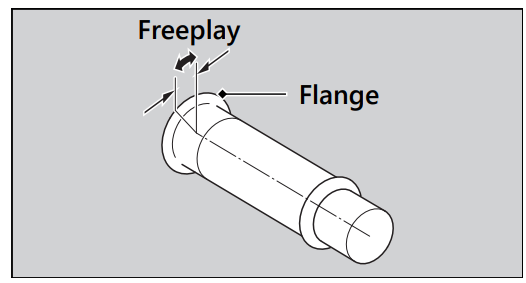
- With the engine off, check that the throttle rotates smoothly from fully closed to fully open in all steering positions and throttle freeplay is correct. If the throttle does not move smoothly, close automatically, or if the cable is damaged, have the vehicle inspected by your dealer.
- Freeplay at the throttle grip flange: 1/16 - 1/4 in (2 - 6 mm)
Troubleshooting
Engine Will Not Start
Starter Motor Operates But Engine Does Not Start
Check the following items:
- Check the correct engine starting sequence.
- Check that there is gasoline in the fuel tank.
- Check if the PGM-FI malfunction indicator lamp (MIL) is on.
- If the indicator lamp is on, contact your dealer as soon as possible.
Starter Motor Does Not Operate
Check the following items:
- Check the correct engine starting sequence.
- Make sure engine stop switch is in the (Run)
 position.
 - Check for a blown fuse.
- Check for a loose battery connection or battery terminal corrosion
- Check the condition of the battery.
If the problem continues, have your vehicle inspected by your dealer.
Overheating (High coolant temperature indicator is on)
The engine is overheating when the following occurs:
- High coolant temperature indicator comes on.
- Acceleration becomes sluggish.
If this occurs, pull safely to the side of the road and perform the following procedure. Extended fast idling may cause the high coolant temperature indicator to come on.
NOTICE: Continuing to ride with an overheated engine can cause serious damage to the engine.
- Stop the engine using the ignition switch.
- Allow the engine to cool with the ignition switch in the OFF position.
- After the engine has cooled, inspect the radiator hose and check if there is a leak. If there is a leak: Do not start the engine. Transport your vehicle to your dealer.
- Check the coolant level in the reserve tank.
- Add coolant as necessary.
- If 1-4 check normal, you may continue riding, but closely monitor the high coolant temperature indicator
Warning Indicators On or Flashing
PGM-FI (Programmed Fuel Injection) Malfunction Indicator Lamp (MIL)
- If the indicator comes on while riding, you may have a serious problem with the PGM-FI system. Reduce speed and have your vehicle inspected by your dealer as soon as possible.
ABS (Anti-lock Brake System) Indicator
If the indicator operates in one of the following ways, you may have a serious problem with the ABS. Reduce your speed and have your vehicle inspected by your dealer as soon as possible.
- Indicator comes on or starts flashing while riding.
- Indicator does not come on when the ignition switch is in the ON position.
- Indicator does not go off at speeds above 6 mph (10 km/h)
If the ABS indicator stays on, your brakes will continue to work as a conventional system, but without the anti-locking function.
The ABS indicator may flash if you turn the rear wheel while the rear wheel is lifted off the ground. In this case, turn the ignition switch to the OFF position, and then to the ON position again. The ABS indicator will go off after your speed reaches 19 mph (30 km/h).
Honda SMART Key Indicator
When the Honda SMART Key indicator flashes 5 times
- Replacing the Honda SMART Key Battery
When the Honda SMART Key indicator is flashing while the ignition switch is in the ON position
The Honda SMART Key indicator flashes when communication between your vehicle and Honda SMART Key stops after turning the ignition switch to the ON position. It is probably caused by the following:
- Strong radio waves or noise are affecting the system
- Unable to authenticate between Honda SMART Key and vehicle when pressing the start button or ignition switch.
- You lose the Honda SMART Key while riding
However, this does not affect the operation of your vehicle until the ignition switch is locked.
If you turn the ignition switch to the SEAT FUEL, OFF or LOCK position while the Honda SMART Key indicator is flashing, the ignition switch ring, the Honda SMART Key indicator will come on, and the buzzer will rings for about 20 seconds, automatically go off, and then the ignition switch will lock.
- Turn signal lights blink at the beginning and end of this function.
Also, to stop this flashing and ringing, press and hold the ignition switch for more than 2 seconds. After the flashing and ringing stop, the ignition switch is locked.
If you do not have the Honda SMART Key, the ignition switch can be unlocked in another way.
Other Warning Indications
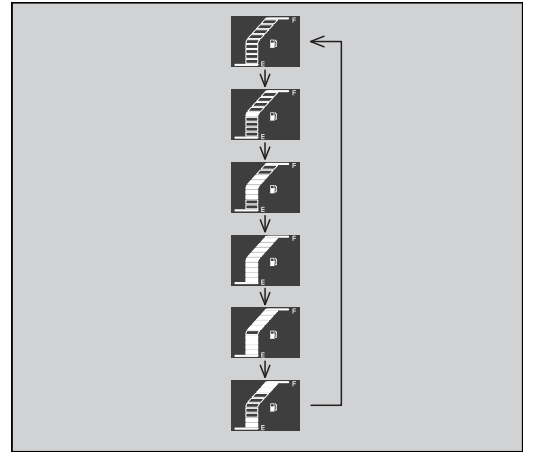
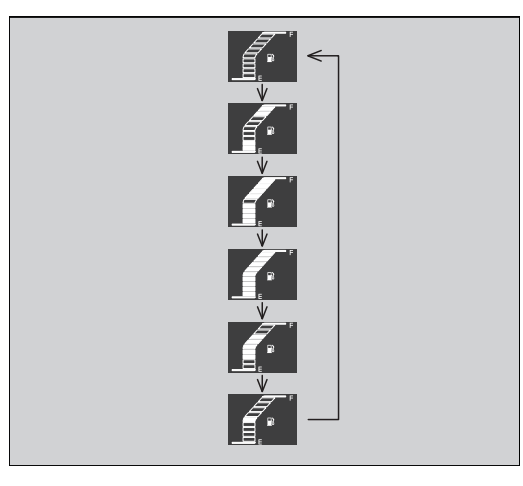
Fuel Gauge Failure Indication
- If the fuel system has an error, the fuel gauge indicators will be displayed as shown in the illustrations.
- If this occurs, see your dealer as soon as possible.
When the Honda SMART Key System Does Not Operate Properly
When the Honda SMART Key system does not work properly, perform the following.
- Check that the Honda SMART Key system is activated. Lightly push the ON/OFF button on the Honda SMART Key. If the LED of the Honda SMART Key is red, switch the Honda SMART Key system to activation. If the LED of the Honda SMART Key does not respond, replace the battery of the Honda SMART Key
- Check that there is no communication failure in the Honda SMART Key system. The Honda SMART Key system uses lowintensity radio waves. The Honda SMART Key system may not work properly in the following conditions:
- When there are facilities nearby that generate strong radio waves or noise such as TV towers, power stations, radio stations, or airports.
- When you carry the Honda SMART Key with a laptop or wireless communication device such as a radio or mobile phone.
- When the Honda SMART Key comes into contact with or is covered by metal objects.
- Check that a registered Honda SMART Key is used. Use a registered Honda SMART Key. The Honda SMART Key system cannot be activated without a registered Honda SMART Key.
- Make sure that you do not use a broken Honda SMART Key. If you use a broken Honda SMART Key, the Honda SMART Key system cannot be activated. Bring the emergency key and ID tag to your dealer.
- Check the battery condition and battery lead in your vehicle. Check the battery and battery terminals. If the battery is weak, contact your dealer.
If the Honda SMART Key system cannot be activated due to other causes, contact your dealer.
Unlock the Seat in an Emergency
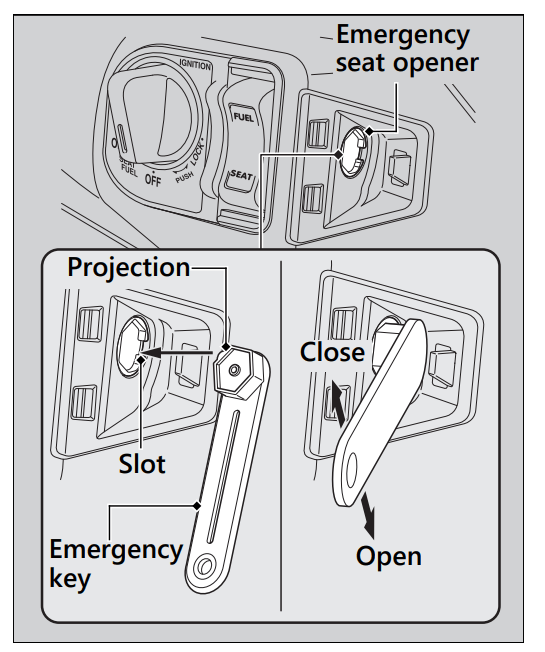
The seat lock can be unlocked by using the emergency key
Open
- Remove the front lid.
- Align the projection of the emergency key with the slot of the emergency seat opener, and turn the emergency key counterclockwise.
- Open the seat and turn the emergency key clockwise
Close
- Close and push down on the rear of the seat until it locks. Make sure that the seat is locked securely by pulling it up lightly. If the seat is not locked, turn the emergency key clockwise to lock the seat catch.
- Install the front lid.
Unlock the Ignition Switch in an Emergency
Set up to ID number input mode
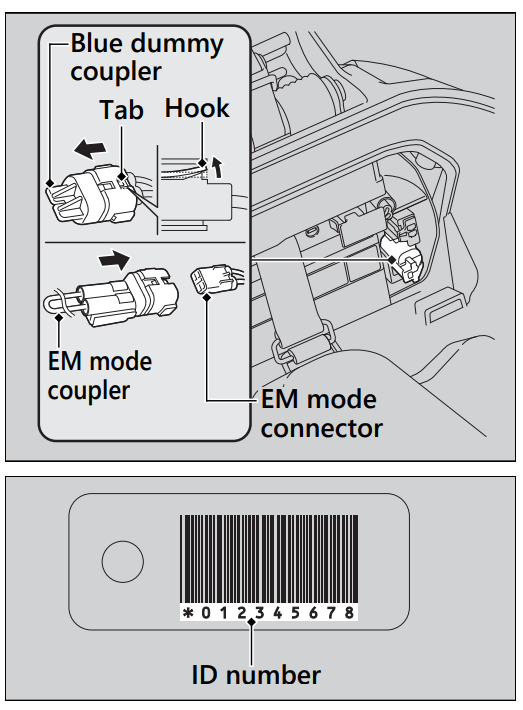
- Use the emergency key to open the seat.
- Remove the battery cover.
- Pull out the EM mode connector.
- Remove the blue dummy coupler by releasing the tab of the EM mode connector while lifting the hook of the blue dummy coupler.
- Check the ID number on the ID tag.
- Connect the EM mode coupler provided in the tool kit to the EM mode connector
ID number input
- You can input your ID number by pressing the ignition switch when the ignition switch is OFF, LOCK and SEAT FUEL position. Input the ID number on the ID tag in order from the left in turn by pressing the ignition switch. The ID number is authenticated according to the number of times the ignition switch is pushed. Push the ignition switch the desired number of times within 5 seconds when the ignition switch ring comes on. After 5 seconds, the ignition switch ring goes off and comes on again. This means that the inputted number is fixed, and you can input the next number.
- If the ignition switch ring does not come on in blue, the battery may be low. Contact your dealer.
- Example:
- To input “0”, wait for 5 seconds without pushing the ignition switch when the ignition switch ring comes on.
- To input “1”, push the ignition switch once within 5 seconds when the ignition switch ring comes on.
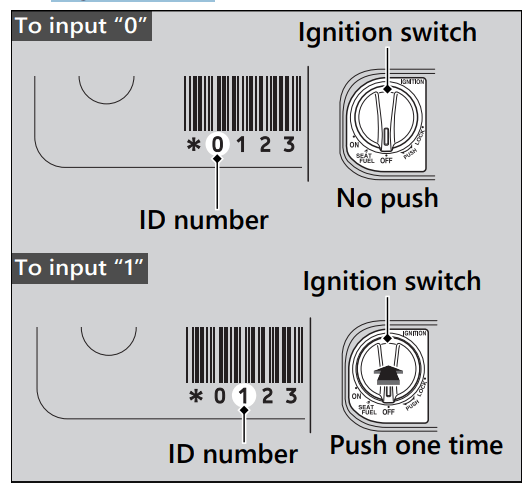
ID number input success
- After the last ID number is inputted, through, the ignition switch ring and Honda SMART Key Indicator will flash every 2 seconds until the EM mode coupler is removed.
- Be sure to remove the EM mode coupler and return the blue dummy coupler. Buzzer rings 2 times when the EM mode coupler was removed. The ignition switch is then unlocked. Reinstall the parts in reverse order of removal and turn the ignition switch to the ON position within 6 minutes. You can start the engine.
- To lock the ignition switch, turn the ignition switch to the SEAT FUEL, OFF, or LOCK position, and press and hold the ignition switch for 2 seconds. Buzzer rings 1 time. The ignition switch also locks automatically when the ignition switch has been in the SEAT FUEL, OFF, or LOCK position for about 6 minutes after the ID number is successfully inputted.
- When the ignition switch is locked, the ignition switch ring goes off.
- To unlock the ignition switch again, repeat the procedure for unlocking the ignition switch.
ID number input failure
- After the last ID number is inputted, the ignition switch ring and Honda SMART Key Indicator will flash every second until the EM mode coupler is removed, and the ignition switch cannot be unlocked.
- Pull out the EM mode coupler and reconnect it to the EM mode connector. Follow the procedure again.
ID number input cancel
- Pull out the EM mode coupler from the EM mode connector.
- Also, if you make a mistake while inputting the ID number, remove the EM mode coupler from the EM mode connector, connect it to the EM mode connector again, and then re-input the ID number from the beginning.
- Store the removed EM mode coupler in the tool kit at all times.
Tire Puncture
- Repairing a puncture or removing a wheel requires special tools and technical expertise. We recommend you have this type of service performed by your dealer.
- After an emergency repair, always have the tire inspected/replaced by your dealer.
- Emergency Repair Using a Tire Repair Kit
- If your tire has a minor puncture, you can make an emergency repair using a tubeless tire repair kit.
- Follow the instructions provided with the emergency tire repair kit.
- Riding your vehicle with a temporary tire repair is very risky. Do not exceed 30 mph (50 km/h). Have the tire replaced by your dealer as soon as possible.
- WARNING
- Riding your vehicle with a temporary tire repair can be risky. If the temporary repair fails, you can crash and be seriously injured or killed.
- If you must ride with a temporary tire repair, ride slowly and carefully and do not exceed 30 mph (50 km/h) until the tire is replaced
Electrical Trouble
Battery Goes Dead
- Charge the battery using a motorcycle battery charger.
- Remove the battery from the vehicle before charging.
- Do not use an automobile-type battery charger, as these can overheat a motorcycle battery and cause permanent damage. If the battery does not recover after recharging, contact your dealer.
- NOTICE: Jump starting using an automobile battery can damage your vehicle's electrical system and is not recommended. Bump starting is also not recommended.
Burned-out Light Bulb
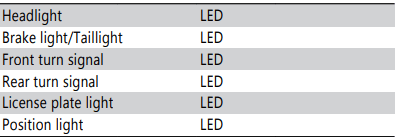
- All light bulbs on the vehicle are LEDs. If there is an LED which is not turned on, see your dealer for servicing.
Blown Fuse
Before handling fuses, see “Inspecting and Replacing Fuses
Fuse Box Fuses
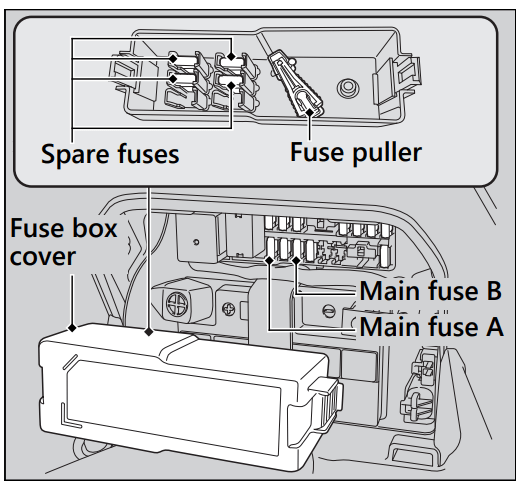
- Remove the battery cover.
- Open the fuse box cover.
- Pull the main fuse and other fuses out one by one with the fuse puller located inside of the fuse box cover. Check for a blown fuse. Always replace a blown fuse with a spare fuse of the same rating.
- Install the fuse box cover.
- Install the battery cover.
NOTICE: If a fuse fails repeatedly, you likely have an electrical problem. Have your vehicle inspected by your dealer.
Unstable Engine Operation Occurs Intermittently
- If the fuel pump filter is clogged, unstable engine operation will occur intermittently while riding.
- Even if this symptom occurs, you can continue to ride your vehicle.
- If unstable engine operation occurs even if sufficient fuel is available, have your vehicle inspected by your dealer as soon as possible
Information
Caring for Your Vehicle
Frequent cleaning and polishing is important to ensure the life of your Honda. A clean vehicle makes it easier to spot potential problems. In particular, seawater and salts used to prevent ice on roads promote the formation of corrosion. Always wash your vehicle thoroughly after riding on coastal or treated roads.
Washing: Allow the engine, muffler, brakes, and other high-temperature parts to cool before washing.
- Rinse your vehicle thoroughly using a low pressure garden hose to remove loose dirt.
- If necessary, use a sponge or a soft towel with mild cleaner to remove road grime.
- Clean the windscreen, headlight lens, panels, and other plastic components with extra care to avoid scratching them. Avoid directing water into the air cleaner, muffler, and electrical parts.
- Thoroughly rinse your vehicle with plenty of clean water and dry with a soft, clean cloth.
- After the vehicle dries, lubricate any moving parts.
- Make sure that no lubricant spills onto the brakes or tires. Brake discs, pads, drum or shoes contaminated with oil will suffer greatly reduced braking effectiveness and can lead to a crash.
- Apply a coat of wax to prevent corrosion.
- Avoid products that contain harsh detergents or chemical solvents. These can damage the metal, paint, and plastic on your vehicle. Keep the wax clear of the tires and brakes.
- If your vehicle has any matte painted parts, do not apply a coat of wax to the matte painted surface.
Washing Precautions - Follow these guidelines when washing:
- Do not use high-pressure washers:
- High-pressure water cleaners can damage moving parts and electrical parts, rendering them inoperable.
- Water in the air intake can be drawn into the throttle body and/or enter the air cleaner.
- Do not direct water at the muffler:
- Water in the muffler can prevent starting and causes rust in the muffler.
- Dry the brakes:
- Water adversely affects braking effectiveness. After washing, apply the brakes intermittently at low speed to help dry them.
- Do not direct water under the seat:
- Water in the under seat compartment can damage your documents and other belongings.
- Do not direct water at the air cleaner:
- Water in the air cleaner can prevent the engine from starting.
- Do not direct water near the headlight:
- The headlight's inside lens may fog temporarily after washing or while riding in the rain. This does not impact the headlight function. However, if you see a large amount of water or ice accumulated inside the lens(es), have your vehicle inspected by your dealer.
- Do not use wax or polishing compounds on matte painted surface:
- Use a soft cloth or sponge, plenty of water, and a mild detergent to clean matte painted surfaces. Dry with a soft clean cloth.
Aluminum Components: Aluminum will corrode from contact with dirt, mud, or road salt. Clean aluminum parts regularly and follow these guidelines to avoid scratches:
- Do not use stiff brushes, steel wool, or cleaners containing abrasives.
- Avoid riding over or scraping against curbs.
Panels
Follow these guidelines to prevent scratches and blemishes:
- Wash gently using a soft sponge and plenty of water.
- To remove stubborn stains, use diluted detergent and rinse thoroughly with plenty of water.
- Avoid getting gasoline, brake fluid, or detergents on the instruments, panels, or headlight.
Windscreen
- Using plenty of water, clean the windscreen with a soft cloth or sponge. (Avoid using detergents or any kind of chemical cleaner on the windscreen.) Dry with a soft, clean cloth.
- NOTICE: To avoid possible scratching or other damage, use only water and a soft cloth or sponge to clean the windscreen.
- For a dirtier windscreen, use a diluted neutral detergent with a sponge and plenty of water. Make sure to wash off all the detergent. (Detergent residue may cause windscreen cracks.)
- Replace the windscreen if scratches cannot be removed and they obstruct clear vision.
- Take care to keep battery electrolyte, brake fluid, or other chemical solvents off the windscreen and screen garnish. They will damage the plastic.
Exhaust Pipe and Muffler
- When the exhaust pipe and muffler are painted, do not use a commercially available abrasive kitchen cleaning compound. Use a neutral detergent to clean the painted surface on the exhaust pipe and muffler. If you are not sure if your exhaust pipe and muffler are painted, contact your dealer.
Storing Your Vehicle
If you store your vehicle outdoors, you should consider using a full-body cover. If you won't be riding for an extended period, follow these guidelines:
- Wash your vehicle and wax all painted surfaces (except matte painted surfaces). Coat chrome pieces with rust-inhibiting oil.
- Place your vehicle on its center stand and position a block so that both tires are off the ground.
- After rain, remove the body cover and allow the vehicle to dry.
- Remove the battery to prevent discharge. Fully charge the battery and then place it in a shaded, well-ventilated area.
- If you leave the battery in place, disconnect the negative - terminal to prevent discharge.
After removing your vehicle from storage, inspect all maintenance items required by the Maintenance Schedule.
For more information about storage, refer to the Honda Winter Storage Guide, available from your dealer.
Transporting Your Vehicle
- If your vehicle needs to be transported, it should be carried on a motorcycle trailer or a flatbed truck or trailer that has a loading ramp or lifting platform, and motorcycle tie-down straps. Never try to tow your vehicle with a wheel or wheels on the ground.
- NOTICE: Towing your vehicle can cause serious damage to the transmission
Specifications
Main Components
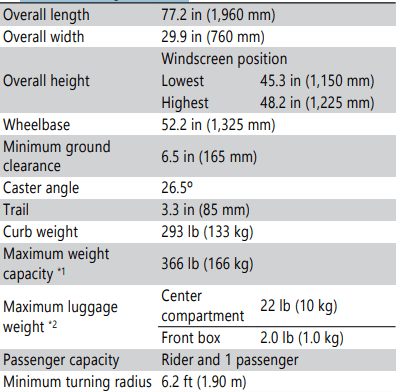
*1 : Including rider, passenger, all luggage, and accessories.
*2 : Includes the weight of the luggage and added accessories.
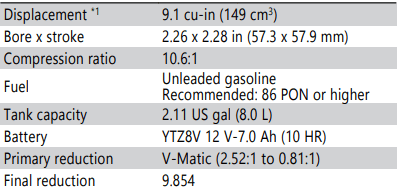
*1 : Displacement less than 9.2 cu-in (150 cm3 ) may have highway operating restrictions depending on state laws.
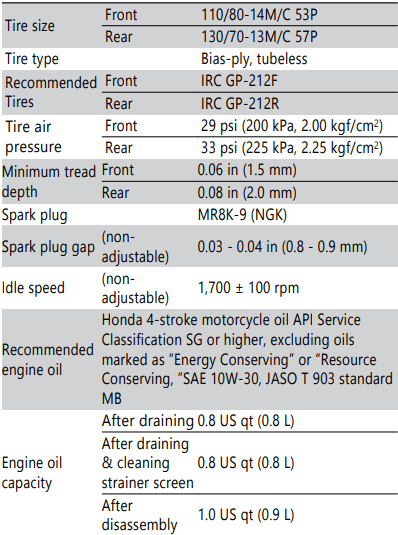
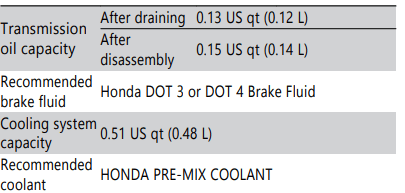
Service Data
Bulbs
Fuses
See other models: FIT 2012 ACCORD COUPE 2008 ACCORD COUPE 1992 ODYSSEY 2018 CIVIC GX 2011
